Embed Size (px)
Citation preview
Siebel Database Upgrade Guide for DB2 for z/OSSiebel Innovation Pack 2016May 2016
Copyright © 2005, 2016 Oracle and/or its affiliates. All rights reserved.
This software and related documentation are provided under a license agreement containing restrictions on use and disclosure and are protected by intellectual property laws. Except as expressly permitted in your license agreement or allowed by law, you may not use, copy, reproduce, translate, broadcast, modify, license, transmit, distribute, exhibit, perform, publish, or display any part, in any form, or by any means. Reverse engineering, disassembly, or decompilation of this software, unless required by law for interoperability, is prohibited.
The information contained herein is subject to change without notice and is not warranted to be error-free. If you find any errors, please report them to us in writing.
If this is software or related documentation that is delivered to the U.S. Government or anyone licensing it on behalf of the U.S. Government, the following notice is applicable:
U.S. GOVERNMENT END USERS: Oracle programs, including any operating system, integrated software, any programs installed on the hardware, and/or documentation, delivered to U.S. Government end users are “commercial computer software” pursuant to the applicable Federal Acquisition Regulation and agency-specific supplemental regulations. As such, use, duplication, disclosure, modification, and adaptation of the programs, including any operating system, integrated software, any programs installed on the hardware, and/or documentation, shall be subject to license terms and license restrictions applicable to the programs. No other rights are granted to the U.S. Government.
This software or hardware is developed for general use in a variety of information management applications. It is not developed or intended for use in any inherently dangerous applications, including applications that may create a risk of personal injury. If you use this software or hardware in dangerous applications, then you shall be responsible to take all appropriate fail-safe, backup, redundancy, and other measures to ensure its safe use. Oracle Corporation and its affiliates disclaim any liability for any damages caused by use of this software or hardware in dangerous applications.
Oracle and Java are registered trademarks of Oracle and/or its affiliates. Other names may be trademarks of their respective owners.
Intel and Intel Xeon are trademarks or registered trademarks of Intel Corporation. All SPARC trademarks are used under license and are trademarks or registered trademarks of SPARC International, Inc. AMD, Opteron, the AMD logo, and the AMD Opteron logo are trademarks or registered trademarks of Advanced Micro Devices. UNIX is a registered trademark of The Open Group.
This software or hardware and documentation may provide access to or information about content, products, and services from third parties. Oracle Corporation and its affiliates are not responsible for and expressly disclaim all warranties of any kind with respect to third-party content, products, and services unless otherwise set forth in an applicable agreement between you and Oracle. Oracle Corporation and its affiliates will not be responsible for any loss, costs, or damages incurred due to your access to or use of third-party content, products, or services, except as set forth in an applicable agreement between you and Oracle.
Documentation Accessibility
For information about Oracle's commitment to accessibility, visit the Oracle Accessibility Program website at http://www.oracle.com/pls/topic/lookup?ctx=acc&id=docacc.
Access to Oracle Support
Oracle customers that have purchased support have access to electronic support through My Oracle Support. For information, visit http://www.oracle.com/pls/topic/lookup?ctx=acc&id=info or visit http://www.oracle.com/pls/topic/lookup?ctx=acc&id=trs if you are hearing impaired.
Siebel Database Upgrade Guide for DB2 for z/OS Siebel Innovation Pack 2016 3
Contents
Siebel Database Upgrade Guide for DB2 for z/OS 1
Chapter 1: What’s New in This Release
Chapter 2: About Siebel Database Upgrade TopicsHow to Use This Guide 13
How the Upgrade Topics Are Organized 13
About the Applicability of Siebel Database Upgrade Topics 14
Naming Conventions Used in This Guide 14
About File Paths and Commands in Upgrade Topics 15
Chapter 3: How the Siebel Database Upgrade WorksAbout Supported Siebel Upgrade Paths 17
Supported Upgrade Paths for Siebel Innovation Pack 2016 18
Types of Siebel Database Upgrades 23
About Using Oracle’s Advanced Customer Services 24
About Unicode Support 25
About Siebel Upgrade Environments 25
About the z/OS Upgrade 28
About the Staging Database 29
About Siebel Additive Schema Upgrade Changes 30
About the Siebel Database Upgrade Process 32
About the Siebel Database Configuration Utilities and Database Configuration Wizard 38
About the Siebel Upgrade Wizard and Driver Files 43
Job Flow of a Production Database Upgrade 45Key Members in the DSNHLQ.SIEBEL.EXEC 49About the JCL Upgrade Jobs 49
About the Override File 50
Siebel Database Upgrade Guide for DB2 for z/OS Siebel Innovation Pack 2016
Contents ■
4
Chapter 4: How to Perform a Siebel Database UpgradeRoadmap for Performing a Siebel Database Upgrade 53
Roadmap for Upgrading from Siebel 7.8.2, 8.0.x or 8.1.1.x 54Roadmap for Upgrading from Siebel 7.x, 8.0.x or 8.1.1.x Without a Development Environment 54
Process of Planning a Siebel Database Upgrade 55
Process of Upgrading a Siebel Development Environment 56
Process of Upgrading a Production Test Environment 63
Process of Tuning the Upgrade Performance 69
Process of Upgrading a Siebel Production Environment 71
Chapter 5: Planning a Siebel Database UpgradePlanning Resources for Upgrading to Siebel CRM on z/OS 79
Planning Changes to the Physical Layout of the Schema 80
Testing Before a Production Upgrade 82
Considering Code Page Support 82
Executing Jobs Using Siebel-Scheduled Mode or Vendor-Scheduled Mode 83
Staging and Target Database Planning 84
Obtaining Required Software and Hardware 84
Obtaining Required IBM Utilities 84
About Using the DSNTIAUL Utility 85About Applying the DSNTIAUL Patch 85About DSNTIAUL CCSID Conversion Errors 87
Obtaining Required Security Privileges 87
Planning Backup and Recovery Stages 88
About Creating a Schedule for the Upgrade 89
About Estimating Database Size 89
Upgrading Your DB2 Software 90
Chapter 6: Basic Database Preparations for a Siebel Upgrade
Verifying Database Configuration 91
Creating Storage Groups 92
Updating Table Space Group Names 92
Contents ■
Siebel Database Upgrade Guide for DB2 for z/OS Siebel Innovation Pack 2016 5
Process of Preparing the Storage Layout of the Schema 93Methods of Modifying the Storage Control File 94Options for Extracting the Storage Control File 95Extracting the Storage Control File 97Validating the Extracted Storage Control File 101Reviewing the Extracted Storage Control File 103
Reviewing EIM Table Partitioning 105
Converting LONG VARCHAR Columns to CLOB Columns 105
Rebuilding Target Tables Containing LONG VARCHAR Columns 106
Backing Up the Database 108
Granting a Siebel User Upgrade Authorization 109
Chapter 7: Preparing a Development Environment for a Siebel Upgrade
Requirements for Upgrading the Development Environment 111
About Moving Tables 111
Checking In Development Repository Projects 112
Determining Which Template File Was Used During an Extract or Merge 113
Chapter 8: Preparing a Production Environment for a Siebel Upgrade
Requirements for Upgrading the Production Environment 115
About Moving the Customized Repository and Schema Definition Files 115
Preparing for a Siebel Upgrade Without a Development Environment 116
Chapter 9: Running the Database Configuration Wizard to Perform Upgrade Tasks
Information Required by the Database Configuration Wizard 119
About Running the Database Configuration Wizard on Windows 125
About Running the Database Configuration Wizard Under UNIX 126
Starting the Siebel Upgrade Wizard 128Restarting the Siebel Upgrade Wizard After Pauses 130Stopping the Siebel Upgrade Wizard 130
Upgrading the Repository and Importing Seed Data 131
Siebel Database Upgrade Guide for DB2 for z/OS Siebel Innovation Pack 2016
Contents ■
6
Chapter 10: Creating the Siebel Staging DatabaseProcess of Creating the Staging Database 133
Required Tasks before Creating the Staging Database 133
Creating the Staging Database Schema DDL Files 135
Transferring the Staging DDL to the z/OS Host 135
Preparing the z/OS Upgrade Environment and Creating the Staging Database 136Authorization Requirements for Performing Upgrade Procedures on the z/OS Host 136Customizing the JCL UNIT Parameter Value 137Creating the z/OS Setup Data Sets 137Preparing the Upgrade Environment and Building the Staging Database 138Verifying JCL Upgrade Jobs 143
Removing Interface Tables and Triggers 143
Chapter 11: Performing the Siebel Repository MergeAbout Backing Up the New Customer Repository or Database Schema 145
About Reorganizing Tables Before the Repository Merge 146
Performing a Siebel Repository Merge 147
Regenerating the Siebel Repository Definition Files 155
Creating a New Siebel Repository File 157
Chapter 12: Performing the Siebel Incremental Repository Merge
About the Siebel Incremental Repository Merge 161
Process of Performing an Incremental Upgrade of the Siebel Database from Siebel CRM Version 8.1.1.x 161
Before You Begin 163
Performing the Incremental Repository Merge 163Executing the Incremental Repository Merge Under UNIX 164
Editing the Siebel Tools Configuration File After the Development Environment Merge 165
Chapter 13: Generating the Siebel Upgrade FilesAbout Generating the Upgrade Files 167
Process of Generating the Upgrade Files 167
Required Tasks for Generating the Upgrade Files 168
Contents ■
Siebel Database Upgrade Guide for DB2 for z/OS Siebel Innovation Pack 2016 7
Preparing the Additive Schema and JCL Files on the z/OS Host 169Transferring the Additive Schema, PRET, and Data Migration Files to the z/OS Host 169Preparing the z/OS Data Sets 170Preparing the Additive Schema SQL and JCL Templates 172
Applying the Additive Schema Changes to the Production Staging Database 174
Preparing for Table Creation on the Staging Database 176
Preparing and Executing the Nonadditive Schema and JCL Files on the z/OS Host 178
Transferring the Nonadditive Schema, Temp Table, and Load and Unload Files to the z/OS Host 179Preparing the Nonadditive Schema SQL and JCL Templates and Executing the DDL 179Applying the Nonadditive Schema Changes 181Creating the Data Migration Indexes 182
Processing the Index Schema File 183Transferring the SCINDX.SQL File to the z/OS Host 183Restructuring the Index DDL 184
Building JCL Templates for the Target Database 184
Chapter 14: Upgrading the Target DatabaseProcess of Upgrading the Target Database 187
Dropping Partitioned EIM Tables 188
Creating and Loading Siebel Log Tables 189
Applying Additive Upgrade Changes to the Target Database 190
Renaming the Production Environment Repository 193
Performing the In-Place Target Database Upgrade 193Preparing the Target Database for the Upgrade 195Running the PRET Jobs for the Target Database 195Applying Nonadditive Schema Upgrade Changes to the Target Database 196Creating and Deploying Stored Procedures on the Target Database 200Migrating Data on the Target Database 202Creating Schema Indexes 204Running the Gen_Primary SQL to Update Data in Target Database Tables 206Generating RUNSTATS Jobs 207
Restarting Upgrade Jobs That Fail 208
Siebel Database Upgrade Guide for DB2 for z/OS Siebel Innovation Pack 2016
Contents ■
8
Chapter 15: Performing Postupgrade Tasks on the Target Database
Transferring the Development Environment Upgrade Output Files to the z/OS Host 209
Synchronizing the Schema 210
Activating New License Keys After an Upgrade 211
Deleting Redundant Upgrade Files 212
Chapter 16: Reviewing the Siebel Upgrade Log FilesAbout the Siebel Upgrade Log Files 215
Reviewing Siebel Upgrade Log Files for Errors 217
Manually Archiving Upgrade Log Files 218
Viewing the Siebel Job Log Status 218
Running SQL in Siebel Logs 219
Chapter 17: Postupgrade Tasks for Siebel Database and File System
Updating File System Attachments 221
Reapplying Schema Customizations to the Siebel Database 222
Regenerating the Database Template File 225
Chapter 18: Postupgrade Tasks for Siebel Business Applications
Performing Postupgrade Tasks for the Siebel Application 227
Upgrading Siebel Seeded Workflows 227
Chapter 19: Tuning the Siebel Production Upgrade ScriptsAbout Tuning the Upgrade Scripts 229
Optimizing Unload and Load Job Performance 230
Adding the Statistics Clause to Load Cards 231
Appendix A: Siebel Upgrade Planning WorksheetTeam Lead Summary 233DB2 Connect Information 233Siebel Development Environment Information 234Siebel Production Environment Information 235
Contents ■
Siebel Database Upgrade Guide for DB2 for z/OS Siebel Innovation Pack 2016 9
z/OS Host System Variables Information 236
Appendix B: Columns Denormalized During the Upgrade to Siebel CRM
Denormalized Columns for Siebel Industry Applications Version 7.5.3 237
Appendix C: Upgrade Files for Siebel Business ApplicationsSiebel CRM z/OS Upgrade Files 239
Tables Amended During PRET Unload Processing 245
PRET Members Generated By Pretedit.txt 247
Target Tables Amended During PRET Processing 247
Index
Siebel Database Upgrade Guide for DB2 for z/OS Siebel Innovation Pack 2016
Contents ■
10
Siebel Database Upgrade Guide for DB2 for z/OS Siebel Innovation Pack 2016 11
1 What’s New in This Release
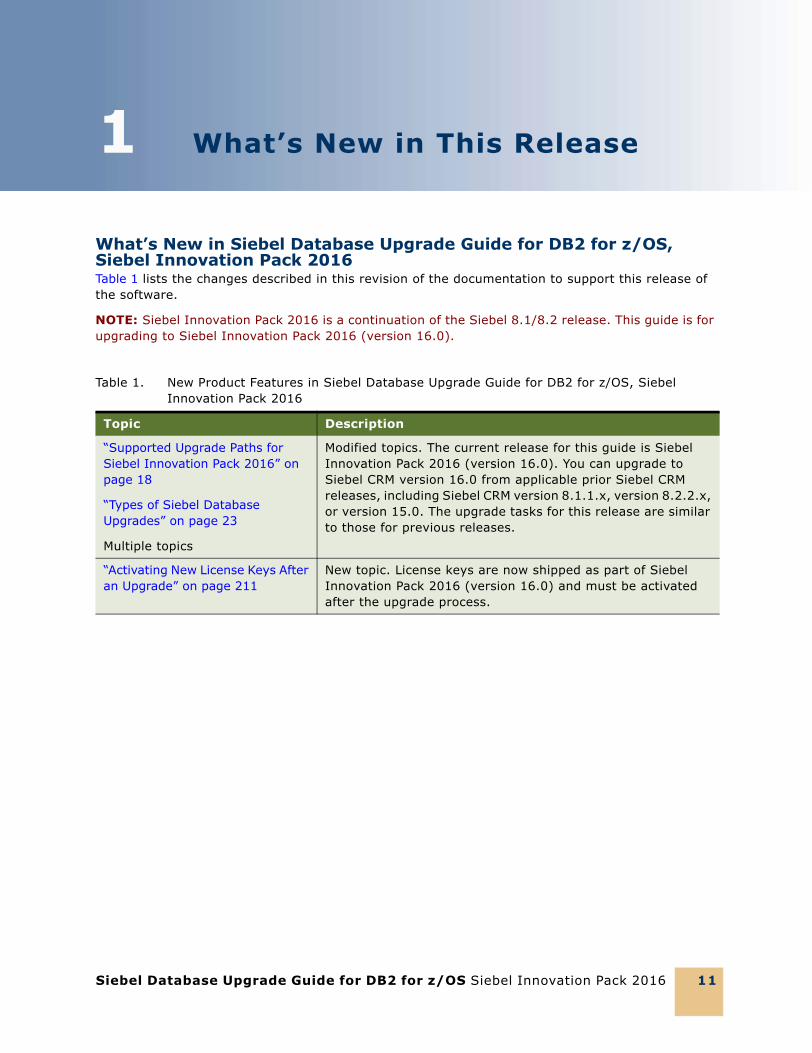
What’s New in Siebel Database Upgrade Guide for DB2 for z/OS, Siebel Innovation Pack 2016Table 1 lists the changes described in this revision of the documentation to support this release of the software.
NOTE: Siebel Innovation Pack 2016 is a continuation of the Siebel 8.1/8.2 release. This guide is for upgrading to Siebel Innovation Pack 2016 (version 16.0).
Table 1. New Product Features in Siebel Database Upgrade Guide for DB2 for z/OS, Siebel Innovation Pack 2016
Topic Description
“Supported Upgrade Paths for Siebel Innovation Pack 2016” on page 18
“Types of Siebel Database Upgrades” on page 23
Multiple topics
Modified topics. The current release for this guide is Siebel Innovation Pack 2016 (version 16.0). You can upgrade to Siebel CRM version 16.0 from applicable prior Siebel CRM releases, including Siebel CRM version 8.1.1.x, version 8.2.2.x, or version 15.0. The upgrade tasks for this release are similar to those for previous releases.
“Activating New License Keys After an Upgrade” on page 211
New topic. License keys are now shipped as part of Siebel Innovation Pack 2016 (version 16.0) and must be activated after the upgrade process.

Siebel Database Upgrade Guide for DB2 for z/OS Siebel Innovation Pack 2016
What’s New in This Release ■
12
Siebel Database Upgrade Guide for DB2 for z/OS Siebel Innovation Pack 2016 13
2 About Siebel Database Upgrade Topics
This chapter provides general information about the guide and how to use the Siebel database upgrade topics. It includes the following topics:
■ How to Use This Guide on page 13
■ How the Upgrade Topics Are Organized on page 13
■ About the Applicability of Siebel Database Upgrade Topics on page 14
■ Naming Conventions Used in This Guide on page 14
■ About File Paths and Commands in Upgrade Topics on page 15
How to Use This GuideTo perform an upgrade to the latest version of Oracle’s Siebel Business Applications on the IBM DB2 for z/OS platform, you must use this guide and Siebel Database Upgrade Guide on the Siebel Bookshelf.
NOTE: The Siebel Bookshelf is available on Oracle Technology Network (http://www.oracle.com/technetwork/indexes/documentation/index.html) and Oracle Software Delivery Cloud. It might also be installed locally on your intranet or on a network location.
This guide describes the upgrade process on a z/OS platform and provides information on tasks that are specific to this platform. To complete your upgrade, however, you must also perform certain tasks outlined in Siebel Database Upgrade Guide.
This guide directs you to Siebel Database Upgrade Guide at the relevant points during the upgrade process. Topics in Siebel Database Upgrade Guide that apply when performing an upgrade of Siebel Business Applications on z/OS contain a Platforms statement similar to the following:
Platforms: Microsoft Windows, UNIX, IBM z/OS.
NOTE: The procedures in this guide assume that you do not use left-hand navigation. However, you can set up left-hand navigation. For more information about left-hand navigation and about implementing it, see Siebel Fundamentals for Siebel Open UI.
How the Upgrade Topics Are OrganizedUse the roadmaps and process topics in Chapter 4, “How to Perform a Siebel Database Upgrade,” to guide you through the upgrade process. These topics provide a checklist of all the steps required to complete a particular type of upgrade, in the order in which you must perform them. Each step includes a link to a topic that explains how to complete the step.
Siebel Database Upgrade Guide for DB2 for z/OS Siebel Innovation Pack 2016
About Siebel Database Upgrade Topics ■ About the Applicability of Siebel Database Upgrade Topics
14
The remaining chapters of the guide are organized according to the major phases of the upgrade. Each chapter includes the specific upgrade tasks you must perform for that portion of the upgrade as well as conceptual and process information relating to those tasks.
CAUTION: Topics in the chapters might not follow the order you perform them during the upgrade and, depending on your upgrade path, all topics might not apply. You must use the roadmap for your upgrade to determine the required and optional steps and their sequence. If you do not, you are likely to experience difficulties in completing your upgrade.
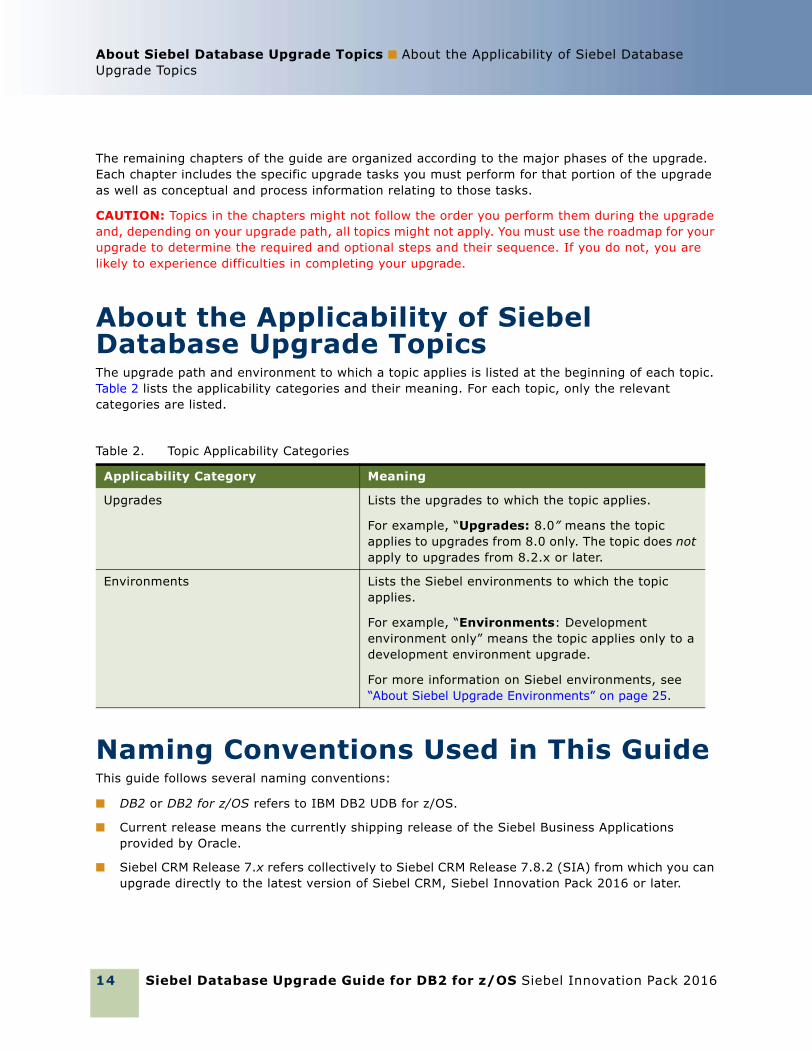
About the Applicability of Siebel Database Upgrade TopicsThe upgrade path and environment to which a topic applies is listed at the beginning of each topic. Table 2 lists the applicability categories and their meaning. For each topic, only the relevant categories are listed.
Naming Conventions Used in This GuideThis guide follows several naming conventions:
■ DB2 or DB2 for z/OS refers to IBM DB2 UDB for z/OS.
■ Current release means the currently shipping release of the Siebel Business Applications provided by Oracle.
■ Siebel CRM Release 7.x refers collectively to Siebel CRM Release 7.8.2 (SIA) from which you can upgrade directly to the latest version of Siebel CRM, Siebel Innovation Pack 2016 or later.
Table 2. Topic Applicability Categories
Applicability Category Meaning
Upgrades Lists the upgrades to which the topic applies.
For example, “Upgrades: 8.0” means the topic applies to upgrades from 8.0 only. The topic does not apply to upgrades from 8.2.x or later.
Environments Lists the Siebel environments to which the topic applies.
For example, “Environments: Development environment only” means the topic applies only to a development environment upgrade.
For more information on Siebel environments, see “About Siebel Upgrade Environments” on page 25.
About Siebel Database Upgrade Topics ■ About File Paths and Commands in UpgradeTopics
Siebel Database Upgrade Guide for DB2 for z/OS Siebel Innovation Pack 2016 15
■ Siebel CRM Release 7.x does not refer to versions of Siebel CRM earlier than version 7.5.3. You cannot upgrade directly from pre-7.8.2 versions of Siebel CRM to Siebel Innovation Pack 2016 or later.
■ The term Windows refers to all Microsoft Windows operating systems listed as supported for this release on the Certifications tab on My Oracle Support.
■ The term UNIX refers to all forms of the UNIX operating system listed as supported for this release on the Certifications tab on My Oracle Support. UNIX is a Siebel Enterprise Server software platform.
NOTE: Linux is treated in this guide as a UNIX operating system. Specific supported Linux operating systems are listed on the Certifications tab on My Oracle Support.
■ The term IBM z/OS refers to all the IBM mainframe operating systems, collectively referred to as z/OS, which are supported for this release as described on the Certifications tab on My Oracle Support. The z/OS operating system is a Siebel database software platform.
About File Paths and Commands in Upgrade TopicsEnvironment variables and path placeholders for both Windows and UNIX paths are used throughout this guide. You must enter UNIX commands in a Korn shell. Enter Windows commands in a Windows Command Prompt window.
Windows PathsThe following path conventions specify file system locations in topics:
■ SIEBEL_ROOT is the absolute path to the Siebel Server installation directory. When you install a Siebel Server, the installation program queries for the Siebel CRM installation path and installs the Siebel Server in a subdirectory of this path called siebsrvr. For example, if you specified C:\sba811 as the installation directory (this is the default), then SIEBEL_ROOT is C:\sba811\siebsrvr.
■ DBSRVR_ROOT is the absolute path to the Siebel Database Configuration Utilities files installation directory on the Siebel Server. When you install the Siebel Database Configuration Utilities, the installation program queries for the Siebel Server installation directory and then installs the Siebel Database Configuration Utilities files at the same level in a subdirectory called dbsrvr. For example, if SIEBEL_ROOT is C:\sba811\siebsrvr, then DBSRVR_ROOT is C:\sba811\dbsrvr.
UNIX PathsThe following environment variables and path conventions specify file system locations in the topics in this guide:
Siebel Database Upgrade Guide for DB2 for z/OS Siebel Innovation Pack 2016
About Siebel Database Upgrade Topics ■ About File Paths and Commands in Upgrade Topics
16
■ SIEBEL_ROOT is an environment variable that defines the absolute path of the Siebel Server installation directory. When you install a Siebel Server, the installation program queries for the installation directory and installs the Siebel Server in a subdirectory of this path called siebsrvr. For example, if you specified usr/siebel as the installation directory, then $SIEBEL_ROOT is /usr/siebel/siebsrvr.
The definition of SIEBEL_ROOT and other environment variables required for doing an upgrade are located in /siebsrvr/siebenv.sh. The Siebel Server installation script sets environment variable definitions in this shell script. Do not edit or delete this file.
TIP: Before performing command line procedures, source siebenv.csh or siebenv.sh first. This refreshes the environment variables required to run commands.
■ DBSRVR_ROOT is a path convention used in this guide. It is not an environment variable and is not defined in siebenv.csh or siebenv.sh.
DBSRVR_ROOT is the absolute path to the Siebel Database Configuration Utilities files on the Siebel Server. When you install the Siebel Database Configuration Utilities, the installation program queries for the Siebel Server installation directory and installs the Siebel Database Configuration Utilities files at the same level in a subdirectory called dbsrvr. For example, if $SIEBEL_ROOT is usr/siebel/siebsrvr, then DBSRVR_ROOT is /usr/siebel/dbsrvr.
■ Run UNIX scripts in a C or Korn shell.
CommandsProcedural steps that ask you to execute a command must be performed as follows, unless specified otherwise:
■ Windows. Open a Command Prompt window and use the cd command to make the specified directory the current directory. Enter the command.
Do not use the Windows File Explorer to navigate to the directory and do not run the command by entering it in the Run window in the Start Menu.
■ UNIX. In a shell window, make the specified directory the current directory, source the siebenv script, then enter the command.
Use lowercase for all filenames, directory names, path names, parameters, flags, and command-line commands, unless you are instructed otherwise.
Siebel Database Upgrade Guide for DB2 for z/OS Siebel Innovation Pack 2016 17
3 How the Siebel Database Upgrade Works
This chapter provides an overview of the Siebel database upgrade process and upgrade environments, and describes the utility used to perform the upgrade. Also review topics relevant to the z/OS database upgrade in the chapters in Siebel Database Upgrade Guide that provide an overview of the upgrade process. This chapter includes the following topics:
■ About Supported Siebel Upgrade Paths on page 17
■ Supported Upgrade Paths for Siebel Innovation Pack 2016 on page 18
■ Types of Siebel Database Upgrades on page 23
■ Types of Siebel Database Upgrades on page 23
■ About Using Oracle’s Advanced Customer Services on page 24
■ About Unicode Support on page 25
■ About Siebel Upgrade Environments on page 25
■ About the z/OS Upgrade on page 28
■ About the Staging Database on page 29
■ About Siebel Additive Schema Upgrade Changes on page 30
■ About the Siebel Database Upgrade Process on page 32
■ About the Siebel Database Configuration Utilities and Database Configuration Wizard on page 38
■ About the Siebel Upgrade Wizard and Driver Files on page 43
■ Job Flow of a Production Database Upgrade on page 45
■ About the Override File on page 50
About Supported Siebel Upgrade PathsUpgrades: All upgrades.
Environments: All environments.
Performing a database upgrade refers to migrating your Siebel custom repository and data schema from one release of Siebel CRM to a higher release. This guide describes how to upgrade the following types of installations:
■ A Siebel CRM 7.x installation to Siebel Innovation Pack 2016 or later.
In this version of the guide, Release 7.x refers collectively to all versions of Siebel CRM Release 7.8.2 (SIA) from which you can upgrade directly to Siebel Innovation Pack 2016 or later.
Siebel Database Upgrade Guide for DB2 for z/OS Siebel Innovation Pack 2016
How the Siebel Database Upgrade Works ■ Supported Upgrade Paths for Siebel Innovation Pack 2016
18
■ A Siebel CRM 8.0 installation to Siebel Innovation Pack 2016 or later.
NOTE: If you are considering migrating your Siebel CRM 8.x z/OS database to Unicode format, be aware that you cannot upgrade to a later release of Siebel CRM using the standard upgrade procedure. If you migrate your Siebel z/OS database to Unicode format, you can upgrade to the latest Siebel patchset. However, Oracle will support Unicode database upgrades from one major release of Siebel CRM to another, or incremental Unicode upgrades, in future innovation packs, if required.
■ A Siebel CRM 8.1.1.x installation to Siebel Innovation Pack 2016 or later
This guide does not cover the following specific upgrade paths or infrastructure changes. For help with these tasks, contact your Oracle sales representative for Oracle Advanced Customer Services to request assistance:
■ Direct upgrades to Siebel CRM version 8.1 from Siebel CRM versions earlier than 7.5.3 are not supported; you must first upgrade to Siebel CRM 7.8.2, or a later release.
■ Direct upgrades to Siebel CRM version 8.2.2.x are not supported.
■ Changing operating system type during an upgrade, for example changing from Windows to UNIX.
■ Changing database platform type during an upgrade, for example changing from Oracle 8i to IBM DB2.
■ Migrating to Unicode.
■ Migrating from Siebel Industry Solutions or Siebel Financial Services applications to Siebel Business Applications.
■ Upgrading from one base language to another. To achieve similar results, upgrade your existing base language and install the Siebel language pack for the desired language.
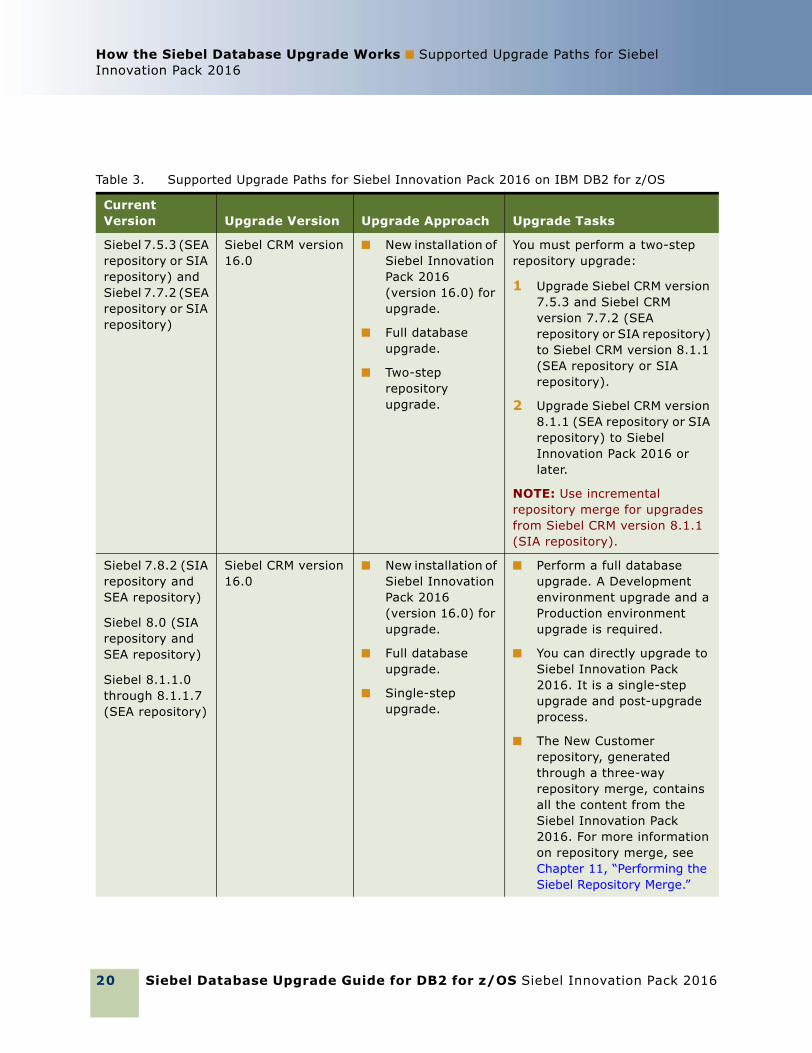
Supported Upgrade Paths for Siebel Innovation Pack 2016Table 3 lists supported upgrade paths for Siebel Innovation Pack 2016 (Siebel CRM version 16.0) on the IBM DB2 for z/OS database platform. The repository for the current release is SIA in all cases.
Updated Siebel Repository files (SRF files) are provided as part of Siebel Innovation Pack 2016. These SRF files correspond to repository updates in the Siebel database for the current release. The updated SRF files are available for all of the supported Siebel languages. Use the updated SRF files after you install Siebel Innovation Pack 2016, for either of the following upgrade tasks summarized in this topic. (It is not necessary to compile the New Siebel Repository SRF.)
■ If you run incremental repository merge for an existing Siebel database.
■ If you perform a full database upgrade for an existing Siebel database.
You also require the updated SRF files to run Siebel Business Applications after you install a new
How the Siebel Database Upgrade Works ■ Supported Upgrade Paths for SiebelInnovation Pack 2016
Siebel Database Upgrade Guide for DB2 for z/OS Siebel Innovation Pack 2016 19
Siebel database for Siebel CRM version 16.0. For more information, see the Siebel Installation Guide for the operating system you are using.
NOTE: After installing the Siebel CRM software for the current release, you must reset any passwords in the siebns.dat file on the Siebel Gateway Name Server that were previously encrypted using RC4 encryption. In the current release, such passwords are encrypted using Advanced Encryption Standard (AES) instead of RC4. You must perform this task regardless of the type of upgrade you are performing. For more information about reencrypting passwords, see Siebel Security Guide.
Siebel Database Upgrade Guide for DB2 for z/OS Siebel Innovation Pack 2016
How the Siebel Database Upgrade Works ■ Supported Upgrade Paths for Siebel Innovation Pack 2016
20
Table 3. Supported Upgrade Paths for Siebel Innovation Pack 2016 on IBM DB2 for z/OS
Current Version Upgrade Version Upgrade Approach Upgrade Tasks
Siebel 7.5.3 (SEA repository or SIA repository) and Siebel 7.7.2 (SEA repository or SIA repository)
Siebel CRM version 16.0
■ New installation of Siebel Innovation Pack 2016 (version 16.0) for upgrade.
■ Full database upgrade.
■ Two-step repository upgrade.
You must perform a two-step repository upgrade:
1 Upgrade Siebel CRM version 7.5.3 and Siebel CRM version 7.7.2 (SEA repository or SIA repository) to Siebel CRM version 8.1.1 (SEA repository or SIA repository).
2 Upgrade Siebel CRM version 8.1.1 (SEA repository or SIA repository) to Siebel Innovation Pack 2016 or later.
NOTE: Use incremental repository merge for upgrades from Siebel CRM version 8.1.1 (SIA repository).
Siebel 7.8.2 (SIA repository and SEA repository)
Siebel 8.0 (SIA repository and SEA repository)
Siebel 8.1.1.0 through 8.1.1.7 (SEA repository)
Siebel CRM version 16.0
■ New installation of Siebel Innovation Pack 2016 (version 16.0) for upgrade.
■ Full database upgrade.
■ Single-step upgrade.
■ Perform a full database upgrade. A Development environment upgrade and a Production environment upgrade is required.
■ You can directly upgrade to Siebel Innovation Pack 2016. It is a single-step upgrade and post-upgrade process.
■ The New Customer repository, generated through a three-way repository merge, contains all the content from the Siebel Innovation Pack 2016. For more information on repository merge, see Chapter 11, “Performing the Siebel Repository Merge.”
How the Siebel Database Upgrade Works ■ Supported Upgrade Paths for SiebelInnovation Pack 2016
Siebel Database Upgrade Guide for DB2 for z/OS Siebel Innovation Pack 2016 21
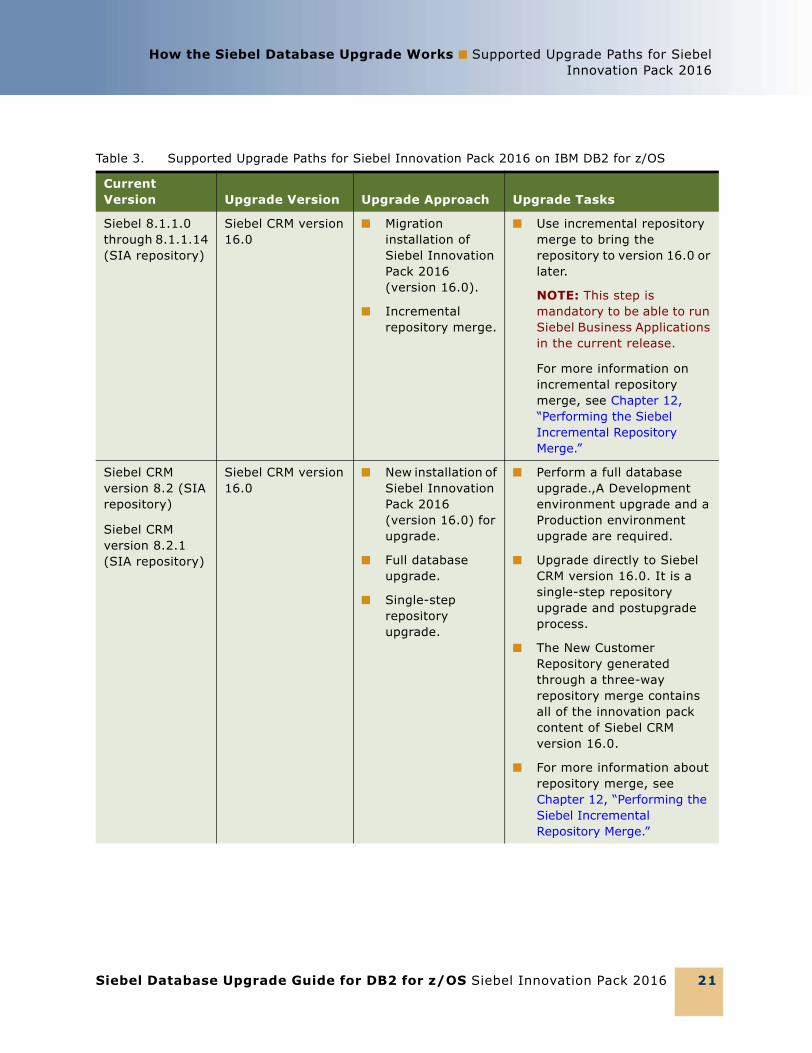
Siebel 8.1.1.0 through 8.1.1.14 (SIA repository)
Siebel CRM version 16.0
■ Migration installation of Siebel Innovation Pack 2016 (version 16.0).
■ Incremental repository merge.
■ Use incremental repository merge to bring the repository to version 16.0 or later.
NOTE: This step is mandatory to be able to run Siebel Business Applications in the current release.
For more information on incremental repository merge, see Chapter 12, “Performing the Siebel Incremental Repository Merge.”
Siebel CRM version 8.2 (SIA repository)
Siebel CRM version 8.2.1 (SIA repository)
Siebel CRM version 16.0
■ New installation of Siebel Innovation Pack 2016 (version 16.0) for upgrade.
■ Full database upgrade.
■ Single-step repository upgrade.
■ Perform a full database upgrade.,A Development environment upgrade and a Production environment upgrade are required.
■ Upgrade directly to Siebel CRM version 16.0. It is a single-step repository upgrade and postupgrade process.
■ The New Customer Repository generated through a three-way repository merge contains all of the innovation pack content of Siebel CRM version 16.0.
■ For more information about repository merge, see Chapter 12, “Performing the Siebel Incremental Repository Merge.”
Table 3. Supported Upgrade Paths for Siebel Innovation Pack 2016 on IBM DB2 for z/OS
Current Version Upgrade Version Upgrade Approach Upgrade Tasks
Siebel Database Upgrade Guide for DB2 for z/OS Siebel Innovation Pack 2016
How the Siebel Database Upgrade Works ■ Supported Upgrade Paths for Siebel Innovation Pack 2016
22
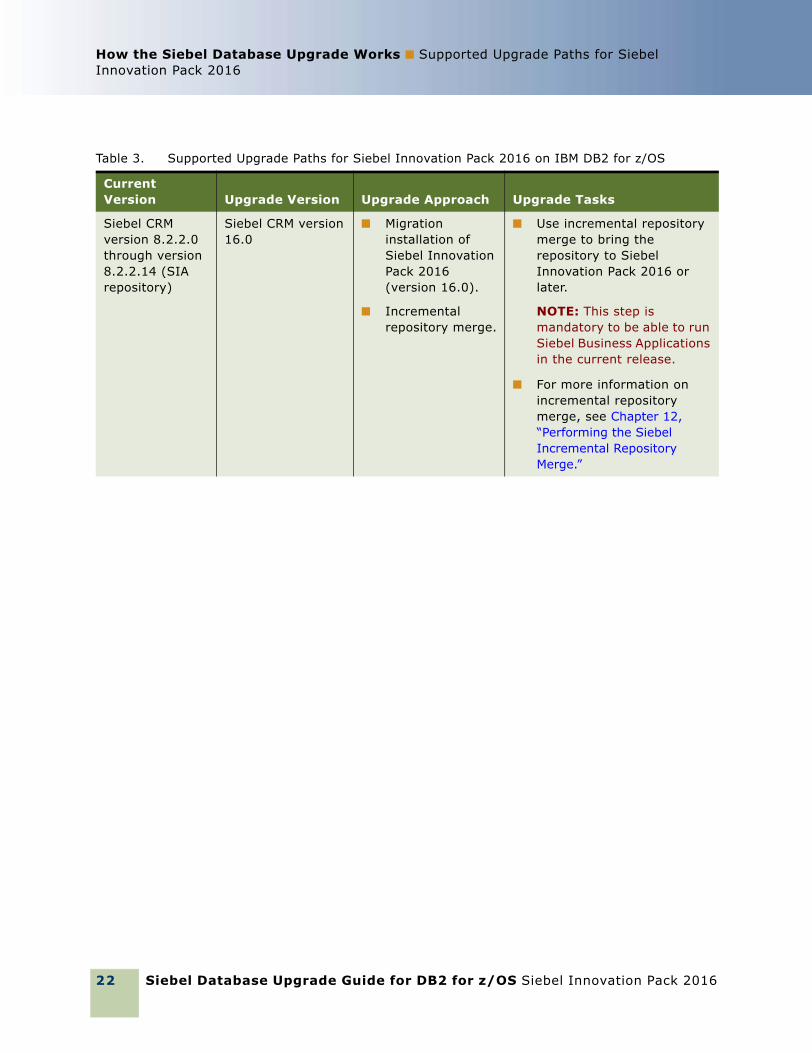
Siebel CRM version 8.2.2.0 through version 8.2.2.14 (SIA repository)
Siebel CRM version 16.0
■ Migration installation of Siebel Innovation Pack 2016 (version 16.0).
■ Incremental repository merge.
■ Use incremental repository merge to bring the repository to Siebel Innovation Pack 2016 or later.
NOTE: This step is mandatory to be able to run Siebel Business Applications in the current release.
■ For more information on incremental repository merge, see Chapter 12, “Performing the Siebel Incremental Repository Merge.”
Table 3. Supported Upgrade Paths for Siebel Innovation Pack 2016 on IBM DB2 for z/OS
Current Version Upgrade Version Upgrade Approach Upgrade Tasks

How the Siebel Database Upgrade Works ■ Types of Siebel Database Upgrades
Siebel Database Upgrade Guide for DB2 for z/OS Siebel Innovation Pack 2016 23
Types of Siebel Database UpgradesThis topic describes the different methods available to upgrade a Siebel Database. The approach you use is determined by your current version of Siebel CRM. Upgrades can be either:
■ Single-step or two-step repository upgrades
■ Full database upgrades or patch installations with incremental repository merge
Each of these upgrade methods is explained as follows.
Siebel CRM version 15.0 through 15.4
Siebel CRM version 16.0
■ Migration Installation of Siebel Innovation Pack 2016 (version 16.0).
■ Incremental repository merge.
■ Use incremental repository merge to bring the repository to Siebel Innovation Pack 2016 or later.
NOTE: This step is mandatory to be able to run Siebel Business Applications in the current release.
For more information on incremental repository merge, see Chapter 12, “Performing the Siebel Incremental Repository Merge.”
Siebel CRM version 15.5 and later
Siebel CRM version 16.0
■ Migration Installation of Siebel Innovation Pack 2016 (version 16.0).
■ Incremental repository merge.
■ Use incremental repository merge to bring the repository to Siebel Innovation Pack 2016 or later.
NOTE: This step is mandatory to be able to run Siebel Business Applications in the current release.
■ For more information on incremental repository merge, see Chapter 12, “Performing the Siebel Incremental Repository Merge.”
Table 3. Supported Upgrade Paths for Siebel Innovation Pack 2016 on IBM DB2 for z/OS
Current Version Upgrade Version Upgrade Approach Upgrade Tasks
Siebel Database Upgrade Guide for DB2 for z/OS Siebel Innovation Pack 2016
How the Siebel Database Upgrade Works ■ About Using Oracle’s Advanced Customer Services
24
Single-Step and Two-Step Siebel Repository UpgradesBefore the release of Siebel CRM version 8.1.1, two Siebel repositories supported Siebel applications: Siebel Business Applications (SEA) repository, and Siebel Industry Applications (SIA) repository. The Siebel Industry Applications (SIA) data model is physically a superset of the Siebel Enterprise Application (SEA) data model. The SIA data model has more tables, more columns in the same tables, and more indexes than the SEA data model, but it does not exclude any tables, columns or indexes from the SEA version.
Since Siebel CRM version 8.1.1, only the SIA repository is supported. On z/OS, an upgrade process enabling a direct, single-step upgrade from SEA to SIA repositories is available only from 8.1.1.x releases. Upgrades from Siebel CRM 7.5.3 (SEA) through Siebel CRM version 8.0 (SEA) require a two-step upgrade process. For additional information, see the topic about single-step repository upgrades in Siebel Database Upgrade Guide.
Patch Releases and Incremental Repository Merge If you are upgrading from one major release of Siebel CRM to another, for example, from Siebel 8.0 to Siebel 8.2, then you must perform a full database upgrade. If you are upgrading within the same Siebel release, then you can upgrade by performing a patch release installation.
Siebel patch releases are applied onto existing patch releases, both of which are part of the same major Siebel CRM release. For example, you can install the Siebel Innovation Pack 2016 or later as a patch release into an existing installation of Siebel CRM version 8.1.1 or 8.1.1.x. For more information on patch releases, see Siebel Installation Guide for the operating system you are using.
If you install the current release as a patch installation, then you must use the Incremental Repository Merge feature to update your Siebel database to the current release. Incremental Repository Merge is a mechanism which allows you to incrementally upgrade your custom repository data (including schema and seed data) from Siebel CRM version 8.1.1.x (SIA Fix Pack) to Siebel Innovation Pack 2016 or later (SIA innovation pack). On the DB2 for z/OS platform, incremental repository merge functionality is not supported for upgrades to Siebel Release 8.2. For more information about the incremental repository merge process, see the chapter about performing an incremental repository merge in Siebel Database Upgrade Guide and Chapter 12, “Performing the Siebel Incremental Repository Merge.”
NOTE: The Siebel CRM version repositories contain the cumulative repository, schema, and seed data for all new content (such as Release Features) developed up to Siebel Innovation Pack 2016 or later.
About Using Oracle’s Advanced Customer ServicesThe Siebel CRM upgrade process on DB2 for z/OS is designed to run in all standard Siebel implementations. It is built on the assumption that data exists in all Siebel tables and that all this data must be migrated.
How the Siebel Database Upgrade Works ■ About Unicode Support
Siebel Database Upgrade Guide for DB2 for z/OS Siebel Innovation Pack 2016 25
In reality, your implementation has probably been customized to suit your business so, for example, you might not use all of the Siebel tables shipped or they might contain varying amounts of data. To accommodate this fact, the upgrade process is customizable, for example, you can eliminate upgrade jobs that run on empty tables, or you can choose to run unload jobs simultaneously.
Global Customer Support provides support for all standard z/OS upgrades but it does not support customized upgrades. If you require help with a standard upgrade, create a service request (SR) on My Oracle Support. You can log service requests by accessing My Oracle Support (Service Request tab), or by using your existing phone support numbers to contact Oracle Global Customer Support
Customizing the upgrade scripts is a complex process and, for this reason, if you want to customize the upgrade scripts, you must contact your Oracle sales representative for Oracle Advanced Customer Services to request assistance.
This guide describes a number of upgrade customization tasks that you can perform where the assistance of Oracle’s Advanced Customer Services is required.
CAUTION: You must contact Oracle’s Advanced Customer Services before performing tasks where such help is noted as a requirement. If you do not, you might invalidate your support agreement.
This guide also describes tasks where enlisting the help of Oracle’s Advanced Customer Services is recommended. Failure to contact Oracle’s Advanced Customer Services for help with these tasks does not have implications for continuing support.
Where a task requires the help of Oracle’s Advanced Customer Services, this requirement is indicated in the relevant topic.
About Unicode SupportPrevious releases of Siebel Business Applications supported ASCII- and EBCDIC-based coded character set IDs (CCSIDs) on DB2 for z/OS. Since Siebel CRM 8.0, Unicode is also supported on DB2 for z/OS version 8 and later releases. For a list of supported languages and code pages, see the Certifications tab on My Oracle Support.
You can migrate your Siebel database from an EBCDIC or ASCII code page to a Unicode encoding system but this process is not part of the standard Siebel CRM upgrade procedure. A separate migration procedure for migrating to Unicode is performed on the DB2 host after you have upgraded to the current release of Siebel CRM. For information on migrating to Unicode, see Implementing Siebel Business Applications on DB2 for z/OS.
NOTE: If you are considering migrating your Siebel CRM 8.x z/OS database to Unicode format, be aware that you cannot upgrade to a later release of Siebel CRM using the standard upgrade procedure. If you migrate your Siebel z/OS database to Unicode format, you can upgrade to the latest patchset. However, Oracle will support Unicode database upgrades from one major release of Siebel CRM to another, or incremental Unicode upgrades, in future innovation packs, if required.
About Siebel Upgrade EnvironmentsUpgrades: All upgrades.
Environments: All environments.
Siebel Database Upgrade Guide for DB2 for z/OS Siebel Innovation Pack 2016
How the Siebel Database Upgrade Works ■ About Siebel Upgrade Environments
26
This guide describes how to upgrade three database environments:
■ Development environment
■ Production test environment
■ Production environment
Detailed information on each database environment is provided in the remainder of this topic. For an overview of the steps involved in upgrading each database environment, see the chapter in Siebel Database Upgrade Guide that provides an overview of the upgrade process.
Development EnvironmentThe development environment is where developers use Siebel Tools to customize Siebel Business Applications. The development environment upgrade merges these customizations with the new Siebel release. The merged repository and schema definitions become inputs to the production upgrade.
A development environment contains the following elements:
■ Siebel Server
■ Web server and Siebel Web Server Extension
■ Siebel Gateway Name Server
■ Siebel Database Configuration Utilities installed on the same computer as the Siebel Server
■ RDBMS server and Siebel database
■ Siebel Tools installed on workstations running a supported Windows environment. This includes the local database running on developers’ Mobile Web Clients.
■ Siebel applications and test data required to verify the basic function of newly compiled SRF files.
Production Test EnvironmentThe production test environment is where you test the upgraded release to validate its function and performance before deploying it to users. This is also where you tune the upgrade process to minimize the time required to perform your production upgrade.
By tuning the production upgrade scripts in a test environment, you can significantly reduce the time required to complete the production upgrade. For this reason, the production test environment database must contain the same data volume and topography as your production database.
This environment includes the following elements:
■ Siebel Enterprise Server, including at least one Siebel Server and an RDBMS server and Siebel database
■ Web server with a Siebel Web Server Extension installed
■ Siebel Gateway Name Server
■ Siebel Database Configuration Utilities installed on the same computer as the Siebel Server
■ All the Siebel applications currently installed in your production environment
How the Siebel Database Upgrade Works ■ About Siebel Upgrade Environments
Siebel Database Upgrade Guide for DB2 for z/OS Siebel Innovation Pack 2016 27
■ A copy of the Siebel database installed in your production environment
You perform the following processes in the production test environment:
■ Test the upgraded release to validate its function and performance before deploying it to users.
■ Tune the upgrade process to minimize the time required to perform your production upgrade.
Tuning the upgrade scripts can significantly reduce the time required to complete the production upgrade.
Production EnvironmentThe production environment is your live business environment, where your internal and external users interact with applications and generate actual business data. The production environment includes all your Siebel Enterprise Servers worldwide.
The upgrade process assumes all production environment databases are completely separate from the development environment and production test environment databases.
Oracle provides these tools to help you transition from production test to production:
■ Siebel Application Deployment Manager (ADM). This application migrates administrative data such as lists of values (LOVs) from the production test environment to the production environment. For further information about ADM, see Siebel Application Deployment Manager Guide.
■ Siebel Anywhere. This application builds distribution kits for remote users. For information about Siebel Anywhere, see Siebel Anywhere Administration Guide.
Siebel Database Upgrade Guide for DB2 for z/OS Siebel Innovation Pack 2016
How the Siebel Database Upgrade Works ■ About the z/OS Upgrade
28
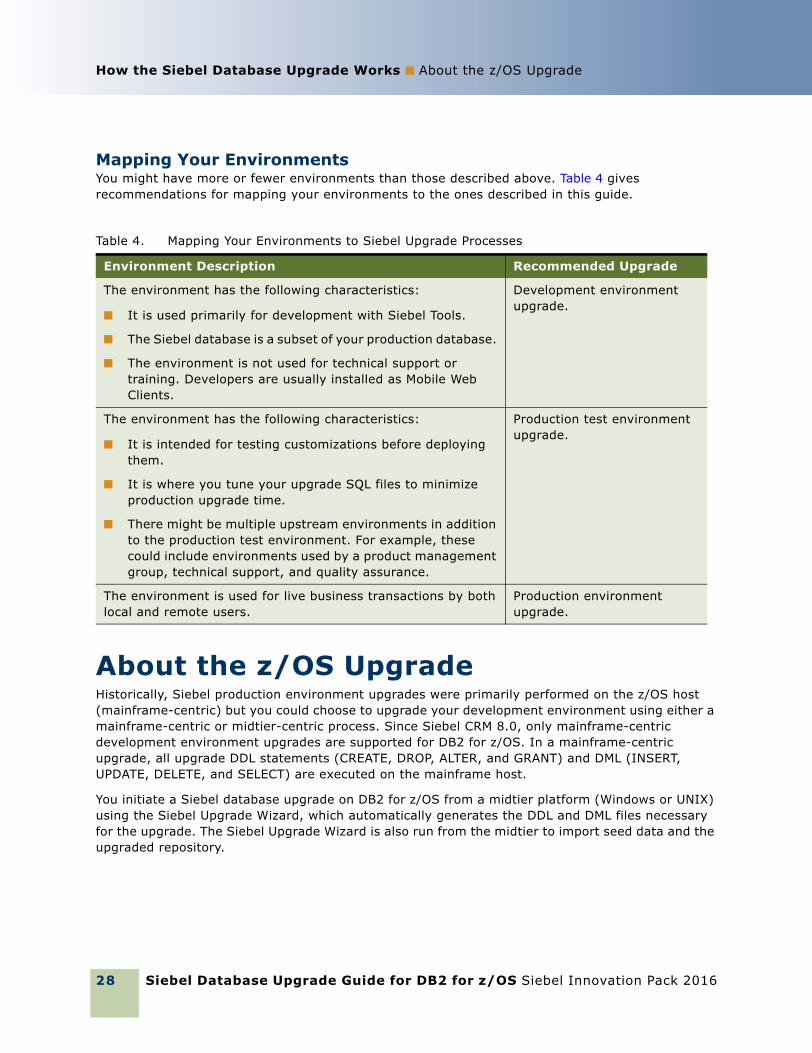
Mapping Your EnvironmentsYou might have more or fewer environments than those described above. Table 4 gives recommendations for mapping your environments to the ones described in this guide.
About the z/OS UpgradeHistorically, Siebel production environment upgrades were primarily performed on the z/OS host (mainframe-centric) but you could choose to upgrade your development environment using either a mainframe-centric or midtier-centric process. Since Siebel CRM 8.0, only mainframe-centric development environment upgrades are supported for DB2 for z/OS. In a mainframe-centric upgrade, all upgrade DDL statements (CREATE, DROP, ALTER, and GRANT) and DML (INSERT, UPDATE, DELETE, and SELECT) are executed on the mainframe host.
You initiate a Siebel database upgrade on DB2 for z/OS from a midtier platform (Windows or UNIX) using the Siebel Upgrade Wizard, which automatically generates the DDL and DML files necessary for the upgrade. The Siebel Upgrade Wizard is also run from the midtier to import seed data and the upgraded repository.
Table 4. Mapping Your Environments to Siebel Upgrade Processes
Environment Description Recommended Upgrade
The environment has the following characteristics:
■ It is used primarily for development with Siebel Tools.
■ The Siebel database is a subset of your production database.
■ The environment is not used for technical support or training. Developers are usually installed as Mobile Web Clients.
Development environment upgrade.
The environment has the following characteristics:
■ It is intended for testing customizations before deploying them.
■ It is where you tune your upgrade SQL files to minimize production upgrade time.
■ There might be multiple upstream environments in addition to the production test environment. For example, these could include environments used by a product management group, technical support, and quality assurance.
Production test environment upgrade.
The environment is used for live business transactions by both local and remote users.
Production environment upgrade.
How the Siebel Database Upgrade Works ■ About the Staging Database
Siebel Database Upgrade Guide for DB2 for z/OS Siebel Innovation Pack 2016 29
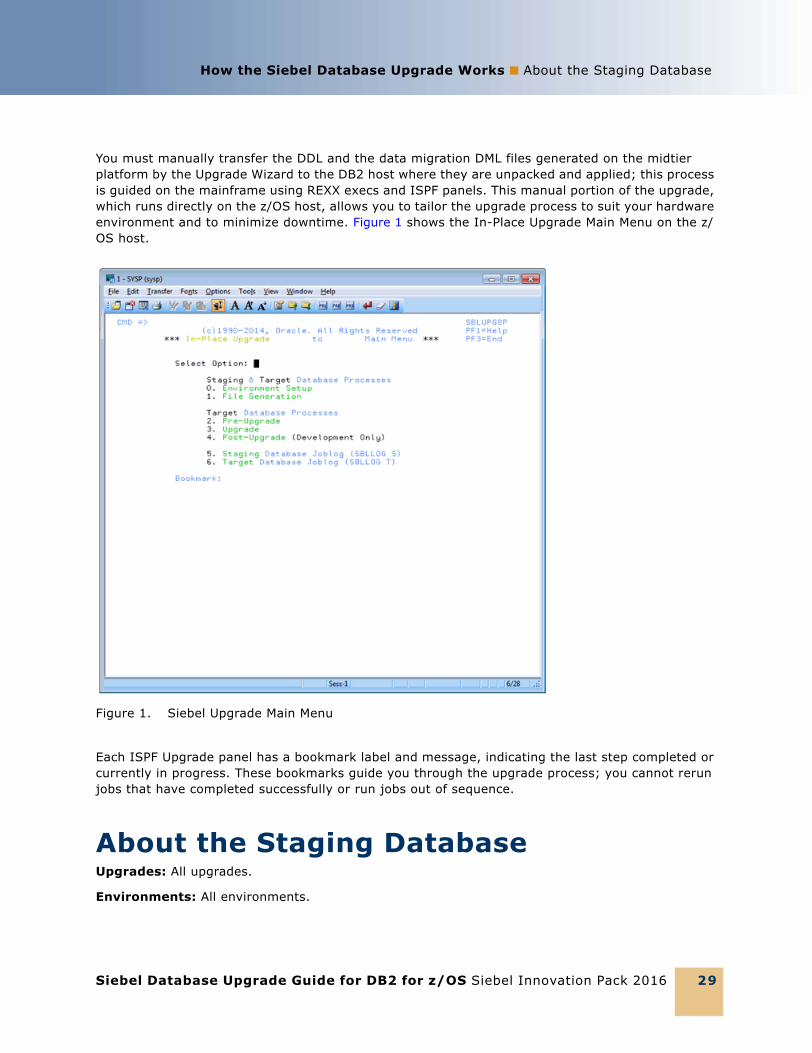
You must manually transfer the DDL and the data migration DML files generated on the midtier platform by the Upgrade Wizard to the DB2 host where they are unpacked and applied; this process is guided on the mainframe using REXX execs and ISPF panels. This manual portion of the upgrade, which runs directly on the z/OS host, allows you to tailor the upgrade process to suit your hardware environment and to minimize downtime. Figure 1 shows the In-Place Upgrade Main Menu on the z/OS host.
Each ISPF Upgrade panel has a bookmark label and message, indicating the last step completed or currently in progress. These bookmarks guide you through the upgrade process; you cannot rerun jobs that have completed successfully or run jobs out of sequence.
About the Staging Database Upgrades: All upgrades.
Environments: All environments.
Figure 1. Siebel Upgrade Main Menu
Siebel Database Upgrade Guide for DB2 for z/OS Siebel Innovation Pack 2016
How the Siebel Database Upgrade Works ■ About Siebel Additive Schema Upgrade Changes
30
Previously, for recovery purposes, in-place upgrades were not supported for Siebel mainframe-centric upgrades (an in-place upgrade occurs when upgrade changes are made directly to the existing database). Instead, a target database was built for the new release and data was unloaded from the existing source database and migrated in the appropriate format to the upgraded target database. The source database was not upgraded, although minor modifications were made to it during the upgrade process.
Since Siebel CRM 8.0, the production database is upgraded in-place. However, to accommodate host customers requirements for high-system-availability, a staging database is first created which is used to generate all the z/OS upgrade components (for example, the JCL and SQL upgrade files). The staging database allows you to generate all the midtier upgrade files and to build the JCL in advance of the actual database upgrade; this removes these steps from the critical upgrade path and minimizes system downtime.
The manual parts of the upgrade are run against the staging database. The automatic parts of the upgrade are run directly against the development or production database being upgraded (the target database).
The staging database is created from the existing development or production database that is to be upgraded (the target database). The target database DDL, and the storage control file specifying the physical database layout, are extracted and then executed in a separate DB2 subsystem to create the staging database. The staging database therefore contains the same schema and tables as the database to be upgraded, but it does not contain data.
About Siebel Additive Schema Upgrade Changes Upgrades: All upgrades.
Environments: Production test, production.
Since Siebel CRM 8.0, you can apply additive and nonadditive schema changes separately to the production database in order to reduce the downtime for the in-place upgrade.
Nonadditive schema changes impact the running application data model and require shutting down the production database. Additive schema changes are nondisruptive; these changes do not impact Siebel application usage. Therefore, you can apply additive schema changes to the live production database before you perform the in-place upgrade. This reduces the number of steps that must be performed when the database is offline and this reduces database downtime.
This is an optional process; if you do not apply the additive schema changes before you perform the production database in-place upgrade, they are applied in one step with the nonadditive upgrade changes.
Types of ChangesThe additive schema files generated by the Upgrade Wizard make the following types of schema changes to support the new release. These changes do not adversely affect data integrity or database normalization:
■ Creating new tables.
How the Siebel Database Upgrade Works ■ About Siebel Additive Schema UpgradeChanges
Siebel Database Upgrade Guide for DB2 for z/OS Siebel Innovation Pack 2016 31
■ Adding columns to an existing table. The column must either be specified as null, or if the column is not null, it must have a specified default value.
■ Creating nonunique indexes on new tables.
■ Creating or altering a unique index on an existing table provided the CLUSTER attribute is not specified for the index.
■ Increasing column sizes for numeric or varchar columns. The column must not be the basis for a picklist. Also, the resultant cumulative row size must not be larger than the data page size.
■ Changing a not-null column to null.
■ Changing a data type from char to varchar.
About Index Creation During the Additive Upgrade ProcessAlthough additive schema changes are generally nondisruptive, index creation during the additive upgrade process can impact Siebel application usage if both of the following conditions exist:
■ Indexes are specified with the DEFINE parameter set to YES
■ The DEFER YES parameter is not specified for the index
If data exists in a table for which an index is being created, DB2 changes the DEFINE parameter value from NO to YES, and issues a warning message. If the DEFER YES parameter is not also specified for the index, the index is populated while it is being created, and locks are placed on the associated table until the process is completed, preventing updates being made to the table.
In these cases, change the index definition to DEFINE YES, DEFER YES; this ensures the index is not populated while it is being created, so the associated table is not locked. You can run the IBM DB2 REBUILD INDEX utility (DSNUTILB) to populate the index at a later time when performing regularly scheduled maintenance. For additional information on applying additive index changes to the target database, see “Applying the Additive Changes in One Job” on page 192.
Implementation of Additive ChangesThe additive and nonadditive schema upgrade files are generated separately by the Upgrade Wizard in the output directory you specify when you run the Database Configuration Wizard. Additive schema filenames include the additive identifier. Review these files to determine the schema changes that are applied by the additive schema process and edit them as necessary, for example, verify that they do not make changes that conflict with customizations.
Additive schema changes must first be applied in a production test environment which has the same data as the production environment, or data that is statistically similar to the data in the production environment. After generating and applying the additive schema files to the production test database, make sure users in the test environment can enter, query and delete records to check that applying additive schema changes to the database does not affect the way in which the existing version of the Siebel application works.
Siebel Database Upgrade Guide for DB2 for z/OS Siebel Innovation Pack 2016
How the Siebel Database Upgrade Works ■ About the Siebel Database Upgrade Process
32
About the Siebel Database Upgrade ProcessUpgrades: All upgrades.
Environments: All environments.
Upgrading to a new release involves two aspects:
■ The order in which to upgrade your environments
■ The flow of the upgrade process within each environment
Environment Upgrade OrderIf you have a development environment, you must upgrade it first. During this phase, your customizations are merged with the new Siebel release. A merged repository file and database schema file are created and become inputs to the production test environment upgrade and production upgrade.
If you do not have a development environment or have not customized your repository, no repository merge is required. You can use the repository and schema definition files included in the new release to upgrade your production test environment and production environment.
How the Siebel Database Upgrade Works ■ About the Siebel Database Upgrade Process
Siebel Database Upgrade Guide for DB2 for z/OS Siebel Innovation Pack 2016 33
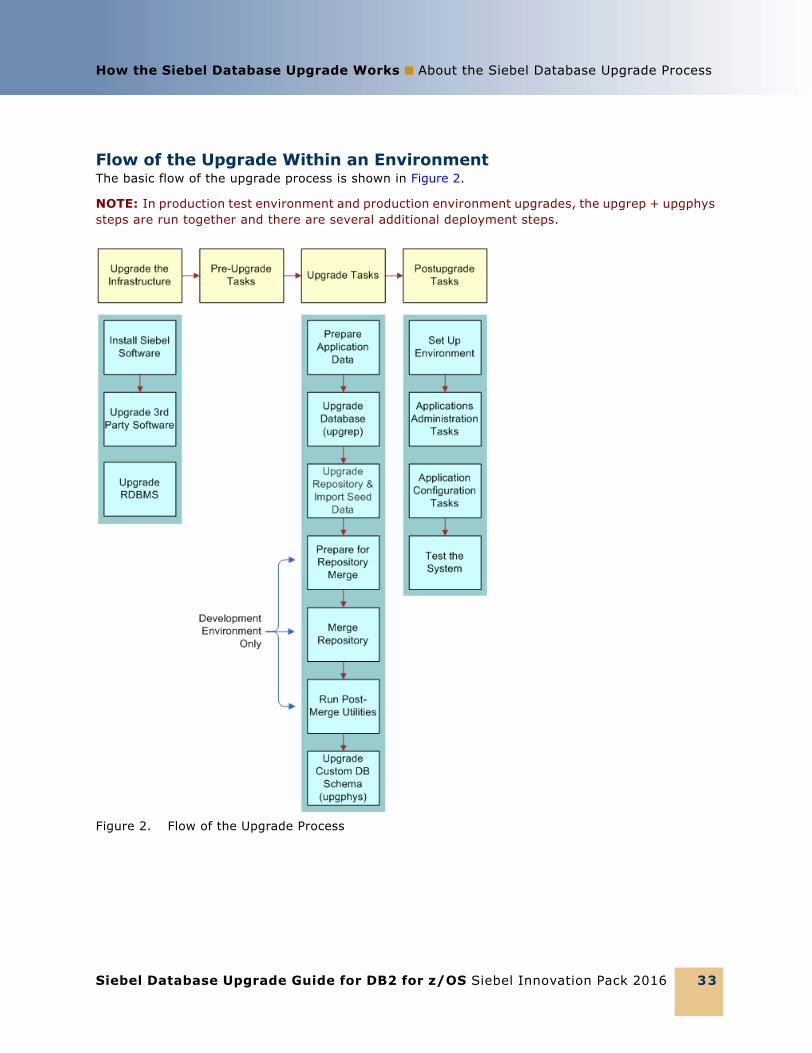
Flow of the Upgrade Within an EnvironmentThe basic flow of the upgrade process is shown in Figure 2.
NOTE: In production test environment and production environment upgrades, the upgrep + upgphys steps are run together and there are several additional deployment steps.
Figure 2. Flow of the Upgrade Process
Siebel Database Upgrade Guide for DB2 for z/OS Siebel Innovation Pack 2016
How the Siebel Database Upgrade Works ■ About the Siebel Database Upgrade Process
34
Upgrade the InfrastructureThe first phase is to upgrade your hardware and software to meet system and implementation requirements, which includes upgrading the Siebel Enterprise Server to the new release. This action upgrades the Siebel Servers and provides the programs, scripts, input files, and other files required to merge the repository and upgrade the Siebel database. For information on how to upgrade the infrastructure, see Siebel Installation Guide for the operating system you are using.
Perform Preupgrade TasksThis phase prepares the Siebel database for upgrade and includes such tasks as closing database connections, clearing pending workflow tasks, disabling customized triggers and editing and validating the storage control file.
NOTE: The Siebel upgrade process is not designed to support custom database triggers. If you have created customized triggers for the Siebel schema to be upgraded, you must remove them before starting the Siebel upgrade process. You can re-create these objects once the Siebel upgrade completes successfully.
Perform Upgrade Tasks (Development Environment)This phase merges your customizations into the new release. This phase also upgrades the development environment database and includes these tasks:
■ Prepare application data. These tasks prepare test data for migration.
■ Upgrade database (upgrep). Run the Database Configuration Wizard in upgrep mode, selecting the zSeries Staging of Files for Upgrade option. This generates the files required to build the staging database and generate the upgrade files required to perform the in-place upgrade of the database.
■ Perform the in-place upgrade of the database. During this phase, a basic upgrade of the Siebel database schema is performed and repositories are loaded to prepare for the repository merge.
The upgrep mode makes the following changes:
■ Drops interface tables and database triggers
■ Populates columns that must change from NULL to NOT NULL
■ Creates new tables. Merges existing tables.
■ Prepares for index creation. Verifies that there are no unique key violations.
■ Creates indexes
■ Imports seed data
■ Imports the Prior Siebel Repository, the New Siebel Repository, and the New Customer Repository
■ Makes modifications to repository objects to prepare for the repository merge
■ Updates primary children foreign key references
■ Performs miscellaneous file actions
How the Siebel Database Upgrade Works ■ About the Siebel Database Upgrade Process
Siebel Database Upgrade Guide for DB2 for z/OS Siebel Innovation Pack 2016 35
■ Merge repository. You use Siebel Tools to merge your existing repository with the repository in the new release. During the repository merge, objects from the Prior Siebel Repository, the Prior Customer Repository, and the New Siebel Repository are compared to identify the total set of object differences. The process also determines how conflicts between repository changes are resolved as they are merged into the New Customer Repository.
■ Run postmerge utilities. You use Siebel Tools to run a set of utilities that examine the merged repository. The utilities analyze your customizations to applets and views, and apply changes to them as required to conform to the user interface in the new release.
■ Upgrade database (upgphys). You run the Database Configuration Wizard in upgphys mode. It further upgrades the Siebel database with changes resulting from the repository merge and completes the database upgrade.
The Database Configuration Wizard also generates the customer repository definition file and logical schema definition file that are used as input to the production test environment and production upgrades.
Specifically, this mode performs the following tasks:
■ Synchronizes the Siebel database schema to the logical schema definition in the merged repository.
NOTE: During the synchronization process, custom columns in the Siebel Schema that are not in the Siebel Repository are not removed but custom indexes in the Siebel Schema that are not in the Siebel Repository are removed.
■ Exports repository object definitions to a file, custrep.dat, and exports the logical schema definition to a file, schema.ddl
These two files are used as input to the production upgrades.
■ Renames the New Customer Repository to Siebel Repository
■ Updates the schema version in S_APP_VER
Perform Upgrade Tasks (Production Test Environment)This phase upgrades a production test environment Siebel database to the new release allowing you to test how customizations work with the new release and to tune the upgrade scripts.
CAUTION: You are required to contact your Oracle sales representative for Oracle Advanced Customer Services to request assistance with tuning your upgrade scripts. If you do not, you might invalidate your support agreement.
This phase includes the following tasks:
■ Prepare application data. These tasks are about preparing application data for migration.

Siebel Database Upgrade Guide for DB2 for z/OS Siebel Innovation Pack 2016
How the Siebel Database Upgrade Works ■ About the Siebel Database Upgrade Process
36
■ Prepare for Production Upgrade (Upgrades from 7.5.3 only): Run the Database Configuration Wizard in Prepare for Production Upgrade mode. This mode compares the repository schema and the physical database schema and generates a file, SCINDX.SQL, which is used to remove obsolete indexes. SCINDX.SQL lists indexes present in the physical schema that are not present in the repository schema.
NOTE: You must define an ODBC connection to the development environment database before performing this upgrade step.
■ Upgrade database (upgrep + upgphys). Run the Database Configuration Wizard in upgrep + upgphys mode, selecting the zSeries Staging of Files for Upgrade option. This generates the files required to build the staging database and generate the upgrade files required to perform the in-place upgrade of the database. The additive and nonadditive schema upgrade files are generated separately.
■ (Optional) Apply the additive upgrade files to upgrade the database. This is a nondisruptive upgrade process.
■ Perform the in-place upgrade of the database. The following changes are made during this phase of the upgrade process:
■ Drops interface tables and database triggers
■ Populates columns that must change from NULL to NOT NULL
■ Uses the schema.ddl file from the development environment upgrade to create new tables and merge existing tables.
■ Prepares for index creation. Verifies that there are no unique key violations.
■ Creates indexes
■ Updates primary children foreign key references
■ Performs miscellaneous file actions
■ Makes several administrative changes to table data, including updating the schema version in S_APP_VER.
■ Upgrade the repository and import seed data (upgrep + upgphys). Run the Database Configuration Wizard in upgrep + upgphys mode again, selecting the zSeries Seed/Repository Upgrade option to complete upgrade processing. During this step, the upgraded repository and seed data are imported.
■ Tune upgrade scripts (optional). You can improve the performance of the production environment upgrade by tuning the production upgrade scripts in the test environment.
Run several production upgrades against the test database. This allows you to understand the upgrade process before performing the production upgrade, to conduct performance testing, and to fine tune the upgrade scripts. After carrying out thorough performance testing, you can perform the live production upgrade using the tuned upgrade files.
Perform Upgrade Tasks (Production Environment)This phase upgrades a production environment Siebel database to the new release and includes the following tasks:
How the Siebel Database Upgrade Works ■ About the Siebel Database Upgrade Process
Siebel Database Upgrade Guide for DB2 for z/OS Siebel Innovation Pack 2016 37
■ Prepare Application Data. These tasks involve preparing application data in the production database for migration.
■ Upgrade database (upgrep + upgphys). Run the Database Configuration Wizard in upgrep + upgphys mode, selecting the zSeries Staging of Files for Upgrade option. This generates the files required to build the staging database and generate the upgrade files required to perform the in-place upgrade of the database. The additive and nonadditive schema upgrade files are generated separately.
NOTE: If you have tuned the upgrade scripts during a production test upgrade and want to use them during your production upgrade, you do not have to perform this step. Instead, change the production test environment values in the upgrade files to production environment values and then apply these files on the Z/OS host to upgrade the target database. For further information on this task, see “Process of Upgrading a Siebel Production Environment” on page 71.
■ (Optional) Apply the additive upgrade files to upgrade the database. This is a nondisruptive upgrade process.
■ Perform the in-place upgrade of the database. The same changes are made during the in-place upgrade of the production environment as were made during the in-place upgrade of the production test environment.
■ Upgrade the repository and import seed data (upgrep + upgphys). Run the Database Configuration Wizard in upgrep + upgphys mode again, selecting the zSeries Seed/Repository Upgrade option to complete upgrade processing.
NOTE: You do not have to run the utility in Prepare for Production mode before starting your production environment upgrade. You ran it as part of the production test environment upgrade. The required upgrade SQL commands have already been generated.
Perform Postupgrade TasksThis phase is where you set up the environment, configure applications, and test the upgraded system as follows:
■ Set Up the Environment. These tasks set up the postupgrade environment, which includes extracting the developers’ databases and running database statistics.
■ Application Administration. These tasks set up applications and include such things as setting up user access and visibility of views and screens.
■ Application Configuration. These tasks prepare applications for testing, including data migration for specific applications.
■ Test the Upgraded System. These tasks test the upgraded system. For development environment upgrades, you perform basic unit tests to verify application function followed by a full suite of regression and stress tests to verify the upgraded system is ready for production.
Siebel Database Upgrade Guide for DB2 for z/OS Siebel Innovation Pack 2016
How the Siebel Database Upgrade Works ■ About the Siebel Database Configuration Utilities and Database Configuration Wizard
38
About the Siebel Database Configuration Utilities and Database Configuration WizardUpgrades: All upgrades.
Environments: All environments.
The Database Configuration Utilities comprise a set of files that you install on a Siebel Server computer. These files are accessed when you run the Database Configuration Wizard and the Siebel Upgrade Wizard to install, configure, or upgrade the Siebel database on the DB2 host, or to perform other operations on the Siebel database after it is installed.
You can use any upgraded Siebel Server to perform an upgrade of the Siebel database. For best performance, however, install the Siebel Database Configuration Utilities files on the Siebel Server that you will use to perform the upgrade.
The Siebel Database Configuration Utilities files are installed at the same directory level as the Siebel Server in a directory called dbsrvr. For example, if the Siebel Server is installed in C:\sba81\siebsrvr (Windows), then the Siebel Database Configuration Utilities are installed in C:\sba81\dbsrvr. To edit and execute Siebel Database Configuration Utilities procedures and maintenance scripts, you must have READ-WRITE access to the Siebel Server bin directories in SIEBEL_ROOT (Windows), $SIEBEL_ROOT (UNIX).
The Database Configuration Wizard is part of the Siebel Configuration Wizard. It interactively gathers the information required to perform the following operations:
■ Install the Siebel database. This wizard sets up the Siebel database in the RDBMS as part of a first-time installation of Siebel Business Applications. It is also used to add a language to the Siebel Database Server installation.
■ Upgrade the Siebel database. This wizard upgrades the Siebel database to a new release in a development or production environment.
■ Import or export a Siebel repository. This wizard moves entire repositories between database environments with the same schema definition.
■ Migrate a Siebel repository. This wizard migrates repositories between databases and synchronizes the target database schema with the migrated repository schema definition.
■ Run database utilities. This group of wizards perform the following functions:
■ Synchronize a database schema with the Siebel Repository schema definition.
■ Convert existing Lists of Values (LOVs) to Multilingual Lists of Values (MLOVs).
■ Configure the database by extracting storage control files from the DB2 catalog and validating the extracted files.
■ Migrate the database from an EBCDIC or ASCII encoding format to a Unicode encoding format.
How the Siebel Database Upgrade Works ■ About the Siebel Database ConfigurationUtilities and Database Configuration Wizard
Siebel Database Upgrade Guide for DB2 for z/OS Siebel Innovation Pack 2016 39
About Running the Upgrade Database OptionWhen you run the Upgrade the Siebel Database option on the Database Configuration Wizard, the wizard prompts you for the upgrade environment (development or production) and the upgrade phase (upgrep, upgphys, or Prepare for Production Upgrade). The Wizard then prompts you for the information it requires about the upgrade environment to perform the upgrade.
After collecting and confirming the information, the wizard creates an upgrade configuration file and calls a driver that uses the environment information to create the SQL files required to upgrade your database.
After you run the Database Configuration Wizard, you run the Siebel Upgrade Wizard. The Siebel Upgrade Wizard opens a driver file containing the steps for the upgrade and executes these steps.
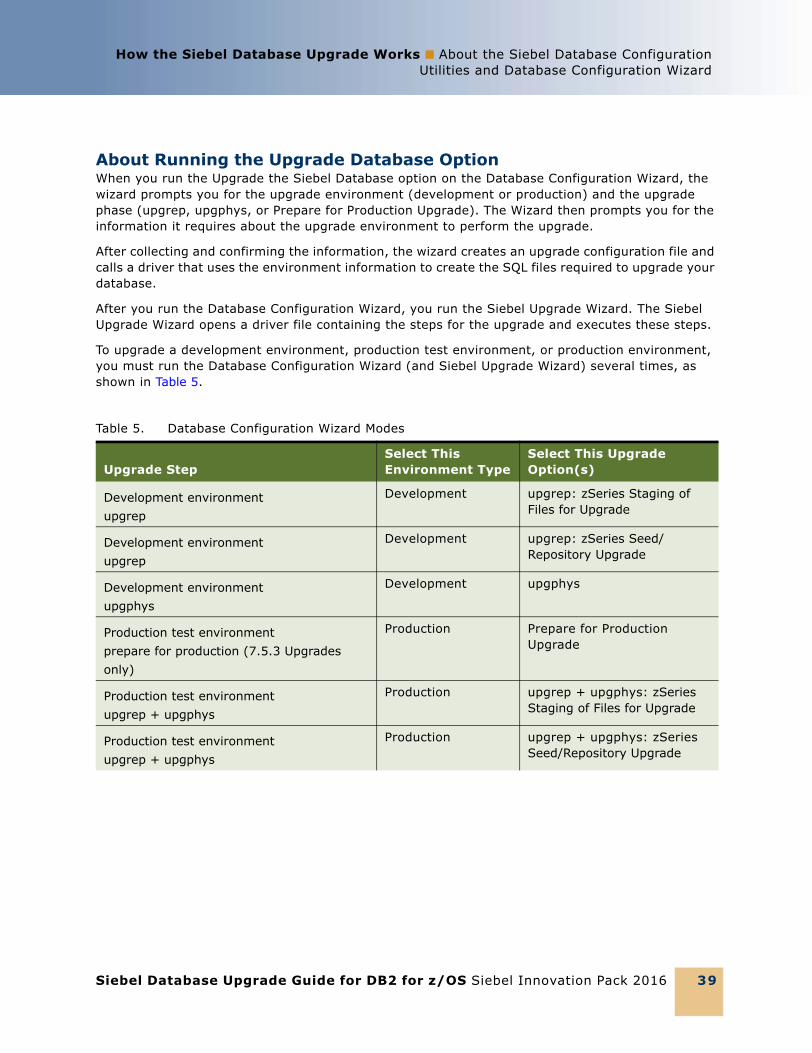
To upgrade a development environment, production test environment, or production environment, you must run the Database Configuration Wizard (and Siebel Upgrade Wizard) several times, as shown in Table 5.
Table 5. Database Configuration Wizard Modes
Upgrade StepSelect This Environment Type
Select This Upgrade Option(s)
Development environment upgrep
Development upgrep: zSeries Staging of Files for Upgrade
Development environmentupgrep
Development upgrep: zSeries Seed/Repository Upgrade
Development environment upgphys
Development upgphys
Production test environment prepare for production (7.5.3 Upgrades only)
Production Prepare for Production Upgrade
Production test environmentupgrep + upgphys
Production upgrep + upgphys: zSeries Staging of Files for Upgrade
Production test environmentupgrep + upgphys
Production upgrep + upgphys: zSeries Seed/Repository Upgrade
Siebel Database Upgrade Guide for DB2 for z/OS Siebel Innovation Pack 2016
How the Siebel Database Upgrade Works ■ About the Siebel Database Configuration Utilities and Database Configuration Wizard
40
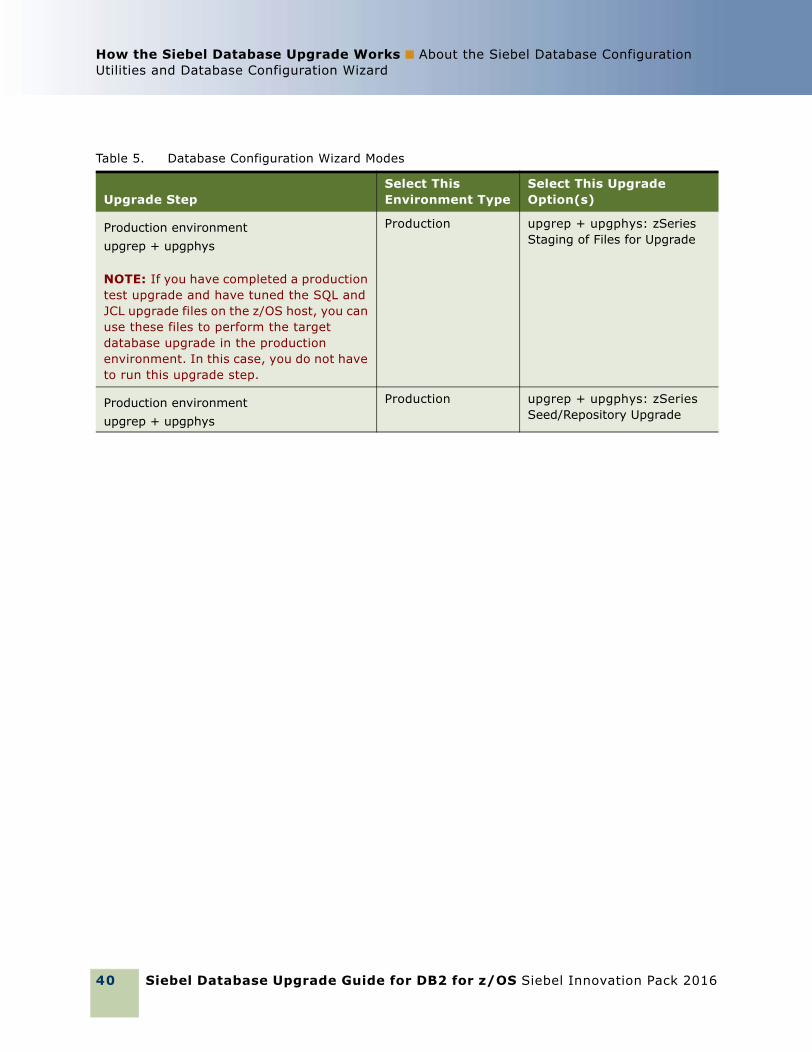
Production environmentupgrep + upgphys
NOTE: If you have completed a production test upgrade and have tuned the SQL and JCL upgrade files on the z/OS host, you can use these files to perform the target database upgrade in the production environment. In this case, you do not have to run this upgrade step.
Production upgrep + upgphys: zSeries Staging of Files for Upgrade
Production environmentupgrep + upgphys
Production upgrep + upgphys: zSeries Seed/Repository Upgrade
Table 5. Database Configuration Wizard Modes
Upgrade StepSelect This Environment Type
Select This Upgrade Option(s)
How the Siebel Database Upgrade Works ■ About the Siebel Database ConfigurationUtilities and Database Configuration Wizard
Siebel Database Upgrade Guide for DB2 for z/OS Siebel Innovation Pack 2016 41
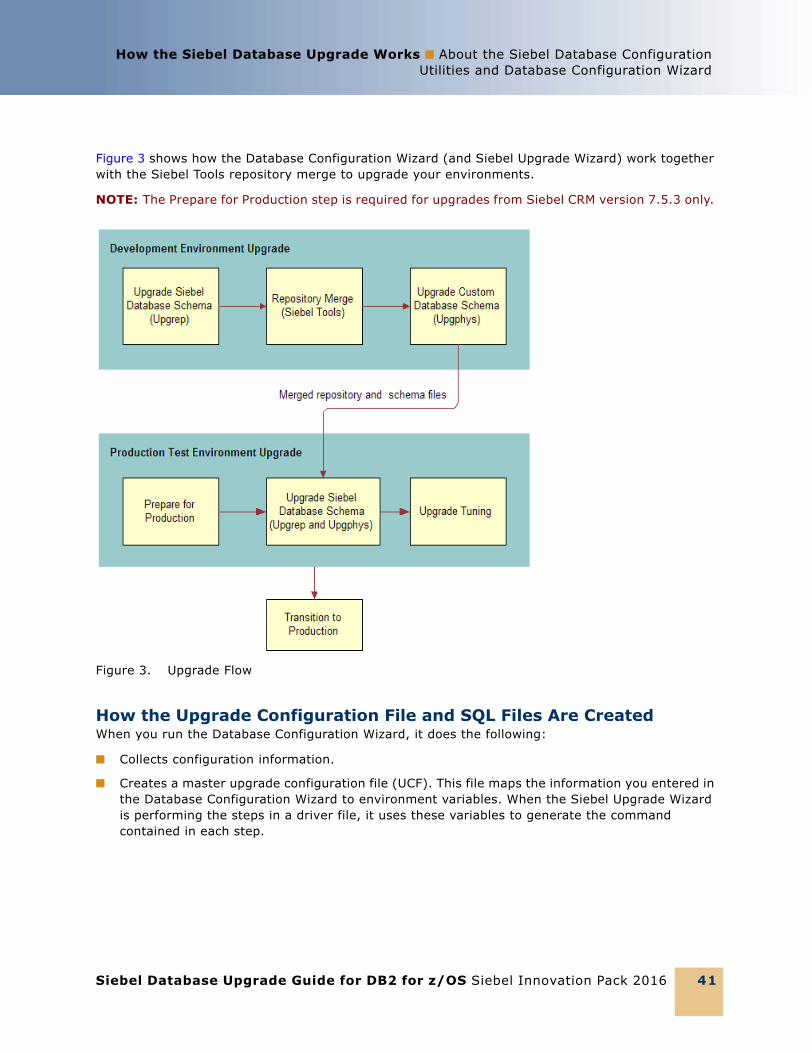
Figure 3 shows how the Database Configuration Wizard (and Siebel Upgrade Wizard) work together with the Siebel Tools repository merge to upgrade your environments.
NOTE: The Prepare for Production step is required for upgrades from Siebel CRM version 7.5.3 only.
How the Upgrade Configuration File and SQL Files Are CreatedWhen you run the Database Configuration Wizard, it does the following:
■ Collects configuration information.
■ Creates a master upgrade configuration file (UCF). This file maps the information you entered in the Database Configuration Wizard to environment variables. When the Siebel Upgrade Wizard is performing the steps in a driver file, it uses these variables to generate the command contained in each step.
Figure 3. Upgrade Flow
Siebel Database Upgrade Guide for DB2 for z/OS Siebel Innovation Pack 2016
How the Siebel Database Upgrade Works ■ About the Siebel Database Configuration Utilities and Database Configuration Wizard
42
■ Prompts you to start the Siebel Upgrade Wizard. The wizard forwards the information in the UCF file to an SQL generator that creates or populates SQL files on the midtier with the required commands to perform the upgrade. You then transfer these files to the z/OS host and apply them.
In some cases, you will have to modify the generated SQL files as required by Alerts, Bulletins, or Siebel Release Notes on My Oracle Support before you transfer the files to the z/OS host.
How to Locate Master Configuration FilesMaster upgrade configuration files are stored in the following location:
Windows: DBSRVR_ROOT\DB2390\upgrade\Version
UNIX: $DBSRVR_ROOT/DB2390/upgrade/Version
where Version is the version from which you are upgrading
Master upgrade configuration files use the following naming convention:
master_UPGRADEOPTION_ENVIRONMENT_VERSION_MasterFileType.ucf
where:
■ UPGRADEOPTION is the upgrade process you are performing. This can be one of the following:
■ upgrep. Siebel database schema upgrade.
■ upgphys. Custom database schema upgrade.
■ upgrep. Siebel Database Upgrade (production).
■ prepare_for_production_upgrade. Prepare for production upgrade; applies to 7.5.3 upgrades only.
■ ENVIRONMENT is the environment that you are upgrading. This can be one of the following:
■ dev. Development environment upgrades.
■ prod. Production environment upgrades.
■ VERSION is the version from which you are upgrading. The following numbers are used for the Siebel version of the filename:
■ 782
■ 80
■ 811
■ MasterFileType is the type of master file. This can be one of the following:
■ mf_m. Configuration files generated for the manual phase of the upgrep process (zSeries Staging of Files for Upgrade process).
■ mf. Configuration files generated for the automatic phase of the upgrep process (zSeries Seed/Repository Upgrade process) and for the upgphys process.
The automatic phases of the upgrade process are run after the manual phases are completed.
How the Siebel Database Upgrade Works ■ About the Siebel Upgrade Wizard and DriverFiles
Siebel Database Upgrade Guide for DB2 for z/OS Siebel Innovation Pack 2016 43
ExampleIf you are upgrading from Siebel CRM version 8.1.1, the UCF files generated from the development environment upgrade are as follows:
master_upgrep_dev_811_mf_m.ucf
master_upgrep_dev_811_mf.ucf
master_upgphys_dev_811_mf.ucf
The UCF file generated from the Prepare for Production Upgrade mode is as follows:
master_prepare_for_production_upgrade.ucf
About the Siebel Upgrade Wizard and Driver FilesUpgrades: All upgrades.
Environments: All environments.
The Upgrade Wizard generates the files required to perform the upgrade of the Siebel database on the z/OS host and also makes changes to the Siebel database directly. After the Siebel Upgrade Wizard starts, it executes this process:
■ Reads the upgrade configuration file (UCF) generated by the Database Configuration Wizard
■ Calls a driver
■ Passes the information in the UCF to the driver, which then passes UCF file information to, for instance:
■ the ddlimp utility, which executes ddl-type SQL commands
■ the dataimp utility, which executes data-related SQL commands
If ddlimp or dataimp (or any of the database utilities) encounter errors, they stop. When the errors have been corrected, you can launch the Siebel Upgrade Wizard, and the upgrade resumes from where it stopped.
The Siebel Upgrade Wizard pauses on four occasions during the upgrade file generation process. At each pause, you must transfer the files that the Upgrade Wizard has generated to the z/OS host and execute them before you resume the upgrade. Message text at each pause informs you of the tasks you must perform.
The files generated by the Upgrade Wizard are output by default to the DBSRVR_ROOT\DB2390\dboutput\upgrade directory (Windows) or DBSRVR_ROOT/DB2390/dboutput/upgrade directory (UNIX) or to the DDL Output Directory you specified when you ran the Database Configuration Wizard.
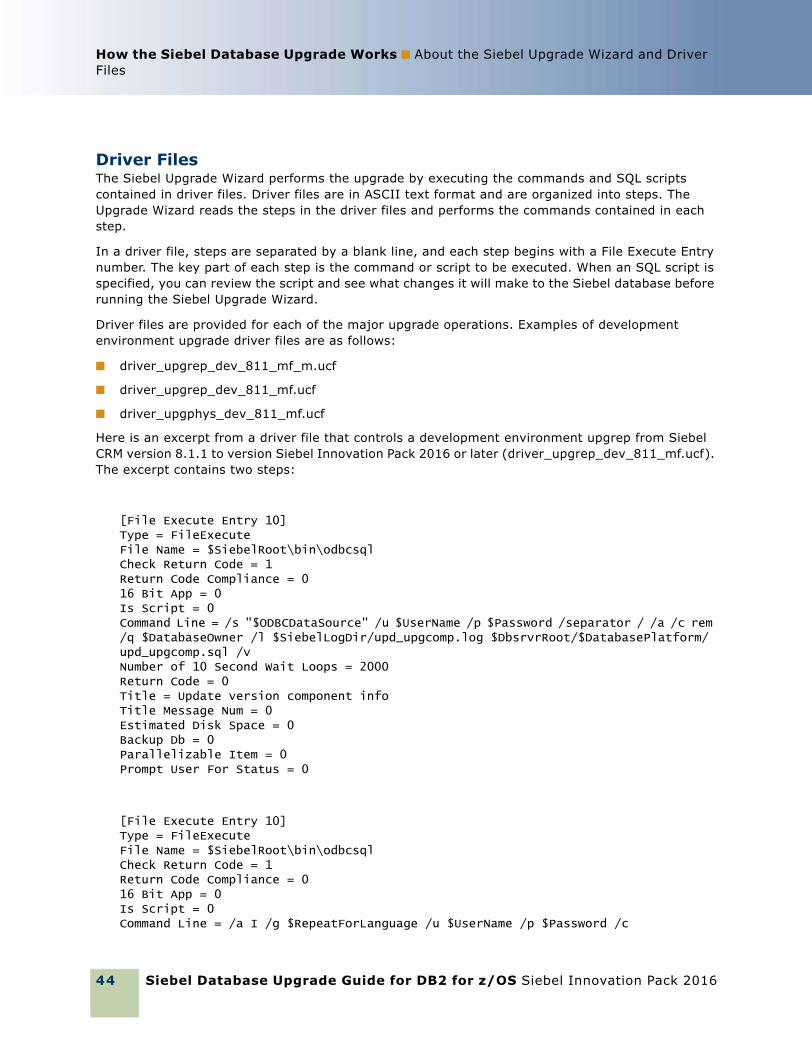
Siebel Database Upgrade Guide for DB2 for z/OS Siebel Innovation Pack 2016
How the Siebel Database Upgrade Works ■ About the Siebel Upgrade Wizard and Driver Files
44
Driver FilesThe Siebel Upgrade Wizard performs the upgrade by executing the commands and SQL scripts contained in driver files. Driver files are in ASCII text format and are organized into steps. The Upgrade Wizard reads the steps in the driver files and performs the commands contained in each step.
In a driver file, steps are separated by a blank line, and each step begins with a File Execute Entry number. The key part of each step is the command or script to be executed. When an SQL script is specified, you can review the script and see what changes it will make to the Siebel database before running the Siebel Upgrade Wizard.
Driver files are provided for each of the major upgrade operations. Examples of development environment upgrade driver files are as follows:
■ driver_upgrep_dev_811_mf_m.ucf
■ driver_upgrep_dev_811_mf.ucf
■ driver_upgphys_dev_811_mf.ucf
Here is an excerpt from a driver file that controls a development environment upgrep from Siebel CRM version 8.1.1 to version Siebel Innovation Pack 2016 or later (driver_upgrep_dev_811_mf.ucf). The excerpt contains two steps:
[File Execute Entry 10]Type = FileExecuteFile Name = $SiebelRoot\bin\odbcsqlCheck Return Code = 1Return Code Compliance = 016 Bit App = 0Is Script = 0Command Line = /s "$ODBCDataSource" /u $UserName /p $Password /separator / /a /c rem /q $DatabaseOwner /l $SiebelLogDir/upd_upgcomp.log $DbsrvrRoot/$DatabasePlatform/upd_upgcomp.sql /vNumber of 10 Second Wait Loops = 2000Return Code = 0Title = Update version component infoTitle Message Num = 0Estimated Disk Space = 0Backup Db = 0Parallelizable Item = 0Prompt User For Status = 0
[File Execute Entry 10]Type = FileExecuteFile Name = $SiebelRoot\bin\odbcsqlCheck Return Code = 1Return Code Compliance = 016 Bit App = 0Is Script = 0Command Line = /a I /g $RepeatForLanguage /u $UserName /p $Password /c
How the Siebel Database Upgrade Works ■ Job Flow of a Production Database Upgrade
Siebel Database Upgrade Guide for DB2 for z/OS Siebel Innovation Pack 2016 45
"$ODBCDataSource" /D $DatabaseOwner /M y /R "$AncestorRepName" /F $AncestorRepFile /l $SiebelLogDir/imprep_ps.log /z 1000Number of 10 Second Wait Loops = 2000Return Code = 0Title = Import Common Ancestor RepositoryTitle Message Num = 0Estimated Disk Space = 0Backup Db = 0Parallelizable Item = 0Prompt User For Status = 0
How to Locate Upgrade Driver Files and SQL ScriptsDriver files are stored in the following location:
Windows: DBSRVR_ROOT\DB2390\UPGRADE\VERSION
UNIX: DBSRVR_ROOT/DB2390/UPGRADE/VERSION
where VERSION is the version from which you are upgrading, for example v8.1.1
For example, if you are upgrading from Siebel CRM 8.1.1, the driver files for the development environment upgrep are as follows:
driver_upgrep_dev_811_mf_m.ucf
driver_upgrep_dev_811_mf.ucf
Related Topic“About the Siebel Database Configuration Utilities and Database Configuration Wizard” on page 38
Job Flow of a Production Database Upgrade Upgrades: All upgrades.
Environments: Production environment only. Does not apply to production test environment.
This topic describes the major steps in a production database upgrade using the Database Configuration Wizard and Upgrade Wizard. This topic does not describe all the pre and postupgrade tasks you must complete for a production environment. See “Process of Upgrading a Siebel Production Environment” on page 71 for a description of all the steps in upgrading a production environment.
The production environment upgrade job flow differs from a development environment upgrade job flow primarily in that a repository merge is not required. The repository (custrep.dat) and the logical schema (schema.ddl) are exported from the upgraded development environment and used in the production upgrade.
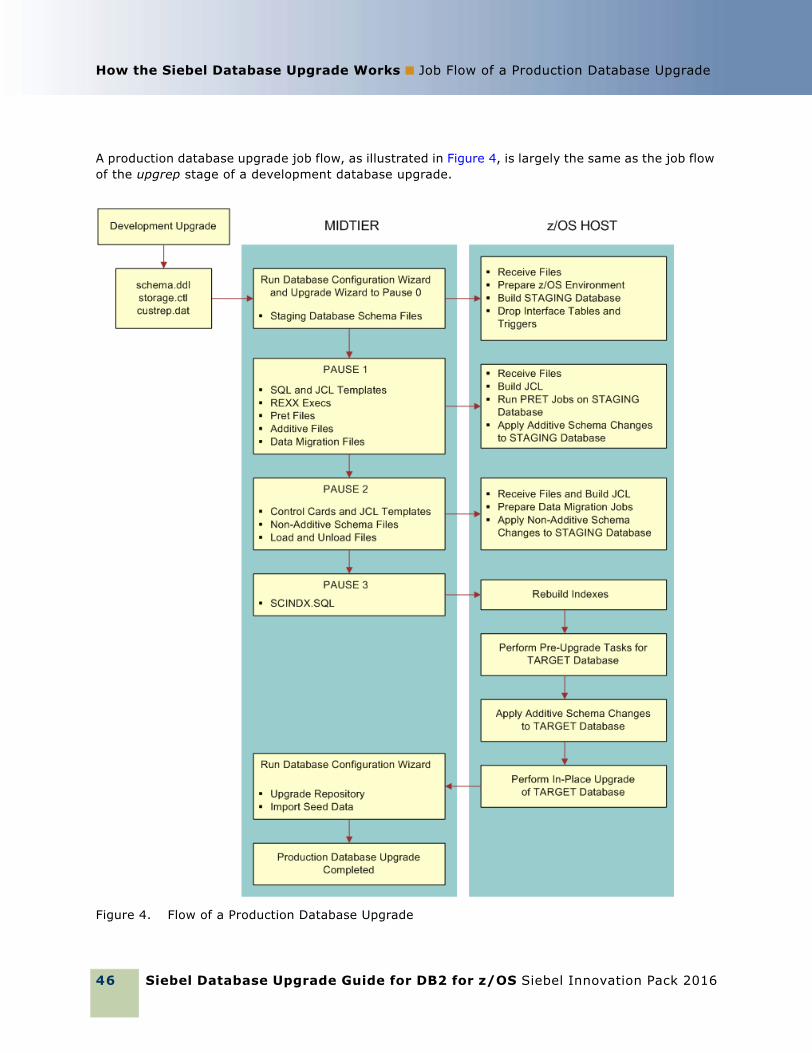
Siebel Database Upgrade Guide for DB2 for z/OS Siebel Innovation Pack 2016
How the Siebel Database Upgrade Works ■ Job Flow of a Production Database Upgrade
46
A production database upgrade job flow, as illustrated in Figure 4, is largely the same as the job flow of the upgrep stage of a development database upgrade.
Figure 4. Flow of a Production Database Upgrade
How the Siebel Database Upgrade Works ■ Job Flow of a Production Database Upgrade
Siebel Database Upgrade Guide for DB2 for z/OS Siebel Innovation Pack 2016 47
The main steps in the production upgrade illustrated in Figure 4 are as follows:
1 Inputs to the Production Upgrade. The files required for the production upgrade are:
■ The storage control file (storage.ctl). This file specifies the storage layout of your upgraded database. Create and validate the storage.ctl before running a production upgrade.
■ The custrep.dat file (new customized repository) and the schema.ddl file (modified schema definition file). These files are generated during the development upgrade and must be copied to the appropriate upgrade directory before running a production upgrade.
2 Prepare for Production (7.5.3 Upgrades only): Run the Database Configuration Wizard on the midtier in Prepare for Production Upgrade mode.
3 Run upgrep + upgphys. Run the Database Configuration Wizard on the midtier:
a Enter production environment information to create the production upgrade configuration file. Specify the following values:
❏ Upgrade Option: Upgrade Siebel Database Schema (upgrep + upgphys)
❏ Upgrade Process: zSeries Staging of Files for Upgrade
b Launch the Upgrade Wizard to generate the DDL files that will be used to build the staging database.
The Wizard generates the staging database schema files on the midtier and then stops (Pause #0).
4 Create the Staging Database. Transfer the staging DDL files from the midtier to the z/OS host and apply them. Create the staging database and prepare the z/OS host upgrade environment.
5 Generate Additive Schema Upgrade Files. Restart the Database Configuration Wizard on the midtier. The wizard generates files and then stops at Pause #1.
6 Apply Pause #1 Files. The files generated by the Upgrade Wizard on the midtier up to pause #1 consist of JCL and SQL templates and REXX execs that are run on the z/OS host against the staging database. These jobs are used to perform preupgrade tasks for the staging database. Do the following:
a FTP the files generated by the Upgrade Wizard from the midtier to the mainframe.
b Receive the files, unpack the staging data sets into PDS format, and create JCL members to run the additive schema and PRET jobs against the staging database.
c Apply additive schema changes to the staging database.
d Run PRET jobs against the staging database.
7 Generate Nonadditive Schema Upgrade Files. Restart the Database Configuration Wizard on the midtier. The wizard generates files and then stops at Pause #2.
8 Apply Pause # 2 Files. The files generated by the Upgrade Wizard on the midtier up to pause #2 include nonadditive schema files, load control cards and JCL templates, and unload SQL and JCL templates. Use the files generated up to this point to perform the in-place upgrade of the staging database. Do the following:
a FTP the files that have been generated from the midtier to the host.
b Modify the load and unload data sets.
Siebel Database Upgrade Guide for DB2 for z/OS Siebel Innovation Pack 2016
How the Siebel Database Upgrade Works ■ Job Flow of a Production Database Upgrade
48
c Run the unpack jobs to populate PDS members.
d Customize the UNLOAD and LOAD jobs for target tables with CLOB columns.
e Add jobcards and Siebel logging to the Load, Unload, and data migration jobs.
f Apply the nonadditive schema changes to the staging database.
g Create temporary tables and indexes for the data migration scripts.
h Generate index rebuilds.
9 Generate the SCINDX Upgrade File. Restart the Database Configuration Wizard on the midtier. The wizard generates files and then stops at Pause #3.
10 Apply Pause # 3 Files. The SCINDX file generated at this point is used to rebuild indexes. Do the following:
a FTP the SCINDX.SQL file from the midtier to the z/OS host.
b Apply the SCINDX.SQL file to rebuild indexes.
This completes the file generation process
11 Perform Pre-Upgrade Tasks for the Target Database as follows:
a On the z/OS host, build the JCL templates that will be used to perform the target database in-place upgrade by applying target database information to the JCL templates that were used to run the staging database in-place upgrade processes.
b Create and load Siebel log tables.
c (Optional) Apply additive schema changes.
12 Perform the In-Place Upgrade of the Target Database as follows:
a Remove interface tables, triggers, and stored procedures from the database.
b Run PRET jobs to prepare the target database for table creation during the upgrade.
c Apply nonadditive schema changes to the target database.
d Create, bind, and test the stored procedures.
e Run the Data Migration jobs to migrate preexisting Siebel data to the current release.
There are optional data migration scripts for Household data and for Siebel Financial Services (FINS) applications.
f Remove old indexes, create new indexes, and run index rebuild jobs.
13 Upgrade the Repository and Import Seed Data as follows:
a Run the Database Configuration Wizard on the midtier.
b Enter production environment information to create the production upgrade configuration file. Specify the following values:
❏ Upgrade Option: Upgrade Siebel Database Schema (upgrep + upgphys)
❏ Upgrade Process: zSeries Seed / Repository Upgrade
How the Siebel Database Upgrade Works ■ Job Flow of a Production Database Upgrade
Siebel Database Upgrade Guide for DB2 for z/OS Siebel Innovation Pack 2016 49
c Launch the Upgrade Wizard. The Upgrade Wizard automatically runs the remaining DML upgrade jobs from the midtier to perform a number of tasks, including the following:
❏ Deletes the old license key.
❏ Verifies the repository name and imports the New Customer Repository from the upgraded development environment.
❏ Upgrades seed data to the new version.
The production database upgrade is now completed.
Key Members in the DSNHLQ.SIEBEL.EXECMembers in the DSNHLQ.SIEBEL.EXEC contain useful information that you can refer to when performing your development and production upgrade. These key members are listed in Table 6.
About the JCL Upgrade JobsThis topic provides information about the JCL jobs you run to perform the upgrade on the z/OS host.
Table 6. Key Members in the DSNHLQ.SIEBEL.EXEC
Member Name Description
@JOBPRFX Shows details of the job prefixes chosen for the upgrade.
@LASTJOB Lists the job name of the last job for each step of the upgrade, for example:
■ PRESCHM:S003562Z
■ PRESCHF: S006463Z
@STGTAR Lists details of the staging and target environments.
@TBOSTG Provides staging tableowner details.
@TBOTAR Provides target tableowner details.
@UPGPATH Lists the upgrade path and the upgrade status, that is, the last step executed, for example:
PAUSE=4 STEP=98- TARGET UPGISS DATA MIGRATION COMPLETE - UPGISS
@UPGFLOW Contains details of all the steps in the upgrade.
@UPGTYPE Shows the type of upgrade being run, for example, SIA 7.8.2
Siebel Database Upgrade Guide for DB2 for z/OS Siebel Innovation Pack 2016
How the Siebel Database Upgrade Works ■ About the Override File
50
About Job CardsThe DSNHLQ.SIEBEL.EXEC data set contains base job cards for all the upgrade jobs. The upgrade process uses these job cards as a base for all jobs of a particular type, and then generates an individual job card for each job based on the information in the base card and in the @JOBPREFX member of the DSNHLQ.SIEBEL.EXEC data set.
For example, the base job card for PRESCHM jobs is JCPRES. An individual job card is created for each PRESCHM job based on information in both of the following:
■ DSNHLQ.SIEBEL.EXEC(@JOBPREFX) provides the job prefix
■ DSNHLQ.SIEBEL.EXEC(JCPRES) provides the base job card
Once job cards have been generated, changing the information in the @JOBPREFX member does not cause job card details to change.
Job DependenciesSome JCL jobs, for example, some Data Migration jobs, have dependencies on other jobs. These jobs are submitted in a specific order, with subsequent jobs only being submitted when the current job has completed successfully. The @DEPFLOW member in the relevant JCL data set shows the order in which the jobs are to be submitted, for example, see DSNHLQ.SIEBEL.PRESCHM.JCL(@DEPFLOW) for information about the submission sequence for PRESCHM jobs.
Load and Unload JobsLoad and Unload job procedures are located in the DSNHLQ.SIEBEL.PROC data set.
About the Override FileUpgrades: All upgrades.
Environments: Development environment only.
The override.inp file allows you to override your existing database storage layout when you upgrade to the current release of Siebel CRM. When you create the storage control file to use in the upgrade, by adding the names of tables to the override.inp file, you indicate that you do not want to preserve the existing definitions for these tables. For additional information, see “Extracting the Storage Control File” on page 97.
Since Siebel CRM version 7.7, the Siebel database schema structure has the following characteristics:
■ One table in each table space
■ One table space in each database
This layout is referred to as the 1:1:1 model. See “Planning Changes to the Physical Layout of the Schema” on page 80 for further information.
How the Siebel Database Upgrade Works ■ About the Override File
Siebel Database Upgrade Guide for DB2 for z/OS Siebel Innovation Pack 2016 51
If you are upgrading from a pre 7.7 release of Siebel Business Applications, you might want to switch to the 1:1:1 model from your existing database schema structure because it is more efficient. There are three options available when upgrading to the current release:
■ Preserve the existing model of multiple tables for each table space and only build new tables with the 1:1:1 model.
To use this option, extract a storage control file and merge it with an existing template. All existing definitions are preserved and new tables are built according to the definitions supplied in the template storage control file.
■ Preserve the existing model for most tables but indicate that specific tables, are to use the 1:1:1 model by adding the table names to the override.inp file. For example, you might want to move populated tables to the 1:1:1 model. By default, the override.inp file has two table entries:
■ S_DOCK_TXN_LOG
■ S_SERVICE_SCRPT
The existing definition for these two tables is not preserved during the upgrade. Therefore, these two tables can be built using the new model as specified in the template.
■ Move all tables from the current model to the 1:1:1 model.
To use this option, do not use the extract and merge process to create the storage control file. Instead, use the preconfigured storage control file. In the preconfigured storage control file, all tables are created using the 1:1:1 model. Therefore, each table is created in its own database or table space.
The use of the preconfigured storage control file allows you to use the 1:1:1 model for all tables other than obsolete tables and customer extended tables. The preconfigured storage control file does not apply to obsolete or customer extended tables so there are no entries for them. You cannot put these into the override.inp file since there is nothing to override and the tables are not in the storage control file. In this case, the existing schema is preserved.
The table spaces are not cleaned up unless they are empty. Some of the obsolete and customer extended tables are still in those table spaces so the upgrade process cannot just do a general cleanup.

Siebel Database Upgrade Guide for DB2 for z/OS Siebel Innovation Pack 2016
How the Siebel Database Upgrade Works ■ About the Override File
52
Siebel Database Upgrade Guide for DB2 for z/OS Siebel Innovation Pack 2016 53
4 How to Perform a Siebel Database Upgrade
This chapter provides a roadmap for performing each type of upgrade to the current Siebel CRM release. Each roadmap lists the processes and tasks you must follow to complete the upgrade. Print the relevant roadmap and use it to guide you in carrying out the upgrade. This chapter includes the following topics:
■ Roadmap for Performing a Siebel Database Upgrade on page 53
■ Process of Planning a Siebel Database Upgrade on page 55
■ Process of Upgrading a Siebel Development Environment on page 56
■ Process of Upgrading a Production Test Environment on page 63
■ Process of Tuning the Upgrade Performance on page 69
■ Process of Upgrading a Siebel Production Environment on page 71
Roadmap for Performing a Siebel Database UpgradeUpgrades: All upgrades.
Environments: All environments.
Use one of the following roadmaps to guide you through the steps for upgrading your Siebel database:
■ “Roadmap for Upgrading from Siebel 7.8.2, 8.0.x or 8.1.1.x” on page 54
■ “Roadmap for Upgrading from Siebel 7.8.2, 8.0.x or 8.1.1.x” on page 54
■ “Roadmap for Upgrading from Siebel 7.x, 8.0.x or 8.1.1.x Without a Development Environment” on page 54
Each roadmap consists of a group of processes. Each process consists of a numbered list of tasks. After you complete the tasks in a process, go on to the next process in the roadmap. When you have completed all the processes in the roadmap, the upgrade is complete.
Depending on your installed release, you might not have to complete all the tasks in a process. Before starting a task, check the applicability information at the beginning of the task and verify the task applies to your upgrade.
Siebel Database Upgrade Guide for DB2 for z/OS Siebel Innovation Pack 2016
How to Perform a Siebel Database Upgrade ■ Roadmap for Performing a Siebel Database Upgrade
54
Roadmap for Upgrading from Siebel 7.8.2, 8.0.x or 8.1.1.xNOTE: This roadmap describes how to upgrade from one major release to another. For information on upgrading from Siebel 8.1.1.x to Siebel Innovation Pack 2016 or later, see Chapter 12, “Performing the Siebel Incremental Repository Merge.”
If you are upgrading from Siebel CRM version 7.8.2 or higher to version 8.1. complete the processes in this roadmap in the order shown:
1 “Process of Planning a Siebel Database Upgrade” on page 55
2 “Process of Upgrading a Siebel Development Environment” on page 56
3 “Process of Upgrading a Production Test Environment” on page 63
4 “Process of Tuning the Upgrade Performance” on page 69
5 “Process of Upgrading a Siebel Production Environment” on page 71
For a description of the differences between production and development upgrades, see “About Siebel Upgrade Environments” on page 25.
Roadmap for Upgrading from Siebel 7.x, 8.0.x or 8.1.1.x Without a Development EnvironmentIf you are upgrading from Siebel CRM Release 7.x, 8.0.x or 8.1.1.x, and you do not have a development environment, complete the processes in this roadmap in the order shown.
Upgrading without a development environment means the following are true:
■ You are running an uncustomized, preconfigured version of Siebel Business Applications.
■ You have not used Siebel Tools to create or modify any objects or logical schema definitions in the Siebel Repository.
■ You have not modified the physical schema in the Siebel database.
If your upgrade meets these criteria, complete the following processes in the order shown:
1 “Process of Planning a Siebel Database Upgrade” on page 55.
2 “Preparing for a Siebel Upgrade Without a Development Environment” on page 116.
3 Perform a production test upgrade. See “Process of Upgrading a Production Test Environment” on page 63.
4 “Process of Tuning the Upgrade Performance” on page 69.
5 Upgrade your production environment. See “Process of Upgrading a Siebel Production Environment” on page 71.
How to Perform a Siebel Database Upgrade ■ Process of Planning a Siebel DatabaseUpgrade
Siebel Database Upgrade Guide for DB2 for z/OS Siebel Innovation Pack 2016 55
Process of Planning a Siebel Database UpgradeUpgrades: All upgrades.
Environments: All environments.
This process is part of an upgrade roadmap. See “Roadmap for Upgrading from Siebel 7.8.2, 8.0.x or 8.1.1.x” on page 54 and “Roadmap for Upgrading from Siebel 7.x, 8.0.x or 8.1.1.x Without a Development Environment” on page 54.
To plan the upgrade, read the following:
1 Chapter 3, “How the Siebel Database Upgrade Works.”
2 In the chapter in Siebel Database Upgrade Guide that describes how the Siebel database upgrade works, read topics about the following:
■ About the Siebel case insensitivity wizard
■ About the Siebel repository merge
■ About inheriting upgrade behavior in a Siebel upgrade
■ About the Siebel postmerge utilities
■ About the Siebel Incorporate Custom Layout upgrade option
■ About the Database Configuration Utilities
3 Chapter 5, “Planning a Siebel Database Upgrade.”
4 In the chapter in Siebel Database Upgrade Guide that describes Siebel database and UI upgrade planning, read topics about the following:
■ About Siebel upgrade planning resources
■ About best practices for doing your Siebel database upgrade
■ About Siebel user interface changes
■ About the Siebel Party Model
■ About migrating Siebel HTML attachments to base tables
■ Upgrade planning for multilingual Siebel deployments
■ Upgrade planning for Siebel RC2 or AES encryption
■ Upgrade planning for Siebel access control
5 The chapter in Siebel Database Upgrade Guide that describes application planning for a Siebel upgrade.
6 The appendix in Siebel Database Upgrade Guide that contains reference information on Siebel Marketing upgrades.
7 The appendix in Siebel Database Upgrade Guide that lists tables modified or seeded during a Siebel upgrade.
Siebel Database Upgrade Guide for DB2 for z/OS Siebel Innovation Pack 2016
How to Perform a Siebel Database Upgrade ■ Process of Upgrading a Siebel Development Environment
56
Process of Upgrading a Siebel Development Environment Upgrades: All upgrades.
Environments: Development environment only.
This process is part of a roadmap. See “Roadmap for Performing a Siebel Database Upgrade” on page 53.
This topic lists the steps required to upgrade a Siebel development environment to the current release. Print this topic and use it as a checklist for doing the upgrade.
The topic is divided into subtopics, each containing a list of numbered steps. Complete each subtopic in the order shown.
Searching for Bulletins and Alerts on My Oracle Support1 Check My Oracle Support for recently published bulletins and alerts regarding the upgrade.
Upgrade Third-Party Software2 If necessary, upgrade third-party software that is used by Oracle’s Siebel software. For example,
you might have to upgrade the operating system software. Some database upgrades require newer versions of UNIX or Windows.
Upgrade the ServersVerify that you have identified all the maintenance releases and Siebel Patchset releases for the upgrade.
CAUTION: Do not install a new Siebel database as part of upgrading the Siebel Enterprise Server.
To perform the following steps, see Siebel Installation Guide for the operating system you are using and Implementing Siebel Business Applications on DB2 for z/OS:
Install the Siebel CRM 8.1 Gateway Name Server, Siebel Servers, and Siebel Web Server Extension (SWSE).
The upgraded Siebel Servers will not work correctly with the RDBMS server until after you have upgraded the Siebel database to the new release.
1 Install the Siebel Database Configuration Utilities files on the Siebel Server you will use to perform the upgrade.
2 Install language packs for your currently deployed languages and any new languages.
3 If you have customized the configuration of Enterprise components, such as Siebel Servers, you must migrate the customizations to the upgraded environment. For information on this task, see Siebel System Administration Guide.
How to Perform a Siebel Database Upgrade ■ Process of Upgrading a SiebelDevelopment Environment
Siebel Database Upgrade Guide for DB2 for z/OS Siebel Innovation Pack 2016 57
Upgrade the RDBMS7 If required, upgrade your version of DB2 for z/OS. Refer to the IBM documentation to perform
the upgrade.
Preupgrade Tasks for the Siebel Database8 Review guidelines for configuring DB2 for z/OS. See Implementing Siebel Business Applications
on DB2 for z/OS.
9 Verify that the Workflow Monitor and Workflow action agents have processed all pending requests.
10 Stop the Siebel Servers.
11 7.5.3 upgrades only: Perform the task in “Updating Table Space Group Names” on page 92.
12 Remove customized database triggers.
The Siebel upgrade process is not designed to support custom database triggers. If you have created customized triggers for the Siebel schema to be upgraded, you must remove them before starting the Siebel upgrade process. You can re-create these objects once the Siebel upgrade completes successfully.
13 Prepare the storage control file to use in the upgrade. See “Process of Preparing the Storage Layout of the Schema” on page 93.
14 Perform the tasks in the following:
■ Chapter 6, “Basic Database Preparations for a Siebel Upgrade”
■ The chapter in Siebel Database Upgrade Guide that describes basic database preparations for a Siebel upgrade.
Preupgrade Tasks for a Development Environment Upgrade15 Perform the tasks in Chapter 7, “Preparing a Development Environment for a Siebel Upgrade.”
16 Rename the Siebel Repository. For information on this task, see the chapter in Siebel Database Upgrade Guide that describes upgrading the Siebel database.
Preupgrade Tasks for Application Data17 Perform the tasks in the chapter in Siebel Database Upgrade Guide that describes how to prepare
Siebel application data for upgrade.
Some of these tasks are optional, depending on the currently installed Siebel products and your upgrade path. Review and perform these tasks as necessary.
Preparing Developers for the Upgrade18 Back up the development database.
19 Verify that all developers have checked in their projects and that all projects are unlocked.
Siebel Database Upgrade Guide for DB2 for z/OS Siebel Innovation Pack 2016
How to Perform a Siebel Database Upgrade ■ Process of Upgrading a Siebel Development Environment
58
20 Verify that all developers have disconnected from the database. The only open connection must be the account that is performing the upgrade.
21 Install the new Siebel Tools on development workstations. Keep at least one copy of the previous version of Siebel Tools. You will require it to perform repository operations before the repository merge.
22 Activate the new Siebel Tools on development workstations. Keep at least one copy of the previous version of Siebel Tools. You will require it to perform repository operations before the repository merge.
23 Perform all remaining tasks with the new Siebel Tools, unless stated otherwise.
Upgrade Siebel Database Schema (upgrep) 23 (Optional) Change the Siebel Database Configuration Wizard language. For information on this
topic, see the chapter in Siebel Database Upgrade Guide that describes how to upgrade the Siebel database.
24 Create the staging database by performing the following tasks:
a “Required Tasks before Creating the Staging Database” on page 133.
b “Creating the Staging Database Schema DDL Files” on page 135.
c “Transferring the Staging DDL to the z/OS Host” on page 135.
d “Preparing the z/OS Upgrade Environment and Creating the Staging Database” on page 136.
e “Removing Interface Tables and Triggers” on page 143.
25 Generate the Upgrade Files by performing the following tasks:
NOTE: Edit the generated files as required by Siebel Technical Notes, Siebel Alerts, Siebel Release Notes on My Oracle Support or other publications before transferring them to the z/OS host.
a “Required Tasks for Generating the Upgrade Files” on page 168.
b “Restarting the Siebel Upgrade Wizard After Pauses” on page 130.
c “Preparing the Additive Schema and JCL Files on the z/OS Host” on page 169.
d “Restarting the Siebel Upgrade Wizard After Pauses” on page 130.
e “Preparing and Executing the Nonadditive Schema and JCL Files on the z/OS Host” on page 178.
f “Restarting the Siebel Upgrade Wizard After Pauses” on page 130.
g “Processing the Index Schema File” on page 183.
h “Building JCL Templates for the Target Database” on page 184.
26 Upgrade the target database by performing the following tasks:
a “Dropping Partitioned EIM Tables” on page 188.
b “Process of Upgrading the Target Database” on page 187.
c “Performing the In-Place Target Database Upgrade” on page 193.
How to Perform a Siebel Database Upgrade ■ Process of Upgrading a SiebelDevelopment Environment
Siebel Database Upgrade Guide for DB2 for z/OS Siebel Innovation Pack 2016 59
27 Upgrade the repository and import seed data as described in “Upgrading the Repository and Importing Seed Data” on page 131.
28 “About the Siebel Upgrade Log Files” on page 215.
29 If the upgrade contains unacceptable errors, do the following:
a Restore the backup of the database that you made previously (see Step 18 on page 57).
b Correct the errors.
c Rerun the Database Configuration Wizard.
30 “Activating New License Keys After an Upgrade” on page 211.
31 Back up the upgraded database repository.
Prepare for Repository Merge32 Perform the following tasks. For information on performing these tasks, see the chapter in Siebel
Database Upgrade Guide that describes how to perform the Siebel Repository merge:
■ Migrate Siebel Repository objects to the standard user interface (UI).
■ Configure Siebel Repository objects to inherit upgrade behavior.
33 “About Backing Up the New Customer Repository or Database Schema” on page 145.
34 Execute the REORG utility on tables that receive a large number of inserts during the repository import process. For a list of the tables that must be reorganized at this point, see “About Reorganizing Tables Before the Repository Merge” on page 146.
35 Run database statistics on the Siebel repository tables. For further information on running database statistics, see “Generating RUNSTATS Jobs” on page 207. Running statistics on the Siebel repository tables improves merge performance.
If upgrading from Siebel CRM versions 7. 7 or 7.8.x, run statistics specifically on the S_SYM_STR and SYM_STR_INT tables. If you are upgrading from a pre-7.7 Siebel CRM release, the S_SYM_STR and SYM_STR_INT tables are not populated until the merge is completed so you do not have to run statistics on them at this point.
Perform Repository MergeCAUTION: The Repository merge process cannot be stopped and restarted so make sure you have backed up the database schema or the New Customer Repository before starting the merge.
36 “Performing a Siebel Repository Merge” on page 147.
NOTE: If you are upgrading from Siebel CRM version 8.1.1.x fix pack (SIA repository) to Siebel Innovation Pack 2016 or later, refer to “Performing the Incremental Repository Merge” on page 163 instead of this topic.
37 Review the Siebel Repository merge log files. For information on this task, see the chapter in Siebel Database Upgrade Guide that describes how to perform the Siebel Repository merge.
38 If the repository merge contains unacceptable errors, do the following:
Siebel Database Upgrade Guide for DB2 for z/OS Siebel Innovation Pack 2016
How to Perform a Siebel Database Upgrade ■ Process of Upgrading a Siebel Development Environment
60
a Restore the backup of the database or New Customer Repository. See “About Backing Up the New Customer Repository or Database Schema” on page 145.
b Correct the errors.
c Rerun the repository merge.
39 Run the Siebel postmerge Utilities. This task is not required if you are performing an incremental repository merge.
For information on this task, see the chapter in Siebel Database Upgrade Guide that describes how to perform the Siebel Repository merge.
40 Perform the following tasks. For information on performing these tasks, see the chapter in Siebel Database Upgrade Guide that describes how to perform the Siebel Repository merge:
■ Delete unneeded Siebel repository files.
■ Generate Siebel Enterprise Integration Manager (EIM) temporary columns.
■ (Optional) Set label alignment for Siebel text fields.
41 Generate database statistics for new tables and new indexes using the RUNSTATS utility. Your DBA can check the system catalog to determine the database objects that do not have statistics.
For further information on generating database statistics, see “Generating RUNSTATS Jobs” on page 207.
42 Back up the Siebel database.
Upgrade Custom Database Schema (upgphys)43 Run the Database Configuration Wizard to extract the storage control file from the target
database as follows:
■ Specify the following values when prompted to do so:
❏ Extract Options: Extract from Catalog.
❏ Storage Control File: Specify the name of the storage control file to be extracted. You must specify the name storage_postupg.ctl.
■ Make sure you specify values for the target database when prompted for the names of the schema qualifier, ODBC data source, and database user name and password.
The procedure to extract a storage control file using the Extract from catalog option is described in Implementing Siebel Business Applications on DB2 for z/OS. The extracted target database storage control file is used as input to the upgphys upgrade process.
44 Run the Database Configuration Wizard to complete the development environment upgrade:
■ Choose the following settings:
❏ Environment Type: Development.
❏ Upgrade Options: Upgrade Custom Database Schema (upgphys).
❏ Storage Control File: The storage control file that you generated in Step 43.
How to Perform a Siebel Database Upgrade ■ Process of Upgrading a SiebelDevelopment Environment
Siebel Database Upgrade Guide for DB2 for z/OS Siebel Innovation Pack 2016 61
■ Make sure you specify values for the target database when prompted for the names of the schema qualifier, ODBC data source, and database user name and password.
Launch the Siebel Upgrade Wizard. SQL commands are executed on the development environment database and a number of output files are generated.
45 “Transferring the Development Environment Upgrade Output Files to the z/OS Host” on page 209.
46 “Synchronizing the Schema” on page 210.
47 “About the Siebel Upgrade Log Files” on page 215.
48 If the upgrade contains unacceptable errors, do the following:
a Restore the backup of the database.
b Correct the errors.
c Rerun the Database Configuration Wizard.
49 “Manually Archiving Upgrade Log Files” on page 218.
50 Back up the upgraded database.
51 “Deleting Redundant Upgrade Files” on page 212.
Initialize and Extract Developers’ Local Databases52 Install the new release of Siebel Tools on developers’ computers.
53 Initialize and extract the local database on development computers. For more information about this task, see Developing and Deploying Siebel Business Applications.
Review the User Interface54 (Optional). Compile an SRF file to help review the UI. See “Creating a New Siebel Repository File”
on page 157.
55 Review Siebel Repository object property conflicts.
For information on this task, see the chapter in Siebel Database Upgrade Guide that describes how to perform the Siebel Repository merge.
56 Carefully review the user interface in the new release by performing the tasks in the chapter in Siebel Database Upgrade Guide that describes reviewing the Siebel user interface.
57 If you customized style sheet or web template files in the previous release, implement those customizations in the new release again, if desired.
58 The postmerge utilities do not convert certain types of flow-based applets to grid-based applets. For example, they do not convert custom form applets to grid-based applets. Convert remaining flow based applets as desired. For further information on editing applet layout, see Configuring Siebel Business Applications.
Siebel Database Upgrade Guide for DB2 for z/OS Siebel Innovation Pack 2016
How to Perform a Siebel Database Upgrade ■ Process of Upgrading a Siebel Development Environment
62
Postmerge Development Tasks59 Perform the following tasks. For information on these tasks, see the chapter in Siebel Database
Upgrade Guide that describes the Siebel postmerge development tasks:
■ Review objects deleted from the Siebel Repository
■ Review obsolete objects in the Siebel Repository
■ Upgrade to the Siebel symbolic string model
■ Update Siebel Enterprise Application Integration (EAI)
60 Resolve any business component and join conflicts.
Postupgrade Tasks for Database and File System61 Perform the applicable tasks in Chapter 17, “Postupgrade Tasks for Siebel Database and File
System.”
62 Perform the following tasks. For information on these tasks, see the chapter in Siebel Database Upgrade Guide that describes postupgrade tasks for the Siebel database and file system:
■ Check for inactivated EIM table columns in the Siebel database
■ Validate dock objects and rule definitions in the Siebel database
63 Reset upgrade-specific database and database server parameters back to their recommended settings for production. See Siebel Installation Guide for the operating system you are using and Implementing Siebel Business Applications on DB2 for z/OS for recommended parameter settings.
64 If you exported data from interface tables before the upgrade, review the database and import the data as desired.
65 Upgrade unencrypted data and data that was encrypted using the standard encryptor to RC2 or AES encryption. For information on this task, see the chapter in Siebel Database Upgrade Guide that describes Siebel database and UI upgrade planning.
NOTE: The development environment is now upgraded. The remaining sections deal with configuration and validation tasks.
Postupgrade Tasks for Applications Configuration66 If applicable, review the results of the Person and Organization merge. Make configuration
changes as required. For further information, see the topic about the Siebel Party Model in the chapter in Siebel Database Upgrade Guide that describes Siebel database and UI upgrade planning.
67 Perform the tasks in:
■ Chapter 18, “Postupgrade Tasks for Siebel Business Applications”
■ The chapter in Siebel Database Upgrade Guide that describes the postupgrade tasks for Siebel Business Applications
68 Verify the function of interfaces in integrated applications.
How to Perform a Siebel Database Upgrade ■ Process of Upgrading a Production TestEnvironment
Siebel Database Upgrade Guide for DB2 for z/OS Siebel Innovation Pack 2016 63
69 Activate and deploy workflows. To perform these tasks, see Siebel Business Process Framework: Workflow Guide.
70 If you have set up integrations for transferring data to or from third-party applications using Siebel EAI, verify the integrations are configured correctly. For information on using EAI, see Overview: Siebel Enterprise Application Integration.
71 If you have used EIM to set up batch processing jobs, verify EIM is configured correctly. For information on using EIM, see Siebel Enterprise Integration Manager Administration Guide.
Perform System Tests72 Use available test data to perform unit testing. Validate application function in the following
areas:
■ User interface
■ Data interfaces
■ Integrity of migrated data
■ Workflow function
Prepare for Transition to Production Test Environment73 Create a new SRF file. For information on creating an SRF file, see Developing and Deploying
Siebel Business Applications.
74 If you revised the repository after running upgphys, you must regenerate the repository definition files. For information, see “Regenerating the Siebel Repository Definition Files” on page 155.
Process of Upgrading a Production Test EnvironmentUpgrades: All upgrades.
Environments: Production test environment only. Does not apply to production environment.
This process is part of a roadmap. See “Roadmap for Performing a Siebel Database Upgrade” on page 53.
This topic lists the tasks required to upgrade your production test environment to the current release. Print this topic and use it as a checklist for doing the upgrade.
NOTE: The production test environment must replicate the production environment exactly.
The topic is divided into subtopics, each containing numbered steps. Complete the steps in the order shown.
Siebel Database Upgrade Guide for DB2 for z/OS Siebel Innovation Pack 2016
How to Perform a Siebel Database Upgrade ■ Process of Upgrading a Production Test Environment
64
Searching for Bulletins and Alerts on My Oracle Support1 Check My Oracle Support for recently published bulletins and alerts regarding the upgrade.
Upgrade Third-Party Software2 Upgrade third-party software that is used by Oracle’s Siebel software if required. For example,
you might have to upgrade the operating system software. Some database upgrades require newer versions of UNIX or Windows.
Upgrade the ServersVerify you have identified all the maintenance releases and Siebel Patchset releases for the upgrade.
CAUTION: Do not install a new Siebel database as part of upgrading the Siebel Enterprise Server.
To perform the following steps, see Siebel Installation Guide for the operating system you are using and Implementing Siebel Business Applications on DB2 for z/OS. Do the following:
3 Install the Siebel CRM 8.1 Gateway Name Server, Siebel Servers, and Siebel Web Server Extension (SWSE).
The upgraded Siebel Servers will not work correctly with the RDBMS server until after you have upgraded the Siebel database to the new release.
4 Install the Siebel Database Configuration Utilities files on the Siebel Server you will use to perform the upgrade.
5 Install language packs for your currently deployed languages and any new languages.
6 If you have customized the configuration of Enterprise components, such as Siebel Servers, you must migrate the customizations to the upgraded environment. For information on this task, see Siebel System Administration Guide.
Upgrade the RDBMS7 If required, upgrade your version of DB2 for z/OS and DB2 Connect middleware. You might also
have to upgrade any DB2 clients that connect to the Siebel database. Refer to the IBM documentation to perform the DB2 for z/OS and DB2 Connect upgrades.
Preupgrade Tasks for the Siebel Database8 Review guidelines for configuring DB2 for z/OS. For information, see Implementing Siebel
Business Applications on DB2 for z/OS.
9 Verify that the Workflow Monitor and Workflow action agents have processed all pending requests.
How to Perform a Siebel Database Upgrade ■ Process of Upgrading a Production TestEnvironment
Siebel Database Upgrade Guide for DB2 for z/OS Siebel Innovation Pack 2016 65
10 Remove customized database triggers.
The Siebel upgrade process is not designed to support custom database triggers. If you have created customized triggers for the Siebel schema to be upgraded, you must remove them before starting the Siebel upgrade process. You can re-create these objects once the Siebel upgrade completes successfully.
11 Prepare the storage control file to use in the upgrade. See “Process of Preparing the Storage Layout of the Schema” on page 93.
12 Perform the tasks in:
■ Chapter 6, “Basic Database Preparations for a Siebel Upgrade”
■ The chapter in Siebel Database Upgrade Guide that describes the basic database preparations for a Siebel upgrade
13 Before starting the production test upgrade, ensure that:
■ Siebel database transactional tables with clustering indexes are organized in cluster sequence.
■ Generate database statistics for your Siebel database transactional tables, if required.
Preupgrade Tasks for Application Data14 Perform the tasks in the chapter in Siebel Database Upgrade Guide that describes how to prepare
Siebel application data for upgrade.
Some of these tasks are optional, depending on the currently installed Siebel products and your upgrade path. Review and perform these tasks as necessary.
Preupgrade Tasks for a Production Test Environment Upgrade15 Review the information in “Requirements for Upgrading the Production Environment” on page 115.
16 For instructions on how to set up the Siebel database and Siebel Servers in the production test environment, refer to 477772.1 (Article ID) on My Oracle Support. This document was formerly published as Siebel Technical Note 586.
17 Stop the Siebel Servers.
18 Close all database connections. The only database connection must be the account performing the upgrade.
Disconnect the Siebel Server from the development environment database and connect it to the production test environment database.
19 Copy application files to the environment:
■ Custom SRF file
■ Reports files
Siebel Database Upgrade Guide for DB2 for z/OS Siebel Innovation Pack 2016
How to Perform a Siebel Database Upgrade ■ Process of Upgrading a Production Test Environment
66
■ Custom Web templates and style sheets
See the topic on copying UI files to a new Siebel environment in the chapter in Siebel Database Upgrade Guide that describes how to perform the Siebel Repository merge.
20 “About Moving the Customized Repository and Schema Definition Files” on page 115.
If you revised repository objects or schema definitions after performing your development environment upgrade, regenerate the schema.ddl and custrep.dat files before transferring them to the production test environment. For information, see “Regenerating the Siebel Repository Definition Files” on page 155.
21 “Preparing for a Siebel Upgrade Without a Development Environment” on page 116.
If you do not have a development environment, perform this task.
22 Verify the production test database is either a copy of the current production database or has the same topology and a similar amount of data. This is important for effective performance testing of the upgrade scripts.
23 Back up the production test environment database. To do upgrade tuning, you will restore this database and perform test upgrades on it.
Prepare for Production24 (Optional) Change the Siebel Database Configuration utilities language. For information on this
topic, see the chapter in Siebel Database Upgrade Guide that describes how to upgrade the Siebel database.
25 (7.5.3 Upgrades only) Run the Database Configuration Wizard as described in “About Running the Database Configuration Wizard on Windows” on page 125 or “About Running the Database Configuration Wizard Under UNIX” on page 126. Do the following:
a Specify the following options:
❏ Upgrade Options: Prepare for Production Upgrade
❏ Environment Type: Production
b Launch the Siebel Upgrade Wizard.
Upgrade the Siebel Database Schema (upgrep + upgphys)26 Create the staging database by performing the following tasks:
a “Required Tasks before Creating the Staging Database” on page 133.
b “Creating the Staging Database Schema DDL Files” on page 135.
c “Transferring the Staging DDL to the z/OS Host” on page 135.
d “Preparing the z/OS Upgrade Environment and Creating the Staging Database” on page 136.
27 Generate the upgrade files by performing the following tasks:
NOTE: Edit the generated files as required by Siebel Technical Notes, Alerts, Siebel Release Notes on My Oracle Support, or other publications before transferring them to the z/OS host.
How to Perform a Siebel Database Upgrade ■ Process of Upgrading a Production TestEnvironment
Siebel Database Upgrade Guide for DB2 for z/OS Siebel Innovation Pack 2016 67
a “Required Tasks for Generating the Upgrade Files” on page 168.
b “Restarting the Siebel Upgrade Wizard After Pauses” on page 130.
c “Preparing the Additive Schema and JCL Files on the z/OS Host” on page 169.
d “Applying the Additive Schema Changes to the Production Staging Database” on page 174.
e “Restarting the Siebel Upgrade Wizard After Pauses” on page 130.
f “Preparing and Executing the Nonadditive Schema and JCL Files on the z/OS Host” on page 178.
g “Restarting the Siebel Upgrade Wizard After Pauses” on page 130.
h “Processing the Index Schema File” on page 183.
i “Building JCL Templates for the Target Database” on page 184.
28 Upgrade the target database by performing the following tasks:
a Read “Process of Upgrading the Target Database” on page 187.
b “Dropping Partitioned EIM Tables” on page 188.
c “Creating and Loading Siebel Log Tables” on page 189
d “Applying Additive Upgrade Changes to the Target Database” on page 190.
e “Renaming the Production Environment Repository” on page 193.
f “Performing the In-Place Target Database Upgrade” on page 193.
29 Extract the storage control file from the target database using the Database Configuration Wizard as follows:
■ Specify the following values when prompted to do so:
❏ Extract Options: Extract from Catalog.
❏ Storage Control File: Specify the name of the storage control file to be extracted. You must specify the name storage_postupg.ctl.
■ Make sure you specify values for the target database when prompted for the names of the schema Qualifier, ODBC data source, and database user name and password.
The procedure to extract a storage control file using the Extract from catalog option is described in Implementing Siebel Business Applications on DB2 for z/OS. The extracted target database storage control file is used as input to the upgphys upgrade process.
30 Upgrade the repository and import seed data. See “Upgrading the Repository and Importing Seed Data” on page 131.
31 “Activating New License Keys After an Upgrade” on page 211.
32 “About the Siebel Upgrade Log Files” on page 215.
33 If the upgrade contains unacceptable errors, do the following:
a Restore the backup of the database.
b Correct the errors.
c Rerun the Database Configuration Wizard.
Siebel Database Upgrade Guide for DB2 for z/OS Siebel Innovation Pack 2016
How to Perform a Siebel Database Upgrade ■ Process of Upgrading a Production Test Environment
68
34 “Manually Archiving Upgrade Log Files” on page 218.
35 Back up the upgraded database.
Postupgrade Tasks for Database and File System36 Perform the relevant tasks in Chapter 17, “Postupgrade Tasks for Siebel Database and File System.”
37 Perform the following tasks. For information on these tasks, see the chapter in Siebel Database Upgrade Guide that describes postupgrade tasks for the Siebel database and file system:
■ Check for inactivated EIM table columns in the Siebel database
■ Validate dock objects and rule definitions in the Siebel database
38 Reset upgrade-specific database and database server parameters back to their recommended settings for production. See Siebel Installation Guide for the operating system you are using and Implementing Siebel Business Applications on DB2 for z/OS for recommended parameter settings.
39 If you exported data from interface tables before the upgrade, review the database and import the data as desired.
40 Upgrade unencrypted data and data that was encrypted using the standard encryptor to RC2 or AES encryption. For information on this task, see the chapter in Siebel Database Upgrade Guide that describes Siebel database and UI upgrade planning.
41 Ensure Siebel database transactional tables with clustering indexes are organized in cluster sequence, and check whether or not you have to run the REORG utility on new tables.
42 Generate statistics for tables and indexes that were created or rebuild when additive schema changes were applied to the database. You might also have to reorganize these tables and indexes. For further information on generating database statistics, see “Generating RUNSTATS Jobs” on page 207.
NOTE: The production test environment is now upgraded. The remaining sections deal with configuration and validation tasks.
Postupgrade Tasks for Siebel Application Configuration43 Perform the tasks in the following to prepare for system testing:
■ Chapter 18, “Postupgrade Tasks for Siebel Business Applications”
■ The chapter in Siebel Database Upgrade Guide that describes the postupgrade tasks for Siebel Business Applications
44 Verify the function of interfaces in integrated applications.
45 Activate and deploy workflows. To perform these tasks, see Siebel Business Process Framework: Workflow Guide.
46 If you have set up integrations for transferring data to or from third-party applications using Siebel EAI, verify the integrations are configured correctly. For information on using EAI, see Overview: Siebel Enterprise Application Integration.
How to Perform a Siebel Database Upgrade ■ Process of Tuning the UpgradePerformance
Siebel Database Upgrade Guide for DB2 for z/OS Siebel Innovation Pack 2016 69
47 If you have used EIM to set up batch processing jobs, verify EIM is configured correctly. For information on using EIM, see Siebel Enterprise Integration Manager Administration Guide.
48 If you customized style sheet or web template files in the previous release, you must implement those customizations in the new release again, if desired.
Carefully review the UI in the new release before implementing customizations to those files.
Perform System Tests49 Use available test data to perform unit testing. Validate application function in the following
areas:
■ User interface
■ Data interfaces
■ Integrity of migrated data
■ Workflow function
Process of Tuning the Upgrade PerformanceUpgrades: All upgrades.
Environments: Production test environment only. Does not apply to production environment.
This process is optional.
This process is part of a roadmap. See “Roadmap for Performing a Siebel Database Upgrade” on page 53.
CAUTION: You are required to contact your Oracle sales representative for Oracle Advanced Customer Services to request assistance with tuning your upgrade scripts. If you do not, you might invalidate your support agreement.
Use this process to run test upgrades in the production test environment so you can tune upgrade performance. Improving upgrade performance reduces downtime when you perform the production environment upgrade. The steps in this process cover standard performance tuning. For help with this process and to implement more advanced tuning, contact your Oracle sales representative for Oracle Advanced Customer Services to request assistance.
You can also use this process to test the additive schema changes feature to verify that it does not adversely affect application functionality. The additive schema changes feature allows you to perform part of the upgrade on the production database without taking it offline. This reduces the downtime required to upgrade the production database.
Perform this process in the production test environment. Do not perform this process in the production environment.
Review the following upgrade planning and performance tuning resources before performing this process:
Siebel Database Upgrade Guide for DB2 for z/OS Siebel Innovation Pack 2016
How to Perform a Siebel Database Upgrade ■ Process of Tuning the Upgrade Performance
70
■ 478308.1 (Article ID) on My Oracle Support. This document was formerly published as Siebel Technical Note 616. This document describes strategies for minimizing production environment downtime during an upgrade. The steps outlined in this topic are intended primarily for use with the baseline best practices described in Technical Note 616.
■ Chapter 19, “Tuning the Siebel Production Upgrade Scripts.” This chapter provides information on how you can improve the performance of the production environment upgrade by tuning the production upgrade scripts in a production test environment.
Set Up the Target Database 1 Back up and remove the upgraded production test database.
2 In the production test environment, install a recent backup of your production database.
This database has not been upgraded and is called the target database. You use it to perform test upgrades as part of tuning upgrade performance.
3 Define an ODBC connection to the target database.
4 Verify that the target database is configured for optimum upgrade performance. Review the relevant topics in the following:
■ Chapter 6, “Basic Database Preparations for a Siebel Upgrade”
■ The chapter in Siebel Database Upgrade Guide that describes the basic database preparations for a Siebel upgrade
5 (Optional) Run statistics on the target database if the catalog statistics require updating.
6 Perform the relevant tasks in the chapter in Siebel Database Upgrade Guide that describes how to prepare Siebel Business Applications data for upgrade.
Upgrade the Target Database Schema (upgrep + upgphys)7 Using the upgrade files you generated during the production test upgrade, upgrade the target
database by performing the following tasks:
a “Dropping Partitioned EIM Tables” on page 188.
b “Applying Additive Upgrade Changes to the Target Database” on page 190.
c “Performing the In-Place Target Database Upgrade” on page 193.
8 Upgrade the repository and import seed data. See “Upgrading the Repository and Importing Seed Data” on page 131. Specify the storage control file you extracted when you performed the production test upgrade (see Step 29 on page 67).
9 “Activating New License Keys After an Upgrade” on page 211.
10 Note the time required to upgrade the database.
11 Review the upgrade logs for errors. See “About the Siebel Upgrade Log Files” on page 215.
12 If the upgrade contains errors that prevented completion or adversely affected performance, correct the errors and rerun the upgrade.
How to Perform a Siebel Database Upgrade ■ Process of Upgrading a Siebel ProductionEnvironment
Siebel Database Upgrade Guide for DB2 for z/OS Siebel Innovation Pack 2016 71
13 “Manually Archiving Upgrade Log Files” on page 218.
Tune the Upgrade Files14 Evaluate upgrade performance, particularly the time required to complete the upgrade.
15 Do one of the following:
■ If the time required to complete the upgrade is acceptable, no further tuning is required. Perform the steps in “Process of Upgrading a Siebel Production Environment” on page 71.
■ If the time required to complete the upgrade is too long, perform the remaining steps in this subtopic to continue tuning upgrade performance.
■ If the time required to complete the upgrade is too long and you cannot tune further, contact your Oracle sales representative for Oracle Advanced Customer Services to request assistance in applying advanced tuning.
16 Carefully review target database and database server configuration. Adjust as required to further improve upgrade performance.
17 Tune the upgrade files:
■ “Optimizing Unload and Load Job Performance” on page 230.
■ “Adding the Statistics Clause to Load Cards” on page 231.
18 Copy the tuned upgrade scripts to a safe location for use in the production upgrade.
Restore the Target DatabasePerform these steps if you have made changes to the upgrade environment or to the upgrade files and want to run the upgrade again to verify performance improvement.
19 In the production test environment, restore the target database from backup.
This returns the target database to its nonupgraded state so that you can perform another test upgrade.
20 In the production test environment, perform another test upgrade and evaluate upgrade performance.
21 Repeat the tuning process and perform test upgrades until upgrade performance is acceptable.
22 When you have completed tuning upgrade performance in the production test environment, delete and remove the target database.
Process of Upgrading a Siebel Production EnvironmentUpgrades: All upgrades.
Environments: Production environment only. Does not apply to production test environment.

Siebel Database Upgrade Guide for DB2 for z/OS Siebel Innovation Pack 2016
How to Perform a Siebel Database Upgrade ■ Process of Upgrading a Siebel Production Environment
72
This process is part of a roadmap. See “Roadmap for Performing a Siebel Database Upgrade” on page 53.
This topic lists the tasks required to transition your production test environment to production. Print this topic and use it as a checklist for doing the upgrade.
The topic is divided into subtopics, each containing numbered steps. Complete the steps in the order shown.
Searching for Bulletins and Alerts on My Oracle Support1 Check My Oracle Support for recently published bulletins and alerts regarding the upgrade.
Upgrade Third-Party Software2 Upgrade third-party software that is used by Oracle’s Siebel software if required. For example,
you might have to upgrade the operating system software. Some database upgrades require newer versions of UNIX or Windows.
Upgrade the ServersVerify you have identified all the maintenance releases and Siebel Patchset releases for the upgrade.
CAUTION: Do not install a new Siebel database as part of upgrading the Siebel Enterprise Server.
To perform the following steps, see Siebel Installation Guide for the operating system you are using and Implementing Siebel Business Applications on DB2 for z/OS.
3 Install the Siebel CRM 8.1 Gateway Name Server, Siebel Servers, and Siebel Web Server Extension (SWSE).
The upgraded Siebel Servers will not work correctly with the RDBMS server until after you have upgraded the Siebel database to the new release.
4 Install the Siebel Database Configuration Utilities files on the Siebel Server you will use to perform the upgrade.
5 Install language packs for your currently deployed languages and any new languages.
6 If you have customized the configuration of Enterprise components, such as Siebel Servers, you must migrate the customizations to the upgraded environment. For information on this task, see Siebel System Administration Guide.
Upgrade the RDBMS7 If required, upgrade your version of DB2 for z/OS and DB2 Connect middleware. You might also
have to upgrade any DB2 clients that connect to the Siebel database. Refer to the IBM documentation to perform the DB2 for z/OS and DB2 Connect upgrades.
How to Perform a Siebel Database Upgrade ■ Process of Upgrading a Siebel ProductionEnvironment
Siebel Database Upgrade Guide for DB2 for z/OS Siebel Innovation Pack 2016 73
Preupgrade Tasks for the Siebel Database8 Review guidelines for configuring DB2 for z/OS. See Implementing Siebel Business Applications
on DB2 for z/OS.
9 Verify that the Workflow Monitor and Workflow action agents have processed all pending requests.
10 Stop the Siebel Servers.
11 Verify there are no open database connections.
12 Remove customized database triggers.
The Siebel upgrade process is not designed to support custom database triggers. If you have created customized triggers for the Siebel schema to be upgraded, you must remove them before starting the Siebel upgrade process. You can re-create these objects once the Siebel upgrade completes successfully.
13 Prepare the storage control file to use in the upgrade. See “Process of Preparing the Storage Layout of the Schema” on page 93.
14 Perform the applicable tasks in the following:
■ Chapter 6, “Basic Database Preparations for a Siebel Upgrade”
■ The chapter in Siebel Database Upgrade Guide that describes the basic database preparations for a Siebel upgrade
Preupgrade Tasks for Application Data15 Perform the tasks in the chapter in Siebel Database Upgrade Guide that describes how to prepare
Siebel application data for upgrade.
Some of these tasks are optional, depending on the currently installed Siebel products and your upgrade path. Review and perform these tasks as necessary.
Preupgrade Tasks for a Production Environment Upgrade16 Review the information in “Requirements for Upgrading the Production Environment” on page 115.
17 Copy application files to the environment:
a Custom SRF file.
b Reports files.
c Custom Web templates and style sheets. See the topic on copying UI files to a new Siebel environment in the chapter in Siebel Database Upgrade Guide that describes how to perform the Siebel Repository merge.
18 “About Moving the Customized Repository and Schema Definition Files” on page 115.
19 Preparing for a No-Development-Environment Siebel Upgrade.
If you do not have a development environment, see “Preparing for a Siebel Upgrade Without a Development Environment” on page 116 for information on this task.
Siebel Database Upgrade Guide for DB2 for z/OS Siebel Innovation Pack 2016
How to Perform a Siebel Database Upgrade ■ Process of Upgrading a Siebel Production Environment
74
Upgrade the Siebel Database Schema (upgrep + upgphys)If you have completed a production test upgrade and have tuned the SQL and JCL upgrade files on the z/OS host, you can use these files to perform the target database upgrade in the production environment. This approach has several advantages:
■ You do not have to generate upgrade files in the production environment and then manually transfer customizations to them from the production test environment.
■ You do not have to run the Database Configuration Wizard in Prepare for Production mode again.
■ You do not have to run the zSeries Staging of Files for Upgrade process using the Database Configuration Wizard to create the staging database and to generate upgrade files again.
■ With some exceptions, you do not have to perform database-related configuration tasks required by Siebel Release Notes on My Oracle Support or by Alerts again.
NOTE: Before using the tuned upgrade files that you generated in the production test environment, you must edit the upgrade files to change the production test environment values to production environment values.
20 Verify you have a current backup of the production environment database.
21 On the Siebel Server you used to upgrade the production test environment, create an ODBC to connect to the production environment database.
22 Edit the tuned upgrade files you generated during the production test environment upgrade. Replace any values in the upgrade files that are specific to the production test environment with production environment values. You might have to change the following values in the upgrade files:
■ Host/LPAR name where the target database resides
■ DB2 subsystem name of the target database
■ Schema/Tableowner qualifier name on the target database
■ ODBC data source name of the target database
You can edit the upgrade files using any utility that allows you to edit partitioned data sets (PDSs). For advice on editing upgrade files, contact your Oracle sales representative for Oracle Advanced Customer Services.
23 Upgrade the target database using the tuned upgrade files, which now contain production environment information, by performing the following tasks:
a “Dropping Partitioned EIM Tables” on page 188.
b “Applying Additive Upgrade Changes to the Target Database” on page 190.
c “Renaming the Production Environment Repository” on page 193.
d “Performing the In-Place Target Database Upgrade” on page 193.
24 Extract the storage control file from the target database using the Database Configuration Wizard as follows:
■ Specify the following values when prompted to do so:
❏ Extract Options: Extract from Catalog.
How to Perform a Siebel Database Upgrade ■ Process of Upgrading a Siebel ProductionEnvironment
Siebel Database Upgrade Guide for DB2 for z/OS Siebel Innovation Pack 2016 75
❏ Storage Control File: Specify the name of the storage control file to be extracted. You must specify the name storage_postupg.ctl.
■ Make sure you specify values for the target database when prompted for the names of the schema Qualifier, ODBC data source, and database user name and password.
The procedure to extract a storage control file using the Extract From Catalog option is described in Implementing Siebel Business Applications on DB2 for z/OS. The extracted target database storage control file is used as input to the upgphys upgrade process.
25 Upgrade the repository and import seed data. See “Upgrading the Repository and Importing Seed Data” on page 131.
26 “Activating New License Keys After an Upgrade” on page 211.
27 “About the Siebel Upgrade Log Files” on page 215.
28 If the upgrade contains unacceptable errors, do the following:
a Restore the backup of the database.
b Correct the errors.
c Rerun the Database Configuration Wizard.
29 “Manually Archiving Upgrade Log Files” on page 218.
30 Back up the upgraded production database.
31 “Deleting Redundant Upgrade Files” on page 212.
Postupgrade Tasks for Database and File System32 Perform the relevant tasks in Chapter 17, “Postupgrade Tasks for Siebel Database and File System.”
33 Perform the following tasks. For information on these tasks, see the chapter in Siebel Database Upgrade Guide that describes postupgrade tasks for the Siebel database and file system:
■ Check for inactivated EIM table columns in the Siebel database
■ Validate dock objects and rule definitions in the Siebel database
34 Reset upgrade-specific database and database server parameters back to their recommended settings for production. See Siebel Installation Guide for the operating system you are using and Implementing Siebel Business Applications on DB2 for z/OS for recommended parameter settings.
35 If you exported data from interface tables before the upgrade, review the database and import the data as desired.
36 Upgrade unencrypted data and data that was encrypted using the standard encryptor to RC2 or AES encryption. For information on this task, see the chapter in Siebel Database Upgrade Guide that describes Siebel database and UI upgrade planning.
Siebel Database Upgrade Guide for DB2 for z/OS Siebel Innovation Pack 2016
How to Perform a Siebel Database Upgrade ■ Process of Upgrading a Siebel Production Environment
76
37 Generate database statistics for new or rebuilt tables and indexes. Determine whether or not any tables must be reorganized by running RUNSTATS with the Report Only option specified. For more information about running statistics, see “Generating RUNSTATS Jobs” on page 207.
NOTE: The production environment is now upgraded. The remaining topics in this chapter deal with configuration and validation tasks.
Postupgrade Tasks for Applications Configuration38 Review the results of the Person and Organization merge, if applicable. Make configuration
changes as required. For further information, see the topic about the Siebel Party Model in the chapter in Siebel Database Upgrade Guide that describes Siebel database and UI upgrade planning.
39 Perform the tasks in the following:
■ Chapter 18, “Postupgrade Tasks for Siebel Business Applications”
■ The chapter in Siebel Database Upgrade Guide that describes the postupgrade tasks for Siebel Business Applications
40 Activate and deploy workflows. To perform these tasks, see Siebel Business Process Framework: Workflow Guide.
41 If you have set up integrations for transferring data to or from third-party applications using Siebel EAI, verify the integrations are configured correctly. For information on using EAI, see Overview: Siebel Enterprise Application Integration.
42 If you have used EIM to set up batch processing jobs, verify EIM is configured correctly. For information on using EIM, see Siebel Enterprise Integration Manager Administration Guide.
43 If you customized style sheet or web template files in the previous release, you have to implement those customizations again in the new release, if desired.
Perform System Tests44 Use available test data to perform unit testing. Validate application function in the following
areas:
■ User interface
■ Data interfaces
■ Integrity of migrated data
■ Workflow function
Deploy to Users45 Upgrade your Siebel Mobile and Developer Web Clients. See Siebel Installation Guide for the
operating system you are using for further information.
How to Perform a Siebel Database Upgrade ■ Process of Upgrading a Siebel ProductionEnvironment
Siebel Database Upgrade Guide for DB2 for z/OS Siebel Innovation Pack 2016 77
46 If you have customized the configuration of Siebel Enterprise Server components, such as Siebel Servers, you must manually enter the customizations in the upgraded environments. For information on this task, see Siebel System Administration Guide.
47 Use Siebel Anywhere to create distribution kits for deployment. See Siebel Anywhere Administration Guide.
48 Generate a Siebel Remote database template. See Siebel Remote and Replication Manager Administration Guide.
49 Set up database extraction for Siebel Mobile Web Clients. See Siebel Remote and Replication Manager Administration Guide.

Siebel Database Upgrade Guide for DB2 for z/OS Siebel Innovation Pack 2016
How to Perform a Siebel Database Upgrade ■ Process of Upgrading a Siebel Production Environment
78
Siebel Database Upgrade Guide for DB2 for z/OS Siebel Innovation Pack 2016 79
5 Planning a Siebel Database Upgrade
This chapter describes some of the important database-related issues to consider when planning an upgrade to the current Siebel CRM release. Also review the applicable topics in the chapter in Siebel Database Upgrade Guide that describes the Siebel database and UI upgrade planning tasks before starting your upgrade. This chapter includes the following topics:
■ Planning Resources for Upgrading to Siebel CRM on z/OS on page 79
■ Planning Changes to the Physical Layout of the Schema on page 80
■ Testing Before a Production Upgrade on page 82
■ Considering Code Page Support on page 82
■ Executing Jobs Using Siebel-Scheduled Mode or Vendor-Scheduled Mode on page 83
■ Staging and Target Database Planning on page 84
■ Obtaining Required Software and Hardware on page 84
■ Obtaining Required IBM Utilities on page 84
■ About Using the DSNTIAUL Utility on page 85
■ Obtaining Required Security Privileges on page 87
■ Planning Backup and Recovery Stages on page 88
■ About Creating a Schedule for the Upgrade on page 89
■ About Estimating Database Size on page 89
■ Upgrading Your DB2 Software on page 90
Planning Resources for Upgrading to Siebel CRM on z/OSThe chapter in Siebel Database Upgrade Guide that describes Siebel database and UI upgrade planning tasks also describes the planning resources available to you before you start to upgrade to the current release of Siebel CRM. This topic describes additional resources available if you use Siebel Business Applications with DB2 for z/OS.
Documentation Read Implementing Siebel Business Applications on DB2 for z/OS, available on the Siebel Bookshelf, for information on configuring your Siebel application after you have upgraded to the current Siebel CRM release.

Siebel Database Upgrade Guide for DB2 for z/OS Siebel Innovation Pack 2016
Planning a Siebel Database Upgrade ■ Planning Changes to the Physical Layout of the Schema
80
About Oracle’s Advanced Customer ServicesOracle’s Advanced Customer Services offers detailed implementation planning and technical consulting services. Oracle recommends that you engage Oracle’s Advanced Customer Services for help in planning your upgrade on DB2 for z/OS. Oracle’s Advanced Customer Services can help you to:
■ Take advantage of the new features provided by the latest version of Siebel CRM
■ Customize the upgrade scripts and the upgrade process as appropriate for your installation
■ Carry out performance tuning on the upgrade scripts to minimize production downtime
For further information, see “About Using Oracle’s Advanced Customer Services” on page 24.
Planning Changes to the Physical Layout of the SchemaIn planning your upgrade, you must understand the existing physical layout of your schema and determine whether or not you have to change the layout for the upgrade to the current release of Siebel CRM. Also consider database space requirements and whether or not you have to move table spaces. These issues are discussed in this topic.
New Database Schema Structure Since Siebel CRM Release 7.7.xUpgrades: Release 7.5.3 only.
In Siebel CRM Release 7.7.x, the current database schema structure, referred to as the 1:1:1 model, was introduced. It has the following characteristics:
■ One table in each table space
■ One table space in each database
Prior to Siebel CRM Release 7.7.x, the database schema was built using approximately 20 databases, each of which contained multiple table spaces. Each of these table spaces (if nonpartitioned) contained multiple tables. The current version of Siebel CRM contains thousands of databases. For example, an SIA installation has approximately 2700 databases. Each database has one table space and each table space has one table.
This model meets IBM recommendations and prevents database descriptor (DBD) locking and logging. These issues arise due to the increasing intensity of DB2 DML and DDL operations and the interaction of these operations with the DBD. The DBD is locked when information about the DB2 objects contained by the DBD is requested and accessed. In general, the more objects a DBD contains, the more probable that a DBD lock will be requested when information about a child object of the DBD is accessed.
Locks are acquired on the DBD table space (DBD01) if a DBD is not in memory (EDM pool). If the DBD is in the EDM pool, no lock is acquired on it if the SQL being run is static. However, most SQL executed by the Siebel application is dynamic; this means locks are acquired on the DBD. For more information on DBD locking, refer to the relevant IBM documentation.
Planning a Siebel Database Upgrade ■ Planning Changes to the Physical Layout of theSchema
Siebel Database Upgrade Guide for DB2 for z/OS Siebel Innovation Pack 2016 81
The adoption of the 1:1:1 model since Siebel CRM Release 7.7.x means that if you are upgrading from Siebel CRM version 7.5.3, you must decide how much of this model to deploy. You have the following options:
■ Create all tables in the 1:1:1 model.
New 8.1 or 8.2 tables are created in the 1:1:1 model and the storage control file supplied with Siebel Business Applications is used for the upgrade.
■ Create new tables in the 1:1:1 model and maintain existing tables in their current table space if possible.
The following scenarios arise if you select this latter option:
■ Some existing tables have to be moved to incorporate the addition of new columns.
■ Some existing tables have to be moved because they have been extended and the addition of new columns causes the table’s LRECL to exceed that of the table space. This necessitates the use of the extract and merge methodology to create the storage control file. For more information on this methodology, see “Extracting the Storage Control File” on page 97.
■ Tables that are to retain the existing format are merged into the template control file which employs the 1:1:1 model.
For both options, enter existing tables that are to be migrated to the 1:1:1 model in the file override.inp. See “About the Override File” on page 50 for further information. For more information on using storage control files, see Implementing Siebel Business Applications on DB2 for z/OS.
Preparing a Storage Control FileA key task for a successful upgrade is the building of a suitable storage control file for both the development and production upgrade. You must consider space requirements. This is particularly important for the development upgrade, because three new repositories are imported into the database (one extra repository is imported during the production upgrade). Some repository tables will increase significantly in size, so you must provide sufficient space for expected database growth. For information on preparing a storage control file, see “Process of Preparing the Storage Layout of the Schema” on page 93.
About Moving Table SpacesIf you want to move tables from one table space to another, you must recreate the tables in the new table space and then drop the existing table space, if it is empty. You cannot change the bufferpool designation in the storage control file to move tables because the page size is associated with the table space.
For example, if you are making changes to an existing table space that is using BP1 or a 4 KB bufferpool and these changes cause you to receive a warning from ddlimp that the table must now be in a 16 KB bufferpool, do not just change the bufferpool designation in the storage control file from BP1 to BP16K1. Doing so can cause any LONG VARCHAR column in the table to be bigger than is necessary, resulting in performance problems.
Siebel Database Upgrade Guide for DB2 for z/OS Siebel Innovation Pack 2016
Planning a Siebel Database Upgrade ■ Testing Before a Production Upgrade
82
Testing Before a Production UpgradeCareful testing is critical for a successful upgrade. In particular, the production upgrade must be thoroughly tested to avoid data-specific issues and gain the best possible performance during your upgrade.
NOTE: Do not implement your upgraded Siebel CRM production database without exhaustive performance testing.
Considering Code Page SupportSiebel CRM 8.x supports ASCII-, EBCDIC-, and Unicode-based coded character set IDs (CCSIDs) on DB2 for z/OS. Development databases, however, cannot use EBCDIC code pages, because databases with EBCDIC code pages do not support two critical procedures in a development environment upgrade:
■ Merging prior configuration changes into a new custom configuration repository
■ Compiling a new Siebel repository file (.srf file) from the new repository
Additional limitations on databases with EBCDIC code pages include the following:
■ Siebel Web Client migration is not supported
■ Siebel Dun & Bradstreet server components are not supported
Before you conduct an upgrade, carefully read Siebel Release Notes on My Oracle Support for information about known restrictions. For guidelines about choosing the code page for your subsystem, see Implementing Siebel Business Applications on DB2 for z/OS. In addition, make sure you follow the rules specified by IBM for character conversion as described in the IBM DB2 installation documentation.
About Code Page ConversionSiebel CRM supports the ASCII 5348 and EBCDIC 1140 code pages on DB2 for z/OS. If your current Siebel CRM release runs on a different code page, you must migrate to one of the supported code pages before upgrading to the current Siebel release.
Since Siebel CRM 7.5, Siebel Business Applications has supported the Unicode character set. On the z/OS platform, Siebel Business Applications only support the Unicode character set on DB2 for z/OS version 8 running in New Function Mode or later releases. Character conversions from Unicode code pages to ASCII and EBCDIC code pages on the z/OS host are performed by the z/OS Unicode Services; these conversions are required if Siebel Business Applications are to function correctly. For information on setting up the z/OS Unicode Services, see the IBM document about using Unicode Services on the IBM z/OS information center Web site at
http://publib.boulder.ibm.com/infocenter/zos/v1r9/index.jsp
Planning a Siebel Database Upgrade ■ Executing Jobs Using Siebel-Scheduled Mode orVendor-Scheduled Mode
Siebel Database Upgrade Guide for DB2 for z/OS Siebel Innovation Pack 2016 83
Check the Siebel schema code page before starting the Siebel upgrade to ensure characters on the target schema will display correctly. Schedule sufficient time to perform and test the code page conversion before beginning the upgrade. For advice and assistance on converting DB2 code pages, contact IBM.
NOTE: To ensure the euro symbol is implemented correctly in the Siebel database on the z/OS host, enable support for the euro symbol by setting the DB2 Connect system environment variable, DB2CONNECT_ENABLE_EURO_CODEPAGE, to YES on all DB2 Connect computers used to connect to the Siebel CRM database. For additional information on the DB2CONNECT_ENABLE_EURO_CODEPAGE variable, see the relevant IBM documentation.
Executing Jobs Using Siebel-Scheduled Mode or Vendor-Scheduled ModeBefore you perform a production upgrade, determine whether you will execute the jobs using Siebel-provided job scheduling or a third-party vendor scheduler. Choose your scheduling mode carefully, because once you begin an upgrade process under a selected mode, you cannot change your scheduling mode or reverse this decision.
Siebel-provided job scheduling is implemented by default. If you want to use a vendor scheduler, you must edit the data set DSNHLQ.SIEBEL.EXEC(@PRETPTH) and set the Scheduling option to a value of 2 (Vendor Scheduled).
In Siebel Scheduled Mode, the Siebel job scheduler uses job submission EXECs to run the following upgrade jobs:
■ Pret
■ Pret_FINS
■ Household
■ Household_FINS
■ Preschm
■ Preschm-FINS
■ Upglss
The Siebel job scheduler automatically submits dependent jobs by their predecessors.
Using Siebel Scheduled Mode, if a job ends abnormally or returns an invalid return code, the upgrade process is halted. You can check the job status by querying the Siebel job log. For further information, see Chapter 16, “Reviewing the Siebel Upgrade Log Files.”
If you use a third-party job scheduler, jobs are not submitted automatically. In this case, you will find it useful to first generate the upgrade scripts using Siebel scheduling to gain an understanding of job dependencies.
Logging is provided for both Siebel-scheduled and vendor-scheduled jobs using a DB2 table. Each job contains a step that checks whether or not all the other steps in the job completed successfully. An SQL UPDATE statement is then executed against the log table specifying the job status.
Siebel Database Upgrade Guide for DB2 for z/OS Siebel Innovation Pack 2016
Planning a Siebel Database Upgrade ■ Staging and Target Database Planning
84
Staging and Target Database PlanningWhen scheduling your upgrade, be aware that the target database schema must not be changed after the staging DDL is produced. If target database schema changes are applied before the upgrade is completed, you must recreate the staging database and generate the upgrade files again.
When planning your upgrade, keep in mind the following:
■ The staging database must be in a separate DB2 subsystem to the target database
■ The staging database table space names must be same as those in the target database
■ The staging database tableowner and storage group names can be the same or different to the target database names
DB2 DSNZPARM Settings For the Target DatabaseFor Siebel Business Applications to run correctly and efficiently, the DSNZPARM parameters for your target database must be set correctly. For a list of the required and recommended DSNZPARM parameter settings for DB2 for z/OS when using Siebel Business Applications, see Implementing Siebel Business Applications on DB2 for z/OS.
Obtaining Required Software and HardwareBecause each enterprise has specific requirements for hardware and software resources, it is recommended that you discuss your particular situation with your Siebel technical resource. Make sure your hardware supports the requirements of your Siebel CRM upgrade.
To verify that your computer, operating system platforms, and third-party programs are supported for the current release of Siebel CRM, see the Certifications tab on My Oracle Support (https://support.oracle.com).
Obtaining Required IBM UtilitiesVerify that the following IBM utilities are available for your upgrade to the current release of Siebel CRM:
■ DSNTEP2. The upgrade uses DSNTEP2 to execute SQL.
Prepare and bind DSNTEP2 by following the procedures in your IBM installation documentation. If you made local modifications, you might have to prepare and bind a separate version. Also, if you are using a separate version of DSNTEP2, you have to change the SIEBSQL* members to reflect the new plan and program names.
■ DFSORT. The utility DFSORT is used to manipulate data for data migration during upgrade.
■ LOAD. The IBM DB2 Load utility is used to load data during data migration.
■ REBUILD INDEX. The IBM DB2 REBUILD INDEX utility (DSNUTILB) is used to build indexes after they are created using DEFER YES.
Planning a Siebel Database Upgrade ■ About Using the DSNTIAUL Utility
Siebel Database Upgrade Guide for DB2 for z/OS Siebel Innovation Pack 2016 85
■ IEBCOPY. The utility IEBCOPY is used to create members in installation data sets. Sequential data sets contains control information used by IEBCOPY.
■ IEBGENER. The utility IEBGENER is used to copy sequential data sets.
■ DSNTIAUL. The upgrade uses DSNTIAUL to unload Siebel application data.
Compile, link-edit, and bind DSNTIAUL by following the procedures in your IBM DB2 installation documentation.
For information on these IBM utilities, see your IBM documentation.
CAUTION: You can choose to use alternative third-party utility products that are preferred for your environment. Evaluate utilities by individual job. Be aware, however, that if you do use utilities other than those recommended, you might have to modify the SQL supplied with Siebel Business Applications to accord with the rules for those utilities. For help with modifying the SQL supplied with Siebel Business Applications, you must contact your Oracle sales representative for Oracle Advanced Customer Services.
About Using the DSNTIAUL UtilityIn Siebel CRM releases since 8.0.x, the DSNTIAUL utility is used to unload data from tables. However, the SELECT statements that Siebel CRM 8.x uses to specify the selected columns to be unloaded cause DSNTIAUL to issue a warning message and return a nonzero return code for every unload job. This makes the process of determining whether an unload job completed successfully or not difficult.
To avoid this problem, Siebel CRM 8.x contains a patch for DSNTIAUL which causes a successful unload job to generate a zero return code by changing the selective SELECT warning message to an informational message. Jobs that generate a zero return code require no further consideration. After you apply the patch to DSNTIAUL, all jobs resulting in nonzero return codes must be reviewed. For further information, see “About Applying the DSNTIAUL Patch.”
About Applying the DSNTIAUL PatchThe DSNTIAUL patch, @@TIAUL USERMOD, is packaged as an SMP/E format USERMOD. The patch is a MACUPD (macro update) because DSNTIAUL is delivered as a macro and not as a source object. The @@TIAUL USERMOD updates the DSNTIAUL assembler source code so that nonzero return codes generated solely by the selective SELECT statements are suppressed. The USERMOD is generic in that it applies to known fix levels of the DSNTIAUL utility.
NOTE: It is recommended that a DB2 systems programmer who has knowledge of SMP/E and your maintenance process applies the patch.
To apply the patch, copy the @@TIAUL USERMOD code, listed in “The @@TIAUL USERMOD Patch” on page 86, and apply it to the SMP/E DB2 target zone on z/OS. You can apply the patch using various methods, for example:
■ Use the SMP/E APPLY command to apply @@TIAUL USERMOD directly to the z/OS system, then run assemble, link, and bind jobs to specify it as the default program
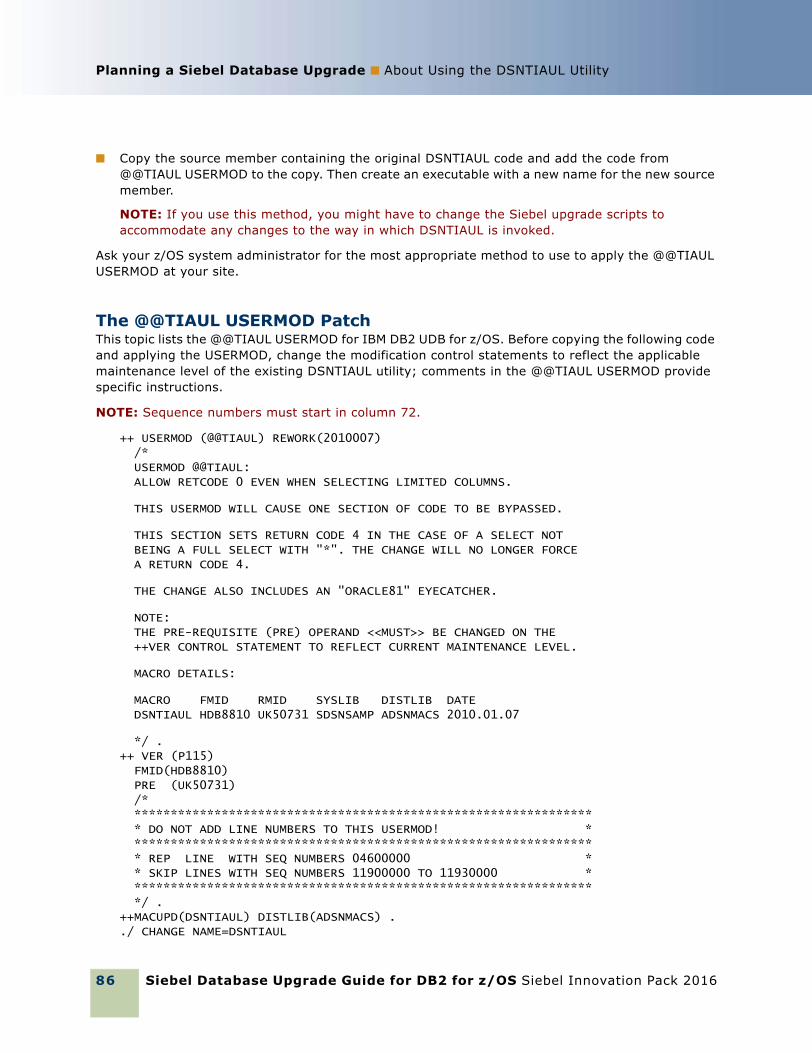
Siebel Database Upgrade Guide for DB2 for z/OS Siebel Innovation Pack 2016
Planning a Siebel Database Upgrade ■ About Using the DSNTIAUL Utility
86
■ Copy the source member containing the original DSNTIAUL code and add the code from @@TIAUL USERMOD to the copy. Then create an executable with a new name for the new source member.
NOTE: If you use this method, you might have to change the Siebel upgrade scripts to accommodate any changes to the way in which DSNTIAUL is invoked.
Ask your z/OS system administrator for the most appropriate method to use to apply the @@TIAUL USERMOD at your site.
The @@TIAUL USERMOD PatchThis topic lists the @@TIAUL USERMOD for IBM DB2 UDB for z/OS. Before copying the following code and applying the USERMOD, change the modification control statements to reflect the applicable maintenance level of the existing DSNTIAUL utility; comments in the @@TIAUL USERMOD provide specific instructions.
NOTE: Sequence numbers must start in column 72.
++ USERMOD (@@TIAUL) REWORK(2010007)/*USERMOD @@TIAUL:ALLOW RETCODE 0 EVEN WHEN SELECTING LIMITED COLUMNS.
THIS USERMOD WILL CAUSE ONE SECTION OF CODE TO BE BYPASSED.
THIS SECTION SETS RETURN CODE 4 IN THE CASE OF A SELECT NOTBEING A FULL SELECT WITH "*". THE CHANGE WILL NO LONGER FORCEA RETURN CODE 4.
THE CHANGE ALSO INCLUDES AN "ORACLE81" EYECATCHER.
NOTE:THE PRE-REQUISITE (PRE) OPERAND <<MUST>> BE CHANGED ON THE++VER CONTROL STATEMENT TO REFLECT CURRENT MAINTENANCE LEVEL.
MACRO DETAILS:
MACRO FMID RMID SYSLIB DISTLIB DATEDSNTIAUL HDB8810 UK50731 SDSNSAMP ADSNMACS 2010.01.07
*/ .++ VER (P115)FMID(HDB8810)PRE (UK50731)/***************************************************************** DO NOT ADD LINE NUMBERS TO THIS USERMOD! ***************************************************************** REP LINE WITH SEQ NUMBERS 04600000 ** SKIP LINES WITH SEQ NUMBERS 11900000 TO 11930000 *****************************************************************/ .
++MACUPD(DSNTIAUL) DISTLIB(ADSNMACS) ../ CHANGE NAME=DSNTIAUL
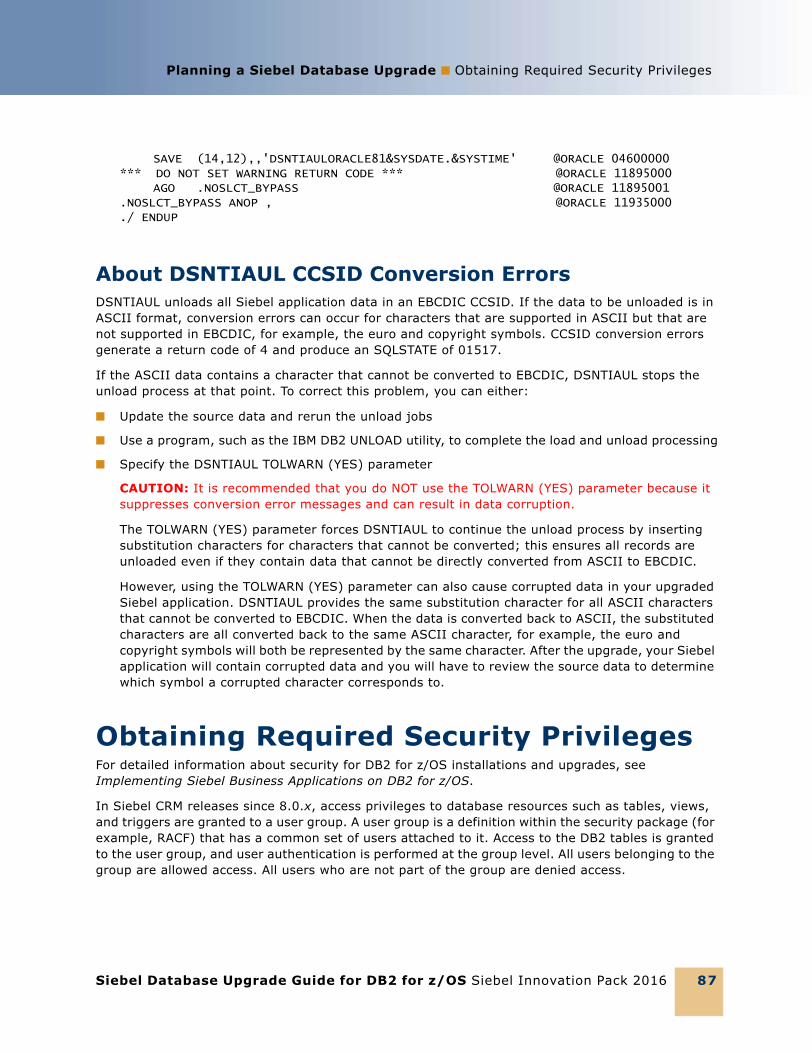
Planning a Siebel Database Upgrade ■ Obtaining Required Security Privileges
Siebel Database Upgrade Guide for DB2 for z/OS Siebel Innovation Pack 2016 87
SAVE (14,12),,'DSNTIAULORACLE81&SYSDATE.&SYSTIME' @ORACLE 04600000*** DO NOT SET WARNING RETURN CODE *** @ORACLE 11895000
AGO .NOSLCT_BYPASS @ORACLE 11895001.NOSLCT_BYPASS ANOP , @ORACLE 11935000./ ENDUP
About DSNTIAUL CCSID Conversion ErrorsDSNTIAUL unloads all Siebel application data in an EBCDIC CCSID. If the data to be unloaded is in ASCII format, conversion errors can occur for characters that are supported in ASCII but that are not supported in EBCDIC, for example, the euro and copyright symbols. CCSID conversion errors generate a return code of 4 and produce an SQLSTATE of 01517.
If the ASCII data contains a character that cannot be converted to EBCDIC, DSNTIAUL stops the unload process at that point. To correct this problem, you can either:
■ Update the source data and rerun the unload jobs
■ Use a program, such as the IBM DB2 UNLOAD utility, to complete the load and unload processing
■ Specify the DSNTIAUL TOLWARN (YES) parameter
CAUTION: It is recommended that you do NOT use the TOLWARN (YES) parameter because it suppresses conversion error messages and can result in data corruption.
The TOLWARN (YES) parameter forces DSNTIAUL to continue the unload process by inserting substitution characters for characters that cannot be converted; this ensures all records are unloaded even if they contain data that cannot be directly converted from ASCII to EBCDIC.
However, using the TOLWARN (YES) parameter can also cause corrupted data in your upgraded Siebel application. DSNTIAUL provides the same substitution character for all ASCII characters that cannot be converted to EBCDIC. When the data is converted back to ASCII, the substituted characters are all converted back to the same ASCII character, for example, the euro and copyright symbols will both be represented by the same character. After the upgrade, your Siebel application will contain corrupted data and you will have to review the source data to determine which symbol a corrupted character corresponds to.
Obtaining Required Security PrivilegesFor detailed information about security for DB2 for z/OS installations and upgrades, see Implementing Siebel Business Applications on DB2 for z/OS.
In Siebel CRM releases since 8.0.x, access privileges to database resources such as tables, views, and triggers are granted to a user group. A user group is a definition within the security package (for example, RACF) that has a common set of users attached to it. Access to the DB2 tables is granted to the user group, and user authentication is performed at the group level. All users belonging to the group are allowed access. All users who are not part of the group are denied access.
Siebel Database Upgrade Guide for DB2 for z/OS Siebel Innovation Pack 2016
Planning a Siebel Database Upgrade ■ Planning Backup and Recovery Stages
88
The user who executes the upgrade must be a member of a qualified group. To grant this user tableowner privileges, the tableowner must be set up as a qualified group, and the DBA who executes DDLs must be a member of this qualified group. The group ID is the qualifier (for example, RACF group ID).
The Siebel installation process allows the installer to specify the group user name for client access (the default is SSEROLE), and the resulting installation scripts generate the appropriate GRANT statements. GRANT statements for additional security groups that might be required must be created manually.
NOTE: The GRANT statements must be executed by either the tableowner, a database administrator, or a system administrator.
The following privileges are necessary for the user who performs the upgrade:
■ Read the DB2 catalog
■ Execute stored procedures
■ Bind stored procedures
Because each enterprise has specific requirements, it is recommended that you discuss your particular situation with your Siebel technical resource.
Planning Backup and Recovery StagesIn addition to the backup and recovery procedures that are standard for your environment, take a set of DB2 backups at key stages during the upgrade, using your preferred utility. A snapshot of your repositories and environment at these stages protects the progress of your upgrade in the event of a failed subsequent process.
It is recommended that you back up your Siebel schema at these key stages of the upgrade:
■ Before any upgrade activity is started
■ Before performing unloads
NOTE: Unloads must be performed when there is no system activity, so that the database is at a point of consistency.
■ After upgrading the Siebel database schema
■ After the repository merge
■ After upgrading the custom database schema
Review the results of all JCL jobs that you execute during the install or upgrade process. You can use a spool viewer such as IBM’s SDSF to inspect the output from these jobs. You can review this information in addition to reviewing the upgrade log files.
Planning a Siebel Database Upgrade ■ About Creating a Schedule for the Upgrade
Siebel Database Upgrade Guide for DB2 for z/OS Siebel Innovation Pack 2016 89
About Creating a Schedule for the UpgradeDevelop a plan for your upgrade based on the objectives and constraints for your deployment.
If you are migrating multiple languages from a prior version, plan extra time for the repository merge process. The expected merge time can increase with the number of languages in the repository. You also might have to plan for additional installation-related tasks.
The following procedures can reduce the time required for your upgrade:
■ Run selected processes in advance of the upgrade.
Certain preupgrade tasks can be run at any time prior to the upgrade. These procedures can be performed in advance either for testing purposes or to accommodate downtime constraints.
Examples of procedures that can be performed by a database administrator in advance of your upgrade include “Process of Preparing the Storage Layout of the Schema” on page 93.
■ Apply additive schema changes to the production database ahead of the target database in-place upgrade. See “About Siebel Additive Schema Upgrade Changes” on page 30.
■ Prepare select processes to run in parallel.
If a large table such as S_EVT_ACT is partitioned, it can run in parallel by transferring shipped statements into the numbered SQL statement.
Do not start a new development effort until after the new version has been rolled out.
About Estimating Database SizeDatabase upgrade is resource intensive. If the upgrade exceeds available resources, the upgrade halts. You must then resolve resource issues before resuming the upgrade.
To help you estimate the database size required when upgrading to the current Siebel CRM release, Table 7 shows the number of tables in 4-KB, 8-KB, 16-KB, and 32-KB table spaces in a sample Siebel Industry Applications database in a 7.8, 8.0 and 8.1 release. Table 7 also shows the space required by the tables.
Because Siebel CRM adopted a 1:1:1 database schema structure since Siebel CRM 7.7 (one table in each table space, one table space in each database), these releases require many more 16-KB and 32-KB table spaces than pre 7.7 releases. However, some tables might not require 16-KB and 32-KB table spaces if you convert LONG VARCHAR columns to CLOB columns.
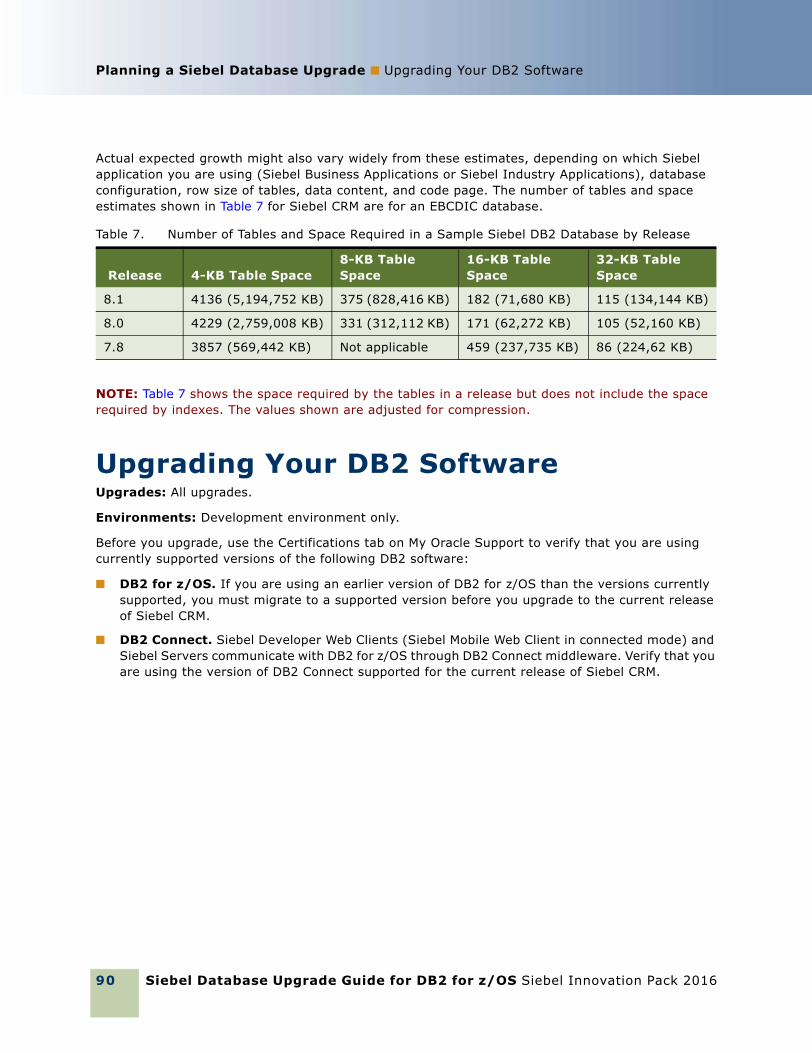
Siebel Database Upgrade Guide for DB2 for z/OS Siebel Innovation Pack 2016
Planning a Siebel Database Upgrade ■ Upgrading Your DB2 Software
90
Actual expected growth might also vary widely from these estimates, depending on which Siebel application you are using (Siebel Business Applications or Siebel Industry Applications), database configuration, row size of tables, data content, and code page. The number of tables and space estimates shown in Table 7 for Siebel CRM are for an EBCDIC database.
NOTE: Table 7 shows the space required by the tables in a release but does not include the space required by indexes. The values shown are adjusted for compression.
Upgrading Your DB2 SoftwareUpgrades: All upgrades.
Environments: Development environment only.
Before you upgrade, use the Certifications tab on My Oracle Support to verify that you are using currently supported versions of the following DB2 software:
■ DB2 for z/OS. If you are using an earlier version of DB2 for z/OS than the versions currently supported, you must migrate to a supported version before you upgrade to the current release of Siebel CRM.
■ DB2 Connect. Siebel Developer Web Clients (Siebel Mobile Web Client in connected mode) and Siebel Servers communicate with DB2 for z/OS through DB2 Connect middleware. Verify that you are using the version of DB2 Connect supported for the current release of Siebel CRM.
Table 7. Number of Tables and Space Required in a Sample Siebel DB2 Database by Release
Release 4-KB Table Space8-KB Table Space
16-KB Table Space
32-KB Table Space
8.1 4136 (5,194,752 KB) 375 (828,416 KB) 182 (71,680 KB) 115 (134,144 KB)
8.0 4229 (2,759,008 KB) 331 (312,112 KB) 171 (62,272 KB) 105 (52,160 KB)
7.8 3857 (569,442 KB) Not applicable 459 (237,735 KB) 86 (224,62 KB)
Siebel Database Upgrade Guide for DB2 for z/OS Siebel Innovation Pack 2016 91
6 Basic Database Preparations for a Siebel Upgrade
This chapter describes the DB2 for z/OS database tasks you must complete before upgrading to the current Siebel CRM release. Also review the chapter in Siebel Database Upgrade Guide that describes the basic database preparations for a Siebel upgrade and perform any applicable tasks before starting your upgrade. This chapter includes the following topics:
■ Verifying Database Configuration on page 91
■ Creating Storage Groups on page 92
■ Updating Table Space Group Names on page 92
■ Process of Preparing the Storage Layout of the Schema on page 93
■ Reviewing EIM Table Partitioning on page 105
■ Converting LONG VARCHAR Columns to CLOB Columns on page 105
■ Rebuilding Target Tables Containing LONG VARCHAR Columns on page 106
■ Backing Up the Database on page 108
■ Granting a Siebel User Upgrade Authorization on page 109
Verifying Database ConfigurationUpgrades: All upgrades.
Environments: All environments.
Verify that your development Siebel database configuration meets or exceeds Siebel requirements as described in Implementing Siebel Business Applications on DB2 for z/OS. Be aware of the following:
■ The upgrade sets the TRACKMOD parameter to YES, which is the IBM default value for table space objects. Oracle recommends that you set the TRACKMOD parameter to NO, to reduce data sharing overhead.
■ Set the DSNZPARM CMTSTAT to INACTIVE to prevent timeout errors from occurring. If you do not set this DSNZPARM parameter to INACTIVE, then set IDTHTOIN to 0 (Inactive).
■ Ensure the z/OS Unicode Conversion Services are correctly installed and configured. For further information on z/OS Unicode Conversion Services, see Implementing Siebel Business Applications on DB2 for z/OS.
Before you begin your upgrade, verify your database configuration. The consequence of exceeding available resources is a halted upgrade that requires you to allocate time to adjust the environment and then resume the upgrade.
Before you begin an upgrade or Incremental Repository Merge, you must have a default WLM environment defined for the DB2 subsystem.
Siebel Database Upgrade Guide for DB2 for z/OS Siebel Innovation Pack 2016
Basic Database Preparations for a Siebel Upgrade ■ Creating Storage Groups
92
When you upgrade from a previous version of Siebel Business Applications to the current release, the size of your database is likely to increase. The amount by which your database grows might vary widely, depending on your database configuration, row size of tables, and data content. For information on estimating the growth, see “About Estimating Database Size” on page 89.
The growth percentage will also increase depending on how you size your database and configure default storage for database table spaces. For example, if you set the default storage for your initial or next extent in a given DB2 table space to 10 KB, that table space will grow by a smaller percentage than if you set it to 100 KB.
Creating Storage GroupsUpgrades: All upgrades.
Environments: Development environment only.
Before upgrading the Siebel database, your DBA must create storage groups on the staging database. The names used to define the storage groups for the staging database can be the same or different to those defined on the target database.
Updating Table Space Group NamesUpgrades: All upgrades.
Environments: Development environment only.
Each Siebel table is assigned a group code number, which is stored in the GROUP_CD column of the S_TABLE table in the Siebel Repository. The group code identifies the name of the DB2 table space that is used when the table is created or re-created.
During the upgrade process, if the table space associated with a table does not match the group code defined for the table, errors occur. Therefore, it is recommended that you update S_TABLE with any changes that have been made to table space names, as reflected in the DB2 catalog. By updating S_TABLE, you ensure that the group names in the Siebel Repository and in your physical database environment are synchronized.
The following procedure describes how to update the S_TABLE table.
To update table space group names■ To update the table space group names, execute the following query:
UPDATE SIEBEL.S_TABLE A
SET A.GROUP_CD = (SELECT B.TSNAME FROM SYSIBM.SYSTABLES B WHERE A.NAME = B.NAME AND B.CREATOR = SIEBEL)WHERE A.INACTIVE_FLG = 'N' and A.REPOSITORY_ID = (SELECT B.ROW_ID FROM SIEBEL.S_REPOSITORY BWHERE B.NAME = 'Siebel Repository')
where SIEBEL is your Siebel schema qualifier name.
Basic Database Preparations for a Siebel Upgrade ■ Process of Preparing the StorageLayout of the Schema
Siebel Database Upgrade Guide for DB2 for z/OS Siebel Innovation Pack 2016 93
Process of Preparing the Storage Layout of the SchemaUpgrades: All upgrades.
Environments: All environments.
Before starting the upgrade, you have to prepare the storage control file you will use during the upgrade.
The storage control file contains information about physical schema attributes, including bufferpools, table space name and database name, that is used as the basis for the storage layout of your new 8.x Siebel database. Even if you are using a preconfigured storage layout, you must make sure that the layout is valid for your schema.
To preparing the storage control file, perform the following tasks:
1 Review the following:
■ “Methods of Modifying the Storage Control File” on page 94
■ “Options for Extracting the Storage Control File” on page 95
2 “Extracting the Storage Control File” on page 97
3 “Validating the Extracted Storage Control File” on page 101
4 “Reviewing the Extracted Storage Control File” on page 103
NOTE: You must validate the storage control file after you extract it and after you modify it.
There are different starting points from which you can customize your storage layout:
■ Scenario 1. Begin with a Siebel-provided storage layout template, import the template into the Siebel Database Storage Configurator (dbconf.xls), customize it, then export it as your customized layout.
■ Scenario 2. Use your current configuration from an existing database layout and merge it with one of the Siebel-provided templates. This can then be imported to the Siebel Database Storage Configurator for further manipulation. For more information on the Siebel Database Storage Configurator, see Implementing Siebel Business Applications on DB2 for z/OS.
To prepare the storage control file, use the Database Configuration Wizard to extract the storage layout of your database from the DB2 catalog. As part of the extraction process, you can merge the storage layout information from your existing database with information you already input into a storage template file or information in a template provided with Siebel Business Applications.
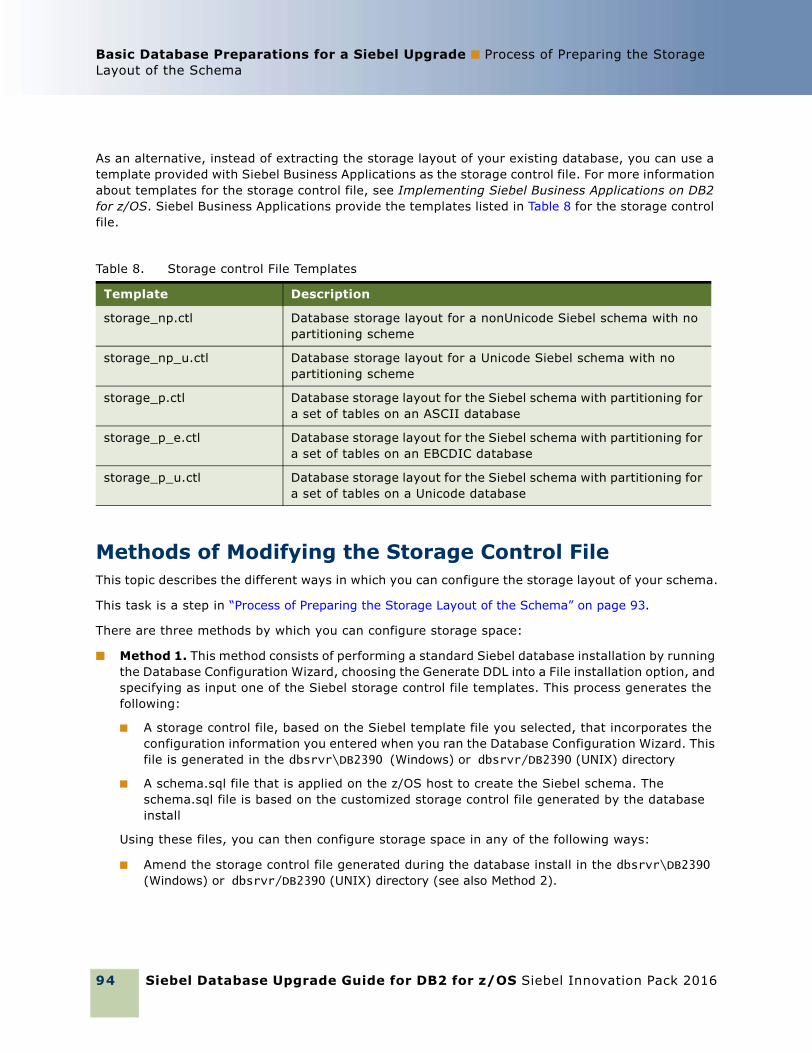
Siebel Database Upgrade Guide for DB2 for z/OS Siebel Innovation Pack 2016
Basic Database Preparations for a Siebel Upgrade ■ Process of Preparing the Storage Layout of the Schema
94
As an alternative, instead of extracting the storage layout of your existing database, you can use a template provided with Siebel Business Applications as the storage control file. For more information about templates for the storage control file, see Implementing Siebel Business Applications on DB2 for z/OS. Siebel Business Applications provide the templates listed in Table 8 for the storage control file.
Methods of Modifying the Storage Control FileThis topic describes the different ways in which you can configure the storage layout of your schema.
This task is a step in “Process of Preparing the Storage Layout of the Schema” on page 93.
There are three methods by which you can configure storage space:
■ Method 1. This method consists of performing a standard Siebel database installation by running the Database Configuration Wizard, choosing the Generate DDL into a File installation option, and specifying as input one of the Siebel storage control file templates. This process generates the following:
■ A storage control file, based on the Siebel template file you selected, that incorporates the configuration information you entered when you ran the Database Configuration Wizard. This file is generated in the dbsrvr\DB2390 (Windows) or dbsrvr/DB2390 (UNIX) directory
■ A schema.sql file that is applied on the z/OS host to create the Siebel schema. The schema.sql file is based on the customized storage control file generated by the database install
Using these files, you can then configure storage space in any of the following ways:
■ Amend the storage control file generated during the database install in the dbsrvr\DB2390 (Windows) or dbsrvr/DB2390 (UNIX) directory (see also Method 2).
Table 8. Storage control File Templates
Template Description
storage_np.ctl Database storage layout for a nonUnicode Siebel schema with no partitioning scheme
storage_np_u.ctl Database storage layout for a Unicode Siebel schema with no partitioning scheme
storage_p.ctl Database storage layout for the Siebel schema with partitioning for a set of tables on an ASCII database
storage_p_e.ctl Database storage layout for the Siebel schema with partitioning for a set of tables on an EBCDIC database
storage_p_u.ctl Database storage layout for the Siebel schema with partitioning for a set of tables on a Unicode database
Basic Database Preparations for a Siebel Upgrade ■ Process of Preparing the StorageLayout of the Schema
Siebel Database Upgrade Guide for DB2 for z/OS Siebel Innovation Pack 2016 95
■ Apply the schema.sql file generated by the database install on the DB2 host to create the Siebel schema, then amend the schema using native DB2 tools. Extract the storage control file from the DB2 catalog; the file will include the changes you have made.
NOTE: You access the extract utility through the Database Configuration Wizard. This utility allows you to extract information from the DB2 catalog. You can use this extract utility any time you want to create a new storage control file, based on the DB2 catalog.
■ Amend the schema.sql file generated by the database install directly, apply it on the DB2 host to create the schema, and then extract the storage control file, which will include the changes you made.
For information on installing the Siebel database and extracting storage control files, see Implementing Siebel Business Applications on DB2 for z/OS.
■ Method 2. This method consists of manipulating the storage control file (storage.ctl) directly by opening it with a text editor program. This method can be used if you understand the file structure.
You can use this method to amend one of the Siebel-supplied storage control files or to amend a storage control file that you have extracted from another Siebel schema.
■ Method 3. This method consists of using the Siebel Database Storage Configurator tool. The Siebel Database Storage Configurator tool is a Microsoft Excel macro (dbconf.xls) that is installed in the dbsrvr\db2390 (Windows) or dbsrvr/db2390 (UNIX) subdirectory of your installation directory. This tool allows you to import a storage control file, amend it, validate the syntax of your changes, and then save it.
UNIX customers must transfer dbconf.xls and the .ctl files to their Microsoft Windows environment. Use BINARY FTP transfer for the dbconf.xls file. For information on using the Siebel Database Storage Configurator, see Implementing Siebel Business Applications on DB2 for z/OS.
NOTE: Validate the storage control file after you modify it. See “Validating the Extracted Storage Control File” on page 101 for further information.
Options for Extracting the Storage Control FileThis topic describes the options available when you run the Database Configuration Wizard to extract the storage control file.
This task is a step in “Process of Preparing the Storage Layout of the Schema” on page 93.
The information in your storage control file comes from the target database, that is, the database to be upgraded.
When you extract the storage control file, you can choose one of two methods:
■ Extract from Catalog
■ Extract from Catalog and Merge with Template
Siebel Database Upgrade Guide for DB2 for z/OS Siebel Innovation Pack 2016
Basic Database Preparations for a Siebel Upgrade ■ Process of Preparing the Storage Layout of the Schema
96
Extract from CatalogThis method extracts the storage layout of your existing database from the DB2 catalog; the output is a representation of the existing target database objects.
Use this option when creating the storage control file that is used to generate the DDL to build the staging database schema. For information on this task, see “Required Tasks before Creating the Staging Database” on page 133.
The Extract from Catalog method can also be used to perfect your target database layout by performing a dummy installation, manipulating the schema layout through native utilities, then extracting the customized layout. For information on the Extract from Catalog option, see Implementing Siebel Business Applications on DB2 for z/OS.
Extract from Catalog and Merge with TemplateThis method preserves your existing layout. This method merges storage layout information from your existing database with a storage template file provided with Siebel Business Applications. This preserves your prior layout, and your output is the prior physical layout merged with a storage layout template for the current release.
After you have created the staging database, use the Extract from Catalog and Merge with Template option to extract the storage layout of the Siebel staging database from the DB2 catalog and merge it with a storage control file for the current release so as to preserve any customizations you have made to the database layout in the upgraded database. For information on this task, see “Required Tasks for Generating the Upgrade Files” on page 168.
Objects Extracted to the Storage Control FileWhen you select the Extract from Catalog and Merge with Template option, the extracted storage control file does not list all database objects in the Siebel schema. The following list details scenarios that might occur during the extract and merge process and the behavior you can expect in these cases:
■ A database object exists in the existing database but not in the template. The definition of the database object is output to the new storage control file.
■ A database object is specified only in the template file. The definition of the database object is output to the new storage control file.
■ A database object is specified in both the existing database and the template. The layout of the existing database is extracted as the default. However, you can manually override this behavior by creating a file called override.inp in the BIN directory under SIEBEL_ROOT. Place any tables that you want to override into this file.
NOTE: Index objects are not output to the new storage control file if they are specified in both the existing database and the template and if there are no specific attribute differences between them. In this case, if you import the extracted storage control file into the Siebel Database Storage Configurator (dbconf.xls), the index objects are not displayed and their attributes cannot be edited.
Basic Database Preparations for a Siebel Upgrade ■ Process of Preparing the StorageLayout of the Schema
Siebel Database Upgrade Guide for DB2 for z/OS Siebel Innovation Pack 2016 97
Extracting the Storage Control FileAfter you have created the staging database but before you begin to generate the upgrade files, you must extract the storage control file from the staging database and merge it with a Siebel CRM template. You do this using the Database Configuration Wizard Extract from Catalog and Merge with Template option. Depending on the type of upgrade you are performing, assign one of the following names to the extracted storage control file:
■ Development environment upgrade: storage_upg_dev.ctl
■ Production environment upgrade: storage_upg_prod.ctl.
This task is a step in “Process of Preparing the Storage Layout of the Schema” on page 93.
To extract the storage control file1 Run the Database Configuration Wizard.
For information on running the Database Configuration Wizard, see “About Running the Database Configuration Wizard on Windows” on page 125 or “About Running the Database Configuration Wizard Under UNIX” on page 126.
2 Enter the information shown in Table 9 on page 98 when prompted by the Database Configuration Wizard. Collect this information and verify it before running the utility.
3 Save the information you have entered and launch the Upgrade Wizard as described in Chapter 9, “Running the Database Configuration Wizard to Perform Upgrade Tasks.”
The database catalog is read and your prior custom database layout is merged with one of the Siebel database layout templates for the current release (located in the DBSRVR_ROOT\db2390 directory). New objects take a layout from one of the layout templates. By default, new tables are created as one-table-per-database to prevent concurrency and locking errors.
NOTE: If you choose a Siebel storage control file template that includes partitioning, and the existing database schema does not include partitioning, by default, the existing database objects are not partitioned in the storage control file generated (that is, the database catalog overrides the templates) unless you specify the table names in the override input file (override.inp).
Before using the merged storage control file, you must verify it against the staging database. For information on this task, see “Validating the Extracted Storage Control File”.
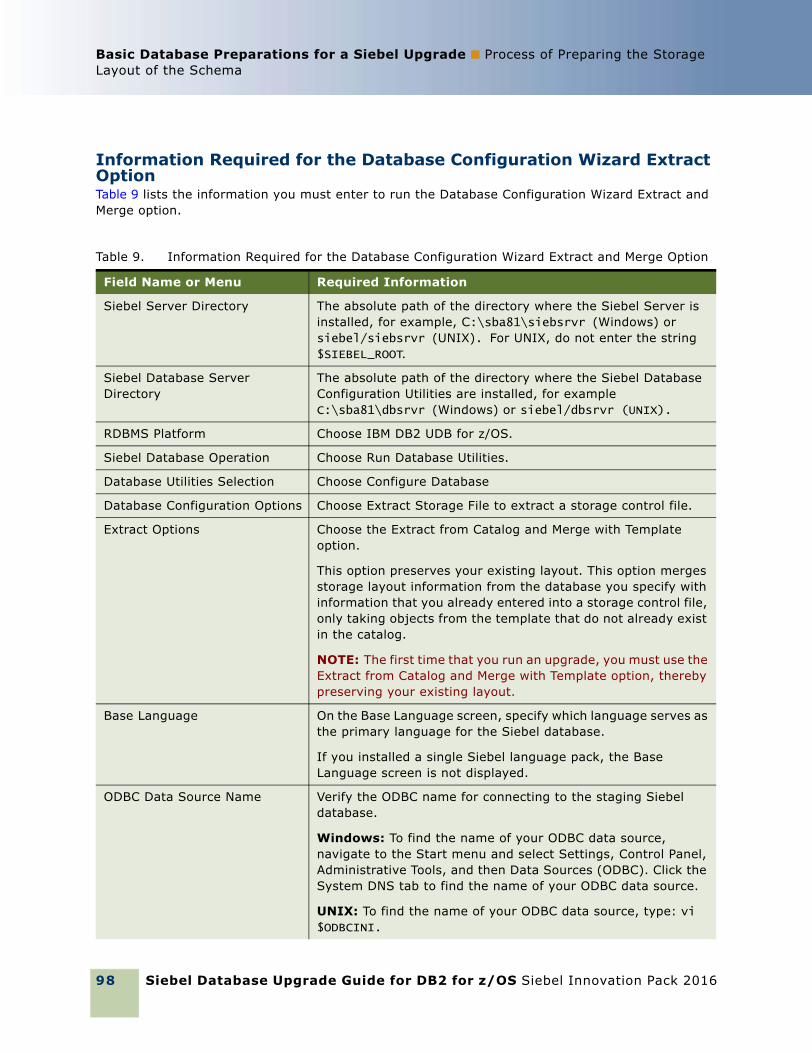
Siebel Database Upgrade Guide for DB2 for z/OS Siebel Innovation Pack 2016
Basic Database Preparations for a Siebel Upgrade ■ Process of Preparing the Storage Layout of the Schema
98
Information Required for the Database Configuration Wizard Extract OptionTable 9 lists the information you must enter to run the Database Configuration Wizard Extract and Merge option.
Table 9. Information Required for the Database Configuration Wizard Extract and Merge Option
Field Name or Menu Required Information
Siebel Server Directory The absolute path of the directory where the Siebel Server is installed, for example, C:\sba81\siebsrvr (Windows) or siebel/siebsrvr (UNIX). For UNIX, do not enter the string $SIEBEL_ROOT.
Siebel Database Server Directory
The absolute path of the directory where the Siebel Database Configuration Utilities are installed, for example C:\sba81\dbsrvr (Windows) or siebel/dbsrvr (UNIX).
RDBMS Platform Choose IBM DB2 UDB for z/OS.
Siebel Database Operation Choose Run Database Utilities.
Database Utilities Selection Choose Configure Database
Database Configuration Options Choose Extract Storage File to extract a storage control file.
Extract Options Choose the Extract from Catalog and Merge with Template option.
This option preserves your existing layout. This option merges storage layout information from the database you specify with information that you already entered into a storage control file, only taking objects from the template that do not already exist in the catalog.
NOTE: The first time that you run an upgrade, you must use the Extract from Catalog and Merge with Template option, thereby preserving your existing layout.
Base Language On the Base Language screen, specify which language serves as the primary language for the Siebel database.
If you installed a single Siebel language pack, the Base Language screen is not displayed.
ODBC Data Source Name Verify the ODBC name for connecting to the staging Siebel database.
Windows: To find the name of your ODBC data source, navigate to the Start menu and select Settings, Control Panel, Administrative Tools, and then Data Sources (ODBC). Click the System DNS tab to find the name of your ODBC data source.
UNIX: To find the name of your ODBC data source, type: vi $ODBCINI.
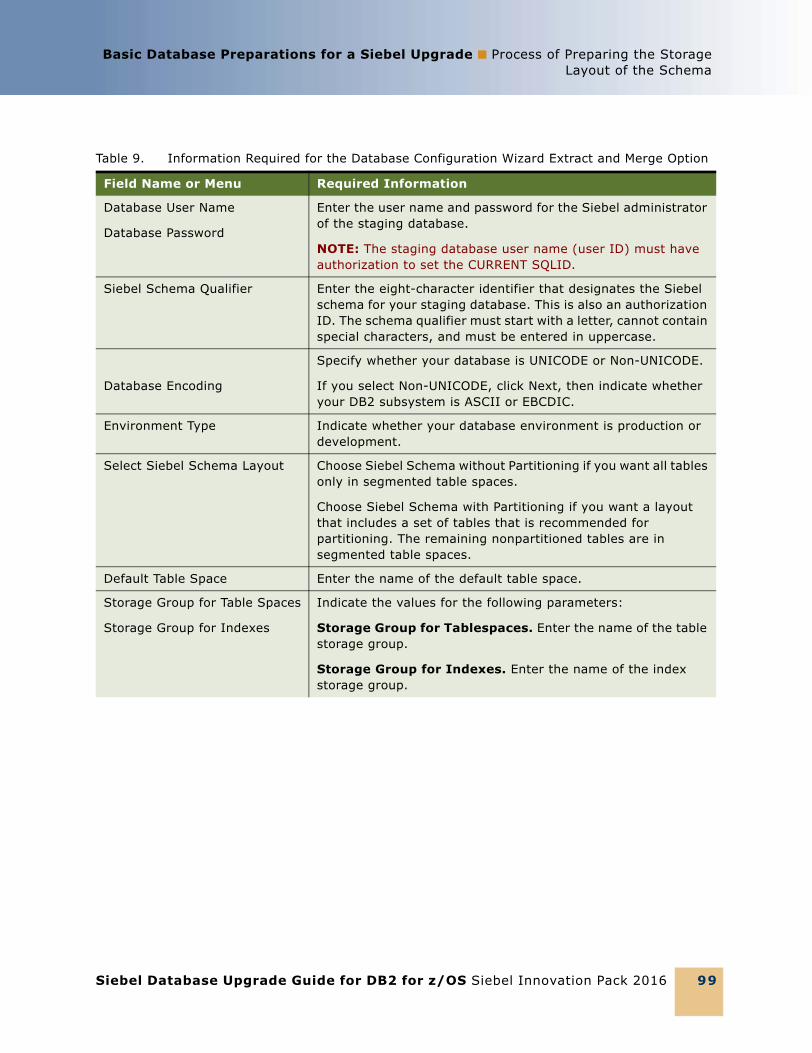
Basic Database Preparations for a Siebel Upgrade ■ Process of Preparing the StorageLayout of the Schema
Siebel Database Upgrade Guide for DB2 for z/OS Siebel Innovation Pack 2016 99
Database User Name
Database Password
Enter the user name and password for the Siebel administrator of the staging database.
NOTE: The staging database user name (user ID) must have authorization to set the CURRENT SQLID.
Siebel Schema Qualifier Enter the eight-character identifier that designates the Siebel schema for your staging database. This is also an authorization ID. The schema qualifier must start with a letter, cannot contain special characters, and must be entered in uppercase.
Database Encoding
Specify whether your database is UNICODE or Non-UNICODE.
If you select Non-UNICODE, click Next, then indicate whether your DB2 subsystem is ASCII or EBCDIC.
Environment Type Indicate whether your database environment is production or development.
Select Siebel Schema Layout Choose Siebel Schema without Partitioning if you want all tables only in segmented table spaces.
Choose Siebel Schema with Partitioning if you want a layout that includes a set of tables that is recommended for partitioning. The remaining nonpartitioned tables are in segmented table spaces.
Default Table Space Enter the name of the default table space.
Storage Group for Table Spaces
Storage Group for Indexes
Indicate the values for the following parameters:
Storage Group for Tablespaces. Enter the name of the table storage group.
Storage Group for Indexes. Enter the name of the index storage group.
Table 9. Information Required for the Database Configuration Wizard Extract and Merge Option
Field Name or Menu Required Information
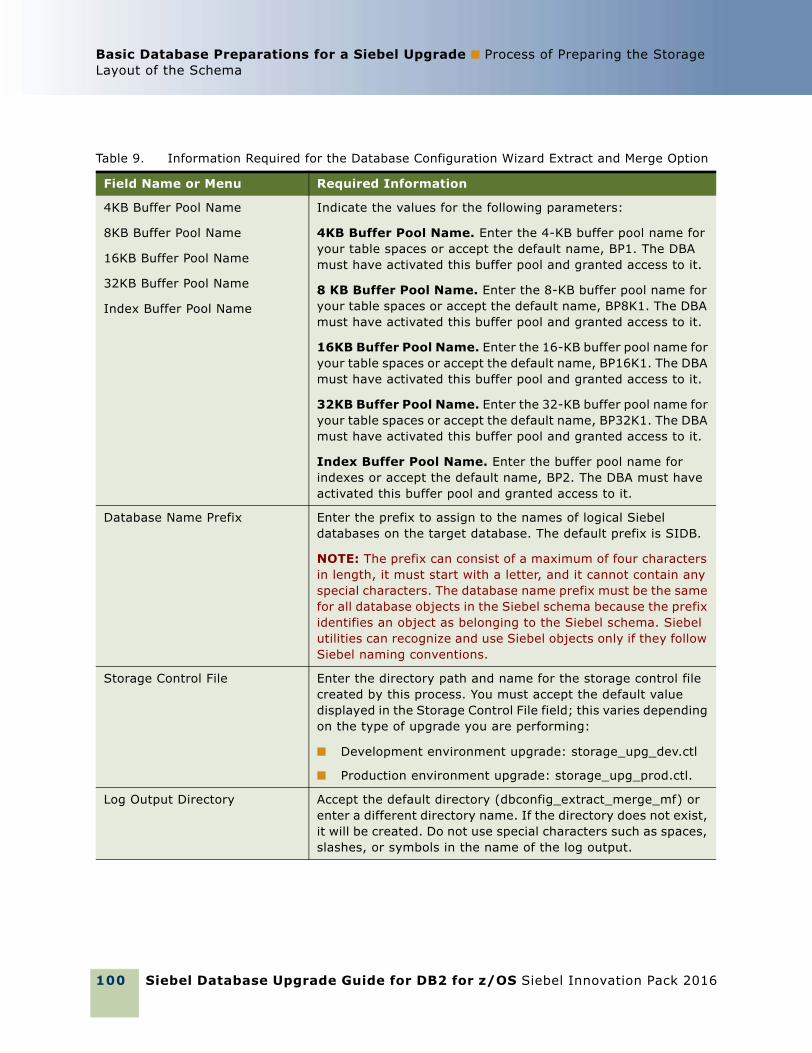
Siebel Database Upgrade Guide for DB2 for z/OS Siebel Innovation Pack 2016
Basic Database Preparations for a Siebel Upgrade ■ Process of Preparing the Storage Layout of the Schema
100
4KB Buffer Pool Name
8KB Buffer Pool Name
16KB Buffer Pool Name
32KB Buffer Pool Name
Index Buffer Pool Name
Indicate the values for the following parameters:
4KB Buffer Pool Name. Enter the 4-KB buffer pool name for your table spaces or accept the default name, BP1. The DBA must have activated this buffer pool and granted access to it.
8 KB Buffer Pool Name. Enter the 8-KB buffer pool name for your table spaces or accept the default name, BP8K1. The DBA must have activated this buffer pool and granted access to it.
16KB Buffer Pool Name. Enter the 16-KB buffer pool name for your table spaces or accept the default name, BP16K1. The DBA must have activated this buffer pool and granted access to it.
32KB Buffer Pool Name. Enter the 32-KB buffer pool name for your table spaces or accept the default name, BP32K1. The DBA must have activated this buffer pool and granted access to it.
Index Buffer Pool Name. Enter the buffer pool name for indexes or accept the default name, BP2. The DBA must have activated this buffer pool and granted access to it.
Database Name Prefix Enter the prefix to assign to the names of logical Siebel databases on the target database. The default prefix is SIDB.
NOTE: The prefix can consist of a maximum of four characters in length, it must start with a letter, and it cannot contain any special characters. The database name prefix must be the same for all database objects in the Siebel schema because the prefix identifies an object as belonging to the Siebel schema. Siebel utilities can recognize and use Siebel objects only if they follow Siebel naming conventions.
Storage Control File Enter the directory path and name for the storage control file created by this process. You must accept the default value displayed in the Storage Control File field; this varies depending on the type of upgrade you are performing:
■ Development environment upgrade: storage_upg_dev.ctl
■ Production environment upgrade: storage_upg_prod.ctl.
Log Output Directory Accept the default directory (dbconfig_extract_merge_mf) or enter a different directory name. If the directory does not exist, it will be created. Do not use special characters such as spaces, slashes, or symbols in the name of the log output.
Table 9. Information Required for the Database Configuration Wizard Extract and Merge Option
Field Name or Menu Required Information
Basic Database Preparations for a Siebel Upgrade ■ Process of Preparing the StorageLayout of the Schema
Siebel Database Upgrade Guide for DB2 for z/OS Siebel Innovation Pack 2016 101
Validating the Extracted Storage Control FileWhen you have extracted your existing database storage control file and merged it with a Siebel CRM template in preparation for the upgrade, you must validate the storage control file. (You must also validate the storage control file any time you modify it.) The validation process checks that the tables are the right length for the target schema. Do not proceed with the upgrade until the validation process runs without error.
This task is a step in “Process of Preparing the Storage Layout of the Schema” on page 93.
The following procedure describes how to validate the storage control file you extracted and merged as described in “Extracting the Storage Control File” on page 97.
To validate the storage control file1 Run the Database Configuration Wizard.
The procedure to validate a storage control file using the Database Configuration Wizard is also described in Implementing Siebel Business Applications on DB2 for z/OS.
2 Specify the following values:
a On the Database Configuration Options screen, select the Validate Storage File option.
b On the Data Transport Method screen, select the Batch - Generate Unload/Load option.
c On the following screens, make sure you specify values for the staging database:
❏ ODBC Data Source Name
❏ Database User Name
❏ Siebel Schema Qualifier
d On the Schema File screen, specify the following values:
❏ Schema File: Specify the directory path and filename of the file against which the extracted file is to be validated. For development environment upgrades, specify the ddl.ctl file. For production environment upgrades, specify the schema.ddl file.
❏ Storage Control File: Specify the name of the storage control file you extracted and merged in “Extracting the Storage Control File” on page 97. For development environment upgrades, specify storage_upg_dev.ctl. For production environment upgrades, specify storage_upg_prod.ctl.
3 When you have entered all the required values and reviewed them, launch the Siebel Upgrade Wizard to start the validation process. See Chapter 9, “Running the Database Configuration Wizard to Perform Upgrade Tasks.”
4 When the validation is completed, review the log files, dbvalidate_report.log and dbvalidate_schema.log, that are generated in the SIEBEL_ROOT\LOG\dbconfig_validate_mf\output directory (Windows) or the SIEBEL_ROOT/LOG/dbconfig_validate_mf/output directory (UNIX).
If any validation errors occurred, correct them, then run the validation process again.

Siebel Database Upgrade Guide for DB2 for z/OS Siebel Innovation Pack 2016
Basic Database Preparations for a Siebel Upgrade ■ Process of Preparing the Storage Layout of the Schema
102
About Validation ErrorsRun the validation process until no errors are reported. The most common reason that the validation process fails is because table spaces for the Siebel schema are not large enough to hold the new table definitions. If this error occurs, examine the validation log file and identify the names of the buffer pools associated with the table spaces generating errors. Increase the bufferpool sizes as necessary in the storage.ctl file.
You can amend the storage control file using any of the methods described in “Methods of Modifying the Storage Control File” on page 94. To amend buffer pool sizes associated with table spaces generating errors using the Database Storage Configurator (dbconf.xls), perform the following procedure. For further information on using the Database Storage Configurator, see Implementing Siebel Business Applications on DB2 for z/OS.
To amend bufferpool sizes using dbconf.xls1 Open dbconf.xls and select Enable Macros when prompted.
2 Import the storage control file that generated the validation errors:
a With the Home tab active, click Import.
b Go to the directory where your storage control file is located and double-click the appropriate file.
c When the import process is completed, click OK.
3 The following message appears:
Please enter default values for your system
Either amend the values for the displayed parameters, or accept the default values. (This screen does not appear if you have already set the default values.)
4 Click Set.
5 You are prompted to indicate whether or not you want to import row lengths. Select No.
6 Select the Functions tab, then click the Tools tab.
7 Click the Repair BP Validation button.
8 Select the log file generated by the validation process by double-clicking on the file, or selecting the file and clicking Open. This file lists the names of the buffer pools associated with the table spaces generating errors.
9 The Database Storage Configurator updates the buffer pool sizes for the table spaces generating errors in the storage control file. When the process is completed, the following message is displayed.
Bufferpools have been updated successfully!
10 Click OK.
11 Click the Home tab, and then click Export to save the amended storage control file. Save the file with the same filename. A message is displayed stating that the file will be validated (the syntax is validated).
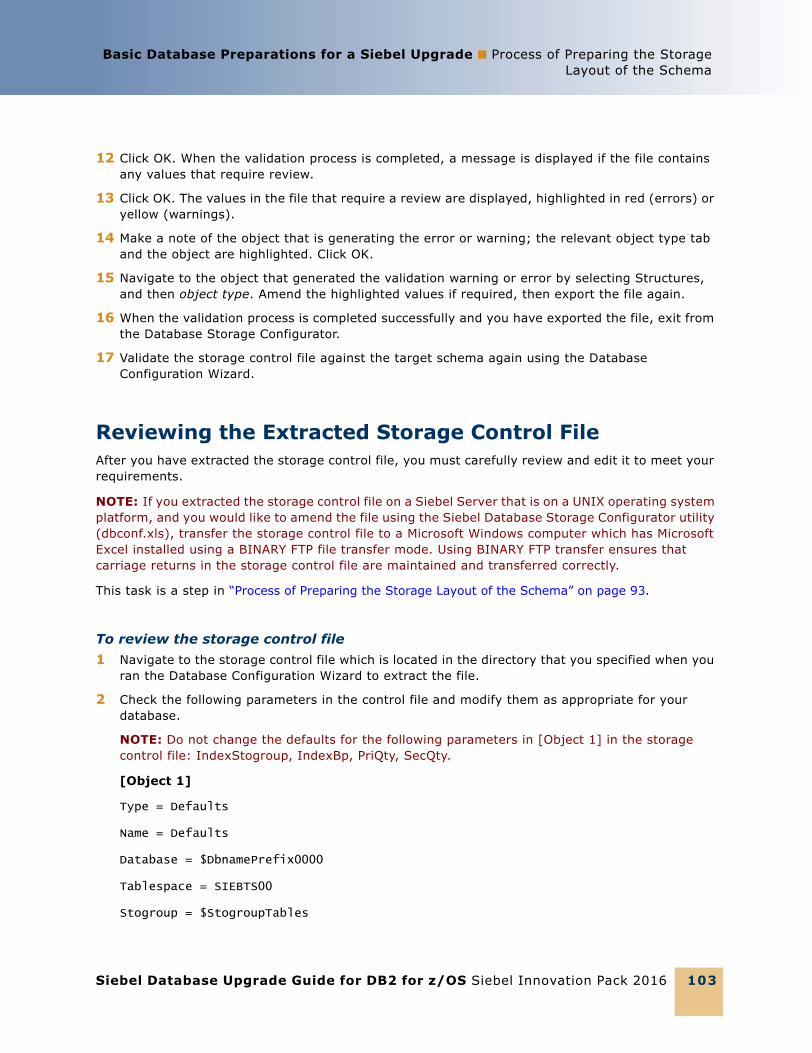
Basic Database Preparations for a Siebel Upgrade ■ Process of Preparing the StorageLayout of the Schema
Siebel Database Upgrade Guide for DB2 for z/OS Siebel Innovation Pack 2016 103
12 Click OK. When the validation process is completed, a message is displayed if the file contains any values that require review.
13 Click OK. The values in the file that require a review are displayed, highlighted in red (errors) or yellow (warnings).
14 Make a note of the object that is generating the error or warning; the relevant object type tab and the object are highlighted. Click OK.
15 Navigate to the object that generated the validation warning or error by selecting Structures, and then object type. Amend the highlighted values if required, then export the file again.
16 When the validation process is completed successfully and you have exported the file, exit from the Database Storage Configurator.
17 Validate the storage control file against the target schema again using the Database Configuration Wizard.
Reviewing the Extracted Storage Control FileAfter you have extracted the storage control file, you must carefully review and edit it to meet your requirements.
NOTE: If you extracted the storage control file on a Siebel Server that is on a UNIX operating system platform, and you would like to amend the file using the Siebel Database Storage Configurator utility (dbconf.xls), transfer the storage control file to a Microsoft Windows computer which has Microsoft Excel installed using a BINARY FTP file transfer mode. Using BINARY FTP transfer ensures that carriage returns in the storage control file are maintained and transferred correctly.
This task is a step in “Process of Preparing the Storage Layout of the Schema” on page 93.
To review the storage control file1 Navigate to the storage control file which is located in the directory that you specified when you
ran the Database Configuration Wizard to extract the file.
2 Check the following parameters in the control file and modify them as appropriate for your database.
NOTE: Do not change the defaults for the following parameters in [Object 1] in the storage control file: IndexStogroup, IndexBp, PriQty, SecQty.
[Object 1]
Type = Defaults
Name = Defaults
Database = $DbnamePrefix0000
Tablespace = SIEBTS00
Stogroup = $StogroupTables
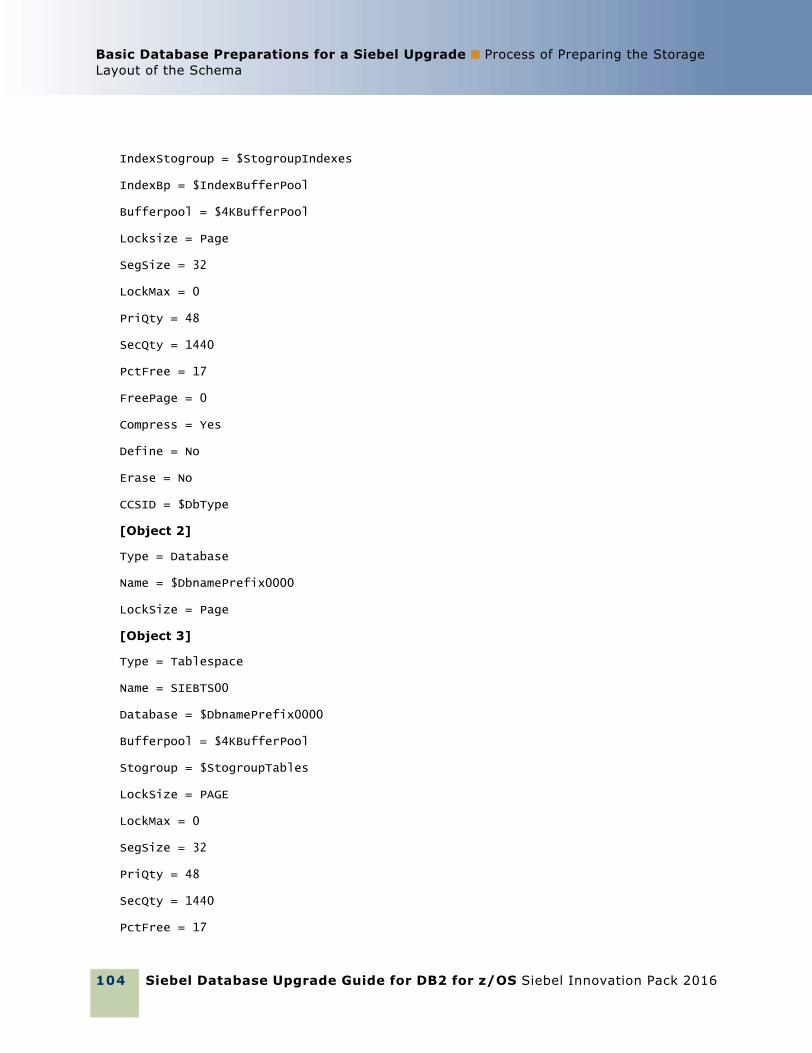
Siebel Database Upgrade Guide for DB2 for z/OS Siebel Innovation Pack 2016
Basic Database Preparations for a Siebel Upgrade ■ Process of Preparing the Storage Layout of the Schema
104
IndexStogroup = $StogroupIndexes
IndexBp = $IndexBufferPool
Bufferpool = $4KBufferPool
Locksize = Page
SegSize = 32
LockMax = 0
PriQty = 48
SecQty = 1440
PctFree = 17
FreePage = 0
Compress = Yes
Define = No
Erase = No
CCSID = $DbType
[Object 2]
Type = Database
Name = $DbnamePrefix0000
LockSize = Page
[Object 3]
Type = Tablespace
Name = SIEBTS00
Database = $DbnamePrefix0000
Bufferpool = $4KBufferPool
Stogroup = $StogroupTables
LockSize = PAGE
LockMax = 0
SegSize = 32
PriQty = 48
SecQty = 1440
PctFree = 17
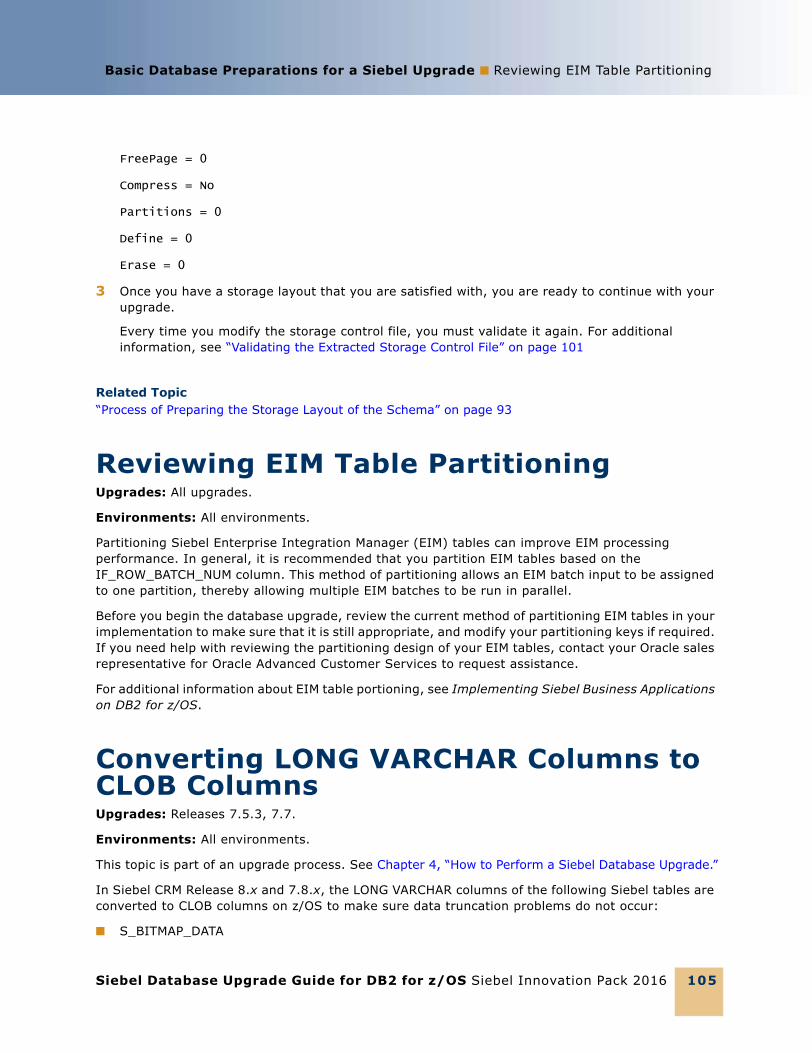
Basic Database Preparations for a Siebel Upgrade ■ Reviewing EIM Table Partitioning
Siebel Database Upgrade Guide for DB2 for z/OS Siebel Innovation Pack 2016 105
FreePage = 0
Compress = No
Partitions = 0
Define = 0
Erase = 0
3 Once you have a storage layout that you are satisfied with, you are ready to continue with your upgrade.
Every time you modify the storage control file, you must validate it again. For additional information, see “Validating the Extracted Storage Control File” on page 101
Related Topic“Process of Preparing the Storage Layout of the Schema” on page 93
Reviewing EIM Table Partitioning Upgrades: All upgrades.
Environments: All environments.
Partitioning Siebel Enterprise Integration Manager (EIM) tables can improve EIM processing performance. In general, it is recommended that you partition EIM tables based on the IF_ROW_BATCH_NUM column. This method of partitioning allows an EIM batch input to be assigned to one partition, thereby allowing multiple EIM batches to be run in parallel.
Before you begin the database upgrade, review the current method of partitioning EIM tables in your implementation to make sure that it is still appropriate, and modify your partitioning keys if required. If you need help with reviewing the partitioning design of your EIM tables, contact your Oracle sales representative for Oracle Advanced Customer Services to request assistance.
For additional information about EIM table portioning, see Implementing Siebel Business Applications on DB2 for z/OS.
Converting LONG VARCHAR Columns to CLOB ColumnsUpgrades: Releases 7.5.3, 7.7.
Environments: All environments.
This topic is part of an upgrade process. See Chapter 4, “How to Perform a Siebel Database Upgrade.”
In Siebel CRM Release 8.x and 7.8.x, the LONG VARCHAR columns of the following Siebel tables are converted to CLOB columns on z/OS to make sure data truncation problems do not occur:
■ S_BITMAP_DATA
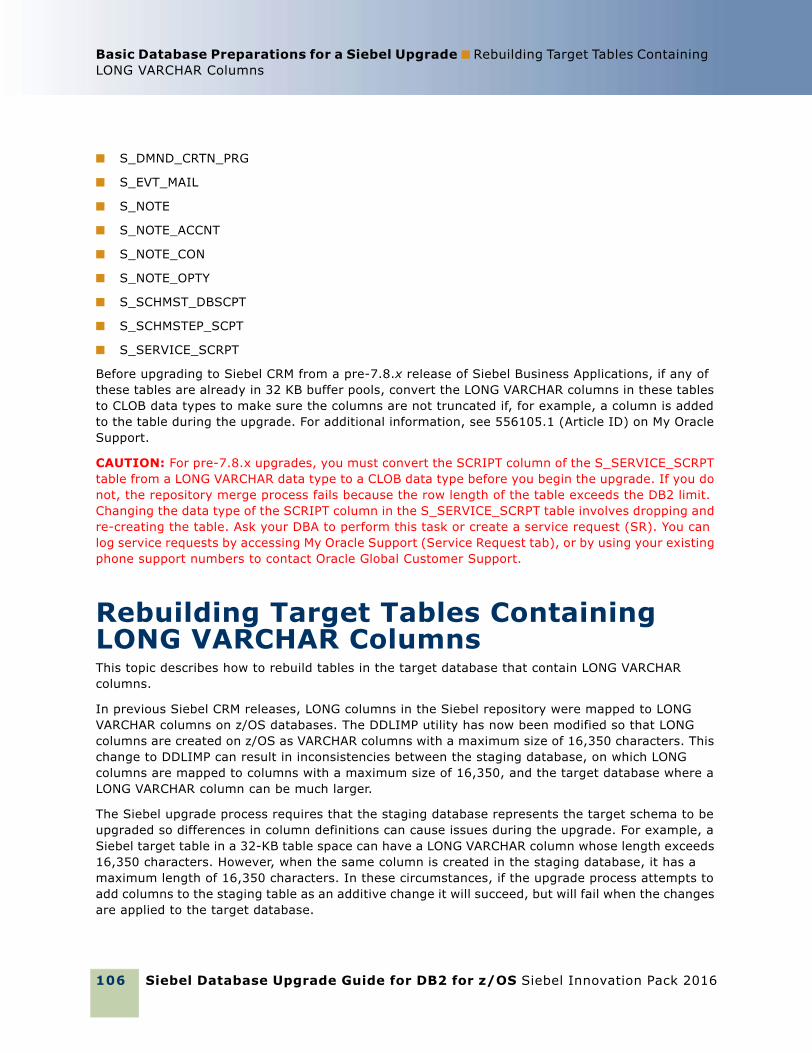
Siebel Database Upgrade Guide for DB2 for z/OS Siebel Innovation Pack 2016
Basic Database Preparations for a Siebel Upgrade ■ Rebuilding Target Tables Containing LONG VARCHAR Columns
106
■ S_DMND_CRTN_PRG
■ S_EVT_MAIL
■ S_NOTE
■ S_NOTE_ACCNT
■ S_NOTE_CON
■ S_NOTE_OPTY
■ S_SCHMST_DBSCPT
■ S_SCHMSTEP_SCPT
■ S_SERVICE_SCRPT
Before upgrading to Siebel CRM from a pre-7.8.x release of Siebel Business Applications, if any of these tables are already in 32 KB buffer pools, convert the LONG VARCHAR columns in these tables to CLOB data types to make sure the columns are not truncated if, for example, a column is added to the table during the upgrade. For additional information, see 556105.1 (Article ID) on My Oracle Support.
CAUTION: For pre-7.8.x upgrades, you must convert the SCRIPT column of the S_SERVICE_SCRPT table from a LONG VARCHAR data type to a CLOB data type before you begin the upgrade. If you do not, the repository merge process fails because the row length of the table exceeds the DB2 limit. Changing the data type of the SCRIPT column in the S_SERVICE_SCRPT table involves dropping and re-creating the table. Ask your DBA to perform this task or create a service request (SR). You can log service requests by accessing My Oracle Support (Service Request tab), or by using your existing phone support numbers to contact Oracle Global Customer Support.
Rebuilding Target Tables Containing LONG VARCHAR ColumnsThis topic describes how to rebuild tables in the target database that contain LONG VARCHAR columns.
In previous Siebel CRM releases, LONG columns in the Siebel repository were mapped to LONG VARCHAR columns on z/OS databases. The DDLIMP utility has now been modified so that LONG columns are created on z/OS as VARCHAR columns with a maximum size of 16,350 characters. This change to DDLIMP can result in inconsistencies between the staging database, on which LONG columns are mapped to columns with a maximum size of 16,350, and the target database where a LONG VARCHAR column can be much larger.
The Siebel upgrade process requires that the staging database represents the target schema to be upgraded so differences in column definitions can cause issues during the upgrade. For example, a Siebel target table in a 32-KB table space can have a LONG VARCHAR column whose length exceeds 16,350 characters. However, when the same column is created in the staging database, it has a maximum length of 16,350 characters. In these circumstances, if the upgrade process attempts to add columns to the staging table as an additive change it will succeed, but will fail when the changes are applied to the target database.
Basic Database Preparations for a Siebel Upgrade ■ Rebuilding Target Tables ContainingLONG VARCHAR Columns
Siebel Database Upgrade Guide for DB2 for z/OS Siebel Innovation Pack 2016 107
To avoid potential issues during the target database upgrade, if a table in the target database resides in a table space within a 32-KB buffer pool, and if the number or size of the table columns will be increased during the upgrade process, then the table must be re-created so that it has the same column definitions as the corresponding staging database table.
NOTE: You can rebuild target tables at any time before you start the upgrade but you must have completed this task before you apply Additive schema changes to the production staging database.
To rebuild target tables that contain LONG VARCHAR columns1 Determine which target tables containing LONG VARCHAR columns need to be re-created.
To do this, edit and then run the sample code listed in “Sample Code for Generating a List of Tables to Rebuild” on page 107.
2 Unload data from each non-empty table included in the list.
3 Drop each of the tables included in the list, including empty tables.
4 Synchronize the target database logical and physical schemas by launching the Database Configuration Wizard and selecting the Synchronize Schema Definition option. Specify values as follow:
■ When prompted to enter the database user name and password, specify values for the target database.
■ When prompted for the name of the repository with which the existing Siebel database is to be synchronized, specify the following values:
❏ Production upgrades: Siebel Repository
❏ Development upgrades: Prior Customer Repository
The Wizard generates the DDL required to synchronize the Siebel database and the Siebel Repository. If you did not select the Run DDL Automatically installation option, then the Wizard generates files that you must apply on the z/OS database to re-create the tables you dropped in Step 3.
5 Reload the tables with the data that you unloaded in Step 2.
For detailed information on running the Synchronize Schema Definition process, see Implementing Siebel Business Applications on DB2 for z/OS.
Sample Code for Generating a List of Tables to RebuildThe following sample SQL code can be used to generate a list of the target tables with LONG VARCHAR columns that need to be re-created before applying ADDITIVE schema changes.
Run this code against the staging schema after the additive changes are applied to the Siebel staging database. If no tables match the selection criteria in the code, then you do not have to rebuild any target tables.
---- CREATE A DROP LIST FOR LONGVARCHAR TABLES--SELECT
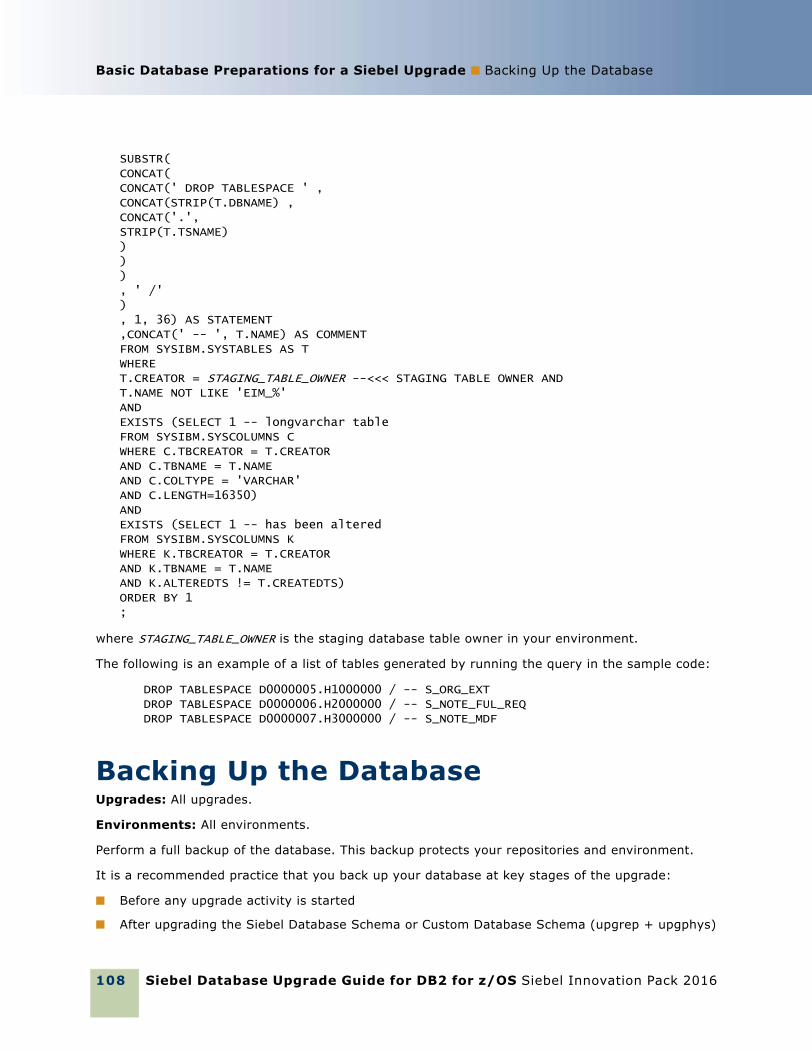
Siebel Database Upgrade Guide for DB2 for z/OS Siebel Innovation Pack 2016
Basic Database Preparations for a Siebel Upgrade ■ Backing Up the Database
108
SUBSTR(CONCAT(CONCAT(' DROP TABLESPACE ' ,CONCAT(STRIP(T.DBNAME) ,CONCAT('.',STRIP(T.TSNAME)))), ' /'), 1, 36) AS STATEMENT,CONCAT(' -- ', T.NAME) AS COMMENTFROM SYSIBM.SYSTABLES AS TWHERET.CREATOR = STAGING_TABLE_OWNER --<<< STAGING TABLE OWNER ANDT.NAME NOT LIKE 'EIM_%'ANDEXISTS (SELECT 1 -- longvarchar tableFROM SYSIBM.SYSCOLUMNS CWHERE C.TBCREATOR = T.CREATORAND C.TBNAME = T.NAMEAND C.COLTYPE = 'VARCHAR'AND C.LENGTH=16350)ANDEXISTS (SELECT 1 -- has been alteredFROM SYSIBM.SYSCOLUMNS KWHERE K.TBCREATOR = T.CREATORAND K.TBNAME = T.NAMEAND K.ALTEREDTS != T.CREATEDTS)ORDER BY 1;
where STAGING_TABLE_OWNER is the staging database table owner in your environment.
The following is an example of a list of tables generated by running the query in the sample code:
DROP TABLESPACE D0000005.H1000000 / -- S_ORG_EXT DROP TABLESPACE D0000006.H2000000 / -- S_NOTE_FUL_REQDROP TABLESPACE D0000007.H3000000 / -- S_NOTE_MDF
Backing Up the DatabaseUpgrades: All upgrades.
Environments: All environments.
Perform a full backup of the database. This backup protects your repositories and environment.
It is a recommended practice that you back up your database at key stages of the upgrade:
■ Before any upgrade activity is started
■ After upgrading the Siebel Database Schema or Custom Database Schema (upgrep + upgphys)
Basic Database Preparations for a Siebel Upgrade ■ Granting a Siebel User UpgradeAuthorization
Siebel Database Upgrade Guide for DB2 for z/OS Siebel Innovation Pack 2016 109
■ After the repository merge
Perform any necessary maintenance on your Siebel database, for example running REORG or RUNSTATS, before backing it up. This ensures that your database is ready for use if you have to perform a database recovery.
Granting a Siebel User Upgrade AuthorizationUpgrades: All upgrades.
Environments: All environments.
The Siebel user who executes the Database Configuration Wizard and performs the upgrade must be set up as an employee on Siebel. This is the Siebel user whose user ID is entered when the Database Configuration Utility prompts for Database User Name.
The user name (user ID) of the target database must have authorization to set CURRENT SQLID and must have Siebel administrator responsibility. SADMIN is the default administrator user name. If this user does not already exist in your database, or does not have Siebel administrator privileges, then you must add this user to your database before starting the upgrade. For further information on adding Siebel users, see Siebel Security Guide.
Siebel Database Upgrade Guide for DB2 for z/OS Siebel Innovation Pack 2016
Basic Database Preparations for a Siebel Upgrade ■ Granting a Siebel User Upgrade Authorization
110
Siebel Database Upgrade Guide for DB2 for z/OS Siebel Innovation Pack 2016 111
7 Preparing a Development Environment for a Siebel Upgrade
This chapter describes the steps in preparing a development environment for upgrade. It includes the following topics:
■ Requirements for Upgrading the Development Environment on page 111
■ About Moving Tables on page 111
■ Checking In Development Repository Projects on page 112
■ Determining Which Template File Was Used During an Extract or Merge on page 113
Requirements for Upgrading the Development EnvironmentUpgrades: All upgrades.
Environments: Development environment only.
Before you upgrade your development environment, make sure that the development database configuration meets the database requirements outlined in “Verifying Database Configuration” on page 91, and meets the requirements depicted in Siebel Installation Guide for the operating system you are using.
If your development environment platform is DB2 for Windows and UNIX, see Siebel Database Upgrade Guide.
If you have not already done so, copy the Upgrade Planning Worksheet, located in Appendix A, “Siebel Upgrade Planning Worksheet,” and fill out the appropriate fields with the information you require to perform the upgrade. Contact your database administrator or systems programmer for help in completing the worksheet. Also, refer to “Information Required by the Database Configuration Wizard” on page 119 for a description of the information you are required to enter when you run the Database Configuration Wizard to perform upgrade operations.
About Moving TablesUpgrades: All upgrades.
Environments: Development environment only.
This topic is part of an upgrade process. See Chapter 4, “How to Perform a Siebel Database Upgrade.”
Siebel Database Upgrade Guide for DB2 for z/OS Siebel Innovation Pack 2016
Preparing a Development Environment for a Siebel Upgrade ■ Checking In Development Repository Projects
112
Some of the Siebel tables will have columns added to them as part of the upgrade. When this happens, the length of the record will increase, which might cause it to require a larger table space or bufferpool. Moving the identified tables to a new, larger, and differently named table space allows you to maintain the model of multiple tables for each table space which is present for all pre-7.7 schemas.
Before you move the tables, you must remove any standard or custom views using an SQL DROP command.
NOTE: If you remove an object that you want to reapply to the database after the upgrade is completed, make sure that you can rebuild it. For example, you can obtain a view definition from the DB2 catalog before removing the view so that you can re-create it after the tables have been moved to a larger table space. You can also use third-party products or other methods to preserve objects that are to be reapplied to the upgraded database.
Complete the following procedure to find the views that are defined on a table. The example in the procedure assumes that you are creating a new 16K table space within the same database as the older, smaller table space.
To find views that are defined on a table■ Run the following SQL statement to produce the list of views:
select * from sysibm.sysVIEWdep
WHERE Bcreator = ‘yourschema’
AND BNAME IN ('S_ASSET', 'S_PROD_INT');
This SQL statement produces the drop statements into a sequential data set:
SELECT DISTINCT 'DROP VIEW '||'yourschema.'||V.DNAME||' ;'
FROM SYSIBM.SYSVIEWDEP V
WHERE V.BNAME IN ('S_ASSET', 'S_PROD_INT')
AND V.BNAME = 'S_ASSET'
AND BCREATOR = 'yourschema';
To process these drop statements on the z/OS host, you must create a PDS member with the output from the preceding statement. Then submit this member through DSNTEP2 using JCL.
If you are using the preconfigured storage control file, you do not have to move any tables as a preupgrade task. This is because the existing schema is not being preserved and all tables will be recreated in the 1:1:1 model.
Checking In Development Repository ProjectsUpgrades: All upgrades.
Preparing a Development Environment for a Siebel Upgrade ■ Determining WhichTemplate File Was Used During an Extract or Merge
Siebel Database Upgrade Guide for DB2 for z/OS Siebel Innovation Pack 2016 113
Environments: Development environment only.
Developers who are using Siebel Tools with a local database must check in their projects to the development repository.
Make sure that all project locks in your current Siebel repository have been released to prevent inadvertent loss of development work during the upgrade.
If you are using Siebel Workflow Manager, you must run the Workflow Monitor Agent and Workflow Action Agent to completion before upgrading to the current Siebel CRM release. The S_ESCL_REQ table does not have any rows if Workflow Manager has completed successfully.
Determining Which Template File Was Used During an Extract or MergeUpgrades: All upgrades.
Environments: Development environment only.
This topic describes how to determine which template file was used for an extract or merge operation when a storage control file is created.
This topic is part of an upgrade process. See Chapter 4, “How to Perform a Siebel Database Upgrade.”
To determine the template file that was used for an extract or merge operation1 Open the dbextract.log file and review the command line that was entered.
2 Check the value for the /i parameter. You can also check the upgwiz.log file for the strgupgd.exe command string.
/i D:\18025\dbsrvr\db2390\storage_p_u.ctl
UpgradeLogUpgradeInfo30000000254290624:02014-09-29 12:06:59Executing (C:\81_23039QF3_390CV\ses\siebsrvr\bin\strgupgd.exe /s C:\81_23039QF3_390CV\ses\dbsrvr\db2390\storage_p_u.ctl /d C:\81_23039QF3_390CV\ses\dbsrvr\db2390\SStempstore.txt /i C:\81_23039QF3_390CV\ses\dbsrvr\db2390\strgvar.inp /m C:\81_23039QF3_390CV\ses\siebsrvr\bin\master_dbconfig_extract_merge_mf.ucf)
Siebel Database Upgrade Guide for DB2 for z/OS Siebel Innovation Pack 2016
Preparing a Development Environment for a Siebel Upgrade ■ Determining Which Template File Was Used During an Extract or Merge
114
Siebel Database Upgrade Guide for DB2 for z/OS Siebel Innovation Pack 2016 115
8 Preparing a Production Environment for a Siebel Upgrade
This chapter describes the steps in preparing a production environment for upgrade. It includes the following topics:
■ Requirements for Upgrading the Production Environment on page 115
■ About Moving the Customized Repository and Schema Definition Files on page 115
■ Preparing for a Siebel Upgrade Without a Development Environment on page 116
Requirements for Upgrading the Production EnvironmentUpgrades: All upgrades.
Environments: Production test, production.
You must be thoroughly familiar with the upgrade process before beginning the production upgrade. Before upgrading your production environment, perform a test upgrade in your production test environment to familiarize yourself with the process and to eliminate errors that can affect upgrade success or performance.
Before beginning the upgrade of your production environment, verify that the production database configuration meets the database requirements outlined in the topic “Verifying Database Configuration” on page 91.
If you have not already done so, copy the Upgrade Planning Worksheet, located in Appendix A, “Siebel Upgrade Planning Worksheet,” and fill out the appropriate fields with the information you require to perform the upgrade. Contact your database administrator or systems programmer for help in completing the worksheet. Also, refer to Table 10 on page 120 and Table 11 on page 124 for a description of the information you are required to enter when you run the Database Configuration Wizard to perform upgrade operations.
About Moving the Customized Repository and Schema Definition FilesUpgrades: All upgrades.
Environments: Production test and Production environments.
This topic is part of an upgrade process. See Chapter 4, “How to Perform a Siebel Database Upgrade.”
Siebel Database Upgrade Guide for DB2 for z/OS Siebel Innovation Pack 2016
Preparing a Production Environment for a Siebel Upgrade ■ Preparing for a Siebel Upgrade Without a Development Environment
116
When you upgraded your development environment, the new customized repository was exported to a file called custrep.dat and the modified schema definition was exported to a file called schema.ddl in the SIEBEL_ROOT\dbsrvr\db2390\ directory (Windows) or the $SIEBEL_ROOT/dbsrvr/db2390/ (UNIX) directory on the Siebel Server client computer from which you ran the upgrade. These files are used as the schema input on the production upgrade.
If the development and production upgrades are run on different midtier computers, then you must copy the schema.ddl and custrep.dat files to the production midtier computer before running the production upgrade.
If you modify repository objects or schema definitions after completing the development upgrade (upgphys), you must regenerate the schema.ddl and custrep.dat files. See “Regenerating the Siebel Repository Definition Files” on page 155 for further information. You must then copy the files from the development to the production midtier computer again.
In the production environment, the custrep.dat file is used by the Siebel Upgrade Wizard to import the New Customer Repository and the schema.ddl file is used by the Siebel Upgrade Wizard to create the new database schema.
Preparing for a Siebel Upgrade Without a Development EnvironmentUpgrades: All upgrades.
Environments: Production test, production.
Platforms: All platforms.
This topic is part of an upgrade process. See Chapter 4, “How to Perform a Siebel Database Upgrade.”
If your installation does not include a development environment, you do not have to merge your Siebel Repository. Instead, you can use the repository and schema definition files included in the Siebel Database installation. Before performing the upgrade, you must move and rename these files.
To prepare for an upgrade without a development environment1 Navigate to DBSRVR_ROOT\common (Windows) or DBSRVR_ROOT/common (UNIX) and locate the
mstrep.dat file.
2 Copy the mstrep.dat file and rename it custrep.dat.
3 Place the custrep.dat file in the DBSRVR_ROOT\DB2390 (Windows) or DBSRVR_ROOT/DB2390 (UNIX) directory.
4 In the DB2390 directory, copy the ddl.ctl file and paste the copy into the same directory.
5 Rename the copy schema.ddl.
6 In the production test environment create a new database instance and install the Siebel database from the new release in the new database instance. Do not migrate any data to the new database.
This database is called the reference database.
Preparing a Production Environment for a Siebel Upgrade ■ Preparing for a SiebelUpgrade Without a Development Environment
Siebel Database Upgrade Guide for DB2 for z/OS Siebel Innovation Pack 2016 117
7 Define an ODBC for the reference database.
Siebel Database Upgrade Guide for DB2 for z/OS Siebel Innovation Pack 2016
Preparing a Production Environment for a Siebel Upgrade ■ Preparing for a Siebel Upgrade Without a Development Environment
118
Siebel Database Upgrade Guide for DB2 for z/OS Siebel Innovation Pack 2016 119
9 Running the Database Configuration Wizard to Perform Upgrade Tasks
This chapter describes how to run the Database Configuration Wizard to perform the midtier tasks for an upgrade. Also review the topics in the chapter in Siebel Database Upgrade Guide that describes how to upgrade the Siebel database, and perform any applicable topics before starting your upgrade.
Refer to the roadmap for your upgrade in Chapter 4, “How to Perform a Siebel Database Upgrade” for a complete list of all the tasks you must perform to upgrade to the current release of Siebel CRM. This chapter contains the following topics:
■ Information Required by the Database Configuration Wizard on page 119
■ About Running the Database Configuration Wizard on Windows on page 125
■ About Running the Database Configuration Wizard Under UNIX on page 126
■ Starting the Siebel Upgrade Wizard on page 128
■ Upgrading the Repository and Importing Seed Data on page 131
Information Required by the Database Configuration WizardUpgrades: All upgrades.
Environments: All environments.
This topic is part of an upgrade process. See Chapter 4, “How to Perform a Siebel Database Upgrade.”
Use this topic to identify the information you must enter when running the Database Configuration Wizard. Make sure you have prepared your upgrade environment, and have collected and verified this information before running the wizard.
The Database Configuration Wizard requests information about the upgrade process you want to perform. It then adds this information to a master upgrade file. The Siebel Upgrade Wizard runs after the Database Configuration Wizard exits. The wizard generates the upgrade SQL files and executes some of the SQL files against the Siebel database. For more information on the Database Configuration Wizard, see “About the Siebel Database Configuration Utilities and Database Configuration Wizard” on page 38.
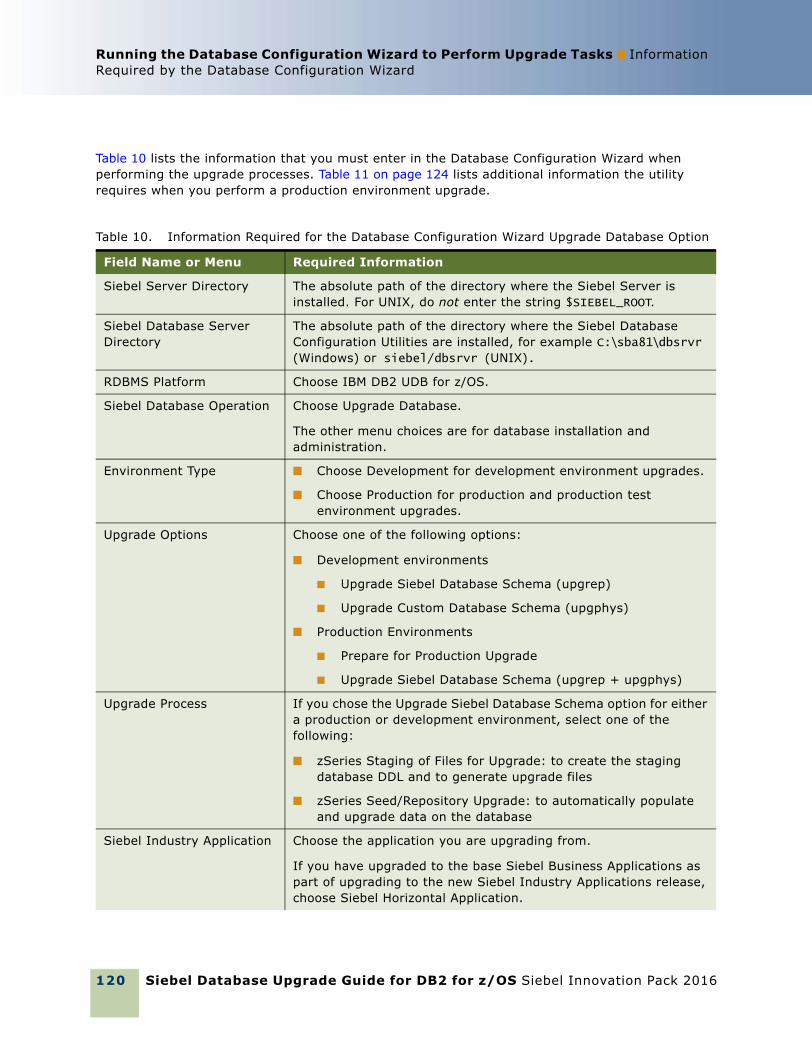
Siebel Database Upgrade Guide for DB2 for z/OS Siebel Innovation Pack 2016
Running the Database Configuration Wizard to Perform Upgrade Tasks ■ Information Required by the Database Configuration Wizard
120
Table 10 lists the information that you must enter in the Database Configuration Wizard when performing the upgrade processes. Table 11 on page 124 lists additional information the utility requires when you perform a production environment upgrade.
Table 10. Information Required for the Database Configuration Wizard Upgrade Database Option
Field Name or Menu Required Information
Siebel Server Directory The absolute path of the directory where the Siebel Server is installed. For UNIX, do not enter the string $SIEBEL_ROOT.
Siebel Database Server Directory
The absolute path of the directory where the Siebel Database Configuration Utilities are installed, for example C:\sba81\dbsrvr (Windows) or siebel/dbsrvr (UNIX).
RDBMS Platform Choose IBM DB2 UDB for z/OS.
Siebel Database Operation Choose Upgrade Database.
The other menu choices are for database installation and administration.
Environment Type ■ Choose Development for development environment upgrades.
■ Choose Production for production and production test environment upgrades.
Upgrade Options Choose one of the following options:
■ Development environments
■ Upgrade Siebel Database Schema (upgrep)
■ Upgrade Custom Database Schema (upgphys)
■ Production Environments
■ Prepare for Production Upgrade
■ Upgrade Siebel Database Schema (upgrep + upgphys)
Upgrade Process If you chose the Upgrade Siebel Database Schema option for either a production or development environment, select one of the following:
■ zSeries Staging of Files for Upgrade: to create the staging database DDL and to generate upgrade files
■ zSeries Seed/Repository Upgrade: to automatically populate and upgrade data on the database
Siebel Industry Application Choose the application you are upgrading from.
If you have upgraded to the base Siebel Business Applications as part of upgrading to the new Siebel Industry Applications release, choose Siebel Horizontal Application.
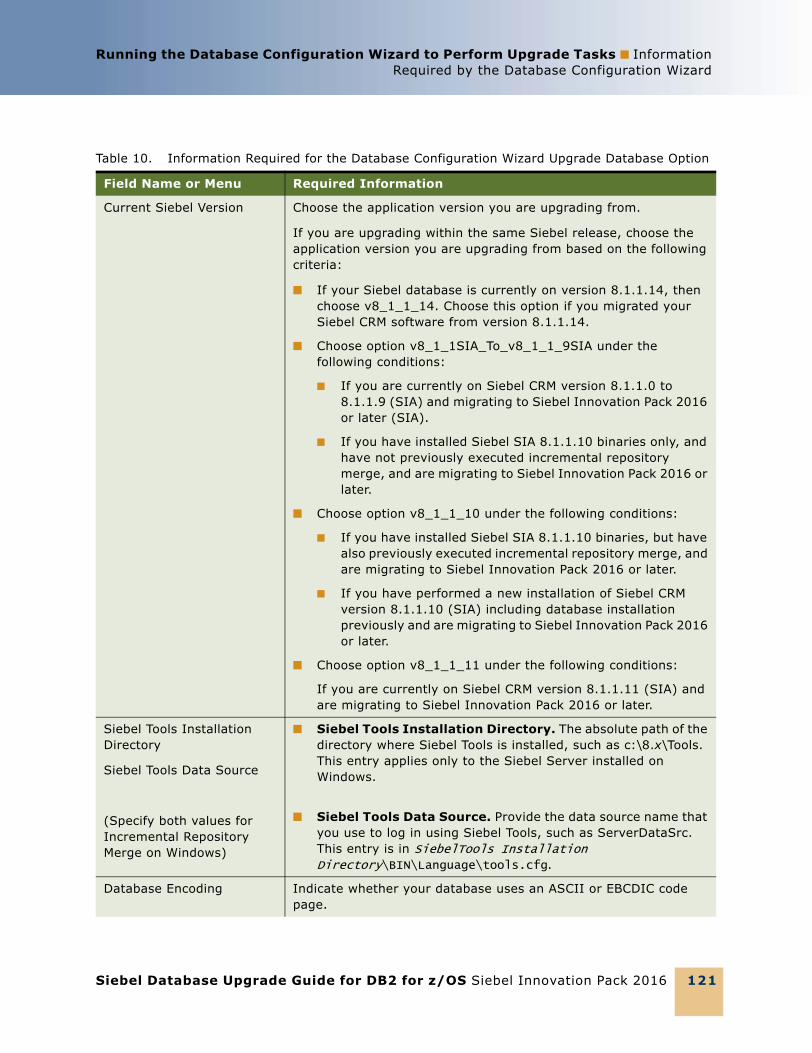
Running the Database Configuration Wizard to Perform Upgrade Tasks ■ InformationRequired by the Database Configuration Wizard
Siebel Database Upgrade Guide for DB2 for z/OS Siebel Innovation Pack 2016 121
Current Siebel Version Choose the application version you are upgrading from.
If you are upgrading within the same Siebel release, choose the application version you are upgrading from based on the following criteria:
■ If your Siebel database is currently on version 8.1.1.14, then choose v8_1_1_14. Choose this option if you migrated your Siebel CRM software from version 8.1.1.14.
■ Choose option v8_1_1SIA_To_v8_1_1_9SIA under the following conditions:
■ If you are currently on Siebel CRM version 8.1.1.0 to 8.1.1.9 (SIA) and migrating to Siebel Innovation Pack 2016 or later (SIA).
■ If you have installed Siebel SIA 8.1.1.10 binaries only, and have not previously executed incremental repository merge, and are migrating to Siebel Innovation Pack 2016 or later.
■ Choose option v8_1_1_10 under the following conditions:
■ If you have installed Siebel SIA 8.1.1.10 binaries, but have also previously executed incremental repository merge, and are migrating to Siebel Innovation Pack 2016 or later.
■ If you have performed a new installation of Siebel CRM version 8.1.1.10 (SIA) including database installation previously and are migrating to Siebel Innovation Pack 2016 or later.
■ Choose option v8_1_1_11 under the following conditions:
If you are currently on Siebel CRM version 8.1.1.11 (SIA) and are migrating to Siebel Innovation Pack 2016 or later.
Siebel Tools Installation Directory
Siebel Tools Data Source
(Specify both values for Incremental Repository Merge on Windows)
■ Siebel Tools Installation Directory. The absolute path of the directory where Siebel Tools is installed, such as c:\8.x\Tools. This entry applies only to the Siebel Server installed on Windows.
■ Siebel Tools Data Source. Provide the data source name that you use to log in using Siebel Tools, such as ServerDataSrc. This entry is in SiebelTools Installation Directory\BIN\Language\tools.cfg.
Database Encoding Indicate whether your database uses an ASCII or EBCDIC code page.
Table 10. Information Required for the Database Configuration Wizard Upgrade Database Option
Field Name or Menu Required Information
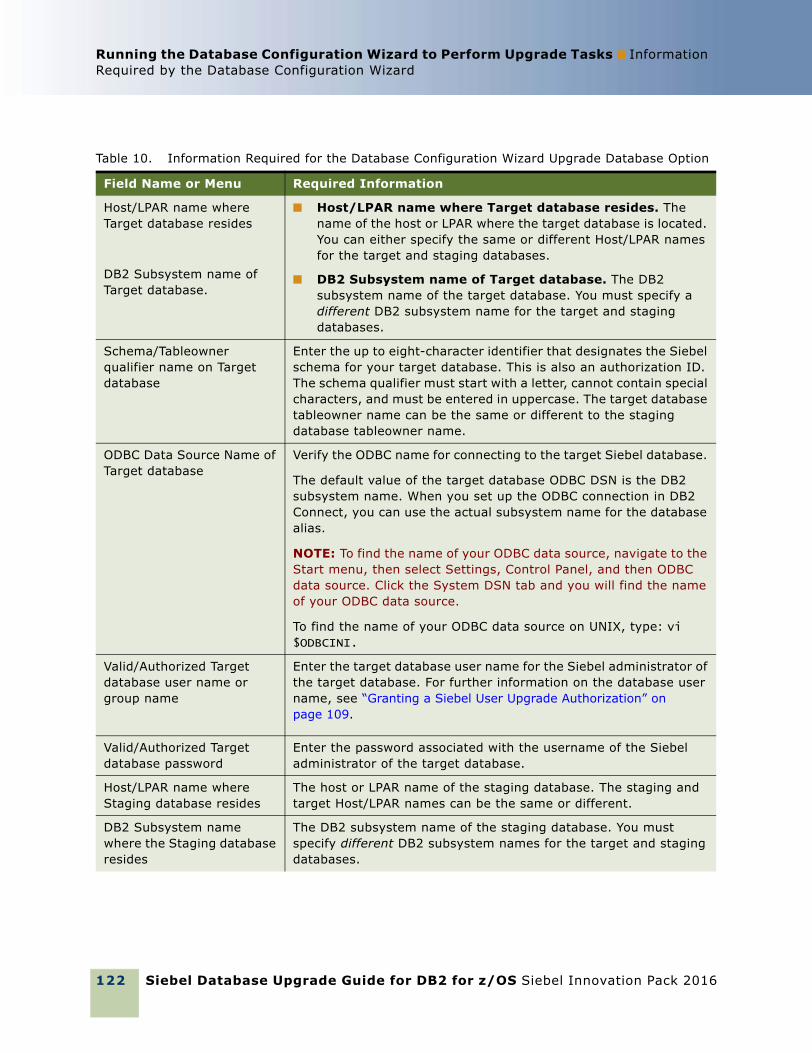
Siebel Database Upgrade Guide for DB2 for z/OS Siebel Innovation Pack 2016
Running the Database Configuration Wizard to Perform Upgrade Tasks ■ Information Required by the Database Configuration Wizard
122
Host/LPAR name where Target database resides
DB2 Subsystem name of Target database.
■ Host/LPAR name where Target database resides. The name of the host or LPAR where the target database is located. You can either specify the same or different Host/LPAR names for the target and staging databases.
■ DB2 Subsystem name of Target database. The DB2 subsystem name of the target database. You must specify a different DB2 subsystem name for the target and staging databases.
Schema/Tableowner qualifier name on Target database
Enter the up to eight-character identifier that designates the Siebel schema for your target database. This is also an authorization ID. The schema qualifier must start with a letter, cannot contain special characters, and must be entered in uppercase. The target database tableowner name can be the same or different to the staging database tableowner name.
ODBC Data Source Name of Target database
Verify the ODBC name for connecting to the target Siebel database.
The default value of the target database ODBC DSN is the DB2 subsystem name. When you set up the ODBC connection in DB2 Connect, you can use the actual subsystem name for the database alias.
NOTE: To find the name of your ODBC data source, navigate to the Start menu, then select Settings, Control Panel, and then ODBC data source. Click the System DSN tab and you will find the name of your ODBC data source.
To find the name of your ODBC data source on UNIX, type: vi $ODBCINI.
Valid/Authorized Target database user name or group name
Enter the target database user name for the Siebel administrator of the target database. For further information on the database user name, see “Granting a Siebel User Upgrade Authorization” on page 109.
Valid/Authorized Target database password
Enter the password associated with the username of the Siebel administrator of the target database.
Host/LPAR name where Staging database resides
The host or LPAR name of the staging database. The staging and target Host/LPAR names can be the same or different.
DB2 Subsystem name where the Staging database resides
The DB2 subsystem name of the staging database. You must specify different DB2 subsystem names for the target and staging databases.
Table 10. Information Required for the Database Configuration Wizard Upgrade Database Option
Field Name or Menu Required Information
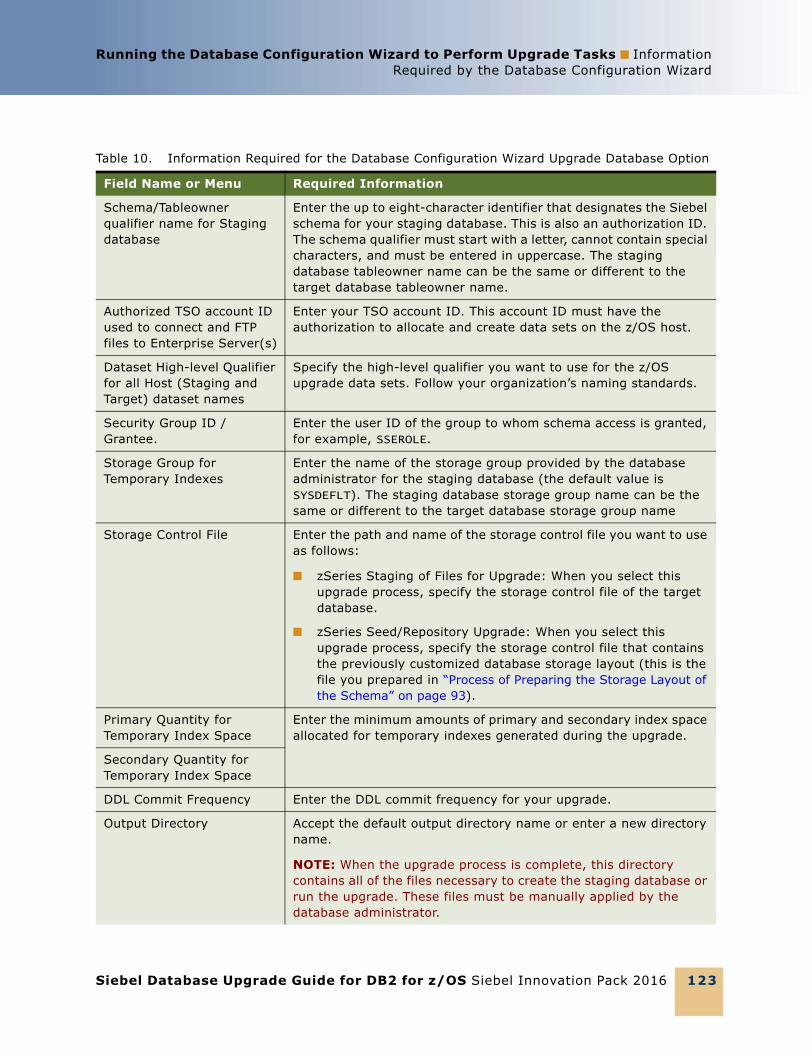
Running the Database Configuration Wizard to Perform Upgrade Tasks ■ InformationRequired by the Database Configuration Wizard
Siebel Database Upgrade Guide for DB2 for z/OS Siebel Innovation Pack 2016 123
Schema/Tableowner qualifier name for Staging database
Enter the up to eight-character identifier that designates the Siebel schema for your staging database. This is also an authorization ID. The schema qualifier must start with a letter, cannot contain special characters, and must be entered in uppercase. The staging database tableowner name can be the same or different to the target database tableowner name.
Authorized TSO account ID used to connect and FTP files to Enterprise Server(s)
Enter your TSO account ID. This account ID must have the authorization to allocate and create data sets on the z/OS host.
Dataset High-level Qualifier for all Host (Staging and Target) dataset names
Specify the high-level qualifier you want to use for the z/OS upgrade data sets. Follow your organization’s naming standards.
Security Group ID / Grantee.
Enter the user ID of the group to whom schema access is granted, for example, SSEROLE.
Storage Group for Temporary Indexes
Enter the name of the storage group provided by the database administrator for the staging database (the default value is SYSDEFLT). The staging database storage group name can be the same or different to the target database storage group name
Storage Control File Enter the path and name of the storage control file you want to use as follows:
■ zSeries Staging of Files for Upgrade: When you select this upgrade process, specify the storage control file of the target database.
■ zSeries Seed/Repository Upgrade: When you select this upgrade process, specify the storage control file that contains the previously customized database storage layout (this is the file you prepared in “Process of Preparing the Storage Layout of the Schema” on page 93).
Primary Quantity for Temporary Index Space
Enter the minimum amounts of primary and secondary index space allocated for temporary indexes generated during the upgrade.
Secondary Quantity for Temporary Index Space
DDL Commit Frequency Enter the DDL commit frequency for your upgrade.
Output Directory Accept the default output directory name or enter a new directory name.
NOTE: When the upgrade process is complete, this directory contains all of the files necessary to create the staging database or run the upgrade. These files must be manually applied by the database administrator.
Table 10. Information Required for the Database Configuration Wizard Upgrade Database Option
Field Name or Menu Required Information

Siebel Database Upgrade Guide for DB2 for z/OS Siebel Innovation Pack 2016
Running the Database Configuration Wizard to Perform Upgrade Tasks ■ Information Required by the Database Configuration Wizard
124
Additional Information Required for Production UpgradesIf you are upgrading from Siebel CRM version 7.5.3, when you perform a production environment upgrade, you are prompted to enter the additional information shown in Table 11 when you run the Database Configuration Wizard in Prepare for Production Upgrade mode.
Note that several screens request information about the Siebel database in the development environment, not the production environment.
Verify Repository after upgrade
Indicate whether you want to execute Verify Repository steps during upgphys. To perform upgphys separately, select the Verify Repository after Upgrade option in the database server configuration.
Upgrep log directory If you select the Verify Repository After Upgrade option, enter the log directory of the upgrep process. The log directory is of the form SIEBEL_ROOT/log/upgrep_dev_UpgradeNumber. For example: C:/ses/siebsrvr/log/upgrep_dev_811. The log directory path is a requirement for generating the seed data conflict report.
Log Output Directory Accept the default output directory for upgrade log files name or enter a new directory name.
Select runupg option Indicate whether you want to run the operation that you configured or run it at another time.
Table 11. Additional Information Required for Production Upgrades
Screen Name Required Information
ODBC Data Source Name for Development Database
Windows only. The ODBC name for connecting to the development environment Siebel database. If you are upgrading without a development environment, this is the ODBC of the reference database.
Database User Name for Development Database
Database Password for Development Database
Account name and password of the Siebel administrator of the Siebel database in the development environment.
Siebel Schema Qualifier for Development Database
Enter the up to eight-character identifier that designates the Siebel schema for your development database. This is also an authorization ID. The schema qualifier must start with a letter, cannot contain special characters, and must be entered in uppercase.
Repository Name for Development Database
Enter the name of the upgraded Siebel Tools repository in the development environment database. Typically, this is Siebel Repository.
Table 10. Information Required for the Database Configuration Wizard Upgrade Database Option
Field Name or Menu Required Information
Running the Database Configuration Wizard to Perform Upgrade Tasks ■ AboutRunning the Database Configuration Wizard on Windows
Siebel Database Upgrade Guide for DB2 for z/OS Siebel Innovation Pack 2016 125
About Running the Database Configuration Wizard on WindowsUpgrades: All upgrades.
Environments: All environments.
Platforms: Windows only.
This topic is part of an upgrade process. See Chapter 4, “How to Perform a Siebel Database Upgrade.”
Run the Database Configuration Wizard to upgrade the Siebel database. The wizard collects information, populates a master configuration file, and calls the SQL generator to create SQL commands. The Siebel Upgrade Wizard then uses the configuration file and SQL commands to generate upgrade files that are applied on the mainframe, and to make upgrade changes to the Siebel database. For more information about the Database Configuration Wizard, see “About the Siebel Database Configuration Utilities and Database Configuration Wizard” on page 38.
Requirements:
■ Collect the information that the Database Configuration Wizard requires. See “Information Required by the Database Configuration Wizard” on page 119.
■ (Incremental Repository Merge Only) If you are performing an incremental repository merge and your Siebel Server is installed on Windows, then start the Siebel Database Configuration Wizard from the computer where Siebel Tools is installed. The merge process automatically starts Siebel Tools to execute the incremental repository merge.
■ Install the new release’s languages packs for all deployed languages. For further information on multilingual upgrades, see the topic on upgrade planning for multilingual Siebel deployments in Siebel Database Upgrade Guide.
CAUTION: When you run the Siebel Database Configuration Wizard to upgrade the Siebel Database, the procedure will not complete successfully if you have deployed languages within your system that are not shipped with the current release of Siebel CRM. You receive an error message stating that your present installation is incomplete, and a list of the languages that caused the error is displayed. If this error occurs, you must delete records for unshipped languages from the S_LST_OF_VAL database table. For information on this task, see the topic on running the Database Configuration Wizard in Siebel Database Upgrade Guide.
Running the Database Configuration Wizard Under WindowsThis topic describes the standard procedure to follow to run the Database Configuration Wizard under Windows.
Siebel Database Upgrade Guide for DB2 for z/OS Siebel Innovation Pack 2016
Running the Database Configuration Wizard to Perform Upgrade Tasks ■ About Running the Database Configuration Wizard Under UNIX
126
To run the Database Configuration Wizard under Windows1 Ensure that no server tasks except the Siebel Gateway Name Service are running in the
background.
To verify, navigate to Start, Settings, Control Panel, and then Services.
NOTE: The Database Configuration Wizard runs in live mode only so you must be connected to the Gateway Name Server to run it. For further information on Siebel Configuration Wizard running modes, see Siebel Installation Guide for the operating system you are using.
2 From the Start menu, select All Programs, Siebel Enterprise Server 8.x, and then Database Server Configuration.
The first screen of the Database Configuration Wizard appears.
3 Enter the information you are prompted for in each screen, and click Next to continue.
4 On the Summary screen, review the configuration values you entered on the previous screens. To change any of the values, click Back to return to the screen with the parameter you want to change. If the values are correct, click Next to continue.
5 Depending on the option you chose on the Select Runupg Option screen, do one of the following:
■ If you selected the No I will apply configuration changes later option, click OK to finish. The configuration information is saved in a master file located in SIEBEL_ROOT\bin but the Upgrade Wizard is not launched. You can restart the configuration and run the Upgrade Wizard later. See “Starting the Siebel Upgrade Wizard” on page 128.
■ If you selected the Yes apply configuration changes now option, the configuration information you entered is saved. Click OK to launch the Siebel Upgrade Wizard; it calls the SQL generator to create or populate SQL scripts.
6 After configuration is complete, click Exit to exit the Configuration Wizard.
You can also launch the Database Configuration Wizard from the command line. For information on the command line syntax and on the available options, see Siebel Installation Guide for Microsoft Windows.
About Running the Database Configuration Wizard Under UNIXUpgrades: All upgrades.
Environments: All environments.
Platforms: UNIX only.
This topic is part of an upgrade process. See Chapter 4, “How to Perform a Siebel Database Upgrade.”
Running the Database Configuration Wizard to Perform Upgrade Tasks ■ AboutRunning the Database Configuration Wizard Under UNIX
Siebel Database Upgrade Guide for DB2 for z/OS Siebel Innovation Pack 2016 127
Run the Database Configuration Wizard to upgrade the Siebel database. The wizard collects information, populates a master configuration file, and calls the SQL generator to create SQL commands. The Siebel Upgrade Wizard then uses the configuration file and SQL commands to generate upgrade files that are applied on the mainframe, and to make upgrade changes to the Siebel database. For more information on the Database Configuration Wizard, see “About the Siebel Database Configuration Utilities and Database Configuration Wizard” on page 38.
Requirements:
■ Collect the information that the Database Configuration Wizard requires. See “Information Required by the Database Configuration Wizard” on page 119.
■ Install the new release’s languages packs for all deployed languages. For further information on multilingual upgrades, see the topic on upgrade planning for multilingual Siebel deployments in Siebel Database Upgrade Guide.
CAUTION: When you run the Siebel Database Configuration Wizard to upgrade the Siebel Database, the procedure will not complete successfully if you have deployed languages within your system that are not shipped with the current release of Siebel CRM. You receive an error message stating that your present installation is incomplete, and a list of the languages that caused the error is displayed. If this error occurs, you must delete records for unshipped languages from the S_LST_OF_VAL database table. For information on this task, see the topic on running the Database Configuration Wizard in Siebel Database Upgrade Guide.
Running the Database Configuration Wizard Under UNIXThis topic describes the standard procedure to follow to run the Database Configuration Wizard under UNIX.
To run the Database Configuration Wizard under UNIX 1 Verify that the Siebel Server is stopped.
The Database Configuration Wizard runs in live mode only so you must be connected to the Gateway Name Server to run it. For further information on Siebel Configuration Wizard running modes, see Siebel Installation Guide for UNIX.
2 Navigate to the SIEBSRVR_ROOT directory, and source either the dbenv.sh or the dbenv.csh file, according to the type of shell you use:
■ Korn or Bourne shell
. ./dbenv.sh
TIP: Make sure there is a space between the initial period and ./dbenv.sh.
■ C shell
source dbenv.csh
3 Review the values of the $SIEBEL_ROOT and LANGUAGE environment variables and verify that they are correct. If necessary, reset the values as follows:
■ Set the LANGUAGE variable to the language in which the Database Configuration Wizard prompts appear, for example, enu for U.S. English.
Siebel Database Upgrade Guide for DB2 for z/OS Siebel Innovation Pack 2016
Running the Database Configuration Wizard to Perform Upgrade Tasks ■ Starting the Siebel Upgrade Wizard
128
■ Set the $SIEBEL_ROOT variable to the path of your Siebel Server installation directory, for example, home/siebel/sba8x/siebsrvr.
4 Navigate to the config subdirectory of the SIEBEL_ROOT directory, for example, /siebel/sba8x/config.
5 Start the Database Configuration Wizard by running the following command:
install_path/config/config -mode dbsrvr
In this path, install_path is the installation path for the installed Siebel Enterprise Server software.
For a description of the command line syntax and options, see Siebel Installation Guide for UNIX.
6 When the first Database Configuration Wizard screen appears, enter the information you are prompted for in this screen, and click next to continue.
7 Enter the information you are prompted for in all subsequent screens. Use the Next and Back buttons to navigate between screens.
8 After you have entered all the requested information, the utility displays the Summary screen listing all the values you have entered.
9 To amend any of the configuration values, click Back to return to the appropriate screen and make changes. Otherwise, click Next.
10 You are prompted as to whether or not you want to execute the configuration:
■ Click Yes, and the configuration information is saved in a master file located in $SIEBEL_ROOT/bin but the Upgrade Wizard is not launched. To start the Upgrade Wizard, see “Starting the Siebel Upgrade Wizard” on page 128.
■ Click No, and the configuration information you entered is not saved.
11 After configuration is complete, click Exit to exit the Configuration Wizard.
Starting the Siebel Upgrade WizardUpgrades: All upgrades.
Environments: All environments.
This topic is part of an upgrade process. See Chapter 4, “How to Perform a Siebel Database Upgrade.”
The Siebel Upgrade Wizard executes the upgrade of the Siebel database. It takes a master configuration file as input. This file contains environment information and a driver filename. The Upgrade Wizard executes the steps in the driver file to perform the upgrade.
As the Upgrade Wizard performs the steps in the driver file, it lists the steps in a state log. The state log is located in \siebsrvr\LOG\process\state where process is the upgrade process, for example upgrep_dev_811 (upgrade from 8.1.1, upgrep process, development environment).
If the Upgrade Wizard encounters an error and exits during an upgrade, you can restart it after correcting the error. The Upgrade Wizard reads the state log and continues the upgrade from the last successfully completed step.
Running the Database Configuration Wizard to Perform Upgrade Tasks ■ Starting theSiebel Upgrade Wizard
Siebel Database Upgrade Guide for DB2 for z/OS Siebel Innovation Pack 2016 129
When you run the Database Configuration Wizard under Windows, you are prompted to indicate whether or not you want to start the Upgrade Wizard. When you run the Database Configuration Wizard under UNIX, you must start the Upgrade Wizard manually. For more information on the Siebel Upgrade Wizard, see “About the Siebel Upgrade Wizard and Driver Files” on page 43.
Requirements for Starting the Siebel Upgrade Wizard After ErrorsIf the Siebel Upgrade Wizard stops due to errors, verify that you have met these requirements before restarting the wizard:
■ Carefully review the relevant log files to make sure that your upgrade has completed successfully up to that point.
■ If you are continuing a previous and incomplete schema upgrade, do not change the Log Output Directory that you previously selected.
■ If problems with your environment prevent the upgrade from restarting, you must restore the database from the prior base version (the version from which you are upgrading).
If you have to restore your database and restart the upgrade, delete or store the upgrade log files. The files are located in the following directory:
Windows: SIEBEL_ROOT\log\PROCESS\output
UNIX: $SIEBEL_ROOT/log/PROCESS/output
Also delete the state.log file. It is located in the following directory:
Windows: SIEBEL_ROOT\log\PROCESS\state
UNIX: $SIEBEL_ROOT/log/PROCESS/state
Starting the Siebel Upgrade Wizard Use this procedure to start the Upgrade Wizard. See “Restarting the Siebel Upgrade Wizard After Pauses” on page 130 for the procedure to restart the Upgrade Wizard after it has paused and “Stopping the Siebel Upgrade Wizard” on page 130 for the procedure to stop the Upgrade Wizard.
To start the Upgrade Wizard1 Navigate to the following directory:
Windows: SIEBEL_ROOT\bin
UNIX: $SIEBEL_ROOT/bin
2 Enter the following command from the command line:
■ Windows: siebupg /m master_UPGRADEOPTION_ENVIRONMENT_VERSION_MasterFileType.ucf
Siebel Database Upgrade Guide for DB2 for z/OS Siebel Innovation Pack 2016
Running the Database Configuration Wizard to Perform Upgrade Tasks ■ Starting the Siebel Upgrade Wizard
130
■ UNIX: srvrupgwiz /m master_UPGRADEOPTION_ENVIRONMENT_VERSION_MasterFileType.ucf
where UPGRADEOPTION_ENVIRONMENT_VERSION_MasterFileType is the portion of the upgrade configuration filename that lists the upgrade process, the upgrade environment, the Siebel release from which you are upgrading, and the master file type. The file is located in SIEBEL_ROOT\bin (UNIX: $SIEBEL_ROOT/bin). See “About the Siebel Database Configuration Utilities and Database Configuration Wizard” on page 38 for further information.
NOTE: Specify either mf_m or mf for the MasterFileType value depending on whether you want to start the manual or automatic portion of an Upgrade Wizard process.
The following table lists examples of filenames for an upgrade from Siebel CRM version 8.1.1
3 To begin the upgrade, click OK (Windows) or click Enter (UNIX).
The Upgrade Wizard resumes from the point at which it stopped.
Restarting the Siebel Upgrade Wizard After PausesUse this procedure to restart the Upgrade Wizard after it has paused to allow you to apply files generated on the midtier to the z/OS host.
To restart the Upgrade Wizard1 Navigate to the DBSRVR_ROOT\DB2390\dboutput\upgrade directory (Windows) or the
$DBSRVR_ROOT/DB2390/dboutput/upgrade directory (UNIX).
2 Do the following:
■ Windows: Double-click on the upg_restart.bat file
■ UNIX: Run upg_restart.ksh
Stopping the Siebel Upgrade Wizard Do not stop the Upgrade Wizard unless you are confident that an error has occurred, and the Upgrade Wizard or a utility it has called is hung. Some SQL commands issued by the Upgrade Wizard or by its utilities can take considerable time to complete.
Upgrade Option Master File Generated
Development environment upgrep
master_upgrep_dev_811_mf_m.ucf
master_upgrep_dev_811_mf.ucf
Development environment upgphys
master_upgphys_dev_811_mf.ucf
Production environment upgrep and upgphys
master_upgrep_prod_811_mf_m.ucf
master_upgrep_prod_811_mf.ucf
Running the Database Configuration Wizard to Perform Upgrade Tasks ■ Upgradingthe Repository and Importing Seed Data
Siebel Database Upgrade Guide for DB2 for z/OS Siebel Innovation Pack 2016 131
If you are unsure whether or not the Upgrade Wizard has stopped responding, create a service request (SR) on My Oracle Support. You can log service requests by accessing My Oracle Support (Service Request tab), or by using your existing phone support numbers to contact Oracle Global Customer Support.
Stopping the Upgrade Wizard can have varying effects on the RDBMS. Before restarting the Upgrade Wizard, review the upgrade log files. Run SQL commands as required to resolve errors found in the logs.
The following procedure describes how to stop the Upgrade Wizard in a Windows environment.
To stop the Upgrade Wizard under Windows■ Do one of the following:
■ If the Upgrade Wizard has launched a separate command window in which a utility is running, close the command window. This terminates the utility and stops the upgrade.
■ In the Upgrade Wizard dialog box, click Cancel.
The Upgrade Wizard will exit when the current upgrade step is completed. There might be a delay while the step completes.
The following procedure describes how to stop the Upgrade Wizard in a UNIX environment.
To stop the Upgrade Wizard under UNIX1 If the Upgrade Wizard has started a utility in a child process, stop the child process.
2 Exit the shell in which the Upgrade Wizard is running.
3 Locate and stop any orphaned child processes started by the Upgrade Wizard.
After the processes terminate, there might be a delay while the RDBMS executes SQL commands that have already been issued.
Upgrading the Repository and Importing Seed DataUpgrades: All upgrades.
Environments: All environments.
This topic is part of an upgrade process. See Chapter 4, “How to Perform a Siebel Database Upgrade.”
After you have created the staging database, generated the upgrade files, and upgraded the target database, you must upgrade the repository and import seed data.
Run the Database Configuration Wizard to upgrade the repository and import seed data as described in the following procedure.
Siebel Database Upgrade Guide for DB2 for z/OS Siebel Innovation Pack 2016
Running the Database Configuration Wizard to Perform Upgrade Tasks ■ Upgrading the Repository and Importing Seed Data
132
To upgrade the repository and import seed data1 Run the Database Configuration Wizard. See “About Running the Database Configuration Wizard
on Windows” on page 125 and “About Running the Database Configuration Wizard Under UNIX” on page 126.
2 Select the following options:
■ Upgrade Options:
❏ Development environment: Upgrade Siebel Database Schema (upgrep)
❏ Production environment: Upgrade Siebel Database Schema (upgrep + upgphys)
■ Upgrade Process: zSeries Seed/Repository Upgrade
■ Make sure you specify values for the target database when prompted for the names of the Host, DB2 subsystem, schema qualifier, ODBC data source, and database user name and password.
3 Enter configuration information for your environment as described in Table 10 on page 120. The master UCF file is updated with the environment configuration information.
4 Start the Siebel Upgrade Wizard. See “Starting the Siebel Upgrade Wizard” on page 128.
NOTE: The process of importing seed data and upgrading the repository can take several hours.
Restarting the Seed Data Import and Repository UpgradeIf the Upgrade Wizard stops responding during the Repository Data Upgrade process, restart the process using the following procedure.
To restart the repository upgrade and seed data import process1 From the command line, navigate to the SIEBSRVR\bin directory (Windows) or SIEBSRVR/bin
directory (UNIX).
2 Run the RUNSTATS utility to update statistics on specified database tables by executing the following commands:
RSTAT390 /u UserId /p Password /c DatabaseName /d TableownerName /a Y /l rstat.log /T S_COLUMN
RSTAT390 /u UserId /p Password /c DatabaseName /d TableownerName /a Y /l rstat.log /T S_UK_ATTJOIN
3 Restart the Upgrade Wizard using one of the methods described in “Starting the Siebel Upgrade Wizard” on page 128.
NOTE: To improve the repository upgrade performance, execute the REORG utility on the tables listed in “About Reorganizing Tables Before the Repository Merge” on page 146 before performing the repository merge.
Siebel Database Upgrade Guide for DB2 for z/OS Siebel Innovation Pack 2016 133
10 Creating the Siebel Staging Database
This chapter describes how to create the staging database used in the development and production database upgrades. It includes the following topics:
■ Process of Creating the Staging Database on page 133
■ Required Tasks before Creating the Staging Database on page 133
■ Creating the Staging Database Schema DDL Files on page 135
■ Transferring the Staging DDL to the z/OS Host on page 135
■ Preparing the z/OS Upgrade Environment and Creating the Staging Database on page 136
■ Removing Interface Tables and Triggers on page 143
Process of Creating the Staging DatabaseUpgrades: All upgrades.
Environments: All environments.
The process of creating the staging database involves performing the following tasks:
1 Perform the prerequisite tasks described in “Required Tasks before Creating the Staging Database” on page 133.
2 Create the DDL schema files that will be used to build the staging database by running the Database Configuration Wizard. See “Creating the Staging Database Schema DDL Files” on page 135.
3 Transfer the staging DDL files generated in Step 2 to the z/OS host where they are applied. See “Transferring the Staging DDL to the z/OS Host” on page 135.
4 Set up the z/OS environment for the staging and target database upgrades and create the staging database. See “Preparing the z/OS Upgrade Environment and Creating the Staging Database” on page 136.
5 Drop interface tables and triggers. See “Removing Interface Tables and Triggers” on page 143.
Required Tasks before Creating the Staging DatabaseUpgrades: All upgrades.
Environments: All environments.
Siebel Database Upgrade Guide for DB2 for z/OS Siebel Innovation Pack 2016
Creating the Siebel Staging Database ■ Required Tasks before Creating the Staging Database
134
Before you create the staging database, complete the following tasks:
1 Select a schema owner for the staging database. Make sure the staging schema owner does not own any objects within the staging DB2 subsystem. The staging schema owner can be the same as the target schema owner.
2 Do the following:
a Make sure you have a valid storage control file for the database to be upgraded. This contains the storage definitions of the existing database and is used to generate the DDL to build the staging database schema.
b Name this storage control file storage_target_extonly.ctl.
If you do not have a valid storage control file, create one by running the Database Configuration Wizard and selecting the Extract from Catalog option. Specify database details for your existing Siebel database (the database to be upgraded). For further information on this task, see Implementing Siebel Business Applications on DB2 for z/OS.
The Extract from Catalog option extracts the storage layout of the database you specify from the DB2 catalog and creates a new storage control file that contains a copy of the storage definitions of the database.
3 Make sure the logical repository definitions and the physical schema definitions of the database to be upgraded match by running the Database Configuration Wizard, and specifying the following options:
■ Siebel Database Operation: Run Database Utilities.
■ Database Utility Selection: Synchronize Schema Definition.
■ Repository Synchronization Mechanism: Generate DDL into Files.
■ Storage Control File: Specify the file you extracted in Step a on page 134 above.
4 Depending on the outcome of the synchronization process, do one of the following:
■ If the logical and physical schema database definitions match, no DDL is generated in the schema.sql file from the Synchronize Schema Definition process and no further action is required.
■ If the logical and physical schema database definitions do not match, the synchronization log file indicates the specific actions that are required to synchronize the schema definitions, such as rebuild tables, and the synchronization process generates the DDL required to perform the actions. Proceed to the next step (Step 5).
5 Click Yes to exit from the Wizard, then do the following
a Navigate to the directory you assigned as the Output Directory.
b Transfer the schema.sql file to the z/OS host and ask your DBA to apply the DDL contained in the file.
For detailed information on running the Synchronize Schema Definition process, see Implementing Siebel Business Applications on DB2 for z/OS.
Creating the Siebel Staging Database ■ Creating the Staging Database Schema DDL Files
Siebel Database Upgrade Guide for DB2 for z/OS Siebel Innovation Pack 2016 135
Creating the Staging Database Schema DDL FilesTo create the staging database, you must generate schema DDL files from the target database. You then use these files and the storage control file you extracted from the target database to create the staging database. The following procedure describes how to generate the DDL files.
To generate the DDL files used to create the staging database1 Run the Database Configuration Wizard. See “About Running the Database Configuration Wizard
on Windows” on page 125 and “About Running the Database Configuration Wizard Under UNIX” on page 126.
2 Specify the following options:
a Upgrade Options:
❏ Development environment: Upgrade Siebel Database Schema (upgrep).
❏ Production environment: Upgrade Siebel Database Schema (upgrep + upgphys).
b Upgrade Process: zSeries Staging of Files for Upgrade.
c Storage Control File: Specify the name of the storage control file you extracted in Step a on page 134.
d DB2 Subsystem Name:
❏ The DB2 subsystem name you specify for the staging database must be different to the DB2 subsystem name of the database to be upgraded (target database).
❏ It is recommended that the DB2 subsystem name you specify for the staging or target database is the same as the ODBC Data Source Name (DSN) you specify for the database. If the database ODBC DSN is not the same as the DB2 subsystem name, you can create a new ODBC DSN for the staging or target database or amend the existing ODBC DSN.
See “Information Required by the Database Configuration Wizard” on page 119.
3 Launch the Siebel Upgrade Wizard. See “Starting the Siebel Upgrade Wizard” on page 128.
SQL commands are executed on your existing database to generate the staging database files. The Upgrade Wizard then stops (Pause #0). For a list of the files generated on the midtier by the Siebel Upgrade Wizard, see Appendix C, “Upgrade Files for Siebel Business Applications.”
Transferring the Staging DDL to the z/OS HostWhen the Upgrade Wizard stops at Pause # 0, you must transfer the SQL and JCL templates and other staging DDL that has been generated on the midtier to the z/OS host where they can be executed. To do this, perform the following procedure.
Siebel Database Upgrade Guide for DB2 for z/OS Siebel Innovation Pack 2016
Creating the Siebel Staging Database ■ Preparing the z/OS Upgrade Environment and Creating the Staging Database
136
To transfer the staging DDL to the z/OS host1 Navigate to the \DB2390\dbsrvr\dboutput\upgrade directory (Windows) or the /DB2390/
dbsrvr/dboutput/upgrade directory (UNIX) and double-click the ftp_stg.bat file (Windows) or issue the following command (UNIX):
ftp -vn < ftp_stg.txt > ftp_stg.log
2 Enter your TSO password and press Enter.
All the files required to create the staging database are transferred from the midtier to the z/OS host.
3 Review the ftp_stg.log file which is created in the upgrade directory and verify that all the files listed in the ftp_stg.txt file transferred successfully to z/OS staging data sets.
Preparing the z/OS Upgrade Environment and Creating the Staging DatabaseYou must transfer the staging database and other upgrade files generated on the midtier by the Upgrade Wizard into data sets on the z/OS host. These files must then be processed and prepared for use. These files include the REXX code that contains all the panels and programs for running the upgrade processes, and files for creating the staging database.
To prepare your z/OS upgrade environment and create the staging database, complete the following procedures:
■ “Authorization Requirements for Performing Upgrade Procedures on the z/OS Host” on page 136
■ “Customizing the JCL UNIT Parameter Value” on page 137
■ “Creating the z/OS Setup Data Sets” on page 137
■ “Preparing the Upgrade Environment and Building the Staging Database” on page 138
■ “Removing Interface Tables and Triggers” on page 143
Authorization Requirements for Performing Upgrade Procedures on the z/OS HostThe user who performs upgrade procedures on the z/OS host requires the following authorities and access:
■ A thorough understanding of zSeries architecture, JCL, and TSO functions and navigation.
■ A TSO account with the authorization to allocate/create data sets on the z/OS host using the high-level qualifier specified in the FTP script.
■ Access to the DB2 staging and target system.
■ DB2 authorities to create DB2 objects and create DB2 VSAM data sets.
Creating the Siebel Staging Database ■ Preparing the z/OS Upgrade Environment andCreating the Staging Database
Siebel Database Upgrade Guide for DB2 for z/OS Siebel Innovation Pack 2016 137
■ Grant and Bind authority.
■ DB2 Workload Manager refresh authority.
The default JOBCLASS is Q. Make sure you use the correct job class in the generated jobcards.
Customizing the JCL UNIT Parameter ValueIf appropriate for your environment, you can amend the UNIT=SYSDA parameter setting for all of the JCL generated for the Siebel upgrade before you run any jobs on the mainframe. The UNIT=SYSDA parameter can be amended in the following data sets:
■ JOB0
■ Any of the VSTG000n or VSTG00nn data sets
To amend the UNIT parameter setting 1 Navigate to the data set you want to amend. Make a backup copy of the data set.
2 Go to Edit mode on the data set.
3 To change the UNIT=SYSDA parameter, enter the following command on the command line:
c sysda sgunit all
where sgunit is the unit name you want to specify.
4 Press PF3 to save your changes.
All the JCL generated by the data set will use the new value you specified.
If you want to revert to the default UNIT parameter settings, either restore the backup copy of the data set you made in Step 1 or transfer the staging data sets from the midtier again.
NOTE: Any amendments you make to the UNIT parameter are not applied to data sets that are allocated using REXX routines.
Creating the z/OS Setup Data SetsPerform the steps in the following procedure to create the z/OS setup data sets.
To define and allocate z/OS setup data sets1 After you have successfully transferred the staging files generated by the Upgrade Wizard up to
Pause #0, log on to the host/LPAR where the staging database is to be created.
2 To create the REXX, CNTL and JCLLIB data sets, navigate to the DSNHLQ.SIEBEL.JOB0 data set.
3 Go to Edit mode on the data set and submit the job using the JCL in the DSNHLQ.SIEBEL.JOB0 data set.
4 After submitting the job, enter cancel on the command line or press PF3 to save changes.
Siebel Database Upgrade Guide for DB2 for z/OS Siebel Innovation Pack 2016
Creating the Siebel Staging Database ■ Preparing the z/OS Upgrade Environment and Creating the Staging Database
138
5 Verify that the job ran successfully (return code is 0) and that the following data sets were created:
■ DSNHLQ.SIEBEL.EXEC
■ DSNHLQ.SIEBEL.JCLLIB
■ DSNHLQ.SIEBEL.SP.SPCNTL
6 Verify that the following PDS members contain information that you defined in the Database Configuration Wizard on the midtier:
■ DSNHLQ.SIEBEL.EXEC(@TBOSTG) contains the value for the staging schema qualifier.
■ DSNHLQ.SIEBEL.EXEC(@TBOTAR) contains the value for the target schema qualifier.
Preparing the Upgrade Environment and Building the Staging DatabaseAfter the files transferred from the midtier have been defined and allocated, you must set up the z/OS system environment variables, receive the files (uncompress the files), create JCL libraries, create the staging database, and assign jobname prefixes. The following procedure describes how to perform these tasks.
To set up the z/OS upgrade environment and build the staging database1 Use the following command to display the Siebel In-Place Upgrade Main Menu:
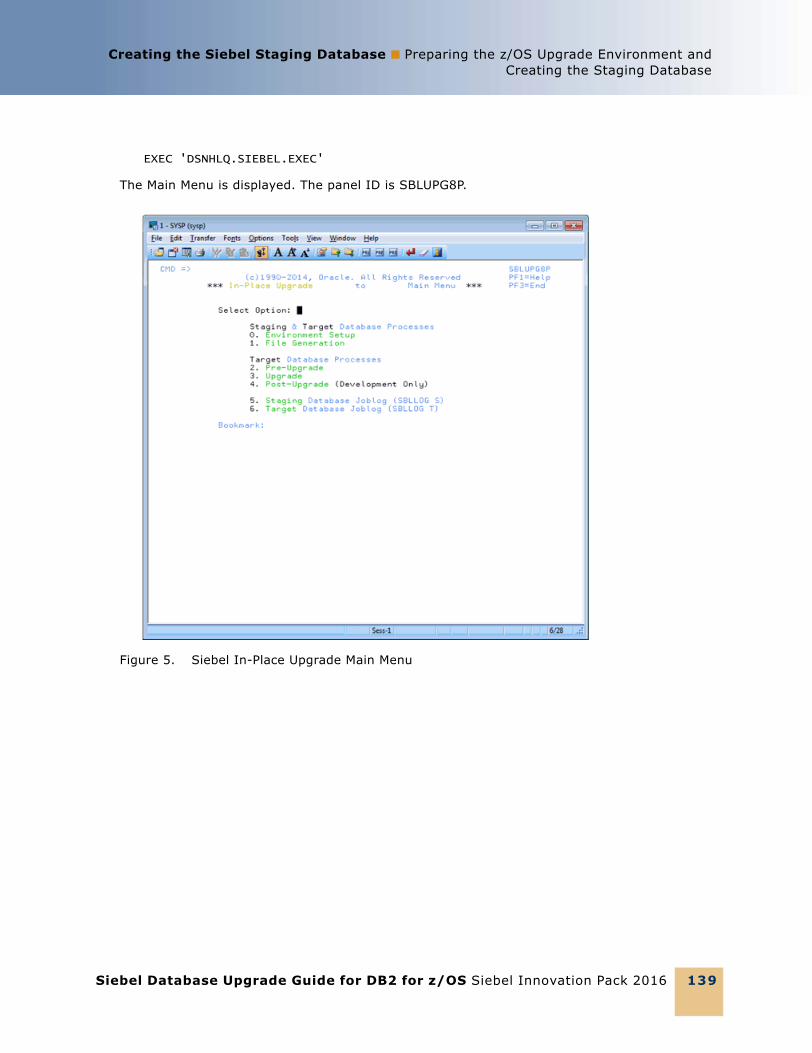
Creating the Siebel Staging Database ■ Preparing the z/OS Upgrade Environment andCreating the Staging Database
Siebel Database Upgrade Guide for DB2 for z/OS Siebel Innovation Pack 2016 139
EXEC 'DSNHLQ.SIEBEL.EXEC'
The Main Menu is displayed. The panel ID is SBLUPG8P.
Figure 5. Siebel In-Place Upgrade Main Menu

Siebel Database Upgrade Guide for DB2 for z/OS Siebel Innovation Pack 2016
Creating the Siebel Staging Database ■ Preparing the z/OS Upgrade Environment and Creating the Staging Database
140
2 On the Siebel Upgrade Main Menu, select option 0: Environment Setup, and press Enter.
The Staging Database Environment Setup Menu is displayed. The panel ID is SBLSSETP. The options on this panel allow you to prepare files and set environment variables to create the staging database.
3 On the Staging Database Environment Setup Menu, select option 0: Set System Environment Variables.
The Staging System Variable Definitions panel appears. The panel ID is SBLSETVP.
4 Enter the following information and then press Enter:
■ WLM Name. Enter the DB2 WLM name, for example, DB28WLM.
■ WLM Load Library. Enter the DB2 WLM load library name.
■ Extract DB2 Libraries: Enter the DB2 load / runlib library names for the target subsystem. (These are the libraries where the DSN, DSNTEP2, and DSNTIAUL programs are located.)
Figure 6. Staging Database Environment Setup Menu
Creating the Siebel Staging Database ■ Preparing the z/OS Upgrade Environment andCreating the Staging Database
Siebel Database Upgrade Guide for DB2 for z/OS Siebel Innovation Pack 2016 141
■ Staging DB2 Libraries. Enter the DB2 load / runlib library names for the staging subsystem.
NOTE: The libraries you enter must exist (that is, they must be cataloged) and the library names must not be blank. Blank library names terminate concatenation.
5 Press Enter.
Messages appear indicating that the DSNHLQ and DB2 load library information was written to individual PDS members in the DSNHLQ.SIEBEL.JCLLIB library.
6 Press PF3 to return to the Staging Database Environment Setup menu.
7 Select option 1: Receive XMIT Datasets, and press Enter.
8 Submit the JCL in data set DSNHLQ.SIEBEL.install.jcl(SPXMITR).
9 After submitting the job, enter cancel on the command line or press PF3 to save changes.
This job receives XMIT format files. Three PDS data sets are allocated and populated with members. The three PDS data set names are:
■ DSNHLQ.SIEBEL.LOAD
■ DSNHLQ.SIEBEL.SP.SPDDL
■ DSNHLQ.SIEBEL.DBRMLIB
10 Verify that the job ran successfully.
Review the output in SDSF or another job output facility and verify that the job RC is 0. Verify that all three data sets (and members) were received properly. If the job ends abnormally with a return code of User 99, fix the failed job before proceeding with the upgrade. For information on restarting failed jobs, see “Restarting Upgrade Jobs That Fail” on page 208.
11 Press PF3 to return to the Staging Database Environment Setup menu.
12 Select option 2: Create JCL Libraries, and press Enter. This option builds and allocates the install JCL libraries.
You are placed in edit mode for data set DSNHLQ.SIEBEL.VSTG0000.
NOTE: If you want to change the job card, do so at this time.
13 Run the job using the JCL in data set DSNHLQ.SIEBEL.VSTG0000. The install JCL libraries are built and allocated and path-specific panels are added to the DSNHLQ.SIEBEL.EXEC library.
14 Verify that the job ran successfully as described in “Verifying JCL Upgrade Jobs” on page 143.
Verify that this job allocated and populated data set DSNHLQ.SIEBEL.INSTALL.JCL. This job also adds path-specific panels to the DSNHLQ.SIEBEL.EXEC library.
15 After submitting the job, enter cancel on the command line or press PF3 to save changes.
16 On the Staging Database Environment Setup menu, select option 3: Create Siebel Logging Table (1). This option allows you to create and load the logging table for the staging jobs and to create the staging TMPTBL_ADDR table.
You are placed in edit mode for data set DSNHLQ.SIEBEL.INSTALL.JCL(LOADLOG1).
NOTE: If you want to change the job card, do so at this time.
Siebel Database Upgrade Guide for DB2 for z/OS Siebel Innovation Pack 2016
Creating the Siebel Staging Database ■ Preparing the z/OS Upgrade Environment and Creating the Staging Database
142
17 Run the job using the JCL in data set DSNHLQ.SIEBEL.INSTALL.JCL(LOADLOG1).
This job runs the DDL to create the TMP_SBLLOG_STG table in the staging environment and loads an initial set of log entries for logging batch job execution.
18 Verify that the job ran successfully as described in “Verifying JCL Upgrade Jobs” on page 143.
Verify that this job created the TMP_SBLLOG_STG table on the staging database and loaded an initial set of log entries for logging batch job execution.
19 After submitting the job, enter cancel on the command line or press PF3 to save changes.
20 On the Staging Database Environment Setup menu, select option 4: Create Staging Database (DDL), and press Enter to execute the DDL necessary to create the staging database.
You are in edit mode for data set DSNHLQ.SIEBEL.INSTALL.JCL(STGDDL).
NOTE: If you want to change the job card, do so at this time.
21 Run the job using the JCL in data set DSNHLQ.SIEBEL.INSTALL.JCL(STGDDL).
22 Verify that the job ran successfully as described in “Verifying JCL Upgrade Jobs” on page 143.
This job executes the staging database DDL to create an exact schema version of the target database (database to be upgraded) in a staging environment using the Host/LPAR, DB2 subsystem and tableowner values you specified when you ran the Database Configuration Wizard.
Only the schema exists; it does not have to be populated with data. All objects must contain the DDL syntax DEFINE NO. Index definitions include the DEFER YES syntax.
23 Press PF3 to return to the Environment Setup menu.
24 Select option 5: Assign Jobname Prefix/Parms, and press Enter to assign unique jobname prefixes to JCL upgrade jobs by job type.
The Staging Jobname Prefix/Parm Definitions Jobcard parameters panel is displayed. The panel ID is SBLJPXP.
25 Enter a three-character job name prefix for all upgrade job types for items 1 through 20.
It is recommended that the three-character prefix is unique to make it easier to find your jobs in the queue, but it is only required for the nonunique index and obsolete index job prefixes (which cannot be the same). The remaining five characters of the job name (which do not appear and cannot be modified) are defined by Oracle and are unique for all upgrade jobs.
26 You can change the NOTIFY value from &SYSUID to your TSO ID or leave it as &SYSUID.
NOTE: If you want to remove the notify parameter from the job card, replace the symbolic parameter &sysuid with spaces.
27 Review the job card parameters and make any necessary changes. Verify that you are using the correct accounting, job class, and message class.
28 Press Enter after entering the job name prefix and parameter definitions. The JCL template files are updated. Messages indicate when each step is completed.
Creating the Siebel Staging Database ■ Removing Interface Tables and Triggers
Siebel Database Upgrade Guide for DB2 for z/OS Siebel Innovation Pack 2016 143
Verifying JCL Upgrade JobsAfter running each JCL upgrade job, you must verify that the job ran successfully by reviewing the output in SDSF or another job output facility. All jobs must complete successfully before you proceed to the next step.
Once you have run the job Receive XMIT Datasets as described in “Preparing the Upgrade Environment and Building the Staging Database” on page 138, all jobs contain one of the following JCL INCLUDE members to check job step return codes. If condition codes are not met, then the job ends abnormally, with a return code of User 99, and the job must be rerun.
Acceptable return codes for each step of each job is controlled by the following three JCL test condition checks:
■ JCLTEST requires that the return code is less than or equal to 4
■ JCLTEST0 requires that the return code is 0
■ JCLTEST8 requires that the return code is less than or equal to 8
For example, if a job that includes the JCLTEST member generates a return code that is less than or equal to 4, the JCLTEST step is not processed and the JCLTEST return code is FLUSH. If the same job generates a return code that is greater than 4, the JCLTEST step is processed and the job ends abnormally.
Verify that the return code for each job is 0, 4, or 8 (depending on the job) and that the JCLTEST return code is FLUSH. If you do not see the FLUSH return code, you can verify the condition codes by searching for the condition code IEF206I.
NOTE: You must fix any failed jobs before proceeding with the upgrade. For information on restarting failed jobs, see “Restarting Upgrade Jobs That Fail” on page 208.
Removing Interface Tables and TriggersOnce you have build the staging database and prepared the upgrade environment on the z/OS host, the final task to complete before you generate the upgrade files is to remove triggers and EIM/Interface tables from the staging database. The following procedure describes this task.
To remove EIM/Interface tables and triggers from the staging database1 On the Staging Database Environment Setup Menu, select option 6: Generate EIM/Interface
Table/Tablespace Drops, and press Enter.
2 Submit the JCL in the data set DSNHLQ.SIEBEL.pregen.jcl (PREGEN1). This job generates the EIM, Interface table, and table space DROP statements.
3 Verify that the job ran successfully as described in “Verifying JCL Upgrade Jobs” on page 143.
4 After submitting the job, enter cancel on the command line or press PF3 to save changes.
5 On the Staging Database Environment Setup Menu, select option 7. Generate Trigger Drops List of Tbl w/ CLOB columns, and press Enter.
Siebel Database Upgrade Guide for DB2 for z/OS Siebel Innovation Pack 2016
Creating the Siebel Staging Database ■ Removing Interface Tables and Triggers
144
6 Submit the JCL in the data set DSNHLQ.SIEBEL.pregen.jcl (PREGEN2). A list of trigger drops and tables with CLOB columns is generated.
7 Verify that the job ran successfully.
8 After submitting the job, enter cancel on the command line or press PF3 to save changes.
9 On the Staging Database Environment Setup Menu, select option 8 Drop Interface Tables, and press Enter.
10 Submit the JCL in the data set DSNHLQ.SIEBEL.install.jcl (INFDRPJS) to drop EIM and Interface tables from the staging database.
11 Verify that the job ran successfully as described in “Verifying JCL Upgrade Jobs” on page 143.
12 After submitting the job, enter cancel on the command line or press PF3 to save changes.
This completes the process of creating a staging database. You can now generate the upgrade files.
Siebel Database Upgrade Guide for DB2 for z/OS Siebel Innovation Pack 2016 145
11 Performing the Siebel Repository Merge
This chapter lists the steps involved in performing a repository merge during a development environment upgrade which are specific to DB2 for z/OS upgrades. You also have to perform the relevant tasks in the chapter in Siebel Database Upgrade Guide that describes how to perform the Siebel Repository merge. This chapter includes the following topics:
■ About Backing Up the New Customer Repository or Database Schema on page 145
■ About Reorganizing Tables Before the Repository Merge on page 146
■ Performing a Siebel Repository Merge on page 147
■ Regenerating the Siebel Repository Definition Files on page 155
■ Creating a New Siebel Repository File on page 157
About Backing Up the New Customer Repository or Database SchemaUpgrades: All upgrades.
Environments: Development environment only.
This topic is part of an upgrade process. See Chapter 4, “How to Perform a Siebel Database Upgrade.”
The process of merging repositories to create the final customized repository used in the upgrade is time-intensive and resource-intensive. As a result, a merge might sometimes fail because of environmental factors, for example, space constraints. When this happens, the merge process continues, even if there is a fatal database error, and the errors might not be detected for some time.
If the merge fails, you must restore the database environment to its premerge state and run the merge again. There are two methods you can use to preserve the premerge environment so that you can restart the merge again if necessary:
■ Back up the entire database. Prior to the merge, back up the entire database, then, if the merge fails, you can restore the database to its premerge state and rerun the merge operation. This is the recommended method of recovering from a failed merge.
■ Export the New Customer Repository. Prior to the merge, export the New Customer Repository to create a backup copy; this preserves existing workflows. If the merge fails, you can delete the failed repository, then import the backup copy of the New Customer Repository. If you use this method of recovering from a failed merge, you also have to truncate the following merge log tables: S_MERGE_LOG, S_MERGE_LOG_OBJ, and S_MERGE_LOG_ATTR. See Using Siebel Tools for information on exporting and importing repositories using the Database Configuration Wizard.
Siebel Database Upgrade Guide for DB2 for z/OS Siebel Innovation Pack 2016
Performing the Siebel Repository Merge ■ About Reorganizing Tables Before the Repository Merge
146
About Reorganizing Tables Before the Repository MergeUpgrades: All upgrades.
Environments: Development environment only.
This topic is part of an upgrade process. See Chapter 4, “How to Perform a Siebel Database Upgrade.”
During the repository merge process, objects from four separate repositories are read and compared. Because this is a memory-intensive process, it is recommended that you execute the REORG utility on certain tables before performing the repository merge to improve performance.
NOTE: Before executing the REORG utility, delete extra repositories from the database using Siebel Tools. Running the repository merge on a database with more than the four repositories which are required for the repository merge degrades repository merge performance. Before deleting extra repositories, make backups. Deletion of extra repositories can take a few hours.
The following tables receive a large number of inserts during each repository import; running REORGs on each of the following table’s ROW_ID column will significantly increase the performance of the merge:
■ S_APPLET
■ S_APPLET_INTL
■ S_APPLET_METH_MI
■ S_APPL_WEB_TMPL
■ S_APPL_WTMPL_IT
■ S_BOCOMP
■ S_BUSCOMP_UPROP
■ S_COLUMN
■ S_CONTROL
■ S_CONTROL_INTL
■ S_CONTROL_UPROP
■ S_DDOWN_OBJECT
■ S_EIM_FK_MAPCOL
■ S_FIELD
■ S_INDEX
■ S_INDEX_COLUMN
■ S_INTFLD_UPROP
■ S_INT_CKEY_FLD
■ S_INT_COMP
■ S_INT_FIELD
Performing the Siebel Repository Merge ■ Performing a Siebel Repository Merge
Siebel Database Upgrade Guide for DB2 for z/OS Siebel Innovation Pack 2016 147
■ S_JOIN
■ S_JOIN_SPEC
■ S_LIST
■ S_LIST_COL_INTL
■ S_LIST_COLUMN
■ S_PICKMAP
■ S_SCREEN_VIEW
■ S_UK_ATTJOIN
■ S_USER_KEY_ATT
■ S_VIEW_WTMPL_IT
■ S_EIM_ATT_MAP
NOTE: After you reorganize tables, it is recommended that you run the RUNSTATS utility to update DB2 catalog statistics.
Performing a Siebel Repository MergeUpgrades: All upgrades.
Environments: Development environment only.
This topic is part of an upgrade process. See Chapter 4, “How to Perform a Siebel Database Upgrade.”
During the repository merge, objects from the Prior Siebel Repository, Prior Customer Repository, and New Siebel Repository are compared by name to identify the total set of object differences. The process also determines how conflicts between repository changes are resolved as they are merged into the New Customer Repository. There are three basic categories of object differences:
■ New
■ Deleted
■ Modified
The repository merge executes the following processing steps to identify object differences:
Siebel Database Upgrade Guide for DB2 for z/OS Siebel Innovation Pack 2016
Performing the Siebel Repository Merge ■ Performing a Siebel Repository Merge
148
■ New or deleted objects. Identify objects that the customer has added by comparing their names in the Prior Customer Repository with the Prior Siebel Repository.
All new customer objects are carried over from the Prior Customer Repository to the New Customer Repository. The repository merge typically avoids deletion of objects. Most of the objects that are deleted in the Prior Customer Repository reappear after the merge. The merge does this to avoid accidental deletion of objects which might be required. It does, however, allow deletion of specific types of objects. Such objects are deleted from the New Customer Repository during the merge.
Objects of the following types are deleted from the New Customer Repository:
■ Objects with altered attributes. Identifies objects that exist in both the Prior Customer Repository and the New Siebel Repository, and compares the attributes of each object to determine if they have been modified. Attribute comparisons are of interest only for those attributes which were changed by the customer.
If an object attribute was altered in the Prior Customer Repository, but not in the New Siebel Repository, the customer’s attribute value is merged into the New Customer Repository.
A conflict occurs, however, if an object attribute was altered in both the Prior Customer Repository and the New Siebel Repository, in which case the values in all three repositories would be different. In this event, the repository merge process uses the setting of the object attribute’s StandardWins flag to determine how to resolve the conflict. If this is set to Y, the attribute value from the New Siebel Repository is used; if this is set to N, the attribute value from the Prior Customer Repository is used. Conflict resolutions can be overridden for each object attribute in the New Customer Repository. For additional information, see the topic about reviewing Siebel repository object property conflicts in the chapter in Siebel Database Upgrade Guide that describes how to perform the Siebel Repository merge.
About the Repository MergeThe configuration utility that you ran while upgrading your development environment loaded two standard repositories. You must now use Siebel Tools to merge your existing custom configuration into one of these new repositories, creating a custom configuration that includes all of your previous configuration changes.
■ Control ■ Chart■ List Column ■ Applet Web Template Item■ Page Tab ■ View Web Template Item
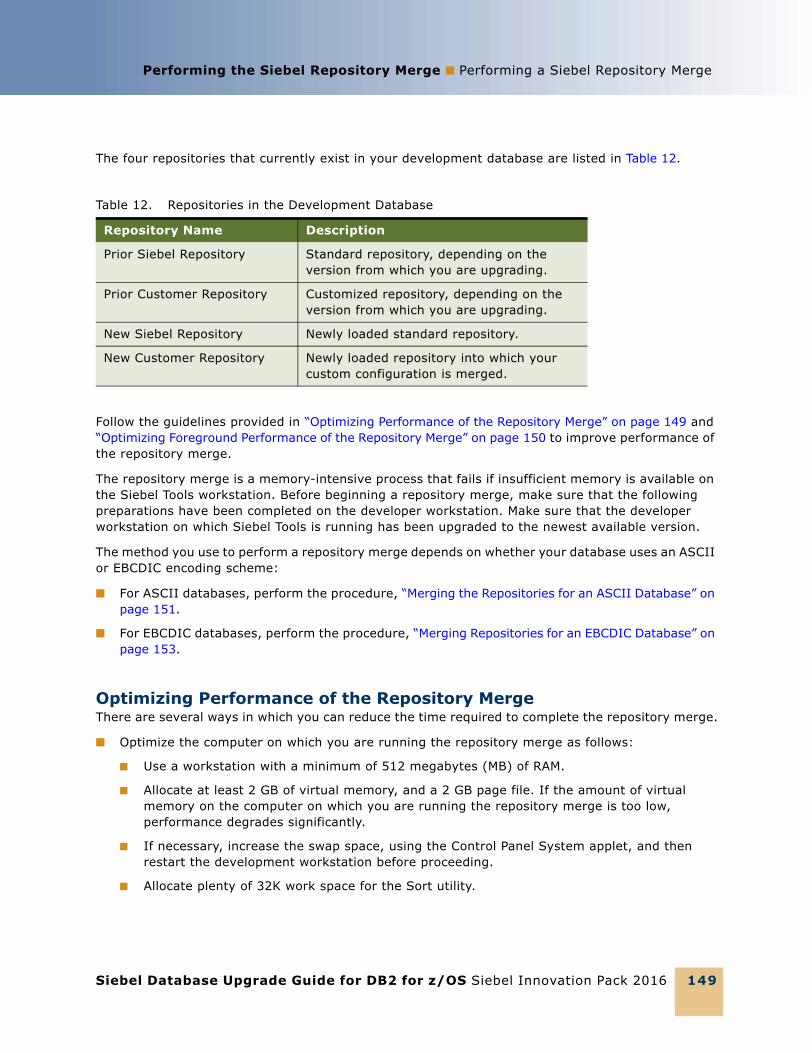
Performing the Siebel Repository Merge ■ Performing a Siebel Repository Merge
Siebel Database Upgrade Guide for DB2 for z/OS Siebel Innovation Pack 2016 149
The four repositories that currently exist in your development database are listed in Table 12.
Follow the guidelines provided in “Optimizing Performance of the Repository Merge” on page 149 and “Optimizing Foreground Performance of the Repository Merge” on page 150 to improve performance of the repository merge.
The repository merge is a memory-intensive process that fails if insufficient memory is available on the Siebel Tools workstation. Before beginning a repository merge, make sure that the following preparations have been completed on the developer workstation. Make sure that the developer workstation on which Siebel Tools is running has been upgraded to the newest available version.
The method you use to perform a repository merge depends on whether your database uses an ASCII or EBCDIC encoding scheme:
■ For ASCII databases, perform the procedure, “Merging the Repositories for an ASCII Database” on page 151.
■ For EBCDIC databases, perform the procedure, “Merging Repositories for an EBCDIC Database” on page 153.
Optimizing Performance of the Repository MergeThere are several ways in which you can reduce the time required to complete the repository merge.
■ Optimize the computer on which you are running the repository merge as follows:
■ Use a workstation with a minimum of 512 megabytes (MB) of RAM.
■ Allocate at least 2 GB of virtual memory, and a 2 GB page file. If the amount of virtual memory on the computer on which you are running the repository merge is too low, performance degrades significantly.
■ If necessary, increase the swap space, using the Control Panel System applet, and then restart the development workstation before proceeding.
■ Allocate plenty of 32K work space for the Sort utility.
Table 12. Repositories in the Development Database
Repository Name Description
Prior Siebel Repository Standard repository, depending on the version from which you are upgrading.
Prior Customer Repository Customized repository, depending on the version from which you are upgrading.
New Siebel Repository Newly loaded standard repository.
New Customer Repository Newly loaded repository into which your custom configuration is merged.
Siebel Database Upgrade Guide for DB2 for z/OS Siebel Innovation Pack 2016
Performing the Siebel Repository Merge ■ Performing a Siebel Repository Merge
150
■ Make sure you have a high-performing network connection.
NOTE: A slow network connection significantly increases the time required for the repository merge.
■ Close all other applications.
■ Close all Siebel services.
■ Defragment the disk. Fragmentation significantly affects system performance.
■ On the workstation, check that the environment variable SIEBEL_LOG_EVENTS is set to zero. To check, enter the following command at the MS DOS prompt:
echo %SIEBEL_LOG_EVENTS%
If the command returns a value other than zero, you must set the SIEBEL_LOG_EVENTS variable to zero by performing the following steps:
❏ Close Siebel Tools and any other Siebel client applications.
❏ From the Start menu, select Settings, Control Panel, System, and then Environment.
❏ In the Environment dialog box, in the System Variables box, select SIEBEL_LOG_EVENTS. Enter 0 in the Value box, and click Set. Click OK.
❏ Relaunch Siebel Tools. The new setting becomes active.
NOTE: The steps required to set this variable can vary depending on the operating system you are using.
■ Optimize your database, because database performance can cause the repository merge to slow down considerably. Check the following:
■ Make sure that temporary table space has enough space allocated.
■ Make sure the database has enough space allocated.
■ Make sure that the topmost logging applet in tools has no extra rows from previous repository merge runs when starting the repository merge.
■ Make sure that the database is not loaded with users when the repository merge is run; no other users must be connected.
Optimizing Foreground Performance of the Repository MergeTo improve the foreground performance of the repository merge, use the following procedure.
To increase the foreground performance of the repository merge1 From the Start menu, choose Control Panel, and then the System menu option.
2 Select the Advanced tab.
3 Select the Performance Options button.
4 In the Application Response box, click the Applications radio button and click OK.
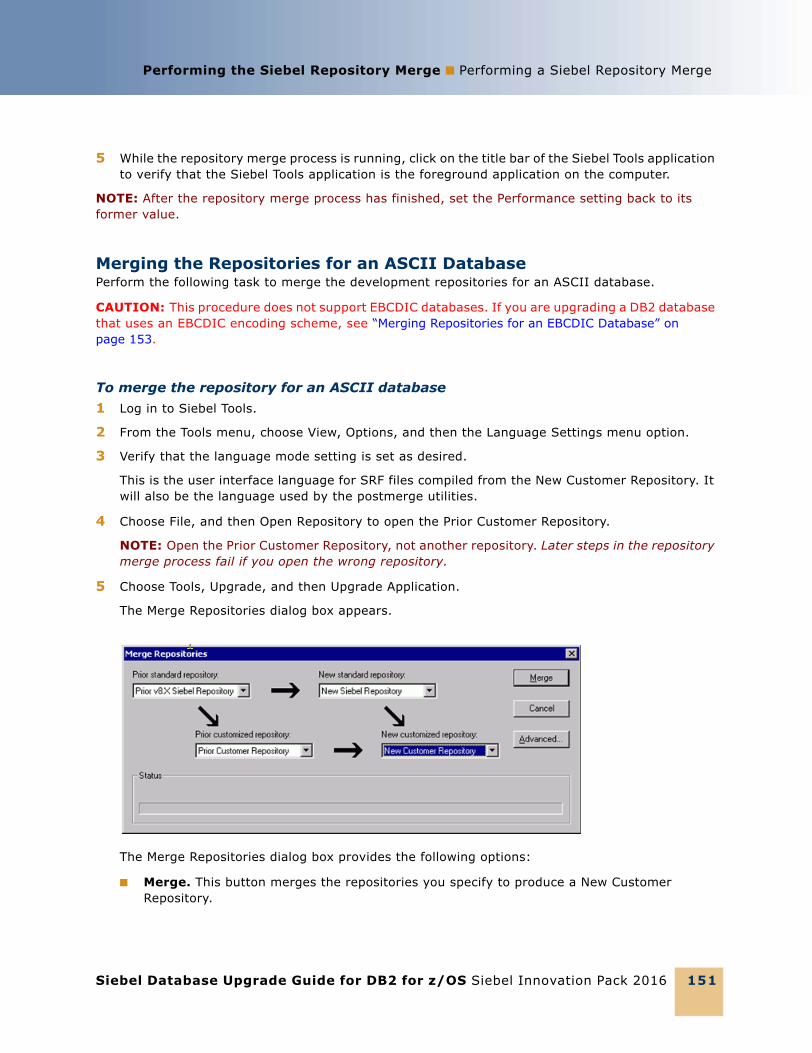
Performing the Siebel Repository Merge ■ Performing a Siebel Repository Merge
Siebel Database Upgrade Guide for DB2 for z/OS Siebel Innovation Pack 2016 151
5 While the repository merge process is running, click on the title bar of the Siebel Tools application to verify that the Siebel Tools application is the foreground application on the computer.
NOTE: After the repository merge process has finished, set the Performance setting back to its former value.
Merging the Repositories for an ASCII DatabasePerform the following task to merge the development repositories for an ASCII database.
CAUTION: This procedure does not support EBCDIC databases. If you are upgrading a DB2 database that uses an EBCDIC encoding scheme, see “Merging Repositories for an EBCDIC Database” on page 153.
To merge the repository for an ASCII database1 Log in to Siebel Tools.
2 From the Tools menu, choose View, Options, and then the Language Settings menu option.
3 Verify that the language mode setting is set as desired.
This is the user interface language for SRF files compiled from the New Customer Repository. It will also be the language used by the postmerge utilities.
4 Choose File, and then Open Repository to open the Prior Customer Repository.
NOTE: Open the Prior Customer Repository, not another repository. Later steps in the repository merge process fail if you open the wrong repository.
5 Choose Tools, Upgrade, and then Upgrade Application.
The Merge Repositories dialog box appears.
The Merge Repositories dialog box provides the following options:
■ Merge. This button merges the repositories you specify to produce a New Customer Repository.
Siebel Database Upgrade Guide for DB2 for z/OS Siebel Innovation Pack 2016
Performing the Siebel Repository Merge ■ Performing a Siebel Repository Merge
152
■ Cancel. This button cancels the repository merge and exits the Merge Repositories dialog box.
■ Advanced. This button opens the Merge Options dialog box described in Step 8.
6 In the Merge Repositories dialog box, choose the appropriate repository name from each picklist, using the repository names listed in the following table.
7 Review the settings in the Merge Repositories dialog box, then click Advanced.
The Merge Options dialog box appears.
8 In the Merge Options dialog box, click the following check boxes as appropriate:
■ Abort merge if more than n errors occur.
This option aborts the repository merge automatically if more than a designated number of errors occur.
NOTE: The typical repository merge generates many benign errors. If you select this option, set the number of errors to a large value. This will help prevent the repository merge from aborting due to benign errors.
■ Incorporate Custom Layout.
Activate this option to help preserve field and button placement on prior custom or modified forms, views, and screens. Select a prior release and style for label placement.
The Prior Release is the release you are upgrading from. The Placement of Labels controls where labels are placed in forms. As of Siebel CRM version 7.7, label alignment of fields changed. Label vertical alignment changed from top to middle, font weight changed from bold to normal, and text alignment changed from left to right. Select Labels on Top and Labels on Left to preserve the look and feel of releases prior to Siebel CRM version 7.7.
9 To continue, click OK.
10 Click Merge on the Merge Repositories dialog box.
The Upgrade Check List dialog box appears.
Drop–Down List Item Value to Choose
Prior Standard Repository
Prior 7.x or 8.0 Siebel Repository, as appropriate for the version from which you are upgrading
Prior Customized Repository
Prior Customer Repository
New Standard Repository
New Siebel Repository
New Customized Repository
New Customer Repository
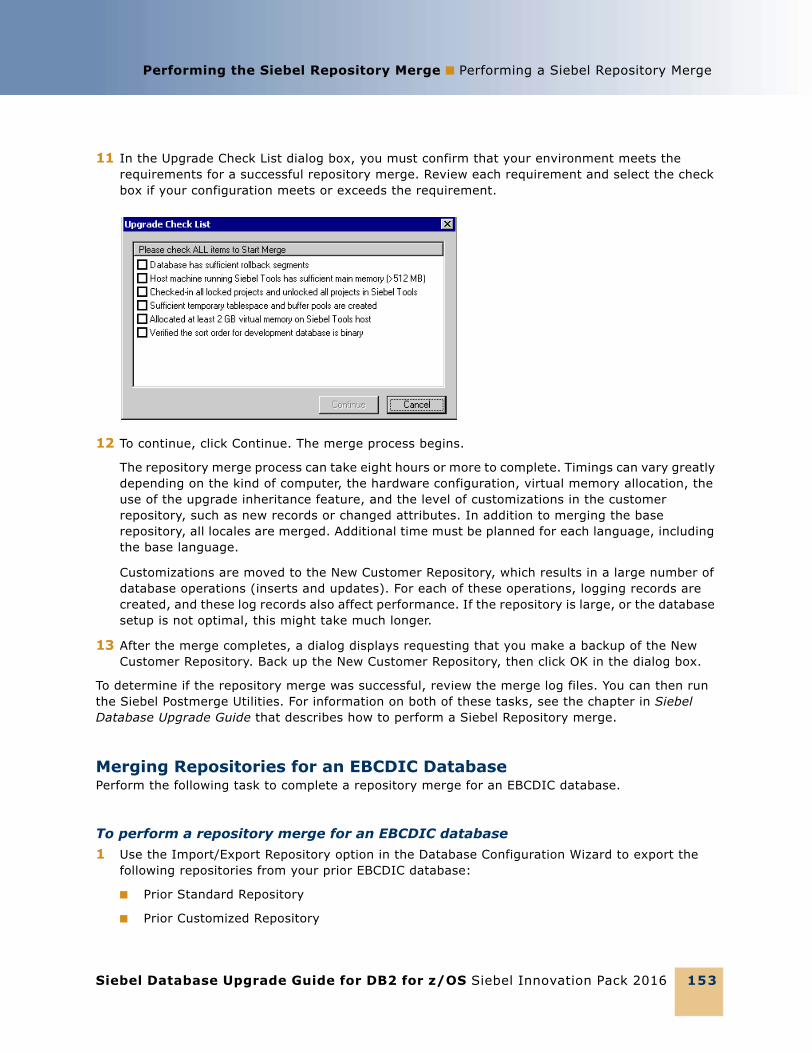
Performing the Siebel Repository Merge ■ Performing a Siebel Repository Merge
Siebel Database Upgrade Guide for DB2 for z/OS Siebel Innovation Pack 2016 153
11 In the Upgrade Check List dialog box, you must confirm that your environment meets the requirements for a successful repository merge. Review each requirement and select the check box if your configuration meets or exceeds the requirement.
12 To continue, click Continue. The merge process begins.
The repository merge process can take eight hours or more to complete. Timings can vary greatly depending on the kind of computer, the hardware configuration, virtual memory allocation, the use of the upgrade inheritance feature, and the level of customizations in the customer repository, such as new records or changed attributes. In addition to merging the base repository, all locales are merged. Additional time must be planned for each language, including the base language.
Customizations are moved to the New Customer Repository, which results in a large number of database operations (inserts and updates). For each of these operations, logging records are created, and these log records also affect performance. If the repository is large, or the database setup is not optimal, this might take much longer.
13 After the merge completes, a dialog displays requesting that you make a backup of the New Customer Repository. Back up the New Customer Repository, then click OK in the dialog box.
To determine if the repository merge was successful, review the merge log files. You can then run the Siebel Postmerge Utilities. For information on both of these tasks, see the chapter in Siebel Database Upgrade Guide that describes how to perform a Siebel Repository merge.
Merging Repositories for an EBCDIC DatabasePerform the following task to complete a repository merge for an EBCDIC database.
To perform a repository merge for an EBCDIC database1 Use the Import/Export Repository option in the Database Configuration Wizard to export the
following repositories from your prior EBCDIC database:
■ Prior Standard Repository
■ Prior Customized Repository
Siebel Database Upgrade Guide for DB2 for z/OS Siebel Innovation Pack 2016
Performing the Siebel Repository Merge ■ Performing a Siebel Repository Merge
154
■ New Standard Repository
■ New Customer Repository
See Using Siebel Tools for information on exporting repositories using the Database Configuration Wizard.
2 Prepare a new Siebel CRM ASCII database on which you will perform the repository merge. In the storage control file, the following tables must be defined with CLOBS set to Yes:
■ S_SCHMST_DBSCPT
■ S_BITMAP_DATA
■ S_SERVICE_SCRPT
3 Use the Import/Export Repository option in the Database Configuration Wizard to import the repositories exported from the EBCDIC database in Step 1 into the ASCII database prepared in Step 2.
NOTE: Make sure you select the Import Custom Repository option to import all languages used.
See Using Siebel Tools for information on importing repositories using the Database Configuration Wizard.
4 Launch Siebel Tools against the ASCII database.
5 Run the repository merge using the procedure, “Merging the Repositories for an ASCII Database” on page 151.
6 Generate Siebel EIM temporary columns. This task is described in the chapter in Siebel Database Upgrade Guide that describes how to perform the Siebel Repository merge.
7 Review the repository merge results to determine if the merge was successful. This task is described in the chapter in Siebel Database Upgrade Guide that describes how to perform the Siebel Repository merge. Verify that the repository merge was successful, and that all reported validation messages are either acceptable or fixed.
8 Use the Database Configuration Wizard to export the merged repository (the New Customer Repository) from the ASCII database.
9 Rename the existing New Customer Repository in the EBCDIC database.
10 Use the Database Configuration Wizard to import the merged New Customer Repository back into the EBCDIC database.
11 From the Tools application, pointing to the ASCII database, click Repository in the Object Explorer and copy the value against the Comments column for the New Customer Repository.
12 Connect to the EBCDIC database through the DB2 command line and update the Comments column with the copied value on the table S_REPOSITORY for the following value:
name= "New Customer Repository"
For example, if you copied a Comments value of:
APPLIED_PATCHES:Grid,UINavUpgrade,MVGUpgPatch77,UINavUpgrade,PCLWebTemplSwap,WFD,PM8.1;UpgEimCol,
Then, execute the following command against the EBCDIC database:
Performing the Siebel Repository Merge ■ Regenerating the Siebel Repository DefinitionFiles
Siebel Database Upgrade Guide for DB2 for z/OS Siebel Innovation Pack 2016 155
Update s_repository set comments
='APPLIED_PATCHES:Grid, UINavUpgrade,MVGUpgPatch77,UINavUpgrade,PCLWebTemplSwap,WFD,PM8.1;UpgEimCol'
Where name=New Customer Repository'
Regenerating the Siebel Repository Definition FilesUpgrades: All upgrades.
Environments: Development environment only.
Platforms: All platforms.
This topic is part of an upgrade process. See Chapter 4, “How to Perform a Siebel Database Upgrade.”
If you have modified repository objects after the development environment upgrade (upgphys) and before upgrading the production test environment, you must regenerate the schema.ddl and custrep.dat files. These files were created during the upgphys process:
■ Schema.ddl. This file contains the logical definition of the Siebel database.
■ Custrep.dat. This file contains the definition of repository objects.
These files are used as input to the production test and production environment upgrades. If you modify the object definitions or the schema definitions in the repository after these files have been created, you must regenerate the files.
Regenerating the schema.ddl FileUse this procedure to regenerate the schema.ddl file.
To regenerate the schema.ddl file1 On the Siebel Server where the Siebel Database Server files are installed, navigate to the
following location:
Windows: SIEBEL_ROOT\bin
UNIX: $SIEBEL ROOT/bin
2 Run the following command:
ddldict /u DatabaseOwner /p Password /c "ODBCDataSource" /d TableOwner /f DBSRVR_ROOT\DatabasePlatform\schema.ddl /e y /a y /l SiebelLogDir\sch_dict.log /n “Siebel Repository” /t dcir
where:
■ DatabaseOwner is the Siebel database Administrator account name.
■ Password is the Siebel database Administrator account password.

Siebel Database Upgrade Guide for DB2 for z/OS Siebel Innovation Pack 2016
Performing the Siebel Repository Merge ■ Regenerating the Siebel Repository Definition Files
156
■ ODBCDataSource is the ODBC name for connecting to the database. Enclose the name in quotes.
■ TableOwner is the Siebel table owner name.
■ DBSRVR_ROOT is the absolute path to the Siebel Database Configuration Utilities installation directory.
■ DatabasePlatform is the Siebel Database Configuration Utilities directory name for the database, that is, DB2390. The example shows Windows path syntax. On UNIX systems, use UNIX path syntax.
■ SiebelLogdir is the path to the directory where you want the output log placed (log output directory). The example shows Windows path syntax. On UNIX systems, use UNIX path syntax.
3 After the command completes, review the output logs for errors. If the log indicates there are errors, create a service request (SR) on My Oracle Support. You can log service requests by accessing My Oracle Support (Service Request tab), or by using your existing phone support numbers to contact Oracle Global Customer Support.
Regenerating the custrep.dat FileUse this procedure to regenerate the custrep.dat file.
To regenerate the custrep.dat file1 On the Siebel Server where the Siebel Database Configuration Utilities files are installed,
navigate to the following location:
Windows: SIEBEL_ROOT\bin
UNIX: $SIEBEL ROOT/bin
2 Run the following command:
repimexp /a e /u DatabaseOwner /p Password /c "ODBCDataSource" /d TableOwner /r “New Customer Repository” /f DBSRVR_ROOT\DatabasePlatform\custrep.dat /l SiebelLogDir\exprep.log
where:
■ DatabaseOwner is the Siebel database Administrator account name.
■ Password is the Siebel database Administrator account password.
■ ODBCDataSource is the ODBC name for connecting to the database. Enclose the name in quotes.
■ TableOwner is the Siebel table owner name.
■ DBSRVR_ROOT is the absolute path to the Siebel Database Configuration Utilities installation directory. The example shows Windows path syntax. On UNIX systems, use UNIX path syntax.
Performing the Siebel Repository Merge ■ Creating a New Siebel Repository File
Siebel Database Upgrade Guide for DB2 for z/OS Siebel Innovation Pack 2016 157
■ DatabasePlatform is the Siebel Database Configuration Utilities directory name for the database, that is, DB2390.
■ SiebelLogdir is the path to the directory where you want the output log placed. The example shows Windows path syntax. On UNIX systems, use UNIX path syntax.
3 After the command completes, review the output logs for errors. If the log indicates there are errors, create a service request (SR) on My Oracle Support. You can log service requests by accessing My Oracle Support (Service Request tab), or by using your existing phone support numbers to contact Oracle Global Customer Support.
Creating a New Siebel Repository FileUpgrades: All upgrades.
Environments: Development environment only.
This topic is part of an upgrade process. See Chapter 4, “How to Perform a Siebel Database Upgrade.”
You can optionally create a Siebel Repository File (.srf file) immediately after the repository merge. This enables you to run an application and evaluate whether you have resolved attribute conflicts correctly.
After the you have completed the upgphys portion of the upgrade, you must create a new .srf file. This file includes the merged repository changes.
If you will review your UI in more than one language, set the Tools Language setting and compile an .srf file for each language. For information about how to compile an .srf file for a specific language, see Siebel Global Deployment Guide.
Prerequisite: The repository merge must have been successful.
Compiling a New SRF File Immediately After the Repository MergePerform this optional procedure immediately after the repository merge and before you perform the upgphys upgrade in the development environment. Repeat this procedure as necessary to help evaluate how you have resolved attribute conflicts.
Do not use this procedure to compile an .srf file if you have completed the upgphys upgrade. Instead, see “Compiling a New .srf File After the Upgphys Upgrade” on page 158.

Siebel Database Upgrade Guide for DB2 for z/OS Siebel Innovation Pack 2016
Performing the Siebel Repository Merge ■ Creating a New Siebel Repository File
158
To compile a new .srf file after the repository merge1 Navigate to the following directory on an upgraded Siebel Server you will use to test applications
in the development environment. Verify that this is not the directory where Siebel Tools is installed:
Windows: SIEBEL_ROOT\OBJECTS\language
UNIX: $SIEBEL_ROOT/OBJECTS/language
where:
language is the installed language, for example, ENU.
2 Rename the siebel.srf file to siebel_release.srf.
3 On the Siebel Tools development workstation, connect to the database against which you ran the merge.
4 Start Siebel Tools.
5 Choose File, and then Open Repository.
6 Select New Customer Repository.
7 Choose Tools, and then Compile Projects.
8 Select All Projects.
9 Enter the path to the Siebel Server OBJECTS directory where you renamed the siebel.srf file, and specify siebel.srf as the filename.
NOTE: Do not enter the path to the Siebel Tools OBJECTS directory. You will overwrite and destroy the Siebel Tools .srf file.
10 Click Compile.
11 Copy the contents of the Siebel Tools WEBTEMPL directory to the Siebel Server WEBTEMPL directory.
12 Start the application.
Compiling a New .srf File After the Upgphys UpgradeAfter completing the upgphys upgrade in the development environment, you must compile a new .srf file. This updates the file with the merged repository changes. This is the .srf file you will copy to the Siebel Servers in your test environment.
To compile a new .srf file after the upgphys upgrade1 Navigate to the following directory on an upgraded Siebel Server you will use to test applications.
Verify that this is not the directory where Siebel Tools is installed:
Windows: SIEBEL_ROOT\OBJECTS\language
UNIX: $SIEBEL_ROOT/OBJECTS/language
where:
language is the installed language, for example, ENU.
Performing the Siebel Repository Merge ■ Creating a New Siebel Repository File
Siebel Database Upgrade Guide for DB2 for z/OS Siebel Innovation Pack 2016 159
2 Rename the siebel.srf file to siebel_release.srf.
3 On the Siebel Tools development workstation, connect to the database against which you ran the merge.
4 Start Siebel Tools.
5 Choose File, and then Open Repository.
6 Select Siebel Repository.
7 Choose Tools, and then Compile Projects.
8 Select All Projects.
9 Enter the path to the Siebel Server OBJECTS directory where you renamed the siebel.srf file, and specify siebel.srf as the filename.
CAUTION: Do not enter the path to the Siebel Tools OBJECTS directory. You will overwrite and destroy the Siebel Tools .srf file.
10 Click Compile.
Siebel Tools creates a new .srf file and places it at the specified location on the Siebel Server.
Siebel Database Upgrade Guide for DB2 for z/OS Siebel Innovation Pack 2016
Performing the Siebel Repository Merge ■ Creating a New Siebel Repository File
160
Siebel Database Upgrade Guide for DB2 for z/OS Siebel Innovation Pack 2016 161
12 Performing the Siebel Incremental Repository Merge
This chapter provides guidelines for performing an incremental upgrade of the Siebel database. It includes the following topics:
■ About the Siebel Incremental Repository Merge on page 161
■ Process of Performing an Incremental Upgrade of the Siebel Database from Siebel CRM Version 8.1.1.x on page 161
■ Before You Begin on page 163
■ Performing the Incremental Repository Merge on page 163
■ Editing the Siebel Tools Configuration File After the Development Environment Merge on page 165
NOTE: Use this chapter if you are upgrading from Siebel CRM version 8.1.1.0 and later (SIA repository) to Siebel Innovation Pack 2016 or later.
About the Siebel Incremental Repository MergeIf you are upgrading from Siebel CRM version 8.1.1.x (SIA repository) to Siebel Innovation Pack 2016 or later, you perform an incremental merge of the Siebel database. Performing an incremental repository merge is required if you intend to use the new features included in the Siebel Innovation Pack 2016 or later.
The process of performing an incremental repository merge is described in detail in Siebel Database Upgrade Guide. This chapter describes tasks that are specific to the z/OS platform. Where necessary, you are directed to Siebel Database Upgrade Guide for information on tasks that are common to all database platforms.
Process of Performing an Incremental Upgrade of the Siebel Database from Siebel CRM Version 8.1.1.x To perform an incremental upgrade of the Siebel database from Siebel CRM Version 8.1.1.x, perform the following tasks:
1 “Before You Begin” on page 163.
2 Perform the following required tasks for the incremental repository upgrade.
For information on completing these tasks, see the Incremental Repository Merge chapter in Siebel Database Upgrade Guide
Siebel Database Upgrade Guide for DB2 for z/OS Siebel Innovation Pack 2016
Performing the Siebel Incremental Repository Merge ■ Process of Performing an Incremental Upgrade of the Siebel Database from Siebel CRM Version 8.1.1.x
162
■ Preparing Siebel Tools for ODBC data source names
■ Editing the Siebel Tools configuration file
■ Testing your Siebel Tools login
■ Setting a primary non-ENU language
■ Copying ancestor repositories.
3 Preparing to run the Siebel Database Configuration Wizard.
Identify the information you must enter when running the Database Configuration utilities to perform the incremental repository upgrade. For information, see “Information Required by the Database Configuration Wizard” on page 119.
4 Upgrade the Siebel Database schema in the development environment by performing all of the tasks listed in the topic “Upgrade Siebel Database Schema (upgrep)” on page 58.
To upgrade the Siebel Database schema, you must run the Database Configuration Wizard upgrade option, Development environment: Upgrade Siebel Database Schema (upgrep), on two occasions, selecting each of the following upgrade processes in turn:
a zSeries Staging of Files for Upgrade
b zSeries Seed/Repository Upgrade
NOTE: You do not need to perform the task to install new license keys. This step is not required when performing a 8.1.1.x upgrade to Siebel Innovation Pack 2016 or later.
5 “Performing the Incremental Repository Merge” on page 163.
6 Review the Siebel Repository merge log files and resolve any errors, such as object property conflicts. If the incremental repository merge stops because of errors, resolve the errors then restart the merge.
For information on these tasks, see the Incremental Repository Merge chapter in Siebel Database Upgrade Guide.
7 Upgrade the custom database schema in the development environment by performing all of the tasks in “Upgrade Custom Database Schema (upgphys)” on page 60.
To upgrade the custom Database schema, you must run the Database Configuration Wizard upgrade option, Development environment: Upgrade Custom Database Schema (upgphys).
8 “Editing the Siebel Tools Configuration File After the Development Environment Merge” on page 165.
9 Prepare for the production upgrade by performing the following tasks, if applicable:
■ “About Moving the Customized Repository and Schema Definition Files” on page 115.
■ “Regenerating the Siebel Repository Definition Files” on page 155.
10 Upgrade the Siebel Database schema in the production or production test environments by performing all of the tasks listed in the following topics:
■ (Production Test) “Process of Upgrading a Production Test Environment” on page 63
Performing the Siebel Incremental Repository Merge ■ Before You Begin
Siebel Database Upgrade Guide for DB2 for z/OS Siebel Innovation Pack 2016 163
■ (Production) “Process of Upgrading a Siebel Production Environment” on page 71
To upgrade the Siebel Database schema in either a production or production test environment, you must run the Database Configuration Wizard upgrade options:
■ Prepare for Production Upgrade
■ Upgrade Siebel Database Schema (upgrep + upgphys). Select the following upgrade processes, as applicable.
❏ zSeries Staging of Files for Upgrade
❏ zSeries Seed/Repository Upgrade
Before You BeginBefore starting the incremental upgrade process, you must have installed the Siebel Enterprise Server, which includes the Siebel Gateway Name Server, the Siebel Server, and the Siebel Database Server. For installation information, see Siebel Installation Guide for the operating system you are using.
This task is a step in “Process of Performing an Incremental Upgrade of the Siebel Database from Siebel CRM Version 8.1.1.x” on page 161.
NOTE: Before running incremental repository merge, you must have one and only one repository in your development instance and that repository must be named Siebel Repository. Also, if you must delete any additional repositories, the only acceptable way to do so is to select the repository record in Siebel Tools and delete it. It is not acceptable to delete repositories using direct SQL.
About the Siebel Server and Siebel Tools on WindowsIt is recommended that the Siebel Server and Siebel Tools be installed on the same Windows computer. If your Siebel Server is installed on Windows, then the merge process automatically starts Siebel Tools to execute the incremental repository merge. For this reason, the Siebel Database Configuration Wizard must be started from the computer where Siebel Tools is installed.
If the Siebel Enterprise server is not installed on the same computer as Siebel Tools, then map a network drive from the computer where Siebel Tools is installed to the computer where Siebel Enterprise Server is installed. Use this mapped drive to specify the location of the Siebel Server when you run the Siebel Database Configuration Wizard.
Performing the Incremental Repository MergeThis topic describes how to perform the incremental repository merge to upgrade the Siebel database in your development environment.
This task is a step in “Process of Performing an Incremental Upgrade of the Siebel Database from Siebel CRM Version 8.1.1.x” on page 161.
Siebel Database Upgrade Guide for DB2 for z/OS Siebel Innovation Pack 2016
Performing the Siebel Incremental Repository Merge ■ Performing the Incremental Repository Merge
164
To perform the incremental repository merge1 After you have run the Siebel Database Configuration Wizard to upgrade the Siebel repository
and import seed data in the development environment (this is the last step in the upgrep process in Step 4 on page 162), the Wizard pauses and prompts you to backup the database and run database statistics. Perform these tasks as follows:
■ “About Backing Up the New Customer Repository or Database Schema” on page 145
■ “Generating RUNSTATS Jobs” on page 207
2 Return to the Siebel Database Configuration Wizard and either click Yes to continue with the upgrade or click No to stop at this step and restart the Wizard later.
■ (Windows) If you click yes, then provided that Siebel Tools is also installed on Windows, the Wizard automatically starts the incremental repository merge.
■ (UNIX) If you selected Y to continue with the upgrade, the Wizard displays a message directing you to perform the incremental repository merge. Enter N to pause the Wizard, then perform the steps in “Executing the Incremental Repository Merge Under UNIX” on page 164.
To resume the upgrade at a later point, see “Starting the Siebel Upgrade Wizard” on page 128.
3 After the incremental repository merge has completed, review the merge log files in Siebel Tools installation directory\LOG.
For information on reviewing merge log files and Siebel repository merge errors, see the chapter in Siebel Database Upgrade Guide that describes how to perform the Siebel incremental repository merge and reviewing the merge report.
NOTE: If the merge fails, or contains unacceptable errors, you can restart the merge as described in Siebel Database Upgrade Guide.
4 Perform the following postmerge tasks. For information on performing these tasks, see Siebel Database Upgrade Guide:
■ Review Siebel object property conflicts
■ Review conflicts at the attribute level
■ Mark conflict resolution as complete using Siebel Tools
5 Return to the upgrade wizard, then do one of the following:
■ (Windows) After you mark conflict resolution as complete, the Wizard automatically executes the last step in the upgrade, then finishes. Click OK.
■ (UNIX) Restart the upgrade wizard as described in “Starting the Siebel Upgrade Wizard” on page 128. The Wizard completes the upgrade, then finishes.
Executing the Incremental Repository Merge Under UNIXUse the following task to execute the incremental repository merge if you are running the Siebel Database Configuration Wizard on UNIX, or if Siebel Tools is installed on UNIX.
Performing the Siebel Incremental Repository Merge ■ Editing the Siebel ToolsConfiguration File After the Development Environment Merge
Siebel Database Upgrade Guide for DB2 for z/OS Siebel Innovation Pack 2016 165
Incremental repository merge is started automatically under Windows, but under UNIX you must initiate the process manually. You begin executing the incremental merge when the Upgrade Wizard pauses and notifies you to execute the manual merge.
To execute incremental repository merge under UNIX1 Compile the New Siebel Repository SRF, and replace the existing siebel_sia.srf with the newly
compiled SRF.
2 Copy the irm_sav_file.ssf from SIEBEL_ROOT\bin from the UNIX computer to Tools_ install_directory\bin on the Windows computer.
3 Execute the following command to start the incremental repository merge: siebdev /u UserName /p Password /d "ToolsDataSource" /c"SiebelToolsRoot\BIN\$Language\tools.cfg" /
iPackmode /IRM UpgDeltaMerge
4 Click Yes to continue.
To pause now and resume later, click No. To resume, see “Starting the Siebel Upgrade Wizard” on page 128.
Editing the Siebel Tools Configuration File After the Development Environment Merge After you have completed the upgphys process to upgrade the custom database schema in the development environment (see Step 7 on page 162), then edit the Siebel Tools configuration file as described in this topic.
This task is a step in “Process of Performing an Incremental Upgrade of the Siebel Database from Siebel CRM Version 8.1.1.x” on page 161.
NOTE: You set the prefix back to X_ from the changed value of SBL_ to enable you to create your own custom symbolic strings after the merge.
To change the SymStrPrefix value in tools.cfg file1 Navigate to Tools_install_directory\bin\lang, and open the tools.cfg file.
2 Make the following changes in the tools.cfg file:
a Change the SymStrPrefix value from SBL_ back to the default value of X_.
b Make sure the Set EnableToolsConstrain value is set to the default value of False. If it is not, then set the value to False.
c Change the DockRepositoryName value from Prior Customer Repository to Siebel Repository.
3 Save the Tools.cfg file.
Siebel Database Upgrade Guide for DB2 for z/OS Siebel Innovation Pack 2016
Performing the Siebel Incremental Repository Merge ■ Editing the Siebel Tools Configuration File After the Development Environment Merge
166
Siebel Database Upgrade Guide for DB2 for z/OS Siebel Innovation Pack 2016 167
-
13 Generating the Siebel Upgrade Files
This chapter describes how to generate the Siebel CRM upgrade files using the staging database. It includes the following topics:
■ About Generating the Upgrade Files on page 167
■ Process of Generating the Upgrade Files on page 167
■ Required Tasks for Generating the Upgrade Files on page 168
■ Preparing the Additive Schema and JCL Files on the z/OS Host on page 169
■ Applying the Additive Schema Changes to the Production Staging Database on page 174
■ Preparing for Table Creation on the Staging Database on page 176
■ Preparing and Executing the Nonadditive Schema and JCL Files on the z/OS Host on page 178
■ Processing the Index Schema File on page 183
■ Building JCL Templates for the Target Database on page 184
About Generating the Upgrade FilesUpgrades: All upgrades.
Environments: All environments.
After you have created the staging database, you generate the upgrade files by running the Upgrade Wizard against the staging database. The upgrade files are then transferred to the z/OS host where the JCL preparation process is done. The JCL preparation process constructs all the JCL to run the preupgrade and upgrade (in-place) processes for both the staging and target databases.
The midtier file generation process can be performed ahead of the in-place target database upgrade provided no further changes are made to the target database schema.
NOTE: The procedures in this chapter use Siebel-Scheduled job execution, but you can also choose to use a third party job scheduler. For information on choosing a scheduler, see “Executing Jobs Using Siebel-Scheduled Mode or Vendor-Scheduled Mode” on page 83.
Process of Generating the Upgrade FilesUpgrades: All upgrades.
Environments: All environments.
When the staging database has been created, you run the Database Configuration Wizard to generate the upgrade files. This process involves the following tasks:
Siebel Database Upgrade Guide for DB2 for z/OS Siebel Innovation Pack 2016
Generating the Siebel Upgrade Files ■ Required Tasks for Generating the Upgrade Files
168
1 Complete the tasks described in “Required Tasks for Generating the Upgrade Files” on page 168.
2 Restart the upgrade process from the midtier to generate upgrade files. See “Restarting the Siebel Upgrade Wizard After Pauses” on page 130 for further information. The Upgrade Wizard stops at Pause #1.
3 Transfer the files generated up to Pause #1 to the z/OS host and apply them. See “Preparing the Additive Schema and JCL Files on the z/OS Host” on page 169.
4 (Production environment only) If you are upgrading a production database, apply the additive schema changes to the staging database. See “Applying the Additive Schema Changes to the Production Staging Database” on page 174 for further information.
5 Restart the Upgrade wizard as described in “Restarting the Siebel Upgrade Wizard After Pauses” on page 130. After generating further files, the Upgrade Wizard stops at Pause #2.
6 Transfer the files generated up to Pause #2 to the z/OS host and run the jobs against the staging database. See “Preparing and Executing the Nonadditive Schema and JCL Files on the z/OS Host” on page 178.
7 Return to the midtier and restart the Upgrade wizard as described in “Restarting the Siebel Upgrade Wizard After Pauses” on page 130. The Upgrade Wizard generates the SCINDX.SQL file on the midtier and stops at Pause #3.
8 Transfer the SCINDX.SQL file to the z/OS host and apply it to drop old schema indexes and create new Siebel CRM schema indexes. See “Processing the Index Schema File” on page 183.
9 Build the JCL Templates that will be used to upgrade the target database. See “Building JCL Templates for the Target Database” on page 184 for further information.
This completes the File Generation Process.
Required Tasks for Generating the Upgrade FilesUpgrades: All upgrades.
Environments: All environments.
This topic is part of an upgrade process. See Chapter 4, “How to Perform a Siebel Database Upgrade.”
Complete the following tasks before starting to generate the upgrade files:
1 After you have created the staging database, you must extract the storage layout of the Siebel staging database from the DB2 catalog and merge it with a Siebel CRM storage control file so as to preserve any customizations you have made to the database layout in the upgraded database. To do this, run the Database Configuration Wizard and select the Extract from Catalog and Merge with Template option.
Name the extracted storage control file as follows:
■ Development environment upgrade: storage_upg_dev.ctl
■ Production environment upgrade: storage_upg_prod.ctl
For further information on this task, see “Extracting the Storage Control File” on page 97.
Generating the Siebel Upgrade Files ■ Preparing the Additive Schema and JCL Files onthe z/OS Host
Siebel Database Upgrade Guide for DB2 for z/OS Siebel Innovation Pack 2016 169
2 Validate the merged storage control file generated in Step 1 against the staging database. For information on this task, see “Validating the Extracted Storage Control File” on page 101. If there are validation errors, you must correct them before proceeding with the upgrade.
3 Rebuild tables in the target database that contain LONG VARCHAR columns. For information on this task, see “Rebuilding Target Tables Containing LONG VARCHAR Columns” on page 106.
You can rebuild target tables at any time before you start the upgrade but you must have completed this task before you apply ADDITIVE schema changes to the production staging database.
Preparing the Additive Schema and JCL Files on the z/OS HostUpgrades: All upgrades.
Environments: All environments.
This topic is part of an upgrade process. See Chapter 4, “How to Perform a Siebel Database Upgrade.”
When you restart the Upgrade Wizard after creating the staging database, it generates SQL and JCL templates for the file generation process. Specifically, the following files are generated:
■ Additive upgrade files
■ Pret files
■ Data migration files
When the Upgrade Wizard stops at Pause # 1, you must transfer these files to data sets on the z/OS host. These data sets are then used to create the SQL and JCL templates used to perform the upgrade. These tasks are described in this topic.
Perform the following procedures:
■ “Transferring the Additive Schema, PRET, and Data Migration Files to the z/OS Host” on page 169
■ “Preparing the z/OS Data Sets” on page 170
■ “Preparing the Additive Schema SQL and JCL Templates” on page 172
Transferring the Additive Schema, PRET, and Data Migration Files to the z/OS HostUse the following procedure to transfer the schema DDL files and the PRET and data migration files generated by the Upgrade Wizard on the midtier up to Pause #1 to the z/OS host.
NOTE: Before transferring the generated files to the z/OS host, edit them as required by relevant publications such as bulletins, alerts, and Siebel Release Notes on My Oracle Support.
Siebel Database Upgrade Guide for DB2 for z/OS Siebel Innovation Pack 2016
Generating the Siebel Upgrade Files ■ Preparing the Additive Schema and JCL Files on the z/OS Host
170
To transfer the files generated on the midtier 1 Navigate to the \DB2390\dbsrvr\dboutput\upgrade directory (Windows) or the /DB2390/
dbsrvr/dboutput/upgrade directory (UNIX) and double-click the ftp_pause1.bat file (Windows) or issue the following command (UNIX):
ftp -vn < ftp_pause1.txt > ftp_pause1.log
2 Enter your TSO password and press Enter.
All the Pause #1 files are transferred from the midtier to the z/OS host.
3 Review the ftp_pause1.log file which is created in the upgrade directory and verify that all the files listed in the ftp_pause1.txt file transferred successfully to z/OS staging data sets.
NOTE: If the FTP script fails because the password prompt is suppressed, then add the password after the user name in the ftp_pause1.txt, ftp_stg1.txt, ftp_pause1.txt, ftp_pause2.txt, and ftp_pause3.txt files and repeat the procedure above.
Preparing the z/OS Data SetsWhen you have transferred the files generated by the Siebel Upgrade Wizard up to Pause #1 from the midtier to the z/OS host, allocate and populate the data sets used to execute the upgrade jobs as described in the following procedure.
To prepare the z/OS data sets1 Go to the Siebel Upgrade Main Menu by entering the following command:
TSO EXEC ’DSNHLQ.SIEBEL.EXEC’
The panel ID is SBLUPG8P. You can find the panel ID in the bottom right corner of the screen.
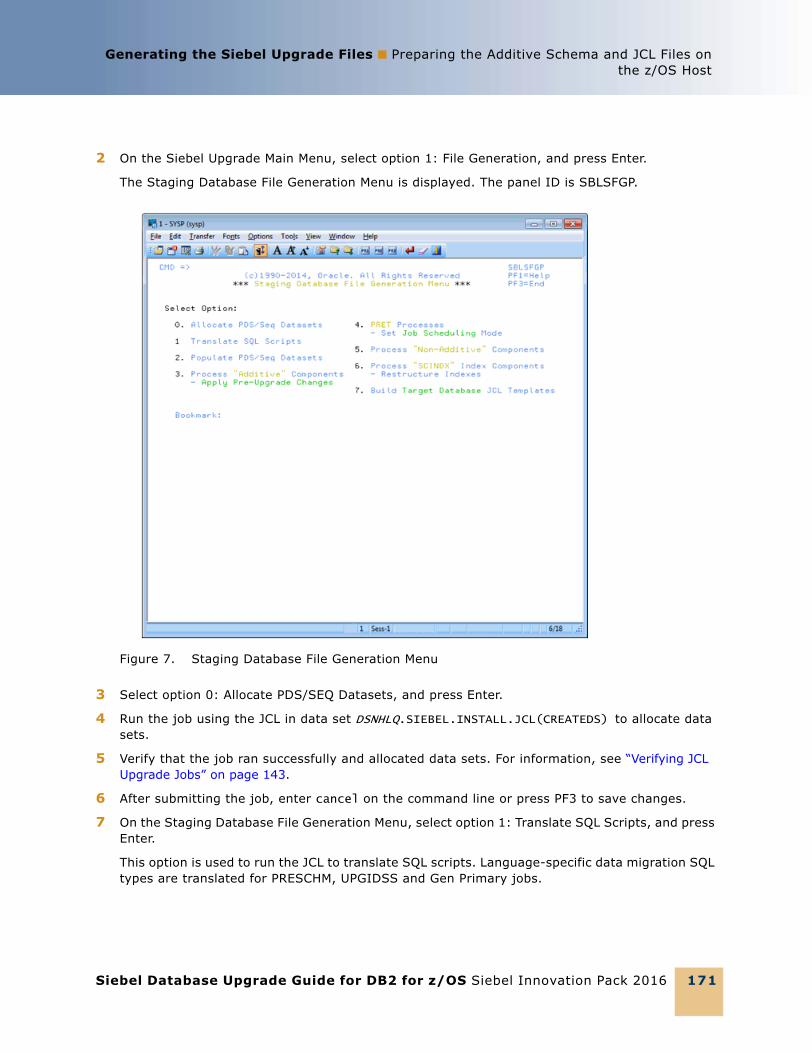
Generating the Siebel Upgrade Files ■ Preparing the Additive Schema and JCL Files onthe z/OS Host
Siebel Database Upgrade Guide for DB2 for z/OS Siebel Innovation Pack 2016 171
2 On the Siebel Upgrade Main Menu, select option 1: File Generation, and press Enter.
The Staging Database File Generation Menu is displayed. The panel ID is SBLSFGP.
3 Select option 0: Allocate PDS/SEQ Datasets, and press Enter.
4 Run the job using the JCL in data set DSNHLQ.SIEBEL.INSTALL.JCL(CREATEDS) to allocate data sets.
5 Verify that the job ran successfully and allocated data sets. For information, see “Verifying JCL Upgrade Jobs” on page 143.
6 After submitting the job, enter cancel on the command line or press PF3 to save changes.
7 On the Staging Database File Generation Menu, select option 1: Translate SQL Scripts, and press Enter.
This option is used to run the JCL to translate SQL scripts. Language-specific data migration SQL types are translated for PRESCHM, UPGIDSS and Gen Primary jobs.
Figure 7. Staging Database File Generation Menu
Siebel Database Upgrade Guide for DB2 for z/OS Siebel Innovation Pack 2016
Generating the Siebel Upgrade Files ■ Preparing the Additive Schema and JCL Files on the z/OS Host
172
8 Run the job using the JCL in data set DSNHLQ.SIEBEL.SP.CNTL(REC1147) where 1147 varies according to your upgrade path and language. If your primary language is ENU, the job runs in foreground mode. If your primary language is not enu, the job runs in batch mode. RECF1147 is used in the case of French language support.
9 Verify that the job ran successfully as described in “Verifying JCL Upgrade Jobs” on page 143. Check the Bookmark field to verify that the job translated the SQL scripts.
10 On the Staging File Generation Menu, select option 2: Populate PDS/SEQ Datasets, and press Enter.
11 Run the job using the JCL in data set DSNHLQ.SIEBEL.INSTALL.JCL(UNPACK01).
12 Verify that the job ran successfully as described as described in “Verifying JCL Upgrade Jobs” on page 143. The job return code must be 0, although a return code of 4 is acceptable if the data set is empty.
Verify that this job populates (unpacks) all PDS members into corresponding PDS data sets and sequential files. It is acceptable to have some empty data sets.
NOTE: PDS data sets are populated using IEBUPDTE; sequential files are populated using IEBGENER.
Preparing the Additive Schema SQL and JCL Templates Perform the following procedure to prepare the additive schema files.
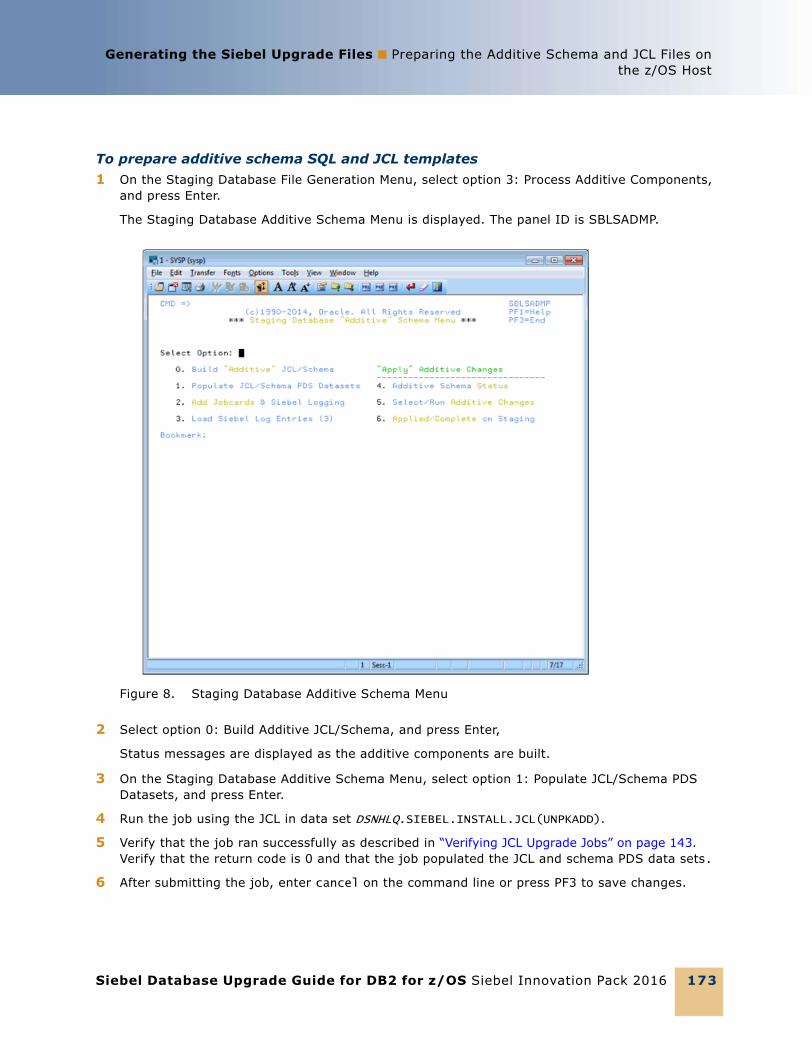
Generating the Siebel Upgrade Files ■ Preparing the Additive Schema and JCL Files onthe z/OS Host
Siebel Database Upgrade Guide for DB2 for z/OS Siebel Innovation Pack 2016 173
To prepare additive schema SQL and JCL templates1 On the Staging Database File Generation Menu, select option 3: Process Additive Components,
and press Enter.
The Staging Database Additive Schema Menu is displayed. The panel ID is SBLSADMP.
2 Select option 0: Build Additive JCL/Schema, and press Enter,
Status messages are displayed as the additive components are built.
3 On the Staging Database Additive Schema Menu, select option 1: Populate JCL/Schema PDS Datasets, and press Enter.
4 Run the job using the JCL in data set DSNHLQ.SIEBEL.INSTALL.JCL(UNPKADD).
5 Verify that the job ran successfully as described in “Verifying JCL Upgrade Jobs” on page 143. Verify that the return code is 0 and that the job populated the JCL and schema PDS data sets.
6 After submitting the job, enter cancel on the command line or press PF3 to save changes.
Figure 8. Staging Database Additive Schema Menu
Siebel Database Upgrade Guide for DB2 for z/OS Siebel Innovation Pack 2016
Generating the Siebel Upgrade Files ■ Applying the Additive Schema Changes to the Production Staging Database
174
7 On the Staging Database Additive Schema Menu, select option 2: Add Jobcards & Siebel Logging, and press Enter.
A message appears, asking you to confirm that the DSNHLQ.SIEBEL.PROC(ISPBAT) (ISPF batch procedure) is correctly configured.
8 Verify that the ISPF batch procedure, dsnhlq.siebel.proc(ispbat), is modified to your installation standards, then enter Y to confirm and press Enter.
9 Run the job using the JCL in data set DSNHLQ.SIEBEL.INSTALL.JCL(SUBJCL12). This job takes some time to complete.
10 Verify that the job ran successfully with a return code of 0. For information, see “Verifying JCL Upgrade Jobs” on page 143.
The JCL job card counts are displayed by job type. The number of jobs that are build for the additive components varies according to your upgrade path.
11 After submitting the job, enter cancel on the command line or press PF3 to save changes.
12 On the Staging Database Additive Schema Menu, select option 3: Load Siebel Log Entries (3), and press Enter. This option runs the job to load the Siebel logging table with additive entries for staging jobs.
13 Run the job using the JCL in data set DSNHLQ.SIEBEL.INSTALL.JCL(LOADLOG2).
14 Verify that the job ran successfully with a return code of 0. For information, see “Verifying JCL Upgrade Jobs” on page 143.
Verify that additional log entries have been loaded to the TMP_SBLLOG_TAR table on the staging database.
15 After submitting the job, enter cancel on the command line or press PF3 to save changes.
16 On the Staging Database Additive Schema Menu, select option 4: Additive Schema Status, and press Enter.
The Additive Schema Status panel is displayed. The panel ID is SBLSADLP. A list of the additive schema members is displayed and their staging status, either PENDING or COMPLETED.
17 To view a member in browse mode, select the member by entering any nonblank character in the Opt column for the member (you can select more than one member to view on each panel).
18 Press Enter. If you selected more than one member to view, press PF3 to move to the next member.
Applying the Additive Schema Changes to the Production Staging DatabaseUpgrades: All upgrades.
Environments: Production test, production.
NOTE: For development environment upgrades, all schema changes are processed as nonadditive, therefore this step is not required.
Generating the Siebel Upgrade Files ■ Applying the Additive Schema Changes to theProduction Staging Database
Siebel Database Upgrade Guide for DB2 for z/OS Siebel Innovation Pack 2016 175
This topic is part of an upgrade process. See Chapter 4, “How to Perform a Siebel Database Upgrade.”
When you are upgrading the production staging database, you can apply all or a subset of the additive schema upgrade files ahead of the in-place upgrade. Only the additive upgrade files that you choose to apply to the staging database can be applied as additive changes to the target database before the in-place upgrade. Any additive changes you do not apply become part of the nonadditive changes that are applied later. See “Applying the Nonadditive Schema Changes” on page 181 for further information.
NOTE: You must rebuild tables in the target database that contain LONG VARCHAR columns before you apply additive schema changes to the production staging database. For information, see “Rebuilding Target Tables Containing LONG VARCHAR Columns” on page 106.
To apply additive schema changes1 On the Staging Database Additive Schema Menu, select option 5: Select / Run Additive Changes,
and press Enter.
The Staging Pending ADDITIVE Job Submission Menus is displayed. The panel ID is SBLSADDP.
2 Choose whether you want to apply all, none, or a subset of the additive schema changes:
■ If you decide not to apply any of the additive schema changes, enter N for the Apply All (Y/N) prompt. Press PF3 until you return to the Staging Database File Generation menu.
■ To apply all of the additive schema changes, do the following:
❏ Enter Y for the Apply All (Y/N) prompt, and press Enter.
❏ Run the job using the JCL in data set DSNHLQ.SIEBEL.INSTALL.JCL(ADDVSCHS).
■ To apply a subset of the additive schema changes, enter either J, S, or SUB in the Opt column of the appropriate member, and press Enter:
❏ Typing SUB in the Opt column for a member automatically submits the JCL to apply the additive change in the member: DSNHLQ.SIEBEL.ADD.JCL(member)
❏ Typing J in the Opt column for a member places you in edit mode in the JCL for the member: DSNHLQ.SIEBEL.ADD.JCL(member)
❏ Typing S in the Opt column for a member places you in edit mode in the SQL for the member: DSNHLQ.SIEBEL.ADD.SQL(member)
NOTE: If you choose to selectively apply additive schema changes, bear in mind that some schema changes might require that other additive database, table space or table changes are applied first. In general, submit additive schema changes in database, table space, table hierarchical order.
3 Verify that the jobs ran successfully as described in “Verifying JCL Upgrade Jobs” on page 143.
You can view the Siebel staging database job log to check whether an additive job completed successfully or not by navigating to the In-Place Upgrade Main Menu and selecting option 5: Staging Database Joblog. See “Viewing the Siebel Job Log Status” on page 218 for further information.

Siebel Database Upgrade Guide for DB2 for z/OS Siebel Innovation Pack 2016
Generating the Siebel Upgrade Files ■ Preparing for Table Creation on the Staging Database
176
4 On the Staging Database Additive Schema Menu, select option 6: Applied / Complete on Staging, and press Enter.
A screen is displayed that lists the status of each of the additive schema changes you applied. Do not proceed until the additive schema changes you chose to apply complete successfully. Any additive changes you do not apply become part of the nonadditive changes that are applied during the in-place database upgrade.
Preparing for Table Creation on the Staging DatabaseUpgrades: All upgrades.
Environments: All environments.
This topic is part of an upgrade process. See Chapter 4, “How to Perform a Siebel Database Upgrade.”
The PRET (pre-table) jobs are run against the staging database tables at the beginning of the upgrade; a small number of tables are altered by the PRET step to prepare the database for upgrading. There are two types of PRET jobs: jobs that you submit manually and jobs that run automatically. The manual PRET jobs perform the following tasks (this list varies according to your upgrade path):
■ Determine whether there are CLOBs in the schema
■ Query catalog tables for clustering index information
The automatic jobs drop some indexes, rename table(s) and add columns to tables. If you are using Siebel Scheduling, the automatic jobs use the unique job name prefixes you previously specified.
Complete the following procedures to prepare the staging database to generate unload, load, and schema files:
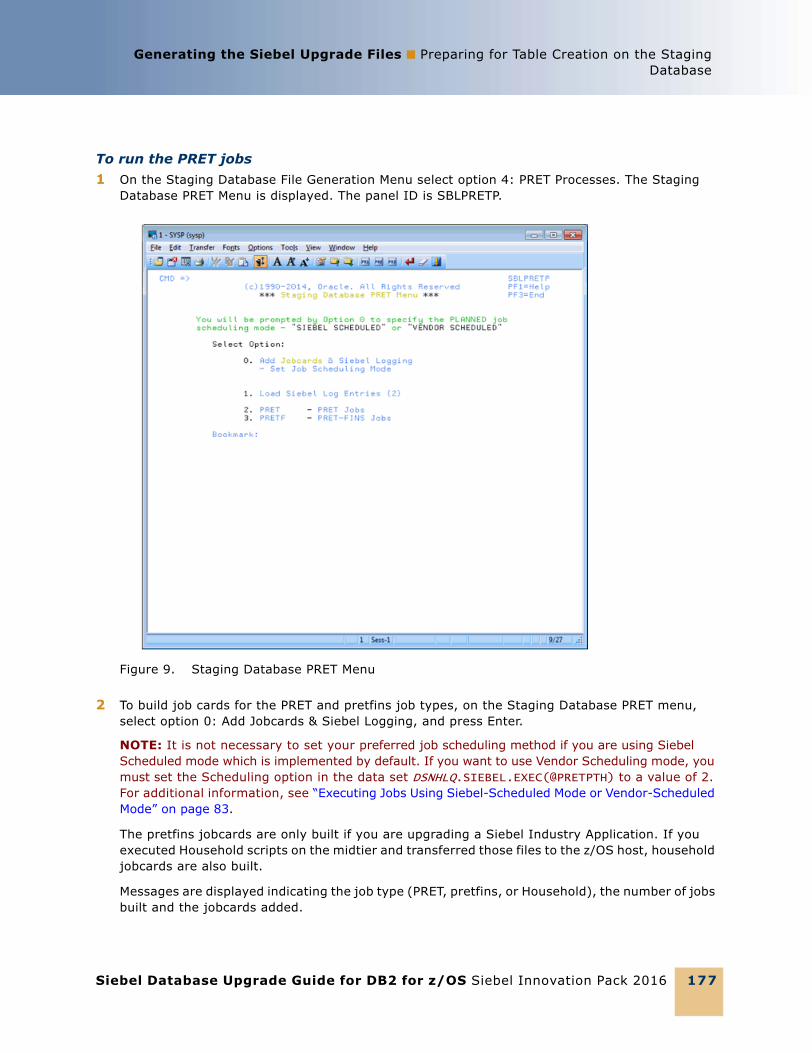
Generating the Siebel Upgrade Files ■ Preparing for Table Creation on the StagingDatabase
Siebel Database Upgrade Guide for DB2 for z/OS Siebel Innovation Pack 2016 177
To run the PRET jobs1 On the Staging Database File Generation Menu select option 4: PRET Processes. The Staging
Database PRET Menu is displayed. The panel ID is SBLPRETP.
2 To build job cards for the PRET and pretfins job types, on the Staging Database PRET menu, select option 0: Add Jobcards & Siebel Logging, and press Enter.
NOTE: It is not necessary to set your preferred job scheduling method if you are using Siebel Scheduled mode which is implemented by default. If you want to use Vendor Scheduling mode, you must set the Scheduling option in the data set DSNHLQ.SIEBEL.EXEC(@PRETPTH) to a value of 2. For additional information, see “Executing Jobs Using Siebel-Scheduled Mode or Vendor-Scheduled Mode” on page 83.
The pretfins jobcards are only built if you are upgrading a Siebel Industry Application. If you executed Household scripts on the midtier and transferred those files to the z/OS host, household jobcards are also built.
Messages are displayed indicating the job type (PRET, pretfins, or Household), the number of jobs built and the jobcards added.
Figure 9. Staging Database PRET Menu
Siebel Database Upgrade Guide for DB2 for z/OS Siebel Innovation Pack 2016
Generating the Siebel Upgrade Files ■ Preparing and Executing the Nonadditive Schema and JCL Files on the z/OS Host
178
3 To load Siebel logging tables for the staging database upgrade jobs, on the Staging Database PRET Menu, select option 1: Load Siebel Log Entries (2), and press Enter.
4 Submit the job using the JCL in data set DSNHLQ.SIEBEL.INSTALL.JCL(LOADLOG3).
5 After submitting the job, verify that the job ran successfully with a return code of 0. For information, see “Verifying JCL Upgrade Jobs” on page 143. Verify that additional log entries have been loaded to the TMP_SBLLOG_TAR table on the staging database.
6 To run the staging PRET processes, on the Staging Database PRET menu, select option 2: PRET - PRET Jobs, and press Enter.
7 Submit the job using the JCL in data set DSNHLQ.SIEBEL.INSTALL.JCL(STGPRET).
This triggers the first PRET job, which then automatically submits the next PRET job in sequence. The number of PRET jobs that are automatically submitted varies according to your upgrade path.
8 After submitting the job, verify that the job ran successfully with a return code of 0. For information, see “Verifying JCL Upgrade Jobs” on page 143.
9 To run the staging pretfins jobs, on the Staging Database PRET menu, select option 3: PRETF - PRET-FINS Jobs, and press Enter.
NOTE: You only have to perform this step if you are performing an Siebel Industry Applications (SIA) upgrade.
10 Submit the job using the JCL in data set DSNHLQ.SIEBEL.INSTALL.JCL(STGPRETF). This triggers the first PRET-FINS job, which then automatically submits the next PRET job in sequence. The number of PRET jobs that are automatically submitted varies according to your upgrade path.
11 After submitting the job, verify that the job ran successfully with a return code of 0. For information, see “Verifying JCL Upgrade Jobs” on page 143.
12 You have now completed the additive schema staging file generation process. You must now return to the midtier and restart the Siebel Upgrade Wizard to generate the nonadditive schema files, Temp table DDL files, and the load and unload files.
Preparing and Executing the Nonadditive Schema and JCL Files on the z/OS HostUpgrades: All upgrades.
Environments: All environments.
This topic is part of an upgrade process. See Chapter 4, “How to Perform a Siebel Database Upgrade.”
When the Upgrade Wizard stops at Pause # 2, you must transfer the nonadditive schema files, Temp table DDL files, and the load and unload files that were generated on the midtier to data sets on the z/OS host. You then prepare the files, and apply them to the staging database. Perform the following tasks:
■ “Transferring the Nonadditive Schema, Temp Table, and Load and Unload Files to the z/OS Host” on page 179
Generating the Siebel Upgrade Files ■ Preparing and Executing the Nonadditive Schemaand JCL Files on the z/OS Host
Siebel Database Upgrade Guide for DB2 for z/OS Siebel Innovation Pack 2016 179
■ “Preparing the Nonadditive Schema SQL and JCL Templates and Executing the DDL” on page 179
■ “Applying the Nonadditive Schema Changes” on page 181
■ “Creating the Data Migration Indexes” on page 182
Transferring the Nonadditive Schema, Temp Table, and Load and Unload Files to the z/OS HostUse the following procedure to transfer the nonadditive schema DDL files, the Temp table DDL files, and the Load and Unload control cards generated by the Upgrade Wizard on the midtier up to Pause #2 to the z/OS host.
NOTE: Edit the generated files as required by Siebel Technical Notes, Siebel Alerts and Siebel Release Notes on My Oracle Support, or other publications before transferring them to the z/OS host.
To transfer the files generated on the midtier 1 Navigate to the \DB2390\dbsrvr\dboutput\upgrade directory (Windows) or the /DB2390/
dbsrvr/dboutput/upgrade directory (UNIX) and double-click the ftp_pause2.bat file (Windows) or issue the following command (UNIX):
ftp -vn < ftp_pause2.txt > ftp_pause2.log
2 Enter your TSO password and press Enter.
All the Pause #2 files are transferred from the midtier to the z/OS host.
3 Review the ftp_pause2.log file which is created in the upgrade directory and verify that all the files listed in the ftp_pause2.txt file transferred successfully to z/OS staging data sets.
Preparing the Nonadditive Schema SQL and JCL Templates and Executing the DDLPerform the following procedure to prepare the nonadditive schema files.
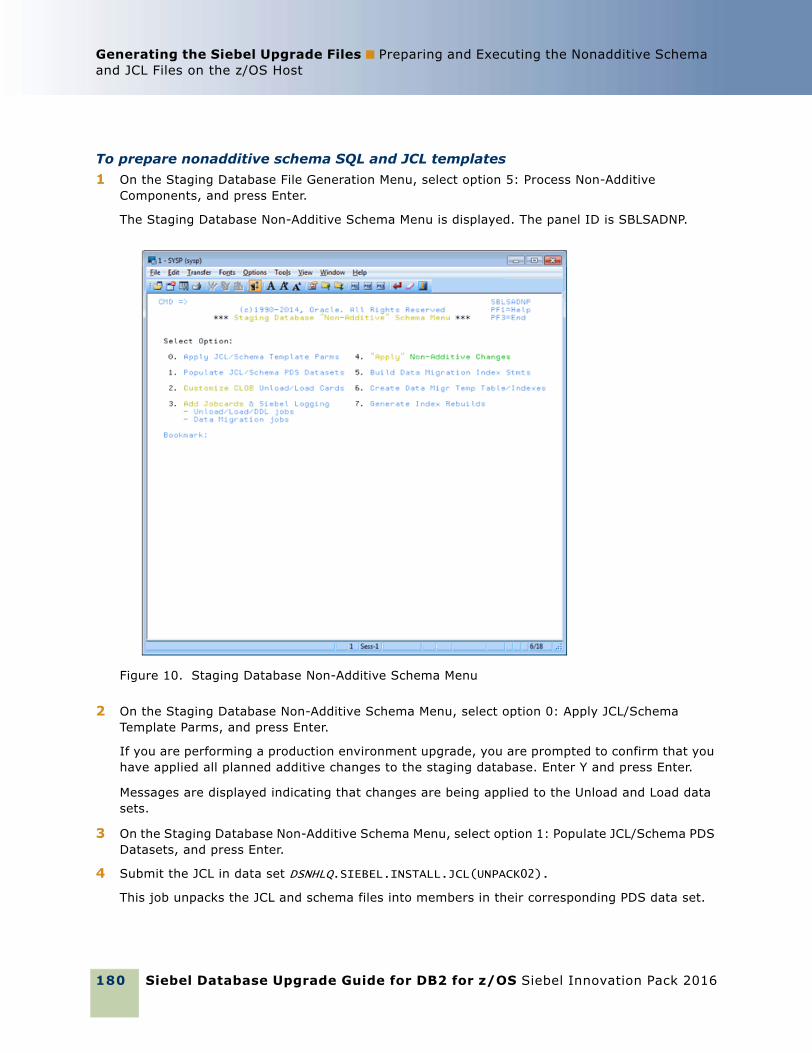
Siebel Database Upgrade Guide for DB2 for z/OS Siebel Innovation Pack 2016
Generating the Siebel Upgrade Files ■ Preparing and Executing the Nonadditive Schema and JCL Files on the z/OS Host
180
To prepare nonadditive schema SQL and JCL templates1 On the Staging Database File Generation Menu, select option 5: Process Non-Additive
Components, and press Enter.
The Staging Database Non-Additive Schema Menu is displayed. The panel ID is SBLSADNP.
2 On the Staging Database Non-Additive Schema Menu, select option 0: Apply JCL/Schema Template Parms, and press Enter.
If you are performing a production environment upgrade, you are prompted to confirm that you have applied all planned additive changes to the staging database. Enter Y and press Enter.
Messages are displayed indicating that changes are being applied to the Unload and Load data sets.
3 On the Staging Database Non-Additive Schema Menu, select option 1: Populate JCL/Schema PDS Datasets, and press Enter.
4 Submit the JCL in data set DSNHLQ.SIEBEL.INSTALL.JCL(UNPACK02).
This job unpacks the JCL and schema files into members in their corresponding PDS data set.
Figure 10. Staging Database Non-Additive Schema Menu
Generating the Siebel Upgrade Files ■ Preparing and Executing the Nonadditive Schemaand JCL Files on the z/OS Host
Siebel Database Upgrade Guide for DB2 for z/OS Siebel Innovation Pack 2016 181
5 After submitting the job, verify that the job ran successfully with a return code of 0. For information, see “Verifying JCL Upgrade Jobs” on page 143.
6 On the Staging Database Non-Additive Schema Menu, select option 2: Customize CLOB Unload/Load cards, and press Enter.
If the target database does not have CLOB columns on any tables, one of two message types appears:
■ A message box that indicates that this step is not required.
■ SADN0037: No CLOB
If CLOBs exist on the target system, a series of messages appear. Read them carefully. This option will run in the foreground and then place you in edit mode in the following data set:
DSNHLQ.SIEBEL.INSTALL.JCL(CLOBCOPY)
7 After submitting the job, verify that the job ran successfully with a return code of 0 or 4. For information, see “Verifying JCL Upgrade Jobs” on page 143.
8 On the Staging Database Non-Additive Schema Menu, select option 3: Add Jobcards & Siebel Logging to Unloads/Loads and Data Migration Jobs, and press Enter.
A message appears, asking you to confirm that the DSNHLQ.SIEBEL.PROC(ISPBAT) (ISPF batch proc) is correctly configured.
You can choose to modify the Unload/Load and data migration jobs in either TSO foreground mode or batch mode. It is recommended that you perform the procedure in batch mode.
In foreground mode, messages are displayed on the screen as the JCL-Prep progresses. This mode will lock up your session until the option is complete. Each option can take an extended period of time (more than thirty minutes), depending on the user’s dispatching priority.
NOTE: It is recommended that you perform the procedure in batch mode. Before doing so, make sure you modify the ISPF batch procedure, dsnhlq.siebel.proc(ispbat), to your installation standards. If you perform the procedure in foreground mode, make sure your logon region size is at least 7092.
9 Enter Y to confirm that the ISPF batch proc is correctly configured, and press Enter.
10 Press Enter again and you are placed in edit mode in the following data set:
DSNHLQ.SIEBEL.INSTALL.JCL(SBLJCL23)
11 After submitting the job, verify that the job ran successfully with a return code of 0 or 4. For information, see “Verifying JCL Upgrade Jobs” on page 143.
NOTE: If you are using Siebel-Scheduled mode, the data migration JCL includes a jobstep that automatically submits dependent jobs in the data migration flow until all jobs are completed for that data migration job type.
Applying the Nonadditive Schema ChangesPerform the following procedure to apply the nonadditive schema changes to the staging database.
Siebel Database Upgrade Guide for DB2 for z/OS Siebel Innovation Pack 2016
Generating the Siebel Upgrade Files ■ Preparing and Executing the Nonadditive Schema and JCL Files on the z/OS Host
182
If you are performing a development database upgrade, or if you are performing a production database upgrade but chose not to apply any additive changes in advance, all the Siebel CRM schema upgrade changes for the current release are now applied to the staging database.
To apply nonadditive schema changes1 On the Staging Database Non-Additive Schema Menu, select option 4: Apply Non-Additive
Changes, and press Enter.
2 Run the job using the JCL in data set DSNHLQ.SIEBEL.INSTALL.JCL(SCHEMAS).
3 After submitting the job, verify that the job ran successfully with a return code of 0 or 4. For information, see “Verifying JCL Upgrade Jobs” on page 143.
4 After submitting the job, enter cancel on the command line or press PF3 to save changes.
Creating the Data Migration IndexesPerform the following procedure to create temporary tables and indexes for the data migration scripts and to rebuild indexes.
To create data migration indexes1 On the Staging Database Non-Additive Schema Menu, select option 5: Build Data Migration Index
Statements, and press Enter.
Messages are displayed on screen indicating that data migration CEATE INDEX and DROP INDEX statements are being generated. The messages you receive depends on your upgrade path.
2 On the Staging Database Non-Additive Schema Menu, select option 6: Create Data Migration Temp Table/Indexes, and press Enter.
This job creates COMMON temp tables and indexes used by upgrade data migration SQL scripts.
3 Submit the JCL in one of the following data sets:
■ For Siebel Industry Application (SIA) upgrades, use DSNHLQ.SIEBEL.INSTALL.JCL(DMXSIA7)
■ For Siebel Business Applications upgrades, use DSNHLQ.SIEBEL.INSTALL.JCL(DMXHOR).
4 Verify that the job ran successfully with a return code of 0, 4, or 8. For information, see “Verifying JCL Upgrade Jobs” on page 143
5 After submitting the job, enter cancel on the command line or press PF3 to save changes.
6 On the Staging Database Non-Additive Schema Menu, select option 7: Generate Index Rebuilds, and press Enter.
A message appears, asking you to confirm that the DSNHLQ.SIEBEL.PROC(ISPBAT) (ISPF batch proc) is correctly configured.
Make sure that the ISPF batch procedure dsnhlq.siebel.proc(ispbat) is modified to your installation standards.
Generating the Siebel Upgrade Files ■ Processing the Index Schema File
Siebel Database Upgrade Guide for DB2 for z/OS Siebel Innovation Pack 2016 183
7 Enter Y to confirm that the ISPF batch procedure is correctly configured, then press Enter.
8 When the following message appears, specify the number of indexes to be included in each rebuild job, and press Enter:
NUMBER OF INDEXES PER REBUILD JOB.
The maximum number of indexes that can be included in a job is 10. It is recommended that you specify 3.
CAUTION: Consider your objective before choosing a maximum number of indexes for each job. Increasing this number results in fewer jobs but requires more memory and sort work. Reducing this number results in more jobs, which reduces resource requirements but causes fewer indexes to be built in parallel.
9 Press Enter, and you are placed in Edit mode in the DSNHLQ.SIEBEL.INSTALL(SBLJCL24) data set.
10 Submit the job and verify that the job ran successfully with a return code of 0 or 4. For information, see “Verifying JCL Upgrade Jobs” on page 143.
11 Press PF3 twice to return to the Staging Database File Generation Menu.
Processing the Index Schema FileUpgrades: All upgrades.
Environments: All environments.
This topic is part of an upgrade process. See Chapter 4, “How to Perform a Siebel Database Upgrade.”
When the Upgrade Wizard stops at Pause # 3, you must transfer the SCINDX.SQL file to the z/OS host and apply it to prepare the Siebel CRM index DDL and to build DROP statements for old schema indexes.
Perform the following procedures:
■ “Transferring the SCINDX.SQL File to the z/OS Host” on page 183
■ “Restructuring the Index DDL” on page 184
Transferring the SCINDX.SQL File to the z/OS HostUse the following procedure to transfer the SCINDX.SQL file generated by the Upgrade Wizard on the midtier up to Pause #3 to the z/OS host.
NOTE: Edit the generated files as required by Siebel Technical Notes, Siebel Alerts and Siebel Release Notes on My Oracle Support, or other publications before transferring them to the z/OS host.
To transfer the file generated on the midtier 1 Navigate to the \DB2390\dbsrvr\dboutput\upgrade directory (Windows) or the /DB2390/
dbsrvr/dboutput/upgrade directory (UNIX) and double-click the ftp_pause3.bat file (Windows) or issue the following command (UNIX):
Siebel Database Upgrade Guide for DB2 for z/OS Siebel Innovation Pack 2016
Generating the Siebel Upgrade Files ■ Building JCL Templates for the Target Database
184
ftp -vn < ftp_pause3.txt > ftp_pause3.log
2 Enter your TSO password and press Enter.
The SCINDX.SQL file is transferred from the midtier to the z/OS host.
3 Review the ftp_pause3.log file which is created in the upgrade directory and verify that the SCINDX file transferred successfully to z/OS staging data sets.
Restructuring the Index DDLPerform the following procedure to prepare the Index JCL.
To restructure the index DDL1 On the Staging Database File Generation Menu, select option 6: Process SCINDX Index
Components - Restructure Indexes, and press Enter.
A message appears, asking you to confirm that the DSNHLQ.SIEBEL.PROC(ISPBAT) (ISPF batch proc) is correctly configured.
You can choose to generate index rebuilds in either TSO foreground mode or batch mode. It is recommended that you perform the procedure in batch mode.
2 Enter Y to confirm that the ISPF batch proc is correctly configured, and press Enter.
3 When the following message appears, specify the number of indexes to be included in each rebuild job, and press Enter:
NUMBER OF INDEXES PER REBUILD JOB.
The maximum number of indexes that can be included in a job is 10. It is recommended that you specify 3.
CAUTION: Consider your objective before choosing a maximum number of indexes for each job. Increasing this number results in fewer jobs but requires more memory and sort work. Reducing this number results in more jobs, which reduces resource requirements but results in fewer indexes being built in parallel.
4 Press Enter, and you are placed in Edit mode in the DSNHLQ.SIEBEL.INSTALL(SBLJCL31) data set.
5 Submit the job and verify that the job ran successfully with a return code of 0 or 4. For information, see “Verifying JCL Upgrade Jobs” on page 143.
6 Press PF3 twice to return to the Staging Database File Generation Menu.
Building JCL Templates for the Target DatabasePerform the following procedure to build the JCL templates for the target database.
Generating the Siebel Upgrade Files ■ Building JCL Templates for the Target Database
Siebel Database Upgrade Guide for DB2 for z/OS Siebel Innovation Pack 2016 185
To build JCL templates for the target database1 On the Staging Database File Generation Menu, select option 7: Build Target Database JCL
Templates, and press Enter.
This option applies target database LPAR, Tableowner and STORGROUP values to the JCL templates that were created to run the preupgrade and upgrade (in-place) processes for the staging database so they are appropriate for the target database upgrade.
2 Submit the JCL in one of the following data sets:
■ For Siebel Industry Application (SIA) upgrades, use DSNHLQ.SIEBEL.INSTALL.JCL(ALLSIAS)
■ For Siebel Business Applications upgrades, use DSNHLQ.SIEBEL.INSTALL.JCL(ALLHORS)
3 Verify that the job ran successfully with a return code of 0 or 4. For information, see “Verifying JCL Upgrade Jobs” on page 143.
4 After submitting the job, enter cancel on the command line or press PF3 to save changes.
5 Press PF3 twice to return to the Staging Database File Generation Menu.
When you successfully complete the target database file generation process, the File Generation option (1) on the Siebel In-Place Upgrade Main Menu is no longer available. You are now ready to start the target database pre-upgrade and upgrade processes.
Siebel Database Upgrade Guide for DB2 for z/OS Siebel Innovation Pack 2016
Generating the Siebel Upgrade Files ■ Building JCL Templates for the Target Database
186
Siebel Database Upgrade Guide for DB2 for z/OS Siebel Innovation Pack 2016 187
14 Upgrading the Target Database
This chapter describes how to upgrade your database to the current release of Siebel CRM using the upgrade files you generated against the staging database. It includes the following topics:
■ Process of Upgrading the Target Database on page 187
■ Dropping Partitioned EIM Tables on page 188
■ Creating and Loading Siebel Log Tables on page 189
■ Applying Additive Upgrade Changes to the Target Database on page 190
■ Renaming the Production Environment Repository on page 193
■ Performing the In-Place Target Database Upgrade on page 193
■ Restarting Upgrade Jobs That Fail on page 208
Process of Upgrading the Target DatabaseUpgrades: All upgrades.
Environments: All environments.
This topic is part of an upgrade process. See Chapter 4, “How to Perform a Siebel Database Upgrade.”
After you have generated upgrade files against the staging database and prepared the JCL used to run the upgrade processes, you are ready to perform the target database upgrade. This involves the following steps:
1 “Dropping Partitioned EIM Tables” on page 188
2 “Creating and Loading Siebel Log Tables” on page 189
3 (Production upgrades only) “Applying Additive Upgrade Changes to the Target Database” on page 190
4 (Production upgrades only) “Renaming the Production Environment Repository” on page 193
5 “Performing the In-Place Target Database Upgrade” on page 193
For production database upgrades, the additive changes applied to the staging database are applied to the production target database as part of the preupgrade process. The remaining nonadditive, schema, unload, load and data migration processes are then applied to the target database as part of the critical path in-place upgrade.
Siebel Database Upgrade Guide for DB2 for z/OS Siebel Innovation Pack 2016
Upgrading the Target Database ■ Dropping Partitioned EIM Tables
188
For development database upgrades, upgrade changes are applied in one step to the target database during the in-place upgrade.
NOTE: The procedures in this chapter use Siebel-Scheduled job execution. For information on job scheduling options, see “Executing Jobs Using Siebel-Scheduled Mode or Vendor-Scheduled Mode” on page 83.
Dropping Partitioned EIM TablesDuring the target database upgrade, EIM tables are dropped after additive changes are applied to the database and are later re-created when the nonadditive schema changes are applied to the database.
When a partitioned EIM table is dropped, however, the table space is also dropped. Because table space creation is considered an additive change, the upgrade attempts to create EIM table spaces for partitioned EIM tables when other additive changes are applied to the target database, that is, before the partitioned EIM tables and related table spaces have been dropped.
To avoid processing errors during the target database upgrade, therefore, you must manually change the sequence in which partitioned EIM tables are dropped. Drop partitioned EIM tables before you apply additive schema changes to the target database.
The following procedure describes how to change the sequence in which partitioned EIM tables are dropped.
To drop partitioned EIM tables1 Run the sample code listed in “Sample Code for Generating a List of Table Spaces to Drop” on
page 188 to generate a list of the table spaces that contain partitioned EIM tables.
A DROP command is also generated for each of the table spaces.
2 Run the generated DROP commands against the target database before you apply additive schema updates.
The table spaces are re-created when you apply additive upgrade changes to the database.
3 Edit the data set SIEBEL.INSTALL.JCL(INFDRPT) and delete the steps that drop the table spaces containing partitioned EIM tables, that is, delete the steps that drop the table spaces you previously dropped in Step 2 on page 188.
The data set SIEBEL.INSTALL.JCL(INFDRPT) is run as part of the process of “Preparing the Target Database for the Upgrade” on page 195.
Sample Code for Generating a List of Table Spaces to DropThe following sample SQL code can be used to generate a list of the table spaces that must be dropped before applying additive schema changes.
The table spaces can be determined with the following SQL:

Upgrading the Target Database ■ Creating and Loading Siebel Log Tables
Siebel Database Upgrade Guide for DB2 for z/OS Siebel Innovation Pack 2016 189
---- CREATE DROP STATEMENTS FOR EIM PARTITIONED TABLES--SET CURRENT SQLID='xxxxxxxx' ; <-- set to current TARGET tableownerSELECTSUBSTR(CONCAT(CONCAT(' DROP TABLESPACE ' ,CONCAT(STRIP(S.DBNAME) ,CONCAT('.',STRIP(S.NAME)))), ' /'), 1, 36) AS STATEMENTFROM SYSIBM.SYSTABLES T, SYSIBM.SYSTABLESPACE SWHERE T.CREATOR = CURRENT SQLIDAND T.NAME LIKE 'EIM_%'AND T.DBNAME=S.DBNAMEAND T.TSNAME=S.NAMEAND T.TYPE='T'AND S.PARTITIONS>0ORDER BY 1;
The following is an example of a list of tables generated by running the query in the sample code:
DROP TABLESPACE D0020004.H0004000 /
DROP TABLESPACE D0020010.H0010000 /
DROP TABLESPACE D0020031.H0031000 /
DROP TABLESPACE D0020065.H0065000 /
DROP TABLESPACE D0020102.H0102000 /
DROP TABLESPACE D0020194.H0194000 /
DROP TABLESPACE D0020255.H0255000 /
DROP TABLESPACE D0020309.H0309000 /
Creating and Loading Siebel Log TablesUpgrades: All upgrades.
Environments: All environments.
This topic is part of an upgrade process. See Chapter 4, “How to Perform a Siebel Database Upgrade.”
Siebel Database Upgrade Guide for DB2 for z/OS Siebel Innovation Pack 2016
Upgrading the Target Database ■ Applying Additive Upgrade Changes to the Target Database
190
Perform the following procedure to create Siebel log tables and load them on the target database before you begin the target database upgrade.
To load the target log table1 Use the following command to display the Siebel In-Place Upgrade Main Menu:
EXEC ’DSNHLQ.SIEBEL.EXEC’
2 Select option 2: Target Database Processes - Pre-Upgrade, and press Enter.
3 Select option 0: Create & Load Target Siebel Log, and press Enter.
4 Run the job using the JCL in data set DSNHLQ.SIEBEL.INSTALL.JCL(LOADTAR).
This loads the target Siebel log table using the DSNHLQ.SIEBEL.JOBLOG.LOADFILE.
5 Verify that the job ran successfully with a return code of 0 or 4. For information, see “Verifying JCL Upgrade Jobs” on page 143.
6 After submitting the job, enter cancel on the command line or press PF3 to save changes.
Applying Additive Upgrade Changes to the Target DatabaseUpgrades: All upgrades.
Environments: Production test, production.
For development database upgrades, all schema changes are processed as nonadditive so this step does not apply.
This topic is part of an upgrade process. See Chapter 4, “How to Perform a Siebel Database Upgrade.”
Before you can perform the in-place target database upgrade, you must first apply all of the additive schema changes that you previously applied to the production staging database. See “Applying the Additive Schema Changes to the Production Staging Database” on page 174 for further information.
When applying additive changes, you can either:
■ Apply one, or a few of the additive changes to the target database during one or more sessions.
■ Apply all of the additive changes as one job, provided that you applied all of the additive changes to the staging database.
Both methods of applying additive changes are described in this topic.
NOTE: You must rebuild tables in the target database that contain LONG VARCHAR columns before you apply additive schema changes to the target database. For information, see “Rebuilding Target Tables Containing LONG VARCHAR Columns” on page 106.
Applying Additive Changes IndividuallyYou can apply individual additive changes to the target database using the following procedure.
Upgrading the Target Database ■ Applying Additive Upgrade Changes to the TargetDatabase
Siebel Database Upgrade Guide for DB2 for z/OS Siebel Innovation Pack 2016 191
To apply selected additive changes to the target production database1 If you are not on the Siebel Upgrade Main Menu, enter the following command:
EXEC ’DSNHLQ.SIEBEL.EXEC’
2 Select option 2: Target Database Processes - Pre-Upgrade, and press Enter.
3 Select option 1: Schedule/Run PENDING Jobs (Target), and press Enter.
The Target Additive PENDING Job Status Menu is displayed. The panel ID is SBLSADTP.
This panel lists all the pending additive jobs, that is, all the jobs that were applied as additive jobs to the staging database and which have not been applied to the target database.
4 Do one of the following:
■ To apply all the additive changes together, enter Y, then follow the procedure in “Applying the Additive Changes in One Job” on page 192.
■ To apply or view individual additive schema changes, enter either J, S, or SUB in the Opt column of the appropriate member, and press Enter:
❏ Typing SUB in the Opt column for a member automatically submits the JCL to apply the additive change in the member: DSNHLQ.SIEBEL.ADDTAR.JCL(member)
❏ Typing J in the Opt column for a member places you in edit mode in the JCL for the member: DSNHLQ.SIEBEL.ADDTAR.JCL(member)
❏ Typing S in the Opt column for a member places you in edit mode in the SQL for the member: DSNHLQ.SIEBEL.ADDTAR.SQL(member)
NOTE: You can selectively submit additive schema changes according to the amount of time you have available. You must bear in mind, however, that some schema changes might require that other additive database, table space or table changes are applied first. Review the additive changes before submitting them and, in general, submit additive schema changes in database, table space, table hierarchical order.
5 After submitting the JCL to apply the additive changes in a member, verify that the job ran successfully with a return code of 0, 4, or 8. For information, see “Verifying JCL Upgrade Jobs” on page 143.
You can view the Siebel target database job log to check whether an additive job completed successfully or not by navigating to the In-Place Upgrade Main Menu and selecting option 6: Target Database Joblog. See “Viewing the Siebel Job Log Status” on page 218 for further information.
Do not proceed until all the pending additive schema jobs are run successfully.
Siebel Database Upgrade Guide for DB2 for z/OS Siebel Innovation Pack 2016
Upgrading the Target Database ■ Applying Additive Upgrade Changes to the Target Database
192
Applying the Additive Changes in One JobYou can apply all the additive schema upgrade changes to the target database using the JCL in the data set DSNHLQ.SIEBEL.INSTALL.JCL(ADDVSCHT) provided you also applied all of the additive changes to the staging database using the JCL in the DSNHLQ.SIEBEL.INSTALL.JCL(ADDVSCHS) data set.
CAUTION: If you applied only a subset of the additive schema upgrade changes to the staging database, you must not apply the additive schema upgrade changes to the target database using the JCL in the data set DSNHLQ.SIEBEL.INSTALL.JCL(ADDVSCHS). If you do, you will corrupt the target database.
To apply all additive changes to the target production database1 Navigate to the ISPF Primary Option Menu, and select option 2: Edit.
2 Specify DSNHLQ.SIEBEL.INSTALL.JCL(ADDVSCHT) as the name of the data set member you want to edit on the Edit Entry Panel.
3 Submit the job in the ADDVSCHT member.
All of the additive schema changes are automatically submitted and applied to the target database.
NOTE: You must choose to either apply all of the additive changes in one job, or apply them all individually. If you apply any of the additive changes to the target database individually, as described in “Applying Additive Changes Individually” on page 190, you cannot use the DSNHLQ.SIEBEL.INSTALL.JCL(ADDVSCHT) member to apply additive changes; attempting to do will cause an error in your upgrade.
4 To ensure performance is not adversely affected when additive changes are applied in one job using the ADDVSCHT member, all of the indexes are created using the DEFINE YES, DEFER YES syntax. After applying the additive changes, you can rebuild the indexes for each index created by the ADDVSCHT member by submitting the JCL in the DSNHLQ.SIEBEL.INSTALL.JCL(SUBADDIX) data set.
You can submit the index rebuild jobs all together, or individually. To submit the rebuild index jobs in one step:
a Navigate to the ISPF Primary Option Menu, and select option 3.4.
b On the Data Set List Utility (DSLIST) panel, type EXEC on the line next to the @SUBADDIX member. Press Enter.
All of the rebuild index jobs are submitted.
To submit each index rebuild job individually:
a Edit the DSNHLQ.SIEBEL.INSTALL.JCL(SUBADDIX) member by typing e to the left of the member name. Press Enter.
b Select the job you want to run, type submit on the command line, and press Enter.
The rebuild index job is submitted.
Upgrading the Target Database ■ Renaming the Production Environment Repository
Siebel Database Upgrade Guide for DB2 for z/OS Siebel Innovation Pack 2016 193
Renaming the Production Environment RepositoryUpgrades: All upgrades.
Environments: Production test, production.
This topic is part of an upgrade process. See Chapter 4, “How to Perform a Siebel Database Upgrade.”
Two separate repositories are used during the production upgrade process:
■ Your existing production repository
■ New Customer Repository
The New Customer Repository is loaded when you run the Siebel Upgrade Wizard.
To prevent a naming conflict, before you take your production database offline to run the in-place target database upgrade, rename your existing production repository (Siebel Repository) to Prior Customer Repository. After the upgrade, your new Siebel CRM production repository is given the name Siebel Repository.
Rename your existing production repository using the procedure described in the chapter in Siebel Database Upgrade Guide that describes how to upgrade the Siebel database.
CAUTION: Your upgrade will encounter errors if you have more than one existing repository for a production upgrade. Export, archive, and delete from the Siebel schema to be upgraded any redundant repositories before you upgrade your production environment.
For further information about renaming repositories, see Configuring Siebel Business Applications.
Performing the In-Place Target Database UpgradeUpgrades: All upgrades.
Environments: All environments.
This topic is part of an upgrade process. See Chapter 4, “How to Perform a Siebel Database Upgrade.”
Before performing the in-place target database upgrade, make sure you have completed the appropriate preupgrade tasks. See “Process of Upgrading the Target Database” on page 187 for further information.
To execute the in-place target database upgrade, perform the following tasks in the sequence shown:
■ “Preparing the Target Database for the Upgrade” on page 195
■ “Running the PRET Jobs for the Target Database” on page 195
■ “Applying Nonadditive Schema Upgrade Changes to the Target Database” on page 196
■ “Creating and Deploying Stored Procedures on the Target Database” on page 200
■ “Migrating Data on the Target Database” on page 202
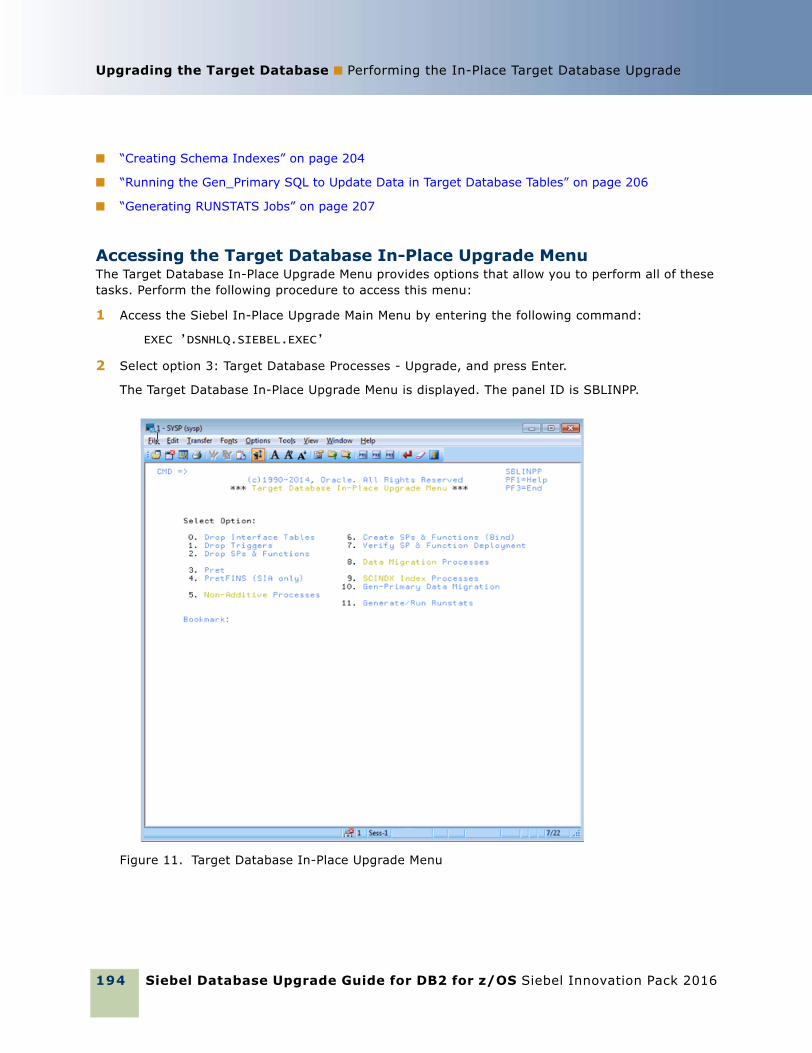
Siebel Database Upgrade Guide for DB2 for z/OS Siebel Innovation Pack 2016
Upgrading the Target Database ■ Performing the In-Place Target Database Upgrade
194
■ “Creating Schema Indexes” on page 204
■ “Running the Gen_Primary SQL to Update Data in Target Database Tables” on page 206
■ “Generating RUNSTATS Jobs” on page 207
Accessing the Target Database In-Place Upgrade MenuThe Target Database In-Place Upgrade Menu provides options that allow you to perform all of these tasks. Perform the following procedure to access this menu:
1 Access the Siebel In-Place Upgrade Main Menu by entering the following command:
EXEC ’DSNHLQ.SIEBEL.EXEC’
2 Select option 3: Target Database Processes - Upgrade, and press Enter.
The Target Database In-Place Upgrade Menu is displayed. The panel ID is SBLINPP.
Figure 11. Target Database In-Place Upgrade Menu
Upgrading the Target Database ■ Performing the In-Place Target Database Upgrade
Siebel Database Upgrade Guide for DB2 for z/OS Siebel Innovation Pack 2016 195
Preparing the Target Database for the UpgradePerform the following procedure to drop interface tables, triggers, and stored procedures from the target database to prepare for the upgrade.
To remove interface tables, triggers and stored procedures from the database1 On the Target Database In-Place Upgrade Menu, select option 0: Drop Interface Tables, and press
Enter.
This option runs the job to remove interface tables from the target database.
2 Run the job using the JCL in data set DSNHLQ.SIEBEL.INSTALL.JCL(INFDRPJT).
NOTE: If your Siebel database contains partitioned EIM tables, before running the job, you must edit the data set SIEBEL.INSTALL.JCL(INFDRPT) to delete the steps that drop table spaces containing partitioned EIM tables. For information, see “Dropping Partitioned EIM Tables” on page 188.
3 Verify that the job ran successfully with a return code of 0. For information, see “Verifying JCL Upgrade Jobs” on page 143.
4 After submitting the job, enter cancel on the command line or press PF3 to save changes.
5 On the Target Database In-Place Upgrade Menu, select option 1: Drop Triggers, and press Enter.
6 Run the job using the JCL in data set DSNHLQ.SIEBEL.INSTALL.JCL(TRGDRPJT) to remove triggers from the target database.
7 Verify that the job ran successfully with a return code of 0. For information, see “Verifying JCL Upgrade Jobs” on page 143.
8 After submitting the job, enter cancel on the command line or press PF3 to save changes.
9 On the Target Database In-Place Upgrade Menu, select option 2: Drop SPs and Functions, and press Enter.
10 Run the job using the JCL in data set DSNHLQ.SIEBEL.INSTALL.JCL(SPFDRPT).
11 Verify that the job ran successfully with a return code of 0, 4, or 8. For information, see “Verifying JCL Upgrade Jobs” on page 143.
12 After submitting the job, enter cancel on the command line or press PF3 to save changes.
Running the PRET Jobs for the Target DatabasePerform the following procedure to run the PRET jobs to prepare the target database for table creation during the in-place upgrade.
To run the PRET jobs1 On the Target Database In-Place Upgrade Menu, select option 3: Pret, and press Enter.
Siebel Database Upgrade Guide for DB2 for z/OS Siebel Innovation Pack 2016
Upgrading the Target Database ■ Performing the In-Place Target Database Upgrade
196
2 Run the job using the JCL in data set DSNHLQ.SIEBEL.INSTALL.JCL(SUBPRET).
This triggers the first PRET job, which then automatically submits the next PRET job in sequence. The number of PRET jobs that are automatically submitted varies according to your upgrade path.
3 Verify that the job ran successfully with a return code of 0. For information, see “Verifying JCL Upgrade Jobs” on page 143.
4 After submitting the job, enter cancel on the command line or press PF3 to save changes.
All jobs must complete successfully before you proceed to the next step.
5 On the Target Database In-Place Upgrade Menu, select option 4: PretFINS, and press Enter.
6 Run the job using the JCL in data set DSNHLQ.SIEBEL.INSTALL.JCL(SUBPRETF).
This triggers the first PRET job, which then automatically submits the next PRET job in sequence. The number of PRET jobs that are automatically submitted varies according to your upgrade path.
NOTE: You only have to perform this step if you are performing an Siebel Industry Applications upgrade.
7 Verify that the job ran successfully with a return code of 0. For information, see “Verifying JCL Upgrade Jobs” on page 143.
8 After submitting the job, enter cancel on the command line or press PF3 to save changes.
All PretFINS jobs must complete successfully before you proceed to the next step.
Applying Nonadditive Schema Upgrade Changes to the Target DatabasePerform the following procedures to apply the nonadditive schema upgrade changes to the target database. Perform the procedures in the sequence in which they are listed.
■ “Removing Target Database Views” on page 196
■ “Running Unload Jobs on the Target Database” on page 197
■ “Creating the Schema on the Target Database” on page 198
■ “Loading the Schema on the Target Database” on page 198
■ “Executing Index DDL and Rebuilding Indexes” on page 199
■ “Creating and Rebuilding Obsolete Indexes” on page 199
Removing Target Database ViewsPerform the following procedure to remove views from the target database.
Upgrading the Target Database ■ Performing the In-Place Target Database Upgrade
Siebel Database Upgrade Guide for DB2 for z/OS Siebel Innovation Pack 2016 197
To remove views from the target database1 On the Target Database In-Place Upgrade Menu, select option 5: Non-Additive Processes, and
press Enter.
The following message appears:
Before proceeding, make sure ALL “Pret-FINS” jobs completed. Re-enter option 5 to continue.
2 Reselect option 5: Non-Additive Processes, and press Enter.
The Target Database “Non-Additive” Processes Menu appears. The panel ID is SBLNONP.
3 Select option 0: Drop Views, and press Enter.
4 Run the job using the JCL in data set DSNHLQ.SIEBEL.INSTALL.JCL(SUBDRPV).
5 Verify that the job ran successfully with a return code of 0 or 4. For information, see “Verifying JCL Upgrade Jobs” on page 143.
6 After submitting the job, enter cancel on the command line or press PF3 to save changes.
Running Unload Jobs on the Target DatabasePerform the following procedure to run unload jobs on the target database.
To run unload jobs on the target database1 On the Target Database “Non-Additive” Processes Menu, select option 1: Unload Schema, and
press Enter.
2 Run the job using the JCL in data set DSNHLQ.SIEBEL.INSTALL.JCL(SUBUNLD).
This job submits all the Unload jobs to run in parallel. The number of Unload jobs run varies according to your upgrade path.
3 Verify that each Unload job ran successfully.
■ Verify that each job ran successfully with a return code of 0. For information, see “Verifying JCL Upgrade Jobs” on page 143.
■ Review unload jobs that generate a return code of 4. A return code of 4 might be returned if a table is empty but it can also indicate that an unload job has failed as a result of DSNTIAUL utility CCSID conversion errors. For additional information, see “About DSNTIAUL CCSID Conversion Errors” on page 87.
If the DSNTIAUL utility encounters an unload job that generates a CCSID conversion error, it generates a return code of 4 and stops the unload process at that point. Exit from the upgrade process and use a program, such as the IBM DB2 UNLOAD utility, to complete the load and unload processing.
You must fix any failed jobs before proceeding with the upgrade. For information on restarting failed jobs, see “Restarting Upgrade Jobs That Fail” on page 208.
4 After submitting the job, enter cancel on the command line or press PF3 to save changes.
Siebel Database Upgrade Guide for DB2 for z/OS Siebel Innovation Pack 2016
Upgrading the Target Database ■ Performing the In-Place Target Database Upgrade
198
5 View the job status log.
You can view the job status log by completing the procedure described in “Running SQL in Siebel Logs” on page 219.
Creating the Schema on the Target DatabasePerform the following procedure to create the Siebel CRM schema for the current release on the target database.
To create the Siebel CRM schema on the target database 1 On the Target Database “Non-Additive” Processes Menu, select option 2: Create Schema, and
press Enter.
The following message appears:
Before proceeding, make sure ALL “UNLOAD” jobs completed. Re-enter option 2 to continue.
2 Reselect option 2: Create Schema, and press Enter.
3 Run the job using the JCL in data set DSNHLQ.SIEBEL.INSTALL.JCL(SCHEMAT).
4 Verify that each job ran successfully with a return code of 0 or 4. For information, see “Verifying JCL Upgrade Jobs” on page 143
5 After submitting the job, enter cancel on the command line or press PF3 to save changes.
Loading the Schema on the Target DatabasePerform the following procedure to run Load jobs on the target database.
To run the Load jobs on the target database1 On the Target Database “Non-Additive” Processes Menu, select option 3: Load/Re-Load Schema,
and press Enter.
2 Run the job using the JCL in data set DSNHLQ.SIEBEL.INSTALL.JCL(SUBLOAD).
This submits all the Load jobs to run in parallel. The number of upgrade Load jobs varies by upgrade path.
NOTE: If your database layout allows multiple tables for each table space, Loads for the same table space are stacked in the input job queue using the same job name to guarantee serialized loading.
3 Verify that the job ran successfully with a return code of 0 or 4. For information, see “Verifying JCL Upgrade Jobs” on page 143.
4 After submitting the job, enter cancel on the command line or press PF3 to save changes.
Upgrading the Target Database ■ Performing the In-Place Target Database Upgrade
Siebel Database Upgrade Guide for DB2 for z/OS Siebel Innovation Pack 2016 199
Executing Index DDL and Rebuilding IndexesPerform the following procedure to execute the index DDL for Siebel CRM, and to rebuild indexes on the target database.
To execute the index DDL and to rebuild indexes1 On the Target Database “Non-Additive” Processes Menu, select option 4: Create Restructured
Indexes (DDL), and press Enter.
The following message appears:
Before proceeding, make sure ALL “LOAD” jobs completed. Re-enter option 4 to continue.
2 Reselect option 4: Create Restructured Indexes (DDL), and press Enter.
3 Run the job using the JCL in data set DSNHLQ.SIEBEL.INSTALL.JCL(SCHEMAT2).
This job runs DDL Create Index statements to build nonunique indexes for the old schema.
4 Verify that the job ran successfully with a return code of 0 or 4. For information, see “Verifying JCL Upgrade Jobs” on page 143.
5 After submitting the job, enter cancel on the command line or press PF3 to save changes.
6 On the Target Database “Non-Additive” Processes Menu, select option 5: Rebuild Indexes, and press Enter.
7 Run the job using the JCL in data set DSNHLQ.SIEBEL.INSTALL.JCL(SUBNONIX).
This job automatically submits all nonunique 8.1 and 8.2 index rebuild jobs.
8 Verify that the job ran successfully with a return code of 0 or 4. For information, see “Verifying JCL Upgrade Jobs” on page 143.
You must fix any failed jobs before proceeding with the upgrade. For information on restarting failed jobs, see “Restarting Upgrade Jobs That Fail” on page 208.
Creating and Rebuilding Obsolete IndexesIf you choose, you can create and rebuild the old schema obsolete indexes. This step is optional.
The procedure to create and rebuild obsolete indexes differs, depending on whether you perform this task during the target database upgrade process, or after you have completed the target database upgrade (recommended). Both procedures are described in this topic.
Perform the following procedure to create and rebuild obsolete indexes on the target database during the target database upgrade process.
To create and rebuild obsolete indexes during the database upgrade1 On the Target Database “Non-Additive” Processes Menu, select option 6: Create Obsolete
Indexes, and press Enter.
Siebel Database Upgrade Guide for DB2 for z/OS Siebel Innovation Pack 2016
Upgrading the Target Database ■ Performing the In-Place Target Database Upgrade
200
2 Run the job using the JCL in data set DSNHLQ.SIEBEL.INSTALL.JCL(SCHEMATO).
This job automatically builds the old-schema obsolete indexes.
3 Verify that the job ran successfully with a return code of 0 or 4. For information, see “Verifying JCL Upgrade Jobs” on page 143.
4 After submitting the job, enter cancel on the command line or press PF3 to save changes.
5 On the Target Database “Non-Additive” Processes Menu, select option 7:Rebuild Obsolete Indexes, and press Enter.
6 Run the job using the JCL in data set DSNHLQ.SIEBEL.INSTALL.JCL(SUBOBSIX).
This job automatically rebuilds the old-schema obsolete indexes.
7 Verify that the job ran successfully with a return code of 0 or 4. For information, see “Verifying JCL Upgrade Jobs” on page 143.
8 After submitting the job, enter cancel on the command line or press PF3 to save changes.
Perform the following procedure to create and rebuild obsolete indexes on the target database after the target database upgrade is completed.
To create and rebuild obsolete indexes after the database upgrade is completed1 To create the obsolete indexes, run the SQL in the DSNHLQ.SIEBEL.DDLOIND data set.
2 Verify that the jobs ran successfully with a return code of 0. For information, see “Verifying JCL Upgrade Jobs” on page 143.
3 Review the list of obsolete indexes created; rebuild only those indexes that you require.
4 Rebuild the obsolete indexes by submitting the appropriate JCL in the DSNHLQ.SIEBEL.OBSIX.JCL data set.
The control cards for the rebuild index jobs are located in the DSNHLQ.SIEBEL.OBSIX.SQL data set.
5 Verify that the jobs ran successfully with a return code of 0. For information, see “Verifying JCL Upgrade Jobs” on page 143.
Creating and Deploying Stored Procedures on the Target DatabasePerform the following task to install stored procedures and functions on the target database and to verify that they deployed correctly.
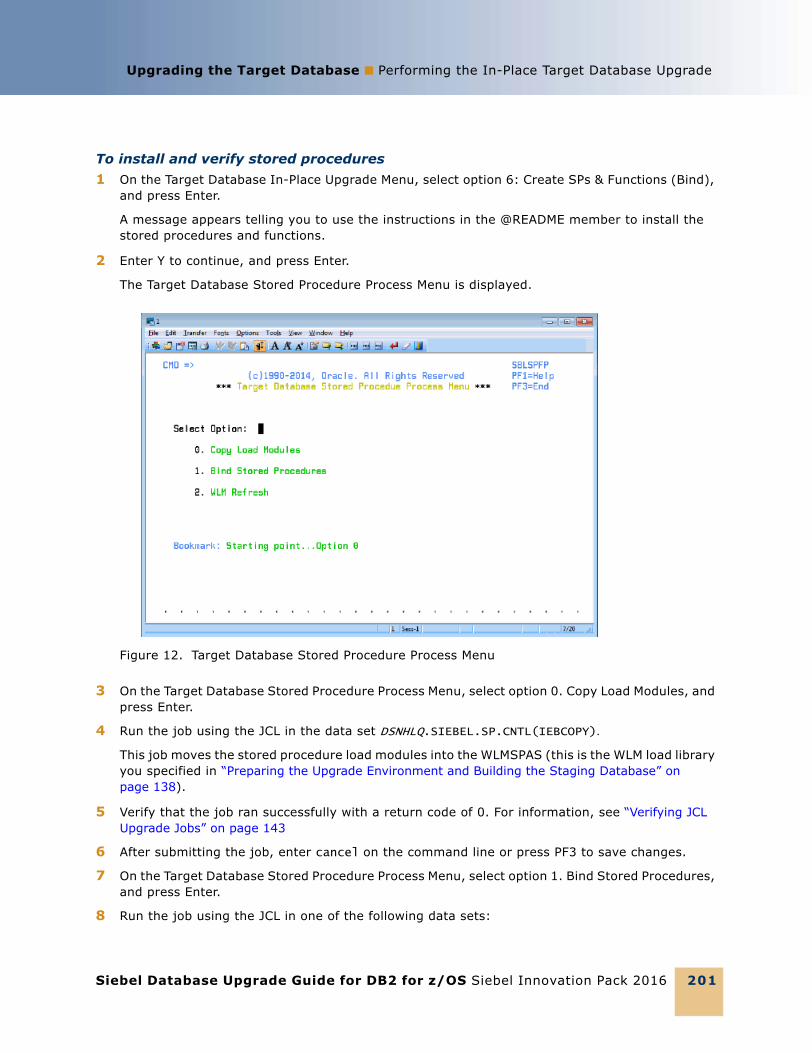
Upgrading the Target Database ■ Performing the In-Place Target Database Upgrade
Siebel Database Upgrade Guide for DB2 for z/OS Siebel Innovation Pack 2016 201
To install and verify stored procedures1 On the Target Database In-Place Upgrade Menu, select option 6: Create SPs & Functions (Bind),
and press Enter.
A message appears telling you to use the instructions in the @README member to install the stored procedures and functions.
2 Enter Y to continue, and press Enter.
The Target Database Stored Procedure Process Menu is displayed.
3 On the Target Database Stored Procedure Process Menu, select option 0. Copy Load Modules, and press Enter.
4 Run the job using the JCL in the data set DSNHLQ.SIEBEL.SP.CNTL(IEBCOPY).
This job moves the stored procedure load modules into the WLMSPAS (this is the WLM load library you specified in “Preparing the Upgrade Environment and Building the Staging Database” on page 138).
5 Verify that the job ran successfully with a return code of 0. For information, see “Verifying JCL Upgrade Jobs” on page 143
6 After submitting the job, enter cancel on the command line or press PF3 to save changes.
7 On the Target Database Stored Procedure Process Menu, select option 1. Bind Stored Procedures, and press Enter.
8 Run the job using the JCL in one of the following data sets:
Figure 12. Target Database Stored Procedure Process Menu
Siebel Database Upgrade Guide for DB2 for z/OS Siebel Innovation Pack 2016
Upgrading the Target Database ■ Performing the In-Place Target Database Upgrade
202
■ SNHLQ.SIEBEL.SP.CNTL(BINDHOR) for Siebel Business Applications upgrades
■ DSNHLQ.SIEBEL.SP.CNTL(BINDSIA) for Siebel Industry Applications upgrades
This job binds the stored procedure packages.
NOTE: If the job fails because the procedure already exists, run the appropriate DROP procedure job, either DSNHLQ.SIEBEL.SP.CNTL(DRPSIA) or DSNHLQ.SIEBEL.SP.CNTL(DRPHOR), then run the bind job again.
9 Verify that the job ran successfully with a return code of 0 or 4. For information, see “Verifying JCL Upgrade Jobs” on page 143.
10 After submitting the job, enter cancel on the command line or press PF3 to save changes.
11 On the Target Database Stored Procedure Process Menu, select option 2. WLM Refresh, and press Enter.
12 Submit the JCL in the data set DSNHLQ.SIEBEL.SP.CNTL(WLMREFSH).
This job refreshes the DB2 WLM environment.
13 Verify that the job ran successfully with a return code of 0. For information, see “Verifying JCL Upgrade Jobs” on page 143.
14 Press PF3 twice to return to the Target Database In-Place Upgrade Menu.
15 Select option 7: Verify SP and Function Deployment, and press Enter.
This places you in edit mode for one of the following PDS data sets and members:
■ For Siebel Business Applications upgrades: DSNHLQ.SIEBEL.INSTALL.JCL(SPVHOR)
■ For Siebel Industry Applications upgrades: DSNHLQ.SIEBEL.INSTALL.JCL(SPVSIA)
16 Run the JCL in the appropriate data set for your upgrade. The JCL in the SPVSIA and SPVHOR members executes each stored procedure against the target database after the new schema has been created and data has been loaded onto the target. This process verifies that the stored procedures have been installed and can be executed.
17 Verify that the job ran successfully with a return code of 0. For information, see “Verifying JCL Upgrade Jobs” on page 143.
The JCLTEST return code must be FLUSH. If you do not see the FLUSH return code, you can verify the condition codes by searching for the condition code IEF206I.
18 After submitting the job, enter cancel on the command line or press PF3 to save changes.
Migrating Data on the Target DatabasePerform the tasks described in this topic to migrate preexisting Siebel data to version 8.1 or 8.2 data. Generally, this involves inserting or updating values in the target tables, but new indexes might also be created and rebuilt.
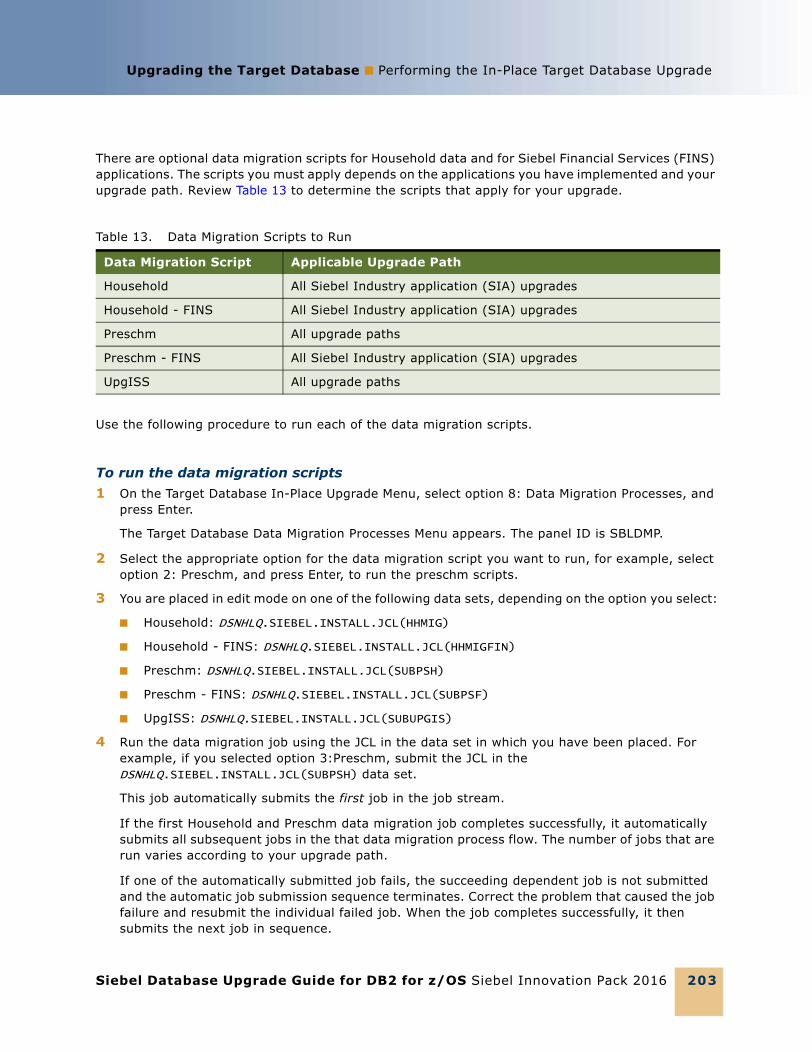
Upgrading the Target Database ■ Performing the In-Place Target Database Upgrade
Siebel Database Upgrade Guide for DB2 for z/OS Siebel Innovation Pack 2016 203
There are optional data migration scripts for Household data and for Siebel Financial Services (FINS) applications. The scripts you must apply depends on the applications you have implemented and your upgrade path. Review Table 13 to determine the scripts that apply for your upgrade.
Use the following procedure to run each of the data migration scripts.
To run the data migration scripts1 On the Target Database In-Place Upgrade Menu, select option 8: Data Migration Processes, and
press Enter.
The Target Database Data Migration Processes Menu appears. The panel ID is SBLDMP.
2 Select the appropriate option for the data migration script you want to run, for example, select option 2: Preschm, and press Enter, to run the preschm scripts.
3 You are placed in edit mode on one of the following data sets, depending on the option you select:
■ Household: DSNHLQ.SIEBEL.INSTALL.JCL(HHMIG)
■ Household - FINS: DSNHLQ.SIEBEL.INSTALL.JCL(HHMIGFIN)
■ Preschm: DSNHLQ.SIEBEL.INSTALL.JCL(SUBPSH)
■ Preschm - FINS: DSNHLQ.SIEBEL.INSTALL.JCL(SUBPSF)
■ UpgISS: DSNHLQ.SIEBEL.INSTALL.JCL(SUBUPGIS)
4 Run the data migration job using the JCL in the data set in which you have been placed. For example, if you selected option 3:Preschm, submit the JCL in the DSNHLQ.SIEBEL.INSTALL.JCL(SUBPSH) data set.
This job automatically submits the first job in the job stream.
If the first Household and Preschm data migration job completes successfully, it automatically submits all subsequent jobs in the that data migration process flow. The number of jobs that are run varies according to your upgrade path.
If one of the automatically submitted job fails, the succeeding dependent job is not submitted and the automatic job submission sequence terminates. Correct the problem that caused the job failure and resubmit the individual failed job. When the job completes successfully, it then submits the next job in sequence.
Table 13. Data Migration Scripts to Run
Data Migration Script Applicable Upgrade Path
Household All Siebel Industry application (SIA) upgrades
Household - FINS All Siebel Industry application (SIA) upgrades
Preschm All upgrade paths
Preschm - FINS All Siebel Industry application (SIA) upgrades
UpgISS All upgrade paths
Siebel Database Upgrade Guide for DB2 for z/OS Siebel Innovation Pack 2016
Upgrading the Target Database ■ Performing the In-Place Target Database Upgrade
204
5 Verify that the job ran successfully with a return code of 0 or 4. For information, see “Verifying JCL Upgrade Jobs” on page 143.
Fix any failed jobs before proceeding with the upgrade. For information on restarting failed jobs, see “Restarting Upgrade Jobs That Fail” on page 208.
6 Press PF3 to return to the Target Database Data Migration Processes Menu and run the next data migration job in sequence.
About Migrating Preschm DataSome of the PRESCHM jobs run independently but others are submitted in a defined order and cannot run until previous jobs have completed successfully; you can run the standalone jobs in parallel with those with dependencies. To see the serial flow of the PRESCHM jobs and the PRESCHM job dependencies, look at the PDS member DSNHLQ.SIEBEL.PRESCHM.JCL(@DEPFLOW).
Creating Schema IndexesPerform the following procedure to drop old schema indexes, create schema and EIM indexes for the current release, and submit the rebuild jobs for the 8.1 or 8.2 Gen Primary indexes for the target database.
To run index jobs for the target database1 On the Target Database In-Place Upgrade Menu, select option 9: SCINDX Index Processes, and
press Enter.
The following message appears:
Before proceeding, make sure ALL Data Migr “UPGISS” jobs complete. Re-enter option 9 to continue...
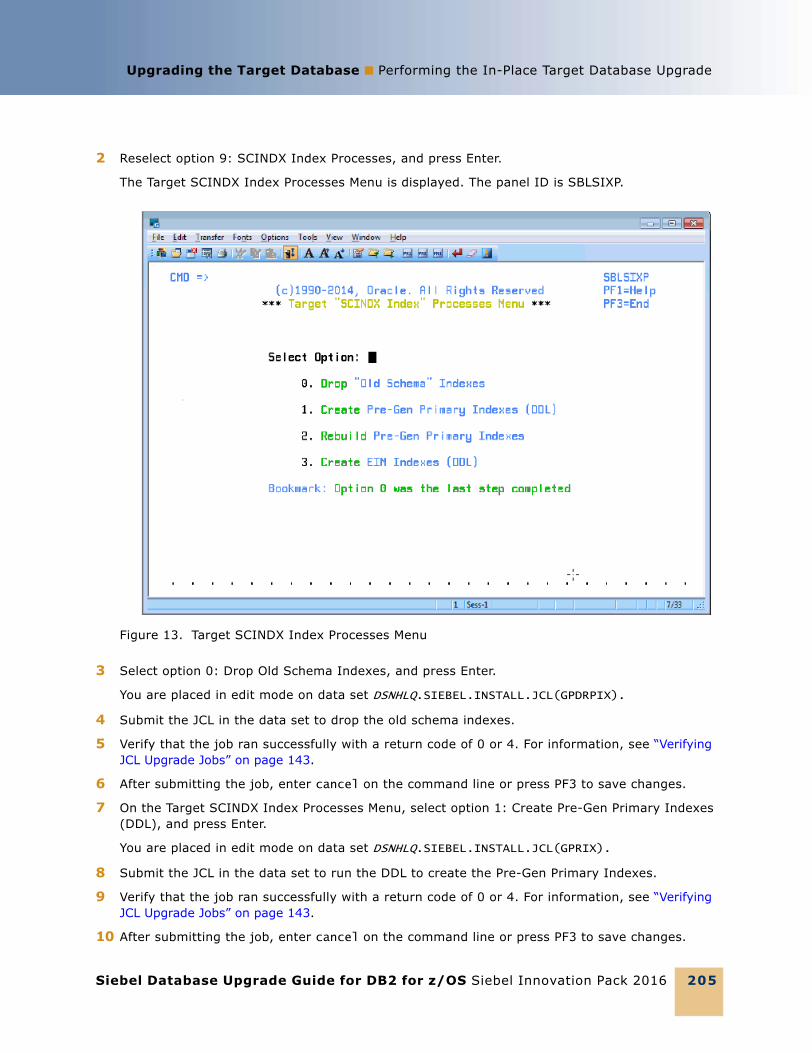
Upgrading the Target Database ■ Performing the In-Place Target Database Upgrade
Siebel Database Upgrade Guide for DB2 for z/OS Siebel Innovation Pack 2016 205
2 Reselect option 9: SCINDX Index Processes, and press Enter.
The Target SCINDX Index Processes Menu is displayed. The panel ID is SBLSIXP.
3 Select option 0: Drop Old Schema Indexes, and press Enter.
You are placed in edit mode on data set DSNHLQ.SIEBEL.INSTALL.JCL(GPDRPIX).
4 Submit the JCL in the data set to drop the old schema indexes.
5 Verify that the job ran successfully with a return code of 0 or 4. For information, see “Verifying JCL Upgrade Jobs” on page 143.
6 After submitting the job, enter cancel on the command line or press PF3 to save changes.
7 On the Target SCINDX Index Processes Menu, select option 1: Create Pre-Gen Primary Indexes (DDL), and press Enter.
You are placed in edit mode on data set DSNHLQ.SIEBEL.INSTALL.JCL(GPRIX).
8 Submit the JCL in the data set to run the DDL to create the Pre-Gen Primary Indexes.
9 Verify that the job ran successfully with a return code of 0 or 4. For information, see “Verifying JCL Upgrade Jobs” on page 143.
10 After submitting the job, enter cancel on the command line or press PF3 to save changes.
Figure 13. Target SCINDX Index Processes Menu
Siebel Database Upgrade Guide for DB2 for z/OS Siebel Innovation Pack 2016
Upgrading the Target Database ■ Performing the In-Place Target Database Upgrade
206
11 On the Target SCINDX Index Processes Menu, select option 2: Rebuild Pre-Gen Primary Indexes (DDL), and press Enter. This job rebuilds the Pre-Gen primary indexes to create ROW_IDs for the data in the existing row.
You are placed in edit mode on data set DSNHLQ.SIEBEL.INSTALL.JCL(SUBGPPIX).
12 Submit the JCL in the data set.
This job runs all the Pre-Gen Primary Index rebuild jobs in parallel. The number of index rebuild jobs that are run varies according to your upgrade path and the number of indexes you specified to be included in each rebuild job. See “Restructuring the Index DDL” on page 184 for further information.
13 Verify that the job ran successfully with a return code of 0 or 4. For information, see “Verifying JCL Upgrade Jobs” on page 143.
14 After submitting the job, enter cancel on the command line or press PF3 to save changes.
15 On the Target SCINDX Index Processes Menu, select option 3: Create EIM Indexes (DDL), and press Enter.
You are placed in edit mode on data set DSNHLQ.SIEBEL.INSTALL.JCL(EIMIX).
16 Submit the JCL in the data set to run the DDL to create new EIM indexes.
17 Verify that the job ran successfully with a return code of 0 or 4. For information, see “Verifying JCL Upgrade Jobs” on page 143.
18 After submitting the job, press PF3 to return to the Target Database In-Place Upgrade Menu.
Running the Gen_Primary SQL to Update Data in Target Database TablesThe Gen_Primary data migration jobs apply changes to primary child columns that are required for the upgrade to the target database tables. The following procedure outlines the steps to follow to run the Gen_Primary jobs.
NOTE: If you are upgrading to Siebel Industry Applications 8.1 from Siebel Industry Applications 8.0, there are no changes to primary child columns in database tables. As a result, the gen_primaryx.jcl upgrade files generated on the midtier platform do not contain any SQL commands, and do not have to be run, for this upgrade path.
To run the Gen_Primary SQL1 On the Target Database In-Place Upgrade Menu, select option 10: Gen_Primary Data Migration,
and press Enter.
You are placed in edit mode on data set DSNHLQ.SIEBEL.INSTALL.JCL(SUBGENP).
2 Submit the JCL in the data set to update data in the target tables.
This submits all the Gen-Primary data migration job streams (the number of job streams varies by upgrade type). All of the jobs are run in parallel as no dependencies exist between them.
Upgrading the Target Database ■ Performing the In-Place Target Database Upgrade
Siebel Database Upgrade Guide for DB2 for z/OS Siebel Innovation Pack 2016 207
3 Verify that the job ran successfully with a return code of 0 or 4. For information, see “Verifying JCL Upgrade Jobs” on page 143.
4 After submitting the job, enter cancel on the command line or press PF3 to save changes.
Generating RUNSTATS JobsUpgrades: All upgrades.
Environments: All environments.
The following procedure generates RUNSTATS jobs for all Siebel table spaces. This process excludes all interface tables (EIM and tables with an _IF suffix).
NOTE: If you are performing a development environment upgrade, run the RUNSTATS jobs before starting the repository merge process.
To generate RUNSTATS jobs1 On the Target Database In-Place Upgrade Menu, select option 11: Generate/Run Runstats, and
press Enter.
The following message appears:
Before proceeding, make sure ALL “Gen-Primary” jobs completed. Re-enter option 11 to continue.
2 Reselect option 11: Generate/Run Runstats, and press Enter.
The Upgrade Runstats panel appears. The panel ID is SBLRSP.
3 Read the information relating to the RUNSTATS jobs on the Upgrade Runstats panel, then press Enter to start the RUNSTATS job generation process.
4 Messages are displayed as the jobs are generated. When the process is completed, press Enter.
You are placed in edit mode on the PDS data set that contains the RUNSTATS jobs, DSNHLQ.SIEBEL.RUNST.
5 Select the DSNHLQ.SIEBEL.RUNST(@RSTXREF) PDS member.
This file contains information relating to each RUNSTATS job, for example, the table for which the job collects statistics and when statistics were last collected on the table.
6 Select the RUNSTATS jobs you want to run and run each one individually using the JCL in the data set DSNHLQ.SIEBEL.RUNST(@RSTXREF).
Alternatively, go to the DSNHLQ.SIEBEL.INSTALL.JCL(SUBRUNST) data set and submit the JCL in the data set to run all the RUNSTATS jobs for table spaces that did not have statistics collected during any of the previous upgrade processes.
7 Verify that the job ran successfully with a return code of 0 or 4. For information, see “Verifying JCL Upgrade Jobs” on page 143.
8 Press PF3 to save changes.
Siebel Database Upgrade Guide for DB2 for z/OS Siebel Innovation Pack 2016
Upgrading the Target Database ■ Restarting Upgrade Jobs That Fail
208
Restarting Upgrade Jobs That FailUpgrades: All upgrades.
Environments: All environments.
This topic is part of an upgrade process. See Chapter 4, “How to Perform a Siebel Database Upgrade.”
This topic describes how to restart mainframe upgrade jobs that fail.
To restart a mainframe upgrade job that fails 1 Identify the job that failed under the SDSF exit (job status).
You can find the name of the job that failed using one of the following options on the In-Place Upgrade Main Menu:
■ Option 5: Staging Database Joblog
■ Option 6: Target Database Joblog
See “Running SQL in Siebel Logs” on page 219 for further information.
2 Determine the reason the job failed. You can determine the reason for the job failure by selecting the job on the SDSF output queue panel using the s action character.
3 Correct the problem.
If a job fails because of an SQL error, fix the problem in the appropriate SQL PDS member. For example, for PRESCHM jobs, you can locate the relevant SQL PDS member in the DSNHLQ.SIEBEL.PRESCHM.SQL data set.
NOTE: If you require help in performing these tasks or if you require confirmation that the tasks that you are about to run are correct, create a service request (SR) on My Oracle Support. You can log service requests by accessing My Oracle Support (Service Request tab), or by using your existing phone support numbers to contact Oracle Global Customer Support.
4 Once the problem has been identified and corrected, restart the job. You can do this by selecting the job that failed on the SDSF output queue using the SJ action character. This will automatically call up the next scheduled job allowing the upgrade process, for example PRESCHM, to continue.
Siebel Database Upgrade Guide for DB2 for z/OS Siebel Innovation Pack 2016 209
15 Performing Postupgrade Tasks on the Target Database
This chapter describes tasks you must perform after upgrading the target database. It includes the following topics:
■ Transferring the Development Environment Upgrade Output Files to the z/OS Host on page 209
■ Synchronizing the Schema on page 210
■ Activating New License Keys After an Upgrade
■ Deleting Redundant Upgrade Files on page 212
Transferring the Development Environment Upgrade Output Files to the z/OS HostUpgrades: All upgrades.
Environments: Development environment only.
This topic is part of an upgrade process. See Chapter 4, “How to Perform a Siebel Database Upgrade.”
The development upgrade upgphys process generates the following files, which synchronize tables and indexes on the development database, and complete the development upgrade:
■ synctab.sql
■ syncidx.sql
Transfer these files to the z/OS host using the following procedure.
To transfer the development environment upgrade output files to the z/OS host1 Navigate to the \DB2390\dbsrvr\dboutput\upgrade directory (Windows) or the /DB2390/
dbsrvr/dboutput/upgrade directory (UNIX) and double-click the ftp_syncdd.bat file (Windows) or issue the following command (UNIX):
ftp -vn < ftp_syncdd.txt > ftp_syncdd.log
2 Enter your TSO password and press Enter.
All the development environment postupgrade files are transferred from the midtier to the z/OS host.
Siebel Database Upgrade Guide for DB2 for z/OS Siebel Innovation Pack 2016
Performing Postupgrade Tasks on the Target Database ■ Synchronizing the Schema
210
3 Review the ftp_syncdd.log file which is created in the upgrade directory and verify that all the files listed in the ftp_syncdd.txt file transferred successfully to z/OS staging data sets.
NOTE: If the development and production upgrades are run on different midtier computers, then you must copy the files to be transferred to the z/OS host to the production midtier computer before running the ftp_syncdd.bat file.
Synchronizing the SchemaUpgrades: All upgrades.
Environments: Development environment only.
This topic is part of an upgrade process. See Chapter 4, “How to Perform a Siebel Database Upgrade.”
After completing the development environment target database upgrade, you must perform the following procedure to synchronize database tables and indexes.
To synchronize the schema1 Use the following command to display the Siebel In-Place Upgrade Main Menu:
EXEC 'DSNHLQ.SIEBEL.EXEC'
The panel ID is SBLUPG8P.
2 Select option 4: Post-Upgrade, and press Enter.
The Target Database Post-Upgrade Menu appears. The panel ID is SBLPSTP.
3 Select option 0: Apply/Run Table Synchronization, and press Enter.
You are placed in edit mode for the data set &DSNHLQ.SIEBEL.INSTALL.JCL(SUBSYNCT).
4 Run the job using the JCL in the data set.
This job submits the SYNCTAB (synchronize table) job which executes a file containing the DDL for the tables.
5 Verify that the job ran successfully with a return code of 0 or 4. For information, see “Verifying JCL Upgrade Jobs” on page 143.
6 After submitting the job, enter cancel on the command line or press PF3 to save changes.
7 On the Target Database Post-Upgrade Menu, select option 1: Apply/Run Index Synchronization, and press Enter.
You are placed in edit mode for the data set &DSNHLQ.SIEBEL.INSTALL.JCL(SUBSYNCX).
8 Run the job using the JCL in the data set.
This job submits the SYNCIDX (synchronize index) job which executes a file containing the DDL for the indexes.
9 Verify that the job ran successfully with a return code of 0 or 4. For information, see “Verifying JCL Upgrade Jobs” on page 143.
Performing Postupgrade Tasks on the Target Database ■ Activating New License KeysAfter an Upgrade
Siebel Database Upgrade Guide for DB2 for z/OS Siebel Innovation Pack 2016 211
10 Press PF3 to return to the Upgrade In-Place Main Menu.
Upgphys processing is now completed.
Activating New License Keys After an UpgradeUpgrades: All upgrades.
Environments: All environments.
This topic is part of an upgrade process. See Chapter 4, “How to Perform a Siebel Database Upgrade.”
In Siebel Innovation Pack 2016, the license keys for Siebel CRM base applications that were previously provided in seed data in the Siebel database are inactive. License keys entered by customers are unchanged. A new utility is provided for activating or deactivating the license keys that you require. You run the License Key Activation utility after installing a new Siebel database, running Incremental Repository Merge (for migration installations), or completing a full database upgrade.
You can find license key information for Siebel Business Applications at Oracle’s license codes site.
For the Siebel license keys, see
http://licensecodes.oracle.com/siebel.html
The License Key Activation utility is supported on all operating systems and databases for Siebel
Business Applications.
To start the License Key Activation utility1 On the computer where you installed Siebel Server, navigate to the following location:
SIEBSRVR_ROOT\bin
2 Run the following program, according to your operating system:
■ Microsoft Windows: licensekeymodule.bat
■ UNIX: licensekeymodule.sh
3 In the License Key screen, enter valid data for the following fields:
a In the Siebel Server Location field, enter the installation path for Siebel Server.
b In the ODBC DSN field, enter the ODBC data source for the Siebel Database.
c In the Table Owner field, enter the table owner for the Siebel database.
d In the Username field, enter the user name for logging into the Siebel database.
e In the Password field, enter the password for logging into the Siebel database.
f In the DB Platform field, enter the RDBMS type: IBM DB2, Microsoft SQL Server, or Oracle Database.
Siebel Database Upgrade Guide for DB2 for z/OS Siebel Innovation Pack 2016
Performing Postupgrade Tasks on the Target Database ■ Deleting Redundant Upgrade Files
212
g In the Log Folder field, enter the folder in which the log file licenseKeys.log is created. This log file shows database connection information for troubleshooting purposes, and lists all of the license keys that were activated or deactivated in each session.
4 Click Login.
The license key activation screen appears, which lists Siebel CRM license keys.
5 For each license key module whose activation status you want to change, click the Active Flag check box to activate or deactivate this license key.
6 To apply your selections to the Siebel database, click Apply. Or, to reset any changes you have made in this screen, or since you last clicked Apply, click Reset.
CAUTION: After you have clicked Apply, the Reset button does not reset activation settings to their original state. However, you can change the activation status and click Apply again.
7 To exit the utility, click the X in the top right corner.
For more information on installing license keys, see Siebel Installation Guide for the operating system you are using and Siebel Applications Administration Guide.
Deleting Redundant Upgrade FilesUpgrades: All upgrades.
Environments: All environments.
This topic is part of an upgrade process. See Chapter 4, “How to Perform a Siebel Database Upgrade.”
After you complete the database upgrade process, delete any upgrade files that are no longer required. The procedures in this topic describe how to drop all staging database objects, and how to delete Unload data sets and stored procedures.
Removing the Staging DatabaseAfter you have successfully completed your database upgrade, you must remove the staging database objects before you can reuse the same database prefix and tableowner name.
To remove the staging database1 Log on to the z/OS host.
2 Submit the JCL in the &DSNHLQ.SIEBEL.INSTALL.JCL(STGDROPJ) data set.
The staging database objects are removed.
3 Press PF3 to complete the process.
Performing Postupgrade Tasks on the Target Database ■ Deleting Redundant UpgradeFiles
Siebel Database Upgrade Guide for DB2 for z/OS Siebel Innovation Pack 2016 213
Deleting Unload Data SetsWhen your database upgrade is completed, you no longer require the Unload data sets. Perform the following procedure to generate a list of the Unload data sets and then delete them.
NOTE: Before performing this procedure, you must have the *.siebel.exec library allocated.
To delete unload data sets1 Log on to the z/OS host.
2 Enter the following command and press Enter:
TSO SBLDELDS
A list of the unload data sets to be deleted is generated.
3 Navigate to the *.siebel.install.jcl library.
4 Submit the JCL in the data set &DSNHLQ.SIEBEL.INSTALL.JCL(DELULDS) to delete the Unload data sets.
5 Verify that the job ran successfully with a return code of 0. For information, see “Verifying JCL Upgrade Jobs” on page 143.
Deleting Stored ProceduresA number of stored procedures are installed during the database upgrade on the z/OS host to facilitate upgrade processing. These stored procedures are not required after the upgrade has been completed successfully and can be deleted. The following procedure describes how to drop the upgrade stored procedures.
For information on installing the stored procedures, see “Creating and Deploying Stored Procedures on the Target Database” on page 200.
To drop the upgrade stored procedures1 Log on to the z/OS host.
2 Submit the JCL in the data set member DSNHLQ.SIEBEL.SP.CNTL(DRPSIA) or DSNHLQ.SIEBEL.SP.CNTL(DRPHOR), depending on your upgrade path.
The Stored Procedures are deleted.
3 Press PF3 to complete the process.
Siebel Database Upgrade Guide for DB2 for z/OS Siebel Innovation Pack 2016
Performing Postupgrade Tasks on the Target Database ■ Deleting Redundant Upgrade Files
214
Siebel Database Upgrade Guide for DB2 for z/OS Siebel Innovation Pack 2016 215
16 Reviewing the Siebel Upgrade Log Files
This chapter describes the upgrade log files that the Siebel Upgrade Wizard produces on the midtier during the upgrade file generation process. It also describes how to check the status of staging and target upgrade jobs on the z/OS host using the z/OS Siebel job logs. This chapter includes the following topics:
■ About the Siebel Upgrade Log Files on page 215
■ Reviewing Siebel Upgrade Log Files for Errors on page 217
■ Manually Archiving Upgrade Log Files on page 218
■ Viewing the Siebel Job Log Status on page 218
■ Running SQL in Siebel Logs on page 219
About the Siebel Upgrade Log Files The Upgrade Wizard writes logs that provide detailed information on the upgrade processes and they also list all errors. The Upgrade Wizard writes the logs for a process to the following directory by default:
Windows: SIEBEL_ROOT\LOG\process
UNIX: $SIEBEL_ROOT/log/process
where process is the name of the upgrade process you have run, for example, upgrep_dev_782 or prepare_for_production_upgrade.
The process directory contains the following subdirectories:
■ Output. Directory containing the Upgrade Wizard log files
■ State. Directory containing the state.log file
The output and state directories are automatically archived on subsequent runs of a process that completes successfully. (The names of subsequent log directories are appended with _1, _2, and so on.) To preserve disk space, periodically delete or save log directories to another location.
NOTE: You can select a different log directory from the Log Output Directory screen on the Database Configuration Wizard.
About the State Log FileEach upgrade process consists of a series of steps, each of which must complete successfully. If the Upgrade Wizard cannot complete a step, it marks the step as incomplete in the state.log file and exits. The state.log file is located in SIEBEL_ROOT\LOG\process\state (Windows) or SIEBEL_ROOT/LOG/process/state (UNIX).
Siebel Database Upgrade Guide for DB2 for z/OS Siebel Innovation Pack 2016
Reviewing the Siebel Upgrade Log Files ■ About the Siebel Upgrade Log Files
216
You must correct the error and then run the Upgrade Wizard again. When you rerun the Upgrade Wizard, it refers to the state log and resumes at the incomplete step that contained the error.
About Process Log FilesYou can identify errors you encounter during an upgrade by reviewing the log file named UpgWiz.log (Windows) or srvrupgwiz1.log (UNIX) in the SIEBEL_ROOT\LOG\process\output directory (Windows) or the SIEBEL_ROOT/LOG/process/output directory (UNIX).
The name of the log file increments for subsequent log files that are created if the Siebel Upgrade Wizard encounters a problem and you run the Siebel Upgrade Wizard again.
Review the end of the log file for details about the latest failure. If the step that failed was not a native SQL step (which would be listed in the log file), then it occurred as part of an external utility. You can review the relevant log file, which is identified by the /L parameter.
How to Determine if the Upgrade Process Completed SuccessfullyIf the status of all the steps in the state.log is Complete, the upgrade process completed successfully.
If the status of any step is Incomplete, the upgrade process did not complete successfully. You must identify the error and correct it before resuming the upgrade.
NOTE: In some cases, the Upgrade Wizard can complete a step even though the step contains unacceptable errors. You must verify that all steps do not contain unacceptable errors, even those with a status of Complete.
Use the following process to identify errors:
1 Resolve errors for steps identified with a Status of Incomplete in the state.log file.
2 Review all the steps with a status of Complete in the state.log file. If any contain unacceptable errors, resolve these errors. See “Reviewing Siebel Upgrade Log Files for Errors” on page 217 for information on identifying unacceptable upgrade errors.
3 Restart the Upgrade Wizard, or, if necessary, restore the database and rerun the upgrade process.
If you have any questions regarding how to resolve errors, create a service request (SR) on My Oracle Support. You can log service requests by accessing My Oracle Support (Service Request tab), or by using your existing phone support numbers to contact Oracle Global Customer Support.
Log Files That Can Be IgnoredIf the upgrade completed successfully, there are several log files that you can safely ignore:
■ Windows: sw_cfg_xxx.log and siebel.log
■ UNIX: srvrupgwiz_*.log and siebel_*.log. For example, srvrupgwiz_001.log, and srvrupqwiz1_02.log
Reviewing the Siebel Upgrade Log Files ■ Reviewing Siebel Upgrade Log Files for Errors
Siebel Database Upgrade Guide for DB2 for z/OS Siebel Innovation Pack 2016 217
■ Any other log file that existed before the start of the upgrade
CAUTION: UNIX Only: The log file srvrupgwiz_001.log is a different file than srvrupgwiz1.log. Do not ignore log files named srvrupgwiz1.log, srvrupgwiz1_01.log and so on.
Reviewing Siebel Upgrade Log Files for ErrorsUpgrades: All upgrades.
Environments: All environments.
This topic is part of an upgrade process. See Chapter 4, “How to Perform a Siebel Database Upgrade.”
Review the logs created when you run the Siebel Upgrade Wizard to verify that the upgrade process completed correctly and to identify errors that must be resolved. The log files might include errors that are expected and benign. You must compare any error messages found in the log files to a list of acceptable error messages, and correct any unacceptable errors.
Complete the following procedure to manually review log files for unacceptable errors.
To manually review the log files for unacceptable errors1 Review the state.log file to see at what step the upgrade failed. This step can be traced back to
the driver file. The state.log file is located in the following directory:
Windows: SIEBEL_ROOT\LOG\process\state
UNIX: $SIEBEL_ROOT/LOG/process/state
2 Print the errors file. The errors file lists the benign and expected errors you might find in the log files; you can ignore these errors. The errors file is located in the installation subdirectory:
Windows: DBSRVR_ROOT\DB2390\errors.rtf or errors.htm
UNIX: DBSRVR_ROOT/DB2390/errors.txt
3 Sort the log files in the following directory by date.
Windows: SIEBEL_ROOT\LOG\process\output
UNIX: $SIEBEL_ROOT/LOG/process/output
4 Open each log file, starting with the earliest, and search for errors. Starting with the earliest log file can shorten your research time.
Log files are identified by the .log extension. Errors are either tagged with the word error or enclosed in square brackets [...].
5 For each error found, compare the error description against the list of acceptable errors documented in the errors file.
The log files generated by the Siebel Upgrade Wizard (for example srvrupgwiz1.log) appear in the errors file as upgwiz1.log, upgwiz2.log, incrementing for additional log files. Identify errors as follows:
Siebel Database Upgrade Guide for DB2 for z/OS Siebel Innovation Pack 2016
Reviewing the Siebel Upgrade Log Files ■ Manually Archiving Upgrade Log Files
218
■ If you find the error in the errors file, it is acceptable and no action is required. Continue to review the errors found in the log file.
■ If an error appears multiple times in a log file, but only one occurrence of that error appears in the errors file, all errors of that type are acceptable and no action is required. Continue to review the errors found in the log file.
■ If a log file is not listed in the errors file, there are no acceptable error messages for that log file. You must correct the condition that caused the error before you rerun the Siebel Upgrade Wizard.
■ If you find an error that is not listed in the errors file, it is unacceptable. You must correct the condition that caused the error before you rerun the Siebel Upgrade Wizard.
To help resolve unacceptable errors, view 477324.1 (Article ID) on My Oracle Support. This document was formerly published as Siebel Troubleshooting Steps 21. Common errors and how to resolve them are listed in this document. If the error is not listed or you cannot resolve it, create a service request (SR) on My Oracle Support. Do not proceed with the upgrade.
6 Repeat Step 5 for each log file.
Although unacceptable errors are rarely encountered, this review is critical. Certain errors, such as a failure to create indexes, can result in performance problems or anomalous behavior in Siebel Business Applications.
Manually Archiving Upgrade Log FilesUpgrades: All upgrades.
Environments: All environments.
This topic is part of an upgrade process. See Chapter 4, “How to Perform a Siebel Database Upgrade.”
After a successful installation and upgrade, you must manually save and archive the log files located in the SIEBEL_ROOT/LOG/process (Windows) directory.
By default, only nine (9) upgrade log files are retained for subsequent retries of the Siebel Upgrade Wizard. After nine log files have been created, when the Siebel Upgrade Wizard is rerun, it overwrites log files beginning with the earliest one created and recycles the rest as necessary. (This does not apply to the state.log file.)
The number of log files retained can be increased by resetting the siebel_log_archive environment variable, for example, set the variable to 20 to retain twenty (20) log files.
Viewing the Siebel Job Log StatusUpgrades: All upgrades.
Environments: All environments.
This topic is part of an upgrade process. See Chapter 4, “How to Perform a Siebel Database Upgrade.”
Reviewing the Siebel Upgrade Log Files ■ Running SQL in Siebel Logs
Siebel Database Upgrade Guide for DB2 for z/OS Siebel Innovation Pack 2016 219
Whether you are using Siebel-scheduling or vendor-scheduling to run your upgrade jobs, you can query the Siebel job log for the staging and target upgrade processes by completing the following procedure.
NOTE: To view job status, you must have installed DSN REXX.
To view the Siebel job log status1 If you are not on the Siebel In-Place Upgrade Main Menu, enter the following command:
EXEC ’DSNHLQ.SIEBEL.EXEC’
2 Select one of the following options, and press Enter:
■ Option 5: Staging Database Joblog (SBLLOG S).
The Staging Joblog Query panel displays.
■ Option 6: Target Database Joblog (SBLLOG T).
The Target Joblog Query panel displays.
The panel ID of both the staging and target joblog panels is SBLLOGP.
A list of successful and failed jobs appears.
3 Next to the label, List By Job Status, enter 1 to list failed jobs and enter 2 to list jobs that have not yet been run.
The list displays 250 lines only. The Unload, Load and Index Rebuild jobs have more than 250 jobs, so you must query using another option or by specific or partial job name.
4 Press PF3 when you are finished viewing the log.
The Siebel In-Place Upgrade Main Menu for your upgrade path appears.
Running SQL in Siebel LogsBy using SPUFI or the command line, you can construct SQL queries to run against the staging or the target log tables.
The following statements report the status of the load jobs for the staging and target databases:
SELECT JOB_DESC, JOB_NAME, JOB_STATUS FROM CQ10A901.TMP_SBLLOG_STG WHERE JOB_NAME LIKE 'LKC%';
SELECT JOB_DESC, JOB_NAME, JOB_STATUS FROM CQ10A901.TMP_SBLLOG_TAR WHERE JOB_NAME LIKE 'LKC%';
You can alter the preceding statements to report the status of any jobs by changing the JOB_NAME LIKE statement to another prefix.
Siebel Database Upgrade Guide for DB2 for z/OS Siebel Innovation Pack 2016
Reviewing the Siebel Upgrade Log Files ■ Running SQL in Siebel Logs
220
This following statement checks for failed unload jobs, but can check for any other job by changing the JOB_NAME LIKE statement to use the appropriate prefix.
SELECT JOB_DESC, JOB_NAME, JOB_STATUS FROM CQ10K034.TMP_SBLLOG_STG WHERE JOB_STATUS
!= 'COMPLETED SUCCESSFUL' AND JOB_NAME LIKE 'LKB%';
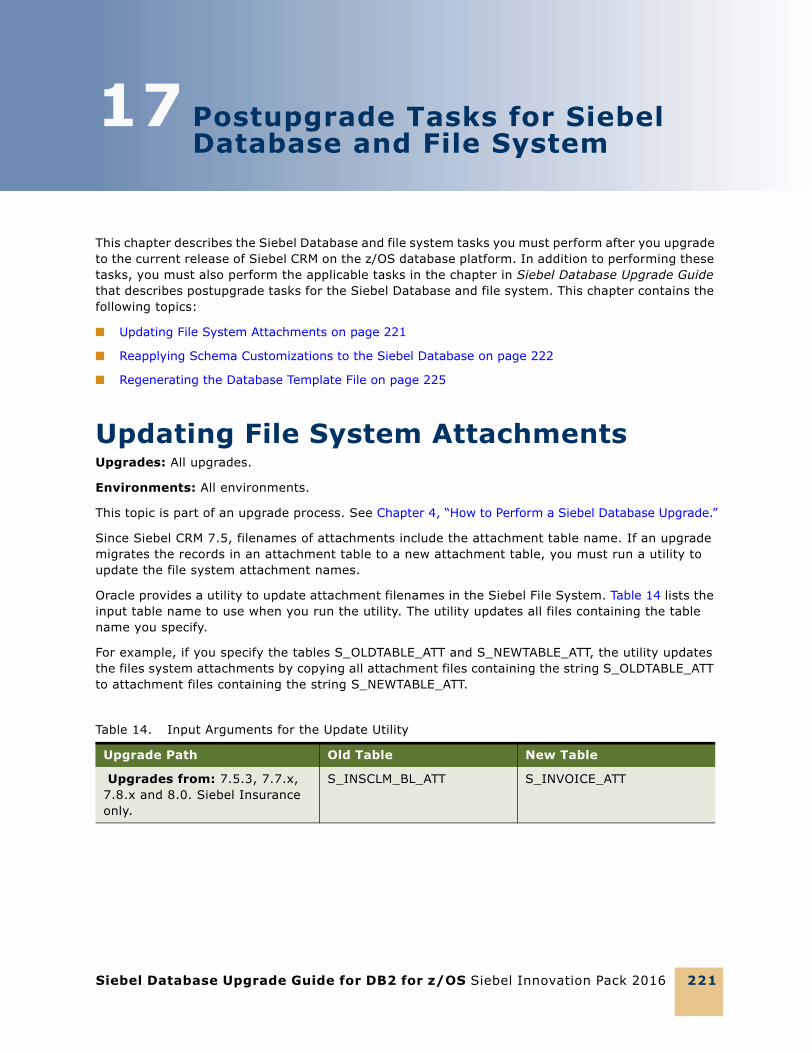
Siebel Database Upgrade Guide for DB2 for z/OS Siebel Innovation Pack 2016 221
17 Postupgrade Tasks for Siebel Database and File System
This chapter describes the Siebel Database and file system tasks you must perform after you upgrade to the current release of Siebel CRM on the z/OS database platform. In addition to performing these tasks, you must also perform the applicable tasks in the chapter in Siebel Database Upgrade Guide that describes postupgrade tasks for the Siebel Database and file system. This chapter contains the following topics:
■ Updating File System Attachments on page 221
■ Reapplying Schema Customizations to the Siebel Database on page 222
■ Regenerating the Database Template File on page 225
Updating File System AttachmentsUpgrades: All upgrades.
Environments: All environments.
This topic is part of an upgrade process. See Chapter 4, “How to Perform a Siebel Database Upgrade.”
Since Siebel CRM 7.5, filenames of attachments include the attachment table name. If an upgrade migrates the records in an attachment table to a new attachment table, you must run a utility to update the file system attachment names.
Oracle provides a utility to update attachment filenames in the Siebel File System. Table 14 lists the input table name to use when you run the utility. The utility updates all files containing the table name you specify.
For example, if you specify the tables S_OLDTABLE_ATT and S_NEWTABLE_ATT, the utility updates the files system attachments by copying all attachment files containing the string S_OLDTABLE_ATT to attachment files containing the string S_NEWTABLE_ATT.
Table 14. Input Arguments for the Update Utility
Upgrade Path Old Table New Table
Upgrades from: 7.5.3, 7.7.x, 7.8.x and 8.0. Siebel Insurance only.
S_INSCLM_BL_ATT S_INVOICE_ATT
Siebel Database Upgrade Guide for DB2 for z/OS Siebel Innovation Pack 2016
Postupgrade Tasks for Siebel Database and File System ■ Reapplying Schema Customizations to the Siebel Database
222
To update file system attachments1 Navigate to the following directory:
Windows: SIEBEL_ROOT\bin
UNIX: $SIEBEL_ROOT/bin
2 Run the following utility:
Windows: chng_file_sys.bat OLD_TABLE NEW_TABLE “FILE_SYSTEM”
UNIX: chng_file_sys.ksh -s OLD_TABLE -t NEW_TABLE -f “FILE_SYSTEM”
where:
■ OLD_TABLE. The name of the attachment table in the release you are upgrading from. This table is obsolete in the new release.
■ NEW_TABLE . Attachment records in OLD_TABLE were migrated to NEW_TABLE in the new release. The utility copies file system attachments containing the string OLD_TABLE to attachments containing the string NEW_TABLE.
■ “FILE_SYSTEM” . The name of the directory where the Siebel File System attachments reside (entered inside quotation marks)
Windows example:
chng_file_sys.bat S_INSCLM_BL_ATT S_INVOICE_ATT“C:\siebfile\att”
UNIX example:
chng_file_sys.ksh -s S_INSCLM_BL_ATT -t S_INVOICE_ATT-f “/usr/siebel/siebfile/att”
3 Review renamed files carefully to verify that they can be accessed by Siebel Business Applications.
For example, since S_INSCLM_BL_ATT is migrated to S_INVOICE_ATT, verify that files such as S_INSCLM_BL_12-1ABC.SAF are renamed to S_INVOICE_12-1ABC.SAF.
Reapplying Schema Customizations to the Siebel DatabaseUpgrades: All upgrades.
Environments: Development environment only.
This topic is part of an upgrade process. See Chapter 4, “How to Perform a Siebel Database Upgrade.”
In the current release, several tables are obsolete or have been replaced by new tables. If you added extension columns or foreign key (FK) columns to tables that are obsolete in the current release, you might want to reapply these changes to new tables that have replaced the obsolete tables.
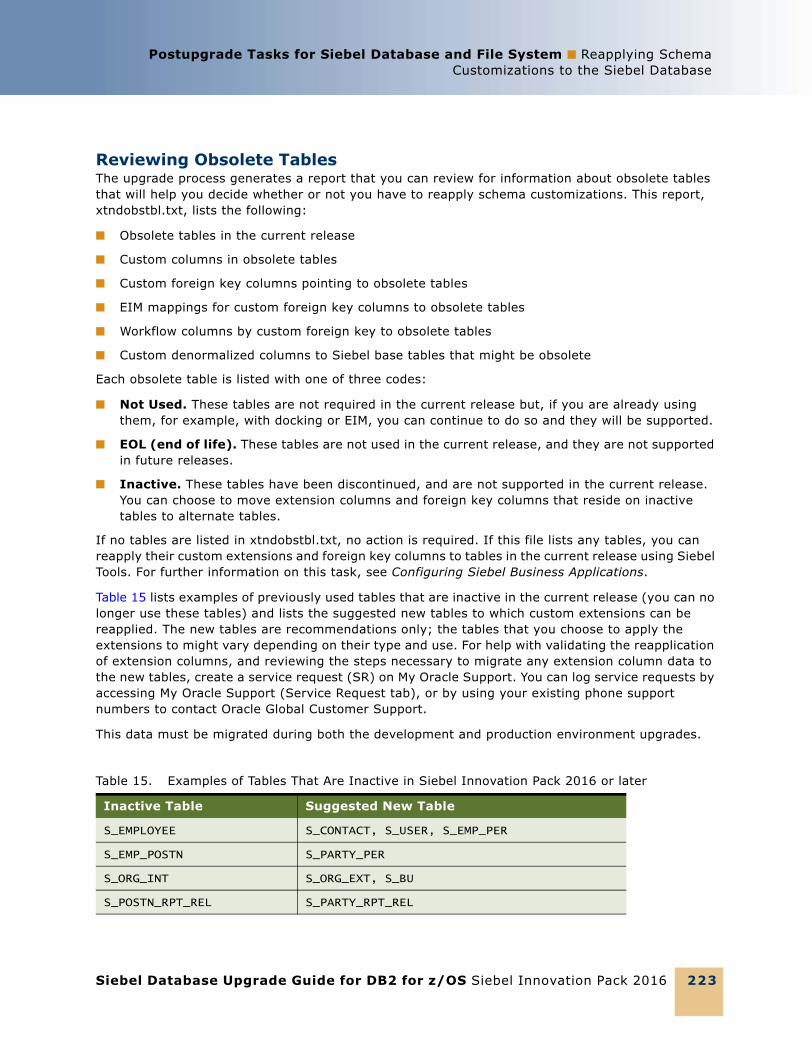
Postupgrade Tasks for Siebel Database and File System ■ Reapplying SchemaCustomizations to the Siebel Database
Siebel Database Upgrade Guide for DB2 for z/OS Siebel Innovation Pack 2016 223
Reviewing Obsolete TablesThe upgrade process generates a report that you can review for information about obsolete tables that will help you decide whether or not you have to reapply schema customizations. This report, xtndobstbl.txt, lists the following:
■ Obsolete tables in the current release
■ Custom columns in obsolete tables
■ Custom foreign key columns pointing to obsolete tables
■ EIM mappings for custom foreign key columns to obsolete tables
■ Workflow columns by custom foreign key to obsolete tables
■ Custom denormalized columns to Siebel base tables that might be obsolete
Each obsolete table is listed with one of three codes:
■ Not Used. These tables are not required in the current release but, if you are already using them, for example, with docking or EIM, you can continue to do so and they will be supported.
■ EOL (end of life). These tables are not used in the current release, and they are not supported in future releases.
■ Inactive. These tables have been discontinued, and are not supported in the current release. You can choose to move extension columns and foreign key columns that reside on inactive tables to alternate tables.
If no tables are listed in xtndobstbl.txt, no action is required. If this file lists any tables, you can reapply their custom extensions and foreign key columns to tables in the current release using Siebel Tools. For further information on this task, see Configuring Siebel Business Applications.
Table 15 lists examples of previously used tables that are inactive in the current release (you can no longer use these tables) and lists the suggested new tables to which custom extensions can be reapplied. The new tables are recommendations only; the tables that you choose to apply the extensions to might vary depending on their type and use. For help with validating the reapplication of extension columns, and reviewing the steps necessary to migrate any extension column data to the new tables, create a service request (SR) on My Oracle Support. You can log service requests by accessing My Oracle Support (Service Request tab), or by using your existing phone support numbers to contact Oracle Global Customer Support.
This data must be migrated during both the development and production environment upgrades.
Table 15. Examples of Tables That Are Inactive in Siebel Innovation Pack 2016 or later
Inactive Table Suggested New Table
S_EMPLOYEE S_CONTACT, S_USER, S_EMP_PER
S_EMP_POSTN S_PARTY_PER
S_ORG_INT S_ORG_EXT, S_BU
S_POSTN_RPT_REL S_PARTY_RPT_REL
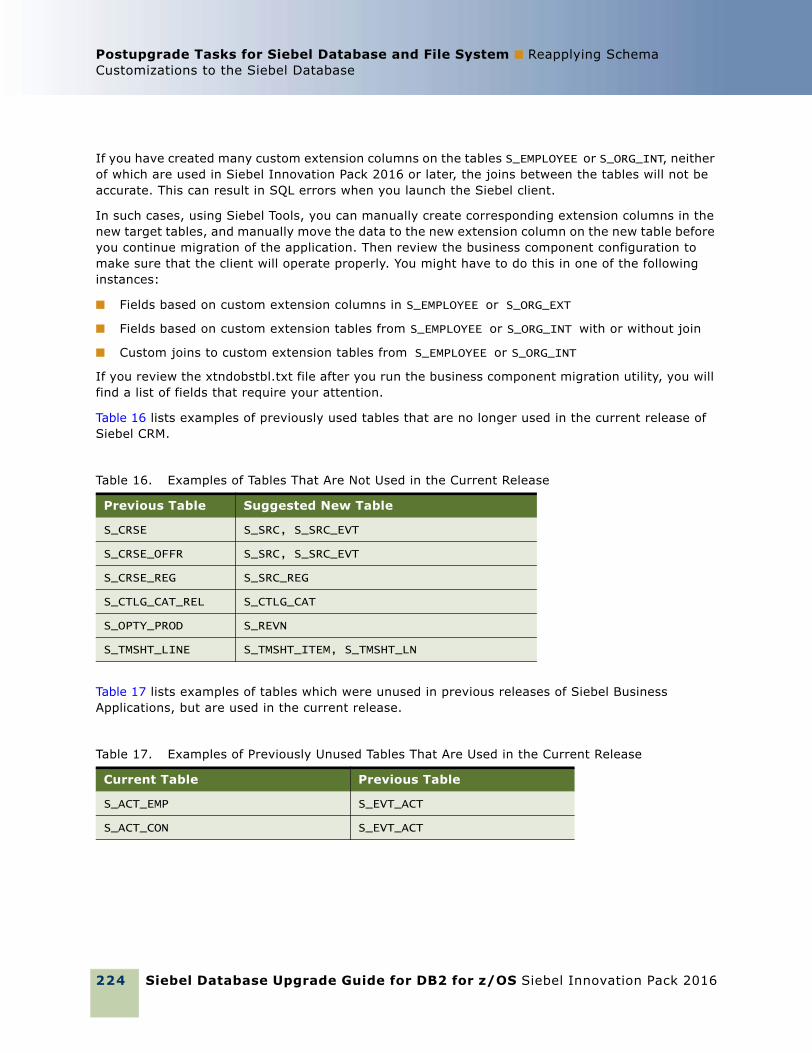
Siebel Database Upgrade Guide for DB2 for z/OS Siebel Innovation Pack 2016
Postupgrade Tasks for Siebel Database and File System ■ Reapplying Schema Customizations to the Siebel Database
224
If you have created many custom extension columns on the tables S_EMPLOYEE or S_ORG_INT, neither of which are used in Siebel Innovation Pack 2016 or later, the joins between the tables will not be accurate. This can result in SQL errors when you launch the Siebel client.
In such cases, using Siebel Tools, you can manually create corresponding extension columns in the new target tables, and manually move the data to the new extension column on the new table before you continue migration of the application. Then review the business component configuration to make sure that the client will operate properly. You might have to do this in one of the following instances:
■ Fields based on custom extension columns in S_EMPLOYEE or S_ORG_EXT
■ Fields based on custom extension tables from S_EMPLOYEE or S_ORG_INT with or without join
■ Custom joins to custom extension tables from S_EMPLOYEE or S_ORG_INT
If you review the xtndobstbl.txt file after you run the business component migration utility, you will find a list of fields that require your attention.
Table 16 lists examples of previously used tables that are no longer used in the current release of Siebel CRM.
Table 17 lists examples of tables which were unused in previous releases of Siebel Business Applications, but are used in the current release.
Table 16. Examples of Tables That Are Not Used in the Current Release
Previous Table Suggested New Table
S_CRSE S_SRC, S_SRC_EVT
S_CRSE_OFFR S_SRC, S_SRC_EVT
S_CRSE_REG S_SRC_REG
S_CTLG_CAT_REL S_CTLG_CAT
S_OPTY_PROD S_REVN
S_TMSHT_LINE S_TMSHT_ITEM, S_TMSHT_LN
Table 17. Examples of Previously Unused Tables That Are Used in the Current Release
Current Table Previous Table
S_ACT_EMP S_EVT_ACT
S_ACT_CON S_EVT_ACT
Postupgrade Tasks for Siebel Database and File System ■ Regenerating the DatabaseTemplate File
Siebel Database Upgrade Guide for DB2 for z/OS Siebel Innovation Pack 2016 225
Regenerating the Database Template FileUpgrades: All upgrades.
Environments: Development environment only.
Following the upgrade, you must regenerate your local database template file used by Siebel Remote. Use the Generate New Database Component from a New Siebel Server option to do this. For procedures on regenerating the local database template file, refer to Siebel Remote and Replication Manager Administration Guide.

Siebel Database Upgrade Guide for DB2 for z/OS Siebel Innovation Pack 2016
Postupgrade Tasks for Siebel Database and File System ■ Regenerating the Database Template File
226
Siebel Database Upgrade Guide for DB2 for z/OS Siebel Innovation Pack 2016 227
18 Postupgrade Tasks for Siebel Business Applications
This chapter describes the application-specific postupgrade tasks you must perform after upgrading to the current release of Siebel CRM on the z/OS database platform. This chapter includes the following topics:
■ Performing Postupgrade Tasks for the Siebel Application on page 227
■ Upgrading Siebel Seeded Workflows on page 227
Performing Postupgrade Tasks for the Siebel ApplicationAfter you upgrade to the current release of Siebel CRM, you must perform a number of application-specific tasks. These include:
■ “Upgrading Siebel Seeded Workflows” on page 227.
This postupgrade task is specific to the z/OS database platform.
■ You must also perform the relevant tasks in the chapter in Siebel Database Upgrade Guide that describes postupgrade tasks for the Siebel application.
When you have completed these tasks, your upgraded Siebel CRM system is ready for use.
Upgrading Siebel Seeded WorkflowsUpgrades: All upgrades.
Environments: All environments.
This topic is part of an upgrade process. See Chapter 4, “How to Perform a Siebel Database Upgrade.”
Customizations to seeded workflows were saved and migrated during upgrade, but you must manually reimplement them in order for them to work properly.
In Siebel CRM Release 7.7.x, workflow definitions were relocated to the Tools Repository.
To upgrade a seeded workflow1 In the Siebel Repository, revise each seeded workflow so that a new copy is created with a new
version number.
2 Manually merge in your customizations, and then deploy and activate the workflow.
Siebel Database Upgrade Guide for DB2 for z/OS Siebel Innovation Pack 2016
Postupgrade Tasks for Siebel Business Applications ■ Upgrading Siebel Seeded Workflows
228
Siebel Database Upgrade Guide for DB2 for z/OS Siebel Innovation Pack 2016 229
19 Tuning the Siebel Production Upgrade Scripts
This chapter describes the ways in which you can improve the performance of the production environment upgrade by tuning the production upgrade scripts in a test environment. This chapter contains the following topics:
■ About Tuning the Upgrade Scripts
■ Optimizing Unload and Load Job Performance on page 230
■ Adding the Statistics Clause to Load Cards on page 231
NOTE: The Siebel Database Upgrade Guide describes how to use the Siebel Upgrade Tuner to tune your production upgrade scripts. The Upgrade Tuner is not supported on the IBM DB2 for z/OS database platform.
About Tuning the Upgrade ScriptsUpgrades: All upgrades.
Environments: Production test environment only. Does not apply to production environment.
You can tune the SQL upgrade scripts in a production test environment to improve their performance and then reuse these tested scripts in the live production environment. For example, the scripts used to upgrade your Siebel database are generic. They update your Siebel database to support all Siebel applications’ functionality. You can reduce downtime by tuning these scripts to optimize performance by eliminating SQL statements that are not required. You can then reuse these revised scripts in your production upgrade.
You can tune your production upgrade scripts at any time after upgrading the Siebel database schema in your production test environment.
Contacting Oracle’s Advanced Customer ServicesYou are required to contact your Oracle sales representative for Oracle Advanced Customer Services to request approval for any upgrade script tuning that you perform. If you do not, you might invalidate your support agreement. It is recommended (but not required) that you contact Oracle’s Advanced Customer Services for help with the following tasks:
■ Running load and unload jobs in parallel
■ Changing the job submission order of load and unload jobs
If you want to change the submission order of jobs other than the load and unload jobs, you must first obtain approval from Oracle’s Advanced Customer Services because many jobs have dependencies on other jobs and must be submitted in a specified sequence.
Siebel Database Upgrade Guide for DB2 for z/OS Siebel Innovation Pack 2016
Tuning the Siebel Production Upgrade Scripts ■ Optimizing Unload and Load Job Performance
230
Optimizing Unload and Load Job PerformanceUpgrades: All upgrades.
Environments: Production test environment only. Does not apply to production environment.
This topic describes ways in which you can improve the performance of the unload and load jobs for the production upgrade. You can do the following:
■ Optimize the unload and load jobs to reach maximum parallelism:
■ Run as many of the unload / load jobs in parallel as the DB2 subsystem can support.
■ Change the generated REXX exec job submission order to submit the longest running unload/load jobs first.
If all the unload jobs are run in parallel, the shortest amount of time this process can take is the length of time it takes for the longest unload job to complete.
■ For partitioned tables, split the unload files so that data is unloaded and loaded in parallel for each partition. Add the WHERE clause to the unload SQL to control the data that is unloaded.
■ Overlap load and unload jobs.
Once an unload job for a table has completed, the load job for that table can be started (assuming you have a schema structure consisting of one table for each table space). This means that load jobs can be running at the same time as unload jobs.
■ Add the ORDER BY clauses to the unload SQL to load data in clustering sequence (you must manually add ORDER BY clauses to the unload SQL).
The *.pretedit.jcl (pretkeys) job builds ORDER BY clauses for individual tables into the data set *.syskeys.orderby.
■ Use third-party utilities to accelerate the unload/load process.
NOTE: Before using third-party utilities, you are required to contact your Oracle sales representative for Oracle Advanced Customer Services to request assistance.
You can use the DB2 Cross Loader (an option of the IBM Load utility) to load data directly from the source to the target database, thereby eliminating the unload step.
■ Populate new columns as part of the unload SQL.
NOTE: If you want to populate new columns as part of the unload SQL, you are required to contact your Oracle sales representative for Oracle Advanced Customer Services to request assistance.
■ Add any large tables to *.TABLIST so that the unload and load processes use the large proc, SIEBEL.PROC(SV7LD10L), which allocates more memory, instead of using the standard proc, SIEBEL.PROC(SV7LD10S).
Tuning the Siebel Production Upgrade Scripts ■ Adding the Statistics Clause to LoadCards
Siebel Database Upgrade Guide for DB2 for z/OS Siebel Innovation Pack 2016 231
Adding the Statistics Clause to Load CardsUpgrades: All upgrades.
Environments: Production test environment only. Does not apply to production environment.
If your database schema structure follows the 1:1:1 model, and if LOAD REPLACE is specified on a load card (so tables are loaded from scratch), you can improve upgrade performance by collecting statistics while running the load job rather than having to run a separate RUNSTATS job. You can do this by adding the STATISTICS clause to the load cards, for example:
STATISTICS TABLE(ALL) INDEX(ALL)
UPDATE ACCESSPATH
NOTE: If LOAD RESUME is specified on a load card, you cannot collect statistics while running the load job.

Siebel Database Upgrade Guide for DB2 for z/OS Siebel Innovation Pack 2016
Tuning the Siebel Production Upgrade Scripts ■ Adding the Statistics Clause to Load Cards
232
Siebel Database Upgrade Guide for DB2 for z/OS Siebel Innovation Pack 2016 233
A Siebel Upgrade Planning Worksheet
This appendix contains the Upgrade Planning Worksheet. Before you upgrade your Siebel application, photocopy this worksheet, complete it, and give a copy to each member of the upgrade team.
The Upgrade Planning Worksheet contains the following sections:
■ Team Lead Summary on page 233
■ DB2 Connect Information on page 233
■ Siebel Development Environment Information on page 234
■ Siebel Production Environment Information on page 235
■ z/OS Host System Variables Information on page 236
Team Lead Summary
DB2 Connect Information
Deployment Team Lead:
Siebel Administrator:
Privileged User/Siebel Database User:
DB2 Systems Programmer (SYSADM):
DB2 Database Administrator (DBADM):
Security Administrator:
z/OS System Programmer:
Midtier System Administrator:
DB2 Host Name/IP Address:
■ DB2 Port Number:
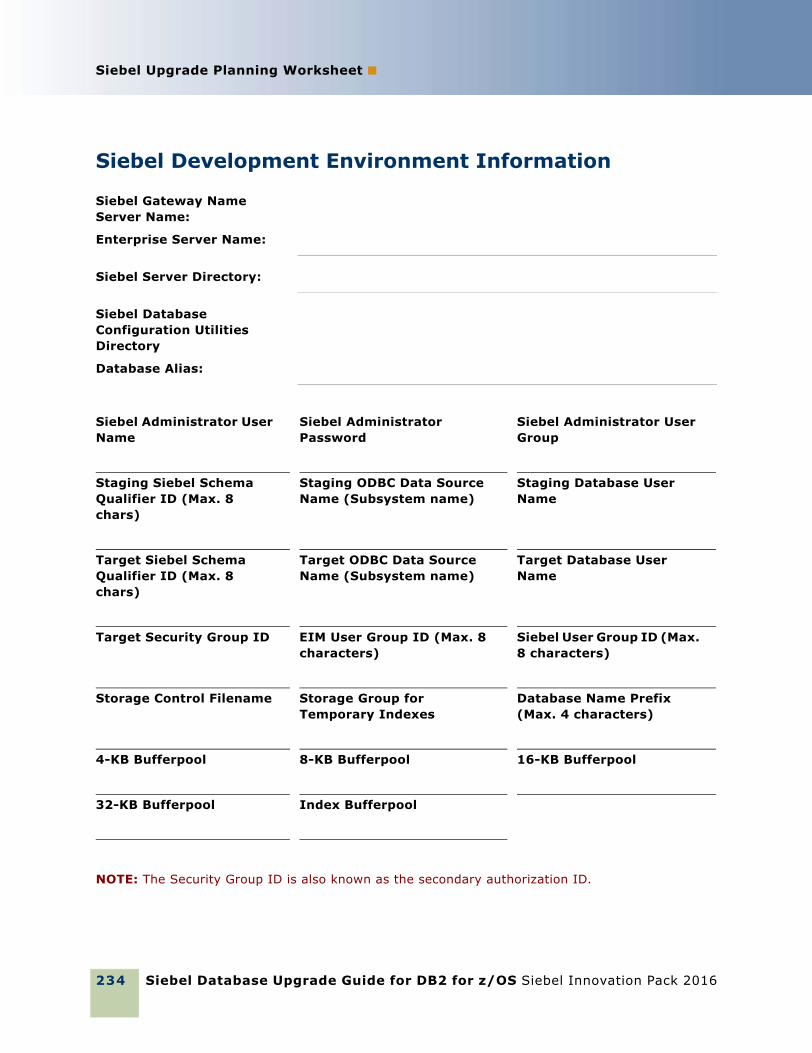
Siebel Database Upgrade Guide for DB2 for z/OS Siebel Innovation Pack 2016
Siebel Upgrade Planning Worksheet ■
234
Siebel Development Environment Information
NOTE: The Security Group ID is also known as the secondary authorization ID.
Siebel Gateway Name Server Name:
Enterprise Server Name:
Siebel Server Directory:
Siebel Database Configuration Utilities Directory
Database Alias:
Siebel Administrator User Name
Siebel Administrator Password
Siebel Administrator User Group
Staging Siebel Schema Qualifier ID (Max. 8 chars)
Staging ODBC Data Source Name (Subsystem name)
Staging Database User Name
Target Siebel Schema Qualifier ID (Max. 8 chars)
Target ODBC Data Source Name (Subsystem name)
Target Database User Name
Target Security Group ID EIM User Group ID (Max. 8 characters)
Siebel User Group ID (Max. 8 characters)
Storage Control Filename Storage Group for Temporary Indexes
Database Name Prefix (Max. 4 characters)
4-KB Bufferpool 8-KB Bufferpool 16-KB Bufferpool
32-KB Bufferpool Index Bufferpool
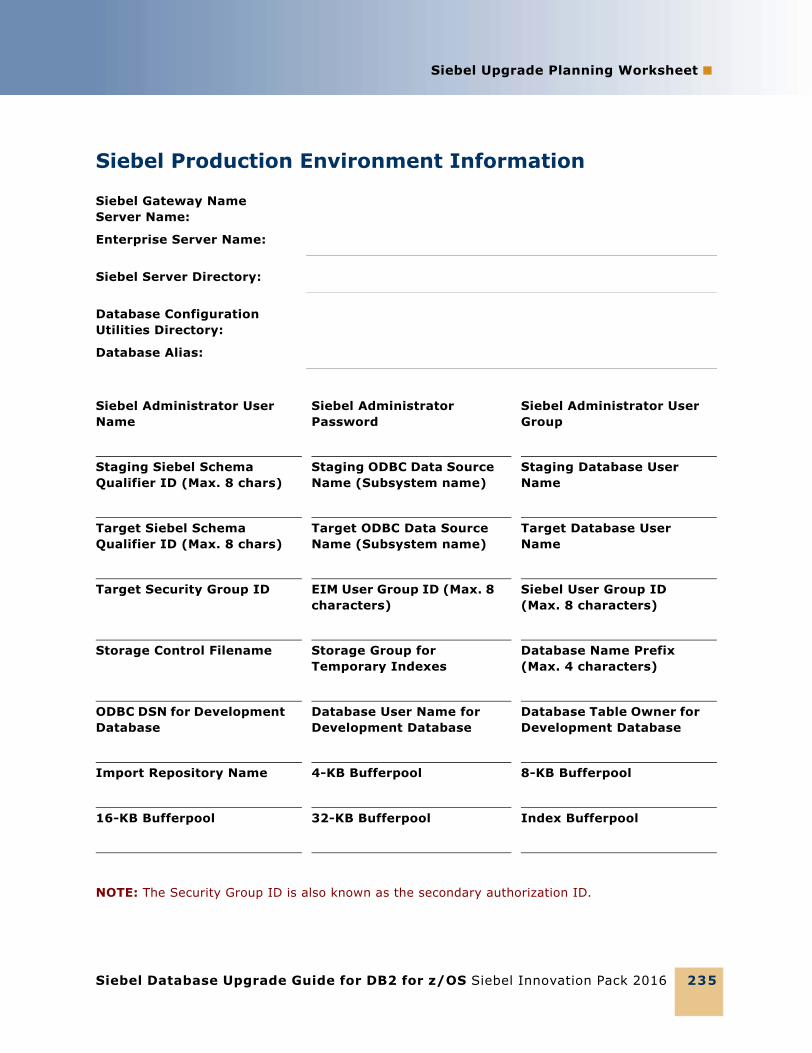
Siebel Upgrade Planning Worksheet ■
Siebel Database Upgrade Guide for DB2 for z/OS Siebel Innovation Pack 2016 235
Siebel Production Environment Information
NOTE: The Security Group ID is also known as the secondary authorization ID.
Siebel Gateway Name Server Name:
Enterprise Server Name:
Siebel Server Directory:
Database Configuration Utilities Directory:
Database Alias:
Siebel Administrator User Name
Siebel Administrator Password
Siebel Administrator User Group
Staging Siebel Schema Qualifier ID (Max. 8 chars)
Staging ODBC Data Source Name (Subsystem name)
Staging Database User Name
Target Siebel Schema Qualifier ID (Max. 8 chars)
Target ODBC Data Source Name (Subsystem name)
Target Database User Name
Target Security Group ID EIM User Group ID (Max. 8 characters)
Siebel User Group ID (Max. 8 characters)
Storage Control Filename Storage Group for Temporary Indexes
Database Name Prefix (Max. 4 characters)
ODBC DSN for Development Database
Database User Name for Development Database
Database Table Owner for Development Database
Import Repository Name 4-KB Bufferpool 8-KB Bufferpool
16-KB Bufferpool 32-KB Bufferpool Index Bufferpool
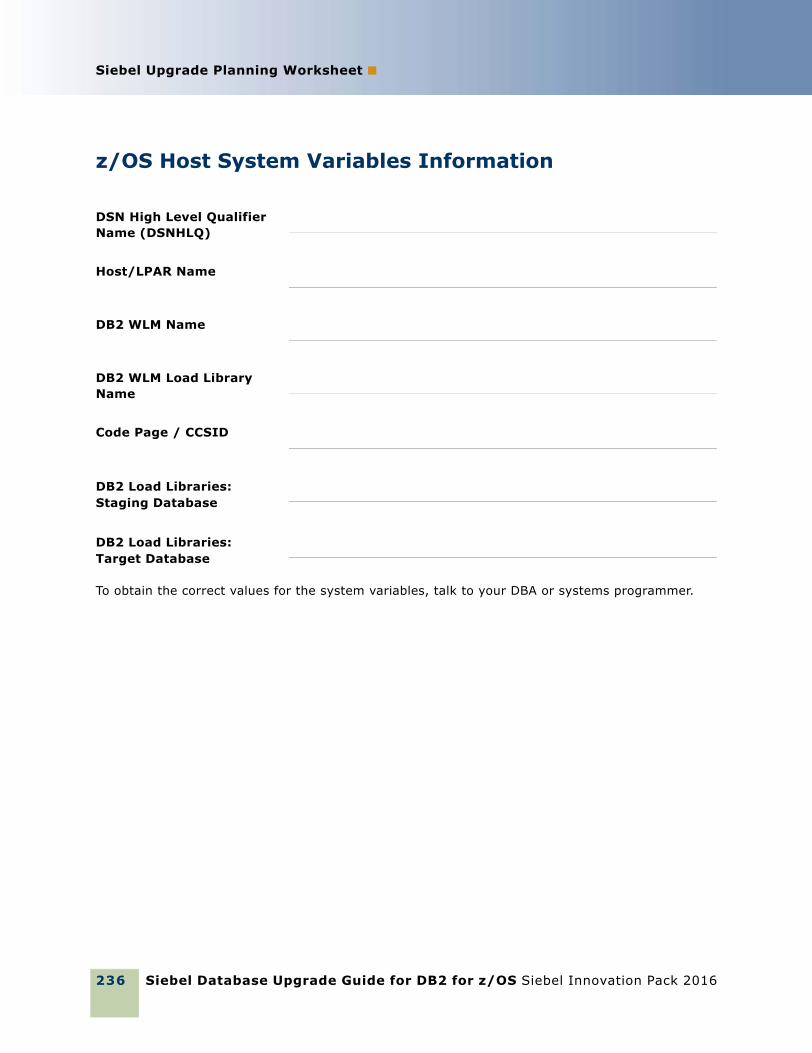
Siebel Database Upgrade Guide for DB2 for z/OS Siebel Innovation Pack 2016
Siebel Upgrade Planning Worksheet ■
236
z/OS Host System Variables Information
To obtain the correct values for the system variables, talk to your DBA or systems programmer.
DSN High Level Qualifier Name (DSNHLQ)
Host/LPAR Name
DB2 WLM Name
DB2 WLM Load Library Name
Code Page / CCSID
DB2 Load Libraries: Staging Database
DB2 Load Libraries: Target Database
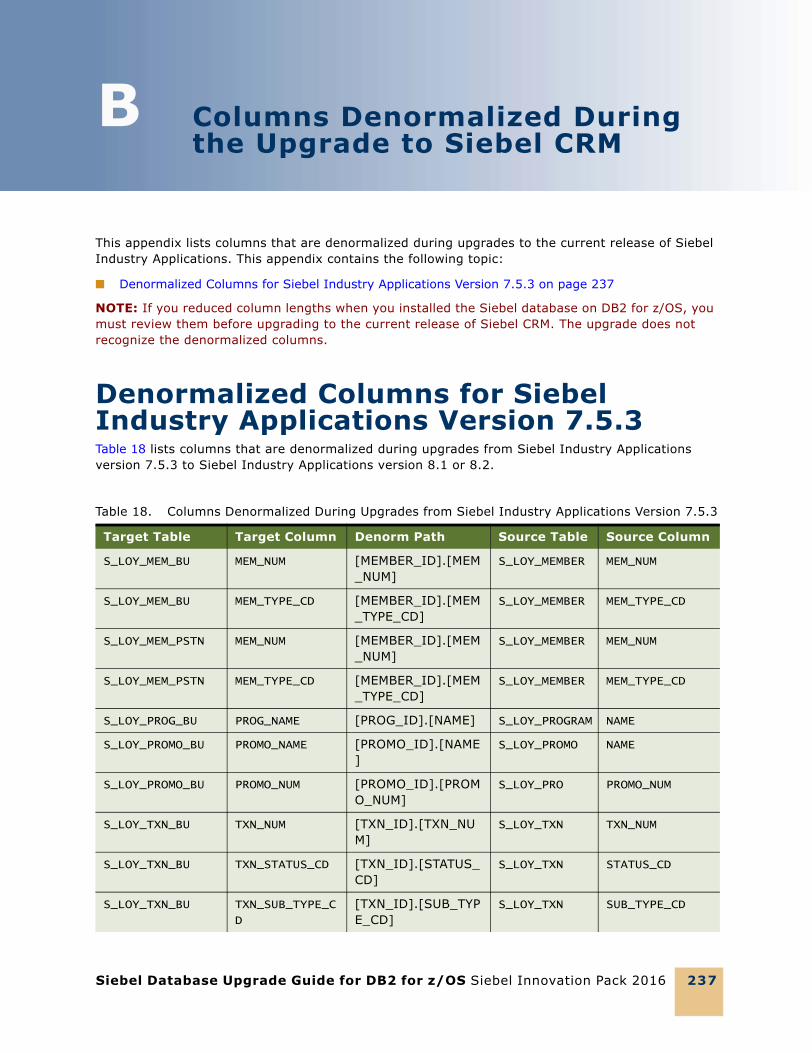
Siebel Database Upgrade Guide for DB2 for z/OS Siebel Innovation Pack 2016 237
B Columns Denormalized During the Upgrade to Siebel CRM
This appendix lists columns that are denormalized during upgrades to the current release of Siebel Industry Applications. This appendix contains the following topic:
■ Denormalized Columns for Siebel Industry Applications Version 7.5.3 on page 237
NOTE: If you reduced column lengths when you installed the Siebel database on DB2 for z/OS, you must review them before upgrading to the current release of Siebel CRM. The upgrade does not recognize the denormalized columns.
Denormalized Columns for Siebel Industry Applications Version 7.5.3Table 18 lists columns that are denormalized during upgrades from Siebel Industry Applications version 7.5.3 to Siebel Industry Applications version 8.1 or 8.2.
Table 18. Columns Denormalized During Upgrades from Siebel Industry Applications Version 7.5.3
Target Table Target Column Denorm Path Source Table Source Column
S_LOY_MEM_BU MEM_NUM [MEMBER_ID].[MEM_NUM]
S_LOY_MEMBER MEM_NUM
S_LOY_MEM_BU MEM_TYPE_CD [MEMBER_ID].[MEM_TYPE_CD]
S_LOY_MEMBER MEM_TYPE_CD
S_LOY_MEM_PSTN MEM_NUM [MEMBER_ID].[MEM_NUM]
S_LOY_MEMBER MEM_NUM
S_LOY_MEM_PSTN MEM_TYPE_CD [MEMBER_ID].[MEM_TYPE_CD]
S_LOY_MEMBER MEM_TYPE_CD
S_LOY_PROG_BU PROG_NAME [PROG_ID].[NAME] S_LOY_PROGRAM NAME
S_LOY_PROMO_BU PROMO_NAME [PROMO_ID].[NAME]
S_LOY_PROMO NAME
S_LOY_PROMO_BU PROMO_NUM [PROMO_ID].[PROMO_NUM]
S_LOY_PRO PROMO_NUM
S_LOY_TXN_BU TXN_NUM [TXN_ID].[TXN_NUM]
S_LOY_TXN TXN_NUM
S_LOY_TXN_BU TXN_STATUS_CD [TXN_ID].[STATUS_CD]
S_LOY_TXN STATUS_CD
S_LOY_TXN_BU TXN_SUB_TYPE_C
D
[TXN_ID].[SUB_TYPE_CD]
S_LOY_TXN SUB_TYPE_CD
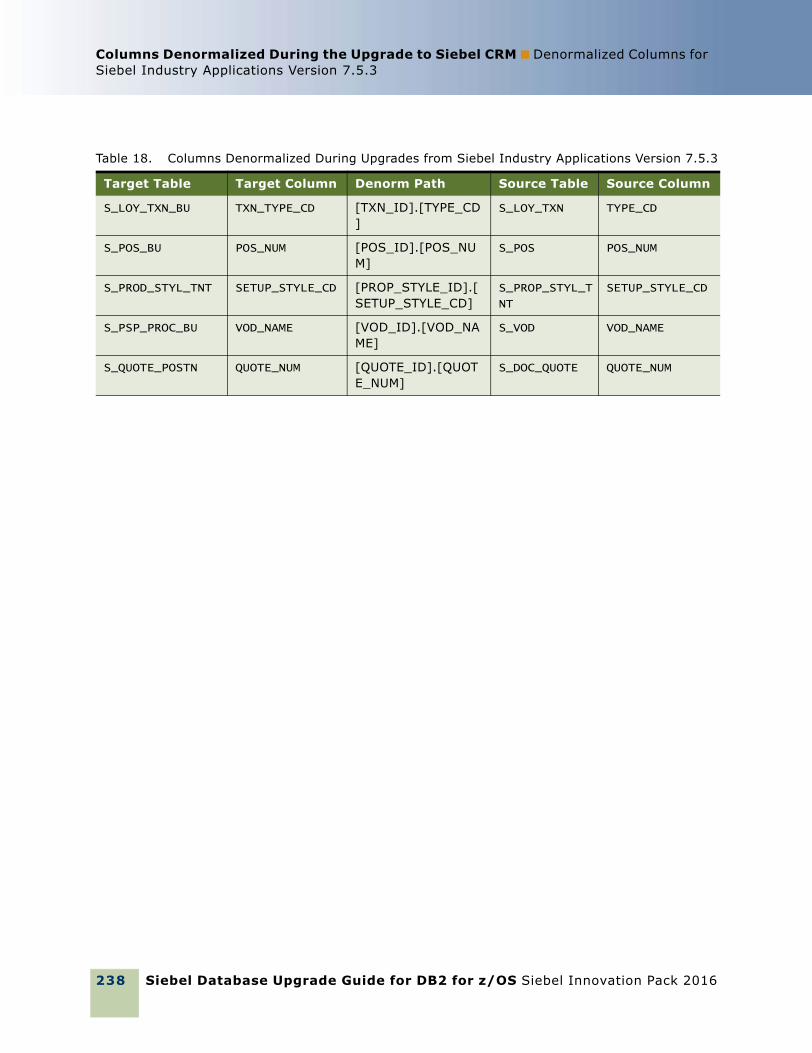
Siebel Database Upgrade Guide for DB2 for z/OS Siebel Innovation Pack 2016
Columns Denormalized During the Upgrade to Siebel CRM ■ Denormalized Columns for Siebel Industry Applications Version 7.5.3
238
S_LOY_TXN_BU TXN_TYPE_CD [TXN_ID].[TYPE_CD]
S_LOY_TXN TYPE_CD
S_POS_BU POS_NUM [POS_ID].[POS_NUM]
S_POS POS_NUM
S_PROD_STYL_TNT SETUP_STYLE_CD [PROP_STYLE_ID].[SETUP_STYLE_CD]
S_PROP_STYL_T
NT
SETUP_STYLE_CD
S_PSP_PROC_BU VOD_NAME [VOD_ID].[VOD_NAME]
S_VOD VOD_NAME
S_QUOTE_POSTN QUOTE_NUM [QUOTE_ID].[QUOTE_NUM]
S_DOC_QUOTE QUOTE_NUM
Table 18. Columns Denormalized During Upgrades from Siebel Industry Applications Version 7.5.3
Target Table Target Column Denorm Path Source Table Source Column
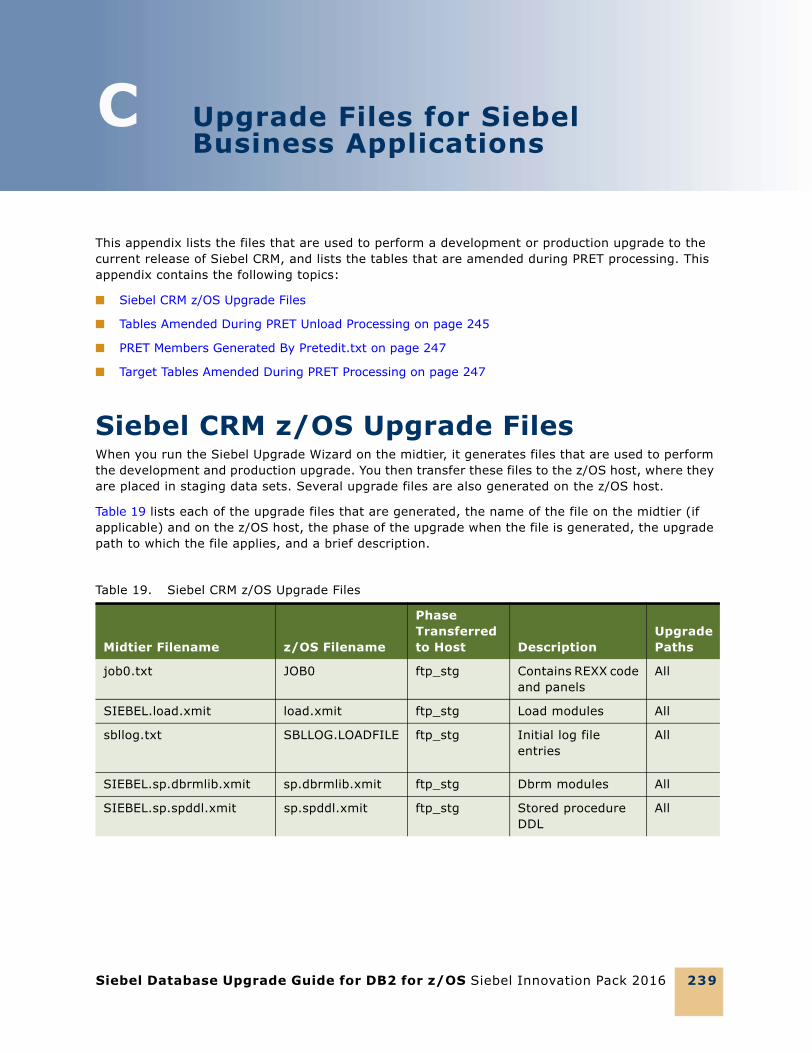
Siebel Database Upgrade Guide for DB2 for z/OS Siebel Innovation Pack 2016 239
C Upgrade Files for Siebel Business Applications
This appendix lists the files that are used to perform a development or production upgrade to the current release of Siebel CRM, and lists the tables that are amended during PRET processing. This appendix contains the following topics:
■ Siebel CRM z/OS Upgrade Files
■ Tables Amended During PRET Unload Processing on page 245
■ PRET Members Generated By Pretedit.txt on page 247
■ Target Tables Amended During PRET Processing on page 247
Siebel CRM z/OS Upgrade FilesWhen you run the Siebel Upgrade Wizard on the midtier, it generates files that are used to perform the development and production upgrade. You then transfer these files to the z/OS host, where they are placed in staging data sets. Several upgrade files are also generated on the z/OS host.
Table 19 lists each of the upgrade files that are generated, the name of the file on the midtier (if applicable) and on the z/OS host, the phase of the upgrade when the file is generated, the upgrade path to which the file applies, and a brief description.
Table 19. Siebel CRM z/OS Upgrade Files
Midtier Filename z/OS Filename
Phase Transferred to Host Description
Upgrade Paths
job0.txt JOB0 ftp_stg Contains REXX code and panels
All
SIEBEL.load.xmit load.xmit ftp_stg Load modules All
sbllog.txt SBLLOG.LOADFILE ftp_stg Initial log file entries
All
SIEBEL.sp.dbrmlib.xmit sp.dbrmlib.xmit ftp_stg Dbrm modules All
SIEBEL.sp.spddl.xmit sp.spddl.xmit ftp_stg Stored procedure DDL
All
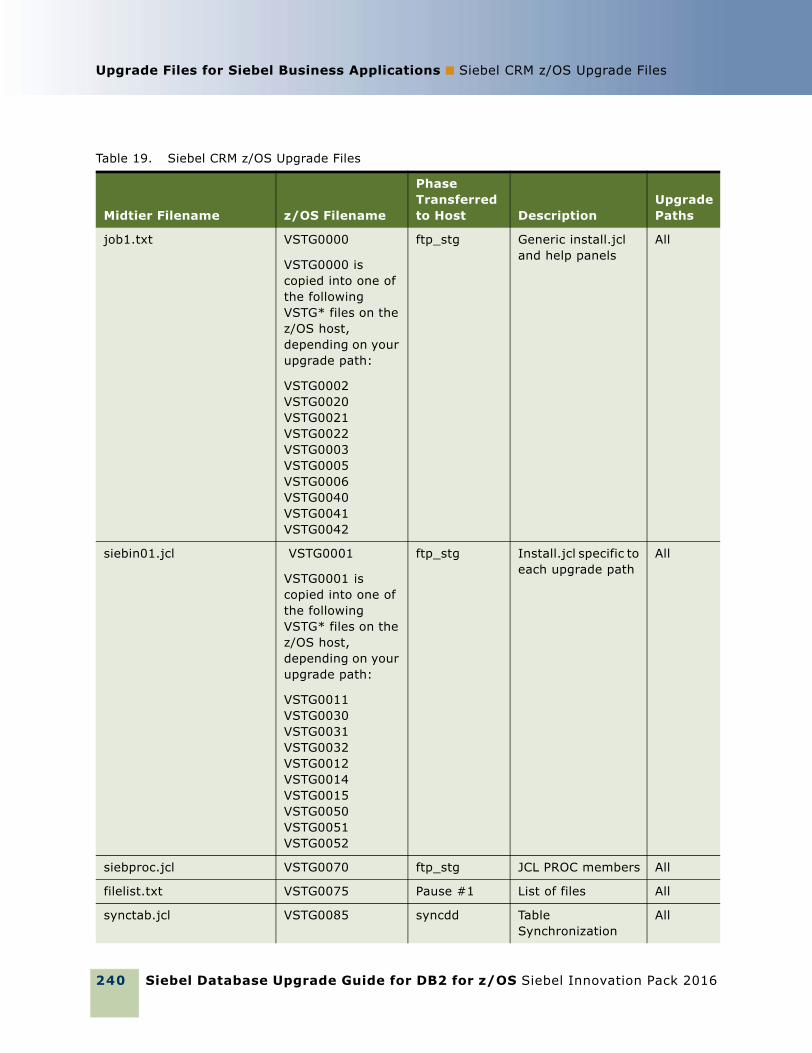
Siebel Database Upgrade Guide for DB2 for z/OS Siebel Innovation Pack 2016
Upgrade Files for Siebel Business Applications ■ Siebel CRM z/OS Upgrade Files
240
job1.txt VSTG0000
VSTG0000 is copied into one of the following VSTG* files on the z/OS host, depending on your upgrade path:
VSTG0002 VSTG0020VSTG0021VSTG0022VSTG0003 VSTG0005VSTG0006VSTG0040VSTG0041VSTG0042
ftp_stg Generic install.jcl and help panels
All
siebin01.jcl VSTG0001
VSTG0001 is copied into one of the following VSTG* files on the z/OS host, depending on your upgrade path:
VSTG0011 VSTG0030 VSTG0031 VSTG0032 VSTG0012 VSTG0014 VSTG0015 VSTG0050 VSTG0051VSTG0052
ftp_stg Install.jcl specific to each upgrade path
All
siebproc.jcl VSTG0070 ftp_stg JCL PROC members All
filelist.txt VSTG0075 Pause #1 List of files All
synctab.jcl VSTG0085 syncdd Table Synchronization
All
Table 19. Siebel CRM z/OS Upgrade Files
Midtier Filename z/OS Filename
Phase Transferred to Host Description
Upgrade Paths
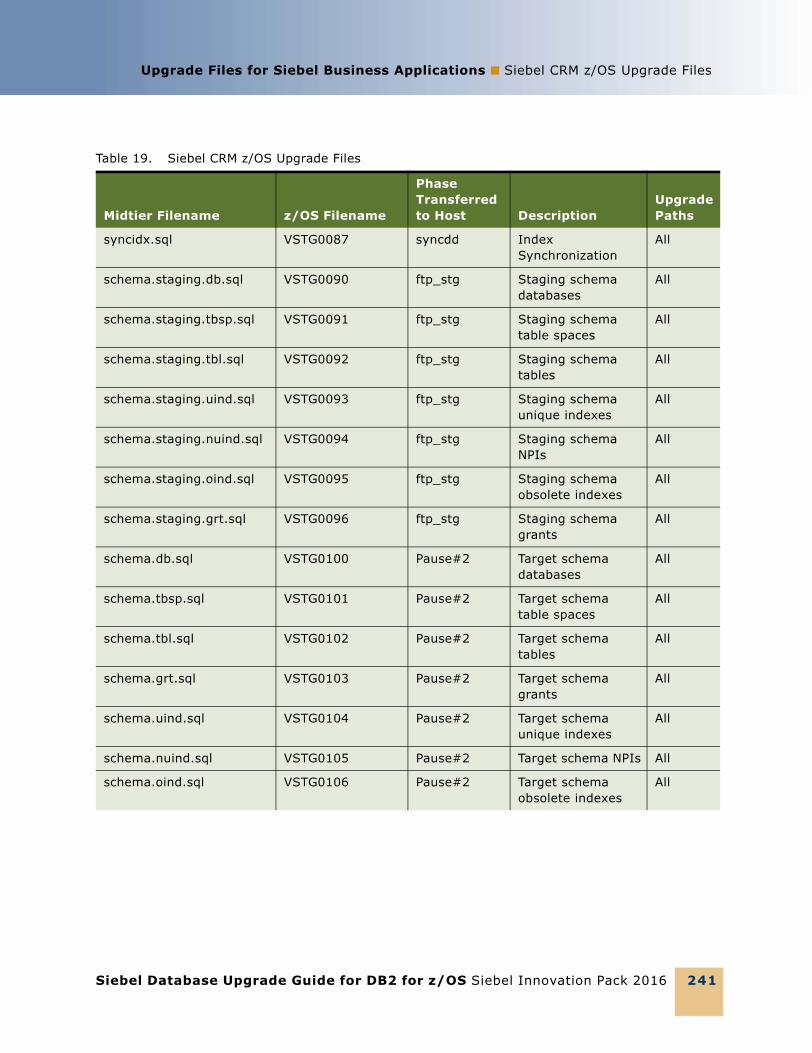
Upgrade Files for Siebel Business Applications ■ Siebel CRM z/OS Upgrade Files
Siebel Database Upgrade Guide for DB2 for z/OS Siebel Innovation Pack 2016 241
syncidx.sql VSTG0087 syncdd Index Synchronization
All
schema.staging.db.sql VSTG0090 ftp_stg Staging schema databases
All
schema.staging.tbsp.sql VSTG0091 ftp_stg Staging schema table spaces
All
schema.staging.tbl.sql VSTG0092 ftp_stg Staging schema tables
All
schema.staging.uind.sql VSTG0093 ftp_stg Staging schema unique indexes
All
schema.staging.nuind.sql VSTG0094 ftp_stg Staging schema NPIs
All
schema.staging.oind.sql VSTG0095 ftp_stg Staging schema obsolete indexes
All
schema.staging.grt.sql VSTG0096 ftp_stg Staging schema grants
All
schema.db.sql VSTG0100 Pause#2 Target schema databases
All
schema.tbsp.sql VSTG0101 Pause#2 Target schema table spaces
All
schema.tbl.sql VSTG0102 Pause#2 Target schema tables
All
schema.grt.sql VSTG0103 Pause#2 Target schema grants
All
schema.uind.sql VSTG0104 Pause#2 Target schema unique indexes
All
schema.nuind.sql VSTG0105 Pause#2 Target schema NPIs All
schema.oind.sql VSTG0106 Pause#2 Target schema obsolete indexes
All
Table 19. Siebel CRM z/OS Upgrade Files
Midtier Filename z/OS Filename
Phase Transferred to Host Description
Upgrade Paths
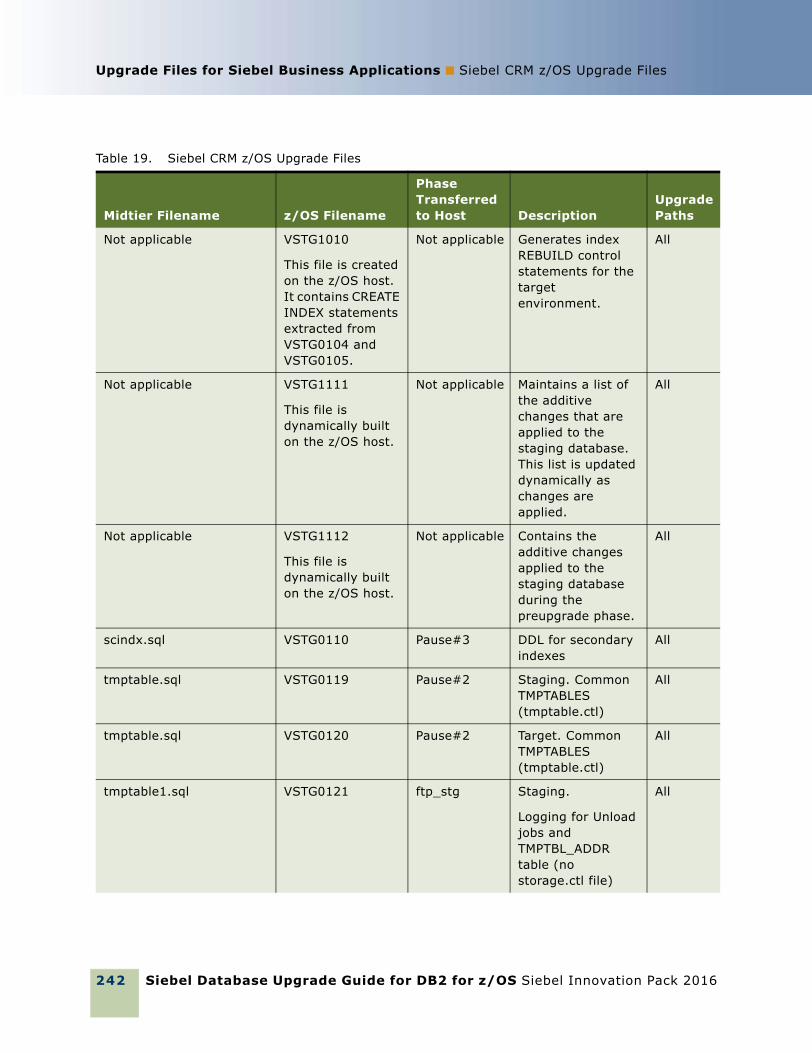
Siebel Database Upgrade Guide for DB2 for z/OS Siebel Innovation Pack 2016
Upgrade Files for Siebel Business Applications ■ Siebel CRM z/OS Upgrade Files
242
Not applicable VSTG1010
This file is created on the z/OS host. It contains CREATE INDEX statements extracted from VSTG0104 and VSTG0105.
Not applicable Generates index REBUILD control statements for the target environment.
All
Not applicable VSTG1111
This file is dynamically built on the z/OS host.
Not applicable Maintains a list of the additive changes that are applied to the staging database. This list is updated dynamically as changes are applied.
All
Not applicable VSTG1112
This file is dynamically built on the z/OS host.
Not applicable Contains the additive changes applied to the staging database during the preupgrade phase.
All
scindx.sql VSTG0110 Pause#3 DDL for secondary indexes
All
tmptable.sql VSTG0119 Pause#2 Staging. Common TMPTABLES (tmptable.ctl)
All
tmptable.sql VSTG0120 Pause#2 Target. Common TMPTABLES (tmptable.ctl)
All
tmptable1.sql VSTG0121 ftp_stg Staging.
Logging for Unload jobs and TMPTBL_ADDR table (no storage.ctl file)
All
Table 19. Siebel CRM z/OS Upgrade Files
Midtier Filename z/OS Filename
Phase Transferred to Host Description
Upgrade Paths
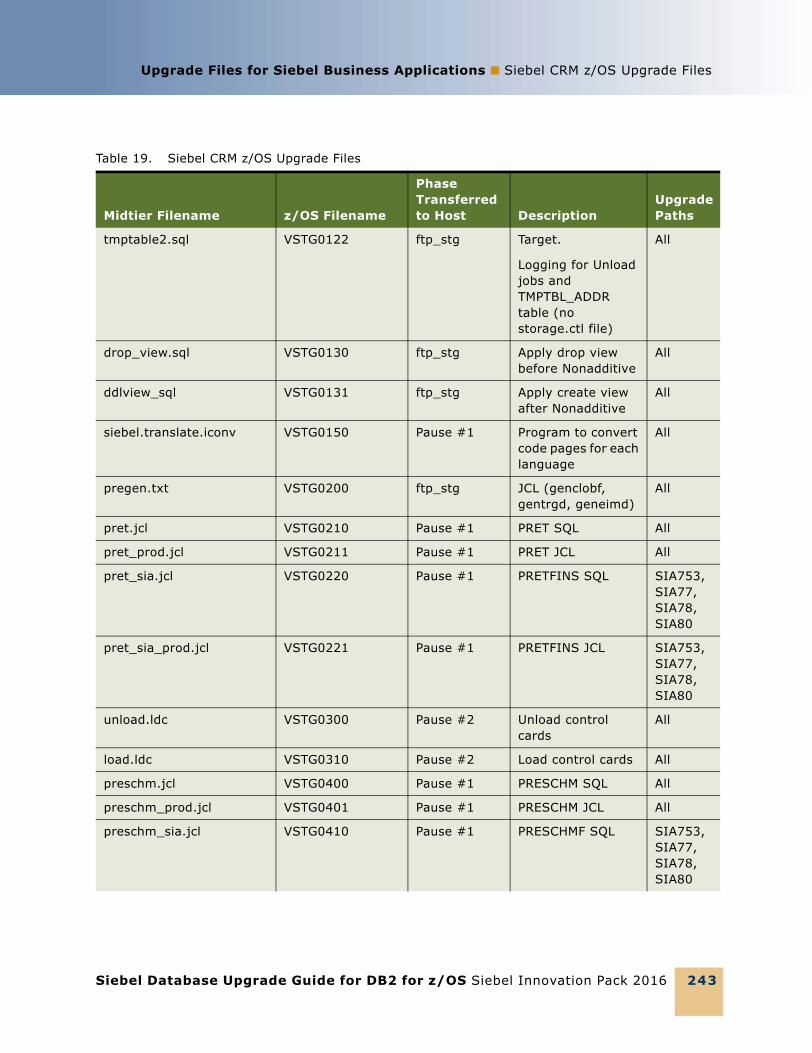
Upgrade Files for Siebel Business Applications ■ Siebel CRM z/OS Upgrade Files
Siebel Database Upgrade Guide for DB2 for z/OS Siebel Innovation Pack 2016 243
tmptable2.sql VSTG0122 ftp_stg Target.
Logging for Unload jobs and TMPTBL_ADDR table (no storage.ctl file)
All
drop_view.sql VSTG0130 ftp_stg Apply drop view before Nonadditive
All
ddlview_sql VSTG0131 ftp_stg Apply create view after Nonadditive
All
siebel.translate.iconv VSTG0150 Pause #1 Program to convert code pages for each language
All
pregen.txt VSTG0200 ftp_stg JCL (genclobf, gentrgd, geneimd)
All
pret.jcl VSTG0210 Pause #1 PRET SQL All
pret_prod.jcl VSTG0211 Pause #1 PRET JCL All
pret_sia.jcl VSTG0220 Pause #1 PRETFINS SQL SIA753,SIA77, SIA78,SIA80
pret_sia_prod.jcl VSTG0221 Pause #1 PRETFINS JCL SIA753, SIA77, SIA78,SIA80
unload.ldc VSTG0300 Pause #2 Unload control cards
All
load.ldc VSTG0310 Pause #2 Load control cards All
preschm.jcl VSTG0400 Pause #1 PRESCHM SQL All
preschm_prod.jcl VSTG0401 Pause #1 PRESCHM JCL All
preschm_sia.jcl VSTG0410 Pause #1 PRESCHMF SQL SIA753, SIA77, SIA78,SIA80
Table 19. Siebel CRM z/OS Upgrade Files
Midtier Filename z/OS Filename
Phase Transferred to Host Description
Upgrade Paths
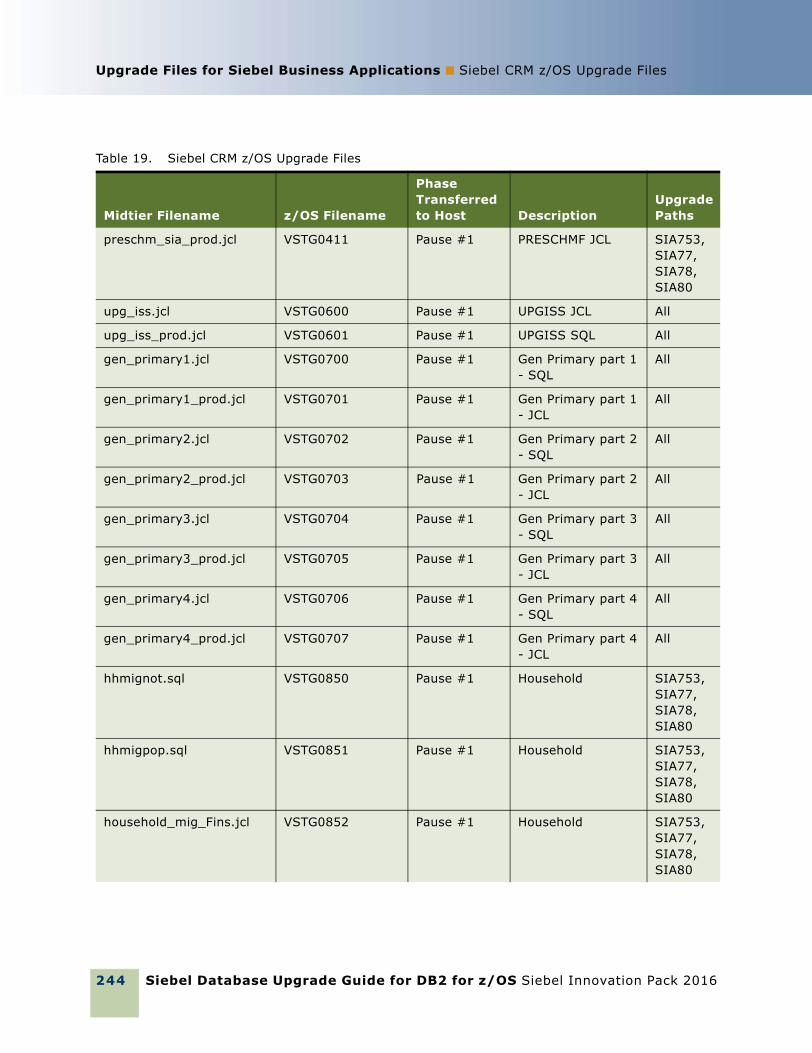
Siebel Database Upgrade Guide for DB2 for z/OS Siebel Innovation Pack 2016
Upgrade Files for Siebel Business Applications ■ Siebel CRM z/OS Upgrade Files
244
preschm_sia_prod.jcl VSTG0411 Pause #1 PRESCHMF JCL SIA753, SIA77, SIA78,SIA80
upg_iss.jcl VSTG0600 Pause #1 UPGISS JCL All
upg_iss_prod.jcl VSTG0601 Pause #1 UPGISS SQL All
gen_primary1.jcl VSTG0700 Pause #1 Gen Primary part 1 - SQL
All
gen_primary1_prod.jcl VSTG0701 Pause #1 Gen Primary part 1 - JCL
All
gen_primary2.jcl VSTG0702 Pause #1 Gen Primary part 2 - SQL
All
gen_primary2_prod.jcl VSTG0703 Pause #1 Gen Primary part 2 - JCL
All
gen_primary3.jcl VSTG0704 Pause #1 Gen Primary part 3 - SQL
All
gen_primary3_prod.jcl VSTG0705 Pause #1 Gen Primary part 3 - JCL
All
gen_primary4.jcl VSTG0706 Pause #1 Gen Primary part 4 - SQL
All
gen_primary4_prod.jcl VSTG0707 Pause #1 Gen Primary part 4 - JCL
All
hhmignot.sql VSTG0850 Pause #1 Household SIA753, SIA77, SIA78,SIA80
hhmigpop.sql VSTG0851 Pause #1 Household SIA753, SIA77, SIA78,SIA80
household_mig_Fins.jcl VSTG0852 Pause #1 Household SIA753, SIA77, SIA78,SIA80
Table 19. Siebel CRM z/OS Upgrade Files
Midtier Filename z/OS Filename
Phase Transferred to Host Description
Upgrade Paths
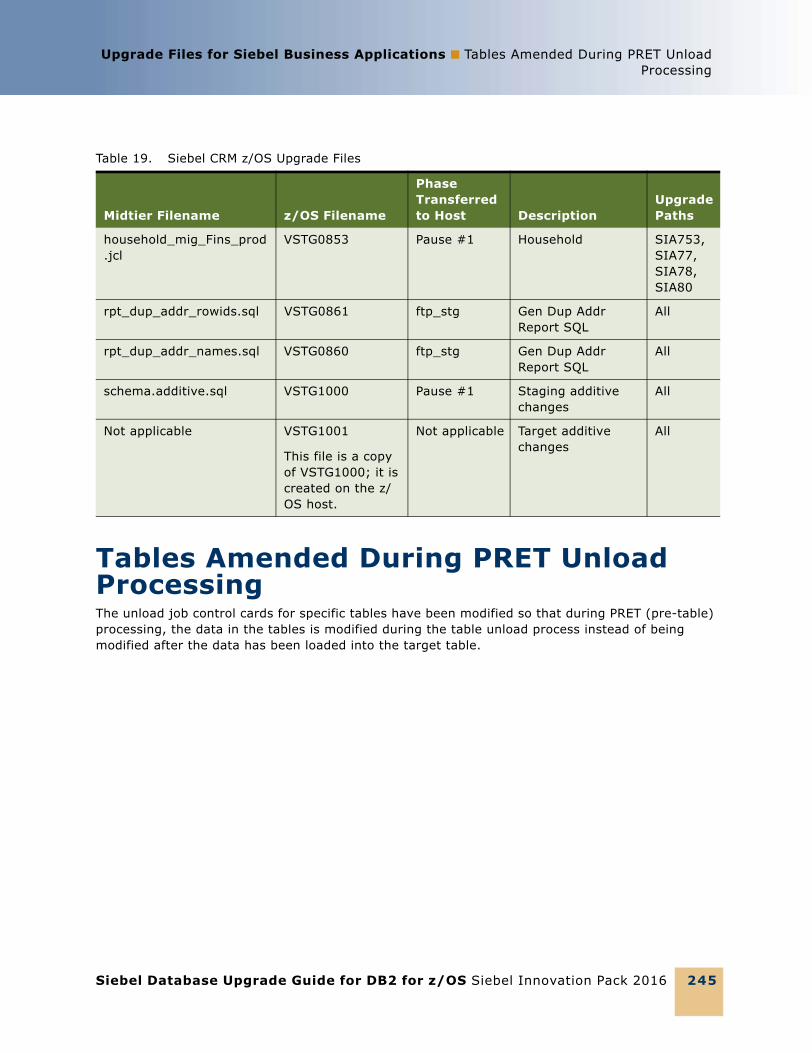
Upgrade Files for Siebel Business Applications ■ Tables Amended During PRET UnloadProcessing
Siebel Database Upgrade Guide for DB2 for z/OS Siebel Innovation Pack 2016 245
Tables Amended During PRET Unload ProcessingThe unload job control cards for specific tables have been modified so that during PRET (pre-table) processing, the data in the tables is modified during the table unload process instead of being modified after the data has been loaded into the target table.
household_mig_Fins_prod.jcl
VSTG0853 Pause #1 Household SIA753, SIA77, SIA78,SIA80
rpt_dup_addr_rowids.sql VSTG0861 ftp_stg Gen Dup Addr Report SQL
All
rpt_dup_addr_names.sql VSTG0860 ftp_stg Gen Dup Addr Report SQL
All
schema.additive.sql VSTG1000 Pause #1 Staging additive changes
All
Not applicable VSTG1001
This file is a copy of VSTG1000; it is created on the z/OS host.
Not applicable Target additive changes
All
Table 19. Siebel CRM z/OS Upgrade Files
Midtier Filename z/OS Filename
Phase Transferred to Host Description
Upgrade Paths
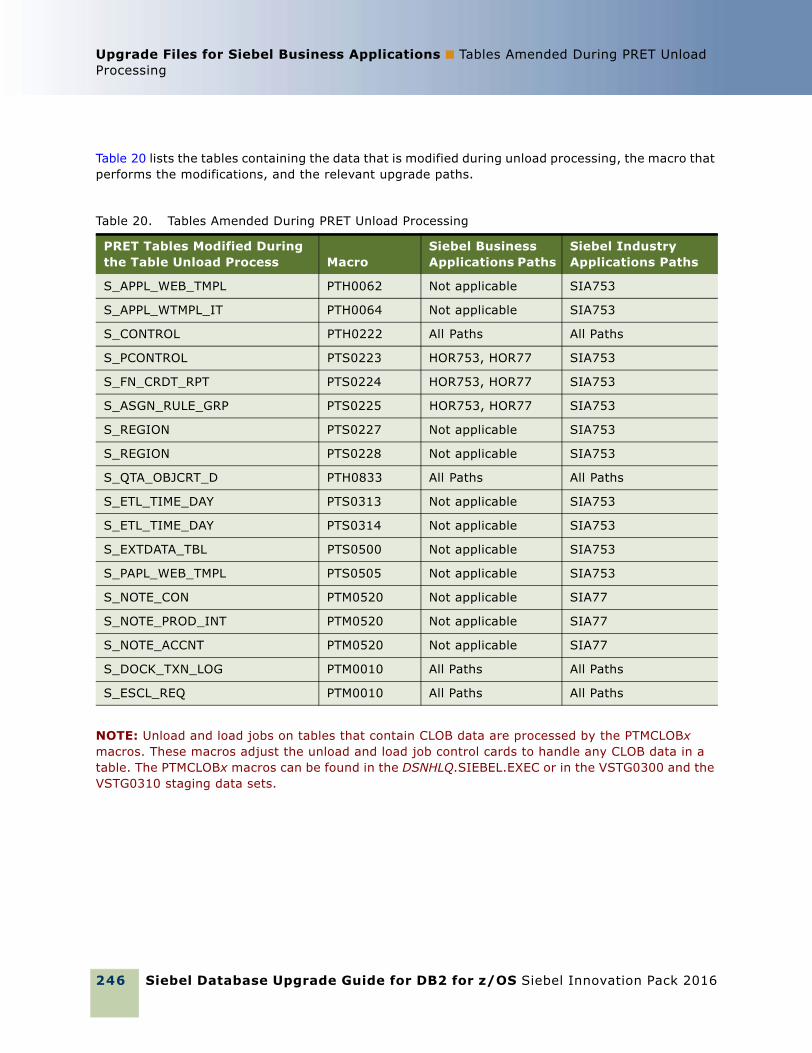
Siebel Database Upgrade Guide for DB2 for z/OS Siebel Innovation Pack 2016
Upgrade Files for Siebel Business Applications ■ Tables Amended During PRET Unload Processing
246
Table 20 lists the tables containing the data that is modified during unload processing, the macro that performs the modifications, and the relevant upgrade paths.
NOTE: Unload and load jobs on tables that contain CLOB data are processed by the PTMCLOBx macros. These macros adjust the unload and load job control cards to handle any CLOB data in a table. The PTMCLOBx macros can be found in the DSNHLQ.SIEBEL.EXEC or in the VSTG0300 and the VSTG0310 staging data sets.
Table 20. Tables Amended During PRET Unload Processing
PRET Tables Modified During the Table Unload Process Macro
Siebel Business Applications Paths
Siebel Industry Applications Paths
S_APPL_WEB_TMPL PTH0062 Not applicable SIA753
S_APPL_WTMPL_IT PTH0064 Not applicable SIA753
S_CONTROL PTH0222 All Paths All Paths
S_PCONTROL PTS0223 HOR753, HOR77 SIA753
S_FN_CRDT_RPT PTS0224 HOR753, HOR77 SIA753
S_ASGN_RULE_GRP PTS0225 HOR753, HOR77 SIA753
S_REGION PTS0227 Not applicable SIA753
S_REGION PTS0228 Not applicable SIA753
S_QTA_OBJCRT_D PTH0833 All Paths All Paths
S_ETL_TIME_DAY PTS0313 Not applicable SIA753
S_ETL_TIME_DAY PTS0314 Not applicable SIA753
S_EXTDATA_TBL PTS0500 Not applicable SIA753
S_PAPL_WEB_TMPL PTS0505 Not applicable SIA753
S_NOTE_CON PTM0520 Not applicable SIA77
S_NOTE_PROD_INT PTM0520 Not applicable SIA77
S_NOTE_ACCNT PTM0520 Not applicable SIA77
S_DOCK_TXN_LOG PTM0010 All Paths All Paths
S_ESCL_REQ PTM0010 All Paths All Paths
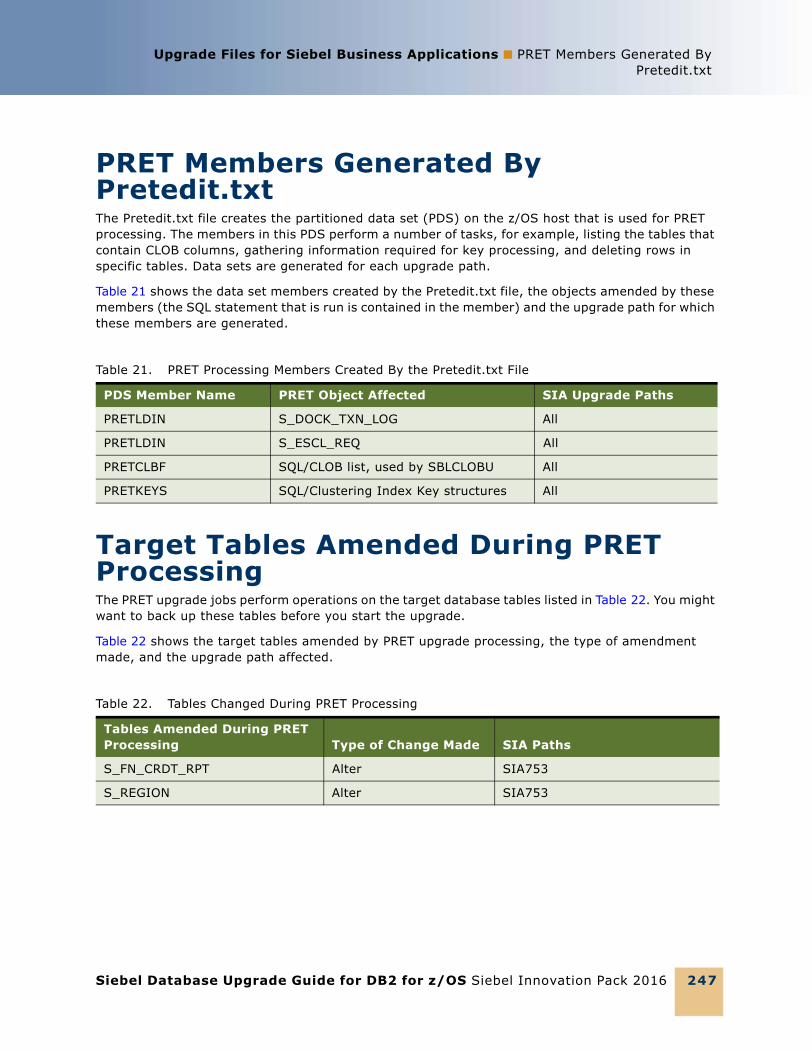
Upgrade Files for Siebel Business Applications ■ PRET Members Generated ByPretedit.txt
Siebel Database Upgrade Guide for DB2 for z/OS Siebel Innovation Pack 2016 247
PRET Members Generated By Pretedit.txtThe Pretedit.txt file creates the partitioned data set (PDS) on the z/OS host that is used for PRET processing. The members in this PDS perform a number of tasks, for example, listing the tables that contain CLOB columns, gathering information required for key processing, and deleting rows in specific tables. Data sets are generated for each upgrade path.
Table 21 shows the data set members created by the Pretedit.txt file, the objects amended by these members (the SQL statement that is run is contained in the member) and the upgrade path for which these members are generated.
Target Tables Amended During PRET ProcessingThe PRET upgrade jobs perform operations on the target database tables listed in Table 22. You might want to back up these tables before you start the upgrade.
Table 22 shows the target tables amended by PRET upgrade processing, the type of amendment made, and the upgrade path affected.
Table 21. PRET Processing Members Created By the Pretedit.txt File
PDS Member Name PRET Object Affected SIA Upgrade Paths
PRETLDIN S_DOCK_TXN_LOG All
PRETLDIN S_ESCL_REQ All
PRETCLBF SQL/CLOB list, used by SBLCLOBU All
PRETKEYS SQL/Clustering Index Key structures All
Table 22. Tables Changed During PRET Processing
Tables Amended During PRET Processing Type of Change Made SIA Paths
S_FN_CRDT_RPT Alter SIA753
S_REGION Alter SIA753

Siebel Database Upgrade Guide for DB2 for z/OS Siebel Innovation Pack 2016
Upgrade Files for Siebel Business Applications ■ Target Tables Amended During PRET Processing
248
Siebel Database Upgrade Guide for DB2 for z/OS Siebel Innovation Pack 2016 249
Index
Numerics7.7.x release, new database schema
structure 80
Aadding a Siebel user 109additive schema upgrade files
applying in one job 192applying individually 190applying to the staging database 174applying to the target database 190description 30implementing 31preparing 169SQL and JCL templates 172
allocating z/OS setup data sets 137applicability of upgrade topics 14ASCII database, merging the repository 151attachments, file system 221
Bbackup and recovery stages, planning 88
Ccapacity planning 89code page conversion 82code page support 82columns, denormalized in 7.5.3 Siebel
Financial Services applications 237configuration file 41
locating master file 42new custom configuration file,
producing 157converting LONG VARCHAR columns 105creating the staging database
generating DDL files 134process of 133required tasks 134transferring staging DDL to the host 135
custom upgradessupport for 17, 25using Oracle’s Advanced Customer
Services 25Customer Repository, preparing for
merge 155custrep.dat file, regenerating 156
Ddata migration
creating temporary tables and indexes 182on the target database 202PRESCHEM jobs 204running Gen Primary scripts 206running scripts 203
data setsallocating and populating 170members in DSNHLQ.SIEBEL.EXEC 48
Database Configuration Utilities 38Database Configuration Wizard
about running 39Extract option 98information required 119information required for production only 124modes 39Prepare for Production mode 47running on UNIX 126running on Windows 125
database configuration, verifying 89, 91database growth during upgrade 89database schema
backing up 145new structure in 7.7 80testing before production upgrade 82
database size, estimating 89Database Storage Configurator, using to
amend bufferpool size 102database template file, regenerating 225database, preparing for upgrade
estimating database size 89New Customer Repository, preparing to
import 155development database, backing up 108development environment, postupgrade
tasksdatabase template file, regenerating 225obsolete tables, reapplying custom
extensions 222development upgrade
checking in development repository projects 112
creating storage groups 92database configuration, verifying 91DB2 software, upgrading 90description 26

Siebel Database Upgrade Guide for DB2 for z/OS Siebel Innovation Pack 2016
Index ■ E
250
development database, backing up 108foreground performance, increasing 150process of 56repositories for an ASCII database,
merging 151repositories for an EBCDIC database,
merging 153repository merge, about 148repository merge, categories of object
differences 147repository merge, optimizing
performance 149requirements 111schema, storage layout 93schema, synchronizing 209, 210Siebel user, adding 109storage control file, modifying 94storage control file, reviewing 103storage control file, validating 101tasks 34
driver filesabout 43example 44locating 45
DSNTIAUL utility@@TIAUL USERMOD patch 86about 85applying the patch 85CCSID conversion errors 87
EEBCDIC database, merging repositories 153Enterprise Integration Manager tables,
dropping 188environments, upgrade
development 26production 27production test 26upgrade sequence 32
error messageserrors.htm file 217errors.rtf file 217errors.txt file 217reviewing log files 217
Ffailed merges, recovering from 145failed upgrade jobs, restarting 208file system attachments, updating 221
GGen Primary indexes 204generating upgrade files
about 167building JCL templates 184process of 167required tasks 168transferring additive schema and JCL files to
the z/OS host 178transferring SCINDX.SQL to the z/OS
host 183group names, updating 92
Hhardware and software, obtaining 84
IIBM utilities, obtaining required 84importing development repository and
schema definition files 115importing seed data 131Incremental Repository Merge
about 24editing the Siebel Tools configuration file 165performing 163process of performing 161using Siebel Tools 163
indexesabout creating during the additive upgrade
process 31creating for data migration 182Gen Primary indexes 204rebuilding obsolete indexes 199rebuilding on the target database 199restructuring the index DDL 184SCINDX.SQL file 183
infrastructure, upgrade 34in-place target database upgrade 48inputs to the production upgrade 47interface tables and triggers, removing 143,
195
JJCL template files, building 184JCL UNIT parameter, customizing 137JCL upgrade jobs
description 49job cards 50job dependencies 50load and unload jobs 50preparing 169verifying 143
job cards 50job flow of a production upgrade 45job submission order, changing 229@JOBPRFX member 49
Index ■ K
Siebel Database Upgrade Guide for DB2 for z/OS Siebel Innovation Pack 2016 251
Kkey members in DSNHLQ.SIEBEL.EXEC 48
L@LASTJOB member 49license keys, activating 211load and unload jobs 50load cards, adding the statistics clause
to 231loading log tables on the target
database 190loading the schema on the target
database 198log files
about 215archiving manually 218process log file 216reviewing for errors 216, 217running SQL against 219SiebSrvr log files, about saving 116state log file 215
log tablescreating and unloading 189
LONG VARCHAR columnsconverting 105
Mmapping your upgrade environments 28master configuration file 42merging the repository
about 147, 148ASCII database 151compiling an .srf file after 157EBCDIC database 153regenerating repository definition files 155renaming tables before 146
Nnaming conventions 14new customer repository, backing up 145nonadditive schema upgrade files
applying to the staging database 181applying to the target database 196description 30preparing and executing 178preparing SQL and JCL templates 179transferring to the z/OS host 179
Oobsolete indexes, rebuilding 199obsolete tables, reviewing 223optimizing repository merge
performance 149optimizing unload and load job
performance 230override file, description 50
PPause 1 files 47Pause 2 files 47Pause 3 files 48planning the upgrade
backup and recovery stages, planning 88code page support, considering 82IBM utilities, obtaining required 84new database schema structure in 7.7 80process of 55schedule, creating 89security privileges, obtaining required 87Siebel-scheduled mode or vendor-schedule
mode 83software and hardware, required 84staging and target database 84testing before production upgrade 82
postupgrade tasksabout 37file system attachments, updating 221for the Siebel application 227inbound workflows, updating 227log files, manually archiving 218new custom configuration file,
producing 157upgrading seeded workflows 227
Prepare for Production modeinformation required by Database
Configuration Wizard 124purpose 47
PRET jobsabout running 176running on the target database 195
PRET members generated by Pretedit.txt 247
PRET processingtables amended during unload
processing 245target tables amended 247
preupgrade tasksabout 34New Customer Repository, preparing to
import 155target database 48
process log file 216production environment upgrade
description 27development environment, upgrading
Siebel Database Upgrade Guide for DB2 for z/OS Siebel Innovation Pack 2016
Index ■ R
252
without 116development repository and schema
definition, importing 115job flow 45New Customer Repository, preparing to
import 155process of 71production environment repositories,
preparing for upgrade 193renaming the production repository 193requirements 115tasks 36testing before 82z/OS host, requirements for upgrade 136z/OS setup data set, defining and
allocating 137z/OS upgrade environment, setting up 138
production test environmentdescription 26process of upgrading 63tasks 35
Rrecovery, planning and backup stages 88regenerating the custrep.dat file 156regenerating the schema.ddl file 155renaming the production environment
repository 193repositories
merging for an ASCII database 151merging for an EBCDIC database 153optimizing merge performance 149production environment repositories,
preparing for upgrade 193regenerating definition files 155renaming 193renaming tables before merging 146repository merge, about 148repository merge, categories of object
differences 147repository merge, increasing the foreground
performance 150upgrading 48
resources for planning the upgrade 79roadmap for performing the upgrade 53running load and unload jobs in parallel 229RUNSTATS jobs, generating 207
SS_LIT files, upgrading to S_CB_ASSET_VER
files 221schedule, planning 89scheduling mode
about 83schema
planning physical layout changes 80storage layout, preparing 93synchronizing 209, 210
schema.ddl file, regenerating 155SCINDX.SQL file, transferring to the z/OS
host 183security, obtaining required privileges 87seed data, importing 48seeded workflows, upgrading 227Siebel database expected growth during
upgrade (table) 89Siebel Financial Services, denormalized
columns for 7.5.3 237Siebel Repository File (.srf)
compiling after the merge 157compiling after the upgphys upgrade 158creating a new .srf file 157
Siebel Upgrade Wizardabout 43restarting 128restarting after pauses 130starting 128stopping 130
Siebel user, adding 109Siebel Workflow, inbound workflow,
updating 227SiebSrvr log files, about saving 116Single 24single-step and two-step repository
upgrades 24software and hardware, obtaining 84SQL and JCL templates 172srf file
See Siebel Repository File (.srf)staging database
about 30applying additive schema upgrade files 174applying nonadditive schema upgrade
files 181building 137creating 133generating schema DDL files 134preparing for table creation 176removing 212required tasks 134table creation 176transferring staging DDL to the host 135
state log file 215@STGTAR member 49storage control file
extracting 95modifying 94
Index ■ T
Siebel Database Upgrade Guide for DB2 for z/OS Siebel Innovation Pack 2016 253
preparing for the upgrade 81reviewing 103validating 101validating extracted file 101
storage groups, creating 92storage layout of the schema 93stored procedures
deleting 213deploying 200
supported upgrade pathsupgrade paths to Siebel version 8.1.1.14 18
Ttable creation on the staging database 176table spaces, moving 81tables
about moving 111amended by PRET processing 247amended during PRET unload
processing 245estimating number 89obsolete tables, reapplying custom
extensions 222reorganizing before the repository
merge 146target database
applying additive upgrade files 190applying nonadditive schema upgrade
files 196creating and loading log tables 190creating the schema 198deploying stored procedures 200dropping Enterprise Integration Manager
tables 188in-place upgrade 48loading the schema 198migrating data 202preupgrade tasks 48process of upgrading 187rebuilding indexes 199removing interface tables and triggers 195removing views 196running PRET jobs 195
target tables amended by PRET processing 247
@TBOSTG member 49@TBOTAR member 49template files used during extract or merge
operations 113testing before production upgrade 82tuning upgrade scripts
about 229adding the statistics clause to load cards 231
changing job submission order 229contacting Oracle’s Advanced Customer
Services 229optimizing unload and load jobs 230process of 69running load and unload jobs in parallel 229
typographical conventions 14
UUnicode
migrating to 25support 25
unload data sets, deleting 213unload jobs
running on the target database 197tables modified 245
@UPGFLOW member 49@UPGPATH member 49upgrade environments 25
development 26production 27production test 26
upgrade filesconfiguration file 41deleting redundant files 212driver files 44generated for the upgrade 239process of generating 167required tasks 168transferring to the z/OS host 169
upgrade files, generating 167upgrade planning resources 79Upgrade Planning Worksheet 233upgrade process
flow of 33Pause 1 47Pause 2 47Pause 3 48
upgrade scripts, customizing 25, 229upgrade tasks
development environment 34production environment 36production test environment 35upgrade repository and import seed data 48
Upgrading from Siebel Release 7.x and Siebel Release 8.0.x
roadmap 54Upgrading from Siebel Release 7.x and
Siebel Release 8.0.x Without a Development Environment 54
upgrep+upgphys modes of Database Configuration Wizard 47
@UPGTYPE member 49
Siebel Database Upgrade Guide for DB2 for z/OS Siebel Innovation Pack 2016
Index ■ V
254
user, adding Siebel user 109utilities
DSNTIAUL utility, using 85IBM utilities, obtaining required 84
Vvalidating the storage control file 101validation errors for the storage control
file 102version 7.7, new database schema
structure 80views, removing from target database 196
Wworkflows, inbound, updating 227worksheet, upgrade Planning 233
Zz/OS host
setup data set, defining and allocating 137upgrade environment, setting up 138upgrade requirements 136