Embed Size (px)
Citation preview
1
1
2
3
4
For more detailswww.permacon.ca
PaversWallsStepSlabsCurbs
DO-I
T-YO
URSE
LF P
ROJE
CT G
UIDE
“… plan, select, estimate,
install … and enjoy!”
“…sidewalks, paths, driveways,
patios, walls, curbs…”
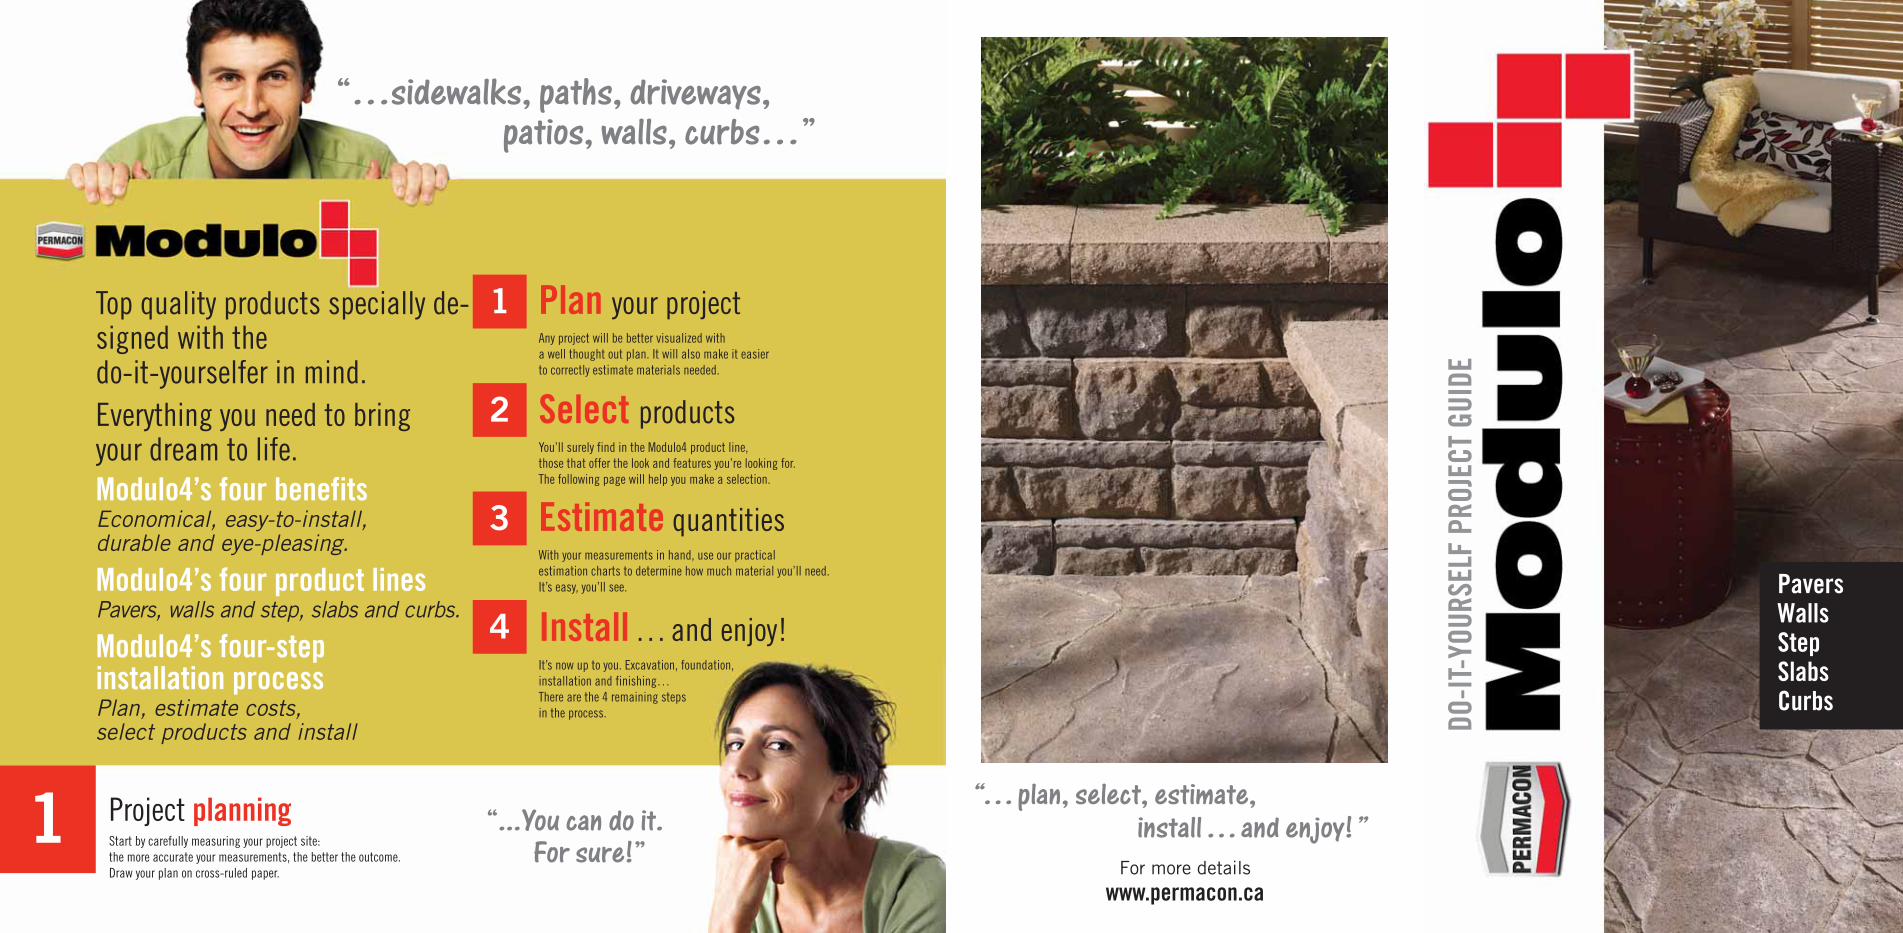
Top quality products specially de-signed with the do-it-yourselfer in mind.Everything you need to bring your dream to life.Modulo4’s four benefitsEconomical, easy-to-install, durable and eye-pleasing.
Modulo4’s four product linesPavers, walls and step, slabs and curbs.
Modulo4’s four-step installation process Plan, estimate costs, select products and install
“...You can do it.
For sure!”
Project planningStart by carefully measuring your project site: the more accurate your measurements, the better the outcome. Draw your plan on cross-ruled paper.
Plan your projectAny project will be better visualized with a well thought out plan. It will also make it easier to correctly estimate materials needed.
Select productsYou’ll surely find in the Modulo4 product line, those that offer the look and features you’re looking for. The following page will help you make a selection.
Estimate quantitiesWith your measurements in hand, use our practical estimation charts to determine how much material you’ll need. It’s easy, you’ll see.
Install … and enjoy!It’s now up to you. Excavation, foundation, installation and finishing… There are the 4 remaining steps in the process.
2
Pavers
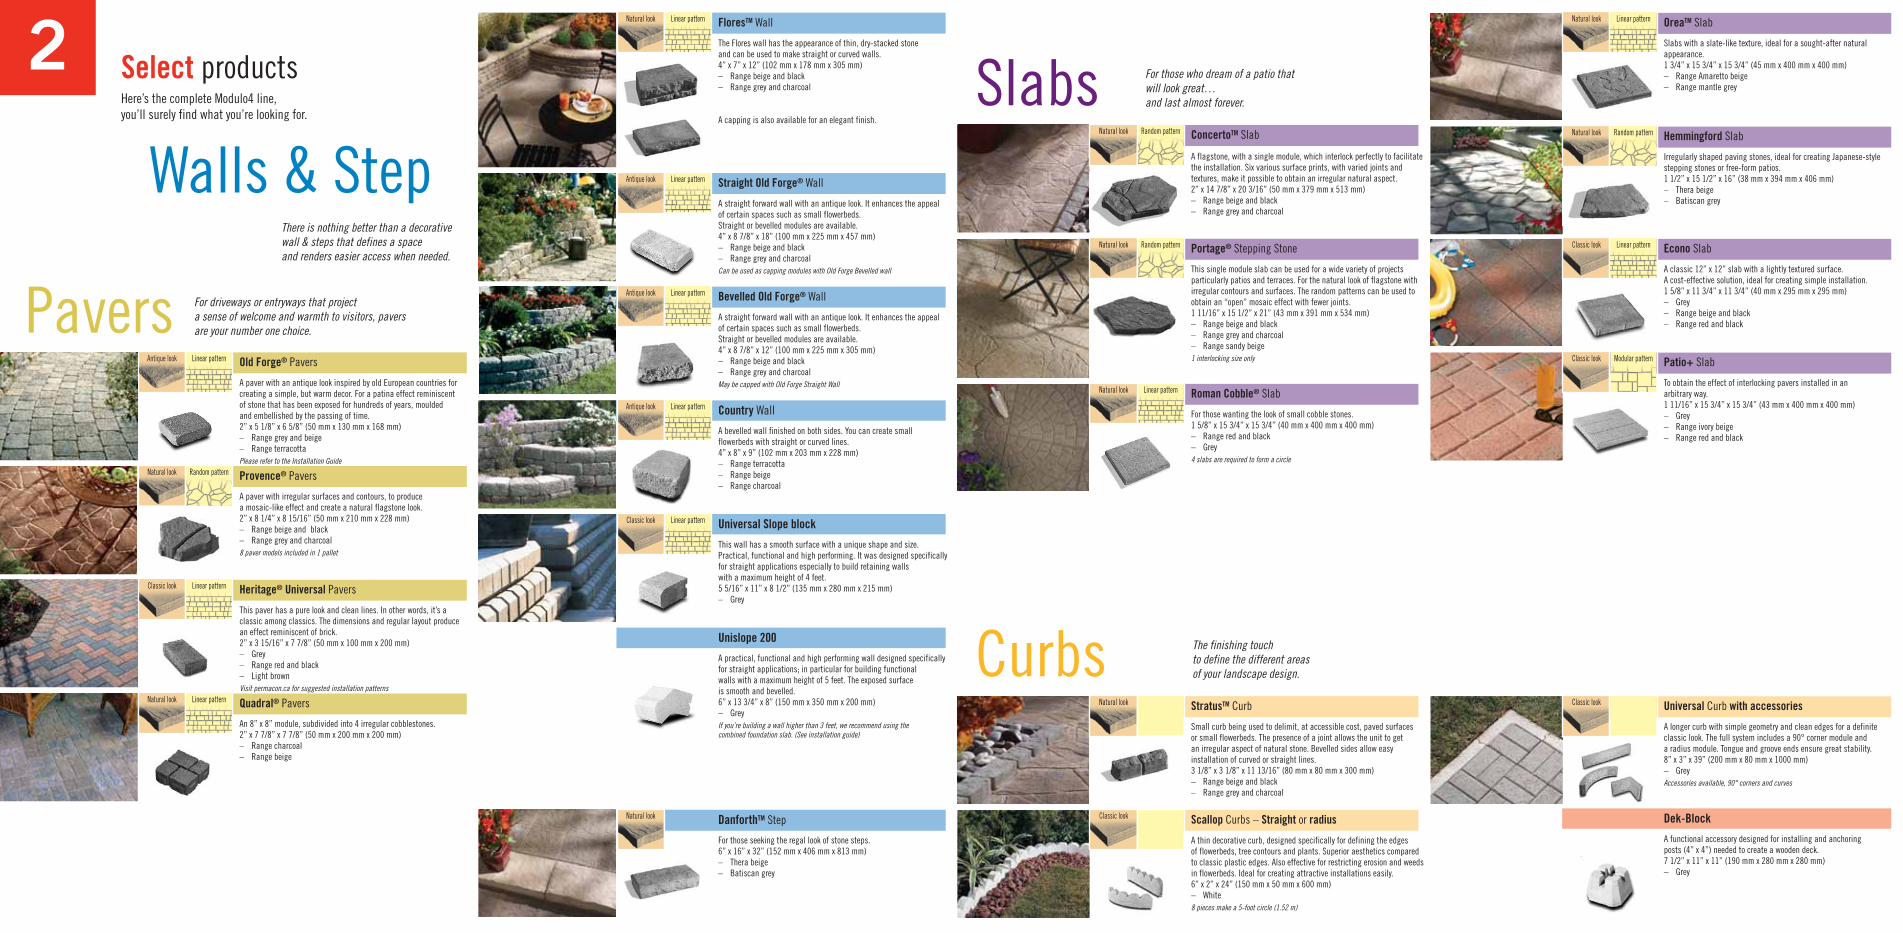
Walls & StepThere is nothing better than a decorative wall & steps that defines a space and renders easier access when needed.
Select productsHere’s the complete Modulo4 line, you’ll surely find what you’re looking for.
Provence® Pavers
A paver with an antique look inspired by old European countries forcreating a simple, but warm decor. For a patina effect reminiscentof stone that has been exposed for hundreds of years, moulded and embellished by the passing of time.2” x 5 1/8” x 6 5/8” (50 mm x 130 mm x 168 mm) – Range grey and beige– Range terracottaPlease refer to the Installation Guide
A paver with irregular surfaces and contours, to produce a mosaic-like effect and create a natural flagstone look.2” x 8 1/4” x 8 15/16” (50 mm x 210 mm x 228 mm)– Range beige and black– Range grey and charcoal8 paver models included in 1 pallet
Heritage® Universal Pavers
This paver has a pure look and clean lines. In other words, it’s aclassic among classics. The dimensions and regular layout producean effect reminiscent of brick.2” x 3 15/16” x 7 7/8” (50 mm x 100 mm x 200 mm) – Grey – Range red and black– Light brownVisit permacon.ca for suggested installation patterns
Quadral® Pavers
An 8” x 8” module, subdivided into 4 irregular cobblestones.2” x 7 7/8” x 7 7/8” (50 mm x 200 mm x 200 mm)– Range charcoal – Range beige
Antique look Linear pattern
Natural look Random pattern
Classic look Linear pattern
Natural look Linear pattern
Old Forge® Pavers
For driveways or entryways that project a sense of welcome and warmth to visitors, pavers are your number one choice.
Straight Old Forge® Wall
A straight forward wall with an antique look. It enhances the appeal of certain spaces such as small flowerbeds. Straight or bevelled modules are available.4” x 8 7/8” x 18” (100 mm x 225 mm x 457 mm) – Range beige and black – Range grey and charcoalCan be used as capping modules with Old Forge Bevelled wall
Bevelled Old Forge® Wall
A straight forward wall with an antique look. It enhances the appeal of certain spaces such as small flowerbeds. Straight or bevelled modules are available.4” x 8 7/8” x 12” (100 mm x 225 mm x 305 mm) – Range beige and black – Range grey and charcoalMay be capped with Old Forge Straight Wall
Country Wall
A bevelled wall finished on both sides. You can create small flowerbeds with straight or curved lines.4” x 8” x 9” (102 mm x 203 mm x 228 mm) – Range terracotta – Range beige – Range charcoal
Universal Slope block
This wall has a smooth surface with a unique shape and size. Practical, functional and high performing. It was designed specificallyfor straight applications especially to build retaining walls with a maximum height of 4 feet.5 5/16” x 11” x 8 1/2” (135 mm x 280 mm x 215 mm)– Grey
Unislope 200
A practical, functional and high performing wall designed specifically for straight applications; in particular for building functionalwalls with a maximum height of 5 feet. The exposed surfaceis smooth and bevelled. 6” x 13 3/4” x 8” (150 mm x 350 mm x 200 mm)– Grey If you’re building a wall higher than 3 feet, we recommend using the combined foundation slab. (See installation guide)
Antique look Linear pattern
Antique look Linear pattern
FloresTM Wall
The Flores wall has the appearance of thin, dry-stacked stone and can be used to make straight or curved walls. 4” x 7” x 12” (102 mm x 178 mm x 305 mm)– Range beige and black – Range grey and charcoal
A capping is also available for an elegant finish.
DanforthTM Step
For those seeking the regal look of stone steps.6” x 16” x 32” (152 mm x 406 mm x 813 mm)– Thera beige – Batiscan grey
Natural look Linear pattern
Natural look
Antique look Linear pattern
Classic look Linear pattern
StratusTM Curb
Small curb being used to delimit, at accessible cost, paved surfacesor small flowerbeds. The presence of a joint allows the unit to get an irregular aspect of natural stone. Bevelled sides allow easy installation of curved or straight lines.3 1/8” x 3 1/8” x 11 13/16” (80 mm x 80 mm x 300 mm)– Range beige and black – Range grey and charcoal
Scallop Curbs – Straight or radius
A thin decorative curb, designed specifically for defining the edges of flowerbeds, tree contours and plants. Superior aesthetics compared to classic plastic edges. Also effective for restricting erosion and weedsin flowerbeds. Ideal for creating attractive installations easily.6” x 2” x 24” (150 mm x 50 mm x 600 mm) – White 8 pieces make a 5-foot circle (1.52 m)
Curbs The finishing touch to define the different areas of your landscape design.
Natural look
Classic look
ConcertoTM Slab
A flagstone, with a single module, which interlock perfectly to facilitatethe installation. Six various surface prints, with varied joints and textures, make it possible to obtain an irregular natural aspect.2” x 14 7/8” x 20 3/16” (50 mm x 379 mm x 513 mm)– Range beige and black – Range grey and charcoal
Portage® Stepping Stone
This single module slab can be used for a wide variety of projects particularly patios and terraces. For the natural look of flagstone with irregular contours and surfaces. The random patterns can be used to obtain an “open” mosaic effect with fewer joints.1 11/16” x 15 1/2” x 21” (43 mm x 391 mm x 534 mm) – Range beige and black – Range grey and charcoal– Range sandy beige1 interlocking size only
Roman Cobble® Slab
For those wanting the look of small cobble stones.1 5/8” x 15 3/4” x 15 3/4” (40 mm x 400 mm x 400 mm) – Range red and black – Grey 4 slabs are required to form a circle
Slabs For those who dream of a patio that will look great…and last almost forever.
Natural look Random pattern
Natural look Random pattern
Natural look Linear pattern
Universal Curb with accessories
A longer curb with simple geometry and clean edges for a definite classic look. The full system includes a 90° corner module and a radius module. Tongue and groove ends ensure great stability.8” x 3” x 39” (200 mm x 80 mm x 1000 mm) – Grey Accessories available, 90° corners and curves
Dek-Block
A functional accessory designed for installing and anchoring posts (4” x 4”) needed to create a wooden deck.7 1/2” x 11” x 11” (190 mm x 280 mm x 280 mm) – Grey
Classic look
Econo Slab
A classic 12” x 12” slab with a lightly textured surface. A cost-effective solution, ideal for creating simple installation.1 5/8” x 11 3/4” x 11 3/4” (40 mm x 295 mm x 295 mm)– Grey – Range beige and black – Range red and black
Patio+ Slab
To obtain the effect of interlocking pavers installed in an arbitrary way.1 11/16” x 15 3/4” x 15 3/4” (43 mm x 400 mm x 400 mm) – Grey – Range ivory beige– Range red and black
Classic look Linear pattern
Classic look Modular pattern
OreaTM Slab
Slabs with a slate-like texture, ideal for a sought-after natural appearance.1 3/4” x 15 3/4” x 15 3/4” (45 mm x 400 mm x 400 mm)– Range Amaretto beige – Range mantle grey
Hemmingford Slab
Irregularly shaped paving stones, ideal for creating Japanese-style stepping stones or free-form patios.1 1/2” x 15 1/2” x 16” (38 mm x 394 mm x 406 mm) – Thera beige– Batiscan grey
Natural look Linear pattern
Natural look Random pattern
3
411 in 8 in
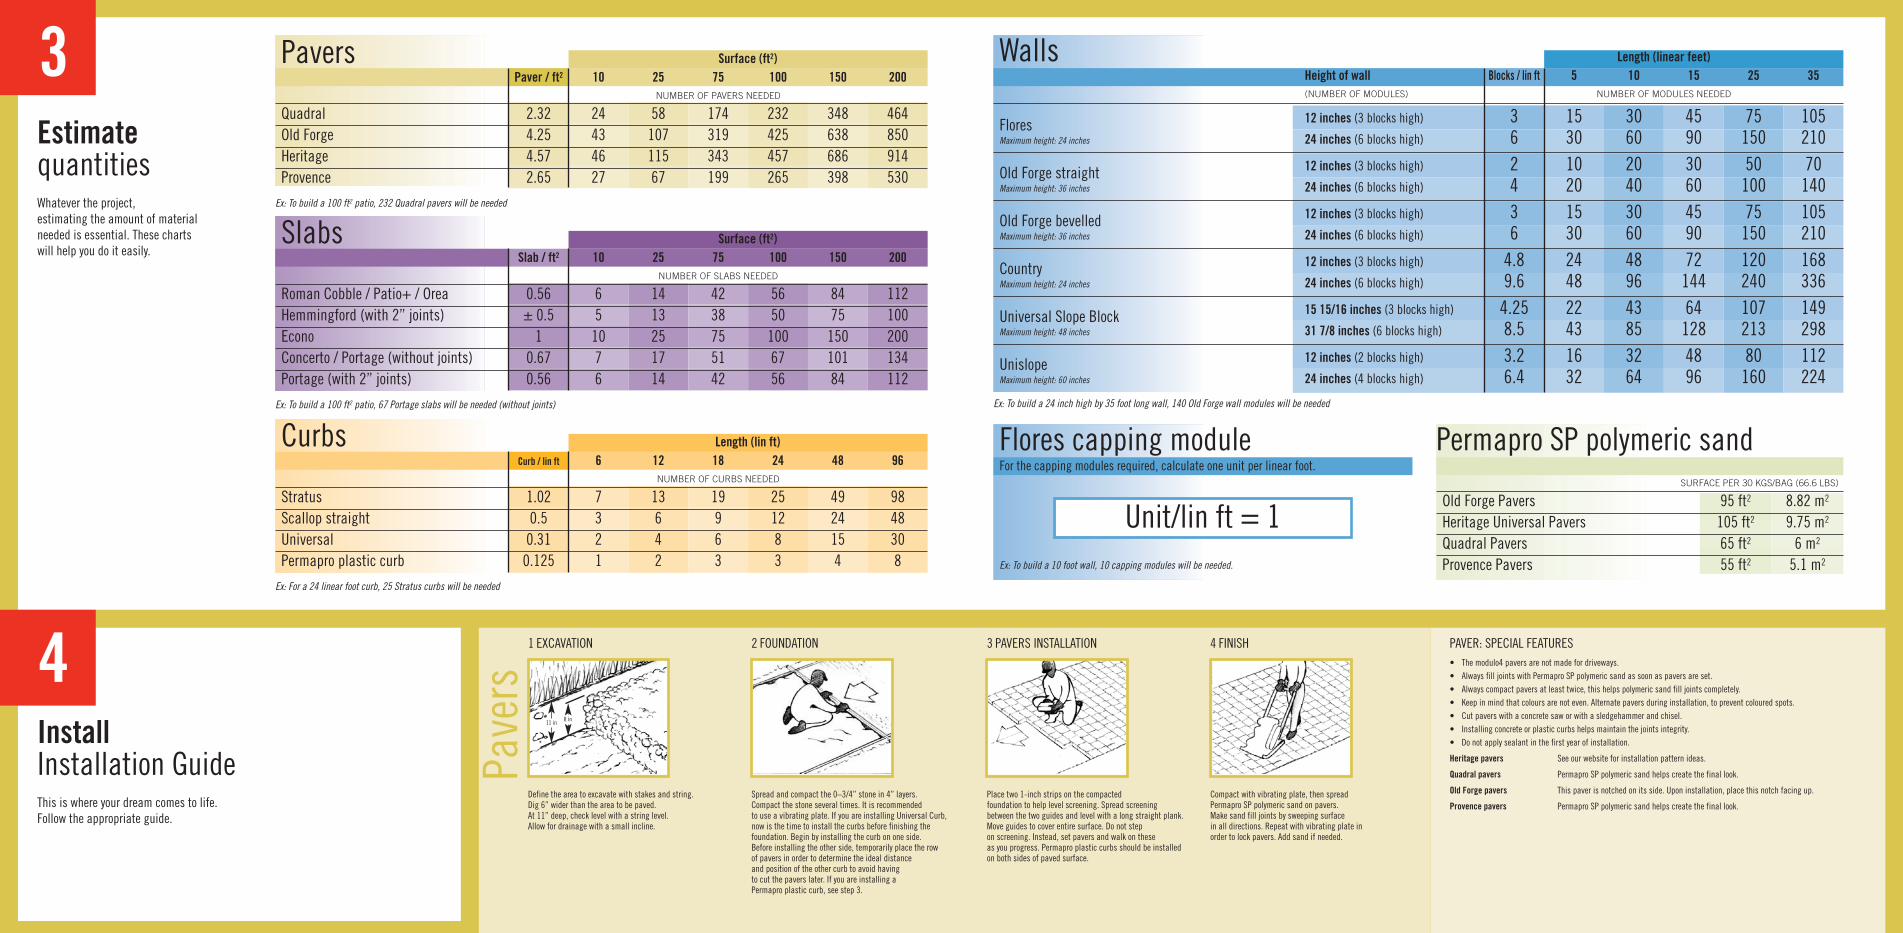
Flores capping module For the capping modules required, calculate one unit per linear foot.
Unit/lin ft = 1Ex: To build a 10 foot wall, 10 capping modules will be needed.
1 EXCAVATION 2 FOUNDATION 3 PAVERS INSTALLATION 4 FINISH PAVER: SPECIAL FEATURES
Pave
rs
EstimatequantitiesWhatever the project, estimating the amount of material needed is essential. These charts will help you do it easily.
InstallInstallation GuideThis is where your dream comes to life. Follow the appropriate guide.
Walls Length (linear feet) Height of wall Blocks / lin ft 5 10 15 25 35 (NUMBER OF MODULES) NUMBER OF MODULES NEEDED
Flores 12 inches (3 blocks high) 3 15 30 45 75 105 Maximum height: 24 inches 24 inches (6 blocks high) 6 30 60 90 150 210
Old Forge straight 12 inches (3 blocks high) 2 10 20 30 50 70 Maximum height: 36 inches 24 inches (6 blocks high) 4 20 40 60 100 140
Old Forge bevelled 12 inches (3 blocks high) 3 15 30 45 75 105 Maximum height: 36 inches 24 inches (6 blocks high) 6 30 60 90 150 210
Country 12 inches (3 blocks high) 4.8 24 48 72 120 168 Maximum height: 24 inches 24 inches (6 blocks high) 9.6 48 96 144 240 336
Universal Slope Block 15 15/16 inches (3 blocks high) 4.25 22 43 64 107 149 Maximum height: 48 inches 31 7/8 inches (6 blocks high) 8.5 43 85 128 213 298
Unislope 12 inches (2 blocks high) 3.2 16 32 48 80 112 Maximum height: 60 inches 24 inches (4 blocks high) 6.4 32 64 96 160 224
Ex: To build a 24 inch high by 35 foot long wall, 140 Old Forge wall modules will be needed
Permapro SP polymeric sand SURFACE PER 30 KGS/BAG (66.6 LBS)
Old Forge Pavers 95 ft2 8.82 m2
Heritage Universal Pavers 105 ft2 9.75 m2
Quadral Pavers 65 ft2 6 m2
Provence Pavers 55 ft2 5.1 m2
Pavers Surface (ft2) Paver / ft2 10 25 75 100 150 200
NUMBER OF PAVERS NEEDED
Quadral 2.32 24 58 174 232 348 464 Old Forge 4.25 43 107 319 425 638 850 Heritage 4.57 46 115 343 457 686 914 Provence 2.65 27 67 199 265 398 530
Ex: To build a 100 ft2 patio, 232 Quadral pavers will be needed
Slabs Surface (ft2) Slab / ft2 10 25 75 100 150 200 NUMBER OF SLABS NEEDED
Roman Cobble / Patio+ / Orea 0.56 6 14 42 56 84 112 Hemmingford (with 2” joints) ± 0.5 5 13 38 50 75 100 Econo 1 10 25 75 100 150 200 Concerto / Portage (without joints) 0.67 7 17 51 67 101 134 Portage (with 2” joints) 0.56 6 14 42 56 84 112
Ex: To build a 100 ft2 patio, 67 Portage slabs will be needed (without joints)
Curbs Length (lin ft) Curb / lin ft 6 12 18 24 48 96 NUMBER OF CURBS NEEDED
Stratus 1.02 7 13 19 25 49 98 Scallop straight 0.5 3 6 9 12 24 48 Universal 0.31 2 4 6 8 15 30 Permapro plastic curb 0.125 1 2 3 3 4 8
Ex: For a 24 linear foot curb, 25 Stratus curbs will be needed
Define the area to excavate with stakes and string. Dig 6” wider than the area to be paved. At 11” deep, check level with a string level. Allow for drainage with a small incline.
Spread and compact the 0–3/4” stone in 4” layers. Compact the stone several times. It is recommended to use a vibrating plate. If you are installing Universal Curb,now is the time to install the curbs before finishing the foundation. Begin by installing the curb on one side. Before installing the other side, temporarily place the row of pavers in order to determine the ideal distance and position of the other curb to avoid having to cut the pavers later. If you are installing a Permapro plastic curb, see step 3.
Place two 1-inch strips on the compacted foundation to help level screening. Spread screening between the two guides and level with a long straight plank.Move guides to cover entire surface. Do not step on screening. Instead, set pavers and walk on these as you progress. Permapro plastic curbs should be installed on both sides of paved surface.
Compact with vibrating plate, then spread Permapro SP polymeric sand on pavers. Make sand fill joints by sweeping surface in all directions. Repeat with vibrating plate in order to lock pavers. Add sand if needed.
• The modulo4 pavers are not made for driveways.• Always fill joints with Permapro SP polymeric sand as soon as pavers are set.• Always compact pavers at least twice, this helps polymeric sand fill joints completely.• Keep in mind that colours are not even. Alternate pavers during installation, to prevent coloured spots. • Cut pavers with a concrete saw or with a sledgehammer and chisel.• Installing concrete or plastic curbs helps maintain the joints integrity.• Do not apply sealant in the first year of installation.
Heritage pavers See our website for installation pattern ideas.
Quadral pavers Permapro SP polymeric sand helps create the final look.
Old Forge pavers This paver is notched on its side. Upon installation, place this notch facing up.
Provence pavers Permapro SP polymeric sand helps create the final look.
A
B
E
D
H
J
N
F
G
C
I
K
L
M
O
11 in 8 in
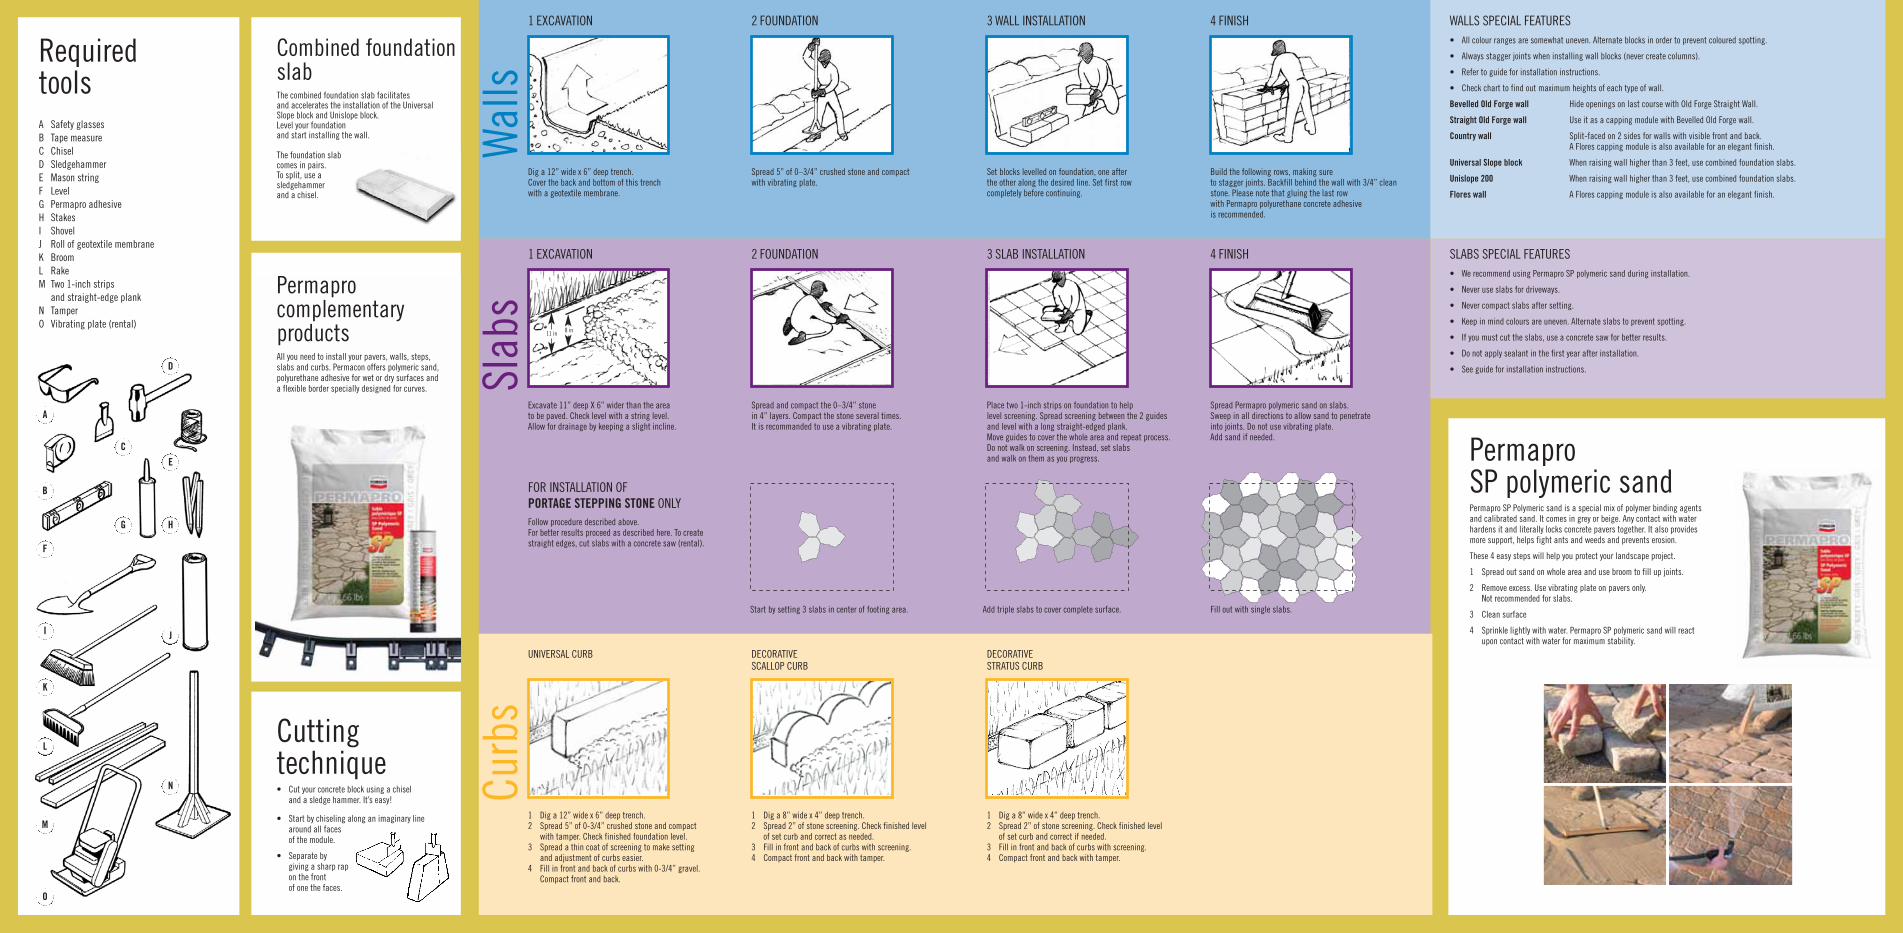
UNIVERSAL CURB DECORATIVE SCALLOP CURB
DECORATIVESTRATUS CURB
Curb
s
1 EXCAVATION 2 FOUNDATION 3 SLAB INSTALLATION 4 FINISH
1 EXCAVATION 2 FOUNDATION 3 WALL INSTALLATION 4 FINISH
Requiredtools
Combined foundationslabThe combined foundation slab facilitates and accelerates the installation of the Universal Slope block and Unislope block. Level your foundation and start installing the wall.
The foundation slab comes in pairs. To split, use a sledgehammer and a chisel.
PermaprocomplementaryproductsAll you need to install your pavers, walls, steps, slabs and curbs. Permacon offers polymeric sand,polyurethane adhesive for wet or dry surfaces and a flexible border specially designed for curves.
Cuttingtechnique• Cut your concrete block using a chisel
and a sledge hammer. It’s easy!
• Start by chiseling along an imaginary line around all faces of the module.
• Separate by giving a sharp rap on the front of one the faces.
A Safety glassesB Tape measureC ChiselD SledgehammerE Mason stringF LevelG Permapro adhesiveH StakesI ShovelJ Roll of geotextile membraneK BroomL RakeM Two 1-inch strips and straight-edge plankN TamperO Vibrating plate (rental)
Wal
lsSl
abs
WALLS SPECIAL FEATURES
SLABS SPECIAL FEATURES
1 Dig a 12” wide x 6” deep trench. 2 Spread 5” of 0-3/4” crushed stone and compact
with tamper. Check finished foundation level.3 Spread a thin coat of screening to make setting
and adjustment of curbs easier. 4 Fill in front and back of curbs with 0-3/4” gravel.
Compact front and back.
1 Dig a 8” wide x 4” deep trench. 2 Spread 2” of stone screening. Check finished level
of set curb and correct as needed.3 Fill in front and back of curbs with screening. 4 Compact front and back with tamper.
1 Dig a 8” wide x 4” deep trench. 2 Spread 2” of stone screening. Check finished level
of set curb and correct if needed.3 Fill in front and back of curbs with screening. 4 Compact front and back with tamper.
Excavate 11” deep X 6” wider than the area to be paved. Check level with a string level. Allow for drainage by keeping a slight incline.
FOR INSTALLATION OF PORTAGE STEPPING STONE ONLYFollow procedure described above. For better results proceed as described here. To createstraight edges, cut slabs with a concrete saw (rental).
Spread and compact the 0–3/4” stone in 4” layers. Compact the stone several times. It is recommanded to use a vibrating plate.
Place two 1-inch strips on foundation to help level screening. Spread screening between the 2 guides and level with a long straight-edged plank. Move guides to cover the whole area and repeat process. Do not walk on screening. Instead, set slabs and walk on them as you progress.
Spread Permapro polymeric sand on slabs. Sweep in all directions to allow sand to penetrate into joints. Do not use vibrating plate. Add sand if needed.
Dig a 12” wide x 6” deep trench. Cover the back and bottom of this trench with a geotextile membrane.
Spread 5” of 0–3/4” crushed stone and compact with vibrating plate.
Set blocks levelled on foundation, one after the other along the desired line. Set first row completely before continuing.
Build the following rows, making sure to stagger joints. Backfill behind the wall with 3/4” cleanstone. Please note that gluing the last row with Permapro polyurethane concrete adhesive is recommended.
Start by setting 3 slabs in center of footing area. Add triple slabs to cover complete surface. Fill out with single slabs.
Permapro SP polymeric sandPermapro SP Polymeric sand is a special mix of polymer binding agents and calibrated sand. It comes in grey or beige. Any contact with water hardens it and literally locks concrete pavers together. It also provides more support, helps fight ants and weeds and prevents erosion.
These 4 easy steps will help you protect your landscape project.
1 Spread out sand on whole area and use broom to fill up joints.
2 Remove excess. Use vibrating plate on pavers only. Not recommended for slabs.
3 Clean surface
4 Sprinkle lightly with water. Permapro SP polymeric sand will react upon contact with water for maximum stability.
• All colour ranges are somewhat uneven. Alternate blocks in order to prevent coloured spotting.
• Always stagger joints when installing wall blocks (never create columns).
• Refer to guide for installation instructions.
• Check chart to find out maximum heights of each type of wall.
Bevelled Old Forge wall Hide openings on last course with Old Forge Straight Wall.
Straight Old Forge wall Use it as a capping module with Bevelled Old Forge wall.
Country wall Split-faced on 2 sides for walls with visible front and back. A Flores capping module is also available for an elegant finish.
Universal Slope block When raising wall higher than 3 feet, use combined foundation slabs.
Unislope 200 When raising wall higher than 3 feet, use combined foundation slabs.
Flores wall A Flores capping module is also available for an elegant finish.
• We recommend using Permapro SP polymeric sand during installation.
• Never use slabs for driveways.
• Never compact slabs after setting.
• Keep in mind colours are uneven. Alternate slabs to prevent spotting.
• If you must cut the slabs, use a concrete saw for better results.
• Do not apply sealant in the first year after installation.
• See guide for installation instructions.