Embed Size (px)
Citation preview
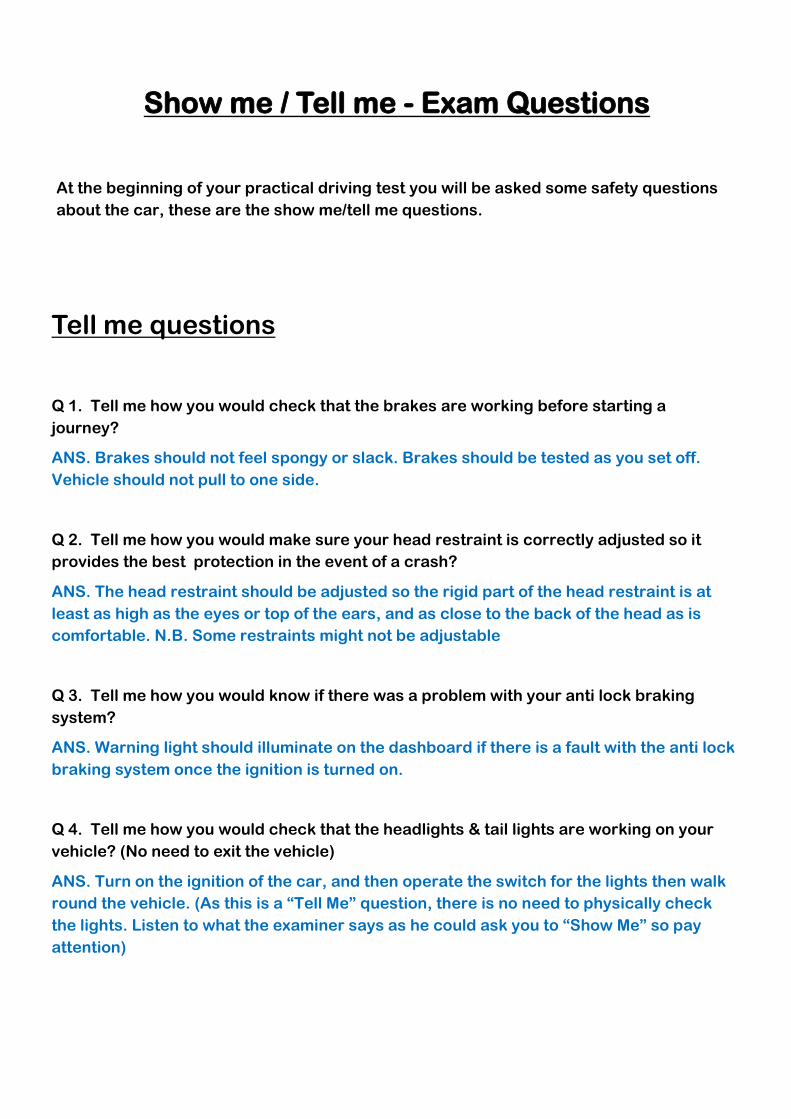
Show me / Tell me - Exam Questions
At the beginning of your practical driving test you will be asked some safety questions
about the car, these are the show me/tell me questions.
Tell me questions
Q 1. Tell me how you would check that the brakes are working before starting a
journey?
ANS. Brakes should not feel spongy or slack. Brakes should be tested as you set off.
Vehicle should not pull to one side.
Q 2. Tell me how you would make sure your head restraint is correctly adjusted so it
provides the best protection in the event of a crash?
ANS. The head restraint should be adjusted so the rigid part of the head restraint is at
least as high as the eyes or top of the ears, and as close to the back of the head as is
comfortable. N.B. Some restraints might not be adjustable
Q 3. Tell me how you would know if there was a problem with your anti lock braking
system?
ANS. Warning light should illuminate on the dashboard if there is a fault with the anti lock
braking system once the ignition is turned on.
Q 4. Tell me how you would check that the headlights & tail lights are working on your
vehicle? (No need to exit the vehicle)
ANS. Turn on the ignition of the car, and then operate the switch for the lights then walk
round the vehicle. (As this is a “Tell Me” question, there is no need to physically check
the lights. Listen to what the examiner says as he could ask you to “Show Me” so pay
attention)
Q 5. Tell me where you would find the information for the recommended tyre
pressure for this car and how tyre pressure should be checked?
ANS. You can find this information in the manufacturer’s guide and also on the inside of
the drivers door sill. Need to use a reliable pressure gauge, check and adjust the pres-
sure in the tyres when they are cold, also remembering to check the spare tyre and re-
member to refit all the valve caps.
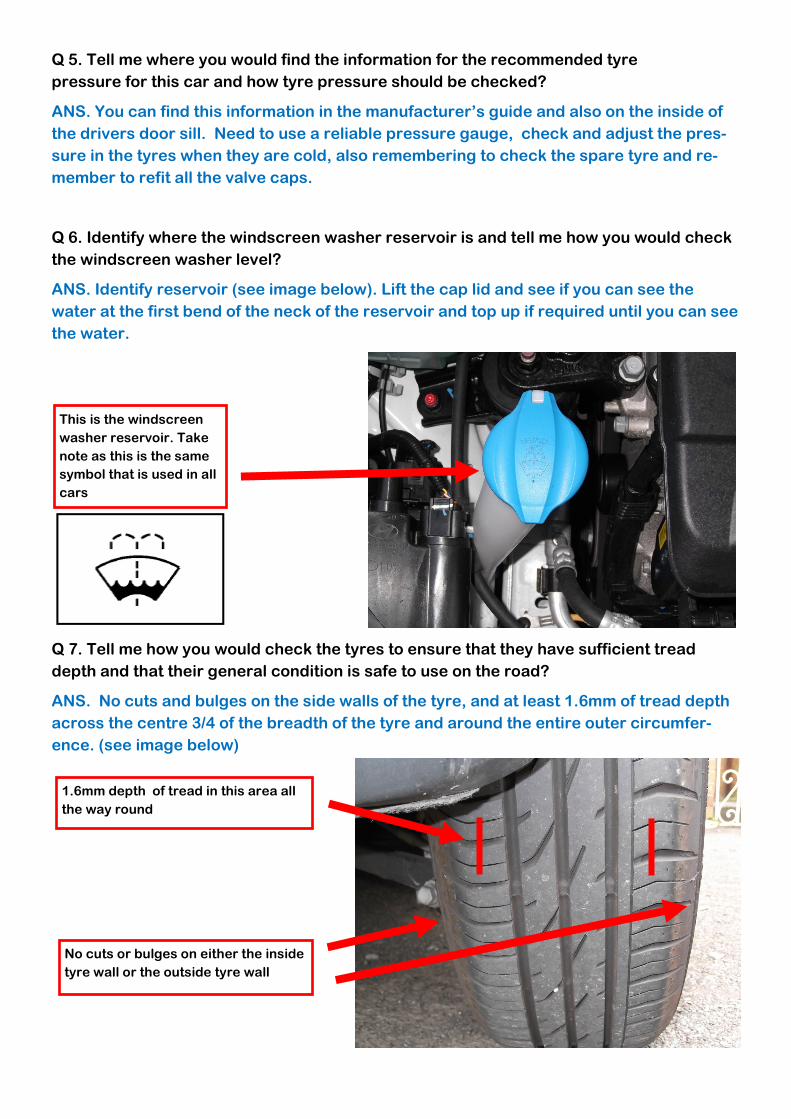
Q 6. Identify where the windscreen washer reservoir is and tell me how you would check
the windscreen washer level?
ANS. Identify reservoir (see image below). Lift the cap lid and see if you can see the
water at the first bend of the neck of the reservoir and top up if required until you can see
the water.
This is the windscreen
washer reservoir. Take
note as this is the same
symbol that is used in all
cars
Q 7. Tell me how you would check the tyres to ensure that they have sufficient tread
depth and that their general condition is safe to use on the road?
ANS. No cuts and bulges on the side walls of the tyre, and at least 1.6mm of tread depth
across the centre 3/4 of the breadth of the tyre and around the entire outer circumfer-
ence. (see image below)
1.6mm depth of tread in this area all
the way round
No cuts or bulges on either the inside
tyre wall or the outside tyre wall
Show me questions
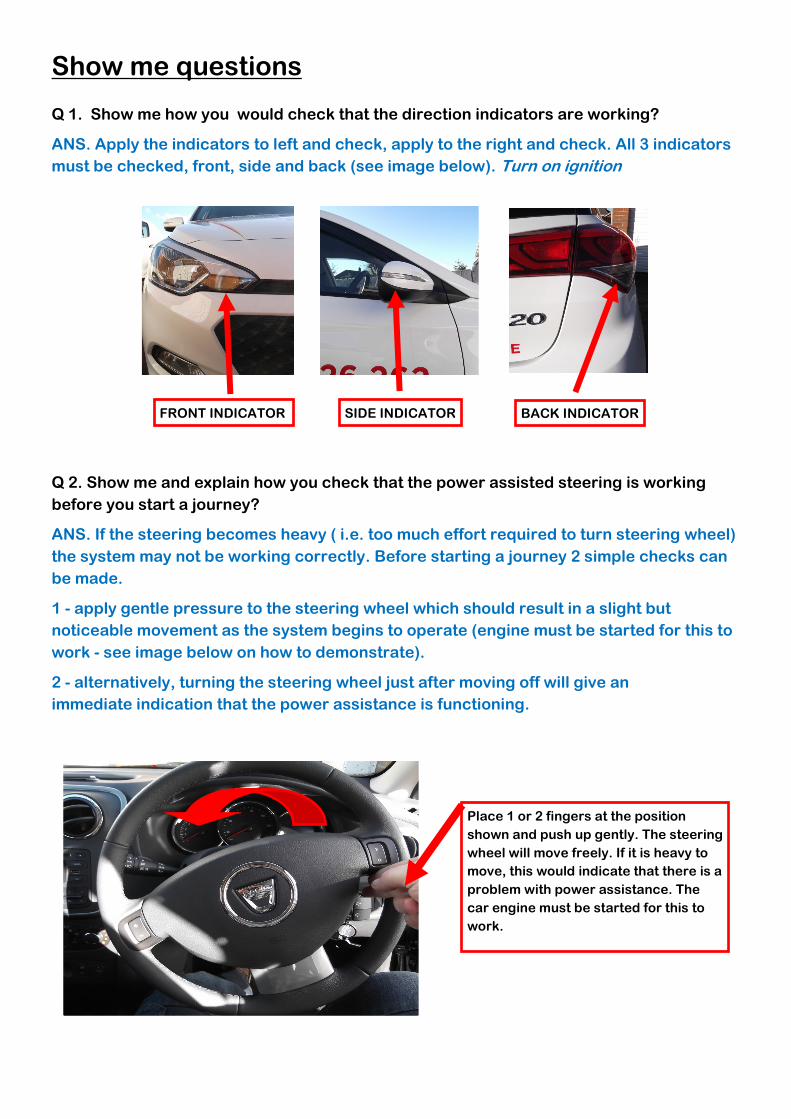
Q 1. Show me how you would check that the direction indicators are working?
ANS. Apply the indicators to left and check, apply to the right and check. All 3 indicators
must be checked, front, side and back (see image below). Turn on ignition
FRONT INDICATOR SIDE INDICATOR BACK INDICATOR
Q 2. Show me and explain how you check that the power assisted steering is working
before you start a journey?
ANS. If the steering becomes heavy ( i.e. too much effort required to turn steering wheel)
the system may not be working correctly. Before starting a journey 2 simple checks can
be made.
1 - apply gentle pressure to the steering wheel which should result in a slight but
noticeable movement as the system begins to operate (engine must be started for this to
work - see image below on how to demonstrate).
2 - alternatively, turning the steering wheel just after moving off will give an
immediate indication that the power assistance is functioning.
Place 1 or 2 fingers at the position
shown and push up gently. The steering
wheel will move freely. If it is heavy to
move, this would indicate that there is a
problem with power assistance. The
car engine must be started for this to
work.
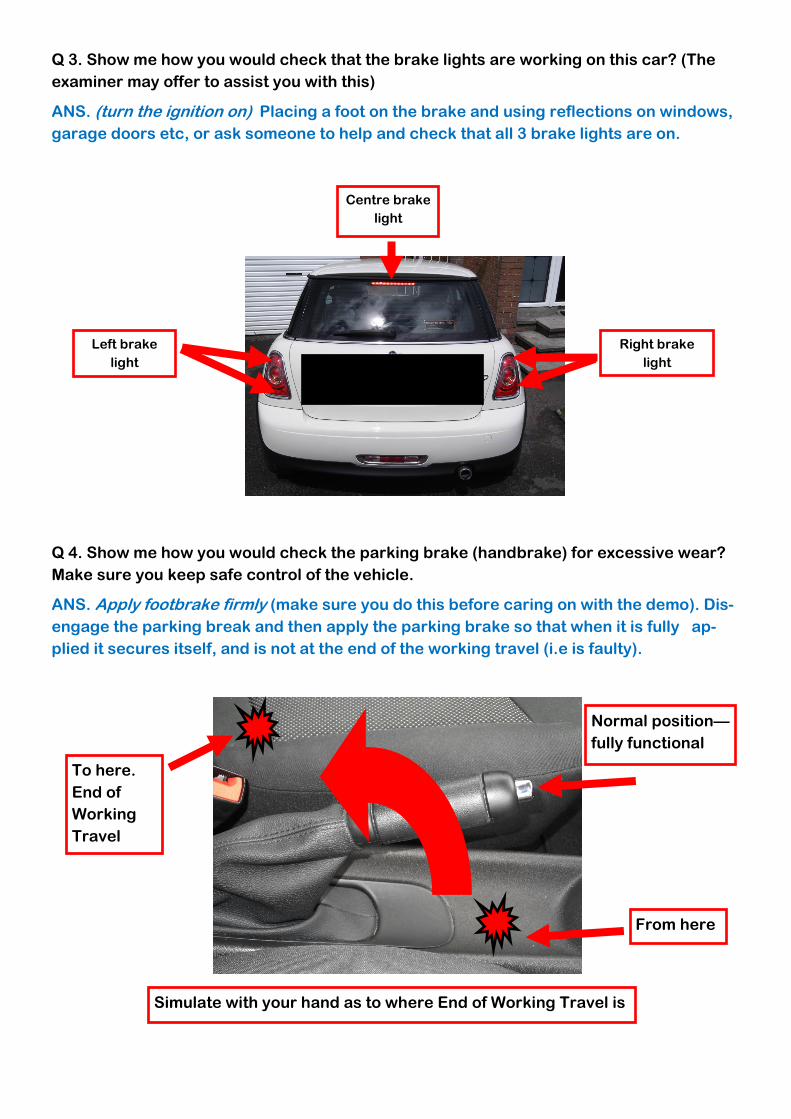
Q 3. Show me how you would check that the brake lights are working on this car? (The
examiner may offer to assist you with this)
ANS. (turn the ignition on) Placing a foot on the brake and using reflections on windows,
garage doors etc, or ask someone to help and check that all 3 brake lights are on.
Centre brake
light
Right brake
light
Left brake
light
Q 4. Show me how you would check the parking brake (handbrake) for excessive wear?
Make sure you keep safe control of the vehicle.
ANS. Apply footbrake firmly (make sure you do this before caring on with the demo). Dis-
engage the parking break and then apply the parking brake so that when it is fully ap-
plied it secures itself, and is not at the end of the working travel (i.e is faulty).
From here
To here.
End of
Working
Travel
Simulate with your hand as to where End of Working Travel is
Normal position—
fully functional
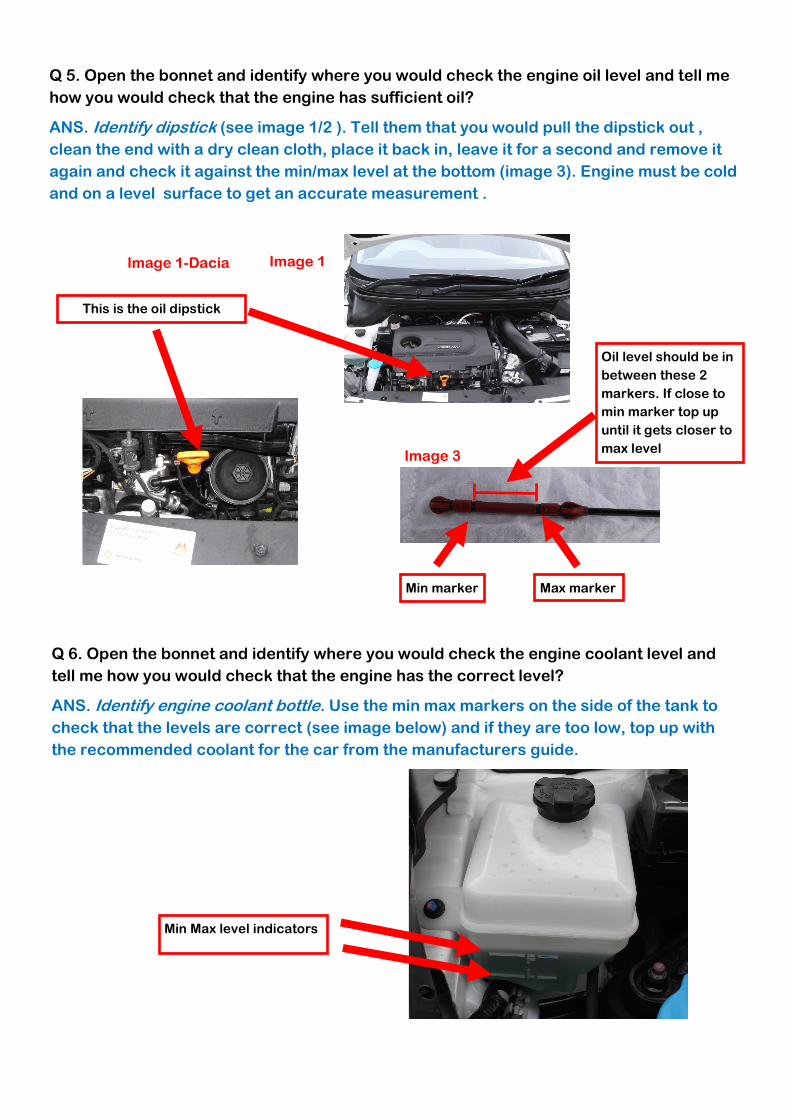
Q 5. Open the bonnet and identify where you would check the engine oil level and tell me
how you would check that the engine has sufficient oil?
ANS. Identify dipstick (see image 1/2 ). Tell them that you would pull the dipstick out ,
clean the end with a dry clean cloth, place it back in, leave it for a second and remove it
again and check it against the min/max level at the bottom (image 3). Engine must be cold
and on a level surface to get an accurate measurement .
This is the oil dipstick
Min marker Max marker
Oil level should be in
between these 2
markers. If close to
min marker top up
until it gets closer to
max level
Q 6. Open the bonnet and identify where you would check the engine coolant level and
tell me how you would check that the engine has the correct level?
ANS. Identify engine coolant bottle. Use the min max markers on the side of the tank to
check that the levels are correct (see image below) and if they are too low, top up with
the recommended coolant for the car from the manufacturers guide.
Min Max level indicators
Image 1
Image 3
Image 1-Dacia
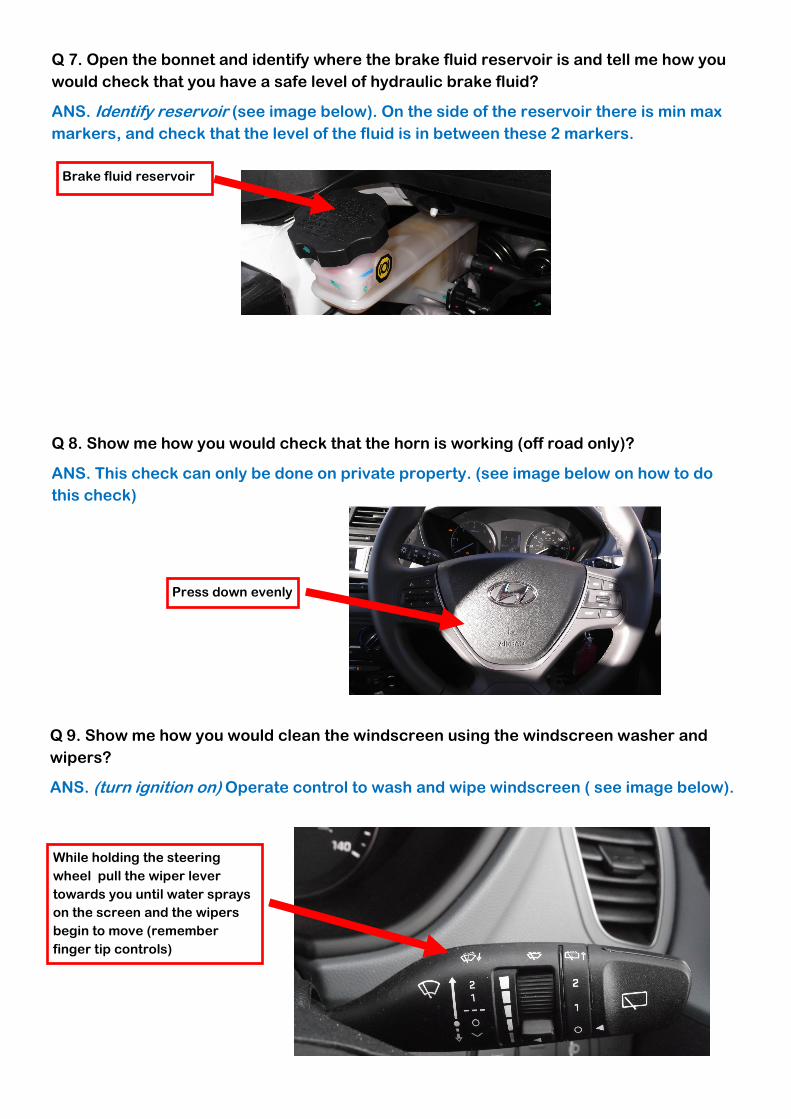
Q 7. Open the bonnet and identify where the brake fluid reservoir is and tell me how you
would check that you have a safe level of hydraulic brake fluid?
ANS. Identify reservoir (see image below). On the side of the reservoir there is min max
markers, and check that the level of the fluid is in between these 2 markers.
Brake fluid reservoir
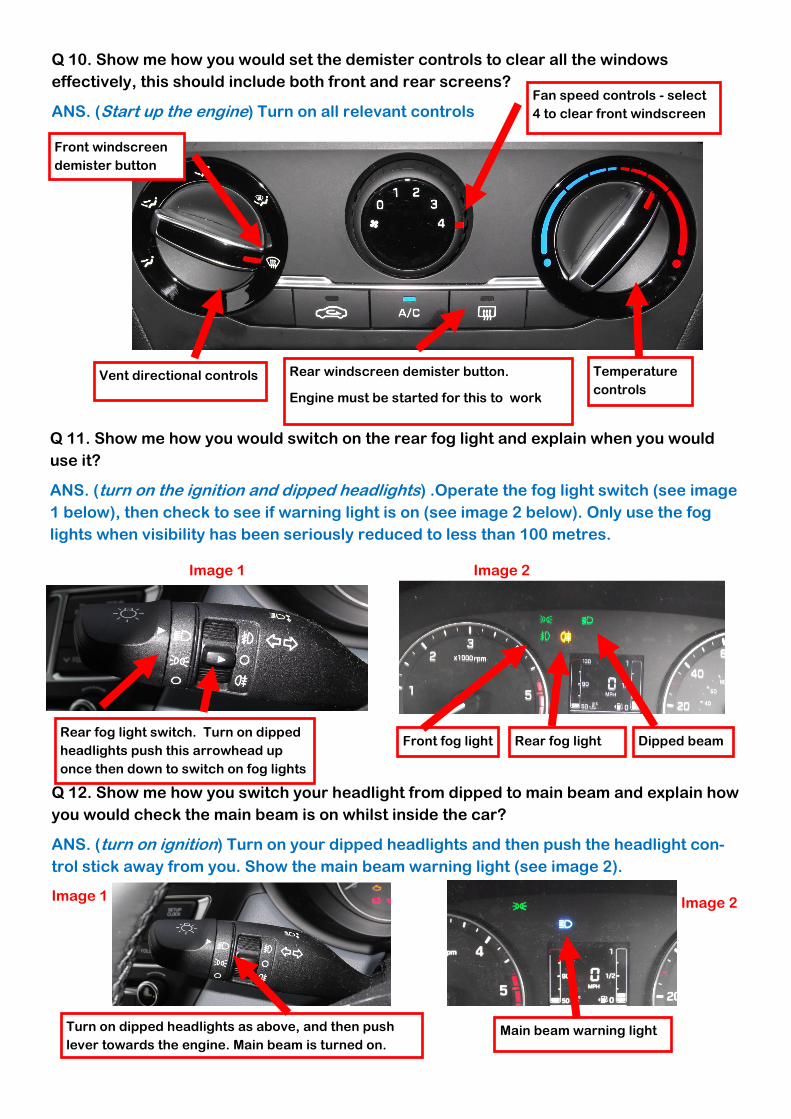
Q 8. Show me how you would check that the horn is working (off road only)?
ANS. This check can only be done on private property. (see image below on how to do
this check)
Press down evenly
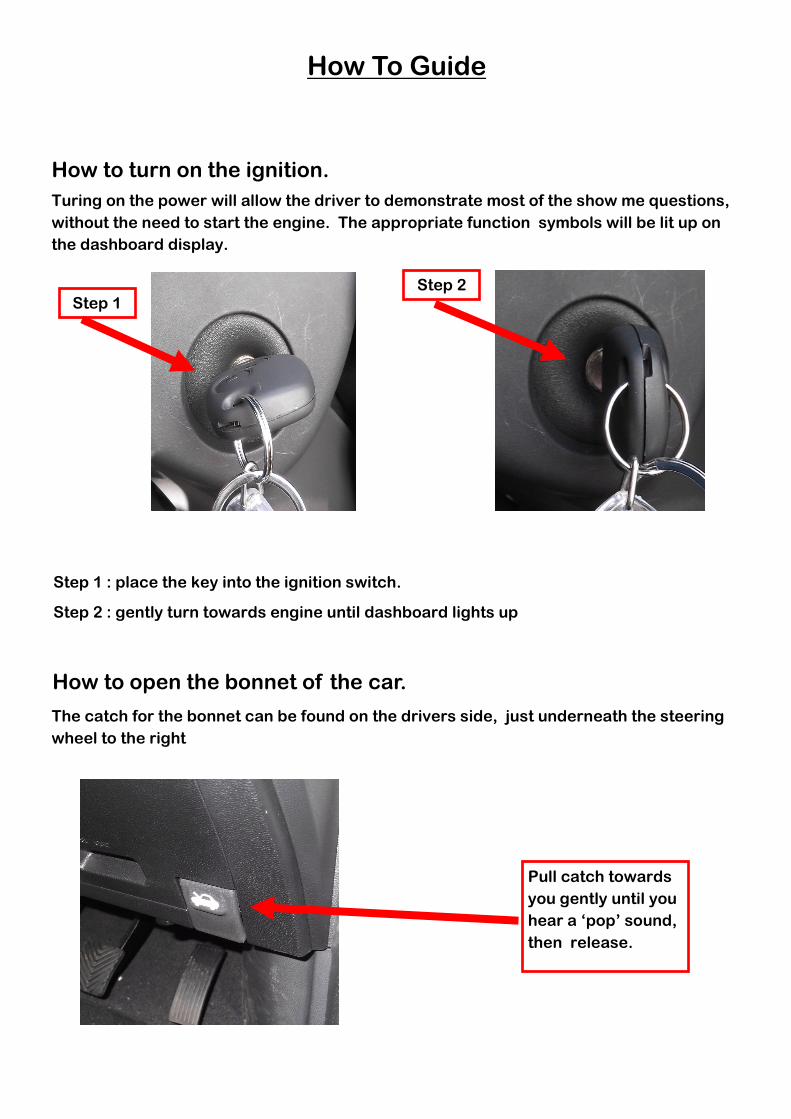
Q 9. Show me how you would clean the windscreen using the windscreen washer and
wipers?
ANS. (turn ignition on) Operate control to wash and wipe windscreen ( see image below).
While holding the steering
wheel pull the wiper lever
towards you until water sprays
on the screen and the wipers
begin to move (remember
finger tip controls)
Q 10. Show me how you would set the demister controls to clear all the windows
effectively, this should include both front and rear screens?
ANS. (Start up the engine) Turn on all relevant controls
Temperature
controls
Fan speed controls - select
4 to clear front windscreen
Q 11. Show me how you would switch on the rear fog light and explain when you would
use it?
ANS. (turn on the ignition and dipped headlights) .Operate the fog light switch (see image
1 below), then check to see if warning light is on (see image 2 below). Only use the fog
lights when visibility has been seriously reduced to less than 100 metres.
Rear fog light switch. Turn on dipped
headlights push this arrowhead up
once then down to switch on fog lights
Front fog light
Q 12. Show me how you switch your headlight from dipped to main beam and explain how
you would check the main beam is on whilst inside the car?
ANS. (turn on ignition) Turn on your dipped headlights and then push the headlight con-
trol stick away from you. Show the main beam warning light (see image 2).
Turn on dipped headlights as above, and then push
lever towards the engine. Main beam is turned on. Main beam warning light
Image 1
Image 2
Image 2
Image 1
Rear windscreen demister button.
Engine must be started for this to work
Vent directional controls
Front windscreen
demister button
Rear fog light Dipped beam
How To Guide
How to turn on the ignition.
Step 1 Step 2
Step 1 : place the key into the ignition switch.
Step 2 : gently turn towards engine until dashboard lights up
How to open the bonnet of the car.
Turing on the power will allow the driver to demonstrate most of the show me questions,
without the need to start the engine. The appropriate function symbols will be lit up on
the dashboard display.
The catch for the bonnet can be found on the drivers side, just underneath the steering
wheel to the right
Pull catch towards
you gently until you
hear a ‘pop’ sound,
then release.
To raise the bonnet, slide fingers across in between the bonnet and front grill, from the
right side of the Hyundai emblem across towards the latch. Push the latch to the left, until
you raise the bonnet a couple of inches. Once fully raised, place the bonnet bracing arm
into position.
Position of bonnet
latch
How to find the engine components.
1. Brake fluid reservoir
2. Dipstick location
3. Windscreen washer reservoir
4. Engine coolant reservoir
5. Bonnet release latch
1
2 3
4
5