Embed Size (px)
Citation preview

7/23/2019 Shoretel Installation Guide
http://slidepdf.com/reader/full/shoretel-installation-guide 1/27
1 | P a g e
Version 5.2.2
ShoreTel Installation Guide
December 22, 2010
Copyright 2010 FaxCore, Inc

7/23/2019 Shoretel Installation Guide
http://slidepdf.com/reader/full/shoretel-installation-guide 2/27
2 | P a g e
Abstract
By integrating F axCore with the ShoreTel System, the customer can have a complete telephony solution for both
voice and fax. Faxes can be sent through the ShoreTel System directly from any application or from a user’s email
client, and can be automatically routed to a user’s email inbox.
Contents
Abstract ...................................................................................................................................................... 2
Overview .................................................................................................................................................... 3
Features and Benefits ................................................................................................................................. 3
FaxCore Overview and Contact .................................................................................................................. 3
FaxCore Product Information ..................................................................................................................... 4
Architecture Overview ............................................................................................................................... 4
Call Flow When Receiving Faxes ............................................................................................................. 5
Call Flow When Sending Faxes ............................................................................................................... 5
Requirements, Certification and Limitations .......................................................................................... 5
Version Support ...................................................................................................................................... 6
Certification Testing Results Summary ................................................................................................... 7
T.38 Fax Applications .................................................................................................................................. 9
Application 1 –One Main Number for Both Voice and Fax –Fax Redirect ............................................... 9
ShoreTel Configuration ....................................................................................................................... 9
Application 2 –User with a Unique Voice Extension and a Unique Fax Extension ................................. 17
FaxCore Configuration .......................................................................................................................... 23
Configuration for the FaxCore/D ialogic Brooktrout SR140 ............................................................... 23
7/23/2019 Shoretel Installation Guide
http://slidepdf.com/reader/full/shoretel-installation-guide 3/27
3 | P a g e
OverviewThis document is meant to provide information about FaxCore Software and its product FaxCore, describing how
FaxCore can integrate with the ShoreTel System to provide a complete telephony solution. This document will tell
how to con tact FaxCore Software and it will provide product specifics, interoperability testing results, typical setup
configurations, troubleshooting s teps and o ther important product-related information.
Features and Benefits
Automatically route incoming faxes to the appropriate recipient
Send faxes from any application
Integration with Active Directory
FoIP Support
Archive faxes to FaxCore or SQL
Supports Microsoft Exchange, Lotus Notes and other Simple Mail Transfer Protocol (SMTP) mail servers
Support for Citrix
Fax Broadcasting using Microsoft Office Mail Merge
Support for Microsoft Ou tlook Contacts
Reports for Fax Usage
Integration with industry-leading fax board manufacturers
FaxCore Overview and Contact
FaxCore Software provides a single source of Web & Mail Security, Archiving, Backup & F ax, Networking & Security
and Hosted solutions software for sm all to medium-sized enterprises. With award-winning technology, an
aggressive pricing strategy, and a strong focus on the unique requirements of small to medium-sized enterprises,
FaxCore Software satisfies the needs of SME organizations on a global scale.
FaxCore Software has offices in USA (Colorado & New Jersey), Malaysia, Australia, which support hundreds of
thousands of installations worldwide and is a channel-focused company with a global network of thousands of
partners. FaxCore Software is also a Microsoft Gold Certified Partner.
For general sales questions, please contact your reseller or contact FaxCore Software directly at:
FaxCore Sales
(888)905-4881
7/23/2019 Shoretel Installation Guide
http://slidepdf.com/reader/full/shoretel-installation-guide 4/27
4 | P a g e
FaxCore Product Information
With FaxCore, less time is spen t on sending, collecting and distributing faxes, saving your company noticeable
costs. Faxes sent/received are also saved in digital format as an email attachment.
FaxCore is easy to install, requires little maintenance and integrates with existing messaging clients and
customized solutions. It seamlessly integrates w ith your mail server, allowing users to send and receive faxes using
their email client. Your company can also search for and b ack up all faxes in the same way that emails are stored
and retrieved on the network.
FaxCore supports analog, digital, and Fax over IP (FoIP) connectivity options. For FoIP, it integrates with IP enabled
PABXs and Brooktrout’s SR140 technology to send faxes over an IP infrastructure. FaxCore is an award-winning fax
server and has been voted #1 by Windows IT Pro readers for 3 years running.
Architecture Overview
FaxCore sits on the network and users connect to FaxCore via their Desktop browser or via their Email client. See
the diagram below.
Figure 1 – Call Flow Diagram

7/23/2019 Shoretel Installation Guide
http://slidepdf.com/reader/full/shoretel-installation-guide 5/27
5 | P a g e
Call Flow When Receiving Faxes
When the ShoreTel system detects that an inbound call is a fax call, the call is routed to the fax device located in
the FaxCore server. This fax device receives the fax and provides it to the FaxCore application. After conversion to
the desired format (PDF, TIF, GIF, JPG, or PNG), FaxCore attaches the received fax to an email transmission report
and sends it to the email server for de livery to the designated user.
Call Flow When Sending Faxes
Internal users send an email to either a business fax contact or to number@ faxserverdomain.com which is then
routed by the email server to the FaxCore server. FaxCore converts the email and any attachments to a fax format
and utilizes the f ax device for transmission to the ShoreTel system. The ShoreTel system handles the connection
between the fax device and the public switched telephone network (PSTN) cloud. After the successful or
unsuccessful transmission of the fax, FaxCore sends an email transmission report back to the sender of the email
with the status.
Requirements, Certification and Limitations
Hardware
CPU: Pentium 4 (2.0Ghz or higher)
Memory: 4 GB RAM
Disk Space: 20 GB available disk space (additional disk space will be required for storing fax messages)
Fax Board: Fax communication device present
For PSTN:
Dialogic Brooktrout TR1034 Series Fax Board (full length and full height PCI board, board will require 12.5 ”
of room in PCI slot)
Dialogic Brooktrout TruFax Series Fax Board
For Fax over IP:
Dialogic Brooktrout SR-140 *
Operating System – Platform
Windows Server 2008 64 bit R2
*with Microsoft .NET 3.5 installed.
VMware Virtual Machine with either of the supported Operating Systems installed.
*64 Bit is support, but both FaxCore and the Dialogic Brooktrout drivers run in 32 bit mode.
Citrix Xen Server with either of the supported Operating Systems installed.
Operating System – Configuration Recommendation
Fresh installation (not an OS upgrade)
Microsoft .Net 3.5 installed
Static or DHCP reserved IP address
Do not join the FaxCore server to your Domain.
Client Software Requirements
Microsoft Internet Explorer 6.0 or later, Firefox or Safari
7/23/2019 Shoretel Installation Guide
http://slidepdf.com/reader/full/shoretel-installation-guide 6/27
6 | P a g e
Notes on ShoreTel requirements:
All ShoreTel ShoreGear Switches that participate in a T.38 fax call MUST support T.38 protocol
The fax machine/fax server behind the ShoreTel PBX should disable V34 to avoid using the G711/Linear
clear channel V.34 faxes are not supported
ShoreTel only supports T.38 in udptl form. T.38 calls in RTP or TCP forms are not supported at this time
ShoreTel does not support either IP m edia or RFC2833-based fax tone detection (in RFC2833, ShoreTel
only supports DTMF, no named telephony events).
ShoreTel depends on fax CNG tone detection or T.38 invite to redirect an incoming fax call. If the fax
connection is established with on SIP-based endpoint (such as SIP extension or SIP trunk), ShoreTel
depends on the invite to e ither establish a fax connection or redirect the c all to a preconfigured fax
device.
T.38 support is not supported on SIP-BRI
Version SupportNote: FaxCore 4370 is no longer supported by Fa xCore.
FaxCore Release
4370 2007 pre-sp2 2007 SP2
ShoreTel Release 7.5
8.0
8.1
10.x
Table 1 - Supported Software Version Matrix
Special considerations:
The following switches do not support T.38 protocol. For those and older switches, G711/L16 clear channel is used
for fax purposes.
ShoreGear –8
ShoreGear –12
ShoreGear- 120
ShoreGear –T1
ShoreGear –E1
ShoreGear –TW
ShoreGear –24 and ShoreGear –24a
7/23/2019 Shoretel Installation Guide
http://slidepdf.com/reader/full/shoretel-installation-guide 7/27
7 | P a g e
Certification Testing Results Summary
Table 2 - In itialization and B asic Feature Test Cases
ID Name Description Results
1.1 Configure a User for Testing
with FaxCore
ShoreTel Certification lab will add a user to the
FaxCore Server for use.
Pass
1.2 Sending Faxes with FaxCoreClient
ShoreTel Certification lab will use the FaxCoreClient to send a Fax to a Fax Machine using FoIP and
the
ShoreGear SIP Proxy switch.
Pass
1.3 Automatic Faxing with
NetPrintQueue2Fax
ShoreTel Certification lab will use the
NetPrintQueue2Fax to send a F ax to a Fax Machine
using FoIP and the ShoreGear SIP Proxy switch.
Pass
1.4 Sending Faxes with
TextAPI
ShoreTel Certification lab will use the FaxCore
Client to send a Fax to a Fax Machine using FoIP and
the
ShoreGear SIP Proxy switch.
Pass
1.5 Receiving Faxes with
FaxCore
ShoreTel Certification lab will receive a fax from an
external fax machine to a mailbox (either Internet
mail or
local mail).
Pass
1.6 Receive a Transmission
Report with FaxCore
ShoreTel Certification lab will send a fax and receive
a
Transmission Report using FaxCore.
Pass
Table 3 - Installation and Configuration Tests
ID Name Description Results
2.1 Installing and
configuring
Microsoft Internet
Information Services(IIS)
ShoreTel Certification lab will install
Microsoft IIS and configure it for
successful use with FaxCore.
Pass
2.2 Installing FaxCore ShoreTel Certification lab will install
FaxCore 14.
Pass
2.3 Software installation
of the Brooktrout
SR140 drivers
ShoreTel Certification lab will install the
Brooktrout SR140 drivers.
Pass

7/23/2019 Shoretel Installation Guide
http://slidepdf.com/reader/full/shoretel-installation-guide 8/27
8 | P a g e
Table 4 - F ault Insertion
ID Name Description Results
3.1 Telephony
Connectivity
Failure between
ShoreGear SIP Proxy
switch and Brooktrout
Telephony Connectivity F ailure should
result in easily recognizable symptoms.
Pass
3.2 SMTP Connection
Failure
SMTP Delivery Failure should not prevent
faxes from being transmitted.
Pass
Table 5 - Documentation
ID Name Description Results
4.1 FaxCore Manual Product manual for FaxCore 14 –provides
installation procedures and general
configuration/usage
information re garding the product.
Pass
4.2 Installing the SR140
Digital / E thernet PCIBoard documentation
Technical document for installing SR140
Digital board – contains diagram of board as well as
installation
instructions.
Pass
7/23/2019 Shoretel Installation Guide
http://slidepdf.com/reader/full/shoretel-installation-guide 9/27
9 | P a g e
T.38 Fax Applications
Application 1 –One Main Number for Both Voice and Fax –Fax Redirect
It is common for businesses to have a main number for unified communications. In this application, all fax and
voice communications are received through one main number. The ShoreTel system will manage all incoming faxcommunications so that they are rou ted via SIP Redirect Method to the FaxCore fax serv er. The FaxCore fax server
will then forward the fax in an e mail format to the email address designated for the intended recipient’s or to a
general fax mailbox.
Note: Enable a ShoreGear SIP Proxy switch to be the SIP proxy for the site where you want to add the SIP UM
server. This switch is referred to as the site SIP proxy switch.
ShoreTel Configuration
This section describes the ShoreTel system configuration to support T.38 fax using the FaxCore software.
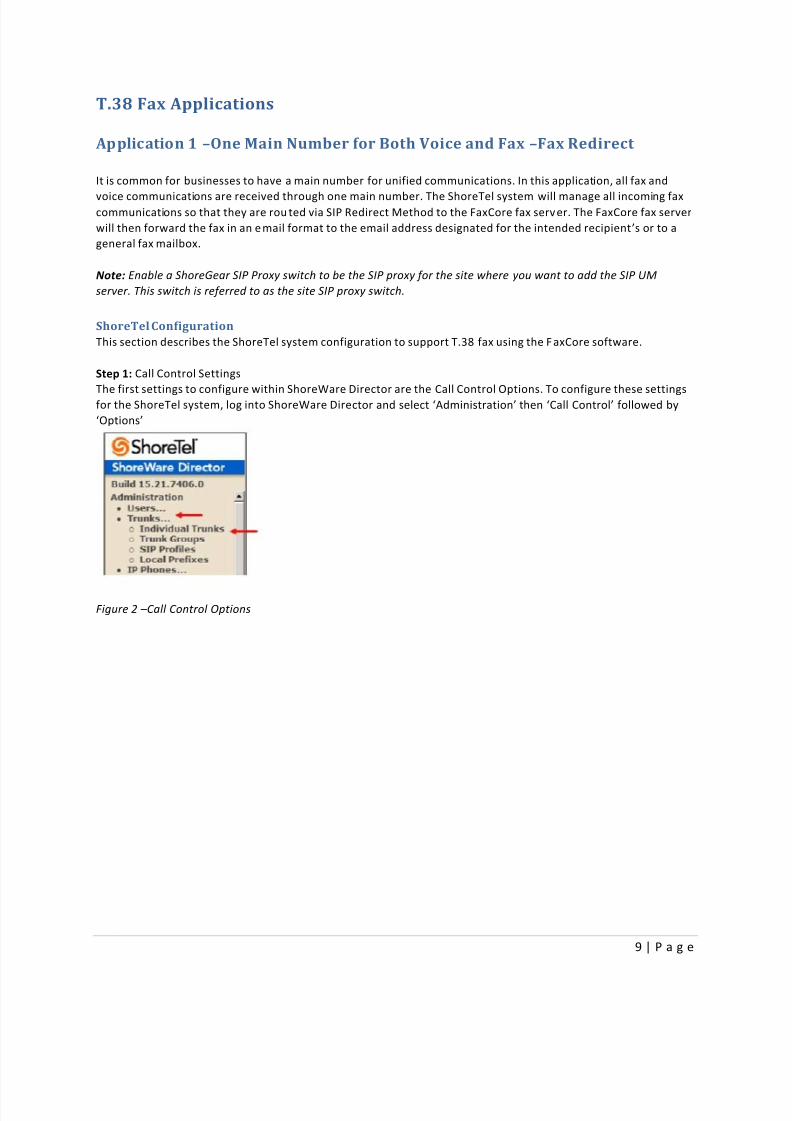
Step 1: Call Control Settings
The first settings to configure within ShoreWare Director are the Call Control Options. To configure these settingsfor the ShoreTel system, log into ShoreWare Director and select ‘Administration’ then ‘Call Control’ followed by
‘Options’
Figure 2 – Call Control Options
7/23/2019 Shoretel Installation Guide
http://slidepdf.com/reader/full/shoretel-installation-guide 10/27
10 | P a g e
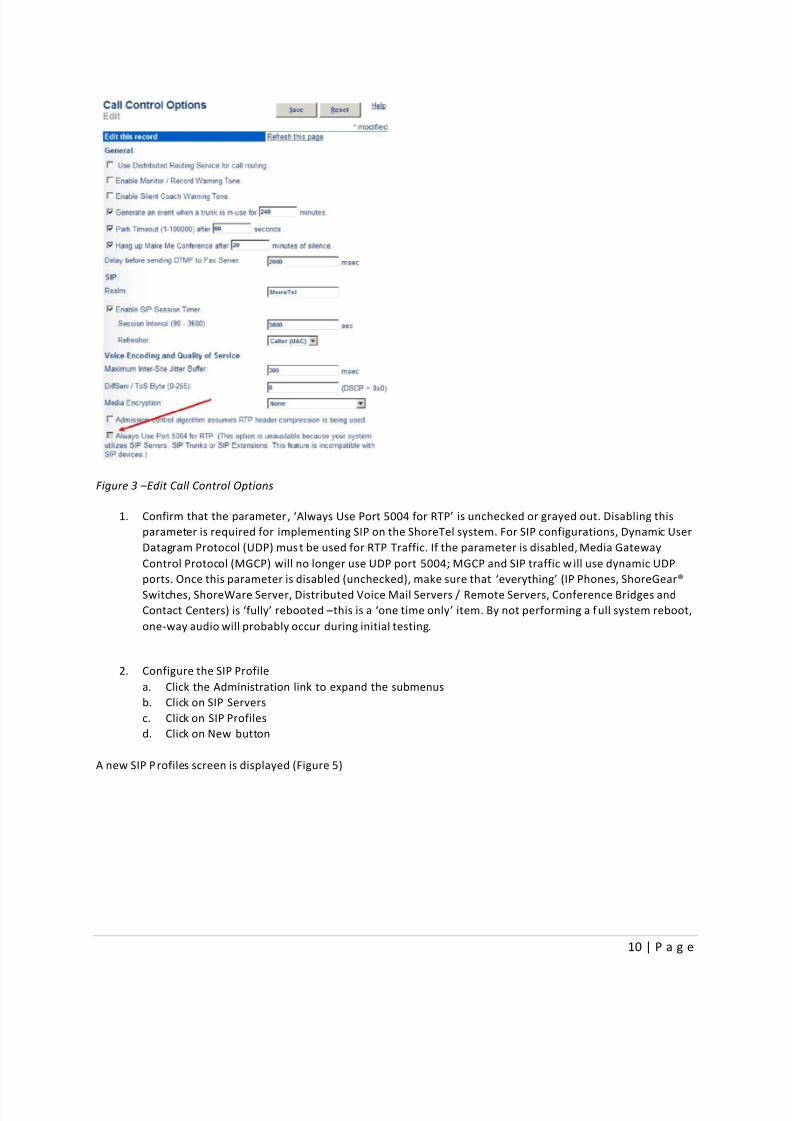
Figure 3 – Edit Call Control Options
1.
Confirm that the parameter, ‘Always Use Port 5004 for RTP’ is unchecked or grayed out. Disabling this
parameter is required for implementing SIP on the ShoreTel system. For SIP configurations, Dynamic User
Datagram Protocol (UDP) must be used for RTP Traffic. If the parameter is disabled, Media Gateway
Control Protocol (MGCP) will no longer use UDP port 5004; MGCP and SIP traffic w ill use dynamic UDP
ports. Once this parameter is disabled (unchecked), make sure that ‘everything’ (IP Phones, ShoreGear®
Switches, ShoreWare Server, Distributed Voice Mail Servers / Remote Servers, Conference Bridges and
Contact Centers) is ‘fully’ rebooted –this is a ‘one time only’ item. By not performing a full system reboot,
one-way audio will probably occur during initial testing.
2.
Configure the SIP Profile
a.
Click the Administration link to expand the submenus
b.
Click on SIP Servers
c.
Click on SIP Profiles
d.
Click on New button
A new SIP Profiles screen is displayed (Figure 5)
7/23/2019 Shoretel Installation Guide
http://slidepdf.com/reader/full/shoretel-installation-guide 11/27
11 | P a g e
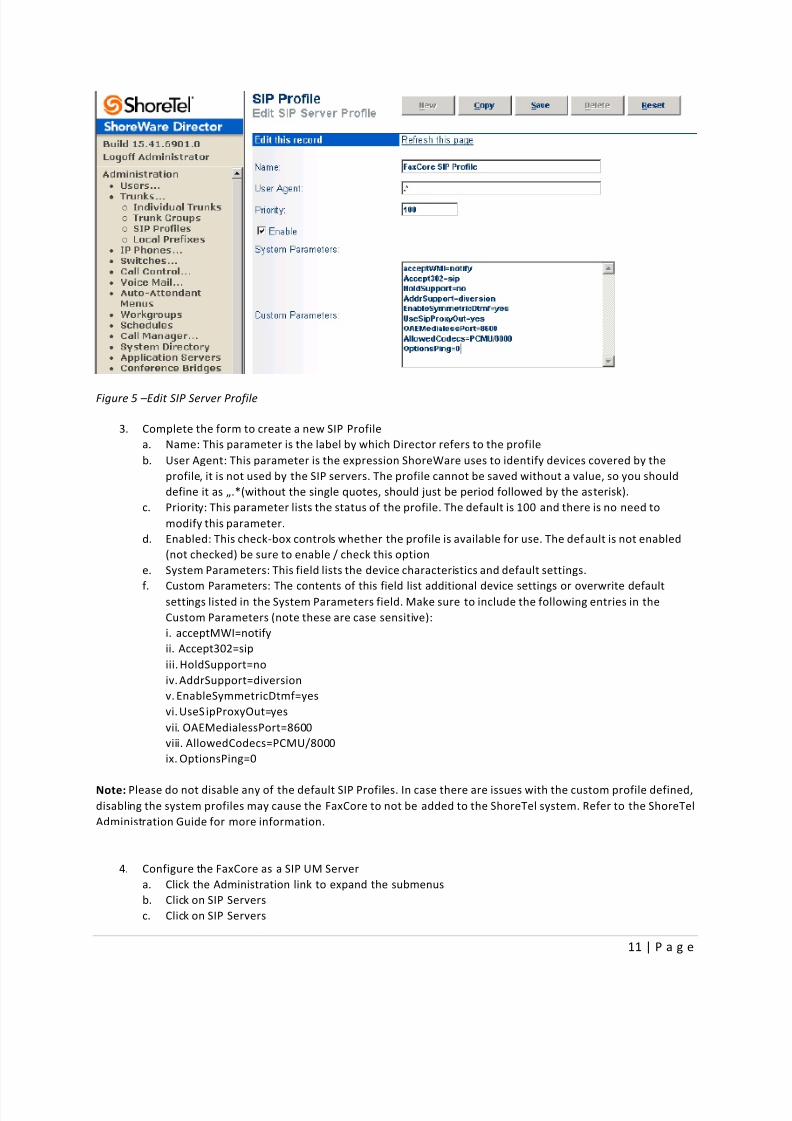
Figure 5–
Edit SIP Server Profile
3.
Complete the form to create a new SIP Profile
a.
Name: This parameter is the label by which Director refers to the profile
b.
User Agent: This parameter is the expression ShoreWare uses to identify devices covered by the
profile, it is not used by the SIP servers. The profile cannot be saved without a value, so you should
define it as „.*(without the single quotes, should just be period followed by the as terisk).
c.
Priority: This parameter lists the status of the profile. The default is 100 and there is no need to
modify this parameter.
d.
Enabled: This check-box controls whether the profile is available for use. The default is not enabled
(not checked) be sure to enable / check this option
e.
System Parameters: This field lists the device characteristics and default settings.
f.
Custom Parameters: The contents of this field list additional device settings or overwrite defaultsettings listed in the System Parameters field. Make sure to include the following entries in the
Custom Parameters (note these are case sensitive):
i. acceptMWI=notify
ii. Accept302=sip
iii. HoldSupport=no
iv. AddrSupport=diversion
v. EnableSymmetricDtmf=yes
vi. UseS ipProxyOut=yes
vii. OAEMedialessPort=8600
viii. AllowedCodecs=PCMU/8000
ix. OptionsPing=0
Note: Please do not disable any of the default SIP Profiles. In case there are issues with the custom profile defined,
disabling the system profiles may cause the FaxCore to not be added to the ShoreTel system. Refer to the ShoreTel
Administration Guide for more information.
4.
Configure the FaxCore as a SIP UM Server
a.
Click the Administration link to expand the submenus
b.
Click on SIP Servers
c.
Click on SIP Servers
7/23/2019 Shoretel Installation Guide
http://slidepdf.com/reader/full/shoretel-installation-guide 12/27
12 | P a g e
d.
Click on the New button
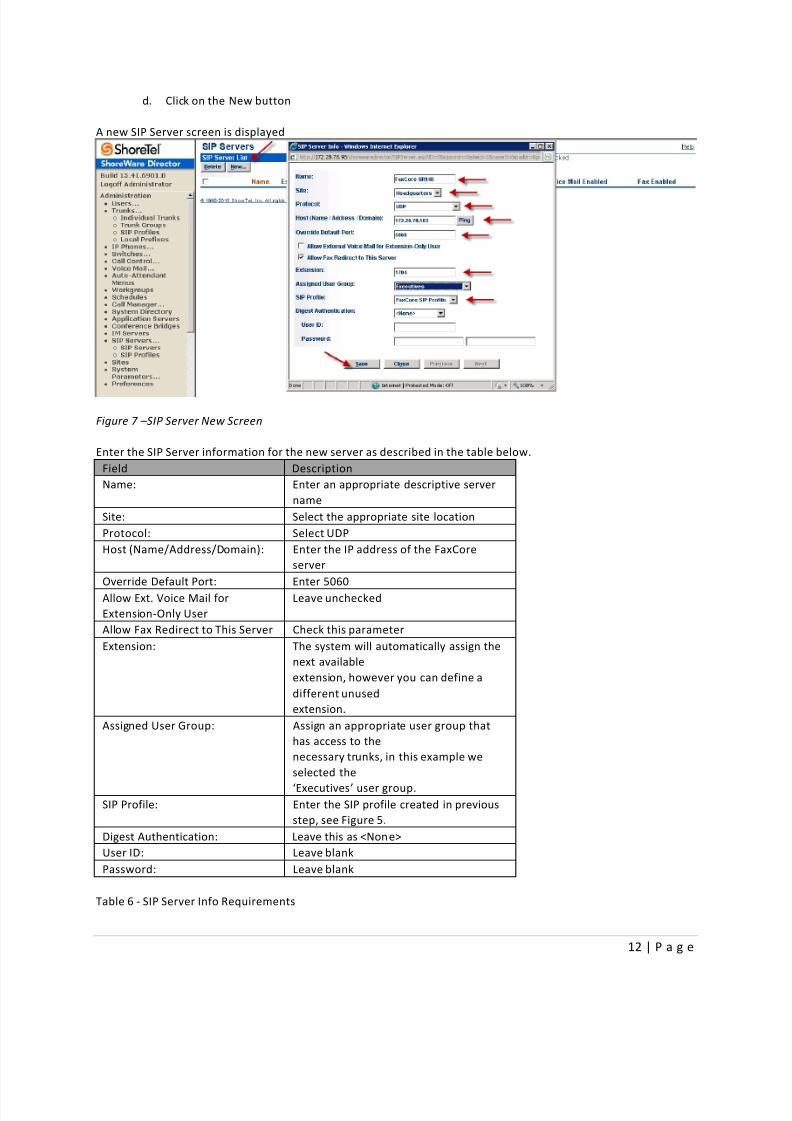
A new SIP Server screen is displayed
Figure 7 – SIP Server New Screen
Enter the SIP Server information for the new server as described in the table below.
Field Description
Name: Enter an appropriate descriptive server
name
Site: Select the appropriate site location
Protocol: Select UDP
Host (Name/Address/Domain): Enter the IP address of the FaxCore
server
Override Default Port: Enter 5060
Allow Ext. Voice Mail for
Extension-Only User
Leave unchecked
Allow Fax Redirect to This Server Check this parameter
Extension: The system will automatically assign the
next available
extension, however you can define a
different unused
extension.
Assigned User Group: Assign an appropriate user group that
has access to the
necessary trunks, in this example we
selected the
‘Executives’ user group.
SIP Profile: Enter the SIP profile created in previous
step, see Figure 5.
Digest Authentication: Leave this as <None>
User ID: Leave blank
Password: Leave blank
Table 6 - SIP Server Info Requirements
7/23/2019 Shoretel Installation Guide
http://slidepdf.com/reader/full/shoretel-installation-guide 13/27
13 | P a g e
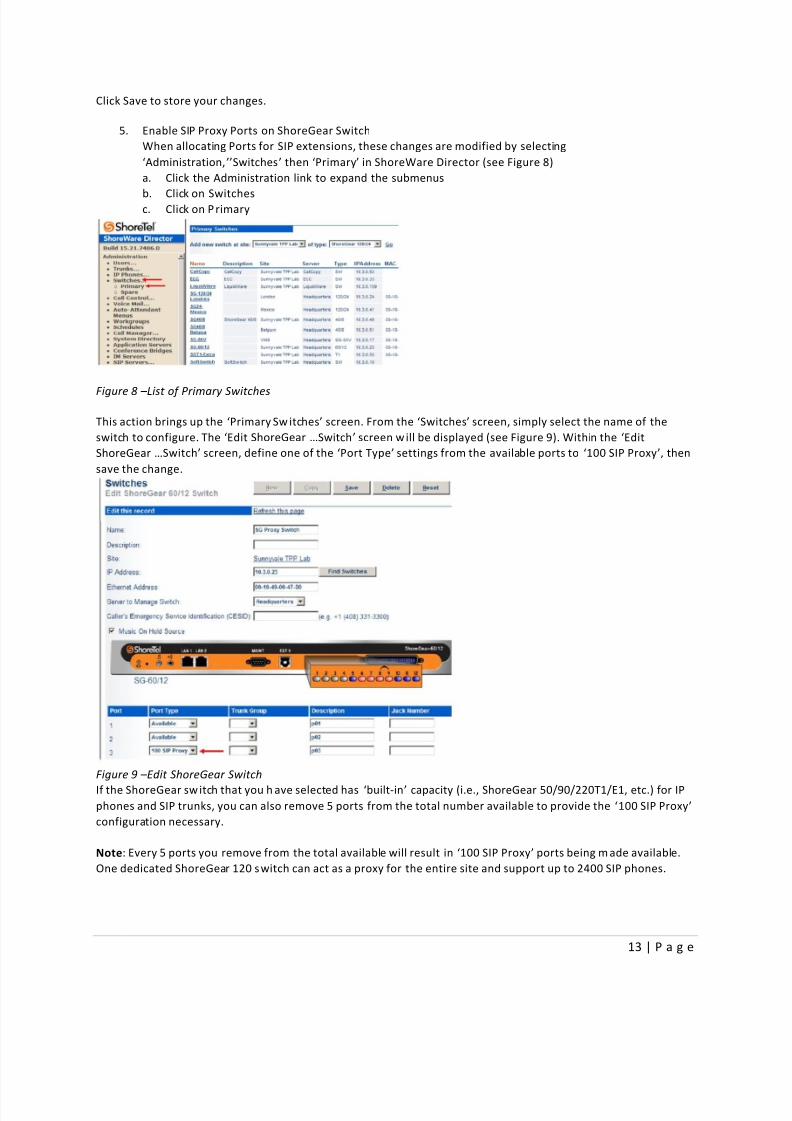
Click Save to store your changes.
5.
Enable SIP Proxy Ports on ShoreGear Switch
When allocating Ports for SIP extensions, these changes are modified by selecting
‘Administration, ’’Switches’ then ‘Primary’ in ShoreWare Director (see Figure 8)
a.
Click the Administration link to expand the submenus
b.
Click on Switchesc.
Click on Primary
Figure 8–
List of Primary Switches
This action brings up the ‘Primary Sw itches’ screen. From the ‘Switches’ screen, simply select the name of the
switch to configure. The ‘Edit ShoreGear …Switch’ screen will be displayed (see Figure 9). Within the ‘Edit
ShoreGear …Switch’ screen, define one of the ‘Port Type’ settings from the available ports to ‘100 SIP Proxy’, then
save the change.
Figure 9 – Edit ShoreGear Switch
If the ShoreGear switch that you h ave selected has ‘built-in’ capacity (i.e., ShoreGear 50/90/220T1/E1, etc.) for IP
phones and SIP trunks, you can also remove 5 ports from the total number available to provide the ‘100 SIP Proxy’
configuration necessary.
Note: Every 5 ports you remove from the total available will result in ‘100 SIP Proxy’ ports being m ade available.
One dedicated ShoreGear 120 switch can act as a proxy for the entire site and support up to 2400 SIP phones.

7/23/2019 Shoretel Installation Guide
http://slidepdf.com/reader/full/shoretel-installation-guide 14/27
14 | P a g e
6.
Modifying the Site Settings
The next settings to addresses are the administration of sites. These settings are modified under the
ShoreWare Director by selecting ‘Administration ’ then ‘Sites’ (Figure 10)
a.
Click on Sites
b.
Click on an existing site or add a new site where the users will be us ing the fax service. In this
example, the Sunnyvale TPP Lab is the site where the users are located.
Figure 10 – Sites
Within the ‘Sites’ screen, select the name of the site to configure. The ‘Edit Site’ screen will then appear. Scroll
down to the ‘SIP Proxy’ parameters (Figure 11).

7/23/2019 Shoretel Installation Guide
http://slidepdf.com/reader/full/shoretel-installation-guide 15/27
15 | P a g e
Figure 11 – Edit Site
7.
If editing an existing Site, select that Site
a.
For the parameter FAX Redirect Extension, click on the search button and select the FaxCore server
created earlier, see Figure 7. The FAX Redirect Extension must be an existing user. In this example,
the SIP UM Server extension created earlier, 330: FaxCore is the fax redirection number
b.
For the parameter FAX and Modem C alls, select ‘Fax Codecs –High Bandwidth’
Note: T.38 has been added to the default Codec Lists (Fax Codecs – High Bandwidth and Fax Codecs –
Low Bandwidth)
c.
In the ‘SIP Proxy:’parameter area, for the parameter ‘Proxy Switch 1:’, select the appropriate ShoreTel
SIP Proxy Switch that supports T.38
d.
Click on Save. For additional details on configuring SIP Proxy or Virtual IP Address please refer to the
ShoreTel Administration Guide.
Note: Bandwidth of 2046 is just an example. Please refer to the ShoreTel Planning and Installation
Guide for additional information on setting Admission Control Bandwidth.
8.
Modify Individual Users for Fax –Creating a SIP Extension
a.
Click on Users
b.
Click on Individual Users
7/23/2019 Shoretel Installation Guide
http://slidepdf.com/reader/full/shoretel-installation-guide 16/27
16 | P a g e
Figure 12 – Individual Users
Figure 13 – Edit User
9.
Select the user whose fax calls you want to be redirected to the Fax Red irected Extension ( FaxCore
server). If this is a new user then select any existing user, then click on the New button to create a new
user
a.
For the parameter ‘Fax Support:’, make sure to select ‘User –Redirect’ (this is the default setting)
b.
Click the Save button
7/23/2019 Shoretel Installation Guide
http://slidepdf.com/reader/full/shoretel-installation-guide 17/27
17 | P a g e
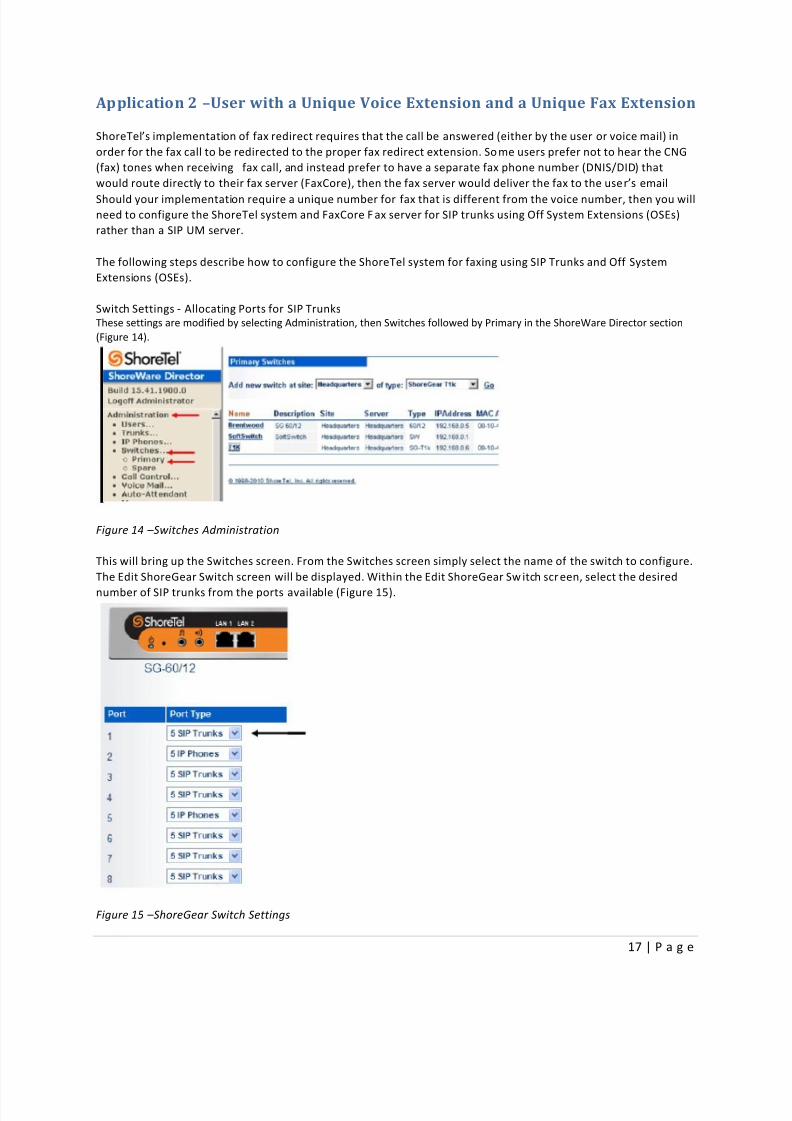
Application 2 –User with a Unique Voice Extension and a Unique Fax Extension
ShoreTel’s implementation of fax redirect requires that the call be answered (either by the user or voice mail) in
order for the fax call to be redirected to the proper fax redirect extension. So me users prefer not to hear the CNG
(fax) tones when receiving fax call, and instead prefer to have a separate fax phone number (DNIS/DID) that
would route directly to their fax server (FaxCore), then the fax server would deliver the fax to the user’s email
Should your implementation require a unique number for fax that is different from the voice number, then you willneed to configure the ShoreTel system and FaxCore F ax server for SIP trunks using Off System Extensions (OSEs)
rather than a SIP UM server.
The following steps describe how to configure the ShoreTel system for faxing using SIP Trunks and Off System
Extensions (OSEs).
Switch Settings - Allocating Ports for SIP Trunks
These settings are modified by selecting Administration, then Switches followed by Primary in the ShoreWare Director section
(Figure 14).
Figure 14 – Switches Administration
This will bring up the Switches screen. From the Switches screen simply select the name of the switch to configure.
The Edit ShoreGear Switch screen will be displayed. Within the Edit ShoreGear Sw itch screen, select the desired
number of SIP trunks from the ports available (Figure 15).
Figure 15 – ShoreGear Switch Settings
7/23/2019 Shoretel Installation Guide
http://slidepdf.com/reader/full/shoretel-installation-guide 18/27
18 | P a g e
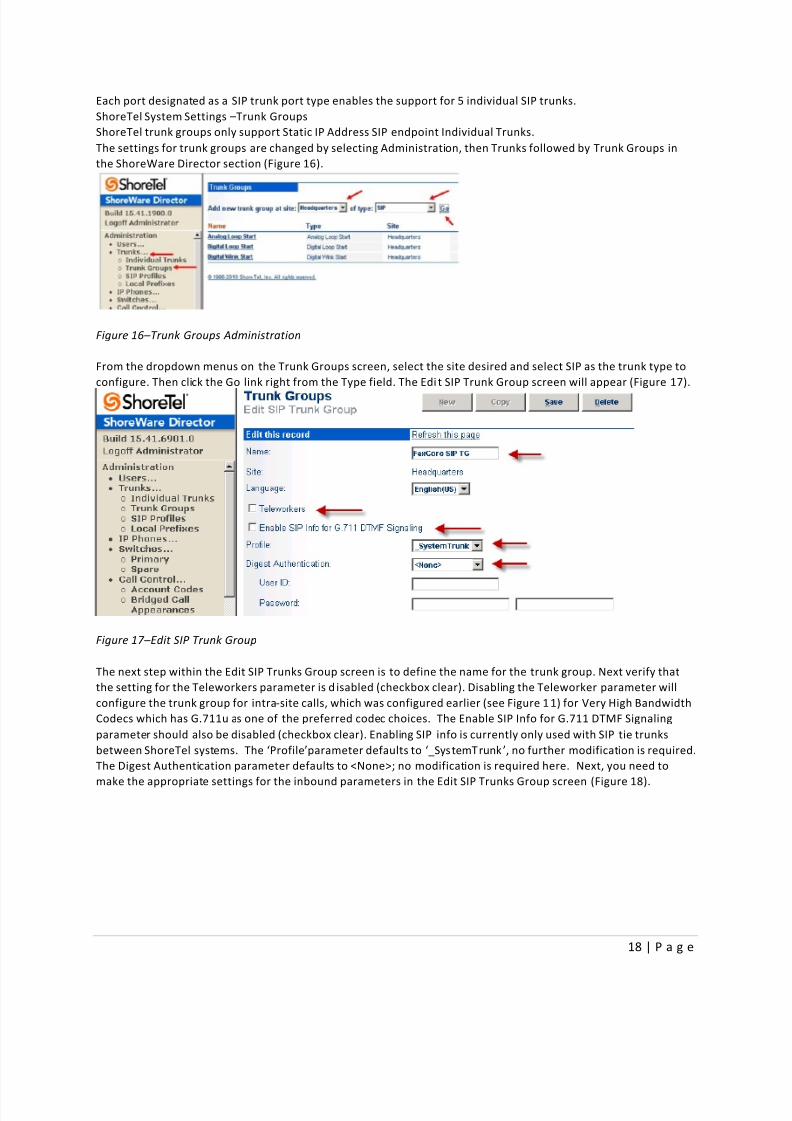
Each port designated as a SIP trunk port type enables the support for 5 individual SIP trunks.
ShoreTel System Settings –Trunk Groups
ShoreTel trunk groups only support Static IP Address SIP endpoint Individual Trunks.
The settings for trunk groups are changed by selecting Administration, then Trunks followed by Trunk Groups in
the ShoreWare Director section (Figure 16).
Figure 16– Trunk Groups Administration
From the dropdown menus on the Trunk Groups screen, select the site desired and select SIP as the trunk type to
configure. Then click the Go link right from the Type field. The Edi t SIP Trunk Group screen will appear (Figure 17).
Figure 17 – Edit SIP Trunk Group
The next step within the Edit SIP Trunks Group screen is to define the name for the trunk group. Next verify that
the setting for the Teleworkers parameter is d isabled (checkbox clear). Disabling the Teleworker parameter will
configure the trunk group for intra-site calls, which was configured earlier (see Figure 1 1) for Very High Bandwidth
Codecs which has G.711u as one of the preferred codec choices. The Enable SIP Info for G.711 DTMF Signaling
parameter should also be disabled (checkbox clear). Enabling SIP info is currently only used with SIP tie trunks
between ShoreTel systems. The ‘Profile’parameter defaults to ‘ _SystemTrunk ’, no further modification is required.
The Digest Authentication parameter defaults to <None>; no modification is required here. Next, you need to
make the appropriate settings for the inbound parameters in the Edit SIP Trunks Group screen (Figure 18).
7/23/2019 Shoretel Installation Guide
http://slidepdf.com/reader/full/shoretel-installation-guide 19/27
19 | P a g e
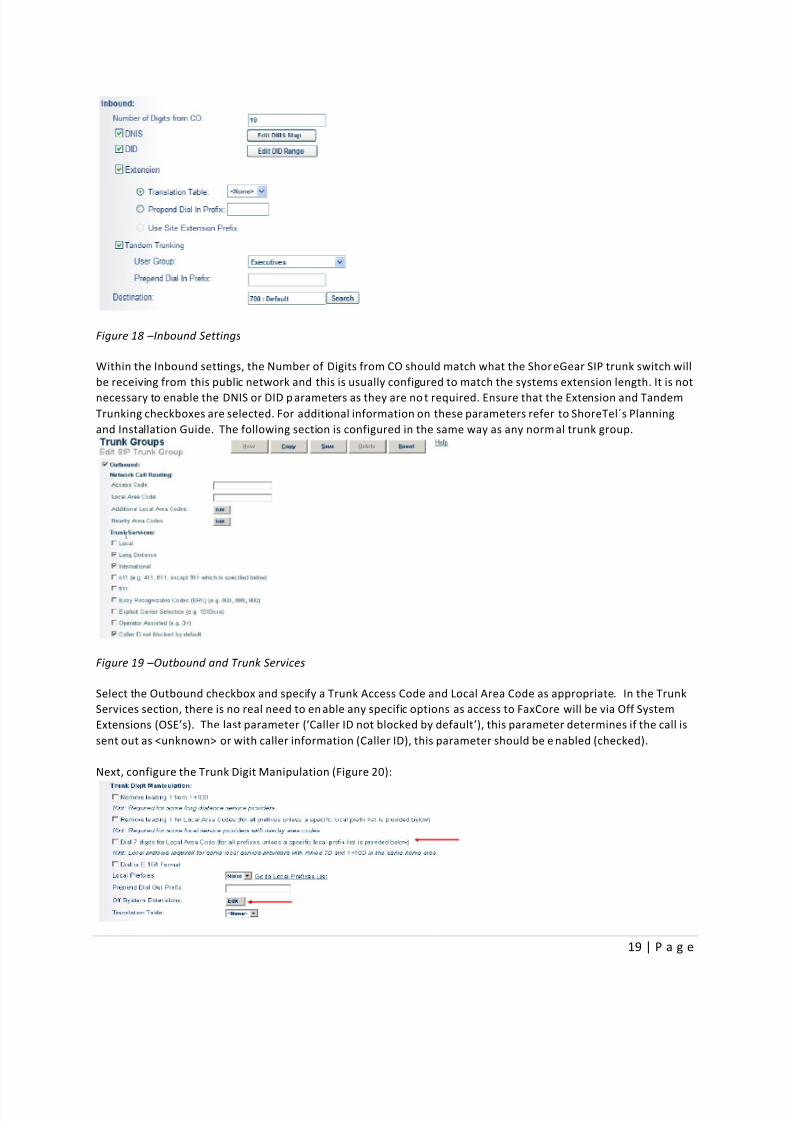
Figure 18 – Inbound Settings
Within the Inbound settings, the Number of Digits from CO should match what the ShoreGear SIP trunk switch will
be receiving from this public network and this is usually configured to match the systems extension length. It is not
necessary to enable the DNIS or DID p arameters as they are no t required. Ensure that the Extension and Tandem
Trunking checkboxes are selected. For additional information on these parameters refer to ShoreTel´s Planning
and Installation Guide. The following section is configured in the same way as any norm al trunk group.
Figure 19 – Outbound and Trunk Services
Select the Outbound checkbox and specify a Trunk Access Code and Local Area Code as appropriate. In the Trunk
Services section, there is no real need to en able any specific options as access to FaxCore will be via Off System
Extensions (OSE’s). The last parameter (‘Caller ID not blocked by default’), this parameter determines if the call is
sent out as <unknown> or with caller information (Caller ID), this parameter should be e nabled (checked).
Next, configure the Trunk Digit Manipulation (Figure 20):
7/23/2019 Shoretel Installation Guide
http://slidepdf.com/reader/full/shoretel-installation-guide 20/27
20 | P a g e
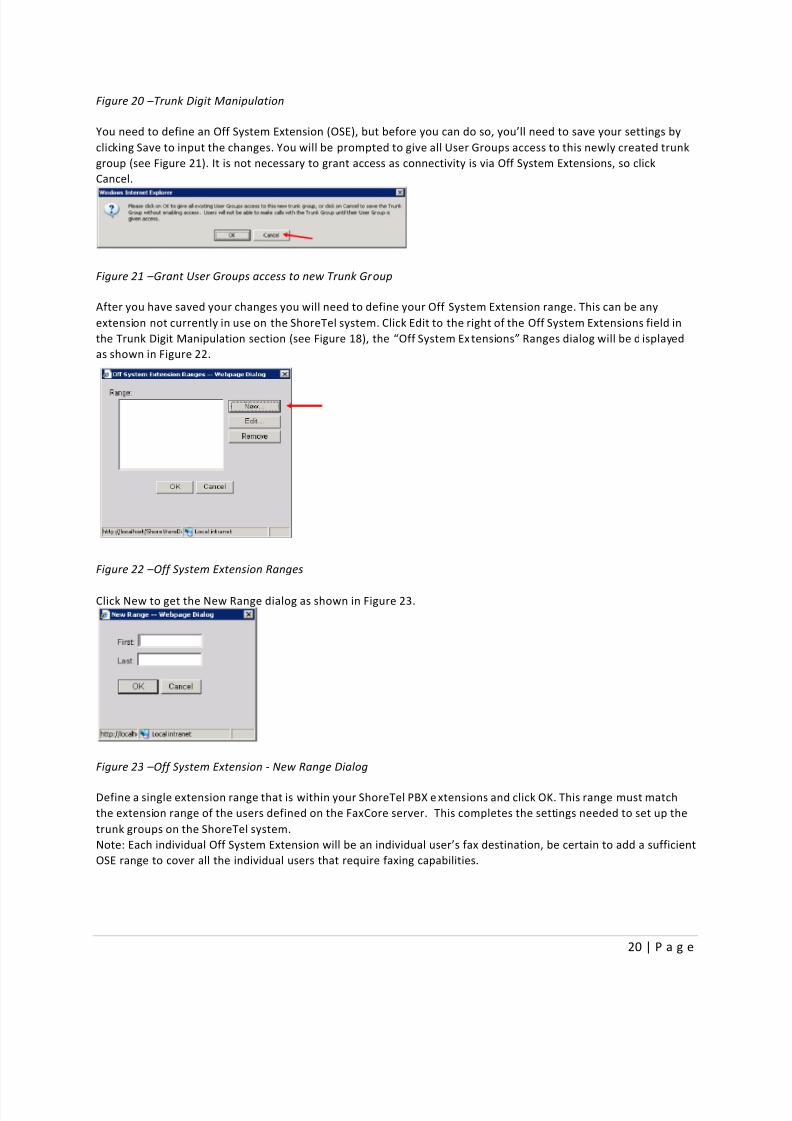
Figure 20 – Trunk Digit Manipulation
You need to define an Off System Extension (OSE), but before you can do so, you’ll need to save your settings by
clicking Save to input the changes. You will be prompted to give all User Groups access to this newly created trunk
group (see Figure 21). It is not necessary to grant access as connectivity is via Off System Extensions, so click
Cancel.
Figure 21 – Grant User Groups access to new Trunk Group
After you have saved your changes you will need to define your Off System Extension range. This can be any
extension not currently in use on the ShoreTel system. Click Edit to the right of the Off System Extensions field in
the Trunk Digit Manipulation section (see Figure 18), the “Off System Extensions” Ranges dialog will be d isplayed
as shown in Figure 22.
Figure 22 – Off System Extension Ranges
Click New to get the New Range dialog as shown in Figure 23.
Figure 23 – Off System Extension - New Range Dialog
Define a single extension range that is within your ShoreTel PBX e xtensions and click OK. This range must match
the extension range of the users defined on the FaxCore server. This completes the settings needed to set up the
trunk groups on the ShoreTel system.
Note: Each individual Off System Extension will be an individual user’s fax destination, be certain to add a sufficient
OSE range to cover all the individual users that require faxing capabilities.
7/23/2019 Shoretel Installation Guide
http://slidepdf.com/reader/full/shoretel-installation-guide 21/27
21 | P a g e
ShoreTel System Settings –Individual Trunks
This section covers the configuration of the individual trunks. Select Administration, then Trunks followed by
Individual Trunks to configure the individual trunks (Figure 27).
Figure 24 – Individual Trunks
The Trunks by Group screen is used to change the individual trunks settings that appear (Figure 25).
Figure 25– Trunks by Group
Select the site for the new individual trunk(s) to be added and select the appropriate trunk group f rom the
dropdown menus at the top of the screen. In this example, the site is Sunnyvale TPP Lab and the trunk group is
FaxCore, as created above, see Figure 17. Click Go to bring up the Edit Trunk screen (Figure 26).
Figure 26 - Edit Trunk Screen for Individual Trunks
On the Edit Trunk screen for individual trunks; enter a Name for the individual trunks. It is recommended to name
the individual trunks the same as the name of the trunk group so that the trunk type can easily be tracked. Next,
select the appropriate Switch upon which the individual trunk will be created. This will b e the ShoreGear switch
that you defined to have SIP Trunks, see Figure 16.

7/23/2019 Shoretel Installation Guide
http://slidepdf.com/reader/full/shoretel-installation-guide 22/27
22 | P a g e
For the SIP Trunk Type the only option available is Use IP Address. Specify the IP address of the FaxCore server.
Next enter the number of individual trunks desired into the Number of Trunks field. Each individual trunk supports
‘one’ audio path –example if 10 is configured, then 10 audio paths can be up at one time, meaning that you can
have up to 10 fax calls connected at once. Once these edits are complete, click Save to commit the changes.
After setting up the trunk groups and individual trunks, refer to the ShoreTel Planning and Installation Guide to
make the appropriate changes for the User Group se ttings. This completes the settings for the ShoreTel systemside.
7/23/2019 Shoretel Installation Guide
http://slidepdf.com/reader/full/shoretel-installation-guide 23/27
23 | P a g e
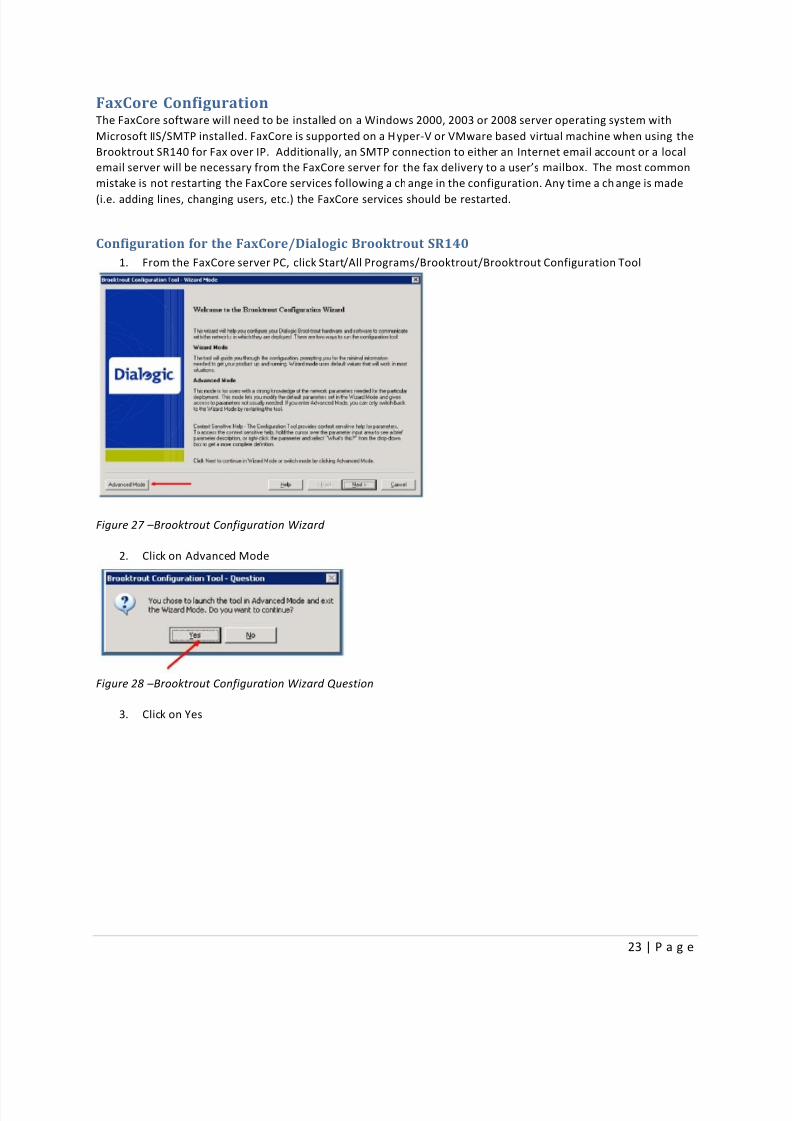
FaxCore ConfigurationThe FaxCore software will need to be installed on a Windows 2000, 2003 or 2008 server operating system with
Microsoft IIS/SMTP installed. FaxCore is supported on a H yper-V or VMware based virtual machine when using the
Brooktrout SR140 for Fax over IP. Additionally, an SMTP connection to either an Internet email account or a local
email server will be necessary from the FaxCore server for the fax delivery to a user’s mailbox. The most common
mistake is not restarting the FaxCore services following a ch ange in the configuration. Any time a ch ange is made
(i.e. adding lines, changing users, etc.) the FaxCore services should be restarted.
Configuration for the FaxCore/Dialogic Brooktrout SR140
1.
From the FaxCore server PC, click Start/All Programs/Brooktrout/Brooktrout Configuration Tool
Figure 27 – Brooktrout Configuration Wizard
2.
Click on Advanced Mode
Figure 28 – Brooktrout Configuration Wizard Question
3.
Click on Yes
7/23/2019 Shoretel Installation Guide
http://slidepdf.com/reader/full/shoretel-installation-guide 24/27
24 | P a g e
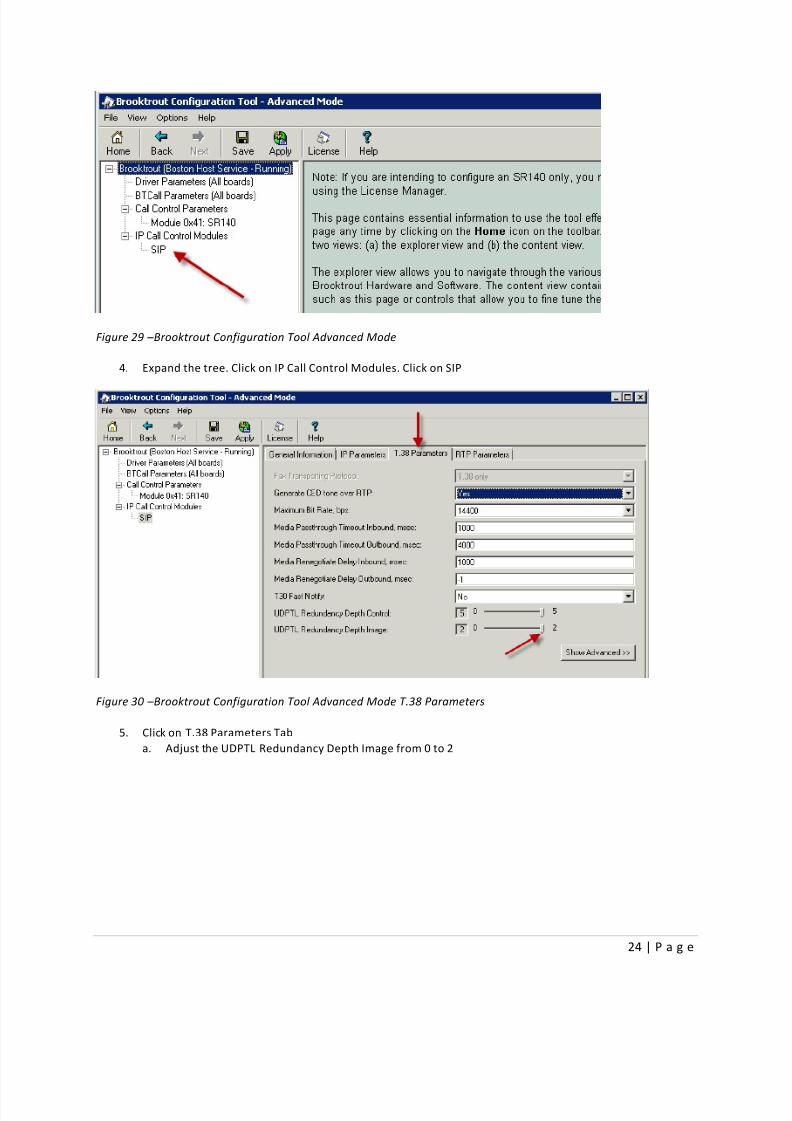
Figure 29 – Brooktrout Configuration Tool Advanced Mode
4.
Expand the tree. Click on IP Call Control Modules. Click on SIP
Figure 30 – Brooktrout Configuration Tool Advanced Mode T.38 Parameters
5.
Click on T.38 Parameters Tab
a.
Adjust the UDPTL Redundancy Depth Image from 0 to 2
7/23/2019 Shoretel Installation Guide
http://slidepdf.com/reader/full/shoretel-installation-guide 25/27
25 | P a g e
Figure 31 – Brooktrout Configuration Tool Advanced Mode IP Parameters
6.
Click on IP Parameters Tab
a.
Primary Gateway - Enter the IP address of the ShoreGear SIP Proxy Switch and enter the default SIP
UDP port 5060
b.
Primary Proxy Server –Leave blank.
c.
From Value: - Enter the FaxCore Request URI (For this example - FaxCore
sip:[email protected]:5060), where ‘FaxCore’ is the name thaw will be used in the SIP call requestand ‘850’is the extension defined for the FaxCore. After the ’@’you should define the IP address of
the FaxCore server followed by a colon ‘:’and 5060.
d.
Contact: - Enter the IP address of the FaxCore Fax Server and the SIP UDP por t 5060
e.
Click on the Show Advanced button
7/23/2019 Shoretel Installation Guide
http://slidepdf.com/reader/full/shoretel-installation-guide 26/27
26 | P a g e
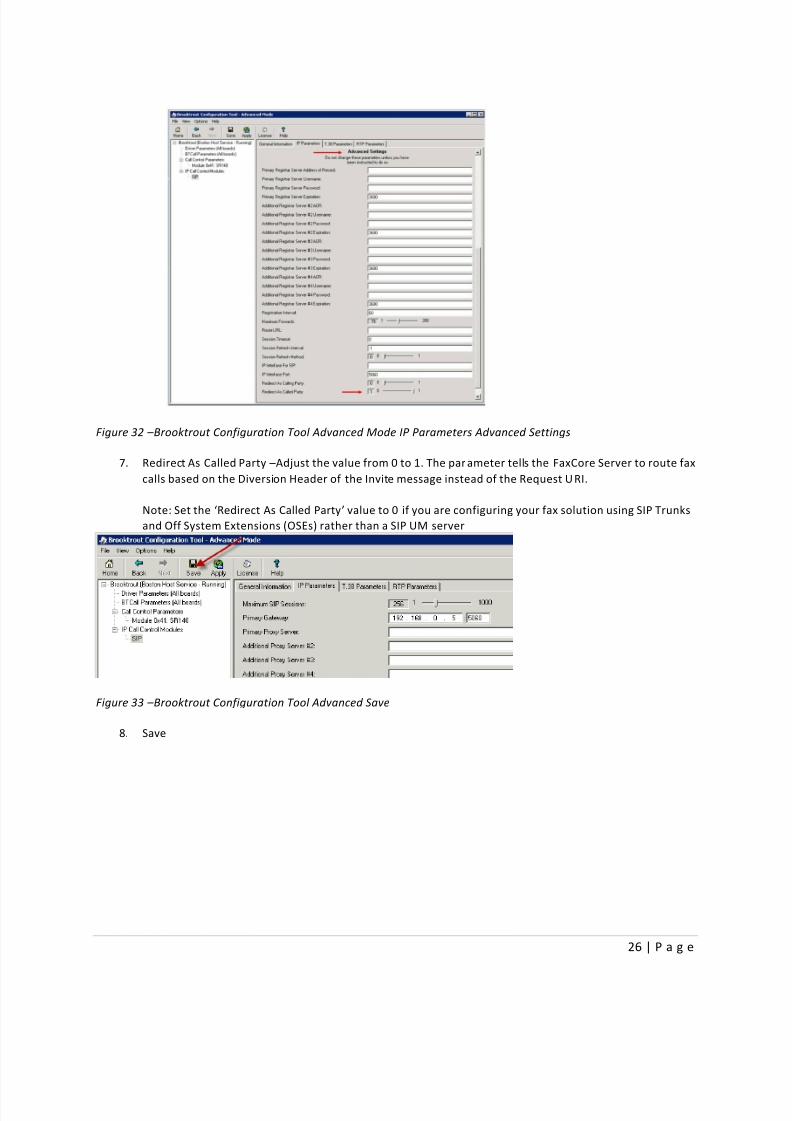
Figure 32 – Brooktrout Configuration Tool Advanced Mode IP Parameters Advanced Settings
7.
Redirect As Called Party –Adjust the value from 0 to 1. The parameter tells the FaxCore Server to route fax
calls based on the Diversion Header of the Invite message instead of the Request URI.
Note: Set the ‘Redirect As Called Party’ value to 0 if you are configuring your fax solution using SIP Trunks
and Off System Extensions (OSEs) rather than a SIP UM server
Figure 33 – Brooktrout Configuration Tool Advanced Save
8.
Save

7/23/2019 Shoretel Installation Guide
http://slidepdf.com/reader/full/shoretel-installation-guide 27/27
Figure 34 – Brooktrout Configuration Tool Advanced Apply
9.
Click on Apply
10.
Restart FXC2.FaxAgent service in Windows Service Console.