1
D P By Duane Thomas, Photo by Ed Leavitt If you ever want to be a great shooter, you have to dry fire. A lot. In a later article we can discuss why that’s true, but for now let’s address equip- ment. When you pull the trigger on a Glock – or any striker fired auto pistol, for that matter – the slide must be hand cycled to reset the action so the trigger will return forward and it may be pulled again. Until this is done, the trigger is disconnect- ed; there is no force pushing it forward to reset, it just stays to the rear. This means you can’t practice multiple, fast shots, i.e. repeated, back-and-forth trigger manip- ulations, hitting the trigger reset each time. Instead you have to hold the trigger to the rear while you hand cycle the slide, then let the trigger out until it resets before you may pull it again. I cannot tell you have many hundreds of thousands of times I’ve done that on a Glock. It would be nice to NOT have to do that, to be able to practice multi- shot strings without needing to hand cycle the action between shots, wouldn’t it? Now, there is a kit available that you can install into a Glock that will stop the trigger mechanism from disconnecting when the trigger is pulled all the way to the rear. It costs about 40 bucks, you have to partially disassemble the gun to install it, and partially disassemble the gun afterward to remove the kit and return the gun to functional status. Well, in this article I’m going to tell you a way to get the same effect without having to break down the gun before and after, and it’s FREE. Simply partially retract the slide, place a dou- bled-over piece of cardboard between the breech face and barrel hood, and then let the action down on it. You’ll wind up with the slide held about 1/4” out of battery. This is far enough that, on a Glock, the cruciform sear plate cannot travel far enough to the rear to disconnect from the trig- ger. When you pull the trigger all the way to the rear, there will still be forward spring pressure on the trigger. Now you can practice multi-shot strings, back and forth on the trigger, time after time. When dry fire time is over, just pull the paper out and the gun is again fully functional. The reason we double over the cardboard is that, at least in my experience, if you use a single thickness the cardboard will, in short order, com- press enough that the gun begins “firing” when you pull the trigger. Double it over, that doesn’t happen. In the accompanying photo I have used a piece of cardboard, because it’s a material that everyone has on hand and it costs nothing. In truth, I don’t use cardboard any more; my friend, photographer Ed Leavitt, actually cut me a piece of thin plastic that serves the same purpose, but is much more durable. Also, I have shown the spacer inserted between the side of the barrel hood and the side of the ejection port because it’s very visible there to illus- trate the concept. In reality, it works better to place the spacer between the top of the barrel hood and the top of the breech face. Just insert it down far enough that it doesn’t stick up and inter- fere with sight pictures during dry fire. Also, with the spacer sticking out to the side, it has a tenden- cy to get pushed out of place and popped out by the lip of a holster if you want to practice drawing. With the spacer tucked down inside the gun, by contrast, draw practice is easily accomplished without dislodging the spacer. This is one of those neat little practice tricks I wish I’d learned years before I actually did. It allows me now to dry fire not just one trigger pull at a time, but entire strings of fire. While you lose the effect of taking up the slack until you hit the “link” resistance point as you pull the trigger to the rear, and of hitting the link reset point when letting the trigger out again, the position of the trigger in the guard when it’s being held back by the spacer is actually pretty darn close to the link point anyway. So you get the same amount of back-and-forth movement during trigger pulls, if not the reset feel. This dry fire “kit” is easily removable and replaceable in seconds without disassembling the gun. And, did I mention it’s FREE? Shooting Tip: The FREE Glock Dry Fire Kit Shooting Tip: The FREE Glock Dry Fire Kit August 09 Blue Press Section 3 6/12/09 1:43 PM Page 42

Shooting Tip: The FREE Glock Dry Fire Kit

Embed Size (px)

Citation preview

DP

By Duane Thomas, Photo by Ed LeavittIf you ever want to be a great shooter, you have

to dry fire. A lot. In a later article we can discusswhy that’s true, but for now let’s address equip-ment. When you pull the trigger on a Glock – orany striker fired auto pistol, for that matter – theslide must be hand cycled to reset the action sothe trigger will return forward and it may be pulledagain. Until this is done, the trigger is disconnect-ed; there is no force pushing it forward to reset, itjust stays to the rear.

This means you can’t practice multiple, fastshots, i.e. repeated, back-and-forth trigger manip-ulations, hitting the trigger reset each time. Insteadyou have to hold the trigger to the rear while youhand cycle the slide, then let the trigger out until itresets before you may pull it again. I cannot tellyou have many hundreds of thousands of timesI’ve done that on a Glock. It would be nice toNOT have to do that, to be able to practice multi-shot strings without needing to hand cycle theaction between shots, wouldn’t it?

Now, there is a kit available that you caninstall into a Glock that will stop the triggermechanism from disconnecting when the triggeris pulled all the way to the rear. It costs about 40bucks, you have to partially disassemble the gunto install it, and partially disassemble the gunafterward to remove the kit and return the gun tofunctional status.

Well, in this article I’m going to tell you a wayto get the same effect without having to breakdown the gun before and after, and it’s FREE.

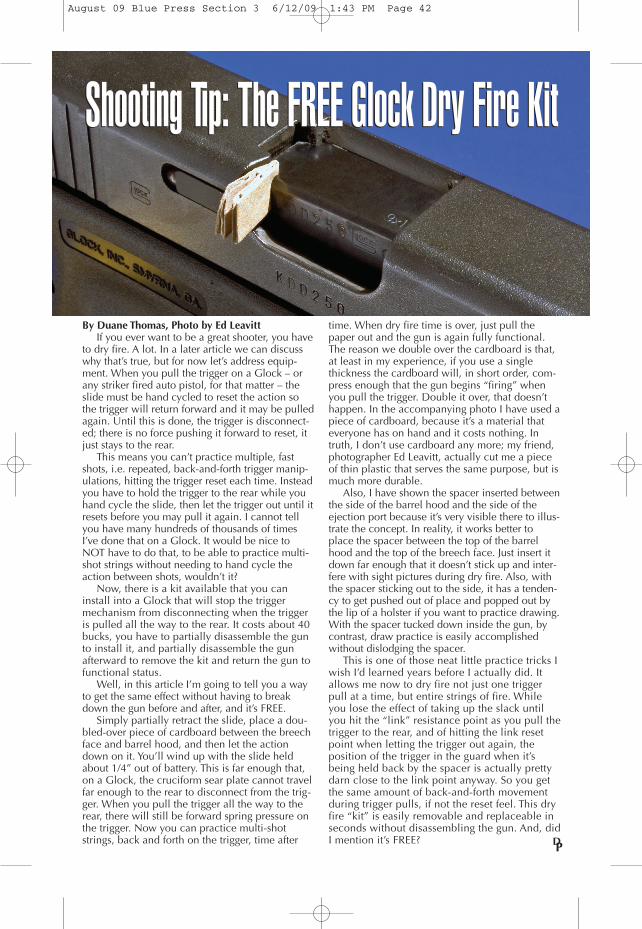
Simply partially retract the slide, place a dou-bled-over piece of cardboard between the breechface and barrel hood, and then let the actiondown on it. You’ll wind up with the slide heldabout 1/4” out of battery. This is far enough that,on a Glock, the cruciform sear plate cannot travelfar enough to the rear to disconnect from the trig-ger. When you pull the trigger all the way to therear, there will still be forward spring pressure onthe trigger. Now you can practice multi-shotstrings, back and forth on the trigger, time after

time. When dry fire time is over, just pull thepaper out and the gun is again fully functional.The reason we double over the cardboard is that,at least in my experience, if you use a singlethickness the cardboard will, in short order, com-press enough that the gun begins “firing” whenyou pull the trigger. Double it over, that doesn’thappen. In the accompanying photo I have used apiece of cardboard, because it’s a material thateveryone has on hand and it costs nothing. Intruth, I don’t use cardboard any more; my friend,photographer Ed Leavitt, actually cut me a pieceof thin plastic that serves the same purpose, but ismuch more durable.

Also, I have shown the spacer inserted betweenthe side of the barrel hood and the side of theejection port because it’s very visible there to illus-trate the concept. In reality, it works better toplace the spacer between the top of the barrelhood and the top of the breech face. Just insert itdown far enough that it doesn’t stick up and inter-fere with sight pictures during dry fire. Also, withthe spacer sticking out to the side, it has a tenden-cy to get pushed out of place and popped out bythe lip of a holster if you want to practice drawing.With the spacer tucked down inside the gun, bycontrast, draw practice is easily accomplishedwithout dislodging the spacer.

This is one of those neat little practice tricks Iwish I’d learned years before I actually did. Itallows me now to dry fire not just one triggerpull at a time, but entire strings of fire. Whileyou lose the effect of taking up the slack untilyou hit the “link” resistance point as you pull thetrigger to the rear, and of hitting the link resetpoint when letting the trigger out again, theposition of the trigger in the guard when it’sbeing held back by the spacer is actually prettydarn close to the link point anyway. So you getthe same amount of back-and-forth movementduring trigger pulls, if not the reset feel. This dryfire “kit” is easily removable and replaceable inseconds without disassembling the gun. And, didI mention it’s FREE?

Shooting Tip: The FREE Glock Dry Fire KitShooting Tip: The FREE Glock Dry Fire Kit

August 09 Blue Press Section 3 6/12/09 1:43 PM Page 42