Embed Size (px)
Citation preview
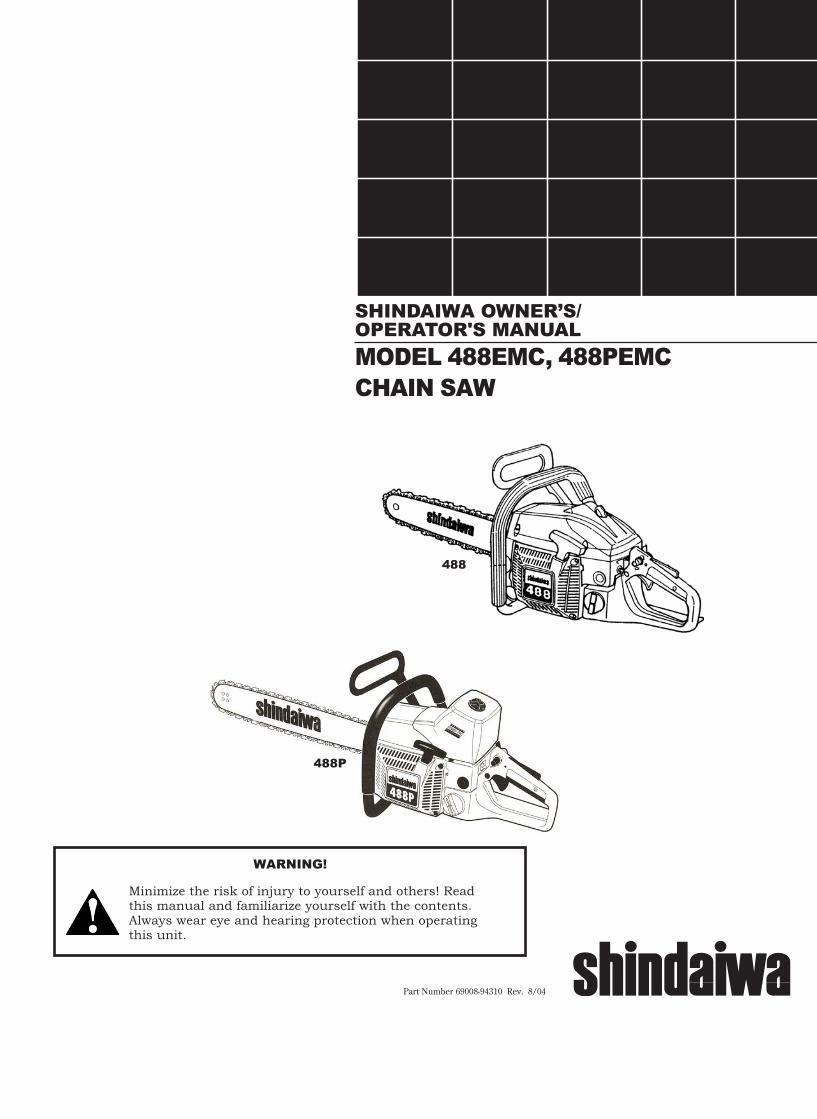
MODEL 488EMC, 488PEMC
CHAIN SAW
488
488P
Part Number 69008-94310 Rev. 8/04
WARNING!
SHINDAIWA OWNER’S/OPERATOR'S MANUAL
Minimize the risk of injury to yourself and others! Readthis manual and familiarize yourself with the contents.Always wear eye and hearing protection when operatingthis unit.
Shindaiwa Inc.11975 S.W. Herman RoadTualatin, Oregon 97062Telephone: 503 692-3070FAX: 503 692-6696www.shindaiwa.com
Shin-Daiwa Kogyo Co., Ltd.Head Office: 6-2-11 OzukaNishi, Asaminami-kuHiroshima, 731-3167, JapanTelephone: 81-82-849-2220FAX: 81-82-849-2481
© 2004 Shindaiwa, Inc.
Part Number 69008-94310
Revision 8/04
Printed in Japan
Specifications subject to change without notice.
2
Throughout this manual are special
“attention statements” surrounded
by boxes and preceded by the trian-
gular Attention Symbol.
Attention Statements
WARNING!
A statement preceded by thetriangular attention symbol andthe word “WARNING” contains infor-mation that should be actedupon to prevent serious bodily injury.
CAUTION!
A statement preceded by theword “CAUTION” contains in-
formation that should be acted upon toprevent mechanical damage.
IMPORTANT!
A statement preceded by the word“IMPORTANT” is one that possessesspecial significance.
NOTE:
A statement preceded by the word
“NOTE” contains information that is
handy to know and may make your job
easier.
Warning LabelsWarning labels affixed to the ma-chine mean as follows:
Read and follow theOperator's Manual. Failureto do so could result in seri-ous injury.
Wear eye and hearing pro-tection at all times during theoperation of this unit.
Do not operate this tool ifyou are tired, ill or under theinfluence of alcohol, drugs,or medicine.
Beware of Kickback! Kick-back can occur wheneverthe tip of the guide bartouches an object while thesaw is operating. Kickbackmay force the bar up andback toward the operatorwith a lightning-fast reaction!
Pinching the saw along thetop of the guide bar mayforce the bar rapidly backtoward the operator. Pinch-ing can occur wheneverwood closes in around themoving chain.
Introductions
The Shindaiwa 488 saw was de-signed and built to deliver superiorperformance and reliability withoutcompromise to quality, comfort,safety, or durability.Shindaiwa high performance enginesrepresent the leading edge of 2-cycleengine technology, and deliverexceptionally high power at remark-ably low displacement and weight.As a professional owner/operator,you'll soon discover why Shindaiwais simply in a class by itself!
IMPORTANT!
The information contained in thismanual describes units available atthe time of production. While everyattempt has been made to give youthe very latest information aboutyour Shindaiwa 488-series chainsaw, there may be some differencesbetween your saw and what isdescribed here. Shindaiwa Inc.reserves the right to make changesin production without prior notice,and without obligation to makealterations to units previouslymanufactured.
Attention Statements ......................... 2
Safety Information ............................. 3
Unit Description ................................. 5
Specifications .................................... 6
Installing Guide Bar/Chain ................ 7
Mixing Fuel .......................................... 8
Bar Oil .................................................. 8
Starting the Engine .............................. 9
Stopping the Engine ............................ 9
Starting a Flooded Engine ................. 10
Carburetor Adjustments ..................... 11
Chain Brake ....................................... 12
Cutting With the Saw ......................... 13
Felling Trees ...................................... 14
Bucking/Limbing ................................ 15
Maintenance ...................................... 16
Saw Chain Performance .................... 18
Troubleshooting ................................. 20
Contents
IMPORTANT!
All chain saw service, other than theitems listed in the owner's manualmaintenance instructions, should beperformed by trained Shindaiwachain saw service personnel. (Forexample, if improper tools are usedto remove the flywheel , or if animproper tool is used to hold theflywheel in order to remove theclutch, structural damage to theflywheel could occur and couldsubsequently cause the flywheel toburst.)
23
Memo

3
Either of the following reactionscould cause you to lose control ofyour saw while cutting, possiblyresulting in serious injury!
1. Kickback can occur whenever theguide bar nose or tip contact anobject while the saw is running.Tip contact may cause the guidebar to kick upward and backtoward the operator, with alightning-fast reaction!
2. Pinching the saw along the top ofthe guide bar may push the guidebar rapidly back toward theoperator! Pinching can occurwhenever wood closes in aroundthe moving chain!
Do not rely exclusively on the safetydevices incorporated with your saw.As a chain saw user, observing thefollowing steps will also help you toavoid accident or injury on the job:
■ Sudden surprise can contributeto accidents! With a basic under-standing of kickback, you canreduce or eliminate the element ofsurprise.
■ Clear obstructions from the workarea before cutting. Remove anylog, branch, or other obstructionthat might contact the guide bartip during cutting operations.
Kickback Safety Precautions
■ Grip the saw firmly with yourright hand on the rear handleand your left hand on the fronthandle, thumbs and fingersencircling the handles, wheneverthe saw is running. Don't let go:A firm grip will help you toreduce kickback while maintain-ing control of the saw.
■ Accelerate the saw before thechain contacts the work area,and always maintain high enginespeeds throughout the cut.
■ Do not overreach or attempt tocut above shoulder height.
■ Follow the manufacturer'sinstructions for sharpening andmaintenance of the saw chain.
■ Use only the replacement barand chain combinations specifiedby the manufacturer.
■ Never stand directly over the sawwhile cutting!
■ Use low-kickback chain, chainbrakes, or special guide bars toreduce the risk of kickback. Lowkickback chain is chain that hasmet the kickback performancerequirements of ANSI B175.1-2000 (American National Stan-dard for Power Tools-GasolinePowered Chain Saws-Safetyrequirements) when tested on therepresentative sample of chainsaws below 3.8 c.i.d. specified inANSI B175.1-2000.
Kickback Safety
This saw is equipped with the follow-ing safety equipment:
1. Inertia chain brake.
2. Low kick chain.
� Activating the chain brake tight-ens a brake band around thechain drive mechanism, stoppingall chain rotation. When suddenkickback occurs, the chain breakis automatically actuated and thechain stops instantly. Also, thechain break can be activatedmanually.
� Low-kick chain can significantlyreduce the rotational force ofkickback.
� Some bars are manufactured witha reduced-radius (smaller) nose.This special guide bar can reducekickback by placing fewer cuttersin the kickback zone.
WARNING!To reduce the risk of kick-back, all of the above de-vices must be properly in-
stalled and in good repair! Use ofother than ANSI B175.1- 2000 com-binations may result in reduced kick-back protection!
WARNING!Brake engagement and op-eration depend upon properadjustment! For proper chain
brake testing and adjustment proce-dures, see page 12.
WARNING! WARNING!
WARNING!Kickback canhappenlightning-fast!
22
Symptom
Poor
acceleration.
Engine stops
abruptly.
Engine difficultto stop or willnot stop.
Chain rotates
at idle speed.
Excessive
vibration
Possible Cause
Clogged air filter.
Clogged fuel filter.
Chain brake engaged.
Carburetor mixture toorich or too lean.
Idle speed set too low.
Switch turned off.
Fuel tank empty.
Clogged fuel filter.
Water in the fuel.
Shorted spark plug orloose terminal.
Ignition coil faulty.
Piston seizure.
Ground (ignition switch)wire is disconnected, orswitch is defective.
Overheating due toincorrect spark plug.
Overheated engine.
Engine idle to fast.
Broken clutch spring orshoe.
Worn or damagedsprocket, chain, or bar.
Bent crankshaft
Remedy
Clean the air cleaner element.
Replace the fuel filter.
Inspect and/or test brake.Return to dealer as required.
Consult with an authorizedservicing dealer.
Adjust: 2,600-3,000 rpm (min-1).
Set the switch to (“ON”) and
restart.
Refuel.
Clean or replace filter asrequired.Drain; replace with clean fuel.
Clean or replace spark plug.Tighten the terminal.
Replace the ignition unit.
Consult with an authorizedservicing dealer.
Consult with an authorizedservicing dealer.
Correct plug: NGK BMR7A.
Idle engine until cool.
Set idle: 2,600-3,000 rpm (min-1).
Replace spring/shoes asrequired.
Inspect and replace chain
components as required.
Consult with an authorizedservicing dealer.
ADDITIONAL PROBLEMSTroubleshooting
4
■ Use extreme caution when cuttingsmaller brush and saplings!Small-diameter material maycatch in the chain and bewhipped toward you or pull youoff balance, causing you to losecontrol of the saw!
■ Operate the saw only in a wellventilated area.
■ Keep the saw handles dry, cleanand free of oil or fuel mixture.
■ Never operate any saw while in atree unless you have been specifi-cally trained to do so!
■ Never perform service or repairsto this saw unless you are specifi-cally trained and equipped to doso!
■ Improper maintenance, use ofnonconforming replacementcomponents, or the removal ofsafety devices, such as the chainbrake or any of the chain brakecomponents, could result inserious injury.
■ Never allow any part of your bodynear the clutch cover of anoperating saw.
■ Never operate a saw with dam-aged or missing anti-vibrationcushions. Long-term exposure tovibration can damage your hands.
■ Always maintain a firm footingwhile operating this saw! Laddersand other temporary platformscan shift unexpectedly, and arenot recommended!
WARNING!
NOTE:
These safety precautions are in-
tended primarily for consumers or
occasional users. When using this
chain saw for logging purposes, refer
to: CFR Section 1910. 266 (5); 2.5.1
of the American National Safety
Standard; Requirements for Pulp-
wood Logging ANSI 03.1-1978; and
any applicable state safety codes.
■ Never operate this chain saw withone hand! One-handed operationcould cause you to lose control,causing serious injury to yourselfor others! A chain saw is in-tended for two-handed use.
■ Wear safety footwear, snug-fittingclothing, protective gloves, andeye, hearing, and head-protectiondevices while working with thischain saw.
■ Do not allow other persons to benear the chain saw when startingor running the chain saw. Keepbystanders and animals out ofthe work area.
■ Never allow young children orany person unfamiliar with chainsaws to operate this saw!
■ Clear the work area before usingthe saw. Never start cutting untilyou are sure you have a securefooting and have planned aretreat path from the falling tree.
■ Before starting the saw engine,make sure nothing is touching thesaw chain.
■ Keep all parts of your body awayfrom the saw chain whenever theengine is running!
■ Stop the engine before carrying thesaw. Carry the saw with the enginestopped, the guide bar and sawchain pointing to the rear, and theengine muffler away from yourbody.
■ Never operate this chain saw if youare fatigued.
■ Stop the engine before setting thechain saw down.
■ Install the appropriate guide-barscabbard before transporting thesaw.
■ Never operate a saw that is dam-aged, improperly adjusted, or notcompletely and securely as-sembled.
■ Use only Shindaiwa-recommendedparts when repairing or servicingthis saw.
■ Do not use this saw if the sawchain continues to move after thethrottle control trigger is released.
■ Use extra care when cutting a limbthat is under tension! A limb undertension could spring back sud-denly, causing you to lose controlof the saw!
Additional Safety Precautions
21
What to Check
Is the engine
overheating?
Engine is roughat all speeds.May also haveblack smokeand/or unburnedfuel at theexhaust.
Engine isknocking.
LOW POWER OUTPUT
Troubleshooting
Possible Cause
Operator isoverworking the unit.
Carburetor mixture istoo lean.
Improper fuel ratio.
Fan, fan cover, cylin-
der fins dirty or
damaged.
Carbon deposits on
the piston or in the
muffler.
Clogged air filter.
Loose/damaged faulty
spark plug.
Air leakage or cloggedfuel line.
Water in the fuel.
Piston seizure.
Faulty carburetor.
Overheating condition.
Improper fuel.
Carbon deposits in thecombustion chamber.
Remedy
Cut at a slower rate. Sharpen
chain as required.
Adjust carburetor or consult
with an authorized servicing
dealer.
Drain and refill with fresh, clean
unleaded gasoline with a pump
octane of 87 or higher mixed
with Shindaiwa 2-cycle Engine
Oil and gasoline at a 50:1 ratio).
Clean, repair or replace as
necessary.
Consult with an authorized
servicing dealer.
Service the air cleaner.
Tighten or replace.
Repair or replace fuel filter and/
or fuel line.
Replace the fuel.
Consult with an authorized
servicing dealer.
Consult with an authorized
servicing dealer.
See above.
Check fuel octane rating; check
for presence of alcohol in the
fuel. Refuel as necessary.
Consult with an authorized
servicing dealer.

5
IMPORTANT!
Safety and Operation InformationLabels: Make sure all information labelsare undamaged and readable. Immedi-ately replace damaged or missinginformation labels. New labels areavailable from your local authorizedShindaiwa dealer.
Safety Labels
123456789012345678123456789012345678123456789012345678123456789012345678123456789012345678123456789012345678123456789012345678123456789012345678123456789012345678123456789012345678123456789012345678123456789012345678123456789012345678123456789012345678123456789012345678123456789012345678123456789012345678123456789012345678123456789012345678123456789012345678123456789012345678123456789012345678
For replacementuse Shindaiwa®
brand 16”, 18”, or20” Guard-Tip bar
with Oregon®
33SL, Carlton®
KICGL chain.Other low-kickcombinations
may be available.
123456789012345678901234123456789012345678901234123456789012345678901234123456789012345678901234123456789012345678901234123456789012345678901234123456789012345678901234123456789012345678901234123456789012345678901234123456789012345678901234123456789012345678901234123456789012345678901234123456789012345678901234123456789012345678901234123456789012345678901234123456789012345678901234
This saw is
equipped with a
USDA-FS approved
model 488 muffler
system.
123456789012345678901123456789012345678901123456789012345678901123456789012345678901123456789012345678901123456789012345678901123456789012345678901123456789012345678901123456789012345678901123456789012345678901123456789012345678901123456789012345678901123456789012345678901123456789012345678901123456789012345678901123456789012345678901123456789012345678901123456789012345678901
WARNING!Read and follow allsafety precautions inthe owner’s manual.Failure to followinstructions couldresult in seriouspersonal injury.
Unit Description
488
Guide Bar
Saw Chain
Front Handle
Brake LeverHand Guard
Chain Oil Filler Cap
Fuel Filler CapStarter Handle
Throttle Trigger
Rear Handle
LockLever
Choke
488P
Brake LeverHand Guard
Oil Filler Cap
Front Handle
Starter HandleFuel Filler Cap
Air Cleaner Cover
Choke
Ignition Switch
Guide Bar
Saw Chain
Throttle Trigger
488Muffler
Clutch Cover
Spike
123456789012345678912345678901234567891234567890123456789123456789012345678912345678901234567891234567890123456789123456789012345678912345678901234567891234567890123456789123456789012345678912345678901234567891234567890123456789123456789012345678912345678901234567891234567890123456789123456789012345678912345678901234567891234567890123456789123456789012345678912345678901234567891234567890123456789123456789012345678912345678901234567891234567890123456789
ALWAYS wear
eye protection
when operating
this machine
488P
Rear Handle
20
What to Check
Does the enginecrank?
Good
compression?
Does the tankcontain freshfuel of theproper grade?
Is fuel reaching
the cylinder andcombustion cham-ber
Is there sparkat the sparkplug wireterminal?
Check the spark
plug.
Possible Cause
Faulty recoil starter.Fluid in the crankcase.Internal damage.
Loose spark plug.
Excess wear on cylin-der, piston, rings.
Stale or contaminatedfuel mixture.
Check for clogged fuelfilter and/or vent.
Is the ignition switchON?
Faulty ignition ground.Faulty transistor unit.
If the plug is wet,excess fuel may be inthe cylinder.
The plug may be fouledor improperly gapped.
The plug may bedamaged internally ormay be the wrong size.
Remedy
Consult with an autho-rized servicing dealer.
Tighten and retest.
Drain and refill withfresh, clean unleadedgasoline with a pumpoctane of 87 or highermixed with Shindaiwa 2-cycle Engine Oil andgasoline at a 50:1 ratio).
Clean and replace asrequired and restart.
Move switch to ONand restart.
Consult with an autho-rized servicing dealer.
Crank the engine with
the plug removed, replacethe plug, and restart. Seepg. 10 (Starting a floodedengine).
Clean and re-gap theplug to 0.24 inch(0.6mm).Restart.
Replace the plug with aNGK BMR7A.
YES
NO
YES
YES
NO
NO
NO
YES
NO
YES
ENGINE DOES NOT START
Troubleshooting
6
488EMC 488PEMC2-cycle gas engine, vertical cylinder
47.9cc (2.92 cu.in.)4.6 kg (10.2 lbs)
50:1 with Shindaiwa 2-Cycle Engine Oil
600ml (20.2 oz)
300ml (10.1 oz)Walbro HDA165
CDI (Capacitor Discharge Ignition)Forced Air
NGK BPMR7A
Automatic centrifugal clutch
Recoil StarterToggle Switch
Anti-vibration, independently vibration
dampened front and rear handles.
Front hand guard, rear hand guard,
throttle lock, chain brake and chaincatcher
Automatic Adjustable Oiler
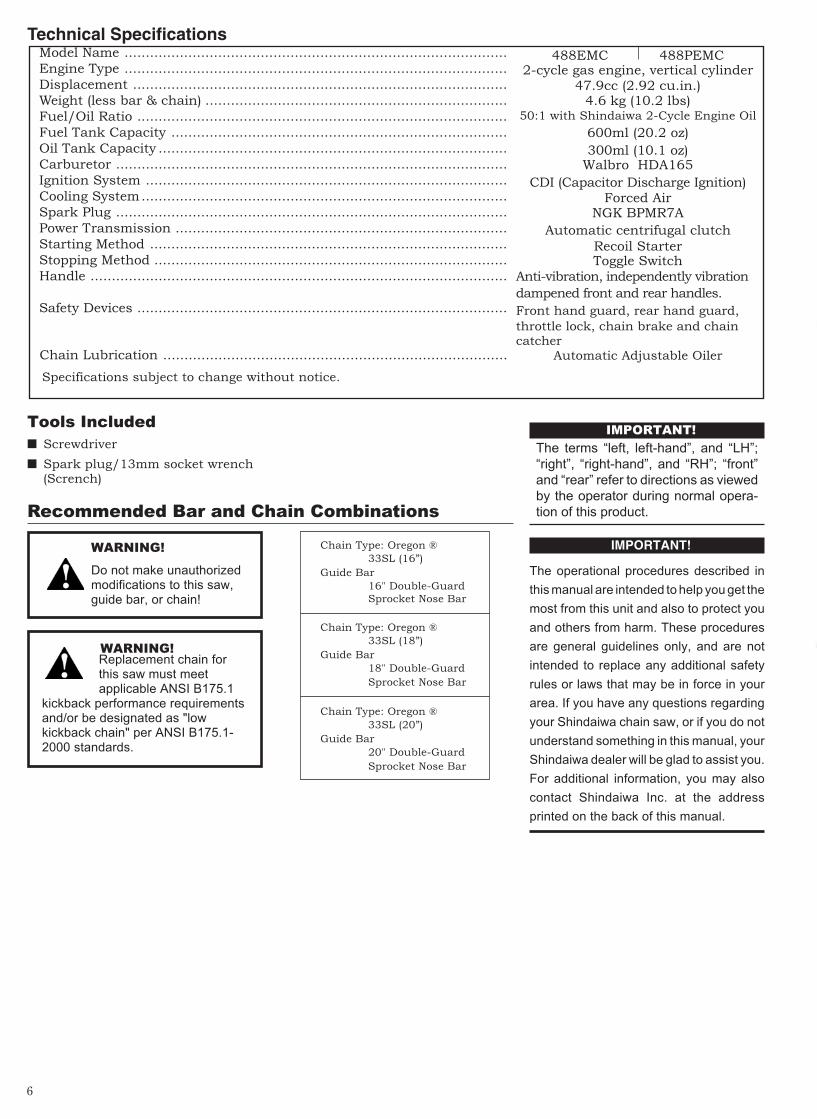
Technical SpecificationsModel Name ..........................................................................................
Engine Type ..........................................................................................
Displacement ........................................................................................
Weight (less bar & chain) .......................................................................
Fuel/Oil Ratio .......................................................................................
Fuel Tank Capacity ...............................................................................
Oil Tank Capacity ..................................................................................
Carburetor ............................................................................................
Ignition System .....................................................................................
Cooling System......................................................................................
Spark Plug ............................................................................................
Power Transmission ..............................................................................
Starting Method ....................................................................................
Stopping Method ...................................................................................
Handle ..................................................................................................
Safety Devices .......................................................................................
Specifications subject to change without notice.
Tools Included
■ Screwdriver
■ Spark plug/13mm socket wrench(Scrench)
WARNING!
Do not make unauthorizedmodifications to this saw,guide bar, or chain!
Recommended Bar and Chain Combinations
WARNING!Replacement chain forthis saw must meetapplicable ANSI B175.1
kickback performance requirementsand/or be designated as "lowkickback chain" per ANSI B175.1-2000 standards.
IMPORTANT!
The terms “left, left-hand”, and “LH”;
“right”, “right-hand”, and “RH”; “front”
and “rear” refer to directions as viewed
by the operator during normal opera-
tion of this product.
IMPORTANT!
The operational procedures described in
this manual are intended to help you get the
most from this unit and also to protect you
and others from harm. These procedures
are general guidelines only, and are not
intended to replace any additional safety
rules or laws that may be in force in your
area. If you have any questions regarding
your Shindaiwa chain saw, or if you do not
understand something in this manual, your
Shindaiwa dealer will be glad to assist you.
For additional information, you may also
contact Shindaiwa Inc. at the address
printed on the back of this manual.
Chain Lubrication .................................................................................
Chain Type: Oregon ®
33SL (16”)
Guide Bar
16" Double-Guard
Sprocket Nose Bar
Chain Type: Oregon ®
33SL (18”)
Guide Bar
18" Double-Guard
Sprocket Nose Bar
Chain Type: Oregon ®
33SL (20”)
Guide Bar
20" Double-Guard
Sprocket Nose Bar
19
Correct Filing Technique
Filing Problems
Top plate angleless thanrecommended
Low depth gauge
Backslope on sideplate cutting edge
Top plate anglemore thanrecommended
High depth gauge
Hook in side platecutting edge
CauseFile held at less thanrecommended angle.ResultSlow cutting. Requires extraeffort to cut.RemedyFile cutters to recommendedangle.
CauseFile held too low or the file wastoo small.ResultRough cutting. Chain grabs.Cutters dull quickly or won't holda cutting edge.RemedyCheck file size. File cutters torecommended angle.
CauseWrong gauge setting or nogauge used.ResultRough cutting. Chain grabs. Sawwon't pull chain throughwood. Excessive wear on thecutter heel.RemedyIf depth gauges are too low, thechain is no longer serviceable.
CauseDepth gauge never filed.ResultSlow cutting. Must force chain tocut. Will cause excessive wearon the cutter heel.RemedyLower gauges to recommendedsetting.
CauseFile held too high or the file wastoo large.ResultCutters won't feed into wood.Slow cutting. Must force chain tocut. Causes excessive bottomwear.RemedyFile cutters at recommendedangle. Check file size.
CauseFile held at more thanrecommended angle.ResultCutting angle is very sharp butwill dull fast. Cutting action roughand erratic.RemedyFile cutters to recommendedangle.
Correct angle
on top plateSlightly protruding hook
or point (curve on non-
chisel chain)
Top of depth gauge
at correct height
below top plate
Front of
depth gauge
rounded
A A = B B0.025”
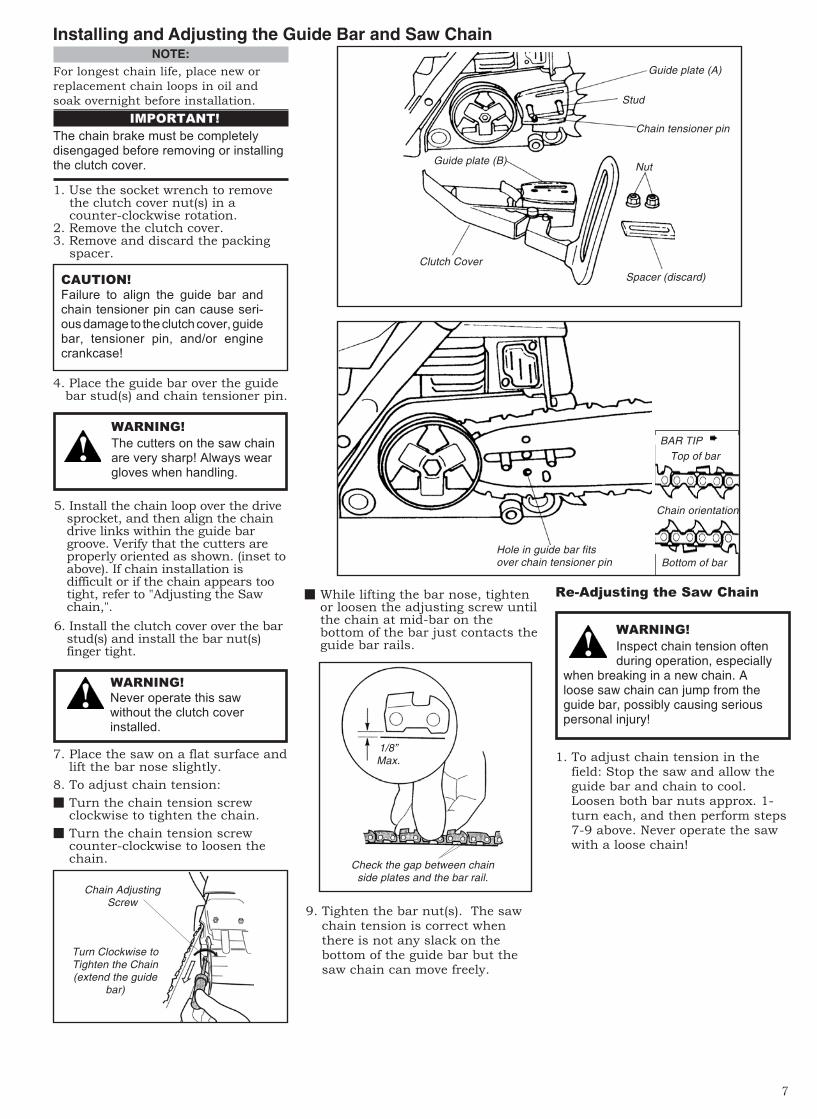
7
Check the gap between chainside plates and the bar rail.
1/8”Max.
Installing and Adjusting the Guide Bar and Saw ChainNOTE:
For longest chain life, place new or
replacement chain loops in oil and
soak overnight before installation.
CAUTION!
Failure to align the guide bar andchain tensioner pin can cause seri-ous damage to the clutch cover, guidebar, tensioner pin, and/or enginecrankcase!
5. Install the chain loop over the drivesprocket, and then align the chaindrive links within the guide bargroove. Verify that the cutters areproperly oriented as shown. (inset toabove). If chain installation isdifficult or if the chain appears tootight, refer to "Adjusting the Sawchain,".
6. Install the clutch cover over the barstud(s) and install the bar nut(s)finger tight.
WARNING!
The cutters on the saw chainare very sharp! Always weargloves when handling.
WARNING!
Never operate this sawwithout the clutch coverinstalled.
Guide plate (A)
Spacer (discard)
Nut
Stud
Clutch Cover
Guide plate (B)
Chain tensioner pin
Hole in guide bar fitsover chain tensioner pin Bottom of bar
Top of bar
Chain orientation
BAR TIP
7. Place the saw on a flat surface andlift the bar nose slightly.
8. To adjust chain tension:
� Turn the chain tension screwclockwise to tighten the chain.
� Turn the chain tension screwcounter-clockwise to loosen thechain.
Chain AdjustingScrew
Turn Clockwise toTighten the Chain(extend the guide
bar)
Re-Adjusting the Saw Chain
WARNING!
Inspect chain tension oftenduring operation, especially
when breaking in a new chain. Aloose saw chain can jump from theguide bar, possibly causing seriouspersonal injury!
1. Use the socket wrench to remove the clutch cover nut(s) in a counter-clockwise rotation.2. Remove the clutch cover.3. Remove and discard the packing spacer.
IMPORTANT!
The chain brake must be completelydisengaged before removing or installingthe clutch cover.
4. Place the guide bar over the guide bar stud(s) and chain tensioner pin.
� While lifting the bar nose, tightenor loosen the adjusting screw untilthe chain at mid-bar on thebottom of the bar just contacts theguide bar rails.
9. Tighten the bar nut(s). The sawchain tension is correct whenthere is not any slack on thebottom of the guide bar but thesaw chain can move freely.
1. To adjust chain tension in thefield: Stop the saw and allow theguide bar and chain to cool.Loosen both bar nuts approx. 1-turn each, and then perform steps7-9 above. Never operate the sawwith a loose chain!
18
Your saw's performance on the jobdepends heavily on the condition ofits saw chain.
How the Saw Chain WorksAs the saw chain is pulled throughthe wood:1. The depth gauge setting deter-
mines the depth of cut for eachcutter.
2. The cutter's leading edge entersthe wood, causing the entire cutterto "rock back" and lift away fromthe bar.
3. The top plate peels the severedwood chip away.
4. The chip is discharged out the rearof the cutter.
IMPORTANT!
Most of the actual cutting is done by thesides and corners of the individualcutters!
Saw Chain Performance
NOTE:
For consistent filing angles, use a filing
guide.
1. Using the appropriate round file,sharpen all cutters to a 25o angleas shown.
2. After all cutters are sharpened,use a depth gauge joiner to mea-sure the height of each depthgauge.
3. As required, use a flat file to lowerdepth gauges to the appropriate.025" (0.635 mm) height.
4. After all depth gauges have beenadjusted, use a flat file to roundeach depth gauge leading edge tooriginal curvature and angle.
1 2 3 4
IMPORTANT!
File all cutters to the same angle anddepth! Unequal filing may cause the sawto vibrate or cut erratically!
Sharpening Technique
Use a Filing Gauge
Using a Depth gauge joiner
Using a Flat File to Round the Front Corneron a Depth Gauge
25o
8
3. Refer to following chart forexamples of 50:1 fuel to oil mixquantities.
Mixing Fuel/Filling With Fuel
WARNING!
Minimize the risk of fire burns andpersonal injury!
IMPORTANT!
Shindaiwa high-performance 2-cycleengines are designed to operate on a50:1 mixture of unleaded gasoline and 2-cycle engine oil. Using a fuel mixture lessthan 50:1 ratio (such as 80:1 or 100:1)can cause catastrophic engine failure!
■ STOP engine before refueling.■ ALWAYS allow the engine to cool
before refueling!■ ALWAYS open the fuel cap slowly
to allow any pressure buildup inthe tank to release fuel vaporslowly.
■ Wipe all spilled fuel and move theengine at least 10 feet (3 meters)from the fueling point and sourcebefore restarting!
■ NEVER start or operate thisunit if there is a fuel leak.
■ NEVER start or operate thisunit if the carburetor, fuel lines,fuel tank and/or fuel tank cap aredamaged.
■ NEVER smoke or light any firesnear the engine or fuel source!
■ NEVER place any flammablematerial near the engine muffler!
■ NEVER operate the engine withoutthe muffler and spark arrester ingood working condition.
CAUTION!
� Some types of gasoline containalcohol. Never use any type ofgasoline containing more than10% alcohol by volume! Morethan 10% alcohol by volume mayaffect the lubricating qualities of 2-cycle engine oils reducing enginelife and/or causing engine failure.
� Generic engine oil and marineengine oil may not be intended foruse in high-performance 2-cycleengines and should never beused in Shindaiwa engines.Engine oils not intended for usehigh-performance air-cooled 2-cycle engines can cause exces-sive carbon deposits, reduceengine life and/or cause enginefailure.
1. Use only fresh, clean unleadedgasoline with a pump octanerating of 87 or higher.
2. Mix fuel with a 2-cycle engine oildesigned for use in high-perfor-mance 2-cycle air-cooled engines.
NOTENOTENOTENOTENOTE: Shindaiwa offers two performancelevels of 2-cycle air-cooled engine oils,Shindaiwa Premium 2-Cycle Engine Oiland Shindaiwa ONE High Performance2-Cycle Engine Oil. Shindaiwa Premium2-Cycle Engine Oil is designed to meetthe lubrication demands of most 2-cycleair-cooled engines. Shindaiwa ONE HighPerformance 2-Cycle Engine Oil isrecommended when superior lubricationis needed to help protect engines used insevere operating conditions. ShindaiwaONE also contains a fuel stabilizer tohelp maintain fuel quality when fuel isstored longer than 30 days.
Oil Requirements� When available, use Shindaiwa
Premium bar & chain oil.
� When Shindaiwa oil is not avail-able, use a premium 30-weight oilspecifically blended for bar &chain lubrication.
� For cold weather operation, bar oilmay be thinned by mixing withclean kerosene at a ratio of 1:1.
Filling the Oil Reservoir� Place the saw on its side (clutch
cover down), and wipe any chipsor debris from around the oil cap.
� Remove the oil cap at the front ofthe saw.
� Fill the oil reservoir with bar &chain oil, and replace the cap.
� Wipe spilled oil from handles andcontrols before starting the saw.
Bar Oil/Filling With Oil
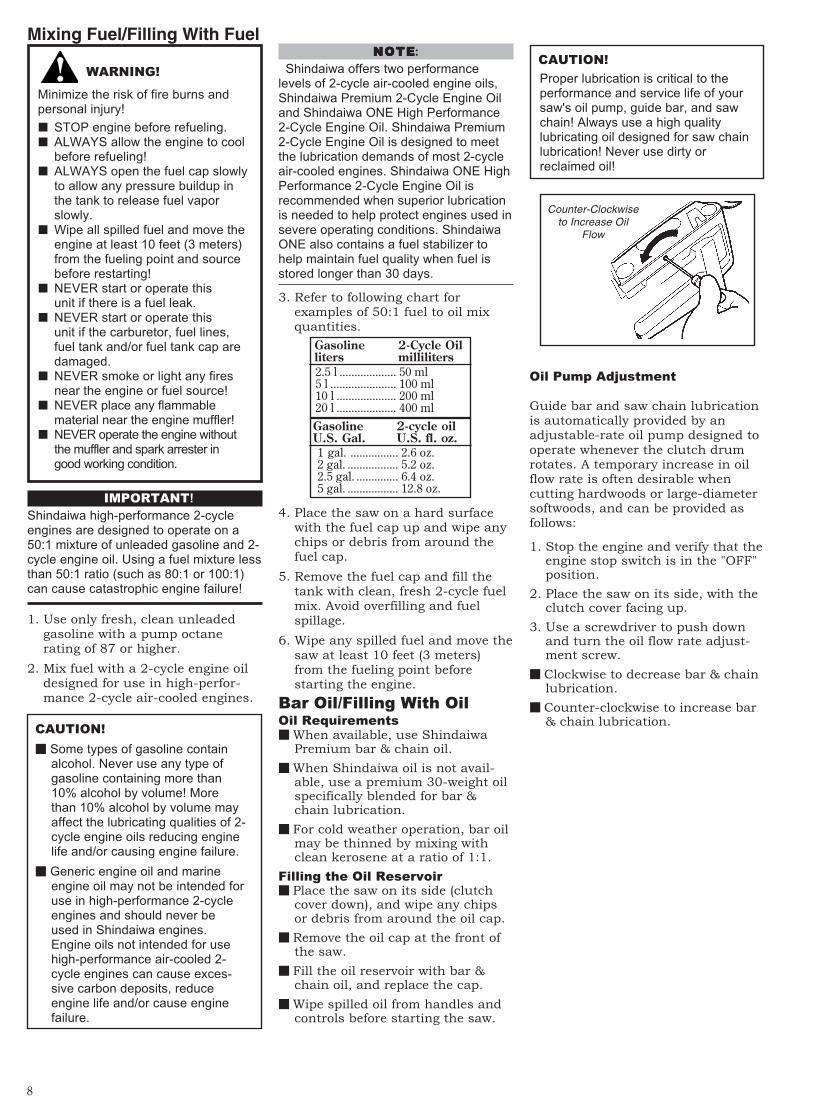
CAUTION!
Proper lubrication is critical to theperformance and service life of yoursaw's oil pump, guide bar, and sawchain! Always use a high qualitylubricating oil designed for saw chainlubrication! Never use dirty orreclaimed oil!
Oil Pump Adjustment
Guide bar and saw chain lubricationis automatically provided by anadjustable-rate oil pump designed tooperate whenever the clutch drumrotates. A temporary increase in oilflow rate is often desirable whencutting hardwoods or large-diametersoftwoods, and can be provided asfollows:
1. Stop the engine and verify that theengine stop switch is in the "OFF"position.
2. Place the saw on its side, with theclutch cover facing up.
3. Use a screwdriver to push downand turn the oil flow rate adjust-ment screw.
� Clockwise to decrease bar & chainlubrication.
� Counter-clockwise to increase bar& chain lubrication.
Counter-Clockwiseto Increase Oil
Flow
Gasoline 2-cycle oilU.S. Gal. U.S. fl. oz.1 gal. ................ 2.6 oz.2 gal. ................. 5.2 oz.2.5 gal. .............. 6.4 oz.5 gal. ................. 12.8 oz.
Gasoline 2-Cycle Oilliters milliliters2.5 l ................... 50 ml5 l ...................... 100 ml10 l .................... 200 ml20 l .................... 400 ml
4. Place the saw on a hard surfacewith the fuel cap up and wipe anychips or debris from around thefuel cap.
5. Remove the fuel cap and fill thetank with clean, fresh 2-cycle fuelmix. Avoid overfilling and fuelspillage.
6. Wipe any spilled fuel and move thesaw at least 10 feet (3 meters)from the fueling point beforestarting the engine.
17
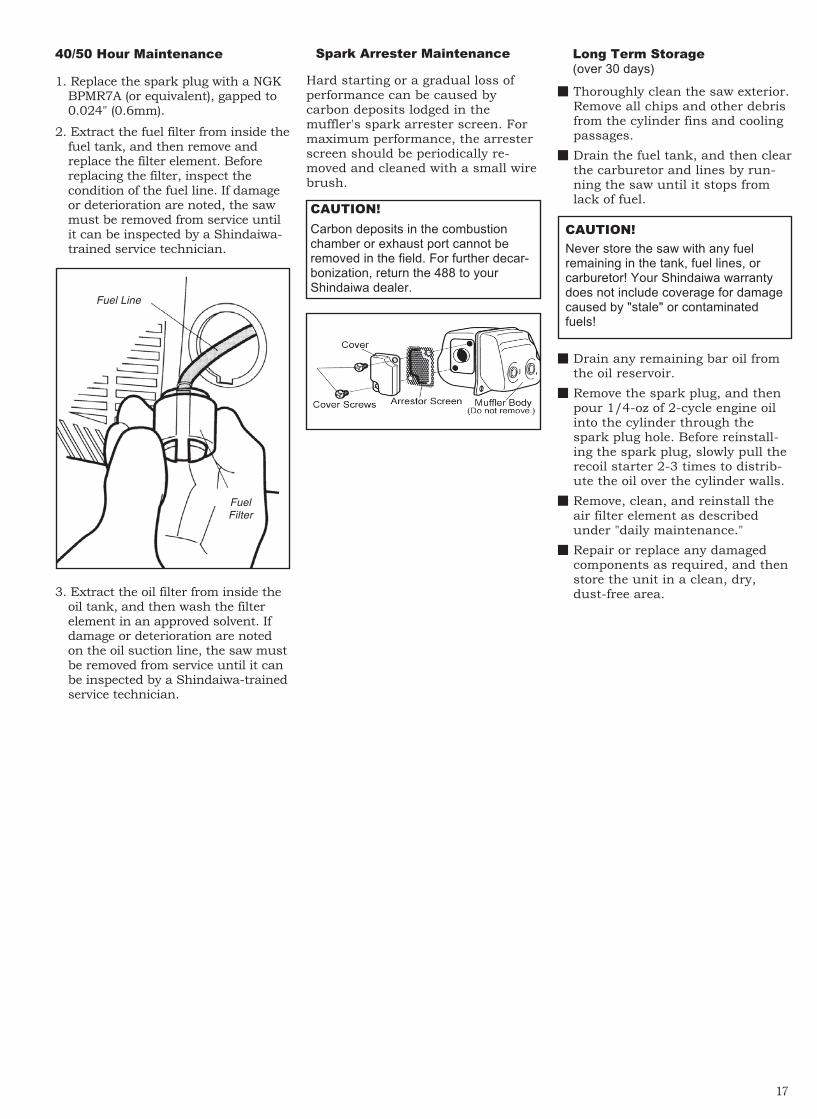
40/50 Hour Maintenance
1. Replace the spark plug with a NGKBPMR7A (or equivalent), gapped to0.024" (0.6mm).
2. Extract the fuel filter from inside thefuel tank, and then remove andreplace the filter element. Beforereplacing the filter, inspect thecondition of the fuel line. If damageor deterioration are noted, the sawmust be removed from service untilit can be inspected by a Shindaiwa-trained service technician.
3. Extract the oil filter from inside theoil tank, and then wash the filterelement in an approved solvent. Ifdamage or deterioration are notedon the oil suction line, the saw mustbe removed from service until it canbe inspected by a Shindaiwa-trainedservice technician.
Fuel Line
FuelFilter
Spark Arrester Maintenance
� Thoroughly clean the saw exterior.Remove all chips and other debrisfrom the cylinder fins and coolingpassages.
� Drain the fuel tank, and then clearthe carburetor and lines by run-ning the saw until it stops fromlack of fuel.
Hard starting or a gradual loss ofperformance can be caused bycarbon deposits lodged in themuffler's spark arrester screen. Formaximum performance, the arresterscreen should be periodically re-moved and cleaned with a small wirebrush.
CAUTION!
Never store the saw with any fuelremaining in the tank, fuel lines, orcarburetor! Your Shindaiwa warrantydoes not include coverage for damagecaused by "stale" or contaminatedfuels!
� Drain any remaining bar oil fromthe oil reservoir.
� Remove the spark plug, and thenpour 1/4-oz of 2-cycle engine oilinto the cylinder through thespark plug hole. Before reinstall-ing the spark plug, slowly pull therecoil starter 2-3 times to distrib-ute the oil over the cylinder walls.
� Remove, clean, and reinstall theair filter element as describedunder "daily maintenance."
� Repair or replace any damagedcomponents as required, and thenstore the unit in a clean, dry,dust-free area.
Long Term Storage
(over 30 days)
CAUTION!
Carbon deposits in the combustionchamber or exhaust port cannot beremoved in the field. For further decar-bonization, return the 488 to yourShindaiwa dealer.
9
Engine Start
CAUTION!
The recoil starter can be damagedby abuse!■ Never pull the starter completely
to the end of the starter cord.Fully extending the starter cordcan damage the starter spring,cord and/or starter assembly.
■ Never release the starter gripwith the starter rope extended.Always hold on to the grip duringengine start and return thestarter grip back to the starterhousing slowly as the starterspring retracts the rope.
NOTE:
If the engine fails to start, repeat the
starting procedure setting the choke control
appropriately for either a cold or warm
engine. If the engine still fails to start, refer
to the section, “Starting a Flooded Engine.”
1. Move the “ON/OFF” ignitioncontrol switch to the off position. Ifthe saw has just been used, allowthe engine to idle for 1 to 2 min-utes to stabilize engine operatingtemperature before stopping theengine.
Engine Stop
NOTE:
This engine ignition system is controlled by
a two-position “ON-OFF” switch labeled “I”
for ON and “O” for OFF located near the
rear handle.
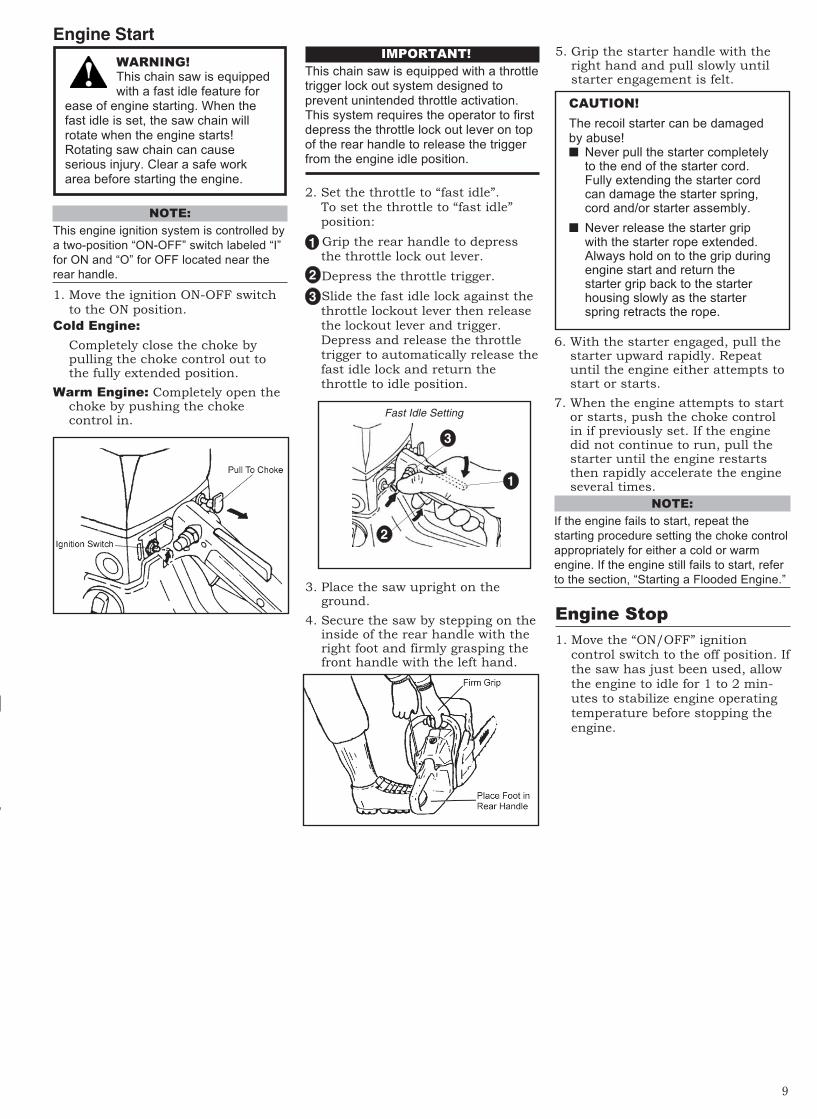
3. Place the saw upright on theground.
4. Secure the saw by stepping on theinside of the rear handle with theright foot and firmly grasping thefront handle with the left hand.
WARNING!This chain saw is equippedwith a fast idle feature for
ease of engine starting. When thefast idle is set, the saw chain willrotate when the engine starts!Rotating saw chain can causeserious injury. Clear a safe workarea before starting the engine.
Cold Engine:
Completely close the choke bypulling the choke control out tothe fully extended position.
Warm Engine: Completely open thechoke by pushing the chokecontrol in.
1. Move the ignition ON-OFF switchto the ON position.
6. With the starter engaged, pull thestarter upward rapidly. Repeatuntil the engine either attempts tostart or starts.
7. When the engine attempts to startor starts, push the choke controlin if previously set. If the enginedid not continue to run, pull thestarter until the engine restartsthen rapidly accelerate the engineseveral times.
5. Grip the starter handle with theright hand and pull slowly untilstarter engagement is felt.
IMPORTANT!
This chain saw is equipped with a throttletrigger lock out system designed toprevent unintended throttle activation.This system requires the operator to firstdepress the throttle lock out lever on topof the rear handle to release the triggerfrom the engine idle position.
Fast Idle Setting
3
2
1
2. Set the throttle to “fast idle”.To set the throttle to “fast idle”position:
Grip the rear handle to depressthe throttle lock out lever.
n fDepress the throttle trigger.
Slide the fast idle lock against thethrottle lockout lever then releasethe lockout lever and trigger.Depress and release the throttletrigger to automatically release thefast idle lock and return thethrottle to idle position.
1
2
3
16
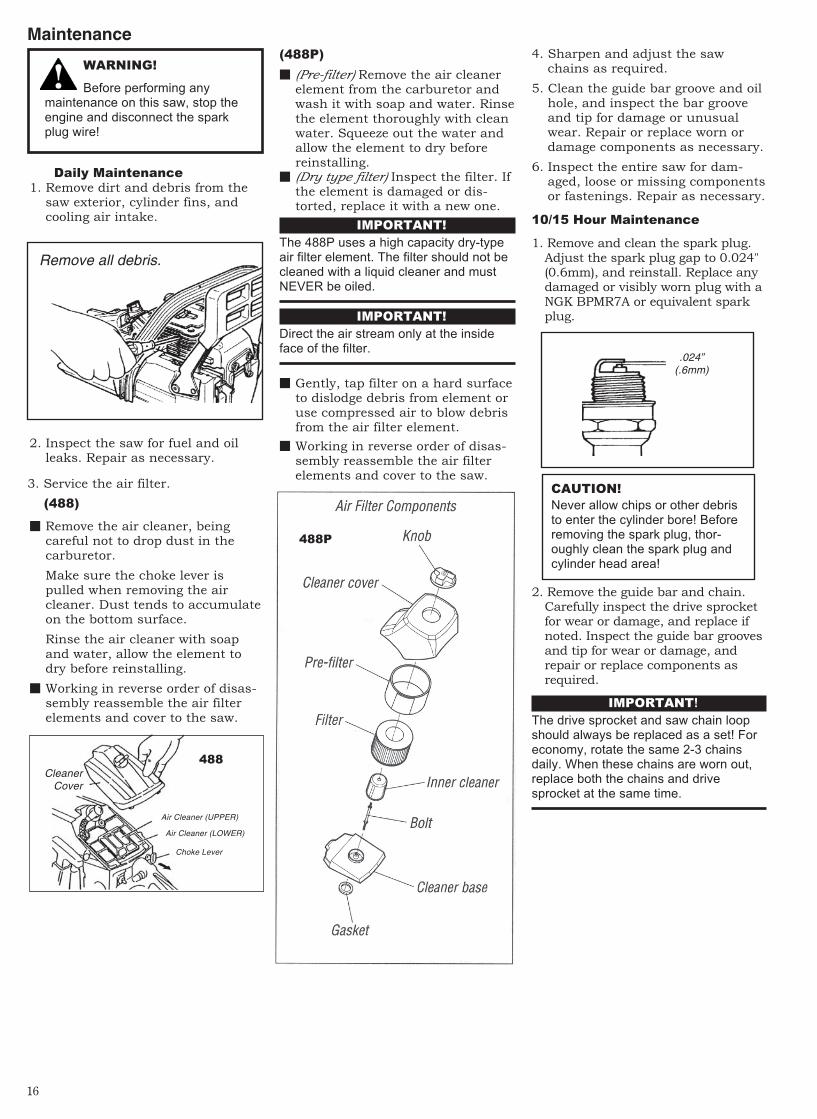
IMPORTANT!
The 488P uses a high capacity dry-typeair filter element. The filter should not becleaned with a liquid cleaner and mustNEVER be oiled.
Maintenance
WARNING!
Before performing anymaintenance on this saw, stop theengine and disconnect the sparkplug wire!
Daily Maintenance1. Remove dirt and debris from the
saw exterior, cylinder fins, andcooling air intake.
� Remove the air cleaner, beingcareful not to drop dust in thecarburetor.
Make sure the choke lever ispulled when removing the aircleaner. Dust tends to accumulateon the bottom surface.
Rinse the air cleaner with soapand water, allow the element todry before reinstalling.
� Working in reverse order of disas-sembly reassemble the air filterelements and cover to the saw.
2. Inspect the saw for fuel and oilleaks. Repair as necessary.
Remove all debris.
3. Service the air filter.
(488)
CleanerCover
Air Cleaner (UPPER)
Air Cleaner (LOWER)
Choke Lever
488
488P
(488P)
� (Pre-filter) Remove the air cleanerelement from the carburetor andwash it with soap and water. Rinsethe element thoroughly with cleanwater. Squeeze out the water andallow the element to dry beforereinstalling.
10/15 Hour Maintenance
1. Remove and clean the spark plug.Adjust the spark plug gap to 0.024"(0.6mm), and reinstall. Replace anydamaged or visibly worn plug with aNGK BPMR7A or equivalent sparkplug.
2. Remove the guide bar and chain.Carefully inspect the drive sprocketfor wear or damage, and replace ifnoted. Inspect the guide bar groovesand tip for wear or damage, andrepair or replace components asrequired.
IMPORTANT!The drive sprocket and saw chain loopshould always be replaced as a set! Foreconomy, rotate the same 2-3 chainsdaily. When these chains are worn out,replace both the chains and drivesprocket at the same time.
CAUTION!
Never allow chips or other debristo enter the cylinder bore! Beforeremoving the spark plug, thor-oughly clean the spark plug andcylinder head area!
.024”(.6mm)
� (Dry type filter) Inspect the filter. Ifthe element is damaged or dis-torted, replace it with a new one.
IMPORTANT!
Direct the air stream only at the insideface of the filter.
� Gently, tap filter on a hard surfaceto dislodge debris from element oruse compressed air to blow debrisfrom the air filter element.
4. Sharpen and adjust the sawchains as required.
5. Clean the guide bar groove and oilhole, and inspect the bar grooveand tip for damage or unusualwear. Repair or replace worn ordamage components as necessary.
6. Inspect the entire saw for dam-aged, loose or missing componentsor fastenings. Repair as necessary.
� Working in reverse order of disas-sembly reassemble the air filterelements and cover to the saw.
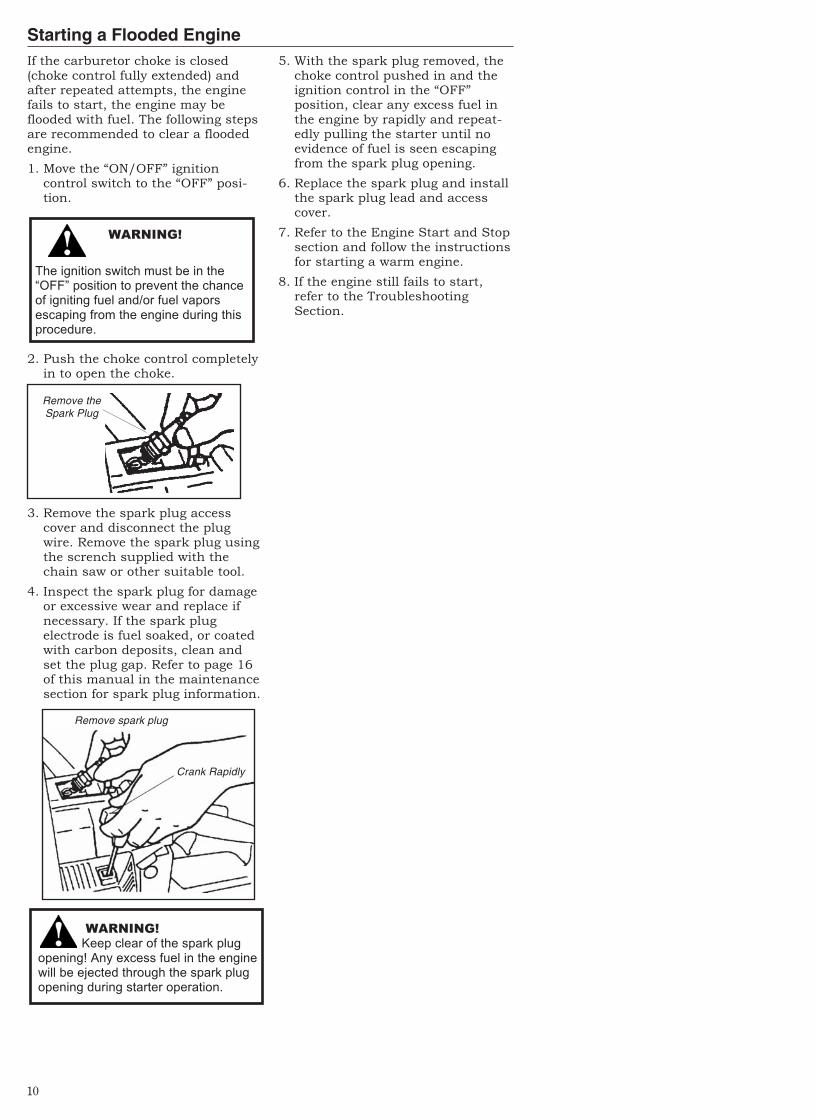
10
5. With the spark plug removed, thechoke control pushed in and theignition control in the “OFF”position, clear any excess fuel inthe engine by rapidly and repeat-edly pulling the starter until noevidence of fuel is seen escapingfrom the spark plug opening.
6. Replace the spark plug and installthe spark plug lead and accesscover.
7. Refer to the Engine Start and Stopsection and follow the instructionsfor starting a warm engine.
8. If the engine still fails to start,refer to the TroubleshootingSection.
If the carburetor choke is closed(choke control fully extended) andafter repeated attempts, the enginefails to start, the engine may beflooded with fuel. The following stepsare recommended to clear a floodedengine.
The ignition switch must be in the“OFF” position to prevent the chanceof igniting fuel and/or fuel vaporsescaping from the engine during thisprocedure.
2. Push the choke control completelyin to open the choke.
3. Remove the spark plug accesscover and disconnect the plugwire. Remove the spark plug usingthe scrench supplied with thechain saw or other suitable tool.
4. Inspect the spark plug for damageor excessive wear and replace ifnecessary. If the spark plugelectrode is fuel soaked, or coatedwith carbon deposits, clean andset the plug gap. Refer to page 16of this manual in the maintenancesection for spark plug information.
Starting a Flooded Engine
Remove theSpark Plug
Crank Rapidly
1. Move the “ON/OFF” ignitioncontrol switch to the “OFF” posi-tion.
WARNING!
Remove spark plug
WARNING!Keep clear of the spark plug
opening! Any excess fuel in the enginewill be ejected through the spark plugopening during starter operation.
15
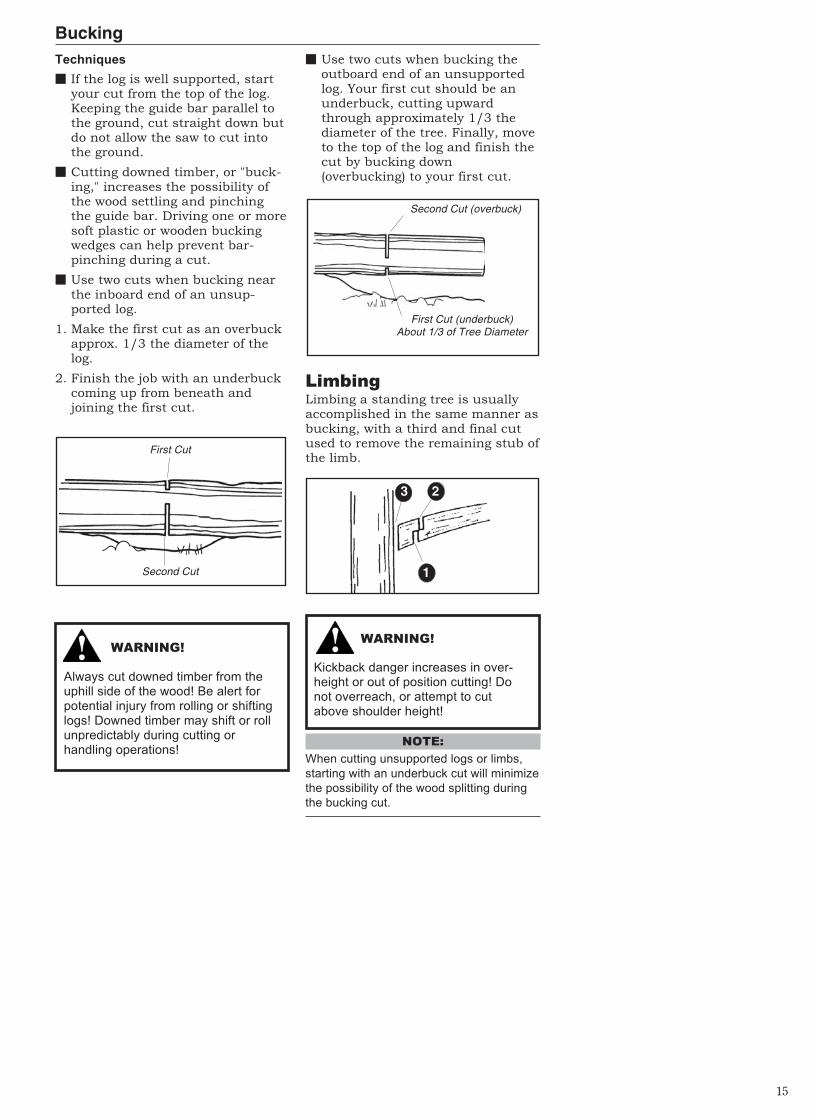
� Use two cuts when bucking theoutboard end of an unsupportedlog. Your first cut should be anunderbuck, cutting upwardthrough approximately 1/3 thediameter of the tree. Finally, moveto the top of the log and finish thecut by bucking down(overbucking) to your first cut.
LimbingLimbing a standing tree is usuallyaccomplished in the same manner asbucking, with a third and final cutused to remove the remaining stub ofthe limb.
NOTE:
When cutting unsupported logs or limbs,
starting with an underbuck cut will minimize
the possibility of the wood splitting during
the bucking cut.
First Cut (underbuck)About 1/3 of Tree Diameter
Second Cut (overbuck)
BuckingTechniques
� If the log is well supported, startyour cut from the top of the log.Keeping the guide bar parallel tothe ground, cut straight down butdo not allow the saw to cut intothe ground.
� Cutting downed timber, or "buck-ing," increases the possibility ofthe wood settling and pinchingthe guide bar. Driving one or moresoft plastic or wooden buckingwedges can help prevent bar-pinching during a cut.
� Use two cuts when bucking nearthe inboard end of an unsup-ported log.
1. Make the first cut as an overbuckapprox. 1/3 the diameter of thelog.
2. Finish the job with an underbuckcoming up from beneath andjoining the first cut.
WARNING!
Always cut downed timber from theuphill side of the wood! Be alert forpotential injury from rolling or shiftinglogs! Downed timber may shift or rollunpredictably during cutting orhandling operations!
WARNING!
Kickback danger increases in over-height or out of position cutting! Donot overreach, or attempt to cutabove shoulder height!
First Cut
Second Cut
3 2
1
11
Carburetor AdjustmentsIMPORTANT!
A clean and unrestricted airflow isessential to your saw engine's perfor-mance and durability! Before attemptingany carburetor adjustments, inspect andclean the engine air filter as required!Procedures for maintaining your saw's airfilter are described on page 16 in thismanual.
Before starting the sawI. Inspect saw chain tension, and
adjust if necessary.
2. Verify that the chain brake isdisengaged, and that the sawchain is free to rotate.
Start the sawStart the saw and warm the engineto operating temperature. Place thesaw on the ground, and adjust thecarburetor as follows:
Idle speed adjustmentUse a screwdriver to slowly turn theidle speed adjusting screw in or outuntil the engine idles smoothly at2,600 - 3,000 rpm (min-1).
WARNING!
The saw chain must never rotate atengine idle speed.
Idle speed adjustment
Adjusting screw
Fuel mixtureadjustments
Low and High MixtureAdjustments.
Low-speed mixture (engine idlingat operating temperature)
1. Using a small screwdriver, slowlyturn the low speed mixture screwclockwise (lean mixture), and noteany changes in engine rpm.
2. Next, turn the low speed mixingscrew counter-clockwise (richmixture) and note any changes inengine rpm.
3. Adjust the low speed mixturescrew to provide the smoothestpossible idle with no sacrifice inacceleration.
4. If necessary, readjust the idlespeed screw for an engine idlespeed of 2,600 - 3,000 rpm (min-1).
CAUTION!
Do not run saw at full throttle with noload. If run in this condition, seizurecan occur.
CAUTION!
Do not adjust H-speed needle to lessthan 3/4 turn. If run at less than 3/4turn, seizure can occur.
Low and High speed adjustment.Standard opening.L .........................1 ± 1/4 turnsH ......................... 1 ± 1/4 turns
"Standard opening" means numberof turns from the fully closedposition by turning needle gentlycounter-clockwise
Low speedadjustment screw
High speed adjustment screw
High speed mixture
1. No adjustment is necessary whenthe saw is new.
2. After approximately 10 hoursrunning, readjust the H-needle to1.0 turn (5 1/4 turns).
14
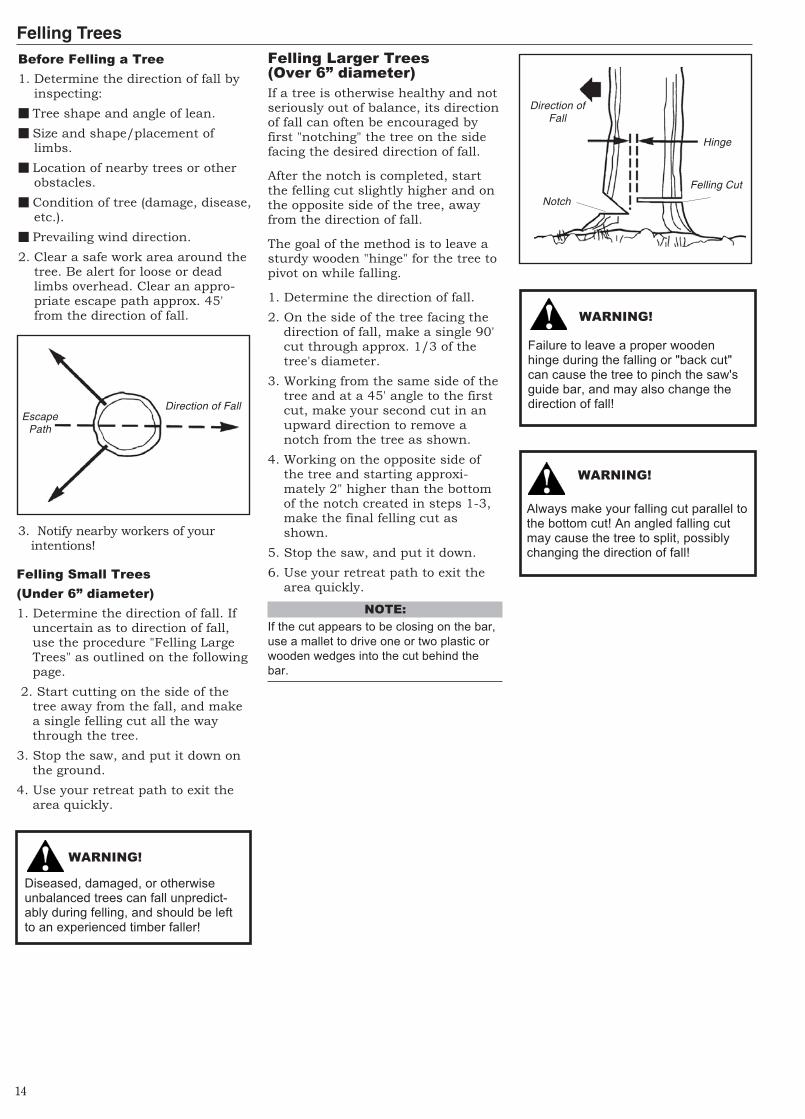
Before Felling a Tree
1. Determine the direction of fall byinspecting:
� Tree shape and angle of lean.
� Size and shape/placement oflimbs.
� Location of nearby trees or otherobstacles.
� Condition of tree (damage, disease,etc.).
� Prevailing wind direction.
2. Clear a safe work area around thetree. Be alert for loose or deadlimbs overhead. Clear an appro-priate escape path approx. 45'from the direction of fall.
3. Notify nearby workers of yourintentions!
Felling Trees
Felling Small Trees
(Under 6” diameter)
1. Determine the direction of fall. Ifuncertain as to direction of fall,use the procedure "Felling LargeTrees" as outlined on the followingpage.
2. Start cutting on the side of thetree away from the fall, and makea single felling cut all the waythrough the tree.
3. Stop the saw, and put it down onthe ground.
4. Use your retreat path to exit thearea quickly.
Diseased, damaged, or otherwiseunbalanced trees can fall unpredict-ably during felling, and should be leftto an experienced timber faller!
WARNING!
EscapePath
Direction of Fall
Felling Larger Trees(Over 6” diameter)
If a tree is otherwise healthy and notseriously out of balance, its directionof fall can often be encouraged byfirst "notching" the tree on the sidefacing the desired direction of fall.
After the notch is completed, startthe felling cut slightly higher and onthe opposite side of the tree, awayfrom the direction of fall.
The goal of the method is to leave asturdy wooden "hinge" for the tree topivot on while falling.
1. Determine the direction of fall.
2. On the side of the tree facing thedirection of fall, make a single 90'cut through approx. 1/3 of thetree's diameter.
3. Working from the same side of thetree and at a 45' angle to the firstcut, make your second cut in anupward direction to remove anotch from the tree as shown.
4. Working on the opposite side ofthe tree and starting approxi-mately 2" higher than the bottomof the notch created in steps 1-3,make the final felling cut asshown.
5. Stop the saw, and put it down.
6. Use your retreat path to exit thearea quickly.
NOTE:
If the cut appears to be closing on the bar,
use a mallet to drive one or two plastic or
wooden wedges into the cut behind the
bar.
WARNING!
Failure to leave a proper woodenhinge during the falling or "back cut"can cause the tree to pinch the saw'sguide bar, and may also change thedirection of fall!
WARNING!
Always make your falling cut parallel tothe bottom cut! An angled falling cutmay cause the tree to split, possiblychanging the direction of fall!
Notch
Hinge
Direction ofFall
Felling Cut
12
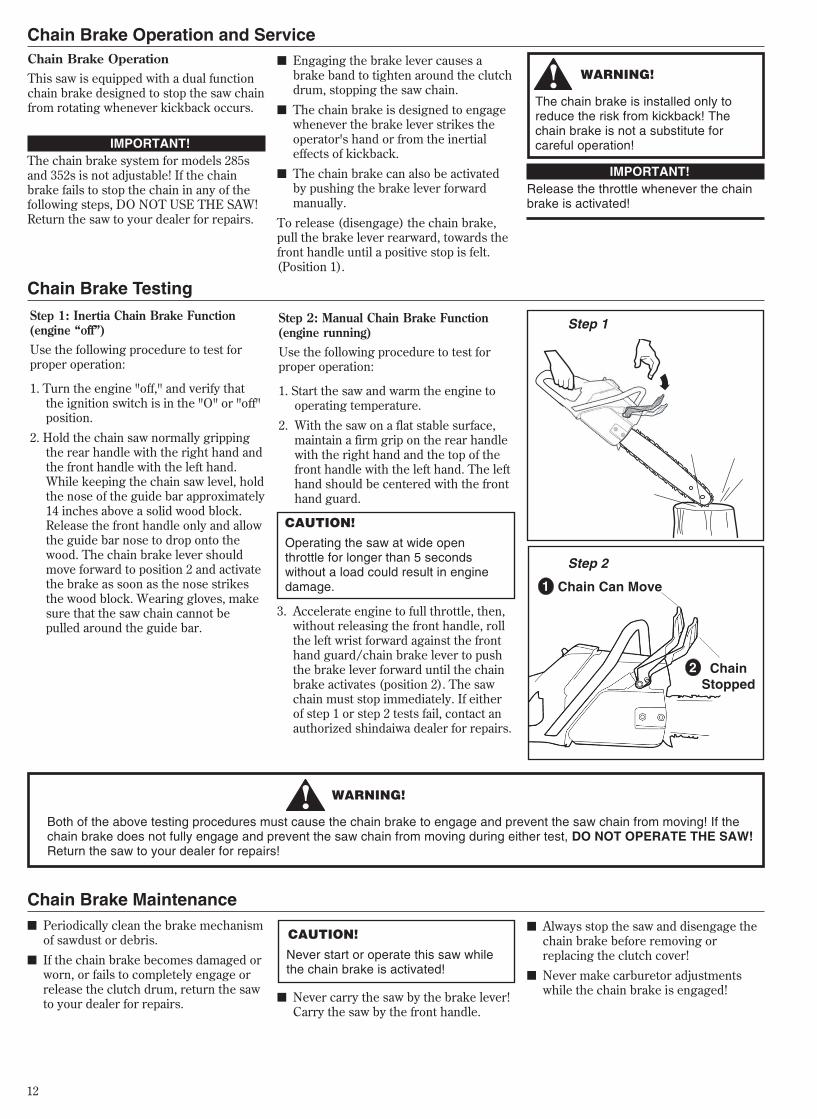
Chain Brake Operation and ServiceChain Brake OperationThis saw is equipped with a dual functionchain brake designed to stop the saw chainfrom rotating whenever kickback occurs.
WARNING!
The chain brake is installed only toreduce the risk from kickback! Thechain brake is not a substitute forcareful operation!
IMPORTANT!Release the throttle whenever the chainbrake is activated!
IMPORTANT!The chain brake system for models 285sand 352s is not adjustable! If the chainbrake fails to stop the chain in any of thefollowing steps, DO NOT USE THE SAW!Return the saw to your dealer for repairs.
WARNING!
■ Periodically clean the brake mechanismof sawdust or debris.
■ If the chain brake becomes damaged orworn, or fails to completely engage orrelease the clutch drum, return the sawto your dealer for repairs.
CAUTION!
Never start or operate this saw whilethe chain brake is activated!
■ Engaging the brake lever causes abrake band to tighten around the clutchdrum, stopping the saw chain.
■ The chain brake is designed to engagewhenever the brake lever strikes theoperator's hand or from the inertialeffects of kickback.
■ The chain brake can also be activatedby pushing the brake lever forwardmanually.
To release (disengage) the chain brake,pull the brake lever rearward, towards thefront handle until a positive stop is felt.(Position 1).
Both of the above testing procedures must cause the chain brake to engage and prevent the saw chain from moving! If thechain brake does not fully engage and prevent the saw chain from moving during either test, DO NOT OPERATE THE SAW!Return the saw to your dealer for repairs!
■ Never carry the saw by the brake lever!Carry the saw by the front handle.
Chain Brake Maintenance
Step 2: Manual Chain Brake Function(engine running)Use the following procedure to test forproper operation:
1. Start the saw and warm the engine tooperating temperature.
2. With the saw on a flat stable surface,maintain a firm grip on the rear handlewith the right hand and the top of thefront handle with the left hand. The lefthand should be centered with the fronthand guard.
1
2 ChainStopped
Chain Can Move
Step 1: Inertia Chain Brake Function(engine “off”)Use the following procedure to test forproper operation:
1. Turn the engine "off," and verify thatthe ignition switch is in the "O" or "off"position.
2. Hold the chain saw normally grippingthe rear handle with the right hand andthe front handle with the left hand.While keeping the chain saw level, holdthe nose of the guide bar approximately14 inches above a solid wood block.Release the front handle only and allowthe guide bar nose to drop onto thewood. The chain brake lever shouldmove forward to position 2 and activatethe brake as soon as the nose strikesthe wood block. Wearing gloves, makesure that the saw chain cannot bepulled around the guide bar.
3. Accelerate engine to full throttle, then,without releasing the front handle, rollthe left wrist forward against the fronthand guard/chain brake lever to pushthe brake lever forward until the chainbrake activates (position 2). The sawchain must stop immediately. If eitherof step 1 or step 2 tests fail, contact anauthorized shindaiwa dealer for repairs.
CAUTION!
Operating the saw at wide openthrottle for longer than 5 secondswithout a load could result in enginedamage.
Chain Brake Testing
■ Always stop the saw and disengage thechain brake before removing orreplacing the clutch cover!
■ Never make carburetor adjustmentswhile the chain brake is engaged!
Step 1
Step 2
13
Cutting with the Saw
THINK SAFETY!
Always use full throttle while cutting! Keep the chain sharp and let the saw do thework! Forcing the saw into the work reduces cutting performance, and can damagethe saw through overheating!
Clear a safework area
before cutting.
Stop the saw before moving it toor from the work area.
Wear hearing protectionand eye protection such
as a face shield orgoggles when operating
the unit.
Always weargloves whenoperating this
saw.Use full-throttle while
cutting and apply only enoughbar pressure to maintain engine
speeds of 9000-10,000 rpm(min-1).
Wear close-fittingclothing to protect
your legs and arms.Do not wear clothingor jewelry that couldget in the machinery
or brush.
Keep a proper footing(do not overreach)!Wear
appropriatenonskid footwear.
Never operate with a loosesaw chain!
Never operate the saw iffastenings are loose or
missing!Never operate the saw ifany component parts are
damaged, loose, ormissing!
IMPORTANT!
Always wear leg protection (Chaps)made of a cut-resistant material such
as ballistic nylon covering the fulllength of the thigh to the top of the
boot.
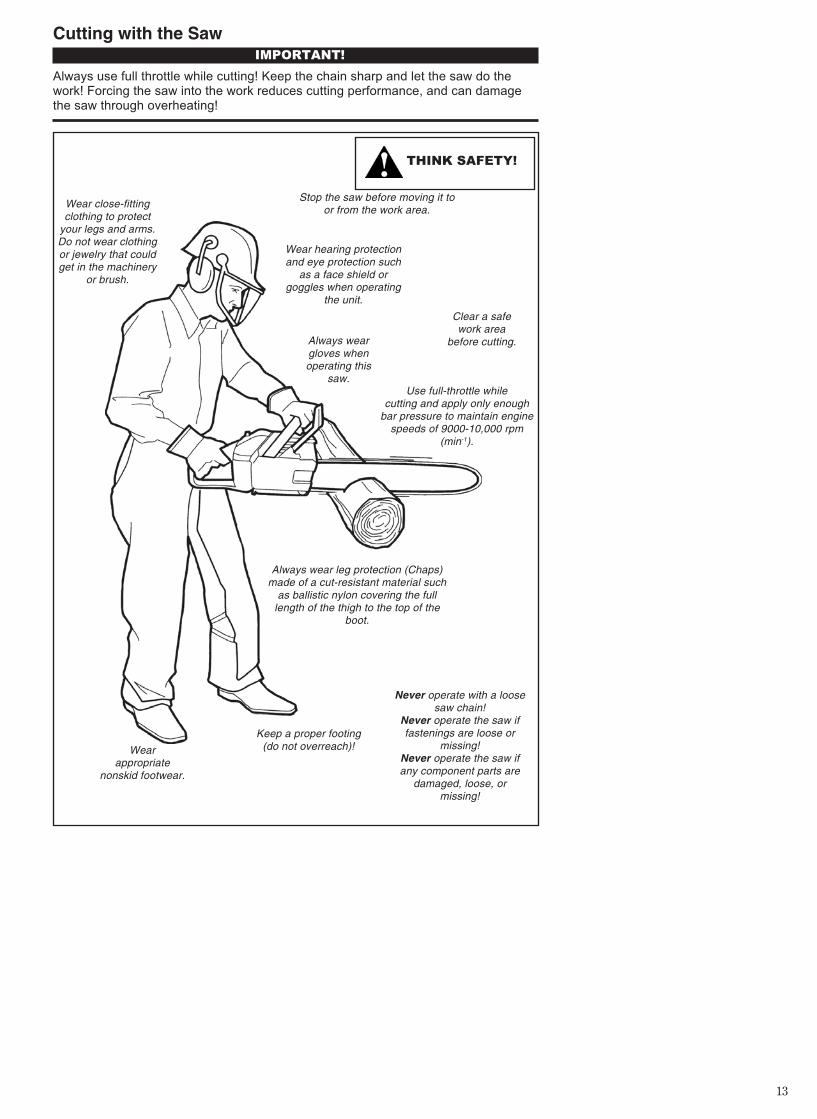
12
Chain Brake Operation and ServiceChain Brake OperationThis saw is equipped with a dual functionchain brake designed to stop the saw chainfrom rotating whenever kickback occurs.
WARNING!
The chain brake is installed only toreduce the risk from kickback! Thechain brake is not a substitute forcareful operation!
IMPORTANT!Release the throttle whenever the chainbrake is activated!
IMPORTANT!The chain brake system for models 285sand 352s is not adjustable! If the chainbrake fails to stop the chain in any of thefollowing steps, DO NOT USE THE SAW!Return the saw to your dealer for repairs.
WARNING!
■ Periodically clean the brake mechanismof sawdust or debris.
■ If the chain brake becomes damaged orworn, or fails to completely engage orrelease the clutch drum, return the sawto your dealer for repairs.
CAUTION!
Never start or operate this saw whilethe chain brake is activated!
■ Engaging the brake lever causes abrake band to tighten around the clutchdrum, stopping the saw chain.
■ The chain brake is designed to engagewhenever the brake lever strikes theoperator's hand or from the inertialeffects of kickback.
■ The chain brake can also be activatedby pushing the brake lever forwardmanually.
To release (disengage) the chain brake,pull the brake lever rearward, towards thefront handle until a positive stop is felt.(Position 1).
Both of the above testing procedures must cause the chain brake to engage and prevent the saw chain from moving! If thechain brake does not fully engage and prevent the saw chain from moving during either test, DO NOT OPERATE THE SAW!Return the saw to your dealer for repairs!
■ Never carry the saw by the brake lever!Carry the saw by the front handle.
Chain Brake Maintenance
Step 2: Manual Chain Brake Function(engine running)Use the following procedure to test forproper operation:
1. Start the saw and warm the engine tooperating temperature.
2. With the saw on a flat stable surface,maintain a firm grip on the rear handlewith the right hand and the top of thefront handle with the left hand. The lefthand should be centered with the fronthand guard.
1
2 ChainStopped
Chain Can Move
Step 1: Inertia Chain Brake Function(engine “off”)Use the following procedure to test forproper operation:
1. Turn the engine "off," and verify thatthe ignition switch is in the "O" or "off"position.
2. Hold the chain saw normally grippingthe rear handle with the right hand andthe front handle with the left hand.While keeping the chain saw level, holdthe nose of the guide bar approximately14 inches above a solid wood block.Release the front handle only and allowthe guide bar nose to drop onto thewood. The chain brake lever shouldmove forward to position 2 and activatethe brake as soon as the nose strikesthe wood block. Wearing gloves, makesure that the saw chain cannot bepulled around the guide bar.
3. Accelerate engine to full throttle, then,without releasing the front handle, rollthe left wrist forward against the fronthand guard/chain brake lever to pushthe brake lever forward until the chainbrake activates (position 2). The sawchain must stop immediately. If eitherof step 1 or step 2 tests fail, contact anauthorized shindaiwa dealer for repairs.
CAUTION!
Operating the saw at wide openthrottle for longer than 5 secondswithout a load could result in enginedamage.
Chain Brake Testing
■ Always stop the saw and disengage thechain brake before removing orreplacing the clutch cover!
■ Never make carburetor adjustmentswhile the chain brake is engaged!
Step 1
Step 2
13
Cutting with the Saw
THINK SAFETY!
Always use full throttle while cutting! Keep the chain sharp and let the saw do thework! Forcing the saw into the work reduces cutting performance, and can damagethe saw through overheating!
Clear a safework area
before cutting.
Stop the saw before moving it toor from the work area.
Wear hearing protectionand eye protection such
as a face shield orgoggles when operating
the unit.
Always weargloves whenoperating this
saw.Use full-throttle while
cutting and apply only enoughbar pressure to maintain engine
speeds of 9000-10,000 rpm(min-1).
Wear close-fittingclothing to protect
your legs and arms.Do not wear clothingor jewelry that couldget in the machinery
or brush.
Keep a proper footing(do not overreach)!Wear
appropriatenonskid footwear.
Never operate with a loosesaw chain!
Never operate the saw iffastenings are loose or
missing!Never operate the saw ifany component parts are
damaged, loose, ormissing!
IMPORTANT!
Always wear leg protection (Chaps)made of a cut-resistant material such
as ballistic nylon covering the fulllength of the thigh to the top of the
boot.
11
Carburetor AdjustmentsIMPORTANT!
A clean and unrestricted airflow isessential to your saw engine's perfor-mance and durability! Before attemptingany carburetor adjustments, inspect andclean the engine air filter as required!Procedures for maintaining your saw's airfilter are described on page 16 in thismanual.
Before starting the sawI. Inspect saw chain tension, and
adjust if necessary.
2. Verify that the chain brake isdisengaged, and that the sawchain is free to rotate.
Start the sawStart the saw and warm the engineto operating temperature. Place thesaw on the ground, and adjust thecarburetor as follows:
Idle speed adjustmentUse a screwdriver to slowly turn theidle speed adjusting screw in or outuntil the engine idles smoothly at2,600 - 3,000 rpm (min-1).
WARNING!
The saw chain must never rotate atengine idle speed.
Idle speed adjustment
Adjusting screw
Fuel mixtureadjustments
Low and High MixtureAdjustments.
Low-speed mixture (engine idlingat operating temperature)
1. Using a small screwdriver, slowlyturn the low speed mixture screwclockwise (lean mixture), and noteany changes in engine rpm.
2. Next, turn the low speed mixingscrew counter-clockwise (richmixture) and note any changes inengine rpm.
3. Adjust the low speed mixturescrew to provide the smoothestpossible idle with no sacrifice inacceleration.
4. If necessary, readjust the idlespeed screw for an engine idlespeed of 2,600 - 3,000 rpm (min-1).
CAUTION!
Do not run saw at full throttle with noload. If run in this condition, seizurecan occur.
CAUTION!
Do not adjust H-speed needle to lessthan 3/4 turn. If run at less than 3/4turn, seizure can occur.
Low and High speed adjustment.Standard opening.L .........................1 ± 1/4 turnsH ......................... 1 ± 1/4 turns
"Standard opening" means numberof turns from the fully closedposition by turning needle gentlycounter-clockwise
Low speedadjustment screw
High speed adjustment screw
High speed mixture
1. No adjustment is necessary whenthe saw is new.
2. After approximately 10 hoursrunning, readjust the H-needle to1.0 turn (5 1/4 turns).
14
Before Felling a Tree
1. Determine the direction of fall byinspecting:
� Tree shape and angle of lean.
� Size and shape/placement oflimbs.
� Location of nearby trees or otherobstacles.
� Condition of tree (damage, disease,etc.).
� Prevailing wind direction.
2. Clear a safe work area around thetree. Be alert for loose or deadlimbs overhead. Clear an appro-priate escape path approx. 45'from the direction of fall.
3. Notify nearby workers of yourintentions!
Felling Trees
Felling Small Trees
(Under 6” diameter)
1. Determine the direction of fall. Ifuncertain as to direction of fall,use the procedure "Felling LargeTrees" as outlined on the followingpage.
2. Start cutting on the side of thetree away from the fall, and makea single felling cut all the waythrough the tree.
3. Stop the saw, and put it down onthe ground.
4. Use your retreat path to exit thearea quickly.
Diseased, damaged, or otherwiseunbalanced trees can fall unpredict-ably during felling, and should be leftto an experienced timber faller!
WARNING!
EscapePath
Direction of Fall
Felling Larger Trees(Over 6” diameter)
If a tree is otherwise healthy and notseriously out of balance, its directionof fall can often be encouraged byfirst "notching" the tree on the sidefacing the desired direction of fall.
After the notch is completed, startthe felling cut slightly higher and onthe opposite side of the tree, awayfrom the direction of fall.
The goal of the method is to leave asturdy wooden "hinge" for the tree topivot on while falling.
1. Determine the direction of fall.
2. On the side of the tree facing thedirection of fall, make a single 90'cut through approx. 1/3 of thetree's diameter.
3. Working from the same side of thetree and at a 45' angle to the firstcut, make your second cut in anupward direction to remove anotch from the tree as shown.
4. Working on the opposite side ofthe tree and starting approxi-mately 2" higher than the bottomof the notch created in steps 1-3,make the final felling cut asshown.
5. Stop the saw, and put it down.
6. Use your retreat path to exit thearea quickly.
NOTE:
If the cut appears to be closing on the bar,
use a mallet to drive one or two plastic or
wooden wedges into the cut behind the
bar.
WARNING!
Failure to leave a proper woodenhinge during the falling or "back cut"can cause the tree to pinch the saw'sguide bar, and may also change thedirection of fall!
WARNING!
Always make your falling cut parallel tothe bottom cut! An angled falling cutmay cause the tree to split, possiblychanging the direction of fall!
Notch
Hinge
Direction ofFall
Felling Cut
10
5. With the spark plug removed, thechoke control pushed in and theignition control in the “OFF”position, clear any excess fuel inthe engine by rapidly and repeat-edly pulling the starter until noevidence of fuel is seen escapingfrom the spark plug opening.
6. Replace the spark plug and installthe spark plug lead and accesscover.
7. Refer to the Engine Start and Stopsection and follow the instructionsfor starting a warm engine.
8. If the engine still fails to start,refer to the TroubleshootingSection.
If the carburetor choke is closed(choke control fully extended) andafter repeated attempts, the enginefails to start, the engine may beflooded with fuel. The following stepsare recommended to clear a floodedengine.
The ignition switch must be in the“OFF” position to prevent the chanceof igniting fuel and/or fuel vaporsescaping from the engine during thisprocedure.
2. Push the choke control completelyin to open the choke.
3. Remove the spark plug accesscover and disconnect the plugwire. Remove the spark plug usingthe scrench supplied with thechain saw or other suitable tool.
4. Inspect the spark plug for damageor excessive wear and replace ifnecessary. If the spark plugelectrode is fuel soaked, or coatedwith carbon deposits, clean andset the plug gap. Refer to page 16of this manual in the maintenancesection for spark plug information.
Starting a Flooded Engine
Remove theSpark Plug
Crank Rapidly
1. Move the “ON/OFF” ignitioncontrol switch to the “OFF” posi-tion.
WARNING!
Remove spark plug
WARNING!Keep clear of the spark plug
opening! Any excess fuel in the enginewill be ejected through the spark plugopening during starter operation.
15
� Use two cuts when bucking theoutboard end of an unsupportedlog. Your first cut should be anunderbuck, cutting upwardthrough approximately 1/3 thediameter of the tree. Finally, moveto the top of the log and finish thecut by bucking down(overbucking) to your first cut.
LimbingLimbing a standing tree is usuallyaccomplished in the same manner asbucking, with a third and final cutused to remove the remaining stub ofthe limb.
NOTE:
When cutting unsupported logs or limbs,
starting with an underbuck cut will minimize
the possibility of the wood splitting during
the bucking cut.
First Cut (underbuck)About 1/3 of Tree Diameter
Second Cut (overbuck)
BuckingTechniques
� If the log is well supported, startyour cut from the top of the log.Keeping the guide bar parallel tothe ground, cut straight down butdo not allow the saw to cut intothe ground.
� Cutting downed timber, or "buck-ing," increases the possibility ofthe wood settling and pinchingthe guide bar. Driving one or moresoft plastic or wooden buckingwedges can help prevent bar-pinching during a cut.
� Use two cuts when bucking nearthe inboard end of an unsup-ported log.
1. Make the first cut as an overbuckapprox. 1/3 the diameter of thelog.
2. Finish the job with an underbuckcoming up from beneath andjoining the first cut.
WARNING!
Always cut downed timber from theuphill side of the wood! Be alert forpotential injury from rolling or shiftinglogs! Downed timber may shift or rollunpredictably during cutting orhandling operations!
WARNING!
Kickback danger increases in over-height or out of position cutting! Donot overreach, or attempt to cutabove shoulder height!
First Cut
Second Cut
3 2
1
9
Engine Start
CAUTION!
The recoil starter can be damagedby abuse!■ Never pull the starter completely
to the end of the starter cord.Fully extending the starter cordcan damage the starter spring,cord and/or starter assembly.
■ Never release the starter gripwith the starter rope extended.Always hold on to the grip duringengine start and return thestarter grip back to the starterhousing slowly as the starterspring retracts the rope.
NOTE:
If the engine fails to start, repeat the
starting procedure setting the choke control
appropriately for either a cold or warm
engine. If the engine still fails to start, refer
to the section, “Starting a Flooded Engine.”
1. Move the “ON/OFF” ignitioncontrol switch to the off position. Ifthe saw has just been used, allowthe engine to idle for 1 to 2 min-utes to stabilize engine operatingtemperature before stopping theengine.
Engine Stop
NOTE:
This engine ignition system is controlled by
a two-position “ON-OFF” switch labeled “I”
for ON and “O” for OFF located near the
rear handle.
3. Place the saw upright on theground.
4. Secure the saw by stepping on theinside of the rear handle with theright foot and firmly grasping thefront handle with the left hand.
WARNING!This chain saw is equippedwith a fast idle feature for
ease of engine starting. When thefast idle is set, the saw chain willrotate when the engine starts!Rotating saw chain can causeserious injury. Clear a safe workarea before starting the engine.
Cold Engine:
Completely close the choke bypulling the choke control out tothe fully extended position.
Warm Engine: Completely open thechoke by pushing the chokecontrol in.
1. Move the ignition ON-OFF switchto the ON position.
6. With the starter engaged, pull thestarter upward rapidly. Repeatuntil the engine either attempts tostart or starts.
7. When the engine attempts to startor starts, push the choke controlin if previously set. If the enginedid not continue to run, pull thestarter until the engine restartsthen rapidly accelerate the engineseveral times.
5. Grip the starter handle with theright hand and pull slowly untilstarter engagement is felt.
IMPORTANT!
This chain saw is equipped with a throttletrigger lock out system designed toprevent unintended throttle activation.This system requires the operator to firstdepress the throttle lock out lever on topof the rear handle to release the triggerfrom the engine idle position.
Fast Idle Setting
3
2
1
2. Set the throttle to “fast idle”.To set the throttle to “fast idle”position:
Grip the rear handle to depressthe throttle lock out lever.
n fDepress the throttle trigger.
Slide the fast idle lock against thethrottle lockout lever then releasethe lockout lever and trigger.Depress and release the throttletrigger to automatically release thefast idle lock and return thethrottle to idle position.
1
2
3
16
IMPORTANT!
The 488P uses a high capacity dry-typeair filter element. The filter should not becleaned with a liquid cleaner and mustNEVER be oiled.
Maintenance
WARNING!
Before performing anymaintenance on this saw, stop theengine and disconnect the sparkplug wire!
Daily Maintenance1. Remove dirt and debris from the
saw exterior, cylinder fins, andcooling air intake.
� Remove the air cleaner, beingcareful not to drop dust in thecarburetor.
Make sure the choke lever ispulled when removing the aircleaner. Dust tends to accumulateon the bottom surface.
Rinse the air cleaner with soapand water, allow the element todry before reinstalling.
� Working in reverse order of disas-sembly reassemble the air filterelements and cover to the saw.
2. Inspect the saw for fuel and oilleaks. Repair as necessary.
Remove all debris.
3. Service the air filter.
(488)
CleanerCover
Air Cleaner (UPPER)
Air Cleaner (LOWER)
Choke Lever
488
488P
(488P)
� (Pre-filter) Remove the air cleanerelement from the carburetor andwash it with soap and water. Rinsethe element thoroughly with cleanwater. Squeeze out the water andallow the element to dry beforereinstalling.
10/15 Hour Maintenance
1. Remove and clean the spark plug.Adjust the spark plug gap to 0.024"(0.6mm), and reinstall. Replace anydamaged or visibly worn plug with aNGK BPMR7A or equivalent sparkplug.
2. Remove the guide bar and chain.Carefully inspect the drive sprocketfor wear or damage, and replace ifnoted. Inspect the guide bar groovesand tip for wear or damage, andrepair or replace components asrequired.
IMPORTANT!The drive sprocket and saw chain loopshould always be replaced as a set! Foreconomy, rotate the same 2-3 chainsdaily. When these chains are worn out,replace both the chains and drivesprocket at the same time.
CAUTION!
Never allow chips or other debristo enter the cylinder bore! Beforeremoving the spark plug, thor-oughly clean the spark plug andcylinder head area!
.024”(.6mm)
� (Dry type filter) Inspect the filter. Ifthe element is damaged or dis-torted, replace it with a new one.
IMPORTANT!
Direct the air stream only at the insideface of the filter.
� Gently, tap filter on a hard surfaceto dislodge debris from element oruse compressed air to blow debrisfrom the air filter element.
4. Sharpen and adjust the sawchains as required.
5. Clean the guide bar groove and oilhole, and inspect the bar grooveand tip for damage or unusualwear. Repair or replace worn ordamage components as necessary.
6. Inspect the entire saw for dam-aged, loose or missing componentsor fastenings. Repair as necessary.
� Working in reverse order of disas-sembly reassemble the air filterelements and cover to the saw.
8
3. Refer to following chart forexamples of 50:1 fuel to oil mixquantities.
Mixing Fuel/Filling With Fuel
WARNING!
Minimize the risk of fire burns andpersonal injury!
IMPORTANT!
Shindaiwa high-performance 2-cycleengines are designed to operate on a50:1 mixture of unleaded gasoline and 2-cycle engine oil. Using a fuel mixture lessthan 50:1 ratio (such as 80:1 or 100:1)can cause catastrophic engine failure!
■ STOP engine before refueling.■ ALWAYS allow the engine to cool
before refueling!■ ALWAYS open the fuel cap slowly
to allow any pressure buildup inthe tank to release fuel vaporslowly.
■ Wipe all spilled fuel and move theengine at least 10 feet (3 meters)from the fueling point and sourcebefore restarting!
■ NEVER start or operate thisunit if there is a fuel leak.
■ NEVER start or operate thisunit if the carburetor, fuel lines,fuel tank and/or fuel tank cap aredamaged.
■ NEVER smoke or light any firesnear the engine or fuel source!
■ NEVER place any flammablematerial near the engine muffler!
■ NEVER operate the engine withoutthe muffler and spark arrester ingood working condition.
CAUTION!
� Some types of gasoline containalcohol. Never use any type ofgasoline containing more than10% alcohol by volume! Morethan 10% alcohol by volume mayaffect the lubricating qualities of 2-cycle engine oils reducing enginelife and/or causing engine failure.
� Generic engine oil and marineengine oil may not be intended foruse in high-performance 2-cycleengines and should never beused in Shindaiwa engines.Engine oils not intended for usehigh-performance air-cooled 2-cycle engines can cause exces-sive carbon deposits, reduceengine life and/or cause enginefailure.
1. Use only fresh, clean unleadedgasoline with a pump octanerating of 87 or higher.
2. Mix fuel with a 2-cycle engine oildesigned for use in high-perfor-mance 2-cycle air-cooled engines.
NOTENOTENOTENOTENOTE: Shindaiwa offers two performancelevels of 2-cycle air-cooled engine oils,Shindaiwa Premium 2-Cycle Engine Oiland Shindaiwa ONE High Performance2-Cycle Engine Oil. Shindaiwa Premium2-Cycle Engine Oil is designed to meetthe lubrication demands of most 2-cycleair-cooled engines. Shindaiwa ONE HighPerformance 2-Cycle Engine Oil isrecommended when superior lubricationis needed to help protect engines used insevere operating conditions. ShindaiwaONE also contains a fuel stabilizer tohelp maintain fuel quality when fuel isstored longer than 30 days.
Oil Requirements� When available, use Shindaiwa
Premium bar & chain oil.
� When Shindaiwa oil is not avail-able, use a premium 30-weight oilspecifically blended for bar &chain lubrication.
� For cold weather operation, bar oilmay be thinned by mixing withclean kerosene at a ratio of 1:1.
Filling the Oil Reservoir� Place the saw on its side (clutch
cover down), and wipe any chipsor debris from around the oil cap.
� Remove the oil cap at the front ofthe saw.
� Fill the oil reservoir with bar &chain oil, and replace the cap.
� Wipe spilled oil from handles andcontrols before starting the saw.
Bar Oil/Filling With Oil
CAUTION!
Proper lubrication is critical to theperformance and service life of yoursaw's oil pump, guide bar, and sawchain! Always use a high qualitylubricating oil designed for saw chainlubrication! Never use dirty orreclaimed oil!
Oil Pump Adjustment
Guide bar and saw chain lubricationis automatically provided by anadjustable-rate oil pump designed tooperate whenever the clutch drumrotates. A temporary increase in oilflow rate is often desirable whencutting hardwoods or large-diametersoftwoods, and can be provided asfollows:
1. Stop the engine and verify that theengine stop switch is in the "OFF"position.
2. Place the saw on its side, with theclutch cover facing up.
3. Use a screwdriver to push downand turn the oil flow rate adjust-ment screw.
� Clockwise to decrease bar & chainlubrication.
� Counter-clockwise to increase bar& chain lubrication.
Counter-Clockwiseto Increase Oil
Flow
Gasoline 2-cycle oilU.S. Gal. U.S. fl. oz.1 gal. ................ 2.6 oz.2 gal. ................. 5.2 oz.2.5 gal. .............. 6.4 oz.5 gal. ................. 12.8 oz.
Gasoline 2-Cycle Oilliters milliliters2.5 l ................... 50 ml5 l ...................... 100 ml10 l .................... 200 ml20 l .................... 400 ml
4. Place the saw on a hard surfacewith the fuel cap up and wipe anychips or debris from around thefuel cap.
5. Remove the fuel cap and fill thetank with clean, fresh 2-cycle fuelmix. Avoid overfilling and fuelspillage.
6. Wipe any spilled fuel and move thesaw at least 10 feet (3 meters)from the fueling point beforestarting the engine.
17
40/50 Hour Maintenance
1. Replace the spark plug with a NGKBPMR7A (or equivalent), gapped to0.024" (0.6mm).
2. Extract the fuel filter from inside thefuel tank, and then remove andreplace the filter element. Beforereplacing the filter, inspect thecondition of the fuel line. If damageor deterioration are noted, the sawmust be removed from service untilit can be inspected by a Shindaiwa-trained service technician.
3. Extract the oil filter from inside theoil tank, and then wash the filterelement in an approved solvent. Ifdamage or deterioration are notedon the oil suction line, the saw mustbe removed from service until it canbe inspected by a Shindaiwa-trainedservice technician.
Fuel Line
FuelFilter
Spark Arrester Maintenance
� Thoroughly clean the saw exterior.Remove all chips and other debrisfrom the cylinder fins and coolingpassages.
� Drain the fuel tank, and then clearthe carburetor and lines by run-ning the saw until it stops fromlack of fuel.
Hard starting or a gradual loss ofperformance can be caused bycarbon deposits lodged in themuffler's spark arrester screen. Formaximum performance, the arresterscreen should be periodically re-moved and cleaned with a small wirebrush.
CAUTION!
Never store the saw with any fuelremaining in the tank, fuel lines, orcarburetor! Your Shindaiwa warrantydoes not include coverage for damagecaused by "stale" or contaminatedfuels!
� Drain any remaining bar oil fromthe oil reservoir.
� Remove the spark plug, and thenpour 1/4-oz of 2-cycle engine oilinto the cylinder through thespark plug hole. Before reinstall-ing the spark plug, slowly pull therecoil starter 2-3 times to distrib-ute the oil over the cylinder walls.
� Remove, clean, and reinstall theair filter element as describedunder "daily maintenance."
� Repair or replace any damagedcomponents as required, and thenstore the unit in a clean, dry,dust-free area.
Long Term Storage
(over 30 days)
CAUTION!
Carbon deposits in the combustionchamber or exhaust port cannot beremoved in the field. For further decar-bonization, return the 488 to yourShindaiwa dealer.
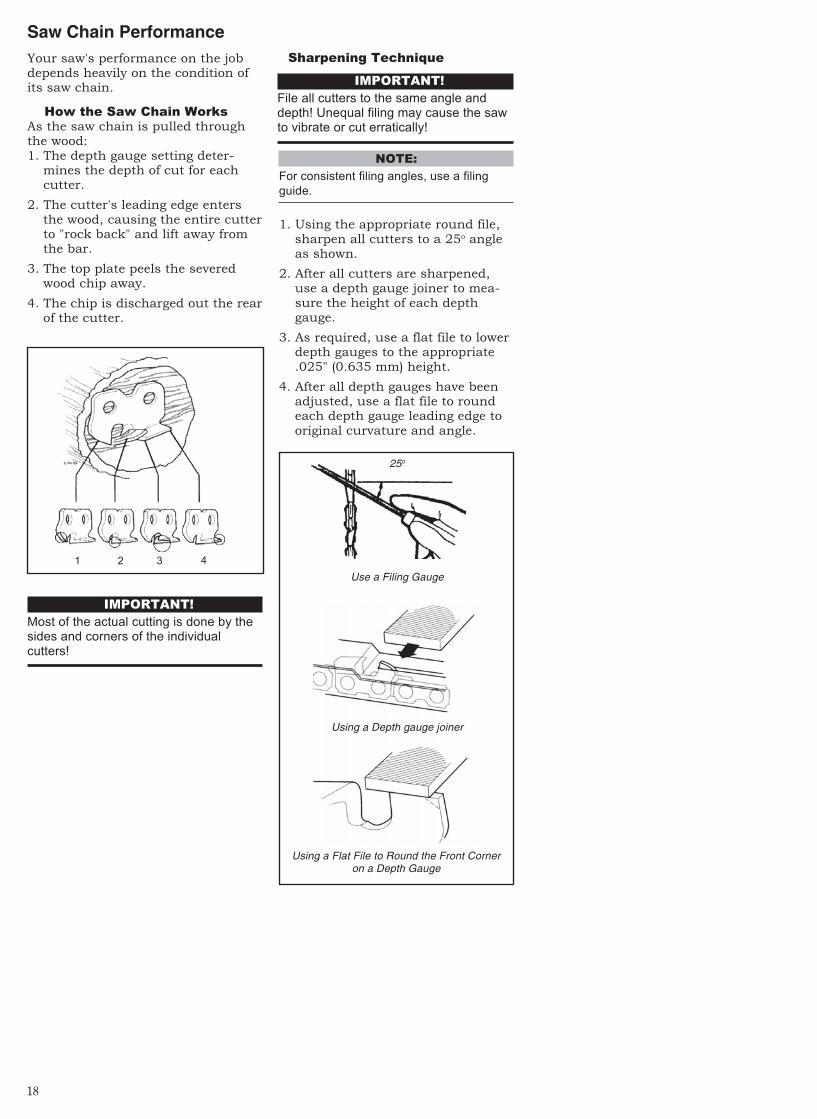
7
Check the gap between chainside plates and the bar rail.
1/8”Max.
Installing and Adjusting the Guide Bar and Saw ChainNOTE:
For longest chain life, place new or
replacement chain loops in oil and
soak overnight before installation.
CAUTION!
Failure to align the guide bar andchain tensioner pin can cause seri-ous damage to the clutch cover, guidebar, tensioner pin, and/or enginecrankcase!
5. Install the chain loop over the drivesprocket, and then align the chaindrive links within the guide bargroove. Verify that the cutters areproperly oriented as shown. (inset toabove). If chain installation isdifficult or if the chain appears tootight, refer to "Adjusting the Sawchain,".
6. Install the clutch cover over the barstud(s) and install the bar nut(s)finger tight.
WARNING!
The cutters on the saw chainare very sharp! Always weargloves when handling.
WARNING!
Never operate this sawwithout the clutch coverinstalled.
Guide plate (A)
Spacer (discard)
Nut
Stud
Clutch Cover
Guide plate (B)
Chain tensioner pin
Hole in guide bar fitsover chain tensioner pin Bottom of bar
Top of bar
Chain orientation
BAR TIP
7. Place the saw on a flat surface andlift the bar nose slightly.
8. To adjust chain tension:
� Turn the chain tension screwclockwise to tighten the chain.
� Turn the chain tension screwcounter-clockwise to loosen thechain.
Chain AdjustingScrew
Turn Clockwise toTighten the Chain(extend the guide
bar)
Re-Adjusting the Saw Chain
WARNING!
Inspect chain tension oftenduring operation, especially
when breaking in a new chain. Aloose saw chain can jump from theguide bar, possibly causing seriouspersonal injury!
1. Use the socket wrench to remove the clutch cover nut(s) in a counter-clockwise rotation.2. Remove the clutch cover.3. Remove and discard the packing spacer.
IMPORTANT!
The chain brake must be completelydisengaged before removing or installingthe clutch cover.
4. Place the guide bar over the guide bar stud(s) and chain tensioner pin.
� While lifting the bar nose, tightenor loosen the adjusting screw untilthe chain at mid-bar on thebottom of the bar just contacts theguide bar rails.
9. Tighten the bar nut(s). The sawchain tension is correct whenthere is not any slack on thebottom of the guide bar but thesaw chain can move freely.
1. To adjust chain tension in thefield: Stop the saw and allow theguide bar and chain to cool.Loosen both bar nuts approx. 1-turn each, and then perform steps7-9 above. Never operate the sawwith a loose chain!
18
Your saw's performance on the jobdepends heavily on the condition ofits saw chain.
How the Saw Chain WorksAs the saw chain is pulled throughthe wood:1. The depth gauge setting deter-
mines the depth of cut for eachcutter.
2. The cutter's leading edge entersthe wood, causing the entire cutterto "rock back" and lift away fromthe bar.
3. The top plate peels the severedwood chip away.
4. The chip is discharged out the rearof the cutter.
IMPORTANT!
Most of the actual cutting is done by thesides and corners of the individualcutters!
Saw Chain Performance
NOTE:
For consistent filing angles, use a filing
guide.
1. Using the appropriate round file,sharpen all cutters to a 25o angleas shown.
2. After all cutters are sharpened,use a depth gauge joiner to mea-sure the height of each depthgauge.
3. As required, use a flat file to lowerdepth gauges to the appropriate.025" (0.635 mm) height.
4. After all depth gauges have beenadjusted, use a flat file to roundeach depth gauge leading edge tooriginal curvature and angle.
1 2 3 4
IMPORTANT!
File all cutters to the same angle anddepth! Unequal filing may cause the sawto vibrate or cut erratically!
Sharpening Technique
Use a Filing Gauge
Using a Depth gauge joiner
Using a Flat File to Round the Front Corneron a Depth Gauge
25o
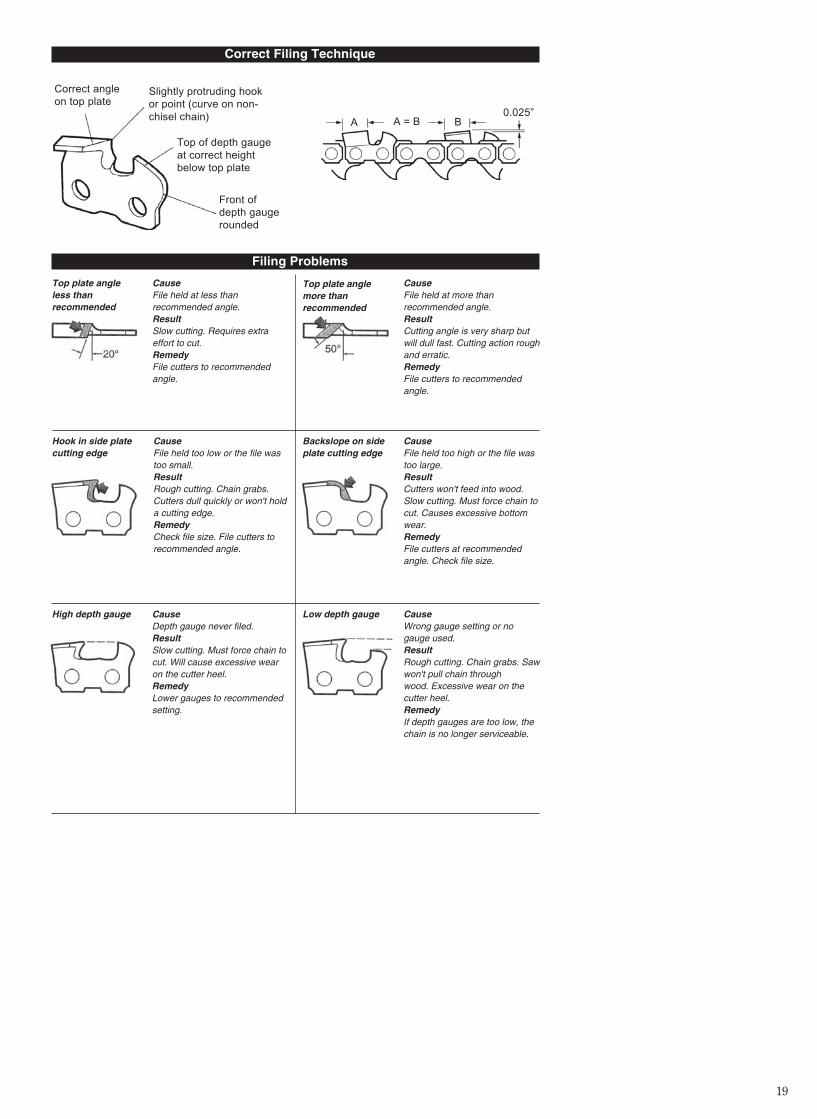
6
488EMC 488PEMC2-cycle gas engine, vertical cylinder
47.9cc (2.92 cu.in.)4.6 kg (10.2 lbs)
50:1 with Shindaiwa 2-Cycle Engine Oil
600ml (20.2 oz)
300ml (10.1 oz)Walbro HDA165
CDI (Capacitor Discharge Ignition)Forced Air
NGK BPMR7A
Automatic centrifugal clutch
Recoil StarterToggle Switch
Anti-vibration, independently vibration
dampened front and rear handles.
Front hand guard, rear hand guard,
throttle lock, chain brake and chaincatcher
Automatic Adjustable Oiler
Technical SpecificationsModel Name ..........................................................................................
Engine Type ..........................................................................................
Displacement ........................................................................................
Weight (less bar & chain) .......................................................................
Fuel/Oil Ratio .......................................................................................
Fuel Tank Capacity ...............................................................................
Oil Tank Capacity ..................................................................................
Carburetor ............................................................................................
Ignition System .....................................................................................
Cooling System......................................................................................
Spark Plug ............................................................................................
Power Transmission ..............................................................................
Starting Method ....................................................................................
Stopping Method ...................................................................................
Handle ..................................................................................................
Safety Devices .......................................................................................
Specifications subject to change without notice.
Tools Included
■ Screwdriver
■ Spark plug/13mm socket wrench(Scrench)
WARNING!
Do not make unauthorizedmodifications to this saw,guide bar, or chain!
Recommended Bar and Chain Combinations
WARNING!Replacement chain forthis saw must meetapplicable ANSI B175.1
kickback performance requirementsand/or be designated as "lowkickback chain" per ANSI B175.1-2000 standards.
IMPORTANT!
The terms “left, left-hand”, and “LH”;
“right”, “right-hand”, and “RH”; “front”
and “rear” refer to directions as viewed
by the operator during normal opera-
tion of this product.
IMPORTANT!
The operational procedures described in
this manual are intended to help you get the
most from this unit and also to protect you
and others from harm. These procedures
are general guidelines only, and are not
intended to replace any additional safety
rules or laws that may be in force in your
area. If you have any questions regarding
your Shindaiwa chain saw, or if you do not
understand something in this manual, your
Shindaiwa dealer will be glad to assist you.
For additional information, you may also
contact Shindaiwa Inc. at the address
printed on the back of this manual.
Chain Lubrication .................................................................................
Chain Type: Oregon ®
33SL (16”)
Guide Bar
16" Double-Guard
Sprocket Nose Bar
Chain Type: Oregon ®
33SL (18”)
Guide Bar
18" Double-Guard
Sprocket Nose Bar
Chain Type: Oregon ®
33SL (20”)
Guide Bar
20" Double-Guard
Sprocket Nose Bar
19
Correct Filing Technique
Filing Problems
Top plate angleless thanrecommended
Low depth gauge
Backslope on sideplate cutting edge
Top plate anglemore thanrecommended
High depth gauge
Hook in side platecutting edge
CauseFile held at less thanrecommended angle.ResultSlow cutting. Requires extraeffort to cut.RemedyFile cutters to recommendedangle.
CauseFile held too low or the file wastoo small.ResultRough cutting. Chain grabs.Cutters dull quickly or won't holda cutting edge.RemedyCheck file size. File cutters torecommended angle.
CauseWrong gauge setting or nogauge used.ResultRough cutting. Chain grabs. Sawwon't pull chain throughwood. Excessive wear on thecutter heel.RemedyIf depth gauges are too low, thechain is no longer serviceable.
CauseDepth gauge never filed.ResultSlow cutting. Must force chain tocut. Will cause excessive wearon the cutter heel.RemedyLower gauges to recommendedsetting.
CauseFile held too high or the file wastoo large.ResultCutters won't feed into wood.Slow cutting. Must force chain tocut. Causes excessive bottomwear.RemedyFile cutters at recommendedangle. Check file size.
CauseFile held at more thanrecommended angle.ResultCutting angle is very sharp butwill dull fast. Cutting action roughand erratic.RemedyFile cutters to recommendedangle.
Correct angle
on top plateSlightly protruding hook
or point (curve on non-
chisel chain)
Top of depth gauge
at correct height
below top plate
Front of
depth gauge
rounded
A A = B B0.025”
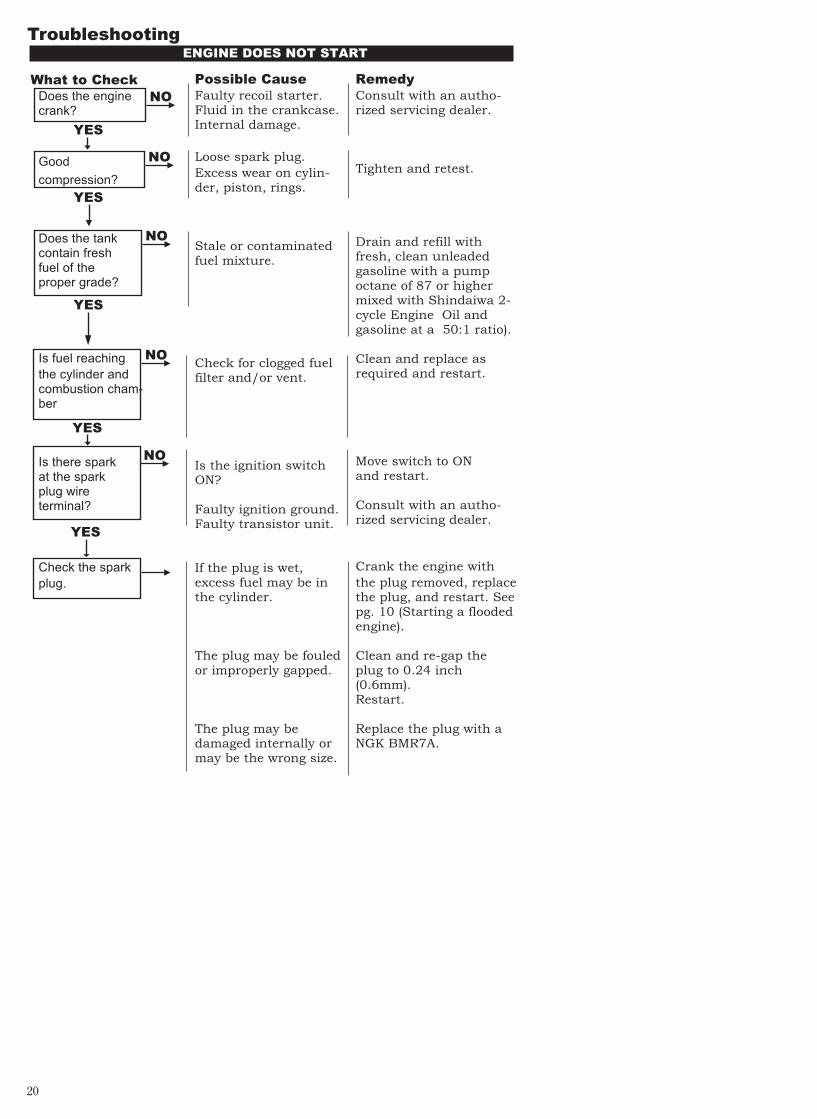
5
IMPORTANT!
Safety and Operation InformationLabels: Make sure all information labelsare undamaged and readable. Immedi-ately replace damaged or missinginformation labels. New labels areavailable from your local authorizedShindaiwa dealer.
Safety Labels
123456789012345678123456789012345678123456789012345678123456789012345678123456789012345678123456789012345678123456789012345678123456789012345678123456789012345678123456789012345678123456789012345678123456789012345678123456789012345678123456789012345678123456789012345678123456789012345678123456789012345678123456789012345678123456789012345678123456789012345678123456789012345678123456789012345678
For replacementuse Shindaiwa®
brand 16”, 18”, or20” Guard-Tip bar
with Oregon®
33SL, Carlton®
KICGL chain.Other low-kickcombinations
may be available.
123456789012345678901234123456789012345678901234123456789012345678901234123456789012345678901234123456789012345678901234123456789012345678901234123456789012345678901234123456789012345678901234123456789012345678901234123456789012345678901234123456789012345678901234123456789012345678901234123456789012345678901234123456789012345678901234123456789012345678901234123456789012345678901234
This saw is
equipped with a
USDA-FS approved
model 488 muffler
system.
123456789012345678901123456789012345678901123456789012345678901123456789012345678901123456789012345678901123456789012345678901123456789012345678901123456789012345678901123456789012345678901123456789012345678901123456789012345678901123456789012345678901123456789012345678901123456789012345678901123456789012345678901123456789012345678901123456789012345678901123456789012345678901
WARNING!Read and follow allsafety precautions inthe owner’s manual.Failure to followinstructions couldresult in seriouspersonal injury.
Unit Description
488
Guide Bar
Saw Chain
Front Handle
Brake LeverHand Guard
Chain Oil Filler Cap
Fuel Filler CapStarter Handle
Throttle Trigger
Rear Handle
LockLever
Choke
488P
Brake LeverHand Guard
Oil Filler Cap
Front Handle
Starter HandleFuel Filler Cap
Air Cleaner Cover
Choke
Ignition Switch
Guide Bar
Saw Chain
Throttle Trigger
488Muffler
Clutch Cover
Spike
123456789012345678912345678901234567891234567890123456789123456789012345678912345678901234567891234567890123456789123456789012345678912345678901234567891234567890123456789123456789012345678912345678901234567891234567890123456789123456789012345678912345678901234567891234567890123456789123456789012345678912345678901234567891234567890123456789123456789012345678912345678901234567891234567890123456789123456789012345678912345678901234567891234567890123456789
ALWAYS wear
eye protection
when operating
this machine
488P
Rear Handle
20
What to Check
Does the enginecrank?
Good
compression?
Does the tankcontain freshfuel of theproper grade?
Is fuel reaching
the cylinder andcombustion cham-ber
Is there sparkat the sparkplug wireterminal?
Check the spark
plug.
Possible Cause
Faulty recoil starter.Fluid in the crankcase.Internal damage.
Loose spark plug.
Excess wear on cylin-der, piston, rings.
Stale or contaminatedfuel mixture.
Check for clogged fuelfilter and/or vent.
Is the ignition switchON?
Faulty ignition ground.Faulty transistor unit.
If the plug is wet,excess fuel may be inthe cylinder.
The plug may be fouledor improperly gapped.
The plug may bedamaged internally ormay be the wrong size.
Remedy
Consult with an autho-rized servicing dealer.
Tighten and retest.
Drain and refill withfresh, clean unleadedgasoline with a pumpoctane of 87 or highermixed with Shindaiwa 2-cycle Engine Oil andgasoline at a 50:1 ratio).
Clean and replace asrequired and restart.
Move switch to ONand restart.
Consult with an autho-rized servicing dealer.
Crank the engine with
the plug removed, replacethe plug, and restart. Seepg. 10 (Starting a floodedengine).
Clean and re-gap theplug to 0.24 inch(0.6mm).Restart.
Replace the plug with aNGK BMR7A.
YES
NO
YES
YES
NO
NO
NO
YES
NO
YES
ENGINE DOES NOT START
Troubleshooting
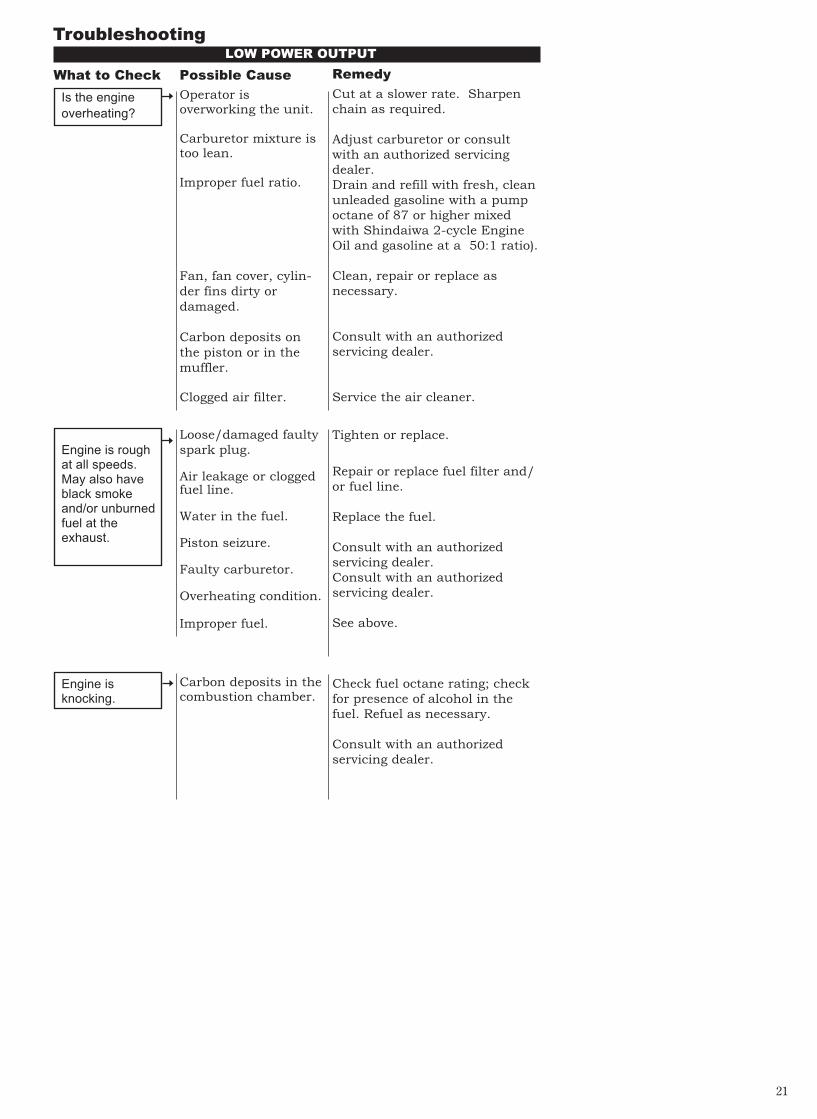
4
■ Use extreme caution when cuttingsmaller brush and saplings!Small-diameter material maycatch in the chain and bewhipped toward you or pull youoff balance, causing you to losecontrol of the saw!
■ Operate the saw only in a wellventilated area.
■ Keep the saw handles dry, cleanand free of oil or fuel mixture.
■ Never operate any saw while in atree unless you have been specifi-cally trained to do so!
■ Never perform service or repairsto this saw unless you are specifi-cally trained and equipped to doso!
■ Improper maintenance, use ofnonconforming replacementcomponents, or the removal ofsafety devices, such as the chainbrake or any of the chain brakecomponents, could result inserious injury.
■ Never allow any part of your bodynear the clutch cover of anoperating saw.
■ Never operate a saw with dam-aged or missing anti-vibrationcushions. Long-term exposure tovibration can damage your hands.
■ Always maintain a firm footingwhile operating this saw! Laddersand other temporary platformscan shift unexpectedly, and arenot recommended!
WARNING!
NOTE:
These safety precautions are in-
tended primarily for consumers or
occasional users. When using this
chain saw for logging purposes, refer
to: CFR Section 1910. 266 (5); 2.5.1
of the American National Safety
Standard; Requirements for Pulp-
wood Logging ANSI 03.1-1978; and
any applicable state safety codes.
■ Never operate this chain saw withone hand! One-handed operationcould cause you to lose control,causing serious injury to yourselfor others! A chain saw is in-tended for two-handed use.
■ Wear safety footwear, snug-fittingclothing, protective gloves, andeye, hearing, and head-protectiondevices while working with thischain saw.
■ Do not allow other persons to benear the chain saw when startingor running the chain saw. Keepbystanders and animals out ofthe work area.
■ Never allow young children orany person unfamiliar with chainsaws to operate this saw!
■ Clear the work area before usingthe saw. Never start cutting untilyou are sure you have a securefooting and have planned aretreat path from the falling tree.
■ Before starting the saw engine,make sure nothing is touching thesaw chain.
■ Keep all parts of your body awayfrom the saw chain whenever theengine is running!
■ Stop the engine before carrying thesaw. Carry the saw with the enginestopped, the guide bar and sawchain pointing to the rear, and theengine muffler away from yourbody.
■ Never operate this chain saw if youare fatigued.
■ Stop the engine before setting thechain saw down.
■ Install the appropriate guide-barscabbard before transporting thesaw.
■ Never operate a saw that is dam-aged, improperly adjusted, or notcompletely and securely as-sembled.
■ Use only Shindaiwa-recommendedparts when repairing or servicingthis saw.
■ Do not use this saw if the sawchain continues to move after thethrottle control trigger is released.
■ Use extra care when cutting a limbthat is under tension! A limb undertension could spring back sud-denly, causing you to lose controlof the saw!
Additional Safety Precautions
21
What to Check
Is the engine
overheating?
Engine is roughat all speeds.May also haveblack smokeand/or unburnedfuel at theexhaust.
Engine isknocking.
LOW POWER OUTPUT
Troubleshooting
Possible Cause
Operator isoverworking the unit.
Carburetor mixture istoo lean.
Improper fuel ratio.
Fan, fan cover, cylin-
der fins dirty or
damaged.
Carbon deposits on
the piston or in the
muffler.
Clogged air filter.
Loose/damaged faulty
spark plug.
Air leakage or cloggedfuel line.
Water in the fuel.
Piston seizure.
Faulty carburetor.
Overheating condition.
Improper fuel.
Carbon deposits in thecombustion chamber.
Remedy
Cut at a slower rate. Sharpen
chain as required.
Adjust carburetor or consult
with an authorized servicing
dealer.
Drain and refill with fresh, clean
unleaded gasoline with a pump
octane of 87 or higher mixed
with Shindaiwa 2-cycle Engine
Oil and gasoline at a 50:1 ratio).
Clean, repair or replace as
necessary.
Consult with an authorized
servicing dealer.
Service the air cleaner.
Tighten or replace.
Repair or replace fuel filter and/
or fuel line.
Replace the fuel.
Consult with an authorized
servicing dealer.
Consult with an authorized
servicing dealer.
See above.
Check fuel octane rating; check
for presence of alcohol in the
fuel. Refuel as necessary.
Consult with an authorized
servicing dealer.

3
Either of the following reactionscould cause you to lose control ofyour saw while cutting, possiblyresulting in serious injury!
1. Kickback can occur whenever theguide bar nose or tip contact anobject while the saw is running.Tip contact may cause the guidebar to kick upward and backtoward the operator, with alightning-fast reaction!
2. Pinching the saw along the top ofthe guide bar may push the guidebar rapidly back toward theoperator! Pinching can occurwhenever wood closes in aroundthe moving chain!
Do not rely exclusively on the safetydevices incorporated with your saw.As a chain saw user, observing thefollowing steps will also help you toavoid accident or injury on the job:
■ Sudden surprise can contributeto accidents! With a basic under-standing of kickback, you canreduce or eliminate the element ofsurprise.
■ Clear obstructions from the workarea before cutting. Remove anylog, branch, or other obstructionthat might contact the guide bartip during cutting operations.
Kickback Safety Precautions
■ Grip the saw firmly with yourright hand on the rear handleand your left hand on the fronthandle, thumbs and fingersencircling the handles, wheneverthe saw is running. Don't let go:A firm grip will help you toreduce kickback while maintain-ing control of the saw.
■ Accelerate the saw before thechain contacts the work area,and always maintain high enginespeeds throughout the cut.
■ Do not overreach or attempt tocut above shoulder height.
■ Follow the manufacturer'sinstructions for sharpening andmaintenance of the saw chain.
■ Use only the replacement barand chain combinations specifiedby the manufacturer.
■ Never stand directly over the sawwhile cutting!
■ Use low-kickback chain, chainbrakes, or special guide bars toreduce the risk of kickback. Lowkickback chain is chain that hasmet the kickback performancerequirements of ANSI B175.1-2000 (American National Stan-dard for Power Tools-GasolinePowered Chain Saws-Safetyrequirements) when tested on therepresentative sample of chainsaws below 3.8 c.i.d. specified inANSI B175.1-2000.
Kickback Safety
This saw is equipped with the follow-ing safety equipment:
1. Inertia chain brake.
2. Low kick chain.
� Activating the chain brake tight-ens a brake band around thechain drive mechanism, stoppingall chain rotation. When suddenkickback occurs, the chain breakis automatically actuated and thechain stops instantly. Also, thechain break can be activatedmanually.
� Low-kick chain can significantlyreduce the rotational force ofkickback.
� Some bars are manufactured witha reduced-radius (smaller) nose.This special guide bar can reducekickback by placing fewer cuttersin the kickback zone.
WARNING!To reduce the risk of kick-back, all of the above de-vices must be properly in-
stalled and in good repair! Use ofother than ANSI B175.1- 2000 com-binations may result in reduced kick-back protection!
WARNING!Brake engagement and op-eration depend upon properadjustment! For proper chain
brake testing and adjustment proce-dures, see page 12.
WARNING! WARNING!
WARNING!Kickback canhappenlightning-fast!
22
Symptom
Poor
acceleration.
Engine stops
abruptly.
Engine difficultto stop or willnot stop.
Chain rotates
at idle speed.
Excessive
vibration
Possible Cause
Clogged air filter.
Clogged fuel filter.
Chain brake engaged.
Carburetor mixture toorich or too lean.
Idle speed set too low.
Switch turned off.
Fuel tank empty.
Clogged fuel filter.
Water in the fuel.
Shorted spark plug orloose terminal.
Ignition coil faulty.
Piston seizure.
Ground (ignition switch)wire is disconnected, orswitch is defective.
Overheating due toincorrect spark plug.
Overheated engine.
Engine idle to fast.
Broken clutch spring orshoe.
Worn or damagedsprocket, chain, or bar.
Bent crankshaft
Remedy
Clean the air cleaner element.
Replace the fuel filter.
Inspect and/or test brake.Return to dealer as required.
Consult with an authorizedservicing dealer.
Adjust: 2,600-3,000 rpm (min-1).
Set the switch to (“ON”) and
restart.
Refuel.
Clean or replace filter asrequired.Drain; replace with clean fuel.
Clean or replace spark plug.Tighten the terminal.
Replace the ignition unit.
Consult with an authorizedservicing dealer.
Consult with an authorizedservicing dealer.
Correct plug: NGK BMR7A.
Idle engine until cool.
Set idle: 2,600-3,000 rpm (min-1).
Replace spring/shoes asrequired.
Inspect and replace chain
components as required.
Consult with an authorizedservicing dealer.
ADDITIONAL PROBLEMSTroubleshooting

MODEL 488EMC, 488PEMC
CHAIN SAW
488
488P
Part Number 69008-94310 Rev. 8/04
WARNING!
SHINDAIWA OWNER’S/OPERATOR'S MANUAL
Minimize the risk of injury to yourself and others! Readthis manual and familiarize yourself with the contents.Always wear eye and hearing protection when operatingthis unit.
Shindaiwa Inc.11975 S.W. Herman RoadTualatin, Oregon 97062Telephone: 503 692-3070FAX: 503 692-6696www.shindaiwa.com
Shin-Daiwa Kogyo Co., Ltd.Head Office: 6-2-11 OzukaNishi, Asaminami-kuHiroshima, 731-3167, JapanTelephone: 81-82-849-2220FAX: 81-82-849-2481
© 2004 Shindaiwa, Inc.
Part Number 69008-94310
Revision 8/04
Printed in Japan
Specifications subject to change without notice.