Embed Size (px)
Citation preview
Sharing and Maintaining SLES11 SP1 Linux under z/VM using FBA disks DCSSs and an NSS
Written by: Michael MacIsaac and Jeng-Fang Wang of IBM,
Craig Collins and Robert Taylor of the State of Wisconsin April, 2011
© Copyright IBM 2011 1
Sharing and Maintaining SLES11 SP1 Linux under z/VM using DCSSs and an NSS
Section 1: IntroductionThis paper shows how to use Dis-contiguous Saved Segments (DCSSs) and a Named Saved System (NSS) with the conceptof a read-only root file system. The use of DCSSs offers the possibility of performance gains.
The Web site associated with this paper is:http://www.vm.ibm.com/linux/dcss/
Also, see the z/VM® performance report entitled DCSS Above 2 GB, on the Web at:http://www.vm.ibm.com/perf/reports/zvm/html/540dcss.html
The sections in this paper after this introduction are as follow:
1. Background on DCSSs and NSSs on page 3
2. Summary of virtual machines on page 5
3. Planning the Linux memory footprint on page 7
4. Creating a read-write cloning system on page 9
5. Creating a DCSS for swapping on page 23
6. Creating a read-only cloning system on page 38
7. Maintaining systems on page 581b0
8. z/VM source code on page 66
9. Linux source code on page 68
1.1 Prospective readersThis white paper is written for system administrators who want to implement the environment and techniques describedwithin, on the mainframe platform using z/VM Version 6 Release 1 (V6.1) and Novell® SUSE® Linux Enterprise Server 11(SLES11 SP1).
1.2 HistoryThis paper follows from four previous papers:
1) The paper Sharing and Maintaining SLES 11 Linux under z/VM using DCSSs and an NSS , March 2010 - shows how touse Dis-contiguous Saved Segments (DCSSs) and a Named Saved System (NSS) with the concept of a read-only root filesystem. It is on the Web at:
http://www.vm.ibm.com/linux/dcss/ror-s11.pdf
2) Sharing and maintaining RHEL 5.3 Linux under z/VM, September 2009 - this paper took the work on Novell's SLES andadapted it for Red Hat's RHEL 5.3. It was published in September of 2009 on the Web at:
http://linuxvm.org/present/ro-root-RH5.pdf
3) Sharing and maintaining SLES 10 SP2 Linux under z/VM, July 2009 - most of the input came from system administratorsat Penn State University. This paper upgraded the Linux distribution to SLES 10 SP2, and it elaborated on the maintenance
© Copyright IBM 2011 2

system. It is on the Web at:
http://www.vm.ibm.com/devpages/mikemac/ROR-S10.PDF
4) The IBM Redpaper Sharing and maintaining Linux® under z/VM, February 2008 - largely based on input from architectsand system administrators from Nationwide Insurance. This paper introduced the concept of a read-only root file system. It ison the Web at:
http://www.redbooks.ibm.com/abstracts/redp4322.html
1.3 Credits and feedbackThis paper was updated from the previous version, largely by Craig Collins and Robert Taylor of the State of Wisconsin, andpublished in May of 2011.
Thanks go out to many people including Bill Bitner, Pam Christina, Bill Holder, David Jeffers, George Madl, PeterOberparleiter, Christian Paro, Denny Refsnider, Gonzalo Muelas Serrano, Steve Shultz, Jim Switzer, Romney White, SteveWilkins, Eva Yan, Hongjie Yang and Wesley Yee, of IBM and also Andreas Gruenbacher and Mark Post of Novell/SuSE.
If you have feedback or questions on this paper, you can e-mail it to mikemac at us.ibm.com.
1.4 Why use EDEV FBA DevicesDisk allocations for Linux systems under z/VM can be provided through multiple logical disk geometries and definitions.
Traditional CKD disk can be used, however some sites do not have many unallocated CKD devices available to assign toLinux and would rather not purchase or configure more. CKD disks have the advantages of multipathing provided throughz/VM and disaster recovery of remote copy disk controlled through z/VM. In addition, CKD disk geometries are not asflexible as Distributed Systems FBA disk. Traditionally, a predetermined number of CKD devices of various sizes are definedto a storage subsystem as part of the initial implementation or storage upgrades. CKD devices are defined as part of the z/VMSYSTEM CONFIG and are portioned out through the z/VM directory as minidisks.
Fixed Block Architecture (FBA) devices can be defined and dedicated to each Linux server using z/VM FCP devices andNPIV. This requires unique definitions within each Linux server, which makes disaster recovery planning more complicated.In addition, each server must have the multipathing defined within Linux for the LUNs assigned to that server and certainmount points do not support multipathing. The FBA devices can be defined with any required disk space allocation, out of apool of previously undefined space. The z/VM FCP device that provides the communication channel for an FBA disk isdedicated to a Linux server definition in the z/VM directory and then the rest of the configuration process takes place withinthe Linux operating system on the server.
Using z/VM's Emulated DEVices (EDEVs) with FBA disks combine the advantages of CKD multipathing with the flexibilityof FBA device size and allocation methods. EDEV FBA disk allocations are defined to the z/VM operating system as EDEV.However, some studies have shown performance trade-offs when using EDEVs since they are emulated devices and thereforethere is overhead for each disk access. Definition of an EDEV is accomplished by defining the EDEV to the z/VM SYSTEMCONFIG file and is portioned out through the z/VM directory as minidisks, much like the CKD devices.
For this document, EDEV FBA devices are used to provide the disk allocations the Linux servers will access.
Section 2: Background on DCSSs and NSSsIn z/VM, a segment is a portion of storage (system memory) 1MB in size. A saved segment refers to a segment (or collectionof segments) that has been stored in z/VM spool space. Sometimes, as with segments of type EN or SN, only a description ofthe segment is saved in spool, with no data from memory saved. Once saved to the spool, a saved segment can be accessed byeither any virtual machine or by a restricted set of virtual machines on the z/VM system, either by loading the segment into itsvirtual storage or by the segment being mapped into the addressable range of the virtual machine.
The most common combinations of segment markings are "shared read-only" and "exclusive writable". When a number ofvirtual machines are mapped to a shared-read-only segment, every virtual machine sees exactly the same segment in z/VM'sreal storage and none of them can modify it. With exclusive-writable, every virtual machine has its own copy of the segment--
© Copyright IBM 2011 3

Sharing and Maintaining SLES11 SP1 Linux under z/VM using DCSSs and an NSS
but before making the copied segment accessible to the virtual machine, CP initializes it from the contents of the segmentthat was originally saved.
In the context of Linux on System z, there are two types of saved segment provided by z/VM: the Discontiguous SavedSegment and the Named Saved System. The third type of segment, the segment space, is not directly supported by Linux atthis time and will not be discussed in this paper.
2.1 What is DCSS?Discontiguous Saved Segment (DCSS) is a z/VM technology that allows a portion of the storage of a guest to be saved. Thissaved storage can then be shared between a number of guests, which all see the same storage. DCSS is a powerful tool thatgives z/VM administrators a way to provide high levels of resource sharing between guests, combined with excellentperformance.
A DCSS can be created covering a continuous range of addresses, or a number of different sections of the guest's addressrange. It can even have parts that are read-write, allowing each guest to have its own copy of a portion of the shared segmentthat it can modify.
Linux can utilize DCSS technology to build file systems that reside in memory, allowing drastic reduction in file system I/Ofor system files. Combined with eXecute-In-Place (XIP) capability, the amount of central storage required to host a group ofLinux systems running similar workloads is greatly reduced, and this leads to the ability to run larger numbers of virtualLinux systems in a given system footprint.
More detail on DCSS can be found in the z/VM Saved Segments Planning and Administration manual, on the Web at:http://publibz.boulder.ibm.com/epubs/pdf/hcsg4b10.pdf
2.1.1 Linux support of DCSSLinux makes use of a DCSS by presenting it as a block device, in the same way that DASDs are presented for use. Thedcssblk device driver is part of the Linux kernel and does the work of making a DCSS appear as a block device.
Even though a DCSS looks just like other block devices, the dcssblk driver does this in such a way that file systems thatsupport XIP recognize that the file system is memory-addressable. Current versions of the Linux second-extended (ext2) filesystem support XIP using a mount option and a DCSS-backed ext2 file system can provide this capability.
2.1.2 Factors that limit DCSS useLinux has had DCSS support for a long time, but little adoption of DCSS has taken place. Most procedures for buildingLinux file systems in a DCSS involved manually copying files from a standard Linux file system to the DCSS. This was seenprone to error, requiring careful attention to package changes and providing little opportunity to be automated. This papershows a way to automate the process with the rw2ro.sh script.
2.1.3 z/VM 5.4 and DCSSIn the announcement letter for z/VM 5.4, IBM announced changes to the DCSS function. In particular, the 2GB bar has beenremoved, meaning that a DCSS can reside almost anywhere in addressable storage
While a single DCSS cannot be larger than 2GB, the Linux dcssblk driver now allows DCSSs to be concatenated so thatmultiple DCSSs can be made to appear to Linux as a single device. This will allow very large DCSS-backed file systems tobe built, eliminating the maintenance complexity of some of the previous DCSS configuration approaches.
© Copyright IBM 2011 4

2.1.4 Working with DCSSsThe z/VM DEFSEG and SAVESEG commands allow you to map pages of memory contents and store them in disk-backedSPOOL space that can be made accessible to multiple virtual machines. The Linux DCSS block device driver, dcssblk, isused to provide disk-like access to these saved segments. The Linux XIP technology allows you to treat code in a memory-backed file system as if it were a part of the virtual memory space. Normally executables on disk have to first be loaded intomemory, however, executables that start in memory can be “executed in place”.
Together these tools allow multiple Linux guests to share one copy of commonly executed code, and reduce overall memoryuse by Linux guests.
The IBM Linux on System z kernel developers have produced a manual explaining how DCSS is used in Linux. Thisdocument contains a lot of background on dcssblk and its use.
• How to use Execute-in-Place Technology with Linux on z/VM on the Web at:http://download.boulder.ibm.com/ibmdl/pub/software/dw/linux390/docu/l26dhe00.pdf
The following document is also recommended reading:
• Chapters 19 and 20 of Device Drivers, Features, and Commands on the Web at:http://download.boulder.ibm.com/ibmdl/pub/software/dw/linux390/docu/l26ddd01.pdf
2.2 Named Saved SystemsNamed Saved System (NSS) is a z/VM technology that allows a bootable operating system ``snapshot'' to be saved to thez/VM spool. This system snapshot can be shared and started by many z/VM guests, all of which can boot it like an operatingsystem disk and run the system therein.
Usually, a NSS is created at a very early stage in the initialization of the operating system. This allows the OS in the NSS todetect hardware and other features at the time it is started in each guest.
A NSS must be defined specifically for the operating system image it will contain. This is because different operating systemshave different memory locations which must be kept exclusive-writable or that can be shared. z/VM keeps track of thesemappings, ensuring that guests get their own copy of pages that are writable while giving shared access to read-only pages. Inaddition, each operating system that creates an NSS must do so with an awareness of what areas to be saved must be read-only and sharable or read-write and exclusive.
2.2.1 Linux use of NSSLinux now has a the ability to define its own NSS mappings, simplifying the creation of a Linux-bootable NSS. This supportprovides is through a new kernel parameter which triggers the saving of a NSS from the kernel being booted. Building a NSSis now as simple as adding a parameter to the kernel command line and IPLing.
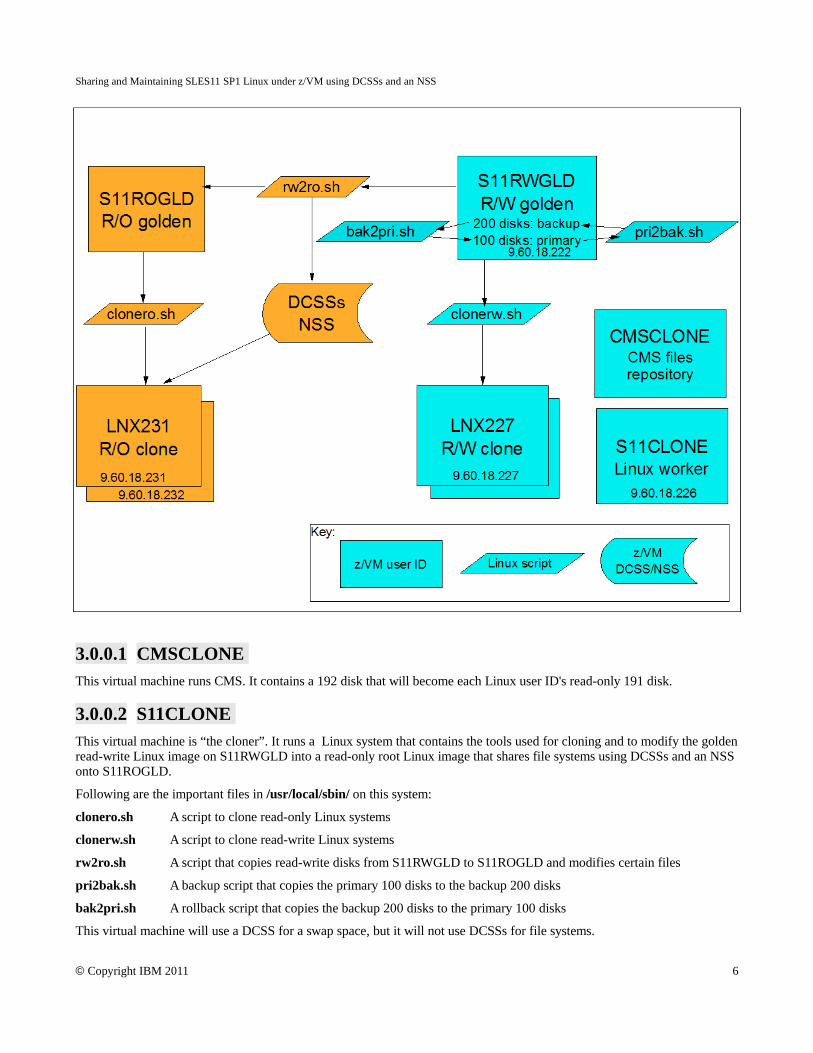
Section 3: Summary of virtual machinesBefore building a read-only root system is described, a methodology for maintaining and cloning a conventional read-writeLinux system is addressed. The read-write system is created with a maintenance plan in mind.
Following is a block diagram of the system described in this paper. The conventional read-write setup is shown on the rightside of the diagram (in turquoise if you can see color in the figure) and the read-only components are shown on the left size(in gold):
© Copyright IBM 2011 5
Sharing and Maintaining SLES11 SP1 Linux under z/VM using DCSSs and an NSS
3.0.0.1 CMSCLONE This virtual machine runs CMS. It contains a 192 disk that will become each Linux user ID's read-only 191 disk.
3.0.0.2 S11CLONE This virtual machine is “the cloner”. It runs a Linux system that contains the tools used for cloning and to modify the goldenread-write Linux image on S11RWGLD into a read-only root Linux image that shares file systems using DCSSs and an NSSonto S11ROGLD.
Following are the important files in /usr/local/sbin/ on this system:
clonero.sh A script to clone read-only Linux systems
clonerw.sh A script to clone read-write Linux systems
rw2ro.sh A script that copies read-write disks from S11RWGLD to S11ROGLD and modifies certain files
pri2bak.sh A backup script that copies the primary 100 disks to the backup 200 disks
bak2pri.sh A rollback script that copies the backup 200 disks to the primary 100 disks
This virtual machine will use a DCSS for a swap space, but it will not use DCSSs for file systems.
© Copyright IBM 2011 6

3.0.0.3 S11RWGLD This is read-write “golden image” virtual machine. It contains four primary disks at 100-103 and four backup disks at 200-203. Maintenance of the golden image is done on this virtual machine. It is normally shut down so it can be cloned from.
Following are the important files this system:
boot.findself A new script in /etc/init.d/, run at first boot to set the host name and IP of the new Linux guest
boot.rootfsck A modified boot script in /etc/init.d/ for read-only Linux guests.
cloneprep.sh A new script that removes extraneous files before cloning
setup-block.sh A modified script in /lib/mkinitrd/scripts/ to load the dcssblk driver in the initial RAMdisk
3.0.0.4 S11ROGLDThe read-only gold virtual machine. The golden image from S11RWGLD is copied to here and modified to become a read-only root system. It contains a read-write 102 minidisk and a read-write 100 minidisk that will later be used to create an NSS.The 101 and 103 disks are not necessary as the file systems will be stored in DCSSs. It is also normally shut down.
3.1 Minidisk and DCSS layoutFollowing are the minidisks, DCSSs and corresponding file systems used in this paper:
File system FBA-512Blocks/size
vdev Type Notes
/boot/ 92160/41 MB 100 ext2/xip Contains the files used to boot the system and create the NSS namedS11S1LX1. Installed as ext2, but later made to be of type xip
/ 5127168/2.2GB
101 ext2/xip Saved as the DCSS named S11S1RT1. Mounted read-only. Installedas ext2, but later made to be of type xip
/usr/local/ 2563584/1.2GB
102 ext3 Mounted read-write – contains copies of /root/, /srv/, /var/ andcertain files in /etc/ which get bind-mounted read-write.
/usr/share/ 2563584/1.1GB
103 ext2/xip Saved as the DCSS named S11S1SH1. Mounted read-only. Installedas ext2, but later made to be of type xip
/var/lib/rpm/ N/A N/A ext2/xip Saved as the DCSS named S11S1RP1.
A read-write system requires approximately 4.5GB. A read-only system requires about 1.1GB.
Section 4: Planning the Linux memory footprintThe size the DCSS swap space and file systems must be chosen. DCSS ranges are expressed as the hexadecimal (base 16)number of 4KB (2**12) pages. To do hexadecimal math, sometimes a cheat sheet is helpful:
Number of 4KB pages Size in powers of two Size in KB, MB, GB
1 2**12 4K
10 2**16 64K
100 2**20 1M
1000 2**24 16M
10000 2**28 256M
100000 2**32 4G
© Copyright IBM 2011 7

Sharing and Maintaining SLES11 SP1 Linux under z/VM using DCSSs and an NSS
The following sizes for the DCSSs are chosen for this paper:
DCSS name Size Range in 4KB pages Description
SWAPPING 1G 80000-BFFFF DCSS for swapping
S11S1RT1 2047M C0000-13FEFF Largest possible single DCSS for the root file system
S11S1RP1 64M 13FF00-142EFF Small DCSS for the RPM database in /var/lib/rpm/.
S11S1SH1 1G 142F00-181EFF DCSS for the /usr/share/ file system
The following figure shows the memory footprint for Linux main memory and DCSSs used in this paper. A default virtualmachine size of 256M is chosen for most Linux systems. “Headroom” is left to move the machine size up to 2GB. A 1GBswap space is used for between 2 and 3 GB. Between 3 and just about 5 GB, the largest size DCSS is used for the root filesystem. A small 64 MB DCSS is used for the /var/lib/rpm/ file system. Finally, a 1GB DCSS is used for /usr/share/.
Linux memory footprint
© Copyright IBM 2011 8

Section 5: Creating a read-write cloning systemThe steps to create a read-write system that can be cloned are as follow:
1) Plan Linux disks
2) Plan page and spool space for z/VM
3) Define emulated devices
4) Create the first z/VM user IDs
5) Download the associated tar file
6) Populate the disks on CMSCLONE
7) Install SLES11 SP1 onto S11RWGLD – the golden image
8) Install and customize SLES11 SP1 onto S11CLONE – the “cloner”
9) Create a DCSS for a swap space
10) Customize Linux on the golden image
11) Backup the golden image
12) Clone Linux
5.1 Disk planningAn EDEV FBA device of 23 GB, or a combination of smaller sized EDEV devices, is initially used. Following is a diagramthat shows the three 8 GB FBA disks and one 3390-9 ECKD disk used in this example:
© Copyright IBM 2011 9

Sharing and Maintaining SLES11 SP1 Linux under z/VM using DCSSs and an NSS
5.2 Page and spool space planningBecause DCSSs are often backed by spool space, additional spool space will be needed. Also, adequate page space will beneeded, as usual. When z/VM is installed onto 3390-3s, one of the five volumes is for spool space and one is for page space.This will not be enough space.
On the z/VM system used to write this paper, two spool volumes (3390-9s) were added. This provided a total size of about16GB of spool space. After setting up the system, 2% of it was being used:
==> q alloc spool EXTENT EXTENT TOTAL PAGES HIGH % VOLID RDEV START END PAGES IN USE PAGE USED ------ ---- ---------- ---------- ------ ------ ------ ---- UV6281 6281 1 3338 600840 19577 549540 3%USC2EB C2EB 0 10016 1761K 55998 958820 3%USC2EC C2EC 0 10016 1761K 12036 989K 1% ------ ------ ----SUMMARY 4108K 87611 2%USABLE 4108K 87611 2%
Three 3390-3s volume were added for more page space. A total of 1% was being used when measured. In general, theamount of page space should not go much over 50%, or adding more spool space should be considered.
==> q alloc page EXTENT EXTENT TOTAL PAGES HIGH %VOLID RDEV START END PAGES IN USE PAGE USED------ ---- ---------- ---------- ------ ------ ------ ----UV6282 6282 1 3338 600840 1 5 1%UP6285 6285 0 3338 601020 0 0 0%UP6286 6286 0 3338 601020 0 0 0%UP6287 6287 0 3338 601020 0 0 0% ------ ------ ----SUMMARY 2348K 1 1%USABLE 2348K 1 1%
5.3 Defining emulated devicesDefining EDEV FCP devices requires multiple steps. First the FBA disks must be defined as FCP device to the LPAR in theIOCDS (Input/Output Control Data Set) using the IOCP (Input/Output Control Program) to the z/VM LPAR. This is oftendone with the HCD tool, however, details are outside the scope of this paper. You should be able to see all the free FCPdevices on your LPAR with the QUERY FCP FREE command.
Once you have the FCP devices identified, perform the following steps:
1. Get the SYSTEM CONFIG file read/write using the appropriate CPRELEASE, LINK and ACCESS commands.
2. In the SYSTEM CONFIG File, enable the SET DEVICES command by adding the Enable Set_Devices clause tothe Features statement: Features , Disable , /* Disable the following features */ Set_Privclass , /* Disallow SET PRIVCLASS command */ Auto_Warm_IPL , /* Prompt at IPL always */ Clear_TDisk , /* Don't clear TDisks at IPL time */
© Copyright IBM 2011 10

Retrieve , /* Retrieve options */ Default 99 , /* Default.... default is 20 */ Maximum 255 , /* Maximum.... default is 255 */ MaxUsers noLimit , /* No limit on number of users */ Passwords_on_Cmds , /* What commands allow passwords? */ Autolog yes , /* ... AUTOLOG does */ Link yes , /* ... LINK does */ Logon yes , /* ... and LOGON does, too */ Disconnect_Timeout off , /* Don't force disconnected users */ Vdisk , /* Allow VDISKS for Linux swaps */ Syslim infinite , Userlim infinite , Enable , Set_Devices /* Enable the SET DEVICES command */
3. The combination of the storage port, the storage LUN number, and the FCP device address are used to dynamicallydefine the EDEV. Add EDEVICE statements to the SYSTEM CONFIG file for each disk you will be using. In thefollowing example, three EDEVs F000-F002 are defined as “real” devices. Ideally you should have at least twopaths to each LUN. In the following example, FCP devices 3B21-3B23 are the primary paths to each ofthree LUNs while 3B3D-3B3F are the secondary paths. The wwpn parameter identifies the storage port andthe lun parameter identifies the physical disk:
edevice F000 type fba attr SCSI, fcp_dev 3B21 wwpn 5005076306138411 lun 4014403300000000, fcp_dev 3B3D wwpn 500507630613C411 lun 4014403300000000 edevice F001 type fba attr SCSI, fcp_dev 3B22 wwpn 5005076306138411 lun 4014403400000000, fcp_dev 3B3E wwpn 500507630613C411 lun 4014403400000000 edevice F002 type fba attr SCSI, fcp_dev 3B23 wwpn 5005076306138411 lun 4014403500000000, fcp_dev 3B3F wwpn 500507630613C411 lun 4014403500000000
4. Ensure the volumes are attached to SYSTEM and IPL time. In this example, disk labels of UMF000,UMF001 and UMF002 are planned:
/**********************************************************************//* User_Volume_List *//* These statements are not active at the present time. They are *//* examples, and can be activated by removing the comment delimeters. *//* Multiple labels can be stacked on one statement. *//**********************************************************************/
User_Volume_Include UM61* User_Volume_List UMF000 User_Volume_List UMF001 User_Volume_List UMF002
5. Verify the syntax of the SYSTEM CONFIG changes with the CPSYNTAX command.
6. Label the devices with the CPFMTXA command and the label parameter. For the purpose of thisdocument, the volsers for the new F000-F002 devices are set at UMF000-UMF002. Once the CPFMTXAcompletes, detach the device from the guest and attach it to SYSTEM.
7. It is recommended that you shutdown and reIPL of the system.
When the system comes back, verify that the new EDEV devices are defined. In this example, they are F000-F002:==> q f000-f002DASD F000 CP SYSTEM UMF000 0DASD F001 CP SYSTEM UMF001 0DASD F002 CP SYSTEM UMF002 0
© Copyright IBM 2011 11

Sharing and Maintaining SLES11 SP1 Linux under z/VM using DCSSs and an NSS
5.4 Defining z/VM virtual machinesNote to implementors: If you're implementing this environment, you will probably have the urge to change minidisk sizes,file system layouts, or other configurations. Please resist this urge :)) Some of the associated files rely on this specific setupand changing settings is likely to prevent the read-only golden image from running. Get the system working once, then youcan throw it out, change settings and tailor it to your liking.
One user directory PROFILE, named LNXDFLT, is created to be used by all Linux systems. Each Linux system will get avirtual NIC starting at virtual address 0600 that will attach to the virtual switch named VSW1:
PROFILE LNXDFLT IPL CMS MACHINE ESA 4 CPU 00 BASE CPU 01 NICDEF 0600 TYPE QDIO LAN SYSTEM VSW1 SPOOL 000C 2540 READER * SPOOL 000D 2540 PUNCH A SPOOL 000E 1403 A CONSOLE 0009 3215 T LINK MAINT 0190 0190 RR LINK MAINT 019D 019D RR LINK MAINT 019E 019E RR LINK CMSCLONE 0192 0191 RR LINK TCPMAINT 0592 0592 RR
For reference, following is VSWITCH definition statement in the SYSTEM CONFIG file. It defines the VSWITCH namedVSW1 using OSA real devices starting at address B440 (primary) and B424 (for failover):
/* define a VSWITCH */define vswitch vsw1 rdev B440 B424
Four user IDs are defined.
1. The CMSCLONE 192 disk will become the Linux user ID's read-only 191 disk. Also the 192 disk will contain theinstall files for SLES11 SP1(kernel, parameter file and initial RAMdisk).
2. The S11CLONE user ID is given a single minidisk onto which Linux will be installed. Its main purpose is to runshell scripts, so only a minimal installation is required. It needs B privilege class to invoke FLASHCOPY and Eprivilege class to save DCSSs
3. The S11RWGLD user ID is the golden image. It is given four minidisks 100-103 for the primary golden image, andfour more, 200-203 for a backup copy.
4. The S11ROGLD user id is given a 100 minidisk for the /boot/ file system, and a 102 for /usr/local/, but it does notrequire a 101 nor a 103 minidisk because the file systems will be stored in DCSSs. It needs E privilege class tocreate an NSS.
Following are the directory entries:USER CMSCLONE PASSWD 64M 128M G INCLUDE IBMDFLT IPL CMS MACHINE ESA 4 OPTION APPLMON LNKNOPAS MDISK 0191 3390 0001 0030 UM63AB MR PASSWD PASSWD PASSWD MDISK 0192 3390 0031 0100 UM63AB MR ALL PASSWD PASSWD *USER S11CLONE PASSWD 256M 6400M BEG
© Copyright IBM 2011 12

INCLUDE LNXDFLT OPTION APPLMON LNKNOPAS MDISK 0100 FB-512 6 4927488 UMF000 MR PASSWD PASSWD PASSWD *USER S11RWGLD PASSWD 1G 2G G INCLUDE LNXDFLT OPTION APPLMON MDISK 0100 FB-512 6 92160 UMF001 MR PASSWD PASSWD PASSWD MDISK 0101 FB-512 92166 2471424 UMF001 MR PASSWD PASSWD PASSWD MDISK 0102 FB-512 2563590 2563584 UMF001 MR PASSWD PASSWD PASSWD MDISK 0103 FB-512 5127174 5127168 UMF001 MR PASSWD PASSWD PASSWD MDISK 0200 FB-512 10254342 92160 UMF001 MR PASSWD PASSWD PASSWD MDISK 0201 FB-512 10346502 2471424 UMF001 MR PASSWD PASSWD PASSWD MDISK 0202 FB-512 12817926 2563584 UMF001 MR PASSWD PASSWD PASSWD MDISK 0203 FB-512 7583238 5127168 UMF000 MR PASSWD PASSWD PASSWD*USER S11ROGLD PASSWD 256M 2G EG INCLUDE LNXDFLT OPTION APPLMON MDISK 0100 FB-512 4927494 92160 UMF000 MR PASSWD PASSWD PASSWD MDISK 0102 FB-512 5019654 2563584 UMF000 MR PASSWD PASSWD PASSWD
For the new virtual machines to be able to access the VSWITCH, the following commands are added to the PROFILE EXECon AUTOLOG1:
'cp set vswitch vsw1 grant s11clone''cp set vswitch vsw1 grant s11rwgld''cp set vswitch vsw1 grant s11rogld'
These three commands are also run interactively to take effect for the current z/VM session.
5.5 Downloading the associated tar fileThe tar file associated with this paper is available at:
http://ibm.com/vm/linux/dcss/ror s11s1 .tgz
It is downloaded to a Linux or UNIX machine and untarred. The z/VM files are needed before the first Linux system isinstalled. Later, the tar file is copied to the Linux worker system running on S11CLONE.
Download the tar file to the /tmp/ directory of any Linux or UNIX system. Untar and uncompress the tar file with the tarcommand:
gpok134:~ # cd /tmpgpok134:/tmp # tar xzvf rors11s1.tgzREADME.txtror-s11s1.odtsbin/sbin/rorfuncs.shsbin/clonero.shsbin/rwtabsbin/clonerw.shsbin/bak2pri.shsbin/mounttgt.shsbin/rw2ro.shsbin/cleantgt.shsbin/boot.local
© Copyright IBM 2011 13
Sharing and Maintaining SLES11 SP1 Linux under z/VM using DCSSs and an NSS
sbin/readonly-rootsbin/fstabsbin/setup-block.shsbin/boot.rootfscksbin/pri2bak.shsbin/cloneprep.shsbin/boot.findselfvm/vm/profile.execvm/prepdisk.execvm/sles11s1.execvm/sample.parm-s11vm/profile.xedit
You should now have access to the files associated with this paper.
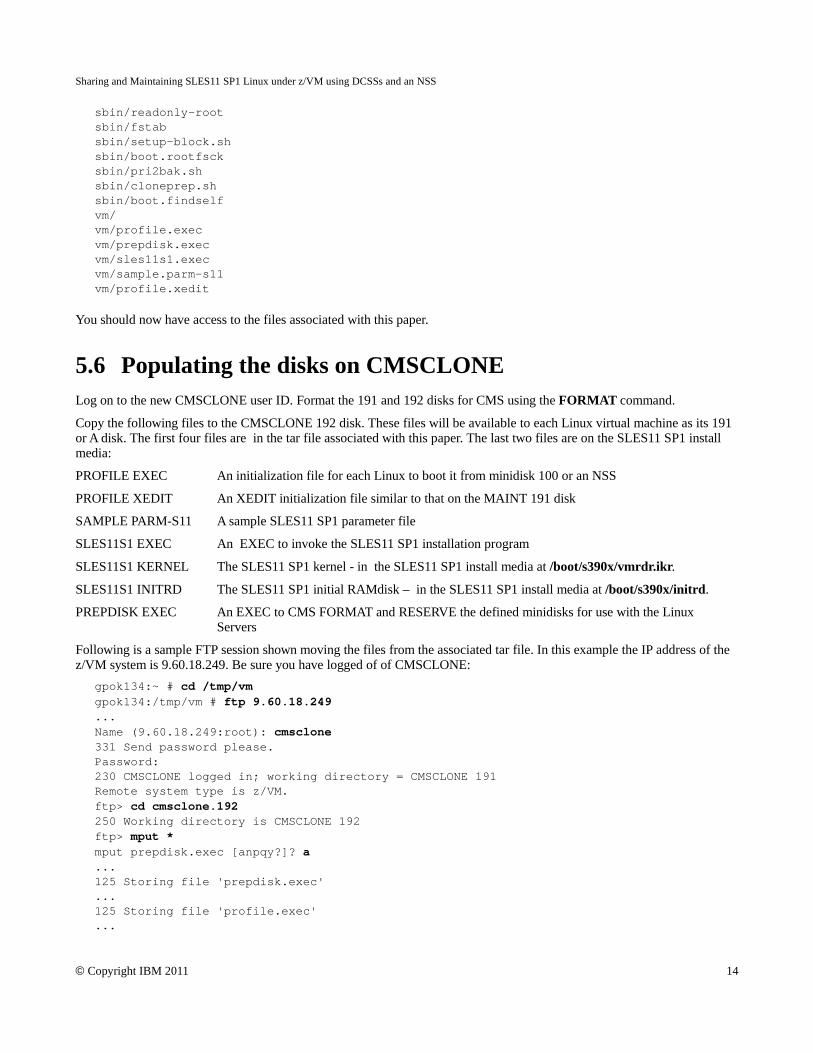
5.6 Populating the disks on CMSCLONELog on to the new CMSCLONE user ID. Format the 191 and 192 disks for CMS using the FORMAT command.
Copy the following files to the CMSCLONE 192 disk. These files will be available to each Linux virtual machine as its 191or A disk. The first four files are in the tar file associated with this paper. The last two files are on the SLES11 SP1 installmedia:
PROFILE EXEC An initialization file for each Linux to boot it from minidisk 100 or an NSS
PROFILE XEDIT An XEDIT initialization file similar to that on the MAINT 191 disk
SAMPLE PARM-S11 A sample SLES11 SP1 parameter file
SLES11S1 EXEC An EXEC to invoke the SLES11 SP1 installation program
SLES11S1 KERNEL The SLES11 SP1 kernel - in the SLES11 SP1 install media at /boot/s390x/vmrdr.ikr.
SLES11S1 INITRD The SLES11 SP1 initial RAMdisk – in the SLES11 SP1 install media at /boot/s390x/initrd.
PREPDISK EXEC An EXEC to CMS FORMAT and RESERVE the defined minidisks for use with the Linux Servers
Following is a sample FTP session shown moving the files from the associated tar file. In this example the IP address of thez/VM system is 9.60.18.249. Be sure you have logged of of CMSCLONE:
gpok134:~ # cd /tmp/vmgpok134:/tmp/vm # ftp 9.60.18.249...Name (9.60.18.249:root): cmsclone331 Send password please.Password:230 CMSCLONE logged in; working directory = CMSCLONE 191Remote system type is z/VM.ftp> cd cmsclone.192250 Working directory is CMSCLONE 192ftp> mput *mput prepdisk.exec [anpqy?]? a...125 Storing file 'prepdisk.exec'...125 Storing file 'profile.exec'...
© Copyright IBM 2011 14

125 Storing file 'profile.xedit'...125 Storing file 'sample.parm-s11'...125 Storing file 'sles11s1.exec'...ftp> quit
5.7 Installing SLES11 SP1 onto S11RWGLDInstall a Linux system into the S11RWGLD virtual machine. This will become the Linux golden image.
Before starting the install process, set up an NFS install server. Mount the ISO image of DVD1 loopback over a directoryand export that directory. In this paper, the NFS server is running with the IP address of 9.60.18.240, the ISO image ofSLES11 SP1 is stored in /nfs/sles11sp1/ and the exported directory is /nfs/sles11sp1/dvd1
The SLES11 SP1 kernel and initial RAMdisk are in the boot/ directory on the DVD. Use FTP to copy them to theCMSCLONE 192 disk as the files SLES11S1 KERNEL and SLES11S1 INITRD. Don't forget to transfer them in binarymode, with fixed-record 80 byte blocks. This can usually be accomplished by the FTP sub-commands bin and site fix 80 (orquote site fix 80).
• Following is a sample FTP session of SLES11 SP1 kernel and RAMdisk from the installation media to theCMSCLONE 192 disk. In this example the IP address of the z/VM system is 9.60.18.249:# cd /nfs/sles11sp1/dvd1/boot/s390x# ftp 9.60.18.249Name (9.60.18.249:root): cmsclonePassword:ftp> cd cmsclone.192ftp> bin200 Representation type is IMAGE.ftp> site fix 80200 Site command was accepted.ftp> put vmrdr.ikr sles11s1.kernel...ftp> put initrd sles11s1.initrd...ftp> quit
• Start a 3270 session and log on as CMSCLONE. Copy the SAMPLE PARM-S11 file to S11RWGLD PARM-S11. ==> copy sample parm-s11 d s11rwgld = =
• Configure the new file with the correct IP and DNS information on the CMSCLONE 192 disk. The scripts used toset server names and ip addresses require the use of the exact capitalization of the keywords HostIP and Hostname inthe parameter files. Following is the example used in this paper:==> xedit s11rwgld parm-s11 dramdisk_size=65536 root=/dev/ram1 ro init=/linuxrc TERM=dumbHostIP=9.60.18.222 Hostname=gpok222.endicott.ibm.comGateway=9.60.18.129 Netmask=255.255.255.128Broadcast=9.60.18.255 Layer2=0ReadChannel=0.0.0600 WriteChannel=0.0.0601 DataChannel=0.0.0602Nameserver=9.0.2.11portname=whateverportno=0Install=nfs://9.60.18.240/nfs/sles11sp1/dvd1UseVNC=1 VNCPassword=12345678InstNetDev=osa OsaInterface=qdio OsaMedium=eth Manual=0
• On the CMSCLONE machine, prepare the disks for each of the minidisks of the Linux servers using the PREPDISKEXEC using the following commands. Each execution will produce multiple messages about the status of theFORMAT and RESERVE commands:
© Copyright IBM 2011 15
Sharing and Maintaining SLES11 SP1 Linux under z/VM using DCSSs and an NSS
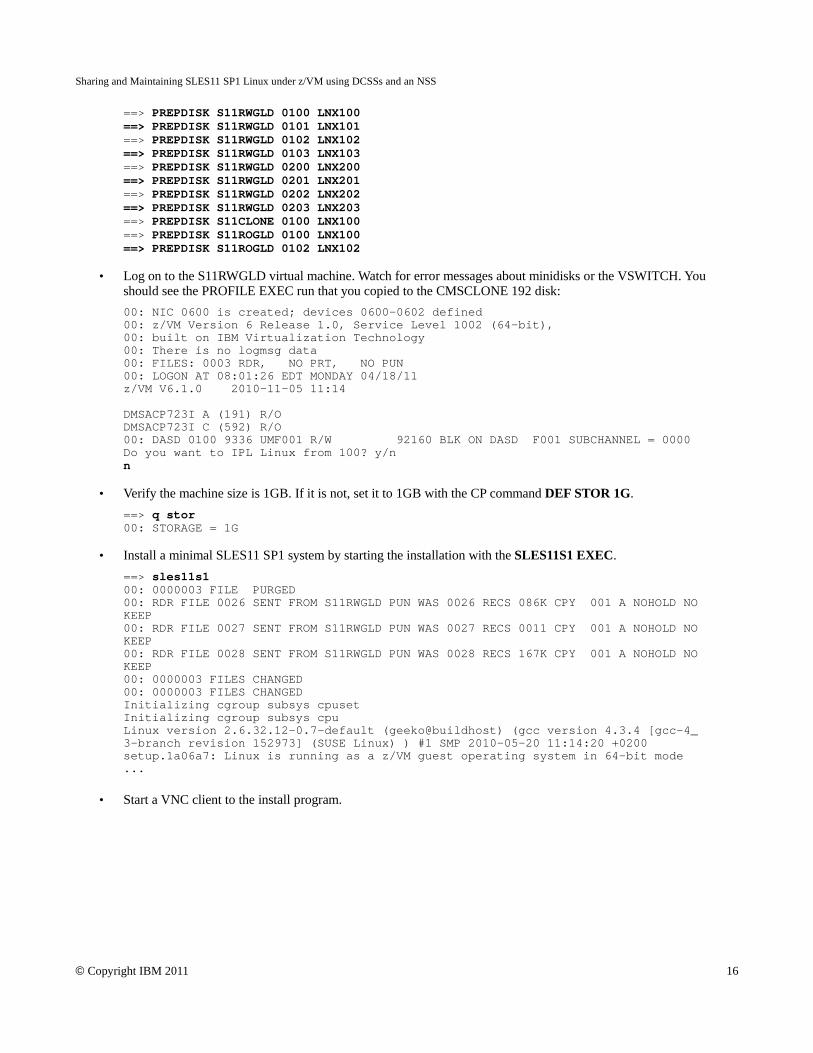
==> PREPDISK S11RWGLD 0100 LNX100==> PREPDISK S11RWGLD 0101 LNX101==> PREPDISK S11RWGLD 0102 LNX102==> PREPDISK S11RWGLD 0103 LNX103==> PREPDISK S11RWGLD 0200 LNX200==> PREPDISK S11RWGLD 0201 LNX201==> PREPDISK S11RWGLD 0202 LNX202==> PREPDISK S11RWGLD 0203 LNX203==> PREPDISK S11CLONE 0100 LNX100==> PREPDISK S11ROGLD 0100 LNX100==> PREPDISK S11ROGLD 0102 LNX102
• Log on to the S11RWGLD virtual machine. Watch for error messages about minidisks or the VSWITCH. Youshould see the PROFILE EXEC run that you copied to the CMSCLONE 192 disk:00: NIC 0600 is created; devices 0600-0602 defined00: z/VM Version 6 Release 1.0, Service Level 1002 (64-bit),00: built on IBM Virtualization Technology00: There is no logmsg data00: FILES: 0003 RDR, NO PRT, NO PUN00: LOGON AT 08:01:26 EDT MONDAY 04/18/11z/VM V6.1.0 2010-11-05 11:14
DMSACP723I A (191) R/ODMSACP723I C (592) R/O00: DASD 0100 9336 UMF001 R/W 92160 BLK ON DASD F001 SUBCHANNEL = 0000Do you want to IPL Linux from 100? y/nn
• Verify the machine size is 1GB. If it is not, set it to 1GB with the CP command DEF STOR 1G. ==> q stor00: STORAGE = 1G
• Install a minimal SLES11 SP1 system by starting the installation with the SLES11S1 EXEC. ==> sles11s100: 0000003 FILE PURGED 00: RDR FILE 0026 SENT FROM S11RWGLD PUN WAS 0026 RECS 086K CPY 001 A NOHOLD NOKEEP 00: RDR FILE 0027 SENT FROM S11RWGLD PUN WAS 0027 RECS 0011 CPY 001 A NOHOLD NOKEEP 00: RDR FILE 0028 SENT FROM S11RWGLD PUN WAS 0028 RECS 167K CPY 001 A NOHOLD NOKEEP 00: 0000003 FILES CHANGED 00: 0000003 FILES CHANGED Initializing cgroup subsys cpuset Initializing cgroup subsys cpu Linux version 2.6.32.12-0.7-default (geeko@buildhost) (gcc version 4.3.4 [gcc-4_3-branch revision 152973] (SUSE Linux) ) #1 SMP 2010-05-20 11:14:20 +0200 setup.1a06a7: Linux is running as a z/VM guest operating system in 64-bit mode ...
• Start a VNC client to the install program.
© Copyright IBM 2011 16

• Accept the license agreement.
• Click Configure DASD Disks, even though these are FCP disks (the EDEVs make them appear more like DASDthan SCSI disks). Activate eight disks, 100-103 and 200-203.
In the Installation Settings window, select Partitioning. On the Preparing Hard Disk: Step 1 panel, select the box CustomPartitioning (for experts). Edit partitions dasda1-dasdd1 as follows:
Minidisk File System File System type Disk
100 /boot/ ext2 /dev/dasda
101 /usr/share/ ext2 /dev/dasdb
102 /usr/local/ ext3 /dev/dasdc
103 / ext2 /dev/dasdd
Following is a summary of the Expert Partitioner screen:
© Copyright IBM 2011 17

Sharing and Maintaining SLES11 SP1 Linux under z/VM using DCSSs and an NSS
© Copyright IBM 2011 18
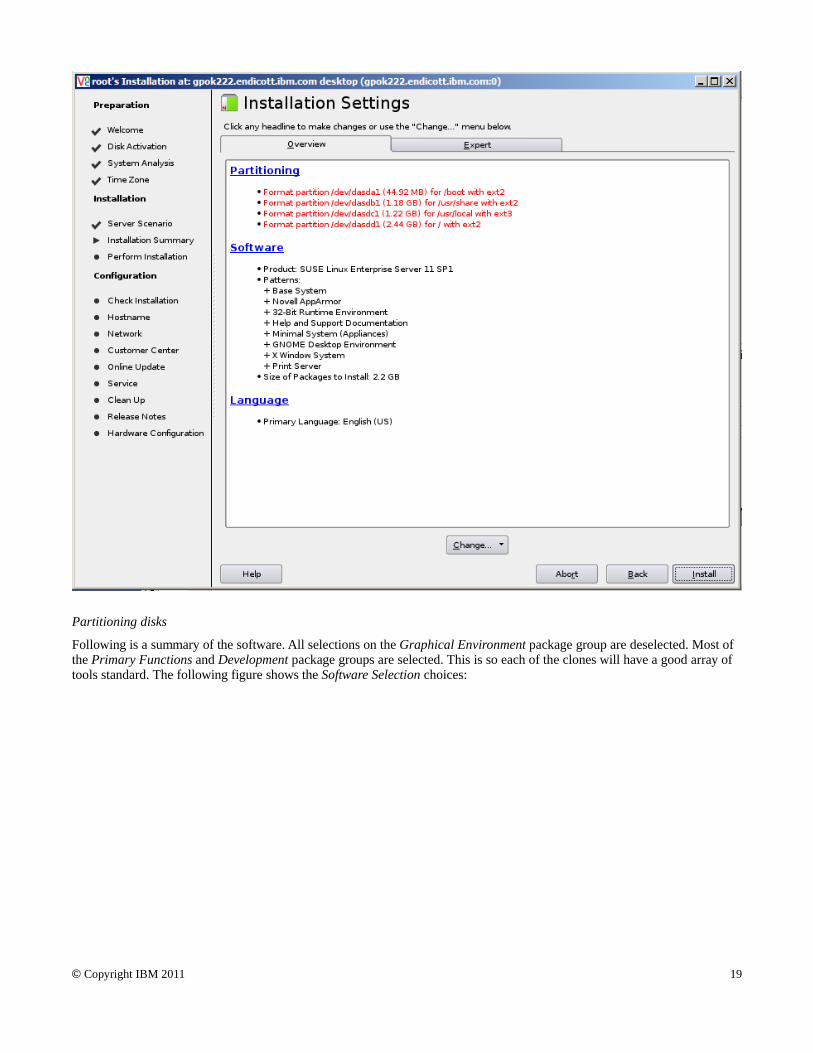
Partitioning disks
Following is a summary of the software. All selections on the Graphical Environment package group are deselected. Most ofthe Primary Functions and Development package groups are selected. This is so each of the clones will have a good array oftools standard. The following figure shows the Software Selection choices:
© Copyright IBM 2011 19

Sharing and Maintaining SLES11 SP1 Linux under z/VM using DCSSs and an NSS
Software selection
After the first half of the install completes, the new system is now automatically IPLed from 100. Complete the second halfof the install using the following notes:
• On the Host and Domain Name panel, deselect the box Change Hostname via DHCP.
• On the Network Configuration panel, set the Firewall to be disabled.
• On the Test Internet Connection panel, the box No, Skip This Test was selected due to firewalls.
• On the Network Services Configuration panel, select OpenLDAP Server and set Start LDAP Server to No.
• On the Installation Completed panel, deselect the check box Clone This System for Autoyast.
When the installation process completes, the “golden” Linux image should be installed.
5.7.0.1 Analyzing the new systemStart an SSH session as root to the golden image. Query the file systems with the df -h command:
gpok222:~ # df -hFilesystem Size Used Avail Use% Mounted on/dev/dasda1 2.5G 1.8G 552M 77% /
© Copyright IBM 2011 20

devtmpfs 499M 148K 499M 1% /devtmpfs 499M 0 499M 0% /dev/shm/dev/dasdb1 44M 18M 24M 43% /boot/dev/dasdf1 1.3G 34M 1.2G 3% /usr/local/dev/dasdc1 1.2G 877M 250M 78% /usr/share
The read-write file systems /root/, /srv/ and /var/ will later be copied to /usr/local/ on the read-only root clones. Right now,those file systems occupy only about 77 MB of disk space:
gpok222:~ # du -sm /root /srv /var1 /root1 /srv77 /var
This system will be the golden image and the basis for both the read-write and the read-only clones.
5.8 Installing and customizing SLES11 SP1 onto S11CLONEOn the S11CLONE virtual machine, install a SLES11 SP1 system onto a single minidisk at virtual device 100. To do this,perform the following steps. The high level steps are listed here, but cookbook-style details are not:
• Create a parameter file, S11CLONE PARM-S11 on the CMSCLONE 192 disk.
• Set the IP address and host name.
• Give the virtual machine access to the VSWITCH.
• Set the virtual storage of the S11CLONE virtual machine to 1G and IPL CMS (Important: Don't forget the DEFSTOR 1G command or the SLES11 SP1 installation will most likely fail!)
• Start the install process with the SLES11S1 EXEC.
• Activate and format just the 100 minidisk.
• Install a minimal system (Base System and Minimal System (Appliances)) with a single root file system.
Then make the following customizations (additional details follow):
• Copy and unwind the tar file associated with this paper.
• Set the cmm, vmcp and dcssblk modules to load at boot time.
• Pass parameters to the dcssblk module.
5.8.1 Copying the files associated with this paperEarlier you staged the tar file on another Linux or UNIX system to copy the z/VM files (in this example, the IP address is9.60.18.134). Copy the tar file rors11s1.tgz to /usr/local/ on the S11CLONE machine and untar it.
gpok226:~ # cd /usr/localgpok226:/usr/local # scp 9.60.18.134:/tmp/rors11s1.tgz .gpok226:/usr/local # tar xzvf rors11s1.tgz...
The files staged on the initial Linux or UNIX system should no longer be needed.
5.8.2 Setting kernel modules to be loadedTwo modules are set to be loaded at boot time:
1. The cmm module in conjunction with configuration changes on z/VM may allows significant performance gains.
© Copyright IBM 2011 21

Sharing and Maintaining SLES11 SP1 Linux under z/VM using DCSSs and an NSS
2. The vmcp module allows CP commands to be issued from Linux.
One module is set to be built into the initial RAMdisk: the dcssblk module allows System z Linux to utilize DCSSs for swapspaces and file systems.
The modules are added to the file /etc/sysconfig/kernel:gpok226:/usr/local # cd /etc/sysconfiggpok226:/etc/sysconfig # vi kernel // Modify two lines ... ## Path: System/Kernel## Description:## Type: string## Command: /sbin/mkinitrd## This variable contains the list of modules to be added to the initial# ramdisk by calling the script "mkinitrd"# (like drivers for scsi-controllers, for lvm or reiserfs)#INITRD_MODULES="dcssblk"
## Type: string(yes)## Command: /sbin/mkinitrd## Default: ""### This variable disables the initialization of KMS in the initrd# by not including the modules required for KMS even though KMS is# supported on the underlying hardware.# After changing run mkinitrd again.#NO_KMS_IN_INITRD="no"
### Type: string## Command: /sbin/mkinitrd## This variable contains the list of modules to be added to the initial# ramdisk that is created for unprivilegd Xen domains (domU); you may need# drivers for virtual block and network devices in addition to filesystem# and device-mapper modules.#DOMU_INITRD_MODULES="xennet xenblk"
## Type: string## ServiceRestart: boot.loadmodules## This variable contains the list of modules to be loaded# once the main filesystem is active# You will find a few default modules for hardware which# can not be detected automatically.#MODULES_LOADED_ON_BOOT="cmm vmcp"...
5.8.3 Setting the dcssblk module parameterAdd a line to /etc/modprobe.conf.local specifying the name of the parameters passed to the dcssblk driver. The DCSSs will
© Copyright IBM 2011 22

be named SWAPPING, S11S1RT1, S11S1RP1 and S11S1SH1:gpok226:/etc/sysconfig # cd /etcgpok226:/etc # vi modprobe.conf.local## please add local extensions to this file#options dcssblk "segments=SWAPPING,S11S1RT1,S11S1RP1,S11S1SH1"
Bring these changes online:gpok226:/etc # mkinitrd
Kernel image: /boot/image-2.6.32.12-0.7-defaultInitrd image: /boot/initrd-2.6.32.12-0.7-defaultRoot device: /dev/disk/by-path/ccw-0.0.0100-part1 (/dev/dasda1) (mounted on / as ext2)Kernel Modules: dcssblk mbcache ext2 dasd_mod dasd_fba_modFeatures: block dasd resume.userspace resume.kernel24727 blocks
gpok226:/etc # ziplUsing config file '/etc/zipl.conf'Building bootmap in '/boot/zipl'Building menu 'menu'Adding #1: IPL section 'SLES11_SP1' (default)Adding #2: IPL section 'FailsafeV1'Adding #3: IPL section 'ipl'Preparing boot device: dasda (0100).Done.
Shutdown the Linux system:gpok226:/etc # shutdown -h now
The Linux system running on the S11CLONE user ID should now be configured.
5.9 Creating a DCSS for swappingDCSSs can provide a fast device for swapping when a guest is memory constrained but z/VM is not. It allows the reduction ofguest virtual memory size while maintaining acceptable performance for peak workloads (move overcommitment to guestlevel). It can provide lower overhead than VDISKs as the data movement is all done by the guest without interaction with thehypervisor. It also avoids the expense of building I/O programs since it is a memory-to-memory move. Because of theseefficiencies, a higher swap rate can be achieved with a DCSS swap device than a VDISK swap device.
Important - swap to VDISKs or DCSSs?
DCSSs can offer better performance as just described, especially when significant swapping occurs (1000s persecond). However, there are potential downsides to swapping to DCSS, as doing so can:
◦ Increase the negative effect of Page Reorder. Processing can cause delays where the virtual machine appears tonot run for a period of time. This is a result of increasing the number of private pages associated with the virtualmachine that would potentially come into play with Reorder processing.
◦ Increase the negative effect of demand scan being handled in the Emergency Pass due to virtual machines notgoing to the z/VM dormant list even when they have no real work to do. This increase is a result of additionalpages being associated with the virtual machine as opposed to being in a separate virtual address space as aVDISK would be.
◦ Remove the ability from z/VM monitoring to determine how much memory is required for the virtual machine,how much swapping space is actively being used, and swapping activity. In a VDISK environment, one would
© Copyright IBM 2011 23

Sharing and Maintaining SLES11 SP1 Linux under z/VM using DCSSs and an NSS
see z/VM data that shows both the VDISK activity and the virtual machine memory usage. In the DCSS case,only the virtual machine memory usage would be shown and you cannot differentiate between the swap DCSSand the normal virtual machine memory.
As a result of these factors and others, VDISKs are recommended for swapping unless a small virtual machine, asseen in the example, is acceptable and it is not running software that prohibits the virtual machine from going to thedormant list, and there is no desire to view details of swapping from z/VM performance tools.
The SLES install process does not recognize DCSS devices at install-time. Thus, these steps are done after the installation.
The dcssblk device driver now supports mixed EW/EN segments. EW means exclusive read/write access and EN meansexclusive read/write access, no data saved.
The overall steps to creating a DCSS swap space are as follows:
1) Define a DCSS name SWAPPING from CMS
2) Boot Linux to prepare loading the new DCSS
3) Reboot Linux to load the new DCSS
4) Create a swap space on the DCSS
5) Add the swap space to the system on S11CLONE
6) Prepare the golden image for the swap space
7) Reboot the golden image to load the swap space
5.9.1 Defining a DCSS for swappingTo define a DCSS for a swap space, perform the following steps:
• Log on to S11CLONE. Do not IPL Linux. Set the storage to 3GB so the swap space DCSS can be addressed. ThenreIPL CMS:==> def stor 3G00: STORAGE = 3G00: Storage cleared - system reset.
==> ipl cmsz/VM V6.1.0 2010-11-05 11:14
DMSACP723I A (191) R/ODMSACP723I C (592) R/O00: DASD 0100 9336 UMF000 R/W 4927488 BLK ON DASD F000 SUBCHANNEL = 0000Do you want to IPL Linux from DASD 100? y/nn
• Define a 1 GB DCSS named SWAPPING using the DEFSEG command:==> defseg swapping 80000-80000 ew 80001-bffff en00: HCPNSD440I Saved segment SWAPPING was successfully defined in fileid 0040.
The first page (80000) is writable so the swap signature can be written to it. The rest of the DCSS is used for theswap data, so it never has to be saved.
• Save the segment with the SAVESEG command:===> saveseg swapping00: HCPNSS440I Saved segment SWAPPING was successfully saved in fileid 0040.
• Query the new DCSS:
© Copyright IBM 2011 24
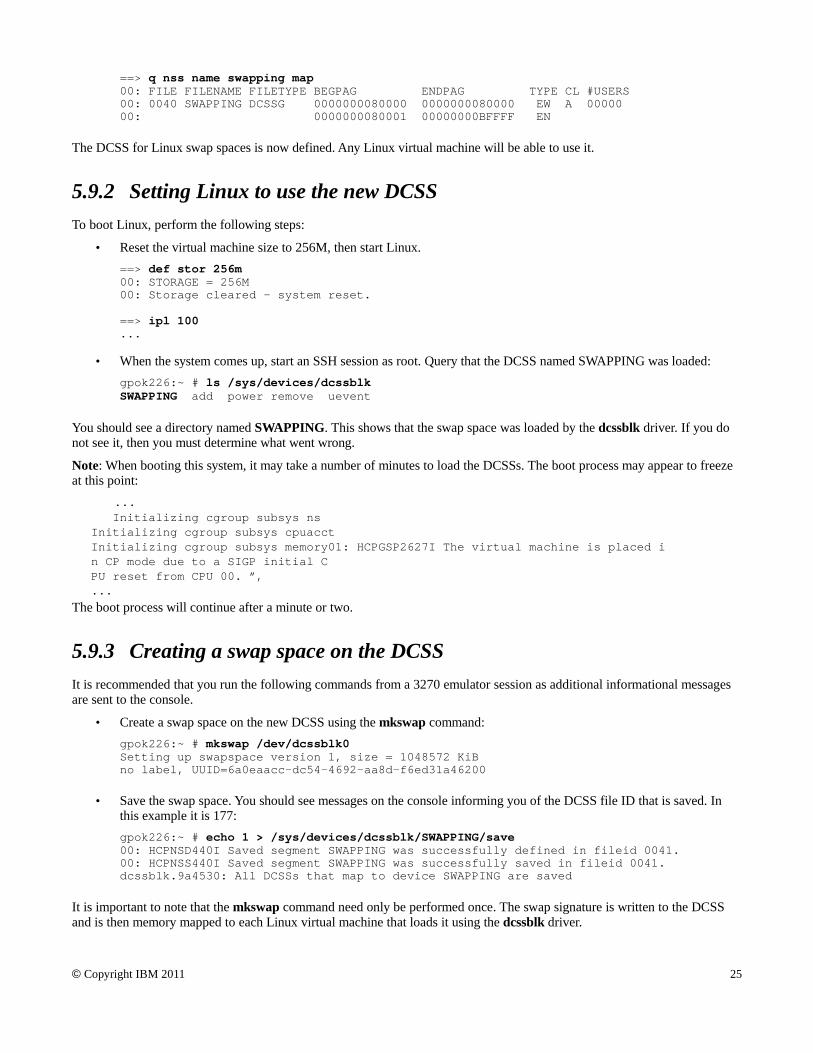
==> q nss name swapping map00: FILE FILENAME FILETYPE BEGPAG ENDPAG TYPE CL #USERS00: 0040 SWAPPING DCSSG 0000000080000 0000000080000 EW A 00000 00: 0000000080001 00000000BFFFF EN
The DCSS for Linux swap spaces is now defined. Any Linux virtual machine will be able to use it.
5.9.2 Setting Linux to use the new DCSS To boot Linux, perform the following steps:
• Reset the virtual machine size to 256M, then start Linux.==> def stor 256m00: STORAGE = 256M00: Storage cleared - system reset.
==> ipl 100...
• When the system comes up, start an SSH session as root. Query that the DCSS named SWAPPING was loaded:gpok226:~ # ls /sys/devices/dcssblkSWAPPING add power remove uevent
You should see a directory named SWAPPING. This shows that the swap space was loaded by the dcssblk driver. If you donot see it, then you must determine what went wrong.
Note: When booting this system, it may take a number of minutes to load the DCSSs. The boot process may appear to freezeat this point:
... Initializing cgroup subsys nsInitializing cgroup subsys cpuacctInitializing cgroup subsys memory01: HCPGSP2627I The virtual machine is placed in CP mode due to a SIGP initial CPU reset from CPU 00. ”, ...
The boot process will continue after a minute or two.
5.9.3 Creating a swap space on the DCSS It is recommended that you run the following commands from a 3270 emulator session as additional informational messagesare sent to the console.
• Create a swap space on the new DCSS using the mkswap command:gpok226:~ # mkswap /dev/dcssblk0Setting up swapspace version 1, size = 1048572 KiB no label, UUID=6a0eaacc-dc54-4692-aa8d-f6ed31a46200
• Save the swap space. You should see messages on the console informing you of the DCSS file ID that is saved. Inthis example it is 177:gpok226:~ # echo 1 > /sys/devices/dcssblk/SWAPPING/save00: HCPNSD440I Saved segment SWAPPING was successfully defined in fileid 0041.00: HCPNSS440I Saved segment SWAPPING was successfully saved in fileid 0041. dcssblk.9a4530: All DCSSs that map to device SWAPPING are saved
It is important to note that the mkswap command need only be performed once. The swap signature is written to the DCSSand is then memory mapped to each Linux virtual machine that loads it using the dcssblk driver.
© Copyright IBM 2011 25
Sharing and Maintaining SLES11 SP1 Linux under z/VM using DCSSs and an NSS
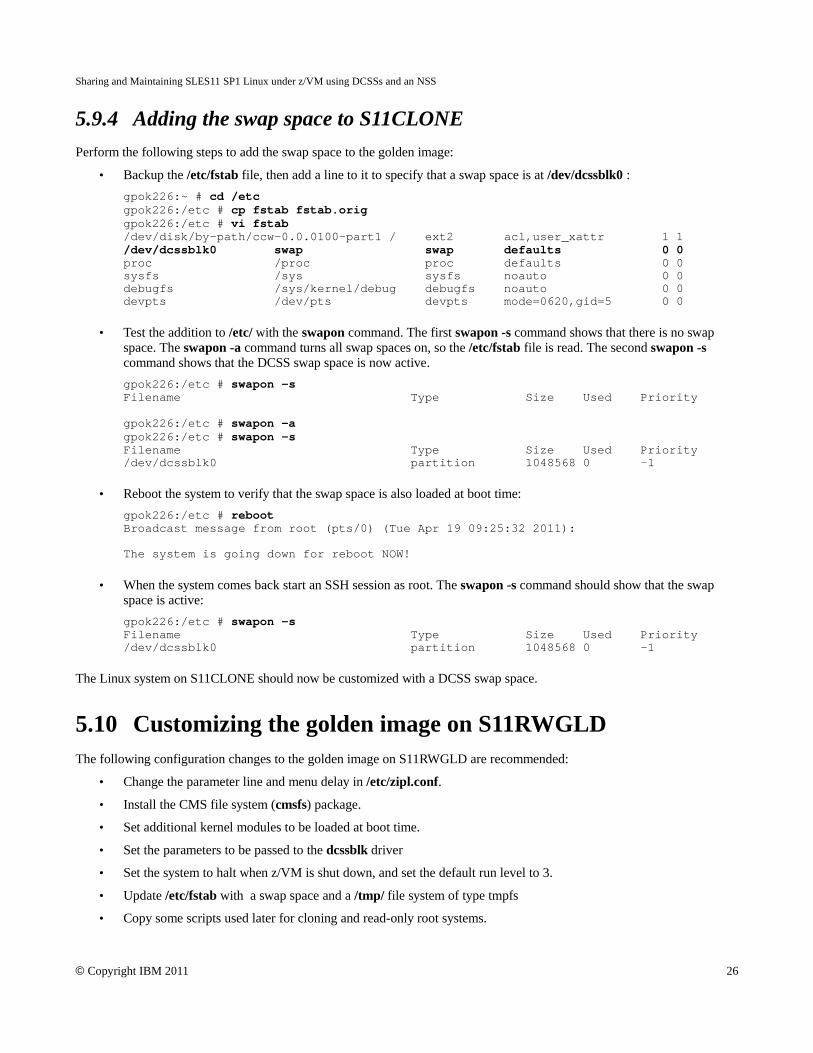
5.9.4 Adding the swap space to S11CLONEPerform the following steps to add the swap space to the golden image:
• Backup the /etc/fstab file, then add a line to it to specify that a swap space is at /dev/dcssblk0 :gpok226:~ # cd /etcgpok226:/etc # cp fstab fstab.origgpok226:/etc # vi fstab/dev/disk/by-path/ccw-0.0.0100-part1 / ext2 acl,user_xattr 1 1/dev/dcssblk0 swap swap defaults 0 0proc /proc proc defaults 0 0sysfs /sys sysfs noauto 0 0debugfs /sys/kernel/debug debugfs noauto 0 0devpts /dev/pts devpts mode=0620,gid=5 0 0
• Test the addition to /etc/ with the swapon command. The first swapon -s command shows that there is no swapspace. The swapon -a command turns all swap spaces on, so the /etc/fstab file is read. The second swapon -scommand shows that the DCSS swap space is now active.gpok226:/etc # swapon -sFilename Type Size Used Priority
gpok226:/etc # swapon -agpok226:/etc # swapon -sFilename Type Size Used Priority/dev/dcssblk0 partition 1048568 0 -1
• Reboot the system to verify that the swap space is also loaded at boot time:gpok226:/etc # rebootBroadcast message from root (pts/0) (Tue Apr 19 09:25:32 2011):
The system is going down for reboot NOW!
• When the system comes back start an SSH session as root. The swapon -s command should show that the swapspace is active:gpok226:/etc # swapon -sFilename Type Size Used Priority/dev/dcssblk0 partition 1048568 0 -1
The Linux system on S11CLONE should now be customized with a DCSS swap space.
5.10 Customizing the golden image on S11RWGLDThe following configuration changes to the golden image on S11RWGLD are recommended:
• Change the parameter line and menu delay in /etc/zipl.conf.
• Install the CMS file system (cmsfs) package.
• Set additional kernel modules to be loaded at boot time.
• Set the parameters to be passed to the dcssblk driver
• Set the system to halt when z/VM is shut down, and set the default run level to 3.
• Update /etc/fstab with a swap space and a /tmp/ file system of type tmpfs
• Copy some scripts used later for cloning and read-only root systems.
© Copyright IBM 2011 26

• Optionally, create mount points under /opt/ for the possibility of mounting middleware.
5.10.1 Modifying zipl.confModify the file /etc/zipl.conf in two ways:
• In the [SLES11_SP1] section, add the parameter vmpoff=LOGOFF and vmhalt=LOGOFF so that the z/VM userIds will be logged off after Linux is shut down.
• In the :menu section, reduce the timeout from 10 seconds to 3 so Linux IPLs more quickly with no user input.
Back up the latest zipl.conf then make the following changes:gpok222:~ # cd /etcgpok222:/etc # cp zipl.conf zipl.conf.origgpok222:/etc # vi zipl.conf# Modified by YaST2. Last modification on Mon Apr 18 16:05:10 EDT 2011[defaultboot]defaultmenu = menu
###Don't change this comment - YaST2 identifier: Original name: linux###[SLES11_SP1] image = /boot/image-2.6.32.12-0.7-default target = /boot/zipl ramdisk = /boot/initrd-2.6.32.12-0.7-default,0x2000000 parameters = "vmpoff=LOGOFF vmhalt=LOGOFF root=/dev/disk/by-path/ccw-0.0.0103-part1TERM=dumb"
###Don't change this comment - YaST2 identifier: Original name: failsafe###[FailsafeV1] image = /boot/image-2.6.32.12-0.7-default target = /boot/zipl ramdisk = /boot/initrd-2.6.32.12-0.7-default,0x2000000 parameters = "root=/dev/disk/by-path/ccw-0.0.0103-part1 TERM=dumb x11failsafe"
:menu default = 1 prompt = 1 target = /boot/zipl timeout = 3 1 = SLES11_SP1 2 = FailsafeV1 3 = ipl...
The zipl command will be run later.
5.10.2 Installing the CMS file system packageAdd the cmsfs RPM with the zypper install command. This RPM will be needed by the boot.findself script to obtain thecorrect IP address and host name from the 191 (CMSCLONE 192) disk at first boot.
gpok222:/etc # zypper install cmsfsLoading repository data...
© Copyright IBM 2011 27
Note to implementers: Again, please resist the urge to add or delete steps. Certain steps such as modifying zipl.conf,adding the cmsfs package, loading the vmcp module, and copying boot.findself are required for the entire solution to work.

Sharing and Maintaining SLES11 SP1 Linux under z/VM using DCSSs and an NSS
Reading installed packages...Resolving package dependencies...
The following NEW package is going to be installed: cmsfs
The following package is not supported by its vendor: cmsfs
1 new package to install.Overall download size: 33.0 KiB. After the operation, additional 148.0 KiB willbe used.Continue? [y/n/?] (y): yRetrieving package cmsfs-1.1.8-6.2.s390x (1/1), 33.0 KiB (148.0 KiB unpacked)Installing: cmsfs-1.1.8-6.2 [done]
5.10.3 Setting additional kernel modules to be loadedAs with the S11CLONE virtual machine, three modules are set to be loaded at boot time:
1. dcssblk: this module allows DCSS swap spaces and file systems to be utilized
2. cmm: when the cmm module is loaded, in conjunction with configuration changes on z/VM, significantperformance gains are possible.
3. vmcp: the vmcp module allows CP commands to be issued from Linux.
Add these modules to the file /etc/sysconfig/kernel in the variables INITRD_MODULES (for the dcssblk driver) andMODULES_LOADED_ON_BOOT:
gpok222:/etc # cd /etc/sysconfiggpok222:/etc/sysconfig # cp kernel kernel.origgpok222:/etc/sysconfig # vi kernel // modify two lines## Path: System/Kernel## Description:## Type: string## Command: /sbin/mkinitrd## This variable contains the list of modules to be added to the initial# ramdisk by calling the script "mkinitrd"# (like drivers for scsi-controllers, for lvm or reiserfs)#INITRD_MODULES="dcssblk"
## Type: string## Command: /sbin/mkinitrd## This variable contains the list of modules to be added to the initial# ramdisk that is created for unprivilegd Xen domains (domU); you may need# drivers for virtual block and network devices in addition to filesystem# and device-mapper modules.#DOMU_INITRD_MODULES="xennet xenblk"
## Type: string## ServiceRestart: boot.loadmodules#
© Copyright IBM 2011 28
# This variable contains the list of modules to be loaded# once the main filesystem is active# You will find a few default modules for hardware which# can not be detected automatically.#MODULES_LOADED_ON_BOOT="cmm vmcp"...
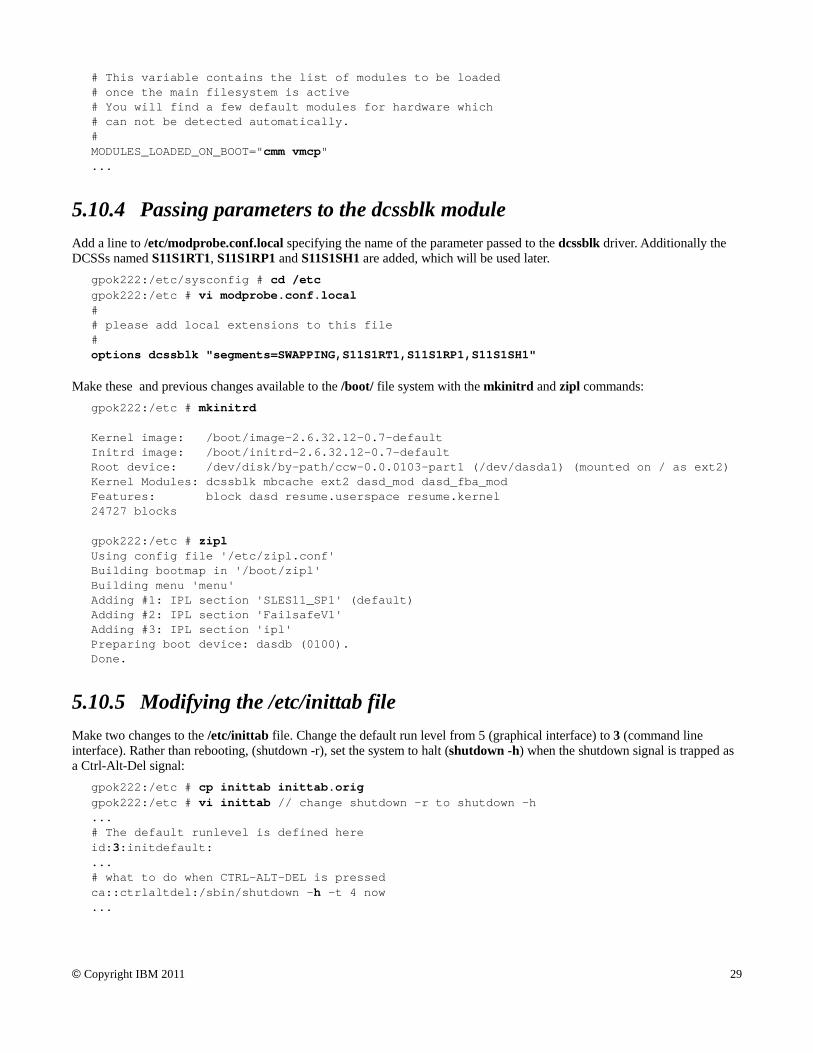
5.10.4 Passing parameters to the dcssblk moduleAdd a line to /etc/modprobe.conf.local specifying the name of the parameter passed to the dcssblk driver. Additionally theDCSSs named S11S1RT1, S11S1RP1 and S11S1SH1 are added, which will be used later.
gpok222:/etc/sysconfig # cd /etcgpok222:/etc # vi modprobe.conf.local## please add local extensions to this file#options dcssblk "segments=SWAPPING,S11S1RT1,S11S1RP1,S11S1SH1"
Make these and previous changes available to the /boot/ file system with the mkinitrd and zipl commands:gpok222:/etc # mkinitrd
Kernel image: /boot/image-2.6.32.12-0.7-defaultInitrd image: /boot/initrd-2.6.32.12-0.7-defaultRoot device: /dev/disk/by-path/ccw-0.0.0103-part1 (/dev/dasda1) (mounted on / as ext2)Kernel Modules: dcssblk mbcache ext2 dasd_mod dasd_fba_modFeatures: block dasd resume.userspace resume.kernel24727 blocks
gpok222:/etc # ziplUsing config file '/etc/zipl.conf'Building bootmap in '/boot/zipl'Building menu 'menu'Adding #1: IPL section 'SLES11_SP1' (default)Adding #2: IPL section 'FailsafeV1'Adding #3: IPL section 'ipl'Preparing boot device: dasdb (0100).Done.
5.10.5 Modifying the /etc/inittab fileMake two changes to the /etc/inittab file. Change the default run level from 5 (graphical interface) to 3 (command lineinterface). Rather than rebooting, (shutdown -r), set the system to halt (shutdown -h) when the shutdown signal is trapped asa Ctrl-Alt-Del signal:
gpok222:/etc # cp inittab inittab.origgpok222:/etc # vi inittab // change shutdown -r to shutdown -h...# The default runlevel is defined hereid:3:initdefault:...# what to do when CTRL-ALT-DEL is pressedca::ctrlaltdel:/sbin/shutdown -h -t 4 now...
© Copyright IBM 2011 29

Sharing and Maintaining SLES11 SP1 Linux under z/VM using DCSSs and an NSS
5.10.6 Modifying /etc/fstabTwo lines are added to the /etc/fstab file
• The line to load the DCSS swap space.
• The /tmp/ file system need not be persistent across reboots, per the Filesystem Hierarchy Specificaiton (FHS).Therefore it can be of type tmpfs which is an in-memory file system.
To accomplish this, add the following two lines to /etc/fstab:gpok222:/etc # cp fstab fstab.origgpok222:/etc # vi fstab/dev/disk/by-path/ccw-0.0.0103-part1 / ext2 acl,user_xattr 1 1/dev/disk/by-path/ccw-0.0.0100-part1 /boot ext2 acl,user_xattr 1 2/dev/disk/by-path/ccw-0.0.0102-part1 /usr/local ext3 acl,user_xattr 1 2/dev/disk/by-path/ccw-0.0.0101-part1 /usr/share ext2 acl,user_xattr 1 2/dev/dcssblk0 swap swap defaults 0 0tmpfs /tmp tmpfs defaults 0 0proc /proc proc defaults 0 0sysfs /sys sysfs noauto 0 0debugfs /sys/kernel/debug debugfs noauto 0 0devpts /dev/pts devpts mode=0620,gid=5 0 0
These changes will be effected after the next reboot.
5.10.7 Copying scripts to the golden imageThe following scripts associated with this paper are copied to the golden image:
File Location Description
boot.findself /usr/local/sbin A new script run at first boot by /etc/init.d/boot.local to set the IP addressand host name
cloneprep.sh /usr/local/sbin/ A new script run before cloning to clean up unnecessary files
setup-block.sh /lib/mkinitrd/scripts/ A modified script that allows mkintrd to recognize the dcssblk module
boot.rootfsck /etc/init.d/ A modified script run at each boot allow for a read-only root file system
boot.local /etc/init.d/ A modified script to call boot.findself at first boot then rename it so it isonly run once
Copy the new shell scripts using the scp command from the cloner. In this example, the IP address of the Linux running onS11CLONE is 9.60.18.226:
gpok222:/etc # cd /usr/local/sbingpok222:/usr/local/sbin # scp 9.60.18.226:/usr/local/sbin/cloneprep.sh .The authenticity of host '9.60.18.226 (9.60.18.226)' can't be established.RSA key fingerprint is 79:a1:da:18:5d:11:84:0d:d9:8d:85:7b:3a:6b:cc:eb.Are you sure you want to continue connecting (yes/no)? yesWarning: Permanently added '9.60.18.226' (RSA) to the list of known hosts.Password:cloneprep.sh 100% 2280 2.2KB/s 00:00gpok222:/usr/local/sbin # scp 9.60.18.226:/usr/local/sbin/boot.findself .Password:boot.findself 100% 6263 6.1KB/s 00:01
© Copyright IBM 2011 30

Copy the modified shell scripts using the scp command from the cloner.gpok222:/usr/local/sbin # cd /lib/mkinitrd/scriptsgpok222:/lib/mkinitrd/scripts # mv setup-block.sh setup-block.sh.origgpok222:/lib/mkinitrd/scripts # scp 9.60.18.226:/usr/local/sbin/setup-block.sh setup-block.shPassword:setup-block.sh 100% 4480 4.4KB/s 00:00gpok222:/lib/mkinitrd/scripts # diff setup-block.sh setup-block.sh.orig ( 79,81d78 < dcss*)< echo dcssblk< ;;gpok222:/lib/mkinitrd/scripts # cd /etc/init.dgpok222:/etc/init.d # mv boot.rootfsck boot.rootfsck.origgpok222:/etc/init.d # scp 9.60.18.226:/usr/local/sbin/boot.rootfsck boot.rootfsckPassword:boot.rootfsck 100% 8745 8.5KB/s 00:00
gpok222:/etc/init.d # diff boot.rootfsck boot.rootfsck.orig // observe many differences29,51d28< # ROR: add read-only root processing< if [ -f /etc/sysconfig/readonly-root ]; then< . /etc/sysconfig/readonly-root< else # no config file, assume no< READONLY=no< fi...gpok222:/etc/init.d # mv boot.local boot.local.origgpok222:/etc/init.d # scp 9.60.18.226:/usr/local/sbin/boot.local boot.localPassword:boot.local 100% 698 0.7KB/s 00:00
gpok222:/etc/init.d # diff boot.local boot.local.orig // observe one addition15,20c15< if [ -f /usr/local/sbin/boot.findself ]; then # this is first boot< /usr/local/sbin/boot.findself # run it to set IP@ & hostname< if [ $? = 0 ]; then # then success => rename< /bin/mv /usr/local/sbin/boot.findself /usr/local/sbin/boot.findself.hasrun< fi< fi--->
The two new and the three modified scripts should now be copied. They are essential to both the read-only and read-writeenvironments.
5.10.8 Creating empty mount pointsMounting middleware binaries read-only is beyond the scope of this paper. However, if there is a possibility that you may runWebSphere® Application Server, DB2 UDB, or MQ Series, you may wish to create the following, or other, empty mountpoints for other software:
• /opt/IBM/WebSphere/
• /opt/mqm/
• /opt/IBM/db2/
© Copyright IBM 2011 31

Sharing and Maintaining SLES11 SP1 Linux under z/VM using DCSSs and an NSS
In this fashion, all cloned servers will have empty mount points for possibly mounting software.gpok222:/etc/init.d # cd /optgpok222:/opt # mkdir mqm IBMgpok222:/opt # cd IBMgpok222:/opt/IBM # mkdir WebSphere db2
5.10.9 Testing the changesThe system can be rebooted and tested.
gpok222:/opt/IBM # rebootBroadcast message from root (pts/0) (Tue Apr 19 10:06:50 2011):
The system is going down for reboot NOW!
The system may take a few minutes to reboot as the DCSSs are being loaded. When it is back, start an SSH session as rootand verify the changes made in this section.
View the file systems with the df -h command: gpok222:~ # df -hFilesystem Size Used Avail Use% Mounted on/dev/dasda1 2.5G 1.8G 520M 78% /devtmpfs 499M 152K 499M 1% /devtmpfs 499M 0 499M 0% /dev/shm/dev/dasdc1 44M 18M 24M 43% /boot/dev/dasdf1 1.3G 34M 1.2G 3% /usr/local/dev/dasdb1 1.2G 877M 250M 78% /usr/sharetmpfs 499M 4.0K 499M 1% /tmp
View the change to the kernel parameters:gpok222:~ # cat /proc/cmdlinevmpoff=LOGOFF vmhalt=LOGOFF root=/dev/disk/by-path/ccw-0.0.0103-part1 TERM=dumbBOOT_IMAGE=0
Use the rpm -q command to show that the cmsfs package was added:gpok222:~ # rpm -q cmsfscmsfs-1.1.8-6.2
Use the lsmod and egrep commands to show that the additional modules have been added:gpok222:~ # lsmod | egrep "cmm|vmcp|dcssblk"vmcp 3845 0cmm 10376 0smsgiucv 4585 1 cmmdcssblk 15137 2
Use the swapon -s command to show that the DCSS swap space is being used:gpok222:~ # swapon -sFilename Type Size Used Priority/dev/dcssblk0 partition 1048568 0 -1
© Copyright IBM 2011 32

5.10.10 Preparing the system for cloningNow the cloneprep.sh script can be run to prepare the system for cloning. The output should be similar to the following:
gpok222:~ # cloneprep.shrm: cannot remove `/var/log/*.gz': No such file or directorySystem should be ready for shutdown and cloning
5.11 Backing up the golden imageYou should now backup the golden image. Shutdown the golden Linux running on S11RWGLD and log off so the system canbe copied.
gpok222:~ # shutdown -h now
Broadcast message from root (pts/0) (Tue Apr 12 17:04:06 2011):
The system is going down for system halt NOW!
To back up the golden image, perform the following steps:
• Start an SSH session as root on the Linux running on S11CLONE.
• Copy the primary minidisks at addresses 100-103 to the backup minidisks at addresses 200-203 with pri2bak.sh.The pri2bak.sh script tries first to use FLASHCOPY for the copy, but if that feature is not installed it will default toLinux dd to perform the copy.gpok226:~ # pri2bak.shAre you sure you want to back up disks 100-103 to 200-203? (y/n): y Copying S11RWGLD 100 to S11RWGLD 200 ...HCPNFC332E Invalid control unit type - 1100Error: non-zero CP response for command 'FLASHCOPY 1100 0 END 2200 0 END': #332FLASHCOPY 1100 0 END 2200 0 END failed with 76Since Flashcopy is not available, Using dd for the disk copySetting device 0.0.1100 onlineDoneSetting device 0.0.2200 onlineDoneFBAInvoking command: dd bs=1M oflag=sync if=/dev/dasdb of=/dev/dasdc45+0 records in45+0 records out47185920 bytes (47 MB) copied, 4.36666 s, 10.8 MB/sSetting device 0.0.1100 offlineDoneDASD 1100 DETACHEDSetting device 0.0.2200 offlineDoneDASD 2200 DETACHEDCopying disk via dd succeeded ...
Copying S11RWGLD 101 to S11RWGLD 201 ......Setting device 0.0.1101 offlineDoneDASD 1101 DETACHEDSetting device 0.0.2201 offlineDoneDASD 2201 DETACHEDCopying disk via dd succeeded ...
Copying S11RWGLD 102 to S11RWGLD 202 ...
© Copyright IBM 2011 33

Sharing and Maintaining SLES11 SP1 Linux under z/VM using DCSSs and an NSS
...Setting device 0.0.1102 offlineDoneDASD 1102 DETACHEDSetting device 0.0.2202 offlineDoneDASD 2202 DETACHEDCopying disk via dd succeeded ...
Copying S11RWGLD 103 to S11RWGLD 203 ......Setting device 0.0.1103 offlineDoneDASD 1103 DETACHEDSetting device 0.0.2203 offlineDoneDASD 2203 DETACHEDCopying disk via dd succeeded …
A copy of the golden image is now on the backup disks. You may want to test making a change to the existing golden image,restoring from the backup with the bak2pri.sh script and seeing that the change is gone because of the rollback.
5.12 Cloning a read-write Linux systemYou should now be ready to clone a read-write system. The clonerw.sh script copies the necessary minidisks fromS11RWGLD system to a target user ID that must be specified.
To clone a read-write system, perform the following steps:
• Create a new target user ID
• Create a new parameter file
• Grant access to the VSWITCH
• Clone a new read-write system
5.12.1 Creating a new target user IDCreate a new user ID with the same size minidisks as the golden image with the same virtual device addresses. In thisexample the user ID is LNX227 and the disk with a label of UMF002 is used:
USER LNX227 PASSWD 256M 1G G INCLUDE LNXDFLT OPTION APPLMON MDISK 0100 FB-512 6 92160 UMF002 MR PASSWD PASSWD PASSWD MDISK 0101 FB-512 92166 2471424 UMF002 MR PASSWD PASSWD PASSWD MDISK 0102 FB-512 2563590 2563584 UMF002 MR PASSWD PASSWD PASSWD MDISK 0103 FB-512 5127174 5127168 UMF002 MR PASSWD PASSWD PASSWD
Bring the directory changes online.
5.12.2 Creating a new parameter fileCreate a parameter file on the CMSCLONE 192 disk (which will become the Linux user ID’s read-only 191 disk). Bydefault CMS accesses the 192 disk as D. The S11RWGLD parameter file on CMSCLONE’s D disk is copied as a template,
© Copyright IBM 2011 34

and the host name and IP address are modified:===> copy s11rwgld parm-s11 d lnx227 = ====> x lnx227 parm-s11 dramdisk_size=65536 root=/dev/ram1 ro init=/linuxrc TERM=dumbHostIP=9.60.18.227 Hostname=gpok227.endicott.ibm.comGateway=9.60.18.129 Netmask=255.255.255.128Broadcast=9.60.18.255 Layer2=0ReadChannel=0.0.0600 WriteChannel=0.0.0601 DataChannel=0.0.0602Nameserver=9.0.2.11portname=whateverportno=0Install=nfs://9.60.18.240/nfs/sles11sp1/dvd1UseVNC=1 VNCPassword=12345678InstNetDev=osa OsaInterface=qdio OsaMedium=eth Manual=0
By using the SLES11 SP1 parameter file to maintain the IP address and host name, there is a side effect. If for some reasonyou need to install Linux manually, or even use the install process as a rescue system, this file will be available and the sameIP/DNS information will be used.
5.12.3 Preparing the diskOn the CMSCLONE machine, prepare the disks for each of the minidisks of the LNX227 server using the PREPDISK EXEC:
==> PREPDISK LNX227 0100 LNX100==> PREPDISK LNX227 0101 LNX101==> PREPDISK LNX227 0102 LNX102==> PREPDISK LNX227 0103 LNX103
5.12.4 Granting access to the VSWITCHGrant the new user ID access to the VSWITCH. The following statement is put in AUTOLOG1’s PROFILE EXEC:
'cp set vswitch vsw1 grant lnx227'
This command is also run interactively from the command line for the current z/VM session.
5.12.5 Cloning a new read-write systemThe read-write Linux system is cloned to the LNX227 user ID with the clonerw.sh shell script from the system running onS11CLONE. Once again, the clonerw.sh shell script attempts to make the copy using FLASHCOPY and if that fails willattempt to make the copy using Linux dd.
Run the clonerw.sh script specifying the target user ID:gpok226:~ # clonerw.sh lnx227Are you SURE you want to clone a read-write system to LNX227 (y/n): y
Copying S11RWGLD 100 to LNX227 100 ...HCPNFC332E Invalid control unit type - 1100Error: non-zero CP response for command 'FLASHCOPY 1100 0 END 2100 0 END': #332FLASHCOPY 1100 0 END 2100 0 END failed with 76Since Flashcopy is not available, Using dd for the disk copySetting device 0.0.1100 onlineDoneSetting device 0.0.2100 onlineDoneFBA
© Copyright IBM 2011 35

Sharing and Maintaining SLES11 SP1 Linux under z/VM using DCSSs and an NSS
Invoking command: dd bs=1M oflag=sync if=/dev/dasdb of=/dev/dasdj45+0 records in45+0 records out47185920 bytes (47 MB) copied, 1.2299 s, 38.4 MB/sSetting device 0.0.1100 offlineDoneDASD 1100 DETACHEDSetting device 0.0.2100 offlineDoneDASD 2100 DETACHEDCopying disk via dd succeeded ...
Copying S11RWGLD 101 to LNX227 101 ...HCPNFC332E Invalid control unit type - 1101...DASD 1101 DETACHEDSetting device 0.0.2101 offlineDoneDASD 2101 DETACHEDCopying disk via dd succeeded ...
Copying S11RWGLD 102 to LNX227 102 ......DASD 1102 DETACHEDSetting device 0.0.2102 offlineDoneDASD 2102 DETACHEDCopying disk via dd succeeded ...
Copying S11RWGLD 103 to LNX227 103 ......DASD 1103 DETACHEDSetting device 0.0.2103 offlineDoneDASD 2103 DETACHEDCopying disk via dd succeeded ...Success! You should be able to IPL the read-write system on LNX227
Note: It is expected that FLASHCOPY will fail as this function is not supported on FCP/SCSI disks. The code is left as is sothe function can still be used with ECKD DASD and in the event that FLASHCOPY is supported on FCP/SCSI at somepoint in the future.
Log on to the newly created LNX227 and IPL from 100. At the initial log on, be sure there are no errors related to minidisksnor VSWITCH access:
LOGON LNX227 00: NIC 0600 is created; devices 0600-0602 defined 00: z/VM Version 6 Release 1.0, Service Level 1002 (64-bit),00: built on IBM Virtualization Technology 00: There is no logmsg data 00: FILES: NO RDR, NO PRT, NO PUN 00: LOGON AT 11:02:21 EDT TUESDAY 04/19/11 z/VM V6.1.0 2010-11-05 11:14
DMSACP723I A (191) R/O DMSACP723I C (592) R/O 00: DASD 0100 9336 UMF002 R/W 92160 BLK ON DASD F002 SUBCHANNEL = 0000Do you want to IPL Linux from 100? y/n
© Copyright IBM 2011 36

y00: zIPL v1.8.0-44.22.5 interactive boot menu 00: 00: 0. default (SLES11_SP1) 00: 00: 1. SLES11_SP1 00: 2. FailsafeV1 00: 3. ipl 00: 00: Note: VM users please use '#cp vi vmsg <number> <kernel-parameters>'00: 00: Please choose (default will boot in 3 seconds): 00: Booting default (SLES11_SP1)... ...
A few screens later, you should see the modified /etc/init.d/boot.rootfsck issue a message that the READONLY variable isnot set for this server:
...
..done ROR: READONLY = noActivating swap-devices in /etc/fstab......
The script /usr/local/sbin/boot.findself should be called by /etc/init.d/boot.local and access the 191 disk, read the parameterfile and set the TCP/IP address and host name. It does this by modifying the files /etc/hosts, /etc/HOSTNAME and/etc/sysconfig/network/ifcfg-eth0. You should see informational messages similar to the following:
...System Boot Control: Running /etc/init.d/boot.local
/usr/local/sbin/boot.findself: changing (escaped) gpok222\.endicott\.ibm\.com to gpok227.endicott.ibm.com in /etc/HOSTNAME/usr/local/sbin/boot.findself: changing gpok222 to gpok227 and IP address in /etc/hosts/usr/local/sbin/boot.findself: changing (escaped) 9\.60\.18\.222 to 9.60.18.227in /etc/sysconfig/network/ifcfg-eth0...
These messages show that the boot.findself script ran and modified the IP address and host name. You should now be able tostart an SSH session with the cloned system at the correct IP address. If the IP address and/or host name are not changed,then look at parm-s11 file for both the LNX227 and the S11RWGLD servers to ensure that the parameters HostIP= andHostname= have the exact capitalization for the parameter names listed here. The script scans for that exact charactercapitalization to find the old and new parameters in order to make the change.
At the end of the boot messages, you should see sshd creating new SSH keys (they were deleted by boot.findself):...Generating /etc/ssh/ssh_host_rsa_key. Generating public/private rsa key pair. Your identification has been saved in /etc/ssh/ssh_host_rsa_key. Your public key has been saved in /etc/ssh/ssh_host_rsa_key.pub. The key fingerprint is: ... Starting SSH daemon..done Starting Name Service Cache Daemon..done Starting CRON daemon..done Starting smartd ..unused Master Resource Control: runlevel 3 has been reached Skipped services in runlevel 3: [80C [37Dnfs irq_balancer splash smartd
© Copyright IBM 2011 37
Sharing and Maintaining SLES11 SP1 Linux under z/VM using DCSSs and an NSS
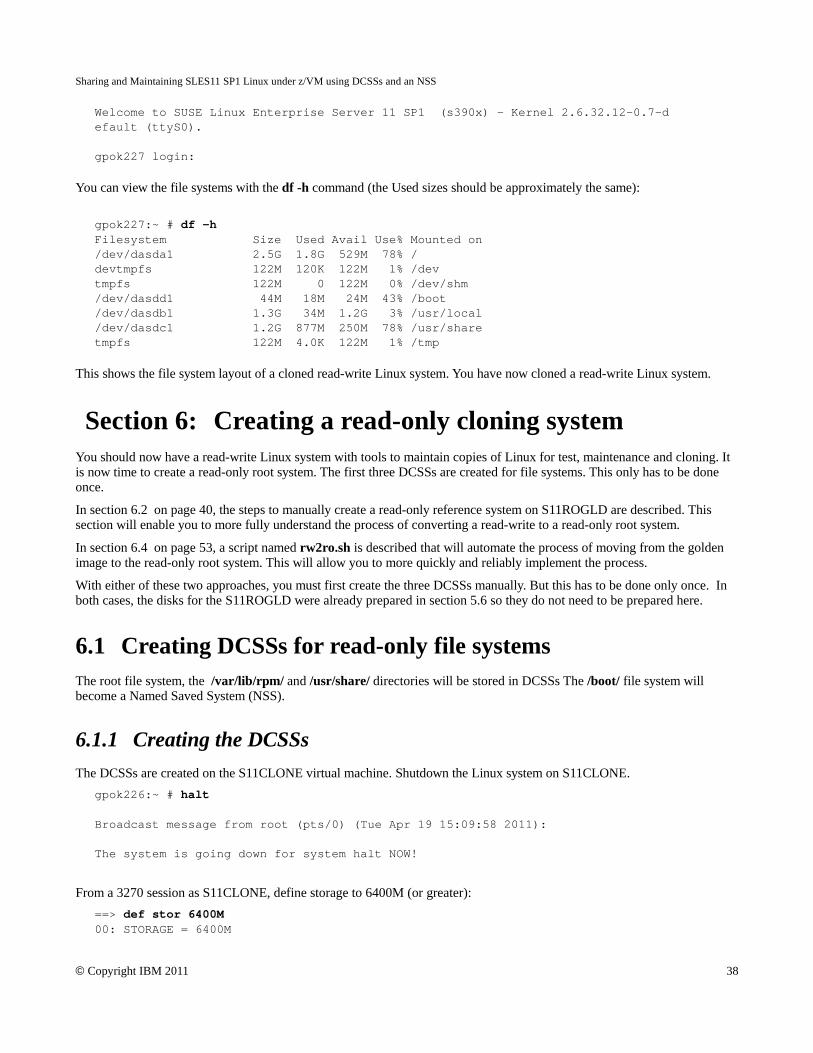
Welcome to SUSE Linux Enterprise Server 11 SP1 (s390x) - Kernel 2.6.32.12-0.7-default (ttyS0). gpok227 login:
You can view the file systems with the df -h command (the Used sizes should be approximately the same):
gpok227:~ # df -hFilesystem Size Used Avail Use% Mounted on/dev/dasda1 2.5G 1.8G 529M 78% /devtmpfs 122M 120K 122M 1% /devtmpfs 122M 0 122M 0% /dev/shm/dev/dasdd1 44M 18M 24M 43% /boot/dev/dasdb1 1.3G 34M 1.2G 3% /usr/local/dev/dasdc1 1.2G 877M 250M 78% /usr/sharetmpfs 122M 4.0K 122M 1% /tmp
This shows the file system layout of a cloned read-write Linux system. You have now cloned a read-write Linux system.
Section 6: Creating a read-only cloning systemYou should now have a read-write Linux system with tools to maintain copies of Linux for test, maintenance and cloning. Itis now time to create a read-only root system. The first three DCSSs are created for file systems. This only has to be doneonce.
In section 6.2 on page 40, the steps to manually create a read-only reference system on S11ROGLD are described. Thissection will enable you to more fully understand the process of converting a read-write to a read-only root system.
In section 6.4 on page 53, a script named rw2ro.sh is described that will automate the process of moving from the goldenimage to the read-only root system. This will allow you to more quickly and reliably implement the process.
With either of these two approaches, you must first create the three DCSSs manually. But this has to be done only once. Inboth cases, the disks for the S11ROGLD were already prepared in section 5.6 so they do not need to be prepared here.
6.1 Creating DCSSs for read-only file systemsThe root file system, the /var/lib/rpm/ and /usr/share/ directories will be stored in DCSSs The /boot/ file system willbecome a Named Saved System (NSS).
6.1.1 Creating the DCSSsThe DCSSs are created on the S11CLONE virtual machine. Shutdown the Linux system on S11CLONE.
gpok226:~ # halt
Broadcast message from root (pts/0) (Tue Apr 19 15:09:58 2011):
The system is going down for system halt NOW!
From a 3270 session as S11CLONE, define storage to 6400M (or greater):==> def stor 6400M00: STORAGE = 6400M
© Copyright IBM 2011 38

00: Storage cleared - system reset.
==> ipl cmsz/VM V6.1.0 2010-11-05 11:14
DMSACP723I A (191) R/ODMSACP723I C (592) R/O00: DASD 0100 9336 UMF000 R/W 4927488 BLK ON DASD F000 SUBCHANNEL = 0000Do you want to IPL Linux from 100? y/nn
Define and save a DCSS of type SR with the name S11S1RT1 . The SAVESEG command saves the DCSS. The SRparameter means the DCSS will have shared read-only access. The LOADNSHR parameter indicates that any user may loada non-shared copy of the saved segment.
==> defseg s11s1rt1 c0000-13feff sr loadnshr00: HCPNSD440I Saved segment S11S1RT1 was successfully defined in fileid 0042.
==> saveseg s11s1rt100: HCPNSS440I Saved segment S11S1RT1 was successfully saved in fileid 0042.
Note: The SAVESEG command can take a few minutes to complete.
Define and save a DCSS with the name S11S1RP1 :==> defseg s11s1rp1 13ff00-142eff sr loadnshr00: HCPNSD440I Saved segment S11S1RP1 was successfully defined in fileid 0043.
==> saveseg s11s1rp100: HCPNSS440I Saved segment S11S1RP1 was successfully saved in fileid 0043.
Define and save a DCSS with the name S11S1SH1 :==> defseg s11s1sh1 142f00-181eff sr loadnshr00: HCPNSD440I Saved segment S11S1SH1 was successfully defined in fileid 0044.
==> saveseg s11s1sh100: HCPNSS440I Saved segment S11S1SH1 was successfully saved in fileid 0044.
Note: This SAVESEG command can also take a few minutes to complete.
Observe the new DCSSs:==> q nss00: OWNERID FILE TYPE CL RECS DATE TIME FILENAME FILETYPE ORIGINID
...00: *NSS 0041 NSS A 0003 04/19 09:17:33 SWAPPING DCSSG S11CLONE00: *NSS 0042 NSS A 524K 04/19 15:36:36 S11S1RT1 DCSSG S11CLONE00: *NSS 0043 NSS A 012K 04/19 15:45:07 S11S1RP1 DCSSG S11CLONE00: *NSS 0044 NSS A 258K 04/19 15:45:45 S11S1SH1 DCSSG S11CLONE
Now that the DCSSs are defined, the Linux system running on S11CLONE can use them. Set the storage back to 256MB andboot Linux:
==> def stor 256m00: STORAGE = 256M00: Storage cleared - system reset.
==> ipl 10000: zIPL v1.8.0-44.22.5 interactive boot menu...
© Copyright IBM 2011 39

Sharing and Maintaining SLES11 SP1 Linux under z/VM using DCSSs and an NSS
Note: Linux should boot but may freeze at some point with a message:HCPGSP2627I The virtual machine is placed in CP mode due to a SIGP initial CPU reset from CPU 00.
The DCSSs for the read-only file systems have now been created.
6.2 Manually creating a read-only root systemThis section describes the steps to move from a read-write system on S11RWGLD to a read-only root system onS11ROGLD. Later this can be done with the rw2ro.sh script because there are a large number of steps.
The main steps are as follows:
1. Set up the basic environment.
2. Enable the source disks.
3. Enable the target DCSSs.
4. Enable the target file systems.
5. Copy the root file system to the target.
6. Mount the remaining source file systems.
7. Format and mount the remaining target file systems.
8. Copy the remaining file systems from source to target.
9. Modify the target system to be read-only.
10. Clean up - unmount file systems, disable and detach devices.
11. Save the three DCSSs.
12. Create an NSS.
6.2.1 Setting up basic environmentPerform the following steps to set up the basic environment:
• Shutdown and log off the source and target systems, S11RWGLD and S11ROGLD. The work is done from the“cloner”, S11CLONE.
• Verify that the new DCSSs have been loaded:gpok226:~ # ls /sys/devices/dcssblkS11S1RP1 S11S1RT1 S11S1SH1 SWAPPING add power remove uevent
• Create a mount point below the /mnt/ directory for the source (src/) and the target (tgt/) systems. Create a thirdmount point for the target DCSS, S11S1RP1, that will contain the /var/lib/rpm/ directory. No attempt is made tomount over /mnt/tgt/var/lib/rpm/ because this would add complexity, and this directory need not be mounted to“chroot” into the target environment. Create three mount points: /mnt/src/, /mnt/tgt/, and /mnt/rpm/:gpok226:~ # cd /mntgpok226:/mnt # mkdir src tgt rpm
© Copyright IBM 2011 40

6.2.2 Enabling the source disksPerform the following steps to enable the source disks on S11RWGLD:
• Link to the four source disks read-only using the CP LINK command, using virtual device addresses with a prefix of1:gpok226:~ # vmcp link s11rwgld 100 1100 rrgpok226:~ # vmcp link s11rwgld 101 1101 rrgpok226:~ # vmcp link s11rwgld 102 1102 rrgpok226:~ # vmcp link s11rwgld 103 1103 rr
• Enable the four disks using the chccwdev command:gpok226:~ # chccwdev -e 1100Setting device 0.0.1100 onlineDone
gpok226:~ # chccwdev -e 1101Setting device 0.0.1101 onlineDone
gpok226:~ # chccwdev -e 1102Setting device 0.0.1102 onlineDone
gpok226:~ # chccwdev -e 1103Setting device 0.0.1103 onlineDone
You should see messages on the console that the disks are enabled.
6.2.3 Enabling the target DCSSsPerform the following steps to enable the three target DCSSs:
• Enable each of the DCSSs for read-write access by echoing a 0 to the file shared in the /sys/ file system. This setsthe DCSSs to “not shared” which means they can be written to:gpok226:~ # echo 0 > /sys/devices/dcssblk/S11S1RT1/sharedgpok226:~ # echo 0 > /sys/devices/dcssblk/S11S1RP1/sharedgpok226:~ # echo 0 > /sys/devices/dcssblk/S11S1SH1/shared
Important: Because some of the DCSS are large, these steps may take some number of minutes. This will alsoprobably have the effect of freezing the z/VM system. The entire z/VM system is not really frozen. Rather, whilesaving or loading is in progress, NSS commands, DCSS commands, or diagnose functions for NSS and DCSS thatare issued from any guest operating system of the same z/VM will be delayed.
• Make an ext2 file system of the three DCSSs:
gpok226:~ # mke2fs /dev/dcssblk1mke2fs 1.41.9 (22-Aug-2009)...
gpok226:~ # mke2fs /dev/dcssblk2mke2fs 1.41.9 (22-Aug-2009)...
gpok226:~ # mke2fs /dev/dcssblk3mke2fs 1.41.9 (22-Aug-2009)
© Copyright IBM 2011 41
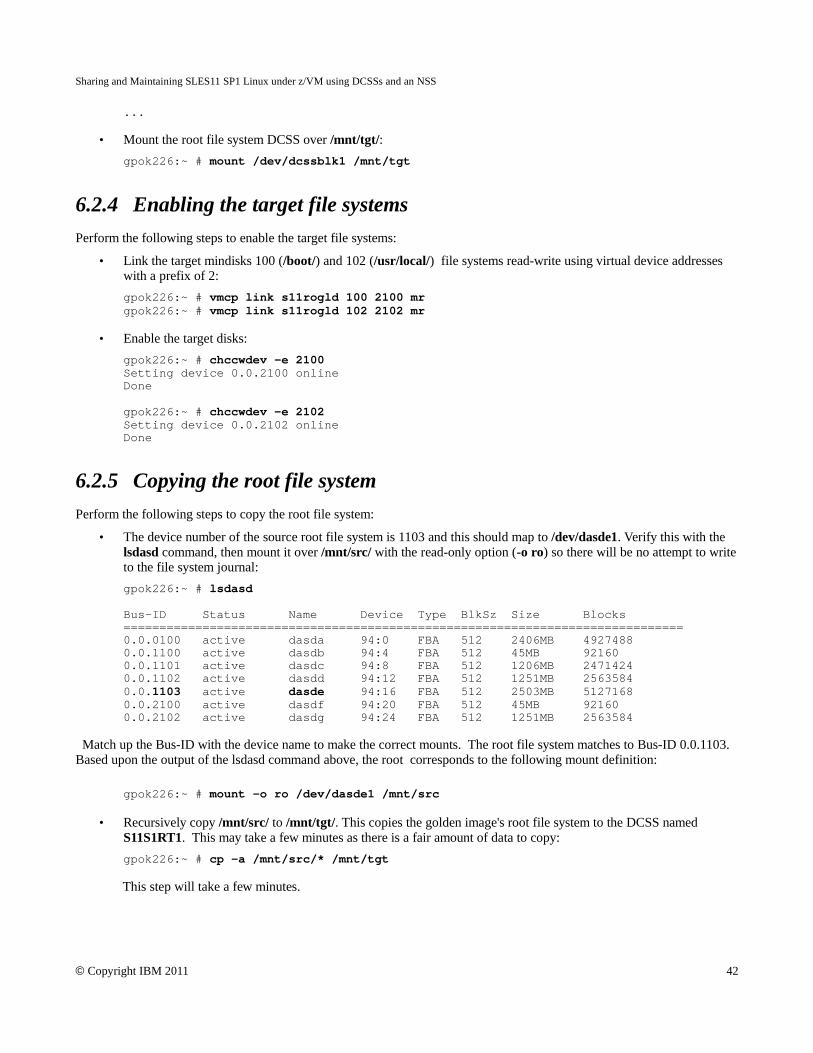
Sharing and Maintaining SLES11 SP1 Linux under z/VM using DCSSs and an NSS
...
• Mount the root file system DCSS over /mnt/tgt/:gpok226:~ # mount /dev/dcssblk1 /mnt/tgt
6.2.4 Enabling the target file systemsPerform the following steps to enable the target file systems:
• Link the target mindisks 100 (/boot/) and 102 (/usr/local/) file systems read-write using virtual device addresseswith a prefix of 2:gpok226:~ # vmcp link s11rogld 100 2100 mrgpok226:~ # vmcp link s11rogld 102 2102 mr
• Enable the target disks:gpok226:~ # chccwdev -e 2100Setting device 0.0.2100 onlineDone
gpok226:~ # chccwdev -e 2102Setting device 0.0.2102 onlineDone
6.2.5 Copying the root file systemPerform the following steps to copy the root file system:
• The device number of the source root file system is 1103 and this should map to /dev/dasde1. Verify this with thelsdasd command, then mount it over /mnt/src/ with the read-only option (-o ro) so there will be no attempt to writeto the file system journal:gpok226:~ # lsdasd
Bus-ID Status Name Device Type BlkSz Size Blocks==============================================================================0.0.0100 active dasda 94:0 FBA 512 2406MB 49274880.0.1100 active dasdb 94:4 FBA 512 45MB 921600.0.1101 active dasdc 94:8 FBA 512 1206MB 24714240.0.1102 active dasdd 94:12 FBA 512 1251MB 25635840.0.1103 active dasde 94:16 FBA 512 2503MB 51271680.0.2100 active dasdf 94:20 FBA 512 45MB 921600.0.2102 active dasdg 94:24 FBA 512 1251MB 2563584
Match up the Bus-ID with the device name to make the correct mounts. The root file system matches to Bus-ID 0.0.1103.Based upon the output of the lsdasd command above, the root corresponds to the following mount definition:
gpok226:~ # mount -o ro /dev/dasde1 /mnt/src
• Recursively copy /mnt/src/ to /mnt/tgt/. This copies the golden image's root file system to the DCSS namedS11S1RT1. This may take a few minutes as there is a fair amount of data to copy:gpok226:~ # cp -a /mnt/src/* /mnt/tgt
This step will take a few minutes.
© Copyright IBM 2011 42

6.2.6 Mounting the remaining source file systemsPerform the following steps to mount the remaining source file systems:
• Issue the lsdasd command and observe that the target /boot/ and /usr/local/ file systems are active:gpok226:~ # lsdasd
Bus-ID Status Name Device Type BlkSz Size Blocks==============================================================================0.0.0100 active dasda 94:0 FBA 512 2406MB 49274880.0.1100 active dasdb 94:4 FBA 512 45MB 921600.0.1101 active dasdc 94:8 FBA 512 1206MB 24714240.0.1102 active dasdd 94:12 FBA 512 1251MB 25635840.0.1103 active dasde 94:16 FBA 512 2503MB 51271680.0.2100 active dasdf 94:20 FBA 512 45MB 921600.0.2102 active dasdg 94:24 FBA 512 1251MB 2563584
• Mount the remaining source file systems as type ext2. Match up the Bus-ID with the device names to make thecorrect mounts. The /boot matches to Bus-ID 0.0.1100, /usr/shr matches to Bus-ID 0.0.1101, and /usr/local matchesto Bus-ID 0.0.1102. Based upon the output of the lsdasd command above, these correspond to the following mountdefinitions: /dev/dasdb1 (/boot/), /dev/dasdc1 (/usr/share) and /dev/dasdd1 (/usr/local/) :gpok226:~ # mount -o ro /dev/dasdb1 /mnt/src/bootgpok226:~ # mount -o ro /dev/dasdc1 /mnt/src/usr/sharegpok226:~ # mount -o ro /dev/dasdd1 /mnt/src/usr/local
You should now have the golden image mounted over /mnt/src/.
6.2.7 Formatting and mounting the remaining target file systemsPerform the following steps to format and mount the remaining target file systems:
• Mount the remaining target DCSSs: /dev/dcssblk2 (/var/lib/rpm/) and /dev/dcssblk3 (/usr/share/):gpok226:~ # mount /dev/dcssblk2 /mnt/rpmgpok226:~ # mount /dev/dcssblk3 /mnt/tgt/usr/share
• Create a single partition and make an ext2 file system on the target disk which corresponds to the Bus-ID 0.0.2100 inthe output of the lsdasd command above and therefore the mount point is /dev/dasdf (/boot/):
gpok226:~ # mke2fs /dev/dasdf1...
• Create a single partition and make an ext3 file system on the target disk which corresponds to the Bus-ID 0.0.2102 inthe output of the lsdasd command above and therefore the mount point is /dev/dasdg (/usr/local/):
gpok226:~ # mke2fs -j /dev/dasdg1...
• Mount the newly formatted target file systems:gpok226:~ # mount /dev/dasdf1 /mnt/tgt/boot/gpok226:~ # mount /dev/dasdg1 /mnt/tgt/usr/local
You should now have all target file systems prepared for copying.
6.2.8 Copying remaining file systemsPerform the following steps to copy the remaining file systems:
© Copyright IBM 2011 43
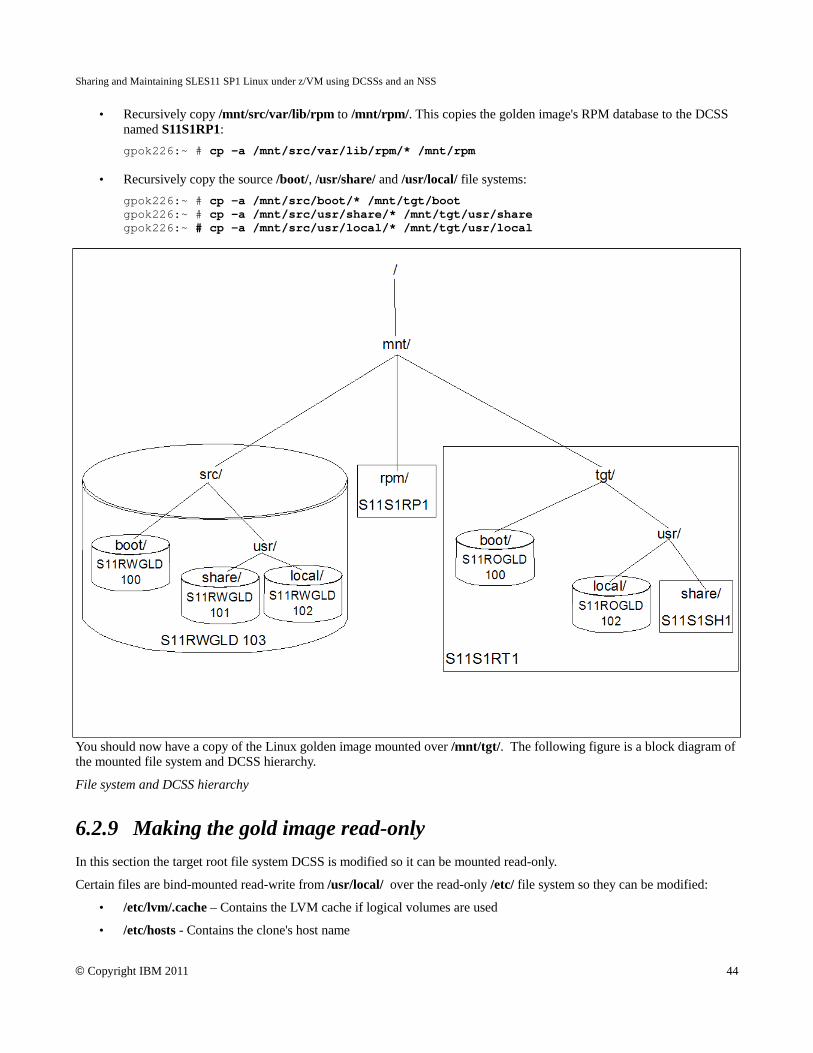
Sharing and Maintaining SLES11 SP1 Linux under z/VM using DCSSs and an NSS
• Recursively copy /mnt/src/var/lib/rpm to /mnt/rpm/. This copies the golden image's RPM database to the DCSSnamed S11S1RP1:gpok226:~ # cp -a /mnt/src/var/lib/rpm/* /mnt/rpm
• Recursively copy the source /boot/, /usr/share/ and /usr/local/ file systems:gpok226:~ # cp -a /mnt/src/boot/* /mnt/tgt/bootgpok226:~ # cp -a /mnt/src/usr/share/* /mnt/tgt/usr/sharegpok226:~ # cp -a /mnt/src/usr/local/* /mnt/tgt/usr/local
You should now have a copy of the Linux golden image mounted over /mnt/tgt/. The following figure is a block diagram ofthe mounted file system and DCSS hierarchy.
File system and DCSS hierarchy
6.2.9 Making the gold image read-onlyIn this section the target root file system DCSS is modified so it can be mounted read-only.
Certain files are bind-mounted read-write from /usr/local/ over the read-only /etc/ file system so they can be modified:
• /etc/lvm/.cache – Contains the LVM cache if logical volumes are used
• /etc/hosts - Contains the clone's host name
© Copyright IBM 2011 44

• /etc/HOSTNAME – Contains the clone's host name
• /etc/sysconfig/network/ifcfg-eth0 – Contains the clone's IP address
• /etc/sysconfig/network/routes – Contains the default gateway
These files and other directories are listed in the file that will be copied to /etc/rwtab. For reference, view it in the/usr/local/sbin/ directory:
gpok226:~ # cat /usr/local/sbin/rwtabdirs /rootdirs /srvdirs /vardirs /etc/sshfiles /etc/fstabfiles /etc/resolv.conffiles /etc/lvm/.cachefiles /etc/hostsfiles /etc/HOSTNAMEfiles /etc/sysconfig/network/ifcfg-eth0files /etc/sysconfig/network/routes
In addition to copying these files, the /etc/mtab file becomes a symbolic link to /proc/mounts. This is not an ideal solution asit affects the output of the df and mount commands. But it is better than trying to bind-mount a read-write /etc/mtab file asthe mount command tries to write a temporary file to /etc/. When it cannot write to /etc/ the mount fails (To Linuxdevelopers: a better solution would be to modify the mount command so that it writes temporary files to /tmp/ rather than/etc/.)
To modify the target root file system, perform the following steps:
• Back up and copy the modified /etc/fstab file so the DCSSs are mounted and not the minidisks. The changes to thefile are in bold:gpok226:~ # cp /mnt/tgt/etc/fstab /mnt/tgt/etc/fstab.origgpok226:~ # cp /usr/local/sbin/fstab /mnt/tgt/etc/fstabgpok226:~ # cat /mnt/tgt/etc/fstab/dev/dcssblk1 / ext2 ro,xip,noatime,nodiratime,acl,user_xattr 1 1/dev/disk/by-path/ccw-0.0.0102-part1 /usr/local ext3 acl,user_xattr 0 0/dev/dcssblk2 /var/lib/rpm ext2 ro,xip,noatime,nodiratime,acl,user_xattr 0 0/dev/dcssblk3 /usr/share ext2 ro,xip,noatime,nodiratime,acl,user_xattr 0 0tmpfs /tmp tmpfs defaults 0 0proc /proc proc defaults 0 0sysfs /sys sysfs noauto 0 0debugfs /sys/kernel/debug debugfs noauto 0 0devpts /dev/pts devpts mode=0620,gid=5 0 0
• Back up and modify the /etc/zipl.conf file so the root file system is the DCSS, not a diskgpok226:~ # cp /mnt/tgt/etc/zipl.conf /mnt/tgt/etc/zipl.conf.origgpok226:~ # vi /mnt/tgt/etc/zipl.conf# Modified by YaST2. Last modification on Mon Apr 4 09:58:21 EDT 2011defaultboot]defaultmenu = menu
###Don't change this comment - YaST2 identifier: Original name: linux###[SLES11_SP1] image = /boot/image-2.6.32.12-0.7-default target = /boot/zipl ramdisk = /boot/initrd-2.6.32.12-0.7-default,0x2000000 parameters = "vmpoff=LOGOFF vmhalt=LOGOFF root=/dev/dcssblk1 TERM=dumb"
###Don't change this comment - YaST2 identifier: Original name: failsafe###[FailsafeV1] image = /boot/image-2.6.32.12-0.7-default target = /boot/zipl ramdisk = /boot/initrd-2.6.32.12-0.7-default,0x2000000
© Copyright IBM 2011 45

Sharing and Maintaining SLES11 SP1 Linux under z/VM using DCSSs and an NSS
parameters = "vmpoff=LOGOFF vmhalt=LOGOFF root=/dev/dcssblk1 TERM=dumbx11failsafe"
• Copy the new /etc/rwtab file. This is the file that specifies the directories and files to bind-mount read-write overthe read-only root file system:gpok226:~ # cp /usr/local/sbin/rwtab /mnt/tgt/etc
• Copy the new /etc/sysconfig/readonly-root file. This is the configuration file for read-only root processing. Notethat the variable READONLY is set to yes:gpok226:~ # cp /usr/local/sbin/readonly-root /mnt/tgt/etc/sysconfiggpok226:~ # grep READONLY /mnt/tgt/etc/sysconfig/readonly-rootREADONLY=yes# or on the block device labeled RW_LABEL. Implied by READONLY
• Delete the /etc/mtab file and replace it with a symbolic link to /proc/mounts, as discussed previously:gpok226:~ # cd /mnt/tgt/etcgpok226:/mnt/tgt/etc # rm mtabgpok226:/mnt/tgt/etc # ln -s /proc/mounts mtab
• Mount the /dev/, /proc/ and /sys/ file systems, then use the chroot command to change root into the targetenvironment:gpok226:/mnt/tgt/etc # mount --bind /dev /mnt/tgt/devgpok226:/mnt/tgt/etc # mount -t proc none /mnt/tgt/procgpok226:/mnt/tgt/etc # mount --bind /sys /mnt/tgt/sysgpok226:/mnt/tgt/etc # chroot /mnt/tgt
• In the target environment, recursively copy the source directories /root/, /srv/ and /var/ to /usr/local/. Thesedirectories will later be bind-mounted read-write over their respective locations:gpok226:/ # cd /usr/localgpok226:/usr/local # cp -a /root /srv /var .gpok226:/usr/local # ls bin include lib64 man sbin src vargames lib lost+found root share srv
• Copy the files in /etc/ that will need to be bind-mounted:gpok226:/usr/local # mkdir /usr/local/etc/gpok226:/usr/local # cd /etcgpok226:/etc # cp HOSTNAME hosts fstab resolv.conf /usr/local/etcgpok226:/etc # cp -a ssh /usr/local/etc
• Make a directory under /usr/local/ then copy two files in /etc/sysconfig/network/:gpok226:/etc # mkdir -p /usr/local/etc/sysconfig/networkgpok226:/etc # cd /etc/sysconfig/networkgpok226:/etc/sysconfig/network # cp ifcfg-eth0 routes/usr/local/etc/sysconfig/network
• Make a directory under /usr/local/ then copy one file in /etc/lvm/:gpok226:/etc/sysconfig/network # mkdir /usr/local/etc/lvmgpok226:/etc/sysconfig/network # cp /etc/lvm/.cache /usr/local/etc/lvm
• Make a directory under /usr/local/ then copy the /var/lib/rpm/ directory:gpok226:/etc/sysconfig/network # mkdir -p /usr/local/etc/var/libgpok226:/etc/sysconfig/network # cp -a /var/lib/rpm /usr/local/etc/var/lib
• Under the chroot'ed /mnt/tgt/ environment, delete the contents of /root/, /srv/ and /var/ because these directories
© Copyright IBM 2011 46

will later be “over-mounted”. This will save some space. gpok226:/etc/sysconfig/network # rm -r /root/* /srv/* /var/*
• Run zipl in the chroot'ed environment to write the boot record to /boot/gpok226:/etc/sysconfig/network # ziplUsing config file '/etc/zipl.conf'Building bootmap in '/boot/zipl'Building menu 'menu'Adding #1: IPL section 'SLES11_SP1' (default)Adding #2: IPL section 'FailsafeV1'Adding #3: IPL section 'ipl'Preparing boot device: dasdf (2100).Done.
6.2.10 Cleaning upExit the chroot'd environment, sync the file system, change directory to root's home and unmount the mounted file systems:
gpok226:/etc/sysconfig/network # exitgpok226:/mnt/tgt/etc # syncgpok226:/mnt/tgt/etc # cdgpok226:~ # umount /mnt/tgt/usr/localgpok226:~ # umount /mnt/tgt/usr/sharegpok226:~ # umount /mnt/tgt/bootgpok226:~ # umount /mnt/tgt/devgpok226:~ # umount /mnt/tgt/procgpok226:~ # umount /mnt/tgt/sysgpok226:~ # umount /mnt/tgtgpok226:~ # umount /mnt/src/usr/sharegpok226:~ # umount /mnt/src/usr/localgpok226:~ # umount /mnt/src/bootgpok226:~ # umount /mnt/srcgpok226:~ # umount /mnt/rpm
• Disable and detach the linked target disks:gpok226:~ # chccwdev -d 2100Setting device 0.0.2100 offlineDone
gpok226:~ # chccwdev -d 2102Setting device 0.0.2102 offlineDone
gpok226:~ # vmcp det 2100DASD 2100 DETACHED
gpok226:~ # vmcp det 2102DASD 2102 DETACHED
• Disable and detach the linked source disks:gpok226:~ # chccwdev -d 1100Setting device 0.0.1100 offlineDone
gpok226:~ # chccwdev -d 1101Setting device 0.0.1101 offlineDone
gpok226:~ # chccwdev -d 1102Setting device 0.0.1102 offlineDone
© Copyright IBM 2011 47

Sharing and Maintaining SLES11 SP1 Linux under z/VM using DCSSs and an NSS
gpok226:~ # chccwdev -d 1103Setting device 0.0.1103 offlineDone
gpok226:~ # vmcp det 1100DASD 1100 DETACHED
gpok226:~ # vmcp det 1101DASD 1101 DETACHED
gpok226:~ # vmcp det 1102DASD 1102 DETACHED
gpok226:~ # vmcp det 1103DASD 1103 DETACHED
6.2.11 Saving the DCSSsTo save the DCSSs, perform the following commands:
gpok226:~ # echo 1 > /sys/devices/dcssblk/S11S1RT1/savegpok226:~ # echo 1 > /sys/devices/dcssblk/S11S1RP1/savegpok226:~ # echo 1 > /sys/devices/dcssblk/S11S1SH1/save
Important: You may lose your SSH session on one or more of the above commands. This may have theappearance of freezing the z/VM system. The entire z/VM system is not really frozen. Rather, while saving orloading is in progress, NSS commands, DCSS commands, or diagnose functions for NSS and DCSS that are issuedfrom any guest operating system of the same z/VM will be delayed. Internally to z/VM development, PITS2U02367 exists with an analysis of this issue. These commands can be run logged onto linux S11CLONE from a3270 session since it will not be disconnected unlike an SSH session.
The modified read-only golden image, now on two minidisks and three DCSSs, should now be ready to boot fromS11ROGLD.
6.2.12 Making an NSSThe files in the boot file system are now used to create a Named Saved System (NSS). Then the read-only golden Linuximage can be booted by referring to a name, such as S11S1LX1, rather than a virtual device address, such as 100.
Note: You may receive a message such as the following:
HCPGSP2627I The virtual machine is placed in CP mode due to a SIGP initial CPU reset from CPU 00.
The IPL will continue on after an apparent brief pause. Give it some time.
To accomplish this, perform the following steps.
• Start a 3270 session to the S11ROGLD user ID.
• IPL the 100 disk with the SAVESYS=S11S1LX1 parameter. You should see informational messages showing thatthe NSS has been saved:
LOGON S11ROGLD 00: z/VM Version 6 Release 1.0, Service Level 1002 (64-bit),00: built on IBM Virtualization Technology 00: There is no logmsg data 00: FILES: NO RDR, NO PRT, NO PUN
© Copyright IBM 2011 48

00: RECONNECTED AT 17:52:50 EDT TUESDAY 04/19/11
DMSACP723I A (191) R/O DMSACP723I C (592) R/O 00: DASD 0100 9336 UMF000 R/W 92160 BLK ON DASD F000 SUBCHANNEL = 0000Do you want to IPL Linux from 100? y/n n
==> ipl 100 parm savesys=s11s1lx100: zIPL v1.8.0-44.22.5 interactive boot menu 00: 00: 0. default (SLES11_SP1) 00: 00: 1. SLES11_SP1 00: 2. FailsafeV1 00: 3. ipl 00: 00: Note: VM users please use '#cp vi vmsg <number> <kernel-parameters>' 00: 00: Please choose (default will boot in 3 seconds): 00: Booting default (SLES11_SP1)... 00: HCPNSD440I The Named Saved System (NSS) S11S1LX1 was successfully defined in fileid 0049. 00: HCPNSS440I Named Saved System (NSS) S11S1LX1 was successfully saved in fileid 0049. ...
• Login as root, shut down the system again, then IPL from the newly created NSS to test it:login as: rootUsing keyboard-interactive authentication.Password:
gpok222:~ # shutdown -h nowBroadcast message from root (pts/0) (Tue Apr 19 17:47:32 2011):
The system is going down for system halt NOW!
LOGON S11ROGLD 00: z/VM Version 6 Release 1.0, Service Level 1002 (64-bit),00: built on IBM Virtualization Technology 00: There is no logmsg data 00: FILES: NO RDR, NO PRT, NO PUN 00: RECONNECTED AT 17:52:50 EDT TUESDAY 04/19/11
DMSACP723I A (191) R/O DMSACP723I C (592) R/O 00: DASD 0100 9336 UMF000 R/W 92160 BLK ON DASD F000 SUBCHANNEL = 0000Do you want to IPL Linux from 100? y/n n
==> ipl s11s1lx1Initializing cgroup subsys cpuset Initializing cgroup subsys cpu Linux version 2.6.32.12-0.7-default (geeko@buildhost) (gcc version 4.3.4 [gcc-4_3-branch revision 152973] (SUSE Linux) ) #1 SMP 2010-05-20 11:14:20 +0200 setup.1a06a7: Linux is running as a z/VM guest operating system in 64-bit mode Zone PFN ranges: DMA 0x00000000 -> 0x00080000 Normal 0x00080000 -> 0x00080000 ...Initializing cgroup subsys ns Initializing cgroup subsys cpuacct Initializing cgroup subsys memory01: HCPGSP2627I The virtual machine is placed in CP mode due to a SIGP initial C PU reset from CPU 00.…
This shows that a read-only system is running. The df -h command will show some unusual output, but this is expected –
© Copyright IBM 2011 49

Sharing and Maintaining SLES11 SP1 Linux under z/VM using DCSSs and an NSS
read-only file systems are still somewhat new to Linux:gpok222: df -hFilesystem Size Used Avail Use% Mounted onrootfs 2.0G 1.7G 206M 90% /udev 122M 116K 122M 1% /devtmpfs 122M 0 122M 0% /dev/shm/dev/dcssblk1 2.0G 1.7G 206M 90% //dev/dasdb1 1.3G 174M 995M 15% /usr/local/dev/dasdb1 1.3G 174M 995M 15% /root/dev/dasdb1 1.3G 174M 995M 15% /srv/dev/dasdb1 1.3G 174M 995M 15% /var/dev/dasdb1 1.3G 174M 995M 15% /etc/ssh/dev/dasdb1 1.3G 174M 995M 15% /etc/fstab/dev/dasdb1 1.3G 174M 995M 15% /etc/resolv.conf/dev/dasdb1 1.3G 174M 995M 15% /etc/lvm/.cache/dev/dasdb1 1.3G 174M 995M 15% /etc/hosts/dev/dasdb1 1.3G 174M 995M 15% /etc/HOSTNAME/dev/dasdb1 1.3G 174M 995M 15% /etc/sysconfig/network/ifcfg-eth0/dev/dasdb1 1.3G 174M 995M 15% /etc/sysconfig/network/routes/dev/dcssblk2 47M 38M 6.7M 85% /var/lib/rpm/dev/dcssblk3 993M 876M 66M 94% /usr/sharetmpfs 122M 4.0K 122M 1% /tmp
Congratulations – you now have a reference read-only system.
6.2.12.1 Debugging the reference read-only root systemThere are many manual steps in the previous section and thus a high possibility for errors. To help in debugging two helperscripts are provided:
mounttgt.sh A script to link, activate and mount the target disks
cleantgt.sh A script to umount, deactivate and detach the target disks and DCSSs
If the rw2ro.sh script fails, a useful command to immediately issue is:# echo $?
which prints the return code. There are almost no error messages, however, there are unique return codes. Look at thefailing return code and you will be able to quickly find where the process is stopping. The file systems are left mounted soyou can interrogate the status of the source and target systems. If you want to run the rw2ro.sh script again, first clean upwith the cleantgt.sh script. Alternatively, you may want to manually mount the target environment to interrogate specificfiles or directories. This is made easier with the mounttgt.sh script. Due to the DCSS commands, an SSH session may dropwhile due to inactivity, so it is advisable to run the rw2ro.sh command from a VM terminal session instead of an SSHsession.
6.3 Cloning a read-only LinuxNow that you have a reference read-only system running on S11ROGLD, you can now clone your first read-only Linux. Thehigh level steps are as follows. Details are only given for using the clonero.sh script, and logging onto the new clone:
• Shutdown the read-only golden image on S11ROGLD.
• Define a new virtual machine with just a 102 disk for /usr/local/. Following is the example that will be used:
© Copyright IBM 2011 50

USER LNX231 PASSWD 256M 1G G INCLUDE LNXDFLT OPTION APPLMON MDISK 0102 FB-512 10254342 2563584 UMF002 MR PASSWD PASSWD PASSWD
• Create a corresponding parameter file on the CMSCLONE 192 disk.
• Allow the new virtual machine access to the VSWITCH.
• Use the clonero.sh script from S11CLONE. Following is an example of cloning a read-only system to the LNX231virtual machine:gpok226:~ # clonero.sh lnx231Are you SURE you want to clone a read-only system to LNX231 (y/n): y
Copying S11ROGLD 102 to LNX231 102 ...HCPNFC332E Invalid control unit type - 1102Error: non-zero CP response for command 'FLASHCOPY 1102 0 END 2102 0 END': #332FLASHCOPY 1102 0 END 2102 0 END failed with 76Since Flashcopy is not available, Using dd for the disk copySetting device 0.0.1102 onlineDoneSetting device 0.0.2102 onlineDoneFBAInvoking command: dd bs=1M oflag=sync if=/dev/dasdd of=/dev/dasdg1251+1 records in1251+1 records out1312555008 bytes (1.3 GB) copied, 40.4027 s, 32.5 MB/sSetting device 0.0.1102 offlineDoneDASD 1102 DETACHEDSetting device 0.0.2102 offlineDoneDASD 2102 DETACHEDCopying disk via dd succeeded ...Disk successfully copied
• Log on to the new virtual machine.LOGON LNX231 00: NIC 0600 is created; devices 0600-0602 defined 00: z/VM Version 6 Release 1.0, Service Level 1002 (64-bit),00: built on IBM Virtualization Technology 00: There is no logmsg data 00: FILES: NO RDR, NO PRT, NO PUN 00: LOGON AT 08:32:24 EDT WEDNESDAY 04/20/11 z/VM V6.1.0 2010-11-05 11:14
DMSACP723I A (191) R/ODMSACP723I C (592) R/O00: HCPQVD040E Device 0100 does not existDo you want to IPL Linux from S11S1LX1? y/nyInitializing cgroup subsys cpusetInitializing cgroup subsys cpuLinux version 2.6.32.12-0.7-default (geeko@buildhost) (gcc version 4.3.4 [gcc-4_3-branch revision 152973] (SUSE Linux) ) #1 SMP 2010-05-20 11:14:20 +0200setup.1a06a7: Linux is running as a z/VM guest operating system in 64-bit modeZone PFN ranges: DMA 0x00000000 -> 0x00080000 Normal 0x00080000 -> 0x00080000Movable zone start PFN for each nodeearly_node_map[2] active PFN ranges 0: 0x00000000 -> 0x00000100 0: 0x00000600 -> 0x00010000...Built 1 zonelists in Zone order, mobility grouping on. Total pages: 63360Kernel command line: vmpoff=LOGOFF vmhalt=LOGOFF root=/dev/dcssblk1 TERM=dumb BO
© Copyright IBM 2011 51

Sharing and Maintaining SLES11 SP1 Linux under z/VM using DCSSs and an NSS
OT_IMAGE=0...Initializing cgroup subsys nsInitializing cgroup subsys cpuacctInitializing cgroup subsys memoryInitializing cgroup subsys devicesInitializing cgroup subsys freezerInitializing cgroup subsys net_clscpu.33a262: 2 configured CPUs, 0 standby CPUs...
• The boot process will stop here for a while as the DCSSs are loaded.doing fast bootextmem.aa62ff: DCSS SWAPPING of range 0000000080000000 to 00000000bfffffff and type EW/EN-MIXED loaded in shared access modedcssblk.f259b2: Loaded SWAPPING with total size 1073741824 bytes and capacity 2097152 sectorsextmem.aa62ff: DCSS S11S1RT1 of range 00000000c0000000 to 000000013fefffff and type SR loaded in shared access modedcssblk.f259b2: Loaded S11S1RT1 with total size 2146435072 bytes and capacity 4192256 sectorsextmem.aa62ff: DCSS S11S1RP1 of range 000000013ff00000 to 0000000142efffff and type SR loaded in shared access modedcssblk.f259b2: Loaded S11S1RP1 with total size 50331648 bytes and capacity 98304 sectorsextmem.aa62ff: DCSS S11S1SH1 of range 0000000142f00000 to 0000000181efffff and type SR loaded in shared access modedcssblk.f259b2: Loaded S11S1SH1 with total size 1056964608 bytes and capacity 2064384 sectorsCreating device nodes with udev...ROR: In modified /etc/init.d/boot.d/S02boot.rootfsckROR: READONLY = yesActivating swap-devices in /etc/fstab.....doneROR: Checking /usr/local file system...fsck from util-linux-ng 2.16[/sbin/fsck.ext3 (1) -- /usr/local] fsck.ext3 -a /dev/dasda1/dev/dasda1: clean, 2177/80160 files, 49030/320106 blocks..doneROR: mounting dirs/files from /usr/local ...ROR: processing bind-mount file /etc/rwtabMounting dir /usr/local/root over /rootMounting dir /usr/local/srv over /srvMounting dir /usr/local/var over /varMounting dir /usr/local/etc/ssh over /etc/sshMounting file /usr/local/etc/fstab over /etc/fstabMounting file /usr/local/etc/resolv.conf over /etc/resolv.confMounting file /usr/local/etc/lvm/.cache over /etc/lvm/.cacheMounting file /usr/local/etc/hosts over /etc/hostsMounting file /usr/local/etc/HOSTNAME over /etc/HOSTNAMEMounting file /usr/local/etc/sysconfig/network/ifcfg-eth0 over /etc/sysconfig/network/ifcfg-eth0Mounting file /usr/local/etc/sysconfig/network/routes over /etc/sysconfig/network/routesSetting up the System Clock..done..doneActivating device mapper.....doneLoading required kernel modules..doneWaiting for tmpfs . no more eventsChecking file systems...fsck from util-linux-ng 2.16Checking all file systems...doneMounting local file systems...mount: /dev/disk/by-path/ccw-0.0.0102-part1 already mounted on /usr/local
© Copyright IBM 2011 52

/dev/dcssblk2 on /var/lib/rpm type ext2 (ro,noatime,nodiratime,xip,acl,user_xattr)/dev/dcssblk3 on /usr/share type ext2 (ro,noatime,nodiratime,xip,acl,user_xattr) tmpfs on /tmp type tmpfs (rw)..doneLoading fuse module ..doneMounting fuse control filesystem..doneCreating /var/log/boot.msg..doneActivating remaining swap-devices in /etc/fstab.....doneSetting current sysctl status from /etc/sysctl.conf..doneEnabling syn flood protection..doneDisabling IP forwarding..doneDisabling IPv6 forwarding..doneDisabling IPv6 privacy..done..doneTurning quota onChecking quotas. This may take some time...doneSetting up hostname 'gpok222'..doneSetting up loopback interface lo lo IP address: 127.0.0.1/8 IP address: 127.0.0.2/8..doneSystem Boot Control: The system has been set upSystem Boot Control: Running /etc/init.d/boot.local
/usr/local/sbin/boot.findself: changing (escaped) gpok222\.endicott\.ibm\.com to gpok231.endicott.ibm.com in /etc/HOSTNAME/usr/local/sbin/boot.findself: changing gpok222 to gpok231 and IP address in /etc/hosts/usr/local/sbin/boot.findself: changing (escaped) 9\.60\.18\.222 to 9.60.18.231in /etc/sysconfig/network/ifcfg-eth0Setting device 0.0.0191 offlineDone..done INIT: Entering runlevel: 3...
Welcome to SUSE Linux Enterprise Server 11 SP1 (s390x) - Kernel 2.6.32.12-0.7-default (ttyS0).
gpok231 login:
6.4 Automatically creating a read-only root Linux systemNow that you have manually created a read-only system, the script rw2ro.sh and some additional files have been madeavailable to help facilitate creating a read-only root system from a conventional read-write Linux system.
The script is run from the worker Linux system running on S11CLONE. The global variables and functions calls are at thebottom of the script. Here is the first set of global variables:
# Global variables specifying user IDs, DCSS and NSS namessrcID="RWGLD" # source read-write golden image minus the prefixtgtID="ROGLD" # target read-only golden image minus the prefixDCSS1="RT" # root file system DCSS minus prefix and suffixDCSS2="RP" # /var/lib/rpm/ DCSS minus prefix and suffixDCSS3="SH" # /usr/share/ DCSS minus prefix and suffixNSS="LX" # name of the NSS minus prefix and suffix
Following are additional descriptions:
• srcID: The source user ID of the read-write golden image. A three character prefix is added in the parseArgs()function. The default is S11, thus the default source ID is S11RWGLD.
© Copyright IBM 2011 53

Sharing and Maintaining SLES11 SP1 Linux under z/VM using DCSSs and an NSS
• tgtID: The target user ID of the golden image modified for read-only root and DCSSs. Again a three characterprefix is added.
• DCSS1: The root file system DCSS. A five character prefix and a one character suffix are added. The defaults areS11S1 and 1, thus the default DCSS1 is S11S1RT1.
• DCSS2: The DCSS for the RPM database - /var/lib/rpm/.
• DCSS3: The DCSS for the /usr/share/ file system
• NSS: Proposed name of the NSS. The script does not create it, but issues a message with the command to do so.
Here is the second set of global variables:# Global variables specifying files that must exist in /usr/local/sbinrootfsckFile="/usr/local/sbin/boot.rootfsck" # modified from /etc/init.dmkinitrdFile="/usr/local/sbin/setup-block.sh" # modified initrd filefstabFile="/usr/local/sbin/fstab" # modified from /etc filerwtabFile="/usr/local/sbin/rwtab" # new /etc/ filereadonlyrootFile="/usr/local/sbin/readonly-root" # new /etc/sysconfig file
The function calls are as follow:. rorfuncs.sh # "source" the common functionsparseArgs $@ # parse argumentscheckIDs # verify source and target IDs exist & are logged offsetUpEnv # verify DCSSs, create mount pointsenableSourceEnv # enable and mount the source root file systemenableTargetDCSSs # enable the target DCSSsenableTargetFSs # enable the target file systemscopyRootFileSystem # copy source root file system to targetmountRemaining # mount remaining file systemscopyRemaining # copy remaining file systems from source to targetmodifySystem # modify target system to be read-onlycleanUp # unmount FSs, disable and detach devicessaveDCSSs # save DCSS1, DCSS2 and DCSS3
See The rw2ro.sh script on page 84 for a complete listing of script. Here is a high level description of the functions.
• The first line loads the common functions in the rorfuncs.sh file.
• parseArgs() parses the arguments: a -p flag for the distribution prefix and a -s flag for a counter suffix
• checkIDs() verifies that the source and target user IDs exist and are logged off.
• setUpEnv() sets up the environment by creating mount points under /mnt/ if necessary
• enableSourceEnv() links the S11RWGLD 100-103 disks read-only and enables them
• enableTargetDCSSs() sets the three DCSSs to not shared and makes file systems out of them
• enableTargetFSs() links the S11ROGLD 100 and 102 disks read-write and enables them
• copyRootFileSystem() copies the source root file system (/mnt/src/) to the target. (/mnt/tgt/).
• mountRemaining() mounts the remaining source and target file systems once the root has been copied.
• copyRemaining() copies the remaining file systems:
◦ /boot/
◦ /usr/share/
◦ /usr/local/
◦ /var/lib/rpm/
© Copyright IBM 2011 54

• modifySystem() backs up and modifies the configuration files described previously. Also the file /etc/rwtab isprocessed to bind-mount all directories and files listed from /usr/local/ over the corresponding location in the rootfile system.
• cleanUp() unmounts file systems then disables and detaches devices that were linked to previously.
• saveDCSSs() saves the changes to the three target DCSSs that will become file systems
6.4.1 Running the rw2ro.sh scriptStart an SSH session to S11CLONE as root. It is recommended that you leave your 3270 session up as messages from theDCSS block driver are often sent to the console. However, you may have to clear the screen many times.
Run the rw2ro.sh script. This performs all the steps automatically that were described in section 6.2 , Manually creating aread-only root system on page 40.
gpok226:~ # time rw2ro.shThe DCSSs will be S11S1RT1, S11S1RP1 and S11S1SH1The NSS should be named S11S1LX1The source and target user IDs are S11RWGLD and S11ROGLD
Checking source ID ...Checking target ID ...
Setting up environment ...
Linking source disks ...
Enabling source disks ...Setting device 0.0.1100 onlineDoneSetting device 0.0.1101 onlineDoneSetting device 0.0.1102 onlineDoneSetting device 0.0.1103 onlineDone
Setting DCSSs to not shared ...
Making ext2 file systems on the DCSSs ...mke2fs 1.41.9 (22-Aug-2009)mke2fs 1.41.9 (22-Aug-2009)mke2fs 1.41.9 (22-Aug-2009)
Linking target disks ...
Enabling target disks ...Setting device 0.0.2100 onlineDoneSetting device 0.0.2102 onlineDone
Copying the root file system (this might take a few minutes) ...
Mounting remaining source file systems ...
Formatting and mounting remaining target file systems ...
Mounting FBA /dev/dasdf1 over /mnt/tgt/boot ...
© Copyright IBM 2011 55

Sharing and Maintaining SLES11 SP1 Linux under z/VM using DCSSs and an NSS
mke2fs 1.41.9 (22-Aug-2009)
Mounting FBA /dev/dasdg1 over /mnt/tgt/usr/local ...mke2fs 1.41.9 (22-Aug-2009)
Copying /boot ...
Copying /usr/share (this might take a few minutes) ...
Copying /usr/local ...Copying /usr/local ...
Copying /var/lib/rpm ...
Copying modified boot.rootfsck script ...
Backing up and copying modified /etc/fstab file ...
Backing up and copying modified /etc/zipl.conf file ...
Backing up and copying /lib/mkinitrd/scripts/setup-block.sh file ...
Backing up and modifying /etc/modprobe.conf.local file ...
Copying /etc/rwtab file ...
Copying /etc/sysconfig/readonly-root file ...
Making /etc/mtab a symbolic link to /proc/mounts .../root
Running zipl in target environment ...Scanning scripts ...Resolve dependencies ...Install symlinks in /lib/mkinitrd/setup ...Install symlinks in /lib/mkinitrd/boot ...
Kernel image: /boot/image-2.6.32.12-0.7-defaultInitrd image: /boot/initrd-2.6.32.12-0.7-defaultRoot device: /dev/dcssblk1 (mounted on / as ext2)Kernel Modules: dcssblk mbcache ext2Features: block resume.userspace resume.kernel24195 blocksUsing config file '/etc/zipl.conf'Building bootmap in '/boot/zipl'Building menu 'menu'Adding #1: IPL section 'SLES11_SP1' (default)Adding #2: IPL section 'FailsafeV1'Adding #3: IPL section 'ipl'Preparing boot device: dasdf (2100).Done.
Copying files and directories in /etc/rwtab ...Copying dir /mnt/tgt/root/* to /mnt/tgt/usr/local/root ...Created directory /mnt/tgt/usr/local/rootCopying dir /mnt/tgt/srv/* to /mnt/tgt/usr/local/srv ...Created directory /mnt/tgt/usr/local/srv
© Copyright IBM 2011 56
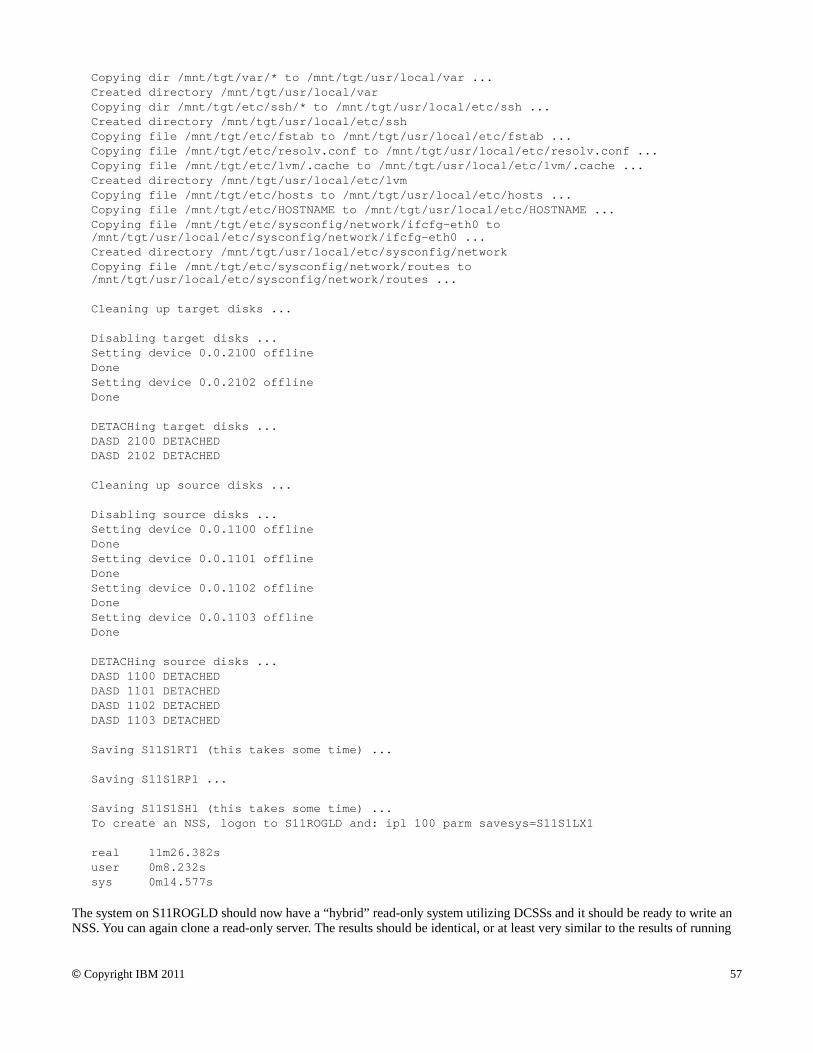
Copying dir /mnt/tgt/var/* to /mnt/tgt/usr/local/var ...Created directory /mnt/tgt/usr/local/varCopying dir /mnt/tgt/etc/ssh/* to /mnt/tgt/usr/local/etc/ssh ...Created directory /mnt/tgt/usr/local/etc/sshCopying file /mnt/tgt/etc/fstab to /mnt/tgt/usr/local/etc/fstab ...Copying file /mnt/tgt/etc/resolv.conf to /mnt/tgt/usr/local/etc/resolv.conf ...Copying file /mnt/tgt/etc/lvm/.cache to /mnt/tgt/usr/local/etc/lvm/.cache ...Created directory /mnt/tgt/usr/local/etc/lvmCopying file /mnt/tgt/etc/hosts to /mnt/tgt/usr/local/etc/hosts ...Copying file /mnt/tgt/etc/HOSTNAME to /mnt/tgt/usr/local/etc/HOSTNAME ...Copying file /mnt/tgt/etc/sysconfig/network/ifcfg-eth0 to/mnt/tgt/usr/local/etc/sysconfig/network/ifcfg-eth0 ...Created directory /mnt/tgt/usr/local/etc/sysconfig/networkCopying file /mnt/tgt/etc/sysconfig/network/routes to/mnt/tgt/usr/local/etc/sysconfig/network/routes ...
Cleaning up target disks ...
Disabling target disks ...Setting device 0.0.2100 offlineDoneSetting device 0.0.2102 offlineDone
DETACHing target disks ...DASD 2100 DETACHEDDASD 2102 DETACHED
Cleaning up source disks ...
Disabling source disks ...Setting device 0.0.1100 offlineDoneSetting device 0.0.1101 offlineDoneSetting device 0.0.1102 offlineDoneSetting device 0.0.1103 offlineDone
DETACHing source disks ...DASD 1100 DETACHEDDASD 1101 DETACHEDDASD 1102 DETACHEDDASD 1103 DETACHED
Saving S11S1RT1 (this takes some time) ...
Saving S11S1RP1 ...
Saving S11S1SH1 (this takes some time) ...To create an NSS, logon to S11ROGLD and: ipl 100 parm savesys=S11S1LX1
real 11m26.382suser 0m8.232ssys 0m14.577s
The system on S11ROGLD should now have a “hybrid” read-only system utilizing DCSSs and it should be ready to write anNSS. You can again clone a read-only server. The results should be identical, or at least very similar to the results of running
© Copyright IBM 2011 57
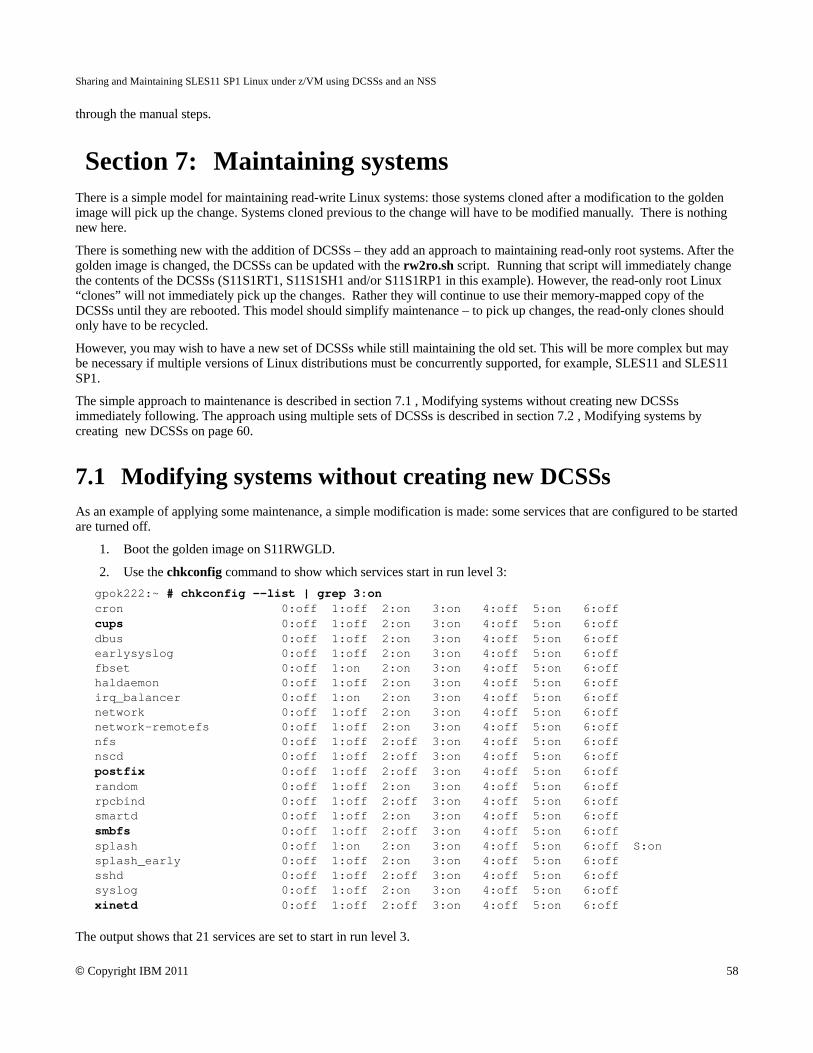
Sharing and Maintaining SLES11 SP1 Linux under z/VM using DCSSs and an NSS
through the manual steps.
Section 7: Maintaining systemsThere is a simple model for maintaining read-write Linux systems: those systems cloned after a modification to the goldenimage will pick up the change. Systems cloned previous to the change will have to be modified manually. There is nothingnew here.
There is something new with the addition of DCSSs – they add an approach to maintaining read-only root systems. After thegolden image is changed, the DCSSs can be updated with the rw2ro.sh script. Running that script will immediately changethe contents of the DCSSs (S11S1RT1, S11S1SH1 and/or S11S1RP1 in this example). However, the read-only root Linux“clones” will not immediately pick up the changes. Rather they will continue to use their memory-mapped copy of theDCSSs until they are rebooted. This model should simplify maintenance – to pick up changes, the read-only clones shouldonly have to be recycled.
However, you may wish to have a new set of DCSSs while still maintaining the old set. This will be more complex but maybe necessary if multiple versions of Linux distributions must be concurrently supported, for example, SLES11 and SLES11SP1.
The simple approach to maintenance is described in section 7.1 , Modifying systems without creating new DCSSsimmediately following. The approach using multiple sets of DCSSs is described in section 7.2 , Modifying systems bycreating new DCSSs on page 60.
7.1 Modifying systems without creating new DCSSsAs an example of applying some maintenance, a simple modification is made: some services that are configured to be startedare turned off.
1. Boot the golden image on S11RWGLD.
2. Use the chkconfig command to show which services start in run level 3:gpok222:~ # chkconfig --list | grep 3:oncron 0:off 1:off 2:on 3:on 4:off 5:on 6:offcups 0:off 1:off 2:on 3:on 4:off 5:on 6:offdbus 0:off 1:off 2:on 3:on 4:off 5:on 6:offearlysyslog 0:off 1:off 2:on 3:on 4:off 5:on 6:offfbset 0:off 1:on 2:on 3:on 4:off 5:on 6:offhaldaemon 0:off 1:off 2:on 3:on 4:off 5:on 6:offirq_balancer 0:off 1:on 2:on 3:on 4:off 5:on 6:offnetwork 0:off 1:off 2:on 3:on 4:off 5:on 6:offnetwork-remotefs 0:off 1:off 2:on 3:on 4:off 5:on 6:offnfs 0:off 1:off 2:off 3:on 4:off 5:on 6:offnscd 0:off 1:off 2:off 3:on 4:off 5:on 6:offpostfix 0:off 1:off 2:off 3:on 4:off 5:on 6:offrandom 0:off 1:off 2:on 3:on 4:off 5:on 6:offrpcbind 0:off 1:off 2:off 3:on 4:off 5:on 6:offsmartd 0:off 1:off 2:on 3:on 4:off 5:on 6:offsmbfs 0:off 1:off 2:off 3:on 4:off 5:on 6:offsplash 0:off 1:on 2:on 3:on 4:off 5:on 6:off S:onsplash_early 0:off 1:off 2:on 3:on 4:off 5:on 6:offsshd 0:off 1:off 2:off 3:on 4:off 5:on 6:offsyslog 0:off 1:off 2:on 3:on 4:off 5:on 6:offxinetd 0:off 1:off 2:off 3:on 4:off 5:on 6:off
The output shows that 21 services are set to start in run level 3.
© Copyright IBM 2011 58

3. It is decided that the services cups, postfix, smbfs and xinetd should not be started. Use the following for loop toturn these services off:
gpok222:~ # for service in cups postfix smbfs xinetd> do> chkconfig $service off> done
Shut down the golden image:gpok222:~ # shutdown -h now...
The system should shut down and the user ID be logged off automatically. The golden image has now been updated to runfewer services in run level 3.
7.1.1 Creating a new read-write cloneFrom S11CLONE, create a new read-write clone with the clonerw.sh script. In this example, the existing LNX227 user ID iscloned over:
gpok226:~ # clonerw.sh lnx227...
Success! You should be able to IPL the read-write system on LNX227
Log on to LNX227 and IPL Linux. When the system comes up you should see that these four services are off:gpok227:~ # chkconfig --list | grep 3:oncron 0:off 1:off 2:on 3:on 4:off 5:on 6:offdbus 0:off 1:off 2:on 3:on 4:off 5:on 6:offearlysyslog 0:off 1:off 2:on 3:on 4:off 5:on 6:offfbset 0:off 1:on 2:on 3:on 4:off 5:on 6:offhaldaemon 0:off 1:off 2:on 3:on 4:off 5:on 6:offirq_balancer 0:off 1:on 2:on 3:on 4:off 5:on 6:offnetwork 0:off 1:off 2:on 3:on 4:off 5:on 6:offnetwork-remotefs 0:off 1:off 2:on 3:on 4:off 5:on 6:offnfs 0:off 1:off 2:off 3:on 4:off 5:on 6:offnscd 0:off 1:off 2:off 3:on 4:off 5:on 6:offrandom 0:off 1:off 2:on 3:on 4:off 5:on 6:offrpcbind 0:off 1:off 2:off 3:on 4:off 5:on 6:offsmartd 0:off 1:off 2:on 3:on 4:off 5:on 6:offsplash 0:off 1:on 2:on 3:on 4:off 5:on 6:off S:onsplash_early 0:off 1:off 2:on 3:on 4:off 5:on 6:offsshd 0:off 1:off 2:off 3:on 4:off 5:on 6:offsyslog 0:off 1:off 2:on 3:on 4:off 5:on 6:off
More simply, the output of the previous command can be piped to the wc command, word count, to see that there are now 17services that will start in run level 3:
gpok227:~ # chkconfig --list | grep 3:on | wc -l17
This shows that a newly-cloned read-write Linux server picked up the change to the golden image.
7.1.2 Updating the read-only golden imageUpdate the read-only golden image on S11ROGLD and the DCSSs from the read-write image on S11RWGLD. This is donefrom the cloner on S11CLONE using the rw2ro.sh script:
gpok226:~ # rw2ro.sh
© Copyright IBM 2011 59

Sharing and Maintaining SLES11 SP1 Linux under z/VM using DCSSs and an NSS
...This will copy the change from the golden image on S11RWGLD to the two disks on S11ROGLD and the read-only DCSSs,S11S1RT1, S11S1SH1 and S11S1RP1.
7.1.3 Creating a new read-only cloneCreate a new read-write clone with the clonerw.sh script. In this example, a new user ID, LNX232 is defined. It has adirectory entry copied from LNX231. It is given access to the VSWITCH and a SLES11 SP1 parameter file is created withthe correct IP address and host name:
gpok226:~ # clonero.sh lnx232...
Log on to LNX232 and IPL Linux from the S11S1LX1 NSS. When the system comes up you should see that these fourservices are off:
gpok232:~ # chkconfig --list | grep 3:on | wc -l17
This shows that a newly-cloned read-only Linux server picked up the change to the modifed read-only golden image.
7.1.4 Updating an existing read-only cloneThe system running on LNX231 still has a copy of the original root file system, that starts 21 services.
gpok231:~ # chkconfig --list | grep 3:on | wc -l21
To pick up the modified DCSS, simply shut the virtual machine down:gpok231:~ # shutdown -h now
The system should be automatically logged off. Log back on to LNX231 and IPL Linux from the S11S1LX1 NSS. The fourservices should now be off:
gpok231:~ # chkconfig --list | grep 3:on | wc -l17
This shows that the original DCSSs were in memory and still being used, then when the system was recycled the modifiedDCSSs were loaded.
It should be noted that significant changes to the system could be such that the read-write directories and files no longerwork properly with the read-only system. However, since there are relatively few read-write components that interact withthe system (/var/ and a handful of /etc/ files), this possibility should be minimized. Of course adequate testing is requiredbefore rolling out any changes.
7.2 Modifying systems by creating new DCSSsIn the above scenario, it is basically a one way trip from the golden image that starts 21 services to the one that starts 17 (youcould restore the original system from the S11RWGLD 20x disks, and re-run the rw2ro.sh script as an effective rollback).
But perhaps you would like to keep some servers at the current golden image, but move others forward. A secondmaintenance example is used: certain servers need the nmap RPM, but others do not, due to security reasons. Existing read-only clones can be left running the S11S1xx1 DCSSs, but the servers to get the nmap package would require a new set ofDCSSs.
© Copyright IBM 2011 60

First let's look at the available spool space: ==> q alloc spool EXTENT EXTENT TOTAL PAGES HIGH %VOLID RDEV START END PAGES IN USE PAGE USED------ ---- ---------- ---------- ------ ------ ------ ----UV6281 6281 1 3338 600840 518220 573975 86%USC2EB C2EB 0 10016 1761K 988106 1183K 54%USC2EC C2EC 0 10016 1761K 993K 1207K 56% ------ ------ ----SUMMARY 4108K 2464K 59%USABLE 4108K 2464K 59%
It is 59% used and there should be enough space to add a second set of DCSSs.
Perform the following steps to add the nmap DCSS:
• Boot the golden image from S11RWGLD
• Query the number of RPMs on the golden image with the rpm and wc commands:gpok222:~ # rpm -qa | wc -l894
This shows that there are 894 RPMs (your value may vary).
• Add the nmap RPM with the zypper command:gpok222:~ # zypper install nmapLoading repository data...Reading installed packages...Resolving package dependencies...
The following NEW packages are going to be installed: libdnet1 liblua5_1 nmap
3 new packages to install.Overall download size: 1.1 MiB. After the operation, additional 4.8 MiB will be used.Continue? [y/n/?] (y): yRetrieving package liblua5_1-5.1.4-1.15.s390x (1/3), 79.0 KiB (217.0 KiB unpacked)Installing: liblua5_1-5.1.4-1.15 [done]Retrieving package libdnet1-1.11-87.17.s390x (2/3), 23.0 KiB (68.0 KiB unpacked)Installing: libdnet1-1.11-87.17 [done]Retrieving package nmap-4.75-1.26.s390x (3/3), 1.0 MiB (4.5 MiB unpacked)Installing: nmap-4.75-1.26 [done]
• Note that zypper installed two co-requisite RPMs. Again query the number of RPMs on the system:gpok222:~ # rpm -qa | wc -l897
There are now 897.
• Shut the system down:gpok222:~ # halt
Broadcast message from root (pts/0) (Wed Apr 20 11:02:55 2011):
The system is going down for system halt NOW!
7.2.1 Creating new DCSSsCreate three new DCSSs on the S11CLONE virtual machine.
© Copyright IBM 2011 61

Sharing and Maintaining SLES11 SP1 Linux under z/VM using DCSSs and an NSS
• Start a 3270 emulator session, shutdown the Linux system on S11CLONE,
• Define storage to 6400M and IPL CMS:==> def stor 6400M00: STORAGE = 6400M00: Storage cleared - system reset.
==> ipl cmsz/VM V6.1.0 2010-11-05 11:14
DMSACP723I A (191) R/ODMSACP723I C (592) R/O00: DASD 0100 9336 UMF000 R/W 4927488 BLK ON DASD F000 SUBCHANNEL = 0000Do you want to IPL Linux from 100? y/nn
• Define and save a DCSS of type SR with the name S11S1RT2 . The SAVESEG command saves the DCSS:==> defseg s11s1rt2 C0000-13FEFF sr loadnshr00: HCPNSD440I Saved segment S11S1RT2 was successfully defined in fileid 0059.
==> saveseg s11s1rt200: HCPNSS440I Saved segment S11S1RT2 was successfully saved in fileid 0059.
• Define and save a DCSS with the name S11S1RP2 :==> defseg s11s1rp2 13FF00-142EFF sr loadnshr00: HCPNSD440I Saved segment S11S1RP2 was successfully defined in fileid 0060.
==> saveseg s11s1rp200: HCPNSS440I Saved segment S11S1RP2 was successfully saved in fileid 0060.
• Define and save a DCSS with the name S11S1SH2 :==> defseg s11s1sh2 142F00-181EFF sr loadnshr00: HCPNSD440I Saved segment S11S1SH2 was successfully defined in fileid 0061.
==> saveseg s11s1sh200: HCPNSS440I Saved segment S11S1SH2 was successfully saved in fileid 0061.
• Observe the new DCSSs:==> q nss...00: *NSS 0056 NSS A 524K 04/20 10:25:38 S11S1RT1 DCSSG S11CLONE00: *NSS 0057 NSS A 012K 04/20 10:32:09 S11S1RP1 DCSSG S11CLONE00: *NSS 0058 NSS A 258K 04/20 10:32:19 S11S1SH1 DCSSG S11CLONE00: *NSS 0059 NSS A 524K 04/20 11:13:33 S11S1RT2 DCSSG S11CLONE00: *NSS 0060 NSS A 012K 04/20 11:21:48 S11S1RP2 DCSSG S11CLONE00: *NSS 0061 NSS A 258K 04/20 11:22:16 S11S1SH2 DCSSG S11CLONE
• Set the memory size back to 256 MB.==> def stor 256mSTORAGE = 256MStorage cleared - system reset.
• IPL Linux on S11CLONE.==> ipl 10000: zIPL v1.8.0-44.22.5 interactive boot menu...
• Start an SSH session as root to S11CLONE.
© Copyright IBM 2011 62

• The new DCSSs must be loaded. Modify the /etc/modprobe.conf.local file to specify the new DCSSs :gpok226:~ # cd /etc
gpok226:/etc # vi modprobe.conf.local## please add local extensions to this file#options dcssblk "segments=SWAPPING,S11S1RT2,S11S1RP2,S11S1SH2"
• Run the mkinitrd and zipl commands to write the changes to the /boot/ directory:gpok226:/etc # mkinitrd
Kernel image: /boot/image-32.12-0.7-defaultInitrd image: /boot/initrd-2.6.32.12-0.7-defaultRoot device: /dev/disk/by-path/ccw-0.0.0100-part1 (/dev/dasda1) (mounted on / asext2)Kernel Modules: dcssblk mbcache ext2 dasd_mod dasd_fba_modFeatures: block dasd resume.userspace resume.kernel24727 blocks
gpok226:/etc # ziplUsing config file '/etc/zipl.conf'Building bootmap in '/boot/zipl'Building menu 'menu'Adding #1: IPL section 'SLES11_SP1' (default)Adding #2: IPL section 'FailsafeV1'Adding #3: IPL section 'ipl'Preparing boot device: dasda (0100).Done.
• Reboot the system:gpok226:/etc # reboot
Broadcast message from root (pts/0) (Wed Apr 20 11:31:29 2011):
The system is going down for reboot NOW!
• When the system comes back up, verify that the new DCSSs that are loaded:gpok226:~ # ls /sys/devices/dcssblk/S11S1RT2 S11S1RP2 S11S1SH2 SWAPPING add remove uevent
This shows that the new DCSSs can be loaded.
• Use the rw2ro.sh script with the -s flag to specify DCSS suffix of 2. Note the new DCSS names are echoed in thefirst line of output:gpok226:~ # rw2ro.sh -s 2The DCSSs will be S11S1RT2, S11S1RP2 and S11S1SH2The NSS should be named S11S1LX2The source and target user IDs are S11RWGLD and S11ROGLD
Checking source ID ......Saving S11S1RT2 (this takes some time) ...
Saving S11S1RP2 ...
Saving S11S1SH2 (this takes some time) ...To create an NSS, logon to S11ROGLD and: ipl 100 parm savesys=S11S1LX2
• Look at the spool space:
© Copyright IBM 2011 63

Sharing and Maintaining SLES11 SP1 Linux under z/VM using DCSSs and an NSS
==> q alloc spool EXTENT EXTENT TOTAL PAGES HIGH %VOLID RDEV START END PAGES IN USE PAGE USED------ ---- ---------- ---------- ------ ------ ------ ----UV6281 6281 1 3338 600840 327573 571320 54%USC2EB C2EB 0 10016 1761K 1101K 1102K 62%USC2EC C2EC 0 10016 1761K 1044K 1048K 59% ------ ------ ----SUMMARY 4108K 2464K 59%USABLE 4108K 2464K 59%
In this example, the spool space is 59% used.
• Log on to S11ROGLD and create a new NSS names S11S1LX2:
z/VM V6.1.0 2010-11-05 11:14 DMSACP723I A (191) R/O DMSACP723I C (592) R/O 00: DASD 0100 9336 UMF000 R/W 92160 BLK ON DASD F000 SUBCHANNEL = 0000Do you want to IPL Linux from 100? y/n n
==> ipl 100 parm savesys=S11S1LX200: zIPL v1.8.0-44.22.5 interactive boot menu 00: 00: 0. default (SLES11_SP1) 00: 00: 1. SLES11_SP1 00: 2. FailsafeV1 00: 3. ipl 00: 00: Note: VM users please use '#cp vi vmsg <number> <kernel-parameters>' 00: 00: Please choose (default will boot in 3 seconds): 00: Booting default (SLES11_SP1)... 00: HCPNSD440I The Named Saved System (NSS) S11S1LX2 was successfully defined in fileid 0065. 00: HCPNSS440I Named Saved System (NSS) S11S1LX2 was successfully saved in fileid 0065.Initializing cgroup subsys cpuset ...gpok222 login:
• Shutdown Linux running on S11ROGLD.
• Start a 3270 session on LNX231 and IPL the updated system with the command IPL S11S1LX2:LOGON LNX23100: NIC 0600 is created; devices 0600-0602 defined 00: z/VM Version 6 Release 1.0, Service Level 1002 (64-bit),00: built on IBM Virtualization Technology 00: There is no logmsg data 00: FILES: NO RDR, NO PRT, NO PUN 00: LOGON AT 12:06:11 EDT WEDNESDAY 04/20/11 z/VM V6.1.0 2010-11-05 11:14 DMSACP723I A (191) R/O DMSACP723I C (592) R/O 00: HCPQVD040E Device 0100 does not exist Do you want to IPL Linux from S11S1LX1? y/n n==> ipl s11s1lx2...
© Copyright IBM 2011 64
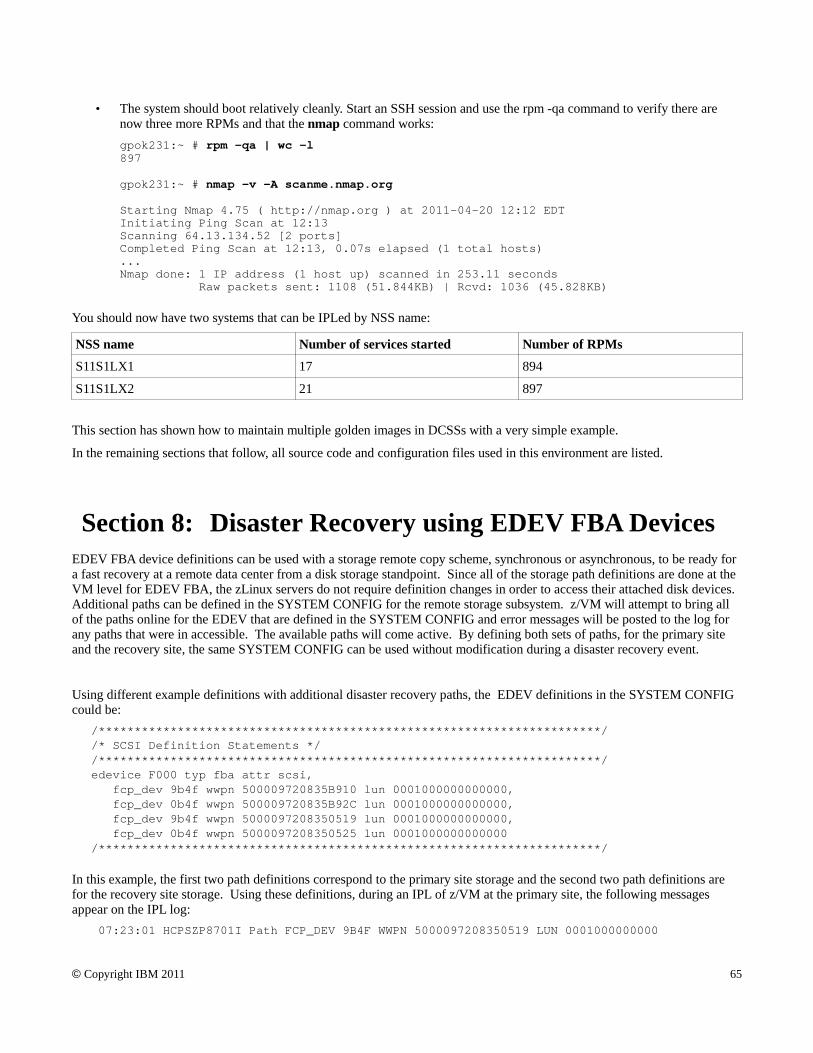
• The system should boot relatively cleanly. Start an SSH session and use the rpm -qa command to verify there arenow three more RPMs and that the nmap command works:gpok231:~ # rpm -qa | wc -l897
gpok231:~ # nmap -v -A scanme.nmap.org
Starting Nmap 4.75 ( http://nmap.org ) at 2011-04-20 12:12 EDTInitiating Ping Scan at 12:13Scanning 64.13.134.52 [2 ports]Completed Ping Scan at 12:13, 0.07s elapsed (1 total hosts)...Nmap done: 1 IP address (1 host up) scanned in 253.11 seconds Raw packets sent: 1108 (51.844KB) | Rcvd: 1036 (45.828KB)
You should now have two systems that can be IPLed by NSS name:
NSS name Number of services started Number of RPMs
S11S1LX1 17 894
S11S1LX2 21 897
This section has shown how to maintain multiple golden images in DCSSs with a very simple example.
In the remaining sections that follow, all source code and configuration files used in this environment are listed.
Section 8: Disaster Recovery using EDEV FBA Devices EDEV FBA device definitions can be used with a storage remote copy scheme, synchronous or asynchronous, to be ready fora fast recovery at a remote data center from a disk storage standpoint. Since all of the storage path definitions are done at theVM level for EDEV FBA, the zLinux servers do not require definition changes in order to access their attached disk devices.Additional paths can be defined in the SYSTEM CONFIG for the remote storage subsystem. z/VM will attempt to bring allof the paths online for the EDEV that are defined in the SYSTEM CONFIG and error messages will be posted to the log forany paths that were in accessible. The available paths will come active. By defining both sets of paths, for the primary siteand the recovery site, the same SYSTEM CONFIG can be used without modification during a disaster recovery event.
Using different example definitions with additional disaster recovery paths, the EDEV definitions in the SYSTEM CONFIGcould be:
/**********************************************************************//* SCSI Definition Statements */ /**********************************************************************/edevice F000 typ fba attr scsi, fcp_dev 9b4f wwpn 500009720835B910 lun 0001000000000000, fcp_dev 0b4f wwpn 500009720835B92C lun 0001000000000000, fcp_dev 9b4f wwpn 5000097208350519 lun 0001000000000000, fcp_dev 0b4f wwpn 5000097208350525 lun 0001000000000000 /**********************************************************************/
In this example, the first two path definitions correspond to the primary site storage and the second two path definitions arefor the recovery site storage. Using these definitions, during an IPL of z/VM at the primary site, the following messagesappear on the IPL log:
07:23:01 HCPSZP8701I Path FCP_DEV 9B4F WWPN 5000097208350519 LUN 0001000000000
© Copyright IBM 2011 65

Sharing and Maintaining SLES11 SP1 Linux under z/VM using DCSSs and an NSS
000 was deleted from EDEV F000 because it is invalid. 07:23:01 HCPSZP8701I Path FCP_DEV 0B4F WWPN 5000097208350525 LUN 0001000000000 000 was deleted from EDEV F000 because it is invalid.
However, the other two paths came online since they were available at the primary location and the IPL continued on and thezLinux servers defined with the EDEV FBA device minidisks booted without a problem. A test at the disaster recovery siteusing this method resulted in a successful IPL and once again the zLinux servers started without any alteration to the diskdefinitions within linux.
Section 9: z/VM source codeThis section contains listings of the following z/VM source code files included with the associated tar file
• SLES11S1.EXEC
• SAMPLE.PARM-S11
• PROFILE.XEDIT
• PROFILE.EXEC
• PREPDISK.EXEC
9.1 The SLES11S1 EXECFollowing is the EXEC to start a SLES11 SP1 installation, SLES11S1.EXEC:
/* EXEC to punch SLES11 SP1 install system to reader and IPL from it */Address 'COMMAND''CP SPOOL PUN *''CP CLOSE RDR''CP PURGE RDR ALL''PUNCH SLES11S1 KERNEL * (NOHEADER''PUNCH' Userid() 'PARM-S11 * (NOHEADER''PUNCH SLES11S1 INITRD * (NOHEADER''CP CHANGE RDR ALL KEEP''CP IPL 00C CLEAR'
9.2 The file SAMPLE.PARM-S11Following is the sample SLES11 parameter file, SAMPLE.PARM-S11:
ramdisk_size=65536 root=/dev/ram1 ro init=/linuxrc TERM=dumb HostIP=9.60.18.222 Hostname=gpok222.endicott.ibm.com Gateway=9.60.18.129 Netmask=255.255.255.128 Broadcast=9.60.18.255 Layer2=0 ReadChannel=0.0.0600 WriteChannel=0.0.0601 DataChannel=0.0.0602 Nameserver=9.0.2.11 portname=whatever portno=0 Install=nfs://9.60.18.240/nfs/sles11sp1/dvd1 UseVNC=1 VNCPassword=12345678 InstNetDev=osa OsaInterface=qdio OsaMedium=eth Manual=0
© Copyright IBM 2011 66

9.3 The PROFILE EXECFollowing is the PROFILE EXEC to be used by Linux virtual machines:
/* PROFILE EXEC for Linux virtual servers */Address 'COMMAND''CP SET RUN ON''CP SET PF11 RETRIEVE FORWARD''CP SET PF12 RETRIEVE''ACCESS 592 C''PIPE CP QUERY' Userid() '| VAR USER'Parse Value user With id . dsc .iplDisk = 100 /* /boot/ is on minidisk 100 */iplNSS = S11S1LX1 /* or it is an NSS */'CP QUERY VIRTUAL' iplDisk /* does this ID have an IPL disk */If (rc = 0) Then /* IPL disk exists */ iplDevice = iplDiskElse /* assume NSS is IPL device */ iplDevice = iplNSSIf (dsc = 'DSC') Then /* user is disconnected */ 'CP IPL' iplDeviceElse Do /* user is interactive -> prompt */ Say 'Do you want to IPL Linux from' iplDevice'? y/n' Parse Upper Pull answer . If (answer = 'Y') Then 'CP IPL' iplDevice EndExit
9.4 The XEDIT PROFILEFollowing is an XEDIT profile to be used on the CMSCLONE virtual machine.
********** THIS IS THE REAL THING ***********SET NUM ONSET NULLS ONSET CASE M ISET SERIAL OFFSET PF3 QUITSET PF7 BACKSET PF8 FORWARDSET PF9 SPLTJOINSET PF10 RIGHT 10SET PF11 LEFT 10SET PF12 ?SET PF23 SPLTJOINSET CMDLINE BOTTOMSET CURLINE ON 3SET SCALE OFFSET STAY ONV 1 73
9.5 The PREPDISK.EXECFollowing is an EXEC to be used on the CMSCLONE virtual machine.
/* An EXEC to be used on the CMSCLONE virtual machine */
© Copyright IBM 2011 67

Sharing and Maintaining SLES11 SP1 Linux under z/VM using DCSSs and an NSS
ARG SERVER DISK LABEL 'LINK' SERVER DISK '1100 W' QUEUE '1' QUEUE LABEL 'FORMAT 1100 Z' QUEUE '1' 'RESERVE' LABEL LABEL 'Z' 'REL Z (DET' EXIT
Section 10: Linux source codeThis section contains listings of the Linux source code which are all bash shell scripts:
• bak2pri.sh Script to rollback the backup golden image to the primary
• boot.findself Script to set the IP address and host name at first boot - see page 68.
• boot.local Modified script to invoke boot.findself at first boot – see page 72
• boot.rootfsck Modified SLES11 SP1 script to set up either a read-write or read-only root Linux system – see
page 72
• cloneprep.sh Script to prepare system before cloning - see page 77
• clonero.sh Script to clone a read-only Linux - see page 77
• clonerw.sh Script to clone a read-write Linux - see page 78
• pri2bak.sh Script to back up the primary golden image - see page 79
• rorfuncs.sh Common functions used by other scripts - see page 80
• rw2ro.sh Script to create R/W golden image on S11RWGLD to R/O system on S11ROGLD - see page 84
• setup-block.sh Modified script so initrd will recognize the dcssblk driver – see
10.1 The bak2pri.sh scriptFollowing is bak2pri.sh script to rollback the backup golden image to the primary:
#!/bin/bash. rorfuncs.sh # load the common functionsuserID="S11RWGLD" # set the source and target user ID
# verify that the user ID is logged offcheckID $userIDif [ $? != 0 ]; then exit 1; fi # not logged off => exit
# copy the three backup 20x minidisks to the primary 10x minidisksecho "WARNING, this will overwrite the golden image!"echo -n "Are you SURE you want to restore disks 200-203 to 100-103? (y/n): "read ansif [ $ans != "y" ]; then exit 2fi
# copy the three backup 20x minidisks to the primary 10x minidiskscopyDisk $userID 200 to $userID 100
© Copyright IBM 2011 68

if [ $rc != 0 ]; then echo "Error: copyDisk $userID 200 to $userID 100 failed with $rc" exit $rcficopyDisk $userID 201 to $userID 101if [ $rc != 0 ]; then echo "Error: copyDisk $userID 201 to $userID 101 failed with $rc" exit $rcficopyDisk $userID 202 to $userID 102if [ $rc != 0 ]; then echo "Error: copyDisk $userID 202 to $userID 102 failed with $rc" exit $rcficopyDisk $userID 203 to $userID 103if [ $rc != 0 ]; then echo "Error: copyDisk $userID 203 to $userID 103 failed with $rc" exit $rcfi
10.2 The boot.findself scriptFollowing is boot.findself script that sets the IP address and host name at first boot:
#!/bin/bash## /etc/init.d/boot.findself#### BEGIN INIT INFO# Provides: boot.findself# Required-Start: boot.localfs# Required-Start:# Required-Stop:# Default-Start: B# Default-Stop:# Description: upon first boot find/modify IP@ + hostname, gen SSH keys### END INIT INFO## This script requires two SLES11 SP1 parameter files to exist on the user ID's# 191 disk: (1) the file S11RWGLD PARM-S11 and (2) $userid PARM-S11 where# $userid is the ID of the user that is running the script. It then modifies# the IP address, Host name and fully qualified domain name in three# configuration files that contain this info. It also regenerates SSH keys.# The script then turns itself off via "chkconfig" so it only runs once.## IBM DOES NOT WARRANT OR REPRESENT THAT THE CODE PROVIDED IS COMPLETE# OR UP-TO-DATE. IBM DOES NOT WARRANT, REPRESENT OR IMPLY RELIABILITY,# SERVICEABILITY OR FUNCTION OF THE CODE. IBM IS UNDER NO OBLIGATION TO# UPDATE CONTENT NOR PROVIDE FURTHER SUPPORT.# ALL CODE IS PROVIDED "AS IS," WITH NO WARRANTIES OR GUARANTEES WHATSOEVER.# IBM EXPRESSLY DISCLAIMS TO THE FULLEST EXTENT PERMITTED BY LAW ALL EXPRESS,# IMPLIED, STATUTORY AND OTHER WARRANTIES, GUARANTEES, OR REPRESENTATIONS,# INCLUDING, WITHOUT LIMITATION, THE WARRANTIES OF MERCHANTABILITY, FITNESS FOR# A PARTICULAR PURPOSE, AND NON-INFRINGEMENT OF PROPRIETARY AND INTELLECTUAL# PROPERTY RIGHTS. YOU UNDERSTAND AND AGREE THAT YOU USE THESE MATERIALS,# INFORMATION, PRODUCTS, SOFTWARE, PROGRAMS, AND SERVICES, AT YOUR OWN# DISCRETION AND RISK AND THAT YOU WILL BE SOLELY RESPONSIBLE FOR ANY DAMAGES
© Copyright IBM 2011 69

Sharing and Maintaining SLES11 SP1 Linux under z/VM using DCSSs and an NSS
# THAT MAY RESULT, INCLUDING LOSS OF DATA OR DAMAGE TO YOUR COMPUTER SYSTEM.# IN NO EVENT WILL IBM BE LIABLE TO ANY PARTY FOR ANY DIRECT, INDIRECT,# INCIDENTAL, SPECIAL, EXEMPLARY OR CONSEQUENTIAL DAMAGES OF ANY TYPE# WHATSOEVER RELATED TO OR ARISING FROM USE OF THE CODE FOUND HEREIN, WITHOUT# LIMITATION, ANY LOST PROFITS, BUSINESS INTERRUPTION, LOST SAVINGS, LOSS OF# PROGRAMS OR OTHER DATA, EVEN IF IBM IS EXPRESSLY ADVISED OF THE POSSIBILITY# OF SUCH DAMAGES. THIS EXCLUSION AND WAIVER OF LIABILITY APPLIES TO ALL# CAUSES OF ACTION, WHETHER BASED ON CONTRACT, WARRANTY, TORT OR ANY OTHER# LEGAL THEORIES.##+--------------------------------------------------------------------------+function findID()# Get my VM user ID - don't find self on S11ROGLD or S11RWGLD#+--------------------------------------------------------------------------+ { myID=$(cat /proc/sysinfo | grep "VM00 Name" | awk '{print $3}') if [ $myID = "S11RWGLD" ] || [ $myID = "S11ROGLD" ]; then # do nothing exit 1 fi }
#+--------------------------------------------------------------------------+function enableAdisk()# Enable my 191 (A) disk#+--------------------------------------------------------------------------+ { /sbin/chccwdev -e 191 > /dev/null 2>&1 rc=$? if [ $rc != 0 ]; then # unable to enable 191 disk echo "$0: Unable to enable 191, rc from chccwdev = $rc" exit 1 fi sleep 1 # wait a sec to be sure disk is ready Adisk=/dev/$(egrep '^0.0.0191' /proc/dasd/devices | awk '{print $7}') }
#+--------------------------------------------------------------------------+function findSourceIP()# Get the source IP address and hostName#+--------------------------------------------------------------------------+ { sourceParm="$sourceID.$parmType" /usr/bin/cmsfslst -d $Adisk | grep $sourceID | grep $parmType > /dev/null rc=$? if [ $rc != 0 ]; then echo "$0: $sourceParm not found on 191 minidisk. Exiting" exit 2 fi export local $(/usr/bin/cmsfscat -a -d $Adisk $sourceParm) # set global variable names escaping any dots (.) in the strings sourceName=$(echo "$Hostname" | sed -e 's:\.:\\\.:g') sourceHost=${Hostname%%.*} # Chop domain name off to leave host name sourceIP=$(echo "$HostIP" | sed -e 's:\.:\\\.:g') sourceOSA=$(echo "$ReadChannel " | sed -e 's:\.:\\\.:g') }
#+--------------------------------------------------------------------------+
© Copyright IBM 2011 70

function findTargetIP()# Get my new IP address and hostname#+--------------------------------------------------------------------------+ { targetParm="$myID.$parmType" /usr/bin/cmsfslst -d $Adisk | grep $myID | grep $parmType > /dev/null rc=$? if [ $rc != 0 ]; then echo "$0: $targetParm not found on 191 minidisk. Exiting" exit 3 fi export local $(/usr/bin/cmsfscat -a -d $Adisk $targetParm) targetName=$Hostname targetHost=${Hostname%%.*} # Chop domain name off to leave host name targetIP=$HostIP }
#+--------------------------------------------------------------------------+function modifyIP()# Modify IP address and host name in /etc/HOSTNAME, /etc/hosts and# /etc/sysconfig/network/ifcfg-qeth-bus-ccw-$ReadChannel#+--------------------------------------------------------------------------+ { # TODO: this function should also modify, DNS, Gateway, broadcast, etc. eth0file="/etc/sysconfig/network/ifcfg-eth0" echo "" echo "$0: changing (escaped) $sourceName to $targetName in /etc/HOSTNAME" /usr/bin/sed -e "s/$sourceName/$targetName/g" /etc/HOSTNAME > /usr/local/HOSTNAME /bin/cp /usr/local/HOSTNAME /etc /bin/rm /usr/local/HOSTNAME echo "$0: changing $sourceHost to $targetHost and IP address in /etc/hosts" /usr/bin/sed -e "s/$sourceHost/$targetHost/g" \ -e "s/$sourceIP/$targetIP/g" /etc/hosts > /usr/local/hosts /bin/cp /usr/local/hosts /etc /bin/rm /usr/local/hosts echo "$0: changing (escaped) $sourceIP to $targetIP in $eth0file" /usr/bin/sed -e "s/$sourceIP/$targetIP/g" $eth0file > /usr/local/ifcfg-eth0 /bin/cp /usr/local/ifcfg-eth0 /etc/sysconfig/network /bin/rm /usr/local/ifcfg-eth0 /bin/hostname $targetHost /sbin/chccwdev -d 191 }
# main()# global variablessourceID="S11RWGLD" # VM user ID where first Linux was installedparmType="PARM-S11" # File type of parameter file on 191 disk
# function callsfindIDenableAdiskfindSourceIPfindTargetIPmodifyIPrm /etc/ssh/ssh_host_* # Delete SSH keys so sshd will recreate new ones
© Copyright IBM 2011 71

Sharing and Maintaining SLES11 SP1 Linux under z/VM using DCSSs and an NSS
10.3 The boot.local scriptFollowing is the modified /etc/init.d/boot.local script.
#! /bin/sh## Copyright (c) 2002 SuSE Linux AG Nuernberg, Germany. All rights reserved.## Author: Werner Fink <[email protected]>, 1996# Burchard Steinbild, 1996## /etc/init.d/boot.local## script with local commands to be executed from init on system startup## Here you should add things, that should happen directly after booting# before we're going to the first run level.#if [ -f /usr/local/sbin/boot.findself ]; then # this is first boot /usr/local/sbin/boot.findself # run it to set IP@ & hostname if [ $? = 0 ]; then # then success => rename /bin/mv /usr/local/sbin/boot.findself /usr/local/sbin/boot.findself.hasrun fifi
10.4 The boot.rootfsck scriptFollowing is the modified /etc/init.d/boot.rootfsck script.
#! /bin/sh## Copyright (c) 2001-2002 SuSE Linux AG, Nuernberg, Germany.# All rights reserved.## /etc/init.d/boot.rootfsck#### BEGIN INIT INFO# Provides: boot.rootfsck# Required-Start: boot.udev# Required-Stop: $null# Default-Start: B# Default-Stop:# Short-Description: check and mount root filesystem# Description: check and mount root filesystem### END INIT INFO
. /etc/rc.status
# to get max number of parallel fsck processes. /etc/sysconfig/boot
export FSCK_MAX_INST
rc_reset
© Copyright IBM 2011 72

case "$1" in start) # ROR: add read-only root processing if [ -f /etc/sysconfig/readonly-root ]; then . /etc/sysconfig/readonly-root else # no config file, assume no READONLY=no fi cat /proc/cmdline | grep "readonlyroot" >/dev/null if [ $? = 0 ]; then READONLY=yes fi if [ -z "$RW_MOUNT" ]; then # string is empty => set it RW_MOUNT=/usr/local fi cat /proc/cmdline | grep "noreadonlyroot" >/dev/null if [ $? = 0 ]; then # "noreadonlyroot" parm trumps "readonlyroot" READONLY=no fi if [ "$READONLY" = "yes" ]; then
echo "ROR: In modified $0" ROOTFS_FSCK="" # don't bypass fsck fi echo "ROR: READONLY = $READONLY" # ROR: end block
## fsck may need a huge amount of memory, so make sure, it is there.#echo "Activating swap-devices in /etc/fstab..."swapon -ae &> /dev/nullrc_status -v1 -r
## do fsck and start sulogin, if it fails.#FSCK_RETURN=0MAY_FSCK=1
# we may get ROOTFS_BLKDEV passed from initrd, skip extra actionsif [ -n "$ROOTFS_BLKDEV" ] ; then if [ -n "$ROOTFS_REALDEV" ] ; then
ROOTFS_BLKDEV=$ROOTFS_REALDEV fielse # if not booted via initrd, /dev is empty. # use private devnode with proper permissions ROOTFS_BLKDEV="/dev/shm/root" rootcpio=`echo / | /bin/cpio --quiet -o -H newc` rootmajor=0x${rootcpio:62:8} rootminor=0x${rootcpio:70:8} if [ $((rootmajor)) -ne 0 ] ; then echo /bin/mknod -m600 $ROOTFS_BLKDEV b $((rootmajor)) $((rootminor)) /bin/mknod -m600 $ROOTFS_BLKDEV b $((rootmajor)) $((rootminor)) fi
fi# common options for file system checkFSCK_OPTS="-a"if test -f /forcefsck -o "$DO_FORCEFSCK" = "yes" ; then # force file system check if forced is specified
© Copyright IBM 2011 73

Sharing and Maintaining SLES11 SP1 Linux under z/VM using DCSSs and an NSS
FSCK_OPTS="$FSCK_OPTS -f" ROOTFS_FSCK=""
fiif test "$ROOTFS_FSCK" = "0" ; then # already checked and ok, skip the rest
MAY_FSCK=0 else
ROOTFS_TYPE=`stat -f -c "%T" /` case $ROOTFS_TYPE in
aufs|tmpfs|afs|cifs|nfs|novell|smb|UNKNOWN*) MAY_FSCK=0 ;;*) if test -x /usr/bin/on_ac_power ; then
# skip fsck if running on battery/usr/bin/on_ac_power -q || MAY_FSCK=0
fi;;
esac fi
if test ! -f /fastboot -a -z "$DO_FASTBOOT" -a $MAY_FSCK -eq 1 ; then # If we use a serial console, don't use the fsck progress bar if test "$REDIRECT" = "/dev/tty1" ; then
FSCK_OPTS="$FSCK_OPTS -C" else
FSCK_OPTS="$FSCK_OPTS -V" fi # on an umsdos root fs this mount will fail, # so direct error messages to /dev/null. # this seems to be ugly, but should not really be a problem. mount -n -o remount,ro / 2> /dev/null if test $? = 0; then
if test -n "$ROOTFS_FSCK" ; then FSCK_RETURN=$ROOTFS_FSCKelse
# ROR: in readonly root env, fsck just /usr/local if [ "$READONLY" = "yes" ]; then
echo "ROR: Checking $RW_MOUNT file system..." fsck $FSCK_OPTS $RW_MOUNT
else echo "Checking root file system..." fsck $FSCK_OPTS $ROOTFS_BLKDEV
fi # ROR: end block
# A return code of 1 indicates that file system errors # were corrected, but that the boot may proceed. # A return code of 2 or larger indicates failure. FSCK_RETURN=$?fitest $FSCK_RETURN -lt 4rc_status -v1 -rif test $FSCK_RETURN -gt 1 -a $FSCK_RETURN -lt 4 ; then # if appropriate, switch bootsplash to verbose # mode to make text messages visible. test -f /proc/splash && echo "verbose" > /proc/splash echo echo "fsck succeed, but reboot is required." echo
© Copyright IBM 2011 74
sleep 1 sync reboot -felif test $FSCK_RETURN -gt 3; then # if appropriate, switch bootsplash to verbose # mode to make text messages visible. test -f /proc/splash && echo "verbose" > /proc/splash # Stop blogd since we reboot after sulogin test -x /sbin/blogd && killproc -QUIT /sbin/blogd if test -x /etc/init.d/kbd ; then
/etc/init.d/kbd start fi
echo echo "fsck failed. Please repair manually and reboot. The root" echo "file system is currently mounted read-only. To remount it" echo "read-write do:" echo echo " bash# mount -n -o remount,rw /" echo echo "Attention: Only CONTROL-D will reboot the system in this" echo "maintanance mode. shutdown or reboot will not work." echo PS1="(repair filesystem) # " export PS1 /sbin/sulogin /dev/console
# if the user has mounted something rw, this should be umounted echo "Unmounting file systems (ignore error messages)" umount -avn
# on umsdos fs this would lead to an error message. # so direct errors to /dev/null
mount -no remount,ro / 2> /dev/null
sync reboot -f fi sync
# ROR: process /etc/rwtab file if [ "$READONLY" = "yes" ]; then echo "ROR: mounting dirs/files from $RW_MOUNT ..." /bin/mount -n $RW_MOUNT if [ $? != 0 ]; then # can't mount echo "ROR: Error, can't mount $RW_MOUNT" else for file in /etc/rwtab /etc/rwtab.d/* ; do if [ -f $file ]; then # this is a file echo "ROR: processing bind-mount file $file" cat $file | while read type path do case "$type" in empty) # clear out the dir first? Hmm - dangerous # /bin/rm -fr "$RW_MOUNT$path" /bin/mount -n --bind "$RW_MOUNT$path" $path ;; files) # bind mount the file echo "Mounting file "$RW_MOUNT$path" over $path" /bin/mount -n --bind "$RW_MOUNT$path" $path ;;
© Copyright IBM 2011 75
Sharing and Maintaining SLES11 SP1 Linux under z/VM using DCSSs and an NSS
dirs) # bind mount the directory /bin/mount -n --bind "$RW_MOUNT$path" $path echo "Mounting dir "$RW_MOUNT$path" over $path" ;; *) # no-op for every other value ;; esac done fi # if this is a file done # looping through all files fi # else mount of R/W disk was successful else # READONLY is not set to "yes"
mount -n -o remount,rw / fi #ROR: end block
test $FSCK_RETURN -gt 0 && > /fsck_corrected_errors else
echo # ROR: chg 1 if [ "$READONLY" = "yes" ]; then
echo '*** ERROR! Cannot fsck because $RW_MOUNT is not read-only!' else
echo '*** ERROR! Cannot fsck because root is not read-only!' fi
echo fielse if test "$ROOTFS_FSCK" != "0" ; then
# ROR: don't check RW_MOUNT file system if [ "$READONLY" = "yes" ]; then
echo "ROR: $RW_MOUNT file system is NOT being checked." else
echo "root file system (/) is NOT being checked." fi # ROR: end block
fifi
# start with a clean mtab and enter root fs entry # ROR: if READONLY = "yes", don't delete /etc/mtab, don't mount / if [ "$READONLY" = "no" ]; then
rm -f /etc/mtab* > /etc/mtab mount -f /
fi # ROR: end block
;; stop)
;; restart)
rc_failed 3rc_status -v;;
status)rc_failed 4rc_status -v;;
*)
© Copyright IBM 2011 76

echo "Usage: $0 {start|stop|status|restart}"exit 1;;
esac
rc_exit
10.5 The cloneprep.sh scriptFollowing is the cloneprep.sh script that prepares the golden image to be cloned.
#!/bin/bash## ... disclaimer ...## Script to clean up files before cloning#+--------------------------------------------------------------------------+function cleanFile()# delete file, create empty file and set permission mode# arg 1: file to delete and create# arg 2: mode to set empty file to#+--------------------------------------------------------------------------+ { if [ -f $1 ]; then rm $1 fi touch $1 chmod $2 $1 }
# main()# clean up certain files in /var/logrm /var/log/YaST2/y2log-*rm /var/log/*.gzcleanFile /var/log/authlog 600cleanFile /var/log/faillog 600cleanFile /var/log/lastlog 644cleanFile /var/log/secure 600cleanFile /var/log/secure 600cleanFile /root/.bash_history 600
echo "System should be ready for shutdown and cloning"
10.6 The clonero.sh scriptFollowing is the clonero.sh script that clones a read-only Linux system.
#!/bin/bash. rorfuncs.shsrcID="S11ROGLD"
# Verify that there is one argumentif [ $# != 1 ]; then # echo "Error: target user ID is missing" echo "Usage: $0 targetID" echo " where targetID is the user ID that $srcID will be cloned to" exit 1
© Copyright IBM 2011 77

Sharing and Maintaining SLES11 SP1 Linux under z/VM using DCSSs and an NSS
fi
# Verify the source and target user IDs are logged offtgtID=`echo $1 | tr '[a-z]' '[A-Z]'` # fold target user ID to upper casecheckID $srcIDif [ $? != 0 ]; then exit 1; fi # not logged off => exitcheckID $tgtIDif [ $? != 0 ]; then exit 2; fi # not logged off => exit
# Ask "Are you sure?"echo -n "Are you SURE you want to clone a read-only system to $tgtID (y/n): "read ansif [ $ans != "y" ]; then exit 2ficopyDisk $srcID 102 to $tgtID 102rc=$?if [ $rc = 0 ]; then echo "Disk successfully copied"else echo "Error: copyDisk $srcID 102 to $tgtID 102 failed with $rc"fi
10.7 The clonerw.sh scriptFollowing is the clonerw.sh script that clones a read-write Linux system.
#!/bin/bash. rorfuncs.shsrcID="S11RWGLD"
# Verify that there is one argumentif [ $# != 1 ]; then # echo "Error: target user ID is missing" echo "Usage: $0 targetID" echo " where targetID is the user ID that $srcID will be cloned to" exit 1fitgtID=`echo $1 | tr '[a-z]' '[A-Z]'` # fold target user ID to upper case
# Verify the source and target user IDs are logged offcheckID $srcIDif [ $? != 0 ]; then exit 1; fi # not logged off => exitcheckID $tgtIDif [ $? != 0 ]; then exit 2; fi # not logged off => exit
echo -n "Are you SURE you want to clone a read-write system to $tgtID (y/n): "read ansif [ $ans != "y" ]; then exit 2fi
# copy four diskscopyDisk $srcID 100 to $tgtID 100rc=$?if [ $rc != 0 ]; then
© Copyright IBM 2011 78

echo "Error: copyDisk $srcID 100 to $tgtID 100 failed with $rc" exit $rcficopyDisk $srcID 101 to $tgtID 101rc=$?if [ $rc != 0 ]; then echo "Error: copyDisk $srcID 101 to $tgtID 101 failed with $rc" exit $rcficopyDisk $srcID 102 to $tgtID 102rc=$?if [ $rc != 0 ]; then echo "Error: copyDisk $srcID 102 to $tgtID 102 failed with $rc" exit $rcficopyDisk $srcID 103 to $tgtID 103rc=$?if [ $rc = 0 ]; then echo "Success! You should be able to IPL the read-write system on $tgtID"else echo "Error: copyDisk $srcID 103 to $tgtID 103 failed with $rc"fi
10.8 The pri2bak.sh scriptFollowing is the bak2pri.sh script that backs up the golden image.
#!/bin/bash. rorfuncs.sh # load the common functionsuserID="S11RWGLD" # set the source and target user IDs
# verify that the user ID is logged offcheckID $userID if [ $? != 0 ]; then exit 1; fi # not logged off => exit
# copy the three primary 10x minidisks to the backup 20x minidisks echo -n "Are you sure you want to back up disks 100-103 to 200-203? (y/n): "read ansif [ $ans != "y" ]; then exit 2ficopyDisk $userID 100 to $userID 200rc=$?if [ $rc != 0 ]; then echo "Error: copyDisk $userID 100 to $userID 200 failed with $rc" exit $rcficopyDisk $userID 101 to $userID 201rc=$?if [ $rc != 0 ]; then echo "Error: copyDisk $userID 101 to $userID 201 failed with $rc" exit $rcficopyDisk $userID 102 to $userID 202rc=$?if [ $rc != 0 ]; then echo "Error: copyDisk $userID 102 to $userID 202 failed with $rc" exit $rc
© Copyright IBM 2011 79

Sharing and Maintaining SLES11 SP1 Linux under z/VM using DCSSs and an NSS
ficopyDisk $userID 103 to $userID 203rc=$?if [ $rc != 0 ]; then echo "Error: copyDisk $userID 103 to $userID 203 failed with $rc" exit $rcfi
10.9 The rorfuncs.sh source fileFollowing is the rorfuncs.sh read-only root system on S11ROGLD:
#!/bin/sh# rorfuncs.sh - functions for the SLES11 SP1 ROR paper# Functions:# CPcmd() Issue a CP command# checkID() Verify that a user ID exists and is logged off# copyDisk() Copy a minidisk using FLASHCOPY or dasdfmt/dd# cleanUp() Unmount file systems, disable and detach devices##+--------------------------------------------------------------------------+function CPcmd()# Run a CP command and invoke it via the vmcp module/command# Arg1-n: the command to issue# Return: the command's return code#+--------------------------------------------------------------------------+ { if [ "$verbose" = 2 ]; then // echo extra output echo "Invoking CP command: $@" fi# parse output to get return code: awk -F# splits line at '#' with rc at end output=$(vmcp $@ 2>&1) if [ ${#output} != 0 -a "$verbose" != 0 ]; then # echo the output echo "$output" fi retVal=0 retVal=$(echo $output | grep "Error: non-zero CP" | awk -F# '{print $2}') return $retVal }
#+--------------------------------------------------------------------------+function checkID()# Verify user ID exists and is logged off# Arg 1: user ID to check#+--------------------------------------------------------------------------+ { userID=$1 verbose=0 CPcmd QUERY $userID rc=$? case $rc in 0) # user ID is logged on or disconnected echo "Error: $userID is logged on" return 1 ;; 3) # user ID does not exist
© Copyright IBM 2011 80

echo "Error: $userID does not exist" return 2 ;; 45) # user ID is logged off - this is correct ;; *) # unexpected echo "Error: unexpected rc from CP QUERY $userID - $rc" return 3 esac verbose=1 return 0 } # checkID()
#+--------------------------------------------------------------------------+function copyDisk()# Try to use z/VM FLASHCOPY to copy one disk to another. If that fails then use# dasdfmt and dd# Arguments:# Arg 1: Source user ID# Arg 2: Source virtual address# Arg 3: the word "to"# Arg 4: Target user ID# Arg 5: Target virtual address# Return codes# 0: success# 1: user ID is not logged off# 2: user ID does not exist# 3: unexpected rc from QUERY user ID# 4: LINK source disk failed# 5: chccwdev -e source disk failed# 6: LINK target disk failed# 7: chccwdev -e source disk failed# 8: can't find source disk in /dev/dasd/devices# 9: can't find target disk in /dev/dasd/devices# 10: dasdfmt failed# 11: dd failed#+--------------------------------------------------------------------------+ { srcUserID=$1 srcVdev1=$2 tgtUserID=$4 tgtVdev1=$5
echo "" echo "Copying $srcUserID $srcVdev1 to $tgtUserID $tgtVdev1 ..."
# link to the source disk in read mode as virtual address vaddr+1000 let srcVdev2=srcVdev1+1000 CPcmd LINK $srcUserID $srcVdev1 $srcVdev2 RR rc=$? if [ $rc != 0 ]; then # LINK failed echo "Error: CP LINK $srcUserID $srcVdev1 $srcVdev2 RR failed with $rc" return 4 fi
# link to the target disk in read-write mode as virtual address vaddr+2000 let tgtVdev2=tgtVdev1+2000 CPcmd LINK $tgtUserID $tgtVdev1 $tgtVdev2 MR rc=$?
© Copyright IBM 2011 81

Sharing and Maintaining SLES11 SP1 Linux under z/VM using DCSSs and an NSS
if [ $rc != 0 ]; then # LINK failed echo "Error: CP LINK $tgtUserID $tgtVdev1 $tgtVdev2 MR failed with $rc" return 6 fi
# try to copy the disk using FLASHCOPY sync # be sure all buffers are written to disk udevadm settle # be sure all events in the udev event queue are handled CPcmd FLASHCOPY $srcVdev2 0 END $tgtVdev2 0 END rc=$? if [ $rc = 0 ]; then # FLASHCOPY succeeded echo "FLASHCOPY succeeded" CPcmd DETACH $srcVdev2 CPcmd DETACH $tgtVdev2 return 0 fi
# if we fall through, then FLASHCOPY failed echo "FLASHCOPY $srcVdev2 0 END $tgtVdev2 0 END failed with $rc" echo "Since Flashcopy is not available, Using dd for the disk copy"
# enable the source and target disks chccwdev -e $srcVdev2 rc=$? if [ $rc != 0 ]; then # chccwdev failed echo "Error: chccwdev -e $srcVdev2 failed with $rc" return 5 fi chccwdev -e $tgtVdev2 rc=$? if [ $rc != 0 ]; then # chccwdev failed echo "Error: chccwdev -e $tgtVdev2 failed with $rc" return 7 fi udevadm settle
# get device name of source disk srcDev=`cat /proc/dasd/devices | grep "$srcVdev2(ECKD)" | awk '{ print $7 }'` if [ ${#srcDev} = 0 ]; then # check for FBA srcDev=`cat /proc/dasd/devices | grep "$srcVdev2(FBA )" | awk '{ print $8 }'` if [ ${#srcDev} = 0 ]; then # error not ECKD or FBA echo "Error: can't find source $src in /proc/dasd/devices" cat /proc/dasd/devices # clean up chccwdev -d $srcVdev2 CPcmd DETACH $srcVdev2 chccwdev -d $tgtVdev2 CPcmd DETACH $tgtVdev2 return 8 fi fi
# get device name of target disk DevTyInd=ECKD tgtDev=`cat /proc/dasd/devices | grep "$tgtVdev2(ECKD)" | awk '{ print $7 }'` if [ ${#tgtDev} = 0 ]; then # check for FBA DevTyInd=FBA
© Copyright IBM 2011 82
tgtDev=`cat /proc/dasd/devices | grep "$tgtVdev2(FBA )" | awk '{ print $8 }'` if [ ${#tgtDev} = 0 ]; then # error echo "Error: can't find $tgtVdev2(ECKD) in /proc/dasd/devices" cat /proc/dasd/devices # clean up chccwdev -d $srcVdev2 CPcmd DETACH $srcVdev2 chccwdev -d $tgtVdev2 CPcmd DETACH $tgtVdev2 return 9 fi fi
# dasdfmt target disk echo $DevTyInd if [ $DevTyInd = ECKD ]; then # format the ECKD disk echo "Invoking command: dasdfmt -b 4096 -y -f /dev/$tgtDev" dasdfmt -b 4096 -y -f /dev/$tgtDev udevadm settle rc=$? if [ $rc != 0 ]; then # dasdfmt failed echo "Error: dasdfmt -b 4096 -y -f /dev/$tgtDev failed with $rc" # clean up chccwdev -d $srcDev CPcmd DETACH $srcVdev2 chccwdev -d $tgtDev CPcmd DETACH $tgtVdev2 return 10 fi echo "dasdfmt succeeded" fi
# copy source disk to target disk with dd echo "Invoking command: dd bs=1M oflag=sync if=/dev/$srcDev of=/dev/$tgtDev" dd bs=1M oflag=sync if=/dev/$srcDev of=/dev/$tgtDev rc=$? if [ $rc != 0 ]; then # dd failed echo "Error: dd bs=1M oflag=sync if=/dev/$srcDev of=/dev/$tgtDev failed with $rc" # clean up chccwdev -d $srcVdev2 CPcmd DETACH $srcVdev2 chccwdev -d $tgtVdev2 CPcmd DETACH $tgtVdev2 return 11 fi sync # sync disks chccwdev -d $srcVdev2 CPcmd DETACH $srcVdev2 chccwdev -d $tgtVdev2 CPcmd DETACH $tgtVdev2 echo "Copying disk via dd succeeded ..." return 0 } # copyDisk()
#+--------------------------------------------------------------------------+function cleanUp()# Unmount source and target file systems and detach minidisks#+--------------------------------------------------------------------------+ {
© Copyright IBM 2011 83

Sharing and Maintaining SLES11 SP1 Linux under z/VM using DCSSs and an NSS
echo "" echo "Cleaning up target disks ..." umount /mnt/tgt/usr/local umount /mnt/tgt/usr/share umount /mnt/tgt/boot umount /mnt/tgt/proc umount /mnt/tgt/sys umount /mnt/tgt/dev umount /mnt/rpm umount /mnt/tgt echo "" echo "Disabling target disks ..." chccwdev -d 2100 chccwdev -d 2102 echo "" echo "DETACHing target disks ..." vmcp det 2100 vmcp det 2102 echo "" echo "Cleaning up source disks ..." umount /mnt/src/usr/local umount /mnt/src/usr/share umount /mnt/src/boot umount /mnt/src echo "" echo "Disabling source disks ..." chccwdev -d 1100 chccwdev -d 1101 chccwdev -d 1102 chccwdev -d 1103 echo "" echo "DETACHing source disks ..." vmcp det 1100 vmcp det 1101 vmcp det 1102 vmcp det 1103 }
10.10 The rw2ro.sh scriptFollowing is the rw2ro.sh script that converts the read-write golden image on S11RWGLD to a read-only root system onS11ROGLD:
#!/bin/sh# rw2ro.sh - script to create a read-only root system on target user ID# Hard-coded virtual device addresses - the first five will become read-only:# 100 - /boot# 101 - /usr/share# 102 - /usr/local# 103 - /## Source disks are linked as 110x# Target disks are linked as 210x## IBM DOES NOT WARRANT OR REPRESENT THAT THE CODE PROVIDED IS COMPLETE# OR UP-TO-DATE. IBM DOES NOT WARRANT, REPRESENT OR IMPLY RELIABILITY,
© Copyright IBM 2011 84

# SERVICEABILITY OR FUNCTION OF THE CODE. IBM IS UNDER NO OBLIGATION TO# UPDATE CONTENT NOR PROVIDE FURTHER SUPPORT.# ALL CODE IS PROVIDED "AS IS," WITH NO WARRANTIES OR GUARANTEES WHATSOEVER.# IBM EXPRESSLY DISCLAIMS TO THE FULLEST EXTENT PERMITTED BY LAW ALL EXPRESS,# IMPLIED, STATUTORY AND OTHER WARRANTIES, GUARANTEES, OR REPRESENTATIONS,# INCLUDING, WITHOUT LIMITATION, THE WARRANTIES OF MERCHANTABILITY, FITNESS FOR# A PARTICULAR PURPOSE, AND NON-INFRINGEMENT OF PROPRIETARY AND INTELLECTUAL# PROPERTY RIGHTS. YOU UNDERSTAND AND AGREE THAT YOU USE THESE MATERIALS,# INFORMATION, PRODUCTS, SOFTWARE, PROGRAMS, AND SERVICES, AT YOUR OWN# DISCRETION AND RISK AND THAT YOU WILL BE SOLELY RESPONSIBLE FOR ANY DAMAGES# THAT MAY RESULT, INCLUDING LOSS OF DATA OR DAMAGE TO YOUR COMPUTER SYSTEM.# IN NO EVENT WILL IBM BE LIABLE TO ANY PARTY FOR ANY DIRECT, INDIRECT,# INCIDENTAL, SPECIAL, EXEMPLARY OR CONSEQUENTIAL DAMAGES OF ANY TYPE# WHATSOEVER RELATED TO OR ARISING FROM USE OF THE CODE FOUND HEREIN, WITHOUT# LIMITATION, ANY LOST PROFITS, BUSINESS INTERRUPTION, LOST SAVINGS, LOSS OF# PROGRAMS OR OTHER DATA, EVEN IF IBM IS EXPRESSLY ADVISED OF THE POSSIBILITY# OF SUCH DAMAGES. THIS EXCLUSION AND WAIVER OF LIABILITY APPLIES TO ALL# CAUSES OF ACTION, WHETHER BASED ON CONTRACT, WARRANTY, TORT OR ANY OTHER# LEGAL THEORIES.
#+--------------------------------------------------------------------------+function giveHelp()# give help#+--------------------------------------------------------------------------+ { script=`basename $0` echo "" echo "Usage: $script [-p prefix] [-s suffix]" echo "" echo "Synopsis:" echo " Convert R/W golden image on source ID to R/O on DCSSs and target ID" echo "" echo "Optional arguments:" echo " -p prefix: optional 3 character DCSS prefix, default is 'S11S1'" echo " -s suffix: optional 1 character DCSS suffix, default is '1'" echo "" echo "Example: $script -s 2" echo " write to target ID S11ROGLD, and DCSSs S11S1RT2, S11S1SH2 and S11S1RP2" exit 1 } # giveHelp()
#+--------------------------------------------------------------------------+function parseArgs()# Parse any arguments# Args: All arguments passed to this script# Arguments parsed: only one optional 1 character DCSS suffix#+--------------------------------------------------------------------------+ { prefix=S11 prefixDCSS=S11S1 suffix=1 while [ -n "$1" ]; do case $1 in -p) # prefix follows shift prefix=$1 let prelen=${#prefix} if [ $prelen -lt 1 -o $prelen -gt 3 ]; then # error echo "Error: prefix must be one, two or three characters"
© Copyright IBM 2011 85
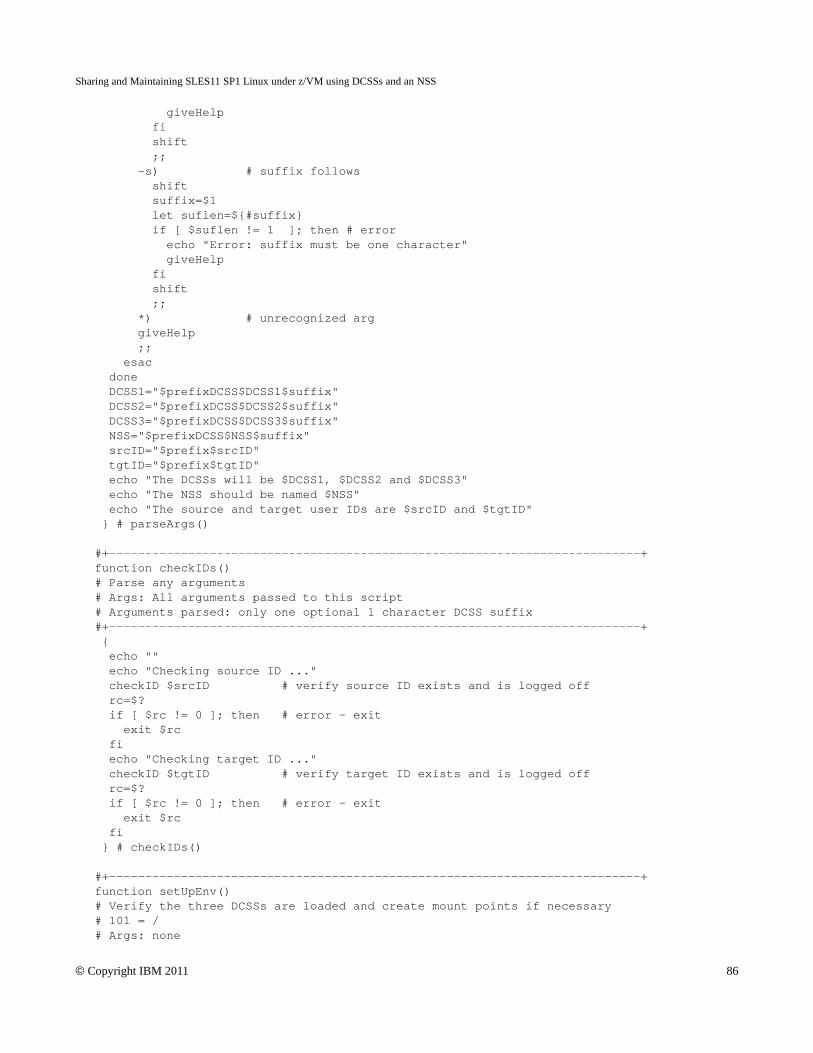
Sharing and Maintaining SLES11 SP1 Linux under z/VM using DCSSs and an NSS
giveHelp fi shift ;; -s) # suffix follows shift suffix=$1 let suflen=${#suffix} if [ $suflen != 1 ]; then # error echo "Error: suffix must be one character" giveHelp fi shift ;; *) # unrecognized arg giveHelp ;; esac done DCSS1="$prefixDCSS$DCSS1$suffix" DCSS2="$prefixDCSS$DCSS2$suffix" DCSS3="$prefixDCSS$DCSS3$suffix" NSS="$prefixDCSS$NSS$suffix" srcID="$prefix$srcID" tgtID="$prefix$tgtID" echo "The DCSSs will be $DCSS1, $DCSS2 and $DCSS3" echo "The NSS should be named $NSS" echo "The source and target user IDs are $srcID and $tgtID" } # parseArgs()
#+--------------------------------------------------------------------------+function checkIDs()# Parse any arguments# Args: All arguments passed to this script# Arguments parsed: only one optional 1 character DCSS suffix#+--------------------------------------------------------------------------+ { echo "" echo "Checking source ID ..." checkID $srcID # verify source ID exists and is logged off rc=$? if [ $rc != 0 ]; then # error - exit exit $rc fi echo "Checking target ID ..." checkID $tgtID # verify target ID exists and is logged off rc=$? if [ $rc != 0 ]; then # error - exit exit $rc fi } # checkIDs()
#+--------------------------------------------------------------------------+function setUpEnv()# Verify the three DCSSs are loaded and create mount points if necessary# 101 = /# Args: none
© Copyright IBM 2011 86

#+--------------------------------------------------------------------------+ { echo "" echo "Setting up environment ..." if [ ! -d /sys/devices/dcssblk/$DCSS1 ]; then echo "Error: /sys/devices/dcssblk/$DCSS1 not found" exit 20 fi if [ ! -d /sys/devices/dcssblk/$DCSS2 ]; then echo "Error: /sys/devices/dcssblk/$DCSS2 not found" exit 21 fi if [ ! -d /sys/devices/dcssblk/$DCSS3 ]; then echo "Error: /sys/devices/dcssblk/$DCSS3 not found" exit 22 fi
# make 3 mount points if necessary: /mnt/src/, /mnt/tgt/ and /mnt/rpm/ if [ ! -d /mnt/src ]; then # create it mkdir /mnt/src if [ $? != 0 ]; then exit 23; fi fi if [ ! -d /mnt/tgt ]; then # create it mkdir /mnt/tgt if [ $? != 0 ]; then exit 24; fi fi # cutting a corner here - but difficult to mount /mnt/tgt/var/lib/rpm if [ ! -d /mnt/rpm ]; then # create it mkdir /mnt/rpm if [ $? != 0 ]; then exit 25; fi fi } # setUpEnv()
#+--------------------------------------------------------------------------+function enableSourceEnv()# Link read-only and enable source file systems# 101 = /# Args: none#+--------------------------------------------------------------------------+ { echo "" echo "Linking source disks ..." CPcmd link $srcID 100 1100 rr if [ $? != 0 ]; then exit 26; fi CPcmd link $srcID 101 1101 rr if [ $? != 0 ]; then exit 27; fi CPcmd link $srcID 102 1102 rr if [ $? != 0 ]; then exit 28; fi CPcmd link $srcID 103 1103 rr if [ $? != 0 ]; then exit 29; fi
echo "" echo "Enabling source disks ..." chccwdev -e 1100 if [ $? != 0 ]; then exit 30; fi chccwdev -e 1101 if [ $? != 0 ]; then exit 31; fi chccwdev -e 1102 if [ $? != 0 ]; then exit 32; fi
© Copyright IBM 2011 87

Sharing and Maintaining SLES11 SP1 Linux under z/VM using DCSSs and an NSS
chccwdev -e 1103 if [ $? != 0 ]; then exit 33; fi udevadm settle
# get source device names devTy1100=ECKD dev1100=/dev/`cat /proc/dasd/devices | grep "0.0.1100(ECKD)" | awk '{ print $7 }'`1 if [ ${#dev1100} -lt 7 ]; then devTy1100=FBA dev1100=/dev/`cat /proc/dasd/devices | grep "0.0.1100(FBA )" | awk '{ print $8 }'`1 if [ ${#dev1100} -lt 7 ]; then exit 34; fi fi devTy1101=ECKD dev1101=/dev/`cat /proc/dasd/devices | grep "0.0.1101(ECKD)" | awk '{ print $7 }'`1 if [ ${#dev1101} -lt 7 ]; then devTy1101=FBA dev1101=/dev/`cat /proc/dasd/devices | grep "0.0.1101(FBA )" | awk '{ print $8 }'`1 if [ ${#dev1101} -lt 7 ]; then exit 35; fi fi devTy1102=ECKD dev1102=/dev/`cat /proc/dasd/devices | grep "0.0.1102(ECKD)" | awk '{ print $7 }'`1 if [ ${#dev1102} -lt 7 ]; then devTy1102=FBA dev1102=/dev/`cat /proc/dasd/devices | grep "0.0.1102(FBA )" | awk '{ print $8 }'`1 if [ ${#dev1102} -lt 7 ]; then exit 36; fi fi devTy1103=ECKD dev1103=/dev/`cat /proc/dasd/devices | grep "0.0.1103(ECKD)" | awk '{ print $7 }'`1 if [ ${#dev1103} -lt 7 ]; then devTy1103=FBA dev1103=/dev/`cat /proc/dasd/devices | grep "0.0.1103(FBA )" | awk '{ print $8 }'`1 if [ ${#dev1103} -lt 7 ]; then exit 37; fi fi } # enableSourceEnv()
#+--------------------------------------------------------------------------+function enableTargetDCSSs()# Enable the target DCSSs# S11S1RT1: DCSS to store the root file system# S11S1RP1: DCSS to store the RPM database: /var/lib/rpm/# S11S1SH1: DCSS to store /usr/share/# Args: none#+--------------------------------------------------------------------------+ { echo "" echo "Setting DCSSs to not shared ..." shared1=`cat /sys/devices/dcssblk/$DCSS1/shared` if [ "shared1" != 0 ]; then # set shared to 0 echo 0 > /sys/devices/dcssblk/$DCSS1/shared if [ $? != 0 ]; then exit 38; fi fi shared2=`cat /sys/devices/dcssblk/$DCSS2/shared` if [ "shared2" != 0 ]; then # set shared to 0 echo 0 > /sys/devices/dcssblk/$DCSS2/shared if [ $? != 0 ]; then exit 39; fi fi shared3=`cat /sys/devices/dcssblk/$DCSS3/shared`
© Copyright IBM 2011 88

if [ "shared3" != 0 ]; then # set shared to 0 echo 0 > /sys/devices/dcssblk/$DCSS3/shared if [ $? != 0 ]; then exit 40; fi fi
echo "" echo "Making ext2 file systems on the DCSSs ..." mke2fs /dev/dcssblk1 > /dev/null if [ $? != 0 ]; then exit 41; fi mke2fs /dev/dcssblk2 > /dev/null if [ $? != 0 ]; then exit 42; fi mke2fs /dev/dcssblk3 > /dev/null if [ $? != 0 ]; then exit 43; fi
} # enableTargetDCSSs()
#+--------------------------------------------------------------------------+function enableTargetFSs()# Enable the target file systems on S11ROGLD:# 100 - /boot/# 102 - /usr/local/# Args: none#+--------------------------------------------------------------------------+ { echo "" echo "Linking target disks ..." CPcmd link $tgtID 100 2100 mr if [ $? != 0 ]; then exit 45; fi CPcmd link $tgtID 102 2102 mr if [ $? != 0 ]; then exit 46; fi
echo "" echo "Enabling target disks ..." chccwdev -e 2100 if [ $? != 0 ]; then exit 47; fi chccwdev -e 2102 if [ $? != 0 ]; then exit 48; fi udevadm settle
# get target device names devTy2100=ECKD dev2100=/dev/`cat /proc/dasd/devices | grep "0.0.2100(ECKD)" | awk '{ print $7 }'`1 if [ ${#dev2100} -lt 7 ]; then devTy2100=FBA dev2100=/dev/`cat /proc/dasd/devices | grep "0.0.2100(FBA )" | awk '{ print $8 }'`1 if [ ${#dev2100} -lt 7 ]; then exit 49; fi fi devTy2102=ECKD dev2102=/dev/`cat /proc/dasd/devices | grep "0.0.2102(ECKD)" | awk '{ print $7 }'`1 if [ ${#dev2102} -lt 7 ]; then devTy2102=FBA dev2102=/dev/`cat /proc/dasd/devices | grep "0.0.2102(FBA )" | awk '{ print $8 }'`1 if [ ${#dev2102} -lt 7 ]; then exit 50; fi fi } # enableTargetEnv()
#+--------------------------------------------------------------------------+function copyRootFileSystem()# Copy the root file system
© Copyright IBM 2011 89
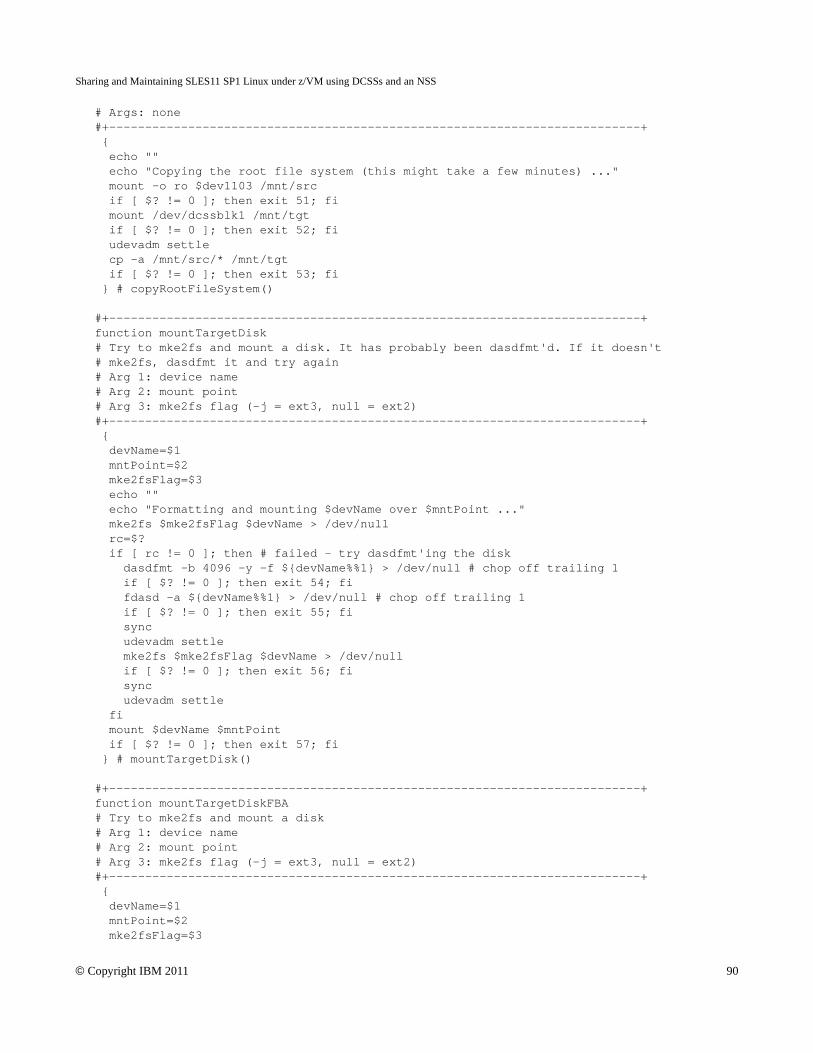
Sharing and Maintaining SLES11 SP1 Linux under z/VM using DCSSs and an NSS
# Args: none#+--------------------------------------------------------------------------+ { echo "" echo "Copying the root file system (this might take a few minutes) ..." mount -o ro $dev1103 /mnt/src if [ $? != 0 ]; then exit 51; fi mount /dev/dcssblk1 /mnt/tgt if [ $? != 0 ]; then exit 52; fi udevadm settle cp -a /mnt/src/* /mnt/tgt if [ $? != 0 ]; then exit 53; fi } # copyRootFileSystem()
#+--------------------------------------------------------------------------+function mountTargetDisk# Try to mke2fs and mount a disk. It has probably been dasdfmt'd. If it doesn't# mke2fs, dasdfmt it and try again# Arg 1: device name# Arg 2: mount point# Arg 3: mke2fs flag (-j = ext3, null = ext2)#+--------------------------------------------------------------------------+ { devName=$1 mntPoint=$2 mke2fsFlag=$3 echo "" echo "Formatting and mounting $devName over $mntPoint ..." mke2fs $mke2fsFlag $devName > /dev/null rc=$? if [ rc != 0 ]; then # failed - try dasdfmt'ing the disk dasdfmt -b 4096 -y -f ${devName%%1} > /dev/null # chop off trailing 1 if [ $? != 0 ]; then exit 54; fi fdasd -a ${devName%%1} > /dev/null # chop off trailing 1 if [ $? != 0 ]; then exit 55; fi sync udevadm settle mke2fs $mke2fsFlag $devName > /dev/null if [ $? != 0 ]; then exit 56; fi sync udevadm settle fi mount $devName $mntPoint if [ $? != 0 ]; then exit 57; fi } # mountTargetDisk()
#+--------------------------------------------------------------------------+function mountTargetDiskFBA# Try to mke2fs and mount a disk# Arg 1: device name# Arg 2: mount point# Arg 3: mke2fs flag (-j = ext3, null = ext2)#+--------------------------------------------------------------------------+ { devName=$1 mntPoint=$2 mke2fsFlag=$3
© Copyright IBM 2011 90

echo "" echo "Mounting FBA $devName over $mntPoint ..." mke2fs $mke2fsFlag $devName > /dev/null rc=$? sync udevadm settle mount $devName $mntPoint if [ $? != 0 ]; then exit 57; fi } # mountTargetDiskFBA()
#+--------------------------------------------------------------------------+#+--------------------------------------------------------------------------+function mountRemaining()# Mount the remaining file systems now that root is copied# Args: none#+--------------------------------------------------------------------------+ { sync udevadm settle echo "" echo "Mounting remaining source file systems ..." mount -o ro $dev1100 /mnt/src/boot if [ $? != 0 ]; then exit 58; fi mount -o ro $dev1101 /mnt/src/usr/share if [ $? != 0 ]; then exit 59; fi mount -o ro $dev1102 /mnt/src/usr/local if [ $? != 0 ]; then exit 60; fi echo "" echo "Formatting and mounting remaining target file systems ..." mount /dev/dcssblk2 /mnt/rpm if [ $? != 0 ]; then exit 61; fi udevadm settle mount /dev/dcssblk3 /mnt/tgt/usr/share if [ $? != 0 ]; then exit 62; fi if [ $devTy2100 = ECKD ]; then mountTargetDisk $dev2100 /mnt/tgt/boot # no arg3 = ext2 file system else if [ $devTy2100 = FBA ]; then mountTargetDiskFBA $dev2100 /mnt/tgt/boot fi fi if [ $devTy2102 = ECKD ]; then mountTargetDisk $dev2102 /mnt/tgt/usr/local -j # -j arg = ext3 file system else if [ $devTy2102 = FBA ]; then mountTargetDiskFBA $dev2102 /mnt/tgt/usr/local -j # -j arg = ext3 file system fi fi } # mountRemaining()
#+--------------------------------------------------------------------------+function copyRemaining()# Copy the remaining file systems# Args: none#+--------------------------------------------------------------------------+ { echo "" echo "Copying /boot ..." cp -a /mnt/src/boot/* /mnt/tgt/boot
© Copyright IBM 2011 91

Sharing and Maintaining SLES11 SP1 Linux under z/VM using DCSSs and an NSS
if [ $? != 0 ]; then exit 63; fi echo "" echo "Copying /usr/share (this might take a few minutes) ..." cp -a /mnt/src/usr/share/* /mnt/tgt/usr/share if [ $? != 0 ]; then exit 64; fi echo "" echo "Copying /usr/local ..." cp -a /mnt/src/usr/local/* /mnt/tgt/usr/local echo "Copying /usr/local ..." cp -a /mnt/src/usr/local/* /mnt/tgt/usr/local if [ $? != 0 ]; then exit 65; fi echo "" echo "Copying /var/lib/rpm ..." cp -a /mnt/src/var/lib/rpm/* /mnt/rpm if [ $? != 0 ]; then exit 66; fi } # copyRemaining()
#+--------------------------------------------------------------------------+function modifySystem()# 0) mount target system over /mnt/tgt# 1) Copy modified /etc/init.d/boot, /etc/init.d/boot.rootfsck and /etc/fstab# 2) Copy source /etc/ and /root/ directories to target /local/# 3) Move /etc/init.d under /sbin/ and create symlink to point back#+--------------------------------------------------------------------------+ { # copy boot.rootfsck, fstab, zipl.conf, rwtab and readonly-root files echo "" echo "Copying modified boot.rootfsck script ..." cp /mnt/tgt/etc/init.d/boot.rootfsck /mnt/tgt/etc/init.d/boot.rootfsck.orig if [ "$?" != 0 ]; then exit 67; fi cp $rootfsckFile /mnt/tgt/etc/init.d/boot.rootfsck if [ "$?" != 0 ]; then exit 68; fi echo "" echo "Backing up and copying modified /etc/fstab file ..." cp /mnt/tgt/etc/fstab /mnt/tgt/etc/fstab.orig if [ "$?" != 0 ]; then exit 69; fi cp $fstabFile /mnt/tgt/etc/fstab if [ "$?" != 0 ]; then exit 70; fi echo "" echo "Backing up and copying modified /etc/zipl.conf file ..." cp /mnt/tgt/etc/zipl.conf /mnt/tgt/etc/zipl.conf.orig if [ "$?" != 0 ]; then exit 71; fi sed -i 's:/dev/disk/by-path/ccw-0.0.0103-part1:/dev/dcssblk1:g' /mnt/tgt/etc/zipl.conf if [ "$?" != 0 ]; then exit 72; fi echo "" echo "Backing up and copying /lib/mkinitrd/scripts/setup-block.sh file ..." setupDir="/mnt/tgt/lib/mkinitrd/scripts" cp $setupDir/setup-block.sh $setupDir/setup-block.sh.orig if [ "$?" != 0 ]; then exit 74; fi cp $mkinitrdFile $setupDir/setup-block.sh if [ "$?" != 0 ]; then exit 75; fi echo "" echo "Backing up and modifying /etc/modprobe.conf.local file ..." modpLine="options dcssblk \"segments=SWAPPING,$DCSS1,$DCSS2,$DCSS3\"" modpFile="/mnt/tgt/etc/modprobe.conf.local" cp $modpFile $modpFile.orig if [ "$?" != 0 ]; then exit 76; fi
© Copyright IBM 2011 92

cat $modpFile.orig | sed -e '/dcssblk/d' > $modpFile # del line with dcssblk echo $modpLine >> $modpFile if [ "$?" != 0 ]; then exit 77; fi echo "" echo "Copying /etc/rwtab file ..." cp $rwtabFile /mnt/tgt/etc if [ "$?" != 0 ]; then exit 78; fi echo "" echo "Copying /etc/sysconfig/readonly-root file ..." cp $readonlyrootFile /mnt/tgt/etc/sysconfig if [ "$?" != 0 ]; then exit 79; fi echo "" echo "Making /etc/mtab a symbolic link to /proc/mounts ..." cd /mnt/tgt/etc rm mtab ln -s /proc/mounts mtab cd -
echo "" echo "Running zipl in target environment ..." mount --bind /dev /mnt/tgt/dev if [ "$?" != 0 ]; then exit 80; fi mount -t proc none /mnt/tgt/proc if [ "$?" != 0 ]; then exit 81; fi mount --bind /sys /mnt/tgt/sys if [ "$?" != 0 ]; then exit 82; fi chroot /mnt/tgt mkinitrd if [ "$?" != 0 ]; then exit 83; fi chroot /mnt/tgt zipl if [ "$?" != 0 ]; then exit 84; fi
echo "" echo "Copying files and directories in /etc/rwtab ..." cat $rwtabFile | while read type path do case "$type" in empty) # TODO: there is not test for this case if [ ! -d /mnt/tgt$path ]; then mkdir /mnt/tgt$path if [ "$?" != 0 ]; then exit 85; fi fi ;; files) # bind mount the file echo "Copying file /mnt/tgt$path to /mnt/tgt/usr/local$path ..." if [ ! -d /mnt/tgt/usr/local${path%/*} ]; then mkdir -p /mnt/tgt/usr/local${path%/*} if [ "$?" != 0 ]; then exit 86; fi echo "Created directory /mnt/tgt/usr/local${path%/*}" fi cp /mnt/tgt/$path /mnt/tgt/usr/local/$path if [ "$?" != 0 ]; then exit 87; fi ;; dirs) # bind mount the directory echo "Copying dir /mnt/tgt$path/* to /mnt/tgt/usr/local$path ..." if [ ! -d /mnt/tgt/usr/local$path ]; then mkdir -p /mnt/tgt/usr/local$path if [ "$?" != 0 ]; then exit 88; fi echo "Created directory /mnt/tgt/usr/local$path" fi
© Copyright IBM 2011 93

Sharing and Maintaining SLES11 SP1 Linux under z/VM using DCSSs and an NSS
cp -a /mnt/tgt$path/* /mnt/tgt/usr/local$path if [ "$?" != 0 ]; then exit 89; fi ;; *) # no-op for every other value ;; esac done } # modifySystem()
#+--------------------------------------------------------------------------+function saveDCSSs()# Save the DCSS# Args: None#+--------------------------------------------------------------------------+ { echo "" echo "Saving $DCSS1 (this takes some time) ..." echo 1 > /sys/devices/dcssblk/$DCSS1/save if [ $? != 0 ]; then exit 90; fi echo "" echo "Saving $DCSS2 ..." echo 1 > /sys/devices/dcssblk/$DCSS2/save if [ $? != 0 ]; then exit 91; fi echo "" echo "Saving $DCSS3 (this takes some time) ..." echo 1 > /sys/devices/dcssblk/$DCSS3/save if [ $? != 0 ]; then exit 92; fi
# Creating the NSS must be done manually echo "To create an NSS, logon to $tgtID and: ipl 100 parm savesys=$NSS" } # saveDCSSs()
# main()# Global variables specifying user IDs, DCSS and NSS namessrcID="RWGLD" # source read-write golden image minus the prefixtgtID="ROGLD" # target read-only golden image minus the prefixDCSS1="RT" # root file system DCSS minus prefix and suffixDCSS2="RP" # /var/lib/rpm/ DCSS minus prefix and suffixDCSS3="SH" # /usr/share/ DCSS minus prefix and suffixNSS="LX" # name of the NSS minus prefix and suffix
# Global variables specifying files that must exist in /usr/local/sbinrootfsckFile="/usr/local/sbin/boot.rootfsck" # modified from /etc/init.dmkinitrdFile="/usr/local/sbin/setup-block.sh" # modified initrd filefstabFile="/usr/local/sbin/fstab" # modified from /etc filerwtabFile="/usr/local/sbin/rwtab" # new /etc/ filereadonlyrootFile="/usr/local/sbin/readonly-root" # new /etc/sysconfig file
# function calls. rorfuncs.sh # "source" the common functionsparseArgs $@ # parse argumentscheckIDs # verify source and target IDs exist & are logged offsetUpEnv # verify DCSSs, create mount pointsenableSourceEnv # enable and mount the source root file systemenableTargetDCSSs # enable the target DCSSsenableTargetFSs # enable the target file systemscopyRootFileSystem # copy source root file system to target
© Copyright IBM 2011 94

mountRemaining # mount remaining file systemscopyRemaining # copy remaining file systems from source to targetmodifySystem # modify target system to be read-onlycleanUp # unmount FSs, disable and detach devicessaveDCSSs # save DCSS1, DCSS2 and DCSS3
10.11 The modified script setup-block.sh The default SLES11 SP1 script /lib/mkinitrd/setup/setup-block.sh does not recognize the dcssblk driver. A modified scriptis included. Following are just the differences:
# diff setup-block.sh.orig setup-block.sh 78a79,81> dcss*)> echo dcssblk> ;;
Section 11: Linux configuration filesThis section contains the following Linux configuration files:
• fstab Modifed /etc/fstab file
• readonly-root Configuration file that goes in /etc/sysconfig for read-only root
• rwtab Configuration file that goes in /etc/ for list of read-write files and directories
• zipl.conf Modified /etc/zipl.conf file
11.1 The modified fstab fileFollowing is a modified /etc/fstab file that is copied to S11ROGLD.
/dev/dcssblk1 / ext2 ro,xip,noatime,nodiratime,acl,user_xattr 1 1/dev/disk/by-path/ccw-0.0.0102-part1 /usr/local ext3 acl,user_xattr 0 0/dev/dcssblk2 /var/lib/rpm ext2 ro,xip,noatime,nodiratime,acl,user_xattr 0 0/dev/dcssblk3 /usr/share ext2 ro,xip,noatime,nodiratime,acl,user_xattr 0 0tmpfs /tmp tmpfs defaults 0 0proc /proc proc defaults 0 0sysfs /sys sysfs noauto 0 0debugfs /sys/kernel/debug debugfs noauto 0 0devpts /dev/pts devpts mode=0620,gid=5 0 0
11.2 The readonly-root configuration fileFollowing is the file readonly-root that is copied to /etc/sysconfig/ on S11ROGLD.
# Set to 'yes' to mount the system filesystems read-only.READONLY=yes# Set to 'yes' to mount various temporary state as either tmpfs# or on the block device labelled RW_LABEL. Implied by READONLYTEMPORARY_STATE=no# Place to put a tmpfs for temporary scratch writable spaceRW_MOUNT=/usr/local# Label on local filesystem which can be used for temporary scratch spaceRW_LABEL=stateless-rw
© Copyright IBM 2011 95
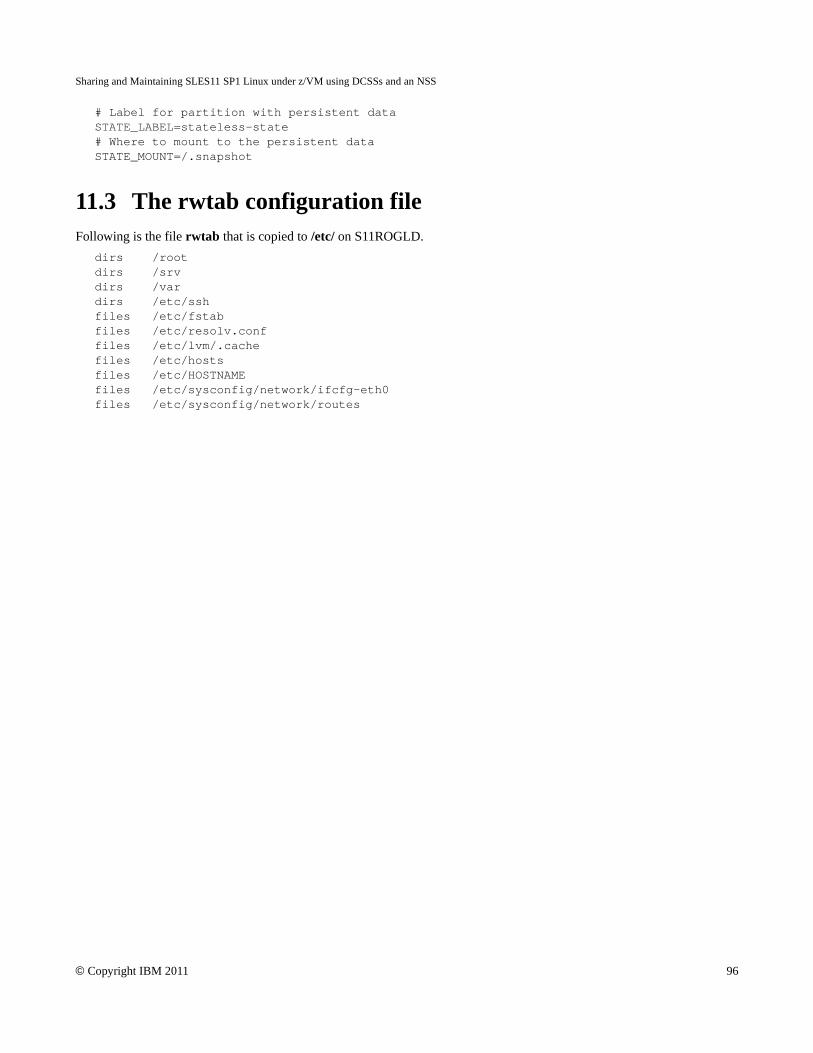
Sharing and Maintaining SLES11 SP1 Linux under z/VM using DCSSs and an NSS
# Label for partition with persistent dataSTATE_LABEL=stateless-state# Where to mount to the persistent dataSTATE_MOUNT=/.snapshot
11.3 The rwtab configuration fileFollowing is the file rwtab that is copied to /etc/ on S11ROGLD.
dirs /rootdirs /srvdirs /vardirs /etc/sshfiles /etc/fstabfiles /etc/resolv.conffiles /etc/lvm/.cachefiles /etc/hostsfiles /etc/HOSTNAMEfiles /etc/sysconfig/network/ifcfg-eth0files /etc/sysconfig/network/routes
© Copyright IBM 2011 96