Embed Size (px)
Citation preview
SharePoint 2013 Quick Reference
Click a link below to jump to a topic:
1. How To Sign In
2. How To Edit Text In A Content Editor Webpart
3. How To Create A Folder
4. How To Upload Files
5. How to Move Files and Folders
6. How To Add/Remove Users To/From A Site
7. How To Connect To A Document List With Windows Explorer
8. How To Add A Persistent Network Location
9. How To Import Folders Into A Document List
10. How To Delete A File or Folder
11. How To Create A New Document Library
12. How to Download a Word / Excel Document
Purdue University College of Education – Education IT (EdIT)

1. How To Sign In
1. Sign In Sign into SharePoint by clicking “Sign In” at top right:
If prompted to authenticate, use Your Purdue Career Account.
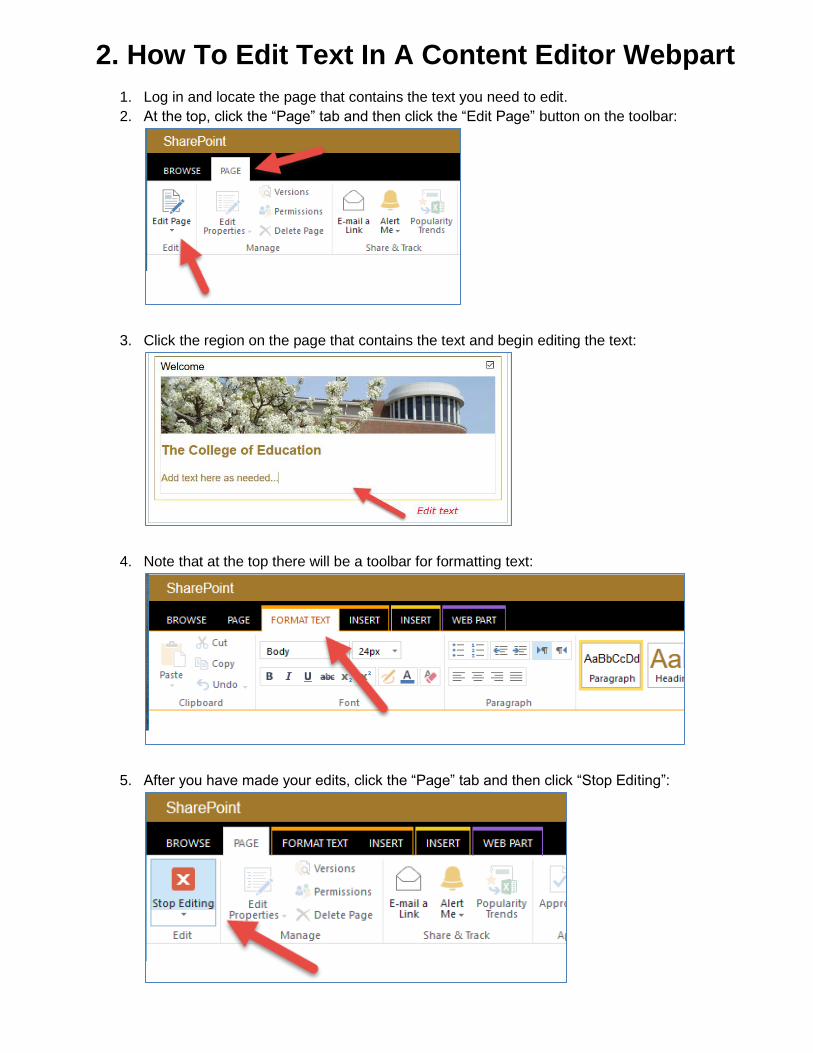
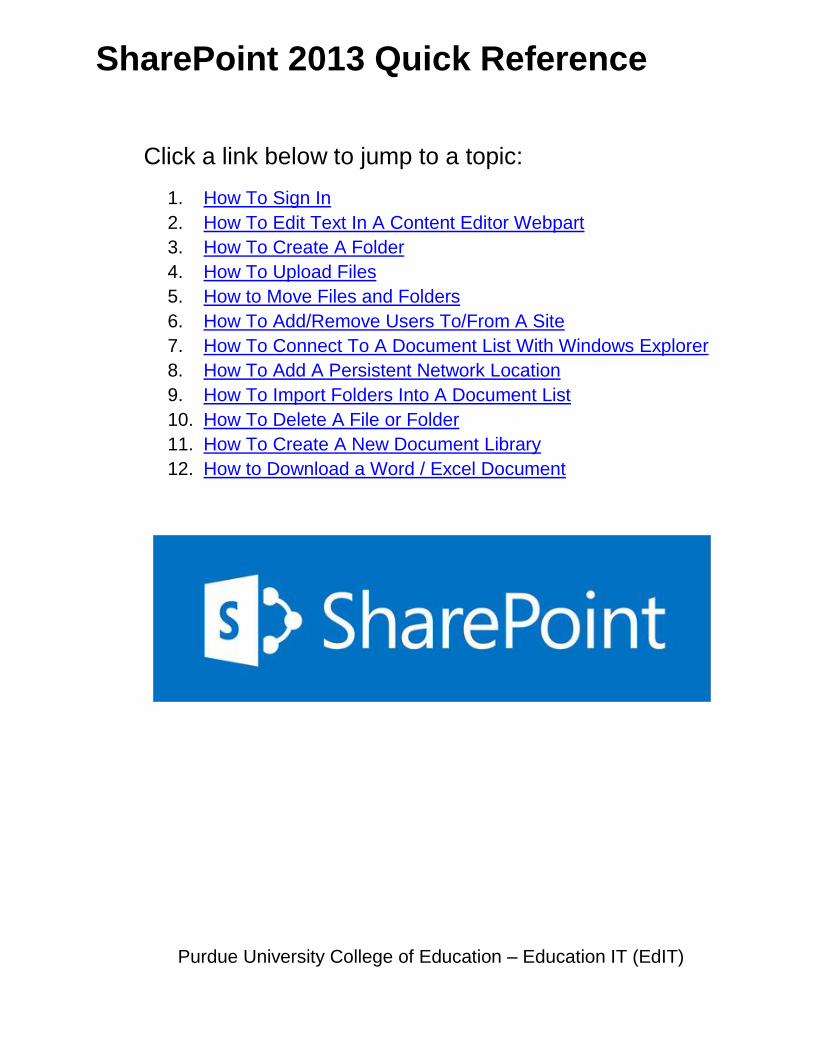
2. How To Edit Text In A Content Editor Webpart
1. Log in and locate the page that contains the text you need to edit.
2. At the top, click the “Page” tab and then click the “Edit Page” button on the toolbar:
3. Click the region on the page that contains the text and begin editing the text:
4. Note that at the top there will be a toolbar for formatting text:
5. After you have made your edits, click the “Page” tab and then click “Stop Editing”:

3. How To Create A Folder
1. Navigate to document library where the new folder will be created:
2. Once you’re in the location where you want to create a new subfolder, click the “Files” tab:
Now click the “New Folder” button:
In the window that appears, enter the name of the folder and click “Save.”
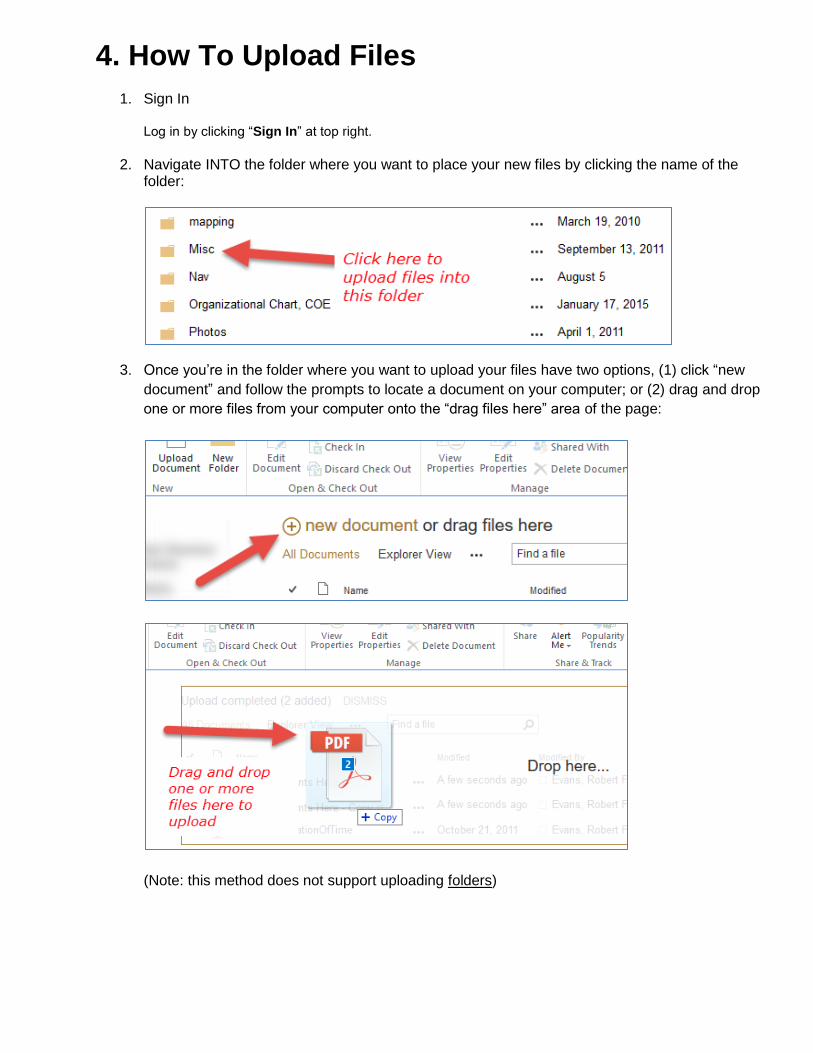
4. How To Upload Files
1. Sign In Log in by clicking “Sign In” at top right.
2. Navigate INTO the folder where you want to place your new files by clicking the name of the folder:
3. Once you’re in the folder where you want to upload your files have two options, (1) click “new
document” and follow the prompts to locate a document on your computer; or (2) drag and drop
one or more files from your computer onto the “drag files here” area of the page:
(Note: this method does not support uploading folders)

5. How To Move Files and Folders
1. Navigate to the location where your files and folders exist.
2. If you simply want to move one or more files into a subfolder in the existing location, you can check the checkboxes next to each file you want to move, and then drag the file icons onto a folder name:
3. If you want to move files to a folder in another location: locate the document; click the three dots to the right of the name; click the three dots in the pop-up; hover over “Manage Selection” and then select “Move.” Then follow the prompts to select the new site / library / folder where the files(s) should be moved:
Note: When SharePoint shows the message “Working on it…” please wait for the page or item to fully load before continuing to click. This is a subtle thing, but very important!
To navigate to the Parent folder, click the “Library” tab and then click “Navigate Up”:

6. How To Add/Remove Users To/From A Site
1. Sign In Sign into SharePoint by clicking “Sign In” at top right:
2. Go to “Site Settings”
Click the “Settings” gear at top right and then select “Site settings”:
Click “Site permissions” under the “Users and Permissions” area:
3. Add Users: Click the name of a group:

Within the group settings, click the “New” menu and select “Add Users”:
4. Enter Purdue Career Account IDs or Names: Begin typing career account IDs or names. Matching names will automatically appear as you type and you can select them from the list that appears. When all users are added, click the “Share” button:
Note: Click “Show Options” and un-check “Send an email invitation” if needed.
Note: If you are adding a group, you will need to select “SHOW OPTIONS” and then select a permission level to grant to the group (you must select a permission level and not the name of a group since groups cannot be nested in SharePoint).
5. Remove Users
Click the checkbox next to one or more names and then click the “Actions” menu and select “Remove Users from Group”:

7. How To Connect To A Document List With Windows Explorer (or with a Mac)
1. Sign into SharePoint by clicking “Sign In” at top right.
2. Navigate to the SharePoint site using your web browser. Here is an example: (do not use this example address)
3. Click and highlight the address and then Copy it using Ctrl+C.
4. Go to Windows Explorer and Paste the address into the location bar and then remove anything after the main name of the site (such as “default.aspx…”). Then press enter in the location bar and Windows Explorer will attempt to connect to SharePoint: (the address used below is an example only, do not use!)
You may be prompted to log in again. Windows Explorer should now open the SharePoint site and you can navigate through the folders as usual and copy / paste / edit / delete documents and folders as usual. [ If for some reason this does not work, this method may not be supported on the specific network and/or your computer you are using. Contact Education IT. ]
If you are using a Mac, use the same web address described above:
https://sp2013.itap.purdue.edu/sphub/education ( example address, do not use!) …and use the Finder “Go” menu to “Connect to Server” as usual (copy the web address into the “Server Address” box on the Mac). For more information about how to connect to a server on a Mac, see: https://support.apple.com/en-us/HT204445 (continued on next page…)

Notes: If you have trouble connecting, be sure to remove anything from the SharePoint
address that is not the main name of the site or the name of a document library. For
example, if you have an address that looks like this:
https://sp2013.itap.purdue.edu/sphub/education/Documents/Forms/DispForm.aspx?ID=1&Sour
ce=https%3A%2F%2Fsp2013%2Eitap%2Epurdue%2Eedu%2Fsphub%2Feducation%2FDocum
ents%2FForms%2FAllItems%2Easpx&ContentTypeId=0x0101000C6E638619D28949920EB2C
D95DAED1C&RootFolder=%2Fsphub%2Feducation%2FDocuments
You will need to remove everything after the main name of the site, or document list, so that the
address looks something like this:
https://sp2013.itap.purdue.edu/sphub/education/Documents ( example address, do not use!)
--or--
https://sp2013.itap.purdue.edu/sphub/education ( example address, do not use!)
Then use these shorter names in the “Folder” field when mapping a drive.
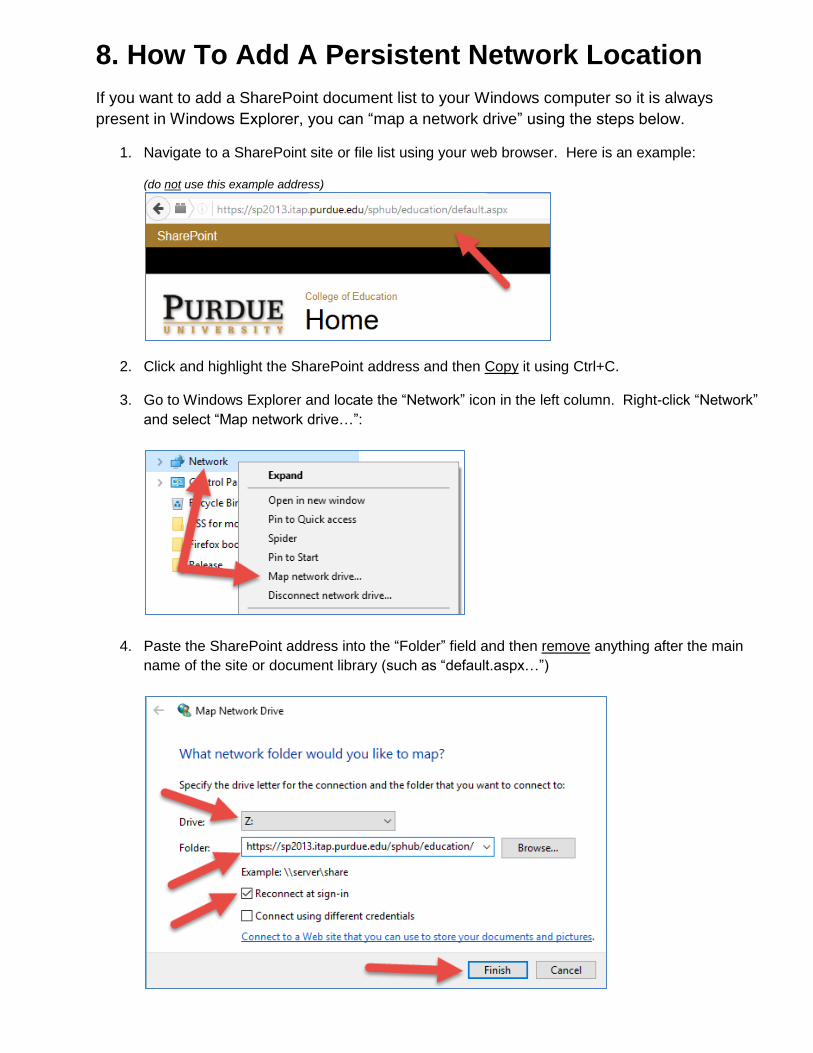
8. How To Add A Persistent Network Location
If you want to add a SharePoint document list to your Windows computer so it is always
present in Windows Explorer, you can “map a network drive” using the steps below.
1. Navigate to a SharePoint site or file list using your web browser. Here is an example: (do not use this example address)
2. Click and highlight the SharePoint address and then Copy it using Ctrl+C.
3. Go to Windows Explorer and locate the “Network” icon in the left column. Right-click “Network”
and select “Map network drive…”:
4. Paste the SharePoint address into the “Folder” field and then remove anything after the main
name of the site or document library (such as “default.aspx…”)

5. Choose a drive letter and click “Reconnect as sign-in” and then click “Finish.”
6. Windows will now try to connect to the SharePoint site and “map a drive letter” on your
computer. When you go to “This PC” you should now see a new drive letter that points to the
SharePoint site:
Notes: If you have trouble connecting, be sure to remove anything from the SharePoint
address that is not the main name of the site or the name of a document library. For
example, if you have an address that looks like this:
https://sp2013.itap.purdue.edu/sphub/education/Documents/Forms/DispForm.aspx?ID=1&Sour
ce=https%3A%2F%2Fsp2013%2Eitap%2Epurdue%2Eedu%2Fsphub%2Feducation%2FDocum
ents%2FForms%2FAllItems%2Easpx&ContentTypeId=0x0101000C6E638619D28949920EB2C
D95DAED1C&RootFolder=%2Fsphub%2Feducation%2FDocuments
You will need to remove everything after the main name of the site, or document list, so that the
address looks something like this:
https://sp2013.itap.purdue.edu/sphub/education/Documents ( example address, do not use!)
--or--
https://sp2013.itap.purdue.edu/sphub/education ( example address, do not use!)
Then use these shorter names in the “Folder” field when mapping a drive.
---------------------------------------
If you are using a Mac, use the same web address described above:
https://sp2013.itap.purdue.edu/sphub/education ( example address, do not use!)
…and use the Finder “Go” menu to “Connect to Server” as usual (copy the web address into
the “Server Address” box on the Mac). For more information about how to connect to a server
on a Mac, see:
https://support.apple.com/en-us/HT204445

9. How To Import Folders Into A Document List
1. Even though SharePoint 2013 allows drag and drop importing of files into a document list (see item #4 above), importing folders cannot be done via drag and drop. However, it is possible import folders into SharePoint 2013 and the process is fairly easy. Using item #7 above, you can connect to a document list with Windows Explorer (or a Mac) and then once connected, you can copy/paste folders (and files) into the connected location. Please refer to item #7 above for instructions on how to connect to SharePoint using Windows Explorer (or Mac).

10. How To Delete A File or Folder
1. Navigate to a document list and find the file(s) or folder(s) you need to delete. 2. Check the checkboxes beside each item you want to delete. 3. Go to the “FILES” tab and click the “X” icon to delete all the items you have selected.
If you need to Un-Delete items (restore them from the Recycle Bin), go to the “Site Settings” gear and select “Site Contents”:
Then look for the link to the RECYCLE BIN and use the options found there to restore items.

11. How To Create A New Document Library
1. Go to the home page of your site and click the “Settings” button at top right (the gear icon).
Then select “Site contents”:
2. Click “add an app”:
3. Select “Document Library”:
…wait…

4. Give the Document Library a name (please do not use spaces in the name!) and then click
“Create”:
5. It is always a good idea to review the permissions on every new document library that you
create to ensure that the right people have access to it, and that unauthorized users cannot
access it. Locate the new document list, hover over it, and click the three dots that give
additional options:
6. Select “SETTINGS” on the pop-up:
7. Click “Permissions for this document library”:

8. Review and adjust permissions as needed:

12. How To Download a Word / Excel Document
1. When you click a Word document in SharePoint, it may open in the built-in Word Viewer. If you
would like to download a copy of a Word document (or other Office document such as Excel,
PowerPoint, etc.), click the three dots next to the file name, then click the three dots at the
bottom of the pop-up box, then select “Download a Copy” from the menu:
2. If you are linking to a SharePoint document and you want people to be able to download the
document instead of having the document open in the online SharePoint viewer, you can add
“?Web=0” to the end of the URL. Examples:
https://collaborate.education.purdue.edu/edu/docs/Public/Sample-Word-Document.docx?Web=1
https://collaborate.education.purdue.edu/edu/docs/Public/Sample-Word-Document.docx?Web=0