Embed Size (px)
Citation preview

Share Point Feature Installation Guide Version 1.0
FedEx Confidential

FedEx Office SharePoint Feature Installation for Administrators
This document is intended to provide step by step instructions on how to deploy the solutions, activate the FedEx Office SharePoint feature and modify your proxy settings. The proxy settings are an optional step and only necessary if your SharePoint installation must access the Internet via a proxy server and if your SharePoint installation hasn’t already been configured to use your proxy server via settings in your web.config files.
1. Run the installer called SendToFedexOfficeSetup.exe.
After install completes you will need to deploy the solutions using the SharePoint Central Administrator or via the STSADM (SharePoint Team Services Administration). The SharePoint Central Administration can be located under Administrative Tools / SharePoint 3.0 Central Administration.
FedEx Confidential

2. Under Central Administration click on the Operations tab. 3. Click on the Solution Management link to see the SharePoint solutions that the installed added to
the SharePoint Solution store.
FedEx Confidential

4. You should see both the FedEx Office Proxy Configuration solution and the SendToFedExOffice
solution. If you did not install the SendToFedExOffice farm version, then the exact name will look different than in the screenshot. As noted at the beginning of the installation document, deploying the FedEx Office Proxy Configuration solution is optional.
FedEx Confidential

5. Click on the solution/s you want to deploy. You can see some details regarding the solution after
you click on it like what is shown below.
FedEx Confidential

6. If you click on “Deploy Solution”, you can schedule the deployment or deploy it now which is the
default option. Please note that deploying a solution immediately will restart all front-end web servers.
FedEx Confidential
7. After the solutions have been deployed, you should now see the status change to deployed for all
solutions that have been deployed.
FedEx Confidential

8. After the solutions have been deployed, you can now activate them. This installation guide
assumes that you selected farm scope installation. If you selected a different scope during the installation process you will need to activate it accordingly. If you click on the Operations tab and then click on the Manage farm features next to the red arrow as shown in the image below, it will give you the option to activate the feature.
FedEx Confidential

9. Click on the Activate button for the Send to FedEx Office feature to activate it. Please note that
when the feature is activated, the web.config file/s will be updated and as a result, SharePoint will automatically reload the site collections and sites.
FedEx Confidential

10. Perform the same steps for all solutions. 11. After the feature has been activated, test it by accessing a site collection or site where it was
activated. Navigate to the site URL , ie.. http://your-sharepoint-server:15000 . 12. Go to any document library for example “Shared Documents.” Click on the dropdown list and
verify the “Send to FedEx Office” option is available. 13. Select a document and click on “Send to FedEx Office.” 14. Verify the user confirmation screen appears.
15. Select “Send File” to upload the file to FedEx Office Print Online and verify that the FedEx Office Print Online has launched in a separate browser. If you did not receive an error and the browser window didn’t launch, verify your popup blocker settings. You may need to add https://partner.fedexkinkos.com to the popup blocker.
FedEx Confidential
Proxy Setup
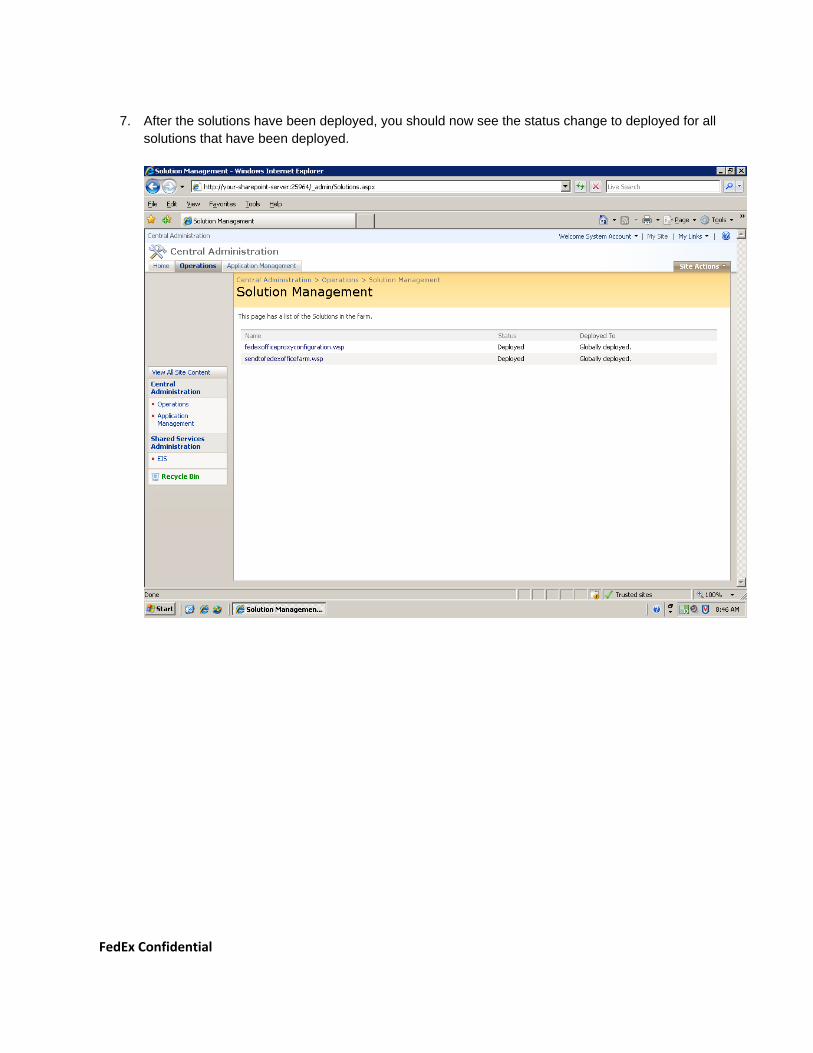
16. If the SharePoint installation is behind a proxy server, SharePoint needs to have the proxy settings set up in the web.config files. As explained previously in this document, this is only necessary if you are behind a proxy server and your SharePoint server doesn’t have any proxy settings defined in the SharePoint web.config files. First, make sure you have deployed the solution “fedexofficeproxyconfiguration.wsp” in the SharePoint Central Administration – Solution Management.
FedEx Confidential

17. You can confirm if the proxy has been set up by opening up the web.config file of any SharePoint web application.
18. The proxy settings is defined under the tag <defaultProxy> and the tag <proxy /> is where it’s defined. If you already have these settings defined, then you don’t need to follow any of the following steps.
FedEx Confidential
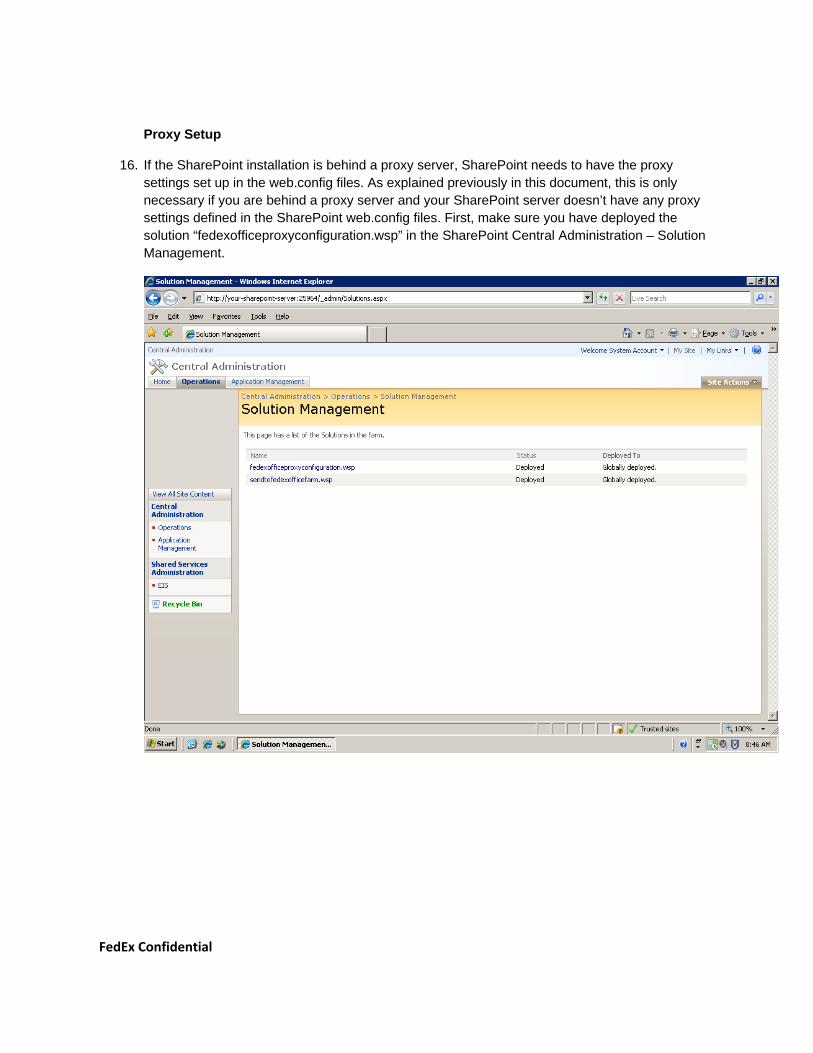
19. You need to run the SharePoint administration console to configure the proxy settings. Open the command console. If you are unsure about how to use a stsadm command you can use the “-help” switch followed by the command. This is true for all stsadm commands. To configure the proxy, enter the command: “stsadm –help fedexofficeproxyconfigure” then all the required and optional switches can be viewed. The switches in brackets are optional.
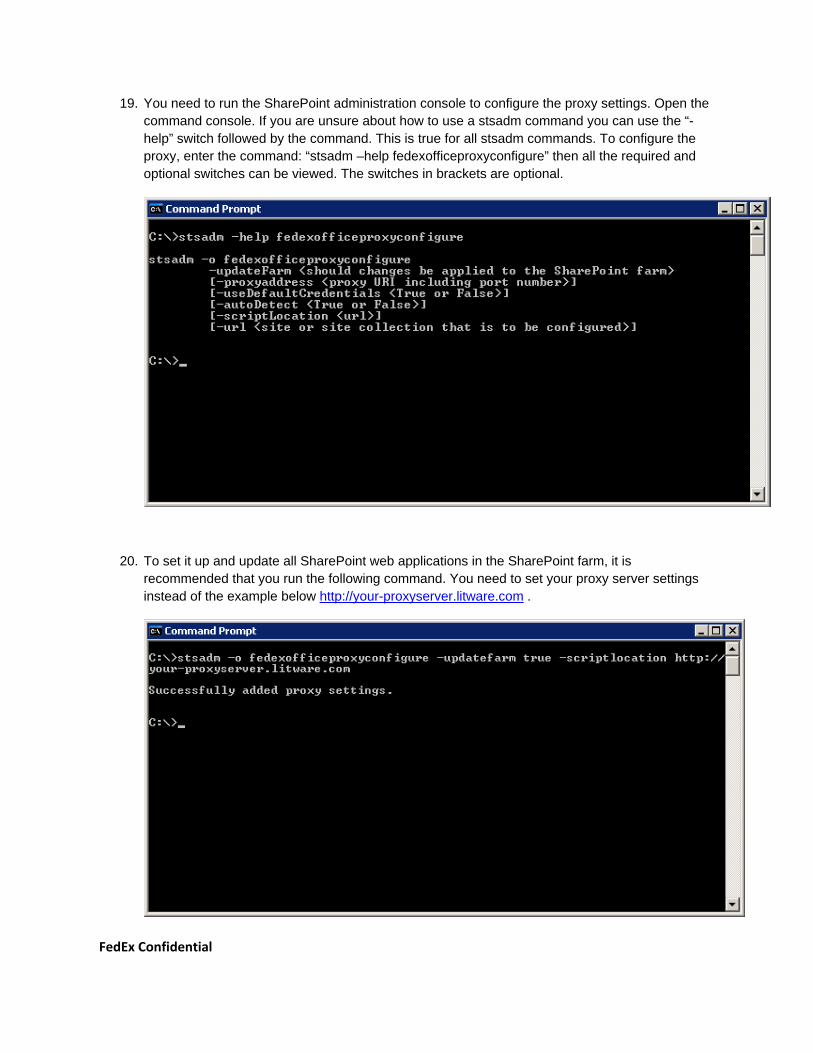
20. To set it up and update all SharePoint web applications in the SharePoint farm, it is recommended that you run the following command. You need to set your proxy server settings instead of the example below http://your-proxyserver.litware.com .
FedEx Confidential

21. Depending on the size of your SharePoint installation, it may take a while before the changes have been deployed to all web applications. The web.config file should now look similar to this:
22. If the browser is run from a machine behind a proxy server, such as directly from the SharePoint farm servers then you also need to use a proxy server for your browser before the SharePoint feature can connect to Print Online. In Internet Explorer, go to Tools/Internet Options/Connections/LAN Settings to confirm.
FedEx Confidential

23. Verify your proxy settings and click OK.
FedEx Confidential