Embed Size (px)
Citation preview

Check Out
For How-To
Videos!
@coolmaker
SEW N’ STYLE MACHINE+6
VISIT:www.coolmaker.comYEARS
02
IMPORTANT: Do not use fabrics other than those supplied or recommended by the manufacturer for sewing. For indoor dry locations use only. Clean the product with a dry cloth only. Always use under adult supervision. Do not store or use product near heat, sparks or flame.a CAUTION: Use machine on a flat surface. a CAUTION: Do not give the plush dolls or accessories that are made by the Cool Maker™ Sew N’ Style Machine to children under 3 years.a CAUTION: The fabric and stuffing materials provided may cause suffocation.a CAUTION: This toy uses sharp needles (already assembled). • Do not use if protective needle shroud is cracked or broken. • NEVER use if any needles are bent or broken. • In the unlikely event that a needle breaks during use, ensure that the needle fragment is found and removed safely. • Do not attempt to dismantle or rebuild the machine. • Never open the main motor case of the machine. • Do not submerge the unit or any other parts in water or use on wet surfaces.
FCC STATEMENT: This device complies with Part 15 of the FCC rules. Operation is subject to the following two conditions: (1) This device may not cause harmful interference, and (2) This device must accept any interference received, including interference that may cause undesired operation. This
BATTE
RY IN
FORM
ATION
equipment has been tested and found to comply with the limits for Class B digital devices pursuant to Part 15 of the FCC rules. These limits are designed to provide reasonable protection against harmful interference to radio communications. This equipment generates, uses and can radiate radio frequency energy and, if not installed and used in accordance with the instruction, may cause harmful interference to radio communication. However, there is no guarantee that interference will not occur in a particular installation. If this toy does cause interference to radio or television reception (you can check this by turning the toy off and on while listening for the interference), one or more of the following measures may be useful: - Reorient or relocate the receiving antenna- Increase the separation between the toy and the radio or the TV- Consult the dealer or an experienced TV-radio technician for help. NOTE: Changes, adjustments or modifications to this unit, including but not limited to, replacement of any transmitter component (crystal, semiconductor, etc) could result in a violation of FCC rules under part 15 and/or 95 and must be expressly approved by Spin Master Ltd or they could void the user’s authority to operate the equipment.
CAN ICES-3(B)/NMB-3(B)
03
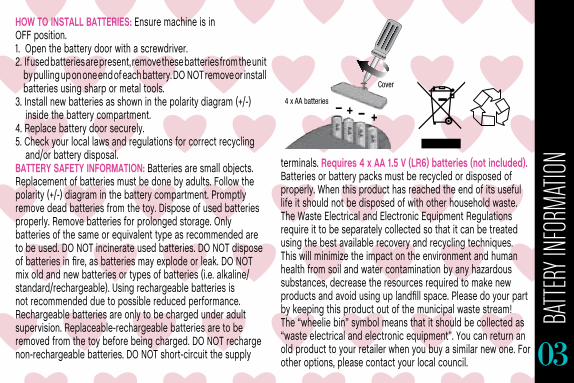
HOW TO INSTALL BATTERIES: Ensure machine is in OFF position. 1. Open the battery door with a screwdriver. 2. If used batteries are present, remove these batteries from the unit
by pulling up on one end of each battery. DO NOT remove or install batteries using sharp or metal tools.
3. Install new batteries as shown in the polarity diagram (+/-) inside the battery compartment. 4. Replace battery door securely. 5. Check your local laws and regulations for correct recycling and/or battery disposal.BATTERY SAFETY INFORMATION: Batteries are small objects. Replacement of batteries must be done by adults. Follow the polarity (+/-) diagram in the battery compartment. Promptly remove dead batteries from the toy. Dispose of used batteries properly. Remove batteries for prolonged storage. Only batteries of the same or equivalent type as recommended are to be used. DO NOT incinerate used batteries. DO NOT dispose of batteries in fire, as batteries may explode or leak. DO NOT mix old and new batteries or types of batteries (i.e. alkaline/standard/rechargeable). Using rechargeable batteries is not recommended due to possible reduced performance. Rechargeable batteries are only to be charged under adult supervision. Replaceable-rechargeable batteries are to be removed from the toy before being charged. DO NOT recharge non-rechargeable batteries. DO NOT short-circuit the supply
terminals. Requires 4 x AA 1.5 V (LR6) batteries (not included). Batteries or battery packs must be recycled or disposed of properly. When this product has reached the end of its useful life it should not be disposed of with other household waste. The Waste Electrical and Electronic Equipment Regulations require it to be separately collected so that it can be treated using the best available recovery and recycling techniques. This will minimize the impact on the environment and human health from soil and water contamination by any hazardous substances, decrease the resources required to make new products and avoid using up landfill space. Please do your part by keeping this product out of the municipal waste stream! The “wheelie bin” symbol means that it should be collected as “waste electrical and electronic equipment”. You can return an old product to your retailer when you buy a similar new one. For other options, please contact your local council.
+–+–
4 x AA batteries
Cover
BATTE
RY IN
FORM
ATION

04
1 Cool Maker™ Sew N’ Style Machine2 Sheets of Glitter Fabric2 Cool Maker™ Pre-cut Projects1 Sheet of Cool Maker™ Felt Fabric3 Cool Maker™ Decorative
Fabric Pieces1 Page of Pop-out Patterns1 Pom Pom Maker Attachment 1 Piece of Stretch Fabric1 Bag of Stuffing1 Elastic1 Bundle of Ribbon
(3/8”x 50”/ 0.9 cm x 127 cm)1 Bundle of Style String
(252” / 6.4 m)2 Bundles of Pom Pom Yarn
(96” / 2.4 m Bundle)1 PlaybookCO
NTEN
TSGlitter Fabric
Felt Fabric
Pre-cut Projects
Pom Pom Maker Attachment
Decorative Fabric Pieces
Stuffing
Pop-out Patterns
Elastic
Stretch Fabric
Pink Ribbon
Blue Pom Pom YarnPink Style
String

05
Diagram:
Manual Knob
Style String Guide
Style String Guide
Seam Guide
Fold Guide
Pom Pom MakerAttachment
ON/OFF Switch
Start/Stop ButtonStorage Drawer
DIAGR
AM
*Requires 4 AA (LR6) Batteries
Not Included.
Needle Guard
Light

06
BASIC
SEWI
NG TI
PS1
2
3 4
@coolmaker Basic Sewing Tips: Follow these steps when creating projects:1. Turn ON/OFF switch to ‘I’.
2. Press START/STOP button to start the machine.
3. Make sure to slowly feed the fabric under the needle guard and follow the seam guides.
4. To stop sewing, press the START/STOP button. To turn off the machine turn the OFF switch to ‘0’.
TIP: Have ruler, scissors and pencil handy before starting your project.
07
STYLE
STRIN
G SEW
ING TI
PS
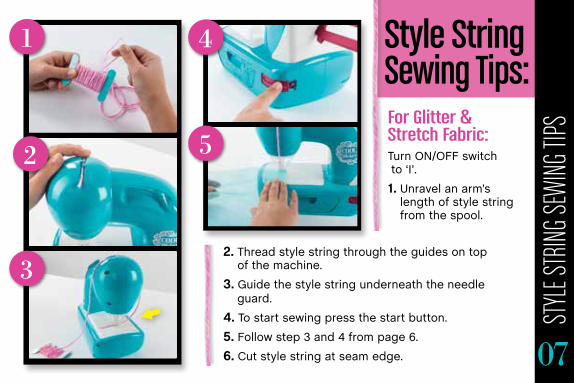
Style String Sewing Tips:For Glitter & Stretch Fabric:Turn ON/OFF switch to ‘I’.
1. Unravel an arm’s length of style string from the spool.
1
2
3
4
5
2. Thread style string through the guides on top of the machine.
3. Guide the style string underneath the needle guard.
4. To start sewing press the start button.
5. Follow step 3 and 4 from page 6.
6. Cut style string at seam edge.
08
CREAT
E A PO
M PO
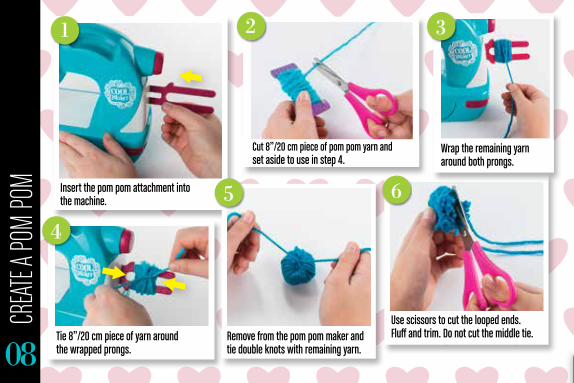
M Insert the pom pom attachment into the machine.
Tie 8”/20 cm piece of yarn around the wrapped prongs.
Use scissors to cut the looped ends. Fluff and trim. Do not cut the middle tie.
Wrap the remaining yarn around both prongs.
Cut 8”/20 cm piece of pom pom yarn and set aside to use in step 4.
1
4
2 3
65
Remove from the pom pom maker and tie double knots with remaining yarn.

09
CREAT
E A PO
M PO
M
Create a Pom Pom
Tie onto Glitter Pouch.
Tie onto Hair Clip Holder.
TIP: For better results, ask an adult to help tie a tighter knot.
Check Out @coolmaker for How-To Videos!

PLUS
H UNIC
ORN
10Scrunch one end of the glitter fabric. Place on top layer of felt and sew with style string. Repeat with smaller piece of glitter fabric to create layered skirt.
Using the two unicorn pop-out patterns, trace and cut two pieces of pink glitter fabric.
3
4
Remove style string, and sew the unicorn front and back layers together. Notice the symbols that show where to START (1), STOP (2), and spot stitch (+) on the back panel. Do not stitch over glitter fabric skirt.
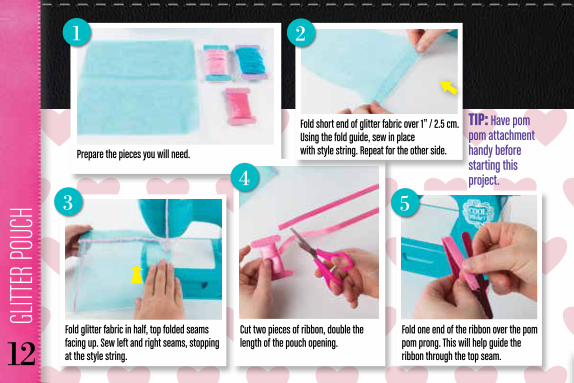
Prepare the pieces you will need.
1 2
PLUS
H UNIC
ORN
11
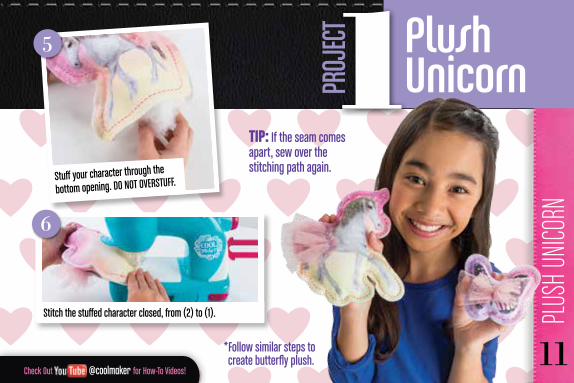
1Stuff your character through the
bottom opening. DO NOT OVERSTUFF.
Stitch the stuffed character closed, from (2) to (1).
TIP: If the seam comes apart, sew over the stitching path again.
Plush UnicornPR
OJEC
T
5
6
*Follow similar steps to create butterfly plush.
Check Out @coolmaker for How-To Videos!
GLITT
ER PO
UCH
12
Prepare the pieces you will need.
Fold glitter fabric in half, top folded seams facing up. Sew left and right seams, stopping at the style string.
Fold short end of glitter fabric over 1” / 2.5 cm. Using the fold guide, sew in place with style string. Repeat for the other side.
Fold one end of the ribbon over the pom pom prong. This will help guide the ribbon through the top seam.
Cut two pieces of ribbon, double the length of the pouch opening.
1
3
2
45
TIP: Have pom pom attachment handy before starting this project.
GLITT
ER PO
UCH
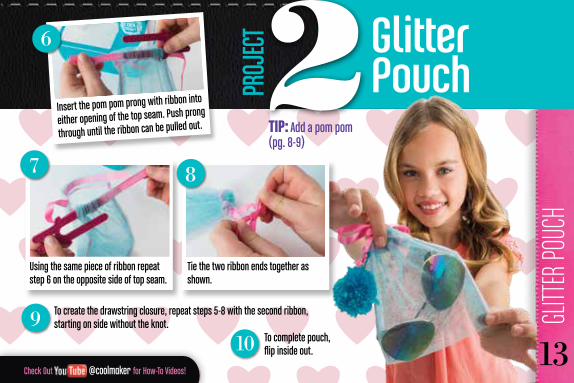
To create the drawstring closure, repeat steps 5-8 with the second ribbon, starting on side without the knot.
To complete pouch, flip inside out.
910
6
7
Check Out @coolmaker for How-To Videos!
Tie the two ribbon ends together as shown.
8
13
PROJ
ECT Glitter
PouchInsert the pom pom prong with ribbon into
either opening of the top seam. Push prong
through until the ribbon can be pulled out.
Using the same piece of ribbon repeat step 6 on the opposite side of top seam.
2TIP: Add a pom pom (pg. 8-9)

HAIR
CLIP
HOLD
ER
14
Prepare the pieces you will need.
Thread style string and sew ribbon at the top and bottom of the felt.
Cut two pieces of ribbon, the length of the felt.
Following the paper pattern instructions, spot stitch the glitter fabric to felt and trim style string. Scrunch the long edge of glitter fabric and sew from (1) to (2), where indicated.
Pop out the two hair clip holder paper patterns. Trace the shorter pattern onto felt, and cut. Using the longer pattern, trace and cut two pieces of glitter fabric.
1 2
543
HAIR
CLIP
HOLD
ER
15
3Hair Clip HolderPR
OJEC
T
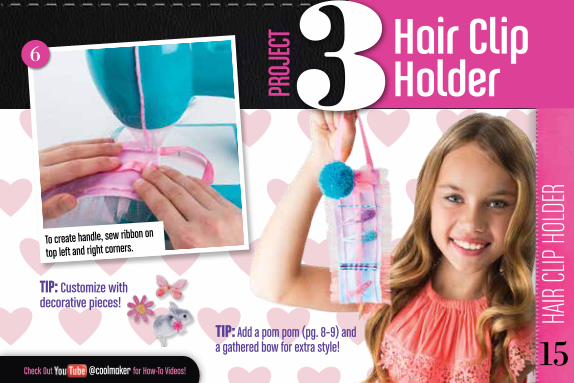
TIP: Add a pom pom (pg. 8–9) and a gathered bow for extra style!
To create handle, sew ribbon on
top left and right corners.
6
TIP: Customize with decorative pieces!
Check Out @coolmaker for How-To Videos!

SCRU
NCHIE
16
Prepare the pieces you will need.
Cut a piece of style string 3” / 7.6 cm longer than the pre-cut stretch fabric.
Thread the machine with style string and sew rest of the seam.
Spot stitch the end of the style string to the side seam.
Pull the long string until fabric bunches and flip inside out.
Fold the fabric lengthwise with the style string inside along the fold.
1
4 6
5
PROJECTScrunchie
2
3
4

17
TROU
BLES
HOOT
ING
Push elastic through and tie the ends together.
Insert one end of fabric into the other end and sew. Do not sew through elastic.
CAUTION: Never use more than 2 layers of felt fabric at a time. Machine can jam.
PROBLEMS: SOLUTIONS:1 Machine Goes On Stand By Mode Turn machine OFF/ON.
2 Flickering Lights 1. Batteries may be low and require changing.
2. Fabric may be jammed. See trouble shooting for Fabric Jams.
3 Loose Seams Stitch over weak spots once more to strengthen seam. The slower you push the fabric through, the stronger the seam will be.
4 Fabric Jams 1. Turn machine OFF/ON - needles will reset to default position. OR
2. Turn machine OFF. Push in and turn the manual knob until the needles are cleared of the fabric and Style String. Remove the fabric and restart the machine.
7 8

TM & © Spin Master Ltd. All rights reserved. Remove all packaging before use. Retain this information, addresses and phone numbers for future reference. Content may vary from pictures. An adult should periodically check this toy to ensure no damage or hazards exist, if so, remove from use. Children should be supervised during play. Meets CPSC Safety Requirements. Spin Master Ltd. reserves the right to discontinue use of the www.coolmaker.com website at any time.
The YouTube logo and YouTube icon are trademarks of Google Inc. The Instagram Glyph logo is a trademark of Instagram, LLC in the United States and elsewhere.
SPIN MASTER LTD., 450 FRONT STREET WEST, TORONTO, ON M5V 1B6 CANADA Imported into EU by SPIN MASTER INTERNATIONAL, S.A.R.L., 20 RUE DES PEUPLIERS, L-2328, LUXEMBOURG MADE IN CHINA (T56013_0003_20088604_GEN_IS_R2)
Be a Cool Maker™!
www.coolmaker.com
DETA
TCH
FOR
REFE
RENC
E
a WARNING: CHOKING HAZARD – Small parts.a WARNING: STRANGULATION HAZARD - Long cord.

18
DETA
TCH
FOR
REFE
RENC
E
DIAGR
AM
Diagram:
Manual Knob
Style String Guide
Style String Guide
Seam Guide
Fold Guide
Pom Pom MakerAttachment
ON/OFF Switch
Start/Stop ButtonStorage Drawer
*Requires 4 AA (LR6) Batteries
Not Included.
Needle Guard
Light

Sew itwith the SEW N’ STYLE MACHINE!
Shape itwith the POTTERY STUDIO!
Style itwith the AIRBRUSH STYLING STUDIO!
Each sold separately.
Be a Cool Maker!™
™
www.coolmaker. @coolmaker #coolmaker
Be a Cool Maker!™Follow Us & Share Your Creations!
com


![Jeu de construction - K’NEXmedia.knex.com/instructions/instruction-books/Mecha-Slash-Ferris... · 7-12 13448 Ages [1] Not Included/Pas Inclus[2] AA (LR6) AA (LR6) 1.9 ft 58 cm MECHA](https://img.pdfslide.us/doc/110x75/5afdf98f7f8b9a994d8e4e87/jeu-de-construction-k-13448-ages-1-not-includedpas-inclus2-aa-lr6-aa.jpg)