Embed Size (px)
Citation preview

Version 12 15.12.2011 1
SETUP PROCEDURES
Windows XP/Vista/7
Things to check when starting ...................................................................................................................... 2 The network cable .................................................................................................................................... 2 Connect the computer to the network ...................................................................................................... 2
The basic setup of your computer ................................................................................................................ 3 How to check DHCP settings ....................................................................................................................... 3 How to check the network connection ......................................................................................................... 5 Windows XP setup procedure ...................................................................................................................... 7 Windows Vista setup procedure ................................................................................................................... 9 Disconnecting CampusNet (Windows Vista) ............................................................................................. 11 Connecting CampusNet (Windows Vista) .................................................................................................. 11 Windows 7 setup procedure ....................................................................................................................... 12 Disconnecting CampusNet (Windows 7) ................................................................................................... 14 Connecting CampusNet (Windows 7) ........................................................................................................ 14 Most common fault situations when logging in to CampusNet .................................................................. 15
Windows XP ............................................................................................................................................ 15 Windows Vista ........................................................................................................................................ 16 Windows 7 .............................................................................................................................................. 17
CampusNet support ................................................................................................................................... 18 Useful information ...................................................................................................................................... 19 Connection to Oulu University .................................................................................................................... 19 Auxiliary equipments in the network .......................................................................................................... 19 Before operating ......................................................................................................................................... 19 CampusNet documents .............................................................................................................................. 20
Version 12 15.12.2011 2
Things to check when starting
The network cable The network cable is not usually included in the hardware of a new computer or a network card. Therefore you need to buy it separately. The adapter of the network cable (in both ends) should be of type RJ45. When buying the network cable you can for example ask for a straight-through network cable for Ethernet-network with RJ45/RJ45 adapters.
“Visual” inspection of the network cable
Check that the type of the adapter is RJ45 (picture below) and that it has 8 pins (the telephone cable has 6 pins). Usually all pins are connected. At least pins 1, 2, 3 and 6 have to be connected.
Picture 1
RJ45-adapter
Connect the computer to the network When you buy a new computer the network card is usually included in the hardware. For older computers you need to buy the network card. When buying the network card you should mention that the card would be used in an Ethernet-network with a RJ45 connection. The speed of the network card is 10/100/1000 Mb/s. When installing the network card you should follow the directions of the manufacturer.
An example of a network card An example of a computer wall socket Picture 2
Attach your computer to the network wall socket with the network cable and start your computer. Check that the leds of your network card are lit. The link-led is lit the whole time and the Data-led is flashing. In older models there are no leds. In Virkakatu 3 (ADSL) and Toivoniementie 1 (HomePNA) the Internet interface is different from the above. You can get more information from PSOAS.
Version 12 15.12.2011 3
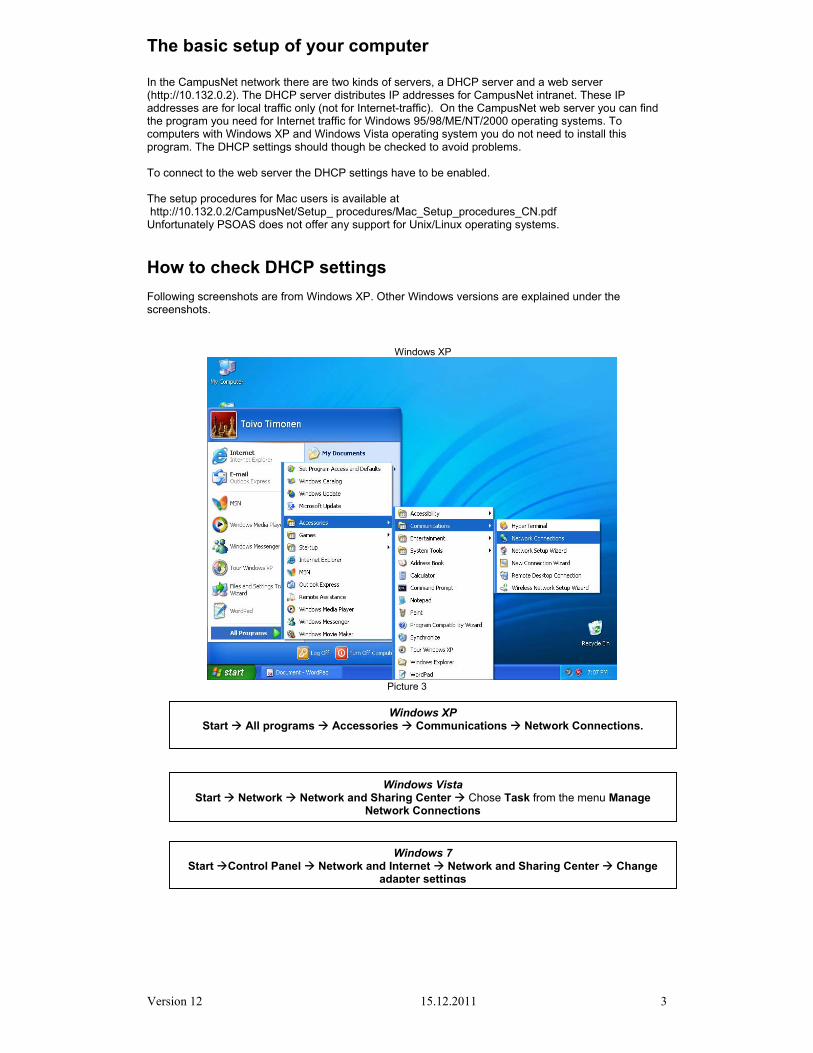
The basic setup of your computer In the CampusNet network there are two kinds of servers, a DHCP server and a web server (http://10.132.0.2). The DHCP server distributes IP addresses for CampusNet intranet. These IP addresses are for local traffic only (not for Internet-traffic). On the CampusNet web server you can find the program you need for Internet traffic for Windows 95/98/ME/NT/2000 operating systems. To computers with Windows XP and Windows Vista operating system you do not need to install this program. The DHCP settings should though be checked to avoid problems. To connect to the web server the DHCP settings have to be enabled. The setup procedures for Mac users is available at http://10.132.0.2/CampusNet/Setup_ procedures/Mac_Setup_procedures_CN.pdf Unfortunately PSOAS does not offer any support for Unix/Linux operating systems. How to check DHCP settings Following screenshots are from Windows XP. Other Windows versions are explained under the screenshots.
Windows XP
Picture 3
Windows XP Start All programs Accessories Communications Network Connections.
Windows Vista Start Network Network and Sharing Center Chose Task from the menu Manage
Network Connections
Windows 7 Start Control Panel Network and Internet Network and Sharing Center Change
adapter settings
Version 12 15.12.2011 4
Windows XP
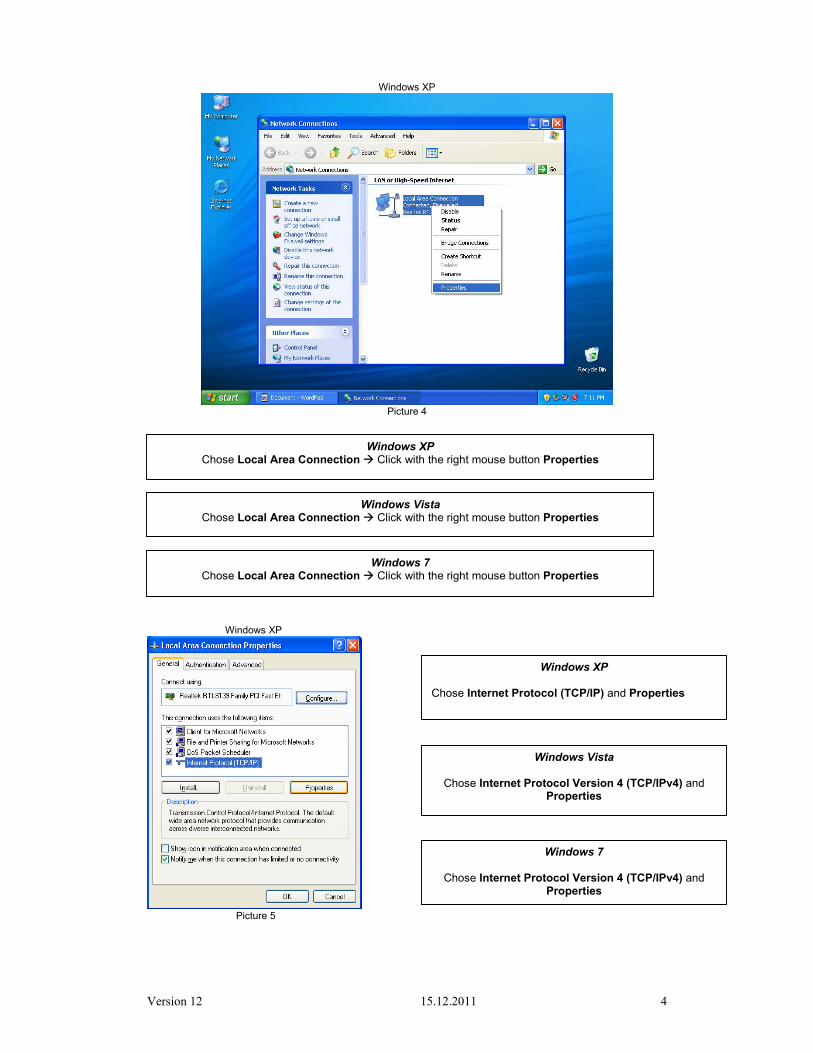
Picture 4
Windows XP
Picture 5
Windows XP Chose Local Area Connection Click with the right mouse button Properties
Windows 7 Chose Local Area Connection Click with the right mouse button Properties
Windows XP Chose Internet Protocol (TCP/IP) and Properties
Windows Vista
Chose Internet Protocol Version 4 (TCP/IPv4) and Properties
Windows 7
Chose Internet Protocol Version 4 (TCP/IPv4) and Properties
Windows Vista Chose Local Area Connection Click with the right mouse button Properties
Version 12 15.12.2011 5
Windows XP
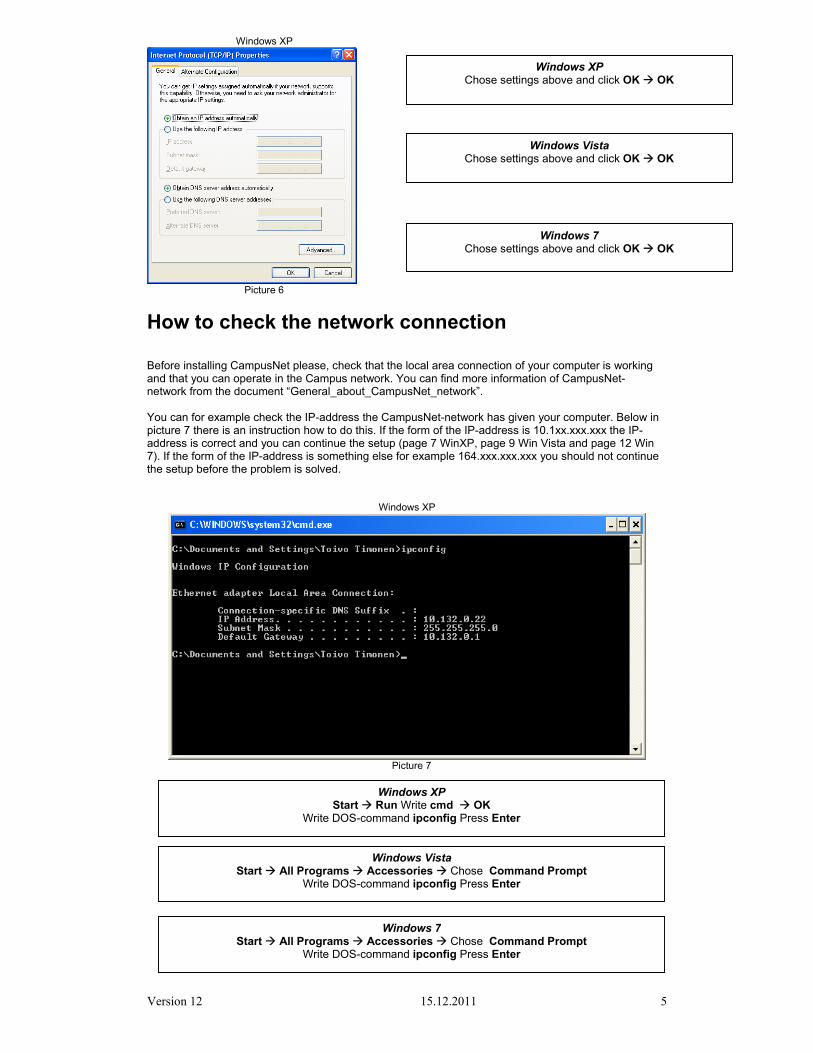
Picture 6
How to check the network connection Before installing CampusNet please, check that the local area connection of your computer is working and that you can operate in the Campus network. You can find more information of CampusNet- network from the document “General_about_CampusNet_network”. You can for example check the IP-address the CampusNet-network has given your computer. Below in picture 7 there is an instruction how to do this. If the form of the IP-address is 10.1xx.xxx.xxx the IP-address is correct and you can continue the setup (page 7 WinXP, page 9 Win Vista and page 12 Win 7). If the form of the IP-address is something else for example 164.xxx.xxx.xxx you should not continue the setup before the problem is solved.
Windows XP
Picture 7
Windows XP Chose settings above and click OK OK
Windows 7 Chose settings above and click OK OK
Windows Vista Chose settings above and click OK OK
Windows XP Start Run Write cmd OK
Write DOS-command ipconfig Press Enter
Windows Vista Start All Programs Accessories Chose Command Prompt
Write DOS-command ipconfig Press Enter
Windows 7 Start All Programs Accessories Chose Command Prompt
Write DOS-command ipconfig Press Enter

Version 12 15.12.2011 6
If there are problems with the connection please, check the local area connections
Windows XP/Vista/7 users can now check if the local area connection not works (the network cable is connected). Here are the most common statues of the Local Area Connection (Picture Win XP).
Picture A
Picture B
Picture C
Picture D
The local area Connection is connected (blue shortcut). Windows Vista and Windows 7 “Unidentified network”. Continue the setup from page 7.
No connection. Check your network cable (page 2). Check if the cable is unplugged. If there is still no connection contact CampusNet technical support (page 18)
The local area connection is disabled (the shortcut is grey). Click the right button on your mouse and choose Enable.
Windows XP. “Limited connectivity”. DHCP-server no anwer. Check the network cable (page 2). If this does not help contact CampusNet technical support (page 18).
Windows Vista Start Network Network and Sharing Center Chose Task from the menu Manage
Network Connections
Windows XP Start All programs Accessories Communications Network Connections.
Windows 7 Start Control Panel Network and Internet Network and Sharing Center Change
adapter settings
Version 12 15.12.2011 7
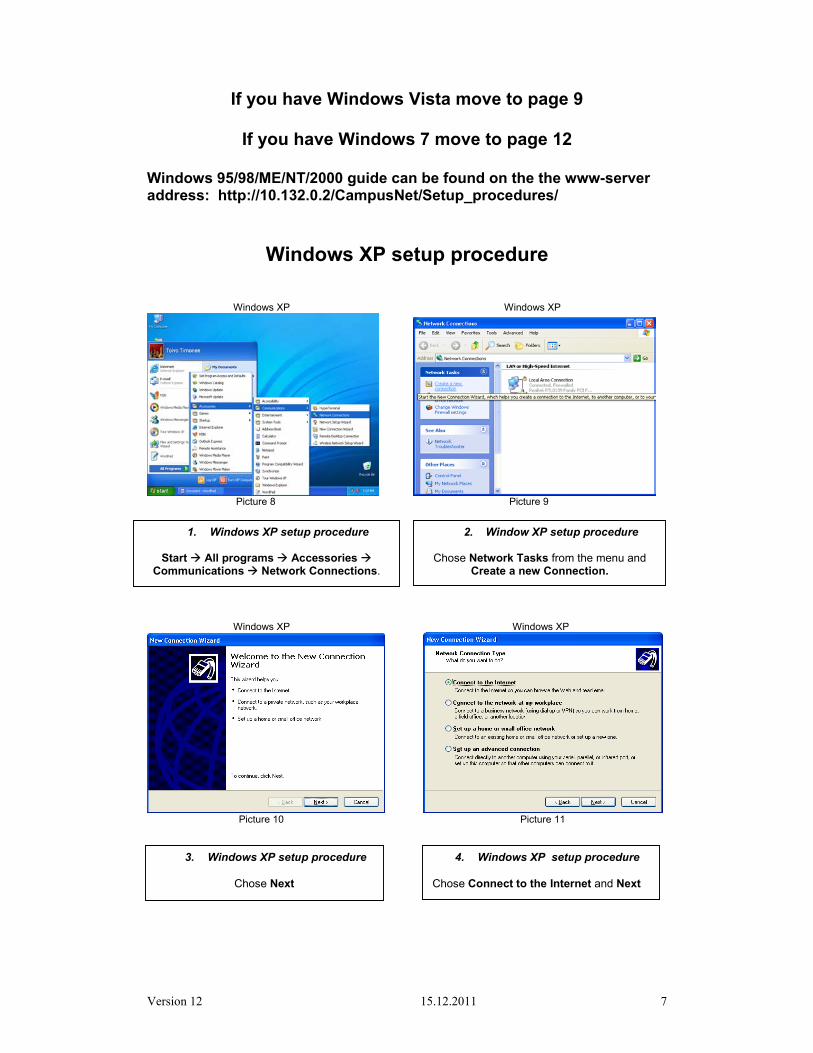
If you have Windows Vista move to page 9
If you have Windows 7 move to page 12
Windows 95/98/ME/NT/2000 guide can be found on the the www-server address: http://10.132.0.2/CampusNet/Setup_procedures/
Windows XP setup procedure Windows XP Windows XP
Picture 8 Picture 9
Windows XP Windows XP
Picture 10 Picture 11
4. Windows XP setup procedure Chose Connect to the Internet and Next
1. Windows XP setup procedure
Start All programs Accessories Communications Network Connections.
2. Window XP setup procedure
Chose Network Tasks from the menu and Create a new Connection.
3. Windows XP setup procedure
Chose Next

Version 12 15.12.2011 8
Windows XP Windows XP
Picture 12 Picture 13
Windows XP Windows XP
Picture 14 Picture 15 Windows XP Windows XP
Picture 16 Picture 17
5. Windows XP setup procedure Chose Setup my connection manually and
Next
6. Windows XP setup procedure
Chose Connect using a broadband connection that requires a user name and
password and Next
7. Windows XP setup procedure Write the name of the operator for example
CampusNet and Next
8. Windows XP setup procedure Write the User name and Password you
have got from PSOAS and Next
9. Windows XP setup procedure
You can create the CampusNet shortcut on your desktop. To finish the process click
Finish
10. Windows XP Network Connections If you want to save your password choose ”Save this user name for the following users” (not recommended). Connect to the Internet by choosing Connect.

Version 12 15.12.2011 9
Windows XP
Picture 18
Windows Vista setup procedure The setup procedure may differ from these instructions due to the configuration of your computer.
Windows Vista Windows Vista
Picture 19 Picture 20
Windows Vista Windows Vista
Picture 21 Picture 22
1. Windows Vista setup procedure
Start Network.
2. Windows Vista setup procedure
Chose Network and Sharing Center
3. Windows Vista setup procedure
Chose Tasks from the menu and Set up Connection or network
4. Windows Vista setup procedure Chose Connect to the Internet and Next
Windows XP Network Connections
There is a new shortcut ”CampusNet” on your desktop and in the Network Connections –window.
Version 12 15.12.2011 10
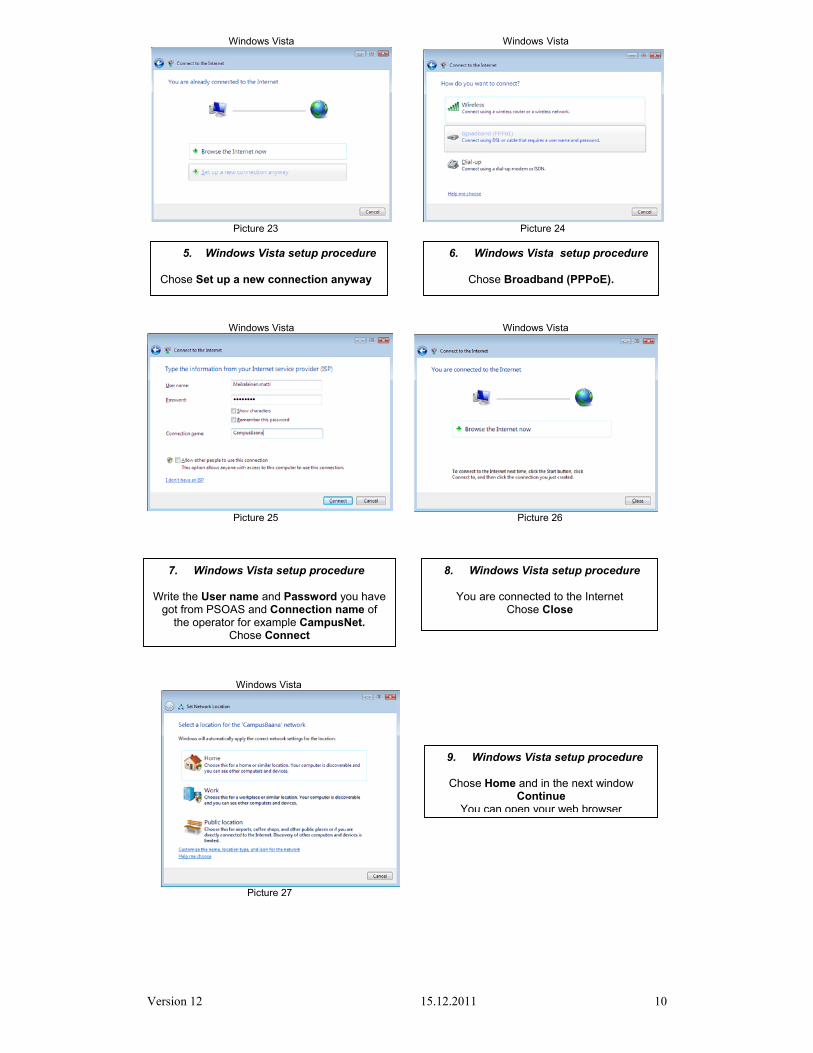
Windows Vista Windows Vista
Picture 23 Picture 24
Windows Vista Windows Vista
Picture 25 Picture 26 Windows Vista
Picture 27
6. Windows Vista setup procedure
Chose Broadband (PPPoE).
7. Windows Vista setup procedure Write the User name and Password you have
got from PSOAS and Connection name of the operator for example CampusNet.
Chose Connect
8. Windows Vista setup procedure
You are connected to the Internet Chose Close
5. Windows Vista setup procedure Chose Set up a new connection anyway
9. Windows Vista setup procedure
Chose Home and in the next window Continue
You can open your web browser

Version 12 15.12.2011 11
Disconnecting CampusNet (Windows Vista)
Windows Vista Windows Vista
Picture 28 Picture 29
Connecting CampusNet (Windows Vista)
Windows Vista Windows Vista
Picture 30 Picture 31
Windows Vista
Picture 32
2. Windows Vista disconnecting
Stop the CampusNet connection by clicking Disconnect and in the next window
Chose Close
1. Windows Vista disconnecting
Start Connect to.
1. Windows Vista connecting
Start Connect to.
2. Windows Vista connecting
Chose CampusNet and Connect
3. Windows Vista connecting
Write User name and Password. If you want to save your password choose ”Save this user name and password for the
following users” (not recommended). Connect to the Internet by choosing
Connect.

Version 12 15.12.2011 12
Windows 7 setup procedure The setup procedure may differ from these instructions due to the configuration of your computer. Windows 7 Windows 7
Picture 33 Picture 34 Windows 7 Windows 7
Picture 35 Picture 36 Windows 7 Windows 7
Picture 37 Picture 38
1. Windows 7 setup procedure
Start Control Panel.
2. Windows 7 setup procedure
Chose Network and Internet
3. Windows 7 setup procedure
Chose Network and Sharing Center.
4. Windows 7 setup procedure
Chose Set up a new connnection or network.
5. Windows 7 setup procedure
Chose Connect to the Internet.
7. Windows 7 setup procedure Chose Set up a new connection anyway.

Version 12 15.12.2011 13
Windows 7 Windows 7
Picture 39 Picture 40 Windows 7 Windows 7
Picture 41 Picture 42 Windows 7
Picture 43
7. Windows 7 setup procedure
Chose Broadband (PPPoE).
8. Windows 7 setup procedure
Write the User name and Password you have got from PSOAS and Connection
name of the operator for example CampusNet.
9. Windows 7 setup procedure
You are connected to the Internet Chose Close
10. Windows 7 setup procedure
In Network and Sharing Center –window there is a new connection CampusNet
11. Windows 7 setup procedure
Set Network Location -window choose for example Public network
You can open your web browser
Version 12 15.12.2011 14
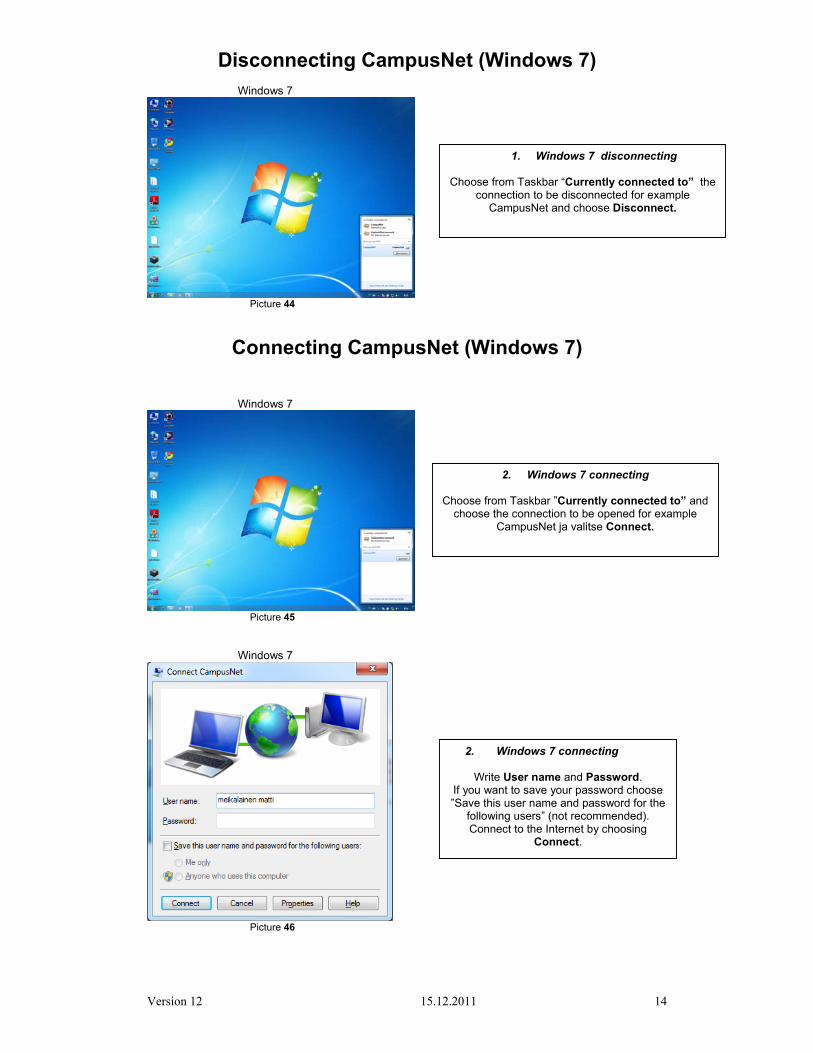
Disconnecting CampusNet (Windows 7) Windows 7
Picture 44
Connecting CampusNet (Windows 7) Windows 7
Picture 45 Windows 7
Picture 46
1. Windows 7 disconnecting
Choose from Taskbar “Currently connected to” the connection to be disconnected for example
CampusNet and choose Disconnect.
2. Windows 7 connecting
Choose from Taskbar ”Currently connected to” and choose the connection to be opened for example
CampusNet ja valitse Connect.
2. Windows 7 connecting
Write User name and Password. If you want to save your password choose ”Save this user name and password for the
following users” (not recommended). Connect to the Internet by choosing
Connect.

Version 12 15.12.2011 15
Most common fault situations when logging in to CampusNet Here is shown the most common fault situations in Windows when trying to log in by starting the CampusNet connection. Below you can find the most common fault reports.
Windows XP Windows XP
Windows XP
Windows XP
Windows XP
Error 692 No connection to the network. Check the Local Area Connection (page 6 and picture B).
Error 633 The local area connection is disabled. Check the Local Area Connection (page 6 and picture D).
Error 678 There is probably no traffic between the computer and the network. Do checkings described on page 5 and 6 (picture C).
Error 691
Your computer and network connection is ok. Rewrite your user name and password. If there is still no connection please check your user name and password from PSOAS accommodation office (tel. +358 8 3173 110).

Version 12 15.12.2011 16
Windows Vista Windows Vista (Fin)
Windows Vista (Fin)
Windows Vista (Fin)
Error 691
Your computer and network connection is ok. Rewrite your user name and password. If there is still no connection please check your user name and password from PSOAS accommodation office (tel. (08) 3173 110).
Error 815 There is probably no traffic between the computer and the network or no connection to the network. Check the Local Area Connection (page 5 and 6 (picture B and D)).
Error 814 The local area connection is disabled. Check the Local Area Connection (page 6 and picture D).

Version 12 15.12.2011 17
Windows 7 Windows 7
Windows 7
Windows 7
Error 691
Your computer and network connection is ok. Rewrite your user name and password. If there is still no connection please check your user name and password from PSOAS accommodation office (tel. (08) 3173 110).
Error 651 There is probably no traffic between the computer and the network or no connection to the network. Check the Local Area Connection (page 5 and 6 (picture B and D)).
Error 368 The local area connection is disabled. Check page 6, picture D.

Version 12 15.12.2011 18
CampusNet support Please, contact PSOAS in any questions and problems concerning CampusNet-network and the Internet traffic. Faults in CampusNet are repaired during working days between 8 am and 4 pm. We aim to repair problems in user interface the next working day after the fault report at the latest. You can make a fault announcement to PSOAS accommodation office, PSOAS CampusNet technical support or on PSOAS web-site (Avux). When calling CampusNet support please tell us the following things to help us find out where the problem is
- Name and user name - Your address - Service class - The operating system of your computer - Date and time, when the fault appeared - How the fault appeared - When calling CampusNet technical support please keep your computer nearby if possible
Technical support: Toivo Timonen.(Finnish) Antti Jaatinen (English) Tel. 044 757 3115 Tel. 0400 585 377 E-mail: [email protected]. E-mail: [email protected] Concerning CampusNet agreements, usernames and password please contact: PSOASin accommodation office Mannenkatu 1 A 90100 Oulu Tel. +358 8 317 3110 E-amil: [email protected]

Version 12 15.12.2011 19
Useful information The address for outgoing mail is smtp.dnainternet.net. Supported protocols are: POP3, POP3s SSL, IMAP4, IMAP4s SSL, HTTP, HTTPS SSL News group news.fv.fi. port 119. Other ISP servers do not work. The IRC-server of DNA is irc.dnainternet.fi. port 666, 667 and 668. Other ISP servers do not work. Name servers 62.241.198.245 ja 62.241.195.246
Connection to Oulu University SSH-connection is possible to following machines: paju, koivu, Dep. of electrical and Information Engineering, tols17, palkki. In addition imaps connections are possible to: paju, koivu, tols17, ees2.
Auxiliary equipments in the network Note that auxiliary equipments like bridges or routers (for example wireless base stations) must not disturb other traffic in the network. For example the device may not work as a DHCP-server. If you have devices disturbing the network your Internet connection will be disconnected.
Before operating Before operating, please read the terms of acceptance.
Version 12 15.12.2011 20
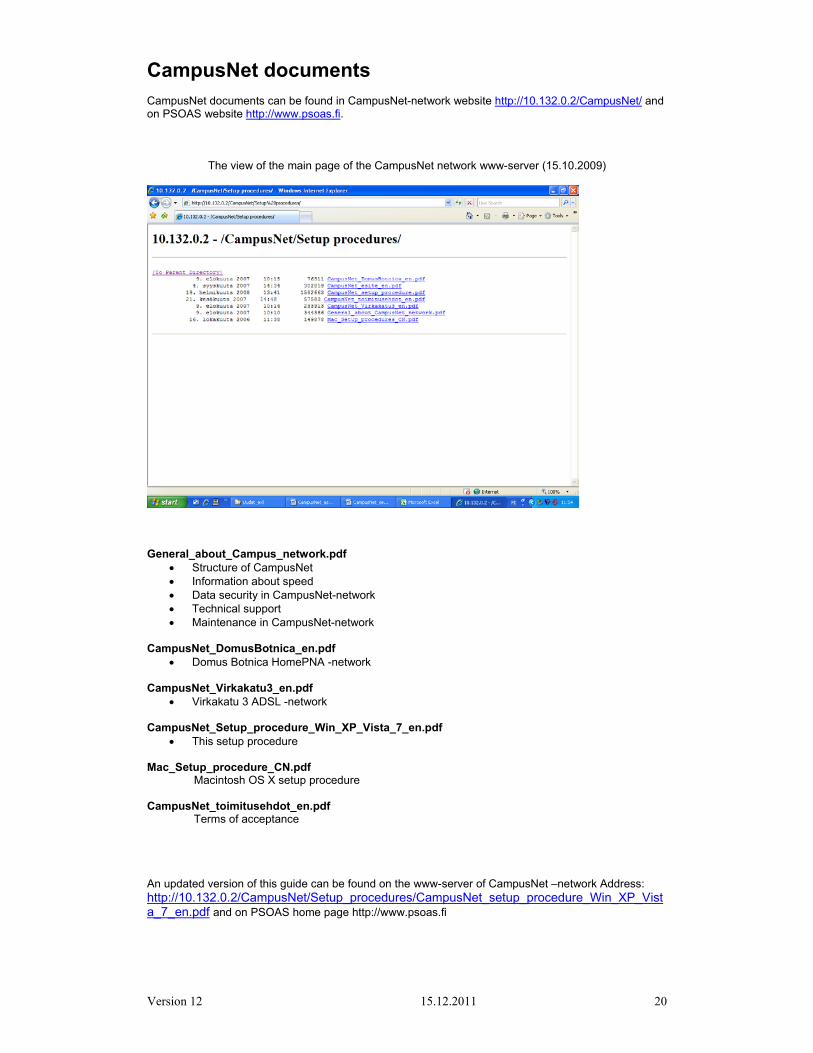
CampusNet documents CampusNet documents can be found in CampusNet-network website http://10.132.0.2/CampusNet/ and on PSOAS website http://www.psoas.fi.
The view of the main page of the CampusNet network www-server (15.10.2009)
General_about_Campus_network.pdf
• Structure of CampusNet • Information about speed • Data security in CampusNet-network • Technical support • Maintenance in CampusNet-network
CampusNet_DomusBotnica_en.pdf
• Domus Botnica HomePNA -network CampusNet_Virkakatu3_en.pdf
• Virkakatu 3 ADSL -network CampusNet_Setup_procedure_Win_XP_Vista_7_en.pdf
• This setup procedure Mac_Setup_procedure_CN.pdf Macintosh OS X setup procedure CampusNet_toimitusehdot_en.pdf Terms of acceptance An updated version of this guide can be found on the www-server of CampusNet –network Address: http://10.132.0.2/CampusNet/Setup_procedures/CampusNet_setup_procedure_Win_XP_Vista_7_en.pdf and on PSOAS home page http://www.psoas.fi