Embed Size (px)
Citation preview

Setting Up Your VITA VACUMAT® 6000 M for Obsidian® Lithium Silicate Ceramic
Page 2 of 16
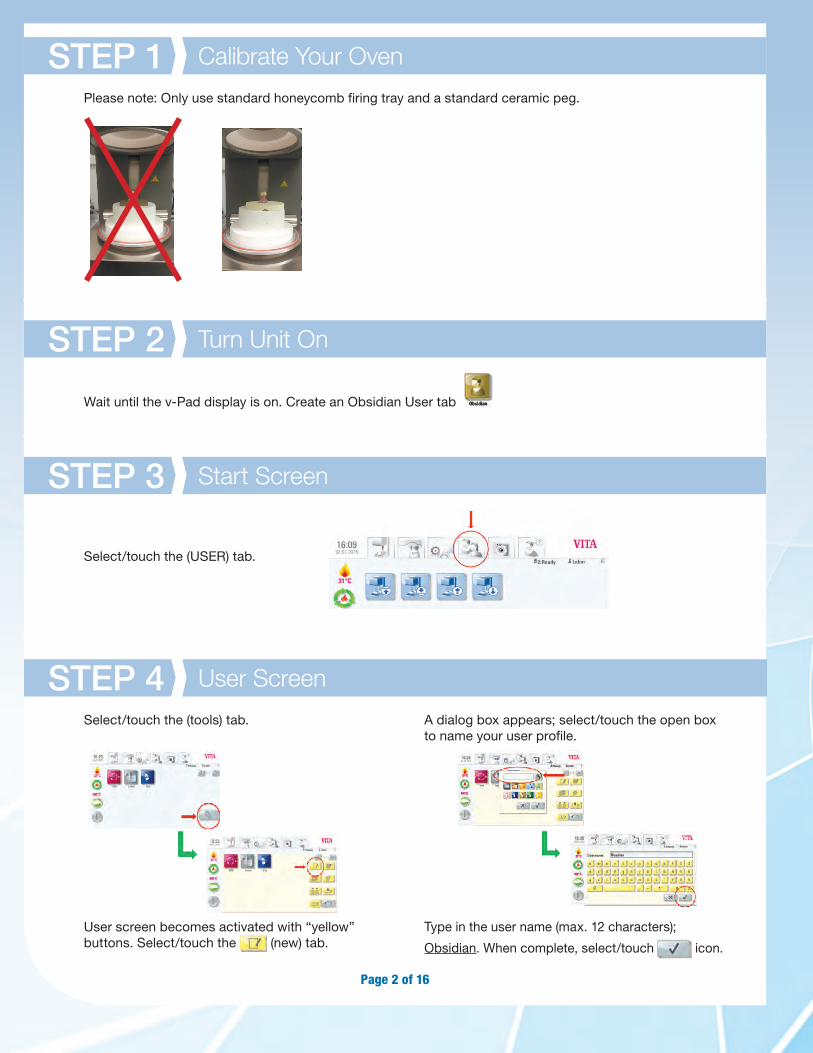
Please note: Only use standard honeycomb firing tray and a standard ceramic peg.
Wait until the v-Pad display is on. Create an Obsidian User tab
Select/touch the (USER) tab.
Select/touch the (tools) tab. A dialog box appears; select/touch the open box to name your user profile.
User screen becomes activated with “yellow” buttons. Select/touch the (new) tab.
Type in the user name (max. 12 characters);
Obsidian. When complete, select/touch icon.
STEP 1 Calibrate Your Oven
STEP 2 Turn Unit On
STEP 3 Start Screen
STEP 4 User Screen
Page 3 of 16
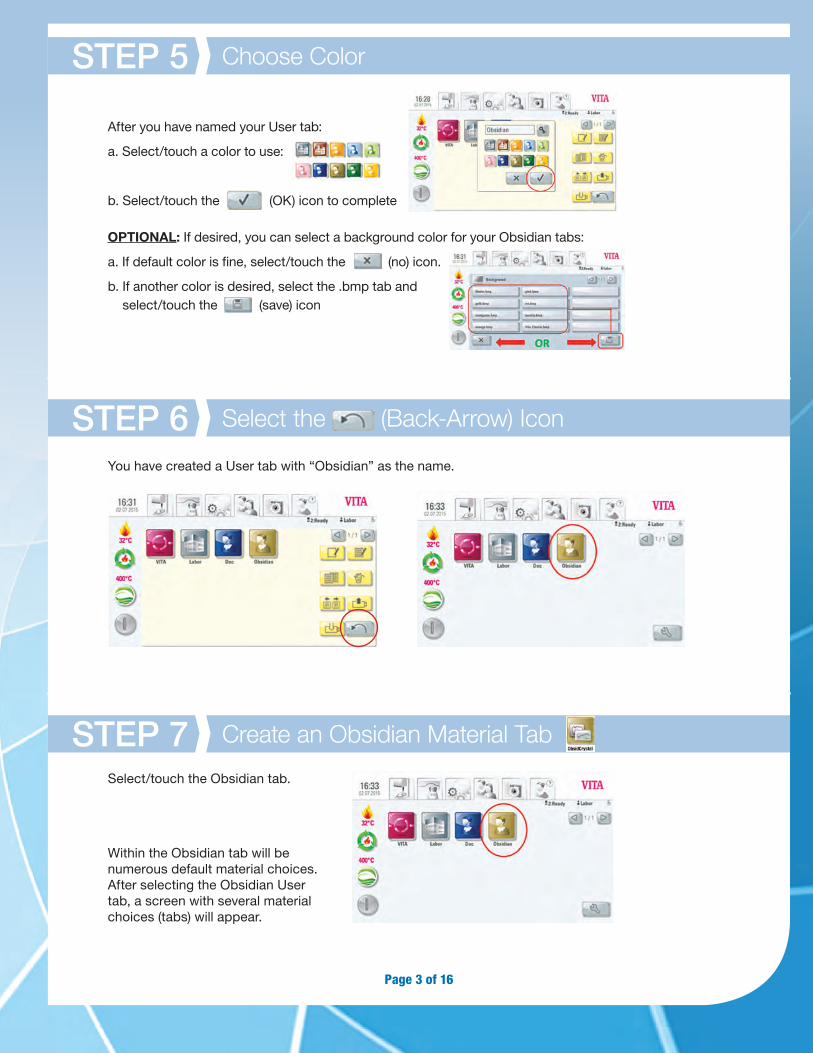
After you have named your User tab:
a. Select/touch a color to use:
b. Select/touch the (OK) icon to complete
OPTIONAL: If desired, you can select a background color for your Obsidian tabs:
a. If default color is fine, select/touch the (no) icon.
b. If another color is desired, select the .bmp tab and select/touch the (save) icon
You have created a User tab with “Obsidian” as the name.
Select/touch the Obsidian tab.
STEP 5 Choose Color
STEP 6 Select the (Back-Arrow) Icon
STEP 7 Create an Obsidian Material Tab
Within the Obsidian tab will be numerous default material choices. After selecting the Obsidian User tab, a screen with several material choices (tabs) will appear.

Page 4 of 16
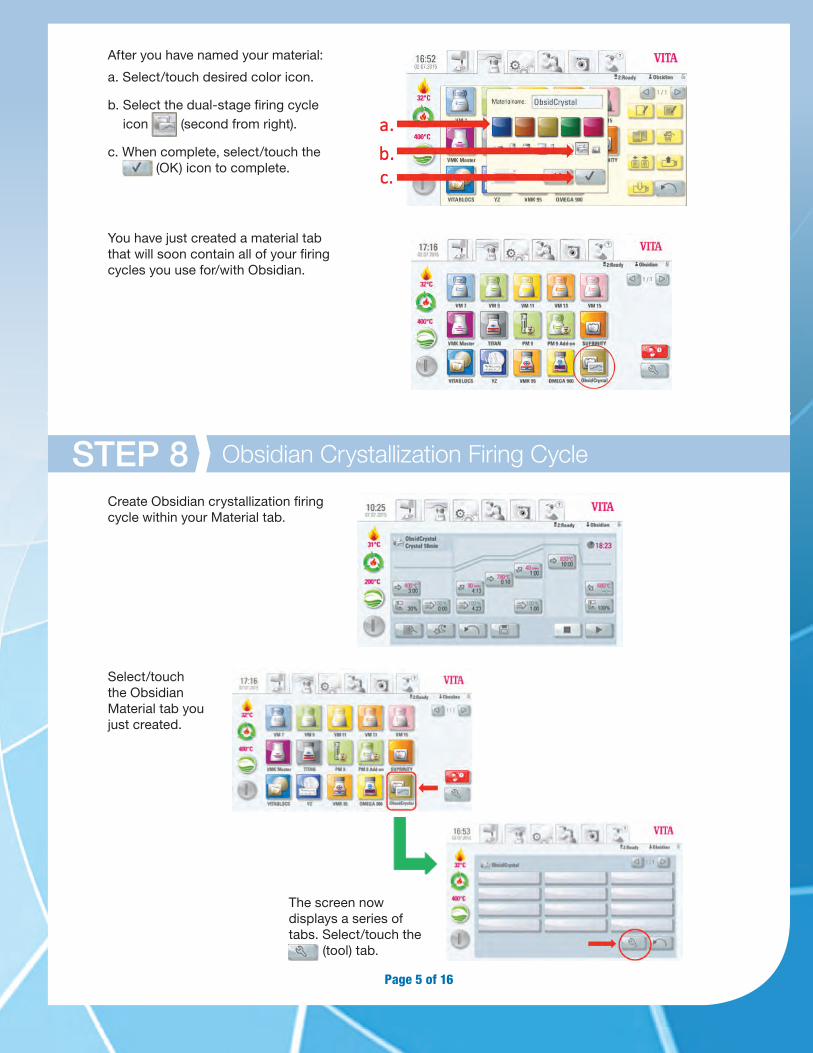
a. Select/touch the (tool) icon.
Material tab screen becomes activated with “yellow” buttons. Select/touch the
(new) tab.
A dialog box appears; select/touch the open box to name your material.
Type in the material name (max. 12 characters); ObsidCrystal. When complete, select/touch the
(OK) icon.
STEP 7 cont’d
Page 5 of 16
After you have named your material:
a. Select/touch desired color icon.
b. Select the dual-stage firing cycle icon (second from right).
c. When complete, select/touch the (OK) icon to complete.
You have just created a material tab that will soon contain all of your firing cycles you use for/with Obsidian.
Create Obsidian crystallization firing cycle within your Material tab.
Select/touch the Obsidian Material tab you just created.
The screen now displays a series of tabs. Select/touch the
(tool) tab.
STEP 8 Obsidian Crystallization Firing Cycle
Page 6 of 16
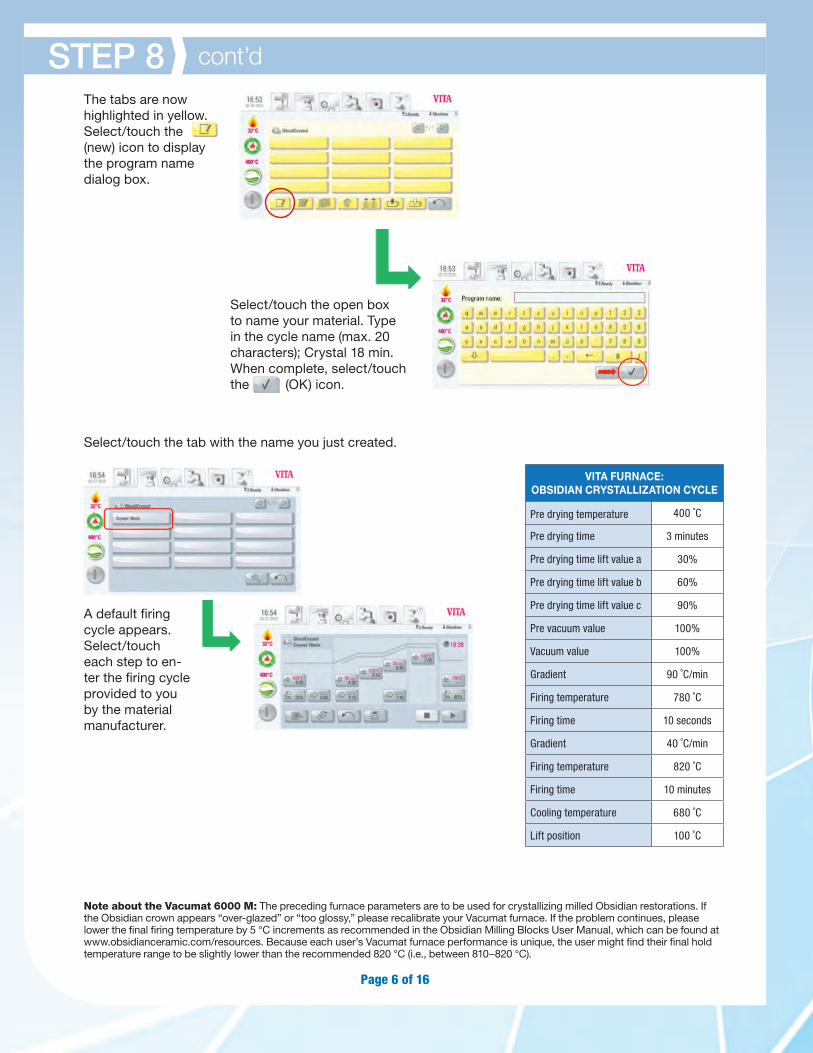
The tabs are now highlighted in yellow. Select/touch the (new) icon to display the program name dialog box.
Select/touch the open box to name your material. Type in the cycle name (max. 20 characters); Crystal 18 min. When complete, select/touch the (OK) icon.
Select/touch the tab with the name you just created.
A default firing cycle appears. Select/touch each step to en-ter the firing cycle provided to you by the material manufacturer.
VITA FURNACE: OBSIDIAN CRYSTALLIZATION CYCLE
Pre drying temperature 400 ˚C
Pre drying time 3 minutes
Pre drying time lift value a 30%
Pre drying time lift value b 60%
Pre drying time lift value c 90%
Pre vacuum value 100%
Vacuum value 100%
Gradient 90 ˚C/min
Firing temperature 780 ˚C
Firing time 10 seconds
Gradient 40 ˚C/min
Firing temperature 820 ˚C
Firing time 10 minutes
Cooling temperature 680 ˚C
Lift position 100 ˚C
Note about the Vacumat 6000 M: The preceding furnace parameters are to be used for crystallizing milled Obsidian restorations. If the Obsidian crown appears “over-glazed” or “too glossy,” please recalibrate your Vacumat furnace. If the problem continues, please lower the final firing temperature by 5 °C increments as recommended in the Obsidian Milling Blocks User Manual, which can be found at www.obsidianceramic.com/resources. Because each user’s Vacumat furnace performance is unique, the user might find their final hold temperature range to be slightly lower than the recommended 820 °C (i.e., between 810–820 °C).
STEP 8 cont’d
Page 7 of 16
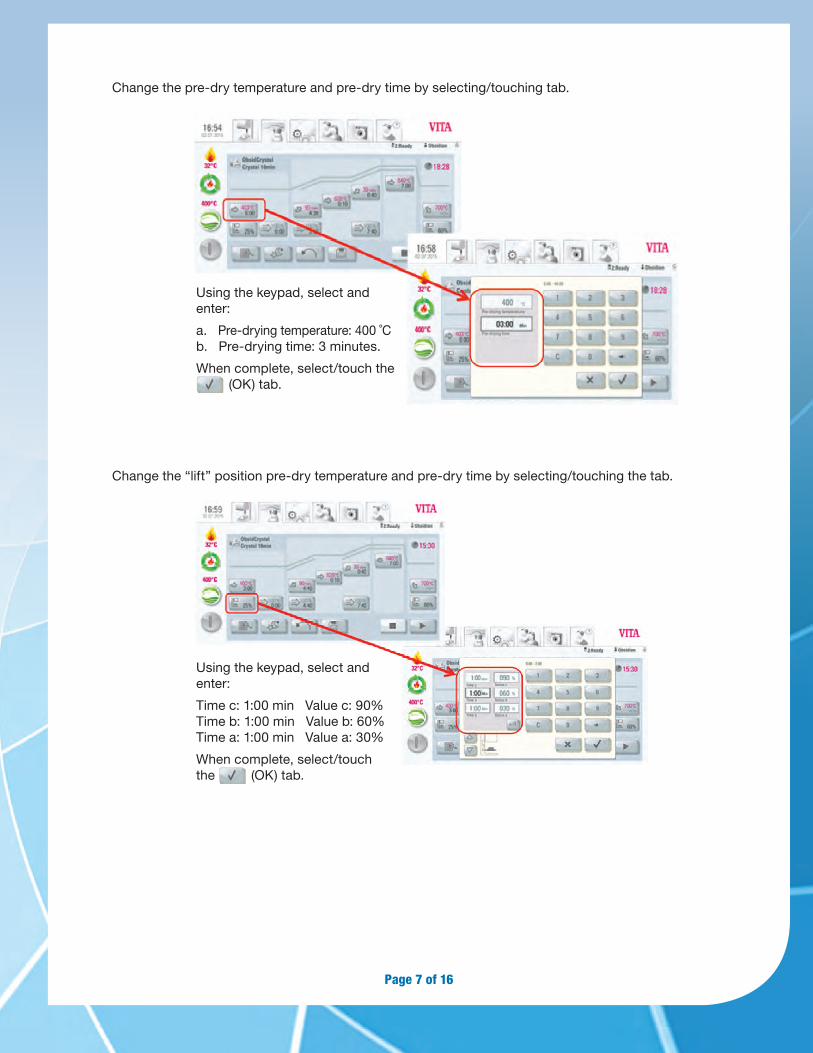
Change the pre-dry temperature and pre-dry time by selecting/touching tab.
Change the “lift” position pre-dry temperature and pre-dry time by selecting/touching the tab.
Using the keypad, select and enter:
a. Pre-drying temperature: 400 ˚C b. Pre-drying time: 3 minutes.
When complete, select/touch the (OK) tab.
Using the keypad, select and enter:
Time c: 1:00 min Value c: 90% Time b: 1:00 min Value b: 60% Time a: 1:00 min Value a: 30%
When complete, select/touch the (OK) tab.
Page 8 of 16
STEP 8 cont’d
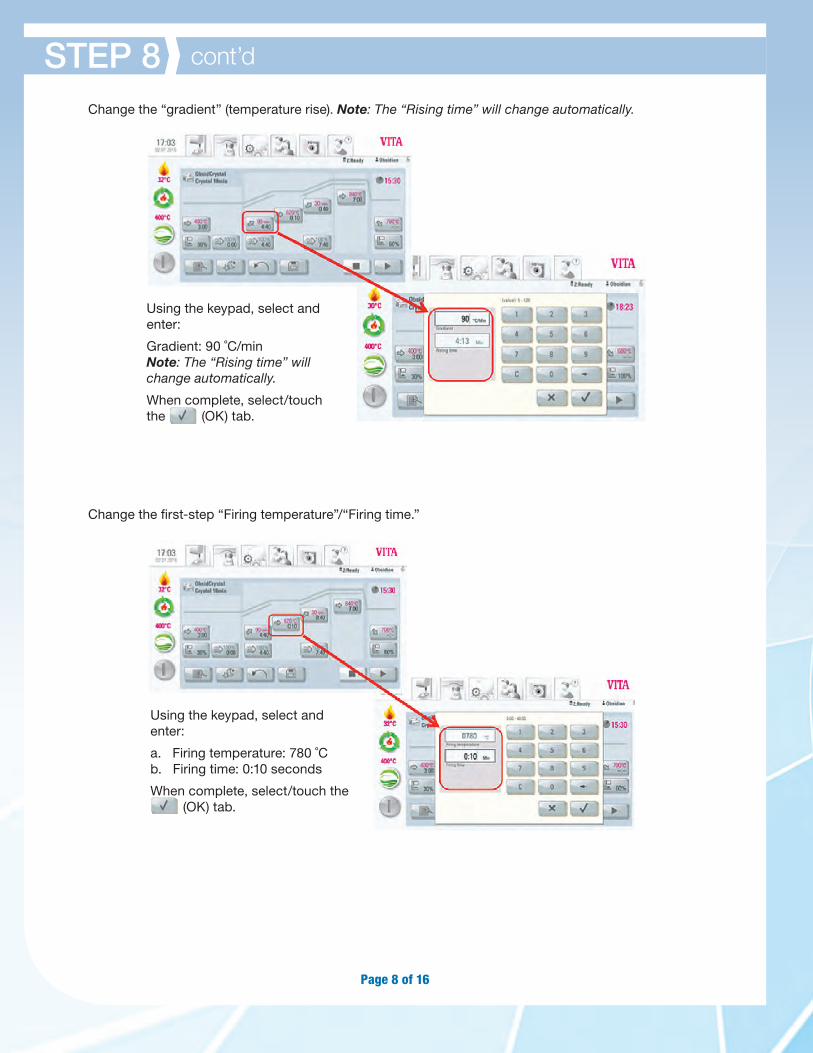
Change the “gradient” (temperature rise). Note: The “Rising time” will change automatically.
Change the first-step “Firing temperature”/“Firing time.”
Using the keypad, select and enter:
Gradient: 90 ˚C/min Note: The “Rising time” will change automatically.
When complete, select/touch the (OK) tab.
Using the keypad, select and enter:
a. Firing temperature: 780 ˚C b. Firing time: 0:10 seconds
When complete, select/touch the (OK) tab.
Page 9 of 16
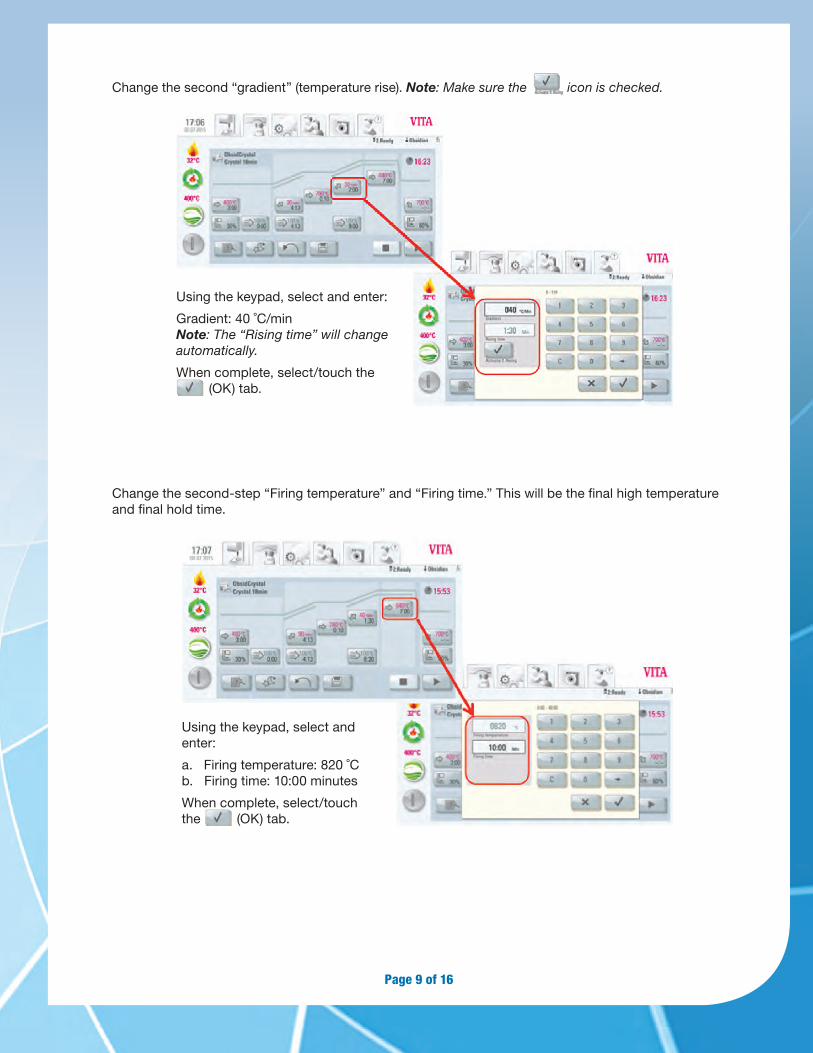
Change the second “gradient” (temperature rise). Note: Make sure the icon is checked.
Change the second-step “Firing temperature” and “Firing time.” This will be the final high temperature and final hold time.
Using the keypad, select and enter:
Gradient: 40 ˚C/min Note: The “Rising time” will change automatically.
When complete, select/touch the (OK) tab.
Using the keypad, select and enter:
a. Firing temperature: 820 ˚C b. Firing time: 10:00 minutes
When complete, select/touch the (OK) tab.
Page 10 of 16
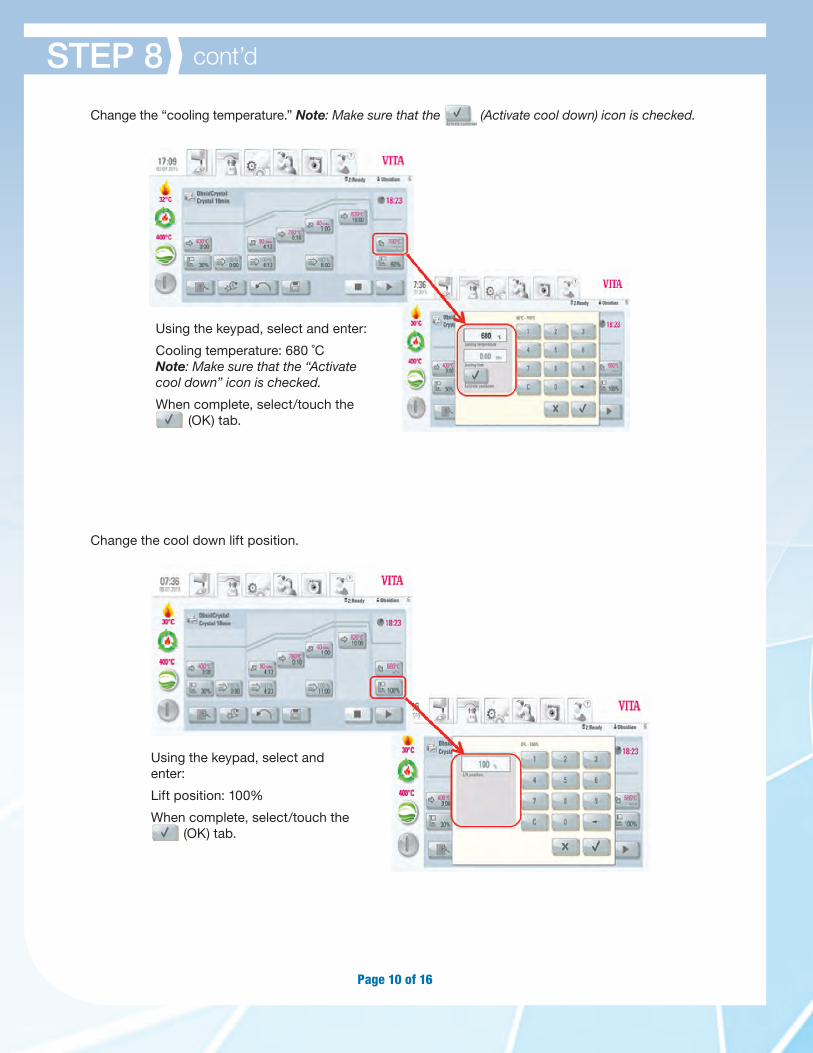
Using the keypad, select and enter:
Lift position: 100%
When complete, select/touch the (OK) tab.
STEP 8 cont’d
Change the “cooling temperature.” Note: Make sure that the (Activate cool down) icon is checked.
Change the cool down lift position.
Using the keypad, select and enter:
Cooling temperature: 680 ˚C Note: Make sure that the “Activate cool down” icon is checked.
When complete, select/touch the (OK) tab.
Page 11 of 16
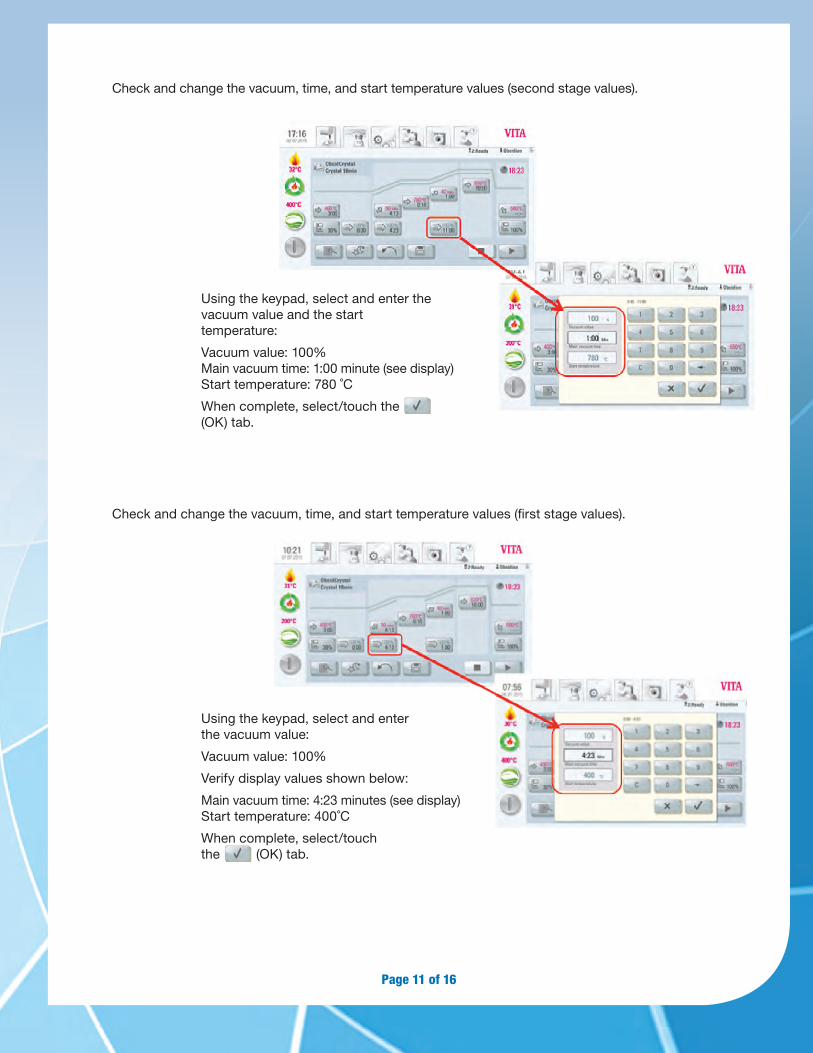
Check and change the vacuum, time, and start temperature values (second stage values).
Check and change the vacuum, time, and start temperature values (first stage values).
Using the keypad, select and enter the vacuum value and the start temperature:
Vacuum value: 100% Main vacuum time: 1:00 minute (see display) Start temperature: 780 ˚C
When complete, select/touch the (OK) tab.
Using the keypad, select and enter the vacuum value:
Vacuum value: 100%
Verify display values shown below:
Main vacuum time: 4:23 minutes (see display) Start temperature: 400˚C
When complete, select/touch the (OK) tab.
Page 12 of 16
STEP 8 cont’d
STEP 9
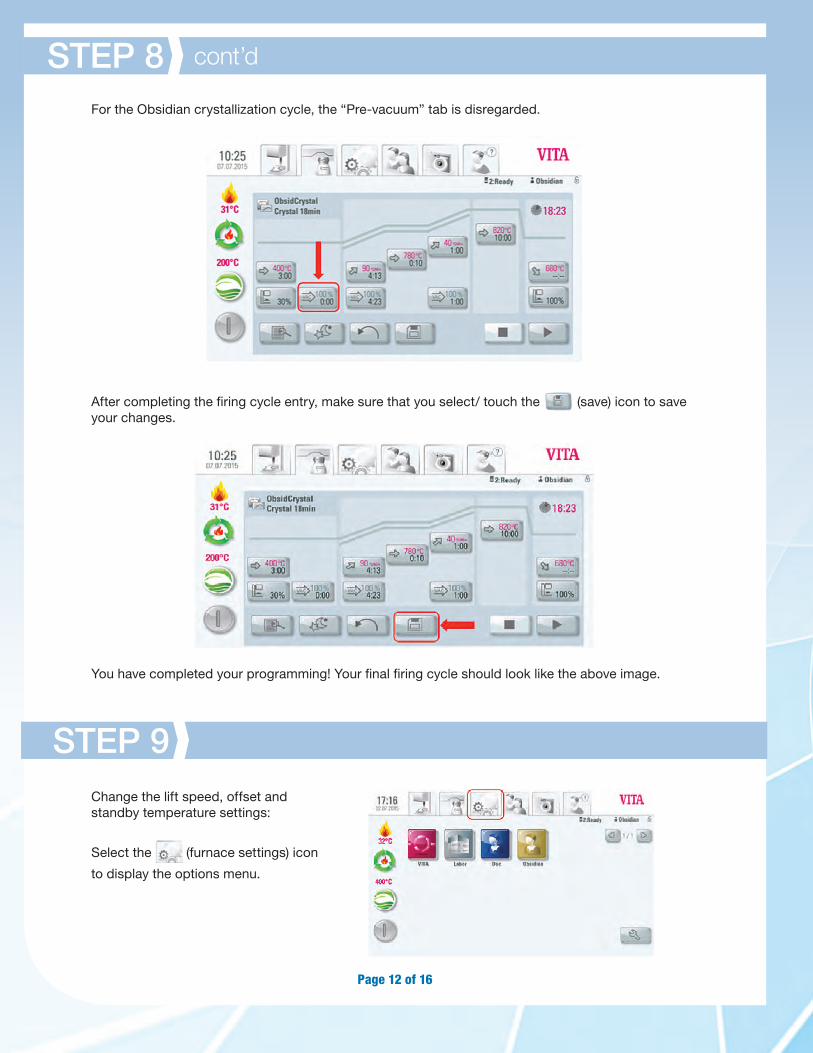
For the Obsidian crystallization cycle, the “Pre-vacuum” tab is disregarded.
Change the lift speed, offset and standby temperature settings:
Select the (furnace settings) icon
to display the options menu.
You have completed your programming! Your final firing cycle should look like the above image.
After completing the firing cycle entry, make sure that you select/ touch the (save) icon to save your changes.
Page 13 of 16
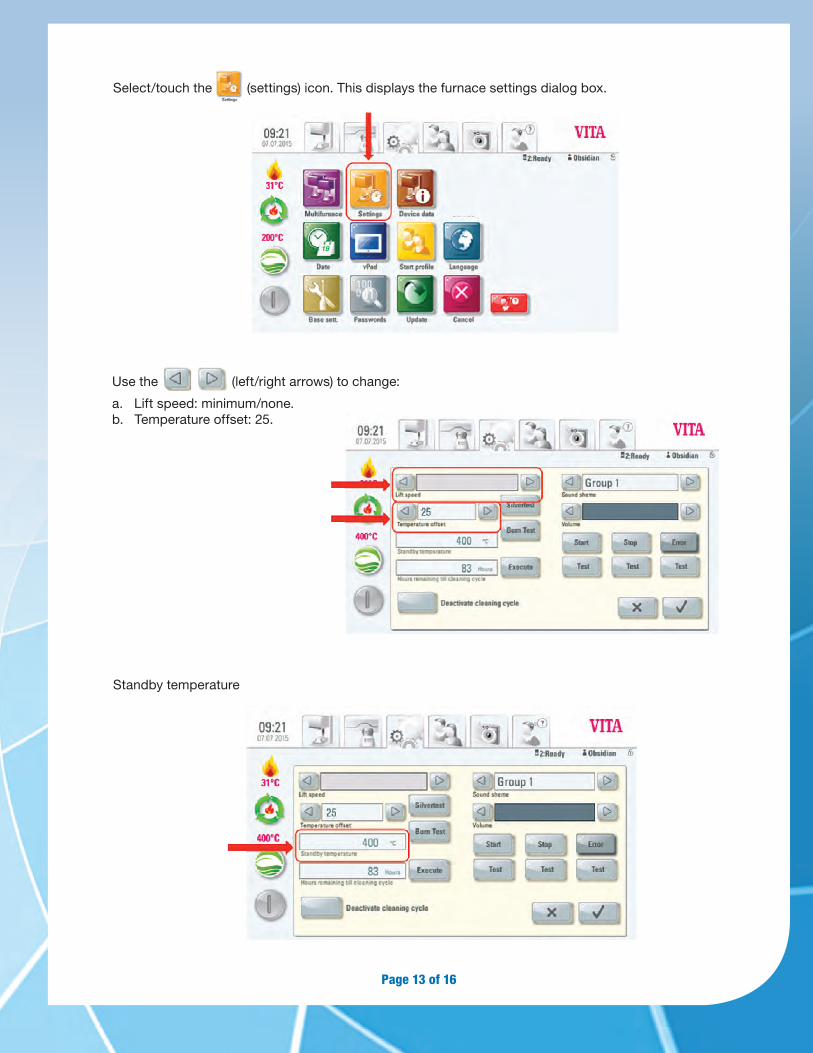
Select/touch the (settings) icon. This displays the furnace settings dialog box.
Use the (left/right arrows) to change:
a. Lift speed: minimum/none. b. Temperature offset: 25.
Standby temperature
Page 14 of 16
STEP 10
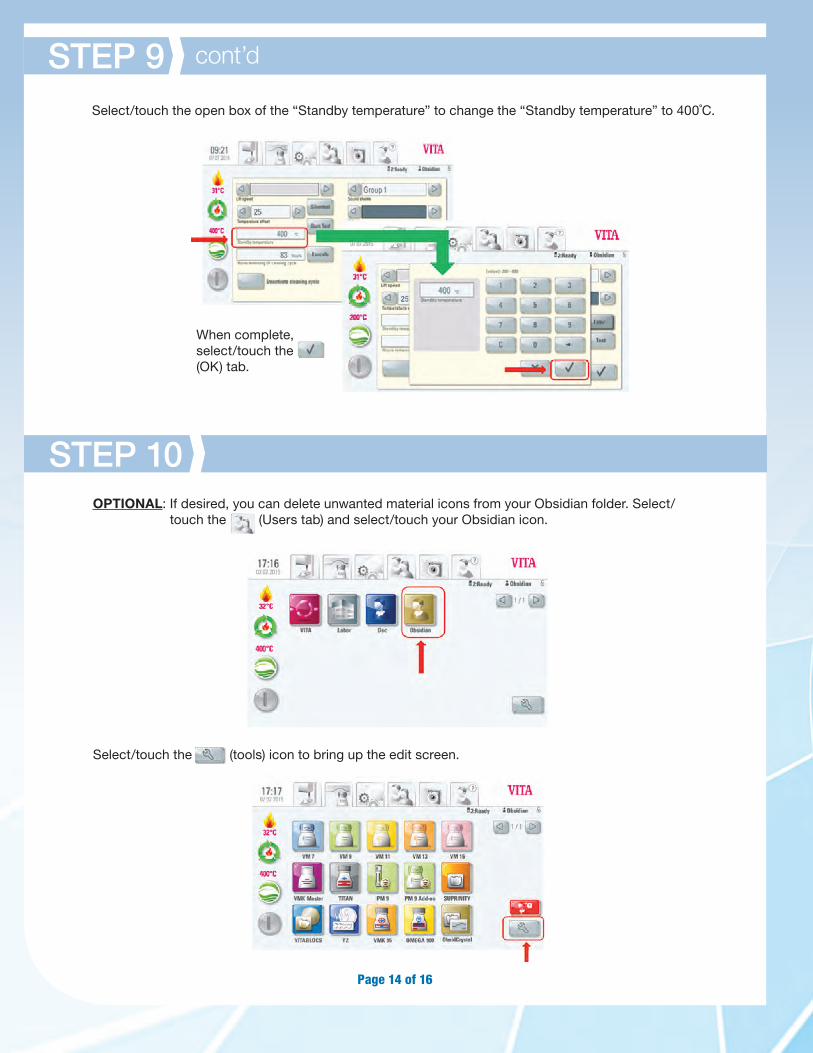
Select/touch the open box of the “Standby temperature” to change the “Standby temperature” to 400˚C.
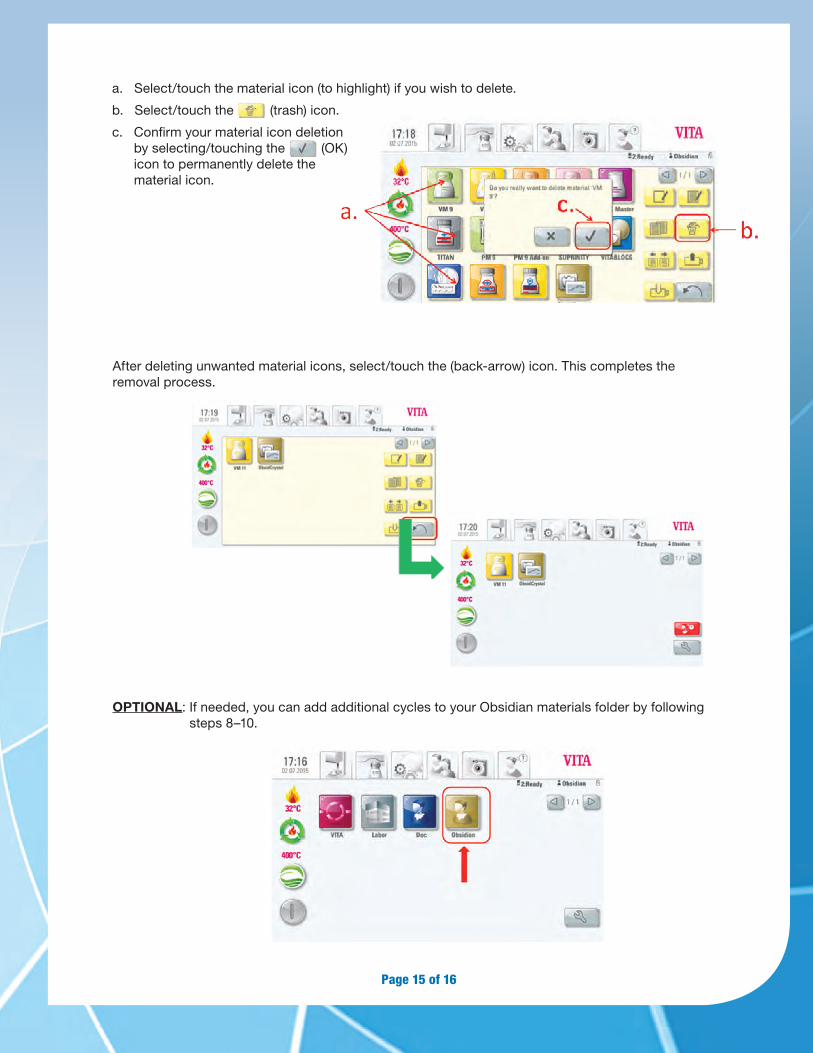
OPTIONAL: If desired, you can delete unwanted material icons from your Obsidian folder. Select/touch the (Users tab) and select/touch your Obsidian icon.
When complete, select/touch the (OK) tab.
STEP 9 cont’d
Select/touch the (tools) icon to bring up the edit screen.
Page 15 of 16
a. Select/touch the material icon (to highlight) if you wish to delete.
b. Select/touch the (trash) icon.
c. Confirm your material icon deletion by selecting/touching the (OK) icon to permanently delete the material icon.
After deleting unwanted material icons, select/touch the (back-arrow) icon. This completes the removal process.
OPTIONAL: If needed, you can add additional cycles to your Obsidian materials folder by following steps 8–10.

PK-216-121115REV ID 25802638_1.0


![[XLS] · Web view1 9741676061 6000 33655 2 9945073545 6000 123161 3 9013044974 12000 4 9945788658 20710027003 6000 11500 5 7259805540 527040100005544 12000 6 6000 7 9886502163 6000](https://img.pdfslide.us/doc/110x75/5b015d377f8b9a65618d8ad1/xls-view1-9741676061-6000-33655-2-9945073545-6000-123161-3-9013044974-12000-4.jpg)


![current vita [vita]](https://img.pdfslide.us/doc/110x75/62397044b818b31db60e2000/current-vita-vita.jpg)
![Vita: Detailed/Nik Dholakia [Vita]](https://img.pdfslide.us/doc/110x75/62649275fe8e3472e203f0d8/vita-detailednik-dholakia-vita.jpg)
