Embed Size (px)
Citation preview
Setting up the sync between Xero and Bill.com To set up the Xero/Bill.com Sync, you will need to:
1. Configure your Xero account 2. Set up and configure a OneSaas account – OneSaas facilitates the sync between Xero and
Bill.com.
Set up your Xero Account Overview
1. Set up the Bill.com Money In and Money Out accounts in Xero a. Payables: Creating Bill.com Money Out Clearing account b. Receivables: Creating a Bill.com Money In Clearing account
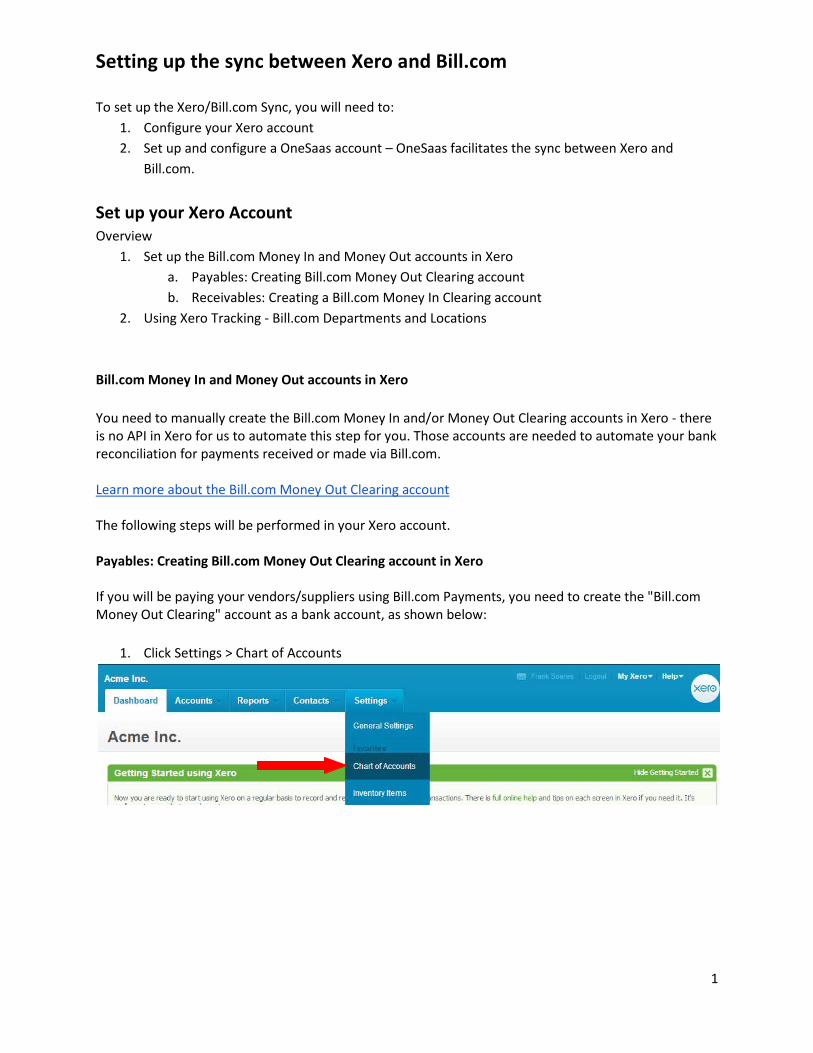
2. Using Xero Tracking - Bill.com Departments and Locations Bill.com Money In and Money Out accounts in Xero You need to manually create the Bill.com Money In and/or Money Out Clearing accounts in Xero - there is no API in Xero for us to automate this step for you. Those accounts are needed to automate your bank reconciliation for payments received or made via Bill.com. Learn more about the Bill.com Money Out Clearing account The following steps will be performed in your Xero account. Payables: Creating Bill.com Money Out Clearing account in Xero If you will be paying your vendors/suppliers using Bill.com Payments, you need to create the "Bill.com Money Out Clearing" account as a bank account, as shown below:
1. Click Settings > Chart of Accounts
1
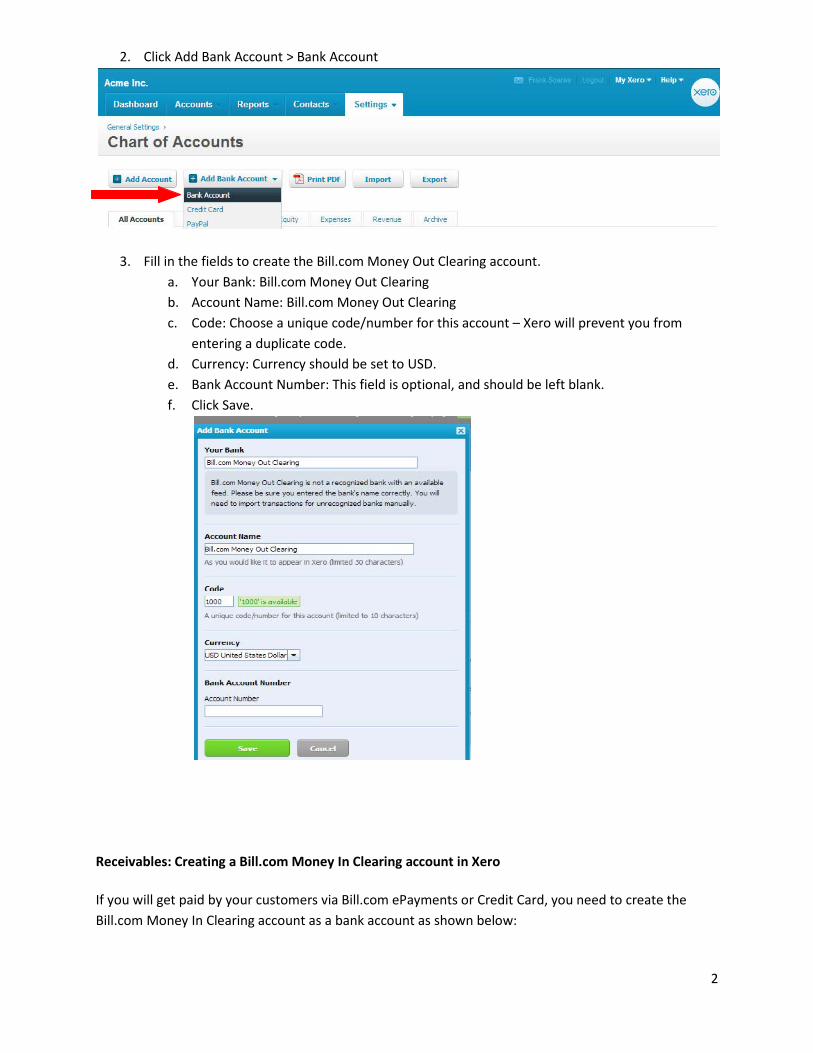
2. Click Add Bank Account > Bank Account
3. Fill in the fields to create the Bill.com Money Out Clearing account.a. Your Bank: Bill.com Money Out Clearingb. Account Name: Bill.com Money Out Clearingc. Code: Choose a unique code/number for this account – Xero will prevent you from
entering a duplicate code.d. Currency: Currency should be set to USD.e. Bank Account Number: This field is optional, and should be left blank.f. Click Save.
Receivables: Creating a Bill.com Money In Clearing account in Xero
If you will get paid by your customers via Bill.com ePayments or Credit Card, you need to create the Bill.com Money In Clearing account as a bank account as shown below:
2
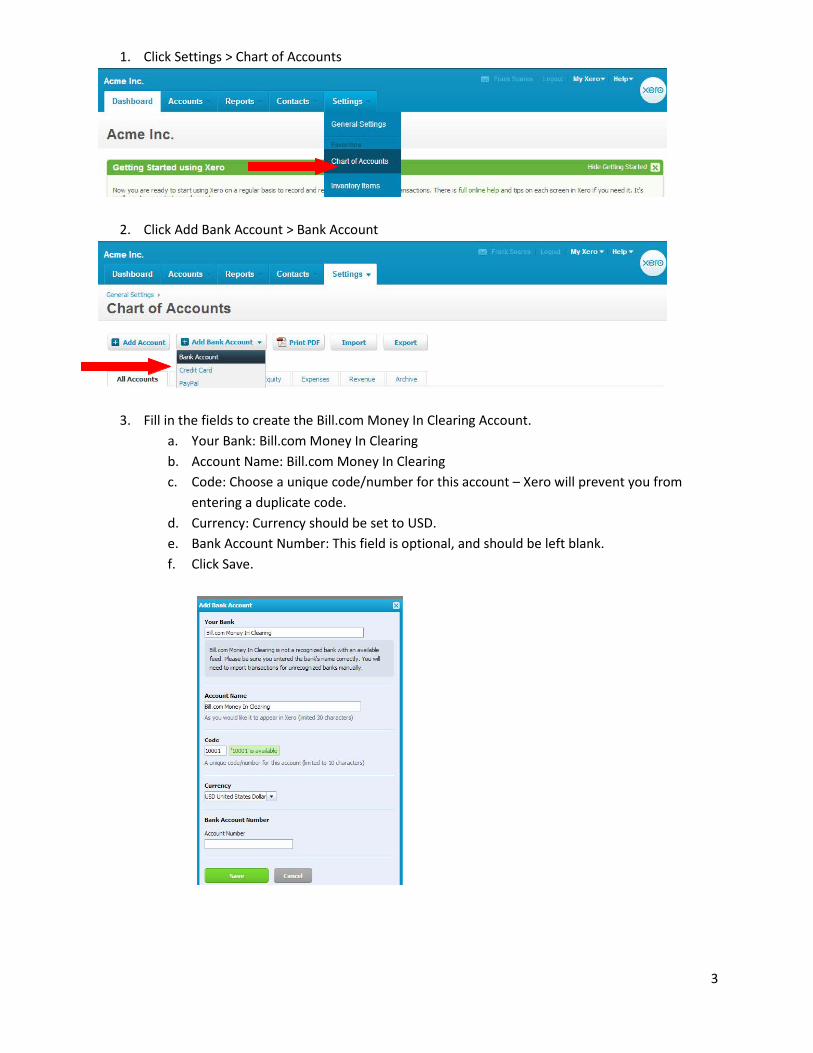
1. Click Settings > Chart of Accounts
2. Click Add Bank Account > Bank Account
3. Fill in the fields to create the Bill.com Money In Clearing Account.a. Your Bank: Bill.com Money In Clearingb. Account Name: Bill.com Money In Clearingc. Code: Choose a unique code/number for this account – Xero will prevent you from
entering a duplicate code.d. Currency: Currency should be set to USD.e. Bank Account Number: This field is optional, and should be left blank.f. Click Save.
3
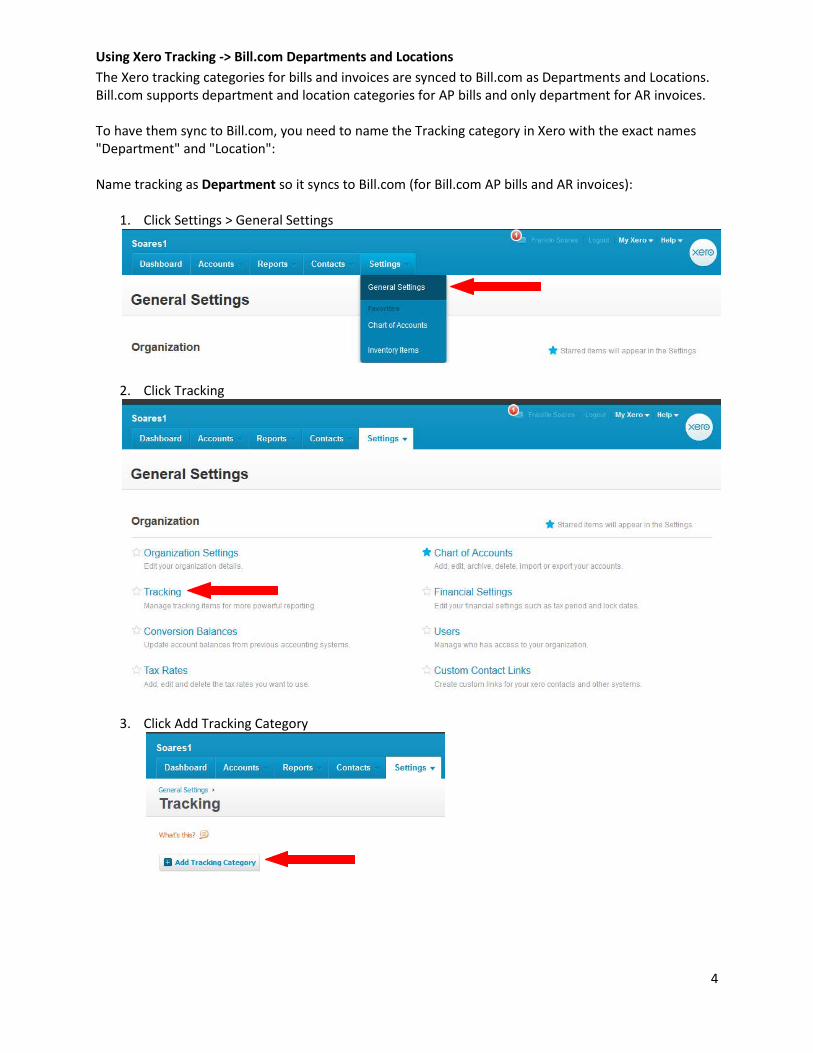
Using Xero Tracking -> Bill.com Departments and Locations The Xero tracking categories for bills and invoices are synced to Bill.com as Departments and Locations. Bill.com supports department and location categories for AP bills and only department for AR invoices. To have them sync to Bill.com, you need to name the Tracking category in Xero with the exact names "Department" and "Location": Name tracking as Department so it syncs to Bill.com (for Bill.com AP bills and AR invoices):
1. Click Settings > General Settings
2. Click Tracking
3. Click Add Tracking Category
4
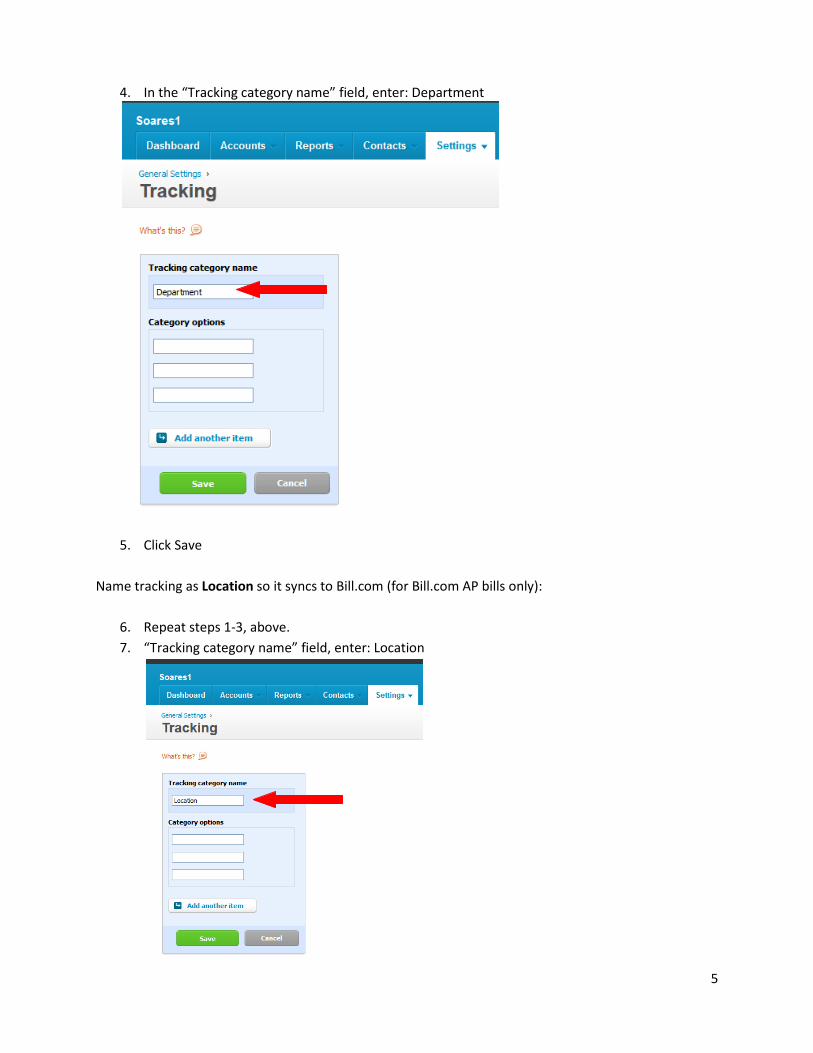
4. In the “Tracking category name” field, enter: Department
5. Click Save Name tracking as Location so it syncs to Bill.com (for Bill.com AP bills only):
6. Repeat steps 1-3, above. 7. “Tracking category name” field, enter: Location
5
8. Click Save
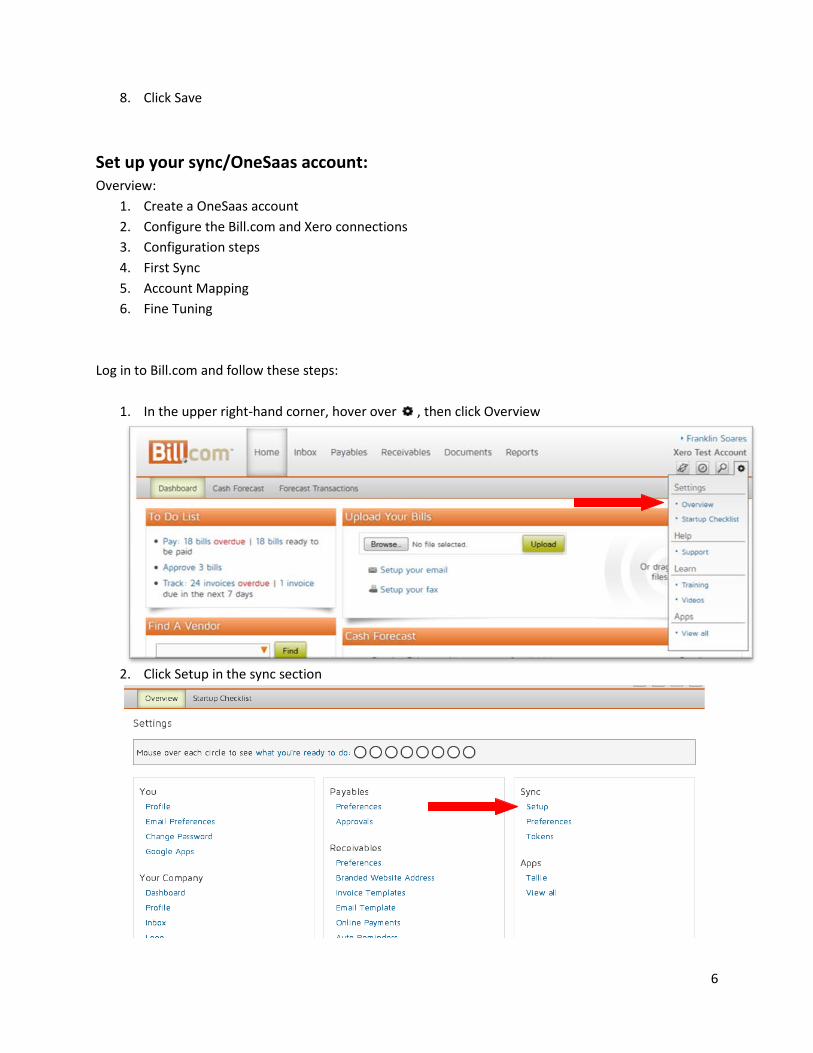
Set up your sync/OneSaas account: Overview:
1. Create a OneSaas account 2. Configure the Bill.com and Xero connections 3. Configuration steps 4. First Sync 5. Account Mapping 6. Fine Tuning
Log in to Bill.com and follow these steps:
1. In the upper right-hand corner, hover over , then click Overview
2. Click Setup in the sync section
6
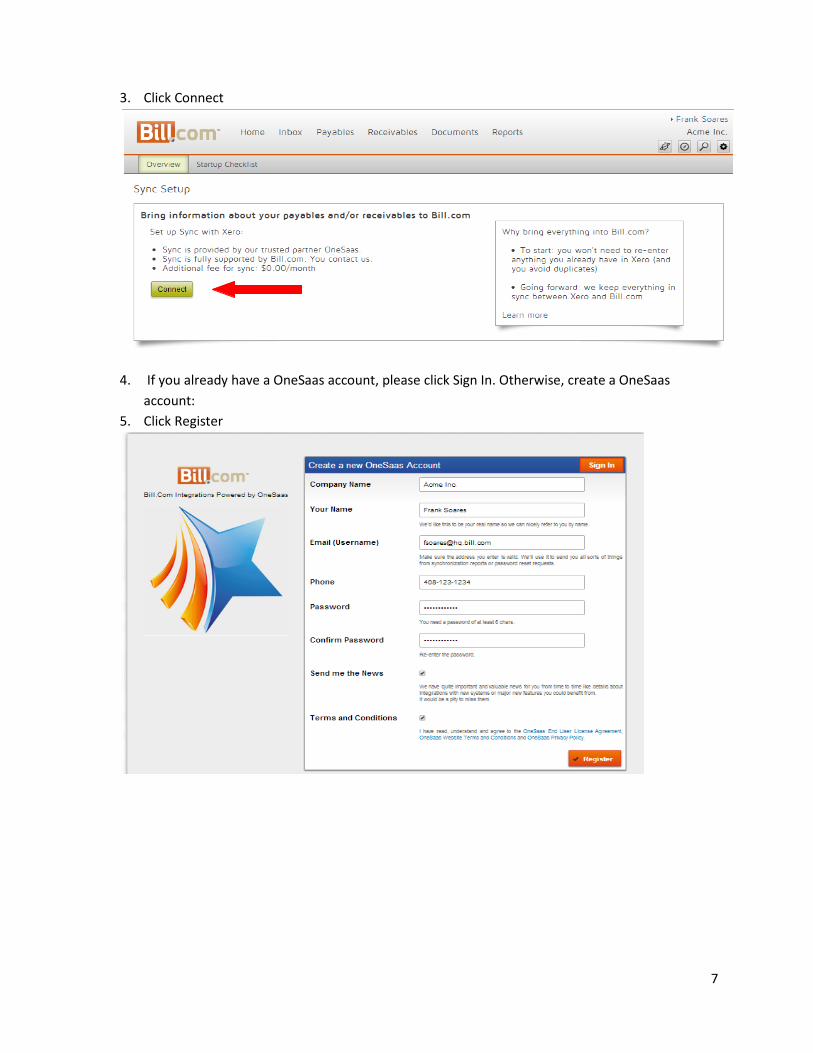
3. Click Connect
4. If you already have a OneSaas account, please click Sign In. Otherwise, create a OneSaas account:
5. Click Register
7
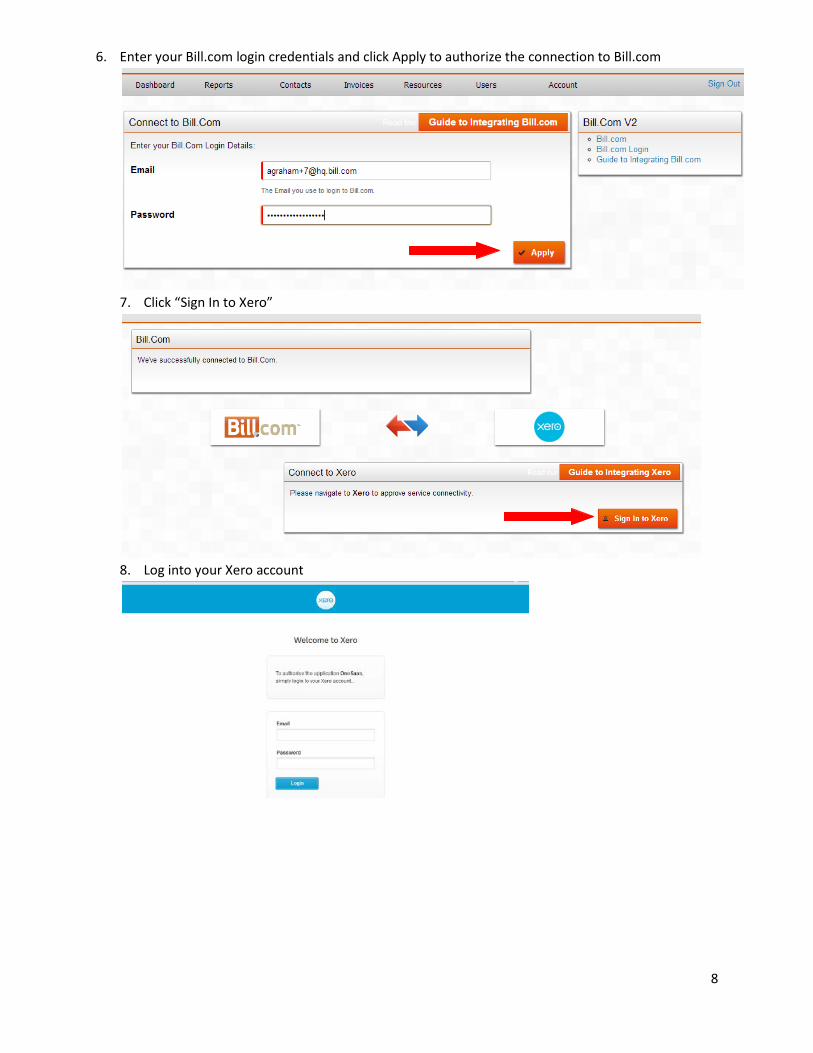
6. Enter your Bill.com login credentials and click Apply to authorize the connection to Bill.com
7. Click “Sign In to Xero”
8. Log into your Xero account
8
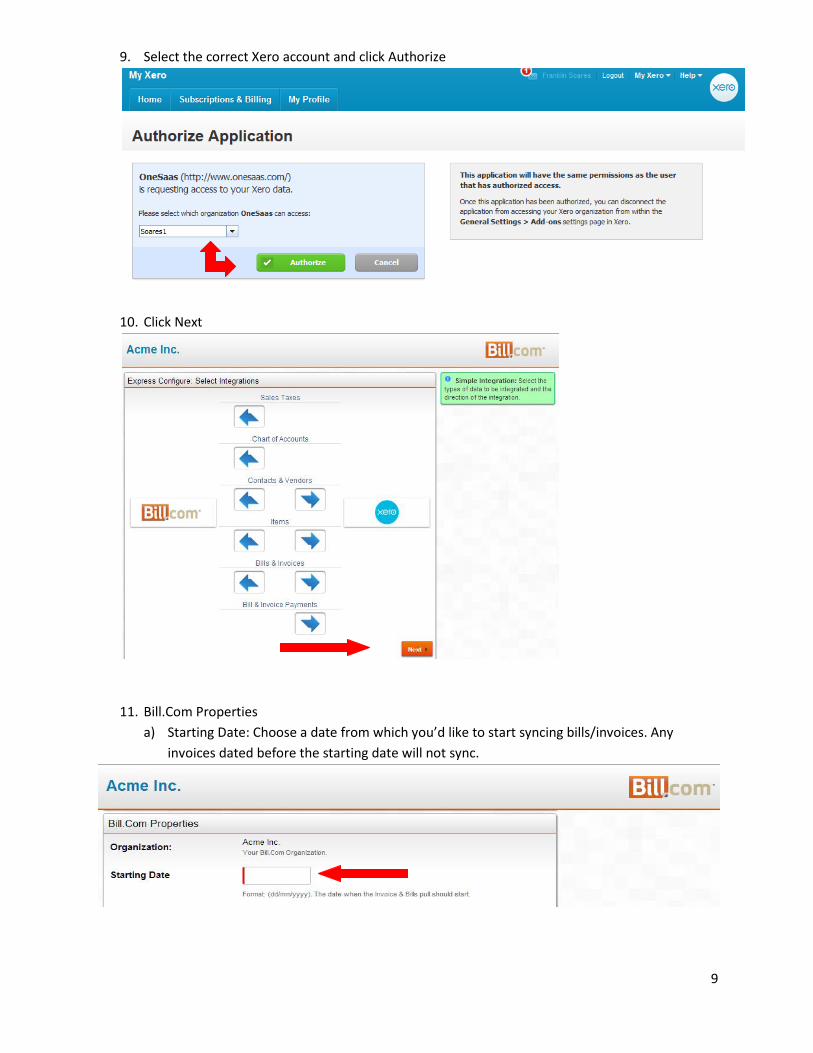
9. Select the correct Xero account and click Authorize
10. Click Next
11. Bill.Com Properties a) Starting Date: Choose a date from which you’d like to start syncing bills/invoices. Any
invoices dated before the starting date will not sync.
9
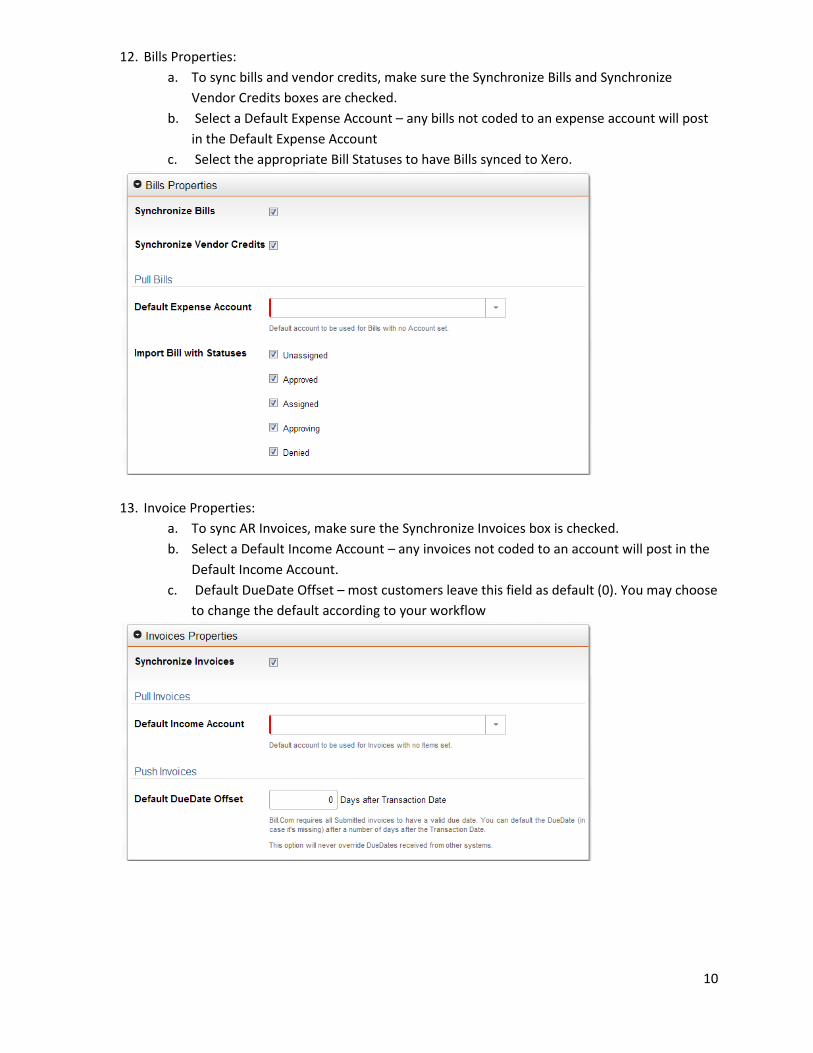
12. Bills Properties: a. To sync bills and vendor credits, make sure the Synchronize Bills and Synchronize
Vendor Credits boxes are checked. b. Select a Default Expense Account – any bills not coded to an expense account will post
in the Default Expense Account c. Select the appropriate Bill Statuses to have Bills synced to Xero.
13. Invoice Properties: a. To sync AR Invoices, make sure the Synchronize Invoices box is checked. b. Select a Default Income Account – any invoices not coded to an account will post in the
Default Income Account. c. Default DueDate Offset – most customers leave this field as default (0). You may choose
to change the default according to your workflow
10
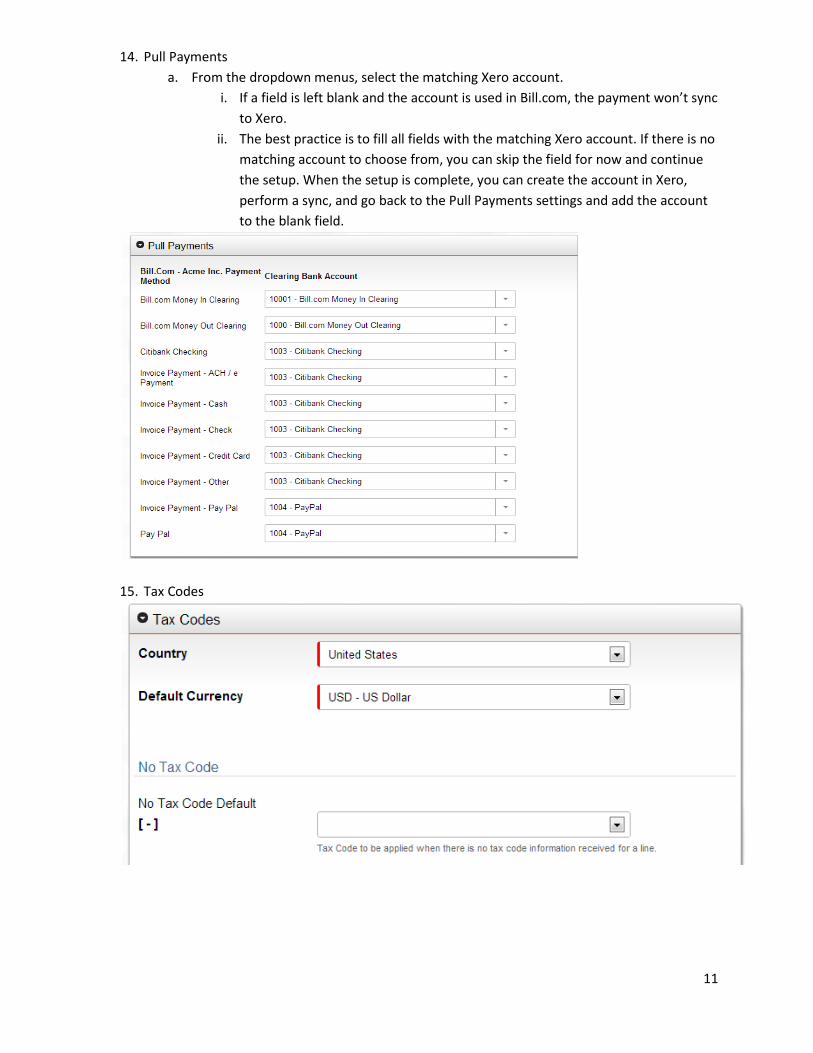
14. Pull Payments a. From the dropdown menus, select the matching Xero account.
i. If a field is left blank and the account is used in Bill.com, the payment won’t sync to Xero.
ii. The best practice is to fill all fields with the matching Xero account. If there is no matching account to choose from, you can skip the field for now and continue the setup. When the setup is complete, you can create the account in Xero, perform a sync, and go back to the Pull Payments settings and add the account to the blank field.
15. Tax Codes
11
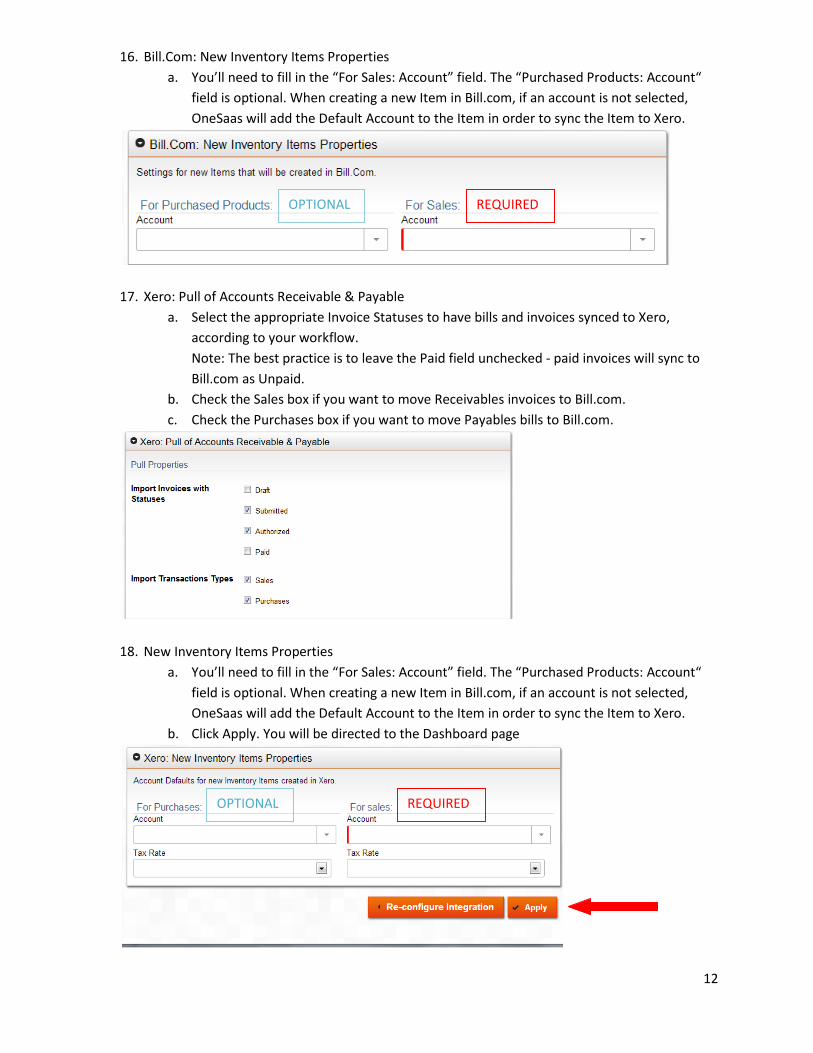
16. Bill.Com: New Inventory Items Properties a. You’ll need to fill in the “For Sales: Account” field. The “Purchased Products: Account“
field is optional. When creating a new Item in Bill.com, if an account is not selected, OneSaas will add the Default Account to the Item in order to sync the Item to Xero.
17. Xero: Pull of Accounts Receivable & Payable a. Select the appropriate Invoice Statuses to have bills and invoices synced to Xero,
according to your workflow. Note: The best practice is to leave the Paid field unchecked - paid invoices will sync to Bill.com as Unpaid.
b. Check the Sales box if you want to move Receivables invoices to Bill.com. c. Check the Purchases box if you want to move Payables bills to Bill.com.
18. New Inventory Items Properties
a. You’ll need to fill in the “For Sales: Account” field. The “Purchased Products: Account“ field is optional. When creating a new Item in Bill.com, if an account is not selected, OneSaas will add the Default Account to the Item in order to sync the Item to Xero.
b. Click Apply. You will be directed to the Dashboard page
REQUIRED OPTIONAL
REQUIRED OPTIONAL
12

19. Perform the first Sync by clicking the Synchronize button.
20. Confirm that the Sync has a status of “success” for both Bill.com and Xero Connections
13
Account Mapping - Bill.com
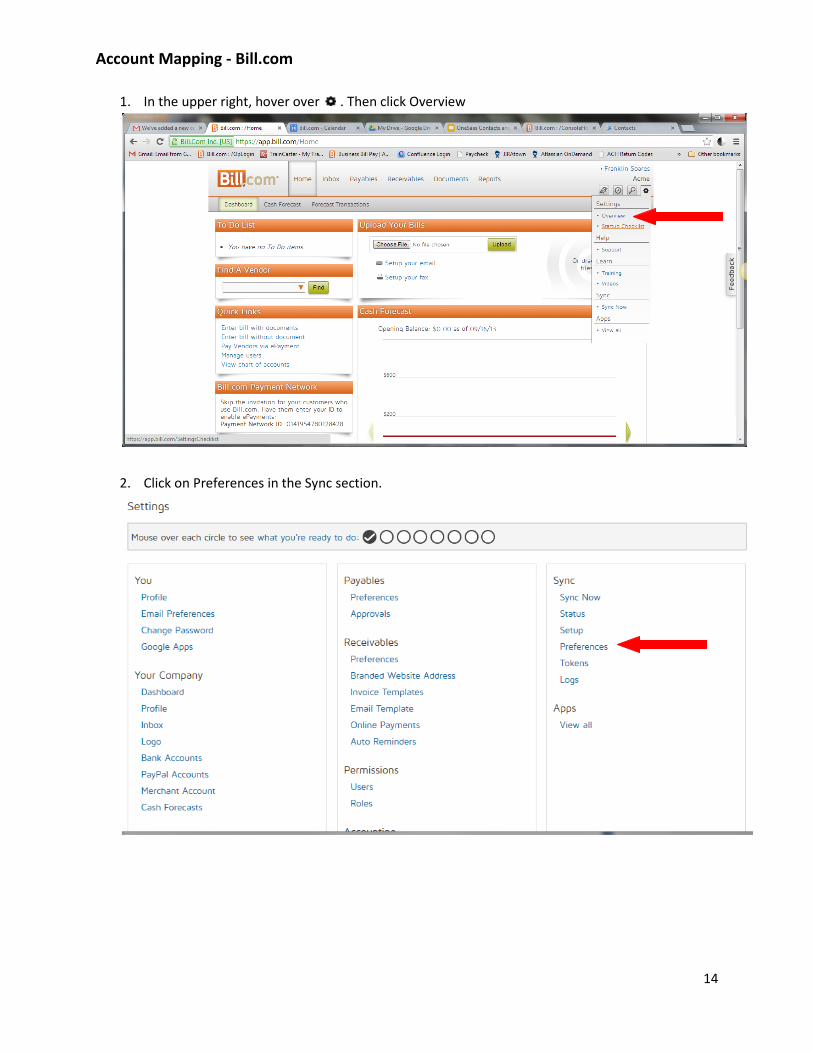
1. In the upper right, hover over . Then click Overview
2. Click on Preferences in the Sync section.
14
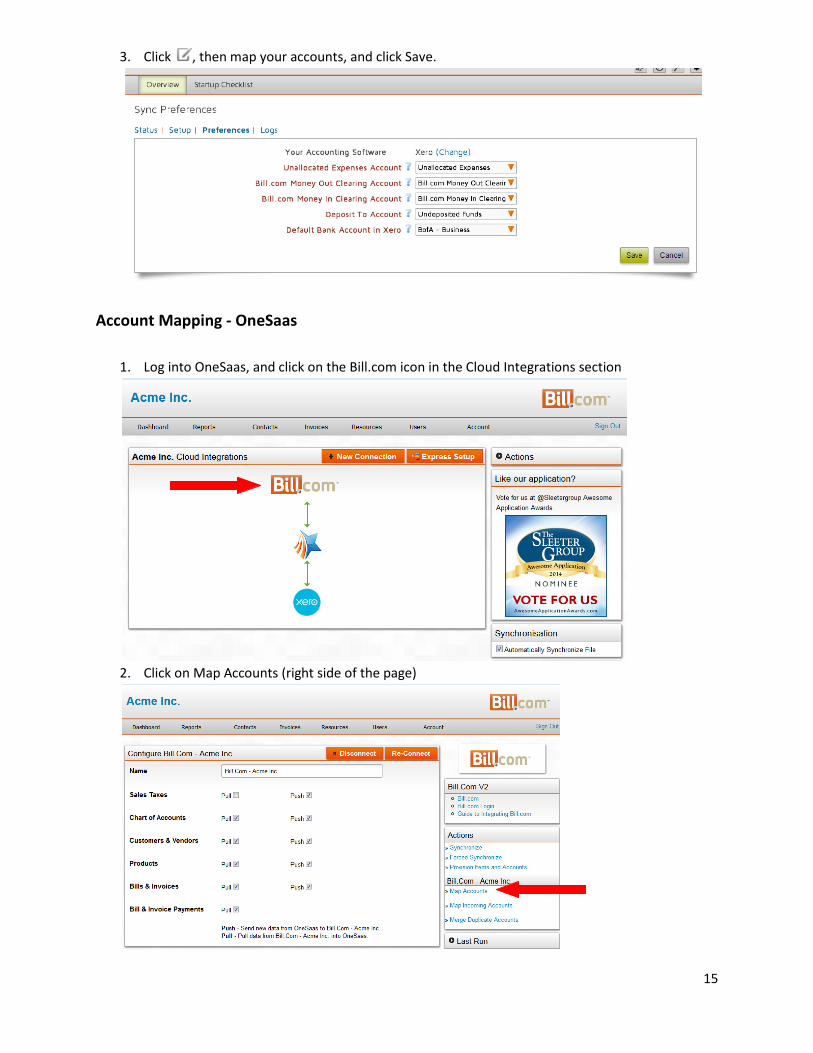
3. Click , then map your accounts, and click Save.
Account Mapping - OneSaas
1. Log into OneSaas, and click on the Bill.com icon in the Cloud Integrations section
2. Click on Map Accounts (right side of the page)
15
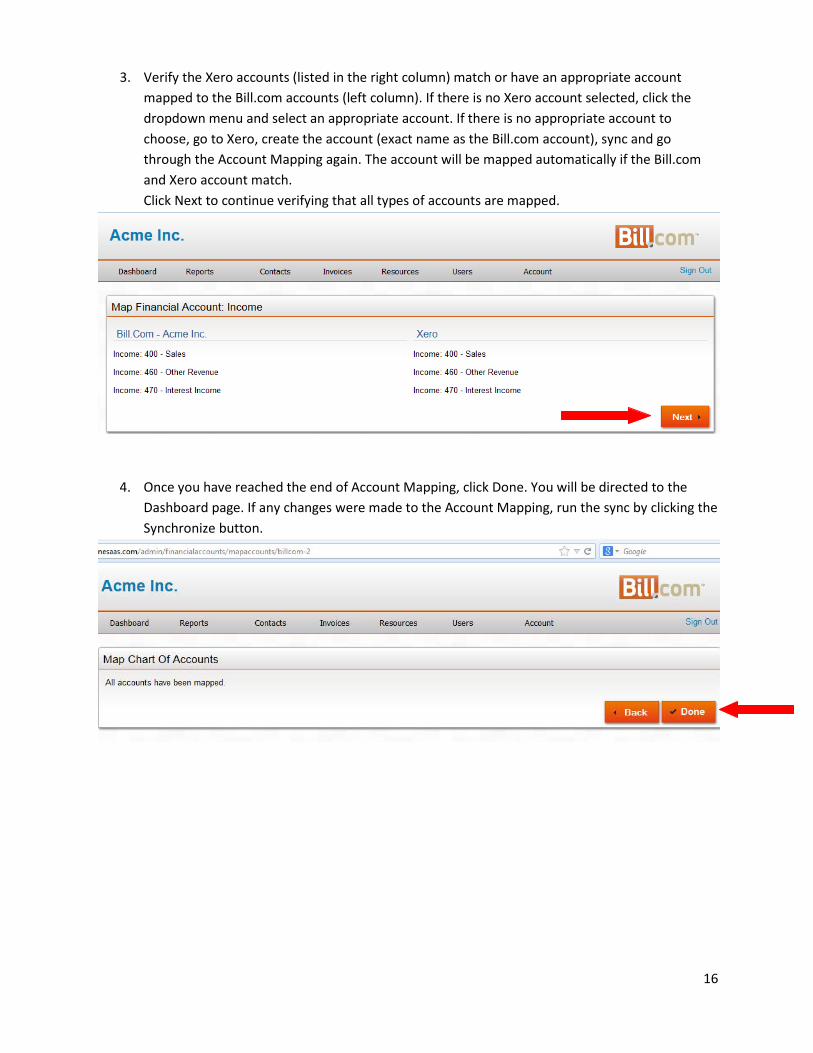
3. Verify the Xero accounts (listed in the right column) match or have an appropriate account
mapped to the Bill.com accounts (left column). If there is no Xero account selected, click the dropdown menu and select an appropriate account. If there is no appropriate account to choose, go to Xero, create the account (exact name as the Bill.com account), sync and go through the Account Mapping again. The account will be mapped automatically if the Bill.com and Xero account match. Click Next to continue verifying that all types of accounts are mapped.
4. Once you have reached the end of Account Mapping, click Done. You will be directed to the Dashboard page. If any changes were made to the Account Mapping, run the sync by clicking the Synchronize button.
16
Fine Tuning your OneSaas Settings Xero Contacts syncing over to Bill.com
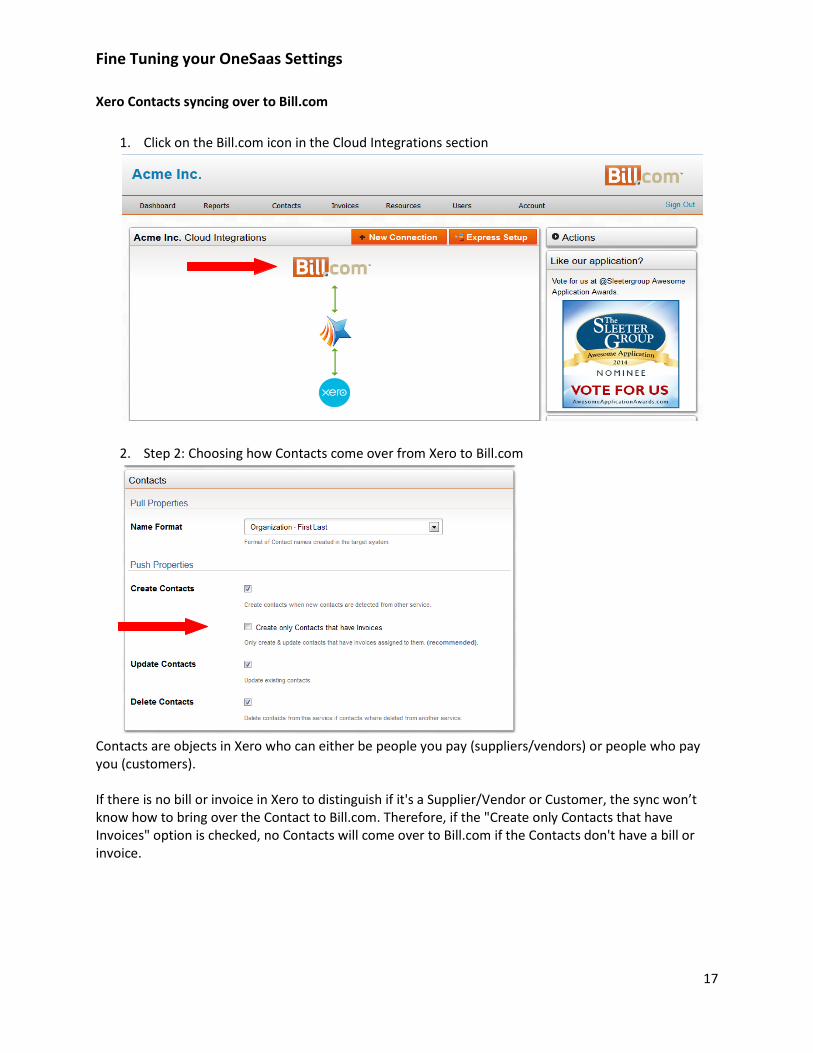
1. Click on the Bill.com icon in the Cloud Integrations section
2. Step 2: Choosing how Contacts come over from Xero to Bill.com
Contacts are objects in Xero who can either be people you pay (suppliers/vendors) or people who pay you (customers). If there is no bill or invoice in Xero to distinguish if it's a Supplier/Vendor or Customer, the sync won’t know how to bring over the Contact to Bill.com. Therefore, if the "Create only Contacts that have Invoices" option is checked, no Contacts will come over to Bill.com if the Contacts don't have a bill or invoice.
17
Contacts FAQs I only use Payables in Bill.com. I want all Xero Contacts to come over to Bill.com, regardless if the Contact has a bill or not. Can this be done? Yes, it can be done. The way the sync allows for Contacts in Xero without a bill or invoice to sync over to Bill.com is to uncheck the "Create only Contacts that have Invoices" option. This will bring over all Contacts in Xero to Bill.com as Vendors. I use Payables and Receivables in Bill.com and want all my Contacts in Xero to come over to Bill.com regardless if the Contact has a bill/invoice or not. Can this be done? No, it can't be done. If the "Create only Contacts that have Invoices" option is unchecked, all Contacts will sync over as Vendors. Since the sync doesn’t know how to categorize a Contact without a bill or an invoice, they will sync in as Vendors as a default. If you use Payables and Receivables, the best practice is to check the "Create only Contacts that have Invoices" option. This way, Contacts get synced to the correct list (Vendors or Customers) in Bill.com. If you choose to check the option and need a Customer in Bill.com, you can either:
• Create the first Invoice in Xero and then sync. The Contact and Invoice will come over to Bill.com. Now you can create future invoices in Bill.com.
Or • Create the Customer in Bill.com with the exact same name as in Xero. Create an invoice for that
customer in Bill.com, and then sync. Since the sync matches by name, the Invoice will come over to Xero.
18
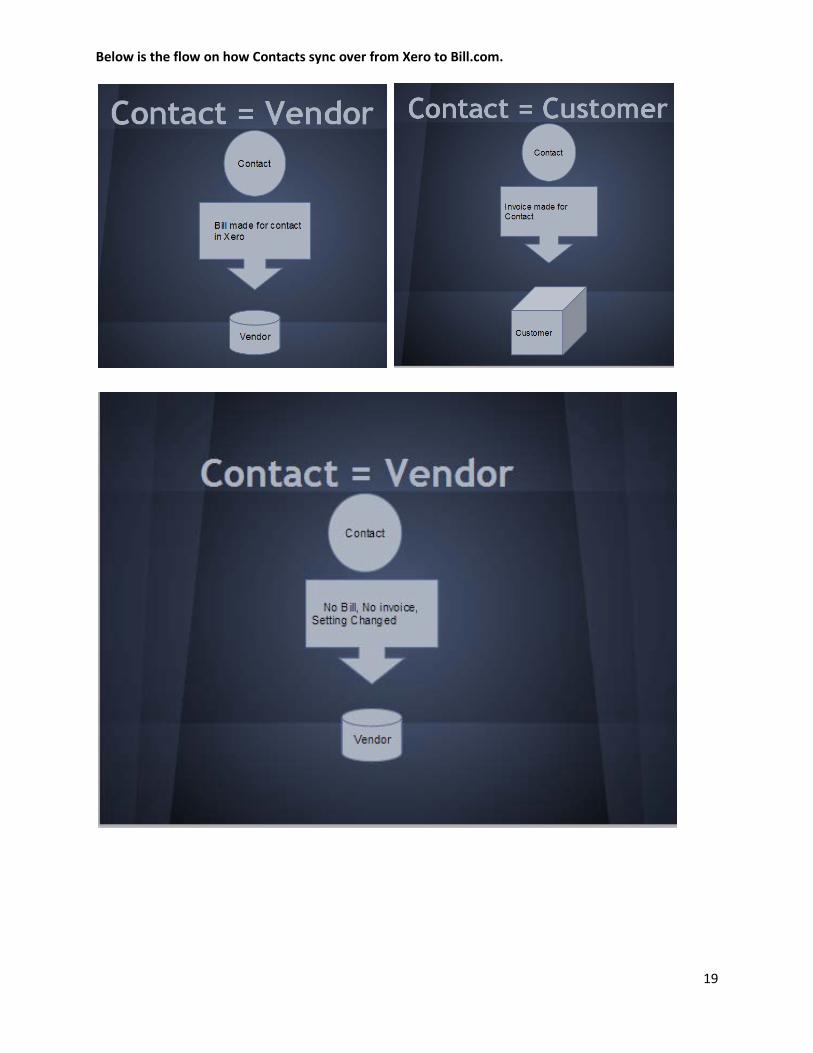
Below is the flow on how Contacts sync over from Xero to Bill.com.
19

Bill.com Vendors/Customers syncing over to Xero
1. Click on the Xero icon in the Cloud Integrations section
2. Choosing how Contacts come over from Bill.com to Xero
Bill.com can sync over Vendors and/or Customers to Xero as Contacts. If there is no bill/ invoice associated to the Vendor or Customer in Bill.com, the sync can move the Vendor or Customer to Xero as a Contact. By unchecking the "Create and Update only Contacts & Organizations that have Invoices" option, all Vendors and Customers (with or without bills or invoices) will sync over to Xero. If you only want Vendors and Customers that have bills or invoices in Bill.com to sync to Xero, then check the option.
20

Syncing Bills/Invoices from Bill.com to Xero as Approved and into the Awaiting Payment queue If you use Bill.com to approve Bills and don't want to approve the same bills again in Xero, there is a way for the sync to move the Bills to Xero as Approved and route them instead to the Awaiting Payment queue.
• By checking the "Authorize Invoices: Push all Accounts Receivable & Payables as Authorized Invoices" option, all Bills and Invoices will sync as Approved in Xero and show up in the Awaiting Payment queue.
• If you choose to approve all Bills and Invoices in Xero, you can uncheck the option.
• You can also choose to allow only Paid Bills and Invoices to skip the awaiting approval queue by
checking the "Only Authorize Paid Invoices" option. Important Note: You may only check one or the other option. If both options are checked, the "Only Authorize Paid Invoices" option will override the "Push all Accounts Receivable & Payables as Authorized Invoices" option and unpaid bill/invoices will go into the Awaiting Approval queue in Xero.
Tips: If you make a payment in Bill.com and it syncs to Xero but need to void it, you will need to void the payment in both systems (Bill.com & Xero). The sync will not sync voids.
21