Embed Size (px)
Citation preview
Setting up and using METRC
(Cannabis Tracking System)
For Medical Registrants

Training Opportunities
and Resources
METRC Training
There are multiple trainings available to familiarize yourself with METRC tracking requirements and how the system works:
PowerPoints from OHA, OLCC, and METRC’s presentations during the recent statewide “road show” on medical tracking are available here: https://www.oregon.gov/oha/PH/DISEASESCONDITIONS/CHRONICDISEASE/MEDICALMARIJUANAPROGRAM/Pages/reporting.aspx
Videos from the presentations are available on OLCC’s YouTube page: https://www.youtube.com/user/OLCC2008
METRC webinars are available on METRC’s website: https://www.metrc.com/oregon
METRC “on demand” videos are available on METRC’s YouTube page: https://www.youtube.com/channel/UCcasu4orIpyqqEmQWWOkW0w
To Find and Register for Training
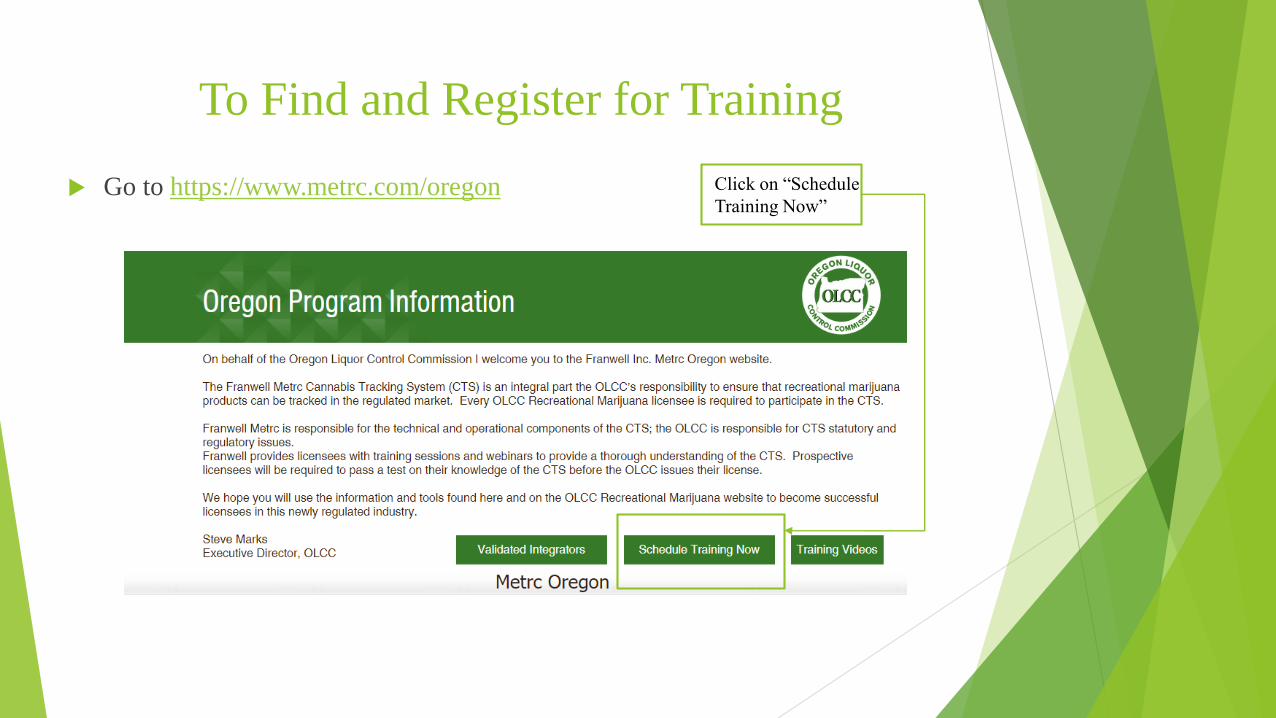
Go to https://www.metrc.com/oregon Click on “Schedule
Training Now”
To Find and Register for Training
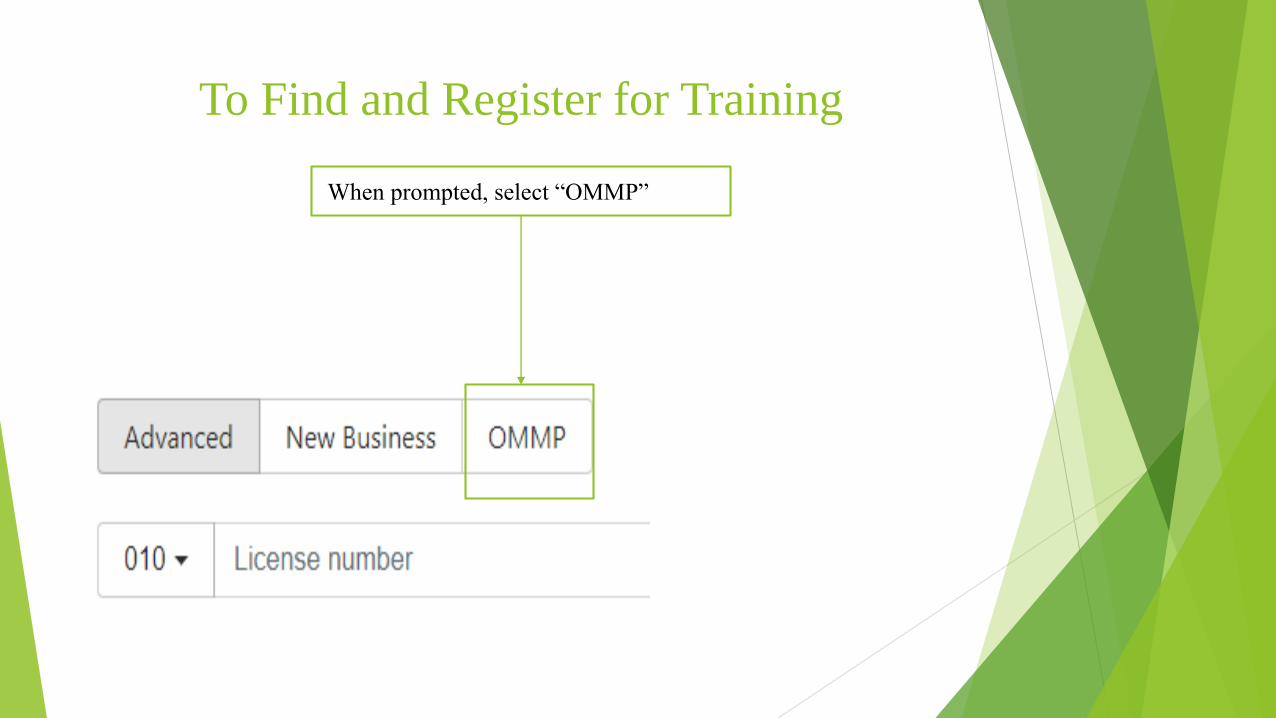
When prompted, select “OMMP”
To Find and Register for Training
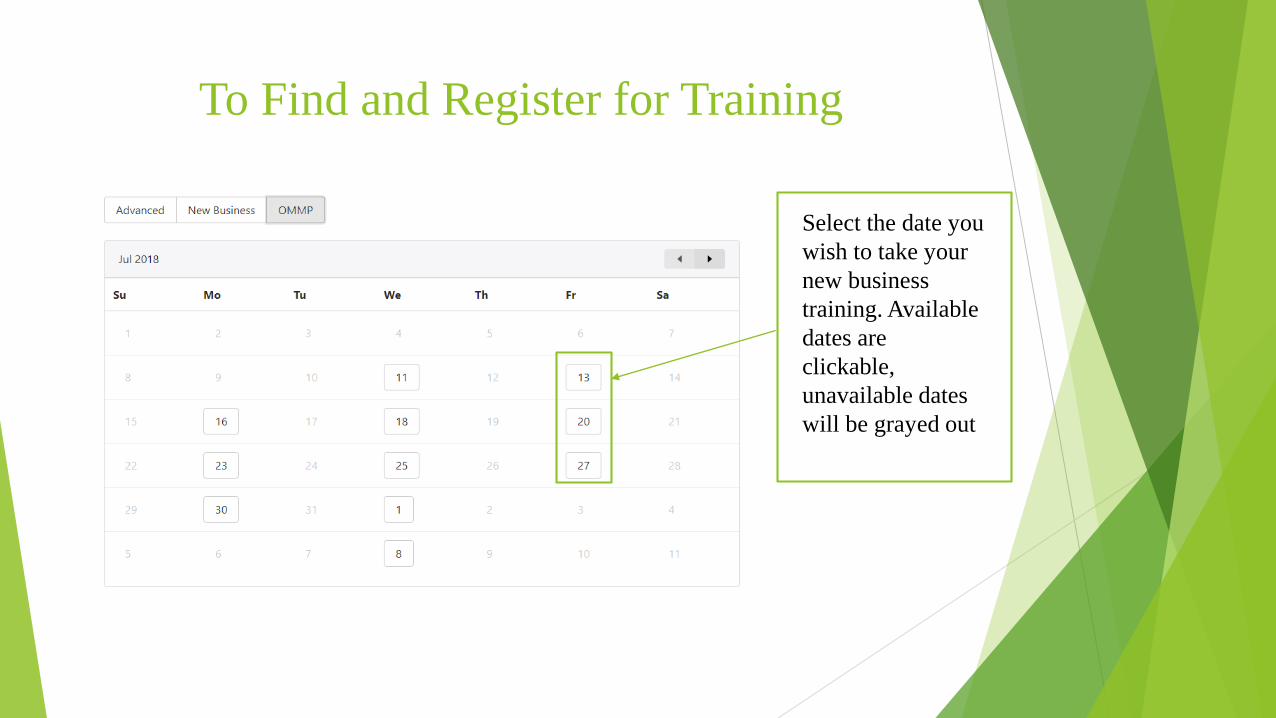
Select the date you
wish to take your
new business
training. Available
dates are
clickable,
unavailable dates
will be grayed out
To Find and Register for Training
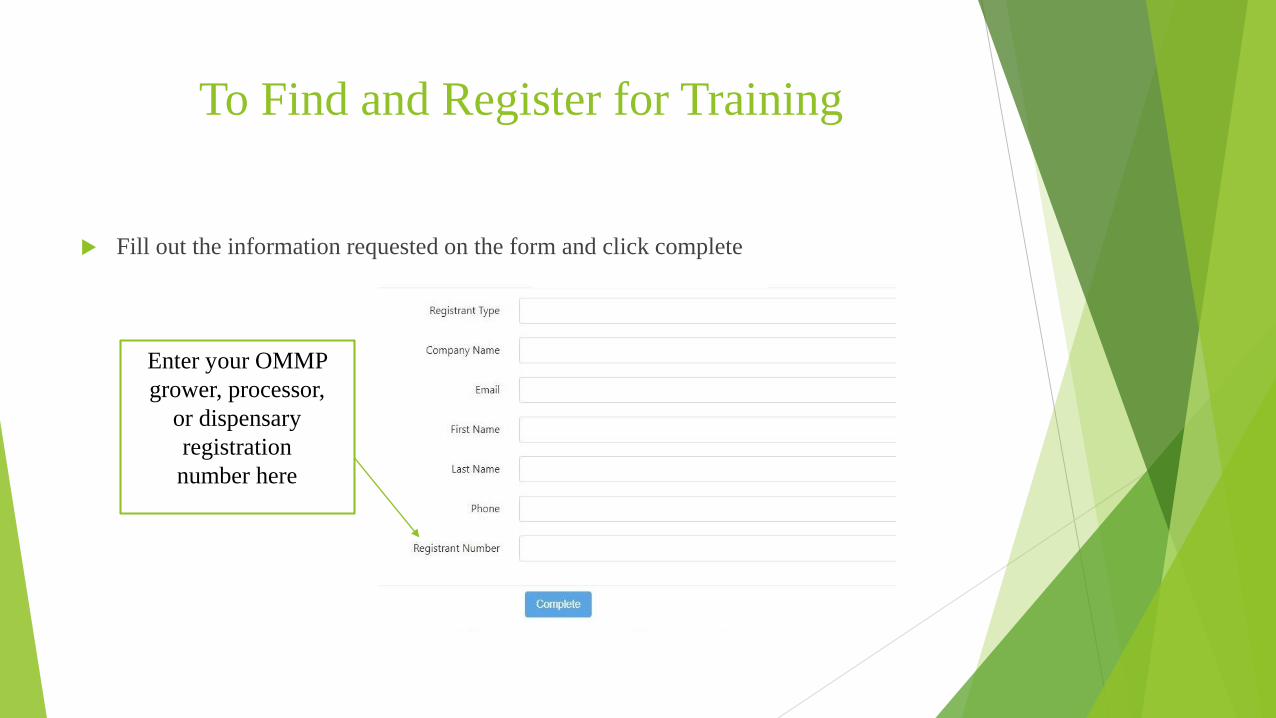
Fill out the information requested on the form and click complete
Enter your OMMP
grower, processor,
or dispensary
registration
number here
To Find and Register for Training
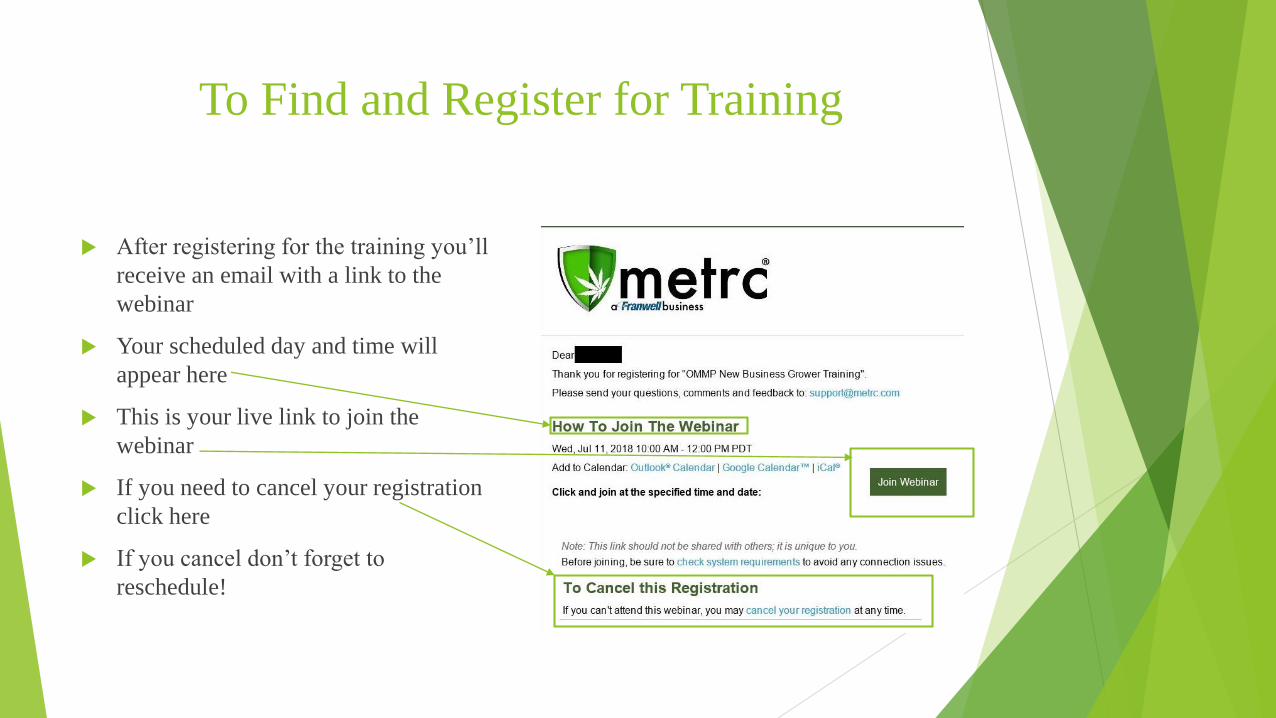
After registering for the training you’ll
receive an email with a link to the
webinar
Your scheduled day and time will
appear here
This is your live link to join the
webinar
If you need to cancel your registration
click here
If you cancel don’t forget to
reschedule!

Getting Signed Up and Set Up in Metrc
First Time Access to METRC
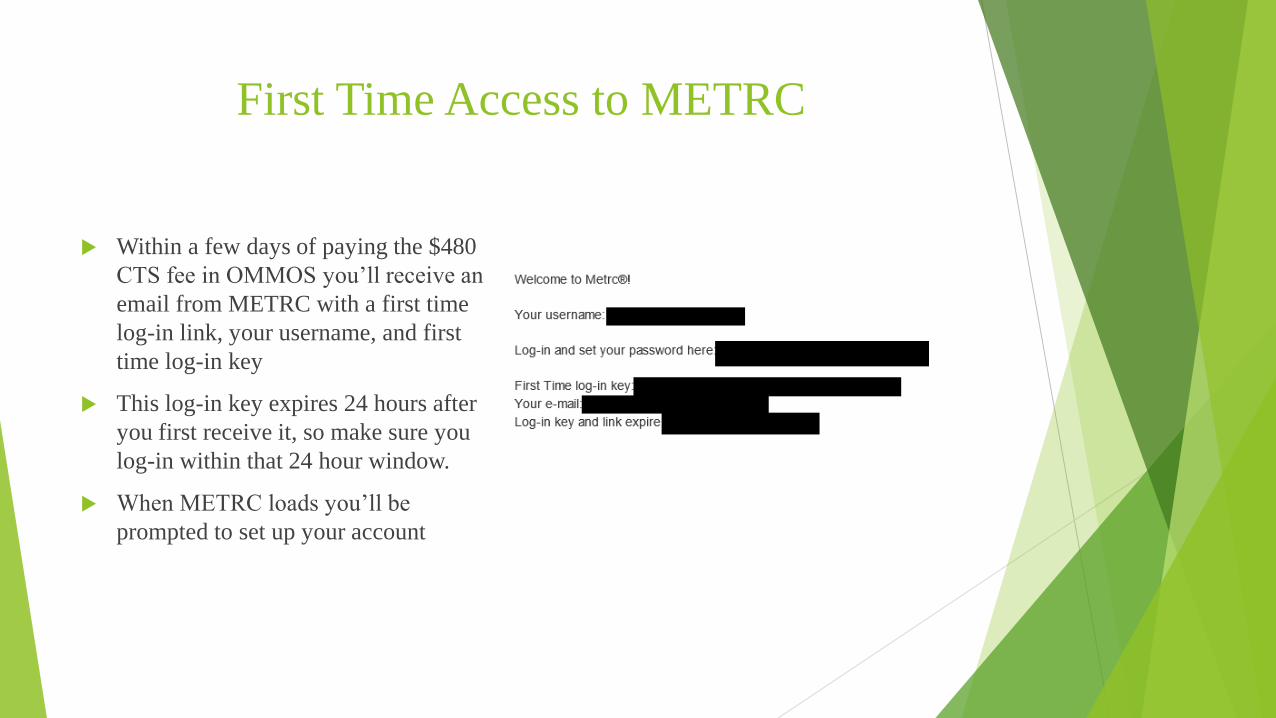
Within a few days of paying the $480
CTS fee in OMMOS you’ll receive an
email from METRC with a first time
log-in link, your username, and first
time log-in key
This log-in key expires 24 hours after
you first receive it, so make sure you
log-in within that 24 hour window.
When METRC loads you’ll be
prompted to set up your account

First Time Access to METRC
If you do not click the link in the email
before it expires (within 24 hours) you
can activate your account by:
Contacting METRC support
([email protected] or calling 877-
566-6506); they are able to send a new
email with a new activation link.
Navigating to
https://or.metrc.com/password/reset and
entering the username and email of the
person who paid the $480 CTS fee in
OHA’s OMMOS system; the username
can be found in the original email sent
by METRC.
Initial Account Set Up
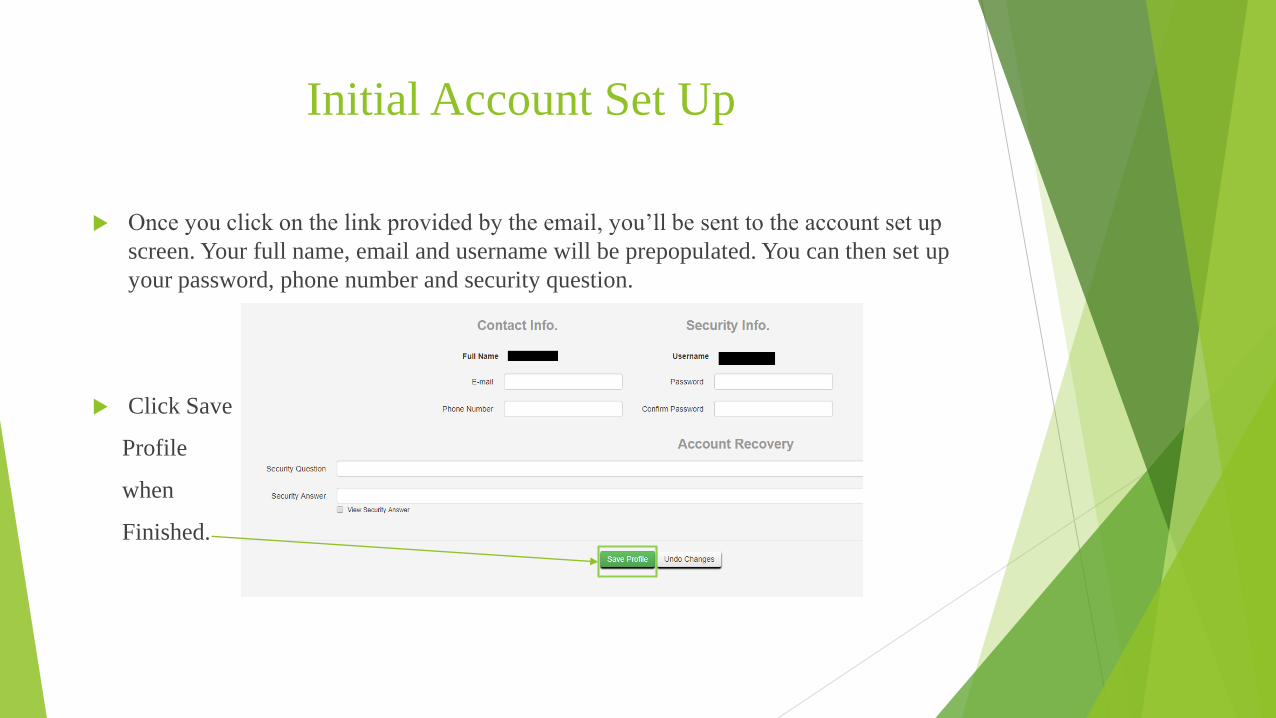
Once you click on the link provided by the email, you’ll be sent to the account set up
screen. Your full name, email and username will be prepopulated. You can then set up
your password, phone number and security question.
Click Save
Profile
when
Finished.
Initial Account Set Up, cont’d
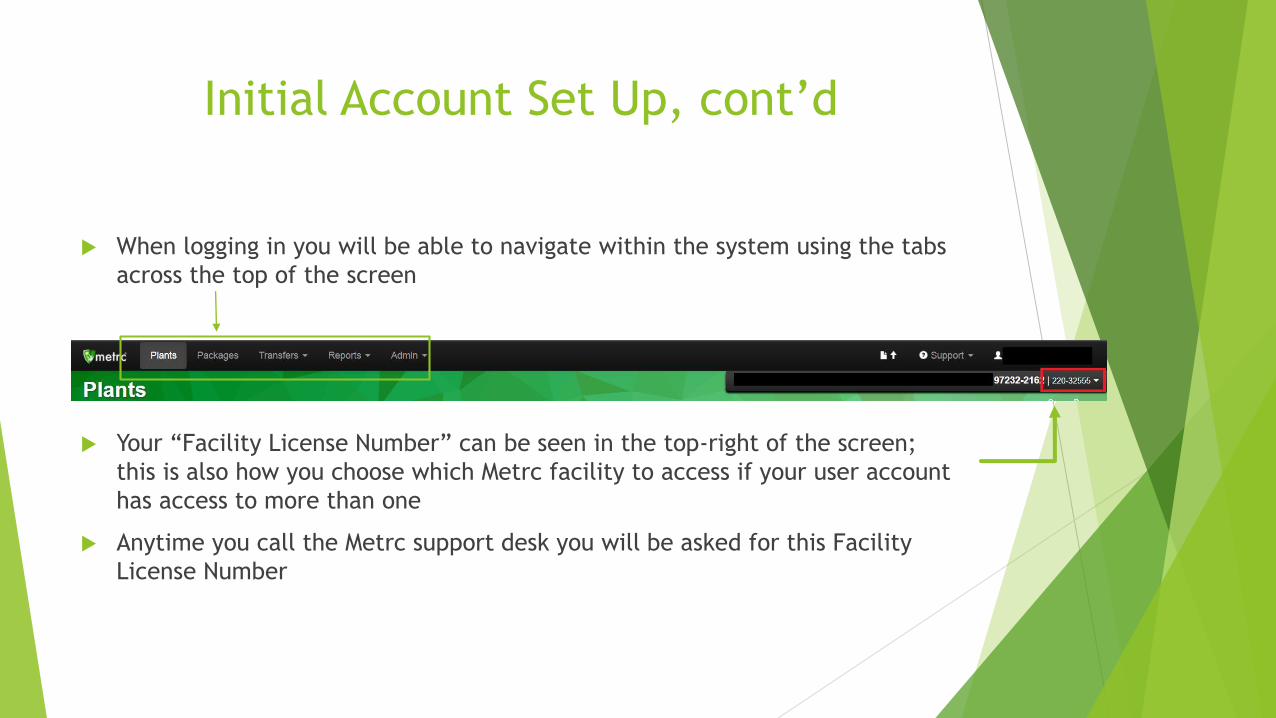
When logging in you will be able to navigate within the system using the tabs
across the top of the screen
Your “Facility License Number” can be seen in the top-right of the screen;
this is also how you choose which Metrc facility to access if your user account
has access to more than one
Anytime you call the Metrc support desk you will be asked for this Facility
License Number
Admin Set Up
There are several steps in making sure that once your account is set up, that you are
ready to use the METRC system completely. Each “facility” in Metrc is an individual
grow site, processing site, or dispensary.
For each Facility:
Order RFID Package and Plant Tags
Add:
Employees
Strains
Items
Rooms (for Growers)
Repeat as necessary for each facility
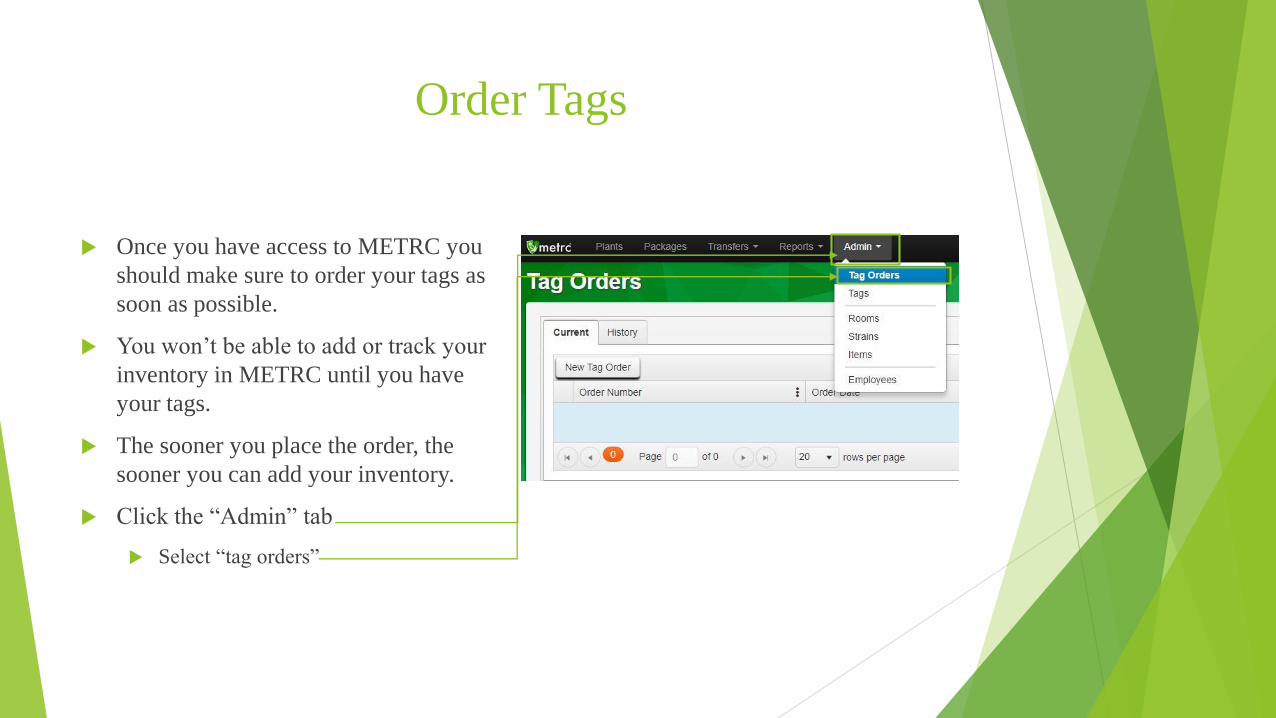
Order Tags
Once you have access to METRC you
should make sure to order your tags as
soon as possible.
You won’t be able to add or track your
inventory in METRC until you have
your tags.
The sooner you place the order, the
sooner you can add your inventory.
Click the “Admin” tab
Select “tag orders”
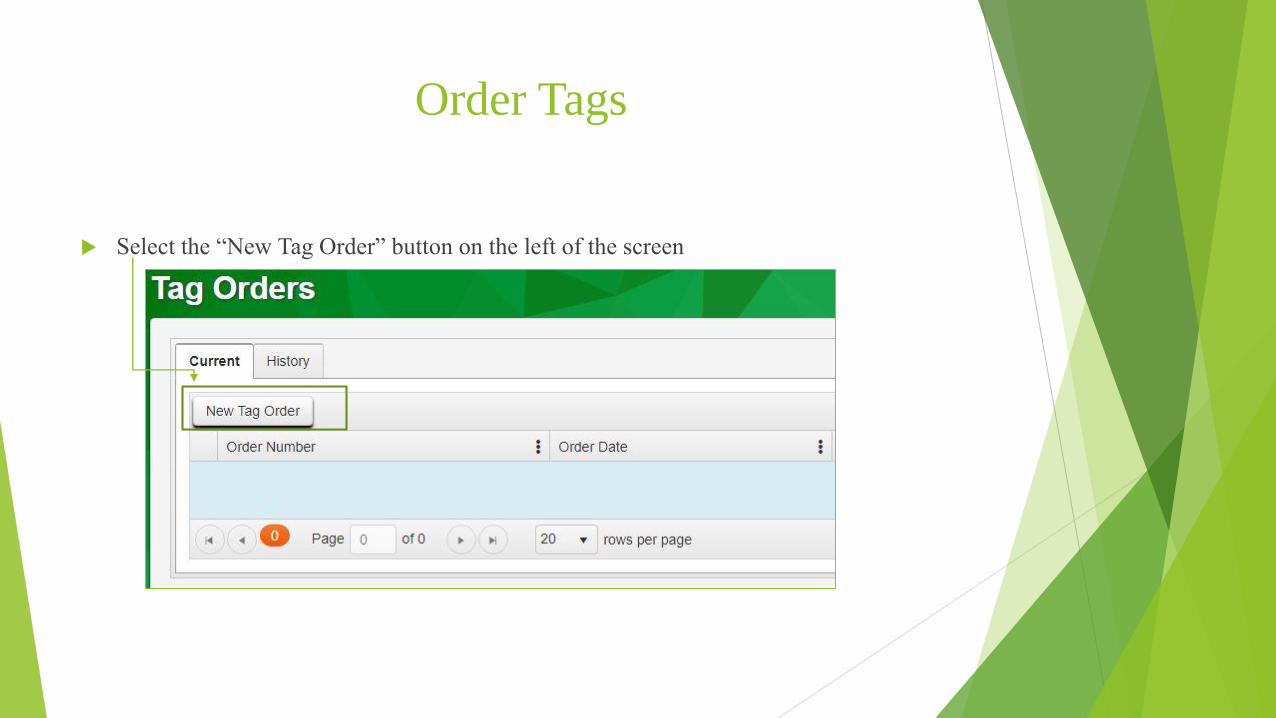
Order Tags
Select the “New Tag Order” button on the left of the screen

Order Tags
Fill in the information requested.
For Medical Growers the tags you
order will be Medical, not Retail as
shown in the image.
Order the number of tags you need for
both packages and plants. You’ll need
both types of tags.
Select your payment method and fill in
the information requested.
Once completed click the “Place
Order” button to place the order.

Order Tags
Once you have ordered tags, METRC
will print and ship them.
You’ll receive a tracking number and
will have a short window to void the
order if it was made in error.
This window varies based on the time
of day the order is placed.
Once you physically receive the tags
from UPS, make sure to log into
METRC and click the “Receive” button
in the “tag orders” section.
Tags cannot be used in METRC until
the Receive button has been clicked!
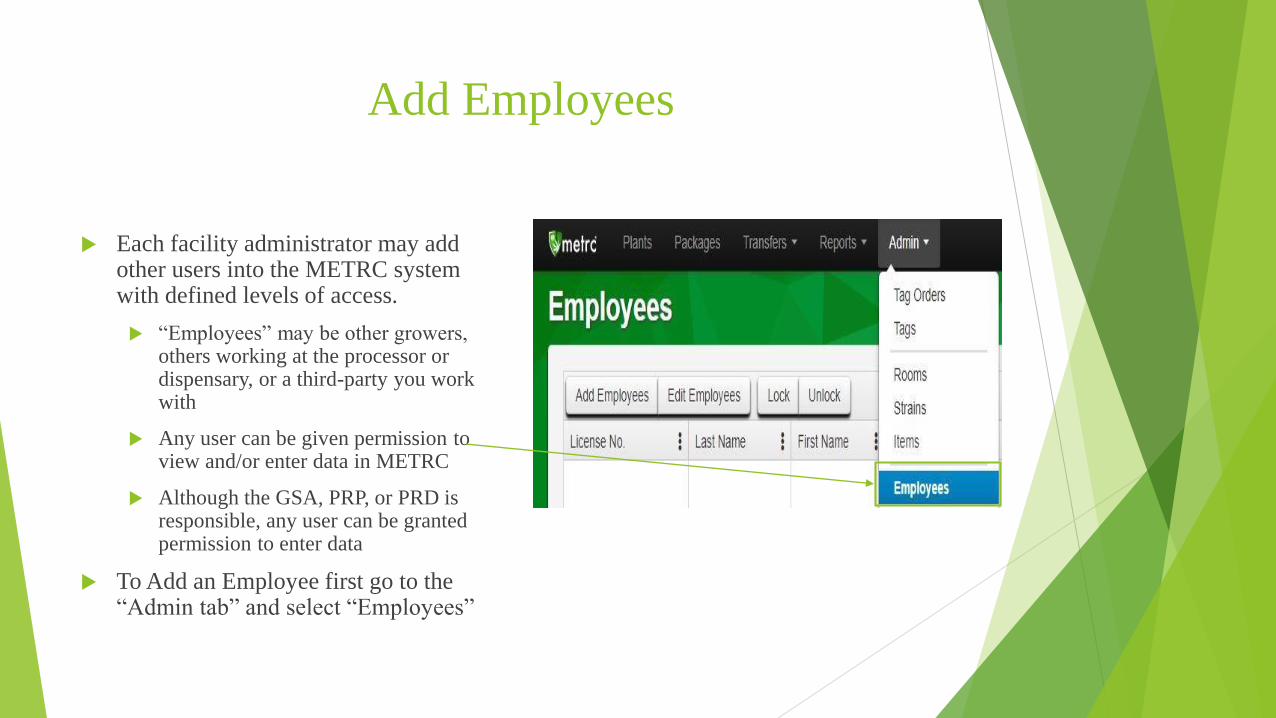
Add Employees
Each facility administrator may add other users into the METRC system with defined levels of access.
“Employees” may be other growers, others working at the processor or dispensary, or a third-party you work with
Any user can be given permission to view and/or enter data in METRC
Although the GSA, PRP, or PRD is responsible, any user can be granted permission to enter data
To Add an Employee first go to the “Admin tab” and select “Employees”
Add Employees
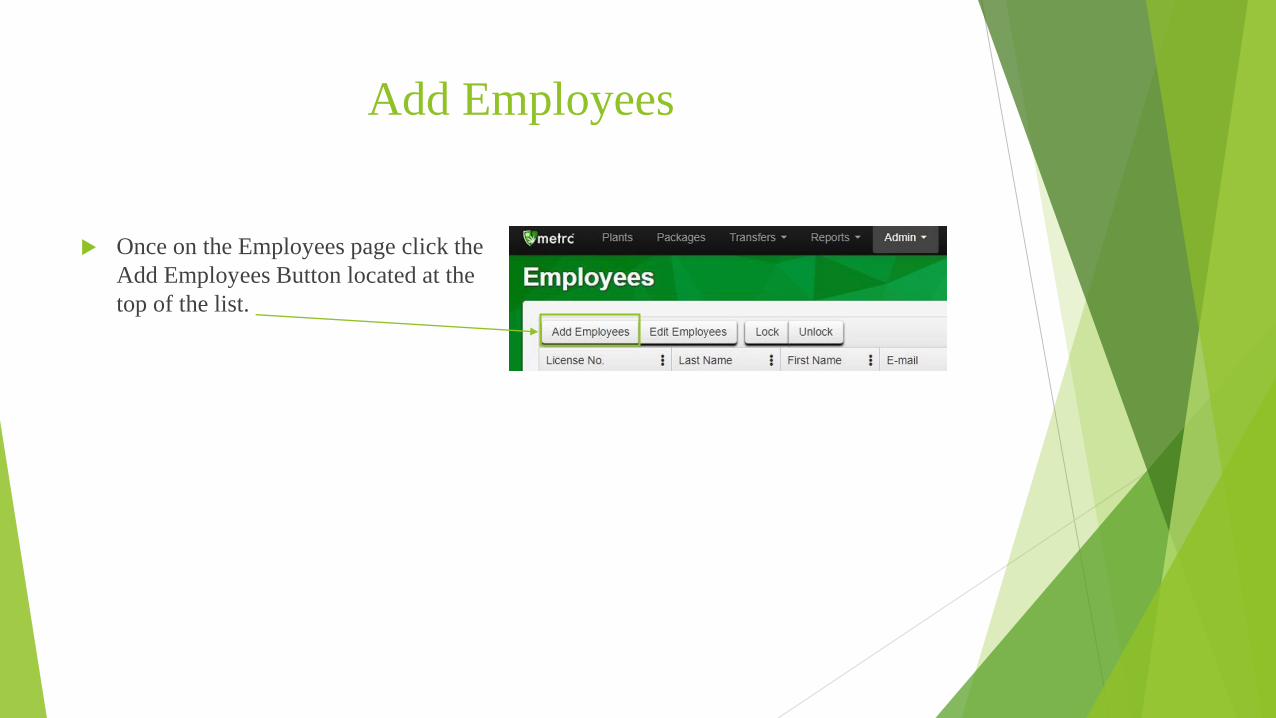
Once on the Employees page click the
Add Employees Button located at the
top of the list.
Add Employees
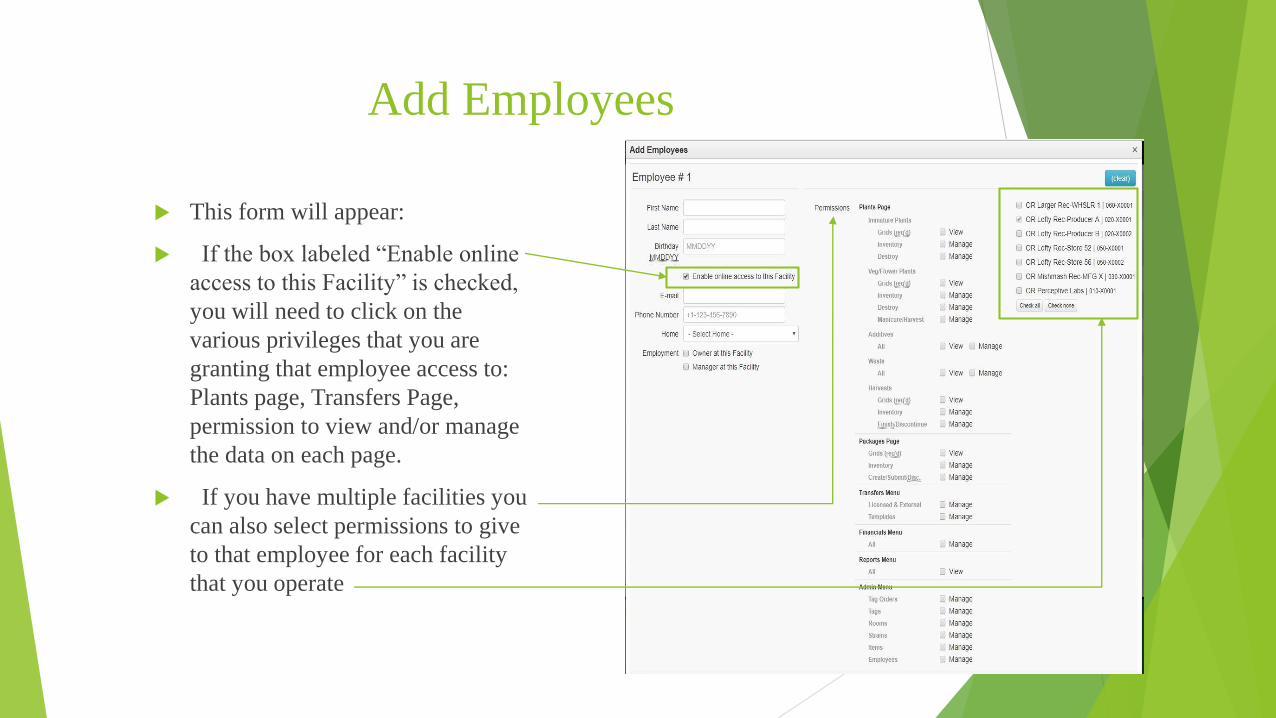
This form will appear:
If the box labeled “Enable online
access to this Facility” is checked,
you will need to click on the
various privileges that you are
granting that employee access to:
Plants page, Transfers Page,
permission to view and/or manage
the data on each page.
If you have multiple facilities you
can also select permissions to give
to that employee for each facility
that you operate
Add Employees
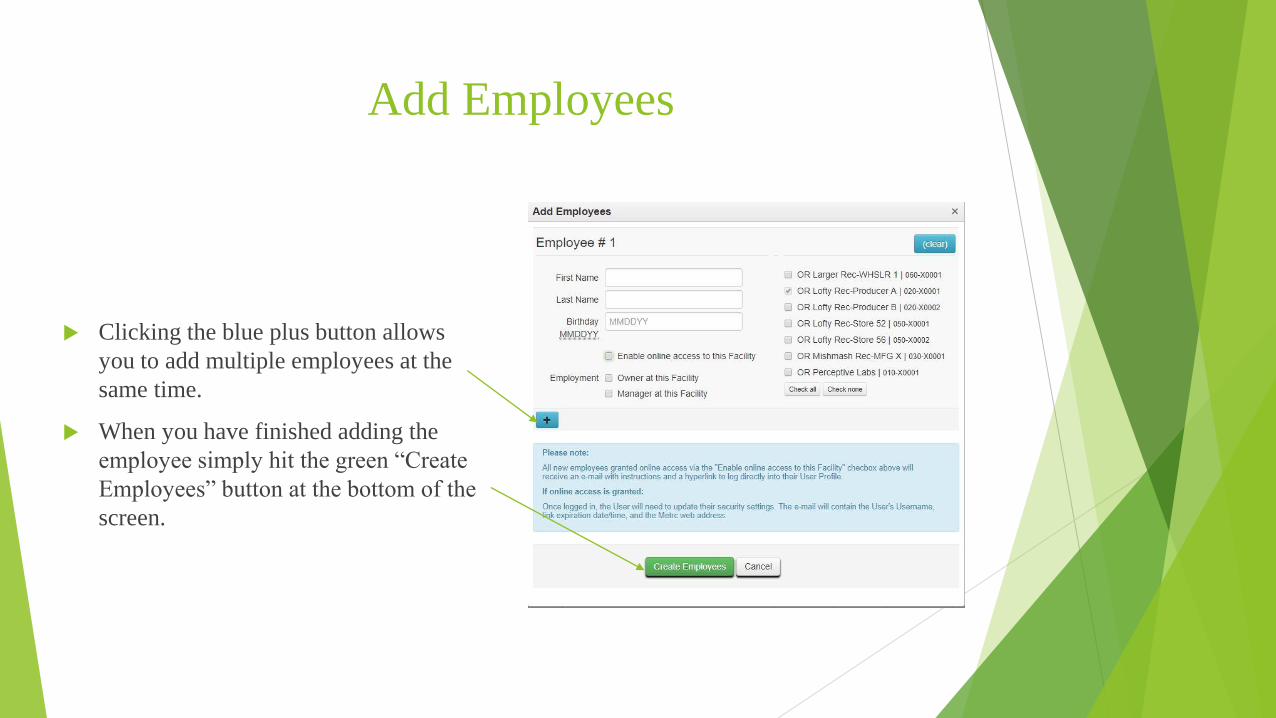
Clicking the blue plus button allows
you to add multiple employees at the
same time.
When you have finished adding the
employee simply hit the green “Create
Employees” button at the bottom of the
screen.
Add Strains
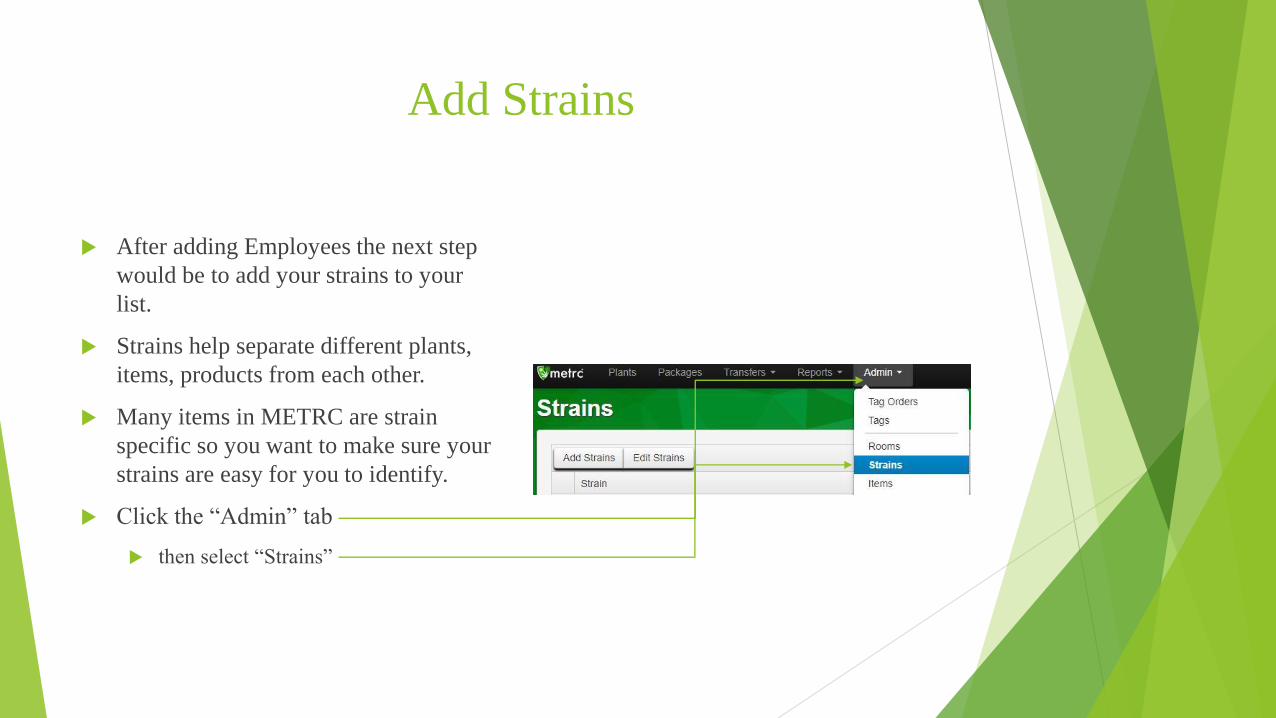
After adding Employees the next step
would be to add your strains to your
list.
Strains help separate different plants,
items, products from each other.
Many items in METRC are strain
specific so you want to make sure your
strains are easy for you to identify.
Click the “Admin” tab
then select “Strains”
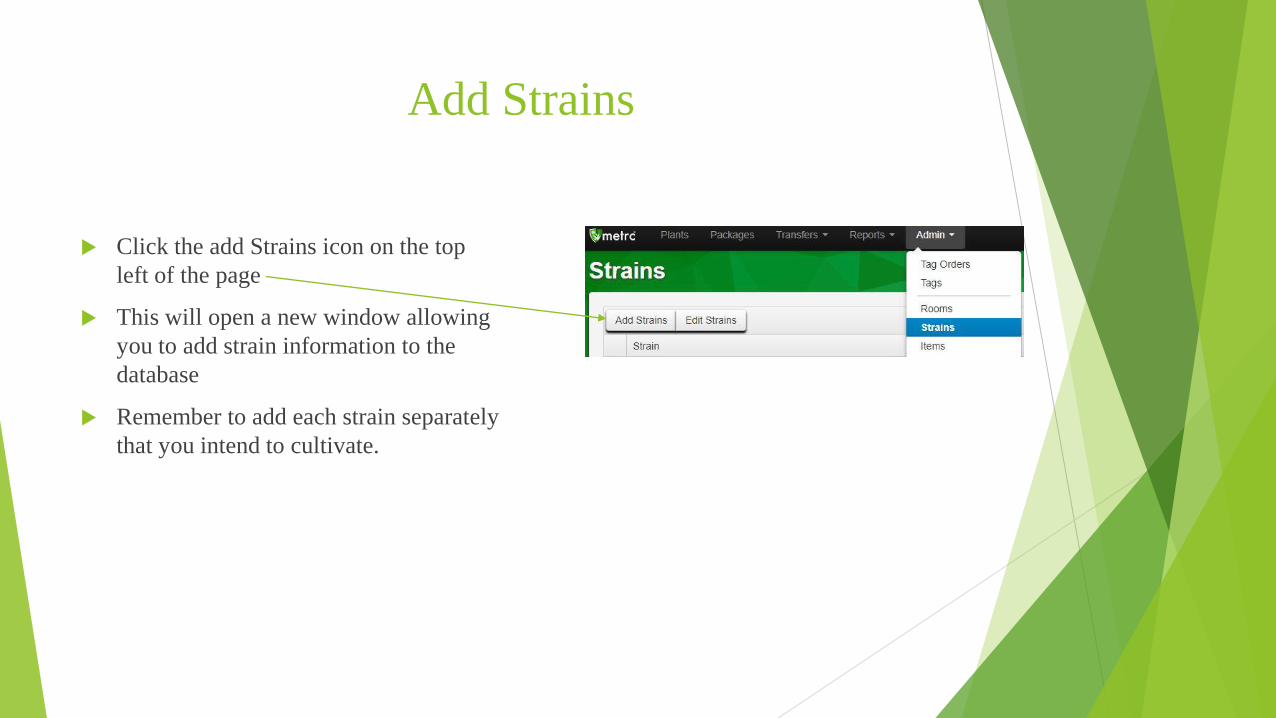
Add Strains
Click the add Strains icon on the top
left of the page
This will open a new window allowing
you to add strain information to the
database
Remember to add each strain separately
that you intend to cultivate.
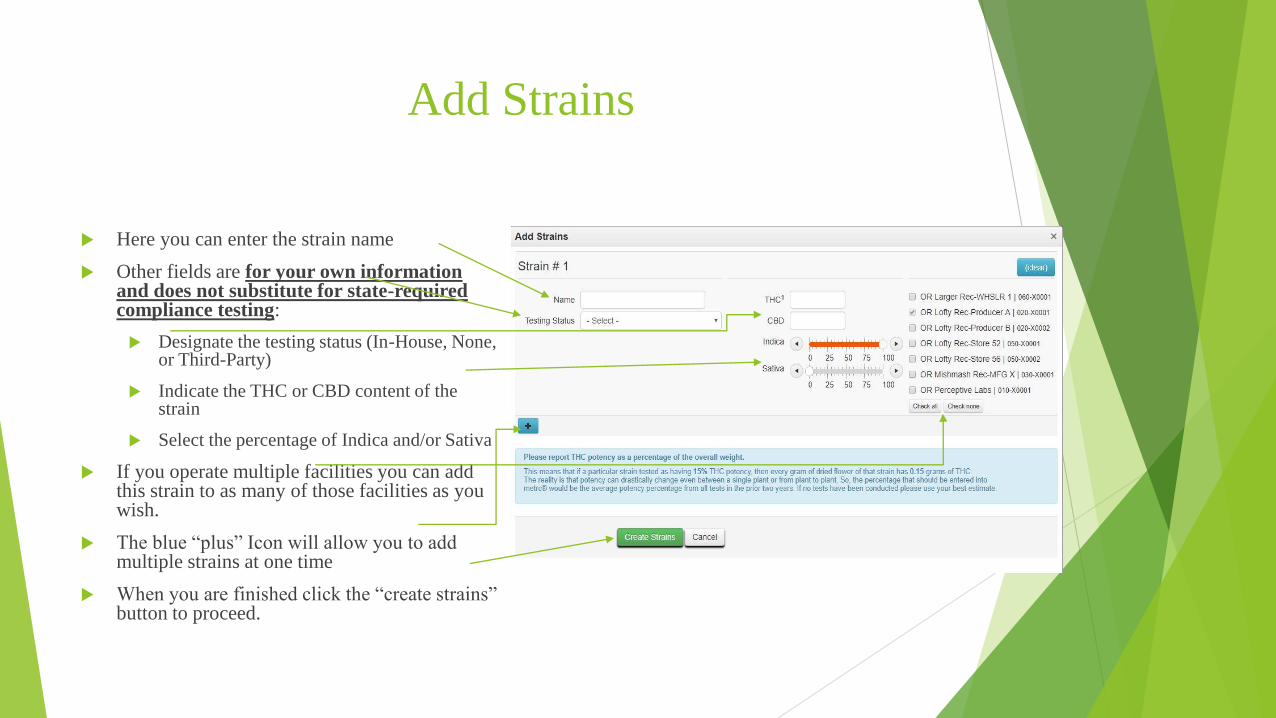
Add Strains
Here you can enter the strain name
Other fields are for your own information and does not substitute for state-required compliance testing:
Designate the testing status (In-House, None, or Third-Party)
Indicate the THC or CBD content of the strain
Select the percentage of Indica and/or Sativa
If you operate multiple facilities you can add this strain to as many of those facilities as you wish.
The blue “plus” Icon will allow you to add multiple strains at one time
When you are finished click the “create strains” button to proceed.
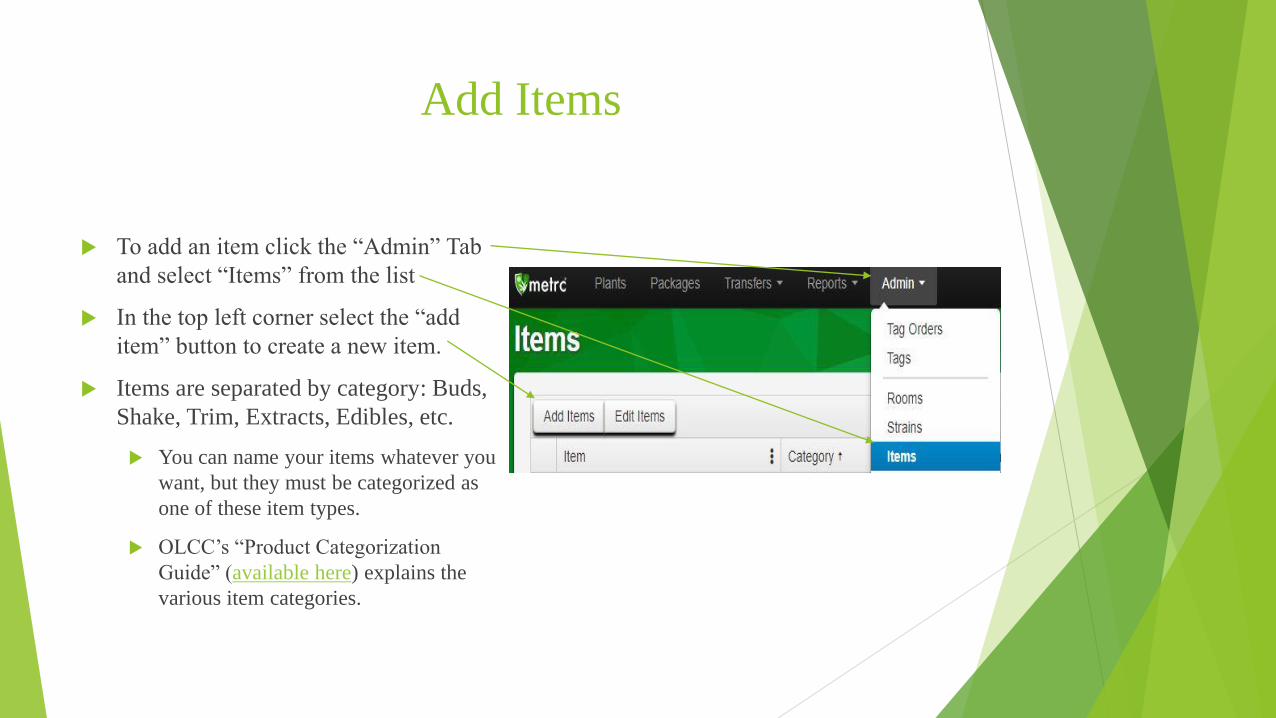
Add Items
To add an item click the “Admin” Tab
and select “Items” from the list
In the top left corner select the “add
item” button to create a new item.
Items are separated by category: Buds,
Shake, Trim, Extracts, Edibles, etc.
You can name your items whatever you
want, but they must be categorized as
one of these item types.
OLCC’s “Product Categorization
Guide” (available here) explains the
various item categories.
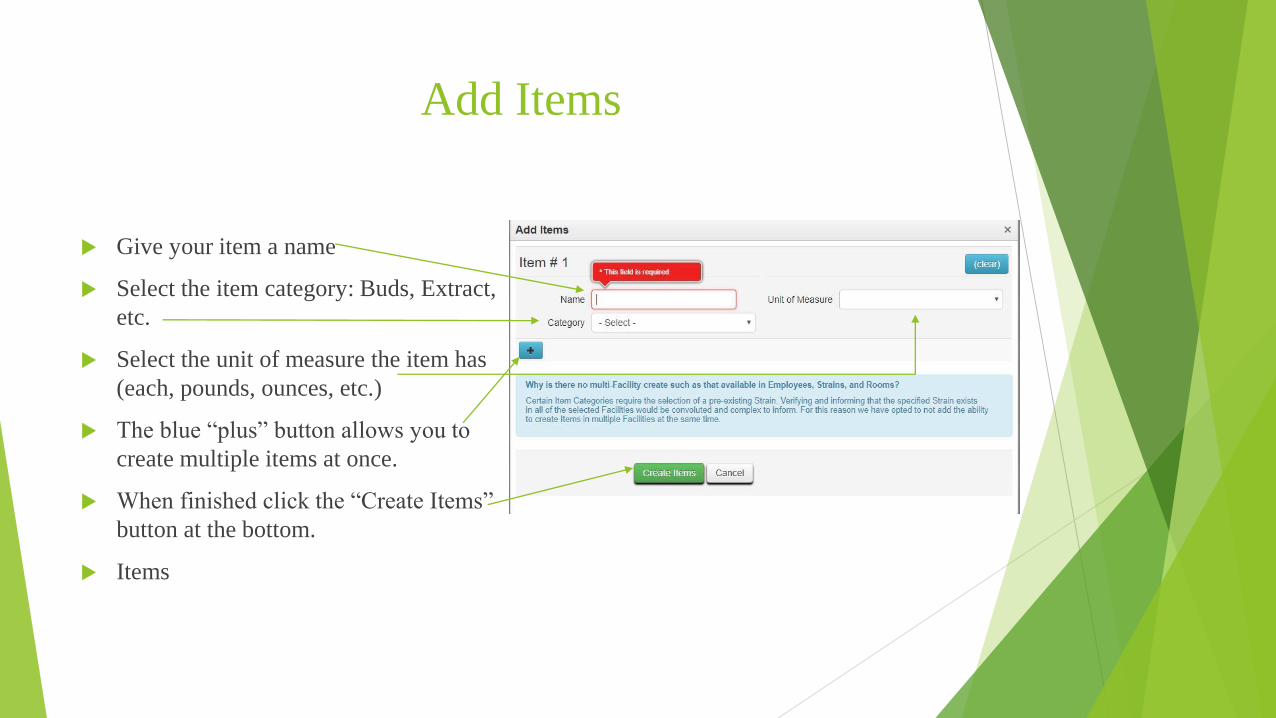
Add Items
Give your item a name
Select the item category: Buds, Extract,
etc.
Select the unit of measure the item has
(each, pounds, ounces, etc.)
The blue “plus” button allows you to
create multiple items at once.
When finished click the “Create Items”
button at the bottom.
Items
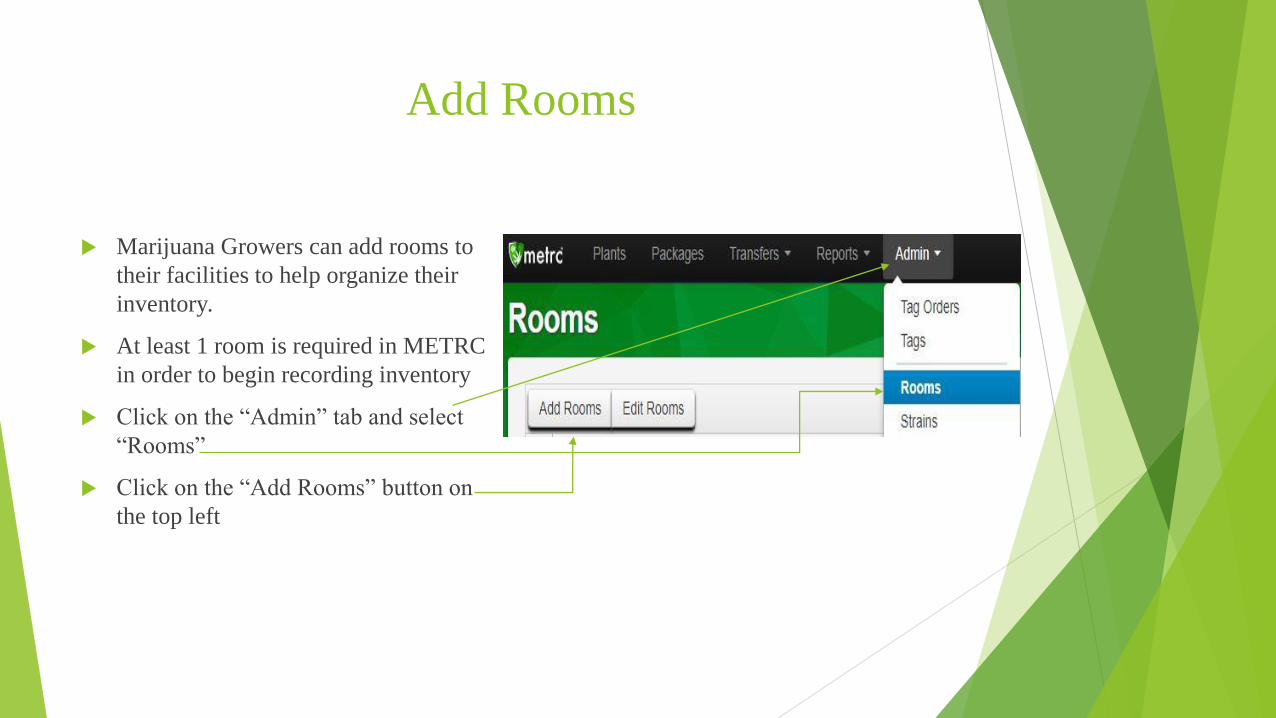
Add Rooms
Marijuana Growers can add rooms to
their facilities to help organize their
inventory.
At least 1 room is required in METRC
in order to begin recording inventory
Click on the “Admin” tab and select
“Rooms”
Click on the “Add Rooms” button on
the top left
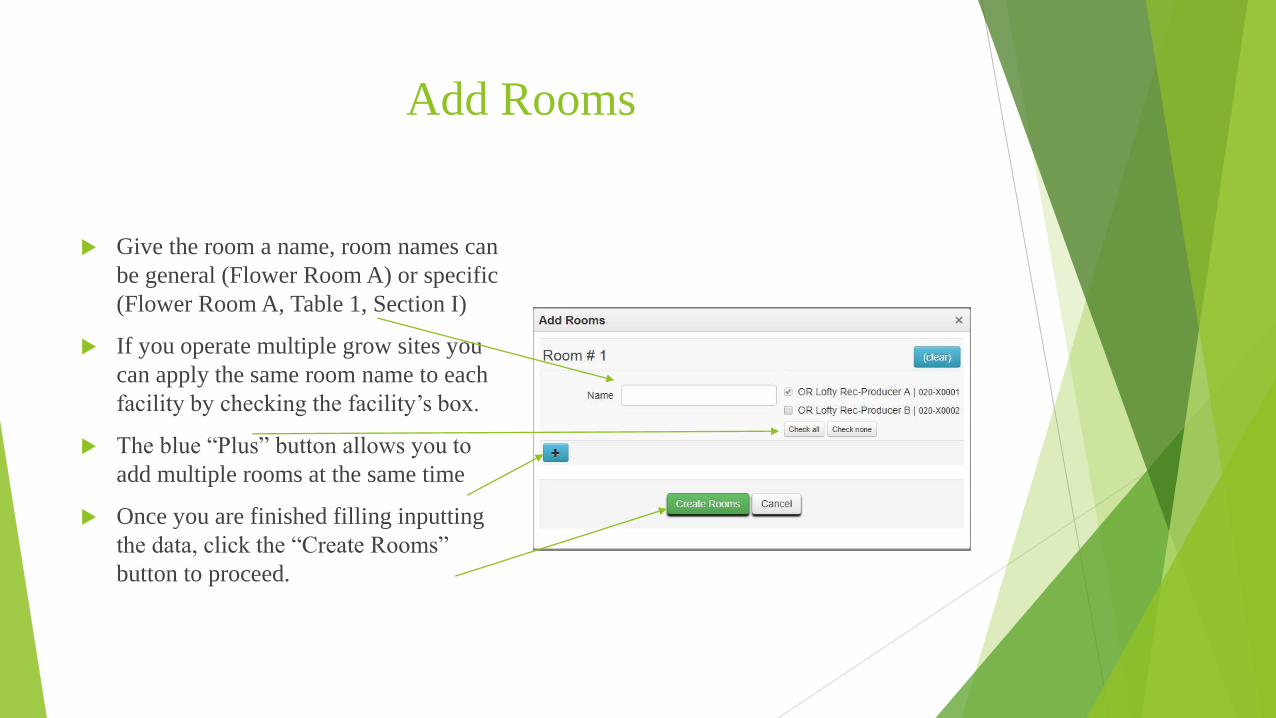
Add Rooms
Give the room a name, room names can
be general (Flower Room A) or specific
(Flower Room A, Table 1, Section I)
If you operate multiple grow sites you
can apply the same room name to each
facility by checking the facility’s box.
The blue “Plus” button allows you to
add multiple rooms at the same time
Once you are finished filling inputting
the data, click the “Create Rooms”
button to proceed.
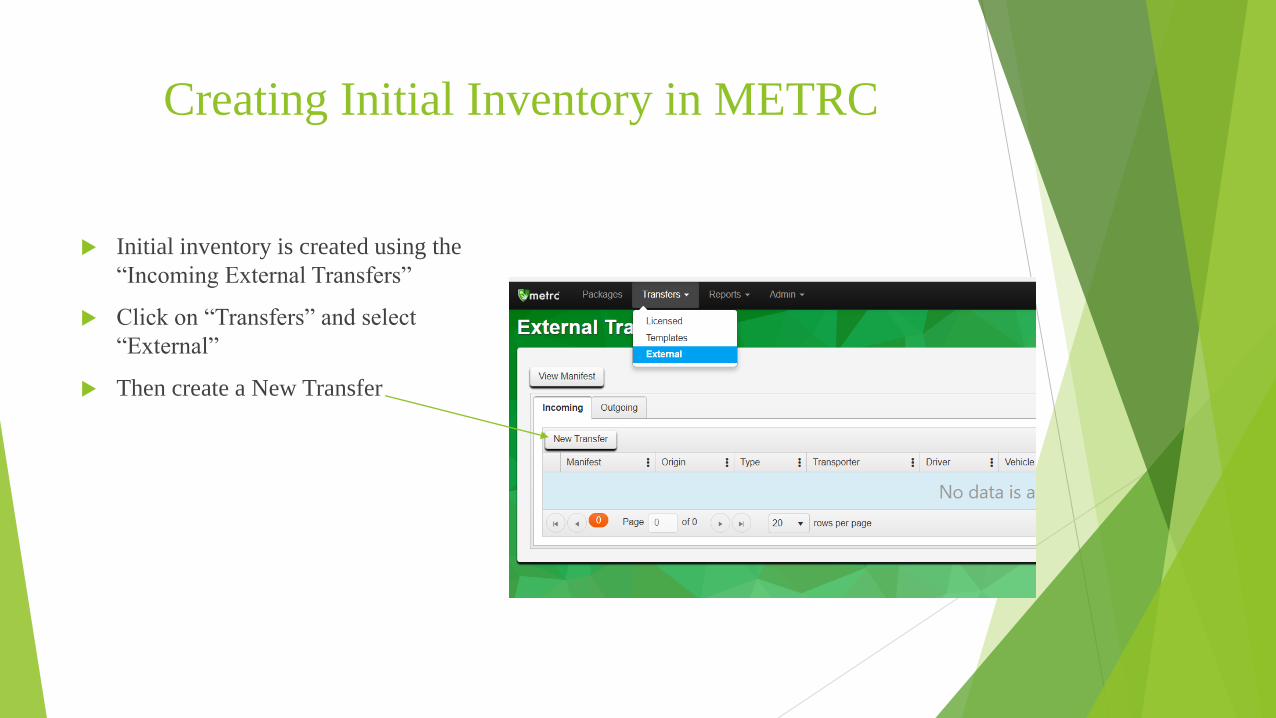
Creating Initial Inventory in METRC
Initial inventory is created using the
“Incoming External Transfers”
Click on “Transfers” and select
“External”
Then create a New Transfer
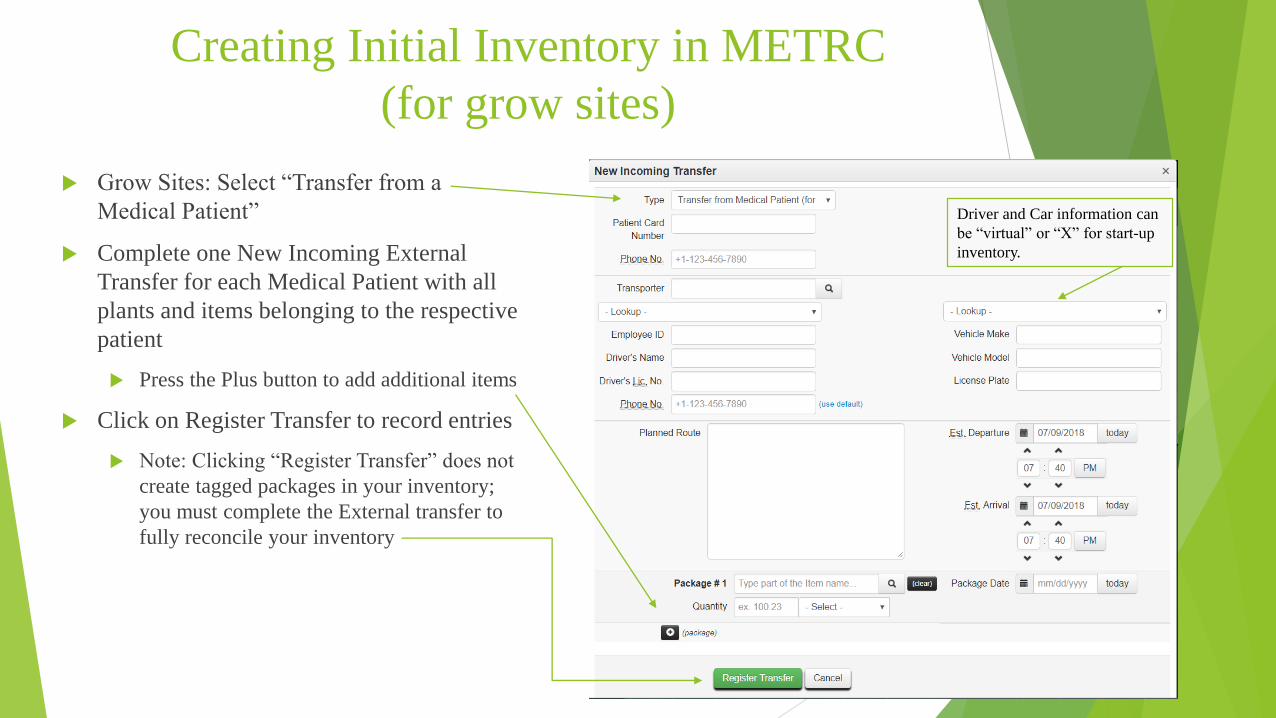
Creating Initial Inventory in METRC
(for grow sites)
Grow Sites: Select “Transfer from a
Medical Patient”
Complete one New Incoming External
Transfer for each Medical Patient with all
plants and items belonging to the respective
patient
Press the Plus button to add additional items
Click on Register Transfer to record entries
Note: Clicking “Register Transfer” does not
create tagged packages in your inventory;
you must complete the External transfer to
fully reconcile your inventory
Driver and Car information can
be “virtual” or “X” for start-up
inventory.
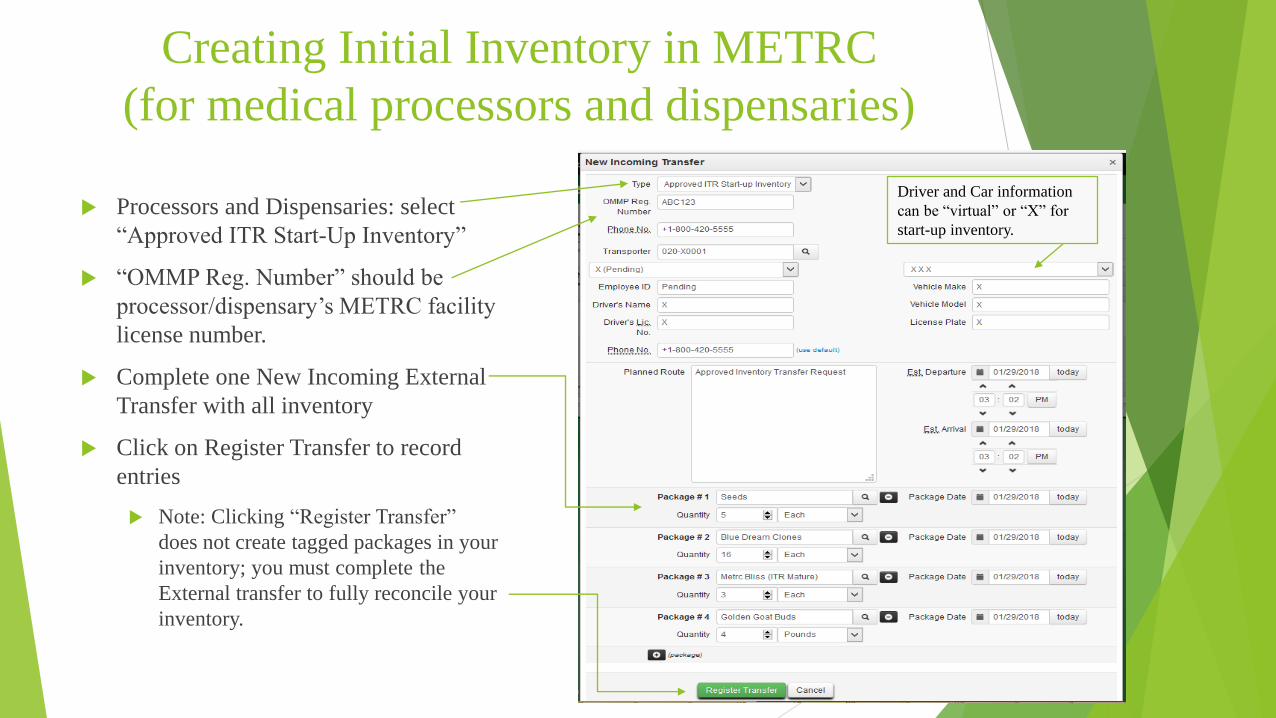
Creating Initial Inventory in METRC
(for medical processors and dispensaries)
Processors and Dispensaries: select
“Approved ITR Start-Up Inventory”
“OMMP Reg. Number” should be
processor/dispensary’s METRC facility
license number.
Complete one New Incoming External
Transfer with all inventory
Click on Register Transfer to record
entries
Note: Clicking “Register Transfer”
does not create tagged packages in your
inventory; you must complete the
External transfer to fully reconcile your
inventory.
Driver and Car information
can be “virtual” or “X” for
start-up inventory.

Completing External Transfer
To create tagged packages you must complete the pending incoming transfer by
clicking the “complete” button and entering the required information.
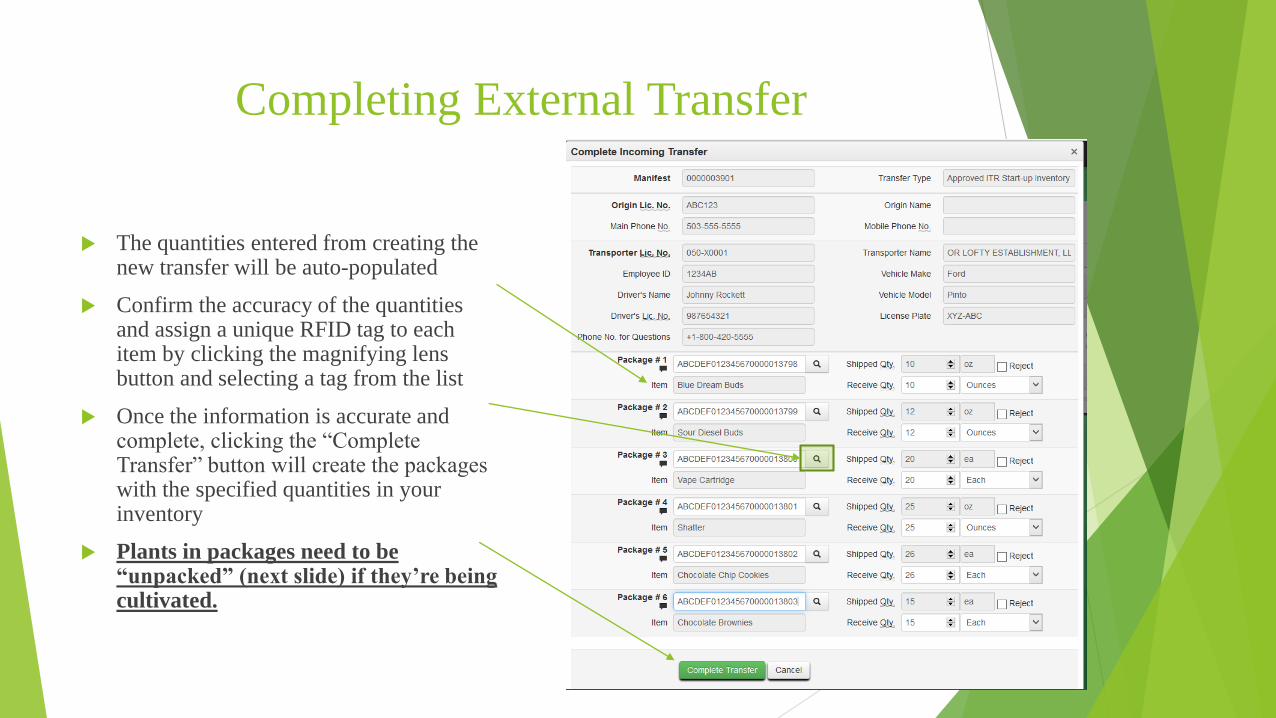
Completing External Transfer
The quantities entered from creating the new transfer will be auto-populated
Confirm the accuracy of the quantities and assign a unique RFID tag to each item by clicking the magnifying lens button and selecting a tag from the list
Once the information is accurate and complete, clicking the “Complete Transfer” button will create the packages with the specified quantities in your inventory
Plants in packages need to be “unpacked” (next slide) if they’re being cultivated.

Creating Plantings from Packages
Plants created via Incoming External
Transfer must be created as plantings in an
immature batch
Record vegetative and flowering plants as
clones and move to appropriate growth
phase
Remember that immature plant batches
need to be recorded in METRC as strain
and patient specific
Click on the Packages Link at the top of the
page, then click the “Create Plantings”
button
The Create Plantings Dialog Box will open

Creating Plantings from Packages
Click the Plus Button to add additional
plantings and activate the template area
If all plantings are the same type, use the
template section to make selections and
click the green check marks to autofill the
form
Can be used for all fields except Package
(tag) and Plant Count
Plants that will be vegetative and
flowering should be recorded first as
clones, then moved to the appropriate
growth phase
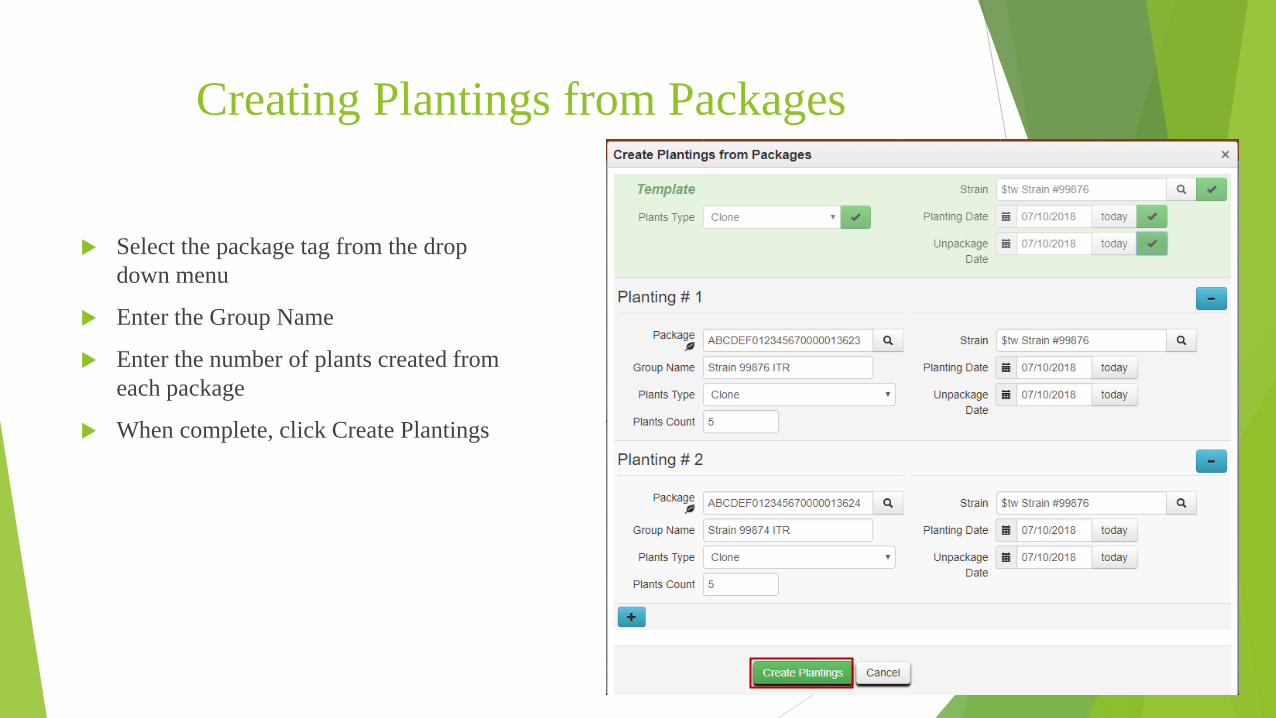
Creating Plantings from Packages
Select the package tag from the drop
down menu
Enter the Group Name
Enter the number of plants created from
each package
When complete, click Create Plantings
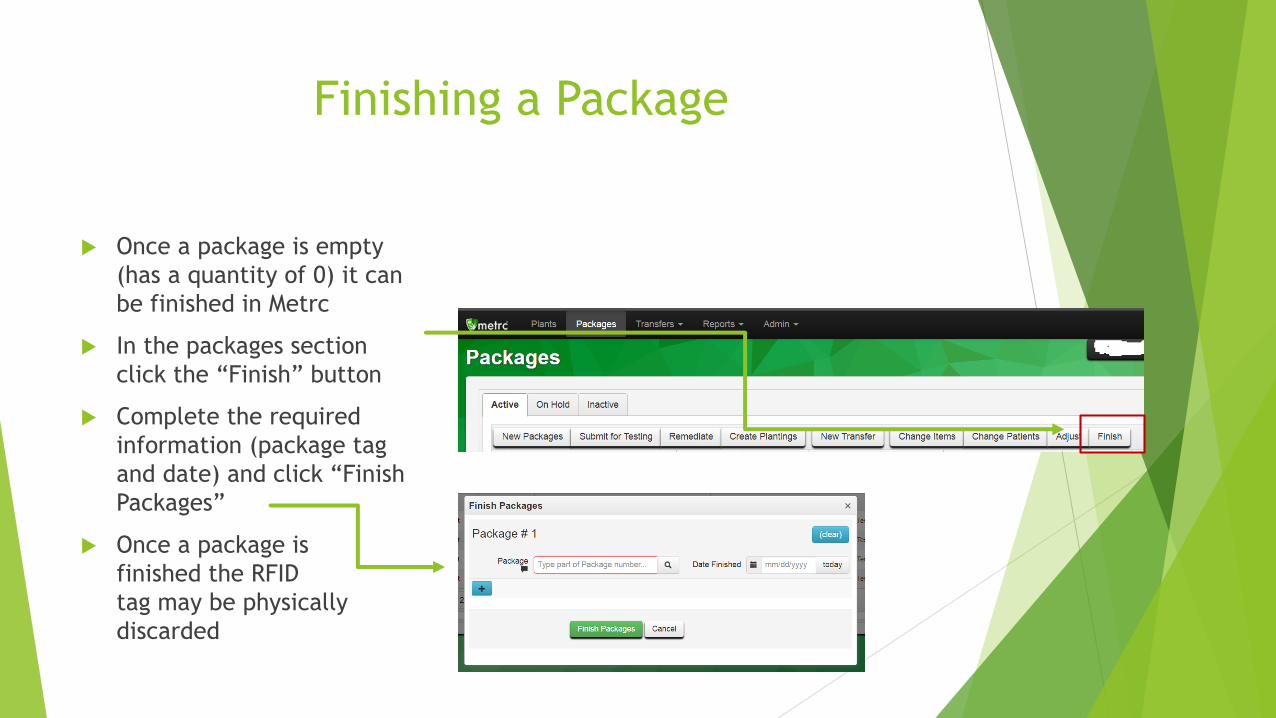
Finishing a Package
Once a package is empty
(has a quantity of 0) it can
be finished in Metrc
In the packages section
click the “Finish” button
Complete the required
information (package tag
and date) and click “Finish
Packages”
Once a package is
finished the RFID
tag may be physically
discarded
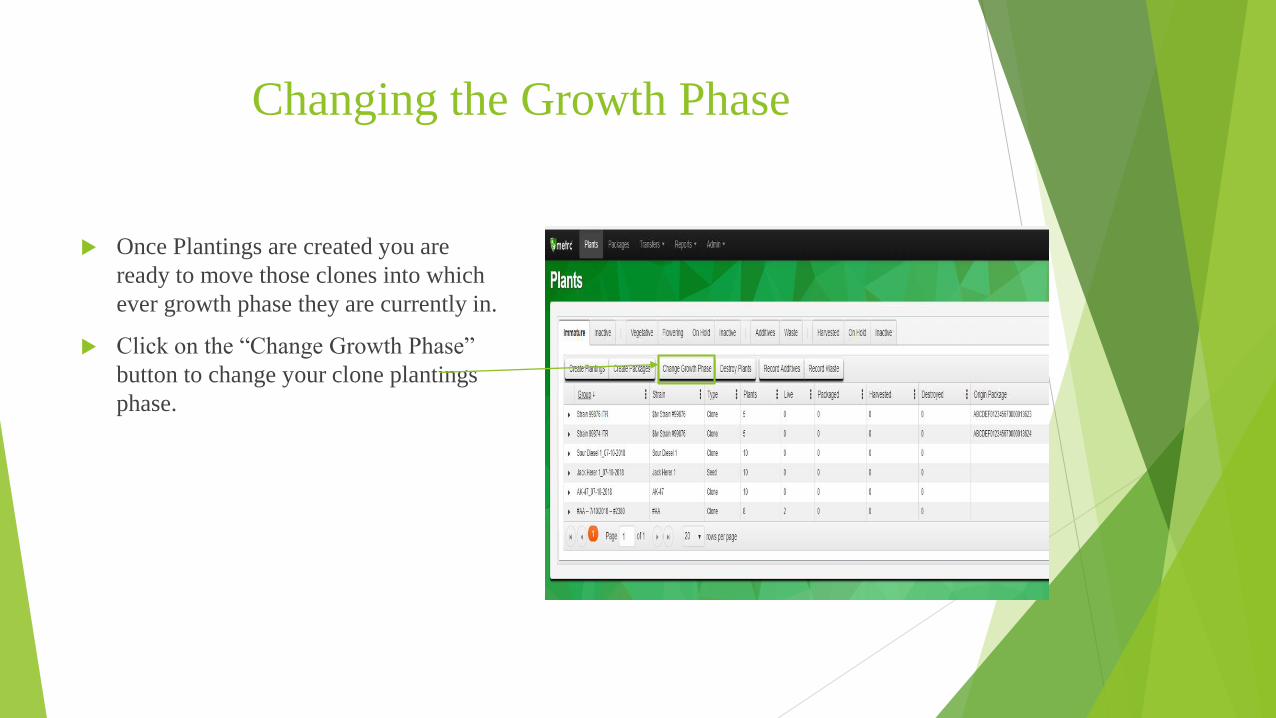
Changing the Growth Phase
Once Plantings are created you are
ready to move those clones into which
ever growth phase they are currently in.
Click on the “Change Growth Phase”
button to change your clone plantings
phase.
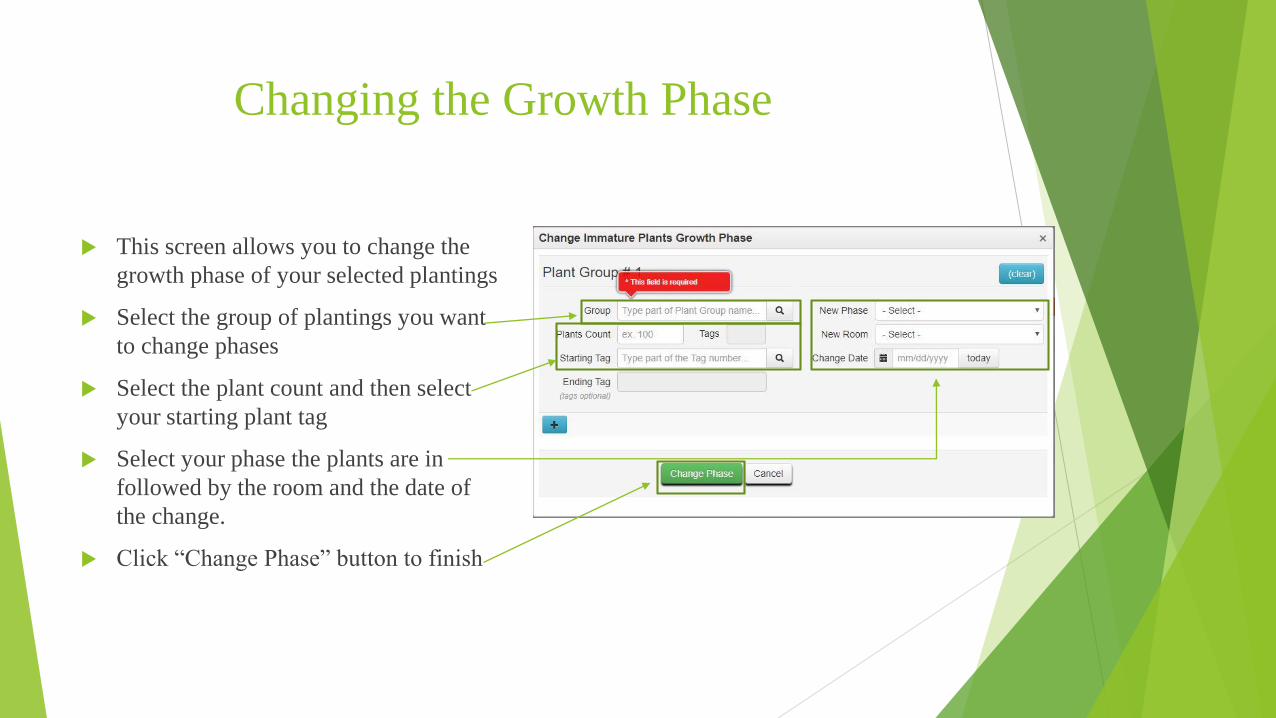
Changing the Growth Phase
This screen allows you to change the
growth phase of your selected plantings
Select the group of plantings you want
to change phases
Select the plant count and then select
your starting plant tag
Select your phase the plants are in
followed by the room and the date of
the change.
Click “Change Phase” button to finish
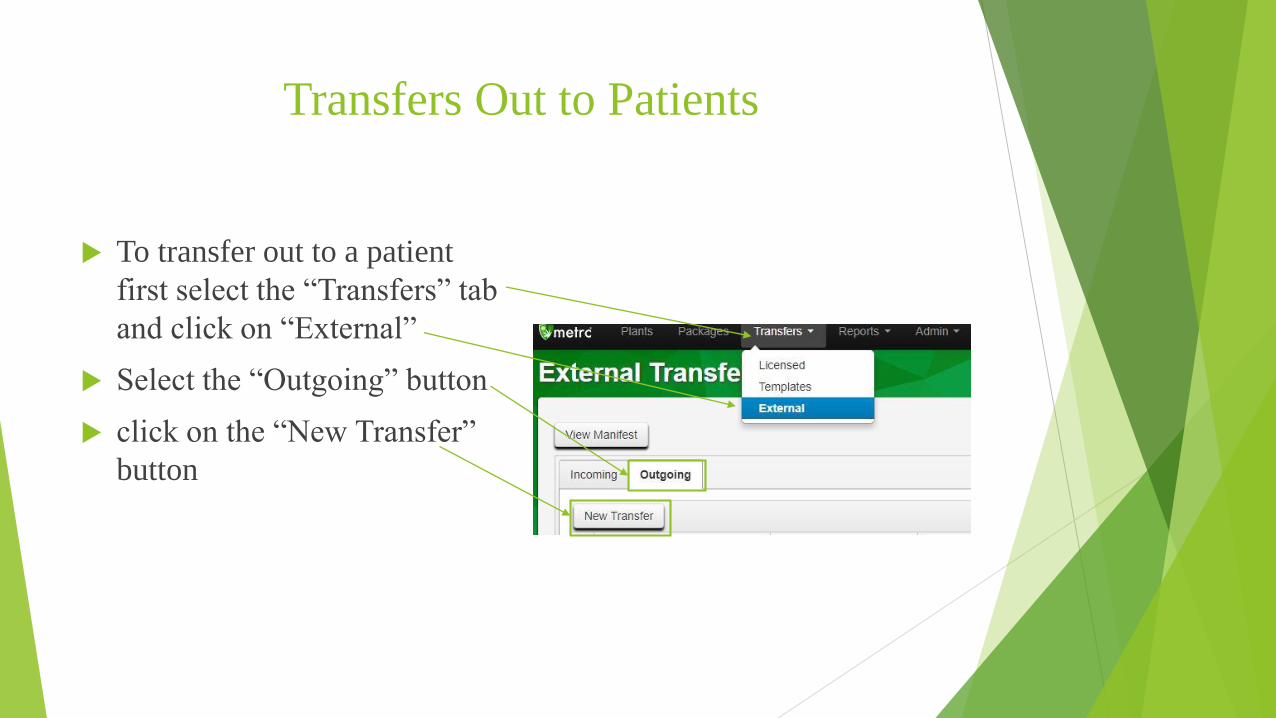
Transfers Out to Patients
To transfer out to a patient
first select the “Transfers” tab
and click on “External”
Select the “Outgoing” button
click on the “New Transfer”
button

Transfers Out to Patients
Select the type of transfer, in this case “External Transfer to Patient”;enter the OHA Patient or Caregiver Card Number to whom the transfer is being sent in the “OMMP Reg. Number” field
Fill in the driver and vehicle information
Fill out the destination, route, and departure and estimated arrival information
Select the package or packages that are being transferred to the patient
The black “plus” button will allow you to add multiple packages to the transfer
Click “Register Transfer” when complete
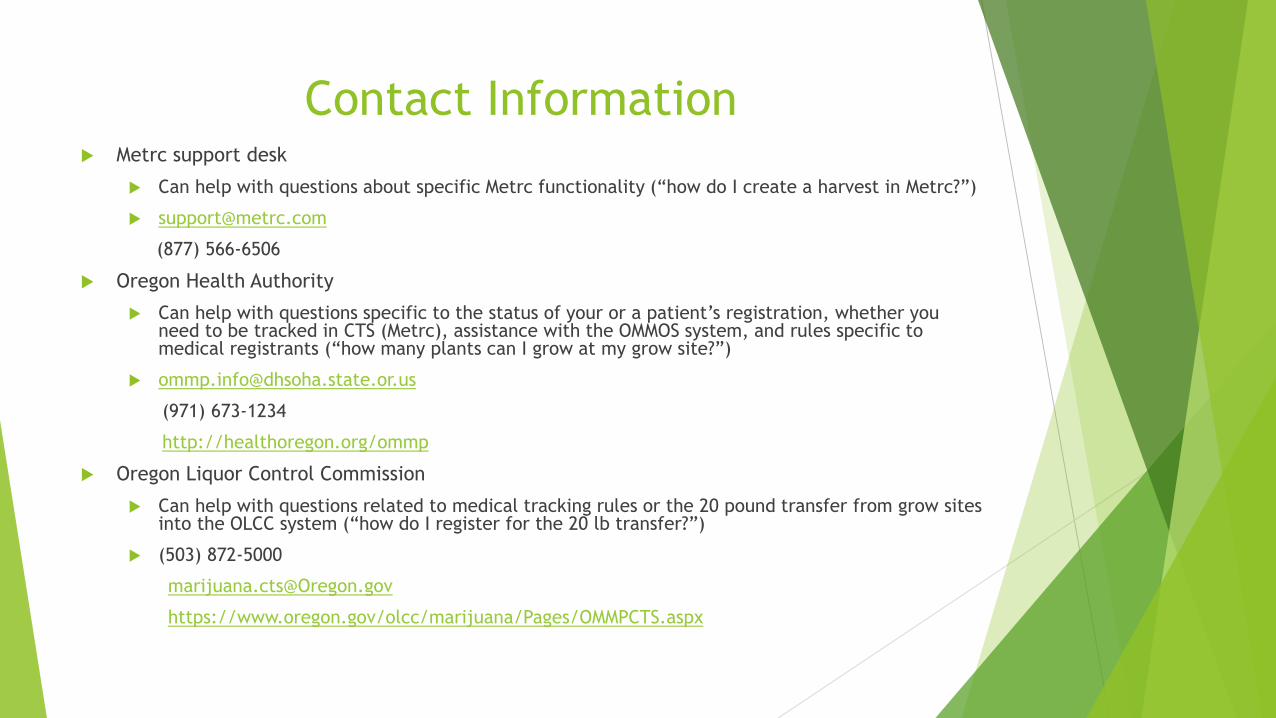
Contact Information Metrc support desk
Can help with questions about specific Metrc functionality (“how do I create a harvest in Metrc?”)
(877) 566-6506
Oregon Health Authority
Can help with questions specific to the status of your or a patient’s registration, whether you need to be tracked in CTS (Metrc), assistance with the OMMOS system, and rules specific to medical registrants (“how many plants can I grow at my grow site?”)
(971) 673-1234
http://healthoregon.org/ommp
Oregon Liquor Control Commission
Can help with questions related to medical tracking rules or the 20 pound transfer from grow sites into the OLCC system (“how do I register for the 20 lb transfer?”)
(503) 872-5000
https://www.oregon.gov/olcc/marijuana/Pages/OMMPCTS.aspx