Embed Size (px)
Citation preview


Page 2 | © 2018 Webroot Inc. All rights reserved. | Proprietary and Confidential Information January 4, 2018
Pre-Requisites ................................................................................................................................................................................ 3
Firewall\Proxy Server Considerations ........................................................................................................................................... 3
GSM Console Availability ............................................................................................................................................................. 3
Webroot Secure Anywhere Business Endpoint (WSABEP) Client Availability ................................................................................... 4
Migration Steps ............................................................................................................................................................................... 5
Disabling DWP Browser Protection ............................................................................................................................................... 5
Exporting WSS Site Overrides ...................................................................................................................................................... 6
Exporting WSS Browser Bypass and DWP Bypass Entries ............................................................................................................. 7
Enabling DNS Protection in the GSM Console ............................................................................................................................... 8
Creating Dynamic IP Setups ........................................................................................................................................................ 9
Creating Custom DNS Protection Policies ................................................................................................................................... 10
Adding Sites to the DNS Protection Block\Allow List (WSS Site Overrides) ................................................................................... 12
Enabling DNS Protection Client Bypass Lists (WSS Browser and DWP Bypasses) ........................................................................ 13
Activating Client Based DNS Protection (Global Level) ................................................................................................................ 14
Activating Client Based DNS Protection (Site Level).................................................................................................................... 15
Uninstalling the Desktop Web Proxy Client (DWP Uninstallation) ................................................................................................. 16
Troubleshooting\FAQ ..................................................................................................................................................................... 17
I Have No Internet Access ......................................................................................................................................................... 17
How Do I Flush My DNS Cache? ................................................................................................................................................. 17
I Cannot Resolve Internal Addresses .......................................................................................................................................... 17
How Long Does It Take For Policies To Update? .......................................................................................................................... 17
Testing Connectivity Using Telnet .............................................................................................................................................. 17
Testing Connectivity and Name Resolution Using Nslookup ........................................................................................................ 18
Appendix ....................................................................................................................................................................................... 19
How A DNS Query Works ........................................................................................................................................................... 19
Local DNS Caching.................................................................................................................................................................... 20
Links ............................................................................................................................................................................................. 21

Page 3 | © 2018 Webroot Inc. All rights reserved. | Proprietary and Confidential Information January 4, 2018
Please ensure you have the following IP addresses and ports allowed on your Firewall\Proxy server for DNS Protection to function correctly:
Setting Description
IP Addresses
45.54.55.54
45.54.55.55
45.54.50.50 (Required for DNS Protection client)
45.54.50.51 (Required for DNS Protection client)
Ports
53 (TCP & UDP)
7777 (TCP & UDP – Required for DNS Protection client)
80
8080
443
If you do not have a GSM Console, please contact your Webroot Account Manager to have your current standalone console migrated to a GSM console or, if you are a new customer, to have a new console created for you. Please review the following documents to familiarize yourself with the GSM console:
GSM Console Admin Guide
GSM Console Getting Started Guide
GSM Console Best Practices Guide

Page 4 | © 2018 Webroot Inc. All rights reserved. | Proprietary and Confidential Information January 4, 2018
Ensure you have the WSABEP client installed on one machine, if you have a dynamic public IP address, or on all machines, if you require user and machine based filtering\reporting. Minimum WSABEP client version 9.0.18.34. You can obtain the client from the following location: https://my.webrootanywhere.com/download.aspx Note: This migration guide assumes that you have installed the Webroot Endpoint Client as per the documentation listed in the GSM
Console Availability section. This is a prerequisite that needs to be met before you can continue with your migration.

Page 5 | © 2018 Webroot Inc. All rights reserved. | Proprietary and Confidential Information January 4, 2018
Please follow the procedures in this section in the order they have been written. This will ensure a smooth transition between the two products, with minimal end user impact.
To disable DWP browser protection:
1. Log into the WSS portal:
https://weblogin.webroot.com
2. Go to Settings > Accounts > DWP Configuration.
3. Click the Edit button.
4. Under the General Settings section, from the Prevent User Access to Browser Proxy Settings drop-down menu select Disabled.
This will ensure that the proxy settings are unlocked once the DWP client has been uninstalled.
5. If you manage DWP on a group level, ensure you disable the same setting within the Group > DWP Configuration section.
You can tell if you are performing group level filtering by going to the Groups section and checking the Use Group Settings column.

Page 6 | © 2018 Webroot Inc. All rights reserved. | Proprietary and Confidential Information January 4, 2018
To export WSS site overrides:
1. Log into the WSS portal:
https://weblogin.webroot.com
2. Go to the Policies section.
3. Click Edit next to your active policy and go to the Site Overrides section.
4. Click Edit again and then select the Export All Site Overrides option.
This saves all your site overrides into a CSV file using the following format:
Page 7 | © 2018 Webroot Inc. All rights reserved. | Proprietary and Confidential Information January 4, 2018
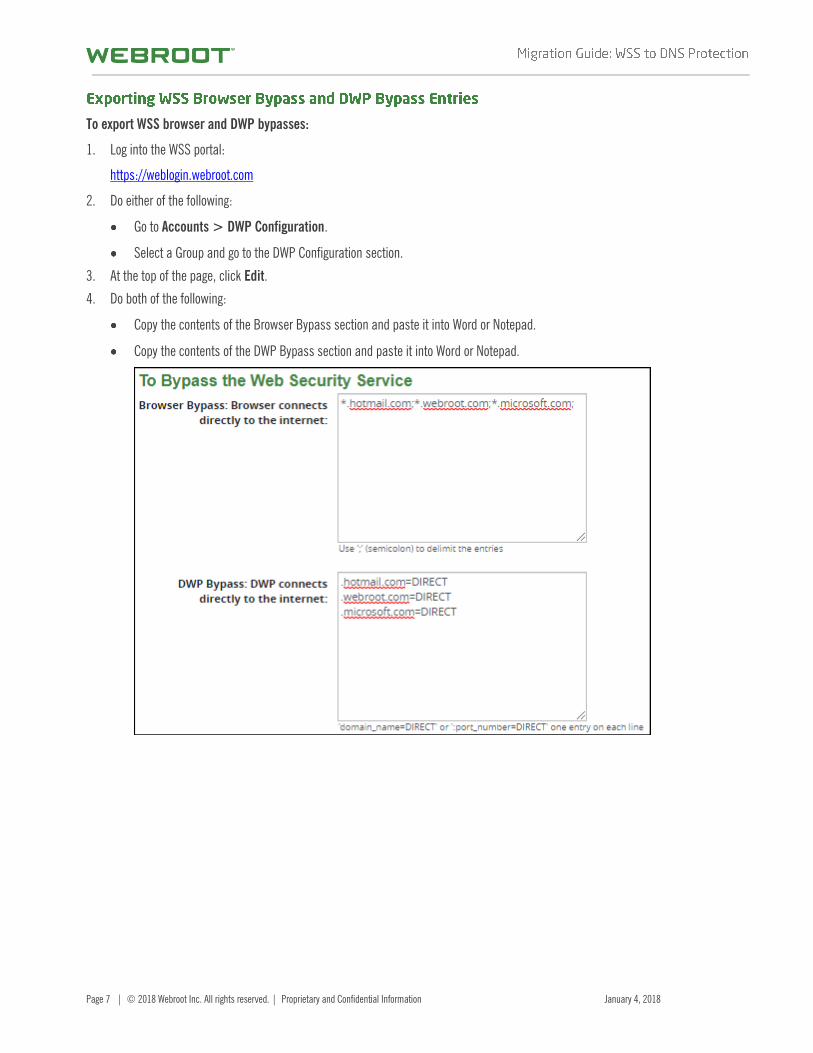
To export WSS browser and DWP bypasses:
1. Log into the WSS portal:
https://weblogin.webroot.com
2. Do either of the following:
Go to Accounts > DWP Configuration.
Select a Group and go to the DWP Configuration section.
3. At the top of the page, click Edit.
4. Do both of the following:
Copy the contents of the Browser Bypass section and paste it into Word or Notepad.
Copy the contents of the DWP Bypass section and paste it into Word or Notepad.

Page 8 | © 2018 Webroot Inc. All rights reserved. | Proprietary and Confidential Information January 4, 2018
To enable DNS protection in the GSM console:
1. Log into your GSM console:
https://my.webrootanywhere.com/default.aspx
Once logged in, your sites page will indicate the following:
Whether DNS Protection is enabled or disabled.
How many days are left if still in the trial phase.
2. Click the Manage button next to each respective site to edit DNS Protection settings, and select the DNS tab.
3. Ensure you have selected the SecureAnywhere DNS checkbox to enable DNS and have set the site’s keycode type.
4. Click the Plus (+) button on the right side of the screen, and enter the site’s public IP addresses, as well as the level of DNS Protection required.

Page 9 | © 2018 Webroot Inc. All rights reserved. | Proprietary and Confidential Information January 4, 2018
5. Select either of the following default policies:
SecureAnywhere DNS High Protection – Access to Security, Parental Controls and Questionable (Cheating, Cult, etc.) sites is restricted.
SecureAnywhere DNS Medium Protection – Access to Security and Parental Controls (Adult, Nude, Porn, etc.) sites is restricted.
Note: You also have the option to create your own policies.
6. When you’re done, click the Save Changes button.
To create a dynamic IP setup:
1. Under the DNS tab when setting up site IP addresses, you have the option to choose Dynamic IP address as opposed to Static IP.
Note: This configuration is required if your ISP dynamically changes your public IP address.
2. Once you have selected the Dynamic IP option, you must nominate a machine to act as a dynamic IP update server and that will update the service, should your public IP address change.
A list displays all machines that have the Webroot Endpoint client installed, along with their respective IP address. You can then nominate a machine of your choosing to be the dynamic IP update server.

Page 10 | © 2018 Webroot Inc. All rights reserved. | Proprietary and Confidential Information January 4, 2018
3. The dynamic IP update server must have the following conditions met to work correctly:
Requires Webroot Endpoint security installed on the machine.
Is always on.
Never leaves the physical site.
The Poll interval for the endpoint client must be set to 15 minutes.
Note: Although dynamic IPs should not change very often, we advise customers who have selected this option, and who want to ensure connectivity in the event their IPs change, to enter in a secondary DNS server address from another service provider (the default DNS server address that is provided by their ISP) in their network settings.
Some customers may choose not to put in a secondary IP address from another provider, as that will not provide policy-based filtering. Those customers may experience a brief period of DNS service interruption (15 minutes, maximum), while their site policies are updated with their new IP address.
To create a custom policy:
1. Select the Global Settings option and then select Policies > DNS.
2. Click the Add button to add a new DNS filtering policy.

Page 11 | © 2018 Webroot Inc. All rights reserved. | Proprietary and Confidential Information January 4, 2018
3. You can now expand the parent categories under your newly created policy to show sub-categories, and whether they are set to be allowed or blocked.
A red X denotes that the parent category and all sub categories are set to be blocked, while a blank entry means that the parent category and all sub categories are allowed.
An orange icon denotes that the parent category has a mixture of allowed and blocked sub categories.

Page 12 | © 2018 Webroot Inc. All rights reserved. | Proprietary and Confidential Information January 4, 2018
Note: The categories present are near enough identical to those available in the Web Security Service so you should be able to replicate your Web Security policies with ease.
You can add sites to a Block\Allow list, which will allow you to do either of the following:
Access websites while keeping a category\sub-category blocked.
Block websites, if you feel they have been added to an incorrect category that is being allowed.
To add sites to the Block\Allow list:
1. Select Global Settings > Web Overrides > Block/Allow List.
2. Click the Add button.
3. Copy and paste the domains from the WSS Site Override export you created in the Exporting WSS Site Overrides procedure.
4. Select Allow or Block.
5. Do either of the following:
Add this entry as a GSM Global Web Override, which makes it available for all sites to use.
Add this entry to a specific site, to perform more granular filtering.

Page 13 | © 2018 Webroot Inc. All rights reserved. | Proprietary and Confidential Information January 4, 2018
Once completed, your entry will look like the following. You can see various details about the override in regards to its Action type (Block\Allow), last modified date, whether it is a site specific override or global, etc. You can also manually delete overrides from your list here.
Note: There is currently a limit of 100 entries for benchmarking purposes.
Note: The DNS Client needs to be activated to use this feature.
To enable the DNS client bypass list:
1. Log into your GSM console:
https://my.webrootanywhere.com/default.aspx
2. Click the Manage button next to each respective site to edit DNS Protection settings, then select the DNS tab.
3. Locate the Agent Bypass List (Intranet) section.
4. Enter any domains that you wish to have bypassed from our DNS resolvers. Any entries located here will be resolved by the DNS servers used by the machine prior to activating the DNS client.
Note: You do not need to add all your browser and DWP bypasses in this section. Only add your internal domains and business critical sites, such as hosted services (Office365.com etc.). The DNS service uses new technology that does not get blocked by 3rd party sites. If you do ever encounter any site accessing issues, please contact our business support team.

Page 14 | © 2018 Webroot Inc. All rights reserved. | Proprietary and Confidential Information January 4, 2018
To activate client-based DNS protection:
1. Log into your GSM console:
https://my.webrootanywhere.com/default.aspx
2. Go to the Global Settings section.
3. Locate the endpoint policy being used your workstations and select the DNS Protection option.
4. Move the Draft slider button from Off to On.
5. Click the Save Draft Changes button.
You will now see the Live option has changed to On, and any Sites using this Global Policy will now have the DNS Client activated on their workstations.
Page 15 | © 2018 Webroot Inc. All rights reserved. | Proprietary and Confidential Information January 4, 2018
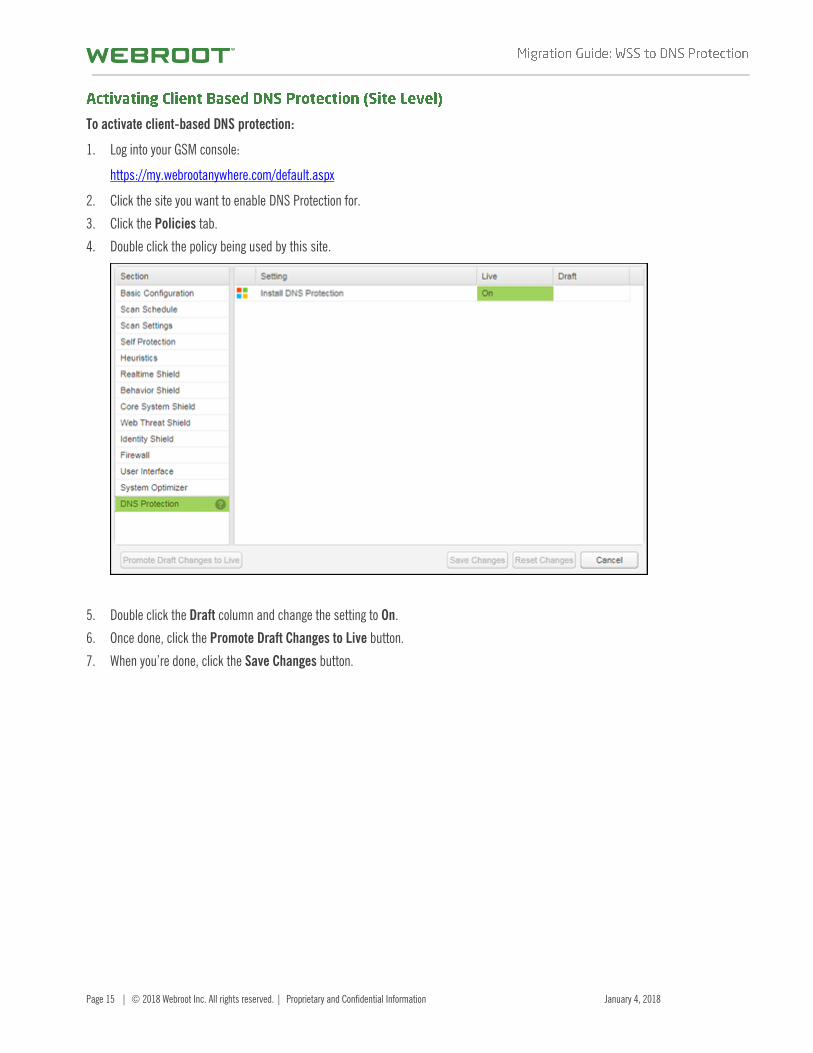
To activate client-based DNS protection:
1. Log into your GSM console:
https://my.webrootanywhere.com/default.aspx
2. Click the site you want to enable DNS Protection for.
3. Click the Policies tab.
4. Double click the policy being used by this site.
5. Double click the Draft column and change the setting to On.
6. Once done, click the Promote Draft Changes to Live button.
7. When you’re done, click the Save Changes button.

Page 16 | © 2018 Webroot Inc. All rights reserved. | Proprietary and Confidential Information January 4, 2018
To uninstall the DWP client:
1. Download the version of the DWP client being used:
DWP v4.1.1.1040 – https://weblogin.webroot.com/resources/DWPSetup.zip
DWP v4.1.1.1040 (Uninstall Disabled) – https://weblogin.webroot.com/resources/DWPSetup_NoUninstall.zip
DWP v5.1.025 – https://dycsf1tq8152g.cloudfront.net/Dwp5_1_025.msi
DWP v5.1.025 – https://weblogin.webroot.com/resources/Dwp5_1_025_Nouninstall.msi
2. If you require older versions of the DWP client, please contact our support team, who will be able to assist you with this request.
Uninstallation Methods
3rd Party Deployment Tools\Group Policy
If you originally installed the DWP client using a 3rd party deployment tool or Group Policy, ensure you have placed the DWP installer within the same public share used when the client was originally installed. This will ensure that when un-installing the DWP client, the same path is used as per the installation.
MSI Command Line
You can remove the DWP client by using the following command:
msiexec.exe –x <full path to DWPSetup.msi> /q
Please ensure you use the full path to the DWP installer including driver letter, for example:
X:\sharedfolder\DWPSetup.msi /q
Manual Uninstall
Launch the DWP installer as an administrator, and follow the on-screen instructions to uninstall the client.
Considerations
Prevent User Access To Browser Proxy Settings
DWP v4 Proxy Settings Being Retained
DWP v4.x does not remove the proxy settings when it has been un-installed. Once you have un-installed DWP v4.x, please disable the proxy settings from within your browsers. You can automate the removing of proxy settings for Internet Explorer and Chrome by using Group Policy or registry keys. The following Microsoft blog helps explain on how to do this: https://blogs.msdn.microsoft.com/askie/2015/10/12/how-to-configure-proxy-settings-for-ie10-and-ie11-as-iem-is-not-available/
DWP has been uninstalled, but you can still see it within Add\Remove Programs.
Should this occur, please contact the support team who can assist you.

Page 17 | © 2018 Webroot Inc. All rights reserved. | Proprietary and Confidential Information January 4, 2018
Ensure your public IP address has been added to the DNS Protection console.
Ensure you have enabled DNS protection within the active policy being used.
Ensure IPv6 is disabled on the active network card on your machines.
Confirm your machines are using their own IP addresses as the DNS server.
Flush your DNS Cache on your workstation.
Windows – Open a cmd prompt and enter the following: C:\>ipconfig /flushdns
MAC OSX 10.10.4 and above – Open terminal and enter the following: sudo killall –HUP mDNSResponder
MAC OSX 10.10.1-10.10.3 – Open terminal and enter the following: sudo discoverutil mdnsflushcache
MAC OSX 10.7-10.9 – Open terminal and enter the following: sudo killall –HIP mDNSResponder
If you find you cannot access internal sites, please check the following:
Your internal DNS server is reachable from the machine.
The resource being accessed does not have a public version. If you do have some internal resource that can be accessed from outside of your network, please add an entry to your local hosts file for the resource you want to take precedence (internal vs external).
It takes on average between 5 to 15 minutes for policy changes to take effect.
Open a cmd prompt on a machine within the network being filtered, and perform the following telnet tests:
telnet 45.54.55.54 53
telnet 45.54.55.55 53
A successful test will result in a blank screen with a flashing cursor in the upper left corner. If all the above tests pass, you should have connectivity to the DNS Protection service.

Page 18 | © 2018 Webroot Inc. All rights reserved. | Proprietary and Confidential Information January 4, 2018
To test connectivity:
1. Open a cmd prompt on a machine that requires filtering and enter the following:
nslookup
server 45.54.55.54
set debug
www.google.com
You should get the following output:
C:\Users\user>nslookup Default Server: xxxx.xxxx.xxxx Address: xxx.xxx.xxx > server 45.54.55.54 Default Server: 54.55.54.45.wsadns.webroot.com Address: 45.54.55.54 > set debug > www.google.com. (Please notice the final dot after the .com) Server: 54.55.54.45.wsadns.webroot.com Address: 45.54.55.54 Got answer: HEADER: opcode = QUERY, id = 3, rcode = NOERROR header flags: response, want recursion, recursion avail. questions = 1, answers = 1, authority records = 0, additional = 0 QUESTIONS: www.google.com, type = A, class = IN ANSWERS: -> www.google.com internet address = 216.58.196.132 ttl = 197 (3 mins 17 secs) Non-authoritative answer: Got answer: HEADER: opcode = QUERY, id = 4, rcode = NOERROR header flags: response, want recursion, recursion avail. questions = 1, answers = 1, authority records = 0, additional = 0 QUESTIONS: www.google.com, type = AAAA, class = IN ANSWERS: -> www.google.com AAAA IPv6 address = 2404:6800:4006:805::2004 ttl = 300 (5 mins) Name: www.google.com Addresses: 2404:6800:4006:805::2004 216.58.196.132

Page 19 | © 2018 Webroot Inc. All rights reserved. | Proprietary and Confidential Information January 4, 2018
When debugging DNS issues, it is important to remember that Windows queries DNS in the following order:
1. Hosts file
2. Local DNS cache
3. Preferred DNS servers
4. Other DNS servers (Secondary, Tertiary, ...)
This is the list of timeouts for DNS requests:
Value Default Value Attempt
1st limit 1 second Query the preferred DNS server on a preferred connection.
2nd limit 2 seconds Query the preferred DNS server on all connections.
3rd limit 2 seconds Query all DNS servers on all connections (1st attempt).
4th limit 4 seconds Query all DNS servers on all connections (2nd attempt).
5th limit 8 seconds Query all DNS servers on all connections (3rd attempt).
6th value (Must be 0)
Machines these days can have multiple active connections and, if this is the case, the following order is in effect when performing DNS queries:
Wired
Wireless
Bluetooth
GSM
If a DNS query fails via the wired network, it will failover and attempt to use the wireless network and so forth until it can resolve the query.

Page 20 | © 2018 Webroot Inc. All rights reserved. | Proprietary and Confidential Information January 4, 2018
To view a local DNS cache:
1. Open a cmd prompt.
2. Enter the following:
C:\>ipconfig /displaydns
This will show an output similar to the following:
The local cache is always queried before the preferred DNS server so if you experience issues accessing sites, it is advisable to close down any open browsers, flush your local DNS cache and then test to see if you are still experiencing browsing issues.

Page 21 | © 2018 Webroot Inc. All rights reserved. | Proprietary and Confidential Information January 4, 2018
Portal Login
DNS Protection Getting Started Guide
DNS Protection Admin Guide
How DNS Works
DNS Query Timeouts