Embed Size (px)
Citation preview
For installation help and operationalinstructions, call:
1-800-828-4040 1-800 OK CANONU.S.A. CUSTOMERS CANADA CUSTOMERS
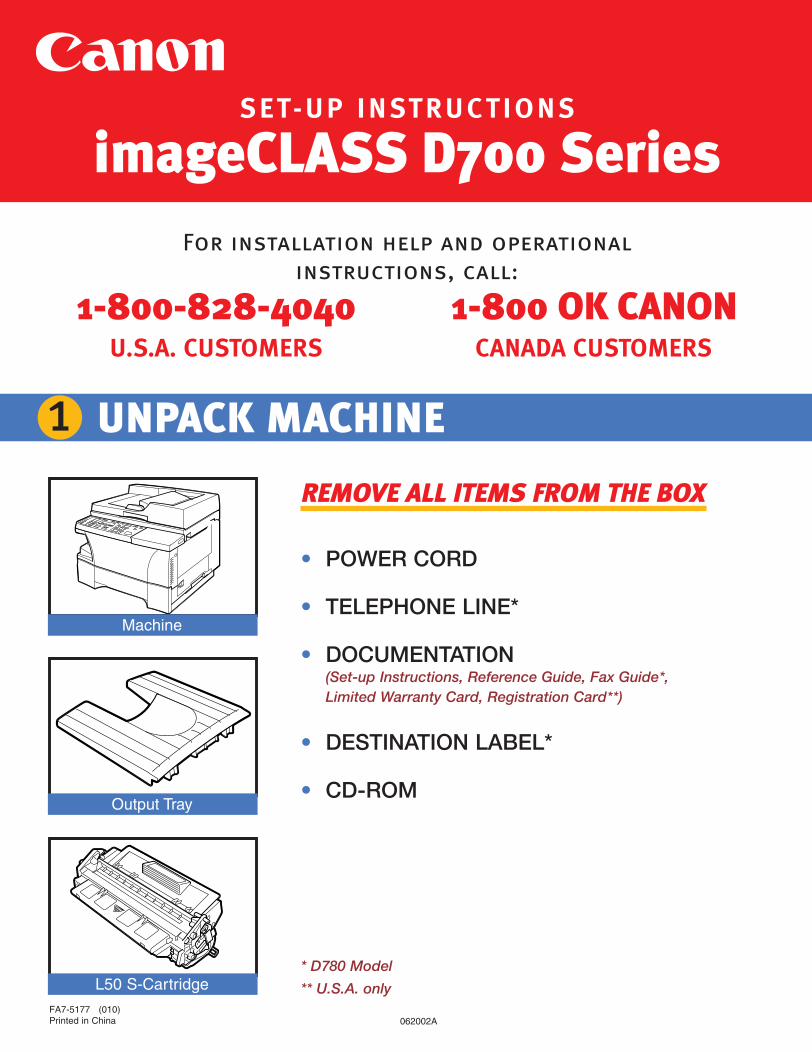
Output Tray
L50 S-Cartridge
Label
Connect the supplied power cord to the power cord connector on the left side of the machine.
REMOVE ALL ITEMS FROM THE BOX
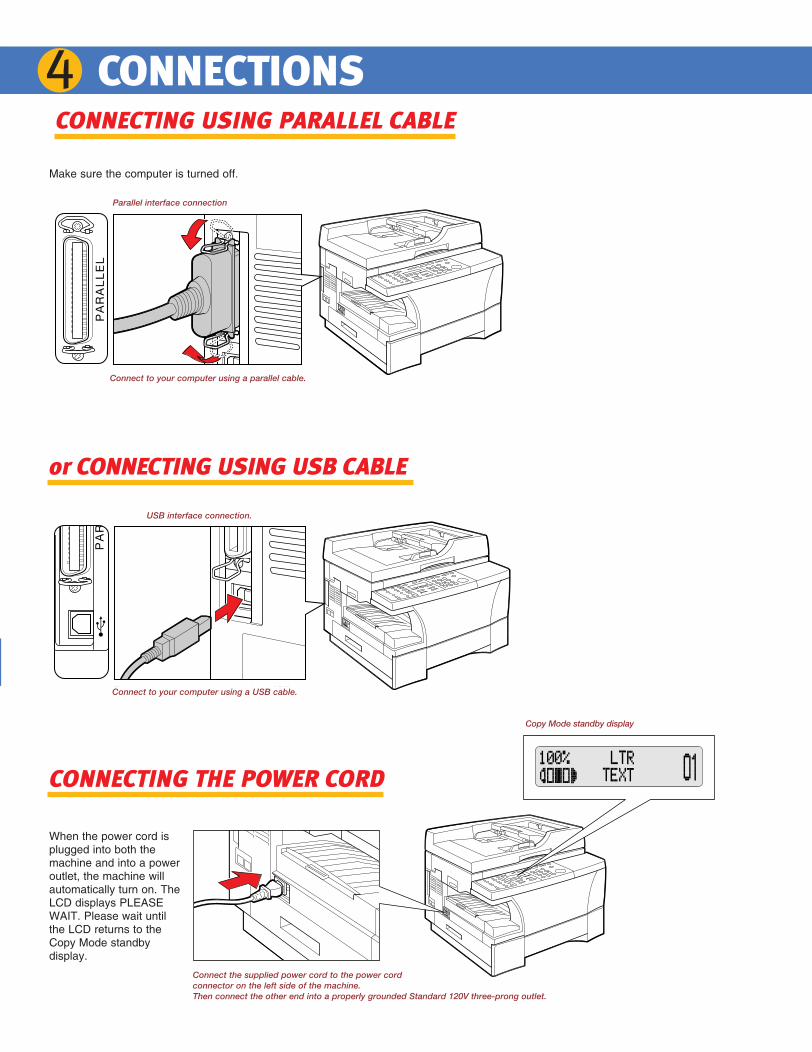
CONNECTING USING PARALLEL CABLE
or CONNECTING USING USB CABLE
CONNECTING THE POWER CORD
• POWER CORD
• TELEPHONE LINE*
• DOCUMENTATION(Set-up Instructions, Reference Guide, Fax Guide*, Limited Warranty Card, Registration Card**)
• DESTINATION LABEL*
• CD-ROM
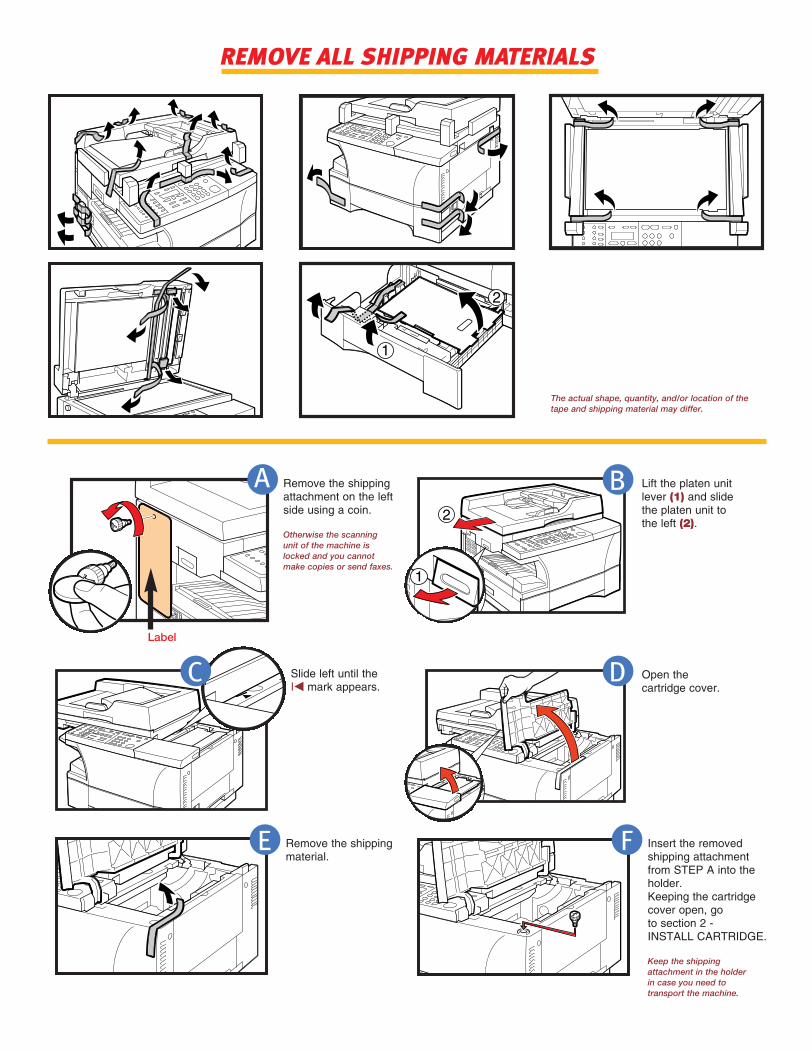
Remove the shippingattachment on the leftside using a coin.
Otherwise the scanning unit of the machine is locked and you cannot make copies or send faxes.
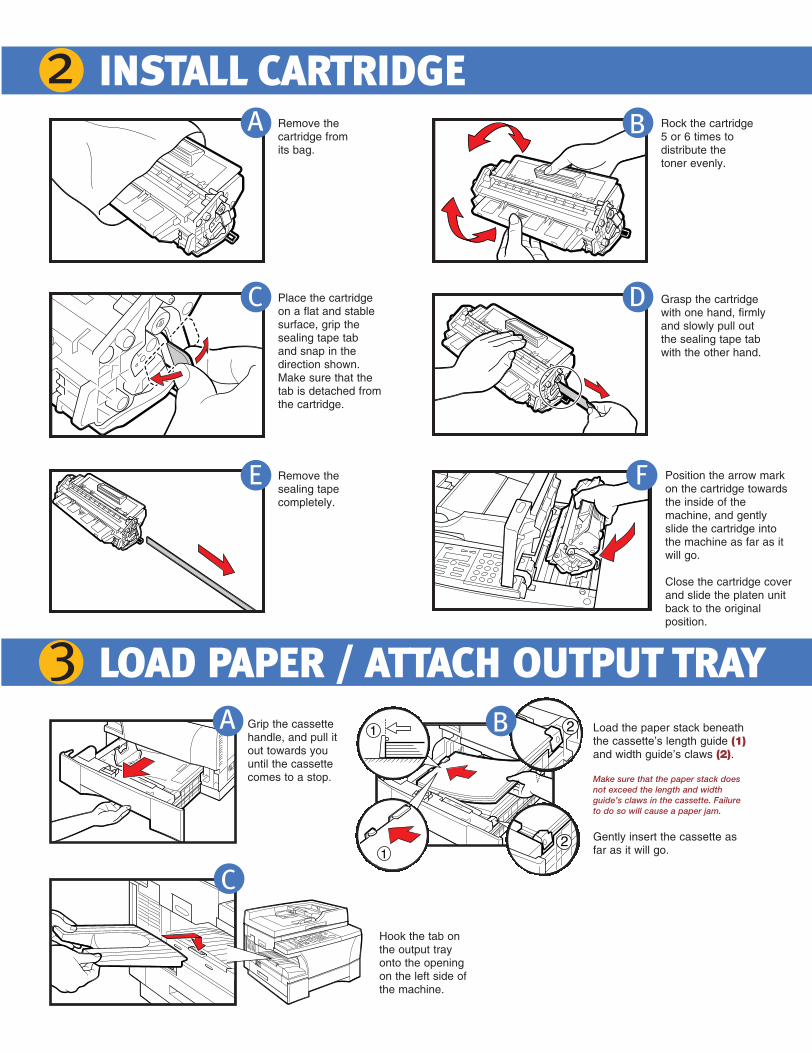
Grasp the cartridgewith one hand, firmlyand slowly pull outthe sealing tape tabwith the other hand.
Remove thesealing tapecompletely.
Slide left until the I4 mark appears.
When the power cord isplugged into both themachine and into a poweroutlet, the machine willautomatically turn on. TheLCD displays PLEASEWAIT. Please wait untilthe LCD returns to theCopy Mode standbydisplay.
Connect the supplied power cord to the power cordconnector on the left side of the machine.Then connect the other end into a properly grounded Standard 120V three-prong outlet.
Copy Mode standby display
Remove thecartridge fromits bag.
Remove the shippingmaterial.
REMOVE ALL SHIPPING MATERIALS
UNPACK MACHINE1
INSTALL CARTRIDGE2 CONNECTIONS4SET-UP INSTRUCTIONS
imageCLASS D700 Series
Place the cartridgeon a flat and stablesurface, grip thesealing tape tab and snap in thedirection shown.Make sure that thetab is detached fromthe cartridge.
Machine
Rock the cartridge5 or 6 times todistribute thetoner evenly.
* D780 Model
** U.S.A. onlyFA7-5177 (010)Printed in China
Position the arrow markon the cartridge towardsthe inside of themachine, and gentlyslide the cartridge intothe machine as far as itwill go.
Close the cartridge coverand slide the platen unitback to the originalposition.
2
11
Lift the platen unitlever (1) and slidethe platen unit tothe left (2).
Open thecartridge cover.
A
E
B
A B
C D
E F
C D
Grip the cassettehandle, and pull itout towards youuntil the cassettecomes to a stop.
Load the paper stack beneaththe cassette’s length guide (1)and width guide’s claws (2).
Make sure that the paper stack doesnot exceed the length and widthguide’s claws in the cassette. Failureto do so will cause a paper jam.
Gently insert the cassette asfar as it will go.
Hook the tab onthe output trayonto the openingon the left side ofthe machine.
LOAD PAPER / ATTACH OUTPUT TRAY3A B
C
PA
R
USB interface connection
Connect to your computer using USB cable.Connect to your computer using a USB cable.
USB interface connection.
PA
RA
LL
EL
Parallel interface connection
Connect to your computer using a parallel cable.
Make sure the computer is turned off.
062002A
Insert the removedshipping attachmentfrom STEP A into theholder.Keeping the cartridgecover open, go to section 2 - INSTALL CARTRIDGE.
Keep the shipping attachment in the holder in case you need to transport the machine.
F
The actual shape, quantity, and/or location of thetape and shipping material may differ.
CRT_IMAGECLASSD700_EN 26/09/2003 17:11PM Page 1
For installation help and operationalinstructions, call:
1-800-828-4040 1-800 OK CANONU.S.A. CUSTOMERS CANADA CUSTOMERS
Output Tray
L50 S-Cartridge
Label
Connect the supplied power cord to the power cord connector on the left side of the machine.
REMOVE ALL ITEMS FROM THE BOX
CONNECTING USING PARALLEL CABLE
or CONNECTING USING USB CABLE
CONNECTING THE POWER CORD
• POWER CORD
• TELEPHONE LINE*
• DOCUMENTATION(Set-up Instructions, Reference Guide, Fax Guide*, Limited Warranty Card, Registration Card**)
• DESTINATION LABEL*
• CD-ROM
Remove the shippingattachment on the leftside using a coin.
Otherwise the scanning unit of the machine is locked and you cannot make copies or send faxes.
Grasp the cartridgewith one hand, firmlyand slowly pull outthe sealing tape tabwith the other hand.
Remove thesealing tapecompletely.
Slide left until the I4 mark appears.
When the power cord isplugged into both themachine and into a poweroutlet, the machine willautomatically turn on. TheLCD displays PLEASEWAIT. Please wait untilthe LCD returns to theCopy Mode standbydisplay.
Connect the supplied power cord to the power cordconnector on the left side of the machine.Then connect the other end into a properly grounded Standard 120V three-prong outlet.
Copy Mode standby display
Remove thecartridge fromits bag.
Remove the shippingmaterial.
REMOVE ALL SHIPPING MATERIALS
UNPACK MACHINE1
INSTALL CARTRIDGE2 CONNECTIONS4SET-UP INSTRUCTIONS
imageCLASS D700 Series
Place the cartridgeon a flat and stablesurface, grip thesealing tape tab and snap in thedirection shown.Make sure that thetab is detached fromthe cartridge.
Machine
Rock the cartridge5 or 6 times todistribute thetoner evenly.
* D780 Model
** U.S.A. onlyFA7-5177 (010)Printed in China
Position the arrow markon the cartridge towardsthe inside of themachine, and gentlyslide the cartridge intothe machine as far as itwill go.
Close the cartridge coverand slide the platen unitback to the originalposition.
2
11
Lift the platen unitlever (1) and slidethe platen unit tothe left (2).
Open thecartridge cover.
A
E
B
A B
C D
E F
C D
Grip the cassettehandle, and pull itout towards youuntil the cassettecomes to a stop.
Load the paper stack beneaththe cassette’s length guide (1)and width guide’s claws (2).
Make sure that the paper stack doesnot exceed the length and widthguide’s claws in the cassette. Failureto do so will cause a paper jam.
Gently insert the cassette asfar as it will go.
Hook the tab onthe output trayonto the openingon the left side ofthe machine.
LOAD PAPER / ATTACH OUTPUT TRAY3A B
CP
AR
USB interface connection
Connect to your computer using USB cable.Connect to your computer using a USB cable.
USB interface connection.
PA
RA
LL
EL
Parallel interface connection
Connect to your computer using a parallel cable.
Make sure the computer is turned off.
062002A
Insert the removedshipping attachmentfrom STEP A into theholder.Keeping the cartridgecover open, go to section 2 - INSTALL CARTRIDGE.
Keep the shipping attachment in the holder in case you need to transport the machine.
F
The actual shape, quantity, and/or location of thetape and shipping material may differ.
CRT_IMAGECLASSD700_EN 26/09/2003 17:11PM Page 1
For installation help and operationalinstructions, call:
1-800-828-4040 1-800 OK CANONU.S.A. CUSTOMERS CANADA CUSTOMERS
Output Tray
L50 S-Cartridge
Label
Connect the supplied power cord to the power cord connector on the left side of the machine.
REMOVE ALL ITEMS FROM THE BOX
CONNECTING USING PARALLEL CABLE
or CONNECTING USING USB CABLE
CONNECTING THE POWER CORD
• POWER CORD
• TELEPHONE LINE*
• DOCUMENTATION(Set-up Instructions, Reference Guide, Fax Guide*, Limited Warranty Card, Registration Card**)
• DESTINATION LABEL*
• CD-ROM
Remove the shippingattachment on the leftside using a coin.
Otherwise the scanning unit of the machine is locked and you cannot make copies or send faxes.
Grasp the cartridgewith one hand, firmlyand slowly pull outthe sealing tape tabwith the other hand.
Remove thesealing tapecompletely.
Slide left until the I4 mark appears.
When the power cord isplugged into both themachine and into a poweroutlet, the machine willautomatically turn on. TheLCD displays PLEASEWAIT. Please wait untilthe LCD returns to theCopy Mode standbydisplay.
Connect the supplied power cord to the power cordconnector on the left side of the machine.Then connect the other end into a properly grounded Standard 120V three-prong outlet.
Copy Mode standby display
Remove thecartridge fromits bag.
Remove the shippingmaterial.
REMOVE ALL SHIPPING MATERIALS
UNPACK MACHINE1
INSTALL CARTRIDGE2 CONNECTIONS4SET-UP INSTRUCTIONS
imageCLASS D700 Series
Place the cartridgeon a flat and stablesurface, grip thesealing tape tab and snap in thedirection shown.Make sure that thetab is detached fromthe cartridge.
Machine
Rock the cartridge5 or 6 times todistribute thetoner evenly.
* D780 Model
** U.S.A. onlyFA7-5177 (010)Printed in China
Position the arrow markon the cartridge towardsthe inside of themachine, and gentlyslide the cartridge intothe machine as far as itwill go.
Close the cartridge coverand slide the platen unitback to the originalposition.
2
11
Lift the platen unitlever (1) and slidethe platen unit tothe left (2).
Open thecartridge cover.
A
E
B
A B
C D
E F
C D
Grip the cassettehandle, and pull itout towards youuntil the cassettecomes to a stop.
Load the paper stack beneaththe cassette’s length guide (1)and width guide’s claws (2).
Make sure that the paper stack doesnot exceed the length and widthguide’s claws in the cassette. Failureto do so will cause a paper jam.
Gently insert the cassette asfar as it will go.
Hook the tab onthe output trayonto the openingon the left side ofthe machine.
LOAD PAPER / ATTACH OUTPUT TRAY3A B
C
PA
R
USB interface connection
Connect to your computer using USB cable.Connect to your computer using a USB cable.
USB interface connection.
PA
RA
LL
EL
Parallel interface connection
Connect to your computer using a parallel cable.
Make sure the computer is turned off.
062002A
Insert the removedshipping attachmentfrom STEP A into theholder.Keeping the cartridgecover open, go to section 2 - INSTALL CARTRIDGE.
Keep the shipping attachment in the holder in case you need to transport the machine.
F
The actual shape, quantity, and/or location of thetape and shipping material may differ.
CRT_IMAGECLASSD700_EN 26/09/2003 17:11PM Page 1
: Telephone line jack
: External device jack
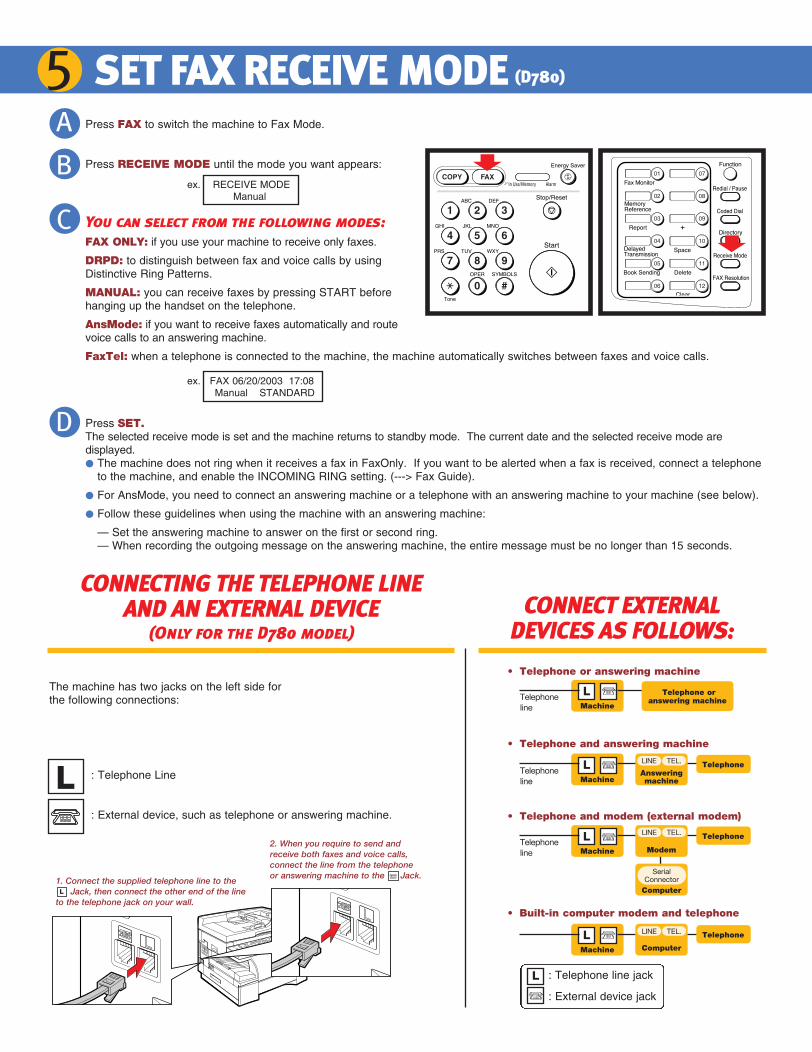
Press FAX to switch the machine to Fax Mode.
Press RECEIVE MODE until the mode you want appears:
You can select from the following modes:FAX ONLY: if you use your machine to receive only faxes.
DRPD: to distinguish between fax and voice calls by usingDistinctive Ring Patterns.
MANUAL: you can receive faxes by pressing START beforehanging up the handset on the telephone.
AnsMode: if you want to receive faxes automatically and routevoice calls to an answering machine.
FaxTel: when a telephone is connected to the machine, the machine automatically switches between faxes and voice calls.
• Telephone or answering machine
• Telephone and answering machine
• Telephone and modem (external modem)
• Built-in computer modem and telephone
Press SET.The selected receive mode is set and the machine returns to standby mode. The current date and the selected receive mode aredisplayed.
• The machine does not ring when it receives a fax in FaxOnly. If you want to be alerted when a fax is received, connect a telephoneto the machine, and enable the INCOMING RING setting. (---> Fax Guide).
• For AnsMode, you need to connect an answering machine or a telephone with an answering machine to your machine (see below).
• Follow these guidelines when using the machine with an answering machine:
— Set the answering machine to answer on the first or second ring.— When recording the outgoing message on the answering machine, the entire message must be no longer than 15 seconds.
ex. FAX 06/20/2003 17:08Manual STANDARD
ex. RECEIVE MODEManual
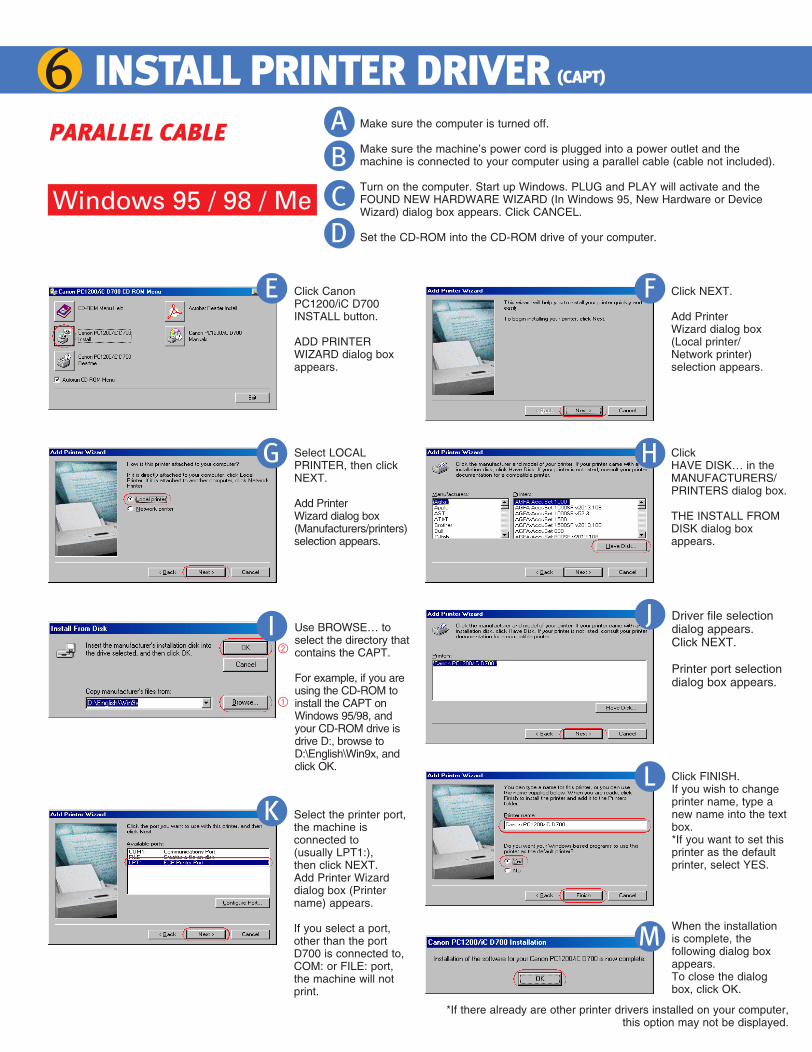
Make sure the computer is turned off.
Make sure the machine’s power cord is plugged into a power outlet and themachine is connected to your computer using a parallel cable (cable not included).
Turn on the computer. Start up Windows. PLUG and PLAY will activate and theFOUND NEW HARDWARE WIZARD (In Windows 95, New Hardware or DeviceWizard) dialog box appears. Click CANCEL.
Set the CD-ROM into the CD-ROM drive of your computer.
Click NEXT.
Add Printer Wizard dialog box (Local printer/Network printer)selection appears.
Select the printer port,the machine isconnected to (usually LPT1:), then click NEXT. Add Printer Wizarddialog box (Printername) appears.
If you select a port,other than the portD700 is connected to,COM: or FILE: port,the machine will notprint.
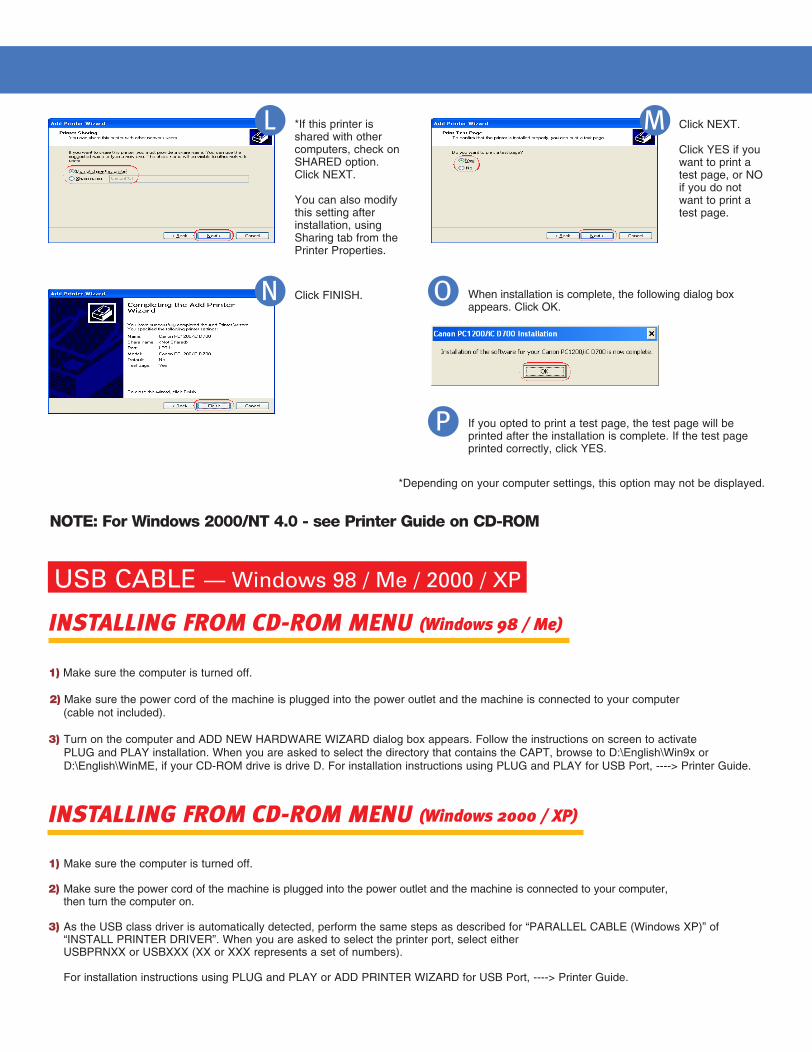
INSTALLING FROM CD-ROM MENU (Windows 98 / Me)
1) Make sure the computer is turned off.
2) Make sure the power cord of the machine is plugged into the power outlet and the machine is connected to your computer (cable not included).
3) Turn on the computer and ADD NEW HARDWARE WIZARD dialog box appears. Follow the instructions on screen to activatePLUG and PLAY installation. When you are asked to select the directory that contains the CAPT, browse to D:\English\Win9x orD:\English\WinME, if your CD-ROM drive is drive D. For installation instructions using PLUG and PLAY for USB Port, ----> Printer Guide.
INSTALLING FROM CD-ROM MENU (Windows 2000 / XP)
1) Make sure the computer is turned off.
2) Make sure the power cord of the machine is plugged into the power outlet and the machine is connected to your computer, then turn the computer on.
3) As the USB class driver is automatically detected, perform the same steps as described for “PARALLEL CABLE (Windows XP)” of“INSTALL PRINTER DRIVER”. When you are asked to select the printer port, select either USBPRNXX or USBXXX (XX or XXX represents a set of numbers).
For installation instructions using PLUG and PLAY or ADD PRINTER WIZARD for USB Port, ----> Printer Guide.
Windows 95 / 98 / Me Windows XP
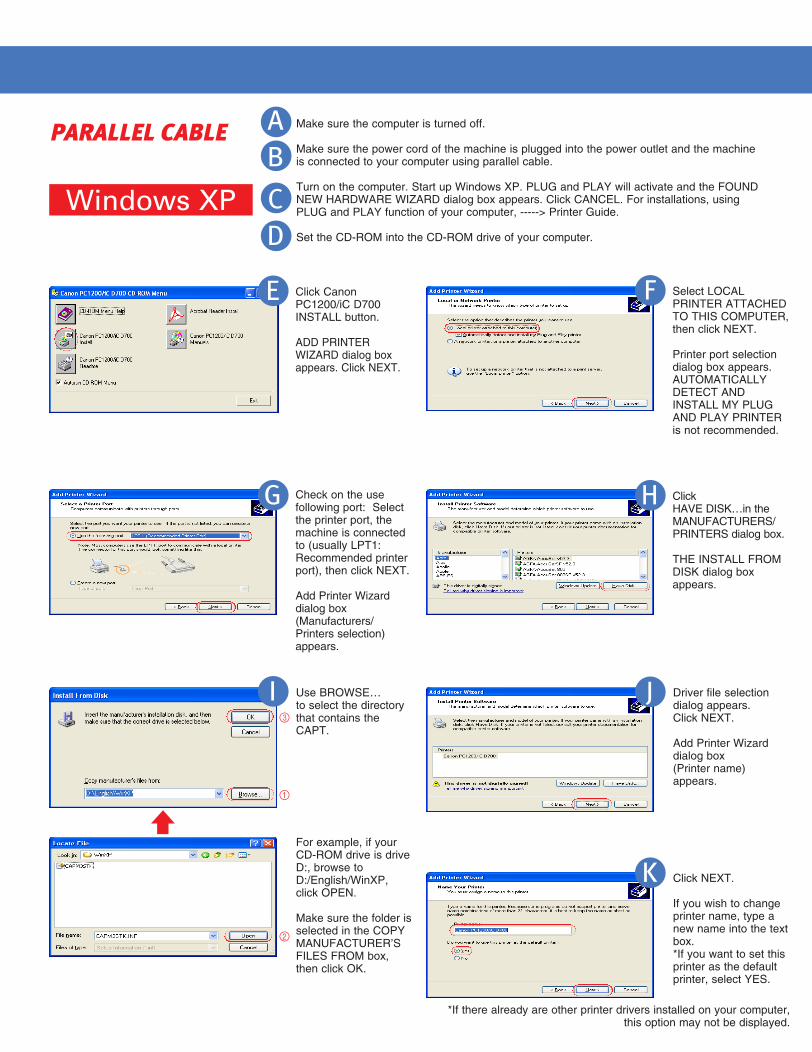
Use BROWSE… toselect the directory thatcontains the CAPT.
For example, if you areusing the CD-ROM toinstall the CAPT onWindows 95/98, andyour CD-ROM drive isdrive D:, browse toD:\English\Win9x, andclick OK.
Use BROWSE…to select the directorythat contains theCAPT.
Click FINISH. If you wish to changeprinter name, type anew name into the textbox.*If you want to set thisprinter as the defaultprinter, select YES.
Driver file selectiondialog appears. Click NEXT.
Add Printer Wizarddialog box (Printer name)appears.
*If this printer is shared with othercomputers, check onSHARED option. Click NEXT.
You can also modifythis setting afterinstallation, usingSharing tab from thePrinter Properties.
Click NEXT.
If you wish to changeprinter name, type anew name into the textbox.*If you want to set thisprinter as the defaultprinter, select YES.
Click NEXT.
Click YES if youwant to print atest page, or NOif you do notwant to print atest page.
If you opted to print a test page, the test page will beprinted after the installation is complete. If the test pageprinted correctly, click YES.
When installation is complete, the following dialog boxappears. Click OK.
Make sure the computer is turned off.
Make sure the power cord of the machine is plugged into the power outlet and the machineis connected to your computer using parallel cable.
Turn on the computer. Start up Windows XP. PLUG and PLAY will activate and the FOUNDNEW HARDWARE WIZARD dialog box appears. Click CANCEL. For installations, usingPLUG and PLAY function of your computer, -----> Printer Guide.
Set the CD-ROM into the CD-ROM drive of your computer.
Click HAVE DISK…in theMANUFACTURERS/PRINTERS dialog box.
THE INSTALL FROMDISK dialog boxappears. USB CABLE — Windows 98 / Me / 2000 / XP
Click CanonPC1200/iC D700INSTALL button.
ADD PRINTERWIZARD dialog boxappears.
Select LOCALPRINTER, then clickNEXT.
Add Printer Wizard dialog box(Manufacturers/printers)selection appears.
Driver file selectiondialog appears.Click NEXT.
Printer port selectiondialog box appears.
Click HAVE DISK… in theMANUFACTURERS/PRINTERS dialog box.
THE INSTALL FROMDISK dialog boxappears.
When the installationis complete, thefollowing dialog boxappears. To close the dialogbox, click OK.
Select LOCALPRINTER ATTACHED TO THIS COMPUTER, then click NEXT.
Printer port selectiondialog box appears.AUTOMATICALLYDETECT ANDINSTALL MY PLUGAND PLAY PRINTERis not recommended.
Click CanonPC1200/iC D700INSTALL button.
ADD PRINTERWIZARD dialog boxappears. Click NEXT.
Check on the use following port: Selectthe printer port, themachine is connectedto (usually LPT1:Recommended printerport), then click NEXT.
Add Printer Wizarddialog box(Manufacturers/Printers selection)appears.
Click FINISH.
INSTALL PRINTER DRIVER (CAPT)6SET FAX RECEIVE MODE (D780)5ABCD
AB
CD
E F
G H
I J
E F
G H
L M
N O
P
I J
K
KL
M
LMachine
Telephoneline
Telephone oranswering machine
LMachine
Telephoneline
TelephoneAnsweringmachine
LINE TEL.
LMachine
Telephoneline
Telephone
Modem
LINE TEL.
Computer
SerialConnector
LMachine
Telephone
Computer
LINE TEL.
L
of the line to the telephone jack on your wall.
1. Connect the supplied telephone line to the Jack, then connect the other end of the line
to the telephone jack on your wall.
2. When you require to send andreceive both faxes and voice calls,connect the line from the telephone or answering machine to the Jack.
CONNECTING THE TELEPHONE LINE AND AN EXTERNAL DEVICE
(Only for the D780 model)
The machine has two jacks on the left side forthe following connections:
: Telephone Line
: External device, such as telephone or answering machine.
CONNECT EXTERNALDEVICES AS FOLLOWS:
L
L
NOTE: For Windows 2000/NT 4.0 - see Printer Guide on CD-ROM
A
B
C
D
PARALLEL CABLEPARALLEL CABLE
For example, if yourCD-ROM drive is driveD:, browse toD:/English/WinXP, click OPEN.
Make sure the folder isselected in the COPYMANUFACTURER’SFILES FROM box, then click OK.
*If there already are other printer drivers installed on your computer,this option may not be displayed.
*If there already are other printer drivers installed on your computer,this option may not be displayed.
1
2
1
2
3
*Depending on your computer settings, this option may not be displayed.
CRT_IMAGECLASSD700_EN 26/09/2003 17:11PM Page 2
: Telephone line jack
: External device jack
Press FAX to switch the machine to Fax Mode.
Press RECEIVE MODE until the mode you want appears:
You can select from the following modes:FAX ONLY: if you use your machine to receive only faxes.
DRPD: to distinguish between fax and voice calls by usingDistinctive Ring Patterns.
MANUAL: you can receive faxes by pressing START beforehanging up the handset on the telephone.
AnsMode: if you want to receive faxes automatically and routevoice calls to an answering machine.
FaxTel: when a telephone is connected to the machine, the machine automatically switches between faxes and voice calls.
• Telephone or answering machine
• Telephone and answering machine
• Telephone and modem (external modem)
• Built-in computer modem and telephone
Press SET.The selected receive mode is set and the machine returns to standby mode. The current date and the selected receive mode aredisplayed.
• The machine does not ring when it receives a fax in FaxOnly. If you want to be alerted when a fax is received, connect a telephoneto the machine, and enable the INCOMING RING setting. (---> Fax Guide).
• For AnsMode, you need to connect an answering machine or a telephone with an answering machine to your machine (see below).
• Follow these guidelines when using the machine with an answering machine:
— Set the answering machine to answer on the first or second ring.— When recording the outgoing message on the answering machine, the entire message must be no longer than 15 seconds.
ex. FAX 06/20/2003 17:08Manual STANDARD
ex. RECEIVE MODEManual
Make sure the computer is turned off.
Make sure the machine’s power cord is plugged into a power outlet and themachine is connected to your computer using a parallel cable (cable not included).
Turn on the computer. Start up Windows. PLUG and PLAY will activate and theFOUND NEW HARDWARE WIZARD (In Windows 95, New Hardware or DeviceWizard) dialog box appears. Click CANCEL.
Set the CD-ROM into the CD-ROM drive of your computer.
Click NEXT.
Add Printer Wizard dialog box (Local printer/Network printer)selection appears.
Select the printer port,the machine isconnected to (usually LPT1:), then click NEXT. Add Printer Wizarddialog box (Printername) appears.
If you select a port,other than the portD700 is connected to,COM: or FILE: port,the machine will notprint.
INSTALLING FROM CD-ROM MENU (Windows 98 / Me)
1) Make sure the computer is turned off.
2) Make sure the power cord of the machine is plugged into the power outlet and the machine is connected to your computer (cable not included).
3) Turn on the computer and ADD NEW HARDWARE WIZARD dialog box appears. Follow the instructions on screen to activatePLUG and PLAY installation. When you are asked to select the directory that contains the CAPT, browse to D:\English\Win9x orD:\English\WinME, if your CD-ROM drive is drive D. For installation instructions using PLUG and PLAY for USB Port, ----> Printer Guide.
INSTALLING FROM CD-ROM MENU (Windows 2000 / XP)
1) Make sure the computer is turned off.
2) Make sure the power cord of the machine is plugged into the power outlet and the machine is connected to your computer, then turn the computer on.
3) As the USB class driver is automatically detected, perform the same steps as described for “PARALLEL CABLE (Windows XP)” of“INSTALL PRINTER DRIVER”. When you are asked to select the printer port, select either USBPRNXX or USBXXX (XX or XXX represents a set of numbers).
For installation instructions using PLUG and PLAY or ADD PRINTER WIZARD for USB Port, ----> Printer Guide.
Windows 95 / 98 / Me Windows XP
Use BROWSE… toselect the directory thatcontains the CAPT.
For example, if you areusing the CD-ROM toinstall the CAPT onWindows 95/98, andyour CD-ROM drive isdrive D:, browse toD:\English\Win9x, andclick OK.
Use BROWSE…to select the directorythat contains theCAPT.
Click FINISH. If you wish to changeprinter name, type anew name into the textbox.*If you want to set thisprinter as the defaultprinter, select YES.
Driver file selectiondialog appears. Click NEXT.
Add Printer Wizarddialog box (Printer name)appears.
*If this printer is shared with othercomputers, check onSHARED option. Click NEXT.
You can also modifythis setting afterinstallation, usingSharing tab from thePrinter Properties.
Click NEXT.
If you wish to changeprinter name, type anew name into the textbox.*If you want to set thisprinter as the defaultprinter, select YES.
Click NEXT.
Click YES if youwant to print atest page, or NOif you do notwant to print atest page.
If you opted to print a test page, the test page will beprinted after the installation is complete. If the test pageprinted correctly, click YES.
When installation is complete, the following dialog boxappears. Click OK.
Make sure the computer is turned off.
Make sure the power cord of the machine is plugged into the power outlet and the machineis connected to your computer using parallel cable.
Turn on the computer. Start up Windows XP. PLUG and PLAY will activate and the FOUNDNEW HARDWARE WIZARD dialog box appears. Click CANCEL. For installations, usingPLUG and PLAY function of your computer, -----> Printer Guide.
Set the CD-ROM into the CD-ROM drive of your computer.
Click HAVE DISK…in theMANUFACTURERS/PRINTERS dialog box.
THE INSTALL FROMDISK dialog boxappears. USB CABLE — Windows 98 / Me / 2000 / XP
Click CanonPC1200/iC D700INSTALL button.
ADD PRINTERWIZARD dialog boxappears.
Select LOCALPRINTER, then clickNEXT.
Add Printer Wizard dialog box(Manufacturers/printers)selection appears.
Driver file selectiondialog appears.Click NEXT.
Printer port selectiondialog box appears.
Click HAVE DISK… in theMANUFACTURERS/PRINTERS dialog box.
THE INSTALL FROMDISK dialog boxappears.
When the installationis complete, thefollowing dialog boxappears. To close the dialogbox, click OK.
Select LOCALPRINTER ATTACHED TO THIS COMPUTER, then click NEXT.
Printer port selectiondialog box appears.AUTOMATICALLYDETECT ANDINSTALL MY PLUGAND PLAY PRINTERis not recommended.
Click CanonPC1200/iC D700INSTALL button.
ADD PRINTERWIZARD dialog boxappears. Click NEXT.
Check on the use following port: Selectthe printer port, themachine is connectedto (usually LPT1:Recommended printerport), then click NEXT.
Add Printer Wizarddialog box(Manufacturers/Printers selection)appears.
Click FINISH.
INSTALL PRINTER DRIVER (CAPT)6SET FAX RECEIVE MODE (D780)5ABCD
AB
CD
E F
G H
I J
E F
G H
L M
N O
P
I J
K
KL
M
LMachine
Telephoneline
Telephone oranswering machine
LMachine
Telephoneline
TelephoneAnsweringmachine
LINE TEL.
LMachine
Telephoneline
Telephone
Modem
LINE TEL.
Computer
SerialConnector
LMachine
Telephone
Computer
LINE TEL.
L
of the line to the telephone jack on your wall.
1. Connect the supplied telephone line to the Jack, then connect the other end of the line
to the telephone jack on your wall.
2. When you require to send andreceive both faxes and voice calls,connect the line from the telephone or answering machine to the Jack.
CONNECTING THE TELEPHONE LINE AND AN EXTERNAL DEVICE
(Only for the D780 model)
The machine has two jacks on the left side forthe following connections:
: Telephone Line
: External device, such as telephone or answering machine.
CONNECT EXTERNALDEVICES AS FOLLOWS:
L
L
NOTE: For Windows 2000/NT 4.0 - see Printer Guide on CD-ROM
A
B
C
D
PARALLEL CABLEPARALLEL CABLE
For example, if yourCD-ROM drive is driveD:, browse toD:/English/WinXP, click OPEN.
Make sure the folder isselected in the COPYMANUFACTURER’SFILES FROM box, then click OK.
*If there already are other printer drivers installed on your computer,this option may not be displayed.
*If there already are other printer drivers installed on your computer,this option may not be displayed.
1
2
1
2
3
*Depending on your computer settings, this option may not be displayed.
CRT_IMAGECLASSD700_EN 26/09/2003 17:11PM Page 2