Embed Size (px)
Citation preview

1 © 2017 QNAP Systems, Inc. All Rights Reserved.
Application Notes
Dec. 2017
Set up a VMware ESXi Datastore via
NFS in QNAP Enterprise Storage

2 © 2017 QNAP Systems, Inc. All Rights Reserved.
Notices
This user manual provides detailed instructions of using the QNAP Enterprise Storage NAS. Please
read carefully and start to enjoy the powerful functions of the Enterprise Storage NAS.
The QNAP Enterprise Storage NAS is hereafter referred to as the ES NAS or the NAS.
This manual provides the description of all the functions of the ES NAS. The product you
purchased may not support certain functions dedicated to specific models.
Legal Notices
All the features, functionality, and other product specifications are subject to change without prior
notice or obligation. Information contained herein is subject to change without notice. QNAP and
the QNAP logo are trademarks of QNAP Systems, Inc. All other brands and product names referred
to are trademarks of their respective holders. Further, the ® or ™ symbols are not used in the text.
Disclaimer
Information in this document is provided in connection with QNAP® products. No license, express or
implied, by estoppels or otherwise, to any intellectual property rights is granted by this document.
Except as provided in QNAP's terms and conditions of sale for such products, QNAP Assumes no
liability whatsoever, and QNAP disclaims any express or implied warranty, relating to sale and/or
use of QNAP products including liability or warranties relating to fitness for a particular purpose,
merchantability, or infringement of any patent, copyright or other intellectual property right.
3 © 2017 QNAP Systems, Inc. All Rights Reserved.
Table of Contents
NFS Introduction ................................................................................................................................ 4
Use NFS Datastore in a vSphere Environment ................................................................................... 5
Preparation for Installation ................................................................................................................ 6
IP Addresses ....................................................................................................................................... 6
Confirmation before Configuration .................................................................................................... 7
Configure NFS Host Access Permissions ............................................................................................ 7
Add a NFS Datastore in vSphere Client .............................................................................................. 9
Add an NFS Datastore in vSphere Web Client 6.0 ............................................................................ 13
Add an NFS Datastore in vSphere Web Client 6.5 ............................................................................ 16

4 © 2017 QNAP Systems, Inc. All Rights Reserved.
NFS Introduction
Network File System (NFS) is a distributed file system protocol that allows remote applications on
other computers to access files over a network similar to how local storage is accessed. With NFS, you
can bring the resources of the ES NAS to client platforms, providing the advantages of system-managed
and high-performance storage, file access security, and centralized data access with the option of data
encryption.
The following figure illustrates the client-server relationship in an NFS environment. Using NFS, the
client can mount all or part of the remote file system and make it appear as part of the local file system.
From there the client user can create, delete, read, write, and treat the NFS server-located files as part of
the workstation’s own file system. On NFS Client 1, /home/data/SrvShared is the directory in the local
client file system where the shared folder. /share/SrvShared, is to be mounted.

5 © 2017 QNAP Systems, Inc. All Rights Reserved.
Use NFS Datastore in a vSphere Environment
Since NFS is file-level storage, an NFS Datastore is ideal storage for file-level resource sharing. To use
NFS as a shared repository, create a directory on the NFS server (i.e. ES NAS) and then mount it as a
datastore on all hosts. The following diagram illustrates the deployment of NFA storage in a vSphere
environment.
Note:
For better performance, a gigabit Ethernet adapter that transmits 1000 megabits per second
(Mbps) is recommended for connection.
6 © 2017 QNAP Systems, Inc. All Rights Reserved.
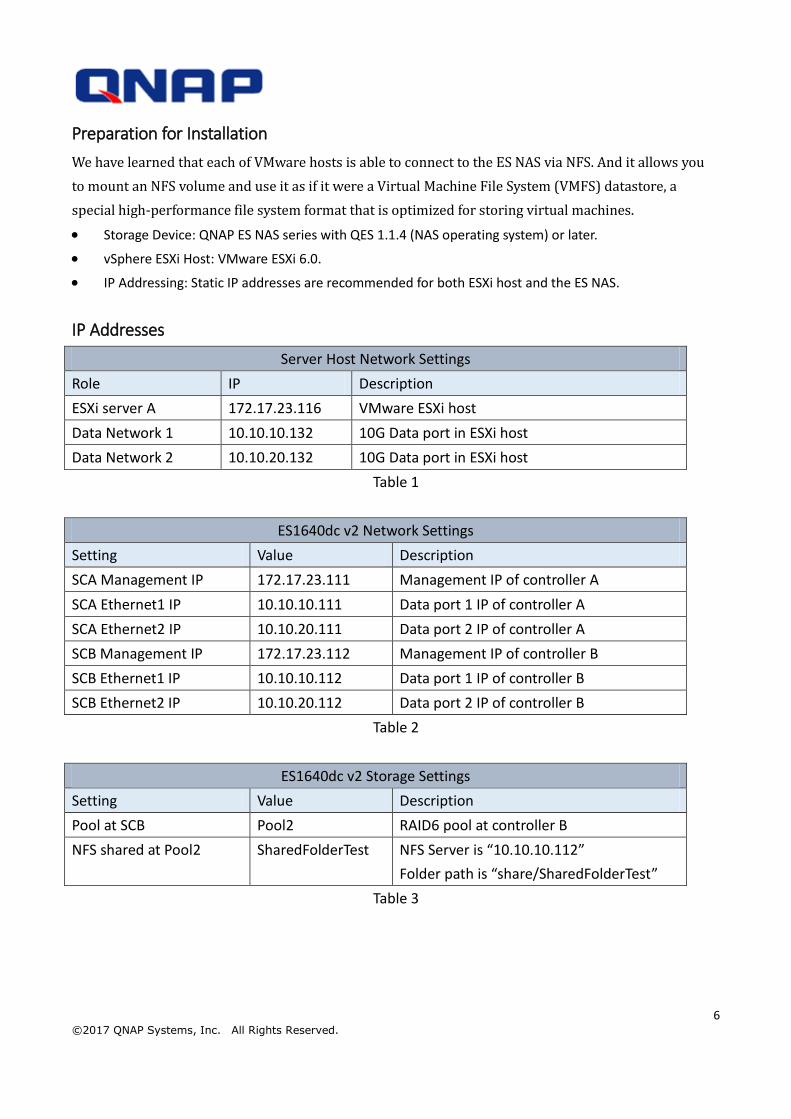
Preparation for Installation
We have learned that each of VMware hosts is able to connect to the ES NAS via NFS. And it allows you
to mount an NFS volume and use it as if it were a Virtual Machine File System (VMFS) datastore, a
special high-performance file system format that is optimized for storing virtual machines.
Storage Device: QNAP ES NAS series with QES 1.1.4 (NAS operating system) or later.
vSphere ESXi Host: VMware ESXi 6.0.
IP Addressing: Static IP addresses are recommended for both ESXi host and the ES NAS.
IP Addresses
Server Host Network Settings
Role IP Description
ESXi server A 172.17.23.116 VMware ESXi host
Data Network 1 10.10.10.132 10G Data port in ESXi host
Data Network 2 10.10.20.132 10G Data port in ESXi host
Table 1
ES1640dc v2 Network Settings
Setting Value Description
SCA Management IP 172.17.23.111 Management IP of controller A
SCA Ethernet1 IP 10.10.10.111 Data port 1 IP of controller A
SCA Ethernet2 IP 10.10.20.111 Data port 2 IP of controller A
SCB Management IP 172.17.23.112 Management IP of controller B
SCB Ethernet1 IP 10.10.10.112 Data port 1 IP of controller B
SCB Ethernet2 IP 10.10.20.112 Data port 2 IP of controller B
Table 2
ES1640dc v2 Storage Settings
Setting Value Description
Pool at SCB Pool2 RAID6 pool at controller B
NFS shared at Pool2 SharedFolderTest NFS Server is “10.10.10.112”
Folder path is “share/SharedFolderTest”
Table 3

7 © 2017 QNAP Systems, Inc. All Rights Reserved.
Confirmation before Configuration
All data ports, from ESXi host and ES NAS, should be in the same subnet.
Available pools must be built before configuring NFS Share on ES NAS. Regarding creating a storage pool,
see”Network and Storage Settings of ES NAS High-Availability Network Storage Services”.
Configure NFS Host Access Permissions
Please follow this procedure to configure the shared folder permissions for NFS host access.
Step 1: Go to “Storage Manager” > “Storage Space”, select the owning controller and the storage pool
on which the shared folder was created, and then select the shared folder.
(In this example, ”Storage Space” > “Pool2” > “SharedFolderTest”.)

8 © 2017 QNAP Systems, Inc. All Rights Reserved.
Step 2: Click “Permissions” in Shared Folder Manager.
Step 3: “Select permission type” > “NFS host access”.
Step 4: “Access right” > “No limit”, select desired host and click “Apply” > “Close”.

9 © 2017 QNAP Systems, Inc. All Rights Reserved.
Add a NFS Datastore in vSphere Client
Step 1: Log into vCenter, select the ESXi host on which you want to add the datastore. Then go to
“Configuration” > “Storage”, and select “Add Storage…”

10 © 2017 QNAP Systems, Inc. All Rights Reserved.
Step 2: Select “Network File System” and click “Next”.

11 © 2017 QNAP Systems, Inc. All Rights Reserved.
Step 3: Server: Enter the data port’s IP of the storage controller on the ES NAS.
Folder: Enter the shared folder’s path.
Datastore Name: Give a name for this NFS share.
(Regarding Server IP/Folder settings, see the previous “IP Addresses” section for reference)

12 © 2017 QNAP Systems, Inc. All Rights Reserved.
Step 4: Confirm your settings and click “Finish”.
Step 5: NFS datastore is added and shown on the list.

13 © 2017 QNAP Systems, Inc. All Rights Reserved.
Add an NFS Datastore in vSphere Web Client 6.0
Step 1: Log into vSphere Web Client, select the ESXi host on which you want to add the datastore.
Then go to “Related Objects” > “Datastores”, and select “Create a new datastore” icon.
Step 2: Select “NFS”, and then click “Next”.

14 © 2017 QNAP Systems, Inc. All Rights Reserved.
Step 3: Datastore name: Give a name for this NFS share.
Folder: Enter the shared folder’s path.
Server: Enter the data port’s IP of the storage controller on the ES NAS.
(Regarding Server IP/Folder settings, see the previous “IP Addresses” section for reference)
Step 4: Confirm the settings and click “Finish”.

15 © 2017 QNAP Systems, Inc. All Rights Reserved.
Step 5: NFS datastore is added and shown on the list.
16 © 2017 QNAP Systems, Inc. All Rights Reserved.
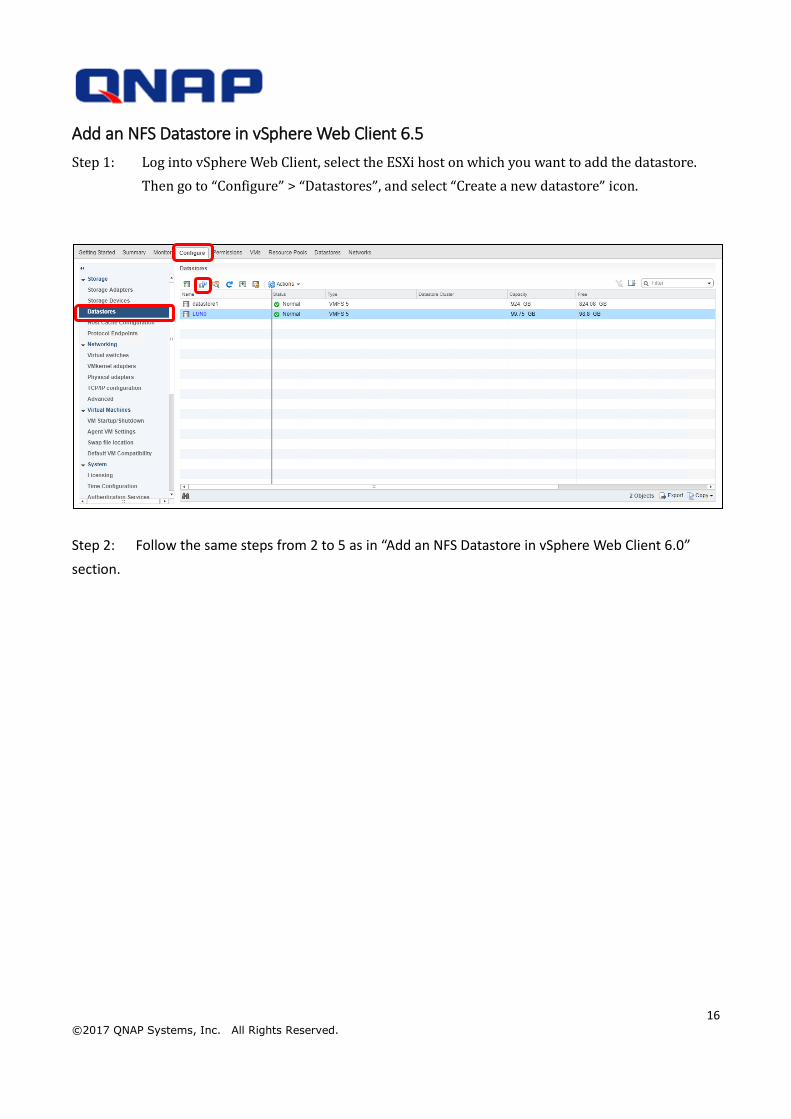
Add an NFS Datastore in vSphere Web Client 6.5
Step 1: Log into vSphere Web Client, select the ESXi host on which you want to add the datastore.
Then go to “Configure” > “Datastores”, and select “Create a new datastore” icon.
Step 2: Follow the same steps from 2 to 5 as in “Add an NFS Datastore in vSphere Web Client 6.0”
section.