Embed Size (px)
Citation preview
1
Yale Change Management Training
Manual
2
Table of Contents
Introduction to ServiceNow .................................................................................................. 4 What is ServiceNow? ......................................................................................................................... 4 What is SaaS? ........................................................................................................................................ 4 What is PaaS? ....................................................................................................................................... 4 What browsers are supported ....................................................................................................... 4 Logging in to ServiceNow ................................................................................................................. 5 Homepage .............................................................................................................................................. 5 Editing ITIL Homepage Content .................................................................................................... 6 Left-Hand Navigation Toolbar ....................................................................................................... 8 ServiceNow Header ............................................................................................................................ 9 User Interface (UI) .............................................................................................................................. 9 Field Basics ........................................................................................................................................ 10 Editing Lists ....................................................................................................................................... 11
Column Sorting............................................................................................................................................. 11 Personalized Lists ....................................................................................................................................... 11 Customized Filters ...................................................................................................................................... 13
Change Process ....................................................................................................................... 14 Change Management Overview .................................................................................................. 14
What is Change Management? ............................................................................................................... 14 Why is it Important? .................................................................................................................................. 14 Key Concepts ................................................................................................................................................. 14 Change Types ................................................................................................................................................ 15
High-Level Process .......................................................................................................................... 16 RACI Chart .......................................................................................................................................... 17 Main Roles .......................................................................................................................................... 18 ServiceNow Roles ............................................................................................................................ 18 Policies ................................................................................................................................................ 19 Process Procedures ........................................................................................................................ 19
1.0 Request Change ................................................................................................................................ 20 2.0 Review and Accept Change .............................................................................................................. 20 3.0 Assess Technical and Business Impact & Risk ......................................................................... 22 4.0 Approve Change for Build ................................................................................................................ 24 5.0 Build and Test Change ....................................................................................................................... 25 6.0 Confirm Implementation Schedule and Impact/Risk Review ........................................... 26 7.0 Approve Change for Implementation .......................................................................................... 29 8.0 Implement and Validate Change.................................................................................................... 30 9.0 Close Change .......................................................................................................................................... 32 Example Change Acceptance Checklist .............................................................................................. 34 Build-Test Approval/Authorization Checklist ................................................................................ 35 Implementation Approval/Authorization Checklist .................................................................... 35
Creating New Changes .......................................................................................................... 36 Theory.................................................................................................................................................. 36 New Change From Forms .............................................................................................................. 36 Creating Change from Lefthand Toolbar ................................................................................. 37
Change Form ............................................................................................................................ 37 New change screen .......................................................................................................................... 37
3
Change States .................................................................................................................................... 38 New Change Field Definitions and Use ..................................................................................... 39 Tabs ...................................................................................................................................................... 43
Notes Tab ........................................................................................................................................................ 43 Schedule Tab ................................................................................................................................................. 43 Planning Tab ................................................................................................................................................. 44 Related Records Tab .................................................................................................................................. 45 QA Tab ............................................................................................................................................................. 45 Security Tab ................................................................................................................................................... 46 Change Tasks Tab ....................................................................................................................................... 46 Approvers Tab .............................................................................................................................................. 48 Affected CIs Tab ........................................................................................................................................... 48 Impacted Services/CI’s Tab .................................................................................................................... 50 Change Requests Tab ................................................................................................................................. 50 Source Problems Tab ................................................................................................................................. 50 Problems Caused by Change Tab .......................................................................................................... 50 Incidents Pending Change Tab .............................................................................................................. 51 Risk Assessment Tab ................................................................................................................................. 51
Fill Out Risk Assessment Button ................................................................................................ 51 Submit for Acceptance Button .................................................................................................... 52 Attachments ....................................................................................................................................... 53 Saving Changes ................................................................................................................................. 54 Creating Templates ......................................................................................................................... 54
Moving Along the Change Lifecycle ................................................................................. 55 Draft ...................................................................................................................................................... 55 Requested ........................................................................................................................................... 55 Acceptance ......................................................................................................................................... 55 Assessment ........................................................................................................................................ 56 Build Test Approval ........................................................................................................................ 56 Build ..................................................................................................................................................... 57 Test ....................................................................................................................................................... 57 CAB Approval .................................................................................................................................... 58 Implementation................................................................................................................................ 58 Completed .......................................................................................................................................... 59 Closed ................................................................................................................................................... 59 Notifications ...................................................................................................................................... 59
Viewing Work .......................................................................................................................... 61 Homepage ........................................................................................................................................... 61 Change Application ......................................................................................................................... 62
“Open” List ..................................................................................................................................................... 62 “Assigned To me” List ................................................................................................................................ 62 “Assigned to My Groups” List ................................................................................................................. 63 “Tasks Assigned to Me” List .................................................................................................................... 63 “Tasks Assigned to My Groups” List .................................................................................................... 63 “Closed” List................................................................................................................................................... 64 “All” List ........................................................................................................................................................... 64 Overview ......................................................................................................................................................... 64 Maintenance Schedules ............................................................................................................................ 65 Change Schedule .......................................................................................................................................... 65
4
Service Desk ...................................................................................................................................... 65 Callers .............................................................................................................................................................. 66 Incidents ......................................................................................................................................................... 66 Knowledge ..................................................................................................................................................... 67 My Work .......................................................................................................................................................... 67 My Groups Work .......................................................................................................................................... 67 My approvals ................................................................................................................................................. 68 My Work (SLA’s) .......................................................................................................................................... 68 My Groups Work (SLA’s) .......................................................................................................................... 68
Approvals ................................................................................................................................. 68 Email ..................................................................................................................................................... 69 Service Desk ...................................................................................................................................... 69
Entering the Approval ............................................................................................................................... 69 In-Line Approval .......................................................................................................................................... 70
Introduction to ServiceNow
What is ServiceNow? Service Now is a suite of cloud-based services for enterprise IT management. It is built and designed around ITIL principles.
What is SaaS? Software as a Service, sometimes referred to as “on-demand software”, is a software delivery model where software and any data associated with it are hosted off-site, typically over the internet. ServiceNow hosts all software and data centrally at the ServiceNow server farms and are accessed via the internet on a web browser. VPN is not needed to access Service Now.
What is PaaS? Platform as a Service is the delivery of a computing platform and solution Stack as a service. This means that users need only to buy the service, but do not have to worry about maintaining the underlying hardware and software.
What browsers are supported ServiceNow supports all current web browsers, including Internet Explorer, Mozilla Firefox, Google Chrome, Safari, and Opera. The only web browser that has had any reported issues is IE6, which is a far-outdated version of Internet Explorer.
5
Logging in to ServiceNow Assuming users are logged into Yale’s network, they will be automatically logged in to ServiceNow. To access Yale’s ServiceNow website, simply go to: yaleproduction.service-now.com in the web browser if your choice. The user will be automatically logged in by the Yale’s Active Directory system
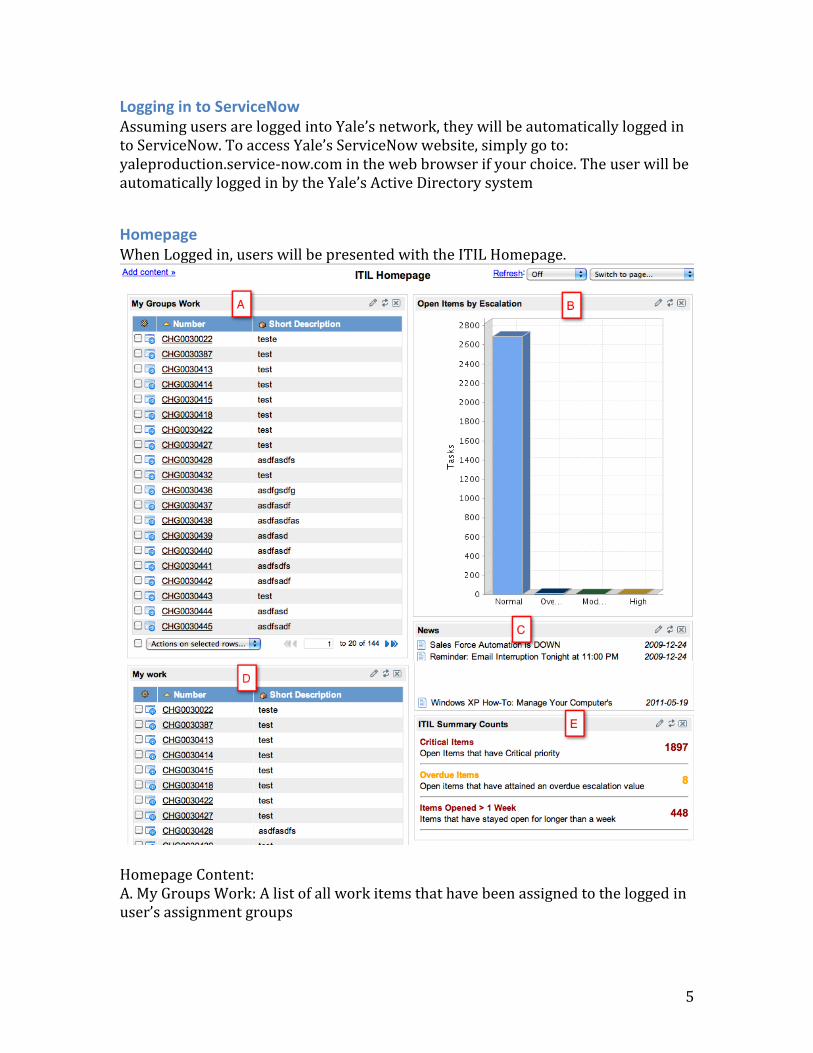
Homepage When Logged in, users will be presented with the ITIL Homepage.
Homepage Content: A. My Groups Work: A list of all work items that have been assigned to the logged in user’s assignment groups
6
B. Open Items by Escalation: A bar chart of all open work items grouped by their escalation level C: News: A scrolling ticker of all news items that have been published D: My Work: A list of all work items assigned to the logged-in user E. ITIL Summary Counts: A breakdown of work items based on three criteria: Open items that have a critical priority, open items that have attained an overdue escalation value, and items that have stayed open longer than a week
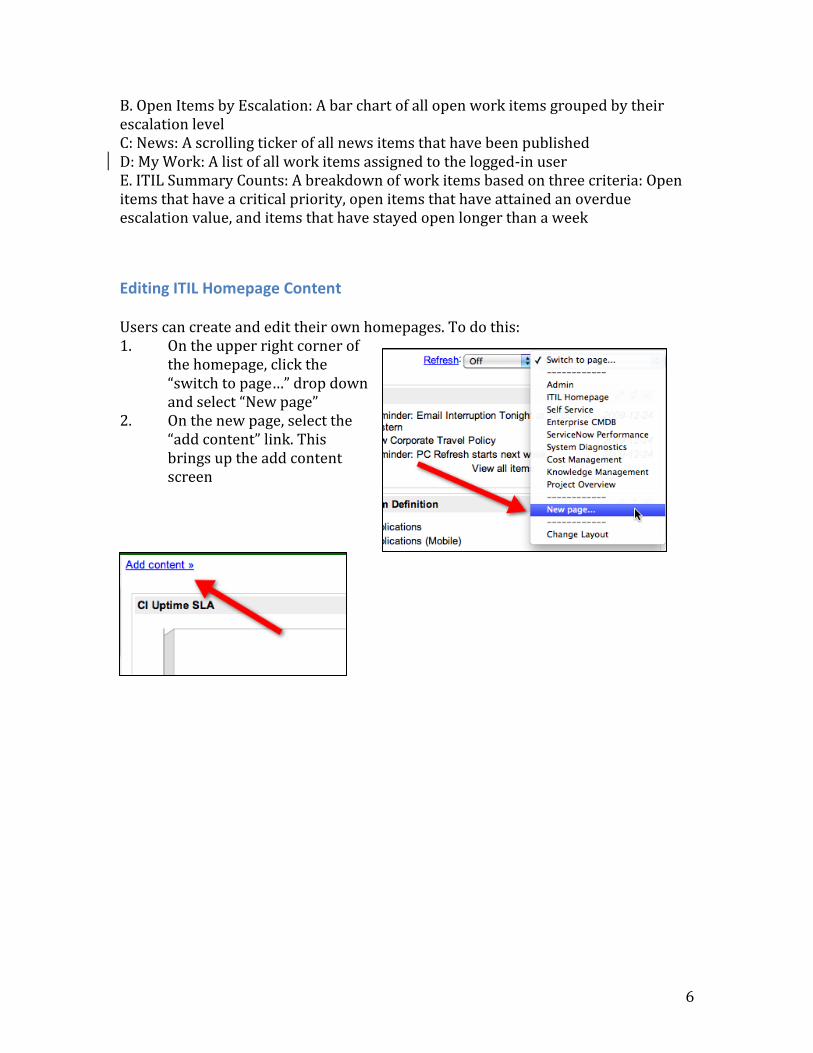
Editing ITIL Homepage Content Users can create and edit their own homepages. To do this: 1. On the upper right corner of
the homepage, click the “switch to page…” drop down and select “New page”
2. On the new page, select the “add content” link. This brings up the add content screen
7
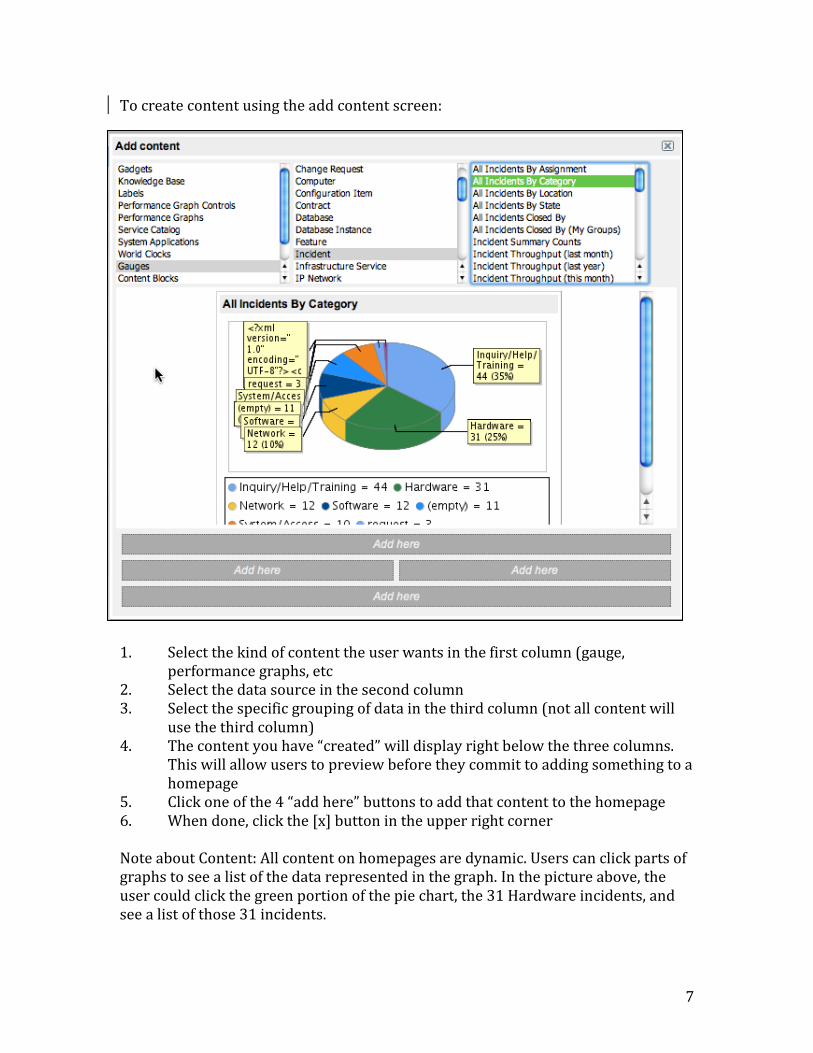
To create content using the add content screen:
1. Select the kind of content the user wants in the first column (gauge,
performance graphs, etc 2. Select the data source in the second column 3. Select the specific grouping of data in the third column (not all content will
use the third column) 4. The content you have “created” will display right below the three columns.
This will allow users to preview before they commit to adding something to a homepage
5. Click one of the 4 “add here” buttons to add that content to the homepage 6. When done, click the [x] button in the upper right corner Note about Content: All content on homepages are dynamic. Users can click parts of graphs to see a list of the data represented in the graph. In the picture above, the user could click the green portion of the pie chart, the 31 Hardware incidents, and see a list of those 31 incidents.
8
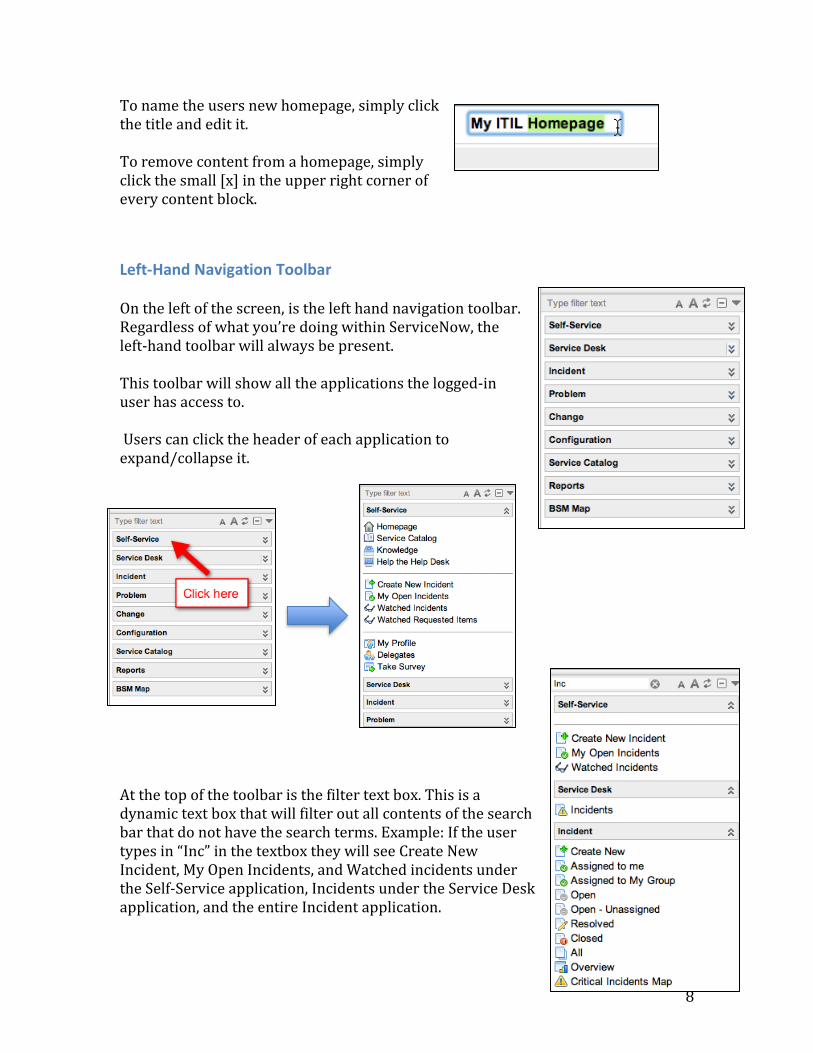
To name the users new homepage, simply click the title and edit it. To remove content from a homepage, simply click the small [x] in the upper right corner of every content block.
Left-Hand Navigation Toolbar On the left of the screen, is the left hand navigation toolbar. Regardless of what you’re doing within ServiceNow, the left-hand toolbar will always be present. This toolbar will show all the applications the logged-in user has access to. Users can click the header of each application to expand/collapse it.
At the top of the toolbar is the filter text box. This is a dynamic text box that will filter out all contents of the search bar that do not have the search terms. Example: If the user types in “Inc” in the textbox they will see Create New Incident, My Open Incidents, and Watched incidents under the Self-Service application, Incidents under the Service Desk application, and the entire Incident application.
9
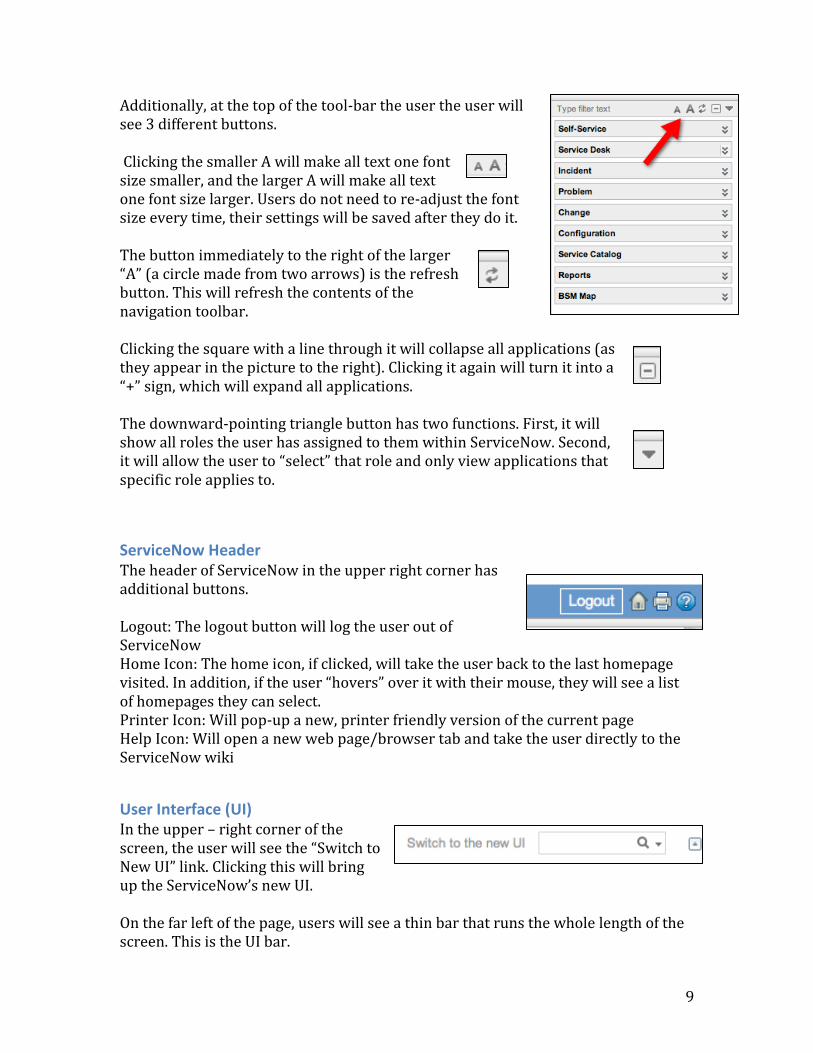
Additionally, at the top of the tool-bar the user the user will see 3 different buttons. Clicking the smaller A will make all text one font size smaller, and the larger A will make all text one font size larger. Users do not need to re-adjust the font size every time, their settings will be saved after they do it. The button immediately to the right of the larger “A” (a circle made from two arrows) is the refresh button. This will refresh the contents of the navigation toolbar. Clicking the square with a line through it will collapse all applications (as they appear in the picture to the right). Clicking it again will turn it into a “+” sign, which will expand all applications. The downward-pointing triangle button has two functions. First, it will show all roles the user has assigned to them within ServiceNow. Second, it will allow the user to “select” that role and only view applications that specific role applies to.
ServiceNow Header The header of ServiceNow in the upper right corner has additional buttons. Logout: The logout button will log the user out of ServiceNow Home Icon: The home icon, if clicked, will take the user back to the last homepage visited. In addition, if the user “hovers” over it with their mouse, they will see a list of homepages they can select. Printer Icon: Will pop-up a new, printer friendly version of the current page Help Icon: Will open a new web page/browser tab and take the user directly to the ServiceNow wiki
User Interface (UI) In the upper – right corner of the screen, the user will see the “Switch to New UI” link. Clicking this will bring up the ServiceNow’s new UI. On the far left of the page, users will see a thin bar that runs the whole length of the screen. This is the UI bar.
10
The top two buttons are the screen expanders. The button on the left will collapse the left hand tool-bar from view, and the one on the right will collapse the top header from view. The next two buttons are the split screen buttons. Clicking the button on the left will divide the screen into two pages vertically. Users will be able to have homepages or lists open on the left screen and items opened from lists (ex: incidents, problems, etc) on the right. The right button will split the screen horizontally, with the homepages/lists on top, and forms on bottom. Clicking either of these buttons again will undo the split screen. The Star button will display a list of all booked marked items. Users have the ability, from list views, to click and drag individual records over to the bookmark bar. They can then click these links to go directly to that record. To edit a bookmark: Point to the Star button and select the gear next to the bookmark you want to edit. Users can also hover over the bookmark and select edit bookmark.
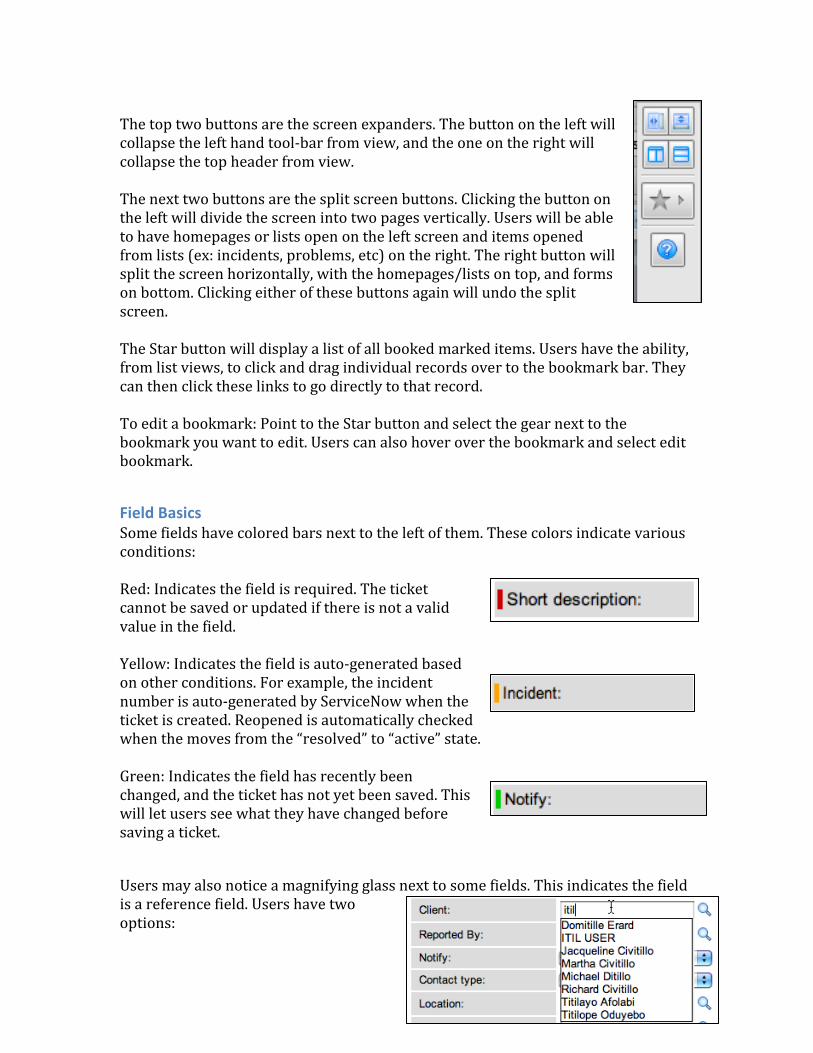
Field Basics Some fields have colored bars next to the left of them. These colors indicate various conditions: Red: Indicates the field is required. The ticket cannot be saved or updated if there is not a valid value in the field. Yellow: Indicates the field is auto-generated based on other conditions. For example, the incident number is auto-generated by ServiceNow when the ticket is created. Reopened is automatically checked when the moves from the “resolved” to “active” state. Green: Indicates the field has recently been changed, and the ticket has not yet been saved. This will let users see what they have changed before saving a ticket.
Users may also notice a magnifying glass next to some fields. This indicates the field is a reference field. Users have two options:
11
1. Type directly into the field, to get a google-like search that dynamically shows all
valid entries with the terms entered. It does not matter what part of the word the
user types in, it will find all values that contain the search term. Ex: Typing “ian”
would find users with the first name “Brian” or the last name “Christian” in
addition to others.
2. Click the magnifying glass to bring up the table the field references
Editing Lists
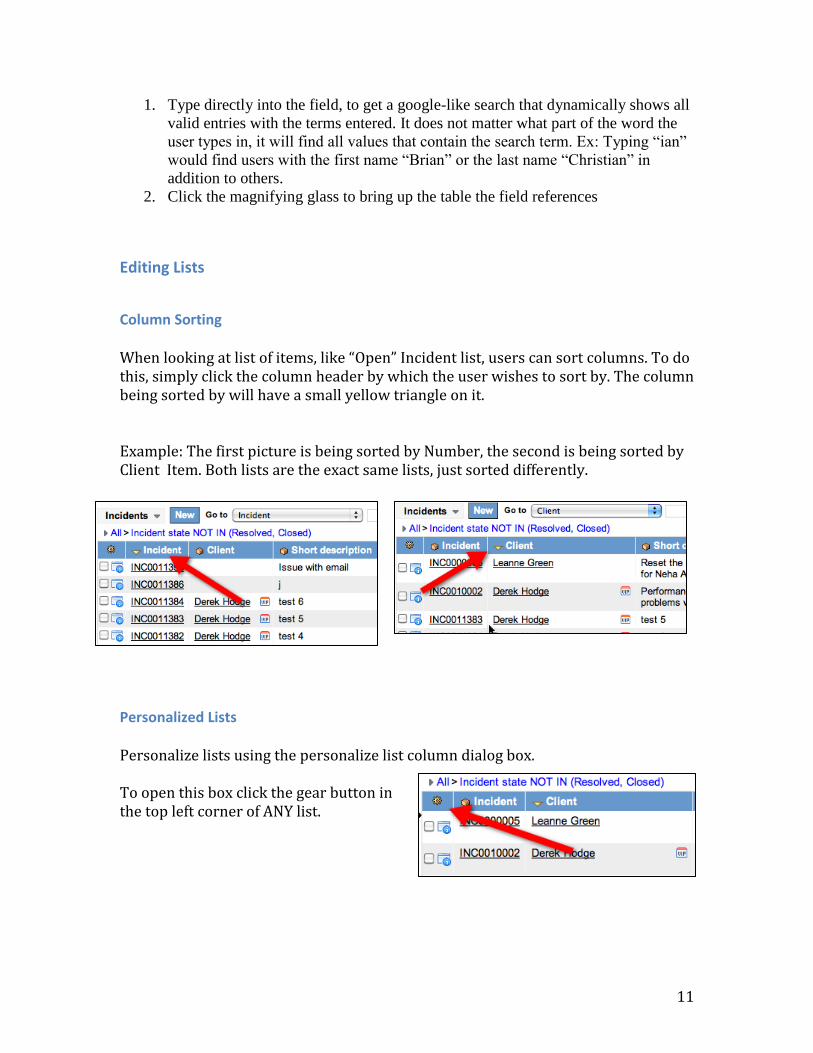
Column Sorting When looking at list of items, like “Open” Incident list, users can sort columns. To do this, simply click the column header by which the user wishes to sort by. The column being sorted by will have a small yellow triangle on it. Example: The first picture is being sorted by Number, the second is being sorted by Client Item. Both lists are the exact same lists, just sorted differently.
Personalized Lists Personalize lists using the personalize list column dialog box. To open this box click the gear button in the top left corner of ANY list.
12
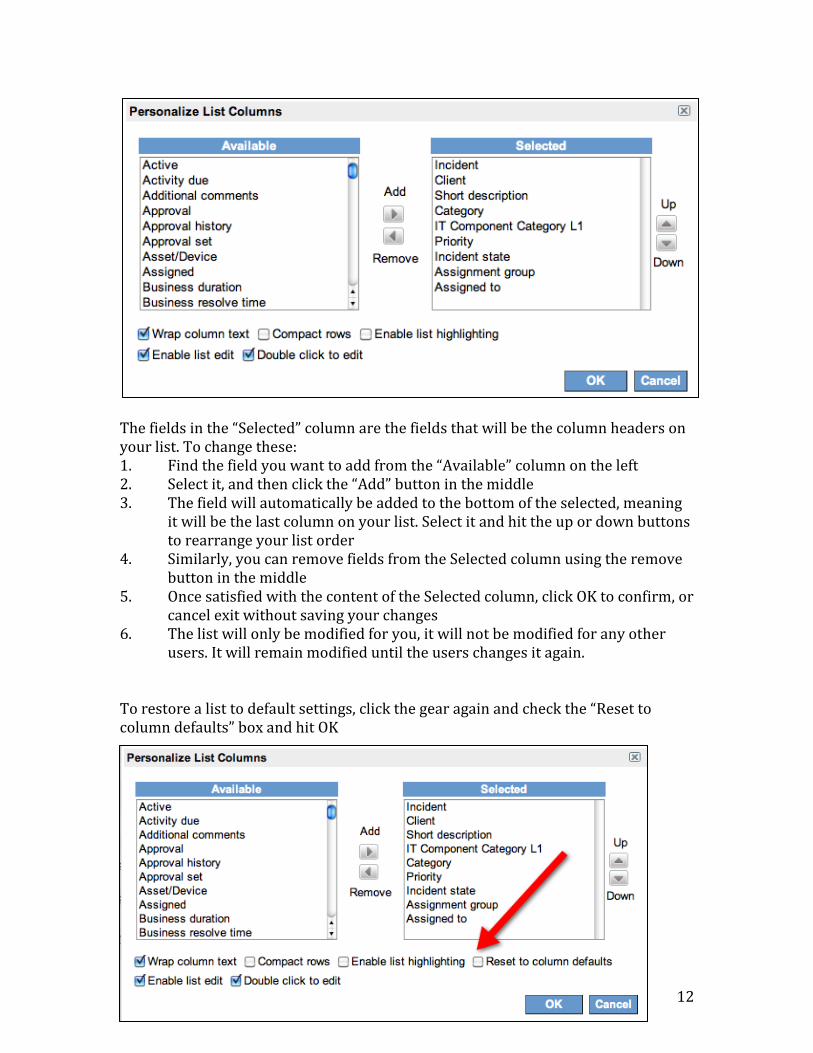
The fields in the “Selected” column are the fields that will be the column headers on your list. To change these: 1. Find the field you want to add from the “Available” column on the left 2. Select it, and then click the “Add” button in the middle 3. The field will automatically be added to the bottom of the selected, meaning
it will be the last column on your list. Select it and hit the up or down buttons to rearrange your list order
4. Similarly, you can remove fields from the Selected column using the remove button in the middle
5. Once satisfied with the content of the Selected column, click OK to confirm, or cancel exit without saving your changes
6. The list will only be modified for you, it will not be modified for any other users. It will remain modified until the users changes it again.
To restore a list to default settings, click the gear again and check the “Reset to column defaults” box and hit OK
13
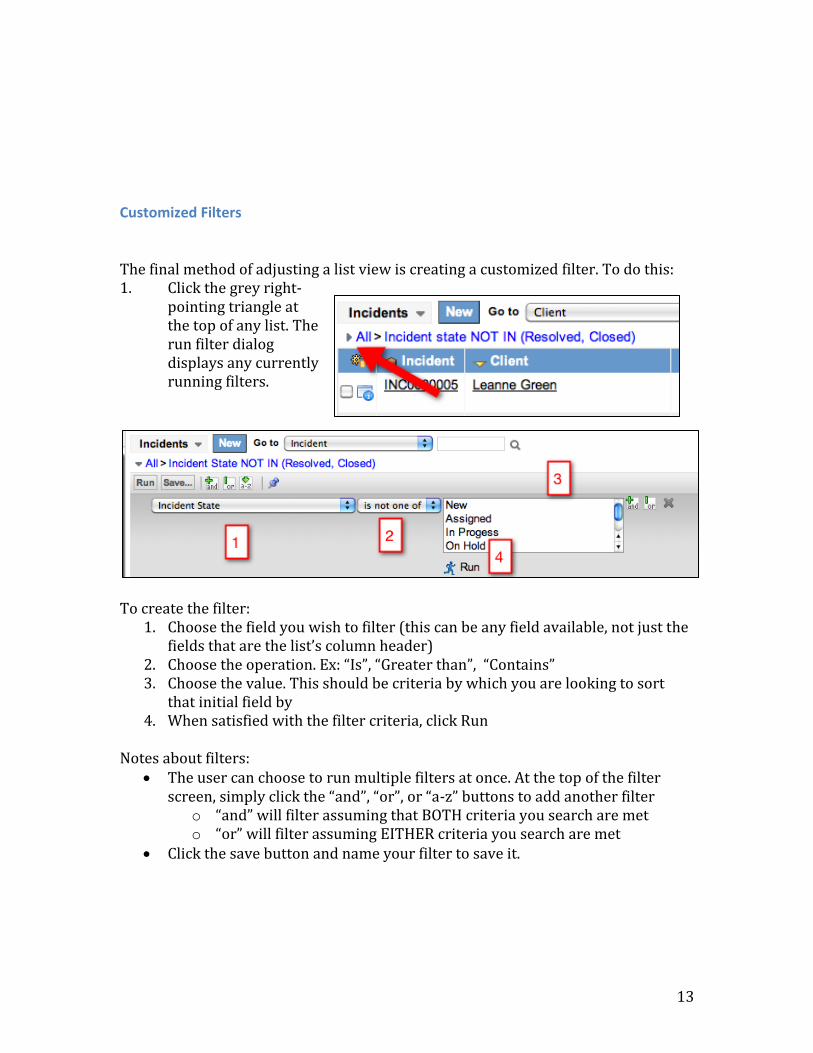
Customized Filters The final method of adjusting a list view is creating a customized filter. To do this: 1. Click the grey right-
pointing triangle at the top of any list. The run filter dialog displays any currently running filters.
To create the filter:
1. Choose the field you wish to filter (this can be any field available, not just the fields that are the list’s column header)
2. Choose the operation. Ex: “Is”, “Greater than”, “Contains” 3. Choose the value. This should be criteria by which you are looking to sort
that initial field by 4. When satisfied with the filter criteria, click Run
Notes about filters:
The user can choose to run multiple filters at once. At the top of the filter screen, simply click the “and”, “or”, or “a-z” buttons to add another filter
o “and” will filter assuming that BOTH criteria you search are met o “or” will filter assuming EITHER criteria you search are met
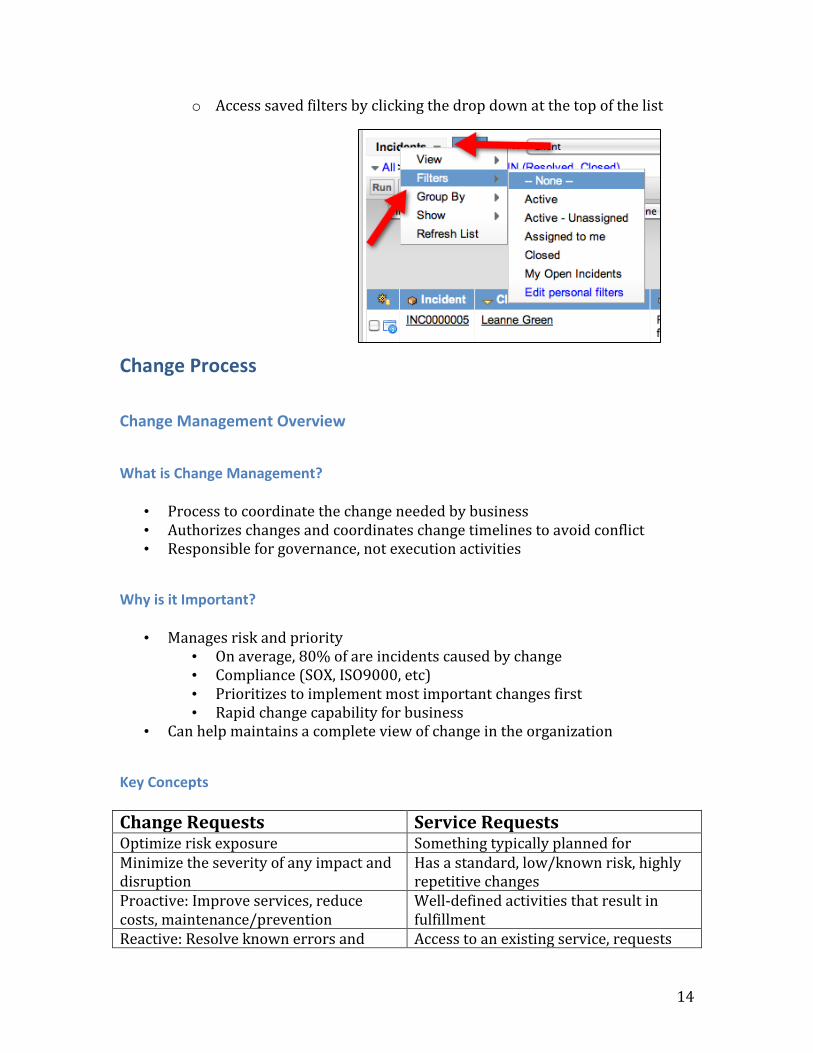
Click the save button and name your filter to save it.
14
o Access saved filters by clicking the drop down at the top of the list
Change Process
Change Management Overview
What is Change Management?
• Process to coordinate the change needed by business • Authorizes changes and coordinates change timelines to avoid conflict • Responsible for governance, not execution activities
Why is it Important?
• Manages risk and priority • On average, 80% of are incidents caused by change • Compliance (SOX, ISO9000, etc) • Prioritizes to implement most important changes first • Rapid change capability for business
• Can help maintains a complete view of change in the organization
Key Concepts
Change Requests Service Requests Optimize risk exposure Something typically planned for Minimize the severity of any impact and disruption
Has a standard, low/known risk, highly repetitive changes
Proactive: Improve services, reduce costs, maintenance/prevention
Well-defined activities that result in fulfillment
Reactive: Resolve known errors and Access to an existing service, requests
15
adapt to business changes for information, or something that has been pre-approved by the Change Advisory Board
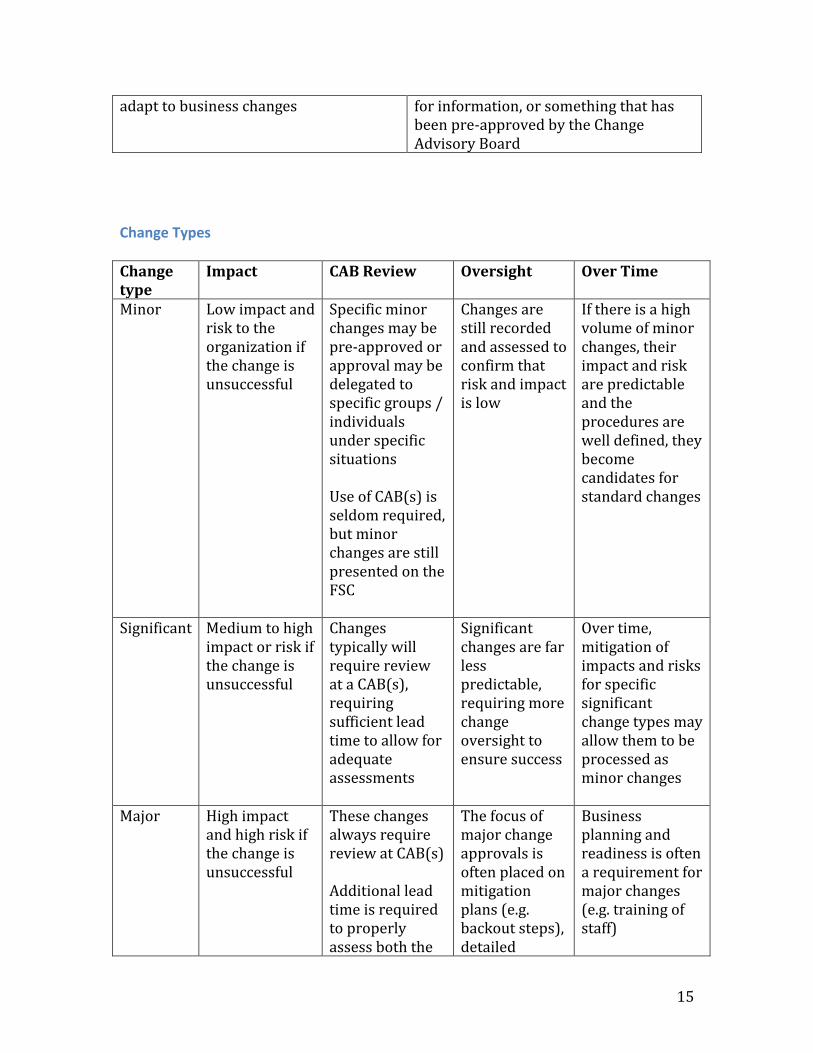
Change Types Change type
Impact CAB Review Oversight Over Time
Minor Low impact and risk to the organization if the change is unsuccessful
Specific minor changes may be pre-approved or approval may be delegated to specific groups / individuals under specific situations Use of CAB(s) is seldom required, but minor changes are still presented on the FSC
Changes are still recorded and assessed to confirm that risk and impact is low
If there is a high volume of minor changes, their impact and risk are predictable and the procedures are well defined, they become candidates for standard changes
Significant Medium to high impact or risk if the change is unsuccessful
Changes typically will require review at a CAB(s), requiring sufficient lead time to allow for adequate assessments
Significant changes are far less predictable, requiring more change oversight to ensure success
Over time, mitigation of impacts and risks for specific significant change types may allow them to be processed as minor changes
Major High impact and high risk if the change is unsuccessful
These changes always require review at CAB(s) Additional lead time is required to properly assess both the
The focus of major change approvals is often placed on mitigation plans (e.g. backout steps), detailed
Business planning and readiness is often a requirement for major changes (e.g. training of staff)

16
build-test (if applicable) and implementation approvals for these types of changes
communication plans and QA validation Major Changes often require oversight found in the Release and Deployment process
Standard Changes with a standard approach and pre-authorized procedure and/or detailed instructions.
RFCs are not required to implement a Standard Change, and they are (may be) logged and tracked using a different mechanism, such as a Service Request
May be executed as Service Requests from the service catalog (fast, simplified approvals, cost handling etc.)
Intent is to streamline the execution as much as possible. Typically absent from the FSC
High-Level Process
17
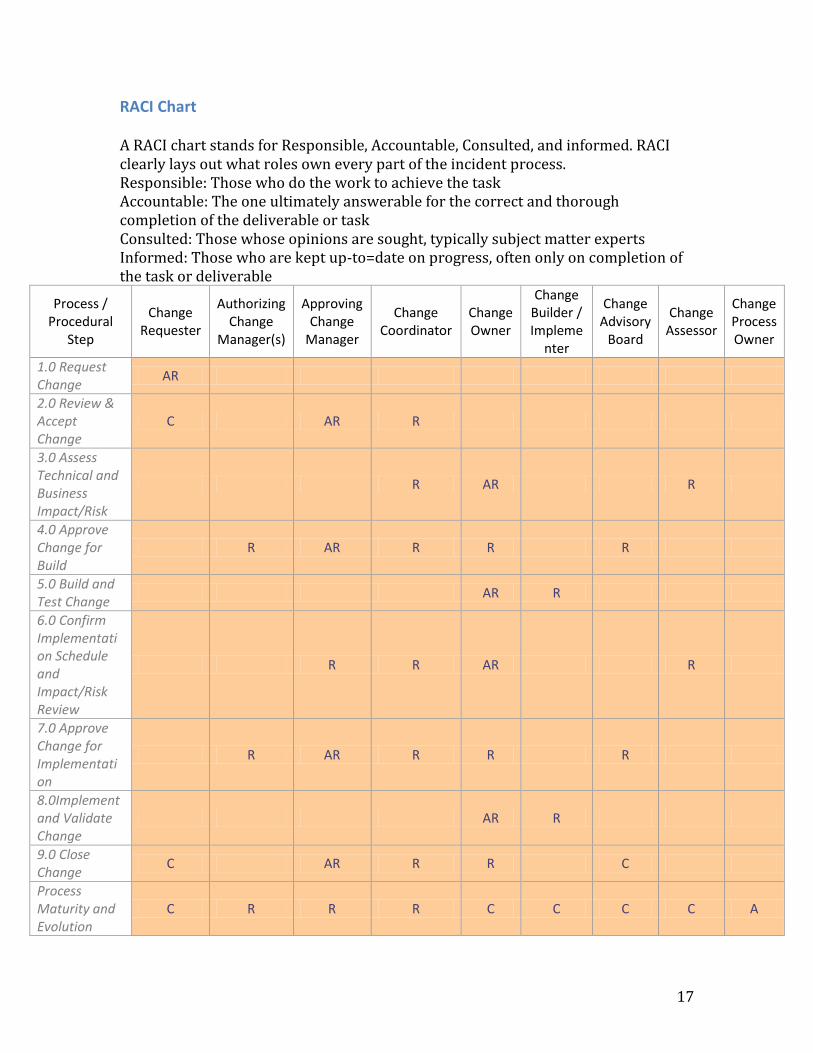
RACI Chart A RACI chart stands for Responsible, Accountable, Consulted, and informed. RACI clearly lays out what roles own every part of the incident process. Responsible: Those who do the work to achieve the task Accountable: The one ultimately answerable for the correct and thorough completion of the deliverable or task Consulted: Those whose opinions are sought, typically subject matter experts Informed: Those who are kept up-to=date on progress, often only on completion of the task or deliverable
Process / Procedural
Step
Change Requester
Authorizing Change
Manager(s)
Approving Change
Manager
Change Coordinator
Change Owner
Change Builder / Impleme
nter
Change Advisory
Board
Change Assessor
Change Process Owner
1.0 Request Change
AR
2.0 Review & Accept Change
C AR R
3.0 Assess Technical and Business Impact/Risk
R AR R
4.0 Approve Change for Build
R AR R R R
5.0 Build and Test Change
AR R
6.0 Confirm Implementation Schedule and Impact/Risk Review
R R AR R
7.0 Approve Change for Implementation
R AR R R R
8.0Implement and Validate Change
AR R
9.0 Close Change
C AR R R C
Process Maturity and Evolution
C R R R C C C C A
18
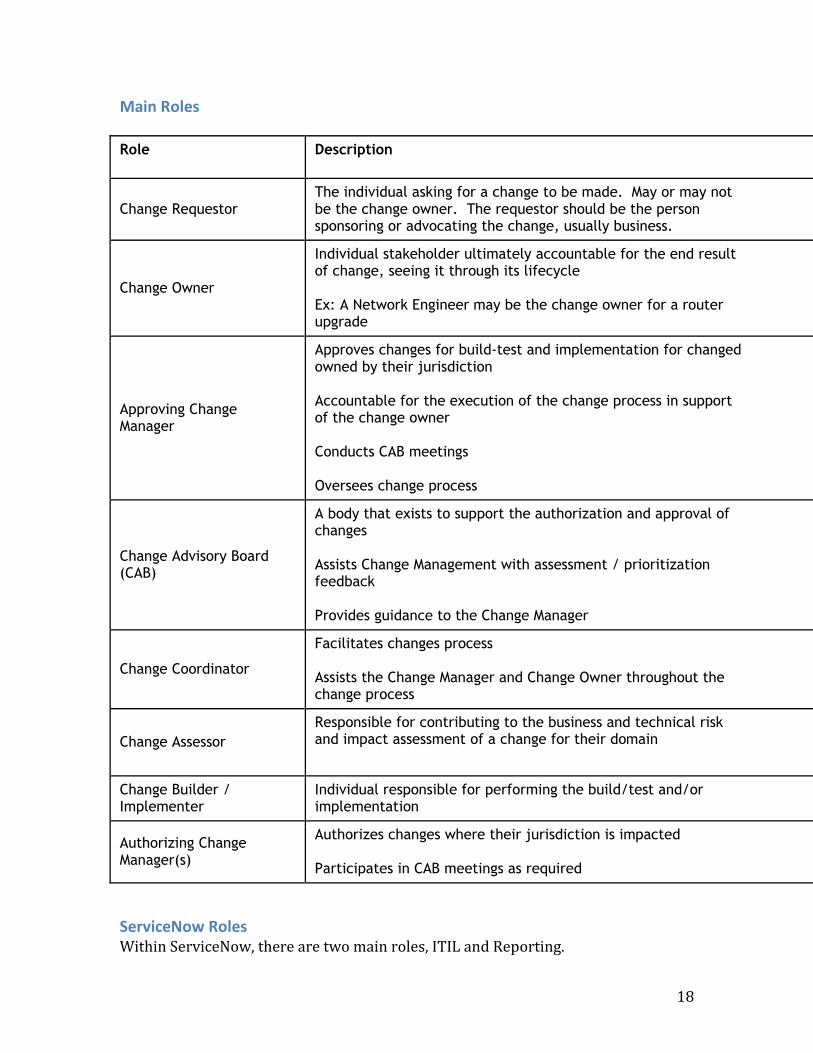
Main Roles
Role Description
Change Requestor The individual asking for a change to be made. May or may not be the change owner. The requestor should be the person sponsoring or advocating the change, usually business.
Change Owner
Individual stakeholder ultimately accountable for the end result of change, seeing it through its lifecycle Ex: A Network Engineer may be the change owner for a router upgrade
Approving Change Manager
Approves changes for build-test and implementation for changed owned by their jurisdiction Accountable for the execution of the change process in support of the change owner Conducts CAB meetings Oversees change process
Change Advisory Board (CAB)
A body that exists to support the authorization and approval of changes Assists Change Management with assessment / prioritization feedback Provides guidance to the Change Manager
Change Coordinator
Facilitates changes process Assists the Change Manager and Change Owner throughout the change process
Change Assessor
Responsible for contributing to the business and technical risk and impact assessment of a change for their domain
Change Builder / Implementer
Individual responsible for performing the build/test and/or implementation
Authorizing Change Manager(s)
Authorizes changes where their jurisdiction is impacted Participates in CAB meetings as required
ServiceNow Roles Within ServiceNow, there are two main roles, ITIL and Reporting.
19
The ITIL Role gives users access to the processes within ServiceNow. It will allow them to create tickets and send them through the entire process. The reporting role will allow users to create reports. This will be essential in the final step, Process Maturity and Evolution.
Policies Policies help define and ensure the Change Management process achieves its objective and adheres to the defined process.
1. The Change Owner is ultimately accountable for the success of their respective
change.
2. The approving Change Manager is accountable for the successful execution of the
process, as a means to mitigate impact and risk for stakeholders/customers.
3. Change Management will manage all changes made to the production
environment, including the operational test environment. This includes changes
implemented by vendors and external organizations.
4. Effective Risk and Impact Assessment is enforced and is considered the
foundation of Change Management.
5. All customers are informed of changes that affect the Service(s) they receive prior
to change implementation.
6. There is a mechanism to implement URGENT changes to the managed
environment with minimum destabilization of that environment.
7. The number of changes deemed URGENT is reduced to a pre-specified and
progressive metric through proper planning.
8. A Change Advisory Board (CAB) exists and the Change Manager is the ultimate
decision making authority within the CAB.
9. A Change implementation plan is required prior to change deployment.
10. All Service Providers will fulfill their roles in compliance with the Change
Management process.
11. A Request for Change (RFC) should not be approved for implementation unless
relevant back-out plans are in place.
Process Procedures
20
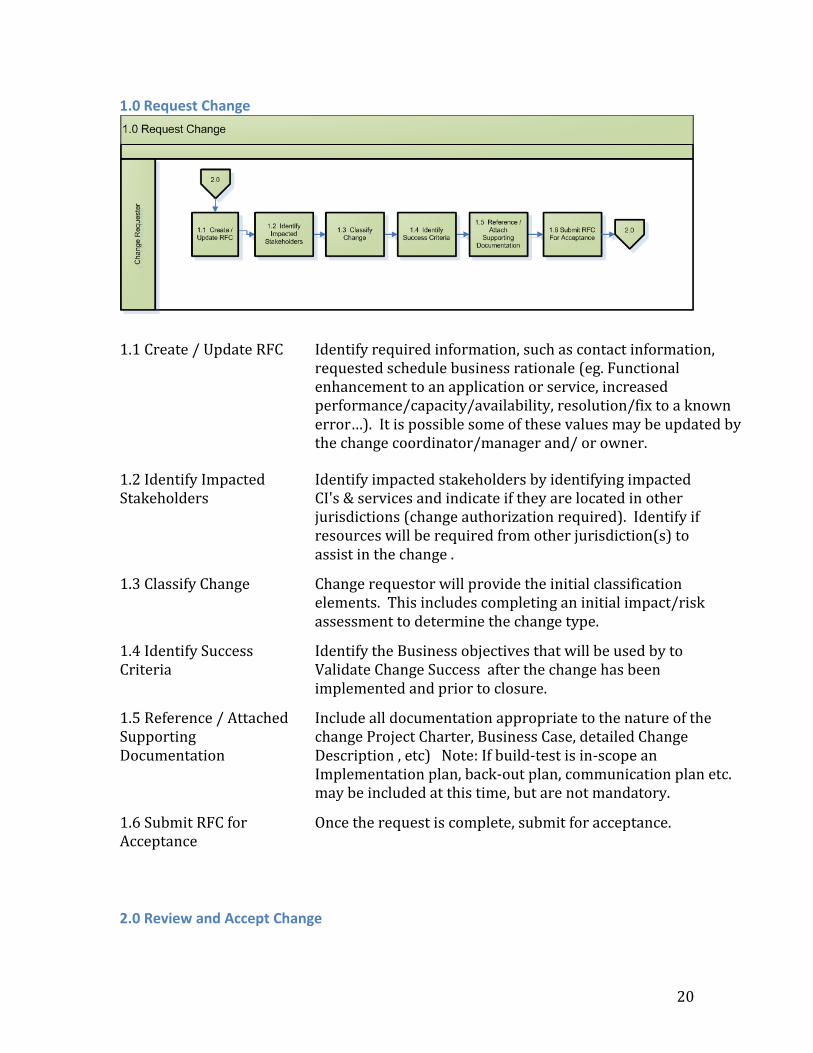
1.0 Request Change
1.1 Create / Update RFC Identify required information, such as contact information, requested schedule business rationale (eg. Functional enhancement to an application or service, increased performance/capacity/availability, resolution/fix to a known error…). It is possible some of these values may be updated by the change coordinator/manager and/ or owner.
1.2 Identify Impacted Stakeholders
Identify impacted stakeholders by identifying impacted CI's & services and indicate if they are located in other jurisdictions (change authorization required). Identify if resources will be required from other jurisdiction(s) to assist in the change .
1.3 Classify Change Change requestor will provide the initial classification elements. This includes completing an initial impact/risk assessment to determine the change type.
1.4 Identify Success Criteria
Identify the Business objectives that will be used by to Validate Change Success after the change has been implemented and prior to closure.
1.5 Reference / Attached Supporting Documentation
Include all documentation appropriate to the nature of the change Project Charter, Business Case, detailed Change Description , etc) Note: If build-test is in-scope an Implementation plan, back-out plan, communication plan etc. may be included at this time, but are not mandatory.
1.6 Submit RFC for Acceptance
Once the request is complete, submit for acceptance.
2.0 Review and Accept Change

21
Step Activities
2.1 Validate Change Submission Verify that all information required to process the RFC has been provided.
2.2 RFC Valid? Verify that the RFC complies with Change Management Standards and any jurisdiction-specific policies and business requirements. Refer exceptions to the Change Requestor for correction, otherwise notify the Change Manager.
2.3 RFC Accepted? Verify that this is a legitimate RFC. If not, reject the RFC and if so, continue processing. It is possible to meet all validation requirements in 2.2 but still not be considered legitimate. This could include changes outside the scope of IT.
2.4 Identify Change Owner Change Coordinator identifies the Change Owner and confirms the accuracy of the selection with the Change Owner. If the Change Owner will come from another jurisdiction, the Change Coordinator will request the Change Manager/Coordinator from that jurisdiction to identify the Change Owner.
22
2.5 Emergency Change? Determine if change meets emergency change criteria . If change is emergency, Chance Coordinator notifies approving Change Manager who invokes local emergency change procedures, otherwise change is processed under normal procedures .
2.6 Standard Change? Verify that this is a legitimate “standard” change and defer the to the Standard Change Procedures.
2.7 Assign RFC to Change Owner Assign RFC to Change Owner for subsequent Review and Assessment.
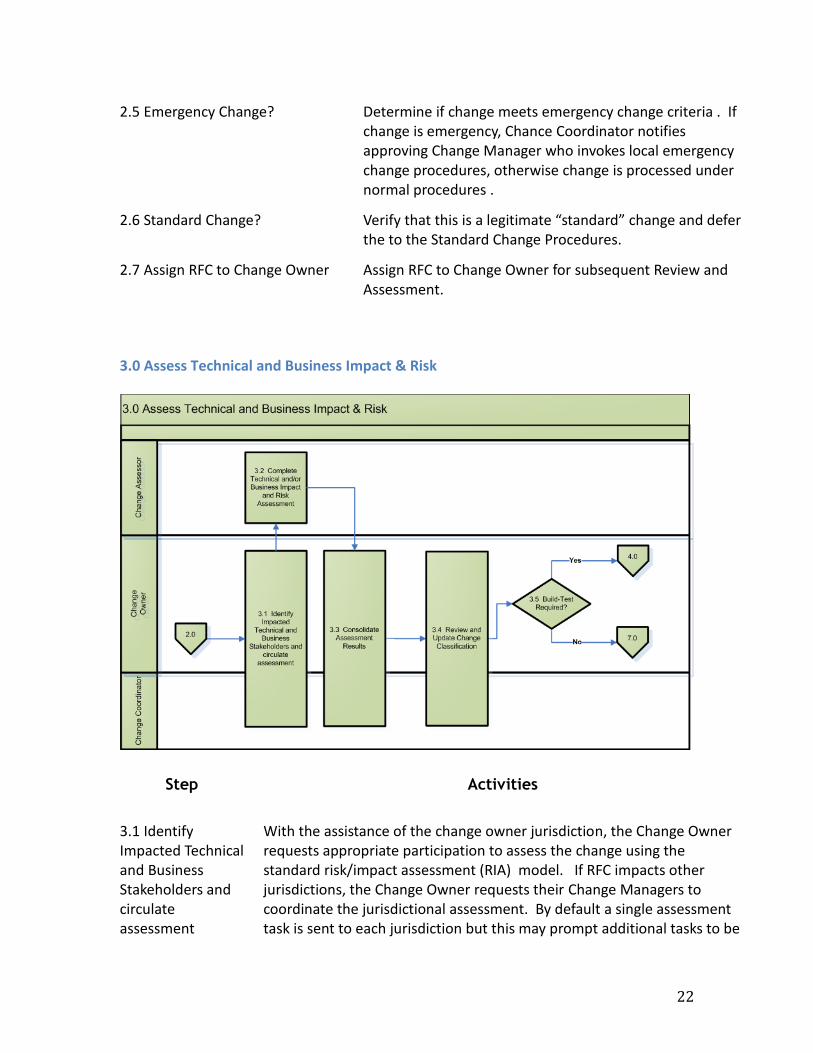
3.0 Assess Technical and Business Impact & Risk
Step Activities
3.1 Identify Impacted Technical and Business Stakeholders and circulate assessment
With the assistance of the change owner jurisdiction, the Change Owner requests appropriate participation to assess the change using the standard risk/impact assessment (RIA) model. If RFC impacts other jurisdictions, the Change Owner requests their Change Managers to coordinate the jurisdictional assessment. By default a single assessment task is sent to each jurisdiction but this may prompt additional tasks to be
23
created by the jurisdictional change coordinator. A specific “Release” task will be sent to the release manager to determine if release coordination activities are required for this specific change. Release criteria will be defined and managed separately.
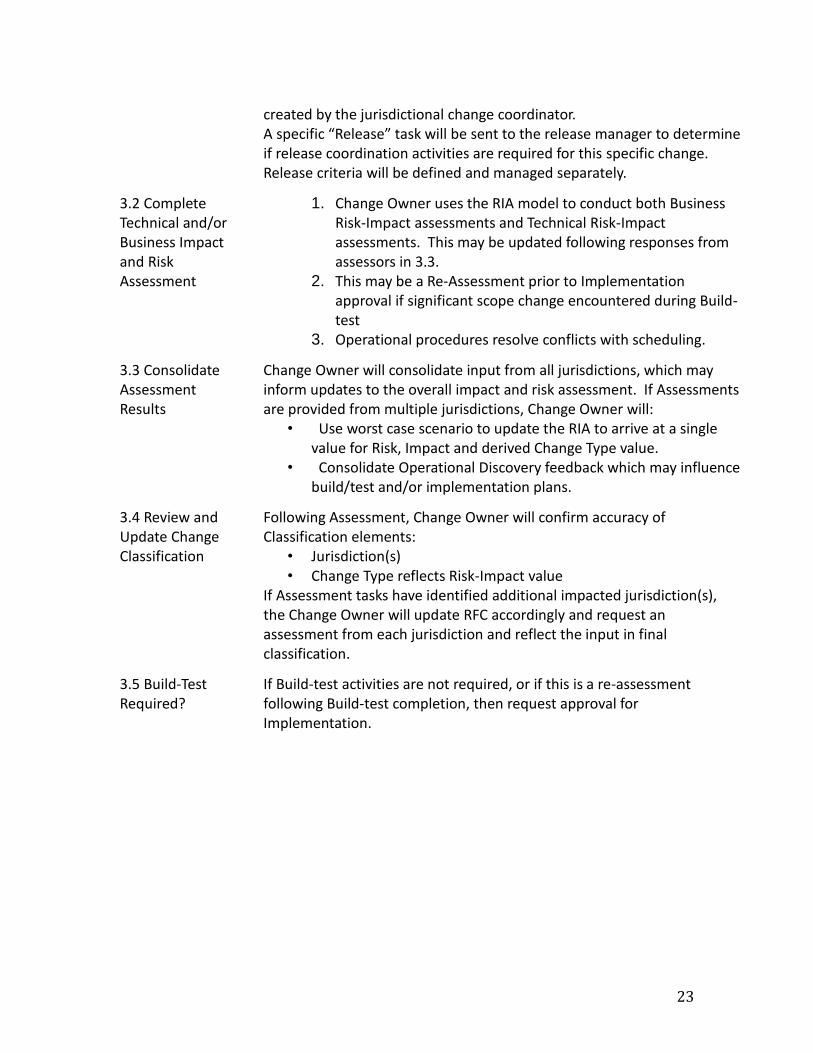
3.2 Complete Technical and/or Business Impact and Risk Assessment
1. Change Owner uses the RIA model to conduct both Business Risk-Impact assessments and Technical Risk-Impact assessments. This may be updated following responses from assessors in 3.3.
2. This may be a Re-Assessment prior to Implementation approval if significant scope change encountered during Build-test
3. Operational procedures resolve conflicts with scheduling.
3.3 Consolidate Assessment Results
Change Owner will consolidate input from all jurisdictions, which may inform updates to the overall impact and risk assessment. If Assessments are provided from multiple jurisdictions, Change Owner will:
• Use worst case scenario to update the RIA to arrive at a single value for Risk, Impact and derived Change Type value.
• Consolidate Operational Discovery feedback which may influence build/test and/or implementation plans.
3.4 Review and Update Change Classification
Following Assessment, Change Owner will confirm accuracy of Classification elements:
• Jurisdiction(s) • Change Type reflects Risk-Impact value
If Assessment tasks have identified additional impacted jurisdiction(s), the Change Owner will update RFC accordingly and request an assessment from each jurisdiction and reflect the input in final classification.
3.5 Build-Test Required?
If Build-test activities are not required, or if this is a re-assessment following Build-test completion, then request approval for Implementation.
24
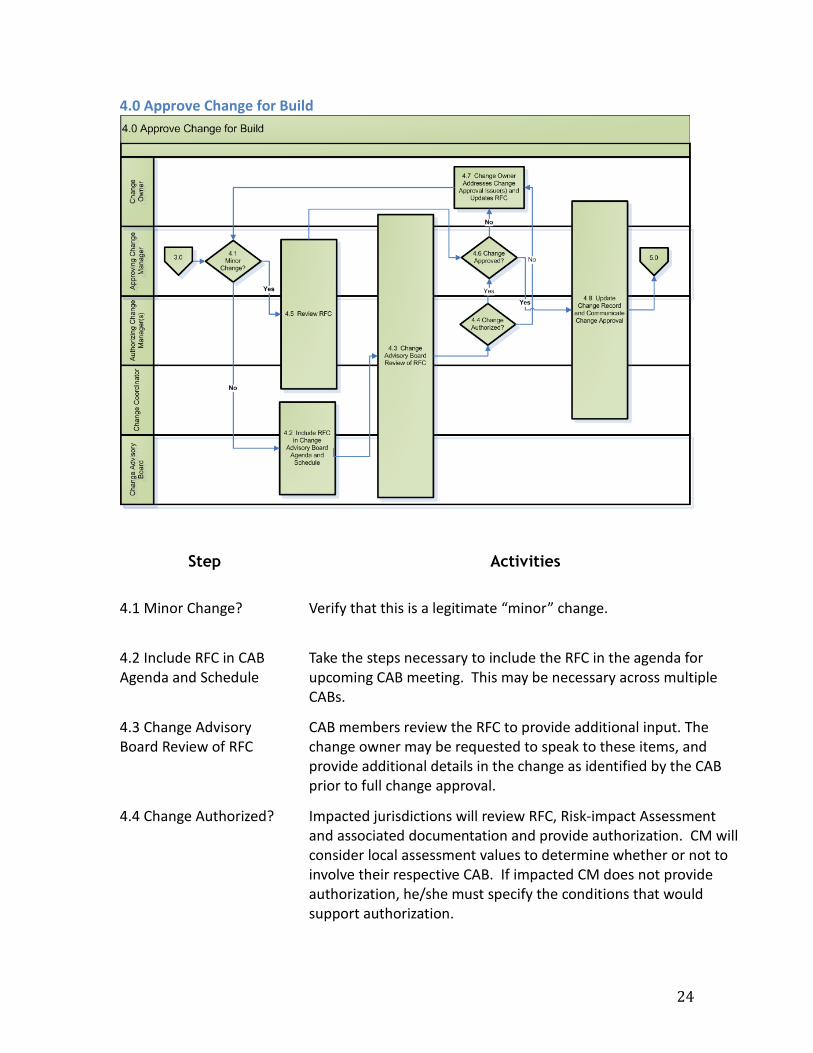
4.0 Approve Change for Build
Step Activities
4.1 Minor Change? Verify that this is a legitimate “minor” change.
4.2 Include RFC in CAB Agenda and Schedule
Take the steps necessary to include the RFC in the agenda for upcoming CAB meeting. This may be necessary across multiple CABs.
4.3 Change Advisory Board Review of RFC
CAB members review the RFC to provide additional input. The change owner may be requested to speak to these items, and provide additional details in the change as identified by the CAB prior to full change approval.
4.4 Change Authorized? Impacted jurisdictions will review RFC, Risk-impact Assessment and associated documentation and provide authorization. CM will consider local assessment values to determine whether or not to involve their respective CAB. If impacted CM does not provide authorization, he/she must specify the conditions that would support authorization.

25
4.5 Review RFC The RFC is reviewed for approval. This may include ensuring that all authorizations are provided should the minor change impact multiple jurisdictions.
4.6 Change Approved? Prior to approval, CM will ensure that any conditions (from conditional Authorizations) are satisfied. Owner jurisdiction Change Manager approves start of Build-Test, involving CAB at his discretion. This can only occur if all jurisdictions have authorized the change.
4.7 Change Owner Addresses Change Approval Issue(s) and Updates RFC
If all avenues for approval have been exhausted, CM will deny the change and inform stakeholders.
4.8 Update Change Record and Communicate Change Approval
Update the record with all necessary information and ensure the approval of the change is approved accordingly.
5.0 Build and Test Change
Step Activities
5.1 Assign Resources Change Owner and Builder ensures necessary resources (HW, SW, staff) are assigned to perform B-T activities, with assistance from other
26
jurisdictions. Example: in addition to application development/testing, infrastructure resources may develop and test the Build Kit, while network resources test new router configurations .
5.2 Design and Build Change
Develop Build-test detailed schedule and review/agree with B-T resources from all jurisdictions . Build Team executes the build plan to develop the solution.
5.3 Create Implementation, Test and Back-out Plans
Change Owner ensures that the Build-test team prepares the Implementation Plan, containing the following:
1. Implementation instructions & estimated duration 2. Verification test instructions & estimated duration 3. Backout instructions, which must specify estimated
duration , backout decision point & protocol, backout verification procedures
4. Communication protocol to communicate implementation, verification & backout results
5.4 Test Change Testing scope includes everything from unit testing, through system testing up to & including Pre-Prod staging. The Implementation Plan is also tested (estimated timeframes are confirmed). The Change Owner may also request that Change Implementers assist in some of the above activity to familiarize themselves with what to expect during implementation.
5.5 Update RFC with Build-Test and Implementation Documentation
Prepare or update other collateral appropriate to the Change, including, at a minimum, Communication Plan (content approved for distribution) and Operations Discovery - prepare description of Configuration Management data to be updated (may include documentation as well as HW/SW components)
5.6 Update RFC with Revised Implementation Data (as required)
If the previously scheduled Implementation Date is no longer achievable, due to Build-test slippage or external factors, the Change Owner requests that a revised Implementation date be scheduled asap. Note, this may require a reassessment in some cases.
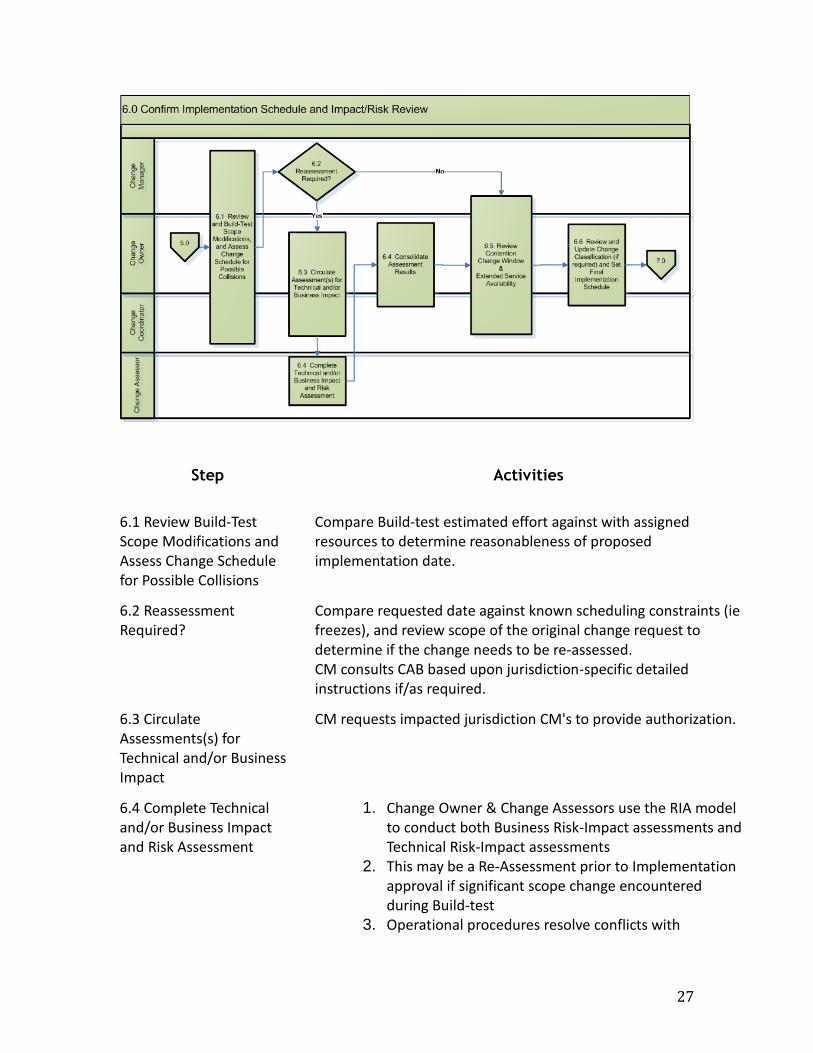
6.0 Confirm Implementation Schedule and Impact/Risk Review
27
Step Activities
6.1 Review Build-Test Scope Modifications and Assess Change Schedule for Possible Collisions
Compare Build-test estimated effort against with assigned resources to determine reasonableness of proposed implementation date.
6.2 Reassessment Required?
Compare requested date against known scheduling constraints (ie freezes), and review scope of the original change request to determine if the change needs to be re-assessed. CM consults CAB based upon jurisdiction-specific detailed instructions if/as required.
6.3 Circulate Assessments(s) for Technical and/or Business Impact
CM requests impacted jurisdiction CM's to provide authorization.
6.4 Complete Technical and/or Business Impact and Risk Assessment
1. Change Owner & Change Assessors use the RIA model to conduct both Business Risk-Impact assessments and Technical Risk-Impact assessments
2. This may be a Re-Assessment prior to Implementation approval if significant scope change encountered during Build-test
3. Operational procedures resolve conflicts with
28
scheduling.
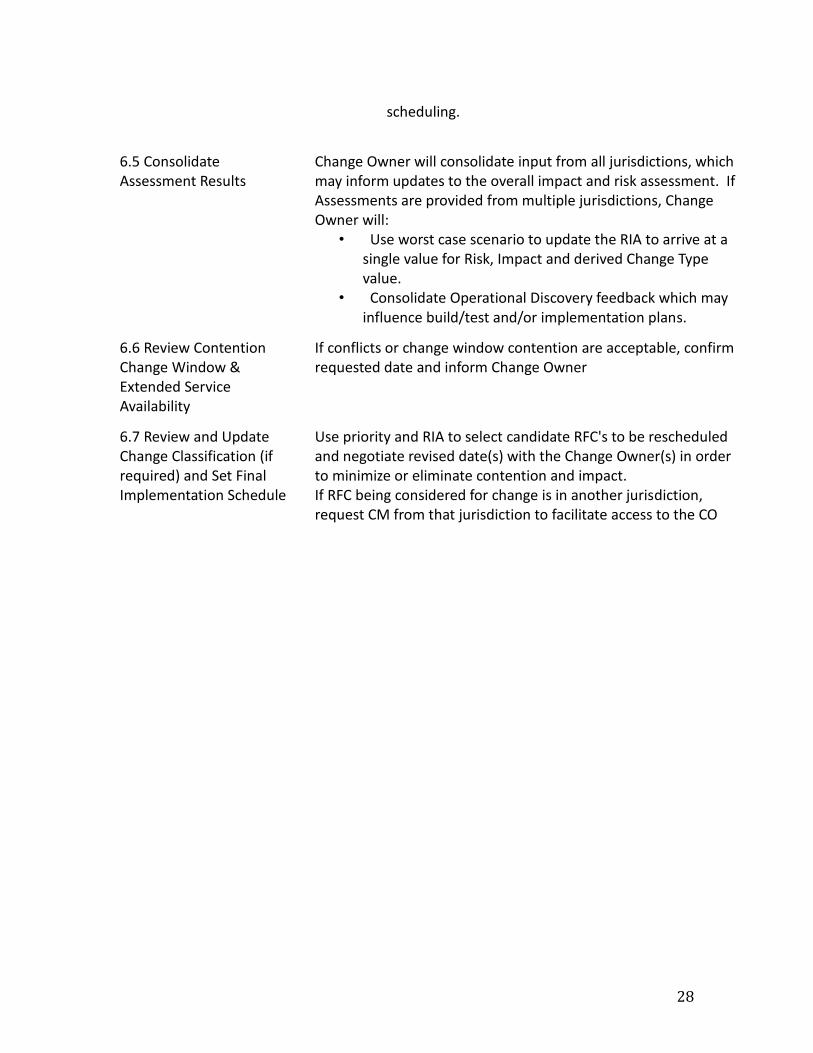
6.5 Consolidate Assessment Results
Change Owner will consolidate input from all jurisdictions, which may inform updates to the overall impact and risk assessment. If Assessments are provided from multiple jurisdictions, Change Owner will:
• Use worst case scenario to update the RIA to arrive at a single value for Risk, Impact and derived Change Type value.
• Consolidate Operational Discovery feedback which may influence build/test and/or implementation plans.
6.6 Review Contention Change Window & Extended Service Availability
If conflicts or change window contention are acceptable, confirm requested date and inform Change Owner
6.7 Review and Update Change Classification (if required) and Set Final Implementation Schedule
Use priority and RIA to select candidate RFC's to be rescheduled and negotiate revised date(s) with the Change Owner(s) in order to minimize or eliminate contention and impact. If RFC being considered for change is in another jurisdiction, request CM from that jurisdiction to facilitate access to the CO

29
7.0 Approve Change for Implementation
Step Activities
7.1 RFC Reviewed to Determine if Change Advisory Board Review Required
CM determines if CAB approval is required to proceed to implementation.
7.2 Include RFC in Change Advisory Board Agenda and Schedule
If CAB approval is required, take the steps necessary to include the RFC in the agenda for upcoming CAB meeting. This may be necessary across multiple CABs.
7.3 Change Advisory Board Review of RFC
CAB reviews all RFC to approve the change for implementation.
7.4 Change Authorized? Impacted jurisdictions will review RFC, Risk-impact Assessment and associated documentation and provide authorization. CM will consider local assessment values to determine whether or not to involve CAB . If impacted CM does not provide authorization, he/she must specify the conditions that would support authorization.
7.5 Change Approved? Prior to approval, CM will ensure that any conditions (from conditional Authorizations) are satisfied. Owner jurisdiction Change Manager approves implementation, involving CAB at his or her discretion. This

30
can only occur if all jurisdictions have authorized the change.
7.6 Change Owner Addresses Change Approval Issue(s) and Updates RFC
If all avenues for approval have been exhausted, CM will deny the change and inform stakeholders.
7.7 Update Change Record and Communicate Change Approval
Update the record with all necessary information and ensure the approval of the change is approved accordingly.
8.0 Implement and Validate Change
Step Activities
8.1 Coordinate Implementation
Confirms that any prerequisite prep work has been performed and implementation resources:
• are available at scheduled times • have documented implementation, verification, and backout plans • understand their implementation tasks • are aware of implementation task dependencies • are aware of communication protocols • are aware of change window timelines, backout go/no-go decision point • have necessary parts, files, media • have necessary logical & physical access
31
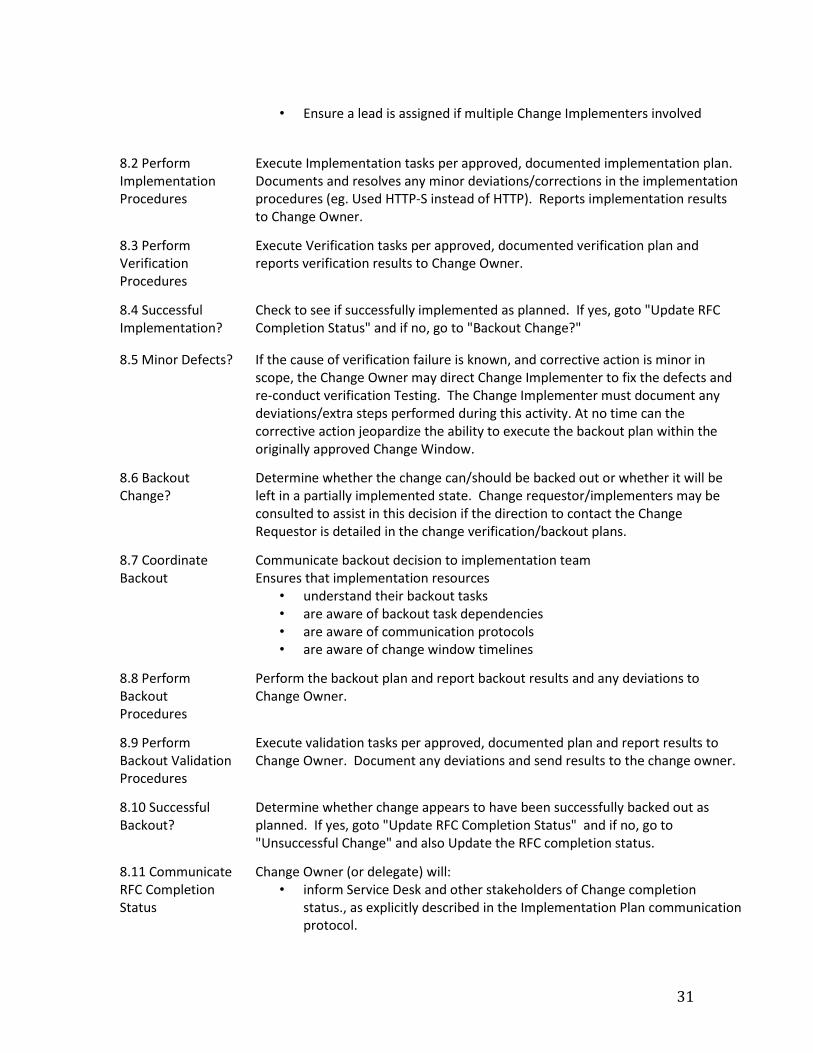
• Ensure a lead is assigned if multiple Change Implementers involved
8.2 Perform Implementation Procedures
Execute Implementation tasks per approved, documented implementation plan. Documents and resolves any minor deviations/corrections in the implementation procedures (eg. Used HTTP-S instead of HTTP). Reports implementation results to Change Owner.
8.3 Perform Verification Procedures
Execute Verification tasks per approved, documented verification plan and reports verification results to Change Owner.
8.4 Successful Implementation?
Check to see if successfully implemented as planned. If yes, goto "Update RFC Completion Status" and if no, go to "Backout Change?"
8.5 Minor Defects? If the cause of verification failure is known, and corrective action is minor in scope, the Change Owner may direct Change Implementer to fix the defects and re-conduct verification Testing. The Change Implementer must document any deviations/extra steps performed during this activity. At no time can the corrective action jeopardize the ability to execute the backout plan within the originally approved Change Window.
8.6 Backout Change?
Determine whether the change can/should be backed out or whether it will be left in a partially implemented state. Change requestor/implementers may be consulted to assist in this decision if the direction to contact the Change Requestor is detailed in the change verification/backout plans.
8.7 Coordinate Backout
Communicate backout decision to implementation team Ensures that implementation resources
• understand their backout tasks • are aware of backout task dependencies • are aware of communication protocols • are aware of change window timelines
8.8 Perform Backout Procedures
Perform the backout plan and report backout results and any deviations to Change Owner.
8.9 Perform Backout Validation Procedures
Execute validation tasks per approved, documented plan and report results to Change Owner. Document any deviations and send results to the change owner.
8.10 Successful Backout?
Determine whether change appears to have been successfully backed out as planned. If yes, goto "Update RFC Completion Status" and if no, go to "Unsuccessful Change" and also Update the RFC completion status.
8.11 Communicate RFC Completion Status
Change Owner (or delegate) will: • inform Service Desk and other stakeholders of Change completion
status., as explicitly described in the Implementation Plan communication protocol.
32
• Update RFC completion codes (Successful or not) • notify Configuration Management to update Configuration Data to reflect
the change
8.12 Log Planned Outage Incident and Associate to RFC
Create a Service Outage Incident that serves as the Master Incident linked to the RFC and any incoming incidents can be associated with.
8.13 Log Service Interruption Incident
Contact Service Desk and report Incident associated to RFC and include details in the Incident that describe the deficiencies in the production environment resulting from the partially implemented change (ie. functionality, performance, outage)
8.14 Resolve Planned Outage Incident
Resolve the Planned Service Outage Incident that was previously created.
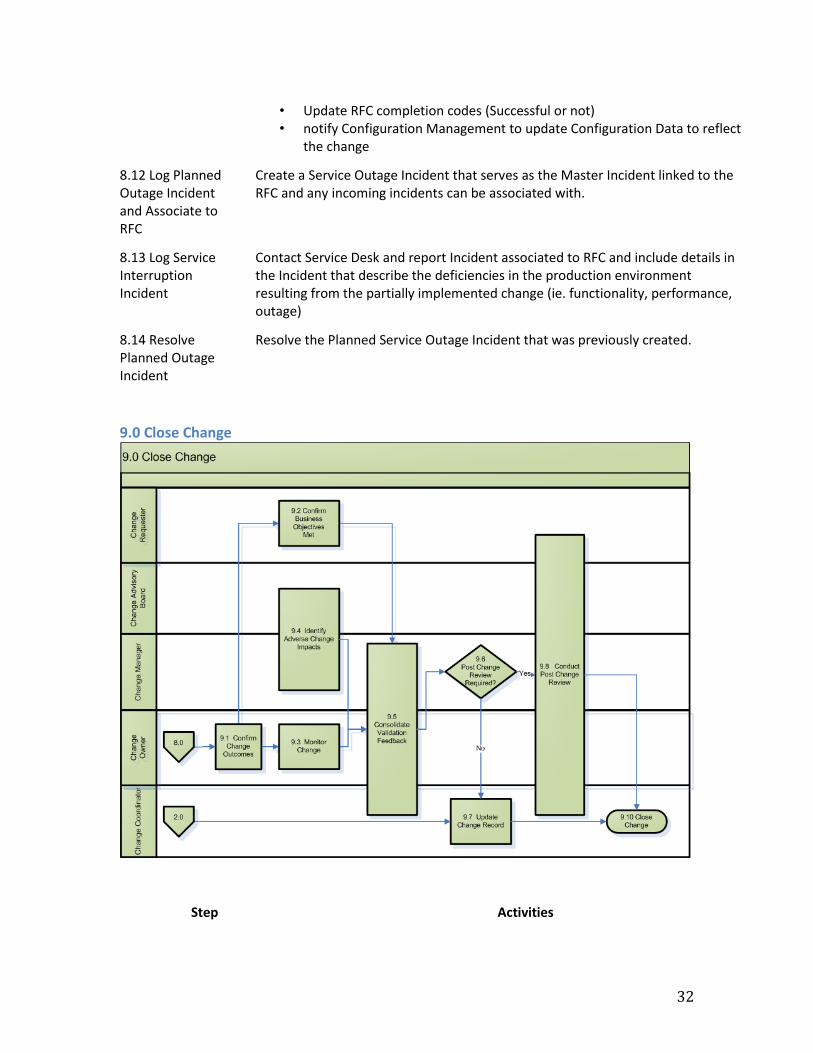
9.0 Close Change
Step Activities
33
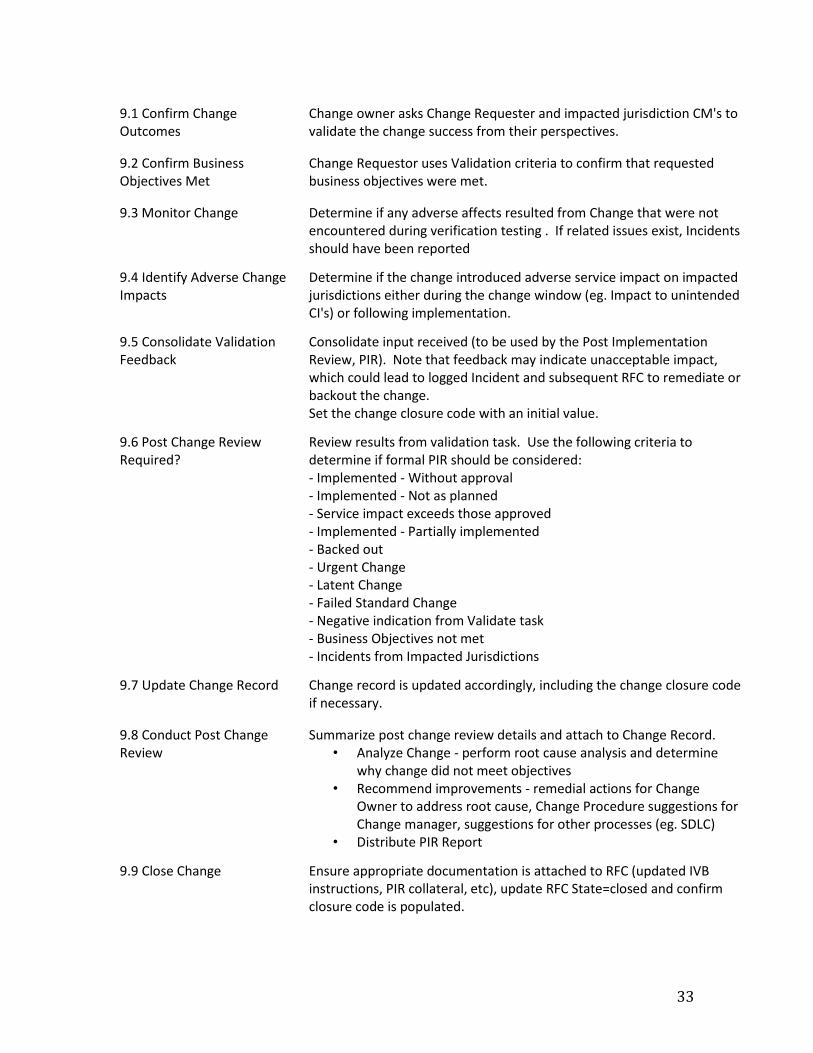
9.1 Confirm Change Outcomes
Change owner asks Change Requester and impacted jurisdiction CM's to validate the change success from their perspectives.
9.2 Confirm Business Objectives Met
Change Requestor uses Validation criteria to confirm that requested business objectives were met.
9.3 Monitor Change Determine if any adverse affects resulted from Change that were not encountered during verification testing . If related issues exist, Incidents should have been reported
9.4 Identify Adverse Change Impacts
Determine if the change introduced adverse service impact on impacted jurisdictions either during the change window (eg. Impact to unintended CI's) or following implementation.
9.5 Consolidate Validation Feedback
Consolidate input received (to be used by the Post Implementation Review, PIR). Note that feedback may indicate unacceptable impact, which could lead to logged Incident and subsequent RFC to remediate or backout the change.
Set the change closure code with an initial value.
9.6 Post Change Review Required?
Review results from validation task. Use the following criteria to determine if formal PIR should be considered: - Implemented - Without approval - Implemented - Not as planned - Service impact exceeds those approved - Implemented - Partially implemented - Backed out - Urgent Change - Latent Change - Failed Standard Change - Negative indication from Validate task - Business Objectives not met - Incidents from Impacted Jurisdictions
9.7 Update Change Record Change record is updated accordingly, including the change closure code if necessary.
9.8 Conduct Post Change Review
Summarize post change review details and attach to Change Record. • Analyze Change - perform root cause analysis and determine
why change did not meet objectives • Recommend improvements - remedial actions for Change
Owner to address root cause, Change Procedure suggestions for Change manager, suggestions for other processes (eg. SDLC)
• Distribute PIR Report
9.9 Close Change Ensure appropriate documentation is attached to RFC (updated IVB instructions, PIR collateral, etc), update RFC State=closed and confirm closure code is populated.
34
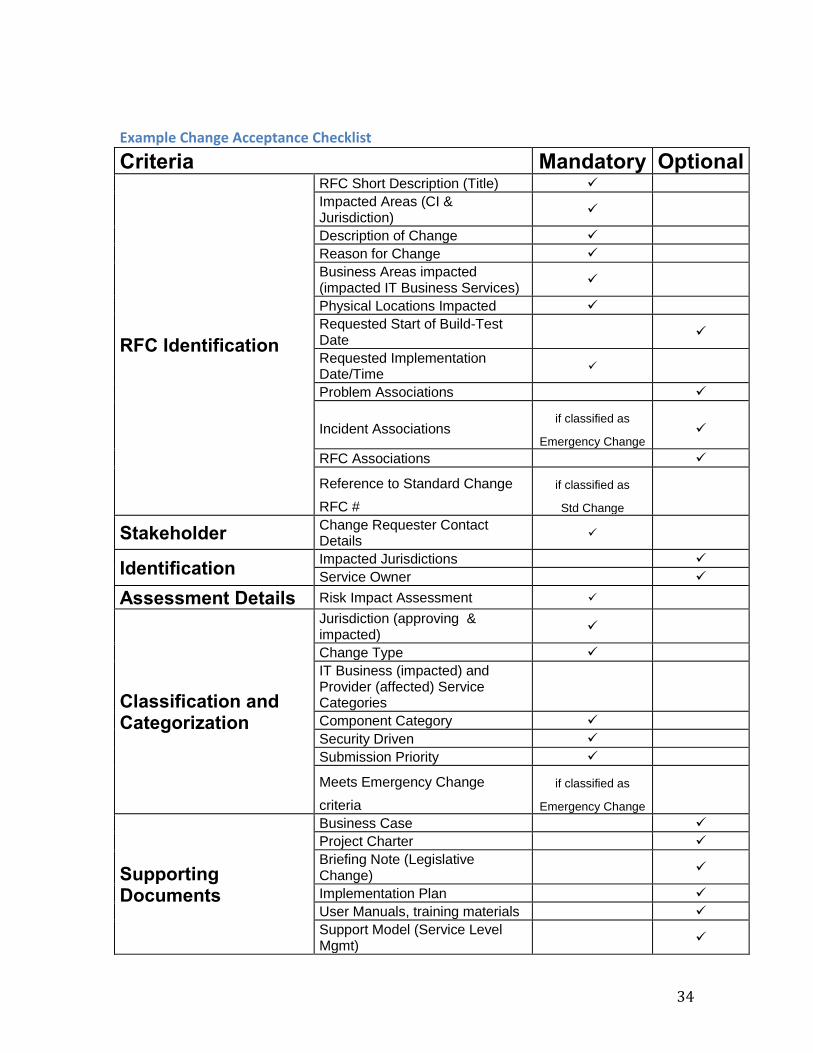
Example Change Acceptance Checklist
Criteria Mandatory Optional
RFC Identification
RFC Short Description (Title) Impacted Areas (CI & Jurisdiction) Description of Change Reason for Change Business Areas impacted (impacted IT Business Services) Physical Locations Impacted Requested Start of Build-Test Date Requested Implementation Date/Time Problem Associations
Incident Associations if classified as
Emergency Change
RFC Associations Reference to Standard Change
RFC # if classified as
Std Change
Stakeholder Change Requester Contact Details
Identification Impacted Jurisdictions Service Owner
Assessment Details Risk Impact Assessment
Classification and Categorization
Jurisdiction (approving & impacted) Change Type IT Business (impacted) and Provider (affected) Service Categories
Component Category Security Driven Submission Priority Meets Emergency Change
criteria if classified as
Emergency Change
Supporting Documents
Business Case Project Charter Briefing Note (Legislative Change) Implementation Plan User Manuals, training materials Support Model (Service Level Mgmt)
35
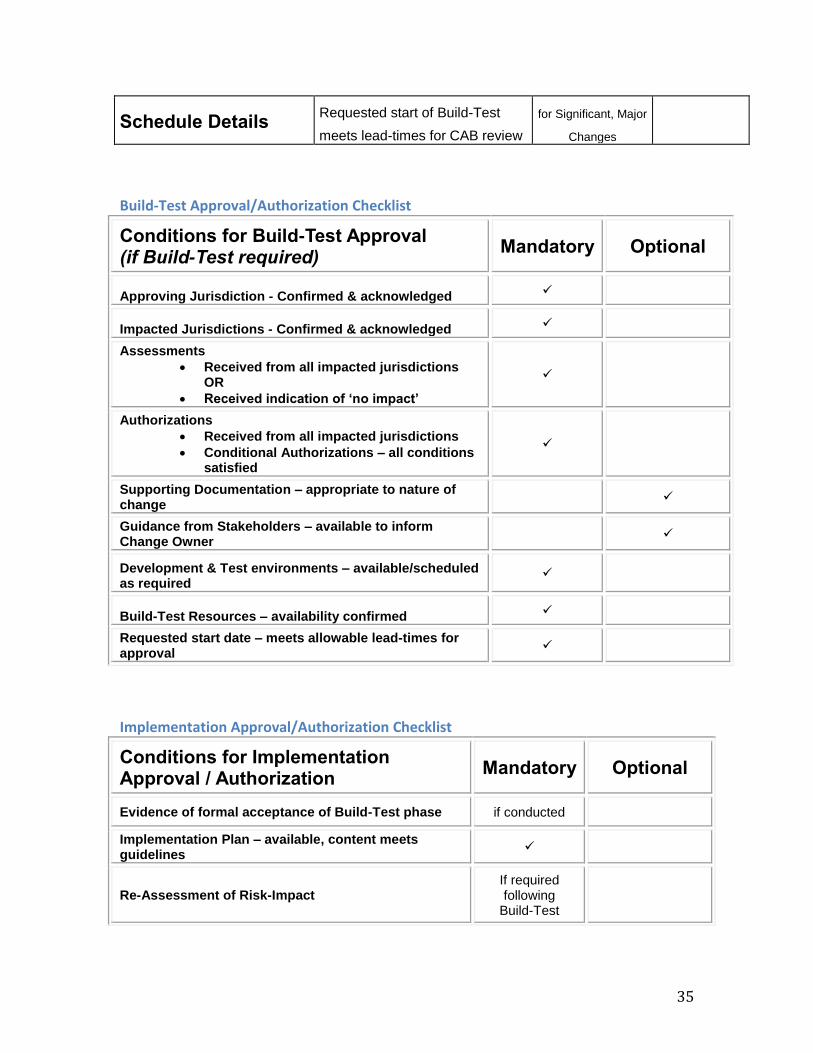
Schedule Details Requested start of Build-Test
meets lead-times for CAB review for Significant, Major
Changes
Build-Test Approval/Authorization Checklist
Conditions for Build-Test Approval (if Build-Test required) Mandatory Optional
Approving Jurisdiction - Confirmed & acknowledged
Impacted Jurisdictions - Confirmed & acknowledged Assessments
Received from all impacted jurisdictions OR
Received indication of ‘no impact’
Authorizations Received from all impacted jurisdictions
Conditional Authorizations – all conditions satisfied
Supporting Documentation – appropriate to nature of change
Guidance from Stakeholders – available to inform Change Owner
Development & Test environments – available/scheduled as required
Build-Test Resources – availability confirmed Requested start date – meets allowable lead-times for approval
Implementation Approval/Authorization Checklist
Conditions for Implementation Approval / Authorization Mandatory Optional
Evidence of formal acceptance of Build-Test phase if conducted Implementation Plan – available, content meets guidelines
Re-Assessment of Risk-Impact If required following
Build-Test
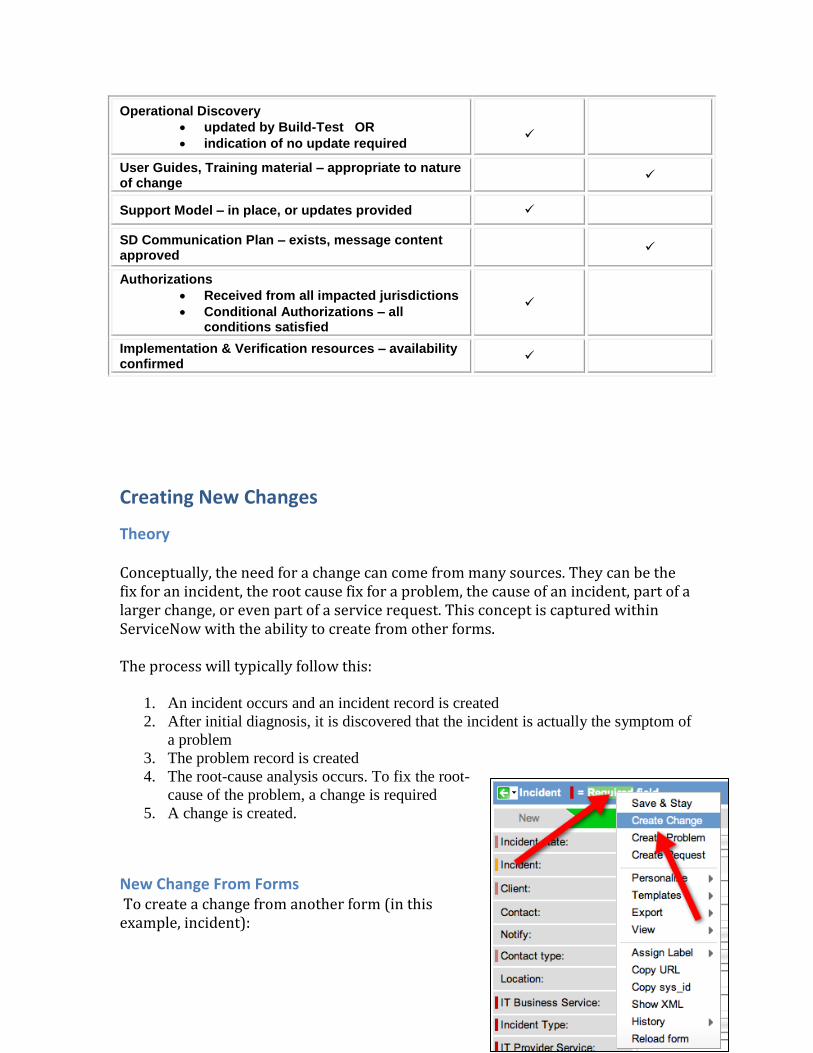
36
Operational Discovery updated by Build-Test OR
indication of no update required
User Guides, Training material – appropriate to nature of change
Support Model – in place, or updates provided
SD Communication Plan – exists, message content approved
Authorizations Received from all impacted jurisdictions
Conditional Authorizations – all conditions satisfied
Implementation & Verification resources – availability confirmed
Creating New Changes
Theory Conceptually, the need for a change can come from many sources. They can be the fix for an incident, the root cause fix for a problem, the cause of an incident, part of a larger change, or even part of a service request. This concept is captured within ServiceNow with the ability to create from other forms. The process will typically follow this:
1. An incident occurs and an incident record is created
2. After initial diagnosis, it is discovered that the incident is actually the symptom of
a problem
3. The problem record is created
4. The root-cause analysis occurs. To fix the root-
cause of the problem, a change is required
5. A change is created.
New Change From Forms To create a change from another form (in this example, incident):
37
1. Open the form
2. Right click the blue bar at the top that has the Save & Exit button
3. Select Create Change
This will create a new change that is linked to the record from which it was created.
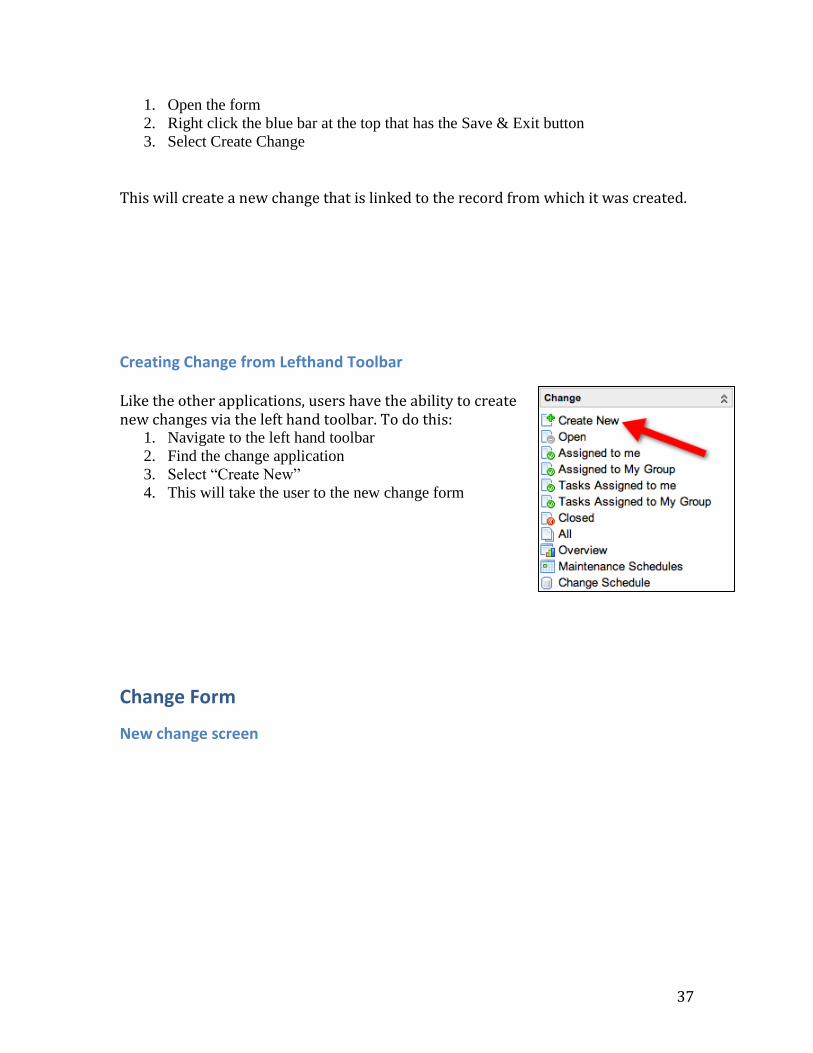
Creating Change from Lefthand Toolbar Like the other applications, users have the ability to create new changes via the left hand toolbar. To do this:
1. Navigate to the left hand toolbar
2. Find the change application
3. Select “Create New”
4. This will take the user to the new change form
Change Form
New change screen
38
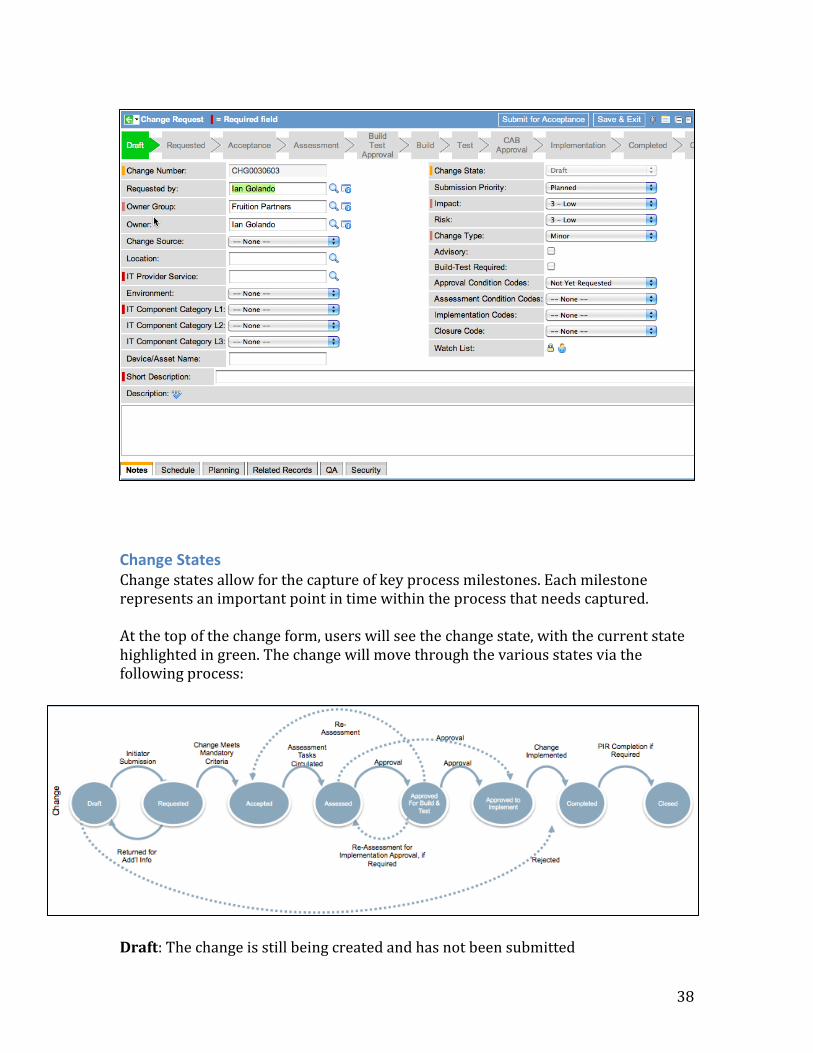
Change States Change states allow for the capture of key process milestones. Each milestone represents an important point in time within the process that needs captured. At the top of the change form, users will see the change state, with the current state highlighted in green. The change will move through the various states via the following process:
Draft: The change is still being created and has not been submitted

39
Requested: The change has been submitted Accepted: The owning group has accepted the change for review based on mandatory criteria Assessed: The assessment tasks have been circulated and completed Approved for Build & Test: The change has been approved to be built Approved to Implement: The change has been passed testing and has been approved to be implemented into the desired environment Completed: The change has been implemented Closed: Post implementation review has been completed
New Change Field Definitions and Use Change Number: The unique number for the change that is auto-generated by ServiceNow Requested by: Person that is requesting the change. This will automatically fill with the logged in user’s own name, but can be changed Owner Group: Yale group that owns the change and is responsible for seeing it through the lifecycle. It is a required field Owner: The person who owns the change (change owner in the process/RACI) Change Source: A drop-down to indicate what is generating this change. See picture to the right for values Location: The location where the change will occur Environment: Indicates whether the change will be in production or a non-production environment IT Provider Service: The high-level service IT provides that is affected (if applicable) Categorization: Yale utilizes a 3-tier categorization scheme.
Recognizes the need to capture service vs. technology details
Future-proofed for introduction of service asset and configuration management
Enhances value of reporting by defining IT service view in terms the business
should understand
IT Component Category 1: The first of the categorization scheme, the high-level view. IT Component Category 2: The second level of the categorization scheme, the values are dependent on Category 1 IT Component Category 3: The final level of the categorization scheme, the values are dependent on Category 2. There will not always be an applicable value for Category 3 Device/Asset Name: A text field to enter the name of the specific asset being changed
40
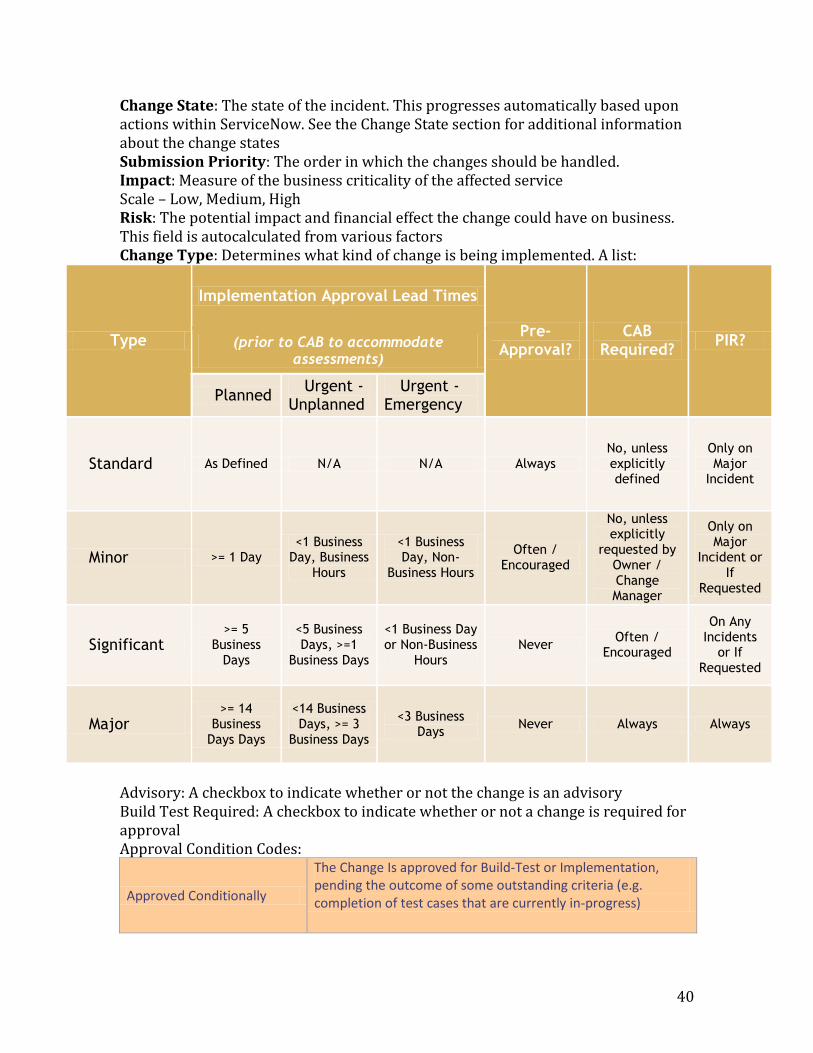
Change State: The state of the incident. This progresses automatically based upon actions within ServiceNow. See the Change State section for additional information about the change states Submission Priority: The order in which the changes should be handled. Impact: Measure of the business criticality of the affected service Scale – Low, Medium, High Risk: The potential impact and financial effect the change could have on business. This field is autocalculated from various factors Change Type: Determines what kind of change is being implemented. A list:
Type
Implementation Approval Lead Times
Pre-Approval?
CAB Required?
PIR? (prior to CAB to accommodate assessments)
Planned Urgent -
Unplanned Urgent -
Emergency
Standard As Defined N/A N/A Always No, unless explicitly defined
Only on Major
Incident
Minor >= 1 Day <1 Business
Day, Business Hours
<1 Business Day, Non-
Business Hours
Often / Encouraged
No, unless explicitly
requested by Owner / Change Manager
Only on Major
Incident or If
Requested
Significant >= 5
Business Days
<5 Business Days, >=1
Business Days
<1 Business Day or Non-Business
Hours Never
Often / Encouraged
On Any Incidents
or If Requested
Major >= 14
Business Days Days
<14 Business Days, >= 3
Business Days
<3 Business Days
Never Always Always
Advisory: A checkbox to indicate whether or not the change is an advisory Build Test Required: A checkbox to indicate whether or not a change is required for approval Approval Condition Codes:
Approved Conditionally
The Change Is approved for Build-Test or Implementation, pending the outcome of some outstanding criteria (e.g. completion of test cases that are currently in-progress)
41
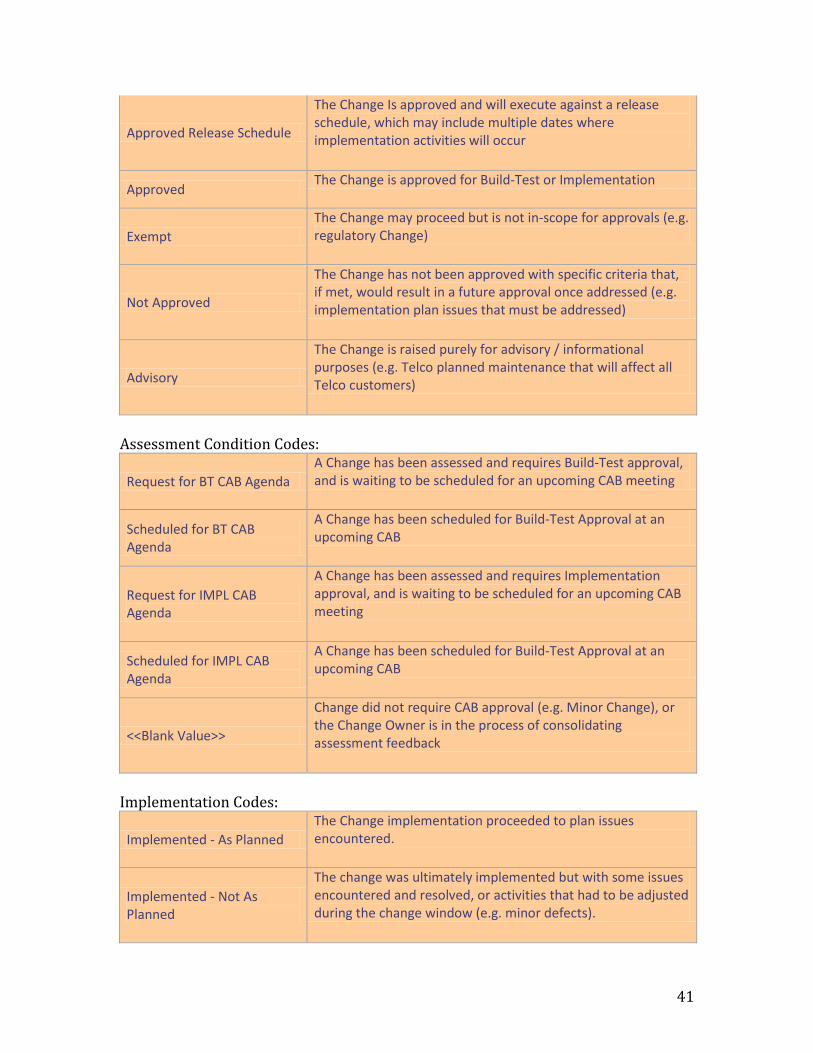
Approved Release Schedule
The Change Is approved and will execute against a release schedule, which may include multiple dates where implementation activities will occur
Approved The Change is approved for Build-Test or Implementation
Exempt
The Change may proceed but is not in-scope for approvals (e.g. regulatory Change)
Not Approved
The Change has not been approved with specific criteria that, if met, would result in a future approval once addressed (e.g. implementation plan issues that must be addressed)
Advisory
The Change is raised purely for advisory / informational purposes (e.g. Telco planned maintenance that will affect all Telco customers)
Assessment Condition Codes:
Request for BT CAB Agenda
A Change has been assessed and requires Build-Test approval, and is waiting to be scheduled for an upcoming CAB meeting
Scheduled for BT CAB Agenda
A Change has been scheduled for Build-Test Approval at an upcoming CAB
Request for IMPL CAB Agenda
A Change has been assessed and requires Implementation approval, and is waiting to be scheduled for an upcoming CAB meeting
Scheduled for IMPL CAB Agenda
A Change has been scheduled for Build-Test Approval at an upcoming CAB
<<Blank Value>>
Change did not require CAB approval (e.g. Minor Change), or the Change Owner is in the process of consolidating assessment feedback
Implementation Codes:
Implemented - As Planned
The Change implementation proceeded to plan issues encountered.
Implemented - Not As Planned
The change was ultimately implemented but with some issues encountered and resolved, or activities that had to be adjusted during the change window (e.g. minor defects).
42
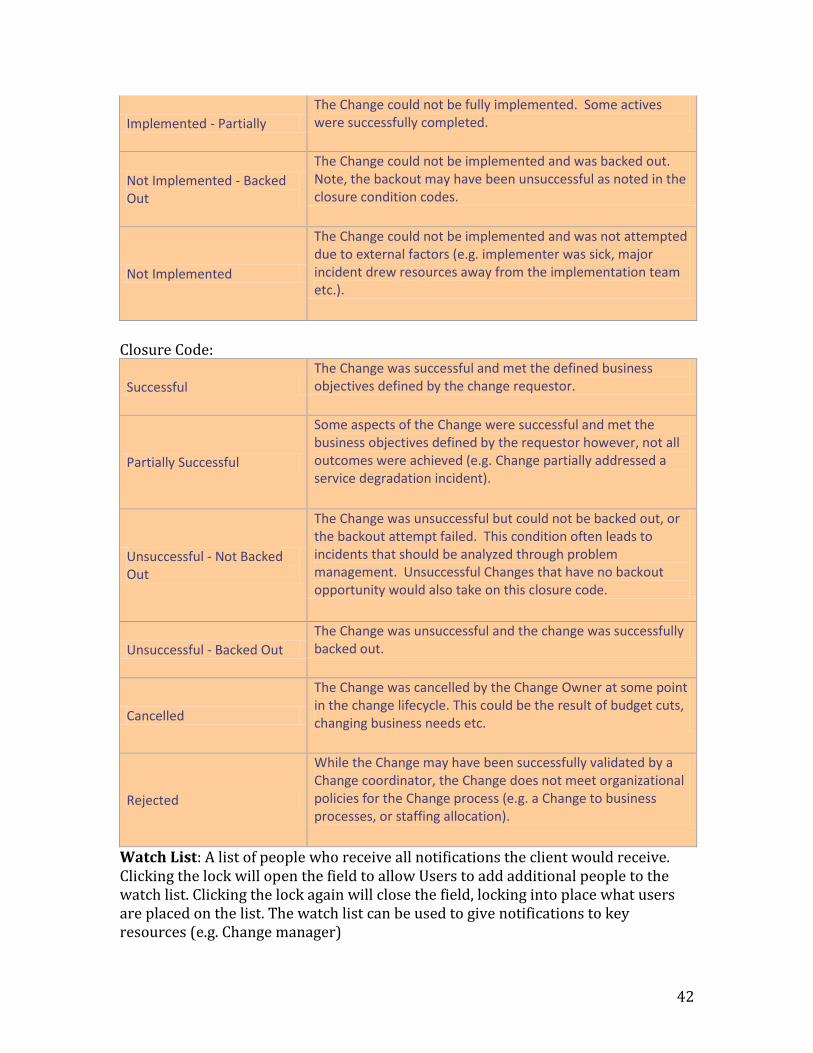
Implemented - Partially
The Change could not be fully implemented. Some actives were successfully completed.
Not Implemented - Backed Out
The Change could not be implemented and was backed out. Note, the backout may have been unsuccessful as noted in the closure condition codes.
Not Implemented
The Change could not be implemented and was not attempted due to external factors (e.g. implementer was sick, major incident drew resources away from the implementation team etc.).
Closure Code:
Successful
The Change was successful and met the defined business objectives defined by the change requestor.
Partially Successful
Some aspects of the Change were successful and met the business objectives defined by the requestor however, not all outcomes were achieved (e.g. Change partially addressed a service degradation incident).
Unsuccessful - Not Backed Out
The Change was unsuccessful but could not be backed out, or the backout attempt failed. This condition often leads to incidents that should be analyzed through problem management. Unsuccessful Changes that have no backout opportunity would also take on this closure code.
Unsuccessful - Backed Out
The Change was unsuccessful and the change was successfully backed out.
Cancelled
The Change was cancelled by the Change Owner at some point in the change lifecycle. This could be the result of budget cuts, changing business needs etc.
Rejected
While the Change may have been successfully validated by a Change coordinator, the Change does not meet organizational policies for the Change process (e.g. a Change to business processes, or staffing allocation).
Watch List: A list of people who receive all notifications the client would receive. Clicking the lock will open the field to allow Users to add additional people to the watch list. Clicking the lock again will close the field, locking into place what users are placed on the list. The watch list can be used to give notifications to key resources (e.g. Change manager)
43
Short Description: A short text field to describe the incident. The lightbulb icon next to the short description will pop-up a window of common issues. Clicking the issue will fill the short description with that value. The book icon will search the knowledge base using the contents of the short description. Depending on how you create your templates (covered later) the short description field could be over-written, so fill it out last. Description: A large text field for a long description of the incident
Tabs
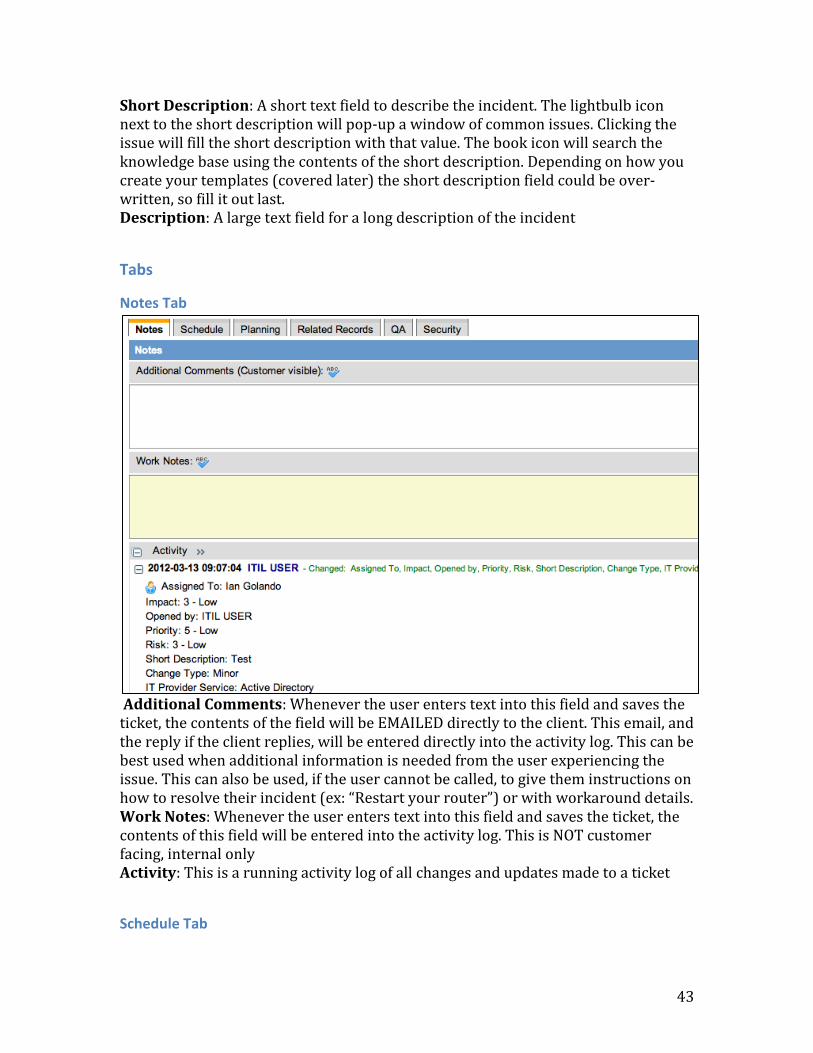
Notes Tab
Additional Comments: Whenever the user enters text into this field and saves the ticket, the contents of the field will be EMAILED directly to the client. This email, and the reply if the client replies, will be entered directly into the activity log. This can be best used when additional information is needed from the user experiencing the issue. This can also be used, if the user cannot be called, to give them instructions on how to resolve their incident (ex: “Restart your router”) or with workaround details. Work Notes: Whenever the user enters text into this field and saves the ticket, the contents of this field will be entered into the activity log. This is NOT customer facing, internal only Activity: This is a running activity log of all changes and updates made to a ticket
Schedule Tab

44
Requested Implementation Date: The date the requester wants the change to be implemented by Planned Start Date: The date the change should begin
Planned end date: The date the change implementation should end Actual Start Date: The date the change implementation actually starts, may not be same as planned start date Actual End Date: The date the change implementation actually ends, may not be same as planned end date Assessments Due Date: The date the assessments are due
Planning Tab
Change Plan: A large text field to enter the change plan Backout Plan: A large text field to enter the backout plan for the change Test Plan: A large text field to enter the test plan for the change
45
Implementation Plan: A large text field to enter the implementation plan for the change
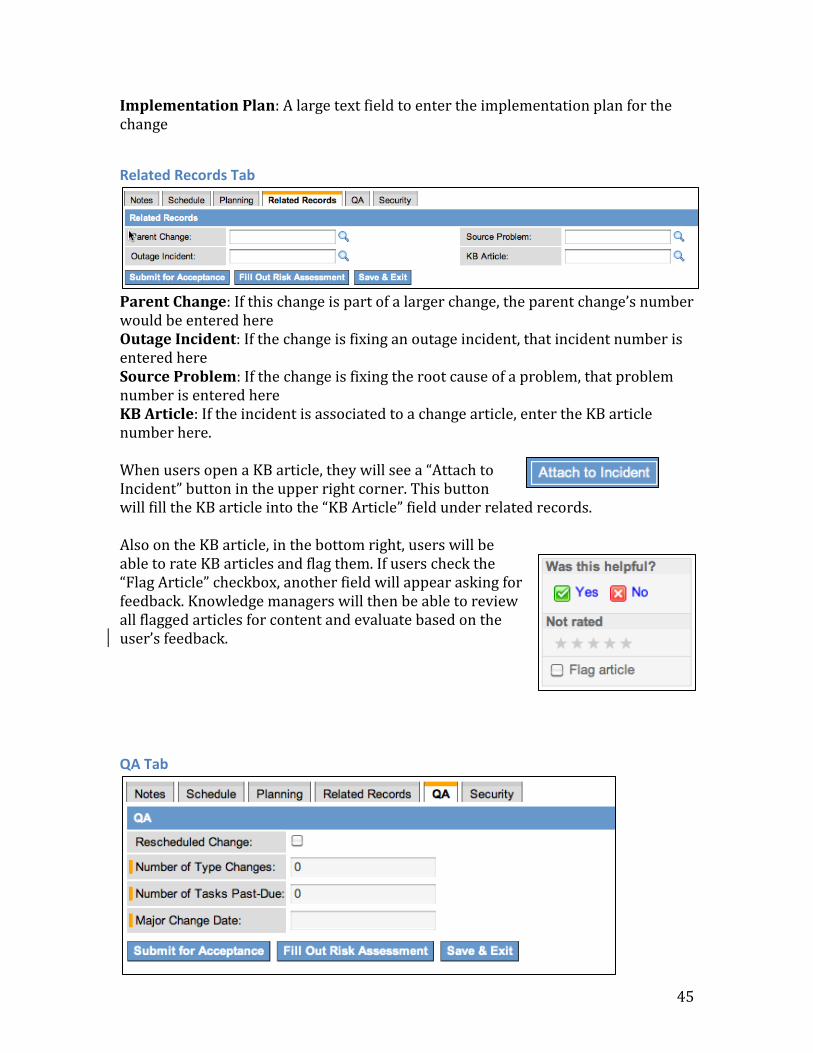
Related Records Tab
Parent Change: If this change is part of a larger change, the parent change’s number would be entered here Outage Incident: If the change is fixing an outage incident, that incident number is entered here Source Problem: If the change is fixing the root cause of a problem, that problem number is entered here KB Article: If the incident is associated to a change article, enter the KB article number here. When users open a KB article, they will see a “Attach to Incident” button in the upper right corner. This button will fill the KB article into the “KB Article” field under related records. Also on the KB article, in the bottom right, users will be able to rate KB articles and flag them. If users check the “Flag Article” checkbox, another field will appear asking for feedback. Knowledge managers will then be able to review all flagged articles for content and evaluate based on the user’s feedback.
QA Tab
46
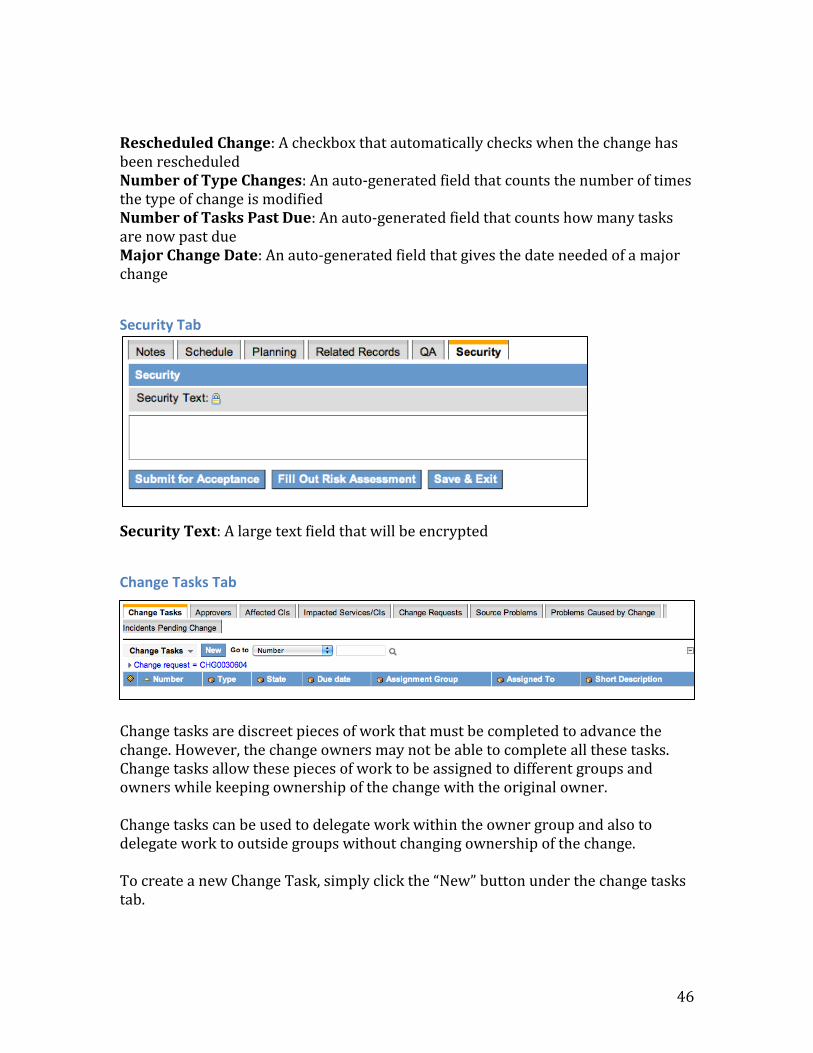
Rescheduled Change: A checkbox that automatically checks when the change has been rescheduled Number of Type Changes: An auto-generated field that counts the number of times the type of change is modified Number of Tasks Past Due: An auto-generated field that counts how many tasks are now past due Major Change Date: An auto-generated field that gives the date needed of a major change
Security Tab
Security Text: A large text field that will be encrypted
Change Tasks Tab
Change tasks are discreet pieces of work that must be completed to advance the change. However, the change owners may not be able to complete all these tasks. Change tasks allow these pieces of work to be assigned to different groups and owners while keeping ownership of the change with the original owner. Change tasks can be used to delegate work within the owner group and also to delegate work to outside groups without changing ownership of the change. To create a new Change Task, simply click the “New” button under the change tasks tab.

47
Change Task Screen:
Change task fields: Number: The unique change task number generated by ServiceNow Configuration Item: The specific CI the change relates to Priority: The order in which change tasks should be handled, values 1-5 with 5 being low and 1 being major Due Date: The date the task must be completed Change request: The change the task is related to Type: What kind of task this task is, values are: General, Assessment, Build, Test, Implementation, Post Implementation State: The status of the task, values are: Open, In progress, Closed complete Completion Code: Describes the nature of the state, values are: None, Complete, Not Completed, Partially Completed Assignment Group: The group that owns the task Assigned to: The individual person from within the assignment group that owns the task: Work Notes List: Any user that is on this list will receive all updates to the work notes field.

48
Short Description: A brief description of what the task is Description: A long description of the task Work notes: A text field to enter the activities done outside of ServiceNow to fulfill a task Activity: The running log of all changes and updates made to the task
Approvers Tab
The approvers tab will show all users whose approval is required for the change to advance. It will also show the status of the change, and whether it has been approved/rejected
Affected CIs Tab
The affected CI’s tab will allow users to associate additional Configuration Items to the incidents. Configuration Items are discrete items that could cause an incident or be affected by a change. These can range from a piece of hardware like a server or a laptop, pieces of software like Adobe, or even a business service like Messaging. These CI’s should be CI’s that are AFFECTED by the incident, but are not CAUSING it. To do this:
1. Click the Edit Button
2. User will be taken to the Edit members screen
3. Users can search all CI’s, and add as many as needed by selecting them in the
“Collection” column and hitting the “Add” button. The selected CI’s should
appear on the Affected CIs list on the Right
4. Click Save
49
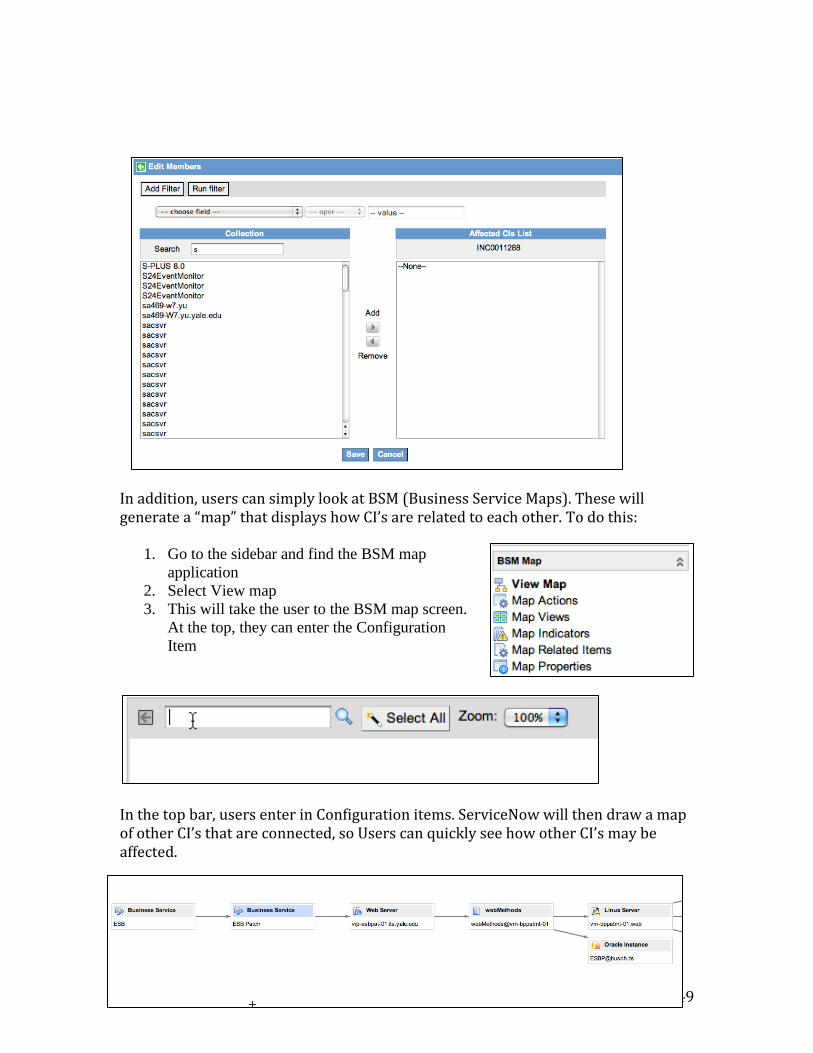
In addition, users can simply look at BSM (Business Service Maps). These will generate a “map” that displays how CI’s are related to each other. To do this:
1. Go to the sidebar and find the BSM map
application
2. Select View map
3. This will take the user to the BSM map screen.
At the top, they can enter the Configuration
Item
In the top bar, users enter in Configuration items. ServiceNow will then draw a map of other CI’s that are connected, so Users can quickly see how other CI’s may be affected.
50
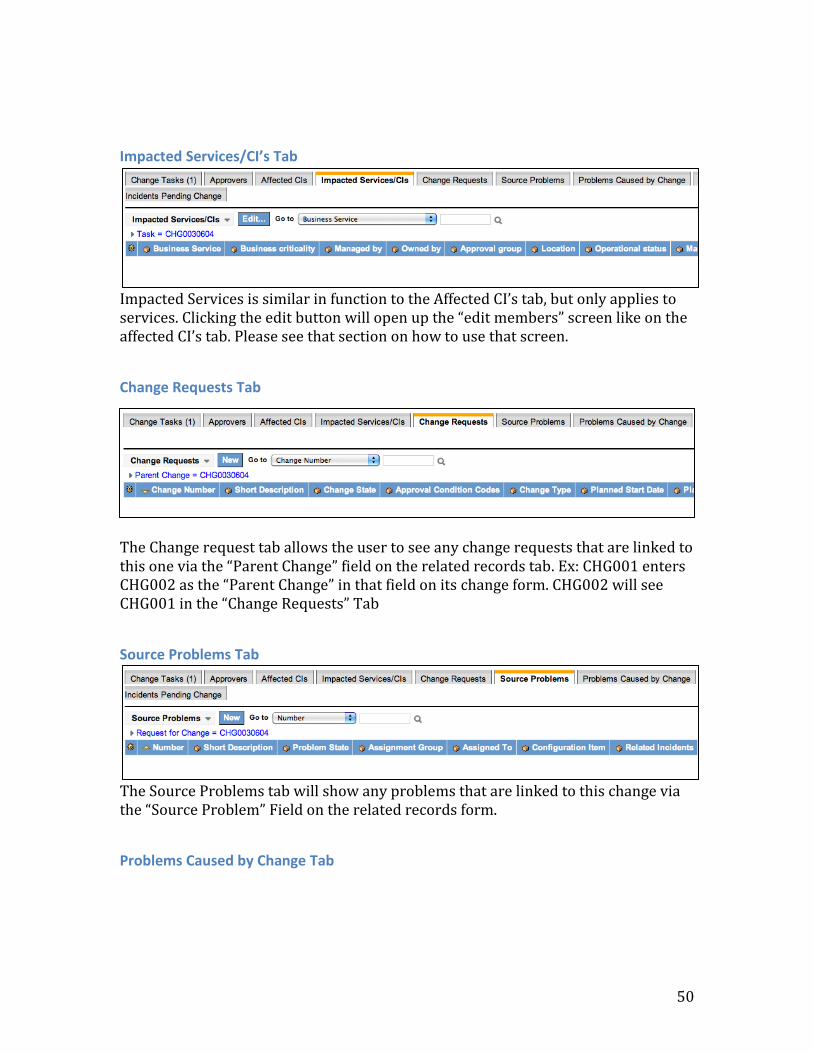
Impacted Services/CI’s Tab
Impacted Services is similar in function to the Affected CI’s tab, but only applies to services. Clicking the edit button will open up the “edit members” screen like on the affected CI’s tab. Please see that section on how to use that screen.
Change Requests Tab
The Change request tab allows the user to see any change requests that are linked to this one via the “Parent Change” field on the related records tab. Ex: CHG001 enters CHG002 as the “Parent Change” in that field on its change form. CHG002 will see CHG001 in the “Change Requests” Tab
Source Problems Tab
The Source Problems tab will show any problems that are linked to this change via the “Source Problem” Field on the related records form.
Problems Caused by Change Tab
51
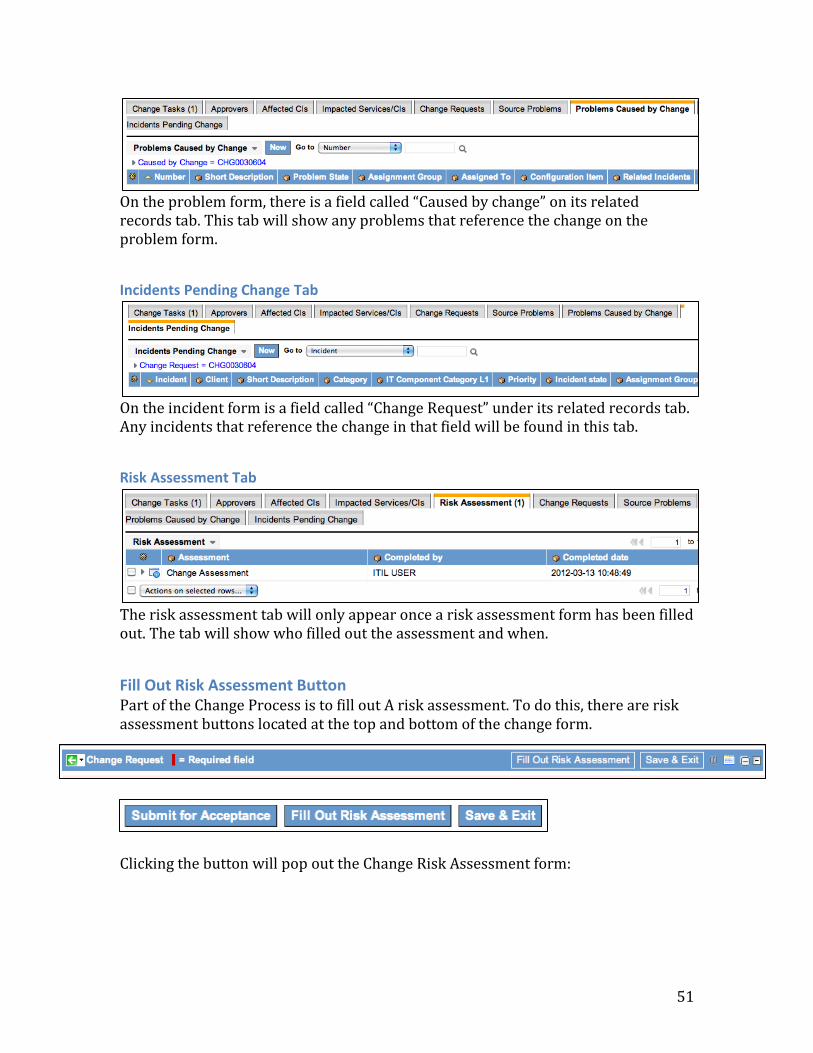
On the problem form, there is a field called “Caused by change” on its related records tab. This tab will show any problems that reference the change on the problem form.
Incidents Pending Change Tab
On the incident form is a field called “Change Request” under its related records tab. Any incidents that reference the change in that field will be found in this tab.
Risk Assessment Tab
The risk assessment tab will only appear once a risk assessment form has been filled out. The tab will show who filled out the assessment and when.
Fill Out Risk Assessment Button Part of the Change Process is to fill out A risk assessment. To do this, there are risk assessment buttons located at the top and bottom of the change form.
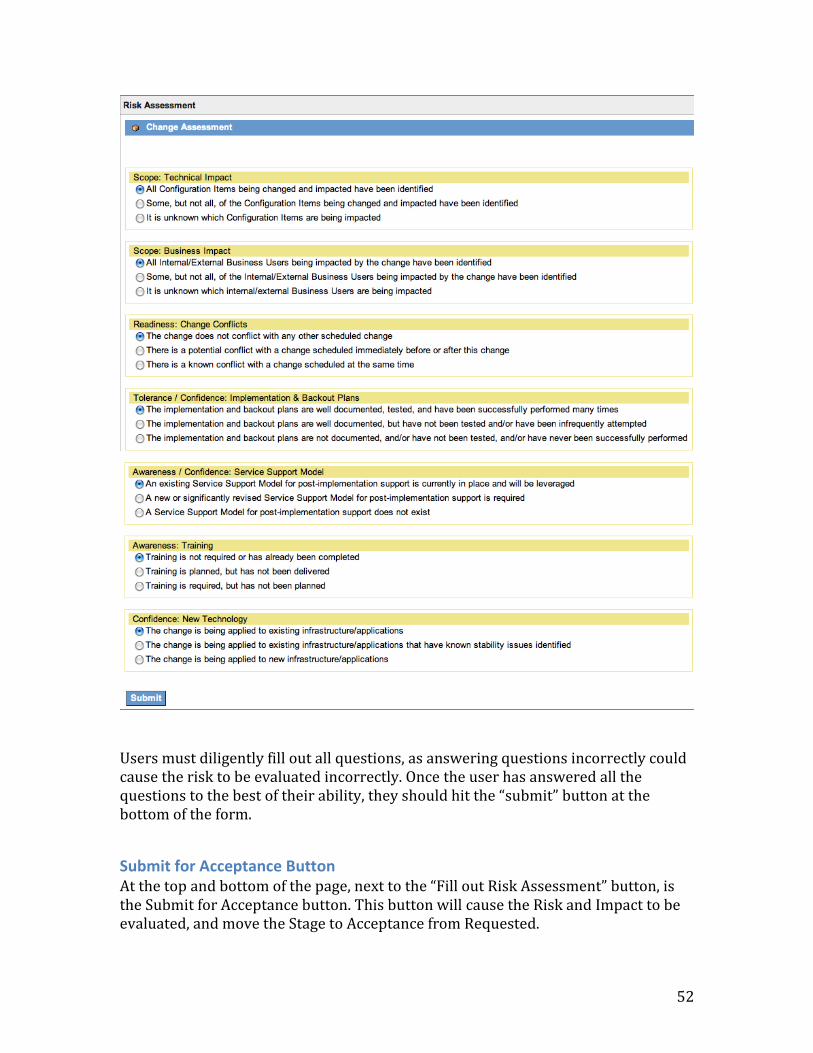
Clicking the button will pop out the Change Risk Assessment form:
52
Users must diligently fill out all questions, as answering questions incorrectly could cause the risk to be evaluated incorrectly. Once the user has answered all the questions to the best of their ability, they should hit the “submit” button at the bottom of the form.
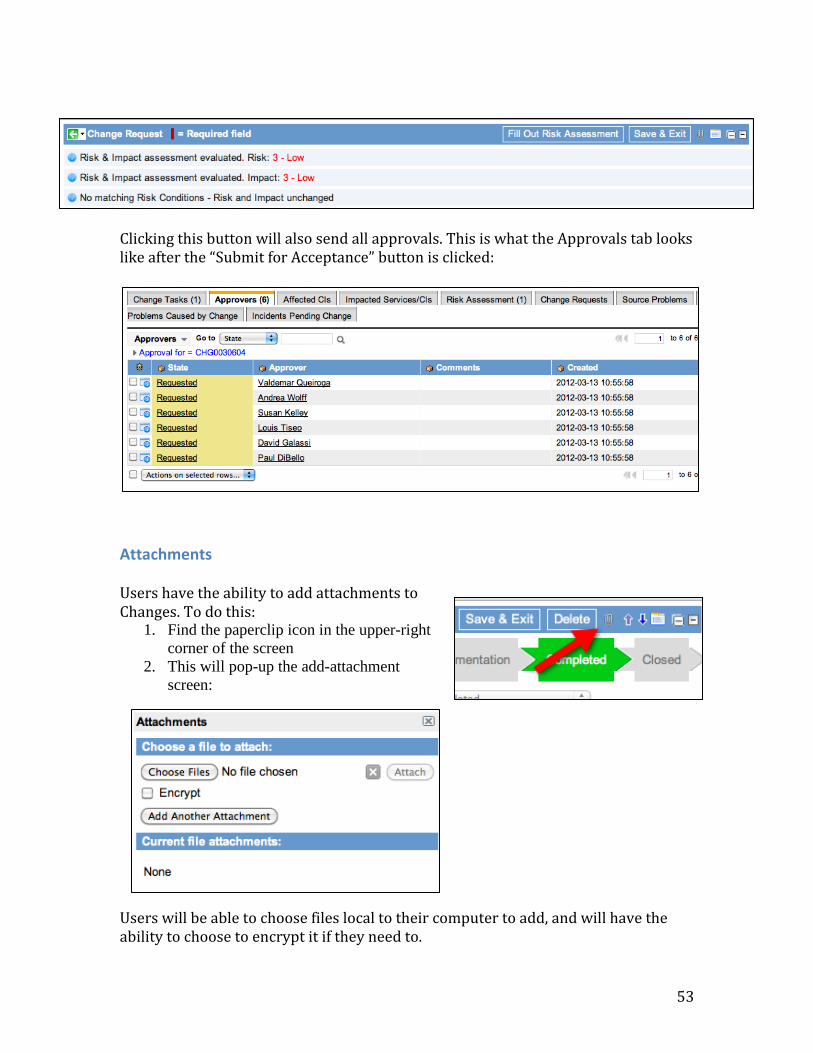
Submit for Acceptance Button At the top and bottom of the page, next to the “Fill out Risk Assessment” button, is the Submit for Acceptance button. This button will cause the Risk and Impact to be evaluated, and move the Stage to Acceptance from Requested.
53
Clicking this button will also send all approvals. This is what the Approvals tab looks like after the “Submit for Acceptance” button is clicked:
Attachments Users have the ability to add attachments to Changes. To do this:
1. Find the paperclip icon in the upper-right
corner of the screen
2. This will pop-up the add-attachment
screen:
Users will be able to choose files local to their computer to add, and will have the ability to choose to encrypt it if they need to.

54
Saving Changes To save updates to a ticket, users simply need to either click the Save & Exit button at the top of the form or right-click the header and select Save & Stay.
Creating Templates Users have the ability to create “templates” for commonly created tickets. They can predefine what values they want various fields to have. To create a template:
1. Right-click the top header
2. Select Templates
3. Select Edit Templates
This will take the user to the list of templates. To create a new one, click the “New” button. This will take the user to the new template screen:
First, give the template a name. Do not change the table, and do not uncheck active. Under the “Template:” bar, select the fields you want to add. Once you have added all fields and values you wish, click the “Save and Exit” button. To apply a template:
1. Right Click the change header
2. Select templates
3. Select Apply Template
4. Select the desired template
This will apply the templates settings to the change ticket
55
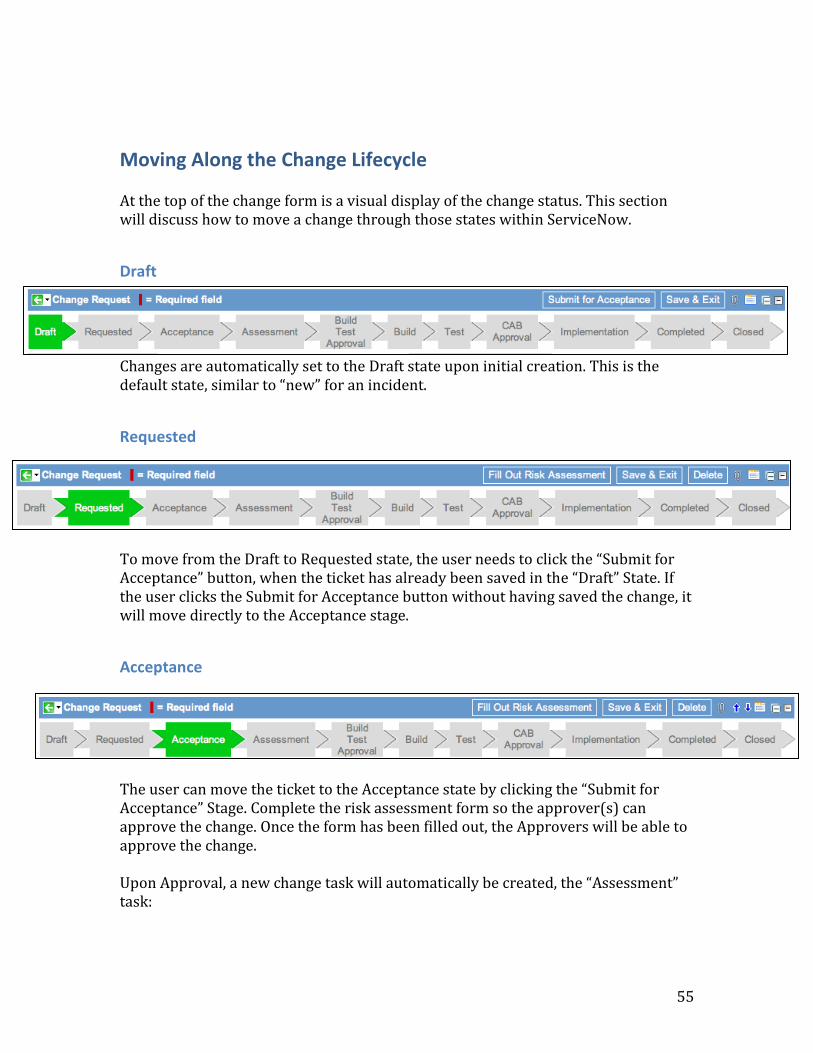
Moving Along the Change Lifecycle At the top of the change form is a visual display of the change status. This section will discuss how to move a change through those states within ServiceNow.
Draft
Changes are automatically set to the Draft state upon initial creation. This is the default state, similar to “new” for an incident.
Requested
To move from the Draft to Requested state, the user needs to click the “Submit for Acceptance” button, when the ticket has already been saved in the “Draft” State. If the user clicks the Submit for Acceptance button without having saved the change, it will move directly to the Acceptance stage.
Acceptance
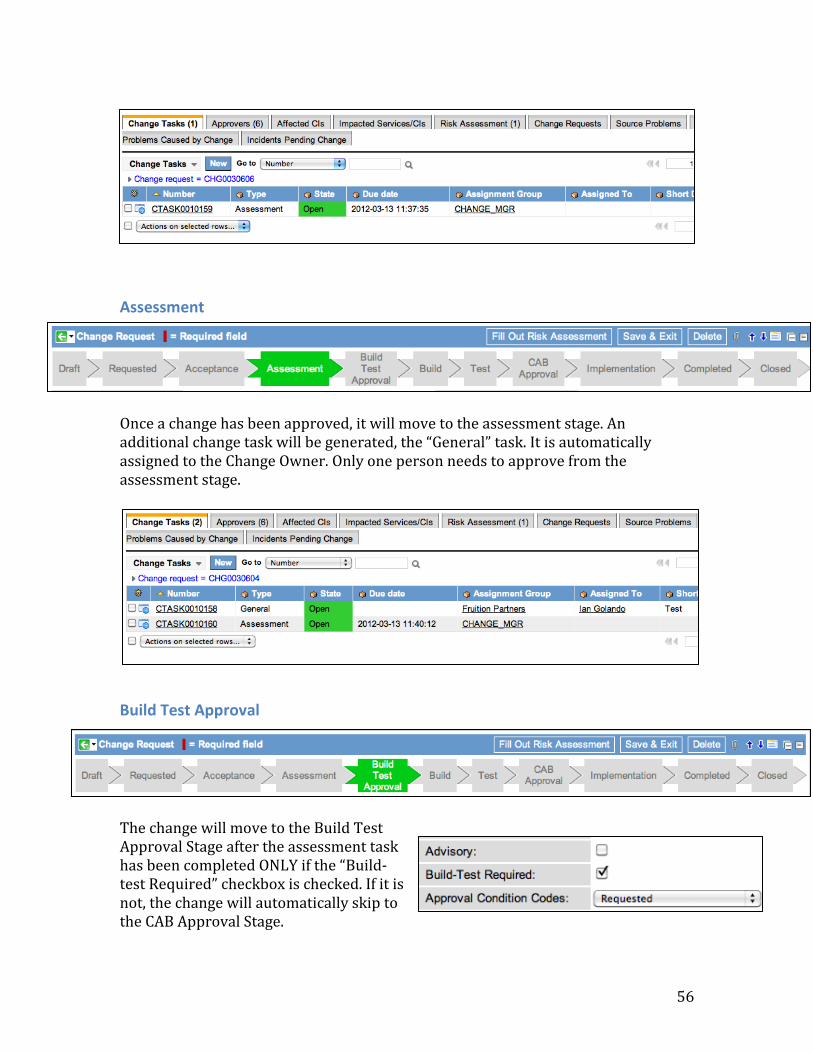
The user can move the ticket to the Acceptance state by clicking the “Submit for Acceptance” Stage. Complete the risk assessment form so the approver(s) can approve the change. Once the form has been filled out, the Approvers will be able to approve the change. Upon Approval, a new change task will automatically be created, the “Assessment” task:
56
Assessment
Once a change has been approved, it will move to the assessment stage. An additional change task will be generated, the “General” task. It is automatically assigned to the Change Owner. Only one person needs to approve from the assessment stage.
Build Test Approval
The change will move to the Build Test Approval Stage after the assessment task has been completed ONLY if the “Build-test Required” checkbox is checked. If it is not, the change will automatically skip to the CAB Approval Stage.
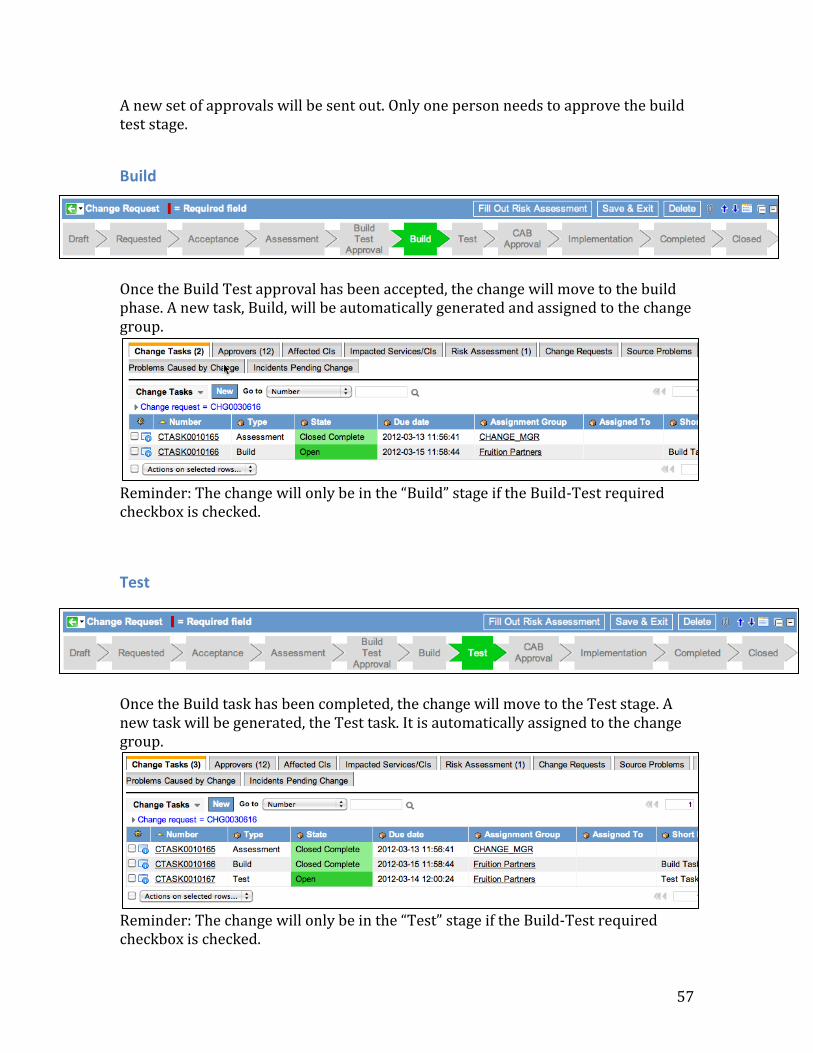
57
A new set of approvals will be sent out. Only one person needs to approve the build test stage.
Build
Once the Build Test approval has been accepted, the change will move to the build phase. A new task, Build, will be automatically generated and assigned to the change group.
Reminder: The change will only be in the “Build” stage if the Build-Test required checkbox is checked.
Test
Once the Build task has been completed, the change will move to the Test stage. A new task will be generated, the Test task. It is automatically assigned to the change group.
Reminder: The change will only be in the “Test” stage if the Build-Test required checkbox is checked.
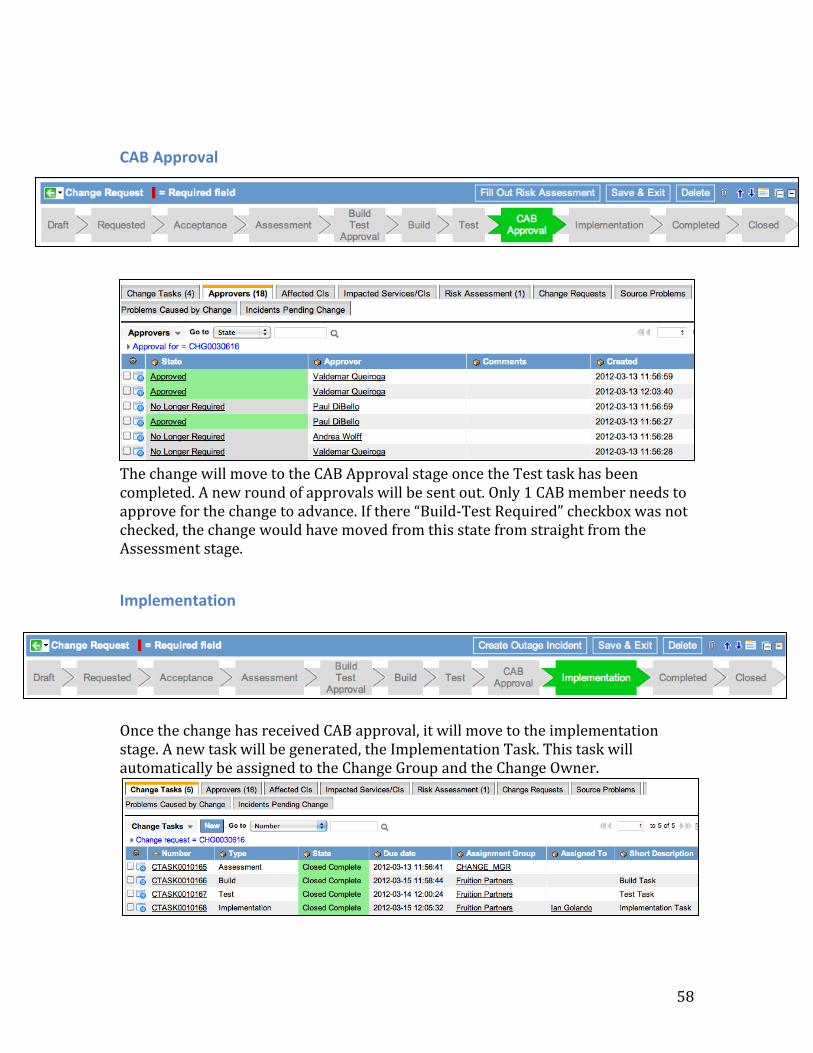
58
CAB Approval
The change will move to the CAB Approval stage once the Test task has been completed. A new round of approvals will be sent out. Only 1 CAB member needs to approve for the change to advance. If there “Build-Test Required” checkbox was not checked, the change would have moved from this state from straight from the Assessment stage.
Implementation
Once the change has received CAB approval, it will move to the implementation stage. A new task will be generated, the Implementation Task. This task will automatically be assigned to the Change Group and the Change Owner.

59
Completed
The change will move to the Completed stage once the Implementation task has been completed. This state will generate a new task, Post Implementation, that is assigned to the Change Advisory board group.
Closed The change will move to the Closed stage once the Post Implementation task has been completed and all Tasks are closed.
Notifications Users will receive notifications at various stages of the change process. Below is a table to describe when notifications will be created.
Trigger Notification ID Audience Purpose
On requested change
Change Requested
Change Coordinator(s) and Change Manager
Identifies a new change has been requested for acceptance review.
On request for more information (state à draft)
Change Info Request
Change Requestor Change requires more information and has been moved back to draft from requested.
On acceptance Change Acceptance
Change Requestor Notifies the change requestor that the requested change has been accepted.
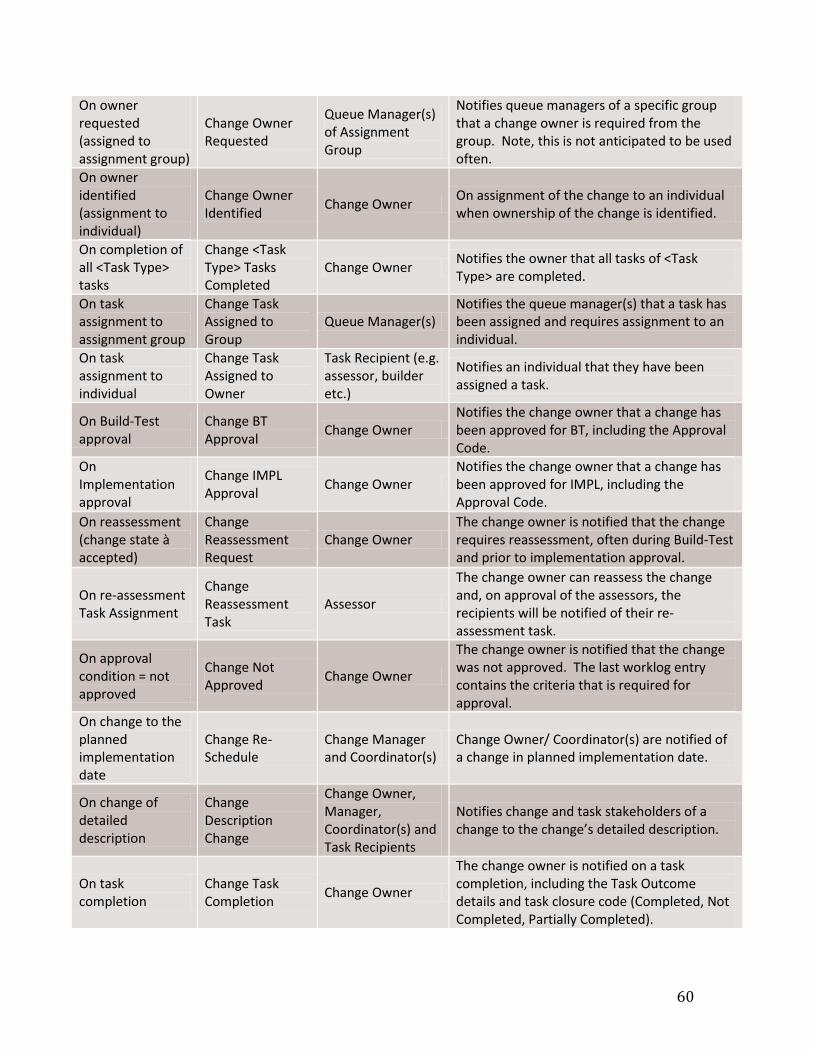
60
On owner requested (assigned to assignment group)
Change Owner Requested
Queue Manager(s) of Assignment Group
Notifies queue managers of a specific group that a change owner is required from the group. Note, this is not anticipated to be used often.
On owner identified (assignment to individual)
Change Owner Identified
Change Owner On assignment of the change to an individual when ownership of the change is identified.
On completion of all <Task Type> tasks
Change <Task Type> Tasks Completed
Change Owner Notifies the owner that all tasks of <Task Type> are completed.
On task assignment to assignment group
Change Task Assigned to Group
Queue Manager(s) Notifies the queue manager(s) that a task has been assigned and requires assignment to an individual.
On task assignment to individual
Change Task Assigned to Owner
Task Recipient (e.g. assessor, builder etc.)
Notifies an individual that they have been assigned a task.
On Build-Test approval
Change BT Approval
Change Owner Notifies the change owner that a change has been approved for BT, including the Approval Code.
On Implementation approval
Change IMPL Approval
Change Owner Notifies the change owner that a change has been approved for IMPL, including the Approval Code.
On reassessment (change state à accepted)
Change Reassessment Request
Change Owner The change owner is notified that the change requires reassessment, often during Build-Test and prior to implementation approval.
On re-assessment Task Assignment
Change Reassessment Task
Assessor
The change owner can reassess the change and, on approval of the assessors, the recipients will be notified of their re-assessment task.
On approval condition = not approved
Change Not Approved
Change Owner
The change owner is notified that the change was not approved. The last worklog entry contains the criteria that is required for approval.
On change to the planned implementation date
Change Re-Schedule
Change Manager and Coordinator(s)
Change Owner/ Coordinator(s) are notified of a change in planned implementation date.
On change of detailed description
Change Description Change
Change Owner, Manager, Coordinator(s) and Task Recipients
Notifies change and task stakeholders of a change to the change’s detailed description.
On task completion
Change Task Completion
Change Owner
The change owner is notified on a task completion, including the Task Outcome details and task closure code (Completed, Not Completed, Partially Completed).
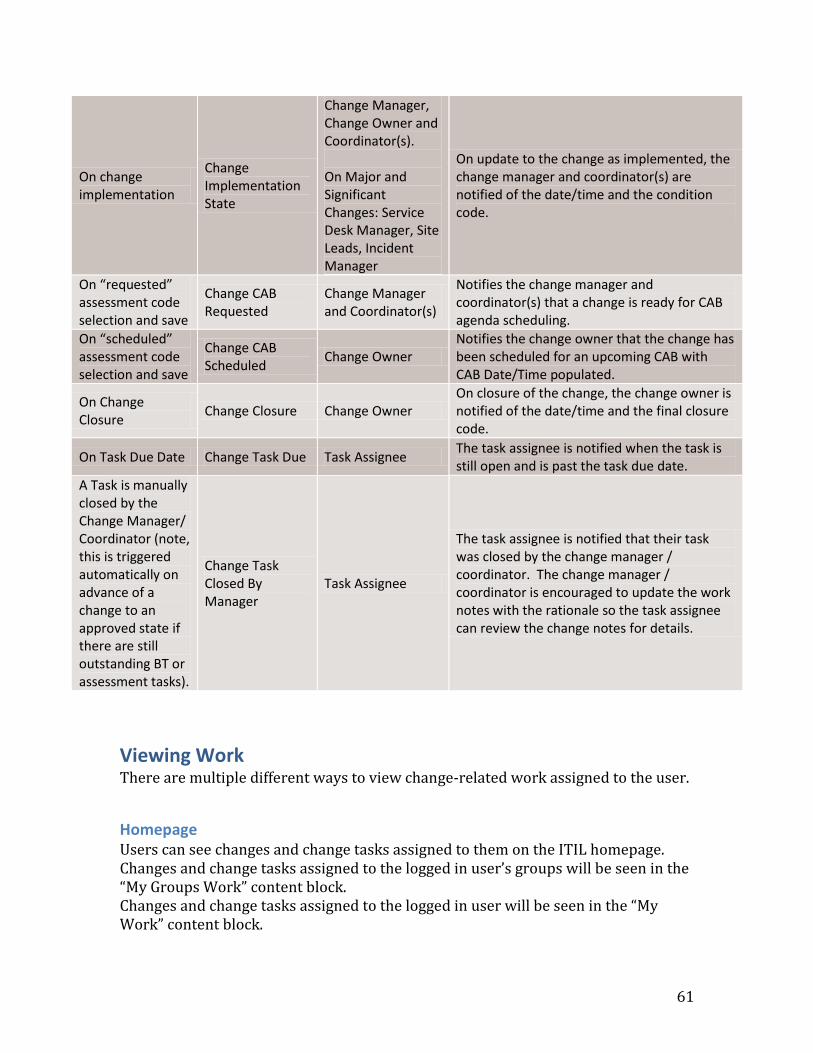
61
On change implementation
Change Implementation State
Change Manager, Change Owner and Coordinator(s). On Major and Significant Changes: Service Desk Manager, Site Leads, Incident Manager
On update to the change as implemented, the change manager and coordinator(s) are notified of the date/time and the condition code.
On “requested” assessment code selection and save
Change CAB Requested
Change Manager and Coordinator(s)
Notifies the change manager and coordinator(s) that a change is ready for CAB agenda scheduling.
On “scheduled” assessment code selection and save
Change CAB Scheduled
Change Owner Notifies the change owner that the change has been scheduled for an upcoming CAB with CAB Date/Time populated.
On Change Closure
Change Closure Change Owner On closure of the change, the change owner is notified of the date/time and the final closure code.
On Task Due Date Change Task Due Task Assignee The task assignee is notified when the task is still open and is past the task due date.
A Task is manually closed by the Change Manager/ Coordinator (note, this is triggered automatically on advance of a change to an approved state if there are still outstanding BT or assessment tasks).
Change Task Closed By Manager
Task Assignee
The task assignee is notified that their task was closed by the change manager / coordinator. The change manager / coordinator is encouraged to update the work notes with the rationale so the task assignee can review the change notes for details.
Viewing Work There are multiple different ways to view change-related work assigned to the user.
Homepage Users can see changes and change tasks assigned to them on the ITIL homepage. Changes and change tasks assigned to the logged in user’s groups will be seen in the “My Groups Work” content block. Changes and change tasks assigned to the logged in user will be seen in the “My Work” content block.
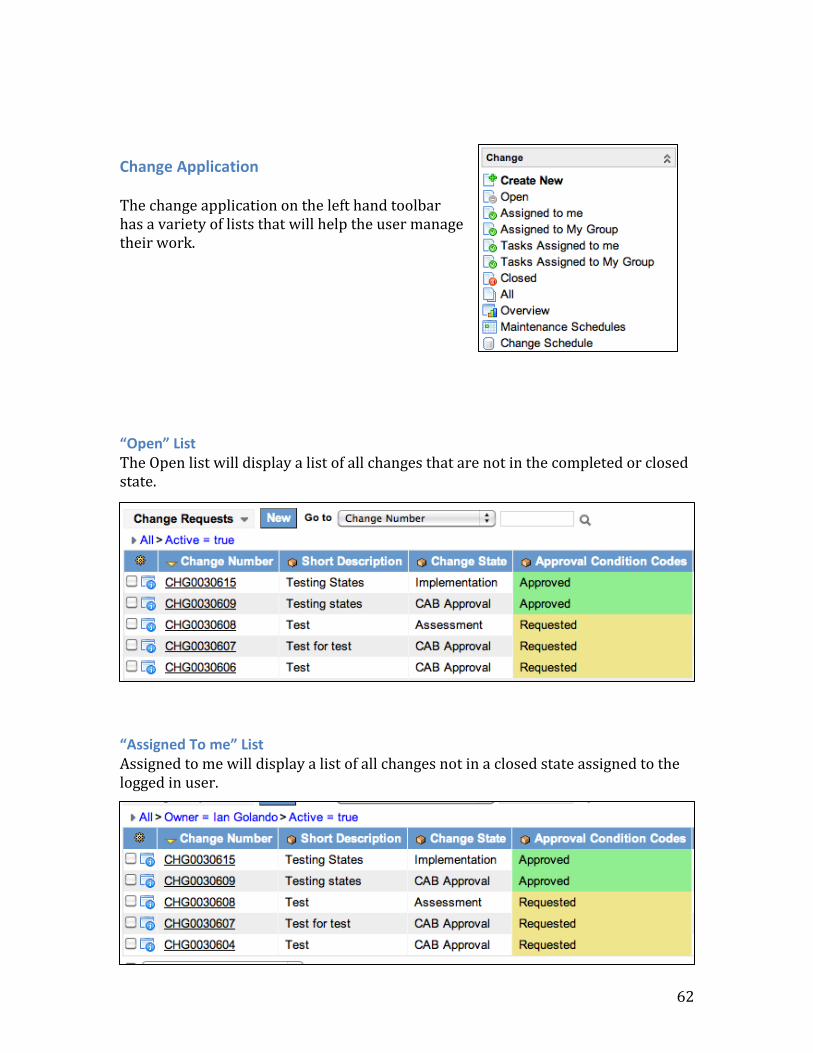
62
Change Application The change application on the left hand toolbar has a variety of lists that will help the user manage their work.
“Open” List The Open list will display a list of all changes that are not in the completed or closed state.
“Assigned To me” List Assigned to me will display a list of all changes not in a closed state assigned to the logged in user.
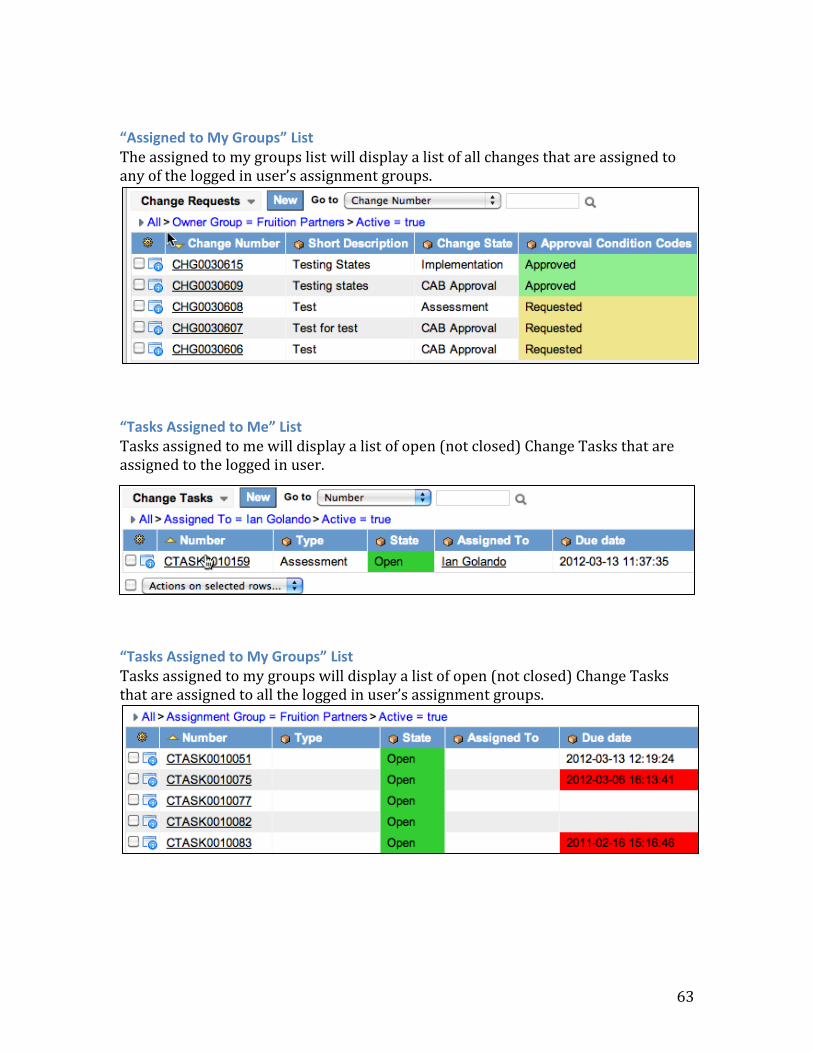
63
“Assigned to My Groups” List The assigned to my groups list will display a list of all changes that are assigned to any of the logged in user’s assignment groups.
“Tasks Assigned to Me” List Tasks assigned to me will display a list of open (not closed) Change Tasks that are assigned to the logged in user.
“Tasks Assigned to My Groups” List Tasks assigned to my groups will display a list of open (not closed) Change Tasks that are assigned to all the logged in user’s assignment groups.
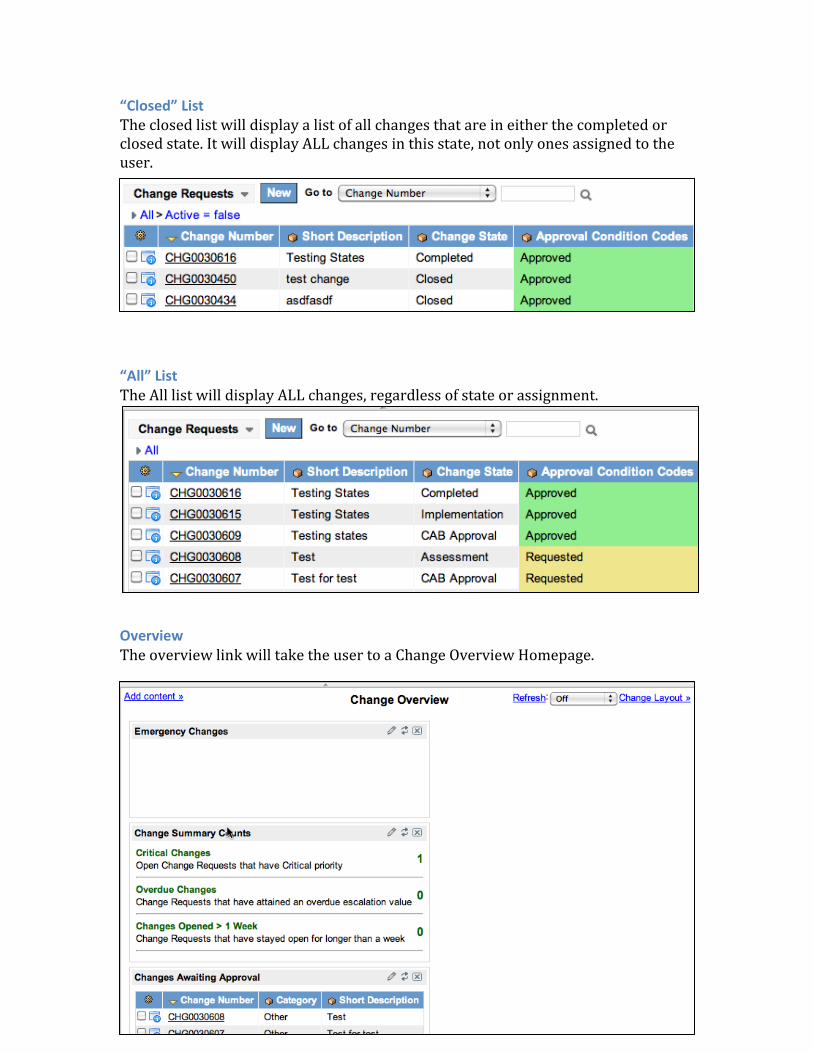
64
“Closed” List The closed list will display a list of all changes that are in either the completed or closed state. It will display ALL changes in this state, not only ones assigned to the user.
“All” List The All list will display ALL changes, regardless of state or assignment.
Overview The overview link will take the user to a Change Overview Homepage.
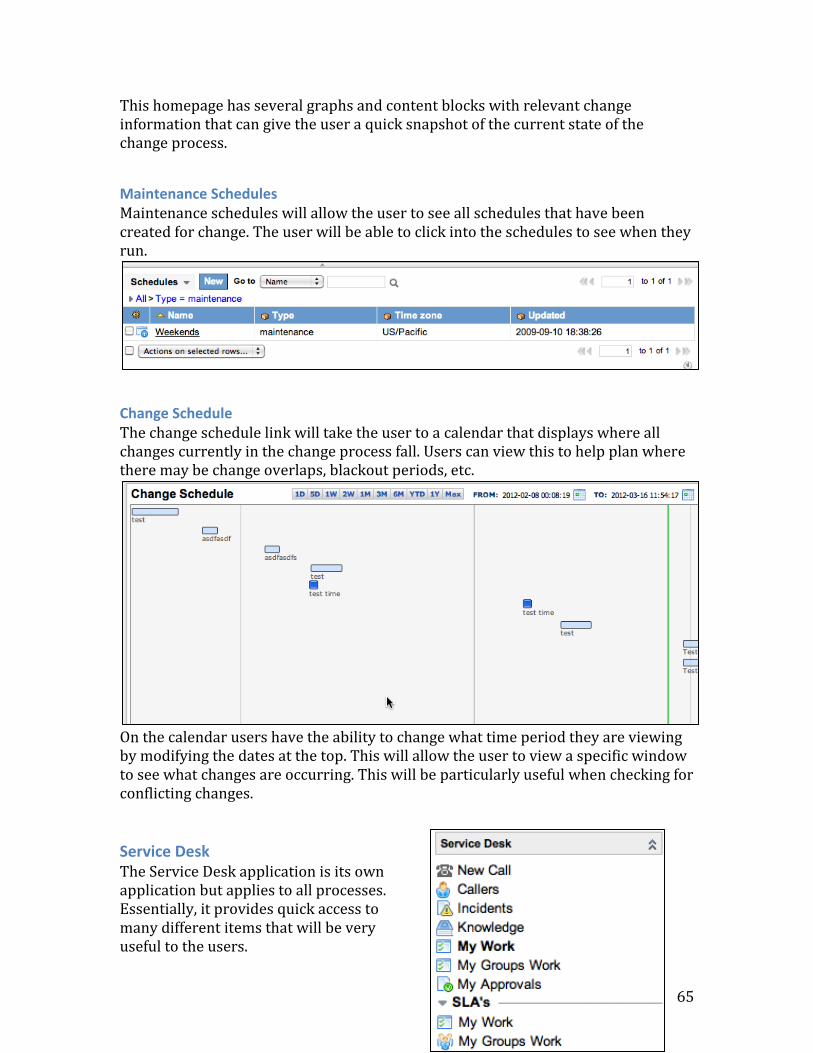
65
This homepage has several graphs and content blocks with relevant change information that can give the user a quick snapshot of the current state of the change process.
Maintenance Schedules Maintenance schedules will allow the user to see all schedules that have been created for change. The user will be able to click into the schedules to see when they run.
Change Schedule The change schedule link will take the user to a calendar that displays where all changes currently in the change process fall. Users can view this to help plan where there may be change overlaps, blackout periods, etc.
On the calendar users have the ability to change what time period they are viewing by modifying the dates at the top. This will allow the user to view a specific window to see what changes are occurring. This will be particularly useful when checking for conflicting changes.
Service Desk The Service Desk application is its own application but applies to all processes. Essentially, it provides quick access to many different items that will be very useful to the users.
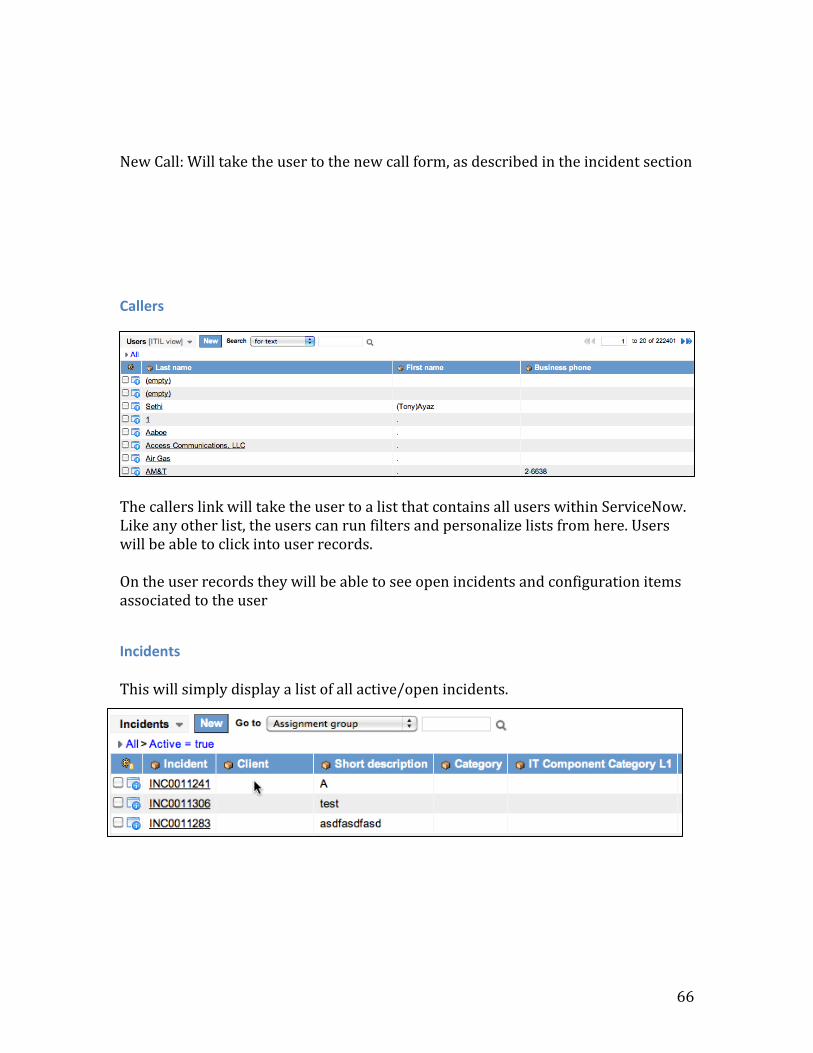
66
New Call: Will take the user to the new call form, as described in the incident section
Callers
The callers link will take the user to a list that contains all users within ServiceNow. Like any other list, the users can run filters and personalize lists from here. Users will be able to click into user records. On the user records they will be able to see open incidents and configuration items associated to the user
Incidents This will simply display a list of all active/open incidents.
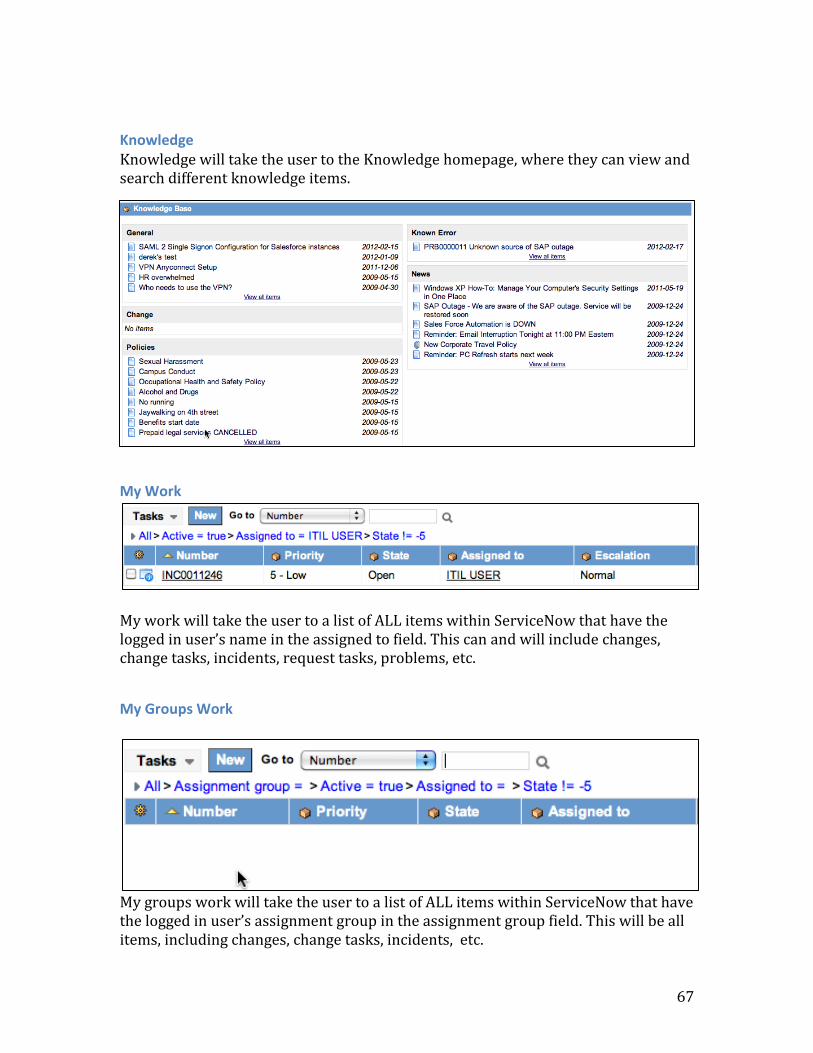
67
Knowledge Knowledge will take the user to the Knowledge homepage, where they can view and search different knowledge items.
My Work
My work will take the user to a list of ALL items within ServiceNow that have the logged in user’s name in the assigned to field. This can and will include changes, change tasks, incidents, request tasks, problems, etc.
My Groups Work
My groups work will take the user to a list of ALL items within ServiceNow that have the logged in user’s assignment group in the assignment group field. This will be all items, including changes, change tasks, incidents, etc.
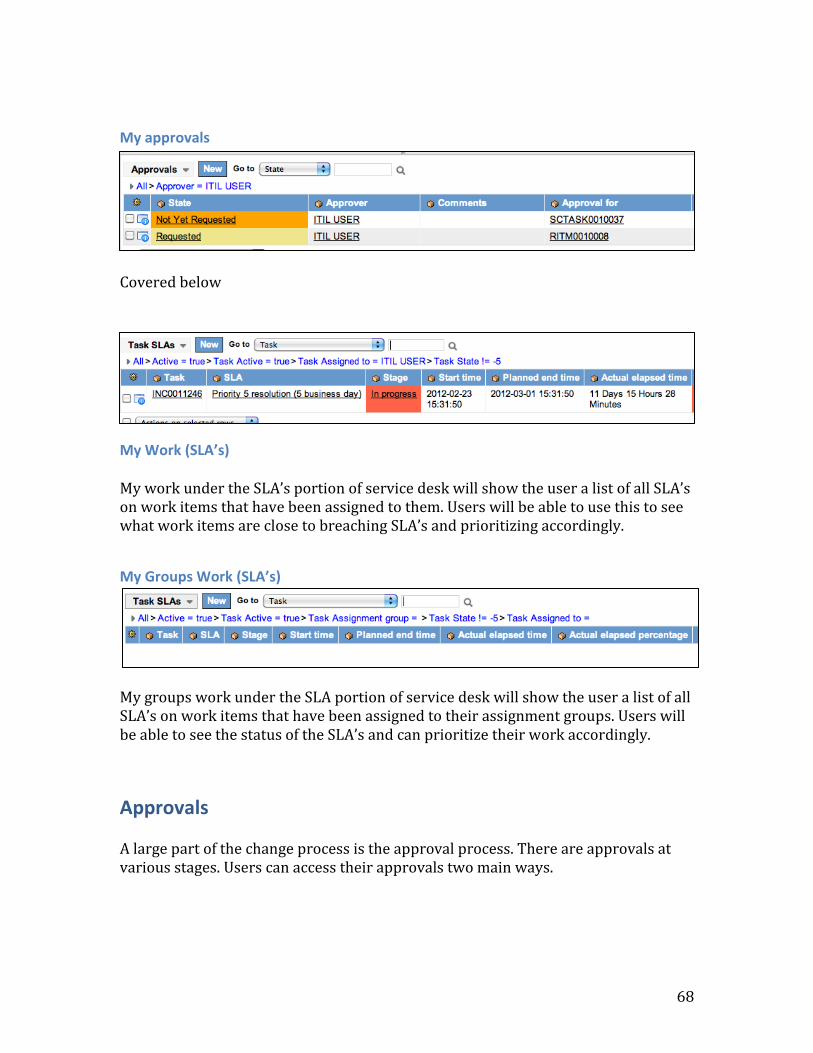
68
My approvals
Covered below
My Work (SLA’s) My work under the SLA’s portion of service desk will show the user a list of all SLA’s on work items that have been assigned to them. Users will be able to use this to see what work items are close to breaching SLA’s and prioritizing accordingly.
My Groups Work (SLA’s)
My groups work under the SLA portion of service desk will show the user a list of all SLA’s on work items that have been assigned to their assignment groups. Users will be able to see the status of the SLA’s and can prioritize their work accordingly.
Approvals A large part of the change process is the approval process. There are approvals at various stages. Users can access their approvals two main ways.

69
Email Whenever an approval is requested from a user, they will receive an email notification. Users will have the ability to approve/reject straight from this email if they wish. Simply click the link for approve/reject.
Service Desk Under the service desk application is a link for “My Approvals”. This will display a list of all the approvals requested of the current user.
From here, users have 2 options:
Entering the Approval Users can click the “state” field to enter the approval screen:
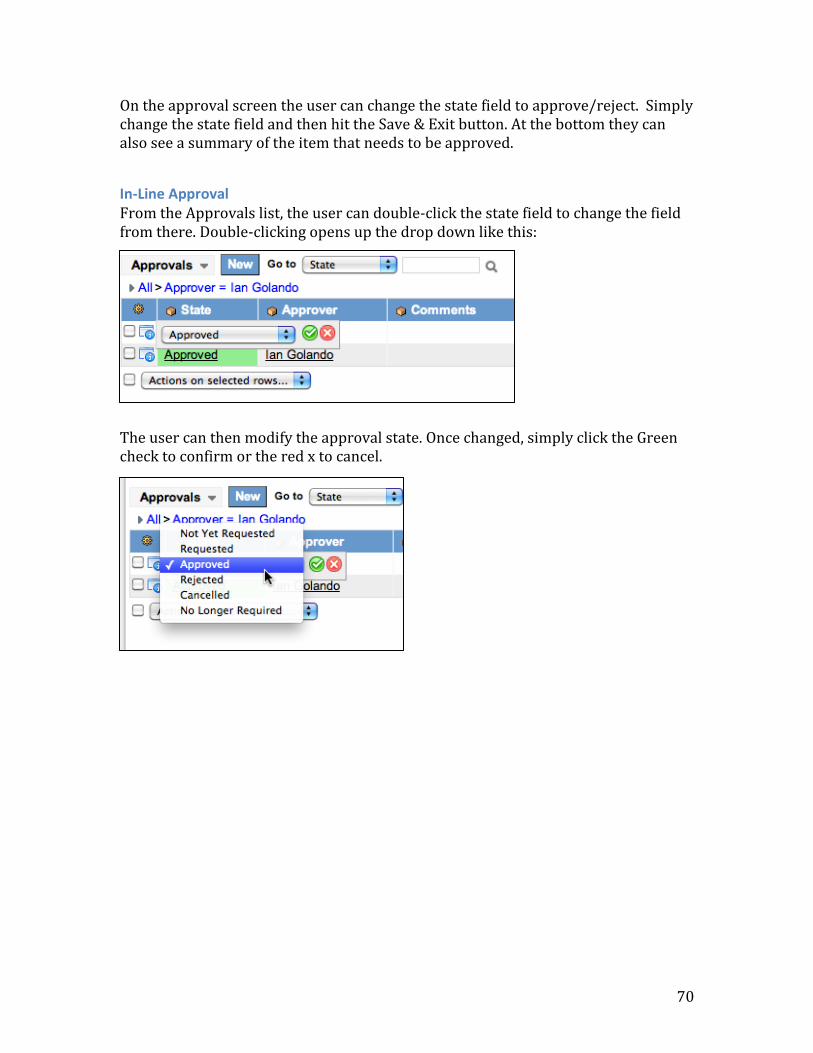
70
On the approval screen the user can change the state field to approve/reject. Simply change the state field and then hit the Save & Exit button. At the bottom they can also see a summary of the item that needs to be approved.
In-Line Approval From the Approvals list, the user can double-click the state field to change the field from there. Double-clicking opens up the drop down like this:
The user can then modify the approval state. Once changed, simply click the Green check to confirm or the red x to cancel.