Embed Size (px)
Citation preview
All information is based on the latest product information available at the time of publication. Kohler Co. reserves the right to make changes in product characteristics, packaging, or availability at any time without notice.
Please leave these instructions for the consumer. They contain important information.
NOTES:1. Flush the water supply pipes thoroughly to remove any debris.2. For new installations, assemble faucet and drain to lavatory before installing lavatory.3. The diameter of mounting hole for valve kit no less than 54mm.4. The highest working pressure for faucet is 0.4Mpa(4 bars). If it exceeds 0.4Mpa(4 bars), a pressure reducer is needed. Or maybe damage the faucet.
1138524-2A-A 1
10319-4 SINGLE LEVER DUAL-HOLE LAV FAUCET
BEFORE YOU BEGIN
HANDLE OPERATION
INSTALLATION INSTRUCTIONS Single Lever/Single Control
ROUGH-IN DIMENSIONS
Operation for open and close, hot and cold water as shown below.
98
45˚
Max
.45
177
66
252 Close
500
32
1138524-2A-A 4
SERVICE PARTS
95
Hot
G1/2″
**Color code must be specified when ordering
67x6764
100~300
Ø54~59 45˚45˚
Open
Cold
1095265Screw
1115706Screw
1115726Key
1111506Threaded Ring
77806Gasket
1061903Vavle
1024405Hose
1112469Aerator
1111503**Escutcheon
51251O-ring
8346383mm Hex Wrench
1111504Steel Washer
1064368Bearing
1138265**Handle
1064364Spring
1111501Nut
1064365Key
3001167Nut
3007291Stud1115710
1.5mm Hex Wrench
1070967Foam Washer
1111496Flow Restrictor40013Gasket
1111669Nut
40015Washer
40014Nut
40097Washer
Ø24~52
10319-4 SINGLE LEVER DUAL-HOLE LAV FAUCET
Single Lever/Single Control
64
188~
200
Ø69Ø60
Ø41.2
27~6
0
Ø31.75
112
1142103**Click Drain
1102890**Stopper 1102891
Washer1102892Piston Kit
1138524-2A-A 2
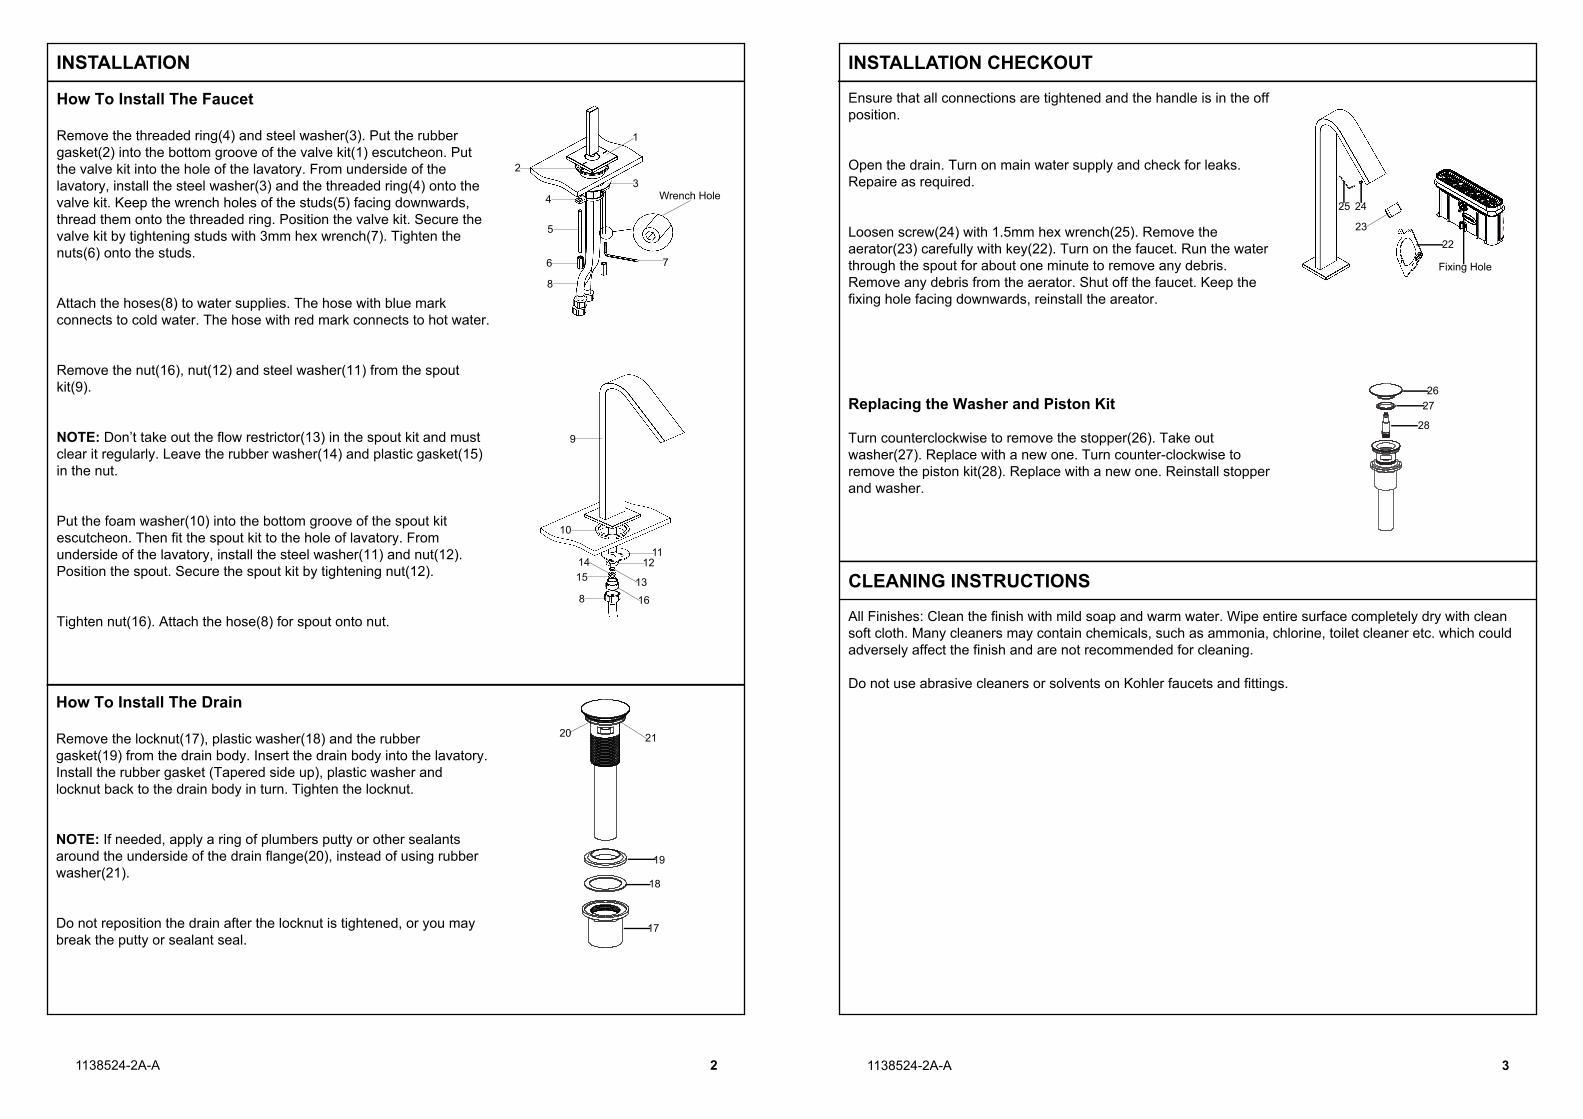
How To Install The Faucet
Remove the threaded ring(4) and steel washer(3). Put the rubber gasket(2) into the bottom groove of the valve kit(1) escutcheon. Put the valve kit into the hole of the lavatory. From underside of the lavatory, install the steel washer(3) and the threaded ring(4) onto the valve kit. Keep the wrench holes of the studs(5) facing downwards, thread them onto the threaded ring. Position the valve kit. Secure the valve kit by tightening studs with 3mm hex wrench(7). Tighten the nuts(6) onto the studs.
Attach the hoses(8) to water supplies. The hose with blue mark connects to cold water. The hose with red mark connects to hot water.
Remove the nut(16), nut(12) and steel washer(11) from the spout kit(9).
NOTE: Don’t take out the flow restrictor(13) in the spout kit and must clear it regularly. Leave the rubber washer(14) and plastic gasket(15) in the nut.
Put the foam washer(10) into the bottom groove of the spout kit escutcheon. Then fit the spout kit to the hole of lavatory. From underside of the lavatory, install the steel washer(11) and nut(12). Position the spout. Secure the spout kit by tightening nut(12).
Tighten nut(16). Attach the hose(8) for spout onto nut.
INSTALLATION
How To Install The Drain
Remove the locknut(17), plastic washer(18) and the rubber gasket(19) from the drain body. Insert the drain body into the lavatory. Install the rubber gasket (Tapered side up), plastic washer and locknut back to the drain body in turn. Tighten the locknut.
NOTE: If needed, apply a ring of plumbers putty or other sealants around the underside of the drain flange(20), instead of using rubber washer(21).
Do not reposition the drain after the locknut is tightened, or you may break the putty or sealant seal.
1138524-2A-A 3
CLEANING INSTRUCTIONS
All Finishes: Clean the finish with mild soap and warm water. Wipe entire surface completely dry with clean soft cloth. Many cleaners may contain chemicals, such as ammonia, chlorine, toilet cleaner etc. which could adversely affect the finish and are not recommended for cleaning.
Do not use abrasive cleaners or solvents on Kohler faucets and fittings.
Ensure that all connections are tightened and the handle is in the off position.
Open the drain. Turn on main water supply and check for leaks. Repaire as required.
Loosen screw(24) with 1.5mm hex wrench(25). Remove the aerator(23) carefully with key(22). Turn on the faucet. Run the water through the spout for about one minute to remove any debris. Remove any debris from the aerator. Shut off the faucet. Keep the fixing hole facing downwards, reinstall the areator.
Replacing the Washer and Piston Kit
Turn counterclockwise to remove the stopper(26). Take out washer(27). Replace with a new one. Turn counter-clockwise to remove the piston kit(28). Replace with a new one. Reinstall stopper and washer.
28
2726
1
34
2
Wrench Hole
7
5
6
8
1415
9
8
11
10
12
13
16
INSTALLATION CHECKOUT
Fixing Hole
25 24
2322
19
18
17
20 21