Embed Size (px)
Citation preview
8/7/2019 server virtualizatio infrastructure deployment GUIDE
http://slidepdf.com/reader/full/server-virtualizatio-infrastructure-deployment-guide 1/20
Server Virtualization Infrastructure
Deployment Guide:
Deploying NComputing L-series and vSpace on Virtual Machines

8/7/2019 server virtualizatio infrastructure deployment GUIDE
http://slidepdf.com/reader/full/server-virtualizatio-infrastructure-deployment-guide 2/20
|
Server Virtualization InrastructureDeployment Guide
Due to the added complexity o hypervisors and VM management, every deployment with server virtualization
sotware will be unique. The tips and tricks contained in this document are general in nature, and may not applyto every situation. I you are unamiliar with server sizing, desktop virtualization, or large-scale deployments,
it is strongly suggested that you consult a qualied proessional prior to deploying.
Documentation version 1.00.1
©Copyright 2010 NComputing Corporation. All rights reserved.
NComputing, the NComputing Logo are trademarks or registered trademarks o NComputing Corporation or its
aliates in the U.S. and other countries. Other names may be trademarks o their respective owners. The product
described in this document is distributed under licenses restricting its use, copying, distribution, and decompilation/
reverse engineering. No part o this document may be reproduced in any orm by any means without prior written
authorization o NComputing Corporation and its licensors, i any.
The documentation is provided”as is”and all express or implied conditions, representations and warranties, including
any implied warranty o merchantability, ftness or a particular purpose or non-inringement, are disclaimed, except
to the extent that such disclaimers are held to be legally invalid. Ncomputing corporation shall not be liable or
incidental or consequential damages in connection with the urnishing, perormance, or use o this documentation.
The inormation contained in this documentation is subject to change without notice.
1 Lagoon Drive, Suite 110, Redwood City, CA 94065 | Phone: 1-650-594-5800 | Fax: 1-650-594-5801 | ncomputing.com
©Copyright 2010 NComputing, Inc. All rights reserved. NComputing, vSpace, and UXP are the property o NComputing. Other trademarks and trade names are
the property o their respective owners. Specications subject to change without notice. Perormance may vary, depending on the conguration o the shared computer.
EVALUATION GUIDE L300 1A
8/7/2019 server virtualizatio infrastructure deployment GUIDE
http://slidepdf.com/reader/full/server-virtualizatio-infrastructure-deployment-guide 3/20
8/7/2019 server virtualizatio infrastructure deployment GUIDE
http://slidepdf.com/reader/full/server-virtualizatio-infrastructure-deployment-guide 4/20
|
Server Virtualization InrastructureDeployment Guide
Overview
NComputing was ounded with the goal o making desktop computing aordable or everyone, and is redening
the economics o desktop computing. NComputing is the astest growing desktop virtualization company with 2.5
million NComputing virtual desktop solutions deployed in 140 countries. The NComputing solution can be deployed
in a variety o ways to best suit the needs o a particular department or organization. Customers can either deploy
the NComputing end-to-end solution standalone or in concert with server virtualization inrastructure solutions rom
popular providers such as Microsot, VMware and Citrix.
The NComputing’s standard deployment architecture oers the best balance o simplicity, aordability and
perormance. In this architecture scenario, the NComputing vSpace desktop virtualization sotware is installed
on an operating system that runs directly on a physical host (ranging rom PC to server-class hardware). In
this conguration, vSpace quickly transorms the host into a multiuser system capable o supporting up to 30
simultaneous users with the NComputing L-series virtual desktop.
For applications requiring additional fexibility, scalability and manageability – NComputing solutions can be
deployed with server virtualization inrastructure that leverages virtual machines and hypervisor technology. Under
this scenario, NComputing vSpace runs on a host operating system that is running inside a virtual machine. This
conguration enables multiple vSpace hosts to run on a single physical server platorm resulting in the ability to
scale up and host a much larger number o users on a single physical machine (>100). Furthermore, the vSpace virtual
machine hosts can be managed using standard management tools giving IT managers additional levels o fexibility
and control. This approach is essentially an eective means o server consolidation. While deploying the NComputing
solution with server virtualization inrastructure provides a number o benets over the traditional model , it is also
inherently more complex to deploy and greater care must be taken to design and deploy an eective solution.
This guide is intended to serve as a primer or those preparing to deploy NComputing vSpace and L-series products
within hypervisor environments. Specic deployment guidelines are provided or VMware’s ESXi hypervisor. Other
hypervisors such as Microsot’s Hyper-V and Citrix’s XenServer may be used in conjunction with NComputing
systems, however, ESXi is the leading hypervisor used or server consolidation in the market today, and as such it isthe ocus o this guide. However, many o the deployment guidelines in this paper also apply to other hypervisors.
This document provides an overview o key technical considerations or successul virtual machine deployment o
NComputing products and includes a selection o specic guidelines to help you optimize the overall perormance o
the VM host and user sessions. Beore you begin, you should amiliarize yoursel with the L-Series User Guide, which
can be ound on the Documentation page o the Support section o www.ncomputing.com website.
Important Note:
Due to the added complexity o hypervisors and VM management, every deployment with server virtualization
sotware will be unique. The tips and tricks contained in this document are general in nature, and may not apply
to every situation. I you are unamiliar with server sizing, desktop virtualization, or large-scale deployments, it is
strongly suggested that you consult a qualifed proessional prior to deploying.
8/7/2019 server virtualizatio infrastructure deployment GUIDE
http://slidepdf.com/reader/full/server-virtualizatio-infrastructure-deployment-guide 5/20
|
Server Virtualization InrastructureDeployment Guide
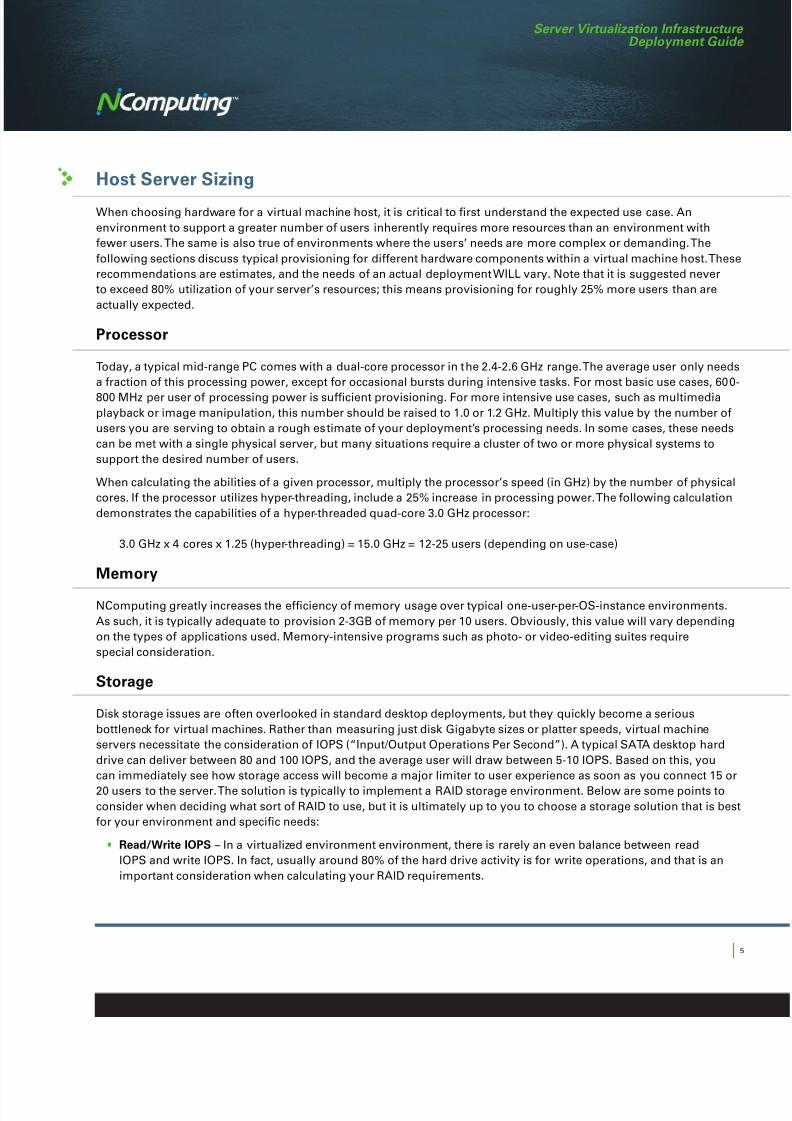
Host Server Sizing
When choosing hardware or a virtual machine host, it is critical to rst understand the expected use case. An
environment to support a greater number o users inherently requires more resources than an environment with
ewer users. The same is also true o environments where the users’ needs are more complex or demanding. The
ollowing sections discuss typical provisioning or dierent hardware components within a virtual machine host. These
recommendations are estimates, and the needs o an actual deployment WILL vary. Note that it is suggested never
to exceed 80% utilization o your server’s resources; this means provisioning or roughly 25% more users than are
actually expected.
Processor
Today, a typical mid-range PC comes with a dual-core processor in the 2.4-2.6 GHz range. The average user only needs
a raction o this processing power, except or occasional bursts during intensive tasks. For most basic use cases, 600-
800 MHz per user o processing power is sucient provisioning. For more intensive use cases, such as multimedia
playback or image manipulation, this number should be raised to 1.0 or 1.2 GHz. Multiply this value by the number o
users you are serving to obtain a rough estimate o your deployment’s processing needs. In some cases, these needs
can be met with a single physical server, but many situations require a cluster o two or more physical systems to
support the desired number o users.
When calculating the abilities o a given processor, multiply the processor’s speed (in GHz) by the number o physical
cores. I the processor utilizes hyper-threading, include a 25% increase in processing power. The ollowing calculation
demonstrates the capabilities o a hyper-threaded quad-core 3.0 GHz processor:
3.0 GHz x 4 cores x 1.25 (hyper-threading) = 15.0 GHz = 12-25 users (depending on use-case)
Memory
NComputing greatly increases the eciency o memory usage over typical one-user-per-OS-instance environments.
As such, it is typically adequate to provision 2-3GB o memory per 10 users. Obviously, this value will vary depending
on the types o applications used. Memory-intensive programs such as photo- or video-editing suites require
special consideration.
Storage
Disk storage issues are oten overlooked in standard desktop deployments, but they quickly become a serious
bottleneck or virtual machines. Rather than measuring just disk Gigabyte sizes or platter speeds, virtual machine
servers necessitate the consideration o IOPS (“Input/Output Operations Per Second”). A typical SATA desktop hard
drive can deliver between 80 and 100 IOPS, and the average user will draw between 5-10 IOPS. Based on this, you
can immediately see how storage access will become a major limiter to user experience as soon as you connect 15 or
20 users to the server. The solution is typically to implement a RAID storage environment. Below are some points to
consider when deciding what sort o RAID to use, but it is ultimately up to you to choose a storage solution that is best
or your environment and specic needs:
• Read/Write IOPS – In a virtualized environment environment, there is rarely an even balance between read
IOPS and write IOPS. In act, usually around 80% o the hard drive activity is or write operations, and that is an
important consideration when calculating your RAID requirements.

8/7/2019 server virtualizatio infrastructure deployment GUIDE
http://slidepdf.com/reader/full/server-virtualizatio-infrastructure-deployment-guide 6/20
|
Server Virtualization InrastructureDeployment Guide
• IOPS Penalty – The type o RAID used can cause signicant IOPS penalties, which result in diminishing returns as
you add more drives. The table below lists these RAID trade-os:
• Calculating RAID IOPS – To support a user base o 50 (250-500 IOPS), the server should be provisioned with 600
IOPS. To calculate the RAID penalty, we take 80% o the total IOPS needs (480 IOPS), multiply them by the Writes
Used value, then add in the remaining Read IOPS (120). The resulting value is the net IOPS required. Under the
dierent RAID standards, this calculation looks like the ollowing:
• RAID 1: (480 x 2) + 120 = 1,080 IOPS 12 SATA Drives
• RAID 5: (480 x 4) + 120 = 2,040 IOPS 23 SATA Drives
• RAID 6: (480 x 6) + 120 = 3,000 IOPS 34 SATA Drives
Network
When determining the network needs o your deployment, it is important to realize that there are two dierent
sources o network activity. First is the communication between vSpace (on the server) and the L-series access
devices. Depending on the product model and type o use, this network load can range rom 100 Kbps up to 10 or 15
Mbps per connected device. Please see the table below or specics.
RAID Level Reads Used Writes Used
RAID 0 1 1
RAID 1 (or 10) 1 2
RAID 5 (or 50) 1 4
RAID 6 (or 60) 1 6
Typical Bandwidth Use (in Mbps)
L130 L230 L300
Basic Ofce Apps 0.3 0.3 0.3
Multimedia+ 15 15 4 to 10
USB Transers 2 8
Recommended Provisioning++ 15 17 8 to 10
+ The L130 & L230 are designed or no or limited multimedia use.
++ These values are an estimate; please test your environment to ensure that network needs are met
8/7/2019 server virtualizatio infrastructure deployment GUIDE
http://slidepdf.com/reader/full/server-virtualizatio-infrastructure-deployment-guide 7/20
|
Server Virtualization InrastructureDeployment Guide
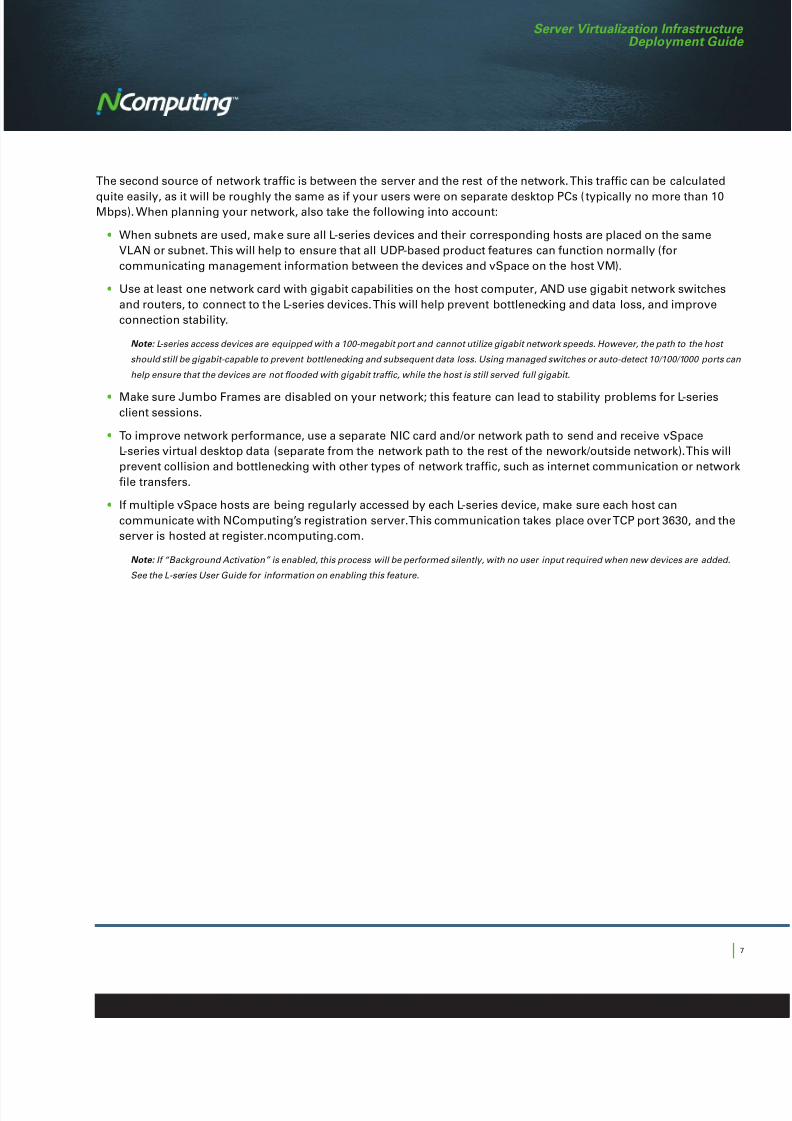
The second source o network trac is between the server and the rest o the network. This trac can be calculated
quite easily, as it will be roughly the same as i your users were on separate desktop PCs (typically no more than 10Mbps). When planning your network, also take the ollowing into account:
• When subnets are used, make sure all L-series devices and their corresponding hosts are placed on the same
VLAN or subnet. This will help to ensure that all UDP-based product eatures can unction normally (or
communicating management inormation between the devices and vSpace on the host VM).
• Use at least one network card with gigabit capabilities on the host computer, AND use gigabit network switches
and routers, to connect to the L-series devices. This will help prevent bottlenecking and data loss, and improve
connection stability.
Note: L-series access devices are equipped with a 100-megabit port and cannot utilize gigabit network speeds. However, the path to the host
should still be gigabit-capable to prevent bottlenecking and subsequent data loss. Using managed switches or auto-detect 10/100/1000 ports can
help ensure that the devices are not ooded with gigabit trafc, while the host is still served ull gigabit.
• Make sure Jumbo Frames are disabled on your network; this eature can lead to stability problems or L-series
client sessions.
• To improve network perormance, use a separate NIC card and/or network path to send and receive vSpace
L-series virtual desktop data (separate rom the network path to the rest o the nework/outside network). This will
prevent collision and bottlenecking with other types o network trac, such as internet communication or network
le transers.
• I multiple vSpace hosts are being regularly accessed by each L-series device, make sure each host can
communicate with NComputing’s registration server. This communication takes place over TCP port 3630, and the
server is hosted at register.ncomputing.com.
Note: I “Background Activation” is enabled, this process will be perormed silently, with no user input required when new devices are added.
See the L-series User Guide or inormation on enabling this eature.
8/7/2019 server virtualizatio infrastructure deployment GUIDE
http://slidepdf.com/reader/full/server-virtualizatio-infrastructure-deployment-guide 8/20
|
Server Virtualization InrastructureDeployment Guide
ESXi Virtual Machine Implementation
Now that you have properly sized the virtual machine host, the next logical step is to decide how to divide your
resource pool into distinct virtual machines. With physical vSpace hosts, we would normally try to squeeze as much as
possible out o each vSpace instance. When dealing with virtual machines, however, the optimal balance tends to be
ound with ewer users per VM. For a typical, low-multimedia use case, the ollowing specications are recommended.
As always, you must test your host under ull load to ensure that sucient resources have been allocated.
• 2 Virtual CPUs
• 2-3 GB Memory
• 8-10 Users per Virtual Machine (ewer i using multimedia)
Choosing an OS
NComputing supports a variety o Microsot Operating Systems, as well as Ubuntu Linux. Please see the vSpace OS
Support Matrix by searching or “os support” at ncomputing.com/kb beore choosing which OS to deploy. Also ully
read the pages at ncomputing.com/mslicensing or inormation on Microsot licensing in a multiuser environment.
Enable USB Support
VMware ESXi virtual machines do not have USB controllers associated with them by deault; thereore, a standard
Windows installation may not include any USB drivers and results in a lack o USB unctionality. You can use either o
the ollowing methods to enable L-series USB unctionality.
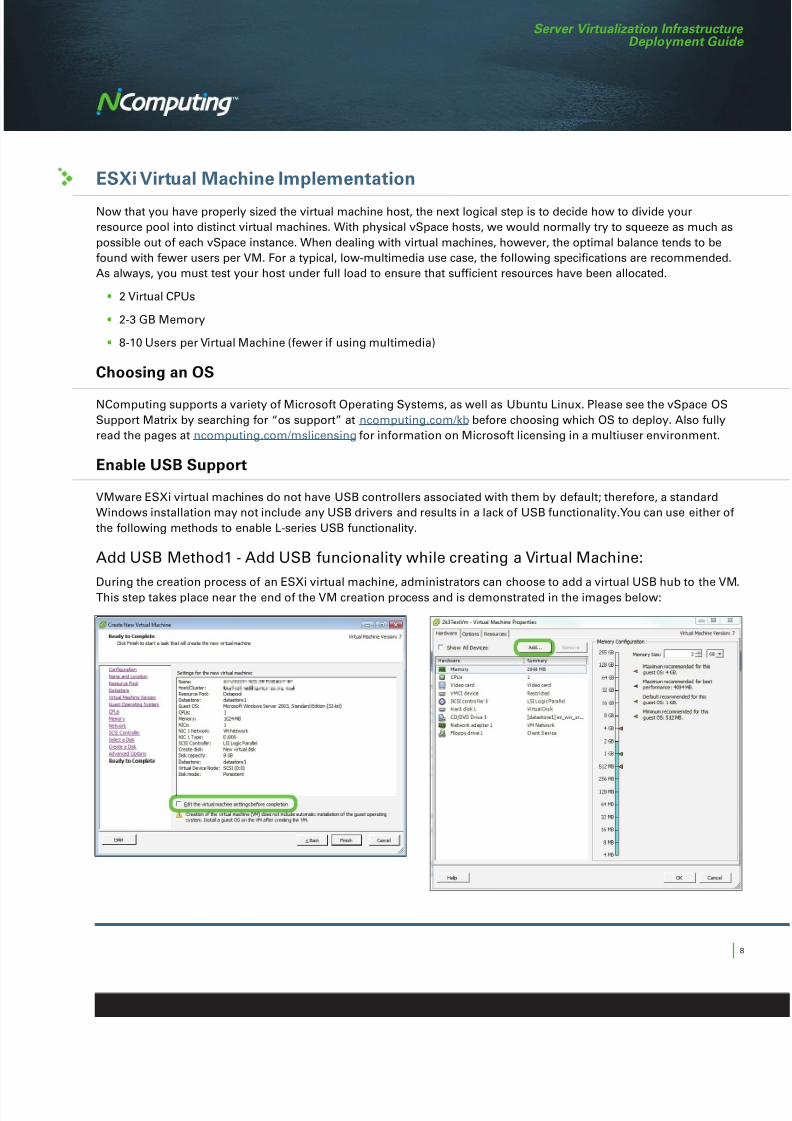
Add USB Method1 - Add USB uncionality while creating a Virtual Machine:
During the creation process o an ESXi virtual machine, administrators can choose to add a virtual USB hub to the VM.
This step takes place near the end o the VM creation process and is demonstrated in the images below:
8/7/2019 server virtualizatio infrastructure deployment GUIDE
http://slidepdf.com/reader/full/server-virtualizatio-infrastructure-deployment-guide 9/20
|
Server Virtualization InrastructureDeployment Guide
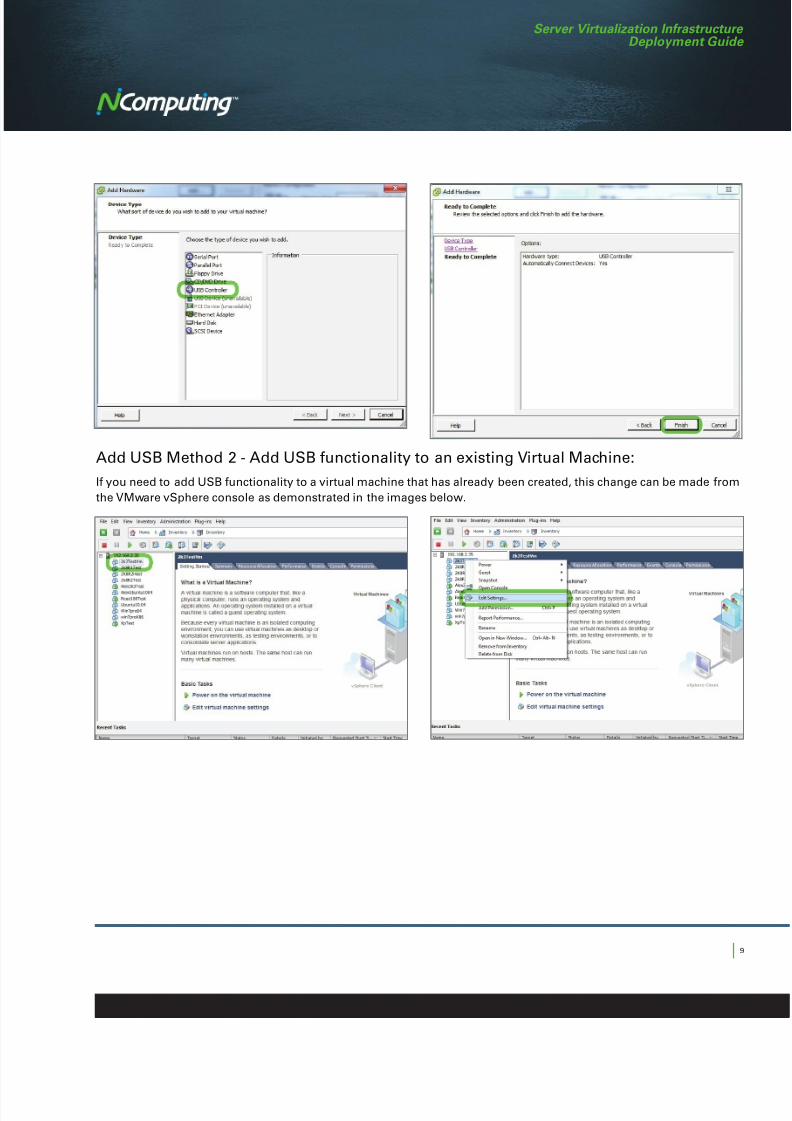
Add USB Method 2 - Add USB unctionality to an existing Virtual Machine:
I you need to add USB unctionality to a virtual machine that has already been created, this change can be made rom
the VMware vSphere console as demonstrated in the images below.

8/7/2019 server virtualizatio infrastructure deployment GUIDE
http://slidepdf.com/reader/full/server-virtualizatio-infrastructure-deployment-guide 10/20
| 1
Server Virtualization InrastructureDeployment Guide
8/7/2019 server virtualizatio infrastructure deployment GUIDE
http://slidepdf.com/reader/full/server-virtualizatio-infrastructure-deployment-guide 11/20
| 1
Server Virtualization InrastructureDeployment Guide
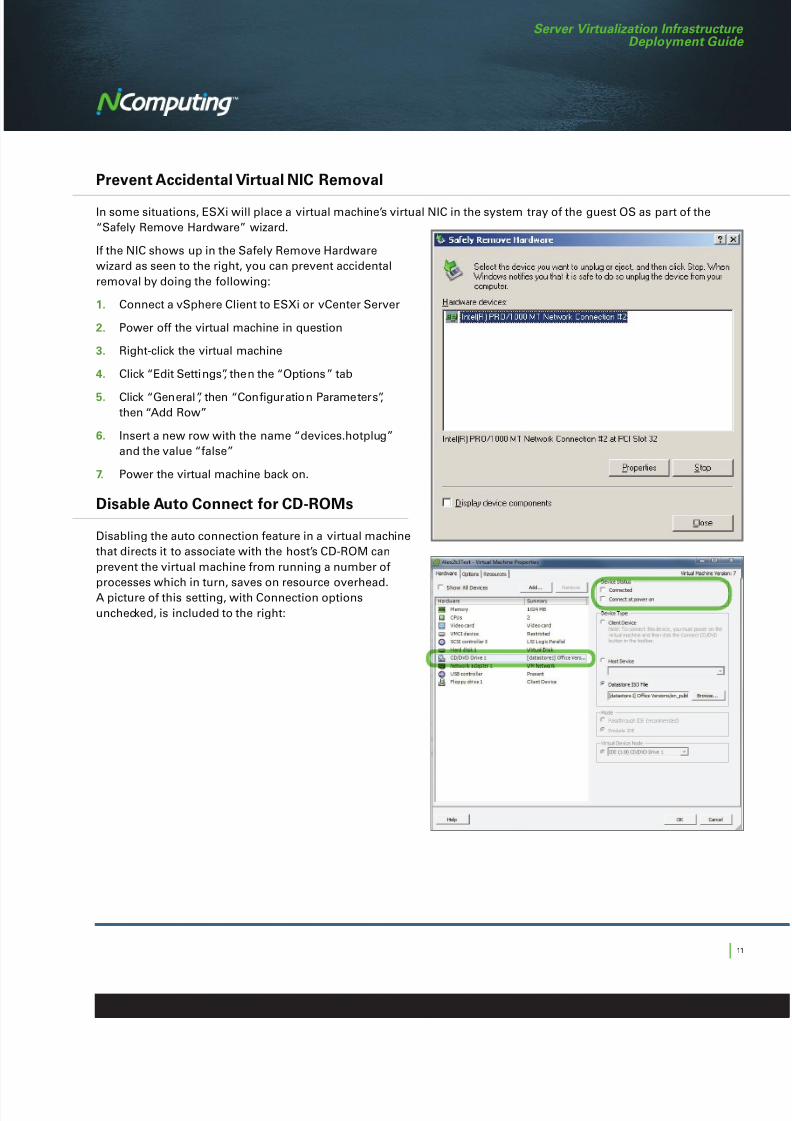
Prevent Accidental Virtual NIC Removal
In some situations, ESXi will place a virtual machine’s virtual NIC in the system tray o the guest OS as part o the
“Saely Remove Hardware” wizard.
I the NIC shows up in the Saely Remove Hardware
wizard as seen to the right, you can prevent accidental
removal by doing the ollowing:
1. Connect a vSphere Client to ESXi or vCenter Server
2. Power o the virtual machine in question
3. Right-click the virtual machine
4. Click “Edit Settings”, then the “Options” tab
5. Click “General”, then “Conguration Parameters”,
then “Add Row”
6. Insert a new row with the name “devices.hotplug”
and the value “alse”
7. Power the virtual machine back on.
Disable Auto Connect or CD-ROMs
Disabling the auto connection eature in a virtual machine
that directs it to associate with the host’s CD-ROM can
prevent the virtual machine rom running a number o
processes which in turn, saves on resource overhead.
A picture o this setting, with Connection options
unchecked, is included to the right:
8/7/2019 server virtualizatio infrastructure deployment GUIDE
http://slidepdf.com/reader/full/server-virtualizatio-infrastructure-deployment-guide 12/20
| 1
Server Virtualization InrastructureDeployment Guide
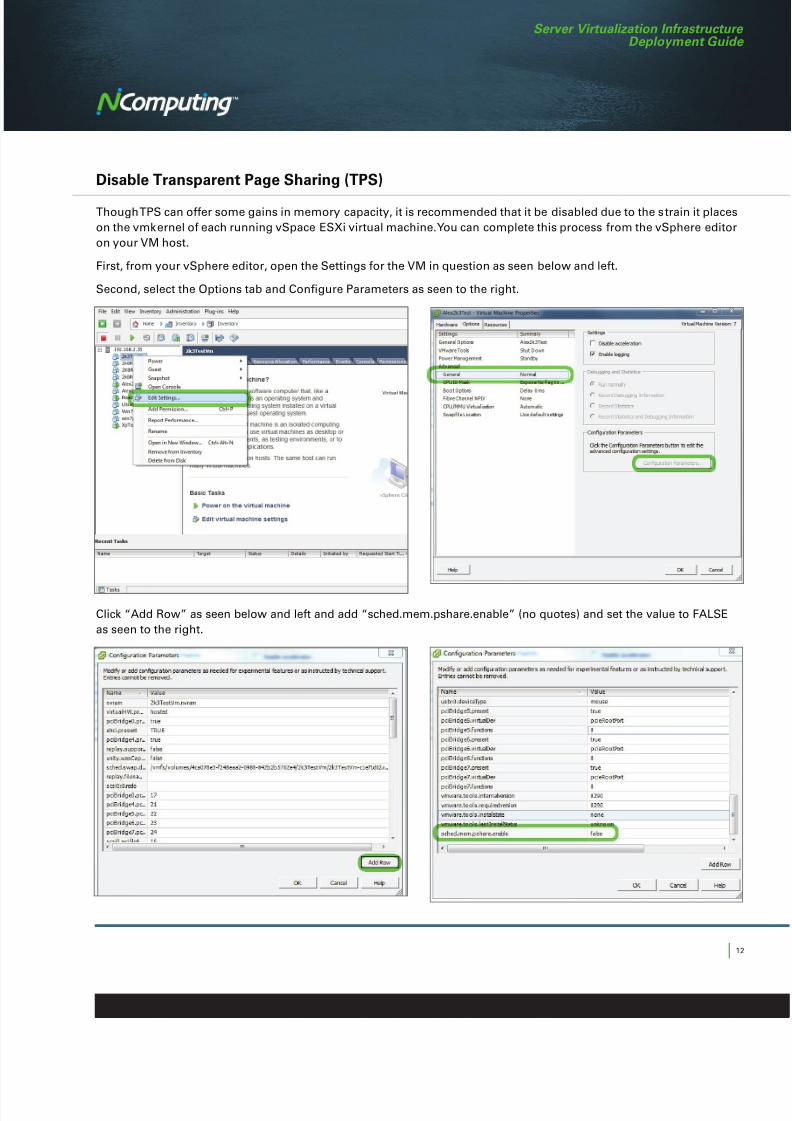
Disable Transparent Page Sharing (TPS)
Though TPS can oer some gains in memory capacity, it is recommended that it be disabled due to the strain it places
on the vmkernel o each running vSpace ESXi virtual machine. You can complete this process rom the vSphere editor
on your VM host.
First, rom your vSphere editor, open the Settings or the VM in question as seen below and let.
Second, select the Options tab and Congure Parameters as seen to the right.
Click “Add Row” as seen below and let and add “sched.mem.pshare.enable” (no quotes) and set the value to FALSE
as seen to the right.

8/7/2019 server virtualizatio infrastructure deployment GUIDE
http://slidepdf.com/reader/full/server-virtualizatio-infrastructure-deployment-guide 13/20
| 1
Server Virtualization InrastructureDeployment Guide
VM Templates
Creating streamlined and optimized VM templates is the most important process you will ace beyond your initial
architecture denition. Leveraging Virtual Center’s template capabilities allows you to create a robust and manageable
imaging system. Below are some general best practices or creating and managing VM templates.
To create a VM template, start by installing and conguring a VM with your desired base settings. Any application,
setting, or user account created on this VM will be included in the template, and thus appear in any VMs subsequently
created rom the template. To avoid issues related to product registration, it is recommended that you NOT include
vSpace in your VM Template. vSpace should be installed, registered, and tested on each VM as it is created. When you
are ready to create a VM template, shut down the VM.
With the virtual machine turned o, right-click it and select Template > Convert to template. Follow on-screen prompts
as needed. When the process completes, your template is ready to go, and you may begin deploying VMs rom the
created template immediately.
To create a VM, right-click the template and select “Deploy VM rom this Template.” Once the virtual machine is named
and a customization specication is designated, the machine will begin the clone/sysprep process.
When the VM cloning is nished, simply assign a static IP address, veriy proper Active Directory membership, and
install/register vSpace. Ater a nal reboot, you are ready to connect your L-series access devices.

8/7/2019 server virtualizatio infrastructure deployment GUIDE
http://slidepdf.com/reader/full/server-virtualizatio-infrastructure-deployment-guide 14/20
| 1
Server Virtualization InrastructureDeployment Guide
Windows VM Optimization
The ollowing procedures are designed to optimize vSpace and the Windows operating system itsel. They are
considered “best practices” and are recommended to deliver the best system stability and to enhance the user
experience. (The ollowing are specic or the Windows Server 2003 OS to enable a Windows XP user experience,
but similar procedures can be used or the Windows Server 2008 OS to enable a Vista user experience, and/or or the
Windows Server 2008 R2 OS to enable a Windows 7 user experience.)
Windows User Profles
Both local and domain user accounts can be accessed through an NComputing access device, as is the case with a
standalone PC. These are standard Windows accounts and are created and managed through Windows in the same
way you would any other user account. User accounts accessed through an NComputing device will retain their older
access settings, drive mapping, and group policies. It should be noted, however, that users on NComputing devices
are treated as Remote Users or the purpose o some settings and policies.
Remote Logon Policy
By deault, Windows only allows Terminal Services (TS) or Remote Desktop Services (RDS) logins or Administrators
and Remote Desktop Users. To allow access or other users or user groups, please open the Group Policy Editor (Run
> “gpedit.msc”) and navigate to [Computer Conguration > Windows Settings > Security Settings > Local Policies >
User Rights Assignment]. Under this category, double-click the policy object named “Allow log on through Terminal
Services” or “Allow log on through Remote Desktop Services”, and add the desired user or user group. To enable all
users with local logon rights, add “Everyone” to this policy.
Data Execution Prevention
To help ensure NComputing’s services are able to run properly, Data Execution Prevention (DEP) should be set to
“Essential Windows programs and services only”. To make this conguration, right-click My Computer and go to
Properties > Advanced (tab) > Perormance Settings > Data Execution Prevention (tab).
Enable XP Themes
1. Go to Start > Run > “services.msc” > OK. Change the ”Themes” service to “Automatic” and click “Start”
2. Go to Start >Run >”gpedit.msc” > OK. Expand [User Conguration > Administrative Templates > Control Panel >
Display > Desktop Themes]. Change “Load a specic visual style le or orce Windows Classic” to “Enabled” and
point it toward “%windir%\Resources\Themes\Luna\luna.msstyles”.
3. Click Apply
Remove IE Enhanced Security Module
1. Start > control panel > add remove programs
2. Select “Add/Remove Windows Components”
3. Uncheck “Internet Explorer enhanced security conguration”
4. Continue and complete the uninstallation.

8/7/2019 server virtualizatio infrastructure deployment GUIDE
http://slidepdf.com/reader/full/server-virtualizatio-infrastructure-deployment-guide 15/20
| 1
Server Virtualization InrastructureDeployment Guide
Disable CD-ROM Autoplay (At the Administrator’s discretion)
Setting the ollowing registry value will prevent the CD-ROM auto-play prompt rom appearing on all terminals.
1. Start>Run>Regedit>HKLM>System>CurrentControlSet>Services>CdRom
2. Set Autorun DWORD value to 0
Disable “First Run” Page in Internet Explorer
To prevent all users rom needing to go through the process o Internet Explorer’s custom set up you can instead set
the ollowing registry values:
1. Launch the Group Policy Editor (Start > Run > “gpedit.msc”)
2. Navigate to [Computer Conguration > Administrative Templates > Windows Components > Internet Explorer]
3. Double-click “Prevent perormance o First Run Customize Settings”
4. Set the value to “Enabled”
5. Once enabled, you must make one o two choices rom the available drop-down menu:
• Skip Customize Settings, and go directly to the user’s home page.
• Skip Customize Settings, and go directly to the “Welcome to Internet Explorer” Web page.
6. A restart may be necessary or this conguration to take eect.
Note: I you disable or do not confgure this policy setting, each user will go through the regular “First Run” process
when launching Internet Explorer.
Disable Winlogon Timeout (At the Administrator’s discretion)
By deault, an access device that is connected to a host but not logged in will disconnect ater a certain period o time.
This is to prevent too many idle sessions rom sitting at the Windows login screen or extended periods o time, using
up available sessions. However, in certain congurations (such as when a terminal has been congured to “auto-
connect” to a host or hosts) this can be detrimental. To disable this unction, make the ollowing registry change.
Start>Run>regedit>HKU>.Deault>Control Panel>Desktop>ScreenSaveTimeOut – change value to 100
Disable Screensaver Password (At the Administrator’s discretion)
By deault in most Active Directory environments, a user’s session would be “locked” ater going to a screensaver. This
can be disabled in a system’s local policy i desired.
1. Click Start > Run
2. Type in gpedit.msc and Click OK.
3. Expand User Conguration > Administrative Templates > Control Panel.
4. Click the Display container.
5. In the Details pan, double click Password protect the screen saver.
8/7/2019 server virtualizatio infrastructure deployment GUIDE
http://slidepdf.com/reader/full/server-virtualizatio-infrastructure-deployment-guide 16/20
| 1
Server Virtualization InrastructureDeployment Guide
6. Click Disabled.
7. Click OK.
Windows Perormance Options
Optimize the speed and responsiveness o your vSpace host rom within Windows. Disabling certain visual eects will
remove graphical overhead, and by conguring the operating system to avor application processes over services,
applications become more visually responsive, improving the overall user experience. To make these congurations,
right-click My Computer and go to Properties > Advanced (tab) > Perormance Settings. From here:
• Visual Eects – To reduce graphical overhead, uncheck any unneeded visual eects in this list. To remove all
eects, simply click “Adjust or best perormance”. It is important to note that this will also disable the Windows
Themes, and return to a Windows Classic appearance.
• Processor Scheduling – Located under the “Advanced” tab, improve user experience by setting this to “Programs”
• Virtual Memory – System perormance can be greatly aected by the size and management o virtual memory,
called the “Paging File.” This should be set to “System Managed” except by advanced users.
Disable Excess Processes
To urther streamline your host computer, it may be desirable to disable certain start-up programs and background
services, which will use up system resources. Go to Start > Run > “mscong” > OK to launch the System Conguration
tool. Under the Services and Startup tabs, uncheck any service or program that is not needed during start-up.
Force O-Screen Compositing
Certain elements o Internet Explorer’s rendering behavior are inecient in a multi-user environment, and can be set
to improve perormance and prevent potential screen fickering issues. The ollowing steps will properly congure one
such element, called “O-Screen Compositing”:
1. Open Notepad and copy-paste the ollowing into a new text le:
CLASS USER
CATEGORY !!AdditionalSettings
CATEGORY !!InternetExplorer
POLICY !!ForceOscreenComposition
KEYNAME “Sotware\Microsot\Internet Explorer\Main”
PART !!ForceOscreenComposition_Help TEXT END PART
VALUENAME “Force Oscreen Composition”
VALUEON NUMERIC 1
VALUEOFF NUMERIC 0
END POLICY ; !!ForceOscreenCompositionEND CATEGORY ; !!InternetExplorer
END CATEGORY ; !!AdditionalSettings
[strings]
AdditionalSettings=Additional Settings
InternetExplorer=Internet Explorer
ForceOscreenComposition=Force Oscreen Composition
ForceOscreenComposition_Help=Force Oscreen Composition
8/7/2019 server virtualizatio infrastructure deployment GUIDE
http://slidepdf.com/reader/full/server-virtualizatio-infrastructure-deployment-guide 17/20
| 1
Server Virtualization InrastructureDeployment Guide
2. Save the text document with an “.adm” extension, and a lename o your choice. (or example, “oscreen.adm”)
3. Start the Group Policy Editor (Start > Run > “gpedit.msc”)
4. Under “User Conguration”, highlight Administrative Templates
5. Go to View > Filtering and uncheck “Only show policy settings that can be ully managed”, then click “OK”
6. Right-click Administrative Templates and click “Add/Remove Templates”. Click “Add” and point to the text le you
just created. Click “Close” to apply the Template.
7. Navigate to Administrative Templates > Additional Settings and click “Internet Explorer” to view the new policy,
called “Force Oscreen Composition”.
8. Double-click this policy and change the value to “Enabled”.
Server Message Block (SMB) Trafc Optimization
To reduce excess SMB trac and improve overall le server perormance, it is recommended that certain changes
be made to the registry as part o the general OS conguration process. Microsot has created a write-up on these
recommendations and their associated registry locations:
http://blogs.technet.com/b/askper/archive/2007/09/21/windows-explorer-and-smb-trac.aspx
To save time with these congurations, you can copy the provided registry data into a text editor, save it as
“smbtweaks.reg”, and double-click it. This will run all o the registry changes automatically, rather than requiring a
time-consuming manual conguration.
vSpace Registration
NComputing products must be registered and activated beore use. Prior to registration, sessions will stop aterone hour and the sotware can only be used or 30 days ater the initial install. Please see the User Guide or more
inormation on this process: www.ncomputing.com/documentation.
L-Series Firmware Updates
Firmware updates are recommended or any new L-series products prior to deployment. Please see the User Guide or
search our online Knowledgebase or more inormation: www.ncomputing.com/support .
L-Series Firmware Password
The L-series devices can be protected rom tampering by setting a rmware password. This setting can be ound in
L-series device’s Device Setup, under the “Password” tab.
Server Roll-over Confguration
To reduce downtime risk rom server ailure, a single L300 device may have the autoconnect eature dened or
multiple vSpace hosts . I the rst host is unresponsive, the L300 device will move to the next host in its list and
attempt to connect. This process repeats until a unctional vSpace host is located. For inormation on conguring this
eature, please see the L300 User Guide at www.ncomputing.com/documentation.
8/7/2019 server virtualizatio infrastructure deployment GUIDE
http://slidepdf.com/reader/full/server-virtualizatio-infrastructure-deployment-guide 18/20
| 1
Server Virtualization InrastructureDeployment Guide
Assorted Console Settings
Within the vSpace Console, there are several settings that can be used to optimize your product experience.
These are listed below:
• Video Compression – I you’re experiencing perormance issues due to the network bandwidth needs o your
L300 devices, you may limit multimedia stream quality. To congure this, open the vSpace Console and navigate
to Sotware Settings (local) > Inormation & Settings > System Settings. The JPEG Compression Ratio is a
percentage rating o quality. 95% means maximum video quality, and requires highest bandwidth. 5% is minimum
video quality, with a respectively lower bandwidth requirement. It is important to note that by decreasing video
quality, the CPU assisted compression can cause an increase in processor usage during video streaming events.
In situations where your network is robust enough to handle higher quality video, you may see perormance
improvements by setting the video quality at maximum. The ideal setting or your environment should be
determined through your own benchmarking.
• Background Activation – To automate the activation process or new L-series devices, this setting allows thevSpace sotware to automatically register and activate new devices as they are connected. It can be enabled unde
System Settings in the vSpace Console.
• Clean-Up Disconnected Sessions – vSpace has an automatic eature which will end any “orphaned” sessions ater
a predetermined interval. The deault setting cleans up sessions ater ve minutes o being disconnected rom any
L-series device. This interval can be increased or decreased to suit the needs o the environment. Setting it to “0”
will disable it, and orphaned sessions will remain logged in until the server is rebooted.
Automatic Login on the Host
To allow plug-n-play remote USB drivers to install and work properly, you will need to have a session with admin
privileges logged into the host. Below are the steps to accomplish with this.
1. Open up the vSpace Console.
2. Expand Sotware Settings > Inormation & Settings and click on System Settings
3. Double click on the setting “Autologon on Host Station”
4. In the new window that opens Check the Box that says “Enable Autologon Mode on Main Station.”
5. Type in the inormation or the admin privileged user name and password. I you are using a Domain admin,
make sure to use the ully qualied domain user name. Example: testdomain\user
6. Click OK
Exclude Programs From Video Acceleration
I a program displays requent “blue box” fickering, it may be desirable to disable video streaming or that
application. To do so, simply add the application’s executable to the ollowing registry key:
[HKEY Local Machine > System > CurrentControlSet >Control > Multiuser > ExcludeVideoPlayerNameList]
Each program in the list must be separated by a semicolon. For example, “explorer.exe;reox.exe”
With these applications in the excluded list, video acceleration will not attempt to accelerate graphical elements
in the application(s).
8/7/2019 server virtualizatio infrastructure deployment GUIDE
http://slidepdf.com/reader/full/server-virtualizatio-infrastructure-deployment-guide 19/20
| 1
Server Virtualization InrastructureDeployment Guide
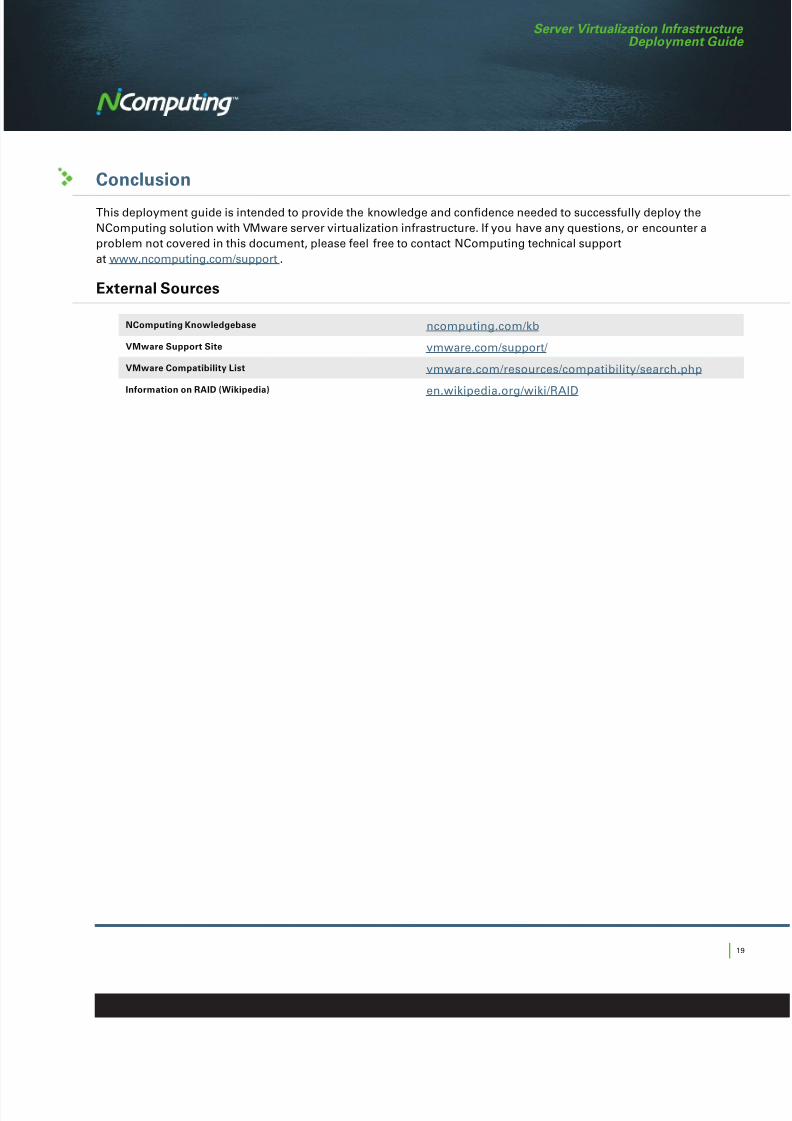
Conclusion
This deployment guide is intended to provide the knowledge and condence needed to successully deploy the
NComputing solution with VMware server virtualization inrastructure. I you have any questions, or encounter a
problem not covered in this document, please eel ree to contact NComputing technical support
at www.ncomputing.com/support .
External Sources
NComputing Knowledgebase ncomputing.com/kb
VMware Support Site vmware.com/support/
VMware Compatibility List vmware.com/resources/compatibility/search.php
Inormation on RAID (Wikipedia) en.wikipedia.org/wiki/RAID
8/7/2019 server virtualizatio infrastructure deployment GUIDE
http://slidepdf.com/reader/full/server-virtualizatio-infrastructure-deployment-guide 20/20
| 2
Server Virtualization InrastructureDeployment Guide
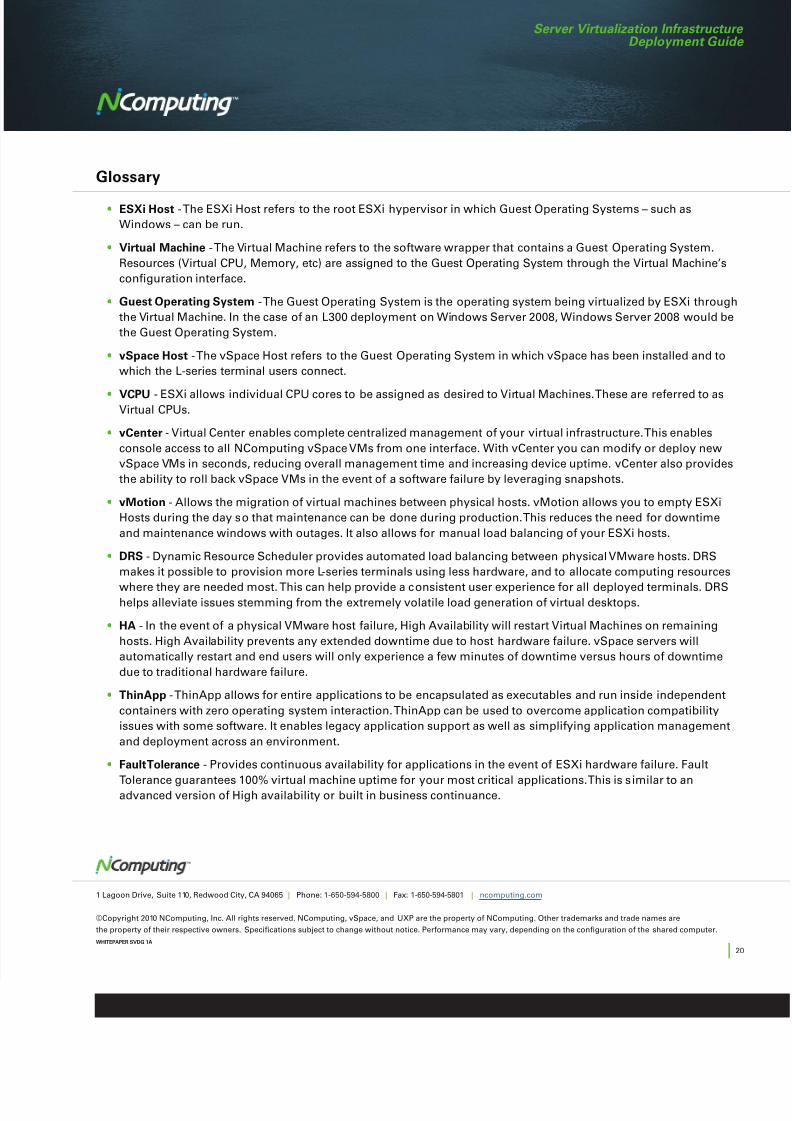
Glossary
• ESXi Host - The ESXi Host reers to the root ESXi hypervisor in which Guest Operating Systems – such as
Windows – can be run.
• Virtual Machine - The Virtual Machine reers to the sotware wrapper that contains a Guest Operating System.
Resources (Virtual CPU, Memory, etc) are assigned to the Guest Operating System through the Virtual Machine’s
conguration interace.
• Guest Operating System - The Guest Operating System is the operating system being virtualized by ESXi through
the Virtual Machine. In the case o an L300 deployment on Windows Server 2008, Windows Server 2008 would be
the Guest Operating System.
• vSpace Host - The vSpace Host reers to the Guest Operating System in which vSpace has been installed and to
which the L-series terminal users connect.
• VCPU - ESXi allows individual CPU cores to be assigned as desired to Virtual Machines. These are reerred to asVirtual CPUs.
• vCenter - Virtual Center enables complete centralized management o your virtual inrastructure. This enables
console access to all NComputing vSpace VMs rom one interace. With vCenter you can modiy or deploy new
vSpace VMs in seconds, reducing overall management time and increasing device uptime. vCenter also provides
the ability to roll back vSpace VMs in the event o a sotware ailure by leveraging snapshots.
• vMotion - Allows the migration o virtual machines between physical hosts. vMotion allows you to empty ESXi
Hosts during the day so that maintenance can be done during production. This reduces the need or downtime
and maintenance windows with outages. It also allows or manual load balancing o your ESXi hosts.
• DRS - Dynamic Resource Scheduler provides automated load balancing between physical VMware hosts. DRS
makes it possible to provision more L-series terminals using less hardware, and to allocate computing resources
where they are needed most. This can help provide a consistent user experience or all deployed terminals. DRShelps alleviate issues stemming rom the extremely volatile load generation o virtual desktops.
• HA - In the event o a physical VMware host ailure, High Availability will restart Virtual Machines on remaining
hosts. High Availability prevents any extended downtime due to host hardware ailure. vSpace servers will
automatically restart and end users will only experience a ew minutes o downtime versus hours o downtime
due to traditional hardware ailure.
• ThinApp - ThinApp allows or entire applications to be encapsulated as executables and run inside independent
containers with zero operating system interaction. ThinApp can be used to overcome application compatibility
issues with some sotware. It enables legacy application support as well as simpliying application management
and deployment across an environment.
• Fault Tolerance - Provides continuous availability or applications in the event o ESXi hardware ailure. Fault
Tolerance guarantees 100% virtual machine uptime or your most critical applications. This is similar to anadvanced version o High availability or built in business continuance.
1 Lagoon Drive, Suite 110, Redwood City, CA 94065 | Phone: 1-650-594-5800 | Fax: 1-650-594-5801 | ncomputing.com
©Copyright 2010 NComputing, Inc. All rights reserved. NComputing, vSpace, and UXP are the property o NComputing. Other trademarks and trade names are
the property o their respective owners. Specications subject to change without notice. Perormance may vary, depending on the conguration o the shared computer.
WHITEPAPER SVDG 1A