Embed Size (px)
Citation preview

Server InstallationWebFOCUS Reporting Server Release 82
DataMigrator Server Release 7707
DataMigrator Console and Client
DN4501641.0417

Active Technologies, EDA, EDA/SQL, FIDEL, FOCUS, Information Builders, the Information Builders logo, iWay, iWaySoftware, Parlay, PC/FOCUS, RStat, Table Talk, Web390, WebFOCUS, WebFOCUS Active Technologies, and WebFOCUSMagnify are registered trademarks, and DataMigrator and Hyperstage are trademarks of Information Builders, Inc.
Adobe, the Adobe logo, Acrobat, Adobe Reader, Flash, Adobe Flash Builder, Flex, and PostScript are either registeredtrademarks or trademarks of Adobe Systems Incorporated in the United States and/or other countries.
Due to the nature of this material, this document refers to numerous hardware and software products by theirtrademarks. In most, if not all cases, these designations are claimed as trademarks or registered trademarks by theirrespective companies. It is not this publisher's intent to use any of these names generically. The reader is thereforecautioned to investigate all claimed trademark rights before using any of these names other than to refer to the productdescribed.
Copyright © 2017, by Information Builders, Inc. and iWay Software. All rights reserved. Patent Pending. This manual, orparts thereof, may not be reproduced in any form without the written permission of Information Builders, Inc.

Contents
Preface . . . . . . . . . . . . . . . . . . . . . . . . . . . . . . . . . . . . . . . . . . . . . . . . . . . . . . . . . . . . . . . . . . . . . . . . 11
Documentation Conventions . . . . . . . . . . . . . . . . . . . . . . . . . . . . . . . . . . . . . . . . . . . . . . . . . . . . . . . . . . 12
Related Publications . . . . . . . . . . . . . . . . . . . . . . . . . . . . . . . . . . . . . . . . . . . . . . . . . . . . . . . . . . . . . . . . . 13
Customer Support . . . . . . . . . . . . . . . . . . . . . . . . . . . . . . . . . . . . . . . . . . . . . . . . . . . . . . . . . . . . . . . . . . . 13
Information You Should Have . . . . . . . . . . . . . . . . . . . . . . . . . . . . . . . . . . . . . . . . . . . . . . . . . . . . . . . . . .13
User Feedback . . . . . . . . . . . . . . . . . . . . . . . . . . . . . . . . . . . . . . . . . . . . . . . . . . . . . . . . . . . . . . . . . . . . . . 14
Software Training and Professional Services . . . . . . . . . . . . . . . . . . . . . . . . . . . . . . . . . . . . . . . . . . . . .15
1. Introduction to Installation . . . . . . . . . . . . . . . . . . . . . . . . . . . . . . . . . . . . . . . . . . . . . . . . . . . 17
Versions . . . . . . . . . . . . . . . . . . . . . . . . . . . . . . . . . . . . . . . . . . . . . . . . . . . . . . . . . . . . . . . . . . . . . . . . . . . 17
What to Read After You Install . . . . . . . . . . . . . . . . . . . . . . . . . . . . . . . . . . . . . . . . . . . . . . . . . . . . . . . . .18
2. Installation for Windows . . . . . . . . . . . . . . . . . . . . . . . . . . . . . . . . . . . . . . . . . . . . . . . . . . . . . . 19
Information You Need Prior to Installation on Windows . . . . . . . . . . . . . . . . . . . . . . . . . . . . . . . . . . . .19
Windows Installation Requirements . . . . . . . . . . . . . . . . . . . . . . . . . . . . . . . . . . . . . . . . . . . . . . . . . . . . 20
JVM Requirements for Java Services (Server Installations Only). . . . . . . . . . . . . . . . . . . . . . . .21
Installation and Configuration Directories on Windows . . . . . . . . . . . . . . . . . . . . . . . . . . . . . . . . . . . . 23
Installation Methods . . . . . . . . . . . . . . . . . . . . . . . . . . . . . . . . . . . . . . . . . . . . . . . . . . . . . . . . . . . . . . . . . 25
Choosing Between Interactive and Silent Installation. . . . . . . . . . . . . . . . . . . . . . . . . . . . . . . . .25
Choosing Between Private and Shared Access to the Data Management Console. . . . . . . . 25
Accessing the Software . . . . . . . . . . . . . . . . . . . . . . . . . . . . . . . . . . . . . . . . . . . . . . . . . . . . . . . . . . . . . . 26
Downloading the Installation Software. . . . . . . . . . . . . . . . . . . . . . . . . . . . . . . . . . . . . . . . . . . . . 26
Installing a Server . . . . . . . . . . . . . . . . . . . . . . . . . . . . . . . . . . . . . . . . . . . . . . . . . . . . . . . . . . . . . . . . . . . 28
Verifying the Windows Server Installation . . . . . . . . . . . . . . . . . . . . . . . . . . . . . . . . . . . . . . . . . . . . . . . 38
Starting and Using a Server or Data Management Console . . . . . . . . . . . . . . . . . . . . . . . . . . . . . . . . 40
Security Providers on Windows . . . . . . . . . . . . . . . . . . . . . . . . . . . . . . . . . . . . . . . . . . . . . . . . . . . . . . . . 41
Additional Installation Options . . . . . . . . . . . . . . . . . . . . . . . . . . . . . . . . . . . . . . . . . . . . . . . . . . . . . . . . .41
Installing and Configuring Silently. . . . . . . . . . . . . . . . . . . . . . . . . . . . . . . . . . . . . . . . . . . . . . . . . 43
Generating a Trace on Windows . . . . . . . . . . . . . . . . . . . . . . . . . . . . . . . . . . . . . . . . . . . . . . . . . . . . . . . 45
Third-Party Software and Licenses on Windows . . . . . . . . . . . . . . . . . . . . . . . . . . . . . . . . . . . . . . . . . . 47
OpenFlex SDK. . . . . . . . . . . . . . . . . . . . . . . . . . . . . . . . . . . . . . . . . . . . . . . . . . . . . . . . . . . . . . . . . . 47
Zip Archiver. . . . . . . . . . . . . . . . . . . . . . . . . . . . . . . . . . . . . . . . . . . . . . . . . . . . . . . . . . . . . . . . . . . . 48
General Information for a Windows Installation . . . . . . . . . . . . . . . . . . . . . . . . . . . . . . . . . . . . . . . . . . 48
Server Installation 3

Sample Metadata, Data, and Other Tutorial Samples. . . . . . . . . . . . . . . . . . . . . . . . . . . . . . . . 48
Limiting CPU/Core Use on Machines With Multiple CPUs and Cores. . . . . . . . . . . . . . . . . . . .49
Troubleshooting for Windows . . . . . . . . . . . . . . . . . . . . . . . . . . . . . . . . . . . . . . . . . . . . . . . . . . . . . . . . . .49
3. Installation for UNIX . . . . . . . . . . . . . . . . . . . . . . . . . . . . . . . . . . . . . . . . . . . . . . . . . . . . . . . . . .53
Information You Need Prior to Installation on UNIX . . . . . . . . . . . . . . . . . . . . . . . . . . . . . . . . . . . . . . . 53
UNIX Installation Requirements . . . . . . . . . . . . . . . . . . . . . . . . . . . . . . . . . . . . . . . . . . . . . . . . . . . . . . . .54
JVM Requirements for Java Services (Server Installations Only). . . . . . . . . . . . . . . . . . . . . . . .56
Installation and Configuration Directories on UNIX . . . . . . . . . . . . . . . . . . . . . . . . . . . . . . . . . . . . . . . .58
Downloading the Server Installation Software for UNIX . . . . . . . . . . . . . . . . . . . . . . . . . . . . . . . . . . . . 59
Running Isetup to Install the Server Software . . . . . . . . . . . . . . . . . . . . . . . . . . . . . . . . . . . . . . . . . . . .61
Installing Using rpm . . . . . . . . . . . . . . . . . . . . . . . . . . . . . . . . . . . . . . . . . . . . . . . . . . . . . . . . . . . . . . . . . .65
Configuring an Additional Instance of the Server . . . . . . . . . . . . . . . . . . . . . . . . . . . . . . . . . . . . . . . . . 66
Refreshing or Upgrading an Installation . . . . . . . . . . . . . . . . . . . . . . . . . . . . . . . . . . . . . . . . . . . . . . . . . 67
Installing and Configuring Silently . . . . . . . . . . . . . . . . . . . . . . . . . . . . . . . . . . . . . . . . . . . . . . . . . . . . . . 68
Verifying the UNIX Server Installation . . . . . . . . . . . . . . . . . . . . . . . . . . . . . . . . . . . . . . . . . . . . . . . . . . . 69
Security Providers on UNIX . . . . . . . . . . . . . . . . . . . . . . . . . . . . . . . . . . . . . . . . . . . . . . . . . . . . . . . . . . . .72
Preventing Unsecured Server Starts After Upgrades. . . . . . . . . . . . . . . . . . . . . . . . . . . . . . . . . .73
Starting and Using a Server . . . . . . . . . . . . . . . . . . . . . . . . . . . . . . . . . . . . . . . . . . . . . . . . . . . . . . . . . . . 73
Generating a Trace on UNIX . . . . . . . . . . . . . . . . . . . . . . . . . . . . . . . . . . . . . . . . . . . . . . . . . . . . . . . . . . . 75
Third-Party Software and Licenses on UNIX . . . . . . . . . . . . . . . . . . . . . . . . . . . . . . . . . . . . . . . . . . . . . . 76
OpenFlex SDK. . . . . . . . . . . . . . . . . . . . . . . . . . . . . . . . . . . . . . . . . . . . . . . . . . . . . . . . . . . . . . . . . . 76
General Information for a UNIX Installation . . . . . . . . . . . . . . . . . . . . . . . . . . . . . . . . . . . . . . . . . . . . . . 77
Sample Metadata, Data, and Other Tutorial Samples. . . . . . . . . . . . . . . . . . . . . . . . . . . . . . . . 77
Java Listener JVM Defaults. . . . . . . . . . . . . . . . . . . . . . . . . . . . . . . . . . . . . . . . . . . . . . . . . . . . . . .77
Limiting CPU Use on Machines With Multiple CPUs. . . . . . . . . . . . . . . . . . . . . . . . . . . . . . . . . . 78
Troubleshooting for UNIX . . . . . . . . . . . . . . . . . . . . . . . . . . . . . . . . . . . . . . . . . . . . . . . . . . . . . . . . . . . . . 80
4. Installation for z/OS . . . . . . . . . . . . . . . . . . . . . . . . . . . . . . . . . . . . . . . . . . . . . . . . . . . . . . . . . .87
Information You Need Prior to Installation on zOS . . . . . . . . . . . . . . . . . . . . . . . . . . . . . . . . . . . . . . . . 87
zOS Installation Requirements . . . . . . . . . . . . . . . . . . . . . . . . . . . . . . . . . . . . . . . . . . . . . . . . . . . . . . . . 88
JVM Requirements for Java Services (Server Installations Only). . . . . . . . . . . . . . . . . . . . . . . .89
Installation for HFS and PDS . . . . . . . . . . . . . . . . . . . . . . . . . . . . . . . . . . . . . . . . . . . . . . . . . . . . . . . . . . 89
Choosing How to Deploy. . . . . . . . . . . . . . . . . . . . . . . . . . . . . . . . . . . . . . . . . . . . . . . . . . . . . . . . . 90
Contents
4 Information Builders

File Locations. . . . . . . . . . . . . . . . . . . . . . . . . . . . . . . . . . . . . . . . . . . . . . . . . . . . . . . . . . . . . . . . . . 92
Supplied Files Location (EDAHOME). . . . . . . . . . . . . . . . . . . . . . . . . . . . . . . . . . . . . . . . . . 93
Configuration Files Location (EDACONF). . . . . . . . . . . . . . . . . . . . . . . . . . . . . . . . . . . . . . .94
Profile Files Location. . . . . . . . . . . . . . . . . . . . . . . . . . . . . . . . . . . . . . . . . . . . . . . . . . . . . . . 95
Administration Files Location. . . . . . . . . . . . . . . . . . . . . . . . . . . . . . . . . . . . . . . . . . . . . . . . 96
Application Files Location (APPROOT). . . . . . . . . . . . . . . . . . . . . . . . . . . . . . . . . . . . . . . . . 97
Step-By-Step Installation Overview. . . . . . . . . . . . . . . . . . . . . . . . . . . . . . . . . . . . . . . . . . . . . . . . .99
HFS Deployment . . . . . . . . . . . . . . . . . . . . . . . . . . . . . . . . . . . . . . . . . . . . . . . . . . . . . . . . . . . . . . . . . . . 100
Installation Requirements for HFS. . . . . . . . . . . . . . . . . . . . . . . . . . . . . . . . . . . . . . . . . . . . . . . .100
Operating System Requirements. . . . . . . . . . . . . . . . . . . . . . . . . . . . . . . . . . . . . . . . . . . .100
JVM Requirements for Java Services. . . . . . . . . . . . . . . . . . . . . . . . . . . . . . . . . . . . . . . . 100
IP Port Number Requirements. . . . . . . . . . . . . . . . . . . . . . . . . . . . . . . . . . . . . . . . . . . . . . 102
Browser Requirements. . . . . . . . . . . . . . . . . . . . . . . . . . . . . . . . . . . . . . . . . . . . . . . . . . . . 102
Disk Space Requirements. . . . . . . . . . . . . . . . . . . . . . . . . . . . . . . . . . . . . . . . . . . . . . . . . 103
Memory Requirements. . . . . . . . . . . . . . . . . . . . . . . . . . . . . . . . . . . . . . . . . . . . . . . . . . . . 103
Communications Requirements. . . . . . . . . . . . . . . . . . . . . . . . . . . . . . . . . . . . . . . . . . . . .104
Installing New on HFS. . . . . . . . . . . . . . . . . . . . . . . . . . . . . . . . . . . . . . . . . . . . . . . . . . . . . . . . . . 104
Step 1. Establish the HFS Directory for the Software. . . . . . . . . . . . . . . . . . . . . . . . . . 104
Step 2. Set Up User IDs. . . . . . . . . . . . . . . . . . . . . . . . . . . . . . . . . . . . . . . . . . . . . . . . . . . 105
Software Installation ID (iinstal). . . . . . . . . . . . . . . . . . . . . . . . . . . . . . . . . . . . . . . 105
OPSYS Server Administrator ID (iadmin). . . . . . . . . . . . . . . . . . . . . . . . . . . . . . . . 106
PTH Administrator ID. . . . . . . . . . . . . . . . . . . . . . . . . . . . . . . . . . . . . . . . . . . . . . . . .106
Server System ID (iserver). . . . . . . . . . . . . . . . . . . . . . . . . . . . . . . . . . . . . . . . . . . . 106
General IDs (for Connecting Users). . . . . . . . . . . . . . . . . . . . . . . . . . . . . . . . . . . . 107
User ID Installation Scenarios. . . . . . . . . . . . . . . . . . . . . . . . . . . . . . . . . . . . . . . . .107
Step 2A. Define the Software Installation ID. . . . . . . . . . . . . . . . . . . . . . . . . . . . .108
Step 2B/RACF. Define the OPSYS Server Administrator ID With RACF. . . . . . .108
Step 2B/ACF2. Define the OPSYS Server Administrator ID With CA-ACF2. . . . 109
Step 2B/Top Secret. Define the OPSYS Server Administrator ID With CA-
Top Secret. . . . . . . . . . . . . . . . . . . . . . . . . . . . . . . . . . . . . . . . . . . . . . . . . . . . . . .109
Step 2C/RACF. Define the Server System User ID With RACF. . . . . . . . . . . . . . 112
Step 2C/ACF2. Define the Server System User ID With CA-ACF2. . . . . . . . . . . 113
Step 2C/Top Secret. Define the Server System User ID With CA-Top Secret. 113
Contents
Server Installation 5

Step 2D. Define the Server System User ID With UNIXPRIV Profiles. . . . . . . . .114
Step 2E. Add the OMVS Segment to General User IDs. . . . . . . . . . . . . . . . . . . . 116
Step 3. Collect Required Information for Adapters. . . . . . . . . . . . . . . . . . . . . . . . . . . . .116
Step 4. Access the Installation Software. . . . . . . . . . . . . . . . . . . . . . . . . . . . . . . . . . . . .123
Step 5. Run ISETUP. . . . . . . . . . . . . . . . . . . . . . . . . . . . . . . . . . . . . . . . . . . . . . . . . . . . . . .126
Step 6. Test the Installation. . . . . . . . . . . . . . . . . . . . . . . . . . . . . . . . . . . . . . . . . . . . . . . 139
Step 7. Configure Server Security. . . . . . . . . . . . . . . . . . . . . . . . . . . . . . . . . . . . . . . . . . . 140
Security Providers. . . . . . . . . . . . . . . . . . . . . . . . . . . . . . . . . . . . . . . . . . . . . . . . . . . 141
Preventing Unsecured Server Starts After Upgrades. . . . . . . . . . . . . . . . . 142
Starting and Stopping a Server for HFS. . . . . . . . . . . . . . . . . . . . . . . . . . . . . . . . . . . . . . . . . . . 147
Starting and Stopping the Server Using a Batch Job. . . . . . . . . . . . . . . . . . . . . . . . . . . 147
Starting and Stopping the Server Using a Started Task. . . . . . . . . . . . . . . . . . . . . . . . .147
Server Operations Using MVS Operator Commands. . . . . . . . . . . . . . . . . . . . . . . . . . . .148
DB2 Security Exit Configuration for HFS. . . . . . . . . . . . . . . . . . . . . . . . . . . . . . . . . . . . . . . . . . . 149
MSODDX for DD Translation for User Subroutines. . . . . . . . . . . . . . . . . . . . . . . . . . . . . . . . . . 154
Overriding the Time Zone Setting . . . . . . . . . . . . . . . . . . . . . . . . . . . . . . . . . . . . . . . . . . . . . . . . 154
Adding a Configuration Instance for HFS. . . . . . . . . . . . . . . . . . . . . . . . . . . . . . . . . . . . . . . . . . 154
Step 1. Run ISETUP. . . . . . . . . . . . . . . . . . . . . . . . . . . . . . . . . . . . . . . . . . . . . . . . . . . . . . .154
Step 2. Test the Installation. . . . . . . . . . . . . . . . . . . . . . . . . . . . . . . . . . . . . . . . . . . . . . . 164
Upgrading Your Server Release for HFS. . . . . . . . . . . . . . . . . . . . . . . . . . . . . . . . . . . . . . . . . . . 165
Step 1. Access the Installation Software. . . . . . . . . . . . . . . . . . . . . . . . . . . . . . . . . . . . .165
Step 2. Run ISETUP. . . . . . . . . . . . . . . . . . . . . . . . . . . . . . . . . . . . . . . . . . . . . . . . . . . . . . .169
Step 3. Test the Server Installation. . . . . . . . . . . . . . . . . . . . . . . . . . . . . . . . . . . . . . . . . 174
Step 4. Reconfigure Server Security. . . . . . . . . . . . . . . . . . . . . . . . . . . . . . . . . . . . . . . . . 175
Preventing Unsecured Server Starts After Upgrades. . . . . . . . . . . . . . . . . . . . . . 176
Step 5. Reconfigure Adapters. . . . . . . . . . . . . . . . . . . . . . . . . . . . . . . . . . . . . . . . . . . . . . 176
Accounting for HFS - SMF Records. . . . . . . . . . . . . . . . . . . . . . . . . . . . . . . . . . . . . . . . . . . . . . . 177
Enabling Use of the zIIP Specialty Engine. . . . . . . . . . . . . . . . . . . . . . . . . . . . . . . . . . . . . . . . . .183
What Is a zIIP Specialty Engine?. . . . . . . . . . . . . . . . . . . . . . . . . . . . . . . . . . . . . . . . . . . . 183
Steps to zIIP Enablement. . . . . . . . . . . . . . . . . . . . . . . . . . . . . . . . . . . . . . . . . . . . . . . . . . 183
Activating a zIIP Environment or Projecting zIIP Usage. . . . . . . . . . . . . . . . . . . . . . . . . .184
How the Server Takes Advantage of the zIIP Processor. . . . . . . . . . . . . . . . . . . . . . . . .187
Evaluating zIIP Usage. . . . . . . . . . . . . . . . . . . . . . . . . . . . . . . . . . . . . . . . . . . . . . . . . . . . . 188
Contents
6 Information Builders

Performance Considerations for HFS. . . . . . . . . . . . . . . . . . . . . . . . . . . . . . . . . . . . . . . . . . . . . 189
Running the Server in a Non-Swappable Address Space. . . . . . . . . . . . . . . . . . . . . . . .189
Workload Manager. . . . . . . . . . . . . . . . . . . . . . . . . . . . . . . . . . . . . . . . . . . . . . . . . . . . . . . .189
General Information for a z/OS HFS Installation. . . . . . . . . . . . . . . . . . . . . . . . . . . . . . . . . . . . 191
Sample Metadata, Data, and Other Tutorial Samples. . . . . . . . . . . . . . . . . . . . . . . . . . 191
Frequently Asked Questions for HFS. . . . . . . . . . . . . . . . . . . . . . . . . . . . . . . . . . . . . . . . .192
Third-Party Software and Licenses. . . . . . . . . . . . . . . . . . . . . . . . . . . . . . . . . . . . . . . . . . . . . . . .193
OpenFlex SDK . . . . . . . . . . . . . . . . . . . . . . . . . . . . . . . . . . . . . . . . . . . . . . . . . . . . . . . . . . . 193
Troubleshooting for HFS. . . . . . . . . . . . . . . . . . . . . . . . . . . . . . . . . . . . . . . . . . . . . . . . . . . . . . . . 193
PDS Deployment . . . . . . . . . . . . . . . . . . . . . . . . . . . . . . . . . . . . . . . . . . . . . . . . . . . . . . . . . . . . . . . . . . . 202
Installation Requirements for PDS. . . . . . . . . . . . . . . . . . . . . . . . . . . . . . . . . . . . . . . . . . . . . . . 202
Operating System Requirements. . . . . . . . . . . . . . . . . . . . . . . . . . . . . . . . . . . . . . . . . . . .203
JVM Requirements for Java Services. . . . . . . . . . . . . . . . . . . . . . . . . . . . . . . . . . . . . . . . 203
IP Port Number Requirements. . . . . . . . . . . . . . . . . . . . . . . . . . . . . . . . . . . . . . . . . . . . . . 205
Browser Requirements. . . . . . . . . . . . . . . . . . . . . . . . . . . . . . . . . . . . . . . . . . . . . . . . . . . . 205
Disk Space Requirements. . . . . . . . . . . . . . . . . . . . . . . . . . . . . . . . . . . . . . . . . . . . . . . . . 206
Memory Requirements. . . . . . . . . . . . . . . . . . . . . . . . . . . . . . . . . . . . . . . . . . . . . . . . . . . . 208
Communication Requirements. . . . . . . . . . . . . . . . . . . . . . . . . . . . . . . . . . . . . . . . . . . . . .209
USS Segment Requirements. . . . . . . . . . . . . . . . . . . . . . . . . . . . . . . . . . . . . . . . . . . . . . . 209
HFS Home and Configuration Directory Requirements. . . . . . . . . . . . . . . . . . . . . . . . . .209
Installing a New Server for PDS. . . . . . . . . . . . . . . . . . . . . . . . . . . . . . . . . . . . . . . . . . . . . . . . . . 210
Step 1. Set Up User IDs. . . . . . . . . . . . . . . . . . . . . . . . . . . . . . . . . . . . . . . . . . . . . . . . . . . 210
Step 2. Collect Required Information for Adapters. . . . . . . . . . . . . . . . . . . . . . . . . . . . .210
Step 3. Access the Installation Software . . . . . . . . . . . . . . . . . . . . . . . . . . . . . . . . . . . . 217
Step 4. Run ISETUP. . . . . . . . . . . . . . . . . . . . . . . . . . . . . . . . . . . . . . . . . . . . . . . . . . . . . . .220
Step 5. Test the Server Installation. . . . . . . . . . . . . . . . . . . . . . . . . . . . . . . . . . . . . . . . . 230
Step 6. Configure Server Security. . . . . . . . . . . . . . . . . . . . . . . . . . . . . . . . . . . . . . . . . . . 232
Security Providers. . . . . . . . . . . . . . . . . . . . . . . . . . . . . . . . . . . . . . . . . . . . . . . . . . . 232
Preventing Unsecured Server Starts After Upgrades. . . . . . . . . . . . . . . . . . . . . . 233
Starting and Stopping a Server for PDS. . . . . . . . . . . . . . . . . . . . . . . . . . . . . . . . . . . . . . . . . . . 234
Starting the Server Using a Batch Job. . . . . . . . . . . . . . . . . . . . . . . . . . . . . . . . . . . . . . . 234
Starting the Server Using a Started Task. . . . . . . . . . . . . . . . . . . . . . . . . . . . . . . . . . . . .235
Stopping the Server. . . . . . . . . . . . . . . . . . . . . . . . . . . . . . . . . . . . . . . . . . . . . . . . . . . . . . .235
Contents
Server Installation 7

DB2 Security Exit Configuration for PDS. . . . . . . . . . . . . . . . . . . . . . . . . . . . . . . . . . . . . . . . . . .235
MSODDX: DDNAME Translation for User Subroutines. . . . . . . . . . . . . . . . . . . . . . . . . . . . . . . 241
Overriding the Time Zone Setting . . . . . . . . . . . . . . . . . . . . . . . . . . . . . . . . . . . . . . . . . . . . . . . . 241
Adding a Configuration Instance for PDS. . . . . . . . . . . . . . . . . . . . . . . . . . . . . . . . . . . . . . . . . . 241
Step 1. Run ISETUP. . . . . . . . . . . . . . . . . . . . . . . . . . . . . . . . . . . . . . . . . . . . . . . . . . . . . . .241
Step 2. Test the New Configuration Instance. . . . . . . . . . . . . . . . . . . . . . . . . . . . . . . . . 251
Upgrading Your Server Release for PDS. . . . . . . . . . . . . . . . . . . . . . . . . . . . . . . . . . . . . . . . . . . 252
Step 1. Access the Installation Software. . . . . . . . . . . . . . . . . . . . . . . . . . . . . . . . . . . . .253
Step 2. Run ISETUP. . . . . . . . . . . . . . . . . . . . . . . . . . . . . . . . . . . . . . . . . . . . . . . . . . . . . . .255
Step 3. Test the Server Installation. . . . . . . . . . . . . . . . . . . . . . . . . . . . . . . . . . . . . . . . . 259
Step 4. Reconfigure Server Security. . . . . . . . . . . . . . . . . . . . . . . . . . . . . . . . . . . . . . . . . 260
Preventing Unsecured Server Starts After Upgrades. . . . . . . . . . . . . . . . . . . . . . . . . . . 260
Step 5. Reconfigure Adapters. . . . . . . . . . . . . . . . . . . . . . . . . . . . . . . . . . . . . . . . . . . . . . 261
Accounting for PDS - SMF Records. . . . . . . . . . . . . . . . . . . . . . . . . . . . . . . . . . . . . . . . . . . . . . . 261
Enabling Use of the zIIP Specialty Engine. . . . . . . . . . . . . . . . . . . . . . . . . . . . . . . . . . . . . . . . . .267
What Is a zIIP Specialty Engine?. . . . . . . . . . . . . . . . . . . . . . . . . . . . . . . . . . . . . . . . . . . . 268
Steps to zIIP Enablement. . . . . . . . . . . . . . . . . . . . . . . . . . . . . . . . . . . . . . . . . . . . . . . . . . 268
Activating a zIIP Environment or Projecting zIIP Usage. . . . . . . . . . . . . . . . . . . . . . . . . .269
How the Server Takes Advantage of the zIIP Processor. . . . . . . . . . . . . . . . . . . . . . . . .272
Evaluating zIIP Usage. . . . . . . . . . . . . . . . . . . . . . . . . . . . . . . . . . . . . . . . . . . . . . . . . . . . . 273
Performance Considerations for PDS. . . . . . . . . . . . . . . . . . . . . . . . . . . . . . . . . . . . . . . . . . . . . 274
Server Initialization Commands Configured in SRVINIT Member. . . . . . . . . . . . . . . . . 274
Running the Server in a Non-Swappable Address Space. . . . . . . . . . . . . . . . . . . . . . . .276
Workload Manager. . . . . . . . . . . . . . . . . . . . . . . . . . . . . . . . . . . . . . . . . . . . . . . . . . . . . . . .277
General Information for a z/OS PDS Installation. . . . . . . . . . . . . . . . . . . . . . . . . . . . . . . . . . . .278
Sample Metadata, Data, and Other Tutorial Samples. . . . . . . . . . . . . . . . . . . . . . . . . . 278
Frequently Asked Questions for PDS. . . . . . . . . . . . . . . . . . . . . . . . . . . . . . . . . . . . . . . . 279
Third-Party Software and Licenses. . . . . . . . . . . . . . . . . . . . . . . . . . . . . . . . . . . . . . . . . . . . . . . .280
OpenFlex SDK . . . . . . . . . . . . . . . . . . . . . . . . . . . . . . . . . . . . . . . . . . . . . . . . . . . . . . . . . . . 280
Troubleshooting for PDS. . . . . . . . . . . . . . . . . . . . . . . . . . . . . . . . . . . . . . . . . . . . . . . . . . . . . . . . 281
5. Installation for IBM i . . . . . . . . . . . . . . . . . . . . . . . . . . . . . . . . . . . . . . . . . . . . . . . . . . . . . . . . 289
Information You Need Prior to Installation on IBM i . . . . . . . . . . . . . . . . . . . . . . . . . . . . . . . . . . . . . .289
Contents
8 Information Builders

IBM i Installation Requirements . . . . . . . . . . . . . . . . . . . . . . . . . . . . . . . . . . . . . . . . . . . . . . . . . . . . . . 290
JVM Requirements for Java Services. . . . . . . . . . . . . . . . . . . . . . . . . . . . . . . . . . . . . . . . . . . . . 292
Installation and Configuration Directories on IBM i . . . . . . . . . . . . . . . . . . . . . . . . . . . . . . . . . . . . . . 295
Creating User IDs on IBM i . . . . . . . . . . . . . . . . . . . . . . . . . . . . . . . . . . . . . . . . . . . . . . . . . . . . . . . . . . .298
Downloading the Server Installation Software for IBM i . . . . . . . . . . . . . . . . . . . . . . . . . . . . . . . . . . .300
Copying the Installation Library From DVD . . . . . . . . . . . . . . . . . . . . . . . . . . . . . . . . . . . . . . . . . . . . . .302
Running ISETUP to Install the Server Software . . . . . . . . . . . . . . . . . . . . . . . . . . . . . . . . . . . . . . . . . .303
Verifying the IBM i Server Installation . . . . . . . . . . . . . . . . . . . . . . . . . . . . . . . . . . . . . . . . . . . . . . . . . 307
Security Providers on IBM i . . . . . . . . . . . . . . . . . . . . . . . . . . . . . . . . . . . . . . . . . . . . . . . . . . . . . . . . . . 308
Preventing Unsecured Server Starts After Upgrades. . . . . . . . . . . . . . . . . . . . . . . . . . . . . . . . .309
Starting and Using the IBM i Server . . . . . . . . . . . . . . . . . . . . . . . . . . . . . . . . . . . . . . . . . . . . . . . . . . . 310
CL and CMD Programs . . . . . . . . . . . . . . . . . . . . . . . . . . . . . . . . . . . . . . . . . . . . . . . . . . . . . . . . . . . . . . 314
General Information for an IBM i Installation . . . . . . . . . . . . . . . . . . . . . . . . . . . . . . . . . . . . . . . . . . . 315
Sample Metadata, Data, and Other Tutorial Samples. . . . . . . . . . . . . . . . . . . . . . . . . . . . . . . 315
Accessing IFS Files and QSYS Libraries. . . . . . . . . . . . . . . . . . . . . . . . . . . . . . . . . . . . . . . . . . . 315
Accessing IFS Files. . . . . . . . . . . . . . . . . . . . . . . . . . . . . . . . . . . . . . . . . . . . . . . . . . . . . . . 315
Accessing QSYS Libraries. . . . . . . . . . . . . . . . . . . . . . . . . . . . . . . . . . . . . . . . . . . . . . . . . .316
Generating a Trace on IBM i . . . . . . . . . . . . . . . . . . . . . . . . . . . . . . . . . . . . . . . . . . . . . . . . . . . . . . . . . 320
Third-Party Software and Licenses on IBM i . . . . . . . . . . . . . . . . . . . . . . . . . . . . . . . . . . . . . . . . . . . . 322
OpenFlex SDK. . . . . . . . . . . . . . . . . . . . . . . . . . . . . . . . . . . . . . . . . . . . . . . . . . . . . . . . . . . . . . . . .322
Troubleshooting for IBM i . . . . . . . . . . . . . . . . . . . . . . . . . . . . . . . . . . . . . . . . . . . . . . . . . . . . . . . . . . . . 322
6. Installation for OpenVMS . . . . . . . . . . . . . . . . . . . . . . . . . . . . . . . . . . . . . . . . . . . . . . . . . . . . 325
Information You Need Prior to Installation on OpenVMS . . . . . . . . . . . . . . . . . . . . . . . . . . . . . . . . . .325
OpenVMS Installation Requirements . . . . . . . . . . . . . . . . . . . . . . . . . . . . . . . . . . . . . . . . . . . . . . . . . . 326
Installation and Configuration Directories on OpenVMS . . . . . . . . . . . . . . . . . . . . . . . . . . . . . . . . . . 328
Creating User IDs on OpenVMS . . . . . . . . . . . . . . . . . . . . . . . . . . . . . . . . . . . . . . . . . . . . . . . . . . . . . . 329
Accessing the Installation Software . . . . . . . . . . . . . . . . . . . . . . . . . . . . . . . . . . . . . . . . . . . . . . . . . . . 331
Downloading the Installation Software. . . . . . . . . . . . . . . . . . . . . . . . . . . . . . . . . . . . . . . . . . . . 332
Running the ISETUP Procedure to Install the Server . . . . . . . . . . . . . . . . . . . . . . . . . . . . . . . . . . . . . 333
Configuring an Additional Instance of the Server. . . . . . . . . . . . . . . . . . . . . . . . . . . . . . . . . . . 337
Refreshing or Upgrading an Installation. . . . . . . . . . . . . . . . . . . . . . . . . . . . . . . . . . . . . . . . . . . 338
Installing and Configuring Silently. . . . . . . . . . . . . . . . . . . . . . . . . . . . . . . . . . . . . . . . . . . . . . . . 339
Contents
Server Installation 9

Verifying the OpenVMS Server Installation . . . . . . . . . . . . . . . . . . . . . . . . . . . . . . . . . . . . . . . . . . . . . 341
Security Providers on OpenVMS . . . . . . . . . . . . . . . . . . . . . . . . . . . . . . . . . . . . . . . . . . . . . . . . . . . . . . 342
Starting and Using the OpenVMS Server . . . . . . . . . . . . . . . . . . . . . . . . . . . . . . . . . . . . . . . . . . . . . . . 344
Other DCL Programs. . . . . . . . . . . . . . . . . . . . . . . . . . . . . . . . . . . . . . . . . . . . . . . . . . . . . . . . . . . 346
Adding JOB, GROUP or Other Defined Environment Values (EDAENV.COM). . . . . . . . . . . . . 347
End-User Requirements. . . . . . . . . . . . . . . . . . . . . . . . . . . . . . . . . . . . . . . . . . . . . . . . . . . . . . . . .347
Generating a Trace on OpenVMS . . . . . . . . . . . . . . . . . . . . . . . . . . . . . . . . . . . . . . . . . . . . . . . . . . . . . 348
Third-Party Software and Licenses on OpenVMS . . . . . . . . . . . . . . . . . . . . . . . . . . . . . . . . . . . . . . . . 350
OpenFlex SDK. . . . . . . . . . . . . . . . . . . . . . . . . . . . . . . . . . . . . . . . . . . . . . . . . . . . . . . . . . . . . . . . .350
General Information for an OpenVMS Installation . . . . . . . . . . . . . . . . . . . . . . . . . . . . . . . . . . . . . . . 350
Sample Metadata, Data, and Other Tutorial Samples. . . . . . . . . . . . . . . . . . . . . . . . . . . . . . . 350
Java Listener JVM Defaults. . . . . . . . . . . . . . . . . . . . . . . . . . . . . . . . . . . . . . . . . . . . . . . . . . . . . .351
Configuring for IEEE/G_FLOAT Float Data. . . . . . . . . . . . . . . . . . . . . . . . . . . . . . . . . . . . . . . . . .351
Troubleshooting for OpenVMS . . . . . . . . . . . . . . . . . . . . . . . . . . . . . . . . . . . . . . . . . . . . . . . . . . . . . . . .352
7. Information Builders and Third-Party Licenses . . . . . . . . . . . . . . . . . . . . . . . . . . . . . . . . 357
Information Builders License . . . . . . . . . . . . . . . . . . . . . . . . . . . . . . . . . . . . . . . . . . . . . . . . . . . . . . . . .357
OpenFlex SDK License . . . . . . . . . . . . . . . . . . . . . . . . . . . . . . . . . . . . . . . . . . . . . . . . . . . . . . . . . . . . . . 361
Zip Archiver License . . . . . . . . . . . . . . . . . . . . . . . . . . . . . . . . . . . . . . . . . . . . . . . . . . . . . . . . . . . . . . . . 373
Contents
10 Information Builders

Preface
This documentation lists installation requirements, describes how to install the software, andaddresses post-installation tasks, such as configuring adapters and securing the environment.It is intended for system administrators responsible for installing the software.
How This Manual Is Organized
This manual includes the following chapters:
Chapter/Appendix Contents
1 Introduction to Installation Lists the necessary terminology and prerequisitesfor general installation.
2 Installation for Windows Describes the requirements and step-by-stepinstructions for installing on Windows.
3 Installation for UNIX Describes the requirements and step-by-stepinstructions for installing on UNIX. This includes allUNIX platforms, such as HP-UX, AIX®, Solarisࡊ, andLinux®.
4 Installation for z/OS Describes the requirements and step-by-stepinstructions for installing on z/OS, deployed usingeither the Hierarchical File System/UNIX SystemServices (HFS/USS) or partitioned data sets (PDS).
5 Installation for IBM i Describes the requirements and step-by-stepinstructions for installing on IBM i.
6 Installation for OpenVMS Describes the requirements and step-by-stepinstructions for installing on OpenVMS.
7 Information Builders andThird-Party Licenses
Contains the license for Information Builders andlicenses required by third party software used byInformation Builders.
Server Installation 11

Documentation Conventions
The following table describes the documentation conventions that are used in this manual.
Convention Description
THIS TYPEFACE
or
this typeface
Denotes syntax that you must enter exactly as shown.
this typeface Represents a placeholder (or variable) in syntax for a value that youor the system must supply.
underscore Indicates a default setting.
this typeface Represents a placeholder (or variable), a cross-reference, or animportant term. It may also indicate a button, menu item, or dialogbox option that you can click or select.
Key + Key1
Indicates keys that you must press simultaneously.
{ } Indicates two or three choices. Type one of them, not the braces.
[ ] Indicates a group of optional parameters. None is required, but youmay select one of them. Type only the parameter in the brackets,not the brackets.
| Separates mutually exclusive choices in syntax. Type one of them,not the symbol.
... Indicates that you can enter a parameter multiple times. Type onlythe parameter, not the ellipsis (...).
.
.
.
Indicates that there are (or could be) intervening or additionalcommands.
Documentation Conventions
12 Information Builders

Related Publications
Visit our Technical Content Library at http://documentation.informationbuilders.com. You canalso contact the Publications Order Department at (800) 969-4636.
Customer Support
Do you have any questions about this product?
Join the Focal Point community. Focal Point is our online developer center and more than amessage board. It is an interactive network of more than 3,000 developers from almost everyprofession and industry, collaborating on solutions and sharing tips and techniques. AccessFocal Point at http://forums.informationbuilders.com/eve/forums.
You can also access support services electronically, 24 hours a day, with InfoResponseOnline. InfoResponse Online is accessible through our website, http://www.informationbuilders.com. It connects you to the tracking system and known-problemdatabase at the Information Builders support center. Registered users can open, update, andview the status of cases in the tracking system and read descriptions of reported softwareissues. New users can register immediately for this service. The technical support section ofwww.informationbuilders.com also provides usage techniques, diagnostic tips, and answers tofrequently asked questions.
Call Information Builders Customer Support Services (CSS) at (800) 736-6130 or (212)736-6130. Customer Support Consultants are available Monday through Friday between 8:00a.m. and 8:00 p.m. EST to address all your questions. Information Builders consultants canalso give you general guidance regarding product capabilities. Please be ready to provide yoursix-digit site code number (xxxx.xx) when you call.
To learn about the full range of available support services, ask your Information Buildersrepresentative about InfoResponse Online, or call (800) 969-INFO.
Information You Should Have
To help our consultants answer your questions most effectively, be ready to provide thefollowing information when you call:
Your six-digit site code (xxxx.xx).
Your server Software configuration:
The software version and release. On a server, you can find your version and releaseusing the Version option in the Web Console.
The communications protocol (for example, TCP/IP or LU6.2), including vendor andrelease.
Preface
Server Installation 13

The stored procedure (preferably with line numbers) or SQL statements being used inserver access.
The database server release levels for any adapters that may be involved.
The database name and release level.
The Master File and Access File.
The exact nature of the problem:
Are the results or the format incorrect? Are the text or calculations missing ormisplaced?
Provide the error message and return code, if applicable.
Is this related to any other problem?
Has the procedure or query ever worked in its present form? Has it been changed recently?How often does the problem occur?
What release of the operating system are you using? Has it, your security system,communications protocol, or front-end software changed?
Is this problem reproducible? If so, how?
Have you tried to reproduce your problem in the simplest form possible? For example, if youare having problems joining two data sources, have you tried executing a query containingjust the code to access the data source?
Do you have a trace file?
How is the problem affecting your business? Is it halting development or production? Doyou just have questions about functionality or documentation?
User Feedback
In an effort to produce effective documentation, the Technical Content Management staffwelcomes your opinions regarding this document. Please use the Reader Comments form atthe end of this document to communicate your feedback or to suggest changes that willsupport improvements to our documentation. You can also contact us through our website, http://documentation.informationbuilders.com/connections.asp.
Thank you, in advance, for your comments.
User Feedback
14 Information Builders

Software Training and Professional Services
Interested in training? Our Education Department offers a wide variety of training courses forInformation Builders products.
For information on course descriptions, locations, and dates, or to register for classes, visitour website (http://education.informationbuilders.com) or call (800) 969-INFO to speak to anEducation Representative.
Interested in technical assistance for your implementation? Our Professional Servicesdepartment provides expert design, systems architecture, implementation, and projectmanagement services for all your business integration projects. For information, visit ourwebsite (http://www.informationbuilders.com/support).
Preface
Server Installation 15

Software Training and Professional Services
16 Information Builders

Chapter1Introduction to Installation
This chapter describes the different software packages that can be installed andconfigured from the software you have downloaded or received on physical media.
While the software is primarily for server installations (and the text often cites "server"),the DataMigrator Console as well as non-Windows clients may be also be installed, asthe package type is controlled by the license key that has been supplied for the softwareand is used in the installation process.
This guide is for all platforms and also suggests where to go for more information onceyou have installed your package, regardless of its type.
In this chapter:
Versions
What to Read After You Install
Versions
The software enables applications to access data without concern for the complexities andincompatibilities of different operating systems, DBMSs, file systems, and networks. Thesoftware provides access to both local and remote data on over 35 platforms from more than65 database formats, including DB2, FOCUS, Informix, Oracle, MS/SQL, Sybase, Teradata,several JDBC based data sources, and SAP BW.
The software installs as one of the following versions, depending upon your license:
WebFOCUS Reporting Server. Provides data access, number crunching, and reportgeneration functionality for WebFOCUS.
The WebFOCUS Reporting Server (sometimes referred to simply as a WebFOCUS Server) isa component of the WebFOCUS environment, which includes the WebFOCUS client and aweb server. It may also include other components, such as a ReportCaster DistributionServer, application servers, and servers used for accessing remote data.
For information about the different ways in which you can choose to deploy a WebFOCUSserver in the WebFOCUS environment, see the WebFOCUS and ReportCaster Installation andConfiguration manual for your platform.
Server Installation 17
Full-Function Server. Provides transparent access to data from your own applications andthird-party systems.
DataMigrator Server. Hosts and executes the data and process flows that automate yourcreation and maintenance of a data warehouse or data mart. The Windows installation alsoincludes the DataMigrator Console and Client.
DataMigrator Console and Client. Front-end application for creating, maintaining andscheduling process flows that automate your creation and maintenance of a datawarehouse or data mart.
Shared Application Server. Runs WebFOCUS Maintain production applications.
The server includes the Web Console, with which you can administer the server once it hasbeen installed.
What to Read After You Install
After you have completed the installation, for more information about:
Managing the server, see the Server Administration manual.
Using adapters for accessing data, see the Adapter Administration manual.
DataMigrator Client. This is a Windows application (and associated server client) fordeveloping and running DataMigrator requests.
Clients Toolkit. This is a client software toolkit for developing and using third partyapplication access.
To find out more about administering a particular version of the software, for:
WebFOCUS Reporting Server or Shared Application Server, see the WebFOCUS Security andAdministration manual.
DataMigrator Server or DMC Client, see the DataMigrator User's Guide.
What to Read After You Install
18 Information Builders

Chapter2Installation for Windows
This chapter describes how to install, or to configure an additional instance on a systemrunning Microsoft® Windows.
In this chapter:
Information You Need Prior toInstallation on Windows
Windows Installation Requirements
Installation and Configuration Directorieson Windows
Installation Methods
Accessing the Software
Installing a Server
Verifying the Windows Server Installation
Starting and Using a Server or DataManagement Console
Security Providers on Windows
Additional Installation Options
Generating a Trace on Windows
Third-Party Software and Licenses onWindows
General Information for a WindowsInstallation
Troubleshooting for Windows
Information You Need Prior to Installation on Windows
You need to know your license key. Product license keys are for specific number of CPU cores(hyper threading within a core is not counted as an extra core). If more cores are detected thanthe license allows, the install will be blocked.
The remedy for a core blocked installation is to obtain and use either a correct license key or amachine with the correct core count (which may be a real or a virtualized environment).
Some features use additional license codes, but are not entered during the installation phase.
The product is usually installed from disk from software that has been downloaded andunarchived to disk.
If you will use any of the server email notification features, you need to know your SMTP mailserver information.
Server Installation 19

You need a server administrator user ID. Server administrators use this ID to install, start,and stop the server. This ID is also used to configure the server if the server is configured torun with an OPSYS (operating system) Security Provider.
Do not install on primary or backup domain controllers.
The Installation ID must have administrator privileges on the machine.
Although Administrative privileges are required only during installation, a Server Administratoronly needs to have at least Power User privileges in order to run the server as a service, onceinstalled.
Note that the name iadmin is used to refer to the server administrator ID throughout thismanual, but you may use any name for this ID.
Windows Installation Requirements
Before you install, review the following requirements.
Type Description
Operating System Windows 7 or higher or Windows Server 2003 or higher.
Product version must be compatible with operating system bit size(32 on 32, 32 on 64 or 64 on 64).
The Information Builders Technical Support web site maintains acurrent list of supported operating systems and levels.
Disk Space Approximately 1.5G (plus additional space during installation).
Integrated Hyperstage releases use approximately 3G of disk space.
IP Ports Up to six consecutive IP ports (two in reserve for typical extrafeatures).
Additional Java Listeners (post install option) require additional ports(beyond basic reserve).
Java Java JRE or Java SDK (aka JDK) 1.7 or higher
Used for Java-based adapters, server-side graphics, XBRL, or user-written CALLJAVA applications are to be used. For additionalinformation, see JVM Requirements for Java Services (ServerInstallations Only) on page 21.
Windows Installation Requirements
20 Information Builders

Type Description
Memory The memory requirements for installation and operation of the serverare:
General memory: 30Mb.
(This includes memory used by the primary one-per-server-instanceprocesses such as Workspace Manager, the print log, DeferredListener, HTTP Listener, and TCP Listener.)
Memory per active agent: 3.5Mb.
These numbers apply when the server is in an idle state, so they mayfluctuate slightly.
Web Browser Needed for using the Web Console.
Microsoft Internet Explorer® 9 or higher.
Microsoft Edge
Mozilla Firefox® 27 or higher.
Google Chrome® 33 or higher.
Apple Safari® 7.0 or higher.
Apple Mobile iOS® v5
Opera 19 or higher.
JVM Requirements for Java Services (Server Installations Only)
If Java-based adapters, server-side graphics, XBRL, or user-written CALLJAVA applications areto be used, a Java Runtime Environment (JRE) JVM must be installed on the machine, and theserver must be configured to use it.
The minimum Java JVM release level is 1.7 or higher, due to required internal components ofthe server. The Java Listener will not start properly (and will show errors in edaprint) if 1.7 (orhigher) is not in use.
The following URL has Java EOL and EOSL information:
http://www.oracle.com/technetwork/java/eol-135779.html
2. Installation for Windows
Server Installation 21

You may install a Java JRE or a Java SDK (aka JDK). The JRE or SDK build version must alsomatch the 32-bit or 64-bit bit type of the server. When you install a Java SDK, the JREcomponent (where the JVM lives) is also included, so either is allowed. However, if using theservlet feature, the Java SDK is required for access to the jar command, so a SDK install isgenerally preferred over a JRE install.
New to 7707 and higher server release levels is an automatic Windows Registry look-upfeature of the latest highest Java available on the system. This feature simply requires that anappropriate 1.7 or higher Java JRE or SDK of the correct bit size has been installed on thesystem using the standard Oracle Java Installer, which registers the installation to theWindows Registry (and that no explicit variables are set on the system that would cause anoverride). If a JRE and SDK are both installed, the SDK will be used. The automatic look-upfeature does not apply to a Java JRE or SDK that has simply been dumped to disk as this doesnot register the install (if this is the case, use explicit variables to configure the server).
Explicit JAVA_HOME or JDK_HOME variables may be setup to manually configure Java access(to override locations found by the automatic Java look-up feature or because an unregisteredJava is in use) as described below.
At server start-up time, if none of the above is true, the server Java Listener may still start ifapplicable JVM directories happen to be on the system PATH, but this not a recommendedmethod as it is not explicit.
If an appropriate JVM is not found at server start-up time, various failed to find JVM messageswill be displayed in EDAPRINT. Reviewing and following the instructions in this section willusually correct the problem.
JSCOM3 is the actual process name for the Java Services Listener and the terms are oftenused interchangeably.
To use explicit variables to specify the Java JVM location, do the following:
For Java SDK set JDK_HOME (to the Java SDK install home location) in system wideenvironment or server environment start up file (edaenv.cfg).
For Java JRE set JAVA_HOME (to the Java JRE install home location) in system wideenvironment or server environment configuration file (edaenv.cfg).
To change or add a variable in the server environment start up file (EDACONF bin\edaenv.cfg),either edit the file in a text editor before starting the server (a start menu icon is also availableunder the configure folder) or:
1. Start the server (services like Java Listener may fail until configured and the server isrestarted).
Windows Installation Requirements
22 Information Builders
2. Open the Web Console and sign in using an administrator ID.
3. Select Workspace from the main menu.
4. In the navigation pane, open the Configuration Files and Miscellaneous folders.
5. Right-click Environment - edaenv.cfg and select Edit.
6. Make the desired edit.
7. Save the file.
8. Restart the server (changes are not effective until server is restarted).
The format of edaenv.cfg variables is one per line in name=value pairs. Spaces before andafter the equal sign are optional. Values with embedded spaces do not have to be enclosed inquotation marks.
To add classes to the JVM class path for customer-written CALLJAVA applications, set theCLASSPATH variable at the operating system level before server start-up or use the WebConsole to set the Java Listener IBI_CLASSPATH property.
If Java JVM-based adapters or features are not required, and no Java is installed (or is 1.6 orlower), the various EDAPRINT Java Listener fail messages are normal and can be ignored.However, this not recommended as a support calls may unintentionally center on this unlessthey are also told that it is intentional.
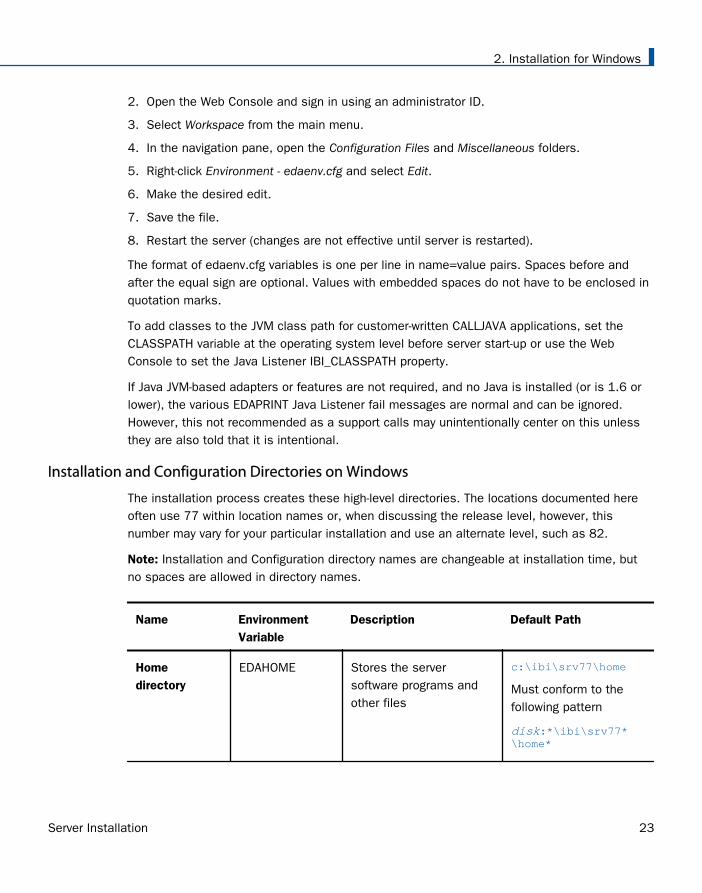
Installation and Configuration Directories on Windows
The installation process creates these high-level directories. The locations documented hereoften use 77 within location names or, when discussing the release level, however, thisnumber may vary for your particular installation and use an alternate level, such as 82.
Note: Installation and Configuration directory names are changeable at installation time, butno spaces are allowed in directory names.
Name EnvironmentVariable
Description Default Path
Homedirectory
EDAHOME Stores the serversoftware programs andother files
c:\ibi\srv77\home
Must conform to thefollowing pattern
disk:*\ibi\srv77*\home*
2. Installation for Windows
Server Installation 23

Name EnvironmentVariable
Description Default Path
Configurationdirectory
EDACONF Stores the configurationfiles.
If you are configuringmultiple instances of theserver, create separateconfiguration directoriesfor each by adding asuffix (for example, anumber) to the end of thedirectory name.
disk:\ibi\srv77\product_type
Must conform to thefollowing pattern
disk:*\ibi\srv77*\product_type*
Product type can be:
WFS for aWebFOCUSReporting Server
FFS for a FullFunction Server
DM for aDataMigrator Server
WFM for aWebFOCUS MaintainServer
Applicationdirectory
APPROOT Contains your applicationfiles.
c:\ibi\apps
Profilesdirectory
EDAPRFU Stores the user andgroup profiles and theadmin.cfg file (whichspecifies the serveradministrator).
c:\ibi\profiles
Multiple WebFOCUS Reporting Servers. If you plan to install multiple copies of WebFOCUS onthe same computer, and you want to provide each copy with its own WebFOCUS ReportingServer, you may wish to maintain a separate ibi root directory for each copy, so that you cankeep copies of each set of components, including the server, together in the same path.
Installation and Configuration Directories on Windows
24 Information Builders

You can specify a separate apps directory for each copy of WebFOCUS, or specify a singleapps directory to be shared by all copies of WebFOCUS.
Installation Methods
Before you install, review the requirements in the following topics. Exact requirements varyaccording to your configuration and the number of users and deployed applications.
Choosing Between Interactive and Silent Installation
You can run the installation procedure in:
Interactive mode. This is the default installation mode. It displays windows that prompt youfor installation parameters. We recommend that you use this mode the first time youinstall, so that you become familiar with the procedure. To install interactively, see Installing a Server on page 28.
Silent mode. In this mode you launch the installation and specify a text file that containsthe installation parameters. The installation procedure does not prompt for any information.Installing silently can be helpful if, for example, you want to install many instances at oncethroughout your enterprise. To install silently, see Installing and Configuring Silently on page43.
Choosing Between Private and Shared Access to the Data Management Console
There are several tools available for administering the server:
Web Console, which is installed with the server on all platforms, and is available to allauthorized users with a TCP/IP connection.
For more information about the Web Console, see the Server Administration manual.
Data Management Console, which is installed with the server on Windows, and is usedprimarily with DataMigrator.
For more information about the Data Management Console, see the DataMigrator User'sGuide.
You can install in a way that makes the Data Management Console available to remote usersas a shared tool. You can choose between:
Private access. You install in a standard Windows folder. The Data Management Consoleis available locally to users on that computer.
2. Installation for Windows
Server Installation 25
Shared access. You install in a shared network folder specified using the Universal NamingConvention (UNC). The Data Management Console is available to remote users who accessthat shared folder.
Before installing, you need to create a shared folder on the computer on which you willinstall the software.
Access to the server by means of the Data Management Console (DMC) is limited bysystem security. To use the DMC, you can open it in several ways, such as:
Mapping a drive to the location of dmcstart.bat.
Creating a shortcut to dmcstart.bat on the user machine.
The location of dmcstart.bat defaults to ibi\srv77\dm\bin.
The Data Management Console is maintained locally on each client machine in Documentsand Settings\UserID\Application Data\Information Builders. This requires 2M of diskspace.
To use the loopback node, reconfigure it to connect to the share server host name,replacing the host name, localhost.
Accessing the Software
Downloading the installation software from the Information Builders download site is theprimary way of obtaining Information Builders software in an archive format, which is thenunarchived and installed by running an installer program. The user may, in turn, choose todownloaded the software, unarchive, and burn to a CD/DVD or place on a UNC drive within acorporation, for easy access. This document assumes the software has been downloadeddirectly to the installation machine and is up to the user to adjust their steps within thismanual if installing in an alternate manner.
Downloading the installation software involves:
1. Registering at the Information Builders download site.
2. Downloading the installation software from the site.
3. Unzipping the downloaded file.
4. Running the isetup procedure to begin installing the software.
For instructions, see Downloading the Installation Software on page 26.
Downloading the Installation Software
Use the following instructions to download the installation software.
Accessing the Software
26 Information Builders

After you have completed the installation, you can delete the download directory in which youhad unzipped the installation archive.
Procedure: How to Download the Installation Software
To download the installation software:
1. Go to http://techsupport.informationbuilders.com.
The Information Builders Technical Support home page opens.
2. Go to My Account and sign in.
3. Click My Downloads and Shipments in the My Account section on the right side of thepage.
The Software Downloads/Shipments page opens.
4. Click the Download link for your product and release.
5. Fill in the registration form and then click Continue.
The Software Download Agreement page opens.
6. Select I agree to consent to the Download Agreement, and then click Continue.
The Download Instructions page opens.
A copy of the instructions is also automatically emailed to you for later reference.
7. Follow the instructions on the Download Page. These are also documented in How toDownload and Expand the Downloaded Archive on page 60.
Procedure: How to Download and Expand the Downloaded Archive
1. Create a directory in which to download the installation software.
For example:
mkdir download
2. After registering at the Information Builders download site and obtaining download siteinformation, an ID, password, and software location information, FTP to the site (GUI FTPtools may also be used, but line mode FTP is what is documented here).
For example:
ftp downloadftp.ibi.com(supply the user id and password information from web page)
3. Make sure your current directory on the machine to which you will download is thedownload directory you created.
For example:
2. Installation for Windows
Server Installation 27

lcd download
4. Navigate to the directory on the Information Builders site that contains the serverinstallation software.
For example:
cd "/Server/77/Windows/7707/842"
5. Download the installation software from the site using binary mode.
For example:
binaryget i7707_842.zipquit
6. Unarchive the downloaded file using any unzip tool (may be also unzipped using GUI-basedtools such as Winzip, RAR or 7-zip).
For example:
unzip i7707_842.zip
7. Run the isetup installation procedure, as described in Running Isetup to Install the ServerSoftware on page 61.
You can delete the download directory after the installation is complete.
Installing a Server
When you install, several server properties are configured automatically. After installation, youcan configure additional properties using the Web Console. The DMC Client also has propertiesthat can be adjusted post installation.
Procedure: How to Install and Configure a Server
Using the location to which you unzipped the software:
1. Preferably, exit all programs before continuing.
2. Execute the following file from the location in which you unarchived the software:
setup.exe
A User Access Control (UAC) security prompt may appear. Respond yes.
Installing a Server
28 Information Builders

The Choose Setup Language window opens.
2. Installation for Windows
Server Installation 29

3. Select the language to be used during installation and click Next.
If you have no prior 77 installation, the License Registration window opens:
Installing a Server
30 Information Builders

If a prior installation was found, the Prior Installs Found: Choose an Action windowopens.
You can choose to upgrade the selected installation or to create a new installation.
If you choose to upgrade, the upgrade starts immediately, with no furtherinformation needed from you.
If you choose to create a new installation/configuration, the License Registrationwindow opens prompting for the license key (similar to when there is no priorsoftware).
However, when there is a prior installation, an additional screen will appear afterthe license key prompt asking you to choose between a new installation or adding aconfiguration. If add configuration is chosen, software is not installed, but thehighlighted entry from the prior screen is used as a base for adding an additionalconfiguration. Choosing a new installation gives a separate complete newinstallation and initial configuration, but in this instance, and when adding a newconfiguration, it is appropriate to not use the default installation paths and servername to avoid overwriting a prior installation or configuration location.
4. On the License screen, enter your license key and click Next.
The license key should be saved for future reference. You must include the hyphens.
2. Installation for Windows
Server Installation 31

The License Key determines which product you are installing, such as a Full-FunctionServer, a WebFOCUS Reporting Server, a DataMigrator Server, or a DMC Client. Defaultsettings, such as folder names, are determined by the license key. One part of the licensekey identifies how many CPUs the license key supports.
Your license key is checked and, if it is valid, an informational Registration Confirmationwindow opens. Click OK.
If you typed an invalid License Key, the setup program displays a warning.
Click OK to correct the key.
If the CPU portion of the License Key for a server is for less than the actual CPUs/cores found, a CPU violation message will occur. The user can:
Continue the installation and virtualize the PC to a correct quantity afterwards.
Discontinue the installation and reattempt the installation in an environment that isalready virtualized correctly.
For more information, see Limiting CPU/Core Use on Machines With Multiple CPUs andCores on page 49.
Installing a Server
32 Information Builders

The License Agreement window opens:
5. Click Yes to accept the terms of the license agreement.
2. Installation for Windows
Server Installation 33

The Select Initial Settings window opens.
6. You can accept the defaults or edit the following settings.
Program Folder. By default, this is named WebFOCUS 77 Server.
Installation Root. By default, this is C:\. You can browse to or enter another location.
Customize default directory locations. Check this box if you want to customize thedirectory locations. For example, if you are configuring an additional instance of theserver, some of the locations, such as EDAHOME and EDACONF must be customized.One way to customize the directories is to just use a different installation root andkeep the default location names under that root.
Configure SMTP Mail Server. If you will use any of the server email features, checkthis box.
Configure NLS Region Settings based on System Locale. By default, this box ischecked, so that you inherit the regional settings for your system at installation timeinstead of having to configure them later on the Web Console.
7. Click Next.
Installing a Server
34 Information Builders

If you checked the box to customize the default directories, the Select Directories windowopens.
8. Specify the following locations, or accept the default values:
a. Product installation directory. This contains the executable files. We refer to thislocation as EDAHOME. It must conform to the pattern:
*\ibi\srv77*\home*
If you are installing new, accept the default directory, or specify a different directory.The new software will be placed in this directory.
2. Installation for Windows
Server Installation 35

If you are configuring an additional instance, using your existing software, accept thedefault EDAHOME directory. If several 77 installation directories exist, select the onethat corresponds to the software home directory for which you are configuring a newinstance.
b. Product configuration directory. This contains configuration information for theinstance. We refer to this location as EDACONF.
If you changed the EDAHOME value, the default EDACONF value changes to conformto EDAHOME.
EDACONF must be in the same srv77 path as EDAHOME. The lowest-level EDAHOMEdirectory (home) becomes the product type directory in EDACONF. For example, ifEDAHOME is
ibi\srv77\home
then EDACONF for a WebFOCUS Reporting Server defaults to:
ibi\srv77\wfs
Each instance must have its own configuration directory. If you are configuring anadditional instance, be sure to append characters to the default name of the directory.(Otherwise, the installation will overwrite the existing configuration directory.) Forexample:
ibi\srv77\wfs2
Accept the default value, or click Browse, or type a name to specify a differentdirectory.
c. Application directory. This contains the server application directories. The applicationdirectories are folders under the internal location known as APPROOT.
Accept the default value, or click Browse to select a different directory.
d. Profiles directory. This contains the server user and group profiles and the admin.cfgfile, which specifies the server administrator. We refer to this location as EDAPRFU.
Accept the default value, or click Browse to select a different directory.
e. Disk. If there is more than one disk or shared folder to which the software can beinstalled, select the one on which you want to install.
f. Click Next.
Installing a Server
36 Information Builders

The Configure Basic Information window opens.
9. Enter the following information.
Server Administrator user ID. The default value is srvadmin. You can change it oraccept the default. When the server first starts, it is configured for the server internalsecurity provider, called PTH. You must enter the server administrator user ID andpassword in order to access the server.
Server Administrator’s Password. You must configure a password, there is no default.
2. Installation for Windows
Server Installation 37

Retype the Password. Enter the password again for verification that you typed itcorrectly.
HTTP Listener Port. Accept the default (8121) or enter a new port number. If you areconfiguring an additional instance of the server, you need a different port number fromany other instances that may be running at the same time. The server requires threeconsecutive ports for the HTTP Listener and other IP-based services. The TCP Listenerport will be the one immediately preceding the HTTP Listener port.
If you are configuring multiple instances, be sure to specify a different range of portsfor each instance.
The default port automatically varies by product to support multiple instances on aparticular computer:
SMTP Host Name. If you will use any of the server email features, enter the host nameor TCP/IP number for your SMTP server.
SMTP Port Number. Accept the default (25) or enter a different port number.
Sender Email. Enter an email address for the default sender for users receiving emailfrom the server, or accept the default.
Server Administrator Email. Enter an email address to receive administrative warnings(such as an agent crash) from the server, or accept the default.
10. Click Next.
The Review Selected Product Parameters window opens showing all of the selections youhave made.
You can now verify your installation, as described in Verifying the Windows Server Installationon page 38.
Verifying the Windows Server Installation
After you have installed, verify that the software is functioning properly.
Procedure: How to Verify Server Installation
1. If the server is not already running, start it using whichever security mode you prefer usingthe Windows menu icon. The server start icons are located on the Windows Start menu inthe program group assigned during the installation (for example, Information Builders/WebFOCUS 77 Server/Start Security ON). The options are:
Start Security ON. For a new installation, the default security provider is PTH. For arefresh of an existing installation, the server starts with the security provider defined inthe security_provider keyword in the edaserve.cfg configuration file.
Verifying the Windows Server Installation
38 Information Builders

Start Security OFF. Security on the server will be OFF regardless of what is configured.
For information about security providers, see Security Providers on Windows on page 41and the Server Security chapter of the Server Administration manual.
2. Open the Web Console and sign in (if prompted) using the server administrator ID andpassword entered during configuration, if it is not already running.
The Web Console start icon is located on the Windows Start menu in the program groupassigned during the installation (for example, Information Builders/WebFOCUS 77Server/Web Console).
The Web Console opens. Online Web Console help, version information, new featureinformation, release notes, and licensing information are available by clicking Help (farright in menu bar).
3. If the Web Console opens and displays application tree folders in the left pane, the serveris working because it uses its own underlying data access and reporting technologies tovisualize the application tree. The server may be further data tested (if desired).
Now that you have successfully verified your server installation, you can:
Configure server security, as described in Security Providers on Windows on page 41.
Configure additional server properties, such as outbound communication nodes andadapter support, using the Web Console.
For more information about using the Web Console and configuring outbound nodes, seethe Server Administration manual.
For more information about configuring adapter support, see the Adapter Administrationmanual. For information about which adapters are supported, see How to Determine WhichAdapters Are Supported on Windows on page 40.
If you license WebFOCUS Active Technologies, you must register your Active Technologieslicense code with the server, as described in How to Register a License Code With theServer on page 40.
Procedure: How to Verify Client Installation
To verify that you have successfully installed, use the base configuration that is created by theinstallation and start the Data Management Console (DMC).
2. Installation for Windows
Server Installation 39

The first step is to add a server node (right click on the server icon in the object tree to addone), and then connect. If the portion of the object tree for the newly added server opens todisplay application directories, the software is properly installed. See the DataMigrator User’sGuide for further use of the DMC.
Procedure: How to Determine Which Adapters Are Supported on Windows
For current information about which adapters are supported:
1. Go to http://techsupport.informationbuilders.com.
The Information Builders Technical Support home page opens.
2. In the Quick Links section on the right side of the page, click Supported Systems/Adapters.
The Supported Systems and Adapters page opens.
3. Click the link for the server release you want.
The Supported Systems and Adapters page for that release opens.
4. Click the link for your platform.
The support chart for that platform opens.
Procedure: How to Register a License Code With the Server
If you license WebFOCUS Active Technologies, you must register its license code with theserver before using Active Technologies.
1. In the Web Console menu bar, select Configuration/Monitor from the Workspace menu.
2. In the navigation pane, right-click License and select Configure.
The License Management pane opens.
3. Type the license code in the license_active_report field.
4. Click Save and Restart Server.
Starting and Using a Server or Data Management Console
Commonly used start, stop, and monitor features are available from the Windows Start menuunder the folder in which the software was installed.
On Windows 8 (and higher), a single start-panel icon is created. Clicking it switches the screeninto desktop mode and opens a Windows Explorer session displaying the installed icons andfolders (as normally seen after an installation). Once the explorer session is open, it isrecommended that you simply use the standard Window Desktop icon to flip from the startpanel to desktop mode or else additional Explorer sessions will open.
Starting and Using a Server or Data Management Console
40 Information Builders

Under the Diagnostics Functions folder there is a Command Windows for Manual Operationsicon that allows you to issue direct edastart commands and options as documented for otherplatforms. Typically, these options should are only be used in debugging situations byexperience administrators.
Security Providers on Windows
The default security provider for a new installation is the internal security provider, PTH. ThePTH provider implements security using user IDs, passwords, and group memberships storedin the admin.cfg configuration file.
After the initial installation, the Server Administrator that was configured during the installationcan start the server and use the Web Console to further customize security settings, forexample, to configure alternate or additional security providers, create additional PTH IDs, andregister groups and users in a security role. For more information about security providers, seethe Server Security chapter in the Server Administration manual.
Additional Installation Options
This section explains how to run the Data Management Console in zero footprint mode anduninstall servers or configurations.
Procedure: How to Run the Data Management Console in Zero Footprint Mode
A full DataMigrator Client must first be installed using UNC Network paths on a machine in theuser's network, as a prerequisite. This machine will then be used as a remote software"share". The UNC installation and configuration paths used for the remote machine also mustbe available to the local machines that will be set up to run in zero footprint mode and mustcontinue to be available after the zero footprint DMC is set up.
A DataMigrator Client installation using UNC paths creates an additional command file script inthe EDACONF\bin directory called zerofootprint.bat, which is used by local machines to set upa zero footprint DMC. No other installation paths, modes, or products create thezerofootprint.bat file, so if the file is not present, it is likely that an improper license key ornon-UNC path was used during installation.
Install the prerequisite DataMigrator Client (as described above) as a first step, if it has notalready been done. Be sure to remember to use a UNC path, and note the resulting full UNCpath for the EDACONF bin\zerofootprint.bat file so you can use it in the later local machinestep.
2. Installation for Windows
Server Installation 41

Once the DataMigrator Client is installed on the "share" machine, there are several choices forrunning the zerofootprint.bat script, depending on a requirements of a site:
The end user opens a DOS command window and runs the zerofootprint.bat file using thefull path UNC name.
The end user opens the Windows Run option, enters the full path UNC name of thezerofootprint.bat file, and clicks OK.
The end user uses Windows Explorer to navigate to the shared UNC directory where thezerofootprint.bat file is located and double--clicks it.
An administrator puts the full path UNC name of the zerofootprint.bat file in a batch scriptthat the user is directed to run.
An administrator puts the full path UNC name of the zerofootprint.bat file in a batch scriptthat is run automatically (such as a system update script).
After the zerofootprint.bat file is run, a DOS command window opens and a desktop iconshortcut to the DMC is created. On English-speaking locales, a Shortcut Created/OK pop-upmessage will also display. (This message times out after a short while, so it is compatible foruse with unattended batch files.)
Once the shortcut icon is created, the end user can start the DMC from the shortcut icon (andthe zerofootprint.bat file is no longer needed by that user). The DMC will behave like a locallyinstalled instance. Any software updates to the original software installation location will bereflected to end users upon DMC restart (with no need to reinstall).
Procedure: How to Uninstall
To uninstall:
1. For server installations, ensure that the server is stopped first.
2. Using the Windows Start menu, select Programs, the program group (for example,WebFOCUS 77 Server), and Uninstall. This program removes the EDAHOME and EDACONFdirectories of this instance.
If more than one configuration uses the same EDAHOME directory, the additionalconfigurations contain unconfigure icons instead of uninstall icons. If you want to uninstall yourinitial configuration, you must unconfigure the additional configurations first. If you do notunconfigure these instances before uninstalling the EDAHOME directory, you will disable theadditional configurations, including their unconfigure icons. A manual cleanup is then required.
Additional Installation Options
42 Information Builders

Installing and Configuring Silently
This is also known as a silent install. The most common form is an initial install which alsoresults in an initial configuration (and is what is documented here). An initial installation andconfiguration should only be done once per EDAHOME (and program folder) and an additionalproduct configuration used thereafter.
Installing silently can be helpful if you want to install multiple instances at once throughout anenterprise. To install an instance silently, you must first create a text file that specifies yourinstallation parameters and then call isetup with the option and the file name. The silentmethod may also be used to do a software refresh.
We recommend that the first time you install, you use the default interactive mode, not thesilent mode, so that you become familiar with the procedure. Installing interactively isdescribed in Installing a Server on page 28.
Procedure: How to Create the Installation Parameters File
Use a text editor to create a file with the following syntax to specify your product installationparameters:
-inst-license nnn-nnn-nnnn-nn -edahome drive:\ibi\srv77\home-edaconf drive:\ibi\srv77\product_type -port portnum -host hostname -approot drive:\ibi\apps-programfolder "folder-title"-pass password -nostart
where:
nnn-nnn-nnnn-nn
Is the 12-digit license. Include a hyphen (-) following the third, sixth, and tenth digits.
drive:\ibi\
Is the drive and directory to which you want to install the software.
product_type
Designates the type of product. The default values are:
FFS for a Full-Function Server
2. Installation for Windows
Server Installation 43

DM for a DataMigrator Server
WFS for a WebFOCUS Reporting Server
WFM for a Shared Application Server for WebFOCUS Maintain
portnum
Is the base TCP port for the server.
hostname
Is the server host name.
folder-title
Is the name you want to assign to the Windows program folder and service. For example:
-programfolder "WebFOCUS 77 Server"
password
Is the password of the user ID with which you are installing the server.
To see a list of additional installation, configuration, and refresh options:
1. Open a command prompt window and navigate to the directory containing the installationsetup.exe file for the software.
2. Enter the following:
setup ?
3. Accept a display language and click Next.
A Help screen with further parameter file options will display.
The user may continue with the install (interactive) or quit at this point to attempt a silentinstall/configure.
Procedure: How to Launch a Silent Installation
1. Open a command prompt and navigate to the directory containing the software and thesetup.exe file for the install.
2. Type the following:
setup -Lcode -opt drive:\path\srvoptions.txt
Additional Installation Options
44 Information Builders

where:
code
Is the code specifying the language of the Web Console user interface. This languagewill also be used in the status windows displayed by the installation procedure.
The language code is preceded by -L (a hyphen followed by the letter "L").
The language codes are:
English 0x409
French 0x040c
German 0x407
Japanese 0x411
Spanish 0x040a
drive:\path\srvoptions.txt
Is the full path and file name of the file specifying your installation options.
For example, to specify English and an options file named serveroptsFFS1.txt, type:
setup -L0x409 -opt C:\temp\serveroptionsFFS1.txt
3. After the installation has completed you should verify that it was successful, as describedin How to Verify Server Installation on page 38.
Generating a Trace on Windows
If you encounter a server problem, you can run a set of traces that will help you assess theproblem, and, if necessary, communicate it to Customer Support Services for furtherassistance. This topic describes trace options and provides instruction for creating the traces.
There are two types of traces you can run to troubleshoot a problem:
A server trace, in which you trace an agent that is running in a server context.
A non-server trace, in which you trace an agent that is running outside a server context,that is, an agent that is running standalone.
2. Installation for Windows
Server Installation 45
Under normal conditions, applications are run in a server context. However, if you run yourtrace in a non-server context (that is, if you run a non-server trace) and produce the necessarydiagnostic information, you can significantly reduce the amount of material that needs to bereviewed. Running a non-server trace also rules out server communications as a cause of aproblem.
You can start traces, turn traces off, and perform the edastart -savediag function by selectingoptions from the Windows Start menu, under the Diagnostics folder. You can also open a DOSsession to execute these commands.
Tip: The Diagnostics folder in the Windows Start menu as a Command Window for ManualOperations icon, which will directly open the DOS session in the EDACONF bin.
Procedure: How to Generate a Server Trace
To generate a server trace:
1. Turn tracing on by doing one of the following:
Go to the Web Console menu bar, select the Main Web Console Other Options controlicon and then Enable Traces.
Start the server by issuing the following command:
edastart -traceon
You must preface edastart with the appropriate path, or place the directory in yoursystem PATH variable.
2. Reproduce the problem.
3. Stop the server.
4. Issue the following command:
edastart -savediag
5. Respond to the prompts to capture, and optionally archive and ship diagnostic information.
Diagnostic information will commonly contain user data. If the release of that data isconsidered a security concern when shipping to Customer Support Services, the -savediagfeature also allows a diagnostic to be saved and shipped later to allow the site theopportunity to review and cleanse the traces of data of this nature before shipping.
For information about sending the diagnostic information to Customer Support Services,see Information You Should Have on page 13 and Customer Support on page 13.
Generating a Trace on Windows
46 Information Builders

Procedure: How to Generate a Non-Server Trace
To generate a non-server trace:
1. Create a directory under APPROOT to reproduce the problem.
2. Copy any files required for the reproduction to the directory.
3. Switch to the directory.
4. Reproduce the problem using edastart -traceon and one of switches -t, -x, or -f.
5. Switch to a directory other than the problem reproduction directory.
6. Issue the following command:
edastart –savediag
7. Respond to the prompts to capture, and optionally archive, diagnostic information.
Diagnostic information will commonly contain user data. If the release of that data isconsidered a security concern when shipping to Customer Support Services, the -savediagfeature also allows a diagnostic to be saved and shipped later to allow the site theopportunity to review and cleanse the traces of data of this nature before shipping.
For information about sending the diagnostic information to Customer Support Services,see Information You Should Have on page 13 and Customer Support on page 13.
Third-Party Software and Licenses on Windows
As of Version 7 Release 6.8, to address display of third-party software license requirements, alicense option has been added to the Help menu located on the Web Console. This sectiondescribes the third-party software used on Windows and includes references to the fulllicenses included in Information Builders and Third-Party Licenses on page 357.
OpenFlex SDK
OpenFlex SDK is included by Information Builders for use with its HOLD FORMAT FLEX feature.This distribution is subject to the terms and conditions of the Mozilla Public License Version1.1.
For more information, see OpenFlex SDK License on page 361 or visit our website at, http://www.informationbuilders.com.
2. Installation for Windows
Server Installation 47

Zip Archiver
The software includes a third-party zip.exe archiving utility for use in the save diagnosticfeature (edastart -savediag). The utility, located in the EDAHOME bin directory, is provided atno charge. Information Builders makes no claim of ownership, nor charges for the utility orinclusion, nor does it warranty it and is provided solely to assist our customers. To see thesoftware full license statement, issue the command:
ZIP -L
There are many free and commercial versions of zip-based archivers. The one supplied is Info-Zip 3.0 with BSD like licensing. For more information about Info-ZIP, visit their website at, http://www.info-zip.org.
For more information, see Zip Archiver License on page 373 or visit our website at, http://www.informationbuilders.com.
If Winzip WZZIP or PKWare PKZIPC are on the system path, the first one found will be usedinstead of zip.exe. If you prefer to not use the supplied version of zip.exe (for example, if yourenterprise has a policy against using freeware), you can manually remove it from the EDAHOMEbin directory or replace it with any zip version that conforms to the same usage rules.
General Information for a Windows Installation
This section covers general information for a Windows Installation.
Sample Metadata, Data, and Other Tutorial Samples
Releases prior to 7.7.06 pre-load various samples into the IBISAMP application. As of 7.7.06,on a new installation, the IBISAMP application is created, but is not pre-loaded. The serverWeb Console has a new feature on the ribbon and on the application tree (under new),Tutorials (the Create Tutorial Framework page), which has a pull-down for various samples. TheDMC also has this feature on the application tree.
There are currently about 10 different tutorial/sample selections available on the pull-downselect list to match various customer needs. The bulk of the prior IBISAMP sample objects canbe generated by selecting the Create Legacy Sample Tables and Files tutorial. Other priorIBISAMP DataMigrator sample objects (usually starting with the characters dm*) are nowloaded by choosing their respective DataMigrator tutorials. Under the new method, thetutorials/samples may be loaded to any application, not just IBISAMP.
If you are doing just a software refresh, the prior IBISAMP objects will be unchanged (becausea refresh does not touch app directories).
General Information for a Windows Installation
48 Information Builders

Limiting CPU/Core Use on Machines With Multiple CPUs and Cores
When the effective number of CPUs (cores) on a computer exceeds the number allowed by theserver license, depending upon the license, either the server will not start or users will begiven warnings in edaprint.log and at Web Console or Data Management Console login.
To correct the situation, the installation site has two choices:
Install the server on a computer with a physical number of CPUs/cores that is less than orequal to the license amount.
Create a virtual environment using VMware or Microsoft Virtual PC with a number of coresthat matches the license requirement, and run the server instance under one of thesevirtualization options.
Note: Running multiple instances of the server (each under a limited virtual processor set) oradding processors to the virtual set after the server is running, constitutes a license violation.
Microsoft Virtual PC only supports single CPU/core virtualization, while VMware supportsmultiple CPU/cores. Both offer converter tools to reimage a PC into a virtualization. At serverinstallation time, if a site is in violation, the site has the option of continuing (and converting tovirtualization afterwards) or stopping the initial install to reattempt the installation in anenvironment that is already virtualized correctly.
The specifics of installing and configuring VMware and Microsoft Virtual PC or the use of theirrespective converter tools are beyond the scope of this document. From the perspective of aserver installation, the installation utility does not know that virtualization has occurred andthere is no difference. Consult the related virtualization documentation for further informationon the use of these features.
Troubleshooting for Windows
As of Release 7702, separately installable debuggable versions are no longer required to get afull stack trace of information for a savediag. The Debuggable Version - Install and DebuggableVersion - Remove options have been removed from the Windows menu.
If you have an earlier 77x release that contains the debug menu options, and have installedservice pack upgrades of 7702 (or higher), these menu options should be deleted, since theyno longer function or are needed.
To troubleshoot an installation problem, identify your problem in the following list, and followthe link to a description of the solution.
If you cannot find your problem described in the list, and cannot resolve it yourself, contactCustomer Support Services as described in Information You Should Have on page 13 and Customer Support on page 13.
2. Installation for Windows
Server Installation 49

If you have a troubleshooting suggestion that is not described in the list, and you think otherswill find it helpful, we invite you to send it to us, as described in How to Add Your Problem tothe Troubleshooting Guide on page 52. We will consider including your problem in a futurerelease of this manual.
Problems:
The server starts in safe mode (as indicated by a message in the Web Console at start up).
For details, see Problem: The Server Starts in Safe Mode on page 50.
A server start request partly fails with JVM not found messages written to edaprint.log.
For details, see Problem: Java Listener Fails to Start With JVM not found Messages Written tothe Log on page 51.
The Windows service will not stop.
For details, see Problem: Cannot Stop the Windows Service of the Server on page 51.
Reference: Problem: The Server Starts in Safe Mode
Problem: The server starts in safe mode. The Web Console home page displays a messagestating that the server is in safe mode and describing what triggered it.
Cause: A common cause for the server starting in safe mode is a problem with the serveradministrator ID password. For example, the password may have been updated on theoperating system but not on the server, so the encrypted copy of the password stored by theserver is out of synchronization with the password on the operating system.
Solution: The server administrator can click the fix hyperlink, which is displayed under theproblem description, to display the relevant pane and resolve the problem.
For example, if the problem is that the server administrator password is out of synchronization:
1. Click the fix hyperlink displayed under the problem description.
2. In the left pane, open the Users folder, then the Server Administrator folder.
3. Click your user ID and select Properties from the pop-up menu.
The Access Control pane is displayed on the right.
4. Type the correct operating system password in the Password field, and type it again in theConfirm Password field.
5. Click Save and Restart.
The Security Mode pane opens on the right.
Troubleshooting for Windows
50 Information Builders

6. Click the Home icon in the menu bar to return to the Web Console home page.
Reference: Problem: Java Listener Fails to Start With JVM not found Messages Written to the Log
Problem: The listener start request fails with JVM not found messages written to theedaprint.log file.
Cause: If the server cannot find the Java Virtual Machine (JVM), the JSCOM Listener will not beable to start, and messages will be written to the server log stating that the JVM cannot befound.
Solution: Set up the JVM as described JVM Requirements for Java Services (Server InstallationsOnly) on page 21.
Reference: Problem: Cannot Stop the Windows Service of the Server
Problem: When you try to stop the server, the associated Windows service does not stop.
Cause: Any server administrator can stop the server. The ID that installed the server isautomatically defined as a server administrator. You can specify additional IDs as serveradministrators using the Web Console.
If an ID is not a server administrator it will not be able to stop the server, even if that same IDhad started the Windows service that started the server.
Solution: Specify the ID that was not able to stop the service as a server administrator:
1. In the Web Console menu bar, select Access Control from the Workspace menu.
The Manage Providers page opens.
2. Click the Users label (to the right of the folder) in the navigation pane.
The New User option appears.
3. Click New User.
The Access Control pane opens.
4. Identify the new administrator by filling in the fields in the Access Control pane.
For more information about these fields and about specifying an additional serveradministrator, see the Server Administration manual.
5. Click Create, and then click Save and Restart.
Reference: Problem: ODBC Test Tool Does Not Show Expected Sources/Connections
Problem: The ODBC Test Tool starts, but either no configured sources (server connections) areshown, or they are not shown as expected.
2. Installation for Windows
Server Installation 51

Cause: The ODBC Test Tool accesses the ODBC Sources configured in the Data Sources(ODBC) section of the Control Panel Administrative Tools. It does not directly use configuredconnections. To be visible by ODBC, the connections (after creation and configuration) must beregistered to ODBC, which is a separate post installation and post connection configurationstep. Additionally, the connection configuration and registration steps must be done under theWindows icons for a client install (a 9xx-xxx-xxxx license) even though some server releasescontain the Windows menu icons for these actions. That is why registering from a serverinstallation is ineffective, leaving the connection list either empty or not as expected.
Solution: If a client installation has not been done, complete the client installation as a pre-requisite. Either start the DMC or (if you are familiar with the appropriate communication nodesyntax) use the Edit Communication Configuration File - ODIN.CFG icon to add connections andsave. When finished adding, use the Register IWAY ODBC Driver icon to make them visible toODBC. The Remove IWAY ODBC Driver icon may be used to remove the connection's ODBCvisibility. If you have more than one client installation on the machine, the Reset Shared iconmay be used to switch the machine's current ODBC configuration to see the client connectionconfiguration within that icon group.
Procedure: How to Add Your Problem to the Troubleshooting Guide
If you have troubleshooting suggestions that you think others will find helpful, we invite you tosend them to us so that we can consider including them in a future release. You can:
Email them to [email protected]. Include your name and phone number, and includeServer Installation Troubleshooting in the subject line.
Send them to:
Technical Content ManagementInformation BuildersTwo Penn PlazaNew York, NY 10121-2898
Please include your name, phone number, email address, and postal address.
Troubleshooting for Windows
52 Information Builders

Chapter3Installation for UNIX
This document describes the requirements and procedures for installing on UNIX.
In this chapter:
Information You Need Prior toInstallation on UNIX
UNIX Installation Requirements
Installation and Configuration Directorieson UNIX
Downloading the Server InstallationSoftware for UNIX
Running Isetup to Install the ServerSoftware
Installing Using rpm
Configuring an Additional Instance of theServer
Refreshing or Upgrading an Installation
Installing and Configuring Silently
Verifying the UNIX Server Installation
Security Providers on UNIX
Starting and Using a Server
Generating a Trace on UNIX
Third-Party Software and Licenses onUNIX
General Information for a UNIXInstallation
Troubleshooting for UNIX
Information You Need Prior to Installation on UNIX
You need to know your license key. These keys are for a specific number of CPUs. If morecores are detected than the license allows, the installation will be blocked.
The remedy for a core blocked installation is to obtain and use a correct license or use amachine with the correct core count (which may be a real or a virtualized environment).
Some features use additional license codes that are not specified during the installation.
You need to know your SMTP mail server information, if you will use any of the server emailnotification features.
Server Installation 53

You need a server administrator user ID, referred to as iadmin in the remainder of thischapter.
The operating system ID you use when installing the server owns the server files and is thedefault server administrator for OPSYS mode. You can create a new operating system ID torun and own the server files, or use any ordinary (non-superuser) ID. However, you shouldnot install the server as root. The server administrator ID should have a Korn, Bourne, orBash shell as the default logon shell.
Some Linux platforms also support RPM installation. In the context of an RPM installation,all files are owned by root, and the server is started by the root ID.
UNIX Installation Requirements
Before you install, review the following requirements.
Type Description
Operating System Product version must be compatible with operating system bit size(32 on 32, 32 on 64 or 64 on 64).
AIX
HP-UX IA64
Linux for x86
Linux for x86_64
Linux for pSeries Kernel-2.6.18
Linux for zSeries
Solaris SPARC
Solaris x86
The Information Builders Technical Support web site maintains acurrent list of supported operating systems and levels.
Disk Space Space for installation
Space after installation
Approximately 2.2 G
Approximately 1.1 G
UNIX Installation Requirements
54 Information Builders

Type Description
IP Ports Up to six consecutive IP ports (two in reserve for typical extrafeatures).
Additional Java Listeners (post install option) require additional ports(beyond basic reserve).
Java Java JRE or Java SDK (aka JDK) 1.7 or higher
Used for Java-based adapters, server-side graphics, XBRL, or user-written CALLJAVA applications are to be used. For additionalinformation, see JVM Requirements for Java Services (ServerInstallations Only) on page 56.
Memory
Commonframework plus peragent memory.
O/S
HP-UX
AIX
Solaris (SPARC)
Solaris (Intel)
Linux for x86
Linux for x86_64
Linux for pSeries 64b
Linux for zSeries 64b
Linux for zSeries 32b
Per Agent/Common
1 MB/45 MB
5 MB/50 MB
19 MB/125 MB
10 MB/72 MB
7 MB/59 MB
9 MB/87 MB
27 MB/165 MB
10 MB/93 MB
7.5 MB/72 MB
3. Installation for UNIX
Server Installation 55

Type Description
Web Browser Needed for using the Web Console.
Microsoft Internet Explorer® 9 or higher.
Microsoft Edge
Mozilla Firefox® 27 or higher.
Google Chrome® 33 or higher.
Apple Safari® 7.0 or higher.
Apple Mobile iOS® v5
Opera 19 or higher.
JVM Requirements for Java Services (Server Installations Only)
If Java-based adapters, server-side graphics, XBRL, or user-written CALLJAVA applications areto be used, a Java Runtime Environment (JRE) JVM must be installed on the machine, and theserver must be configured to use it.
The minimum Java JVM release level is 1.7 or higher, due to required internal components ofthe server. The Java Listener will not start unless the applicable minimal level for the platformis used by setting JAVA_HOME/JDK_HOME values. For platforms where Java 1.6 is the onlychoice, expect edaprint jar errors on loading the ibi.webfoc.wfapi.IBICreateCGIGif class andexpect that server-side graphics will not function.
The following URL has Java EOL and EOSL information:
http://www.oracle.com/technetwork/java/eol-135779.html
You may install a Java JRE or a Java SDK (aka JDK). The JRE or SDK build version must alsomatch the 32-bit or 64-bit bit type of the server. When you install a Java SDK, the JREcomponent (where the JVM lives) is also included, so either is allowed.
However, if you are using the servlet feature, the Java SDK is required for access to the jarcommand, so an SDK install is generally preferred over a JRE install.
There are several ways to specify the Java JVM location:
For Java JDK, set JDK_HOME (to the install home location) in the environment or serverenvironment start-up file (edaenv.cfg).
UNIX Installation Requirements
56 Information Builders

For Java JRE, set JAVA_HOME (to the install home location) in the environment or serverenvironment configuration file (edaenv.cfg).
If JDK_HOME and JAVA_HOME variables are both declared, the JDK_HOME value will be used.
To change or add a variable in the server environment start up file (EDACONF bin/edaenv.cfg),either edit the file in a text editor before starting the server or:
1. Start the server (services like Java Listener may fail until configured and the server isrestarted).
2. Open the Web Console and sign in using an administrator ID.
3. Select Workspace from the main menu.
4. In the navigation pane, open the Configuration Files and Miscellaneous folders.
5. Right-click Environment - edaenv.cfg, and click Edit.
6. Make the desired edit.
7. Save the file.
8. Restart the server (changes are not effective until server is restarted).
The format of edaenv.cfg variables is one per line in name=value pairs. Spaces before andafter the equal sign are optional. Values with embedded spaces do not have to be enclosed inquotation marks.
To add classes to the JVM class path for customer-written CALLJAVA applications, set andexport the CLASSPATH variable to the operating system level before server start-up or use theWeb Console to set the Java Listener IBI_CLASSPATH property.
If JVM-based adapters or features are not required, and the JVM environment is not configured,the message Failed to find JVM is normal and can be ignored.
3. Installation for UNIX
Server Installation 57
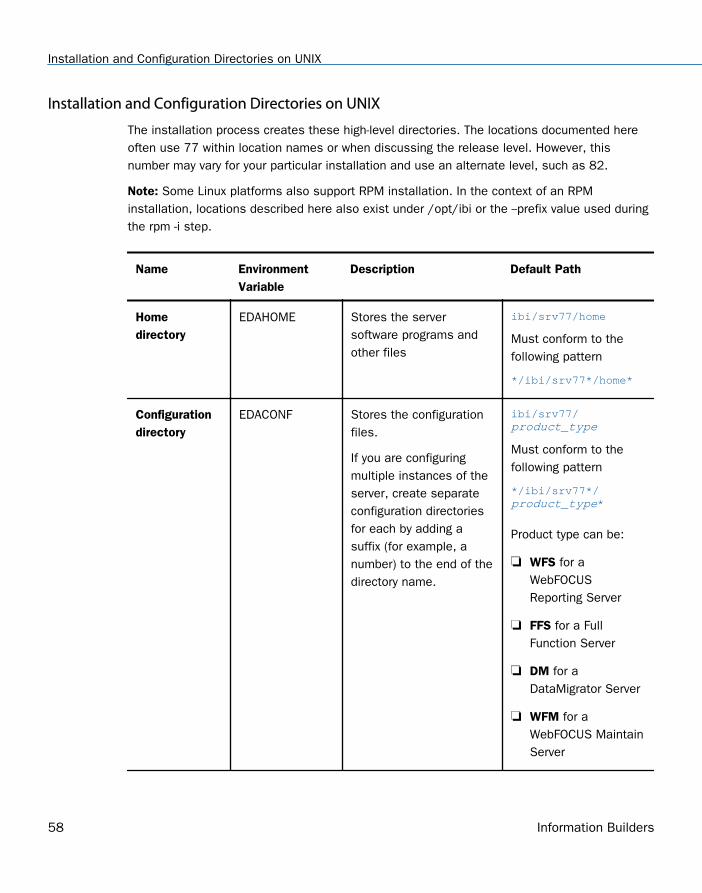
Installation and Configuration Directories on UNIX
The installation process creates these high-level directories. The locations documented hereoften use 77 within location names or when discussing the release level. However, thisnumber may vary for your particular installation and use an alternate level, such as 82.
Note: Some Linux platforms also support RPM installation. In the context of an RPMinstallation, locations described here also exist under /opt/ibi or the --prefix value used duringthe rpm -i step.
Name EnvironmentVariable
Description Default Path
Homedirectory
EDAHOME Stores the serversoftware programs andother files
ibi/srv77/home
Must conform to thefollowing pattern
*/ibi/srv77*/home*
Configurationdirectory
EDACONF Stores the configurationfiles.
If you are configuringmultiple instances of theserver, create separateconfiguration directoriesfor each by adding asuffix (for example, anumber) to the end of thedirectory name.
ibi/srv77/product_type
Must conform to thefollowing pattern
*/ibi/srv77*/product_type*
Product type can be:
WFS for aWebFOCUSReporting Server
FFS for a FullFunction Server
DM for aDataMigrator Server
WFM for aWebFOCUS MaintainServer
Installation and Configuration Directories on UNIX
58 Information Builders

Name EnvironmentVariable
Description Default Path
Applicationdirectory
APPROOT Contains your applicationfiles.
ibi/apps
Profilesdirectory
EDAPRFU Stores the user andgroup profiles and theadmin.cfg file (whichspecifies the serveradministrator).
ibi/profiles
Multiple WebFOCUS Reporting Servers. If you plan to install multiple copies of WebFOCUS onthe same computer, and you want to provide each copy with its own WebFOCUS ReportingServer, you may wish to maintain a separate ibi root directory for each copy, so that you cankeep copies of each set of components, including the server, together in the same path.
You can specify a separate apps directory for each copy of WebFOCUS, or specify a singleapps directory to be shared by all copies of WebFOCUS.
Downloading the Server Installation Software for UNIX
Downloading the installation software from the Information Builders download site is theprimary way of obtaining Information Builders software in an archive format, which is thenunarchived and installed by running an installer program. The user may in turn, choose todownload the software, unarchive, and burn to a CD/DVD or place on an NFS, drive within acorporation for easy access. This document assumes the software has been downloadeddirectly to the installation machine and is up to the user to adjust their steps within thismanual if installing in an alternate manner.
Procedure: How to Download the Installation Software
To download the installation software:
1. Go to http://techsupport.informationbuilders.com.
The Information Builders Technical Support home page opens.
2. Go to My Account and sign in.
3. Click My Downloads and Shipments in the My Account section on the right side of thepage.
The Software Downloads/Shipments page opens.
3. Installation for UNIX
Server Installation 59

4. Click the Download link for your product and release.
5. Fill in the registration form and then click Continue.
The Software Download Agreement page opens.
6. Select I agree to consent to the Download Agreement, and then click Continue.
The Download Instructions page opens.
A copy of the instructions is also automatically emailed to you for later reference.
7. Follow the instructions on the Download Page. These are also documented in How toDownload and Expand the Downloaded Archive on page 60.
Some Linux platforms also support RPM-formatted archives for download and installation,and will have a .rpm file in the download location as well as the RPM Public Key file (forsignature verification).
If a .rpm is present in the download location, you may chose the format you want todownload and use. Use of the .rpm will cause a verification warning unless the public keyis imported to rpm. The public key is the file ibi-gpg-publickey-for-one-time-rpm-import.txt,which will also be in the download directory (use the rpm --import file command to importit, once it is downloaded).
Procedure: How to Download and Expand the Downloaded Archive
1. Create a directory in which to download the installation software.
For example:
mkdir download
2. After registering at the Information Builders download site and obtaining download siteinformation, an ID, password, and software location information, ftp to the site (GUI FTPtools may also be used, but line mode FTP is what is documented here).
For example:
ftp downloadftp.ibi.com(supply the user id and password information from web page)
3. Make sure your current directory on the machine to which you will download is thedownload directory you created.
For example:
lcd download
4. Navigate to the directory on the Information Builders site that contains the serverinstallation software.
Downloading the Server Installation Software for UNIX
60 Information Builders

For example:
cd "/Server/77/Linux_Kernel-2_6_18-glibc-2_5_and_up_x86_64_64bit/77/837"
5. Download the installation software from the site using binary mode.
For example:
binaryget i77_837.tarquit
6. Unzip the downloaded file.
For example:
tar -voxf i77_837.tar
7. Run the isetup installation procedure, as described in Running Isetup to Install the ServerSoftware on page 61.
You can delete the download directory after the installation is complete.
Running Isetup to Install the Server Software
You can install the server software by running isetup interactively and responding to prompts orby creating a file containing the answers to the prompts and running isetup against that file.The method using a file is called a silent install.
Both use a .tar-formatted archive file. The isetup program is also used to later do softwarerefreshes and to add configurations (interactively or silently).
Additionally, some Linux platforms have .rpm-formatted archive files available for doing an RPMtype of installation and configuration with default values (which can be used in conjunction withthe isetup silent installation feature for specific option values, when the option parameters aresaved in the file /tmp/ibi.opt.)
Procedure: How to Run isetup Interactively Using the .tar File
For performance reasons, the software should not be installed on, or accessed using NFS-mounted disks. A directly connected disk is always preferable.
To install the software:
1. Sign in using the iadmin user ID.
2. Set the default protection mask to, at a minimum, read/execute (if it is not already set tothat). For example:
umask 022
3. Installation for UNIX
Server Installation 61

Ensure that you have write privileges to the directory from which you are running the isetupcommand. To test this, enter:
touch xxxx
3. Run the installation procedure, isetup, specifying its full path. You can run the installationprocedure from any location. Do not switch the current directory to the location of isetup.
For example, if you downloaded the installation software to a directory named downloadunder the iadmin home directory:
/u/iadmin/download/isetup
The following isetup screen displays.
-------------------------------------------------------------------------- Welcome to the Product Set Up Facility Please respond to the prompts or enter Q to quit at any prompt.--------------------------------------------------------------------------Select an option: 1. Install and Configure 2. Add Additional Configuration Instance 3. Refresh Installation (Reinstall, Keep Configurations) 4. Install Debuggables to the Installation Directory 5. View Installation NotesEnter a selection (Default=1) :
4. Enter 1 for the Install and Configure option.
You are prompted for the location of the installation file iserver.tar
Please enter the full path name of the media for the product
5. Type the full path name of iserver.tar, or press Enter to accept the default.
You are prompted for your license key.
Enter your License Key (Current number of CPUs = n)(Format 999-999-9999-99) : xxx-xxx-xxxx-xx
6. Enter your license key.
Your license attributes are displayed, and the license key is confirmed. Certain licensekeys will issue a warning that the actual CPU quantity is over the licensed amount. In thatcase, the software needs to be run using OS commands that limit CPU use. For moreinformation, see Limiting CPU Use on Machines With Multiple CPUs on page 78.
You are prompted for the ID of the server administrator for the internal server securityprovider.
Running Isetup to Install the Server Software
62 Information Builders

Enter credentials for the server's internal securityprovider (PTH), the server's default start up mode.Enter the Server Administrator ID(Default=srvadmin) :
The server automatically starts with this security provider. You can add other securityproviders using the server Web Console after installation. For information, see the ServerAdministration manual.
7. Enter the server administrator ID or accept the default.
You are prompted for the server administrator password. There is no default.
Enter the Administrator Password :
8. Type the password of the account you are using to install the software.
The password, which does not display, is stored in encrypted form.
You are now shown the default values of the server environment variables and portnumber, and given an opportunity to change them. For example:
Please review the default settings.EDAHOME = /prog3/iadmin/ibi/srv77/homeEDACONF = /prog3/iadmin/ibi/srv77/wfs (*EXISTS, owner iadmin *)EDAPRFU = /prog3/iadmin/profilesAPPROOT = /prog3/iadmin/ibi/appsHOMEAPPS = /prog3/iadmin/ibi/homeappsHTTP_BASE_PORT = 8121WARNING: Directories marked as existing will be deleted and recreated!If you are satisfied with the default settings you may proceed tofinal confirmation else you will be prompted for individual values.Proceed with defaults? (Y/N Default=Y) : y
9. If you want to accept the default values, type Y and skip to Step 10. Otherwise, select Nand change any properties that you wish.
For information about the EDAHOME, EDACONF, EDAPRFU, and APPROOT environmentvariables you can set, see Installation and Configuration Directories on UNIX on page 58.
3. Installation for UNIX
Server Installation 63
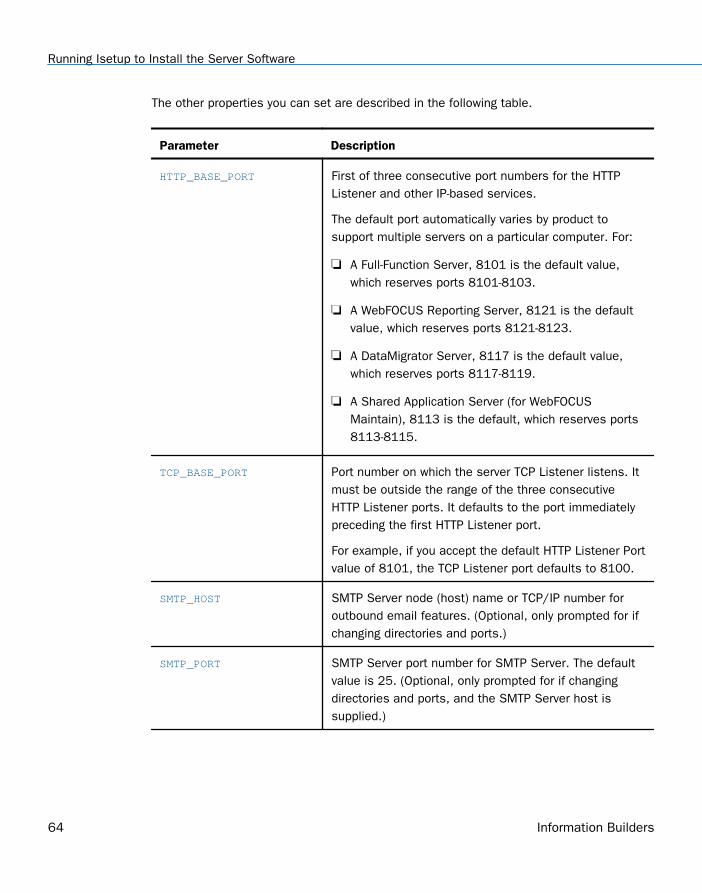
The other properties you can set are described in the following table.
Parameter Description
HTTP_BASE_PORT First of three consecutive port numbers for the HTTPListener and other IP-based services.
The default port automatically varies by product tosupport multiple servers on a particular computer. For:
A Full-Function Server, 8101 is the default value,which reserves ports 8101-8103.
A WebFOCUS Reporting Server, 8121 is the defaultvalue, which reserves ports 8121-8123.
A DataMigrator Server, 8117 is the default value,which reserves ports 8117-8119.
A Shared Application Server (for WebFOCUSMaintain), 8113 is the default, which reserves ports8113-8115.
TCP_BASE_PORT Port number on which the server TCP Listener listens. Itmust be outside the range of the three consecutiveHTTP Listener ports. It defaults to the port immediatelypreceding the first HTTP Listener port.
For example, if you accept the default HTTP Listener Portvalue of 8101, the TCP Listener port defaults to 8100.
SMTP_HOST SMTP Server node (host) name or TCP/IP number foroutbound email features. (Optional, only prompted for ifchanging directories and ports.)
SMTP_PORT SMTP Server port number for SMTP Server. The defaultvalue is 25. (Optional, only prompted for if changingdirectories and ports, and the SMTP Server host issupplied.)
Running Isetup to Install the Server Software
64 Information Builders

Parameter Description
SENDER_EMAIL Default from address for users reading an email fromthe server if none was specified in the originatingapplication. (Optional, only prompted for if changingdirectories and ports, and the SMTP Server host issupplied.)
SERVER_ADMIN_EMAIL Server administrator email address to sendadministrative warnings to, such as an agent crash.(Optional, only prompted for if changing directories andports, and the SMTP Server host is supplied.)
If you decide to change a default, you are prompted for a replacement value each of theabove variables, and given another chance to accept the default. If the SMTP Server nodeis not supplied, the remaining SMTP and EMAIL prompts do not occur.
10. Review the configuration options displayed on the screen, and type Y if you accept them.Alternatively, to start over, enter N; to quit the installation procedure, enter Q.
Several progress messages display while the server is being installed. You are then askedif you want to start the server.
11. If a server installation, type Y to start the server or N to exit.
If you start the server, startup messages and the Web Console URL are now displayed.
You should now verify your installation, as described in How to Verify Server Installation onpage 70.
Installing Using rpm
If you downloaded the rpm files, use the following steps to install the server.
Procedure: How to Install Using rpm and the .rpm File
For performance reasons, the software should not be installed on or accessed using NFS-mounted disks. A directly connected disk is always preferable.
Install the product software as root:
rpm [-prefix directory ] rpm_archive_name.rpm
3. Installation for UNIX
Server Installation 65

The default installation location will be /opt/ibi/... unless specified otherwise by the --prefixoption. To change defaults further after the RPM installation, use the Web Console to changeoptions. To change defaults during the RPM installation, create the silent installation inputfile /tmp/ibi.opt (before running the rpm -i command) containing:
-inst -edahome /home/webfocus/ibi/srv77/home -edaconf /home/webfocus/ibi/srv77/wfs -license xxx-xxx-xxxx-xx -http_port 8121 -edaprfu /home/webfocus/ibi/profiles -approot /home/webfocus/ibi/apps -pth_user srvadmin -pth_password mypass -nostart
Substitute your desired locations, port, ID, password, and license key for the default valueslisted above.
When the RPM command completes, continue at the Verifying Installation step described in Verifying the UNIX Server Installation on page 69.
Note: As RPM requires the installing ID to be root, all resulting files are owned by root andfollow the umask of root at the time of the installation (unlike other installation methods wherethe iadmin owns the files). This is the nature of RPM, and the server will operate as expectedin this state. If a site does not desire the server to be root-owned, it is up to the site tocorrectly reassign ownerships and permissions throughout the various directory trees thatmake up the product.
Configuring an Additional Instance of the Server
The prompts for adding a configuration are similar to those for an original installation.
Procedure: How to Configure an Additional Server Instance
If you have additional licenses and need to configure additional instances:
1. Sign in using the iadmin ID.
2. Run EDAHOME/bin/isetup, where EDAHOME is the directory in which the software wasinstalled.
3. At the main menu, select option 2, Add Additional Configuration Instance.
Each instance must have its own configuration directory. When prompted for theconfiguration directory, append characters to the default name of the product typedirectory. Otherwise, the installation will overwrite the existing configuration directory. Inthe following example, the number 2 has been added to the default name of theWebFOCUS Reporting Server configuration directory:
Configuring an Additional Instance of the Server
66 Information Builders

/home/iadmin/ibi/srv77/wfs2
If the EDACONF directory you specify already exists, the installation process copiesselected files from files in the current configuration to a directory named BACKUP that is asibling directory to EDACONF, and then deletes the contents of the original directory. Forexample, if EDACONF is:
/home/iadmin/ibi/srv77/wfs
then the selected configuration files are backed up to:
/home/iadmin/ibi/srv77/BACKUP
Refreshing or Upgrading an Installation
Refreshing reinstalls the files in the installation directory, without changing any configurationinformation in the configuration directory.
Procedure: How to Refresh or Upgrade an Installation
If it becomes necessary to refresh, or if you want to upgrade to a new release:
1. Sign in using the iadmin user ID.
Logging on with the iadmin ID is recommended (rather than with the su command).
2. Set the default protection mask to, at a minimum, read/execute (if it is not already set tothat). For example:
umask 022
Ensure that you have write privileges to the directory from which you are running thecommand. To test this, type:
touch xxxx
3. Run the installation procedure, isetup, specifying its full path. You can run the installationprocedure from any location. Do not switch the current directory to the location of isetup.For example:
/u/iadmin/download/isetup
4. At the main menu, type option 3, Refresh Installation (Reinstall, Keep Configuration), andrespond to the prompts.
3. Installation for UNIX
Server Installation 67

Installing and Configuring Silently
This is also known as a silent install. The most common form is an initial install, which alsoresults in an initial configuration. An initial installation and configuration should only be doneonce per EDAHOME and an add product configuration used thereafter.
Installing silently can be helpful if you want to install multiple servers at once throughout anenterprise. To install a server silently, you must first create a text file that specifies your serverinstallation parameters and then call isetup with the option and the file name. The silentmethod may also be used to do a software refresh.
We recommend that the first time you install, you use the default interactive mode, not thesilent mode, so that you become familiar with the procedure. Installing a server interactively isdescribed in Running Isetup to Install the Server Software on page 61.
Run isetup -? to see full information on the setup and specific use of a parameters file forsilent installation, configuration, or refresh.
Procedure: How to Create the Installation Parameters File
Use a text editor to create a file with the following syntax to specify your product installationparameters:
-inst-license nnn-nnn-nnnn-nn -edahome /ibi/srv77/home-edaconf /ibi/srv77/product_type -port portnum -host hostname -approot /ibi/apps-pass password -nostart
where:
nnn-nnn-nnnn-nn
Is the 12-digit license. Include a hyphen (-) following the third, sixth, and tenth digits.
/ibi/
Is the directory in which you want to install the software.
product_type
Designates the type of product. The default values are:
FFS. Full-Function Server.
DM. DataMigrator Server.
Installing and Configuring Silently
68 Information Builders

WFS. WebFOCUS Reporting Server.
WFM. Shared Application Server for WebFOCUS Maintain.
portnum
Is the base TCP port for the server.
hostname
Is the server host name.
password
Is the password of the user ID with which you are installing the server.
To see a list of additional installation, configuration, and refresh options, on the commandline, enter the following:
/path/isetup -?
where:
path
Is the directory path to location of the isetup program.
Procedure: How to Launch a Silent Installation
1. On the command line, enter the following:
/path/isetup -opt /path/srvoptions.txt
where:
/path/srvoptions.txt
Is the full path and file name of the file specifying your installation options.
For example, to specify English and an options file named serveroptsffs1.txt, type:
/tmp/isetup -opt /tmp/serveroptionsffs1.txt
2. After the installation has completed you should verify that it was successful, as describedin Verifying the UNIX Server Installation on page 69.
Verifying the UNIX Server Installation
After installing, verify that the software is functioning properly.
3. Installation for UNIX
Server Installation 69

Procedure: How to Verify Server Installation
To verify that you have successfully installed, use the configuration that is created by the baseinstallation. You can verify the installation by bringing up, checking, connecting to, testing,disconnecting from, and shutting down the server. (If you started the server as the last step ofthe installation procedure, skip ahead to Step 4.)
1. Log on to your UNIX or Linux operating system using the iadmin ID.
2. Start the server with the appropriate path to edastart and the -start option. For example,for a WebFOCUS Reporting Server, you would type:
/home/iadmin/ibi/srv77/wfs/bin/edastart -start
3. Check to ensure that the processes are up by specifying the -show option:
/home/iadmin/ibi/srv77/wfs/bin/edastart -show
4. Start the Web Console by starting a browser pointed at the server HTTP Listener port,which was specified during installation. The URL format is http://host:port. (The URL isalso displayed at the end of the installation procedure.)
For example, if default ports were used during installation, for:
A Full-Function Server, use http://host:8101.
A WebFOCUS Reporting Server, use http://host:8121.
A DataMigrator Server, use http://host:8117.
A Shared Application Server (for WebFOCUS Maintain), use http://host:8113.
5. If the server is running in a secure mode, you will first see a logon screen. Log on usingthe iadmin ID used during server configuration. For information about server security, see Security Providers on UNIX on page 72.
The Web Console home page opens. The Home Page is arranged in a menu-like context forthe various features it supports. Detailed use of the Web Console for configuration orgeneral operation of the server is available by clicking Help in the left navigation menu andin the Server Administration manual.
6. If the Web Console opens and displays application tree folders in the left pane, the serveris working because it uses its own underlying data access and reporting technologies tovisualize the application tree. The server may be further data tested (if desired).
7. When you are done using the server, you can stop it using the Web Console by clicking theStop option on the Web Console toolbar.
8. If you experience any problems, examine the /home/iadmin/ibi/srv77/product_type/edaprint.log file.
Verifying the UNIX Server Installation
70 Information Builders

Now that you have successfully verified your installation, you can:
Configure server security, as described in Security Providers on UNIX on page 72.
Configure additional server properties, such as outbound communication nodes andadapter support, using the Web Console.
For more information about using the Web Console and configuring outbound nodes, seethe Server Administration manual.
For more information about configuring adapter support, see the Adapter Administrationmanual. For information about which adapters are supported, see How to Determine WhichAdapters Are Supported on UNIX on page 71.
If you license WebFOCUS Active Technologies, you must register your Active Technologieslicense code with the server, as described in How to Register a License Code With theServer on page 71.
Procedure: How to Determine Which Adapters Are Supported on UNIX
For current information about which adapters are supported:
1. Go to http://techsupport.informationbuilders.com.
The Information Builders Technical Support home page opens.
2. In the Quick Links section on the right side of the page, click Supported Systems/Adapters.
The Supported Systems and Adapters page opens.
3. Click the link for the server release you want.
The Supported Systems and Adapters page for that release opens.
4. Click the link for your platform.
The support chart for that platform opens.
Procedure: How to Register a License Code With the Server
If you license WebFOCUS Active Technologies, you must register its license code with theserver before using Active Technologies.
1. In the Web Console menu bar, select Configuration/Monitor from the Workspace menu.
2. In the navigation pane, right-click License and select Configure.
The License Management pane opens.
3. Type the license code in the license_active_report field.
3. Installation for UNIX
Server Installation 71

4. Click Save and Restart Server.
Security Providers on UNIX
The default security provider for a new installation is the internal security provider, PTH. ThePTH provider implements security using user IDs, passwords, and group memberships storedin the admin.cfg configuration file.
After the initial installation, the Server Administrator that was configured during the installationcan start the server and use the Web Console to further customize security settings, forexample, to configure alternate or additional security providers, create additional PTH IDs, andregister groups and users in a security role. For more information about security providers, seethe Server Security chapter in the Server Administration manual.
Procedure: How to Satisfy Security Provider OPSYS Requirements
To run a server in security provider OPSYS mode in UNIX, you must perform the followingsteps. You must do this once after installing and after each refresh of the server with fixes.
Set up tscom300.out as a root-owned SUID program:
1. If the server is running, bring it down.
2. Log on to the system as root, or issue the su root command.
3. Change your current directory to the bin directory of the home directory created during theinstallation procedure.
For example, type the following command:
cd /home/iadmin/ibi/srv77/home/bin
4. Change file ownership and permissions by typing the following commands:
chown root tscom300.outchmod 4555 tscom300.out
5. Verify your changes by issuing the following command:
ls -l tscom300.out
The output should be similar to the following:
-r-sr-xr-x 1 root iadmin 123503 Aug 23 04:45 tscom300.out
Note the permissions and ownerships.
When you start the server, it will now run with security provider OPSYS.
The chmod and chown steps will need to be repeated after any server upgrade since thetscom300.out file is replaced during upgrade and the attributes are lost.
Security Providers on UNIX
72 Information Builders

Note: If this Security Provider OPSYS step has been done and the site later decides to switchto Security OFF, special steps must be taken to ensure the mode remains after a full servershutdown (where edastart -start is used to restart the server). The steps are:
1. After the server recycles from the change to OFF, use the Web Console to open theenvironment configuration file of the server by clicking Workspace and expanding theConfiguration Files folder, followed by the Miscellaneous folder.
2. Double-click Environment - edaenv.cfg to edit the file and add the EDAEXTSEC=OFF variable.
3. Save your work.
After the next full server shutdown, be sure to do an edastart -cleardir before restarting theserver. This will clear any root owned files that would prevent a security OFF server fromstarting.
Preventing Unsecured Server Starts After Upgrades
If the explicit environment variable EDAEXTSEC is set to OPSYS (or ON) and the server cannotimpersonate users because it lacks platform-specific authorization steps, the server startaborts and error messages are written to the edaprint log.
This feature prevents an unsecured server start after a software upgrade if any of the requiredpost-upgrade, reauthorization steps are missed on a UNIX, IBM i, or z/OS HFS deployment.This is not applicable to other platforms. The setting may be placed in any normal server start-up shell or profile that a site is using or in the server edaenv.cfg environment configuration file.The messages vary slightly by platform.
The edaprint messages are:
Configured security is 'ON' as set by EDAEXTSEC variable.
Server has no root privilege.
Workspace initialization aborted.
(EDA13171) UNABLE TO START SERVER
Starting and Using a Server
For information about starting a server, see How to Verify Server Installation on page 70.
For information about using and managing a server, see the Server Administration manual.
3. Installation for UNIX
Server Installation 73

Reference: Commonly Used Server Start Options and Functions
Command and Option Function
edastart Starts the server with the line mode console, which enablesyou to view the server log and to dynamically issue edastartoptions, such as show, traceon, and stop.
To display the console command prompt, press Ctrl + C.
edastart -start Starts the server without the line mode console.
edastart -sstart n Starts the server, but waits n seconds for actual start up.
edastart -show Shows general status of server and agents.
edastart -stop Stops the server.
edastart -cleardir Removes all temporary directories (and their contents), as wellas log and other files created by the server (including thermlda*.log files, if active) in EDACONF. If Resource Manager isin use and you want to maintain the rmlda*.log data, backupthe rmlda*.log files before using this feature and restore themafterward.
edastart -traceon Turns on tracing. May be used at startup or afterward. It ispreferable to run traces at startup, unless instructedotherwise.
Turn tracing on only when there is a problem that needs to betraced, to avoid incurring the associated overhead.
edastart -traceoff Turns off tracing.
edastart -? Displays full set of edastart server control options.
edastart -?s Displays support information and support-related options.
Starting and Using a Server
74 Information Builders

Generating a Trace on UNIX
If you encounter a server problem, you can run a set of traces that will help you assess theproblem, and, if necessary, communicate it to Customer Support Services for furtherassistance. This topic describes trace options and provides instruction for creating the traces.
There are two types of traces you can run to troubleshoot a problem:
A server trace, in which you trace an agent that is running in a server context.
A non-server trace, in which you trace an agent that is running outside a server context,that is, an agent that is running in standalone mode.
Under normal conditions, applications are run in a server context. However, if you run yourtrace in a non-server context (that is, you run a non-server trace), and produce the necessarydiagnostic information while significantly reducing the amount of material that needs to bereviewed. Running a non-server trace also rules out server communications as a cause of aproblem.
Procedure: How to Generate a Server Trace
To generate a server trace:
1. Turn tracing on by doing one of the following:
Go to the Web Console menu bar, select the Main Web Console Other Options controlicon and then Enable Traces.
Start the server by issuing the following command:
edastart -traceon
You must preface edastart with the appropriate path, or place the directory in yoursystem PATH variable.
2. Reproduce the problem.
3. Stop the server.
4. Issue the following command:
edastart -savediag
5. Respond to the prompts to capture, and optionally archive and ship diagnostic information.
Diagnostic information will commonly contain user data. If the release of that data isconsidered a security concern when shipping to Customer Support Services, the -savediagfeature also allows a diagnostic to be saved and shipped later to allow the site the opportunityto review and cleanse the traces of data of this nature before shipping.
3. Installation for UNIX
Server Installation 75

For information about sending the diagnostic information to Customer Support Services, see Information You Should Have on page 13 and Customer Support on page 13.
Procedure: How to Generate a Non-Server Trace
To generate a non-server trace:
1. Create a directory under APPROOT to reproduce the problem.
2. Copy any files required for the reproduction to the directory.
3. Switch to the directory.
4. Reproduce the problem using edastart -traceon and one of switches -t, -x, or -f.
5. Switch to a directory other than the problem reproduction directory.
6. Issue the following command:
edastart –savediag
You must preface edastart with the appropriate path, or place the directory in your systemPATH variable.
7. Respond to the prompts to capture, and optionally archive, diagnostic information.
Diagnostic information will commonly contain user data. If the release of that data isconsidered a security concern when shipping to Customer Support Services, the -savediagfeature also allows a diagnostic to be saved and shipped later to allow the site the opportunityto review and cleanse the traces of data of this nature before shipping.
For information about sending the diagnostic information to Customer Support Services, see Information You Should Have on page 13 and Customer Support on page 13.
Third-Party Software and Licenses on UNIX
As of Version 7 Release 6.8, to address display of third-party software license requirements, alicense option has been added to the Help menu located on the Web Console. This sectiondescribes the third-party software and includes references to the full licenses included in Information Builders and Third-Party Licenses on page 357.
OpenFlex SDK
OpenFlex SDK is included by Information Builders for use with its HOLD FORMAT FLEX feature.This distribution is subject to the terms and conditions of the Mozilla Public License Version1.1.
For more information, see OpenFlex SDK License on page 361 or visit our website at:
http://www.informationbuilders.com.
Third-Party Software and Licenses on UNIX
76 Information Builders

General Information for a UNIX Installation
This section covers general information for a UNIX Installation.
Sample Metadata, Data, and Other Tutorial Samples
Releases prior to 7.7.06 pre-load various samples into the IBISAMP application. As of 7.7.06,on a new installation, the IBISAMP application is created, but is not pre-loaded. The serverWeb Console has a new feature on the ribbon and on the application tree (under new),Tutorials (the Create Tutorial Framework page), which has a pull-down for various samples. TheDMC also has this feature on the application tree.
There are currently about 10 different tutorial/sample selections available on the pull-downselect list to match various customer needs. The bulk of the prior IBISAMP sample objects canbe generated by selecting the Create Legacy Sample Tables and Files tutorial. Other priorIBISAMP DataMigrator sample objects (usually starting with the characters dm*) are nowloaded by choosing their respective DataMigrator tutorials. Under the new method, thetutorials/samples may be loaded to any application, not just IBISAMP.
If you are doing just a software refresh, the prior IBISAMP objects will be unchanged (becausea refresh does not touch app directories).
Java Listener JVM Defaults
The Java Listener on AIX has a pre-set value for Maximum Java Heap Size (JVM_MAX_HEAP)because the internal default for Java for this heap size is insufficient, which causes serverfeatures to fail. The pre-set value does not reflect any specific tuning, but is simply a knownworking value. Specific tuning should be done based on application need.
Other UNIX/Linux operating systems have not shown issues with internal defaults, and are notpre-set. However, applications may benefit from tuning, and it should be done based onapplication need.
Procedure: How to Tune the Java Listener From the Web Console
To tune the Java Listener from the Web Console:
1. Select Workspace from the menu bar.
2. Open the Java Services folder.
3. Right-click DEFAULT and select Properties.
The Java Services Configuration pane opens.
4. Expand the JVM Settings section.
5. Under Non-standard JVM options, enter values in the Initial Java Heap Size and MaximumJava Heap Size fields.
3. Installation for UNIX
Server Installation 77

6. Click Save and Restart Java Services.
Limiting CPU Use on Machines With Multiple CPUs
When the effective number of CPUs (cores) on a computer exceeds the number allowed by theserver license, depending upon the license, either the server will not start or users are givenwarnings in edaprint.log and at Web Console or Data Management Console login.
To remediate the situation, the installation site has two choices:
Install the server on a computer with a physical number of CPUs that is less than or equalto the license amount.
Create a virtual environment with the number of cores that satisfies the licenserequirement, and run the server instance under that environment as outlined below.
Note that running multiple instances of the server (each under a limited virtual processor set)or adding processors to the virtual set after the server is running constitutes a licenseviolation.
The virtual environment methods, specific commands, and options that should be useddepend on the operating system vendor and what the site wants to accomplish with theoperating system supplied tools. Basic syntax examples are supplied below as an assistance.Consult your operating system documentation for further specific information on the use of therespective commands as the commands are not a server feature, but an operating systemprovided environment in which the server runs, thus the operating system vendor should beconsulted if you experience problems..
Syntax: How to Start the Server With Limited Effective CPUs for Solaris
The psrset operating system command is used to create virtual processor sets and runprocesses under them, but it also requires ID authorization. Authorization must be done by theroot by adding a line to the /etc/user_attr file. For example:
iadmin::::type=normal;defaultpriv=basic,sys_res_config
The server admin decides on and forms a set, and then uses the resulting set number in thepsrset -e command to start the server. For example:
$ psrset -c 2 3processor 2: was not assigned, now 1processor 3: was not assigned, now 1$ cd ibi/srv77/wfs$ psrset -e 1 bin/edstart -start
General Information for a UNIX Installation
78 Information Builders

Syntax: How to Start the Server With Limited CPUs for Solaris Zones
Under Solaris Zones, the psrset command cannot be used. The appropriate way to limit accessfor a zoned system is to explicitly set up the local zone with dedicated CPUs using the globalzone zonecfg command against the desired local zone, and then issue the applicable "adddedicated-cpu" subcommand and desired specific "set ncpus=" value subcommands. See theSolaris Administration Guide for the further details on zones.
Syntax: How to Start the Server With Limited Effective CPUs for HP-UX
The psrset operating system command is used to create virtual processor sets and runprocesses under them.
The server admin decides on and forms a set, and then uses the resulting set number in thepsrset -e command to start the server. For example:
$ psrset -c 2 3processor 2: was not assigned, now 1processor 3: was not assigned, now 1$ cd ibi/srv77/wfs$ psrset -e 1 bin/edstart -start
Syntax: How to Start the Server With Limited Effective CPUs for AIX
The mkrset and execrset operating system commands are used to create processor/memoryregion sets and run processes under them, but they also require ID authorization. Authorizationmust be done by the root by issuing:
chuser capabilities=CAP_NUMA_ATTACH,CAP_PROPAGATE iadmin
The server admin decides on and forms a set, and then uses the assigned name in theexecrset command to start the server. For example:
$ mkrset -c 2-3 mycorp/mycpus$ cd ibi/srv77/wfs$ execrset mycorp/mycpus bin/edstart -start
Syntax: How to Start the Server With Limited Effective CPUs for Linux (all vendors)
The taskset operating system command is used to bond a process to particular processors, ineffect creating a virtual environment.
The server admin decides on the processors to use and uses them in the taskset command tostart the server. For example:
$ cd ibi/srv77/wfs$ taskset -c 3,4 bin/edstart -start
3. Installation for UNIX
Server Installation 79

Troubleshooting for UNIX
To troubleshoot an installation problem, identify your problem in the following list, and followthe link to a description of the solution.
If you cannot find your problem described in the list, and cannot resolve it yourself, contactCustomer Support Services as described in Information You Should Have on page 13 and Customer Support on page 13.
Problems:
The server starts in safe mode (as indicated by a message in the Web Console at start up).
For details, see Problem: The Server Starts in Safe Mode on page 81.
A server start request partly fails with JVM not found messages written to the edaprint.log.
For details, see Problem: Java Listener Fails to Start With JVM not found Messages Written tothe Log on page 81.
In Linux releases only, isetup gives an immediate error about a GLIBC version not found.
This means that the underlying glibc libraries are not high enough for isetup (nor the server)to run. Examine the error message to determine which version is missing, and then installthat GLIBC RPM version (or higher), and any GLIBC dependencies, before proceeding.
Server with Non OPSYS Security where tscom300.out is also not configured as setuid doesnot write core dump information to the edaprint log, so there is no snap (core dump) in thediagnostic.
For details, see Problem: Setting ulimit to Allow Core Dumps on page 82.
Server with OPSYS Security (where tscom300.out is configured as setuid) does not writecore dump information to the edaprint log, so there is no snap (core dump) in thediagnostic.
Many UNIX environments intentionally limit the ability to read core files in setuidapplications (the mode in which Security Provider OPSYS runs) for security reasons. Onsome platforms, the feature is configurable, but the commands to activate it vary byplatform or may not be implemented in earlier OS releases. If the crash can be reproducedin an unsecured server, the core information will be produced. This is the best route toproducing a complete save diagnostic. If the server cannot be run unsecured to producethe crash, see the following for details:
Problem: Forcing Core Dump Information on Solaris on page 82.
Problem: Forcing Core Dump Information on HP-UX on page 82.
Troubleshooting for UNIX
80 Information Builders

Problem: Forcing Core Dump Information on AIX on page 83.
Problem: Forcing Core Dump Information on Linux on page 83.
Reference: Problem: The Server Starts in Safe Mode
Problem: The server starts in safe mode. The Web Console home page displays a messagestating that the server is in safe mode and describing what triggered it.
Cause: A common cause for the server starting in safe mode is a problem with the serveradministrator ID password. For example, the password may have been updated on theoperating system but not on the server, so the encrypted copy of the password stored by theserver is out of synchronization with the password on the operating system.
Solution: The server administrator can click the fix hyperlink, which is displayed under theproblem description, to display the relevant pane and resolve the problem.
For example, if the problem is that the server administrator password is out of synchronization:
1. Click the fix hyperlink displayed under the problem description.
2. In the left pane, open the Users folder, then the Server Administrator folder.
3. Click your user ID and select Properties from the pop-up menu.
The Access Control pane is displayed on the right.
4. Type the correct operating system password in the Password field, and type it again in theConfirm Password field.
5. Click Save and Restart.
The Security Mode pane opens on the right.
6. Click the Home icon in the menu bar to return to the Web Console home page.
Reference: Problem: Java Listener Fails to Start With JVM not found Messages Written to the Log
Problem: The listener start request fails with JVM not found messages written to theedaprint.log file.
Cause: If the server cannot find the Java Virtual Machine (JVM), the JSCOM Listener will not beable to start, and messages will be written to the server log stating that the JVM cannot befound.
Solution: Set up the JVM as described in JVM Requirements for Java Services (ServerInstallations Only) on page 56.
3. Installation for UNIX
Server Installation 81

Reference: Problem: Setting ulimit to Allow Core Dumps
The ulimit value of a process controls how large (in blocks) a core can grow. If the value is setto zero, no dump is produced, and the dump information is not read, therefore, a proper savediagnostic stack trace (snap) cannot be produced.
To check the current value, issue:
ulimit -c
To set a ulimit so that dump information can be produced, stop the server, set a value, andrestart:
bin/edastart -stopulimit -c 99999bin/edastart -start
The actual size value is in blocks and will vary by need. Since the need is unpredictable, selecta number and then check the dump information. If the information is incomplete, increase thevalue.
Reference: Problem: Forcing Core Dump Information on Solaris
Solaris uses the coreadm command to control the ability to produce core files.
To see the current value, issue:
coreadm
For secured servers, before the server starts, issue:
coreadm -e proc-setid
No reboot of OS or service daemons is required, but core files must have a non-zero ulimit –cvalue.
Reference: Problem: Forcing Core Dump Information on HP-UX
As of HP-UX 11.31, the coreadm command controls the ability to produce core files.
To see the current settings or values for machines that support the coreadm command, issue:
coreadm
For secured server purposes, before the server starts, issue:
coreadm -e proc-setid
Troubleshooting for UNIX
82 Information Builders

No reboot of OS or service daemons is required, but core files must have a non-zero ulimit –cvalue.
Reference: Problem: Forcing Core Dump Information on AIX
AIX uses the chdev command to control the ability to produce core files. This command is onby default, so it only needs to be adjusted if it has been turned off.
To see the current value, issue:
lsattr -El sys0 -a fullcore
For secured server purposes, before the server starts, issue:
chdev -l sys0 -a fullcore=true
Reference: Problem: Forcing Core Dump Information on Linux
While Linux has options to activate core dumps, none currently work in the context of theserver. Linux sites can only use the unsecure server method to produce a complete savediagnostic for a crash.
Reference: Problem: Process Core Dumps, Core Produced, No Snap, and Debugger Missing Error
When a process crashes, the operating system generally produces a core dump. The serversoftware is designed to detect this event and use the system debugger to extract the state ofthe crashed process from the core and produce what is known as a snap. While the specificdebugger command may vary by vendor, the standard debugger for the vendor must beinstalled or a Not Found condition on running the debugger can occur (effectively a core, but nosnap information). Some vendors install the debugger in /bin or /usr/bin, which are normallyon $PATH, but some vendors use locations not normally on $PATH. This can result in asecondary reason for a debugger Not Found condition. Once the debugger is installed and/oron the $PATH, reproducing the crash condition will then produce the snap information.
Reference: Problem: Server Fails to Start With Cannot Create Shared Memory Message Written toedaprint
The full message indicates the need to review edapth traces for r1shmop* entries with errors.If the server was not started with traces, start it with traces, and then view the edapth trace.
3. Installation for UNIX
Server Installation 83

One of the r1shmop* entries in the edapth trace will show a specific error, but a common erroris size is greater than system shared memory limit. This particular message indicates that thesystem kernel value for shared memory needs to be increased. The actual required value isgenerally a multiple of machine page size (typically 4K, but it can vary). The number of agentsa server runs, and other installed software can also be a factor, and the required value mayvary (slightly) from release to release.
There are tools, such as size and ps that will allow an experienced administrator to narrowdown the precise shared memory size requirements, considering all of the software in use.However, a good rule of thumb is to increase memory in 10% increments until a working valueis found.
Error messages other than shared memory size can occur, in which case, the system messageis displayed. These other messages may provide an administrator with enough information todetermine the appropriate action. If not, call Customer Support Services for a review. Actualkernel change commands or steps vary by vendor, so they are not explicitly outlined here.
Procedure: How to Install and Activate the Debuggable Version of the Server
In core dump (crash) situations, the stack information may or may not provide enoughinformation for a problem to be resolved. Debuggable versions of the software will generallyprovide that information, but would not normally be installed nor used due to the disk overheadthey take and they are not optimized for performance.
If a diagnostic is determined to not have enough information and use of debuggables iswarranted, Customer Support Services will inform you to install and activate the debuggableversion of the server and re-run the reproduction to capture a new diagnostic with the detailedstack to help troubleshoot the problem.
Caution: Do not activate the debuggable version unless explicitly requested to by CustomerSupport Services.
To activate the debuggable version of the server:
1. Log on with the server administrator ID (often referred to as iadmin).
2. Download the iserverd archive file (for example, .tar, .zip, or .bck) from the download siteto a local directory. Debuggables for UNIX environments are not normally shipped on theoriginal CD media, but can be made available on CD by special request to CustomerSupport Services and requires a lead time of approximately one week. If CD media isbeing used, mount the media.
3. Run the isetup installation program located in the EDAHOME bin (if download was used) orin the root directory of the CD media.
4. At the main menu, select option 4, Install Debuggables to the Installation Directory andfollow its steps supplying information similar to when the original install was performed.
Troubleshooting for UNIX
84 Information Builders

5. After completion of isetup the server may be run in debug mode with the following steps.
edastart -stopedastart -dbgonedastart -start (run until repro is completed)edastart -stopedastart -dbgoffedastart -start
6. If the debug version is no longer needed, the debuggables may be removed. If a servicepack is being installed, the debuggables must be removed to prevent mismatches with thenew release. To remove the debuggables, change the directory to the home directory ofEDAHOME and issue rm -f dbg.
Customer Support Services will provide you with additional instructions as your situationrequires.
3. Installation for UNIX
Server Installation 85

Troubleshooting for UNIX
86 Information Builders

Chapter4Installation for z/OS
The unified software for z/OS provides a choice of deployment environments, either:
Hierarchical file system (HFS) or z/OS Distributed File Service zSeries File System(zFS) files on UNIX System Services. (This manual uses the term "HFS" generically torefer to both the HFS and the zFS file systems, except where explicitly statedotherwise.)
Partitioned data set (PDS) libraries.
To compare their benefits, see Choosing How to Deploy on page 90.
In this chapter:
Information You Need Prior to Installation on zOS
zOS Installation Requirements
Installation for HFS and PDS
HFS Deployment
PDS Deployment
Information You Need Prior to Installation on zOS
You need to know your license key. These keys are for a specific number of CPUs. If morecores are detected than the license allows, the installation will be blocked.
The remedy for a core blocked installation is to obtain and use a correct license or use amachine with the correct core count (which may be a real or a virtualized environment).
Some features use additional license codes that are not specified during the installation.
You need to know your SMTP mail server information, if you will use any of the server emailnotification features.
Server Installation 87

You need a server administrator user ID, referred to as iadmin in the remainder of thischapter.
The operating system ID you use when installing the server owns the server files and is thedefault server administrator for OPSYS mode. You can create a new operating system ID torun and own the server files, or use any ordinary (non-superuser) ID. However, you shouldnot install the server as root.
zOS Installation Requirements
Before you install, review the following requirements.
Type Description
Operating System z/OS 2.1 or higher
The Information Builders Technical Support web site maintains acurrent list of supported operating systems and levels.
Disk Space For USS/HFS Deployment, approximately 2 G, however, about doublethe space is needed during installation.
For PDS Deployment, approximately 1555 cylinders of 3390 disk forHOME data sets.
IP Ports Up to six consecutive IP ports (two in reserve for typical extrafeatures).
Additional Java Listeners (post install option) require additional ports(beyond basic reserve).
Java Java JRE or Java SDK (aka JDK) 1.7 or higher
Used for Java-based adapters, server-side graphics, XBRL, or user-written CALLJAVA applications are to be used. For additionalinformation, see JVM Requirements for Java Services (ServerInstallations Only) on page 89.
Memory
Commonframework plus peragent memory.
Per Agent 20 MB
Common Framework 500 MB
zOS Installation Requirements
88 Information Builders

Type Description
Web Browser Needed for using the Web Console.
Microsoft Internet Explorer® 9 or higher.
Microsoft Edge
Mozilla Firefox® 27 or higher.
Google Chrome® 33 or higher.
Apple Safari® 7.0 or higher.
Apple Mobile iOS® v5
Opera 19 or higher.
JVM Requirements for Java Services (Server Installations Only)
The minimum Java JVM release level is 1.7 or higher, due to required internal components ofthe server. The Java Listener will not start properly (and will show errors in edaprint) if 1.7 (orhigher) is not in use.
A server start adds search directories based on JDK_HOME or JAVA_HOME variables. If JVM isfound with the correct bit size and level (1.7+), the Java Listener will start, send a startmessage to edaprint, and no further configuration is needed.
If JVM loading fails, the server will start, but should be corrected by setting JDK_HOME orJAVA_HOME to a respective home directory for a Java that matches the required bit size andrelease level. If both values are declared, JDK_HOME will be used. Set the environmentvariable in the server EDAENV environment file.
For example:
JDK_HOME=/usr/java/32/jdk1.7.0_7
Installation for HFS and PDS
Before installing, read the topics in this section for:
Guidance on choosing how to deploy on HFS in UNIX System Services or PDS.
Configuration information common to both deployments, such as the location of differenttypes of server files.
4. Installation for z/OS
Server Installation 89

An overview of which steps you will need to perform to install your server.
Choosing How to Deploy
z/OS provides you with a choice of deployment environments. You can deploy using either:
The Hierarchical File System (HFS) on UNIX System Services (USS). The HFS-deployedsoftware stores executable code and user data on the HFS. Security is provided by UNIX filesecurity and by your z/OS security package, such as RACF, eTrustࡊ CA-Top Secret®, oreTrustࡊ CA-ACF2®. You install from ISPF and start it using JCL. All other processes occurunder USS.
Partitioned data sets (PDS) which deploys software in partitioned data sets. The PDS-deployed software provides the same rich level of features as the HFS-deployed software,but removes the requirement for interaction with Unix System Services at installation timeand run time. Administration of the software, from a systems perspective, has beenstreamlined to match that of the classic MVS version of the server (also known as theSSCTL server).
The following table compares the benefits of each way of deploying on z/OS.
Feature HFS / USS PDS
File Management:
Server run-time andconfiguration files
In the UNIX Hierarchical filesystem (HFS).
In partitioned data sets (PDSs).
File Management:
User data,metadata, andprocedures
In the UNIX HFS and,optionally, in a PDS.
In a PDS and, optionally, in theUNIX HFS.
Installation for HFS and PDS
90 Information Builders

Feature HFS / USS PDS
Security Standard security packagesare supported (RACF, eTrustࡊ,CA-ACF2®, and eTrust CA-TopSecret).
All directories and files musthave their user/group/worldattributes correctly set.
A user ID with a UID of 0 (thatis, a superuser) is requiredwhen running the server withsecurity set to OPSYS or aspecial UNIXPRIV user ID canbe used.
Standard security packages aresupported (RACF, eTrust CA-ACF2,and eTrust CA-Top Secret). Noadditional security is required.
User IDs A UID of 0 (that is, asuperuser) can install, but notadminister or connect to, theserver.
Each user ID that will install,administer, or connect to theserver requires an HFSsegment with sufficient spaceand appropriate filepermissions for the tasks thatthe ID will perform.
Any user ID can install,administer, and connect to theserver.
Adapters Use a mixture of USS-basedand MVS-based libraries/APIs.
Use MVS-based libraries/APIs.
The exception is DBMSs thatsupport only USS-based libraries/APIs, such as DB2 CLI and Java-based adapters, such as MS SQLServer, which use vendorlibraries/APIs residing in thehierarchical file system.
4. Installation for z/OS
Server Installation 91

Feature HFS / USS PDS
Traces and ServerLog
Accessible from Web Console These are available on the JESoutput of the server job.
Web ConsoleStress Tool
Available from Web Console Feature not available.
Format XLSX andPPTX
Supported Not Supported
Note: As a workaround, you canSET EXCELSERVEURL to point toanother reporting server thatsupports these formats.
Adobe Flex Supported Not Supported
RACF TEMPDSNclass
Supported Supported except for FOCCACHEapp
DFM reports storedin approot app
Supported Not Supported
Use standard DFM data setsinstead.
Native ! (bang)USS OperatingSystem commandsin applications
Supported Not Supported
Adapter Flat Filevia FTP Server
Supported Not Supported
PDS deployment also requires each user of the server to be identified to USS by means of adefault segment definition. For more information, see USS Segment Requirements on page209.
File Locations
The software includes several groups of files used for installation, configuration, andadministration. These groups are implemented differently in HFS and PDS deployments:
Supplied files (EDAHOME), which contains programs and related files. For moreinformation, see Supplied Files Location (EDAHOME) on page 93.
Installation for HFS and PDS
92 Information Builders

Configuration (EDACONF), which contains the files that control the behavior of eachconfigured instance. For more information, see Configuration Files Location (EDACONF) onpage 94.
Applications (APPROOT), which is the default location for storing applications. For moreinformation, see Application Files Location (APPROOT) on page 97.
Profiles, which contains user and group profiles. For more information, see Profile FilesLocation on page 95.
Administration, which includes a file that specifies server administrators. For moreinformation, see Administration Files Location on page 96.
Supplied Files Location (EDAHOME)
The programs and related files are stored in a location referred to as EDAHOME. Theinstallation process copies the software into EDAHOME.
In HFS deployment, EDAHOME defaults to the following directory and severalsubdirectories:
ibi/srv77/home
In PDS deployment, EDAHOME defaults to the following partitioned data sets:
high_level_qualifier.P.HOME.component_type
where:
high_level_qualifier
Is the high-level qualifier for HOME.DATA and for all other data sets that theinstallation procedure allocates. We recommend that the high-level qualifier reflect therelease of the software (for example, IADMIN.SRV77). However, you can use any site-specific value.
component_type
Designates the type of server component. The values are:
ETC for script and text files.
BIN for binary-based object files.
4. Installation for z/OS
Server Installation 93

ACX for the server Access Files.
MAS for the server Master Files.
FEX for the server procedure (FOCEXEC) files.
ERR for error files.
LOAD for the load library.
Configuration Files Location (EDACONF)
The configuration files are stored in a location referred to as EDACONF. Each configuredinstance has its own EDACONF, which controls the behavior of that instance.
In HFS deployment, EDACONF defaults to the following directory and several subdirectories:
ibi/srv77/product_type
In PDS deployment, EDACONF defaults to the following partitioned data sets:
high_level_qualifier.product_type.CONF.config_type
where:
high_level_qualifier
Is the high-level qualifier for HOME.DATA and for all other data sets that theinstallation procedure allocates. We recommend that the high-level qualifier reflect therelease of the software (for example, IADMIN.SRV77). However, you can use any site-specific value.
product_type
Designates the software installation type. There will be one product_type for each typeof product that you install. The value is determined by your license key:
FFS for a Full-Function Server
DM for a DataMigrator Server
WFS for a WebFOCUS Reporting Server
Installation for HFS and PDS
94 Information Builders

WFM for a Shared Application Server for WebFOCUS Maintain
config_type
Designates the type of configuration file. The value(s) for:
The primary configuration file is CFG.
The Report Server deferred execution configuration files are DEL, REQ, RPE, RPF, RPI,RQD, RQF, RQP, and RSP.
Profile Files Location
Server profiles are stored in the following location:
In HFS deployment, the location is specified in the environment variable EDAPRFU, anddefaults to the following directory:
ibi\profiles
In PDS deployment, the location is the following partitioned data set
high_level_qualifier.product_type.CONF.PRF
where:
high_level_qualifier
Is the high-level qualifier for HOME.DATA and for all other data sets that theinstallation procedure allocates. We recommend that the high-level qualifier reflect therelease of the software (for example, IADMIN.SRV77). However, you can use any site-specific value.
product_type
Designates the software installation type. There will be one product_type qualifier foreach type of product that you install. The value is determined by your license key:
FFS for a Full-Function Server
DM for a DataMigrator Server
WFS for a WebFOCUS Reporting Server
4. Installation for z/OS
Server Installation 95

WFM for a Shared Application Server for WebFOCUS Maintain
This PDS is allocated in ddname EDAPROF in the servers JCL.
Administration Files Location
The file that specifies server administrators is located in:
In HFS deployment, the location is specified in the environment variable EDAPRFU, anddefaults to the following directory:
ibi\profiles
In PDS deployment, the location is member ADMIN of the following partitioned data set
high_level_qualifier.product_type.CONF.CFG
where:
high_level_qualifier
Is the high-level qualifier for HOME.DATA and for all other data sets that theinstallation procedure allocates. We recommend that the high-level qualifier reflect therelease of the software (for example, IADMIN.SRV77). However, you can use any site-specific value.
product_type
Designates the software installation type. There will be one product_type qualifier foreach type of product that you install. The value is determined by your license key:
FFS for a Full-Function Server
DM for a DataMigrator Server
WFS for a WebFOCUS Reporting Server
WFM for a Shared Application Server for WebFOCUS Maintain
This PDS is allocated to ddname EDACFG in the servers JCL.
Installation for HFS and PDS
96 Information Builders

Application Files Location (APPROOT)
The server application files are stored in a location referred to as APPROOT. APPROOT may beshared by applications created with other Information Builders products.
In HFS deployment, APROOT defaults to the following directory:
ibi/apps
In PDS deployment, APPROOT defaults to the following partitioned data sets:
approot.appname.type.DATA
where:
approot
Designates the root qualifier for the server applications.
appname
Designates the name of the application. There will be one appname qualifier for eachapplication.
type
Designates the type of application component. The values are:
ACCESS for Access Files.
ETG for DataMigrator flow information.
FOCEXEC for procedure files.
FTM for temporary files.
GIF for image files (both GIF and JPG).
HTML for HTML files.
MAINTAIN for Maintain files.
MASTER for Master Files.
WINFORMS for forms.
4. Installation for z/OS
Server Installation 97

DTD for XML DTD files.
FOCCOMP for foccomp files.
FOCSTYLE for stylesheet files.
SQL for SQL files.
XML for XML files.
XSD for XML XSD files.
FOCUS for FOCUS data files.
Two applications are generated automatically during installation: IBISAMP and BASEAPP, adefault application space.
Installation for HFS and PDS
98 Information Builders

Step-By-Step Installation Overview
The installation process differs somewhat, depending on how you are deploying the softwarefor z/OS. To deploy using:
HFS/USS:
1. Installation Requirements for HFS on page 100
2. Installing New on HFS on page 104
3. Starting and Stopping a Server for HFS on page 147
4. DB2 Security Exit Configuration for HFS on page 149
5. MSODDX for DD Translation for User Subroutines on page 154
6. Overriding the Time Zone Setting on page 154
7. Adding a Configuration Instance for HFS on page 154
8. Upgrading Your Server Release for HFS on page 165
9. Performance Considerations for HFS on page 189
10.General Information for a z/OS HFS Installation on page 191
11.Third-Party Software and Licenses on page 193
12.Troubleshooting for HFS on page 193
PDS:
1. Installation Requirements for PDS on page 202
2. Installing a New Server for PDS on page 210
3. Starting and Stopping a Server for PDS on page 234
4. DB2 Security Exit Configuration for PDS on page 235
5. MSODDX: DDNAME Translation for User Subroutines on page 241
6. Overriding the Time Zone Setting on page 241
7. Adding a Configuration Instance for PDS on page 241
8. Upgrading Your Server Release for PDS on page 252
9. Performance Considerations for PDS on page 274
10.General Information for a z/OS PDS Installation on page 278
11.Third-Party Software and Licenses on page 280
12.Troubleshooting for PDS on page 281
4. Installation for z/OS
Server Installation 99

HFS Deployment
The topics in this section describe how to install your software in a Hierarchical File System(HFS) environment on UNIX System Services.
Installation Requirements for HFS
Before beginning the installation, review all requirements.
Operating System Requirements
The software runs on any supported release of z/OS. For current information about supportedreleases:
1. Go to http://techsupport.informationbuilders.com.
The Information Builders Technical Support home page opens.
2. In the Quick Links section on the right side of the page, click Supported Systems/Adapters.
The Supported Systems and Adapters page opens.
3. Click the link for the release you want.
The Supported Systems and Adapters page for that release opens.
4. Click the link for your platform.
The support chart for that platform opens.
In general, the operating system should have the latest cumulative patch levels applied.
Confirm that your server installation software is labeled for your operating system level.
JVM Requirements for Java Services
If JVM-based adapters, server-side graphics, XBRL, or user-written CALLJAVA applications areto be used, a Java Runtime Environment (JRE) JVM must be installed on the machine, and theserver must be configured to use it
The minimum JVM release level is 1.7 or higher, due to required internal components of theserver. The Java Listener will not start unless 1.7 (or higher) is in use. Prior 7.x releases wouldallow the listener to start with any release, and sub-components would fail if they required ahigher Java Level. The primary reason for this change is that Java 1.5 (and prior releases) arepast their End of Service Life (EOSL) dates, and, as such, are unsupportable, in addition tolacking newer functionality. The following URL has Java EOL and EOSL information:
http://www.oracle.com/technetwork/java/eol-135779.html
HFS Deployment
100 Information Builders

Installing maintenance updates to the EDAHOME of an existing server running releases prior toproduction 7.7.05 will also have the requirement of moving up all dependent configurations touse Java 1.7 (as instructed in this section).
You may install a Java JRE or a Java SDK. When you install a Java SDK, the JRE component(where the JVM lives) is included, so either is allowed. If using servlet, the Java SDK isrequired for the jar command, so it is generally preferred over the Java JRE. The SDK or JREbuild type must also match the 32-bit or 64-bit bit type of the server. If an appropriate JVMfrom a JRE or SDK is not found on the library path or using variables as described below, or isnot the appropriate bit type, a Failed to find JVM message will be displayed. Further JavaServices debugging information about loading the JVM will be written to the server start logindicating JSCOM3 start failed as well as additional information that may be useful in resolvingthe problem. JSCOM3 is the actual process name for the Java Services Listener and the termsare often used interchangeably.
The JDK JRE bin and server (or client) subdirectories must be specified in the load library pathenvironment variable. A server restart is required, plus the appropriate JVM must be on thepath if switching JRE levels. The load library path will be prompted at install time if JVM-basedadapters or features are required. Otherwise, it can be manually set by editing the EDAENV fileusing any of the following methods.
For Java JDK, set JDK_HOME (to the install home location) in the server environmentconfiguration file (EDAENV).
For Java JRE, set JAVA_HOME (to the install home location) in the server environmentconfiguration file (EDAENV).
Use library path (LIBPATH) to set explicit pathing. Use of JDK_HOME or JAVA_HOME ispreferred as they are less prone to error. The JRE bin and server (or client) subdirectoriesmust be specified in a path-based environment variable and a server restart is required.
To change or add operating system environment variables, set and export the variable ina .profile or script that always gets called during a server start. It is very common to placevariables in the server edastart script, but it is recommended that they be placed in a scriptthat in turn calls edastart (so that the edastart script remains vanilla).
To change or add a variable in a server environment start up file (EDACONF bin\edaenv.cfg),either edit the file in a text editor before starting the server or:
1. Start the server (services like Java Listener may fail until configured and the server isrestarted).
2. Open the Web Console and log on using an administrator ID.
3. Select Workspace from the main menu.
4. Installation for z/OS
Server Installation 101

4. In the navigation pane, open the Configuration Files and Miscellaneous folders.
5. Right-click Environment - edaenv.cfg and select Edit.
6. Make the desired edit.
7. Save the file.
8. Restart the server (changes are not effective until server is restarted).
The format of edaenv.cfg variables is one per line in name=value pairs. Spaces before andafter the equal sign are optional. Values with embedded spaces do not require quoting.Variables are always uppercase.
If JVM-based adapters or features are not required, and the JVM environment is not configured,the message Failed to find JVM is normal and can be ignored.
To add classes to the JVM class path for customer-written CALLJAVA applications, set andexport the CLASSPATH variable to the operating system level before server start-up or use theWeb Console to set the Java Listener IBI_CLASSPATH property.
IP Port Number Requirements
The install process prompts for two IP port numbers: the TCP Listener and HTTP Listener. Italso uses the next two consecutive ports after the supplied HTTP Listener port for FDS use.This results in a total of four IP ports.
The supplied IP port numbers must be above the IANA registered well-known reserve range(numbers under 1024) and not over the maximum legal number (65535). Additionally, do notuse IP port numbers already being used by other applications or products. Netstat, or netstatlike commands, should reveal what actual ports are in use.
Browser Requirements
The Web Console requires one of the following web browsers:
Microsoft Internet Explorer® 9 or higher.
Mozilla Firefox® 27 or higher.
Google Chrome® 33 or higher.
Apple Safari® 7 or higher and Mobile iOS v5.
Opera 19 or higher.
HFS Deployment
102 Information Builders
Disk Space Requirements
The server disk space requirement for:
Installation is 2 GB.
Run time is a combination of the server software (620 megabytes) plus the space requiredfor applications, databases, sorts, output preparation, and logs. The actual space requiredwill depend on the number and size of the applications and databases that you deploy tothe server.
You can divide your space requirements in different ways. For example, you may choose toemploy one mount point for the working directory for users and trace files (edatemp), andone mount point for the application directory (apps). Another option is to employ one mountpoint for edatemp, and one for each individual application.
For more information about using mount points, see the IBM USS documentation.
Memory Requirements
Memory usage of a configured environment consists of the following elements:
Workspace Manager
Listeners
Concurrently running application agents
Actual memory usage depends on application features, and varies depending on theapplication. The SHRLIBRGNSIZE parameter (defined on SYS1.PARMLIB, member BPXPRMxx)can affect the amount of memory that the server address space will allocate. ForSHRLIBRGNSIZE, we recommend the default MVS installation value of 64Mb:
SHRLIBRGNSIZE(67108864)
Server memory usage:
The workspace (including Listeners) uses 200 megabytes.
Each pre-started agent requires 4 megabytes.
The minimum amount of memory for a newly installed server with no workload is 250Mb.However, depending on usage, workload, and configuration options, 500Mb is recommendedto start, to be adjusted as needed.
4. Installation for z/OS
Server Installation 103

Communications Requirements
You need four TCP/IP ports for each server instance that you configure. Three of these portsmust be consecutive. You specify these port numbers during installation. You may requireadditional ports depending on which options you configure later.
The server supports only IBM TCP/IP. It does not support Interlink or any other third-partyTCP/IP.
Installing New on HFS
To install on z/OS deployed using the Hierarchical File System (HFS) and UNIX SystemServices (USS), perform the following steps.
Step 1. Establish the HFS Directory for the Software
The installation requires a set of HFS directories where the product executable files,configuration files and sample applications are loaded. The software also uses HFS directoriesfor temporary files during the software operation, by default. Application files can be kept inthe HFS directories or in PDS.
To better control the space allocated to the software, we recommend defining a separate HFSdata set, OMVS.IADMIN, and mounting it as /u/iadmin for the exclusive use of the software.Note that both names can be changed and existing HFS data sets used as an alternative.
The sample JCL in step 1a is for 1 gigabyte of space. The total space that can be allocated toan HFS data set is dependent on the operating system release and the physical device type.Refer to IBM documentation for more information about HFS allocation. For an SMS-manageddata set, add the appropriate parameters.
Procedure: How to Establish the HFS Directory for the Software
To establish the HFS directory for the server:
1. Create the following JCL to define the HFS data set:
//********* JOB CARD GOES HERE ************//////*************DEFINE HFS ******************////DEFWEB EXEC PGM=IEFBR14//DD1 DD DISP=(NEW,CATLG),DSN=OMVS.IADMIN,DSNTYPE=HFS,// VOL=SER=VPWRKC,DCB=(DSORG=PO),// SPACE=(CYL,(1200,5),,CONTIG,ROUND)
2. Add a job card and submit the JCL.
3. Mount the file system by issuing the following commands at the command line in Option 6of ISPF:
HFS Deployment
104 Information Builders

MOUNT FILESYSTEM('OMVS.IADMIN')MOUNTPOINT ('/u/iadmin') TYPE (HFS) MODE (RDWR)
where:
OMVS.IADMIN
Is the name associated with the file system defined in Step 1.
/u/iadmin
Is the mount entry point for the file system. Specify a directory appropriate for yoursite.
The specified directory must exist before you issue the MOUNT command. Once thedirectory is created, the minimum permissions for all directory levels leading to iadminmust be 755.
4. Update your BPXPRMxx member of SYS1.PARMLIB to permanently mount the file system.
Step 2. Set Up User IDs
To install and run the software, the following types of user IDs are required:
Server installation ID (iinstal).
OPSYS Server administrator ID (iadmin).
PTH Administrator ID (srvadmin).
Server system ID (iserver).
General IDs (for connecting users).
The number of IDs and their names depend on the needs and configuration of your site.
Software Installation ID (iinstal)
An ID is required to unload the software installation from tape and to create PDSs and HFSdirectories. Many sites already have a suitable ID that they use for installing vendor software.
The sample ID name iinstal is used throughout the installation procedure to refer to this ID, butyou can choose any name. (We have omitted the second "l" from "install" due to a seven-character length restriction in some RACF and eTrustࡊ CA-Top Secret® environments.) Todefine iinstal, see Step 2A. Define the Software Installation ID on page 108.
4. Installation for z/OS
Server Installation 105

OPSYS Server Administrator ID (iadmin)
An ID is required to administer the server. It will own and have full access to server filesinstalled in the HFS directory that you specify during installation. This ID should be availableonly to users who require administrative server privileges, such as starting and stopping theserver, adding adapters, and changing run-time parameters.
The sample ID name iadmin and group isrvgrp are used throughout the installation procedureto refer to this ID, but you can choose any names. To define iadmin, if you are using:
RACF, see Step 2B/RACF. Define the OPSYS Server Administrator ID With RACF on page108.
CA-ACF2, see Step 2B/ACF2. Define the OPSYS Server Administrator ID With CA-ACF2 onpage 109.
CA-Top Secret, see Step 2B/Top Secret. Define the OPSYS Server Administrator ID With CA-Top Secret on page 109.
PTH Administrator ID
An ID is required to administer the server immediately after initial installation. This ID isdefined and maintained solely in the realm of the server.
For more information about running the server in secure mode, see Step 7. Configure ServerSecurity on page 140.
Server System ID (iserver)
If you plan to run the server with security provider OPSYS, you must create a user ID forinternal use by the server. The server will use this server system ID when it needs superuserprivileges. For example, it will use it to impersonate a connected user when the server agent iscreated.
This ID does not need TSO logon privileges. All IDs require an OMVS segment. Be sure neverto delete this ID. Doing so would cause server administration problems.
The sample ID name iserver is used throughout the installation procedure to refer to this ID,but you can choose any name.
You can define this server system ID as either:
A superuser ID. This is an ID whose security definition specifies UID(0), authorizing it toperform all z/OS UNIX functions without restriction.
To define iserver using a superuser ID, if you are using:
RACF, see Step 2C/RACF. Define the Server System User ID With RACF on page 112.
HFS Deployment
106 Information Builders
CA-ACF2, see Step 2C/ACF2. Define the Server System User ID With CA-ACF2 on page 113.
CA-Top Secret, see Step 2C/Top Secret. Define the Server System User ID With CA-TopSecret on page 113.
An ID employing profiles with UNIXPRIV for authorization, which is necessary for certainsuperuser privileges.
By granting limited superuser privileges with a high degree of granularity to an ID that doesnot have superuser authority, you minimize the number of assignments of superuserauthority at your installation and reduce your security risk.
This is supported for sites using RACF, eTrustࡊ CA-ACF2®, and eTrust CA-Top Secret. Notethat global access checking is not used for authorization checking to UNIXPRIV resources.
To define iserver using UNIXPRIV profiles, see Step 2D. Define the Server System User IDWith UNIXPRIV Profiles on page 114.
General IDs (for Connecting Users)
Any user requiring access to the server must have a non-superuser ID (that is, it must have aunique UID other than 0) and have an OMVS segment. For information about this, see Step 2E.Add the OMVS Segment to General User IDs on page 116.
User ID Installation Scenarios
There are two user ID installation scenarios:
Installation and administrator IDs are the same.
The user ID must have a unique non-zero UID. It cannot be a superuser. For this scenario,logon to TSO with this ID and do not change the default administrator ID that is presentedon the first full panel of the ISETUP installation process.
Installation and administrator IDs are different.
The installation ID can be a superuser or non-superuser, and must have authority over theadministrator ID so that it can change ownership of the server directory structure from theinstallation ID to the administrator ID. The command issued during the installation processto change ownership is shown.
The administrator ID must have a unique non-0 UID. It cannot be a superuser.
4. Installation for z/OS
Server Installation 107

Step 2A. Define the Software Installation ID
When defining the software installation ID:
The installation ID requires read access to the BPX.FILEATTR.APF facility class.
The installation ID requires an OMVS segment.
The installation ID can be any existing user ID. If it is the same as the administrator ID(iadmin), see one of the following topics for a sample definition. If you are using:
RACF, see Step 2B/RACF. Define the OPSYS Server Administrator ID With RACF on page108.
CA-ACF2, see Step 2B/ACF2. Define the OPSYS Server Administrator ID With CA-ACF2 onpage 109.
CA-Top Secret, see Step 2B/Top Secret. Define the OPSYS Server Administrator ID WithCA-Top Secret on page 109.
Step 2B/RACF. Define the OPSYS Server Administrator ID With RACF
The server administrator ID requires an OMVS segment.
To define the server administrator ID with RACF:
1. Have the Security Administrator issue the following RACF commands:
ADDUSER iadmin PASSW(xxxx)DFLTGRP(ISRVGRP)OMVS(UID(8) HOME('/u/iadmin') PROGRAM('/bin/sh)')TSO(ACCTNUM(12345) PROC(PROC01))
2. Verify that the ADDUSER command completed successfully by issuing the followingcommand, and be sure that the command is available to the iadmin ID:
[TSO] LISTUSER iadmin OMVS NORACF
You should receive the following response:
USER=iadminOMVS INFORMATION------------------------------UID=0000000008HOME=/u/iadminPROGRAM=/bin/sh
3. A Security Administrator must update the Facility classes of RACF, using the followingcommands issued with ISPF Option 6:
RDEFINE FACILITY BPX.FILEATTR.APF UACC(NONE)PERMIT BPX.FILEATTR.APF CL(FACILITY) ID(iadmin) ACCESS(READ)
HFS Deployment
108 Information Builders

4. Refresh the RACF Facility class so that these commands will take effect.
SETROPTS RACLIST(FACILITY) REFRESH
5. Continue by verifying the server administrator ID, as described in How to Verify the OPSYSServer Administrator ID on page 111.
Step 2B/ACF2. Define the OPSYS Server Administrator ID With CA-ACF2
The server administrator ID requires an OMVS segment.
To define the server administrator ID with eTrust CA-ACF2:
1. To define the ID that will administer the server, issue the following commands:
SET LIDINSERT iadmin GROUP(admin) PASSWORD(pass) STCSET PROFILE(USER) DIV(OMVS)INSERT iadmin UID(n) HOME(/) OMVSPGM(/bin/sh)
where:
iadmin
Is the ID you are creating to administer the server.
admin
Is the group in which iadmin will reside.
pass
Is the password for iadmin.
n
Is the UID.
2. Continue by verifying the server administrator ID, as described in How to Verify the OPSYSServer Administrator ID on page 111.
Step 2B/Top Secret. Define the OPSYS Server Administrator ID With CA-Top Secret
The server administrator ID requires an OMVS segment.
To define the server administrator ID with eTrust CA-Top Secret:
1. Create a department ID for everyone defined to eTrust CA-Top Secret who will be using theserver, by issuing the command
TSS CRE(dept) TYPE(DEPT) NAME('formaldepartment name')
4. Installation for z/OS
Server Installation 109
where:
dept
Is the name of the department you are creating.
formal department name
Is the label you want to associate with the new department.
2. For users within the department you just created for the server, you can define resourceaccess within a group. To define an ID for that group, issue the command
TSS CRE(deptgrp) NAME('dept group') DEPT(dept) TYPE(GROUP) GID(n)
where:
deptgrp
Is the name of the group you are creating.
dept group
Is the label you want to associate with the new group.
dept
Is the name of the department you created.
n
Is the number you want to assign to the new group.
3. Create the iadmin ID and attach it to the new department by issuing the followingcommands
TSS CRE(iadmin) NAME('iadminid') TYPE(USER) DEPT(dept) PASSWORD(pass)GROUP(deptgrp) DFLTGRP(deptgrp)
where:
iadmin
Is the ID you are creating to administer the server.
iadmin id
Is the label you want to associate with the new ID.
dept
Is the name of the department that you created.
pass
Is the password for the ID you are creating.
HFS Deployment
110 Information Builders

deptgrp
Is the group you created.
4. Issue the following command to define the user's USS shell program (using OMVSPGM),facility access (using FAC), and, optionally, the initial directory (using HOME).
The OMVS segment of the ACID defines the ACID's UID, the user's home directory, and theinitial program that the user will run. The initial program is generally the shell program thatthe user invokes.
TSS ADD(iadmin) UID(n) [HOME(/u/dir)] OMVSPGM(/bin/sh) FAC(BATCH,TSO)
where:
iadmin
Is the ID you created to administer the server.
n
Is the UID. It cannot be 0 (zero).
HOME
Defines the initial directory path name. If it is omitted, USS sets the user's initialdirectory to the root directory.
dir
Is the ID home directory.
5. Issue the following command
TSS PER(iadmin) IBMFAC(BPX.FILEATTR.APF) ACC(READ)
where:
iadmin
Is the ID you created to administer the server.
6. Continue by verifying the server administrator ID, as described in How to Verify the OPSYSServer Administrator ID on page 111.
Procedure: How to Verify the OPSYS Server Administrator ID
To verify the server administrator ID:
1. Verify that the home directory of the server administrator ID is correct by logging on to theserver administrator ID (if not already logged on) and issuing the following command fromISPF option 6:
OSHELL pwd
4. Installation for z/OS
Server Installation 111

You should receive the following response:
/u/iadmin
This directory should be the home directory specified in the UID definition for iadmin.
2. For a second confirmation, issue the following command:
OSHELL echo $HOME
You should receive the following response:
/u/iadmin
3. Verify that the server administrator ID has a unique UID and the correct GID defined byissuing the following command and press Enter:
OSHELL id
You should receive the following response:
uid=8(IADMIN) gid=50(ISRVGRP)
This UID and GID should match what is defined in the OMVS segment.
Step 2C/RACF. Define the Server System User ID With RACF
The RACF commands in this procedure must be issued by the Security Administrator. Theserver system user ID does not require logon authority.
To define the server system user ID with RACF:
1. Issue the following RACF command
ADDUSER iserver DFLTGRP(OMVSGRP) OMVS(UID(0)) NOPASSWORD
where:
iserver
Is the account you use for the system server ID.
2. Verify that the above ADDUSER command completed successfully by issuing the followingcommand:
[TSO] LISTUSER iserver OMVS NORACF
You should receive the following output:
HFS Deployment
112 Information Builders

USER=iserverOMVS INFORMATION------------------------------UID=0000000000HOME=/u/iserverPROGRAM=/bin/sh
Step 2C/ACF2. Define the Server System User ID With CA-ACF2
To define the server system user ID with eTrust CA-ACF2, issue the following commands:
SET LIDINSERT iserver NAME(iserverID) GROUP(pgm)SET PROFILE(USER) DIV(omvs)INSERT iserver UID(0) HOME(/) PROGRAM(/bin/sh)SET PROFILE(GROUP) DIV(omvs)INSERT pgm GID(n)
where:
iserver
Is the ID you are defining for the server system ID.
iserverID
Is the description you want to associate with the system server ID.
pgm
Is the ID group.
omvs
Is the name of your OMVS division.
n
Is the group ID.
Step 2C/Top Secret. Define the Server System User ID With CA-Top Secret
To define the server system user ID with eTrust CA-Top Secret:
1. Issue the following commands
TSS CRE(iserver) TYPE(USER) NAME('serversystem ID') DEPT(dept)PASS(pass,0) SOURCE(INTRDR)
4. Installation for z/OS
Server Installation 113

where:
iserver
Is the name you wish to assign to the server system ID you are defining.
dept
Is the name of the department you created in step 2b.
server system ID
Is the label you want to associate with the new ID.
pass
Is the ID password.
This password never expires.
Note that the SOURCE(INTRDR) setting prevents this ACID from logging on.
2. Define the required access for the server system ID by issuing the following command
TSS ADD(iserver) UID(0) HOME(/) OMVSPGM(/bin/sh) GROUP(deptgrp) DFLTGRP(deptgrp)
where:
iserver
Is the server system ID.
deptgrp
Is the name of the group you created in step 2b.
3. You can choose to audit the server system ID. Each time the ACID is used, an audit recordwill be written to eTrust CA-Top Secret audit tracking file. To set this option, issue thefollowing command
TSS ADD(iserver) AUDIT
where:
iserver
Is the server system ID.
Step 2D. Define the Server System User ID With UNIXPRIV Profiles
Resource names in the UNIXPRIV class are associated with z/OS UNIX privileges. In order touse authorization to grant z/OS UNIX privileges, you must define profiles in the UNIXPRIV classprotecting these resources. The UNIXPRIV class must be active. If you are using RACF,SETROPTS RACLIST must be in effect for the UNIXPRIV class.
HFS Deployment
114 Information Builders

To use profiles in the UNIXPRIV class to grant authorization for superuser privileges to a serversystem ID that does not have superuser authority (UID=0), you must assign:
READ access for SUPERUSER.FILESYS.CHOWN
CONTROL access for SUPERUSER.FILESYS
Note:
It is strongly recommended that you do you not assign TSO privileges to the UNIXPRIV userID. This can be done by adding the keyword NOPASSWORD to the RACF commandADDUSER.
The installation routine ISETUP will ask for the server system ID (default ISERVER). It willcheck if the supplied userid has a UID of 0. If it does not, UNIXPRIV authorization isassumed. This will result in an entry in the ibi/srv77/product_type/bin/edaserve.cfg file asfollows:
server_system_id = ISERVR3/PRIV
rather than
server_system_id = ISERVER
If you installed the software with the server system ID pointing to a superuser ID (UID=0), andthen decide to use UNIXPRIV userid, the value in the edaserve.cfg file must reflect the /PRIVsyntax. Edit the file manually or using the Web Console, click Workspace, Configuration/Monitor. Open the Configuration Files folder, double-click Workspace, and change theserver_system_id value before starting the server.
For more information about UNIXPRIV authorization, for:
RACF, see the IBM Security Server RACF Security Administrator's Guide.
ACF2, see the eTrust CA-ACF2 Security Cookbook.
Top Secret, see the eTrust CA-Top Secret Security Cookbook.
Example: Server System User ID With UNIXPRIV
The server system ID requires different authorities in order to be used with UNIXPRIV. Thefollowing RACF example lists the authorities for a system server ID with UNIXPRIVauthorization, named ISERVR3. Authorizations for your site may differ.
4. Installation for z/OS
Server Installation 115

Occurrences of ISERVR3In standard access list of general resource profile UNIXMAP U100122In standard access list of general resource profile TSOAUTH RECOVERIn standard access list of general resource profile TSOAUTH JCLIn standard access list of general resource profile ACCTNUM EDAIn standard access list of general resource profile UNIXPRIV SUPERUSER.FILESYS.CHOWNIn standard access list of general resource profile UNIXPRIV SUPERUSER.FILESYSOwner of profile ISERVR3.* (G)First qualifier of profile ISERVR3.* (G)In access list of group EDAUser entry exists
Step 2E. Add the OMVS Segment to General User IDs
To add the OMVS segment to general user IDs:
1. For all end-users connecting to servers, ensure that each user ID has an OMVS segment (oris set up to use a default user ID as documented in the IBM manual UNIX System ServicesPlanning).
For example, to modify an existing RACF TSO user ID profile, from ISPF Option6, issue thefollowing command
ALTUSER user_ID OMVS(UID(nnn) HOME('/u/user_ID') PROGRAM('/bin/sh'))
where:
user_ID
Is the user ID you are modifying.
Step 3. Collect Required Information for Adapters
For current information about which adapters are supported:
1. Go to http://techsupport.informationbuilders.com.
The Information Builders Technical Support home page opens.
2. In the Quick Links section on the right side of the page, click Supported Systems/Adapters.
The Supported Systems and Adapters page opens.
3. Click the link for the release you want.
The Supported Systems and Adapters page for that release opens.
4. Click the link for your platform.
The support chart for that platform opens.
HFS Deployment
116 Information Builders

You must provide information to configure the adapters that you are licensed to install. Theinstallation procedure automatically prompts you for this information. When you are promptedfor an optional steplib, ddname, or environment variable, the installation procedure willindicate this with an OPT> prompt.
If you are using non-APF-authorized DBMS libraries, you must allocate the libraries to theddname TASKLIB in IRUNJCL. The installation routine collects the information and allocatesthe required libraries in STEPLIB.
After you have installed and configured the server, you will be able to further configure youradapters using a web-based server configuration tool called the Web Console.
The following table describes what information you need to provide for each adapter that youhave. (If an adapter is not listed, no information needs to be provided for it.) Note that thetable refers to:
EDAENV. This parameter file is a member of
high_level_qualifier.product_type.DATA
IRUNJCL. This procedure starts the server, and is a member of the configuration library
high_level_qualifier.product_type.DATA
where:
high_level_qualifier
Is the high-level qualifier for HOME.DATA and for all other data sets that theinstallation procedure allocates. We recommend that the high-level qualifier reflect therelease of the software (for example, IADMIN.SRV77). However, you can use any site-specific value.
product_type
Is one of the following:
FFS for a Full-Function Server
DM for a DataMigrator Server
WFS for a WebFOCUS Reporting Server
WFM for a Shared Application Server for WebFOCUS Maintain
4. Installation for z/OS
Server Installation 117

Adapter Information you must provide
Adabas Provide the data set name for the following STEPLIB allocation:
load library
This is required only for the synonym creation process. For example, in aproduction environment in which all synonyms already exist, you can omitthis.
When you configure the adapter, you will need to provide the name of theAdabas source library and the associated data set name.
CA- DATACOM Provide the data set names for the following STEPLIB allocations:
CUSLIB load library
CAILIB load library
utility library
URT library
CA- IDMS
(both DB andSQL)
Provide the data set names for the following STEPLIB allocations:
load library
DBA load library
Provide the data set names to which the following ddnames are allocated:
SYSIDMS. Check with your CA-IDMS DBA regarding this ddname.
SYSCTL. Is the library corresponding to the central version you want touse.
Call Java You must have the JDK installed.
Provide a value for the following environment variables:
CLASSPATH. Provide the paths of the .jar files that you want to access.These paths will be appended to CLASSPATH.
This adapter requires configuration of the JSCOM3 listener. The path toJVM must be provided using either JDK_HOME or JAVA_HOME. Theinstallation will prompt for it.
HFS Deployment
118 Information Builders

Adapter Information you must provide
CICSTransaction
Provide the data set name for the following STEPLIB allocation:
CICS EXCI load library
DB2 CAF Provide the data set names for the following STEPLIB allocations:
DSNLOAD load library
For security information, see DB2 Security Exit Configuration for HFS onpage 149.
DSNEXIT load library (optional)
DB2 CLI Provide the data set names for the following STEPLIB allocations:
DSNLOAD load library
For security information, see DB2 Security Exit Configuration for HFS onpage 149.
DSNEXIT load library (optional; this is needed only for an explicitconnection).
Provide a value for the following environment variable:
DSNAOINI, which contains the full path and file name of the DB2CLI .ini file.
4. Installation for z/OS
Server Installation 119

Adapter Information you must provide
EJB You must have the JDK installed.
Provide a value for the following environment variables:
CLASSPATH. Provide the paths of the .jar files that you want to access.These paths will be appended to CLASSPATH.
If you are deploying the adapter to access an EJB on a:
WebLogic server, specify the following path:
/pathspec/weblogic.jar
WebSphere server, specify the following paths:
/pathspec/websphere.jar/pathspec/ejbcontainer.jar
(one for each EJB container)
This adapter requires configuration of the JSCOM3 listener. The path toJVM must be provided using either JDK_HOME or JAVA_HOME. Theinstallation will prompt for it.
IMS Provide the data set names for the following STEPLIB allocations:
DFSPZP load library (optional; not needed if PZP modules are stored inthe DFSRESLB library)
DFSRESLB load library
IMSBMP Provide the data set names for the following STEPLIB allocation:
DFSRESLB load library
Provide the data set names for the following FOCPSB allocation:
FOCPSB library containing FOCPSB definitions
HFS Deployment
120 Information Builders

Adapter Information you must provide
JDBC You must have the JDK installed.
Provide a value for the following environment variables:
CLASSPATH. Provide the paths of the .jar files that you want to access.These paths will be appended to CLASSPATH.
This adapter requires configuration of the JSCOM3 listener. The path toJVM must be provided using either JDK_HOME or JAVA_HOME. Theinstallation will prompt for it.
Microsoft SQLServer
Select the Call Java adapter, in addition to the Microsoft SQL Serveradapter.
Provide a value for the following environment variables:
CLASSPATH. Provide the paths to the following files. These paths willbe appended to CLASSPATH.
msbase.jar
mssqlserver.jar
msutil.jar
This adapter requires configuration of the JSCOM3 listener. The path toJVM must be provided using either JDK_HOME or JAVA_HOME. Theinstallation will prompt for it.
Millennium Provide the data set name for the following STEPLIB allocation:
load library
Model 204 Provide the data set name for the following STEPLIB allocation:
load library
MQSeries Provide the data set names for the following STEPLIB allocations:
SCSQLOAD load library
SCSQAUTH load library
4. Installation for z/OS
Server Installation 121

Adapter Information you must provide
NATURALBatch
Provide the data set name for the following STEPLIB allocation:
NATURAL load library
SAP (SQL) Provide values for the following environment variables:
LIBPATH, which contains the path to SAP RFC SDK.
SAP_CODEPAGE=0126, or the correct SAP code page for your languageenvironment.
SAP BW Provide values for the following environment variables:
LIBPATH, which contains the path to SAP RFCSDK.SAP_CODEPAGE=0126, or the correct SAP code page for yourlanguage environment.
Supra Provide the dataset name for the following STEPLIB allocations:
LINKLIB load library.
INTERFLM load library.
ENVLIB load library.
Provide the dataset name to which the following ddname is allocated:
CSIPARM containing the CSIPARM definition, which in turn points to theCentral PDM you are accessing.
CSISYSIN containing the parameters used for connecting the multi-session adapter to the Central PDM.
VSAM CICS Provide the data set name for the following STEPLIB allocation:
SDFHEXCI load library
HFS Deployment
122 Information Builders

Step 4. Access the Installation Software
You can choose to access the server installation software using either:
Tape. The software is provided on a 3490 or 3590 cartridge.
You must unload the installation data set from the tape before you can run the installation.This is how most installations are performed.
FTP. You download the installation software from the Information Builders download site.
Downloading the installation software involves:
1. Registering at the Information Builders download site.
2. Downloading the installation data set from the site.
3. Running the isetup procedure to complete the download process and install thesoftware.
Procedure: How to Unload the Installation Software From Tape
The software is provided on a cartridge in 3490 or 3590 format with MVS PDSs. Perform thefollowing to unload the installation data set from the tape:
1. Log on to TSO.
2. Run an IEBCOPY job to allocate and unload the qualifier.HOME.DATA data set. This PDScontains the members needed for the actual installation.
It is recommended that you use HOME.DATA as the low-level qualifier for the target dataset. Although you can specify any low-level qualifier, HOME.DATA enables the installationprocedure to generate default data set names, simplifying your installation.
Note: If you do not use HOME.DATA, then change the following line to reflect the value youused.
// SET EDAUSSD='HOME.DATA'
Do this before you run ISETUP.
The following sample JCL is for the initial unload to a new data set:
4. Installation for z/OS
Server Installation 123
//IEBCOPY EXEC PGM=IEBCOPY,REGION=0M//SYSPRINT DD SYSOUT=*//SYSUT1 DD UNIT=workunit,SPACE=(CYL,(5,1))//OUT1 DD DISP=(NEW,CATLG,DELETE),// DSN=qualifier.HOME.DATA,// DCB=(RECFM=FB,LRECL=80,BLKSIZE=3200),// SPACE=(CYL,(5,5,25)),// UNIT=SYSDA//IN1 DD DISP=(OLD,PASS),// DSN=HOME.DATA,// UNIT=cart,// VOL=(,RETAIN,,SER=volser),// LABEL=(1,SL)//SYSPRINT DD SYSOUT=*//SYSIN DD * COPY INDD=IN1,OUTDD=OUT1
where:
workunit
Is the unit for the work data set.
qualifier
Is the high-level qualifier for HOME.DATA and for all other data sets that theinstallation procedure allocates. We recommend that the high-level qualifier reflect therelease of the software. However, you can use any site-specific value.
For PDS, we recommend retaining the low-level qualifier HOME.DATA, but you canchange this to any site-specific value. If you use a low-level qualifier other thanHOME.DATA, you must then edit member PDSSNAME to change the string“HOME.DATA” to the low-level qualifier you specify here.
cart
Is the unit type of the tape drive. Common names include 3490, TAPE, and 3590.Change as needed.
volser
Is the value shown on the media label.
After this job has run, qualifier.HOME.DATA is allocated, cataloged, and populated with themembers needed to continue the product installation.
Procedure: How to Download the Installation Software Using FTP
To download the installation software:
1. Go to http://techsupport.informationbuilders.com.
HFS Deployment
124 Information Builders

The Information Builders Technical Support home page opens.
2. Click My Downloads in the My Account section on the right side of the page.
The Downloads, Upgrades, Service Packs, and PTFs page opens.
3. Click the link for your product (for example, WebFOCUS and iWay Server and iWay Client).
The Downloads by Release page for your product opens.
4. Click your release from the Current Production Releases list.
The Software Downloads page for your release opens.
5. Scroll down and find the platform on which you want to install the server, and then clickDownload to the right of the platform name.
6. Fill in the registration form and then click Continue.
The Software Download Agreement page opens.
7. Select I agree... to consent to the Download Agreement, and then click Continue.
The Download Instructions page opens. Select AUTOMATIC or MANUAL and follow therelevant instructions.
A copy of the instructions is automatically emailed to you for later reference.
8. Log on to TSO.
9. Follow the instructions on the Download Page in your TSO session.
10. Review Optional Low-Level Qualifier Changes on page 126. If you did not restore the firstdata set as HOME.DATA (see download instructions) then change the following line toreflect the data value you used:
// SET EDAUSSD='HOME.DATA'
11. Run the ISETUP procedure.
Specify (F)tp for Input Source on the second panel.
Note that after the server is properly installed, you can optionally delete any downloadedtemporary files.
Continue with Step 5. Run ISETUP on page 126.
4. Installation for z/OS
Server Installation 125

Reference: Optional Low-Level Qualifier Changes
We recommend retaining the default low-level qualifiers that are supplied for the installationlibraries. However, if you need to change any of them (for example, to conform to site-specificnaming conventions), you can do so by editing them in member PDSSNAME ofhigh_level_qualifier.HOME.DATA. You can see a list of the qualifiers in Default Low-LevelQualifiers on page 126.
Caution: If you change any low-level qualifiers and do not reflect those changes exactly inUSSSNAME, you will experience problems with the server installation and operation.
Once you have finished changing any names, continue with Step 5. Run ISETUP on page 126.
Reference: Default Low-Level Qualifiers
The following low-level qualifiers are set in high_level_qualifier.HOME.DATA(PDSSNAME):
// SET EDAUSSD='HOME.DATA' Server installation library// SET EDAUSSL='HOME.LOAD' Server base load library // SET FFSUSSD='FFS.DATA' Full Function server // SET WFSUSSD='WFS.DATA' WebFocus Reporting server // SET ETLUSSD='DM.DATA' DataMigrator // SET WFMUSSD='WFM.DATA' WebFocus Maintain Server // SET CGWUSSD='CGW.DATA' Communications Gateway // SET CLNUSSD='CLN.DATA' Client // SET EDACICS='HOME.CICS.LOAD' CICS load library
Step 5. Run ISETUP
Server installation consists of a series of ISPF panels, which gather the required information.After the panel dialog is complete, JCL is created and submitted to install the server on z/OS.This JCL job retrieves the remainder of the MVS libraries and HFS files from the media andconfigures a basic working server.
1. Execute the ISETUP member of your high_level_qualifier.HOME.DATA using ISPF option 6.
HFS Deployment
126 Information Builders

The first Installation and Configuration panel opens.
4. Installation for z/OS
Server Installation 127

2. Type 1 and press Enter to continue to the next panel.
The following panel opens.
3. Complete the panel as follows.
Field Instructions
Enter selection Accept the default value 1, Install and Configure, for a newinstallation.
For option 2, Add Additional Configuration Instance, see Adding a Configuration Instance for HFS on page 154.
For option 3, Refresh Installation, see Upgrading Your ServerRelease for HFS on page 165.
Enter License Key Enter the license key that was provided with the software.
Be sure to store this key in a safe place for future reference.
HFS Deployment
128 Information Builders

Field Instructions
Input source Enter the input source:
T for Tape - If you received your software on tape media.
D for Disk - If you selected manual download from thedownload instructions.
F for FTP - If you selected automatic download from thedownload instructions.
Installation Userid Shows the current logon ID. It cannot be changed.
OPSYS AdministratorUserid
Initially, this field shows the same ID as the installation userID.
If the installation user ID is a superuser (UID=0), you mustspecify a non-superuser ID to administer the server. Specifythis ID here.
PTH AdministratorUserid
An ID is required to administer the server immediately afterinitial installation. This is defined and maintained solely in therealm of the server. Defaults to srvadmin and it can bechanged here.
For more information about running the server in securemode, see Step 7. Configure Server Security on page 140.
PTH AdministratorPassword
Password for the PTH Administrator ID. It cannot be left blankand must be matched at Retype field.
4. Installation for z/OS
Server Installation 129

Field Instructions
Umask setting to use Shows the current umask setting for the iadmin ID. The JCLpasses this setting to the server for use at run time.
Every time the server creates a file in the .../ibi/profilesor .../ibi/apps directory structures (usually in response toWeb Console activity), the server assigns to the file thedefault permissions 666 filtered by the umask value. Youspecify whichever umask value is necessary to mask out thepermissions you do not want to grant.
For example, if you specify a umask value of 0022, the servercreate files with the permissions 644: umask 0022 issubtracted from the default 666, disallowing the group andworld write permissions.
Enter Job Cardinformation
To provide JOB card information for submitting jobs to the JESqueue, provide a valid job name (a maximum of sevencharacters following the // on the first JCL line), whichdefaults to the user ID that you are currently using.
This job name is used for multiple submissions (for example,jobnameA, jobnameB, jobnameC, and so on) in the JCLgenerated by the installation procedure.
Override JOB namechecking
To provide your own JOB card information, including JOBname, enter Y and provide valid JOB card information in theEnter Job Card information field. The JOB card informationthat you enter will be used for each job that is submitted.
If you used the same user ID for both installation and administration, skip to Step 6.Otherwise, continue with Step 4.
4. Press Enter to continue to the next panel.
HFS Deployment
130 Information Builders

The following panel opens.
This panel appears only if you provided two different user IDs in the previous panel.
The installation process will change ownership of HFS files from the installation ID (iinstal)to the administrator ID (iadmin). The installation ID must have authority to issue the chowncommand to make this change of ownership. This action is taken at the end of theinstallation process.
5. Complete the panel as follows.
Field Instructions
Enter Job Cardinformation
To provide JOB card information for submitting the run-time jobsto the JES queue, provide a valid job name (a maximum of sevencharacters following the // on the first JCL line), which defaultsto the user ID that you are currently using.
This job name is used for multiple submissions (for example,jobnameA, jobnameB, jobnameC, and so on) in the JCL generatedby the installation procedure.
4. Installation for z/OS
Server Installation 131

Field Instructions
Override JOB namechecking
To provide your own JOB card information, including JOB name,enter Y and provide valid JOB card information in the Enter JobCard information field. The JOB card information that you enterwill be used for each run-time job that is created.
6. Press Enter to continue to the next panel.
This following panel only appears if FTP was previously selected. Otherwise, skip to Step 8.
7. Complete the panel as follows.
Field Instructions
FTP Download Directory This defaults to the current userid home directory plus /download. Change the value to an existing directory nameor leave unchanged (/download will be created).
FTP Userid Cut and paste from the download instructions
FTP Password Cut and paste from the download instructions
8. Press Enter to continue to the next panel.
Note that in the current panel (and some later panels), if you are running ISETUP from:
high_level_qualifier.HOME.DATA, the panel will display default values for some fields.
Any other library, the panel will not display any default values.
HFS Deployment
132 Information Builders

In this and some later panels, you can see a field default value (if one exists) by blankingout the field and pressing Enter.
Complete the panel as follows.
Field Instructions
Input Media (installing from tape only)
Volume serial number Provide the volume serial number of the server media. Thenumber is located on the tape supplied in you server package.
Work unit type Review the default value and change if necessary.
You can specify a UNIT= type value (for example, SYSDA), oryou can direct work files to a specific volume serial number byspecifying, in single quotation marks ('),'SYSDA,VOL=SER=volume'.
Input Media (installing from disk/FTP only)
4. Installation for z/OS
Server Installation 133

Field Instructions
Directory name ofinput
Provide the name of the directory in which the installation filesreside.
General Installation Parameters
Base Directory This indicates where to install the software. The default valueis the home directory of the user ID you are using to install theproduct. Change this value, if necessary, to a valid directorythat has space for the installation. The installation procedurechecks whether this directory exists and has enough space. Ifeither test fails, you will receive a message indicating thefailure and available options.
Application Directory This indicates where application components will reside. Thedefault value is based on the value specified for BaseDirectory. To specify another location for applicationcomponents, change the value for this field.
Profile & AdminDirectory
This indicates where user profiles and administration files willreside. The default value is based on the value specified forBase Directory. To specify a different location for applicationcomponents, change the value for this field.
Server System Userid This shows the default value, ISERVER. To change this value,see the requirements in Step 2. Set Up User IDs on page 105.
HTTP Listener Port This indicates the port number that the server will use forHTTP. It is the first of three connection ports that must beavailable to the server.
For example, if you choose port 8101, then ports 8101, 8102,and 8103 are used by the server. Ensure that you chooseports that are not currently being used.
TCP Listener Port This is the port number of the TCP Listener.
The default is one less than the port specified for the HTTPListener, but it can be any port number other than the threereserved for HTTP.
HFS Deployment
134 Information Builders

Field Instructions
MVS Installation Libraries
EDACONF Library This is the full data set name the installation procedure willuse to allocate the EDACONF configuration library on MVS. Ifyou are running from high_level_qualifier.HOME.DATA, this fieldwill have the default valuehigh_level_qualifier.product_type.DATA (where product_type isbased on license key). If you used another name to unload thefirst data set, this field will be blank. On subsequent runningof ISETUP, the previous value used will be displayed. Changethe value as necessary.
EDACONF Library Unit/Type
These show the values that the installation process will use toallocate the EDACONF library on MVS. If necessary, you canchange these to site-specific values.
Type can be VOL=SER (default), DATACLAS, MGMTCLAS, orSTORCLAS.
EDAHOME Library This is the full data set name the installation procedure willuse to allocate the EDAHOME load library on MVS. If you arerunning from high_level_qualifier.HOME.DATA, this field willhave the default value high_level_qualifier.HOME.LOAD. If youused another name to unload the first data set, this field willbe blank. On subsequent running of ISETUP, the previousvalue used will be displayed. Change the value as necessary.
EDAHOME LibraryUnit/Type
These show the values that the installation process will use toallocate the EDAHOME load library on MVS. If necessary, youcan change these to site-specific values.
Type can be VOL=SER (default), DATACLAS, MGMTCLAS, orSTORCLAS.
9. Press Enter to continue to the next panel.
Depending on your license key, the Data Adapter panel may open before the DemonstrationFiles panel. If the Data Adapter panel opens, continue with Step 10. Otherwise, skip toStep 11.
10.The Data Adapter panel lists adapters that require the allocation of MVS libraries inIRUNJCL or environment variables in the EDAENV member.
4. Installation for z/OS
Server Installation 135

To select specific adapters:
a. Type Y next to the required adapters and press Enter.
b. Supply the requested information, which is described in Step 3. Collect RequiredInformation for Adapters on page 116.
After you have finished installing and configuring, you can use the Web Console to finishconfiguring these adapters, and to configure adapters that do not have MVS JCLrequirements.
c. Press Enter to continue to the next panel.
The JSCOM3 Listener configuration panel opens.
11.Configuration of the JSCOM3 Listener is either optional or mandatory depending on whichadapters were selected. If any Java-based adapters were selected (EJB, Call Java, JDBC,Microsoft SQL Server), the configuration is mandatory.
a. The panel will prompt for the path to the Java environment to be passed to eitherJDK_HOME or JAVA_HOME, as described in JVM Requirements for Java Services on page100.
b. If no Java-based adapters were select, this configuration might still be desirable toenable server-side graphics and Adobe® Flex® features. To skip the configuration, leavethe path blank.
12.Press Enter to continue to the next panel.
The confirmation panel opens.
HFS Deployment
136 Information Builders

13.Ensure that all values on the Confirmation panel are correct, then select one of thefollowing options:
N to return to the initial panel so that you can change installation values.
C to create JCL which you can submit at a later time. The JCL is placed in yourhigh_level_qualifier.product_type.DATA configuration library.
S to create JCL and submit the job immediately.
Note: If FTP was selected, JCL will be created to download the server software and run theinstall and configuration process.
14.As the job is processed, in SDSF, check JESLOG for errors and return codes.
The following is a table of the jobs created. All members are created in the configuration library(EDACONF).
Job Description
ISETUPJ1 Main JCL Job stream that is used to install the software. For FTPprocessing, this JCL can be restarted at any step due to a previous failure.To do this, add RESTART = procname.stepname to the JOB card andresubmit the ISETUPJ1 JCL.
ISOPTS1 Options used to install the server.
The following members all call procedure IRUNJCL, which is the main server JCL. If you need tochange the server JCL, change member IRUNJCL.
Member Description
ISTART Starts the server.
ISTOP Stops the server.
ICLEAR Clears server resources after abnormal end.
ICLRDIR Clears superuser-owned directories from a previously run secure server.
ISAVEDIA Creates a directory called sdnnnnnn and populates it with full diagnosticinformation.
ISHOW Shows current workspace status.
4. Installation for z/OS
Server Installation 137

Member Description
ITRCON Turns on dynamic tracing (server will be started if not already running).
ITRCOFF Turns off dynamic tracing (server will be started if not already running).
The following members contain batch JCL for auxiliary functions, and are also created in theconfiguration library.
Member Description
CMRUN JCL to run DataMigrator batch jobs.
DB2V9PRM DB2 version 9 DBRM referenced in GENDB2 JCL.
DB2V10PR DB2 version 10 DBRM referenced in GENDB2 JCL.
DB2V11PR DB2 version 11 DBRM referenced in GENDB2 JCL.
GENDB2 JCL to bind the DB2/CAF plan.
IIMSBMP Example JCL to run the IMS/XMI server job in BMP mode.
IIMSDLI Example JCL to run the IMS/XMI server job in DLI mode.
IRDAAPPC Example CLIST to run RDAAPP Client test tool.
IRDAAPPJ Example JCL to run RDAAPP Client test tool.
The following members contain sample started task JCL, and are also created in theconfiguration library.
Member Description
IWAYS A started task that starts the server.
IWAYP A started task that stops the server.
EDAPRMP A parameter file used by IWAYP.
EDAENV A parameter file used by IWAYS, IWAYP, ISTART, and ISTOP.
HFS Deployment
138 Information Builders
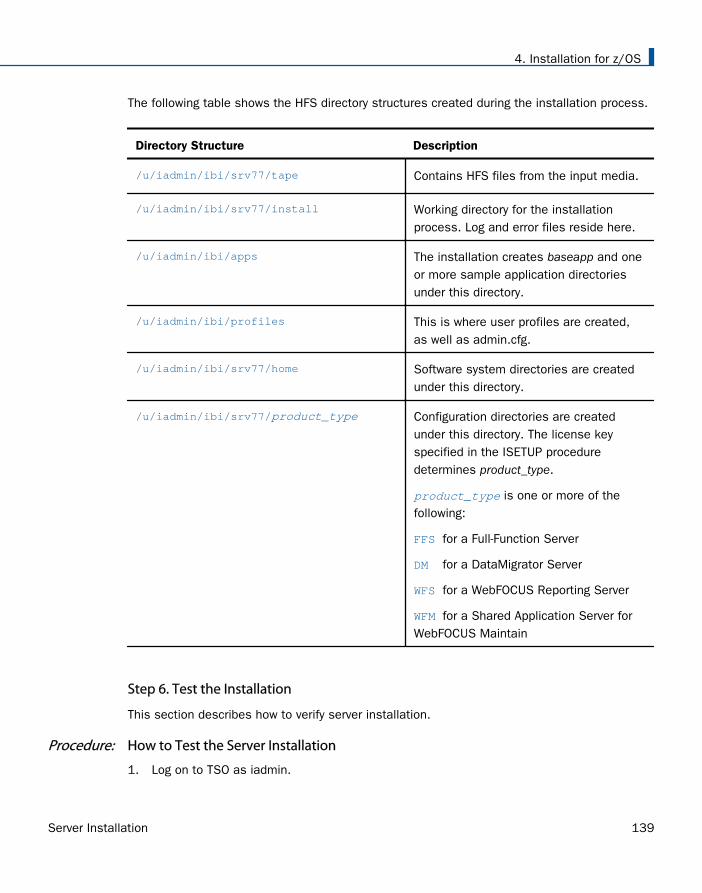
The following table shows the HFS directory structures created during the installation process.
Directory Structure Description
/u/iadmin/ibi/srv77/tape Contains HFS files from the input media.
/u/iadmin/ibi/srv77/install Working directory for the installationprocess. Log and error files reside here.
/u/iadmin/ibi/apps The installation creates baseapp and oneor more sample application directoriesunder this directory.
/u/iadmin/ibi/profiles This is where user profiles are created,as well as admin.cfg.
/u/iadmin/ibi/srv77/home Software system directories are createdunder this directory.
/u/iadmin/ibi/srv77/product_type Configuration directories are createdunder this directory. The license keyspecified in the ISETUP proceduredetermines product_type.
product_type is one or more of thefollowing:
FFS for a Full-Function Server
DM for a DataMigrator Server
WFS for a WebFOCUS Reporting Server
WFM for a Shared Application Server forWebFOCUS Maintain
Step 6. Test the Installation
This section describes how to verify server installation.
Procedure: How to Test the Server Installation
1. Log on to TSO as iadmin.
4. Installation for z/OS
Server Installation 139

2. Submit the ISTART JCL to start the server. This executes the IRUNJCL proc.
3. Check the job output for errors. Look for the EDAPRINT message:
(EDA13023) ALL INITIAL SERVERS STARTED
4. Start the Web Console by opening a browser pointed at the listener port of the server. TheURL format is
http://host:port
where:
host
Is the name of the machine on which the server is installed.
port
Is one port higher than the port specified when installing the server. For example, ifyou specified port 8100 during installation, then use port 8101 to access the WebConsole.
The Web Console opens.
5. If the Web Console opens and displays application tree folders in the left pane, the serveris working because it uses its own underlying data access and reporting technologies tovisualize the application tree. The server may be further data tested (if desired).
6. Continue with adapter configuration, as described in the Adapter Administration manual.
When you are finished using the server, you can use the Web Console to stop the server bygoing to the Web Console menu bar, selecting Workspace, and then Stop.
If you experience problems at start up, examine the job output for more information.
Step 7. Configure Server Security
If you will be configuring your server with an OPSYS security provider, you must perform theinstructions in the following topics. (For PTH, DBMS, and LDAP security providers, skip thesetopics.)
How to Configure Security With All Security Products on page 143, regardless of whichsecurity product you use.
How to Configure Security With eTrust CA-ACF2 on page 143 if you use eTrust CA-ACF2.
How to Configure Security With eTrust CA-Top Secret on page 144 if you use eTrust CA-TopSecret.
HFS Deployment
140 Information Builders

You can see a full description of all server security providers in the Web Console help, andalso in the Server Administration manual. To see it in the Web Console:
1. From the Web Console menu bar, select Help, then Contents and Search.
The Web Console Help window opens.
2. In the left pane, expand Server Administration.
Security Providers
The default security provider for a new installation is the internal security provider, PTH. ThePTH provider implements security using user IDs, passwords, and group memberships storedin the admin.cfg configuration file.
After the initial installation, the Server Administrator that was configured during the installationcan start the server and use the Web Console to further customize security settings, forexample, to configure alternate or additional security providers, create additional PTH IDs, andregister groups and users in a security role. For more information about security providers, seethe Server Security chapter in the Server Administration manual.
Procedure: How to Satisfy Security Provider OPSYS Requirements
To run a server with security provider OPSYS, you must perform the following steps. You mustdo this once after installing and after each refresh of the server with fixes.
Set up tscom300.out as a root-owned SUID program:
1. If the server is running, bring it down.
2. Log on to the system as root, or issue the su root command.
3. Change your current directory to the bin directory of the home directory created during theinstallation procedure.
For example, type the following command:
cd /home/iadmin/ibi/srv77/home/bin
4. Change file ownership and permissions by typing the following commands:
chown root tscom300.outchmod 4555 tscom300.out
5. Verify your changes by issuing the following command:
ls -l tscom300.out
The output should be similar to the following:
-r-sr-xr-x 1 root iadmin 123503 Aug 23 04:45 tscom300.out
4. Installation for z/OS
Server Installation 141

Note the permissions and ownerships.
When you start the server, it will now run with security provider OPSYS.
The chmod and chown steps will need to be repeated after any server upgrade since thetscom300.out file is replaced during upgrade and the attributes are lost.
Note: If this Security Provider OPSYS step has been configured and the site later decides toswitch to Security OFF, special steps must be taken to ensure the mode remains after a fullserver shutdown (where edastart -start is used to restart the server). The steps are:
1. After the server recycles from the change to OFF, use the Web Console to open theenvironment configuration file of the server by clicking Workspace and expanding theConfiguration Files folder, followed by the Miscellaneous folder.
2. Double-click Environment - edaenv.cfg to edit the file and add the EDAEXTSEC=OFF variable.
3. Save your work.
After the next full server shutdown, be sure to do an edastart -cleardir before restarting theserver. This will clear any root owned files that would prevent a security OFF server fromstarting.
Preventing Unsecured Server Starts After Upgrades
If the server cannot impersonate users because it lacks platform-specific authorization steps,the server start aborts and error messages are written to the edaprint log.
This feature prevents an unsecured server start after a software upgrade if any of the requiredpost-upgrade reauthorization steps are missed on a UNIX, IBM i, or z/OS HFS deployment. Thisis not applicable to other platforms. The setting may be placed in any normal server start-upshell or profile that a site is using or in the server edaenv.cfg environment configuration file.The messages vary slightly by platform.
The edaprint messages are:
Configured security is 'ON' as set by EDAEXTSEC variable.
Server has no root privilege.
Workspace initialization aborted.
(EDA13171) UNABLE TO START SERVER
HFS Deployment
142 Information Builders

Procedure: How to Configure Security With All Security Products
To configure server security with RACF, eTrust CA-ACF2, or eTrust CA-Top Secret:
1. Log on to TSO using an ID with read access to the BPX.FILEATTR.APF facility class.
2. Using the name of the actual EDAHOME directory, change file attributes by entering thefollowing TSO commands in ISPF Command Shell (option 6):
OSHELL extattr +a /u/iadmin/ibi/srv77/home/bin/tscom300.outOSHELL extattr +a /u/iadmin/ibi/srv77/home/bin/tsqprx.out
3. Verify your changes by issuing the following command:
OSHELL ls -E /u/iadmin/ibi/srv77/home/bin/tscom300.outOSHELL ls -E /u/iadmin/ibi/srv77/home/bin/tsqprx.out
The extended attributes portion of the output should be a-s-.
4. The libraries allocated to STEPLIB in IRUNJCL must be APF-authorized. Any non-APF-authorized libraries must be allocated to the TASKLIB DDNAME.
5. Test server security by repeating the process described in Step 6. Test the Installation onpage 139.
Procedure: How to Configure Security With eTrust CA-ACF2
If you are installing the server to run with eTrust CA-ACF2 security package, you may have toapply fix number QO71149 for eTrust CA-ACF2 6.4 or QO51462 for eTrust CA-ACF2 6.5. If youare installing the server under z/OS 2.1 or higher to run with eTrust CA-ACF2 14.0, PTFRO24848 may have to be applied if server USS user IDs are to be defined using the USSdefault segment. For more information about these fixes, contact Computer Associates.
The MVS address space must have access to those system resources that are required byeach user. eTrust CA-ACF2 will check for job-level access as well as user-level access.Therefore, the job-level user ID must have access to all data sets. For example, this can bedone by setting the MAINT attribute on the eTrust CA-ACF2 record for the job-level user ID.Refer to eTrust CA-ACF2 technical reference guides for further information.
The job-level user ID of the server should have the Multiple User, Single Address Space(MUSSAS) attribute set to on. If the server is run as a started task, you must enable thestarted task attribute for the job-level user ID. You must also use the Web Console to definethis user ID with OPER authority. For more information, see the Server Administration manual.
Each user ID must be defined to eTrust CA-ACF2.
To create the necessary logon IDs and profile records, issue the following commands:
4. Installation for z/OS
Server Installation 143

ACFSET LIDINSERT OMVS GROUP(OMVSGRP) STC UID(0)INSERT INETD GROUP(OMVSGRP) STC UID(0) HOME(/) OMVSPGM(/bin/sh)INSERT TCPIP GROUP(OMVSGRP) STC UID(0)
For more information, see the following sections in Computer Associates eTrust CA-ACF2Security for z/OS and OS/390 Cookbook:
Defining USS Users
Superusers
HTTP Server
Installation Steps
Procedure: How to Configure Security With eTrust CA-Top Secret
If you use Computer Associates eTrust CA-Top Secret, follow these guidelines and refer to thesecurity vendor manual for implementing user-level security.
The TSS PERMIT command for BPX.FILEATTR.APF facility class access is:
TSS PER(user_acid) IBMFAC(BPX.FILEATTR.APF) ACC(READ)
This allows users to turn on the APF-authorized attribute for an HFS file. Please refer to z/OSUNIX System Services Support in the eTrust CA-Top Secret Security Cookbook for moreinformation.
To use eTrust CA-Top Secret, perform the following steps:
1. Create a eTrust CA-Top Secret facility entry for the server security module, *PATHNAM.
This is an example of a facility entry defining the server to eTrust CA-Top Secret:
FACILITY DISPLAYPGM=*PATHNAM ID=9 TYPE=26ATTRIBUTES=IN-USE,ACTIVE,SHRPRF,ASUBM,TENV,NOABEND,MULTIUSER,NOXDEFATTRIBUTES=LUMSG,STMSG,SIGN(M),NOPSEUDO,INSTDATA,NORNDPW,AUTHINITATTRIBUTES=NOPROMPT,MENU,NOAUDIT,RES,NOMRO,WARNPW,NOTSOCATTRIBUTES=NOTRACE,NOLAB,NODORMPW,NONPWR,NOIMSXTNDMODE=IMPLLOGGING=ACCESS,INIT,SMF,MSG,SEC9UIDACID=8 LOCKTIME=000 DEFACID=*NONE* KEY=8
For more information, see How to Define z/OS UNIX System Services Users in ComputerAssociates' eTrust CA-Top Secret Security for OS/390 and z/OS Cookbook.
2. Within this entry, include eTrust CA-Top Secret parameters to establish the proper operatingcharacteristics.
HFS Deployment
144 Information Builders
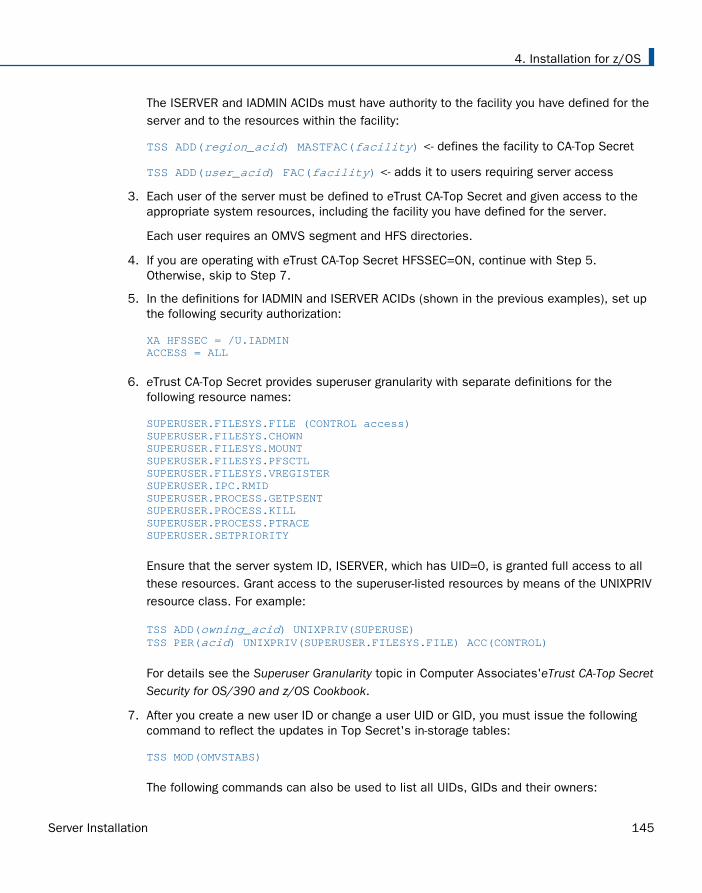
The ISERVER and IADMIN ACIDs must have authority to the facility you have defined for theserver and to the resources within the facility:
TSS ADD(region_acid) MASTFAC(facility) <- defines the facility to CA-Top Secret
TSS ADD(user_acid) FAC(facility) <- adds it to users requiring server access
3. Each user of the server must be defined to eTrust CA-Top Secret and given access to theappropriate system resources, including the facility you have defined for the server.
Each user requires an OMVS segment and HFS directories.
4. If you are operating with eTrust CA-Top Secret HFSSEC=ON, continue with Step 5.Otherwise, skip to Step 7.
5. In the definitions for IADMIN and ISERVER ACIDs (shown in the previous examples), set upthe following security authorization:
XA HFSSEC = /U.IADMINACCESS = ALL
6. eTrust CA-Top Secret provides superuser granularity with separate definitions for thefollowing resource names:
SUPERUSER.FILESYS.FILE (CONTROL access)SUPERUSER.FILESYS.CHOWNSUPERUSER.FILESYS.MOUNTSUPERUSER.FILESYS.PFSCTLSUPERUSER.FILESYS.VREGISTERSUPERUSER.IPC.RMIDSUPERUSER.PROCESS.GETPSENTSUPERUSER.PROCESS.KILLSUPERUSER.PROCESS.PTRACESUPERUSER.SETPRIORITY
Ensure that the server system ID, ISERVER, which has UID=0, is granted full access to allthese resources. Grant access to the superuser-listed resources by means of the UNIXPRIVresource class. For example:
TSS ADD(owning_acid) UNIXPRIV(SUPERUSE)TSS PER(acid) UNIXPRIV(SUPERUSER.FILESYS.FILE) ACC(CONTROL)
For details see the Superuser Granularity topic in Computer Associates'eTrust CA-Top SecretSecurity for OS/390 and z/OS Cookbook.
7. After you create a new user ID or change a user UID or GID, you must issue the followingcommand to reflect the updates in Top Secret's in-storage tables:
TSS MOD(OMVSTABS)
The following commands can also be used to list all UIDs, GIDs and their owners:
4. Installation for z/OS
Server Installation 145

TSS WHOOWNS UID(*)TSS WHOOWNS GID(*)
This information can be used for diagnostic purposes.
For more information, see Computer Associates eTrust CA-Top Secret Security for OS/390and z/OS Cookbook.
Example: Facility Entry Defining the Server to CA-Top Secret
The following is an example of a facility entry that defines the server to eTrust CA-Top Secret:
FACILITY DISPLAYPGM=*PATHNAM ID=9 TYPE=26ATTRIBUTES=IN-USE,ACTIVE,SHRPRF,ASUBM,TENV,NOABEND,MULTIUSER,NOXDEFATTRIBUTES=LUMSG,STMSG,SIGN(M),NOPSEUDO,INSTDATA,NORNDPW,AUTHINITATTRIBUTES=NOPROMPT,MENU,NOAUDIT,RES,NOMRO,WARNPW,NOTSOCATTRIBUTES=NOTRACE,NOLAB,NODORMPW,NONPWR,NOIMSXTNDMODE=IMPLLOGGING=ACCESS,INIT,SMF,MSG,SEC9UIDACID=8 LOCKTIME=000 DEFACID=*NONE* KEY=8
Example: ISERVER ACID Definition for CA-Top Secret
Following is an example of an ISERVER ACID definition for eTrust CA-Top Secret. Note that:
UID is zero.
The facility of the server is set to IWAY as an example; it can differ at your site.
The SOURCE = INTRDR setting prevents this ACID from logging on.
TSS LIST(ISERVER) DATA(ALL,PROFILE)ACCESSORID = ISERVER NAME = IWAY IDTYPE = USER SIZE = 512 BYTESSOURCE = INTRDRDEPT ACID = IWAY DEPARTMENT = IWAY DEPTDIV ACID = IWAYDIV DIVISION = IWAYDIVGROUPS = IWAYGRPDFLTGRP = IWAYGRP----------- SEGMENT OMVSHOME = /OMVSPGM = /bin/shUID = 0000000000
Example: IADMIN ACID Definition for CA-Top Secret
Following is an example of an IADMIN ACID definition for eTrust CA-Top Secret. Note that UID isnot zero.
HFS Deployment
146 Information Builders

TSS LIST(IADMIN) DATA(ALL,PROFILE)ACCESSORID = IADMIN NAME = IWAY ADMIN IDTYPE = USER SIZE = 512 BYTESFACILITY = TSOFACILITY = BATCHDEPT ACID = IWAY DEPARTMENT = IWAY DEPTDIV ACID = IWAYDIV DIVISION = IWAY DIVISIONGROUPS = IWAYGRPDFLTGRP = IWAYGRP----------- SEGMENT OMVSHOME = /u/iadminOMVSPGM = /bin/shUID = 0000000008
Starting and Stopping a Server for HFS
This section provides information on operation and use of the server. Additional information onthe server and how to configure adapters is available in the Web Console help. The WebConsole help is also available as the Server Administration manual.
Starting and Stopping the Server Using a Batch Job
To start the server, submit the ISTART member of the MVS configuration library(high_level_qualifier.product_type.DATA).
To stop a server, submit the ISTOP member of the MVS configuration library or use the WebConsole. For information about using the Web Console, see the Server Administration manual.
Starting and Stopping the Server Using a Started Task
ISETUP creates started task JCL to start and stop the server. These started task members ofthe MVS configuration library are:
IWAYS, which starts the server.
IWAYP, which stops the server.
In order to execute the started tasks, you must:
Copy them into SYS1.PROCLIB or any other JES2 Proclib data set.
Satisfy security requirements. All external security-related permissions must exist for boththe data sets and the started tasks. In order to issue the started tasks, the user mustsatisfy both of the following requirements:
Have at least OPERATOR authority defined within the Web Console.
Be in the same security group, or associated with the same security group, as theowner of the server directory structure (for example, as iadmin).
4. Installation for z/OS
Server Installation 147

To submit the started tasks from the MVS console, issue the following command:
S IWAYSS IWAYP
You can add the started tasks to any automation product that you run.
Example: Sample IWAYS Started Task
This is an example of iWAYS, the started task that starts the server:
//IWAYS PROC //TSCOM300 EXEC PGM=TSCOM300,// PARM='ENVAR("_EDC_UMASK_DFLT=0022")/'//STEPLIB DD DSN=IADMIN.SRV77.HOME.LOAD,DISP=SHR//EDAPRINT DD SYSOUT=A//SYSPRINT DD SYSOUT=A//SYSOUT DD SYSOUT=A//EDAPARM DD DUMMY//EDAENV DD DSN=IADMIN.SRV77.FFS.DATA(EDAENV),DISP=SHR
Example: Sample IWAYP Started Task
This is an example of iWAYP, the started task that stops the server:
//IWAYP PROC //TSCOM300 EXEC PGM=TSCOM300//STEPLIB DD DSN=IADMIN.SRV77.HOME.LOAD,DISP=SHR//EDAPRINT DD SYSOUT=A//SYSPRINT DD SYSOUT=A//SYSOUT DD SYSOUT=A//EDAPARM DD DSN=IADMIN.SRV77.FFS.DATA(EDAPRMP),DISP=SHR//EDAENV DD DSN=IADMIN.SRV77.FFS.DATA(EDAENV),DISP=SHR
Server Operations Using MVS Operator Commands
On MVS, you can issue operator MODIFY commands against the server job from either fromthe MVS Console or SDSF. You can use MODIFY commands to pass options to an alreadyrunning job:
Use MVS Operator MODIFY commands in the following format:
F jobname, parameters
For instance:
F IWAY77,-SHOW
Note: If the server job is cancelled or it abends, submit the ICLEAR job in the configurationdata set before restarting the server.
HFS Deployment
148 Information Builders

DB2 Security Exit Configuration for HFS
Customize the DB2 security exit to allow the Adapter for DB2 to run with user-level securityenabled. If you do so, users will connect to DB2 with the authorization of the user ID withwhich they logged on to the server. The server must also be running with security turned on.
If you do not customize the DB2 security exit, all users will be assigned the connection ID toDB2 that is associated with the region, job submitter, or started task.
For DB2 CLI adapter, the connection to DB2 must be configured as trusted for the exit to beinvoked.
The changes that must be made to the IBM DB2 sign-on exit, DSN3SATH, differ for RACF andeTrust CA-Top Secret sites and eTrust CA-ACF2 sites.
The following sections show an example for each security package.
The highlighted text and comments shown in the examples indicate the lines containing therecommended modification of DSN3SATH, which calls the module FOCDSN3 the supplied exit.
After you finish the edits, assemble the exit into an object file. This object file is input to thelink JCL found in one of the examples that follow.
Note:
The positioning of these lines is approximate, assuming that no other changes or additionshave already been made to DSN3SATH. If any changes have been made, you should decideon the most appropriate location for this call to FOCDSN3.
FOCDSN3 is used to set the proper primary (individual user ID) authorization.
Another program, FOCDSN4, is used to set the proper secondary (group ID) authorizationfor RACF and eTrust CA-Top Secret. FOCDSN4 is not needed with eTrust CA-ACF2; thesecondary authorization ID(s) will be set correctly without it.
4. Installation for z/OS
Server Installation 149

Example: Changing DSN3SATH for RACF and eTrust CA-Top Secret Sites
1. Search for the SATH001 label - add two lines (FOCDSN3):
SATH001 DS 0H USING WORKAREA,R11 ESTABLISH DATA AREA ADDRESSABILITY ST R2,FREMFLAG SAVE FREEMAIN INDICATOR XC SAVEAREA(72),SAVEAREA CLEAR REGISTER SAVE AREA . . . *********SECTION 1: DETERMINE THE PRIMARY AUTHORIZATION ID ************* ** IF THE INPUT AUTHID IS NULL OR BLANKS, CHANGE IT TO THE AUTHID ** IN EITHER THE JCT OR THE FIELD POINTED TO BY ASCBJBNS. ** THE CODE IN THIS SECTION IS AN ASSEMBLER LANGUAGE VERSION OF ** THE DEFAULT IDENTIFY AUTHORIZATION EXIT. IT IS EXECUTED ONLY ** IF THE FIELD ASXBUSER IS NULL UPON RETURN FROM THE RACROUTE ** SERVICE. FOR EXAMPLE, IT DETERMINES THE PRIMARY AUTH ID FOR ** ENVIRONMENTS WITH NO SECURITY SYSTEM INSTALLED AND ACTIVE. ** ************************************************************************** SPACE LA R1,AIDLPRIM LOAD PARM REG1 <--ADD CALL FOCDSN3 GO GET THE IBI EXIT <--ADD CLI AIDLPRIM,BLANK IS THE INPUT PRIMARY AUTHID NULL BH SATH020 SKIP IF A PRIMARY AUTH ID EXISTS
HFS Deployment
150 Information Builders

2. Search for the SATH020 label - add a comment box, add one line, and comment out fourlines:
SATH020 DS 0H BRANCH TO HERE IF PRIMARY EXISTS*****OPTIONAL CHANGE @CHAR7: FALLBACK TO SEVEN CHAR PRIMARY AUTHID**** ** IF YOUR INSTALLATION REQUIRES ONLY SEVEN CHARACTER PRIMARY ** AUTHORIZATION IDS (POSSIBLY TRUNCATED) DUE TO DB2 PRIVILEGES ** GRANTED TO TRUNCATED AUTHORIZATION IDS, THEN YOU MUST BLANK OUT ** COLUMN 1 OF THE ASSEMBLER STATEMENT IMMEDIATELY FOLLOWING THIS ** BLOCK COMMENT. THEN ASSEMBLE THIS PROGRAM AND LINK-EDIT IT INTO ** THE APPROPRIATE DB2 LOAD LIBRARY AS EXPLAINED IN AN APPENDIX ** OF "THE DB2 ADMINISTRATION GUIDE". ** ** OTHERWISE, YOU NEED DO NOTHING. ** @KYD0271************************************************************************ MVI AIDLPRIM+7,BLANK BLANK OUT EIGHTH CHARACTER SPACE . . .* RACF IS ACTIVE ON THIS MVS ****************************************************************** <--ADD * * <--ADD * The logic was modified because in DB2 V8 AIDLACEE is always not* <--ADD * NULL. We used to honor AIDLACEE first, FOCDSN4 second and then * <--ADD * AS ACEE. Now we honor FOCDSN4 first, AIDLACEE second and then * <--ADD * AS ACEE. * <--ADD * * <--ADD * 03/11/05 ASK0 * <--ADD ****************************************************************** <--ADD USING ACEE,R6 ESTABLISH BASE FOR ACEE @KYL0108 L R6,AIDLACEE Get => caller ACEE if any <--ADD * ICM R6,B'1111',AIDLACEE CALLER PASSED ACEE ADDRESS? @KYL0108 <-COMMENT * BZ SATH024 NO, USE ADDRESS SPACE ACEE @KYL0108 <-COMMENT * CLC ACEEACEE,EYEACEE IS IT REALLY AN ACEE? @KYL0108 <-COMMENT * BE SATH027 YES, PROCEED NORMALLY @KYL0108 <-COMMENT SPACE 1 SATH024 DS 0H USE ADDRESS SPACE ACEE @KYL0108 . . .
4. Installation for z/OS
Server Installation 151

3. Search for the SATH025 label - replace sath025 and add sath026 (FOCDSN4):
SATH025 DS 0H CALL FOCDSN4 GO GET THE IBI EXIT (4=GROUP AUTH) <--ADD LTR R6,R6 DOES AN ACEE EXIST? IF NOT, <--ADD BZ SATH026 CHECK ACEE IN ADDRESS SPACE <--ADD CLC ACEEACEE,EYEACEE DOES IT LOOK LIKE AN ACEE? <--ADD BE SATH027 YES, GO DO GROUPS <--ADD SATH026 DS 0H <--ADD . . .
SATH027 DS 0H CHECK LIST OF GROUPS OPTION TM RCVTOPTX,RCVTLGRP IS LIST OF GROUPS CHECKING ACTIVE BZ SATH040 SKIP TO SINGLE GROUP COPY IF NOT DROP R7 DROP RCVT BASE REG SPACE 1 * RACF LIST OF GROUPS OPTION IS ACTIVE EJECT . . .
HFS Deployment
152 Information Builders

Example: Changing DSN3SATH for eTrust CA-ACF2 Sites
*DSN3SATH source is provided by ACF2.
1. Search for PRIMARY AUTHORIZATION ID - add two lines (FOCDSN3):
***************************************************************** * ** PRIMARY AUTHORIZATION ID ** * ****************************************************************** ** IF THE PRIMARY AUTHORIZATION ID IS NULL OR BLANKS ** IF CA-ACF2 IS AVAILABLE ** SET PRIMARY ID FROM ACFASVT (ASVLID) ** ELSE ** IF TSO FOREGROUND USER ** SET PRIMARY ID FROM TSO LOGON ID (ASCBJBNS) ** ELSE ** SET PRIMARY ID FROM JOB USER (JCTUSER) ** ****************************************************************** SPACE 2 04260000 LA R1,AIDLPRIM LOAD PARM REG1 <--ADD CALL FOCDSN3 GO GET THE IBI EXIT <--ADD CLI AIDLPRIM,C' ' PRIMARY AUTHID THERE ? 04270000 BH PRIMWTO ..YES, EVERYTHINGS OK HERE 04280000 L R3,PSAAOLD-PSA(0) CURRENT ASCB ADDRESS 04290000 USING ASCB,R3 ASCB ADDRESSABILITY 04300000 SPACE 2 04310000
Example: Modifying the Link JCL for DSN3SATH
This is sample link JCL for the IBM exit DSN3SATH. Modify the JCL to link the modules into theDB2 security exit as follows.
//LKED EXEC PGM=IEWL,PARM='LIST,XREF,LET,RENT,AMODE=31'//OBJECT DD DSN=db2pref.SDSNSAMP.OBJ,DISP=SHR <--OUTPUT OF ASSEMBLE STEP//EDAMOD DD DSN=high_level_qualifier.HOME.LOAD,DISP=SHR//SYSLMOD DD DSN=db2pref.DSNEXIT,DISP=SHR//SYSPRINT DD SYSOUT=*//SYSUT1 DD UNIT=SYSDA,SPACE=(100,(50,50))//SYSLIN DD * INCLUDE EDAMOD(FOCDSN3)************************************************************************** Omit the following line for eTrust CA-ACF2*********************************************************************** INCLUDE EDAMOD(FOCDSN4) ENTRY DSN3@ATH NAME DSN3@ATH(R)/*
4. Installation for z/OS
Server Installation 153

where:
db2pref
Is the prefix for the DB2 data sets.
high_level_qualifier
Is the high-level qualifier for the data sets.
Once this job finishes successfully, you must recycle the DB2 subsystem in order for thechanges to take effect.
MSODDX for DD Translation for User Subroutines
On z/OS, you can incorporate an additional routine called MSODDX into a user-writtensubroutine that needs to access ddnames allocated to a WebFOCUS Reporting Server, aDataMigrator Server, or a Full-function Server. MSODDX provides ddname translation servicesthat enable external programs to access files under the ddname used by the Server.
For details, see Chapter 6, Platform-Specific Commands and Features, in the Stored ProceduresReference manual.
Overriding the Time Zone Setting
By default, the server will use the system set value for Time Zone. This can be overridden bysetting the TZ in the EDAENV member of the servers configuration library.
TZ = valid tz string
For more information about time zone values, see the IBM UNIX System Services CommandReference and search for TZ.
Adding a Configuration Instance for HFS
Adding a configuration instance allows you to run additional or different configuration instancesusing the same software binaries. For example, if you installed using a Full-Function Serverlicense code, you can use a WebFOCUS license to add a second configuration for a WebFOCUSReporting Server. You can also add up to nine additional instances of the same type.
Step 1. Run ISETUP
To add a configuration instance, perform the following steps.
1. Execute ISETUP again. You should have a high_level_qualifier.HOME.DATA PDS unloadedfrom the installation tape. Use option 6 in ISPF to execute the ISETUP member of this PDS.
HFS Deployment
154 Information Builders

Note: If this PDS is not available, run an IEBCOPY job to allocate and unload it from theinstallation tape.
The first Installation and Configuration panel opens.
2. Enter 1 and press Enter to continue to the next panel.
The first Installation and Configuration panel for HFS opens.
3. Complete the first Installation and Configuration panel as follows.
Field Instructions
Enter selection Choose option 2, Add Additional Configuration Instance.
Enter License Key Enter the license key that was provided with the softwarefor the type of software instance that you want toconfigure (for example, the license key for a WebFOCUSReporting Server or for a Full-Function Server).
Input source This is ignored for option 2.
Installation Userid Shows the current logon ID. It cannot be changed.
OPSYS AdministrationUserid
Initially, this field shows the same ID as the installationuser ID.
If the installation user ID is a superuser (UID=0), youmust specify a non-superuser ID to administer theserver. Specify this ID here.
PTH Administrator Userid An ID is required to administer the server immediatelyafter initial installation. This ID is defined andmaintained solely in the realm of the server. It defaultsto srvadmin and it can be changed here.
For more information about running the server in securemode, see Step 7. Configure Server Security on page140.
PTH Administrator Password Password for the PTH Administrator ID. It cannot be leftblank and must be matched at Retype field.
4. Installation for z/OS
Server Installation 155

Field Instructions
Enter Job Card information To provide JOB card information for submitting jobs tothe JES queue, provide a valid job name (a maximum ofseven characters following the // on the first JCL line),which defaults to the user ID that you are currentlyusing.
This job name is used for multiple submissions (forexample, jobnameA, jobnameB, jobnameC, and so on) inthe JCL generated by the installation procedure.
Override JOB name checking To provide your own JOB card information, including JOBname, enter Y and provide valid JOB card information inthe Enter Job Card information field. The JOB cardinformation that you enter will be used for each job thatis submitted.
4. If you used the same user ID for both installation and administration, skip to Step 7.Otherwise, continue with Step 5.
5. Press Enter to continue to the next panel.
This panel appears only if you provided two different user IDs in the previous panel.
The installation process will change ownership of HFS server files from the installation ID(iinstal) to the administrator ID (iadmin). The installation ID must have authority to issuethe chown command to make this change of ownership. This action is taken at the end ofthe installation process.
6. Complete the panel as follows.
Field Instructions
Enter Job Cardinformation
To provide JOB card information for submitting the run-timejobs to the JES queue, provide a valid job name (a maximumof seven characters following the // on the first JCL line),which defaults to the user ID that you are currently using.
This job name is used for multiple submissions (for example,jobnameA, jobnameB, jobnameC, and so on) in the JCLgenerated by the installation procedure.
HFS Deployment
156 Information Builders

Field Instructions
Override JOB namechecking
To provide your own JOB card information, including JOBname, enter Y and provide valid JOB card information in theEnter Job Card information field. The JOB card informationthat you enter will be used for each run-time job that iscreated.
7. Press Enter to continue to the next panel.
The Add Configuration panel opens.
8. Enter the current base high-level qualifier used for EDAHOME.
This indicates where to install the configuration (EDACONF) and where the binaries(EDAHOME) are installed. The installation procedure checks whether this directory existsand if an instance is already installed. If either test fails, you receive a message indicatingthe failure and available options.
9. Press Enter to continue to the next panel.
If you are configuring the first instance of a given software type, the following panel opens.
Otherwise, if you are configuring an additional instance of a given software type, thefollowing panel opens.
4. Installation for z/OS
Server Installation 157

10.Complete the panel as follows.
Configuration Parameters
Application Directory This indicates where application components will reside forthe configuration. The default value is based on the valuespecified for Base Directory on the previous panel. To specifyanother location for application components, change thevalue for this field.
Profile & AdminDirectory
This indicates where user profiles and administration files willreside. The default value is based on the value specified forBase Directory. To specify another location for applicationcomponents, change the value for this field.
HFS Deployment
158 Information Builders

Configuration Parameters
EDACONF suffix You are prompted for this information only if you areconfiguring an additional instance of a product type (forexample, if you are configuring a second instance of aWebFOCUS Reporting Server).
Each software instance must have its own set ofconfiguration libraries. To guarantee this, and to prevent anew set of configuration libraries from overwriting an existingset, the suffix that you specify here will be appended to thename of the software type qualifier. For example, if you areconfiguring the second instance of a WebFOCUS ReportingServer, you could specify that the suffix "1" be added, so thatthe EDACONF high-level qualifier would be:
IADMIN.SRV77.WFS1
You can add a new configuration as a numeric or string suffixto the base software type. If you supply a string, theinstallation procedure ignores any numeric suffix. For a:
Numeric suffix, Enter a digit between 1 and 9. This will beadded to the software type in the directory name andlibrary name to distinguish it from other configurationinstances.
String suffix, enter a string of between 1 and 5 characters(for example, TEST, PROD, or DEV). The string cannotcontain embedded spaces.
You can also use the string suffix to extend the numericnumbering past 9. Just supply a number greater than 9.
If you change the suffix value, when you press Enter, thepanel refreshes with a new value for EDACONF Library.
Server System Userid This shows the default value, ISERVER. To change this value,see the requirements in Step 2. Set Up User IDs on page 105.
4. Installation for z/OS
Server Installation 159

Configuration Parameters
HTTP Listener Port This indicates the port number that the server will use forHTTP. It is the first of three connection ports that must beavailable to the server.
For example, if you choose port 8101, then ports 8101,8102, and 8103 are used by the server. Ensure that youchoose ports that are not currently being used.
TCP Base Port This is the port number of the TCP Listener.
The default is one less than the port specified for the HTTPListener, but it can be any port number other than the threereserved for HTTP.
EDACONF Library This is the full data set name the installation procedure willuse to allocate the EDACONF configuration library on MVS. Ifyou are running from high_level_qualifier.HOME.DATA, thisfield will have the default valuehigh_level_qualifier.product_type.DATA (where product_type isbased on license key).
If you are adding a configuration for a product type that hasalready been configured, the default value will reflect theEDACONF suffix value.
If you used another name to unload the first data set, thisfield will be blank.
On subsequent running of ISETUP, the previous value usedwill be displayed. Change the value as necessary.
HFS Deployment
160 Information Builders

Configuration Parameters
Unit/Type You are prompted for this information only if you areconfiguring the first instance of a product type (for example, ifyou are configuring the first instance of a WebFOCUSReporting Server).
These show the values that the installation process will useto allocate the output libraries. If necessary, you can changethese to site-specific values.
Type can be VOL=SER (default), DATACLAS, MGMTCLAS, orSTORCLAS.
11.Press Enter to continue to the next panel.
Depending on your license key, the Data Adapter panel may open before the DemonstrationFiles panel. If the Data Adapter panel opens, continue with Step 12. Otherwise, skip toStep 13.
12.The Data Adapter panel lists adapters that require the allocation of MVS libraries inIRUNJCL or environment variables in the EDAENV member. To select specific adapters:
a. Type Y next to the required adapters and press Enter.
b. Supply the requested information, which is described in Step 3. Collect RequiredInformation for Adapters on page 116.
After you have finished installing and configuring the server, you can use the WebConsole to finish configuring these adapters, and to configure adapters that do not haveMVS JCL requirements.
c. Press Enter.
The JSCOM3 Listener configuration panel opens.
13.Configuration of the JSCOM3 Listener is either optional or mandatory depending on whichadapters were selected. If any Java-based adapters were selected (EJB, Call Java, JDBC,MS SQL Server), the configuration is mandatory.
a. The panel will prompt for the path to the Java environment to be passed to eitherJDK_HOME or JAVA_HOME, as described in JVM Requirements for Java Services on page100.
b. If no Java-based adapters were select, this configuration might still be desirable toenable server-side graphics and Adobe® Flex® features. To skip the configuration, leavethe path blank.
c. Press Enter to continue to the next panel.
4. Installation for z/OS
Server Installation 161

14.Ensure that all values on the Confirmation panel are correct, then select one of thefollowing options:
N to return to the initial panel so that you can change installation values.
C to create JCL which you can submit at a later time. The JCL is placed in yourconfiguration library.
S to create JCL and submit the job immediately.
15.As the job is processed, in SDSF, check JESLOG for errors and return codes.
Following is a table of the jobs created. All members are created in the configuration library(EDACONF).
Job Description
ISETUPJ2 Main JCL Job stream that is used to install the server.
ISOPTS2 Options used to install the server.
The following members all call procedure IRUNJCL, which is the main server JCL. If youneed to change the server JCL, change member IRUNJCL.
Member Description
ISTART Starts the server.
ISTOP Stops the server.
ICLEAR Clears server resources after abnormal end.
ICLRDIR Clears superuser-owned directories from a previously run secure server.
ISAVEDIA Creates a directory called sdnnnnnn and populates it with full diagnosticinformation.
ISHOW Shows current workspace status.
ITRCON Turns on dynamic tracing (server will be started if not already running).
ITRCOFF Turns off dynamic tracing (server will be started if not already running).
HFS Deployment
162 Information Builders

The following members contain batch JCL for auxiliary functions, and are also created in theconfiguration library.
Member Description
CMRUN JCL to run DataMigrator batch jobs.
DB2V9PRM DB2 version 9 DBRM referenced in GENDB2 JCL.
DB2V10PR DB2 version 10 DBRM referenced in GENDB2 JCL.
DB2V11PR DB2 version 11 DBRM referenced in GENDB2 JCL.
GENDB2 JCL to bind the DB2/CAF plan.
IIMSBMP Example JCL to run the IMS/XMI server job in BMP mode.
IIMSDLI Example JCL to run the IMS/XMI server job in DLI mode.
IRDAAPPC Example CLIST to run RDAAPP Client test tool.
IRDAAPPJ Example JCL to run RDAAPP Client test tool.
The following members contain sample started task JCL, and are also created in theconfiguration library.
Member Description
IWAYS A started task that starts the server.
IWAYP A started task that stops the server.
EDAPRMP A parameter file used by IWAYP.
EDAENV A parameter file used by IWAYS, IWAYP, ISTART, and ISTOP.
4. Installation for z/OS
Server Installation 163

The following table shows the HFS directory structures created during the installationprocess.
Directory Structure Description
/u/iadmin/ibi/srv77/tape Contains HFS files from the inputmedia.
/u/iadmin/ibi/srv77/install Working directory for the installationprocess. Log and error files reside here.
/u/iadmin/ibi/apps The installation creates baseapp andone or more sample applicationdirectories under this directory.
/u/iadmin/ibi/profiles This is where user profiles are created,as well as admin.cfg.
/u/iadmin/ibi/srv77/home Server system directories are createdunder this directory.
/u/iadmin/ibi/srv77/product_type Configuration directories are createdunder this directory. The license keyspecified in the ISETUP proceduredetermines product_type.
product_type is one or more of thefollowing:
FFS for a Full-Function Server
DM for a DataMigrator Server
WFS for a WebFOCUS Reporting Server
WFM for a Shared Application Server forWebFOCUS Maintain
Step 2. Test the Installation
This section describes how to verify server installation.
Procedure: How to Test the Server Installation
1. Log on to TSO as iadmin.
HFS Deployment
164 Information Builders

2. Submit the ISTART JCL to start the server. This executes the IRUNJCL proc.
3. Check the job output for errors. Look for the EDAPRINT message:
(EDA13023) ALL INITIAL SERVERS STARTED
4. Start the Web Console by opening a browser pointed at the listener port of the server. TheURL format is
http://host:port
where:
host
Is the name of the machine on which the server is installed.
port
Is one port higher than the port specified when installing the server. For example, ifyou specified port 8100 during installation, then use port 8101 to access the WebConsole.
The Web Console opens.
5. If the Web Console opens and displays application tree folders in the left pane, the serveris working because it uses its own underlying data access and reporting technologies tovisualize the application tree. The server may be further data tested (if desired).
6. Continue with adapter configuration, as described in the Adapter Administration manual.
When you are finished using the server, you can use the Web Console to stop the server bygoing to the Web Console menu bar, selecting Workspace, and then Stop.
If you experience problems at start up, examine the job output for more information.
Upgrading Your Server Release for HFS
Use this option to upgrade a server to a new maintenance level within the same major release.A major release is indicated by the first two digits of the release number.
Step 1. Access the Installation Software
You can choose to access the server installation software using either
Tape. The software is provided on a 3490 or 3590 cartridge.
You must unload the installation data set from the tape before you can run the installation.This is how most installations are performed.
FTP. You download the installation software from the Information Builders download site.
4. Installation for z/OS
Server Installation 165

Downloading the installation software involves:
1. Registering at the Information Builders download site.
2. Downloading the installation data set from the site.
3. Running the isetup procedure to complete the download process and install thesoftware.
Procedure: How to Unload the Installation Software From Tape
The software is provided on a cartridge in 3490 or 3590 format with MVS PDSs. Perform thefollowing to unload the installation data set from the tape:
1. Log on to TSO.
2. Run an IEBCOPY job to allocate and unload the qualifier.HOME.DATA data set. This PDScontains the members needed for the actual installation.
It is recommended that you use HOME.DATA as the low-level qualifier for the target dataset. Although you can specify any low-level qualifier, HOME.DATA enables the installationprocedure to generate default data set names, simplifying your installation.
Note: If you do not use HOME.DATA, then change the following line to reflect the value youused.
// SET EDAUSSD='HOME.DATA'
Do this before you run ISETUP.
The following sample JCL is for the initial unload to a new data set:
//IEBCOPY EXEC PGM=IEBCOPY,REGION=0M//SYSPRINT DD SYSOUT=*//SYSUT1 DD UNIT=workunit,SPACE=(CYL,(5,1))//OUT1 DD DISP=(NEW,CATLG,DELETE),// DSN=qualifier.HOME.DATA,// DCB=(RECFM=FB,LRECL=80,BLKSIZE=3200),// SPACE=(CYL,(5,5,25)),// UNIT=SYSDA//IN1 DD DISP=(OLD,PASS),// DSN=HOME.DATA,// UNIT=cart,// VOL=(,RETAIN,,SER=volser),// LABEL=(1,SL)//SYSPRINT DD SYSOUT=*//SYSIN DD * COPY INDD=IN1,OUTDD=OUT1
HFS Deployment
166 Information Builders

where:
workunit
Is the unit for the work data set.
qualifier
Is the high-level qualifier for HOME.DATA and for all other data sets that theinstallation procedure allocates. We recommend that the high-level qualifier reflect therelease of the software. However, you can use any site-specific value.
For PDS, we recommend retaining the low-level qualifier HOME.DATA, but you canchange this to any site-specific value. If you use a low-level qualifier other thanHOME.DATA, you must then edit member PDSSNAME to change the string“HOME.DATA” to the low-level qualifier you specify here.
cart
Is the unit type of the tape drive. Common names include 3490, TAPE, and 3590.Change as needed.
volser
Is the value shown on the media label.
After this job has run, qualifier.HOME.DATA is allocated, cataloged, and populated with themembers needed to continue the product installation.
Proceed to Step 2. Run ISETUP on page 169.
Procedure: How to Download the Installation Software Using FTP
To download the installation software:
1. Go to http://techsupport.informationbuilders.com.
The Information Builders Technical Support home page opens.
2. Click My Downloads in the My Account section on the right side of the page.
The Downloads, Upgrades, Service Packs, and PTFs page opens.
3. Click the link for your product (for example, WebFOCUS and iWay Server and iWay Client).
The Downloads by Release page for your product opens.
4. Click your release from the Current Production Releases list.
The Software Downloads page for your release opens.
5. Scroll down and find the platform on which you want to install the server, and then clickDownload to the right of the platform name.
4. Installation for z/OS
Server Installation 167

6. Fill in the registration form and then click Continue.
The Software Download Agreement page opens.
7. Select I agree... to consent to the Download Agreement, and then click Continue.
The Download Instructions page opens. Select AUTOMATIC or MANUAL and follow therelevant instructions.
A copy of the instructions is automatically emailed to you for later reference.
8. Log on to TSO.
9. Follow the instructions on the Download Page in your TSO session.
10. Review Optional Low-Level Qualifier Changes on page 168. If you did not restore the firstdata set as HOME.DATA (see download instructions) then change the following line toreflect the data value you used:
// SET EDAUSSD='HOME.DATA'
11. Run the ISETUP procedure.
Specify (F)tp for Input Source on the second panel.
Note that after the server is properly installed, you can optionally delete any downloadedtemporary files.
Continue with Step 2. Run ISETUP on page 169.
Reference: Optional Low-Level Qualifier Changes
We recommend retaining the default low-level qualifiers that are supplied for the installationlibraries. However, if you need to change any of them (for example, to conform to site-specificnaming conventions), you can do so by editing them in member USSSNAME ofhigh_level_qualifier.HOME.DATA. You can see a list of the qualifiers in Default Low-LevelQualifiers on page 168.
Caution: If you change any low-level qualifiers and do not reflect those changes exactly inUSSSNAME, you will experience problems with the server installation and operation.
Once you have finished changing any names, continue with Step 2. Run ISETUP on page 169.
Reference: Default Low-Level Qualifiers
The following low-level qualifiers are set in high_level_qualifier.HOME.DATA(PDSSNAME):
HFS Deployment
168 Information Builders

// SET EDAUSSD='HOME.DATA' Server installation library// SET EDAUSSL='HOME.LOAD' Server base load library // SET FFSUSSD='FFS.DATA' Full Function server // SET WFSUSSD='WFS.DATA' WebFocus Reporting server // SET ETLUSSD='DM.DATA' DataMigrator // SET WFMUSSD='WFM.DATA' WebFocus Maintain Server // SET CGWUSSD='CGW.DATA' Communications Gateway // SET CLNUSSD='CLN.DATA' Client // SET EDACICS='HOME.CICS.LOAD' CICS load library
Step 2. Run ISETUP
Caution: Ensure that all server processes are stopped before upgrading.
Server upgrade consists of a series of ISPF panels, which gather information for the upgrade.After the panel dialog is complete, JCL is created and submitted (if required) to upgrade theserver on z/OS. This JCL job retrieves the remainder of the MVS libraries and HFS files fromthe media.
1. Execute the ISETUP member of your high_level_qualifier.HOME.DATA using ISPF option 6.
The Installation and Configuration panel opens.
2. Select 1 for HFS deployment and press Enter to continue to the next panel.
3. Complete the panel as follows.
Field Instructions
Enter selection Choose option 3, Refresh Installation.
Enter License Key Enter the 10-digit license key that was provided with thesoftware.
Input source Choose the Input source, T for tape, D for disk (see note), orF for automatic FTP download direct to MVS.
Note: If you downloaded the server software using FTP toanother platform and then manually transferred the files toMVS, choose D and, on the next panel, provide the directoryname where the transferred files reside.
Installation Userid Shows the current logon ID. It cannot be changed.
4. Installation for z/OS
Server Installation 169

Field Instructions
OPSYS AdministrationUserid
Initially, this field shows the same ID as the installation userID.
If the installation user ID is a superuser (UID=0), you mustspecify a non-superuser ID to administer the server. Specifythis ID here.
PTH AdministratorUserid
An ID is required to administer the server immediately afterinitial installation. This ID is defined and maintained solely inthe realm of the server. It defaults to srvadmin.
Note: For a Refresh Installation, this parameter is ignored, asno configuration files are updated. ISETUP must be run by theOPSYS Administration userid.
PTH AdministratorPassword
Password for the PTH Administrator ID.
Note: For a Refresh Installation, this parameter is ignored, asno configuration files are updated. ISETUP must be run by theOPSYS Administration userid.
Umask setting to use Shows the current umask setting for the iadmin ID. The JCLpasses this setting to the server for use at run time.
Every time the server creates a file in the .../ibi/profilesor .../ibi/apps directory structures (usually in response toWeb Console activity), the server assigns to the file thedefault permissions 666 filtered by the umask value. Youspecify whichever umask value is necessary to mask out thepermissions you do not want to grant.
For example, if you specify a umask value of 0022, the servercreate files with the permissions 644: umask 0022 issubtracted from the default 666, disallowing the group andworld write permissions.
HFS Deployment
170 Information Builders
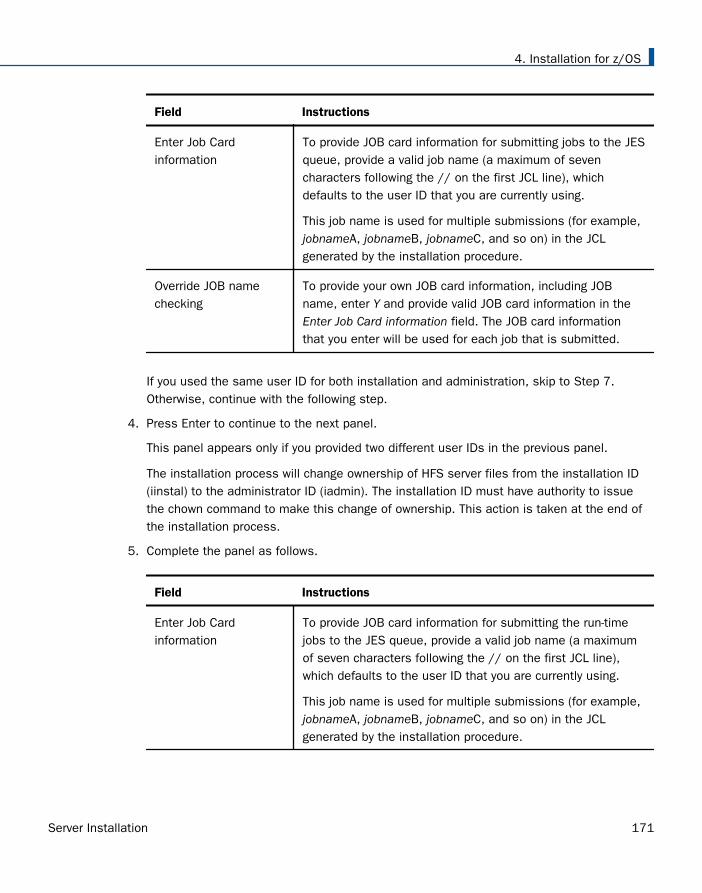
Field Instructions
Enter Job Cardinformation
To provide JOB card information for submitting jobs to the JESqueue, provide a valid job name (a maximum of sevencharacters following the // on the first JCL line), whichdefaults to the user ID that you are currently using.
This job name is used for multiple submissions (for example,jobnameA, jobnameB, jobnameC, and so on) in the JCLgenerated by the installation procedure.
Override JOB namechecking
To provide your own JOB card information, including JOBname, enter Y and provide valid JOB card information in theEnter Job Card information field. The JOB card informationthat you enter will be used for each job that is submitted.
If you used the same user ID for both installation and administration, skip to Step 7.Otherwise, continue with the following step.
4. Press Enter to continue to the next panel.
This panel appears only if you provided two different user IDs in the previous panel.
The installation process will change ownership of HFS server files from the installation ID(iinstal) to the administrator ID (iadmin). The installation ID must have authority to issuethe chown command to make this change of ownership. This action is taken at the end ofthe installation process.
5. Complete the panel as follows.
Field Instructions
Enter Job Cardinformation
To provide JOB card information for submitting the run-timejobs to the JES queue, provide a valid job name (a maximumof seven characters following the // on the first JCL line),which defaults to the user ID that you are currently using.
This job name is used for multiple submissions (for example,jobnameA, jobnameB, jobnameC, and so on) in the JCLgenerated by the installation procedure.
4. Installation for z/OS
Server Installation 171

Field Instructions
Override JOB namechecking
To provide your own JOB card information, including JOBname, enter Y and provide valid JOB card information in theEnter Job Card information field. The JOB card informationthat you enter will be used for each run-time job that iscreated.
6. If you selected input source T or D, skip to Step 7.
If you selected F for automatic FTP only, complete the panel as follows.
Field Instructions
FTP DownloadDirectory
Directory to be used as the target for the FTP files. Thisdirectory must already exist.
FTP Userid User ID provided on the download instructions.
FTP Password Password provided on the download instructions.
7. Press Enter to continue to the next panel, and complete the panel as follows.
Field Instructions
HFS Base Directory Base directory of the current server that is to be refreshed.The value will be checked to see if it contains a valid serverdirectory structure. (It should contain .../ibi/srvxx/home/binwhere xx is the major release level.) From this value, thecurrent installation library name is obtained and this will bethe location used to create the refresh JCL.
8. Press Enter to continue to the next panel, and complete the panel as follows.
Field Instructions
Input Media (installing from tape)
Volume serial number Provide the volume serial number of the server media. Thenumber is located on the tape supplied in you server package.
Volume unit type Review the default value and change it, if necessary.
HFS Deployment
172 Information Builders

Field Instructions
Work unit type Review the default value and change, if necessary.
You can specify a UNIT= type value (for example, SYSDA), oryou can direct work files to a specific volume serial number byspecifying, in single quotation marks ('),'SYSDA,VOL=SER=volume'.
Input Media (installing from disk)
Directory name ofinput
Provide the name of the directory in which the installation filesreside.
MVS Installation Libraries
EDAHOME Library This is the full data set name the installation procedure willuse to allocate the EDAHOME load library on MVS and wherethe refresh load modules will be stored. If you are runningfrom high_level_qualifier.HOME.DATA, this field will have thedefault value high_level_qualifier.HOME.LOAD. If you usedanother name to unload the first data set, this field will beblank. On subsequent running of ISETUP, the previous valueused will be displayed. Change the value as necessary.
EDAHOME LibraryUnit/Type
These show the values that the installation process will use toallocate the EDAHOME load library on MVS. If necessary, youcan change these to site-specific values.
Type can be VOL=SER (default), DATACLAS, MGMTCLAS, orSTORCLAS.
Note: The EDACONF Library name is where the refresh JCL will be created. This library isthe current server installation library. The value cannot be changed.
9. Ensure that all values on the panel are correct, then select one of the following options:
N to return to the initial panel so that you can change installation values.
C to create JCL which you can submit at a later time. The JCL is placed in yourconfiguration library.
S to create JCL and submit the job immediately.
4. Installation for z/OS
Server Installation 173

10.As the job is processed, in SDSF, check JESLOG for errors and return codes.
The following jobs are added to the current configuration library of the server:
Job Description
ISETUPJ3ISOPTS3
Main JCL Job stream that is used to install the server.
The following directories are added to the HFS directory structure of the existing server:
Directory Description
/u/iadmin/ibi/srv77/tape Contains HFS files from the input media.
/u/iadmin/ibi/srv77/install Working directory for the installation process. Logand error files reside here.
Step 3. Test the Server Installation
This section describes how to test the server installation.
Procedure: How to Test the Server Installation
1. Log on to TSO as iadmin.
2. Submit the ISTART JCL to start the server.
3. Check the job output for errors. Look for the EDAPRINT message:
(EDA13023) ALL INITIAL SERVERS STARTED
4. Start the Web Console by opening a browser pointed at the listener port of the server. TheURL format is
http://host:port
where:
host
Is the name of the machine on which the server is installed.
HFS Deployment
174 Information Builders

port
Is one port higher than the port specified when installing the server. For example, ifyou specified port 8100 during installation, then use port 8101 to access the WebConsole.
The Web Console opens.
5. If the Web Console opens and displays application tree folders in the left pane, the serveris working because it uses its own underlying data access and reporting technologies tovisualize the application tree. The server may be further data tested (if desired).
When you are finished using the server, you can use the Web Console to stop the server bygoing to the Web Console menu bar, selecting Workspace, and then Stop.
If you experience problems at start up, examine the job output for more information.
Step 4. Reconfigure Server Security
For information about configuring server security, see Step 7. Configure Server Security on page140.
To reconfigure server security to OPSYS provider only:
1. Log on to TSO using an ID with read access to the BPX.FILEATTR.APF facility class.
2. Using the name of the actual EDAHOME directory, change file attributes by entering thefollowing TSO commands in ISPF Command Shell (option 6):
OSHELL extattr +a /u/iadmin/ibi/srv77/home/bin/tscom300.outOSHELL extattr +a /u/iadmin/ibi/srv77/home/bin/tsqprx.out
3. Verify your changes by issuing the following command:
OSHELL ls -E /u/iadmin/ibi/srv77/home/bin/tscom300.outOSHELL ls -E /u/iadmin/ibi/srv77/home/bin/tsqprx.out
The extended attributes portion of the output should be a-s-.
4. The libraries allocated to STEPLIB in IRUNJCL must be APF-authorized. Any non-APF-authorized libraries must be allocated the TASKLIB DDNAME.
5. Test server security by repeating the process described in Step 3. Test the ServerInstallation on page 174.
This step will need to be repeated after any server upgrade since these files are replacedduring upgrade.
4. Installation for z/OS
Server Installation 175

Preventing Unsecured Server Starts After Upgrades
If the security provider is set to OPSYS in the configuration file and, additionally, explicitenvironment variable EDAEXTSEC is set to OPSYS (or ON), and the server cannot impersonateusers because it lacks platform-specific authorization steps, the server start aborts and errormessages are written to the edaprint log.
This feature prevents an unsecured server start after a software upgrade if any of the requiredpost-upgrade reauthorization steps are missed on a UNIX, IBM i, or z/OS HFS deployment. Thisis not applicable to other platforms. The setting may be placed in any normal server start-upshell or profile that a site is using or in the server edaenv.cfg configuration file. The messagesvary slightly by platform.
The edaprint messages are:
I Configured primary security is 'OPSYS' as set in configuration file
E Server security explicitly set to OPSYS, but lacks authority!
Workspace initialization aborted.
(EDA13171) UNABLE TO START SERVER
Step 5. Reconfigure Adapters
While most adapters do not require additional steps after updating binary files, the followingtable notes the adapters that do require some consideration.
Adapter Steps After Updating Binaries
Adabas Re-enable the module containing SVC using the Web Console adapterconfiguration page.
Test the adapter from the adapter page before running your applications.
DB2 CAF Rebind the DB2 plan using the Web Console adapter configuration page.
Test the adapter from the adapter page before running your applications.
HFS Deployment
176 Information Builders

Accounting for HFS - SMF Records
The server provides an optional facility to use for accounting purposes that enables you to logresource utilization on a per-user basis. This facility enables the server to generate SMFrecords for query-level and user-level accounting.
Server accounting requires that the server STEPLIB data sets be APF-authorized. When SMFrecords are generated, they contain:
The logon ID and security ID of the user.
The CPU time and EXCPs consumed.
Data based on the type of record written.
You can process the SMF records using the accounting programs that exist at your site.Examples of SMF records are provided in SMF Record Format for RECTYPES 1 and 4 on page180.
In order to write SMF records, the server must be running APF authorized.
Two sample Master Files (SMFVSAM and SMFFIX) are provided for accessing accountingstatistics. They reside under the catalog subdirectory in the EDAHOME location. Theirdifference is that SMFVSAM can be used to report directly from the system-live SYS1.MANxrecords, while SMFFIX can be used to report from a sequential file produced from running theSMFDUMP utility. These Master Files enable you to interpret the SMF records generated by theaccounting facility using reporting requests or store procedures. Both Master Files are forlogoff records only, as indicated by ALIAS=2 on the RECTYPE field entry.
A sample procedure report to query the SMF data is also provided under the same location. Itis called smfman1.fex.
Syntax: How to Enable Accounting
To enable accounting, insert the following statement into the server configuration file(edaserve.cfg):
smf_recno=smfnumber
where:
smfnumber
Is an integer in a range from 128 to 255, inclusive. This number represents the SMFnumber used by the accounting facility when it sends records to the SMF system.
By default, both RECTYPE pairs will be created when accounting is enabled. You can overridethe default by coding the following parameter on edaserve.cfg:
4. Installation for z/OS
Server Installation 177

smf_subtype = {all|logon|query}
where:
all
Cuts all records. This is the default.
logon
Cuts logon records only (RECTYPE pair 1 and 2).
query
Cuts query records only (RECTYPE pair 4 and 5).
Syntax: How to Set the Accounting Field
Up to 40 characters can be supplied that appear in the SMF records field SMFOFA40. The SETBILLCODE command can be used in any support server profile to provide the account fieldinformation. The syntax is
SET BILLCODE=value
where:
value
Is the 1–40 characters to be used on each SMF record produced.
This information can also be set dynamically from a client application by coding an RPCwith the SET command and executing it with the value as a parameter. WebFOCUS userscan send the SET command to the server.
Procedure: How to Report From SMF Data
To report from SMF data, execute the sample procedure smfman1.fex, provided under home/catalog (DDNAME EDAHFEX for a PDS Deployment server).
You will be prompted for the DSN of the SMF VSAM data set from which you want to report,and the smf_recno value used to produce the SMF records.
HFS Deployment
178 Information Builders

Following is a listing of smfman1.fex
DYNAM ALLOC FI SMFVSAM DSN &SMFDSN.Please provide SMF VSAM DSN. SHR REUDEFINE FILE SMFVSAMCPU/D8.2 = SMFOFCPU / 100 ;USER/A20 = SMFOFUID ;EXCPS/I6 = SMFOFEXC ;TIME/D9.2 = SMFOFLTM / 100 ;HR/I2 = SMFOFTME / 360000 ;MIN/I2 = (SMFOFTME - (HR*360000)) / 6000 ;TOD/A5 = EDIT(HR) | ':' | EDIT(MIN) ;ENDTABLE FILE SMFVSAMPRINT USER CPU EXCPS TIME TODWHERE SMFOFRTY EQ &SMFNUM.Please provide SMF number(type) for report.END
Reference: SMF RECTYPES
There are four RECTYPE values defined to produce SMF records:
RECTYPE Description
1 Indicates a start of task record. When included in a report, these statisticstell when a task initiation occurred, and are of no particular use inchargeback. By pairing start and end of task records for all tasks within atime period, statistics, such as average active time, peak task count, andaverage task count, can be determined. These values can be used for futurecapacity planning activities for the server.
2 Indicates the start of a task record. When included in a report, thesestatistics tell when a task termination occurred. These records are cut forboth publicly and privately deployed services and contain statistics for thesubtask as a whole.
For privately deployed services, RECTYPE (2) records contain statisticsassociated with a single user connection.
4 Begin query. Record layout is the same as RECTYPE (1).
5 End query. Record layout is the same as RECTYPE (2).
4. Installation for z/OS
Server Installation 179

Reference: SMF Record Format for RECTYPES 1 and 4
The record format for RECTYPES 1 and 4 of the SMF records written by the server is definedbelow. The format is provided in the system 390 assembler DSECT form.
SMFON DSECT SPACE*----------------------------------------------------** USAGE ACCOUNTING SMF RECORD LAYOUT FOR LOGON RECORDS. ** ** THIS IS THE DSECT DESCRIBING THE SMF RECORD WHICH IS PASSED TO ** YOUR EXIT ON AT USER LOGON TIME. IT IS COMPLETELY READY TO BE ** WRITTEN WHEN YOUR EXIT RECEIVES CONTROL. **----------------------------------------------------* SPACE
*----------------------------------------------------** THE FIRST TWENTY FOUR BYTES OF THE RECORD ARE THE SMF HEADER. ** THESE FIELDS ARE REQUIRED IN ALL SMF RECORDS (18 BYTES FOR RECORDS ** WITHOUT SUBTYPES; WE USE SUBTYPES, THE HEADER IS 24 BYTES). * SPACE
SMFONLEN DS H'116' RECORD LENGTHSMFONSEG DS XL2'0000' SEGMENT DESCRIPTOR (0 UNLESS SPANNED)SMFONFLG DS XL1 SYSTEM INDICATORSMFONRTY DS XL1 RECORD TYPESMFONTME DS XL4 TIME, IN HUNDREDTHS OF A SECONDSMFONDTE DS PL4 DATE, 00CYYDDDF, WHERE F IS THE SIGNSMFONSID DS CL4 SYSTEM IDENTIFICATIONSMFONSBS DS CL4 SUBSYSTEM IDENTIFICATIONSMFONSBT DS XL2'0001' SUBTYPE OF RECORD - X'0001' INDICATES X THIS IS A LOGON RECORD SPACE
*----------------------------------------------------** THE NEXT FIELDS ARE THOSE PRESENT IN THE LOGON ** RECORD FOR THE START OF A USER SESSION. **----------------------------------------------------* SPACESMFONMSO DS CL8 JOBNAMESMFONJID DS CL8 JOBID (FROM SSIBJBID)SMFONASI DS Y ASIDSMFONRV1 DS XL2 RESERVEDSMFONUID DS CL20 SECURITY USERIDSMFONLID DS CL20 USERID PRESENTED AT LOGON (SAME AS X SMFONSID UNLESS CHANGED VIA MSIDTR X SECURITY EXIT)SMFONRSV DS XL8 RESERVED FOR FUTURE EXPANSIONSMFONCTI DS XL4 RESERVED FOR FUTURE EXPANSIONSMFONSRV DS CL8 SERVICE NAME FROM SERVICE BLOCKSMFONRS0 DS XL4 RESERVED FOR FUTURE EXPANSIONSMFONCNT DS XL1 CONNECTION TYPE SPACE
HFS Deployment
180 Information Builders

SMFONTSO EQU 1 CONNECTION VIA TSOSMFONCIC EQU 2 CONNECTION VIA CICSSMFONVTM EQU 4 CONNECTION VIA VTAMSMFONPSR EQU 8 SPACESMFONRS1 DS XL3 RESERVEDSMFONID1 DS F SYSPLEX ID 1SMFONID2 DS F SYSPLEX ID 2SMFOFPID DS XL20 POOLED USER IDSMFONRS2 DS XL12 RESERVEDSMFONL EQU *-SMFON LENGTH OF THE SMF LOGON RECORD
Reference: SMF Record Format for RECTYPES 2 and 5
The record format for RECTYPES 2 and 5 of the SMF records written by the server is definedbelow. The format is provided in the system 390 assembler DSECT form.
SMFOF DSECT SPACE*----------------------------------------------------** USAGE ACCOUNTING SMF RECORD LAYOUT FOR LOGOFF RECORDS. ** ** THIS IS THE DSECT DESCRIBING THE SMF RECORD WHICH IS PASSED TO ** YOUR EXIT ON AT USER LOGOFF TIME. IT IS COMPLETELY READY TO BE ** WRITTEN WHEN YOUR EXIT RECEIVES CONTROL. **----------------------------------------------------* SPACE
*----------------------------------------------------** THE FIRST TWENTY FOUR BYTES OF THE RECORD ARE THE SMF HEADER. ** THESE FIELDS ARE REQUIRED IN ALL SMF RECORDS (18 BYTES FOR RECORDS ** WITHOUT SUBTYPES; WE USE SUBTYPES, THE HEADER IS 24 BYTES). **----------------------------------------------------* SPACESMFOFLEN DS H'168' RECORD LENGTHSMFOFSEG DS XL2'0000' SEGMENT DESCRIPTOR (0 UNLESS SPANNED)SMFOFFLG DS XL1 SYSTEM INDICATORSMFOFRTY DS XL1 RECORD TYPESMFOFTME DS XL4 TIME, IN HUNDREDTHS OF A SECONDSMFOFDTE DS PL4 DATE, 00CYDDDF, WHERE F IS THE SIGNSMFOFSID DS CL4 SYSTEM IDENTIFICATIONSMFOFSBS DS CL4 SUBSYSTEM IDENTIFICATIONSMFOFSBT DS XL2'0002' SUBTYPE OF RECORD - X'0002' INDICATES X THIS IS A LOGOFF RECORD SPACE
4. Installation for z/OS
Server Installation 181

*----------------------------------------------------** THE NEXT FIELDS ARE THOSE PRESENT IN THE LOGOFF ** RECORD FOR THE END OF A USER SESSION. **----------------------------------------------------* SPACESMFOFMSO DS CL8 JOBNAMESMFOFJID DS CL8 JOBID (FROM SSIBJBID)SMFOFASI DS Y ASIDSMFOFRV1 DS XL2 RESERVEDSMFOFUID DS CL20 SECURITY USERIDSMFOFLID DS CL20 USERID PRESENTED AT LOGON (SAME AS X SMFOFSID UNLESS CHANGED VIA MSIDTR X SECURITY EXIT)SMFMEMA DS XL4 MEMORY ABOVE THE LINE (IN KILOBYTES)SMFMEMB DS XL4 MEMORY BELOW THE LINE (IN KILOBYTES) SMFZIIP DS XL4 ZIIP CPU NORMALIZED (HUNDREDTHS OF A SEC)SMFOFSRV DS CL8 SERVICE NAME FROM THE SERVICE BLOCKSMFZPOCP DS XL4 ZIIP ON CP (HUNDREDTHS OF A SEC)SMFOFCNT DS XL1 CONNECTION TYPE SPACE
SMFOFTSO EQU 1 CONNECTION VIA TSOSMFOFCIC EQU 2 CONNECTION VIA CICSSMFOFVTM EQU 4 CONNECTION VIA VTAMSMFOFPSR EQU 8SMFOFCC DS XL3 COMPLETION CODE FOR THE TASKSMFOFACT DS CL8 USER ACCOUNTING INFORMATION; THIS X FIELD CURRENTLY PASSED AS LOW VALUESMFOFCPU DS XL4 CPU TIME IN HUNDREDTHS OF A SECONDSMFOFEXC DS XL4 COUNT OF EXCP'SSMFOFLTM DS FL4 LOGON DURATION IN HUNDREDTHS OF A X SECONDSMFPRTY DS XL1 PRIORITYSMFCOMPL DS XL1 COMPLETION TYPE DS XL2 RESERVEDSMFOFID1 DS F SYSPLEX ID 1SMFOFID2 DS F SYSPLEX ID 2SMFOPID DS XL20 POOLED USERIDSMFOFA40 DS CL40 FULL 40-BYTE ACCOUNTING FIELD SPACESMFOFL EQU *-SMFOF LENGTH OF THE SMF LOGOFF RECORD
Reference: Accounting for DB2 in a Server Task
When using a server to access DB2 data, certain processing takes place within the DB2address space and is governed by the DB2 chargeback system. If a user requests data fromDB2, the server passes the request to the DB2 subsystem. The DB2 subsystem thenprocesses the request, performing such tasks as retrieving rows and aggregating the data. Itgenerates the answer set, and passes the output back to the server. The server then performsany joins and formatting which have not been performed by DB2 to satisfy the original request.
HFS Deployment
182 Information Builders

Charges incurred while the request was being processed by the DB2 subsystem are added tothe charges accumulated in the server task that originated the request for processing. If theserver accounting is enabled, these charges are associated with the user logon and securityIDs in the SMF records described earlier.
Enabling Use of the zIIP Specialty Engine
If your site has a zIIP (System z Integrated Information Processor) specialty engine from IBM,you can offload specific categories of workload from the Central Processors to the zIIP.
The zIIP engine is a restricted version of a Central Processor (CP), also referred to as a GeneralProcessor (GP). The capacity of the zIIP engine does not count toward the overall MIPS ratingof the mainframe image, so the CPU usage incurred on the zIIP is effectively free. CentralProcessors are often configured to run at speeds below their maximum rating for cost savingand capacity planning purposes. For Central Processors, 100% capacity typically refers to themaximum MIPS that the processor is allowed to generate at that installation, in accordancewith your contract with IBM. In contrast, the zIIP engine always runs at true 100 percent ofcapacity.
As much as 80 percent of server processing is enabled to run on the zIIP engine. Typicalworkloads are expected to offload 30 to 80 percent of CPU processing to the zIIP engine.
To make use of the zIIP enablement feature, the server must run in an authorized state.
What Is a zIIP Specialty Engine?
Though physically identical to a Central Processor, the zIIP engine is microcoded at installationtime to run specific types of workloads. The Central Processor continues to handle theoperating system, I/O interrupts and timer interrupts, job initiations, and user interactions withthe operating system. The zIIP concentrates on CPU intensive workloads, leaving the CentralProcessor more time to absorb otherwise queued workloads, thereby achieving some overallperformance improvement across all mainframe activity.
Steps to zIIP Enablement
This section describes steps and requirements for the server use of the zIIP processor.
The steps to server zIIP enablement are:
1. If your site has purchased the zIIP feature, obtain a license code that licenses you to usethe zIIP feature.
2. Obtain APF authorization for the server load library.
3. Activate the zIIP feature using the SET ZIIP=ON or SET ZIIP=ON/SIMMAXZIIP command. Forinstructions, see Activating a zIIP Environment or Projecting zIIP Usage on page 184.
4. Installation for z/OS
Server Installation 183

Reference: Usage Notes for Use of the zIIP Processor
Maximize the blocksizes of data sources that are read or written by the server to reduce thenumber of I/Os required to access the file. This will reduce the number of switches to non-zIIP mode that the server agents have to make, thus permitting a greater percentage of zIIPcontribution to the request.
Move or rewrite functions developed at your site since the server must switch to non-zIIPmode for each call to such routines. You may be able to use one of the following possiblesolutions:
Move the routines from DEFINEs to COMPUTEs to reduce the number of times they arereferenced. This tactic must be applied carefully, and only when report results would notchange.
Rewrite the routines using DEFINE FUNCTION, which executes on the zIIP processor.
Confine the routine to a pre-step run with ZIIP=OFF which collects its calculated results,then use those calculations in the next step with ZIIP=ON.
Activating a zIIP Environment or Projecting zIIP Usage
The last step in zIIP enablement is to activate the use of the zIIP processor in the server. zIIPenablement is activated by the SET ZIIP command.
The SET ZIIP command has three options:
OFF. This setting prevents the server from offloading its processing to a zIIP.
ON. This setting causes the server to offload processing to a zIIP engine if you have a zIIPprocessor and the environment is properly APF-authorized.
ON/SIMMAXZIIP. This setting enables you to project zIIP processing in two differentenvironments:
You do not have a zIIP processor. Using this setting along with the PROJECTCPUparameter, you can project how much server workload would have been offloaded to azIIP.
You do have a zIIP processor. Using this setting you can project how much advantageyou would achieve by offloading 100% of eligible server processing to the zIIP.
Syntax: How to Activate the zIIP Enablement Feature
You can issue the SET ZIIP command in a server profile or in a particular FOCEXEC.
HFS Deployment
184 Information Builders

SET ZIIP={ON[/SIMMAXZIIP]|OFF}
where:
ON
Configures the server to offload processing to the zIIP engine.
This setting:
Determines if the zIIP processor is accessible to the LPAR in which a job is running.
Determines if the server environment has been properly authorized to run a zIIPworkload.
Note: If the server determines that the zIIP processor is not accessible or that theenvironment has not been authorized correctly, it issues a message describing the reasonand continues in ZIIP=OFF mode, which forwards all subsequent work to the CentralProcessor.
ON/SIMMAXZIIP
Configures the server to either:
Project what the zIIP usage would be if the server could offload processing to a zIIP,when the server is operating in an LPAR without a zIIP. This requires that thePROJECTCPU parameter be set to YES.
The SYS1.PARMLIB member IEAOPTxx contains the PROJECTCPU statement. Activatingthe PROJECTCPU parameter projects zIIP consumption when a zIIP processor is not yetdefined to the LPAR. SMF type 30 records will show the potential calculated zIIP time,so that you can accurately project zIIP usage. This enables you to evaluate the effect ofconfiguring a zIIP processor to be available for server usage. The Systems Programmerfor your site will have access to this data. Use this option for simulation purposes only.
Since the zIIP engine actually is not present, all zIIP-eligible workload will be diverted tothe Central Processor. Thus, all of that CPU utilization will be recorded in a servervariable called &FOCZIIPONCP. This is the amount of workload that would have run onthe zIIP engine, and would have appeared in &FOCZIIPCPU, had the zIIP been presentand accessible to server work. This information is also recorded in the server jobstatistics as well as in IBM SMF type 30 records.
To use this option, insert the following parameter in SYS1.PARMLIB for your LPAR, andalso issue the SET ZIIP=ON/SIMMAXZIIP command:
PROJECTCPU=YES
4. Installation for z/OS
Server Installation 185

This setting:
Determines if the PROJECTCPU=YES command has been set in the LPAR.
Determines if the server environment has been properly authorized to run a zIIPworkload.
Projects zIIP utilization if 100% of eligible server processing could be offloaded to thezIIP, when the server is running in an LPAR with a zIIP. This lets you determine what youwould gain by configuring Workload Manager to give the server a bigger share of zIIPprocessing.
IBM Workload Manager (WLM) prioritizes workloads among the Central Processors andzIIP processors at your site based on a complex set of goals and rules established bythe system administrator. These rules apply to all workloads from all sources, not justthe server. These goals combine to influence the decision to direct server requests tothe zIIP engine at any particular moment.
Utilizing this setting with a zIIP present can help you determine how much advantageyou would get if the server had more of a share of the zIIP processor. To see thedifference in actual and projected zIIP usage, run the same job with SET ZIIP=ON andthen with SET ZIIP=ON/SIMMAXZIIP and compare the results. For more informationabout evaluating zIIP usage, see Evaluating zIIP Usage on page 188.
This setting:
Determines if the zIIP processor is accessible to the LPAR in which a job is running.
Determines if the server environment has been properly authorized to run a zIIPworkload.
Note: If the server determines that the environment has not been authorized correctly, itissues a message describing the reason and continues in ZIIP=OFF mode, which forwardsall subsequent work to the Central Processor.
OFF
Configures the server not to offload processing to the zIIP engine. OFF is the default value.
Information Builders Note: Turn off zIIP enablement only when you know for sure that a jobwill not gain any advantage from using the zIIP processor or if the system operator oradministrator requires that you turn it off.
HFS Deployment
186 Information Builders
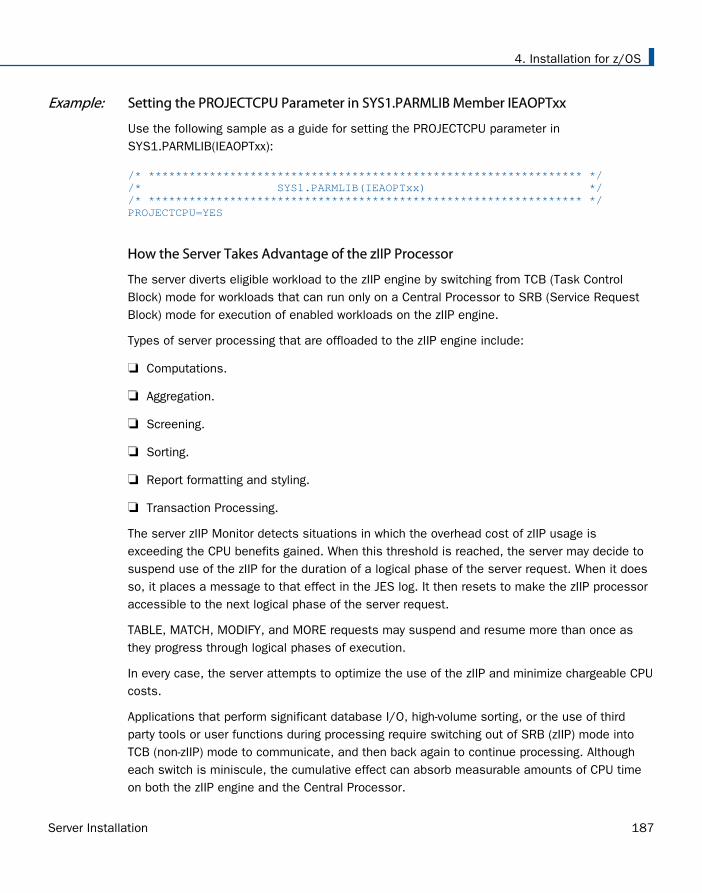
Example: Setting the PROJECTCPU Parameter in SYS1.PARMLIB Member IEAOPTxx
Use the following sample as a guide for setting the PROJECTCPU parameter inSYS1.PARMLIB(IEAOPTxx):
/* **************************************************************** */ /* SYS1.PARMLIB(IEAOPTxx) */ /* **************************************************************** */ PROJECTCPU=YES
How the Server Takes Advantage of the zIIP Processor
The server diverts eligible workload to the zIIP engine by switching from TCB (Task ControlBlock) mode for workloads that can run only on a Central Processor to SRB (Service RequestBlock) mode for execution of enabled workloads on the zIIP engine.
Types of server processing that are offloaded to the zIIP engine include:
Computations.
Aggregation.
Screening.
Sorting.
Report formatting and styling.
Transaction Processing.
The server zIIP Monitor detects situations in which the overhead cost of zIIP usage isexceeding the CPU benefits gained. When this threshold is reached, the server may decide tosuspend use of the zIIP for the duration of a logical phase of the server request. When it doesso, it places a message to that effect in the JES log. It then resets to make the zIIP processoraccessible to the next logical phase of the server request.
TABLE, MATCH, MODIFY, and MORE requests may suspend and resume more than once asthey progress through logical phases of execution.
In every case, the server attempts to optimize the use of the zIIP and minimize chargeable CPUcosts.
Applications that perform significant database I/O, high-volume sorting, or the use of thirdparty tools or user functions during processing require switching out of SRB (zIIP) mode intoTCB (non-zIIP) mode to communicate, and then back again to continue processing. Althougheach switch is miniscule, the cumulative effect can absorb measurable amounts of CPU timeon both the zIIP engine and the Central Processor.
4. Installation for z/OS
Server Installation 187

In order to diminish this effect, the server buffers the collection of records passed to thesystem sort utility and some adapters rather than passing one record at a time, thus reducingthe number of switches between TCB and SRB modes.
These third party products may themselves be zIIP enabled and may offload some or all oftheir processing to the zIIP engine independent of the server. The server always calls theseproducts from the Central Processor because it cannot know whether they will perform anyprocessing that is prohibited on the zIIP.
Even though zIIP usage occurs more frequently on non-optimized requests to a relational datasource, optimized requests are still inherently more efficient and, therefore, may incur lessCPU time. Being zIIP enabled, DB2 may also take advantage of the zIIP processor for serverrequests based on the local configuration of DB2 relative to the server.
Requests against some types of data sources whose I/O can be buffered gain a lot ofadvantage from zIIP enablement. Data sources that gain the most benefit from zIIP processingdue to buffered I/O include:
Blocked flat files.
FOCUS.
XFOCUS.
VSAM.
DB2.
Evaluating zIIP Usage
In order to evaluate server zIIP processing in a session, you can query three Dialogue Managervariables that accumulate statistics about CPU processing:
&FOCCPU accumulates the time spent on a Central Processor. This is an existing variablethat precedes zIIP enablement.
&FOCZIIPCPU accumulates the time actually spent on the zIIP processor (in SRB mode).This is the normalized CPU value using the same scale as &FOCCPU.
&FOCZIIPONCP accumulates the time that processing could have been offloaded to the zIIPprocessor but was diverted to the Central Processor by the system.
Note:
&FOCCPU includes the value of &FOCZIIPONCP.
HFS Deployment
188 Information Builders

The sum of &FOCZIIPCPU and &FOCCPU represents the total CPU utilized by the serveragent.
If you set ZIIP=OFF, the zIIP variables do not accumulate further but are not reset tozero. If you later set ZIIP=ON, they resume accumulating statistics.
The RM (Resource Manager) that monitors server usage also captures zIIP statistics.
Performance Considerations for HFS
There are several ways in which you can improve the server performance:
Non-swappable address space. We recommend that you run the server in a non-swappableaddress space. For more information, see Running the Server in a Non-Swappable AddressSpace on page 189.
Workload Manager (WLM). You can balance server workload by using Workload Manager.For more information, see Workload Manager on page 189.
Running the Server in a Non-Swappable Address Space
We recommend that you run the server in a non-swappable address space. In order to makethe server address space permanently non-swappable, add the following entry toSYS1.PARMLIB(SCHEDxx):
PPT PGMNAME(TSCOM300) /* PROGRAM NAME */NOSWAP /* NON-SWAPPABLE */CANCEL /* CAN BE CANCELLED */
Do not use the KEY 0 parameter, or any other parameter (such as NOPASS), unless thesystem programmer completely understands the consequences of adding the parameter.
All local spawn transactions will perform in the mode of the server. For example, if the serveraddress space is non-swappable, all local spawn execute as non-swappable.
The server executes limited non-local spawn, such as when the user executes a UNIX systemcommand. Non-local spawn execute as swappable.
The server never executes a fork subroutine. (A fork subroutine creates a new process. Thenew process, called the child process, is an almost exact copy of the calling process, which iscalled the parent process.)
Workload Manager
Although the server may run in a specific performance group, transactions submitted by serveragents may perform differently than the server by adding the following keyword to edaserve.cfg:
4. Installation for z/OS
Server Installation 189

wlm_enclave_trname = WLM_transaction_name
where:
WLM_transaction_name
Can be up to 8 characters.
This is a service-level keyword.
Using this setting, the task will join a Workload Manager (WLM) enclave when a request starts,and leave the enclave when the request finishes. This gives WLM control of the dispatchingpriority of the task. The transaction rules defined on WLM will determine the default serviceclass assigned to this transaction, and that service class will determine how the request runs.
This feature helps to balance a workload so that a long request will not affect a short request.This can be achieved through WLM rules designed to lower the priority of a long request after acertain period of time. Without this feature, all requests share the region priority.
The transaction name passed in this keyword must match one defined in the WLMClassification Rules for the Job Entry Subsystem (JES). A corresponding WLM Service Classpointed to by this rule will then be associated with this service.
The classification rules for JES must be used even if the server is started as a started task.The subtasks are always run under JES.
For example, you would include the following in edaserve.cfg:
SERVICE = DEFAULT BEGINwlm_enclave_trname = IWAYFAST...END
The WLM definition is:
Subsystem Type JES - Batch JobsClassification: Default service class is PRDBATLOThere is no default report class. Qualifier Qualifier Starting Service Report# type name position Class Class- ---------- -------------- --------- --------- --------1 TN IWAYFAST EDAQRYHI
HFS Deployment
190 Information Builders

WLM subrules (levels 2 and above) are supported. For a server request to join an enclave in aparticular service class, the names of all rule qualifiers below our transaction name arechecked. For example, consider the following WLM definition:
Subsystem Type JES - Batch JobsClassification: Default service class is PRDBATLOThere is no default report class. Qualifier Qualifier Starting Service Report# type name position Class Class- --------- ------------- -------- -------- --------1 SSC PRDMVS PRDDFLT2 . TN . IWAYFAST EDAQRYHI
In this particular case, the qualifier 1 type is SSC (Subsystem Collection), and a server requestwill only join the enclave IWAYFAST if it is running on a particular LPAR in the SYSPLEX. Thisqualifier (PRDMVS) must match the XCF group definition: issue $DMASDEF (for JES2) andcheck the value of XCFGRPNM field.
You can handle WLM scheduling environments by defining them to WLM and then adding theJOB statement parameter SCHENV=xxxxx to the ISTART JCL.
General Information for a z/OS HFS Installation
This section covers general information for a z/OS installation.
Sample Metadata, Data, and Other Tutorial Samples
Releases prior to 7.7.06 pre-load various samples into the IBISAMP application. As of 7.7.06,on a new installation, the IBISAMP application is created, but is not pre-loaded. The serverWeb Console has a new feature on the ribbon and on the application tree (under new),Tutorials (the Create Tutorial Framework page), which has a pull-down for various samples. TheDMC also has this feature on the application tree.
There are currently about 10 different tutorial/sample selections available on the pull-downselect list to match various customer needs. The bulk of the prior IBISAMP sample objects canbe generated by selecting the Create Legacy Sample Tables and Files tutorial. Other priorIBISAMP DataMigrator sample objects (usually starting with the characters dm*) are nowloaded by choosing their respective DataMigrator tutorials. Under the new method, thetutorials/samples may be loaded to any application, not just IBISAMP.
If you are doing just a software refresh, the prior IBISAMP objects will be unchanged (becausea refresh does not touch app directories).
4. Installation for z/OS
Server Installation 191

Frequently Asked Questions for HFS
Q: How do I execute server user profiles from a PDS?
A: We recommended that you copy the server user profiles from the PDS to the HFSdirectory /ibi/profiles, and rename them to add the extension .prf (for example, user_id.prf).Alternatively, you can use the following technique to execute user profiles from a PDS:
1. In the IRUNJCL member, allocate DDNAME //MVSPROF to the PDS containing user profiles.For example:
//MVSPROF DD DISP=SHR,DSN=high_level_qualifier.EDAPROF.DATA
2. Add the highlighted lines to the global server profile, edasprof.prf:
APP MAP MVSPROF fex=//dd:mvsprof APP MAP MVSAPP mas=//dd:master;fex=//dd:focexec;acx=//dd:access; ... APP PATH IBISAMP MVSAPP -SET &USERID='12345678';-SET &USERID=GETUSER(&USERID); EX MVSPROF/&USERID
Q: What permissions are specified for application component files?
A: Application component files, such as FOCEXEC procedures (.FEX), Master Files (.MAS), andAccess Files (.ACX), reside in the /ibi/apps/applicationname directory, where they are createdwith a permission of 666 minus the UMASK setting.
For example, if the UMASK value is 022, each application component is created with apermission of 644.
Caution: When using the above UMASK values, if one user ID creates application components,all other users will be able to read them, but not to write, update, or refresh.
You can provide write access by changing the value of UMASK at installation time, or manuallyin IRUNJCL. For example:
//TSCOM300 EXEC PGM=TSCOM300,// PARM='ENVAR("_EDC_UMASK_DFLT=0022")/'//STEPLIB DD DISP=SHR,DSN=EDABXV.SRV77.HOME.LOAD
Q: Can I monitor server startup by checking the MVS SYSLOG?
A: Yes.
The following messages are written to the SYSLOG when
The server starts successfully:
(EDA13023) ALL INITIAL SERVERS STARTED
HFS Deployment
192 Information Builders

The Server does not start:
(EDA13171) UNABLE TO START IWAY SERVER
Third-Party Software and Licenses
As of Version 7 Release 6.8, to address display of third-party software license requirements, alicense option has been added to the Help menu located on the Web Console. This sectiondescribes the third-party software and includes references to the full licenses included in Information Builders and Third-Party Licenses on page 357.
OpenFlex SDK
OpenFlex SDK is included by Information Builders for use with its HOLD FORMAT FLEX feature.This distribution is subject to the terms and conditions of the Mozilla Public License Version1.1.
For more information, see Zip Archiver License on page 373 or visit our website, http://www.informationbuilders.com.
Troubleshooting for HFS
To troubleshoot an installation problem, identify your problem in the following list, and followthe link to a description of the solution.
If you cannot find your problem described in the list, and cannot resolve it yourself, contactCustomer Support Services as described in Information You Should Have on page 13 and Customer Support on page 13. In addition, supply the following information to CustomerSupport Services:
Server trace (see How to Generate a Server Trace on page 195).
JCL for IRUNJCL.
Job output.
System dump, if needed (see How to Generate a System Dump on page 195).
Any additional information regarding how the problem occurred.
If you have a troubleshooting suggestion that is not described in the list, and you think otherswill find it helpful, we invite you to send it to us, as described in How to Add Your Problem tothe Troubleshooting Guide on page 202. We will consider including your problem in a futurerelease of this manual.
4. Installation for z/OS
Server Installation 193

Problems:
The server abends with a U4039 code.
For details, see Problem: The Server Abends With a U4039 Code on page 194.
INSUFFICIENT AUTHORITY TO GETSPENT messages appear in JESLOG.
For details, see Problem: INSUFFICIENT AUTHORITY TO GETPSENT messages in JESLOG onpage 194.
The request fails, and JVM not found messages are written to edaprint.log.
For details, see Problem: Request fails, and JVM not found messages written to edaprint.logon page 194.
Reference: Problem: The Server Abends With a U4039 Code
Problem: The server abends with a U4039 code.
Cause: This is a generic abend.
Solution: Find out what caused the abend by checking the edaprint.log file, SYSOUT ddname,and the MVS system log.
Reference: Problem: INSUFFICIENT AUTHORITY TO GETPSENT messages in JESLOG
Problem: INSUFFICIENT AUTHORITY TO GETPSENT messages appearing in JESLOG.
Cause: See IBM APAR II11813.
Solution: The APAR recommends issuing one of the following RACF commands:
SETROPTS LOGOPTIONS (NEVER(PROCACT))SETOPTS LOGOPTIONS (DEFAULT(PROCACT))
However, when a non-superuser in the OMVS shell issues the command ps -ef, the followingsecurity message is repeated in SYSLOG:
ICH408I USER(default) GROUP(dgltgrp) NAME(bpxdefaultuser) 060CL(PROCACT) INSUFFICIENT AUTHORITY TO GETPSENT
This does not indicate an error. It is an informational message issued because of RACFLOGOPTIONS settings. The ps -ef command is a request to show all processes that therequester is authorized to see, but a non-superuser is allowed to see only his or her ownprocesses.
Reference: Problem: Request fails, and JVM not found messages written to edaprint.log
Problem: The request fails, and JVM not found messages are written to edaprint.log.
HFS Deployment
194 Information Builders

Cause: If the server cannot find the Java Virtual Machine (JVM), the JSCOM Listener will not beable to start, and messages will be written to the server log stating that the JVM cannot befound.
Solution: Specify the location of the JVM in JDK_HOME or JAVA_HOME. (For information, see JVM Requirements for Java Services on page 100.)
Reference: Secured Server Starts Unsecured or Does not Start After Upgrade
A server will implicitly attempt to start unsecured if proper authorization steps have not beencompleted. Starting the server normally clears edatemp. If prior edatemp files exist (andauthorization has not been done), start up will fail due to an inability to clear the directory.However, if an edastart -cleardir command was issued just before the upgrade, there is nothingto clear, no error occurs, and the server starts. If the server starts and is not inspected afterthe initial start up, the server being in the wrong mode may go unnoticed.
The proper solution is to add proper authorizations after an upgrade, as described in Step 4.Reconfigure Server Security on page 175, and restart the server. A new safety measure hasalso been added. If the environment variable EDAEXTSEC is set to OPSYS explicitly, and aserver lacks authorization, it will not start (see Preventing Unsecured Server Starts AfterUpgrades on page 176 for details).
Procedure: How to Generate a Server Trace
To generate a server trace:
1. Turn tracing by going to the Web Console menu bar, selecting Workspace, and thenDiagnostics; or else by running the ITRCON JCL member.
2. Reproduce the problem.
3. Submit the ISAVEDIA member to produce the diagnostic information.
A directory called sdnnnnnn is created under your configuration directory (forexample, /ibi/srv77/ffs/sd123456). Diagnostic information is placed in this directory.Make sure you have access to this directory.
Do not change anything in the EDAENV member: changes could prevent the correct informationfrom being copied to your directory.
Procedure: How to Generate a System Dump
To generate a system dump:
1. Allocate DDNAME SYSMDUMP pointing to the data set with the following DCB parameters:
RECFM=FB,LRECL=4160,BLKSIZE=4160.
4. Installation for z/OS
Server Installation 195

2. To get the first dump, add the parameter FREE=CLOSE to your DD statement. The DDstatement should appear as follows:
//SYSMDUMP DD DISP=SHR,DSN=MYID.EDAPTH.SYSMDUMP,FREE=CLOSE
3. To get the last dump, the statement should appear as follows:
//SYSMDUMP DD DISP=SHR,DSN=MYID.EDAPTH.SYSMDUMP
Only two IDs must have privileges to write into this data set: ISERVER and IADMIN.General server users DO NOT need read or write access to the SYSMDUMP data set.
4. To prevent abendaid from intercepting the dump, add:
//ABNLIGNR DD DUMMY
5. To prevent Language Environment from intercepting the dump, specify:
EDADUMPOPT=UAIMM in EDAENV DD
This enables you to get more accurate information reflecting the moment the abendactually occurs.
6. Save the entire job output for the server (including JES logs), and send it to CustomerSupport Services.
Instead of using JCL allocations to add SYSMDUMP, the procedure described below can beused alternatively.
Procedure: How to Add JCL Allocations to a Running Server
A z/OS operator can issue modify commands from the z/OS system console to allocateDDNAMES to the server without restarting it. This procedure is useful if you need to reallocatea file that was freed to allow a batch overnight utility to run, or perhaps to add SYSMDUMPallocation to a running server.
Syntax: How to Allocate a Data set From the z/OS System Console
F <iway_server_jobname/started task>,DYNAM ALLOC FI <ddname> DA <dsname> <optional dynam parameters>
Example: Allocating a VSAM Data set
F IWAY2,DYNAM ALLOC F VSAMFILE DA VSAM.FILEA.CLUSTER SHR
Example: Allocating a SYSMDUMP Data set With FREE=CLOSE Option
F IWAY2,DYNAM ALLOC FILE SYSMDUMP DA PROD2.SYSMDUMP.DATA SHR CLOSE
Note: The examples above assume IWAY2 is the jobname/started task ID for the server.
HFS Deployment
196 Information Builders

All valid DYNAM ALLOC syntaxes are supported. For more information on the DYNAMcommand, please refer to the Store Procedures Reference manual.
The following message will be issued in the server JESMSGLG indicating if the command wasprocessed successfully or not.
Success:
+DYNAM COMMAND SUCCESFULLY PROCESSED Rc=0
Failure:
+DYNAM ERROR: IKJ56225I DATA SET IWAY.TEST ALREADY IN USE, TRY LATER
Procedure: How to Free Data sets Allocated to the Server
A z/OS operator can issue modify commands from the z/OS system console to free DDNAMEsor DSNAMEs allocated to the server. Both global allocations (made at the server ISTART JCL)and local ones (DYNAM ALLOC commands issued by user tasks) can be freed. This procedureis useful if you need to free an allocation to run a batch utility overnight, without restarting theserver.
Syntax: How to Free a Data set From the MVS System Console
To free a single DDNAME:
F <iway_server_jobname/started task>,DYNAM FREE FI <ddname>
To free a single DSNAME (all occurrences in the server):
F <iway_server_jobname/started task>,DYNAM FREE DS <dsname>
To free multiple DDNAMEs, passing a pattern (free all DDNAMEs staring with AB):
F <iway_server_jobname/started task>,DYNAM FREE FI AB*
To free multiple DSNAMEs (all occurrences in the server), passing a pattern (free allallocations of data sets starting with IWAY.VSAM):
F <iway_server_jobname/started task>,DYNAM FREE DA IWAY.VSAM*
A message will be issued in the iway_server JESMSGLG indicating if the command wasprocess successfully or not, as follows.
Success:
+DYNAM COMMAND SUCCESFULLY PROCESSED Rc=0
Failure:
4. Installation for z/OS
Server Installation 197

+DYNAM ERROR: IKJ56225I DATA SET IWAY.TEST ALREADY IN USE, TRY LATER
Example: Freeing an Allocated Data Set
Suppose ISTART JCL (jobname IWAY2) has the following allocation:
//VSAMFILE DD DISP=SHR,DSN=VSAM.FILEA.CLUSTER
The operator can free this file using the command (from MVS console):
F IWAY2,DYNAM FREE FI VSAMFILE
Procedure: How to Initialize the RDAAPP Application
RDAAPP is an interactive client test application that facilitates the execution of SQLstatements and stored procedures on the Unified server. During the installation process, JCLand REXX routines are created in the installation data set as members IRDAAPPJ andIRDAAPPC respectively.
The following installation data set is used for HFS deployment.
qualify.servertype.DATA
where:
product_type
Is determined by your license key.
The following installation data set is used for PDS deployment.
qualify.PDS.product_type.DATA
where:
product_type
Is determined by your license key.
Note: The RDAAPP application is not intended for use as a production tool.
1. To use the IRDAAPPJ JCL, you must first edit the member IRDAAPPJ and add your requestdetails.
a. To edit the member IRDAAPPJ, change the following field,
//STDIN DD * Put your request here//
to
HFS Deployment
198 Information Builders

//STDIN DD * <enter blank line><enter userid><enter password>LOOPBACK<enter request><enter optional parameters>QQ//
4. Installation for z/OS
Server Installation 199

b. Complete the panel as follows.
Field Instructions
<enter userid> Enter a valid user ID or blank line if the userid of theuser who submitted the job is to be used for a trustedconnection.
<enter password> Enter the password for the above userid or a blank line ifthe userid/password of the user who submitted the jobis to be used for a trusted connection.
LOOPBACK Match a node name in the EDACS3 allocation in theIRDAAPPJ JCL. Default is LOOPBACK.
<enter request> Enter one of the following values:
S To enter an SQL SELECT statement. Type thestatement after you enter the value S (see thefollowing example).
P To enter an SQL PREPARE statement. Type thestatement after you enter the value P.
D To execute a prepared statement by supplying theID. Type the ID after you enter the value E.
Q To quit.
? For this list of commands.
<enter optional parameters>
Depending on the above command, you may beprompted for:
Select engine (0/ENTER - EDA, 1 - DB2, 2 - TERADATA,and so on.).
Reclimit (Press Enter for all records).
Readlimit (Press Enter for all records).
Q Quit RDAAPP (It is needed twice).
c. Once you have made the above edits, submit the JCL for execution.
HFS Deployment
200 Information Builders
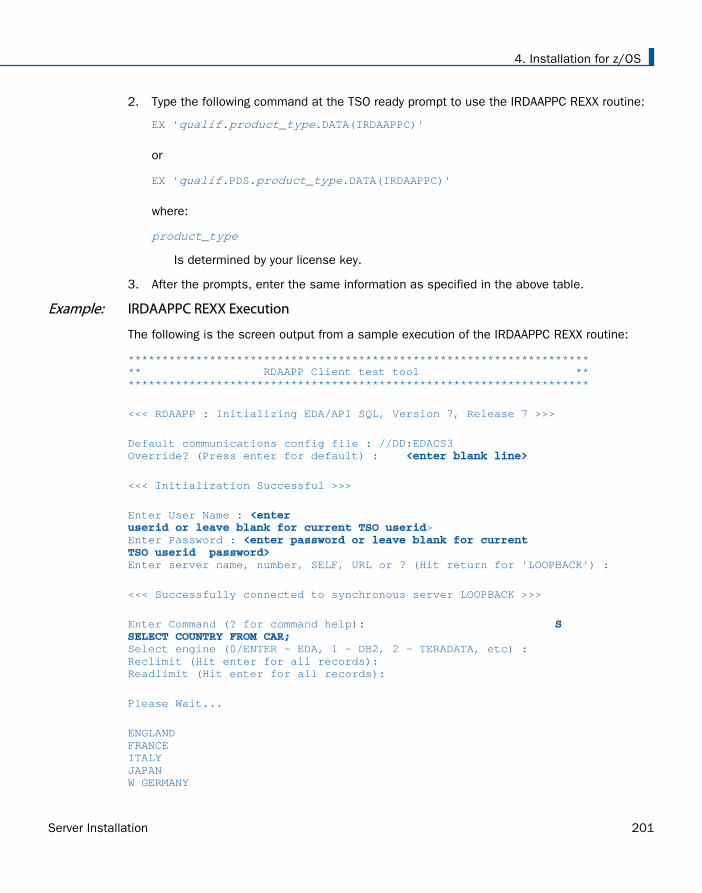
2. Type the following command at the TSO ready prompt to use the IRDAAPPC REXX routine:
EX 'qualif.product_type.DATA(IRDAAPPC)'
or
EX 'qualif.PDS.product_type.DATA(IRDAAPPC)'
where:
product_type
Is determined by your license key.
3. After the prompts, enter the same information as specified in the above table.
Example: IRDAAPPC REXX Execution
The following is the screen output from a sample execution of the IRDAAPPC REXX routine:
********************************************************************** RDAAPP Client test tool **********************************************************************
<<< RDAAPP : Initializing EDA/API SQL, Version 7, Release 7 >>>
Default communications config file : //DD:EDACS3 Override? (Press enter for default) : <enter blank line>
<<< Initialization Successful >>>
Enter User Name : <enteruserid or leave blank for current TSO userid>Enter Password : <enter password or leave blank for currentTSO userid password> Enter server name, number, SELF, URL or ? (Hit return for 'LOOPBACK') :
<<< Successfully connected to synchronous server LOOPBACK >>>
Enter Command (? for command help): SSELECT COUNTRY FROM CAR; Select engine (0/ENTER - EDA, 1 - DB2, 2 - TERADATA, etc) :Reclimit (Hit enter for all records):Readlimit (Hit enter for all records):
Please Wait...
ENGLANDFRANCEITALYJAPANW GERMANY
4. Installation for z/OS
Server Installation 201

<<< 5 record(s) processed. (scb count 5) wait=4 secs, retrieval=0 secs>>>
<<< 5 record(s) processed. (scb count 5)>>>
Q
Enter Connect or Quit:
Q
<<< RDAAPP : Exiting... >>>
***
Enter Command (? for command help):
Procedure: How to Add Your Problem to the Troubleshooting Guide
If you have troubleshooting suggestions that you think others will find helpful, we invite you tosend them to us so that we can consider including them in a future release. You can:
Email them to [email protected]. Include your name and phone number, and includeServer Installation Troubleshooting in the subject line.
Send them to:
Technical Content ManagementInformation BuildersTwo Penn PlazaNew York, NY 10121-2898
Please include your name, phone number, email address, and postal address.
PDS Deployment
The topics in this section describe how to install your server in a partitioned data set (PDS)environment.
Installation Requirements for PDS
Before beginning server installation, review all requirements.
PDS Deployment
202 Information Builders

Operating System Requirements
The server runs on any supported release of z/OS. For current information about supportedreleases:
1. Go to http://techsupport.informationbuilders.com.
The Information Builders Technical Support home page opens.
2. In the Quick Links section on the right side of the page, click Supported Systems/Adapters.
The Supported Systems and Adapters page opens.
3. Click the link for the release you want.
The Supported Systems and Adapters page for that release opens.
4. Click the link for your platform.
The support chart for that platform opens.
In general, the operating system should have the latest cumulative patch levels applied.
Confirm that your server installation software is labeled for your operating system level.
JVM Requirements for Java Services
If JVM-based adapters, server-side graphics, XBRL, or user-written CALLJAVA applications areto be used, a Java Runtime Environment (JRE) JVM must be installed on the machine, and theserver must be configured to use it
The minimum JVM release level is 1.7 or higher, due to required internal components of theserver. The Java Listener will not start unless 1.7 (or higher) is in use. Prior 7.x releases wouldallow the listener to start with any release, and sub-components would fail if they required ahigher Java Level. The primary reason for this change is that Java 1.5 (and prior releases) arepast their End of Service Life (EOSL) dates, and, as such, are unsupportable, in addition tolacking newer functionality. The following URL has Java EOL and EOSL information:
http://www.oracle.com/technetwork/java/eol-135779.html
Installing maintenance updates to the EDAHOME of an existing server running releases prior toproduction 7.7.05 will also have the requirement of moving up all dependent configurations touse Java 1.7 (as instructed in this section).
4. Installation for z/OS
Server Installation 203
You may install a Java JRE or a Java SDK. When you install a Java SDK, the JRE component(where the JVM lives) is included, so either is allowed. If using servlet, the Java SDK isrequired for the jar command, so it is generally preferred over the Java JRE. The SDK or JREbuild type must also match the 32-bit or 64-bit bit type of the server. If an appropriate JVMfrom a JRE or SDK is not found on the library path or using variables as described below, or isnot the appropriate bit type, a Failed to find JVM message will be displayed. Further JavaServices debugging information about loading the JVM will be written to the server start logindicating JSCOM3 start failed as well as additional information that may be useful in resolvingthe problem. JSCOM3 is the actual process name for the Java Services Listener and the termsare often used interchangeably.
The JDK JRE bin and server (or client) subdirectories must be specified in the load library pathenvironment variable. A server restart is required, plus the appropriate JVM must be on thepath if switching JRE levels. The load library path will be prompted at install time if JVM-basedadapters or features are required. Otherwise, it can be manually set by editing the EDAENV fileusing any of the following methods.
For Java JDK, set JDK_HOME (to the install home location) in the server environmentconfiguration file (EDAENV).
For Java JRE, set JAVA_HOME (to the install home location) in the server environmentconfiguration file (EDAENV).
Use library path (LIBPATH) to set explicit pathing. Use of JDK_HOME or JAVA_HOME ispreferred as they are less prone to error. The JRE bin and server (or client) subdirectoriesmust be specified in a path-based environment variable and a server restart is required.
To change or add operating system environment variables, set and export the variable ina .profile or script that always gets called during a server start. It is very common to placevariables in the server edastart script, but it is recommended that they be placed in a scriptthat in turn calls edastart (so that the edastart script remains vanilla).
To change or add a variable in a server environment start up file (EDACONF bin\edaenv.cfg),either edit the file in a text editor before starting the server or:
1. Start the server (services like Java Listener may fail until configured and the server isrestarted).
2. Open the Web Console and log on using an administrator ID.
3. Select Workspace from the main menu.
4. In the navigation pane, open the Configuration Files and Miscellaneous folders.
5. Right-click Environment - edaenv.cfg and select Edit.
PDS Deployment
204 Information Builders

6. Make the desired edit.
7. Save the file.
8. Restart the server (changes are not effective until server is restarted).
The format of edaenv.cfg variables is one per line in name=value pairs. Spaces before andafter the equal sign are optional. Values with embedded spaces do not require quoting.Variables are always uppercase.
If JVM-based adapters or features are not required, and the JVM environment is not configured,the message Failed to find JVM is normal and can be ignored.
To add classes to the JVM class path for customer-written CALLJAVA applications, set andexport the CLASSPATH variable to the operating system level before server start-up or use theWeb Console to set the Java Listener IBI_CLASSPATH property.
IP Port Number Requirements
The install process prompts for two IP port numbers: the TCP Listener and HTTP Listener. Italso uses the next two consecutive ports after the supplied HTTP Listener port for FDS use.This results in a total of four IP ports.
The supplied IP port numbers must be above the IANA registered well-known reserve range(numbers under 1024) and not over the maximum legal number (65535). Do not use IP portnumbers already used by other applications or products. Netstat, or netstat like commands,should reveal what actual ports are in use.
Browser Requirements
The Web Console requires one of the following web browsers:
Microsoft Internet Explorer® 9 or higher.
Mozilla Firefox® 27 or higher.
Google Chrome® 33 or higher.
Apple Safari® 7 or higher and Mobile iOS v5.
Opera 19 or higher.
4. Installation for z/OS
Server Installation 205
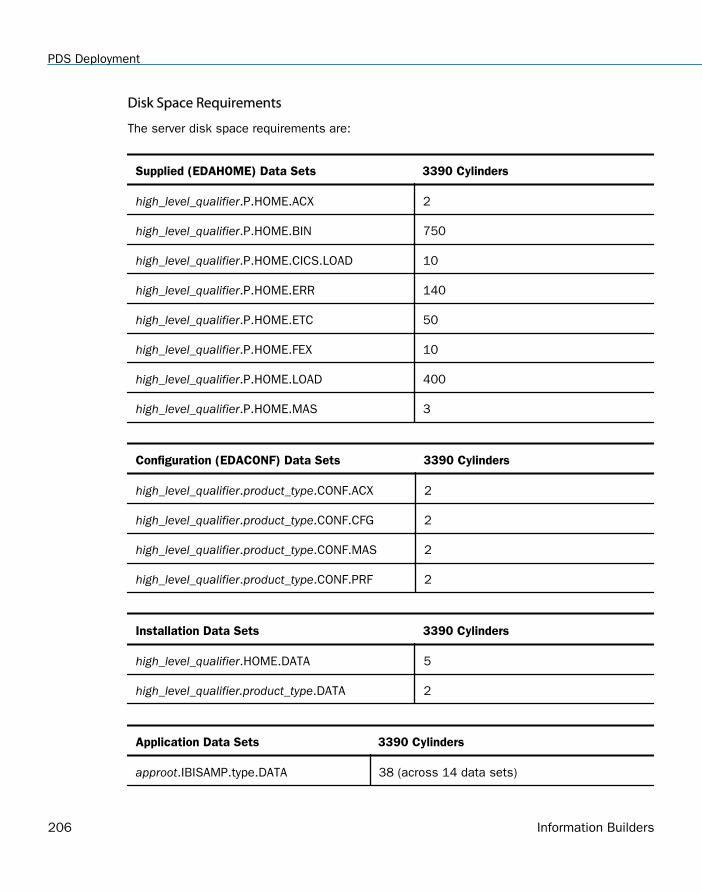
Disk Space Requirements
The server disk space requirements are:
Supplied (EDAHOME) Data Sets 3390 Cylinders
high_level_qualifier.P.HOME.ACX 2
high_level_qualifier.P.HOME.BIN 750
high_level_qualifier.P.HOME.CICS.LOAD 10
high_level_qualifier.P.HOME.ERR 140
high_level_qualifier.P.HOME.ETC 50
high_level_qualifier.P.HOME.FEX 10
high_level_qualifier.P.HOME.LOAD 400
high_level_qualifier.P.HOME.MAS 3
Configuration (EDACONF) Data Sets 3390 Cylinders
high_level_qualifier.product_type.CONF.ACX 2
high_level_qualifier.product_type.CONF.CFG 2
high_level_qualifier.product_type.CONF.MAS 2
high_level_qualifier.product_type.CONF.PRF 2
Installation Data Sets 3390 Cylinders
high_level_qualifier.HOME.DATA 5
high_level_qualifier.product_type.DATA 2
Application Data Sets 3390 Cylinders
approot.IBISAMP.type.DATA 38 (across 14 data sets)
PDS Deployment
206 Information Builders

Application Data Sets 3390 Cylinders
approot.BASEAPP.type.DATA 56 (14 data sets using 4 cylinders per file)
Deferred Execution Data Sets (Optional) 3390 Cylinders
high_level_qualifier.product_type.CONF.DFM.DEL 5
high_level_qualifier.product_type.CONF.DFM.REQ 5
high_level_qualifier.product_type.CONF.DFM.RPE 5
high_level_qualifier.product_type.CONF.DFM.RPF 5
high_level_qualifier.product_type.CONF.DFM.RPI 5
high_level_qualifier.product_type.CONF.DFM.RQD 5
high_level_qualifier.product_type.CONF.DFM.RQF 5
high_level_qualifier.product_type.CONF.DFM.RQP 5
high_level_qualifier.product_type.CONF.DFM.RSP 20
Note: Deferred Execution Datasets are not created by the install procedure. They are createdwhen the Scheduler/Deferred service starts. By default, the Scheduler/Deferred service autostarts at server startup. To disable the feature, enter dfm_autostart = n in the EDASERVEadministration control file.
Supplementary Data Sets 3390 Cylinders
high_level_qualifier.product_type.SYSRPC.FOCUS 1
high_level_qualifier.product_type.ETLLOG.FOCUS(DataMigrator configurations only)
1
high_level_qualifier.product_type.ETLSTATS.FOCUS(DataMigrator configurations only)
1
high_level_qualifier.product_type.CONF.SMARTLIB.DATA 1
4. Installation for z/OS
Server Installation 207

where:
high_level_qualifier
Is the high-level qualifier to be used for all output libraries. You specify the high-levelqualifier during server installation, as described in Step 4. Run ISETUP on page 220, inStep 4.
product_type
Is one of the following:
FFS for a Full-Function Server
DM for a DataMigrator Server
WFS for a WebFOCUS Reporting Server
WFM for a Shared Application Server for WebFOCUS Maintain
approot
Is the default location for storing applications. You specify approot during serverinstallation, as described in Step 4. Run ISETUP on page 220,
Memory Requirements
Memory usage of a configured environment consists of the following elements:
Workspace Manager
Listeners
Concurrently running application agents
Actual memory usage depends on application features, and varies depending on theapplication. The SHRLIBRGNSIZE parameter (defined on SYS1.PARMLIB, member BPXPRMxx)can affect the amount of memory that the server address space will allocate. ForSHRLIBRGNSIZE, we recommend the default MVS installation value of 64Mb:
SHRLIBRGNSIZE(67108864)
Server memory usage:
The workspace (including Listeners) uses 200 megabytes.
Each pre-started agent requires 4 megabytes.
PDS Deployment
208 Information Builders

The minimum amount of memory for a newly installed server with no workload is 250Mb.However, depending on usage, workload, and configuration options, 500Mb is recommendedto start, to be adjusted as needed.
Communication Requirements
You need four TCP/IP ports for each server instance that you configure. Three of these portsmust be consecutive. You specify these port numbers during installation. You may requireadditional ports depending on which options you configure later.
The server supports only IBM TCP/IP. It does not support Interlink or any other third-partyTCP/IP.
USS Segment Requirements
PDS deployment requires each user of the server to be identified to USS by means of a defaultsegment definition. This default OMVS segment is defined when USS is installed as a part ofz/OS. Please refer to your IBM UNIX System Services documentation for more informationabout this subject.
HFS Home and Configuration Directory Requirements
Libraries and the APIs supporting them must reside in the HFS file system to enable thefollowing features:
Server-side graphics.
They are also required for the following Java-based and SAP-based adapters:
Call Java.
EJB.
JDBC.
Microsoft SQL Server.
SQL SAP.
SAP BWB.
At installation time, a panel with a list of adapters to be configured will be displayed. If any ofthe above adapters are selected, the installation will require the path for two HFS locations asfollows:
edahome_dir. Provide the edahome path for the dll modules that interface with Java/SAPand must reside in HFS. The directory will be created with 755 permissions, if it does notexist.
4. Installation for z/OS
Server Installation 209

edaconf_dir. Provide the edaconf path to be used for both configuration files (such ascodepage files), as well as the root location for temporary files (such as traces and logs),that must reside in HFS. If it does not exist, the directory will be created with 755permissions.
If no data adapters were selected, the next panel will allow an optional configuration for theJSCOM3 listener. If server-side graphics support is desired, the listener must be configuredand all three paths are required (edahome_dir, edaconf_dir, plus the path to Java passed toeither JDK_HOME or JAVA_HOME).
If edahome_dir is not defined at installation time, it will not be possible to configure it laterusing the Web Console. The server will have to be re-installed, configuring the JSCOM3listener.
Installing a New Server for PDS
To install a new Server for z/OS deployed using partitioned data set (PDS) libraries, performthe following steps.
Step 1. Set Up User IDs
You can use any user ID to install and run the server. Whichever ID you use becomes the firstserver administrator ID (sometimes referred to as iadmin).
Step 2. Collect Required Information for Adapters
For current information about which adapters are supported:
1. Go to http://techsupport.informationbuilders.com.
The Information Builders Technical Support home page opens.
2. In the Quick Links section on the right side of the page, click Supported Systems/Adapters.
The Supported Systems and Adapters page opens.
3. Click the link for the release you want.
The Supported Systems and Adapters page for that release opens.
4. Click the link for your platform.
The support chart for that platform opens.
You must provide information to configure the adapters that you are licensed to install. Theinstallation procedure automatically prompts you for this information. When you are promptedfor an optional steplib, ddname, or environment variable, the installation procedure willindicate this with an OPT> prompt.
PDS Deployment
210 Information Builders

After you have installed and configured the server, you will be able to further configure youradapters using a web-based server configuration tool called the Web Console.
The following table describes what information you need to provide for each adapter that youhave. (If an adapter is not listed, no information needs to be provided for it.) Note that thetable refers to:
IRUNJCL. This procedure contains the JCL procedure for the server, and is a member of theconfiguration library
high_level_qualifier.PDS.product_type.DATA
where:
high_level_qualifier
Is the high-level qualifier to be used for all output libraries. You specify the high-levelqualifier during server installation, as described in Step 4. Run ISETUP on page 220,in Step 6.
product_type
Is one of the following:
FFS for a Full-Function Server
DM for a DataMigrator Server
WFS for a WebFOCUS Reporting Server
WFM for a Shared Application Server for WebFOCUS Maintain
4. Installation for z/OS
Server Installation 211

Adapter Information you must provide
Adabas Provide the data set name for the following STEPLIB allocation:
load library
This is required only for the synonym creation process. For example, in aproduction environment in which all synonyms already exist, you can omitthis.
When you configure the adapter, you will need to provide the name of theAdabas source library and the associated data set name.
CA- DATACOM Provide the data set names for the following STEPLIB allocations:
CUSLIB load library
CAILIB load library
utility library
URT library
CA- IDMS
(both DB andSQL)
Provide the data set names for the following STEPLIB allocations:
load library
DBA load library
Provide the data set names to which the following ddnames are allocated:
SYSIDMS. Check with your CA-IDMS DBA regarding this ddname.
SYSCTL. Is the library corresponding to the central version you want touse.
CICSTransaction
Provide the data set name for the following STEPLIB allocation:
CICS EXCI load library
PDS Deployment
212 Information Builders

Adapter Information you must provide
Call Java You must have the JDK installed.
Provide a value for the following environment variables:
CLASSPATH. Provide the paths of the .jar files that you want to access.These paths will be appended to CLASSPATH.
This adapter requires configuration of the JSCOM3 listener. Provide threerequired paths:
The path to JVM using either JDK_HOME or JAVA_HOME, as describedin JVM Requirements for Java Services on page 203.
The paths to edahome_dir and edaconf_dir, as described in HFS Homeand Configuration Directory Requirements on page 209.
EJB You must have the JDK installed.
Provide a value for the following environment variables:
CLASSPATH. Provide the paths of the .jar files that you want to access.These paths will be appended to CLASSPATH.
If you are deploying the adapter to access an EJB on a:
WebLogic server, specify the following path:
/pathspec/weblogic.jar
WebSphere server, specify the following paths:
/pathspec/websphere.jar
/pathspec/ejbcontainer.jar (one for each EJB container)
This adapter requires configuration of the JSCOM3 listener. Provide threerequired paths:
The path to JVM using either JDK_HOME or JAVA_HOME, as describedin JVM Requirements for Java Services on page 203.
The paths to edahome_dir and edaconf_dir, as described in HFS Homeand Configuration Directory Requirements on page 209.
4. Installation for z/OS
Server Installation 213

Adapter Information you must provide
JDBC You must have the JDK installed.
Provide a value for the following environment variables:
CLASSPATH. Provide the paths of the .jar files that you want to access.These paths will be appended to CLASSPATH.
This adapter requires configuration of the JSCOM3 listener. Provide threerequired paths:
The path to JVM using either JDK_HOME or JAVA_HOME, as describedin JVM Requirements for Java Services on page 203.
The paths to edahome_dir and edaconf_dir, as described in HFS Homeand Configuration Directory Requirements on page 209.
Microsoft SQLServer
You must select Call Java adapter in addition to the Microsoft SQL Serveradapter.
Provide a value for the following environment variables:
CLASSPATH. Provide the paths to the following files; these paths willbe appended to CLASSPATH.
msbase.jar
mssqlserver.jar
msutil.jar
This adapter requires configuration of the JSCOM3 listener. Provide threerequired paths:
The path to JVM using either JDK_HOME or JAVA_HOME, as describedin JVM Requirements for Java Services on page 203.
The paths to edahome_dir and edaconf_dir, as described in HFS Homeand Configuration Directory Requirements on page 209.
PDS Deployment
214 Information Builders

Adapter Information you must provide
DB2 CAF Provide the data set names for the following STEPLIB allocations:
DSNLOAD load library
For security information, see DB2 Security Exit Configuration for PDS onpage 235.
DSNEXIT load library (optional)
DB2 CLI Provide the data set names for the following STEPLIB allocations:
DSNLOAD load library
For security information, see DB2 Security Exit Configuration for PDS onpage 235.
DSNEXIT load library (optional; this is needed only for an explicitconnection).
Provide the data set name (including member name if applicable) for thefollowing DDname:
DSNAOINI, which contains the DB2 CLI ini file.
IMS Provide the data set names for the following STEPLIB allocations:
DFSPZP load library (optional; not needed if PZP modules are stored inthe DFSRESLB library)
DFSRESLB load library
IMSBMP Provide the data set names for the following STEPLIB allocation:
DFSRESLB load library
Provide the data set names for the following FOCPSB allocation:
FOCPSB library containing FOCPSB definitions
Millennium Provide the data set name for the following STEPLIB allocation:
load library
4. Installation for z/OS
Server Installation 215

Adapter Information you must provide
Model 204 Provide the data set name for the following STEPLIB allocation:
load library
MQSeries Provide the data set names for the following STEPLIB allocations:
SCSQLOAD load library
SCSQAUTH load library
NATURALBatch
Provide the data set name for the following STEPLIB allocation:
NATURAL load library
SAP (SQL) Provide values for the following environment variables:
LIBPATH, which contains the path to SAP RFC SDK.
SAP_CODEPAGE=0126, or the correct SAP code page for your languageenvironment.
This adapter requires configuration of two required paths:
The paths to edahome_dir and edaconf_dir, as described in HFS Homeand Configuration Directory Requirements on page 209
Is recommended that the code page conversion tables be created underdirectory edaconf_dir.
SAP BW Provide values for the following environment variables:
LIBPATH, which contains the path to SAP RFCSDK.SAP_CODEPAGE=0126, or the correct SAP code page for yourlanguage environment.
This adapter requires configuration of two required paths:
The paths to edahome_dir and edaconf_dir, as described in HFS Homeand Configuration Directory Requirements on page 209
Is recommended that the code page conversion tables be created underdirectory edaconf_dir.
PDS Deployment
216 Information Builders

Adapter Information you must provide
Supra Provide the dataset name for the following STEPLIB allocations:
LINKLIB load library.
INTERFLM load library.
ENVLIB load library.
Provide the data set name to which the following ddname is allocated:
CSIPARM containing the CSIPARM definition, which in turn points to theCentral PDM you are accessing.
CSISYSIN containing the parameters used for connecting the multi-session adapter to the Central PDM.
VSAM CICS Provide the data set name for the following STEPLIB allocation:
CICS EXCI load library
Step 3. Access the Installation Software
You can choose to access the server installation software using either:
Tape. The software is provided on a 3490 or 3590 cartridge.
You must unload the installation data set from the tape before you can run the installation.This is how most installations are performed.
FTP. You download the installation software from the Information Builders download site.
Downloading the installation software involves:
1. Registering at the Information Builders download site.
2. Downloading the installation data set from the site.
3. Running the isetup procedure to complete the download process and install thesoftware.
4. Installation for z/OS
Server Installation 217

Procedure: How to Unload the Installation Software From Tape
The software is provided on a cartridge in 3490 or 3590 format with MVS PDSs. Perform thefollowing to unload the installation data set from the tape:
1. Log on to TSO.
2. Run an IEBCOPY job to allocate and unload the qualifier.HOME.DATA data set. This PDScontains the members needed for the actual installation.
It is recommended that you use HOME.DATA as the low-level qualifier for the target dataset. Although you can specify any low-level qualifier, HOME.DATA enables the installationprocedure to generate default data set names, simplifying your installation.
Note: If you do not use HOME.DATA, then change the following line to reflect the value youused.
// SET EDAUSSD='HOME.DATA'
Do this before you run ISETUP.
The following sample JCL is for the initial unload to a new data set:
//IEBCOPY EXEC PGM=IEBCOPY,REGION=0M//SYSPRINT DD SYSOUT=*//SYSUT1 DD UNIT=workunit,SPACE=(CYL,(5,1))//OUT1 DD DISP=(NEW,CATLG,DELETE),// DSN=qualifier.HOME.DATA,// DCB=(RECFM=FB,LRECL=80,BLKSIZE=3200),// SPACE=(CYL,(5,5,25)),// UNIT=SYSDA//IN1 DD DISP=(OLD,PASS),// DSN=HOME.DATA,// UNIT=cart,// VOL=(,RETAIN,,SER=volser),// LABEL=(1,SL)//SYSPRINT DD SYSOUT=*//SYSIN DD * COPY INDD=IN1,OUTDD=OUT1
where:
workunit
Is the unit for the work data set.
qualifier
Is the high-level qualifier for HOME.DATA and for all other data sets that theinstallation procedure allocates. We recommend that the high-level qualifier reflect therelease of the software. However, you can use any site-specific value.
PDS Deployment
218 Information Builders

For PDS, we recommend retaining the low-level qualifier HOME.DATA, but you canchange this to any site-specific value. If you use a low-level qualifier other thanHOME.DATA, you must then edit member PDSSNAME to change the string“HOME.DATA” to the low-level qualifier you specify here.
cart
Is the unit type of the tape drive. Common names include 3490, TAPE, and 3590.Change as needed.
volser
Is the value shown on the media label.
After this job has run, qualifier.HOME.DATA is allocated, cataloged, and populated with themembers needed to continue the product installation.
For details, see Optional Low-Level Qualifier Changes on page 220.
Procedure: How to Download the Installation Software Using FTP
To download the installation software:
1. Go to http://techsupport.informationbuilders.com.
The Information Builders Technical Support home page opens.
2. Click My Downloads in the My Account section on the right side of the page.
The Downloads, Upgrades, Service Packs, and PTFs page opens.
3. Click the link for your product (for example, WebFOCUS and iWay Server and iWay Client).
The Downloads by Release page for your product opens.
4. Click your release from the Current Production Releases list.
The Software Downloads page for your release opens.
5. Scroll down and find the platform on which you want to install the server, and then clickDownload to the right of the platform name.
6. Fill in the registration form and then click Continue.
The Software Download Agreement page opens.
7. Select I agree... to consent to the Download Agreement, and then click Continue.
The Download Instructions page opens. Select AUTOMATIC or MANUAL and follow therelevant instructions.
A copy of the instructions is automatically emailed to you for later reference.
4. Installation for z/OS
Server Installation 219

8. Log on to TSO.
9. Follow the instructions on the Download Page in your TSO session.
Continue with Optional Low-Level Qualifier Changes on page 220.
Reference: Optional Low-Level Qualifier Changes
We recommend retaining the default low-level qualifiers that are supplied for the installationlibraries. However, if you need to change any of them (for example, to conform to site-specificnaming conventions), you can do so by editing them in member PDSSNAME ofhigh_level_qualifier.HOME.DATA. You can see a list of the qualifiers in Default Low-LevelQualifiers on page 220.
Caution: If you change any low-level qualifiers and do not reflect those changes exactly inPDSSNAME, you will experience problems with the server installation and operation.
Do not change the value of &CONFTYPE.
Once you have finished changing any names, continue with Step 4. Run ISETUP on page 220.
Reference: Default Low-Level Qualifiers
The following low-level qualifiers are set in high_level_qualifier.HOME.DATA(PDSSNAME):
// SET EDAUSSD='HOME.DATA' Server installation library// SET EDAUSSL='HOME.LOAD' Server base load library // SET FFSUSSD='FFS.DATA' Full Function server // SET WFSUSSD='WFS.DATA' WebFocus Reporting server // SET ETLUSSD='DM.DATA' DataMigrator // SET WFMUSSD='WFM.DATA' WebFocus Maintain Server // SET CGWUSSD='CGW.DATA' Communications Gateway // SET CLNUSSD='CLN.DATA' Client // SET EDACICS='HOME.CICS.LOAD' CICS load library
Step 4. Run ISETUP
Server installation consists of a series of ISPF panels, which gather the required information.After the panel dialog is complete, JCL is created and submitted to install the server on z/OS.This JCL job retrieves the remainder of the data sets from the media and configures a basicworking server.
1. Execute the ISETUP member of your high_level_qualifier.HOME.DATA using ISPF option 6.
PDS Deployment
220 Information Builders

The first Installation and Configuration panel opens.
2. Type 2 and press Enter to continue to the next panel.
The following panel opens.
4. Installation for z/OS
Server Installation 221

3. Complete the panel as directed in the following table.
Field Instructions
Enter selection Accept the default value 1, Install and Configure, for a newinstallation.
For option 2, Add Additional Configuration Instance, see Adding a Configuration Instance for PDS on page 241.
For option 3, Refresh Installation, see Upgrading Your ServerRelease for PDS on page 252.
Enter License Key Enter the license key that was provided with the software.
Be sure to store this key in a safe place for future reference.
Input source Enter the input source:
T for Tape - If you received your software on tape media.
D for Disk - If you selected manual download from thedownload instructions.
F for FTP - If you selected automatic download from thedownload instructions.
Installation Userid Shows the current logon ID. It cannot be changed.
PTH AdministratorUserid
An ID is required to administer the server immediately afterinitial installation. This ID is defined and maintained solely inthe realm of the server. It defaults to srvadmin, and it can bechanged here.
For more information about running the server in securemode, see Step 6. Configure Server Security on page 232.
PTH AdministratorPassword
Password for the PTH Administrator ID. It cannot be left blankand must be matched at Retype field.
PDS Deployment
222 Information Builders

Field Instructions
Enter Job Cardinformation
To provide JOB card information for submitting jobs to the JESqueue, provide a valid job name (a maximum of sevencharacters following the // on the first JCL line), whichdefaults to the user ID that you are currently using.
This job name is used for multiple submissions (for example,jobnameA, jobnameB, jobnameC, and so on) in the JCLgenerated by the installation procedure.
Override JOB namechecking
To provide your own JOB card information, including JOBname, enter Y and provide valid JOB card information in theEnter Job Card information field. The JOB card informationthat you enter will be used for each job that is submitted.
4. Press Enter to continue to the next panel.
This following panel only appears if FTP was previously selected. Otherwise, skip to Step 6.
4. Installation for z/OS
Server Installation 223

5. Complete the panel as follows.
Field Instructions
HLQ fordownloaded files
This value defaults to the high level qualifier of the HOME.DATAfile that ISETUP is running from. If necessary, change the value toany other high level qualifier that is to be used to create theuncompressed version of the FTP files.
FTP Userid Cut and paste from the download instructions.
FTP Password Cut and paste from the download instructions.
6. Press Enter to continue to the next panel.
Note that in the current panel (and some later panels), if you are running ISETUP from:
high_level_qualifier.HOME.DATA, the panel will display default values for some fields.
Any other library, the panel will not display any default values.
In this and some later panels, you can see a field's default value (if one exists) by blankingout the field and pressing Enter.
PDS Deployment
224 Information Builders

Complete the panel as follows.
Field Instructions
Input Media (installing from tape only)
Volume serial number Provide the volume serial number of the server media. Thenumber is located on the tape supplied in you server package.
Unit type Review the default value and change if necessary.
Work unit type Review the default value and change if necessary.
You can specify a UNIT= type value (for example, SYSDA), oryou can direct work files to a specific volume serial number byspecifying, in single quotation marks ('),'SYSDA,VOL=SER=volume'.
Input Media (installing from disk/FTP only)
Input Libraries HLQ
(EDAHOME)
This is the high-level qualifier that you had specified when youmanually downloaded the installation software from thedownload site. This is an input field if Disk input source waspreviously selected. Otherwise, it is a protected field.
Copy to runtimelibraries
If you want to use the downloaded installation software as abackup, and create a new copy from which to run, enter Y. Ifthe Input Libraries HLQ and the Output Libraries HLQ are thesame, this value will be ignored and no copy will take place.
Otherwise, accept the default N to run from the downloadedsoftware.
General Installation Parameters
Output Libraries HLQ This is the high-level qualifier that the installation procedurewill use to allocate output libraries.
4. Installation for z/OS
Server Installation 225

Field Instructions
Unit/Type These show the values that the installation process will use toallocate the output libraries. If necessary, you can changethese to site-specific values.
Type can be VOL=SER (default), DATACLAS, MGMTCLAS, orSTORCLAS.
Approot value This is where application components will reside.
Note that this high-level qualifier must differ from the outputlibraries high-level qualifier (EDACONF) that you entered at thetop of the panel.
To specify a different qualifier for application components,change the value for this field. It can be up to 21 characters.
HTTP Listener Port This is the port number that the server will use for HTTP. It isthe first of three connection ports that must be available tothe server.
For example, if you choose port 8101, then ports 8101, 8102,and 8103 are used by the server. Ensure that you chooseports that are not currently being used.
TCP Listener Port This is the port number of the TCP Listener.
The default is one less than the port specified for the HTTPListener, but it can be any port number other than the threereserved for HTTP.
7. Press Enter to continue to the next panel.
Depending on your license key, the Data Adapter panel may open. If the Data Adapter panelopens, continue with Step 8; otherwise, skip to Step 9.
8. The Data Adapter panel lists adapters that require the allocation of MVS libraries inIRUNJCL or environment variables in the EDAENV member. To select specific adapters:
a. Type Y next to the required adapters and press Enter.
b. Supply the requested information, which is described in Step 2. Collect RequiredInformation for Adapters on page 210.
After you have finished installing and configuring the server, you can use the WebConsole to finish configuring these adapters, and to configure adapters that do not haveMVS JCL requirements.
PDS Deployment
226 Information Builders

9. Press Enter to continue to the next panel.
The JSCOM3 Listener configuration panel opens.
a. The panel will prompt for the path to the Java environment to be passed to eitherJDK_HOME or JAVA_HOME, as described in JVM Requirements for Java Services on page203, and it will also prompt for edahome_dir and edaconf_dir, as described in HFSHome and Configuration Directory Requirements on page 209.
b. Configuration of the JSCOM3 Listener is either optional or mandatory depending onwhich adapters were selected. If any Java-based adapters were selected (EJB, Call Java,JDBC, MS SQL Server), the configuration of all three paths listed above is mandatory. IfSAP-based adapters were selected (SAP or SAP BW), only edahome_dir and edaconf_dirare required.
c. If no Java-based or SAP based adapters were select, this configuration might still bedesirable to enable the server-side graphics feature. To skip the configuration, leave thepath blank.
10.Press Enter to continue to the next panel.
The confirmation panel opens.
11.If you wish to review a list of the data sets to be allocated, type Y in the Review outputallocations field and press Enter.
A panel opens listing the data sets. You may need to page down to see the entire list.Press Enter when you are done to return to the confirmation panel.
4. Installation for z/OS
Server Installation 227

12.Ensure that all values on the Confirmation panel are correct, then select one of thefollowing options
N to return to the initial panel so that you can change installation values.
C to create JCL which you can submit at a later time. The JCL is placed in yourhigh_level_qualifier.PDS.product_type.DATA configuration library.
S to create JCL in high_level_qualifier.PDS.product_type.DATA, and submit the jobimmediately.
Note: If FTP was selected, JCL will be created to download the software and run the installand configuration process.
where:
high_level_qualifier
Is the high-level qualifier to be used for all output libraries. You specified the high-levelqualifier during installation, as described in Step 4. Run ISETUP on page 220, in Step4.
product_type
Is one of the following:
FFS for a Full-Function Server
DM for a DataMigrator Server
WFS for a WebFOCUS Reporting Server
WFM for a Shared Application Server for WebFOCUS Maintain
13.As the job is processed, in SDSF, check JESLOG for errors and return codes.
PDS Deployment
228 Information Builders

Following is a table of the jobs created. All members are created in the configuration library (asdescribed in Step 11).
Job Description
ISETUPJ1 Main JCL Job stream that is used to install the server. For FTP processing,this JCL can be restarted at any step due to a previous failure. To do this,add RESTART = procname.stepname to the JOB card and resubmit theISETUPJ1 JCL.
ISOPTS1 Options used to install.
The following members all call procedure IRUNJCL, which is the main server JCL. If you need tochange the server JCL, change member IRUNJCL.
Member Description
ISTART Starts the server.
ISAVEDIA JCL to print a copy of configuration files for diagnostic purposes.
ITRCON Starts the server with traces on.
The following members contain batch JCL for auxiliary functions, and are also created in theconfiguration library.
Member Description
CMRUN JCL to run DataMigrator batch jobs. This is created only when installinga DataMigrator Server.
IBATDEF JCL to create the deferred execution data sets, in case they were notcreated in the original install.
DB2V9PRM DB2 version 9 DBRM referenced in GENDB2 JCL.
DB2V10PR DB2 version 10 DBRM referenced in GENDB2 JCL.
DB2V11PR DB2 version 11 DBRM referenced in GENDB2 JCL.
4. Installation for z/OS
Server Installation 229

Member Description
GENDB2 JCL to bind the DB2/CAF plan.
IIMSBMP Example JCL to run the IMS/XMI server job in BMP mode.
IIMSDLI Example JCL to run the IMS/XMI server job in DLI mode.
IRDAAPPC Example CLIST to run RDAAPP Client test tool.
IRDAAPPJ Example JCL to run RDAAPP Client test tool.
The following members contain sample started task JCL, and are also created in theconfiguration library.
Member Description
IWAYS A started task that starts the server.
EDAENV A parameter file used by the server. It contains all requiredenvironment variables.
Step 5. Test the Server Installation
To test the server installation:
1. Log on to TSO as iadmin.
2. Submit the ISTART JCL from the configuration library to start the server. This executes theIRUNJCL proc. The configuration library is
high_level_qualifier.PDS.product_type.DATA
where:
high_level_qualifier
Is the high-level qualifier to be used for all output libraries. You specified the high-levelqualifier during server installation, as described in Step 4. Run ISETUP on page 220, inStep 6.
PDS Deployment
230 Information Builders

product_type
Is one of the following:
FFS for a Full-Function Server
DM for a DataMigrator Server
WFS for a WebFOCUS Reporting Server
WFM for a Shared Application Server for WebFOCUS Maintain
3. Check the job output for errors. Look for the EDAPRINT message:
(EDA13023) ALL INITIAL SERVERS STARTED
4. Start the Web Console by opening a browser pointed at the listener port of the server. TheURL format is
http://host:port
where:
host
Is the name of the machine on which the product is installed.
port
Is one port higher than the port specified when installing the server. For example, ifyou specified port 8100 during installation, then use port 8101 to access the WebConsole.
The Web Console opens.
5. If the Web Console opens and displays application tree folders in the left pane, the serveris working because it uses its own underlying data access and reporting technologies tovisualize the application tree.
6. Continue with adapter configuration, as described in the Adapter Administration manual.
When you are finished using the server, you can use the Web Console to stop the server bygoing to the Web Console menu bar, selecting Workspace, and then Stop.
If you experience problems at start up, examine the job output for more information.
4. Installation for z/OS
Server Installation 231

Step 6. Configure Server Security
If you will be configuring security provider OPSYS, you must perform the instructions in How toConfigure Security With All Security Products on page 234, regardless of which security productyou use. (For security providers PTH, DBMS, and LDAP, skip these topics.)
For a full description of all security providers:
1. From the Web Console menu bar, select Help, then Contents and Search.
The Web Console Help window opens.
2. In the left pane expand Server Administration.
Alternatively, see the Server Administration manual.
Security Providers
The default security provider for a new installation is the internal security provider, PTH. ThePTH provider implements security using user IDs, passwords, and group memberships storedin the admin.cfg configuration file.
After the initial installation, the Server Administrator that was configured during the installationcan start the server and use the Web Console to further customize security settings, forexample, to configure alternate or additional security providers, create additional PTH IDs, andregister groups and users in a security role. For more information about security providers, seethe Server Security chapter in the Server Administration manual.
Procedure: How to Satisfy Security Provider OPSYS Requirements
To run a server with security provider OPSYS, you must perform the following steps. You mustdo this once after installing and after each refresh of the server with fixes.
Set up tscom300.out as a root-owned SUID program:
1. If the server is running, bring it down.
2. Log on to the system as root, or issue the su root command.
3. Change your current directory to the bin directory of the home directory created during theinstallation procedure.
For example, type the following command:
cd /home/iadmin/ibi/srv77/home/bin
4. Change file ownership and permissions by typing the following commands:
chown root tscom300.outchmod 4555 tscom300.out
PDS Deployment
232 Information Builders

5. Verify your changes by issuing the following command:
ls -l tscom300.out
The output should be similar to the following:
-r-sr-xr-x 1 root iadmin 123503 Aug 23 04:45 tscom300.out
Note the permissions and ownerships.
When you start the server, it will now run with security provider OPSYS.
The chmod and chown steps will need to be repeated after any server upgrade since thetscom300.out file is replaced during upgrade and the attributes are lost.
Note: If this Security Provider OPSYS step has been configured and the site later decides toswitch to Security OFF, special steps must be taken to ensure the mode remains after a fullserver shutdown (where edastart -start is used to restart the server). The steps are:
1. After the server recycles from the change to OFF, use the Web Console to open theenvironment configuration file of the server by clicking Workspace and expanding theConfiguration Files folder, followed by the Miscellaneous folder.
2. Double-click Environment - edaenv.cfg to edit the file and add the EDAEXTSEC=OFF variable.
3. Save your work.
After the next full server shutdown, be sure to do an edastart -cleardir before restarting theserver. This will clear any root owned files that would prevent a security OFF server fromstarting.
Preventing Unsecured Server Starts After Upgrades
If the server cannot impersonate users because it lacks platform-specific authorization steps,the server start aborts and error messages are written to the edaprint log.
This feature prevents an unsecured server start after a software upgrade if any of the requiredpost-upgrade reauthorization steps are missed on a UNIX, IBM i, or z/OS HFS deployment. Thisis not applicable to other platforms. The setting may be placed in any normal server start-upshell or profile that a site is using or in the server edaenv.cfg environment configuration file.The messages vary slightly by platform.
The edaprint messages are:
Configured security is 'ON' as set by EDAEXTSEC variable.
Server has no root privilege.
Workspace initialization aborted.
4. Installation for z/OS
Server Installation 233

(EDA13171) UNABLE TO START SERVER
Procedure: How to Configure Security With All Security Products
To configure security with RACF, eTrust CA-ACF2, or eTrust CA-Top Secret:
1. Log on to TSO using the ID used to install the server.
2. The libraries allocated to STEPLIB in IRUNJCL must be APF-authorized. Any non-APF-authorized libraries must be allocated to the TASKLIB DDNAME.
3. Restart the server.
Note: If you want to use eTrust CA-ACF2 or eTrust CA-Top Secret, please contact CustomerSupport Services.
Procedure: How to Configure Security With eTrust CA-Top Secret
To use eTrust CA-Top Secret security, perform the following step:
1. Create an eTrust CA-Top Secret facility entry for the server security module, R1SEC. Theonly need for permissions is for the RACROUTE call from the R1SEC program.
Example: Facility Entry Defining the Server to CA-Top Secret
The following is an example of a facility entry that defines the server to eTrust CA-Top Secret:
PGM=R1SEC ID=1 TYPE=099 ATTRIBUTES=IN-USE,ACTIVE,SHRPRF,ASUBM,NOABEND,MULTIUSER,NOXDEFATTRIBUTES=LUMSG,STMSG,SIGN(M),INSTDATA,RNDPW,AUTHINITATTRIBUTES=NOPROMPT,NOAUDIT,RES,WARNPW,NOTSOC,LCFTRANSATTRIBUTES=NOMSGLC,NOTRACE,NOEODINIT,IJU,NODORMPW,NONPWR ATTRIBUTES=LUUPD MODE=FAIL DOWN=GLOBAL LOGGING=ACCESS,INIT UIDACID=8 LOCKTIME=000 DEFACID=*NONE* KEY=8 MAXUSER=03000 PRFT=003
Starting and Stopping a Server for PDS
This section provides information on operation and use of the server. Additional information onthe server and how to configure adapters is available in the Web Console help. The WebConsole help is also available as the Server Administration manual.
Starting the Server Using a Batch Job
To start the server, submit the ISTART member of the MVS configuration library(high_level_qualifier.product_type.DATA) for your server.
PDS Deployment
234 Information Builders

Starting the Server Using a Started Task
ISETUP creates started task JCL to start the server. This started task in a member of the MVSconfiguration library is IWAYS.
In order to execute the started task, you must:
Copy it into SYS1.PROCLIB or any other JES2 Proclib data set.
Satisfy security requirements. All external security-related permissions must exist for boththe data sets and the started tasks. In order to issue the started tasks, the user mustsatisfy both of the following requirements:
Have at least OPERATOR authority defined within the Web Console.
Be in the same security group, or associated with the same security group, as theowner of the server directory structure (for example, as iadmin).
To submit the started task from the MVS console, issue the following command:
S IWAYS
You can add the started task to any automation product that you run.
Stopping the Server
You can stop the server using any of the following methods:
Web Console. From the Web Console menu bar select Workspace and then Stop.
MVS operator command. On the MVS Console or SDSF, issue the following operatorMODIFY command:
F jobname, -stop
where:
jobname
Is the job under which the server is running.
Cancel the server job. In SDSF, cancel the job.
DB2 Security Exit Configuration for PDS
Customize the DB2 security exit to allow the Adapter for DB2 to run with user-level securityenabled. If you do so, users will connect to DB2 with the authorization of the user ID withwhich they logged on to the server. The server must also be running with security turned on.
4. Installation for z/OS
Server Installation 235

If you do not customize the DB2 security exit, all users will be assigned the connection ID toDB2 that is associated with the region, job submitter, or started task.
For DB2 CLI adapter, the connection to DB2 must be configured as trusted for the exit to beinvoked.
The changes that must be made to the IBM DB2 sign-on exit, DSN3SATH, differ for RACF andeTrust CA-Top Secret sites and eTrust CA-ACF2 sites.
An example of each is shown in the following sections.
The highlighted text and comments shown in the examples indicate the lines containing therecommended modification of DSN3SATH, which calls the module FOCDSN3 the supplied exit.
After you finish the edits, assemble the exit into an object file. This object file is input to thelink JCL found in one of the examples that follow.
Note:
The positioning of these lines is approximate, assuming that no other changes or additionshave already been made to DSN3SATH. If any changes have been made, you should decideon the most appropriate location for this call to FOCDSN3.
FOCDSN3 is used to set the proper primary (individual user ID) authorization.
Another program, FOCDSN4, is used to set the proper secondary (group ID) authorizationfor RACF and eTrust CA-Top Secret. FOCDSN4 is not needed with eTrust CA-ACF2. Thesecondary authorization ID(s) will be set correctly without it.
PDS Deployment
236 Information Builders

Example: Changing DSN3SATH for RACF and eTrust CA-Top Secret Sites
1. Search for the SATH001 label - add two lines (FOCDSN3):
SATH001 DS 0H USING WORKAREA,R11 ESTABLISH DATA AREA ADDRESSABILITY ST R2,FREMFLAG SAVE FREEMAIN INDICATOR XC SAVEAREA(72),SAVEAREA CLEAR REGISTER SAVE AREA . . . *********SECTION 1: DETERMINE THE PRIMARY AUTHORIZATION ID ************* ** IF THE INPUT AUTHID IS NULL OR BLANKS, CHANGE IT TO THE AUTHID ** IN EITHER THE JCT OR THE FIELD POINTED TO BY ASCBJBNS. ** THE CODE IN THIS SECTION IS AN ASSEMBLER LANGUAGE VERSION OF ** THE DEFAULT IDENTIFY AUTHORIZATION EXIT. IT IS EXECUTED ONLY ** IF THE FIELD ASXBUSER IS NULL UPON RETURN FROM THE RACROUTE ** SERVICE. FOR EXAMPLE, IT DETERMINES THE PRIMARY AUTH ID FOR ** ENVIRONMENTS WITH NO SECURITY SYSTEM INSTALLED AND ACTIVE. ** ************************************************************************** SPACE LA R1,AIDLPRIM LOAD PARM REG1 <--ADD CALL FOCDSN3 GO GET THE IBI EXIT <--ADD CLI AIDLPRIM,BLANK IS THE INPUT PRIMARY AUTHID NULL BH SATH020 SKIP IF A PRIMARY AUTH ID EXISTS
4. Installation for z/OS
Server Installation 237

2. Search for the SATH020 label - add a comment box, add one line, and comment out fourlines:
SATH020 DS 0H BRANCH TO HERE IF PRIMARY EXISTS*****OPTIONAL CHANGE @CHAR7: FALLBACK TO SEVEN CHAR PRIMARY AUTHID**** ** IF YOUR INSTALLATION REQUIRES ONLY SEVEN CHARACTER PRIMARY ** AUTHORIZATION IDS (POSSIBLY TRUNCATED) DUE TO DB2 PRIVILEGES ** GRANTED TO TRUNCATED AUTHORIZATION IDS, THEN YOU MUST BLANK OUT ** COLUMN 1 OF THE ASSEMBLER STATEMENT IMMEDIATELY FOLLOWING THIS ** BLOCK COMMENT. THEN ASSEMBLE THIS PROGRAM AND LINK-EDIT IT INTO ** THE APPROPRIATE DB2 LOAD LIBRARY AS EXPLAINED IN AN APPENDIX ** OF "THE DB2 ADMINISTRATION GUIDE". ** ** OTHERWISE, YOU NEED DO NOTHING. ** @KYD0271************************************************************************ MVI AIDLPRIM+7,BLANK BLANK OUT EIGHTH CHARACTER SPACE . . .* RACF IS ACTIVE ON THIS MVS ****************************************************************** <--ADD * * <--ADD * The logic was modified because in DB2 V8 AIDLACEE is always not* <--ADD * NULL. We used to honor AIDLACEE first, FOCDSN4 second and then * <--ADD * AS ACEE. Now we honor FOCDSN4 first, AIDLACEE second and then * <--ADD * AS ACEE. * <--ADD * * <--ADD * 03/11/05 ASK0 * <--ADD ****************************************************************** <--ADD USING ACEE,R6 ESTABLISH BASE FOR ACEE @KYL0108 L R6,AIDLACEE Get => caller ACEE if any <--ADD * ICM R6,B'1111',AIDLACEE CALLER PASSED ACEE ADDRESS? @KYL0108 <-COMMENT * BZ SATH024 NO, USE ADDRESS SPACE ACEE @KYL0108 <-COMMENT * CLC ACEEACEE,EYEACEE IS IT REALLY AN ACEE? @KYL0108 <-COMMENT * BE SATH027 YES, PROCEED NORMALLY @KYL0108 <-COMMENT SPACE 1 SATH024 DS 0H USE ADDRESS SPACE ACEE @KYL0108 . . .
PDS Deployment
238 Information Builders

3. Search for the SATH025 label - replace sath025 and add sath026 (FOCDSN4):
SATH025 DS 0H CALL FOCDSN4 GO GET THE IBI EXIT (4=GROUP AUTH) <--ADD LTR R6,R6 DOES AN ACEE EXIST? IF NOT, <--ADD BZ SATH026 CHECK ACEE IN ADDRESS SPACE <--ADD CLC ACEEACEE,EYEACEE DOES IT LOOK LIKE AN ACEE? <--ADD BE SATH027 YES, GO DO GROUPS <--ADD SATH026 DS 0H <--ADD . . .
SATH027 DS 0H CHECK LIST OF GROUPS OPTION TM RCVTOPTX,RCVTLGRP IS LIST OF GROUPS CHECKING ACTIVE BZ SATH040 SKIP TO SINGLE GROUP COPY IF NOT DROP R7 DROP RCVT BASE REG SPACE 1 * RACF LIST OF GROUPS OPTION IS ACTIVE EJECT . . .
4. Installation for z/OS
Server Installation 239

Example: Changing DSN3SATH for eTrust CA-ACF2 Sites
*DSN3SATH source is provided by ACF2.
1. Search for PRIMARY AUTHORIZATION ID - add two lines (FOCDSN3):
***************************************************************** * ** PRIMARY AUTHORIZATION ID ** * ****************************************************************** ** IF THE PRIMARY AUTHORIZATION ID IS NULL OR BLANKS ** IF CA-ACF2 IS AVAILABLE ** SET PRIMARY ID FROM ACFASVT (ASVLID) ** ELSE ** IF TSO FOREGROUND USER ** SET PRIMARY ID FROM TSO LOGON ID (ASCBJBNS) ** ELSE ** SET PRIMARY ID FROM JOB USER (JCTUSER) ** ****************************************************************** SPACE 2 04260000 LA R1,AIDLPRIM LOAD PARM REG1 <--ADD CALL FOCDSN3 GO GET THE IBI EXIT <--ADD CLI AIDLPRIM,C' ' PRIMARY AUTHID THERE ? 04270000 BH PRIMWTO ..YES, EVERYTHINGS OK HERE 04280000 L R3,PSAAOLD-PSA(0) CURRENT ASCB ADDRESS 04290000 USING ASCB,R3 ASCB ADDRESSABILITY 04300000 SPACE 2 04310000
Example: Modifying the Link JCL for DSN3SATH
This is sample link JCL for the IBM exit DSN3SATH. Modify the JCL to link the modules into theDB2 security exit as follows.
//LKED EXEC PGM=IEWL,PARM='LIST,XREF,LET,RENT,AMODE=31'//OBJECT DD DSN=db2pref.SDSNSAMP.OBJ,DISP=SHR <--OUTPUT OF ASSEMBLE STEP//EDAMOD DD DSN=high_level_qualifier.HOME.LOAD,DISP=SHR//SYSLMOD DD DSN=db2pref.DSNEXIT,DISP=SHR//SYSPRINT DD SYSOUT=*//SYSUT1 DD UNIT=SYSDA,SPACE=(100,(50,50))//SYSLIN DD * INCLUDE EDAMOD(FOCDSN3)************************************************************************** Omit the following line for eTrust CA-ACF2*********************************************************************** INCLUDE EDAMOD(FOCDSN4) ENTRY DSN3@ATH NAME DSN3@ATH(R)/*
PDS Deployment
240 Information Builders

where:
db2pref
Is the prefix for the DB2 data sets.
high_level_qualifier
Is the high-level qualifier for the data sets.
Once this job finishes successfully, you must recycle the DB2 subsystem in order for thechanges to take effect.
MSODDX: DDNAME Translation for User Subroutines
On z/OS, you can incorporate an additional routine called MSODDX into a user-writtensubroutine that needs to access ddnames allocated to a WebFOCUS Reporting Server, aDataMigrator Server, or a Full-function Server. MSODDX provides ddname translation servicesthat enable external programs to access files under the ddname used by the Server.
For details, see Chapter 6, Platform-Specific Commands and Features, in the Stored ProceduresReference.
Overriding the Time Zone Setting
By default, the server will use the system set value for Time Zone. This can be overridden bysetting the TZ in the EDAENV member of the servers configuration library.
TZ = valid tz string
For more information about time zone values, see the IBM UNIX System Services CommandReference and search for TZ.
Adding a Configuration Instance for PDS
Adding a configuration instance allows you to run different server configuration instances usingthe same server binaries. For example, if you installed using a Full-Function Server licensecode, you can use a WebFOCUS license to add a second configuration for a WebFOCUSReporting Server. You can also add up to nine additional servers of the same type.
Step 1. Run ISETUP
To add a configuration instance, perform the following steps.
1. Execute ISETUP again. You should have a high_level_qualifier.HOME.DATA PDS unloadedfrom the installation tape. Use option 6 in ISPF to execute the ISETUP member of this PDS.
4. Installation for z/OS
Server Installation 241

Note: If this PDS is not available, run an IEBCOPY job to allocate and unload it from theinstallation tape.
The first Installation and Configuration panel opens.
2. Type 2 and press Enter to continue to the next panel.
The following panel opens.
PDS Deployment
242 Information Builders

3. Complete the first Installation and Configuration panel as follows.
Field Instructions
Enter selection Choose option 2, Add Additional Configuration Instance.
Enter License Key Enter the license key that was provided with the softwarefor the type of server instance that you want to configure(for example, the license key for a WebFOCUS ReportingServer or for a Full-Function Server).
Input source This is ignored for option 2, adding a configurationinstance.
Installation Userid Shows the current logon ID. It cannot be changed.
4. Installation for z/OS
Server Installation 243
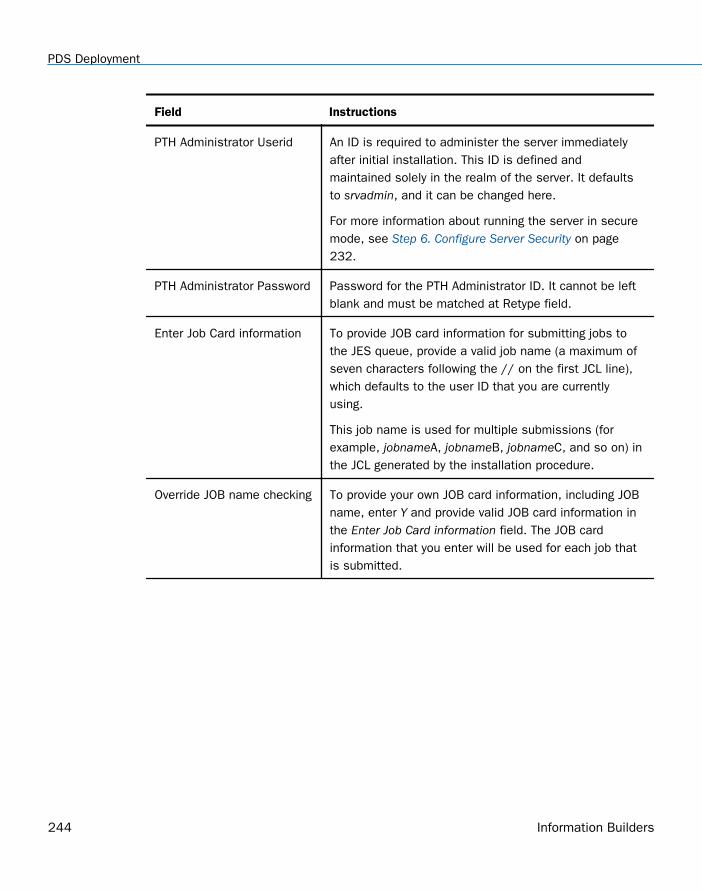
Field Instructions
PTH Administrator Userid An ID is required to administer the server immediatelyafter initial installation. This ID is defined andmaintained solely in the realm of the server. It defaultsto srvadmin, and it can be changed here.
For more information about running the server in securemode, see Step 6. Configure Server Security on page232.
PTH Administrator Password Password for the PTH Administrator ID. It cannot be leftblank and must be matched at Retype field.
Enter Job Card information To provide JOB card information for submitting jobs tothe JES queue, provide a valid job name (a maximum ofseven characters following the // on the first JCL line),which defaults to the user ID that you are currentlyusing.
This job name is used for multiple submissions (forexample, jobnameA, jobnameB, jobnameC, and so on) inthe JCL generated by the installation procedure.
Override JOB name checking To provide your own JOB card information, including JOBname, enter Y and provide valid JOB card information inthe Enter Job Card information field. The JOB cardinformation that you enter will be used for each job thatis submitted.
PDS Deployment
244 Information Builders

4. Press Enter to continue to the next panel.
The following panel opens.
5. Enter the current base high-level qualifier used for EDAHOME.
This indicates where to install the configuration (EDACONF) and where the binaries(EDAHOME) are installed. The installation procedure checks whether the required set ofEDAHOME data sets exist. If the test fails, you receive a message indicating the failure andavailable options.
6. Press Enter to continue to the next panel.
If you are configuring the first instance of a given product type, the following panel opens.
4. Installation for z/OS
Server Installation 245

Otherwise, if you are configuring an additional instance of a given product type, thefollowing panel opens. In this sample panel, two Full-Function Server configurationinstances (FFS and FFS1) already exist, and a third (FFS2) is being added.
PDS Deployment
246 Information Builders

7. Complete the panel as follows.
Field Instructions
Configuration Parameters
4. Installation for z/OS
Server Installation 247

Field Instructions
Approot value This indicates where application components will reside forthis configuration. The default value is based on the valuespecified for Current Base HLQ (EDAHOME) on the previouspanel. To specify a different location for applicationcomponents, change the value of this field.
Different configurations which use the same base HLQ (highlevel qualifier) libraries (EDAHOME) can share the sameapproot value (that is, the same application files).Alternatively, they can use different approot values so thatthey have different sets of application files.
If you specify the approot value of an existing serverconfiguration, the installation process will recreate the serversupplementary data sets and sample files (see Disk SpaceRequirements on page 206). If you do not want them to berecreated, provide a different value for approot.
Output Libraries HLQ(EDACONF)
You are prompted for this information only if you areconfiguring the first instance of a product type (for example, ifyou are configuring the first instance of a WebFOCUSReporting Server).
This is the high-level qualifier that the installation procedurewill use to allocate output libraries, that is, to allocate theconfiguration libraries for this server instance. This high-levelqualifier is also known as EDACONF.
Unit/Type You are prompted for this information only if you areconfiguring the first instance of a product type (for example, ifyou are configuring the first instance of a WebFOCUSReporting Server).
These show the values that the installation process will use toallocate the output libraries. If necessary, you can changethese to site-specific values.
Type can be VOL=SER (default), DATACLAS, MGMTCLAS, orSTORCLAS.
PDS Deployment
248 Information Builders

Field Instructions
EDACONF suffix You are prompted for this information only if you areconfiguring an additional instance of a product type (forexample, if you are configuring a second instance of aWebFOCUS Reporting Server).
Each instance must have its own set of configuration libraries.To guarantee this, and to prevent a new set of configurationlibraries from overwriting an existing set, the suffix that youspecify here will be appended to the name of the product typequalifier. For example, if you are configuring the secondinstance of a WebFOCUS Reporting Server, you could specifythat the suffix "1" be added, so that the EDACONF high-levelqualifier would be:
IADMIN.SRV77.PDS.WFS1.DATA
You can add a new configuration as a numeric or string suffixto the base product type. If you supply a string, the installationprocedure ignores any numeric suffix. For a:
Numeric suffix, enter a digit between 1 and 9. This will beadded to the product type in the directory name and libraryname to distinguish it from other configuration instances.
String suffix, enter a string of between 1 and 5 characters(for example, TEST, PROD, or DEV). The string cannotcontain embedded spaces.
You can also use the string suffix to extend the numericnumbering past 9. Just supply a number greater than 9.
If you change the suffix value, when you press Enter, the panelrefreshes with a new value for EDACONF Library.
HTTP Listener Port This indicates the port number that the server will use forHTTP. It is the first of three connection ports that must beavailable to the server.
For example, if you choose port 8101, then ports 8101, 8102,and 8103 are used by the server. Ensure that you chooseports that are not currently being used.
4. Installation for z/OS
Server Installation 249

Field Instructions
TCP Listener Port This is the port number of the TCP Listener.
The default is one less than the port specified for the HTTPListener, but it can be any port number other than the threereserved for HTTP.
8. Press Enter to continue to the next panel.
Depending on your license key, the Data Adapter panel may open before the confirmationpanel. If the Data Adapter panel opens, continue with Step 9; otherwise, skip to Step 10.
9. The Data Adapter panel lists adapters that require the allocation of libraries in IRUNJCL orenvironment variables in the EDAENV member. To select specific adapters:
a. Type Y next to the required adapters and press Enter.
b. Supply the requested information, which is described in Step 2. Collect RequiredInformation for Adapters on page 210.
After you have finished installing and configuring the server, you can use the WebConsole to finish configuring these adapters, and to configure adapters that do not haveJCL requirements.
10.Press Enter to continue to the next panel.
The JSCOM3 Listener configuration panel opens.
a. The panel will prompt for the path to the Java environment to be passed to eitherJDK_HOME or JAVA_HOME, as described in JVM Requirements for Java Services on page203, and it will also prompt for edahome_dir and edaconf_dir, as described in HFSHome and Configuration Directory Requirements on page 209.
b. Configuration of the JSCOM3 Listener is either optional or mandatory depending onwhich adapters were selected. If any Java-based adapters were selected (EJB, Call Java,JDBC, MS SQL Server), the configuration of all three paths listed above is mandatory. IfSAP-based adapters were selected (SAP or SAP BW), only edahome_dir and edaconf_dirare required.
c. If no Java-based or SAP based adapters were select, this configuration might still bedesirable to enable the server-side graphics feature. To skip the configuration, leave thepath blank.
11.Press Enter to continue to the next panel.
The confirmation panel opens.
PDS Deployment
250 Information Builders
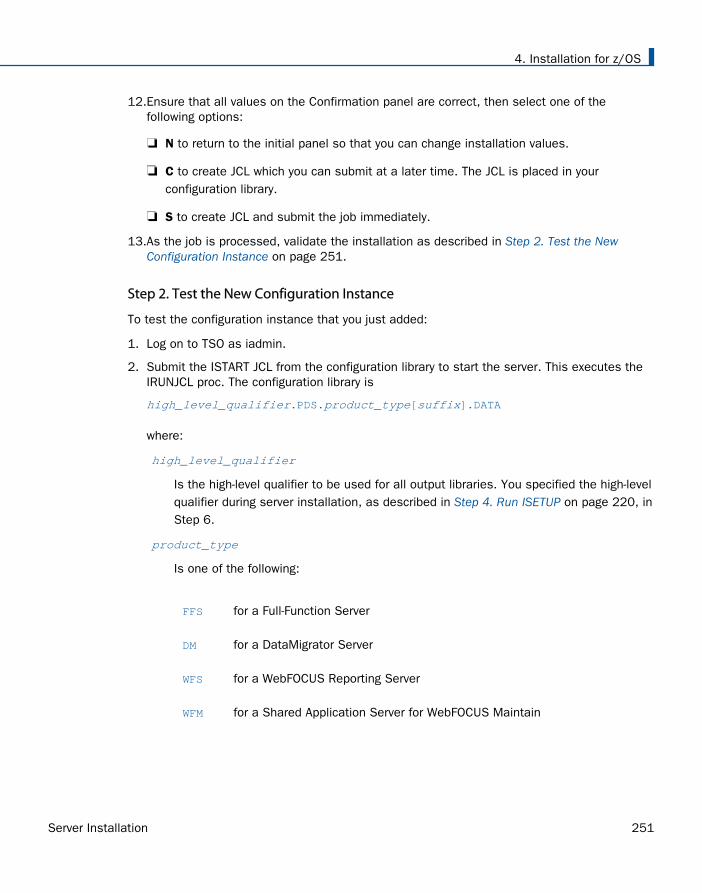
12.Ensure that all values on the Confirmation panel are correct, then select one of thefollowing options:
N to return to the initial panel so that you can change installation values.
C to create JCL which you can submit at a later time. The JCL is placed in yourconfiguration library.
S to create JCL and submit the job immediately.
13.As the job is processed, validate the installation as described in Step 2. Test the NewConfiguration Instance on page 251.
Step 2. Test the New Configuration Instance
To test the configuration instance that you just added:
1. Log on to TSO as iadmin.
2. Submit the ISTART JCL from the configuration library to start the server. This executes theIRUNJCL proc. The configuration library is
high_level_qualifier.PDS.product_type[suffix].DATA
where:
high_level_qualifier
Is the high-level qualifier to be used for all output libraries. You specified the high-levelqualifier during server installation, as described in Step 4. Run ISETUP on page 220, inStep 6.
product_type
Is one of the following:
FFS for a Full-Function Server
DM for a DataMigrator Server
WFS for a WebFOCUS Reporting Server
WFM for a Shared Application Server for WebFOCUS Maintain
4. Installation for z/OS
Server Installation 251

suffix
If you are testing an additional instance of a product type for which an earlierconfiguration exists, the new configuration library product type qualifier will have asuffix (for example, FFS1 or FFSDEV). The suffix distinguishes the new configurationlibrary from the original one.
3. Check the job output for errors. Look for the EDAPRINT message:
(EDA13023) ALL INITIAL SERVERS STARTED
4. Start the Web Console by opening a browser pointed at the listener port of the server. TheURL format is
http://host:port
where:
host
Is the name of the machine on which the server is installed.
port
Is one port higher than the port specified when installing the server. For example, ifyou specified port 8100 during installation, then use port 8101 to access the WebConsole.
The Web Console opens.
5. If the Web Console opens and displays application tree folders in the left pane, the serveris working because it uses its own underlying data access and reporting technologies tovisualize the application tree.
6. Continue with adapter configuration, as described in the Adapter Administration manual.
Upgrading Your Server Release for PDS
Use this option to upgrade to a new maintenance level within the same major release or,starting with major release 77, upgrade to a higher major release level. A major release isindicated by the first two digits of the release number.
The purpose of the PDS refresh option is to create a new set of EDAHOME libraries. It isrecommended that you test the new libraries in a test environment before manually changingyour production JCL (IRUNJCL) to point to the new software. The upgrade process can overwritean existing set of EDAHOME libraries (not recommended) if both "Current Base HLQ" and "HLQfor downloaded files" or "Output Libraries HLQ" are the same value.
PDS Deployment
252 Information Builders

Step 1. Access the Installation Software
You can choose to access the server installation software using either:
Tape. The software is provided on a 3490 or 3590 cartridge.
You must unload the installation data set from the tape before you can run the installation.This is how most installations are performed.
FTP. You download the installation software from the Information Builders download site.
Downloading the installation software involves:
1. Registering at the Information Builders download site.
2. Downloading the installation data set from the site.
3. Running the isetup procedure to complete the download process and install thesoftware.
Note: The above FTP steps are for the AUTOMATIC download instructions to MVS. If youdownloaded the software to another platform, then transferred the files to MVS (following themanual FTP instructions), a new set of EDAHOME Libraries will already exist on MVS, thereforethere will be no need to run ISETUP. The only process that needs to occur is the copying of theDB2VPRM members from the new HOME.DATA to the current HOME.DATA of the release to beupgraded. Complete the upgrade by following steps 3-5 in Step 2. Run ISETUP on page 255.
Procedure: How to Unload the Installation Software From Tape
The software is provided on a cartridge in 3490 or 3590 format with MVS PDSs. Perform thefollowing to unload the installation data set from the tape:
1. Log on to TSO.
2. Run an IEBCOPY job to allocate and unload the qualifier.HOME.DATA data set. This PDScontains the members needed for the actual installation.
It is recommended that you use HOME.DATA as the low-level qualifier for the target dataset. Although you can specify any low-level qualifier, HOME.DATA enables the installationprocedure to generate default data set names, simplifying your installation.
Note: If you do not use HOME.DATA, then change the following line to reflect the value youused.
// SET EDAUSSD='HOME.DATA'
Do this before you run ISETUP.
The following sample JCL is for the initial unload to a new data set:
4. Installation for z/OS
Server Installation 253

//IEBCOPY EXEC PGM=IEBCOPY,REGION=0M//SYSPRINT DD SYSOUT=*//SYSUT1 DD UNIT=workunit,SPACE=(CYL,(5,1))//OUT1 DD DISP=(NEW,CATLG,DELETE),// DSN=qualifier.HOME.DATA,// DCB=(RECFM=FB,LRECL=80,BLKSIZE=3200),// SPACE=(CYL,(5,5,25)),// UNIT=SYSDA//IN1 DD DISP=(OLD,PASS),// DSN=HOME.DATA,// UNIT=cart,// VOL=(,RETAIN,,SER=volser),// LABEL=(1,SL)//SYSPRINT DD SYSOUT=*//SYSIN DD * COPY INDD=IN1,OUTDD=OUT1
where:
workunit
Is the unit for the work data set.
qualifier
Is the high-level qualifier for HOME.DATA and for all other data sets that theinstallation procedure allocates. We recommend that the high-level qualifier reflect therelease of the software. However, you can use any site-specific value.
For PDS, we recommend retaining the low-level qualifier HOME.DATA, but you canchange this to any site-specific value. If you use a low-level qualifier other thanHOME.DATA, you must then edit member PDSSNAME to change the string“HOME.DATA” to the low-level qualifier you specify here.
cart
Is the unit type of the tape drive. Common names include 3490, TAPE, and 3590.Change as needed.
volser
Is the value shown on the media label.
After this job has run, qualifier.HOME.DATA is allocated, cataloged, and populated with themembers needed to continue the product installation.
Proceed to Step 2. Run ISETUP on page 255.
PDS Deployment
254 Information Builders

Procedure: How to Download the Installation Software Using FTP
To download the installation software:
1. Go to http://techsupport.informationbuilders.com.
The Information Builders Technical Support home page opens.
2. Click My Downloads in the My Account section on the right side of the page.
The Downloads, Upgrades, Service Packs, and PTFs page opens.
3. Click the link for your product (for example, WebFOCUS and iWay Server and iWay Client).
The Downloads by Release page for your product opens.
4. Click your release from the Current Production Releases list.
The Software Downloads page for your release opens.
5. Scroll down and find the platform on which you want to install the server, and then clickDownload to the right of the platform name.
6. Fill in the registration form and then click Continue.
The Software Download Agreement page opens.
7. Select I agree... to consent to the Download Agreement, and then click Continue.
The Download Instructions page opens. Select AUTOMATIC or MANUAL and follow therelevant instructions.
A copy of the instructions is automatically emailed to you for later reference.
8. Log on to TSO.
9. Follow the instructions on the Download Page in your TSO session.
Continue with Step 2. Run ISETUP on page 255.
Step 2. Run ISETUP
Software upgrade consists of a series of ISPF panels, which gather information for theupgrade. After the panel dialog is complete, JCL is created and submitted (if required) tocreate a new set of EDAHOME libraries.
1. Execute the ISETUP member of your high_level_qualifier.HOME.DATA using ISPF option 6.
The Installation and Configuration panel opens.
4. Installation for z/OS
Server Installation 255
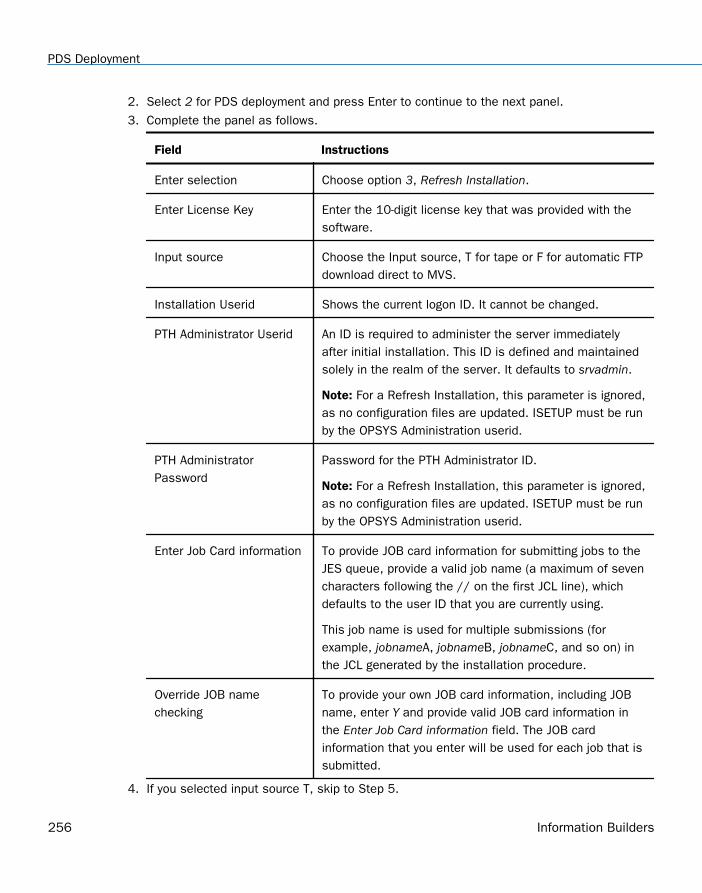
2. Select 2 for PDS deployment and press Enter to continue to the next panel.
3. Complete the panel as follows.
Field Instructions
Enter selection Choose option 3, Refresh Installation.
Enter License Key Enter the 10-digit license key that was provided with thesoftware.
Input source Choose the Input source, T for tape or F for automatic FTPdownload direct to MVS.
Installation Userid Shows the current logon ID. It cannot be changed.
PTH Administrator Userid An ID is required to administer the server immediatelyafter initial installation. This ID is defined and maintainedsolely in the realm of the server. It defaults to srvadmin.
Note: For a Refresh Installation, this parameter is ignored,as no configuration files are updated. ISETUP must be runby the OPSYS Administration userid.
PTH AdministratorPassword
Password for the PTH Administrator ID.
Note: For a Refresh Installation, this parameter is ignored,as no configuration files are updated. ISETUP must be runby the OPSYS Administration userid.
Enter Job Card information To provide JOB card information for submitting jobs to theJES queue, provide a valid job name (a maximum of sevencharacters following the // on the first JCL line), whichdefaults to the user ID that you are currently using.
This job name is used for multiple submissions (forexample, jobnameA, jobnameB, jobnameC, and so on) inthe JCL generated by the installation procedure.
Override JOB namechecking
To provide your own JOB card information, including JOBname, enter Y and provide valid JOB card information inthe Enter Job Card information field. The JOB cardinformation that you enter will be used for each job that issubmitted.
4. If you selected input source T, skip to Step 5.
PDS Deployment
256 Information Builders

If you selected F for automatic FTP only, complete the panel as follows.
Field Instructions
HLQ for downloaded files High level qualifier to be used as the target for the FTPfiles. If this is the same value as "Current Base HLQ"(see below) then files will be overwritten. Two warningmessages will be given and the enter key must bepressed to continue.
FTP Userid User ID provided on the download instructions.
FTP Password Password provided on the download instructions.
5. Press Enter to continue to the next panel, and complete the panel as follows.
Field Instructions
Current BaseHLQ (EDAHOME)
High level qualifier of the current server that is to be refreshed. ThisHLQ will be used to check if a full set of EDAHOME libraries exist.From this value, the current installation library name is obtainedand this will be the location used to create the refresh JCL.
6. Press Enter to continue to the next panel, and complete the panel as follows.
Field Instructions
Input Media (installing from tape)
Volume serial number Provide the volume serial number of the server media. Thenumber is located on the tape supplied in you server package.
Volume unit type Review the default value and change it if necessary.
Work unit type Review the default value and change if necessary.
You can specify a UNIT= type value (for example, SYSDA), oryou can direct work files to a specific volume serial number byspecifying, in single quotation marks ('),'SYSDA,VOL=SER=volume'.
Output Libraries
4. Installation for z/OS
Server Installation 257

Field Instructions
Output Libraries HLQ For tape input only: High level qualifier that will be used toallocate and load a full set of EDAHOME libraries. Change thevalue as necessary. If this is the same value as "Current BaseHLQ" (see previous page) then files will be overwritten. Twowarning messages will be given and the enter key must bepressed to continue.
HLQ for downloadedfiles
If FTP is selected, this "HLQ for downloaded files" wasprovided on the previous panel.
Unit/Type Values that the installation process will use to allocate theEDAHOME libraries on MVS. If necessary, you can changethese to site-specific values.
Type can be VOL=SER (default), DATACLAS, MGMTCLAS, orSTORCLAS.
Refresh edahome_dir? Select Y/N to refresh the contents of the edahome_dirdirectory.
edahome_dir If Y was selected above, enter the path to edahome_dir.
RA Active? If you are refreshing a 7.7, 7.7.01, or 7.7.02 installation, andResource Management is configured, select Y to recreateRMLDATxx datasets, otherwise select N. The default value isN.
Note: The installation JCL library name is where the refresh JCL will be created. This libraryis the current software installation library. The value cannot be changed.
7. Ensure that all values on the panel are correct, then select one of the following options:
N to return to the initial panel so that you can change installation values.
C to create JCL which you can submit at a later time. The JCL is placed in yourconfiguration library.
S to create JCL and submit the job immediately.
8. As the job is processed, in SDSF, check JESLOG for errors and return codes.
PDS Deployment
258 Information Builders

The following jobs are added to the current server configuration library:
Job Description
ISETUPJ3ISOPTS3
Main JCL Job stream that is used to install the software.
Step 3. Test the Server Installation
To test the installation:
1. Log on to TSO as iadmin.
2. Using a test server, replace all the EDAHOME libraries referenced in IRUNJCL with the newset.
3. Submit the ISTART JCL to start the server.
4. Check the job output for errors. Look for the EDAPRINT message:
(EDA13023) ALL INITIAL SERVERS STARTED
5. Start the Web Console by opening a browser pointed at the listener port of the server. TheURL format is
http://host:port
where:
host
Is the name of the machine on which the server is installed.
port
Is one port higher than the port specified when installing the server. For example, ifyou specified port 8100 during installation, then use port 8101 to access the WebConsole.
The Web Console opens.
6. If the Web Console opens and displays application tree folders in the left pane, the serveris working because it uses its own underlying data access and reporting technologies tovisualize the application tree.
When you are finished using the server, you can use the Web Console to stop the server bygoing to the Web Console menu bar, selecting Workspace, and then Stop.
If you experience problems at start up, examine the job output for more information.
4. Installation for z/OS
Server Installation 259

Step 4. Reconfigure Server Security
For information about configuring server security, see Step 6. Configure Server Security on page232.
To reconfigure server security to OPSYS provider only:
1. Log on to TSO.
2. The libraries allocated to STEPLIB in IRUNJCL must be APF-authorized. Any non APF-authorized libraries must be allocated the TASKLIB DDNAME.
3. Test server security by repeating the process described in Step 3. Test the ServerInstallation on page 259.
Preventing Unsecured Server Starts After Upgrades
If the security provider is set to OPSYS in the configuration file and, additionally, explicitenvironment variable EDAEXTSEC is set to OPSYS (or ON), and the server cannot impersonateusers because it lacks platform-specific authorization steps, the server start aborts and errormessages are written to the edaprint log.
This feature prevents an unsecured server start after a software upgrade if any of the requiredpost-upgrade reauthorization steps are missed on a UNIX, IBM i, or z/OS HFS deployment. Thisis not applicable to other platforms. The setting may be placed in any normal server start-upshell or profile that a site is using or in the server edaenv.cfg configuration file. The messagesvary slightly by platform.
The edaprint messages are:
I Configured primary security is 'OPSYS' as set in configuration file
E Server security explicitly set to OPSYS, but lacks authority!
Workspace initialization aborted.
(EDA13171) UNABLE TO START SERVER
PDS Deployment
260 Information Builders

Step 5. Reconfigure Adapters
While most adapters do not require additional steps after updating binary files, the followingtable notes the adapters that do require some consideration.
Adapter Steps After Updating Binaries
Adabas Change the value for EDALOAD in member EDAENV of your currentserver configuration library (qualif.PDS.product_type.DATA) to pointto the new P.HOME.LOAD.
Re-enable the module containing SVC using the Web Consoleadapter configuration page.
Test the adapter from the adapter page before running yourapplications.
DB2 CAF Rerun the IDB2BIND JCL found in your current server configurationlibrary qualif.PDS.product_type.DATA. This needs to be done foreach subsystem that is used.
Test the adapter from the adapter page before running yourapplications.
Accounting for PDS - SMF Records
The server provides an optional facility to use for accounting purposes that enables you to logresource utilization on a per-user basis. This facility enables the server to generate SMFrecords for query-level and user-level accounting.
Server accounting requires that the server STEPLIB data sets be APF-authorized. When SMFrecords are generated, they contain:
The logon ID and security ID of the user.
The CPU time and EXCPs consumed.
Data based on the type of record written.
You can process the SMF records using the accounting programs that exist at your site.Examples of SMF records are provided in SMF Record Format for RECTYPES 1 and 4 on page264.
4. Installation for z/OS
Server Installation 261

In order to write SMF records, the server must be running APF authorized.
Two sample Master Files (SMFVSAM and SMFFIX) are provided for accessing accountingstatistics. They reside in qualif.P.HOME.MAS.
Their difference is that SMFVSAM can be used to report directly from the system-liveSYS1.MANx records, while SMFFIX can be used to report from a sequential file produced fromrunning the SMFDUMP utility. These Master Files enable you to interpret the SMF recordsgenerated by the accounting facility using reporting requests or store procedures. Both MasterFiles are for logoff records only, as indicated by ALIAS=2 on the RECTYPE field entry.
A sample procedure report to query the SMF data is also provided inqualif.P.HOME.FEX(SMFMAN1).
Syntax: How to Enable Accounting
To enable accounting, insert the following statement into the server configuration file(edaserve.cfg):
smf_recno=smfnumber
where:
smfnumber
Is an integer in a range from 128 to 255, inclusive. This number represents the SMFnumber used by the accounting facility when it sends records to the SMF system.
By default, both RECTYPE pairs will be created when accounting is enabled. You can overridethe default by coding the following parameter on edaserve.cfg :
smf_subtype = {all|logon|query}
where:
all
Cuts all records. This is the default.
logon
Cuts logon records only (RECTYPE pair 1 and 2).
query
Cuts query records only (RECTYPE pair 4 and 5).
PDS Deployment
262 Information Builders

Syntax: How to Set the Accounting Field
Up to 40 characters can be supplied that appear in the SMF records field SMFOFA40. The SETBILLCODE command can be used in any support server profile to provide the account fieldinformation. The syntax is
SET BILLCODE=value
where:
value
Is the 1–40 characters to be used on each SMF record produced.
This information can also be set dynamically from a client application by coding an RPCwith the SET command and executing it with the value as a parameter. WebFOCUS userscan send the SET command to the server.
Procedure: How to Report From SMF Data
To report from SMF data, execute the sample procedure smfman1.fex, provided under home/catalog (DDNAME EDAHFEX for a PDS Deployment server).
You will be prompted for the DSN of the SMF VSAM data set from which you want to report,and the smf_recno value used to produce the SMF records.
Following is a listing of smfman1.fex:
DYNAM ALLOC FI SMFVSAM DSN &SMFDSN.Please provide SMF VSAM DSN. SHR REUDEFINE FILE SMFVSAMCPU/D8.2 = SMFOFCPU / 100 ;USER/A20 = SMFOFUID ;EXCPS/I6 = SMFOFEXC ;TIME/D9.2 = SMFOFLTM / 100 ;HR/I2 = SMFOFTME / 360000 ;MIN/I2 = (SMFOFTME - (HR*360000)) / 6000 ;TOD/A5 = EDIT(HR) | ':' | EDIT(MIN) ;ENDTABLE FILE SMFVSAMPRINT USER CPU EXCPS TIME TODWHERE SMFOFRTY EQ &SMFNUM.Please provide SMF number(type) for report.END
4. Installation for z/OS
Server Installation 263

Reference: SMF RECTYPES
There are four RECTYPE values defined to produce SMF records:
RECTYPE Description
1 Indicates a start of task record. When included in a report, these statisticstell when a task initiation occurred, and are of no particular use inchargeback. By pairing start and end of task records for all tasks within atime period, statistics, such as average active time, peak task count, andaverage task count, can be determined. These values can be used for futurecapacity planning activities for the server.
2 Indicates the start of a task record. When included in a report, thesestatistics tell when a task termination occurred. These records are cut forboth publicly and privately deployed services and contain statistics for thesubtask as a whole.
For privately deployed services, RECTYPE (2) records contain statisticsassociated with a single user connection.
4 Begin query. Record layout is the same as RECTYPE (1).
5 End query. Record layout is the same as RECTYPE (2).
Reference: SMF Record Format for RECTYPES 1 and 4
The record format for RECTYPES 1 and 4 of the SMF records written by the server is definedbelow. The format is provided in the system 390 assembler DSECT form.
SMFON DSECT SPACE*----------------------------------------------------** USAGE ACCOUNTING SMF RECORD LAYOUT FOR LOGON RECORDS. ** ** THIS IS THE DSECT DESCRIBING THE SMF RECORD WHICH IS PASSED TO ** YOUR EXIT ON AT USER LOGON TIME. IT IS COMPLETELY READY TO BE ** WRITTEN WHEN YOUR EXIT RECEIVES CONTROL. **----------------------------------------------------* SPACE
PDS Deployment
264 Information Builders

*----------------------------------------------------** THE FIRST TWENTY FOUR BYTES OF THE RECORD ARE THE SMF HEADER. ** THESE FIELDS ARE REQUIRED IN ALL SMF RECORDS (18 BYTES FOR RECORDS ** WITHOUT SUBTYPES; WE USE SUBTYPES, THE HEADER IS 24 BYTES). * SPACESMFONLEN DS H'116' RECORD LENGTHSMFONSEG DS XL2'0000' SEGMENT DESCRIPTOR (0 UNLESS SPANNED)SMFONFLG DS XL1 SYSTEM INDICATORSMFONRTY DS XL1 RECORD TYPESMFONTME DS XL4 TIME, IN HUNDREDTHS OF A SECONDSMFONDTE DS PL4 DATE, 00CYYDDDF, WHERE F IS THE SIGNSMFONSID DS CL4 SYSTEM IDENTIFICATIONSMFONSBS DS CL4 SUBSYSTEM IDENTIFICATIONSMFONSBT DS XL2'0001' SUBTYPE OF RECORD - X'0001' INDICATES X THIS IS A LOGON RECORD SPACE
*----------------------------------------------------** THE NEXT FIELDS ARE THOSE PRESENT IN THE LOGON ** RECORD FOR THE START OF A USER SESSION. **----------------------------------------------------* SPACESMFONMSO DS CL8 JOBNAMESMFONJID DS CL8 JOBID (FROM SSIBJBID)SMFONASI DS Y ASIDSMFONRV1 DS XL2 RESERVEDSMFONUID DS CL20 SECURITY USERIDSMFONLID DS CL20 USERID PRESENTED AT LOGON (SAME AS X SMFONSID UNLESS CHANGED VIA MSIDTR X SECURITY EXIT)SMFONRSV DS XL8 RESERVED FOR FUTURE EXPANSIONSMFONCTI DS XL4 RESERVED FOR FUTURE EXPANSIONSMFONSRV DS CL8 SERVICE NAME FROM SERVICE BLOCKSMFONRS0 DS XL4 RESERVED FOR FUTURE EXPANSIONSMFONCNT DS XL1 CONNECTION TYPE SPACE
SMFONTSO EQU 1 CONNECTION VIA TSOSMFONCIC EQU 2 CONNECTION VIA CICSSMFONVTM EQU 4 CONNECTION VIA VTAMSMFONPSR EQU 8 SPACE
SMFONRS1 DS XL3 RESERVEDSMFONID1 DS F SYSPLEX ID 1SMFONID2 DS F SYSPLEX ID 2SMFOFPID DS XL20 POOLED USER IDSMFONRS2 DS XL12 RESERVEDSMFONL EQU *-SMFON LENGTH OF THE SMF LOGON RECORD
4. Installation for z/OS
Server Installation 265

Reference: SMF Record Format for RECTYPES 2 and 5
The record format for RECTYPES 2 and 5 of the SMF records written by the server is definedbelow. The format is provided in the system 390 assembler DSECT form.
SMFOF DSECT SPACE*----------------------------------------------------** USAGE ACCOUNTING SMF RECORD LAYOUT FOR LOGOFF RECORDS. ** ** THIS IS THE DSECT DESCRIBING THE SMF RECORD WHICH IS PASSED TO ** YOUR EXIT ON AT USER LOGOFF TIME. IT IS COMPLETELY READY TO BE ** WRITTEN WHEN YOUR EXIT RECEIVES CONTROL. **----------------------------------------------------* SPACE
*----------------------------------------------------** THE FIRST TWENTY FOUR BYTES OF THE RECORD ARE THE SMF HEADER. ** THESE FIELDS ARE REQUIRED IN ALL SMF RECORDS (18 BYTES FOR RECORDS ** WITHOUT SUBTYPES; WE USE SUBTYPES, THE HEADER IS 24 BYTES). **----------------------------------------------------* SPACESMFOFLEN DS H'168' RECORD LENGTHSMFOFSEG DS XL2'0000' SEGMENT DESCRIPTOR (0 UNLESS SPANNED)SMFOFFLG DS XL1 SYSTEM INDICATORSMFOFRTY DS XL1 RECORD TYPESMFOFTME DS XL4 TIME, IN HUNDREDTHS OF A SECONDSMFOFDTE DS PL4 DATE, 00CYDDDF, WHERE F IS THE SIGNSMFOFSID DS CL4 SYSTEM IDENTIFICATIONSMFOFSBS DS CL4 SUBSYSTEM IDENTIFICATIONSMFOFSBT DS XL2'0002' SUBTYPE OF RECORD - X'0002' INDICATES X THIS IS A LOGOFF RECORD SPACE
*----------------------------------------------------** THE NEXT FIELDS ARE THOSE PRESENT IN THE LOGOFF ** RECORD FOR THE END OF A USER SESSION. **----------------------------------------------------* SPACESMFOFMSO DS CL8 JOBNAMESMFOFJID DS CL8 JOBID (FROM SSIBJBID)SMFOFASI DS Y ASIDSMFOFRV1 DS XL2 RESERVEDSMFOFUID DS CL20 SECURITY USERIDSMFOFLID DS CL20 USERID PRESENTED AT LOGON (SAME AS X SMFOFSID UNLESS CHANGED VIA MSIDTR X SECURITY EXIT)SMFMEMA DS XL4 MEMORY ABOVE THE LINE (IN KILOBYTES)SMFMEMB DS XL4 MEMORY BELOW THE LINE (IN KILOBYTES)SMFZIIP DS XL4 ZIIP CPU NORMALIZED (HUNDREDTHS OF A SEC)SMFOFSRV DS CL8 SERVICE NAME FROM THE SERVICE BLOCKSMFZPOCP DS XL4 ZIIP ON CP (HUNDREDTHS OF A SEC)SMFOFCNT DS XL1 CONNECTION TYPE SPACE
PDS Deployment
266 Information Builders

SMFOFTSO EQU 1 CONNECTION VIA TSOSMFOFCIC EQU 2 CONNECTION VIA CICSSMFOFVTM EQU 4 CONNECTION VIA VTAMSMFOFPSR EQU 8SMFOFCC DS XL3 COMPLETION CODE FOR THE TASKSMFOFACT DS CL8 USER ACCOUNTING INFORMATION; THIS X FIELD CURRENTLY PASSED AS LOW VALUESMFOFCPU DS XL4 CPU TIME IN HUNDREDTHS OF A SECONDSMFOFEXC DS XL4 COUNT OF EXCP'SSMFOFLTM DS FL4 LOGON DURATION IN HUNDREDTHS OF A X SECONDSMFPRTY DS XL1 PRIORITYSMFCOMPL DS XL1 COMPLETION TYPE DS XL2 RESERVEDSMFOFID1 DS F SYSPLEX ID 1SMFOFID2 DS F SYSPLEX ID 2SMFOPID DS XL20 POOLED USERIDSMFOFA40 DS CL40 FULL 40-BYTE ACCOUNTING FIELD SPACESMFOFL EQU *-SMFOF LENGTH OF THE SMF LOGOFF RECORD
Reference: Accounting for DB2 in a Server Task
When using a server to access DB2 data, certain processing takes place within the DB2address space and is governed by the DB2 chargeback system. If a user requests data fromDB2, the server passes the request to the DB2 subsystem. The DB2 subsystem thenprocesses the request, performing such tasks as retrieving rows and aggregating the data. Itgenerates the answer set, and passes the output back to the server. The server then performsany joins and formatting which have not been performed by DB2 to satisfy the original request.
Charges incurred while the request was being processed by the DB2 subsystem are added tothe charges accumulated in the server task that originated the request for processing. If theserver accounting is enabled, these charges are associated with the user logon and securityIDs in the SMF records described earlier.
Enabling Use of the zIIP Specialty Engine
If your site has a zIIP (System z Integrated Information Processor) specialty engine from IBM,you can offload specific categories of workload from the Central Processors to the zIIP.
4. Installation for z/OS
Server Installation 267

The zIIP engine is a restricted version of a Central Processor (CP), also referred to as a GeneralProcessor (GP). The capacity of the zIIP engine does not count toward the overall MIPS ratingof the mainframe image, so the CPU usage incurred on the zIIP is effectively free. CentralProcessors are often configured to run at speeds below their maximum rating for cost savingand capacity planning purposes. For Central Processors, 100% capacity typically refers to themaximum MIPS that the processor is allowed to generate at that installation, in accordancewith your contract with IBM. In contrast, the zIIP engine always runs at true 100 percent ofcapacity.
As much as 80 percent of server processing is enabled to run on the zIIP engine. Typicalworkloads are expected to offload 30 to 80 percent of CPU processing to the zIIP engine.
To make use of the zIIP enablement feature, the server must run in an authorized state.
What Is a zIIP Specialty Engine?
Though physically identical to a Central Processor, the zIIP engine is microcoded at installationtime to run specific types of workloads. The Central Processor continues to handle theoperating system, I/O interrupts and timer interrupts, job initiations, and user interactions withthe operating system. The zIIP concentrates on CPU intensive workloads, leaving the CentralProcessor more time to absorb otherwise queued workloads, thereby achieving some overallperformance improvement across all mainframe activity.
Steps to zIIP Enablement
This section describes steps and requirements for the server use of the zIIP processor.
The steps to server zIIP enablement are:
1. If your site has purchased the zIIP feature, obtain a license code that licenses you to usethe zIIP feature.
2. Obtain APF authorization for the server load library.
3. Activate the zIIP feature using the SET ZIIP=ON or SET ZIIP=ON/SIMMAXZIIP command. Forinstructions, see Activating a zIIP Environment or Projecting zIIP Usage on page 269.
Reference: Usage Notes for Use of the zIIP Processor
Maximize the blocksizes of data sources that are read or written by the server to reduce thenumber of I/Os required to access the file. This will reduce the number of switches to non-zIIP mode that the server agents have to make, thus permitting a greater percentage of zIIPcontribution to the request.
PDS Deployment
268 Information Builders

Move or rewrite functions developed at your site since the server must switch to non-zIIPmode for each call to such routines. You may be able to use one of the following possiblesolutions:
Move the routines from DEFINEs to COMPUTEs to reduce the number of times they arereferenced. This tactic must be applied carefully, and only when report results would notchange.
Rewrite the routines using DEFINE FUNCTION, which executes on the zIIP processor.
Confine the routine to a pre-step run with ZIIP=OFF which collects its calculated results,then use those calculations in the next step with ZIIP=ON.
Activating a zIIP Environment or Projecting zIIP Usage
The last step in zIIP enablement is to activate the use of the zIIP processor in the server. zIIPenablement is activated by the SET ZIIP command.
The SET ZIIP command has three options:
OFF. This setting prevents the server from offloading its processing to a zIIP.
ON. This setting causes the server to offload processing to a zIIP engine if you have a zIIPprocessor and the environment is properly APF-authorized.
ON/SIMMAXZIIP. This setting enables you to project zIIP processing in two differentenvironments:
You do not have a zIIP processor. Using this setting along with the PROJECTCPUparameter, you can project how much server workload would have been offloaded to azIIP.
You do have a zIIP processor. Using this setting you can project how much advantageyou would achieve by offloading 100% of eligible server processing to the zIIP.
Syntax: How to Activate the zIIP Enablement Feature
You can issue the SET ZIIP command in a server profile or in a particular FOCEXEC.
SET ZIIP={ON[/SIMMAXZIIP]|OFF}
where:
ON
Configures the server to offload processing to the zIIP engine.
4. Installation for z/OS
Server Installation 269

This setting:
Determines if the zIIP processor is accessible to the LPAR in which a job is running.
Determines if the server environment has been properly authorized to run a zIIPworkload.
Note: If the server determines that the zIIP processor is not accessible or that theenvironment has not been authorized correctly, it issues a message describing the reasonand continues in ZIIP=OFF mode, which forwards all subsequent work to the CentralProcessor.
ON/SIMMAXZIIP
Configures the server to either:
Project what the zIIP usage would be if the server could offload processing to a zIIP,when the server is operating in an LPAR without a zIIP. This requires that thePROJECTCPU parameter be set to YES.
The SYS1.PARMLIB member IEAOPTxx contains the PROJECTCPU statement. Activatingthe PROJECTCPU parameter projects zIIP consumption when a zIIP processor is not yetdefined to the LPAR. SMF type 30 records will show the potential calculated zIIP time,so that you can accurately project zIIP usage. This enables you to evaluate the effect ofconfiguring a zIIP processor to be available for server usage. The Systems Programmerfor your site will have access to this data. Use this option for simulation purposes only.
Since the zIIP engine actually is not present, all zIIP-eligible workload will be diverted tothe Central Processor. Thus, all of that CPU utilization will be recorded in a servervariable called &FOCZIIPONCP. This is the amount of workload that would have run onthe zIIP engine, and would have appeared in &FOCZIIPCPU, had the zIIP been presentand accessible to server work. This information is also recorded in the server jobstatistics as well as in IBM SMF type 30 records.
To use this option, insert the following parameter in SYS1.PARMLIB for your LPAR, andalso issue the SET ZIIP=ON/SIMMAXZIIP command:
PROJECTCPU=YES
This setting:
Determines if the PROJECTCPU=YES command has been set in the LPAR.
Determines if the server environment has been properly authorized to run a zIIPworkload.
PDS Deployment
270 Information Builders

Projects zIIP utilization if 100% of eligible server processing could be offloaded to thezIIP, when the server is running in an LPAR with a zIIP. This lets you determine what youwould gain by configuring Workload Manager to give the server a bigger share of zIIPprocessing.
IBM Workload Manager (WLM) prioritizes workloads among the Central Processors andzIIP processors at your site based on a complex set of goals and rules established bythe system administrator. These rules apply to all workloads from all sources, not justthe server. These goals combine to influence the decision to direct server requests tothe zIIP engine at any particular moment.
Utilizing this setting with a zIIP present can help you determine how much advantageyou would get if the server had more of a share of the zIIP processor. To see thedifference in actual and projected zIIP usage, run the same job with SET ZIIP=ON andthen with SET ZIIP=ON/SIMMAXZIIP and compare the results. For more informationabout evaluating zIIP usage, see Evaluating zIIP Usage on page 273.
This setting:
Determines if the zIIP processor is accessible to the LPAR in which a job is running.
Determines if the server environment has been properly authorized to run a zIIPworkload.
Note: If the server determines that the environment has not been authorized correctly, itissues a message describing the reason and continues in ZIIP=OFF mode, which forwardsall subsequent work to the Central Processor.
OFF
Configures the server not to offload processing to the zIIP engine. OFF is the default value.
Information Builders Note: Turn off zIIP enablement only when you know for sure that a jobwill not gain any advantage from using the zIIP processor or if the system operator oradministrator requires that you turn it off.
Example: Setting the PROJECTCPU Parameter in SYS1.PARMLIB Member IEAOPTxx
Use the following sample as a guide for setting the PROJECTCPU parameter inSYS1.PARMLIB(IEAOPTxx):
/* ************************************************************** */ /* SYS1.PARMLIB(IEAOPTxx) */ /* ************************************************************** */ PROJECTCPU=YES
4. Installation for z/OS
Server Installation 271

How the Server Takes Advantage of the zIIP Processor
The server diverts eligible workload to the zIIP engine by switching from TCB (Task ControlBlock) mode for workloads that can run only on a Central Processor to SRB (Service RequestBlock) mode for execution of enabled workloads on the zIIP engine.
Types of server processing that are offloaded to the zIIP engine include:
Computations.
Aggregation.
Screening.
Sorting.
Report formatting and styling.
Transaction Processing.
The server zIIP Monitor detects situations in which the overhead cost of zIIP usage isexceeding the CPU benefits gained. When this threshold is reached, the server may decide tosuspend use of the zIIP for the duration of a logical phase of the server request. When it doesso, it places a message to that effect in the JES log. It then resets to make the zIIP processoraccessible to the next logical phase of the server request.
TABLE, MATCH, MODIFY, and MORE requests may suspend and resume more than once asthey progress through logical phases of execution.
In every case, the server attempts to optimize the use of the zIIP and minimize chargeable CPUcosts.
Applications that perform significant database I/O, high-volume sorting, or the use of thirdparty tools or user functions during processing require switching out of SRB (zIIP) mode intoTCB (non-zIIP) mode to communicate, and then back again to continue processing. Althougheach switch is miniscule, the cumulative effect can absorb measurable amounts of CPU timeon both the zIIP engine and the Central Processor.
In order to diminish this effect, the server buffers the collection of records passed to thesystem sort utility and some adapters rather than passing one record at a time, thus reducingthe number of switches between TCB and SRB modes.
These third party products may themselves be zIIP enabled and may offload some or all oftheir processing to the zIIP engine independent of the server. The server always calls theseproducts from the Central Processor because it cannot know whether they will perform anyprocessing that is prohibited on the zIIP.
PDS Deployment
272 Information Builders

Even though zIIP usage occurs more frequently on non-optimized requests to a relational datasource, optimized requests are still inherently more efficient and, therefore, may incur lessCPU time. Being zIIP enabled, DB2 may also take advantage of the zIIP processor for serverrequests based on the local configuration of DB2 relative to the server.
Requests against some types of data sources whose I/O can be buffered gain a lot ofadvantage from zIIP enablement. Data sources that gain the most benefit from zIIP processingdue to buffered I/O include:
Blocked flat files.
FOCUS.
XFOCUS.
VSAM.
DB2.
Evaluating zIIP Usage
In order to evaluate server zIIP processing in a session, you can query three Dialogue Managervariables that accumulate statistics about CPU processing:
&FOCCPU accumulates the time spent on a Central Processor. This is an existing variablethat precedes zIIP enablement.
&FOCZIIPCPU accumulates the time actually spent on the zIIP processor (in SRB mode).This is the normalized CPU value using the same scale as &FOCCPU.
&FOCZIIPONCP accumulates the time that processing could have been offloaded to the zIIPprocessor but was diverted to the Central Processor by the system.
Note:
&FOCCPU includes the value of &FOCZIIPONCP.
The sum of &FOCZIIPCPU and &FOCCPU represents the total CPU utilized by the serveragent.
If you set ZIIP=OFF, the zIIP variables do not accumulate further but are not reset tozero. If you later set ZIIP=ON, they resume accumulating statistics.
The RM (Resource Manager) that monitors server usage also captures zIIP statistics.
4. Installation for z/OS
Server Installation 273

Performance Considerations for PDS
There are several ways in which you can improve the server performance:
Server initialization commands. You can specify DYNAM commands in member SRVINIT ofthe data set referenced by //EDACCFG DD in IRUNJCL. For more information, see ServerInitialization Commands Configured in SRVINIT Member on page 274.
Non-swappable address space. We recommend that you run the server in a non-swappableaddress space. For more information, see Running the Server in a Non-Swappable AddressSpace on page 276.
Workload Manager (WLM). You can balance server workload by using Workload Manager.For more information, see Workload Manager on page 277.
Server Initialization Commands Configured in SRVINIT Member
It is possible to specify DYNAM commands in member SRVINIT of the data set referencedby //EDACCFG DD in IRUNJCL. These commands will be executed during server startup andwill be in effect until the server is shut down. You can execute the following DYNAM commandsfrom SRVINIT:
DYNAM SET APP FOR filetype [SKIP}CREATE] [POSTFIX a.b] [ parms]
Specify the types of component files that are skipped or created for the application whenan APP CREATE command is issued. By default, all component file types are generated.
where:
filetype
Are the component types that may be affected by this command: ACCESS, DTD, ETG,FOCCOMP, FOCEXEC, FOCSTYLE, GIF, HTML, MAINTAIN, MASTER, SQL, WINFORMS,XML, XSD. You must issue a separate command for each component type you wish toaffect.
SKIP
Indicates that the designated file type should not be created when the APP CREATEcommand is issued.
CREATE
Creates the designated file type when the APP CREATE command is issued. This is thedefault setting.
PDS Deployment
274 Information Builders

POSTFIX
Specifies the lower-level qualifier of the DSN (data set name) for the component type.The APPROOT value is used to complete the full DSN, which is expressed as
approotvalue.appname.component_type
The default value for component_type is
filetype.DATA
parms
Are the allocation parameters you can set. The default parameter values are:
Filetype Parms
ACCESS RECFM FB TRKS LRECL 80 BLKSIZE 22000 SPACE 50 50 DIR 50
DTD RECFM VB TRKS LRECL 4096 BLKSIZE 27998 SPACE 50 50 DIR 50
ETG RECFM FB TRKS LRECL 80 BLKSIZE 22000 SPACE 50 50 DIR 50
FOCCOMP RECFM VB TRKS LRECL 32756 BLKSIZE 32760 SPACE 50 50 DIR 50
FOCEXEC RECFM VB TRKS LRECL 4096 BLKSIZE 27998 SPACE 50 50 DIR 50
FOCSTYLE RECFM FB TRKS LRECL 1024 BLKSIZE 27648 SPACE 50 50 DIR 50
GIF RECFM VB TRKS LRECL 1028 BLKSIZE 27998 SPACE 50 50 DIR 50
GIF type creates libraries for GIF and JPG files.
HTML RECFM VB TRKS LRECL 4096 BLKSIZE 27998 SPACE 50 50 DIR 50
MAINTAIN RECFM VB TRKS LRECL 4096 BLKSIZE 27998 SPACE 50 50 DIR 50
4. Installation for z/OS
Server Installation 275

Filetype Parms
MASTER RECFM FB TRKS LRECL 80 BLKSIZE 22000 SPACE 50 50 DIR 50
SQL RECFM VB TRKS LRECL 32756 BLKSIZE 32760 SPACE 50 50 DIR 50
WINFORM RECFM VB TRKS LRECL 4096 BLKSIZE 27998 SPACE 50 50 DIR 50
XML RECFM VB TRKS LRECL 4096 BLKSIZE 27998 SPACE 50 50 DIR 50
XSD RECFM VB TRKS LRECL 4096 BLKSIZE 27998 SPACE 50 50 DIR 50
DYNAM APP app1 [app2 ...]
Enable application libraries to be allocated during the server startup, improvingperformance. This command is not applicable to sequential data sets in the application (forexample, FOCUS, FTM) which will only be allocated when they are referenced. For example:
DYNAM APP IBISAMP BASEAPP (default command at installation time)
DYNAM ALLOC commands
For sequential data sets in the application (for example, FOCUS, FTM) to be allocated atserver startup (equivalent to adding a JCL allocation for these files in IRUNJCL).
Running the Server in a Non-Swappable Address Space
We recommend that you run the server in a non-swappable address space. In order to makethe server address space permanently non-swappable, add the following entry toSYS1.PARMLIB(SCHEDxx):
PPT PGMNAME(TSCOM300) /* PROGRAM NAME */NOSWAP /* NON-SWAPPABLE */CANCEL /* CAN BE CANCELLED */
Do not use the KEY 0 parameter, or any other parameter (such as NOPASS), unless thesystem programmer completely understands the consequences of adding the parameter.
All local spawn transactions will perform in the mode of the server. For example, if the serveraddress space is non-swappable, all local spawn execute as non-swappable.
PDS Deployment
276 Information Builders

The server executes limited non-local spawn, such as when the user executes a UNIX systemcommand. Non-local spawn execute as swappable.
The server never executes a fork subroutine. (A fork subroutine creates a new process. Thenew process, called the child process, is an almost exact copy of the calling process, which iscalled the parent process.)
Workload Manager
Although the server may run in a specific performance group, transactions submitted by serveragents may perform differently than the server by adding the following keyword to edaserve.cfg:
wlm_enclave_trname = WLM_transaction_name
where:
WLM_transaction_name
Can be up to 8 characters.
This is a service-level keyword.
Using this setting, the task will join a Workload Manager (WLM) enclave when a request starts,and leave the enclave when the request finishes. This gives WLM control of the dispatchingpriority of the task. The transaction rules defined on WLM will determine the default serviceclass assigned to this transaction, and that service class will determine how the request runs.
This feature helps to balance a workload so that a long request will not affect a short request.This can be achieved through WLM rules designed to lower the priority of a long request after acertain period of time. Without this feature, all requests share the region priority.
The transaction name passed in this keyword must match one defined in the WLMClassification Rules for the Job Entry Subsystem (JES). A corresponding WLM Service Classpointed to by this rule will then be associated with this service.
The classification rules for JES must be used even if the server is started as a started task.The subtasks are always run under JES.
For example, you would include the following in edaserve.cfg:
SERVICE = DEFAULT BEGINwlm_enclave_trname = IWAYFAST...END
The WLM definition is:
4. Installation for z/OS
Server Installation 277

Subsystem Type JES - Batch JobsClassification: Default service class is PRDBATLOThere is no default report class. Qualifier Qualifier Starting Service Report# type name position Class Class- ---------- -------------- --------- --------- --------1 TN IWAYFAST EDAQRYHI
WLM sub-rules (levels 2 and above) are supported. For a server request to join an enclave in aparticular service class, the names of all rule qualifiers below our transaction name arechecked. For example, consider the following WLM definition:
Subsystem Type JES - Batch JobsClassification: Default service class is PRDBATLOThere is no default report class. Qualifier Qualifier Starting Service Report# type name position Class Class- --------- ------------- -------- -------- --------1 SSC PRDMVS PRDDFLT2 TN IWAYFAST EDAQRYHI
In this particular case, the qualifier 1 type is SSC (Subsystem Collection), and a server requestwill only join the enclave IWAYFAST if it is running on a particular LPAR in the SYSPLEX. Thisqualifier (PRDMVS) must match the XCF group definition: issue $DMASDEF (for JES2) andcheck the value of XCFGRPNM field.
You can handle WLM scheduling environments by defining them to WLM and then adding theJOB statement parameter SCHENV=xxxxx to the ISTART JCL.
General Information for a z/OS PDS Installation
This section covers general information for a z/OS installation.
Sample Metadata, Data, and Other Tutorial Samples
Releases prior to 7.7.06 pre-load various samples into the IBISAMP application. As of 7.7.06,on a new installation, the IBISAMP application is created, but is not pre-loaded. The serverWeb Console has a new feature on the ribbon and on the application tree (under new),Tutorials (the Create Tutorial Framework page), which has a pull-down for various samples. TheDMC also has this feature on the application tree.
PDS Deployment
278 Information Builders
There are currently about 10 different tutorial/sample selections available on the pull-downselect list to match various customer needs. The bulk of the prior IBISAMP sample objects canbe generated by selecting the Create Legacy Sample Tables and Files tutorial. Other priorIBISAMP DataMigrator sample objects (usually starting with the characters dm*) are nowloaded by choosing their respective DataMigrator tutorials. Under the new method, thetutorials/samples may be loaded to any application, not just IBISAMP.
If you are doing just a software refresh, the prior IBISAMP objects will be unchanged (becausea refresh does not touch app directories).
Frequently Asked Questions for PDS
Q: Why might someone want to use the PDS deployment?
A: PDS deployment provides the same rich level of features as the HFS-deployed server,including the Web Console, but removes the requirement for interaction with Unix SystemServices at installation and run time. It deploys the server software in partitioned data sets.Configuration and user-created source files, such as procedures and metadata, are also storedin PDS libraries.
Administration of the server, from a systems perspective, has been streamlined to match thatof the classic MVS version of the server (also known as the SSCTL server). There are feweruser ID requirements for installing and operating the PDS-deployed server than the HFS-deployed version, and security management has been simplified.
Q: Does this replace the older MVS server (also known as SSCTL)?
A: The z/OS server with PDS deployment is a migration path from the older MVS server.
Q: Can one refresh a server's installation software that had been deployed one way withsoftware using other type of deployment?
A: No. Each deployment type is independent of the other with regards to installation.
Q: Can both deployments of the server coexist on one z/OS system?
A: Yes, if your license agreement allows for this.
Q: Can one configure two server instances of the same server, one instance an HFS/USSdeployment, and the other a PDS deployment?
A: No. Although the media and installation are unified, once the base server software isinstalled, the two deployment types run separately.
As with the HFS/USS deployment, the PDS deployment can have many instances running fromthe same EDAHOME set of libraries.
4. Installation for z/OS
Server Installation 279

Q: Can I monitor server startup by checking the MVS SYSLOG?
A: Yes.
The following messages are written to the SYSLOG when
The server starts successfully:
(EDA13023) ALL INITIAL SERVERS STARTED
The Server does not start:
(EDA13171) UNABLE TO START IWAY SERVER
Q: What, if anything, does the PDS deployment not support? In what installationimplementation?
A: The PDS deployment of the server currently does not support the following functions:
The Web Console Run Stress option.
Displaying server logs and traces in the Web Console.
Formats XLSX and PPTX.
Note: As a workaround, you can issue the SET EXCELSERVEURL command to point toanother reporting server that supports these formats.
Adobe Flex.
RACF TEMPDSN class—Supported except for FOCCACHE application datasets.
Third-Party Software and Licenses
As of Version 7 Release 6.8, to address display of third-party software license requirements, alicense option has been added to the Help menu located on the Web Console. This sectiondescribes the third-party software and includes references to the full licenses included in Information Builders and Third-Party Licenses on page 357.
OpenFlex SDK
OpenFlex SDK is included by Information Builders for use with its HOLD FORMAT FLEX feature.This distribution is subject to the terms and conditions of the Mozilla Public License Version1.1.
For more information, see Zip Archiver License on page 373 or visit our website http://www.informationbuilders.com.
PDS Deployment
280 Information Builders

Troubleshooting for PDS
If you have a problem and cannot resolve it yourself, contact Customer Support Services asdescribed in Information You Should Have on page 13 and Customer Support on page 13. Inaddition, supply the following information to Customer Support Services:
Server trace (see How to Generate a Server Trace on page 281).
JCL for IRUNJCL.
Job output.
System dump, if needed (see How to Generate a System Dump on page 282).
Any additional information regarding how the problem occurred.
If you have a troubleshooting suggestion and you think others will find it helpful, we invite youto send it to us, as described in How to Add Your Problem to the Troubleshooting Guide on page288. We will consider including your problem in a future release of this manual.
Reference: Problem: The Server Abends With a U4039 Code
Problem: The server abends with a U4039 code.
Cause: This is a generic abend.
Solution: Find out what caused the abend by checking the edaprint.log file, SYSOUT ddname,and the MVS system log.
Procedure: How to Generate a Server Trace
To generate a server trace:
1. Turn tracing on by doing one of the following:
Going to the Web Console menu bar, selecting Workspace, and then Enable Traces.
Starting the server by running the ITRCON JCL member.
On the MVS Console or SDSF, issue the following operator MODIFY command
F jobname , -traceon
where jobname is the job under which the server is running.
2. Reproduce the problem.
3. Submit the ISAVEDIA member to produce additional diagnostic information.
4. Send the server JES log, and the ISAVEDIA JES log, to Customer Support Services.
4. Installation for z/OS
Server Installation 281

Procedure: How to Generate a System Dump
To generate a system dump:
1. Allocate DDNAME SYSMDUMP pointing to the data set with the following DCB parameters:
RECFM=FB,LRECL=4160,BLKSIZE=4160.
2. To get the first dump, add the parameter FREE=CLOSE to your DD statement. The DDstatement should appear as follows:
//SYSMDUMP DD DISP=SHR,DSN=MYID.EDAPTH.SYSMDUMP,FREE=CLOSE
3. To get the last dump, the statement should appear as follows:
//SYSMDUMP DD DISP=SHR,DSN=MYID.EDAPTH.SYSMDUMP
Only two IDs must have privileges to write into this data set: ISERVER and IADMIN.General server users DO NOT need read or write access to the SYSMDUMP data set.
4. To prevent abendaid from intercepting the dump, add:
//ABNLIGNR DD DUMMY
5. To prevent Language Environment from intercepting the dump, specify:
EDADUMPOPT=UAIMM in EDAENV DD
This enables you to get more accurate information reflecting the moment the abendactually occurs.
6. Save the entire job output for the server (including JES logs), and send it to CustomerSupport Services.
Instead of using JCL allocations to add SYSMDUMP, the procedure described below can beused alternatively.
Procedure: How to Add JCL Allocations to a Running Server
A z/OS operator can issue modify commands from the z/OS system console to allocateDDNAMES to the server without restarting it. This procedure is useful if you need to re-allocatea file that was freed to allow a batch overnight utility to run, or perhaps to add SYSMDUMPallocation to a running server.
Syntax: How to Allocate a Data set From the z/OS System Console
F <iway_server_jobname/started task>,DYNAM ALLOC FI <ddname> DA <dsname> <optional dynam parameters>
PDS Deployment
282 Information Builders
Example: Allocating a VSAM Data set
F IWAY2,DYNAM ALLOC F VSAMFILE DA VSAM.FILEA.CLUSTER SHR
Example: Allocating a SYSMDUMP Data set With FREE=CLOSE Option
F IWAY2,DYNAM ALLOC FILE SYSMDUMP DA PROD2.SYSMDUMP.DATA SHR CLOSE
Note: The examples above assume IWAY2 is the jobname/started task ID for the server.
All valid DYNAM ALLOC syntaxes are supported. For more information on DYNAM command,please refer to the Store Procedures Reference manual.
The following message will be issued in the server JESMSGLG indicating if the command wasprocessed successfully or not.
Success:
+DYNAM COMMAND SUCCESFULLY PROCESSED Rc=0
Failure:
+DYNAM ERROR: IKJ56225I DATA SET IWAY.TEST ALREADY IN USE, TRY LATER
Procedure: How to Free Data sets Allocated to the Server
A z/OS operator can issue modify commands from the z/OS system console to free DDNAMEsor DSNAMEs allocated to the server. Both global allocations (made at the server ISTART JCL)and local ones (DYNAM ALLOC commands issued by user tasks) can be freed. This procedureis useful if you need to free an allocation to run a batch utility overnight, without restarting theserver.
Syntax: How to Free a Data set From the MVS System Console
To free a single DDNAME:
F <iway_server_jobname/started task>,DYNAM FREE FI <ddname>
To free a single DSNAME (all occurrences in the server):
F <iway_server_jobname/started task>,DYNAM FREE DS <dsname>
To free multiple DDNAMEs, passing a pattern (free all DDNAMEs staring with AB):
F <iway_server_jobname/started task>,DYNAM FREE FI AB*
To free multiple DSNAMEs (all occurrences in the server), passing a pattern (free allallocations of data sets starting with IWAY.VSAM):
4. Installation for z/OS
Server Installation 283

F <iway_server_jobname/started task>,DYNAM FREE DA IWAY.VSAM*
A message will be issued in the iway_server JESMSGLG indicating if the command wasprocess successfully or not, as follows.
Success:
+DYNAM COMMAND SUCCESFULLY PROCESSED Rc=0
Failure:
+DYNAM ERROR: IKJ56225I DATA SET IWAY.TEST ALREADY IN USE, TRY LATER
Example: Freeing an Allocated Data Set
Suppose ISTART JCL (jobname IWAY2) has the following allocation:
//VSAMFILE DD DISP=SHR,DSN=VSAM.FILEA.CLUSTER
The operator can free this file using the command (from MVS console):
F IWAY2,DYNAM FREE FI VSAMFILE
Procedure: How to Initialize the RDAAPP Application
RDAAPP is an interactive client test application that facilitates the execution of SQLstatements and stored procedures on the Unified server. During the installation process, JCLand REXX routines are created in the installation data set as members IRDAAPPJ andIRDAAPPC respectively.
The following installation data set is used for HFS deployment.
qualify.product_type.DATA
where:
product_type
Is determined by your license key.
The following installation data set is used for PDS deployment.
qualify.PDS.product_type.DATA
where:
product_type
Is determined by your license key.
PDS Deployment
284 Information Builders

Note: The RDAAPP application is not intended for use as a production tool.
1. To use the IRDAAPPJ JCL, you must first edit the member IRDAAPPJ and add your requestdetails.
a. To edit the member IRDAAPPJ, change the following field,
//STDIN DD * Put your request here//
to
//STDIN DD * <enter blank line><enter userid><enter password>LOOPBACK<enter request><enter optional parameters>QQ//
4. Installation for z/OS
Server Installation 285

b. Complete the panel as follows.
Field Instructions
<enter userid> Enter a valid user ID or blank line if the userid of theuser who submitted the job is to be used for a trustedconnection.
<enter password> Enter the password for the above userid or a blank line ifthe userid/password of the user who submitted the jobis to be used for a trusted connection.
LOOPBACK Match a node name in the EDACS3 allocation in theIRDAAPPJ JCL. Default is LOOPBACK.
<enter request> Enter one of the following values:
S To enter an SQL SELECT statement. Type thestatement after you enter the value S (see thefollowing example).
P To enter an SQL PREPARE statement. Type thestatement after you enter the value P.
D To execute a prepared statement by supplying theID. Type the ID after you enter the value E.
Q To quit.
? For this list of commands.
<enter optional parameters>
Depending on the above command, you may beprompted for:
Select engine (0/ENTER - EDA, 1 - DB2, 2 - TERADATA,and so on).
Reclimit (Hit Enter for all records).
Readlimit (Hit Enter for all records).
Q Quit RDAAPP (It is needed twice).
c. Once you have made the above edits, submit the JCL for execution.
PDS Deployment
286 Information Builders

2. Type the following command at the TSO ready prompt to use the IRDAAPPC REXX routine:
EX 'qualif.product_type.DATA(IRDAAPPC)'
or
EX 'qualif.PDS.product_type.DATA(IRDAAPPC)'
where:
product_type
Is determined by your license key.
3. After the prompts, enter the same information as specified in the above table.
Example: IRDAAPPC REXX Execution
The following is the screen output from a sample execution of the IRDAAPPC REXX routine:
********************************************************************** RDAAPP Client test tool **********************************************************************
<<< RDAAPP : Initializing EDA/API SQL, Version 7, Release 7 >>>
Default communications config file : //DD:EDACS3 Override? (Press enter for default) : <enter blank line>
<<< Initialization Successful >>>
Enter User Name : <enteruserid or leave blank for current TSO userid> Enter Password : <enter password or leave blank for currentTSO userid password> Enter server name, number, SELF, URL or ? (Hit return for 'LOOPBACK') :
<<< Successfully connected to synchronous server LOOPBACK >>>
Enter Command (? for command help): SSELECT COUNTRY FROM CAR; Select engine (0/ENTER - EDA, 1 - DB2, 2 - TERADATA, etc) :Reclimit (Hit enter for all records):Readlimit (Hit enter for all records):
Please Wait...
ENGLANDFRANCEITALYJAPANW GERMANY
4. Installation for z/OS
Server Installation 287

<<< 5 record(s) processed. (scb count 5) wait=4 secs, retrieval=0 secs>>>
<<< 5 record(s) processed. (scb count 5)>>>
Q
Enter Connect or Quit:
Q
<<< RDAAPP : Exiting... >>>
***
Enter Command (? for command help):
Procedure: How to Add Your Problem to the Troubleshooting Guide
If you have troubleshooting suggestions that you think others will find helpful, we invite you tosend them to us so that we can consider including them in a future release. You can:
Email them to [email protected]. Include your name and phone number, and includeServer Installation Troubleshooting in the subject line.
Send them to:
Technical Content ManagementInformation BuildersTwo Penn PlazaNew York, NY 10121-2898
Please include your name, phone number, email address, and postal address.
PDS Deployment
288 Information Builders

Chapter5Installation for IBM i
This chapter describes the requirements and procedures for installing on IBM i.
Note. This manual uses the term IBM i generically to refer to all OS/400, i5/OS, andIBM i releases.
In this chapter:
Information You Need Prior toInstallation on IBM i
IBM i Installation Requirements
Installation and Configuration Directorieson IBM i
Creating User IDs on IBM i
Downloading the Server InstallationSoftware for IBM i
Copying the Installation Library FromDVD
Running ISETUP to Install the ServerSoftware
Verifying the IBM i Server Installation
Security Providers on IBM i
Starting and Using the IBM i Server
CL and CMD Programs
General Information for an IBM iInstallation
Generating a Trace on IBM i
Third-Party Software and Licenses onIBM i
Troubleshooting for IBM i
Information You Need Prior to Installation on IBM i
You need to know your license key. These keys are for a specific number of CPUs. If morecores are detected than the license allows, the installation will be blocked.
The remedy for a core blocked installation is to obtain and use a correct license or use amachine with the correct core count (which may be a real or a virtualized environment).
Some features use additional license codes that are not specified during the installation.
You need to know your SMTP mail server information, if you will use any of the server emailnotification features.
Server Installation 289

You need a server administrator user ID, referred to as iadmin in the remainder of thischapter.
The operating system ID you use when installing the server owns the server files and is thedefault server administrator for OPSYS mode. You can create a new operating system ID torun and own the server files, or use any ordinary (non-superuser) ID. However, you shouldnot install the server as root. The server administrator ID should have a Korn, Bourne, orBash shell as the default logon shell.
In addition to the iadmin ID, you have the option of creating a an iserver user ID that isQSECOFR for internal use by the server to proxy the authority of QSECOFR. The ID can bean account never used for logging in. You might wish to create an iserver ID if, for example,you do not want certain server processes to appear as owned by QSECOFR.
For specific information on creating IDs, see Creating User IDs on IBM i on page 298.
IBM i Installation Requirements
Before you install, review the following requirements.
Type Description
Operating System IBM i V7R1 or higher
The Information Builders Technical Support website maintains acurrent list of supported operating systems and levels.
Disk Space
(Do not install toiASP basedlocations)
Space for installation
Space after installation
Approximately 2 G
Approximately 1 G
IBM i Installation Requirements
290 Information Builders

Type Description
IP Ports Up to six consecutive IP ports (two in reserve for typical extrafeatures).
The supplied IP port numbers must be above the IANA registered well-known reserve range (numbers under 1024) and not over themaximum legal number (65535). Additionally, do not use IP portnumbers already being used by other applications or products.Netstat, or netstat like commands, should reveal what actual portsare in use.
Additional Java Listeners (post-install option) require additional ports(beyond basic reserve).
Memory Memory and shared memory usage depend on the followingelements:
Number of data access agents.
Type of access that is performed, such as joins and largeretrieval.
Connection queue.
Actual memory usage differs between applications and the serverload.
Java Java JRE or Java SDK (also known as JDK) 1.7 or higher
Needed if JVM-based adapters, server-side graphics, XBRL, or user-written CALLJAVA applications are to be used. For additionalinformation, see JVM Requirements for Java Services on page 292.
5. Installation for IBM i
Server Installation 291

Type Description
Web Browser Needed for using the Web Console.
Microsoft Internet Explorer® 9 or higher.
Microsoft Edge
Mozilla Firefox® 27 or higher.
Google Chrome® 33 or higher.
Apple Safari® 7.0 or higher.
Apple Mobile iOS® v5
Opera 19 or higher.
Shell The IBM i - QShell Interpreter (IBM i Installation Option 30) must beinstalled to use the product. The QShell Interpreter is a free optionalfeature of IBM i. The easiest way to check if this feature is installedis to enter QSH on the IBM i command line. If it is installed, a UNIX-like environment starts (F3 to exit). If it is not installed, you receive aCommand QSH in library *LIBL not found message. If it is notinstalled, install it before proceeding.
JVM Requirements for Java Services
If Java-based adapters, server-side graphics, XBRL, or user-written CALLJAVA applications areto be used, a Java Runtime Environment (JRE) JVM must be installed on the machine, and theserver must be configured to use it.
The minimum Java JVM release level is 1.7 or higher, due to required internal components ofthe server. The Java Listener will not start properly (and will show errors in edaprint) if 1.7 (orhigher) is not in use.
The following URL has Java EOL and EOSL information:
http://www.oracle.com/technetwork/java/eol-135779.html
ON IBM i5, Java is a system installed option and there is no differentiation between JRE andSDK, but the build version in uses must also match the 32-bit or 64-bit bit type of the server.
IBM i Installation Requirements
292 Information Builders

By default, the server uses the system default Java level and directories. If JVM is found withthe correct bit size and level (1.7+), the Java Listener will start and send the start message toedaprint, in which case no further configuration is needed. If 1.7 is not the default, thenexplicit set up variable must be configured.
If JVM loading fails, the server will start, but not the Java Listener. This should be corrected.The default IBM i Java level may be set at a system level, however, changing this may affectother processes, so control is best done at the server level. For V7R1 (or higher), this is doneby setting the following in the server environment file, edaenv.cfg,
JAVA_HOME=/QOpenSys/QIBM/ProdData/JavaVM/jdk70/32bit
The location of the default JVM on IBM i is controlled by the object QSYS/QJVAJNI. This isnormally on the system path, so you do not need to do anything to fulfill basic JVM findrequirements. However, if the default JVM level of the machine is not 1.7 or higher, correctiveaction may be required to access the correct JVM level.
If the default JVM is not found or is set to an appropriate release at server start time, a Failedto find JVM message will be displayed. Further Java Services debugging information aboutloading the JVM will be written to the server start log, indicating JSCOM3 start failed, as well asadditional information that may be useful in resolving the problem. JSCOM3 is the actualprocess name for the Java Services Listener, and the terms are often used interchangeably.
The easiest way to determine the current default for the server iadmin ID is to issue thecommand QSH CMD('java -version'), which will display the default release level for the ID.
There are several choices on how to address using the correct JVM level, but as of V7R1, thesteps no longer vary by operating system.
Change the Java (5761-JV1) install options to point at the desired JVM level as a machinedefault. This may or may not be desirable based on other applications that may be usingJava.
Set JAVA_HOME to point at a desired JVM release level.
The various Java releases and PTF releases that may be available will be found in the /QOpenSys/QIBM/ProdData/JavaVM folder. For example:
/QOpenSys/QIBM/ProdData/JavaVM/jdk14/64bit /QOpenSys/QIBM/ProdData/JavaVM/jdk50/32bit /QOpenSys/QIBM/ProdData/JavaVM/jdk50/64bit /QOpenSys/QIBM/ProdData/JavaVM/jdk60/32bit /QOpenSys/QIBM/ProdData/JavaVM/jdk60/64bit /QOpenSys/QIBM/ProdData/JavaVM/jdk70/32bit /QOpenSys/QIBM/ProdData/JavaVM/jdk70/64bit
To use the JVM from one of these releases, specifically for the server iadmin ID (if it is notalready the system default), set the JAVA_HOME variable to point at a 32bit JDK. For example:
5. Installation for IBM i
Server Installation 293

JAVA_HOME=/QOpenSys/QIBM/ProdData/JavaVM/jdk70/32bit
The variable may be set in any of the following ways:
As a system variable set from the profile of the server iadmin ID, using INLPGM exit, aJOBD RQSDTA() CL option, or any number of other methods for setting system variableswithin the environment of a job.
As an exported QSH variable in any script that is used to call the edastart script.
As a system variable in any customized CL that is used to call the QSH IFS edastart script,or as an export variable within the QSH portion of the CL.
Add to the edaenv.cfg environment configuration file of the server.
Use of the -Djava property on V7R1 and higher is not an option, and if it was used previouslyunder V6R1, and the machine is upgraded to V7R1, the Java release must be configured usingV7R1 methods (described above).
To change or add operating system environment variables, set and export the variable ina .profile, script, or CL that always gets called during a server start. It is very common to placevariables in the server edastart script, but it is recommended that they be placed in a scriptthat in turn calls edastart (so that the edastart script remains vanilla).
To change or add a variable in a server environment start up file (EDACONF bin\edaenv.cfg),either edit the file in a text editor before starting the server or:
1. Start the server (services like Java Listener may fail until configured and the server isrestarted).
2. Open the Web Console and log on using an administrator ID.
3. Select Workspace from the main menu.
4. In the navigation pane, open the Configuration Files and Miscellaneous folders.
5. Right-click Environment - edaenv.cfg and select Edit.
6. Make the desired edit.
7. Save the file.
8. Restart (changes are not effective until restart).
The format of edaenv.cfg variables is one per line in name=value pairs. Spaces before andafter the equal sign are optional. Values with embedded spaces do not require quoting.Variables are always uppercase.
IBM i Installation Requirements
294 Information Builders

To add classes to the JVM class path for customer-written CALLJAVA applications, set andexport the CLASSPATH variable to the operating system level before server start-up or use theWeb Console to set the Java Listener IBI_CLASSPATH property by using the Web Console toaccess the Java Listener:
1. Select Workspace from menu bar.
2. Open the Java Services folder.
3. Right-click DEFAULT and select Properties.
The Java Services Configuration pane opens.
4. Expand the Class Path section.
5. Add the desired full path jar names (one per line).
6. Click Save and Restart Java Services.
If JVM-based adapters or features are not required, and the JVM environment is not configured,the message Failed to find JVM is normal and can be ignored.
Installation and Configuration Directories on IBM i
The installation process creates these high-level directories. The locations documented oftenuse 77 in the location names or when discussing the release level, however, this value mayvary for your particular installation and reference an alternate level such as 82.
Name EnvironmentVariable
Description Default Path
Homedirectory
EDAHOME Stores the serversoftware programs andother files
ibi/srv77/home
Must conform to thefollowing pattern
*/ibi/srv77*/home*
Home library This installation librarycontains the actualserver programs thatappear in the homedirectory as symboliclinks.
The default library nameis SRV77, but you canspecify any valid libraryname.
5. Installation for IBM i
Server Installation 295

Name EnvironmentVariable
Description Default Path
Configurationdirectory
EDACONF Stores the configurationfiles.
If you are configuringmultiple instances of theserver, create separateconfiguration directoriesfor each by adding asuffix (for example, anumber) to the end of thedirectory name.
ibi/srv77/product_type
Must conform to thefollowing pattern.
*/ibi/srv77*/product_type*
Product type can be:
WFS for aWebFOCUSReporting Server
FFS for a FullFunction Server
DM for aDataMigrator Server
WFM for aWebFOCUS MaintainServer
Installation and Configuration Directories on IBM i
296 Information Builders

Name EnvironmentVariable
Description Default Path
Applicationdirectory
APPROOT Contains your applicationfiles.
Security for applicationdirectories is handled atthe operating systemlevel. To avoid anypossibility of thesedirectories beingaccessed inappropriatelyby means of APPcommands (such as APPDELETE AppDirName),use directory security toset the appropriatepermissions on thesedirectories.
ibi/apps
Profilesdirectory
EDAPRFU Stores the user andgroup profiles and theadmin.cfg file (whichspecifies the serveradministrator).
ibi/profiles
Multiple WebFOCUS Reporting Servers. If you plan to install multiple copies of WebFOCUS onthe same computer, and you want to provide each copy with its own WebFOCUS ReportingServer, you may wish to maintain a separate ibi root directory for each copy, so that you cankeep copies of each set of components, including the server, together in the same path.
You can specify a separate apps directory for each copy of WebFOCUS, or specify a singleapps directory to be shared by all copies of WebFOCUS.
5. Installation for IBM i
Server Installation 297

Creating User IDs on IBM i
Server administrator ID (iadmin)
The installation of a server requires an ID to install and own the files as well as to administerthe server; this is also known as the iadmin ID. The iadmin ID should:
Not be QSECOFR, not have a group of QSECOFR, and not have other special authorities.
Have authority to use RSTLIB for the duration of the installation process.
Have a message queue delivery of *NOTIFY if this is not the default for the system.
Have a writable explicit CURLIB (not *CRTDFT QGPL). We recommend a library that is thesame name as the user ID (for example, CRTLIB IADMIN). However, if the DB2 interface isbeing used in SQL mode (vs. CLI) then the library should be created as a DB2 Collection(for example, STRTSQL -> CREATE COLLECTION IADMIN) so DB2 Journaling is active for theserver. Alternately, Journaling for DB2 may be redirected (instead of creating a specificcollection) by creating a QDFTJRN Data Area entry in the CURLIB with:
CRTDTAARA DTAARA(IADMIN/QDFTJRN) TYPE(*CHAR) LEN(25) VALUE('IADMIN QSQJRN *FILE')
The CRTDTAARA VALUE parm must be padded to the sizing shown (10 10 5). If not, Journalredirection will not work.
Note: As of Release 7.6.3, requiring an explicit CURLIB is a requirement. Sites with priorinstallations must update the server admin ID to have a CURLIB if it did not (for example,CHGPRF CURLIB(IADMIN)). Otherwise, the installation process will fail. The easiest way tocheck if an ID has a CURLIB is to do a DSPLIBL and look for a library entry with type ofCUR. Information Builders does not recommend CURLIB library names matching thesoftware install library (for example, SRV77) as this allows the software library to possiblyget corrupted with files from daily activities. It also creates a high possibility of accidentaloverwrites/deletions of important software.
The server administrator ID should only have basic IBM i libraries and no System/36compatibility libraries.
The server administrator ID should have a user profile sort sequence default for SRTSEQ()of *HEX, either explicitly or because *SYSVAL system default resolves to *HEX.
Have a HOMEDIR other than the IBM i default of "/" and the directory should exist, forexample, /home/iadmin.
Creating User IDs on IBM i
298 Information Builders

The server administrator ID (at the operating system level) must be configured for codepage 37 (EBCDIC 8-bit West European) or a code page that is compatible with 37 in orderfor the server to work properly. Code Page 65535 (raw data mode) is not acceptable. Afterinstallation, the server itself (using the Web Console) may be configured for a particularcode page configuration (and language).
To determine if the code page you use is compatible with code page 37, check if thesquare brackets ( [ ] ) in your code page are in the same position as on code page 37.
If square brackets are in the same position, your code page is compatible with 37. Youdo not need to do anything else.
If square brackets are not in the same position, change the code page that is specifiedin the IBM i iadmin profile to 37 (or to a code page compatible with 37). Then log iadminoff the system, and log it on again to install.
You can find IBM code page descriptions at:
http://www.ibm.com/servers/eserver/iseries/software/globalization/codepages.html
This documentation refers to the server administrator ID, which you use to install andadminister the server, as the iadmin ID, but you can name it anything you want. If you name itsomething other than iadmin, you will need to create a second ID, literally named iadmin, forthe DVD library to properly unload. If you do not use this literal iadmin ID to install and own thefiles, you can remove it after installation.
While logged on as QSECOFR, create the server administrator ID and home directory using thefollowing sample code:
CRTUSRPRF USRPRF(IADMIN) PASSWORD(MYPASS) HOMEDIR('/home/iadmin')CCSID(37) TEXT('Server Administrator ID') DLVRY(*NOTIFY)QSH CMD('mkdir /home/iadmin')QSH CMD('chmod 755 /home/iadmin')QSH CMD('chown iadmin /home/iadmin')
Running the server in secured mode also requires that particular files have their ownershipchanged to QSECOFR (this step is done after installation).
User IDs
End users of the server will also require an ID and password created/configured for theSecurity Provider modes a server is using. For the OPSYS Security Provider mode, no specialauthorities or setup parameters are needed for the IDs.
To keep the server secure, you should make the iadmin ID available only to users that requireserver administrative privileges.
5. Installation for IBM i
Server Installation 299

Server system ID (iserver)
You have the option of creating a user ID that is QSECOFR for internal use by the server toproxy the authority of QSECOFR. We call this the Server system ID (iserver). The ID can be anaccount that is never used for logging in. You might wish to create an iserver ID if, for example,you do not want certain server processes to appear as owned by QSECOFR.
To create iserver, issue the following command
CRTUSRPRF USRPRF(id) PASSWORD(*NONE) USRCLS(*SECADM)TEXT('Server System Security ID') SPCAUT(*SECADM *ALLOBJ *JOBCTL)
where:
id
Is the name of the actual iserver ID.
Downloading the Server Installation Software for IBM i
Downloading the installation software from the Information Builders download site is theprimary way of obtaining Information Builders software in an archive format, which is thenunarchived and installed by running an installer program. The user may, in turn, choose todownload the software, unarchive, and burn to a CD/DVD. This document assumes thesoftware has been downloaded directly to the installation machine and is up to the user toadjust their steps within this manual if installing in an alternate manner.
Procedure: How to Download the Installation Software
To download the installation software:
1. Go to http://techsupport.informationbuilders.com.
The Information Builders Technical Support home page opens.
2. Go to My Account and sign in.
3. Click My Downloads and Shipments in the My Account section on the right side of thepage.
The Software Downloads/Shipments page opens.
4. Click the Download link for your product and release.
5. Fill in the registration form and then click Continue.
The Software Download Agreement page opens.
6. Select I agree to consent to the Download Agreement, and then click Continue.
The Download Instructions page opens.
Downloading the Server Installation Software for IBM i
300 Information Builders

A copy of the instructions is also automatically emailed to you for later reference.
7. Follow the instructions on the Download Page. These are also documented in How toDownload and Expand the Downloaded Archive on page 301.
Some Linux platforms also support RPM-formatted archives for download and installation,and will have a .rpm file in the download location as well as the RPM Public Key file (forsignature verification).
If a .rpm is present in the download location, you may chose the format you want todownload and use. Use of the .rpm will cause a verification warning unless the public keyis imported to rpm. The public key is the file ibi-gpg-publickey-for-one-time-rpm-import.txt,which will also be in the download directory (use the rpm --import file command to importit).
Procedure: How to Download and Expand the Downloaded Archive
The download directory will contain .savf, .pdf, and a read me.
1. After registering at the Information Builders download site and obtaining download siteinformation, an ID, password, and software location information, ftp to the site (GUI FTPtools may also be used, but line mode FTP is what is documented here).
For example:
ftp downloadftp.ibi.com(supply the user id and password information from web page)
2. Navigate to the directory on the Information Builders site that contains the serverinstallation software.
For example:
cd "/Server/77/OS400_V7R1_and_up_iSeries/7707/793"
3. Download the installation software from the site using binary mode.
For example:
binarysyscmd crtsavf file(*curlib/download)get i7707_793.savf download (replacequit
4. Using QSECOFR ID, restore the library with
RSTLIB SAVLIB(R727707BTP) DEV(*SAVF) SAVF(*CURLIB/DOWNLOAD) MBROPT(*ALL) ALWOBJDIF(*ALL) RSTLIB(DOWNLOAD)
5. Run the isetup installation procedure, as described in Running ISETUP to Install the ServerSoftware on page 303.
5. Installation for IBM i
Server Installation 301

You can delete the download directory after the installation is complete.
Copying the Installation Library From DVD
1. Log on as a QSECOFR authorized ID. The ID must have ALLOBJ authority and RSTLIBauthority.
2. Place the media in the drive.
3. Restore the installation library from the DVD to disk by issuing the command
RSTLIB SAVLIB(InnnLIB) DEV(device) MBROPT(*ALL) ALWOBJDIF(*ALL) RSTLIB(instLibName)
where:
nnn
Is the software version and release number (for example, 777).
device
Is the device name. To view available devices, issue the command:
WRKCFGSTS CFGTYPE(*DEV) CFGD(*OPT)
RSTLIB(instLibName)
Is required if you will be using the product with a code page that is incompatible withcode page 37, EBCDIC 8-bit West European. For example, this is required if you will beusing the server with Japanese or another double-byte character set. Otherwise, this isoptional but recommended. Be sure to use either a clean restore library or theALWOBJDIF(*ALL) option to ensure overwriting any prior files.
instLibName is the name you assign to the library to which you are restoring thecontents of the DVD. It can be any valid library name. The library should either notexist prior or be empty of files (CFG and SRV* in-particular). If you do not specifyRSTLIB(instLibName), the restored installation library name defaults to the originalsave name.
Note that in examples later in the installation process we will show this as I777LIB,but you should always enter the actual name that you specified here.
Copying the Installation Library From DVD
302 Information Builders

4. If you are not using the real iadmin as the iadmin ID to own the files and manage theserver, issue (as QSECOFR)
CHGOBJOWN OBJ(instLibName/INU) OBJTYPE(*PGM) NEWOWN(QSECOFR)
where:
instLibName
Is the name of the installation library that you restored from DVD in Step 3.
5. Log off the QSECOFR user ID and proceed to Running ISETUP to Install the Server Softwareon page 303.
After you complete the installation, you can delete the installation library.
Running ISETUP to Install the Server Software
You can install the server software by running isetup interactively and responding to prompts orby creating a file containing the answers to the prompts and running isetup against that file.The method using a file is called a silent install.
Procedure: How to Run ISETUP Interactively
1. Sign in using the iadmin user ID.
2. On the IBM i command line, call the installation procedure. For example, for downloadedsoftware, do the following.
CALL instLibName/ISETUP
where:
instLibName
Is the name of the installation library that you downloaded, or restored from DVD, in Downloading the Server Installation Software for IBM i on page 300. The default nameis I77LIB.
5. Installation for IBM i
Server Installation 303

The following isetup screen displays.
-------------------------------------------------------------------------- Welcome to the Product Set Up Facility Please respond to the prompts or enter Q to quit at any prompt.--------------------------------------------------------------------------Select an option: 1. Install and Configure 2. Add Additional Configuration Instance 3. Refresh Installation (Reinstall, Keep Configurations) 4. Install Debuggables to the Installation Directory 5. View Installation NotesEnter a selection (Default=1) :
3. Enter 1 for the Install and Configure option.
You are prompted for the location of the installation file.
4. Enter the name of the installation library that you downloaded, or restored from DVD, orpress Enter to accept the default. The default name is I77LIB.
You are prompted for your license key.
Enter your License Key (Current number of CPUs = n)(Format 999-999-9999-99) : xxx-xxx-xxxx-xx
5. Enter your license key.
Your license attributes are displayed, and the license key is confirmed. Certain licensekeys will issue a warning that the actual CPU quantity is over the licensed amount. In thatcase, the software needs to be run using OS commands that limit CPU use.
You are prompted for the ID of the server administrator for the internal server securityprovider.
Enter credentials for the server's internal securityprovider (PTH), the server's default start up mode.Enter the Server Administrator ID(Default=srvadmin) :
The server automatically starts with this security provider. You can add other securityproviders using the server Web Console after installation. For information, see the ServerAdministration manual.
6. Enter the server administrator ID or accept the default.
You are prompted for the server administrator password. There is no default.
Enter the Administrator Password :
Running ISETUP to Install the Server Software
304 Information Builders

7. Type the password of the account you are using to install the software.
The password, which does not display, is stored in encrypted form.
You are now shown the default values of the server environment variables and portnumber, and given an opportunity to change them. For example:
Please review the default settings.EDAHOME = /prog3/iadmin/ibi/srv77/homeEDACONF = /prog3/iadmin/ibi/srv77/wfs (*EXISTS, owner iadmin *)EDAPRFU = /prog3/iadmin/profilesAPPROOT = /prog3/iadmin/ibi/appsHOMEAPPS = /prog3/iadmin/ibi/homeappsHTTP_BASE_PORT = 8121WARNING: Directories marked as existing will be deleted and recreated!If you are satisfied with the default settings you may proceed tofinal confirmation else you will be prompted for individual values.Proceed with defaults? (Y/N Default=Y) : y
If any of the prompted locations (such as EDAHOME) exist, they will be marked with"(*EXISTS*)" on the display line. This gives you the opportunity to change a location if youdo not want to overwrite it by changing the default values.
When specifying a location, note these requirements:
The EDAHOME directory path name directory path name must conform to the pattern*ibi/srv77*/home* and must be an absolute path.
If you changed the EDAHOME value, the default EDACONF and EDAHOMELIB valueschange to conform to EDAHOME.
EDACONF must be in the same srv77 path as EDAHOME. The lowest-level EDAHOMEdirectory (home) becomes the product type directory in EDACONF.
For example, if EDAHOME is
iadmin/ibi/srv77/home
then EDACONF for a WebFOCUS Reporting Server defaults to:
iadmin/ibi/srv77/wfs
If you are configuring an additional server instance, be sure to specify a newconfiguration directory here; do not use an existing directory. Each instance must haveits own configuration directory. You can append characters to the name of theproduct_type directory to avoid overwriting the existing directory. For example:
iadmin/ibi/srv77/wfs2
8. If you want to accept the default values, type Y and skip to Step 10. Otherwise, changeany properties that you wish.
5. Installation for IBM i
Server Installation 305

For information about the EDAHOME, EDACONF, EDAPRFU, and APPROOT environmentvariables you can set, see Installation and Configuration Directories on IBM i on page 295.
The other properties you can set are described in the following table.
Parameter Description
HTTP_BASE_PORT First of three consecutive port numbers for the HTTPListener and other IP-based services.
The default port automatically varies by product tosupport multiple servers on a particular computer. For:
A Full-Function Server, 8101 is the default value,which reserves ports 8101-8103.
A WebFOCUS Reporting Server, 8121 is the defaultvalue, which reserves ports 8121-8123.
A DataMigrator Server, 8117 is the default value,which reserves ports 8117-8119.
A Shared Application Server (for WebFOCUSMaintain), 8113 is the default, which reserves ports8113-8115.
TCP_BASE_PORT Port number on which the server TCP Listener listens. Itmust be outside the range of the three consecutiveHTTP Listener ports. It defaults to the port immediatelypreceding the first HTTP Listener port.
For example, if you accept the default HTTP ListenerPort value of 8101, the TCP Listener port defaults to8100.
SMTP_HOST SMTP Server node (host) name or TCP/IP number foroutbound email features. (Optional, only prompted for ifchanging directories and ports.)
SMTP_PORT SMTP Server port number for SMTP Server. The defaultvalue is 25. (Optional, only prompted for if changingdirectories and ports, and the SMTP Server host issupplied.)
Running ISETUP to Install the Server Software
306 Information Builders

Parameter Description
SENDER_EMAIL Default from address for users reading an email fromthe server if none was specified in the originatingapplication. (Optional, only prompted for if changingdirectories and ports, and the SMTP Server host issupplied.)
SERVER_ADMIN_EMAIL Server administrator email address to sendadministrative warnings to, such as an agent crash.(Optional, only prompted for if changing directories andports, and the SMTP Server host is supplied.)
If you decide to change a default, you are prompted for a replacement value each of theabove variables, and given another chance to accept the default. If the SMTP Server nodeis not supplied, the remaining SMTP and EMAIL prompts do not occur.
9. Review the configuration options displayed on the screen, and type Y if you accept them.Alternatively, to start over, enter N; to quit the installation procedure, enter Q.
Several progress messages display while the server is being installed. You are then askedif you want to start the server.
10. If a server installation, type Y to start the server or N to exit.
If you start the server, startup messages and the Web Console URL are now displayed.
You should now verify your installation, as described in Verifying the IBM i Server Installation onpage 307.
Verifying the IBM i Server Installation
To verify that you have successfully installed, use the configuration that is created by theinstallation. You can verify the installation by bringing up, checking, connecting to, testing,disconnecting from, and shutting down the server.
After verifying the installation, you can create any product tutorials you need and configureadapters.
Procedure: How to Verify Server Installation
1. Log on to your IBM i operating system with the iadmin user ID.
2. There are several methods to start a server and options that may be used. The followingmethod for starting a server (using the appropriate library name and TSCOM300 options)would be the most familiar to an IBM i Administrator:
5. Installation for IBM i
Server Installation 307

CALL SRV77/TSCOM300 PARM('-edaconf' '/home/iadmin/ibi/srv77/ffs' '-start')
Alternate startup methods and batch examples are noted below.
3. Check to ensure that the processes are up with -show:
CALL SRV77/TSCOM300 PARM('-edaconf' '/home/iadmin/ibi/srv77/ffs' '-show')
4. Start the Web Console by starting a browser pointed at the server HTTP Listener portspecified during installation. The URL format is http://host:port. (The URL is alsodisplayed at the end of the installation procedure.)
For example, if default ports were used during installation, use http://host:8101 for a Full-Function Server and http://host:8121 for a WebFOCUS Server.
5. If the server is running in a secure mode, you will first see a logon screen. Log on usingthe iadmin ID used during server configuration. For information about configuring theserver security, see Security Providers on IBM i on page 308
The Web Console home page opens. The Home Page is arranged in a menu-like context forthe various features it supports. Detailed use of the Web Console for configuration orgeneral operation of the server is available by clicking Help in the left navigation menu andin the Server Administration manual.
6. If the Web Console opens and displays application tree folders in the left pane, the serveris working because it uses its own underlying data access and reporting technologies tovisualize the application tree. The server may be further data tested (if desired).
7. When you are done using the server, you can stop it using the Web Console by clicking theStop option on the Web Console toolbar.
8. If you experience any problems, examine the IFS /home/iadmin/ibi/srv77/ffs/edaprint.logfile.
Security Providers on IBM i
The default security provider for a new installation is the internal security provider, PTH. ThePTH provider implements security using user IDs, passwords, and group memberships storedin the admin.cfg configuration file.
After the initial installation, the Server Administrator that was configured during the installationcan start the server and use the Web Console to further customize security settings, forexample, to configure alternate or additional security providers, create additional PTH IDs, andregister groups and users in a security role. For more information about security providers, seethe Server Security chapter in the Server Administration manual.
Security Providers on IBM i
308 Information Builders

Procedure: How to Satisfy Security Provider OPSYS Requirements
To run a server with security provider OPSYS in IBM i, you must satisfy the followingrequirements. You must do this once after installing and after each refreshing of the serverwith fixes.
Certain files must be owned and run under the QSECOFR profile or a QSECOFR-authorized ID(such as iserver) that allows impersonation for the OPSYS security mode. Running with securitymode OPSYS requires users to send a password to connect to the server, or to use someother form of verification. Although general installation of the server software is done by iadmin(an ordinary user ID), this step requires QSECOFR authority.
To change ownerships, do the following:
1. Log on as QSECOFR.
2. Using the library specified during the installation, change the file ownership by entering thefollowing commands, then restart the server and configure for OPSYS:
CHGPGM PGM(SRV77/TSCOM300) USRPRF(*OWNER)CHGOBJOWN OBJ(SRV77/TSCOM300) OBJTYPE(*PGM) NEWOWN(QSECOFR)
Review and register IDs and groups for various user roles as well as setup folder accesscontrol at the role or user level (right click role or user).
The CHGPGM and CHGOBJOWN steps will need to be repeated after any server upgrade sincethe tscom300.out file is replaced during upgrade and the attributes are lost.
Note: If this Security Provider OPSYS step has been done and the site later decides to switchto Security OFF, then special steps must be done to ensure the mode remains after a fullserver shutdown, where edastart -start is used to restart the server.
After the server recycles from the change to OFF, use the Web Console to open theenvironment configuration file of the server. Select Workspace, Configuration Files,Miscellaneous, and then select Environment -edaenv. Next, double-click to edit, add thevariable EDAEXTSEC=OFF, and then save.
After the next full server shutdown, be sure to do an edastart -cleardir before restarting theserver. This will clear any root owned files that would prevent a security OFF server fromstarting.
Preventing Unsecured Server Starts After Upgrades
If the explicit environment variable EDAEXTSEC is set to OPSYS (or ON) and the server cannotimpersonate users because it lacks platform-specific authorization steps, the server startaborts and error messages are written to the edaprint log.
5. Installation for IBM i
Server Installation 309

This feature prevents an unsecured server start after a software upgrade if any of the requiredpost-upgrade reauthorization steps are missed on a UNIX, IBM i, or z/OS HFS deployment. Thisis not applicable to other platforms. The setting may be placed in any normal server start-upshell or profile that a site is using or in the server edaenv.cfg configuration file. The messagesvary slightly by platform.
The edaprint messages are:
Configured security is 'ON' as set by EDAEXTSEC variable.
TSCOM300.PGM has no QSECOFR authority.
Workspace initialization aborted.
(EDA13171) UNABLE TO START SERVER
Starting and Using the IBM i Server
After configuring for secured mode (if desired), the server is started and managed using thesame server startup and Web Console startup steps used for validating the server (steps 1-6).
If the server has not been configured for adapters, now is an appropriate time to do so, usingthe Web Console and the Server Administration manual. For current information about whichadapters are supported:
1. Go to http://techsupport.informationbuilders.com.
The Information Builders Technical Support home page opens.
2. In the Quick Links section on the right side of the page, click Supported Systems/Adapters.
The Supported Systems and Adapters page opens.
3. Click the link for the server you want.
The Supported Systems and Adapters page for that release opens.
4. Click the link for your platform.
The support chart for that platform opens.
To ensure that the Web Console is accessible, the ID that starts the server must be iadmin(the ID that installed the server) and have a code page compatible with the one you specifiedduring installation in Running ISETUP to Install the Server Software on page 303. For moreinformation about code pages, see Creating User IDs on IBM i on page 298.
IBM i sites have the option of using QSH commands that run edastart or a CALL TSCOM300 tostart and manage a server. CALL TSCOM300 is described in General Information for an IBM iInstallation on page 315.
Starting and Using the IBM i Server
310 Information Builders

The following chart lists commonly used edastart options and functions (the parameters arethe same for CALL TSCOM300 usage).
Command and Option Function
edastart (No parameters) Starts the server with the line mode consoleto actively view the server log (edaprint). Also allowsdynamically issuing edastart options, such as show, traceon,traceoff, quit, and stop. Use your 5250 SysReq key and enter2 to receive the console command prompt to enter commands.
If you are using a PC and 5250 emulator software, see youremulator keyboard map for the equivalent key or use the Helpinstructions of your emulator on how to create mapping for theSysReq key.
edastart -start Starts the server in background. Only a short messageappears.
edastart -sstart n Starts the server, but waits n seconds for actual startup.
edastart -show Shows general status of server and agents.
edastart -stop Stops the server.
edastart -cleardir Removes all temporary directories (and their contents), as wellas log and other files created by the server (including thermlda*.log files, if active) in EDACONF. If Resource Manager isin use and you want to maintain the rmlda*.log data, backupthe rmlda*.log files before using this feature and restore themafterward.
edastart -quit Exits the server line mode console log (edaprint) and returns tothe operating system command prompt, but leaves the serverrunning.
edastart -console Re-enters the server line mode console log (edaprint).
5. Installation for IBM i
Server Installation 311
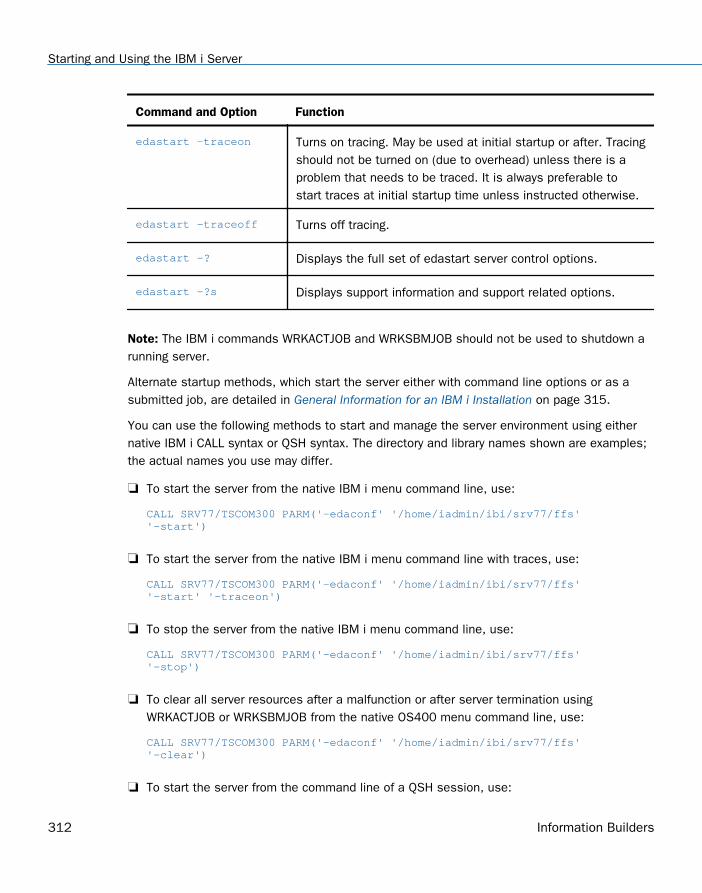
Command and Option Function
edastart -traceon Turns on tracing. May be used at initial startup or after. Tracingshould not be turned on (due to overhead) unless there is aproblem that needs to be traced. It is always preferable tostart traces at initial startup time unless instructed otherwise.
edastart -traceoff Turns off tracing.
edastart -? Displays the full set of edastart server control options.
edastart -?s Displays support information and support related options.
Note: The IBM i commands WRKACTJOB and WRKSBMJOB should not be used to shutdown arunning server.
Alternate startup methods, which start the server either with command line options or as asubmitted job, are detailed in General Information for an IBM i Installation on page 315.
You can use the following methods to start and manage the server environment using eithernative IBM i CALL syntax or QSH syntax. The directory and library names shown are examples;the actual names you use may differ.
To start the server from the native IBM i menu command line, use:
CALL SRV77/TSCOM300 PARM('-edaconf' '/home/iadmin/ibi/srv77/ffs' '-start')
To start the server from the native IBM i menu command line with traces, use:
CALL SRV77/TSCOM300 PARM('-edaconf' '/home/iadmin/ibi/srv77/ffs' '-start' '-traceon')
To stop the server from the native IBM i menu command line, use:
CALL SRV77/TSCOM300 PARM('-edaconf' '/home/iadmin/ibi/srv77/ffs' '-stop')
To clear all server resources after a malfunction or after server termination usingWRKACTJOB or WRKSBMJOB from the native OS400 menu command line, use:
CALL SRV77/TSCOM300 PARM('-edaconf' '/home/iadmin/ibi/srv77/ffs' '-clear')
To start the server from the command line of a QSH session, use:
Starting and Using the IBM i Server
312 Information Builders

QSH (starts QSH)/home/iadmin/ibi/srv77/ffs/bin/edastart -start
To stop the server from the command line of a QSH session, use:
QSH (starts QSH)/home/iadmin/ibi/srv77/ffs/bin/edastart -stop
To start the server as a QSH session, but from the IBM i command line, use:
QSH CMD('/home/iadmin/ibi/srv77/ffs/bin/edastart -start &')
To stop the server as a QSH session, but from the IBM i command line, use:
QSH CMD('/home/iadmin/ibi/srv77/ffs/bin/edastart -stop')
To start the server as a submitted QSH session on the IBM i command line with a codepage (Belgium), use:
SBMJOB CMD(QSH CMD('/home/iadmin/ibi/srv77/ffs/bin/edastart -start &'))JOB(MYJOB) LANGID(NLB) CNTRYID(BE) CCSID(500)
To start the server as a submitted job on the IBM i command line with a code page(Belgium) and specific job queue, use:
SBMJOB CMD(CALL SRV77/TSCOM300 PARM('-edaconf' '/home/iadmin/ibi/srv77/ffs'))JOB(MYJOB) LANGID(NLB) CNTRYID(BE) CCSID(500) JOBQ(MYQUEUE)
If the -start or -sstart option is:
Included in a submitted job, the full edaprint log is written to the edaprint.log file on disk,and standard short server start up messages are written to the job system spool file.
Omitted from a submitted job, the full edaprint log is written to the edaprint.log file ondisk, and the full edaprint log is written to the job system spool file.
You can view the spool file by means of WRKSBMJOB Option 8 (Work with spooled files) of thePGM-QZSHSH task (start using QSH shell scripts) or of the PGM-TSCOM300 task (start usingTSCOM300) task.
You can issue other combinations of standard server control parameters by replacing theoption in one of the examples above with another edastart option, such as -stop, -show, -traceon, and -traceoff.
5. Installation for IBM i
Server Installation 313

CL and CMD Programs
The process of installing will also create and compile CL and CMD sources so that serverfunctions, such as start, stop, show and tracing may be activated on the IBM i menu commandline. The start command starts the server as a batch job issued to a specified job queue, andis particularly useful for automatically starting a server at boot time or with minimal effort.
The CL and CMD sources are created in a configuration bin directory, then copied into QTEMPand compiled into the user CURLIB (for example, the IADMIN library). The core EDASTARTprogram is generic for any installation and is driven by the defaults within the command files. Ifyou want to have more than one configuration, use separate libraries or rename the programsto prevent overwriting.
Note: Releases prior to Version 7.6.3 allowed *CRTDFT QGPL as a CURLIB and, if soconfigured, the CL and CMD files would have been placed into QGPL. These QGPL copiesshould be deleted and, if there are any site-created CLs that use them, they should beadjusted for the new location.
The basic commands and functions are listed in the following table.
Command Function
ISTART edastart
ISTOP edastart -stop
ISHOW edastart -show
ISHOWLOG edastart -showlog
ITRCON edastart -traceon
ITRCOFF edastart -traceoff
ICLEAR edastart -clear
ICLRDIR edastart -cleardir
ISAVEDIA edastart -savediag
To use any of the commands, type the command at the IBM i menu command line. You mayalso point to other EDACONF directories using the IBM i F4 Prompt mode.
CL and CMD Programs
314 Information Builders

The CL and CMD script may be further customized, or the defaults may be changed, bymanually copying the desired file to a library and then changing and recompiling it. Detailedinstructions for all steps are contained within the EDASTART CL source. Configuration of aparticular language on the Web Console does not currently change the defaults with the filesources. These must be changed manually.
General Information for an IBM i Installation
This section covers general information for an IBM i installation.
Sample Metadata, Data, and Other Tutorial Samples
Releases prior to 7.7.06 pre-load various samples into the IBISAMP application. As of 7.7.06,on a new installation, the IBISAMP application is created, but is not pre-loaded. The serverWeb Console has a new feature on the ribbon and on the application tree (under new),Tutorials (the Create Tutorial Framework page), which has a pull-down for various samples. TheDMC also has this feature on the application tree.
There are currently about 10 different tutorial/sample selections available on the pull-downselect list to match various customer needs. The bulk of the prior IBISAMP sample objects canbe generated by selecting the Create Legacy Sample Tables and Files tutorial. Other priorIBISAMP DataMigrator sample objects (usually starting with the characters dm*) are nowloaded by choosing their respective DataMigrator tutorials. Under the new method, thetutorials/samples may be loaded to any application, not just IBISAMP.
If you are doing just a software refresh, the prior IBISAMP objects will be unchanged (becausea refresh does not touch app directories).
Accessing IFS Files and QSYS Libraries
The location of procedure (FOCEXEC) files, Master Files (MASTER), Access Files (ACCESS), andFOCUS database files may be QSYS, IFS, or both. IFS is the preferred location, and is thelocation used for files created by the HTTP Web Console.
Accessing IFS Files
The native mode of the server is to use the QSH Integrated File System (IFS), which followsstandard file syntax as found on UNIX platforms to access files.
Syntax: How to Access IFS Files
IFS access follows the standards of a number of other platforms for FILEDEF, USE, and APPS,but is most like UNIX because the file names follow the same rules. The following is asummary of the respective commands and conventions
5. Installation for IBM i
Server Installation 315

FILEDEF ddname DISK filename [(options]USE filename [AS name]END APP MAP MYAPP directory
where:
ddname
Is the reference name for the file being opened.
filename
Is either the relative path or full path and the file name (for example, myfile.dat, acctng/myfile.dat, or /home/iadmin/acctng/myfile.dat).
options
Are the available access options, such as LRECL or RECFM.
For more information about FILEDEF options, see the Stored Procedures Reference.
name
Is the optional alternate name of the Master File.
directory
Is the full path name of the directory (for example, /home/iadmin/acctng).
Use of a relative path name is not recommended, since this varies with any given connectionto the server. Use of environment variables or shortcuts (for example, $HOME or ~) is notsupported in any context.
Accessing QSYS Libraries
QSYS access works with libraries and has the following APP, FILEDEF, DATASET, and USEsupport for accessing existing applications.
The option to use IFS references to QSYS libraries is a native feature of IBM i. IFS referencesto QSYS names, such MYLIB, use IFS-style references, such as /QSYS.LIB/MYLIB.LIB, whichare clearly recognizable as QSYS references.
To map a QSYS library to a WebFOCUS application root directory (APPROOT), use the APP MAPcommand, as described in How to Map a QSYS Library to APPROOT on page 317.
To access or create a FOCUS database in a QSYS library, you need to issue a USE command,as described in How to Use the USE Command to Access a FOCUS Database on page 319.
General Information for an IBM i Installation
316 Information Builders
To access a member of a physical file (other than a FOCUS database) in a QSYS library, youcan use either:
The FILEDEF command, as described in How to Use FILEDEF to Access a QSYS LibraryMember on page 318.
The DATASET attribute in a Master File synonym, as described in How to Use DATASET toAccess a QSYS Library Member on page 318.
Using the DATASET attribute has the advantage of automatically specifying the correctmember when you refer to the synonym.
If you issue an explicit FILEDEF command, and a DATASET attribute exists, the FILEDEFcommand takes precedence.
Creating a HOLD file automatically creates the physical file if it does not already exist. Issuinga -WRITE or -READ statement, however, requires that the physical file exist.
Syntax: How to Map a QSYS Library to APPROOT
To assist with existing applications outside the pre-defined application root directory(APPROOT), the APP MAP command allows an alias to be assigned to a non-APPROOT directory.This alias becomes a virtual directory under APPROOT so it can then be referenced in an APPPATH command. Mapping does not automatically add to the path. It simply makes it availableto participate in an APP PATH command. For more information about APPROOT, see theWebFOCUS Developing Reporting Applications manual.
In APP mode, the APP MAP command supports use of IFS QSYS library references so that theapplication name can be used for path search purposes in applications through the APP PATHcommand. However, the contents of a QSYS mapping are not available from the Web Console.
The syntax for mapping an application to a QSYS library is:
APP MAP appname /QSYS.LIB/libname.LIB
where:
appname
Is the name of the application.
libname
Is the name of the library to which you are mapping the application. The name must beuppercase.
5. Installation for IBM i
Server Installation 317

Syntax: How to Use FILEDEF to Access a QSYS Library Member
To use the FILEDEF command to access a member of a physical file in a QSYS library, thesyntax is
FILEDEF ddname DISK QSYS:library/file(member) (LRECL n
where:
ddname
Is the logical name you want to assign to the member. It can be up to eight characters inlength, and can contain letters, numbers, and underscores. It must begin with a letter.
When used to associate a data source with a Master File, the ddname must match thename of the Master File.
library
Is the QSYS library in which the file is located.
file
Is the name of the file.
member
Is the name of the member to which you are assigning a logical name.
For the member of a single-member physical file, the member name must be identical tothe file name. The operating system shorthand of *FIRST is not a valid alternative.
For a member of a multiple-member physical file, you can specify any member name.
LRECL
Specifies the logical record length (LRECL) of the member.
n
Is the local record length.
Syntax: How to Use DATASET to Access a QSYS Library Member
To use the DATASET attribute of a Master File synonym to access a member of a physical filein a QSYS library, the syntax is
DATASET = QSYS:library/file(member) (LRECL n
General Information for an IBM i Installation
318 Information Builders

where:
library
Is the QSYS library in which the physical file is located.
file
Is the name of the physical file.
member
Is the name of the member that you want to access.
LRECL
Specifies the logical record length (LRECL) of the member.
n
Is the local record length.
Syntax: How to Use the USE Command to Access a FOCUS Database
To access a FOCUS database, the syntax is
USE library/file[(member)] [AS name] [NEW]END
where:
library
Is the QSYS library in which the physical file is located.
file
Is the name of the physical file.
member
Is the name of the member that you want to access. If you omit the name, it defaults tothe name of the physical file.
This is the default name used by WebFOCUS to refer to the member. You can override it byspecifying AS name.
AS
Defines a logical name that you can use instead of the member name.
name
Is the logical name you want to assign to the member.
5. Installation for IBM i
Server Installation 319

NEW
Creates the member, and also creates the physical file if it does not exist. The data sourceis created as a member of a physical file starting with "F$". The file is created in thespecified QSYS library.
This construction allows you to organize multiple FOCUS databases within a single QSYSphysical file with a functional name, such as FOCUS, ACCTG, SHIPPING, AR, or AP; or asindividual QSYS physical file members, such as SHIP(SHIP), AR(AR), AP(AP), or SHIP(FOCUS).
Early releases of FOCUS and iWay (FOCUS Release 6.x, and iWay Releases 3.x and 4.x)created FOCUS databases with an arbitrary "F$" added to the beginning of the source physicalname and used "FOCUS" as the member name. Therefore, the name on the disk was in theform CURLIB/F$MYDB(FOCUS). All subsequent releases do not assume this is a default, andtherefore require either a USE command with an explicit AS, or that the files are renamed to fitthe current conventions.
For more information about the USE command, see the WebFOCUS Developing ReportingApplications manual.
Generating a Trace on IBM i
If you encounter a server problem, you can run a set of traces that will help you assess theproblem, and, if necessary, communicate it to Customer Support Services for furthertroubleshooting. This topic describes trace options and provides instruction for creating thetraces.
There are two types of traces you can run to troubleshoot a problem:
A server trace, in which you trace an agent that is running in a server context.
A non-server trace, in which you trace an agent that is running outside a server context,that is, an agent that is running in standalone mode.
Under normal conditions, applications are run in a server context. However, if you run yourtrace in a non-server context (that is, you run a non-server trace), and produce the necessarydiagnostic information, you can significantly reduce the amount of material that needs to bereviewed. Running a non-server trace also rules out server communications as a cause of aproblem.
Generating a Trace on IBM i
320 Information Builders

If you prefer to use native IBM i commands, a number of CMD/CL programs are created duringinstallation in the server administrator comment library and can be used to start traces, turntraces off, and perform edastart -savediag functions. The commands are, respectively, ITRCON,ITRCOFF, and ISAVEDIA. To use them (instead of using edastart under QSH), enter the requiredcommand and press F4 for prompted mode, then edit parameters, as needed, and pressEnter. For related information, see CL and CMD Programs on page 314.
Procedure: How to Generate a Server Trace
To generate a server trace:
1. Turn tracing on by doing one of the following:
Go to the Web Console menu bar, select the Main Web Console Other Options controlicon and then Enable Traces.
Start the server by issuing the following command:
edastart -traceon
You must preface edastart with the appropriate path, or place the directory in yoursystem PATH variable.
2. Reproduce the problem.
3. Stop the server.
4. Issue the following command:
edastart -savediag
5. Respond to the prompts to capture, and optionally archive and ship diagnostic information.
Diagnostic information will commonly contain user data. If the release of that data isconsidered a security concern when shipping to Customer Support Services, the -savediagfeature also allows a diagnostic to be saved and shipped later to allow the site theopportunity to review and cleanse the traces of data of this nature before shipping.
For information about sending the diagnostic information to Customer Support Services,see Information You Should Have on page 13 and Customer Support on page 13.
Procedure: How to Generate a Non-Server Trace
To generate a non-server trace:
1. Create an directory under APPROOT to reproduce the problem.
2. Copy any files required for the reproduction to the directory.
5. Installation for IBM i
Server Installation 321

3. Switch to the directory.
4. Reproduce the problem using edastart -traceon and one of switches -t, -x, or -f.
5. Switch to a directory other than the problem reproduction directory.
6. Issue the following command
edastart –savediag
You must preface edastart with the appropriate path, or place the directory in your systemPATH variable.
7. Respond to the prompts to capture, and optionally archive, diagnostic information.
Diagnostic information will commonly contain user data. If the release of that data isconsidered a security concern when shipping to Customer Support Services, the -savediagfeature also allows a diagnostic to be saved and shipped later to allow the site theopportunity to review and cleanse the traces of data of this nature before shipping.
For information about sending the diagnostic information to Customer Support Services,see Information You Should Have on page 13 and Customer Support on page 13.
Third-Party Software and Licenses on IBM i
As of Version 7 Release 6.8, to address display of third-party software license requirements, alicense option has been added to the Help menu located on the Web Console. This sectiondescribes the third-party software used on IBM i and includes references to the full licensesincluded in Information Builders and Third-Party Licenses on page 357.
OpenFlex SDK
OpenFlex SDK is included by Information Builders for use with its HOLD FORMAT FLEX feature.This distribution is subject to the terms and conditions of the Mozilla Public License Version1.1.
For more information, see OpenFlex SDK License on page 361 or visit our website, http://www.informationbuilders.com.
Troubleshooting for IBM i
To troubleshoot an installation problem, identify your problem in the following list, and followthe link to a description of the solution.
If you cannot find your problem described in the list, and cannot resolve it yourself, contactCustomer Support Services as described in Information You Should Have on page 13 and Customer Support on page 13.
Third-Party Software and Licenses on IBM i
322 Information Builders

Problems:
The server starts in safe mode (as indicated by a message in the Web Console at start up).
See Problem: The Server Starts in Safe Mode on page 323.
A server start request partly fails with JVM not found messages are written to edaprint.log.
See Problem: Java Listener Fails to Start With JVM not found Messages Written to the Log onpage 324.
Reference: Problem: The Server Starts in Safe Mode
Problem: The server starts in safe mode. The Web Console home page displays a messagestating that the server is in safe mode and describing what triggered it.
Cause: A common cause for the server starting in safe mode is a problem with the serveradministrator ID password. For example, the password may have been updated on theoperating system but not on the server, so the encrypted copy of the password stored by theserver is out of synchronization with the password on the operating system.
Solution: The server administrator can click the fix hyperlink, which is displayed under theproblem description, to display the relevant pane and resolve the problem.
For example, if the problem is that the server administrator password is out of synchronization:
1. Click the fix hyperlink displayed under the problem description.
2. In the left pane, open the Users folder, then the Server Administrator folder.
3. Click your user ID and select Properties from the pop-up menu.
The Access Control pane is displayed on the right.
4. Type the correct operating system password in the Password field, and type it again in theConfirm Password field.
5. Click Save and Restart.
The Security Mode pane opens on the right.
6. Click the Home icon in the menu bar to return to the Web Console home page.
5. Installation for IBM i
Server Installation 323

Reference: Problem: Java Listener Fails to Start With JVM not found Messages Written to the Log
Problem: The listener start request fails with JVM not found messages written to theedaprint.log file.
Cause: If the server cannot find the Java Virtual Machine (JVM), the JSCOM Listener will not beable to start, and messages will be written to the server log stating that the JVM cannot befound.
Solution: Set up the JVM as described in JVM Requirements for Java Services on page 292.
Reference: Problem: Secured Server Starts Unsecured or Does not Start after Upgrade
A server will implicitly attempt to start unsecured if proper authorization steps have not beencompleted. Starting the server normally clears edatemp. If prior edatemp files exist (andauthorization has not been done), start up will fail due to an inability to clear the directory.However, if an edastart -cleardir command was issued just before the upgrade, there is nothingto clear, no error occurs, and the server starts. If the server starts and is not inspected afterthe initial start up, the server being in the wrong mode may go unnoticed.
The proper solution is to add proper authorizations after an upgrade, as described in How toSatisfy Security Provider OPSYS Requirements on page 309, and restart the server. A newsafety measure has also been added. If the environment variable EDAEXTSEC is set to OPSYSexplicitly, and a server lacks authorization, it will not start (see Preventing Unsecured ServerStarts After Upgrades on page 309 for details).
Reference: Problem: CREATE SYNONYM Fails for Excel 2007 (or Higher) Workbooks
Problem: Using the Adapter for Excel Direct Retrieval, the CREATE SYNONYM process for Excel2007 (or higher) Workbook .xlsx files fails on i5 V5R4.
Cause: The server uses Apache poi-ooxml-schemas (a light version of Java ooxml-schemas) tointerpret Excel files. However, poi-ooxml-schemas fail on i5 V5R1 (but work on higher operatingsystem levels). This has been investigated and determined to be outside the server code. Itworks if the ooxml-schemas jar file is substituted for the poi-ooxml-schemas jar file, or if theJVM is forced into interpret mode.
Solution: If you need to create synonyms from Excel 2007 .xlsx files on i5 V5R4, the simplestsolution is to add a JVM property of -Dos400.run.mode=interpret to the Java Listenerproperties, rather than substituting jar files.
Troubleshooting for IBM i
324 Information Builders

Chapter6Installation for OpenVMS
This chapter describes the requirements and procedures for proper installation onOpenVMS.
In this chapter:
Information You Need Prior toInstallation on OpenVMS
OpenVMS Installation Requirements
Installation and Configuration Directorieson OpenVMS
Creating User IDs on OpenVMS
Accessing the Installation Software
Running the ISETUP Procedure to Installthe Server
Verifying the OpenVMS ServerInstallation
Security Providers on OpenVMS
Starting and Using the OpenVMS Server
Generating a Trace on OpenVMS
Third-Party Software and Licenses onOpenVMS
General Information for an OpenVMSInstallation
Troubleshooting for OpenVMS
Information You Need Prior to Installation on OpenVMS
You need to know your license key. These keys are for a specific number of CPUs. If morecores are detected than the license allows, the installation will be blocked.
The remedy for a core blocked installation is to obtain and use a correct license or use amachine with the correct core count (which may be a real or a virtualized environment).
Some features use additional license codes that are not specified during the installation.
You need to know your SMTP mail server information, if you will use any of the server emailnotification features.
You need a server administrator user ID, referred to as iadmin in the remainder of thischapter. For information about server administrator and other user IDs, see Creating User IDson OpenVMS on page 329.
Server Installation 325
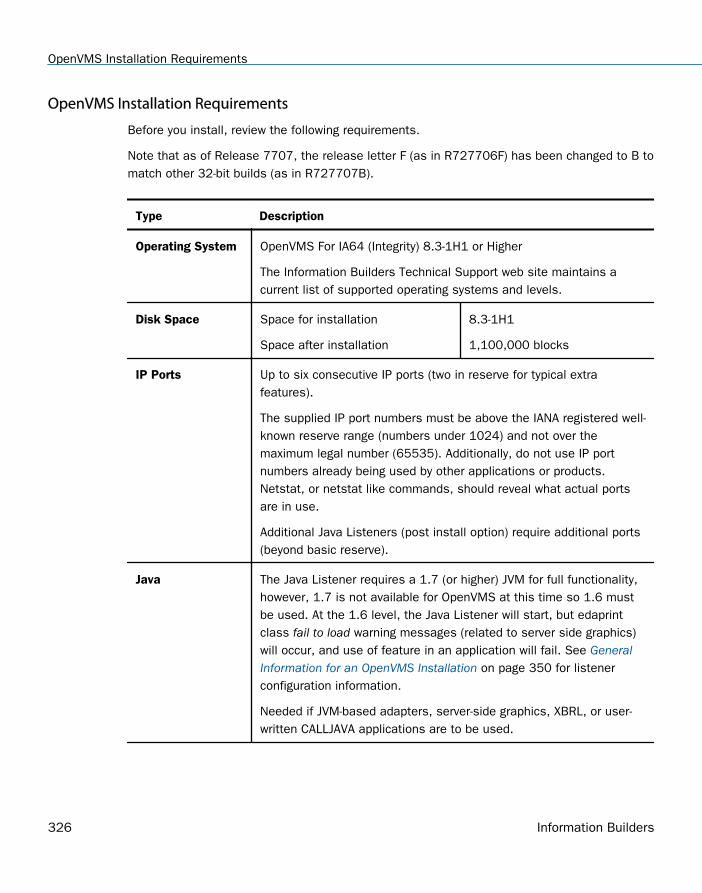
OpenVMS Installation Requirements
Before you install, review the following requirements.
Note that as of Release 7707, the release letter F (as in R727706F) has been changed to B tomatch other 32-bit builds (as in R727707B).
Type Description
Operating System OpenVMS For IA64 (Integrity) 8.3-1H1 or Higher
The Information Builders Technical Support web site maintains acurrent list of supported operating systems and levels.
Disk Space Space for installation
Space after installation
8.3-1H1
1,100,000 blocks
IP Ports Up to six consecutive IP ports (two in reserve for typical extrafeatures).
The supplied IP port numbers must be above the IANA registered well-known reserve range (numbers under 1024) and not over themaximum legal number (65535). Additionally, do not use IP portnumbers already being used by other applications or products.Netstat, or netstat like commands, should reveal what actual portsare in use.
Additional Java Listeners (post install option) require additional ports(beyond basic reserve).
Java The Java Listener requires a 1.7 (or higher) JVM for full functionality,however, 1.7 is not available for OpenVMS at this time so 1.6 mustbe used. At the 1.6 level, the Java Listener will start, but edaprintclass fail to load warning messages (related to server side graphics)will occur, and use of feature in an application will fail. See GeneralInformation for an OpenVMS Installation on page 350 for listenerconfiguration information.
Needed if JVM-based adapters, server-side graphics, XBRL, or user-written CALLJAVA applications are to be used.
OpenVMS Installation Requirements
326 Information Builders

Type Description
Memory Memory use depends on the following factors.
Workspace Manager
Listeners
Concurrently running application agents
Actual memory usage varies depending on the features used by theapplication, and will increase or decrease as agents change betweenactive and idle states.
The Workspace Manager makes use of a specific system resourceknown as shared memory. Each individually configured server, with orwithout adapters, uses one shared memory. The size of this memoryvaries based upon the sizes of the agents table and the queue.
Generally, shared memory use does not require special configuration.It is just a resource that system administrators like to know is beingused so they can monitor it with the SHOW MEMORY/POOLEDcommand (non-paged section).
Web Browser Needed for using the Web Console.
Microsoft Internet Explorer® 9 or higher.
Microsoft Edge
Mozilla Firefox® 27 or higher.
Google Chrome® 33 or higher.
Apple Safari® 7.0 or higher.
Apple Mobile iOS® v5
Opera 19 or higher.
6. Installation for OpenVMS
Server Installation 327

Installation and Configuration Directories on OpenVMS
The installation process creates these high-level directories.
Name Environment Variable andDescription
Default Path
Homedirectory
EDAHOME
Stores the server softwareprograms and other files
disk:[ibi.srv77]
Must conform to the followingpattern
disk:[*.ibi.srv77*]
Configurationdirectory
EDACONF
Stores the configuration files.
If you are configuring multipleinstances of the server, createseparate configuration directoriesfor each by adding a suffix (forexample, a number) to the end ofthe directory name.
When EDASTART is used to controlthe server, if the full path name ofthe EDACONF directory exceeds 31characters, the directory isautomatically aliased asEDASHARE=EDAn where n is thestarting TCP port number of theserver.
When aliasing occurs, a messagesimilar to the following appears:
Warning: WSM id DISK$SOFTWARE:[IWAY.IBI.SRV77.FFS] has been aliased to EDASHARE=EDA8100 due to length.
disk:[iadmin.ibi.srv77.product_type]
Must conform to the followingpattern
disk:[*.ibi.srv77*.product_type*]
Product type can be:
WFS for a WebFOCUSReporting Server
FFS for a Full Function Server
DM for a DataMigrator Server
WFM for a WebFOCUSMaintain Server
Installation and Configuration Directories on OpenVMS
328 Information Builders

Name Environment Variable andDescription
Default Path
Applicationdirectory
APPROOT
Contains your application files.
ibi.apps
Profilesdirectory
EDAPRFU
Stores the user and group profilesand the admin.cfg file (whichspecifies the server administrator).
ibi.profiles
Multiple WebFOCUS Reporting Servers. If you plan to install multiple copies of WebFOCUS onthe same computer, and you want to provide each copy with its own WebFOCUS ReportingServer, you may wish to maintain a separate ibi root directory for each copy, so that you cankeep copies of each set of components, including the server, together in the same path.
You can specify a separate apps directory for each copy of WebFOCUS, or specify a singleapps directory to be shared by all copies of WebFOCUS.
Creating User IDs on OpenVMS
The installation of a server requires an ID to install and own the files, as well as to administerthe server. This is also known as the iadmin ID. The same ID should be used for bothfunctions (installation and administration) and should not be the SYSTEM ID. The iadmin IDcan be any user ID that has the required privileges and quotas for running the server in allsecurity modes. For the iadmin privileges necessary for running the server in security modeOPSYS, see Security Providers on OpenVMS on page 342, and configure for that mode at thistime. We highly recommend running the server secured (that is, with security set to OPSYS,PTH, or DBMS).
The iadmin privileges necessary for running a server in security mode OFF are:
Privilege Function Required for
NETMBX May create network device Mailboxes
PRMGBL May create permanent global sections IPC Shared Memory
PRMMBX May create permanent mailbox IPC Control Pipes
6. Installation for OpenVMS
Server Installation 329

Privilege Function Required for
SYSGBL May create system wide global sections IPC Shared Memory
SYSNAM May insert in system logical name table IPC Control Pipes
SYSPRV May access objects using system protection Creating system logicaltables
TMPMBX May create temporary mailbox Mailboxes
SYSLCK May lock system wide resources Adapter for Progress only
Any additional privileges required by particular underlying databases must also be authorized.
We recommend running the OpenVMS server in security mode OPSYS. This is because non-secured servers also run as an account with elevated privileges and connecting end-userrequests run as the privileged account, thus presenting a security risk. Non-secured modeshould only be used when adequate safeguards have been taken so that the requiredprivileges do not present a risk, or for short periods of time only (such as while debugging anissue).
The following OpenVMS minimal quota resources are also required for the iadmin ID:
Quota Resources UAF Keyword Value
PAGE_FILE Pgflquo 1000000
BUFFER_LIMIT Bytlm 800000
IO_BUFFERED BIOlm 200
IO_DIRECT DIOlm 200
AST_LIMIT ASTlm 300
QUEUE_LIMIT TQElm 50
PRIORITY Prio 4
WORKING_SET WSdef 3076
MAXIMUM_WORKING_SET WSquo 8192
Creating User IDs on OpenVMS
330 Information Builders

Quota Resources UAF Keyword Value
MAX_JOBS Maxjobs 0
EXTENT WSextent 10240
FILE_LIMIT Fillm 300
ENQUEUE_LIMIT Enqlm 2000
JOB_TABLE_QUOTA JTquota 10000
Note: The IMPERSONATE privilege (one of the requirements for secured mode operation)allows dynamic setting of quota levels and uses the above table of values. If the configurationis run in secured mode, the initial default values for server validation purposes do not need tobe a concern unless the defaults are unusually low.
The iadmin ID must also have a UIC group associated with the ID (so the calls for IDinformation under OpenVMS 7.x and 8.x are returned in standard OpenVMS 6.x[group,member] format).
To check the UIC, issue the following:
WRITE SYS$OUTPUT F$USER()
Note: The iadmin ID should only be available to users who require administrative privileges tothe server for security purposes.
End users of the server will also require an ID and password created/configured for theSecurity Provider modes a server is using. For the OPSYS Security Provider mode, see End-UserRequirements on page 347.
Accessing the Installation Software
Downloading the installation software from the Information Builders download site is theprimary way of obtaining Information Builders software in an archive format, which is thenunarchived and installed by running an installer program. The user may, in turn, choose todownload the software, unarchive, and burn to a CD/DVD or place on a shared ODS drivewithin a corporation for easy access. This document assumes the software has beendownloaded directly to the installation machine and is up to the user to adjust their stepswithin this manual if installing in an alternate manner.
6. Installation for OpenVMS
Server Installation 331

Downloading the software involves:
1. Registering at the Information Builders download site.
2. Downloading the server installation software from the site.
3. Unzipping the downloaded file.
4. Running the isetup procedure to begin installing the server.
For instructions, see Downloading the Installation Software on page 332.
Downloading the Installation Software
To download the installation software, use the following steps.
After you complete the installation, you can delete the [.download] directory, as well as thedirectory to which the saveset was expanded.
Procedure: How to Download the Installation Software
To download the installation software:
1. Go to http://techsupport.informationbuilders.com.
The Information Builders Technical Support home page opens.
2. Go to My Account and sign in.
3. Click My Downloads and Shipments in the My Account section on the right side of thepage.
The Software Downloads/Shipments page opens.
4. Click the Download link for your product and release.
5. Fill in the registration form and then click Continue.
The Software Download Agreement page opens.
6. Select I agree to consent to the Download Agreement, and then click Continue.
The Download Instructions page opens.
A copy of the instructions is also automatically emailed to you for later reference.
7. Follow the instructions on the Download Page. These are also documented in Downloadingthe Installation Software on page 332.
Procedure: How to Download and Expand the Downloaded Archive
The download directory will contain .bck, .pdf, and readme files.
1. Create a directory in which to download the installation software. For example,
Accessing the Installation Software
332 Information Builders

CREATE /DIRECTORY [.DOWNLOAD]
2. After registering at the Information Builders download site and obtaining download siteinformation, an ID, password, and software location information, ftp to the site (GUI FTPtools may also be used, but line mode FTP is what is documented here).
For example:
ftp downloadftp.ibi.com(supply the user id and password information from web page)
3. Make sure your current directory on the machine to which you will download is thedownload directory you created.
For example:
lcd download
4. Navigate to the directory on the Information Builders site that contains the serverinstallation software.
For example:
cd "/Server/77/OpenVMS_V83_and_up_IA64_32on64bit_IEEE/7707/Prod_833"
5. Download the installation software from the site using binary mode.
For example:
binaryget i7707_833.BCKquit
6. Adjust archive format and unarchive the downloaded file.
For example:
SET FILE /ATTRIBUTE=(RFM:FIX,LRL:32256) i7707_833.BCKBACKUP /LOG i7707_833.BCK/SAVE []
7. Run the isetup installation procedure, as described in Running the ISETUP Procedure toInstall the Server on page 333.
You can delete the download directory after the installation is complete.
Running the ISETUP Procedure to Install the Server
The installation procedure name is called ISETUP. For performance reasons, you should notinstall to an FSD or NFS-mounted disk.
6. Installation for OpenVMS
Server Installation 333

Procedure: How to Run the ISETUP Procedure
1. Log on with the iadmin user ID.
2. Set the default protection mask to at least read/execute (if it has not already been setthis way). For example:
SET PROTECTION=(S:RWED,O:RWED,G:RE,W:RE)/DEFAULT
3. Ensure that you are not in a directory containing the installation files:
SET DEFAULT SYS$LOGIN
4. Ensure that you have write privileges to the directory in which you execute the installation.You can test whether you have write permissions as follows:
CREATE [.XXX] /DIRECTORY
5. Execute the ISETUP procedure from either:
RUN [.download]ISETUP
The following isetup screen displays.
-------------------------------------------------------------------- Welcome to the Product Set Up Facility Please respond to the prompts or enter Q to quit at any prompt.--------------------------------------------------------------------Select an option: 1. Install and Configure 2. Add Additional Configuration Instance 3. Refresh Installation (Reinstall, Keep Configurations) 4. Install Debuggables to the Installation Directory 5. View Installation NotesEnter a selection (Default=1) :
6. Enter 1 for the Install and Configure option.
You are prompted for the location of the installation file iserver.bck.
Please enter the full path name of the media for the product
7. Type the full path (including the CD or disk drive) of the installation file, or press Enter toaccept the default.
For example:
[.download]iserver.bck
You are prompted for your license key.
Enter your License Key (Current number of CPUs = n)(Format 999-999-9999-99) : xxx-xxx-xxxx-xx
Running the ISETUP Procedure to Install the Server
334 Information Builders

8. Enter your license key.
Your license attributes are displayed, and the license key is confirmed.
You are prompted for the ID of the server administrator for the internal server securityprovider.
Enter credentials for the server's internal securityprovider (PTH), the server's default start up mode.Enter the Server Administrator ID(Default=srvadmin) :
The server automatically starts with this security provider. You can add other securityproviders using the server Web Console after installation. For information, see the ServerAdministration manual.
9. Enter the server administrator ID or accept the default.
You are prompted for the server administrator password. There is no default.
Enter the Administrator Password :
10. Type the password of the account you are using to install the software.
The password, which does not display, is stored in encrypted form.
You are now shown the default values of the server environment variables and portnumber, and given an opportunity to change them. For example:
Please review the default settings.EDAHOME = dka0:[iadmin.ibi.srv77.home]EDACONF = dka0:[iadmin.ibi.srv77.wfs] (*EXISTS, owner iadmin *)EDAPRFU = iadmin.profilesAPPROOT = iadmin.ibi.appsHOMEAPPS = iadmin.ibi.homeappsHTTP_BASE_PORT = 8121WARNING: Directories marked as existing will be deleted and recreated!If you are satisfied with the default settings you may proceed tofinal confirmation else you will be prompted for individual values.Proceed with defaults? (Y/N Default=Y) : y
11. If you want to accept the default values, type Y and skip to Step 12. Otherwise, changeany properties that you wish.
For information about the EDAHOME, EDACONF, EDAPRFU, and APPROOT environmentvariables you can set, see Installation and Configuration Directories on OpenVMS on page328.
6. Installation for OpenVMS
Server Installation 335

The other properties you can set are described in the following table.
Parameter Description
HTTP_BASE_PORT First of three consecutive port numbers for the HTTPListener and other IP-based services.
The default port automatically varies by product tosupport multiple servers on a particular computer. For:
A Full-Function Server, 8101 is the default value,which reserves ports 8101-8103.
A WebFOCUS Reporting Server, 8121 is the defaultvalue, which reserves ports 8121-8123.
A DataMigrator Server, 8117 is the default value,which reserves ports 8117-8119.
A Shared Application Server (for WebFOCUSMaintain), 8113 is the default, which reserves ports8113-8115.
TCP_BASE_PORT Port number on which the server TCP Listener listens. Itmust be outside the range of the three consecutiveHTTP Listener ports. It defaults to the port immediatelypreceding the first HTTP Listener port.
For example, if you accept the default HTTP ListenerPort value of 8101, the TCP Listener port defaults to8100.
SMTP_HOST SMTP Server node (host) name or TCP/IP number foroutbound email features. (Optional, only prompted for ifchanging directories and ports.)
SMTP_PORT SMTP Server port number for SMTP Server. The defaultvalue is 25. (Optional, only prompted for if changingdirectories and ports, and the SMTP Server host issupplied.)
Running the ISETUP Procedure to Install the Server
336 Information Builders
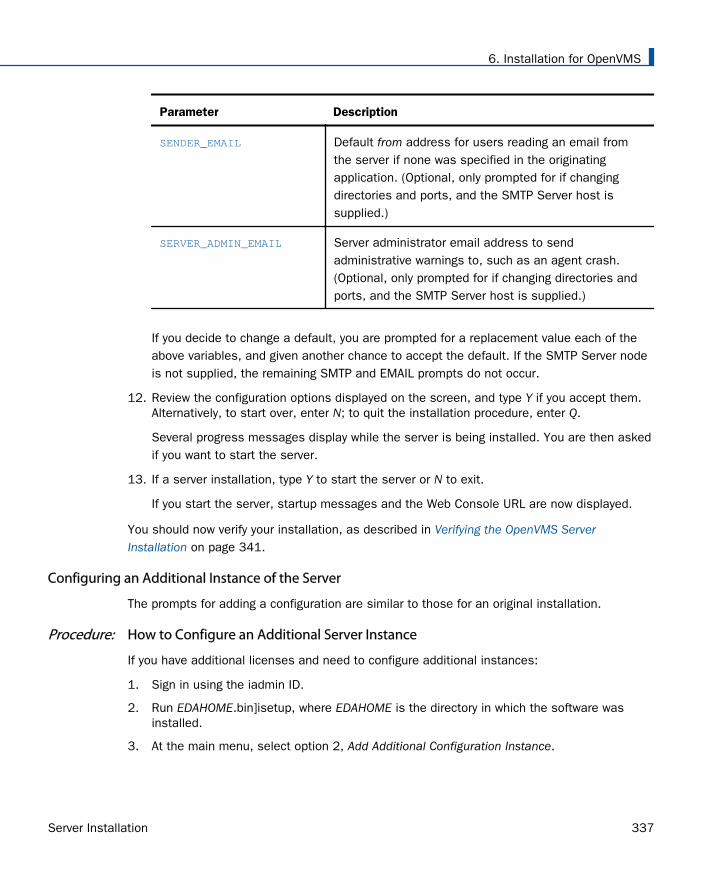
Parameter Description
SENDER_EMAIL Default from address for users reading an email fromthe server if none was specified in the originatingapplication. (Optional, only prompted for if changingdirectories and ports, and the SMTP Server host issupplied.)
SERVER_ADMIN_EMAIL Server administrator email address to sendadministrative warnings to, such as an agent crash.(Optional, only prompted for if changing directories andports, and the SMTP Server host is supplied.)
If you decide to change a default, you are prompted for a replacement value each of theabove variables, and given another chance to accept the default. If the SMTP Server nodeis not supplied, the remaining SMTP and EMAIL prompts do not occur.
12. Review the configuration options displayed on the screen, and type Y if you accept them.Alternatively, to start over, enter N; to quit the installation procedure, enter Q.
Several progress messages display while the server is being installed. You are then askedif you want to start the server.
13. If a server installation, type Y to start the server or N to exit.
If you start the server, startup messages and the Web Console URL are now displayed.
You should now verify your installation, as described in Verifying the OpenVMS ServerInstallation on page 341.
Configuring an Additional Instance of the Server
The prompts for adding a configuration are similar to those for an original installation.
Procedure: How to Configure an Additional Server Instance
If you have additional licenses and need to configure additional instances:
1. Sign in using the iadmin ID.
2. Run EDAHOME.bin]isetup, where EDAHOME is the directory in which the software wasinstalled.
3. At the main menu, select option 2, Add Additional Configuration Instance.
6. Installation for OpenVMS
Server Installation 337

Each instance must have its own configuration directory. When prompted for theconfiguration directory, append characters to the default name of the product typedirectory. Otherwise, the installation will overwrite the existing configuration directory. Inthe following example, the number 2 has been added to the default name of theWebFOCUS Reporting Server configuration directory:
iadmin.ibi.srv77.wfs2
If the EDACONF directory you specify already exists, the installation process copiesselected files from files in the current configuration to a directory named BACKUP that is asibling directory to EDACONF, and then deletes the contents of the original directory. Forexample, if EDACONF is
dka0:[iadmin.ibi.srv77.wfs]
then the selected configuration files are backed up to:
dka0:[iadmin.ibi.srv77.BACKUP]
Refreshing or Upgrading an Installation
Refreshing reinstalls the files in the installation directory, without changing any configurationinformation in the configuration directory.
Procedure: How to Refresh or Upgrade an Installation
If it becomes necessary to refresh, or if you want to upgrade to a new release:
1. Sign in using the iadmin user ID.
Logging on with the iadmin ID is recommended (rather than with the su command).
2. Set the default protection mask to, at a minimum, read/execute (if it is not already set tothat). For example:
SET PROTECTION=(S:RWED,O:RWED,G:RE,W:RE)/DEFAULT
Ensure that you have write privileges to the directory from which you are running thecommand. To test this, type:
SET DEFAULT SYS$LOGIN
3. Run the installation procedure, isetup, specifying its full path. You can run the installationprocedure from any location. Do not switch the current directory to the location of isetup.For example:
iadmin.download.isetup
Running the ISETUP Procedure to Install the Server
338 Information Builders

4. At the main menu, type option 3, Refresh Installation (Reinstall, Keep Configuration), andrespond to the prompts.
Installing and Configuring Silently
This is also known as a silent install. The most common form is an initial install, which alsoresults in an initial configuration. An initial installation and configuration should only be doneonce per EDAHOME and an add product configuration used thereafter.
Installing silently can be helpful if you want to install multiple servers at once throughout anenterprise. To install a server silently, you must first create a text file that specifies your serverinstallation parameters and then call isetup with the option and the file name. The silentmethod may also be used to do a software refresh
We recommend that the first time you install, you use the default interactive mode, not thesilent mode, so that you become familiar with the procedure. Installing a server interactively isdescribed in Running the ISETUP Procedure to Install the Server on page 333.
Run isetup -? to see full information on the setup and specific use of a parameters file forsilent installation, configuration, or refresh.
Procedure: How to Create the Installation Parameters File
Use a text editor to create a file with the following syntax to specify your product installationparameters:
-inst-license nnn-nnn-nnnn-nn-edahome dka0:[iadmin.ibi.srv77.home]-edaconf dka0:[iadmin.ibi.srv77.product_type]-port portnum-host hostname-approot dka0:[iadmin.ibi.srv77.apps] -pass password-nostart
where:
nnn-nnn-nnnn-nn
Is the 12-digit license. Include a hyphen (-) following the third, sixth, and tenth digits.
dka0:[iadmin.ibi.
Is the drive and directory to which you want to install the software.
product_type
Designates the type of product. The default values are:
FFS. Full-Function Server.
DM. DataMigrator Server.
6. Installation for OpenVMS
Server Installation 339

WFS. WebFOCUS Reporting Server.
WFM. Shared Application Server for WebFOCUS Maintain.
portnum
Is the base TCP port for the server.
hostname
Is the server host name.
password
Is the password of the user ID with which you are installing the server.
To see a list of additional installation, configuration, and refresh options:
1. Open a command prompt window and navigate to the directory containing the installationsetup.exe file for the software.
2. Enter the following:
MCR [.download]setup.exe ?
3. Accept a display language and click Next.
A Help screen with further parameter file options will display.
The user may continue with the install (interactive) or quit at this point to attempt a silentinstall/configure.
Procedure: How to Launch a Silent Installation
1. Open a command prompt and navigate to the directory containing the software and thesetup.exe file for the installation.
2. Type the following:
dka0:[iadmin.path]srvoptions.txt
where:
dka0:[iadmin.path]srvoptions.txt
Is the full path and file name of the file specifying your installation options.
For example, to specify English and an options file named serveroptions.txt, type:
MCR [.download]setup -opt dka0:[iadmin.path]srvoptions.txt
3. After the installation has completed you should verify that it was successful, as describedin Verifying the OpenVMS Server Installation on page 341.
Running the ISETUP Procedure to Install the Server
340 Information Builders

Verifying the OpenVMS Server Installation
To verify that you have successfully installed, use the configuration that is created by theinstallation. You can verify the product installation by bringing up, checking, connecting to,testing, disconnecting from, and shutting down. (If you started the server as the last step ofthe installation procedure, skip this.)
Procedure: How to Verify Server Installation
1. Log on to your OpenVMS operating system with the iadmin user ID.
2. Activate the account privileges (if they are not yet activated) by issuing the followingcommand.
SET PROCESS /PRIV=ALL
This is typically done by using AUTHORIZE to set privileges to be active by default, or byputting the SET PROCESS command in the ID login profile (LOGIN.COM).
3. Start the server with the appropriate path to edastart and the -start option
@IWAY:[IADMIN.IBI.SRV77.FFS.BIN]EDASTART.COM -START
4. Check to see whether the processes are active using -show
@IWAY:[IADMIN.IBI.SRV77.FFS.BIN]EDASTART.COM -SHOW
5. Start the Web Console by starting a browser pointed at the server HTTP Listener portspecified during installation. The URL format is http://host:port. (The URL is alsodisplayed at the end of the installation procedure.)
For example, if default ports were used during installation, use http://host:8101 for a Full-Function Server and http://host:8121 for a WebFOCUS Server.
6. If the server is running in a secure mode, you will first see a logon screen. Log on usingthe iadmin ID used during server configuration. For information about configuring theserver security, see Security Providers on OpenVMS on page 342
The Web Console home page opens. The Home Page is arranged in a menu-like context forthe various features it supports. Detailed use of the Web Console for configuration orgeneral operation of the server is available by clicking Help in the left navigation menu andin the Server Administration manual.
7. If the Web Console opens and displays application tree folders in the left pane, the serveris working because it uses its own underlying data access and reporting technologies tovisualize the application tree. The server may be further data tested (if desired).
8. When you are done using the server, you can stop it using the Web Console by clicking theStop option on the Web Console toolbar.
6. Installation for OpenVMS
Server Installation 341

9. If you experience any problems, examine the IWAY:[IADMIN.IBI.SRV77.FFS]EDAPRINT.LOGfile.
Security Providers on OpenVMS
The default security provider for a new installation is the internal security provider, PTH. ThePTH provider implements security using user IDs, passwords, and group memberships storedin the admin.cfg configuration file.
After the initial installation, the Server Administrator that was configured during the installationcan start the server and use the Web Console to further customize security settings, forexample, to configure alternate or additional security providers, create additional PTH IDs, andregister groups and users in a security role. For more information about security providers, seethe Server Security chapter in the Server Administration manual.
Procedure: How to Satisfy Security Provider OPSYS Requirements
To run a server with security provider OPSYS in OpenVMS, you must satisfy the followingrequirements. You must do this when you set up the server administration (iadmin) ID.
Although installation can be done by an ordinary user, the changes listed here require theSYSTEM ID.
Run MCR AUTHORIZE to add the following privileges to the iadmin ID.
Privilege Function Required for
CMKRNL May change mode to kernel Server impersonation features
IMPERSONATE May impersonate another user Server impersonation features
NETMBX May create network device Mailboxes *
PRMGBL May create permanent globalsections
IPC Shared Memory *
PRMMBX May create permanent mailbox IPC Control Pipes *
SYSGBL May create system wide globalsections
IPC Shared Memory *
SYSNAM May insert in system logical nametable
IPC Control Pipes *
Security Providers on OpenVMS
342 Information Builders

Privilege Function Required for
SYSPRV May access objects using systemprotection
Creating system logical tables*and server security features
TMPMBX May create temporary mailbox Mailboxes *
WORLD May affect other processes in theworld
Control of impersonatedprocesses
SYSLCK May lock system wide resources Adapter for Progress only *
* Also required for non-secured servers.
Any additional privileges or changes in quota required by particular underlying databases mustalso be authorized and customized in the EDAENV.PRM file, as described in How to Add/Change Privileges and Quotas (EDAENV.PRM) on page 343.
The default minimal quota resources are also contained in the default EDAENV.PRM file. Youdo not need to have values explicitly declared in the UAF or SYSTEM tables, provided theiadmin user ID has IMPERSONATE privileges. However, some situations may require quotas tobe increased (for instance, if there are problems accessing very large databases). This is alsodone by customizing the EDAENV.PRM file, as described below.
Procedure: How to Add/Change Privileges and Quotas (EDAENV.PRM)
You can create privilege and quota settings using a configuration file (EDAENV.PRM). Tocustomize the settings:
Copy the default EDAHOME [.BIN]EDAENV.PRM file to EDACONF [.BIN].
Edit and customize the EDACONF [.BIN]EDAENV.PRM file as needed (for edit rules, seebelow).
Recycle the server.
Repeat as needed until the desired effect is achieved (for example, until the page file quotais large enough to access large files).
EDAENV.PRM edit rules:
Changing quota values are simply edited values.
To add a quota, use the form name=value with one declaration per line. Actual namesfollow the standard OpenVMS names for resources.
6. Installation for OpenVMS
Server Installation 343

Privilege declarations lines have the format Privilege_n : privilege [, privilege, ...], where n isany integer from 1 to 99. The value for n must be unique among the Privilege_n lines. Anynumber of comma-separated privilege names per line may be declared, but each Privilege_nline must be on separate lines. Privilege names follow the standard OpenVMS names forthese privileges.
The EDAENV.PRM file should not be confused with the EDAENV.COM file, which is used forrunning additional OpenVMS commands (typically logical declarations) at startup. An exampleof EDAENV.PRM follows:
io_direct = 200queue_limit = 100page_file = 2097152buffer_limit = 800000io_buffered = 200ast_limit = 300working_set = 3076maximum_working_set = 8192extent = 10240file_limit = 4096enqueue_limit = 4000job_table_quota = 10000priority = 4privilege_1 : TMPMBX, NETMBX, PRMMBXprivilege_2 : PRMGBL, SYSGBL, SYSNAMprivilege_3 : SYSPRV, CMKRNL, WORLDprivilege_4 : SYSLCK, IMPERSONATE
Starting and Using the OpenVMS Server
After configuring for secured mode (if desired), the server is started and managed using thesame server startup and Web Console startup steps used for validating the server (steps 1 - 6in Verifying the OpenVMS Server Installation on page 341).
If the server has not been configured for adapters, now is an appropriate time to do so usingthe Web Console and Server Administration manual. For current information about whichadapters are supported:
1. Go to http://techsupport.informationbuilders.com.
The Information Builders Technical Support home page opens.
2. In the Quick Links section on the right side of the page, click Supported Systems/Adapters.
The Supported Systems and Adapters page opens.
Starting and Using the OpenVMS Server
344 Information Builders
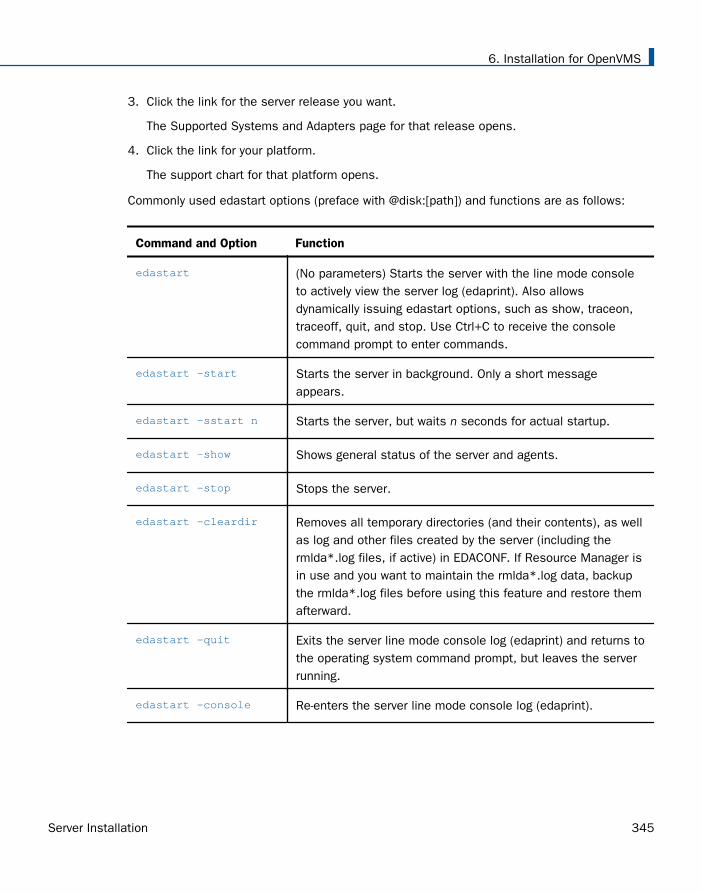
3. Click the link for the server release you want.
The Supported Systems and Adapters page for that release opens.
4. Click the link for your platform.
The support chart for that platform opens.
Commonly used edastart options (preface with @disk:[path]) and functions are as follows:
Command and Option Function
edastart (No parameters) Starts the server with the line mode consoleto actively view the server log (edaprint). Also allowsdynamically issuing edastart options, such as show, traceon,traceoff, quit, and stop. Use Ctrl+C to receive the consolecommand prompt to enter commands.
edastart -start Starts the server in background. Only a short messageappears.
edastart -sstart n Starts the server, but waits n seconds for actual startup.
edastart -show Shows general status of the server and agents.
edastart -stop Stops the server.
edastart -cleardir Removes all temporary directories (and their contents), as wellas log and other files created by the server (including thermlda*.log files, if active) in EDACONF. If Resource Manager isin use and you want to maintain the rmlda*.log data, backupthe rmlda*.log files before using this feature and restore themafterward.
edastart -quit Exits the server line mode console log (edaprint) and returns tothe operating system command prompt, but leaves the serverrunning.
edastart -console Re-enters the server line mode console log (edaprint).
6. Installation for OpenVMS
Server Installation 345
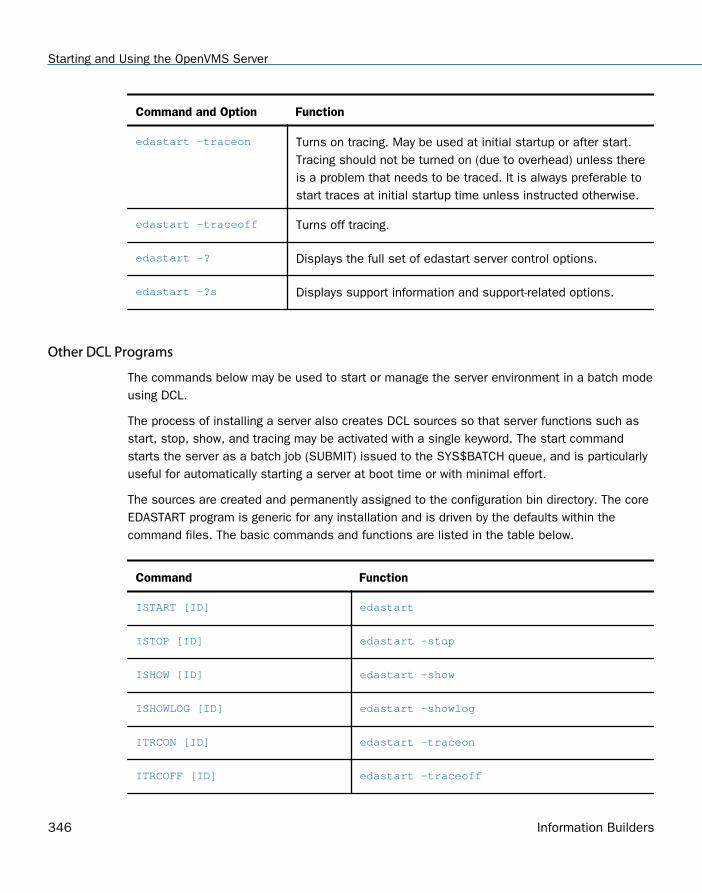
Command and Option Function
edastart -traceon Turns on tracing. May be used at initial startup or after start.Tracing should not be turned on (due to overhead) unless thereis a problem that needs to be traced. It is always preferable tostart traces at initial startup time unless instructed otherwise.
edastart -traceoff Turns off tracing.
edastart -? Displays the full set of edastart server control options.
edastart -?s Displays support information and support-related options.
Other DCL Programs
The commands below may be used to start or manage the server environment in a batch modeusing DCL.
The process of installing a server also creates DCL sources so that server functions such asstart, stop, show, and tracing may be activated with a single keyword. The start commandstarts the server as a batch job (SUBMIT) issued to the SYS$BATCH queue, and is particularlyuseful for automatically starting a server at boot time or with minimal effort.
The sources are created and permanently assigned to the configuration bin directory. The coreEDASTART program is generic for any installation and is driven by the defaults within thecommand files. The basic commands and functions are listed in the table below.
Command Function
ISTART [ID] edastart
ISTOP [ID] edastart -stop
ISHOW [ID] edastart -show
ISHOWLOG [ID] edastart -showlog
ITRCON [ID] edastart -traceon
ITRCOFF [ID] edastart -traceoff
Starting and Using the OpenVMS Server
346 Information Builders

Command Function
ICLEAR [ID] edastart -clear
ICLRDIR [ID] edastart -cleardir
ISAVEDIA [ID] edastart -savediag
To use any of the commands, type an "@" and the full path name of any of the DCL scripts.
The DCL scripts may be further customized, or the defaults may be changed, by manuallyediting the files. Detailed instructions for all steps are contained within the sources.
System symbols for the DCL scripts may be created, but this is left to OpenVMSadministrators.
A user ID may be supplied as an optional parameter and is used as the SUBMIT /USER=value. This is particularly useful when starting the server with the system boot script toensure the server starts under the proper ID.
Adding JOB, GROUP or Other Defined Environment Values (EDAENV.COM)
At server startup, all Process level logicals are copied to the startup job stream; System levellogicals are present by default. If a server must be configured to "see" Job or Group levellogicals, or there are Process level logicals that should only be declared for the server, theymust be individually declared in an EDACONF [.BIN]EDAENV.COM file. The contents of this filemust be valid DCL syntax (typically just consisting of logical declarations). An example ofEDAENV.COM follows:
$ DEFINE /GROUP ORASID MYORASID
Note: If EDAENV.COM is needed, you must create it. An empty template is not supplied.
End-User Requirements
IDs connecting to a server (secured or unsecured) have requirements in terms of specificsetup and privileges. The requirements are as follows:
An ID must have a UIC group associated with the ID, so the calls for ID information underOpenVMS 7.x are returned in standard OpenVMS 6.x [group,member] format.
To check the UIC, issue the following:
WRITE SYS$OUTPUT F$USER()
6. Installation for OpenVMS
Server Installation 347

An ID must have QUOTA on the same disk where the server writes its temp files (typicallyEDACONF [.EDATEMP]).
An ID must have following privileges:
NETMBX, may create network device, required for use of mailboxes.
TMPMBX, may create temporary mailbox, required for use of mailboxes.
SYSLCK, may lock system wide resources, required for use of the Adapter for Progressonly.
Generating a Trace on OpenVMS
If you encounter a server problem, you can run a set of traces that will help you assess theproblem, and, if necessary, communicate it to Customer Support Services for furthertroubleshooting. This topic describes trace options and provides instruction for creating thetraces.
There are two types of traces you can run to troubleshoot a problem:
A server trace, in which you trace an agent that is running in a server context.
A non-server trace, in which you trace an agent that is running outside a server context,that is, an agent that is running in standalone mode.
Under normal conditions, applications are run in a server context. However, if you run yourtrace in a non-server context (that is, you run a non-server trace), and produce the necessarydiagnostic information, you can significantly reduce the amount of material that needs to bereviewed. Running a non-server trace also rules out server communications as a cause of aproblem.
If you prefer to use DCL jobs to control tracing and save diagnostics functions, you can takeadvantage of a number of DCL scripts that are created during installation in the EDACONF[.BIN] directory and can be used to start traces, turn traces off, and perform edastart -savediagfunctions. The commands are, respectively, ITRCON.COM, ITRCOFF.COM, and ISAVEDIA.COM.An alternate ID parameter is available, under which you can submit the job. For details, see Other DCL Programs on page 346.
Generating a Trace on OpenVMS
348 Information Builders

Procedure: How to Generate a Server Trace
To generate a server trace:
1. Turn tracing on by doing one of the following:
Go to the Web Console menu bar, select the Main Web Console Other Options controlicon and then Enable Traces.
Start the server by issuing the following command:
edastart -traceon
Note: Preface edastart with an @ sign and pathname, unless a symbol has been setup.
2. Reproduce the problem.
3. Stop the server.
4. Issue the following command:
edastart -savediag
5. Respond to the prompts to capture, and optionally archive and ship diagnostic information.
Diagnostic information will commonly contain user data. If the release of that data isconsidered a security concern when shipping to Customer Support Services, the -savediagfeature also allows a diagnostic to be saved and shipped later to allow the site theopportunity to review and cleanse the traces of data of this nature before shipping.
For information about sending the diagnostic information to Customer Support Services,see Information You Should Have on page 13 and Customer Support on page 13.
Procedure: How to Generate a Non-Server Trace
To generate a non-server trace:
1. Create a directory under APPROOT to reproduce the problem.
2. Copy any files required for the reproduction to the directory.
3. Switch to the directory.
4. Reproduce the problem using edastart -traceon and one of switches -t, -x, or -f.
5. Switch to a directory other than the problem reproduction directory.
6. Issue the following command:
edastart –savediag
Note: Preface edastart with an @ sign and pathname, unless a symbol has been set up.
6. Installation for OpenVMS
Server Installation 349

7. Respond to the prompts to capture, and optionally archive, diagnostic information.
Diagnostic information will commonly contain user data. If the release of that data isconsidered a security concern when shipping to Customer Support Services, the -savediagfeature also allows a diagnostic to be saved and shipped later to allow the site theopportunity to review and cleanse the traces of data of this nature before shipping.
For information about sending the diagnostic information to Customer Support Services,see Information You Should Have on page 13 and Customer Support on page 13.
Third-Party Software and Licenses on OpenVMS
As of Version 7 Release 6.8, to address display of third-party software license requirements, alicense option has been added to the Help menu located on the Web Console. This sectiondescribes the third-party software used on OpenVMS and includes references to the fulllicenses included in Information Builders and Third-Party Licenses on page 357.
OpenFlex SDK
OpenFlex SDK is included by Information Builders for use with its HOLD FORMAT FLEX feature.This distribution is subject to the terms and conditions of the Mozilla Public License Version1.1.
For more information, see OpenFlex SDK License on page 361 or visit our website, http://www.informationbuilders.com.
General Information for an OpenVMS Installation
This section covers general information for an OpenVMS Installation.
Sample Metadata, Data, and Other Tutorial Samples
Releases prior to 7.7.06 pre-load various samples into the IBISAMP application. As of 7.7.06,on a new installation, the IBISAMP application is created, but is not pre-loaded. The serverWeb Console has a new feature on the ribbon and on the application tree (under new),Tutorials (the Create Tutorial Framework page), which has a pull-down for various samples. TheDMC also has this feature on the application tree.
There are currently about 10 different tutorial/sample selections available on the pull-downselect list to match various customer needs. The bulk of the prior IBISAMP sample objects canbe generated by selecting the Create Legacy Sample Tables and Files tutorial. Other priorIBISAMP DataMigrator sample objects (usually starting with the characters dm*) are nowloaded by choosing their respective DataMigrator tutorials. Under the new method, thetutorials/samples may be loaded to any application, not just IBISAMP.
Third-Party Software and Licenses on OpenVMS
350 Information Builders

If you are doing just a software refresh, the prior IBISAMP objects will be unchanged (becausea refresh does not touch app directories).
Java Listener JVM Defaults
The Java Listener on OpenVMS Alpha has pre-set values for Initial Java Heap Size(JVM_INIT_HEAP) and Maximum Java Heap Size (JVM_MAX_HEAP) because the internal Javadefaults for these values are insufficient (and cause features to fail). Plus, the OpenVMS AlphaJava documentation explicitly states that the internal defaults should not be depended on.
The pre-set values do not reflect any tuning, but are simply known working values. Specifictuning should be done based on your application need. Java’s own internal default for thisheap size is insufficient and in-turn causes server features to fail. The pre-set value does notreflect any specific tuning, but is simply a known working value. Specific tuning should be donebased on application need.
Since OpenVMS Integrity (IA64) Java does not have issues with these internal defaults, theyare not pre-set. However, applications may benefit from specific tuning.
Procedure: How to Tune the Java Listener From the Web Console
To tune the Java Listener from the Web Console:
1. Select Workspace from the menu bar.
2. Open the Java Services folder.
3. Right-click DEFAULT and select Properties.
The Java Services Configuration pane opens.
4. Expand the JVM Settings section.
5. Under Non-standard JVM options, enter values in the Initial Java Heap Size and MaximumJava Heap Size fields.
6. Click Save and Restart Java Services.
Configuring for IEEE/G_FLOAT Float Data
As of 7.7.02, OpenVMS 8.x builds are natively IEEE builds and the SET VMSFLOATCONV =IEEE/G-FLOAT command is used to SET the float read method for single (F)/double (D) floatdata. This requires separate configurations for each float type and a hub-sub arrangement tojoin data By default, an IEEE build needs no explicit SET command to access IEEE float data,although it is allowed. To access G_FLOAT data, the following command must be added to theserver edasprof.prf:
SET VMSFLOATCONV = G-FLOAT
6. Installation for OpenVMS
Server Installation 351

This may be done from the Web Console using the server profile edit feature.
The SET command is ignored on non-applicable platforms, so application sources may beshared. The setting also does not apply to the OpenVMS 7.x builds, which are strictly G_FLOATbuilds.
Troubleshooting for OpenVMS
To troubleshoot an installation problem, identify your problem in the following list, and followthe link to a description of the solution.
If you cannot find your problem described in the list, and cannot resolve it yourself, contactCustomer Support Services as described in Information You Should Have on page 13 and Customer Support on page 13.
Problems:
The server starts in safe mode (as indicated by a message in the Web Console at start-up).
For details, see Problem: The Server Starts in Safe Mode on page 353.
Issuing the edastart command without the -start option displays only a few lines in theEDASTART window.
For details, see Problem: EDASTART Window Displays Only a Few Lines on page 353.
The HTTP Listener does not start, or runs intermittently, unless traces are on (edastart -traceon option).
For details, see Problem: HTTP Listener Does Not Start Or Runs Intermittently on page 353.
The Web Console Procedure and Metadata panes do not display any folders.
For details, see Problem: Missing Folders in Web Console Procedure and Metadata Panes onpage 354.
You receive an unexpected EDASHARE message after starting the server.
For details, see Problem: Unexpected EDASHARE Message on page 354.
Troubleshooting for OpenVMS
352 Information Builders

Reference: Problem: The Server Starts in Safe Mode
Problem: The server starts in safe mode. The Web Console home page displays a messagestating that the server is in safe mode and describing what triggered it.
Cause: A common cause for the server starting in safe mode is a problem with the serveradministrator ID password. For example, the password may have been updated on theoperating system but not on the server, so the encrypted copy of the password stored by theserver is out of synchronization with the password on the operating system.
Solution: The server administrator can click the fix hyperlink, which is displayed under theproblem description, to display the relevant pane and resolve the problem.
For example, if the problem is that the server administrator password is out of synchronization:
1. Click the fix hyperlink displayed under the problem description.
2. In the left pane, open the Users folder, then the Server Administrator folder.
3. Click your user ID and select Properties from the pop-up menu.
The Access Control pane is displayed on the right.
4. Type the correct operating system password in the Password field, and type it again in theConfirm Password field.
5. Click Save and Restart.
The Security Mode pane opens on the right.
6. Click the Home icon in the menu bar to return to the Web Console home page.
Reference: Problem: EDASTART Window Displays Only a Few Lines
Problem: Issuing the edastart command without the -start option displays only a few lines inthe terminal session, even though the server starts and EDAPRINT.LOG is complete.
Cause: This is a file contention problem that generally happens on very fast systems. It doesnot affect creating and updating the EDAPRINT.LOG file.
Solution: Start the server by issuing the edastart -start command, immediately followed by theedastart -console command to display the edaprint log.
Reference: Problem: HTTP Listener Does Not Start Or Runs Intermittently
Problem: The HTTP Listener does not start, or runs intermittently, unless traces are on(edastart -traceon option).
Cause: This is caused by a TCP/IP socket synchronization problem on fast systems.
6. Installation for OpenVMS
Server Installation 353

Solution: Briefly delay the socket logic by setting a delay variable intended for this purpose. Todefine the delay, add the following statement to the iadmin ID LOGIN.CON before starting theserver:
DEFINE VMS_RECV_DELAY 1
The unit of measurement is the microsecond. A value of 1 usually resolves the problem.However, the value is likely to be affected by system load, so you will need to experiment tofind the correct value for your system.
Reference: Problem: Missing Folders in Web Console Procedure and Metadata Panes
Problem: The Web Console Procedure and Metadata panes do not display any folders.
Cause: This is caused by a TCP/IP socket synchronization problem on fast systems.
Solution: Briefly delay the socket logic by setting a delay variable intended for this purpose. Todefine the delay, add the following statement to the iadmin ID LOGIN.CON before starting theserver:
DEFINE VMS_RECV_DELAY 1
The unit of measurement is the microsecond. A value of 1 usually resolves the problem;however, the value is likely to be affected by system load, so you will need to experiment tofind the correct value for your system.
Reference: Problem: Unexpected EDASHARE Message
Problem: After the server starts, you receive an unexpected EDASHARE message.
Cause: EDASHARE may have been declared manually in an earlier release.
Solution: Remove the manual EDASHARE declaration.
Reference: Problem: Java Tasks Fail When Using Oracle
Problem: Java tasks fail when using Oracle.
Cause: Newer Oracle releases use Java. When you call Oracle setup scripts (for example, inedaenv.com) and then start the server.
Solution: Call the standard Java setup environment after calling any Oracle setup scripts.
Troubleshooting for OpenVMS
354 Information Builders

Procedure: How to Install and Activate the Debuggable Version of the Server
In core dump or crash situations, the stack information may or may not provide enoughinformation for a problem to be resolved. Debugging software will generally provide thatinformation, but will not normally be installed nor used due to the disk overhead they take.They are also not optimized for performance.
If diagnostic is determined to not have enough information and the use of debugging softwareis warranted, Customer Support Services will inform you to install and activate the debuggableversion of the server. You will then re-run the reproduction to capture a new diagnostic with thedetailed stack to help troubleshoot the problem.
Caution: Do not activate the debuggable version unless explicitly requested to by CustomerSupport Services.
To install and activate the debuggable version of the software:
1. Log on with the administrator ID (often referred to as iadmin).
2. Download the iserverd archive file (for example, .tar, .zip, or .bck) from the download siteto a local directory. Debuggables for OpenVMS environments are not normally shipped onthe original CD media, but can be made available on CD by special request to CustomerSupport Services and requires a lead time of approximately one week. IF CD media isbeing used, mount the media.
3. Run the isetup installation program (located in EDAHOME bin if download was used or in aroot directory of the CD media).
4. At the isetup main menu, select option 4, Install Debuggables to the Installation Directoryand follow the steps supplying information similar to when the original install wasperformed.
5. After completion of isetup, the software may be run in debug mode with the followingsteps.
edastart -stop
Copy the edastart.com to edastartdbg.com and on TSCOM symbol set up line editbin]tscom300.exe to be dbg]tscom300.exe and save.
edastart -dbgonedastartdbg -start
The debugger starts and the user is required to type GO and GO for the actual executableto start (run until repro is completed).
edastart -stopedastart -dbgoffedastart -start
6. Installation for OpenVMS
Server Installation 355

The debugger GO/GO step may be avoided by creating a text file with the words GO andGO on separate lines and issuing a logical for DBG$INPUT before starting the server.
6. If the debug version is no longer needed, the debuggables may be removed. If a servicepack is being installed, the debuggables must be removed to prevent mismatches with thenew release. To remove the debuggables, change the directory to the home directory ofEDAHOME and issue DELETE [.DBG...]*.*;* and then DELETE DBG.DIR;*.
Customer Support Services will provide you with additional instructions as your situationrequires.
Troubleshooting for OpenVMS
356 Information Builders

Chapter7 Information Builders and Third-PartyLicenses
This section contains license text for Information Builders, as well as licenses requiredby the third-party software used by Information Builders.
Since Zip is only supplied on Windows environments, its license is only in reference tothose environments. OpenFlex SDK is supplied on all environments, and, therefore, thelicense applies to all environments. For more information on these technologies andpackages, see their respective websites.
In this chapter:
Information Builders License
OpenFlex SDK License
Zip Archiver License
Information Builders License
CLICK WRAP SOFTWARE LICENSE AGREEMENT
INFORMATION BUILDERS ("IBI") IS WILLING TO GRANT YOU A LICENSE TO THE SOFTWARE ANDACCOMPANYING DOCUMENTATION YOU HAVE ORDERED ON THE CONDITION THAT YOUACCEPT ALL OF THE TERMS CONTAINED HEREIN. THE LICENSE SHALL BE GRANTEDPURSUANT TO EITHER: (A) THE TERMS OF AN APPLICABLE MUTUALLY EXECUTED MASTERSOFTWARE LICENSE AGREEMENT ("MSLA''); OR THE TERMS OF THIS CLICK WRAP SOFTWARELICENSE AGREMEENT ("CWSLA"). IN THE EVENT THAT IBI DETERMINES, IN ITS SOLE ANDEXCLUSIVE JUDGEMENT, THAT AN APPLICABLE MASTER SOFTARE LICENSE AGREEMENT IS INPLACE (THE "MSLA"), THEN THE TERMS OF THE MSLA SHALL APPLY AND SHALL SUPERSEDETHE TERMS OF THIS CWSLA . IF IN ITS SOLE AND EXCLUSIVE JUDGEMENT IBI DETERMINESTHAT AN APPLICABLE MSLA IS NOT IN PLACE, THEN THE TERMS OF THIS CWSLA SHALL APPLYAND SHALL GOVERN YOUR USE OF THE SOFTWARE.
Server Installation 357

IMPORTANT NOTICE TO CUSTOMERS ENCOUNTERING THE DISPLAY OF THIS CWSLA DURINGAN INSTALL: READ ALL OF THE TERMS AND CONDITIONS CONTAINED HEREIN CAREFULLYBEFORE ACCEPTING THESE TERMS. YOU ACCEPT THE TERMS BY EITHER: (A) CLICKING ONTHE "YES" BUTTON BELOW (WINDOWS PLATFORM INSTALLS); (B) REPLYING "YES" WHEREINDICATED (NON-WINDOWS PLATFORM INSTALLS); OR (C) PROCEEDING OTHERWISE WITH THEINSTALLATION. BY PROCEEDING WITH THE INSTALLATION, YOU ACKNOWLEDGE THAT YOU AREACCEPTING AND AGREEING TO ALL OF THE TERMS AND CONDITIONS CONTAINED HEREIN. IFYOU ARE NOT WILLING TO BE BOUND BY THESE TERMS AND CONDITIONS, YOU MUSTPROMPTLY TERMINATE THE INSTALLATION PROCEDURE BY CLICKING "NO" OR REPLYING"NO" TO EXIT.
IN THE EVENT IBI DETERMINES, IN ITS SOLE AND EXCLUSIVE JUDGEMENT, THAT ANAPPLICABLE MUTUALLY ACCEPTED MSLA IS NOT IN PLACE, THEN THE TERMS OF THIS CWSLAREPRESENTS THE ENTIRE AGREEMENT CONCERNING THE SOFTWARE BETWEEN YOU AND IBI,AND THE CWSLA SUPERSEDES ANY PRIOR PROPOSAL, REPRESENTATION, ORUNDERSTANDING BETWEEN THE PARTIES. IN ADDITION TO THE ABOVE, THE FOLLOWINGTERMS APPLY UNDER THE CWSLA:
1. You are hereby granted a nonexclusive, nontransferable object code (machine readable)license to install and internally use the IBI computer software (the "Software") under theterms and conditions set forth in this CWSLA, including any documentation filesaccompanying the Software ("Documentation"). You do not obtain title to or any ownershipor proprietary rights to the Software by virtue of this CWSLA. The Software is owned by IBI,which retains all right, title, and interest therein. The Software is protected by copyright,patent, trademark, trade secret, and other laws.
2. The license grant is limited to the Software products which have been duly licensed asevidenced by your payment of the applicable License Fees to IBI (or your agreement to paythem). The License Fee you pay is determined by certain licensing parameters which areset forth in IBI then current published fee schedule. Such license parameters may include,but are not limited to: (a) permitted number of copies; (b) hardware classification; (c)permitted number of Users; (d) permitted number of "Cores" on a duly licensed computer;(e) number of permitted Images; (e) number of connected Instances; all as more fully setforth in the applicable IBI fee schedule. The applicable licensing parameters shall be setforth in the ordering vehicle by which you have committed to pay the applicable LicenseFees, such as a Rider to the MSLA, or your purchase order. In no event, however, shall thelicense parameters of the license granted exceed those for a license for an equivalentdollar value as set forth in IBI's then current published fee schedule, unless expresslyagreed to in writing by IBI. Any "trial" or "evaluation" copy of the Software shall be oflimited duration and shall expire upon expiration or termination of the trial period agreedupon by IBI in writing.
Information Builders License
358 Information Builders

Unless otherwise set forth on the applicable Rider to the MSLA, or on a purchase orderwhich has been accepted by IBI (IBI reserves the right to reject any purchase order within areasonable period of time), this License grants you the right to use the Software on thesingle computer identified in the Rider to the MSLA or your purchase order by ModelNumber, Serial Number and installation location, such grant permits use on only onecomputer at any time. If you have multiple licenses for the Software, then at any one timeyou may have as many copies of the Software in use as you have licenses. The Software isin use on a computer when it is loaded into the temporary memory (i.e., RAM) or installedinto the permanent memory (e.g., hard disk or other storage device) of that computer,except that a copy installed on a network server for the sole purpose of access from acomputer terminal or workstation for which a separate license is required is not considered"in use." You may not use the Software to process work for any party other than yourself ifyou are the holder of an individual license for your company's own internal businesspurposes if the licensee is a company. Under no circumstances may the Software be usedfor purposes of performing service bureau work or on a time-share basis or rental or leasebasis or be sold by the licensee, whether or not for consideration.
3. Copyright. The Software is owned by IBI or its suppliers and is protected by United Statescopyright laws and international treaty provisions. Therefore, you must treat the Softwarelike any other copyrighted material (e.g., book or musical recording) except that you mayeither (a) make one copy of the Software solely for backup or archival purposes; or (b)transfer the Software to a single hard disk provided you keep the original solely for backupor archival purposes. You may not copy the written materials accompanying the Software.
Upgrade Fees. You agree that upgrade fees may apply in the event pricing parameter whichapplies to a license acquired hereunder is exceeded. You agree to promptly notify IBI inwriting in the event you exceed any applicable licensing parameter, such as: (a) An increasein the number of copies licensed; (b) a change to a computer in a higher hardwareclassification; (c) An increase in the number of permitted Users. A "User" shall mean aspecific individual employed by the licensee who you have authorized to use the Software,regardless of whether the individual is actively using the Software at any time; (d) anincrease in the number of permitted Images. An "Image" is defined as a single instance orinstallation of the licensed Software, operating on an authorized computer; (e) An increasein the number of "Connected Instances". Certain iWay Software items are priced based onthe number of connections to an application software package such as SAP, or atransaction system such as CICS. Each connection is referred to as an "Instance"; (f) Anincrease in the number of physical or virtual "Cores". Some Windows / Intel, UNIX or Linuxbased servers have a multicore chip set. A multicore server has a single chip whichcontains multiple processors, referred to as Cores. Some Intel based servers employ hyper-threading technology which allows virtual processors to be defined from one or morephysical processors. For licensing purposes each virtual processor created via hyper-threading must be licensed, as opposed to the number of physical processors.
7. Information Builders and Third-Party Licenses
Server Installation 359

4. You may not sell, transfer, sublicense, rent, lease, convey, copy, modify, translate, convertto another programming language, decompile, disassemble, or create derivative works ofthe Software for any purpose. You may make one backup copy as specified in Section 3.However, decompilation or any attempt to break or circumvent the Software verificationmechanisms (for example, copy protection) is expressly prohibited.
5. This license does not include any support, maintenance or upgrades, or enhancements ofthe Software. Such services are available through subscription to IBI's annualInfoResponse support offering.
6. IBI warrants that the distribution media on which the Software is furnished will be free ofdefects for 90 days from the date of purchase. The entire liability of IBI and your exclusiveremedy for breach of this limited warranty is the replacement of any distribution media thatis defective.
EXCEPT FOR THE LIMITED WARRANTY AS TO THE MEDIA, THE SOFTWARE IS PROVIDED "ASIS" WITHOUT WARRANTY OF ANY KIND, EITHER EXPRESSED OR IMPLIED. THERE ARE NOIMPLIED WARRANTIES OF MERCHANTABILITY OR FITNESS FOR A PARTICULAR PURPOSE.THE ENTIRE RISK AS TO THE FITNESS, QUALITY, AND PERFORMANCE OF THE SOFTWARE ISWITH YOU. IBI DOES NOT WARRANT THAT USE OF THE SOFTWARE WILL BEUNINTERRUPTED OR ERROR FREE.
IBI SHALL NOT HAVE ANY LIABILITY FOR ANY KIND OF DAMAGES FOR LOST PROFITS,WHETHER DIRECT, INDIRECT, INCIDENTAL, PUNITIVE, OR CONSEQUENTIAL ARISING OUTOF THE USE OR PERFORMANCE OF THE SOFTWARE, THE SOFTWARE DOCUMENTATION, ORANY SERVICES PROVIDED IN CONNECTION THEREWITH, EVEN IF IBI HAS BEEN ADVISED OFTHE LIKELIHOOD OF SUCH DAMAGES OCCURRING.
If, notwithstanding the above disclaimers, IBI is found liable as a consequence of the useor performance of the Software, the Software Documentation or services provided (whetherbased on contract, negligence, tort, strict liability, breach of warranty, or any other legaltheory of liability whatsoever), the amount of IBI's liability shall not exceed the license feepaid by you for your license for the Software.
Some jurisdictions do not allow excluding or limiting implied warranties or limiting liabilityfor incidental or consequential damages, and some jurisdictions have special statutoryconsumer protection provisions that may supersede the limitations in this Section. As aresult, these imitations may not apply to you if prohibited by the laws of your jurisdiction.
7. Term. This License is effective until terminated. You may terminate it at any time bydestroying the media containing the Software, together with all copies of the Software inany form, and deleting the Software from any computer on which it is loaded. IBI mayterminate this license by giving you written notice that you are in breach of any of the termsand conditions set forth in this Agreement. You agree that upon such termination, you willdestroy or deliver to IBI all copies of the Software and related documents and delete allcopies of the Software from any computer on which the Software is loaded.
Information Builders License
360 Information Builders

8. You acknowledge and agree to the following:
a. You have read this License and are bound hereby.
b. This License may not be modified or waived except in a written document signed by anofficer of IBI. Any modification or waiver contained in any document which you submit toIBI (whether prior to or after receiving the Software) shall be invalid and ineffective, andthis License alone shall govern and control.
c. This License contains our full agreement and you are not relying on any statements orrepresentations concerning the Software made to you, other than contained in themanuals and other written materials furnished by IBI.
d. This License shall be governed and controlled by the substantive laws of the State ofNew York.
e. If any term of this agreement is held illegal or unenforceable by any court of competentjurisdiction, such term shall be considered inoperable only to the extent of such illegalityor unenforceability, and such holding shall not impair the validity or enforceability of anyremaining term of this License. The parties agree to replace any such illegal orunenforceable provision with a new provision, which has the most nearly similarpermissible economic or other effect.
f. A waiver of the breach of any provision hereof shall not be deemed to be a waiver of asubsequent breach of such provision or a waiver of the breach of any other provision.
g. The License shall be binding upon and inure to the benefit of the parties' respectiveheirs, successors, and assigns.
h. The terms of this CWSLA may be superseded upon the parties executing IBI's MasterSoftware License Agreement and an applicable Rider identifying the Software licensedthere under.
Information Builders, Inc.Two Penn PlazaNew York, NY 10121-2898
(212) 736-4433
OpenFlex SDK License
MOZILLA PUBLIC LICENSE Version 1.1 ------------------------------
1. Definitions.
7. Information Builders and Third-Party Licenses
Server Installation 361

1.0.1. "Commercial Use" means distribution or otherwise making the Covered Codeavailable to a third party.
1.1. "Contributor" means each entity that creates or contributes to the creation ofModifications.
1.2. "Contributor Version" means the combination of the Original Code, priorModifications used by a Contributor, and the Modifications made by that particularContributor.
1.3. "Covered Code" means the Original Code or Modifications or the combination of theOriginal Code and Modifications, in each case including portions thereof.
1.4. "Electronic Distribution Mechanism" means a mechanism generally accepted in thesoftware development community for the electronic transfer of data.
1.5. "Executable" means Covered Code in any form other than Source Code.
1.6. "Initial Developer" means the individual or entity identified as the Initial Developer inthe Source Code notice required by Exhibit A.
1.7. "Larger Work" means a work which combines Covered Code or portions thereof withcode not governed by the terms of this License.
1.8. "License" means this document.
1.8.1. "Licensable" means having the right to grant, to the maximum extent possible,whether at the time of the initial grant or subsequently acquired, any and all of the rightsconveyed herein.
OpenFlex SDK License
362 Information Builders

1.9. "Modifications" means any addition to or deletion from the substance or structureof either the Original Code or any previous Modifications. When Covered Code isreleased as a series of files, a Modification is:
A. Any addition to or deletion from the contents of a file containing Original Code orprevious Modifications.
B. Any new file that contains any part of the Original Code or previous Modifications.
1.10. "Original Code" means Source Code of computer software code which is describedin the Source Code notice required by Exhibit A as Original Code, and which, at the timeof its release under this License is not already Covered Code governed by this License.
1.10.1. "Patent Claims" means any patent claim(s), now owned or hereafter acquired,including without limitation, method, process, and apparatus claims, in any patentLicensable by grantor.
1.11. "Source Code" means the preferred form of the Covered Code for makingmodifications to it, including all modules it contains, plus any associated interfacedefinition files, scripts used to control compilation and installation of an Executable, orsource code differential comparisons against either the Original Code or another wellknown, available Covered Code of the Contributor's choice. The Source Code can be in acompressed or archival form, provided the appropriate decompression or de-archivingsoftware is widely available for no charge.
1.12. "You" (or "Your") means an individual or a legal entity exercising rights under, andcomplying with all of the terms of, this License or a future version of this License issuedunder Section 6.1. For legal entities, "You" includes any entity which controls, iscontrolled by, or is under common control with You. For purposes of this definition,"control" means (a) the power, direct or indirect, to cause the direction or managementof such entity, whether by contract or otherwise, or (b) ownership of more than fiftypercent (50%) of the outstanding shares or beneficial ownership of such entity.
2. Source Code License.
7. Information Builders and Third-Party Licenses
Server Installation 363

2.1. The Initial Developer Grant. The Initial Developer hereby grants You a world-wide,royalty-free, non-exclusive license, subject to third party intellectual property claims:
(a) under intellectual property rights (other than patent or trademark) Licensable byInitial Developer to use, reproduce, modify, display, perform, sublicense and distributethe Original Code (or portions thereof) with or without Modifications, and/or as part ofa Larger Work; and
(b) under Patents Claims infringed by the making, using or selling of Original Code, tomake, have made, use, practice, sell, and offer for sale, and/or otherwise dispose ofthe Original Code (or portions thereof).
(c) the licenses granted in this Section 2.1(a) and (b) are effective on the date InitialDeveloper first distributes Original Code under the terms of this License.
(d) Notwithstanding Section 2.1(b) above, no patent license is granted: 1) for codethat You delete from the Original Code; 2) separate from the Original Code; or 3) forinfringements caused by: i) the modification of the Original Code or ii) the combinationof the Original Code with other software or devices.
2.2. Contributor Grant. Subject to third party intellectual property claims, eachContributor hereby grants You a world-wide, royalty-free, non-exclusive license
(a) under intellectual property rights (other than patent or trademark) Licensable byContributor, to use, reproduce, modify, display, perform, sublicense and distribute theModifications created by such Contributor (or portions thereof) either on anunmodified basis, with other Modifications, as Covered Code and/or as part of aLarger Work; and
OpenFlex SDK License
364 Information Builders

(b) under Patent Claims infringed by the making, using, or selling of Modificationsmade by that Contributor either alone and/or in combination with its ContributorVersion (or portions of such combination), to make, use, sell, offer for sale, havemade, and/or otherwise dispose of: 1) Modifications made by that Contributor (orportions thereof); and 2) the combination of Modifications made by that Contributorwith its Contributor Version (or portions of such combination).
(c) the licenses granted in Sections 2.2(a) and 2.2(b) are effective on the dateContributor first makes Commercial Use of the Covered Code.
(d) Notwithstanding Section 2.2(b) above, no patent license is granted: 1) for anycode that Contributor has deleted from the Contributor Version; 2) separate from theContributor Version; 3) for infringements caused by: i) third party modifications ofContributor Version or ii) the combination of Modifications made by that Contributorwith other software (except as part of the Contributor Version) or other devices; or 4)under Patent Claims infringed by Covered Code in the absence of Modifications madeby that Contributor.
3. Distribution Obligations.
3.1. Application of License. The Modifications which You create or to which Youcontribute are governed by the terms of this License, including without limitation Section2.2. The Source Code version of Covered Code may be distributed only under the termsof this License or a future version of this License released under Section 6.1, and Youmust include a copy of this License with every copy of the Source Code You distribute.You may not offer or impose any terms on any Source Code version that alters orrestricts the applicable version of this License or the recipients' rights hereunder.However, You may include an additional document offering the additional rightsdescribed in Section 3.5.
7. Information Builders and Third-Party Licenses
Server Installation 365

3.2. Availability of Source Code. Any Modification which You create or to which Youcontribute must be made available in Source Code form under the terms of this Licenseeither on the same media as an Executable version or via an accepted ElectronicDistribution Mechanism to anyone to whom you made an Executable version available;and if made available via Electronic Distribution Mechanism, must remain available for atleast twelve (12) months after the date it initially became available, or at least six (6)months after a subsequent version of that particular Modification has been madeavailable to such recipients. You are responsible for ensuring that the Source Codeversion remains available even if the Electronic Distribution Mechanism is maintained bya third party.
3.3. Description of Modifications. You must cause all Covered Code to which Youcontribute to contain a file documenting the changes You made to create that CoveredCode and the date of any change. You must include a prominent statement that theModification is derived, directly or indirectly, from Original Code provided by the InitialDeveloper and including the name of the Initial Developer in (a) the Source Code, and (b)in any notice in an Executable version or related documentation in which You describethe origin or ownership of the Covered Code.
3.4. Intellectual Property Matters
(a) Third Party Claims. If Contributor has knowledge that a license under a third party'sintellectual property rights is required to exercise the rights granted by suchContributor under Sections 2.1 or 2.2, Contributor must include a text file with theSource Code distribution titled "LEGAL" which describes the claim and the partymaking the claim in sufficient detail that a recipient will know whom to contact. IfContributor obtains such knowledge after the Modification is made available asdescribed in Section 3.2, Contributor shall promptly modify the LEGAL file in all copiesContributor makes available thereafter and shall take other steps (such as notifyingappropriate mailing lists or newsgroups) reasonably calculated to inform those whoreceived the Covered Code that new knowledge has been obtained.
OpenFlex SDK License
366 Information Builders

(b) Contributor APIs. If Contributor's Modifications include an application programminginterface and Contributor has knowledge of patent licenses which are reasonablynecessary to implement that API, Contributor must also include this information in theLEGAL file.
(c) Representations. Contributor represents that, except as disclosed pursuant toSection 3.4(a) above, Contributor believes that Contributor's Modifications areContributor's original creation(s) and/or Contributor has sufficient rights to grant therights conveyed by this License.
3.5. Required Notices. You must duplicate the notice in Exhibit A in each file of theSource Code. If it is not possible to put such notice in a particular Source Code file dueto its structure, then You must include such notice in a location (such as a relevantdirectory) where a user would be likely to look for such a notice. If You created one ormore Modification(s) You may add your name as a Contributor to the notice described inExhibit A. You must also duplicate this License in any documentation for the SourceCode where You describe recipients' rights or ownership rights relating to Covered Code.You may choose to offer, and to charge a fee for, warranty, support, indemnity or liabilityobligations to one or more recipients of Covered Code. However, You may do so only onYour own behalf, and not on behalf of the Initial Developer or any Contributor. You mustmake it absolutely clear than any such warranty, support, indemnity or liability obligationis offered by You alone, and You hereby agree to indemnify the Initial Developer andevery Contributor for any liability incurred by the Initial Developer or such Contributor as aresult of warranty, support, indemnity or liability terms You offer.
7. Information Builders and Third-Party Licenses
Server Installation 367

3.6. Distribution of Executable Versions. You may distribute Covered Code in Executableform only if the requirements of Section 3.1-3.5 have been met for that Covered Code,and if You include a notice stating that the Source Code version of the Covered Code isavailable under the terms of this License, including a description of how and where Youhave fulfilled the obligations of Section 3.2. The notice must be conspicuously includedin any notice in an Executable version, related documentation or collateral in which Youdescribe recipients' rights relating to the Covered Code. You may distribute theExecutable version of Covered Code or ownership rights under a license of Your choice,which may contain terms different from this License, provided that You are in compliancewith the terms of this License and that the license for the Executable version does notattempt to limit or alter the recipient's rights in the Source Code version from the rightsset forth in this License. If You distribute the Executable version under a different licenseYou must make it absolutely clear that any terms which differ from this License areoffered by You alone, not by the Initial Developer or any Contributor. You hereby agree toindemnify the Initial Developer and every Contributor for any liability incurred by the InitialDeveloper or such Contributor as a result of any such terms You offer.
3.7. Larger Works. You may create a Larger Work by combining Covered Code with othercode not governed by the terms of this License and distribute the Larger Work as asingle product. In such a case, You must make sure the requirements of this License arefulfilled for the Covered Code.
4. Inability to Comply Due to Statute or Regulation.
If it is impossible for You to comply with any of the terms of this License with respect tosome or all of the Covered Code due to statute, judicial order, or regulation then Youmust: (a) comply with the terms of this License to the maximum extent possible; and (b)describe the limitations and the code they affect. Such description must be included inthe LEGAL file described in Section 3.4 and must be included with all distributions of theSource Code. Except to the extent prohibited by statute or regulation, such descriptionmust be sufficiently detailed for a recipient of ordinary skill to be able to understand it.
5. Application of this License.
This License applies to code to which the Initial Developer has attached the notice inExhibit A and to related Covered Code.
6. Versions of the License.
OpenFlex SDK License
368 Information Builders

6.1. New Versions. Netscape Communications Corporation ("Netscape") may publishrevised and/or new versions of the License from time to time. Each version will be givena distinguishing version number.
6.2. Effect of New Versions. Once Covered Code has been published under a particularversion of the License, You may always continue to use it under the terms of thatversion. You may also choose to use such Covered Code under the terms of anysubsequent version of the License published by Netscape. No one other than Netscapehas the right to modify the terms applicable to Covered Code created under this License.
6.3. Derivative Works. If You create or use a modified version of this License (which youmay only do in order to apply it to code which is not already Covered Code governed bythis License), You must (a) rename Your license so that the phrases "Mozilla","MOZILLAPL", "MOZPL", "Netscape", "MPL", "NPL" or any confusingly similar phrase donot appear in your license (except to note that your license differs from this License) and(b) otherwise make it clear that Your version of the license contains terms which differfrom the Mozilla Public License and Netscape Public License. (Filling in the name of theInitial Developer, Original Code or Contributor in the notice described in Exhibit A shallnot of themselves be deemed to be modifications of this License.)
7. DISCLAIMER OF WARRANTY.
COVERED CODE IS PROVIDED UNDER THIS LICENSE ON AN "AS IS" BASIS, WITHOUTWARRANTY OF ANY KIND, EITHER EXPRESSED OR IMPLIED, INCLUDING, WITHOUTLIMITATION, WARRANTIES THAT THE COVERED CODE IS FREE OF DEFECTS,MERCHANTABLE, FIT FOR A PARTICULAR PURPOSE OR NON-INFRINGING. THE ENTIRERISK AS TO THE QUALITY AND PERFORMANCE OF THE COVERED CODE IS WITH YOU.SHOULD ANY COVERED CODE PROVE DEFECTIVE IN ANY RESPECT, YOU (NOT THEINITIAL DEVELOPER OR ANY OTHER CONTRIBUTOR) ASSUME THE COST OF ANYNECESSARY SERVICING, REPAIR OR CORRECTION. THIS DISCLAIMER OF WARRANTYCONSTITUTES AN ESSENTIAL PART OF THIS LICENSE. NO USE OF ANY COVERED CODEIS AUTHORIZED HEREUNDER EXCEPT UNDER THIS DISCLAIMER.
8. TERMINATION.
7. Information Builders and Third-Party Licenses
Server Installation 369

8.1. This License and the rights granted hereunder will terminate automatically if You failto comply with terms herein and fail to cure such breach within 30 days of becomingaware of the breach. All sublicenses to the Covered Code which are properly grantedshall survive any termination of this License. Provisions which, by their nature, mustremain in effect beyond the termination of this License shall survive.
8.2. If You initiate litigation by asserting a patent infringement claim (excludingdeclaratory judgment actions) against Initial Developer or a Contributor (the InitialDeveloper or Contributor against whom You file such action is referred to as"Participant") alleging that:
(a) such Participant's Contributor Version directly or indirectly infringes any patent,then any and all rights granted by such Participant to You under Sections 2.1 and/or2.2 of this License shall, upon 60 days notice from Participant terminateprospectively, unless if within 60 days after receipt of notice You either: (i) agree inwriting to pay Participant a mutually agreeable reasonable royalty for Your past andfuture use of Modifications made by such Participant, or (ii) withdraw Your litigationclaim with respect to the Contributor Version against such Participant. If within 60days of notice, a reasonable royalty and payment arrangement are not mutuallyagreed upon in writing by the parties or the litigation claim is not withdrawn, the rightsgranted by Participant to You under Sections 2.1 and/or 2.2 automatically terminateat the expiration of the 60 day notice period specified above.
(b) any software, hardware, or device, other than such Participant's ContributorVersion, directly or indirectly infringes any patent, then any rights granted to You bysuch Participant under Sections 2.1(b) and 2.2(b) are revoked effective as of the dateYou first made, used, sold, distributed, or had made, Modifications made by thatParticipant.
8.3. If You assert a patent infringement claim against Participant alleging that suchParticipant's Contributor Version directly or indirectly infringes any patent where suchclaim is resolved (such as by license or settlement) prior to the initiation of patentinfringement litigation, then the reasonable value of the licenses granted by suchParticipant under Sections 2.1 or 2.2 shall be taken into account in determining theamount or value of any payment or license.
OpenFlex SDK License
370 Information Builders

8.4. In the event of termination under Sections 8.1 or 8.2 above, all end user licenseagreements (excluding distributors and resellers) which have been validly granted by Youor any distributor hereunder prior to termination shall survive termination.
9. LIMITATION OF LIABILITY.
UNDER NO CIRCUMSTANCES AND UNDER NO LEGAL THEORY, WHETHER TORT(INCLUDING NEGLIGENCE), CONTRACT, OR OTHERWISE, SHALL YOU, THE INITIALDEVELOPER, ANY OTHER CONTRIBUTOR, OR ANY DISTRIBUTOR OF COVERED CODE, ORANY SUPPLIER OF ANY OF SUCH PARTIES, BE LIABLE TO ANY PERSON FOR ANYINDIRECT, SPECIAL, INCIDENTAL, OR CONSEQUENTIAL DAMAGES OF ANY CHARACTERINCLUDING, WITHOUT LIMITATION, DAMAGES FOR LOSS OF GOODWILL, WORKSTOPPAGE, COMPUTER FAILURE OR MALFUNCTION, OR ANY AND ALL OTHERCOMMERCIAL DAMAGES OR LOSSES, EVEN IF SUCH PARTY SHALL HAVE BEENINFORMED OF THE POSSIBILITY OF SUCH DAMAGES. THIS LIMITATION OF LIABILITYSHALL NOT APPLY TO LIABILITY FOR DEATH OR PERSONAL INJURY RESULTING FROMSUCH PARTY'S NEGLIGENCE TO THE EXTENT APPLICABLE LAW PROHIBITS SUCHLIMITATION. SOME JURISDICTIONS DO NOT ALLOW THE EXCLUSION OR LIMITATION OFINCIDENTAL OR CONSEQUENTIAL DAMAGES, SO THIS EXCLUSION AND LIMITATION MAYNOT APPLY TO YOU.
10. U.S. GOVERNMENT END USERS.
The Covered Code is a "commercial item," as that term is defined in 48 C.F.R. 2.101(Oct. 1995), consisting of "commercial computer software" and "commercial computersoftware documentation," as such terms are used in 48 C.F.R. 12.212 (Sept. 1995).Consistent with 48 C.F.R. 12.212 and 48 C.F.R. 227.7202-1 through 227.7202-4 (June1995), all U.S. Government End Users acquire Covered Code with only those rights setforth herein.
11. MISCELLANEOUS.
7. Information Builders and Third-Party Licenses
Server Installation 371

This License represents the complete agreement concerning subject matter hereof. Ifany provision of this License is held to be unenforceable, such provision shall bereformed only to the extent necessary to make it enforceable. This License shall begoverned by California law provisions (except to the extent applicable law, if any,provides otherwise), excluding its conflict-of-law provisions. With respect to disputes inwhich at least one party is a citizen of, or an entity chartered or registered to dobusiness in the United States of America, any litigation relating to this License shall besubject to the jurisdiction of the Federal Courts of the Northern District of California, withvenue lying in Santa Clara County, California, with the losing party responsible for costs,including without limitation, court costs and reasonable attorneys' fees and expenses.The application of the United Nations Convention on Contracts for the International Saleof Goods is expressly excluded. Any law or regulation which provides that the language ofa contract shall be construed against the drafter shall not apply to this License.
12. RESPONSIBILITY FOR CLAIMS.
As between Initial Developer and the Contributors, each party is responsible for claimsand damages arising, directly or indirectly, out of its utilization of rights under thisLicense and You agree to work with Initial Developer and Contributors to distribute suchresponsibility on an equitable basis. Nothing herein is intended or shall be deemed toconstitute any admission of liability.
13. MULTIPLE-LICENSED CODE.
Initial Developer may designate portions of the Covered Code as "Multiple-Licensed"."Multiple-Licensed" means that the Initial Developer permits you to utilize portions of theCovered Code under Your choice of the NPL or the alternative licenses, if any, specifiedby the Initial Developer in the file described in Exhibit A.
EXHIBIT A -Mozilla Public License.
``The contents of this file are subject to the Mozilla Public License Version 1.1 (the"License"); you may not use this file except in compliance with the License. You mayobtain a copy of the License at http://www.mozilla.org/MPL/
OpenFlex SDK License
372 Information Builders

Software distributed under the License is distributed on an "AS IS" basis, WITHOUTWARRANTY OF ANY KIND, either express or implied. See the License for the specificlanguage governing rights and limitations under the License.
The Original Code is ______________________________________.
The Initial Developer of the Original Code is ________________________. Portions createdby ______________________ are Copyright (C) ______ _______________________. AllRights Reserved.
Contributor(s): ______________________________________.
Alternatively, the contents of this file may be used under the terms of the _____ license(the "[___] License"), in which case the provisions of [______] License are applicableinstead of those above. If you wish to allow use of your version of this file only under theterms of the [____] License and not to allow others to use your version of this file underthe MPL, indicate your decision by deleting the provisions above and replace them withthe notice and other provisions required by the [___] License. If you do not delete theprovisions above, a recipient may use your version of this file under either the MPL or the[___] License."
[NOTE: The text of this Exhibit A may differ slightly from the text of the notices in theSource Code files of the Original Code. You should use the text of this Exhibit A ratherthan the text found in the Original Code Source Code for Your Modifications.]
Zip Archiver License
This is version 2007-Mar-4 of the Info-ZIP license. The definitive version of this documentshould be available at ftp://ftp.info-zip.org/pub/infozip/license.html indefinitely and a copy at http://www.info-zip.org/pub/infozip/license.html.
Copyright (c) 1990-2007 Info-ZIP. All rights reserved.
For the purposes of this copyright and license, "Info-ZIP" is defined as the following set ofindividuals:
7. Information Builders and Third-Party Licenses
Server Installation 373

Mark Adler, John Bush, Karl Davis, Harald Denker, Jean-Michel Dubois, Jean-loup Gailly, HunterGoatley, Ed Gordon, Ian Gorman, Chris Herborth, Dirk Haase, Greg Hartwig, Robert Heath,Jonathan Hudson, Paul Kienitz, David Kirschbaum, Johnny Lee, Onno van der Linden, IgorMandrichenko, Steve P. Miller, Sergio Monesi, Keith Owens, George Petrov, Greg Roelofs, KaiUwe Rommel, Steve Salisbury, Dave Smith, Steven M. Schweda, Christian Spieler, CosminTruta, Antoine Verheijen, Paul von Behren, Rich Wales, Mike White.
This software is provided "as is," without warranty of any kind, express or implied. In no eventshall Info-ZIP or its contributors be held liable for any direct, indirect, incidental, special orconsequential damages arising out of the use of or inability to use this software.
Permission is granted to anyone to use this software for any purpose, including commercialapplications, and to alter it and redistribute it freely, subject to the above disclaimer and thefollowing restrictions:
Redistributions of source code (in whole or in part) must retain the above copyright notice,definition, disclaimer, and this list of conditions.
Redistributions in binary form (compiled executables and libraries) must reproduce theabove copyright notice, definition, disclaimer, and this list of conditions in documentationand/or other materials provided with the distribution. The sole exception to this condition isredistribution of a standard UnZipSFX binary (including SFXWiz) as part of a self-extractingarchive; that is permitted without inclusion of this license, as long as the normal SFXbanner has not been removed from the binary or disabled.
Altered versions--including, but not limited to, ports to new operating systems, existingports with new graphical interfaces, versions with modified or added functionality, anddynamic, shared, or static library versions not from Info-ZIP--must be plainly marked as suchand must not be misrepresented as being the original source or, if binaries, compiled fromthe original source. Such altered versions also must not be misrepresented as being Info-ZIP releases--including, but not limited to, labeling of the altered versions with the names"Info-ZIP" (or any variation thereof, including, but not limited to, different capitalizations),"Pocket UnZip," "WiZ" or "MacZip" without the explicit permission of Info-ZIP. Such alteredversions are further prohibited from misrepresentative use of the Zip-Bugs or Info-ZIP emailaddresses or the Info-ZIP URL(s), such as to imply Info-ZIP will provide support for thealtered versions.
Info-ZIP retains the right to use the names "Info-ZIP," "Zip," "UnZip," "UnZipSFX," "WiZ,""Pocket UnZip," "Pocket Zip," and "MacZip" for its own source and binary releases.
Zip Archiver License
374 Information Builders

Index
&FOCCPU 188, 273
&FOCZIIPCPU 188, 273
&FOCZIIPONCP 188, 273
A
accessing files under ddnames 154, 241
Adabas adapter requirements for z/OS Server
118, 212
adapter requirements for z/OS Server 116, 210
adapters 149, 235
DB2 CLI 149, 235
C
CA-DATACOM adapter requirements for z/OS
Server 118, 212
CA-IDMS/DB adapter requirements for z/OS
Server 118, 212
CA-IDMS/SQL adapter requirements for z/OS
Server 118, 212
CA-Top Secret configuration for z/OS Server 144
Call Java adapter requirements for z/OS Server
118
CICS Transaction adapter requirements for z/OS
Server 119, 212
CL and CMD programs 314, 346
D
DATACOM adapter requirements for z/OS Server
118, 212
DB2 adapter 149, 235
security exit 149, 235
DB2 CAF adapter requirements for z/OS Server
119, 215
DB2 CLI adapter 149, 235
requirements for z/OS Server 119, 215
DB2 data 182, 267
DDNAME translation with MSODDX 154, 241
debuggable version of server
OpenVMS 355
UNIX 84
Dialogue Manager commands 357
downloading installation files via FTP 26
OpenVMS Server 332
UNIX Server 27, 59, 300, 332
Windows Server 26
E
EDAENV.COM 347
edasprint 51, 81, 324
JVM not found 194
EJB adapter requirements for z/OS Server 120
eTrust CA-Top Secret 234
Server Installation 375

F
FTPing installation files 26, 124, 255
OpenVMS Server 332
UNIX Server 27, 59, 300, 332
Windows Server 26
z/OS 124, 255
G
generating server traces 45, 75, 320, 348
GETPSENT troubleshooting 194
I
ibisamp samples 48, 77, 191, 279, 315, 351
IBM i Server 289
accessing IFS files 315
accessing QSYS libraries 315
CL and CMD programs 314
configuring security mode OPSYS 309
conventions for QSYS 316
creating user IDs 298
installation requirements 290
memory usage 291
startup options 312
supported operating systems 290
supported platforms 290
verifying installation 307
IDMS/DB adapter requirements for z/OS Server
118, 212
IDMS/SQL adapter requirements for z/OS Server
118, 212
IFS files and QSYS libraries 315
IMS adapter requirements for z/OS Server 120,
215
installation requirements 25
IBM i 290
OpenVMS 326
UNIX 54
Windows 20, 25
zOS 88
INSUFFICIENT AUTHORITY TO GETPSENT
troubleshooting 194
ISETUP procedure 126, 220
J
Java heap size 77, 351
Java Listener 77, 351
JDBC adapter requirements for z/OS Server 121
JVM not found 51, 81, 324
troubleshooting on USS 194
L
license code 40, 71
M
Master Files 177, 261
memory usage
IBM i 291
Microsoft SQL Server adapter requirements for
z/OS Server 121
Index
376 Information Builders

Millennium adapter requirements for z/OS Server
121, 215
Model 204 adapter requirements for z/OS Server
121, 216
MODIFY commands 148
Monitor for zIIP processing 187, 272
MQSeries adapter requirements for z/OS Server
121, 216
MSODDX in user-written subroutines 154, 241
MSODDX routine for DDNAME Translation 154,
241
N
NATURAL batch adapter requirements for z/OS
Server 122, 216
O
offload processing to zIIP engine 183, 267
OpenVMS Server 325
adding JOB, GROUP or defined environment
values 347
changing privileges and quotas 343
CL and CMD programs 346
configuring security mode OPSYS 342
creating user IDs 329
debuggable version 355
downloading installation files 332
end-user requirements 347
installation requirements 326
software availability 332
OpenVMS Server 325
startup options 344, 346
supported operating systems 326
supported platforms 326
troubleshooting tools 355
verifying installation 341
Web Console 344
OPSYS security mode 72, 141, 232
IBM i Server 309
OpenVMS Server 342
UNIX Server 72, 141, 232
overriding time zone setting 154, 241
P
performance enhancement 189
HFS deployment 189
PDS deployment 274
processing, offloading to zIIP engine 183, 267
Q
QSYS libraries and IFS files 315
R
RECTYPE values 177, 261
S
safe mode 50, 81, 323, 353
troubleshooting 50, 81, 323, 353
samples 48, 77, 191, 279, 315, 351
Index
Server Installation 377

SAP adapter requirements for z/OS Server 122,
216
security
IBM i Server 309
OpenVMS Server 342
UNIX Server 72, 141, 232
server accounting 177, 261
enabling 177, 262
for DB2 182, 267
statistics 177, 261
server does not start 353
troubleshooting on OpenVMS 353, 354
server traces 45, 75, 320, 348
service can't be stopped on Windows 51
SET parameters, ZIIP 185, 269
SIMMAXZIIP 185, 270
SMF records RECTYPES 1 and 4 180, 264
SMF records RECTYPES 2 and 5 181, 266
SMF RECTYPES 179, 264
SMFNUM facility 177, 261, 262
starting the server in UNIX 73
statistics 177, 261
stored procedures 177, 261
Supra adapter requirements for z/OS Server 122,
217
system requirements for zIIP enablement 184,
268
T
time zone setting 154, 241
Top Secret configuration for z/OS Server 144
traces 45, 75, 320, 348
generating 45, 75, 320, 348
Translating DDNAMES for migration 154, 241
troubleshooting 52, 202, 288
adding your problem to the manual 52, 202,
288
EDASHARE message on OpenVMS 354
IBM i server 322
INSUFFICIENT AUTHORITY TO
GETPSENT;INSUFFICIENT AUTHORITY TO
GETPSENT 194
Java tasks fail with Oracle on OpenVMS 354
JVM not found 194
JVM not found message 51, 81, 324
OpenVMS server 352
safe mode 50, 81, 323, 353
server on OpenVMS displays only a few lines
353
server on OpenVMS does not start 353, 354
U4039 abend on USS 194, 281
UNIX server 80
Windows server 49
Windows service won't stop 51
z/OS USS server (HFS deployment) 193
z/OS USS server (PDS deployment) 281
tuning the Java Listener 77, 351
tutorials 48, 77, 191, 279, 315, 351
Index
378 Information Builders

U
U4039 abend 194, 281
troubleshooting 194, 281
UNIX Server 53
additional configurations 66, 337
configuring security mode OPSYS 72, 141,
232
debuggable version 84
downloading installation files 27, 59, 300,
332
installation requirements 54
installing using .rpm 65
installing using isetup 61
refreshing installation 67, 338
starting 73
supported operating systems 54
supported platforms 54
troubleshooting tools 84
verifying installation 69
Web Console 70
user IDs
IBM i 298
OpenVMS 329
V
verifying installation 38
IBM i 307
OpenVMS Server 341
UNIX 69
Windows 38
VSAM CICS adapter requirements for z/OS Server
122, 217
W
Web Console 28
z/OS 147, 234
IBM i 307
UNIX 70
Windows NT/2000 28
Windows Server 19
downloading installation files 26
installation requirements 20, 25
installing 28
supported operating systems 20
supported platforms 20
uninstalling 42
verifying installation 38
Web Console 28
Workspace Manager 327
Z
z/OS Server
adapter requirements 116, 210
allocating HFS files 104
communications requirements 209
configuring for CA-Top Secret 144
disk allocation 104
disk space requirements 103, 206
file systems 104
FTP steps 124, 167, 219, 255
Index
Server Installation 379

z/OS Server
installation requirements 100, 202
installing 126, 220
ISETUP procedure 126, 220
memory usage 103, 208
startup 147, 234
supported operating systems 100, 203
supported platforms 100, 203
tape steps 123, 218, 253
used IDs 105, 210
verifying installation 139, 164, 230, 251
zIIP enablement 183, 187, 267, 272
zIIP enablement, data sources 188, 273
zIIP enablement, requirements for 183, 268
zIIP enablement, system requirements 184, 268
zIIP enablement, types of processing offloaded
187, 272
zIIP Monitor 187, 272
ZIIP parameter 185, 269
zOS Server
installation requirements 88
supported operating systems 88
supported platforms 88
Index
380 Information Builders

FeedbackCustomer success is our top priority. Connect with us today!
Information Builders Technical Content Management team is comprised of many talentedindividuals who work together to design and deliver quality technical documentation products.Your feedback supports our ongoing efforts!
You can also preview new innovations to get an early look at new content products andservices. Your participation helps us create great experiences for every customer.
To send us feedback or make a connection, contact Sarah Buccellato, Technical Editor,Technical Content Management at [email protected].
To request permission to repurpose copyrighted material, please contact Frances Gambino,Vice President, Technical Content Management at [email protected].

Creating Reports WithWebFOCUS Language
Information Builders
Two Penn Plaza
New York, NY 10121-2898
Printed on recycled paper in the U.S.A.
Server InstallationWebFOCUS Reporting Server Release 82 DataMigrator Server Release 7707 DataMigrator Console and Client


![WebFOCUS Support Tool - accs.co.jpPro-Web]introduction_data.pdf · WebFOCUS Support Tool ... Application Server WebFOCUS Pro-Reserve enables you to schedule FOCUS report-requests](https://img.pdfslide.us/doc/110x75/5b9125e809d3f22c258d65c0/webfocus-support-tool-accscojp-pro-webintroductiondatapdf-webfocus-support.jpg)