Embed Size (px)
Citation preview

SolarWindsServ-U File Server
Adminstrator Guide
Version: 15.1.4
Last updated: 8/15/2016
Copyright © 2016 SolarWinds Worldwide, LLC. All rights reserved worldwide. No partof this document may be reproduced by any means nor modified, decompiled,disassembled, published or distributed, in whole or in part, or translated to anyelectronic medium or other means without the written consent of SolarWinds. Allright, title, and interest in and to the software and documentation are and shallremain the exclusive property of SolarWinds and its respective licensors.
SOLARWINDS DISCLAIMS ALL WARRANTIES, CONDITIONS OR OTHER TERMS, EXPRESSOR IMPLIED, STATUTORY OR OTHERWISE, ON SOFTWARE AND DOCUMENTATIONFURNISHED HEREUNDER INCLUDING WITHOUT LIMITATION THE WARRANTIES OFDESIGN, MERCHANTABILITY OR FITNESS FOR A PARTICULAR PURPOSE, ANDNONINFRINGEMENT. IN NO EVENT SHALL SOLARWINDS, ITS SUPPLIERS, NOR ITSLICENSORS BE LIABLE FOR ANY DAMAGES, WHETHER ARISING IN TORT, CONTRACT ORANY OTHER LEGAL THEORY EVEN IF SOLARWINDS HAS BEEN ADVISED OF THEPOSSIBILITY OF SUCH DAMAGES.
The SOLARWINDS and SOLARWINDS & Design marks are the exclusive property ofSolarWinds Worldwide, LLC and its affiliates, are registered with the U.S. Patent andTrademark Office, and may be registered or pending registration in other countries.All other SolarWinds trademarks, service marks, and logos may be common lawmarks, registered or pending registration in the United States or in other countries.All other trademarks mentioned herein are used for identification purposes only andmay be or are trademarks or registered trademarks of their respective companies.
2
Table of Contents
Tips and tricks 17
Serv-U File Server 19
Serv-U editions 21
Purchase options 22
System requirements 23
Hardware requirements 23
Operating system and software requirements 24
Client requirements 25
Server concepts 26
Glossary 28
Quick start guide 29
Install Serv-U File Server 29
Upgrade Serv-U 29
Create domains 30
Create user accounts 33
Management Console layout 35
Launch the Web Client 35
User interface conventions 35
Example use case 36
Server 37
Server details 37
Specifying IP access masks 37
Caveats 38
3

IP access list controls 40
Examples of IP address rules 41
Office-only access 41
Prohibited computers 41
DNS-based access control 41
Serv-U Gateway 41
Serv-U Gateway deployment documentation 42
Serv-U Gateway tab 43
Gateway Address column 43
Public IP Address column 44
Description column 44
Manage gateways 44
Serv-U Gateway properties dialog 45
Status 46
Install Information 46
Registration ID 47
Database access 47
Configure a database 47
SQL templates 47
User and group table mappings 48
Case file: ODBC authentication 49
Data source name creation in Linux 49
Domain events 50
Event actions 51
4
Email actions 51
Balloon tip actions 51
Execute command actions 51
Windows Event Log 52
Microsoft Message Queuing (MSMQ) 52
Event filters 53
Event filter fields 53
Event filters 55
License information 56
Serv-U registration 57
Program Information 57
SMTP configuration 58
Test the SMTP configuration 58
Directory access rules 59
File permissions 60
Directory permissions 61
Subdirectory permissions 61
Advanced: Access as Windows user (Windows only) 62
Quota permissions 62
Mandatory access control 63
Restrict file types 63
Virtual paths 66
Physical path 66
Virtual path 66
5
Include virtual paths in Maximum Directory Size calculations 67
Virtual paths example 67
Relative virtual paths example 67
Automated file management 68
Define a new file management rule 68
Server limits and settings 69
Server settings 70
Connection settings 71
Network settings 71
Other settings 72
FTP settings 72
Global properties 73
Edit FTP commands and responses 74
Case file: Custom FTP command response 75
Configure server encryption 76
Configure SSL for FTPS and HTTPS 77
Advanced SSL options 78
FIPS options 79
SFTP (Secure File Transfer over SSH2) 80
SSH ciphers and MACs 81
Configure custom HTML for the Serv-U login pages 81
Configure file sharing 82
Server activity 83
Disconnect sessions 83
6
Spy & Chat 84
Broadcast messages 84
Cancel sessions 84
Server and domain statistics 85
Session statistics 85
Login statistics 85
Transfer statistics 86
User and group statistics 86
Session statistics 87
Login statistics 87
Transfer statistics 88
Save statistics 88
Server and domain log 89
Domain 91
Manage domains 91
Domain details 92
Domain listeners 93
Add a listener 94
Pure virtual domains 96
Virtual hosts 96
Server details 97
Specifying IP access masks 98
Caveats 98
IP access list controls 100
7
Examples of IP address rules 101
Office-only access 101
Prohibited computers 101
DNS-based access control 101
Database access 102
Configure a database 102
SQL templates 102
User and group table mappings 103
Case file: ODBC authentication 103
Data source name creation in Linux 104
Domain events 105
Event actions 105
Email actions 106
Balloon tip actions 106
Execute command actions 106
Windows Event Log 107
Microsoft Message Queuing (MSMQ) 107
Event filters 108
Event filter fields 108
Event filters 110
SMTP configuration 111
Test the SMTP configuration 112
Directory access rules 113
File permissions 114
8
Directory permissions 115
Subdirectory permissions 115
Advanced: Access as Windows user (Windows only) 115
Quota permissions 116
Mandatory access control 116
Restrict file types 117
Virtual paths 120
Physical path 120
Virtual path 120
Include virtual paths in Maximum Directory Size calculations 121
Virtual paths example 121
Relative virtual paths example 121
Automated file management 122
Define a new file management rule 122
Domain limits and settings 123
Domain settings 124
Connection settings 125
Custom HTTP settings 125
Other settings 127
FTP settings 127
Global properties 128
Edit FTP commands and responses 129
Case file: Custom FTP command response 130
Configure domain encryption 131
9

Configure SSL for FTPS and HTTPS 132
View the certificate 133
SFTP (Secure File Transfer over SSH2) 133
SSH ciphers and MACs 134
Configure custom HTML for the Serv-U login pages 134
Configure file sharing 135
Server activity 136
Disconnect sessions 137
Spy & Chat 137
Broadcast messages 138
Cancel sessions 138
Server and domain statistics 138
Session statistics 138
Login statistics 139
Transfer statistics 140
User and group statistics 140
Session statistics 140
Login statistics 141
Transfer statistics 142
Save statistics 142
Server and domain log 142
Configure domain logs 144
Log to file settings 144
Users 147
10
User accounts 147
User information 150
Directory access rules 156
File permissions 157
Directory permissions 158
Subdirectory permissions 159
Advanced: Access as Windows user (Windows only) 159
Quota permissions 159
Mandatory access control 160
Restrict file types 161
Virtual paths 163
Physical path 163
Virtual path 163
Include virtual paths in Maximum Directory Size calculations 164
Virtual paths example 164
Relative virtual paths example 164
User and group logs 164
Log to File settings 165
Enable logging to file 165
Rotate the log file automatically 166
Purge old log files 166
Specify IP addresses as exempt from logging 167
Group memberships 167
Domain events 167
11
Event actions 168
Email actions 168
Balloon tip actions 168
Execute command actions 169
Windows Event Log 169
Microsoft Message Queuing (MSMQ) 169
Event filters 170
Event filter fields 171
Event filters 172
Server details 173
Specifying IP access masks 174
Caveats 174
IP access list controls 176
Examples of IP address rules 177
Office-only access 177
Prohibited computers 177
DNS-based access control 177
Limits and settings 178
Transfer ratios and quotas 179
Transfer ratios 179
Quotas 180
Ratio free files 180
Compare Windows and LDAP authentication 181
Differences between Windows users and LDAP users 181
12
Configure Windows and LDAP authentication 181
Keep Serv-U updated 182
Windows authentication 182
Use a Windows user group home directory instead of the account homedirectory 183
Windows user groups 183
Windows user permissions 184
LDAP authentication 185
Before you begin 185
Configure the LDAP server 185
Specify the LDAP login ID suffix 189
LDAP group membership 189
Use LDAP user groups 190
Use a list of LDAP servers 192
Test the connection to the LDAP server 193
LDAP error messages 194
Enable LDAP authentication 196
User home folders 196
Use the LDAP user group home directory instead of the account homedirectory 196
The interaction between domain home directories with Default LDAP UserGroup home directories 198
SFTP for users and groups 199
Use an existing public key 199
Create a key pair 199
13
Create multiple keys per user 200
Groups 201
User groups 201
Group templates 202
Windows groups (Windows only) 202
Configure a Windows user group (Windows only) 203
LDAP user groups 203
LDAP group membership 204
Group information 205
Directory access rules 208
File permissions 209
Directory permissions 210
Subdirectory permissions 210
Advanced: Access as Windows user (Windows only) 211
Quota permissions 211
Mandatory access control 212
Restrict file types 212
Virtual paths 215
Physical path 215
Virtual path 215
Include virtual paths in Maximum Directory Size calculations 216
Virtual paths example 216
Relative virtual paths example 216
User and group logs 216
14

Log to File settings 217
Enable logging to file 217
Rotate the log file automatically 218
Purge old log files 218
Specify IP addresses as exempt from logging 219
Group members 219
Domain events 221
Event actions 221
Email actions 221
Balloon tip actions 222
Execute command actions 222
Windows Event Log 222
Microsoft Message Queuing (MSMQ) 222
Event filters 223
Event filter fields 224
Event filters 225
Server details 227
Specifying IP access masks 227
Caveats 228
IP access list controls 230
Examples of IP address rules 231
Office-only access 231
Prohibited computers 231
DNS-based access control 231
15

Limits and Settings 232
Ratio free files 233
SFTP for users and groups 234
Use an existing public key 234
Create a key pair 234
Create multiple keys per user 234
System variables 236
Server information 236
Server statistics 238
Domain statistics 239
User statistics 240
Last transfer statistics 241
Date/Time 243
Server settings 243
Session information 243
File information 246
Current activity 247
16

Tips and tricks
Tips and tricksl To confirm that a file transfer has been completed, configure a Serv-U event to
receive notifications about successful file transfers. For information aboutconfiguring events, see Domain events.
l Use $ macros for events and in system messages (such as login messages orcustomized FTP responses) and % macros for configuration values. For moreinformation about macros, see System variables and Directory access rules.
l To automatically add new users to a group, use a user template in which adefault group is specified. For information about setting up user templates, seeUser accounts.
l Organize user accounts into collections to make account management morelogical and organized. For information about creating user collections, see Useraccounts.
l To limit user access to client views, modify the system settings that controlclient view accessibility. For more information about configuring limits andsettings, see Server limits and settings.
l To send emails to multiple recipients and to groups when an event (such as afile transfer) occurs, configure email actions. For more information, see Domainevents.
l To back up your Serv-U configuration, save the following files and folders:
l serv-u.archive file
l Users folder
l serv-uid.txt file
l To identify the user's home directory, use the %DOMAIN_HOME% macro. Forexample, to place a user's home directory into a common location, use%DOMAIN_HOME%\%USER%. For more information, see User information.
l Encryption options specified at the server level are automatically inherited byall domains. Any encryption option specified at the domain level automaticallyoverrides the corresponding server-level option. For more information aboutsetting encryption levels, see Configure server encryption.
l To control access to virtual paths, configure virtual paths for individual users orgroups. For more information, see Virtual paths.
17

l To override default system limits when configuring the file server, create a newlimit. The value of the new limit takes precedence over the default value. Formore information, see Server limits and settings.
18
Tips and tricks

Serv-U File ServerServ-U File Server is a multi-protocol file server capable of sending and receiving filesfrom other networked computers through various means. Administrators createaccounts for users that allow access to specific files and folders on the server's harddrive or any other available network resource. These access permissions definewhere and how the users can access the available resources. Serv-U's multi-protocolsupport means that users can employ whatever access method is available to themwhen connecting to your server. In addition, Serv-U supports both IPv4 and IPv6 fornext-generation networks. Serv-U File Server supports the following protocols:
l FTP (File Transfer Protocol)
l HTTP (Hyper Text Transfer Protocol)
l FTPS (FTP over SSL)
l HTTPS (HTTP over SSL)*
l SFTP using SSH2 (File Transfer over Secure Shell)*
In addition to Serv-U's support for a large collection of the most popular FTP clients,you can use your favorite web browser or SSH client to connect and transfer files toand from Serv-U. Server administrators looking to provide a full-featured FTP client tousers who may not have an FTP client license of their own can even license FTPVoyager JV. FTP Voyager JV is a Java-enabled FTP client delivered to the user afterlogging in to their Serv-U account.
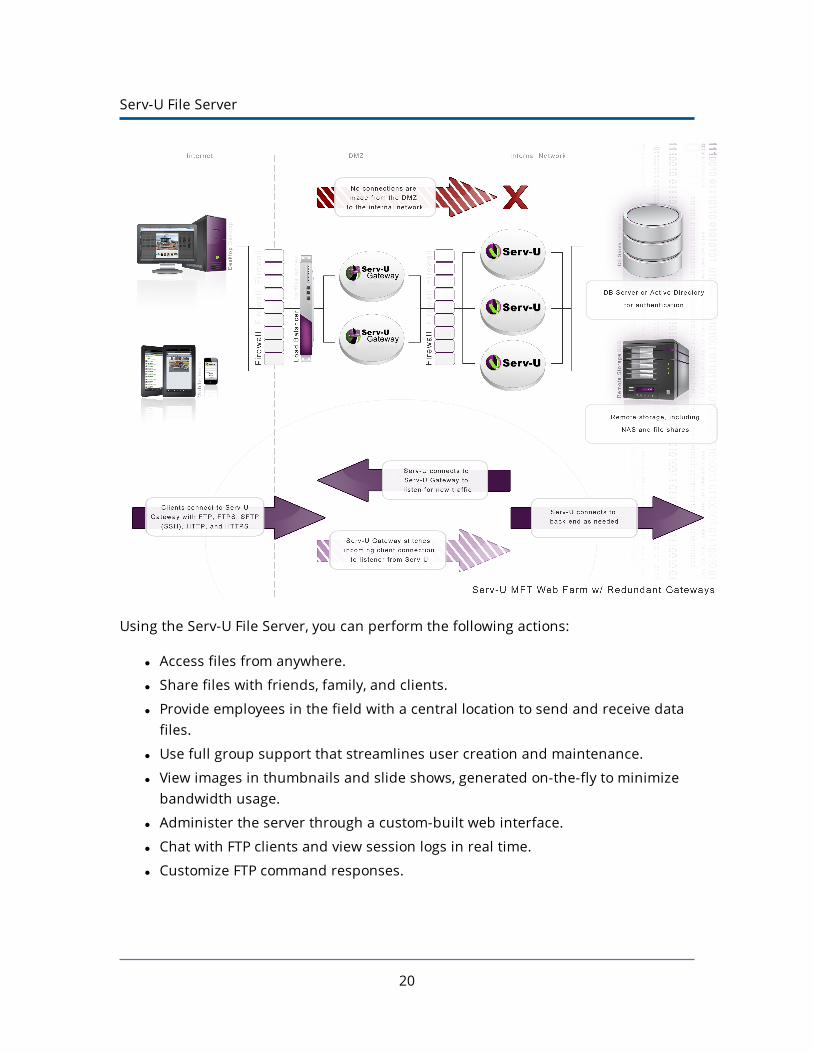
The following graphic shows a high level overview of a Serv-U deployment.
19
Serv-U File Server
Using the Serv-U File Server, you can perform the following actions:
l Access files from anywhere.
l Share files with friends, family, and clients.
l Provide employees in the field with a central location to send and receive datafiles.
l Use full group support that streamlines user creation and maintenance.
l View images in thumbnails and slide shows, generated on-the-fly to minimizebandwidth usage.
l Administer the server through a custom-built web interface.
l Chat with FTP clients and view session logs in real time.
l Customize FTP command responses.
20

l Create custom limits and rules at a granular level to control resource usage onthe server.
l Connect securely using SSL/TLS or SSH2.
l Use third party digital certificates to guarantee the identity of the server toclients.
l Host multiple domains on the same IP address and port.
l Use multiple sources of authentication on the same domain (local userdatabase, NT/SAM, ODBC).
l Automatically build the tables necessary for ODBC authentication.
You can test Serv-U MFT Server in a non-production environment for a limited periodof time. After the evaluation period expires, a commercial license or maintenancerenewal provides you with free software updates and technical support throughemail, phone, or both, depending on your edition, for the duration of the associatedmaintenance plan.
* - Requires Serv-U MFT Server
Serv-U editions
Serv-U is available in two editions:
Serv-U FTP Server
This edition is designed for small businesses and project teams requiring FTPSto secure FTP, scripted transfers, and a smaller number of users and domainssupported on a single server.
Serv-U MFT Server
This edition is designed for businesses of all sizes that need to secure data intransit through SFTP, FTPS or HTTPS. It adds remote administration throughweb browsers and iPad, authentication through Active Directory or a database,clustering and event-driven automation, and branding. It includes the FTPVoyager JV module for a rich sync and side-by-side web client interface.
Both editions support FTP, web transfer, and mobile devices. Both editions alsosupport the optional Serv-U Gateway module, which is a reverse proxy componentthat prevents data at rest in a DMZ segment.
21
Serv-U editions

Serv-U File Server
For a feature-by-feature comparison of the versions, see the Serv-U FTP ServerEditions Information.
Purchase options
Serv-U is available as a fully functional MFT Server trial for 30 days after the date ofinitial installation. To continue using Serv-U with its full set of features, you mustpurchase a Serv-U license.
You can purchase a license online at the Serv-U website. Choose which edition of theServ-U File Server is required and the quantity to purchase. Discount pricing appliesfor bulk purchasing. You must purchase a Serv-U File Server license before adding anFTP Voyager JV license to your shopping cart.
You can find pricing information at the Serv-U FTP Server pricing web page.
Serv-U licenses are now available in the Customer Portal. Any license purchased orrenewed after July 27, 2016 will be available in the Customer Portal Management tab.Refer to Serv-U licenses now available in Customer Portal for steps to access thisinformation.
When the purchase has been completed, an email containing the registration detailsis immediately sent. If you do not receive it within an hour, check your spam filter tomake sure that the email has not been filtered.
You can send a purchase order to SolarWinds in one of the following ways:
1. Send an email purchase order, preferably in a PDF, JPG, or GIF format, to amarketing representative at the Serv-U Sales web page.
2. Send a fax purchase order to +1 512 682 9301.
3. Send a mail directly to SolarWinds to the following address:
SolarWinds7171 Southwest ParkwayBldg 400Austin, TX 78735USA
22

System requirements
Hardware requirements
The hardware requirements are modest, but Serv-U can take advantage of multi-coreprocessors and multiple processor architectures.
HARDWARE MINIMUM REQUIREMENT
CPU 1 GHz+
RAM 256 MB+
Network 10/100 Mbps NIC
Hard drive space 30 MB
Video 128 MB Video RAM
The following table lists the requirements in the case of modest traffic: up to 500configured users and 25 simultaneous transfers.
HARDWARE MINIMUM REQUIREMENT FOR MODEST TRAFFIC
CPU 2 GHz+ multi-core
RAM 2 GB+
Network 10/100/1000 Mbps NIC
Hard drive space 120 GB
Video 128 MB Video RAM
The following table lists the requirements in the case of high traffic: up to 10,000configured users and 250 simultaneous transfers.
HARDWARE MINIMUM REQUIREMENT FOR HIGH TRAFFIC
CPU Multiple 3.2 GHz+ multi-core
23

HARDWARE MINIMUM REQUIREMENT FOR HIGH TRAFFIC
RAM 4 GB+
Network 10/100/1000 Mbps NIC
Hard drive space 120 GB
Video 128 MB Video RAM
Operating system and software requirementsOPERATING SYSTEM OR
SOFTWAREREQUIREMENT
Microsoft Windows
l Windows Server 2012
l Windows Server 2012 RC2
l Windows Server 2008, 2008 SP2, 2008 R2, and 2008 R2SP1 (Recommended)
l Windows Server 2003 SP2 and 2003 R2 SP2
l Windows XP SP2, Windows Vista, Windows 7, Windows8, Windows 8.1 for trial purposes
Linux
l Red Hat Enterprise Linux (RHEL) v.6.4 (Recommended)
l Fedora 19
l Ubuntu
l CentOS 6.4
l OpenSUSE
Database server(optional)
l MS SQL 2012, 2012 SP1
l MySQL 5.7.3 and 5.7.4
l PostgreSQL: latest version
LDAP server(optional)
l Active Directory 2003, 2008 and 2012
l Open Directory 4
l OpenLDAP 2.4
24

Client requirements
The default web browser on many mobile devices can be used to transfer files, workwith files and folders, or run the web-based Management Console of Serv-U withoutany plug-ins. However, JavaScript and cookies must be enabled.
DEVICE SUPPORTED FUNCTIONALITY
Apple iPhone 3+ Download, manage, and preview files.
Apple iPad 1+Download, manage, preview files, and run theManagement Console.
Apple iPod Download, manage, and preview files.
Google Android 2.2+ Upload, download, manage, and preview files.
Amazon Kindle Fire Upload, download, manage, and preview files.
BlackBerry Upload, download, manage, and preview files.
Microsoft WindowsMobile
Upload, download, manage, and preview files.
The following major browsers are supported with the basic web client, for filemanagement and for web administration purposes:
l Microsoft Internet Explorer 8.0+
l Mozilla Firefox: latest two versions
l Safari 5 and 7
l Google Chrome: latest version
l Mobile browser
Java Runtime Environmen (JRE) 7 and 8 are supported for Web Client Pro and FTPVoyager JV.
Notes:
l To be able to use Web Client Pro and FTP Voyager JV, Java must be installed andenabled in the browser.
l Web Client Pro does not work on Linux in Google Chrome version later than 35
25
Client requirements
due to an incompatibility between Chrome and the Java browser plug-in.
l Apple users must have at least Mac OS X 10.6 installed.
Server concepts
Serv-U File Server makes use of several concepts that help you understand how toconfigure and administer your file server as a single, hierarchical unit. Serv-U FileServer contains four related levels of configuration: the server, the domain, thegroup, and the user. Only the group level is optional. The other levels are mandatoryparts of the file server.
Server
The server is the basic unit of Serv-U File Server and the highest level ofconfiguration available. The server represents the file server as a whole andgoverns the behavior of all domains, groups, and users. Serv-U File Servercontains a set of default options that can be overridden on a per-setting basis.The server is at the top level of the hierarchy of configuring Serv-U. Domains,groups, and users inherit their default settings from the server. Inheritedsettings can be overridden at each of these lower levels. However, somesettings are exclusive to the server, such as the PASV port range.
Domain
A server can contain one or more domains. A domain is the interface throughwhich users connect to the file server and access a specific user account. Thesettings of a domain are inherited from the server. A domain also defines thecollection of settings that all of its groups and user accounts inherit. If a serversetting is overridden at the domain level, all the groups and user accounts thatbelong to the domain inherit the domain value as their default value.
26

Group
The group is an optional level of configuration that can make it easier tomanage related user accounts that share many of the same settings. By using agroup, you can make changes that propagate to more than one user accountinstead of having to manually configure each user account separately. A groupinherits all of its default settings from the domain it belongs to. A groupdefines the collection of settings inherited by all users who are members of thegroup. Virtually every user level setting can be configured at the group level, or
can be overridden at the user level.
User
The user is at the bottom of the hierarchy. It can inherit its default settingsfrom multiple groups (if it is a member of more than one group) or from itsparent domain (if it is not a member of a group, or the group does not define adefault setting). A user account identifies a physical connection to the fileserver and defines the access rights and limitations of that connection. Settingsoverridden at the user level cannot be overridden elsewhere and are alwaysapplied to connections authenticated with that user account.
User collection
Contrary to groups, a user collection does not offer any level of configuration tothe user accounts they contain. Instead, a user collection offers a way toorganize users into containers for easy viewing and administration. Forexample, collections can be created to organize user accounts based on groupmembership. User collections must be maintained manually when useraccounts change group membership.
27
Server concepts
Glossary
Listener
A listening service in Serv-U that is configured in a domain to accept incomingFTP, FTPS, SFTP, HTTP or HTTPS connections.
Limit
A configuration option that can be set at the server, domain, group, or userlevel. Limits can be set for password complexity requirements, session timeout,Web Client customization, and more.
Event
A Serv-U event primarily consists of an event type (for example, User Login orFile Upload Failed), and an action type (for example, Show Balloon Tip or SendEmail). Serv-U events are used to automate behavior and to provide greatervisibility of important file transfer processes.
Anti-hammering
A Serv-U feature that allows administrators to block IP addresses who attemptto connect repeatedly with incorrect credentials. By handling only IP addresseswho repeatedly fail to log on correctly, anti-hammering allows for smartblocking of bots and hackers.
28
IP access rules
IP access rules are used in Serv-U to determine who can connect to the server.Rules set up at the server and domain levels define who is allowed to make aninitial connection to Serv-U. Rules set up at the group and user levels definewho can connect using a given user account.
Directory access
Directory access encompasses all of the permissions applied to a server,domain, group, and user that grant and deny access to files and folders.Directory access rules are the foundation of file access rights, because theydetermine what a user can or cannot access, and how they can access it.
Quick start guide
Install Serv-U File Server
Serv-U licenses are now available in the Customer Portal. Any license purchased orrenewed after July 27, 2016 will be available in the Customer Portal on the LicenseManagement tab. Refer to Serv-U licenses now available in Customer Portal for stepsto access this information.
If you are installing Serv-U for the first time, follow the instructions on the installationscreens to choose the installation directory and to configure desktop shortcuts forquickly accessing the server.
Upgrade Serv-U
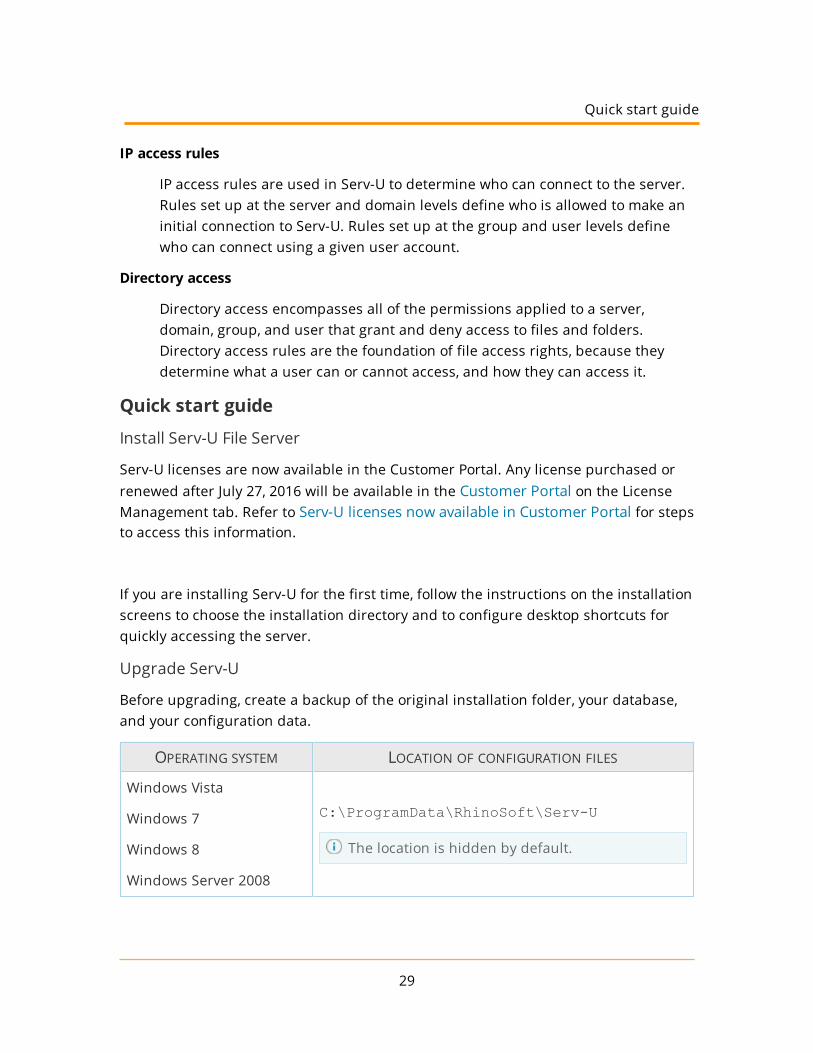
Before upgrading, create a backup of the original installation folder, your database,and your configuration data.
OPERATING SYSTEM LOCATION OF CONFIGURATION FILES
Windows Vista
Windows 7
Windows 8
Windows Server 2008
C:\ProgramData\RhinoSoft\Serv-U
The location is hidden by default.
29
Quick start guide
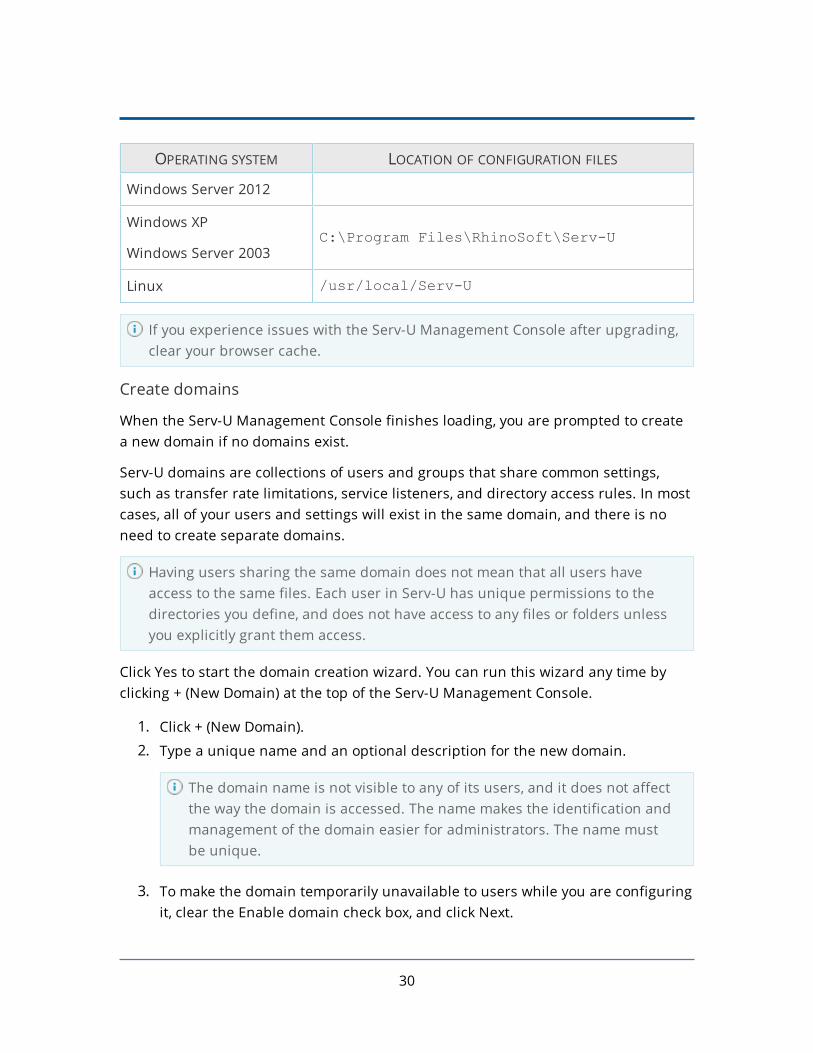
OPERATING SYSTEM LOCATION OF CONFIGURATION FILES
Windows Server 2012
Windows XP
Windows Server 2003C:\Program Files\RhinoSoft\Serv-U
Linux /usr/local/Serv-U
If you experience issues with the Serv-U Management Console after upgrading,clear your browser cache.
Create domains
When the Serv-U Management Console finishes loading, you are prompted to createa new domain if no domains exist.
Serv-U domains are collections of users and groups that share common settings,such as transfer rate limitations, service listeners, and directory access rules. In mostcases, all of your users and settings will exist in the same domain, and there is noneed to create separate domains.
Having users sharing the same domain does not mean that all users haveaccess to the same files. Each user in Serv-U has unique permissions to thedirectories you define, and does not have access to any files or folders unlessyou explicitly grant them access.
Click Yes to start the domain creation wizard. You can run this wizard any time byclicking + (New Domain) at the top of the Serv-U Management Console.
1. Click + (New Domain).
2. Type a unique name and an optional description for the new domain.
The domain name is not visible to any of its users, and it does not affectthe way the domain is accessed. The name makes the identification andmanagement of the domain easier for administrators. The name mustbe unique.
3. To make the domain temporarily unavailable to users while you are configuringit, clear the Enable domain check box, and click Next.
30
4. Select File Transfer Domain, File Sharing Domain, or both, and click Next.
l If you are setting up a File Transfer Domain only, perform the followingsteps:
a. On the Protocols page, select the protocols and port numbers thedomain should use to provide access to its users, and click Next.
The standard file sharing protocol is FTP, which operates onthe default port 21. However, you can change any of theavailable ports to a custom value. To run the server on anon-default port, SolarWinds recommends you use a portabove 1024.
b. On the IP Listeners page, specify the IP address that is used toconnect to this domain, and click Next.
If you do not specify an address, Serv-U uses any available IPaddress on the computer.
c. On the Encryption page, select the encryption mode to use whenstoring passwords on the domain.
d. To enable users to recover their passwords, select the appropriateoption.
e. Click Finish to create the domain.
31
Create domains
l If you are setting up a File Sharing Domain only, perform the followingsteps:
a. On the File Sharing page, specify the domain URL, the file sharingrepository, and whether to use a secure URL.
b. Click Configure SMTP to set up an SMTP server, which is necessaryfor sending email notifications and for events that use emailactions.
c. Click Next.
d. On the IP Listeners page, specify the IP address that is used toconnect to this domain.
If you do not specify an address, Serv-U uses any available IPaddress on the computer.
e. Click Finish to create the domain.
32
l If you are setting up a File Transer and File Sharing Domain, perform thefollowing steps:
a. On the File Sharing page, specify the domain URL, the file sharingrepository, and whether you want to use a secure URL.
b. Click Configure SMTP to set up an SMTP server, which is necessaryfor sending email notifications and for events that use emailactions.
c. Click Next.
d. On the Protocols page, select the protocols and port numbers thedomain should use to provide access to its users, and click Next.
The standard file sharing protocol is FTP, which operates onthe default port 21. However, you can change any of theavailable ports to a custom value. To run the server on anon-default port, SolarWinds recommends you use a portabove 1024.
e. On the IP Listeners screen, specify the IP address that is used toconnect to this domain, and click Next.
If you do not specify an address, Serv-U uses any available IPaddress on the computer.
f. On the Encryption screen, select the encryption mode to use whenstoring passwords on the domain.
g. To enable users to recover their passwords, select the appropriateoption.
h. Click Finish to create the domain.
Create user accounts
After your first domain is created, you are taken to the user's page of the Serv-UManagement Console. Click Yes to start the User Wizard and create a new useraccount.
You can run this wizard at any time by navigating to the Users menu under Global orDomain, and then clicking Wizard on the Users page.
33
Create user accounts
First, provide a login ID for the account. The login ID must be unique for the domain.Other domains on your server can have an account with the same login ID.
To create an anonymous account, specify anonymous or ftp as the login ID.
You can also specify a name and email address for the user account. The emailaddress is used by Serv-U to send email notifications and recovered passwords to theuser account. Click Next to continue.
After specifying a unique login ID, you must also specify a password for the account.You can leave this field blank, but that allows anyone who knows the login ID toaccess your domain. Click Next to continue.
The third step is to specify a home directory for the account. The home directory isthe location on the hard drive of the server, or on an accessible network resourcethat the user account is placed in after a successful login. It is the location you wantthe user account to use when sending and receiving files on the server. Type thelocation or click Browse to select a location on the hard drive. If users are locked intheir home directory, they cannot access files or folders above the directory structureof their home directory. Additionally, the actual location of their home directory ismasked and displayed as "/". Click Next to proceed to the last step.
The last step is to grant access rights to the user account. Access rights are grantedon a per-directory basis. However, access rights can be inherited by all subdirectoriescontained in an accessible directory. The default access is Read Only, which meansthat the user can list files and folders in their home directory and can downloadthem. However, they cannot upload files, create new directories, delete files orfolders, or rename files or folders. If Full Access is selected, the user can do all ofthese things. After the user is created, you can configure the access rights in moredetail by editing the user, and selecting the Directory Access page.
After selecting the directory access rights, click Finish to create the user account.
Serv-U File Server is now accessible and ready for sharing. You can create moreaccounts just like this one to share with friends, family, or colleagues. Each user canhave a different home directory. This way you can share different files with differentpeople.
The Serv-U Management Console is designed to provide quick and easy access to theconfiguration options of the file server in a familiar way. When viewing a
34
configuration page, you can return to the main Management Console page at anytime by clicking the Serv-U File Server logo in the top-left corner.
Management Console layout
The Management Console is presented with an accordion list on the left and theglobal dashboard on the right. The accordion menu contains the name of the serveron top, and then the list of configured domains. The global dashboard contains thesession statistics, the server log, information about the active sessions, and it alsoprovides direct access to the thwack community.
Click the name of the server or a domain to expand the list of configuration optionsavailable for the server or for the particular domain, and then select one of theoptions.
Domain administrators only have access to configuring settings and options for theirparticular domain, and do not have access to the server-level categories that aredisplayed to system administrators.
To return to the global dashboard, click the Serv-U Management Console icon in thetop-left corner.
When opening a category from the Management Console, all related sub-categorypages are displayed in tabs on the same page. This allows for quick navigationbetween related configuration options.
Launch the Web Client
While configuring Serv-U File Server, an HTTP session can be launched by clickingServ-U Products > Web Client on the top toolbar. If licensed for use, the Web Client isavailable and runs in the browser. If licensed for use, FTP Voyager JV can also belaunched by clicking Serv-U Products > FTP Voyager JV.
To use FTP Voyager JV, you must install the Java Runtime Environment.
User interface conventions
Serv-U File Server uses a consistent method of representing configuration options ina manner that conveys the current value of the option, and also indicates whetherthat value is the default or the inherited value.
When an option inherits its value from a parent, the text of the option is displayed in
35
Management Console layout

regular font. The value that is displayed (whether it is a text value or a check box) canchange to reflect changes made to the parent where the item is currently inheritingits value.
However, if the value is overriding the default, the text of the value is displayed inbold. The value that is currently displayed is always the value of that option,regardless of changes to its parent.
Example use case
Example Technology is a computer repair company that maintains a Serv-U FileServer, which provides global access to shared corporate resources to their travelingtechnicians. Each technician has their own account on the file server. To facilitateeasy administration of the user accounts, the file server administrator makes eachuser account a member of the "Technician" group. The Administration Privilege levelof this group is set to No Privilege because none of the technicians have any fileserver administration duties.
A technician receives a promotion. In addition to his current duties, he is also givenadministration privileges on the file server so he can assist other technicians withtheir accounts. The file server administrator can edit the technician's user accountand change the technician's Administration Privilege level to Domain Administrator.The text of this option turns bold to reflect that it is overriding the default value (NoPrivilege) that the user account inherits from its membership of the "Technician"group.
At a later date, the Administration Privilege can be reverted to the default valuewhich is inherited from the "Technician" group by selecting Inherit Default Valuefrom the Administration Privilege list.
36
ServerIf you configure a setting at the server level, the setting applies to all users, groups,
and domains on the server unless it is overridden at a lower level. Settings you canconfigure at the server level include directory access rules, IP access rules,bandwidth limitations, global user accounts, and more. The following sectionscontain detailed information about each setting and how it can be configured.
Server details
IP access rules restrict login access to specific IP addresses, ranges of IP addresses, ora domain name. IP access rules can be configured at the server, domain, group, anduser levels.
IP access rules are applied in the order they are displayed. In this way, specific rulescan be placed at the top to allow or deny access before a more general rule isapplied later on in the list. The arrows on the right side of the list can be used tochange the position of an individual rule in the list.
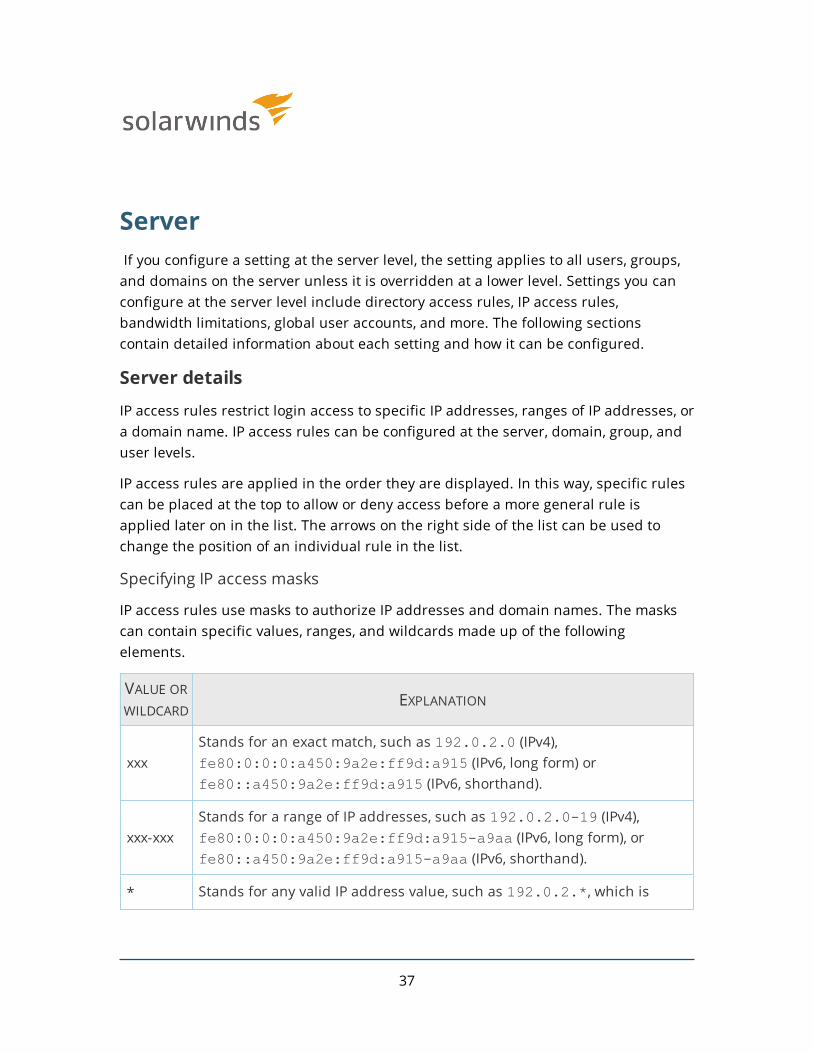
Specifying IP access masks
IP access rules use masks to authorize IP addresses and domain names. The maskscan contain specific values, ranges, and wildcards made up of the followingelements.
VALUE OR
WILDCARDEXPLANATION
xxxStands for an exact match, such as 192.0.2.0 (IPv4),fe80:0:0:0:a450:9a2e:ff9d:a915 (IPv6, long form) orfe80::a450:9a2e:ff9d:a915 (IPv6, shorthand).
xxx-xxxStands for a range of IP addresses, such as 192.0.2.0-19 (IPv4),fe80:0:0:0:a450:9a2e:ff9d:a915-a9aa (IPv6, long form), orfe80::a450:9a2e:ff9d:a915-a9aa (IPv6, shorthand).
* Stands for any valid IP address value, such as 192.0.2.*, which is
37
Server
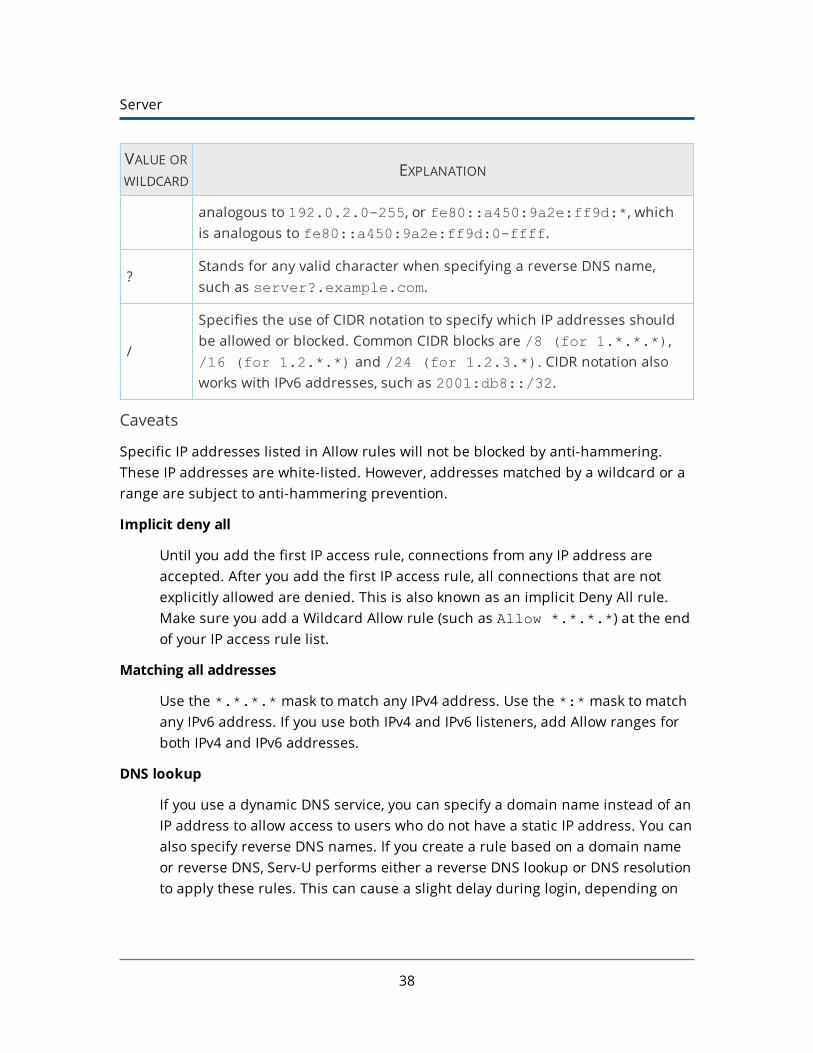
VALUE OR
WILDCARDEXPLANATION
analogous to 192.0.2.0-255, or fe80::a450:9a2e:ff9d:*, whichis analogous to fe80::a450:9a2e:ff9d:0-ffff.
?Stands for any valid character when specifying a reverse DNS name,such as server?.example.com.
/
Specifies the use of CIDR notation to specify which IP addresses shouldbe allowed or blocked. Common CIDR blocks are /8 (for 1.*.*.*),/16 (for 1.2.*.*) and /24 (for 1.2.3.*). CIDR notation alsoworks with IPv6 addresses, such as 2001:db8::/32.
Caveats
Specific IP addresses listed in Allow rules will not be blocked by anti-hammering.These IP addresses are white-listed. However, addresses matched by a wildcard or arange are subject to anti-hammering prevention.
Implicit deny all
Until you add the first IP access rule, connections from any IP address areaccepted. After you add the first IP access rule, all connections that are notexplicitly allowed are denied. This is also known as an implicit Deny All rule.Make sure you add a Wildcard Allow rule (such as Allow *.*.*.*) at the endof your IP access rule list.
Matching all addresses
Use the *.*.*.* mask to match any IPv4 address. Use the *:* mask to matchany IPv6 address. If you use both IPv4 and IPv6 listeners, add Allow ranges forboth IPv4 and IPv6 addresses.
DNS lookup
If you use a dynamic DNS service, you can specify a domain name instead of anIP address to allow access to users who do not have a static IP address. You canalso specify reverse DNS names. If you create a rule based on a domain nameor reverse DNS, Serv-U performs either a reverse DNS lookup or DNS resolutionto apply these rules. This can cause a slight delay during login, depending on
38
the speed of the DNS server of the system.
Rule use during connection
The level at which you specify an IP access rule also defines how far aconnection is allowed before it is rejected. Server and domain level IP accessrules are applied before the welcome message is sent. Domain level IP accessrules are also applied when responding to the HOST command to connect to avirtual domain. Group and user level IP access rules are applied in response toa USER command when the client identifies itself to the server.
Anti-hammering
You can set up an anti-hammering policy that blocks clients who connect andfail to authenticate more than a specified number of times within a specifiedperiod of time. You can configure an anti-hammering policy server-wide inServer Limits and Settings > Settings and domain-wide in Domain Limits andSettings > Settings.
IP addresses blocked by anti-hammering rules appear in the domain IP accessrules with a value in the Expires in column. If you have multiple domains withdifferent listeners, blocked IP addresses appear in the domain that containsthe listener. Blocked IP addresses do not appear in the server IP access list,even if anti-hammering is configured at the server level.
The Expires in value of the blocked IP address counts down second-by-second untilthe entry disappears. You can unblock any blocked IP address early by deleting itsentry from the list.
39
Caveats

Server
IP access list controls
The following options are available on the IP Access page.
Using the sort mode
You can sort the IP access list numerically rather than in the processing order.Displaying the IP access list in sort mode does not change the order in whichrules are processed. To view rule precedence, disable this option. Viewing theIP access list in numerical order can be useful when you review long lists ofaccess rules to determine if an entry already exists.
Importing and exporting IP access rules
You can export and import Serv-U IP access rules from users, groups, domains,and the server by using a text-based .csv file. To export IP access rules, viewthe list of rules to export, click Export, and specify the path and file name youwant to save the list to. To import IP access rules, click Import and select the filethat contains the rules you want to import. The .csv file must contain the
40

following fields, including the headers:
l IP: The IP address, IP range, CIDR block, or domain name for which therule applies.
l Allow: Set this value to 0 for Deny, or 1 for Allow.
l Description: A text description of the rule for reference purposes.
Examples of IP address rules
Office-only access
A contractor has been hired to work in the office, and only in the office. Officeworkstations have IP addresses in the range of 192.0.2.0 - 192.0.2.24. The relatedServ-U access rule should be Allow 192.0.2.0-24, and it should be added toeither the user account of the contractor or a Contractors group that containsmultiple contractors. No deny rule is required because Serv-U provides an implicitDeny All rule at the end of the list.
Prohibited computers
Users should normally be able to access Serv-U from anywhere, except from a bankof special internal computers in the IP address range of 192.0.2.0 - 192.0.2.24. Therelated Serv-U access rules should be Deny 192.0.2.0-24, followed by Allow*.*.*.*, and these rules should be added to either the domain or the server IPaccess rules.
DNS-based access control
The only users allowed to access a Serv-U domain connect from *.example.com or*.example1.com. The related Serv-U access rules should be Allow*.example.com and Allow *.example1.com in any order, and these rulesshould be added to the domain IP access rules. No deny rule is required becauseServ-U provides an implicit Deny All rule at the end of the list.
Serv-U Gateway
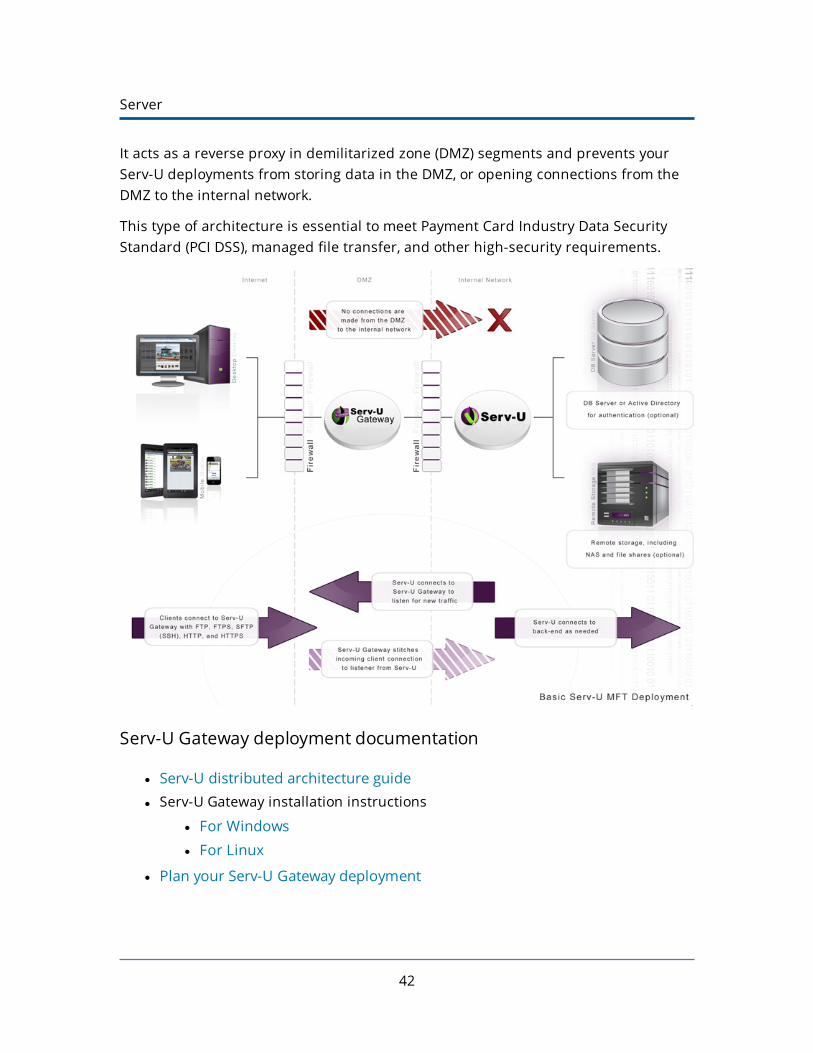
Serv-U Gateway provides defense in depth to Serv-U deployments.
41
Examples of IP address rules
Server
It acts as a reverse proxy in demilitarized zone (DMZ) segments and prevents yourServ-U deployments from storing data in the DMZ, or opening connections from theDMZ to the internal network.
This type of architecture is essential to meet Payment Card Industry Data SecurityStandard (PCI DSS), managed file transfer, and other high-security requirements.
Serv-U Gateway deployment documentation
l Serv-U distributed architecture guidel Serv-U Gateway installation instructions
l For Windowsl For Linux
l Plan your Serv-U Gateway deployment
42

Serv-U Gateway tab
The Serv-U Gateway page in Server Details displays all configured gateways known tothe Serv-U deployment. Serv-U periodically checks every configured gateway anddisplays a status message here.
Gateway Address column
The gateway address is the IP address on the Serv-U Gateway that Serv-U uses tocommunicate with Serv-U Gateway. This should almost always be a private IPaddress.
A status icon is displayed on the left of the gateway address. The Status columndisplays a brief message that indicates the current status of the gateway.
The icon in the Gateway Address column changes to reflect the current gatewaystatus.
43
Serv-U Gateway tab

Server
ICON DESCRIPTION
The gateway is ready for connections. However, the gateway still needslisteners to receive connections.
Serv-U is checking the status of the gateway. Another status will appearin a few seconds.
The gateway is ready but the Serv-U installation is running close to theend of the trial period, or support period.
An error occurred. For more information about why it is not possibleconnect to the gateway, select the gateway entry, and select Properties.
Public IP Address column
The Public IP Address column shows the IP address file transfer clients shouldconnect to.
A private IP address is displayed in the Public IP Address column if a private IPaddress was explicitly configured in the gateway. This occurs if the gateway has nopublic IP addresses, which is common during trials and situations in which thegateway is placed behind network address translation (NAT).
Description column
The Description column displays any note that is added to the gateway configuration.It does not affect behavior.
Manage gateways
Click Add, Edit, or Delete to manage gateway configurations.
44
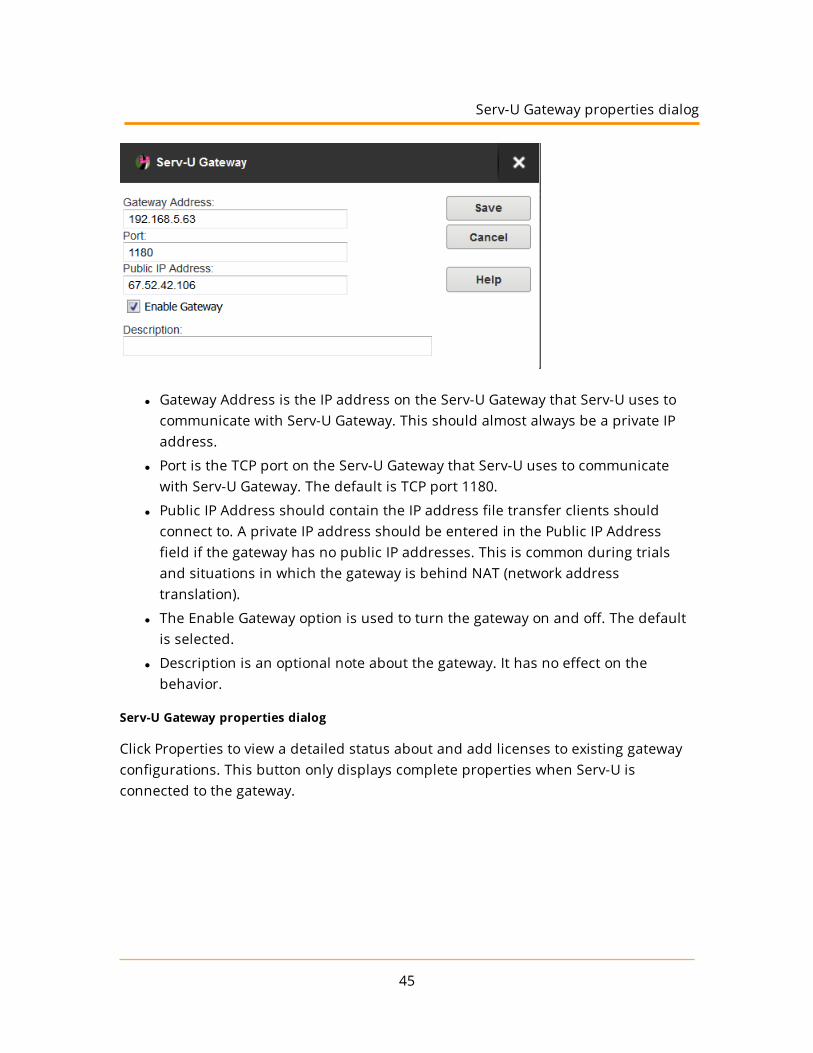
l Gateway Address is the IP address on the Serv-U Gateway that Serv-U uses tocommunicate with Serv-U Gateway. This should almost always be a private IPaddress.
l Port is the TCP port on the Serv-U Gateway that Serv-U uses to communicatewith Serv-U Gateway. The default is TCP port 1180.
l Public IP Address should contain the IP address file transfer clients shouldconnect to. A private IP address should be entered in the Public IP Addressfield if the gateway has no public IP addresses. This is common during trialsand situations in which the gateway is behind NAT (network addresstranslation).
l The Enable Gateway option is used to turn the gateway on and off. The defaultis selected.
l Description is an optional note about the gateway. It has no effect on thebehavior.
Serv-U Gateway properties dialog
Click Properties to view a detailed status about and add licenses to existing gatewayconfigurations. This button only displays complete properties when Serv-U isconnected to the gateway.
45
Serv-U Gateway properties dialog
Server
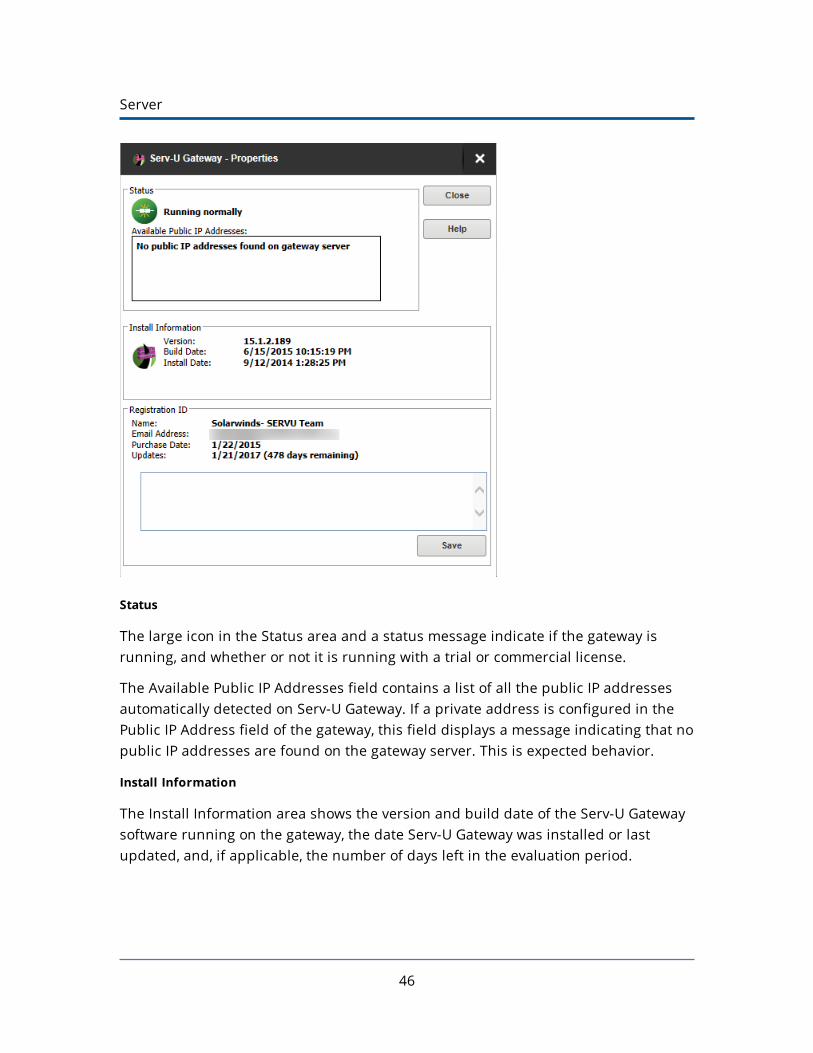
Status
The large icon in the Status area and a status message indicate if the gateway isrunning, and whether or not it is running with a trial or commercial license.
The Available Public IP Addresses field contains a list of all the public IP addressesautomatically detected on Serv-U Gateway. If a private address is configured in thePublic IP Address field of the gateway, this field displays a message indicating that nopublic IP addresses are found on the gateway server. This is expected behavior.
Install Information
The Install Information area shows the version and build date of the Serv-U Gatewaysoftware running on the gateway, the date Serv-U Gateway was installed or lastupdated, and, if applicable, the number of days left in the evaluation period.
46
Registration ID
Copy and paste your Serv-U Gateway Registration ID (not your Serv-U Registration ID)into this field, and click Save to apply a commercial license to your Serv-U Gatewaysoftware.
If you have lost your registration ID, visit the Online Customer Service Center toretrieve it.
Database access
Serv-U enables the use of an Open Database Connectivity (ODBC) database to storeand maintain group and user accounts at the domain and server levels. You canconfigure the ODBC connections in two locations:
l Domain > Domain Details > Database
l Server > Server Details > Database.
Serv-U can automatically create all of the tables and columns necessary to beginstoring users and groups in the database. Because Serv-U uses one set of tablenames to store its information, individual ODBC connections must be configured foreach item which stores details in the database. In other words, the server and eachdomain must have a unique ODBC connection to ensure they are stored separately.
Configure a database
1. Create an ODBC connection for Serv-U to use. SolarWinds recommends MySQL,but you can use any database that has an ODBC driver available. Use a Systemdata source name (DSN) if Serv-U is operating as a system service, or a UserDSN if Serv-U is operating as a regular application.
2. Open the Serv-U Management Console and browse to the appropriate domainor server database settings. Enter the required information, and click Save.
If configuring the database connection for the first time, leave the Automaticallycreate options selected. With these options selected, the Serv-U File Server builds thedatabase tables and columns automatically.
SQL templates
Serv-U uses multiple queries to maintain the databases that contain user and group
47
Registration ID
Server
information. These queries conform to the Structured Query Language (SQL)standards. However, if your database has problems working with Serv-U, you mayneed to alter these queries. In the SQL Templates window, you can modify eachquery used by Serv-U to conform to the standards supported by your database.
Incorrectly editing these SQL queries could cause ODBC support to stopworking in Serv-U. Do not edit these queries unless you are comfortableconstructing SQL statements and are sure that it is necessary to enable ODBCsupport with your database software.
User and group table mappings
By default, Serv-U creates and maintains the tables and columns necessary to storeuser and group information in a database. However, if you want to connect Serv-U toan existing database that contains this information, you must customize the tableand column names to conform to the existing database structure. Click User TableMappings or Group Table Mappings to get started.
Serv-U stores information for a user or group in 10 separate tables. Only theUser/Group Info Table and User/Group Dir Access Table are required. You canchange the current table in the Object Table list. The Attribute column lists theattributes that are stored in the current table. The Mapped Database Value displaysthe name of the column that attribute is mapped to in the database. The first rowdisplays the table name and you can change the name.
Certain tables, where the order of the entries is important, have a SortColumnattribute listed. This column is used to store the order in which rules are applied.
Click Edit or double-click the column name to edit a value.
When enabled, the table is accessed as needed. In special situations, a table that isnot being used can be disabled to reduce the number of ODBC (database) calls. Forexample, if you do not use ratios and quotas, you can disable the User Ratio-FreeFiles, Per User Files Ratio, Per User Bytes Ratio, Per Session Files Ratio, and PerSession Bytes Ratio tables to prevent unnecessary ODBC calls. Use caution when youdisable tables, because although the fields appear in dialogs, they will not be savedor loaded.
The User Info and Group Info tables cannot be disabled.
48

Case file: ODBC authentication
Authentication in the Serv-U File Server can be handled through an ODBC database,allowing for scripted account management and maintenance. To use ODBCfunctionality, migrate to ODBC authentication through a database. By storingcredentials in settings in a database, accounts can be managed from outside theServ-U Management Console through scripted database operations which can bebuilt into many existing account provisioning systems. A DSN must first be created inControl Panel > Administrative Tools > ODBC Data Sources. Use a System DSN if Serv-U is running as a service or a User DSN if Serv-U is running as an application. Afteryou create the appropriate DSN, enter the required information and click Save. Serv-U creates the tables and columns. You can manage database users and groups in theDatabase Users and Database Groups pages of Serv-U, located near the normal Usersand Groups pages.
Data source name creation in Linux
Database access in Serv-U on Linux follows the same method as Serv-U on Windows,with the one change to how data source names are created. On Linux, you can createa DSN after installing the following packages:
l mysql-connector-odbc
l postgressql-odbc
l unixodbc
Only the ODBC driver corresponding to the database needs to be installed. If Serv-Uis running as a service, the next step is to edit the /etc/odbc.ini file, whichcontains all system-level DSNs. If Serv-U is running as an application, edit the~/odbc.ini file instead, and then enter the parameters as follows:
[MySQL-test]Description = MySQL test databaseTrace = OffTraceFile = stderrDriver = MySQLSERVER = YOURIPADDRESSUSER = USERNAME
49
Case file: ODBC authentication
Server
PASSWORD = PASSWORDPORT = 3306DATABASE = YOURDATABASE
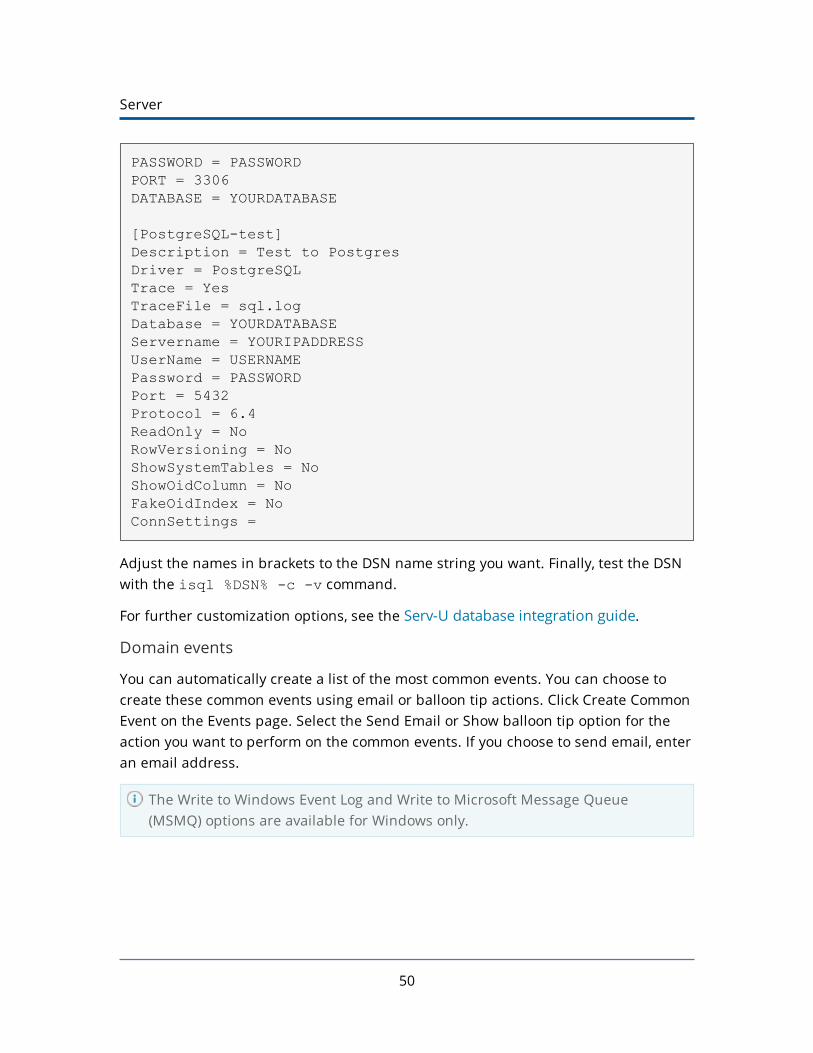
[PostgreSQL-test]Description = Test to PostgresDriver = PostgreSQLTrace = YesTraceFile = sql.logDatabase = YOURDATABASEServername = YOURIPADDRESSUserName = USERNAMEPassword = PASSWORDPort = 5432Protocol = 6.4ReadOnly = NoRowVersioning = NoShowSystemTables = NoShowOidColumn = NoFakeOidIndex = NoConnSettings =
Adjust the names in brackets to the DSN name string you want. Finally, test the DSNwith the isql %DSN% -c -v command.
For further customization options, see the Serv-U database integration guide.
Domain events
You can automatically create a list of the most common events. You can choose tocreate these common events using email or balloon tip actions. Click Create CommonEvent on the Events page. Select the Send Email or Show balloon tip option for theaction you want to perform on the common events. If you choose to send email, enteran email address.
The Write to Windows Event Log and Write to Microsoft Message Queue(MSMQ) options are available for Windows only.
50
Event actions
You can select from the following actions that are executed when an event istriggered:
l Send Email
l Show Balloon Tip*
l Execute Command*
l Write to Windows Event Log (Windows only)*
l Write to Microsoft Message Queue (MSMQ) (Windows only)*
Events involving anything other than email can only be configured byServ-U server administrators.
Email actions
You can configure email actions to send emails to multiple recipients and to Serv-Ugroups when an event is triggered.
To add an email address, enter it in the To or Bcc fields. To send emails to a Serv-Ugroup, use the Group icon to add or remove Serv-U groups from the distribution list.Separate email addresses by commas or semicolons. Email actions contain a To,Subject and Message parameter. You can use special variables to send specific datapertaining to the event. For more information about the variables, see Systemvariables.
To use email actions, you must first SMTP configuration.
Balloon tip actions
You can configure a balloon tip to show in the system tray when an event istriggered. Balloon tip actions contain a Balloon Title and a Balloon Messageparameter. You can use special variables to send specific data pertaining to theevent. For more information about the variables, see System variables.
Execute command actions
You can configure execute command actions to execute a command on a file when anevent is triggered. Execute command actions contain an Executable Path, Command
51
Event actions

Server
Line Parameters, and a Completion Wait Time parameter. For the Completion WaitTime parameter, you can enter the number of seconds to wait after starting theexecutable path. Enter zero for no waiting.
Time spent waiting delays any processing that Serv-U can perform.
A wait value should only be used to give an external program enough time to performan operation, such as move a log file before it is deleted (for example,$LogFilePath for the Log File Deleted event). You can use special variables to sendspecific data pertaining to the event. For more information about the variables, seeSystem variables.
Windows Event Log
By writing event messages to a local Windows Event Log, you can monitor and recordServ-U activity by using third-party network management software. All messagesappear in the Windows Application Log from a source of Serv-U.
This event has only one field:
l Log Information: The contents of the message to be written into the event log.This is normally either a human-readable message (for example, filenameuploaded by person) or a machine-readable string (for example,filename|uploaded|person), depending on who or what is expected toread these messages. Serv-U system variables are supported in this field. Thisfield can be left blank, but usually is not.
Microsoft Message Queuing (MSMQ)
Microsoft Message Queuing (MSMQ) is an enterprise technology that provides amethod for independent applications to communicate quickly and reliably. Serv-Ucan send messages to new or existing MSMQ queues whenever an event is triggered.Corporations can use this feature to tell enterprise applications that files havearrived, files have been picked up, partners have signed on, or many other activitieshave occurred.
These events have the following two fields:
52

l Message Queue Path: The MSMQ path that addresses the queue. Remotequeues can be addressed when a full path (for example,MessageServer\Serv-U Message Queue) is specified. Public queues onthe local machine can be addressed when a full path is not specified (forexample, .\Serv-U Message Queue or Serv-U Message Queue). If thespecified queue does not exist, Serv-U attempts to create it. This normally onlyworks on public queues on the local machine. You can also use Serv-U systemvariables in this field.
l Message Body: The contents of the message to be sent into the queue. This isnormally a text string with a specific format specified by an enterpriseapplication owner or enterprise architect. Serv-U system variables can also beused in this field. This field may be left blank, but usually is not.
Microsoft message queues created in Windows do not grant access to SYSTEMby default, preventing Serv-U from writing events to the queue. To correct this,after creating the queue in MSMQ, right-click it, select Properties, and then setthe permissions so that SYSTEM (or the network account under which Serv-Uruns) has permission to the queue.
Event filters
Use event filters to control when a Serv-U event is triggered. By default, events triggereach time the event occurs. The event filter allows events to be triggered only ifcertain conditions are met. For example, a standard event may trigger an email eachtime a file is uploaded to the server. However, by using an event filter, events can betriggered on a more targeted basis. For example, you can configure a File Uploadedevent to only send an email when the file name contains the string important, soan email would be sent when the file Important Tax Forms.pdf is uploaded butnot when other files are uploaded to the server. Additionally, you can configure a FileUpload Failed event to run only when the FTP protocol is used, not triggering forfailed HTTP or SFTP uploads. You can do this by controlling the variables and valuesrelated to the event and by evaluating their results when the event is triggered.
Event filter fields
Each event filter has the following critical values that must be set:
53
Event filters
Server
l Name: This is the name of the filter, used to identify the filter for the event.
l Description (Optional): This is the description of the event, which may beincluded for reference.
l Logic: This determines how the filter interacts with other filters for an event. Inmost cases, AND is used, and all filters must be satisfied for the event totrigger. The function of AND is to require that all conditions be met. However,the OR operator can be used if there are multiple possible satisfactoryresponses (for example, abnormal bandwidth usage of less than 20 KB/s ORgreater than 2000 KB/s).
l Filter Comparison: This is the most critical portion of the filter. The FilterComparison contains the evaluation that must occur for the event to trigger.For example, a filter can be configured so that only the user admin triggers theevent. In this case, the comparison is If $Name = (is equal to) admin,and the data type is string. For bandwidth, either an unsigned integer ordouble precision floating point value is used.
Event filters also support wildcards when evaluating text strings. The supported wild-cards include:
l * - The asterisk wildcard matches any text string of any length. For example:
l An event filter that compares the $FileName variable to the stringdata* matches files named data, data7, data77, data.txt,data7.txt, and data77.txt.
l ? - The question mark wildcard matches any one character, but only onecharacter. For example:
l An event filter that compares the $FileName variable to the stringdata? matches a file named data7 but not data, data77, data.txt,data7.txt, or data77.txt.
l An event filter that compares the $FileName variable to the stringdata?.* matches files named data7 and data7.txt but not data,data77, data.txt, or data77.txt.
l An event filter that compares the $Name variable to the string A????matches any five-character user name that starts with A.
54
l [] - The bracket wildcard matches a character against the set of charactersinside the brackets. For example:
l An event filter that compares the $FileName variable to the string data[687].txt matches files named data6.txt, data7.txt anddata8.txt but not data5.txt.
l An event filter that compares the $LocalPathName variable to the string[CD]:\* matches any file or folder on the C: or D: drives.
You can use multiple wildcards in each filter. For example:
l An event filter that compares the $FileName variable to the string[cC]:\*.??? matches any file on the C: drive that ends in a three letter fileextension.
l An event filter that compares the $FileName variable to the string ?:\*Red[678]\?????.* matches a file on any Windows drive, contained in any folderwhose name contains Red6, Red7 or Red8, and that also has a five characterfile name followed by a file extension of any length.
Event filters
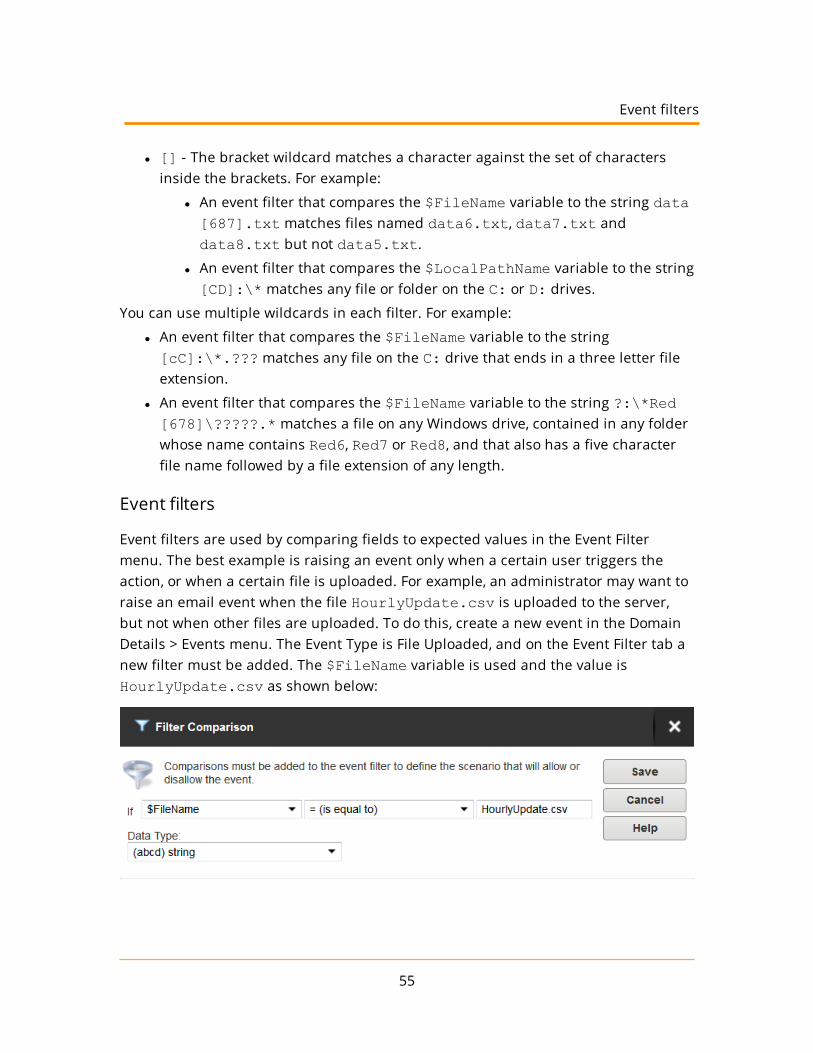
Event filters are used by comparing fields to expected values in the Event Filtermenu. The best example is raising an event only when a certain user triggers theaction, or when a certain file is uploaded. For example, an administrator may want toraise an email event when the file HourlyUpdate.csv is uploaded to the server,but not when other files are uploaded. To do this, create a new event in the DomainDetails > Events menu. The Event Type is File Uploaded, and on the Event Filter tab anew filter must be added. The $FileName variable is used and the value isHourlyUpdate.csv as shown below:
55
Event filters
Server
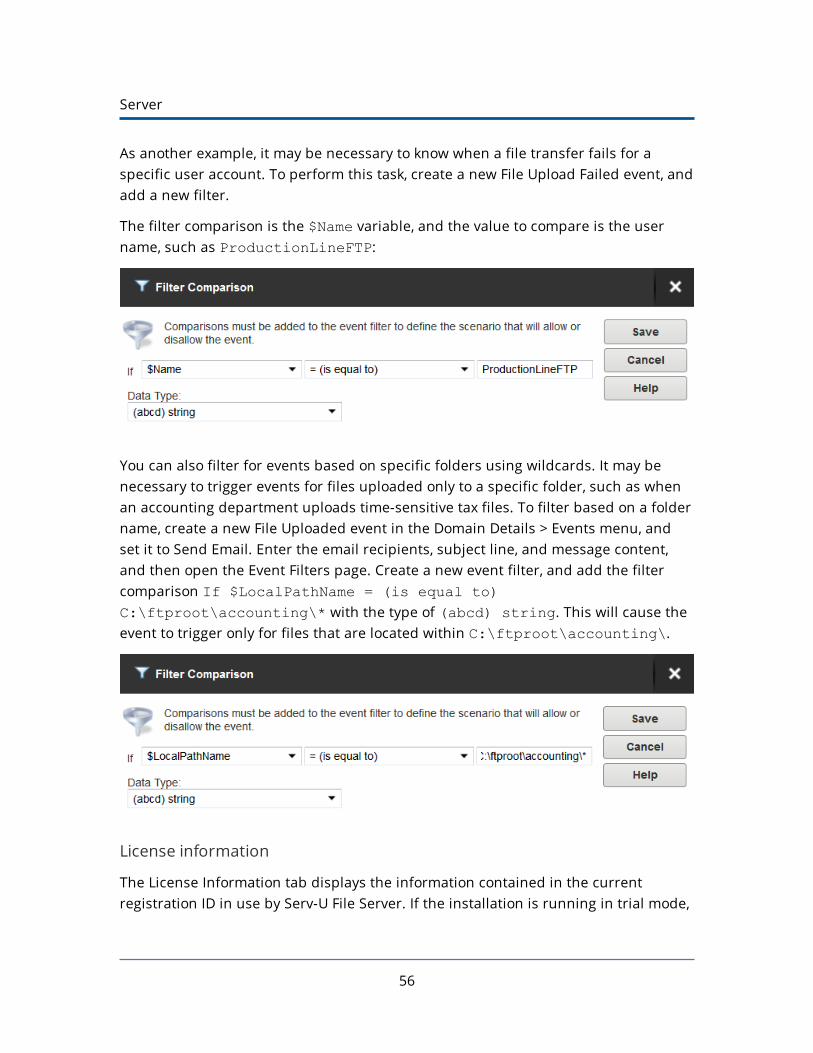
As another example, it may be necessary to know when a file transfer fails for aspecific user account. To perform this task, create a new File Upload Failed event, andadd a new filter.
The filter comparison is the $Name variable, and the value to compare is the username, such as ProductionLineFTP:
You can also filter for events based on specific folders using wildcards. It may benecessary to trigger events for files uploaded only to a specific folder, such as whenan accounting department uploads time-sensitive tax files. To filter based on a foldername, create a new File Uploaded event in the Domain Details > Events menu, andset it to Send Email. Enter the email recipients, subject line, and message content,and then open the Event Filters page. Create a new event filter, and add the filtercomparison If $LocalPathName = (is equal to)C:\ftproot\accounting\* with the type of (abcd) string. This will cause theevent to trigger only for files that are located within C:\ftproot\accounting\.
License information
The License Information tab displays the information contained in the currentregistration ID in use by Serv-U File Server. If the installation is running in trial mode,
56

information about the number of trial days remaining is also included.
FIELD DESCRIPTION
Name The name associated with the current license.
Emailaddress
The email address associated with the current license.
Serv-Uedition
The Serv-U edition that is enabled by the current license. For moreinformation, see Serv-U editions.
CopiesThe number of concurrent installations allowed by the currentlicense.
Purchasedate
The date the current license was purchased.
UpdatesThe date through which the current license allows free updates tothe latest version. If Serv-U is running as a trial version, the numberof trial days remaining is displayed.
Additionalproducts
Additional add-ons for Serv-U, and whether they are enabled.
Editioninformation
The enabled functionality and limitations of the licensed Serv-Uedition.
Serv-U registration
To register Serv-U File Server, click Enter License ID on the bottom toolbar, and enteryour alphanumeric registration ID. If you lost your ID, click Lost ID to retrieve it. If youwant to purchase an ID, click Purchase to visit the Serv-U website. To upgrade, clickUpgrade License.
Program Information
The Program Information page displays information about the current version ofServ-U installed on the server.
57
Serv-U registration
Server
SMTP configuration
Configure an SMTP connection to send email for events which are configured to useemail actions.
You can configure SMTP on the server or domain level, or both. SMTP configuration atthe domain level can be inherited from the server level. The SMTP configurationdialog is located in the Events tab on the Domain Details and Server Details pages.
Click Configure SMTP to launch the dialog.
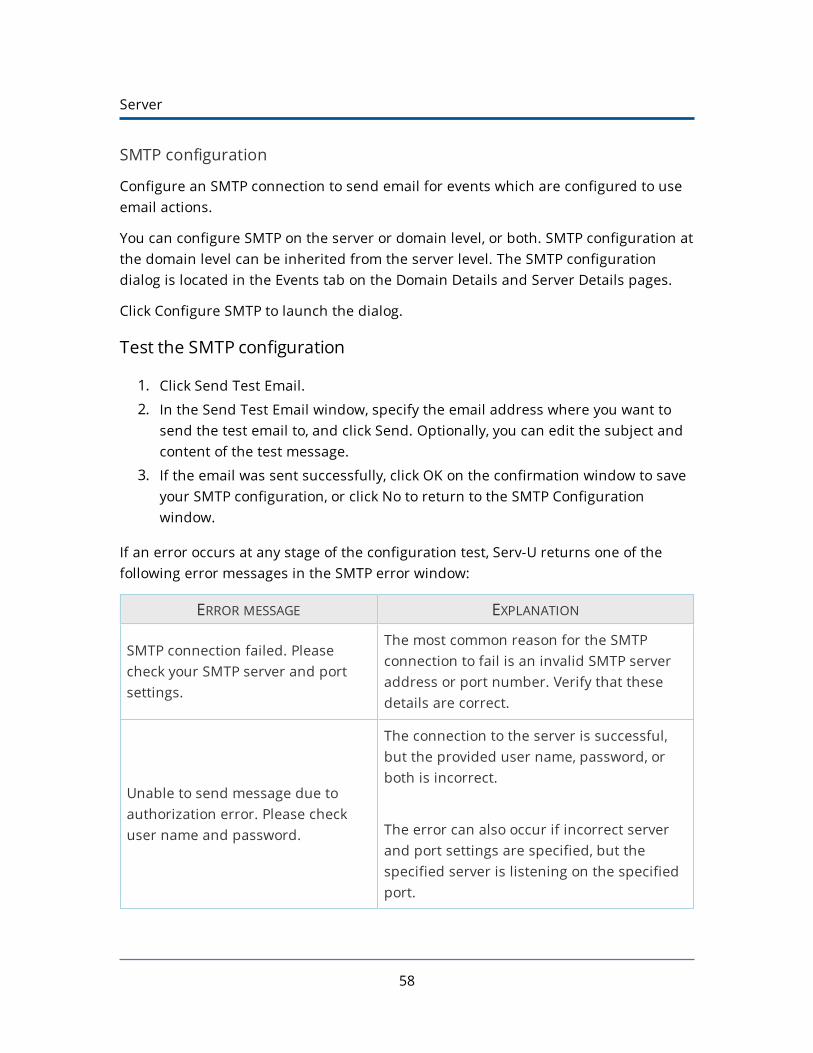
Test the SMTP configuration
1. Click Send Test Email.
2. In the Send Test Email window, specify the email address where you want tosend the test email to, and click Send. Optionally, you can edit the subject andcontent of the test message.
3. If the email was sent successfully, click OK on the confirmation window to saveyour SMTP configuration, or click No to return to the SMTP Configurationwindow.
If an error occurs at any stage of the configuration test, Serv-U returns one of thefollowing error messages in the SMTP error window:
ERROR MESSAGE EXPLANATION
SMTP connection failed. Pleasecheck your SMTP server and portsettings.
The most common reason for the SMTPconnection to fail is an invalid SMTP serveraddress or port number. Verify that thesedetails are correct.
Unable to send message due toauthorization error. Please checkuser name and password.
The connection to the server is successful,but the provided user name, password, orboth is incorrect.
The error can also occur if incorrect serverand port settings are specified, but thespecified server is listening on the specifiedport.
58

ERROR MESSAGE EXPLANATION
Unable to send message due torecipient error. Please check thatrecipient email address is valid.
The connection to the server is successful,but the email address provided in the ToEmail Address field of the Send Test Emailwindow is not valid.
Unable to send a message. Pleasetry again later.
The connection to the server is successful,but an unspecified error occurred whilesending the test email.
SMTP communication failed. Ensurethat SMTP server settings arecorrect, and that the SMTP server isup and running.
An unspecified error occurred. Check yourSMTP connection details, and try the testagain.
Timeout while contacting SMTPserver. Please check that the SMTPserver address is correct.
The connection to the SMTP server timedout.
Directory access rules
Directory access rules define the areas of the system which are accessible to useraccounts. While traditionally restricted to the user and group levels, in Serv-U, theusage of directory access rules is extended to both the domain and the server levelsthrough the creation of global directory access rules. Directory access rules specifiedat the server level are inherited by all users of the file server. If they are specified atthe domain level, they are only inherited by users who belong to the particulardomain. The traditional rules of inheritance apply where rules specified at a lowerlevel (for example, the user level) override conflicting or duplicate rules specified at ahigher level (for example, the server level).
59
Directory access rules

Server
When you set the directory access path, you can use the %USER%, %HOME%, %USER_FULL_NAME%, and %DOMAIN_HOME% variables to simplify the process. For example,use %HOME%/ftproot/ to create a directory access rule that specifies the ftprootfolder in the home directory of the user. Directory access rules specified in thismanner are portable if the actual home directory changes while maintaining thesame subdirectory structure. This leads to less maintenance for the file serveradministrator. If you specify the %USER% variable in the path, it is replaced with theuser's login ID. This variable is useful in specifying a group's home directory toensure that users inherit a logical and unique home directory. You can use the%USER_FULL_NAME% variable to insert the Full Name value into the path (the user
must have a Full Name specified for this to function). For example, the user "TomSmith" could use D:\ftproot\%USER_FULL_NAME% for D:\ftproot\Tom Smith.You can also use the %DOMAIN_HOME% macro to identify the user's home directory.For example, to place a user and their home directory into a common directory, use%DOMAIN_HOME%\%USER%.
Directory access rules are applied in the order they are listed. The first rule in the listthat matches the path of a client's request is the one that is applied for that rule. Inother words, if a rule exists that denies access to a particular subdirectory but islisted below the rule that grants access to the parent directory, then a user still hasaccess to the particular subdirectory. Use the arrows on the right of the directoryaccess list to rearrange the order in which the rules are applied.
Serv-U allows to list and open the parent directory of the directory the user isgranted access to, even if no explicit access rules are defined for the parentdirectory. However, the parent directory accessed this way will only display thecontent to which the user has access.
File permissionsP
ERMISSIONDESCRIPTION
ReadAllows users to read (download) files. This permission does not allowusers to list the contents of a directory, which is granted by the Listpermission.
WriteAllows users to write (upload) files. This permission does not allowusers to modify existing files, which is granted by the Append
60

PERMISSION
DESCRIPTION
permission.
AppendAllows users to append data to existing files. This permission is typicallyused to enable users to resume transferring partially uploaded files.
Rename Allows users to rename files.
Delete Allows users to delete files.
Execute
Allows users to remotely execute files. The execute access is meant forremotely starting programs and usually applies to specific files. This is apowerful permission and great care should be used in granting it tousers. Users with Write and Execute permissions can install anyprogram on the system.
Directory permissionsP
ERMISSIONDESCRIPTION
ListAllows users to list the files and subdirectories contained in thedirectory. Also allows users to list this folder when listing the contentsof a parent directory.
Create Allows users to create new directories within the directory.
Rename Allows users to rename directories within the directory.
Remove
Allows users to delete existing directories within the directory.
If the directory contains files, the user also must have the Deletefiles permission to remove the directory.
Subdirectory permissionsP
ERMISSIONDESCRIPTION
Inherit Allows all subdirectories to inherit the same permissions as the parent
61
Directory permissions
Server
PERMISSION
DESCRIPTION
directory. The Inherit permission is appropriate for most circumstances,but if access must be restricted to subfolders (for example, whenimplementing mandatory access control), clear the Inherit check boxand grant permissions specifically by folder.
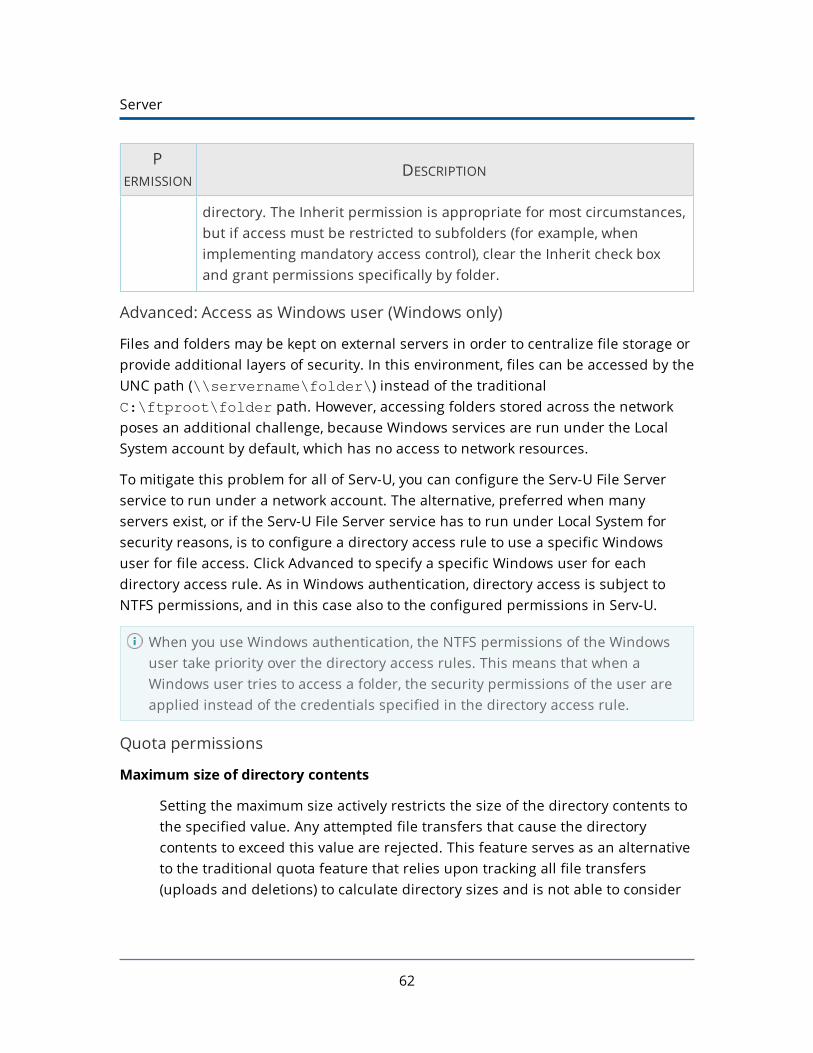
Advanced: Access as Windows user (Windows only)
Files and folders may be kept on external servers in order to centralize file storage orprovide additional layers of security. In this environment, files can be accessed by theUNC path (\\servername\folder\) instead of the traditionalC:\ftproot\folder path. However, accessing folders stored across the networkposes an additional challenge, because Windows services are run under the LocalSystem account by default, which has no access to network resources.
To mitigate this problem for all of Serv-U, you can configure the Serv-U File Serverservice to run under a network account. The alternative, preferred when manyservers exist, or if the Serv-U File Server service has to run under Local System forsecurity reasons, is to configure a directory access rule to use a specific Windowsuser for file access. Click Advanced to specify a specific Windows user for eachdirectory access rule. As in Windows authentication, directory access is subject toNTFS permissions, and in this case also to the configured permissions in Serv-U.
When you use Windows authentication, the NTFS permissions of the Windowsuser take priority over the directory access rules. This means that when aWindows user tries to access a folder, the security permissions of the user areapplied instead of the credentials specified in the directory access rule.
Quota permissions
Maximum size of directory contents
Setting the maximum size actively restricts the size of the directory contents tothe specified value. Any attempted file transfers that cause the directorycontents to exceed this value are rejected. This feature serves as an alternativeto the traditional quota feature that relies upon tracking all file transfers(uploads and deletions) to calculate directory sizes and is not able to consider
62

changes made to the directory contents outside of a user's file server activity.
Mandatory access control
You can use mandatory access control (MAC) in cases where users need to begranted access to the same home directory but should not necessarily be able toaccess the subdirectories below it. To implement mandatory access control at adirectory level, disable the Inherit permission as shown below.
In the following example, the rule applies to C:\ftproot\.
Now, the user has access to the ftproot folder but to no folders below it.Permissions must individually be granted to subfolders that the user needs access to,providing the security of mandatory access control in Serv-U File Server.
Restrict file types
If users are using storage space on the Serv-U File Server to store non-work-relatedfiles, such as .mp3 files, you can prevent this by configuring a directory access ruleplaced above the main directory access rule to prevent .mp3 files from beingtransferred as shown below.
In the text entry for the rule, type *.mp3, and use the permissions shown beolw:
63
Mandatory access control
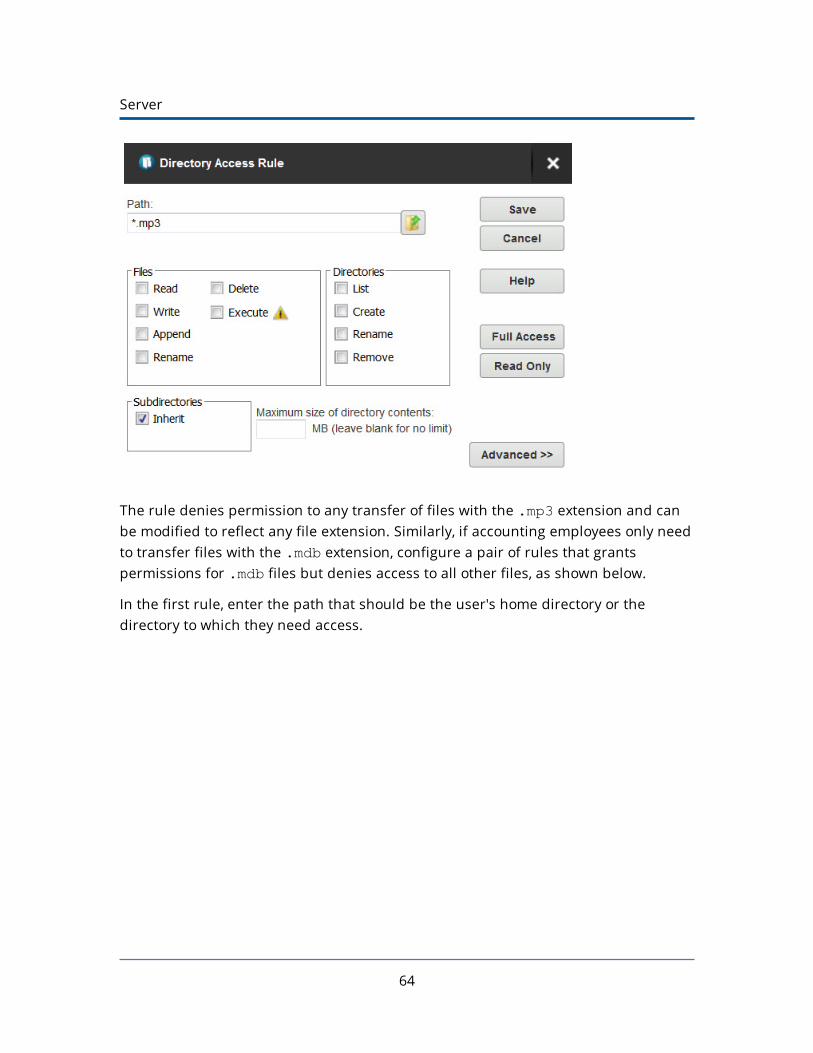
Server
The rule denies permission to any transfer of files with the .mp3 extension and canbe modified to reflect any file extension. Similarly, if accounting employees only needto transfer files with the .mdb extension, configure a pair of rules that grantspermissions for .mdb files but denies access to all other files, as shown below.
In the first rule, enter the path that should be the user's home directory or thedirectory to which they need access.
64
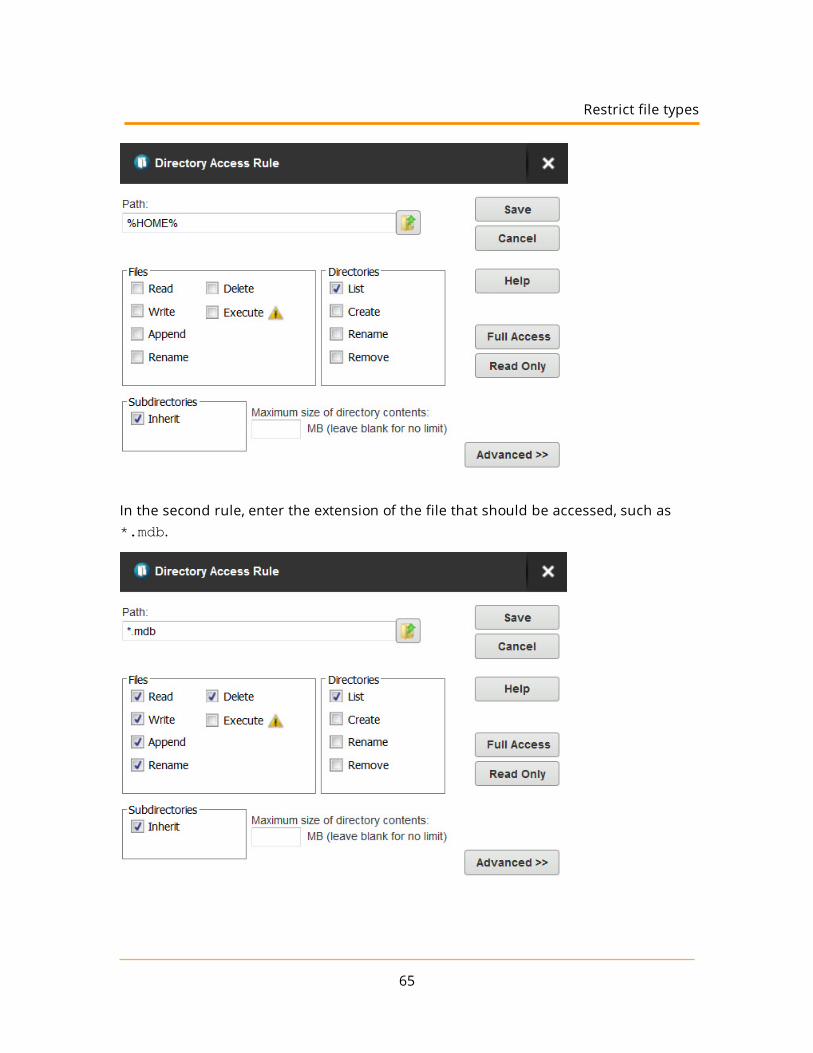
In the second rule, enter the extension of the file that should be accessed, such as*.mdb.
65
Restrict file types

Server
These rules only allow users to access .mdb files within the specified directories. Youcan adapt these rules to any file extension or set of file extensions.
Virtual paths
If virtual paths are specified, users can gain access to files and folders outside oftheir own home directory. A virtual path only defines a method of mapping anexisting directory to another location on the system to make it visible within a user'saccessible directory structure. In order to access the mapped location, the user muststill have a directory access rule specified for the physical path of a virtual path.
Like directory access rules, virtual paths can be configured at the server, domain,group, and user levels. Virtual paths created at the server level are available for allusers of the file server. When virtual paths are created at the domain level, they areonly accessible by users belonging to that domain.
You can also create virtual paths specifically for individual users or groups.
Physical path
The physical path is the actual location on the system, or network, that is to be placedin a virtual location accessible by a user. If the physical path is located on the samecomputer, use a full path, such as D:\inetpub\ftp\public. You can also use aUNC path, such as \\Server\share\public. To make a virtual path visible tousers, users must have a directory access rule specified for the physical path.
Virtual path
The virtual path is the location that the physical path should appear in for the user.The %HOME% macro is commonly used in the virtual path to place the specified
66
physical path in the home directory of the user. When specifying the virtual path, thelast specified directory is used as the name displayed in directory listings to the user.For example, a virtual path of %HOME%/public places the specified physical path ina folder named public within the user's home directory. You can also use a full pathwithout any macros.
Include virtual paths in Maximum Directory Size calculations
When this option is selected, the virtual path is included in Maximum Directory Sizecalculations. The Maximum Directory Size limits the size of directories affecting howmuch data can be uploaded.
Virtual paths example
A group of web developers have been granted access to the directoryD:\ftproot\example.com\ for web development purposes. The developers alsoneed access to an image repository located at D:\corpimages\. To avoid grantingthe group access to the root D drive, a virtual path must be configured so that theimage repository appears to be contained within their home directory. Within thegroup of web developers, add a virtual path to bring the directory to the users byspecifying D:\corpimages\ as the physical path andD:\ftproot\example.com\corpimages as the virtual path. Be sure to add agroup level directory access rule for D:\corpimages\ as well. The developers nowhave access to the image repository without compromising security or relocatingshared resources.
Relative virtual paths example
Continuing with the previous example, if the home directory of the group of webdevelopers is relocated to another drive, both the home directory and the virtual pathmust be updated to reflect this change. You can avoid this by using the %HOME%macro to create a relative virtual path location that eliminates the need to update thepath if the home directory changes. Instead of usingD:\ftproot\example.com\corpimages as the virtual path, use%HOME%\corpimages. This way the corpimages virtual path is placed within the
home directory of the group, regardless of what the home directory is. If the homedirectory changes at a later date, the virtual path still appears there.
67
Include virtual paths in Maximum Directory Size calculations

Server
Automated file management
Using file management rules, you can automatically remove or archive files from thefile server. You can configure automated file management rules at the server anddomain level. If they are specified at the server level, the file management rules areaccessible to all users of the file server. If they are specified at the domain level, theyare only accessible to users belonging to that domain.
Depending on the file system, Serv-U uses the creation or change date of files todetermine the expiration date. On Windows, the creation date of the file is used todetermine when a file expires. On Linux, the change date is used to determine theexpiration date. The change date is updated whenever the metadata or index node(inode) of the file is modified. If the contents or attributes (such as the permissions)of the file are modified, the change date is also updated.
The change date is not modified if the file is read from.
The file management rules apply recursively to all files within the folder for whichthey are configured, and not only to those that have been uploaded through Serv-U.This way you can manage files that are transferred by clients, or that are copied tothe folder outside of Serv-U.
The folder structure is not affected by the file management rules. When expired filesare deleted or moved, the folders themselves remain intact.
The file management rules run hourly in the background. For this reason, there canbe an hour delay before Serv-U deletes or moves an expired file.
To monitor the status of the file management rules, you can configure a FileManagement Rule Success and a File Management Rule Error event underServer/Domain Details > Events. The file management rules continue to run even ifdeleting or moving a single file fails. For more information, see Domain events.
Define a new file management rule
1. Navigate to Directories > File Management, and click Add.
2. Type the path to the file or folder in the Directory Path field, or click Browse tonavigate to the file or folder.
68

3. Select the action you want to perform on the file:a. If you want to delete the file after it expires, select Delete file(s) after
specified time.
b. If you want to move the file after it expires, select Move file(s) afterspecified time, and then in the Destination Directory Path field, specifythe folder where you want to move the file.
4. Specify the number of days after the file creation date when the action shouldbe executed.
5. Click Save.
Serv-U regularly checks each file in the directory for its age, and performs thespecified action on the files that meet the age criteria you specify.
Server limits and settings
Serv-U contains options which you can use to customize how Serv-U can be used, andwhich also provide ways to apply limits and custom settings to users, groups,domains, and the server in its entirety. The limits stack intelligently, with usersettings overriding group settings, group settings overriding domain settings, anddomain settings overriding server settings. In addition, you can configure limits sothat they are only applied during certain days of the week or times of the day. Youcan also grant exceptions to administrators and restrict specific users more thanothers, providing total control over the server. The limits and settings in Serv-Uconsist of the following categories:
l Connection
l Password
l Directory Listing
l Data Transfer
l HTTP
l Email
l File Sharing
l Advanced
69
Server limits and settings
Server
To apply a limit, select the appropriate category, click Add, select the limit, and thenselect or enter the value. For example, to disable the Lock users in home directoryoption for a server, perform the following steps:
1. In the Serv-U Management Console, click Limits & Settings.
2. From the Limit Type list, select the Directory Listing.
3. Click Add.
4. From the Limit list, select Lock users in home directory.5. Deselect the option.
6. Click Save.
The limits list displays the current limits applied to the domain. Limits with a light-blue background are default values. Limits with a white background are values thatoverride the defaults. After completing the previous steps, a new "Lock users in homedirectory" limit appears in the list that displays "No" for the value. Because ofinheritance rules, this option applies to all users in the domain unless overridden atthe group or user level. For more information about this method of inheritance, seeUser interface conventions.
You can delete limits by selecting them and clicking Delete. To edit an overriddenvalue, select the limit, and then click Edit.
Default rules cannot be edited or deleted. Create a new limit to override adefault limit.
To create a limit that is restricted to a specific time of day, or specific days of theweek, click Advanced in the New Limit or Edit Limit window. Select Apply limit only atthis time of day to specify a start and stop time for the new limit. To restrict the limitto certain days of the week, deselect the days for which you do not want the limitapplied. When a limit is restricted in this way, default values (or the value of otherlimit overrides) are applied when the time of day or day of the week restrictions arenot met for this limit.
Server settings
On the Server Limits & Settings > Settings pages, you can configure basic serversettings that affect performance, security, and network connectivity. To configure asetting, type the value you want in the appropriate area, and then click Save. This
70

topic contains detailed information about the settings that you can configure.
Connection settings
Block users who connect more than 'x' times within 'y' seconds for 'z' minutes
Also known as anti-hammering, enabling this option is a method of preventingbrute force password guessing systems from using dictionary style attacks tolocate a valid password for a user account. Using strong, complex passwordsdefeats most dictionary attacks. However, enabling this option ensures thatServ-U does not waste time processing connections from these illegitimatesources. When configuring this option, ensure that there is some room forlegitimate users to correct an incorrect password before they are blocked.
When enabled, this option temporarily blocks IP addresses for the specifiednumber of minutes that fail to successfully login after the specified number ofattempts within the specified number of seconds. IP addresses blocked in thisway can be viewed in the appropriate IP access rules tab. A successful loginresets the counter that is tracking login attempts.
Hide server information from SSH identity
After a successful SSH login, the server sends identification information to theclient. Normally, this information includes the server name and versionnumber. Enable this option to prevent the information from being given to theclient.
Default Web Client
Specifies whether the Web Client, Web Client Pro, or FTP Voyager JV should beused by all HTTP clients by default. The third, default option is to prompt theusers for the client they want to use instead. This option is also available at thegroup and user level.
Network settings
Auto-configure firewall through UPnP (Windows Only)
When enabled, Serv-U automatically configures the necessary port forwards inyour UPnP-enabled network device (usually a router) so that the file server isaccessible from outside your network. This is particularly useful in enabling
71
Connection settings
Server
PASV mode FTP data transfers.
Packet time-out
Specifies the timeout, in seconds, for a TCP packet transfer. Only very slownetworks experiencing high levels of latency may need to change this valuefrom the default 300 seconds.
PASV Port Range
Specifies the inclusive range of ports that Serv-U should use for PASV modedata transfers. Serv-U normally allows the operating system to assign it arandom port number when opening a socket for a PASV mode data transfer.This attribute accommodates routers or firewalls that need to know a specificrange of ports in advance by restricting the PASV port range of Serv-U to aknown range. A range of 10 ports is sufficient for the busiest of file servers.
Some NAT routers work differently and may require a larger port range.If Serv-U and clients have troubles listing directories or transferring files,try increasing the port range here and on your router.
Other settings
Ratio Free Files
Files listed by opening the Ratio Free Files button are exempt from transferratio limitations on file transfers. Ratio free files specified at the server ordomain level are inherited by all their users accounts. For more information,see Transfer ratios and quotas.
Change Admin Password
The Serv-U Management Console can be password protected when it islaunched by double-clicking on the Serv-U system tray icon. When theManagement Console is running in this way, the option to change the passwordbecomes available. By default, there is no admin password.
FTP settings
In the Serv-U File Server, you can customize the FTP commands that Serv-U accepts,and you can also customize the responses of Serv-U to the FTP commands it receives.
72

If you configure these options at the server level, all domains inherit thecustomizations. To customize the FTP behavior for a specific domain, select theappropriate domain, open the FTP Settings page for the domain, and then click UseCustom Settings. At any time, you can click Use Default Settings to have the domainrevert back to the default settings of the server.
Warning: Customizing the FTP behavior in this way is not recommended except forthose very familiar with the FTP protocol and its standard and extended commandset.
Global properties
When using custom settings, the Global Properties button becomes available.
FTP Responses
Global FTP responses are responses shared amongst most FTP commands, suchas the error message sent when a file is not found. Customizing a global FTPresponse ensures that the response is used by all other FTP commands ratherthan having to customize it for each individual FTP command. FTP commandresponses can contain special macros that allow real-time data to be insertedin to the response. For more information, see System variables.
Message File
The server welcome message is sent in addition to the standard "220 WelcomeMessage" that identifies the server to clients when they first connect. If theInclude response code in text of message file option is selected, the 220response code begins each line of the specified welcome message. Tocustomize the welcome message, enter the path to a text file in the MessageFile Path field. Click Browse to select a file on the computer. Serv-U opens thisfile and sends its contents to connecting clients.
Advanced Options
Block "FTP_bounce" attacks and FXP (server-to-server transfers): Select thisoption to block all server-to-server file transfers involving this Serv-U File Serverby only allowing file transfers to the IP address in use by the commandchannel. For more information about FTP_bounce attacks, see CERT advisoryCA-97.27.
73
Global properties
Server
Include response code on all lines of multi-line responses: The FTP protocoldefines two ways in which a multi-line response can be issued by an FTPserver. Some older FTP clients have trouble parsing multi-line responses thatdo not contain the three-digit response code on each line. Select this option ifyour clients are using an FTP client experiencing problems with multi-lineresponses from Serv-U.
Use UTF-8 encoding for all sent and received paths and file names: By default,Serv-U treats all file names and paths as UTF-8 encoded strings. It also sendsall file names and paths as UTF-8 encoded strings, such as when sending adirectory listing. Deselecting this option prevents Serv-U from UTF-8 encodingthese strings. When this option is deselected, UTF-8 is not included in the FEATcommand response to indicate to clients that the server is not using UTF-8encoding.
Edit FTP commands and responses
To edit FTP Commands, select the FTP command you want to change, and then clickEdit.
Information
On the Information page, basic information about the command is shown alongwith a link to more information on the Serv-U website. Each FTP command canalso be disabled by selecting the Disable command option. Disabledcommands are treated as unrecognized commands when they are receivedfrom a client.
FTP Responses
On the FTP Responses page, all possible FTP responses to the command asissued by the server can be modified by clicking Edit for each response. FTPcommand responses can contain special macros that allow real-time data to beinserted in to the response. For more information, see System variables.
Message Files
Certain FTP commands allow a message file to be associated with them. Thecontents of a message file are sent along with the standard FTP response. Inaddition, a secondary message file path is available as a default option. This
74

allows for message files to be specified using a path relative to the homedirectory of the user for the Message File. If the first message file is not found,Serv-U attempts to use the Secondary Message File instead. By specifying anabsolute file path in the secondary location, you can ensure that each userreceives a message file.
The following FTP commands can be used for specifying a message file:
l CDUP
l CWD
l QUIT
Managing Recursive Listings
Serv-U supports recursive listings by default, allowing FTP clients to obtainlarge directory listings with a single command. In some cases, clients mayrequest excessively large directory listings using the -R parameter to the LISTand NLST commands. If performance in Serv-U is impacted by usersrequesting excessively large listings, recursive listings can be disabled by usingthe Allow client to specify recursive directory listings with -R parameter option.
Advanced Options
Some FTP commands contain advanced configuration options that offeradditional ways to configure the behavior of the command. Where available,the configuration option is described in detail in the Management Console. Thefollowing FTP commands contain advanced configuration options:
l LIST
l MDTM
l NLST
Case file: Custom FTP command response
Users connecting to the server need to know how much quota space is available in agiven folder when they have completed a transfer. To do this, edit the response tothe STOR command to include a report about available space. By default, the 226(command successful) response to the STOR command (which stores files on theserver) is the following:
75
Case file: Custom FTP command response
Server
Transfer complete. $TransferBytes bytes transferred.$TransferKBPerSecond KB/sec.
Modify this to include an extra variable in the following way:
Transfer complete. $TransferBytes bytes transferred.$TransferKBPerSecond KB/sec. Remaining storage space is$QuotaLeft.
The last sentence shows the user how much storage space is left at the end of eachfile upload. The same can be done for the DELE command, so that every time a userdeletes a file, their updated quota value, showing an increase in available space, isdisplayed. This can be done for any FTP command response.
Configure server encryption
Serv-U supports two methods of encrypted data transfer: Secure Socket Layer (SSL)and Secure Shell 2 (SSH2). SSL is used to secure the File Transfer Protocol (FTP) andHypertext Transfer Protocol (HTTP). SSH2 is a method of securely interacting with aremote system that supports a method of file transfer commonly referred to as SFTP.Despite its name, SFTP does not have anything in common with the FTP protocolitself.
In order for each method of encryption to work, a certificate, a private key, or bothmust be supplied. SSL requires the presence of both, while SSH2 only requires aprivate key. If you do not have either of these required files, you can create them inServ-U.
Encryption options specified at the server level are automatically inherited byall domains. Any encryption option specified at the domain level automaticallyoverrides the corresponding server-level option. Certain configuration optionsare only available to the server.
When creating SSL/TLS, SSH, and HTTPS encrypted domains within Serv-U, it isimportant to know that encrypted domains cannot share listeners. Because SSL/TLSand SSH encryption is based on encrypting traffic sent between IP addresses, eachdomain must have unique listeners in order to operate properly. In the case thatmultiple encrypted domains are created that share listeners, the domain that iscreated first takes precedence, and causes other encrypted domains to fail tofunction properly. To operate multiple encrypted domains, modify the listeners of
76
each domain to ensure they listen on unique port numbers.
Configure SSL for FTPS and HTTPS
To use an existing certificate:
1. Obtain an SSL certificate and private key file from a certificate authority.
2. Place these files in a secured directory in the server.
3. Use the appropriate Browse button to select both the certificate and privatekey files.
4. If a CA (Certificate Authority) PEM file has been issued, enter or browse to thefile.
5. Enter the password used to encrypt the private key file.
6. Click Save.
If the provided file paths and password are all correct, Serv-U starts to use thecertificate immediately to secure FTPS and HTTPS connections using the providedcertificate. If the password is incorrect or Serv-U cannot find either of the providedfiles, an error message is displayed that explains the encountered error.
To create a new certificate:
1. Click Create Certificate.
2. Specify the Certificate Set Name that is used to name each of the files Serv-Ucreates.
3. Specify the output path where the created files are to be placed. In most cases,the installation directory is a safe location (for example,C:\ProgramData\SolarWinds\Serv-U\).
4. Specify the city in which the server or corporation is located.
5. Specify the state (if applicable) in which the server or corporation is located.
6. Specify the two-digit country code for the country in which the server orcorporation is located.
7. Specify the password used to secure the private key.
8. Specify the full organization name.
77
Configure SSL for FTPS and HTTPS
Server
9. Specify the common name of the certificate. The IP address or the FullyQualified Domain Name (FQDN) that users use to connect must be listed here.
If the Common Name is not the IP address or FQDN used by clients toconnect, clients may be prompted that the certificate does not match thedomain name they are connecting to.
10. Specify the business unit the server is located in.
11. Specify the key length in bits.
12. Click Create to complete the certificate creation.
Serv-U creates three files using the provided information: A self-signed certificate(.crt) that can be used immediately on the server but is not authenticated by anyknown certificate authority, a certificate request (.csr) that can be provided to acertificate authority for authentication, and a private key file (.key) that is used tosecure both certificate files. It is extremely important that you keep the private key ina safe and secure location. If your private key is compromised, your certificate can beused by malicious individuals.
Viewing the certificate
To view the SSL certificate when it is configured, click View Certificate. All identifyinginformation about the certificate, including the dates during which the certificate isvalid, are displayed in a new window.
Advanced SSL options
The advanced SSL options can only be configured at the server level. All domainsinherit this behavior, which cannot be individually overridden.
Serv-U now supports TLSv1.1 and TLSv1.2, and 15 new cipher suites, includingCamellia, SEED, higher levels of SHA, and GCM cipher suites where encryption andauthentication are native rather than two discrete operations. Serv-U also supportsother cipher suites which enable perfect forward secrecy (PFS).
You can configure the following among the advanced SSL options:
l Enable low-security SSL ciphers: Select this option to enable low-security SSLciphers to be used. Some older or international clients may not support today'sbest SSL ciphers. Because these ciphers are considered insecure by today's
78
computing standards, Serv-U does not accept these ciphers by default.
l Disable SSLv2 or SSLv3 support: Serv-U supports several different versions ofSSL. SSLv2 and SSLv3 have documented security weaknesses that make it lesssecure than TLS. However, it may be necessary to support SSLv2 or SSLv3 forcompatibility with exported clients or old client software. Select the relevantoption to disable support for the SSLv2 or SSLv3 protocols.
l Disable TLSv1.0, TLSv1.1 or TLSv1.2 support: For compatibility reasons, it may benecessary to disable certain versions of TLS. Select the relevant option todisable support for TLSv1.0, TLSv1.1 or TLSv1.2.
To enable or disable specific cipher suites, click Configure Cipher Suites.
You can configure the following cipher suites:
l TLSv1.2 only cipher suites: Cipher suites used only by TLSv1.2. If TLSv1.2 isdisabled, changing a setting here has no effect.
l TLSv1.x and SSLv3 cipher suites: Cipher suites used by SSLv3 and all versions ofTLSv1.
l SSLv2 cipher suites: Cipher suites used only by SSLv2. If you disabled SSLv2,changing a setting here has no effect.
l Low security cipher suites: Cipher suites that are considered to be insecure formodern cryptographic use, but may be required for legacy applications. If youdisabled low security ciphers, changing a setting here has no effect.
FIPS options
Enable FIPS 140-2 mode: FIPS 140-2 is a set of rigorously tested encryptionspecifications set by the National Institute of Standards and Technology (NIST).Enabling FIPS 140-2 mode limits Serv-U to encryption algorithms certified to be FIPS140-2 compliant and ensures the highest level of security for encrypted connections.
By enabling FIPS mode, the OpenSSL library of Serv-U will run in FIPS compliantmode.
When FIPS 140-2 mode is enabled, ciphers which are not FIPS compliant are notaccepted, and applications which are not FIPS compliant cannot connect to Serv-U.
79
FIPS options
Server
In practice it means that older hardware and legacy applications which haveembedded support for, for example, SSH, may stop working correctly when FIPS modeis enabled. Additionally, non-compliant SSH keys and certificates stop working afterenabling FIPS mode.
To avoid these issues, the recommended workflow is to first enable FIPS mode, andthen configure your security certificates and SSH private keys to make sure they areFIPS compliant.
For the list of encryption algorithms and ciphers compliant with FIPS, see the NISTwebsite.
SFTP (Secure File Transfer over SSH2)
To use an existing private key:
1. Obtain a private key file.
2. Place the private key file in a secured directory in the server. Use Browse inServ-U to select the file.
3. Enter the password for the private key file.
4. Click Save. After clicking Save, Serv-U displays the SSH key fingerprintassociated with the private key.
To create a private key:
1. Click Create Private Key.2. Enter the name of the private key (for example, MyDomain Key), which is also
used to name the storage file.
3. Enter the output path of the certificate (for example,C:\ProgramData\SolarWinds\Serv-U\).
4. Select the Key Type (default of DSA is preferred, but RSA is available).
5. Select the Key Length (default of 1024 bits provides best performance, 2048 bitsis a good median, and 4096 bits provides best security).
6. Enter the password to use for securing the private key file.
7. After you create a new key, Serv-U displays the SSH key fingerprint associatedwith the new private key.
80
SSH ciphers and MACs
By default, all supported SSH ciphers and MACs (Message Authentication Codes) areenabled for use by the server. If your specific security needs dictate that only certainciphers or MACs can be used, you can individually disable unwanted ciphers andMACs by deselecting the appropriate ciphers or MACs.
Configure custom HTML for the Serv-U login pages
You can use custom HTML for the HTTP and HTTPS login pages of Serv-U. By usingthis feature, web developers can design their login experience to show off theirexclusive brand and design the page to match existing business themes. Basicbranding (custom logo and limited text changes) is also available. For moreinformation, see Domain settings.
By using the custom HTML feature, you can provide a custom header and customfooter for the HTTP and HTTPS login page. The main login form is automaticallyinserted between the content defined in the header file and footer file. The customHTML interface also uses a CSS file which defines the style used in the login form.This CSS file can also be used to define custom CSS styles, containers, and other CSSformatting as needed.
Several branding samples are automatically unpacked to your installation folder (forexample, C:\Program Files\SolarWinds\Serv-U\Custom HTML Samples)when Serv-U is installed. Serv-U Custom HTML and CSS has step-by-step instructionsto explore the current set of samples and build your own branding.
The following fields are used by the Custom HTML feature:
l Custom HTML Container Directory: This directory contains all of the files usedby the custom HTML, including all images, the header file, the footer file, andthe CSS file. Subdirectories in this folder are allowed.
l CSS File: This .CSS file contains all the styles, containers, and other formattingthat is used throughout the header file and footer file, and also the styles thatwill be used by the login form.
l Header File: This .HTM file contains the content for the HTML header that isinserted before the login form.
l Footer File: This .HTM file contains the content for the HTML footer that isinserted after the login form.
81
SSH ciphers and MACs
Server
l Enable Custom HTML: The custom HTML is not used by Serv-U until this optionis enabled.
Most custom HTML interfaces include custom images. To use custom images, thestorage location of the images must be specified. To universalize the storage location,use the %CUSTOM_HTML_DIR% tag in paths that refer to images. This has the furtherbenefit of avoiding changes to HTML when the container storing the HTML files andimages is changed, because the path only has to be defined once in the CustomHTML Container Directory field. The tag is used in the following way:
<img src="/%CUSTOM_HTML_DIR%/images/image.png" alt="My Image">
Configure file sharing
By using the file sharing feature, domain users can send or receive files from guests.
File sharing is disabled by default. You must select the relevant option toenable it.
To send file sharing invitation emails, you must configure your SMTP settings. Thisconfiguration only needs to be set once for the entire server or a domain.
For more information about file sharing, see the Serv-U Web Client and File SharingUser Guide.
To enable file sharing:
1. Navigate to Server Limits and Settings > File Sharing.2. Type the address for the domain URL.
3. Type the location of the file sharing repository.
4. Select the number of days until the shares expire.
5. Select whether you want to use the inherited default email invitation subject, orcustomize your own. If the option is deselected, you can type in a custom emailinvitation subject.
6. Select whether you want to use the inherited default email notificationmessage, or customize your own. If the option is deselected, you can type in acustom message.
7. Select Enable File Sharing.
82

8. If it is not configured yet, configure your SMTP to be able to send and receivenotification emails. For more information about configuring an SMTP server,see SMTP configuration.
9. Click Save.
Server activity
The Server Activity > Sessions and Domain Activity > Sessions pages display thecurrent file server session activity.
When you view the Sessions page from the server, all connected sessions from alldomains are displayed. When you view the Sessions page while you areadministering a domain, only the current sessions of the particular domain aredisplayed. From this page, you can see an overall picture of the current activity on thefile server. In addition, you can view individual sessions, including their currentstatus, connection state, and transfer information.
To view detailed information about a specific session, select the session. The ActiveSession Information group is populated with the details of the currently highlightedsession. This information is frequently updated to provide an accurate and up-to-date snapshot of the activities of the session.
Depending on the type of connection made by that session (for example, FTP, HTTP, orSFTP), certain additional functions are available.
Disconnect sessions
You can disconnect any type of session at any time by clicking Disconnect. Click thisbutton to bring up another window with additional options for how the disconnectshould be performed. The following disconnect options are available:
l Disconnect: Immediately disconnects the session. Another session can beimmediately established by the disconnected client. This is also known as"kicking" the user.
l Disconnect and ban IP for x: Immediately disconnects the session and bans itsIP address for the specified number of minutes, preventing the client fromimmediately reconnecting.
l Disconnect and block IP permanently: Immediately disconnects the session andadds a deny IP access rule for the IP address, preventing the client from everreconnecting from the same IP address.
83
Server activity

Server
When disconnecting a session from the Server Session view, you can also use theApply IP rule to option. By using this option, you can select where you want thetemporary or permanent IP ban to be applied: for the entire server, or only thedomain the session is connected to.
In addition to disconnecting the session, you can also disable the user account in useby the session by selecting Disable user account.
If the current session is using the FTP protocol, you can send a message to the userbefore disconnecting them by typing it in the Message to user field. This option is notavailable for HTTP or SFTP sessions because neither protocol defines a method forchatting with users.
Spy & Chat
You can spy on any type of session by clicking Spy & Chat or by double-clicking asession in the list. Spying on a user displays all the detailed information normallyvisible by highlighting the session, and also includes a complete copy of the sessionlog since it first connected to the file server. This way you can browse the log andview all actions taken by the user of the session.
If the current session is using the FTP protocol, additional options are available forchatting with the user. The Chat group shows all messages sent to and received fromthe session since beginning to spy on the session. To send a message to the session,type the message text in the Message Content field, and then click Send. When amessage is received from the session, it is automatically displayed here.
Not all FTP clients support chatting with system administrators. The commandused to send a message to the server is SITE MSG. In order for a client toreceive messages, the client application must be capable of receivingunsolicited responses from the server instead of discarding them.
Broadcast messages
You can send a message to all currently connected FTP sessions by clickingBroadcast. Sending a message through broadcast is equivalent to opening the Spy &Chat window to each individual FTP session and sending it a chat message.
Cancel sessions
If a session is performing a file transfer, you can cancel the file transfer without
84
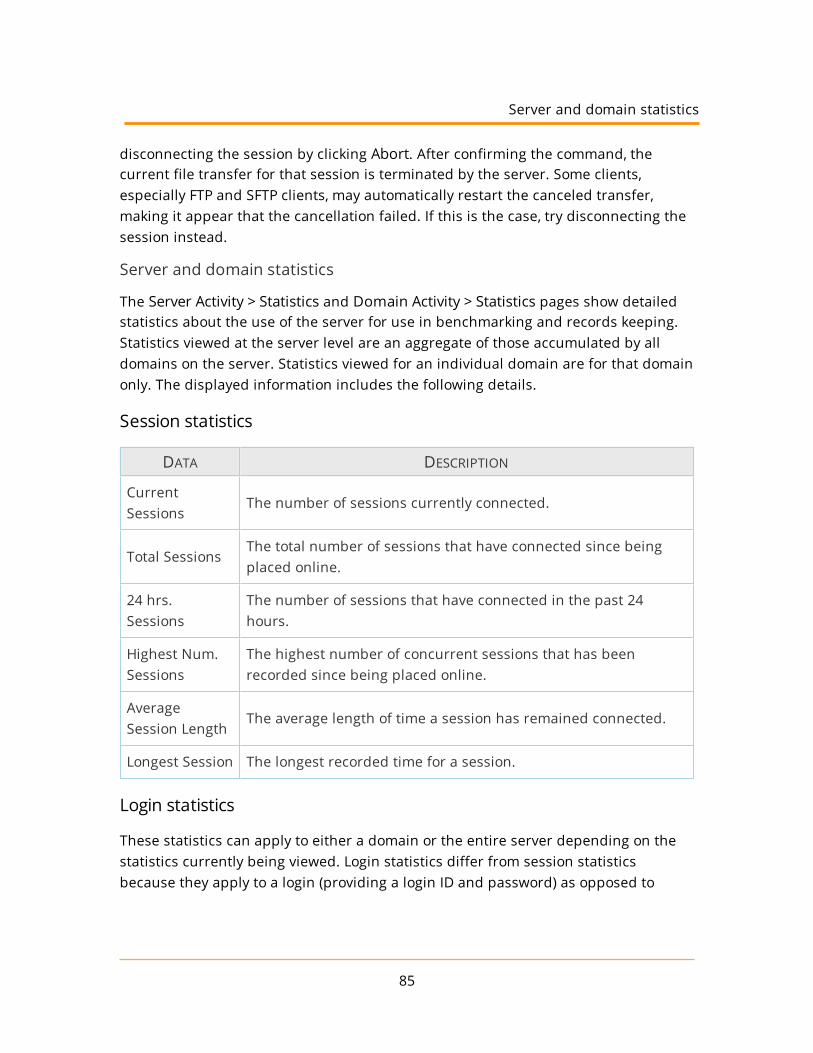
disconnecting the session by clicking Abort. After confirming the command, thecurrent file transfer for that session is terminated by the server. Some clients,especially FTP and SFTP clients, may automatically restart the canceled transfer,making it appear that the cancellation failed. If this is the case, try disconnecting thesession instead.
Server and domain statistics
The Server Activity > Statistics and Domain Activity > Statistics pages show detailedstatistics about the use of the server for use in benchmarking and records keeping.Statistics viewed at the server level are an aggregate of those accumulated by alldomains on the server. Statistics viewed for an individual domain are for that domainonly. The displayed information includes the following details.
Session statistics
DATA DESCRIPTION
CurrentSessions
The number of sessions currently connected.
Total SessionsThe total number of sessions that have connected since beingplaced online.
24 hrs.Sessions
The number of sessions that have connected in the past 24hours.
Highest Num.Sessions
The highest number of concurrent sessions that has beenrecorded since being placed online.
AverageSession Length
The average length of time a session has remained connected.
Longest Session The longest recorded time for a session.
Login statistics
These statistics can apply to either a domain or the entire server depending on thestatistics currently being viewed. Login statistics differ from session statisticsbecause they apply to a login (providing a login ID and password) as opposed to
85
Server and domain statistics

Server
connecting and disconnecting.
DATA DESCRIPTION
Logins The total number of successful logins.
Average DurationLogged In
The average login time for all sessions.
Last Login TimeThe last recorded valid login time. This is not the last time aconnection was made.
Last Logout Time The last recorded valid logout time.
Most Logged In The highest number of users logged in concurrently.
Currently Logged In The number of sessions currently logged in.
Transfer statistics
DATA DESCRIPTION
Download Speed The cumulative download bandwidth currently being used.
Upload Speed The cumulative upload bandwidth currently being used.
DownloadedThe total amount of data, and number of files, downloadedsince being placed online.
UploadedThe total amount of data, and number of files, uploaded sincebeing placed online.
AverageDownload Speed
The average download bandwidth used since being placedonline.
Average UploadSpeed
The average upload bandwidth used since being placedonline.
User and group statistics
The User and Group Statistics pages show detailed statistics based on individual useror group activity. Statistics viewed for a user or group are for that user or group only.The displayed information includes the following details.
86
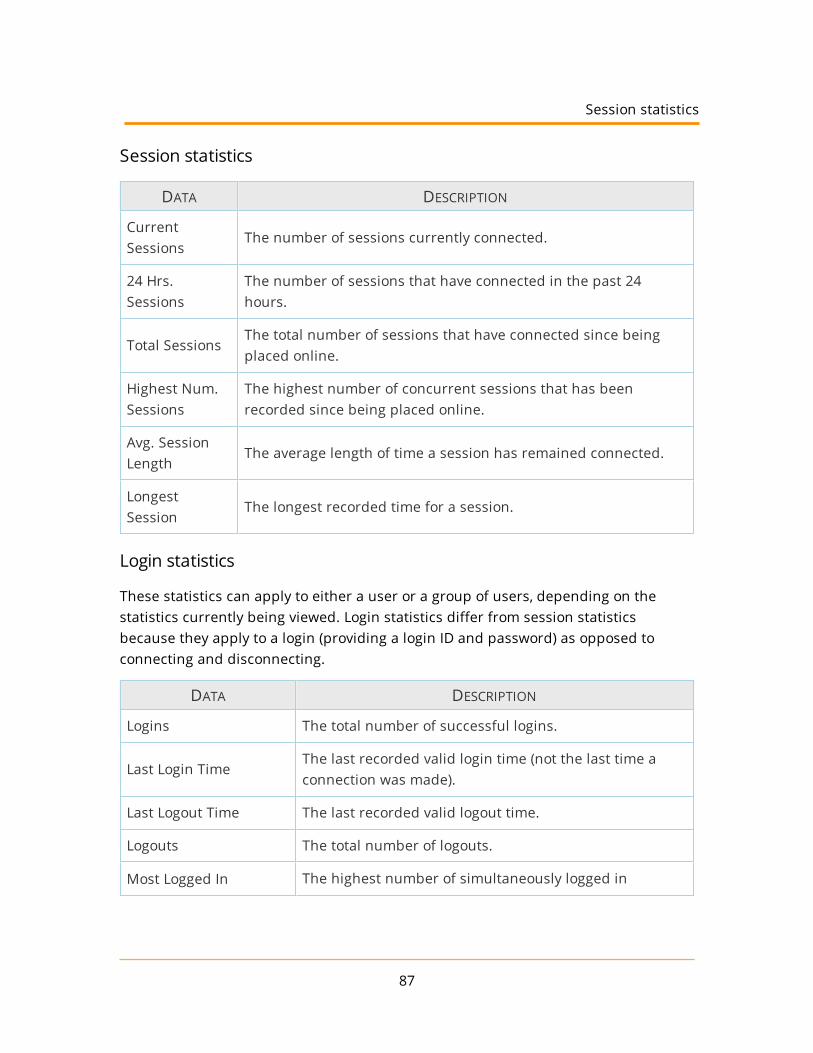
Session statistics
DATA DESCRIPTION
CurrentSessions
The number of sessions currently connected.
24 Hrs.Sessions
The number of sessions that have connected in the past 24hours.
Total SessionsThe total number of sessions that have connected since beingplaced online.
Highest Num.Sessions
The highest number of concurrent sessions that has beenrecorded since being placed online.
Avg. SessionLength
The average length of time a session has remained connected.
LongestSession
The longest recorded time for a session.
Login statistics
These statistics can apply to either a user or a group of users, depending on thestatistics currently being viewed. Login statistics differ from session statisticsbecause they apply to a login (providing a login ID and password) as opposed toconnecting and disconnecting.
DATA DESCRIPTION
Logins The total number of successful logins.
Last Login TimeThe last recorded valid login time (not the last time aconnection was made).
Last Logout Time The last recorded valid logout time.
Logouts The total number of logouts.
Most Logged In The highest number of simultaneously logged in
87
Session statistics

Server
DATA DESCRIPTION
sessions.
Longest DurationLogged In
The longest amount of time a session was logged in.
Currently Logged In The number of sessions currently logged in.
Average DurationLogged In
The average login time for all sessions.
Shortest Login DurationSeconds
The shortest amount of time a session was logged in.
Transfer statistics
DATA DESCRIPTION
Download Speed The cumulative download bandwidth currently being used.
Upload Speed The cumulative upload bandwidth currently being used.
AverageDownload Speed
The average download bandwidth used since being placedonline.
Average UploadSpeed
The average upload bandwidth used since being placedonline.
DownloadedThe total amount of data, and number of files, downloadedsince being placed online.
UploadedThe total amount of data, and number of files, uploaded sincebeing placed online.
Save statistics
User and group statistics can be saved directly to a CSV file for programmaticanalysis and review. To save statistics to a file, first select the user or group you wantto generate a statistics file for, and then click Save Statistics at the bottom of thepage.
88
Server and domain log
The Server Activity > Log and Domain Activity > Log pages show logged activity forthe server or domain.
The server log shows file server startup, configuration, and shutdown information. Itdoes not show domain activity information. For activity logs, view the log of theappropriate domain instead. In addition to status information about libraries,licensing, and the current build that is logged when the file server first starts, theserver log also contains information about all domain listener status, Universal Plug-and-Play (UPnP) status information, and PASV port range status. The informationcontained in the server log is also saved to a text file located in the installationdirectory that is named Serv-U-StartupLog.txt. This file is replaced each timethe Serv-U File Server is started.
The domain log contains information about and activity pertaining to the currentlyadministered domain only. This includes the status of the listeners of the domain,and any configured activity log information. For more information about the types ofactivity information that can be placed in the domain log, see Configure domain logs.
You can highlight information contained in the log by clicking and dragging themouse cursor over the appropriate portion of the log. When it is highlighted, you cancopy the selected portion to the clipboard.
Freeze Log
Select this option to temporarily pause the refreshing of the log. This is usefulon busy systems so you can highlight and copy a particular section of the logbefore it scrolls out of view. When you have finished, deselect the option toresume the automatic updating of the log.
Select All
Click this button to automatically freeze the log and highlight all currentlydisplayed log information so you can copy it to the clipboard.
Clear Log
When the log has become too large for you to view at once, click this button toerase the currently displayed log information. Only log information receivedafter clicking the button is displayed.
89
Server and domain log

Server
Legend
To make viewing the different components of the log easier, each different typeof logged message is color-coded for quick identification. Clicking this showsthe legend in a draggable dialog. Drag the legend dialog to a convenientlocation so you can use it for reference while you browse the log.
Filter Log
To quickly find and read through specific sections of the log, you can filter itbased on a search string. Click this button to bring up the Filter Log window.Provide a search string, and then click Filter to refresh the log to only displaylog entries containing the search string. To view the entire contents of the logagain, open the Filter Log window, and then click Reset.
Download Log
To download the full log file from Serv-U, click Download Log. If you havepermission to download the file, your web browser prompts you to choose alocation to save the file, or it begins to download the file automatically.
90
DomainAt the core of the Serv-U File Server is the Serv-U domain. At the most basic level, aServ-U domain is a set of user accounts and listeners that allow users to connect tothe server to access files and folders. Serv-U domains can also be configured furtherto restrict access based on IP address, limit bandwidth usage, enforce transferquotas, and more. Virtually every setting available at the server level can beoverridden for each individual domain. With careful advanced planning, you canspecify an acceptable level of default options at the server level to minimize theamount of configuration required for a domain.
Serv-U supports any number of domains on the file server. Domains can sharelisteners, or they can each be hosted on a unique IP address if the system hasmultiple IP addresses. However, the maximum number of domains that can becreated on an installation is dictated by the license. For more information about thedifferent editions of Serv-U, see Serv-U editions.
When you run a new installation of the Serv-U File Server for the first time, you areprompted to create your first domain using the New Domain Wizard. Follow theinstructions on each page of the wizard to create your first domain. For moreinformation about creating domains, see the Quick start guide.
Manage domains
The domain that you currently manage is always displayed in the header of eachpage next to the + (New Domain) button. To change the active domain, click thedomain name in the accordion menu on the left, and then select one of the availableoptions.
If it is supported by your license, you can create new domains at any time by clicking+ (New Domain) in the Management Console. After you change the active domain,the current page is automatically reloaded to reflect the settings of the new activedomain.
To delete a domain and all of its users and groups, navigate to Domain > DomainDetails, and then click Delete Domain.
91
Domain
This action cannot be undone.
Domain details
Domain name and description
Each domain must be uniquely identified with a domain name. If you provide a namethat is not unique, an error message is displayed, indicating that a unique name isrequired for each domain. The domain name is used purely for administrativepurposes and is not visible or accessible to users.
In addition, you can associate additional descriptive information to each domainthrough the description. Like the domain name, the description text is also onlyavailable to users with administrative access. This field is useful for describing thepurpose of the domain or summarizing the resources made available by theexistence of the domain on the file server.
You can temporarily disable a domain by clearing the Enable domain option. Whiledisabled, the domain is inaccessible to all users. The domain still exists on the fileserver, all settings are preserved, and you can still administer it while it is disabled.To make the domain accessible to users again, select Enable domain.
After making changes to any of the previous domain settings, click Save to apply thechanges.
Domain home directory
You can limit the disk space available to a domain by configuring a home directoryfor the domain and specifying a maximum size. The home directory of the domaindoes not affect user directory access rules, and it does not restrict the paths that areavailable to a user in any way. However, in order to calculate the amount of diskspace in use by a domain, you must specify the root directory under which Serv-Uexpects all domain files to be stored.
92

To specify the domain home directory, enter a path in the Domain Home Directoryfield, or click Browse to select a path. When you create a domain administratoraccount for this domain, it is suggested that their home directory be the same, whichensures that all users of the domain are placed in a subdirectory of the homedirectory of the domain. Enter the amount of disk space, in megabytes (MB), availableto the domain in the Maximum Size field. Leaving this field blank or entering "0"does not impose a maximum size on the domain. When a limit is imposed, anyupload that would cause this maximum size to be exceeded is rejected by the server.
Click Save to apply the changes.
Calculating the amount of disk space in use by a domain can be a timeconsuming operation depending on the directory structure.
Domain listeners
The Serv-U File Server offers a highly configurable interface for enabling the differentfile sharing protocols on a domain. You can add, edit, and delete listeners. Eachdomain can listen on multiple ports and IP addresses by adding a listener bound tothe IP address and port you want. In addition to selecting these connection attributesfor a listener, you must also select a file sharing protocol. Serv-U supports IPv4 andIPv6 simultaneously. To offer services to both IPv4 and IPv6 users, create a listenerboth for an IPv4 address and an IPv6 address.
The following section contains the list and short description of the file sharingprotocols supported by the Serv-U File Server.
FTP - File Transfer Protocol
FTP is the traditional protocol for transferring files over the Internet. It normallyoperates on the default port 21. Traditionally, FTP is handled in plain-text,however, SSL connections are explicitly supported through the use of the AUTHcommand.
FTPS - File Transfer Protocol using SSL
FTPS is identical to FTP, however, connecting to a listener configured for FTPSmeans that an SSL connection is required before any protocol communicationis performed. This is commonly referred to as Implicit FTPS, which normallytakes place on the default port 990.
93
Domain listeners
Domain
SFTP - Secure File Transfer Using SSH2
SFTP is a secure method of transferring files through a secure shell session. Itperforms all protocol communications and data transfers over the same porteliminating the need to open multiple ports in firewalls as is commonlyrequired when using FTP. SFTP sessions are always encrypted. SFTP operateson the default port 22.
HTTP - Hypertext Transfer Protocol
HTTP is the protocol used to browse websites. It is also a simple method fordownloading and transferring files. One benefit to adding an HTTP listener to adomain is the availability of the Web Client, which allows users to transfer filesto and from your file server without the need for a standalone client. HTTPtraditionally operates on port 80.
HTTPS - Hypertext Transfer Protocol using SSL
HTTPS is identical to HTTP except all communications are secured using SSL.Like FTPS, a secure connection is implied when connecting to a listener runningthe HTTPS protocol. The default port for HTTPS is 443.
Add a listener
After clicking Add, the listener configuration window is displayed. After configuringeach of the listener options, click Save to add the listener to the domain.
The following section contains the list and short description of the options you canconfigure for a listener.
Type
Select the file sharing protocol that is to be supported by this listener. Eachlistener can only support a single protocol. To add more file sharing protocolsto the domain, create new listeners for each protocol. A brief description of thesupported file sharing protocols is found in the previous section.
IP Address
You can bound a listener to a single IP address by entering the IP address here.Serv-U supports both IPv4 and IPv6 addresses. If the file server does not havean external IP address (for example, it is behind a router), you can leave this
94
field blank. If you do not specify an IP address, you must select the option toeither listen on all available IPv4 addresses or all IPv6 addresses. Unless youare running a purely IPv6 network, it is recommended to use IPv4 addressesand add IPv6 listeners as needed.
PASV IP Address or Domain Name (FTP ONLY)
If the listener supports the FTP protocol, this additional field is available whereyou can specify a separate IP address to use for PASV mode data transfers.Entering an IP address here ensures that PASV mode works properly on bothunsecured and secured connections. If the file server does not have anexternal IP address, try using a dynamic DNS service and entering your DNSdomain name in this field. Serv-U resolves the DNS domain name to ensure italways has the proper external IP address for PASV command responses.
Use only with SSL connections
This option allows the PASV IP address or domain name to only be used for SSLconnections where it is always necessary to provide the PASV IP address toconnecting clients. When this option is enabled, the IP address specified forPASV mode will not be provided to clients connecting through non-SSL FTP.
Use with LAN connections
Normally, Serv-U does not use the PASV IP address for connections coming fromthe local area network (computers on the same network as Serv-U). When thisoption is enabled, the PASV IP Address is also used for LAN connections.
Port
The default port for the selected protocol is automatically provided. However,you can use any port between 1 and 65535. When using a non-standard port,clients must know the proper port in advance when they attempt to connect tothe domain. If you use a non-standard port, it is recommended that you use avalue above 1024 to prevent potential conflicts.
Enable listener
You can temporarily disable a listener by deselecting this option. When theyare disabled, listeners are displayed with a different icon in the list.
95
Add a listener
Domain
Pure virtual domains
Serv-U supports the ability for multiple domains to "share" the same listeners. Inother words, one domain can possess the necessary listener configurations while theother domain "piggybacks" on the first one. In this way, the second domain exists in avirtual way. To have a domain "piggyback" on the listener configurations of existingdomains, leave the listener list blank for the domain. The "piggybacking" domainneeds to have at least one virtual host defined for it. For more information, seeVirtual hosts.
This method of "piggybacking" only works with the FTP and HTTP protocols becausethey are the only two file sharing protocols that specify a method for identifying thespecific host after a connection is established. For FTP connections, the client mustissue a HOST command to identify the specific domain. For HTTP connections, thebrowser automatically handles providing the necessary host header to Serv-U basedon the domain name that is used to establish the HTTP connection.
Virtual hosts
Virtual hosts provide a way for multiple domains to share the same IP and listenerport numbers.
Normally, each domain listener must use a unique IP address and port numbercombination. By using virtual hosts, you can host multiple domains on a system thatonly has one unique IP address without having to use non-standard port numbers.The domains can share the same listeners by proper implementation of virtual hosts.This feature is only available when the current license supports hosting multipledomains.
To configure virtual hosts for a domain, click Add under Domain Details > VirtualHosts, and then type the virtual host name for the domain. The virtual host name isusually the fully qualified domain name used to connect to the domain, such asftp.Serv-U.com.
The method used by a client to connect to a specific virtual host depends on theprotocol that is used to connect to Serv-U.
96

FTP
FTP users can use one of two methods to connect to a specific virtual host. If it issupported by the FTP client, the HOST command can be issued to Serv-U before loginto identify the virtual host. Otherwise, the virtual host can be provided with the loginID in the following format: virtual_host_name|login ID. The virtual host nameis entered first, followed by the vertical bar character ('|'), then the login ID.
SFTP
SFTP users who want to connect to a specific virtual host must use the speciallycrafted login ID format as described in the FTP section.
HTTP
For HTTP users, the browser automatically provides Serv-U with the host name that isused to reach the site, allowing Serv-U to identify the virtual host from the fullyqualified domain name entered into the navigation bar of the browser.
Case File: Using virtual hosts
Multiple domains are being configured on the same server, which has one IP addressand two Fully Qualified Domain Names (FQDN) pointing to it. Because usersconnecting to both domains must use port 21 for connections, configure virtual hostson each domain so that Serv-U can distinguish between requests for the twodomains. After setting up the same listener properties on each domain, open theVirtual Hosts page, click Add, and then type the FQDN that clients should use toconnect to the domain (such as ftp.Serv-U.com).
After connecting to the server with FTP, users can send a HOST ftp.Serv-U.comcommand to connect to the appropriate domain on the File Server. FTP and SFTPusers can also identify the virtual host through their login ID of ftp.Serv-U.com|login ID. If connecting through HTTP, users can connect to this domain byvisiting http://ftp.Serv-U.com.
Server details
IP access rules restrict login access to specific IP addresses, ranges of IP addresses, ora domain name. IP access rules can be configured at the server, domain, group, anduser levels.
97
Server details

Domain
IP access rules are applied in the order they are displayed. In this way, specific rulescan be placed at the top to allow or deny access before a more general rule isapplied later on in the list. The arrows on the right side of the list can be used tochange the position of an individual rule in the list.
Specifying IP access masks
IP access rules use masks to authorize IP addresses and domain names. The maskscan contain specific values, ranges, and wildcards made up of the followingelements.
VALUE OR
WILDCARDEXPLANATION
xxxStands for an exact match, such as 192.0.2.0 (IPv4),fe80:0:0:0:a450:9a2e:ff9d:a915 (IPv6, long form) orfe80::a450:9a2e:ff9d:a915 (IPv6, shorthand).
xxx-xxxStands for a range of IP addresses, such as 192.0.2.0-19 (IPv4),fe80:0:0:0:a450:9a2e:ff9d:a915-a9aa (IPv6, long form), orfe80::a450:9a2e:ff9d:a915-a9aa (IPv6, shorthand).
*Stands for any valid IP address value, such as 192.0.2.*, which isanalogous to 192.0.2.0-255, or fe80::a450:9a2e:ff9d:*, whichis analogous to fe80::a450:9a2e:ff9d:0-ffff.
?Stands for any valid character when specifying a reverse DNS name,such as server?.example.com.
/
Specifies the use of CIDR notation to specify which IP addresses shouldbe allowed or blocked. Common CIDR blocks are /8 (for 1.*.*.*),/16 (for 1.2.*.*) and /24 (for 1.2.3.*). CIDR notation alsoworks with IPv6 addresses, such as 2001:db8::/32.
Caveats
Specific IP addresses listed in Allow rules will not be blocked by anti-hammering.These IP addresses are white-listed. However, addresses matched by a wildcard or arange are subject to anti-hammering prevention.
98
Implicit deny all
Until you add the first IP access rule, connections from any IP address areaccepted. After you add the first IP access rule, all connections that are notexplicitly allowed are denied. This is also known as an implicit Deny All rule.Make sure you add a Wildcard Allow rule (such as Allow *.*.*.*) at the endof your IP access rule list.
Matching all addresses
Use the *.*.*.* mask to match any IPv4 address. Use the *:* mask to matchany IPv6 address. If you use both IPv4 and IPv6 listeners, add Allow ranges forboth IPv4 and IPv6 addresses.
DNS lookup
If you use a dynamic DNS service, you can specify a domain name instead of anIP address to allow access to users who do not have a static IP address. You canalso specify reverse DNS names. If you create a rule based on a domain nameor reverse DNS, Serv-U performs either a reverse DNS lookup or DNS resolutionto apply these rules. This can cause a slight delay during login, depending onthe speed of the DNS server of the system.
Rule use during connection
The level at which you specify an IP access rule also defines how far aconnection is allowed before it is rejected. Server and domain level IP accessrules are applied before the welcome message is sent. Domain level IP accessrules are also applied when responding to the HOST command to connect to avirtual domain. Group and user level IP access rules are applied in response toa USER command when the client identifies itself to the server.
Anti-hammering
You can set up an anti-hammering policy that blocks clients who connect andfail to authenticate more than a specified number of times within a specifiedperiod of time. You can configure an anti-hammering policy server-wide inServer Limits and Settings > Settings and domain-wide in Domain Limits andSettings > Settings.
99
Caveats

Domain
IP addresses blocked by anti-hammering rules appear in the domain IP accessrules with a value in the Expires in column. If you have multiple domains withdifferent listeners, blocked IP addresses appear in the domain that containsthe listener. Blocked IP addresses do not appear in the server IP access list,even if anti-hammering is configured at the server level.
The Expires in value of the blocked IP address counts down second-by-second untilthe entry disappears. You can unblock any blocked IP address early by deleting itsentry from the list.
IP access list controls
The following options are available on the IP Access page.
Using the sort mode
You can sort the IP access list numerically rather than in the processing order.Displaying the IP access list in sort mode does not change the order in whichrules are processed. To view rule precedence, disable this option. Viewing the
100

IP access list in numerical order can be useful when you review long lists ofaccess rules to determine if an entry already exists.
Importing and exporting IP access rules
You can export and import Serv-U IP access rules from users, groups, domains,and the server by using a text-based .csv file. To export IP access rules, viewthe list of rules to export, click Export, and specify the path and file name youwant to save the list to. To import IP access rules, click Import and select the filethat contains the rules you want to import. The .csv file must contain thefollowing fields, including the headers:
l IP: The IP address, IP range, CIDR block, or domain name for which therule applies.
l Allow: Set this value to 0 for Deny, or 1 for Allow.
l Description: A text description of the rule for reference purposes.
Examples of IP address rules
Office-only access
A contractor has been hired to work in the office, and only in the office. Officeworkstations have IP addresses in the range of 192.0.2.0 - 192.0.2.24. The relatedServ-U access rule should be Allow 192.0.2.0-24, and it should be added toeither the user account of the contractor or a Contractors group that containsmultiple contractors. No deny rule is required because Serv-U provides an implicitDeny All rule at the end of the list.
Prohibited computers
Users should normally be able to access Serv-U from anywhere, except from a bankof special internal computers in the IP address range of 192.0.2.0 - 192.0.2.24. Therelated Serv-U access rules should be Deny 192.0.2.0-24, followed by Allow*.*.*.*, and these rules should be added to either the domain or the server IPaccess rules.
DNS-based access control
The only users allowed to access a Serv-U domain connect from *.example.com or*.example1.com. The related Serv-U access rules should be Allow*.example.com and Allow *.example1.com in any order, and these rules
101
Examples of IP address rules
Domain
should be added to the domain IP access rules. No deny rule is required becauseServ-U provides an implicit Deny All rule at the end of the list.
Database access
Serv-U enables the use of an Open Database Connectivity (ODBC) database to storeand maintain group and user accounts at the domain and server levels. You canconfigure the ODBC connections in two locations:
l Domain > Domain Details > Database
l Server > Server Details > Database.
Serv-U can automatically create all of the tables and columns necessary to beginstoring users and groups in the database. Because Serv-U uses one set of tablenames to store its information, individual ODBC connections must be configured foreach item which stores details in the database. In other words, the server and eachdomain must have a unique ODBC connection to ensure they are stored separately.
Configure a database
1. Create an ODBC connection for Serv-U to use. SolarWinds recommends MySQL,but you can use any database that has an ODBC driver available. Use a Systemdata source name (DSN) if Serv-U is operating as a system service, or a UserDSN if Serv-U is operating as a regular application.
2. Open the Serv-U Management Console and browse to the appropriate domainor server database settings. Enter the required information, and click Save.
If configuring the database connection for the first time, leave the Automaticallycreate options selected. With these options selected, the Serv-U File Server builds thedatabase tables and columns automatically.
SQL templates
Serv-U uses multiple queries to maintain the databases that contain user and groupinformation. These queries conform to the Structured Query Language (SQL)standards. However, if your database has problems working with Serv-U, you mayneed to alter these queries. In the SQL Templates window, you can modify eachquery used by Serv-U to conform to the standards supported by your database.
102
Incorrectly editing these SQL queries could cause ODBC support to stopworking in Serv-U. Do not edit these queries unless you are comfortableconstructing SQL statements and are sure that it is necessary to enable ODBCsupport with your database software.
User and group table mappings
By default, Serv-U creates and maintains the tables and columns necessary to storeuser and group information in a database. However, if you want to connect Serv-U toan existing database that contains this information, you must customize the tableand column names to conform to the existing database structure. Click User TableMappings or Group Table Mappings to get started.
Serv-U stores information for a user or group in 10 separate tables. Only theUser/Group Info Table and User/Group Dir Access Table are required. You canchange the current table in the Object Table list. The Attribute column lists theattributes that are stored in the current table. The Mapped Database Value displaysthe name of the column that attribute is mapped to in the database. The first rowdisplays the table name and you can change the name.
Certain tables, where the order of the entries is important, have a SortColumnattribute listed. This column is used to store the order in which rules are applied.
Click Edit or double-click the column name to edit a value.
When enabled, the table is accessed as needed. In special situations, a table that isnot being used can be disabled to reduce the number of ODBC (database) calls. Forexample, if you do not use ratios and quotas, you can disable the User Ratio-FreeFiles, Per User Files Ratio, Per User Bytes Ratio, Per Session Files Ratio, and PerSession Bytes Ratio tables to prevent unnecessary ODBC calls. Use caution when youdisable tables, because although the fields appear in dialogs, they will not be savedor loaded.
The User Info and Group Info tables cannot be disabled.
Case file: ODBC authentication
Authentication in the Serv-U File Server can be handled through an ODBC database,allowing for scripted account management and maintenance. To use ODBC
103
User and group table mappings
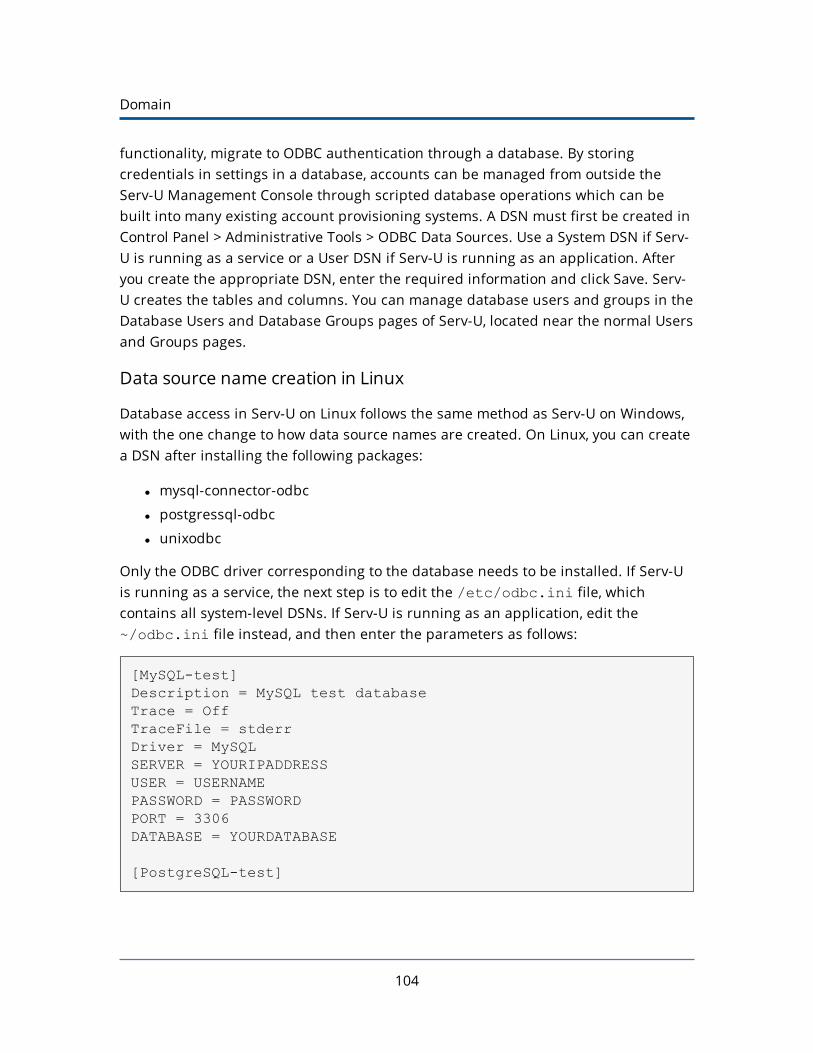
Domain
functionality, migrate to ODBC authentication through a database. By storingcredentials in settings in a database, accounts can be managed from outside theServ-U Management Console through scripted database operations which can bebuilt into many existing account provisioning systems. A DSN must first be created inControl Panel > Administrative Tools > ODBC Data Sources. Use a System DSN if Serv-U is running as a service or a User DSN if Serv-U is running as an application. Afteryou create the appropriate DSN, enter the required information and click Save. Serv-U creates the tables and columns. You can manage database users and groups in theDatabase Users and Database Groups pages of Serv-U, located near the normal Usersand Groups pages.
Data source name creation in Linux
Database access in Serv-U on Linux follows the same method as Serv-U on Windows,with the one change to how data source names are created. On Linux, you can createa DSN after installing the following packages:
l mysql-connector-odbc
l postgressql-odbc
l unixodbc
Only the ODBC driver corresponding to the database needs to be installed. If Serv-Uis running as a service, the next step is to edit the /etc/odbc.ini file, whichcontains all system-level DSNs. If Serv-U is running as an application, edit the~/odbc.ini file instead, and then enter the parameters as follows:
[MySQL-test]Description = MySQL test databaseTrace = OffTraceFile = stderrDriver = MySQLSERVER = YOURIPADDRESSUSER = USERNAMEPASSWORD = PASSWORDPORT = 3306DATABASE = YOURDATABASE
[PostgreSQL-test]
104

Description = Test to PostgresDriver = PostgreSQLTrace = YesTraceFile = sql.logDatabase = YOURDATABASEServername = YOURIPADDRESSUserName = USERNAMEPassword = PASSWORDPort = 5432Protocol = 6.4ReadOnly = NoRowVersioning = NoShowSystemTables = NoShowOidColumn = NoFakeOidIndex = NoConnSettings =
Adjust the names in brackets to the DSN name string you want. Finally, test the DSNwith the isql %DSN% -c -v command.
For further customization options, see the Serv-U database integration guide.
Domain events
You can automatically create a list of the most common events. You can choose tocreate these common events using email or balloon tip actions. Click Create CommonEvent on the Events page. Select the Send Email or Show balloon tip option for theaction you want to perform on the common events. If you choose to send email, enteran email address.
The Write to Windows Event Log and Write to Microsoft Message Queue(MSMQ) options are available for Windows only.
Event actions
You can select from the following actions that are executed when an event istriggered:
l Send Email
l Show Balloon Tip*
l Execute Command*
105
Domain events

Domain
l Write to Windows Event Log (Windows only)*
l Write to Microsoft Message Queue (MSMQ) (Windows only)*
Events involving anything other than email can only be configured byServ-U server administrators.
Email actions
You can configure email actions to send emails to multiple recipients and to Serv-Ugroups when an event is triggered.
To add an email address, enter it in the To or Bcc fields. To send emails to a Serv-Ugroup, use the Group icon to add or remove Serv-U groups from the distribution list.Separate email addresses by commas or semicolons. Email actions contain a To,Subject and Message parameter. You can use special variables to send specific datapertaining to the event. For more information about the variables, see Systemvariables.
To use email actions, you must first SMTP configuration.
Balloon tip actions
You can configure a balloon tip to show in the system tray when an event istriggered. Balloon tip actions contain a Balloon Title and a Balloon Messageparameter. You can use special variables to send specific data pertaining to theevent. For more information about the variables, see System variables.
Execute command actions
You can configure execute command actions to execute a command on a file when anevent is triggered. Execute command actions contain an Executable Path, CommandLine Parameters, and a Completion Wait Time parameter. For the Completion WaitTime parameter, you can enter the number of seconds to wait after starting theexecutable path. Enter zero for no waiting.
Time spent waiting delays any processing that Serv-U can perform.
106
A wait value should only be used to give an external program enough time to performan operation, such as move a log file before it is deleted (for example,$LogFilePath for the Log File Deleted event). You can use special variables to sendspecific data pertaining to the event. For more information about the variables, seeSystem variables.
Windows Event Log
By writing event messages to a local Windows Event Log, you can monitor and recordServ-U activity by using third-party network management software. All messagesappear in the Windows Application Log from a source of Serv-U.
This event has only one field:
l Log Information: The contents of the message to be written into the event log.This is normally either a human-readable message (for example, filenameuploaded by person) or a machine-readable string (for example,filename|uploaded|person), depending on who or what is expected toread these messages. Serv-U system variables are supported in this field. Thisfield can be left blank, but usually is not.
Microsoft Message Queuing (MSMQ)
Microsoft Message Queuing (MSMQ) is an enterprise technology that provides amethod for independent applications to communicate quickly and reliably. Serv-Ucan send messages to new or existing MSMQ queues whenever an event is triggered.Corporations can use this feature to tell enterprise applications that files havearrived, files have been picked up, partners have signed on, or many other activitieshave occurred.
These events have the following two fields:
l Message Queue Path: The MSMQ path that addresses the queue. Remotequeues can be addressed when a full path (for example,MessageServer\Serv-U Message Queue) is specified. Public queues onthe local machine can be addressed when a full path is not specified (forexample, .\Serv-U Message Queue or Serv-U Message Queue). If thespecified queue does not exist, Serv-U attempts to create it. This normally onlyworks on public queues on the local machine. You can also use Serv-U system
107
Windows Event Log

Domain
variables in this field.
l Message Body: The contents of the message to be sent into the queue. This isnormally a text string with a specific format specified by an enterpriseapplication owner or enterprise architect. Serv-U system variables can also beused in this field. This field may be left blank, but usually is not.
Microsoft message queues created in Windows do not grant access to SYSTEMby default, preventing Serv-U from writing events to the queue. To correct this,after creating the queue in MSMQ, right-click it, select Properties, and then setthe permissions so that SYSTEM (or the network account under which Serv-Uruns) has permission to the queue.
Event filters
Use event filters to control when a Serv-U event is triggered. By default, events triggereach time the event occurs. The event filter allows events to be triggered only ifcertain conditions are met. For example, a standard event may trigger an email eachtime a file is uploaded to the server. However, by using an event filter, events can betriggered on a more targeted basis. For example, you can configure a File Uploadedevent to only send an email when the file name contains the string important, soan email would be sent when the file Important Tax Forms.pdf is uploaded butnot when other files are uploaded to the server. Additionally, you can configure a FileUpload Failed event to run only when the FTP protocol is used, not triggering forfailed HTTP or SFTP uploads. You can do this by controlling the variables and valuesrelated to the event and by evaluating their results when the event is triggered.
Event filter fields
Each event filter has the following critical values that must be set:
l Name: This is the name of the filter, used to identify the filter for the event.
l Description (Optional): This is the description of the event, which may beincluded for reference.
108
l Logic: This determines how the filter interacts with other filters for an event. Inmost cases, AND is used, and all filters must be satisfied for the event totrigger. The function of AND is to require that all conditions be met. However,the OR operator can be used if there are multiple possible satisfactoryresponses (for example, abnormal bandwidth usage of less than 20 KB/s ORgreater than 2000 KB/s).
l Filter Comparison: This is the most critical portion of the filter. The FilterComparison contains the evaluation that must occur for the event to trigger.For example, a filter can be configured so that only the user admin triggers theevent. In this case, the comparison is If $Name = (is equal to) admin,and the data type is string. For bandwidth, either an unsigned integer ordouble precision floating point value is used.
Event filters also support wildcards when evaluating text strings. The supported wild-cards include:
l * - The asterisk wildcard matches any text string of any length. For example:
l An event filter that compares the $FileName variable to the stringdata* matches files named data, data7, data77, data.txt,data7.txt, and data77.txt.
l ? - The question mark wildcard matches any one character, but only onecharacter. For example:
l An event filter that compares the $FileName variable to the stringdata? matches a file named data7 but not data, data77, data.txt,data7.txt, or data77.txt.
l An event filter that compares the $FileName variable to the stringdata?.* matches files named data7 and data7.txt but not data,data77, data.txt, or data77.txt.
l An event filter that compares the $Name variable to the string A????matches any five-character user name that starts with A.
l [] - The bracket wildcard matches a character against the set of charactersinside the brackets. For example:
l An event filter that compares the $FileName variable to the string data[687].txt matches files named data6.txt, data7.txt anddata8.txt but not data5.txt.
l An event filter that compares the $LocalPathName variable to the string[CD]:\* matches any file or folder on the C: or D: drives.
109
Event filter fields

Domain
You can use multiple wildcards in each filter. For example:
l An event filter that compares the $FileName variable to the string[cC]:\*.??? matches any file on the C: drive that ends in a three letter fileextension.
l An event filter that compares the $FileName variable to the string ?:\*Red[678]\?????.* matches a file on any Windows drive, contained in any folderwhose name contains Red6, Red7 or Red8, and that also has a five characterfile name followed by a file extension of any length.
Event filters
Event filters are used by comparing fields to expected values in the Event Filtermenu. The best example is raising an event only when a certain user triggers theaction, or when a certain file is uploaded. For example, an administrator may want toraise an email event when the file HourlyUpdate.csv is uploaded to the server,but not when other files are uploaded. To do this, create a new event in the DomainDetails > Events menu. The Event Type is File Uploaded, and on the Event Filter tab anew filter must be added. The $FileName variable is used and the value isHourlyUpdate.csv as shown below:
As another example, it may be necessary to know when a file transfer fails for aspecific user account. To perform this task, create a new File Upload Failed event, andadd a new filter.
The filter comparison is the $Name variable, and the value to compare is the username, such as ProductionLineFTP:
110
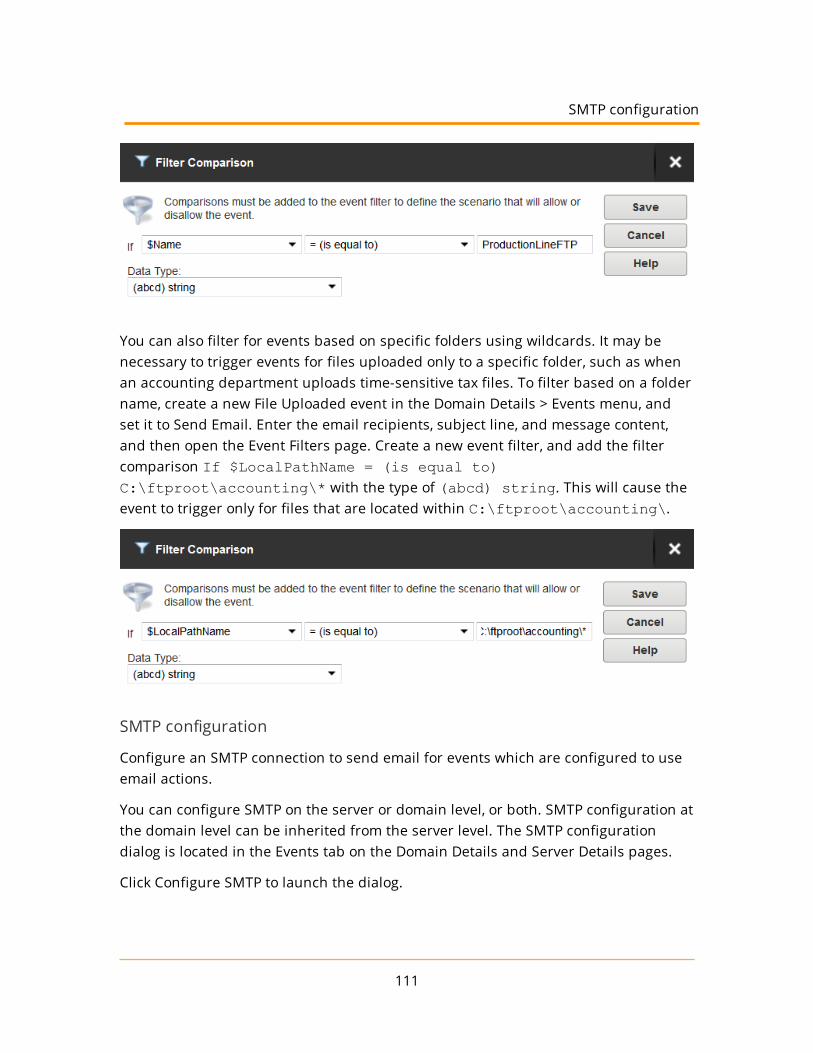
You can also filter for events based on specific folders using wildcards. It may benecessary to trigger events for files uploaded only to a specific folder, such as whenan accounting department uploads time-sensitive tax files. To filter based on a foldername, create a new File Uploaded event in the Domain Details > Events menu, andset it to Send Email. Enter the email recipients, subject line, and message content,and then open the Event Filters page. Create a new event filter, and add the filtercomparison If $LocalPathName = (is equal to)C:\ftproot\accounting\* with the type of (abcd) string. This will cause theevent to trigger only for files that are located within C:\ftproot\accounting\.
SMTP configuration
Configure an SMTP connection to send email for events which are configured to useemail actions.
You can configure SMTP on the server or domain level, or both. SMTP configuration atthe domain level can be inherited from the server level. The SMTP configurationdialog is located in the Events tab on the Domain Details and Server Details pages.
Click Configure SMTP to launch the dialog.
111
SMTP configuration

Domain
Test the SMTP configuration
1. Click Send Test Email.
2. In the Send Test Email window, specify the email address where you want tosend the test email to, and click Send. Optionally, you can edit the subject andcontent of the test message.
3. If the email was sent successfully, click OK on the confirmation window to saveyour SMTP configuration, or click No to return to the SMTP Configurationwindow.
If an error occurs at any stage of the configuration test, Serv-U returns one of thefollowing error messages in the SMTP error window:
ERROR MESSAGE EXPLANATION
SMTP connection failed. Pleasecheck your SMTP server and portsettings.
The most common reason for the SMTPconnection to fail is an invalid SMTP serveraddress or port number. Verify that thesedetails are correct.
Unable to send message due toauthorization error. Please checkuser name and password.
The connection to the server is successful,but the provided user name, password, orboth is incorrect.
The error can also occur if incorrect serverand port settings are specified, but thespecified server is listening on the specifiedport.
Unable to send message due torecipient error. Please check thatrecipient email address is valid.
The connection to the server is successful,but the email address provided in the ToEmail Address field of the Send Test Emailwindow is not valid.
Unable to send a message. Pleasetry again later.
The connection to the server is successful,but an unspecified error occurred whilesending the test email.
SMTP communication failed. Ensure An unspecified error occurred. Check your
112

ERROR MESSAGE EXPLANATION
that SMTP server settings arecorrect, and that the SMTP server isup and running.
SMTP connection details, and try the testagain.
Timeout while contacting SMTPserver. Please check that the SMTPserver address is correct.
The connection to the SMTP server timedout.
Directory access rules
Directory access rules define the areas of the system which are accessible to useraccounts. While traditionally restricted to the user and group levels, in Serv-U, theusage of directory access rules is extended to both the domain and the server levelsthrough the creation of global directory access rules. Directory access rules specifiedat the server level are inherited by all users of the file server. If they are specified atthe domain level, they are only inherited by users who belong to the particulardomain. The traditional rules of inheritance apply where rules specified at a lowerlevel (for example, the user level) override conflicting or duplicate rules specified at ahigher level (for example, the server level).
When you set the directory access path, you can use the %USER%, %HOME%, %USER_FULL_NAME%, and %DOMAIN_HOME% variables to simplify the process. For example,use %HOME%/ftproot/ to create a directory access rule that specifies the ftprootfolder in the home directory of the user. Directory access rules specified in thismanner are portable if the actual home directory changes while maintaining thesame subdirectory structure. This leads to less maintenance for the file serveradministrator. If you specify the %USER% variable in the path, it is replaced with theuser's login ID. This variable is useful in specifying a group's home directory toensure that users inherit a logical and unique home directory. You can use the%USER_FULL_NAME% variable to insert the Full Name value into the path (the user
must have a Full Name specified for this to function). For example, the user "TomSmith" could use D:\ftproot\%USER_FULL_NAME% for D:\ftproot\Tom Smith.You can also use the %DOMAIN_HOME% macro to identify the user's home directory.For example, to place a user and their home directory into a common directory, use%DOMAIN_HOME%\%USER%.
113
Directory access rules

Domain
Directory access rules are applied in the order they are listed. The first rule in the listthat matches the path of a client's request is the one that is applied for that rule. Inother words, if a rule exists that denies access to a particular subdirectory but islisted below the rule that grants access to the parent directory, then a user still hasaccess to the particular subdirectory. Use the arrows on the right of the directoryaccess list to rearrange the order in which the rules are applied.
Serv-U allows to list and open the parent directory of the directory the user isgranted access to, even if no explicit access rules are defined for the parentdirectory. However, the parent directory accessed this way will only display thecontent to which the user has access.
File permissionsP
ERMISSIONDESCRIPTION
ReadAllows users to read (download) files. This permission does not allowusers to list the contents of a directory, which is granted by the Listpermission.
WriteAllows users to write (upload) files. This permission does not allowusers to modify existing files, which is granted by the Appendpermission.
AppendAllows users to append data to existing files. This permission is typicallyused to enable users to resume transferring partially uploaded files.
Rename Allows users to rename files.
Delete Allows users to delete files.
Execute
Allows users to remotely execute files. The execute access is meant forremotely starting programs and usually applies to specific files. This is apowerful permission and great care should be used in granting it tousers. Users with Write and Execute permissions can install anyprogram on the system.
114

Directory permissionsP
ERMISSIONDESCRIPTION
ListAllows users to list the files and subdirectories contained in thedirectory. Also allows users to list this folder when listing the contentsof a parent directory.
Create Allows users to create new directories within the directory.
Rename Allows users to rename directories within the directory.
Remove
Allows users to delete existing directories within the directory.
If the directory contains files, the user also must have the Deletefiles permission to remove the directory.
Subdirectory permissionsP
ERMISSIONDESCRIPTION
Inherit
Allows all subdirectories to inherit the same permissions as the parentdirectory. The Inherit permission is appropriate for most circumstances,but if access must be restricted to subfolders (for example, whenimplementing mandatory access control), clear the Inherit check boxand grant permissions specifically by folder.
Advanced: Access as Windows user (Windows only)
Files and folders may be kept on external servers in order to centralize file storage orprovide additional layers of security. In this environment, files can be accessed by theUNC path (\\servername\folder\) instead of the traditionalC:\ftproot\folder path. However, accessing folders stored across the networkposes an additional challenge, because Windows services are run under the LocalSystem account by default, which has no access to network resources.
115
Directory permissions
Domain
To mitigate this problem for all of Serv-U, you can configure the Serv-U File Serverservice to run under a network account. The alternative, preferred when manyservers exist, or if the Serv-U File Server service has to run under Local System forsecurity reasons, is to configure a directory access rule to use a specific Windowsuser for file access. Click Advanced to specify a specific Windows user for eachdirectory access rule. As in Windows authentication, directory access is subject toNTFS permissions, and in this case also to the configured permissions in Serv-U.
When you use Windows authentication, the NTFS permissions of the Windowsuser take priority over the directory access rules. This means that when aWindows user tries to access a folder, the security permissions of the user areapplied instead of the credentials specified in the directory access rule.
Quota permissions
Maximum size of directory contents
Setting the maximum size actively restricts the size of the directory contents tothe specified value. Any attempted file transfers that cause the directorycontents to exceed this value are rejected. This feature serves as an alternativeto the traditional quota feature that relies upon tracking all file transfers(uploads and deletions) to calculate directory sizes and is not able to considerchanges made to the directory contents outside of a user's file server activity.
Mandatory access control
You can use mandatory access control (MAC) in cases where users need to begranted access to the same home directory but should not necessarily be able toaccess the subdirectories below it. To implement mandatory access control at adirectory level, disable the Inherit permission as shown below.
In the following example, the rule applies to C:\ftproot\.
116

Now, the user has access to the ftproot folder but to no folders below it.Permissions must individually be granted to subfolders that the user needs access to,providing the security of mandatory access control in Serv-U File Server.
Restrict file types
If users are using storage space on the Serv-U File Server to store non-work-relatedfiles, such as .mp3 files, you can prevent this by configuring a directory access ruleplaced above the main directory access rule to prevent .mp3 files from beingtransferred as shown below.
In the text entry for the rule, type *.mp3, and use the permissions shown beolw:
117
Restrict file types

Domain
The rule denies permission to any transfer of files with the .mp3 extension and canbe modified to reflect any file extension. Similarly, if accounting employees only needto transfer files with the .mdb extension, configure a pair of rules that grantspermissions for .mdb files but denies access to all other files, as shown below.
In the first rule, enter the path that should be the user's home directory or thedirectory to which they need access.
118

In the second rule, enter the extension of the file that should be accessed, such as*.mdb.
119
Restrict file types

Domain
These rules only allow users to access .mdb files within the specified directories. Youcan adapt these rules to any file extension or set of file extensions.
Virtual paths
If virtual paths are specified, users can gain access to files and folders outside oftheir own home directory. A virtual path only defines a method of mapping anexisting directory to another location on the system to make it visible within a user'saccessible directory structure. In order to access the mapped location, the user muststill have a directory access rule specified for the physical path of a virtual path.
Like directory access rules, virtual paths can be configured at the server, domain,group, and user levels. Virtual paths created at the server level are available for allusers of the file server. When virtual paths are created at the domain level, they areonly accessible by users belonging to that domain.
You can also create virtual paths specifically for individual users or groups.
Physical path
The physical path is the actual location on the system, or network, that is to be placedin a virtual location accessible by a user. If the physical path is located on the samecomputer, use a full path, such as D:\inetpub\ftp\public. You can also use aUNC path, such as \\Server\share\public. To make a virtual path visible tousers, users must have a directory access rule specified for the physical path.
Virtual path
The virtual path is the location that the physical path should appear in for the user.The %HOME% macro is commonly used in the virtual path to place the specified
120

physical path in the home directory of the user. When specifying the virtual path, thelast specified directory is used as the name displayed in directory listings to the user.For example, a virtual path of %HOME%/public places the specified physical path ina folder named public within the user's home directory. You can also use a full pathwithout any macros.
Include virtual paths in Maximum Directory Size calculations
When this option is selected, the virtual path is included in Maximum Directory Sizecalculations. The Maximum Directory Size limits the size of directories affecting howmuch data can be uploaded.
Virtual paths example
A group of web developers have been granted access to the directoryD:\ftproot\example.com\ for web development purposes. The developers alsoneed access to an image repository located at D:\corpimages\. To avoid grantingthe group access to the root D drive, a virtual path must be configured so that theimage repository appears to be contained within their home directory. Within thegroup of web developers, add a virtual path to bring the directory to the users byspecifying D:\corpimages\ as the physical path andD:\ftproot\example.com\corpimages as the virtual path. Be sure to add agroup level directory access rule for D:\corpimages\ as well. The developers nowhave access to the image repository without compromising security or relocatingshared resources.
Relative virtual paths example
Continuing with the previous example, if the home directory of the group of webdevelopers is relocated to another drive, both the home directory and the virtual pathmust be updated to reflect this change. You can avoid this by using the %HOME%macro to create a relative virtual path location that eliminates the need to update thepath if the home directory changes. Instead of usingD:\ftproot\example.com\corpimages as the virtual path, use%HOME%\corpimages. This way the corpimages virtual path is placed within the
home directory of the group, regardless of what the home directory is. If the homedirectory changes at a later date, the virtual path still appears there.
121
Include virtual paths in Maximum Directory Size calculations
Domain
Automated file management
Using file management rules, you can automatically remove or archive files from thefile server. You can configure automated file management rules at the server anddomain level. If they are specified at the server level, the file management rules areaccessible to all users of the file server. If they are specified at the domain level, theyare only accessible to users belonging to that domain.
Depending on the file system, Serv-U uses the creation or change date of files todetermine the expiration date. On Windows, the creation date of the file is used todetermine when a file expires. On Linux, the change date is used to determine theexpiration date. The change date is updated whenever the metadata or index node(inode) of the file is modified. If the contents or attributes (such as the permissions)of the file are modified, the change date is also updated.
The change date is not modified if the file is read from.
The file management rules apply recursively to all files within the folder for whichthey are configured, and not only to those that have been uploaded through Serv-U.This way you can manage files that are transferred by clients, or that are copied tothe folder outside of Serv-U.
The folder structure is not affected by the file management rules. When expired filesare deleted or moved, the folders themselves remain intact.
The file management rules run hourly in the background. For this reason, there canbe an hour delay before Serv-U deletes or moves an expired file.
To monitor the status of the file management rules, you can configure a FileManagement Rule Success and a File Management Rule Error event underServer/Domain Details > Events. The file management rules continue to run even ifdeleting or moving a single file fails. For more information, see Domain events.
Define a new file management rule
1. Navigate to Directories > File Management, and click Add.
2. Type the path to the file or folder in the Directory Path field, or click Browse tonavigate to the file or folder.
122
3. Select the action you want to perform on the file:a. If you want to delete the file after it expires, select Delete file(s) after
specified time.
b. If you want to move the file after it expires, select Move file(s) afterspecified time, and then in the Destination Directory Path field, specifythe folder where you want to move the file.
4. Specify the number of days after the file creation date when the action shouldbe executed.
5. Click Save.
Serv-U regularly checks each file in the directory for its age, and performs thespecified action on the files that meet the age criteria you specify.
Domain limits and settings
Serv-U contains options which you can use to customize how Serv-U can be used, andwhich also provide ways to apply limits and custom settings to users, groups,domains, and the server in its entirety. The limits stack intelligently, with usersettings overriding group settings, group settings overriding domain settings, anddomain settings overriding server settings. In addition, limits can be applied onlyduring certain days of the week or times of the day. It is possible to grant exceptionsto administrators and restrict specific users more than others, providing total controlover the server. The limits and settings in Serv-U consist of the following categories:
l Connection
l Password
l Directory Listing
l Data Transfer
l HTTP
l Email
l File Sharing
l Advanced
123
Domain limits and settings
Domain
To apply a limit, select the appropriate category, click Add, select the limit, and thenselect or enter the value. For example, to disable the Lock users in home directoryoption for a domain, follow these steps:
1. Select Domain Limits & Settings from the Serv-U Management Console.
2. From the Limit Type list, select Directory Listing.
3. Click Add.
4. From the Limit list, select Lock users in home directory.5. Deselect the option.
6. Click Save.
The limits list displays the current limits applied to the domain. Limits with a light-blue background are default values. Limits with a white background are values thatoverride the defaults. After completing the previous steps, a new Lock users in homedirectory limit appears in the list that displays "No" as the value. Because ofinheritance rules, this option applies to all users in the domain unless overridden atthe group or user level. For more information about this method of inheritance, seeUser interface conventions.
You can delete limits by selecting them and clicking Delete. To edit an overriddenvalue, select the limit, and then click Edit. Default rules cannot be edited or deleted.Create a new limit to override a default one.
To create a limit that is restricted to a specific time of day or days of the week, clickAdvanced in the New Limit or Edit Limit window. Select Apply limit only at this timeof day to specify a start and stop time for the new limit. To restrict the limit to certaindays of the week, deselect the days for which you do not want to apply the limit.When a limit is restricted in this way, default values (or the value of other limitoverrides) are applied when the time of day or day of the week restrictions are notmet for this limit.
Domain settings
On the Domain Limits and Settings > Settings pages, you can configure basic domainsettings that affect performance, security, and network connectivity. To configure asetting, type the value you want in the appropriate area, and then click Save. Thistopic contains detailed information about the settings that you can configure.
124
Connection settings
Block users who connect more than 'x' times within 'y' seconds for 'z' minutes
Also known as anti-hammering, enabling this option is a method of preventingbrute force password guessing systems from using dictionary style attacks tolocate a valid password for a user account. Using strong, complex passwordsdefeats most dictionary attacks. However, enabling this option ensures thatServ-U does not waste time processing connections from these illegitimatesources. When configuring this option, ensure that there is some room forlegitimate users to correct an incorrect password before they are blocked.
When enabled, this option temporarily blocks IP addresses for the specifiednumber of minutes that fail to successfully login after the specified number ofattempts within the specified number of seconds. IP addresses blocked in thisway can be viewed in the appropriate IP Access rules tab. A successful loginresets the counter that is tracking login attempts.
Hide server information from SSH identity
After a successful SSH login, the server sends identification information to theclient. Normally, this information includes the server name and versionnumber. Enable this option to prevent the information from being given to theclient.
Default Web Client
Specifies whether the Web Client, Web Client Pro, or FTP Voyager JV should beused by all HTTP clients by default. The third, default option is to prompt theuser for the client they want to use instead. This option is also available at thegroup and user level.
Custom HTTP settings
Basic branding (custom logo and limited text changes) can be implementedusing the Custom HTTP Settings. Advanced branding is also available. For moreinformation, see Configure custom HTML for the Serv-U login pages.
Specify a custom logo to be displayed on the login and Web Client pages
Custom logos must have a width of 400 pixels and a height of 100 pixels. If a
125
Connection settings
Domain
logo does not meet this criteria an error message will appear when you attemptto save the logo.
JPEG images which use CMYK instead of RGB encoding may not workproperly in certain browsers. Test your logo image to make sure it isdisplayed properly in all browsers.
To add a logo, click Browse next to Custom Logo Path, and then select the pathto your logo. Click Save and the logo will appear below the Custom Logo Pathfield. To delete a custom logo, clear the path in the Custom Logo Path field,and then click Save.
HTTP Login Title Text (no HTML)
Provide text to be used as the title of the HTTP login and Web Client pages.
HTTP Login Page Text
Provide any custom login page text you want in this area. This text can beHTML-formatted, including links, images, and standard formatting like italics,bold, underline, alignment and more.
HTTP Client Interface Background (CSS Only)
Provide a custom CSS background style for the Web Client, File Sharing and FTPVoyager JV landing page. This style follows the CSS background shorthand standard.The "background:" string is assumed so it does not need to be entered here. Theformat for a CSS background is color url('/%CUSTOM_HTML_DIR%/images/yourimage.png') repeat-type horizontal-alignmentvertical-alignment.
The %CUSTOM_HTML_DIR% must be used in conjunction with the Custom HTMLsettings. Custom HTML must be enabled and a Custom HTML Container Directorymust be specified.
The following examples provide a reference:
l #0b16f8 url('/%CUSTOM_HTML_DIR%/images/Header01.png') no-repeat right top
l #FFFFFF url('/%CUSTOM_HTML_DIR%/images/MyLogoTile.png')repeat-x left top
l red (this example uses no image)
126

l url('/%CUSTOM_HTML_DIR%/images/MyHeader.png') no-repeatcenter top (this example uses no custom color)
Password Recovery Email Message
Send email messages to users with their login credentials using thiscustomizable password recovery message.
The password recovery email message has a simple default subject andmessage with the user's login ID and password. This message will be sent if theuser has a valid email address recorded in Serv-U. Users can request thismessage from the Serv-U login page.
Administrators can also send this message to users using the RecoverPassword button under domain users and global users in the ManagementConsole.
Integration DLL / Shared Library
For information about writing an Integration DLL or Shared Library, see theServ-U Integration Sample DLL installed with Serv-U in the Serv-UIntegration Sample DLL sub-directory. The Integration API is documentedin this sample.
Other settings
Ratio Free Files
Files listed by clicking Ratio Free Files are exempt from transfer ratiolimitations on file transfers. Ratio free files specified at the server or domainlevel are inherited by all their users accounts. For more information about ratiofree files, see Transfer ratios and quotas.
FTP settings
In the Serv-U File Server, you can customize the FTP commands that Serv-U accepts,and you can also customize the responses of Serv-U to the FTP commands it receives.If you configure these options at the server level, all domains inherit thecustomizations. To customize the FTP behavior for a specific domain, select theappropriate domain, open the FTP Settings page for the domain, and then click UseCustom Settings. At any time, you can click Use Default Settings to have the domainrevert back to the default settings of the server.
127
Other settings

Domain
Warning: Customizing the FTP behavior in this way is not recommended except forthose very familiar with the FTP protocol and its standard and extended commandset.
Global properties
When using custom settings, the Global Properties button becomes available.
FTP Responses
Global FTP responses are responses shared amongst most FTP commands, suchas the error message sent when a file is not found. Customizing a global FTPresponse ensures that the response is used by all other FTP commands ratherthan having to customize it for each individual FTP command. FTP commandresponses can contain special macros that allow real-time data to be insertedin to the response. For more information, see System variables.
Message File
The server welcome message is sent in addition to the standard "220 WelcomeMessage" that identifies the server to clients when they first connect. If theInclude response code in text of message file option is selected, the 220response code begins each line of the specified welcome message. Tocustomize the welcome message, enter the path to a text file in the MessageFile Path field. Click Browse to select a file on the computer. Serv-U opens thisfile and sends its contents to connecting clients.
Advanced Options
Block "FTP_bounce" attacks and FXP (server-to-server transfers): Select thisoption to block all server-to-server file transfers involving this Serv-U File Serverby only allowing file transfers to the IP address in use by the commandchannel. For more information about FTP_bounce attacks, see CERT advisoryCA-97.27.
128
Include response code on all lines of multi-line responses: The FTP protocoldefines two ways in which a multi-line response can be issued by an FTPserver. Some older FTP clients have trouble parsing multi-line responses thatdo not contain the three-digit response code on each line. Select this option ifyour clients are using an FTP client experiencing problems with multi-lineresponses from Serv-U.
Use UTF-8 encoding for all sent and received paths and file names: By default,Serv-U treats all file names and paths as UTF-8 encoded strings. It also sendsall file names and paths as UTF-8 encoded strings, such as when sending adirectory listing. Deselecting this option prevents Serv-U from UTF-8 encodingthese strings. When this option is deselected, UTF-8 is not included in the FEATcommand response to indicate to clients that the server is not using UTF-8encoding.
Edit FTP commands and responses
To edit FTP Commands, select the FTP command you want to change, and then clickEdit.
Information
On the Information page, basic information about the command is shown alongwith a link to more information on the Serv-U website. Each FTP command canalso be disabled by selecting the Disable command option. Disabledcommands are treated as unrecognized commands when they are receivedfrom a client.
FTP Responses
On the FTP Responses page, all possible FTP responses to the command asissued by the server can be modified by clicking Edit for each response. FTPcommand responses can contain special macros that allow real-time data to beinserted in to the response. For more information, see System variables.
Message Files
Certain FTP commands allow a message file to be associated with them. Thecontents of a message file are sent along with the standard FTP response. Inaddition, a secondary message file path is available as a default option. This
129
Edit FTP commands and responses

Domain
allows for message files to be specified using a path relative to the homedirectory of the user for the Message File. If the first message file is not found,Serv-U attempts to use the Secondary Message File instead. By specifying anabsolute file path in the secondary location, you can ensure that each userreceives a message file.
The following FTP commands can be used for specifying a message file:
l CDUP
l CWD
l QUIT
Managing Recursive Listings
Serv-U supports recursive listings by default, allowing FTP clients to obtainlarge directory listings with a single command. In some cases, clients mayrequest excessively large directory listings using the -R parameter to the LISTand NLST commands. If performance in Serv-U is impacted by usersrequesting excessively large listings, recursive listings can be disabled by usingthe Allow client to specify recursive directory listings with -R parameter option.
Advanced Options
Some FTP commands contain advanced configuration options that offeradditional ways to configure the behavior of the command. Where available,the configuration option is described in detail in the Management Console. Thefollowing FTP commands contain advanced configuration options:
l LIST
l MDTM
l NLST
Case file: Custom FTP command response
Users connecting to the server need to know how much quota space is available in agiven folder when they have completed a transfer. To do this, edit the response tothe STOR command to include a report about available space. By default, the 226(command successful) response to the STOR command (which stores files on theserver) is the following:
130
Transfer complete. $TransferBytes bytes transferred.$TransferKBPerSecond KB/sec.
Modify this to include an extra variable in the following way:
Transfer complete. $TransferBytes bytes transferred.$TransferKBPerSecond KB/sec. Remaining storage space is$QuotaLeft.
The last sentence shows the user how much storage space is left at the end of eachfile upload. The same can be done for the DELE command, so that every time a userdeletes a file, their updated quota value, showing an increase in available space, isdisplayed. This can be done for any FTP command response.
Configure domain encryption
Serv-U supports two methods of encrypted data transfer: Secure Socket Layer (SSL)and Secure Shell 2 (SSH2). SSL is used to secure the File Transfer Protocol (FTP) andHypertext Transfer Protocol (HTTP). SSH2 is a method of securely interacting with aremote system that supports a method of file transfer commonly referred to as SFTP.Despite its name, SFTP does not have anything in common with the FTP protocolitself.
In order for each method of encryption to work, a certificate, a private key, or bothmust be supplied. SSL requires the presence of both, while SSH2 only requires aprivate key. If you do not have either of these required files, you can create them inServ-U.
Encryption options specified at the server level are automatically inherited byall domains. Any encryption options specified at the domain levelautomatically overrides the corresponding server-level option. Certainconfiguration options are only available to the server.
When creating SSL/TLS, SSH, and HTTPS encrypted domains within Serv-U, it isimportant to know that encrypted domains cannot share listeners. Because SSL/TLSand SSH encryption is based on encrypting traffic sent between IP addresses, eachdomain must have unique listeners in order to operate properly. In the case thatmultiple encrypted domains are created that share listeners, the domain that iscreated first takes precedence, and causes other encrypted domains to fail tofunction properly. To operate multiple encrypted domains, modify the listeners of
131
Configure domain encryption

Domain
each domain to ensure they listen on unique port numbers.
Configure SSL for FTPS and HTTPS
To use an existing certificate:
1. Obtain an SSL certificate and private key file from a certificate authority.
2. Place these files in a secured directory in the server.
3. Use the appropriate Browse button to select both the certificate and private keyfiles.
4. If a CA (Certificate Authority) PEM file has been issued, enter or browse to thefile.
5. Enter the password used to encrypt the private key file.
6. Click Save.
If the provided file paths and password are all correct, Serv-U starts to use thecertificate immediately to secure FTPS and HTTPS connections using the providedcertificate. If the password is incorrect or Serv-U cannot find either of the providedfiles, an error message is displayed that explains the encountered error.
To create a new certificate:
1. Click Create Certificate.
2. Specify the Certificate Set Name that is used to name each of the files Serv-Ucreates.
3. Specify the output path where the created files are to be placed. In most cases,the installation directory is a safe location (for example,C:\ProgramData\RhinoSoft\Serv-U\).
4. Specify the city in which the server or corporation is located.
5. Specify the state (if applicable) in which the server or corporation is located.
6. Specify the 2-digit country code for the country in which the server orcorporation is located.
7. Specify the password used to secure the private key.
8. Specify the full organization name.
132
9. Specify the common name of the certificate. The IP address or the FullyQualified Domain Name (FQDN) that users use to connect must be listed here.
If the Common Name is not the IP address or FQDN used by clients toconnect, clients may be prompted that the certificate does not match thedomain name they are connecting to.
10. Specify the business unit the server is located in.
11. Specify the key length in bits.
12. Click Create to complete the certificate creation.
Serv-U creates three files using the provided information: A self-signed certificate(.crt) that can be used immediately on the server but is not authenticated by anyknown certificate authority, a certificate request (.csr) that can be provided to acertificate authority for authentication, and a private key file (.key) that is used tosecure both certificate files. It is extremely important that you keep the private key ina safe and secure location. If your private key is compromised, your certificate can beused by malicious individuals.
View the certificate
To view the SSL certificate once it is configured, click View Certificate. All identifyinginformation about the certificate, including the dates during which the certificate isvalid, are displayed in a new window.
SFTP (Secure File Transfer over SSH2)
To use an existing private key:
1. Obtain a private key file.
2. Place the private key file in a secured directory in the server. Use Browse inServ-U to select the file.
3. Enter the password for the private key file.
4. Click Save. After clicking Save, Serv-U displays the SSH key fingerprintassociated with the private key.
133
View the certificate

Domain
To create a private key:
1. Click Create Private Key.2. Enter the name of the private key, (for example, MyDomain Key), which is also
used to name the storage file.
3. Enter the output path of the certificate, (for example,C:\ProgramData\RhinoSoft\Serv-U\).
4. Select the Key Type (default of DSA is preferred, but RSA is also available).
5. Select the Key Length (default of 1024 bits provides best performance, 2048 bitsis a good median, and 4096 bits provides best security).
6. Enter the password to use for securing the private key file.
7. After you create a new key, Serv-U displays the SSH key fingerprint associatedwith the new private key.
SSH ciphers and MACs
By default, all supported SSH ciphers and MACs (Message Authentication Codes) areenabled for use by the server. If your specific security needs dictate that only certainciphers or MACs can be used, you can individually disable unwanted ciphers andMACs by deselecting the appropriate ciphers or MACs.
Configure custom HTML for the Serv-U login pages
You can use custom HTML for the HTTP and HTTPS login pages of Serv-U. By usingthis feature, web developers can design their login experience to show off theirexclusive brand and design the page to match existing business themes. Basicbranding (custom logo and limited text changes) is also available. For moreinformation, see Domain settings.
By using the custom HTML feature, you can provide a custom header and customfooter for the HTTP and HTTPS login page. The main login form is automaticallyinserted between the content defined in the header file and footer file. The customHTML interface also uses a CSS file which defines the style used in the login form.This CSS file can also be used to define custom CSS styles, containers, and other CSSformatting as needed.
134

Several branding samples are automatically unpacked to your installation folder (forexample, C:\Program Files\SolarWinds\Serv-U\Custom HTML Samples)when Serv-U is installed. Serv-U Custom HTML and CSS has step-by-step instructionsto explore the current set of samples and build your own branding.
The following fields are used by the Custom HTML feature:
l Custom HTML Container Directory: This directory contains all of the files usedby the custom HTML, including all images, the header file, the footer file, andthe CSS file. Subdirectories in this folder are allowed.
l CSS File: This .CSS file contains all the styles, containers, and other formattingthat is used throughout the header file and footer file, and also the styles thatwill be used by the login form.
l Header File: This .HTM file contains the content for the HTML header that isinserted before the login form.
l Footer File: This .HTM file contains the content for the HTML footer that isinserted after the login form.
l Enable Custom HTML: The custom HTML is not used by Serv-U until this optionis enabled.
Most custom HTML interfaces include custom images. To use custom images, thestorage location of the images must be specified. To universalize the storage location,use the %CUSTOM_HTML_DIR% tag in paths that refer to images. This has the furtherbenefit of avoiding changes to HTML when the container storing the HTML files andimages is changed, because the path only has to be defined once in the CustomHTML Container Directory field. The tag is used in the following way:
<img src="/%CUSTOM_HTML_DIR%/images/image.png" alt="My Image">
Configure file sharing
By using the file sharing feature, domain users can send or receive files from guests.
File sharing is disabled by default. You must select the relevant option toenable it.
To send file sharing invitation emails, you must configure your SMTP settings. Thisconfiguration only needs to be set once for the entire server or a domain.
135
Configure file sharing

Domain
For more information about file sharing, see the Serv-U Web Client and File SharingUser Guide.
To enable file sharing:
1. Navigate to Server Limits and Settings > File Sharing.2. Type the address for the domain URL.
3. Type the location of the file sharing repository.
4. Select the number of days until the shares expire.
5. Select whether you want to use the inherited default email invitation subject, orcustomize your own. If the option is deselected, you can type in a custom emailinvitation subject.
6. Select whether you want to use the inherited default email notificationmessage, or customize your own. If the option is deselected, you can type in acustom message.
7. Select Enable File Sharing.8. If it is not configured yet, configure your SMTP to be able to send and receive
notification emails. For more information about configuring an SMTP server,see SMTP configuration.
9. Click Save.
Server activity
The Server Activity > Sessions and Domain Activity > Sessions pages display thecurrent file server session activity.
When you view the Sessions page from the server, all connected sessions from alldomains are displayed. When you view the Sessions page while you areadministering a domain, only the current sessions of the particular domain aredisplayed. From this page, you can see an overall picture of the current activity on thefile server. In addition, you can view individual sessions, including their currentstatus, connection state, and transfer information.
To view detailed information about a specific session, select the session. The ActiveSession Information group is populated with the details of the currently highlightedsession. This information is frequently updated to provide an accurate and up-to-date snapshot of the activities of the session.
136
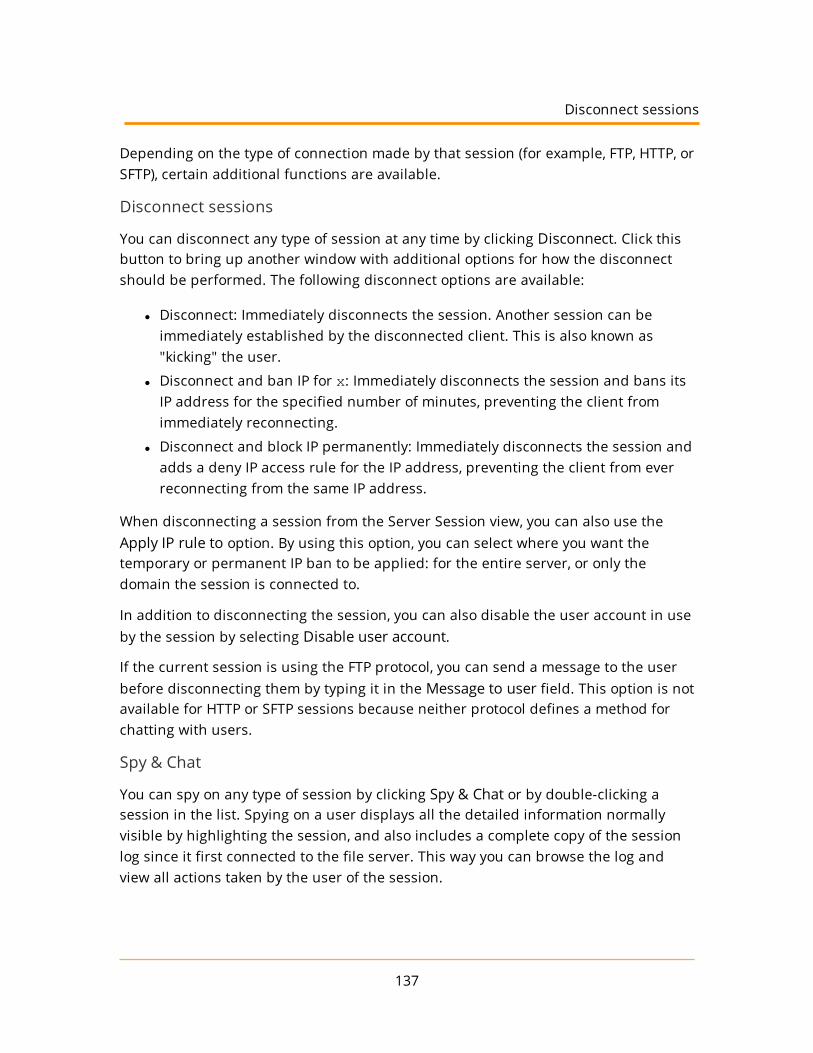
Depending on the type of connection made by that session (for example, FTP, HTTP, orSFTP), certain additional functions are available.
Disconnect sessions
You can disconnect any type of session at any time by clicking Disconnect. Click thisbutton to bring up another window with additional options for how the disconnectshould be performed. The following disconnect options are available:
l Disconnect: Immediately disconnects the session. Another session can beimmediately established by the disconnected client. This is also known as"kicking" the user.
l Disconnect and ban IP for x: Immediately disconnects the session and bans itsIP address for the specified number of minutes, preventing the client fromimmediately reconnecting.
l Disconnect and block IP permanently: Immediately disconnects the session andadds a deny IP access rule for the IP address, preventing the client from everreconnecting from the same IP address.
When disconnecting a session from the Server Session view, you can also use theApply IP rule to option. By using this option, you can select where you want thetemporary or permanent IP ban to be applied: for the entire server, or only thedomain the session is connected to.
In addition to disconnecting the session, you can also disable the user account in useby the session by selecting Disable user account.
If the current session is using the FTP protocol, you can send a message to the userbefore disconnecting them by typing it in the Message to user field. This option is notavailable for HTTP or SFTP sessions because neither protocol defines a method forchatting with users.
Spy & Chat
You can spy on any type of session by clicking Spy & Chat or by double-clicking asession in the list. Spying on a user displays all the detailed information normallyvisible by highlighting the session, and also includes a complete copy of the sessionlog since it first connected to the file server. This way you can browse the log andview all actions taken by the user of the session.
137
Disconnect sessions

Domain
If the current session is using the FTP protocol, additional options are available forchatting with the user. The Chat group shows all messages sent to and received fromthe session since beginning to spy on the session. To send a message to the session,type the message text in the Message Content field, and then click Send. When amessage is received from the session, it is automatically displayed here.
Not all FTP clients support chatting with system administrators. The commandused to send a message to the server is SITE MSG. In order for a client toreceive messages, the client application must be capable of receivingunsolicited responses from the server instead of discarding them.
Broadcast messages
You can send a message to all currently connected FTP sessions by clickingBroadcast. Sending a message through broadcast is equivalent to opening the Spy &Chat window to each individual FTP session and sending it a chat message.
Cancel sessions
If a session is performing a file transfer, you can cancel the file transfer withoutdisconnecting the session by clicking Abort. After confirming the command, thecurrent file transfer for that session is terminated by the server. Some clients,especially FTP and SFTP clients, may automatically restart the canceled transfer,making it appear that the cancellation failed. If this is the case, try disconnecting thesession instead.
Server and domain statistics
The Server Activity > Statistics and Domain Activity > Statistics pages show detailedstatistics about the use of the server for use in benchmarking and records keeping.Statistics viewed at the server level are an aggregate of those accumulated by alldomains on the server. Statistics viewed for an individual domain are for that domainonly. The displayed information includes the following details.
Session statistics
DATA DESCRIPTION
CurrentSessions
The number of sessions currently connected.
138
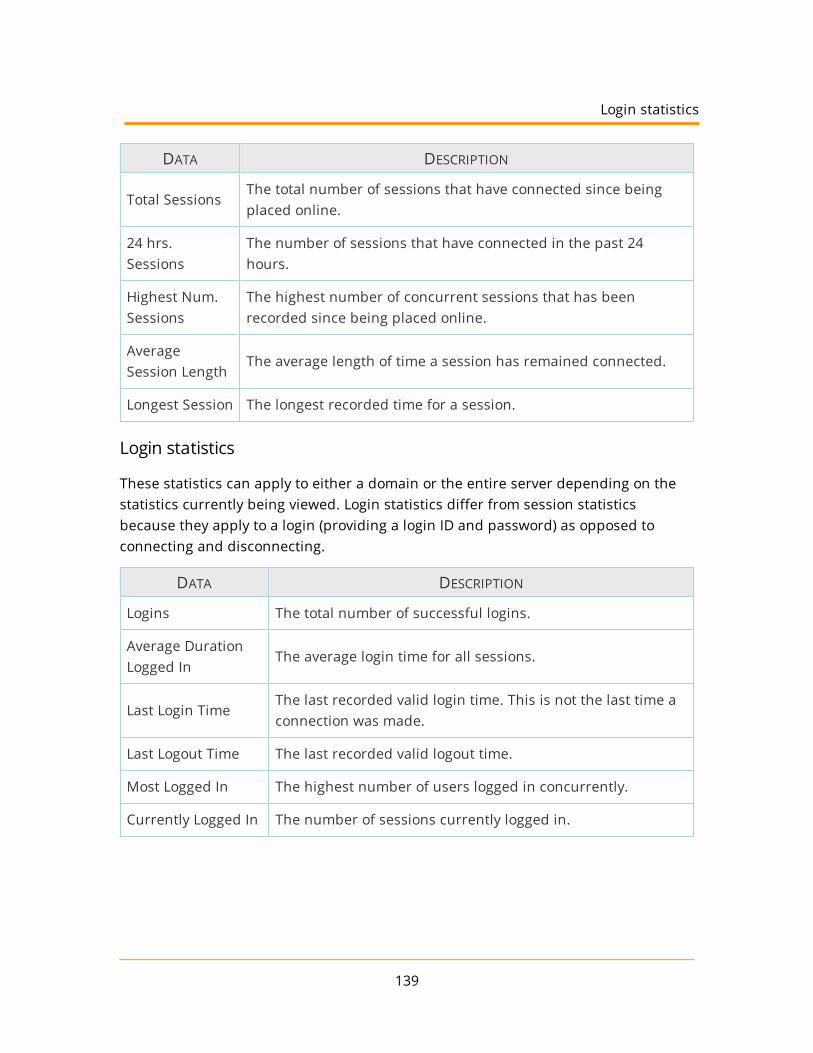
DATA DESCRIPTION
Total SessionsThe total number of sessions that have connected since beingplaced online.
24 hrs.Sessions
The number of sessions that have connected in the past 24hours.
Highest Num.Sessions
The highest number of concurrent sessions that has beenrecorded since being placed online.
AverageSession Length
The average length of time a session has remained connected.
Longest Session The longest recorded time for a session.
Login statistics
These statistics can apply to either a domain or the entire server depending on thestatistics currently being viewed. Login statistics differ from session statisticsbecause they apply to a login (providing a login ID and password) as opposed toconnecting and disconnecting.
DATA DESCRIPTION
Logins The total number of successful logins.
Average DurationLogged In
The average login time for all sessions.
Last Login TimeThe last recorded valid login time. This is not the last time aconnection was made.
Last Logout Time The last recorded valid logout time.
Most Logged In The highest number of users logged in concurrently.
Currently Logged In The number of sessions currently logged in.
139
Login statistics

Domain
Transfer statistics
DATA DESCRIPTION
Download Speed The cumulative download bandwidth currently being used.
Upload Speed The cumulative upload bandwidth currently being used.
DownloadedThe total amount of data, and number of files, downloadedsince being placed online.
UploadedThe total amount of data, and number of files, uploaded sincebeing placed online.
AverageDownload Speed
The average download bandwidth used since being placedonline.
Average UploadSpeed
The average upload bandwidth used since being placedonline.
User and group statistics
The User and Group Statistics pages show detailed statistics based on individual useror group activity. Statistics viewed for a user or group are for that user or group only.The displayed information includes the following details.
Session statistics
DATA DESCRIPTION
CurrentSessions
The number of sessions currently connected.
24 Hrs.Sessions
The number of sessions that have connected in the past 24hours.
Total SessionsThe total number of sessions that have connected since beingplaced online.
Highest Num.Sessions
The highest number of concurrent sessions that has beenrecorded since being placed online.
Avg. Session The average length of time a session has remained connected.
140
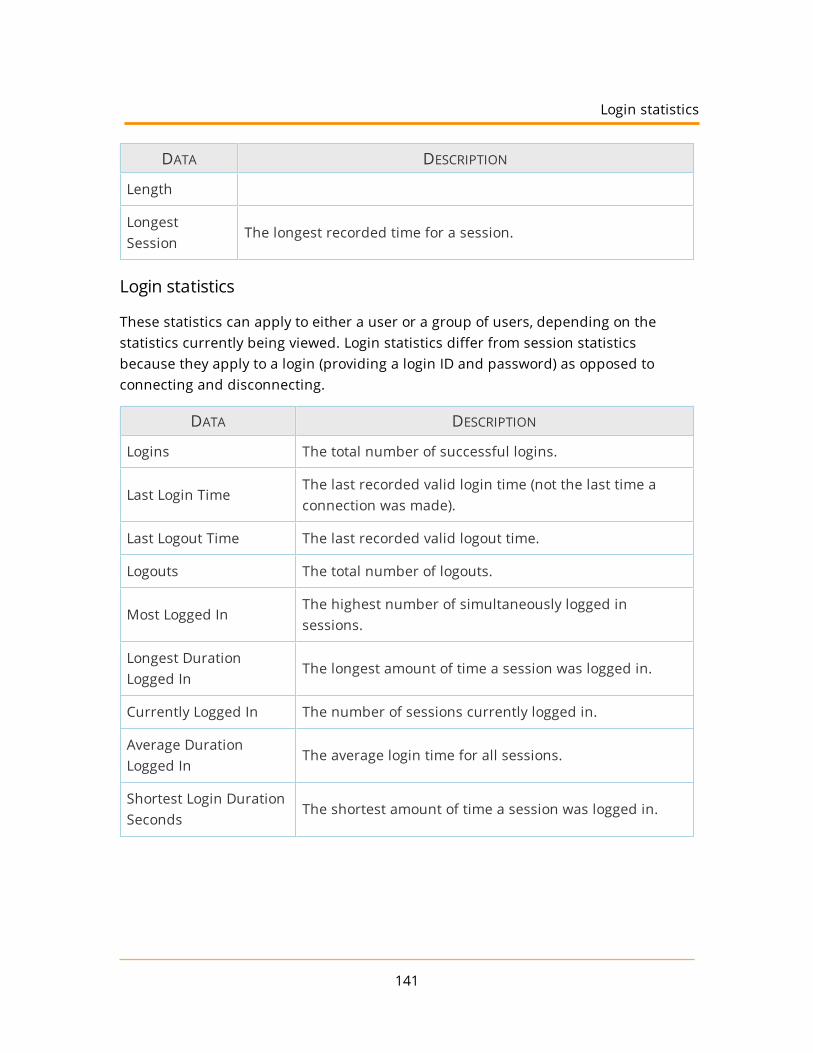
DATA DESCRIPTION
Length
LongestSession
The longest recorded time for a session.
Login statistics
These statistics can apply to either a user or a group of users, depending on thestatistics currently being viewed. Login statistics differ from session statisticsbecause they apply to a login (providing a login ID and password) as opposed toconnecting and disconnecting.
DATA DESCRIPTION
Logins The total number of successful logins.
Last Login TimeThe last recorded valid login time (not the last time aconnection was made).
Last Logout Time The last recorded valid logout time.
Logouts The total number of logouts.
Most Logged InThe highest number of simultaneously logged insessions.
Longest DurationLogged In
The longest amount of time a session was logged in.
Currently Logged In The number of sessions currently logged in.
Average DurationLogged In
The average login time for all sessions.
Shortest Login DurationSeconds
The shortest amount of time a session was logged in.
141
Login statistics

Domain
Transfer statistics
DATA DESCRIPTION
Download Speed The cumulative download bandwidth currently being used.
Upload Speed The cumulative upload bandwidth currently being used.
AverageDownload Speed
The average download bandwidth used since being placedonline.
Average UploadSpeed
The average upload bandwidth used since being placedonline.
DownloadedThe total amount of data, and number of files, downloadedsince being placed online.
UploadedThe total amount of data, and number of files, uploaded sincebeing placed online.
Save statistics
User and group statistics can be saved directly to a CSV file for programmaticanalysis and review. To save statistics to a file, first select the user or group you wantto generate a statistics file for, and then click Save Statistics at the bottom of thepage.
Server and domain log
The Server Activity > Log and Domain Activity > Log pages show logged activity forthe server or domain.
The server log shows file server startup, configuration, and shutdown information. Itdoes not show domain activity information. For activity logs, view the log of theappropriate domain instead. In addition to status information about libraries,licensing, and the current build that is logged when the file server first starts, theserver log also contains information about all domain listener status, Universal Plug-and-Play (UPnP) status information, and PASV port range status. The informationcontained in the server log is also saved to a text file located in the installationdirectory that is named Serv-U-StartupLog.txt. This file is replaced each timethe Serv-U File Server is started.
142
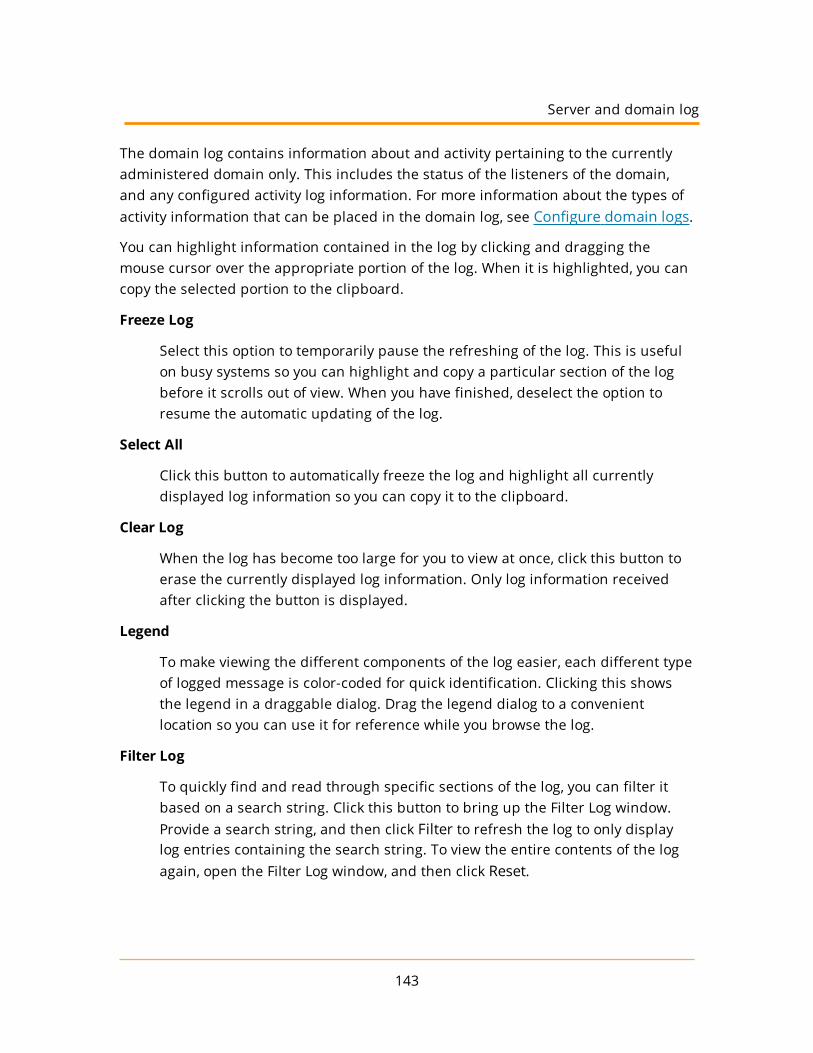
The domain log contains information about and activity pertaining to the currentlyadministered domain only. This includes the status of the listeners of the domain,and any configured activity log information. For more information about the types ofactivity information that can be placed in the domain log, see Configure domain logs.
You can highlight information contained in the log by clicking and dragging themouse cursor over the appropriate portion of the log. When it is highlighted, you cancopy the selected portion to the clipboard.
Freeze Log
Select this option to temporarily pause the refreshing of the log. This is usefulon busy systems so you can highlight and copy a particular section of the logbefore it scrolls out of view. When you have finished, deselect the option toresume the automatic updating of the log.
Select All
Click this button to automatically freeze the log and highlight all currentlydisplayed log information so you can copy it to the clipboard.
Clear Log
When the log has become too large for you to view at once, click this button toerase the currently displayed log information. Only log information receivedafter clicking the button is displayed.
Legend
To make viewing the different components of the log easier, each different typeof logged message is color-coded for quick identification. Clicking this showsthe legend in a draggable dialog. Drag the legend dialog to a convenientlocation so you can use it for reference while you browse the log.
Filter Log
To quickly find and read through specific sections of the log, you can filter itbased on a search string. Click this button to bring up the Filter Log window.Provide a search string, and then click Filter to refresh the log to only displaylog entries containing the search string. To view the entire contents of the logagain, open the Filter Log window, and then click Reset.
143
Server and domain log

Domain
Download Log
To download the full log file from Serv-U, click Download Log. If you havepermission to download the file, your web browser prompts you to choose alocation to save the file, or it begins to download the file automatically.
Configure domain logs
In the Serv-U File Server, you can customize the logging of domain events and activityto a great extent. Logging consists of two sections: File and Screen. To enable alogging option, select the appropriate option in the File or Screen column. When anoption is selected from the File column, the appropriate logging information is savedto the specified log file if Enable logging to file is selected. When an option isselected from the Screen column, the event is displayed in the log when viewed fromthe Serv-U Management Console. You can configure the log to show as much or aslittle information as you want. After configuring the logging options you want, clickSave to save the changes.
Log to file settings
Before information can be saved to a file, you must specify the name of the log file.Click Browse to select an existing file or directory location for the log file. The log filepath supports certain wildcard characters. Wildcard characters which refer to thedate apply to the day that the log file is created. When combined with theAutomatically rotate log file option, wildcards provide an automatic way to archivedomain activity for audits.
You can use the following wildcard characters.
WILDCARD DESCRIPTION
%H The hour of the day (24-hour clock).
%D The current day of the month.
%M The name of the current month.
%N The numeric value of the current month (1-12).
%Y The 4-digit value of the current year (for example, 2015).
%X The 2-digit value of the current year (for example, 15 for 2015).
144
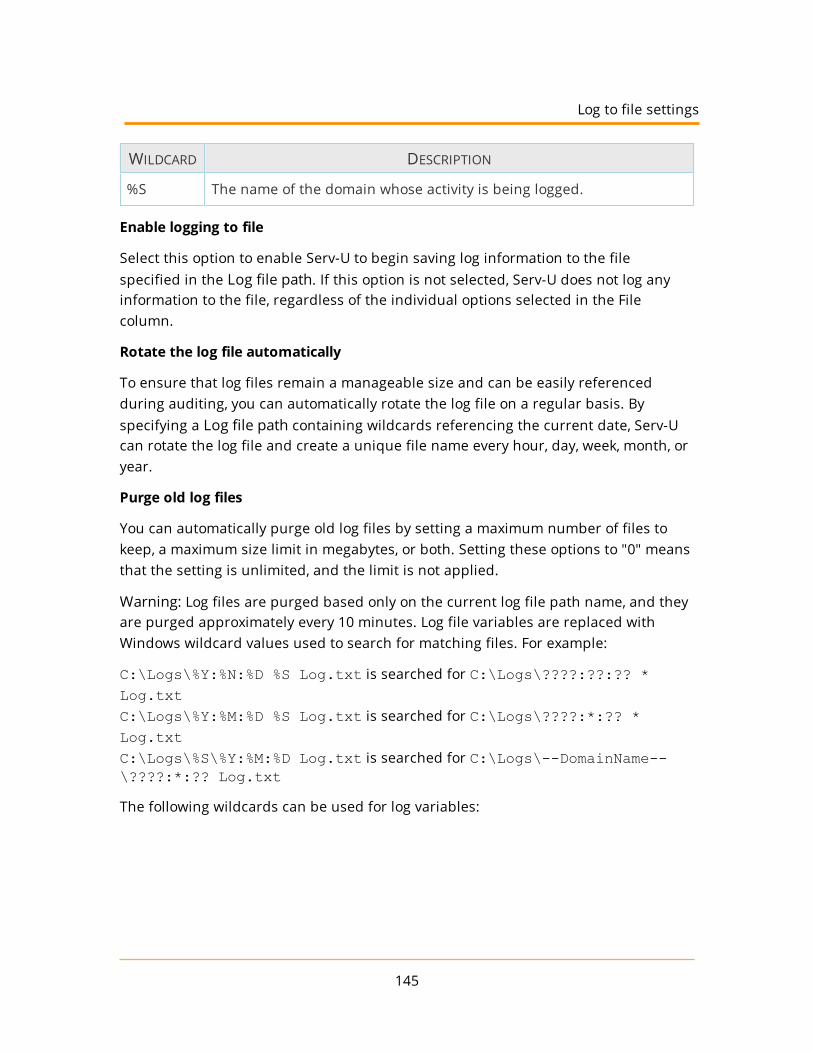
WILDCARD DESCRIPTION
%S The name of the domain whose activity is being logged.
Enable logging to file
Select this option to enable Serv-U to begin saving log information to the filespecified in the Log file path. If this option is not selected, Serv-U does not log anyinformation to the file, regardless of the individual options selected in the Filecolumn.
Rotate the log file automatically
To ensure that log files remain a manageable size and can be easily referencedduring auditing, you can automatically rotate the log file on a regular basis. Byspecifying a Log file path containing wildcards referencing the current date, Serv-Ucan rotate the log file and create a unique file name every hour, day, week, month, oryear.
Purge old log files
You can automatically purge old log files by setting a maximum number of files tokeep, a maximum size limit in megabytes, or both. Setting these options to "0" meansthat the setting is unlimited, and the limit is not applied.
Warning: Log files are purged based only on the current log file path name, and theyare purged approximately every 10 minutes. Log file variables are replaced withWindows wildcard values used to search for matching files. For example:
C:\Logs\%Y:%N:%D %S Log.txt is searched for C:\Logs\????:??:?? *Log.txtC:\Logs\%Y:%M:%D %S Log.txt is searched for C:\Logs\????:*:?? *Log.txtC:\Logs\%S\%Y:%M:%D Log.txt is searched for C:\Logs\--DomainName--\????:*:?? Log.txt
The following wildcards can be used for log variables:
145
Log to file settings

Domain
%D --> ??%N --> ??%M --> *%Y --> ????%X --> ??%S --> *
Anything matching the path name you used wildcards for can be purged. Usecaution: it is best practice to place log files into a single directory to avoid unexpectedfile deletion.
Specify IP addresses as exempt from logging
You can specify IP addresses that are exempt from logging. Activity from these IPaddresses is not logged to the location specified by the rule: the Screen, a File, orboth. This is useful to exempt IP addresses for administrators that may otherwisegenerate a significant amount of logging information that can obfuscate domainactivity from regular users. It can also be used to save log space and reduceoverhead. Click Do Not Log IPs, and then add IP addresses as appropriate.
146
UsersUser accounts
A user account is required in order to provide access to the file server. At its mostbasic level, a user account defines login credentials (that is, login ID and password), ahome directory, and a set of directory access rules that define the areas of thesystem that are accessible to the user, and the actions the user can perform in thoselocations. Each active session on the file server has a user account associated with itthat identifies the client to the administrator.
User accounts can be defined in various ways on the Serv-U File Server, including thefollowing:
Domain users
Defined at the domain level, domain users can only log in to the domain underwhich they are created.
Global users
Defined at the server level, global users can log in to any domain on the fileserver.
Database users
Available at both the server and domain level, database users are stored in anexternal database accessible through ODBC and supplement the local accountdatabase.
Windows users
Defined at the domain level, Windows users use the credentials and often, thehome directories, of Windows accounts from the local machine or Windowsdomain controller (including Active Directory). Windows users only work onWindows, and require a Serv-U MFT Server license.
147

Users
LDAP users
Defined at the domain level, LDAP users use the credentials and often, theemail and other attributes, of LDAP accounts from a remote LDAP server. UnlikeWindows users, LDAP users work on both Windows and Linux, and may accessLDAP servers, including Active Directory and OpenLDAP, in any accessibledomain. LDAP users require a Serv-U MFT Server license.
Because user accounts can be assigned at the various levels with the same login ID, ahierarchy is used by Serv-U to determine which account takes precedence. The useraccount types listed previously are listed in the order of precedence. Where useraccounts can be specified at both the domain and server levels, the domain levelaccount always takes precedence over the server one.
When you create users, consider what kind of access they need, and select theappropriate location for the user account accordingly. You can save time and effortby entering such settings at the server level to remove the need for multiple useraccounts at the domain level.
In Serv-U MFT Server, you can organize user accounts into collections to makeaccount management more logical and organized. This can be useful whenyou manage all users from a department or physical location. For example,you can place all users in the accounting department in a collection namedAccounting, or place all users at an office in Topeka in a collection namedTopeka Users.
To create a collection, click Add in the Select user collection area in the userswindow. In the new window, type the name of your collection, and then click Save.You can add users to this new collection by selecting them and clicking Add belowthe user list. To move a user from one collection to another, click Move below theuser list, and then select the destination collection for the highlighted user accounts.You can also rename or delete collections by using the appropriate button.
Warning: When deleting a collection, all user accounts contained in that collectionare deleted, too. If you want to keep the user accounts, make sure you move thembefore deleting the collection.
By default, all users are created in the General user collection.
148

New User Wizard
Click Wizard on the Users page to open the New User Wizard. The New User Wizardwalks you through the four steps required to create a user account with theminimum number of required attributes. After it is created, you can edit the useraccount to configure more advanced settings, such as group membership oradditional directory access rules. For more information about using the New UserWizard, see the Quick start guide.
User Template
While the New User Wizard provides a way to quickly create a user account with theminimum number of required attributes, most File Server administrators have acollection of settings that they want all user accounts to abide by. Groups are thebest way to accomplish this task, however, there are times when it may not be thecourse of action you want.
Serv-U allows an administrator to configure a template for new user accounts byclicking Template. You can configure the template user just like any other useraccount, with the exception of a login ID. After these settings are saved to thetemplate, all new user accounts that are manually created are done so with theirdefault settings set to those found within the template.
By using user templates, you can add users to a specific default group. If youset up the user template as a member of the group you want all users to be amember of. This way, when new users are created, they will automatically beadded to the particular group which is specified in the user template.
Copy user accounts
User templates offer a way for large numbers of users to be created with the samesettings. In cases where only the settings of a single user must be duplicated or thereis a need for multiple user templates, use Copy to create a copy of a user accountthat only lacks the user name and the password. To copy a user, select the useraccount, and then choose Copy.
Recovering passwords
Serv-U supports password recovery both through the Management Console andthrough the Web Client. For password recovery to be available, you must configure
149
User accounts

Users
the SMTP options for the server or domain, and the user account must have an emailaddress listed. To use password recovery from the Management Console, select auser account, and then click Recover Password. If the password is stored using one-way encryption, the password will be reset and the new password will be sent to theuser's email address. If the password is stored using two-way encryption or noencryption, the original password will be sent by email.
Password Recovery from the Web Client requires that the Allow users to recoverpassword limit be enabled for the user account. Once this option is enabled, userscan use the Recover Password option in the Web Client. Password Recovery from theWeb Client otherwise works the same as from the Management Console.
Importing and exporting user accounts
User accounts can be imported and exported using the Import and Export options.Click Export to export all users in either the current domain or server, or the currentCollection to a comma-separated values file (CSV file), which can be viewed in Exceland analyzed by database engines, among other things. Additionally, by creating aCSV file using the same format as the export it is possible to import lists of usersfrom CSV files into Serv-U.
Filtering user and group ID lists
In larger deployments of Serv-U, the user list can grow very large. In order to easilyfind a specific user account, you can filter user and group lists by login ID using inputfrom the administrator. The following wildcards are also supported:
l Use the "*" parameter to filter for Users or Group login IDs when the whole IDis unknown (for example, *Department, *Admin*, Tech*).
l Use the "?" parameter when a specific character is unknown (for example,????Lastname, Firstname???).
l Use the "[]" parameter when a specific character is unknown but shouldcontain one of the specified characters in the brackets (for example, [utr]sername, User[fmn]ame).
User information
A user account consists of several attributes and settings. The User Information pagecontains general information about the user account including login credentials, thehome directory, and the type of account. This topic provides detailed information
150

about each attribute.
Login ID
The login ID is provided by the client as one part of authenticating the session to thefile server. In addition to the login ID, clients must provide a password to completeauthentication. Login IDs must be unique for each account specified at the particularlevel. Login IDs cannot contain any of the following special characters:
\ / < > | : . ? *
Two special login IDs exist: Anonymous and FTP. These login IDs aresynonymous with one another, and they can be used for guests on your fileserver. These users do not require a password, which should be left blank inthis case. Instead, Serv-U requires users who log on with one of these accountsto provide their email address to complete the login process.
Full name
The full name of the account is available to specify additional identifying informationabout the account. It is not used by clients when they log in.
Password
The password is the second item that is required so that a session can beauthenticated with the file server. The password should be kept a secret and notshared with anyone other than the person that owns the account. A strong passwordcontains at least six characters including a mix of upper and lowercase letters and atleast one number. You can place restrictions on the length and complexity ofpasswords through limits. For more information about password limits, see Limitsand settings.
You can also generate a new random password for a user by clicking the Lock iconnext to the Password. This new password will follow the defined password lengthrequirements. By default, all passwords are eight characters long and are complex. Ifthe minimum password length is equal to or less than four characters, the passwordwill be four characters long. Otherwise, generated passwords will follow the specifieddomain value.
Administration privilege
A user account can be granted one of the following types of administrative privileges:
151
User information
Users
l No Privilege
l Group Administrator
l Domain Administrator
l System Administrator
The value of this attribute can be inherited through group membership. A useraccount with No Privilege is a regular user account that can only log in to transferfiles to and from the File Server. The Serv-U Management Console is not available tothese user accounts.
A Group Administrator can only perform administrative duties relating to theirprimary group (the group that is listed first in their Groups memberships list). Theycan add, edit, and delete users which are members of their primary group, and theycan also assign permissions at or below the level of the Group Administrator. Theymay not make any other changes.
A Domain Administrator can only perform administrative duties for the domain towhich their account belongs. A Domain Administrator is also restricted fromperforming domain-related activities that may affect other domains.
The domain-related activities that may not be performed by Domain Administratorsconsist of:
l configuring their domain listeners
l configuring or administering LDAP groups
l configuring ODBC database access for the domain
A System Administrator can perform any file server administration activity includingcreating and deleting domains, user accounts, or even updating the license of the fileserver. A user account with System Administrator privileges that is logged in throughHTTP remote administration can administer the server as if they had physical accessto the server.
You can also create read-only administrator accounts which can allow administratorsto log in and view configuration options at the domain or server level, greatly aidingremote problem diagnosis when working with outside parties. Read-onlyadministrator privileges are identical to their full-access equivalents, except that theycannot change any settings, and cannot create, delete or edit user accounts.
When you configure a user account with administrative privileges, take care in
152
specifying their home directory. An administrator with a home directory otherthan "\" (root) that is locked in their home directory may not use absolute filepaths outside of their home directory when configuring the file server. Instead,relative paths must be used.
Additionally, such a user account can also use setting files located outside the homedirectory, however, these files must also be specified by using relative paths, forexample, ../../exampleFile.txt.
Home directory
The home directory for a user account is where the user is placed immediately afterlogging in to the file server. Each user must have a home directory assigned to it,although it can be specified at the group level if the user is a member of a group.Home directories must be specified using a full path including the drive letter or theUNC share name. If the home directory is not found, you can configure Serv-U tocreate it.
When you specify the home directory, you can use the %USER% macro to insert thelogin ID in to the path. This is used mostly to configure a default home directory atthe group level or within the new user template to ensure that all new users have aunique home directory. When it is combined with a directory access rule for %HOME%,a new user can be configured with a unique home directory and the appropriateaccess rights to that location with a minimal amount of effort.
You can also use the %DOMAIN_HOME% macro to identify the user's homedirectory. For example, to place a user's home directory into a commonlocation, use %DOMAIN_HOME%\%USER%.
The home directory can be specified as "\" (root) in order to grant system-level accessto a user, allowing them the ability to access all system drives. In order for this towork properly, the user must not be locked in their home directory.
SSH public key path
The SSH public key can be used to authenticate a user when logging in to the theServ-U File Server. The public key path should point to the key file in a secureddirectory on the server. This path can include the following macros:
153
User information
Users
%HOME%
The home directory of the user account.
%USER%
The login ID, used if the public key will have the login ID as part of the filename.
%DOMAIN_HOME%
The home directory of the domain, set in Domain Details > Settings, used if thekeys are in a central folder relative to the domain home directory.
Examples:
%HOME%\SSHpublic.pub%HOME%\%USER%.pub%DOMAIN_HOME%\SSHKeys\%USER%.pub
For information about creating an SSH key pair, see SFTP for users and groups.
Account type
By default, all accounts are permanent and exist on the file server until they aremanually deleted or disabled. You can configure an account to be automaticallydisabled or even deleted on a specified date by configuring the account type. Afterselecting the appropriate type, the Account Expiration Date control is displayed. Clickthe calendar or expiration date to select when the account should be disabled ordeleted.
The account is accessible until the beginning of the day on which it is set to bedisabled. For example, if an account is set to be disabled on 15 July 2015, theuser can log in until 14 July 2015, 23:59.
Default Web Client
If your Serv-U license enables the use of FTP Voyager JV, then users connecting to thefile server through HTTP can choose which client they want to use after logging in.Instead of asking users which client they want to use, you can also specify a defaultclient. If you change this option, it overrides the option specified at the server ordomain level. It can also be inherited by a user through group membership. Use the
154
Inherit default value option to reset it to the appropriate default value.
Email address
Serv-U events can use the Email Address field when sending email notifications togroups, and password recovery using the Web Client requires an email address tosend a recovered password to a user. Type an email address here to allow emailnotifications or password recovery for the user account.
Lock user in home directory
Users locked in their home directory may not access paths above their homedirectory. In addition, the actual physical location of their home directory is maskedbecause Serv-U always reports it as "/" (root). The value of this attribute can beinherited through group membership.
Enable account
Deselect this option to disable the current account. Disabled accounts remain on thefile server but cannot be used to log in. To re-enable the account, select the Enableaccount option again.
Always allow login
Enabling this option means that the user account is always permitted to log in,regardless of restrictions placed upon the file server, such as maximum number ofsessions. It is useful as a fail-safe in order to ensure that critical systemadministrator accounts can always remotely access the file server. As with any optionthat allows bypassing access rules, care should be taken in granting this ability. Thevalue of this attribute can be inherited through group membership.
Enabling the Always Allow Login option does not override IP access rules. Ifboth options are defined, the IP access rules prevail.
Description
The description allows for the entry of additional notes that are only visible toadministrators.
Availability
This feature limits when users can connect to this server. You can place limitations
155
User information

Users
on the time of day, and also on the day of the week. When users attempt to log inoutside the specified available times, they are presented with a message that theiruser account is currently unavailable.
Welcome message
The welcome message is a message that is traditionally sent to the FTP client duringa successful user login. Serv-U extends this ability to HTTP so that users accessingthe file server through the Web Client or FTP Voyager JV also receive the welcomemessage. This feature is not available to users logging in through SFTP over SSH2,because SSH2 does not define a method for sending general text information tousers.
The welcome message can contain general information about the status of theserver, a special message for the user, disclaimers, or other legal notices. You canconfigure a welcome message in one of two ways. The first method involvesspecifying the path to a file containing the welcome message in the Message FilePath field. Use Browse to select an existing file on the system.
As an alternative, the text of the welcome message can be explicitly provided to Serv-U in the appropriate text field. In order to override an explicit welcome message atthe user level, select the Override inherited group welcome message option first.The provided text is then sent to the user instead of the contents of the file specifiedin the Message File Path field.
These values can be inherited by the user through group membership.
You can also use system variables in the welcome message. For a comprehensive listof system variables, see System variables.
Directory access rules
Directory access rules define the areas of the system which are accessible to useraccounts. While traditionally restricted to the user and group levels, in Serv-U, theusage of directory access rules is extended to both the domain and the server levelsthrough the creation of global directory access rules. Directory access rules specifiedat the server level are inherited by all users of the file server. If they are specified atthe domain level, they are only inherited by users who belong to the particulardomain. The traditional rules of inheritance apply where rules specified at a lowerlevel (for example, the user level) override conflicting or duplicate rules specified at a
156
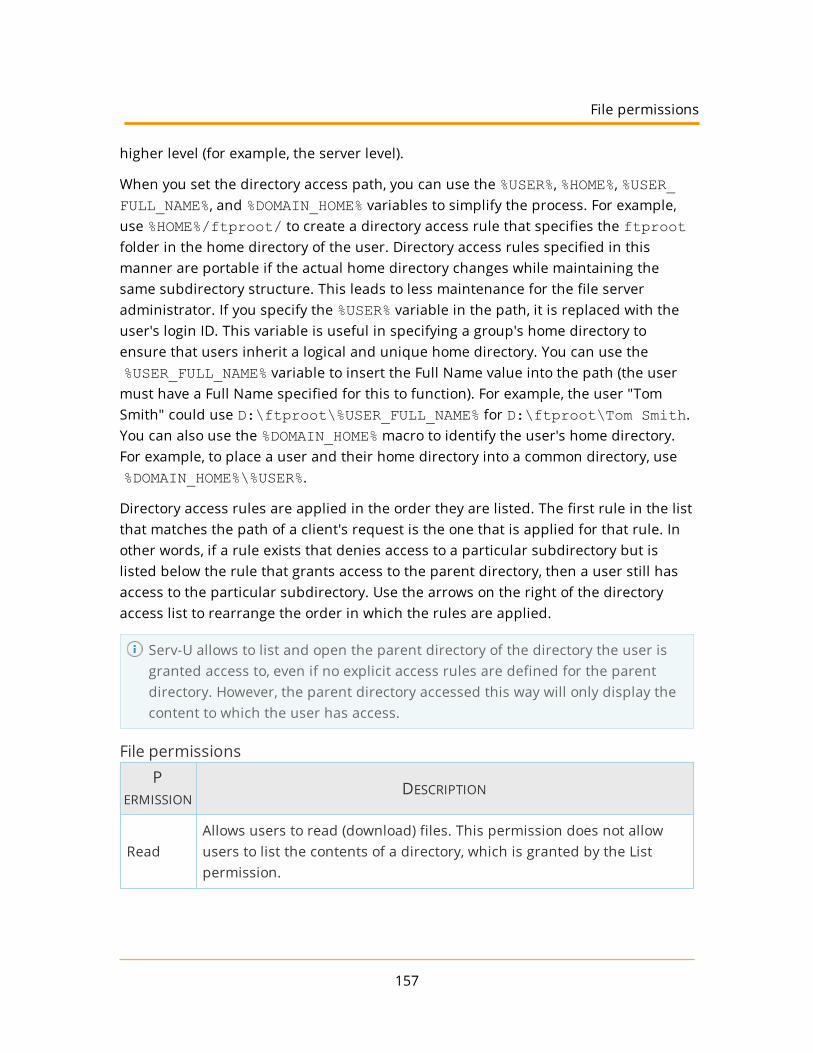
higher level (for example, the server level).
When you set the directory access path, you can use the %USER%, %HOME%, %USER_FULL_NAME%, and %DOMAIN_HOME% variables to simplify the process. For example,use %HOME%/ftproot/ to create a directory access rule that specifies the ftprootfolder in the home directory of the user. Directory access rules specified in thismanner are portable if the actual home directory changes while maintaining thesame subdirectory structure. This leads to less maintenance for the file serveradministrator. If you specify the %USER% variable in the path, it is replaced with theuser's login ID. This variable is useful in specifying a group's home directory toensure that users inherit a logical and unique home directory. You can use the%USER_FULL_NAME% variable to insert the Full Name value into the path (the user
must have a Full Name specified for this to function). For example, the user "TomSmith" could use D:\ftproot\%USER_FULL_NAME% for D:\ftproot\Tom Smith.You can also use the %DOMAIN_HOME% macro to identify the user's home directory.For example, to place a user and their home directory into a common directory, use%DOMAIN_HOME%\%USER%.
Directory access rules are applied in the order they are listed. The first rule in the listthat matches the path of a client's request is the one that is applied for that rule. Inother words, if a rule exists that denies access to a particular subdirectory but islisted below the rule that grants access to the parent directory, then a user still hasaccess to the particular subdirectory. Use the arrows on the right of the directoryaccess list to rearrange the order in which the rules are applied.
Serv-U allows to list and open the parent directory of the directory the user isgranted access to, even if no explicit access rules are defined for the parentdirectory. However, the parent directory accessed this way will only display thecontent to which the user has access.
File permissionsP
ERMISSIONDESCRIPTION
ReadAllows users to read (download) files. This permission does not allowusers to list the contents of a directory, which is granted by the Listpermission.
157
File permissions
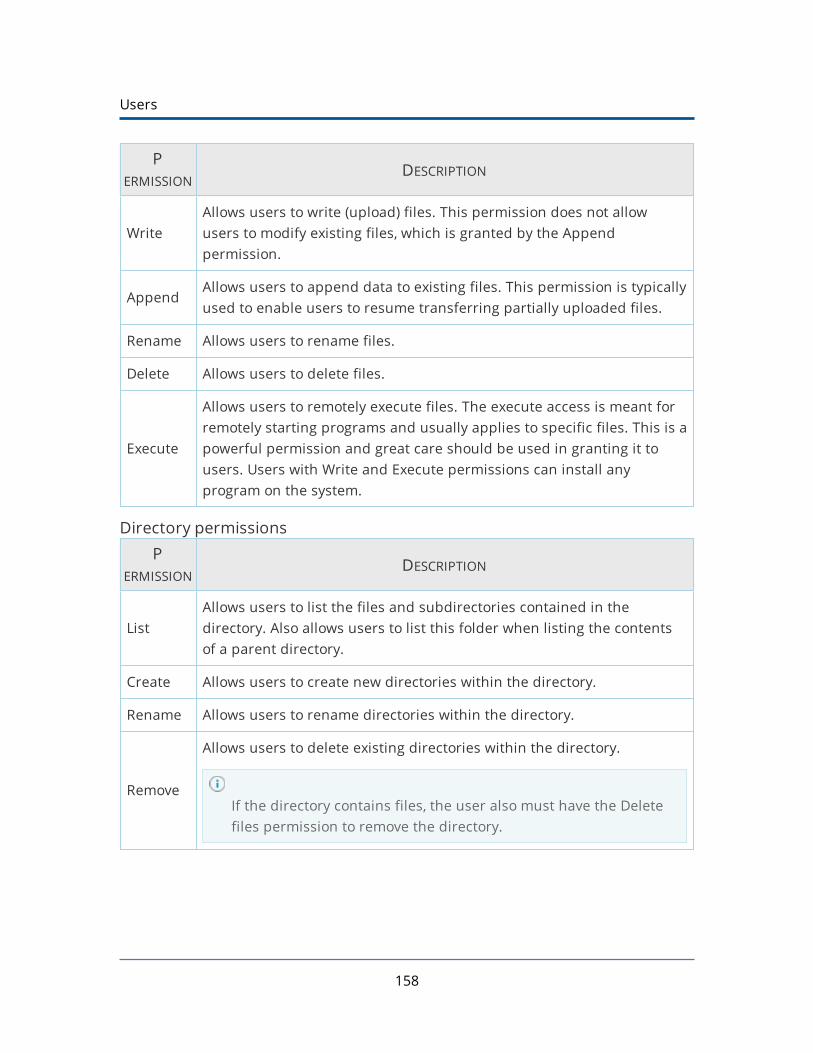
Users
PERMISSION
DESCRIPTION
WriteAllows users to write (upload) files. This permission does not allowusers to modify existing files, which is granted by the Appendpermission.
AppendAllows users to append data to existing files. This permission is typicallyused to enable users to resume transferring partially uploaded files.
Rename Allows users to rename files.
Delete Allows users to delete files.
Execute
Allows users to remotely execute files. The execute access is meant forremotely starting programs and usually applies to specific files. This is apowerful permission and great care should be used in granting it tousers. Users with Write and Execute permissions can install anyprogram on the system.
Directory permissionsP
ERMISSIONDESCRIPTION
ListAllows users to list the files and subdirectories contained in thedirectory. Also allows users to list this folder when listing the contentsof a parent directory.
Create Allows users to create new directories within the directory.
Rename Allows users to rename directories within the directory.
Remove
Allows users to delete existing directories within the directory.
If the directory contains files, the user also must have the Deletefiles permission to remove the directory.
158

Subdirectory permissionsP
ERMISSIONDESCRIPTION
Inherit
Allows all subdirectories to inherit the same permissions as the parentdirectory. The Inherit permission is appropriate for most circumstances,but if access must be restricted to subfolders (for example, whenimplementing mandatory access control), clear the Inherit check boxand grant permissions specifically by folder.
Advanced: Access as Windows user (Windows only)
Files and folders may be kept on external servers in order to centralize file storage orprovide additional layers of security. In this environment, files can be accessed by theUNC path (\\servername\folder\) instead of the traditionalC:\ftproot\folder path. However, accessing folders stored across the networkposes an additional challenge, because Windows services are run under the LocalSystem account by default, which has no access to network resources.
To mitigate this problem for all of Serv-U, you can configure the Serv-U File Serverservice to run under a network account. The alternative, preferred when manyservers exist, or if the Serv-U File Server service has to run under Local System forsecurity reasons, is to configure a directory access rule to use a specific Windowsuser for file access. Click Advanced to specify a specific Windows user for eachdirectory access rule. As in Windows authentication, directory access is subject toNTFS permissions, and in this case also to the configured permissions in Serv-U.
When you use Windows authentication, the NTFS permissions of the Windowsuser take priority over the directory access rules. This means that when aWindows user tries to access a folder, the security permissions of the user areapplied instead of the credentials specified in the directory access rule.
Quota permissions
Maximum size of directory contents
Setting the maximum size actively restricts the size of the directory contents tothe specified value. Any attempted file transfers that cause the directorycontents to exceed this value are rejected. This feature serves as an alternative
159
Subdirectory permissions

Users
to the traditional quota feature that relies upon tracking all file transfers(uploads and deletions) to calculate directory sizes and is not able to considerchanges made to the directory contents outside of a user's file server activity.
Mandatory access control
You can use mandatory access control (MAC) in cases where users need to begranted access to the same home directory but should not necessarily be able toaccess the subdirectories below it. To implement mandatory access control at adirectory level, disable the Inherit permission as shown below.
In the following example, the rule applies to C:\ftproot\.
Now, the user has access to the ftproot folder but to no folders below it.Permissions must individually be granted to subfolders that the user needs access to,providing the security of mandatory access control in Serv-U File Server.
160

Restrict file types
If users are using storage space on the Serv-U File Server to store non-work-relatedfiles, such as .mp3 files, you can prevent this by configuring a directory access ruleplaced above the main directory access rule to prevent .mp3 files from beingtransferred as shown below.
In the text entry for the rule, type *.mp3, and use the permissions shown beolw:
The rule denies permission to any transfer of files with the .mp3 extension and canbe modified to reflect any file extension. Similarly, if accounting employees only needto transfer files with the .mdb extension, configure a pair of rules that grantspermissions for .mdb files but denies access to all other files, as shown below.
In the first rule, enter the path that should be the user's home directory or thedirectory to which they need access.
161
Restrict file types

Users
In the second rule, enter the extension of the file that should be accessed, such as*.mdb.
162
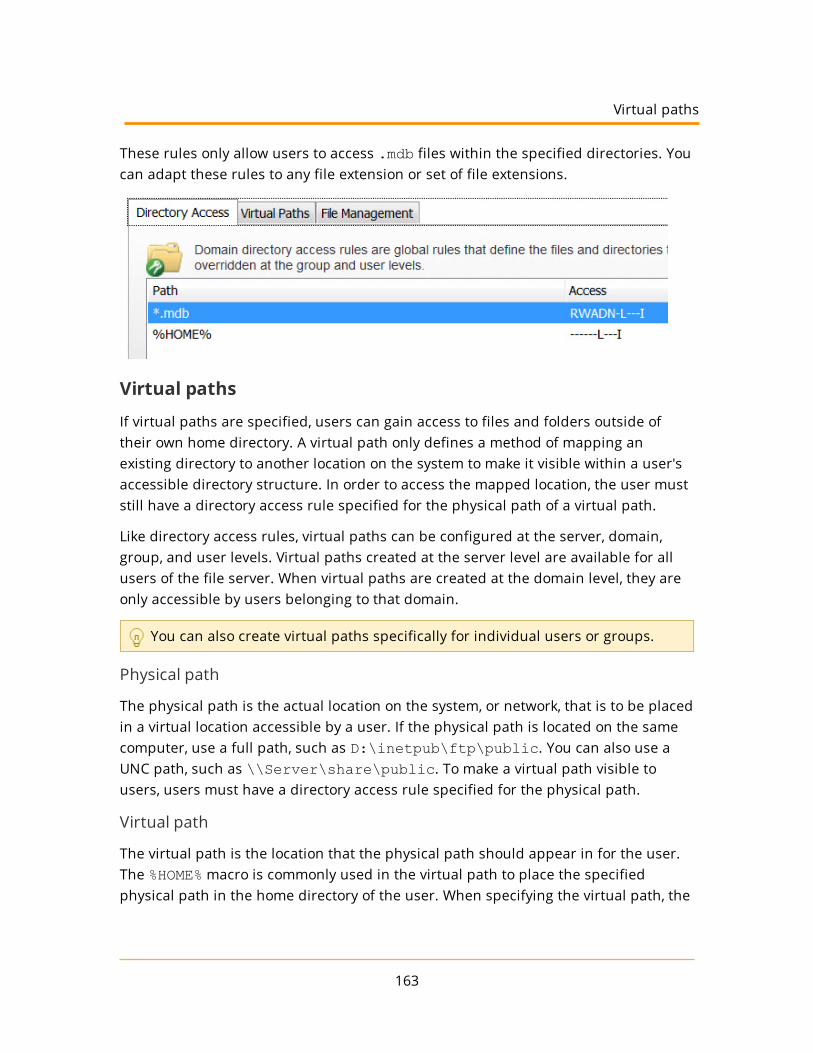
These rules only allow users to access .mdb files within the specified directories. Youcan adapt these rules to any file extension or set of file extensions.
Virtual paths
If virtual paths are specified, users can gain access to files and folders outside oftheir own home directory. A virtual path only defines a method of mapping anexisting directory to another location on the system to make it visible within a user'saccessible directory structure. In order to access the mapped location, the user muststill have a directory access rule specified for the physical path of a virtual path.
Like directory access rules, virtual paths can be configured at the server, domain,group, and user levels. Virtual paths created at the server level are available for allusers of the file server. When virtual paths are created at the domain level, they areonly accessible by users belonging to that domain.
You can also create virtual paths specifically for individual users or groups.
Physical path
The physical path is the actual location on the system, or network, that is to be placedin a virtual location accessible by a user. If the physical path is located on the samecomputer, use a full path, such as D:\inetpub\ftp\public. You can also use aUNC path, such as \\Server\share\public. To make a virtual path visible tousers, users must have a directory access rule specified for the physical path.
Virtual path
The virtual path is the location that the physical path should appear in for the user.The %HOME% macro is commonly used in the virtual path to place the specifiedphysical path in the home directory of the user. When specifying the virtual path, the
163
Virtual paths

Users
last specified directory is used as the name displayed in directory listings to the user.For example, a virtual path of %HOME%/public places the specified physical path ina folder named public within the user's home directory. You can also use a full pathwithout any macros.
Include virtual paths in Maximum Directory Size calculations
When this option is selected, the virtual path is included in Maximum Directory Sizecalculations. The Maximum Directory Size limits the size of directories affecting howmuch data can be uploaded.
Virtual paths example
A group of web developers have been granted access to the directoryD:\ftproot\example.com\ for web development purposes. The developers alsoneed access to an image repository located at D:\corpimages\. To avoid grantingthe group access to the root D drive, a virtual path must be configured so that theimage repository appears to be contained within their home directory. Within thegroup of web developers, add a virtual path to bring the directory to the users byspecifying D:\corpimages\ as the physical path andD:\ftproot\example.com\corpimages as the virtual path. Be sure to add agroup level directory access rule for D:\corpimages\ as well. The developers nowhave access to the image repository without compromising security or relocatingshared resources.
Relative virtual paths example
Continuing with the previous example, if the home directory of the group of webdevelopers is relocated to another drive, both the home directory and the virtual pathmust be updated to reflect this change. You can avoid this by using the %HOME%macro to create a relative virtual path location that eliminates the need to update thepath if the home directory changes. Instead of usingD:\ftproot\example.com\corpimages as the virtual path, use%HOME%\corpimages. This way the corpimages virtual path is placed within the
home directory of the group, regardless of what the home directory is. If the homedirectory changes at a later date, the virtual path still appears there.
User and group logs
In the Serv-U File Server, you can customize the logging of user and group events and
164
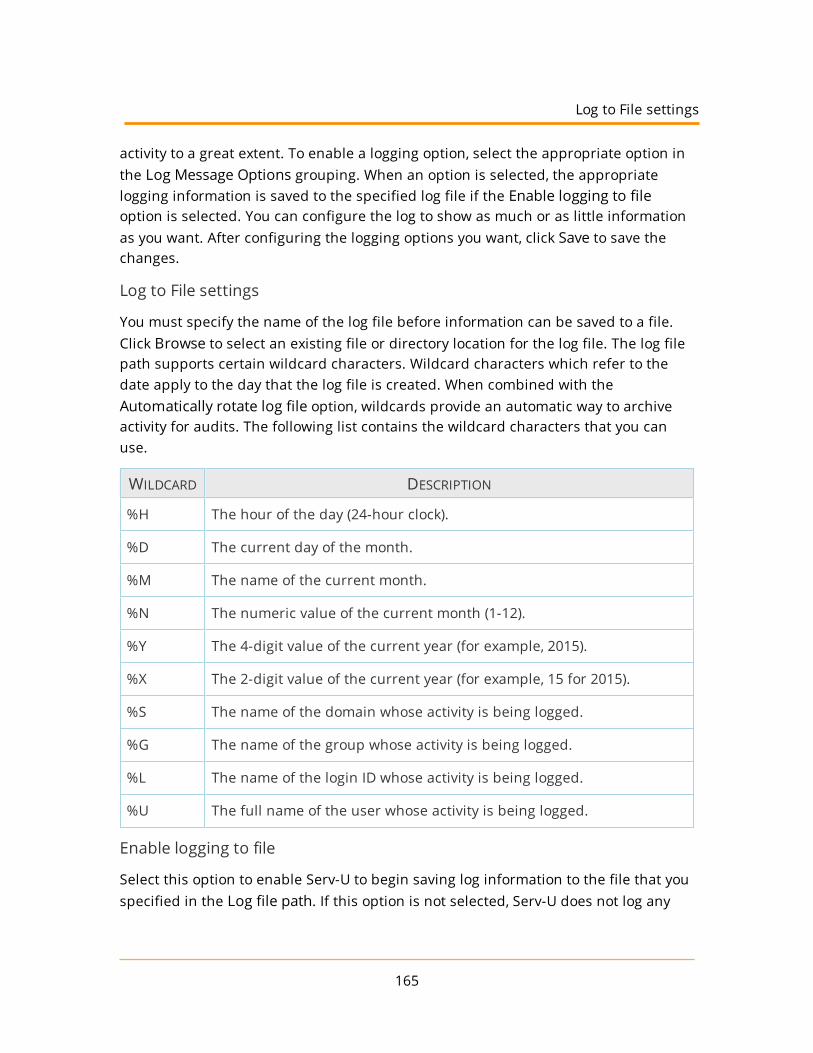
activity to a great extent. To enable a logging option, select the appropriate option inthe Log Message Options grouping. When an option is selected, the appropriatelogging information is saved to the specified log file if the Enable logging to fileoption is selected. You can configure the log to show as much or as little informationas you want. After configuring the logging options you want, click Save to save thechanges.
Log to File settings
You must specify the name of the log file before information can be saved to a file.Click Browse to select an existing file or directory location for the log file. The log filepath supports certain wildcard characters. Wildcard characters which refer to thedate apply to the day that the log file is created. When combined with theAutomatically rotate log file option, wildcards provide an automatic way to archiveactivity for audits. The following list contains the wildcard characters that you canuse.
WILDCARD DESCRIPTION
%H The hour of the day (24-hour clock).
%D The current day of the month.
%M The name of the current month.
%N The numeric value of the current month (1-12).
%Y The 4-digit value of the current year (for example, 2015).
%X The 2-digit value of the current year (for example, 15 for 2015).
%S The name of the domain whose activity is being logged.
%G The name of the group whose activity is being logged.
%L The name of the login ID whose activity is being logged.
%U The full name of the user whose activity is being logged.
Enable logging to file
Select this option to enable Serv-U to begin saving log information to the file that youspecified in the Log file path. If this option is not selected, Serv-U does not log any
165
Log to File settings
Users
information to the file, regardless of the individual options selected in the LogMessage Options area.
Rotate the log file automatically
To ensure that log files remain a manageable size and can be easily referencedduring auditing, you can automatically rotate the log file on a regular basis. Byspecifying a Log file path containing wildcards that reference the current date, Serv-U can rotate the log file and create a unique file name every hour, day, week, month,or year.
Purge old log files
You can automatically purge old log files by setting a maximum number of files tokeep, a maximum size limit in megabytes, or both. Setting these options to "0" meansthat the setting is unlimited and the limit is not applied.
Warning: Log files are purged based only on the current log file path name, and theyare purged approximately every 10 minutes. Log file variables are replaced withWindows wildcard values used to search for matching files. For example:
C:\Logs\%Y:%N:%D %S Log.txt is searched for C:\Logs\????:??:?? *Log.txtC:\Logs\%Y:%M:%D %S Log.txt is searched for C:\Logs\????:*:?? *Log.txtC:\Logs\%S\%Y:%M:%D Log.txt is searched for C:\Logs\--DomainName--\????:*:?? Log.txtC:\Logs\%G\%Y:%M:%D Log.txt is searched for C:\Logs\--GroupName--\????:*:?? Log.txtC:\Logs\%L\%Y:%M:%D Log.txt is searched for C:\Logs\--LoginID--\????:*:?? Log.txtC:\Logs\%U\%Y:%M:%D Log.txt is searched for C:\Logs\--UserFullName--\????:*:?? Log.txt
The following wildcards can be used for log variables:
166
%H --> ??%D --> ??%N --> ??%M --> *%Y --> ????%X --> ??%S --> *%G --> *%L --> *%U --> *
Anything matching the path name you used wildcards for can be purged. Usecaution: it is best practice to place log files into a single directory to avoid unexpectedfile deletion.
Specify IP addresses as exempt from logging
You can specify IP addresses that are exempt from logging. Activity from these IPaddresses is not logged. This is useful to exempt IP addresses for administrators thatmay otherwise generate a lot of logging information that can obfuscate domainactivity from regular users. It can also be used to save log space and reduceoverhead. Click Do Not Log IPs, and then add IP addresses as appropriate.
Group memberships
A user can be a member of any number of groups. Groups provide a convenient wayof applying a base set of user attributes and settings to multiple users. For moreinformation about configuring groups, see User groups.
Because a user can be a member of multiple groups, the order in which groupmemberships are presented is important. The first group membership for a userencountered by Serv-U that provides a value for an attribute is the value that is used.Use the arrows on the right side of the group membership list to arrange the order ofgroup memberships.
Use the left arrow buttons to add additional group memberships to the user, or usethe right arrow buttons to remove the user from the selected groups.
Domain events
You can automatically create a list of the most common events. You can choose to
167
Specify IP addresses as exempt from logging

Users
create these common events using email or balloon tip actions. Click Create CommonEvent on the Events page. Select the Send Email or Show balloon tip option for theaction you want to perform on the common events. If you choose to send email, enteran email address.
The Write to Windows Event Log and Write to Microsoft Message Queue(MSMQ) options are available for Windows only.
Event actions
You can select from the following actions that are executed when an event istriggered:
l Send Email
l Show Balloon Tip*
l Execute Command*
l Write to Windows Event Log (Windows only)*
l Write to Microsoft Message Queue (MSMQ) (Windows only)*
Events involving anything other than email can only be configured byServ-U server administrators.
Email actions
You can configure email actions to send emails to multiple recipients and to Serv-Ugroups when an event is triggered.
To add an email address, enter it in the To or Bcc fields. To send emails to a Serv-Ugroup, use the Group icon to add or remove Serv-U groups from the distribution list.Separate email addresses by commas or semicolons. Email actions contain a To,Subject and Message parameter. You can use special variables to send specific datapertaining to the event. For more information about the variables, see Systemvariables.
To use email actions, you must first SMTP configuration.
Balloon tip actions
You can configure a balloon tip to show in the system tray when an event istriggered. Balloon tip actions contain a Balloon Title and a Balloon Message
168
parameter. You can use special variables to send specific data pertaining to theevent. For more information about the variables, see System variables.
Execute command actions
You can configure execute command actions to execute a command on a file when anevent is triggered. Execute command actions contain an Executable Path, CommandLine Parameters, and a Completion Wait Time parameter. For the Completion WaitTime parameter, you can enter the number of seconds to wait after starting theexecutable path. Enter zero for no waiting.
Time spent waiting delays any processing that Serv-U can perform.
A wait value should only be used to give an external program enough time to performan operation, such as move a log file before it is deleted (for example,$LogFilePath for the Log File Deleted event). You can use special variables to sendspecific data pertaining to the event. For more information about the variables, seeSystem variables.
Windows Event Log
By writing event messages to a local Windows Event Log, you can monitor and recordServ-U activity by using third-party network management software. All messagesappear in the Windows Application Log from a source of Serv-U.
This event has only one field:
l Log Information: The contents of the message to be written into the event log.This is normally either a human-readable message (for example, filenameuploaded by person) or a machine-readable string (for example,filename|uploaded|person), depending on who or what is expected toread these messages. Serv-U system variables are supported in this field. Thisfield can be left blank, but usually is not.
Microsoft Message Queuing (MSMQ)
Microsoft Message Queuing (MSMQ) is an enterprise technology that provides amethod for independent applications to communicate quickly and reliably. Serv-Ucan send messages to new or existing MSMQ queues whenever an event is triggered.Corporations can use this feature to tell enterprise applications that files have
169
Execute command actions

Users
arrived, files have been picked up, partners have signed on, or many other activitieshave occurred.
These events have the following two fields:
l Message Queue Path: The MSMQ path that addresses the queue. Remotequeues can be addressed when a full path (for example,MessageServer\Serv-U Message Queue) is specified. Public queues onthe local machine can be addressed when a full path is not specified (forexample, .\Serv-U Message Queue or Serv-U Message Queue). If thespecified queue does not exist, Serv-U attempts to create it. This normally onlyworks on public queues on the local machine. You can also use Serv-U systemvariables in this field.
l Message Body: The contents of the message to be sent into the queue. This isnormally a text string with a specific format specified by an enterpriseapplication owner or enterprise architect. Serv-U system variables can also beused in this field. This field may be left blank, but usually is not.
Microsoft message queues created in Windows do not grant access to SYSTEMby default, preventing Serv-U from writing events to the queue. To correct this,after creating the queue in MSMQ, right-click it, select Properties, and then setthe permissions so that SYSTEM (or the network account under which Serv-Uruns) has permission to the queue.
Event filters
Use event filters to control when a Serv-U event is triggered. By default, events triggereach time the event occurs. The event filter allows events to be triggered only ifcertain conditions are met. For example, a standard event may trigger an email eachtime a file is uploaded to the server. However, by using an event filter, events can betriggered on a more targeted basis. For example, you can configure a File Uploadedevent to only send an email when the file name contains the string important, soan email would be sent when the file Important Tax Forms.pdf is uploaded butnot when other files are uploaded to the server. Additionally, you can configure a FileUpload Failed event to run only when the FTP protocol is used, not triggering forfailed HTTP or SFTP uploads. You can do this by controlling the variables and valuesrelated to the event and by evaluating their results when the event is triggered.
170
Event filter fields
Each event filter has the following critical values that must be set:
l Name: This is the name of the filter, used to identify the filter for the event.
l Description (Optional): This is the description of the event, which may beincluded for reference.
l Logic: This determines how the filter interacts with other filters for an event. Inmost cases, AND is used, and all filters must be satisfied for the event totrigger. The function of AND is to require that all conditions be met. However,the OR operator can be used if there are multiple possible satisfactoryresponses (for example, abnormal bandwidth usage of less than 20 KB/s ORgreater than 2000 KB/s).
l Filter Comparison: This is the most critical portion of the filter. The FilterComparison contains the evaluation that must occur for the event to trigger.For example, a filter can be configured so that only the user admin triggers theevent. In this case, the comparison is If $Name = (is equal to) admin,and the data type is string. For bandwidth, either an unsigned integer ordouble precision floating point value is used.
Event filters also support wildcards when evaluating text strings. The supported wild-cards include:
l * - The asterisk wildcard matches any text string of any length. For example:
l An event filter that compares the $FileName variable to the stringdata* matches files named data, data7, data77, data.txt,data7.txt, and data77.txt.
l ? - The question mark wildcard matches any one character, but only onecharacter. For example:
l An event filter that compares the $FileName variable to the stringdata? matches a file named data7 but not data, data77, data.txt,data7.txt, or data77.txt.
l An event filter that compares the $FileName variable to the stringdata?.* matches files named data7 and data7.txt but not data,data77, data.txt, or data77.txt.
l An event filter that compares the $Name variable to the string A????matches any five-character user name that starts with A.
171
Event filter fields

Users
l [] - The bracket wildcard matches a character against the set of charactersinside the brackets. For example:
l An event filter that compares the $FileName variable to the string data[687].txt matches files named data6.txt, data7.txt anddata8.txt but not data5.txt.
l An event filter that compares the $LocalPathName variable to the string[CD]:\* matches any file or folder on the C: or D: drives.
You can use multiple wildcards in each filter. For example:
l An event filter that compares the $FileName variable to the string[cC]:\*.??? matches any file on the C: drive that ends in a three letter fileextension.
l An event filter that compares the $FileName variable to the string ?:\*Red[678]\?????.* matches a file on any Windows drive, contained in any folderwhose name contains Red6, Red7 or Red8, and that also has a five characterfile name followed by a file extension of any length.
Event filters
Event filters are used by comparing fields to expected values in the Event Filtermenu. The best example is raising an event only when a certain user triggers theaction, or when a certain file is uploaded. For example, an administrator may want toraise an email event when the file HourlyUpdate.csv is uploaded to the server,but not when other files are uploaded. To do this, create a new event in the DomainDetails > Events menu. The Event Type is File Uploaded, and on the Event Filter tab anew filter must be added. The $FileName variable is used and the value isHourlyUpdate.csv as shown below:
172
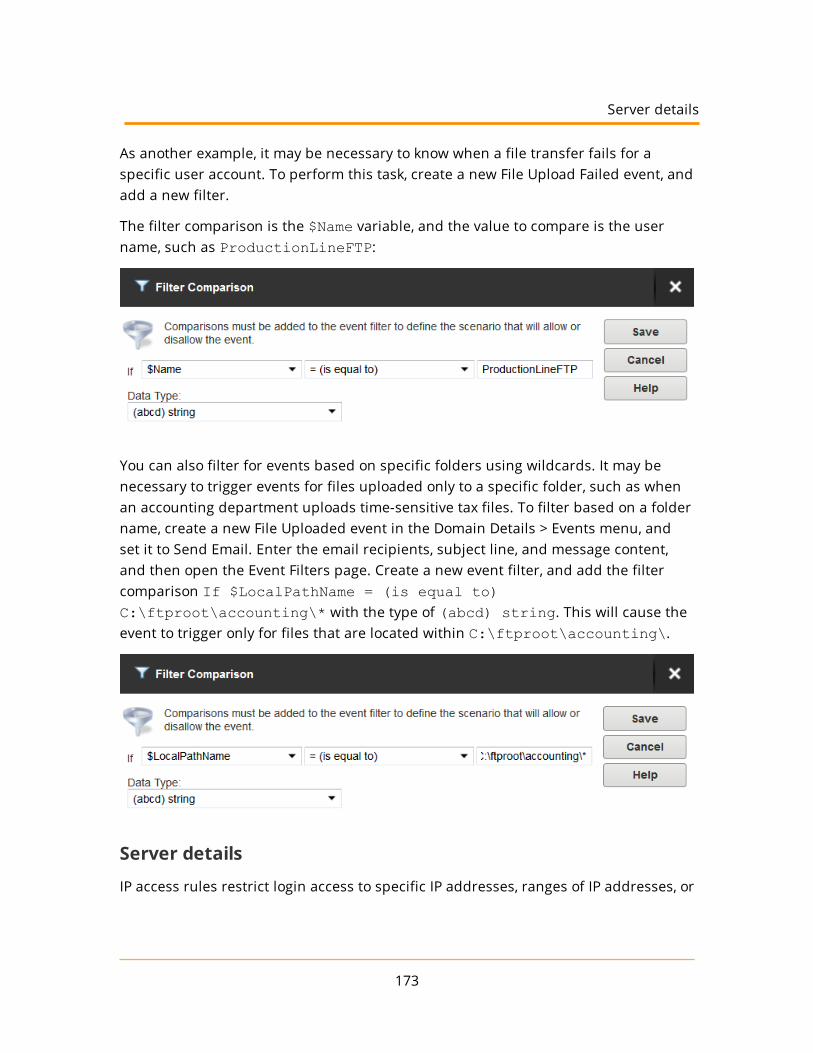
As another example, it may be necessary to know when a file transfer fails for aspecific user account. To perform this task, create a new File Upload Failed event, andadd a new filter.
The filter comparison is the $Name variable, and the value to compare is the username, such as ProductionLineFTP:
You can also filter for events based on specific folders using wildcards. It may benecessary to trigger events for files uploaded only to a specific folder, such as whenan accounting department uploads time-sensitive tax files. To filter based on a foldername, create a new File Uploaded event in the Domain Details > Events menu, andset it to Send Email. Enter the email recipients, subject line, and message content,and then open the Event Filters page. Create a new event filter, and add the filtercomparison If $LocalPathName = (is equal to)C:\ftproot\accounting\* with the type of (abcd) string. This will cause theevent to trigger only for files that are located within C:\ftproot\accounting\.
Server details
IP access rules restrict login access to specific IP addresses, ranges of IP addresses, or
173
Server details

Users
a domain name. IP access rules can be configured at the server, domain, group, anduser levels.
IP access rules are applied in the order they are displayed. In this way, specific rulescan be placed at the top to allow or deny access before a more general rule isapplied later on in the list. The arrows on the right side of the list can be used tochange the position of an individual rule in the list.
Specifying IP access masks
IP access rules use masks to authorize IP addresses and domain names. The maskscan contain specific values, ranges, and wildcards made up of the followingelements.
VALUE OR
WILDCARDEXPLANATION
xxxStands for an exact match, such as 192.0.2.0 (IPv4),fe80:0:0:0:a450:9a2e:ff9d:a915 (IPv6, long form) orfe80::a450:9a2e:ff9d:a915 (IPv6, shorthand).
xxx-xxxStands for a range of IP addresses, such as 192.0.2.0-19 (IPv4),fe80:0:0:0:a450:9a2e:ff9d:a915-a9aa (IPv6, long form), orfe80::a450:9a2e:ff9d:a915-a9aa (IPv6, shorthand).
*Stands for any valid IP address value, such as 192.0.2.*, which isanalogous to 192.0.2.0-255, or fe80::a450:9a2e:ff9d:*, whichis analogous to fe80::a450:9a2e:ff9d:0-ffff.
?Stands for any valid character when specifying a reverse DNS name,such as server?.example.com.
/
Specifies the use of CIDR notation to specify which IP addresses shouldbe allowed or blocked. Common CIDR blocks are /8 (for 1.*.*.*),/16 (for 1.2.*.*) and /24 (for 1.2.3.*). CIDR notation alsoworks with IPv6 addresses, such as 2001:db8::/32.
Caveats
Specific IP addresses listed in Allow rules will not be blocked by anti-hammering.These IP addresses are white-listed. However, addresses matched by a wildcard or a
174
range are subject to anti-hammering prevention.
Implicit deny all
Until you add the first IP access rule, connections from any IP address areaccepted. After you add the first IP access rule, all connections that are notexplicitly allowed are denied. This is also known as an implicit Deny All rule.Make sure you add a Wildcard Allow rule (such as Allow *.*.*.*) at the endof your IP access rule list.
Matching all addresses
Use the *.*.*.* mask to match any IPv4 address. Use the *:* mask to matchany IPv6 address. If you use both IPv4 and IPv6 listeners, add Allow ranges forboth IPv4 and IPv6 addresses.
DNS lookup
If you use a dynamic DNS service, you can specify a domain name instead of anIP address to allow access to users who do not have a static IP address. You canalso specify reverse DNS names. If you create a rule based on a domain nameor reverse DNS, Serv-U performs either a reverse DNS lookup or DNS resolutionto apply these rules. This can cause a slight delay during login, depending onthe speed of the DNS server of the system.
Rule use during connection
The level at which you specify an IP access rule also defines how far aconnection is allowed before it is rejected. Server and domain level IP accessrules are applied before the welcome message is sent. Domain level IP accessrules are also applied when responding to the HOST command to connect to avirtual domain. Group and user level IP access rules are applied in response toa USER command when the client identifies itself to the server.
Anti-hammering
You can set up an anti-hammering policy that blocks clients who connect andfail to authenticate more than a specified number of times within a specifiedperiod of time. You can configure an anti-hammering policy server-wide inServer Limits and Settings > Settings and domain-wide in Domain Limits andSettings > Settings.
175
Caveats
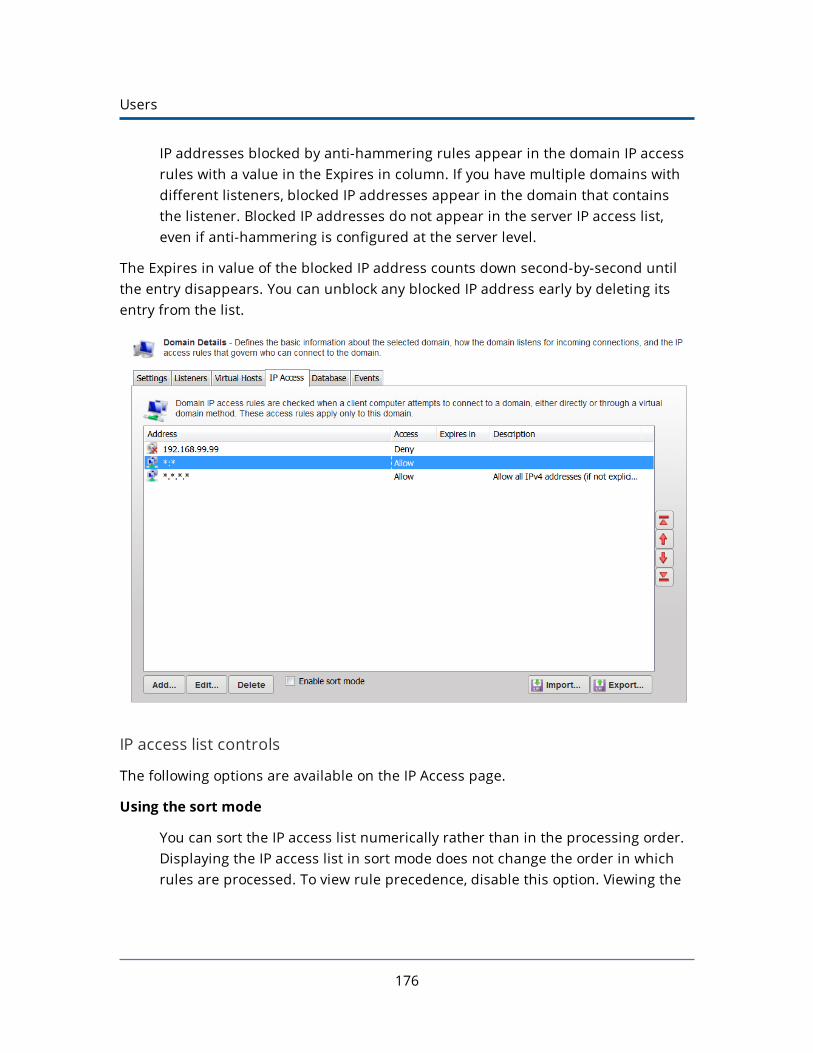
Users
IP addresses blocked by anti-hammering rules appear in the domain IP accessrules with a value in the Expires in column. If you have multiple domains withdifferent listeners, blocked IP addresses appear in the domain that containsthe listener. Blocked IP addresses do not appear in the server IP access list,even if anti-hammering is configured at the server level.
The Expires in value of the blocked IP address counts down second-by-second untilthe entry disappears. You can unblock any blocked IP address early by deleting itsentry from the list.
IP access list controls
The following options are available on the IP Access page.
Using the sort mode
You can sort the IP access list numerically rather than in the processing order.Displaying the IP access list in sort mode does not change the order in whichrules are processed. To view rule precedence, disable this option. Viewing the
176
IP access list in numerical order can be useful when you review long lists ofaccess rules to determine if an entry already exists.
Importing and exporting IP access rules
You can export and import Serv-U IP access rules from users, groups, domains,and the server by using a text-based .csv file. To export IP access rules, viewthe list of rules to export, click Export, and specify the path and file name youwant to save the list to. To import IP access rules, click Import and select the filethat contains the rules you want to import. The .csv file must contain thefollowing fields, including the headers:
l IP: The IP address, IP range, CIDR block, or domain name for which therule applies.
l Allow: Set this value to 0 for Deny, or 1 for Allow.
l Description: A text description of the rule for reference purposes.
Examples of IP address rules
Office-only access
A contractor has been hired to work in the office, and only in the office. Officeworkstations have IP addresses in the range of 192.0.2.0 - 192.0.2.24. The relatedServ-U access rule should be Allow 192.0.2.0-24, and it should be added toeither the user account of the contractor or a Contractors group that containsmultiple contractors. No deny rule is required because Serv-U provides an implicitDeny All rule at the end of the list.
Prohibited computers
Users should normally be able to access Serv-U from anywhere, except from a bankof special internal computers in the IP address range of 192.0.2.0 - 192.0.2.24. Therelated Serv-U access rules should be Deny 192.0.2.0-24, followed by Allow*.*.*.*, and these rules should be added to either the domain or the server IPaccess rules.
DNS-based access control
The only users allowed to access a Serv-U domain connect from *.example.com or*.example1.com. The related Serv-U access rules should be Allow
177
Examples of IP address rules
Users
*.example.com and Allow *.example1.com in any order, and these rulesshould be added to the domain IP access rules. No deny rule is required becauseServ-U provides an implicit Deny All rule at the end of the list.
Limits and settings
Serv-U contains options which you can use to customize how Serv-U can be used, andwhich also provide ways to apply limits and custom settings to users, groups,domains, and the server in its entirety. The limits stack intelligently, with usersettings overriding group settings, group settings overriding domain settings, anddomain settings overriding server settings. In addition, you can configure limits sothat they are only applied during certain days of the week, or certain times of theday. You can also grant exceptions to administrators and restrict specific users morethan others, providing total control over the server.
The limits and settings in Serv-U are divided into the following categories:
l Connection
l Password
l Directory Listing
l Data Transfer
l HTTP
l Email
l File Sharing
l Advanced
To apply a limit, select the appropriate category, click Add, select the limit, and thenselect or enter the value. For example, to disable the Lock users in home directoryoption for a domain, perform the following steps:
l In the Serv-U Management Console, click Domain > Domain Limits & Settings.
l From the Limit Type list, select Directory Listing.
l Click Add.
l From the Limit list, select Lock users in home directory.
l Deselect the option.
l Click Save.
The limits list displays the current limits applied to the domain. Limits with a light-
178

blue background are default values. Limits with a white background are values thatoverride the default values. After you complete the previous steps, a new Lock usersin home directory limit appears in the list that displays "No" as the value. Because ofinheritance rules, this option applies to all users in the domain unless it isoverridden at the group or user level. For more information about this method ofinheritance, see User interface conventions.
You can delete limits by selecting them and clicking Delete. To edit an overriddenvalue, select the limit, and then click Edit. Default rules cannot be edited or deleted.Create a new limit to override a default one.
To create a limit that is restricted to a specific time of day or days of the week, clickAdvanced in the New Limit or Edit Limit window. Select Apply limit only at this timeof day to specify a start and stop time for the new limit. To restrict the limit to certaindays of the week, deselect the days for which you do not want to apply the limit.When a limit is restricted in this way, default values (or the value of other limitoverrides) are applied when the time of day or day of the week restrictions are notmet for this limit.
Transfer ratios and quotas
Transfer ratios and quotas are just one of the many ways in which file transfers aremanaged on the Serv-U File Server. The following sections provide information abouttheir usage.
Transfer ratios
Transfer ratios are a convenient way of encouraging file sharing on your file server.By specifying an appropriate transfer ratio setting, you can grant credits to the userfor transferring a specified number of bytes or complete files. This is commonly usedto grant a user the ability to download 'x' megabytes of data or files for every 'y'megabytes of data or files that they upload.
To enable transfer ratios for the current user account, click Ratios & Quotas on theUser Information page of the User Properties window, and then select Enabletransfer ratio. Select the appropriate type of ratio to impose on the user account.Ratios can be tracked in terms of megabytes or complete files. They can also betracked per session established or for all sessions established by the user account.
179
Transfer ratios and quotas
Users
The ratio itself is configured by assigning a numeric value to both the uploads anddownloads side of the ratio. For example, a 3:1 ratio that is counting files over allsessions means that the user account must upload three files in order to have theability to download one file. The current credit for the user account is displayed inthe Credit field. This value is the current value and can be initialized to a non-zerovalue to grant the user initial credits.
Quotas
Quotas are another way to limit the amount of data that is transferred by a useraccount. When a Maximum quota value is assigned to the user, they are not able touse more disk space than that value. The Current field shows how much disk space iscurrently being used by the user account. When initially configuring a quota, bothfields must be filled in. From that point on, Serv-U tracks the file uploads anddeletions made by the user and updates the current value as appropriate.
A considerable drawback to using quotas is that in order for the current valueto remain accurate, changes must not be made to the contents of thedirectories that are accessible by the user account outside of Serv-U. Becausethese changes take place outside of a file server connection, Serv-U cannottrack them and update the current quota value. As an alternative to quotas,consider imposing a maximum size on the contents of a directory whenspecifying the directory access rules for the user account. For moreinformation about this option, see Directory access rules.
Ratio free files
Files listed in the ratio free file list are exempt from any imposed transfer ratios. Inother words, if a user must upload files in order to earn credits towards downloadinga file, a file that matches an entry in this list can always be downloaded by users,even if they have no current credits. This is commonly used to make special files,such as a readme or a directory information file, always accessible to users.
You can use the * and ? wildcard characters when you specify a ratio free file. Using* specifies a wildcard of any kind of character and any length. For example, entering*.txt makes any file with a .txt extension free for download, regardless of theactual filename. You can use a ? to represent a single character within the file nameor directory. You can also specify full paths by using standard directory paths such asC:\ftproot\common\ (on Windows) or /var/ftpfiles/shared/ (on Linux).
180

In addition, you can use full or relative paths when you are specifying an entry. If youuse a full path when you specify a file name, only that specific file is exempt fromtransfer ratios. If you use a relative path, such as when you enter just readme.txt,the provided file is exempt from transfer ratios regardless of the directory it islocated in.
Compare Windows and LDAP authentication
Both LDAP and Active Directory are used to allow users to connect to Serv-U by usingActive Directory credentials. Additionally, LDAP allows for authentication againstother LDAP servers such as Apache Directory Server and OpenLDAP.
Differences between Windows users and LDAP users
Windows and LDAP Users are similar in many ways but there are a number ofimportant differences that can help you decide which type of user is right for yourenvironment.
Use Windows users if the following conditions apply:
l You only want to access one Windows machine or domain (per Serv-U domain).
l You want each end user to see that user's home folders and enjoy that user'sNTFS permissions. Serv-U uses impersonation so that it respects the Windowsdirectory access rules. The Windows directory access rules can besupplemented with directory access rules defined in Serv-U. For moreinformation, see Directory access rules.
Use LDAP users if the following conditions apply:
l You want to deploy Serv-U on Linux.
l You want to be able to access more than one Windows domain.
l You want to be able to access different Windows domains.
l You do not care about natively incorporating NTFS permissions. It is notpossible to pull directory access rules from LDAP directly, but you can defineServ-U directory access rules for LDAP users. For more information, seeDirectory access rules.
Configure Windows and LDAP authentication
For information about configuring Windows authentication in Serv-U, refer to thefollowing resources:
181
Compare Windows and LDAP authentication
Users
l Windows authenticationl User groupsl Integrate Serv-U with Windows accountsl Windows Groups and Organizational Units in Serv-Ul Enable Windows User NT-SAM - Active Directory Support in Serv-U
For information about configuring LDAP authentication in Serv-U, refer to thefollowing resources:
l LDAP authenticationl User groupsl LDAP Authentication - error: Login was not successful
Keep Serv-U updated
If you work with LDAP or Windows authentication, it is highly recommended that youmake sure your Serv-U installation is up to date. To ensure the best experience,upgrade to the latest version of Serv-U before configuring your advanced userauthentication. For more information about the latest version of Serv-U, visit therelease notes.
For upgrade, backup, and migration information, refer to the following resources:
l Upgrade to the Latest Version of Serv-Ul Back up or move Serv-U settings
Windows authentication
By enabling Windows authentication, users can log in to Serv-U using their Windowslogin credentials as provided by the local Windows account database or a specificWindows domain server (Active Directory). When logging in using their Windowsaccount, users are placed in the home directory for their Windows accounteliminating the need to manually specify a home directory.
To enable Windows authentication, select Enable Windows authentication.
182
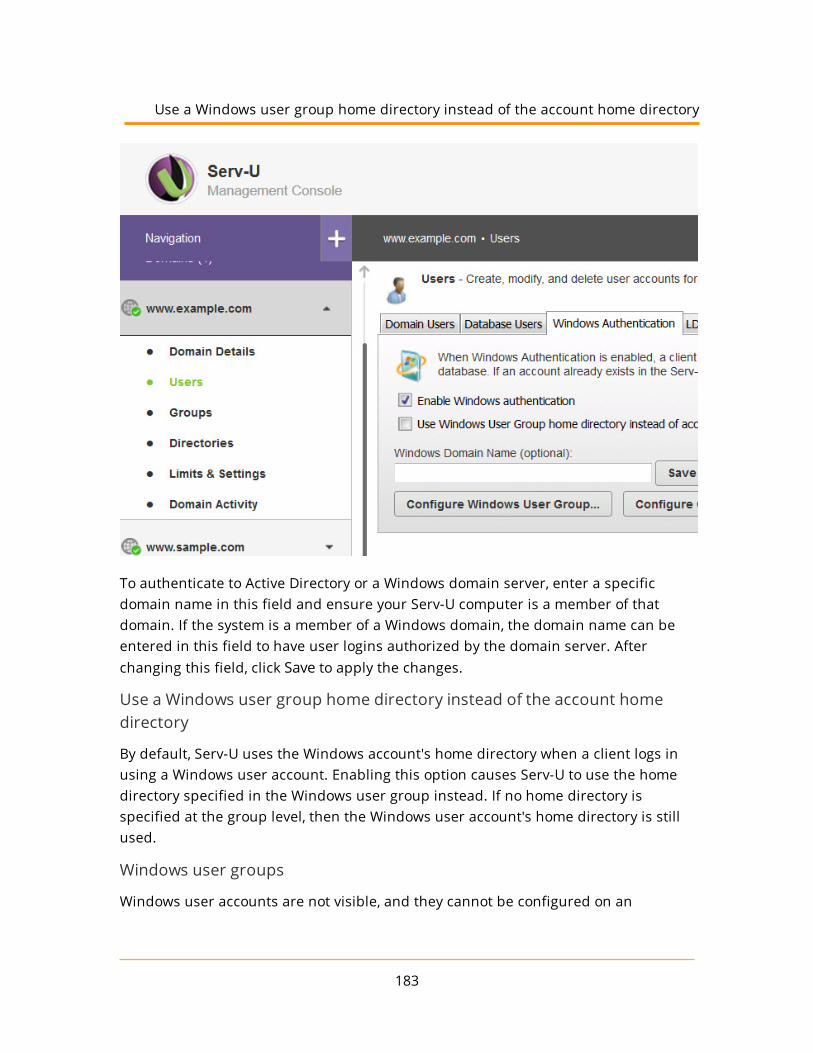
To authenticate to Active Directory or a Windows domain server, enter a specificdomain name in this field and ensure your Serv-U computer is a member of thatdomain. If the system is a member of a Windows domain, the domain name can beentered in this field to have user logins authorized by the domain server. Afterchanging this field, click Save to apply the changes.
Use a Windows user group home directory instead of the account homedirectory
By default, Serv-U uses the Windows account's home directory when a client logs inusing a Windows user account. Enabling this option causes Serv-U to use the homedirectory specified in the Windows user group instead. If no home directory isspecified at the group level, then the Windows user account's home directory is stillused.
Windows user groups
Windows user accounts are not visible, and they cannot be configured on an
183
Use a Windows user group home directory instead of the account home directory

Users
individual basis in Serv-U. To aid in configuring the many advanced options of a localuser account, all Windows user accounts are a member of a special Windows usergroup. Click Configure Windows User Group to configure this group just like anormal group.
All settings configured in this group are inherited by Windows user accounts. Thisfeature can be used to add IP access rules, specify bandwidth limitations, or addadditional directory access rules.
For more information, see User groups.
Windows user permissions
By default, Windows and Active Directory user accounts do not require any directoryaccess rules to be configured because Serv-U automatically applies their NTFSpermissions to their login sessions. This way, administrators do not need to configurespecific permissions beyond those already defined on the network, saving time anddocumentation.
184

In some cases Windows may cache directory access rules for a short period oftime. If an important NTFS permissions change is made that requiresimmediate application, restarting the Serv-U service can force Windows toprovide the updated permissions to the Serv-U File Server.
LDAP authentication
If LDAP authentication is enabled, users can log in to Serv-U using login credentialsas provided by a remote LDAP server, such as Active Directory or OpenLDAP. LDAPusers can use a home directory from their LDAP account, eliminating the need tomanually specify a home directory.
Before you begin
Before you begin the configuration of LDAP authentication, consider the followingsteps:
l Check the logs of your LDAP server to identify the correct group membership.
l Log in to your LDAP server to verify the correct directory structure.
l Configure the default LDAP group in Serv-U. For information, see Use LDAPuser groups.
Active Directory and OpenLDAP users are configured in the same way. In thecase of OpenLDAP, the user account must have permission to connect to theOpenLDAP database.
To decide between LDAP authentication and Windows user authentication, seeCompare Windows and LDAP authentication.
The examples and illustrations in this topic show a Serv-U instance configured to useauthentication through Active Directory.
To start configuring LDAP authentication, navigate to Users > LDAP Authentication inthe Serv-U Management Console.
Configure the LDAP server
The LDAP Server configuration dialog is displayed when you click Add, Edit, or Copyon the LDAP Servers list.
185
LDAP authentication

Users
Provide the following information to configure your LDAP server:
l Host: The host name or IP address of the LDAP server. This may be IPv4 or IPv6,but it is always required.
l Port: The TCP port on which the LDAP server is listening. This will often be 389.
l Connection Account: The user name of the account that is used to connect tothe LDAP server and execute queries against it. Provide the account namecomplete with the UPN suffix. Serv-U does not automatically apply the UPNsuffix for the name you provide here.
186
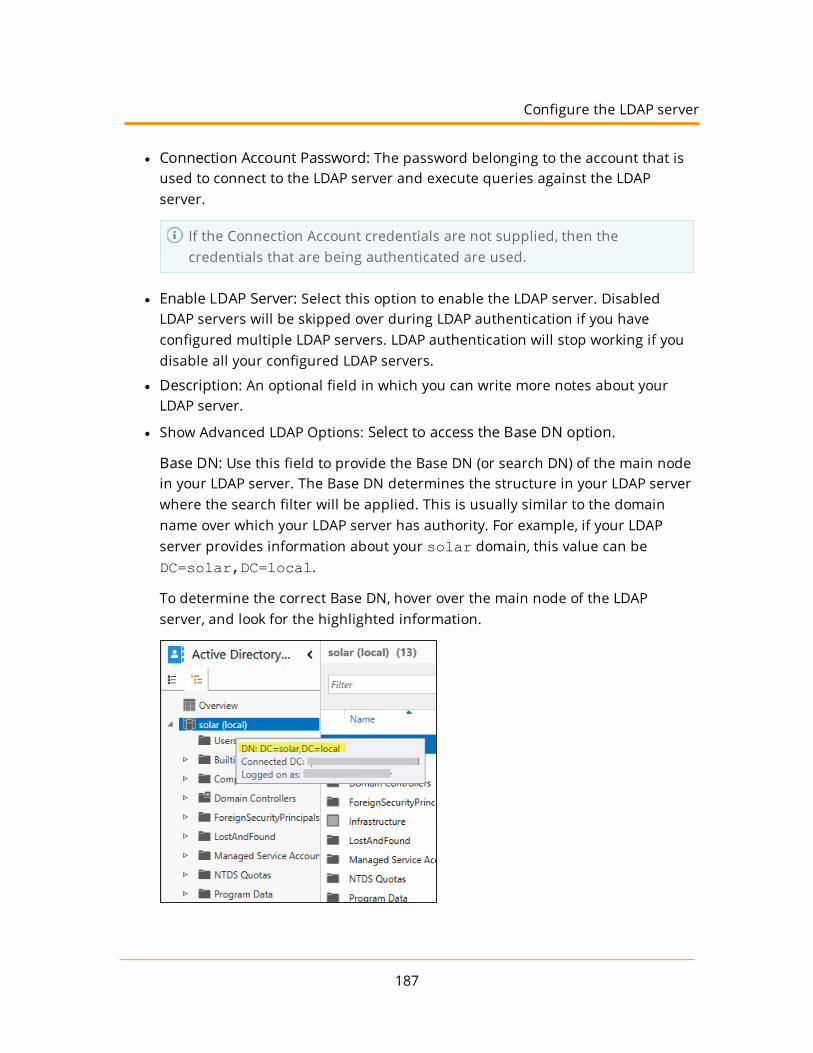
l Connection Account Password: The password belonging to the account that isused to connect to the LDAP server and execute queries against the LDAPserver.
If the Connection Account credentials are not supplied, then thecredentials that are being authenticated are used.
l Enable LDAP Server: Select this option to enable the LDAP server. DisabledLDAP servers will be skipped over during LDAP authentication if you haveconfigured multiple LDAP servers. LDAP authentication will stop working if youdisable all your configured LDAP servers.
l Description: An optional field in which you can write more notes about yourLDAP server.
l Show Advanced LDAP Options: Select to access the Base DN option.
Base DN: Use this field to provide the Base DN (or search DN) of the main nodein your LDAP server. The Base DN determines the structure in your LDAP serverwhere the search filter will be applied. This is usually similar to the domainname over which your LDAP server has authority. For example, if your LDAPserver provides information about your solar domain, this value can beDC=solar,DC=local.
To determine the correct Base DN, hover over the main node of the LDAPserver, and look for the highlighted information.
187
Configure the LDAP server

Users
Search Filter
This required field is used to tell Serv-U how to match incoming LoginIDs("usernames") to specific LDAP Server entries. $LoginID must be includedsomewhere in this field. The search filter is used to search in the Users tree of theLDAP server.
During authentication Serv-U will replace this variable with the LDAP User's LoginID(and LDAP Login ID suffix, if specified). The value of the search filter varies betweendifferent types of LDAP servers, and may even vary between different LDAP servers ofthe same type (depending on the specific schema your LDAP administrator hasimplemented).
For Active Directory LDAP servers, a value of (&(objectClass=user)(userPrincipalName=$LoginID)) is recommended. This value is provided bydefault in Serv-U.
Consult with your local LDAP administrator or use an LDAP client (for example,Softerra LDAP Browser or Apache Directory Studio) to find and test the right value foryour LDAP server before deploying into production, and then modify the defaultsearch filter according to your specific setup.
For example, if your LDAP server configuration contains subfolders, modify the searchfilter by adding a wildcard value (*) to match the whole folder structure.The searchfilter must be configured in a way that it only returns one user.
To test your search filters against Active Directory, use the Ldp tool. Thedefault location of the tool is C:\Windows\System32\ldp.exe.For more information about the location and usage of the Ldp tool, search forLdp on the Microsoft Technet or on the Microsoft Support website.
The configuration of the following values in the Attribute Mapping grouping isoptional.
l Home Directory: This field assigns the value of the named LDAP user entryattribute as your LDAP Users' home directory. A typical value on Active Directoryis homeDirectory.
l Full Name: This field assigns the value of the named LDAP user entry attributeas your LDAP Users' full name. A typical value on Active Directory is name.
188

l Email Address: This field assigns the value of the named LDAP user entryattribute as your LDAP Users' email address. A typical value on Active Directoryis mail.
l Login ID: This field assigns the value of the named LDAP user entry attribute asyour LDAP Users' login ID (username). A typical value on Active Directory isuserPrincipalName. This value will almost always match the value pairedwith $LoginID in your Search Filter. In other words, this is your login ID inServ-U, and it is compared to the userPrincipalName in the search filter.
l Group Membership: This field uses all the values found in the named LDAPattribute as additional LDAP Group membership assigments. For example, ifthis is configured as grp and an LDAP user record has both grp=Green andgrp=Red attributes, Serv-U associates that LDAP User with both the "Red" and"Green" LDAP Groups. A typical value on Active Directory is memberOf.
Specify the LDAP login ID suffix
After configuring the LDAP server, specify the LDAP login ID suffix. The LDAP login IDsuffix is necessary to send fully qualified login IDs to the LDAP server. The suffix youspecify here is placed at the end of the user name when a user logs in.
A typical value in an Active Directory environment might be @mydomain.com. Afterchanging this field, click Save to apply the change.
LDAP group membership
In order for Serv-U to match users up to the appropriate user groups, the entirehierarchy, including the Distinguished Name (DN) must be recreated in the usergroup hierarchy.
LDAP Users are also added to any LDAP Groups whose names appear in "GroupMembership" attributes defined on the LDAP Authentication page. For example, ifthe Group Membership field is configured to be grp and an LDAP user record hasboth grp=Green and grp=Red attributes, Serv-U will associate that LDAP User withboth the "Red" and "Green" LDAP Groups.
189
Specify the LDAP login ID suffix

Users
Membership in one or more LDAP groups is required if the Require fully-qualifiedgroup membership for login option is selected on the Groups > LDAP Groups page.If this option is selected, and LDAP Users cannot be matched up to at least one LDAPGroup, they will not be allowed to sign on. In this case it is possible that Serv-Usuccessfully authenticates to the LDAP server, and then rejects the user loginbecause the user is not a member of any group.
For more information about group permissions and settings, see User groups.
Use LDAP user groups
LDAP user accounts are not visible or configurable on an individual basis in Serv-U,but LDAP group membership can be used to apply common permissions and settingssuch as IP restrictions and bandwidth throttles.
All LDAP users are members of a special default LDAP group.
To configure the default LDAP group in Serv-U:
1. Navigate either to Users > LDAP Authentication, or Groups > LDAPAuthentication.
2. Click Configure Default LDAP Group.
LDAP Users can also be members of individual LDAP Groups.
To configure LDAP groups in Serv-U:
1. Navigate to Users > LDAP Authentication.
2. Click Configure LDAP Groups.
LDAP groups have the same configuration options as other Serv-U groups. Forinformation about the configuration options available at the group level, see LDAPuser groups.
When you configure LDAP groups, recreate the same structure as the group structurein Active Directory, and use the same names as the group names in Active Directory.
The following image illustrates the group structure in Active Directory. By hoveringover a user or group in Active Directory, the group structure is displayed.
This information is highlighted in yellow.
190

The following image illustrates how the group structure of Active Directory isrecreated in Serv-U.
191
Use LDAP user groups
Users
Use a list of LDAP servers
Serv-U requires administrators to define one or more LDAP Servers before LDAPauthentication will work. LDAP Servers are configured on the Users > LDAPAuthentication page in the Serv-U Management Console.
You can define more than one LDAP Server if you want Serv-U to try a backup serverin case the primary LDAP server is down, or if you want to try LDAP credentialsagainst different LDAP servers with different sets of users.
Serv-U attempts authentication against the list of LDAP servers from top to bottom.During login, the first LDAP server that approves a set of credentials will be the serverfrom which the associated LDAP user will draw its full name, email address and otherattributes.
After attempting a login against the first LDAP server, Serv-U tries each LDAP server inthe list until it either encounters a successful login, or it encounters an unsuccessfullogin paired with an authoritative response from the LDAP server that the attemptedLoginID exists on that LDAP server.
In other words, Serv-U makes login attempts on LDAP servers that are lower on thelist if the preceding LDAP servers are unresponsive, or if they report that they haveno knowledge of the LDAP user.
Serv-U tries each available LDAP server, even if the login credentials fail. The error logprovides detailed information of any possible connection failure. For informationabout the error messages, see LDAP error messages.
The error log contains information about the last LDAP server Serv-Ucontacted.
192

Use the Add, Edit, Delete, and Copy buttons to work with individual LDAP serverentries. When there are multiple LDAP server entries in the list, selecting any entrywill reveal move up, move down, move to top, and move to bottom ordering arrowson the right of the window.
Test the connection to the LDAP server
To test the connection to the LDAP server, log in with an LDAP user. If the connectionfails, the log files of Serv-U will provide detailed information about the reason for thefailure.
The following images show what a successful HTTP login looks like for the user andfor the Serv-U administrator. Note that LDAP and Windows authentication looksidentical in the log files.
The following image shows the login page for the user named LDAP.
193
Test the connection to the LDAP server
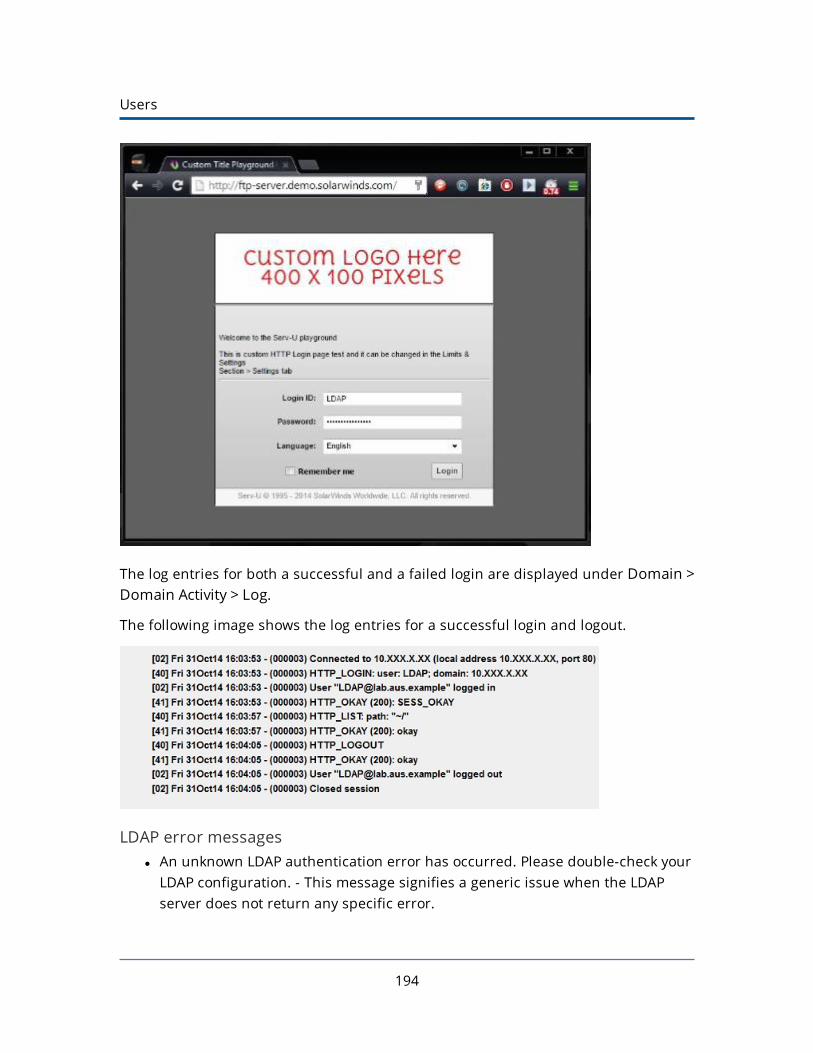
Users
The log entries for both a successful and a failed login are displayed under Domain >Domain Activity > Log.
The following image shows the log entries for a successful login and logout.
LDAP error messagesl An unknown LDAP authentication error has occurred. Please double-check your
LDAP configuration. - This message signifies a generic issue when the LDAPserver does not return any specific error.
194

l An unknown LDAP authentication error has occurred. The error code returnedby the LDAP server was %d. - This message signifies a specific LDAP error. Theerror code returned by the LDAP server can be used to find the specific LDAPerror.
l LDAP server returned zero or multiple user records matching the accountcredentials. - This message either indicates that the provided user name iswrong (if zero accounts are returned), or it indicates a problem with the searchfilter (if multiple accounts are returned). The search filter must be configuredin a way that it only returns a single user account. For information aboutconfiguring the search filter, see Search Filter.
l Authenticated external user "%s" rejected because group membership isrequired and no matching Serv-U group was found. A list of all known groupsfor this user follows.
l No group memberships found. If group membership is expected, double-checkthe "Group Membership" attribute map for your LDAP configuration in Serv-U.
l No LDAP servers are defined or enabled.
l Unable to initialize LDAP server.
l The connection credentials in the LDAP server configuration have been rejectedby the LDAP server.
l The user credentials were rejected by the LDAP server.
l The LDAP server is unavailable to Serv-U.
l The connection credentials in the LDAP server configuration do not havepermission to run queries.
l The search filter string in the LDAP server configuration was rejected by theLDAP server.
The following error messages relate to issues with accessing an account's homedirectory, and are not LDAP specific:
l Error logging in user "%s", permission denied by Serv-U access rules to accesshome dir "%s".
l Error logging in user "%s", the device for home dir "%s" is not ready.
l Error logging in user "%s", could not access home dir "%s"; the error returnedby the operating system was %d.
l Error logging in user "%s", permission denied by the operating system toaccess home dir "%s".
195
LDAP error messages
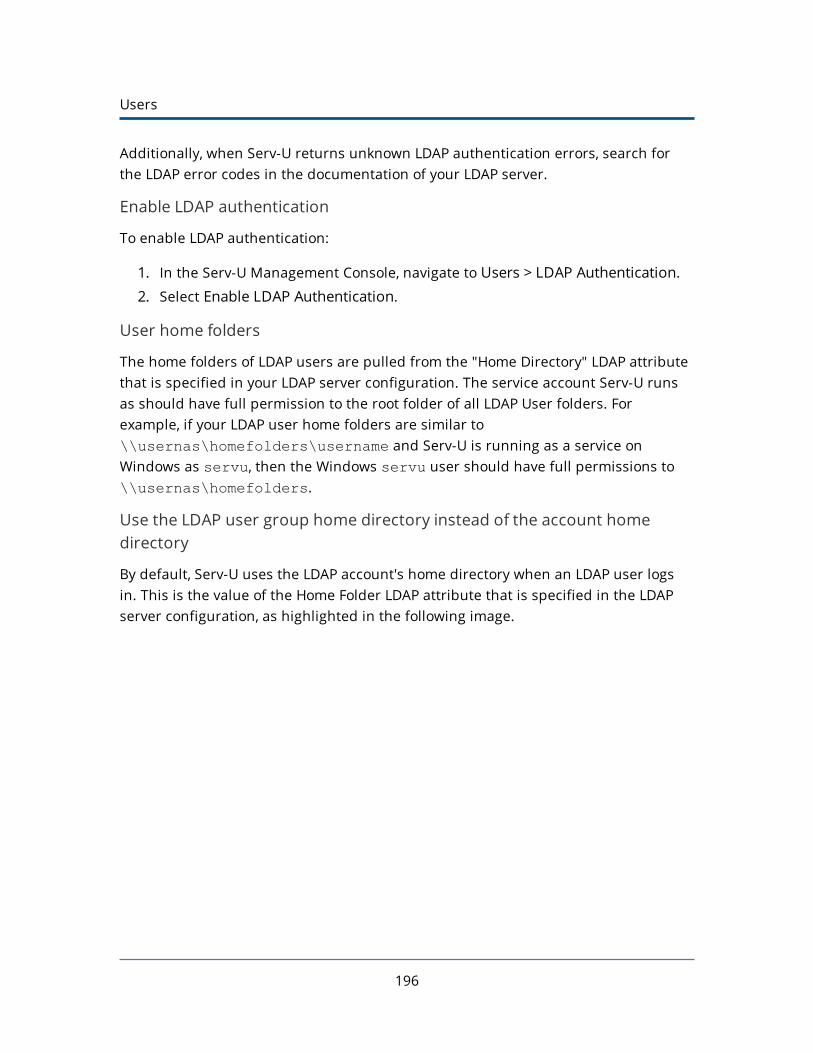
Users
Additionally, when Serv-U returns unknown LDAP authentication errors, search forthe LDAP error codes in the documentation of your LDAP server.
Enable LDAP authentication
To enable LDAP authentication:
1. In the Serv-U Management Console, navigate to Users > LDAP Authentication.
2. Select Enable LDAP Authentication.
User home folders
The home folders of LDAP users are pulled from the "Home Directory" LDAP attributethat is specified in your LDAP server configuration. The service account Serv-U runsas should have full permission to the root folder of all LDAP User folders. Forexample, if your LDAP user home folders are similar to\\usernas\homefolders\username and Serv-U is running as a service onWindows as servu, then the Windows servu user should have full permissions to\\usernas\homefolders.
Use the LDAP user group home directory instead of the account homedirectory
By default, Serv-U uses the LDAP account's home directory when an LDAP user logsin. This is the value of the Home Folder LDAP attribute that is specified in the LDAPserver configuration, as highlighted in the following image.
196

For information about configuring the LDAP account's home directory, see Configurethe LDAP server.
If you select the Use LDAP Group home directory instead of account home directoryoption under Users > LDAP Authentication in the Serv-U Management Console, Serv-U will use the home directory that you specify in the Default LDAP User Group insteadof the LDAP account's home directory.
The home directory of the Default LDAP User Group is specified on the GroupProperties window of the Default LDAP User Group, as highlighted in the followingimage.
197
Use the LDAP user group home directory instead of the account home directory

Users
For information about configuring the Default LDAP User Group, see Use LDAP usergroups.
If no home directory is specified at the group level, then the LDAP account's homedirectory is still used. However, if no home directory is defined at the user, group,domain, or system level, and none is available from the LDAP server, the user will notbe allowed to sign on.
The interaction between domain home directories with Default LDAP UserGroup home directories
If a domain home directory is defined on the Domain Details > Settings page, thisdirectory would be used by Serv-U as the default directory for LDAP authentication,resulting in errors.
198

To avoid possible issues in this case, make sure that you select the Use LDAP Grouphome directory instead of the account home directory option under Users > LDAPAuthentication, and configure the LDAP group home directory as described in UseLDAP user groups.
SFTP for users and groups
Use an existing public key1. Obtain a public key file.
2. Place the public key file in a secured directory in the server, and then useBrowse in Serv-U to select the file.
3. Click Save.
Create a key pair1. Click Manage Keys.
2. Click Create Key.3. Type the name of the key pair (for example, MyKey), which is also used to name
the storage file.
4. Type the output directory of the certificate (for example,C:\ProgramData\SolarWinds\Serv-U\).
5. Select the key type (default of DSA is preferred, but RSA is available).
6. Select the key length (default of 1024 bits provides best performance, 2048 bitsis a good median, and 4096 bits provides best security).
199
SFTP for users and groups

Users
7. Enter the password to use for securing the key file.
8. Click Create.
Create multiple keys per user
For the purposes of public key authentication, you can associate multiple public keyswith a user account.
To create multiple keys for an account:
1. Click Manage Keys.
2. Click Add Key, and then specify the key name and the key path.
When authenticating a client, Serv-U checks all the keys you provide here. Ifauthenticating against one key fails, Serv-U proceeds to check the next key.
For optimal results, the following best practices are recommended:
l It is recommended that you do not create more than 100 keys per user account.
l If you have a large number of public keys, divide the keys between multipleusers, and define the common user properties at group level.
l Avoid storing the public keys in a network path.
200
GroupsUser groups
Groups are a method of sharing common configuration options with multiple useraccounts. Configuring a group is similar to configuring a user account. Virtually everyconfiguration option available for a user account can be set at the group level. Inorder for a user to inherit a group's settings, it must be a member of the group.Permissions and attributes inherited by a user through group membership can stillbe overridden at the user level. A user can be a member of multiple groups in orderto acquire multiple collections of permissions, such as directory or IP access rules.
Like user accounts, groups can be created at multiple different levels, including thefollowing:
l Global Groups
l Domain Groups
l Database Groups (available at both the server and domain levels)
l Windows Groups
However, groups are only available to user accounts that are defined at the samelevel. In other words, a global user (that is, a user defined at the server level) can onlybe a member of a global group. Likewise, a user defined for a specific domain canonly be a member of a group also created for that domain. This restriction alsoapplies to groups created in a database in that only users created within a databaseat the same level can be members of those groups.
Use the Add, Edit, and Delete buttons to manage the available groups.
201

Groups
Group templates
You can configure a template for creating new groups by clicking Template. Thetemplate group can be configured just like any other group object, with the exceptionof giving it a name. After the settings are saved to the template, all new groups arecreated with their default settings set to those found within the template. This wayyou can configure some basic settings that you want all of your groups to use bydefault.
Windows groups (Windows only)
You can use Window groups to apply common permissions and settings such as IPrestrictions and bandwidth throttles to Windows users.
All Windows users are members of the default Windows group. You can createadditional Windows groups to assign different permissions and settings to differentgroups of Windows users.
202

Windows group membership is determined by the hierarchical OU (organizationalunit) membership of each Windows user. For example, a user in the My Business >Accounting > red team OU tree would be a member of the My Business > Accounting> red team Windows group on Serv-U, if that group exists. (Visually, "My Business"would be the top Windows group, "Accounting" would be an indented child Windowsgroup under that, and "red team" would be an indented child under "Accounting".)
Membership in one or more Windows Groups is required if the Require fully-qualified group membership for login option is selected on the Windows Groupspage. If this option is selected and Windows users cannot be matched up to at leastone Windows group, they are not be allowed to log in.
Windows groups are only available when the following conditions apply:
l Serv-U is running on Windows.
l Serv-U has an MFT Server license.
l Windows Authentication is enabled under Domain Users > WindowsAuthentication.
Configure a Windows user group (Windows only)
Administrators can allow clients to log in to the file server using the local Windowsuser database or one that is made accessible through a domain server. These useraccounts do not exist in the local Serv-U user database and cannot be configured onan individual basis. To aid in configuring these accounts, all users logged in throughthis method belong to the Default Windows User Group. Clicking this button allowsthis group to be configured like normal. However, changes that are made to thisgroup only apply to Windows user accounts.
LDAP user groups
LDAP user accounts are not visible or configurable on an individual basis in Serv-U,but LDAP group membership can be used to apply common permissions and settingssuch as IP restrictions and bandwidth throttles.
All LDAP users are members of a special default LDAP group. Click Configure DefaultLDAP Group in Users > LDAP Authentication or in Groups > LDAP groups toconfigure this group just like a normal Serv-U group.
203
Configure a Windows user group (Windows only)
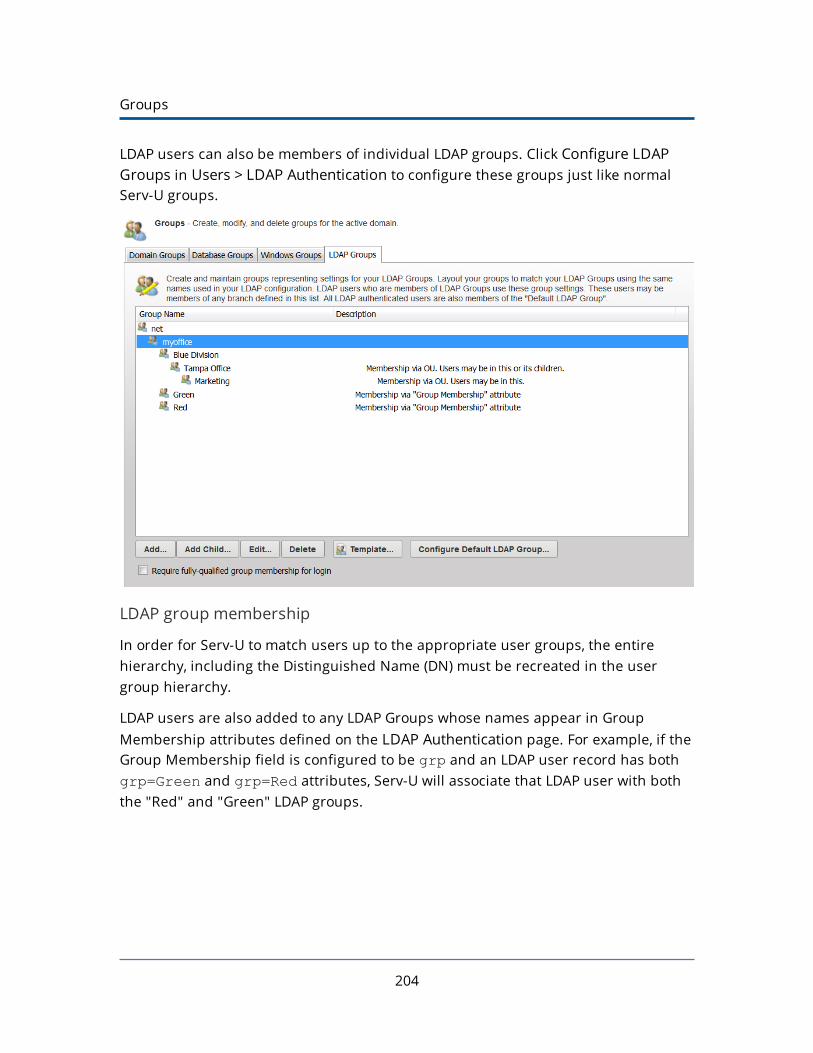
Groups
LDAP users can also be members of individual LDAP groups. Click Configure LDAPGroups in Users > LDAP Authentication to configure these groups just like normalServ-U groups.
LDAP group membership
In order for Serv-U to match users up to the appropriate user groups, the entirehierarchy, including the Distinguished Name (DN) must be recreated in the usergroup hierarchy.
LDAP users are also added to any LDAP Groups whose names appear in GroupMembership attributes defined on the LDAP Authentication page. For example, if theGroup Membership field is configured to be grp and an LDAP user record has bothgrp=Green and grp=Red attributes, Serv-U will associate that LDAP user with boththe "Red" and "Green" LDAP groups.
204
Membership in one or more LDAP groups is required if the Require fully-qualifiedgroup membership for login option is selected on the Groups > LDAP Groups page.If this option is selected, and LDAP users cannot be matched up to at least one LDAPGroup, they will not be allowed to sign on. In this case it is possible that Serv-Usuccessfully authenticates to the LDAP server, and then rejects the user loginbecause the user is not a member of any group.
For more information about LDAP authentication, see LDAP authentication.
Group information
Virtually every attribute available for a user account can be configured at the grouplevel. Group level settings are inherited by the group members and can beoverridden at the user level. The Group Information tab contains general informationabout the group including the name, home directory, and the default administrativeprivilege for group members. The following sections contain detailed informationabout each of the available attributes.
Group name
The group name is a unique identifier that must be unique for each groupspecified at the particular level (server or domain). Group names may notcontain any of the following special characters:
\ / < > . | : ? *
Home directory
The home directory for a user account is where the user is placed immediatelyafter logging in to the file server. Each user must have a home directoryassigned to it, although the home directory can be specified at the group levelif the user is a member of a group. Home directories must be specified using afull path including the drive letter or the UNC share name. If the homedirectory is not found, Serv-U can be configured to create it.
205
Group information
Groups
When specifying the home directory, you can use the %USER% macro to insertthe login ID into the path. This is used mostly to configure a default homedirectory at the group level or within the new user template to ensure that allnew users have a unique home directory. When combined with a directoryaccess rule for %HOME%, a new user can be configured with a unique homedirectory and the proper access rights to that location with a minimal amountof effort.
You can also use the %DOMAIN_HOME% macro to identify the user's homedirectory. For example, to place a user's home directory into a common location,use %DOMAIN_HOME%\%USER%.
The home directory can be specified as "\" (root) in order to grant system-levelaccess to users, allowing them the ability to access all system drives. In orderfor this to work properly, the user must not be locked in their home directory.
Administration privilege
A user account can be granted one of the following types of administrativeprivileges:
l No Privilege
l Group Administrator
l Domain Administrator
l System Administrator
The value of this attribute can be inherited through group membership.
A user account with no privilege is a regular user account that can only log in totransfer files to and from the file server. The Serv-U Management Console isnot available to these user accounts.
A group administrator can only perform administrative duties relating to theirprimary group (the group that is listed first in their group memberships list).They can add, edit, and delete users which are members of their primarygroup, and they can also assign permissions at or below the level of the groupadministrator. They may not make any other changes.
206
A domain administrator can only perform administrative duties for the domainto which their account belongs. A domain administrator is also restricted fromperforming domain-related activities that may affect other domains. Thedomain-related activities that may not be performed by domain administratorsconsist of configuring their domain listeners or configuring ODBC databaseaccess for the domain.
A system administrator can perform any file server administration activityincluding creating and deleting domains, user accounts, or even updating thelicense of the file server. A user account with system administrator privilegesthat is logged in through HTTP remote administration can essentiallyadminister the server as if they had physical access to the system.
Default web client
If your Serv-U license enables the use of FTP Voyager JV, then users connectingto the file server through HTTP can choose which client they want to use afterlogging in. Instead of asking users which client they want to use, you can alsospecify a default client. If this option is changed, it overrides the optionspecified at the server or domain level. It can also be inherited by a userthrough group membership. Use the Inherit default value option to reset it tothe appropriate default value.
Lock user in home directory
Users who are locked in their home directory cannot access paths above theirhome directory. In addition, the actual physical location of their home directoryis masked because Serv-U always reports it as "/" (root). The value of thisattribute can be inherited through group membership.
Apply group directory access rules first
The order in which directory access rules are listed has significance indetermining the resources that are available to a user account. By default,directory access rules specified at the group level take precedence overdirectory access rules specified at the user level. However, there are certaininstances where you may want the user level rules to take precedence.Deselect this option to place the directory access rules of the group below theuser's.
207
Group information

Groups
Always allow login
Enabling this option means that the user account is always permitted to log in,regardless of restrictions placed upon the file server such as maximumnumber of sessions. It is useful as a fail-safe in order to ensure that criticalsystem administrator accounts can always remotely access the file server. Aswith any option that allows bypassing access rules, care should be taken ingranting this ability. The value of this attribute can be inherited through groupmembership.
Enabling the Always Allow Login option does not override IP access rules.If both options are defined, the IP access rules prevail.
Description
The description allows for the entry of additional notes that are only visible byadministrators.
Availability
This feature limits when users can connect to this server. You can placelimitations on the time of day and also on the day of the week. When usersattempt to log in outside the specified available times, they are presented witha message that their user account is currently unavailable.
Directory access rules
Directory access rules define the areas of the system which are accessible to useraccounts. While traditionally restricted to the user and group levels, in Serv-U, theusage of directory access rules is extended to both the domain and the server levelsthrough the creation of global directory access rules. Directory access rules specifiedat the server level are inherited by all users of the file server. If they are specified atthe domain level, they are only inherited by users who belong to the particulardomain. The traditional rules of inheritance apply where rules specified at a lowerlevel (for example, the user level) override conflicting or duplicate rules specified at ahigher level (for example, the server level).
208
When you set the directory access path, you can use the %USER%, %HOME%, %USER_FULL_NAME%, and %DOMAIN_HOME% variables to simplify the process. For example,use %HOME%/ftproot/ to create a directory access rule that specifies the ftprootfolder in the home directory of the user. Directory access rules specified in thismanner are portable if the actual home directory changes while maintaining thesame subdirectory structure. This leads to less maintenance for the file serveradministrator. If you specify the %USER% variable in the path, it is replaced with theuser's login ID. This variable is useful in specifying a group's home directory toensure that users inherit a logical and unique home directory. You can use the%USER_FULL_NAME% variable to insert the Full Name value into the path (the user
must have a Full Name specified for this to function). For example, the user "TomSmith" could use D:\ftproot\%USER_FULL_NAME% for D:\ftproot\Tom Smith.You can also use the %DOMAIN_HOME% macro to identify the user's home directory.For example, to place a user and their home directory into a common directory, use%DOMAIN_HOME%\%USER%.
Directory access rules are applied in the order they are listed. The first rule in the listthat matches the path of a client's request is the one that is applied for that rule. Inother words, if a rule exists that denies access to a particular subdirectory but islisted below the rule that grants access to the parent directory, then a user still hasaccess to the particular subdirectory. Use the arrows on the right of the directoryaccess list to rearrange the order in which the rules are applied.
Serv-U allows to list and open the parent directory of the directory the user isgranted access to, even if no explicit access rules are defined for the parentdirectory. However, the parent directory accessed this way will only display thecontent to which the user has access.
File permissionsP
ERMISSIONDESCRIPTION
ReadAllows users to read (download) files. This permission does not allowusers to list the contents of a directory, which is granted by the Listpermission.
WriteAllows users to write (upload) files. This permission does not allowusers to modify existing files, which is granted by the Append
209
File permissions
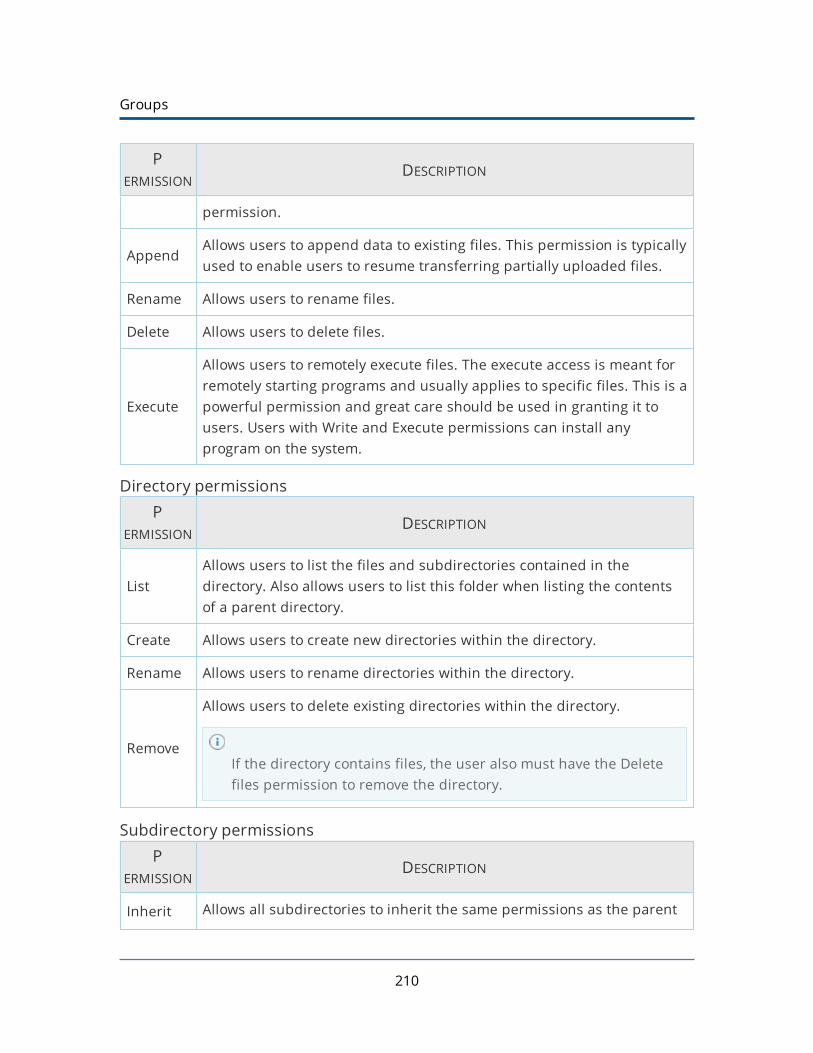
Groups
PERMISSION
DESCRIPTION
permission.
AppendAllows users to append data to existing files. This permission is typicallyused to enable users to resume transferring partially uploaded files.
Rename Allows users to rename files.
Delete Allows users to delete files.
Execute
Allows users to remotely execute files. The execute access is meant forremotely starting programs and usually applies to specific files. This is apowerful permission and great care should be used in granting it tousers. Users with Write and Execute permissions can install anyprogram on the system.
Directory permissionsP
ERMISSIONDESCRIPTION
ListAllows users to list the files and subdirectories contained in thedirectory. Also allows users to list this folder when listing the contentsof a parent directory.
Create Allows users to create new directories within the directory.
Rename Allows users to rename directories within the directory.
Remove
Allows users to delete existing directories within the directory.
If the directory contains files, the user also must have the Deletefiles permission to remove the directory.
Subdirectory permissionsP
ERMISSIONDESCRIPTION
Inherit Allows all subdirectories to inherit the same permissions as the parent
210
PERMISSION
DESCRIPTION
directory. The Inherit permission is appropriate for most circumstances,but if access must be restricted to subfolders (for example, whenimplementing mandatory access control), clear the Inherit check boxand grant permissions specifically by folder.
Advanced: Access as Windows user (Windows only)
Files and folders may be kept on external servers in order to centralize file storage orprovide additional layers of security. In this environment, files can be accessed by theUNC path (\\servername\folder\) instead of the traditionalC:\ftproot\folder path. However, accessing folders stored across the networkposes an additional challenge, because Windows services are run under the LocalSystem account by default, which has no access to network resources.
To mitigate this problem for all of Serv-U, you can configure the Serv-U File Serverservice to run under a network account. The alternative, preferred when manyservers exist, or if the Serv-U File Server service has to run under Local System forsecurity reasons, is to configure a directory access rule to use a specific Windowsuser for file access. Click Advanced to specify a specific Windows user for eachdirectory access rule. As in Windows authentication, directory access is subject toNTFS permissions, and in this case also to the configured permissions in Serv-U.
When you use Windows authentication, the NTFS permissions of the Windowsuser take priority over the directory access rules. This means that when aWindows user tries to access a folder, the security permissions of the user areapplied instead of the credentials specified in the directory access rule.
Quota permissions
Maximum size of directory contents
Setting the maximum size actively restricts the size of the directory contents tothe specified value. Any attempted file transfers that cause the directorycontents to exceed this value are rejected. This feature serves as an alternativeto the traditional quota feature that relies upon tracking all file transfers(uploads and deletions) to calculate directory sizes and is not able to consider
211
Advanced: Access as Windows user (Windows only)
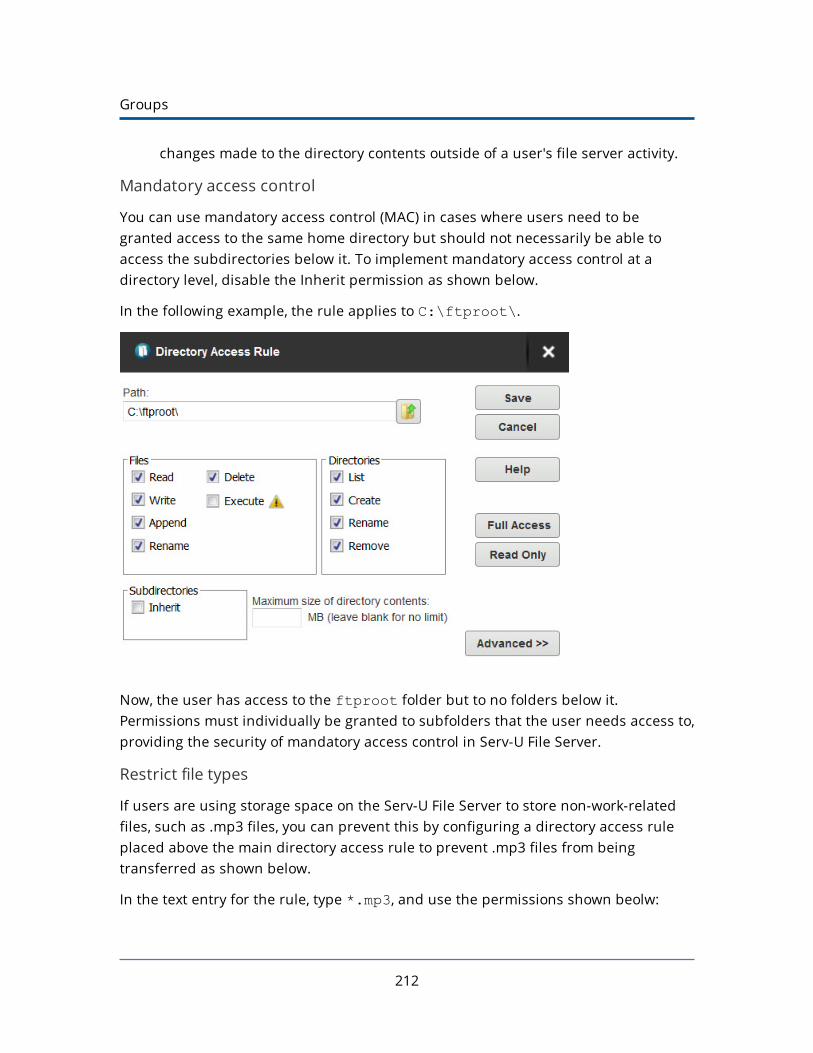
Groups
changes made to the directory contents outside of a user's file server activity.
Mandatory access control
You can use mandatory access control (MAC) in cases where users need to begranted access to the same home directory but should not necessarily be able toaccess the subdirectories below it. To implement mandatory access control at adirectory level, disable the Inherit permission as shown below.
In the following example, the rule applies to C:\ftproot\.
Now, the user has access to the ftproot folder but to no folders below it.Permissions must individually be granted to subfolders that the user needs access to,providing the security of mandatory access control in Serv-U File Server.
Restrict file types
If users are using storage space on the Serv-U File Server to store non-work-relatedfiles, such as .mp3 files, you can prevent this by configuring a directory access ruleplaced above the main directory access rule to prevent .mp3 files from beingtransferred as shown below.
In the text entry for the rule, type *.mp3, and use the permissions shown beolw:
212
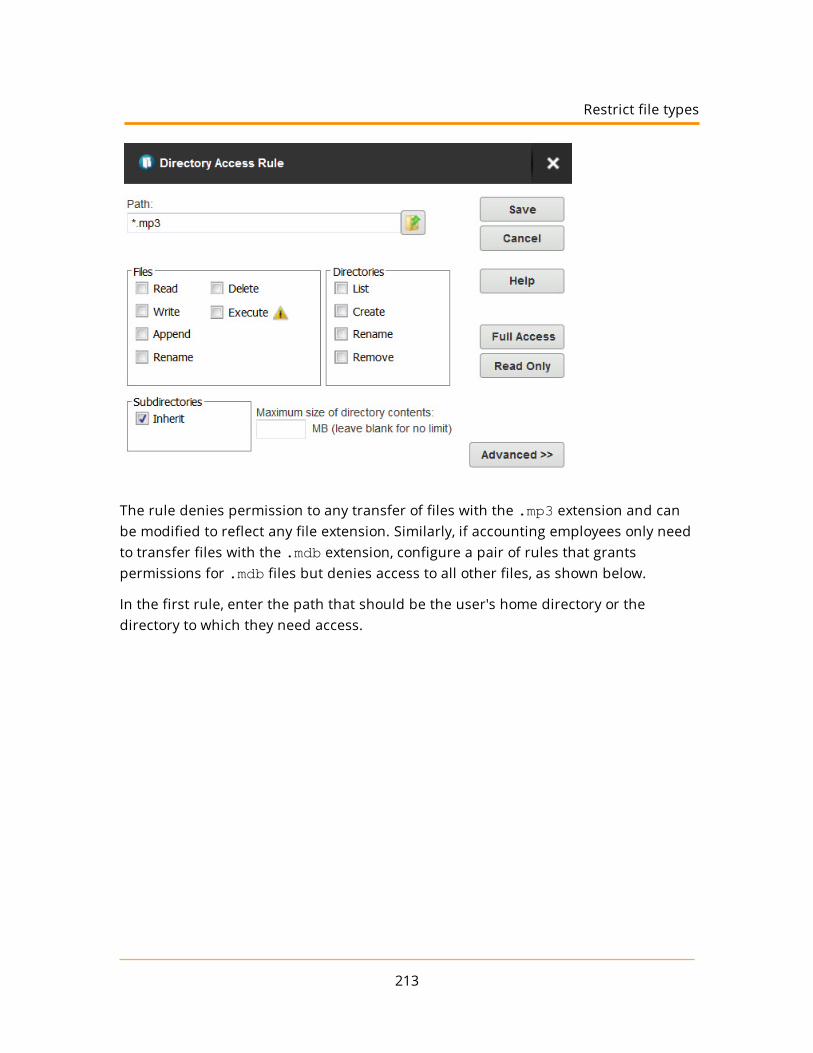
The rule denies permission to any transfer of files with the .mp3 extension and canbe modified to reflect any file extension. Similarly, if accounting employees only needto transfer files with the .mdb extension, configure a pair of rules that grantspermissions for .mdb files but denies access to all other files, as shown below.
In the first rule, enter the path that should be the user's home directory or thedirectory to which they need access.
213
Restrict file types

Groups
In the second rule, enter the extension of the file that should be accessed, such as*.mdb.
214

These rules only allow users to access .mdb files within the specified directories. Youcan adapt these rules to any file extension or set of file extensions.
Virtual paths
If virtual paths are specified, users can gain access to files and folders outside oftheir own home directory. A virtual path only defines a method of mapping anexisting directory to another location on the system to make it visible within a user'saccessible directory structure. In order to access the mapped location, the user muststill have a directory access rule specified for the physical path of a virtual path.
Like directory access rules, virtual paths can be configured at the server, domain,group, and user levels. Virtual paths created at the server level are available for allusers of the file server. When virtual paths are created at the domain level, they areonly accessible by users belonging to that domain.
You can also create virtual paths specifically for individual users or groups.
Physical path
The physical path is the actual location on the system, or network, that is to be placedin a virtual location accessible by a user. If the physical path is located on the samecomputer, use a full path, such as D:\inetpub\ftp\public. You can also use aUNC path, such as \\Server\share\public. To make a virtual path visible tousers, users must have a directory access rule specified for the physical path.
Virtual path
The virtual path is the location that the physical path should appear in for the user.The %HOME% macro is commonly used in the virtual path to place the specifiedphysical path in the home directory of the user. When specifying the virtual path, the
215
Virtual paths
Groups
last specified directory is used as the name displayed in directory listings to the user.For example, a virtual path of %HOME%/public places the specified physical path ina folder named public within the user's home directory. You can also use a full pathwithout any macros.
Include virtual paths in Maximum Directory Size calculations
When this option is selected, the virtual path is included in Maximum Directory Sizecalculations. The Maximum Directory Size limits the size of directories affecting howmuch data can be uploaded.
Virtual paths example
A group of web developers have been granted access to the directoryD:\ftproot\example.com\ for web development purposes. The developers alsoneed access to an image repository located at D:\corpimages\. To avoid grantingthe group access to the root D drive, a virtual path must be configured so that theimage repository appears to be contained within their home directory. Within thegroup of web developers, add a virtual path to bring the directory to the users byspecifying D:\corpimages\ as the physical path andD:\ftproot\example.com\corpimages as the virtual path. Be sure to add agroup level directory access rule for D:\corpimages\ as well. The developers nowhave access to the image repository without compromising security or relocatingshared resources.
Relative virtual paths example
Continuing with the previous example, if the home directory of the group of webdevelopers is relocated to another drive, both the home directory and the virtual pathmust be updated to reflect this change. You can avoid this by using the %HOME%macro to create a relative virtual path location that eliminates the need to update thepath if the home directory changes. Instead of usingD:\ftproot\example.com\corpimages as the virtual path, use%HOME%\corpimages. This way the corpimages virtual path is placed within the
home directory of the group, regardless of what the home directory is. If the homedirectory changes at a later date, the virtual path still appears there.
User and group logs
In the Serv-U File Server, you can customize the logging of user and group events and
216

activity to a great extent. To enable a logging option, select the appropriate option inthe Log Message Options grouping. When an option is selected, the appropriatelogging information is saved to the specified log file if the Enable logging to fileoption is selected. You can configure the log to show as much or as little informationas you want. After configuring the logging options you want, click Save to save thechanges.
Log to File settings
You must specify the name of the log file before information can be saved to a file.Click Browse to select an existing file or directory location for the log file. The log filepath supports certain wildcard characters. Wildcard characters which refer to thedate apply to the day that the log file is created. When combined with theAutomatically rotate log file option, wildcards provide an automatic way to archiveactivity for audits. The following list contains the wildcard characters that you canuse.
WILDCARD DESCRIPTION
%H The hour of the day (24-hour clock).
%D The current day of the month.
%M The name of the current month.
%N The numeric value of the current month (1-12).
%Y The 4-digit value of the current year (for example, 2015).
%X The 2-digit value of the current year (for example, 15 for 2015).
%S The name of the domain whose activity is being logged.
%G The name of the group whose activity is being logged.
%L The name of the login ID whose activity is being logged.
%U The full name of the user whose activity is being logged.
Enable logging to file
Select this option to enable Serv-U to begin saving log information to the file that youspecified in the Log file path. If this option is not selected, Serv-U does not log any
217
Log to File settings
Groups
information to the file, regardless of the individual options selected in the LogMessage Options area.
Rotate the log file automatically
To ensure that log files remain a manageable size and can be easily referencedduring auditing, you can automatically rotate the log file on a regular basis. Byspecifying a Log file path containing wildcards that reference the current date, Serv-U can rotate the log file and create a unique file name every hour, day, week, month,or year.
Purge old log files
You can automatically purge old log files by setting a maximum number of files tokeep, a maximum size limit in megabytes, or both. Setting these options to "0" meansthat the setting is unlimited and the limit is not applied.
Warning: Log files are purged based only on the current log file path name, and theyare purged approximately every 10 minutes. Log file variables are replaced withWindows wildcard values used to search for matching files. For example:
C:\Logs\%Y:%N:%D %S Log.txt is searched for C:\Logs\????:??:?? *Log.txtC:\Logs\%Y:%M:%D %S Log.txt is searched for C:\Logs\????:*:?? *Log.txtC:\Logs\%S\%Y:%M:%D Log.txt is searched for C:\Logs\--DomainName--\????:*:?? Log.txtC:\Logs\%G\%Y:%M:%D Log.txt is searched for C:\Logs\--GroupName--\????:*:?? Log.txtC:\Logs\%L\%Y:%M:%D Log.txt is searched for C:\Logs\--LoginID--\????:*:?? Log.txtC:\Logs\%U\%Y:%M:%D Log.txt is searched for C:\Logs\--UserFullName--\????:*:?? Log.txt
The following wildcards can be used for log variables:
218
%H --> ??%D --> ??%N --> ??%M --> *%Y --> ????%X --> ??%S --> *%G --> *%L --> *%U --> *
Anything matching the path name you used wildcards for can be purged. Usecaution: it is best practice to place log files into a single directory to avoid unexpectedfile deletion.
Specify IP addresses as exempt from logging
You can specify IP addresses that are exempt from logging. Activity from these IPaddresses is not logged. This is useful to exempt IP addresses for administrators thatmay otherwise generate a lot of logging information that can obfuscate domainactivity from regular users. It can also be used to save log space and reduceoverhead. Click Do Not Log IPs, and then add IP addresses as appropriate.
Group members
The user accounts that are members of the currently selected group are displayed onthis page. It can be used to get a quick overview of what users are currentlyinheriting the settings of the group at this time. Users cannot be added or removedfrom the group using this interface. Adding or removing a group membership mustbe done from the appropriate user's account properties window.
A user account can be granted one of four types of administrative privileges:
l No Privilege
l Group Administrator
l Domain Administrator
l System Administrator
219
Specify IP addresses as exempt from logging
Groups
The value of this attribute can be inherited through group membership. A useraccount with no privilege is a regular user account that can only log in to transferfiles to and from the file server. The Serv-U Management Console is not available tothese user accounts.
A group administrator can only perform administrative duties relating to theirprimary group (the group that is listed first in their groups memberships list). Theycan add, edit, and delete users which are members of their primary group, and theycan also assign permissions at or below the level of the group administrator. Theymay not make any other changes.
A domain administrator can only perform administrative duties for the domain towhich their account belongs. A domain administrator is also restricted fromperforming domain-related activities that may affect other domains. The domain-related activities that may not be performed by domain administrators consist ofconfiguring their domain listeners or configuring ODBC database access for thedomain.
A system administrator can perform any file server administration activity includingcreating and deleting domains, user accounts, or even updating the license of the fileserver. A user account with system administrator privileges that is logged in throughHTTP remote administration can essentially administer the server as if they hadphysical access to the system.
Serv-U also supports read-only administrator accounts which can allowadministrators to log in and view configuration options at the domain or server level,greatly aiding remote problem diagnosis when working with outside parties. Read-only administrator privileges are identical to their full-access equivalents, except thatthey cannot change any settings or create, delete or edit user accounts.
When you configure a user account with administrative privileges, take care inspecifying their home directory. An administrator with a home directory otherthan "\" (root) that is locked in their home directory may not use absolute filepaths outside of their home directory when configuring the file server. Instead,relative paths must be used.
Additionally, such a user account can also use setting files located outside the homedirectory, however, these files must also be specified by using relative paths, forexample, ../../exampleFile.txt.
220

Domain events
You can automatically create a list of the most common events. You can choose tocreate these common events using email or balloon tip actions. Click Create CommonEvent on the Events page. Select the Send Email or Show balloon tip option for theaction you want to perform on the common events. If you choose to send email, enteran email address.
The Write to Windows Event Log and Write to Microsoft Message Queue(MSMQ) options are available for Windows only.
Event actions
You can select from the following actions that are executed when an event istriggered:
l Send Email
l Show Balloon Tip*
l Execute Command*
l Write to Windows Event Log (Windows only)*
l Write to Microsoft Message Queue (MSMQ) (Windows only)*
Events involving anything other than email can only be configured byServ-U server administrators.
Email actions
You can configure email actions to send emails to multiple recipients and to Serv-Ugroups when an event is triggered.
To add an email address, enter it in the To or Bcc fields. To send emails to a Serv-Ugroup, use the Group icon to add or remove Serv-U groups from the distribution list.Separate email addresses by commas or semicolons. Email actions contain a To,Subject and Message parameter. You can use special variables to send specific datapertaining to the event. For more information about the variables, see Systemvariables.
To use email actions, you must first SMTP configuration.
221
Domain events

Groups
Balloon tip actions
You can configure a balloon tip to show in the system tray when an event istriggered. Balloon tip actions contain a Balloon Title and a Balloon Messageparameter. You can use special variables to send specific data pertaining to theevent. For more information about the variables, see System variables.
Execute command actions
You can configure execute command actions to execute a command on a file when anevent is triggered. Execute command actions contain an Executable Path, CommandLine Parameters, and a Completion Wait Time parameter. For the Completion WaitTime parameter, you can enter the number of seconds to wait after starting theexecutable path. Enter zero for no waiting.
Time spent waiting delays any processing that Serv-U can perform.
A wait value should only be used to give an external program enough time to performan operation, such as move a log file before it is deleted (for example,$LogFilePath for the Log File Deleted event). You can use special variables to sendspecific data pertaining to the event. For more information about the variables, seeSystem variables.
Windows Event Log
By writing event messages to a local Windows Event Log, you can monitor and recordServ-U activity by using third-party network management software. All messagesappear in the Windows Application Log from a source of Serv-U.
This event has only one field:
l Log Information: The contents of the message to be written into the event log.This is normally either a human-readable message (for example, filenameuploaded by person) or a machine-readable string (for example,filename|uploaded|person), depending on who or what is expected toread these messages. Serv-U system variables are supported in this field. Thisfield can be left blank, but usually is not.
Microsoft Message Queuing (MSMQ)
Microsoft Message Queuing (MSMQ) is an enterprise technology that provides a
222

method for independent applications to communicate quickly and reliably. Serv-Ucan send messages to new or existing MSMQ queues whenever an event is triggered.Corporations can use this feature to tell enterprise applications that files havearrived, files have been picked up, partners have signed on, or many other activitieshave occurred.
These events have the following two fields:
l Message Queue Path: The MSMQ path that addresses the queue. Remotequeues can be addressed when a full path (for example,MessageServer\Serv-U Message Queue) is specified. Public queues onthe local machine can be addressed when a full path is not specified (forexample, .\Serv-U Message Queue or Serv-U Message Queue). If thespecified queue does not exist, Serv-U attempts to create it. This normally onlyworks on public queues on the local machine. You can also use Serv-U systemvariables in this field.
l Message Body: The contents of the message to be sent into the queue. This isnormally a text string with a specific format specified by an enterpriseapplication owner or enterprise architect. Serv-U system variables can also beused in this field. This field may be left blank, but usually is not.
Microsoft message queues created in Windows do not grant access to SYSTEMby default, preventing Serv-U from writing events to the queue. To correct this,after creating the queue in MSMQ, right-click it, select Properties, and then setthe permissions so that SYSTEM (or the network account under which Serv-Uruns) has permission to the queue.
Event filters
Use event filters to control when a Serv-U event is triggered. By default, events triggereach time the event occurs. The event filter allows events to be triggered only ifcertain conditions are met. For example, a standard event may trigger an email eachtime a file is uploaded to the server. However, by using an event filter, events can betriggered on a more targeted basis. For example, you can configure a File Uploadedevent to only send an email when the file name contains the string important, soan email would be sent when the file Important Tax Forms.pdf is uploaded butnot when other files are uploaded to the server. Additionally, you can configure a FileUpload Failed event to run only when the FTP protocol is used, not triggering for
223
Event filters

Groups
failed HTTP or SFTP uploads. You can do this by controlling the variables and valuesrelated to the event and by evaluating their results when the event is triggered.
Event filter fields
Each event filter has the following critical values that must be set:
l Name: This is the name of the filter, used to identify the filter for the event.
l Description (Optional): This is the description of the event, which may beincluded for reference.
l Logic: This determines how the filter interacts with other filters for an event. Inmost cases, AND is used, and all filters must be satisfied for the event totrigger. The function of AND is to require that all conditions be met. However,the OR operator can be used if there are multiple possible satisfactoryresponses (for example, abnormal bandwidth usage of less than 20 KB/s ORgreater than 2000 KB/s).
l Filter Comparison: This is the most critical portion of the filter. The FilterComparison contains the evaluation that must occur for the event to trigger.For example, a filter can be configured so that only the user admin triggers theevent. In this case, the comparison is If $Name = (is equal to) admin,and the data type is string. For bandwidth, either an unsigned integer ordouble precision floating point value is used.
Event filters also support wildcards when evaluating text strings. The supported wild-cards include:
l * - The asterisk wildcard matches any text string of any length. For example:
l An event filter that compares the $FileName variable to the stringdata* matches files named data, data7, data77, data.txt,data7.txt, and data77.txt.
224
l ? - The question mark wildcard matches any one character, but only onecharacter. For example:
l An event filter that compares the $FileName variable to the stringdata? matches a file named data7 but not data, data77, data.txt,data7.txt, or data77.txt.
l An event filter that compares the $FileName variable to the stringdata?.* matches files named data7 and data7.txt but not data,data77, data.txt, or data77.txt.
l An event filter that compares the $Name variable to the string A????matches any five-character user name that starts with A.
l [] - The bracket wildcard matches a character against the set of charactersinside the brackets. For example:
l An event filter that compares the $FileName variable to the string data[687].txt matches files named data6.txt, data7.txt anddata8.txt but not data5.txt.
l An event filter that compares the $LocalPathName variable to the string[CD]:\* matches any file or folder on the C: or D: drives.
You can use multiple wildcards in each filter. For example:
l An event filter that compares the $FileName variable to the string[cC]:\*.??? matches any file on the C: drive that ends in a three letter fileextension.
l An event filter that compares the $FileName variable to the string ?:\*Red[678]\?????.* matches a file on any Windows drive, contained in any folderwhose name contains Red6, Red7 or Red8, and that also has a five characterfile name followed by a file extension of any length.
Event filters
Event filters are used by comparing fields to expected values in the Event Filtermenu. The best example is raising an event only when a certain user triggers theaction, or when a certain file is uploaded. For example, an administrator may want toraise an email event when the file HourlyUpdate.csv is uploaded to the server,but not when other files are uploaded. To do this, create a new event in the DomainDetails > Events menu. The Event Type is File Uploaded, and on the Event Filter tab anew filter must be added. The $FileName variable is used and the value isHourlyUpdate.csv as shown below:
225
Event filters

Groups
As another example, it may be necessary to know when a file transfer fails for aspecific user account. To perform this task, create a new File Upload Failed event, andadd a new filter.
The filter comparison is the $Name variable, and the value to compare is the username, such as ProductionLineFTP:
You can also filter for events based on specific folders using wildcards. It may benecessary to trigger events for files uploaded only to a specific folder, such as whenan accounting department uploads time-sensitive tax files. To filter based on a foldername, create a new File Uploaded event in the Domain Details > Events menu, andset it to Send Email. Enter the email recipients, subject line, and message content,and then open the Event Filters page. Create a new event filter, and add the filtercomparison If $LocalPathName = (is equal to)C:\ftproot\accounting\* with the type of (abcd) string. This will cause theevent to trigger only for files that are located within C:\ftproot\accounting\.
226

Server details
IP access rules restrict login access to specific IP addresses, ranges of IP addresses, ora domain name. IP access rules can be configured at the server, domain, group, anduser levels.
IP access rules are applied in the order they are displayed. In this way, specific rulescan be placed at the top to allow or deny access before a more general rule isapplied later on in the list. The arrows on the right side of the list can be used tochange the position of an individual rule in the list.
Specifying IP access masks
IP access rules use masks to authorize IP addresses and domain names. The maskscan contain specific values, ranges, and wildcards made up of the followingelements.
VALUE OR
WILDCARDEXPLANATION
xxxStands for an exact match, such as 192.0.2.0 (IPv4),fe80:0:0:0:a450:9a2e:ff9d:a915 (IPv6, long form) orfe80::a450:9a2e:ff9d:a915 (IPv6, shorthand).
xxx-xxxStands for a range of IP addresses, such as 192.0.2.0-19 (IPv4),fe80:0:0:0:a450:9a2e:ff9d:a915-a9aa (IPv6, long form), orfe80::a450:9a2e:ff9d:a915-a9aa (IPv6, shorthand).
*Stands for any valid IP address value, such as 192.0.2.*, which isanalogous to 192.0.2.0-255, or fe80::a450:9a2e:ff9d:*, whichis analogous to fe80::a450:9a2e:ff9d:0-ffff.
227
Server details

Groups
VALUE OR
WILDCARDEXPLANATION
?Stands for any valid character when specifying a reverse DNS name,such as server?.example.com.
/
Specifies the use of CIDR notation to specify which IP addresses shouldbe allowed or blocked. Common CIDR blocks are /8 (for 1.*.*.*),/16 (for 1.2.*.*) and /24 (for 1.2.3.*). CIDR notation alsoworks with IPv6 addresses, such as 2001:db8::/32.
Caveats
Specific IP addresses listed in Allow rules will not be blocked by anti-hammering.These IP addresses are white-listed. However, addresses matched by a wildcard or arange are subject to anti-hammering prevention.
Implicit deny all
Until you add the first IP access rule, connections from any IP address areaccepted. After you add the first IP access rule, all connections that are notexplicitly allowed are denied. This is also known as an implicit Deny All rule.Make sure you add a Wildcard Allow rule (such as Allow *.*.*.*) at the endof your IP access rule list.
Matching all addresses
Use the *.*.*.* mask to match any IPv4 address. Use the *:* mask to matchany IPv6 address. If you use both IPv4 and IPv6 listeners, add Allow ranges forboth IPv4 and IPv6 addresses.
DNS lookup
If you use a dynamic DNS service, you can specify a domain name instead of anIP address to allow access to users who do not have a static IP address. You canalso specify reverse DNS names. If you create a rule based on a domain nameor reverse DNS, Serv-U performs either a reverse DNS lookup or DNS resolutionto apply these rules. This can cause a slight delay during login, depending onthe speed of the DNS server of the system.
Rule use during connection
The level at which you specify an IP access rule also defines how far a
228

connection is allowed before it is rejected. Server and domain level IP accessrules are applied before the welcome message is sent. Domain level IP accessrules are also applied when responding to the HOST command to connect to avirtual domain. Group and user level IP access rules are applied in response toa USER command when the client identifies itself to the server.
Anti-hammering
You can set up an anti-hammering policy that blocks clients who connect andfail to authenticate more than a specified number of times within a specifiedperiod of time. You can configure an anti-hammering policy server-wide inServer Limits and Settings > Settings and domain-wide in Domain Limits andSettings > Settings.
IP addresses blocked by anti-hammering rules appear in the domain IP accessrules with a value in the Expires in column. If you have multiple domains withdifferent listeners, blocked IP addresses appear in the domain that containsthe listener. Blocked IP addresses do not appear in the server IP access list,even if anti-hammering is configured at the server level.
The Expires in value of the blocked IP address counts down second-by-second untilthe entry disappears. You can unblock any blocked IP address early by deleting itsentry from the list.
229
Caveats
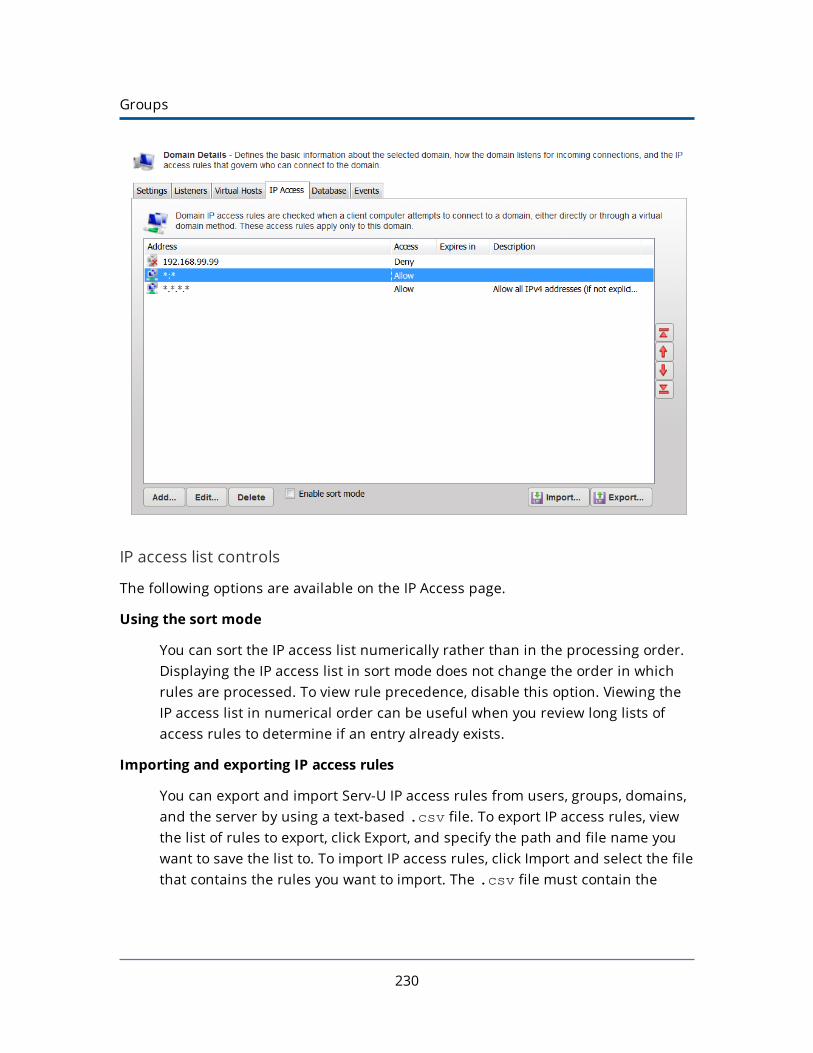
Groups
IP access list controls
The following options are available on the IP Access page.
Using the sort mode
You can sort the IP access list numerically rather than in the processing order.Displaying the IP access list in sort mode does not change the order in whichrules are processed. To view rule precedence, disable this option. Viewing theIP access list in numerical order can be useful when you review long lists ofaccess rules to determine if an entry already exists.
Importing and exporting IP access rules
You can export and import Serv-U IP access rules from users, groups, domains,and the server by using a text-based .csv file. To export IP access rules, viewthe list of rules to export, click Export, and specify the path and file name youwant to save the list to. To import IP access rules, click Import and select the filethat contains the rules you want to import. The .csv file must contain the
230

following fields, including the headers:
l IP: The IP address, IP range, CIDR block, or domain name for which therule applies.
l Allow: Set this value to 0 for Deny, or 1 for Allow.
l Description: A text description of the rule for reference purposes.
Examples of IP address rules
Office-only access
A contractor has been hired to work in the office, and only in the office. Officeworkstations have IP addresses in the range of 192.0.2.0 - 192.0.2.24. The relatedServ-U access rule should be Allow 192.0.2.0-24, and it should be added toeither the user account of the contractor or a Contractors group that containsmultiple contractors. No deny rule is required because Serv-U provides an implicitDeny All rule at the end of the list.
Prohibited computers
Users should normally be able to access Serv-U from anywhere, except from a bankof special internal computers in the IP address range of 192.0.2.0 - 192.0.2.24. Therelated Serv-U access rules should be Deny 192.0.2.0-24, followed by Allow*.*.*.*, and these rules should be added to either the domain or the server IPaccess rules.
DNS-based access control
The only users allowed to access a Serv-U domain connect from *.example.com or*.example1.com. The related Serv-U access rules should be Allow*.example.com and Allow *.example1.com in any order, and these rulesshould be added to the domain IP access rules. No deny rule is required becauseServ-U provides an implicit Deny All rule at the end of the list.
231
Examples of IP address rules
Groups
Limits and Settings
Serv-U contains options which you can use to customize how Serv-U can be used, andwhich also provide ways to apply limits and custom settings to users, groups,domains, and the server in its entirety. The limits stack intelligently, with usersettings overriding group settings, group settings overriding domain settings, anddomain settings overriding server settings. In addition, you can configure limits sothat they are only applied during certain days of the week, or certain times of theday. You can also grant exceptions to administrators and restrict specific users morethan others, providing total control over the server.
The Limits and Settings in Serv-U are divided into the following categories:
l Connection
l Password
l Directory Listing
l Data Transfer
l HTTP
l Email
l File Sharing
l Advanced
To apply a limit, select the appropriate category, click Add, select the limit, and thenselect or enter the value. For example, to disable the Lock users in home directoryoption for a domain, perform the following steps:
l Select Domain > Domain Limits & Settings from the Serv-U ManagementConsole.
l Select Directory Listing from the Limit Type list.
l Click Add.
l Select Lock users in home directory from the Limit list.
l Deselect the option.
l Click Save.
The limits list displays the current limits applied to the domain. Limits with a light-blue background are default values. Limits with a white background are values thatoverride the defaults. After you complete the previous steps, a new Lock users in
232
home directory limit appears in the list that displays "No" as the value. Because ofinheritance rules, this option applies to all users in the domain unless it isoverridden at the group or user level. For more information about this method ofinheritance, see User interface conventions.
You can delete limits by selecting them and clicking Delete. To edit an overriddenvalue, select the limit, and then click Edit. Default rules cannot be edited or deleted.Create a new limit to override a default one.
To create a limit that is restricted to a specific time of day or days of the week, clickAdvanced in the New Limit or Edit Limit window. Select Apply limit only at this timeof day to specify a start and stop time for the new limit. To restrict the limit to certaindays of the week, deselect the days for which you do not want to apply the limit.When a limit is restricted in this way, default values (or the value of other limitoverrides) are applied when the time of day or day of the week restrictions are notmet for this limit.
Ratio free files
Files listed in the ratio free file list are exempt from any imposed transfer ratios. Inother words, if a user must upload files in order to earn credits towards downloadinga file, a file that matches an entry in this list can always be downloaded by users,even if they have no current credits. This is commonly used to make special files,such as a readme or a directory information file, always accessible to users.
You can use the '*' and '?' wildcard characters when specifying a ratio free file. Using'*' specifies a wildcard of any kind of character and any length. For example, entering*.txt makes any file with a .txt extension free for download, regardless of the actualfile name. A '?' can be used to represent a single character within the file name ordirectory. Finally, full paths can be specified by using standard directory paths suchas C:\ftproot\common\ (on Windows) or /var/ftpfiles/shared/ (on Linux).
In addition, full or relative paths can be used when making an entry. If a full path isused when specifying a file name, only that specific file is exempt from transferratios. If a relative path is used, such as entering only readme.txt, the provided fileis exempt from transfer ratios regardless of the directory it is located in.
233
Ratio free files
Groups
SFTP for users and groups
Use an existing public key1. Obtain a public key file.
2. Place the public key file in a secured directory in the server, and then useBrowse in Serv-U to select the file.
3. Click Save.
Create a key pair1. Click Manage Keys.
2. Click Create Key.3. Type the name of the key pair (for example, MyKey), which is also used to name
the storage file.
4. Type the output directory of the certificate (for example,C:\ProgramData\SolarWinds\Serv-U\).
5. Select the key type (default of DSA is preferred, but RSA is available).
6. Select the key length (default of 1024 bits provides best performance, 2048 bitsis a good median, and 4096 bits provides best security).
7. Enter the password to use for securing the key file.
8. Click Create.
Create multiple keys per user
For the purposes of public key authentication, you can associate multiple public keyswith a user account.
To create multiple keys for an account:
1. Click Manage Keys.
2. Click Add Key, and then specify the key name and the key path.
When authenticating a client, Serv-U checks all the keys you provide here. Ifauthenticating against one key fails, Serv-U proceeds to check the next key.
For optimal results, the following best practices are recommended:
l It is recommended that you do not create more than 100 keys per user account.
l If you have a large number of public keys, divide the keys between multiple
234
users, and define the common user properties at group level.
l Avoid storing the public keys in a network path.
235
Create multiple keys per user
System variablesYou can customize certain configurable messages in Serv-U to include a wide rangeof variables as outlined in the following list. These variables are replaced at run timewith the appropriate value allowing up-to-date statistics and feedback to be providedto logged in users. Some of the places where you can use these variables includeevent messages, customized FTP command responses, or a welcome message.
Furthermore, you can also use the %USER%, %HOME%, %USER_FULL_NAME%, and%DOMAIN_HOME% variables. For more information about these variables, see
Directory access rules.
When you use macros, in general, it is best to use $ macros for events and insystem messages (such as login messages or customized FTP responses) and% macros for configuration values. Many of the $ macros do not have explicitvalues until a session has been successfully established or a specific actionhas taken place, whereas the % macros have explicit values at all times.
All variables are case sensitive. Statistical information, unless otherwise specified, iscalculated since the Serv-U File Server was last started.
Server information
VARIABLE DESCRIPTION
$ServerName Displays the full name of the server (that is, Serv-U).
$ServerVersionShortDisplays the first two digits of the current version of theServ-U File Server (for example, 15.1).
$ServerVersionLongDisplays the full version number of the Serv-U File Server (forexample, 15.1.0.480).
$OSDisplays the name of the operating system (for example,Windows Server 2008 R2).
$OSVerDisplays the full version number of the operating system (forexample, 6.1.7601).
236

System variables
VARIABLE DESCRIPTION
$OSAndPlatformDisplays the name of the operating system (for example,Windows Server 2008 R2) and platform (for example, 32-bitor 64-bit).
$OSCaseSensitive States if the operating system is case sensitive.
$ComputerNameDisplays the name of the computer retrieved from theoperating system, normally the same as the UNC name on aWindows network (for example, WEB-SERVER-01).
$EventName Contains the configured name of the event.
$EventType Contains the type of the event that was triggered.
$EventDescription Contains the configured description of the event.
$LogFilePathRetrieves the path to the log file (Log File Deleted and LogFile Rotated Events only).
$OldLogFilePathRetrieves the old path to the log file (Log File Rotated Eventsonly).
$GatewayIPAddressRetrieves the Gateway IP address (Gateway Listener Success,Gateway Listener Failure, Permanent Gateway ListenerSuccess, Permanent Gateway Listener Failure Events only).
$GatewayPortRetrieves the Gateway port (Gateway Listener Success,Gateway Listener Failure, Permanent Gateway ListenerSuccess, Permanent Gateway Listener Failure Events only).
$ListenerIPAddressRetrieves the listener IP address (Listener Success, ListenerFailure, Permanent Listener Success, Permanent ListenerFailure Events only).
$ListenerPortRetrieves the listener port (Listener Success, Listener Failure,Permanent Listener Success, Permanent Listener FailureEvents only).
$ListenerTypeRetrieves the listener type (Listener Success, Listener Failure,Permanent Listener Success, Permanent Listener Failure
237
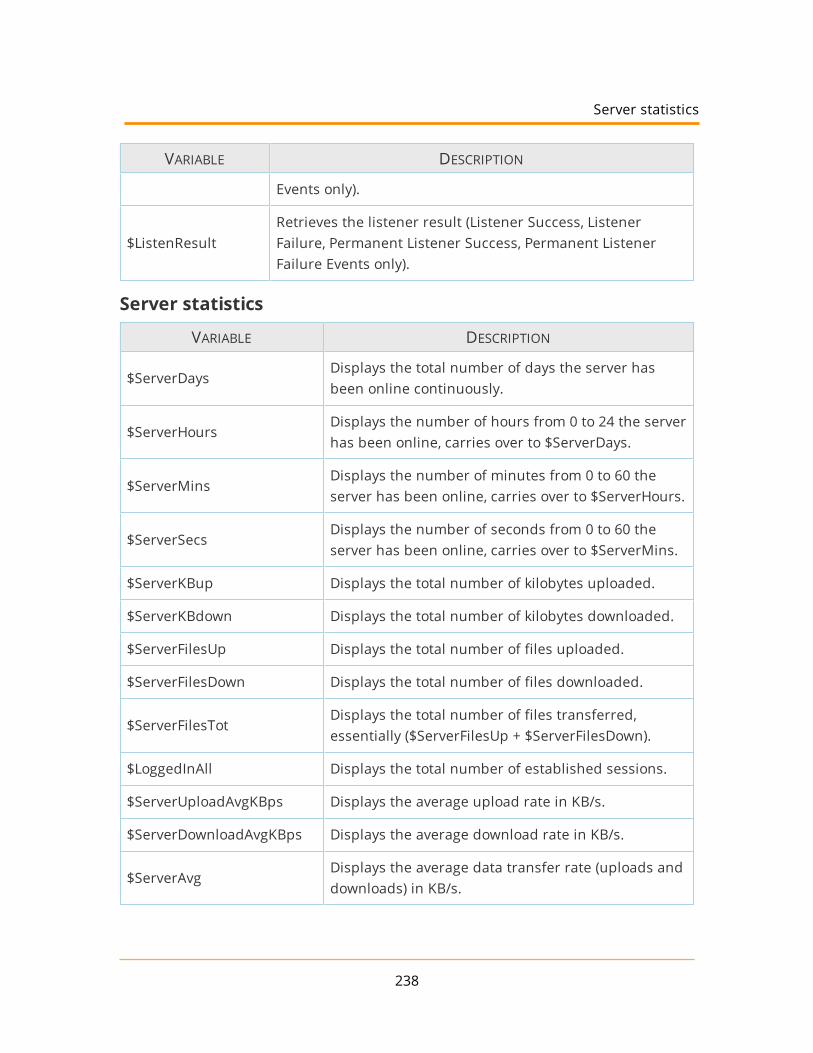
VARIABLE DESCRIPTION
Events only).
$ListenResultRetrieves the listener result (Listener Success, ListenerFailure, Permanent Listener Success, Permanent ListenerFailure Events only).
Server statistics
VARIABLE DESCRIPTION
$ServerDaysDisplays the total number of days the server hasbeen online continuously.
$ServerHoursDisplays the number of hours from 0 to 24 the serverhas been online, carries over to $ServerDays.
$ServerMinsDisplays the number of minutes from 0 to 60 theserver has been online, carries over to $ServerHours.
$ServerSecsDisplays the number of seconds from 0 to 60 theserver has been online, carries over to $ServerMins.
$ServerKBup Displays the total number of kilobytes uploaded.
$ServerKBdown Displays the total number of kilobytes downloaded.
$ServerFilesUp Displays the total number of files uploaded.
$ServerFilesDown Displays the total number of files downloaded.
$ServerFilesTotDisplays the total number of files transferred,essentially ($ServerFilesUp + $ServerFilesDown).
$LoggedInAll Displays the total number of established sessions.
$ServerUploadAvgKBps Displays the average upload rate in KB/s.
$ServerDownloadAvgKBps Displays the average download rate in KB/s.
$ServerAvgDisplays the average data transfer rate (uploads anddownloads) in KB/s.
238
Server statistics
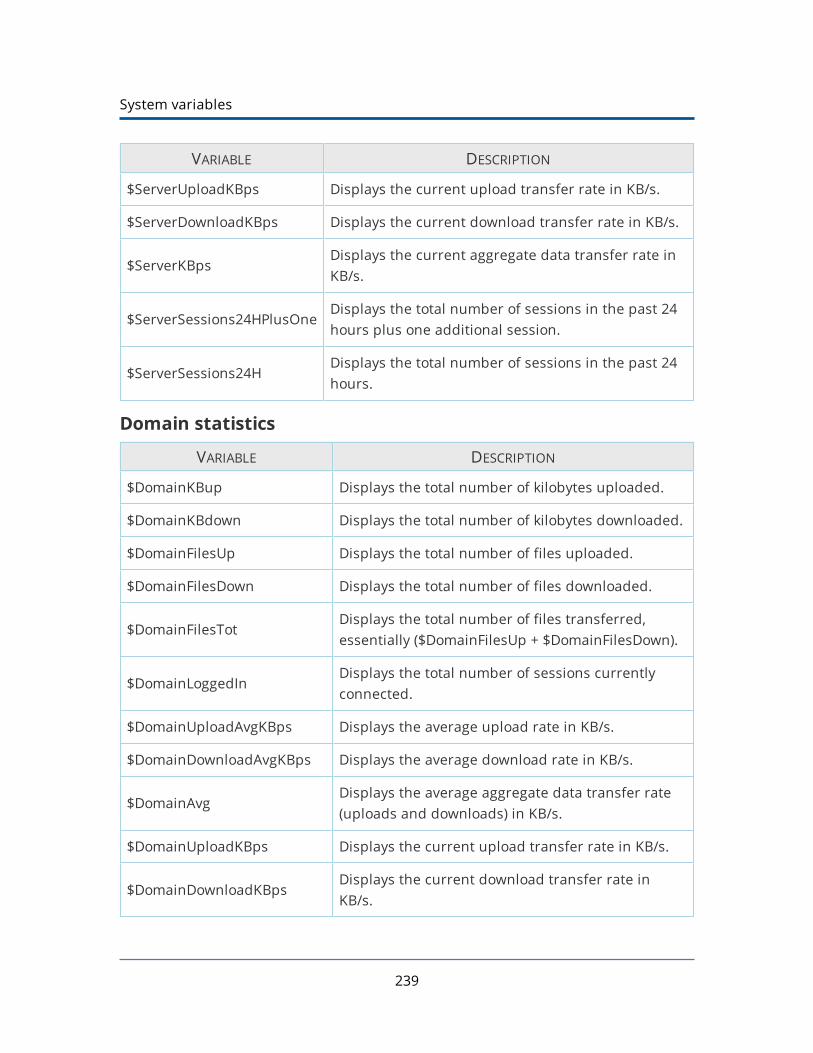
System variables
VARIABLE DESCRIPTION
$ServerUploadKBps Displays the current upload transfer rate in KB/s.
$ServerDownloadKBps Displays the current download transfer rate in KB/s.
$ServerKBpsDisplays the current aggregate data transfer rate inKB/s.
$ServerSessions24HPlusOneDisplays the total number of sessions in the past 24hours plus one additional session.
$ServerSessions24HDisplays the total number of sessions in the past 24hours.
Domain statistics
VARIABLE DESCRIPTION
$DomainKBup Displays the total number of kilobytes uploaded.
$DomainKBdown Displays the total number of kilobytes downloaded.
$DomainFilesUp Displays the total number of files uploaded.
$DomainFilesDown Displays the total number of files downloaded.
$DomainFilesTotDisplays the total number of files transferred,essentially ($DomainFilesUp + $DomainFilesDown).
$DomainLoggedInDisplays the total number of sessions currentlyconnected.
$DomainUploadAvgKBps Displays the average upload rate in KB/s.
$DomainDownloadAvgKBps Displays the average download rate in KB/s.
$DomainAvgDisplays the average aggregate data transfer rate(uploads and downloads) in KB/s.
$DomainUploadKBps Displays the current upload transfer rate in KB/s.
$DomainDownloadKBpsDisplays the current download transfer rate inKB/s.
239
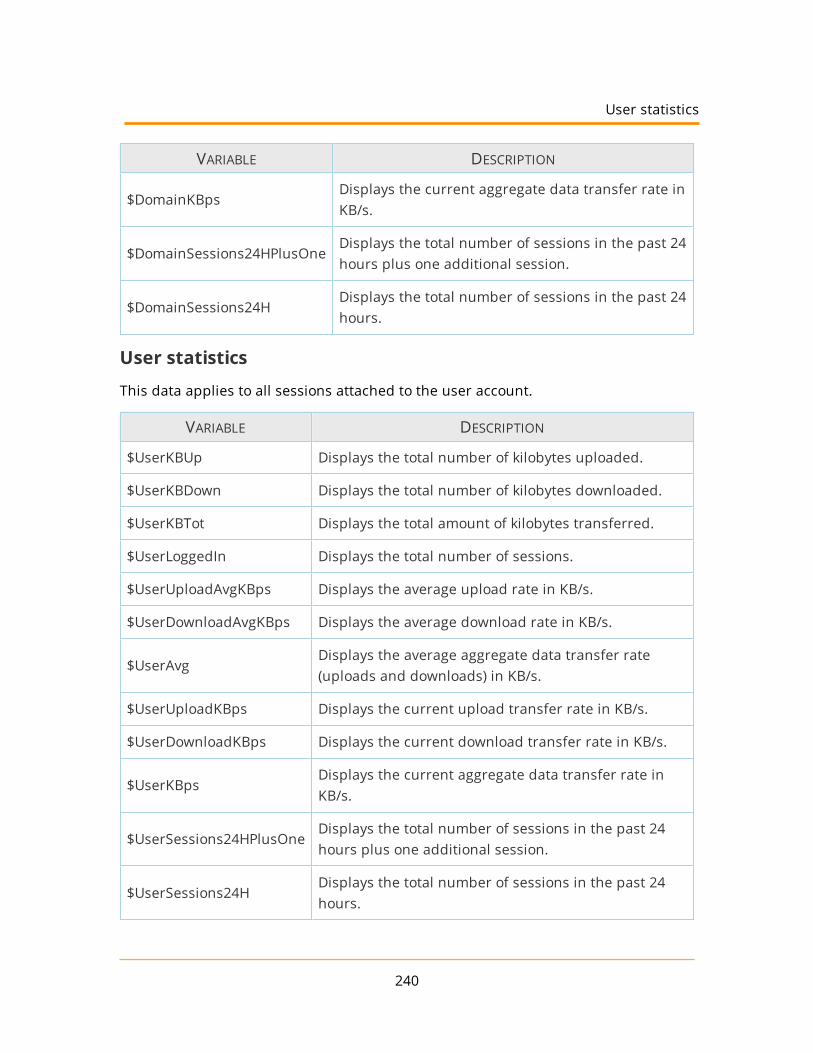
VARIABLE DESCRIPTION
$DomainKBpsDisplays the current aggregate data transfer rate inKB/s.
$DomainSessions24HPlusOneDisplays the total number of sessions in the past 24hours plus one additional session.
$DomainSessions24HDisplays the total number of sessions in the past 24hours.
User statistics
This data applies to all sessions attached to the user account.
VARIABLE DESCRIPTION
$UserKBUp Displays the total number of kilobytes uploaded.
$UserKBDown Displays the total number of kilobytes downloaded.
$UserKBTot Displays the total amount of kilobytes transferred.
$UserLoggedIn Displays the total number of sessions.
$UserUploadAvgKBps Displays the average upload rate in KB/s.
$UserDownloadAvgKBps Displays the average download rate in KB/s.
$UserAvgDisplays the average aggregate data transfer rate(uploads and downloads) in KB/s.
$UserUploadKBps Displays the current upload transfer rate in KB/s.
$UserDownloadKBps Displays the current download transfer rate in KB/s.
$UserKBpsDisplays the current aggregate data transfer rate inKB/s.
$UserSessions24HPlusOneDisplays the total number of sessions in the past 24hours plus one additional session.
$UserSessions24HDisplays the total number of sessions in the past 24hours.
240
User statistics

System variables
Last transfer statistics
This data applies to the most recently completed successful data transfer.
VARIABLE DESCRIPTION
$TransferBytesPerSecondDisplays the effective (compressed) transferrate in bytes/s.
$TransferKBPerSecondDisplays the effective (compressed) transferrate in KB/s.
$TransferBytesDisplays the effective (compressed) numberof bytes transferred, formatted for display,for example, 32,164.
$NoFormatTransferBytesDisplays the effective (compressed) numberof bytes transferred, unformatted, forexample, 32164.
$TransferKBDisplays the effective (compressed) numberof kilobytes transferred, formatted fordisplay.
$ActualTransferBytesPerSecondDisplays the actual (uncompressed)transfer rate in bytes/s.
$ActualTransferKBPerSecondDisplays the actual (uncompressed)transfer rate in KB/s.
$ActualTransferBytesDisplays the actual (uncompressed)number of bytes transferred, formatted fordisplay, for example, 32,164.
$NoFormatActualTransferBytesDisplays the actual (uncompressed)number of bytes transferred, unformatted,for example, 32164.
$ActualTransferKBDisplays the actual (uncompressed)number of kilobytes transferred, formattedfor display.
241
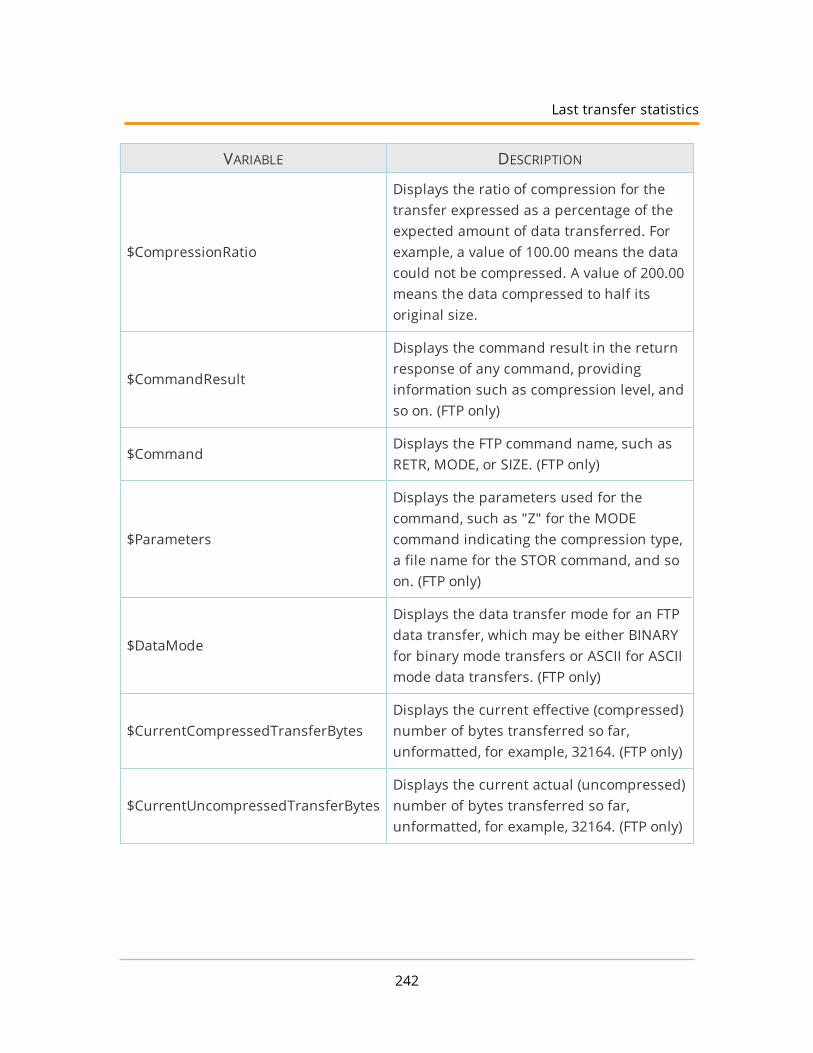
VARIABLE DESCRIPTION
$CompressionRatio
Displays the ratio of compression for thetransfer expressed as a percentage of theexpected amount of data transferred. Forexample, a value of 100.00 means the datacould not be compressed. A value of 200.00means the data compressed to half itsoriginal size.
$CommandResult
Displays the command result in the returnresponse of any command, providinginformation such as compression level, andso on. (FTP only)
$CommandDisplays the FTP command name, such asRETR, MODE, or SIZE. (FTP only)
$Parameters
Displays the parameters used for thecommand, such as "Z" for the MODEcommand indicating the compression type,a file name for the STOR command, and soon. (FTP only)
$DataMode
Displays the data transfer mode for an FTPdata transfer, which may be either BINARYfor binary mode transfers or ASCII for ASCIImode data transfers. (FTP only)
$CurrentCompressedTransferBytesDisplays the current effective (compressed)number of bytes transferred so far,unformatted, for example, 32164. (FTP only)
$CurrentUncompressedTransferBytesDisplays the current actual (uncompressed)number of bytes transferred so far,unformatted, for example, 32164. (FTP only)
242
Last transfer statistics
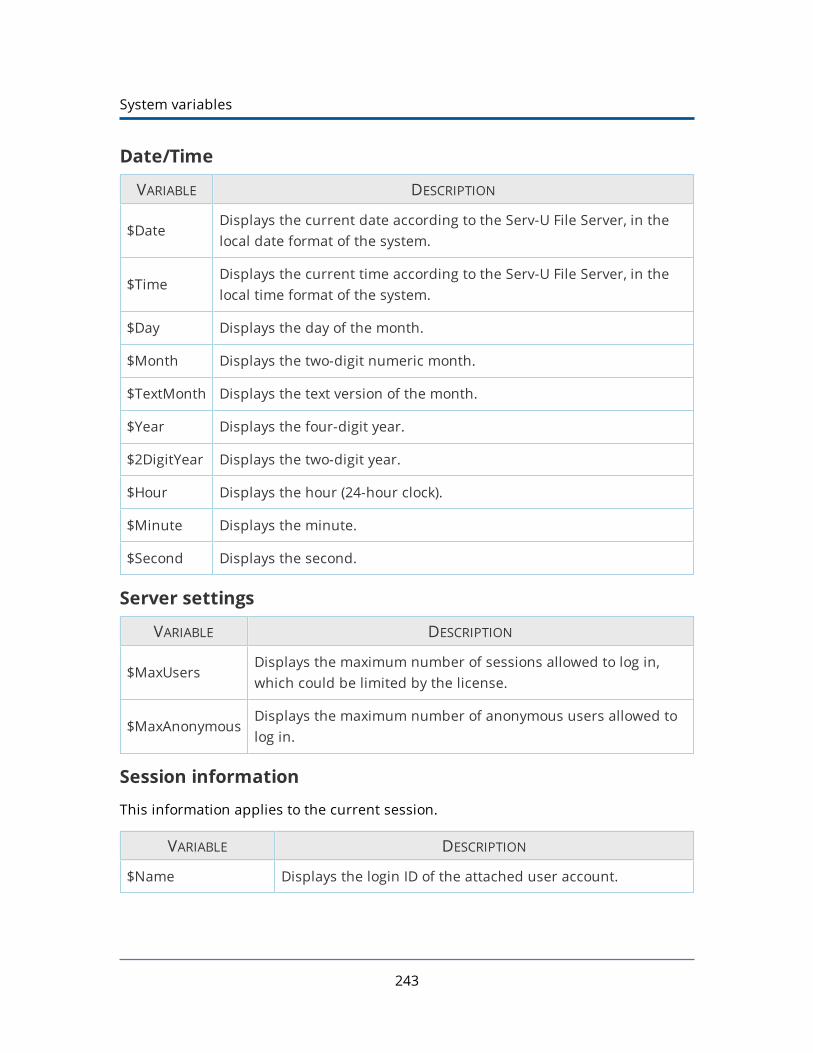
System variables
Date/Time
VARIABLE DESCRIPTION
$DateDisplays the current date according to the Serv-U File Server, in thelocal date format of the system.
$TimeDisplays the current time according to the Serv-U File Server, in thelocal time format of the system.
$Day Displays the day of the month.
$Month Displays the two-digit numeric month.
$TextMonth Displays the text version of the month.
$Year Displays the four-digit year.
$2DigitYear Displays the two-digit year.
$Hour Displays the hour (24-hour clock).
$Minute Displays the minute.
$Second Displays the second.
Server settings
VARIABLE DESCRIPTION
$MaxUsersDisplays the maximum number of sessions allowed to log in,which could be limited by the license.
$MaxAnonymousDisplays the maximum number of anonymous users allowed tolog in.
Session information
This information applies to the current session.
VARIABLE DESCRIPTION
$Name Displays the login ID of the attached user account.
243
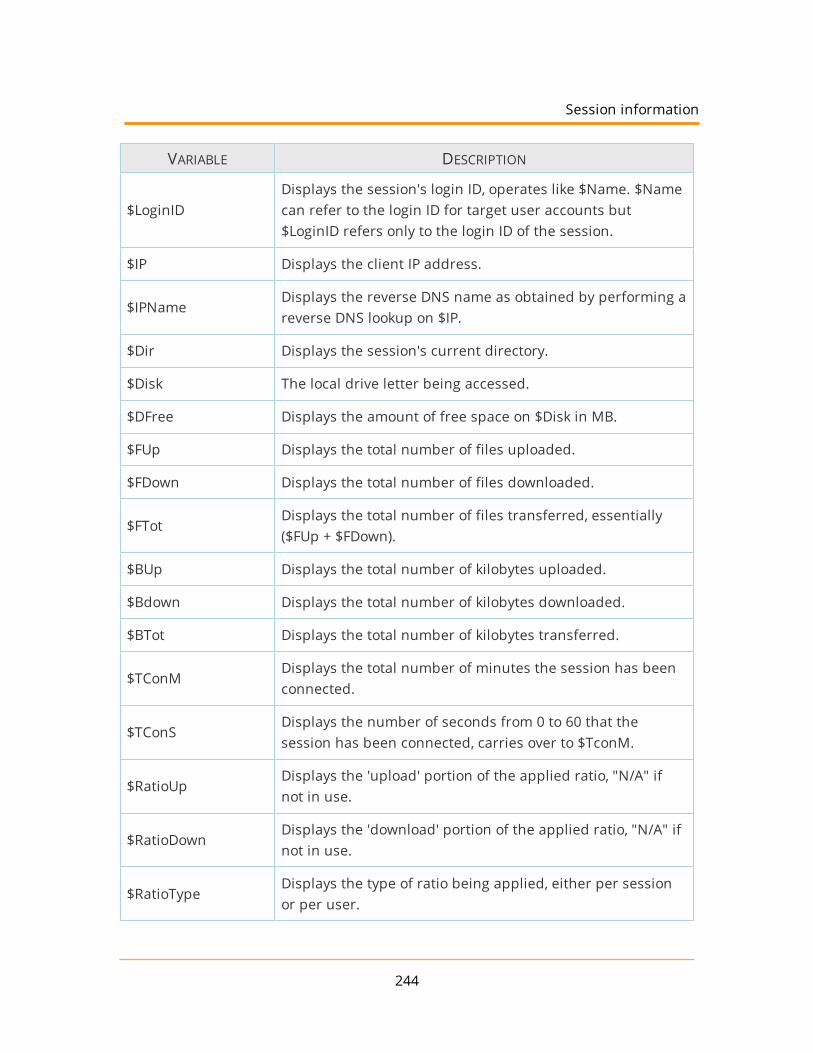
VARIABLE DESCRIPTION
$LoginIDDisplays the session's login ID, operates like $Name. $Namecan refer to the login ID for target user accounts but$LoginID refers only to the login ID of the session.
$IP Displays the client IP address.
$IPNameDisplays the reverse DNS name as obtained by performing areverse DNS lookup on $IP.
$Dir Displays the session's current directory.
$Disk The local drive letter being accessed.
$DFree Displays the amount of free space on $Disk in MB.
$FUp Displays the total number of files uploaded.
$FDown Displays the total number of files downloaded.
$FTotDisplays the total number of files transferred, essentially($FUp + $FDown).
$BUp Displays the total number of kilobytes uploaded.
$Bdown Displays the total number of kilobytes downloaded.
$BTot Displays the total number of kilobytes transferred.
$TConMDisplays the total number of minutes the session has beenconnected.
$TConSDisplays the number of seconds from 0 to 60 that thesession has been connected, carries over to $TconM.
$RatioUpDisplays the 'upload' portion of the applied ratio, "N/A" ifnot in use.
$RatioDownDisplays the 'download' portion of the applied ratio, "N/A" ifnot in use.
$RatioTypeDisplays the type of ratio being applied, either per sessionor per user.
244
Session information

System variables
VARIABLE DESCRIPTION
$RatioCreditTypeDisplays the type of ratio credit granted for transfers, eitherper bytes or per complete file.
$RatioCreditDisplays the current transfer credit for the applied ratio,either megabytes or complete files.
$QuotaUsedDisplays how much disk quota is currently being used inMB, "Unlimited" if no quota is in use.
$QuotaLeftDisplays how much disk quota is available in MB,"Unlimited" if no quota is in use.
$QuotaMaxDisplays the maximum amount of disk space that can beused in MB, "Unlimited" if no quota is in use.
$CurrentDirMaxSize
Displays the maximum size of the current directory in MB. Ifthe directory has no size limit, the variable will return"unlimited". If permission is denied in the directory, or anyother error occurs, the value "N/A" will be returned.
$SessionIDDisplays the unique session ID of the current session.Session IDs are counted from 000001, and the counter isreset each time Serv-U is started.
$ProtocolDisplays the current protocol being used (FTP, FTPS, HTTP,HTTPS, or SFTP (SSH2)).
$UserDomainNameUses either the logged in domain name or the user's parentdomain name. A blank name is returned if the user is aglobal server user that is not logging in.
$DomainName Displays the current domain that the session is logged into.
$DomainDescriptionDisplays the description of the current domain that thesession is logged into.
$TimeRemainingDisplays the time remaining when blocking an IP addressfor an amount of time (available only in Event notifications).
$LocalHomeDirectory Displays the local home directory. It should only be used for
245
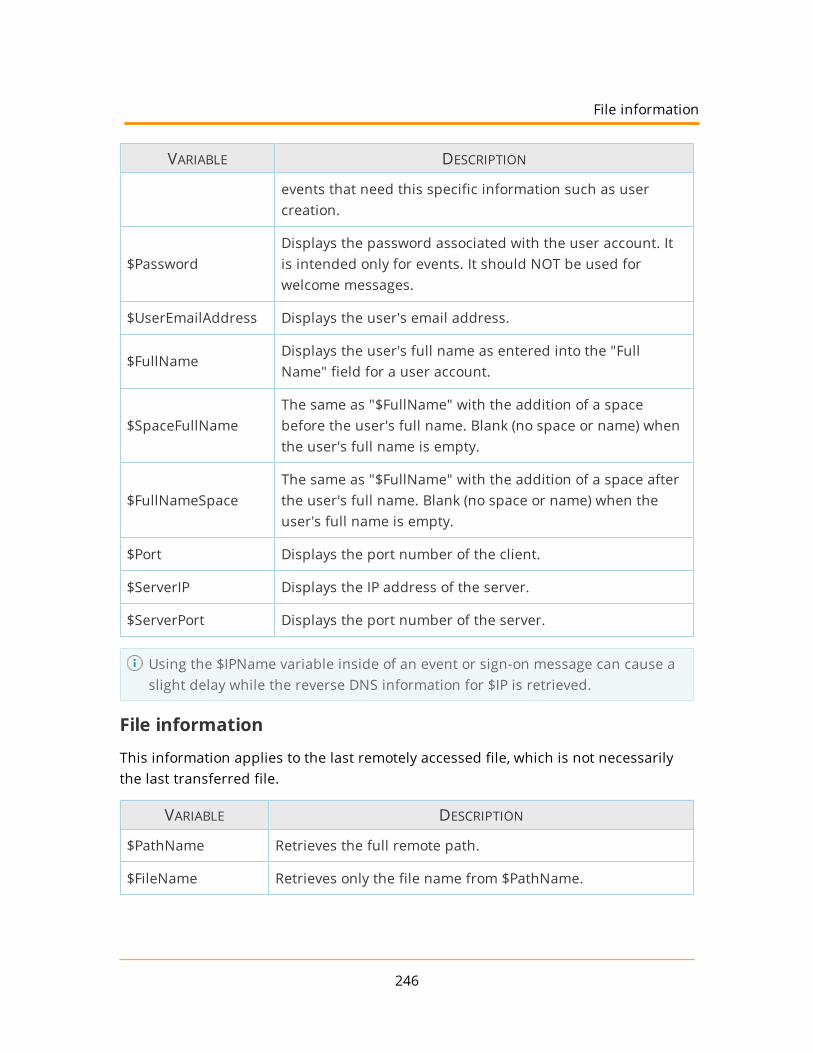
VARIABLE DESCRIPTION
events that need this specific information such as usercreation.
$PasswordDisplays the password associated with the user account. Itis intended only for events. It should NOT be used forwelcome messages.
$UserEmailAddress Displays the user's email address.
$FullNameDisplays the user's full name as entered into the "FullName" field for a user account.
$SpaceFullNameThe same as "$FullName" with the addition of a spacebefore the user's full name. Blank (no space or name) whenthe user's full name is empty.
$FullNameSpaceThe same as "$FullName" with the addition of a space afterthe user's full name. Blank (no space or name) when theuser's full name is empty.
$Port Displays the port number of the client.
$ServerIP Displays the IP address of the server.
$ServerPort Displays the port number of the server.
Using the $IPName variable inside of an event or sign-on message can cause aslight delay while the reverse DNS information for $IP is retrieved.
File information
This information applies to the last remotely accessed file, which is not necessarilythe last transferred file.
VARIABLE DESCRIPTION
$PathName Retrieves the full remote path.
$FileName Retrieves only the file name from $PathName.
246
File information

System variables
VARIABLE DESCRIPTION
$FileSize Retrieves the size, in bytes, of the file from $FileName.
$FileSizeFmtDisplays a formatted version of the file size, containing thethousands separator (comma or period depending on thecomputer's regional settings).
$FileSizeKBDisplays a formatted floating point value representing thefile size in KB.
$LocalPathNameRetrieves the fully qualified local path name for an operation,as it relates to Windows. For example C:\Temp\File.fidinstead of /Temp/file.fid.
$LocalFileNameRetrieves the name of the file as it is stored on the localcomputer. See $LocalPathName for details.
$OldLocalPathNameSame as $LocalPathName, but contains the path prior torenaming.
$OldLocalFileNameSame as $LocalFileName, but contains the file name prior torenaming.
$OldPathName Retrieves the remote path name prior to renaming.
$OldFileName Retrieves the remote file name prior to renaming.
Current activity
VARIABLE DESCRIPTION
$UNowDisplays the current number of sessions on the Serv-UFile Server.
$UAllDisplays the total number of sessions that haveconnected to the Serv-U File Server since it was laststarted.
$U24hDisplays the total number of sessions that haveconnected to the Serv-U File Server in the last 24 hours.
$UAnonAll Displays the current number of sessions attributed to the
247
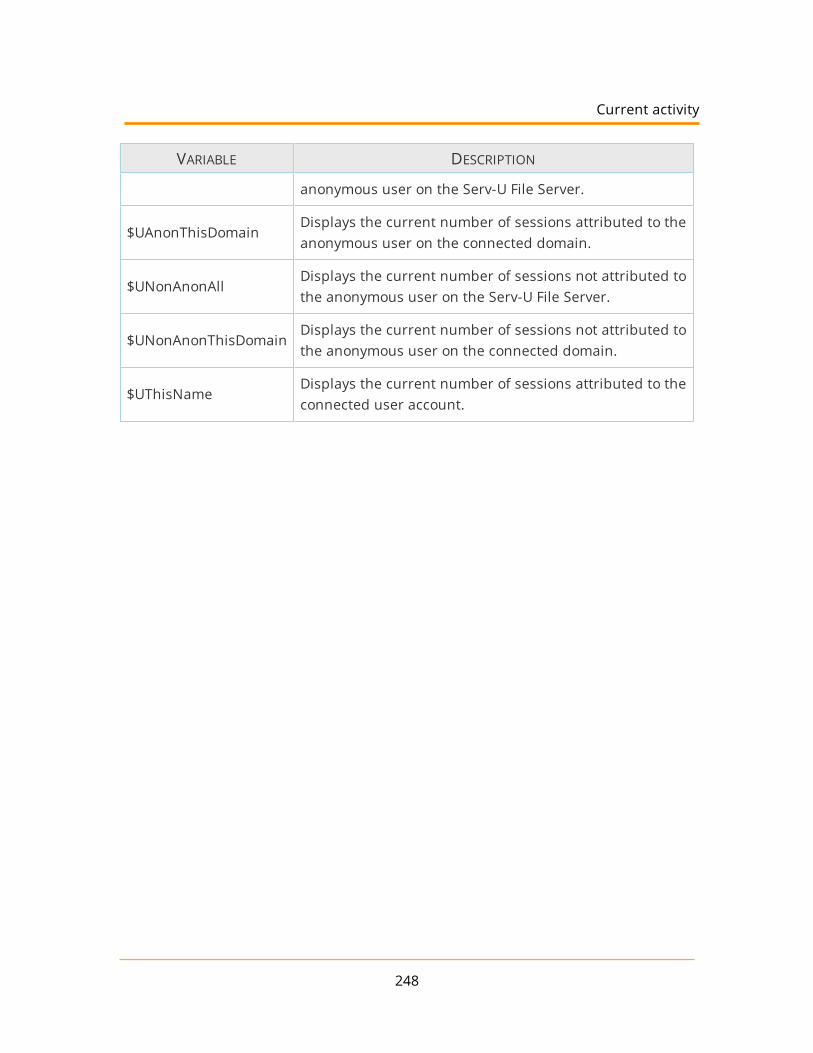
VARIABLE DESCRIPTION
anonymous user on the Serv-U File Server.
$UAnonThisDomainDisplays the current number of sessions attributed to theanonymous user on the connected domain.
$UNonAnonAllDisplays the current number of sessions not attributed tothe anonymous user on the Serv-U File Server.
$UNonAnonThisDomainDisplays the current number of sessions not attributed tothe anonymous user on the connected domain.
$UThisNameDisplays the current number of sessions attributed to theconnected user account.
248
Current activity


![Global Serv[0]](https://img.pdfslide.us/doc/110x75/55cf8c7f5503462b138d09a0/global-serv0.jpg)