Embed Size (px)
Citation preview

Series

IMPORTANT SAFETY INSTRUCTIONSWhen using an electrical appliance, basic safety should always befollowed, including the following:Read all instructions before using this sewing machine.
DANGER - To reduce the risk ot electric shock:1. An appliance should never be left unattended when plugged in.2. Always unplug this appliance from the electric outlet immediately
after using and before cleaning.3. Always unplug before re-lamping. Replace bulb with same type rated
15 watts (220-240V area).
WARNING - To reduce the riskot burns, tire, electricshock, or injury to persons:
1. Do not allow to be used as a toy. Close attention is necessary whenthis appliance is used by or near children.
2. Use this appliance only for its intended use as described in thismanual. Use only attachments recommended by the manufacturer ascontained in this manual.
3. Never operate this appliance if it has a damaged cord or plug, if it is notworking properly, if it has been dropped or damaged, or dropped intowater. Return the appliance to the nearest authorized dealer or servicecenter for examination, repair, electrical or mechanical adjustment.
4. Never operate the appliance with any air openings block. Keepventilation openings of the sewing machine and foot controller freefrom accumulation of lint, dust, and loose cloth.
5. Keep fingers away from all moving parts. Special care is requiredaround the sewing machine needle.
6. Always use the proper needle plate, The wrong plate can cause theneedle to break.
7. Do not use bent needles.8. Do not pull or push fabric while stitching. It may deflect the needle
causing it to break.
9. Switch the sewing machine off (“O“) when making any adjustmentsin the needle area, such as threading needle, changing needle,threading bobbin, or changing presser foot, and the like.
10. Always unplug sewing machine from the electrical outlet whenremoving covers, lubricating, or when making any other userservicing adjustments mentioned in the instruction manual.
11. Never drop or insert any object into any opening.12. Do not use outdoors.13. Do not operate where aerosol spray products are being used or
where oxygen is being administered.14. To disconnect, turn all controls to the off (“O“) position, then remove
plug from outlet.15. Do not unplug by pulling on cord. To unplug, grasp the plug, not the
cord.16. The sound pressure level under normal operating conditions is
75dB(A).17. Please turn off the machine or unplug when the machine is not
operating properly.18. Never place anything on the foot controller.19. If the supply cord that fixed with foot controller is damaged, it must
be replaced by the manufacturer or its service agent or a similarqualified person in order to avoid a hazard.
20. This appliance is not intended for use by persons (including children)with reduced physical, sensory or mental capabilities, or lack ofexperience and knowledge, unless they have been given supervisionor instruction concerning use of the appliance by a personresponsible for their safety.
21. Children should be supervised to ensure that they do not play withthe appliance.
SAVE THESE INSTRUCTIONSThis sewing machine is intended for household use only.

IMPORTANTE INSTRUCCIONES DE SEGURIDADCuando se utiliza un dispositivo eléctrico, debe seguirse siempreprecauciones de seguridad básica, incluyendo las siguientes:Leer todas las instrucciones antes de utilizar está máquina de coser.
PELIGRO - Para reducir el riesgo de descarga eléctricas:1. Un dispositivo eléctrico nunca debe dejarse desatendido cuando está
conectado.2. Desenchufar siempre la máquina de la toma de corriente
inmediatamente después de utilizarla y antes de su limpieza.3. Desconectar siempre antes de sustituir la lámpara.
Sustituir la bombilla con otra del mismo tipo de 15 voltios (tensión de220-240V área).
9. Desconectar la máquina de coser (posición “0“) cuando se realicecualquier ajuste en la zona de la aguja, tal como enhebrado de laaguja, cambio de aguja, enhebrado de la canilla o cambio del piéprensatelas u operaciones similares.
10. Desconecte siempre la máquina de coser de la toma de corrientecuando se retiren tapas, se engrase o cuando se haga cualquier otroajuste por el usuario mencionado en el manual de instrucciones.
11. Nunca dejar caer ni insertar ningún objeto a través de ningunaabertura.
12. No utilizar la máquina en exteriores.13. No hacer funcionar la máquina en presencia de aerosol (si se están
utilizando productos pulverizados o donde se administre oxígeno).14. Para desconectarla, girar todos los mandos a la posición 0FF (“0“) y
luego retirar el enchufe del tomacorriente.15. No desconectar tirando del cable. Para desconectar tome el conector
ADVERTENCIA - Para reducir el riesgo de y no el cable.16. El nivel de intensidad sonora bajo condiciones normales de manejo
quemaduras, incendios, descarga eléctricas o lesiones corporales:1. No permitir que se utilice como un juguete. Prestar especial atención
cuando se utilice por o cerca de niños.2. Utilice está máquina solamente para su uso previsto, según se
describe en este manual. Usar solamente accesorios recomendadospor el fabricante, indicados en este manual.
3. Nunca haga funcionar esta máquina si tiene un conector o cabledeteriorado, si no está funcionando adecuadamente o si ha resultadodeteriorada o expuesta a la acción del agua.
4. Nunca haga funcionar la máquina con ninguna apertura de airebloqueada. Mantenga la apertura de ventilación de la máquina decoser y el dispositivo de control de pedal libre de acumulación desuciedad, polvo y hilos sueltos.
5. Mantener los dedos alejados de todas las piezas móviles. Cuide demantener los dedos alejados de la aguja para evitar accidentes.
6. Utilice siempre la chapa aguja adecuada. Una placa incorrecta puedehacer que se rompa la aguja.
7. No utilizar agujas en mal estado.8. No empujar ni tirar de la tela mientras se cose. Esto puede ocasionar
que la aguja se rompa.
es 75dB(A).17. Apague la máquina y desconéctela si no funciona correctamente.18. Nunca coloque nada encima del pedal.19. Si el cable de alimentación fijado al pedal está dañado, debe ser
reemplazado por el fabricante o su servicio técnico u otra personadebidamente calificada a fin de evitar riesgos.
20. Este aparato no está previsto para ser usado por personas (incluidoslos niños) con capacidades físicas, sensoriales o mentalesdisminuidas, o sin experiencia y conocimiento, a menos que esténsupervisadas o hayan sido instruidas en el uso del aparato por unapersona responsable de su seguridad.
21. Los niños deben ser supervisados para garantizar que no jueguencon el aparato.
CONSERVAR ESTASINSTRUCCIONES
Esta máquina de coser está prevista para uso doméstico solamente.

Congratulations: Estimado Cliente:
As the owner of a new sewing machine, you will enjoyprecision quality stitching on all types of fabrics, from multiplelayers of denim to delicate silks.
Your sewing machine offers the ultimate in simplicity and easeof operation. For your safety and to fully enjoy the manyadvantages and ease of operation of your sewing machine, werecommend that you read all the important safeguards and useand care instructions in this instruction book.
May we suggest that before you start to use your sewingmachine, you discover the many features and advantages bygoing through this instruction book, step by step, while seatedat your sewing machine.
Le felicitamos muy cordialmente por su nueva máquina decoser.
Vd. acaba de comprar un producto de calidad que ha sidofabricado con el máximo cuidado. Su máquina de coser esfácil de usar pero naturalmente hay que seguir las reglas. Yestas las hemos especificado en este manual de instrucciones.Si Vd. Les presta atención entonces realizará sus trabajosperfectamente desde el comienzo.
Por supuesto que Vd. tendrá algunas preguntas que en estemanual no hemos podido agotar del todo. En este casonuestro representante estará siempre a su disposición, paracualquier pregunta que Vd. pueda tener.
������������� � ��
����������� ������ ����������������������������������������������������������������������������������������� ���������������������������������������������������������������������������������������������������������������������������� ���������������������������������������������������������������������������������������� ��� �������������������������������������������������������!������������ ����������������������������������������������������������������������������������������"#��������������������������������������������������������������������������������������������$
��������������������� �������������������������������������������������������������%&'��(����������� ����������������������������������������������������������������������������������%%)���������������� ���������������������������������������������������������������������������������%�
#����(������ ���������( ���������������������������������������������������������������������%�
#����(�����������������������������������������������������������������������������������������������%*+������� �������������(��������������������������������������������������������������������%",�-���������� ���������������������������������������������������������������������������������������%$ ����������(���������������( ����������������������������������������������������������������&.���������������� ����������������������������������������������������������������������������������������/��0�����������������������������������������������������������������������������������������������������+���(����������������������������������������������������������������������������������������������1-����2�������� ���������������������������������������������������������������������������������������.������� ���� ������������������������������������������������������������������������������������!3������ �����������������������������������������������������������������������������������"/��������(������ ������������������������������������������������������������������������������������&.����������������� �������������������������������������������������������������������������&������0���0�� ��������������������������������������������������������������������������������������������.��������������������������������������������������������������������������������������������������������.��2���������������������������������������������������������������������������������������������������.��������������(����� ���������������������������������������������������������������������������� �����������������������������������������������������������������������������������������������������!4�������������������������������������������������������������������������������������������������������*
4������2 ������������������������������������������������������������������������������������������������&
�����5 ������������������������������������������������������������������������������������������������������ �����������(�����(��������������(��6�� �����������������������#�����2������������6 ����������������������������������������������������������������������� ���������� ���������������������������������������������������������������������������������������������*#� ���������� �(� �����������������������������������������������������������������������������$
�(7 ���������������� ������������������������������������������������������������������������$����2
)��������������(��8.6����%�&�*&�39 ��������������������������������������������������%�
� ���������(�������(��8������9�������������������������������������������������������%!
: ������������������������������������������������������������������������������������������������������������";�������� ��������������������������������������������������������������������������������������������������$
#������(�� ���������������������������������������������������������������������������������������������%
��������(����<5 ��� �������������������������������������������������������������������������������������� ��������������������������������������������������������������������������������������������������
=������((������ �����=������(�� ��<���(����� 7�8������9 ����������������������������������������%!#����>�(���������������������������������������������������������������������������������������������%*. ���������������
; ?�(��������>�(��� 7����7�(���� ����������������������������������������������������%
/��0�� ��������������������������������������������������������������������������������������������������������
��������� ������������������������������������������������������������������������������������������*��� ��(�7����������>�(���������������������?�(���(����(� ������������������������������������������������������������������%��� ��0��0���������������������������������������������������������������������������������������������
4 ��(���((����7�����������������������������������������������������������������������������������������@��(����������������������������������������������������������������������������/ ���(������������������������������������������������������������������������������������������������������!4 ���A����� ���������������������������������������������������������������������������������������������*�����������������������������������������������������������������������������������������������������������"�� �����������������������������������������������������������������������������������������������������������$,�����( �������������������������������������������������������������������������������������������������&�� 7�(��������������������������������������������������������������������������������������������������%��������>� ��������������������������������������������������������������������������������������������������
.� ��>�(��������� �����������������������������������������������������������������������������&
�������������������������������������������������������������������������������������������������������������������*
��������������������������������������������������������������������������������"�����������������������������������������������������������������������$
����������������������������������������������������$����������������������������������������������������������������������������%&����������������������������������������������������������������������������%%���������������������������������������������������������������������������%�
�������������������������������������������%�
����������������������������������������������������������������������%$
��������������������������������������������������������������������������������������������
�����������������������������������������������������������������������������������������������������������������������������������������������
������������������������������������������������������������������������������
��������������������������������������������������������������!
�������������������������������������������������������������������"
���������������������������������������������������������������������%�
����������������������������������������������������������������������������������%"
��������������������������������������������������������������������������������������$�����������������������������������������������������������������������&
�7 ���(�����������>��>-������������5 ����������������@�����������(����<������������ ��(�������������7 ���(��������>�(����@����������� ���7�(�������� ���-���((����������������>�(����������������>�(����� 7�8.������%�&�*&�39
������������<��,�����
4 ���(�����
��� ����-�������� ��(�������?�4 ���(��-����2
.������>�(�� ���(��
������>�(���������6�������(����(���(����������(�������������(�(����������� �����������(����<5 ���

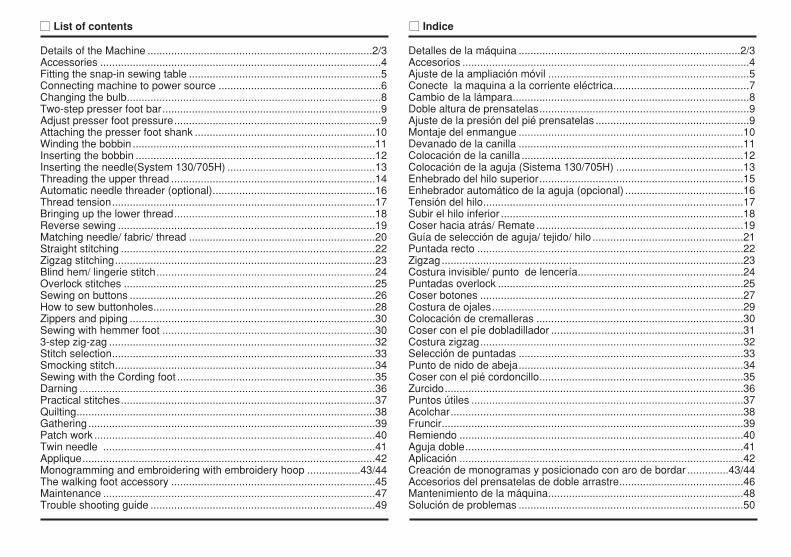
Details of the machine / Detalles de la máquina
1. Thread tension dial2. Presser foot pressure (not on all models)3. Thread take-up lever4. Thread cutter5. Presser foot6. Needle plate7. Sewing table and accessory box8. Bobbin winder spindle9. Bobbin winder stopper
10. Stitch length dial (not on all models)11. Stitch width dial (not on all models)12. Stitch display13. Reverse sewing lever14. Automatic threader (optional)
1. Tensión del hilo2. Presión del pié prensatelas (no en todos los modelos)3. Tirahilos4. Cortahilos5. Pié prensatelas6. Placa de aguja7. Ampliación móvil y caja de accesorios8. Devanador9. Tope del devanador
10. Mando de longitud de puntada (no en todos los modelos)11. Mando para puntada zigzag (no en todos los modelos)12. Visor de Puntadas13. Botón de retroceso14. Enhebrador automático (opcional)
1
2
3
4
5
6
7
8
9
11
1:
17
16
�
Details of the machine / Detalles de la máquina
15. Horizontal spool pin16. Hole Por second spool pin17. Hand wheel18. Patten selector dial19. Power switch20. Main plug socket21. Bobbin thread guide22. Upper thread guide23. Handle24. Presser Poot liPter25. Foot control26. Power cord
15. Porta conos horizontal16. Agujero para el perno de la bobina17. Volante18. Selector de puntadas19. Interruptor20. Toma de conexión a la red21. Guía del hilo superior22. Guía del devanador23. Asa de transporte24. Palanca alza-prensatelas25. Pedal de control26. Cable de alimentación
13
14
15
18
19
61
66
62
6:
67
63
64

Accessories / Accesorios
Standard accessoriesa. All purpose footb. Zipper footc. Buttonhole footd. Button sewing foote. L-screwdriverf. Seam ripper/ brush
g. Oil bottleh. Pack of needlesi. Edge/quilting guidej. Bobbin (3x)k. Darning plateI. Spool holder
m. Second spool pinn. Spool pin felt
Optional accessorieso. Satin stitch footp. Overcasting footq. Blind hem footr. Darning/ Embroidery foots. Hemmer foott. Cording foot
u. Quilting footv. Gathering footw. Working footx. Twin needle
Accesorios Standard Accesorios opcionales
i j
Standard accessories / Accesorios Standard
=
> ?
Optional accessories / Accesorios Opcionales

Fitting the snap-in sewing table ! Ajuste de la ampliación móvil
Keep the snap-in sewing table horizontal, and push it in the direction ofthe arrow. (1)
The inside of the snap-in sewing table can be utilized as an accessorybox.
To open, flip cover down as shown. (2)
1
Introduzca la ampliación móvil, según se indica en la figura. (1)
La ampliación móvil puede utilizarse como caja de accesorios.
Abrala según se indica en la imagen. (2)
2

Connecting machine to power source
Connect the machine to a power source as illustrated. (1)
Attention:Unplug power cord when machine is not in use.
Foot controlFoot control regulates the sewing speed. (2)
Attention:Consult a qualified electrician if in doubt as to connect machine topower source.Unplug power cord when machine is not in use.The appliance must be used with the foot controller KD-2902 (220-240V area)
1
�
6

Conecte la máquina a la toma de corriente
Conecte la máquina a una toma de corriente según la ilustración. (1)
Atención:Desenchufe la máquina de la toma de corriente cuando no la use.
Pedal de controlEl pedal de control puede regular la velocidad de costura. (2)
Atención:Consulte a un electricista si tiene la duda cuando usted conecta lamáquina a la toma de corriente.Desenchufe la máquina de la toma corriente cuando no la use.El pedal debe ser usado con el dispositivo de enchufe KD-2902(220-240V área)
1
�
6
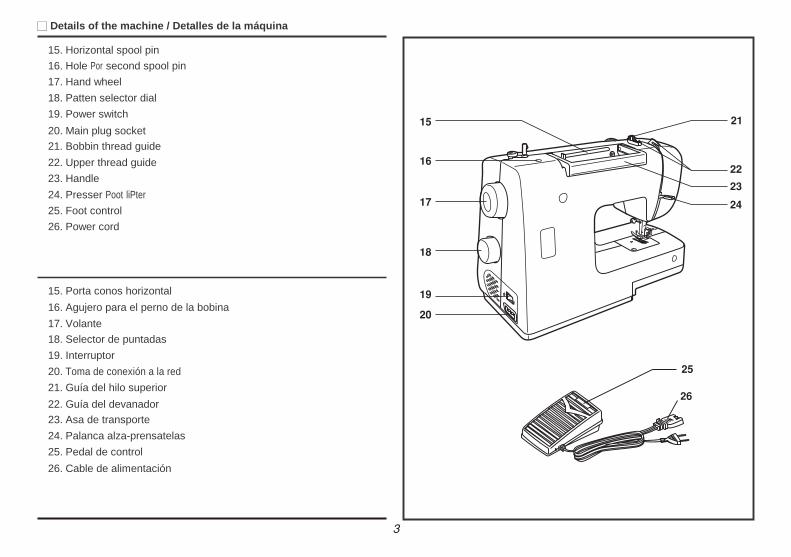
Changing the bulb ! Cambio de la lámpara
Disconnect the machine from the power supply by removing the plugfrom the main socket!
Replace bulb with same type rated 15watts (220-240V area).
- Loosen screw (A) as illustrated. (1)
- Remove the cover (B).
- Unscrew the bulb and fit new one (C). (2)
- Replace the cover and tighten screw.
Desconecte la máquina de la alimentación principal retirando el enchufede la toma de corriente.
Sustituir la lámpara con otra del mismo tipo de 15 vatios(tensión de 220-240V área).
- Afloje el tornillo (A) según se ilustra. (1)
- Retire la tapa frontal (B).
- Desenroscar la lámpara e instalar una nueva (C). (2)
- Volver a colocar la tapa frontal y apretar el tornillo.
B
�
�
1
6

Two-step presser foot bar ! Doble altura de prensatelas
When sewing several layers or thick fabrics, the presser foot can beraised a second stage for easy positioning of the work. (A)
Para coser ropas extremadamente gruesas y obtener una mayor alturaentre la placa de aguja y el prensatelas, tire hacia arriba de la palanca deprensatelas. Como se muestra en la figura. (A)
Adjust presser foot pressure !Ajuste de la presión del pié prensatelas
The presser foot pressure of the machine has ben pre-set and requiresno particular readjustment according to the type of fabric (light-or-heavyweight).
However, if you need to adjust the presser foot pressure, turn thepresser adjusting screw with a coin.For sewing very thin fabric, loosen the pressure by turning the screwcounter clockwise, and for heavy fabric, tighten by turning it clockwise.
La presión del pie prensatelas de la máquina ha sido preseleccionada yno requiere especiales ajustes de acuerdo con el tipo de tejido (livianoo pesado).
Sin embargo, si se necesita ajustar la presión del pie prensatelas gireel tornillo de ajuste de presión con una moneda. Para coser tela muyfina afloje la presión girando el tornillo en sentido antihorario y paratelas pesadas aumente la presión girándolo en sentido horario.
�

Attaching the presser foot holder ! Montaje del enmague
Raise the presser bar (a) with the presser foot lifter. Attach the presserfoot holder (b) as illustrated. (1)Attaching the presser footLower the presser foot holder (b) using the presser foot lifter, until thecut-out (c) is directly above the pin (d). (2) The presser foot (f) willengage automatically.Remoying the presser footRaise the presser foot using the presser foot lifter. (3)Raise the lever (e) and the foot disengages.Attaching the edge! quilting guideAttach the edge/ quilting guide (g) in the slot as illustrated. Adjust asneeded for hems, pleats, quilting, etc. (4)
Attention:Turn power switch to off (“O“) when carrying out any of the aboveoperations!
Levantar la barra prensatelas (a) (1) e introducir el enmangue (b) comoen la ilustración.Montaje del prensatelasBajar el enmangue (b) hasta que la ranura (c) esté directamente sobre laespiga (d). (2)Empujar ligeramente la palanca (e) hacia adelante. Bajar el enmangue (b)y el pie (f) se quedará enganchado al enmangue.Desmontaje del prensatelasLevantar el prensatelas. (3)Apretar ligeramente la palanca (e) hacia adelante y entonces el piequedará libre.Montaje de la guía para coser bordes! edredonesMontar la guía para coser bordes/ edredones (g) con cuidado, como enla ilustración. Para dcbladillos, pliegues, etc. (4)
Atención:Cualquier manipulación debe efectuarse con el interruptor principalen posición (“O“)!
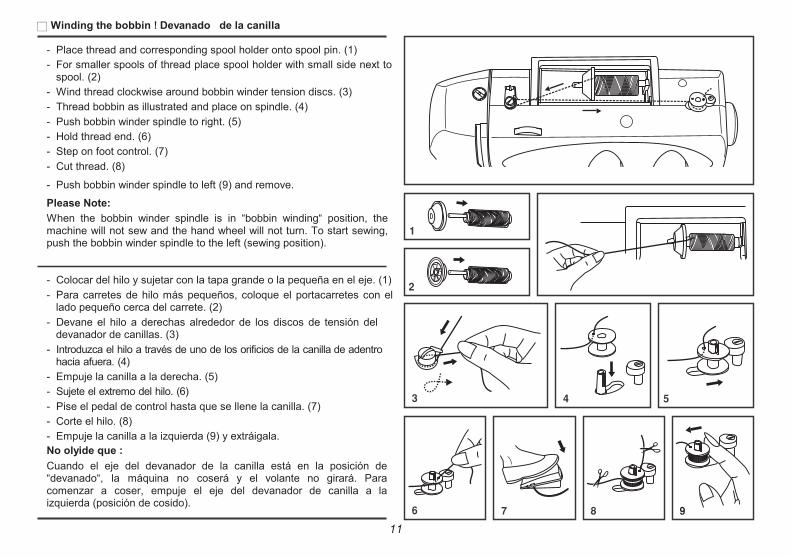
Winding the bobbin ! Devanado de la canilla
- Place thread and corresponding spool holder onto spool pin. (1)- For smaller spools of thread place spool holder with small side next to
spool. (2)- Wind thread clockwise around bobbin winder tension discs. (3)- Thread bobbin as illustrated and place on spindle. (4)- Push bobbin winder spindle to right. (5)- Hold thread end. (6)- Step on foot control. (7)- Cut thread. (8)
- Push bobbin winder spindle to left (9) and remove.
Please Note:When the bobbin winder spindle is in “bobbin winding“ position, themachine will not sew and the hand wheel will not turn. To start sewing,push the bobbin winder spindle to the left (sewing position).
- Colocar del hilo y sujetar con la tapa grande o la pequeña en el eje. (1)- Para carretes de hilo más pequeños, coloque el portacarretes con el
lado pequeño cerca del carrete. (2)- Devane el hilo a derechas alrededor de los discos de tensión del
devanador de canillas. (3)- Introduzca el hilo a través de uno de los orificios de la canilla de adentro
hacia afuera. (4)- Empuje la canilla a la derecha. (5)- Sujete el extremo del hilo. (6)- Pise el pedal de control hasta que se llene la canilla. (7)- Corte el hilo. (8)- Empuje la canilla a la izquierda (9) y extráigala.No olyide que :Cuando el eje del devanador de la canilla está en la posición de“devanado“, la máquina no coserá y el volante no girará. Paracomenzar a coser, empuje el eje del devanador de canilla a laizquierda (posición de cosido).
12
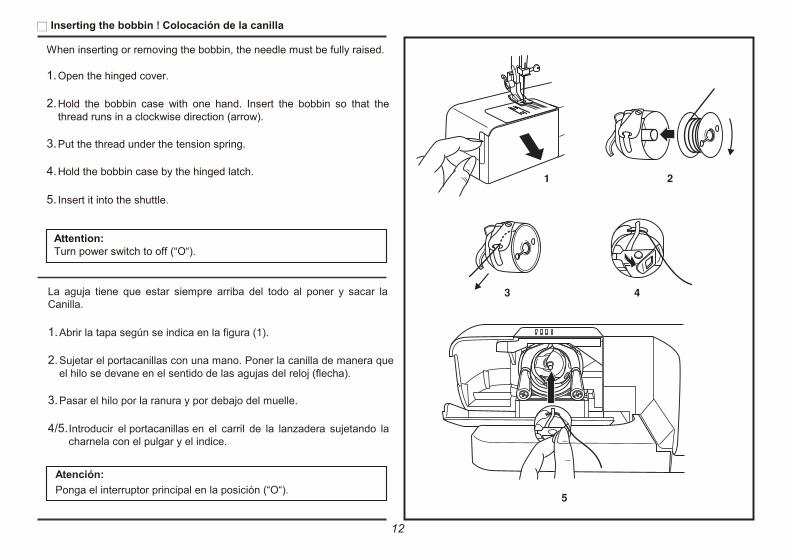
Inserting the bobbin ! Colocación de la canilla
When inserting or removing the bobbin, the needle must be fully raised.
1.Open the hinged cover.
2.Hold the bobbin case with one hand. Insert the bobbin so that thethread runs in a clockwise direction (arrow).
3.Put the thread under the tension spring.
4.Hold the bobbin case by the hinged latch.
5. Insert it into the shuttle.
Attention:Turn power switch to off (“O“).
La aguja tiene que estar siempre arriba del todo al poner y sacar laCanilla.
1.Abrir la tapa según se indica en la figura (1).
2.Sujetar el portacanillas con una mano. Poner la canilla de manera queel hilo se devane en el sentido de las agujas del reloj (flecha).
3.Pasar el hilo por la ranura y por debajo del muelle.
4/5.Introducir el portacanillas en el carril de la lanzadera sujetando lacharnela con el pulgar y el indice.
Atención:Ponga el interruptor principal en la posición (“O“).
13
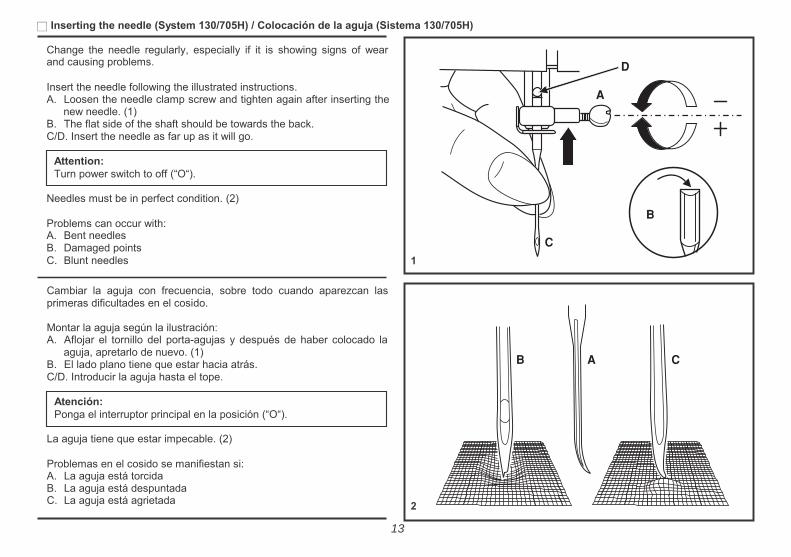
Inserting the needle (System 130/705H) / Colocación de la aguja (Sistema 130/705H)
Change the needle regularly, especially if it is showing signs of wearand causing problems.
Insert the needle following the illustrated instructions.A. Loosen the needle clamp screw and tighten again after inserting the
new needle. (1)B. The flat side of the shaft should be towards the back.C/D. Insert the needle as far up as it will go.
Attention:Turn power switch to off (“O“).
Needles must be in perfect condition. (2)
Problems can occur with:A. Bent needlesB. Damaged pointsC. Blunt needles 1
Cambiar la aguja con frecuencia, sobre todo cuando aparezcan lasprimeras dificultades en el cosido.
Montar la aguja según la ilustración:A. Aflojar el tornillo del porta-agujas y después de haber colocado la
aguja, apretarlo de nuevo. (1)B. El lado plano tiene que estar hacia atrás.C/D. Introducir la aguja hasta el tope.
Atención:Ponga el interruptor principal en la posición (“O“).
La aguja tiene que estar impecable. (2)
Problemas en el cosido se manifiestan si:A. La aguja está torcidaB. La aguja está despuntadaC. La aguja está agrietada 2
�
B
�
�
�B �
14
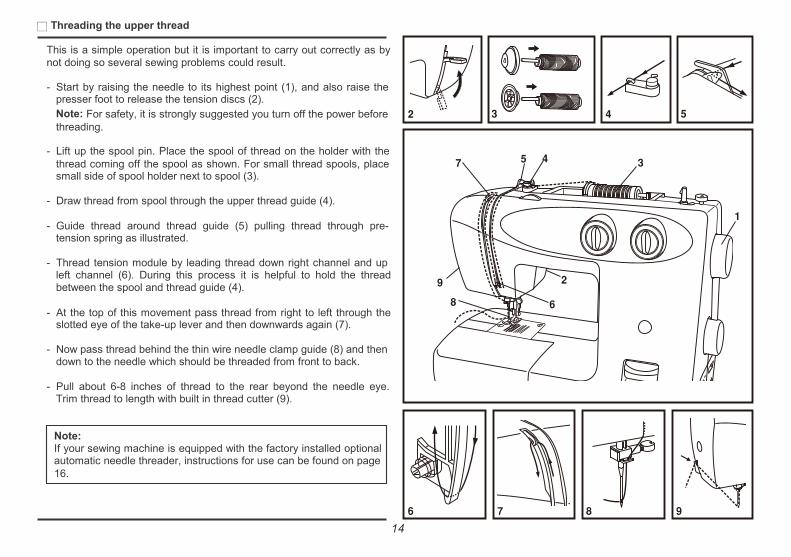
Threading the upper thread
This is a simple operation but it is important to carry out correctly as bynot doing so several sewing problems could result.
- Start by raising the needle to its highest point (1), and also raise thepresser foot to release the tension discs (2).Note: For safety, it is strongly suggested you turn off the power beforethreading.
- Lift up the spool pin. Place the spool of thread on the holder with thethread coming off the spool as shown. For small thread spools, placesmall side of spool holder next to spool (3).
- Draw thread from spool through the upper thread guide (4).
- Guide thread around thread guide (5) pulling thread through pre-tension spring as illustrated.
- Thread tension module by leading thread down right channel and upleft channel (6). During this process it is helpful to hold the threadbetween the spool and thread guide (4).
- At the top of this movement pass thread from right to left through theslotted eye of the take-up lever and then downwards again (7).
- Now pass thread behind the thin wire needle clamp guide (8) and thendown to the needle which should be threaded from front to back.
- Pull about 6-8 inches of thread to the rear beyond the needle eye.Trim thread to length with built in thread cutter (9).
Note:If your sewing machine is equipped with the factory installed optionalautomatic needle threader, instructions for use can be found on page16.

15
Enhebrado del hilo superior
Se trata de una operación sencilla pero es importanterealizarla correctamente pues de no hacerlo podrían surgir problemasen la costura.
- Comience elevando la aguja a su posición más alta (1) y tambiéneleve el prensatelas para liberar los discos de tensión (2).Nota: Para seguridad, se recomienda encarecidamente desconectarla alimentación principal antes del enhebrado.
- Eleve el pasador del carrete. Coloque el carrete de hilo en su soportecon el hilo saliendo del carrete como se indica (3). Para carretes dehilo pequeños, coloque el lado pequeño del portacarretes cerca delcarrete.
- Retire el hilo del carrete a través de la guía del hilo superior (4).
- Guíe el hilo alrededor de la guía-hilo (5) tirando del hilo mediante elmuelle pretensor según se ilustra.
- Regule la tensión del hilo insertando el hilo hacia abajo en el canalderecho y hacia arriba en el canal izquierdo (6). Durante este proceso,es de utilidad sujetar el hilo entre el carrete y el guía-hilos (4).
- En la parte superior de este movimiento, pase el hilo desde laderecha a izquierda a través del ojo ranurado de la palanca detirahilos y luego hacia debajo de nuevo (7).
- Pase el hilo por detrás del guía-hilo horizontal plano (8).
- Lleve ahora el hilo por detrás de la guía de abrazadera de la aguja yluego hacia abajo a la aguja que debe enhebrarse desde la partefrontal a la posterior. Estire de 6 a 8 cms de hilo hacia la parteposterior, más allá del ojo de la aguja (9).
Nota:Si su máquina de coser está provista del enhebrador automático dela aguja opcional, instalado en fábrica, las instrucciones para suutilización las encontrará en la página 16.
16
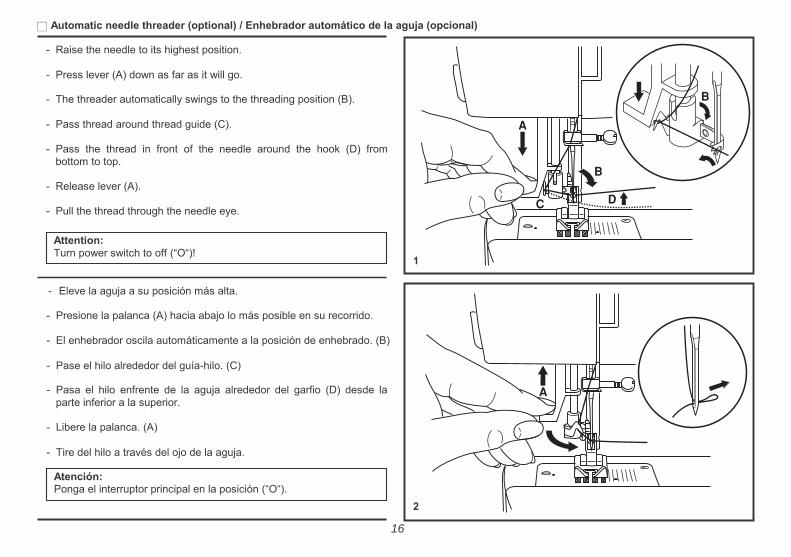
Automatic needle threader (optional) / Enhebrador automático de la aguja (opcional)
- Raise the needle to its highest position.
- Press lever (A) down as far as it will go.
- The threader automatically swings to the threading position (B).
- Pass thread around thread guide (C).
- Pass the thread in front of the needle around the hook (D) frombottom to top.
- Release lever (A).
- Pull the thread through the needle eye.
Attention:Turn power switch to off (“O“)!
1
- Eleve la aguja a su posición más alta.
- Presione la palanca (A) hacia abajo lo más posible en su recorrido.
- El enhebrador oscila automáticamente a la posición de enhebrado. (B)
- Pase el hilo alrededor del guía-hilo. (C)
- Pasa el hilo enfrente de la aguja alrededor del garfio (D) desde laparte inferior a la superior.
- Libere la palanca. (A)
- Tire del hilo a través del ojo de la aguja.
Atención:Ponga el interruptor principal en la posición (“O“).
2
B
�
B
��
�

17
Thread tension / Tensión del hilo
Lower thread tensionTo test the bobbin thread tension, remove the bobbin case and bobbinand hold it by suspending it by the thread. Jerk it once or twice. If thetension is correct, the thread will unwind by about an inch or two.If the tension is too tight, it does not unwind at all. If the tension is tooloose, it will drop too much. To adjust, turn the small screw on the sideof the bobbin case. (1)Upper thread tensionBasic thread tension setting: “4“. (2)
To increase the tension, turn the dial to the next number up.To reduce the tension, turn the dial to the next number down.A. Normal thread tensionB. Upper thread tension too looseC. Upper thread tension too tight
Note:The bobbin thread tension does not normally have to be adjusted. 1 2
Tensión del hilo inferiorPara controlar la tensión del hilo inferior coger el portacanillas y tireligeramente del hilo. Si la canilla no se desenrollasuavemente, esto indica que la tensión es demasiado fuerte.Si por el contrario el hilo sale demasiado fácilmente, esto significa queLa tensión es muy floja.La tensión es correcta cuando el portacanillas baja unos 10 cm ydespués se para colgado al hilo. (1)
Atención:Normalmente no es necesario cambiar la tensión del hilo inferior.
Tensión del hilo superiorRegulación de base de la tensión del hilo: “4“. (2)Para aumentar la tensión del hilo superior hay que girar el botón deregulación hacia un número más alto.Para aflojar la tensión del hilo se gira dicho botón hacia un número másbajo.A. Tensión del hilo normal.B. Tensión del hilo superior muy floja.C. Tensión del hilo superior demasiado fuerte.
�
B
�

18
Bringing up the lower thread / Subir el hilo inferior
Hold the upper thread with the left hand. Turn the handwheel forwardsuntil the needle is raised. (1)
Pull on the upper thread to bring the lower thread up through the stitchplate hole.
Lay both threads to the back under the presser foot. (2)
1
Sujetar la punta del hilo superior con la mano. Girar el volante haciaadelante hasta que la aguja esté de nuevo en su posición más alta. (1)
Tirar del hilo superior con lo que se hace subir el hilo inferior a travésdel agujero de la placa de la aguja.
Dejar ambos hilos en la parte posterior bajo el pie prensatelas. (2)
2

19
Reverse sewing / Coser hacia atrás / Remate
At the end of seam, press down the reverse sewing lever. Sew a fewreverse stitches.Release the lever and the machine will sew forwards again. (1/A)
Al final de la costura apretar el botón de retroceso. Coser algunaspuntadas hacia atrás. Cuando suelte el botón de retroceso, la máquinacoserá de nuevo hacia adelante. (1/A)
Removing the work / Como sacar el tejido de la máquina
Turn the handwheel towards to bring the thread take up lever to itshighest position, raise the presser foot and remove work towards theback. (2)
1 2
Colocar la palanca tensora del hilo en su posición más alta (girar elvolante hacia adelante), levantar el pie prensatelas y retirar el tejidotirando hacia atrás. (2)
B
Cutting the thread / Cortar el hilo
Hold the threads behind the presser foot with both hands, guide them tothe slit (B) and press down. (3)
Sujetar los hilos con las dos manos detrás de la pie prensatelas.Hacerlos entrar en la ranura (B) y tirar los hilos hacia abajo hasta que secorten. (3)
3
�

20
Matching needle/ fabric/ thread
NEEDLE, FABRIC, THREAD SELECTION GUIDE
NEEDLE SIZE FABRICS THREAD9-11(65-75) Lightweight fabrics-thin cottons, voile, serge, silk, muslin, Qiana, interlocks,
cotton knits, tricot, jerseys, crepes, woven polyester, shirt & blouse fabrics.Light-duty thread in cotton, nylon orpolyester.
12(80) Medium weight fabrics-cotton, satin, kettleclote, sailcloth, double knits,lightweight woollens.
14(90) Medium weight fabrics-cotton duck, woolen, heavier knits, terrycloth, denims.
16(100) Heavyweight fabrics-canvas, woolens, outdoor tent and quilted fabrics, denims,upholstery material (light to medium).
Most threads sold are medium size andsuitable for these fabrics and needle sizes.Use polyester threads on syntheticmaterials and cotton on natural wovenfabrics for best results. Always use thesame thread on top and bottom.
18(110) Heavy woollens, overcoat fabrics, upholstery fabrics, some leathers and vinyls. Heavy duty thread, carpet thread.(Use heavy foot pressure-large numbers.)
NEEDLE, FABRIC SELECTIONIMPORTANT: Match needle size to thread size and weight of fabric
NEEDLES EXPLANATION TYPE OF FABRIC
Standard sharp needles. Sizes range thin to large.9 (65) to 18(110)
Natural woven fabrics-wool, cotton, silk, etc. Qiana.Not recommended for double knits.
Semi-ball point needle, scarfed. 9(65) to 18(110) Natural and synthetic woven fabrics, polyester blends.Knits-polyesters, interlocks, tricot, single and double knits. Can beused instead of for sewing all fabrics.
Full ball point needle 9(65) to 18(110) Sweater knits, Lycra, swimsuit fabric, elastic.
Leather needles. 12(80) to 18(110) Leather, vinyl, upholstery.(Leaves smaller hole than standard large needle.)
Note: 1. Twin needles, can be purchased for utility and decorative work.2. When sewing with twin needles, the stitch width dial should be set at less than “3“.3. European needles show sizes 65, 70, 80 etc. American and Japanese needles show size 9, 11, 12 etc.4. Replace needle often (approximately every other garment ) and / or at first thread breakage or skipped stitches.

21
Guía de selección de aguja! tejido! hilo
GUÍA DE SELECCIÓN DE AGUJA/ TEJIDO/ HILO
TAMAÑO DE AGUJA TEJIDO HILO9-11(65-75) Tejido de peso ligero-Algodón delgado, Voile, Sarga, Seda
Muselina, Quiana, Traba, Tejidos de algodón, Tricot, Jersey,Crepes, Tejidos de poliester, Camisa & Tejido de blusa.
Hilo ligero en algodón, nylon o poliéster.
12(80) Tejido de peso medio-Algodón, Raso, Lona, Tejido doble,Tejido de lana de peso ligero.
14(90) Tejido de peso medio-Algodón de dril, Tejido de lana,Tejidura más pesada, Dril de algodón.
16(100) Tejido pesado-Lienzos, Tejido de lana, Dril de algodón,Material de tapiceria (lígero hasta medio).
La mayor parte de los hilos son para tej idos depeso medio. Si usa el hilo de poliéster enmateriales sintéticos, algodón y tejido natural,obtendrá unos buenos resultados. Utilice siempre elmismo hilo en el hilo (superior e inferior).
18(110) Tejido de lana pesado, Tejido de abrigo, Tejido de tapicería,Cuero, Vinilo.
Hilos fuertes, hilo de alfombra
NOTA IMPORTANTE: Hay que adaptar el tamaño de la aguja al tamaño del hilo y al peso de la tela.
GUÍA DE SELECCIÓN DE AGUJA/ TEJIDO/ HILOAGUJAS EXPLICACIÓN TIPO DE TEJIDO
Agujas normales. Extensión de tamaño delgado a grande.9(65) a 18(110)
Tejido natural-Lana, Algodón, Seda, etc.
Aguja punta de bola. 9(65) a 18(110) Tejido natural y tejido sintético, mezclilla. Tejido depoliéster, Triba, Tricot, Tejido simple &doble.
Aguja punta de bola. 9(65) a 18(110) Tejido de chaquetas de lana, Tela de bañadores.
Aguja para cuero. 12(80) a 18(110) Cuero, Vinilo, Tejido de tapicería.
Nota: 1. Puede adquirir agujas dobles para labores decorativas y de uso general.2. Cuando cosa con agujas dobles, el disco selector de ancho de puntada debe ajustarlo a menos de “3“.3. Agujas europeas tiene tamaños de 65,70,80 etc. Americanas y Japónesas tiene tamaños de 9,11,12 etc.4. Cambie la aguja con frecuencia (aproximadamente cada dos prendas) y / o a los primeros hilos rotos o faltas de puntadas.
22
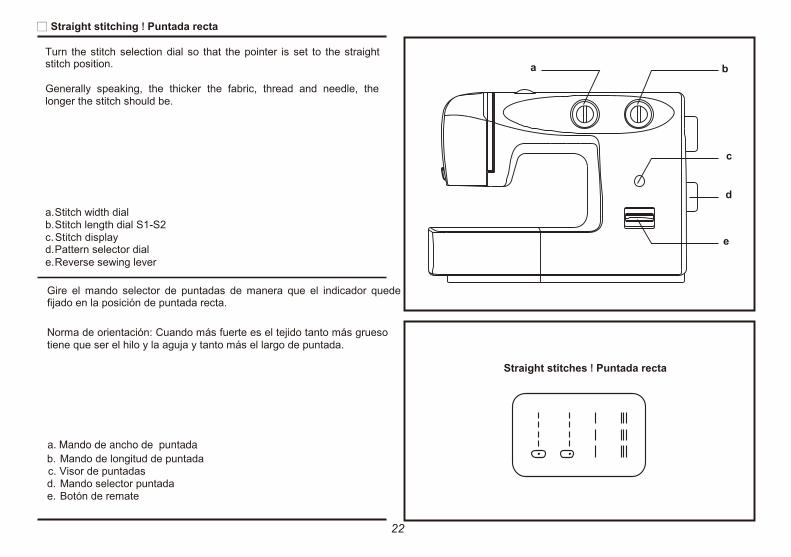
Straight stitching ! Puntada recta
Turn the stitch selection dial so that the pointer is set to the straightstitch position. a b
Generally speaking, the thicker the fabric, thread and needle, thelonger the stitch should be.
c
da.Stitch width dialb.Stitch length dial S1-S2c.Stitch display ed.Pattern selector diale.Reverse sewing lever
Gire el mando selector de puntadas de manera que el indicador quedefijado en la posición de puntada recta.
Norma de orientación: Cuando más fuerte es el tejido tanto más gruesotiene que ser el hilo y la aguja y tanto más el largo de puntada.
Straight stitches ! Puntada recta
b. Mando de longitud de puntadac. Visor de puntadasd. Mando selector puntadae. Botón de remate

23
Zigzag stitching / Zigzag
Turn the stitch selection dial to “ “.Function of zigzag dial (1)The maximum zigzag stitch width for zigzag stitching is “5“, however,the width can be reduced on any patterns. The width increases as youmove zigzag dial from “0“ to “5“. For twin needle sewing, never set thewidth wider than “3“.
Function of stitch length dial while zigzaging (2)The density of zigzag stitches increase as the setting of stitch length dialapproaches “0“.Neat zigzag stitches are usually achieved at “2.5“ or below.
For 2-dial model /Para 2 diales modelos
Gire el botón selector de puntos a “ “.
Función del disco de ancho de la puntada (1)El ancho máximo de la puntada en zig-zag es de “5“; sin embargo, elancho puede reducirse en cualquier dibujo. El ancho aumenta cuandodesplaza el disco del zig-zag desde “0“ a “5“. Para el cosido de agujadoble, nunca adusta el ancho a más de “3“.
Función del disco del largo de la puntada mientras se realiza elzig-zag (2)La densidad de las puntadas en zig-zag aumenta cuando el ajuste deldial de longitud de puntada se aproxima a “0“.Las puntadas en zig-zag mejor ejecutadas se suelen conseguir en “2.5“o menor.
Las puntadas en zig-zag cerradas (más próximas) se denominanpuntada de raso.
1Stitch width dial /
Dial de ancho de puntada Stitch length dial /
2 Dial de longitud de puntada
24
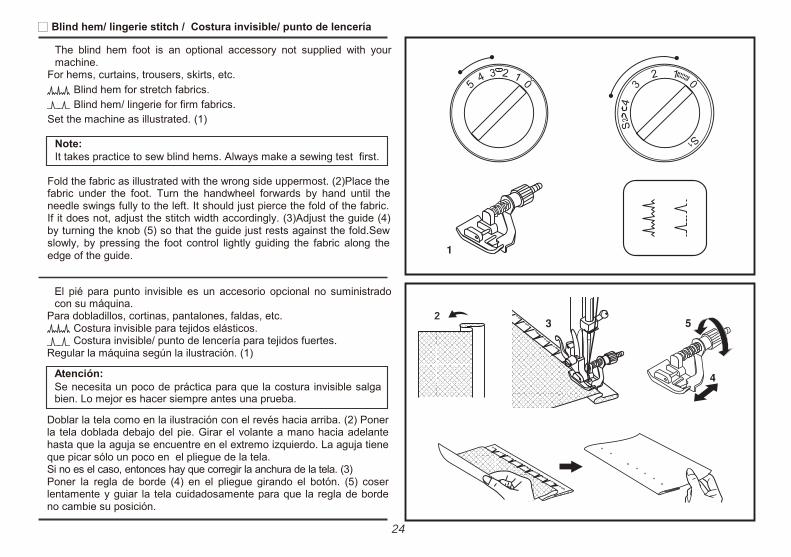
Blind hem/ lingerie stitch / Costura invisible/ punto de lencería
The blind hem foot is an optional accessory not supplied with yourmachine.
For hems, curtains, trousers, skirts, etc.Blind hem for stretch fabrics.Blind hem/ lingerie for firm fabrics.
Set the machine as illustrated. (1)
Note:It takes practice to sew blind hems. Always make a sewing test first.
Fold the fabric as illustrated with the wrong side uppermost. (2)Place thefabric under the foot. Turn the handwheel forwards by hand until theneedle swings fully to the left. It should just pierce the fold of the fabric.If it does not, adjust the stitch width accordingly. (3)Adjust the guide (4)by turning the knob (5) so that the guide just rests against the fold.Sewslowly, by pressing the foot control lightly guiding the fabric along theedge of the guide.
El pié para punto invisible es un accesorio opcional no suministradocon su máquina.
Para dobladillos, cortinas, pantalones, faldas, etc.Costura invisible para tejidos elásticos.Costura invisible/ punto de lencería para tejidos fuertes.
Regular la máquina según la ilustración. (1)
Atención:Se necesita un poco de práctica para que la costura invisible salgabien. Lo mejor es hacer siempre antes una prueba.
Doblar la tela como en la ilustración con el revés hacia arriba. (2) Ponerla tela doblada debajo del pie. Girar el volante a mano hacia adelantehasta que la aguja se encuentre en el extremo izquierdo. La aguja tieneque picar sólo un poco en el pliegue de la tela.Si no es el caso, entonces hay que corregir la anchura de la tela. (3)Poner la regla de borde (4) en el pliegue girando el botón. (5) coserlentamente y guiar la tela cuidadosamente para que la regla de bordeno cambie su posición.
2 3
7
1
2

25
Overlock stitches / Puntos overlock
The overcasting foot is an optional accessory not supplied with yourmachine.
Seams, neatening, visible hems.Turn stitch length dial to “S1“ or “S2“, The stitch width can be adjustedto suit the fabric.Stretch overlock (1):For fine knits, jerseys, neck edges, ribbing.Standard overlock (2):For fine knits, jerseys, neck edges, ribbing.Double overlock stitch (3):For fine knits, handknits, seams.All overlock stitches are suitable for sewing and neatening edges andvisible seams in one operation.
When neatening, the needle should just go over the edge of the fabric.
Attention:Use new needles or ball point needles or stretch needle!
El pié overlock es un accesorio opcional no suministrado con su máquina.Costura, alisando, orillas visibles.
Gire el mando selector del longitud de puntada a la posición “S1“ o “S2“.Gire el mando a puntada zigzag puede ser ajustado para adecuar la tela.Overlock elástico (1):Para terminar dobladillos, costuras decorativas.Adecuado para dobladillos y costuras decorativas en materiales elásticos.Overlock Standararizado (2):Para géneros de punto finos, partes de punto hechas a mano, costurasoverlock.Overlock doble (3):Para géneros de punto finos, escotes, puños.Todos los puntos de overlock son adecuados para coser los bordes delos tejidos.
Atención:Usar una aguja nueva o una aguja con punta de bola!
1 6 2
26
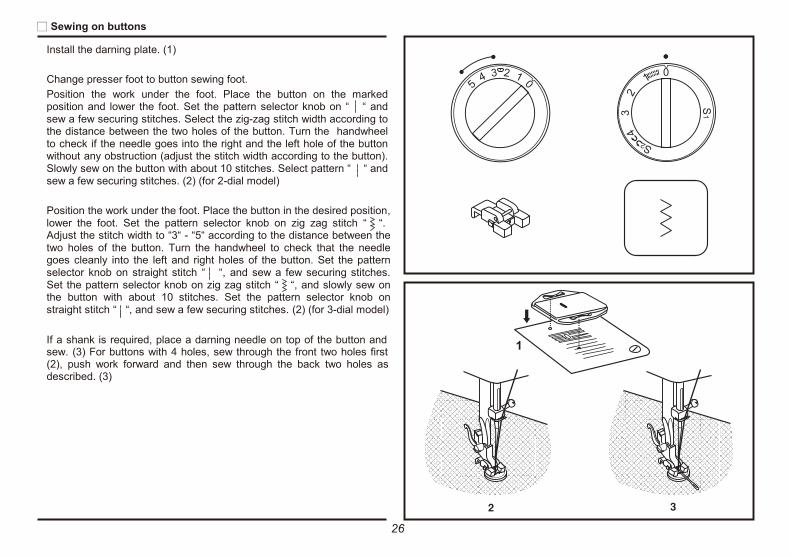
Sewing on buttons
Install the darning plate. (1)
Change presser foot to button sewing foot.Position the work under the foot. Place the button on the markedposition and lower the foot. Set the pattern selector knob on “ “ andsew a few securing stitches. Select the zig-zag stitch width according tothe distance between the two holes of the button. Turn the handwheelto check if the needle goes into the right and the left hole of the buttonwithout any obstruction (adjust the stitch width according to the button).Slowly sew on the button with about 10 stitches. Select pattern “ “ andsew a few securing stitches. (2) (for 2-dial model)
Position the work under the foot. Place the button in the desired position,lower the foot. Set the pattern selector knob on zig zag stitch “ “.Adjust the stitch width to “3“ - “5“ according to the distance between thetwo holes of the button. Turn the handwheel to check that the needlegoes cleanly into the left and right holes of the button. Set the patternselector knob on straight stitch “ “, and sew a few securing stitches.Set the pattern selector knob on zig zag stitch “ “, and slowly sew onthe button with about 10 stitches. Set the pattern selector knob onstraight stitch “ “, and sew a few securing stitches. (2) (for 3-dial model)
If a shank is required, place a darning needle on top of the button andsew. (3) For buttons with 4 holes, sew through the front two holes first 1(2), push work forward and then sew through the back two holes asdescribed. (3)
6 2
27
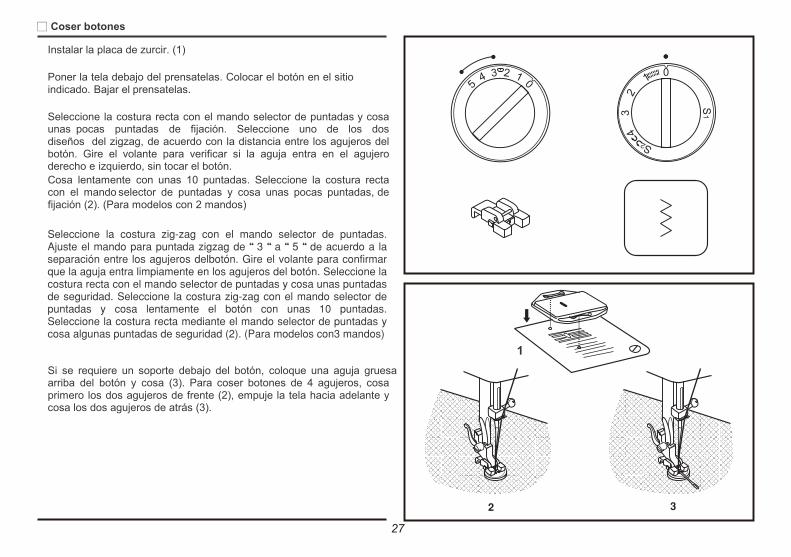
Coser botones
Instalar la placa de zurcir. (1)
Poner la tela debajo del prensatelas. Colocar el botón en el sitioindicado. Bajar el prensatelas.
Seleccione la costura recta con el mando selector de puntadas y cosaunas pocas puntadas de fijación. Seleccione uno de los dosdiseños del zigzag, de acuerdo con la distancia entre los agujeros delbotón. Gire el volante para verificar si la aguja entra en el agujeroderecho e izquierdo, sin tocar el botón.Cosa lentamente con unas 10 puntadas. Seleccione la costura rectacon el mando selector de puntadas y cosa unas pocas puntadas, defijación (2). (Para modelos con 2 mandos)
1Si se requiere un soporte debajo del botón, coloque una aguja gruesaarriba del botón y cosa (3). Para coser botones de 4 agujeros, cosaprimero los dos agujeros de frente (2), empuje la tela hacia adelante ycosa los dos agujeros de atrás (3).
6 2

28
How to sew buttonholes
Preparation:Remove the zigzag foot and attach the buttonhole foot. Adjust the stitchlength dial between “0.5“ - “1“. The density of the stitch depends onthickness of the fabric.Note: Always test sew a buttonhole.
To prepare the fabric:Measure the diameter of the button and add 0.3cm (1/8“) for the bartacks.If you have a very thick button, add more to the diameter measurement.Mark the position and length of the buttonhole on the fabric.Position the fabric so that the needle is on the mark that is furthest fromyou.Pull the buttonhole foot towards you as far as it will go.Lower the foot.a. Turn the pattern selector dial to “ “. Sew at moderate speed until
you reach the end mark.b. Turn the pattern selector dial to “ “ and sew 5-6 bartack stitches.
c. Turn the pattern selector dial to “ “ and sew the left side of thebuttonhole to the mark at the end which is further from you.
d. Turn the pattern selector dial to “ “ and sew bar tack stitches.
Remove the fabric from under the foot. Draw the upper thread throughthe backside of the fabric and knot upper and lower threads. Cut thecenter of the buttonhole with the seam ripper, being careful not to cutthe stitches on either side.
Tips:- Slightly reduce upper thread tension to produce better results.- Use backing material for fine and stretchy fabrics.- It is advisable to use a gimp cord for stretch or knit fabrics. The zigzag
should sew over the gimp. (e)
�
, % � �
29
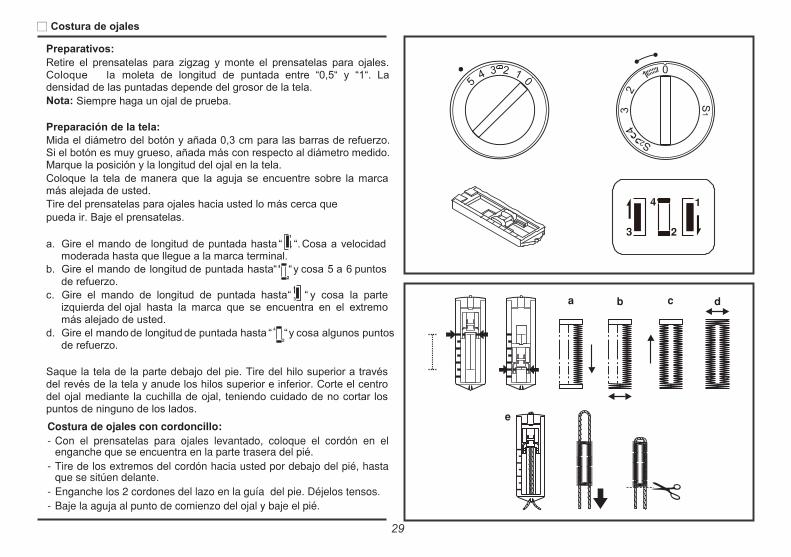
Costura de ojales
Preparativos:Retire el prensatelas para zigzag y monte el prensatelas para ojales.Coloque la moleta de longitud de puntada entre “0,5“ y “1“. Ladensidad de las puntadas depende del grosor de la tela.Nota: Siempre haga un ojal de prueba.
Preparación de la tela:Mida el diámetro del botón y añada 0,3 cm para las barras de refuerzo.Si el botón es muy grueso, añada más con respecto al diámetro medido.Marque la posición y la longitud del ojal en la tela.Coloque la tela de manera que la aguja se encuentre sobre la marcamás alejada de usted.Tire del prensatelas para ojales hacia usted lo más cerca quepueda ir. Baje el prensatelas.
a. Gire el mando de longitud de puntada hasta “ “. Cosa a velocidadmoderada hasta que llegue a la marca terminal.
b. Gire el mando de longitud de puntada hasta“ “y cosa 5 a 6 puntosde refuerzo.
c. Gire el mando de longitud de puntada hasta“ “ y cosa la parteizquierda del ojal hasta la marca que se encuentra en el extremomás alejado de usted.
d. Gire el mando de longitud de puntada hasta “ “y cosa algunos puntosde refuerzo.
Saque la tela de la parte debajo del pie. Tire del hilo superior a travésdel revés de la tela y anude los hilos superior e inferior. Corte el centrodel ojal mediante la cuchilla de ojal, teniendo cuidado de no cortar lospuntos de ninguno de los lados.
�
, % � �

30
Zippers and piping / Colocación de cremalleras
Set the machine as illustrated.
Set stitch length dial between “1“ - “4“ (according to thickness of fabric).
The zipper foot can be inserted right or left, depending on which side ofthe foot you are going to sew. (1)
To sew past the zipper pull, lower the needle into the fabric, raise thepresser foot and push the zipper pull behind the presser foot. Lower thefoot and continue to sew.
It is also possible to sew in a length of cord, into a bias strip to form a‘welt‘. (2)
Regular la máquina según la ilustración.
Ponga la longitud de puntada entre “1“ - “4“ (de acuerdo con el grosorde la tela).
El presatelas para cremalleras puede ser insertado a la derecha oa la izquierda(1)
Para coser la cremallera, bajar la aguja dentro la tela, levantar el pieprensatelas y empujar la cremallera debajo del pie prensatelas.Bajar el prensatelas y continuar cosiendo.
Es posible coser la longitud de la cuerda, dentro una banda diagonaldesde una “vira“. (2)
1 2

31
Sewing with the hemmer foot / Coser con el pie dobladillador
The hemmer foot is an optional accessory not supplied with yourmachine.
For hems in fine or sheer fabrics.
Set the machine as illustrated.
Neaten the edge of the fabric. At the beginning of the hem, turn underthe edge twice by about 3 mm (1/8“) and sew 4-5stitches to secure.Pull the thread slightly towards the back. Insert the needle into the fabric,raise the presser foot and guide the fold into the scroll on the foot. (1)
Gently pull the fabric edge towards you and lower the presser foot.Begin sewing, guiding the fabric into the scroll by holding it upright andslightly to the left. (2)
El prensatelas dobladillador es un accesorio opcional no suministradocon su máquina.
Sirve para hacer dobladillos en tejidos finos y ligeros.
Regule la máquina según la ilustración.
Realizar una doblez en el tejido de unos 2,5 mm de ancho y unos 8 cms de largo aprox. Introducir la aguja en el tejido justo en el punto donde debe iniciarse la Costura, bajar entonces el prensatelas dobladillador. Dar 3 o 4 puntadas manteniendo sujetos los hilos de la aguja y de la canilla.Introducir la aguja en el tejido y elevar el prensatelas. Introducir en la entradacurva del prensatelas un trozo doblado de la tela.Bajar el prensatelas, coser guiando y girando el borde del tejido, de formaque este se introduzca con suavidad en la curvatura del prensatelas.
1 2

32
3-step zig-zag / Costura zigzag
Sewing on lace and elastic, darning, mending, reinforcing edges.
Set the machine as illustrated.
Place patch in position.The stitch length can be shortened to produce very close stitches. (A)
When mending tears, it is advisable to use a piece of backing fabric toreinforce. The stitch density can be varied by adjusting the stitch length.First sew over the center and then overlap on both sides. Depending onthe type of fabric and damage, sew between 3 and 5 rows. (B)
Para aplicar elásticos y puntillas, colocar remiendos, remendardesgarros, reforzar los bordes, etc.
Regular la máquina según la ilustración.
Aplicar el remiendo.La longitud de la puntada puede reducirse hasta que los puntos esténbien juntos. (A)
Cuando se remiendan rasgones es aconsejable poner debajo de latela un tejido (refuerzo). El espesor de los puntos se puede variarcambiando la longitud de la puntada. Primero cosa en el centro ydespués sobrepase un poco los dos lados. Según el tejido y elrasgado cosa de 3 a 5 filas. (B)
A B

33
Stitch selection / Selección de puntadas
Triple straight stitch: (1)For hardwearing seams.Turn the stitch length dial to “S1“ or “S2“.The machine sews two stitches forwards and one stitch backwards. Thisgives triple reinforcement.
Triple zig-zag: (2)For hardwearing seams, hems and decorative seams.Turn the stitch length dial to “S1“ or “S2“.Adjust the stitch width dial to between “3“ and “5“.Triple zig-zag is suitable for firm fabrics like denim, corduroy, etc.
1
Triple puntada recta: (1)Puntada de costura muy resistente.Gire el mando selector del longitud de la puntada en la posición“S1“ o “S2“.La máquina coserá dos puntadas adelantes y una puntada atrás.Conseguirá una puntada muy resistente.
Triple zig-zag: (2)Puntada de costura muy resistente para bordes y costuras decorativas.Gire el mando selector del longitud de la puntada en la posición “S1“o “S2“.Regular el mando selector del ancho de la puntada entre “3“ y “5“.Triple zig-zag es adecuado para telas firmes como dril, pana, etc.
NOTA: valido para maquinas con 2 o 3 mandos2

34
Smocking stitch / Punto de nido de abeja
Seams, hems, T-shirts, underwear, etc.
Set the machine as illustrated.
This stitch can be used for all types of jersey as well as for wovenfabrics. (1)
Sew at 1cm (1/4“) from the fabric edge and trim the surplus fabric. (2)
Para costuras en bordes, camisas, ropa interior, etc.
Regular la máquina según la ilustración .
Este punto puede ser usado para todos los tipos de jersey como paratela de textura. (1)
Cosa 1 cm (1/4“) desde el borde de la tela y corte la tela sobrante. (2)
1 2

35
Sewing with the cording foot / Coser con el prensatelas de cordoncillo
The cording foot is an optional accessory not supplied with yourmachine.
Decorative effects, cushions, tablecloths, etc.
Set the machine as illustrated.Various stitches are suitable for sewing on cord, e.g. Zig-zag, Triple zig-zag, decorative stitches.
Insert the cord between the spring covering the cord groove and the foot.The cord should run in the groove. One, two or three cords can be sewnon. The stitch width is adjusted according to the number of cords andthe stitch selected. (1/2)
El prensatelas para hilo de cordoncillo es un accesorio opcional nosuministrado con su máquina.
Decoraciones, cojines, manteles, etc.
Regular la máquina según la ilustración.Se pueden utilizar diversos puntos para sobrecoser el cordoncillo, comopor ejemplo el zig-zag, zig-zag triple, puntos decorativos, etc.
Meta los hilos en el muelle de guía y hágalos pasar por debajo delprensatelas hacia atrás. Los hilos tienen que estar dentro de lasranuras y preste atención al grosor del cordoncillo. Se pueden coseruno, dos o tres hilos. El ancho de la puntada varia según el númerode los hilos y de la puntada escogida. (1/2)
1 2
36
Darning / Zurcido
The darning/ Embroidery foot is an optional accessory not suppliedwith your machine.
Set the machine as illustrated.Install the darning plate. (1)Remove the presser foot bar. (2)
Attach the darning/ Embroidery foot to the presser foot holder. The lever(a) should be behind the needle clamp screw (b). Press the darning/Embroidery foot on firmly from behind with your index finger and tightenthe screw (c). (3)
First sew round the edge of the hole (to secure the threads). (4)First row: Always work from left to right. Turn work by 1/4 and oversew.
A darning ring is recommended for easier sewing and better results.
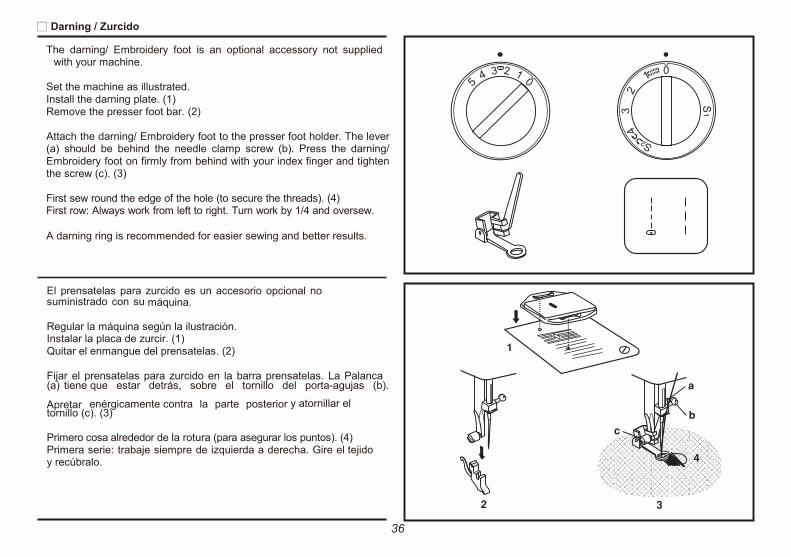
El prensatelas para zurcido es un accesorio opcional nosuministrado con su máquina.
Regular la máquina según la ilustración.Instalar la placa de zurcir. (1)Quitar el enmangue del prensatelas. (2)
Fijar el prensatelas para zurcido en la barra prensatelas. La Palanca(a) tiene que estar detrás, sobre el tornillo del porta-agujas (b).
Apretar enérgicamente contra la parte posterior y atornillar eltornillo (c). (3)
Primero cosa alrededor de la rotura (para asegurar los puntos). (4)Primera serie: trabaje siempre de izquierda a derecha. Gire el tejidoy recúbralo.
1
6 2
,
%
�
7

37
Practical stitches / Puntadas útiles
Set the machine as illustrated.Turn the stitch length dial to suit the fabric.
Shell hem (1)For decorative edges.Suitable for edges on sheer, fine and stretch fabrics. The larger stitchshould go just over the edge of the fabric to create the shell effect.
Rampart (2)For flat joining seams, sewing on elastic, visible hems.This stitch can be used for firm, thicker fabrics.
Bridging (3)For seams, place mats, tablecloths.Decorative joining seam for a fagoted effect. Gathering with cord orshirring elastic.
Regular la máquina según la ilustración.
Punto para dobladillo de concha (1)Para acabados decorativos de los bordes.Adecuado para acabados en tejidos finos, fuertes y elásticos. Lapuntada larga apenas t iene que sobrepasar el borde del tejido paraobtener el efecto de concha.
Punto universal (2)Para costura lisa de unión, coser elásticos, dobladillos visibles. Estapuntada es adecuada para diversos tejidos fuertes y géneros de punto.
Punto de fruncido (3)Para dobladillos, sets, manteles.Punto muy decorativo de unión con efecto de dobladillo hueco. Enfilarcon hilo de cordón o elástico.
1 6 2

38
Quilting / Acolchar
The quilting foot is an optional accessory not supplied with thismachine.
Set pattern selector as illustrated.
Insert the edge/quilting guide in presser foot holder and set the spaceas you desired.
Move the fabric over and sew successive rows with the guide ridingalong on the previous row of stitching.
El prensatelas para acolchar es un accesorio opcional no suministradocon su máquina.
Regular la máquina según la ilustración.
Inserta la guía de acolchar en la ranura del pie prensatelas y pongael espacio que Ud. quiera.
Mueva la tela y cosa las hileras sucesivas con la guía siguiendo lacostura anterior.

39
Gathering / Fruncir
The gathering foot is an optional accessory not supplied with thismachine.
Set the machine as illustrated.
1. Attach the gathering foot.
2. Sew a single row or multiple rows of straight stitches. Pull the lowerthread to gather more of the material.
3. if more gathering in required, loosen the upper thread (to about 2) sothat the lower thread lies on the under side of the material.
4. Pull the lower thread to gather more of the material.
El prensatelas para fruncir es un accesorio opcional no suministradocon su máquina.
Regular la máquina según la ilustración.
1. Sujete el prensatelas de fruncir.
2. Cosa una hilera sola o hileras múltiples de puntadas rectas.
3. Si se requiere un fruncido más recogido, soltar el hilo superior(más o menos hasta 2) entonces el hilo inferior cae sobre el revésde la tela.

40
Patch work / Remiendo
These stitches are used to join two pieces of fabric while leaving aspace between their edges.
1. Fold over the edges of the two pieces of fabric for the hem and bastethe edges to a thin piece of paper leaving a small space betweenthem.
2. Set the Pattern selector as illustrated. Turn the stitch length dial to“S1“.
3. Stitch along the edge, pulling both threads slightly when beginning tosew.Use thicker than normal threads for sewing.
4. After sewing, remove the basting and the paper. Finish by tying knotson the reverse side at the beginning and the end of the seams.
Estas puntadas sirven para juntar dos piezas de tejido, dejando unespacio entre los 2 bordes.
1. Doble los bordes de las dos piezas de tejido para el dobladilloe hilvánelas a un papel fino dejando un pequeño espacio entreambas piezas.
2. Ponga el selector de modelos según ilustración. Gire el mandoselector de longitud de puntada a la posición “S1“.
3. Cosa a lo largo de los bordes, tirando ligeramente de ambos hilos alcomienzo.Use hilos mas gruesos de lo normal.
4. Después de coser, quite los hilvanes y el papel. Anude los cabos delos hilos del comienzo y final de la costura por el revés.

41
Twin needle / Aguja doble
The twin needle accessory is optional. It is not included with thismachine.
- Turn stitch selector to straight stitch, center needle position.- For twin needle sewing, insert the extra spool pin into the hole on top
of the machine.- Make sure that the two threads used to thread the twin needle are of
the same weight. You can use one or two colors.- Insert the twin needle in the same way as single needle. Flat side of
needle should face away from you.- Follow instructions for single needle threading. Thread each needle
separately.
Please note:When sewing with twin needle, always proceed slowly, and makesure to maintain a low speed to insure quality stitching.When using twin needle on zig-zag make sure the stitch width dial isset between “0“ and “3“. Do not use twin needle at setting above “3“(for model- 3 dials).
La aguja doble es un accesorio opcional no suministrado con sumáquina.
- Gire el selector de la puntada recta a la posición central de la aguja.- Para coser con aguja doble, inserte un sujetador de hilo adicional
(incluido en los accesorios).- Asegúrese que los hilos utilizados sean del mismo grosor y peso para
las dobles agujas. Usted puede utilizar uno o dos colores.- Introduzca la aguja doble de la misma manera que la aguja simple.
La parte plana de la aguja debe estar mirando hacia atrás.- Enhebrar cada aguja por separado.
Nota:Cuando este cosiendo con aguja doble proceda lentamente, y esteseguro de mantener la misma velocidad para asegurarse la calidad dela puntada y de la costura. Cuando este usando la aguja doble en zigzag asegúrese que el ancho de la puntada este programada de “0“a “3“. No use aguja doble en puntadas mayores de “3“ (valido paramaquinas con 3 mandos).

42
Applique / Aplicación
- Turn pattern selector dial to small zig zag width.
- Cut out the applique design and baste it to the fabric.
- Sew slowly around the edge of the design.
- Trim excess material outside the stitching. Make sure not to cut anystitches.
- Remove the basting thread.
- Tie top and bottom thread under the applique to avoid unraveling.
- Estrechar el ancho de puntada de zig zag.
- Corte el diseño del encaje e hilvanarlo a la tela.
- Cosa lentamente alrededor del borde del diseño.
- Corte la tela sobrante con cuidado de no cortar las puntadas. No se cortar puntos.
- Sea cuidadoso al retirar la tela, para evitar roturas de puntadas.

43
Monogramming and embroidering with embroidery hoop / Creación de monogramas y posicionado con aro de bordar
Drop the feed dogs- Set the machine as illustrated above.- Remove the presser foot and the presser foot holder.- Attach the darning plate.- Lower presser foot lever before starting to sew.- Adjust the stitch width according to the size of lettering or design.Preparation for Monogramming and Embroidering- Draw the desired lettering or design on the right side of the fabric.- Stretch the fabric between embroidery hoop as firmly as possible.- Place the fabric under the needle. Make sure the presser foot bar is
down in its lowest position.- Turn the balance wheel towards you to bring up the lower thread
through the fabric. Sew a few securing stitches at the starting point.- Hold the hoop with thumb and forefingers of both hands while
pressing the material with the middle and third fingers and supportingthe outside of hoop with smaller finger.
Embroidery hoop not included with machine.
Baje los dientes del transportador.- Regular la máquina según la ilustración.- Quite el pie prensatela y el enmangue.- Instale la placa de zurcir.- Baje la palanca del prensatelas antes de comenzar a coser.- Gire el ancho de acuerdo con el tamaño de las letras del monograma
o dibujo.Preparación para la creación del monograma y recamado- Trace las letras o el dibujo deseado en el lado derecho de la tela.- Extienda la tela dentro del aro de bordar con la mayor firmeza posible.- Coloque la tela bajo la aguja. Cerciórese de qué la barra del
prensatelas está en la posición más baja.- Gire el volante hacia usted para elevar el hilo inferior a través de la
tela. Proceda a coser unas pocas puntadas en el punto inicial.- Sujete el aro con los dedos pulgar e índice de ambas manos.Coordine la velocidad de cosido y el movimiento del aro.

44
Monogramming and embroidering with embroidery hoop / Creación de monogramas y posicionado con aro de bordar
Monogramming1. Sew, moving the hoop slowly along the lettering at a constant speed.2. Secure with a few straight stitches at the end of the last letter.
Embroidering1. Stitch the outline of the design by moving the embroidery hoop.2. Fill in the design working from the outline of the design to the inside
and from the inside to the edge of the outline until the design iscompletely filled in. Keep the stitching close together. A long stitch is made by moving the hoop rapidly and a short s t i tch
is made by moving it slowly.3. Secure with a few straight stitches at the end of the design.
1 2
Monogramas1. Cosa moviendo el bastidor lentamente por las letras, a una
velocidad constante.2. Termine con unas puntadas rectas de seguridad al final de la última
letra.
Como bordar1. Remarque el contorno del diseño, moviendo el bastidor de acuerdo
con el dibujo.2. Rellene el dibujo de puntadas adelantando alternativamente el
contorno hacia el interior y del interior hacia el exterior hasta que eldibujo quede completamente cubierto de puntadas, teniendo siemprecuidado en mantener las puntadas muy juntas.
Se pueden realizar puntadas largas al mover el bastidorrápidamente y puntadas cortas al moverlo lentamente.
3. Termine con unas puntadas rectas de seguridad al final del dibujo.3 4
45
The walking foot accessory
* The walking foot accessory is optional. It is not included with thismachine.
Alwaystrytosewfirstwithoutthewalkingfootaccessorywhichshould beusedonlywhen necessary.
It is easier to guide the fabric and you have a better view of the seamwhen using the standard, regular foot on your machine. Your sewingmachine offers excellent stitch quality on a wide range of fabrics fromdelicate chiffons to multiple layers of denim.
The “Walking foot“ accessory equalizes the feeding of the upper andlower layers of fabric and improves the matching of plaids, stripes andpatterns. This foot helps to prevent uneven feeding of very difficultfabrics.
1. Lift the presser foot bar.
2. Remove the “foot holder“ by opening counter clockwise the presserbar attaching screw. (3)
3. Attach the “walking foot“ to the machine in the following way.i) The fork arm should fit into the needle screw and clamp.(2)ii) Slide the plastic ‘attaching head‘ from your left to right so that it is
fitted into the “presser foot bar“.iii) Lower the “presser foot bar“.iv) Replace and tighten clockwise the “presser bar attaching screw“.
4. Make sure both the “needle screw“ and the “presser bar attachingscrew“ are tightly secured.
5. Draw the bobbin thread up and place both the bobbin thread and theneedle thread behind the walking foot attachment.
2
F��2��&
,�����
,�����������Q���&�
,��������
) ��������
F��2��&
*���������� ����������
*���������� ���

46
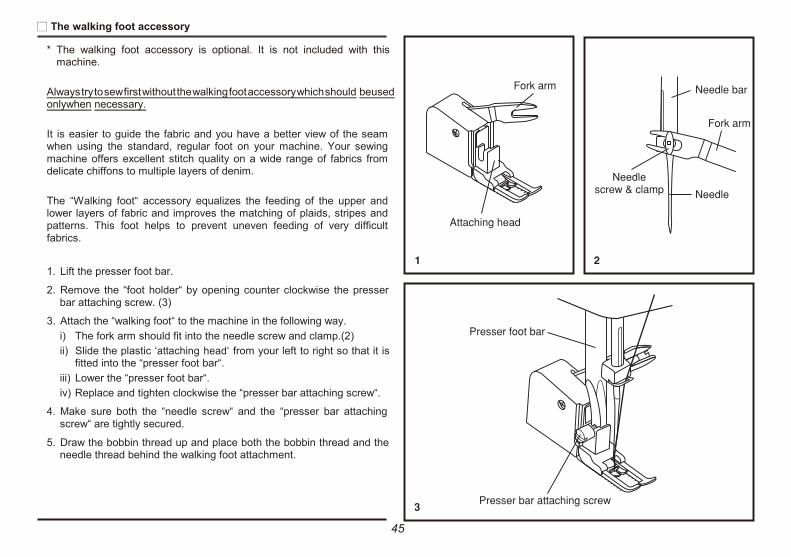
Accesorios presatelas de doble arrastre
Este prensatelas es un accesorio opcional no suministrado con sumáquina.
Utilice este prenatelas cuando sea estrictamente necesario.
Tendrá mejor visión de costura cosiendo con el prensatelasuniversal de su máquina. Su máquina de coser ofrece una excelentecalidad de puntada tanto para telas muy delicadas hasta los tejidosmas gruesos.
Con el prensatelas de doble arrastre, podrá coser varias capas de tejidoy mejorar la unión entre ellas. Este prensatelas ayuda a obtener uncosido mas uniforme.
1. Levante la barra del pie prensatelas.
2. Quite el “enmangue“ soltando el tornillo según se indica en lailustración. (3)
3. Sujeta el “prensatelas“ a la máquina de la siguiente forma:a) Inserte el brazo en el tornillo como se indica en la ilustración. (2)b) Deslice el plástico sujetando la cabeza desde su izquierda a la
derecha y se ajustará en la “barra del pie prensatela“.c) Baje la “barra del pie prensatela“.d) Fijar el tornillo haciéndolo girar en el sentido de las agujas
del reloj.4. Asegurarse que los tornillos están fijados correctamente.
5. Coja tanto el hilo de la aguja como el de la canilla y páselos a la parteposterior del prensatelas.
Cabeza sujetado
Tornillo de sujeto del pi prensatela=
Aguja
Tornillo deaguja ypalanca
Barra deaguja
Barra del piprensatela
=
Brazo
1 6
2

47
Maintenance
Attention:Disconnect the machine from the electricity supply by removing theplug from the mains socket. When cleaning the machine, it mustalways be disconnected from the electricity supply.
Remoye the stitch plate (1):Turn the handwheel until the needle is fully raised. Open the hingedfront cover and unscrew the needle plate screw withe the screw driver.
Cleaning the feed dog (2):Remove the bobbin case and use the brush supplied to clean the wholearea.
Cleaning and lubricating the hook (3):Remove the bobbin case. Snap the two hook retaining arms (a) 1 2outwards. Remove the hook race cover (b) and the hook (c) and cleanwithe a soft cloth. Lubricate at the points (d) (1-2 drops) with sewingmachine oil. Turn the handwheel until the hook race (e) is in the leftposition. Replace the hook (c). Replace the hook race cover and snapback the two hook retaining arms. Insert he bobbin case and bobbin andreplace the stitch plate.
d
Important: e cFabric fluff and threads must be removed regularly.Your machine should be serviced at regular intervals at one of ourservice agencies.
b
a3
48
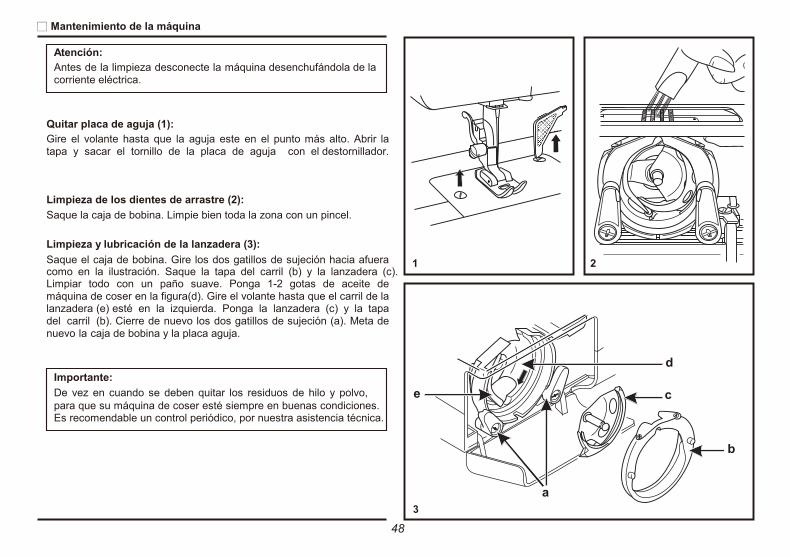
Mantenimiento de la máquina
Atención:Antes de la limpieza desconecte la máquina desenchufándola de lacorriente eléctrica.
Quitar placa de aguja (1):Gire el volante hasta que la aguja este en el punto más alto. Abrir latapa y sacar el tornillo de la placa de aguja con el destornillador.
Limpieza de los dientes de arrastre (2):Saque la caja de bobina. Limpie bien toda la zona con un pincel.
Limpieza y lubricación de la lanzadera (3):Saque el caja de bobina. Gire los dos gatillos de sujeción hacia afueracomo en la ilustración. Saque la tapa del carril (b) y la lanzadera (c).
1 2
Limpiar todo con un paño suave. Ponga 1-2 gotas de aceite demáquina de coser en la figura(d). Gire el volante hasta que el carril de lalanzadera (e) esté en la izquierda. Ponga la lanzadera (c) y la tapadel carril (b). Cierre de nuevo los dos gatillos de sujeción (a). Meta denuevo la caja de bobina y la placa aguja.
dImportante:De vez en cuando se deben quitar los residuos de hilo y polvo, e cpara que su máquina de coser esté siempre en buenas condiciones.Es recomendable un control periódico, por nuestra asistencia técnica.
b
a3

49
Trouble shooting guide
Problem Cause CorrectionUpper thread breaks
Lower thread breaks
Skipped stitches
Needle breaks
Loose stitches
Seams gatheror pucker
Uneven stitches,uneven feed
The machineis noisy
The machine jams
1.The machine is not threaded correctly2.The thread tension is too tight3.The thread is too thick for the needle4.The needle is not inserted correctly5.The thread is round wound the spool holder pin6.The needle is damaged
1.The bobbin case is not inserted correctly2.The bobbin case is threaded wrongly3.The lower thread tension is too tight
1.The needle is not inserted correctly2.The needle is damaged3.The wrong size needle has been used4.The foot is not attached correctly
1.The needle is damaged2.The needle is not correctly inserted3.Wrong needle size for the fabric4.The wrong foot is attached
1.The machine is not correctly threaded2.The bobbin case is not correctly threaded3.Needle/fabric/thread combination is wrong4.Thread tension wrong
1.The needle is too thick for the fabric2.The stitch length is wrongly adjusted3.The thread tension is too tight
1.Poor quality thread2.The bobbin case is wrongly threaded3.Fabric has been pulled
1.The machine must be lubricated2.Fluff or oil have collected on the hook or needle bar3.Poor quality oil has been used4.The needle is damaged
Thread is caught in the hook
1.Rethread the machine2.Reduce the thread tension (lower number)3.Select a larger needle4.Remove and reinsert the needle (flat side towards the back)5.Remove the reel and wind thread onto reel6.Replace the needle
1.Remove and reinsert the bobbin case and pull on the thread.The thread should pull easily
2.Check both bobbin and bobbin case3.Loosen lower thread tension as described
1.Remove and reinsert needle(flat side towards the back)2.Insert a new needle3.Choose a needle to suit the thread and fabric4.Check and attach correctly
1.Insert a new needle2.Insert the needle correctly (flat side towards the back)3.Choose a needle to suit the thread and fabric4.Select the correct foot
1.Check the threading2.Thread the bobbin case as illustrated3.The needle size must suit the fabric and thread4.Correct the thread tension
1.Select a finer needle2.Readjust the stitch length3.Loosen the thread tension
1.Select a better quality thread2.Remove bobbin case and retread and insert correctly3.Do not pull on the fabric while sewing, let it be taken up by the machine
1.Lubricate as described2.Clean the hook and feed dog as described3.Only use good quality sewing machine oil4.Replace the needle
Remove the upper thread and bobbin case, turn the handwheel backwardsand forwards by hand and remove the thread remands.Lubricate as described

50
Problemas Causas SolucionesRotura del hilosuperior
Rotura del hiloinferior
Puntos saltados
Rotura de la aguja
Puntos demasiadoflojos
Uniones queforman frunces opliegues
Puntos irregulares,avance irregular
Máquina ruidosa
Atasco de lamáquina
1.La máquina no está enhebrada correctamente.2.El hilo está demasiado tenso.3.El hilo es demasiado grueso para la aguja.4.La aguja no ha sido colocada correctamente.5.El hilo está enrollado alrededor de la varilla del soporte
de la canilla.6.La aguja está dañada.
1.La caja de bobina no ha sido colocada correctamente.2.La caja de bobina está mal enhebrada.3.El hilo inferior está demasiado tenso.
1.La aguja no ha sido colocada correctamente.2.La aguja está dañada.3.La aguja utilizada no es del tamaño correcto.4.El prensatelas no está fijado correctamente.
1.La aguja está dañada.2.La aguja no ha sido colocada correctamente.3.La aguja no tiene el tamaño correcto para la tela.4.El prensatelas colocado no es el correcto.
1.La máquina no ha sido enhebrada correctamente.2.La caja de bobina no ha sido enhebrada correctamente.3.La combinación aguja/tela/hilo no es correcta.4.La tensión del hilo no es correcta.
1.La aguja es demasiado gruesa para la tela.2.La longitud de puntada está mal ajustada.3.El hilo está demasiado tenso.
1.El hilo es de mala calidad.2.La caja de bobina está mal enhebrada.3.La tela ha sido estirada.
1.La máquina debe ser lubricada obligatoriamente.2.Se ha acumulado borra o aceite en la lanzadera o el
montante de aguja.3.Se ha utilizado un aceite de mala calidad.4.La aguja está dañada.
El hilo está atascado en la lanzadera.
1.Vuelva a enhebrar la máquina.2.Reduzca la tensión del hilo (cifra más pequeña).3.Escoja una aguja más gruesa.4.Retire la aguja y vuelva a colocarla (lado plano hacia atrás).5.Retire la canilla y enrolle el hilo encima.6.Reemplace la aguja.
1.Retire la caja de bobina, vuelva a colocarla y tire del hilo. El hilo debe salirfácilmente.
2.Verifique la canilla y la caja de bobina.3.Reduzca la tensión del hilo inferior como está descrito.
1.Retire la aguja y vuelva a colocarla (lado plano hacia atrás).2.Monte una aguja nueva.3.Escoja una aguja que sea conveniente para el hilo y la tela.4.Verifique y fíjelo correctamente.
1.Monte una aguja nueva.2.Monte la aguja correctamente (lado plano hacia atrás).3.Escoja una aguja que sea conveniente para el hilo y la tela.4.Escoja el prensatelas que sea conveniente.
1.Verifique el enhebrado.2.Enhebre la caja de bobina tal como está ilustrado.3.El tamaño de la aguja debe obligatoriamente ser el adecuado para el hilo y la
tela.4.Corrija la tensión del hilo.
1.Escoja una aguja más fina.2.Repita el ajuste de longitud de puntada.3.Afloje el hilo.
1.Escoja un hilo de mejor calidad.2.Saque la caja de bobina, vuelva a enhebrarla y colóquela de vuelta
correctamente.3.No tire de la tela mientras cose. Deje que la máquina se encargue del arrastre.
1.Lubrique tal como está indicado.2.Limpie la lanzadera y las garras de accionamiento tal como está indicado.3.Utilice exclusivamente aceite para máquinas de coser de buena calidad.4.Reemplace la aguja.
Retire el hilo superior y la caja de bobina, gire el volante hacia atrás y haciaadelante con la mano y luego quite los restos de hilo. Lubrique tal como estáindicado.

Do not dispose of electrical appliances as unsorted municipal waste, use separate collection facilities.Contact your local government for information regarding the collection systems available.If electrical appliances are disposed of in landfills or dumps, hazardous substances can leak into the groundwater andget into the food chain, damaging your health and well-being.When replacing old appliances with new once, the retailer is legally obligated to take back your old appliance fordisposal at least for free of charge.
No deseche aparatos electrodomésticos como si fueran basura común. Use recipientes especiales para su desecho.Contacte su Gobierno local para informarse acerca de los sistemas de recolección disponibles.Si artefactos eléctricos son arrojados en pozos o vertederos, sustancias peligrosas pueden contaminar las aguassubterráneas y entrar en la cadena de alimentación, dañando su salud y bienestar.
021V8A0101( ) Feb/09ORION 70(82A0)