Embed Size (px)
Citation preview

OPTION - To mount housing anywhere between ceiling framing: Use optional Hanger Bar Kit (sold separately from local distributors or website). Follow mounting instructions included with kit.
1. Remove blower and all packing material from fan housing.
2. Remove wiring panel from fan housing.
3. Attach damper/duct connector to fan housing.
4. Mount housing to ceiling structure.
ROOF CAP* (with built-in damper)
WALL CAP*(with built-in
damper)4-IN. ROUNDELBOWS*
FANHOUSING
Seal gapsaround
housing.
Seal duct jointswith tape.
INSULATION(Place around andover fan housing.)
POWERCABLE *
* Purchase separately.
OR
Keep ductruns short.
4-IN. ROUNDDUCT*
TABS
5. Connect 4-in. round duct.
6. Connect wiring.
ALL INSTALLATIONS Start here.
IMPORTANT - The ducting from this fan to the outside of the building has a strong effect on the air flow, noise and energy use of the fan. Use the shortest, straightest duct routing possible for best performance, and avoid installing the fan with smaller ducts than recommended. Insulation around the ducts can reduce energy loss and inhibit mold growth. Fans installed with existing ducts may not achieve their rated airflow.
WARNING TO REDUCE THE RISK OF FIRE, ELECTRIC SHOCK, OR INJURY TO PERSONS, OBSERVE THE FOLLOWING:
1. Use this unit only in the manner intended by the manufacturer. If you have questions, contact the manufacturer at the address or telephone number listed in the warranty.
2. Before servicing or cleaning unit, switch power off at service panel and lock the service disconnecting means to prevent power from being switched on accidentally. When the service disconnecting means cannot be locked, securely fasten a prominent warning device, such as a tag, to the service panel.
3. Installation work and electrical wiring must be done by a qualified person(s) in accordance with all applicable codes and standards, including fire-rated construction codes and standards.
4. Sufficient air is needed for proper combustion and exhausting of gases through the flue (chimney) of fuel burning equipment to prevent backdrafting. Follow the heating equipment manufacturer’s guideline and safety standards such as those published by the National Fire Protection Association (NFPA), and the American Society for Heating, Refrigeration and Air Conditioning Engineers (ASHRAE), and the local code authorities.
5. When cutting or drilling into wall or ceiling, do not damage electrical wiring and other hidden utilities.
6. Ducted fans must always be vented to the outdoors.
7. Acceptable for use over a tub or shower when connected to a GFCI (Ground Fault Circuit Interrupter) - protected branch circuit (ceiling installation only).
8. This unit must be grounded.
CAUTION 1. For general ventilating use only. Do not use to exhaust
hazardous or explosive materials and vapors.
2. To avoid motor bearing damage and noisy and/or unbalanced impellers, keep drywall spray, construction dust, etc. off power unit.
3. Please read specification label on product for further information and requirements.
CLEANING & MAINTENANCEFor quiet and efficient operation, long life, and attractive appearance - lower or remove grille and vacuum interior of unit with the dusting brush attachment.
The motor is permanently lubricated and never needs oiling. If the motor bearings are making excessive or unusual noises, replace the blower assembly (includes motor and impeller).
OPERATIONUse an on/off switch or speed control to operate this ventilator. See “Connect Wiring” for details.
Installer: Leave this manual with the homeowner.
READ AND SAVE THESE INSTRUCTIONS Push connector through opening from inside of housing.
Engage tabs and secure with screw from parts bag.
Make sure bottom of housing will be flush with finished ceiling.
For proper location using ½” ceiling material: Bend out housing tabs to fit against bottom of structure.
Secure housing through mounting ears with appropriate fasteners.
If mounting housing to I-joist, use wood blocking as shown.
Bend tab to expose desired access hole. Connect power cable to housing with appropriate UL approved connector. Connect black to black, white to white and green to green or bare wire. Re-install wiring panel and secure with screw from parts bag.
NEW CONSTRUCTIONFor Retrofit Installation - Skip to back page.
Please visit our website - www.broan.com, www.broan.ca, www.nutone.com, or www.nutone.ca - to register this product and to view installation tips and videos.
HOUSING TABS
CookingEquipment
Floor
COOKING AREADo not install above or
inside this area.
45o 45o
NOT FOR USE INA COOKING AREA.
SERIES FAN / LIGHT
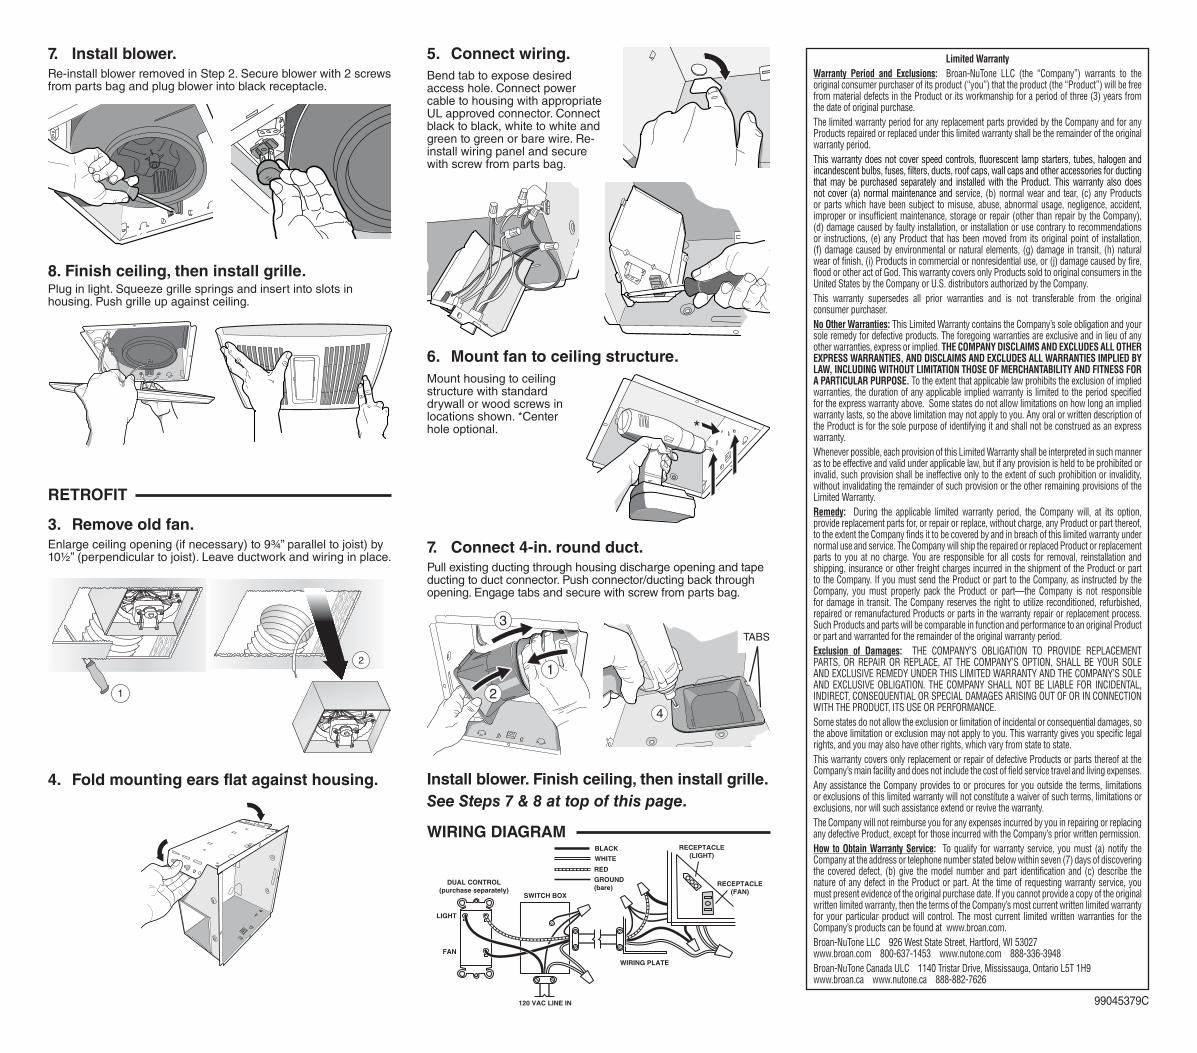
8. Finish ceiling, then install grille.Plug in light. Squeeze grille springs and insert into slots in housing. Push grille up against ceiling.
3. Remove old fan.Enlarge ceiling opening (if necessary) to 9¾” parallel to joist) by 10½” (perpendicular to joist). Leave ductwork and wiring in place.
7. Connect 4-in. round duct.Pull existing ducting through housing discharge opening and tape ducting to duct connector. Push connector/ducting back through opening. Engage tabs and secure with screw from parts bag.
6. Mount fan to ceiling structure.
1
2
3
4
TABS
1
2
*
4. Fold mounting ears flat against housing.
7. Install blower.Re-install blower removed in Step 2. Secure blower with 2 screws from parts bag and plug blower into black receptacle.
RETROFIT
Limited WarrantyWarranty Period and Exclusions: Broan-NuTone LLC (the “Company”) warrants to the original consumer purchaser of its product (“you”) that the product (the “Product”) will be free from material defects in the Product or its workmanship for a period of three (3) years from the date of original purchase.The limited warranty period for any replacement parts provided by the Company and for any Products repaired or replaced under this limited warranty shall be the remainder of the original warranty period.This warranty does not cover speed controls, fluorescent lamp starters, tubes, halogen and incandescent bulbs, fuses, filters, ducts, roof caps, wall caps and other accessories for ducting that may be purchased separately and installed with the Product. This warranty also does not cover (a) normal maintenance and service, (b) normal wear and tear, (c) any Products or parts which have been subject to misuse, abuse, abnormal usage, negligence, accident, improper or insufficient maintenance, storage or repair (other than repair by the Company), (d) damage caused by faulty installation, or installation or use contrary to recommendations or instructions, (e) any Product that has been moved from its original point of installation, (f) damage caused by environmental or natural elements, (g) damage in transit, (h) natural wear of finish, (i) Products in commercial or nonresidential use, or (j) damage caused by fire, flood or other act of God. This warranty covers only Products sold to original consumers in the United States by the Company or U.S. distributors authorized by the Company. This warranty supersedes all prior warranties and is not transferable from the original consumer purchaser. No Other Warranties: This Limited Warranty contains the Company’s sole obligation and your sole remedy for defective products. The foregoing warranties are exclusive and in lieu of any other warranties, express or implied. THE COMPANY DISCLAIMS AND EXCLUDES ALL OTHER EXPRESS WARRANTIES, AND DISCLAIMS AND EXCLUDES ALL WARRANTIES IMPLIED BY LAW, INCLUDING WITHOUT LIMITATION THOSE OF MERCHANTABILITY AND FITNESS FOR A PARTICULAR PURPOSE. To the extent that applicable law prohibits the exclusion of implied warranties, the duration of any applicable implied warranty is limited to the period specified for the express warranty above. Some states do not allow limitations on how long an implied warranty lasts, so the above limitation may not apply to you. Any oral or written description of the Product is for the sole purpose of identifying it and shall not be construed as an express warranty.Whenever possible, each provision of this Limited Warranty shall be interpreted in such manner as to be effective and valid under applicable law, but if any provision is held to be prohibited or invalid, such provision shall be ineffective only to the extent of such prohibition or invalidity, without invalidating the remainder of such provision or the other remaining provisions of the Limited Warranty.Remedy: During the applicable limited warranty period, the Company will, at its option, provide replacement parts for, or repair or replace, without charge, any Product or part thereof, to the extent the Company finds it to be covered by and in breach of this limited warranty under normal use and service. The Company will ship the repaired or replaced Product or replacement parts to you at no charge. You are responsible for all costs for removal, reinstallation and shipping, insurance or other freight charges incurred in the shipment of the Product or part to the Company. If you must send the Product or part to the Company, as instructed by the Company, you must properly pack the Product or part—the Company is not responsible for damage in transit. The Company reserves the right to utilize reconditioned, refurbished, repaired or remanufactured Products or parts in the warranty repair or replacement process. Such Products and parts will be comparable in function and performance to an original Product or part and warranted for the remainder of the original warranty period. Exclusion of Damages: THE COMPANY’S OBLIGATION TO PROVIDE REPLACEMENT PARTS, OR REPAIR OR REPLACE, AT THE COMPANY’S OPTION, SHALL BE YOUR SOLE AND EXCLUSIVE REMEDY UNDER THIS LIMITED WARRANTY AND THE COMPANY’S SOLE AND EXCLUSIVE OBLIGATION. THE COMPANY SHALL NOT BE LIABLE FOR INCIDENTAL, INDIRECT, CONSEQUENTIAL OR SPECIAL DAMAGES ARISING OUT OF OR IN CONNECTION WITH THE PRODUCT, ITS USE OR PERFORMANCE. Some states do not allow the exclusion or limitation of incidental or consequential damages, so the above limitation or exclusion may not apply to you. This warranty gives you specific legal rights, and you may also have other rights, which vary from state to state. This warranty covers only replacement or repair of defective Products or parts thereof at the Company’s main facility and does not include the cost of field service travel and living expenses.Any assistance the Company provides to or procures for you outside the terms, limitations or exclusions of this limited warranty will not constitute a waiver of such terms, limitations or exclusions, nor will such assistance extend or revive the warranty.The Company will not reimburse you for any expenses incurred by you in repairing or replacing any defective Product, except for those incurred with the Company’s prior written permission.How to Obtain Warranty Service: To qualify for warranty service, you must (a) notify the Company at the address or telephone number stated below within seven (7) days of discovering the covered defect, (b) give the model number and part identification and (c) describe the nature of any defect in the Product or part. At the time of requesting warranty service, you must present evidence of the original purchase date. If you cannot provide a copy of the original written limited warranty, then the terms of the Company’s most current written limited warranty for your particular product will control. The most current limited written warranties for the Company’s products can be found at www.broan.com.Broan-NuTone LLC 926 West State Street, Hartford, WI 53027 www.broan.com 800-637-1453 www.nutone.com 888-336-3948Broan-NuTone Canada ULC 1140 Tristar Drive, Mississauga, Ontario L5T 1H9 www.broan.ca www.nutone.ca 888-882-7626
5. Connect wiring.Bend tab to expose desired access hole. Connect power cable to housing with appropriate UL approved connector. Connect black to black, white to white and green to green or bare wire. Re-install wiring panel and secure with screw from parts bag.
Mount housing to ceiling structure with standard drywall or wood screws in locations shown. *Center hole optional.
Install blower. Finish ceiling, then install grille.See Steps 7 & 8 at top of this page.
WIRING DIAGRAM
99045379C
SWITCH BOX
LIGHT
FAN
DUAL CONTROL(purchase separately)
WHITE
BLACK
RED
GROUND(bare)
WIRING PLATE
120 VAC LINE IN
RECEPTACLE(FAN)
RECEPTACLE(LIGHT)

OPTION - Pour installer le boîtier n’importe où entre les solives du plafond : Utilisez l’ensemble de barres de suspension offert en option (vendu séparément chez votre distributeur local ou sur notre site Web.). Suivez les instructions accompagnant l’ensemble.
1. Retirez le ventilateur et tout le matériel d’emballage du boîtier du ventilateur.
2. Enlevez le panneau de câblage du boîtier du ventilateur.
3. Fixez le clapet/raccord de conduit au boîtier de ventilateur.
4. Montage du boîtier à la charpente du plafond.
CAPUCHON DE TOIT* (avec clapet intégré)
CAPUCHON MURAL*
(avec clapet intégré)COUDES RONDS DE 10 CM (4 PO)*
BOÎTIER DE VENTILATEUR
Scellez l’écart autour
du boîtier.
Scellez les joints avec du ruban à conduit.
ISOLANT (Le placer sur le boîtier de ventilateur et autour.)
CÂBLE D’ALIMENTATION*
*Vendu séparément.
OU
Utilisez des conduits les plus courts
possible.
CONDUIT ROND* DE 10 CM (4 PO)
LANGUETTES
5. Raccordez un conduit rond de 10 cm (4 po).
6. Raccordez les fils.
TOUS LES TYPES DE POSE Commencer ici.
IMPORTANT - Les conduits allant de ce ventilateur jusqu’à l’extérieur de l’habitation ont une grande influence sur le débit d’air, le bruit du ventilateur et sa consommation d’énergie. Pour obtenir le meilleur rendement, utilisez les conduits les plus courts et les plus droits possible et évitez d’utiliser des conduits plus petits que ceux recommandés. L’isolation des conduits peut contribuer à réduire les pertes d’énergie et éviter la prolifération de moisissures. Les ventilateurs installés sur d’anciens conduits pourraient ne pas produire leur débit d’air nominal.
AVERTISSEMENT OBSERVEZ LES DIRECTIVES CI-DESSOUS AFIN DE RÉDUIRE LES RISQUES D’INCENDIE, DE CHOC ÉLECTRIQUE OU DE BLESSURES CORPORELLES :1. N’utilisez cet appareil que de la manière prévue par le fabricant. Si
vous avez des questions, communiquez avec le fabricant à l’adresse ou au numéro de téléphone indiqués dans la garantie.
2. Avant de procéder à l’entretien ou au nettoyage de l’appareil, coupez l’alimentation du panneau électrique et verrouillez l’interrupteur principal afin d’empêcher que le courant ne soit accidentellement rétabli. S’il est impossible de verrouiller l’interrupteur principal, fixez solidement un message d’avertissement, par exemple une étiquette, sur le panneau électrique.
3. La pose de l’appareil et les travaux d’électricité doivent être effectués par des personnes qualifiées conformément à la réglementation en vigueur, notamment les normes de la construction ayant trait à la protection contre les incendies.
4. Pour éviter les refoulements, l’apport d’air doit être suffisant pour brûler les gaz produits par les appareils à combustion et les évacuer dans le conduit de fumée (cheminée). Respectez les directives du fabricant de l’appareil de chauffage et les normes de sécurité, notamment celles publiées par la National Fire Protection Association (NFPA), l’American Society for Heating, Refrigeration and Air Conditioning Engineers (ASHRAE) et les codes des autorités locales.
5. Veillez à ne pas endommager le câblage électrique ou d’autres équipements non apparents lors de la découpe ou du perçage du mur ou du plafond.
6. Les ventilateurs avec conduits doivent toujours rejeter l’air à l’extérieur.
7. Cet appareil peut être installé au-dessus d’une enceinte de baignoire ou de douche s’il est branché sur un circuit de dérivation protégé par un disjoncteur différentiel de fuite à la terre (installation au plafond seulement).
8. Cet appareil doit être relié à une mise à la terre.
ATTENTION 1. Pour ventilation générale uniquement. N’utilisez pas cet appareil pour
évacuer des matières ou des vapeurs dangereuses ou explosives.
2. Pour éviter d’endommager les roulements du moteur, de déséquilibrer la roue du ventilateur ou de la rendre bruyante, débarrassez l’appareil de la poussière de plâtre, de construction, etc.
3. Veuillez lire l’étiquette de spécifications du produit pour obtenir plus de renseignements, notamment sur les exigences.
NETTOYAGE ET ENTRETIEN Pour un fonctionnement silencieux et efficace, ainsi qu’une durabilité et une apparence supérieures, abaissez ou enlevez la grille et nettoyez l’intérieur de l’appareil avec un aspirateur muni d’une brosse à épousseter.
Le moteur est lubrifié en permanence et n’a pas besoin d’être huilé. Si les roulements du moteur sont anormalement bruyants, remplacez l’ensemble de ventilateur (incluant le moteur et la roue à ailettes).
FONCTIONNEMENTUtilisez un interrupteur marche/arrêt ou une commande de vitesse pour actionner le ventilateur. Pour plus de détails, consultez la section « Diagramme de câblage ».
Installateur : Veuillez remettre ce manuel au propriétaire.
LIRE CES DIRECTIVES ET LES CONSERVERPoussez le raccord au travers de l’ouverture par l’intérieur du boîtier.Engagez les languettes et fixez le tout avec les vis se trouvant dans le sachet de pièces.
Assurez-vous que le dessous du boîtier affleure la surface finie du plafond.Pour un positionnement adéquat avec une surface de plafond de 13 mm (½ po) : Pliez les onglets de logement vers l’extérieur du boîtier pour les appuyer contre le dessous de la charpente.Fixez le boîtier aux solives en utilisant la visserie appropriée dans les trous des brides de montage.
Si vous fixez le boîtier à une solive en « I », utilisez un bloc de bois comme illustré.
Repliez la languette pour exposer le trou d’accès voulu. Fixez le câble d’alimentation au boîtier à l’aide du connecteur approprié homologué UL. Connectez le fil noir avec le noir, le blanc avec le blanc, et le vert avec le vert ou le fil nu de mise à la terre. Réinstallez le panneau de câblage et fixez-le avec les vis se trouvant dans le sachet de pièces.
CONSTRUCTION NEUVEPour une rénovation - passez à la page suivante.
ONGLETS DE LOGEMENT
VENTILATEUR / ÉCLAIRAGE SÉRIE
Cuisinière ouplaque decuisson
Plancher
ZONE DE CUISSONNe pas installer au-dessus
ou à l’intérieurde cette zone.
45o 45o
NE PAS UTILISERDANS UNE ZONE
DE CUISSON.
Veuillez visiter notre site Web – www.broan.ca, www.broan.com, www.nutone.ca, ou www.nutone.com – pour enregistrer ce produit et voir des conseils et vidéos d’installation.

8. Finissez le plafond, puis installez la grille.Branchez l’éclairage. Pincez les ressorts de la grille et insérez-les dans les fentes du boîtier. Poussez la grille contre le plafond.
3. Enlevez l’ancien ventilateur.Agrandissez l’ouverture (si nécessaire) à 25 cm (9 3/4 po) (parallèle aux solives) par 26,6 cm (10 1/2 po) (perpendiculaire aux solives). Laissez les conduits et le câblage électrique en place.
7. Raccordez un conduit rond de 10 cm (4 po).Tirez le conduit existant au travers de la sortie et fixez-le au raccord avec du ruban à conduit. Repoussez le raccord/conduit au travers de l’ouverture. Engagez les languettes et fixez le tout avec les vis se trouvant dans le sachet de pièces.
6. Fixez le boîtier à la charpente du plafond.
1
2
3
4
LANGUETTES
1
2
*
4. Pliez les brides de montage à plat contre le boîtier.
7. Installez le ventilateur.Réinstallez le ventilateur enlevé à l’étape 2. Fixez-le avec 2 vis du sachet de pièces et branchez-le dans la prise noire.
RÉNOVATION
Garantie limitéePériode de garantie et exclusions : Broan-NuTone LLC (la « Société ») garantit au consommateur acheteur initial (« vous ») de son produit (le « Produit ») que celui-ci est exempt de tout vice de matériau ou de fabrication pour une période de trois (3) ans à compter de la date d’achat originale. La garantie sur les ampoules fournies avec le produit est de trois (3) ans et ne couvre pas leur bris. La période de la garantie limitée sur toute pièce de remplacement fournie par la Société et sur tout produit réparé ou remplacé en vertu de la présente garantie limitée correspond au reste de la période de garantie originale.La présente garantie ne s’applique pas aux commandes de vitesse, tubes fluorescents et aux démarreurs, ni aux ampoules halogènes ou incandescentes, fusibles, filtres, conduits, capuchons de toit, capuchons muraux et autres accessoires pour conduits pouvant avoir été achetés séparément et installés avec le produit. La présente garantie ne couvre pas (a) les travaux d’entretien et de service normaux, (b) l’usure normale, (c) tout produit ou toute pièce ayant fait l’objet d’une mauvaise utilisation, d’un abus, d’un usage anormal, d’une négligence, d’un accident, d’un entretien, rangement ou réparation inadéquats ou insuffisants (autre que par la Société), (d) les dommages dus à une mauvaise installation, ou à une installation ou utilisation contraires aux recommandations ou instructions, (e) tout produit déplacé de son lieu d’installation original, (f) les dommages dus à des éléments environnementaux ou naturels, (g) les dommages dus au transport, (h) l’usure naturelle du fini, (i) les produits utilisés à des fins commerciales ou non-résidentielles ou (j) les dommages dus à un incendie, à une inondation ou à un événement fortuit. La présente garantie ne couvre que les produits vendus au consommateur initial aux États-Unis ou Canada par la Société ou par les distributeurs américains ou canadiens autorisés par la Société.La présente garantie remplace toute garantie précédente et le consommateur et acheteur initial ne peut la céder à quiconque.Aucune autre garantie : La présente garantie limitée stipule les seules obligations de la Société et votre seul recours en cas de produits défectueux. La garantie ci-dessus est exclusive et remplace toute autre garantie, expresse ou tacite. LA SOCIÉTÉ EXCLUT TOUTE AUTRE GARANTIE EXPRESSE ET TOUTE GARANTIE DÉCOULANT IMPLICITEMENT DE LA LOI, Y COMPRIS, SANS S’Y LIMITER, LES GARANTIES DE VALEUR MARCHANDE ET D’ADÉQUATION À UN USAGE PARTICULIER. Dans la mesure où la loi en vigueur interdit l’exclusion des garanties tacites, la durée de toute garantie tacite est limitée à la période stipulée ci-dessus pour la garantie expresse. Certaines juridictions interdisant de limiter la durée d’une garantie tacite, la limitation ci-dessus peut ne pas s’appliquer à votre situation. Toute description verbale ou écrite du produit a pour seule fin de l’identifier et ne doit pas être interprétée comme une garantie expresse.Si possible, chaque disposition de cette garantie limitée doit être interprétée de sorte à être en vigueur et valide en vertu des lois applicables, mais si une disposition s’avère interdite ou invalide, elle le sera seulement dans la mesure de cette interdiction ou invalidité, sans invalider le reste de cette disposition ni les autres dispositions de la présente garantie limitée.Recours : Pendant la période de garantie limitée applicable, la Société pourra, à son choix, fournir des pièces de rechange ou réparer ou remplacer, sans frais, tout produit ou toute pièce, dans la mesure où la Société constate qu’il est couvert et contrevient à la présente garantie limitée dans des conditions normales d’utilisation et de service. La Société vous enverra gratuitement le produit réparé ou remplacé ou les pièces de rechange. Vous êtes responsable des frais de retrait, de réinstallation, d’expédition, d’assurance ou de tous autres frais de transport pour l’envoi du produit ou de la pièce à la Société. Si vous devez envoyer le produit ou la pièce à la Société, tel que la Société vous l’indiquera, vous devrez l’emballer correctement. La Société n’est pas responsable des dommages subis lors du transport. La Société se réserve le droit d’utiliser des produits ou des pièces remis en état, remis à neuf, réparés ou réusinés dans le processus de réparation ou de remplacement sous garantie. Lesdits produits ou pièces seront comparables en fonction et en performance aux produits et pièces d’origine et seront garantis pendant le reste de la période de garantie originale. Exclusion de dommages : L’OBLIGATION DE LA SOCIÉTÉ DE FOURNIR DES PIÈCES DE RECHANGE, OU DE RÉPARER OU REMPLACER LE PRODUIT, À SON CHOIX, CONSTITUE VOTRE SEUL ET UNIQUE RECOURS EN VERTU DE LA PRÉSENTE GARANTIE LIMITÉE ET LA SEULE ET UNIQUE OBLIGATION DE LA SOCIÉTÉ. LA SOCIÉTÉ NE PEUT ÊTRE TENUE RESPONSABLE DE TOUT DOMMAGE INDIRECT, CONSÉCUTIF, ACCESSOIRE OU SPÉCIAL DÉCOULANT DE L’UTILISATION OU DU RENDEMENT DU PRODUIT.Certains territoires ou provinces ne permettant pas la limitation ou l’exclusion des dommages indirects ou consécutifs, la limitation ci-dessus peut ne pas s’appliquer à votre situation. La présente garantie vous confère des droits spécifiques reconnus par la loi. D’autres droits pourraient également vous être accordés selon la législation locale en vigueur.La présente garantie ne couvre que le remplacement ou la réparation des produits ou pièces défectueux à l’usine principale de la Société et ne comprend pas les frais de voyage et ni les dépenses quotidiennes pour une réparation à domicile.Toute aide que la Société vous fournit en dehors des dispositions, limitations ou exclusions de cette garantie limitée ne constituera en rien une renonciation auxdites dispositions, limitations ou exclusions, et ne prolongera aucunement cette garantie pas plus qu’elle ne la remettra en vigueur.La Société ne vous remboursera aucune dépense encourue par vous pour la réparation ou le remplacement de tout produit défectueux, sauf celles que vous avez encourues avec la permission écrite préalable de la Société.Comment bénéficier du service de garantie : Pour vous prévaloir de cette garantie, vous devez (a) aviser la Société à l’adresse ou au numéro de téléphone indiqués ci-dessous dans les sept (7) jours du constat de la défectuosité couverte, (b) donner le numéro de modèle du produit et le numéro d’identification de la pièce et (c) décrire la nature de la défectuosité du produit ou de la pièce. Lors de votre demande de garantie, vous devez présenter une preuve de la date d’achat originale. Si vous ne pouvez pas fournir une copie écrite de la garantie limitée originale, les dispositions de la garantie limitée écrite la plus récente de la Société concernant ce produit particulier s’appliqueront. Vous trouverez les garanties limitées écrites les plus récentes des produits de la Société sur le site www.broan.ca et www.nutone.ca. Broan-NuTone LLC 926 West State Street, Hartford, WI 53027 www.broan.com 800-558-1711 www.nutone.com 888-336-3948Broan-NuTone Canada ULC 1140 Tristar Drive, Mississauga, Ontario L5T 1H9 www.broan.ca www.nutone.ca 888-882-7626
5. Branchez les fils.Repliez la languette pour exposer le trou d’accès voulu. Fixez le câble d’alimentation au boîtier à l’aide du connecteur approprié homologué UL. Connectez le fil noir avec le noir, le blanc avec le blanc, et le vert avec le vert ou le fil nu de mise à la terre. Réinstallez le panneau de câblage et fixez-le avec les vis se trouvant dans le sachet de pièces.
Fixez le boîtier à la charpente du plafond avec des vis à cloison sèche ou des vis à bois standards aux endroits indiqués. *Le trou du centre est facultatif.
Installez le ventilateur. Finissez le plafond, puis installez la grille. Voir le étapes 7 et 8 en haut de cette page.
DIAGRAMME DE CÂBLAGE
99045571C
BOÎTE D’INTERRUPTEUR
ÉCLAIRAGE
VENTILATEUR
DOUBLE COMMANDE (vendue séparément)
BLANC
NOIR
ROUGE
FIL DE TERRE (nu)
PLAQUE DE CÂBLAGE
ENTRÉE 120 VCA
PRISE DE COURANT
(VENTILATEUR)
PRISE DE COURANT (ÉCLAIRAGE)