Embed Size (px)
Citation preview

Century Electric Motors New sletter
September 2013
Using the Proper Test Equipmentto Troubleshoot Pool MotorsOver the course of the past several months the discussion has centered on pump motor
maintenance and troubleshooting ideas For service technicians and installers having
the proper test equipment and understanding how to use these tools to diagnose motor
problems is essential
Conventional Multimeter or Ohmmeter
An ohmmeter can be used to measure the resistance of the various motor windings as
well as to test the insulation The ohmmeter will have numerous ranges from R x 1 where
the meter reads directly in ohms to R x 100K where the actual meter reading must be
multiplied by 100000 for the actual ohm value
Before using an Ohmmeter
Make sure the power is off
Read the instruction manual for the meter
All troubleshooting checks specify the ohmmeter range to be used If your meter
does not have the exact range use the next higher range
Digital OhmmeterMultimeter
Direct reading digital ohmmeters are readily available in the field To use this type
Subscribe Share Past Issues RSSTranslate
Make sure the power is off
Read the instruction manual for the meter
You do not have to set the ohmmeter to a particular scale as the meter displays the
ohm value up to maximum capability of the meter
Install probes and take resistance readings in the normal manner
Ammeter
Install leads in the bottom of the ammeter
Select the desired voltage scale
Take readings by touching one probe to each of the lead line terminals
Voltmeter
Arrange leads so the jaws of the ammeter will encircle one lead
Set meter on maximum amp scale and encircle jaws around one lead and take a
reading It may be necessary to reset to a lower scale
Voltage Check
Make sure power is off
Determine motor voltage and set meter
Reconnect power
Start the motor
Caution All wires are live (hot) so use extensive care
Touch one probe to L1 and the other to L2 The voltage reading should be within 10
percent of the motor nameplate voltage ie between 207 and 253 volts for a 230 volt
motor
If no voltage is recorded check fuses circuit breakers timers wiring etc for open
connection or broken wires If voltage is outside the acceptable limits check for
adequate wire size Look for loose terminals and connections or pitted contacts Check
the pump disconnect switch Also check the voltage at the service entrance If voltage is
not within plus or minus 10 percent contact the proper utility company
Amperage Check
Make sure the power is off
Set ammeter scale based on the maximum load amps
Position one line lead (L1 or L2) so that the jaws of the ammeter can encircle one
power lead It will usually be necessary to install a test loop to have room for the
meter jaws
Make sure the motor switch and governor are free of obstructions (if applicable)
Reconnect power and then start the motor All wires are live (hot) so use caution
Take a reading The value should not exceed maximum load amps (service factor
amps) listed on the motor nameplate
Excessive amps could mean an overloaded condition or incorrect voltage applied The
problem could also be a short in the motor
Perform the following checks to confirm that each component is functioning properly
Ground Check
Make sure the power is off
Set ohmmeter to R x 1K
Attach one probe to the ground screw on the end frame and touch the other probe
to all terminals on the terminal board switch capacitor and protector A reading of
less than 10K could indicate a ground New motors typically read over one
megaohm Old motors with dust dirt and moisture could show resistance to
ground below 10K and still run satisfactorily A cleaning may be in order
Readings may vary from day to day depending on the humidity levels
Approximately 25K at 115 volts will trip the ground fault device Keep in mind the
ground fault device is seeing a total leakage of all loads on the circuit GFIs
normally trip on readings from four to six milliamps
If grounded check all external leads for cuts breaks frayed wires etc Replace
damaged leads and recheck for grounds and proper lead routings Make sure
replaced leads are not pinched between the canopy or cover and the end frame If
ground is in the stator the motor must be replaced
Start Switch Check (if applicable)
Make sure the power is off
Remove the canopy
Discharge the capacitor by touching the two terminals simultaneously with the
blade of an insulated handle screwdriver
Make sure there are no obstructions preventing the proper operation of the
rotating governor Check the wiring and make sure none of the leads are in the
area of the governor where they can be cut or interfere with the governor Check
the governor for proper operation and make sure the flipper moves freely
Check switch contacts for severely burned or pitted contacts sticking etc Some
blackening or pitting is normal after the motor has been used Replace the switch if
there is any doubt DO NOT try to repair the switch by bending the contact blades
The switch contacts in motors are plated and should never be sanded which would
remove the plating and cause early failure They may be cleaned by wiping the
contacts with a piece of cardboard or paper bag
Attach one lead to each terminal of the switch The ohmmeter reading should be 0
With one lead on each terminal flip the governor weight to the run position The
reading should be infinity
Reconnect the power and start the motor Visually check the action of the switch
and governor The switch contacts must be closed when the motor is at rest and
should open when the motor reaches about two-thirds of full load speed Tip -
Replace the capacitor and the switch at the same time as a defective switch usually
stresses the start capacitor
Winding Continuity
For typical two compartment single phase dual voltage only capacitor start single
speed motors connected for 230 volts Set the meter to R x 1
Disconnect one of the red leads to the switch
Discharge the capacitor by shorting across the terminals with the blade of an
insulated screwdriver
Take ohm readings between L2 and A and then A and Yellow The resistance
between L2 and A must be the same as the resistance between A and Yellow
Yellow to Red (winding side of the switch) must be the same as L2 to the same Red
terminal
Protector (Thermal Overload) Check
Set ohmmeter to R x 1
Resistance between terminals 1 and 2 should be approximately 0 (Disc)
Resistance between 2 and 3 should be approximately 0 (heater)
Replace if either value exceeds 1 ohm Tip - Motor cycling on overload indicates
some other problem not just a defective overload
Capacitor Check (Start or Run)
Set ohmmeter to R x 1K
Slip a heavy piece of paper between points on the switch
Discharge the capacitor by touching the two terminals simultaneously with the
blade of an insulated handle screwdriver
Attach one probe to each terminal The ohmmeter needle should move rapidly to
right then slowly drift to the left (Low ohm reading to high ohm reading)
If digital meter is used readings should start low and rapidly increase to maximum
value
Replace the capacitor if found to be bad Tip - The replacement capacitor must be
the same MFD as the original However if the same voltage rating is not available
it is acceptable to use the next higher voltage For example if a 370 volt unit is not
available use the next rating which is a 440 volt
How would you rate the value of this article
lowest 1 2 3 4 5 6 7 8 9 10 highest
Sorry voting is closed
Next IssueIn October the discussion shifts from troubleshooting pool pump motors to the benefits of
upgrading to multi-speed replacement motors Excerpts from a recent customer letter
documenting very real and quite substantial energy cost saving directly related to the use
of variable speed replacement motors will be showcased
Questions or SuggestionsDo you have pool and spa motor questions or suggestions for future pump motor
articles E-mail them today to infocenturyelectricmotorcom
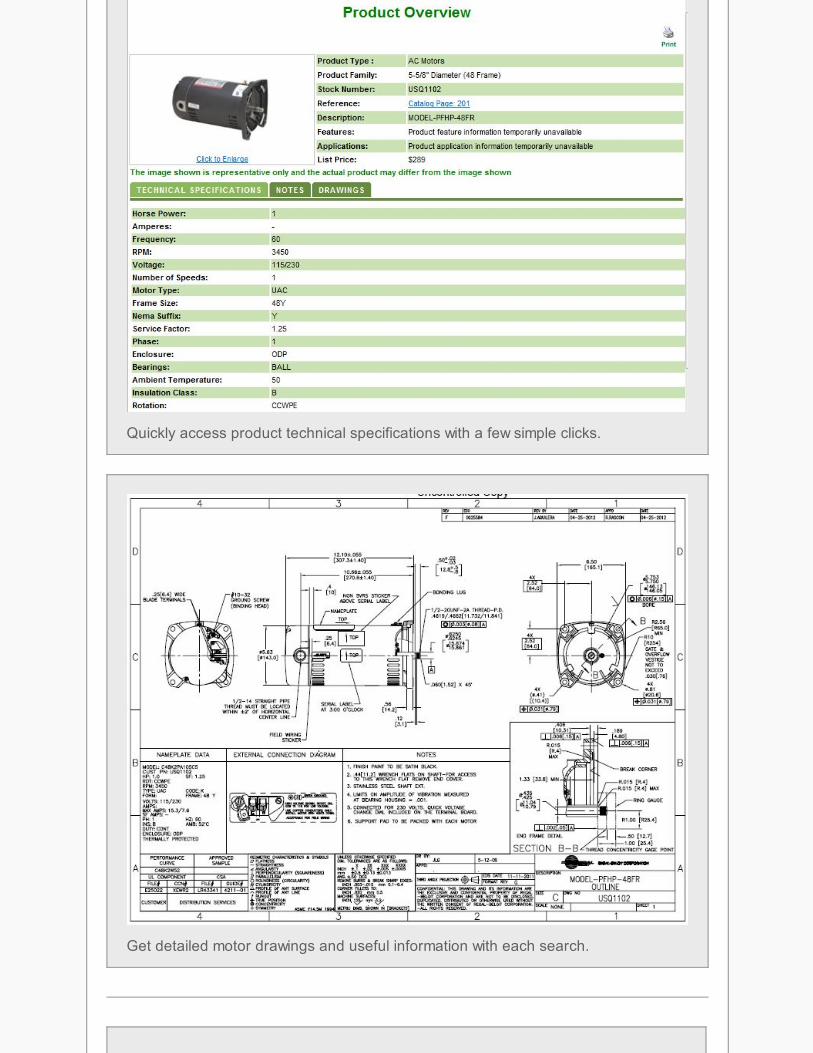
The Century Online Cross Reference Tool
Find suitable Century pool and spa replacement motor options quickly and easily
Quickly access product technical specifications with a few simple clicks
Get detailed motor drawings and useful information with each search
For additional Century pump motor product information or to place an order
contact customer service at 8668875216 or visit wwwpool-motorscom
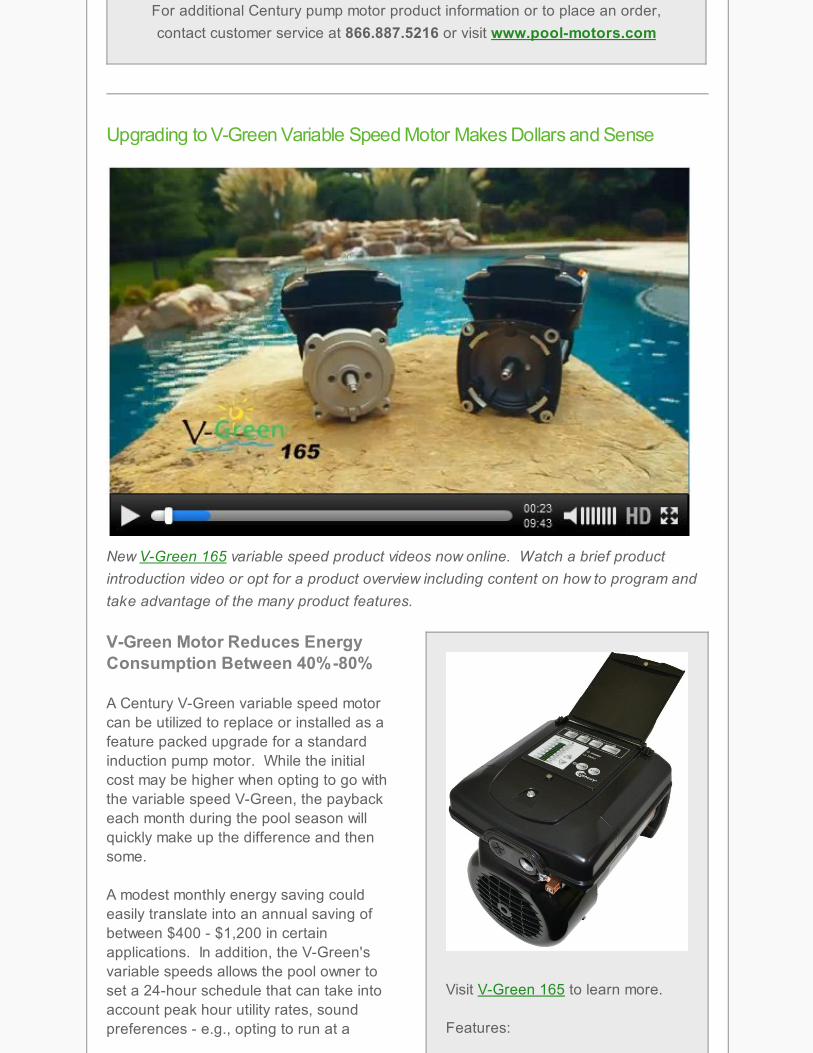
Upgrading to V-Green Variable Speed Motor Makes Dollars and Sense
New V-Green 165 variable speed product videos now online Watch a brief product
introduction video or opt for a product overview including content on how to program and
take advantage of the many product features
V-Green Motor Reduces EnergyConsumption Between 40-80
A Century V-Green variable speed motor
can be utilized to replace or installed as a
feature packed upgrade for a standard
induction pump motor While the initial
cost may be higher when opting to go with
the variable speed V-Green the payback
each month during the pool season will
quickly make up the difference and then
some
A modest monthly energy saving could
easily translate into an annual saving of
between $400 - $1200 in certain
applications In addition the V-Greens
variable speeds allows the pool owner to
set a 24-hour schedule that can take into
account peak hour utility rates sound
preferences - eg opting to run at a
Visit V-Green 165 to learn more
Features
lower speed during afternoon and nights
thereby lowering the noise levels when
family and neighbors are home and the
versatility to dial in the right speeds and
duration for the unique characteristics of
the pool
Imagine a Pool Ownersreaction to saving up to$400 - $1200 annually
Integrated User Interface
Three Variable Speeds (600-
3450 RPM)
Timer Mode
Manual Override Mode
Freeze Protection
Factory Default Schedule amp
Reset
Schedule Advance
Keypad Lockout Feature
Digital Inputs for Integration
with Existing Third Party
Automation
Copyright copy 2013 Regal Beloit America Inc All rights reservedunsubscribe from this list update subscription preferences
Make sure the power is off
Read the instruction manual for the meter
You do not have to set the ohmmeter to a particular scale as the meter displays the
ohm value up to maximum capability of the meter
Install probes and take resistance readings in the normal manner
Ammeter
Install leads in the bottom of the ammeter
Select the desired voltage scale
Take readings by touching one probe to each of the lead line terminals
Voltmeter
Arrange leads so the jaws of the ammeter will encircle one lead
Set meter on maximum amp scale and encircle jaws around one lead and take a
reading It may be necessary to reset to a lower scale
Voltage Check
Make sure power is off
Determine motor voltage and set meter
Reconnect power
Start the motor
Caution All wires are live (hot) so use extensive care
Touch one probe to L1 and the other to L2 The voltage reading should be within 10
percent of the motor nameplate voltage ie between 207 and 253 volts for a 230 volt
motor
If no voltage is recorded check fuses circuit breakers timers wiring etc for open
connection or broken wires If voltage is outside the acceptable limits check for
adequate wire size Look for loose terminals and connections or pitted contacts Check
the pump disconnect switch Also check the voltage at the service entrance If voltage is
not within plus or minus 10 percent contact the proper utility company
Amperage Check
Make sure the power is off
Set ammeter scale based on the maximum load amps
Position one line lead (L1 or L2) so that the jaws of the ammeter can encircle one
power lead It will usually be necessary to install a test loop to have room for the
meter jaws
Make sure the motor switch and governor are free of obstructions (if applicable)
Reconnect power and then start the motor All wires are live (hot) so use caution
Take a reading The value should not exceed maximum load amps (service factor
amps) listed on the motor nameplate
Excessive amps could mean an overloaded condition or incorrect voltage applied The
problem could also be a short in the motor
Perform the following checks to confirm that each component is functioning properly
Ground Check
Make sure the power is off
Set ohmmeter to R x 1K
Attach one probe to the ground screw on the end frame and touch the other probe
to all terminals on the terminal board switch capacitor and protector A reading of
less than 10K could indicate a ground New motors typically read over one
megaohm Old motors with dust dirt and moisture could show resistance to
ground below 10K and still run satisfactorily A cleaning may be in order
Readings may vary from day to day depending on the humidity levels
Approximately 25K at 115 volts will trip the ground fault device Keep in mind the
ground fault device is seeing a total leakage of all loads on the circuit GFIs
normally trip on readings from four to six milliamps
If grounded check all external leads for cuts breaks frayed wires etc Replace
damaged leads and recheck for grounds and proper lead routings Make sure
replaced leads are not pinched between the canopy or cover and the end frame If
ground is in the stator the motor must be replaced
Start Switch Check (if applicable)
Make sure the power is off
Remove the canopy
Discharge the capacitor by touching the two terminals simultaneously with the
blade of an insulated handle screwdriver
Make sure there are no obstructions preventing the proper operation of the
rotating governor Check the wiring and make sure none of the leads are in the
area of the governor where they can be cut or interfere with the governor Check
the governor for proper operation and make sure the flipper moves freely
Check switch contacts for severely burned or pitted contacts sticking etc Some
blackening or pitting is normal after the motor has been used Replace the switch if
there is any doubt DO NOT try to repair the switch by bending the contact blades
The switch contacts in motors are plated and should never be sanded which would
remove the plating and cause early failure They may be cleaned by wiping the
contacts with a piece of cardboard or paper bag
Attach one lead to each terminal of the switch The ohmmeter reading should be 0
With one lead on each terminal flip the governor weight to the run position The
reading should be infinity
Reconnect the power and start the motor Visually check the action of the switch
and governor The switch contacts must be closed when the motor is at rest and
should open when the motor reaches about two-thirds of full load speed Tip -
Replace the capacitor and the switch at the same time as a defective switch usually
stresses the start capacitor
Winding Continuity
For typical two compartment single phase dual voltage only capacitor start single
speed motors connected for 230 volts Set the meter to R x 1
Disconnect one of the red leads to the switch
Discharge the capacitor by shorting across the terminals with the blade of an
insulated screwdriver
Take ohm readings between L2 and A and then A and Yellow The resistance
between L2 and A must be the same as the resistance between A and Yellow
Yellow to Red (winding side of the switch) must be the same as L2 to the same Red
terminal
Protector (Thermal Overload) Check
Set ohmmeter to R x 1
Resistance between terminals 1 and 2 should be approximately 0 (Disc)
Resistance between 2 and 3 should be approximately 0 (heater)
Replace if either value exceeds 1 ohm Tip - Motor cycling on overload indicates
some other problem not just a defective overload
Capacitor Check (Start or Run)
Set ohmmeter to R x 1K
Slip a heavy piece of paper between points on the switch
Discharge the capacitor by touching the two terminals simultaneously with the
blade of an insulated handle screwdriver
Attach one probe to each terminal The ohmmeter needle should move rapidly to
right then slowly drift to the left (Low ohm reading to high ohm reading)
If digital meter is used readings should start low and rapidly increase to maximum
value
Replace the capacitor if found to be bad Tip - The replacement capacitor must be
the same MFD as the original However if the same voltage rating is not available
it is acceptable to use the next higher voltage For example if a 370 volt unit is not
available use the next rating which is a 440 volt
How would you rate the value of this article
lowest 1 2 3 4 5 6 7 8 9 10 highest
Sorry voting is closed
Next IssueIn October the discussion shifts from troubleshooting pool pump motors to the benefits of
upgrading to multi-speed replacement motors Excerpts from a recent customer letter
documenting very real and quite substantial energy cost saving directly related to the use
of variable speed replacement motors will be showcased
Questions or SuggestionsDo you have pool and spa motor questions or suggestions for future pump motor
articles E-mail them today to infocenturyelectricmotorcom
The Century Online Cross Reference Tool
Find suitable Century pool and spa replacement motor options quickly and easily
Quickly access product technical specifications with a few simple clicks
Get detailed motor drawings and useful information with each search
For additional Century pump motor product information or to place an order
contact customer service at 8668875216 or visit wwwpool-motorscom
Upgrading to V-Green Variable Speed Motor Makes Dollars and Sense
New V-Green 165 variable speed product videos now online Watch a brief product
introduction video or opt for a product overview including content on how to program and
take advantage of the many product features
V-Green Motor Reduces EnergyConsumption Between 40-80
A Century V-Green variable speed motor
can be utilized to replace or installed as a
feature packed upgrade for a standard
induction pump motor While the initial
cost may be higher when opting to go with
the variable speed V-Green the payback
each month during the pool season will
quickly make up the difference and then
some
A modest monthly energy saving could
easily translate into an annual saving of
between $400 - $1200 in certain
applications In addition the V-Greens
variable speeds allows the pool owner to
set a 24-hour schedule that can take into
account peak hour utility rates sound
preferences - eg opting to run at a
Visit V-Green 165 to learn more
Features
lower speed during afternoon and nights
thereby lowering the noise levels when
family and neighbors are home and the
versatility to dial in the right speeds and
duration for the unique characteristics of
the pool
Imagine a Pool Ownersreaction to saving up to$400 - $1200 annually
Integrated User Interface
Three Variable Speeds (600-
3450 RPM)
Timer Mode
Manual Override Mode
Freeze Protection
Factory Default Schedule amp
Reset
Schedule Advance
Keypad Lockout Feature
Digital Inputs for Integration
with Existing Third Party
Automation
Copyright copy 2013 Regal Beloit America Inc All rights reservedunsubscribe from this list update subscription preferences