Embed Size (px)
Citation preview

Sentry K300 Managed User GuideDataLocker Inc.
April 2020
Sentry K300 Managed - User Guide
1

Sentry K300 Managed User Guide
Contents
At A Glance 4
Introduction . . . . . . . . . . . . . . . . . . . . . . . . . . . . . . . . . . . . . . . . . . . . . . . . 4
About the Sentry K300 . . . . . . . . . . . . . . . . . . . . . . . . . . . . . . . . . . . . . . . . . . 4
What Systems Can I Use It On? . . . . . . . . . . . . . . . . . . . . . . . . . . . . . . . . . . . . . 4
Citrix Compatibilities . . . . . . . . . . . . . . . . . . . . . . . . . . . . . . . . . . . . . . . . . . . 5
Best Practices . . . . . . . . . . . . . . . . . . . . . . . . . . . . . . . . . . . . . . . . . . . . . . . 5
Product Specifications . . . . . . . . . . . . . . . . . . . . . . . . . . . . . . . . . . . . . . . . . . 5
Setup 6
Button Roles . . . . . . . . . . . . . . . . . . . . . . . . . . . . . . . . . . . . . . . . . . . . . . . . 6
Unlocking Your Device . . . . . . . . . . . . . . . . . . . . . . . . . . . . . . . . . . . . . . . . . . 7
Screen Selection . . . . . . . . . . . . . . . . . . . . . . . . . . . . . . . . . . . . . . . . . . . . . 8
Changing Device Password . . . . . . . . . . . . . . . . . . . . . . . . . . . . . . . . . . . . . . 8
Enabling SafeConsole . . . . . . . . . . . . . . . . . . . . . . . . . . . . . . . . . . . . . . . . . . 8
Accessing The Sentry K300 . . . . . . . . . . . . . . . . . . . . . . . . . . . . . . . . . . . . . . . 9
Registering to SafeConsole . . . . . . . . . . . . . . . . . . . . . . . . . . . . . . . . . . . . . . . 9
SafeConsole Mode . . . . . . . . . . . . . . . . . . . . . . . . . . . . . . . . . . . . . . . . . . . . 10
DataLocker Control Panel . . . . . . . . . . . . . . . . . . . . . . . . . . . . . . . . . . . . . . . . 11
Locking The Device . . . . . . . . . . . . . . . . . . . . . . . . . . . . . . . . . . . . . . . . . . . 11
Features 12
Standalone Logins . . . . . . . . . . . . . . . . . . . . . . . . . . . . . . . . . . . . . . . . . . . . 12
Password Reset . . . . . . . . . . . . . . . . . . . . . . . . . . . . . . . . . . . . . . . . . . . . . . 13
Unlocking In Read-Only Mode . . . . . . . . . . . . . . . . . . . . . . . . . . . . . . . . . . . . . 14
Changing The Unlock Message . . . . . . . . . . . . . . . . . . . . . . . . . . . . . . . . . . . . 14
Device Information . . . . . . . . . . . . . . . . . . . . . . . . . . . . . . . . . . . . . . . . . . . . 15
Editing The Applications List . . . . . . . . . . . . . . . . . . . . . . . . . . . . . . . . . . . . . . . 16
Scanning My Device For Malware . . . . . . . . . . . . . . . . . . . . . . . . . . . . . . . . . . . 16
Using ZoneBuilder In SafeConsole . . . . . . . . . . . . . . . . . . . . . . . . . . . . . . . . . . . 17
Boot Mode . . . . . . . . . . . . . . . . . . . . . . . . . . . . . . . . . . . . . . . . . . . . . . . . . 18
Self Destruct . . . . . . . . . . . . . . . . . . . . . . . . . . . . . . . . . . . . . . . . . . . . . . . . 18
Inactivity Mode . . . . . . . . . . . . . . . . . . . . . . . . . . . . . . . . . . . . . . . . . . . . . . 19
Main Menu Screen Options . . . . . . . . . . . . . . . . . . . . . . . . . . . . . . . . . . . . . . . 19
© 2020 DataLocker Inc. All rights reserved. 2

Sentry K300 Managed User Guide
Formatting 19
Selecting The Correct File System . . . . . . . . . . . . . . . . . . . . . . . . . . . . . . . . . . . 19
Reformat Using DataLocker Control Panel . . . . . . . . . . . . . . . . . . . . . . . . . . . . . . 20
Sanitize . . . . . . . . . . . . . . . . . . . . . . . . . . . . . . . . . . . . . . . . . . . . . . . . . . . 20
Where Can I Get Help? 21
© 2020 DataLocker Inc. All rights reserved. 3
Sentry K300 Managed User Guide
At A Glance
Introduction
Congratulations on your purchase of the Sentry K300TM Encrypted Flash Drive. This user manual isintended to help you set up your device in conjunction with your company’s SafeConsole Server.SafeConsole support was introduced to the K300 with firmware version 1.19. See Device Informa-tion to find out which firmware version is currently running on your device. If the device is currentlyon 1.08 or lower, please use the links below or contact your system administrator to update yourdevice. Because DataLocker is constantly updating its products, the images and text in this man-ual may vary slightly from the images and text displayed by your Sentry K300. These changes areminor and should not adversely affect the ease of setup.
Updating Your Device
Updated software and documentation are freely available for download at our website:
• Latest device updates - http://datalocker.com/device-updates• Documentation and support - https://support.datalocker.com
Important: Only the latest device updates should be applied to the device. Downgrading thedevice to an older software or firmware version is not supported and can potentially cause aloss of stored data or impair other device functionality. The latest device updates will always beavailable at the link above.
About the Sentry K300
The Sentry K300 stands alone as the only solid-state flash drive to incorporate an OLED display toenable advanced security features. The display supports true alpha-numeric password authenti-cation and a full-featured onboard menu system.
The DataLocker Sentry K300 offers affordable military-grade security with 256-bit AES hardware-based encryption in XTS mode that provides always-on protection for your data. Unlike software-based encryption, the Sentry K300 cryptochip does not export encryption keys to the host PC,thereby protecting against cold-boot and malware attacks.
Although the Sentry K300 is extremely user friendly, it is recommended that you review this guideto ensure that you become fully acquainted with the Sentry K300 and all of its features.
What Systems Can I Use It On?
• Windows® 10• Windows® 7• Any computer that supports USB mass storage when used in Standalone* mode.
*Standalone mode is disabled by default and controlled by your SafeConsole Administrator.
© 2020 DataLocker Inc. All rights reserved. 4

Sentry K300 Managed User Guide
Citrix Compatibilities
The Sentry K300 is compatible with:
• Citrix Virtual Apps and Desktops service• Citrix Virtual Apps and Desktops service on Azure• XenDesktop 7.14• XenDesktop 7.15 LTSR• XenDesktop 7.16• XenDesktop 7.17
Best Practices
1. Lock the device:
• when not in use• before unplugging it• before the system enters sleep mode
2. Never share your device password.
3. Perform a computer anti-virus scan before setting up the device.
4. If the battery within the device is low or dead, charge it by plugging it into a certified USBport for 30 minutes before using the drive.
5. Remove the device from the computer before using the keypad to prevent damage to theUSB port.
6. The device must be completely dry before connecting to a computer.
7. Only connect the device to certified USB ports.
8. Use the correct file system based on the operating system and file needs. See Formatting formore information.
Product Specifications
Specification Details
Capacity* 8GB, 16GB, 32GB, 64GB, 128GB, 256GB
Speed** USB 3.1 Gen 1:- 8GB, 16GB, 32GB: 220MB/s Read, 100MB/s Write- 64GB, 128GB, 256GB: 220MB/S Read, 200MB/sWrite
USB 2.0:- All: 30MB/s read, 20MB/s write
Dimensions 101mm (L) x 22mm (W) x 13mm (H)
© 2020 DataLocker Inc. All rights reserved. 5

Sentry K300 Managed User Guide
Specification Details
Weight 30.4g
Water Resistant*** IP57
Operating System Compatibility Windows
Operating Temperature 0°C - 45°C
Storage Temperature -20°C - 60°C
Long Term Storage Temperature(More than 1 week)
-20°C - 40°C
Warranty 3 years Limited
Hardware USB 3.1 Gen 1(SuperSpeed) port recommended.Backward compatible with USB 2.0 ports (HighSpeed)
* Advertised capacity is approximate. Some space is required for onboard software.** Speed varies with host hardware, usage, and defined SafeConsole Policies.*** Device should be completely dry before use.
Setup
This section will guide you through the necessary steps to set up the Sentry K300 drive. It is highlyrecommended that you set a password using alpha-numeric characters.
The default password for the device is set to 1234567. This password allows access to the device3 times before forcing the user to change it. On the fourth entry with the default password, themessage “You must change default password” will scroll across the screen until the password ischanged. Press any button to continue to the Change Password screen.
Note: A SafeConsole Factory Reset or initiating a Self Destruct with too many password attemptswill set the password back to the default upon re-initialization.
Button Roles
Enter: Perform a function
Power/Backspace: Press and hold for 3 seconds to power the Sentry K300 on or off. Thedevice can be turned off while any screen is displayed by pressing and holding the button for 3
© 2020 DataLocker Inc. All rights reserved. 6
Sentry K300 Managed User Guide
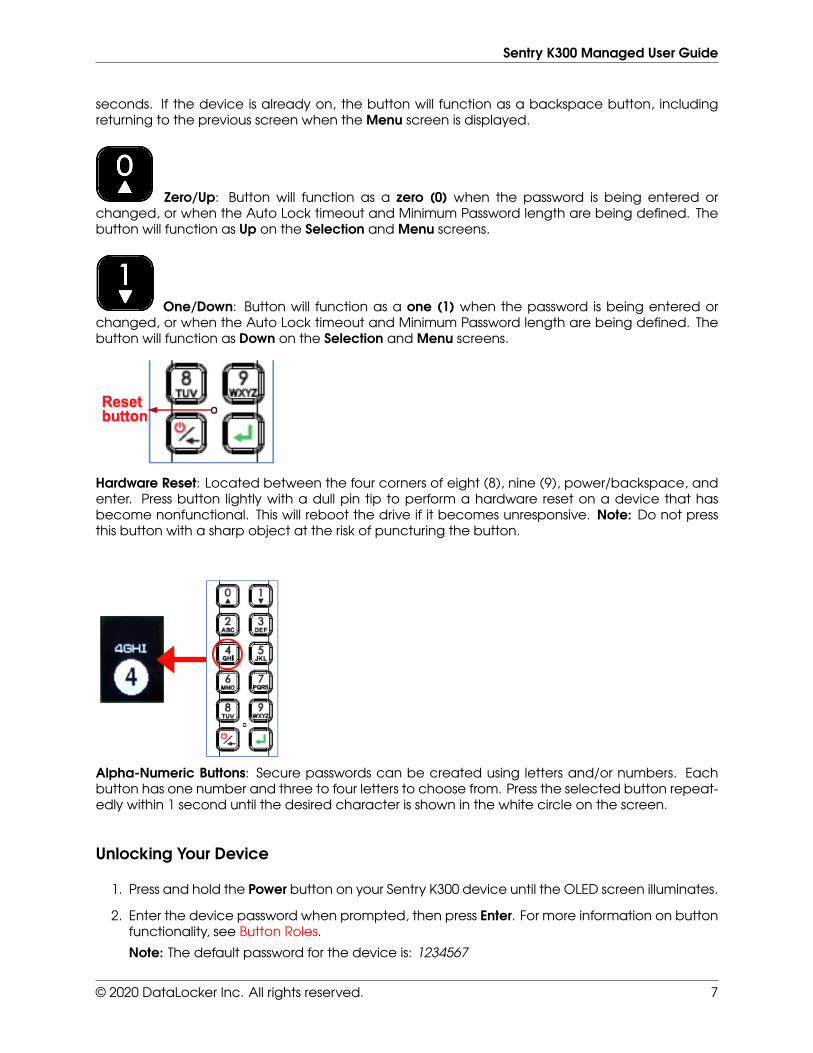
seconds. If the device is already on, the button will function as a backspace button, includingreturning to the previous screen when the Menu screen is displayed.
Zero/Up: Button will function as a zero (0) when the password is being entered orchanged, or when the Auto Lock timeout and Minimum Password length are being defined. Thebutton will function as Up on the Selection and Menu screens.
One/Down: Button will function as a one (1) when the password is being entered orchanged, or when the Auto Lock timeout and Minimum Password length are being defined. Thebutton will function as Down on the Selection and Menu screens.
Hardware Reset: Located between the four corners of eight (8), nine (9), power/backspace, andenter. Press button lightly with a dull pin tip to perform a hardware reset on a device that hasbecome nonfunctional. This will reboot the drive if it becomes unresponsive. Note: Do not pressthis button with a sharp object at the risk of puncturing the button.
Alpha-Numeric Buttons: Secure passwords can be created using letters and/or numbers. Eachbutton has one number and three to four letters to choose from. Press the selected button repeat-edly within 1 second until the desired character is shown in the white circle on the screen.
Unlocking Your Device
1. Press and hold the Power button on your Sentry K300 device until the OLED screen illuminates.
2. Enter the device password when prompted, then press Enter. For more information on buttonfunctionality, see Button Roles.
Note: The default password for the device is: 1234567
© 2020 DataLocker Inc. All rights reserved. 7

Sentry K300 Managed User Guide
3. The device will display connection options. For more information on screen selection, seeScreen Selection.
4. Select the appropriate option and press Enter to unlock the device.
Note: If no selection is made in 60 seconds, the device will time out and power off.
5. Plugin the device. For more information, see Accessing The Sentry K300.
Screen Selection
After unlocking your Sentry K300 you will be presented with the following selections.
• Connect: The device will connect in normal read/write mode after plugging it into a com-patible system.
• Read Only Mode: The device will connect to the system in read-only mode for both. For moreinformation, see Read-Only Mode.
• Boot Mode: Boot Mode is not compatible when SafeConsole is enabled.
• Menu: The device will enter the Main menu. For more information, see Main Menu
Changing Device Password
It is highly recommended that you set a new password using alpha-numeric characters.
1. Unlock the device. See Unlocking Your Device for more information.
2. Locate the Menu screen by pressing the Up or Down key. Press Enter to select.
3. Press the Up or Down key to locate the Change Password option. Press Enter to select.
4. Enter the new secure password, using the alpha-numeric characters. To select a letter, pressthe designated key repeatedly until the desired letter shows in the white circle on the screen.Press Enter when the password has been entered completely.
Note: Be aware of your surroundings while entering a new password. The password is dis-played on the screen in its entirety so the user can be sure it was correctly typed. It is nothidden from view.
Note: As of firmware v1.24 set passwords cannot have more than an 80% repeating se-quence. For example, you will be unable to set the password to ‘01234567’ or ‘11111111’even with Strong Password disabled.
5. Re-enter the new secure password to confirm. Press Enter.
Enabling SafeConsole
These are the steps to enable SafeConsole mode on your Sentry K300. These steps might havealready been performed by your SafeConsole Administrator. If this is the case, the SafeConsolemenu will be blocked, forcing the Sentry K300 to be unlocked in SafeConsole mode before datacan be transferred and the following steps can be skipped.
1. Unlock the device. See Unlocking Your Device for more information.
© 2020 DataLocker Inc. All rights reserved. 8

Sentry K300 Managed User Guide
2. Locate the Menu screen by pressing the Up or Down key. Press Enter to select.
3. Press the Up or Down key to locate the SafeConsole option. Press Enter to select.
4. Press the Up or Down key to locate the Enable option. Press Enter to select.
5. Use the Backspace button to return to the Selection Screen.
Accessing The Sentry K300
After SafeConsole is enabled for the Sentry K300, the device client must be executed before thesecure volume will be mounted. These are the steps that will need to be followed to register andaccess the files on the secure volume. Once the secure volume is mounted, files can be accesseddirectly through Windows Explorer or other applications that can save to a removable drive.
1. Unlock your Sentry K300 using the keypad and connect it to your Windows workstation. Formore information, see Unlocking Your Device.
• Windows 7/10 users will receive a device driver notification.• Once the new hardware detection is complete, Windows will prompt to begin the initial-
ization process.
2. Select the option Unlocker.exe inside of the Unlocker partition that can be found in File Ex-plorer. Please note that the partition letter will vary based on the next free drive letter. Thedrive letter may change depending on what devices are connected. In the image below,the drive letter is E:.
Registering to SafeConsole
The registration process will begin by allowing the device to communicate with the SafeConsoleserver. The steps needed to register a Sentry K300 to SafeConsole will depend on the policies thatyour administrator is enforcing. Not all options will be shown.
A SafeConsole Connection Token will be needed. The SafeConsole Connection Token is obtainedby the SafeConsole Admin through the Quick Connect Guide and is usually sent via email.
© 2020 DataLocker Inc. All rights reserved. 9

Sentry K300 Managed User Guide
Users without access to a Management Server, please contact sales: [email protected] /+1(913)310-9088
1. Enter the SafeConsole Connection Token that is obtained in the steps above. Review thelicense agreement, check the checkbox to accept it, and click Activate in the bottom left-hand corner.
• Optionally Enabled Policies - These policies may or may not be enabled by your systemadministrator. They will appear during device registration if they have been enabled.
– Confirm Ownership of the device: Enter the Windows username and password thatis associated with the login credentials of the computer the device is plugged into.
– Custom Device Information: Required information about you or your device. Therequired fields will vary.
– Unique User Token: This token is directly associated with the end user’s account andwill be provided by the SafeConsole Admin usually via email.
– Administrator Registration Approval: The SafeConsole Admin may require their ap-proval to proceed with device registration.
2. Enter the Sentry K300 password into the client. This is the same password used to unlock thedevice and any letters should be entered as capitals.
3. If the Sentry K300 doesn’t currently have a file system, you will be prompted to choose onefor the Secure Volume (see Formatting) and click Continue.
4. The device will now finalize the setup process and be ready for use. Access the EncryptedStorage by clicking the Folder Icon in the top menu. The settings of the device can beaccessed and altered by clicking the Gear Icon. See the DataLocker Control Panel for moreinformation.
SafeConsole Mode
Once the Sentry K300 is registered to SafeConsole, the Secure Volume can be accessed by fol-lowing the steps below:
1. Enter the password into the K300.
2. Select Connect or Read Only Mode using the K300 keypad and physically connect it to yourworkstation.
© 2020 DataLocker Inc. All rights reserved. 10

Sentry K300 Managed User Guide
3. Select the option Unlocker.exe inside of the Unlocker partition that can be found in File Ex-plorer.
4. Click the Unlock button shown on the DataLocker Control Panel.
5. The Secure Volume will be mounted to a separate drive letter on your workstation. The SecureVolume can also be accessed by clicking the Folder Icon in the DataLocker Control Panel.
DataLocker Control Panel
Locking The Device
Lock your device when you are not using it to prevent unwanted access to your secure files on thedrive. You can manually lock the device or you can set the device to automatically lock after aspecified period of inactivity. For Managed devices, this feature may or may not be enabled byyour system administrator.
Caution: By default, if a file or application is open when the device tries to auto-lock, it will notforce the application or file to close. Although you can configure the auto-lock setting to forcethe device to lock, doing so can result in loss of data to any open and unsaved files.
If your files have become corrupt from a forced lock procedure or from unplugging the devicebefore locking, you might be able to recover the files by running CHKDSK and using data recoverysoftware (Windows only).
To manually lock the device:
1. Click Lock in the bottom left-hand corner of the DataLocker Control Panel to safely lock yourdevice.
• You can also use the keyboard shortcut: CTRL + L (Windows only), or right-click the Dat-aLocker Icon in the system tray and click Lock Device.
© 2020 DataLocker Inc. All rights reserved. 11

Sentry K300 Managed User Guide
Note: Managed devices will automatically lock during use if an administrator remotely disablesthe device. You will not be able to unlock the device until the system administrator re-enables thedevice.
To set a device to automatically lock:
1. Unlock your device and click Settings on the menu bar in the DataLocker Control Panel.
2. Click Preferences in the left sidebar.
3. Click the Checkbox for auto-locking the device and set the time-out to one of the followingtime intervals: 5, 15, 30, 60, 120, or 180 minutes.
To run CHKDSK (Windows only):
1. Unlock the device.
2. Press the WINDOWS LOGO KEY + R to open the Run prompt:
3. Type CMD and press ENTER.
4. From the command prompt, type CHKDSK, the PRIVATE USB drive letter, then “/F /R”. Forexample, if the PRIVATE USB drive letter is G, you would type: CHKDSK G: /F /R
5. Use data recovery software if necessary to recover your files.
Features
Standalone Logins
Requesting Standalone Logins
Standalone mode allows the Secure Volume of the Sentry K300 to be accessed by any computerthat has support for removable storage without running the Windows Unlocker application. Stan-dalone mode is controlled by a policy that is set by your SafeConsole Administrator. If this mode isnot available, please contact them to enable this feature. SafeConsole administrators will definethe maximum allowed times the Sentry K300 can be unlocked in Standalone mode before thedevice needs to be returned to a Windows computer to check-in.
To request Standalone Logins, perform the following steps on a workstation that has a valid con-nection to the SafeConsole server:
1. Connect the Sentry K300 in SafeConsole mode. See the SafeConsole Mode for more infor-mation.
2. On the K300 Control Panel, click the Gear Icon to open up settings.3. Select the Standalone tab.4. Select the reason for the request or enter a custom reason. This information will be sent to the
SafeConsole Administrator.5. Click the Request button. You will receive the maximum number allowed.
Note: The Request automatically checkbox can optionally be enabled by your SafeConsole Ad-ministrator. When checked, the Control Panel will automatically request the maximum allowed
© 2020 DataLocker Inc. All rights reserved. 12

Sentry K300 Managed User Guide
Standalone Logins after unlocking on a Windows workstation with a valid connection to SafeCon-sole.
Using Standalone Logins
On the next unlock of the Sentry K300, select Standalone using the keypad to unlock in Stan-dalone Mode. When in Standalone mode, the Unlocker partition will not be mounted to the hostcomputer and the DataLocker Control Panel will not need to be executed.
1. Unlock the device. See Unlocking Your Device for more information.
2. Locate the Standalone screen by pressing the Up or Down key. Press Enter to select.
3. Physically connect the device to a host with USB Mass Storage Support. This will decrease theCurrently Available count of Standalone Logins by one.
To continue to use the Sentry K300 in the normal SafeConsole mode, select SafeConsole in step 2.
To access the Main Menu, Standalone will need to be selected in step 2. The Currently Availablecount will not be impacted unless connected to a host computer.
Note: The Currently Available number of Standalone Logins will be reset to zero if a SafeConsoleAdministrator remotely disables or factory resets your Sentry K300. Currently available will also beset back to zero after a password reset or when the device is blocked by GeoFence.
Password Reset
If the Sentry K300 cannot be unlocked due to a forgotten password, a recovery password can besent by A SafeConsole Administrator.
© 2020 DataLocker Inc. All rights reserved. 13

Sentry K300 Managed User Guide
1. Enter the recovery password using the Sentry K300 keypad. Pressing the keypad multipletimes within one second will select the next character assigned to that button. For example,pressing the button with the number 3 twice will input the letter ‘D’.
2. Once the password is confirmed, the Sentry K300 will change the password back to the de-fault of 1234567 and prompt to change the password.
3. The password should be changed to something secure. Continuing to use the Sentry K300without changing the password will result in the device forcing a password change. For moreinformation see Changing Device Password
Important: Each password recovery code can only be used once. The Sentry K300 must be un-locked in SafeConsole Mode with a valid connection to SafeConsole before a new passwordrecovery code can be generated. Failure to do so could cause loss of access to the device andthe data on it if the password is forgotten again.
Unlocking In Read-Only Mode
You can unlock your device in a read-only state so that files cannot be altered on your securedrive. For example, when using an untrusted or unknown computer, unlocking your device inRead-Only Mode will prevent any malware on that computer from infecting your device or modi-fying your files. Managed devices can be forced to unlock in a read-only state by an administrator.
When working in this mode, the DataLocker Control Panel will display the text Read-Only Mode.In this mode, you cannot perform any operations that involve modifying files on the device. Forexample, you cannot reformat the device, restore applications or edit the Applications List, or editfiles on the drive.
To unlock the device in Read-Only Mode through the Control Panel:
1. Unlock and Connect the device into the USB port of the host computer, then run the Un-locker.exe.
2. Check the Read-Only Checkbox below the Unlock button.
3. Click Unlock. The DataLocker Control Panel will appear with the text Read-Only Mode at thebottom.
To unlock the device in Read-Only Mode from the keypad:
1. Enter the password on the Sentry K300.
2. In the connection menu select READ ONLY MODE, then connect the Sentry K300 to the com-puter.
Note: Unlocking in Read-Only Mode from the keypad also works in Standalone mode.
Changing The Unlock Message
The Unlock Message is custom text that displays in the Unlocker window when you unlock thedevice. This feature allows you to customize the message that displays. For example, adding clas-sification labels can help identify which documents can be saved to the device due to companypolicy. A SafeConsole Admin can set a pre-defined message or disable the ability for it to bechanged.
To change the Unlock Message:
© 2020 DataLocker Inc. All rights reserved. 14

Sentry K300 Managed User Guide
1. In the DataLocker Control Panel, click Settings on the menu bar.
2. Click Preferences in the left sidebar.
3. Type the message text in the Unlock Message field. The text must fit in the space provided(approximately 7 lines and 200 characters).
Device Information
Before Unlocking
To see information about the device without logging into it, press and hold the Power button for 3seconds. Before entering the password, press Enter. Use any key to see different information.
Device information shown:
• Device Model• Firmware Version• Capacity• Alpha-numeric Serial Number• QR Code Serial Number• Certification Logos• Patent Information
After Unlocking
More information can be obtained after logging into the device and launching the unlocker.exeapplication.
Use the Capacity Meter, located at the bottom right of the DataLocker Control Panel, to see howmuch storage space is still available on your device. The green bar graph represents how full thedevice is. For example, the meter will be completely green when the device is full. The white texton the Capacity Meter displays how much free space remains.
For general information about your device, see the Device Info page.
To view device information:
1. Unlock your device and click Settings on the menu bar of the DataLocker Control Panel.
2. Click Device Info in the left sidebar.
The About This Device section includes the following details about your device:
• Model Number• Serial Number• Software and Firmware Version• Release Date• Management Console• Secure Files Drive Letter• Unlocker Drive Letter• Operating System and System Administrative Privileges
© 2020 DataLocker Inc. All rights reserved. 15

Sentry K300 Managed User Guide
Note: To visit the DataLocker website or access more information about legal notices or certifica-tions for DataLocker products, click one of the information buttons on the Device Info page.
Hint: Click Copy to copy the device information to the clipboard so that you can paste it in anemail or support request.
Editing The Applications List
The Applications List, located in the DataLocker Control Panel, is the area where you can quicklylaunch on-board applications and files. Items that appear in the list are shortcuts to the actualfiles. Managing the list items does not alter the actual file. This feature may be disabled by yourSafeConsole Admin.
To edit the Applications List:
1. Unlock your device. The DataLocker Control Panel will appear with the Applications List se-lected by default.
2. If the DataLocker Control Panel is already open, click Applications on the menu bar to viewthe Applications List. Do one of the following:
• To add a file or application shortcut: Drag a file from the desktop to the Applications Listarea to add it to the list. You can also right-click the Applications List area and click AddApplication.
• To rename or delete list items: Right-click the application or file and choose the actionfrom the menu.
• To sort or change the way icons appear in the list: Right-click anywhere in the Applica-tion list and choose Large Icons, List, Tile, or Sort Alphabetically.
Functions of the Applications List:
• You can add any file to the list, including documents, images, and batch files.• For items that are not applications, the operating system opens the item with the default
program associated with that file type.
Scanning My Device For Malware
If enabled by your SafeConsole Admin, the Malware Scanner is a self-cleaning technology thatdetects and quarantines malware on your device. Powered by the McAfee® anti-virus and anti-malware signature database, and constantly updated to combat the latest malware threats,the scanner first checks for the latest updates, scans your device, then reports and cleans anymalware that is found.
Your system administrator may require the anti-malware definition to be updated before the de-vice can be unlocked. In this event, the full anti-malware definition will need to be downloaded toa temporary folder on the local computer before the password can be entered. This can increasethe time it takes to unlock the device based on the host computer’s networking connection andthe size of malware updates needed
Some things to know about scanning your device:
• The scanner runs automatically when you unlock your device.
• It scans all onboard files (compressed and uncompressed).
© 2020 DataLocker Inc. All rights reserved. 16
Sentry K300 Managed User Guide
• It reports and quarantines any malware it finds.
• The scanner will automatically update itself before each scan to protect you from the latestmalware threats.
• An update requires an internet connection.
• Ensure a minimum of 135 MB of free space on the device to accommodate the downloadedmalware signature files.
• Your first update may take a long time to download, depending on your internet connection.
• The date of the last update is displayed onscreen.
• If the scanner becomes too far out of date, it will need to download a large file to bring itback up-to-date.
Restoring or Deleting a Quarantined File
Note: Depending on the size of infected files, quarantine may not be available. If the file cannotbe quarantined it will be deleted and will not be able to be restored using the following process.
If a file is detected as infected a warning dialog will be shown with the option to lock the driveat that time. Quarantined files remain on the device in an encrypted state to prevent furtherexecution.
To view quarantined files:
1. Unlock your device and click Settings in the DataLocker Control Panel.
2. Click Quarantine on the left sidebar.
Selecting a file from the list will display additional details including, Threat Name, Threat Type, anti-malware definition version, and the date of quarantine. After the file is selected files can either beRestored or Deleted.
Restored files will be exempt from automatic scanning while the device is currently unlocked. Thefile will be scanned during the next unlock or if a manual scan is selected from the Anti-Malwaretab. If the anti-malware definitions still determine that the file is infected it will quarantine the fileonce again.
Deleted files will be permanently deleted.
Using ZoneBuilder In SafeConsole
If enabled by your system administrator, ZoneBuilder is a SafeConsole tool used to create a TrustedZone of computers. It can be used to restrict device access to computers within the Trusted Zone.
If your administrator chooses to enable this policy, you may be required to trust the account.
Trusting the account:
1. Unlock your device and click Settings in the DataLocker Control Panel.
2. Click Zone Builder on the left sidebar.
3. Click Trust This Account.
© 2020 DataLocker Inc. All rights reserved. 17
Sentry K300 Managed User Guide
4. Enter the password for the device and click OK. Your account will now show up in the TrustedAccounts box.
Your account is now in the Trusted Zone of computers. Depending on the policy set by your systemadministrator, you may have restricted device access outside of the Trusted Zone or when offline.To remove a trusted account, simply highlight the account you wish to remove and click Remove.
Boot Mode
Boot Mode is not compatible when the Sentry K300 is managed by SafeConsole.
Self Destruct
Note: To prevent an accidental Self Destruct a password reset can be done with the help of aSafeConsole Admin. See Password Reset for more information.
Self destruct functionality is enabled by default on the device and cannot be disabled. After 20incorrect password attempts, the device will wipe all data and encryption keys. The message“Incorrect Password”, along with the current incorrect password count, will scroll across the screeneach time an incorrect password attempt is made. Press Enter to display device information orpress any other button to return to the password entry screen.
After each 5 consecutive incorrect password attempts, the device will power off. Pressing thePower button will allow the user to continue entering passwords.
After 17 and 18 consecutive incorrect password attempts, the message “Brute Force detected!All data will be deleted.” will scroll across the screen. After the 19th attempt, the message “SelfDestruct will begin with next failed login” will scroll across the screen.
Once the 20th consecutive incorrect password attempt has been made, the device will display“Hack detected. All data has been deleted.” The device will then power off by pressing anybutton.
Note: After the 20th incorrect password attempt, all data is wiped from the drive and it will bereset to factory settings. The drive will need to be reinitialized upon the next use.
Setting Up The Sentry K300 After Self Destruct
Setting up your device after a Self Destruct has been initiated is much like setting up a new drive.
1. Power on the device by pressing the Power button.
2. The device will ask “Initialize the device?” Select Yes, then press Enter.
3. The device will ask “All saved data will be deleted. Continue?” Select Yes, then press Enter.
4. The device will ask “Warning! Verify to Continue?” Select Yes, then press Enter.
5. The device will ask you to plug it in by showing an image of a plugged-in device on thescreen.
Warning: Do not power off or unplug the device at this step. The device will move to the nextstep automatically when it’s finished initializing.
© 2020 DataLocker Inc. All rights reserved. 18

Sentry K300 Managed User Guide
6. The device will show the message “The initialized password is 1234567”. Unplug the deviceand press any key to continue.
7. The device will show the message “You must reformat the drive.” Press any key to continue.
8. The device will power off and back on automatically. The password entry screen will bedisplayed when it is finished restarting. Enter the default password of 1234567.
9. See Formatting for more information on how to create a new file system.
Inactivity Mode
The device is programmed to power off after 60 seconds of inactivity. To power back on, press thePower button. This setting cannot be turned off.
Note: The device will not power off while connected to the computer. The screen may turn offafter 10 seconds to prevent screen burn-in, however, you can revive it by pressing any key.
Main Menu Screen Options
• Change Password: Change the device password.
• User Password: User Password is disabled after registering to SafeConsole.
• Strong Password: Enforce strong password requirements for new password changes.
Requirements:
– 8 characters– 1 letter– no consecutive numbers– no consecutive letters
• Minimum Password Length: Can be set to require 7-30 password characters for all new pass-words.
• SafeConsole: Enables SafeConsole mode, cannot be disabled after registering to SafeCon-sole.
• Read-Only Mode: Read-Only Mode in this menu is disabled after registering to SafeConsole.
• Auto Lock: Set the amount of inactivity time (in minutes) before the device automaticallylocks. The maximum number of minutes that can be entered is 180. A second auto lock timercan be configured in SafeConsole. Both timers will apply.
• Zeroize: Zeroize is disabled in after registering to SafeConsole.
Formatting
Selecting The Correct File System
Your device is formatted as NTFS from the factory.
The Sentry K300 can be reformatted to the following file systems of your choice to accommodatea different operating system or to remove file size restrictions. Not all file systems are available onall operating systems.
© 2020 DataLocker Inc. All rights reserved. 19
Sentry K300 Managed User Guide
• FAT32 (Drives 32GB and smaller)
– Pros: Cross-platform compatible (Windows, macOS, and Linux)– Cons: Limited individual file size of 4GB
• NTFS
– Pros: No file size limitations– Cons: Limited cross-platform compatibility - Windows, macOS (read-only), and Linux
(read-only)
• exFAT
– Pros: No file size limitations– Cons: Not supported by legacy operating systems
Another consideration during formatting is what media type you want your device to be mountedas. The options are Fixed Disk and Removable Disk. In most usage scenarios there should be nodifferences between the two types. However, some applications will specifically only enumerateUSB drives, in that case, your Sentry K300 should be formatted with Removable media type. Mod-ification of the K300’s media type is only available with the K300 Disk Formatter Tool and deviceUnlocker application.
Note: Reformatting your Sentry K300 drive will erase all your files but will not erase your devicepassword and settings. This should not be used as a method of securely erasing files. To securelyerase your files, perform a Zeroize function. For more information, see the Zeroize section.
Reformat Using DataLocker Control Panel
To reformat a device:
1. Unlock your device and click Settings on the menu bar of the DataLocker Control Panel.
2. Click Tools on the left sidebar.
3. Under Device Health, select the file system and media type then click the Reformat SecureVolume button. If changing the drive media type then this action will require administratorpermission on the local computer.
Warning: Reformatting your Sentry K300 drive will erase all your files but will not erase your devicepassword and settings. This should not be used as a method of securely erasing files. To securelyerase your files, contact your SafeConsole Administrator or use Sanitize.
Important: Before you reformat the device, back up your files to a separate location.
Note: If a filesystem already exists on the drive the ability to format the drive may depend onsettings defined by your SafeConsole Admin.
Sanitize
Sanitize allows for the contents of the encrypted drive to be securely erased. This is accomplishedby erasing the encryption key that the drive uses to access files on the Secure Volume while stillretaining the connection to SafeConsole. This action prevents the need of registering the deviceback to SafeConsole like after a full device reset.
© 2020 DataLocker Inc. All rights reserved. 20

Sentry K300 Managed User Guide
Warning: Performing this action will completely erase all data on the Secure Volume. This action ispermanent.
The ability to sanitize a drive depends on the settings configured by your SafeConsole Admin. Ifallowed your drive can be sanitized by the following steps:
1. Unlock your K300 and open the device Control Panel by launching Unlocker.exe
2. Right-click the system tray icon for the Control Panel and select Sanitize Device.
3. Enter the numbers prompted in the dialog box to confirm that all data can be wiped fromthe drive.
4. The device will reset. Unplug and re-insert the device back into the computer to set thepassword back to the default of 1234567
5. Login with the default password and connect the K300 to the computer
6. On the next launch of the Unlocker.exe application, you will be prompted to format theSecure Volume, see Reformat Using DataLocker Control Panel for more information.
Where Can I Get Help?
The following resources provide more information about DataLocker products. Please contactyour Help Desk or system administrator if you have further questions.
• support.datalocker.com: Information, knowledgebase articles, and video tutorials• [email protected]: Feedback and feature requests• datalocker.com: General information• datalocker.com/warranty: Warranty information
© 2020 DataLocker Inc. All rights reserved. 21

Sentry K300 Managed User Guide
© 2020 DataLocker Inc. All rights reserved.
Note: DataLocker is not liable for technical or editorial errors and/or omissions containedherein; nor for incidental or consequential damages resulting from the furnishing or use of thismaterial. The information provided herein is subject to change without notice. The informationcontained in this document represents the current view of DataLocker on the issue discussed asof the date of publication. DataLocker cannot guarantee the accuracy of any information pre-sented after the date of publication. This document is for information purposes only. DataLockermakes no warranties, expressed or implied, in this document. DataLocker, DataLocker Sentry, andthe DataLocker logo are registered trademarks of DataLocker Inc. and its subsidiaries. All othertrademarks are the property of their respective owners. All rights reserved.
Patent: datalocker.com/patents
FCC Information: This device complies with part 15 of the FCC Rules. Operation is subject tothe following two conditions: (1) This device may not cause harmful interference, and (2) thisdevice must accept any interference received, including interference that may cause undesiredoperation. This equipment has been tested and found to comply with the limits for a Class B digitaldevice, pursuant to part 15 of the FCC Rules. These limits are designed to provide reasonableprotection against harmful interference in a residential installation. This equipment generates,uses and can radiate radio frequency energy and, if not installed and used in accordance withthe instructions, may cause harmful interference to radio communications. However, there is noguarantee that interference will not occur in a particular installation. If this equipment does causeharmful interference to radio or television reception, which can be determined by turning theequipment off and on, the user is encouraged to try to correct the interference by one or more ofthe following measures:
• Reorient or relocate the receiving antenna.• Increase the separation between the equipment and receiver.• Connect the equipment to an outlet on a circuit different from that to which the receiver is
connected.• Consult the dealer or an experienced radio/TV technician for help.
Note: Changes or modifications not expressly approved by the party responsible for compliancecould void the user’s authority to operate the equipment.
© 2020 DataLocker Inc. All rights reserved. 22