Embed Size (px)
Citation preview
The Graphix Factorytm Thruput Limited
TruePixel tm
Issue: 1 Page 1 of 38 Date: 6th April 2011 Sentinel DVI Integrated Recorder User Manual
14-15 Londonderry Farm, Keynsham Road, Willsbridge, Bristol, BS30 6EL, United Kingdom
Office: +44 117 932 85 85 Fax: +44 117 932 93 39
Email: [email protected] Web: http:/thruput.co.uk
Sentinel DVI Integrated Recorder
User Manual
Issue 1
06/04/11
This document is the copyright of the Thruput Limited. No material may be reproduced, copied,
translated or modified without the express written permission of Thruput Limited.
The Graphix Factorytm and TruePixel tm are trademarks of Thruput Limited
Thruput products are fully Compliant.
The Graphix Factorytm Thruput Limited
TruePixel tm
Issue: 1 Page 2 of 38 Date: 6th April 2011 Sentinel DVI Integrated Recorder User Manual
Contents 1 Introduction ........................................................................................................ 3
1.1 Features ....................................................................................................... 3
1.2 DVI Interface .............................................................................................. 3 1.3 Ethernet Interface ........................................................................................ 5
1.4 Typical At-The-Glass Applications ............................................................. 6 1.5 Thruput Sentinel Record and Replay Software ............................................ 7
2 Hardware Features.............................................................................................. 9 2.1 Automatic Analogue Detection .................................................................... 9
2.2 At-the-glass recording ................................................................................. 9 3 Shipping Contents .............................................................................................10
3.1 Power supplies ...........................................................................................10 3.2 Data Cables ................................................................................................10
4 Installation Guide ..............................................................................................11 4.1 Source ........................................................................................................12
4.2 The Recorder / NAS Position .....................................................................12 4.3 The Replay Position ...................................................................................12
5 The Demonstration System ................................................................................13 5.1 Recorder/NAS and Replay Networking ......................................................14
5.2 Source Position ..........................................................................................14 5.3 Recorder/NAS Position ..............................................................................15
5.4 Replay Position. .........................................................................................17 6 Appendix...........................................................................................................19
6.1 Setting a static IP address ...........................................................................19 6.2 Recorder/NAS and Replay network connections .........................................21
6.3 Create a new partition .................................................................................23 6.4 Recorder Permissions .................................................................................24
6.5 Change Recorder default settings................................................................27 6.6 Change Replay default settings ...................................................................28
6.7 Further information ....................................................................................29 7 Troubleshooting Guide ......................................................................................30
Figures Figure 1: DVI CONNECTOR TYPES ....................................................................... 4
Figure 2: SENTINEL ANALOGUE AT-THE-GLASS RECORDING ...................... 6 Figure 3: SENTINEL DIGITAL AT-THE-GLASS RECORDING ............................ 7
Figure 4: SENTINEL INTEGRATED RECORDER FULLY OPERATIONAL .......29
The Graphix Factorytm Thruput Limited
TruePixel tm
Issue: 1 Page 3 of 38 Date: 6th April 2011 Sentinel DVI Integrated Recorder User Manual
1 Introduction
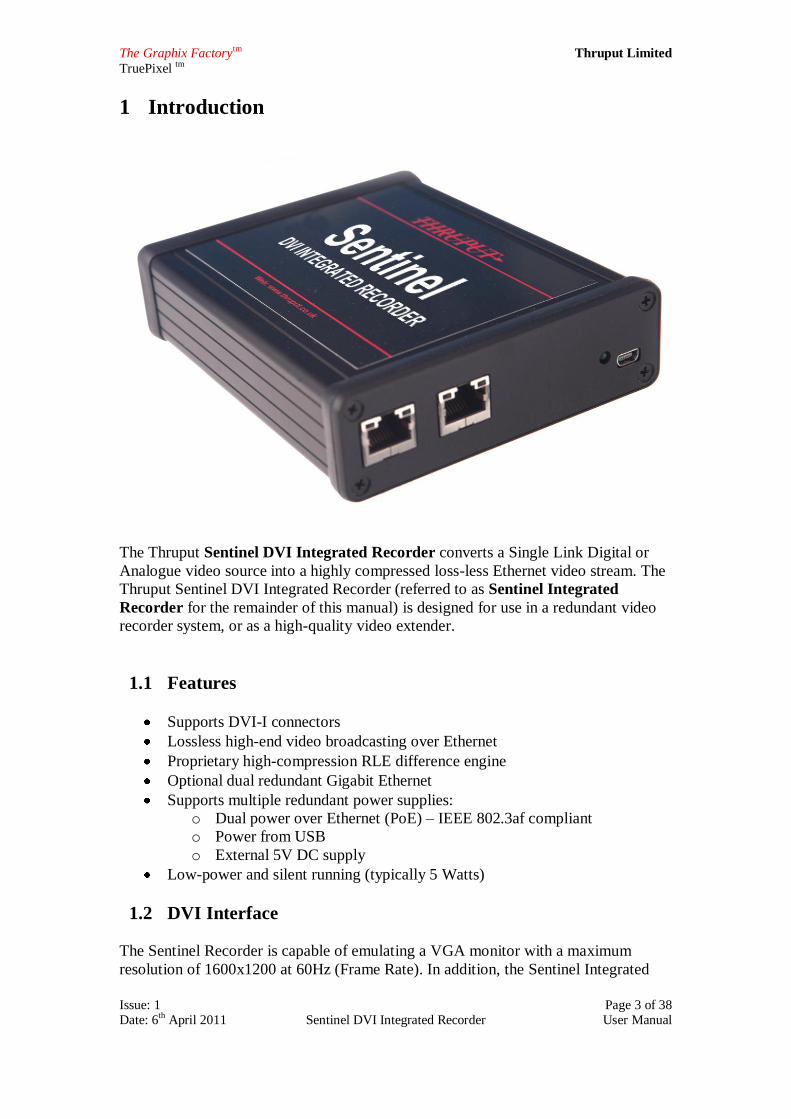
The Thruput Sentinel DVI Integrated Recorder converts a Single Link Digital or
Analogue video source into a highly compressed loss-less Ethernet video stream. The
Thruput Sentinel DVI Integrated Recorder (referred to as Sentinel Integrated
Recorder for the remainder of this manual) is designed for use in a redundant video
recorder system, or as a high-quality video extender.
1.1 Features
Supports DVI-I connectors
Lossless high-end video broadcasting over Ethernet
Proprietary high-compression RLE difference engine
Optional dual redundant Gigabit Ethernet
Supports multiple redundant power supplies:
o Dual power over Ethernet (PoE) – IEEE 802.3af compliant
o Power from USB
o External 5V DC supply
Low-power and silent running (typically 5 Watts)
1.2 DVI Interface
The Sentinel Recorder is capable of emulating a VGA monitor with a maximum
resolution of 1600x1200 at 60Hz (Frame Rate). In addition, the Sentinel Integrated

The Graphix Factorytm Thruput Limited
TruePixel tm
Issue: 1 Page 4 of 38 Date: 6th April 2011 Sentinel DVI Integrated Recorder User Manual
Recorder can be configured to „snoop‟ a DVI or VGA signal to an existing monitor up
to a maximum resolution of 1600x1200 at 60Hz.
The Sentinel Integrated Recorder supports DVI-I (single-link) which can operate with
analogue or digital (single-link) cabling. If the Sentinel Integrated Recorder is
programmed to emulate a monitor, then the supported resolution is defined in an
EDID EEPROM as defined by the DVI specification.
DVI-I (single link) cable can be easily recognised by its half populated pins, as shown
in figure 1.
Figure 1: DVI CONNECTOR TYPES
With digital connections, the maximum throughput for Single Link DVI is 165Million
pixels/second (165MHz pixel-clock).
The Graphix Factorytm Thruput Limited
TruePixel tm
Issue: 1 Page 5 of 38 Date: 6th April 2011 Sentinel DVI Integrated Recorder User Manual
As an example, a 1920x1200 monitor at 60Hz refresh rate displays 1920x1200x60
pixels in one second. This would be 138 Million pixels/ second. There is also around
10% of extra time required for the internal timings. Therefore a 1920x1200 @ 60Hz
monitor has a pixel clock of 152 MHZ. This is below 165MHz, so the Sentinel
Integrated Recorder can be used.
In contrast, a 2560x1600 resolution monitor at 60Hz has pixel clock of 2560x1600x60
(+10%), which is 270MHz.This is above 165MHz, so the graphics card works in DVI
Dual Link. This would require the Sentinel DVI Dual-Link Recorder product.
It is the responsibility of the user to ensure that the resolution defined by the EDID
EEPROM is supported by the video source and the cabling.
1.3 Ethernet Interface
The Sentinel Integrated Recorder is designed to operate on Gigabit Ethernet networks
that provide a low-latency and high-bandwidth channel to distribute the data. To
ensure loss-less transmission of the video data, Thruput has developed a proprietary
high-compression RLE difference engine.
To ensure optimal compression, it is important that users understand how RLE
compression operates, as not all video types give the same level of compression.
For video data that consists of large areas of uniform colour, the RLE compression
reduces the data traffic considerably. This is done by compressing the pixel data into a
different form , for example, 200 pixels of 24-bit data could take 24x200 (i.e. 480
bits) of storage, or could be shortened to pixel + count (i.e. 24+8 bits) of storage.
In addition, by comparing the current frame with the previous frame and only sending
the differences, even greater savings can be made. This is because the Sentinel
Integrated Recorder can convert complex areas (that would require significant storage
even with RLE) and compress this to an instruction such as “just repeat the last
frame”.
With difference engine and RLE, slow-moving, vector driven images (such as those
found in air-traffic control systems) compress very well.
The Graphix Factorytm Thruput Limited
TruePixel tm
Issue: 1 Page 6 of 38 Date: 6th April 2011 Sentinel DVI Integrated Recorder User Manual
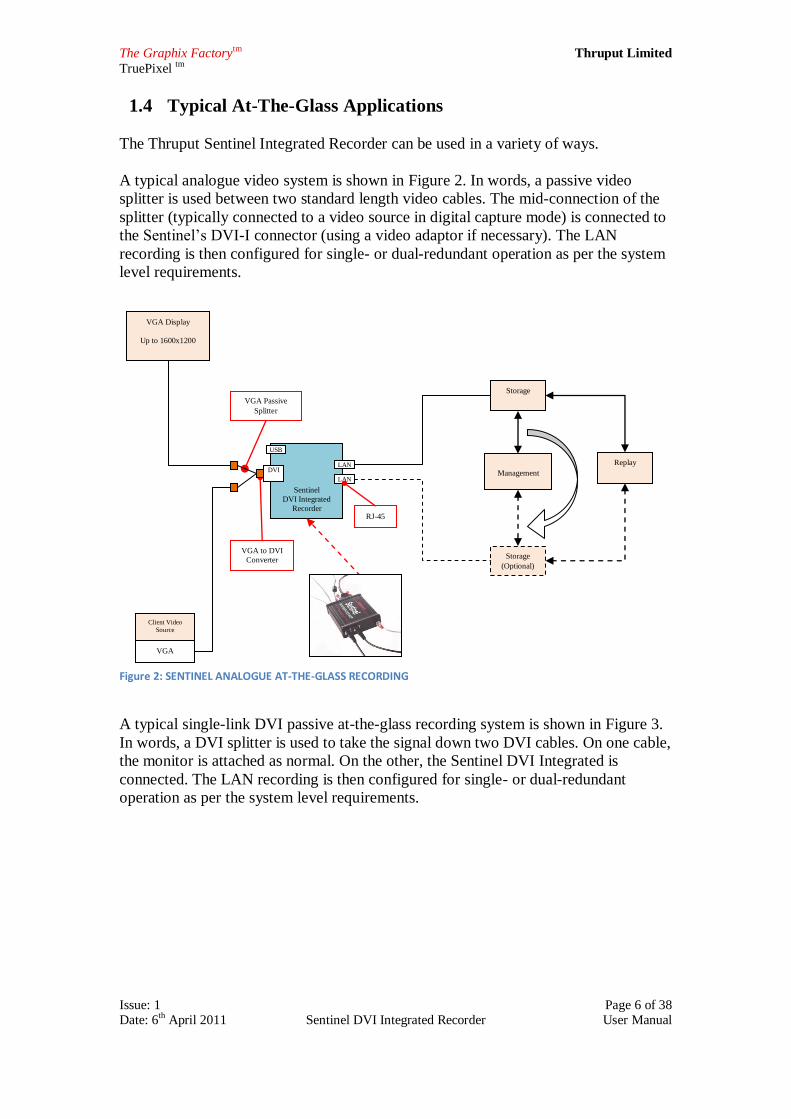
1.4 Typical At-The-Glass Applications
The Thruput Sentinel Integrated Recorder can be used in a variety of ways.
A typical analogue video system is shown in Figure 2. In words, a passive video
splitter is used between two standard length video cables. The mid-connection of the
splitter (typically connected to a video source in digital capture mode) is connected to
the Sentinel‟s DVI-I connector (using a video adaptor if necessary). The LAN
recording is then configured for single- or dual-redundant operation as per the system
level requirements.
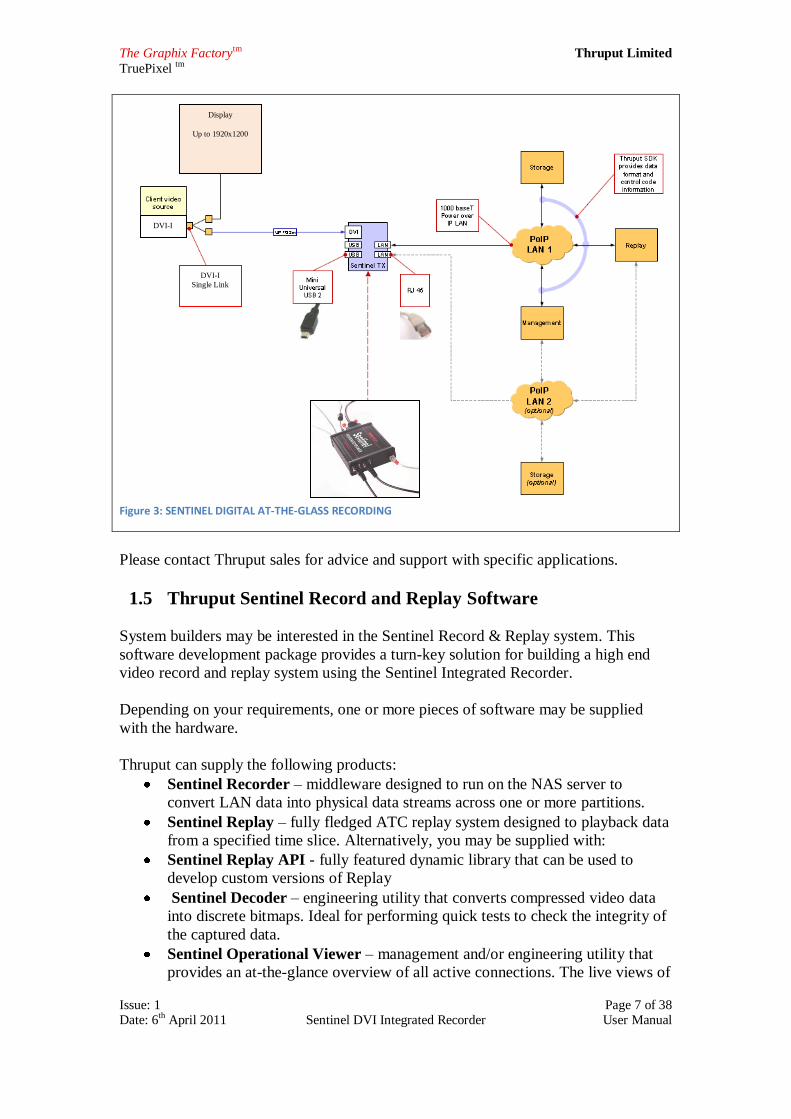
A typical single-link DVI passive at-the-glass recording system is shown in Figure 3.
In words, a DVI splitter is used to take the signal down two DVI cables. On one cable,
the monitor is attached as normal. On the other, the Sentinel DVI Integrated is
connected. The LAN recording is then configured for single- or dual-redundant
operation as per the system level requirements.
VGA Display
Up to 1600x1200
Client Video
Source
VGA
VGA to DVI
Converter
VGA Passive
Splitter
Sentinel
DVI Integrated
Recorder
USB
LAN
LAN
DVI
RJ-45
Storage
Storage
(Optional)
Management
Replay
Figure 2: SENTINEL ANALOGUE AT-THE-GLASS RECORDING
The Graphix Factorytm Thruput Limited
TruePixel tm
Issue: 1 Page 7 of 38 Date: 6th April 2011 Sentinel DVI Integrated Recorder User Manual
Figure 3: SENTINEL DIGITAL AT-THE-GLASS RECORDING
Please contact Thruput sales for advice and support with specific applications.
1.5 Thruput Sentinel Record and Replay Software
System builders may be interested in the Sentinel Record & Replay system. This
software development package provides a turn-key solution for building a high end
video record and replay system using the Sentinel Integrated Recorder.
Depending on your requirements, one or more pieces of software may be supplied
with the hardware.
Thruput can supply the following products:
Sentinel Recorder – middleware designed to run on the NAS server to
convert LAN data into physical data streams across one or more partitions.
Sentinel Replay – fully fledged ATC replay system designed to playback data
from a specified time slice. Alternatively, you may be supplied with:
Sentinel Replay API - fully featured dynamic library that can be used to
develop custom versions of Replay
Sentinel Decoder – engineering utility that converts compressed video data
into discrete bitmaps. Ideal for performing quick tests to check the integrity of
the captured data.
Sentinel Operational Viewer – management and/or engineering utility that
provides an at-the-glance overview of all active connections. The live views of
Display
Up to 1920x1200
DVI-I
DVI-I
Single Link

The Graphix Factorytm Thruput Limited
TruePixel tm
Issue: 1 Page 8 of 38 Date: 6th April 2011 Sentinel DVI Integrated Recorder User Manual
the data are ideal for Operational Supervisors as they are current, and can be
displayed at their native resolution.
Please contact support or your sales representative for more information.
The Graphix Factorytm Thruput Limited
TruePixel tm
Issue: 1 Page 9 of 38 Date: 6th April 2011 Sentinel DVI Integrated Recorder User Manual
2 Hardware Features
The Sentinel Integrated can be controlled and monitored using Sentinel Management
software. The following features are supported in hardware.
Please consult the software guides for information on how to set these within the
hardware.
2.1 Automatic Analogue Detection
By default, the Sentinel Integrated will attempt to automatically detect whether the
source is analogue or digital. When both are available, the digital source will be
chosen in preference.
To force analogue mode, please ensure that analogue cables are used throughout the
system. The final connection to the Sentinel Integrated Recorder may need a video
adaptor. Note that the recommended at-the-glass connection is as a daisy chain
between the monitor and source video (see Figure 2).
To force digital mode, please ensure that digital cables are used throughout the
system. Note that the recommended at-the-glass connection is from the second spur of
a passive Y-splitter (see Figure 3).
2.2 At-the-glass recording
The Sentinel Integrated Recorder supports at-the-glass recording which means that the
video source can be recorded without loading software onto the host computer, and
without affecting the normal monitor operation.
During at-the-glass recording the Sentinel Integrated Recorder will not be detected by
the video source computer.
The Graphix Factorytm Thruput Limited
TruePixel tm
Issue: 1 Page 10 of 38 Date: 6th April 2011 Sentinel DVI Integrated Recorder User Manual
3 Shipping Contents
The Sentinel DVI Integrated Recorder ships with
1. Sentinel DVI Integrated Recorder Unit
2. User Manual
3. Installation CD
3.1 Power supplies
The Sentinel DVI Integrated Recorder is able to use several different sources of
power:
Power over Ethernet (PoE) from a IEE802.3af compliant injector (not
supplied)
5v from a USB power leads (not supplied)
Dedicated 5v power source (not supplied)
If PoE is used, it must be noted that the injector must be gigabit Ethernet compatible.
Thruput can advise on suitability of power arrangements. Please contact your sales
representative for more details.
3.2 Data Cables
The Sentinel Integrated Recorder is a high-end video streaming device, and benefits
from high-quality cabling.
Thruput recommends that all Gigabit Ethernet cables are CAT 5e or better, and that
all digital and analogue cables are fully DVI-I compliant.

The Graphix Factorytm Thruput Limited
TruePixel tm
Issue: 1 Page 11 of 38 Date: 6th April 2011 Sentinel DVI Integrated Recorder User Manual
4 Installation Guide
The Sentinel Integrated Recorder is capable of emulating a monitor, or at-the-glass
recording (snooping) of the video sent to a real monitor. This installation guide
describes both methods.
If you experiences issues, please consult the troubleshooting section (see end of the
manual) for help and advice on what to do next.
For the purpose of the guide, control and monitoring of the hardware is performed by
the Thruput Record and Replay software suite. Please contact support or your local
sales representative for information on what is available.

The Graphix Factorytm Thruput Limited
TruePixel tm
Issue: 1 Page 12 of 38 Date: 6th April 2011 Sentinel DVI Integrated Recorder User Manual
This document describes the steps involved in setting up a demonstration of the
Sentinel Integrated Record system. This demonstration will also include a replay
position to demonstrate playback of the captured data. The system primarily consists
of the following main components:
1. The video source. 2. The recorder / NAS position. 3. The replay position. 4. Sentinel TX recorder. 5. Installer CD – Please contact support or sales if not supplied.
Each component has a minimum set of system requirements; however we would
recommend a fully featured NAS such as a Dell PowerEdge R510.
4.1 Source a) The Video Source
a. A Dual or single link DVI graphics card. b. A suitable monitor e.g., 1600x1200. c. A passive DVI splitter. d. A DVI cable.
b) Sentinel TX Recorder a. Sentinel TX device – with USB cable. b. External Power supply, or a Power over Ethernet (PoE) adapter.
4.2 The Recorder / NAS Position a) Window 7 Professional 32 bit Edition. b) A suitable monitor e.g., 1280x1024 or greaterx GigE network cards. c) Sufficient disk space for the recorded data; e.g.,
a. 1 HDD for the Windows Operating system, min 320GB b. HDD for the video data e.g., 1.5TB
4.3 The Replay Position
a) Window 7 Professional 32 bit Edition. b) Dual head DVI graphics card with support for the maximum video resolution being
recorded e.g., 1600x1200 (max 2560x1600). c) Thruput licence dongle. d) A suitable monitor(s)
a. Option 1: A single monitor e.g., 1920x1200 b. Option 2: Two monitors e.g., 1920x1200 and 2560x1600
The Graphix Factorytm Thruput Limited
TruePixel tm
Issue: 1 Page 13 of 38 Date: 6th April 2011 Sentinel DVI Integrated Recorder User Manual
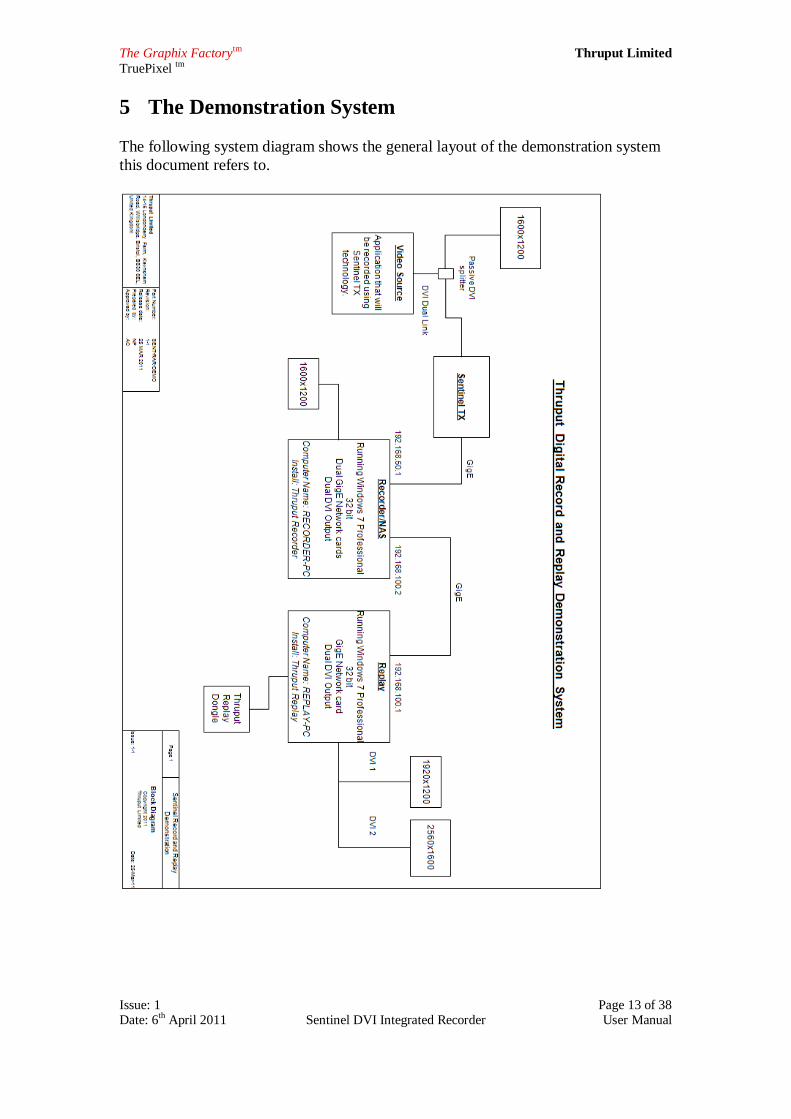
5 The Demonstration System
The following system diagram shows the general layout of the demonstration system
this document refers to.
The Graphix Factorytm Thruput Limited
TruePixel tm
Issue: 1 Page 14 of 38 Date: 6th April 2011 Sentinel DVI Integrated Recorder User Manual
5.1 Recorder/NAS and Replay Networking
a) Set up the following IP addresses for the Recorder/NAS position; refer to Appendix 6.1 for details.
a. IP1: 192.168.50.1/255.255.255.0 b. IP2: 192.168.100.2/255.255.255.0
b) Set up the following IP address for the Replay position; refer to Appendix 6.1 for details.
a. IP: 192.168.100.1/255.255.255.0 c) Setup the network between the Recorder/NAS and Replay positions; refer to
Appendix 6.2 for details. d) Ensure the Windows Firewall is disabled on both the Recorder/NAS position and the
Replay position
5.2 Source Position
With the source computer turned off perform the following steps
a) Connect the DVI splitter to the source computer DVI output.
b) Connect one output from the DVI splitter to the chosen monitor.
(Note that in „snoop‟ mode, a passive video splitter should be used to ensure
that the monitor and Sentinel Integrated Recorder co-exist. If connected in
direct mode, video splitters must not be used.)
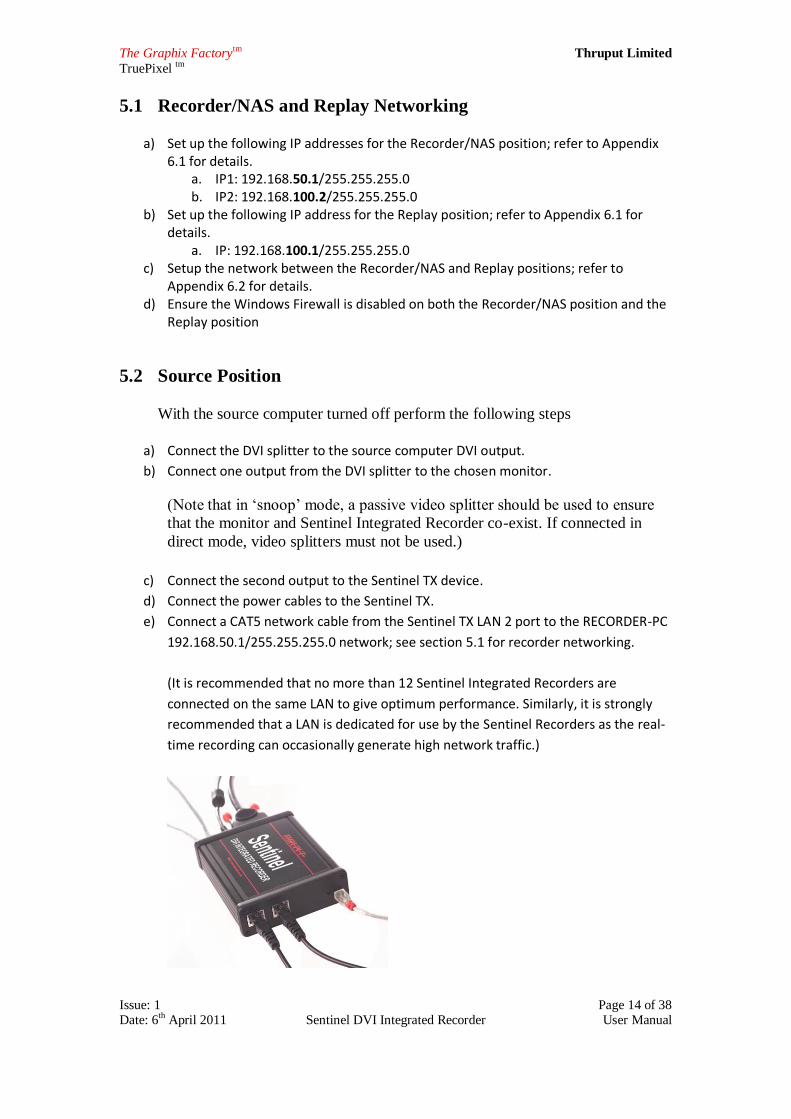
c) Connect the second output to the Sentinel TX device.
d) Connect the power cables to the Sentinel TX.
e) Connect a CAT5 network cable from the Sentinel TX LAN 2 port to the RECORDER-PC
192.168.50.1/255.255.255.0 network; see section 5.1 for recorder networking.
(It is recommended that no more than 12 Sentinel Integrated Recorders are
connected on the same LAN to give optimum performance. Similarly, it is strongly
recommended that a LAN is dedicated for use by the Sentinel Recorders as the real-
time recording can occasionally generate high network traffic.)
The Graphix Factorytm Thruput Limited
TruePixel tm
Issue: 1 Page 15 of 38 Date: 6th April 2011 Sentinel DVI Integrated Recorder User Manual
f) Power up the source computer. g) Check that the power LED is green (located next to the power input)
h) Check the DVI LED on the Sentinel TX is green; if no light is seen, confirm that both
sides support Gigabit Ethernet, and check that the PC network card is enabled. See
troubleshooting for more advice.
5.3 Recorder/NAS Position
It is recommended that data from the Sentinel TX device is recorded to a disk
partition other than the windows system partition; ideally a second HDD would
be used create a new partition.
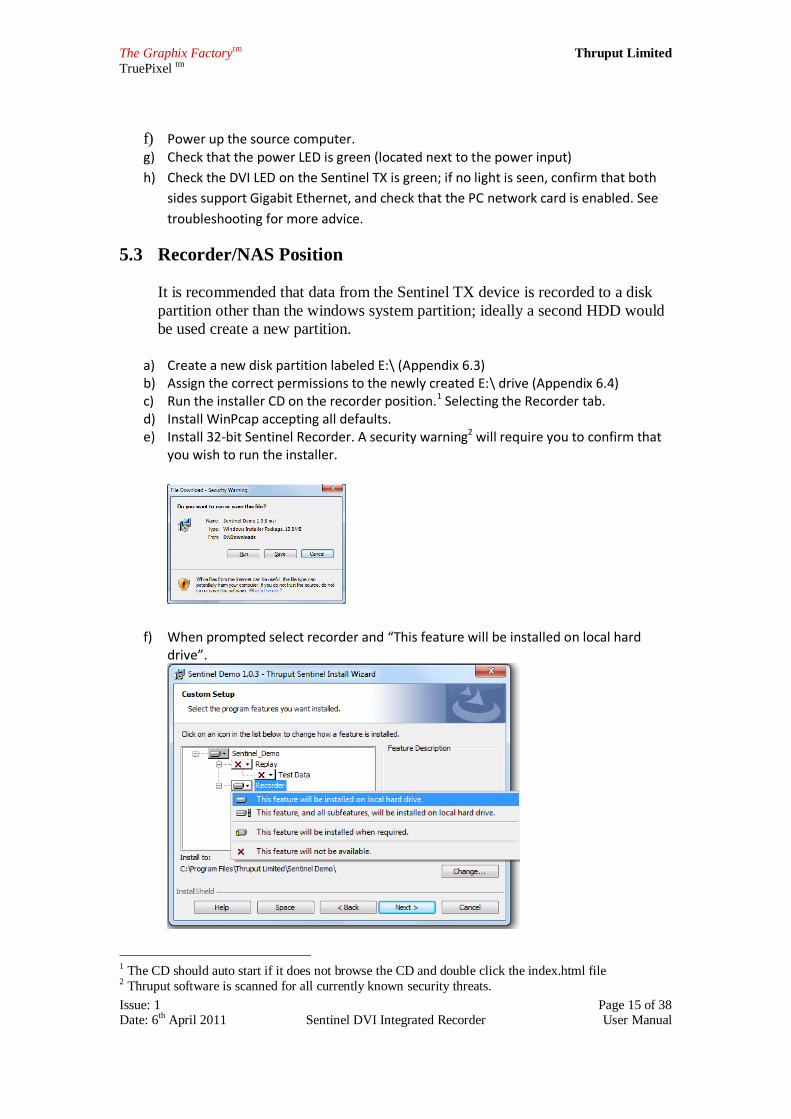
a) Create a new disk partition labeled E:\ (Appendix 6.3) b) Assign the correct permissions to the newly created E:\ drive (Appendix 6.4) c) Run the installer CD on the recorder position.1 Selecting the Recorder tab. d) Install WinPcap accepting all defaults. e) Install 32-bit Sentinel Recorder. A security warning2 will require you to confirm that
you wish to run the installer.
f) When prompted select recorder and “This feature will be installed on local hard drive”.
1 The CD should auto start if it does not browse the CD and double click the index.html file 2 Thruput software is scanned for all currently known security threats.
The Graphix Factorytm Thruput Limited
TruePixel tm
Issue: 1 Page 16 of 38 Date: 6th April 2011 Sentinel DVI Integrated Recorder User Manual
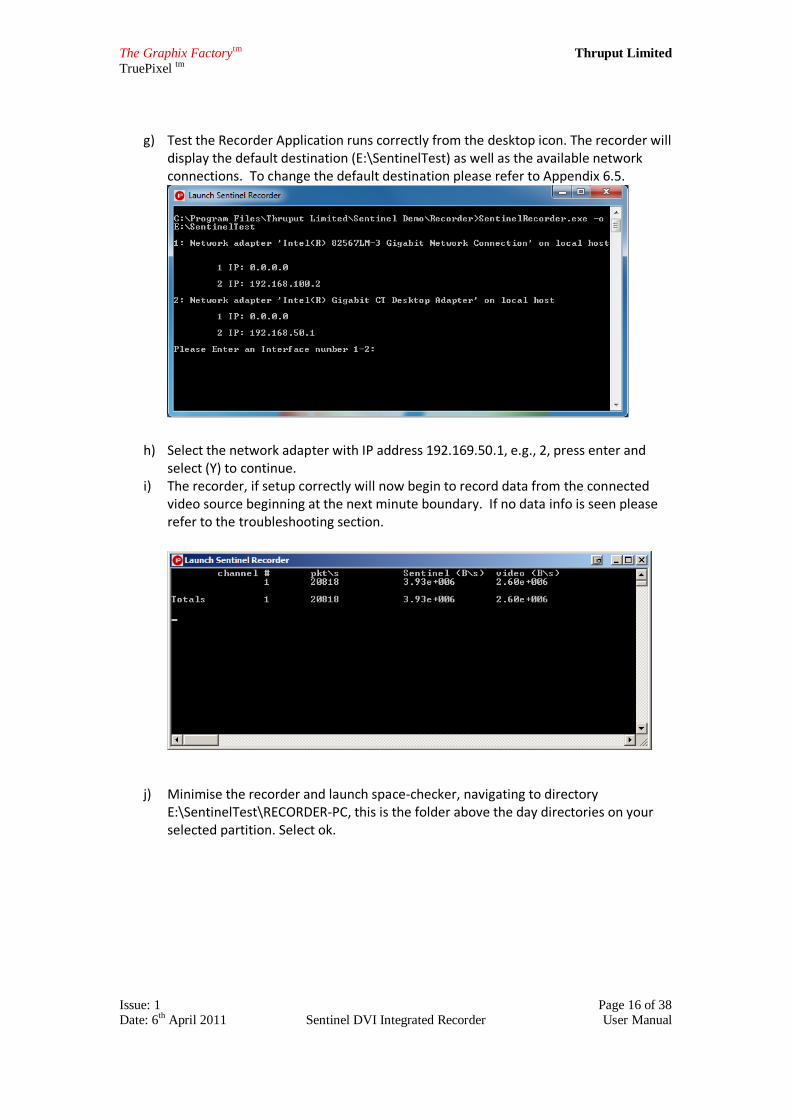
g) Test the Recorder Application runs correctly from the desktop icon. The recorder will
display the default destination (E:\SentinelTest) as well as the available network connections. To change the default destination please refer to Appendix 6.5.
h) Select the network adapter with IP address 192.169.50.1, e.g., 2, press enter and select (Y) to continue.
i) The recorder, if setup correctly will now begin to record data from the connected video source beginning at the next minute boundary. If no data info is seen please refer to the troubleshooting section.
j) Minimise the recorder and launch space-checker, navigating to directory
E:\SentinelTest\RECORDER-PC, this is the folder above the day directories on your selected partition. Select ok.

The Graphix Factorytm Thruput Limited
TruePixel tm
Issue: 1 Page 17 of 38 Date: 6th April 2011 Sentinel DVI Integrated Recorder User Manual
5.4 Replay Position.
Replay functionality is supplied by the Sentinel Replay application. To install
the Replay applications follow the steps below.
a) Run the installer CD on the replay position.3 Selecting the Replay tab and proceed as
follows: b) Install CodeMeter accepting all defaults.
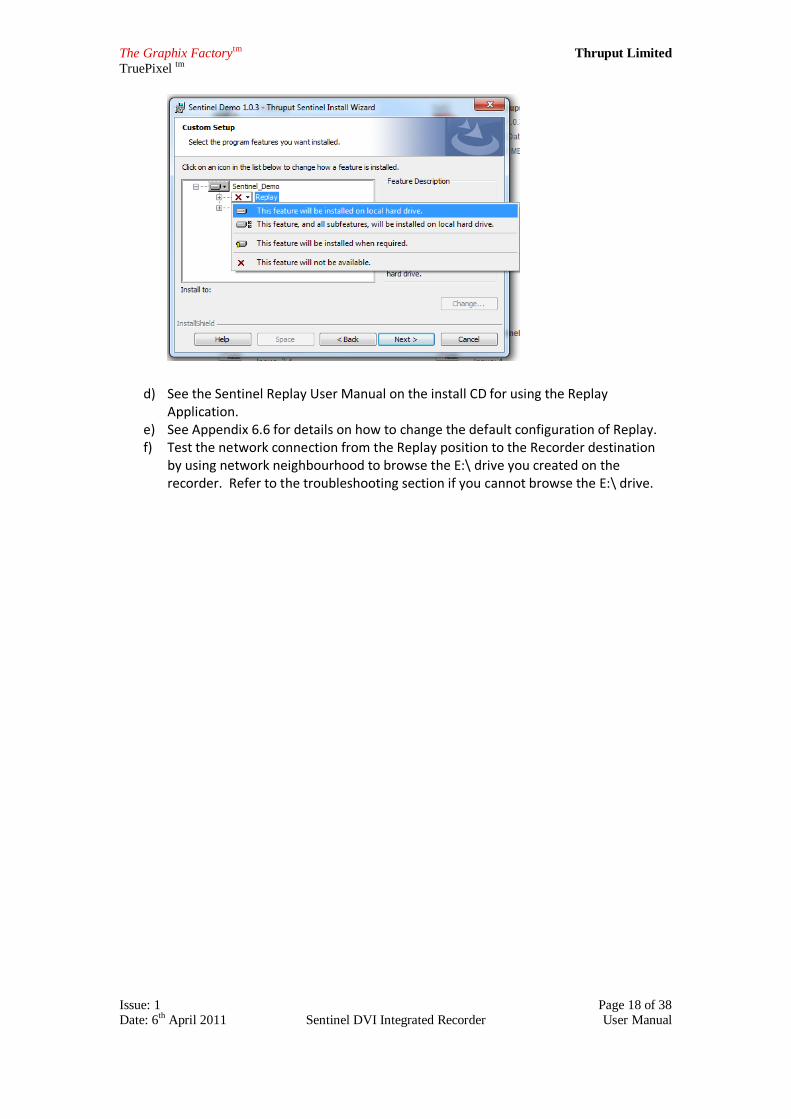
c) Install 32-bit Sentinel Replay. A security warning4 will require you to confirm that you wish to run the installer.
When prompted select replay and “This feature will be installed on local hard drive”.
3 The CD should auto start if it does not browse the CD and double click the index.html file 4 Thruput software is scanned for all currently known security threats.
The Graphix Factorytm Thruput Limited
TruePixel tm
Issue: 1 Page 18 of 38 Date: 6th April 2011 Sentinel DVI Integrated Recorder User Manual
d) See the Sentinel Replay User Manual on the install CD for using the Replay Application.
e) See Appendix 6.6 for details on how to change the default configuration of Replay. f) Test the network connection from the Replay position to the Recorder destination
by using network neighbourhood to browse the E:\ drive you created on the recorder. Refer to the troubleshooting section if you cannot browse the E:\ drive.
The Graphix Factorytm Thruput Limited
TruePixel tm
Issue: 1 Page 19 of 38 Date: 6th April 2011 Sentinel DVI Integrated Recorder User Manual
6 Appendix
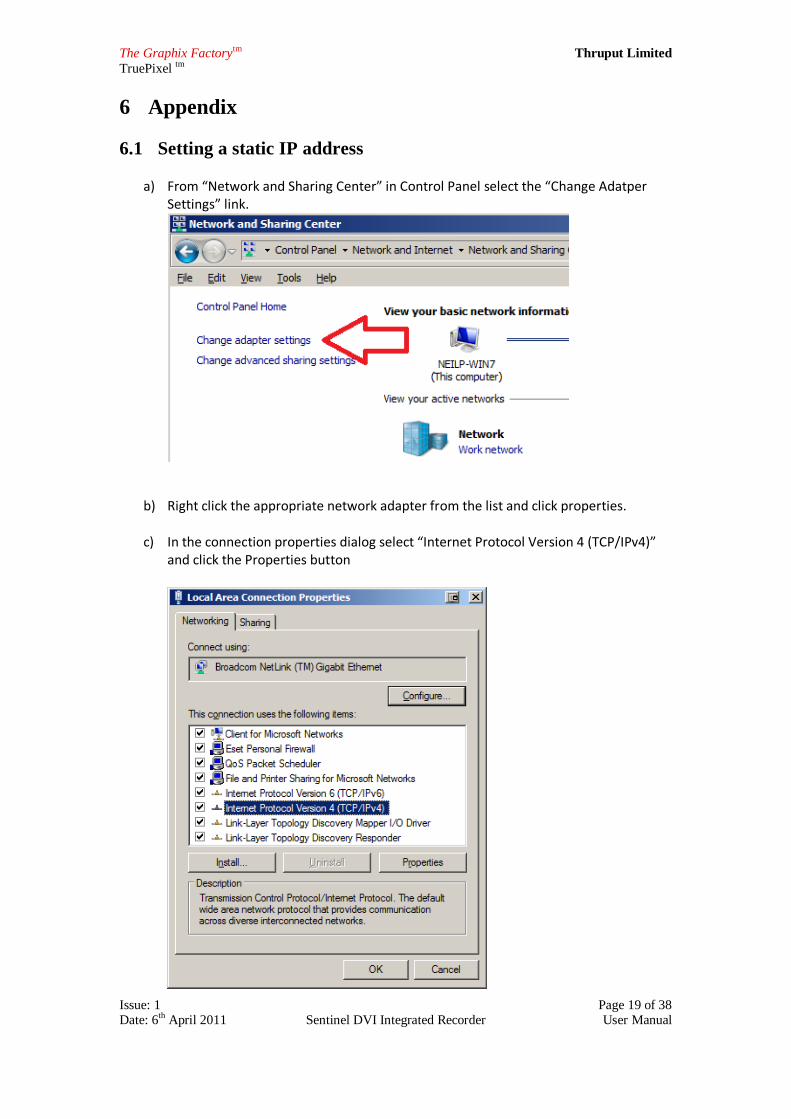
6.1 Setting a static IP address
a) From “Network and Sharing Center” in Control Panel select the “Change Adatper Settings” link.
b) Right click the appropriate network adapter from the list and click properties.
c) In the connection properties dialog select “Internet Protocol Version 4 (TCP/IPv4)”
and click the Properties button

The Graphix Factorytm Thruput Limited
TruePixel tm
Issue: 1 Page 20 of 38 Date: 6th April 2011 Sentinel DVI Integrated Recorder User Manual
d) Select the radio button Use the following IP address:
e) Set your IP and subnet mask accordingly
The Graphix Factorytm Thruput Limited
TruePixel tm
Issue: 1 Page 21 of 38 Date: 6th April 2011 Sentinel DVI Integrated Recorder User Manual
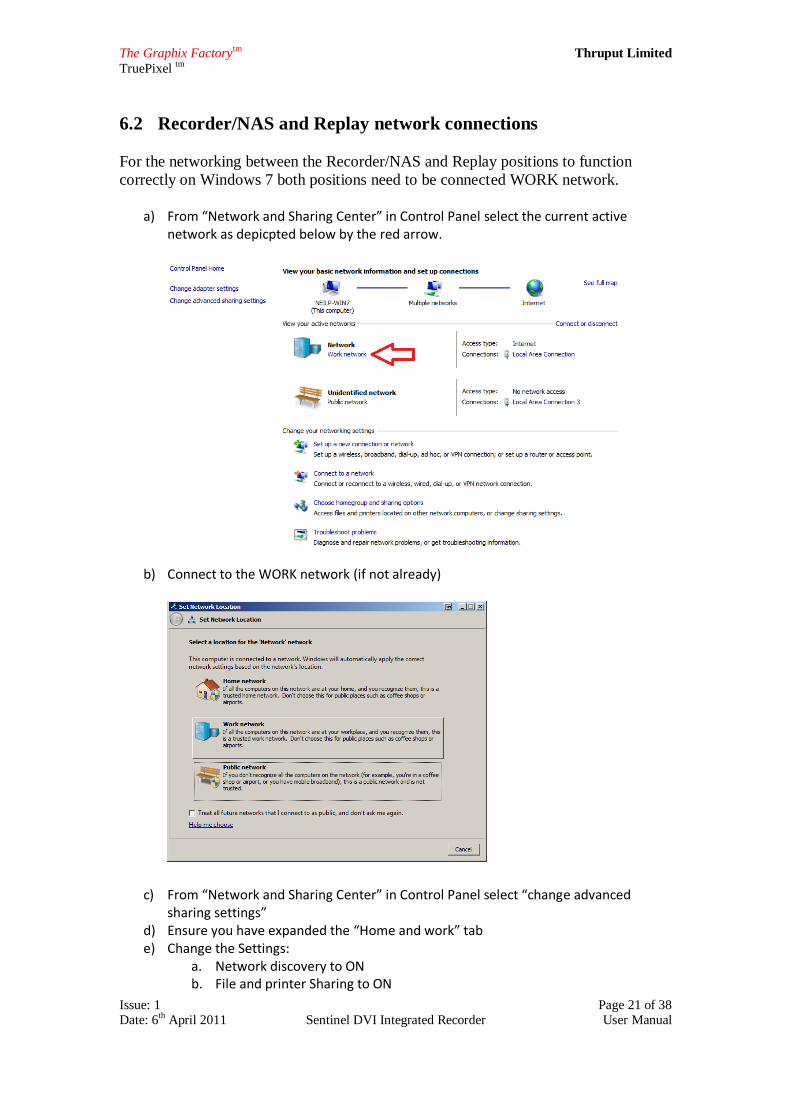
6.2 Recorder/NAS and Replay network connections
For the networking between the Recorder/NAS and Replay positions to function
correctly on Windows 7 both positions need to be connected WORK network.
a) From “Network and Sharing Center” in Control Panel select the current active
network as depicpted below by the red arrow.
b) Connect to the WORK network (if not already)
c) From “Network and Sharing Center” in Control Panel select “change advanced sharing settings”
d) Ensure you have expanded the “Home and work” tab e) Change the Settings:
a. Network discovery to ON b. File and printer Sharing to ON
The Graphix Factorytm Thruput Limited
TruePixel tm
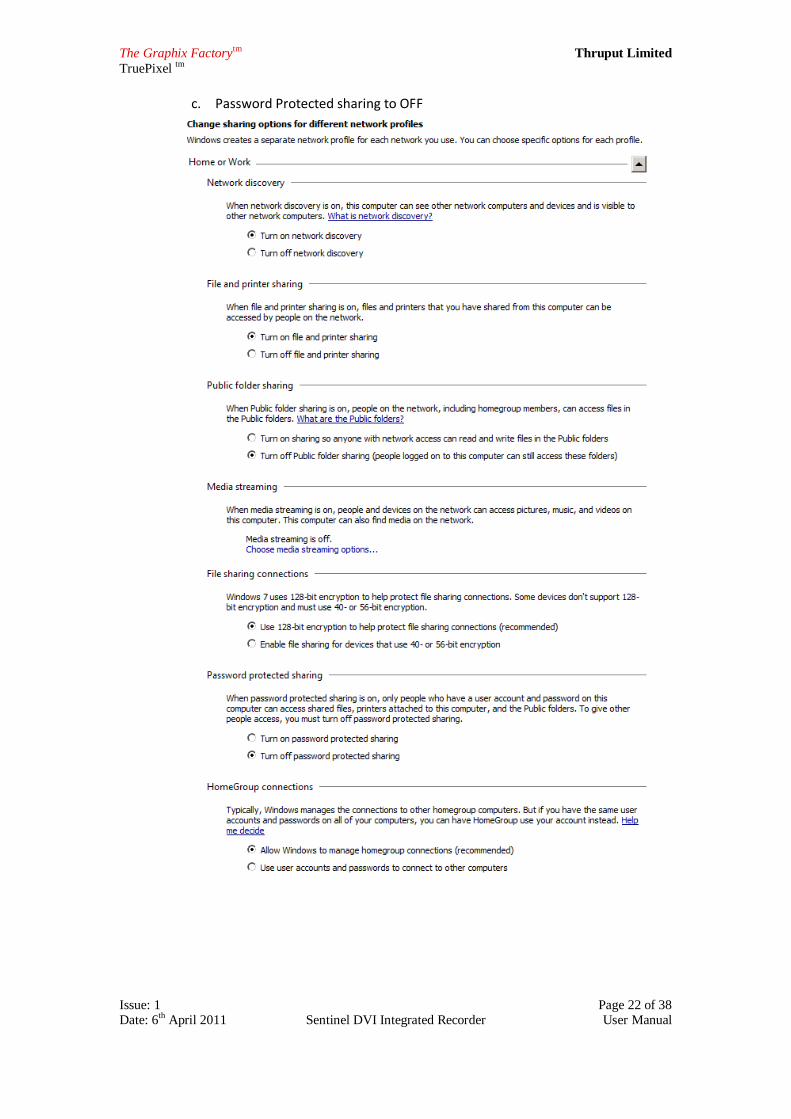
Issue: 1 Page 22 of 38 Date: 6th April 2011 Sentinel DVI Integrated Recorder User Manual
c. Password Protected sharing to OFF
The Graphix Factorytm Thruput Limited
TruePixel tm
Issue: 1 Page 23 of 38 Date: 6th April 2011 Sentinel DVI Integrated Recorder User Manual
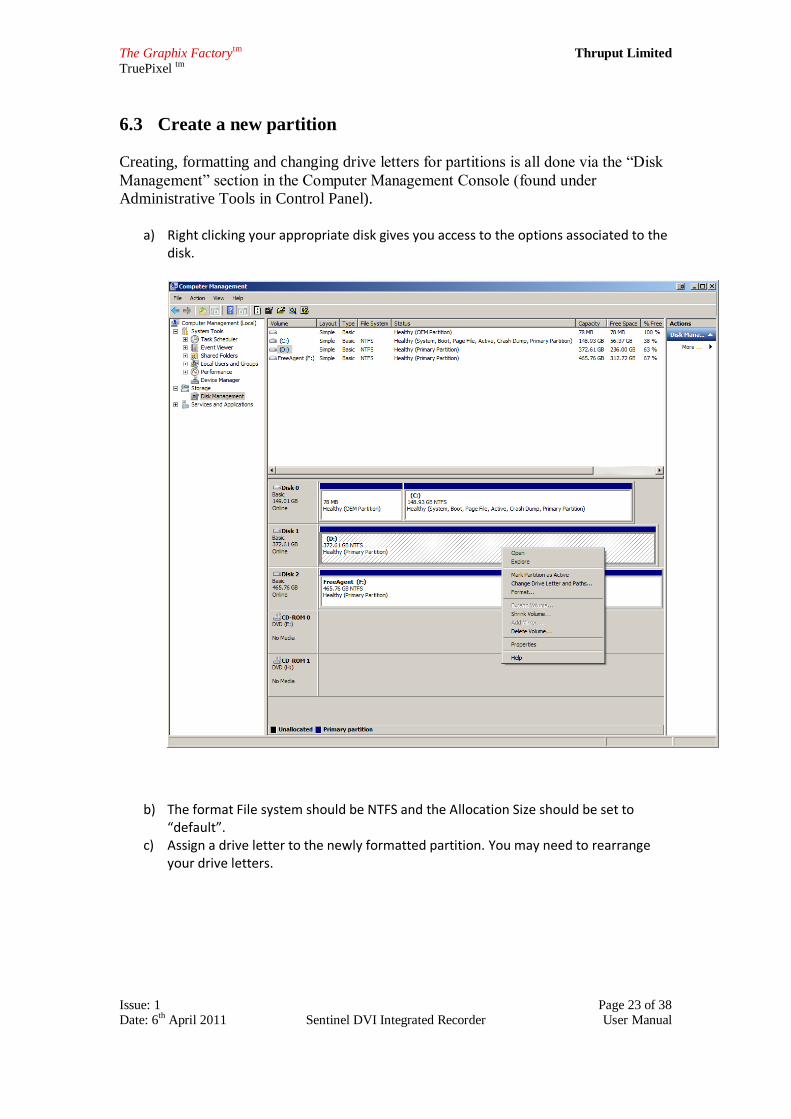
6.3 Create a new partition
Creating, formatting and changing drive letters for partitions is all done via the “Disk
Management” section in the Computer Management Console (found under
Administrative Tools in Control Panel).
a) Right clicking your appropriate disk gives you access to the options associated to the
disk.
b) The format File system should be NTFS and the Allocation Size should be set to
“default”. c) Assign a drive letter to the newly formatted partition. You may need to rearrange
your drive letters.
The Graphix Factorytm Thruput Limited
TruePixel tm
Issue: 1 Page 24 of 38 Date: 6th April 2011 Sentinel DVI Integrated Recorder User Manual
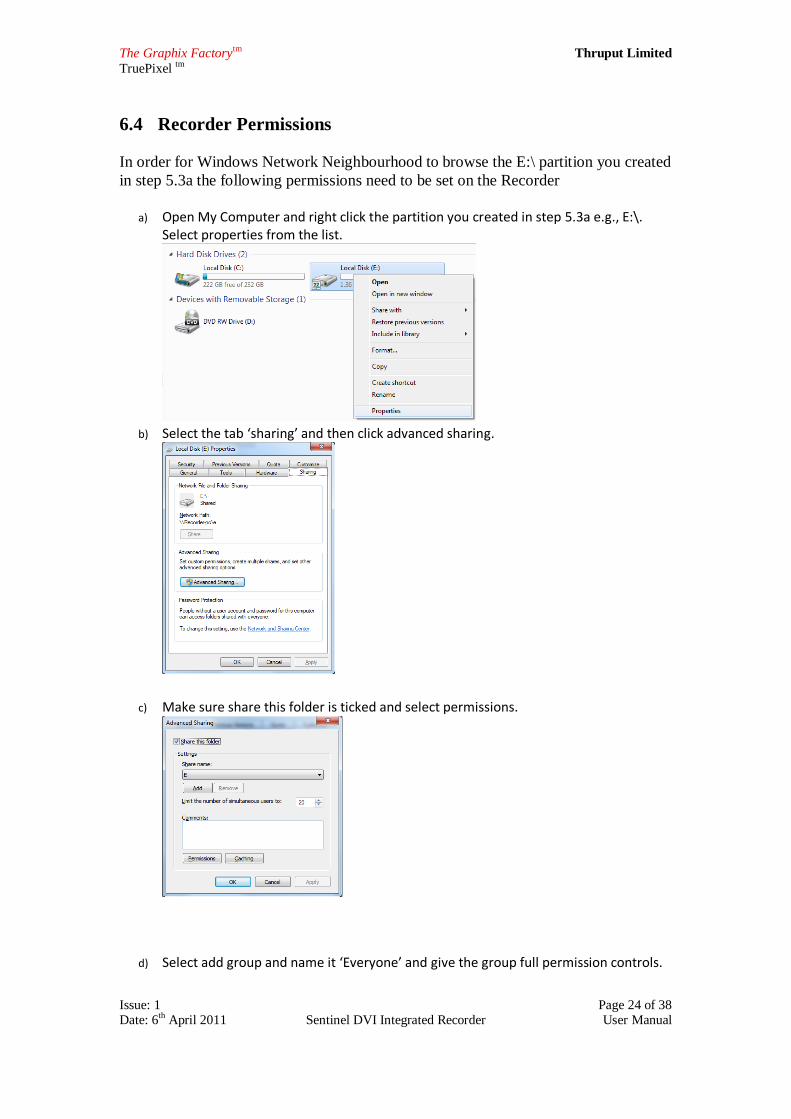
6.4 Recorder Permissions
In order for Windows Network Neighbourhood to browse the E:\ partition you created
in step 5.3a the following permissions need to be set on the Recorder
a) Open My Computer and right click the partition you created in step 5.3a e.g., E:\.
Select properties from the list.
b) Select the tab ‘sharing’ and then click advanced sharing.
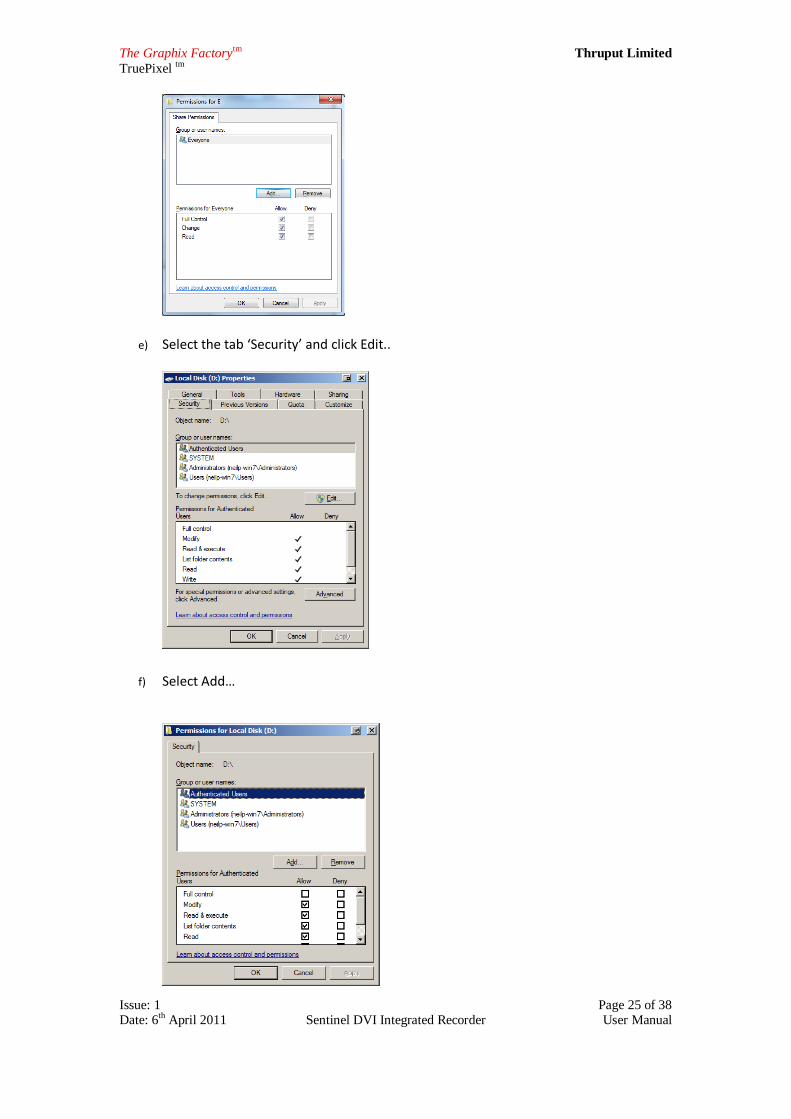
c) Make sure share this folder is ticked and select permissions.
d) Select add group and name it ‘Everyone’ and give the group full permission controls.
The Graphix Factorytm Thruput Limited
TruePixel tm
Issue: 1 Page 25 of 38 Date: 6th April 2011 Sentinel DVI Integrated Recorder User Manual
e) Select the tab ‘Security’ and click Edit..
f) Select Add…
The Graphix Factorytm Thruput Limited
TruePixel tm
Issue: 1 Page 26 of 38 Date: 6th April 2011 Sentinel DVI Integrated Recorder User Manual
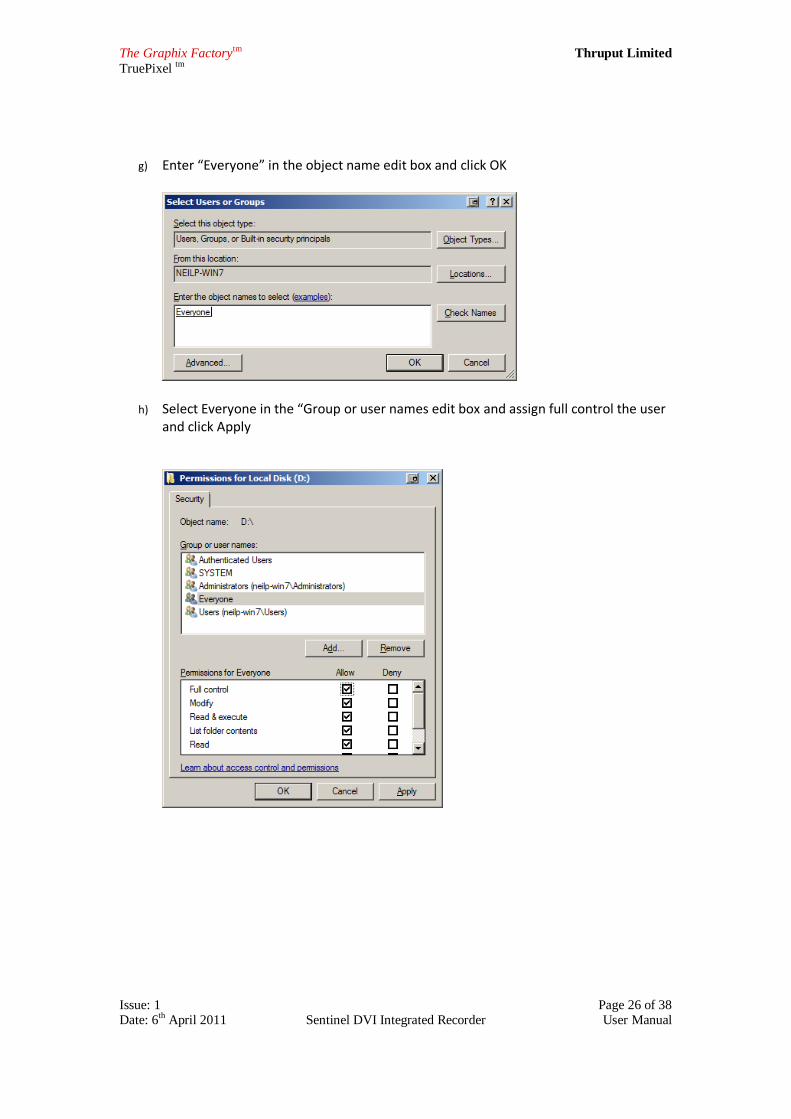
g) Enter “Everyone” in the object name edit box and click OK
h) Select Everyone in the “Group or user names edit box and assign full control the user and click Apply
The Graphix Factorytm Thruput Limited
TruePixel tm
Issue: 1 Page 27 of 38 Date: 6th April 2011 Sentinel DVI Integrated Recorder User Manual
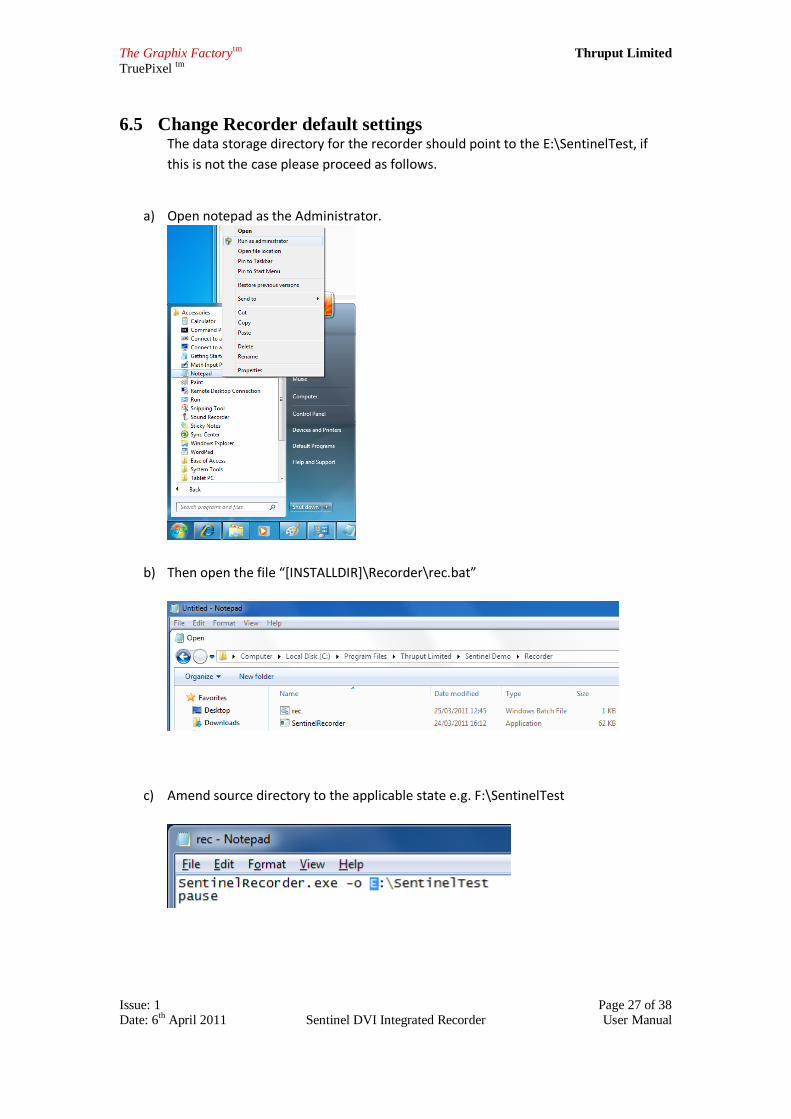
6.5 Change Recorder default settings The data storage directory for the recorder should point to the E:\SentinelTest, if
this is not the case please proceed as follows.
a) Open notepad as the Administrator.
b) Then open the file “*INSTALLDIR+\Recorder\rec.bat”
c) Amend source directory to the applicable state e.g. F:\SentinelTest
The Graphix Factorytm Thruput Limited
TruePixel tm
Issue: 1 Page 28 of 38 Date: 6th April 2011 Sentinel DVI Integrated Recorder User Manual
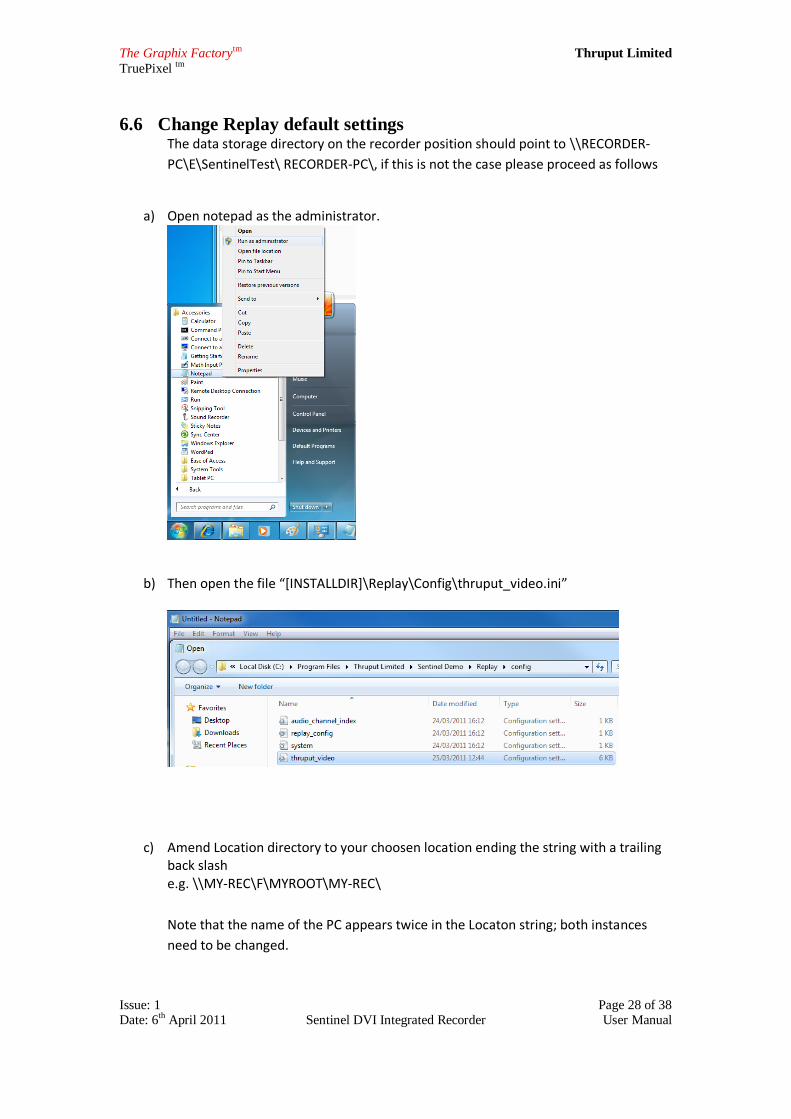
6.6 Change Replay default settings The data storage directory on the recorder position should point to \\RECORDER-
PC\E\SentinelTest\ RECORDER-PC\, if this is not the case please proceed as follows
a) Open notepad as the administrator.
b) Then open the file “*INSTALLDIR+\Replay\Config\thruput_video.ini”
c) Amend Location directory to your choosen location ending the string with a trailing
back slash e.g. \\MY-REC\F\MYROOT\MY-REC\
Note that the name of the PC appears twice in the Locaton string; both instances
need to be changed.
The Graphix Factorytm Thruput Limited
TruePixel tm
Issue: 1 Page 29 of 38 Date: 6th April 2011 Sentinel DVI Integrated Recorder User Manual
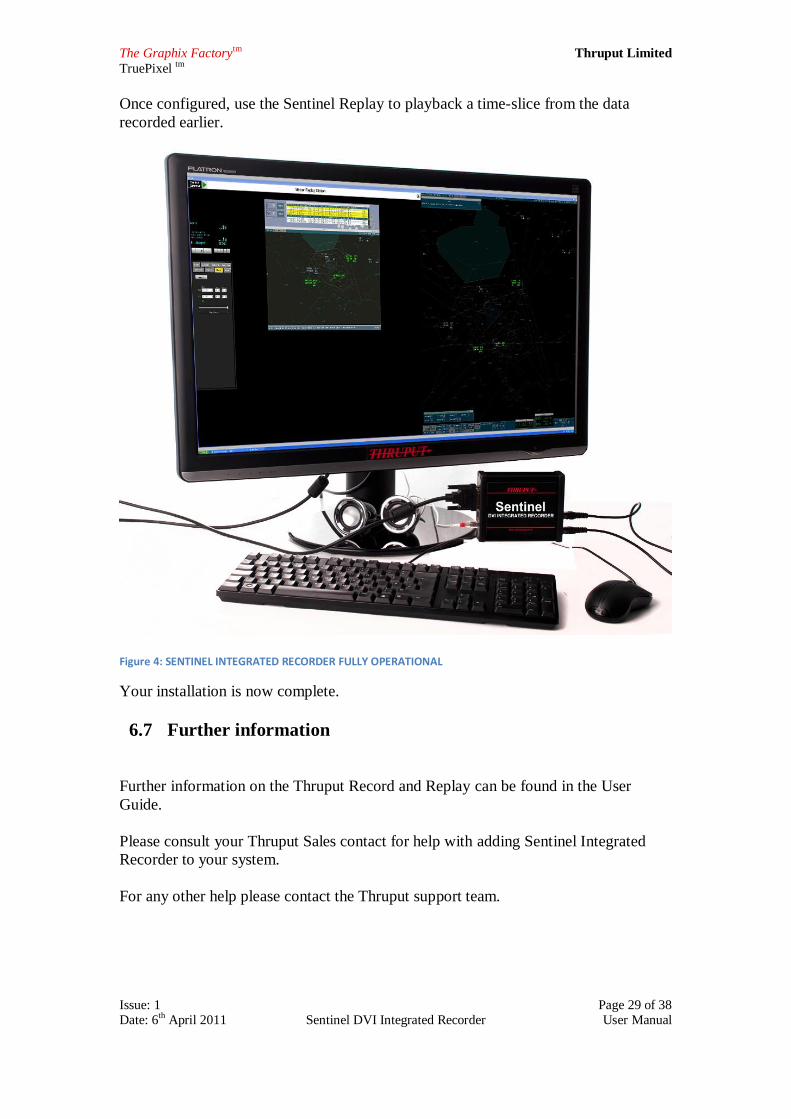
Once configured, use the Sentinel Replay to playback a time-slice from the data
recorded earlier.
Figure 4: SENTINEL INTEGRATED RECORDER FULLY OPERATIONAL
Your installation is now complete.
6.7 Further information
Further information on the Thruput Record and Replay can be found in the User
Guide.
Please consult your Thruput Sales contact for help with adding Sentinel Integrated
Recorder to your system.
For any other help please contact the Thruput support team.
The Graphix Factorytm Thruput Limited
TruePixel tm
Issue: 1 Page 30 of 38 Date: 6th April 2011 Sentinel DVI Integrated Recorder User Manual
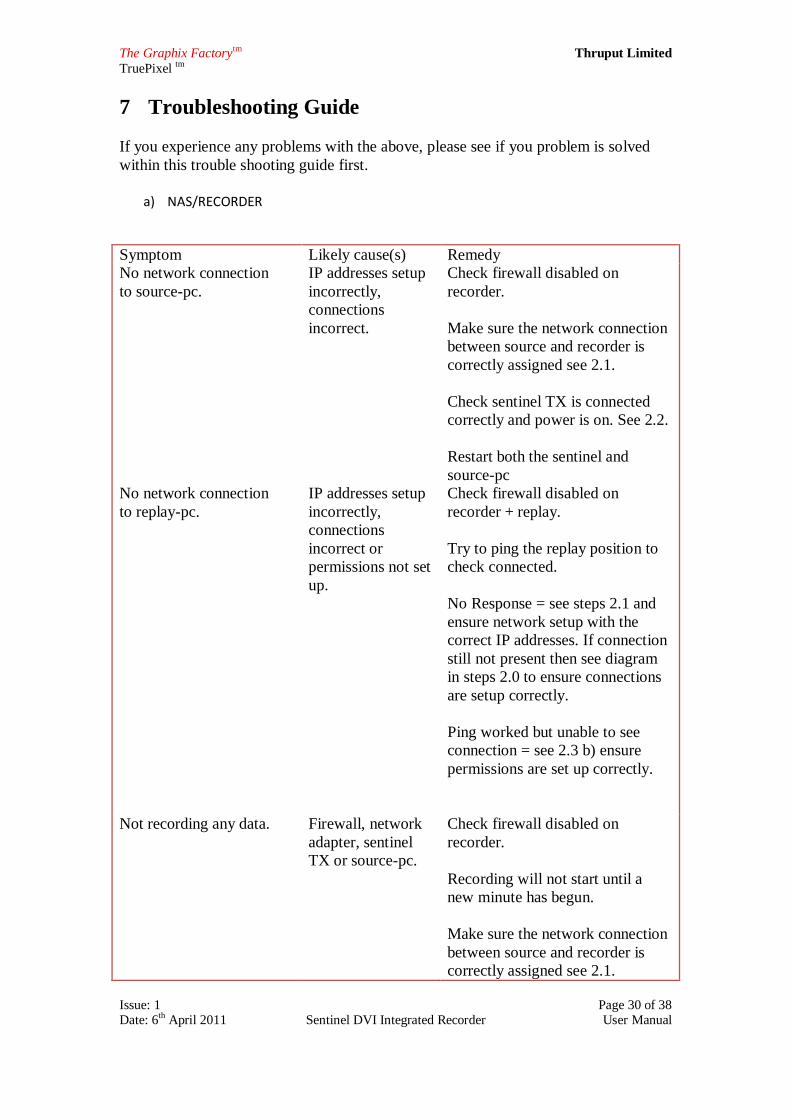
7 Troubleshooting Guide
If you experience any problems with the above, please see if you problem is solved
within this trouble shooting guide first.
a) NAS/RECORDER
Symptom Likely cause(s) Remedy
No network connection
to source-pc.
IP addresses setup
incorrectly,
connections
incorrect.
Check firewall disabled on
recorder.
Make sure the network connection
between source and recorder is
correctly assigned see 2.1.
Check sentinel TX is connected
correctly and power is on. See 2.2.
Restart both the sentinel and
source-pc
No network connection
to replay-pc.
IP addresses setup
incorrectly,
connections
incorrect or
permissions not set
up.
Check firewall disabled on
recorder + replay.
Try to ping the replay position to
check connected.
No Response = see steps 2.1 and
ensure network setup with the
correct IP addresses. If connection
still not present then see diagram
in steps 2.0 to ensure connections
are setup correctly.
Ping worked but unable to see
connection = see 2.3 b) ensure
permissions are set up correctly.
Not recording any data. Firewall, network
adapter, sentinel
TX or source-pc.
Check firewall disabled on
recorder.
Recording will not start until a
new minute has begun.
Make sure the network connection
between source and recorder is
correctly assigned see 2.1.
The Graphix Factorytm Thruput Limited
TruePixel tm
Issue: 1 Page 31 of 38 Date: 6th April 2011 Sentinel DVI Integrated Recorder User Manual
Check sentinel TX is connected
correctly and power is on. See 2.2.
Restart both the sentinel TX and
source-pc.
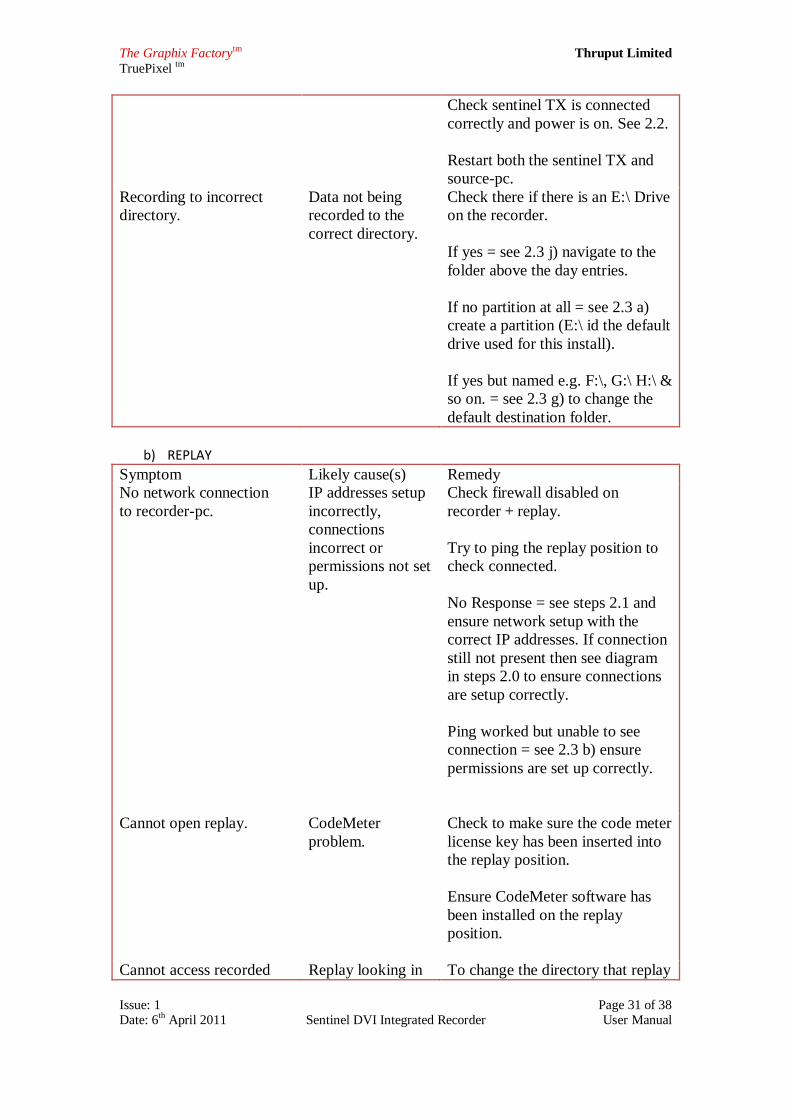
Recording to incorrect
directory.
Data not being
recorded to the
correct directory.
Check there if there is an E:\ Drive
on the recorder.
If yes = see 2.3 j) navigate to the
folder above the day entries.
If no partition at all = see 2.3 a)
create a partition (E:\ id the default
drive used for this install).
If yes but named e.g. F:\, G:\ H:\ &
so on. = see 2.3 g) to change the
default destination folder.
b) REPLAY
Symptom Likely cause(s) Remedy
No network connection
to recorder-pc.
IP addresses setup
incorrectly,
connections
incorrect or
permissions not set
up.
Check firewall disabled on
recorder + replay.
Try to ping the replay position to
check connected.
No Response = see steps 2.1 and
ensure network setup with the
correct IP addresses. If connection
still not present then see diagram
in steps 2.0 to ensure connections
are setup correctly.
Ping worked but unable to see
connection = see 2.3 b) ensure
permissions are set up correctly.
Cannot open replay. CodeMeter
problem.
Check to make sure the code meter
license key has been inserted into
the replay position.
Ensure CodeMeter software has
been installed on the replay
position.
Cannot access recorded Replay looking in To change the directory that replay

The Graphix Factorytm Thruput Limited
TruePixel tm
Issue: 1 Page 32 of 38 Date: 6th April 2011 Sentinel DVI Integrated Recorder User Manual
data. the wrong
directory.
looks in see 2.4 e).
Check the permissions are correct
on both replay & recorder, see 2.3
b). should be able to access the
files via neighborhood network.
c) SENTINEL TX
Symptom Likely Cause(s) Remedy
Power LED
not green
(located to
the left of
external 5V
PSU
connector)
No power supplied. Check that the unit is power supplies are
turned on (either PoE, external AC/DC or
USB) – n.b. the unit can be supplied from one
or more sources.
If still not LED, but you are able to
communicate with the unit (i.e. via software or
through other LEDs), then the power LED has
failed.
If there are still problems contact support.
DVI LED not
green (located
to the right of
the DVI
connector)
Video source not
present,
If in at-the-glass mode, check that a valid
picture is still present on the monitor i.e. there
is data on the cable.
If in direct connection mode, or no video
present on the monitor, check the video
settings on the video source computer i.e. If
Windows, right-click on the desktop to bring
up the display control panel. Check that the
video card can „see‟ the video card, and that
the resolution is valid.
Ensure that DVI Integrated resolutions are
1600x1200 or lower for analogue and
1920x1200 or lower for digital connections.
Ensure that the associated display is enabled
(if it is a second monitor, then it may need
„enabling‟ from software).
If there is data on the second monitor, but the
DVI LED is still not coming on, then check
that the unit is powered.
If the video source computer cannot detect the
attached Sentinel Recorder, restart the
The Graphix Factorytm Thruput Limited
TruePixel tm
Issue: 1 Page 33 of 38 Date: 6th April 2011 Sentinel DVI Integrated Recorder User Manual
computer as it may need to refresh the list of
known monitors.
If there are still problems contact support.
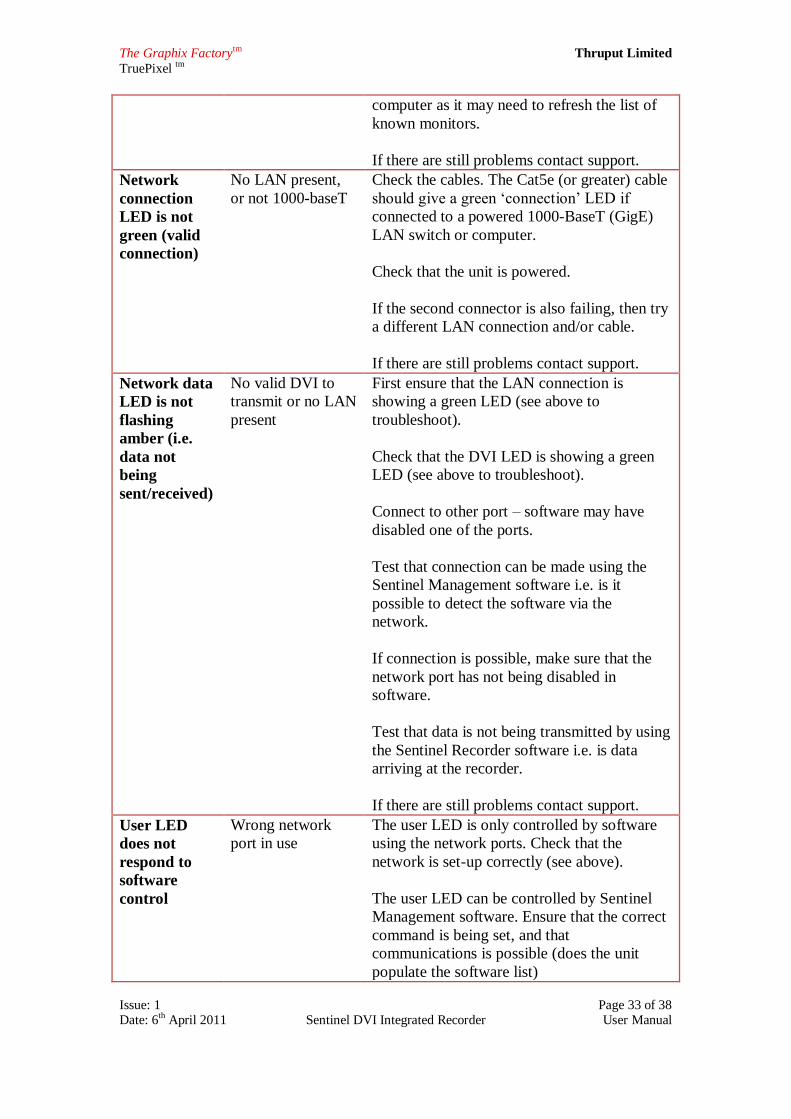
Network
connection
LED is not
green (valid
connection)
No LAN present,
or not 1000-baseT
Check the cables. The Cat5e (or greater) cable
should give a green „connection‟ LED if
connected to a powered 1000-BaseT (GigE)
LAN switch or computer.
Check that the unit is powered.
If the second connector is also failing, then try
a different LAN connection and/or cable.
If there are still problems contact support.
Network data
LED is not
flashing
amber (i.e.
data not
being
sent/received)
No valid DVI to
transmit or no LAN
present
First ensure that the LAN connection is
showing a green LED (see above to
troubleshoot).
Check that the DVI LED is showing a green
LED (see above to troubleshoot).
Connect to other port – software may have
disabled one of the ports.
Test that connection can be made using the
Sentinel Management software i.e. is it
possible to detect the software via the
network.
If connection is possible, make sure that the
network port has not being disabled in
software.
Test that data is not being transmitted by using
the Sentinel Recorder software i.e. is data
arriving at the recorder.
If there are still problems contact support.
User LED
does not
respond to
software
control
Wrong network
port in use
The user LED is only controlled by software
using the network ports. Check that the
network is set-up correctly (see above).
The user LED can be controlled by Sentinel
Management software. Ensure that the correct
command is being set, and that
communications is possible (does the unit
populate the software list)
The Graphix Factorytm Thruput Limited
TruePixel tm
Issue: 1 Page 34 of 38 Date: 6th April 2011 Sentinel DVI Integrated Recorder User Manual
If communications are possible, but the LED
does not respond ensure that no other units are
on the network as these may be interfering.
Ensure that the correct command is being sent
to the unit. See the network interface user
guide.
If there are still problems contact support.
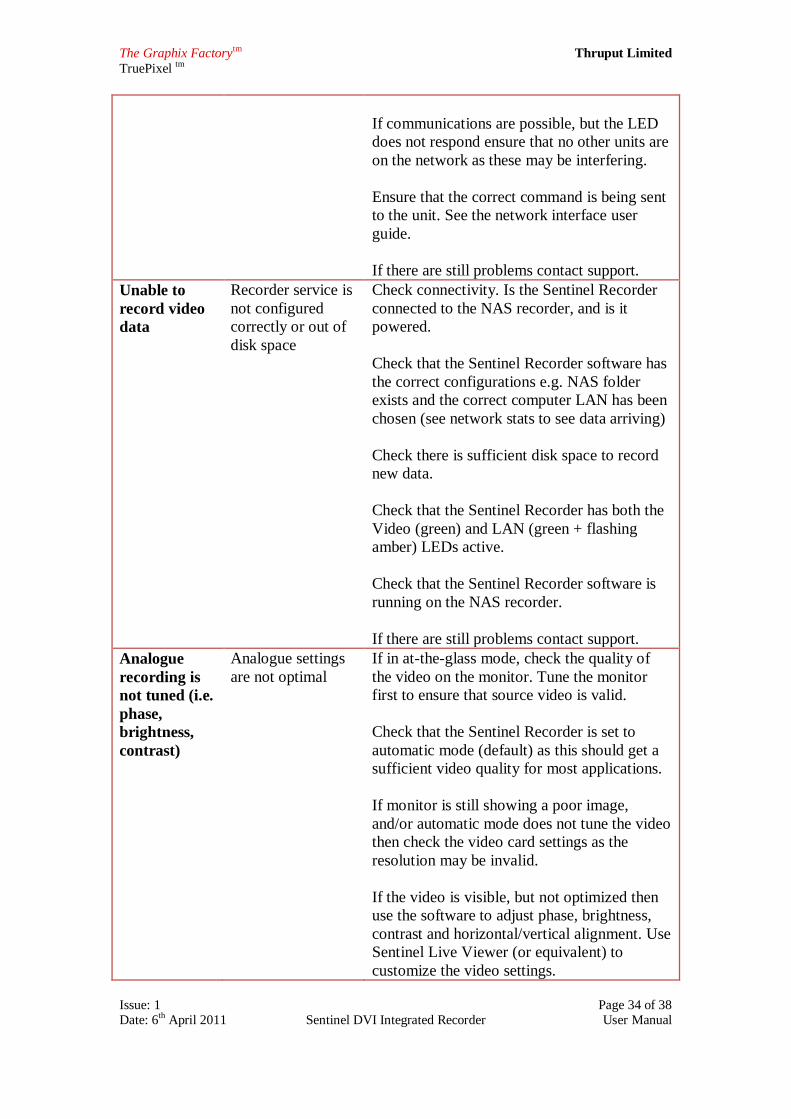
Unable to
record video
data
Recorder service is
not configured
correctly or out of
disk space
Check connectivity. Is the Sentinel Recorder
connected to the NAS recorder, and is it
powered.
Check that the Sentinel Recorder software has
the correct configurations e.g. NAS folder
exists and the correct computer LAN has been
chosen (see network stats to see data arriving)
Check there is sufficient disk space to record
new data.
Check that the Sentinel Recorder has both the
Video (green) and LAN (green + flashing
amber) LEDs active.
Check that the Sentinel Recorder software is
running on the NAS recorder.
If there are still problems contact support.
Analogue
recording is
not tuned (i.e.
phase,
brightness,
contrast)
Analogue settings
are not optimal
If in at-the-glass mode, check the quality of
the video on the monitor. Tune the monitor
first to ensure that source video is valid.
Check that the Sentinel Recorder is set to
automatic mode (default) as this should get a
sufficient video quality for most applications.
If monitor is still showing a poor image,
and/or automatic mode does not tune the video
then check the video card settings as the
resolution may be invalid.
If the video is visible, but not optimized then
use the software to adjust phase, brightness,
contrast and horizontal/vertical alignment. Use
Sentinel Live Viewer (or equivalent) to
customize the video settings.
The Graphix Factorytm Thruput Limited
TruePixel tm
Issue: 1 Page 35 of 38 Date: 6th April 2011 Sentinel DVI Integrated Recorder User Manual
If there are still problems contact support.
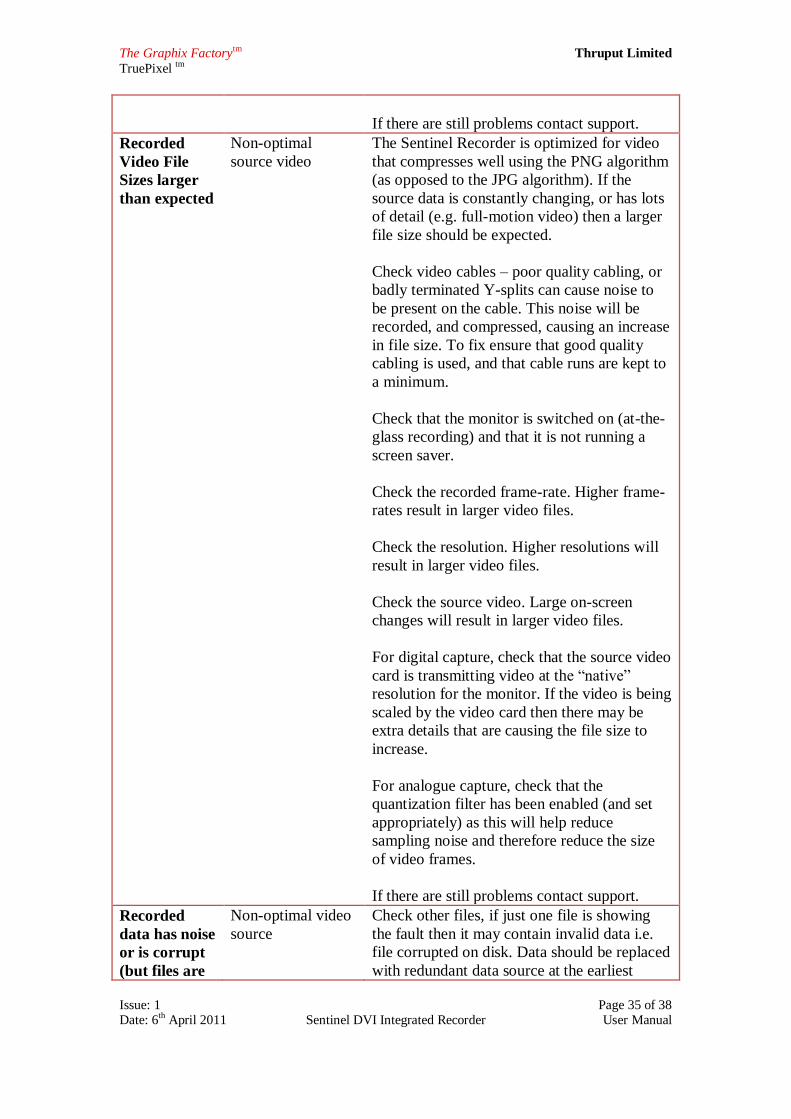
Recorded
Video File
Sizes larger
than expected
Non-optimal
source video
The Sentinel Recorder is optimized for video
that compresses well using the PNG algorithm
(as opposed to the JPG algorithm). If the
source data is constantly changing, or has lots
of detail (e.g. full-motion video) then a larger
file size should be expected.
Check video cables – poor quality cabling, or
badly terminated Y-splits can cause noise to
be present on the cable. This noise will be
recorded, and compressed, causing an increase
in file size. To fix ensure that good quality
cabling is used, and that cable runs are kept to
a minimum.
Check that the monitor is switched on (at-the-
glass recording) and that it is not running a
screen saver.
Check the recorded frame-rate. Higher frame-
rates result in larger video files.
Check the resolution. Higher resolutions will
result in larger video files.
Check the source video. Large on-screen
changes will result in larger video files.
For digital capture, check that the source video
card is transmitting video at the “native”
resolution for the monitor. If the video is being
scaled by the video card then there may be
extra details that are causing the file size to
increase.
For analogue capture, check that the
quantization filter has been enabled (and set
appropriately) as this will help reduce
sampling noise and therefore reduce the size
of video frames.
If there are still problems contact support.
Recorded
data has noise
or is corrupt
(but files are
Non-optimal video
source
Check other files, if just one file is showing
the fault then it may contain invalid data i.e.
file corrupted on disk. Data should be replaced
with redundant data source at the earliest
The Graphix Factorytm Thruput Limited
TruePixel tm
Issue: 1 Page 36 of 38 Date: 6th April 2011 Sentinel DVI Integrated Recorder User Manual
not missing) opportunity.
If all data shows the fault, then follow the
trouble-shooting steps for “Recorded Video
File Sizes larger than expected” (above).
If there are still problems contact support.
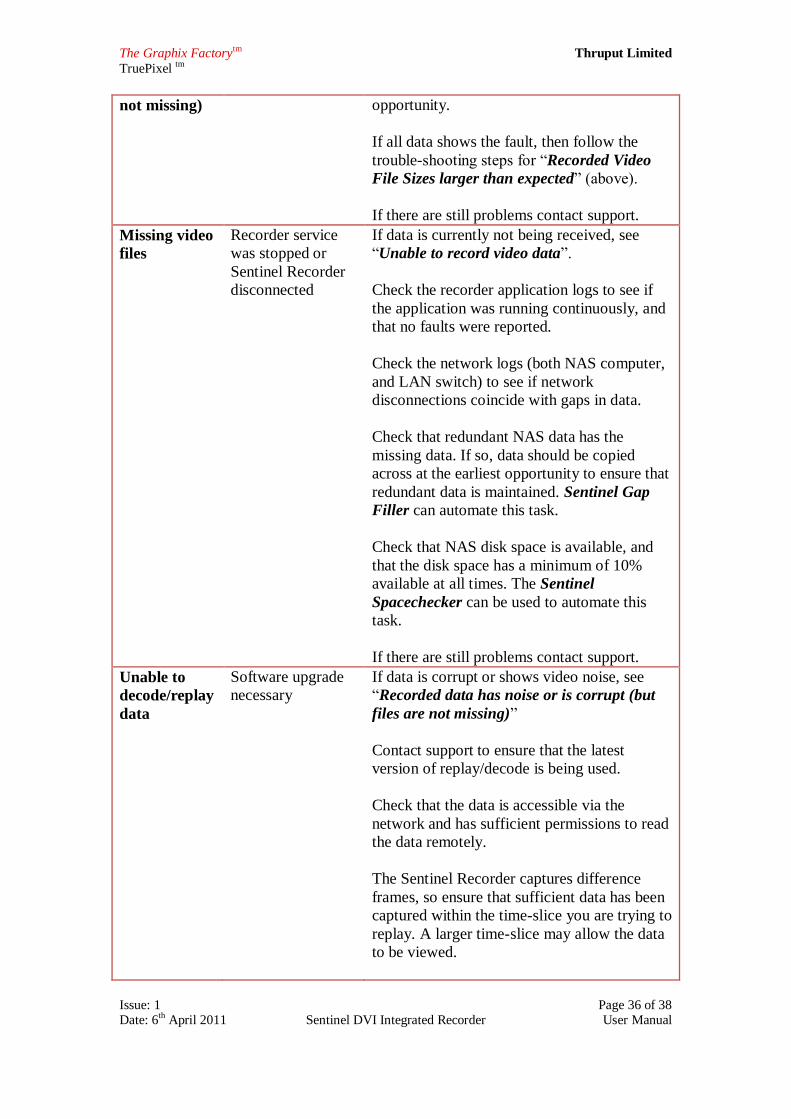
Missing video
files
Recorder service
was stopped or
Sentinel Recorder
disconnected
If data is currently not being received, see
“Unable to record video data”.
Check the recorder application logs to see if
the application was running continuously, and
that no faults were reported.
Check the network logs (both NAS computer,
and LAN switch) to see if network
disconnections coincide with gaps in data.
Check that redundant NAS data has the
missing data. If so, data should be copied
across at the earliest opportunity to ensure that
redundant data is maintained. Sentinel Gap
Filler can automate this task.
Check that NAS disk space is available, and
that the disk space has a minimum of 10%
available at all times. The Sentinel
Spacechecker can be used to automate this
task.
If there are still problems contact support.
Unable to
decode/replay
data
Software upgrade
necessary
If data is corrupt or shows video noise, see
“Recorded data has noise or is corrupt (but
files are not missing)”
Contact support to ensure that the latest
version of replay/decode is being used.
Check that the data is accessible via the
network and has sufficient permissions to read
the data remotely.
The Sentinel Recorder captures difference
frames, so ensure that sufficient data has been
captured within the time-slice you are trying to
replay. A larger time-slice may allow the data
to be viewed.
The Graphix Factorytm Thruput Limited
TruePixel tm
Issue: 1 Page 37 of 38 Date: 6th April 2011 Sentinel DVI Integrated Recorder User Manual
If there are still problems contact support.
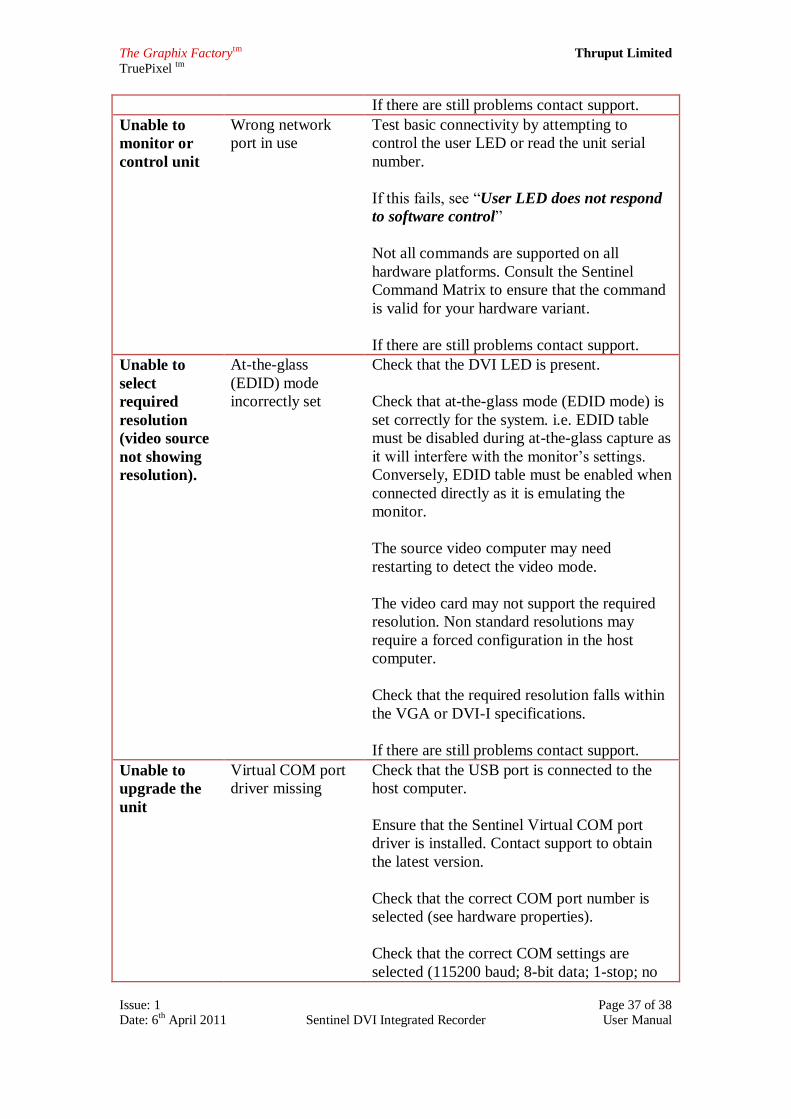
Unable to
monitor or
control unit
Wrong network
port in use
Test basic connectivity by attempting to
control the user LED or read the unit serial
number.
If this fails, see “User LED does not respond
to software control”
Not all commands are supported on all
hardware platforms. Consult the Sentinel
Command Matrix to ensure that the command
is valid for your hardware variant.
If there are still problems contact support.
Unable to
select
required
resolution
(video source
not showing
resolution).
At-the-glass
(EDID) mode
incorrectly set
Check that the DVI LED is present.
Check that at-the-glass mode (EDID mode) is
set correctly for the system. i.e. EDID table
must be disabled during at-the-glass capture as
it will interfere with the monitor‟s settings.
Conversely, EDID table must be enabled when
connected directly as it is emulating the
monitor.
The source video computer may need
restarting to detect the video mode.
The video card may not support the required
resolution. Non standard resolutions may
require a forced configuration in the host
computer.
Check that the required resolution falls within
the VGA or DVI-I specifications.
If there are still problems contact support.
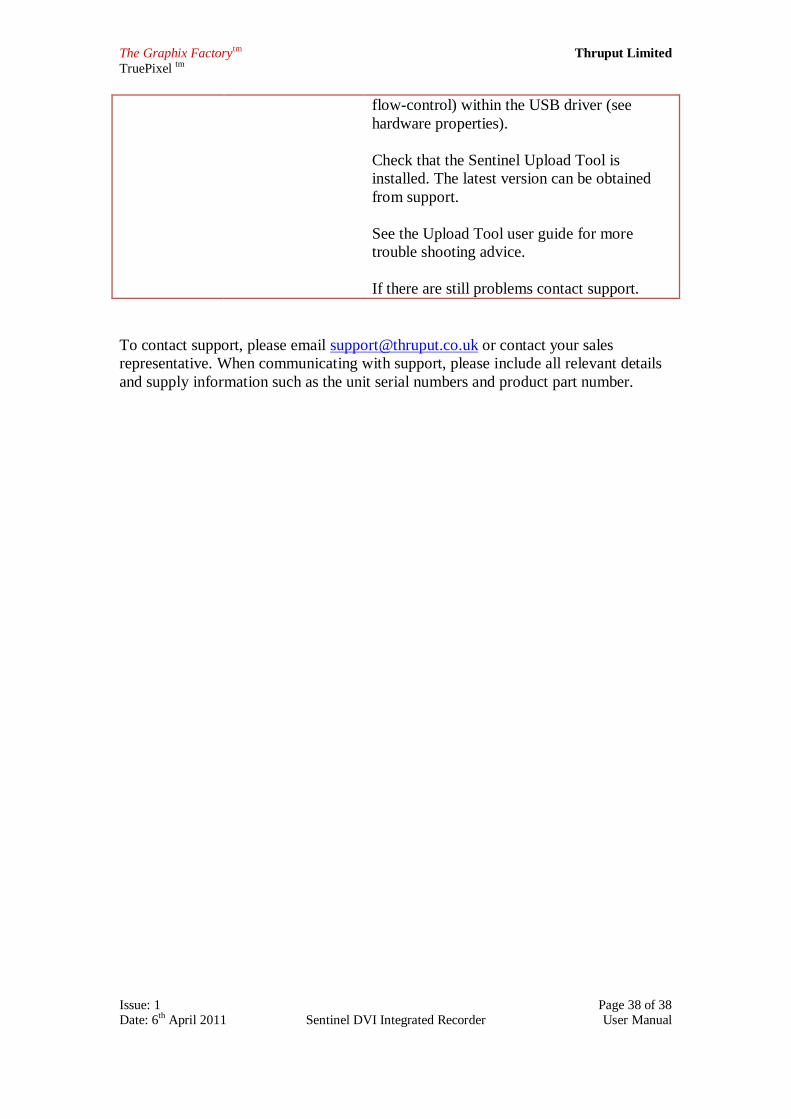
Unable to
upgrade the
unit
Virtual COM port
driver missing
Check that the USB port is connected to the
host computer.
Ensure that the Sentinel Virtual COM port
driver is installed. Contact support to obtain
the latest version.
Check that the correct COM port number is
selected (see hardware properties).
Check that the correct COM settings are
selected (115200 baud; 8-bit data; 1-stop; no
The Graphix Factorytm Thruput Limited
TruePixel tm
Issue: 1 Page 38 of 38 Date: 6th April 2011 Sentinel DVI Integrated Recorder User Manual
flow-control) within the USB driver (see
hardware properties).
Check that the Sentinel Upload Tool is
installed. The latest version can be obtained
from support.
See the Upload Tool user guide for more
trouble shooting advice.
If there are still problems contact support.
To contact support, please email [email protected] or contact your sales
representative. When communicating with support, please include all relevant details
and supply information such as the unit serial numbers and product part number.