Embed Size (px)
Citation preview

Sending Images to a Web Service
Please note that throught this document pages in the product manual are referenced. Please see the Canon website to download the complete PDF.
Sending Images to a Web Service
Sending Images to a Web Service
Please note that throught this document pages in the product manual are referenced. Please see the Canon website to download the complete PDF.
The general procedure for sending images to a Web service is as follows.
Prepare a computer on which EOS Utility has been installed. Use the software CD‐ROM provided with the camera to Install EOS Utility. Access Canon Web site from the computer and sign up as a CANON iMAGE GATEWAY member (free of charge). If you are already a member, proceed to step 3.
Connect the camera and computer with an interface cable.
Before connection, set [ 3: Wi‐Fi ] to [Disable].
Start EOS Utility on the computer, log in to CANON iMAGE GATEWAY then configure
the camera’s settings to enable access to Web services.
For details, refer to the EOS Utility instruction manual (CD‐ROM).
Connect to the wireless LAN access point from the camera (p.106).
Disconnect the Interface cable In advance.
Send images to a Web service registered on the camera (p.120).
You can share images with your family and friends by sending images from the camera
to a Web service registered on the camera or by sending links to the online albums.
Information about countries and areas where CANOIN IMAGE GATEWAY service is
provided is available at Canon's web site (http://canon.com/cig).
When the camera is connected to a computer as described in "Remote Operation
Using EOS Utility” (p.93), settings can be configured without using any interface
cable.
The camera’s Wi‐Fi functions are compatible with the following Web services (as
or August 2013): CANON IMAGE GATEWAY, Facebook, Twitter, YouTube, Flickr,
and Email.
Sending Images to a Web Service
Please note that throught this document pages in the product manual are referenced. Please see the Canon website to download the complete PDF.
Checking the Type of Access Point
When Wi‐Fi Protected Setup (WPS) is supported
p.107: Easy Connection via WPS (PBC Mode)
p.111: Easy Connection via WPS (PIN Mode)
When WPS Is not supported
p.115: Manual Connection by Searching Networks
If you do not know if the access point you use is WPS‐compatible, refer to the access point instruction
manual or other documentation.
When connecting to a network that has a network administrator, ask the administrator about the detailed setting procedures.
If the network you use filters by MAC address, register the MAC address of the camera at the access point. The MAC address can be checked on the [General sett.] screen (p.149).
Sending Images to a Web Service
Please note that throught this document pages in the product manual are referenced. Please see the Canon website to download the complete PDF.
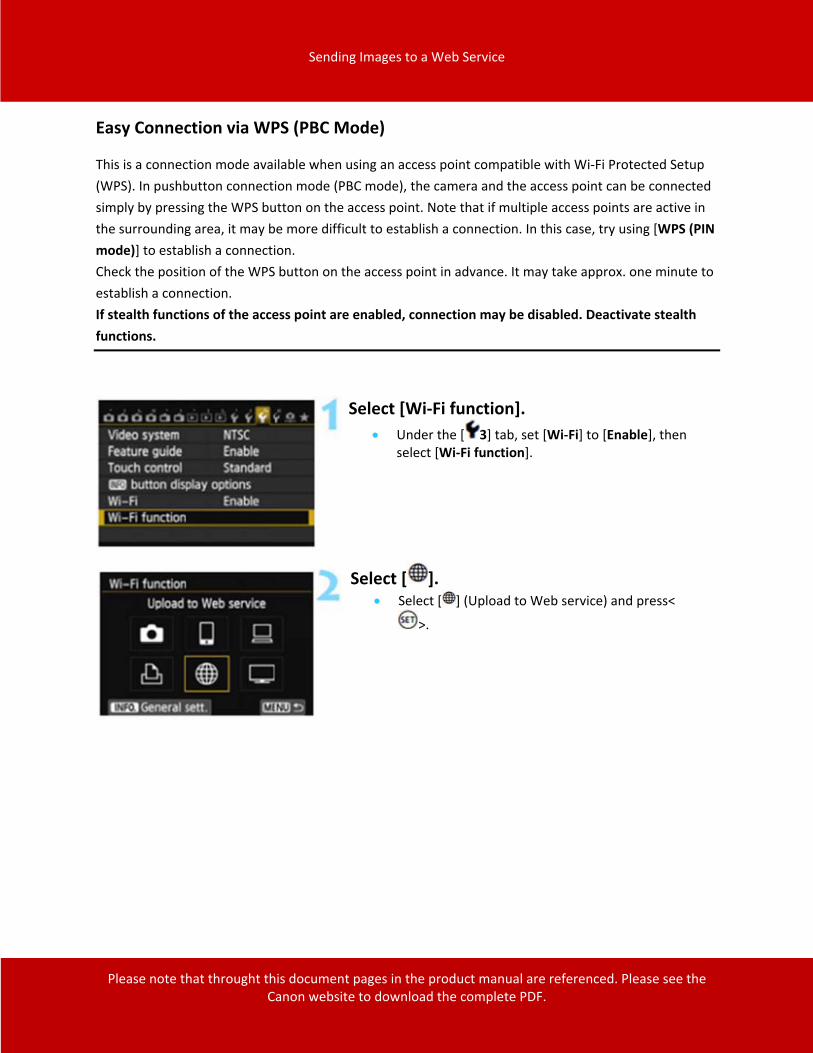
Easy Connection via WPS (PBC Mode)
This is a connection mode available when using an access point compatible with Wi‐Fi Protected Setup
(WPS). In pushbutton connection mode (PBC mode), the camera and the access point can be connected
simply by pressing the WPS button on the access point. Note that if multiple access points are active in
the surrounding area, it may be more difficult to establish a connection. In this case, try using [WPS (PIN
mode)] to establish a connection.
Check the position of the WPS button on the access point in advance. It may take approx. one minute to
establish a connection.
If stealth functions of the access point are enabled, connection may be disabled. Deactivate stealth
functions.
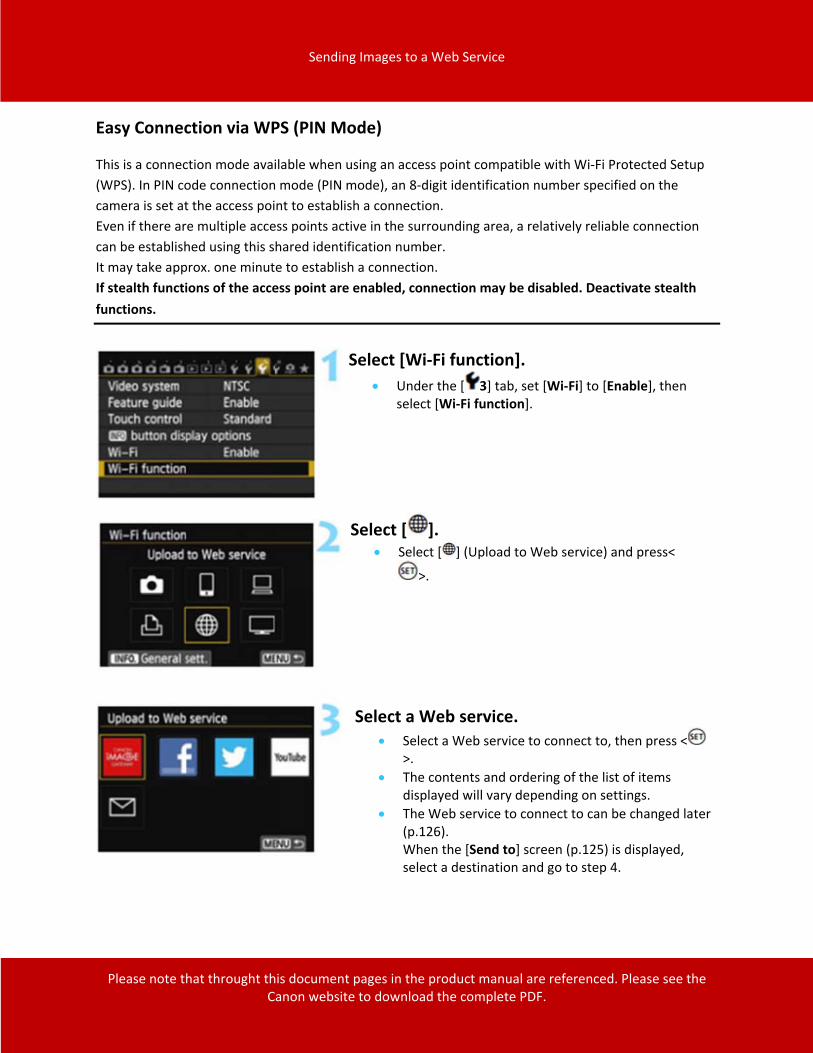
Select [Wi‐Fi function].
Under the [ 3] tab, set [Wi‐Fi] to [Enable], then select [Wi‐Fi function].
Select [ ]. Select [ ] (Upload to Web service) and press<
>.
Sending Images to a Web Service
Please note that throught this document pages in the product manual are referenced. Please see the Canon website to download the complete PDF.
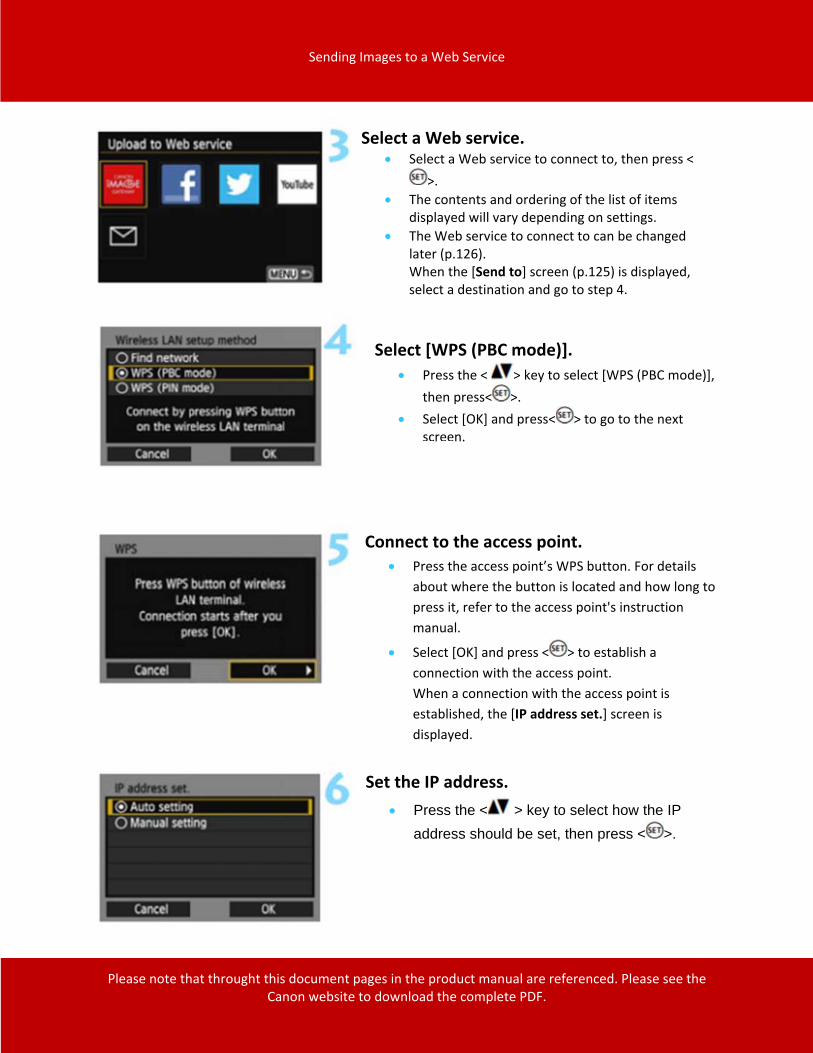
Select a Web service. Select a Web service to connect to, then press <
>.
The contents and ordering of the list of items displayed will vary depending on settings.
The Web service to connect to can be changed later (p.126).
When the [Send to] screen (p.125) is displayed, select a destination and go to step 4.
Select [WPS (PBC mode)].
Press the < > key to select [WPS (PBC mode)],
then press< >.
Select [OK] and press< > to go to the next screen.
Connect to the access point. Press the access point’s WPS button. For details
about where the button is located and how long to
press it, refer to the access point's instruction
manual.
Select [OK] and press < > to establish a
connection with the access point.
When a connection with the access point is
established, the [IP address set.] screen is
displayed.
Set the IP address.
Press the < > key to select how the IP
address should be set, then press < >.
Sending Images to a Web Service
Please note that throught this document pages in the product manual are referenced. Please see the Canon website to download the complete PDF.
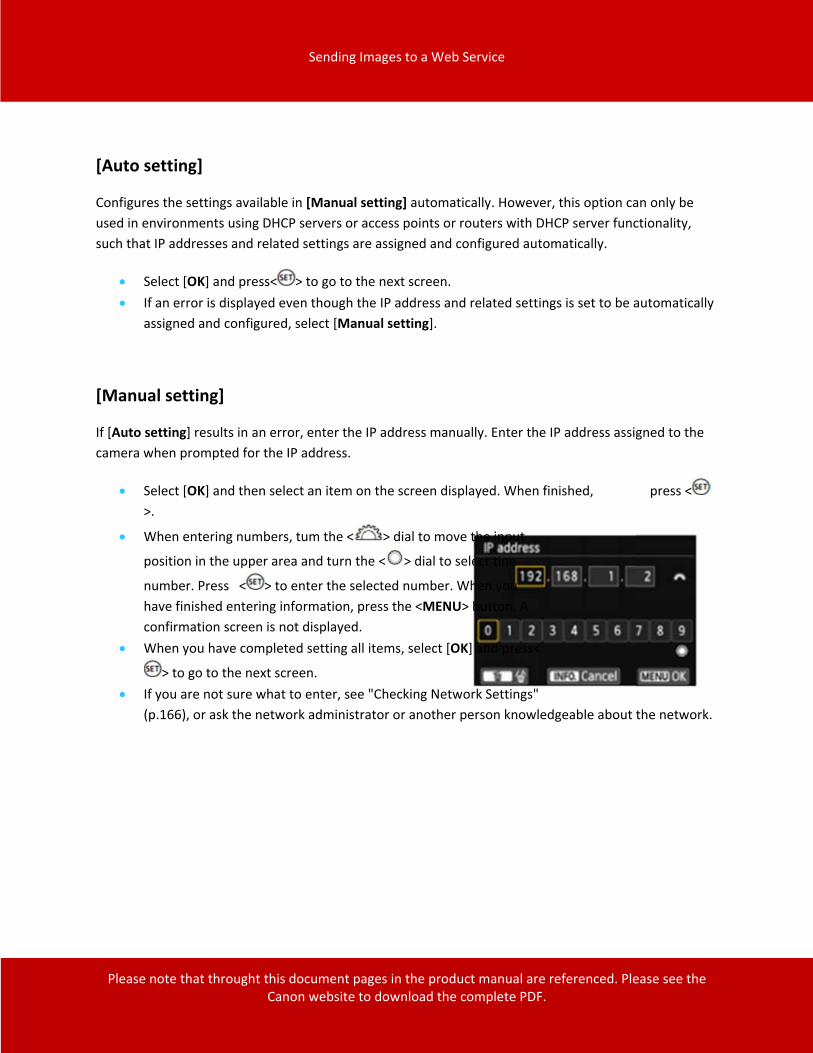
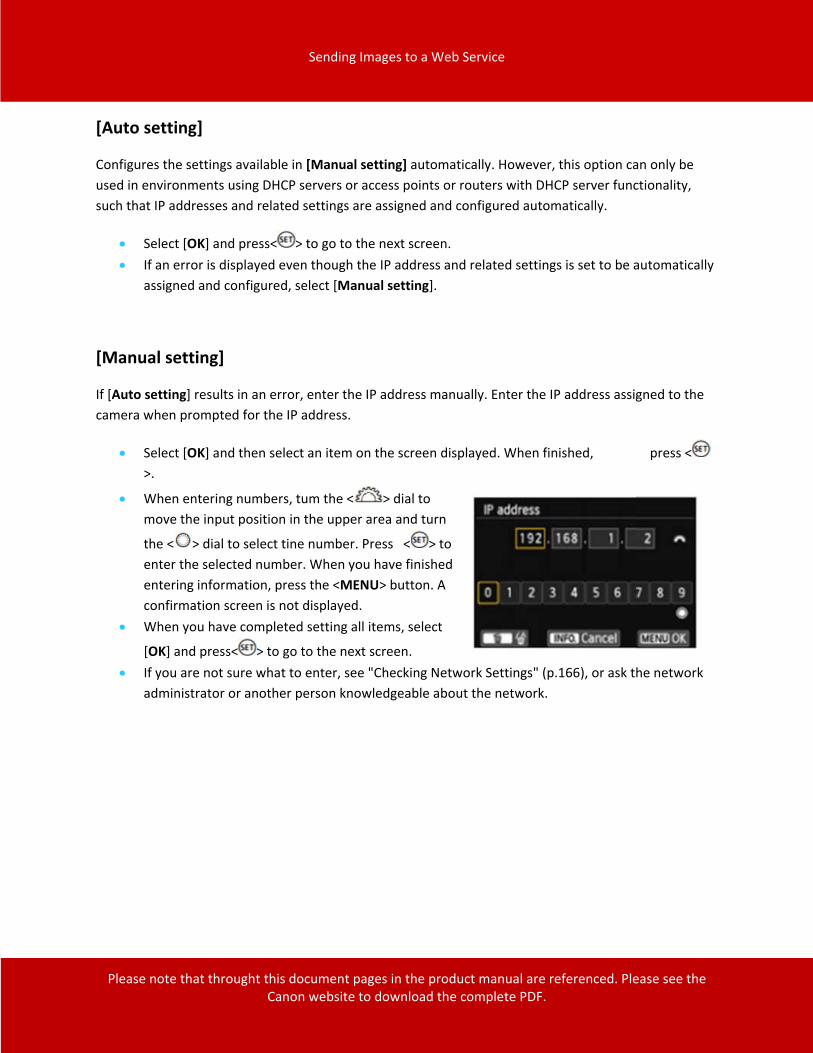
[Auto setting]
Configures the settings available in [Manual setting] automatically. However, this option can only be
used in environments using DHCP servers or access points or routers with DHCP server functionality,
such that IP addresses and related settings are assigned and configured automatically.
Select [OK] and press< > to go to the next screen.
If an error is displayed even though the IP address and related settings is set to be automatically
assigned and configured, select [Manual setting].
[Manual setting]
If [Auto setting] results in an error, enter the IP address manually. Enter the IP address assigned to the
camera when prompted for the IP address.
Select [OK] and then select an item on the screen displayed. When finished, press <
>.
When entering numbers, tum the < > dial to move the input
position in the upper area and turn the < > dial to select tine
number. Press < > to enter the selected number. When you
have finished entering information, press the <MENU> button. A
confirmation screen is not displayed.
When you have completed setting all items, select [OK] and press<
> to go to the next screen.
If you are not sure what to enter, see "Checking Network Settings"
(p.166), or ask the network administrator or another person knowledgeable about the network.
Sending Images to a Web Service
Please note that throught this document pages in the product manual are referenced. Please see the Canon website to download the complete PDF.
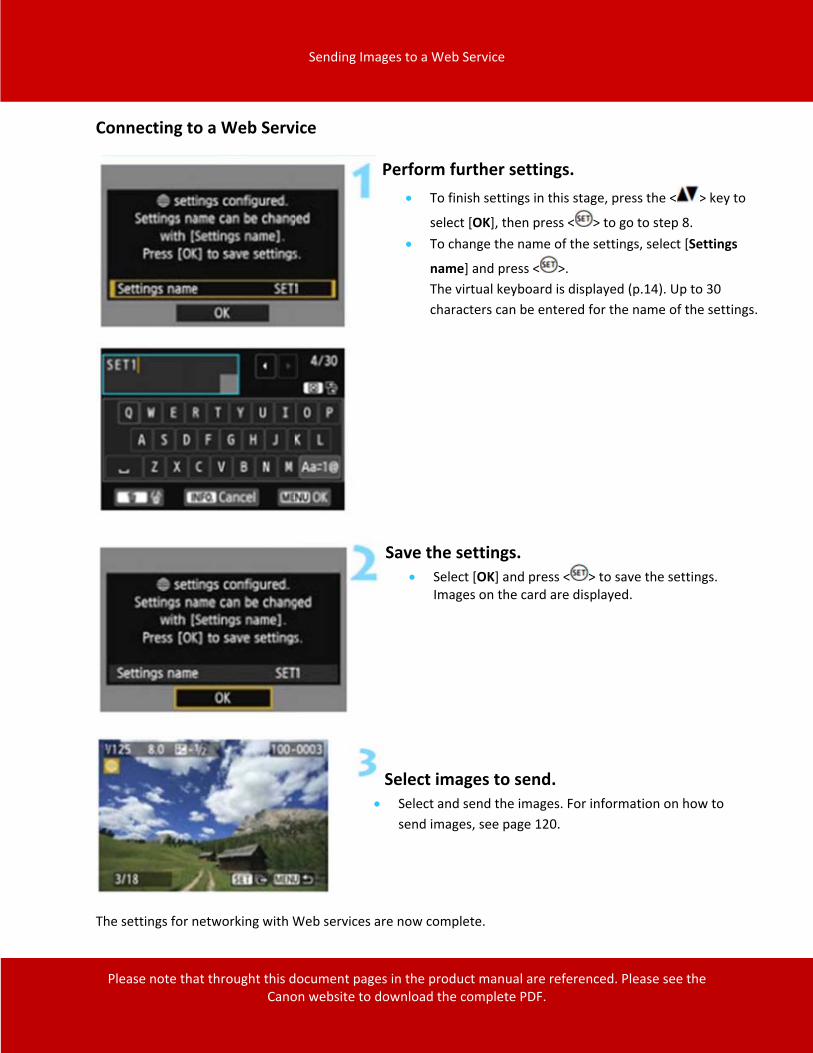
The settings for networking with Web services are now complete.
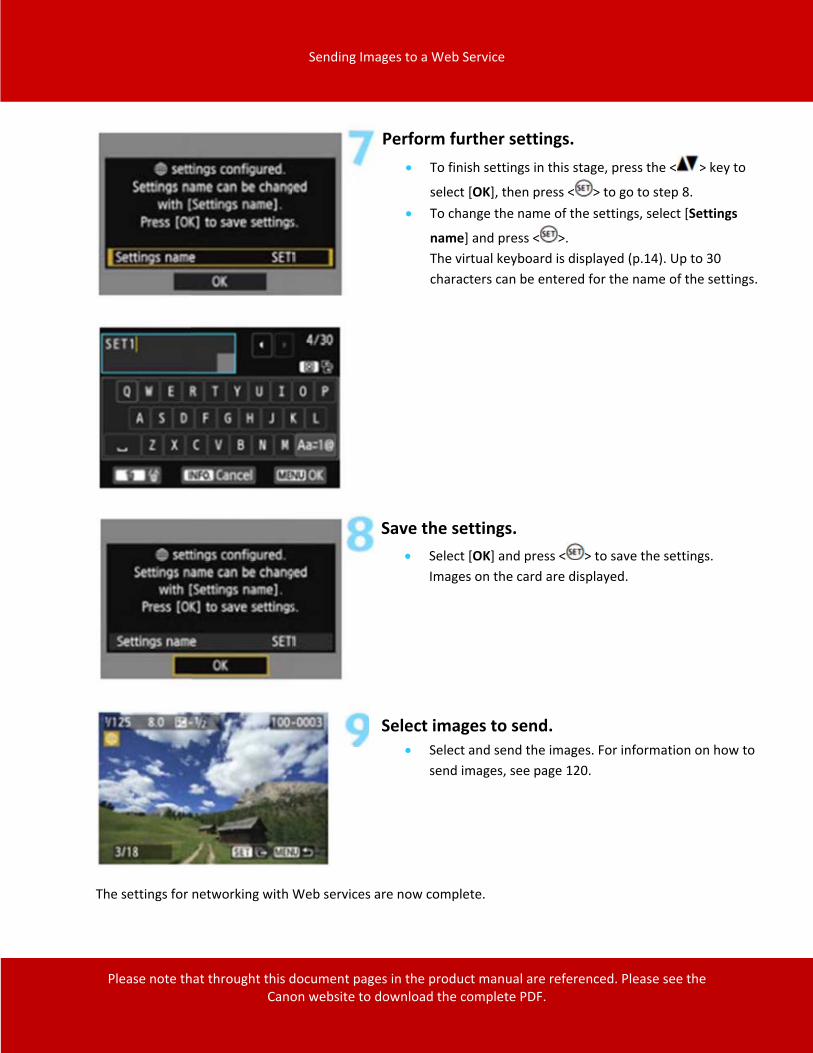
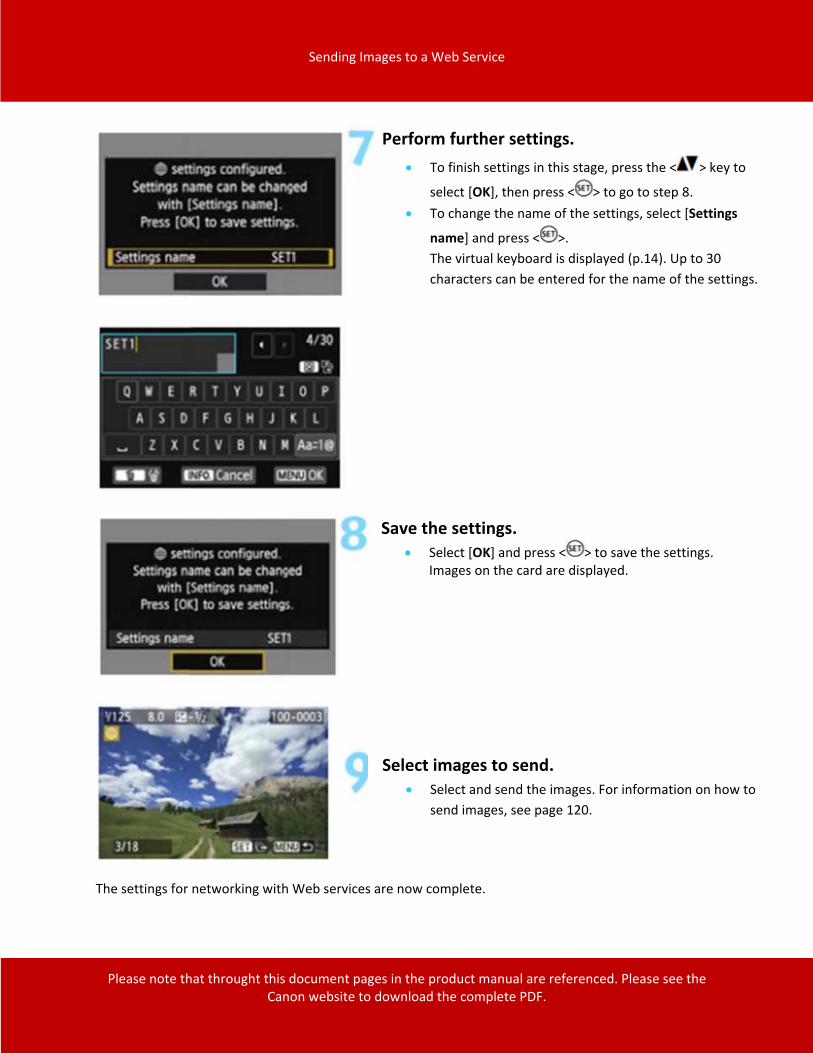
Perform further settings.
To finish settings in this stage, press the < > key to
select [OK], then press < > to go to step 8.
To change the name of the settings, select [Settings
name] and press < >.
The virtual keyboard is displayed (p.14). Up to 30
characters can be entered for the name of the settings.
Save the settings.
Select [OK] and press < > to save the settings.
Images on the card are displayed.
Select images to send. Select and send the images. For information on how to
send images, see page 120.
Sending Images to a Web Service
Please note that throught this document pages in the product manual are referenced. Please see the Canon website to download the complete PDF.
Easy Connection via WPS (PIN Mode)
This is a connection mode available when using an access point compatible with Wi‐Fi Protected Setup
(WPS). In PIN code connection mode (PIN mode), an 8‐digit identification number specified on the
camera is set at the access point to establish a connection.
Even if there are multiple access points active in the surrounding area, a relatively reliable connection
can be established using this shared identification number.
It may take approx. one minute to establish a connection.
If stealth functions of the access point are enabled, connection may be disabled. Deactivate stealth
functions.
Select [Wi‐Fi function].
Under the [ 3] tab, set [Wi‐Fi] to [Enable], then select [Wi‐Fi function].
Select [ ]. Select [ ] (Upload to Web service) and press<
>.
Select a Web service. Select a Web service to connect to, then press <
>.
The contents and ordering of the list of items displayed will vary depending on settings.
The Web service to connect to can be changed later (p.126).
When the [Send to] screen (p.125) is displayed, select a destination and go to step 4.
Sending Images to a Web Service
Please note that throught this document pages in the product manual are referenced. Please see the Canon website to download the complete PDF.
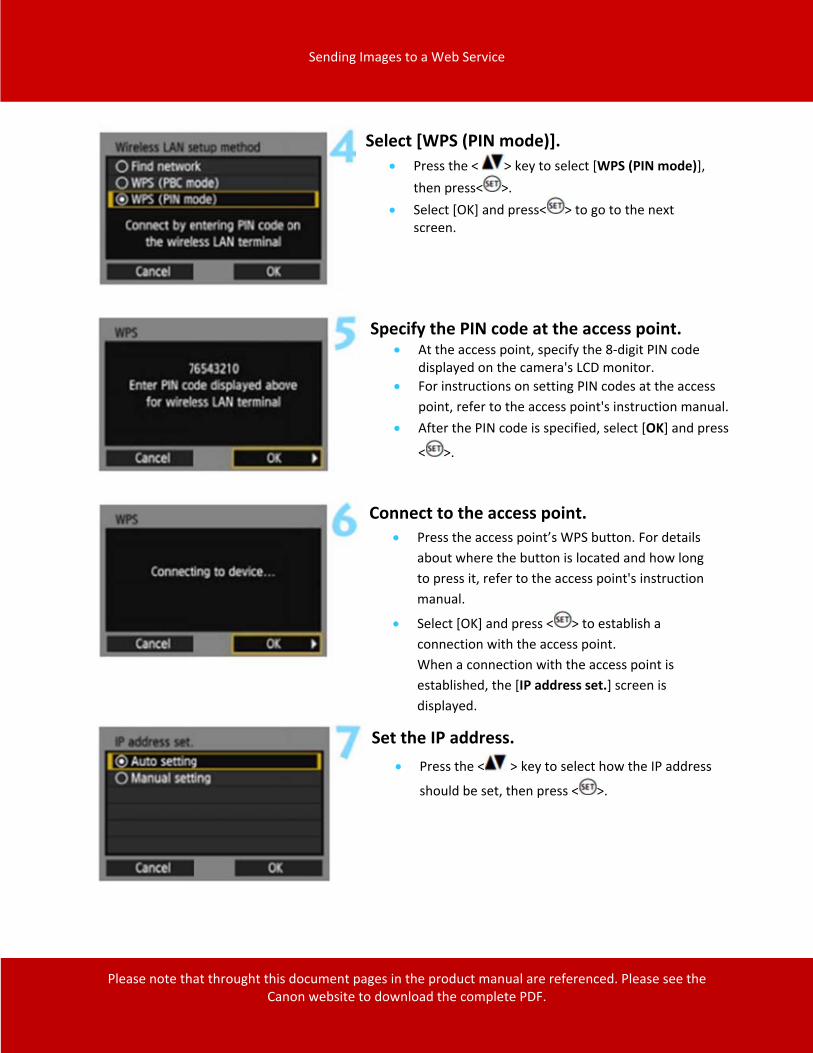
Select [WPS (PIN mode)].
Press the < > key to select [WPS (PIN mode)],
then press< >.
Select [OK] and press< > to go to the next screen.
Connect to the access point. Press the access point’s WPS button. For details
about where the button is located and how long
to press it, refer to the access point's instruction
manual.
Select [OK] and press < > to establish a
connection with the access point.
When a connection with the access point is
established, the [IP address set.] screen is
displayed.
Set the IP address.
Press the < > key to select how the IP address
should be set, then press < >.
Specify the PIN code at the access point. At the access point, specify the 8‐digit PIN code
displayed on the camera's LCD monitor.
For instructions on setting PIN codes at the access
point, refer to the access point's instruction manual.
After the PIN code is specified, select [OK] and press
< >.
Sending Images to a Web Service
Please note that throught this document pages in the product manual are referenced. Please see the Canon website to download the complete PDF.
[Auto setting]
Configures the settings available in [Manual setting] automatically. However, this option can only be
used in environments using DHCP servers or access points or routers with DHCP server functionality,
such that IP addresses and related settings are assigned and configured automatically.
Select [OK] and press< > to go to the next screen.
If an error is displayed even though the IP address and related settings is set to be automatically
assigned and configured, select [Manual setting].
[Manual setting]
If [Auto setting] results in an error, enter the IP address manually. Enter the IP address assigned to the
camera when prompted for the IP address.
Select [OK] and then select an item on the screen displayed. When finished, press <
>.
When entering numbers, tum the < > dial to
move the input position in the upper area and turn
the < > dial to select tine number. Press < > to
enter the selected number. When you have finished
entering information, press the <MENU> button. A
confirmation screen is not displayed.
When you have completed setting all items, select
[OK] and press< > to go to the next screen.
If you are not sure what to enter, see "Checking Network Settings" (p.166), or ask the network
administrator or another person knowledgeable about the network.
Sending Images to a Web Service
Please note that throught this document pages in the product manual are referenced. Please see the Canon website to download the complete PDF.
The settings for networking with Web services are now complete.
Perform further settings.
To finish settings in this stage, press the < > key to
select [OK], then press < > to go to step 8.
To change the name of the settings, select [Settings
name] and press < >.
The virtual keyboard is displayed (p.14). Up to 30
characters can be entered for the name of the settings.
Save the settings. Select [OK] and press < > to save the settings.
Images on the card are displayed.
Select images to send. Select and send the images. For information on how to
send images, see page 120.
Sending Images to a Web Service
Please note that throught this document pages in the product manual are referenced. Please see the Canon website to download the complete PDF.
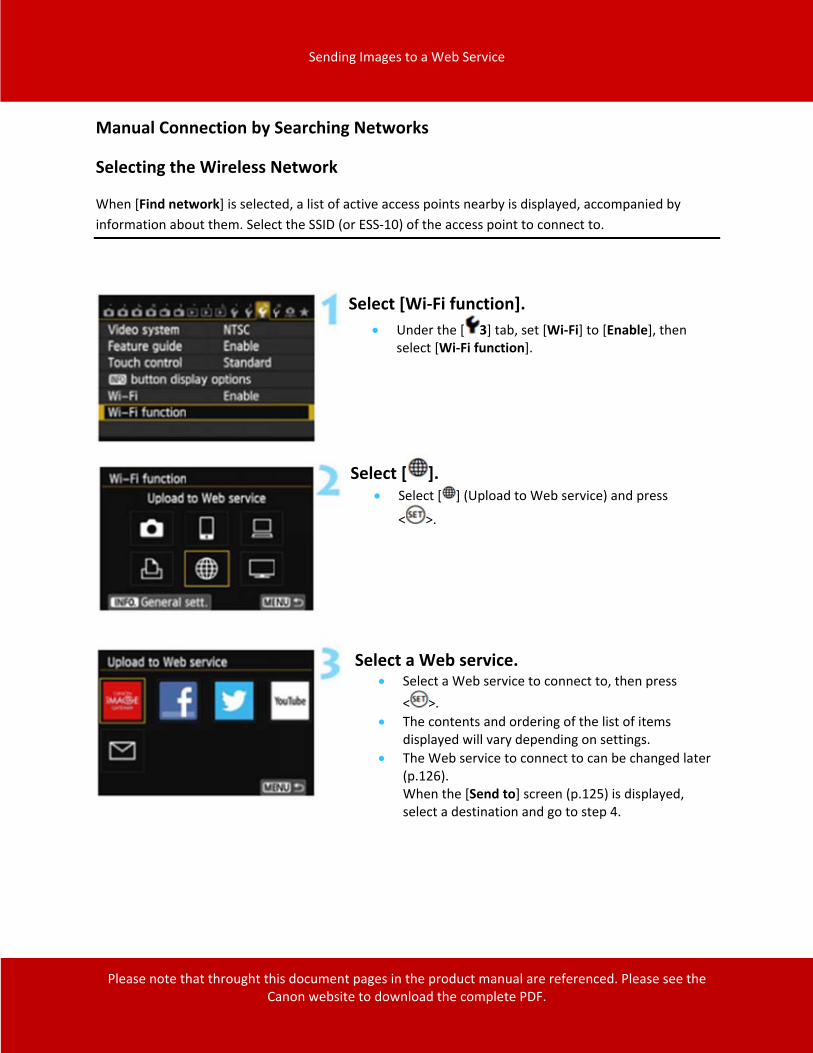
Manual Connection by Searching Networks
Selecting the Wireless Network
When [Find network] is selected, a list of active access points nearby is displayed, accompanied by
information about them. Select the SSID (or ESS‐10) of the access point to connect to.
Select [Wi‐Fi function].
Under the [ 3] tab, set [Wi‐Fi] to [Enable], then select [Wi‐Fi function].
Select [ ]. Select [ ] (Upload to Web service) and press
< >.
Select a Web service. Select a Web service to connect to, then press
< >.
The contents and ordering of the list of items displayed will vary depending on settings.
The Web service to connect to can be changed later (p.126).
When the [Send to] screen (p.125) is displayed, select a destination and go to step 4.
Sending Images to a Web Service
Please note that throught this document pages in the product manual are referenced. Please see the Canon website to download the complete PDF.
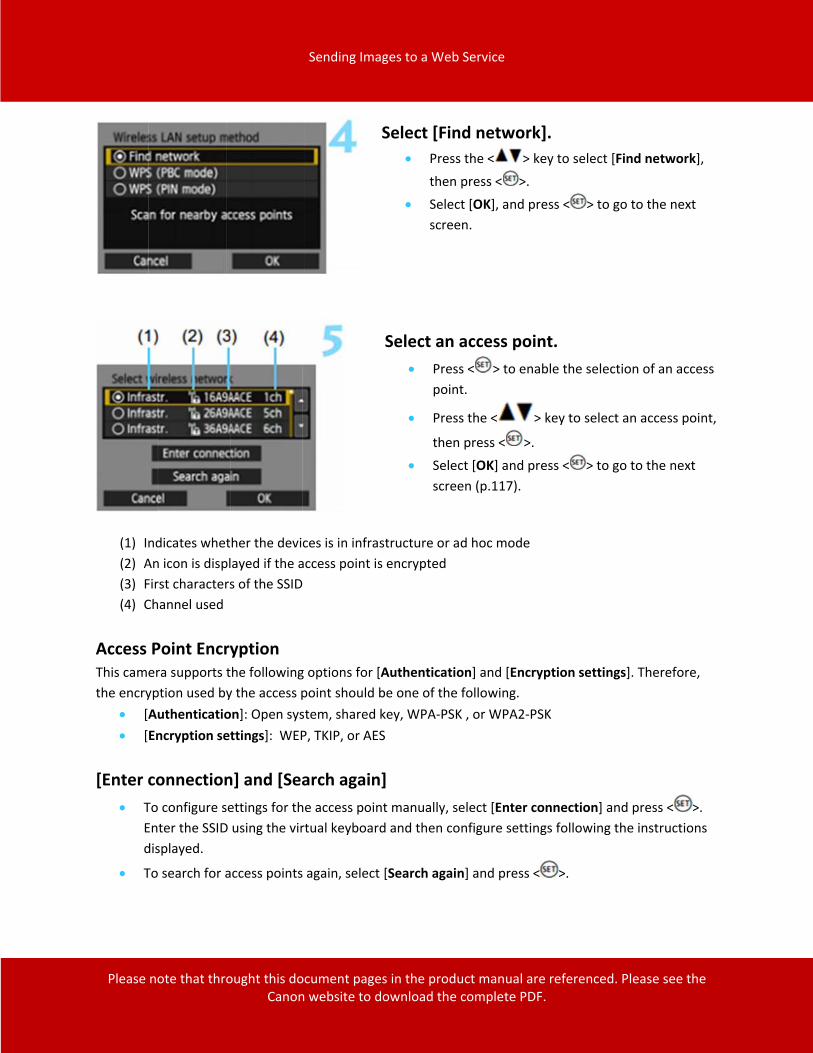
(1) Indicates whether the devices is in infrastructure or ad hoc mode
(2) An icon is displayed if the access point is encrypted
(3) First characters of the SSID
(4) Channel used
Access Point Encryption This camera supports the following options for [Authentication] and [Encryption settings]. Therefore,
the encryption used by the access point should be one of the following.
[Authentication]: Open system, shared key, WPA‐PSK , or WPA2‐PSK
[Encryption settings]: WEP, TKIP, or AES
[Enter connection] and [Search again]
To configure settings for the access point manually, select [Enter connection] and press < >.
Enter the SSID using the virtual keyboard and then configure settings following the instructions
displayed.
To search for access points again, select [Search again] and press < >.
Select an access point.
Press < > to enable the selection of an access
point.
Press the < > key to select an access point,
then press < >.
Select [OK] and press < > to go to the next
screen (p.117).
Select [Find network].
Press the < > key to select [Find network],
then press < >.
Select [OK], and press < > to go to the next
screen.
Sending Images to a Web Service
Please note that throught this document pages in the product manual are referenced. Please see the Canon website to download the complete PDF.
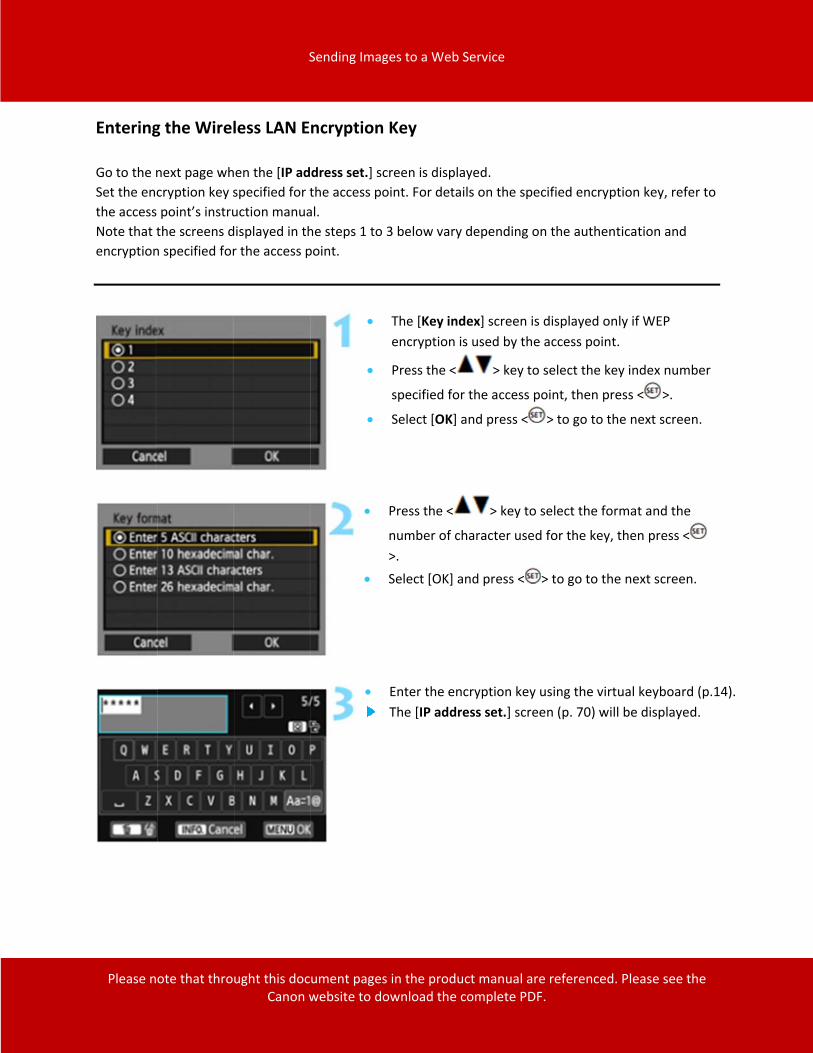
Entering the Wireless LAN Encryption Key
Go to the next page when the [IP address set.] screen is displayed.
Set the encryption key specified for the access point. For details on the specified encryption key, refer to
the access point’s instruction manual.
Note that the screens displayed in the steps 1 to 3 below vary depending on the authentication and
encryption specified for the access point.
The [Key index] screen is displayed only if WEP
encryption is used by the access point.
Press the < > key to select the key index number
specified for the access point, then press < >.
Select [OK] and press < > to go to the next screen.
Press the < > key to select the format and the
number of character used for the key, then press <
>.
Select [OK] and press < > to go to the next screen.
Enter the encryption key using the virtual keyboard (p.14).
The [IP address set.] screen (p. 70) will be displayed.
Sending Images to a Web Service
Please note that throught this document pages in the product manual are referenced. Please see the Canon website to download the complete PDF.
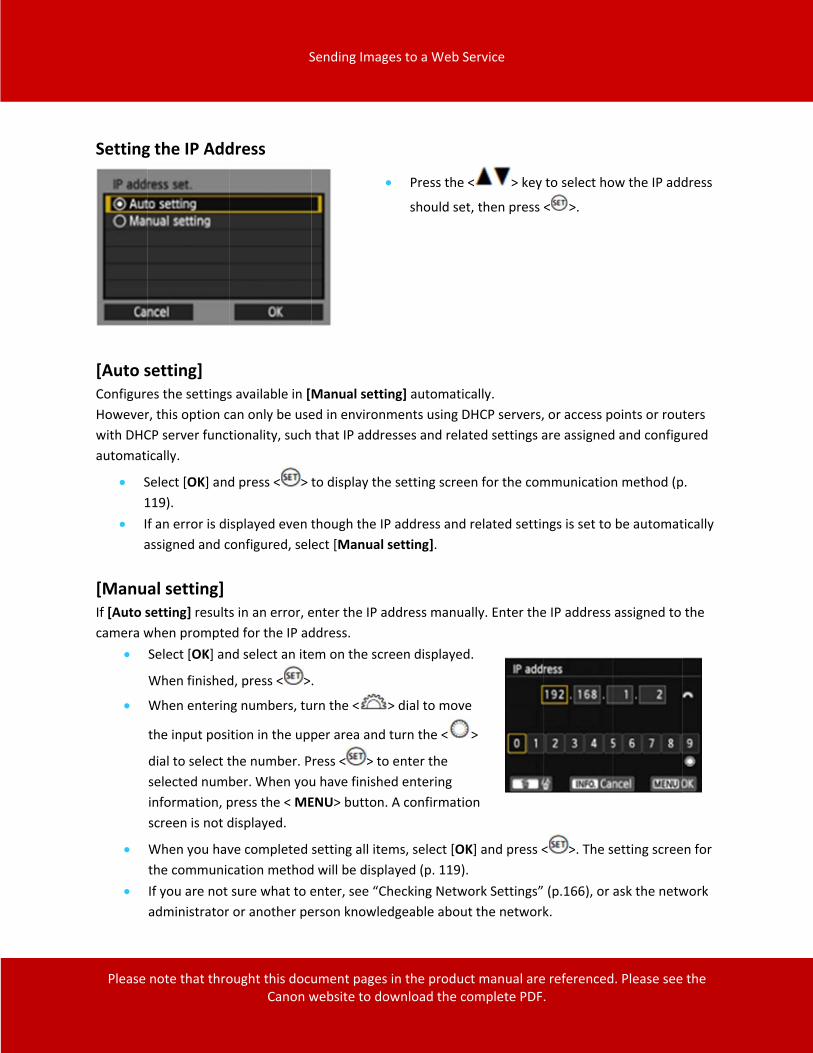
Setting the IP Address
[Auto setting] Configures the settings available in [Manual setting] automatically.
However, this option can only be used in environments using DHCP servers, or access points or routers
with DHCP server functionality, such that IP addresses and related settings are assigned and configured
automatically.
Select [OK] and press < > to display the setting screen for the communication method (p.
119).
If an error is displayed even though the IP address and related settings is set to be automatically
assigned and configured, select [Manual setting].
[Manual setting] If [Auto setting] results in an error, enter the IP address manually. Enter the IP address assigned to the
camera when prompted for the IP address.
Select [OK] and select an item on the screen displayed.
When finished, press < >.
When entering numbers, turn the < > dial to move
the input position in the upper area and turn the < >
dial to select the number. Press < > to enter the
selected number. When you have finished entering
information, press the < MENU> button. A confirmation
screen is not displayed.
When you have completed setting all items, select [OK] and press < >. The setting screen for
the communication method will be displayed (p. 119).
If you are not sure what to enter, see “Checking Network Settings” (p.166), or ask the network
administrator or another person knowledgeable about the network.
Press the < > key to select how the IP address
should set, then press < >.
Sending Images to a Web Service
Please note that throught this document pages in the product manual are referenced. Please see the Canon website to download the complete PDF.
Connecting to a Web Service
The settings for networking with Web services are now complete.
Perform further settings.
To finish settings in this stage, press the < > key to
select [OK], then press < > to go to step 8.
To change the name of the settings, select [Settings
name] and press < >.
The virtual keyboard is displayed (p.14). Up to 30
characters can be entered for the name of the settings.
Save the settings. Select [OK] and press < > to save the settings.
Images on the card are displayed.
Select images to send. Select and send the images. For information on how to
send images, see page 120.

Sending Images to a Web Service
Please note that throught this document pages in the product manual are referenced. Please see the Canon website to download the complete PDF.
Sending Images to a Web Service
You can share movies and still photos you shot by sending them to a Web service registered on the
camera such as CANON iMAGE GATEWAY. Sent images are saved in an online album on CANON iMAGE
GATEWAY and a link to the album is sent to each Wett service. It is also possible to send images to Web
services directly depending on the selected Web service and settings.
Sending Images One by One
Selected images are sent one by one.
Select an image to send.
Press the < > key to select an image to send,
then press < >.
You can also press the < >button to select an image in the index display. To return to the
single‐image display, press the < > button.
Select [Send img shown]. To select a size at which to send the image,
select [Resize image] and press < >.
Press the < > key to select [Send img
shown], then press< >.
The transfer progress screen is displayed.
On the screen to complete the process for
sending the image, select [OK] and press< > to
terminate the connection.
A send error message may not be displayed in the following cases, even when sending fails due to there being no space on the Web server that the image was sent to:
When the image has been reduced in size and sent
When the image has been sent directly to a Web service other than CANON iMAGE GATEWAY

Sending Images to a Web Service
Please note that throught this document pages in the product manual are referenced. Please see the Canon website to download the complete PDF.
A [Terms of use] screen is displayed when
sending images to certain Web services.
Thoroughly read the terms of use, press the <
> key to select [I Agree], then press<
>.
The screen can be scrolled up and down by
pressing the < > key.
If playback or shooting operation is started during the connection, the connection will
be terminated.
When accessing CANON iMAGE GATEWAY from a computer, you can check the
uploading history to registered Web services.
Sending Images to a Web Service
Please note that throught this document pages in the product manual are referenced. Please see the Canon website to download the complete PDF.
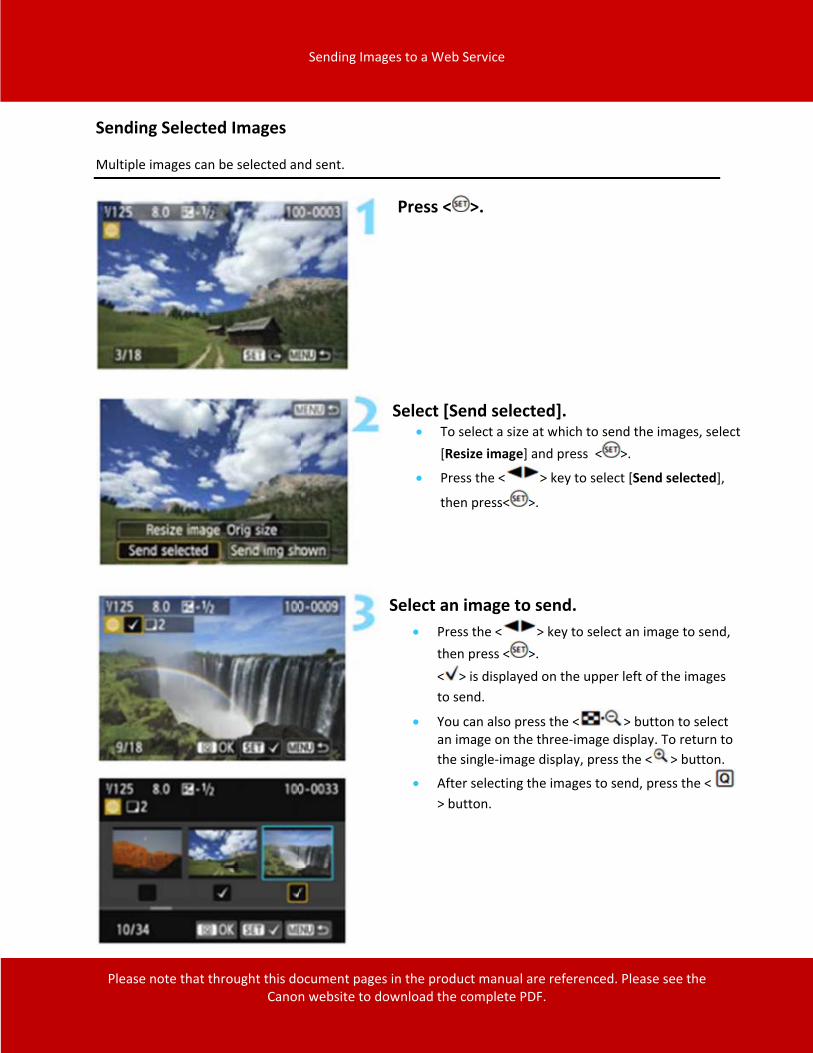
Sending Selected Images
Multiple images can be selected and sent.
Select [Send selected]. To select a size at which to send the images, select
[Resize image] and press < >.
Press the < > key to select [Send selected],
then press< >.
Press < >.
Select an image to send.
Press the < > key to select an image to send,
then press < >.
< > is displayed on the upper left of the images
to send.
You can also press the < > button to select an image on the three‐image display. To return to
the single‐image display, press the < > button.
After selecting the images to send, press the <
> button.
Sending Images to a Web Service
Please note that throught this document pages in the product manual are referenced. Please see the Canon website to download the complete PDF.
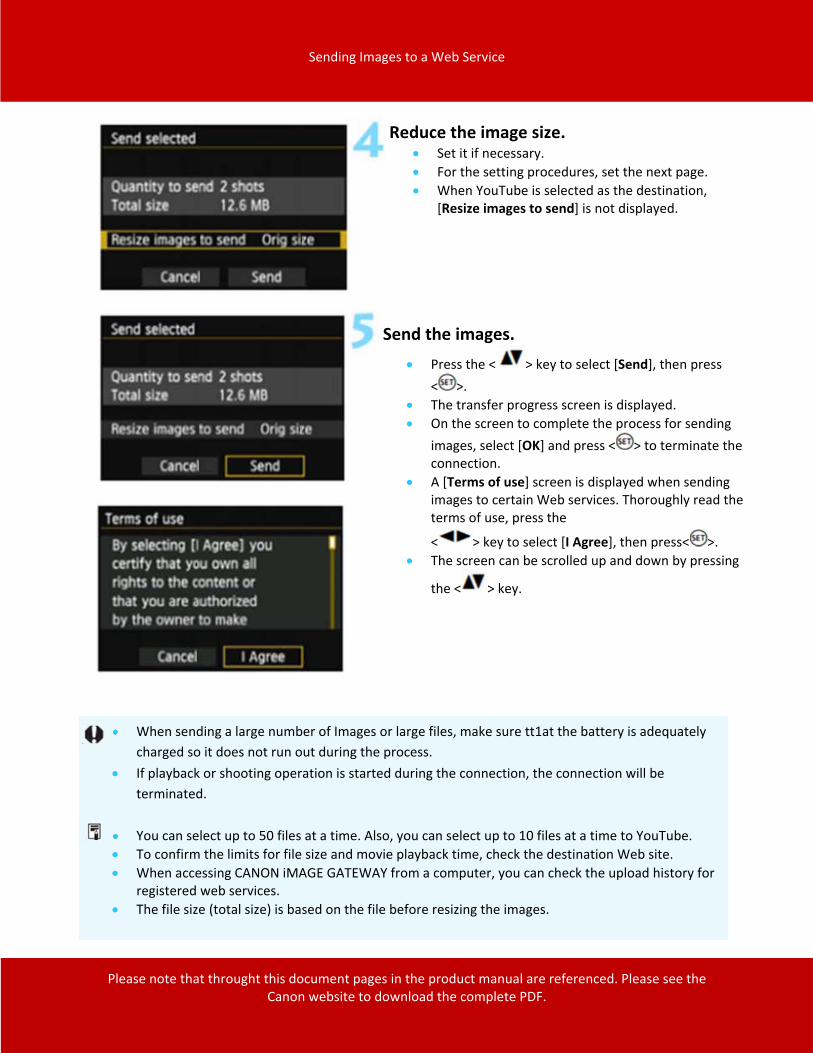
Reduce the image size. Set it if necessary.
For the setting procedures, set the next page.
When YouTube is selected as the destination, [Resize images to send] is not displayed.
Send the images.
Press the < > key to select [Send], then press
< >.
The transfer progress screen is displayed.
On the screen to complete the process for sending
images, select [OK] and press < > to terminate the connection.
A [Terms of use] screen is displayed when sending images to certain Web services. Thoroughly read the terms of use, press the
< > key to select [I Agree], then press< >.
The screen can be scrolled up and down by pressing
the < > key.
When sending a large number of Images or large files, make sure tt1at the battery is adequately
charged so it does not run out during the process.
If playback or shooting operation is started during the connection, the connection will be
terminated.
You can select up to 50 files at a time. Also, you can select up to 10 files at a time to YouTube.
To confirm the limits for file size and movie playback time, check the destination Web site.
When accessing CANON iMAGE GATEWAY from a computer, you can check the upload history for registered web services.
The file size (total size) is based on the file before resizing the images.
Sending Images to a Web Service
Please note that throught this document pages in the product manual are referenced. Please see the Canon website to download the complete PDF.
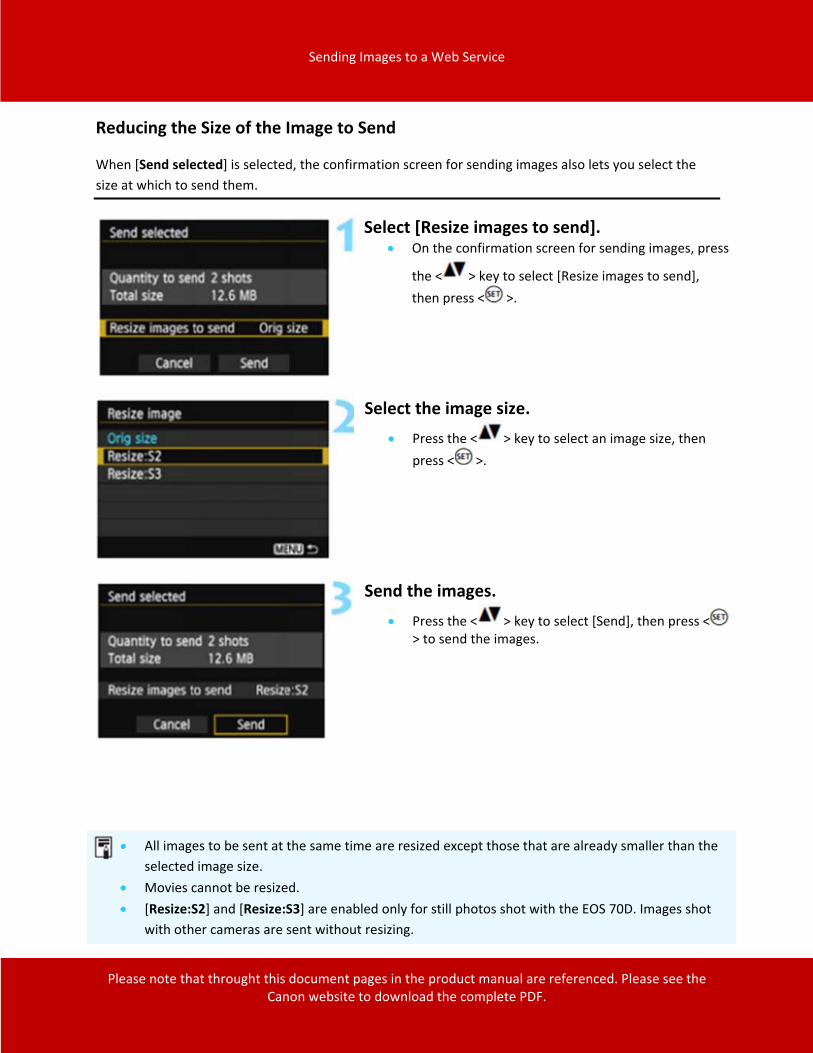
Reducing the Size of the Image to Send
When [Send selected] is selected, the confirmation screen for sending images also lets you select the
size at which to send them.
Select [Resize images to send]. On the confirmation screen for sending images, press
the < > key to select [Resize images to send],
then press < >.
Select the image size.
Press the < > key to select an image size, then
press < >.
Send the images.
Press the < > key to select [Send], then press < > to send the images.
All images to be sent at the same time are resized except those that are already smaller than the
selected image size.
Movies cannot be resized.
[Resize:S2] and [Resize:S3] are enabled only for still photos shot with the EOS 70D. Images shot
with other cameras are sent without resizing.
Sending Images to a Web Service
Please note that throught this document pages in the product manual are referenced. Please see the Canon website to download the complete PDF.
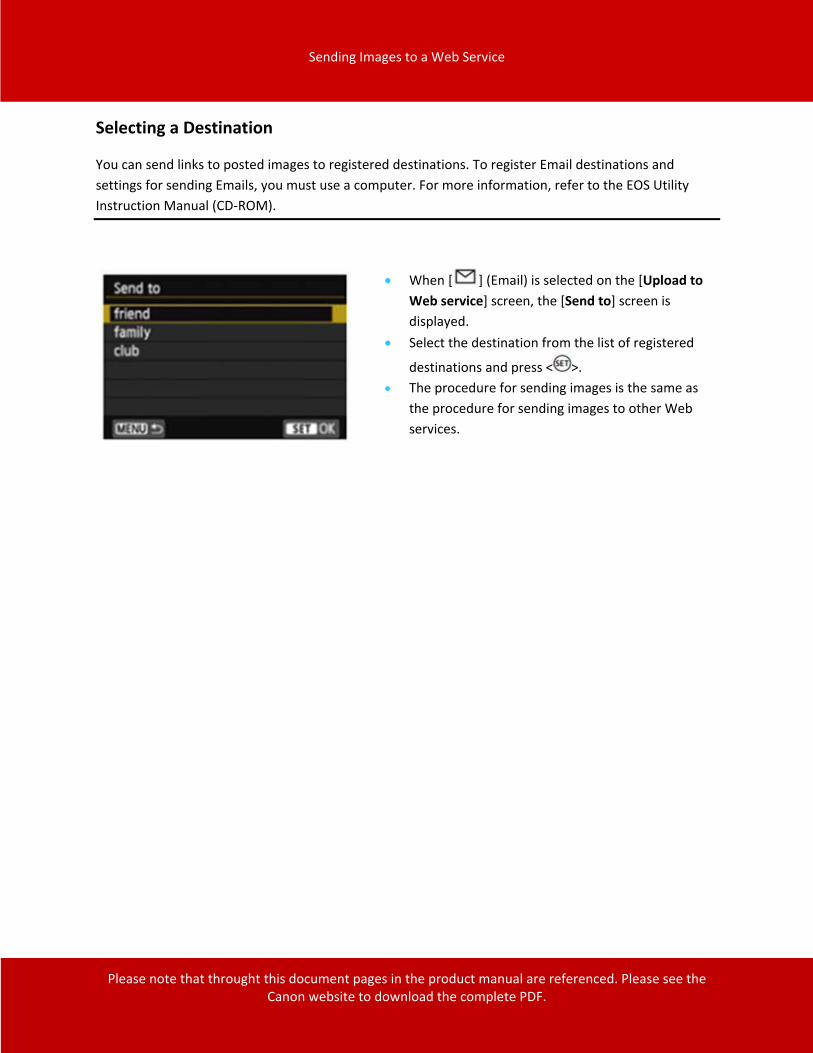
Selecting a Destination
You can send links to posted images to registered destinations. To register Email destinations and
settings for sending Emails, you must use a computer. For more information, refer to the EOS Utility
Instruction Manual (CD‐ROM).
When [ ] (Email) is selected on the [Upload to
Web service] screen, the [Send to] screen is
displayed.
Select the destination from the list of registered
destinations and press < >.
The procedure for sending images is the same as
the procedure for sending images to other Web
services.

![Sending images to a computer (Wi-Fi function) PowerShot G1X …downloads.canon.com/wireless/camera/PS-Sending-images-to... · 2015-07-23 · Click [Download Images From Canon Camera]](https://img.pdfslide.us/doc/110x75/5f1974d9b358e13af81a38bc/sending-images-to-a-computer-wi-fi-function-powershot-g1x-2015-07-23-click-download.jpg)