Embed Size (px)
Citation preview
CENTRAL VENOUS ACCESS DEVICES
Self Directed Learning & Resource Book
Registered Nurses and Midwives
First Edition, January 2011
Last updated October 2013
Professional Development Unit
Reference No. 3022 Canterbury District Health Board
2
Author: Elizabeth Culverwell IV Nurse Educator - Central Venous Access Devices
Professional Development Unit, Christchurch Hospital
Reviewed by: Dr Heather Byrne Nurse Manager PDU Wendy Jar CNS Bone Marrow Transplant Unit Sarah Ellery CNS Oncology Robyn Beach CNS Respiratory Ruth Barratt CNS Infection Prevention and Control Philippa Francis CNM Radiology Kerry Davis Nurse Educator Dr Simon Burrows Consultant Anaesthetist Becky Conway NE Child Health Germaine Sandford NE ICU ICU CLAB team Intensive Care Unit
Acknowledgements
Dr Mark Smith - Haemostasis Consultant for advice on thrombosis and catheter salvage agents
Ruth Barratt - CNS Infection Prevention and Control for the section on „Infection Prevention and
Control‟
Becky Conway – NE Child Health
Germaine Sandford - NE ICU for contributing to the continuous renal replacement therapy, „Dialysis Catheter Section‟
Ann Marie Mullan - CNS Department of Surgery for contributing to the section on „Principles of
Administration of Parenteral Nutrition‟
First Edition January 2011
3
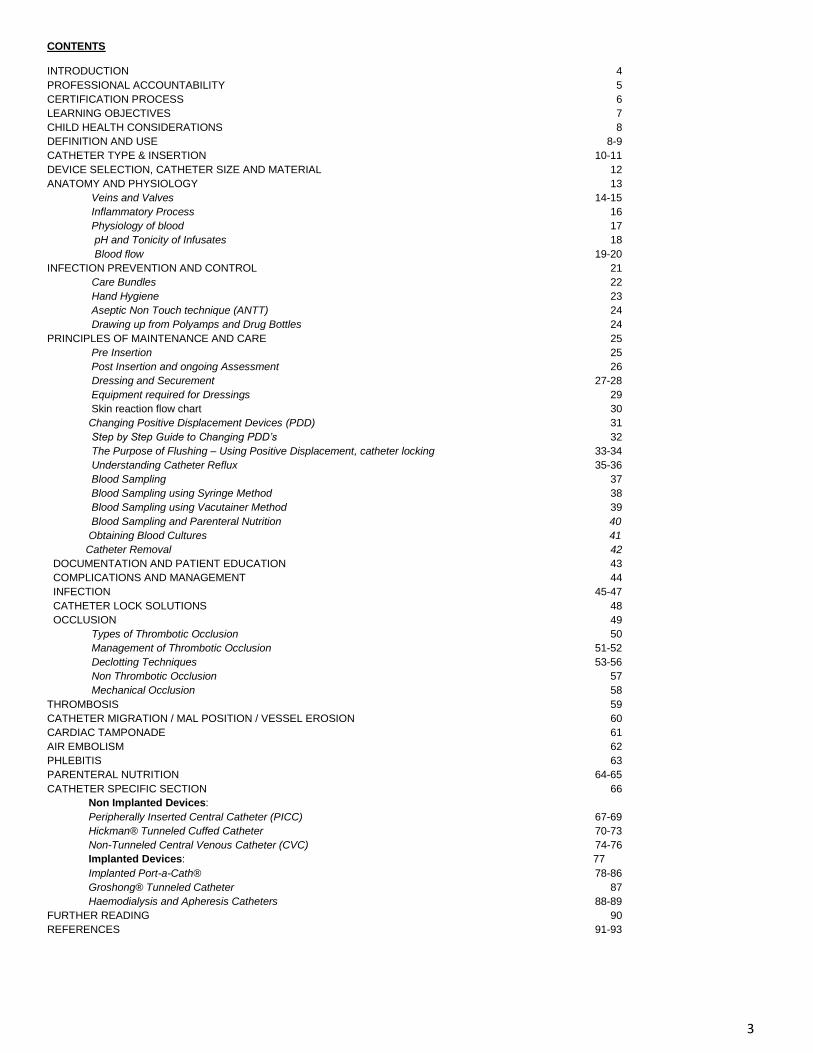
CONTENTS INTRODUCTION 4
PROFESSIONAL ACCOUNTABILITY 5
CERTIFICATION PROCESS 6
LEARNING OBJECTIVES 7
CHILD HEALTH CONSIDERATIONS 8
DEFINITION AND USE 8-9
CATHETER TYPE & INSERTION 10-11
DEVICE SELECTION, CATHETER SIZE AND MATERIAL 12
ANATOMY AND PHYSIOLOGY 13
Veins and Valves 14-15
Inflammatory Process 16
Physiology of blood 17
pH and Tonicity of Infusates 18
Blood flow 19-20
INFECTION PREVENTION AND CONTROL 21
Care Bundles 22
Hand Hygiene 23
Aseptic Non Touch technique (ANTT) 24
Drawing up from Polyamps and Drug Bottles 24
PRINCIPLES OF MAINTENANCE AND CARE 25
Pre Insertion 25
Post Insertion and ongoing Assessment 26
Dressing and Securement 27-28
Equipment required for Dressings 29
Skin reaction flow chart 30
Changing Positive Displacement Devices (PDD) 31
Step by Step Guide to Changing PDD‟s 32
The Purpose of Flushing – Using Positive Displacement, catheter locking 33-34
Understanding Catheter Reflux 35-36
Blood Sampling 37
Blood Sampling using Syringe Method 38
Blood Sampling using Vacutainer Method 39
Blood Sampling and Parenteral Nutrition 40
Obtaining Blood Cultures 41
Catheter Removal 42
DOCUMENTATION AND PATIENT EDUCATION 43
COMPLICATIONS AND MANAGEMENT 44
INFECTION 45-47
CATHETER LOCK SOLUTIONS 48
OCCLUSION 49
Types of Thrombotic Occlusion 50
Management of Thrombotic Occlusion 51-52
Declotting Techniques 53-56
Non Thrombotic Occlusion 57
Mechanical Occlusion 58
THROMBOSIS 59
CATHETER MIGRATION / MAL POSITION / VESSEL EROSION 60
CARDIAC TAMPONADE 61
AIR EMBOLISM 62
PHLEBITIS 63
PARENTERAL NUTRITION 64-65
CATHETER SPECIFIC SECTION 66
Non Implanted Devices:
Peripherally Inserted Central Catheter (PICC) 67-69
Hickman® Tunneled Cuffed Catheter 70-73
Non-Tunneled Central Venous Catheter (CVC) 74-76
Implanted Devices: 77
Implanted Port-a-Cath® 78-86
Groshong® Tunneled Catheter 87
Haemodialysis and Apheresis Catheters 88-89
FURTHER READING 90
REFERENCES 91-93
4
INTRODUCTION
______________________________________________
Central Venous Access Devices (CVADs) have been used successfully for over 40 years in a wide
variety of settings. In the acute care setting they provide a route for rapid and reliable intravenous
administration of drugs, fluids, blood products and Parenteral Nutrition (PN) and may be used to
monitor Central Venous Pressure. They are also used for patients who require long term IV access
undergoing continuous/intermittent complex IV therapies such as chemotherapy and blood sampling
and Parenteral Nutrition (PN) (Dougherty, 2000).
With increased use we now see a diversity of catheter devices available to provide central venous
access. However, these catheters are not without risk.
All types of IV catheters are associated with catheter related blood stream infection (CRBSI).
CVADs are associated with a higher rate of CRBSI than peripheral IV catheters therefore
interventions to reduce the rate of CRBSI are especially important for their management and care
(Maki, et. al, 2006). Elsewhere CRBSI is also referred to as Central Line Associated Bacteraemia
(CLAB), catheter related infection (CRI).
The NZ Auditor-General‟s Report, Management of Hospital Acquired Infections. (2003 Vol:1&2 p.27-28) state „one in 10 patients admitted to hospital will acquire an infection as a result of their hospital stays. The rate may well be higher due to under reporting (p.271.21). Blood stream infections comprise 5-10% of Healthcare Associated Infection (HAI) and can have very high mortality rates, higher than 30%. Patients with Healthcare Acquired Blood Stream Infections (HABSI) tend to stay longer in hospital and cost more to treat (p 51, 2.53). Almost 80% of HABSI occurred in six large District Health Boards with complex services at an estimated cost of $19 million each year (NZ Auditor - General‟s Report, 2003).
CVAD complications range from mild local irritation to blood stream infections associated with
significant mortality and morbidity. It is imperative that nurses and midwives involved in the care of
CVADs are competent to do so, because practice vigilance is critical in reducing and preventing
complications (Robert, et al., 2000).
The CDC-Guidelines for the Prevention of Intravascular Catheter–Related Infections Vol:51
No RR-10 2002, (p5) state „inexperienced staff increase the risk for catheter colonization where as
well organized Quality Assurance and Continuing Education programmes enable health-care
institutions to provide, monitor and evaluate care and to become educated for successful
outcomes. Specialised teams have shown unequivocal effectiveness in reducing the incidence of
CRI and complication‟.
5
PROFESSIONAL ACCOUNTABILITY
______________________________________________
Registered Nurses must meet the standards outlined in the Competencies for entry to the
Register of Comprehensive Nurses (Nursing Council of NZ 2002) and Midwives (NZ Midwifery
Council) this applies to all nurses currently practicing.
Definition: Competence is the combination of skills, knowledge, attitudes, values and abilities
that underpin effective performance as a nurse (NZNC, 2003).
With an increased scope of practice professional accountability is established through:
1. Demonstrating a level of practice and professional accountability, appropriate to level of skills
2. Having a sound knowledge of the management and care of CVADs
3. Having knowledge of medication and IV fluid treatment modalities
4. Performing accurate assessment through identifying catheter specific indications, contraindications and associated risks
5. Utilising critical thinking skills and evidence based practice to achieve best patient outcomes
6. Confidently articulating scope of practice, identifying and acknowledging limitations and seeking assistance appropriately
7. Patient education
6
CENTRAL VENOUS ACCESS DEVICE CERTIFICATION
___________________________________________________ The CDHB Central Venous Access Device (CVAD) Certification is a second level competency. A
three (3) yearly recertification required. It is a prerequisite to have obtained the initial Intravenous
Therapy Certification (Level 1).
Components of CVAD Certification:
1. CVAD Self-directed Learning package
2. Review Multi choice Theory Test. (100% pass is required)
3. Practical Skills Assessment for:
Non implanted Devices - PICC, CVC, Hickman® catheters
Implanted Devices – standard and power injectable Port-a-caths® if require for area
of practice
Follow the Instructions for CVAD Certification on MOODLE:
1. Review the Self-Directed Learning package and education resources power point.
2. Complete Multi-choice Theory Test for non implanted or implanted devices as applicable. This is
an „open book‟ test the answers can be found in this Self-Directed Learning package and the
education resource power points. 100% pass mark is required.
3. Print off the Certificate of Completion
4. Print off the Practical Skills Assessment Checklist and complete with a NE, CNS, IV Link Staff
whose CVAD competency remains current on the training data base.
5. Return the completed form to the IV Nurse Educator CVAD PDU. On completion of this process
you will receive 8 hours towards professional development.
Non Implanted Devices: On completion of this competency your name will be entered into the
„CVAD‟ Competency Training Data base as competent in managing the following devices:
PICC
CVC
Hickman® Catheter
Implanted Devices: The Port-a-cath® competency is a separate competency Complete the non
implanted device competency and the Port-a-cath® competency. Your name will be entered into
both Competency Training Databases. Complete this competency if you use Port-a-caths® on a
regular basis and are required to access and de-access them.
NB. Only nurses with a Portacath competency may access (insert the needle) and de-access
(remove the needle). All nurses with non implanted device CVAD competency can use a Portacath
to deliver medications/infusions / blood samples once the port has been accessed by a Port
certificated nurse. Always refer to the Portacath section to guide your practice.
7
LEARNING OBJECTIVES
___________________________________________________
This comprehensive Self-Directed Learning Package and resource book is designed to assist
Registered Nurses and Midwives develop critical thinking skills to demonstrate knowledge in
assessment, management, maintenance and care of Central Venous Access Devices (CVAD). At
the completion of this package you should be able to:
Identify types and definitions of CVADs
Describe the anatomy and physiology of blood flow in relation to CVADs
Describe the advantages and disadvantages of each device
Describe the principles of infection prevention and control
Identify complications and describe prevention and management of each
Understand the action of medications and drug precipitates
Accurately document using the „CVAD Insertion and Management Care Plan‟ form
Understand the principles of patient education
Describe catheter considerations when administering Parenteral Nutrition (PN) (as applicable
to your area of practice)
Identify key differences in caring for a child or infant with a CVAD
Throughout this package are Alerts, Actions and Further Reading
This symbol indicates „important alerts‟
ACTION This symbol indicates „important actions‟
This symbol indicates „for further reading‟
8
CHILD HEALTH CONSIDERATIONS
______________________________________________
Many children experience a range of emotions at the prospect of a nurse carrying out a procedure
on their CVAD. Children might be distressed by dressing removal, cleaning around the insertion
site and needle access. It is important for the nurse to understand that:
younger children may see the intervention as punishment 1
the language used to explain and prepare the child needs to be developmentally
appropriate
parents also need to be involved and prepared for the procedure
children sometimes move unexpectedly during procedures- more than one nurse will
usually be required to help with the procedure
children with chronic illnesses may become particularly sensitised to painful procedure 2–
they don‟t just get used to it
coping is increased by enabling children to have a degree of control during the
procedure(e.g. holding the blood tube)
Preparation
CVAD procedures are usually carried out in the treatment room because the child‟s bed is
considered to be a „safe‟ place
Always explain to parents and care givers what the procedure will involve. The parents or
caregivers should not be used to restrain the child or be an extra pair of hands. Their role is
to support their child
Hospital Play Specialists should be involved(distraction, support of the child and therapeutic
play) whenever possible and this is best achieved with prior organisation
All equipment should be prepared before the child is brought to the treatment room
Avoid unnecessary delays
Associated Reading
Restraint minimisation, Child Health
E-guidelines
1 Twycross,A.,Dowden,S., Bruce,E.,(2009). Managing Pain in Children: A Clinical Guide. Blackwell Publishing LTD.
United Kingdom.2 Lawes,C.,Sawyer,L.,Amos,S.,Kanddiah,M.,Pearce,L.,Symons,I.(2008).Impact of an education
programme for staff working with children undergoing painful procedures. Paediatric Nursing.20(2)p33-37
9
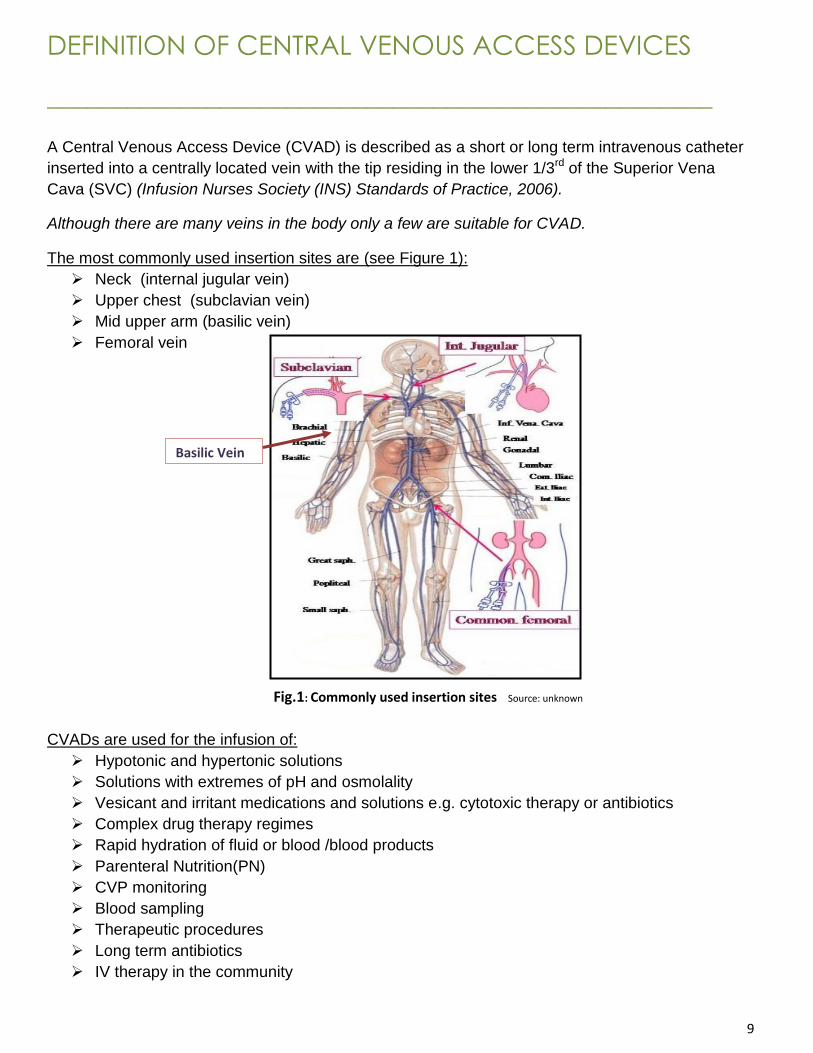
DEFINITION OF CENTRAL VENOUS ACCESS DEVICES
__________________________________________________
A Central Venous Access Device (CVAD) is described as a short or long term intravenous catheter
inserted into a centrally located vein with the tip residing in the lower 1/3rd of the Superior Vena
Cava (SVC) (Infusion Nurses Society (INS) Standards of Practice, 2006).
Although there are many veins in the body only a few are suitable for CVAD.
The most commonly used insertion sites are (see Figure 1):
Neck (internal jugular vein)
Upper chest (subclavian vein)
Mid upper arm (basilic vein)
Femoral vein
Fig.1: Commonly used insertion sites Source: unknown
CVADs are used for the infusion of:
Hypotonic and hypertonic solutions
Solutions with extremes of pH and osmolality
Vesicant and irritant medications and solutions e.g. cytotoxic therapy or antibiotics
Complex drug therapy regimes
Rapid hydration of fluid or blood /blood products
Parenteral Nutrition(PN)
CVP monitoring
Blood sampling
Therapeutic procedures
Long term antibiotics
IV therapy in the community
Basilic Vein

10
Tip positions of CVAD must be radiologically verified prior to use
CVADs come in different sizes with either single or multiple lumens. With multiple lumens, each
lumen provides independent access to the venous circulation. This allows two incompatible drugs or
fluids to be infused simultaneously. As a general principle the lumen diameter and number of
lumens should be kept to a minimum as multiple large bore catheters are associated with a higher
risk of infection and thrombosis (Simcock, 2001). However, in the high dependency settings,
multiple lumen large bore catheters tend to be used because they are essential for management of
acutely ill patients.
The following CVADs are used in the Canterbury District Health Board (refer Figure 2):
Peripherally Inserted Central Catheter (referred to as a PICC)
Hickman® skin tunnelled catheter
Central Venous Catheter (short term non-tunnelled referred to as CVC)
Port-a-cath® implanted port and Power Port® (power injectable)
Dialysis & Apheresis catheters which are procedure specific
Antibiotic and antimicrobial coated catheters
Information regarding the management and care these catheters can be found in the section on
„Catheter Specific Information’.
PICC CVC
Hickman®
Portacath®
®
DIALYSIS/APHERESIS
Fig.2: CVAD used in the CDHB Source: Original Photo
11
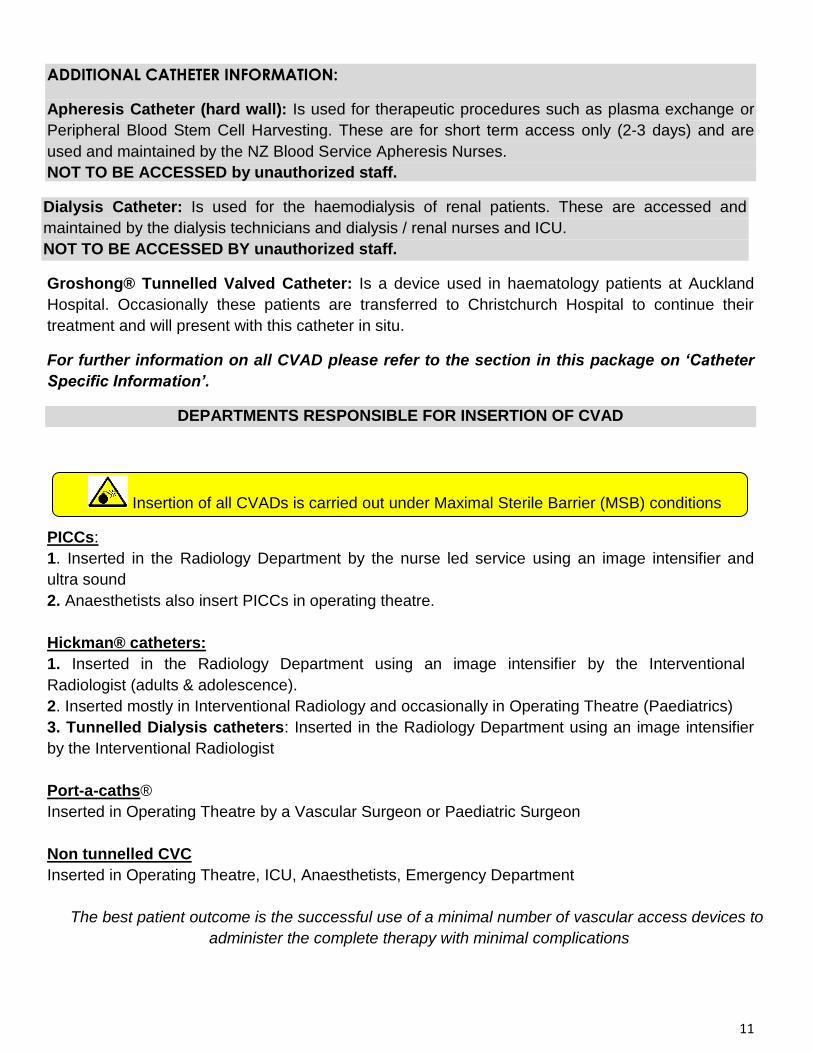
ADDITIONAL CATHETER INFORMATION:
Apheresis Catheter (hard wall): Is used for therapeutic procedures such as plasma exchange or
Peripheral Blood Stem Cell Harvesting. These are for short term access only (2-3 days) and are
used and maintained by the NZ Blood Service Apheresis Nurses.
NOT TO BE ACCESSED by unauthorized staff.
Dialysis Catheter: Is used for the haemodialysis of renal patients. These are accessed and
maintained by the dialysis technicians and dialysis / renal nurses and ICU.
NOT TO BE ACCESSED BY unauthorized staff.
Groshong® Tunnelled Valved Catheter: Is a device used in haematology patients at Auckland
Hospital. Occasionally these patients are transferred to Christchurch Hospital to continue their
treatment and will present with this catheter in situ.
For further information on all CVAD please refer to the section in this package on ‘Catheter
Specific Information’.
DEPARTMENTS RESPONSIBLE FOR INSERTION OF CVAD
Insertion of all CVADs is carried out under Maximal Sterile Barrier (MSB) conditions
PICCs:
1. Inserted in the Radiology Department by the nurse led service using an image intensifier and
ultra sound
2. Anaesthetists also insert PICCs in operating theatre.
Hickman® catheters:
1. Inserted in the Radiology Department using an image intensifier by the Interventional
Radiologist (adults & adolescence).
2. Inserted mostly in Interventional Radiology and occasionally in Operating Theatre (Paediatrics)
3. Tunnelled Dialysis catheters: Inserted in the Radiology Department using an image intensifier
by the Interventional Radiologist
Port-a-caths®
Inserted in Operating Theatre by a Vascular Surgeon or Paediatric Surgeon
Non tunnelled CVC
Inserted in Operating Theatre, ICU, Anaesthetists, Emergency Department
The best patient outcome is the successful use of a minimal number of vascular access devices to
administer the complete therapy with minimal complications
12
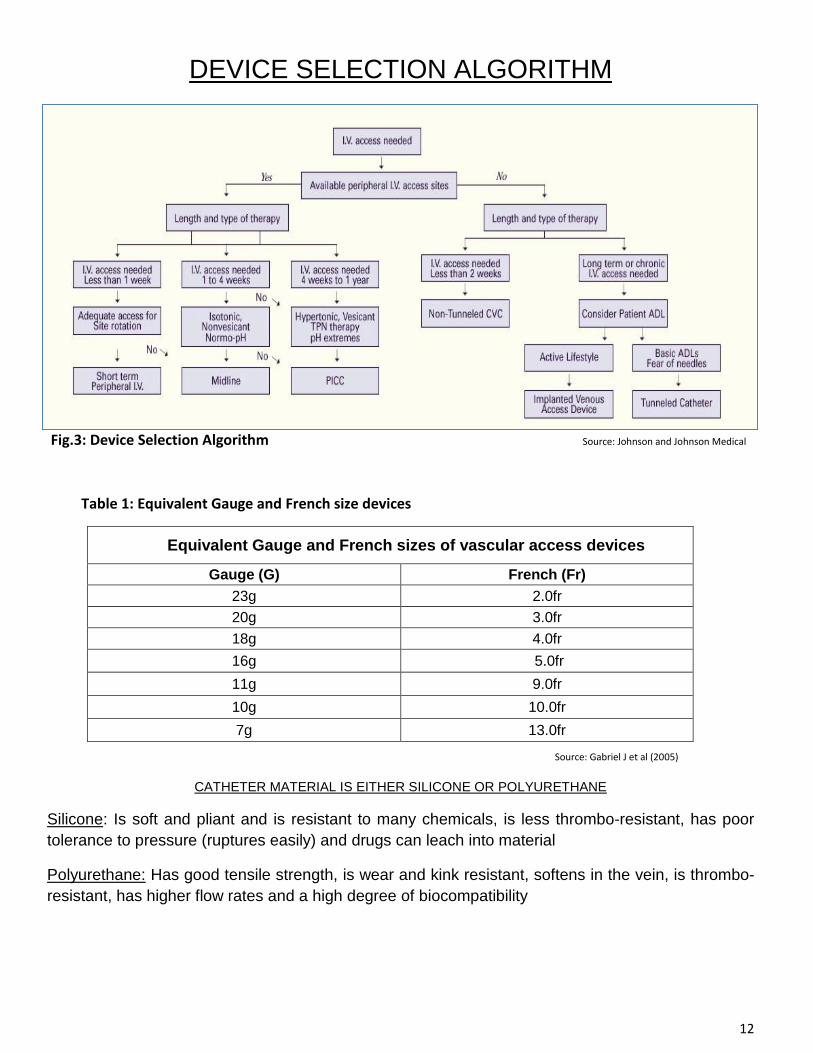
DEVICE SELECTION ALGORITHM
Fig.3: Device Selection Algorithm Source: Johnson and Johnson Medical
CATHETER MATERIAL IS EITHER SILICONE OR POLYURETHANE
Silicone: Is soft and pliant and is resistant to many chemicals, is less thrombo-resistant, has poor
tolerance to pressure (ruptures easily) and drugs can leach into material
Polyurethane: Has good tensile strength, is wear and kink resistant, softens in the vein, is thrombo-
resistant, has higher flow rates and a high degree of biocompatibility
Equivalent Gauge and French sizes of vascular access devices
Gauge (G) French (Fr)
23g 2.0fr
20g 3.0fr
18g 4.0fr
16g 5.0fr
11g 9.0fr
10g 10.0fr
7g 13.0fr
Source: Gabriel J et al (2005)
Table 1: Equivalent Gauge and French size devices
13
ANATOMY AND PHYSIOLOGY REVIEW
___________________________________________________
Knowledge of anatomy, physiology and the principles of blood flow are essential for safe
management of all Central Venous Access Devices.
Figure 4 below shows the major veins of the central vasculature where CVAD are placed.
CVADs can become displaced although displacement is more likely to be seen with a PICC. This
is due in part to its smaller diameter compared to the larger CVADs. The tip can migrate or
become malpositioned in the following veins:
Internal jugular
Contralateral brachiocephalic (opposite to the vein the catheter has been inserted into)
Azygos
Action: Locate the 3 veins above on the diagram below
Fig.4: Major Central Veins Source: Medical Illustrations, Christchurch Hospital
14
Veins and Valves
Veins are known as reservoir vessels with approximately 65% of blood volume found in the venous
circulation system. The vein walls distend six to ten times more than arterial walls with only the
smallest amount of pressure. This means that normal pressure is re-established quickly, for
example following the release of a tourniquet. This is referred to as a „Stress Relaxation
Phenomena‟.
The veins also have what is referred to as a muscle or venous pump. When muscles contract they
compress the vein. This helps return blood to the heart. When a muscle contracts, proximal valves
open while distal valves close. This action can specifically affect the PICC causing it to migrate
either in or out of its correct tip position if it is not well secured.
Muscle action is also responsible for reflux of blood into the tips of CVADs. Pressure from the
contracting muscle forces the „locking fluid‟ out of the catheter lumen allowing blood to reflux into
the CVAD when the muscle relaxes. The vein and catheter are two distinct flow systems, each
vulnerable to occlusion (Hadaway, 2005).
Valves are structures within the lumen of the vein which are formed by the endothelial lining of the
Tunica Intima. They are present as bumps usually found at vein bifurcations and predominantly
found in large veins of the extremities (refer to figure 6). There are approximately 40 venous valves
between the hand and the axillary vein. Larger veins of the central vasculature do not have valves
Veins have three layers and each plays an important role in catheter placement and catheter dwell
(refer to figure 5). These are:
Tunica Intima - inner lining
Tunica Media - middle layer
Tunica Adventitia - outer layer
15
The Tunica Intima is the delicate inner lining of the vein which can become damaged by
mechanical, chemical or bacterial means.
When the Tunica Intima is damaged, bleeding occurs into the interstitial compartments of the
basement membrane. The Tunic Adventitia, rich in nerves provides the pain pathway.
All three layers can be affected giving rise to phlebitis. The CVAD most affected by mechanical
phlebitis is the PICC. Mechanical phlebitis is a result of catheter movement within the peripheral
vein and is often referred to as „pistoning‟ or moving back and forth resulting in irritation to the vein
lining.
Another contributing factor is overuse of the arm which causes the muscles to squeeze on the vein
where the PICC is indwelling irritating the vein wall initiating mechanical phlebitis.
Tunica Intima
Tunica Media
Tunica Adventitia
Venous Valve
Valve
Fig.6: Venous valve Source: BD Medical Systems
Fig.5: Veins Source: Johnson and Johnson Medical
16
PHYSIOLOGY OF THE INFLAMMATORY PROCESS
Phlebitis is the result of an inflammatory process in of the intima of the vein due to irritation
to the endothelial cells (refer figure 7). It is classified according to its causative factors. The
four causative factors are:
chemical
mechanical
bacterial
post infusion
Fig. 7: Inflammatory Process Source: Johnson & Johnson Medical
17
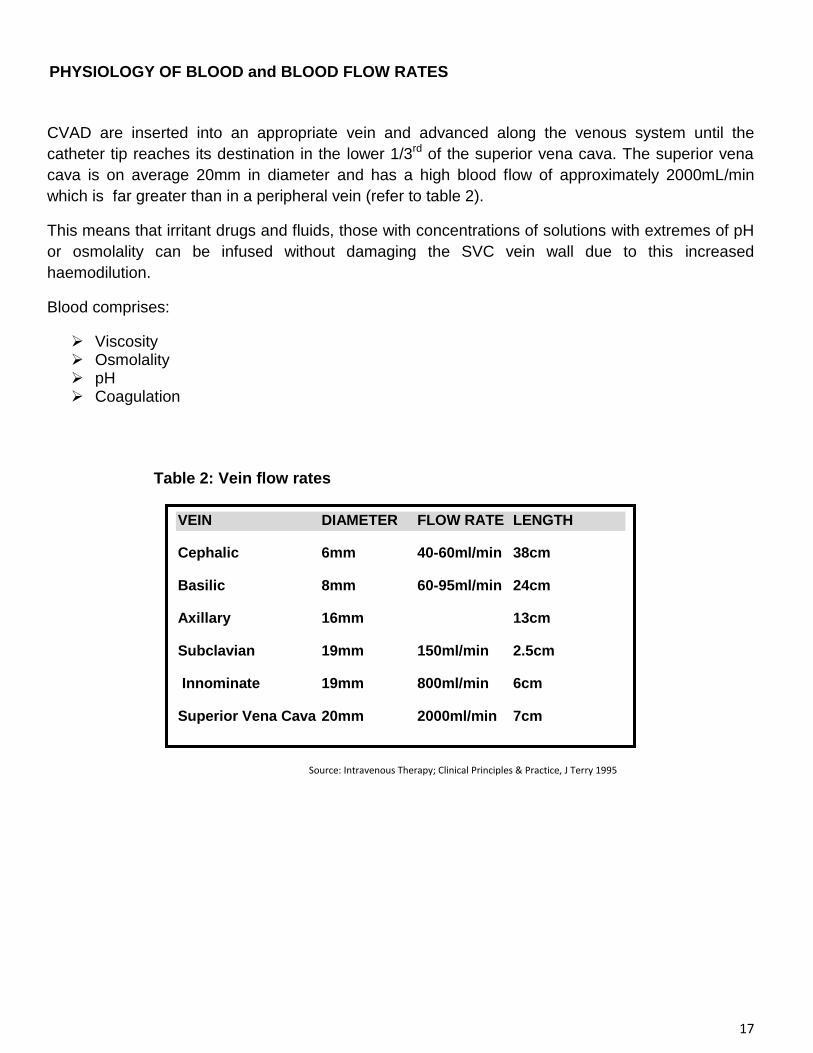
PHYSIOLOGY OF BLOOD and BLOOD FLOW RATES
CVAD are inserted into an appropriate vein and advanced along the venous system until the
catheter tip reaches its destination in the lower 1/3rd of the superior vena cava. The superior vena
cava is on average 20mm in diameter and has a high blood flow of approximately 2000mL/min
which is far greater than in a peripheral vein (refer to table 2).
This means that irritant drugs and fluids, those with concentrations of solutions with extremes of pH
or osmolality can be infused without damaging the SVC vein wall due to this increased
haemodilution.
Blood comprises:
Viscosity Osmolality pH Coagulation
Table 2: Vein flow rates
Source: Intravenous Therapy; Clinical Principles & Practice, J Terry 1995
VEIN DIAMETER FLOW RATE LENGTH
Cephalic 6mm 40-60ml/min 38cm
Basilic 8mm 60-95ml/min 24cm
Axillary 16mm 13cm
Subclavian 19mm 150ml/min 2.5cm
Innominate 19mm 800ml/min 6cm
Superior Vena Cava 20mm 2000ml/min 7cm
18
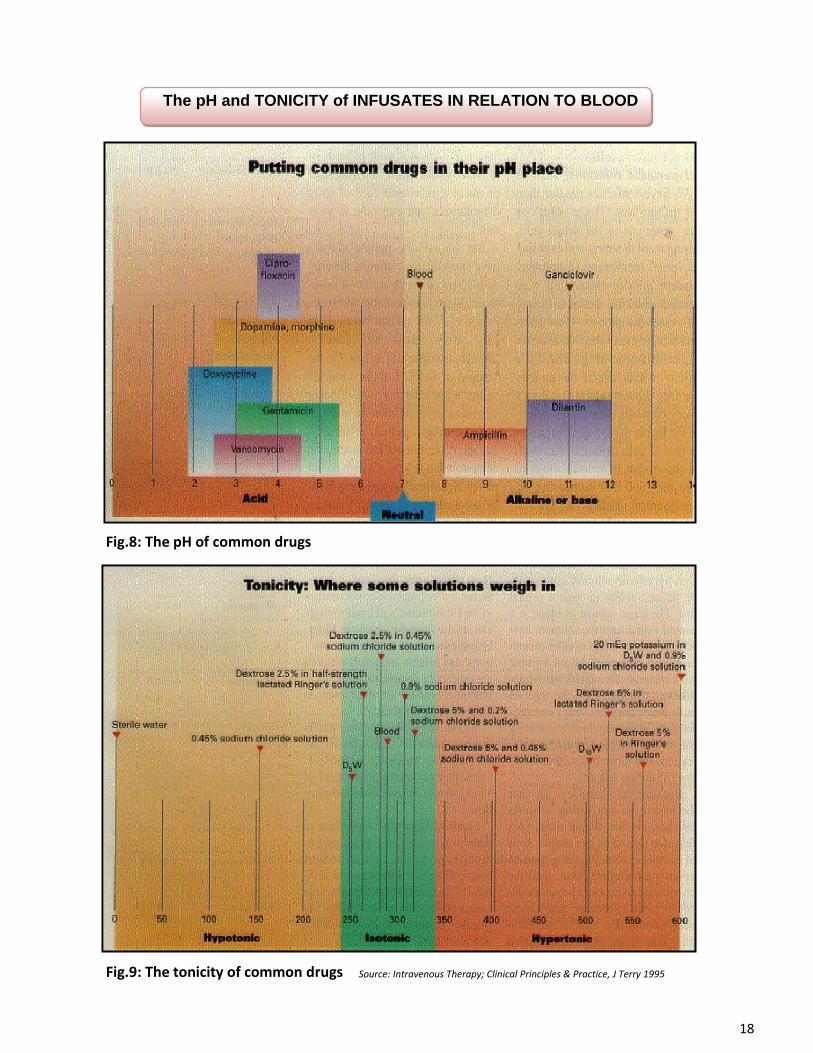
The pH and TONICITY of INFUSATES IN RELATION TO BLOOD
Fig.8: The pH of common drugs
Fig.9: The tonicity of common drugs Source: Intravenous Therapy; Clinical Principles & Practice, J Terry 1995

19
BLOOD FLOW
Blood flow is primarily affected by the following:
Diameter and shape of the vessel. When the vessel doubles in diameter, the flow rate
increases sixteen times and is known as „Poisuille‟s Law‟ or „Fourth Power Law‟ (refer to
figure 10.)
Blood viscosity. As blood viscosity increases, flow rates decrease due to resistance.
Flow rates. Described as either laminar or turbulent.
Fig.10: Poisuille’s Law Source: Johnson & Johnson Medical
20
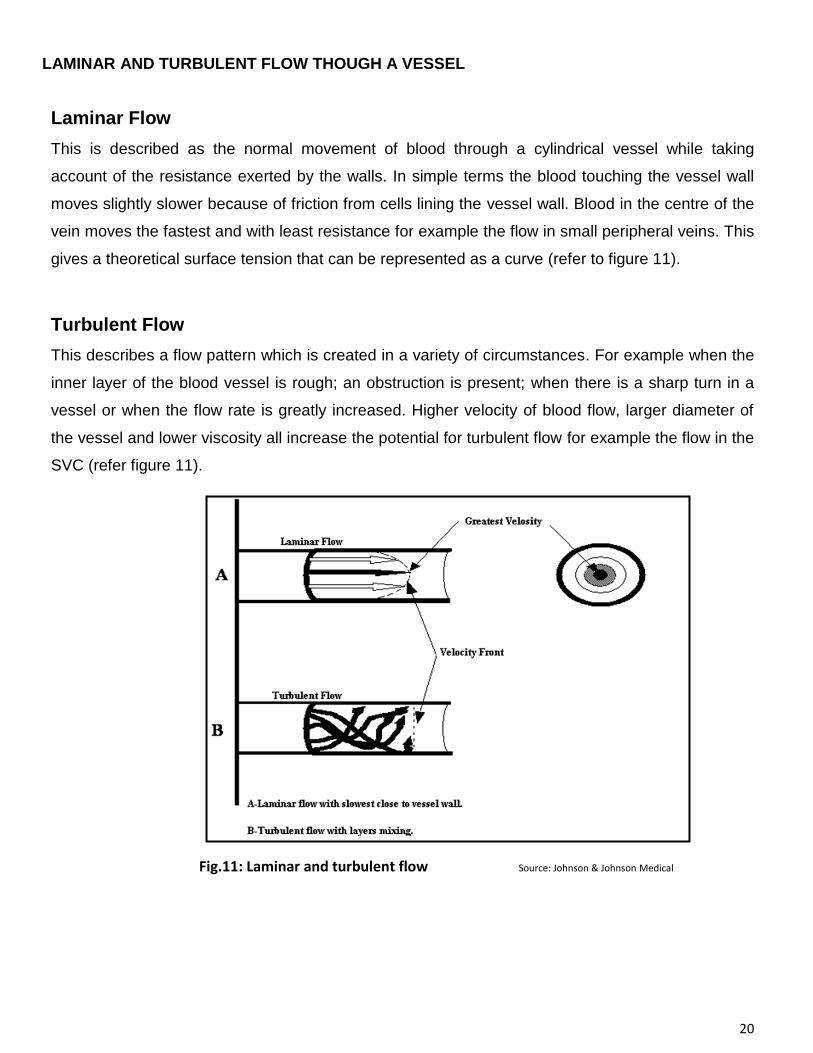
LAMINAR AND TURBULENT FLOW THOUGH A VESSEL
Laminar Flow
This is described as the normal movement of blood through a cylindrical vessel while taking
account of the resistance exerted by the walls. In simple terms the blood touching the vessel wall
moves slightly slower because of friction from cells lining the vessel wall. Blood in the centre of the
vein moves the fastest and with least resistance for example the flow in small peripheral veins. This
gives a theoretical surface tension that can be represented as a curve (refer to figure 11).
Turbulent Flow
This describes a flow pattern which is created in a variety of circumstances. For example when the
inner layer of the blood vessel is rough; an obstruction is present; when there is a sharp turn in a
vessel or when the flow rate is greatly increased. Higher velocity of blood flow, larger diameter of
the vessel and lower viscosity all increase the potential for turbulent flow for example the flow in the
SVC (refer figure 11).
Fig.11: Laminar and turbulent flow Source: Johnson & Johnson Medical
21
INFECTION PREVENTION AND CONTROL
___________________________________________________
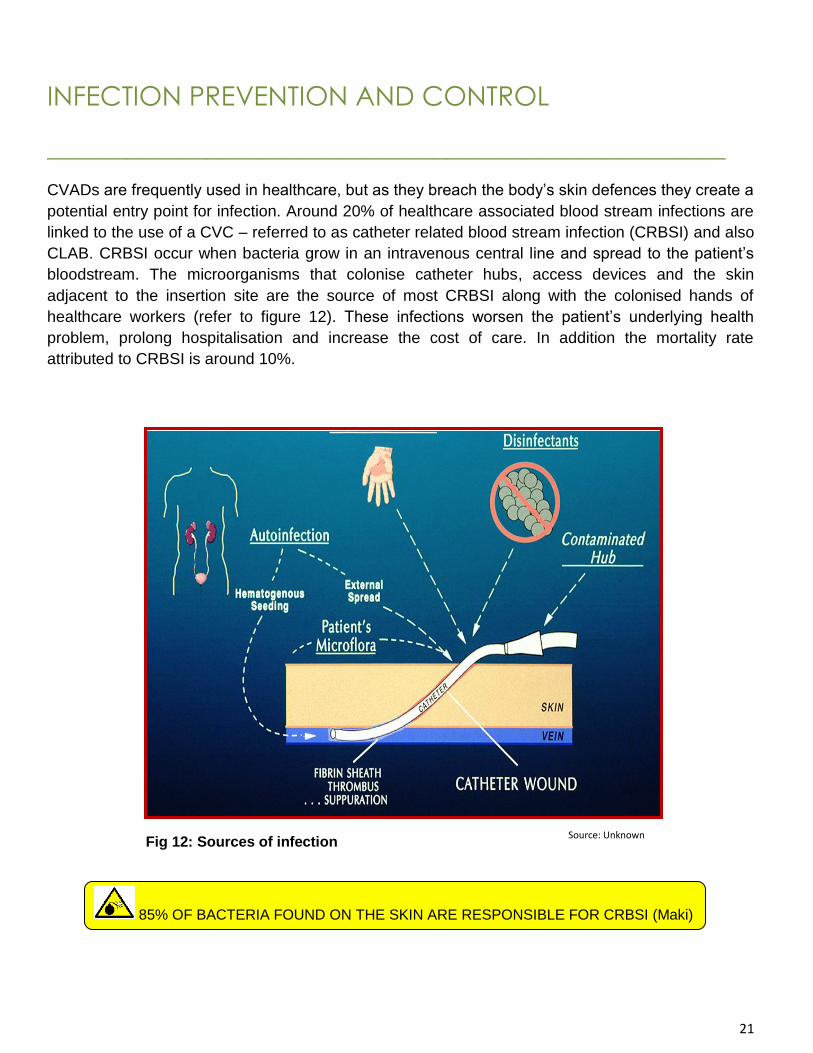
CVADs are frequently used in healthcare, but as they breach the body‟s skin defences they create a
potential entry point for infection. Around 20% of healthcare associated blood stream infections are
linked to the use of a CVC – referred to as catheter related blood stream infection (CRBSI) and also
CLAB. CRBSI occur when bacteria grow in an intravenous central line and spread to the patient‟s
bloodstream. The microorganisms that colonise catheter hubs, access devices and the skin
adjacent to the insertion site are the source of most CRBSI along with the colonised hands of
healthcare workers (refer to figure 12). These infections worsen the patient‟s underlying health
problem, prolong hospitalisation and increase the cost of care. In addition the mortality rate
attributed to CRBSI is around 10%.
Source: Unknown
85% OF BACTERIA FOUND ON THE SKIN ARE RESPONSIBLE FOR CRBSI (Maki)
Fig 12: Sources of infection
22
An evidence-based approach underlies the strategies for the prevention of CRBSI. Interventions
are based on the concept of „bundles‟ of care components which incorporate individual practices
that together result in greater improvements than when used individually.
There are two care bundles of components aimed at the prevention of CRBSI (Institute for
Healthcare Improvement, 2008).
CVAD insertion bundle
Hand hygiene Maximal barrier precautions Chlorhexidine skin antisepsis Optimal catheter site selection
CVAD maintenance bundle
Daily review and documentation of line necessity and prompt removal of unnecessary lines Dedicated lumen for Parenteral Nutrition (PN) This is the WHITE lumen of a multiple lumen
catheter Access the CVAD lumens aseptically using chlorhexidine 2% and alcohol 70% wipes with
vigorous friction prior to access, allow to dry Review and document each shift the entry site (CVC/PICC) exit site (Hickman) and surrounding
area for inflammation Other CVAD infection prevention principles include:
Hand hygiene before and after manipulation of CVADs and administration set using the 5 Moments approach (refer to table 4)
Aseptic and non-touch technique(ANTT) for all CVAD access and medication preparation The use of personal protective equipment
Fig.13 Source: Johnson & Johnson Medical Source: Institute of Healthcare Improvement 2008
Table 3: CVAD insertion principles
23
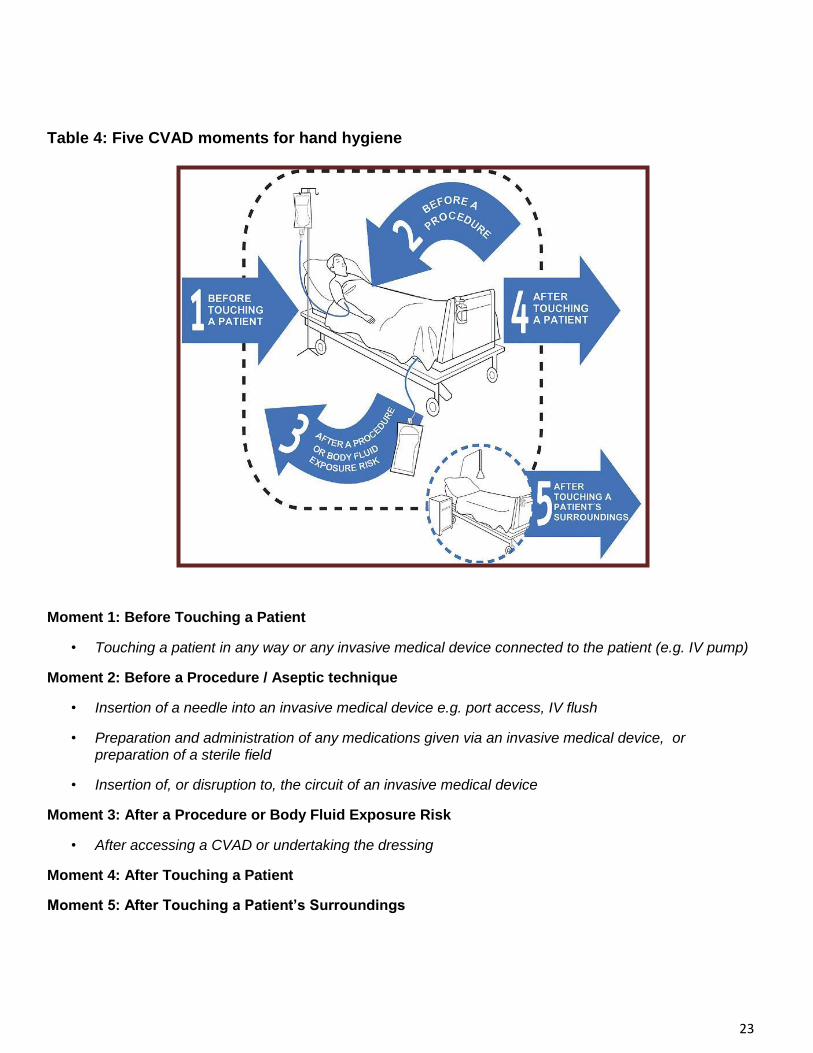
Table 4: Five CVAD moments for hand hygiene
Moment 1: Before Touching a Patient
• Touching a patient in any way or any invasive medical device connected to the patient (e.g. IV pump)
Moment 2: Before a Procedure / Aseptic technique
• Insertion of a needle into an invasive medical device e.g. port access, IV flush
• Preparation and administration of any medications given via an invasive medical device, or preparation of a sterile field
• Insertion of, or disruption to, the circuit of an invasive medical device
Moment 3: After a Procedure or Body Fluid Exposure Risk
• After accessing a CVAD or undertaking the dressing
Moment 4: After Touching a Patient
Moment 5: After Touching a Patient‟s Surroundings
24
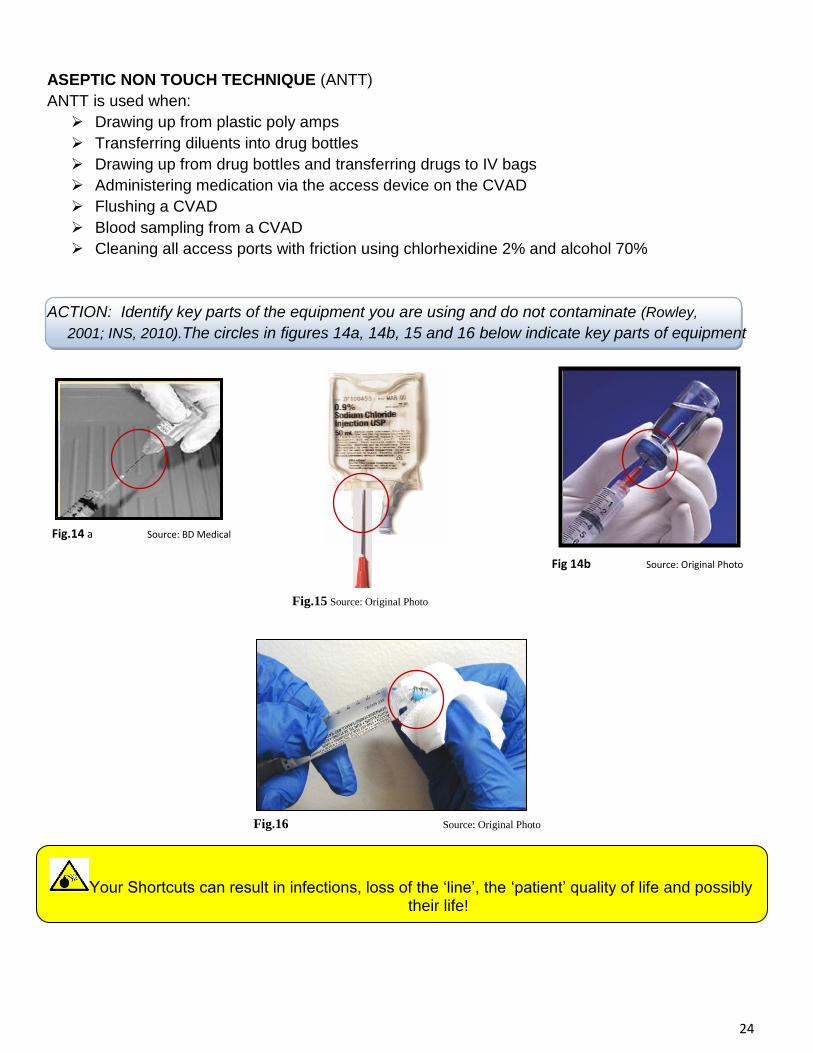
ASEPTIC NON TOUCH TECHNIQUE (ANTT)
ANTT is used when:
Drawing up from plastic poly amps
Transferring diluents into drug bottles
Drawing up from drug bottles and transferring drugs to IV bags
Administering medication via the access device on the CVAD
Flushing a CVAD
Blood sampling from a CVAD
Cleaning all access ports with friction using chlorhexidine 2% and alcohol 70%
ACTION: Identify key parts of the equipment you are using and do not contaminate (Rowley,
2001; INS, 2010).The circles in figures 14a, 14b, 15 and 16 below indicate key parts of equipment
Fig.16 Source: Original Photo
Your Shortcuts can result in infections, loss of the „line‟, the „patient‟ quality of life and possibly their life!
Fig.14 a Source: BD Medical
Systems
Fig.14 Source: Original Photo Fig.15 Source: Original Photo
Fig 14b Source: Original Photo
25
PRINCIPLES OF MAINTENANCE AND CARE
_________________________________________________
Management of Central Venous Access Devices requires us to maintain the patency of the
catheter and vein (Hadaway, 2005).
Knowledge and good assessment skills are essential when caring for a CVAD.
NB. For the management and care of Implanted Ports refer to the „Catheter Specific‟ section on
Implanted Ports
Formal written consent by the patient must be obtained prior to the insertion of a CVAD
PRE-INSERTION
Education:
Patient education is essential to achieve best patient outcomes
Ensure the patient and / or family / Whanau understand what is involved in the process
and what to expect during and following insertion
For children this will include an-age appropriate explanation and involvement with the
hospital play specialist
Use a catheter diagram to explain what the catheter looks like, where it will be inserted
and where the tip will reside (this can be sourced from this SLP)
Explain how the catheter will be cared for i.e. flushing, dressing and securement
Encourage the patient to report any thing that doesn‟t „feel right‟ or concerns them
Ensure the patient is given the appropriate CVAD patient information booklet
Instruct the patient and /or family/ Whanau to always wash their hands prior to touching
the catheter
Hydration:
Encourage oral fluids at least 1-2 litres or maintain prescribed IV fluids
This helps reduce insertion trauma to the vein which can result in phlebitis
Dehydration increases venous problems and viscosity which may make cannulation of the
vein difficult
Warmth:
Ensure the patient is kept warm. Use a warm blanket for this purpose
This helps to dilate the veins by increasing blood flow and venous return to larger veins
26
POST INSERTION
Check catheter insertion site for:
Bleeding
Swelling
Bruising
Pain or discomfort
Dressing integrity
BIOPATCH® in correct position around catheter at exit site and BLUE side uppermost.
Exception for children and ICU patients –Biopatch® is not routinely used
Catheter securement device in place
MaxPlus® positive displacement devices (PDD) are securely attached to the catheter
lumens. Flush all catheter lumens with 0.9% sodium chloride to ensure patency is
established before using catheter. For Child Health please follow the CVAD „locking solution‟
chart found in the Flushing section of this package
Document any variances on the „CVAD Insertion & Management Form‟
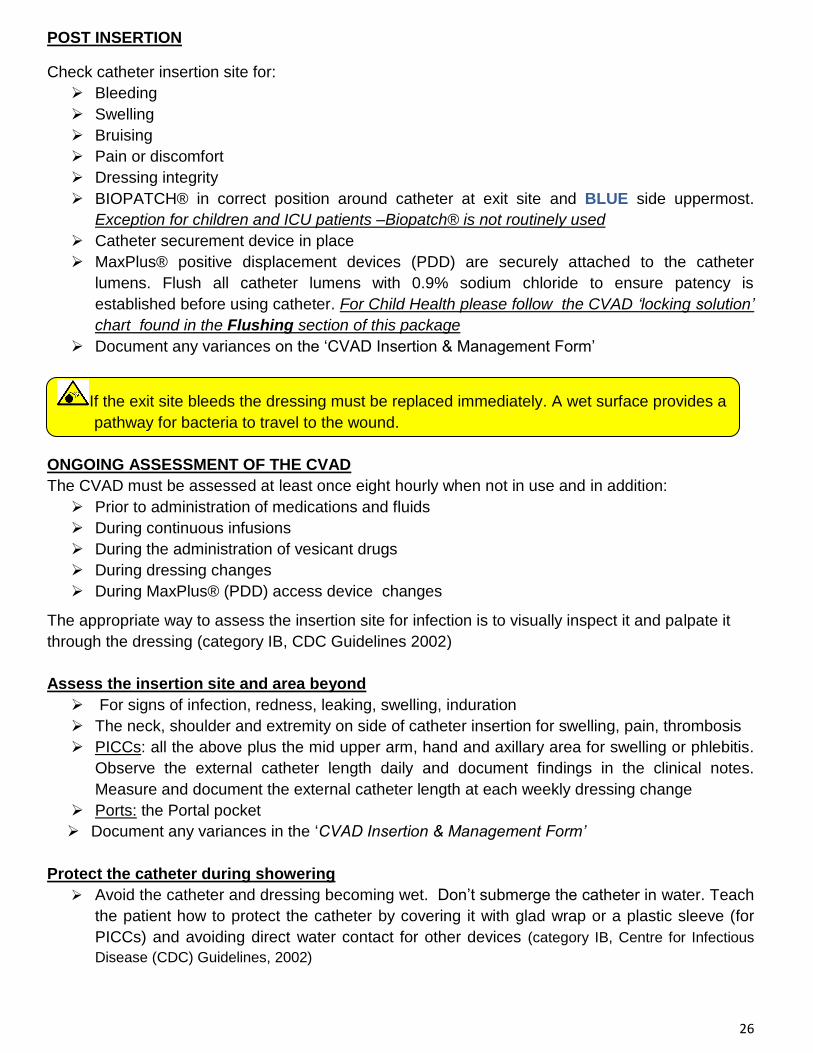
If the exit site bleeds the dressing must be replaced immediately. A wet surface provides a
pathway for bacteria to travel to the wound.
ONGOING ASSESSMENT OF THE CVAD
The CVAD must be assessed at least once eight hourly when not in use and in addition:
Prior to administration of medications and fluids
During continuous infusions
During the administration of vesicant drugs
During dressing changes
During MaxPlus® (PDD) access device changes
The appropriate way to assess the insertion site for infection is to visually inspect it and palpate it
through the dressing (category IB, CDC Guidelines 2002)
Assess the insertion site and area beyond
For signs of infection, redness, leaking, swelling, induration
The neck, shoulder and extremity on side of catheter insertion for swelling, pain, thrombosis
PICCs: all the above plus the mid upper arm, hand and axillary area for swelling or phlebitis.
Observe the external catheter length daily and document findings in the clinical notes.
Measure and document the external catheter length at each weekly dressing change
Ports: the Portal pocket
Document any variances in the „CVAD Insertion & Management Form‟
Protect the catheter during showering
Avoid the catheter and dressing becoming wet. Don‟t submerge the catheter in water. Teach
the patient how to protect the catheter by covering it with glad wrap or a plastic sleeve (for
PICCs) and avoiding direct water contact for other devices (category IB, Centre for Infectious
Disease (CDC) Guidelines, 2002)
27
DRESSINGS AND SECUREMENT
An aseptic non touch technique (ANTT) is used when dressing the catheter. Where a BIOPATCH®
is used place it around the catheter at the insertion site and replace at each routine dressing change
every 7 days or whenever the dressing requires replacement. A BIOPATCH® is only used for
PICC‟s if clinically indicated.
BIOPATCH® is not used for CVADs inserted into children or routinely used in ICU.
BIOPATCH® is not used where antimicrobial or antibiotic coated catheters are used.
ADDITIONAL DRESSING CHANGES will be required when the dressing is:
Loose
Visibly soiled
Lifting from site
Excess oozing at insertion site
BIOPATCH® shows signs of fluid absorption (has increased in size) or has been incorrectly
applied
Where skin reactions have occurred refer to the „Skin Reaction Flow Chart‟ on page 30 as a
guide.
SECURMENT (Statlock® or Grip Loc®) is used to:
Secure the CVAD
Minimize catheter movement
Prevent catheter migration
Prevent tension on the dressing causing the dressing to lift
Prevent catheter lumens hanging below waist line
NB: do not use tape to secure the catheter
CLEANING THE EXIT SITE, SUROUNDING SKIN and the CATHETER
Use 2% Chlorhexidine & 70% alcohol swab sticks
Clean the skin using friction
Do not contaminate the insertion site. Clean along catheter length that sits under dressing
Allow to air dry for 15-30 seconds. Do not wipe the solution off (CDC Guidelines
Recommendations)
Either circular or grid method is acceptable (INS.2010).The important point is to use friction. If
blood is present at or around the insertion site, use STERILE WATER to clean and remove
blood, then clean site with 2% Chlorhexidine & 70% alcohol swabs.
Chlorhexidine 2% has demonstrated continued activity for up to six hours after application
Cavilon® skin protectant is applied to the area around the insertion site extending out beyond
where the dressing will be placed to prevent the dressing lifting. A sterile occlusive transparent
Semi-permeable dressing is applied to the insertion site to protect the area and allow for
visualization and early detection of complications.
Do not apply CAVILON® to the area directly at the insertion site or where the BIOPATCH ® or
CHG gel pad is to be placed.
28
Do not apply topical ointments to the insertion site as they promote fungal infection and
antimicrobial resistance (CDC Guidelines Recommendations, 2010)
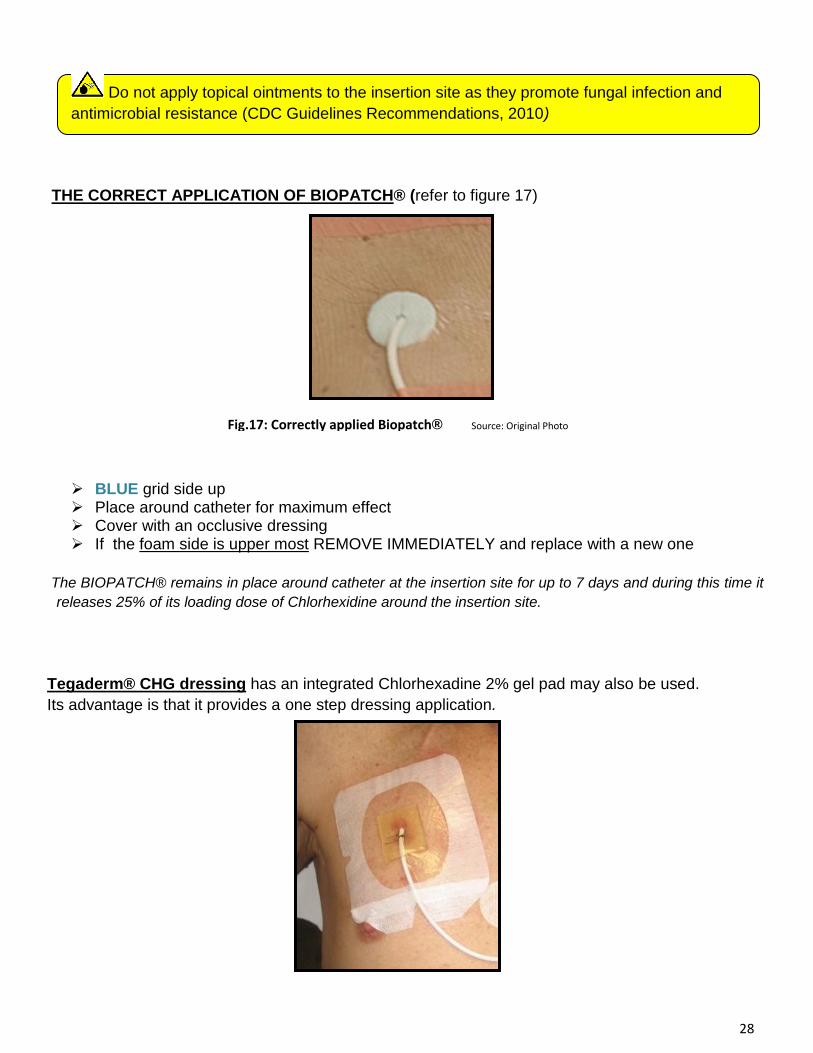
THE CORRECT APPLICATION OF BIOPATCH® (refer to figure 17)
BLUE grid side up Place around catheter for maximum effect Cover with an occlusive dressing If the foam side is upper most REMOVE IMMEDIATELY and replace with a new one
The BIOPATCH® remains in place around catheter at the insertion site for up to 7 days and during this time it
releases 25% of its loading dose of Chlorhexidine around the insertion site.
Tegaderm® CHG dressing has an integrated Chlorhexadine 2% gel pad may also be used.
Its advantage is that it provides a one step dressing application.
Fig.17: Correctly applied Biopatch® Source: Original Photo
29
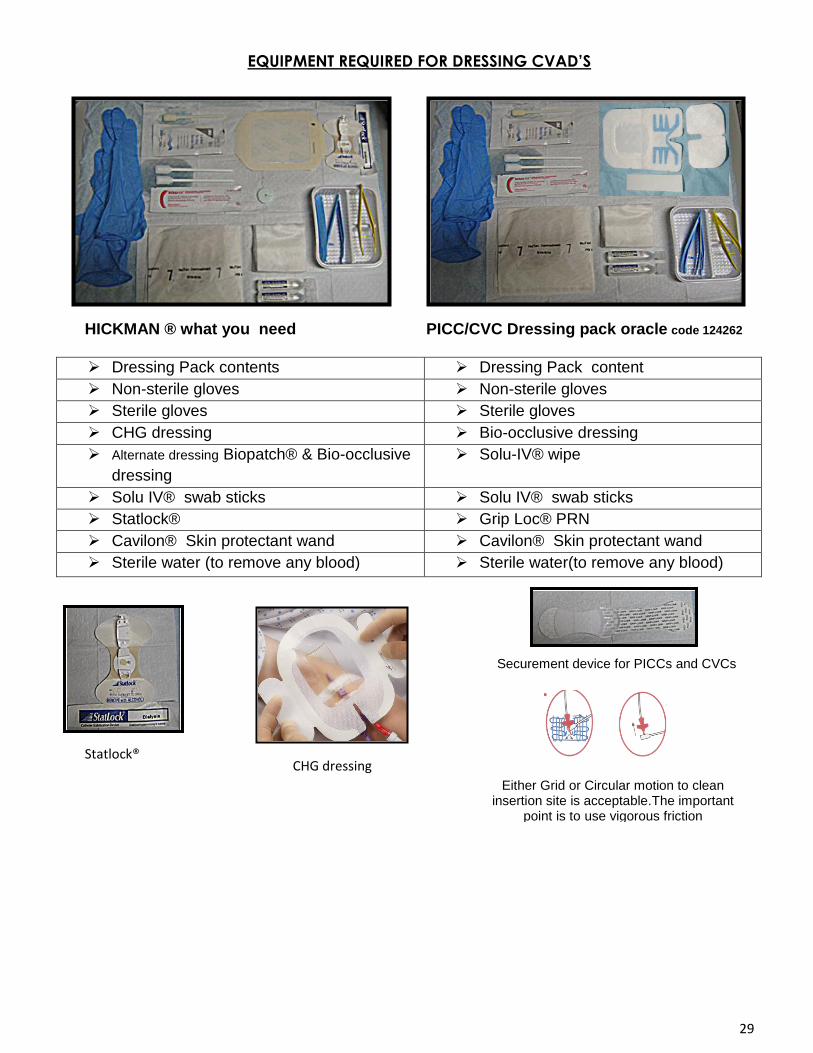
EQUIPMENT REQUIRED FOR DRESSING CVAD’S
Dressing Pack contents Dressing Pack content
Non-sterile gloves Non-sterile gloves
Sterile gloves Sterile gloves
CHG dressing Bio-occlusive dressing
Alternate dressing Biopatch® & Bio-occlusive
dressing
Solu-IV® wipe
Solu IV® swab sticks Solu IV® swab sticks
Statlock® Grip Loc® PRN
Cavilon® Skin protectant wand Cavilon® Skin protectant wand
Sterile water (to remove any blood) Sterile water(to remove any blood)
Securement device for PICCs and CVCs
Statlock® securement device for
double lumen Hickman® catheters
HICKMAN ® what you need PICC/CVC Dressing pack oracle code 124262
Statlock® CHG dressing
Either Grid or Circular motion to clean insertion site is acceptable.The important
point is to use vigorous friction
30
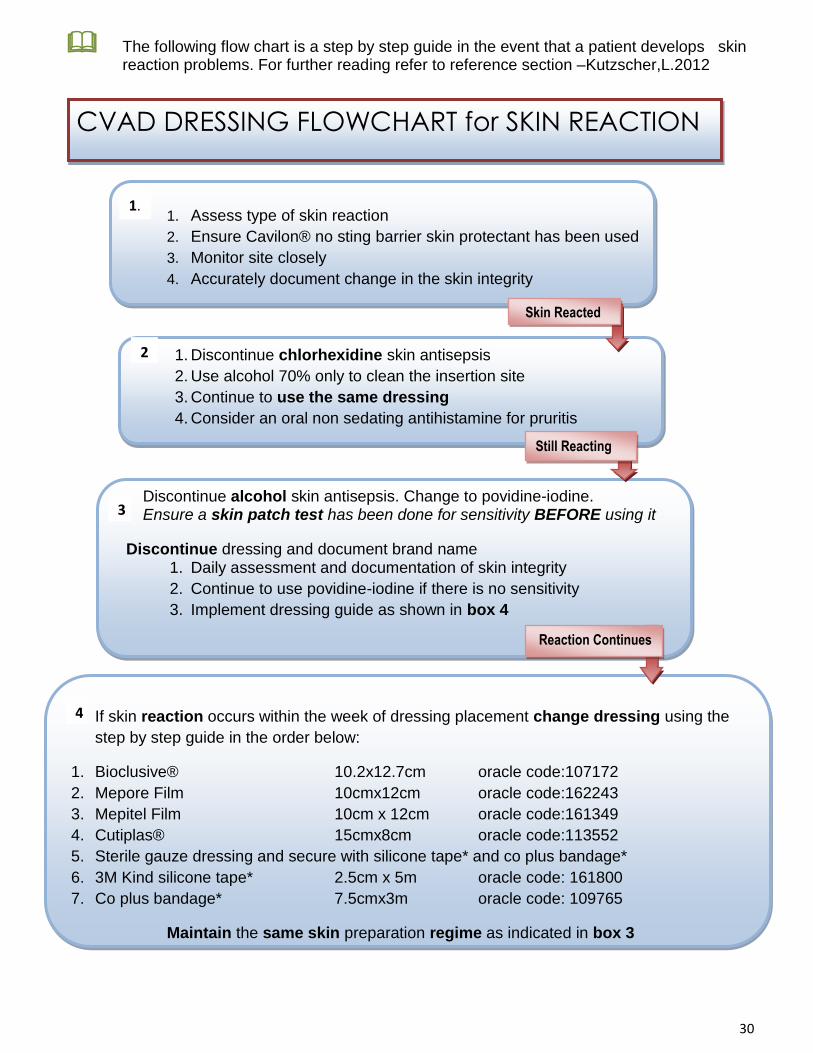
The following flow chart is a step by step guide in the event that a patient develops skin reaction problems. For further reading refer to reference section –Kutzscher,L.2012
CVAD DRESSING FLOWCHART for SKIN REACTION
1. Assess type of skin reaction
2. Ensure Cavilon® no sting barrier skin protectant has been used
3. Monitor site closely
4. Accurately document change in the skin integrity
1. Discontinue chlorhexidine skin antisepsis
2. Use alcohol 70% only to clean the insertion site
3. Continue to use the same dressing
4. Consider an oral non sedating antihistamine for pruritis
Discontinue alcohol skin antisepsis. Change to povidine-iodine. Ensure a skin patch test has been done for sensitivity BEFORE using it
Discontinue dressing and document brand name 1. Daily assessment and documentation of skin integrity
2. Continue to use povidine-iodine if there is no sensitivity
3. Implement dressing guide as shown in box 4
If skin reaction occurs within the week of dressing placement change dressing using the
step by step guide in the order below:
1. Bioclusive® 10.2x12.7cm oracle code:107172
2. Mepore Film 10cmx12cm oracle code:162243
3. Mepitel Film 10cm x 12cm oracle code:161349
4. Cutiplas® 15cmx8cm oracle code:113552
5. Sterile gauze dressing and secure with silicone tape* and co plus bandage*
6. 3M Kind silicone tape* 2.5cm x 5m oracle code: 161800
7. Co plus bandage* 7.5cmx3m oracle code: 109765
Maintain the same skin preparation regime as indicated in box 3
1.
2
.
3
.
4
.
Skin Reacted
Still Reacting
Reaction Continues
31
POSITIVE DISPLACEMENT (PDD) ACCESS DEVICE CHANGES
The CDHB policy requires all CVADs to have positive displacement devices (PDD) attached to the
catheter hub (exception Child Health and Dialysis Catheters). Inpatients change no more frequently
than 72hrs (CDC, 2002). It is important to establish regular change days. This ensures the catheter
is not compromised and minimizes the potential for infection. Strict hand hygiene and the wearing of
non sterile gloves are required for this procedure.
Child Health please refer to the CVAD locking solutions in Flushing Section
SCRUB THE HUB
Because organisms can be introduced via the catheter hub, it is essential to vigorously clean the
hub and its luer threads using an antimicrobial wipe before replacing a new access device.
Catheter hubs carry the highest risk for infection and should be protected from
contamination at all stages of the changing procedure (CDC Guidelines 2010).
CDHB DESIGNATED CHANGE DAYS FOR MaxPlus® PDD ACCESS DEVICES ARE:
INPATIENTS: TUESDAY and FRIDAY
OUTPATIENT: weekly (or 72hrly depending on number of accesses if receiving
treatment)
Dressing changes can be timed to coincide with PDD access device changes and catheter
flushing and catheter assessment and patency flow checks.
An aseptic non touch technique is used when changing PDD access devices. Ensure that all key
parts of the equipment are protected and not contaminated during the procedure. (Refer to figure18)
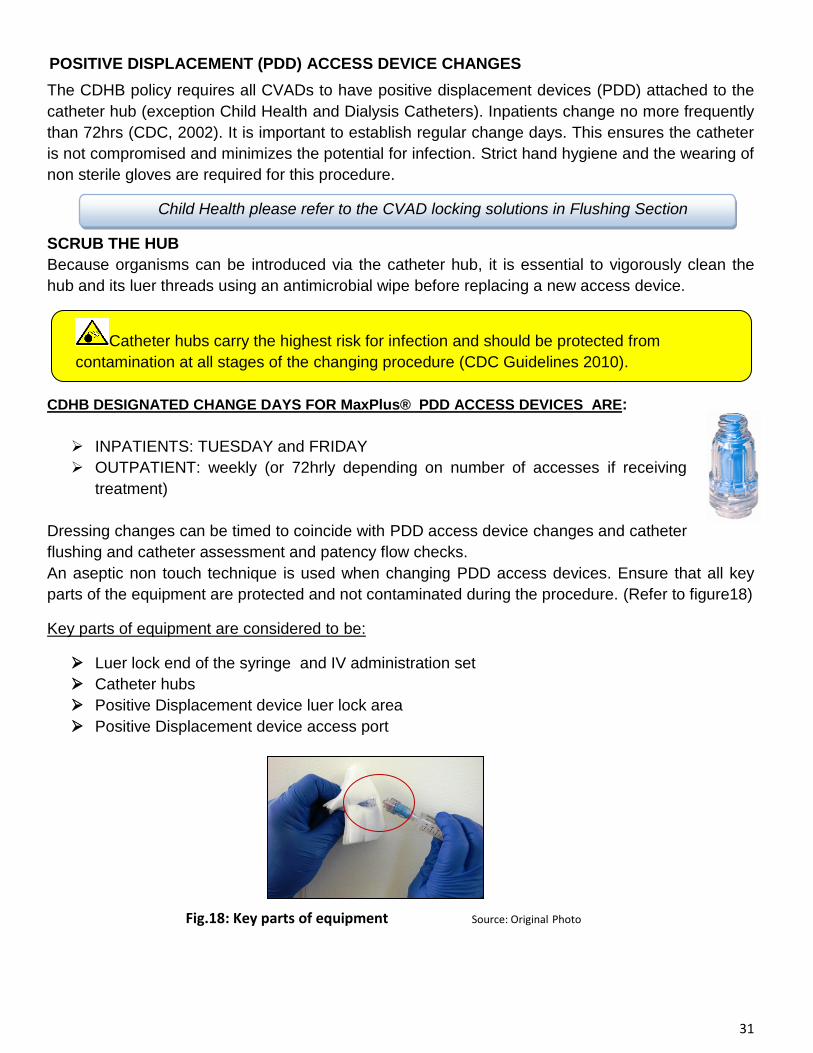
Key parts of equipment are considered to be:
Luer lock end of the syringe and IV administration set
Catheter hubs
Positive Displacement device luer lock area
Positive Displacement device access port
Fig.18: Key parts of equipment Source: Original Photo
32
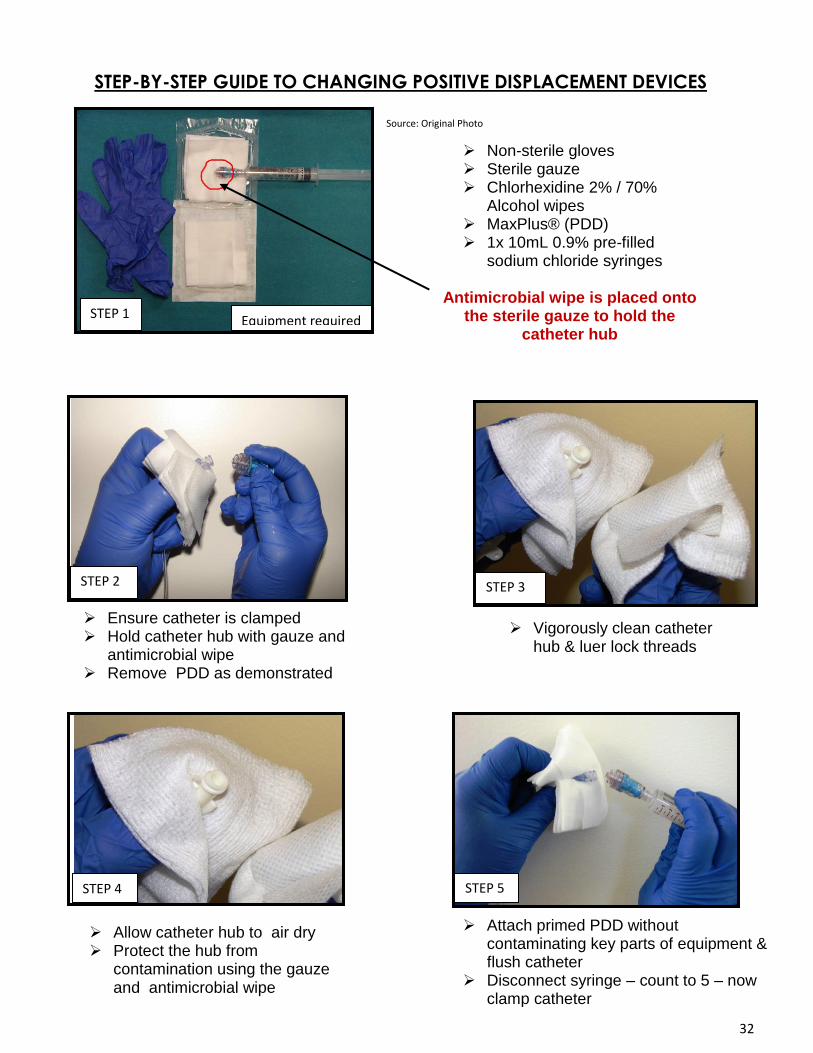
STEP-BY-STEP GUIDE TO CHANGING POSITIVE DISPLACEMENT DEVICES
Source: Original Photo
Non-sterile gloves Sterile gauze Chlorhexidine 2% / 70%
Alcohol wipes MaxPlus® (PDD) 1x 10mL 0.9% pre-filled
sodium chloride syringes Antimicrobial wipe is placed onto
the sterile gauze to hold the catheter hub
Ensure catheter is clamped Hold catheter hub with gauze and
antimicrobial wipe Remove PDD as demonstrated
above
Vigorously clean catheter hub & luer lock threads
Allow catheter hub to air dry Protect the hub from
contamination using the gauze and antimicrobial wipe
Attach primed PDD without contaminating key parts of equipment & flush catheter
Disconnect syringe – count to 5 – now clamp catheter
STEP 1
STEP 2 STEP 3
STEP 4 STEP 5
Equipment required
33
FLUSHING THE CATHETER
Flush all lumens to: maintain catheter patency
prevent contact between incompatible medications /fluids
reduce of intra-luminal biofilm
CVADs must never be forcefully flushed as this can lead to catheter damage, mal-positioning
and complications. Using 10mL syringes or larger create less positive pressure within the catheter
lumen therefore 10mL syringes are used to flush the catheter. Syringes 10mL or larger are used to
administer medications through CVADs
The flushing procedure involves significant manipulation of the access device site. Organisms can
be introduced during this procedure therefore disinfection is important to eliminate this potential.
Infections are transmitted via bacteria found on the skin and hands. Non sterile gloves should be
worn when accessing central lines to administer flushes or medication and when changing PDD
access devices. This protects the hands from blood contamination and descaling of bacteria from
the skin onto key parts during the procedure (Rowley, 2001).
Numerous factors affect the flushing procedure. These include:
Knowledge of the positive displacement device (MaxPlus®)
Using the appropriate flushing technique for that device
Correct catheter clamping sequence
Correct use of the syringe – (standard versus pre-filled)
Cleaning injection surface before connecting
Points to consider when flushing catheters
Catheter length adds resistance to fluid flow
Never flush against resistance
Flushing should not feel „hard‟
Resistance requires careful assessment to determine the cause
The inner diameter of the catheter dictates the:
o flow rate
o amount of pressure the catheter can tolerate
o priming volume for the lumen
MAINTAINING CATHETER PATENCY
Regular flush regimes are important in maintaining catheter patency. These should be carried out
prior to administration to check catheter patency; following the completion of medication and fluid
administration; in-between medications; blood product administration; PN; blood sampling and at
access device changes. NB. Adult Inpatients: When CVADs are not in use daily then the catheter
must be flushed once daily using 10mL sodium chloride 0.9% to maintain patency. Adult
Outpatients: CVAD must be flushed once weekly if not in use with10mL sodium chloride 0.9% to
maintain patency Child Health please refer to the CVAD „Locking solution‟ chart page 32
34
USING A POSITIVE DISPLACEMENT DEVICE
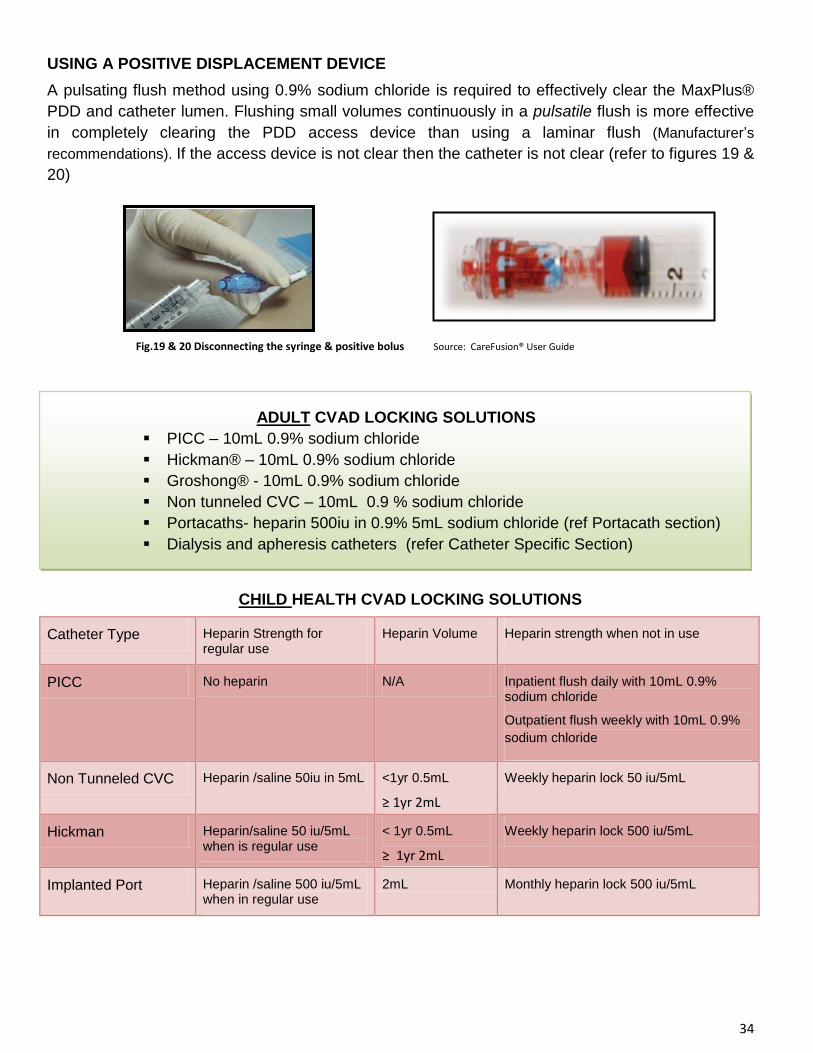
A pulsating flush method using 0.9% sodium chloride is required to effectively clear the MaxPlus®
PDD and catheter lumen. Flushing small volumes continuously in a pulsatile flush is more effective
in completely clearing the PDD access device than using a laminar flush (Manufacturer‟s
recommendations). If the access device is not clear then the catheter is not clear (refer to figures 19 &
20)
ADULT CVAD LOCKING SOLUTIONS
PICC – 10mL 0.9% sodium chloride
Hickman® – 10mL 0.9% sodium chloride
Groshong® - 10mL 0.9% sodium chloride
Non tunneled CVC – 10mL 0.9 % sodium chloride
Portacaths- heparin 500iu in 0.9% 5mL sodium chloride (ref Portacath section)
Dialysis and apheresis catheters (refer Catheter Specific Section)
CHILD HEALTH CVAD LOCKING SOLUTIONS
Catheter Type Heparin Strength for regular use
Heparin Volume Heparin strength when not in use
PICC No heparin N/A Inpatient flush daily with 10mL 0.9% sodium chloride
Outpatient flush weekly with 10mL 0.9%
sodium chloride
Non Tunneled CVC Heparin /saline 50iu in 5mL <1yr 0.5mL
≥ 1yr 2mL
Weekly heparin lock 50 iu/5mL
Hickman Heparin/saline 50 iu/5mL when is regular use
< 1yr 0.5mL
≥ 1yr 2mL
Weekly heparin lock 500 iu/5mL
Implanted Port Heparin /saline 500 iu/5mL when in regular use
2mL Monthly heparin lock 500 iu/5mL
Fig.19 & 20 Disconnecting the syringe & positive bolus Source: CareFusion® User Guide
35
Flushing a catheter requires the following flushing regime. This is referred to as the „S.A.S.‟
method.
S.A.S METHOD
S. Saline pre- flush using 10 mL
A. Administer medication / IV fluids
S. Saline post flushes using10mL pulsitile flush
Remember to always use 2 x 10mL flushes following:
Blood transfusion
Blood products
Blood sampling
PN
HOW BLOOD REFLUX OCCURS LEADING TO CATHETER OCCLUSION
Several factors can cause unintentional reflux of blood back into the catheter lumen leading to
partial or complete occlusion. These factors are:
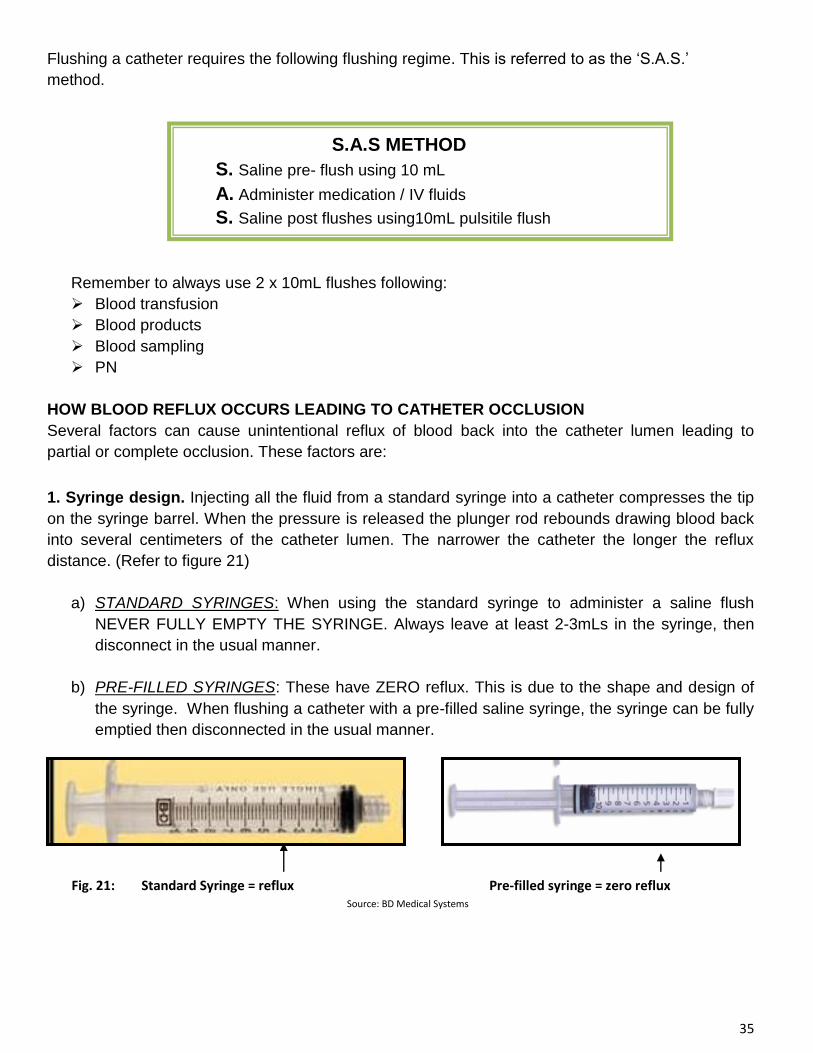
1. Syringe design. Injecting all the fluid from a standard syringe into a catheter compresses the tip
on the syringe barrel. When the pressure is released the plunger rod rebounds drawing blood back
into several centimeters of the catheter lumen. The narrower the catheter the longer the reflux
distance. (Refer to figure 21)
a) STANDARD SYRINGES: When using the standard syringe to administer a saline flush
NEVER FULLY EMPTY THE SYRINGE. Always leave at least 2-3mLs in the syringe, then
disconnect in the usual manner.
b) PRE-FILLED SYRINGES: These have ZERO reflux. This is due to the shape and design of
the syringe. When flushing a catheter with a pre-filled saline syringe, the syringe can be fully
emptied then disconnected in the usual manner.
Fig. 21: Standard Syringe = reflux Pre-filled syringe = zero reflux Source: BD Medical Systems
36
2. Needleless connectors. The MaxPlus® PDD access device is termed a positive displacement
device (PDD). This device withholds a small amount of fluid to overcome blood reflux.
Disconnecting the syringe forces the reserve fluid into the catheter lumen.
REMEMBER to disconnect the syringe, count to 5 to allow for the fluid displacement to occur,
and then clamp the catheter.
3. Aggressive Flushing
Aggressive flushing can shear off biofilm or thrombus and propel it into the blood stream. It can also
be responsible for mal positioning the catheter resulting in incorrect tip position and „whipping of the
catheter within the vein leading to perforation of the vessel
4. Changes in intra-thoracic pressure
Because no valve is located between the vena cava and the right atrium, some of the blood flows
retrograde (backwards) with every heart beat. Coughing, sneezing, vomiting, lifting heavy objects or
heart failure can increase intrathorasic pressure, forcing blood into the catheter lumen. For example,
if the patient coughs while the catheter isn‟t „locked‟ blood moves into the lumen.
5. Muscle contraction
Muscles act as a venous pump that helps the blood return to the heart. When a muscle contracts,
proximal valves open while distal valves close. Pressure from the contracting muscle forces the
locking fluid out of the catheter lumen allowing blood to reflux when the muscle relaxes. Therefore
avoid strenuous activities that involve arm movement in patients with PICCs.
6. Changes in Infusion Pressure
Venous pressure in the hand is about 35mm Hg; at the upper arm it is about 8mm Hg; in the SVC it
is 0mm Hg. Infusion pressure must be great enough to overcome venous pressure so that IV fluids
can enter the systemic circulation. Fluid infusing by gravity from 120cm above the patient exerts
about 100mm Hg of pressure. When the infusion bag empties, the infusion pressure is 0mmHG
which allows blood to flow back into the catheter lumen. Most infusion pumps will maintain positive
pressure and thus prevent blood reflux occurring.
It is important to note when fluids are free flowed they allow blood to reflux (flow back) into
the CVAD giving rise to catheter occlusion. For this reason medications and IV fluids are
administered via an infusion pump to prevent this complication.

37
BLOOD SAMPLING
_______________________________________________ Blood sampling from catheters is common practice. However it is important to recognise that blood
withdrawal can contribute to thrombotic catheter occlusion if the catheter is not adequately flushed.
The INS „Flush Protocols‟ recommend 5-10mLs 0.9% sodium chloride after any blood withdrawal
from a CVAD. The most common method used to obtain blood is the discard method. The first
aspirate of blood is discarded to reduce the risk of drug concentration or diluted specimen
(Boodhan, 2006). When a CVAD has more than one lumen, the largest lumen should be used for
obtaining specimens.
The accuracy of samples can be altered when blood is drawn from silicone catheters. Some
drugs leach into the silicone e.g. gentamycin and tobramycin (Boodhan, 2006). If bloods tests for
aminoglycocides levels or coagulation profiles are required from a single lumen CVAD, flush the
catheter / Port first with 20mL sodium chloride prior to blood sampling then aspirate blood discard
sample before taking required blood tests (Boodhan, 2006).
Hickman® catheters, non tunnelled CVCs and Portacaths have larger lumens therefore both the syringe and vacutainer method is suitable for obtaining samples. PICC are also suitable for both methods and whilst both methods may be used, the vacutainer
method may not be as reliable as it creates more negative pressure resulting in difficulty in obtaining
blood samples. A more reliable method of obtaining blood samples from PICC„s is by using smaller
syringes i.e. 5mL which create less negative pressure enabling blood to be drawn into the syringe.
ACTION
1. If blood does not flow into the blood tube or syringe have the patient cough, hold their breath,
change position, or lift their arm
2. Flush with 10mL 0.9% sodium chloride and then attempt to withdraw blood again
3. Replace blood tube with a new tube (the tube may have lost its vacuum)
ORDER OF DRAW
Always ensure blood sample collection tubes are used in the correct order of draw. This avoids cross contamination of anticoagulants used in the different tubes and ensures integrity
of the sample.
NB. The order of draw can be found on the laboratory blood request form.
If blood cultures are required then the „discard blood‟ samples are used. These are placed in blood
culture bottles. The remaining blood samples are then taken in correct order of draw.
METHODS OF OBTAINING BLOOD SAMPLES
Two recommended methods can be used to withdraw samples (INS, 2010). These are:
The syringe method (page 38)
The vacutainer method (page 39)
38
SYRINGE METHOD Please note the syringe method is always used for blood sampling in Child health
1. Check blood tests requested
2. Hand hygiene and use non sterile gloves
3. Vigorously clean the MaxPlus® access device with chlorhexidine 2% & alcohol 70%
4. Allow to dry – 15-30 seconds
5. Unclamp catheter
6. Withdraw 10mL of discard blood – Hickman®, CVC, Port-a-cath
7. Clean access device then attach 10mL syringe and withdraw blood sample/s. The maximum
fill is found on the tube. For PICCs, withdraw 3-5mL discard blood before taking samples.
withdrawal blood sample/s
8. Attach syringe to a blood transfer device (PINK TIP) and insert blood tubes in order of draw
and allow tubes to fill
9. Gently mix blood tube/s
10. Vigorously clean the MaxPlus ® port access, as above and allow to dry
11. Pulsitile flush catheter with 2x 10mL 0.9% sodium chloride
12. Disconnect syringe, count to 5 and allow displacement to occur
13. Clamp catheter
14. Label blood tubes with patient details and send to laboratory with blood request form
PICCs may require a firm flush of 10mL 0.9% sodium chloride to initiate flow prior to taking a
blood sample. Attach a 10mL standard syringe filled with 5-10mL sodium chloride to the access
device, administer a firm flush then gently aspirate back to establish flow. If blood return is
achieved then discard sample & attach a 5mL syringe/s or vacutainer (as appropriate) and take
blood samples.
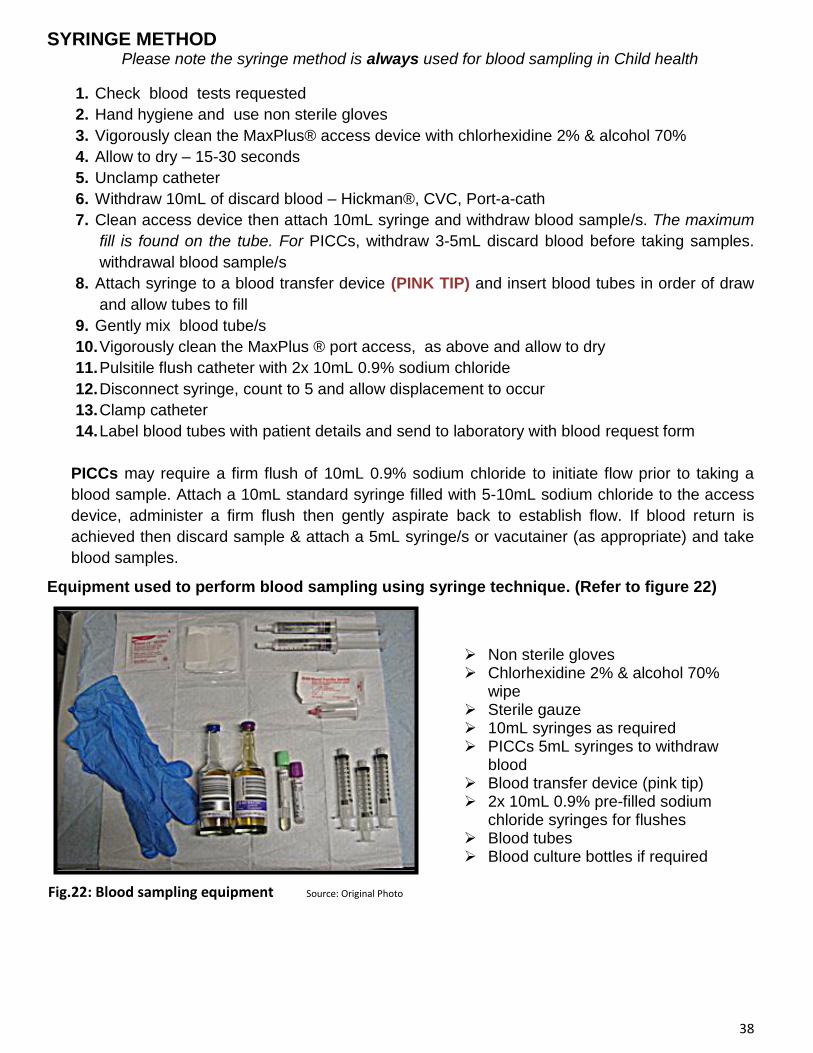
Equipment used to perform blood sampling using syringe technique. (Refer to figure 22)
Non sterile gloves Chlorhexidine 2% & alcohol 70%
wipe Sterile gauze 10mL syringes as required PICCs 5mL syringes to withdraw
blood Blood transfer device (pink tip) 2x 10mL 0.9% pre-filled sodium
chloride syringes for flushes Blood tubes Blood culture bottles if required
Fig.22: Blood sampling equipment Source: Original Photo

39
VACUTAINER METHOD
Please note the vacutainer method is never used for blood sampling in Child health
ACTION The sterile vacutainer with a BLUE „MALE‟ LUER LOCK is used for this procedure. If
the blood collection is unsuccessful then the vacutainer must be discarded and replace with a
new sterile vacutainer
1. Check blood tests requested
2. Hand hygiene and use non sterile gloves
3. Vigorously clean the MaxPlus® access device with chlorhexidine 2% & alcohol 70%
4. Allow to dry – 15-30 seconds
5. Unclamp catheter
6. Attach the blue tip vacutainer holder to the MaxPlus® access device and insert a plain 10mL
blood tube (RED) to collect discard blood. Remove tube and discard
7. Insert blood tubes in correct order of draw
8. Gently mix blood tubes
9. Remove vacutainer from access device
10. Vigorously clean MaxPlus® PDD and allow to dry
11. Flush with 2x 10mL 0.9% pre-filled sodium chloride syringes
12. Disconnect syringe count to 5 and allow for displacement to occur
13. Clamp catheter
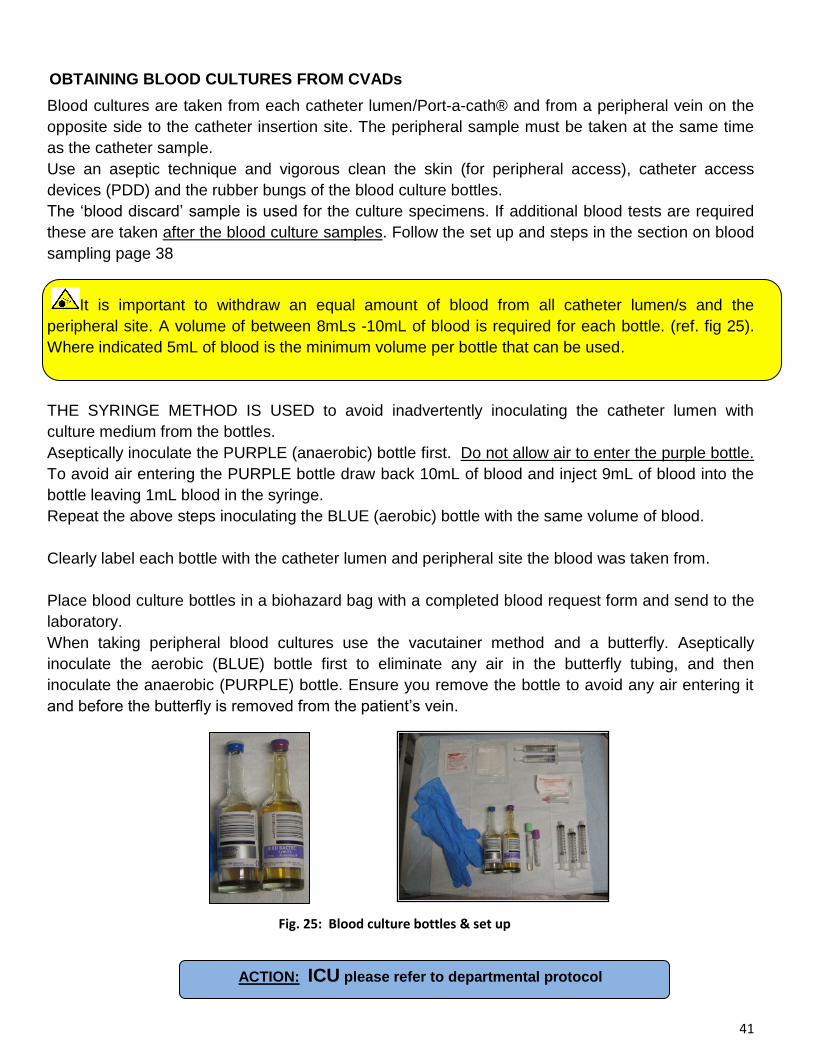
Equipment used to perform blood sampling using a vacutainer. (Refer to figure 23)
Non sterile gloves Chlorhexidine 2% & alcohol 70%
wipe Sterile gauze BLUE tip vacutainer holder 2x 10mL 0.9% pre-filled sodium
chloride syringes Blood tubes
Fig.23: Vacutainer equipment Source: Original Photo
40
BLOOD SAMPLING AND PARENTRAL NUTRITION
It is recommended that blood tests should be taken from a peripheral vein in patients receiving PN
unless the patient is venous compromised or it is clinically indicated.
If using a CVAD to obtain blood samples it is recommended that these should be taken at the
completion of each cycle of PN infusion and prior to commencing a new infusion. This gives a more
accurate picture of the biochemistry profile.
Refer to Adult Parenteral Nutrition Prescription QMR114 for guidelines on monitoring Parenteral
Nutrition (PN).
ACTION: There are some exceptions to obtaining peripheral blood samples. Haematology,
Oncology and Child Health patients‟ are usually venous compromised due to disease management
and administration of complex IV therapies. In addition children find repeated peripheral blood
sampling traumatic. The CVAD is therefore the appropriate method of obtaining blood samples. If
blood samples are required during administration of PN figure 24 demonstrates the correct method.
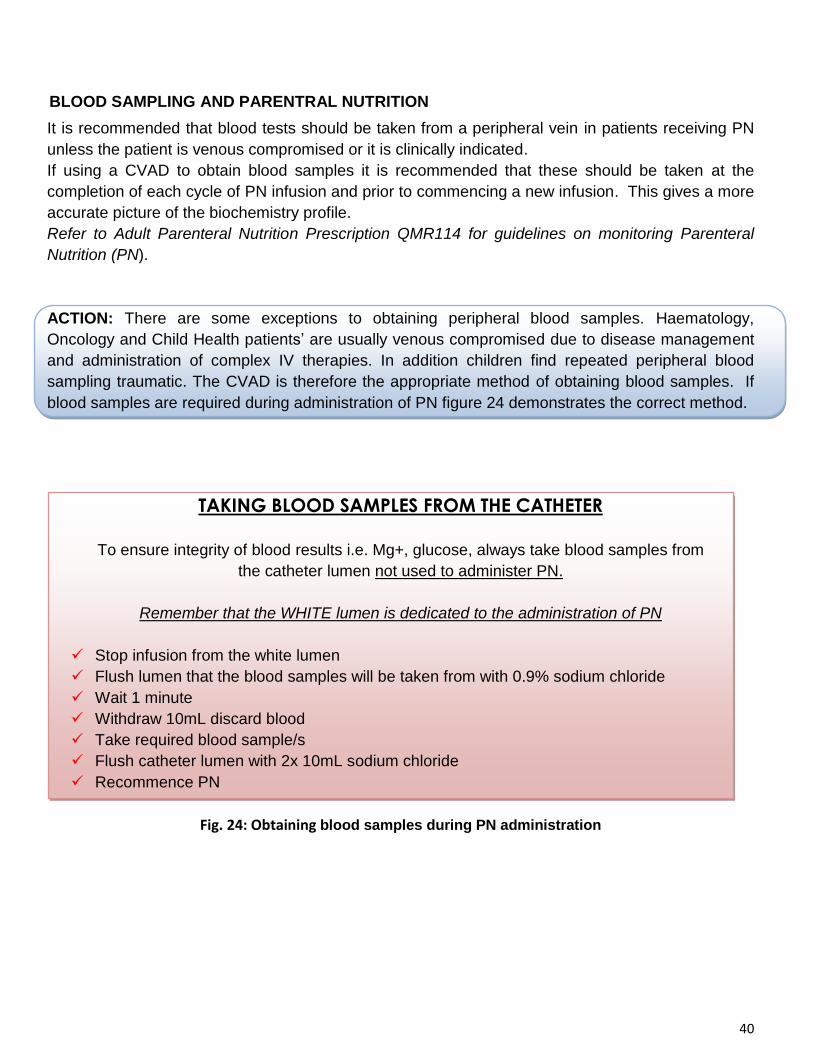
TAKING BLOOD SAMPLES FROM THE CATHETER
To ensure integrity of blood results i.e. Mg+, glucose, always take blood samples from
the catheter lumen not used to administer PN.
Remember that the WHITE lumen is dedicated to the administration of PN
Stop infusion from the white lumen
Flush lumen that the blood samples will be taken from with 0.9% sodium chloride
Wait 1 minute
Withdraw 10mL discard blood
Take required blood sample/s
Flush catheter lumen with 2x 10mL sodium chloride
Recommence PN
Fig. 24: Obtaining blood samples during PN administration
41
OBTAINING BLOOD CULTURES FROM CVADs
Blood cultures are taken from each catheter lumen/Port-a-cath® and from a peripheral vein on the
opposite side to the catheter insertion site. The peripheral sample must be taken at the same time
as the catheter sample.
Use an aseptic technique and vigorous clean the skin (for peripheral access), catheter access
devices (PDD) and the rubber bungs of the blood culture bottles.
The „blood discard‟ sample is used for the culture specimens. If additional blood tests are required
these are taken after the blood culture samples. Follow the set up and steps in the section on blood
sampling page 38
It is important to withdraw an equal amount of blood from all catheter lumen/s and the
peripheral site. A volume of between 8mLs -10mL of blood is required for each bottle. (ref. fig 25).
Where indicated 5mL of blood is the minimum volume per bottle that can be used.
THE SYRINGE METHOD IS USED to avoid inadvertently inoculating the catheter lumen with
culture medium from the bottles.
Aseptically inoculate the PURPLE (anaerobic) bottle first. Do not allow air to enter the purple bottle.
To avoid air entering the PURPLE bottle draw back 10mL of blood and inject 9mL of blood into the
bottle leaving 1mL blood in the syringe.
Repeat the above steps inoculating the BLUE (aerobic) bottle with the same volume of blood.
Clearly label each bottle with the catheter lumen and peripheral site the blood was taken from.
Place blood culture bottles in a biohazard bag with a completed blood request form and send to the
laboratory.
When taking peripheral blood cultures use the vacutainer method and a butterfly. Aseptically
inoculate the aerobic (BLUE) bottle first to eliminate any air in the butterfly tubing, and then
inoculate the anaerobic (PURPLE) bottle. Ensure you remove the bottle to avoid any air entering it
and before the butterfly is removed from the patient‟s vein.
ACTION: ICU please refer to departmental protocol
Fig. 25: Blood culture bottles & set up
42
CATHETER REMOVAL
__________________________________________________________
CVADs should be removed as soon as they are no longer required. Daily review of the catheter with
prompt removal of unnecessary catheters is one of the components of the
Maintenance Bundle as originally defined and promoted by the Institute of
Healthcare Improvement (IHI, 2008). It is the responsibility of Medical staff to authorise catheter removal.
Medical staffs are responsible for the removal of the following CVADs.
Tunneled Hickman catheters
Central Venous Catheters(CVC) non tunneled catheters
The Vascular surgeon is responsible for the removal of:
Implanted Ports (N.B. this may be performed under a general
anaesthetic or sedation for the respiratory compromised )
Registered Nurses and Midwives with appropriate knowledge and skill may remove
Central Venous Catheters(CVC) non tunneled catheters
PICCs
KEY POINTS OF CVC AND PICC CATHETER REMOVAL
Use caution when removing either a PICC or CVC non tunnelled catheter to prevent air entering
along the catheter tract.
Position patient in supine or semi supine
For PICCs ensure the arm is at 90° angle if a Basilic placement and a 45° angle if Cephalic
Use a dressing pack and aseptic technique to prepare site
Remove dressings, securement devices and/or sutures
Clean exit site with chlorhexidine 2% and 70% alcohol wipe (if oozing or discharge present
take a swab for culture)
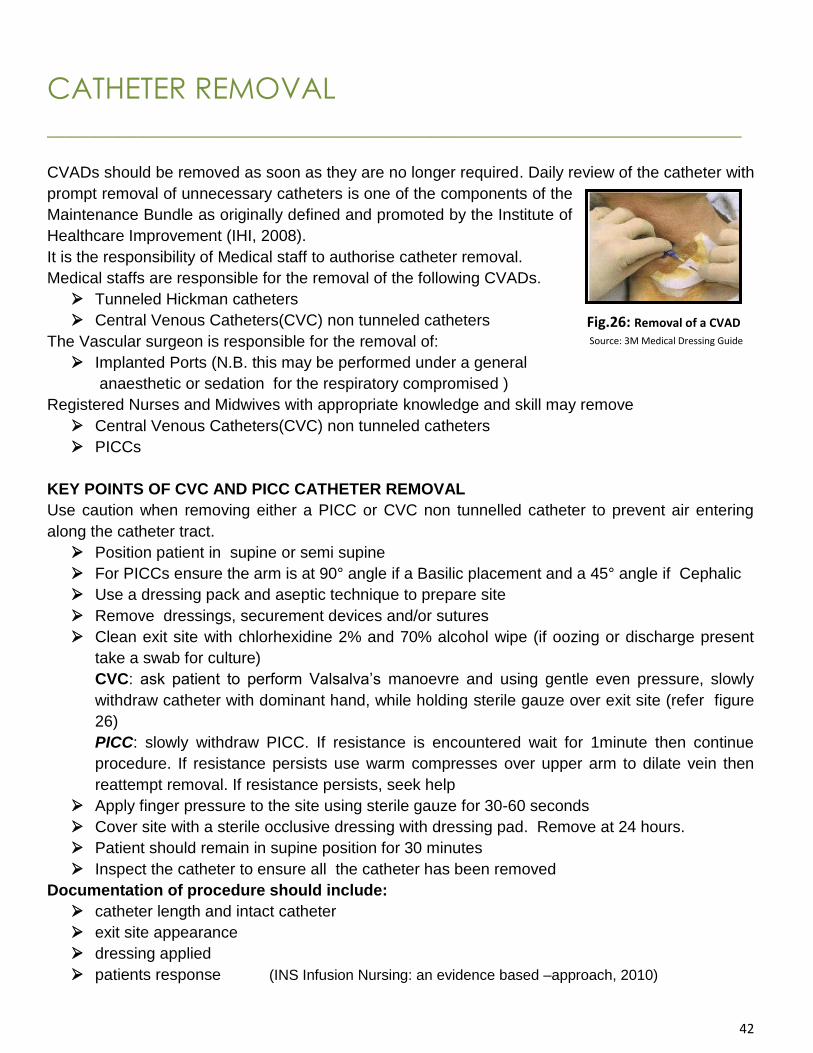
CVC: ask patient to perform Valsalva‟s manoevre and using gentle even pressure, slowly
withdraw catheter with dominant hand, while holding sterile gauze over exit site (refer figure
26)
PICC: slowly withdraw PICC. If resistance is encountered wait for 1minute then continue
procedure. If resistance persists use warm compresses over upper arm to dilate vein then
reattempt removal. If resistance persists, seek help
Apply finger pressure to the site using sterile gauze for 30-60 seconds
Cover site with a sterile occlusive dressing with dressing pad. Remove at 24 hours.
Patient should remain in supine position for 30 minutes
Inspect the catheter to ensure all the catheter has been removed
Documentation of procedure should include:
catheter length and intact catheter
exit site appearance
dressing applied
patients response (INS Infusion Nursing: an evidence based –approach, 2010)
Fig.26: Removal of a CVAD
Source: 3M Medical Dressing Guide
43
DOCUMENTATION
__________________________________________________________ Nurses and Midwives are responsible for assessment of the patient; development of the nursing plan
of care to reach established goals and evaluate the effectiveness of the care given.
Clinical effectiveness is about doing the right thing in the right way and at the right time for the patient
(Royal College of Nursing, 2006).
The importance of central line assessment and documentation of findings is often overlooked and can
lead to complication which can be avoidable.
Effective documentation is an integral part of good patient care (INS, 2010).
Documentation provides a pathway to continuity of care. Each point of care reveals the patient‟s
clinical picture therefore documentation on the „CVAD Insertion and Management Form‟ C270118 /9
should accurately include the following:
Patient assessment
Catheter site assessment
Catheter flow assessment
Catheter care assessment
Length and gauge size of non coring needle used to access Port-a-cath®
Review of medications and infusates
Any complications
Interventions performed
Evaluation of interventions including „care bundles‟
Outcomes
PATIENT EDUCATION_______________________________
Based on a thorough assessment of the patient‟s needs, a plan is devised based on what needs to be taught; how the patient will be taught; overcoming barriers to effective teaching; and when and in what time frame the patient will be taught (INS, 2010).Use the appropriate catheter „Patient Information booklet‟ To plan an educational intervention that will be effective and family/Whanau patient-centred, the following objectives should be considered: Determine a clear understanding of what the patient needs to learn
Determine barriers to learning
Determine how the patient best learns
Determine the goals for catheter maintenance
Written information that will help the patient and family/Whanau learn how to identify
problems
Deconstruct treatment information into understandable manageable units
Promote self-care skills where appropriate
ACTION: Initiate the patient‟s education from the day of admission or as soon as possible.
44
COMPLICATIONS AND MANAGEMENT
_____________________________________________ The presence of a Central Venous Access Device (CVAD) places the patient at risk not only
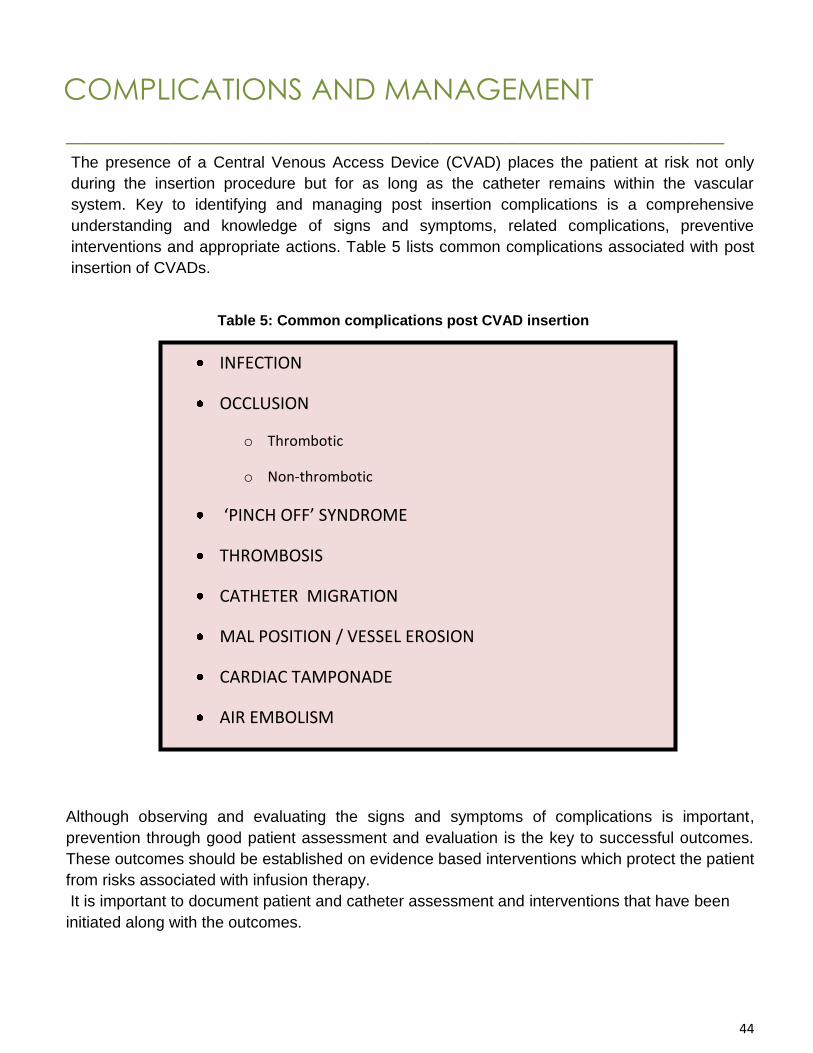
during the insertion procedure but for as long as the catheter remains within the vascular
system. Key to identifying and managing post insertion complications is a comprehensive
understanding and knowledge of signs and symptoms, related complications, preventive
interventions and appropriate actions. Table 5 lists common complications associated with post
insertion of CVADs.
Although observing and evaluating the signs and symptoms of complications is important,
prevention through good patient assessment and evaluation is the key to successful outcomes.
These outcomes should be established on evidence based interventions which protect the patient
from risks associated with infusion therapy.
It is important to document patient and catheter assessment and interventions that have been
initiated along with the outcomes.
INFECTION
OCCLUSION
o Thrombotic
o Non-thrombotic
‘PINCH OFF’ SYNDROME
THROMBOSIS
CATHETER MIGRATION
MAL POSITION / VESSEL EROSION
CARDIAC TAMPONADE
AIR EMBOLISM
PHLEBITIS
Table 5: Common complications post CVAD insertion
45
CATHETER RELATED INFECTION
_______________________________________________
Infection interrupts the patient‟s prescribed therapy, impacts on the length of therapy the patient
requires or receives and increases the length of hospital stay and cost.
Skin is the primary source of contamination. The source can either be from the patient‟s skin or
hands of health care workers. Infection can be local or systemic. Risk factors for infection are
institution related, patient related or a combination of both.
Institution Related Risk Factors Lack of hand hygiene
Lack of asepsis
Skill of inserter
Substandard equipment
Non adherence to maximal sterile barrier technique
Catheter material and number of lumens
Maintenance and care
Patient Related Risk Factors
Immune suppressed
Neutropenic
Multiple blood product administration (Hanna & Raad, 2001)
Poor nutrition
Parenteral nutrition (Penel et al,2007)
Renal failure (Hosoglu,2004)
Chronic infection
Diabetes
Short bowel syndrome
Oedema
Vascular disease
Self care deficit – poor hygiene and ability to manage cares
46
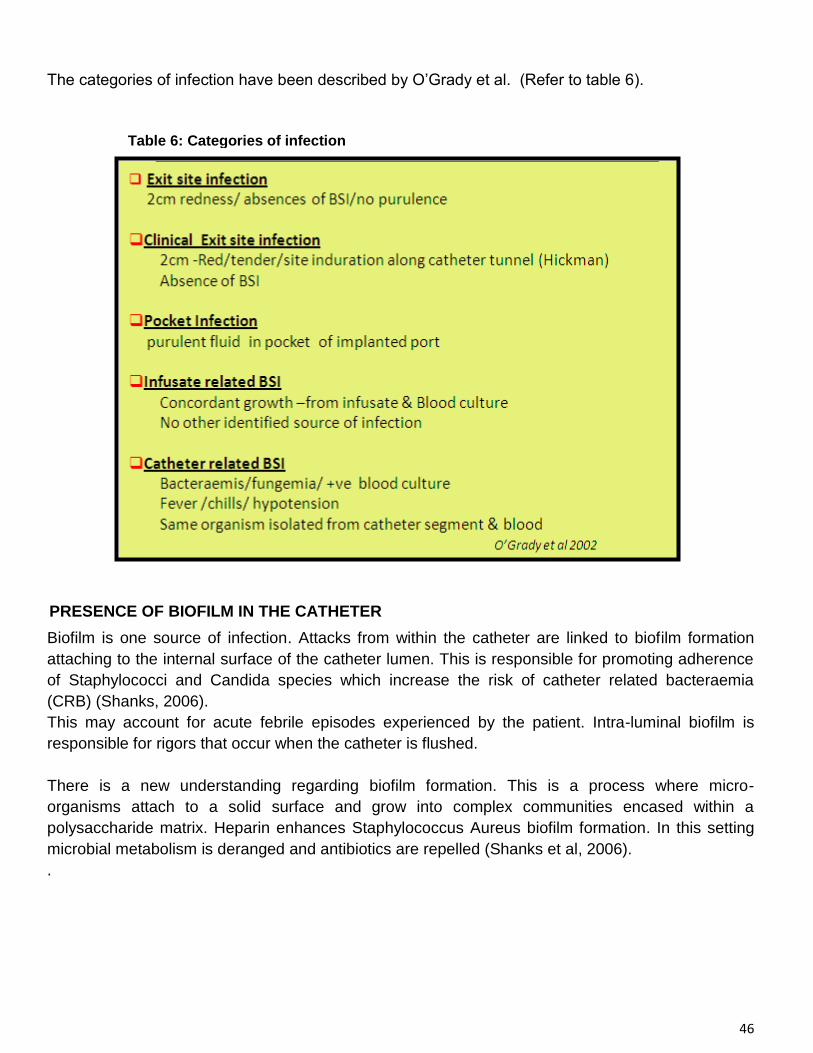
The categories of infection have been described by O‟Grady et al. (Refer to table 6).
PRESENCE OF BIOFILM IN THE CATHETER
Biofilm is one source of infection. Attacks from within the catheter are linked to biofilm formation
attaching to the internal surface of the catheter lumen. This is responsible for promoting adherence
of Staphylococci and Candida species which increase the risk of catheter related bacteraemia
(CRB) (Shanks, 2006).
This may account for acute febrile episodes experienced by the patient. Intra-luminal biofilm is
responsible for rigors that occur when the catheter is flushed.
There is a new understanding regarding biofilm formation. This is a process where micro-
organisms attach to a solid surface and grow into complex communities encased within a
polysaccharide matrix. Heparin enhances Staphylococcus Aureus biofilm formation. In this setting
microbial metabolism is deranged and antibiotics are repelled (Shanks et al, 2006).
.
Table 6: Categories of infection
47
DETECTING INFECTION Detecting requires daily assessment and monitoring of the following:
The catheter exit site for redness and / or discharge
Tunnel area of tunnelled catheters for swelling and induration.
The portal pocket for swelling and redness
Neck and upper arm for swelling, pain, redness
Monitoring for systemic changes such as:
Fever
Hypotension
Tachycardia
Chills/rigors
Vomiting
MANAGEMENT OF INFECTION
If symptoms of an infection develop a blood cultures are taken from each catheter lumen and a
peripheral sample is taken from the arm opposite to the catheter insertion site. In addition the
following is also carried out:
A swab is taken from the catheter insertion site if exudate is present
A mid-stream urine specimen may be obtained and other test may be ordered such as a
chest x-ray
Antibiotics will be prescribed and depending on the blood culture result the antibiotics may be
reviewed and replaced with target antibiotics
In some instances the catheter will require removal with the tip sent to the laboratory for
culture.
PREVENTION OF INFECTION
Knowledge of patients most likely at risk, good nursing assessment and infection prevention
strategies are the key to preventing infection. They are:
Monitoring the patient for any changes in the vital signs and documenting outcomes
Effective hand hygiene
Aseptic non touch technique (ANTT)
Vigorous cleaning of all catheter and infusion set access ports, allowing time to dry before
connection
Changing access devices on designated days or if the access device is unable to be cleared
of blood or drugs
Replacing the catheter dressing if it becomes compromised
Infusion set changes every 72 hours. Exceptions are following PN, Ciclosporin(CSA) and
some other drugs where the IV sets are changed at 24 hours or single use only
Labeling IV administration sets to identify the infusion in progress e.g. PN, CSA,
Maintenance fluids, Heparin, Insulin
Maintaining a „closed system‟ during Parenteral Nutrition (PN) administration and using a
dedicated catheter lumen – this is the WHITE LUMEN
Consider an antimicrobial /antiseptic coated catheter for high risk patients in ICU
Good documentation of the patient and their vital signs, catheter site, catheter care and
catheter function
48
PROPHYLATIC CATHETER LOCK SOLUTIONS
______________________________________________
Prophylactic catheter lock solutions are referred to as „locks.‟ They are used to prevent catheter
related infection (CRI) occurring in CVADs by reducing the bacterial biofilm that forms on catheter
surfaces. They eradicate the microorganisms within the catheter lumen. The use of routine lock
solutions is recommended for patients with a history of recurring CRI and who are at risk for serious
consequences from these infections. The following „locks‟ solutions are commonly used.
ETHANOL (ETOH)
Ethanol is used on a regular basis to prevent catheter related infections in the immune -
compromised patient. Locks made up of ETOH 70% are instilled into each catheter lumen and left in
the catheter lumens for 2hrs. The locks are withdrawn or can be flushed through the catheter using
10mLs 0.9% sodium chloride (Chambers, Peddie & Pithie, 2006).
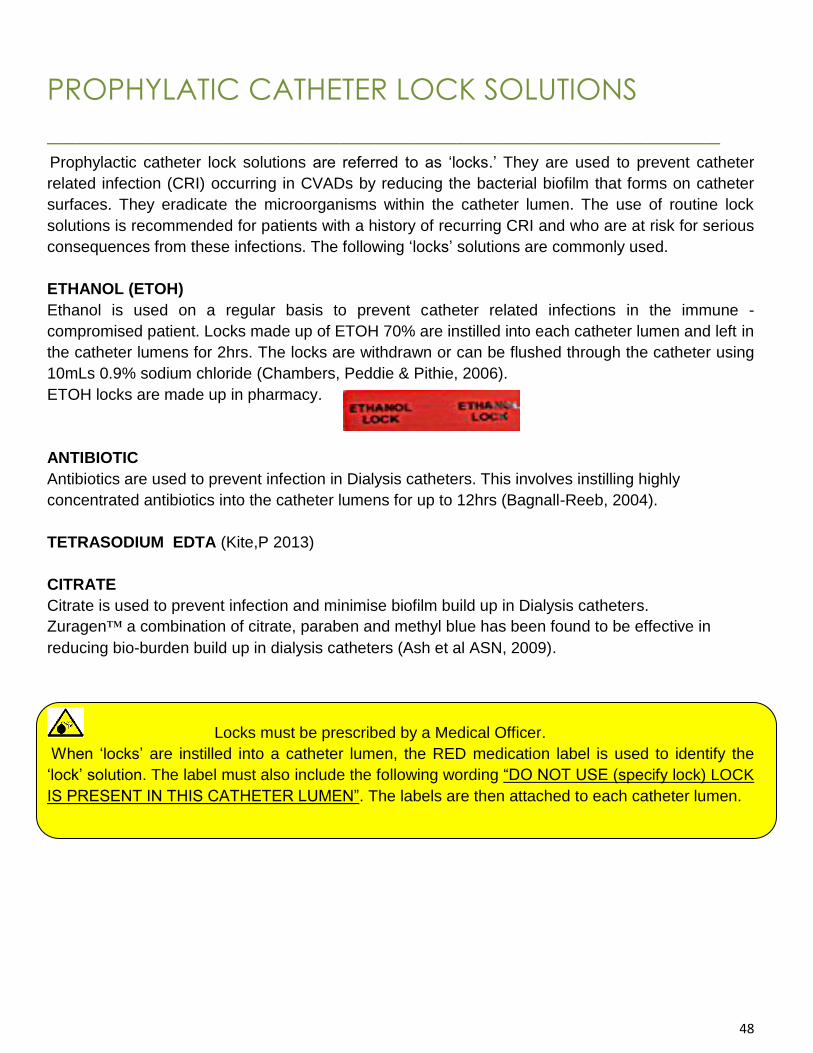
ETOH locks are made up in pharmacy.
ANTIBIOTIC
Antibiotics are used to prevent infection in Dialysis catheters. This involves instilling highly
concentrated antibiotics into the catheter lumens for up to 12hrs (Bagnall-Reeb, 2004).
TETRASODIUM EDTA (Kite,P 2013)
CITRATE
Citrate is used to prevent infection and minimise biofilm build up in Dialysis catheters.
Zuragen™ a combination of citrate, paraben and methyl blue has been found to be effective in
reducing bio-burden build up in dialysis catheters (Ash et al ASN, 2009).
Locks must be prescribed by a Medical Officer.
When „locks‟ are instilled into a catheter lumen, the RED medication label is used to identify the
„lock‟ solution. The label must also include the following wording “DO NOT USE (specify lock) LOCK
IS PRESENT IN THIS CATHETER LUMEN”. The labels are then attached to each catheter lumen.

49
CATHETER OCCLUSION
______________________________________________
Catheter occlusion is defined as a partial or complete obstruction of the catheter that limits or
prevents the ability to withdraw blood, flush the catheter, and/or administer medications or solutions.
It is a significant complication that may delay or interrupt therapy.
Catheter occlusions may be due to thrombotic, non-thrombotic or mechanical causes (INS, 2010)
It is imperative to recognise the TYPE of OCCLUSION and how it occurred so that it is managed
appropriately.
SIGNS OF OCCLUSION:
Ability to flush but not aspirate blood is called a persistent withdrawal occlusion (PWO)
Ability to aspirate but not flush is called a reverse ball occlusion(Ports)
Resistance to flushing
Sluggish infusion
Complete inability to flush or infuse
Increasing alarm occlusion with electronic infusion devices
ACTION When a catheter is partially occluded immediate action is required to restore patency or
the line may need to be removed and/or replaced. It is easier to restore patency in a partially
occluded line than one that has become totally occluded
Education and knowledge is a key element to successful management in overcoming such
problems as:
Insufficient or incorrect flushing technique and clamping sequence to maintain catheter
patency
Knowledge deficit with equipment and catheter add on devices
Knowledge deficit regarding catheter blood reflux
Late recognition of problems / ignoring problems
Inadequate assessment of occlusions
Underestimating drug precipitate problems and lack of comfort with new drugs
RISK FACTORS: Risk factors include:
Coagulation abnormalities, blood viscosity, dehydration
Anatomy and physiology
The catheter gauge and length
The characteristics of drugs and blood products
The type of occlusion
The way occlusion occurs either sudden or gradual
DON‟T IGNORE SYMPTOMS, OCCLUSIONS DO NOT RESOLVE OF THEIR OWN ACCORD
50
THROMBOTIC OCCLUSION
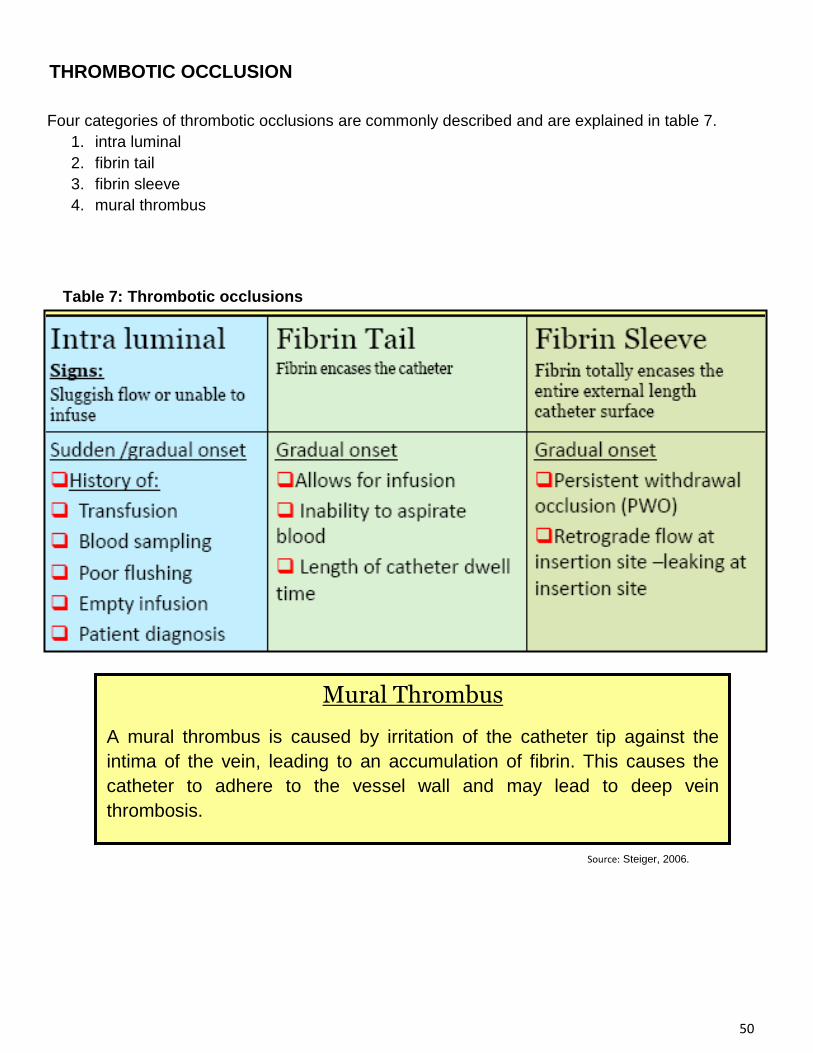
Four categories of thrombotic occlusions are commonly described and are explained in table 7.
1. intra luminal
2. fibrin tail
3. fibrin sleeve
4. mural thrombus
Table 7: Thrombotic occlusions
Mural Thrombus
A mural thrombus is caused by irritation of the catheter tip against the
intima of the vein, leading to an accumulation of fibrin. This causes the
catheter to adhere to the vessel wall and may lead to deep vein
thrombosis.
Source: Steiger, 2006.
51
PREVENTION OF THROMBOTIC OCCLUSION
INTRA LUMINAL
Intra luminal thrombotic occlusion may be prevented and is usually caused by reflux of blood flowing
back into the catheter tip.
Prevention Strategies:
Use correct flushing technique in a pulsating flush
Use pre-filled normal saline syringes which have zero reflux
Use a positive displacement device(PDD)
Use the correct clamping sequence
Treat partial occlusions as they occur using Actilyse® (t-PA )
FIBRIN TAILS
Fibrin tails usually result in persistent withdrawal occlusion (PWO). Fibrin can be lysised /dissolved by
very slowly by instilling t-PA into the catheter lumen/s and leaving for 2hrs.The „over fill technique‟
(described on page 54) can also be used and will successfully re-establish catheter patency. If
clearance is not achieved then snaring of the fibrin can be carried out under radiology guidance in
Interventional Radiology.
FIBRIN SLEEVE
A fibrin sleeve can also result in PWO. Because of the way this occlusion develops removing the
fibrin becomes a challenge. Often the „over-fill technique‟ will be successful in re-establishing
catheter patency and flow. Interventional radiology may be used to snare the sleeve however it is
dependent on the length of the sleeve. If the sleeve interferes with catheter flow then removal may
be the only solution.
MURAL THROMBUS
A mural thrombus occurs when irritation by the catheter causes damage to the vein wall and an
accumulation of fibrin also builds up in the catheter. The catheter adheres to the vein wall which
may lead to a deep vein thrombosis requiring catheter removal.
Mal positioning of a catheter tip may cause occlusion problems preventing blood withdrawal.
The catheter tip may be resting against the vein wall blocking blood withdrawal. This is suspected
when difficulty in blood aspiration is resolved with a cough, Valsalva‟s maneuver, or change of a body
position. Persistent inability to obtain blood return may indicate poor catheter tip placement, catheter
migration or fibrin tail or sleeve formation.

52
MANAGEMENT OF OCCLUSIONS
The appropriate method for installation of Actilyse® (t-PA) should be determined by whether the catheter is partially or completely occluded. The standard protocol for instilling t-PA for incomplete occlusion or withdrawal occlusion found on page 53 refers to the „restoring catheter patency‟ flow chart. This flow chart can also be used for instilling agents for non thrombotic occlusions. In the case of a complete occlusion follow the alternative methods found on pages 55-56. It is a medical responsibility to prescribe the appropriate catheter restoration agent.
In both adults and children the only recommended technique for complete occlusion is the 3 way
tap method
Clots that persist for more than seven days become resistant to thrombolytic treatment
(Steiger, 2006), therefore thrombotic occlusions should be treated as soon as they are identified.
Fig.27: Action of t-PA in dissolving clot formation Source: Gentec Inc. 2006
Actylise® (t-PA) is a recombinant form of the normal blood component tissue-type plasminogen activator (t-PA), which causes thrombolysis. t-PA binds to and activates plasminogen, producing plasmin. Plasmin dissolves fibrin, releasing fibrin degradation products and causing the clot to dissolve as shown in figure 27.

53
FLOW CHART TO RESTORE CATHETER PATENCY USING ACTILYSE t-PA
Before administering Actilyse t-PA check patients platelet count (haematology only)
Have Actilyse® prescribed on medication chart
Reconstitute Actilyse t-PA 10mgs/10mL with the diluent provided, mix well, place the patients ID label on vial with date and time.
Draw up 2mL into a 10mL syringe. Put remainder of labelled vial in fridge should a second dose be required.
This must be discarded after 8 hours if not used
Source: The Haematology Red Book Christchurch Hospital
Instil 2mL Actilyse t-PA into catheter lumen/s (Label catheter lumen/s with red drug label and include “Declotting agent in place do not use”) Leave t-PA for two (2) hours
Aspirate t-PA from catheter (5-10mL blood). If unable to aspirate, flush through the catheter using 10mls 0.9% normal saline, then aspirate back.
Is patency restored?
Flush catheter with 2 x 10mL normal saline. Then put new primed access device onto catheter No further action required
Re-instill second dose of t-PA 2mL
into lumen for an additional 90mins (or
overnight) - then attempt withdrawal.
Attach a RED drug label complete
with date & time instilled & ‘Do not
use catheter’ to the lumen/s to
indicate it contains t-PA.
Consider dye studies (Radiology) to
determine type of occlusion and check
catheter position
Catheter malfunction remains
May require repositioning or removal If fibrin tail – then removal by snaring may be possible
If catheter presents with a complete occlusion use
the 3-way tap technique to create negative
pressure in the catheter lumen. The vacuum
draws the t-PA into the catheter lumen (use this
flow chart and refer to diagrams on page 56).
Is patency restored?
YES
YES
NO
NO
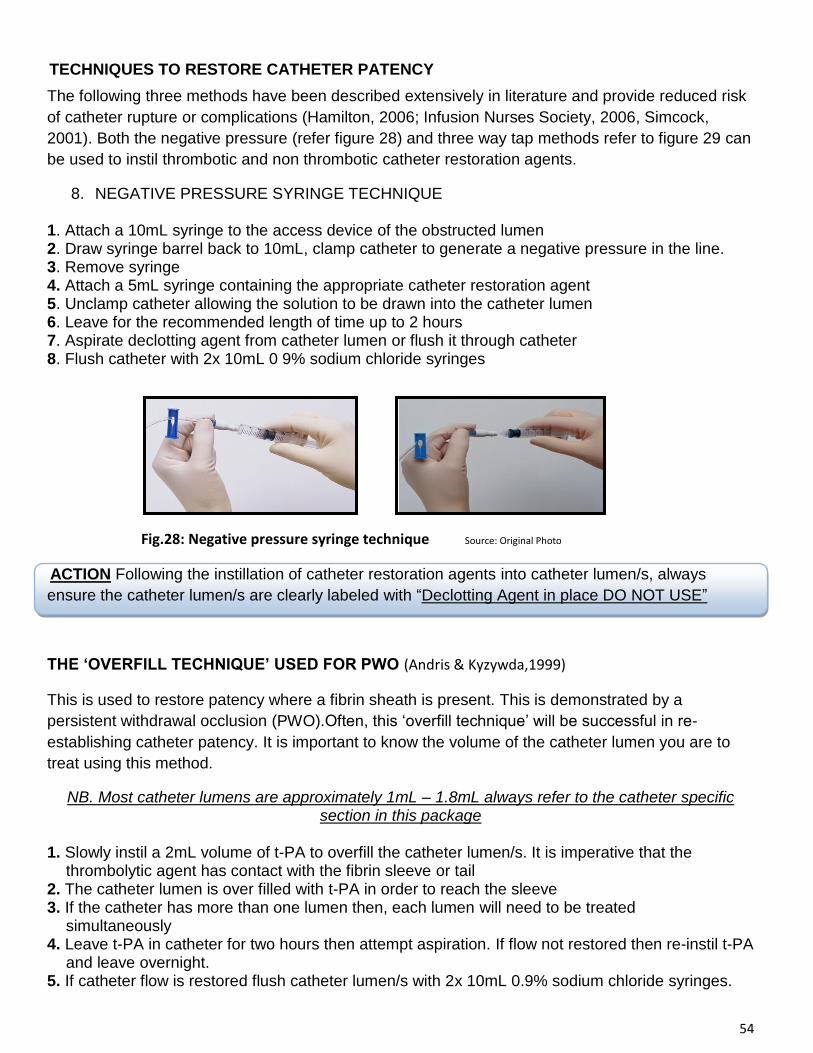
54
TECHNIQUES TO RESTORE CATHETER PATENCY
The following three methods have been described extensively in literature and provide reduced risk
of catheter rupture or complications (Hamilton, 2006; Infusion Nurses Society, 2006, Simcock,
2001). Both the negative pressure (refer figure 28) and three way tap methods refer to figure 29 can
be used to instil thrombotic and non thrombotic catheter restoration agents.
8. NEGATIVE PRESSURE SYRINGE TECHNIQUE 1. Attach a 10mL syringe to the access device of the obstructed lumen 2. Draw syringe barrel back to 10mL, clamp catheter to generate a negative pressure in the line. 3. Remove syringe 4. Attach a 5mL syringe containing the appropriate catheter restoration agent 5. Unclamp catheter allowing the solution to be drawn into the catheter lumen 6. Leave for the recommended length of time up to 2 hours 7. Aspirate declotting agent from catheter lumen or flush it through catheter 8. Flush catheter with 2x 10mL 0 9% sodium chloride syringes
Fig.28: Negative pressure syringe technique Source: Original Photo
ACTION Following the instillation of catheter restoration agents into catheter lumen/s, always
ensure the catheter lumen/s are clearly labeled with “Declotting Agent in place DO NOT USE”
THE „OVERFILL TECHNIQUE‟ USED FOR PWO (Andris & Kyzywda,1999)
This is used to restore patency where a fibrin sheath is present. This is demonstrated by a
persistent withdrawal occlusion (PWO).Often, this „overfill technique‟ will be successful in re-
establishing catheter patency. It is important to know the volume of the catheter lumen you are to
treat using this method.
NB. Most catheter lumens are approximately 1mL – 1.8mL always refer to the catheter specific section in this package
1. Slowly instil a 2mL volume of t-PA to overfill the catheter lumen/s. It is imperative that the
thrombolytic agent has contact with the fibrin sleeve or tail 2. The catheter lumen is over filled with t-PA in order to reach the sleeve 3. If the catheter has more than one lumen then, each lumen will need to be treated
simultaneously 4. Leave t-PA in catheter for two hours then attempt aspiration. If flow not restored then re-instil t-PA
and leave overnight. 5. If catheter flow is restored flush catheter lumen/s with 2x 10mL 0.9% sodium chloride syringes.
55
STEP BY STEP GUIDE TO THE THREE WAY TAP NEGATIVE PRESSURE TECHNIQUE
STEP 1: CREATING A VACCUM IN THE CATHETER
1. Clamp catheter lumen 2. Remove PDD access device, clean catheter hub using antimicrobial wipe on sterile gauze 3. Attach the luer lock end of a 3 way tap to the catheter hub. Ensure 3-way tap is in the OFF
position to patient 4. Attach an empty 10mL luer lock syringe with all air expelled onto the 3-way tap port that
lies in line with the catheter. 5. To the other port attach the syringe containing the t-PA 6. Turn 3-way tap OFF to the syringe containing t-PA 7. Withdraw empty syringe (negative aspirate) barrel back to the 10mL mark to create a
vacuum. This can be repeated at least three times to ensure the vacuum is established. Remember to expel the air between each aspiration and ensure negative pressure is been maintained.
8. Clamp the catheter while maintaining negative pressure in this syringe 9. Now turn 3-way tap OFF to the negative aspirate syringe
STEP 2: INSTILLATION OF t-PA USING VACCUM IN CATHETER
10. Turn 3-way tap ON to the 5mL syringe containing t-PA and unclamp catheter. 11. Allow the vacuum to draw the t-PA into the catheter lumen. The syringe barrel may need to
be gently pushed at this stage to assist the uptake of the t-PA 12. Once the t-PA is drawn into the catheter turn the 3-way tap to close the flow 13. Clamp catheter
STEP 3: REMOVAL OF 3 WAY TAP AND LABEL CATHETER
14. Remove 3-way tap and syringes 15. Attach a new primed PDD to catheter 16. Place RED medication label on catheter stating “Declotting agent in place DO NOT
USE” 17. Allow t-PA to dwell in the catheter for 60 -120 minutes before checking CVAD patency 18. The longer the t-PA is left in catheter the more likely it will be successful in restoring flow.
NB: t-PA may be left in the catheter overnight if required
STEP 4: EVALUATION CATHETER FLOW 19. Attempt blood aspiration if successful then flush catheter with 2x 10mL 0.9% pre-filled
sodium chloride suringes 20. Document procedure and outcome in clinical notes and patients care plan
Repeat installations can be carried out using the 3 way tap procedure. If the CVAD remains
partially occluded a repeat dose of t-PA can be instilled using the syringe only technique (Refer to
flow chart page 53)
Fig. 29: Source: INS. Infusion Nursing: An evidence –based approach 2010
56
A STEP-BY-STEP GUIDE TO THE THREE WAY TAP TECHNIQUE
Clamp catheter and remove PDD
Attach a 3-way tap directly to the catheter hub
Ensure 3-way tap is OFF to patient
Attach empy10mL syringe to the port on 3-way tap in line with the catheter
Attach 5mL syringe containing t-PA to the other port and ensure 3-way tap is now OFF to the syringe containing
t-PA
Unclamp catheter
Ensure 3-way tap is ON to the patient
Withdraw the empty 10mL syringe barrel back to the 10mL mark to create vacuum. This may need to be repeated up to 5 times to ensure the catheter is collapsed.
Maintain negative pressure in syringe and clamp catheter simultaneously
Turn 3-way tap OFF to 10mL negative aspirate syringe
Turn 3-way tap ON to syringe containing t-PA
Unclamp catheter
Vacuum will draw t-PA into catheter
Once t-PA is in catheter turn 3-way tap to close flow
Clamp catheter
Remove 3-way tap and syringes
Aseptically attach PDD
Ensure catheter lumen/s have a medication label attached indicating declotting agent in place
10ml Negative aspirate syringe
syringe
5ml Syringe containing t-PA
Step 2
Step 3
Step 4
Step 1
Source: Original Photo

57
NON THROMBOTIC OCCLUSIONS
Non thrombotic occlusions include drug precipitates and lipid deposits. Drug precipitates may cause
obstruction when incompatible medications or fluids are administered without flushing the catheter.
One container of PN can cause a waxy build up of lipids on the internal lumen of the catheter
leading to occlusion.
The flow chart on page 53 can be used as a guide for restoring catheter patency where lipid or drug
precipitates have occurred. For appropriate catheter restoration agents (refer to table 8).
Table 8: AGENTS USED FOR CATHETER CLEARANCE
Precipitate/Occlusion Clearing Agent Dose Fill Volume
Low pH drugs(pH 1-5) Hydrochloric acid 0.1%
60 minutes
Capacity of catheter
High pH drugs(pH9-12) Sodium bicarbonate 1 mEq/ml
60 minutes
Capacity of catheter
Fat /PN deposits Ethanol 70%
2 minutes
Capacity of catheter
Blood product t-PA 1-2mg/2ml
2 hours
Capacity of catheter
Source: INS Infusion Nursing: an evidence - based approach 3 ed. 2010
Fig. 30: Non Thrombotic Occlusions Source: Andris & Kyzywda, 1999
58
MECHANICAL OCCLUSION
„Pinch off syndrome‟ is a significant complication involving catheters and is often unrecognized. It occurs when a catheter is inserted or passes through the subclavian vein and is compressed by the clavicle and first rib. Catheters that pass through this route and can be affected are:
PICCs
Subclavian CVCs
Implanted Ports
Catheter compression causes intermittent or permanent catheter obstruction and can result in
catheter tearing, transection and catheter embolus most often to the right side of the heart or
pulmonary artery (Masoorli, 2002; Mirza et al, 2004).
Signs and Symptoms:
Intermittent and positional occlusion
Difficulty with flushing, infusing, or aspirating
Frequent occlusion alarm
Occlusion relieved by specific postural changes such as rolling the shoulder back or raising
the arm. This opens the angle of the costoclavicular space.
Patient may experience chest pain, palpitations, swelling in the area of the CVAD
Pain with flushing
Management:
Supine chest x-rays at regular intervals is recommended for the first 6 months of placement
to identify late occurrences.
Interval between insertion and diagnosis can range from the day of insertion to 60 months
with an average of 5 months.
Catheter removal is recommended once diagnosed,
Retrieval of embolised segment
Some patients have been reported as having no symptoms when the catheter partially or
completely transects,
Fig.31: Recommended insertion area Fig.32: Catheter affected by „Pinch off‟ Source: unknown
59
VESSEL THROMBOSIS
______________________________________________
The normal physiological response to a foreign body (such as a central venous catheter) in a vein is
for aggregation of platelets and the accumulation of fibrin. This process can take weeks or months
to occur. As well as causing problems within the catheter, it can cause thrombosis of the central
veins. Thrombosis is where the blood has changed from a liquid state into a solid state producing a
blood clot.
Three factors are implicated in the development of a thrombus. This is referred to as Virchow‟s
Triad described as follows:
1. Vessel wall damage or injury. Causes may be trauma; the presence of a central venous catheter
or irritating solutions
2. Alteration in the blood flow. Causes include venous stasis associated with immobility; obstruction
of veins and heart failure
3. Hypercoagulability. Contributing factors such as decrease in coagulation inhibitors, pregnancy,
malignancy and post operative states.
Left sided catheter placement is associated with thrombosis in tunneled catheters (Brown-Smith,
Stoner, Barley.1999). PICCs appear to have a greater risk of thrombosis than catheters placed via
the subclavian or jugular route. The catheter tip position is a factor and when the CVAD tip is in the
upper SVC the risk of DVT is greater than when the tip is at or just above the right atrium (Geerts,
2008).
Signs and Symptoms of thrombosis:
(Kearon et al, 2008)
Oedema of the arm, shoulder or neck on the side of the catheter placement
Distended veins – the jugular vein may be quite visible
Appearance of dilated collateral veins over the chest and upper arm
Pain around the area and a feeling of pressure
Difficulty breathing (if the trachea is compressed)
Darkening of the skin in the upper body
Changes in colour of the hand on the effected side (plum colour)
Management of thrombosis:
Dye studies to verify catheter placement
The catheter does not routinely require removal if it is functioning and necessary.
Systemic anticoagulants
Antibiotics
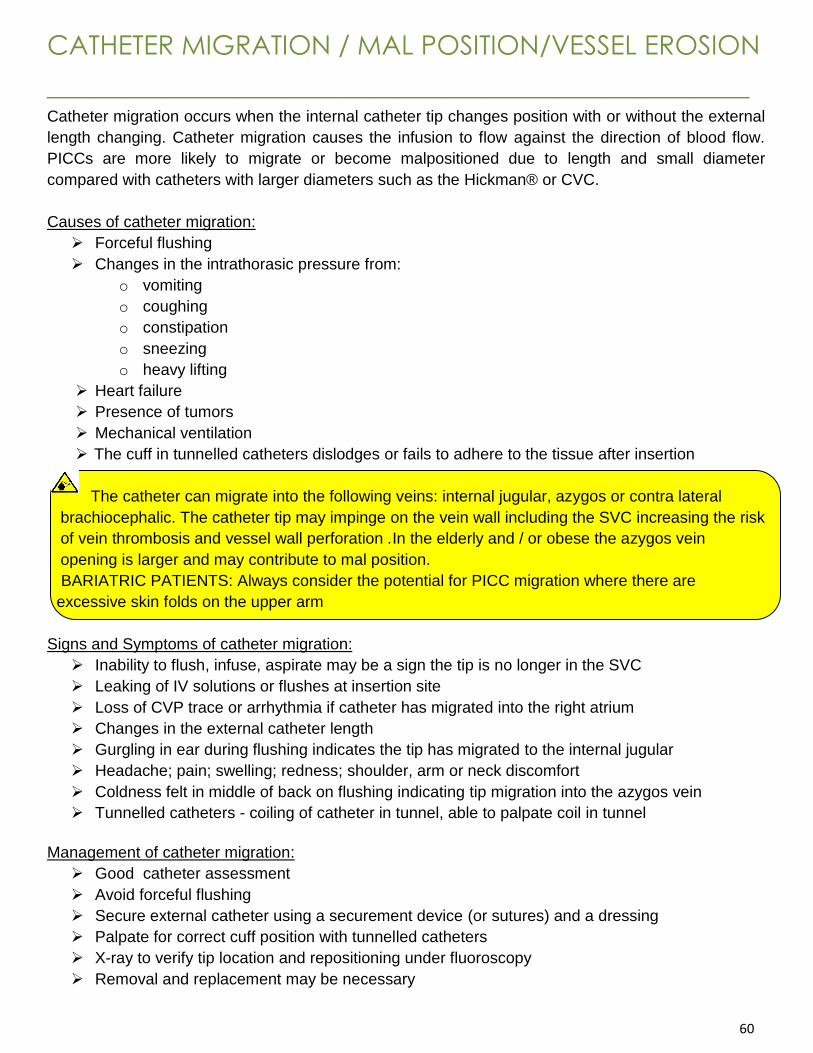
60
CATHETER MIGRATION / MAL POSITION/VESSEL EROSION
________________________________________________ Catheter migration occurs when the internal catheter tip changes position with or without the external
length changing. Catheter migration causes the infusion to flow against the direction of blood flow.
PICCs are more likely to migrate or become malpositioned due to length and small diameter
compared with catheters with larger diameters such as the Hickman® or CVC.
Causes of catheter migration:
Forceful flushing
Changes in the intrathorasic pressure from:
o vomiting
o coughing
o constipation
o sneezing
o heavy lifting
Heart failure
Presence of tumors
Mechanical ventilation
The cuff in tunnelled catheters dislodges or fails to adhere to the tissue after insertion
The catheter can migrate into the following veins: internal jugular, azygos or contra lateral
brachiocephalic. The catheter tip may impinge on the vein wall including the SVC increasing the risk
of vein thrombosis and vessel wall perforation .In the elderly and / or obese the azygos vein
opening is larger and may contribute to mal position.
BARIATRIC PATIENTS: Always consider the potential for PICC migration where there are
excessive skin folds on the upper arm
Signs and Symptoms of catheter migration:
Inability to flush, infuse, aspirate may be a sign the tip is no longer in the SVC
Leaking of IV solutions or flushes at insertion site
Loss of CVP trace or arrhythmia if catheter has migrated into the right atrium
Changes in the external catheter length
Gurgling in ear during flushing indicates the tip has migrated to the internal jugular
Headache; pain; swelling; redness; shoulder, arm or neck discomfort
Coldness felt in middle of back on flushing indicating tip migration into the azygos vein
Tunnelled catheters - coiling of catheter in tunnel, able to palpate coil in tunnel
Management of catheter migration:
Good catheter assessment
Avoid forceful flushing
Secure external catheter using a securement device (or sutures) and a dressing
Palpate for correct cuff position with tunnelled catheters
X-ray to verify tip location and repositioning under fluoroscopy
Removal and replacement may be necessary

61
CARDIAC TAMPONADE
______________________________________________
Cardiac tamponade, in relation to central venous access devices, is where the vein, right atrium or
ventricle wall is perforated due to erosion by the CVAD tip. This perforation allows excess fluid to be
present between the pericardium and the heart. The fluid causes abnormal pressure and prevents
the heart from beating normally (Forauer, 2007).
Signs and Symptoms of cardiac tamponade:
Unexplained hypotension
Arrhythmia
Chest tightness
Shortness of breath beyond one hour post catheter insertion and up to removal of the CVAD
if it dislodges from its position
Management of cardiac tamponade:
An emergency echocardiogram will be required to diagnose cardiac tamponade
Signs and symptoms should prompt immediate treatment to relieve cardiac compression
Prevention of Cardiac tamponade requires that:
Catheters are made of less stiff material
A flexible J-wire is used to aid in avoiding puncturing the heart or SVC wall during insertion
The tip of the CVAD to be placed above the pericardium reflection to avoid cardiac
perforation
Heart monitoring be carried out which can give an accurate picture of the tip position. CVADs
placed using electrocardiograph guidance reduces the need for routine chest radiography
after central line placement (Davis, 2008).
Accurate assessment of the patient post insertion is carried out to ensure appropriate action
is taken if indicated
Accurate documentation is undertaken
CARDIAC TAMPONADE IS A MEDICAL EMERGENCY
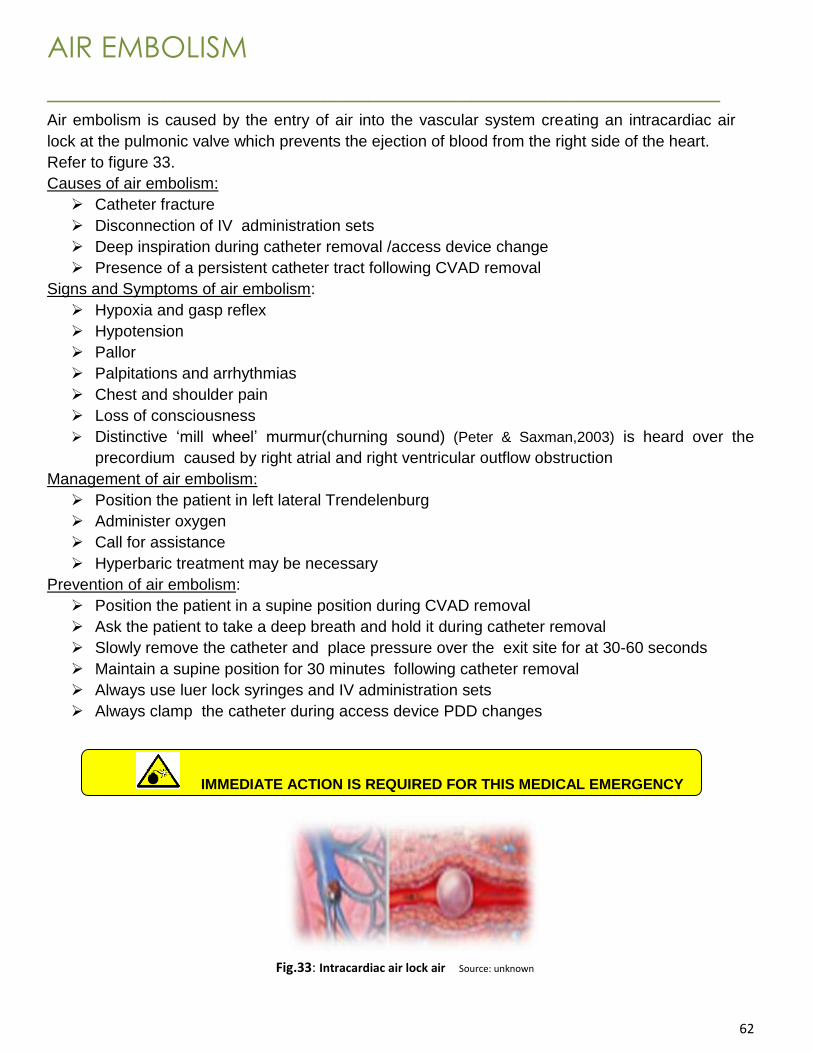
62
AIR EMBOLISM
______________________________________________ Air embolism is caused by the entry of air into the vascular system creating an intracardiac air
lock at the pulmonic valve which prevents the ejection of blood from the right side of the heart.
Refer to figure 33.
Causes of air embolism:
Catheter fracture
Disconnection of IV administration sets
Deep inspiration during catheter removal /access device change
Presence of a persistent catheter tract following CVAD removal
Signs and Symptoms of air embolism:
Hypoxia and gasp reflex
Hypotension
Pallor
Palpitations and arrhythmias
Chest and shoulder pain
Loss of consciousness
Distinctive „mill wheel‟ murmur(churning sound) (Peter & Saxman,2003) is heard over the
precordium caused by right atrial and right ventricular outflow obstruction
Management of air embolism:
Position the patient in left lateral Trendelenburg
Administer oxygen
Call for assistance
Hyperbaric treatment may be necessary
Prevention of air embolism:
Position the patient in a supine position during CVAD removal
Ask the patient to take a deep breath and hold it during catheter removal
Slowly remove the catheter and place pressure over the exit site for at 30-60 seconds
Maintain a supine position for 30 minutes following catheter removal
Always use luer lock syringes and IV administration sets
Always clamp the catheter during access device PDD changes
IMMEDIATE ACTION IS REQUIRED FOR THIS MEDICAL EMERGENCY
Fig.33: Intracardiac air lock air Source: unknown
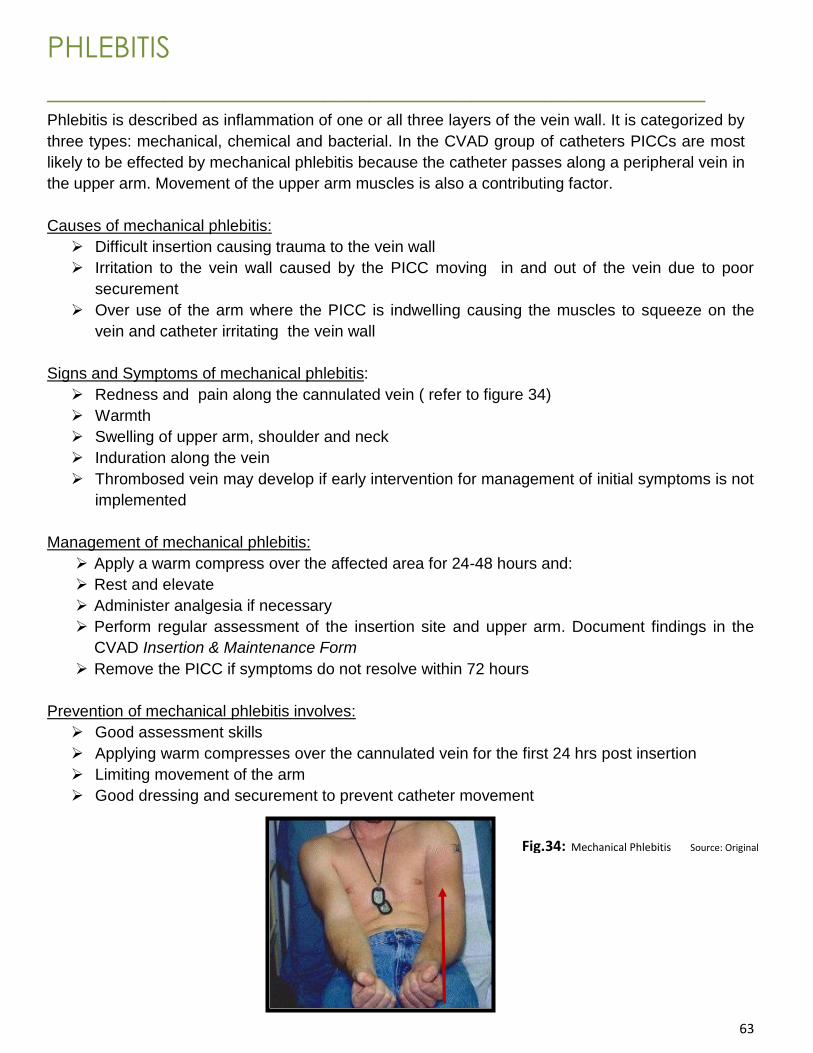
63
PHLEBITIS
_____________________________________________ Phlebitis is described as inflammation of one or all three layers of the vein wall. It is categorized by
three types: mechanical, chemical and bacterial. In the CVAD group of catheters PICCs are most
likely to be effected by mechanical phlebitis because the catheter passes along a peripheral vein in
the upper arm. Movement of the upper arm muscles is also a contributing factor.
Causes of mechanical phlebitis:
Difficult insertion causing trauma to the vein wall
Irritation to the vein wall caused by the PICC moving in and out of the vein due to poor
securement
Over use of the arm where the PICC is indwelling causing the muscles to squeeze on the
vein and catheter irritating the vein wall
Signs and Symptoms of mechanical phlebitis:
Redness and pain along the cannulated vein ( refer to figure 34)
Warmth
Swelling of upper arm, shoulder and neck
Induration along the vein
Thrombosed vein may develop if early intervention for management of initial symptoms is not
implemented
Management of mechanical phlebitis:
Apply a warm compress over the affected area for 24-48 hours and:
Rest and elevate
Administer analgesia if necessary
Perform regular assessment of the insertion site and upper arm. Document findings in the
CVAD Insertion & Maintenance Form
Remove the PICC if symptoms do not resolve within 72 hours
Prevention of mechanical phlebitis involves:
Good assessment skills
Applying warm compresses over the cannulated vein for the first 24 hrs post insertion
Limiting movement of the arm
Good dressing and securement to prevent catheter movement
Fig.34: Mechanical Phlebitis Source: Original
Photo
64
PARENTERAL NUTRITION
______________________________________________ Parenteral Nutrition (PN), formerly known as Total Parenteral Nutrition (TPN), refers to the
intravenous infusion of a specialised nutrition solution of high osmolarity. This therapy may be used
to provide nutritional support to a person whose gastrointestinal tract is either not functioning or is
inaccessible and is unable to receive adequate nutrition with oral feeding, supplements or enteral
feeding. PN consists of an all-in-one bag which is produced in the Pharmacy Sterile Production Unit
and is referred to as a triple phase system.
PN requires a central vein, allowing rapid dilution of solutions to prevent phlebitis, pain and
thrombosis. It is generally recommended that a CVAD be dedicated solely for the use PN (CDC,
2002; INS 2010). This is to minimise the risk of infection or sepsis and prevents drug incompatibility.
However, catheters with multiple lumens may be necessary for essential medical management
especially where compromised patients are receiving complex therapies in addition to multiple blood
sampling.
MINIMISING RISK OF INFECTION ASSOCIATED WITH PN
Due to the nutritional components of the PN solution it has the potential to create an environment
that promotes the development of microbial growth. Within the hospital setting this risk of infection
will increase as a result of:
Malnutrition associated with immune suppression
Graft versus Host Disease (GVHD) mucosa of alimentary tract
Mucositis of the alimentary tract
Neutropaenia
Hyperglycaemia
Microbial colonisation and contamination of the catheter hub and surrounding skin.
ACTION: When PN is administered using CVADs with multiple lumens always ensure the WHITE
lumen is used. Attach a PN label to the tubing to identify that PN is being infused. To reduce the
potential for catheter related blood-stream infection (CRBSI) always designate one lumen for PN
(CDC, 2002).
65
CONSIDERATIONS WHEN ADMINISTERING CONTINUOUS PN
CVADs used to deliver PN are usually:
Central venous catheter (non- tunnelled short term CVC)
Peripherally Inserted Central Catheter (PICC)
Hickman® catheter (skin tunnelled)
The intended use of the CVAD and the intended length of duration for PN must be considered.
Administration of PN only (Long Term or Short Term)
PN in conjunction with other Parenteral therapy
Blood sampling or CVP monitoring
Nursing considerations for administration of PN
Always use a dedicated catheter lumen for PN. The WHITE lumen is used where multiple lumen catheters are in place - No Additives to solution (except in Pharmacy under strict sterile conditions).
All PN solutions should be completed within the 24 hour period (Refer to Dietician Prescription Form).
All administration sets and inline filters to be changed every 24 hours (Refer to Volume D-Fluid & Medication Manual).
Always maintain a closed system and don‟t discontinue or disrupt PN administration.
Administration of PN in Haematology, Oncology and Child Health may be over 20 hours. The
rationale for this is:
Catheter maintenance
Patient‟s freedom from the infusion pump
Personal cares and showering
„Time out‟ for the patient before reconnect
Routine bloods can be taken during this time giving a more accurate picture of
Biochemistry profiles
For further reading and information on PN refer to the references below
References:
Nutrition Support in Adults (2006). National Institute for Health and Clinical Excellence (NICE). www.nice.org.uk
Infusion Nursing Society. (2010) Infusion Nursing, An Evidence Based Approach Third Edition; Saunders
ESPEN Guidelines on Parenteral Nutrition: Central Venous Catheters. (2009). Clinical Nutrition.
PN FAQ‟s Nutritional Support Team (NST). Updated May 2009. Canterbury DHB, Fluid & Medication, Volume 12
Centre for Disease Control and Prevention (2002) Guidelines for the prevention of intravascular catheter related infection.

66
CATHETER SPECIFIC SECTION _______________________________________________________________
PERIPHERALLY INSERTED CENTRAL CATHETER (PICC)
HICKMAN® TUNNELED CUFFED CATHETER
NON-TUNNELED CENTRAL VENOUS CATHETER (CVC)
IMPLANTED PORT-A-CATH®
GROSHONG® TUNNELED CUFFED CATHETER
HAEMODIALYSIS /APHERESIS CATHETERS
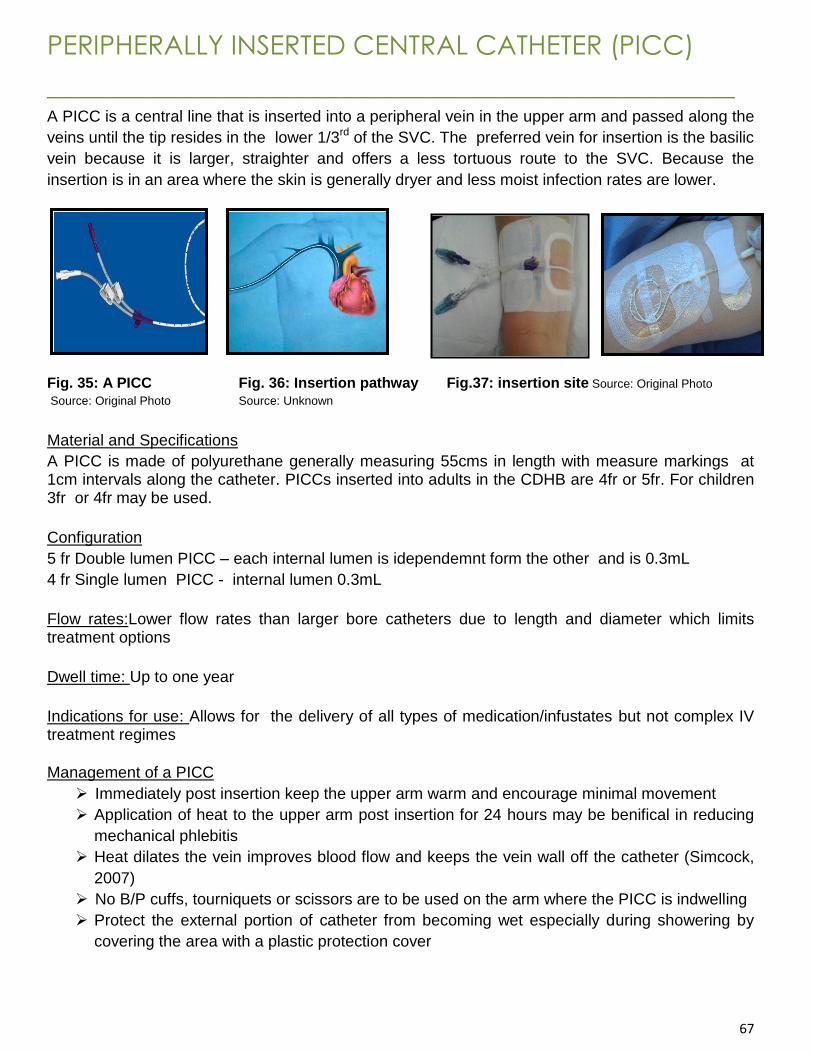
67
PERIPHERALLY INSERTED CENTRAL CATHETER (PICC)
_______________________________________________ A PICC is a central line that is inserted into a peripheral vein in the upper arm and passed along the
veins until the tip resides in the lower 1/3rd of the SVC. The preferred vein for insertion is the basilic
vein because it is larger, straighter and offers a less tortuous route to the SVC. Because the
insertion is in an area where the skin is generally dryer and less moist infection rates are lower.
Fig. 35: A PICC Fig. 36: Insertion pathway Fig.37: insertion site Source: Original Photo Source: Original Photo Source: Unknown
Material and Specifications
A PICC is made of polyurethane generally measuring 55cms in length with measure markings at 1cm intervals along the catheter. PICCs inserted into adults in the CDHB are 4fr or 5fr. For children 3fr or 4fr may be used.
Configuration
5 fr Double lumen PICC – each internal lumen is idependemnt form the other and is 0.3mL
4 fr Single lumen PICC - internal lumen 0.3mL
Flow rates:Lower flow rates than larger bore catheters due to length and diameter which limits treatment options
Dwell time: Up to one year
Indications for use: Allows for the delivery of all types of medication/infustates but not complex IV treatment regimes
Management of a PICC
Immediately post insertion keep the upper arm warm and encourage minimal movement
Application of heat to the upper arm post insertion for 24 hours may be benifical in reducing
mechanical phlebitis
Heat dilates the vein improves blood flow and keeps the vein wall off the catheter (Simcock,
2007)
No B/P cuffs, tourniquets or scissors are to be used on the arm where the PICC is indwelling
Protect the external portion of catheter from becoming wet especially during showering by
covering the area with a plastic protection cover
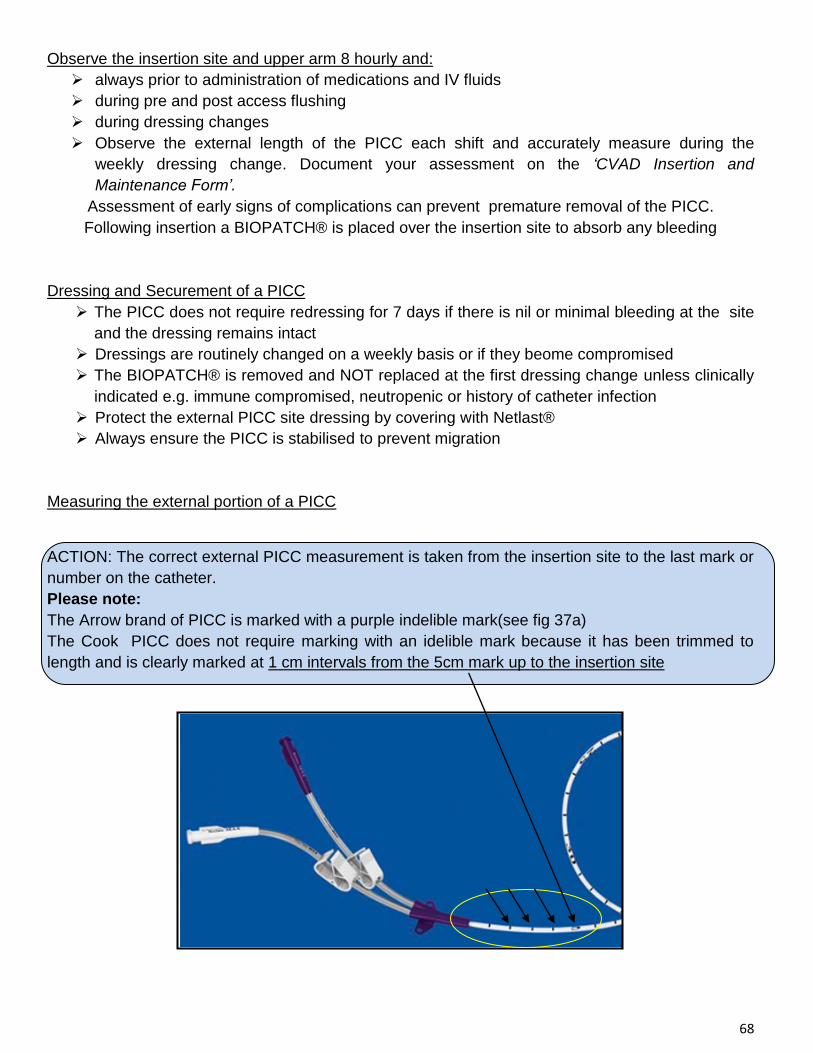
68
Observe the insertion site and upper arm 8 hourly and:
always prior to administration of medications and IV fluids
during pre and post access flushing
during dressing changes
Observe the external length of the PICC each shift and accurately measure during the
weekly dressing change. Document your assessment on the „CVAD Insertion and
Maintenance Form‟.
Assessment of early signs of complications can prevent premature removal of the PICC.
Following insertion a BIOPATCH® is placed over the insertion site to absorb any bleeding
Dressing and Securement of a PICC
The PICC does not require redressing for 7 days if there is nil or minimal bleeding at the site
and the dressing remains intact
Dressings are routinely changed on a weekly basis or if they beome compromised
The BIOPATCH® is removed and NOT replaced at the first dressing change unless clinically
indicated e.g. immune compromised, neutropenic or history of catheter infection
Protect the external PICC site dressing by covering with Netlast®
Always ensure the PICC is stabilised to prevent migration
Measuring the external portion of a PICC ACTION: The correct external PICC measurement is taken from the insertion site to the last mark or
number on the catheter.
Please note:
The Arrow brand of PICC is marked with a purple indelible mark(see fig 37a)
The Cook PICC does not require marking with an idelible mark because it has been trimmed to
length and is clearly marked at 1 cm intervals from the 5cm mark up to the insertion site
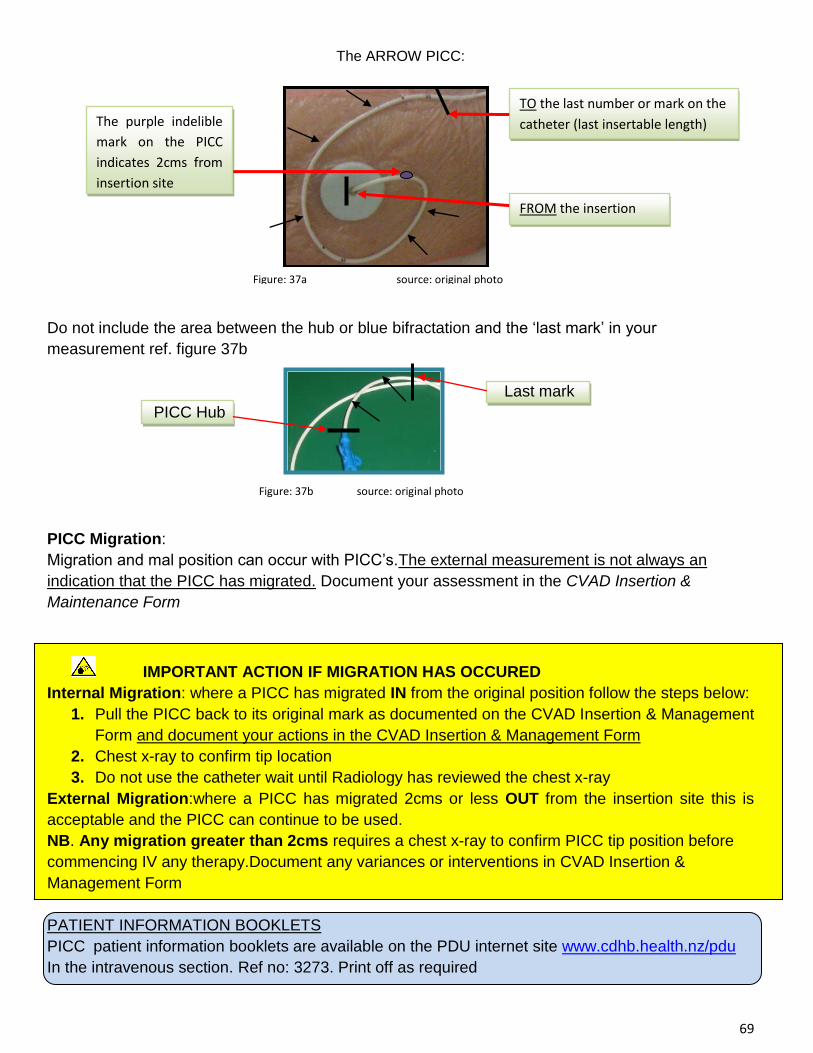
69
The ARROW PICC:
Do not include the area between the hub or blue bifractation and the „last mark‟ in your
measurement ref. figure 37b
Last mark
PICC Hub
PICC Migration:
Migration and mal position can occur with PICC‟s.The external measurement is not always an
indication that the PICC has migrated. Document your assessment in the CVAD Insertion &
Maintenance Form
IMPORTANT ACTION IF MIGRATION HAS OCCURED
Internal Migration: where a PICC has migrated IN from the original position follow the steps below:
1. Pull the PICC back to its original mark as documented on the CVAD Insertion & Management
Form and document your actions in the CVAD Insertion & Management Form
2. Chest x-ray to confirm tip location
3. Do not use the catheter wait until Radiology has reviewed the chest x-ray
External Migration:where a PICC has migrated 2cms or less OUT from the insertion site this is
acceptable and the PICC can continue to be used.
NB. Any migration greater than 2cms requires a chest x-ray to confirm PICC tip position before
commencing IV any therapy.Document any variances or interventions in CVAD Insertion &
Management Form
PATIENT INFORMATION BOOKLETS
PICC patient information booklets are available on the PDU internet site www.cdhb.health.nz/pdu
In the intravenous section. Ref no: 3273. Print off as required
FROM the insertion
site
TO the last number or mark on the
catheter (last insertable length)
Figure: 37a source: original photo
Figure: 37b source: original photo
The purple indelible
mark on the PICC
indicates 2cms from
insertion site
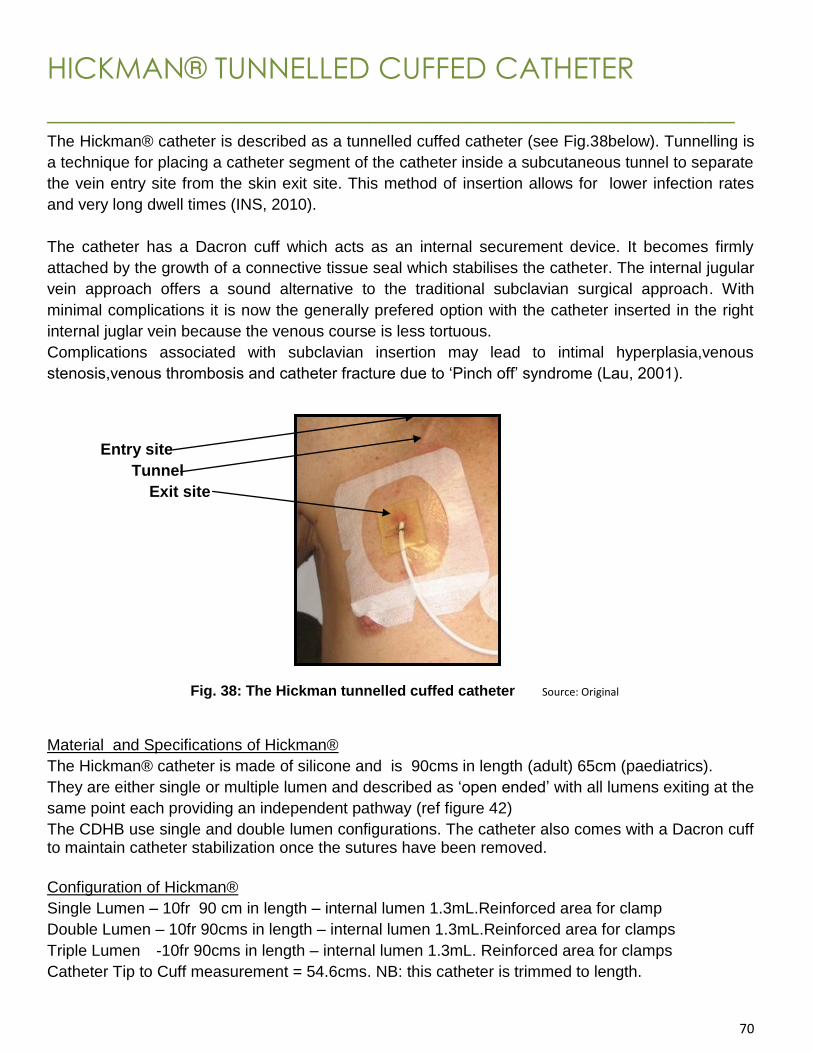
70
HICKMAN® TUNNELLED CUFFED CATHETER
_______________________________________________ The Hickman® catheter is described as a tunnelled cuffed catheter (see Fig.38below). Tunnelling is
a technique for placing a catheter segment of the catheter inside a subcutaneous tunnel to separate
the vein entry site from the skin exit site. This method of insertion allows for lower infection rates
and very long dwell times (INS, 2010).
The catheter has a Dacron cuff which acts as an internal securement device. It becomes firmly
attached by the growth of a connective tissue seal which stabilises the catheter. The internal jugular
vein approach offers a sound alternative to the traditional subclavian surgical approach. With
minimal complications it is now the generally prefered option with the catheter inserted in the right
internal juglar vein because the venous course is less tortuous.
Complications associated with subclavian insertion may lead to intimal hyperplasia,venous
stenosis,venous thrombosis and catheter fracture due to „Pinch off‟ syndrome (Lau, 2001).
Entry site
Tunnel
Exit site
Material and Specifications of Hickman®
The Hickman® catheter is made of silicone and is 90cms in length (adult) 65cm (paediatrics).
They are either single or multiple lumen and described as „open ended‟ with all lumens exiting at the
same point each providing an independent pathway (ref figure 42)
The CDHB use single and double lumen configurations. The catheter also comes with a Dacron cuff to maintain catheter stabilization once the sutures have been removed.
Configuration of Hickman®
Single Lumen – 10fr 90 cm in length – internal lumen 1.3mL.Reinforced area for clamp
Double Lumen – 10fr 90cms in length – internal lumen 1.3mL.Reinforced area for clamps
Triple Lumen -10fr 90cms in length – internal lumen 1.3mL. Reinforced area for clamps
Catheter Tip to Cuff measurement = 54.6cms. NB: this catheter is trimmed to length.
Fig. 38: The Hickman tunnelled cuffed catheter Source: Original
Photo
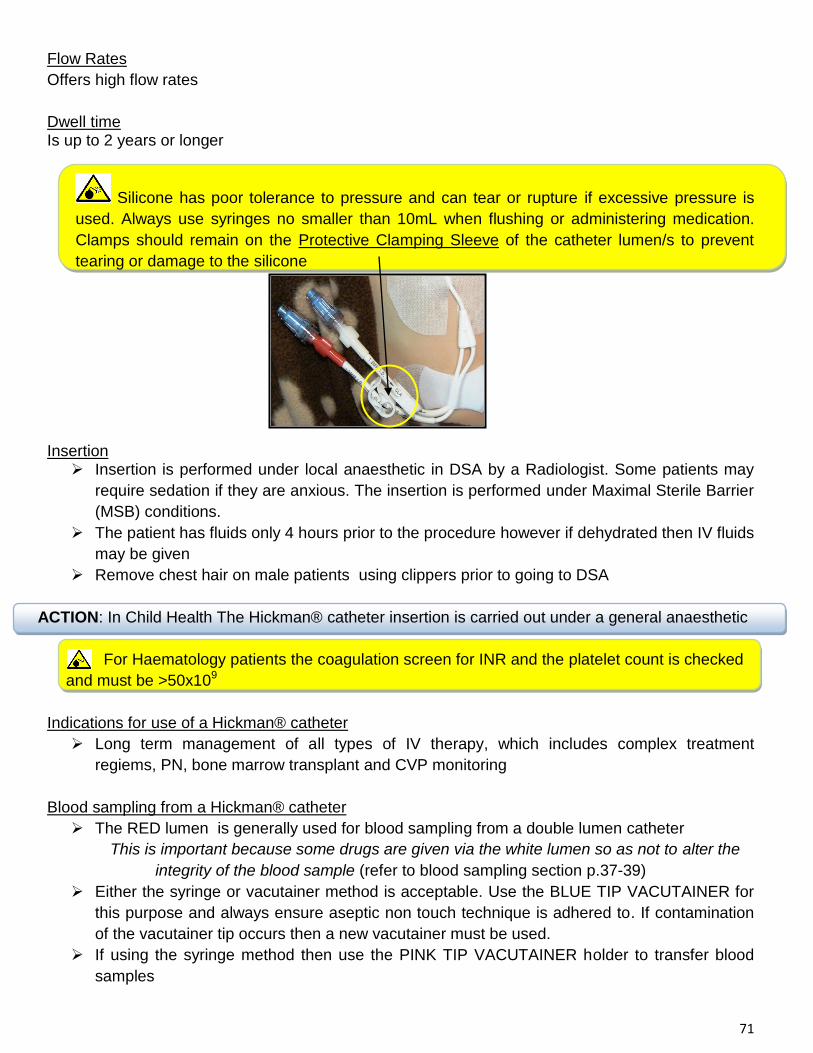
71
Flow Rates
Offers high flow rates
Dwell time Is up to 2 years or longer
Silicone has poor tolerance to pressure and can tear or rupture if excessive pressure is
used. Always use syringes no smaller than 10mL when flushing or administering medication.
Clamps should remain on the Protective Clamping Sleeve of the catheter lumen/s to prevent
tearing or damage to the silicone
Insertion Insertion is performed under local anaesthetic in DSA by a Radiologist. Some patients may
require sedation if they are anxious. The insertion is performed under Maximal Sterile Barrier
(MSB) conditions.
The patient has fluids only 4 hours prior to the procedure however if dehydrated then IV fluids
may be given
Remove chest hair on male patients using clippers prior to going to DSA
ACTION: In Child Health The Hickman® catheter insertion is carried out under a general anaesthetic
For Haematology patients the coagulation screen for INR and the platelet count is checked
and must be >50x109
Indications for use of a Hickman® catheter
Long term management of all types of IV therapy, which includes complex treatment
regiems, PN, bone marrow transplant and CVP monitoring
Blood sampling from a Hickman® catheter
The RED lumen is generally used for blood sampling from a double lumen catheter
This is important because some drugs are given via the white lumen so as not to alter the
integrity of the blood sample (refer to blood sampling section p.37-39)
Either the syringe or vacutainer method is acceptable. Use the BLUE TIP VACUTAINER for
this purpose and always ensure aseptic non touch technique is adhered to. If contamination
of the vacutainer tip occurs then a new vacutainer must be used.
If using the syringe method then use the PINK TIP VACUTAINER holder to transfer blood
samples
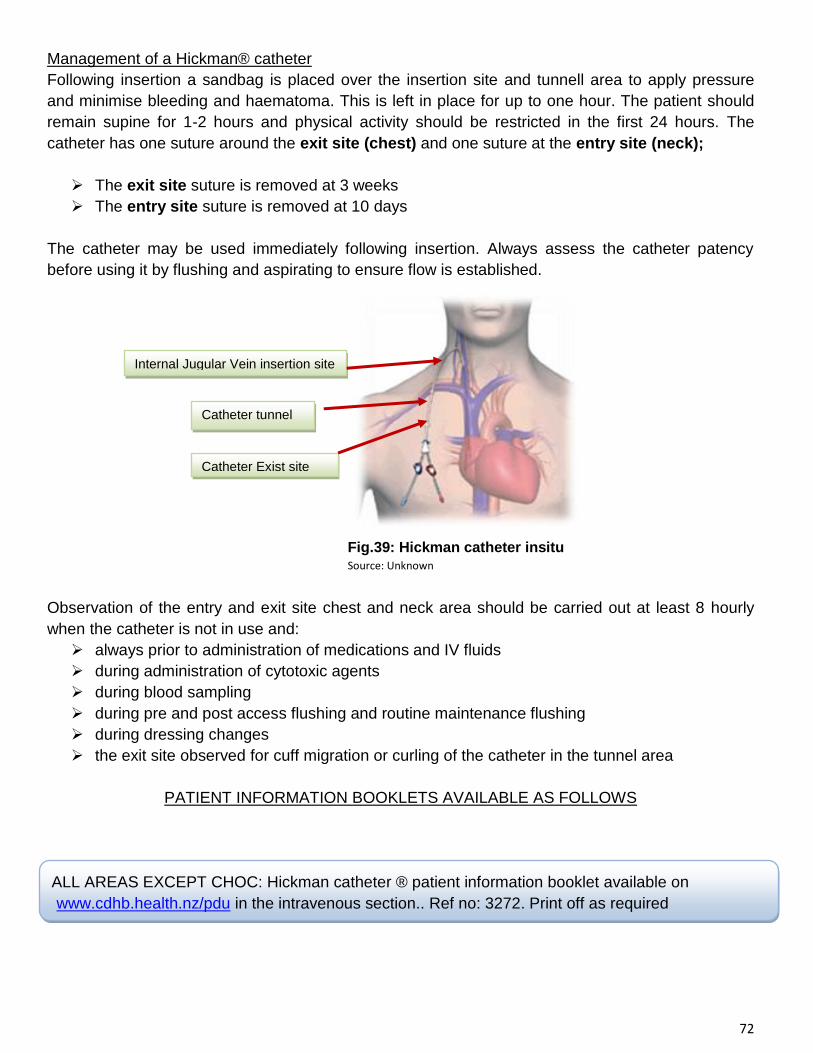
72
Management of a Hickman® catheter
Following insertion a sandbag is placed over the insertion site and tunnell area to apply pressure
and minimise bleeding and haematoma. This is left in place for up to one hour. The patient should
remain supine for 1-2 hours and physical activity should be restricted in the first 24 hours. The
catheter has one suture around the exit site (chest) and one suture at the entry site (neck);
The exit site suture is removed at 3 weeks
The entry site suture is removed at 10 days
The catheter may be used immediately following insertion. Always assess the catheter patency
before using it by flushing and aspirating to ensure flow is established.
Observation of the entry and exit site chest and neck area should be carried out at least 8 hourly
when the catheter is not in use and:
always prior to administration of medications and IV fluids
during administration of cytotoxic agents
during blood sampling
during pre and post access flushing and routine maintenance flushing
during dressing changes
the exit site observed for cuff migration or curling of the catheter in the tunnel area
PATIENT INFORMATION BOOKLETS AVAILABLE AS FOLLOWS
ALL AREAS EXCEPT CHOC: Hickman catheter ® patient information booklet available on
www.cdhb.health.nz/pdu in the intravenous section.. Ref no: 3272. Print off as required
Internal Jugular Vein insertion site
Catheter tunnel
Catheter Exist site
Fig.39: Hickman catheter insitu
Source: Unknown
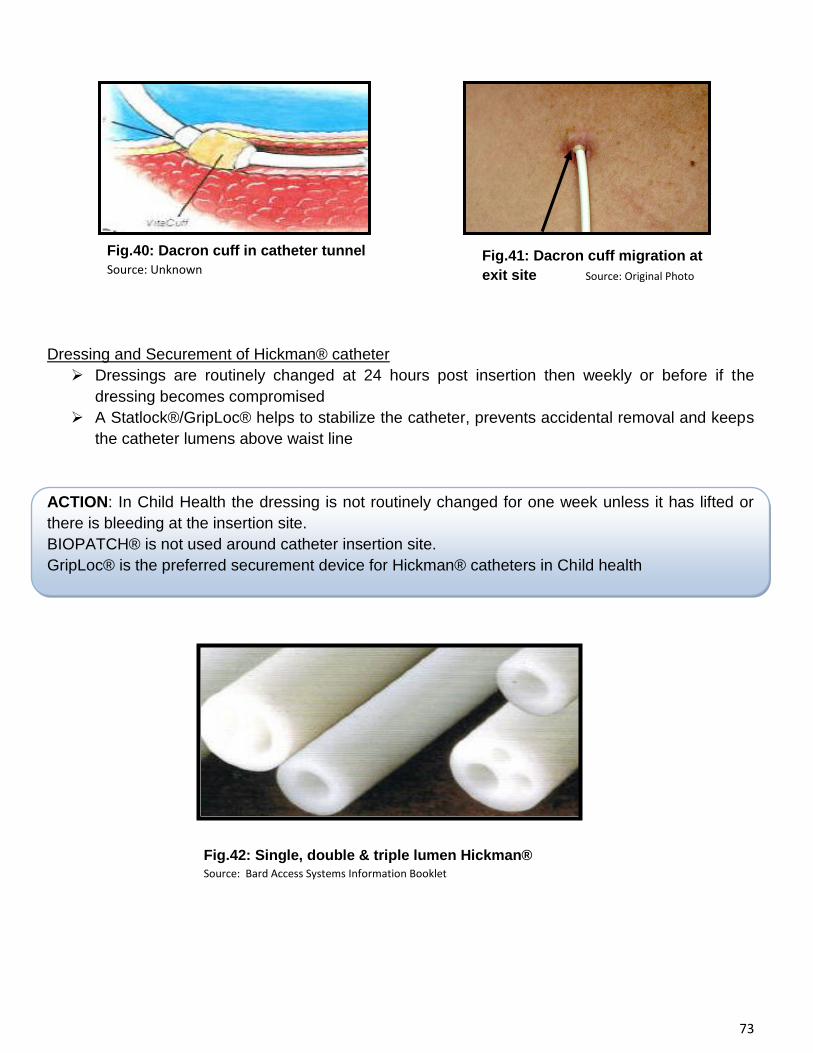
73
Dressing and Securement of Hickman® catheter
Dressings are routinely changed at 24 hours post insertion then weekly or before if the
dressing becomes compromised
A Statlock®/GripLoc® helps to stabilize the catheter, prevents accidental removal and keeps
the catheter lumens above waist line
ACTION: In Child Health the dressing is not routinely changed for one week unless it has lifted or
there is bleeding at the insertion site.
BIOPATCH® is not used around catheter insertion site.
GripLoc® is the preferred securement device for Hickman® catheters in Child health
Fig.40: Dacron cuff in catheter tunnel
Source: Unknown Fig.41: Dacron cuff migration at
exit site Source: Original Photo
Fig.42: Single, double & triple lumen Hickman® Source: Bard Access Systems Information Booklet
74
NON-TUNNELED CENTRAL VENOUS CATHETER (CVC)
______________________________________________
CVCs are non tunnelled short term CVADs (see figure 43, 44 & 45). They can be jugular or subclavian. They are for short term use only (3-5 days) and associated with a high infection rate compared to the other CVADs. This is due in part to the method of insertion, i.e. direct from skin into vein and the warm moist environment of the neck and shoulder area.
Material and Specifications of CVCs
They are made of polyurethane which is quite rigid, but softens once indwelling in the vein. Multiple lumen CVC‟s have exits at the distal, medial and proximal points and are clearly labeled on each catheter lumen
Configuration
Single through to multiple lumen
7fr - 8.5fr (standard adult)
4fr – 5fr( paediatrics)
Single lumen -16 -20 cm in length (adult)
Multiple lumen – 16 -20 cm in length (adult)
Other lengths available for paediatric patients
Flow Rates
Deliver high flow rates due to its large lumen and short length
White –proximal exit
Blue – medial exit
Brown – distal exit
Holes for sutures
Fig.46
Fig.44: Triple lumen CVC
Source: Unknown
Fig. 43: Triple lumen CVC
Source: Medical Illustrations CDHB
Fig. 45: Triple Lumen CVC source: unknown
75
Dwell time
They are for short term access only from 1and up to 5 days. Consider PICC insertion after the
period.
Insertion
Insertion of CVC‟s is carried under MSB by senior medical officers in ICU, CCU or by an
anaesthetist in peri-operative. CVCs may also be inserted in the emergency department.
CVADs radiographic tip confirmation is carried out prior to use.
Either a jugular or subclavian approach may be used. The catheter is secured by a suture at the catheter wings
Non tunnelled CVCs carry a higher risk for insertion complication and infection
Indications for using a CVC
Infusion of all types of medications, solutions, blood / blood products
Fluid resuscitation, fluid assessment and accurate fluid management
PN
CVP monitoring and blood sampling
Blood sampling from a CVC
The BROWN lumen is used for blood sampling (refer to p37-40)
Either the syringe or vacutainer method is acceptable. If the vacutainer method is used
choose the BLUE TIP VACUTAINER for this purpose and always ensure aseptic non
touch technique is adhered to. If contamination of the vacutainer tip occurs then a new
vacutainer must be used
If using the syringe method then choose the PINK TIP VACUTAINER holder to transfer
blood samples
Management of a CVC
Following insertion via the jugular vein the entry site is monitored for bleeding and
swelling. If a haematoma develops it can cause compression of the sympathetic pathway
resulting in drooping of the eye and absence of sweating which indicates Horner‟s
syndrome. This is associated with jugular placement and upward tracking of the catheter
The patient should remain supine for 1-2 hours and physical activity should be restricted
in the first 24 hours
The catheter is sutured on either side of the blue bifurcation and these remain in situ
until the CVC is removed
The catheter may be used immediately following X-ray confirmation
Always assess the catheter patency before using it by flushing and aspirating to ensure
flow is established
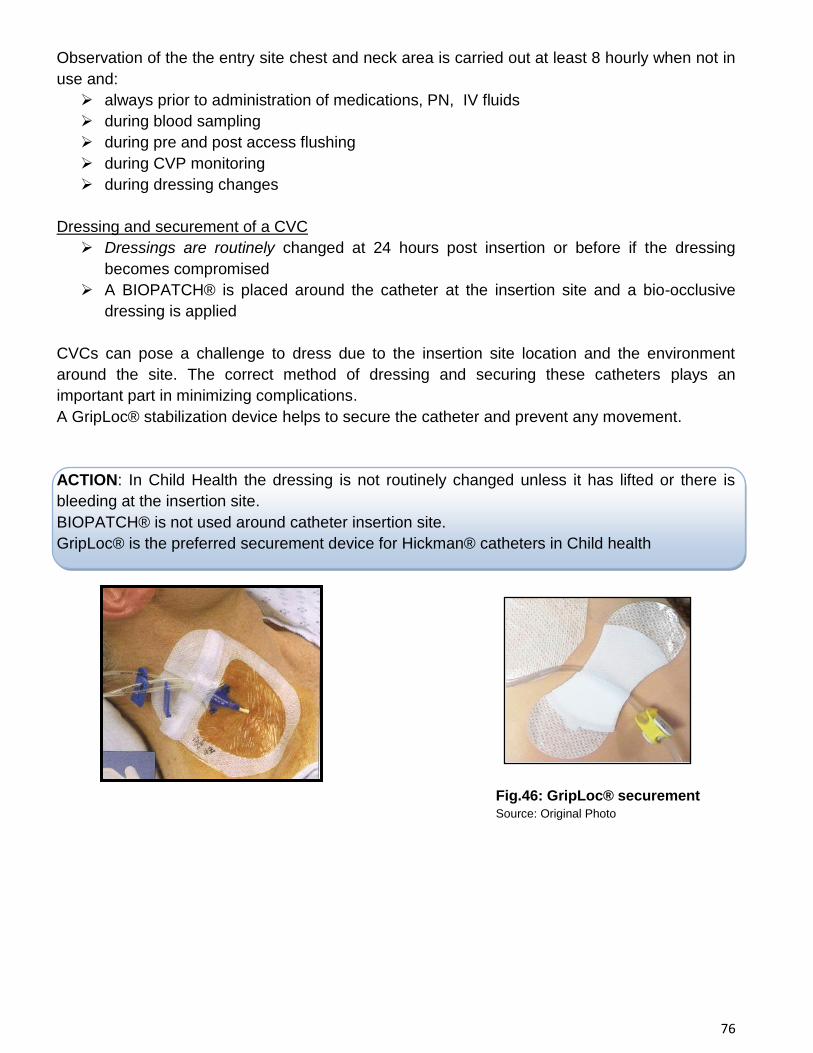
76
Observation of the the entry site chest and neck area is carried out at least 8 hourly when not in
use and:
always prior to administration of medications, PN, IV fluids
during blood sampling
during pre and post access flushing
during CVP monitoring
during dressing changes
Dressing and securement of a CVC
Dressings are routinely changed at 24 hours post insertion or before if the dressing
becomes compromised
A BIOPATCH® is placed around the catheter at the insertion site and a bio-occlusive
dressing is applied
CVCs can pose a challenge to dress due to the insertion site location and the environment
around the site. The correct method of dressing and securing these catheters plays an
important part in minimizing complications.
A GripLoc® stabilization device helps to secure the catheter and prevent any movement.
ACTION: In Child Health the dressing is not routinely changed unless it has lifted or there is
bleeding at the insertion site.
BIOPATCH® is not used around catheter insertion site.
GripLoc® is the preferred securement device for Hickman® catheters in Child health
Fig.46: GripLoc® securement Source: Original Photo
77
IMPLANTED DEVICE LEARNING OBJECTIVES
___________________________________________________
Learning Objectives:
Identify types of Ports used in the CDHB
Describe the anatomy of Port placement
Describe accessing and de-accessing a Port
Describe the principles of infection prevention & control
Describe management, care & blood sampling
Describe complications and describe their prevention management
Describe the removal of a Port
Describe assessment and accurate documentation
Describe the principles of patient education
Describe catheter considerations when administering Parenteral Nutrition (PN) (as
applicable to your area of practice)
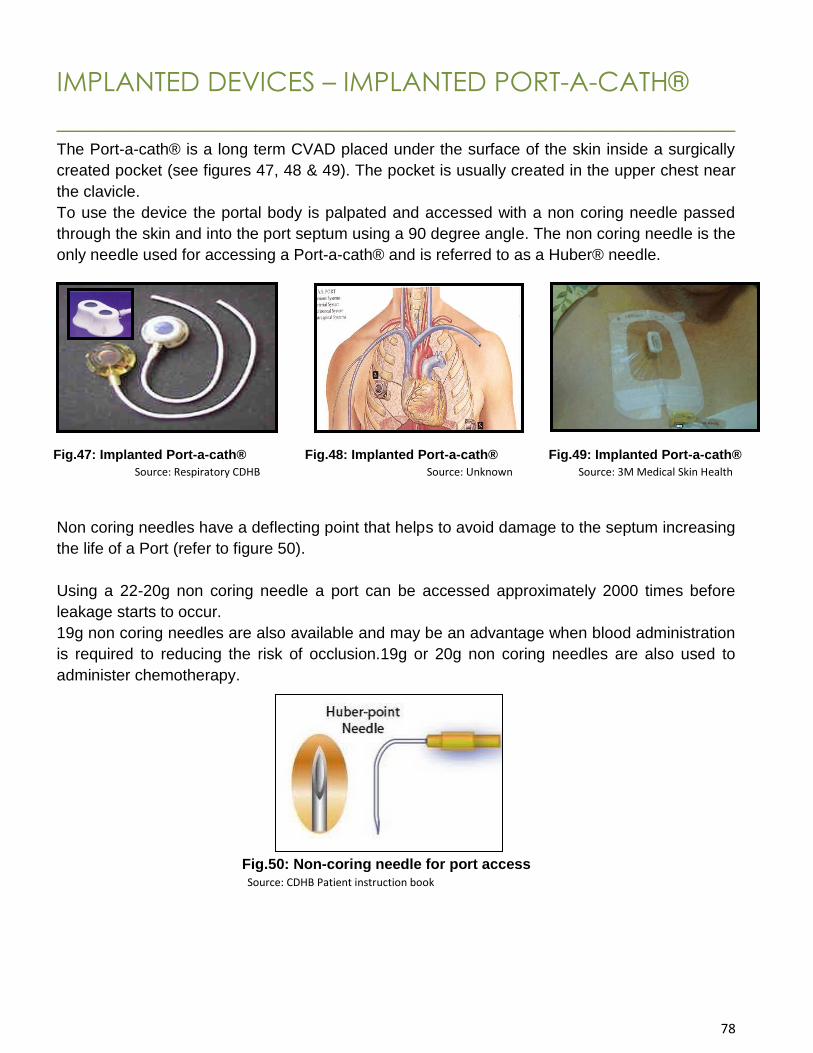
78
IMPLANTED DEVICES – IMPLANTED PORT-A-CATH®
___________________________________________________ The Port-a-cath® is a long term CVAD placed under the surface of the skin inside a surgically
created pocket (see figures 47, 48 & 49). The pocket is usually created in the upper chest near
the clavicle.
To use the device the portal body is palpated and accessed with a non coring needle passed
through the skin and into the port septum using a 90 degree angle. The non coring needle is the
only needle used for accessing a Port-a-cath® and is referred to as a Huber® needle.
Non coring needles have a deflecting point that helps to avoid damage to the septum increasing
the life of a Port (refer to figure 50).
Using a 22-20g non coring needle a port can be accessed approximately 2000 times before
leakage starts to occur.
19g non coring needles are also available and may be an advantage when blood administration
is required to reducing the risk of occlusion.19g or 20g non coring needles are also used to
administer chemotherapy.
Fig.47: Implanted Port-a-cath®
Source: Respiratory CDHB
Fig.48: Implanted Port-a-cath®
Source: Unknown
Fig.49: Implanted Port-a-cath®
Source: 3M Medical Skin Health
Fig.50: Non-coring needle for port access Source: CDHB Patient instruction book
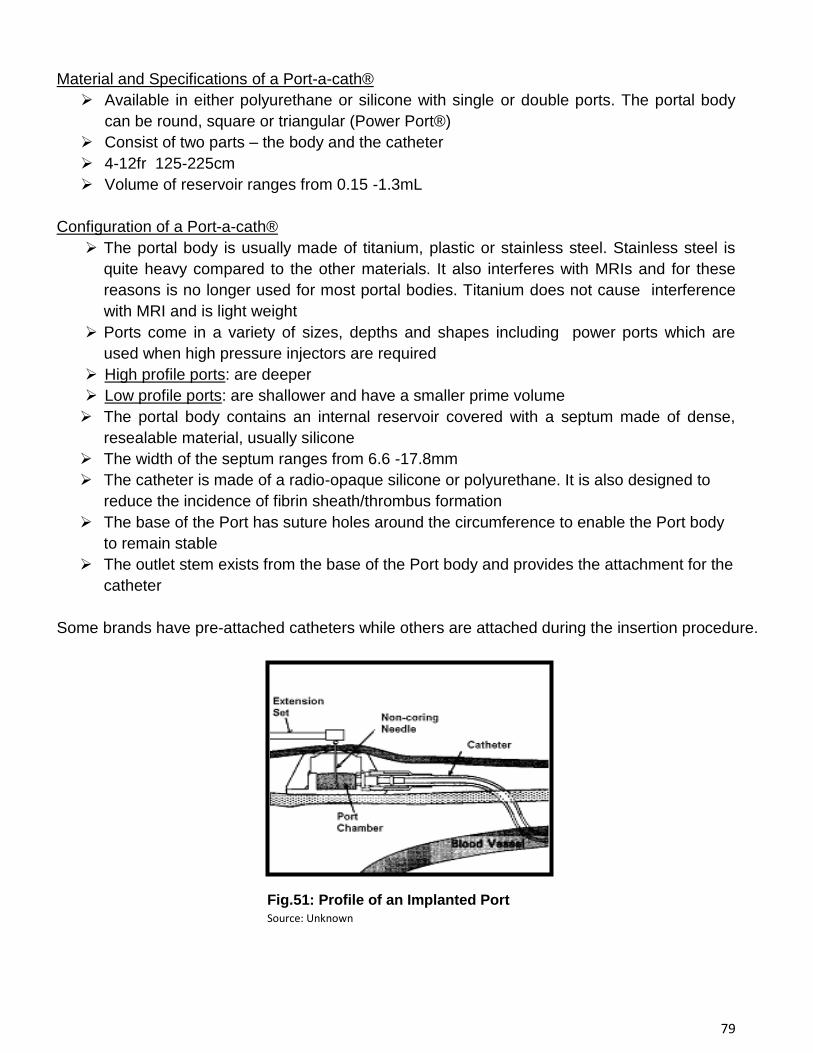
79
Material and Specifications of a Port-a-cath®
Available in either polyurethane or silicone with single or double ports. The portal body
can be round, square or triangular (Power Port®)
Consist of two parts – the body and the catheter
4-12fr 125-225cm
Volume of reservoir ranges from 0.15 -1.3mL
Configuration of a Port-a-cath®
The portal body is usually made of titanium, plastic or stainless steel. Stainless steel is
quite heavy compared to the other materials. It also interferes with MRIs and for these
reasons is no longer used for most portal bodies. Titanium does not cause interference
with MRI and is light weight
Ports come in a variety of sizes, depths and shapes including power ports which are
used when high pressure injectors are required
High profile ports: are deeper
Low profile ports: are shallower and have a smaller prime volume
The portal body contains an internal reservoir covered with a septum made of dense,
resealable material, usually silicone
The width of the septum ranges from 6.6 -17.8mm
The catheter is made of a radio-opaque silicone or polyurethane. It is also designed to
reduce the incidence of fibrin sheath/thrombus formation
The base of the Port has suture holes around the circumference to enable the Port body
to remain stable
The outlet stem exists from the base of the Port body and provides the attachment for the
catheter
Some brands have pre-attached catheters while others are attached during the insertion procedure.
Fig.51: Profile of an Implanted Port
Source: Unknown
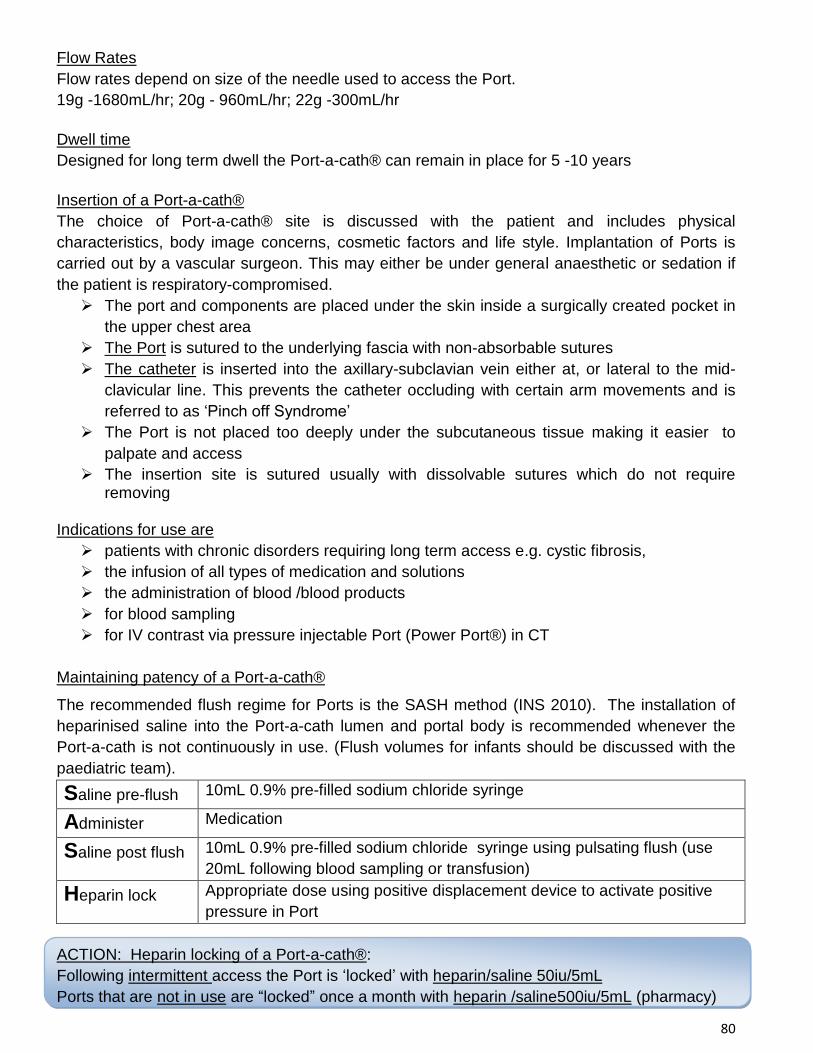
80
Flow Rates
Flow rates depend on size of the needle used to access the Port.
19g -1680mL/hr; 20g - 960mL/hr; 22g -300mL/hr
Dwell time
Designed for long term dwell the Port-a-cath® can remain in place for 5 -10 years
Insertion of a Port-a-cath®
The choice of Port-a-cath® site is discussed with the patient and includes physical
characteristics, body image concerns, cosmetic factors and life style. Implantation of Ports is
carried out by a vascular surgeon. This may either be under general anaesthetic or sedation if
the patient is respiratory-compromised.
The port and components are placed under the skin inside a surgically created pocket in
the upper chest area
The Port is sutured to the underlying fascia with non-absorbable sutures
The catheter is inserted into the axillary-subclavian vein either at, or lateral to the mid-
clavicular line. This prevents the catheter occluding with certain arm movements and is
referred to as „Pinch off Syndrome‟
The Port is not placed too deeply under the subcutaneous tissue making it easier to
palpate and access
The insertion site is sutured usually with dissolvable sutures which do not require removing
Indications for use are
patients with chronic disorders requiring long term access e.g. cystic fibrosis,
the infusion of all types of medication and solutions
the administration of blood /blood products
for blood sampling
for IV contrast via pressure injectable Port (Power Port®) in CT
Maintaining patency of a Port-a-cath®
The recommended flush regime for Ports is the SASH method (INS 2010). The installation of
heparinised saline into the Port-a-cath lumen and portal body is recommended whenever the
Port-a-cath is not continuously in use. (Flush volumes for infants should be discussed with the
paediatric team).
Saline pre-flush 10mL 0.9% pre-filled sodium chloride syringe
Administer Medication
Saline post flush 10mL 0.9% pre-filled sodium chloride syringe using pulsating flush (use
20mL following blood sampling or transfusion)
Heparin lock Appropriate dose using positive displacement device to activate positive
pressure in Port
ACTION: Heparin locking of a Port-a-cath®:
Following intermittent access the Port is „locked‟ with heparin/saline 50iu/5mL
Ports that are not in use are “locked” once a month with heparin /saline500iu/5mL (pharmacy)
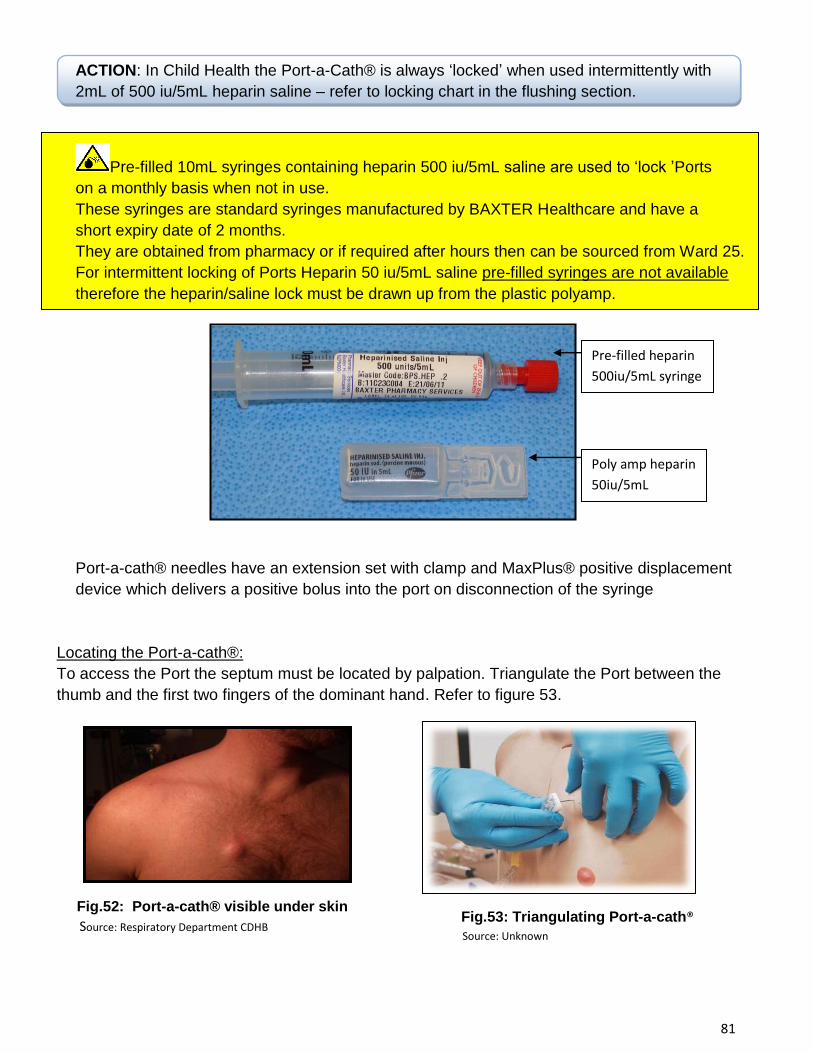
81
ACTION: In Child Health the Port-a-Cath® is always „locked‟ when used intermittently with
2mL of 500 iu/5mL heparin saline – refer to locking chart in the flushing section.
Pre-filled 10mL syringes containing heparin 500 iu/5mL saline are used to „lock ‟Ports
on a monthly basis when not in use.
These syringes are standard syringes manufactured by BAXTER Healthcare and have a
short expiry date of 2 months.
They are obtained from pharmacy or if required after hours then can be sourced from Ward 25.
For intermittent locking of Ports Heparin 50 iu/5mL saline pre-filled syringes are not available
therefore the heparin/saline lock must be drawn up from the plastic polyamp.
Port-a-cath® needles have an extension set with clamp and MaxPlus® positive displacement
device which delivers a positive bolus into the port on disconnection of the syringe
Locating the Port-a-cath®:
To access the Port the septum must be located by palpation. Triangulate the Port between the
thumb and the first two fingers of the dominant hand. Refer to figure 53.
Fig.52: Port-a-cath® visible under skin
Source: Respiratory Department CDHB Fig.53: Triangulating Port-a-cath®
Source: Unknown
Pre-filled heparin
500iu/5mL syringe
Poly amp heparin
50iu/5mL
82
Blood sampling from a Port-a-cath® (also refer to section on Blood Sampling p.36-40)
Always perform hand hygiene and use an aseptic technique for preparing equipment
The syringe or vacutainer method is acceptable
If blood tests for aminoglycocides levels or coagulation profiles are required, flush port
first with 20mL 0.9% sodium chloride prior to blood sampling then aspirate blood
discard sample the take required blood tests (Boodhan et al,2006)
Where BLOOD CULTURES are required DO NOT FLUSH THE PORT. Use the initial
discard blood for the blood culture specimens
Following blood sampling the port is flushed with 20mls normal saline “Lock” the Port
using Heparin saline 500iu/5mL(monthly) Heparin/saline 50iu/5mL(intermittent use)
Management of a Port-a-cath®
Prior to accessing a Port a topical anesthetic cream is applied one hour prior to the procedure
(adults and children).
Correct needle selection is an important factor in preventing complications.
The size and length of needle used to access a Port will depend on the type of infusion and how
much tissue lies over the Port.
a. If the Port is easily palpated and visible under the skin, then a ¾” - 1” needle is appropriate.
b. If the Port is well covered by tissue and not visible, then a 1” - 1½” needle is preferred.
Selection of the correct needle length will prevent complications of inadvertent
displacement and extravasation of infusates into surrounding tissues
Extension Set Change for a Port-a-cath®
If an additional extension set with clamp is required then this is connected aseptically at
the time the needle is inserted and this is considered part of the catheter remaining in situ
until the weekly needle change.
Replacement of the extension set is only required if it becomes compromised i.e. worn
from over clamping, leakage, contamination or use of blood products.
Power Injectable Port-a-cath PowerPorts®
Power injectable Ports are used in Oncology because they allow for diagnostic CT using high pressure
injectors..Once the Power Loc® needle has been inserted into the Port the area is covered with a bio
occlusive dressing to secure the needle. The label shown below is then attached to the dressing to
identify that it is a PowerPort®
Standard Ports SHOULD NEVER be used for CT using high pressure injectors
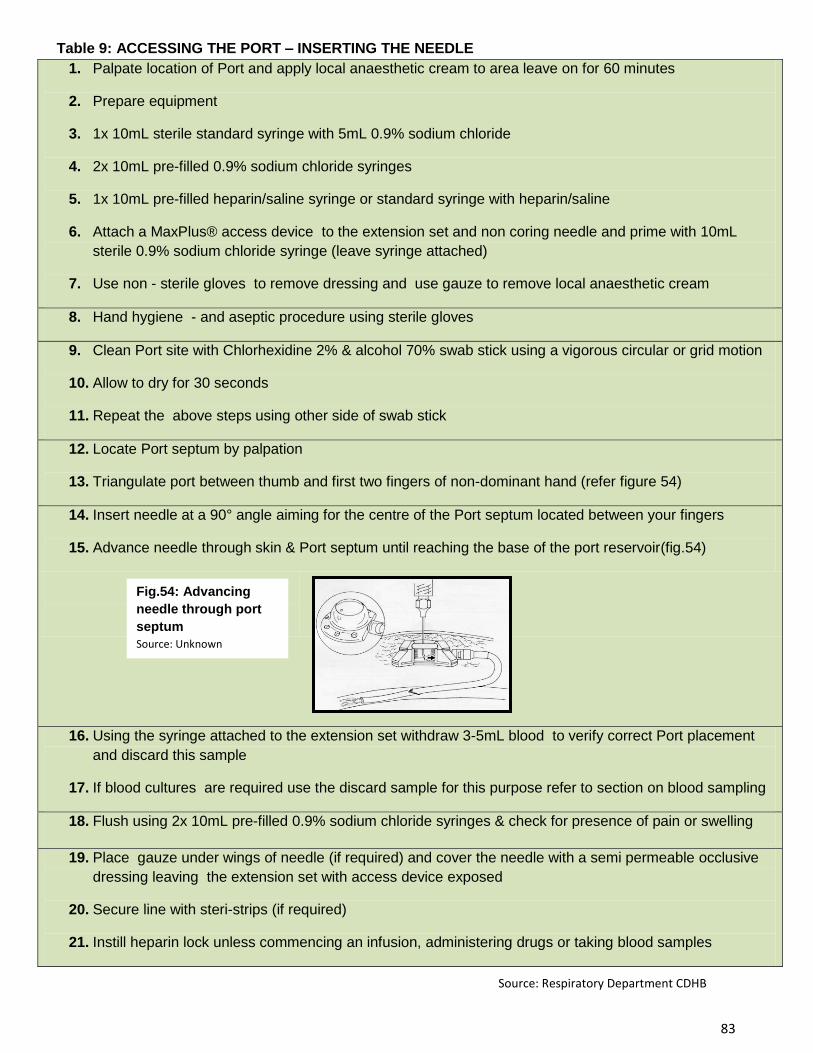
83
Table 9: ACCESSING THE PORT – INSERTING THE NEEDLE
1. Palpate location of Port and apply local anaesthetic cream to area leave on for 60 minutes
2. Prepare equipment
3. 1x 10mL sterile standard syringe with 5mL 0.9% sodium chloride
4. 2x 10mL pre-filled 0.9% sodium chloride syringes
5. 1x 10mL pre-filled heparin/saline syringe or standard syringe with heparin/saline
6. Attach a MaxPlus® access device to the extension set and non coring needle and prime with 10mL
sterile 0.9% sodium chloride syringe (leave syringe attached)
7. Use non - sterile gloves to remove dressing and use gauze to remove local anaesthetic cream
8. Hand hygiene - and aseptic procedure using sterile gloves
9. Clean Port site with Chlorhexidine 2% & alcohol 70% swab stick using a vigorous circular or grid motion
10. Allow to dry for 30 seconds
11. Repeat the above steps using other side of swab stick
12. Locate Port septum by palpation
13. Triangulate port between thumb and first two fingers of non-dominant hand (refer figure 54)
14. Insert needle at a 90° angle aiming for the centre of the Port septum located between your fingers
15. Advance needle through skin & Port septum until reaching the base of the port reservoir(fig.54)
16. Using the syringe attached to the extension set withdraw 3-5mL blood to verify correct Port placement
and discard this sample
17. If blood cultures are required use the discard sample for this purpose refer to section on blood sampling
18. Flush using 2x 10mL pre-filled 0.9% sodium chloride syringes & check for presence of pain or swelling
19. Place gauze under wings of needle (if required) and cover the needle with a semi permeable occlusive
dressing leaving the extension set with access device exposed
20. Secure line with steri-strips (if required)
21. Instill heparin lock unless commencing an infusion, administering drugs or taking blood samples
Fig.54: Advancing
needle through port
septum
Source: Unknown
Source: Respiratory Department CDHB

84
1. Ensure patient is positioned comfortably
2. Hand hygiene
3. Prepare equipment
4. 1x10mL pre-filled 0.9% sodium chloride syringe
5. 1x 10mL pre-filled 500iu/5mL heparin/ saline syringe ( for child use 2mL) or draw up
heparin/saline 50iu/5mL using standard sterile syringe
6. Hand hygiene
7. Apply non-sterile gloves
8. Saline flush using 10mL pre-filled 0.9% sodium chloride syringe
9. Heparin/saline lock (either pre-filled or standard syringe) & disconnect syringe to initiate
positive displacement via the MaxPlus® access device
10. Remove dressing – do not contaminate needle entry site
11. Clean needle site with Chlorhexidine 2% & 70% alcohol stick
12. Allow to dry – 30 seconds
13. Stabilize Port with two fingers
14. Remove needle
15. Apply a sterile bio-occlusive dressing over the needle exit site
16. Remove non-sterile gloves
17. Hand hygiene
18. Document procedure & variances in patient‟s CVAD Insertion & Maintenance Form
Table 10: DE-ACCESSING THE PORT - REMOVING THE NEEDLE
Fig.55: Port-a-cath® placement
Source: Unknown
Fig. 56: Port-a-cath® accessed with
needle Source: Respiratory Department CDHB
85
PORT-A-CATH® COMPLICATIONS
Complication may affect the implanted port. Many of these interventions are medical responsibilities and the appropriate medical staff should be notified if any of the following complications are suspected. Total or partial occlusion of a Port-a-cath®
Check needle position Portal or catheter movement Catheter kinking / clamped catheter Fibrin sheath formation
Interventions Check needle position is fully advanced through the portal septum making contact with
the chamber Check patency by flushing Change needle if incorrect position is suspected Using a sterile 10mL syringe with 0.9% sodium chloride, gently alternate between
aspiration and irrigation to ascertain blood return. Do not use excessive pressure as this can cause catheter rupture or force a clot into the circulation
Have patient reviewed by doctor and/or nurses specialising in the care of Ports X-ray-dye studies to confirm location of Port and catheter If Port and catheter have become separated, surgical intervention is required. DO NOT
USE PORT If the catheter tip is against the vein wall, but the Port is flushing freely, continue to use If occluded follow the „t-PA Catheter Restoration‟ flow chart in section on occlusion
Pain on flushing of a Port-a-cath® could indicate the following: separation of the catheter from the portal body needle dislodgement from the portal body
Prevention of incorrect needle access or placement: always ensure that the needle is adequately secured after accessing do not tilt, rock or pull on needle when Port is accessed
Symptoms of incorrect needle placement are: chest, shoulder or back pain with infusion of fluids or medications signs of extravasation such as swelling, pain and redness around the Port
Interventions required if pain is experienced during infusions stop the infusion/flushing immediately. Do not remove needle. Notify medical team. treat extravasation as per medical team re-access the Port (if appropriate)
86
Infection of a Port-a-cath®: Implanted Ports may become infected at the insertion site, port pocket, inside the catheter, or along the catheter tunnel track. Infection can be introduced when accessing the Port, withdrawing blood samples or by contaminated infusates. Symptoms of an infected Port-a-cath® are: redness, swelling or tenderness over Port site and tunnel track fever rigors during flushing of Port
Prevention of a Port-a-cath® infection requires the following: effective hand hygiene aseptic technique during all Port procedures changing extension tubing weekly maintaining dressing integrity – keep dry, change if it becomes compromised changing the needle and dressing weekly
Interventions for a Port-a-cath® infection include: prescribing antibiotic therapy – medical orders prescribing an antibiotic/heparin lock which may be required prior to de-accessing the
Port, if infection is present in the portal body or catheter removing the Port if indicated
For further reading on refer to the „Complications Section‟
PATIENT INFORMATION BOOKLETS
Port-a-Cath ® patient information booklets available on www.cdhb.health.nz/pdu in the
intravenous section. Ref no: 3274. Print off as required
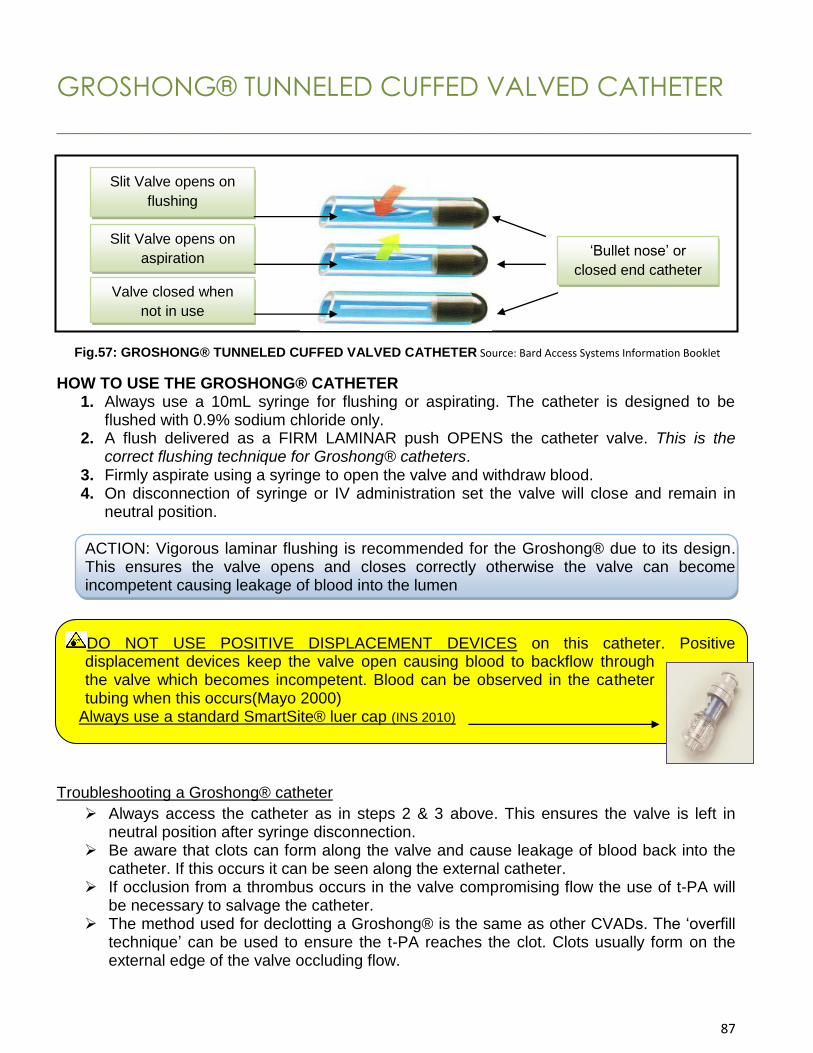
87
GROSHONG® TUNNELED CUFFED VALVED CATHETER
__________________________________________________________
HOW TO USE THE GROSHONG® CATHETER 1. Always use a 10mL syringe for flushing or aspirating. The catheter is designed to be
flushed with 0.9% sodium chloride only. 2. A flush delivered as a FIRM LAMINAR push OPENS the catheter valve. This is the
correct flushing technique for Groshong® catheters. 3. Firmly aspirate using a syringe to open the valve and withdraw blood. 4. On disconnection of syringe or IV administration set the valve will close and remain in
neutral position.
ACTION: Vigorous laminar flushing is recommended for the Groshong® due to its design. This ensures the valve opens and closes correctly otherwise the valve can become incompetent causing leakage of blood into the lumen
DO NOT USE POSITIVE DISPLACEMENT DEVICES on this catheter. Positive displacement devices keep the valve open causing blood to backflow through the valve which becomes incompetent. Blood can be observed in the catheter tubing when this occurs(Mayo 2000)
Always use a standard SmartSite® luer cap (INS 2010)
Troubleshooting a Groshong® catheter
Always access the catheter as in steps 2 & 3 above. This ensures the valve is left in neutral position after syringe disconnection.
Be aware that clots can form along the valve and cause leakage of blood back into the catheter. If this occurs it can be seen along the external catheter.
If occlusion from a thrombus occurs in the valve compromising flow the use of t-PA will be necessary to salvage the catheter.
The method used for declotting a Groshong® is the same as other CVADs. The „overfill technique‟ can be used to ensure the t-PA reaches the clot. Clots usually form on the external edge of the valve occluding flow.
Slit Valve opens on
flushing
Slit Valve opens on
aspiration
Valve closed when
not in use
„Bullet nose‟ or
closed end catheter
Fig.57: GROSHONG® TUNNELED CUFFED VALVED CATHETER Source: Bard Access Systems Information Booklet
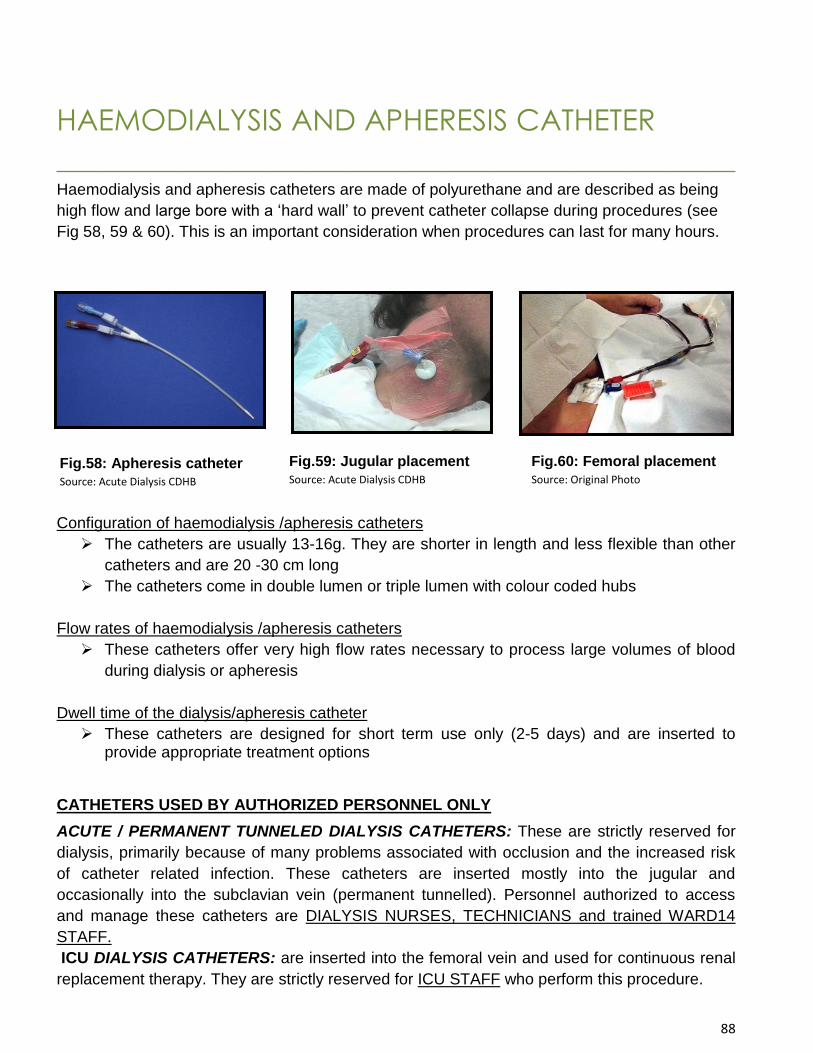
88
HAEMODIALYSIS AND APHERESIS CATHETER
___________________________________________________ Haemodialysis and apheresis catheters are made of polyurethane and are described as being
high flow and large bore with a „hard wall‟ to prevent catheter collapse during procedures (see
Fig 58, 59 & 60). This is an important consideration when procedures can last for many hours.
Configuration of haemodialysis /apheresis catheters
The catheters are usually 13-16g. They are shorter in length and less flexible than other
catheters and are 20 -30 cm long
The catheters come in double lumen or triple lumen with colour coded hubs
Flow rates of haemodialysis /apheresis catheters
These catheters offer very high flow rates necessary to process large volumes of blood
during dialysis or apheresis
Dwell time of the dialysis/apheresis catheter
These catheters are designed for short term use only (2-5 days) and are inserted to provide appropriate treatment options
CATHETERS USED BY AUTHORIZED PERSONNEL ONLY
ACUTE / PERMANENT TUNNELED DIALYSIS CATHETERS: These are strictly reserved for
dialysis, primarily because of many problems associated with occlusion and the increased risk
of catheter related infection. These catheters are inserted mostly into the jugular and
occasionally into the subclavian vein (permanent tunnelled). Personnel authorized to access
and manage these catheters are DIALYSIS NURSES, TECHNICIANS and trained WARD14
STAFF.
ICU DIALYSIS CATHETERS: are inserted into the femoral vein and used for continuous renal
replacement therapy. They are strictly reserved for ICU STAFF who perform this procedure.
Fig.58: Apheresis catheter
Source: Acute Dialysis CDHB
Fig.59: Jugular placement
Source: Acute Dialysis CDHB
Fig.60: Femoral placement
Source: Original Photo

89
APHERESIS CATHETERS: These are used strictly for the purpose of therapeutic procedures
such as plasma exchange and peripheral blood stem cell harvesting for bone marrow
transplant. They are inserted into the jugular, or femoral vein.
Personnel authorized to access and manage these catheters are the NZ REGIONAL BLOOD
SERVICE REGISTERED NURSES.
Management of dialysis/apheresis catheter
This group of catheters is problematic in that they are difficult to secure and maintain because of
their rigidity and area of insertion. Their large size makes them more painful and restricts patient
movement.
The site can bleed easily making it difficult to keep the dressing clean, dry and intact.
A BIOPATCH® is placed around the catheter at the insertion site and a bio-occlusive
transparent dressing is applied over the site.
Femoral vein placement requires the patient‟s activities to be restricted to prevent bleeding at
the insertion site and /or perforation of the femoral vein.
Unauthorized personnel who access these catheters increase the risk for complications
such as occlusion and infection, compromising the catheter dwell and the patient‟s treatment.
The catheter lumens are labelled with a RED drug label to indicate that the „locking solution‟
is instilled into the catheter. The catheter lumens are then wrapped together in gauze.
CATHETER „LOCKING‟ SOLUTIONS:
ACUTE /PERMANENT TUNNELED DIALYSIS CATHETERS are „locked‟ with one of the
following to fill the volume of the catheter lumens. The fill volume is written on the catheter
lumens.
Heparin 5000iu
Citrate (Duraloc™)
Antibiotics
ICU DIALYSIS CATHETERS are „locked‟ with the following:
Heparin 5000iu and the volume is indicated on the catheter lumens
APHERESIS CATHETERS are „locked‟ with the following:
Heparin 5000iu 1.3mL into each lumen
Dialysis and Apheresis catheters carry a high risk for infection. Always ensure they
are managed appropriately and removed as soon as they are no longer required
90
For Further Reading on CVAD
Child Health Volume Q. Child Health Policy & Procedure Manual Central Venous Access Devices Management in Children & Young People
Crinch, C., Halfmann, J.A., Crone, W.C. and Maki, D.J. (2005). The effects of prolonged ethanol exposure on the
mechanical properties of polyurethane and silicone catheters used for intravascular access. Infect Control and Hospital Epidemiology, 26 (8) 708-714. Hendrickson, K. J., Axtell, R. A., Hoover, S.M., Kuhn, S.M., Pritchard, J. Kehl, S and Klein, J. (2000). Prevention of central venous catheter-related infections and thrombotic events in immunocompromised children by the use of vancomycin/ciprofloxacin/heparin flush solution: A randomized, multicenter, double-blind trial. Journal of Clinical Oncololgy, 18(6):1269-78. National Quality Improvement Programme. (accessed 2009). Catheter-related Bloodstream Infection
Project. Available at www.infectioncontriol.org.nz
New Zealand Blood Service Transfusion Medicine Hand Book(2008)
Onland, W., Shin, C.E., Fustar, S., Rushing, T. and Wong, Wing-Yen. (2006). Ethanol-lock technique for persistent bacteremia of long term intravascular devices in pediatric patients. Archives of Pediatric Adolescent Medicine, 60.
Rhin, T.L. (2001). Fibrinolytic Therapy in central Venous Catheter Occlusion. Journal of Intravenous Nursing, 24(3s)May/June. Rowley, S, and Sinclair, S. (2004). Working towards an National Heath System standard for aseptic non-touch technique. Nursing Times. 24;100(8):5052. Todd,,J. and Braverly, K. (2002). BARD the AccessAbility™ programme. http://www.accessabilitybard.co.uk/ (accessed 2009). Weinstein, S.M. (2007). Plummer‟s principles and practice of intravenous therapy, 8th Edition, Lippincott Williams & Wilkins: Philadelphia. Woodrow, P. (2002).Central venous catheters and central venous pressure. Nursing Standards,16(26):45-51.
91
LIST OF REFERENCES
__________________________________________________ Acute Dialysis Department (2010) Christchurch Hospital. Christchurch Hospital; NZ Andris, D. A. and Krzywada, E. A. (1999). Central venous catheter occlusion: Successful management strategies. Medical Surgical Nursing, 8(4). ACCP guidelines anti-thrombotic therapy for venous thromboembolic disease. Chest 133 msuppl (6):4454-5545. Boodhan, S, Maloney, A. M, Dupuis, L. L. (2006). Extent of agreement in gentamycin concentrations between serum and that is drawn peripherally and from central venous catheters. Pediatrics, 118 (6):e1650-1656. Bagnall-Reeb, H. (2004). Evidence for the use of the antibiotic lock technique. Journal of Infusion Nursing, 27(2):118-120. Bard Access Systems, (2005). Patient Information Booklet. Sydney: Australia. Becton Dickinson (BD). (2004). Medical Systems Leaflet. Auckland: New Zealand. Brown-Smith, J. K, Stoner, M.H. and Barley, Z.A. (1990). Tunnelled catheter thrombosis: Factors related to incidence. Oncology Nursing Forum, 17(4):543-549. Carefusion® users guide. (2008). Auckland: New Zealand. Centres for Disease Control. (2002). Guidelines for the prevention of intravascular catheter-related infections. Morbidity & Mortality Weekly Report, 51(RR10):1-32. Chambers, S.T., Peddie, B., and Pithie, A. (2006). Ethanol disinfection of plastic-adherent micro-organisms. J Hosp Infect, 63:193-6. Davis, K. A. (2008). Assessing procedural and clinical data plus electrocardiographic guidance greatly reduce the need for routine chest radiography after central line placement. Journal of Trauma 64(2):542. Dougherty, L. (2000). Central Venous Access Devices. Nursing Standard, 14(43):45-50. Forauer, A.R. (2007). Pericardial tamponade in patients with central venous catheters. Journal of Infusion Nursing, 30(3):161-167. Gabriel, J., Bravery, K., Dougherty. L., Kayley. J., Mlaster, M. and Scales, K. (2005). Vascular Access: Indications implications for patient care. Nursing standard, 19(26):45-52. Geerts, W.H, Bergqvist, D, Pineo, G.F., Heit, J., Samam. C., Lassen, M. and Colewell, C. (2008).
Prevention of venous thromobembolism. American College of Chest Physicians (ACCP) evidence
based clinical practice guidelines (8th Edition). Chest, 133(suppl) 6:381S-453S.
Genetech Inc.(2006)Cathflow® Activase®(Alteplase) for restoring catheter flow.www.gene.com/
Hadaway, L. (2005). Reopen the pipeline. Nursing 2005, 35(8).
92
Hamilton, H. (2006). Complications associated with venous access devices: Part one. Nursing Standard, 20(26):43-50. Hanna, H.A., Raad, I. (2001). Blood products: A significant risk for long-term catheter–related blood stream infections in cancer patients. Infection Control Hospital Epidemiology, 22 (3):165-166.
Hosoglu, S., Akalin, S., Kidir, V., Suner, A., Kayabas, H. and Geyik, M. F. (2004). Prospective surveillance study for risk factors of central venous catheter –related blood stream infections. American Journal of Infection Control, 32(3):131-134. Infection Prevention and Control Department Christchurch Hospital,(2010) Hand hygiene education Infusion Nurses Society. (2010). Infusion Nursing: An Evidence –Based Approach. 3rd Edition. Saunders: Massachusetts, USA. Infusion Nurses Society. (2006). Infusion Nursing Standards of Practice. Infusion Nurse, 29(1 suppl):S1-S92, 2006a. Institute for Healthcare Improvement. (2008). 5 million Lives campaign. Getting started kit: Prevent Central Line Infections How to Guide, Cambridge, MA. http://www.ihi.org/IHI/Programs/Campaign/CentralLineInfection.htm
Johnson & Johnson Medical Continuing Education (1998). Sydney: Australia. Kearon, C. Kahn, S.R, Agnelli, G., Goldhaber, S., Raskob, G.E. and Comerota, A.J. (2008).
Antithrombotic therapy for venous thromboembolic disease. American College of Chest Physicians
(ACCP) evidence based clinical practice guidelines (8th Edition). Chest, 133(msuppl) 6:4454-5545.
Kutzscher,L.(2012). Management of Irritant Contact Dermatitis and Peripherally Inserted Central Catheters. Clinical Journal of Oncology Nursing. Volume 16 ,Number 2. Lau, K.Y. (2002). Percutaneous insertion of Hickman central venous catheters: Jugular approach. Journal of Hong Kong College of Radiology, 5:69-72.
Maki, D.G., Kluger, D.M., Crnich, C.J. (2006). The risk of blood stream infection in adults with different intravascular devices: A systematic review of 200 published prospective studies. Mayo Clinical Proctocol, 81:1159-1171.
Masoorli, S. (2002). Getting a line on CVAD: Central vascular access devices. Nursing. 32(4)36-45.
Mayo, D. (2002). Current treatment options for catheter-related thrombosis. Journal of Vascular Access Devices,5(2):10-20, Summer. Medical Illustrations Department (2009) Christchurch Hospital, Christchurch: NZ Mirza, B., Vanek, V.W., Kupensky, D.T. (2004). Pinch - off syndrome: Case report and collective review of the literature. American Surgery, 70(7):635-644.
NZ Auditor – General Report. (2002). Management of Hospital Acquired infections.Vol:1and 2
Nursing Council of New Zealand. (2000). Competencies for Registered Nurses:32.
O'Grady, N.P., Alexander, M., Dellinger, E.P., Gerberding, J.L., Heard, S.O., Maki, D.G., Masur, H.,
McCormick, R.D., Mermel, L.A., Pearson, M.L., Reed, I.I., Randolph, A. and Weinstein, R.A. (2002).
Guidelines for the prevention of intravascular catheter-related infections. American Journal of Infection
Control, 30(8):476-89.
93
Penel, J. ,Neu, J.C., Clisant, S. Hoppe, S., Devos, P. and Yazdanpanah, Y. (2007). Risk factors for early catheter related infections in cancer patients. Cancer ,110:1586-1592. Peter, D.A.and Saxman, C.(2003). Preventing air embolism when removing CVC‟s: An evidence-based approach to changing practice. Medsurg Nurs, 12(4):223-228. Respiratory Department Christchurch Hospital (2010) Christchurch : NZ Robert, J., Fridkin, S. K., Blumber, H. M., Anderson, B., White, N., Ray, S. M., Chan, J. and Jarvis, W. R. (2000). The influence of the composition of the nursing staff on primary blood stream infection rates in a surgical intensive care. Infection Control and Hospital Epidemiology, 21(1)12-17. Rowley, S. (2001). Aseptic Non-Touch Technique. Nursing Times,97(7) Infection Control Supplement V1-V111. Royal College of Nursing. (2006). Standards for Infusion Therapy. London: England.
Steiger, E. (2006). Dysfunction and thrombotic complications of vascular access devices. Journal of Parenteral and Enteral Nutrition (JPEN), 30(1suppl):S70- S72. Shanks, R.Donegan, N., Graver, M. (2006). Heparin stimulate staphylococcus aureus biofilm formation. Infection Immunisation,73:4596-4606. Simcock, E. (2007). Complications of CVC‟s and their nursing management. Nursing Times, 97(20). Simcock, L. (2001). The use of central venous catheters for IV therapy. Nursing Times, 97(18). Steiger, E. (2006). Dysfunction and thrombotic complications of vascular access devices. Journal of Parenteral and Enteral Nutrition, 30(1suppl):S70-S72. Terry, J. (Ed). (1995). Intravenous Therapy: Clinical Principles and Practice. W B Saunders Co: Massachusetts, USA. The Haematology Red Book (2009) Christchurch Hospital 3M Medical. (2008).Skin health guide. www.3m.com/healthcare
Canterbury District Health Board January 2011