Embed Size (px)
Citation preview
Join us for Breakpoint 2021, a 2-day virtual summit on software quality. Register now
• Products
• • Developers
•
• Live for Teams
• Pricing
•
•
• Sign in
• Free Trial
•
Guide
• Testing on Cloud
• Debugging
• Best Practices
• Tools & Frameworks
• Tutorials
• GET A DEMO
• Free Trial
Home Guide Selenium with Java : Getting Started to Run Automated Tests
Selenium with Java : Getting Started to Run
Automated Tests
By Sadhvi Singh, Community Contributor and Pradeep Krishnakumar, Manager - February 22,
2021
•
•
•
•
Selenium is the first thing that comes to mind when one is planning to automate the testing of
web applications. Selenium is a beneficial tool because it is not only open source but also a
portable software testing framework for web applications that support multiple languages like
Java, C#, Ruby, Python. Choosing the right language depends on the application under test, the
supporting community, available test automation frameworks, usability, elegance, and of course,
seamless build integration.
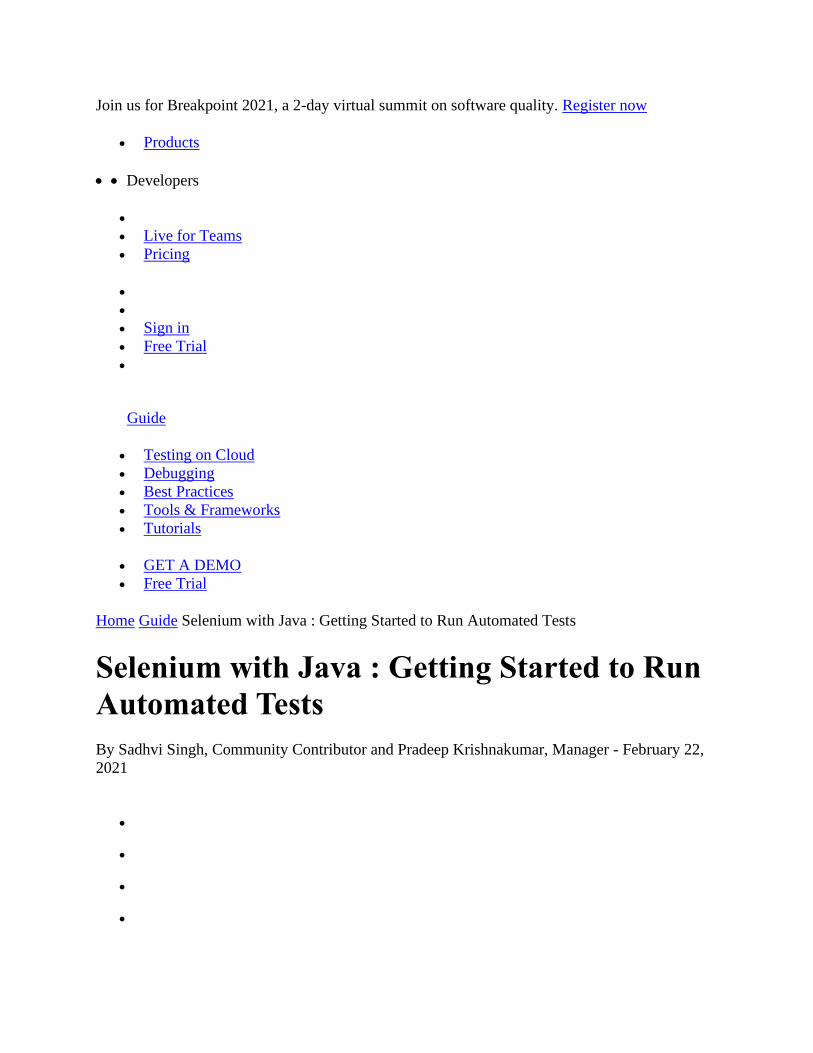
Java is a popular programming language. As per StackOverflow, it is the third most popular
back-end technology after JavaScript and SQL.
This article highlights the step-by-step guide on how to kickstart Selenium with Java.
Why Developers prefer Selenium With Java?
A good community of developers to create documentation and resolve issues has helped Java to
become the most preferred language among the application developers. Thus, writing selenium
test cases using Java has multiple benefits:
• Selenium supports Java. So, testers can leverage the active community of contributors
and detailed documentation to write test cases
• Programs written in Java are faster than other popular languages like Python
• Java is more widely used in commercial applications as compared to other programming
languages like Python and hence integrating Selenium tests it easier
Eventually choosing the right language varies by project, organization, and individuals driving it.
An essential criterion is to know the language in-depth when dealing with Selenium.
Run Selenium Test with Java For Free
Getting Started with Selenium using Java
To kickstart Selenium Webdriver with Java, one needs to bring the different components
together, to start coding.
Selenium is compatible with multiple operating systems like Windows, Linux, Solaris,
Macintosh. It also supports multiple browsers like Chrome, Safari, IE, Edge, Firefox. It is used to
automate functional tests. Also, Selenium is easy to integrate with tools like Jenkins, Maven, and
Docker to achieve a continuous testing approach. Tools like TestNG and JUnit further help in
structuring the selenium tests for easy maintainability and generating reports.
A Must-Read for Python users: Tutorial on how to run Selenium tests using Python.
In this section, we explain how to set up and run a simple test through Selenium with Java
bindings.
Pre-requisites for Setup Configuration
The following components are required to get started with automation:
1. Install Java(JDK)
2. Install Eclipse
3. Selenium Client and WebDriver Language bindings
4. Configuring Selenium Webdriver with Eclipse
5. Creating and Running the first test with Selenium and Java
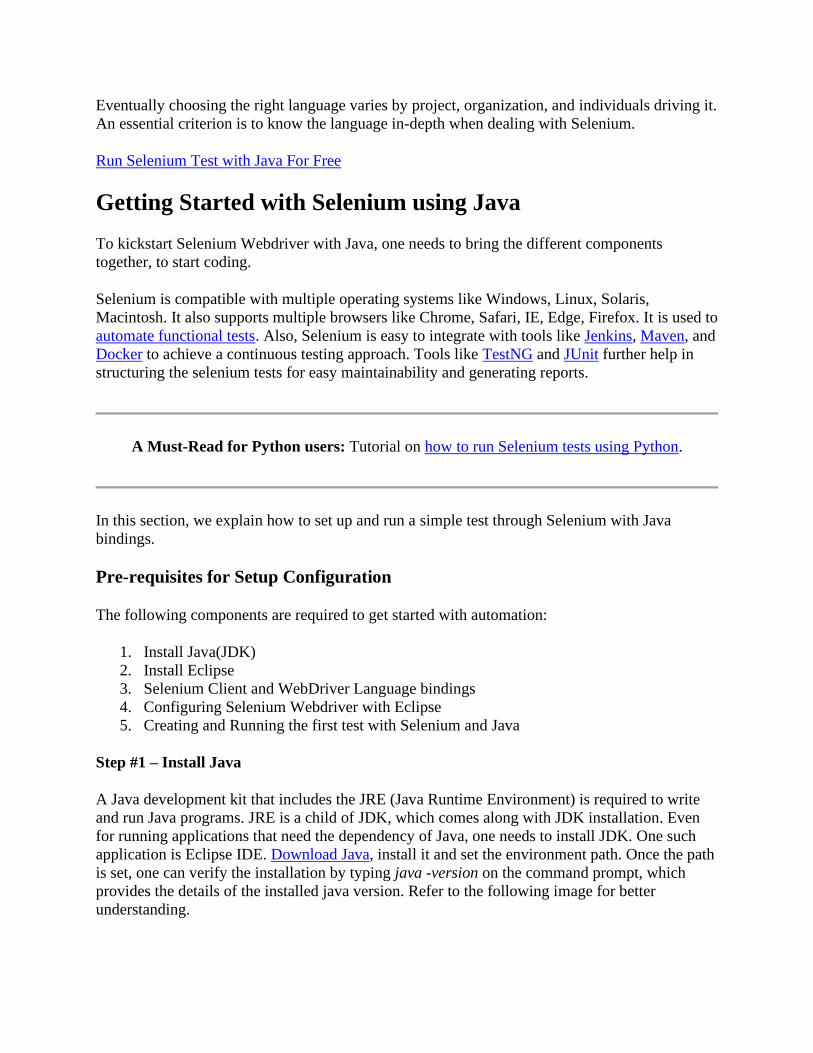
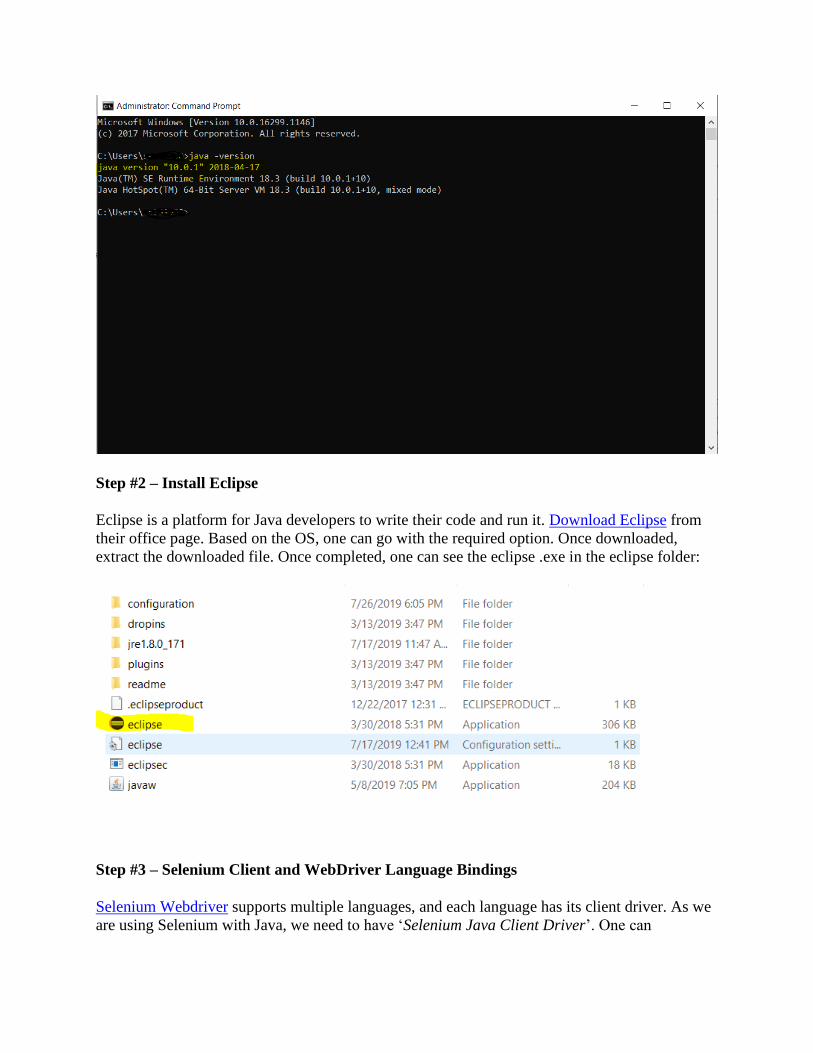
Step #1 – Install Java
A Java development kit that includes the JRE (Java Runtime Environment) is required to write
and run Java programs. JRE is a child of JDK, which comes along with JDK installation. Even
for running applications that need the dependency of Java, one needs to install JDK. One such
application is Eclipse IDE. Download Java, install it and set the environment path. Once the path
is set, one can verify the installation by typing java -version on the command prompt, which
provides the details of the installed java version. Refer to the following image for better
understanding.
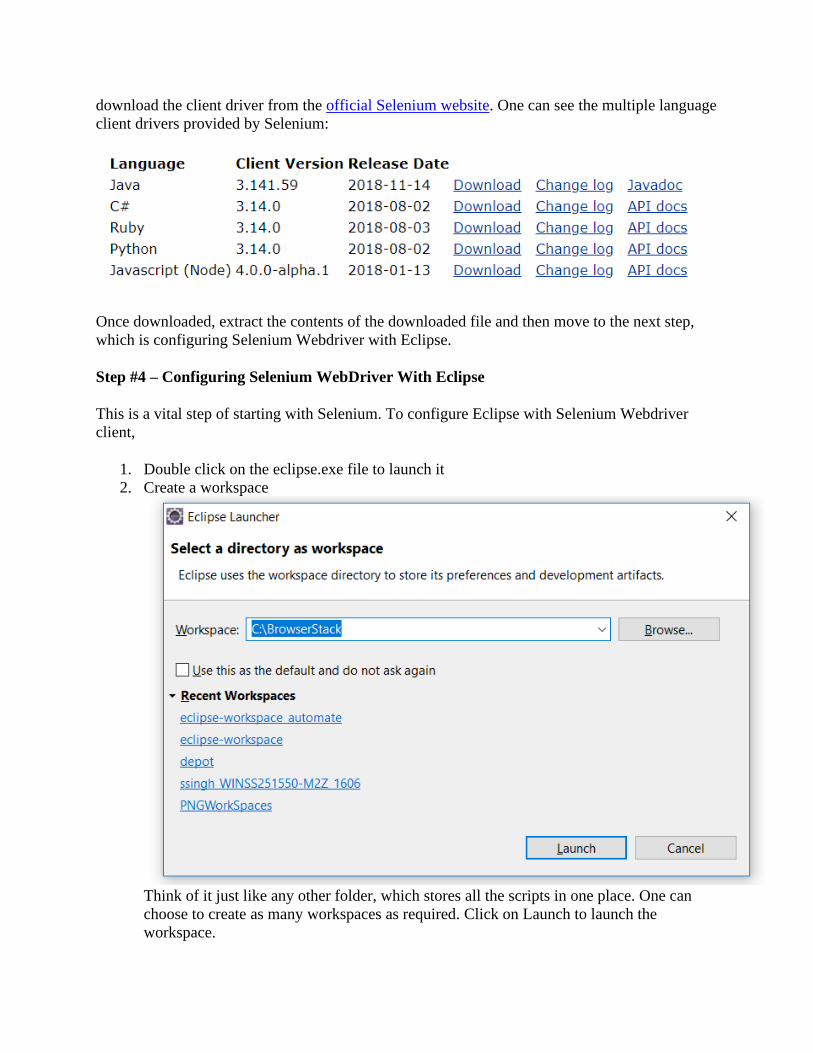
Step #2 – Install Eclipse
Eclipse is a platform for Java developers to write their code and run it. Download Eclipse from
their office page. Based on the OS, one can go with the required option. Once downloaded,
extract the downloaded file. Once completed, one can see the eclipse .exe in the eclipse folder:
Step #3 – Selenium Client and WebDriver Language Bindings
Selenium Webdriver supports multiple languages, and each language has its client driver. As we
are using Selenium with Java, we need to have ‘Selenium Java Client Driver’. One can
download the client driver from the official Selenium website. One can see the multiple language
client drivers provided by Selenium:
Once downloaded, extract the contents of the downloaded file and then move to the next step,
which is configuring Selenium Webdriver with Eclipse.
Step #4 – Configuring Selenium WebDriver With Eclipse
This is a vital step of starting with Selenium. To configure Eclipse with Selenium Webdriver
client,
1. Double click on the eclipse.exe file to launch it
2. Create a workspace
Think of it just like any other folder, which stores all the scripts in one place. One can
choose to create as many workspaces as required. Click on Launch to launch the
workspace.
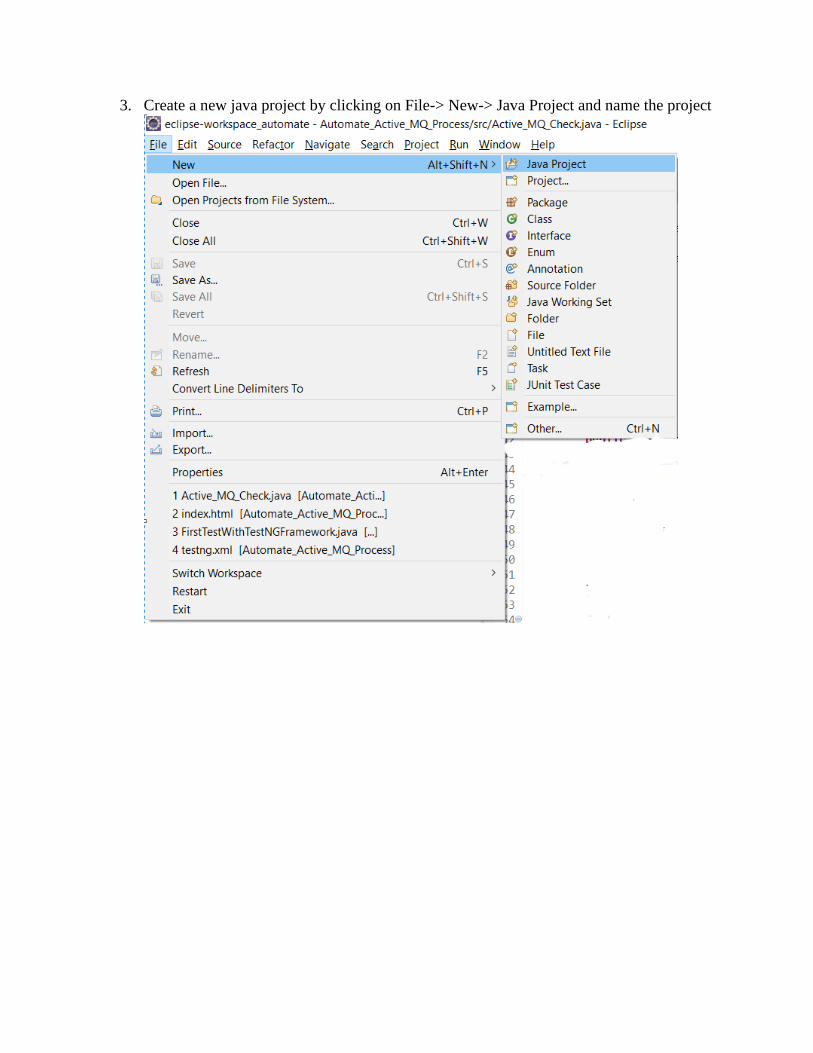
3. Create a new java project by clicking on File-> New-> Java Project and name the project
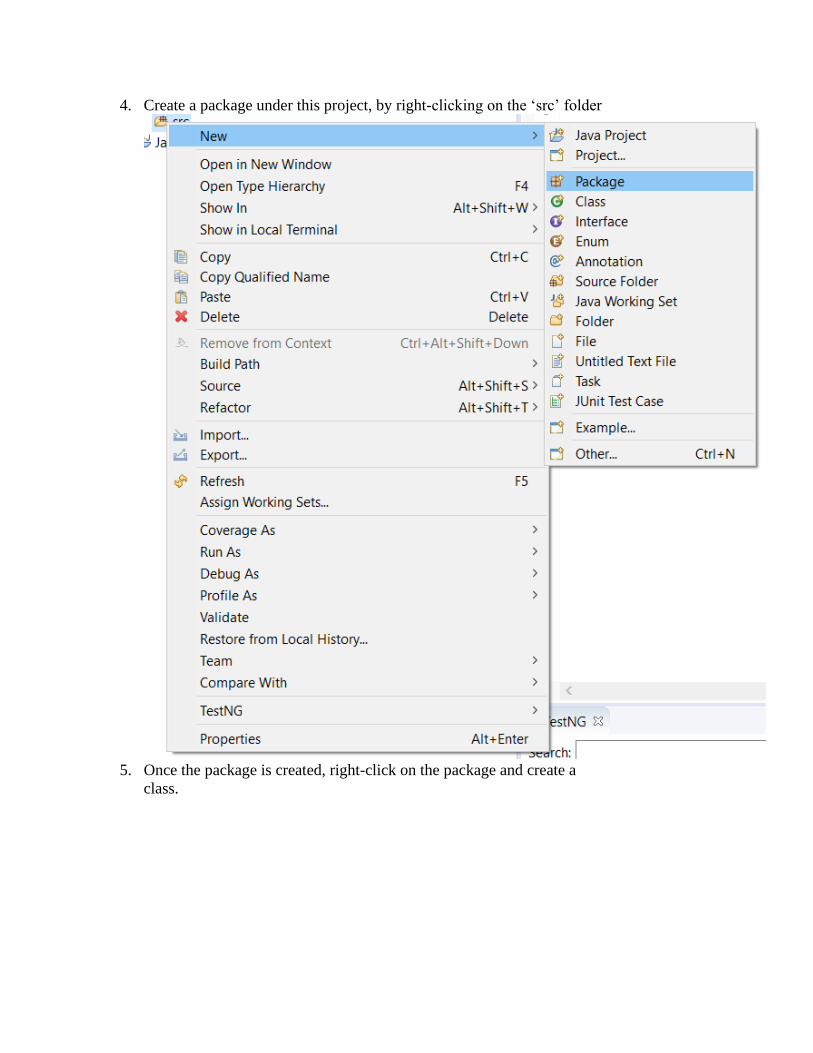
4. Create a package under this project, by right-clicking on the ‘src’ folder
5. Once the package is created, right-click on the package and create a
class.
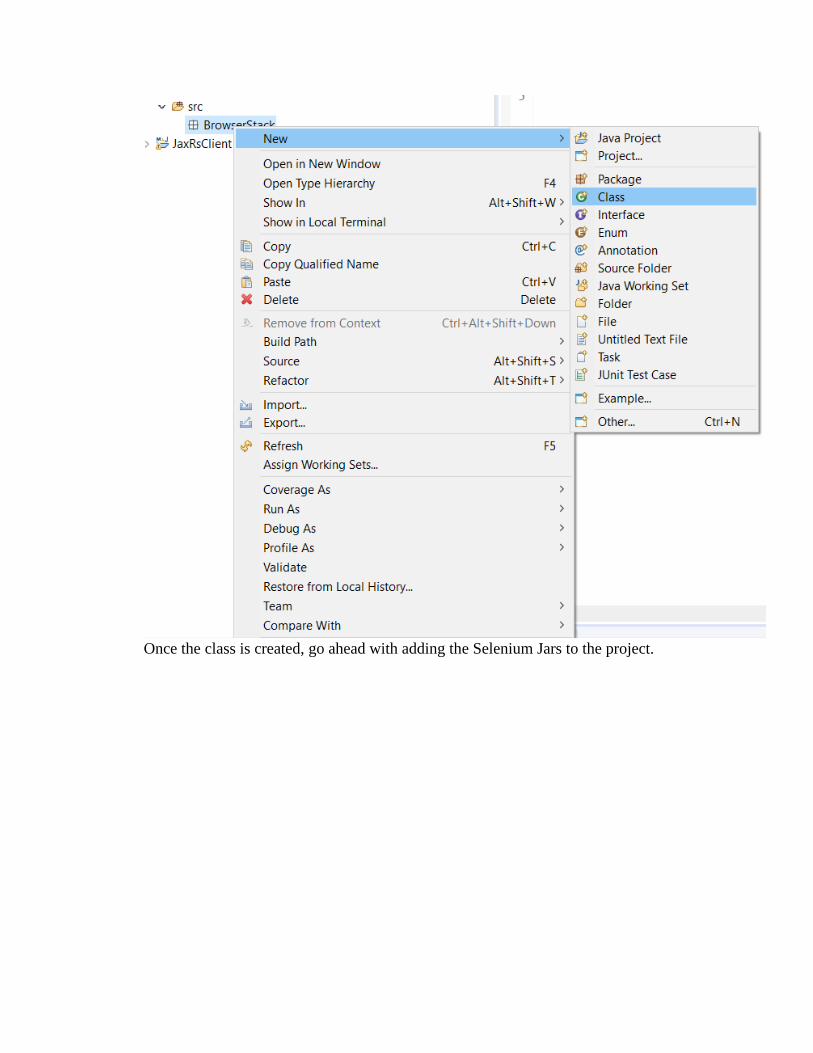
Once the class is created, go ahead with adding the Selenium Jars to the project.
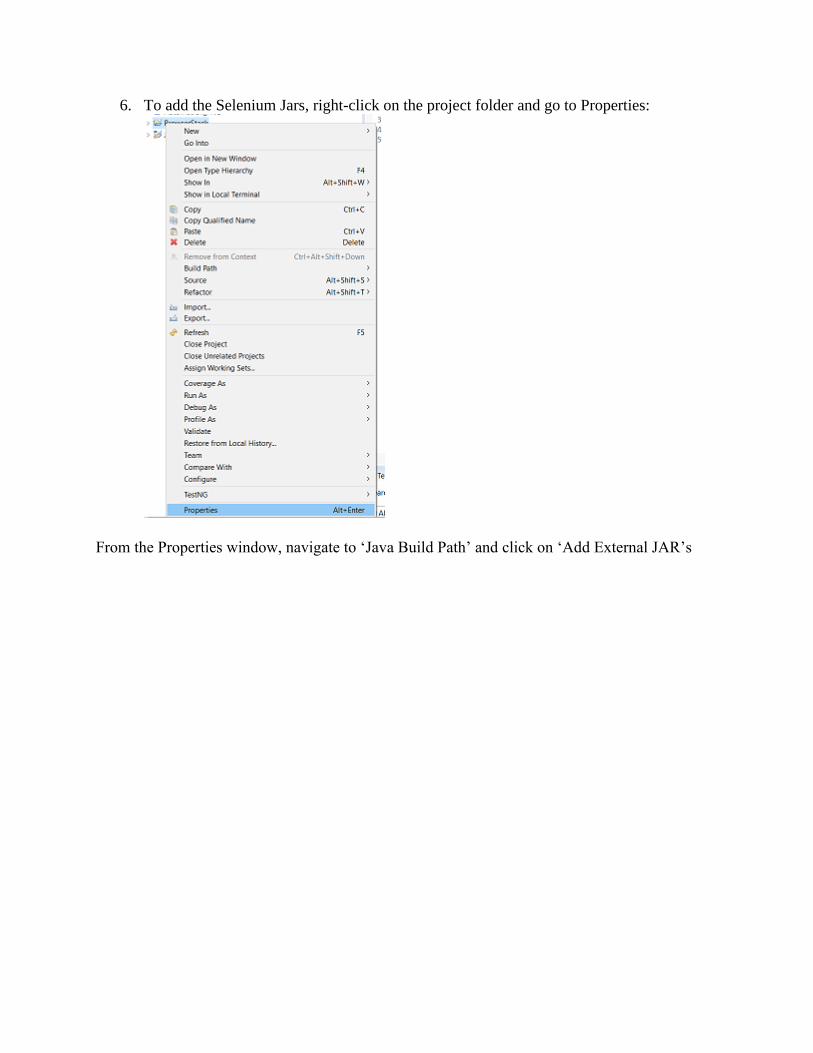
6. To add the Selenium Jars, right-click on the project folder and go to Properties:
From the Properties window, navigate to ‘Java Build Path’ and click on ‘Add External JAR’s

Add the downloaded Selenium Jars and click on ‘Apply and Close.’ Selenium with Eclipse is
configured now. Now Eclipse is ready to execute the first script.
Want to learn basics? Learn how to how to build and execute Selenium Projects with ease.
Step #5 – Creating and Running the first test using Selenium and Java
As the first test, we will write a script to open ‘google.com’ on the Chrome browser. To use
Chrome, it is mandatory to have the driver executable. To download the driver executable, visit
the Selenium website. In the third-party driver browser section, one can download the executable
file for a specific browser.
Post downloading, below is the code snippet to run the first test using Selenium and Java:
import java.util.concurrent.TimeUnit;
import org.openqa.selenium.WebDriver;
import org.openqa.selenium.chrome.ChromeDriver;
public class FirstTestInSelenium {
public static void main(String[] args) {
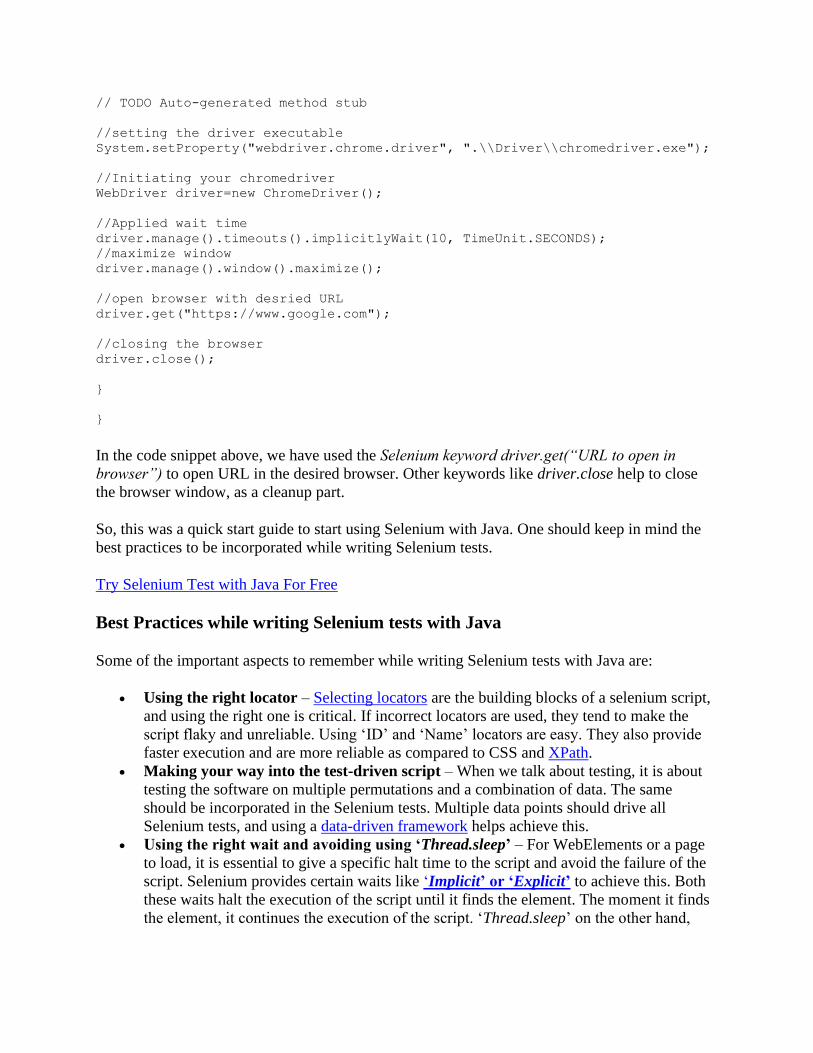
// TODO Auto-generated method stub
//setting the driver executable
System.setProperty("webdriver.chrome.driver", ".\\Driver\\chromedriver.exe");
//Initiating your chromedriver
WebDriver driver=new ChromeDriver();
//Applied wait time
driver.manage().timeouts().implicitlyWait(10, TimeUnit.SECONDS);
//maximize window
driver.manage().window().maximize();
//open browser with desried URL
driver.get("https://www.google.com");
//closing the browser
driver.close();
}
}
In the code snippet above, we have used the Selenium keyword driver.get(“URL to open in
browser”) to open URL in the desired browser. Other keywords like driver.close help to close
the browser window, as a cleanup part.
So, this was a quick start guide to start using Selenium with Java. One should keep in mind the
best practices to be incorporated while writing Selenium tests.
Try Selenium Test with Java For Free
Best Practices while writing Selenium tests with Java
Some of the important aspects to remember while writing Selenium tests with Java are:
• Using the right locator – Selecting locators are the building blocks of a selenium script,
and using the right one is critical. If incorrect locators are used, they tend to make the
script flaky and unreliable. Using ‘ID’ and ‘Name’ locators are easy. They also provide
faster execution and are more reliable as compared to CSS and XPath.
• Making your way into the test-driven script – When we talk about testing, it is about
testing the software on multiple permutations and a combination of data. The same
should be incorporated in the Selenium tests. Multiple data points should drive all
Selenium tests, and using a data-driven framework helps achieve this.
• Using the right wait and avoiding using ‘Thread.sleep’ – For WebElements or a page
to load, it is essential to give a specific halt time to the script and avoid the failure of the
script. Selenium provides certain waits like ‘Implicit’ or ‘Explicit’ to achieve this. Both
these waits halt the execution of the script until it finds the element. The moment it finds
the element, it continues the execution of the script. ‘Thread.sleep’ on the other hand,

stops the execution for the defined period even when it finds the element in the defined
interval. This increases the execution time of the script
• Don’t make scripts specific to a browser or driver – Cross browser testing plays a vital
role in testing. One may expect the scripts to run on multiple browsers or a specific
browser depending on business needs. Selenium frameworks like TestNG provide
annotations such as @parameters and JUnit provides annotations like @RunWith, which
helps in running tests on multiple browsers and corresponding drivers.
• Validating tests using assertions – The key to writing a good test is validating the tests.
Just like when one writes a test case and mentions the actual and expected results, one
needs to assert the tests in Selenium with the help of assertions provided in frameworks
like TestNG and JUnit. If the assertions are not used, the testing process is incomplete, as
it is not validating the correctness of the test build.
• Taking screenshots and Reporting – As a QA tester, to provide proof of testing for
failures, it is essential to have supportive screenshots. The same stands for Automated
Selenium testing. In case a test fails, it is vital to have corresponding screenshots. This
helps explain the bug to the developer, who can debug it instantly. Similarly, from a
reporting perspective, to provide insight to the stakeholders, it is valuable to share reports
with them, to establish the stability of the product. For this, Selenium provides a default
reporting system with frameworks like TestNG and provides further customizations to
them using listeners.
Did you know: Have you heard about the latest framework Cypress?
Conclusion
Automation testing using Selenium with Java has made life easier for both developers and
testers. Being an open-source tool, it provides an opportunity to speed up the time of execution
and to remove manual redundancy and human-prone errors. Java is a hugely popular
programming language, given the extensive support it receives from the developer community.
Selenium with Java has proved helpful and provided an optimized way of testing, especially in
terms of regression testing and cross browser testing. With multiple plugins making their way
into Selenium, it has resulted in making testing effortless and less time-consuming. Continuous
Integrations with tools like Jenkins and Maven have led to continuous testing models.
Talk to a Solutions Expert
Cloud-based automated Selenium testing tools like BrowserStack provide instant access to
2000+ browsers and device combinations, to run Selenium tests using Java.
Was this post useful?
Yes, Thanks Not Really
•
•
•
•
Related Articles
Selenium with JavaScript : Getting Started with Automation Testing
Learn how to use Selenium and Javascript for automated testing. Step-by-step guide with code
snippet...
Learn More
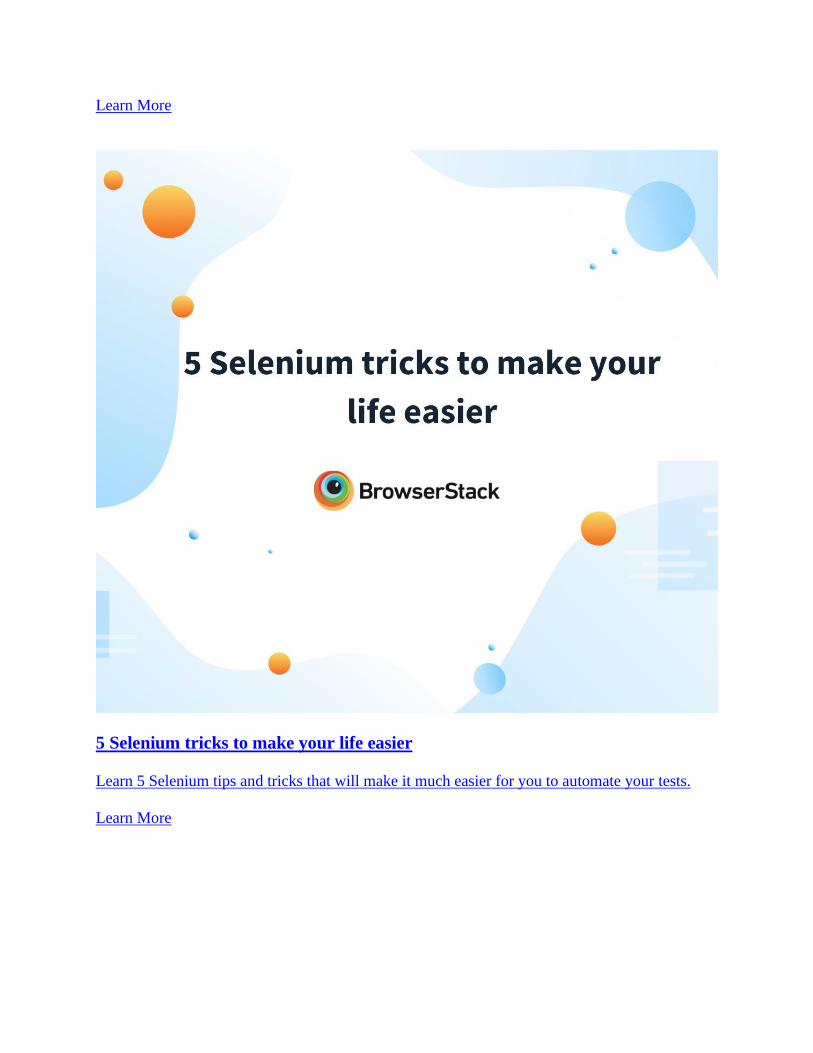
5 Selenium tricks to make your life easier
Learn 5 Selenium tips and tricks that will make it much easier for you to automate your tests.
Learn More

How to Read and Write an Excel File using Selenium WebDriver
Learn how to read and write into Excel files using Selenium WebDriver. Code snippets and
samples inc...
Learn More
Featured Articles
Selenium with JavaScript : Getting Started with Automation Testing
5 Selenium tricks to make your life easier
How to Read and Write an Excel File using Selenium WebDriver
Automation Testing Selenium Selenium Webdriver
Products
• Live
• Automate
• Percy New!
• App Live
• App Automate
• Screenshots
• Responsive
• Enterprise
• SpeedLab New!
Platform
• Browsers & Devices
• Data Centers
• Mobile Features
• Security
Resources
• Test on Right Devices
• Support
• Status
• Release Notes
• Case Studies
• Blog
• Events
Company
• About Us
• Customers
• Careers We’re hiring!
• Open Source
• Partners
• Press
• Contact
Social
•
•

•
•
•
•
•
Do more with BrowserStack
• Test In IE
• Mobile Emulators
• Test on iPhone
• Test on iPad
• Test on Galaxy
• Android Testing
• iOS Testing
• Guide
• Cross Browser Testing
• Emulators & Simulators
• Selenium
• Cypress
• Android Emulators
• Responsive Design
• Visual Testing
© 2011-2021 BrowserStack - The Most Reliable Mobile App & Cross Browser Testing
Company
• Terms of Service
• Privacy Policy
• Cookie Policy
• Sitemap


![[320] Web 3: Selenium · for Selenium Java module for Selenium Ruby module for Selenium JavaScript mod for Selenium Chrome Driver Firefox Driver Edge Driver. Examples. Starter Code](https://img.pdfslide.us/doc/110x75/5eadce82cc4f0d7405687f01/320-web-3-selenium-for-selenium-java-module-for-selenium-ruby-module-for-selenium.jpg)