Embed Size (px)
Citation preview

Computershare Electoral Management
Services
SelCheck User Manual14 th April 2010

IndexIntroduction---------------------------------------------------------------------------------------------------------------------
2Preparing the SelCheck System for an Election--------------------------------------------------
2Resetting the SelCheck System-------------------------------------------------------------------------------
2Entering Your Authority Details--------------------------------------------------------------------------------
5Checking the System Settings------------------------------------------------------------------------------
6Exporting the Register Data from Elreg----------------------------------------------------------------------------------
7Exporting the Master Images from Elreg----------------------------------------------------------------------------------
11Importing the Register Data to SelCheck-----------------------------------------------------------------------------
13Importing the Master Images to SelCheck-----------------------------------------------------------------------------
17Cross Boundary Imports----------------------------------------------------------
19User Accounts-----------------------------------------------------------------------------
20Processing the Master Images-----------------------------------------------------------------------
27Duplicate Masters-------------------------------------------------------------------------------
33Ensuring all Absent Voters have a Master Image Attached-----------------------------------------------------------------------------
36Exporting Supplemental Data and Master Images from Elreg----------------------------------------------------------------------------------
37Importing Supplemental Data and Master Images to SelCheck-----------------------------------------------------------------------------
37Proofing the Security Statements -----------------------------------------------------------------------------------------
38Setting the Automated Cropping Areas------------------------------------------------------------
40Postal Vote Opening------------------------------------------------------------------------------
46Sorting the Postal Packs----------------------------------------------------------------------------
46Scanning in Security Statements-------------------------------------------------------------------
47Cropping Security Statement Signatures----------------------------------------------------------
54Cropping and Correcting Security Statement Dates of Birth------------------------------------
54Verifying and Publishing Batches------------------------------------------------------------------
56The Verification Process – Security Statements--------------------------------------------------
57Review – RO Processing----------------------------------------------------------
64Re-Assigning Images to the Correct Elector----------------------------------------------------------
72Reverting Failed Security Statements-------------------------------------------------------------
75Waiver Security Statements------------------------------------------------------------------------
76Blank Security Statements--------------------------------------------------------------------------
76Missing Security Statements-----------------------------------------------------------------------
77Missing Ballot Papers--------------------------------------------------------------------------------
80Statistics and Reports-------------------------------------------------------------------------------
82Daily Results-------------------------------------------------------------------------------
83Exporting Signatures and Dates of Birth from SelCheck------------------------------------------
86Importing Signatures and Dates of Birth to Elreg------------------------------------------------
88Producing the Marked AV List------------------------------------------------------------------------------------
90Backups---------------------------------------------------------------------------- 92Queries and Support-------------------------------------------------------------------------------
921

ANNEX 1 – Specifications for PI Data Forms From External Printers --------
93ANNEX 2 – Postal Vote Opening Session Flow Chart------------------------------------------------------------
94IntroductionThis manual is a step by step guide of all of the processes required to implement the SelCheck Signature and Date of Birth automated checking system.These instructions will include the steps required to complete certain tasks in the Electoral Registration System (Elreg). This manual supersedes any previous version of the SelCheck manual as many of the menus and screens may have changed from previous versions. Please take the time to read this manual carefully, print it in colour in order to see the warning areas in red and make it readily available to ALL staff that will be using SelCheck. Do not follow the screenshots blindly. Please read the instructions that relate to them as you may be required to make changes to what is actually displayed on the screenshot in the manual. The processes of transferring the data from Elreg to SelCheck should be a combined effort between the Electoral Registration staff and the IT department. The golden rule to follow throughout this manual is that if you are unsure of any of the processes that you are undertaking, or for whatever reason intend to proceed in a different manner than is shown here in the manual, please seek the advice of the Strand Support Team BEFORE attempting anything.
Preparing the SelCheck System for an ElectionResetting the SelCheck SystemThe SelCheck system only clears down the information from a previous election, when being prepared to be used in the next election.If this is your first time using the system, you do not have to follow these processes to clear existing information and can move on to the next section, entering your Authority details.
Log on to SelCheck and select to Use the election concerned.
The first task to therefore undertake is to preserve the information held within the system for the last election, should you need to reinstate it for any reason.
Should you see an initial screen for the election slots that does not have a date or election name in it, simply Edit that election slot, give it a name and date and select the slot. You will not be able to proceed without these elements. Once you have selected the slot concerned, follow the menu Services -> Backup Mysql Database to open the interface shown in fig 1.0.
Fig 1.0
2
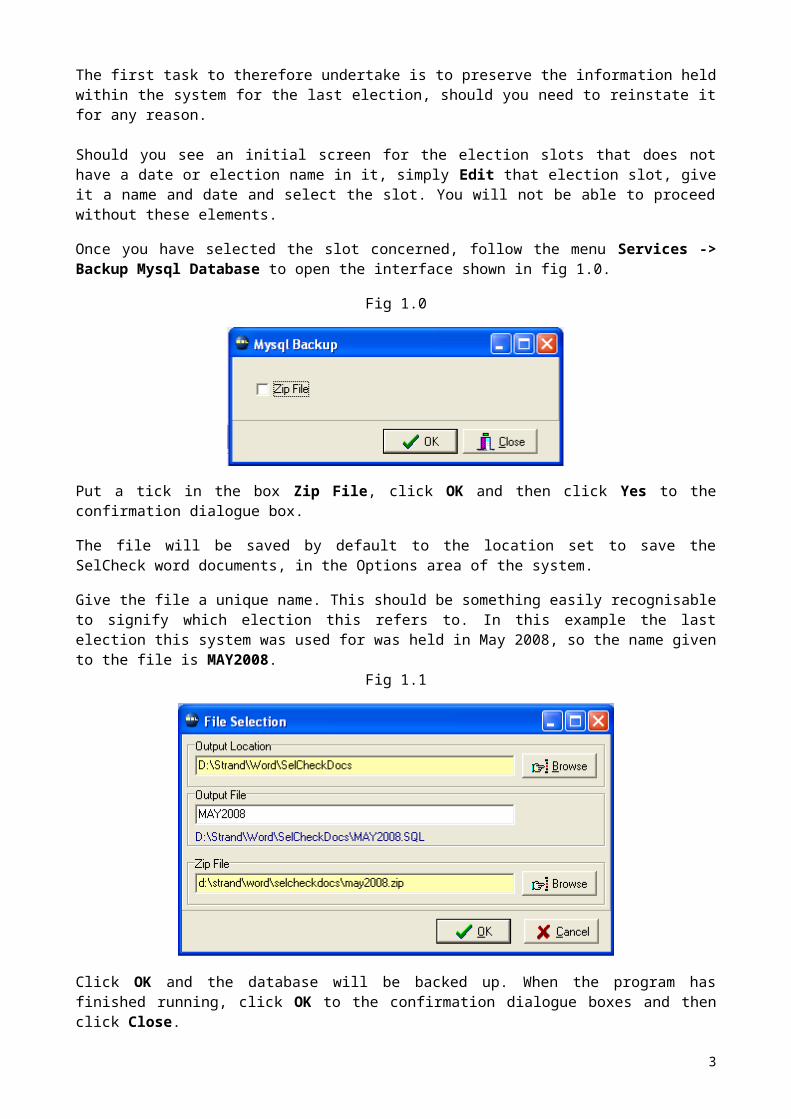
Put a tick in the box Zip File, click OK and then click Yes to the confirmation dialogue box. The file will be saved by default to the location set to save the SelCheck word documents, in the Options area of the system. Give the file a unique name. This should be something easily recognisable to signify which election this refers to. In this example the last election this system was used for was held in May 2008, so the name given to the file is MAY2008.
Fig 1.1
Click OK and the database will be backed up. When the program has finished running, click OK to the confirmation dialogue boxes and then click Close. Follow the menu Functions -> Clear to activate the window shown in fig 1.2.
Fig 1.2
3

Select PVS Data and then click OK. Click Yes to the confirmation message and then after having read and understood the implications of the warning message, type in YES and click OK. After a short period of time you will see an interim information box similar to that shown in fig 1.3
Fig 1.3
The system will inform you of how many folders are to be cleared and the name of the folder they are being cleared to. The number of folders will depend on the size of your last election and the number of Security Statement batches you had. Click Yes to continue. When the program has completed click OK to the dialogue box, click Close to shut the active window and then log out of Selcheck. Open a Windows Explorer window and then navigate to the ServerRoot folder on the server. You should see a screen similar to that shown in fig 1.4.
Fig 1.4
As you will see in fig 1.4 the PVS folder has been created as directed by the program. Right-click the PVS folder and rename it so that you can identify which election it relates to. We recommend that you use the same name that you gave the backup of the MySQL database in fig 1.1 so that the two are clearly linked.
4

Once you have renamed this folder, if you do not wish to use the data held in this slot for the SelCheck Test system, delete any folders which are not PVS folders (Either from this or previously backed up elections) that remain in the ServerRoot folder.
If you do wish to use this data for the SelCheck Test system, follow the installation instructions for that program on how to import these elements. It is the decision and responsibility of the ERO at each authority to decide when they can delete the back-ups from previous elections.
Once the ERO is satisfied that this information would no longer be required (for example in the event of a challenge) then both the backup file that was created and the corresponding PVS folder can be deleted. Once the server has been cleared of the existing images you must now check EACH scanning PC in turn. Look in the C:\TempRoot folder on each scanning PC and delete everything from within this folder.
Entering or Checking your Authority DetailsFollow the menu path Services -> Setup -> Authority to activate the interface shown in fig 2.0
Fig 2.0
Amend each field to reflect YOUR authority’s details. The next steps show where to obtain information for the fields you may not be familiar with. ONS Code – Click on the Change Authority button, select your authority from the list on the left and click on the green arrow button to move it to the right-hand column.
5

If you are accepting forms from other authorities, either for Cross Boundary or Unitary reasons, repeat this process selecting each authority in turn. You should also then complete the Details and Address fields for the second authority.
Once all required authority codes have been added, click Close.Register String – The register string information for each authority needs to be obtained from within Elreg. In Elreg, follow the menu path shown System -> Setup Menu -> System Configuration and then select the General System tab, to activate the window shown in fig 2.1. As can be seen from fig 2.1, the Register String code for the system used in this example is CRD and has therefore been entered into the Register String field in SelCheck as shown in fig 2.0 Once the Authority screen has been completed, click OK to save the changes.
Fig 2.1
Checking the System SettingsThis section deals with the Program Options area of the system. This is where the settings are held for the folder paths and some scanner interface choices. These checks should be undertaken when the system is initially prepared for an election and then before each and every postal voting session. These checks are for your own benefit to ensure that the system is configured correctly and will perform as expected. 1. On each SelCheck client PC, in Program Options, on the General tab ensure that the following is selected:
File size Limit 300 – this will prevent you scanning in files that will use up a lot of disk space.
6

Pages to scan 1 – this will help detect forms that may be stuck together as they pass through the scanner.
Current Year x – Where x is a numerical value for the last number of your Rolling Register Year.
G4 has a tick – Helps compress files to save disk space Duplex Scanning off – there are no security statements that are duplex Show Scanner Interface – THIS MUST BE SWITCHED ON
Single / Multiple Scanners – Each Scanning PC MUST have a unique ID
Partner Comparison – Switched off.
Word Type – Correct MS Word version selectedWe recommend that you check and set these configuration options on every PC, whether you intend to use it to scan Security Statements or not.
If the situation arises whereby you need to use a different PC for scanning (in the event of a PC failure or to deal with a bottle-neck) this can be undertaken safe in the knowledge that the PC is correctly set. If you are a large authority using more than 10 PCs for the SelCheck setup, you can obviously only configure a maximum of 10 scanning PCs. Simply make a note of which PCs are not to be used for scanning. Regularly check to ensure the glass plate in the scanner is clean and free from debris.
Marks on the glass will affect the images that you create, possibly causing them to fail the automatic comparison.2. On both the Barcode tab and on the Scanner & Camera tab, ensure that the Bitmap Resolution is set to 300. Anything less and you will have more forms fail the automated process. 3. On the Form Types tab, ensure that you have an entry for Security Statements and Blank Forms, which should be records 7 & 8 respectively.
4. Highlight each one in turn and ensure the Form Type radio button is checked for Security Statements and Blank Signature (No Comparison) respectively.5. On the Paths tab, ensure that ALL of the paths are the same on the PCs and that they are correct.6. On the Comparison tab ensure that the Date of Birth Characters are set at 8 and that you are comparing BOTH Signature and Date of Birth. 7. Ensure the Algorithm is set at 50, or at the level decided by your authority. Once the first batch has begun the verification process this setting CANNOT be changed. 8. Ensure that you can print a test page to the printer on your network. These are the only settings that you can configure or check at this time. The User Account area of the system also requires configuring, but this cannot be undertaken until the first data file for the new election is imported into the system.
Exporting the Register Data from Elreg7

The first task is to produce a file which contains the register data from your Elreg system to be imported into SelCheck. Before you undertake this process you need to set up your elections in Elreg.
Having set up your elections we recommend you produce a report from Elreg which will ensure that all of your absent voters have an image attached to their elector record.
Follow the menu path Rolling Database -> Reports -> Elector Reports -> Absent Voter Lists (Non-Election Based) to activate the interface shown in fig 2.2
Fig 2.2
Under Report Options put a tick in the box for AVs with No Image.
Select the Month of Qualification as the month for your election and click OK.
You should not get ANY electors output in this list. If you do, you MUST take the following actions immediately.
1. Delete the absent vote record for the elector. 2. Send the elector a new AV application.
8

If you do not follow these steps exactly, you could end up sending a ballot paper to an elector where there is no alternative to the Returning Officer other than to fail this, as there is no master image to compare against. Once your elections have been set up in Elreg and you have run this report ensure that the correct electoral areas have been selected. Select the primary election (if you are running a combined election) and follow the menu path Election Maintenance -> SelCheck -> Export -> Data to activate the screen shown in fig 3.0
Fig 3.0
This interface screen allows you to control exactly what register data is to be transferred into SelCheck. Assuming that you have set up your elections in Elreg with the correct electoral areas selected, leaving the Polling District Range and Selective Polling District Range blank will bring in the correct data. These features have been included in this area to deal with a by-election scenario, but are not applicable here when preparing all of your Master images.Therefore, the only elements that you have to deal with on this screen are Include Deleted Electors and Month of Qualification. Put a tick in the box for Include Deleted Electors. The correct Month of Qualification for your election should be selected from the drop-down box. Once the required selections have been made, click on OK. This will activate the screen shown in fig 3.1. In this example a file name has been entered, MAY10DATA1.
9

The path that is shown on your screen will not be the same as is shown in this example. Your path will be relevant to your system, but ensure you make a note of where the file will be saved.
Fig 3.1
Now click OK. DO NOT TERMINATE THIS PROCESS. Microsoft includes a feature in their systems called “Task Manager”. If Task Manager is examined whilst this process is running it may give a message “Not Responding”. This is ONLY what Microsoft deems to be a response from a particular piece of software. It does NOT mean the program has “frozen”. Task Manager is unaware of the work being undertaken on a client-based system. All of the work being completed by this process is being done on the server. If you do terminate this process through Task Manager, you will have to repeat the task from the beginning and it will take just as long. You will see the progress bar at the bottom of the screen and when the file has been created you will see the screenshot shown in fig 3.2
Fig 3.2
10

The time shown in this screenshot should not be compared to the time taken to produce your own file.
Your output will take longer as it is conducted on a Local Authority network and is affected by a number of varying factors. Click OK to close this dialogue box and then click Close to shut the SelCheck Export window.
Exporting the Master Images from ElregNavigate through the menu path Election Maintenance -> SelCheck -> Export -> Image to activate the screen shown in fig 4.0
Fig 4.0
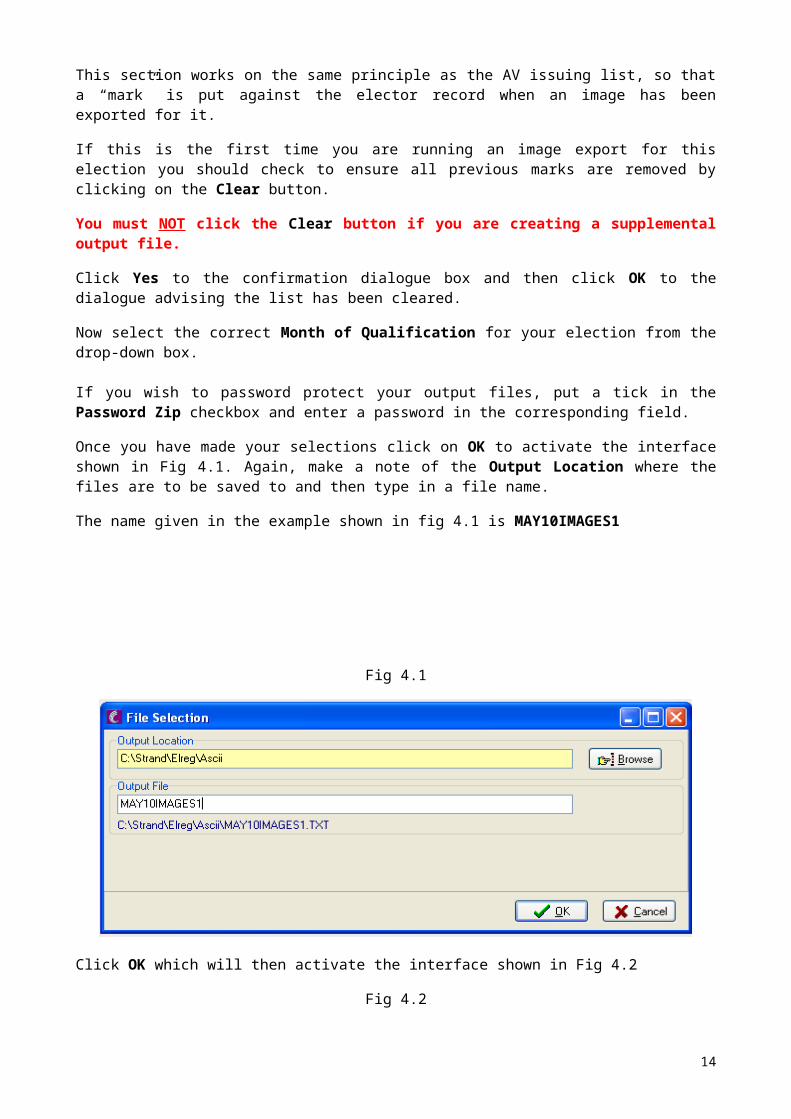
This section works on the same principle as the AV issuing list, so that a “mark” is put against the elector record when an image has been exported for it.
11

If this is the first time you are running an image export for this election you should check to ensure all previous marks are removed by clicking on the Clear button. You must NOT click the Clear button if you are creating a supplemental output file.
Click Yes to the confirmation dialogue box and then click OK to the dialogue advising the list has been cleared. Now select the correct Month of Qualification for your election from the drop-down box.
If you wish to password protect your output files, put a tick in the Password Zip checkbox and enter a password in the corresponding field. Once you have made your selections click on OK to activate the interface shown in Fig 4.1. Again, make a note of the Output Location where the files are to be saved to and then type in a file name. The name given in the example shown in fig 4.1 is MAY10IMAGES1
Fig 4.1
Click OK which will then activate the interface shown in Fig 4.2Fig 4.2
12

Ensure that all of the correct Polling Districts (if you are running a by-election) are selected in this interface and then click OK. When the file has been created, you will see a confirmation box as shown in fig 4.3.
Fig 4.3
ALL zip files created along with this text file will be required when completing the import to SelCheck. If you are an authority with circa 10,000+ absent voters, then you may find that you have multiple zip files and one text file.Click OK to interface shown in fig 4.3 and you will be returned to the Elreg Image Export screen as shown in fig 4.0. Click Close to shut down this interface. All IT staff attending the installation courses have been advised that they are responsible for providing a suitable means of transferring these data and image files, which you have created, to your SelCheck system. Due to the varying sizes of authority and number of files, each LA undertakes this process in what ever way suits them best, whether it be CD, DVD, external hard disk or cross-over cable. The following section of this manual is based upon the premise that your IT staff have chosen a method best suited to your local authority, taking these considerations into count.
13
Therefore in this example therefore, the MAY10DATA1.dta, MAY10IMAGES1-001.zip, and MAY10IMAGES1.txt files must all be transferred to and available on your SelCheck system network for the import processes to take place.We recommend that the files be placed in the SelCheck\Data folder on the server, so that they may be accessed as required from a client PC.
Importing the Register Data to SelCheckLog into SelCheck on a client PC using the Supervisor/Admin account. The first screen you will see is shown in fig 5.0
Fig 5.0
You may have previous elections shown in this interface. If you wish to remove old elections from here, or make them available to be used in the SelCheck Test system and are not sure how to do so, please log a call on the support website, www.strandsupport.com or refer to the close down section later in this manual. Click on the New button to activate the interface shown in fig 5.1
Fig 5.1
Name and Event are free text fields, so type something appropriate to your first election in there. Select the date of your election from the drop-down box.
14

Select the correct Franchise for this election from the drop-down box and then click Save. Your screen should now appear similar to that shown in fig 5.2.
Fig 5.2
If you are running a combined election, or more than 1 election on the same date, you should now repeat this process to create the second election slot. Select the first election slot in this interface and click Use. Navigate to Functions -> Import -> Elreg -> Data to activate the interface shown in fig 5.3.
Fig 5.3
15

The file that you created containing the data from the Elreg system (in this example MAY10DATA1.dta) should have been transferred over to the SelCheck system and stored in a known location. Use the Browse button on this interface to navigate to the file that was created and has been transferred to the SelCheck system.
The Suffix Polling District Reference with ONS Code check-box, is only for Cross Boundary authorities, where both authorities have a PD Reference that matches.As soon as you select your DTA file, the Data Import screen will show any elections in Elreg that are contained within that file, as shown in Fig 5.4.
Fig 5.4
16

From each of the SelCheck Elections drop-down boxes, select the corresponding election you wish to import to and you screen should appear similar to Fig 5.5
Fig 5.5
17

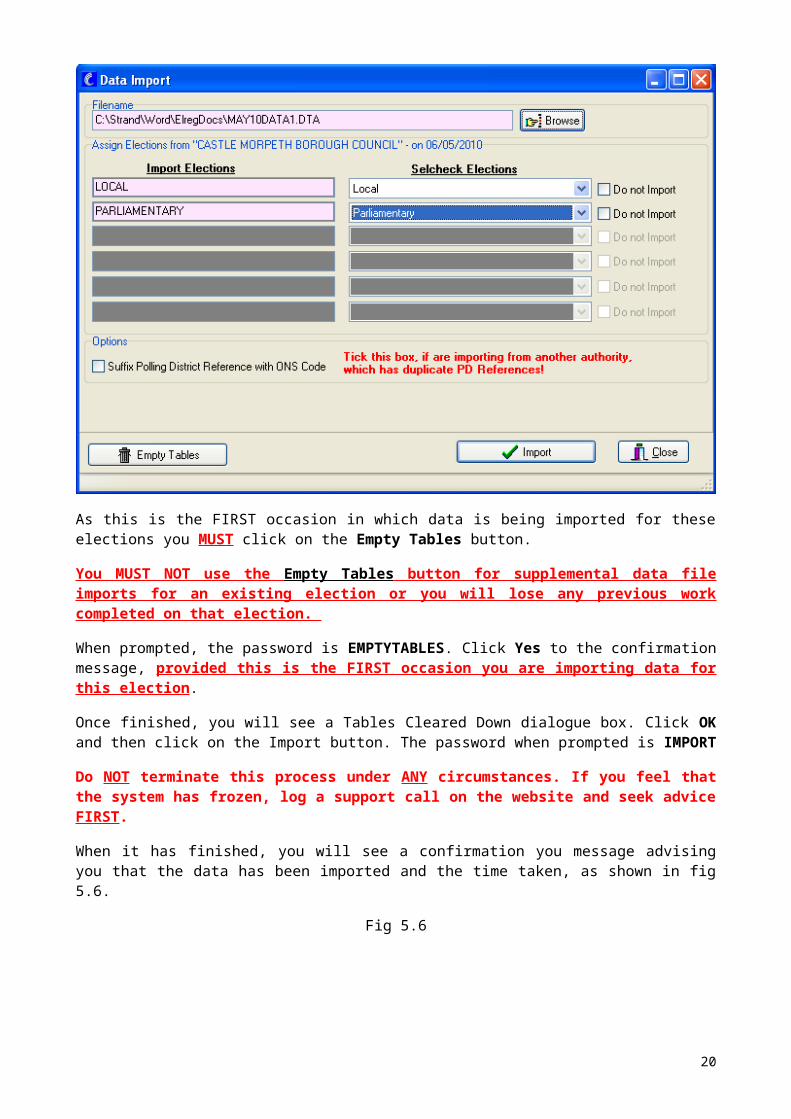
As this is the FIRST occasion in which data is being imported for these elections you MUST click on the Empty Tables button. You MUST NOT use the Empty Tables button for supplemental data file imports for an existing election or you will lose any previous work completed on that election.
When prompted, the password is EMPTYTABLES. Click Yes to the confirmation message, provided this is the FIRST occasion you are importing data for this election. Once finished, you will see a Tables Cleared Down dialogue box. Click OK and then click on the Import button. The password when prompted is IMPORT Do NOT terminate this process under ANY circumstances. If you feel that the system has frozen, log a support call on the website and seek advice FIRST.
When it has finished, you will see a confirmation you message advising you that the data has been imported and the time taken, as shown in fig 5.6.
Fig 5.6
Do not take the amount of time shown here as a guide. Your import may take much longer, particularly if you have installed the system on the local authority network. Click Ok and then click Close to return to the main SelCheck interface.
Importing the Master Images to SelCheckThis following section deals with processing the master images in the SelCheck system. There are certain tasks that must be completed with these images. We therefore recommend that this process is completed on a SelCheck client that is readily accessible and convenient to use, should you decide to complete the following processes over a number of days.
Before importing your images onto ANY SelCheck PC you must ALWAYS first ensure that each machine has a UNIQUE scanner ID in the Options area of the system.
Failure to do so could cause the loss of data and any cropping that has already been completed will have to be re-cropped.
On a SelCheck client PC follow the menu path Functions -> Import -> Elreg -> Images to activate the interface shown in fig 6.0
18

Fig 6.0
The interface shown in Fig 6.0 to locate the files is ONLY looking for the text file, NOT the zip file or files, but the zip file or files MUST be in the same location for the import to work correctly. Use the Browse button to navigate to the location of the image files that you have transferred to this network.
Double-click the text file which will enter the path and file name into the Images to be Imported field. Click OK to run the import program. DO NOT TERMINATE THIS IMPORT PROCESS UNDER ANY CIRCUMSTANCES
You MUST be patient with this process . It is undertaking a lot of work in bringing these images in, sorting them, creating batches and marking the batches accordingly. If you feel that this process has “frozen” then log a call on the Strand Support Website BEFORE you do anything else. Once the import has completed you will see a dialogue box informing you how many batches have been created. Click OK and then click Close to close the Image Import interface.
19
Cross Boundary ImportsIf you are taking in data and images from other authorities for absent voters, you should first import your own data and images, so that the system has all of the election information present, before you proceed with importing cross boundary data and images. Those authorities that are taking in data and images from an authority that uses the Computershare Elreg system should just import the data and images in exactly the same way as they do for their own. You must ensure that your neighbouring authority has provided you with the data DTA file, as well as both the image text and zip files that contain the images.Those authorities that take in data from another authority that do not use the Computershare Elreg system, will be supplied with a zip file from the neighbouring authority. As it may be necessary to crop these forms, you must ensure that you arrange to receive this data from the neighbouring authority with sufficient time to complete that task given the number of images exchanged and the previous experience of cropping speeds. This zip file provided contains both the data and images for the absent voters from their electorate. To import this information into SelCheck, follow the menu path Functions -> Import -> Parliamentary Cross Boundary File
Click on the Browse button and locate the zip file you have been provided with. Select the Election from the drop down boxes.
If your neighbouring authority has any PD references that are the same as yours, you MUST put a tick in the box for Suffix Polling District Reference with ONS Code.
Click Import. Enter the password IMPORT and then click OK The data will import. Do NOT attempt to stop this process. It may take some time to run and appear to “freeze” but it is not, please be patient. When the data has finished importing you will be prompted with another dialogue Do you want to Import the Images Yes/No. Click Yes. Again the program may appear to be frozen but it is not. It is processing. Do NOT attempt to stop this process. It is not possible to provide a task bar in this area. The information is coming from an alien system, so there is no way of predicting how long this will take. When the import is complete, click OK to the confirmation dialogue box. The batches for these cross boundary electors will now be available to you in the Scanning Functions area of the system.
20

You should now process these forms in exactly the same way as you do with your normal SelCheck batches.
User AccountsSelCheck is a MySQL based program and does not use “lock files” like the Sems and Elreg systems. Therefore, to prevent more than one person attempting to access the same data at the same time it is necessary to manually control that area. For the Data Verification process this is achieved by allocating a Data Verification ID to the staff that will be completing this process. This will be fully explained later on in this manual. For sites that may wish to have multiple RO’s or DRO’s to complete the final adjudication on any forms that are referred to them, these accounts are created based upon Electoral Areas. This section of the manual will deal with how to create both of these types of account. We will start with the accounts for the data verification process.In order to allocate your ID’s you must first know the Multiple Scanner ID of every PC that you intend to scan on. Check each PC in turn under Program Options and look at the Single/Multiple Scanner settings. Make a note of each ID. Every ID MUST be different.
Log in to SelCheck using the username SUPERVISOR and the Password ADMIN then follow and select the menu path Services -> User Maintenance to activate the interface in fig 7.0.
Fig 7.0
If you have already created accounts for a previous election then they will already be shown here. You must follow this section to ensure that their allocations to Data Verification IDs are correct. The Electoral Areas will have no doubt have changed for this election and will need to be allocated to the RO/DRO accounts.
21

The SUPERVISOR account is added by default and we would recommend that from this point onwards this account is not used for any type of processing, but only to access the system for administrative purposes. Each user should now be allocated their individual logon account. Whether you choose to do this by name, or by allocating generic names such as “scan1” or “verify1” is a decision for you to take as an authority. Provided that you can identify who was “scan1” on a particular occasion will suffice during any auditing that may be required. Click on the New button, shown in Fig 7.0 and you will see that the fields at the bottom of the interface turn white and become active. Type in the username of your first user and allocate them a password. Then select their role from the drop-down box. It is logical to start with scanning as that is the first step in the system when dealing with security statements. Click Save and you should end up with a screen similar to Fig 7.1.
Fig 7.1
If you are only running one scanning station then this will suffice, but of course if you are running multiple scanning stations then you will need to create more accounts, so repeat these steps. For the purpose of this manual and example, 3 scanning accounts are created. As the scanning and cropping processes are completed locally on the PC there is no need to allocate any Data Verification IDs to these staff. Only the operators of these PCs can access the forms that they have scanned in, so there is no risk of other users accessing this data. Once you have created your Scanning Accounts you need to create accounts for the staff that will be running the Data Verification process, also known as the First Level Review. These staff will be running the automated comparison engine and examining those forms that have failed the comparison. If there is a misread of a master or security form date of birth by the engine, this operator can correct this information here.
22
If the engine has failed any obvious signature matches, perhaps due to poor cropping, this operator can manually pass the form. Anything doubtful or clearly failing will be referred to the Returning Officer for a decision on its validity. Nothing can be permanently failed by this user. This user therefore requires a slightly higher level of authority to complete these processes than the scanner operator. Only users that are granted level 2 permissions and above can access the Data Verification area. Click on New and type in the username and password for the first Data Verification account. Select Level 2 from the drop-down box and save the record. Repeat these steps as required, creating accounts for the number of stations you will use for reviewing. As the scanning and cropping processes are the most time consuming of all of the steps required to process these forms, sites with greater numbers of absent voters will have more scanning terminals than review PCs, in order to ensure there are no bottle-necks.
In line with this ideal, this manual shows 2 review accounts as detailed in fig 7.2Fig 7.2
You now need to allocate a Data Verification ID to those staff who are completing the Data Verification process.Firstly let us look in greater detail exactly what the Data Verification ID is. As you will see later on in this manual, in the Data Verification area of the system, the initial step is to open a batch in order to process it. As these batches are now held on the server they could be accessed by all of the machines on the network. It is therefore necessary to prevent more then 1 user attempting to open and verify the same batch at the same time. Each scanning PC has its own unique scanning ID when multiple scanners are in use.
23
The Data Verification ID utilises this unique information to allow a Verification user to ONLY access batches that are scanned on a particular PC. This table shows which Multiple Scanner ID is linked to which Data Verification ID
Multiple Scanner ID
Data Verification ID
1 01001 12001 23001 34001 45001 56001 67001 78001 89001 9
Therefore, if you are a Verification user and you are allocated Data Verification ID 1, you will ONLY be able to review batches that have been scanned on the scanner that has a Multiple Scanner ID of 1001. Of course, if for example you have 6 scanning PCs and 2 Review PCs it is possible to assign multiple Data Verification ID’s to a user, allowing them to process batches from a number of scanning stations.For example, as a Verification user, if you are assigned Data Verification ID’s 1, 4 and 7 you and you alone will now be able to verify batches that are scanned on the 3 scanning PCs that have a Multiple Scanning ID of 1001, 4001 and 7001. The following steps will lead you through the process of allocating Data Verification ID’s. Select one of the Verification users that you have just created and click Edit. You will see that the green arrow on the User Maintenance screen is now active, the selected user has a black triangle against his name and his details are in the Username field as shown in Fig 7.3
Fig 7.3
Under the All ID’s column on the right hand side of the screen you will see the black triangle indicator, identifying which ID you are about to allocate. SELECT THE CORRECT ID if this is not the one you wish to allocate. Once you have selected the correct ID under the All ID’s column, click the green arrow.
24

As the scanning PCs in this example have Multiple Scanner ID’s of 1001, 2001 and 3001, ID 1 has been selected in the review table to allocate to the user Verify1, as this is the corresponding Data Verification ID from the table on the previous page.You will see that the user name is now shown in the All IDs table and the Data Verification ID is shown in the centre column against Verify1. Click Save and the screen should appear similar to Fig 7.4
Fig 7.4
As this example still has 2 scanning PCs to allocate to Verification staff and there is only one more Verification PC, the user Verify2 will be allocated the 2 remaining Data Verification ID’s.Select the account first and then click Edit. Select the correct ID under the All IDs column and click the green arrow. When this ID is allocated the black triangle moves down the list to the next ID. After ensuring the correct ID is selected, click the green arrow again to allocate the second ID to this user. Click Save and your table should look like Fig 7.5
Fig 7.5
25

Verify2 will now be the only person able to verify batches produced on the 2 Scanning PCs with Multiple Scanner ID’s 2001 and 3001. If you are a smaller authority and are only using 1 PC to scan with and one PC to Verify with, your Multiple Scanner ID should be set at 1 and therefore your Verify user would have a Data Verification ID of 0. Once you have finished allocating your scanning stations to Verification PCs you must now create your RO or DRO account(s). These accounts are for users who have the authority to fully reject an absent vote from the count if they consider it to have failed the security checking process.For the purposes of this manual we will create 2 DRO’s to deal with the areas in this election, but the number required will vary from authority to authority. Create the new accounts as before, giving them a name, a unique password and Level 3 access so that you end up with something similar to fig 7.6
Fig 7.6
Now click on the Review (Electoral Area) tab. You will see a list of all the areas active in this election. The Supervisor account is allocated to all areas by default as this is the initial Level 3 account set up within the system.
26

The process of allocating areas is identical to that of allocating scanning ID’s. If you are running a combined election, you can use the Order By drop-down box which is on the Review (Electoral Areas) tab to choose to allocate the PD’s in relation to the Electoral Area for the type of election selected. Select the account that you wish to allocate areas to and then click the Edit button. Select the Polling District that you wish to allocate to the account and then click on the green arrow. You will of course wish to assign multiple Polling Districts to a single account so continue to select the areas in turn and then click the green arrow. Click Save to complete the process. Fig 7.7 shows the areas that have been allocated to user Return1.
Fig 7.7
You can now allocate further Areas to other RO/DRO accounts. Fig 7.8
27

If you are running an election throughout your authority, the list of areas may be much longer. Before exiting this area of the system you MUST check the list of Electoral Areas to ensure that all have been allocated to a RO/DRO account.
It is not possible to assign an area to an account that does not have Level 3 access. Now that you have prepared all of the user accounts, the next step is to deal with the master images that you have imported from Elreg.
Processing the Master ImagesUsing a Scanning user account that you have created, log into SelCheck on the client PC used to import your Elreg data and images.Enter the Scanning Functions area of Selcheck. Before we address the issue of processing forms, here is an explanation of each of the buttons available on this screen:
These buttons are for rotating your images on-screen.
These buttons are for zooming in or out of your images.
These buttons are to page through your images.
This button will attempt to re-read your barcode.
This button will print the image you have displayed on-screen.
These buttons will go to the text or barcode position you set.
28

This button opens the search facility for electors in Elreg.
This button searches for any incorrect barcodes or dates of birth, dependent on which section it is in.
As you scroll down through the list of unpublished batches, you may find that some of the batches may be coloured blue as opposed to the vast majority which should be green, as shown in fig 8.0.
Fig 8.0
Green batches are images that have already been cropped. These batches are locked and there are no obvious reasons to unlock them. You will note that there is an Unlock button which is password protected and the cropping buttons for the Signature and Date of Birth are not available. Blue batches require cropping. The following section will lead you through these processes. Select a blue coloured batch from the list and click on the Signature button on the main interface to activate the interface shown in fig 8.1.If the batch you have selected is a Waiver batch, the Signature button will not be available to you. In this case, move onto the next section which deals with cropping the dates of birth.
Fig 8.1
29

You may or may not see the actual grey signature box on your form, depending how lightly it is printed. Use the mouse to position the cursor above and to the left of the signature. If you can see the box, just inside the top left corner of the box. Holding down the left click-button on the mouse, drag and draw a rectangle around the signature as shown in fig 8.2, releasing your finger from the mouse when you reach the bottom right-hand corner.
Fig 8.2
Click on Save Signature and you will see the saved signature in the top right-hand window. Click on Process all Forms and click Yes to the confirmation dialogue box.
30

At this point you should watch the top right-hand signature box very carefully as each signature is cropped and saved. If you see that there are large numbers of signatures that have cropped some of the signature box lines, you should repeat the cropping process, repositioning your initial box to accommodate the majority of forms and exclude these lines.
You must now check each form in turn, moving down the form listing, to ensure that each signature is cropped cleanly and there are no signature box lines. If you find such a form, crop the signature for this form alone and then click Save and Close. Do NOT click Process all Forms. Once all of the signatures have been cropped and checked, the process must be repeated for the date of birth. Click on the Date of Birth button and use the mouse to “draw” the cropping box as before, as shown in fig 8.3
Fig 8.3
Click Save DOB and then Process all Forms. Once the program has run, click Save and Close.This will return you to the main scanning interface and you should see the dates of birth recorded, as shown in fig 8.4
Fig 8.4
31

The highlighted pink entries are where the date of birth engine has been unable to determine a character. Click on the green arrow next to the date of birth field. The cursor will move to the 1 st
incorrectly read character. At this point you can release the mouse and work solely from the keyboard. Once you have entered the correct number for the first unread character, press the downwards navigational arrow on your keyboard. This will automatically take you to the next unread character. Continue to process and correct the dates of birth using the numerical keys and down arrow key on your keyboard. When all have been corrected you will see a dialogue box advising that there are no more invalid dates of birth. Click OK. Once you have entered all of the unread date of birth characters, this batch should be verified. Click on the Verify Batch button and if successfully verified, click OK to the confirmation dialogue. If not successfully verified, note the errors reported in the interface and take steps to resolve them. You will note that once the batch is successfully verified, the batch will now turn green in the interface and become locked. Continue to process any remaining blue batches until all batches have been successfully verified and are green. Once all batches have been verified they can now be published to the server.Click on the Publish Batch button and you will see the dialogue box shown in fig 8.5.
Fig 8.5
32

Provided all batches have been successfully verified and are green, select ALL VERIFIED [A]. After clicking All the system will check all of the batches and you will then see a Publish window which will list the batches you are publishing. Click OK and then click Yes to the final confirmation window. Click OK to the successfully published confirmation message which will then return you to the now empty Unpublished Batches window.
Do not be concerned at the “Deleting Batch” message. This is just removing them from the local interface as they have now been published to the server.
In order to complete the process of loading the master images into SelCheck, log out of the system as the scanner user account and log in using the verify user account. It MUST be the account that has the corresponding Data Verification ID and Multiple Scanner IDs from the PC that you used to process the forms.
Enter the Data Verification area of the system and your screen should be similar to Fig 8.6
Fig 8.633

If the window shows the batches as 0 Batches Waiting (20) (using the numbers in this example) then this means that the user account that you have logged in with, does not have the Data Verification ID for these batches. You should check the User Maintenance area of the system and either allocate the correct ID to this user account, or check which account you need to log in with, to be able to access them. Click on New Batch which will activate an interface. Put a tick in the Import Masters Only box and then click on the All button. This will now automatically select all of the Master batches waiting to be processed in this area and your screen should be similar to that shown in fig 8.7.
Fig 8.734

Click OK and then click Confirm that you wish to begin processing. The system will now move through each batch in turn with no further action required from the operator until it has completed processing all of the batches. Once completed, you will be presented with an interface advising on the number of batches imported. Click OK, click Close Batch and then click OK to return to the main interface. You should now have the message 0 Batches Waiting (0) at the top of the screen. If you have not, log a support call. You can now close this interface.
Duplicate Masters
Once you have your Master images cropped, published and verified you must then examine the duplicates.
There is no need to convert a duplicate master form for a waiver elector as this will never be compared.
There may be occasions where some of your absent voters have more than one PI image in your Elreg system.
This may be completely valid, where they have returned a Challenge letter and before you had received it they were sent a Reminder letter, which they have also completed. This is also the situation with Postal-Proxy Voters. It is not always possible to discern which image belongs to the elector and which image belongs to their Postal-Proxy in Elreg, so it is therefore necessary to bring both of these images into SelCheck. You then have to select which of the images to used in the automated comparison process.
These 2 scenarios are dealt with in this section.
35

Click on the Duplicate Masters button on the main SelCheck interface to activate the window shown in fig 9.0
Fig 9.0
Select an elector and click on the Convert Master Button to see the window shown in fig 9.1
Fig 9.1
36

This screen provides a multitude of information.
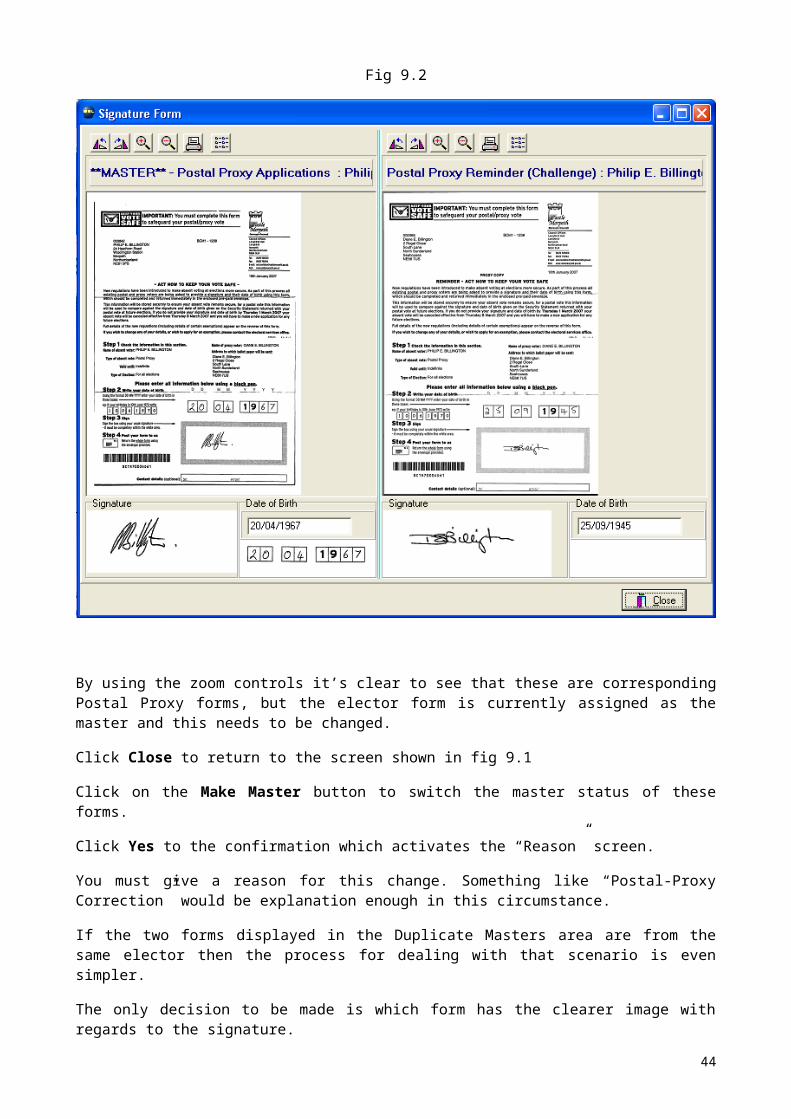
The first important point to note here is that this duplicate relates to a Postal Proxy absent voter indicated by the yellow highlighted “Proxy” marker.
The Proxy is Diane E Billington and it is the signature of the Proxy voter that will of course appear on the Security Statement at the election. It is therefore Diane E Billington’s form that should be the master form in this example.
The current master form is that of a Postal Proxy Application form for Philip E Billington. The master form is always clearly highlighted with the pink banner and the **MASTER** designation next to it.
The signatures and dates of birth are clearly different.
Although in this example it is easy to see that the master signature begins with a “P” and the duplicate begins with a “D”, it may not always possible to differentiate signatures in this manner.
The only way to ensure that you correctly assign the master designation for a Postal Proxy voter is to assess the whole form. Only the whole form will show who the form was sent to and therefore which signature relates to the Proxy voter.
Click on the “twin form” view button in the bottom left hand corner of the screen. This will display both forms side-by-side as shown in fig 9.2
Fig 9.2
37

By using the zoom controls it’s clear to see that these are corresponding Postal Proxy forms, but the elector form is currently assigned as the master and this needs to be changed.
Click Close to return to the screen shown in fig 9.1
Click on the Make Master button to switch the master status of these forms.
Click Yes to the confirmation which activates the “Reason” screen.
You must give a reason for this change. Something like “Postal-Proxy Correction” would be explanation enough in this circumstance.
If the two forms displayed in the Duplicate Masters area are from the same elector then the process for dealing with that scenario is even simpler.
The only decision to be made is which form has the clearer image with regards to the signature.
This is an entirely subjective decision. If the “best” signature is currently assigned as the master then there is nothing else to do.
If the better image is the duplicate form then reassign the master as in the example of the Postal Proxy voter, again giving a suitable reason.
If you do not “convert” to the “other” form when reviewing in these circumstances, when you close the comparison screen (fig 9.1) you will see a dialogue box which will ask if you wish to remove this entry from the list.
This feature allows you to effectively clear the list, knowing that you have reviewed each form and taken the appropriate action where required.
Once a Master document has been “converted” to the “other” form, or you have selected yes to remove an unchanged form from the list, it will be removed from the listing in fig 9.0.
In order to view all forms (including those “converted”) put a tick in the box Show All Forms.
Having dealt with the first form you will then be presented with an interface asking “Do you want to check the next master Y/N?”
Click Yes allowing you to continue processing without the need to return to the main screen and select the next form.
The Master List button shown in fig 9.0 will give you a list by PD of all duplicate master forms.
The Change Report button will give you a report of any master forms that have been reassigned master status.
Ensuring All AV’s have a Master Image AttachedOnce all of the Master Images have been processed through Data Verification and Duplicate Images, you MUST run the report which will identify any Absent Voters in SelCheck that do not have an image attached to their record.
It would of course be a serious problem if you subsequently scanned in a Security Statement for an elector with no Master Image!
Follow the menu path Functions -> Checks -> Image select the option AV’s with no Master Image and click OK.
If there are any results in the Detail window, you should investigate these electors to ascertain why there is no image present in SelCheck for them.
It may be that you did not select to Include Deleted Electors when you exported the data from Elreg, or that they have no image in Elreg at all.
38

If you are unable to ascertain why these electors have no image and take steps to resolve that situation, you MUST log a call on the Strand Support Website IMMEDIATELY.
This report MUST be run after each import of Master Images and Data from Elreg has been processed through SelCheck.
Exporting Supplemental Data and Master Images from ElregOnce you have finished processing your initial import of forms in SelCheck, the data and number of images in Elreg will have changed. You may have absent voters that are now deleted or deceased, or new applications for absent votes. How often you import this “updated” information is entirely the decision of the ERO at each Local Authority. You will have to complete this export/import process after the closing date for applications for an election regardless. Whether you wait until that closing date, or perform an interim export/import is up for each Local Authority to decide.The process to export supplementary data and images is identical to the initial process covered at the beginning of the manual except that the Clear function MUST NOT be used when creating the outputs for the images.The image export is based upon an “issuing list” format, so that images exported on the first occasion will not be exported this time, only newly added images.
Importing Supplemental Data and Images to SelCheckThe import processes into SelCheck for supplementary data and images is identical to the initial import covered earlier in this manual except that when importing the supplemental data into SelCheck the Empty Tables button MUST NOT be used.
The password to import data is IMPORT
Once any images have been imported, they should be cropped if required and published in exactly the same manner as before.
After all of the master signatures have been imported, cropped and processed through Data Verification, the system is nearly ready for the Postal Vote Opening Session. Once the Master Images have been processed through Data Verification and Duplicate Images, you should again run the report which will identify any Absent Voters in SelCheck that do not have an image attached to their record.
Follow the menu path Functions -> Checks -> Image select the option AV’s with no Master Image and click OK. If there are any results in the Detail window, you should investigate these electors to ascertain why there is no image. It may be that you did not select to Include Deleted Electors when you exported the data from Elreg, or that they have no image in Elreg at all. If you are unable to ascertain why these electors have no image, you MUST log a call on the Strand Support Website IMMEDIATELY.
39

Proofing the Security StatementsTo ensure that your postal vote security statements will work correctly in SelCheck or DecView, you MUST receive live printed proofs from your printer.Faxed or e-mailed proofs are not acceptable.
The reasons for these tests are as follows: To ensure that your printer has included the correct barcode on each type of
postal vote security statement, That they have used the correct barcode font That the barcode is of a sufficient size and clarity to be read by your scanner. That the Date of Birth box formatting is correct.
To proof the postal voting statement please do the following:Make sure the numerical barcode number on the form begins with a $ sign. (Character number 1)The 2nd and 3rd characters are a unique cross reference in the database that identifies your authority. The 4th Character relates to the issue number. In the first output file this number will be zero. If you reissue a Security Statement for an elector, the 4th character will increment by 1.The 5th character is the last digit of the Rolling Register Year. (i.e. 2009 = 9, 2010 = 0) The 6th Character relates to the election slot number in Elreg.
In a single election, this number will simply be the slot number. In a Combined Election, using Combined Security Statements, this number will
be the slot number of the Primary Election. In a combined election using Separate Security Statements, this number will be
the slot number for each election. Ensure that you test both types of statement if you are using Separate Security Statements for Combined Elections. Log into StrandView and select the following options:Database – RollingBarcode Type – NormalForm Type – Absent Voter ApplicationAbsent Voter Type – PostalOnce you have selected the appropriate options above, click OK. A message will appear confirming the options you have chosen. If your selections are correct, click Yes. If they are not, click on No and amend your selections.Make sure the scanner is switched on and connected to the PC. Ensure that the date of birth boxes on the proofs have some fictitious entries in them in order to check the date of birth reading facility. Load the proofs of the relevant postal voting statement into your scanner.
40

You MUST use the EXACT make & model of scanner that you will be using for your opening sessions. The Canon DR-3060 and the Canon DR-3080 DO NOT give the same results!
Click on Scan Form and proceed to scan the form as you would normally. You MUST make the selections in the scanner interface that are recommended by Strand for all PI forms (shown below) otherwise your real forms may not scan in this mode when it comes to your opening session
Mode - Text EnhancedPage Size - Select YOUR statement size. The majority of sites last year had a landscaped style A5 form. If this is yours, A5R is the correct selection for you.Dots Per Inch - 300 DpiDeskew - EnabledScanning Option - StandardOnce the form has been scanned in successfully, return to the Scanned Images screen. Ensure that the barcode displayed on screen in the barcode field matches the barcode that is printed on the Security Statement itself. Check that the elector number and elector’s name in orange below the scanned image on screen, matches that on the statement itself.Crop the date of birth on the form and ensure that the engine recognises the date of birth.
Do NOT try to Verify or Publish these forms. It will NOT work. You are only establishing that the format of the various components of the form are correct and will work when required in SelCheck. Once you have finished checking these entries, click on Close. You will be asked if you wish to abandon these forms; Click Yes. If the proofing of your security statements fails on any of these checks, you should liaise directly with your printer in order to resolve any problems.If ANY changes are made to the barcodes or date of birth boxes to either correct or improve them you MUST repeat the whole proofing process. Do NOT assume that because your printer has been made aware of any issues that they have been solved without re-testing. Once you are satisfied that the barcodes and dates of birth all read correctly and you are confident that the formatting of the signature box is correct, you can produce your live forms. Although this document refers to a single form when referring to proofing, I strongly recommend that you have a much larger number of forms to test upon, between 20 and 50. Testing on 1 form is insufficient. The more you have the more reliable your test results will be.
41

Setting the Automated Cropping AreasSelcheck has the facility to pre-set the cropping areas for both the signature and date of birth for each form. This means that when you come to crop the forms, the area will already be set for you and you will not have to “draw” the cropping rectangle as described later in this manual. When setting the cropping area for Security Statements, this provides a standard at which all of these forms will be cropped, removing the variable for poor cropping by an individual operator. This improves the overall processing speed as the operator does not spend any time “drawing” the individual cropping boxes. There is also no time wasted verifying poorly cropped forms.Click on the Options button in SelCheck, click on the Form Types tab and select the type of form you wish to set the cropping areas for as shown in fig 10.0.
Fig 10.0
Click on the Edit button to activate the screen shown in fig 10.1
42
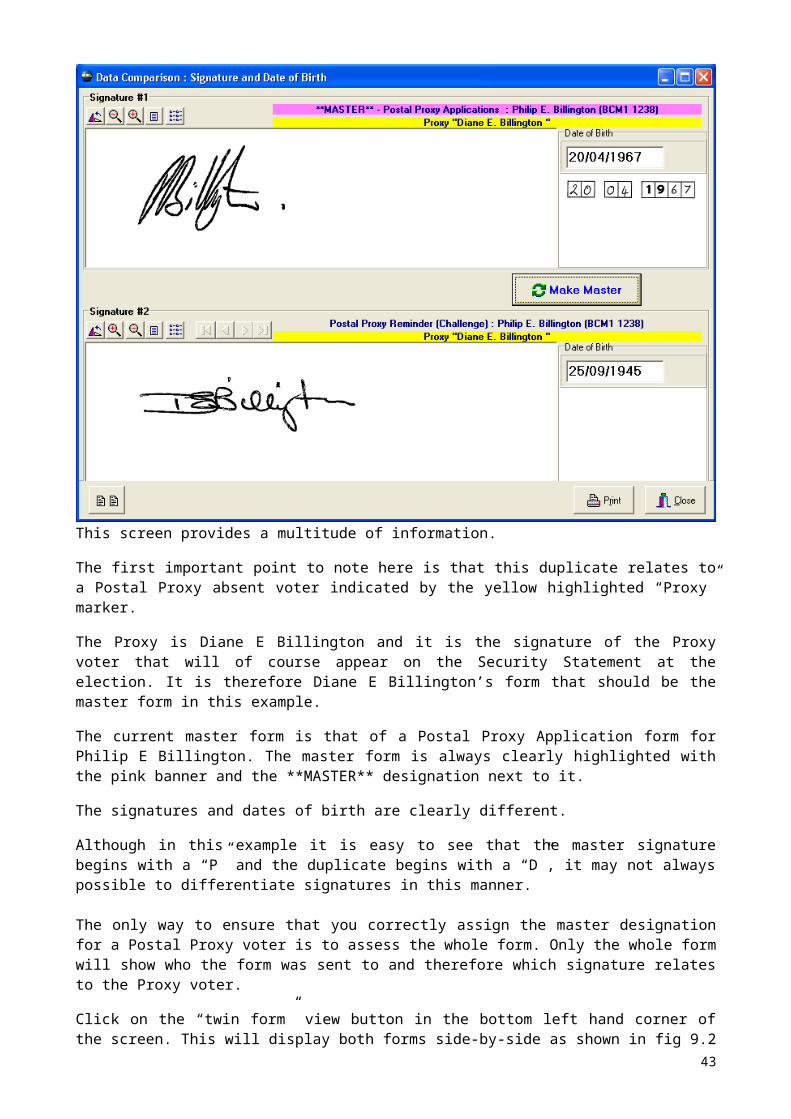
Fig 10.1
If you have set positions for a previous election and there are numbers in the position boxes, click on the Clear Positions button to remove those old settings. Click on the Set Positions button to activate the screen shown in fig 10.2
Fig 10.2
43
It does not matter if there is already a form displayed here from a previous election. Ensure that the ROI Selection is set to Signature, load your form onto the scanner and click Scan Form. When the scanner interface appears, ensure that you select the PI Forms settings as mentioned previously in this manual. (Text Enhanced etc…) Once the form has been scanned in and you have acknowledged the scanning dialogue boxes, you should now see the screen shown in fig 10.3
Fig 10.3
44

You will note that this window now holds information about the barcode position on your form. In order to set the signature cropping box position place the cursor of the mouse above and to the left of the signature, encompassing as much of the white space around the signature as possible, without moving too close to the signature box itself.
If your scanned image does not show the signature box, then utilise the white area around the signature, encompassing as much as possible without getting too close to external form lines. Click and hold the mouse button down and then “drag” the cursor to below and to the right of the signature, drawing a rectangle around it, again keeping away from any surrounding text or linesIf you make a mistake with this process, simply click into any other part of the form with the mouse and this will reset the box and you can “draw” it again. Time and care should be taken with this process, as this will govern the position that ALL of your signatures are cropped from for this type of form. Fig 10.4 shows a box that is too close to the border of the box. Any tiny movement as the form moves through the scanner will mean that part of the signature box will be cropped in along with the signature.
This will cause the automated signature comparison to fail during the election, requiring it to be manually processed.
Fig 10.4
45

Fig 10.5 shows a box that has removed too much of the signature box area. This is far too small. This signature would pass but any other signatures that use the extremities of the signature box would be “cut off” by this box, increasing the likelihood of failing during the automated comparison.
Fig 10.5
Fig 10.6 shows a good cropping box. It has a little clear space from the signature box, but includes the majority of the box in its cropping range.
Fig 10.6
Once you are satisfied that you have a good position for the signature cropping box, select the Date of Birth radio button under the ROI Selection. Repeat the process of “drawing” a cropping box around the date of birth boxes. Ensure that the box is not too close to the date of birth boxes themselves or too close to any lines or text that may be next to the date of birth boxes. You will note from this example, the signature box is quite close to the date of birth boxes. Therefore, the optimum position for a cropping box in these circumstances is in the middle of the space between the two sets of lines as displayed in fig 10.7
Fig 10.7
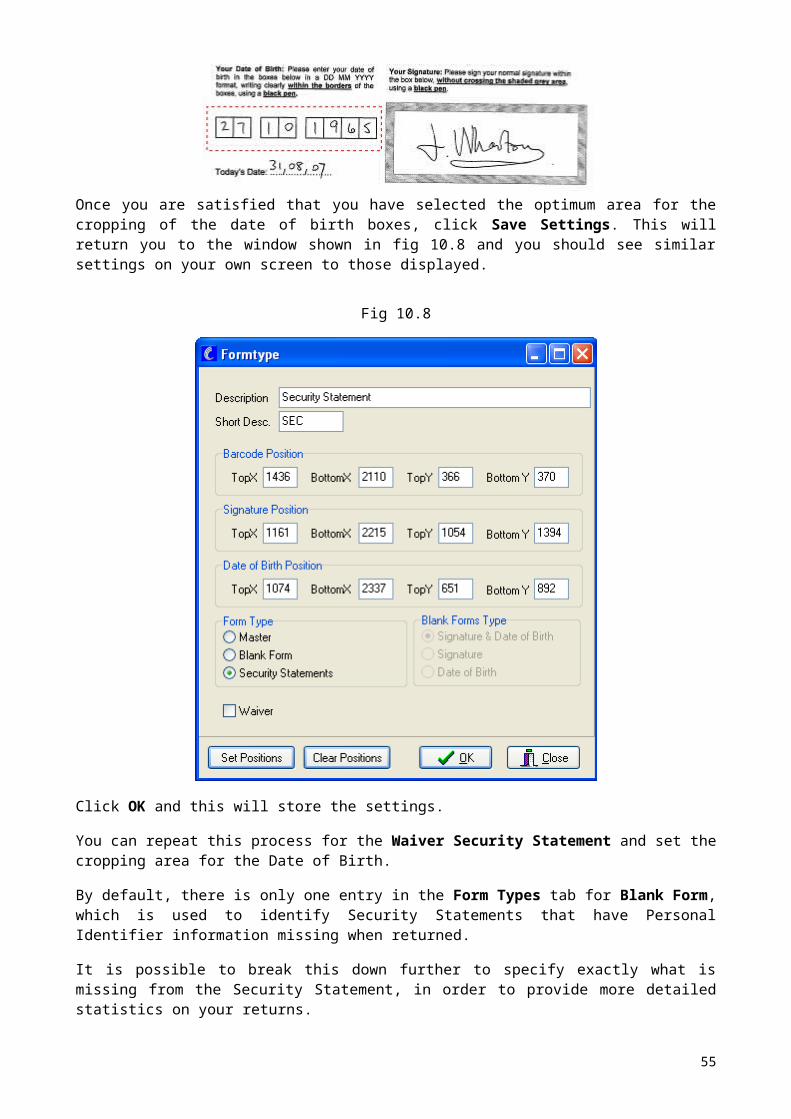
Once you are satisfied that you have selected the optimum area for the cropping of the date of birth boxes, click Save Settings. This will return you to the window shown in fig 10.8 and you should see similar settings on your own screen to those displayed.
Fig 10.8
46

Click OK and this will store the settings. You can repeat this process for the Waiver Security Statement and set the cropping area for the Date of Birth. By default, there is only one entry in the Form Types tab for Blank Form, which is used to identify Security Statements that have Personal Identifier information missing when returned.It is possible to break this down further to specify exactly what is missing from the Security Statement, in order to provide more detailed statistics on your returns. In the Form Types tab, select the Blank Security Statement. Click into the Description field and at the end of the description, type in – BOTH That field should now look something like fig 10.9
Fig 10.9
Click OK to save the changes.
In the Form Types tab, click New.
47

Type in Blank Security Statement – DOB in the Description field. Type in BLD in the Short Desc. field.
Under Form Type, select the Blank Form Radio button.
Under Blank Forms Type select the Date of Birth radio button.
Your screen should now look like fig 10.10
Fig 10.10
Click OK to save the changes. Repeat this process, except on this occasion the Description is Blank Security Statement – SIG, the Short Desc. is BLS and you select the Signature radio button under Blank Forms Type.
Click OK to save the changes. You now have 3 entries for Blank Security Statements in the table and can select the appropriate option when scanning these forms in.
Postal Vote Opening
48

One of the key things to bear in mind here is that you have always previously checked the Security Statements at a Postal Vote Opening Session. The new legislation requires a much more detailed examination of this Security Statement.SelCheck is therefore designed to automate this more detailed examination, but all of the other processes that you have always carried out at an opening session remain. ANNEX 1 to this document is a flow chart designed to assist you in envisaging how the Postal Packs should be handled from the time that they are brought into the session. It is in no way mandatory, merely a guide to assist you.
How you sort the forms or where/how you store or track them through the various stages are decisions for you to take. These processes should be planned in advance in order to prevent any chance of Security Statements or Postal Votes not being fully and correctly processed.Before you begin any AV Opening Session you MUST ALWAYS follow the section of this manual, Checking the System Settings .
Sorting the Postal PacksInitially the packs are sorted into Wards if you are running a borough election or batches if it is Parliamentary. The packs should then have the Security Statements removed. Any packs that have a Security Statement which is unsigned (not a waiver) or has no date of birth entered, should be removed and out-stacked. These will be scanned in at the end of the opening session and will be automatically failed as they lack the requisite PI data. (Scanning in “Blanks” is covered later in this manual) Any ballot packs that have no Security Statement in the outer envelope should be opened to see if the statement has been included in with the ballot paper(s). If the Security Statement is found then this can be scanned and dealt with as normal. If no Security Statement is found the pack should be out-stacked and manually entered in at the end of the opening session as “Missing Declarations” which will be covered later in the manual. Once all of these “invalid” packs have been removed you should separate the Waiver Security Statements from the normal forms and ensure that all forms are facing the same way. They can then be taken to a scanning station where the automated checking will begin.
49

Scanning In Security StatementsThe scanner operator should be logged in to SelCheck under the username and password allocated to them. Clicking on the Scanner Functions button on the main interface will activate the screen shown in Fig 11.0
Fig 11.0
The scanner operator should spend a minute or two ensuring that the forms are straight and up the right way. Once straightened, load the forms onto the scanner hopper ensuring that the guide bars leading the forms into the scanner are pushed against the edge of the forms to prevent them entering the scanner reader at an angle. Click on New Batch to begin the scanning process, activating the window shown in Fig 11.1.
Fig 11.1
50

If you see a screen with a greater number of options, this is because you are scanning in Security Statements more than 11 days in advance of the election date – This will revert when you are less than 11 days from the election.
If you have the same type of interface as shown in fig 11.1, but do not have all of the form options shown on that graphic, refer to the earlier section in this manual which details setting the cropping areas. Adding new forms to the Form Types is included there. In fig 11.1 Security Statement is selected by default. Click OK to proceed and activate the screen shown in Fig 11.2. If you are scanning in one of the other form types, select that option and click OK.
Fig11.2
All of our confirmation dialogue boxes are included to ASSIST you to prevent you from making an “immediate” mistake. Please ensure that you read each in turn carefully to confirm your actions. Click Yes to continue to Fig 11.3
Fig 11.3
The window in Fig 11.3 provides information about the batch you are about to scan. The batch name consists of the type of form (SEC for Security Statement) and the date in reverse. Click Create and Scan to activate the screen in Fig 11.4
51

Fig 11.4
Fig 11.4 gives the final part of the batch name; the unique identifier.As this batch was processed on the scanning PC with a multiple scanner ID of 1001, ALL batches scanned on this PC will begin the unique identifier with the number 1. It therefore follows that the name of any batches scanned on a PC with a multiple scanner ID of 2001 will begin with the unique identifier of 2.If you intend to record the batch number to remain with the forms from a particular ward, then this should be recorded now. This can be a valuable aid when tracking batches and forms. Click OK to continue to Fig 11.5
Fig 11.5
This screen confirms the batch number and is selected All Pages by default. Click Scan to continue to the next interface.
Fig 11.6
52

If you do not see the interface shown in Fig 11.6 (or something similar if you have a different make/model of scanner) and the forms just begin to process through the scanner allow the batch to finish and inform your supervisor IMMEDIATELY. If you did not see the scanner interface, then the system is not configured correctly and you should refer to Checking the System Settings covered earlier in this manual. This batch must be deleted and re-scanned, using the correct settings. Fig 11.6 shows the settings that should be implemented when scanning PI forms.
Advanced Text Enhancement (or similar) 300 Dpi Deskew Enabled Standard speed You should also select the correct page size for YOUR Security
Statements. A5R (210 x 148) is the correct size and rotation for a standard landscape A5 image.
These are NOT the settings that appear on this interface by default and they will reset after EVERY batch, which means that you have to reset them every time you scan a new batch. In order to alleviate the amount of settings that you have to change on each occasion, the following steps show you how to save these settings so that you only have to select your saved settings from the drop-down box. Selecting these preference settings is STILL required on EVERY occasion that you scan a batch.
53

Once you have changed the settings on the first occasion to match those in Fig 11.6 click on the Save button. This will bring up a small dialogue box where you can type in a name for your settings. For the purposes of this manual “PI FORMS” has been used as shown in Fig 11.7
Fig 11.7
Click OK to save these settings. The next time you come to scan a batch you simply have to select the PI FORMS from the drop-down box at the top and all settings will revert to these saved ones. Click Scan to commence scanning the forms. If you have for example 150 forms for a ward, do not attempt to load 150 forms in one go into the scanner hopper. Your forms will get stuck and will have to be re-scanned. Do not attempt to add forms to the hopper whilst the scanner is still scanning. The forms will not go in straight and you may cause a jam, requiring the whole batch to be scanned again. Allow the initial number of forms that you have placed in the hopper to finish scanning. When completed you will see the interface shown in Fig 11.8
Fig 11.8
Click OK to this dialogue and you will be returned to the screen in Fig 11.5.
If you now have more forms to add to this batch add them to the scanner and click Scan. These forms will now be scanned in and added to the same batch. This can be completed any number of times to add forms to a batch until complete.
When dealing with Wards we recommend that 1 batch be allocated to 1 ward to enable faster processing and simplify controls and processes. Once all forms for this batch have been scanned in, click OK to the dialogue and then Close on the scan interface. You should then see your Unpublished Batches window, similar to Fig 11.9
Fig 11.9
54
You will see that the batch you have scanned in is shown in the left hand column.
If you have scanned in Waiver Security Statements, the Signatures button is not available. The details of the batch (its contents) are shown in the centre pane.The form that is selected in the centre pane is shown in the pane on the right. (Note that the form is straight!)
If the form has a line running through the signature box or date of birth box area, your scanner is dirty.
The glass must be cleaned, this batch deleted and these forms scanned again as the line will cause them to fail the automated comparison.
Regular checks should be made to ensure the scanner is kept clean at all times.
The first task is to set the form so that it is of a size that you can read easily and positioned in the window correctly. Use the magnify controls and the scroll bars on the right and bottom of the window to enlarge the form and drag it so that you can see the elector details on the form. Now right-click on the form and select Set Text Position as in Fig 11.10
Fig 11.10
55

Repeat this process for the date of birth field. Now if you wish to go to a particular area on the form quickly you just have to right-click on the form and select Goto date of Birth or Goto Text and the form will return to your settings. The next step is to ensure that all of the barcodes have read correctly. Click on the green arrow immediately next to the barcode field in the centre of the screen. If there are any unread barcodes in the batch the marker will “jump” to that form in the Batch Detail window. The cursor will enter the barcode field and the first 5 characters will be entered for you. Please do not be tempted to manually enter the barcode here! Use the system fully to ensure that the correct barcode is selected.
Click on the icon at the top of the screen which will activate the elector search window. Use the information on the form to locate the elector in the database as shown in Fig 11.11.
Fig 11.11
56

The elector number search has selected the correct elector. Click on the Use Barcode button which will automatically enter the barcode in the correct field for you. If there are other incorrect barcodes the cursor will move to the next in the batch. If there are no more, or were none from the outset, you will see a dialogue advising you “No more invalid barcodes” – Click OK.
Cropping Security Statement SignaturesThe next step is to crop the signatures. Click on the Signatures button to activate the window. If you have scanned in Waiver Security Statements, the Signatures button is not available and you should proceed to the next section of this manual.If you have pre-set your cropping areas as described earlier in this manual, you will simply have to click on the Process All Forms button, as the cropping box will already be in the correct position.
If the boundaries are not pre-set, click into the signature box and drag the cursor, with the button held down on the mouse, to create a rectangle around the signature, but not too near to the edge of the box as described in the section of this manual for Setting the Automated Cropping Areas.
57

If you are too close, a small amount of movement within the scanning process will crop some of the box area and will result in increased automatic failure of signatures. Once you have the rectangle in good position, release the button on the mouse and the signature will appear in the Selected Signature Zone area in the top right hand corner of the window. If you are satisfied with its position click Save. If you wish to reset the box and improve its position or size, click into an area outside of the signature box on the form and the cropping area will reset.
Once you have clicked Save, the Process All Forms button will become active and the signature will now also appear in the Existing Captured Signature window in the top right-hand corner of this interface.Click Process all Forms and monitor the movement and cropping area in the Existed Captured Signature frame of the interface as the forms are cropped automatically. If you see a large number of lines around the edge of the box you should reset your signature crop box and begin again.
Once all of the signatures have been cropped successfully, click Save and Close.
You will be returned to the main interface and the cropped signatures should now appear in the Signature frame of this interface.
Cropping and Correcting Security Statement Dates of BirthClick on the Date of Birth button. If you have pre-set your cropping area, you will simply have to click on the Process all Forms button, as the cropping box will already be in the correct position for you.
Crop the date of birth in exactly the same way as you did with the signatures, again monitoring them as all forms are automatically processed to correct the cropping box if necessary. Once you have saved the dates of birth and returned to the main screen you will note that any digit that has not been identified by the engine is clearly shown by the whole date of birth being highlighted in pink as shown in Fig 12.0
Fig 12.0
58

To begin correcting these, click on the green arrow immediately below the date of birth field. The cursor will automatically jump to the first incorrect digit. We recommend that for speed of process you now release the mouse and work solely from the keyboard, utilising the numerical pad on the right of the keyboard, along with the navigational arrow keys to enter this information. Enter the correct digit for the * character shown by the engine. If the rest of the date of birth is correct press the down arrow key to jump to the next unread digit. If you come across a form that is blank in the date of birth field as shown in Fig 12.1 which has “slipped through” the sorting process, simply move to the end of the date of birth and use the back-space key on the keyboard to completely remove all of the characters in the field as shown in Fig 12.2. Fig 12.1 Fig 12.2
This form will be failed at a later stage by the RO, but you will now be able to process the rest of the batch by pressing the down arrow key again to take you to the next unread digit. If, as you are processing unread digits, you notice a digit that has been incorrectly read by the engine then there is nothing to prevent you using the navigational arrows and numerical keys to correct this. There is no need to check all of the dates of birth.
Any characters misread by the engine will be “picked up” at the Verification stage and can be corrected there. Once all of the unread digits have been entered, this batch is ready to be published to the server.
Verifying & Publishing Batches59

As soon as you have finished cropping and processing a batch, publish it to the server. Holding a batch at the scanning PC serves no purpose and the verification PC may be waiting for a batch to process. Click on the Verify button to verify the batch. If you have not cropped a date of birth or a signature you will be informed of this via a dialogue box, the verify process will fail and you will have to go back to complete whatever you have missed. If you have blanked out a date of birth in the interface as in our example that had “slipped through” you will see a dialogue box advising you of this. This is NOT an error message. Once successfully verified, click on the Publish Batch button to activate the screen shown in Fig 13.0
Fig 13.0
Select Yes to publish the current batch which will activate the screen shown in Fig 13.1
Fig 13.1
Click Yes to confirm the publication of this batch.
60

The interface shown below in fig 13.2 will ONLY appear if you have a word document called batchheader.doc in the folder (SelCheckDocs) shown in the WP path, in the Program Options area.If you do not have such a document present, you will receive a dialogue box to day the batch has been successfully published. Click OK.
Fig 13.2
This will provide you with a simple batch header document, showing the batch name and the total number of forms in a batch. If you wish to use such a form, click Yes. (Remember that you MUST have a configured and working printer attached to your network!) If you are prompted to print such a document and you select No in error, there is no opportunity to print a header for this batch again. You should advise your supervisor immediately, who will have to produce a manual document for that batch. If you do not wish to use such a form at all, or have no printer on your SelCheck network, I strongly recommend that you either remove the batchheader.doc from the WP Path folder (SelCheckDocs) or just rename the document to batchheaderOLD.doc. This will prevent operators clicking Yes in error, which then causes the system to lock if there is no printer available. It also removes an unnecessary dialogue box in the process. Once the batch is successfully published you will receive a confirmation dialogue box. Click OK
The batch will now disappear from your scanning interface and you are ready to scan and crop the next batch. The batch you have published to the server is now available for the verification process.
The Verification Process – Security StatementsAs this batch was scanned in on the scanner PC with scanner ID 1001, this batch can only be verified by the review person, VERIFY1 as this is the user that was assigned Review ID 1. When Verify1 enters the Verification area of the system after this batch is published there is an indicator at the top of the screen showing batches that are waiting to be processed as shown in Fig 14.0 The figure in brackets is the total number of batches waiting to be verified. The figure not in brackets is the number of batches available for this user to process.
61

Fig 14.0
Click on New Batch to open the selection window shown in Fig 14.1. Only batches that this verification user has access to as determined by the Verification ID will be shown here.
Fig 14.1
62

Select a batch (if there are a number of them available) and click OK. This will bring up the verification confirmation window as shown in Fig 14.2
Fig 14.2
Click Confirm to begin the Verification. Fig 14.3
Fig 14.3 shows the progress of the batch as the comparisons are made. Once this has completed, the summary windows shown in Fig 14.4 will be automatically displayed.
Fig 14.4
63

This shows that there are 7 failures out of the 22 forms compared. There are only 2 options here, either to view the failures or return to batch control. If you return to batch control the only option is to close the batch and in order to do that you are forced to view the failures. This is a safety feature of SelCheck to ensure that there are no batches left without being fully reviewed in this area. Click View Failures to begin the process of examining the failed forms. The first image is brought to screen showing the master signature and date of birth in the top window and the Security Statement signature and date of birth in the bottom window. The icons at the top of the screen are there to assist. They will allow you to rotate the form, zoom in or zoom out of the image, view the entire form or view the details held in the database for this elector. The navigational buttons will allow you to review the other failures in the batch without making a Pass or Fail decision. The centre of the window gives information on the comparison. The signature comparison is shown on a bar scale designed to indicate relative accuracy between the 2 signatures, based upon the algorithm used in the system. In layman’s terms it is a confidence indicator. Green is Pass, Red is Fail and the bars will give a “confidence factor” in the similarity between the 2 signatures. The date of birth comparison is of course a completely factual one. Either the 2 sets of numbers match, or they do not. The date of birth comparison is NOT made on the image of the date of birth, but on the numbers that have been automatically and/or manually entered to the system. Therefore there is no bar graph here for “relative accuracy” but a straight forward Pass or Fail. The icon in the bottom left hand corner of the screen will allow you to view both complete forms side-by-side. All of these points are shown in Fig 14.5
Fig 14.564

This shows that the signature has failed and there were only very slight similarities, given the pink confidence bar. I would say that this is a fair assessment of these 2 signature. The date of birth passed. Even allowing for “local rules” on what images a user at this level is allowed to pass (some authorities insist ALL automatic failures are referred) a variation of this degree in the signature should be failed and therefore, referred to the Returning Officer to assess. Click on the Fail button and you will be prompted with a confirmation dialogue box. Click Yes to confirm your actions. The next automatic failure to be processed will automatically be brought to screen.
65

Fig 14.6
Fig 14.6 shows that the signature is completely different (as confirmed by the confidence bar) and the date of birth has also failed. This form should obviously be failed.
Fig 14.7
66

Fig 14.7 shows a form where the signature ‘just’ passed and from the visual comparison there are some differences, but the date of birth failed.
The operator should view the entire form by clicking on the button in the left hand corner to see if the date of birth is incorrect here because it has been either misread or manually entered incorrectly on the master image.
If the operator finds the date of birth is different from that on the form, they can use the calendar field to amend the master image date of birth, confirming the action when prompted.
If this then matches the date of birth for the security statement the date of birth will change to “passed” and the form can be passed in its entirety.
Continue to review each automated failure until they have all either been passed or failed. You will then be automatically returned to the Verification interface and your screen will appear similar to fig 14.8
Fig 14.8
The forms are displayed in a colour coded fashion to give an “at a glance” reference to their status.This batch is now ready to be forwarded to the RO for their decision on the forms that have been failed.
67
At this stage, you may wish to print a report that shows forms that have been “provisionally failed”. This will enable you to out-stack the corresponding ballot paper envelopes for these provisionally failed statements in this batch, to allow you to commence opening the ones that have been automatically passed. This is a decision for each Local Authority to take on how they wish to control their opening session. Click Close Batch. If there are failures in this batch, you will be advised that they will now be passed to a Supervisor for processing. Click OK and then click OK to the Batch has been successfully closed dialogue. If there are further batches waiting to be verified, open then next batch in turn and continue as before.
Review – RO ProcessingThis next section deals with the Returning Officers Review. The RO only reviews forms that have been failed at the Verification stage. Only a user with level 3 permissions can access this area. Click on Review in the main interface to activate the screen shown in Fig 15.0
Fig 15.0
This initial screen shows all forms that have been referred to the RO by the Verification stations.
68

Throughout this area of the system there are buttons for Report and View Details on each screen to assist in producing information and examining all information held on the electors within it.Click on View Signatures to review the first comparison. This will activate the screen shown in Fig 15.1
Fig 15.1
You will note that this screen is very similar to that of the Verification screen with one or two minor differences. The Master signature is in the bottom frame, the Fail button says “Fail Now” and there is an extra button Refer To AF.The Fail Now button is differentiated in this fashion to reinforce to the Returning Officer that if that option is selected, the form will not be passed on for any further investigation. Selecting this immediately fails the form completely and the ballot paper will be withdrawn.
The Refer to AF button allows the Returning Officer to move the form into the Advanced Fraud area, where further checks may be carried out, for example, comparing the image to that of co-habitants. It is the decision of the Returning Officer at each Local Authority whether he wishes to implement this further investigation.
69

It is clear from the example given in Fig 15.1 that no further investigation is required as the Security Statement has not been signed at all and therefore there is nothing to compare with at the advanced level. Selecting Fail Now will activate the screen shown in Fig 15.2
Fig 15.2
This window gives a very clear indication of the action being undertaken in choosing to fail now.
The Returning Officer should select the reason that he is failing the form, or if not listed, select Other Reason and then type in free text the reason for the decision to fail.
In this example the “Signature Field is Blank” option is suitable for this form and that radio button should be selected. Click OK to the confirmation dialogue to confirm the action.
The screen will return to the Review Process window and the failed elector will have been removed from this screen.
Fig 15.3 shows a signature that has failed the automated engine, but the date of birth has passed.
70

Fig 15.3
The “confidence factor” of the comparison engine shows that it is unsure if the signatures are comparable. It has failed, but only just. There are similarities between them that the engine has recognized. You can see that there are some very small similarities in the up and down motion of the signature and its length. The Returning Officer could now make any one of the 3 choices as the date of birth matches and there are signatures to compare. The RO may pass it immediately. He may feel that there are sufficient similarities to pass this signature. This is an ENTIRELY SUBJECTIVE point of view and the sole responsibility of the Returning Officer to make this decision. The RO may fail it immediately. He may agree with the automated engine and feel that they are too dissimilar. This is an ENTIRELY SUBJECTIVE point of view and the sole responsibility of the Returning Officer to make this decision.The RO may decide that this comparison requires further investigation, perhaps to compare against co-habitants. This is an ENTIRELY SUBJECTIVE point of view and the sole responsibility of the Returning Officer to make this decision.For the purposes of this manual this comparison is referred to advanced fraud for further investigation. Click Yes to the dialogue box to confirm your action. In order to review forms that have been referred to Advanced Fraud you have to select the Processed Failures tab.
71

This will open the screen shown in Fig 15.4Fig 15.4
Click on the Advanced Fraud Detection button to activate the window shown in Fig 15.5
Fig 15.5
72

You will see that comparison at property level is selected by default as this is the most common level required to run advanced comparisons. The wider levels of search are password protected as these take longer to run and should only be considered after consultation with the Support team at Computershare, via the support website.Click on the Perform Comparison button and you will be advised by a dialogue box how many signatures your sample is going to be compared against. Click Yes if you wish to continue. Once the automated comparison has run, the next dialogue will give you the results of your check, as shown in Fig 15.6
Fig 15.6
Click OK and then click View Signatures to view the results of your comparison. Select All on the next dialogue box to view all of the signatures that the referred signature was compared against. You should see something similar to Fig 15.7You will see that the Security Statement being examined is at the top of the screen. Each other form in the database for the property is displayed. Please note that the first form selected may not be the corresponding form to the one being examined.
Fig 15.7
73

Examining the details for other occupants of the property against the security statement we are reviewing, shows that they have a very different signature and date of birth.The “owner” of each of the signatures and date of birth is shown at the top of each frame. The final decision to pass or fail this security statement now resides again with the RO and is a subjective decision. They will be able to decide whether to pass or fail it, given all of the information on the occupants of the property. If after running a comparison in Advanced Fraud Detection the RO decides that he will fail the signature, the interface shown in fig 15.2 will again be activated. If the RO decides to pass the signature, they should select the correct matching signature from the list and then click on the Pass button. This will activate the interface shown in Fig 15.8
Fig 15.8
Note that there are again pre-loaded reasons for passing at this level or the RO may select to enter another reason in the free text option. There is an option here for form signed by other Householder. It is a decision to be made by the RO at the authority concerned, if he chooses to allow such forms to be passed. An example of this scenario is shown in fig 15.9 where the Security Statement submitted to Advanced Fraud Detection, has been successfully matched by the system to a form held at that property. Closer examination shows that John Frater has signed Julia Frater’s Security Statement and visa versa.
74

Fig 15.9
It is recommended that the RO Review list is continually monitored to assess the numbers of referrals. Once a particular batch (which represents a ward or parish) has been processed through the RO Review area, a report can be obtained from the Advanced Failures area. This report shows the failures within each batch or Polling District however you select to output it.This report can be utilised to select and remove the ballot paper envelopes for the corresponding Security Statements the RO has rejected. Once these have been removed, the remaining ballot papers for this ward or parish may be opened. This report, as have many of the reports within SelCheck, has a date qualifier field so that data can be output for a particular date (opening session). Once there are no remaining entries in either the New Failures or Processed Failures tabs, the reviewing process for the Returning Officer is complete. The Advanced Failures tab will now show all of the Security Statements that the Returning Officer has rejected and the Passes tab will show all that he has passed. The New Failures and the Processed Failures tabs MUST be completely empty at the conclusion of a Postal Vote Opening Session.
75

Re-Assigning Images to the Correct ElectorIf, during the RO processes a Security Statement is found to have been attached to the wrong elector, only the RO can reassign this form to the correct elector. The form must go through the processes of having been failed by the RO before it can be reassigned to the correct elector. The reassign feature is on the Advanced Failures tab as shown in fig 16.0
Fig 16.0
Ensure the elector that you wish to reassign is the one selected, click on the Reassign button, then enter the password REASSIGN and click OK. This will activate the screen shown in fig 16.1.
Fig 16.1
76

You will see that in this example the Security Statement for Margaret Spratt has been assigned to John Wharton in error. This will probably have been caused by the manual entry of the incorrect barcode. We therefore need to assign this form to the Master of Margaret Spratt. Click on the Locate Master button to activate the search screen shown in fig 16.2. Enter the search details for the elector that you are looking for as shown in this screen and then click Search.
Fig 16.2
77

You will note from this screenshot that there are 2 Margaret Spratt’s. You may well find duplicates when searching for names. You MUST ensure that you select and highlight the correct elector first and then click on the Use Barcode button.
This will return you to the screen shown in fig 16.3, with the Master form now displayed alongside the security statement.
Fig 16.3
78

Once you have checked to ensure that the elector on the 2 forms match, click on the Reassign button, enter the password REASSIGN and click OK. This will activate a confirmation dialogue as shown in Fig 16.4
Fig 16.4
Once you are sure that you are reassigning the form to the correct elector, Click OK to the dialogue box to activate the comparison screen shown in fig 16.5
Fig 16.5
79

If the date of birth matches and you are satisfied that the signature matches sufficiently to pass, then click on the Pass button which will then pass this form, requiring no further action. If the date of birth does not match, or you think that the signature does not match sufficiently to pass, then click on the Fail button. This will then move the form to the New Failures area of the RO Review, where the form can now be examined as any other form entering this area, for example running further comparison checks on other forms at the property if required.
Reverting Failed Security StatementsIf, for whatever reason, you wish to reverse the decision on a failed Security Statement, this can only be performed from the RO Review area. In the screen shown in fig 16.0, select the elector that you wish to reverse the decision on and click on the Revert button. Enter the password REVERT and click OK. You will see a confirmation box advising you Signature Reverted for Reviewing. Click OK.If you now examine the Processed Failures tab in the RO Review area, this form will now be listed where it can be processed through the Advanced Fraud Detection area and passed or failed as required.
Waiver Security Statements80

Waiver Security Statements are processed in virtually exactly the same way as normal security statements. There are in fact only 2 differences. When you come to the interface shown in fig 17.0 you of course select the Waiver Security Statement option.
Fig 17.0
When it comes to cropping the form, the button to crop the Signature is missing and therefore unavailable. Of course there is nothing to crop in this instance as there is no signature on a waiver form.
Blank Security StatementsOnce all of the valid Security Statements have been scanned in, you can process the “blank” security statements. These are the Security Statements that have been returned with no date of birth entered at all, or the elector is not a waiver and there is no signature on the statement, or both of these. There is no need to scan Blank Security Statements separately per ward or parish. They can all be scanned in together in 1 batch. Divide the Blank Security Statements that you have into 3 groups, dependent upon what is missing from the form. At one of the scanning stations, follow the same scanning procedure EXCEPT on this occasion select appropriate form type, for the forms you are scanning, on the interface shown in Fig 17.0Once you have made this selection, then process the forms in exactly the same way as you did with the signed Security Statements. As you will see the buttons to crop the Signature and Date of Birth are missing. This is because these forms are invalid and will be rejected regardless and there is therefore no need to capture any data from the form. Simply click on Verify Batch once it has been scanned and then publish it to the server. The Blank Security Statements must still be run through the Verification process.
No comparison will be made on the signature or date of birth, as there is of course nothing to compare against, but this process also associates the image with the
81

elector, providing information with regards to returns for the Marked AV List and statisticsThe summary will show you the number of blanks that are entered and they will all be displayed with a white background. Close the batch to complete the process.
Missing Security StatementsYou can only use this area IF you have produced your Ballot Paper Numbers from within Elreg.
If you have not generated your Ballot Paper Numbers from within the Elreg system you will have to manually record this information as you have done in previous elections. Obviously there is nothing here to scan as the Security Statement is missing. Therefore the required information has to be manually entered into the system. Follow the menu path Functions -> Missing -> Declarations to activate the interface shown in Fig 18.0.
Fig 18.0
Select the area that you wish to record missing Security Statements against from the left hand column and then click on the New button. Confirm with the dialogue box that you wish to make entries with the area you have selected and this will activate the screen shown in Fig 18.1
82

Fig 18.1
The selections required here are dependent on how you have produced your Ballot Papers and Security Statements. The Accept Duplicate Ballot Number on Different Election was specifically added for the Welsh Authorities who have a combined election and their ballot numbers are the same. If you fall into that category, put a tick in the box. The Single PVS – Combined Election is self explanatory in who it is targeted at. If you have such an election, put a tick in this box. For example, if your Combined Election is a Ward/Parish, when you now enter a missing Security Statement against a Ward, the system will also automatically enter it for you against the Parish. This will be the case for any combined combination. If you have a combined election and separate Security Statements for each election, you will need to record the missing Security Statement for each type of election, as it is feasible for you to have received a Security Statement for one type of election and not the other. Count how many missing Security Statements you have for the selected ward and increment the Quantity field on the screen by clicking the “up” triangle. You will see the number of fields in the main screen increase as you do so. For the purpose of this manual 3 missing Security Statements are entered and the single PVS for a combined election has been selected. If you have your Ballot Paper Number as a barcode on the ballot paper envelope, you can utilise the hand scanner facility to read in the numbers. If not simply click into the first field and enter the Ward Ballot Paper Number for the first missing Security Statement. Use the down arrow to move to the next empty field in the BP Number column and continue to enter each number until all fields have the required information. You should end up with something like Fig 18.2
83
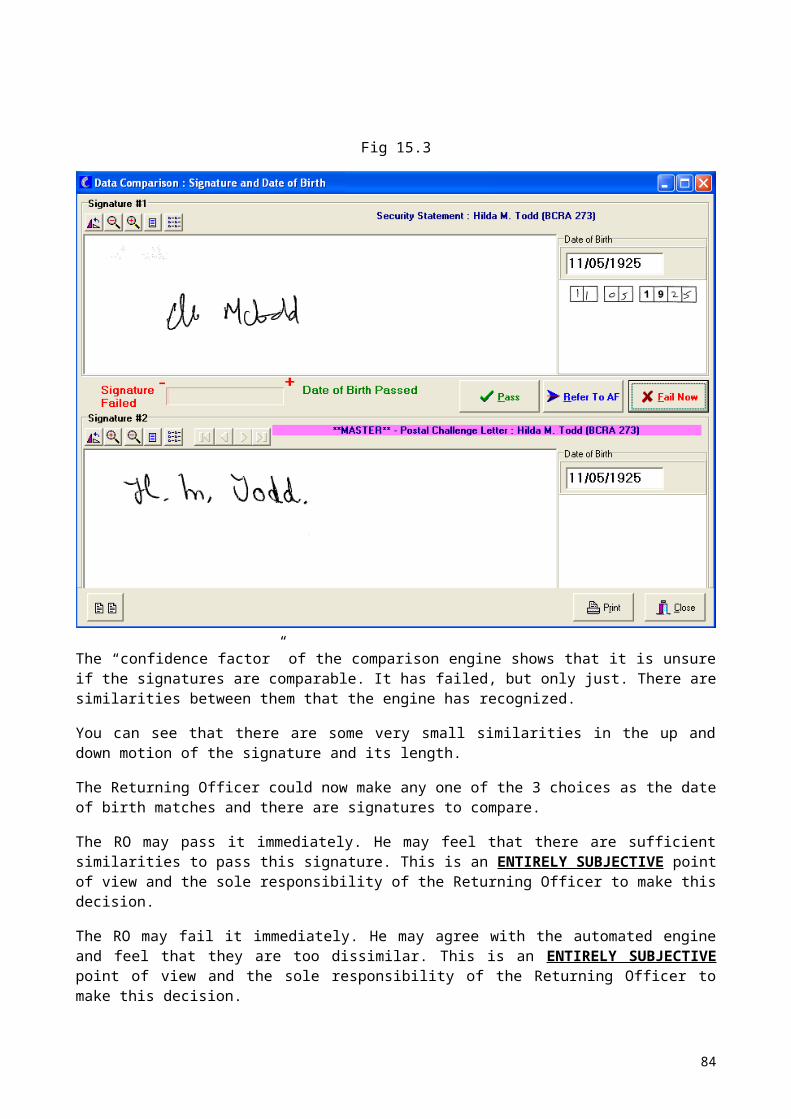
Fig 18.2
Once you have entered all of you ballot paper numbers for this area, click OK. This will return you to the Missing Declarations screen and an entry will be shown against this area as shown in Fig 18.3
Fig 18.3
Continue with the next Ward or Parish until you have recorded all missing Security Statements.
84

Missing Ballot PapersYou can only use this area IF you have produced your Ballot Paper Numbers from within Elreg.
If you have not generated the Ballot Paper Numbers from within the Elreg system you will have to manually record this information, as you have done in previous elections. Once Security Statements have been passed by the RO and if he has failed any within that Ward or Parish, the corresponding ballot paper envelopes have been removed, the remaining envelopes can now be opened. If, as the envelopes are opened, they are found to be deficient of a Ballot Paper (or papers in the case of a combined election) then a note of the missing Ballot Paper should be made on the corresponding envelope. These should be preserved and at the end of the opening session, taken to a single station to be manually entered into the system. Again, this information is recorded to ensure the Marked AV List details exactly what has been returned by each elector. Follow the menu path Functions -> Missing -> Ballot Papers to activate the interface in Fig 19.0
Fig 19.0
This screen is identical to that of missing Security Statements and the processes are virtually identical, but with one main difference. Whereas with a combined election (single PVS) in the Missing Declarations area of the system the program will make entries in both election slots for you, in this area it will not. This is because you may only be missing a single type of ballot paper.
85

Click New and then confirm your action in the next dialogue box to activate the screen shown in Fig 19.1.
Fig 19.1
Put a tick in the Accept Duplicate Ballot Number on Different Election if this is applicable to you. Count the number of entries you need to make in this Ward and increment the counter as before. Type in the Ballot Paper Numbers of the missing forms and then click OK. As before your entry is recorded in the table. Process each Ward in turn, making the appropriate entries. Ensure that you remember to select the correct Election from the drop-down box at the top of the screen when you begin to make entries for different types of election in a combined election scenario. If you enter a number that has already been entered into the Missing Security Statements area, you will see a screen similar to fig 192.
Fig 19.2
86

Simply click OK to this message and remove that entry from the grid. You should then remove the corresponding entry from the Missing Security Statements area and reunite the forms. The same message would appear in the Missing Security Statements area, if the position was reversed and one of them subsequently returned. This feature ensures that forms that are returned separately, even at different opening sessions, can be rejoined and processed as normal.
Statistics and ReportsThis manual does not go into great detail with regards to the statistics and reports within the system. The reason for this is that the Statistics page itself, as shown in Fig 20.0, is comprehensive, yet self-explanatory.
Fig 20.0
87

By selecting a range of various criteria, reports and statistics can be produced from this area covering the widest number of outputs. One report that is highlighted here however is the “Postal Register”. This can be produced after each opening session if required and of course can be produced at the conclusion of the election. The output from here is not the Marked AV List as is legislatively required. The Marked AV List can only be produced from the Elreg system.
When you select the Postal Register option here a new area will become active within the main interface to allow you to output to a Report or CSV with the options Received or Show All.You must NOT allow access to the Show All report to any Candidate/Agent or any other person beyond Electoral Registration or the Returning Officer.
It should be noted that many of the features in this window will only be either visible or active if a particular selection is made within the page, as for example with the Postal Register and the Received and Show All options.
Daily ResultsIn order to allow you to be able to provide information on whether a Ballot Paper pack has been received, there is a function to produce a results file from SelCheck that will be imported into Elreg. This section deals with the steps required to produce and import this file and this should be undertaken at the conclusion of EACH opening session.
88

Enter the Word Processing area of the SelCheck system and then select Daily Results in the Report Type area of the interface to see the screen shown in Fig 21.0
Fig 21.0
Ensure that the day of the opening session is selected in the date box.
If you have imported data and images for more than one authority for cross boundary or unitary reasons, select the authority you want to produce results for from the drop-down box.
Click on OK to activate the screen shown in Fig 21.1Fig 21.1
89

You will see that the output location is the path to the SelCheck Word Documents folder that is configured in Program Options. The default name of the file is also entered for you as RESULTS. Give this file a unique name by clicking into the Output File field and we suggest that you type in the date, i.e RESULTS1703. in reverse order format Once you have a unique name, click OK and you will see the progress bar along the bottom of the window. Once the file creation process has completed you will see a dialogue box similar to Fig 21.2
Fig 21.2
Do not be alarmed if you are running a combined election and the figure seems too high, as results are being created for BOTH types of election.
Navigate to the location that the file has been saved to and if your system is configured as per Computershare’s recommendations, you will need to use some third party media to copy this file to in order to import it to the Elreg system, such as a CD or USB key.
Log into the Elreg system and navigate through the path Election Maintenance -> SelCheck -> Import -> Results & Date of Birth to activate the interface shown in Fig 21.3
Fig 21.390

Select the Results radio button, then click on Browse and navigate to the location of your results text file. Either double-click on the file or select the file and click Open, which will enter the path and filename for you in the Selcheck Import window. Click on Process to import the results. At the conclusion of the import you should see an information box giving you details of the import as shown in Fig 21.4
Fig 21.4
Click OK to this message and then Close to shut down the import window. You can confirm the success of the import if you wish by locating an absent voter whose ballot paper(s) was\were processed during this session. This information can be found from the AV Register or any of the reports that you have produced during the session.Locate the elector on the scrolling screen and you will immediately see that there is a BP:<Date> entry alongside their name. By right-clicking the elector and selecting Ballot Papers you will activate the screen shown in Fig 21.5.
91

Fig 21.5
Again this screen is very self-explanatory, simply providing information regarding the ballot papers and their status. Failed papers also show the reason in the respective column. If you did not use Elreg to generate your ballot paper numbers then of course this screen will not be available to you.
Exporting Signatures and Dates of Birth from SelCheckAt the conclusion of the election, the cropped signatures and the dates of birth need to be transferred back into the Elreg system. This will ensure that the next time the SelCheck system is used, only forms that do not have a cropped master image in Elreg will need to be cropped before the election.Click on the Word Processing button on the main SelCheck interface and then select Elreg Master Signatures as shown in fig 22.0
Fig 22.0
92

Ensure that you have the correct authority selected if you have more than one loaded into your system. Click on OK to activate the screen shown in fig 22.1
Fig 22.1
The file name is already entered for you, as is the location that the file(s) will be created.
Make a note of the location that the file is to be saved to and then click OK. Once the program has run you will see a confirmation dialogue box similar to that shown in fig 22.2
93

Fig 22.2
Click OK and then click Close. Dependent on the number of images being transferred back to Elreg you will have one text file and any number of zip files. As before, the system is designed to create multiple zip files in order to reduce the likelihood of file corruption when there are large numbers of files to be output.The cropped signatures and dates of birth are now ready to be imported back into your Elreg system. As before when transferring data between the systems, an agreed method between the IT dept and the Electoral Registration dept should be used.
Importing Signatures and Dates of Birth to ElregLocate the files that have been created in the previous section. This will be a text file and any number of zip files. Once you have located the files, they should be copied onto a suitable transfer medium (USB key, CD, DVD) and transferred to the network where your Elreg system resides. Copying these files into a convenient folder on your server will speed up the import process, rather than copying them onto your PC which will mean that they are then imported from your PC across the network to the server. You MUST ensure that everyone else is logged out of the Elreg system before you begin to undertake this process.
Log into Elreg, follow the menu path Election Maintenance -> SelCheck -> Import -> Results & Date of Birth.Select the Signature / Date of Birth radio button shown in fig 21.3 and then use the Browse button to locate the text file that you have copied over from the SelCheck system.
Note that this interface is ONLY looking for the text file, not the zip files, but ALL of these files must be in the same location.
Select the correct text file, click Open and then click Process. If you are completing this process during the electoral canvass period, the system will advise you that you should be importing these files to both registers.
94

In that case click Yes to that dialogue box. If you are not in the canvass period, the files will simply import to the Rolling Register. Once the program has finished importing the images, click OK to the dialogue box. You may now see a screen similar to that shown in fig 23.0 where there are errors shown in the import process.
Fig 23.0
You should now examine each of these electors and absent vote records in turn. A signature image or date of birth record should only be shown to have an error for one of the following reasons:
a) The elector has been deleted from the register. b) The elector has had their absent vote deleted. c) The elector is an absent voter but the absent vote form image does not
correspond to the form type of the signature. (If an application has been reissued for whatever reason and the previous form had been deleted.
In all of these examples, there is no reason to have the signature image or date of birth data attached to these electors. Once you are satisfied that any “errors” shown in the import process are correct, click Close to exit the import program screen. You should now perform some random checks across your register to ensure that the signatures and dates of birth have been imported correctly. Firstly, select random postal voters from the beginning, middle and end of your register. Click on the Elector Images button and when the absent vote form is displayed for this elector there should now be a button which Has Signature.
95

Click on the button and ensure the signature and date of birth is present and that it corresponds to the information shown on the main form. Now select random Waiver electors and Postal Proxy electors throughout your register and ensure that the correct images and date of birth information (there will be no signature image for a waiver) is attached. This has now completed the cycle of getting the requisite data out of Elreg, cropped and processed in SelCheck and then back into Elreg. Any elections that are now undertaken using SelCheck will utilise the date of birth information and the cropped signatures that currently exist in Elreg.
Producing the Marked AV ListAlthough this process is completed entirely within Elreg, it has been included in the SelCheck manual to complete the circle of required tasks for processing absent votes during an election. In Elreg, follow the menu path Election Maintenance -> AV’s Issuing+PS Lists, Labels, etc (Election) Click OK to the dialogue box and this will activate the interface shown in fig 24.0. This is the area of the system used to create your AV output files.
Fig 24.0
Select Re-create Original List
Remove the date from the Date Original List Sent windowPut a tick in the Show BP Returned boxSelect the relevant Qualifying Month for your election
96

You may choose to output the list either across the whole register, or break it up into Electoral areas. Simply select each electoral area in turn from the screen shown on the previous page. The decision on how you wish to output these lists is a personal one to be made by each authority. Click OK to create the list. In a combined election, if an elector only returns 1 ballot paper, this will be indicated by a single letter against their record identifying which paper has been returned. If two asterisks are shown or both letters are shown, depending on how you created your earlier files, then they have returned both papers.This process is the correct way to produce the Marked AV list as this is the only version which will include the ballot paper address, which is required under the regulations. This will require a much larger quantity of paper to print the list because of the address requirement, but it is possible to produce the list as a PDF if requested as a file output. Click on the printer icon in the top left hand corner of the screen. Put a tick in the Print to File box. Select PDF File from the drop down box. Click on the ellipsis button to select the location where you wish to output the file.
Give the file a name to distinguish it and click Save. Your screen should then look appear as shown in fig 24.1
Fig 24.1
Click OK to create the PDF file.
Backups97

Exactly how the server is backed up is a decision for each local authority to take. This may be done by local backup drive, CD, DVD, or network. The decision is yours to take on what is best for you and should be a consultative process between Electoral Registration and the IT dept. This section deals with recommendations on WHAT should be backed up and WHEN. This is quite a logical process and these recommendations are a minimum. If you have the facility to back up the entire system on a regular basis, perhaps on a CBS if your system is on the corporate LAN, then this would of course be beneficial. There is an inbuilt facility within the system to backup the MySQL database, without stopping the MySQL Service, to a text file which is automatically zipped.
In order to use this facility when advised in the backup schedule, log into SelCheck and follow the menu path Services → Backup MySql Database. Put a tick in the zip file box and click OK. Confirm your action in the next dialogue box. Give the file a name and include a date format i.e. 05MAY2010, so that you have a record of which day the backup is from. Click OK to continue. The file will be saved to the Word\SelCheckDocs folder on the server.These are the minimum standard backup recommendations:
1. Once the SelCheck system has been initially installed: Run the Backup MySql Database program
2. For an election, after each occasion where the Register Data and Master Images have been imported:
Run the Backup MySql Database program
Take a full copy of : <Server Drive>:\Strand\Selcheck\Data\ServerRoot folder
3. During the election after each Postal Vote Opening Session:
Run the Backup MySql Database program
Take a full copy of : <Server Drive>:\Strand\Selcheck\Data\ServerRoot folder
Should you experience a hardware failure to the server, which requires the restoration of the backups you have taken, please log a call on the support website where you will be taken through the steps required.
Queries & SupportIf you have ANY problems with the system that is not covered in this manual then you should inform Strand immediately without attempting to resolve the “problem” yourself first. All queries should be logged on the Support Website www.strandsupport.com. Support calls logged in this manner receive a faster response time and will always take preference over contact through any other medium.This document is subject to the data protection act and the information contained within should not be disclosed to any source outside the electoral registration arena or its controlling authorities. G.Briggs ©
ANNEX 198

Specifications for PI Data Forms From External Printers
These specifications may be supplied to any external printer and STRICTLY adhered to.
a) The paper for the forms MUST be white.
b) The barcode is font 3 of 9 and should be in 2 lines of size 18 font MINIMUM.
c) The signature box must be a soft wash grey box, internal dimensions of clean white space of 90mm x 30mm
d) NOTHING must be printed inside this box.
e) The soft grey wash border of the signature box should be at least 4mm thick.
f) The date of birth boxes should consist of two sets of 2 and one set of 4 boxes.
g) All individual boxes must be 9mm wide, 10mm high and bordered with a 1pt black line.
h) The first 2 boxes must be joined and separated from the next 2 boxes by a gap of 5mm
i) The next 2 boxes must be joined and separated from the next set of 4 by a gap of 5mm.
j) The last 4 boxes must be joined.
k) It is now accepted that the first 2 boxes for the year of birth may have the digits 1 & 9 printed within them.
l) There must be an area of clean white space all around these boxes of AT LEAST 10mm. (The more space there is, the easier they will be for you to process)
m) The Barcode, Signature Box and Date of Birth boxes MUST be positioned in such a fashion on the form that if the form is folded in half or in thirds, none of these fields will be subjected to a crease or fold in the paper.
99

ANNEX 2 - Process Flow Chart for Postal Vote Opening Sessions
5. RO Review. Print stats then remove
“Failed” BP Envelopes and store as Rejected. Open any remaining
“Passed”
2. Remove Security Statements for 1 Ward
4. Level 1 Review. MAY print stats after this and open Passed BP’s and
temporarily remove “Failed” pending RO
Review.
Put BP & Envelope to one side
Rejoin BP and SS with batch at step 3.
3. Stack unopened BP Envelopes. Scan and
process Security Statements through
Selcheck
Put Security Statement & BP to one side
Open BP Envelope to look for Security Statement
At the end of the Opening Session, Scan & Process these as form type “Blank” and then store as Rejected.
1. Sort Postal Packs into Wards (or
whichever area type is applicable)
SS Missing Blank Signature or
DOB (Not Waiver)
Security Statement Found
No Security Statement
At the end of the Opening Session, manually enter these into the Selcheck system under Missing -> Declarations.
Store as Provisionally Rejected.
Processing “Passed” BP Envelopes
If 1 or more BP’s are missing, write what is missing on the envelope and then store it with the “Provisionally Rejected”.
Process the ballot paper as normal.
At the end of the Opening Session manually enter these to the Selcheck System under Missing -> Ballot Papers
If the wrong BP is in the envelope, leave the BP in the envelope and store it with the “Provisionally Rejected”.
At the end of the Opening Session, manually enter these in both Missing BP & Missing SS for their respective entries.


![Checkbox - Festo · Software package CheckOpti Checkbox Optimizer Version 2.1 Manual 192 145 en 0309c [676 442] Checkbox](https://img.pdfslide.us/doc/110x75/5c86ef1c09d3f2206a8c74f3/checkbox-festo-software-package-checkopti-checkbox-optimizer-version-21-manual.jpg)