Embed Size (px)
Citation preview
Security Management Guide
Operations Center 5.0April 26, 2013
Legal Notices
THIS DOCUMENT AND THE SOFTWARE DESCRIBED IN THIS DOCUMENT ARE FURNISHED UNDER AND ARE SUBJECT TO THE TERMS OF A LICENSE AGREEMENT OR A NON‐DISCLOSURE AGREEMENT. EXCEPT AS EXPRESSLY SET FORTH IN SUCH LICENSE AGREEMENT OR NON‐DISCLOSURE AGREEMENT, NETIQ CORPORATION PROVIDES THIS DOCUMENT AND THE SOFTWARE DESCRIBED IN THIS DOCUMENT ʺAS ISʺ WITHOUT WARRANTY OF ANY KIND, EITHER EXPRESS OR IMPLIED, INCLUDING, BUT NOT LIMITED TO, THE IMPLIED WARRANTIES OF MERCHANTABILITY OR FITNESS FOR A PARTICULAR PURPOSE. SOME STATES DO NOT ALLOW DISCLAIMERS OF EXPRESS OR IMPLIED WARRANTIES IN CERTAIN TRANSACTIONS; THEREFORE, THIS STATEMENT MAY NOT APPLY TO YOU.
For purposes of clarity, any module, adapter or other similar material (ʺModuleʺ) is licensed under the terms and conditions of the End User License Agreement for the applicable version of the NetIQ product or software to which it relates or interoperates with, and by accessing, copying or using a Module you agree to be bound by such terms. If you do not agree to the terms of the End User License Agreement you are not authorized to use, access or copy a Module and you must destroy all copies of the Module and contact NetIQ for further instructions.
This document and the software described in this document may not be lent, sold, or given away without the prior written permission of NetIQ Corporation, except as otherwise permitted by law. Except as expressly set forth in such license agreement or non‐disclosure agreement, no part of this document or the software described in this document may be reproduced, stored in a retrieval system, or transmitted in any form or by any means, electronic, mechanical, or otherwise, without the prior written consent of NetIQ Corporation. Some companies, names, and data in this document are used for illustration purposes and may not represent real companies, individuals, or data.
This document could include technical inaccuracies or typographical errors. Changes are periodically made to the information herein. These changes may be incorporated in new editions of this document. NetIQ Corporation may make improvements in or changes to the software described in this document at any time.
U.S. Government Restricted Rights: If the software and documentation are being acquired by or on behalf of the U.S. Government or by a U.S. Government prime contractor or subcontractor (at any tier), in accordance with 48 C.F.R. 227.7202‐4 (for Department of Defense (DOD) acquisitions) and 48 C.F.R. 2.101 and 12.212 (for non‐DOD acquisitions), the government’s rights in the software and documentation, including its rights to use, modify, reproduce, release, perform, display or disclose the software or documentation, will be subject in all respects to the commercial license rights and restrictions provided in the license agreement.
© 2014 NetIQ Corporation. All Rights Reserved.
For information about NetIQ trademarks, see https://www.netiq.com/company/legal/ (https://www.netiq.com/company/legal/).
All third‐party trademarks are the property of their respective owners.
Contents
About This Guide 7
1 Introduction 91.1 Security Mechanisms . . . . . . . . . . . . . . . . . . . . . . . . . . . . . . . . . . . . . . . . . . . . . . . . . . . . . . . . . . . . . . 91.2 Data Storage Security . . . . . . . . . . . . . . . . . . . . . . . . . . . . . . . . . . . . . . . . . . . . . . . . . . . . . . . . . . . . . 9
2 User Identification and Authorization 112.1 Security-Related User Properties. . . . . . . . . . . . . . . . . . . . . . . . . . . . . . . . . . . . . . . . . . . . . . . . . . . . 112.2 Components Requiring User Identification and Authentication . . . . . . . . . . . . . . . . . . . . . . . . . . . . . 122.3 User and Group Accounts . . . . . . . . . . . . . . . . . . . . . . . . . . . . . . . . . . . . . . . . . . . . . . . . . . . . . . . . . 13
2.3.1 Special User and Group Accounts . . . . . . . . . . . . . . . . . . . . . . . . . . . . . . . . . . . . . . . . . . . 142.3.2 Creating a User . . . . . . . . . . . . . . . . . . . . . . . . . . . . . . . . . . . . . . . . . . . . . . . . . . . . . . . . . . 142.3.3 Changing User Group Memberships . . . . . . . . . . . . . . . . . . . . . . . . . . . . . . . . . . . . . . . . . . 162.3.4 Forcing Password Resets . . . . . . . . . . . . . . . . . . . . . . . . . . . . . . . . . . . . . . . . . . . . . . . . . . 162.3.5 Alerting Users About Password Expiration . . . . . . . . . . . . . . . . . . . . . . . . . . . . . . . . . . . . . 172.3.6 Editing User Accounts . . . . . . . . . . . . . . . . . . . . . . . . . . . . . . . . . . . . . . . . . . . . . . . . . . . . . 172.3.7 Deleting User Accounts . . . . . . . . . . . . . . . . . . . . . . . . . . . . . . . . . . . . . . . . . . . . . . . . . . . . 17
2.4 Managing User Profiles . . . . . . . . . . . . . . . . . . . . . . . . . . . . . . . . . . . . . . . . . . . . . . . . . . . . . . . . . . . 182.4.1 Modifying a User Profile. . . . . . . . . . . . . . . . . . . . . . . . . . . . . . . . . . . . . . . . . . . . . . . . . . . . 182.4.2 Deleting a User Profile . . . . . . . . . . . . . . . . . . . . . . . . . . . . . . . . . . . . . . . . . . . . . . . . . . . . . 19
2.5 Credentials, Passwords, and Password Management. . . . . . . . . . . . . . . . . . . . . . . . . . . . . . . . . . . . 192.5.1 Changing User Passwords in the Operations Center Console . . . . . . . . . . . . . . . . . . . . . . 20
2.6 Organizing Users Into Groups . . . . . . . . . . . . . . . . . . . . . . . . . . . . . . . . . . . . . . . . . . . . . . . . . . . . . . 202.6.1 Creating a Group . . . . . . . . . . . . . . . . . . . . . . . . . . . . . . . . . . . . . . . . . . . . . . . . . . . . . . . . . 212.6.2 Editing a Group . . . . . . . . . . . . . . . . . . . . . . . . . . . . . . . . . . . . . . . . . . . . . . . . . . . . . . . . . . 222.6.3 Deleting a Group . . . . . . . . . . . . . . . . . . . . . . . . . . . . . . . . . . . . . . . . . . . . . . . . . . . . . . . . . 23
2.7 Enabling Automatic User Login . . . . . . . . . . . . . . . . . . . . . . . . . . . . . . . . . . . . . . . . . . . . . . . . . . . . . 232.8 Implementing Token-Based Logins . . . . . . . . . . . . . . . . . . . . . . . . . . . . . . . . . . . . . . . . . . . . . . . . . . 242.9 Implementing Single Sign-On . . . . . . . . . . . . . . . . . . . . . . . . . . . . . . . . . . . . . . . . . . . . . . . . . . . . . . 252.10 Managing Sessions . . . . . . . . . . . . . . . . . . . . . . . . . . . . . . . . . . . . . . . . . . . . . . . . . . . . . . . . . . . . . . 26
2.10.1 Restricting Concurrent Logins Per User . . . . . . . . . . . . . . . . . . . . . . . . . . . . . . . . . . . . . . . 262.10.2 Restricting User Access to Components . . . . . . . . . . . . . . . . . . . . . . . . . . . . . . . . . . . . . . . 262.10.3 Restricting Concurrent Users in a Group. . . . . . . . . . . . . . . . . . . . . . . . . . . . . . . . . . . . . . . 272.10.4 Establishing Session Timeouts . . . . . . . . . . . . . . . . . . . . . . . . . . . . . . . . . . . . . . . . . . . . . . 272.10.5 Viewing User Session Information. . . . . . . . . . . . . . . . . . . . . . . . . . . . . . . . . . . . . . . . . . . . 272.10.6 Viewing the Login Method Used by Active Users . . . . . . . . . . . . . . . . . . . . . . . . . . . . . . . . 292.10.7 Forcing Logout. . . . . . . . . . . . . . . . . . . . . . . . . . . . . . . . . . . . . . . . . . . . . . . . . . . . . . . . . . . 29
3 Identification and Authentication 313.1 Native Services Methods . . . . . . . . . . . . . . . . . . . . . . . . . . . . . . . . . . . . . . . . . . . . . . . . . . . . . . . . . . 313.2 External Services Methods . . . . . . . . . . . . . . . . . . . . . . . . . . . . . . . . . . . . . . . . . . . . . . . . . . . . . . . . 32
3.2.1 Logging in Using External Services . . . . . . . . . . . . . . . . . . . . . . . . . . . . . . . . . . . . . . . . . . . 323.2.2 Configuring LDAP Authentication . . . . . . . . . . . . . . . . . . . . . . . . . . . . . . . . . . . . . . . . . . . . 33
3.3 Key Component I&A. . . . . . . . . . . . . . . . . . . . . . . . . . . . . . . . . . . . . . . . . . . . . . . . . . . . . . . . . . . . . . 403.3.1 Operations Server Servers . . . . . . . . . . . . . . . . . . . . . . . . . . . . . . . . . . . . . . . . . . . . . . . . . 403.3.2 Operations Center Server to Remote Management System . . . . . . . . . . . . . . . . . . . . . . . 413.3.3 Operations Center Server to Web Server I&A . . . . . . . . . . . . . . . . . . . . . . . . . . . . . . . . . . . 423.3.4 Operations Center Server to Database I&A. . . . . . . . . . . . . . . . . . . . . . . . . . . . . . . . . . . . . 42
Contents 3
4 Ope
3.3.5 Operations Center server to SQL Views and Web Services . . . . . . . . . . . . . . . . . . . . . . . . 42
4 Access Control 434.1 Security Mechanisms for Access Control. . . . . . . . . . . . . . . . . . . . . . . . . . . . . . . . . . . . . . . . . . . . . . 43
4.1.1 Operations Center Administrator Account . . . . . . . . . . . . . . . . . . . . . . . . . . . . . . . . . . . . . . 434.1.2 Operations Center Security Manager . . . . . . . . . . . . . . . . . . . . . . . . . . . . . . . . . . . . . . . . . 444.1.3 Delegated Administration. . . . . . . . . . . . . . . . . . . . . . . . . . . . . . . . . . . . . . . . . . . . . . . . . . . 45
4.2 Accessing Servers . . . . . . . . . . . . . . . . . . . . . . . . . . . . . . . . . . . . . . . . . . . . . . . . . . . . . . . . . . . . . . . 464.3 Viewing the Access Control Hierarchy . . . . . . . . . . . . . . . . . . . . . . . . . . . . . . . . . . . . . . . . . . . . . . . . 464.4 Access Privileges Overview . . . . . . . . . . . . . . . . . . . . . . . . . . . . . . . . . . . . . . . . . . . . . . . . . . . . . . . . 47
4.4.1 Access Permissions. . . . . . . . . . . . . . . . . . . . . . . . . . . . . . . . . . . . . . . . . . . . . . . . . . . . . . . 474.4.2 Permission Inheritance . . . . . . . . . . . . . . . . . . . . . . . . . . . . . . . . . . . . . . . . . . . . . . . . . . . . 47
4.5 Assigning Access Privileges . . . . . . . . . . . . . . . . . . . . . . . . . . . . . . . . . . . . . . . . . . . . . . . . . . . . . . . 484.5.1 Assigning Privileges to Elements. . . . . . . . . . . . . . . . . . . . . . . . . . . . . . . . . . . . . . . . . . . . . 484.5.2 Inheriting Access Privileges. . . . . . . . . . . . . . . . . . . . . . . . . . . . . . . . . . . . . . . . . . . . . . . . . 524.5.3 Assigning Permissions to User and Group Elements . . . . . . . . . . . . . . . . . . . . . . . . . . . . . 53
4.6 Access Control Affects Different Views . . . . . . . . . . . . . . . . . . . . . . . . . . . . . . . . . . . . . . . . . . . . . . . 534.6.1 Network View. . . . . . . . . . . . . . . . . . . . . . . . . . . . . . . . . . . . . . . . . . . . . . . . . . . . . . . . . . . . 544.6.2 Performance View . . . . . . . . . . . . . . . . . . . . . . . . . . . . . . . . . . . . . . . . . . . . . . . . . . . . . . . . 544.6.3 Portal View. . . . . . . . . . . . . . . . . . . . . . . . . . . . . . . . . . . . . . . . . . . . . . . . . . . . . . . . . . . . . . 544.6.4 Alarms View. . . . . . . . . . . . . . . . . . . . . . . . . . . . . . . . . . . . . . . . . . . . . . . . . . . . . . . . . . . . . 544.6.5 Layout View . . . . . . . . . . . . . . . . . . . . . . . . . . . . . . . . . . . . . . . . . . . . . . . . . . . . . . . . . . . . . 554.6.6 Relationship Browser. . . . . . . . . . . . . . . . . . . . . . . . . . . . . . . . . . . . . . . . . . . . . . . . . . . . . . 55
4.7 Importing and Exporting User, Group, and Access Control Information . . . . . . . . . . . . . . . . . . . . . . 554.8 Metamodel Access Control . . . . . . . . . . . . . . . . . . . . . . . . . . . . . . . . . . . . . . . . . . . . . . . . . . . . . . . . 55
4.8.1 Setting Access Rights for Classes and Behavior Models . . . . . . . . . . . . . . . . . . . . . . . . . . 564.8.2 Setting Access Rights for Property Pages. . . . . . . . . . . . . . . . . . . . . . . . . . . . . . . . . . . . . . 57
4.9 Service Models Access Control . . . . . . . . . . . . . . . . . . . . . . . . . . . . . . . . . . . . . . . . . . . . . . . . . . . . . 644.10 Setting Security on Graphic Elements . . . . . . . . . . . . . . . . . . . . . . . . . . . . . . . . . . . . . . . . . . . . . . . . 644.11 Feature-Specific Access Control . . . . . . . . . . . . . . . . . . . . . . . . . . . . . . . . . . . . . . . . . . . . . . . . . . . . 65
4.11.1 Root Cause . . . . . . . . . . . . . . . . . . . . . . . . . . . . . . . . . . . . . . . . . . . . . . . . . . . . . . . . . . . . . 654.11.2 Show Impacted . . . . . . . . . . . . . . . . . . . . . . . . . . . . . . . . . . . . . . . . . . . . . . . . . . . . . . . . . . 664.11.3 Suppress and Acknowledge Commands. . . . . . . . . . . . . . . . . . . . . . . . . . . . . . . . . . . . . . . 674.11.4 Automation Events. . . . . . . . . . . . . . . . . . . . . . . . . . . . . . . . . . . . . . . . . . . . . . . . . . . . . . . . 68
5 Communications Security 695.1 Configuring Communications Security . . . . . . . . . . . . . . . . . . . . . . . . . . . . . . . . . . . . . . . . . . . . . . . 69
5.1.1 Understanding Options in the Operations Center Configuration Manager . . . . . . . . . . . . . 695.1.2 Understanding Options in the Dashboard’s Configuration Manager . . . . . . . . . . . . . . . . . . 715.1.3 Understanding Options in the CMS’ Configuration Manager. . . . . . . . . . . . . . . . . . . . . . . . 735.1.4 Understanding Dependency Requirements for Operations Center Client/Server
Communications . . . . . . . . . . . . . . . . . . . . . . . . . . . . . . . . . . . . . . . . . . . . . . . . . . . . . . . . . 745.1.5 Understanding Security Requirements for the Image Server . . . . . . . . . . . . . . . . . . . . . . . 76
5.2 Keystore and Trust Store Configuration. . . . . . . . . . . . . . . . . . . . . . . . . . . . . . . . . . . . . . . . . . . . . . . 775.2.1 Understanding SSL Connections, Certificate Components, and JKS Files . . . . . . . . . . . . . 775.2.2 Keystore and Trust Store Configuration Details . . . . . . . . . . . . . . . . . . . . . . . . . . . . . . . . . 785.2.3 Examples SSL Configurations . . . . . . . . . . . . . . . . . . . . . . . . . . . . . . . . . . . . . . . . . . . . . . . 83
5.3 Advanced Security Topics . . . . . . . . . . . . . . . . . . . . . . . . . . . . . . . . . . . . . . . . . . . . . . . . . . . . . . . . . 915.3.1 SSL Cipher Suites and Protocols Configuration . . . . . . . . . . . . . . . . . . . . . . . . . . . . . . . . . 915.3.2 Enabling Protocol Versions for SSL Connections . . . . . . . . . . . . . . . . . . . . . . . . . . . . . . . . 935.3.3 Configuring Certificate Validators . . . . . . . . . . . . . . . . . . . . . . . . . . . . . . . . . . . . . . . . . . . . 935.3.4 Configuring RMI Connection ACLs . . . . . . . . . . . . . . . . . . . . . . . . . . . . . . . . . . . . . . . . . . . 94
6 Auditing 956.1 Support and Management Information Surfaced by Auditing . . . . . . . . . . . . . . . . . . . . . . . . . . . . . . 95
rations Center 5.0 Security Management Guide
6.2 Monitoring Session Activity . . . . . . . . . . . . . . . . . . . . . . . . . . . . . . . . . . . . . . . . . . . . . . . . . . . . . . . . 956.3 Administration Events that Can Be Audited . . . . . . . . . . . . . . . . . . . . . . . . . . . . . . . . . . . . . . . . . . . . 966.4 Globally Enabling Auditing and Storage of Audit Events . . . . . . . . . . . . . . . . . . . . . . . . . . . . . . . . . . 97
6.4.1 Using the Explorer Pane to Enable Auditing . . . . . . . . . . . . . . . . . . . . . . . . . . . . . . . . . . . . 986.4.2 Using the Audit Element Menu to Update Audit Options . . . . . . . . . . . . . . . . . . . . . . . . . . . 99
6.5 Auditing Administration Elements . . . . . . . . . . . . . . . . . . . . . . . . . . . . . . . . . . . . . . . . . . . . . . . . . . 1016.5.1 Selecting Audit Events for an Administration Element. . . . . . . . . . . . . . . . . . . . . . . . . . . . 1016.5.2 Globally Disabling Auditing and Storage of Audit Events . . . . . . . . . . . . . . . . . . . . . . . . . 1026.5.3 Administrative Audit Events . . . . . . . . . . . . . . . . . . . . . . . . . . . . . . . . . . . . . . . . . . . . . . . . 102
6.6 Generating Audit Alarms for Non-Adapter Log Messages . . . . . . . . . . . . . . . . . . . . . . . . . . . . . . . . 1076.7 Viewing Audit Events . . . . . . . . . . . . . . . . . . . . . . . . . . . . . . . . . . . . . . . . . . . . . . . . . . . . . . . . . . . . 108
7 Dashboard Security 1117.1 Logging In to the Dashboard . . . . . . . . . . . . . . . . . . . . . . . . . . . . . . . . . . . . . . . . . . . . . . . . . . . . . . 1117.2 Operations Center and Dashboard Interaction . . . . . . . . . . . . . . . . . . . . . . . . . . . . . . . . . . . . . . . . 1117.3 Setting User Permissions on Portal Pages and Page Content . . . . . . . . . . . . . . . . . . . . . . . . . . . . 1127.4 Dashboard Control Panel and Administration Portlets . . . . . . . . . . . . . . . . . . . . . . . . . . . . . . . . . . . 112
A Documentation Updates 113A.1 April 2013 Patch Release. . . . . . . . . . . . . . . . . . . . . . . . . . . . . . . . . . . . . . . . . . . . . . . . . . . . . . . . . 113A.2 June 2012 Patch Release . . . . . . . . . . . . . . . . . . . . . . . . . . . . . . . . . . . . . . . . . . . . . . . . . . . . . . . . 113A.3 September 2011 Patch Release . . . . . . . . . . . . . . . . . . . . . . . . . . . . . . . . . . . . . . . . . . . . . . . . . . . 114
Glossary 115
Contents 5

6 Operations Center 5.0 Security Management Guide
About This Guide
The Security Management Guide explains the security mechanisms implemented throughout the product.
Chapter 1, “Introduction,” on page 9Chapter 2, “User Identification and Authorization,” on page 11Chapter 3, “Identification and Authentication,” on page 31Chapter 4, “Access Control,” on page 43Chapter 5, “Communications Security,” on page 69Chapter 6, “Auditing,” on page 95Chapter 7, “Dashboard Security,” on page 111“Glossary” on page 115
AudienceThis guide is intended for a security expert who uses Operations Center in an organization. Most likely, this person has a separate role from the Operations Center administrator. The security expert evaluates how the features in Operations Center comply with existing company security policies.
FeedbackWe want to hear your comments and suggestions about this manual and the other documentation included with this product. Please use the User Comments feature at the bottom of each page of the online documentation.
Additional Documentation & Documentation UpdatesThis guide is part of the Operations Center documentation set. For the most recent version of the Security Management Guide and a complete list of publications supporting Operations Center, visit our Online Documentation Web Site at Operations Center 5.0 online documentation.
The Operations Center documentation set is also available as PDF files on the installation CD or ISO; and is delivered as part of the online help accessible from multiple locations in Operations Center depending on the product component.
Additional ResourcesWe encourage you to use the following additional resources on the Web:
NetIQ User Community (https://www.netiq.com/communities/): A Web‐based community with a variety of discussion topics.
About This Guide 7
NetIQ Support Knowledgebase (https://www.netiq.com/support/kb/product.php?id=SG_XOPERATIONSCENTER_1_2): A collection of in‐depth technical articles.NetIQ Support Forums (https://forums.netiq.com/forumdisplay.php?26‐Operations‐Center): A Web location where product users can discuss NetIQ product functionality and advice with other product users.
Technical SupportYou can learn more about the policies and procedures of NetIQ Technical Support by accessing its Technical Support Guide (https://www.netiq.com/Support/process.asp#_Maintenance_Programs_and).
Use these resources for support specific to Operations Center:
Telephone in Canada and the United States: 1‐800‐858‐4000Telephone outside the United States: 1‐801‐861‐4000E‐mail: [email protected] ([email protected])Submit a Service Request: http://support.novell.com/contact/ (http://support.novell.com/contact/)
Documentation ConventionsIn Novell documentation, a greater‐than symbol (>) is used to separate actions within a step and items in a cross‐reference path. The > symbol is also used to connect consecutive links in an element tree structure where you can either click a plus symbol (+) or double‐click the elements to expand them.
When a single pathname can be written with a backslash for some platforms or a forward slash for other platforms, the pathname is presented with a forward slash to preserve case considerations in the UNIX* or Linux* operating systems.
A trademark symbol (®, ™, etc.) denotes a Novell trademark. An asterisk (*) denotes a third‐party trademark.
8 Operations Center 5.0 Security Management Guide
1 1Introduction
Novell® Operations Center interacts with external management systems, databases and servers, which each employ their own security mechanisms.
Section 1.1, “Security Mechanisms,” on page 9Section 1.2, “Data Storage Security,” on page 9
1.1 Security MechanismsOperations Center provides security mechanisms in the following areas:
Identification and authentication (I&A): Use either the Operations Center native I&A mechanism or an external method, such as LDAP, to identify and authenticate users who want to access data.Access control permissions: Provide the appropriate access privileges to each user by assigning a permission level. Permissions include password management as well as access control to servers, databases, and specific features.Communication security: Information is protected when transmitted over a communications channel. Use code signing certificates to verify code issued by Operations Center. Operations Center supports SSL, nonsecure, and mixed mode communications between the client and server.Client software deployment: The Operations Center client software is deployed by using a public/private key certificate chain through a public trusted certificate authority. System configuration settings: Configuration information is secured by encryption or digital signatures, or both.Auditing: Keep a log of all management activity for the purposes of review and troubleshooting.
1.2 Data Storage SecurityMost organizations physically secure the Operations Center server. The main security concerns regarding data storage involve third‐party relational databases that are accessed through JDBC* calls. These requests involve the following Operations Center components:
The Event Data Store, which stores SNMP and Event Manager configuration data.The Service Warehouse, which stores alarm history, audit data, and SLA and performance data, if Service Level Manager (SLM) is used.The Configuration Storage database, which stores system configuration data such as access control permissions, service model elements and relationships, operations, and user account data.
Introduction 9
An optional embedded database, which is accessed through JDO calls, can be used to store system configuration data. The embedded database is used by default upon installation.User credentials are optionally stored on an LDAP server that stores user credentials (Identification and Authentication data). User credentials might or might not be stored on the Operations Center server, depending on whether the native or external I&A is used. If the external I&A option is deployed, credentials are stored in an external LDAP directory or data store and security is enforced by using the external data store’s security.
Database security is enforced by using the native Operating System and DBMS security mechanisms. For information on configuring databases, see the Operations Center 5.0 Server Configuration Guide.
All other Operations Center server data (such as log data) and ORB data are secured by using the native operating system security mechanisms. For example, use native OS security permissions to limit the set of users given access to the directories where Operations Center is installed.
10 Operations Center 5.0 Security Management Guide
2 2User Identification and Authorization
Novell® Operations Center maintains security‐related properties for each authorized user. These properties exist for user identification and authentication and also for determining access to various Operations Center components, including:
Operations Server consoleWeb components, including custom dashboards and portals built using the dashboard, Web Services, and SQL Views
Access to licensed Operations Center functions and data is allowed only after a user is identified and authorized. Operations Center supports two methods of user identification and authentication:
Native authenticationIntegrated LDAP authentication
Operations Center enforces a policy based on the strength of passwords used for authentication, which are configured by the administrator. User passwords are protected by being masked in the login dialog box. Users must re‐authenticateafter an administrator‐specified time of inactivity.
Section 2.1, “Security‐Related User Properties,” on page 11Section 2.2, “Components Requiring User Identification and Authentication,” on page 12Section 2.3, “User and Group Accounts,” on page 13Section 2.4, “Managing User Profiles,” on page 18Section 2.5, “Credentials, Passwords, and Password Management,” on page 19Section 2.6, “Organizing Users Into Groups,” on page 20Section 2.7, “Enabling Automatic User Login,” on page 23Section 2.8, “Implementing Token‐Based Logins,” on page 24Section 2.9, “Implementing Single Sign‐On,” on page 25Section 2.10, “Managing Sessions,” on page 26
2.1 Security-Related User PropertiesThe following security‐related properties are assigned to individual users:
User IDPasswordConsole Access PermissionWeb Access PermissionNumber of total concurrent user login sessions allowed
User Identification and Authorization 11
User and Group AccountsAccess control permissions
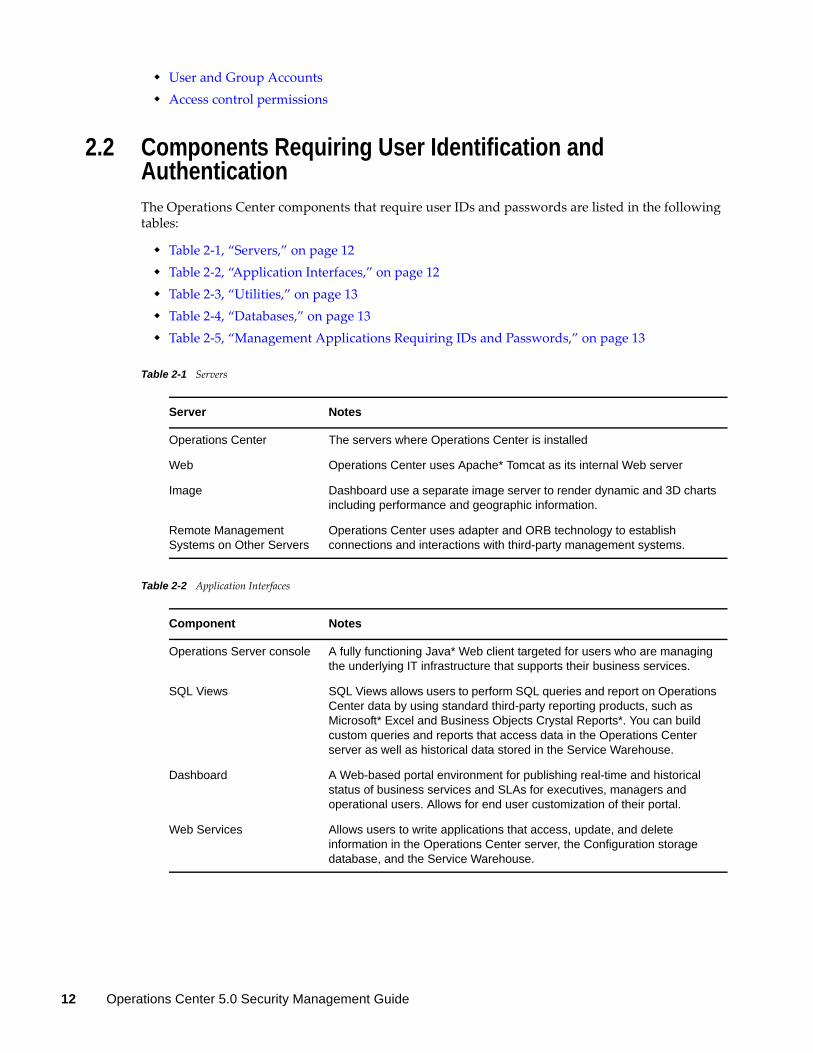
2.2 Components Requiring User Identification and AuthenticationThe Operations Center components that require user IDs and passwords are listed in the following tables:
Table 2‐1, “Servers,” on page 12Table 2‐2, “Application Interfaces,” on page 12Table 2‐3, “Utilities,” on page 13Table 2‐4, “Databases,” on page 13Table 2‐5, “Management Applications Requiring IDs and Passwords,” on page 13
Table 2-1 Servers
Table 2-2 Application Interfaces
Server Notes
Operations Center The servers where Operations Center is installed
Web Operations Center uses Apache* Tomcat as its internal Web server
Image Dashboard use a separate image server to render dynamic and 3D charts including performance and geographic information.
Remote Management Systems on Other Servers
Operations Center uses adapter and ORB technology to establish connections and interactions with third-party management systems.
Component Notes
Operations Server console A fully functioning Java* Web client targeted for users who are managing the underlying IT infrastructure that supports their business services.
SQL Views SQL Views allows users to perform SQL queries and report on Operations Center data by using standard third-party reporting products, such as Microsoft* Excel and Business Objects Crystal Reports*. You can build custom queries and reports that access data in the Operations Center server as well as historical data stored in the Service Warehouse.
Dashboard A Web-based portal environment for publishing real-time and historical status of business services and SLAs for executives, managers and operational users. Allows for end user customization of their portal.
Web Services Allows users to write applications that access, update, and delete information in the Operations Center server, the Configuration storage database, and the Service Warehouse.
12 Operations Center 5.0 Security Management Guide
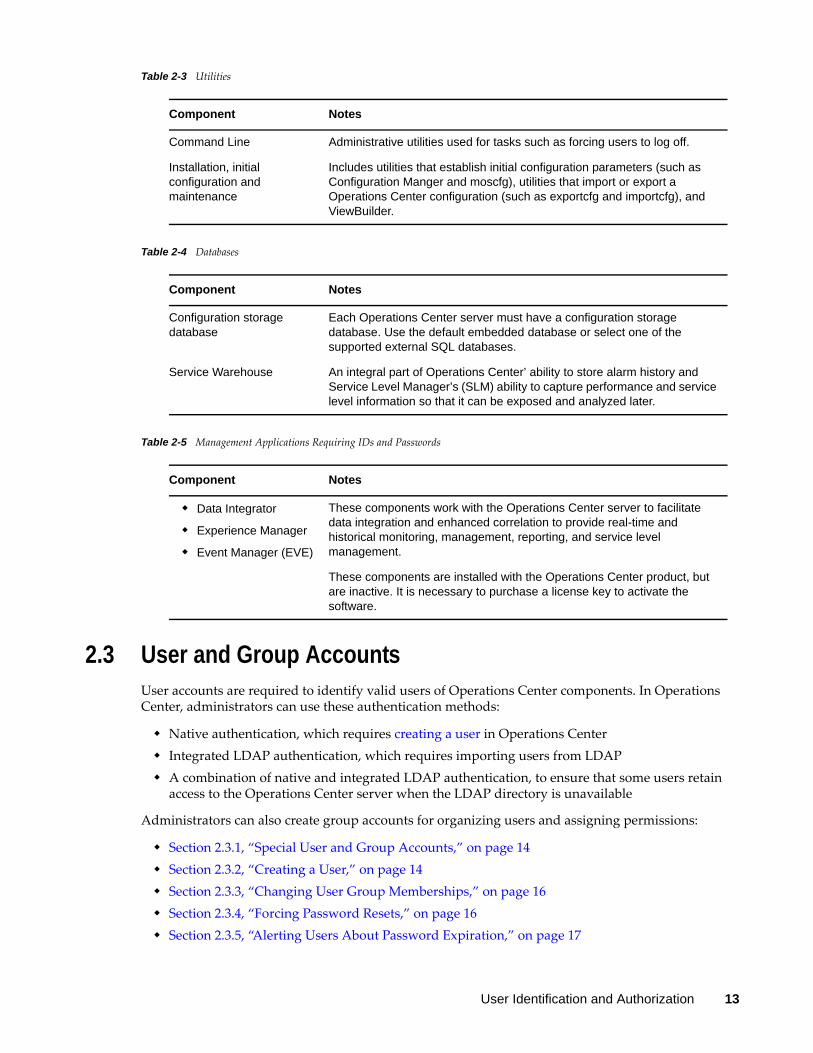
Table 2-3 Utilities
Table 2-4 Databases
Table 2-5 Management Applications Requiring IDs and Passwords
2.3 User and Group AccountsUser accounts are required to identify valid users of Operations Center components. In Operations Center, administrators can use these authentication methods:
Native authentication, which requires creating a user in Operations CenterIntegrated LDAP authentication, which requires importing users from LDAPA combination of native and integrated LDAP authentication, to ensure that some users retain access to the Operations Center server when the LDAP directory is unavailable
Administrators can also create group accounts for organizing users and assigning permissions:
Section 2.3.1, “Special User and Group Accounts,” on page 14Section 2.3.2, “Creating a User,” on page 14Section 2.3.3, “Changing User Group Memberships,” on page 16Section 2.3.4, “Forcing Password Resets,” on page 16Section 2.3.5, “Alerting Users About Password Expiration,” on page 17
Component Notes
Command Line Administrative utilities used for tasks such as forcing users to log off.
Installation, initial configuration and maintenance
Includes utilities that establish initial configuration parameters (such as Configuration Manger and moscfg), utilities that import or export a Operations Center configuration (such as exportcfg and importcfg), and ViewBuilder.
Component Notes
Configuration storage database
Each Operations Center server must have a configuration storage database. Use the default embedded database or select one of the supported external SQL databases.
Service Warehouse An integral part of Operations Center’ ability to store alarm history and Service Level Manager’s (SLM) ability to capture performance and service level information so that it can be exposed and analyzed later.
Component Notes
Data Integrator
Experience Manager
Event Manager (EVE)
These components work with the Operations Center server to facilitate data integration and enhanced correlation to provide real-time and historical monitoring, management, reporting, and service level management.
These components are installed with the Operations Center product, but are inactive. It is necessary to purchase a license key to activate the software.
User Identification and Authorization 13
Section 2.3.6, “Editing User Accounts,” on page 17Section 2.3.7, “Deleting User Accounts,” on page 17
Special system user and group accounts exist by default. To create custom groups, see Section 2.6.1, “Creating a Group,” on page 21. Custom groups should be used when defining access privileges (see Section 4.4, “Access Privileges Overview,” on page 47).
2.3.1 Special User and Group Accounts The following special user accounts exist in Operations Center:
admin: The Default admin account that is the super/system administrator. The server does not function without this account.guest: The guest account is used to access the Operations Center home page before a user logs in through the Console or Web. The dashboard cannot be accessed without this account.
The following rules apply to these special user accounts to ensure that they retain all of their privileges. Unexpected behavior might occur if you do not follow these rules:
Do not delete these user accountsDo not limit user logins for these accountsDo not restrict user access via the Console or Web for either of these accounts
The following special group accounts exist in Operations Center:
users: The users account is used to assign standard user permissions (view and access to Services and Elements) to any user. New users are automatically added to this group. This group should not be deleted. Restricted user access should be defined using custom groups.admins: The admins account is used to delegate administrative rights to administrative users. The default admin account is a member of this group. The following rules apply to the Admins group and its members to ensure that administrators retain all of their privileges:
The following rules apply to these special user group accounts to ensure that they retain all of their privileges. Unexpected behavior might occur if you do not follow these rules:
Do not delete these groupsDo not limit user logins for members of the admins groupDo not restrict user access via the Console or Web for members of the admins group
2.3.2 Creating a UserOperations Center user accounts can be created one of two ways: either by creating each user account manually, or by importing a group of users using an LDAP connection.
For more information about importing LDAP users, see Section 3.2.2, “Configuring LDAP Authentication,” on page 33.
14 Operations Center 5.0 Security Management Guide

To create a new user:
1 In the Explorer pane, expand the Administration root element > Security.2 Right‐click Users and select Create User to display the Create User dialog box:
3 In the Create User dialog box, specify the following information in the appropriate field:
User Property Description
Name The user ID for logging in to Operations Center. Usually, it is a combination of the user’s first name initial and full last name. It must contain at least three characters.
Password, Password (again)
The password that corresponds to the user ID. It must contain at least three characters.
Full Name The user’s first and last names. Each must contain at least three characters.
E-mail, Phone, Fax and Pager Numbers
This standard contact information is optional. Specify the country and area codes if necessary.
Logins The maximum number of concurrent logins that the user is allowed. Enter 0 (zero) to prevent the user from logging in to any Operations Center component (Console or Web). If this field is left blank, unlimited concurrent logins are allowed.
User Identification and Authorization 15
The symbol identifies required properties: Name, Password, Password (again), and Full name. As soon as these properties are defined, the Create button can be selected.
TIP: Each method of Web Access requires an individual Web user connection. This directly affects the number of licensed Web users required for a server.
4 To add a user to a group, select a group name in the Groups section, then click Add.5 To enable the user for Section 508 accessibility functionality in the Operations Center
Dashboard, select Enable Accessibility Options.For information about enabling 508 accessibility, see “Enabling the Dashboard for Section 508 Accessibility” in the Operations Center 5.0 Dashboard Guide.
6 Click Create.The user account is created. The Create User dialog box opens so that you can create another user.
7 Click Close or continue creating users by repeating the previous steps.
2.3.3 Changing User Group MembershipsTo add or remove a user from a group:
1 To add a user to a group, select a group name in the Groups section, then click Add.For information on creating groups, see Section 2.6.1, “Creating a Group,” on page 21.
2 To remove a user from a group, select the group name in the right pane, then click Remove.
2.3.4 Forcing Password Resets To force new users to change their passwords upon initial login:
1 Add the following as a property in the /OperationsCenter_install_path/config/Formula.custom.properties file:ResetPassword=password
For more information about the Formula.custom.properties file, see “Making Custom Changes” in the Operations Center 5.0 Server Configuration Guide.
Home This option is relevant only to the dashboard application. Use the Browse button to select a starting point in the element hierarchy for viewing data within portlets. This default element is displayed when the user accesses a portlet. The default home element is Enterprise, which is the top level of the entire element hierarchy.
Restrict Usage To restrict user access through either the Operations Center console or the Operations Center Web components, select the corresponding check box.
If Operations Console is selected, the user cannot log in to the Operations Center console.
If Web Access is selected, the user cannot log in and access data on the server by using custom portals/dashboards built by using the dashboard, Web services, or SQL Views.
Do not restrict access for Admin user accounts to both the Operations Center console and the Web. If both restrictions are selected, admin users cannot log in, even if they are members of the Admins group.
User Property Description
16 Operations Center 5.0 Security Management Guide
2 Stop and restart the Operations Center server for changes in the Formula.custom.properties file to take effect.For instructions on stopping and starting the Operations Center server, see “Configuring Operations Center Start Conditions” in the Operations Center 5.0 Server Configuration Guide.
3 In the Operations Center console, in Create User dialog box, set the password to password.
IMPORTANT: Using the ResetPassword property can conflict with the Password Pattern feature in the Configuration Manager, which enables specifying a value or regular expression as a password pattern. The user’s password must match the specified pattern or the user cannot log in. If ResetPassword=password is used, but the Password Pattern is set to a regular expression that does not match password, the user cannot log in to Operations Center software.
2.3.5 Alerting Users About Password ExpirationSet the PasswordExpirationWarning property to automatically alert users that their password is expiring. If the user does not change the password before it expires, the system administrator must reset their password. By default, this property is not set and users are not warned before password expiration.
To alert users that their password is expiring:
1 Add the following as a property in the /OperationsCenter_install_path/config/Formula.custom.properties file:PasswordExpirationWarning
Set the parameter to the number of days before password expiry to start warning users.For more information about the Formula.custom.properties file, see “Making Custom Changes” in the Operations Center 5.0 Server Configuration Guide.
2 Stop and restart the Operations Center server for changes to take effect.For instructions on stopping and starting the Operations Center server, see “Configuring Operations Center Start Conditions” in the Operations Center 5.0 Server Configuration Guide.
2.3.6 Editing User AccountsTo edit a user account:
1 In the Explorer pane, expand the Administration root element > Security > Users.2 Right‐click the account name and select Properties to open the Status property page.3 In the left pane, click User to open the User property page.4 Modify the user account data as needed.5 Click Apply to save the changes.
2.3.7 Deleting User AccountsTo delete a user account:
1 In the Explorer pane, right‐click a user account and select Delete User. A confirmation dialog opens.
2 Click Yes to confirm the deletion.
User Identification and Authorization 17
2.4 Managing User ProfilesAdministrators can modify a user profile by performing these functions:
Lock: Retains a user’s preferences such as element bookmarks and color settings.Copy: Copies a user’s profile to another user or set of users.Clear: Deletes the user’s profile and the associated user preferences.
To manage user profiles:
Section 2.4.1, “Modifying a User Profile,” on page 18Section 2.4.2, “Deleting a User Profile,” on page 19
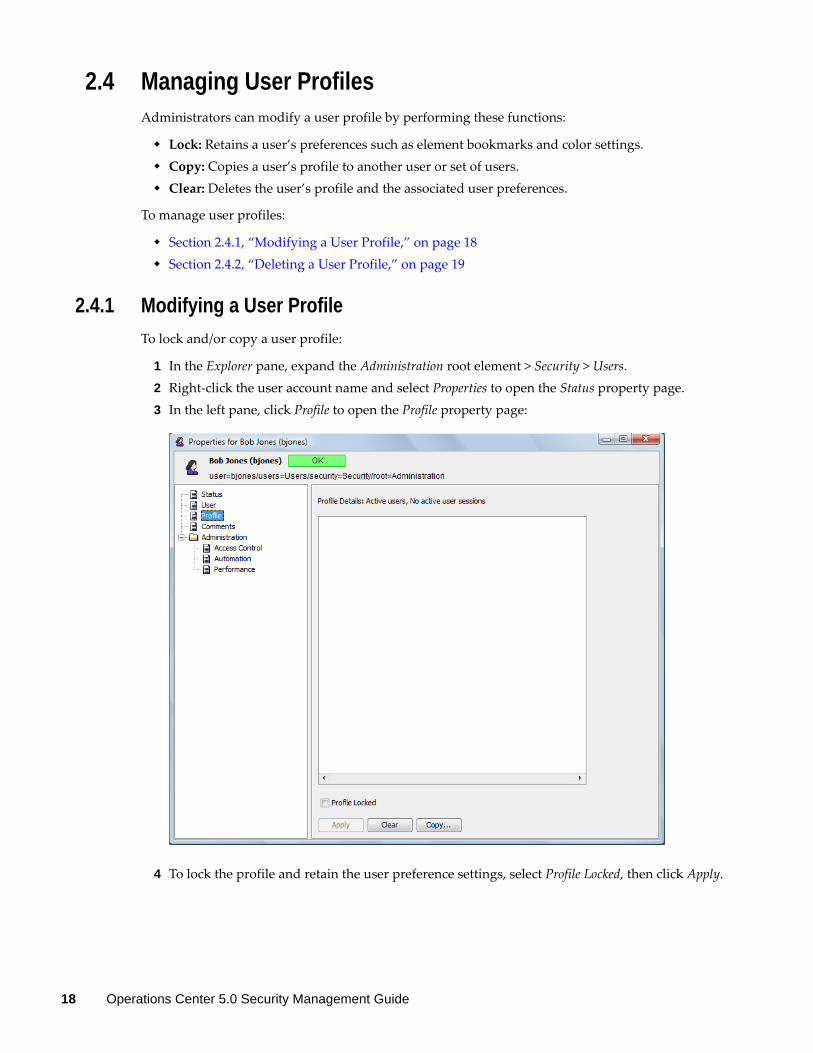
2.4.1 Modifying a User ProfileTo lock and/or copy a user profile:
1 In the Explorer pane, expand the Administration root element > Security > Users.2 Right‐click the user account name and select Properties to open the Status property page.3 In the left pane, click Profile to open the Profile property page:
4 To lock the profile and retain the user preference settings, select Profile Locked, then click Apply.
18 Operations Center 5.0 Security Management Guide
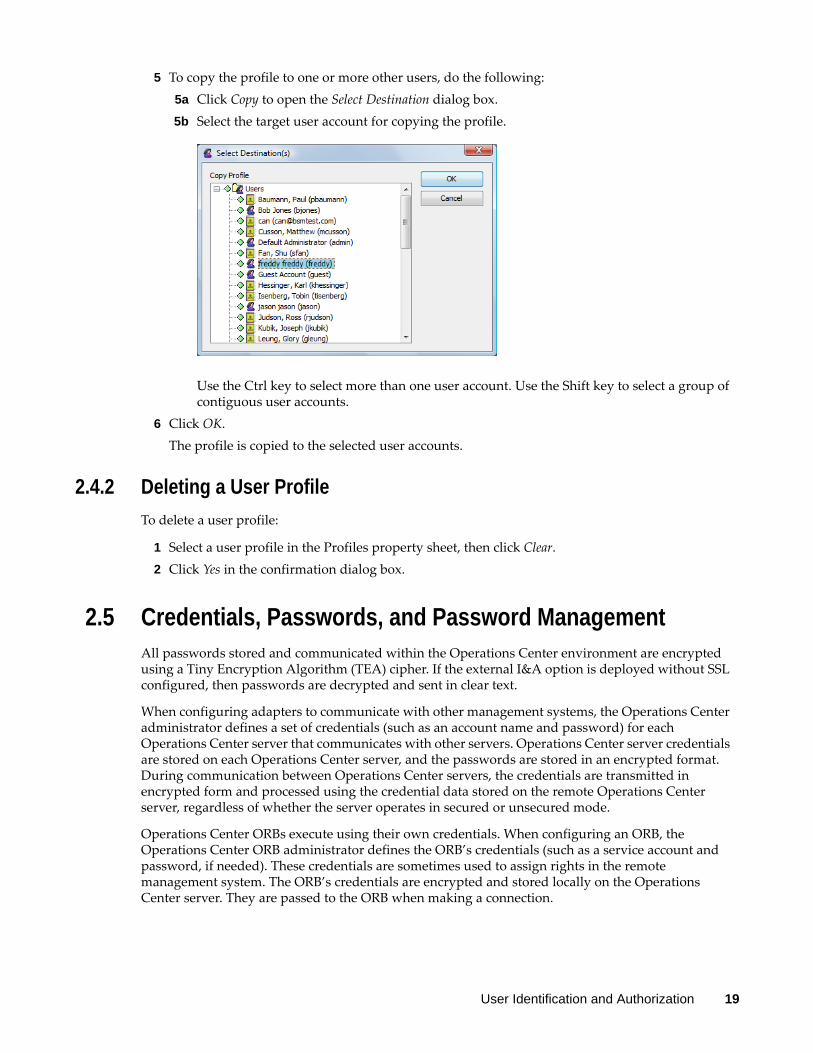
5 To copy the profile to one or more other users, do the following:5a Click Copy to open the Select Destination dialog box.5b Select the target user account for copying the profile.
Use the Ctrl key to select more than one user account. Use the Shift key to select a group of contiguous user accounts.
6 Click OK.The profile is copied to the selected user accounts.
2.4.2 Deleting a User ProfileTo delete a user profile:
1 Select a user profile in the Profiles property sheet, then click Clear.2 Click Yes in the confirmation dialog box.
2.5 Credentials, Passwords, and Password ManagementAll passwords stored and communicated within the Operations Center environment are encrypted using a Tiny Encryption Algorithm (TEA) cipher. If the external I&A option is deployed without SSL configured, then passwords are decrypted and sent in clear text.
When configuring adapters to communicate with other management systems, the Operations Center administrator defines a set of credentials (such as an account name and password) for each Operations Center server that communicates with other servers. Operations Center server credentials are stored on each Operations Center server, and the passwords are stored in an encrypted format. During communication between Operations Center servers, the credentials are transmitted in encrypted form and processed using the credential data stored on the remote Operations Center server, regardless of whether the server operates in secured or unsecured mode.
Operations Center ORBs execute using their own credentials. When configuring an ORB, the Operations Center ORB administrator defines the ORB’s credentials (such as a service account and password, if needed). These credentials are sometimes used to assign rights in the remote management system. The ORB’s credentials are encrypted and stored locally on the Operations Center server. They are passed to the ORB when making a connection.
User Identification and Authorization 19
When communicating with an ORB, the Operations Center adapter transmits the ORB’s credentials to the ORB in encrypted form. The ORB authenticates the credentials and processes the request. Communication between the adapter and the ORB is accomplished by using CORBA APIs.
The Operations Center Configuration Manager provides password control options that meet diverse security requirements. The key password management features are:
You can use a combination of password patterns, password expiration intervals and password reuse rules to control user defined passwords for logging into Operations Center. These password management settings are defined in Security pane of the Configuration Manager.
For more information, see “Security Pane” in the Operations Center 5.0 Server Configuration GuideYou can force new users to change their passwords upon initial login to the Operations Server console.For more information about forcing new users to change their passwords, see Section 2.3.4, “Forcing Password Resets,” on page 16.
2.5.1 Changing User Passwords in the Operations Center ConsoleAll users can change their passwords at any time by using the Operations Server console. In addition, the administrator might require changing passwords on a scheduled basis.
To change a user password:
1 In the Operations Server console, click File > Change Password.2 In the Change Password dialog box, type the current password in the Old password field.3 Type the new password in both the New password and New password (again) fields to confirm the
spelling.4 Click OK.
2.6 Organizing Users Into GroupsUsers can be organized into groups based on a variety of criteria such as job function, department, and security clearance level. In Operations Center, access privileges to various elements are assigned to groups. In general, it is efficient to define groups first, then assign access privileges to these groups. The last step is assigning users to the groups.
Section 2.6.1, “Creating a Group,” on page 21Section 2.6.2, “Editing a Group,” on page 22Section 2.6.3, “Deleting a Group,” on page 23
20 Operations Center 5.0 Security Management Guide
2.6.1 Creating a GroupGroups can be defined with a specific set of access privileges. Later, users are assigned to groups and inherit the access privileges. This process allows administrators to assign access privileges to multiple users at once. Two default groups, Admins and Users, are provided. The default admin user belongs to the Admins group, and the default guest user belongs to the Users group. New users are added to the Users group by default.
This section covers the creating of a standard user group where users and groups are manually assigned to the group. For more information about an LDAP group where users are imported and maintained using an LDAP look up, see Section 3.2.2, “Configuring LDAP Authentication,” on page 33.
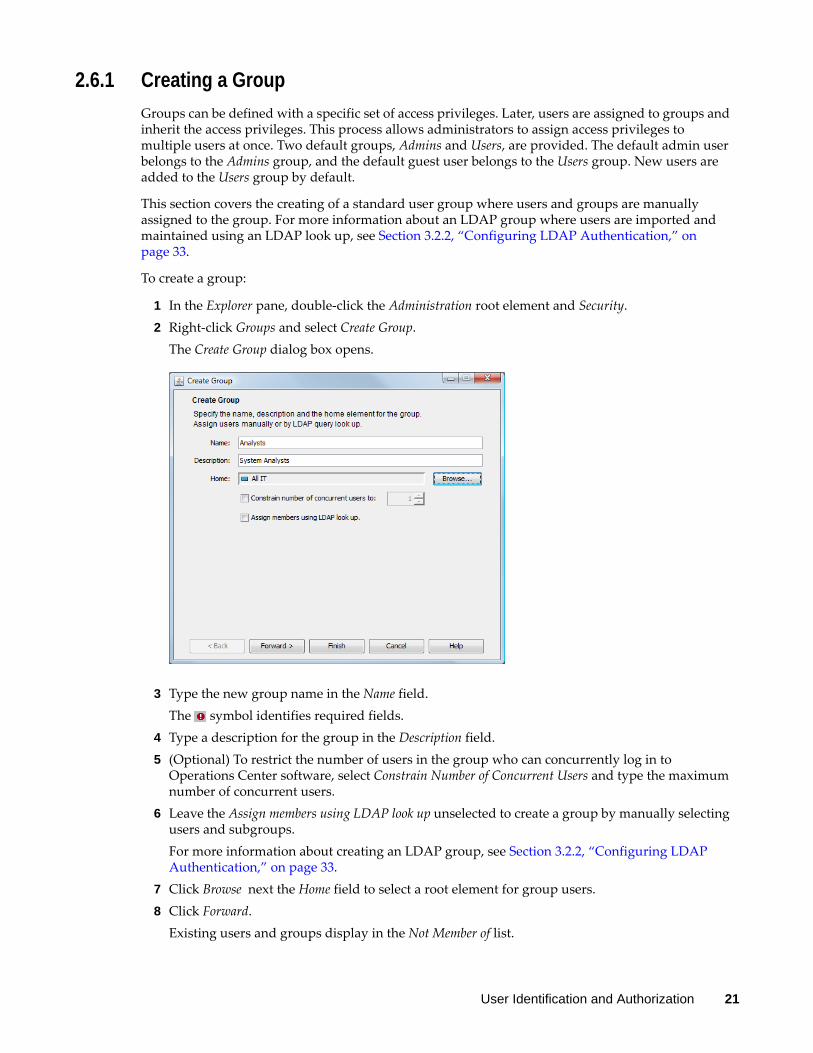
To create a group:
1 In the Explorer pane, double‐click the Administration root element and Security.2 Right‐click Groups and select Create Group.
The Create Group dialog box opens.
3 Type the new group name in the Name field.The symbol identifies required fields.
4 Type a description for the group in the Description field.5 (Optional) To restrict the number of users in the group who can concurrently log in to
Operations Center software, select Constrain Number of Concurrent Users and type the maximum number of concurrent users.
6 Leave the Assign members using LDAP look up unselected to create a group by manually selecting users and subgroups.For more information about creating an LDAP group, see Section 3.2.2, “Configuring LDAP Authentication,” on page 33.
7 Click Browse next the Home field to select a root element for group users.8 Click Forward.
Existing users and groups display in the Not Member of list.
User Identification and Authorization 21
9 Perform one of the following steps to assign users to the group:To assign one user, click a user name and then click Add.The user name moves to the Member of list.To assign all users at once, click Add All.All users move to the Member of list.
Any user that is a member of the Admins group, displays in bold text.10 Click Create.
The new group is added to the Groups element in the Administration root.If you are familiar with NOC Script, you can use the SetGroupNames function to change a user’s group membership. For instructions, see the Operations Center 5.0 Scripting Guide.
2.6.2 Editing a GroupIf an LDAP user group is converted from an LDAP imported group to a standard user group (by unselecting Assign members using LDAP look up), all LDAP users are deleted unless the LDAP user is selected as a member of the group or is a member of another group.
NOTE: It is not possible to edit the privileges for the Admins group.
To edit a user group:
1 In the Explorer pane, expand the Administration root element > Security > Groups.2 Right‐click a group and select Properties to open the Status property page. 3 In the left pane, click Group to open the Group property page.4 Perform one of the following steps to edit a group composed of standard users and user groups:
To add a user to a group, select a group name in the Groups list, then click Add.The user is added to the Member of list.To add all users to the group, click Add All.All users are added to the Member of list.To remove a user from a group, select the group name in the right pane, then click Remove.The user is removed from the Member of list.Click Remove All to remove all users from the group. All users are removed from the Member of list.
Any user that is a member of the Admins group, displays in bold text.5 Perform one of the following steps to edit an LDAP user group:
Click New next to LDAP Connection to create a new LDAP connection.Click Edit next to LDAP Connection to update an existing LDAP connection.LDAP Connection definitions can be edited directly. For more information, see “Maintaining LDAP Connections” on page 37.Modify LDAP query seach filters and parameters as desired. For more information on the LDAP search query filters and parameters, see “Scheduling Regular Import and Maintainance of LDAP Users from an LDAP Directory Server” on page 35.Click Schedule to verify or modify the LDAP query schedule.
22 Operations Center 5.0 Security Management Guide

Click Job to view the job schedule settings. Modify the schedule as desired. LDAP Connections use Job Scheduling. For more information, see “Scheduling Jobs” in the Operations Center 5.0 Server Configuration Guide.Click Apply.
6 Click Apply to save the changes.
2.6.3 Deleting a GroupIt is not possible to delete the Admins group or Admin user account.
To delete a user group:
1 In the Explorer pane, right‐click the group and select Delete Group to open a confirmation dialog box.
2 Click Yes to confirm the deletion.The group is removed from assigned user accounts and also from the Operations Center system. However, users who were members of the group are not deleted.
2.7 Enabling Automatic User LoginThe Operations Center server supports the automatic login of users. Enabling auto‐login requires the following:
The user must already have an account in Operations CenterThe formula.properties and applet-params.xml files must be modified on the Operations Center server as described belowA specified HTTP header exists and has a valid Operations Center user name when the Operations Server console connects to the Operations Center Web server to resolve the initial CORBA IOR reference
To enable automatic user login:
1 Configure the following three properties in the formula.properties file as indicated:Server.header.auth.principal= should be set to the HTTP header name that will be used, such as remote-user.
# Server.allow.auth.principal# Allow token based logins if true.Server.allow.auth.principal=true
# Server.header.auth.principal# Header used for the token login principal.Server.header.auth.principal=auth-principal
# Server.header.auth.token# Header used for the token login token.Server.header.auth.token=auth-token
User Identification and Authorization 23
2 Configure the following three properties in the applet-param.xml file as indicated:
<param name="Connection.allow.auth.principal" value="true" /><param name="Connection.header.auth.principal" value="auth-principal" /><param name="Connection.header.auth.token" value="auth-token" />
Connection.header.auth.principal and Connection.header.auth.token properties must have the same values as the corresponding properties in the formula.properties file.
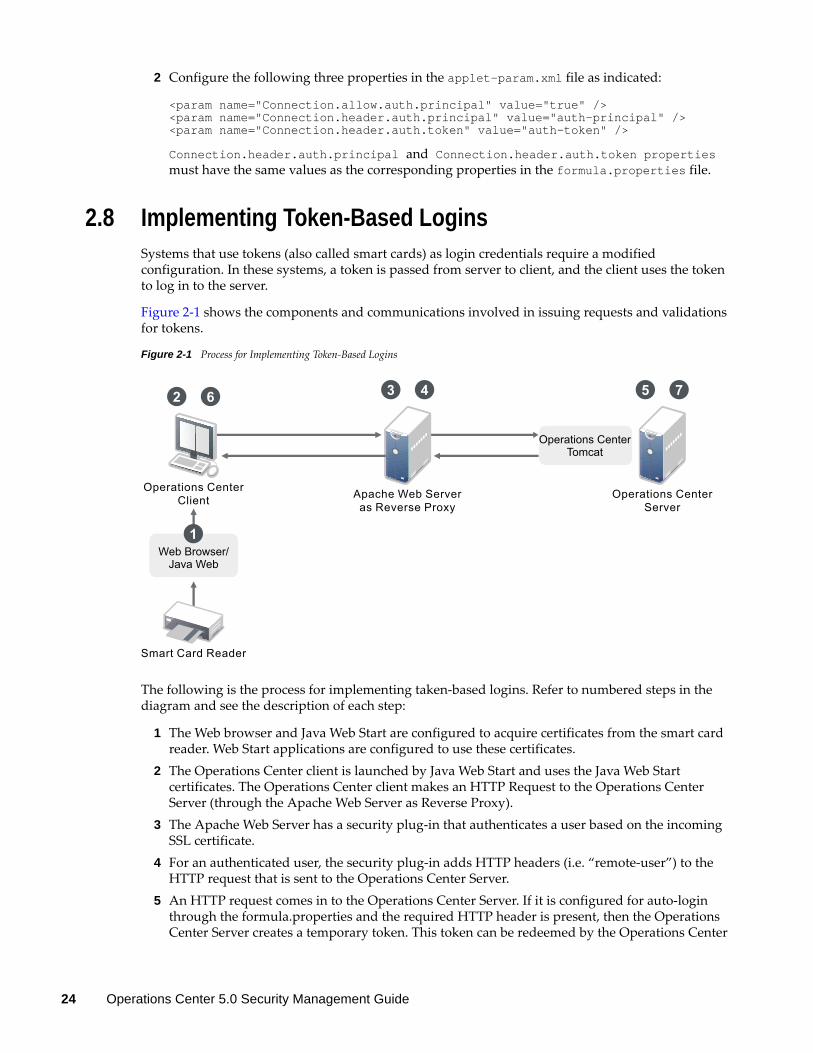
2.8 Implementing Token-Based LoginsSystems that use tokens (also called smart cards) as login credentials require a modified configuration. In these systems, a token is passed from server to client, and the client uses the token to log in to the server.
Figure 2‐1 shows the components and communications involved in issuing requests and validations for tokens.
Figure 2-1 Process for Implementing Token‐Based Logins
The following is the process for implementing taken‐based logins. Refer to numbered steps in the diagram and see the description of each step:
1 The Web browser and Java Web Start are configured to acquire certificates from the smart card reader. Web Start applications are configured to use these certificates.
2 The Operations Center client is launched by Java Web Start and uses the Java Web Start certificates. The Operations Center client makes an HTTP Request to the Operations Center Server (through the Apache Web Server as Reverse Proxy).
3 The Apache Web Server has a security plug‐in that authenticates a user based on the incoming SSL certificate.
4 For an authenticated user, the security plug‐in adds HTTP headers (i.e. “remote‐user”) to the HTTP request that is sent to the Operations Center Server.
5 An HTTP request comes in to the Operations Center Server. If it is configured for auto‐login through the formula.properties and the required HTTP header is present, then the Operations Center Server creates a temporary token. This token can be redeemed by the Operations Center
Operations CenterServer
Apache Web Serveras Reverse Proxy
Operations CenterClient
Smart Card Reader
2 6 3 4 5 7
Web Browser/Java Web
Operations CenterTomcat
1
24 Operations Center 5.0 Security Management Guide
client to automatically log in the user specified in the required HTTP header. Headers for the user name and the token value are added to the HTTP Response, which is sent to the Operations Center client.
6 If the Operations Center client has been configured for auto‐login, then the HTTP response is examined for HTTP headers specifying the user name and a token value. If found, the Operations Center client requests a Operations Center Server login using the user name and token provided.
7 The Operations Center Server verifies the token, and if it is valid, auto‐logins the user.
To implement token‐based logins:
1 Configure the following properties in the /OperationsCenter_install_path/config/Formula.custom.properties file:
# Server.allow.auth.principal## Allow token based logins if true.Server.allow.auth.principal=true
# Server.header.auth.principal## Header used for the token login principal.Server.header.auth.principal=HTTP Header Name
# Server.header.auth.token## Header used for the token login token.Server.header.auth.token=auth-token
For Server.header.auth.principal, replace HTTP Header Name with the actual HTTP header, such as “remote‐user” that is added by the security plug‐in to the HTTP request sent to the Operations Center server.For more information about using the Formula.custom.properties file to customize configuration options, see Making Custom Changes in the Operations Center 5.0 Server Configuration Guide.
2 Configure the following properties in the applet-param.xml file:
<param name="Connection.allow.auth.principal" value="true" /><param name="Connection.header.auth.principal" value="auth-principal" /><param name="Connection.header.auth.token" value="auth-token" />
The Connection.header.auth.principal and Connection.header.auth.token values must be the same as those in the formula.properties file.
2.9 Implementing Single Sign-OnSome sites use single sign‐on to allow users to log in once and access multiple software systems without having to log in multiple times. Single sign‐on can be used to bypass the need for logging in to Operations Center from the client. To achieve single sign‐on, disable the Operations Center client login dialog box.
To disable logins to the Operations Center client, set the following parameters in the applet_params.xml file:
<param name="Client.DisableLogins" value="true" /> <param name="Client.DisableLogins.AllowedAccounts" value="admin,guest" /> <param name="Client.DisableLogins.Message" value="Access Denied" />
User Identification and Authorization 25
Where:
Client.DisableLogins disables logins to the operations client.Client.DisableLogins.AllowedAccounts defines a comma separated list of accounts that should be allowed to log in. This would be applicable when the single sign‐on provider is not available and administrators still need to access the system.Client.DisableLogins.Message is the message that displays to users when they are denied access.
For information on how to configure Single Sign On (SSO) for Operations Center databases, see “Configuring and Administering the Database” in the Operations Center 5.0 Server Configuration Guide.
For single sign‐on options to use the auto‐login function, or disable direct access to the dashboard server or operations client, see the Operations Center 5.0 Dashboard Guide.
2.10 Managing SessionsAnother aspect of restricting user access to Operations Center components is session management, which includes the following functions:
Section 2.10.1, “Restricting Concurrent Logins Per User,” on page 26Section 2.10.2, “Restricting User Access to Components,” on page 26Section 2.10.3, “Restricting Concurrent Users in a Group,” on page 27Section 2.10.4, “Establishing Session Timeouts,” on page 27Section 2.10.5, “Viewing User Session Information,” on page 27Section 2.10.6, “Viewing the Login Method Used by Active Users,” on page 29Section 2.10.7, “Forcing Logout,” on page 29
Configure all of these features by using the Operations Server console, except for the session timeout cutoff, which is configured by using the Configuration Manager. This section summarizes the features and provides links or references to detailed documentation.
Monitoring the sessions and analyzing the effectiveness of these session policies are discussed in Chapter 6, “Auditing,” on page 95.
The total number of concurrent user sessions is determined by the number of licensed Console and Portal users.
2.10.1 Restricting Concurrent Logins Per UserTo control the number of concurrent logins that a user is allowed, open the user’s User property page and type a number in the Logins field. See Section 2.3, “User and Group Accounts,” on page 13 for details.
2.10.2 Restricting User Access to ComponentsTo prevent a user from accessing the Operations Server console or the Business Service Dashboard components, open the user’s User property page and select Operations Server console or Business Service Dashboard in the Restrict Usage section. See Section 2.3, “User and Group Accounts,” on page 13 for details.
26 Operations Center 5.0 Security Management Guide
2.10.3 Restricting Concurrent Users in a GroupIn some situations, you might want to allocate a subset of licensed user sessions to different groups. This ensures that certain groups are not allowed to use all of the allotted user sessions and prevent other users from accessing the system.
To restrict the number of users in the group who can concurrently log in to Operations Center software:
1 In the Explorer pane, right‐click the group and select Properties to open the Status property page.2 In the left pane, click Group to open the Group property page.3 Select Constrain Number of Concurrent Users and specify the maximum allowable number of
users.4 Click Apply to save the changes.
If a user belongs to more than one group, Operations Center software leases a session from the group to which the user belongs, containing the largest number of available concurrent sessions. If a group has no setting for the maximum number of concurrent users, the session is leased from the default product license.
2.10.4 Establishing Session Timeouts Administrators can establish a session inactivity interval, which is the number of minutes that users can remain inactive before they are required to log in again. Use the Configuration Manager to define the Inactivity Timeout setting, which is explained in the Operations Center 5.0 Server Installation Guide.
2.10.5 Viewing User Session InformationThe Session property page for each user displays login and session information about a user who is currently logged into Operations Center. All active users currently logged into Operations Center software display under the Sessions element in the Operations Server console.
To view session information:
1 In the Explorer pane, expand the Server root element > Sessions.All active users currently logged into Operations Center are listed under the Sessions element.
2 Right‐click a user name and select Properties to open the Status property page.
User Identification and Authorization 27
3 In the left pane, click Session to open the Session property page:
The Session property page identifies the group name from which the session was leased, the IP address from which the user logged in, the time of the login, and the group under which the user logged in.The group under which the user logged in has nothing to do with the user’s permissions.
28 Operations Center 5.0 Security Management Guide

2.10.6 Viewing the Login Method Used by Active UsersThe administrator can identify whether active users are logged in to Operations Center software through the Console (operations client) or through the Dashboard (Web client). Knowing how a user logged in is important when attempting to forcibly log out a user.
You can also use the mosstatus command to obtain session information about users.
To identify which users are logged in to Operations Center and which login method they used:
1 In the Explorer pane, expand the Administration root element > Servers > Sessions.All users who are logged in to Operations Center are listed. Their login methods display in parentheses.The following graphic indicates that the user is logged in through the Operations Center console (operations client) and the Operations Center dashboard:
2.10.7 Forcing LogoutLicensed user sessions can be allocated to the Operations Server console and the Portal. Occasionally, it is necessary to forcibly log out a user or a group from either of these Operations Center components. Users can be forced off either the Console or the dashboard.
NOTE: Force off messages are only deliverable to users of the Operations Center console only.
“Forcibly Logging Out Users or Groups from the Operations Server console” on page 29“Forcing a User or Group to Log Out” on page 30“Sending a Group Message” on page 30
Forcibly Logging Out Users or Groups from the Operations Server console1 In the Explorer pane, expand the Administration root element > Security > Groups or Users.2 Select one or more groups or users, then right‐click and select Force Off to open the Force Off
dialog box.
User Identification and Authorization 29
3 Type a message to send to the users being forced to log off.
NOTE: This message is only sent to console users. Dashboard users will not receive this message.
4 Click OK to force the users or groups off the server.
You can also use a forceoff during a session that uses an InterCommunication connection of multiple Operations Center servers, to cause the far‐end adapter to stop. Otherwise, the adapter retry logic continues to log in to the server.
Forcing a User or Group to Log OutIf you want to notify users or group members that they are to be forcibly logged off, you can send them a message. For more information, see “Sending a Group Message” on page 30.
To forcibly log off a user or group of users:
1 Use one of the following commands:
forceoff username
or
forceoff group: groupname
Replace username and groupname with the actual names as configured in Operations Center.2 When prompted, specify the following information:Enter Web server host hostname: Enter the hostname of the Operations Center server.The default is the local host.Enter Web server port: Enter the Web server port number of the Operations Center server.The default is 8080.Enter your account userid: Enter your user name.Enter your user password: Enter your password.The password is not masked.
Sending a Group MessageBefore forcing users to log off, you can send users, the members of a group, or members of a session a message:
1 At the command prompt, enter:
moswall users/group/username “message”
Replace users or group with an actual name, or if the message is to a session, replace username with the session ID.Replace message with the information to send to the user, group, or session.Examples:
moswall jtball "You are being forcibly logged off the Operations Center server."moswall group6 "You are being forcibly logged off the Operations Center server."moswall session3 "You are being forcibly logged off the Operations Center server."
30 Operations Center 5.0 Security Management Guide
3 3Identification and Authentication
Users must be identified and authenticated before they are granted access rights to data managed within the Novell® Operations Center environment. Operations Center provides two options for identification and authentication (I&A):
Native I&A: Uses Operations Center’ internal identification and authentication mechanism.
External I&A: LDAP (Lightweight Directory Access Protocol) is one method of external I&A. The LDAP method leverages an external LDAP data source for user identification and authentication.
Review the following sections for information on I&A:
Section 3.1, “Native Services Methods,” on page 31Section 3.2, “External Services Methods,” on page 32Section 3.3, “Key Component I&A,” on page 40
3.1 Native Services MethodsNative I&A uses Operations Center internal identification and authentication mechanism.
Operations Center supports the following I&A methods using native services:
Operations Center (internal)Operations Center to Operations Center (through a remote configuration)
The native I&A stores all usernames, passwords, and associated access control list (ACL) data in a binary file on the Operations Center server. Native I&A provides the option of requiring users to specify usernames and passwords that are the same as or different from their network login credentials. Requiring new usernames and passwords can effectively tighten security on the system.
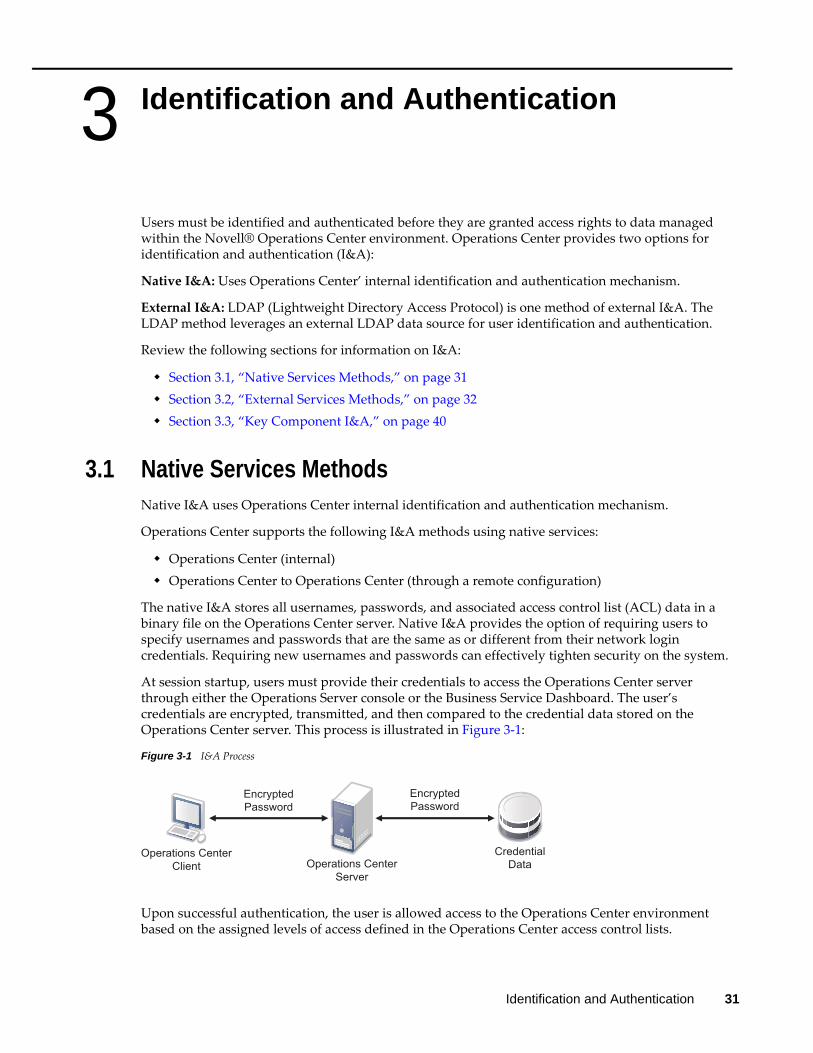
At session startup, users must provide their credentials to access the Operations Center server through either the Operations Server console or the Business Service Dashboard. The user’s credentials are encrypted, transmitted, and then compared to the credential data stored on the Operations Center server. This process is illustrated in Figure 3‐1:
Figure 3-1 I&A Process
Upon successful authentication, the user is allowed access to the Operations Center environment based on the assigned levels of access defined in the Operations Center access control lists.
Operations CenterServer
EncryptedPassword
Operations CenterClient
EncryptedPassword
CredentialData
Identification and Authentication 31
3.2 External Services MethodsOperations Center supports the following methods using the external I&A option:
Windows* 2000 Active Directory*iPlanetOpenLDAPRACFOther LDAP‐enabled directory services
Review the following for logging and configuring information:
Section 3.2.1, “Logging in Using External Services,” on page 32Section 3.2.2, “Configuring LDAP Authentication,” on page 33
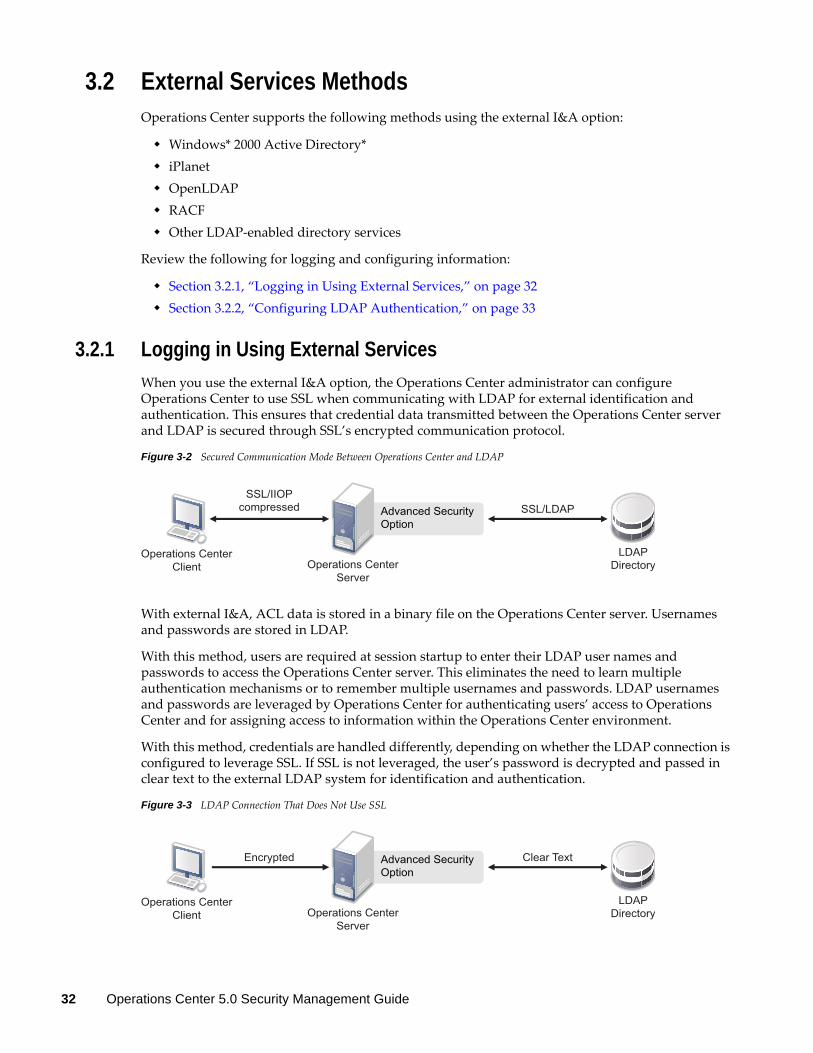
3.2.1 Logging in Using External ServicesWhen you use the external I&A option, the Operations Center administrator can configure Operations Center to use SSL when communicating with LDAP for external identification and authentication. This ensures that credential data transmitted between the Operations Center server and LDAP is secured through SSL’s encrypted communication protocol.
Figure 3-2 Secured Communication Mode Between Operations Center and LDAP
With external I&A, ACL data is stored in a binary file on the Operations Center server. Usernames and passwords are stored in LDAP.
With this method, users are required at session startup to enter their LDAP user names and passwords to access the Operations Center server. This eliminates the need to learn multiple authentication mechanisms or to remember multiple usernames and passwords. LDAP usernames and passwords are leveraged by Operations Center for authenticating users’ access to Operations Center and for assigning access to information within the Operations Center environment.
With this method, credentials are handled differently, depending on whether the LDAP connection is configured to leverage SSL. If SSL is not leveraged, the user’s password is decrypted and passed in clear text to the external LDAP system for identification and authentication.
Figure 3-3 LDAP Connection That Does Not Use SSL
Advanced SecurityOption
Operations CenterServer
SSL/IIOPcompressed
Operations CenterClient
SSL/LDAP
LDAPDirectory
Advanced SecurityOption
Operations CenterServer
Encrypted
Operations CenterClient
Clear Text
LDAPDirectory
32 Operations Center 5.0 Security Management Guide
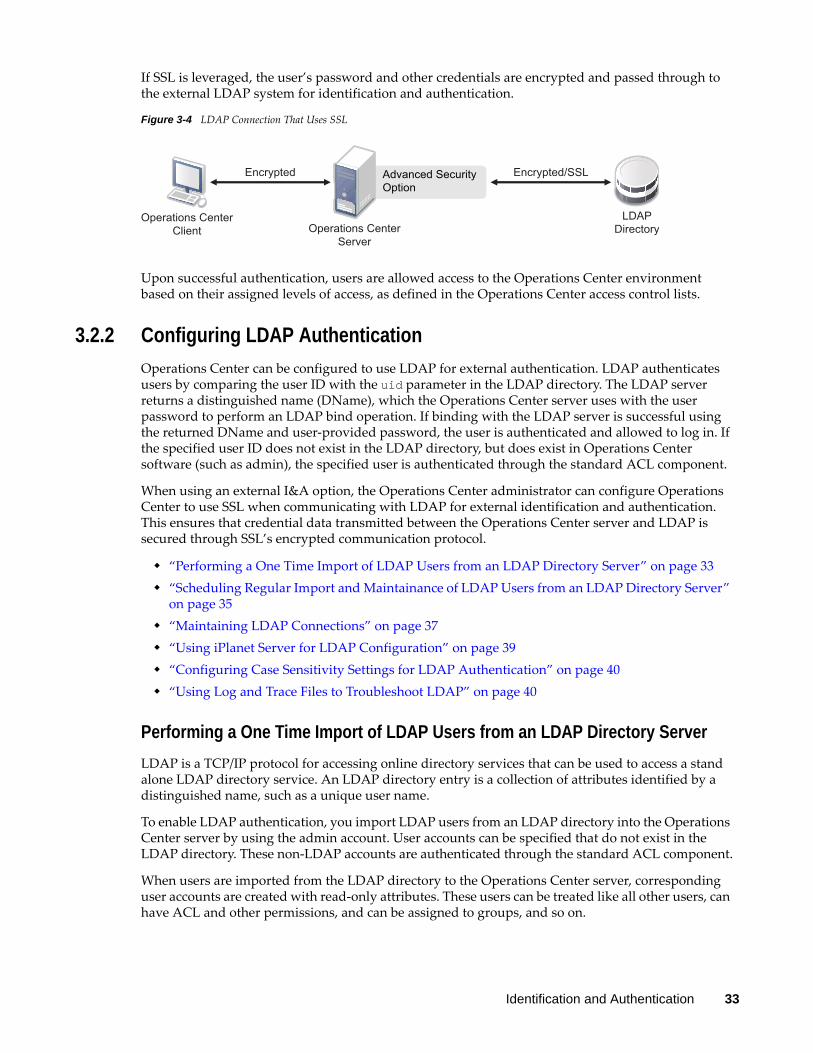
If SSL is leveraged, the user’s password and other credentials are encrypted and passed through to the external LDAP system for identification and authentication.
Figure 3-4 LDAP Connection That Uses SSL
Upon successful authentication, users are allowed access to the Operations Center environment based on their assigned levels of access, as defined in the Operations Center access control lists.
3.2.2 Configuring LDAP AuthenticationOperations Center can be configured to use LDAP for external authentication. LDAP authenticates users by comparing the user ID with the uid parameter in the LDAP directory. The LDAP server returns a distinguished name (DName), which the Operations Center server uses with the user password to perform an LDAP bind operation. If binding with the LDAP server is successful using the returned DName and user‐provided password, the user is authenticated and allowed to log in. If the specified user ID does not exist in the LDAP directory, but does exist in Operations Center software (such as admin), the specified user is authenticated through the standard ACL component.
When using an external I&A option, the Operations Center administrator can configure Operations Center to use SSL when communicating with LDAP for external identification and authentication. This ensures that credential data transmitted between the Operations Center server and LDAP is secured through SSL’s encrypted communication protocol.
“Performing a One Time Import of LDAP Users from an LDAP Directory Server” on page 33“Scheduling Regular Import and Maintainance of LDAP Users from an LDAP Directory Server” on page 35“Maintaining LDAP Connections” on page 37“Using iPlanet Server for LDAP Configuration” on page 39“Configuring Case Sensitivity Settings for LDAP Authentication” on page 40“Using Log and Trace Files to Troubleshoot LDAP” on page 40
Performing a One Time Import of LDAP Users from an LDAP Directory ServerLDAP is a TCP/IP protocol for accessing online directory services that can be used to access a stand alone LDAP directory service. An LDAP directory entry is a collection of attributes identified by a distinguished name, such as a unique user name.
To enable LDAP authentication, you import LDAP users from an LDAP directory into the Operations Center server by using the admin account. User accounts can be specified that do not exist in the LDAP directory. These non‐LDAP accounts are authenticated through the standard ACL component.
When users are imported from the LDAP directory to the Operations Center server, corresponding user accounts are created with read‐only attributes. These users can be treated like all other users, can have ACL and other permissions, and can be assigned to groups, and so on.
Advanced SecurityOption
Operations CenterServer
Encrypted
Operations CenterClient
Encrypted/SSL
LDAPDirectory
Identification and Authentication 33
To perform a one‐time import of LDAP users:
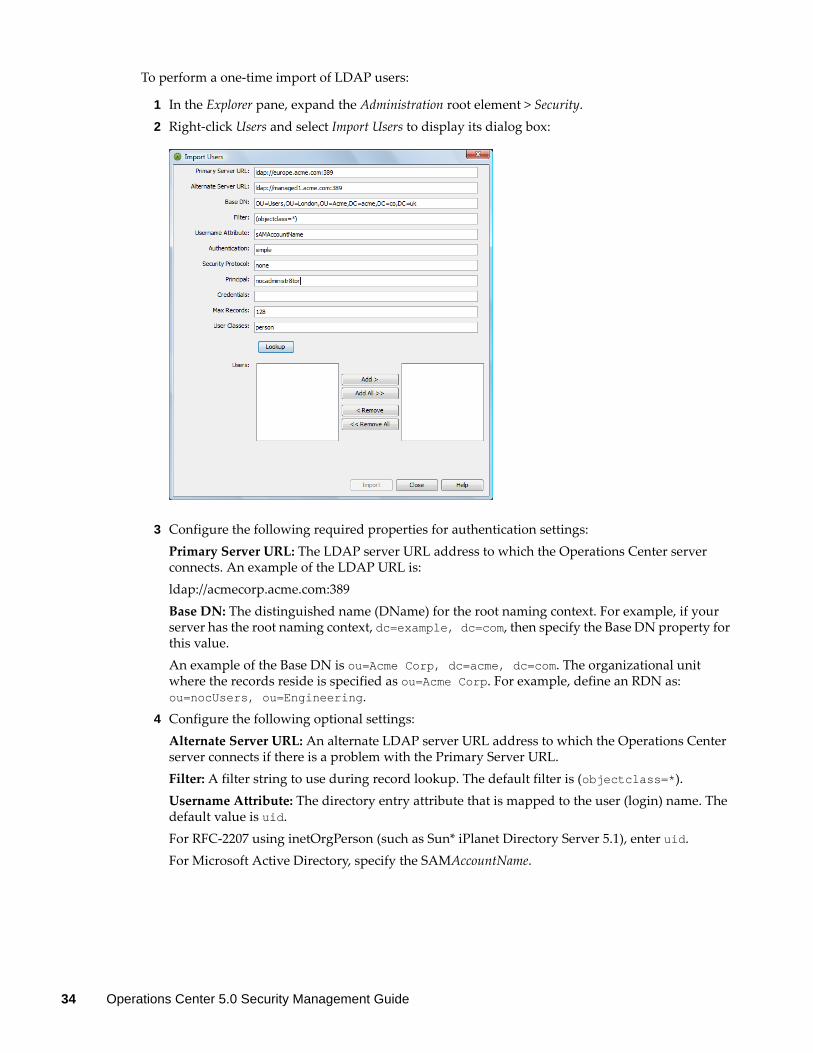
1 In the Explorer pane, expand the Administration root element > Security.2 Right‐click Users and select Import Users to display its dialog box:
3 Configure the following required properties for authentication settings:Primary Server URL: The LDAP server URL address to which the Operations Center server connects. An example of the LDAP URL is:ldap://acmecorp.acme.com:389Base DN: The distinguished name (DName) for the root naming context. For example, if your server has the root naming context, dc=example, dc=com, then specify the Base DN property for this value.An example of the Base DN is ou=Acme Corp, dc=acme, dc=com. The organizational unit where the records reside is specified as ou=Acme Corp. For example, define an RDN as: ou=nocUsers, ou=Engineering.
4 Configure the following optional settings:Alternate Server URL: An alternate LDAP server URL address to which the Operations Center server connects if there is a problem with the Primary Server URL.Filter: A filter string to use during record lookup. The default filter is (objectclass=*).Username Attribute: The directory entry attribute that is mapped to the user (login) name. The default value is uid.For RFC‐2207 using inetOrgPerson (such as Sun* iPlanet Directory Server 5.1), enter uid.For Microsoft Active Directory, specify the SAMAccountName.
34 Operations Center 5.0 Security Management Guide

Authentication: The level of security to use for authentication. Specify one of the following levels (default is simple):
None: No LDAP authentication is used.Simple: Uses the server’s fully qualified DName to authenticate users; transmits user passwords in clear text. Using simple LDAP authentication within an encrypted channel can protect passwords.Strong: The server uses a certificate and private key to communicate with other servers. With this level, no transmission of passwords is required, and no sensitive data is exchanged between servers until each has verified the other’s identity by using the certificates.
Security Protocol: The security protocol to use for authentication. Use a security protocol such as SSL.Principal: The identity of the principal that authenticates the caller to the service. The format of this property depends on the authentication scheme. For example, one valid format is:
uid=Manager, dc=mosol, dc=com
Credentials: The credentials of the principal that authenticates the initial context of the service. The value of this property depends on the authentication scheme. For example, the value can be a hashed password, a clear‐text password, a key, or a certificate.Max Records: The maximum number of user records to access during lookup.User Classes: A comma‐delimited list of classes associated with imported users.
5 Click Lookup.Operations Center searches the specified LDAP server for all the records specified, using the Base DN and Username Attribute values. For each record found, a user entry displays in the Users list.For example, if the Base DN is dc=acme, dc=com, ou=Acme Corp, and the User Attribute is uid, a search is conducted for records of all users that have the user attribute uid under the directory object ou=Novell Inc, dc=acme, dc=com.
6 To add users, select the users in the left Users list and then click Add.The users are imported to the Operations Center server and display in the right Users list.
7 (Optional) To delete users previously added, select the users in the right list and click Remove.The users are removed from the right Users list.
8 Click Import.The records are imported one at a time for each user listed in the right pane of the Import Users dialog box.
Scheduling Regular Import and Maintainance of LDAP Users from an LDAP Directory ServerLDAP user groups allow you to import LDAP users and automatically maintain the user accounts using regularly scheduled look up queries to the LDAP directory server.
A job schedule is set for each LDAP user group defintion that runs the query for the LDAP look up procedure. The following logic applies to user profiles imported from an LDAP server:
For each user returned, a user account with real‐only attributes is created under Security > Users. These users can be treated like all other users, can have ACL and other permissions, and can be assigned to groups, and so on.
Identification and Authentication 35
If a user is not returned by the LDAP look up, the user is removed from the LDAP user group; and the user profile is deleted unless the user is a member of another user group. If an LDAP user group is converted from an LDAP imported group to a standard user group, all LDAP users are deleted unless the LDAP user is selected as a member of the group or is a member of another group.
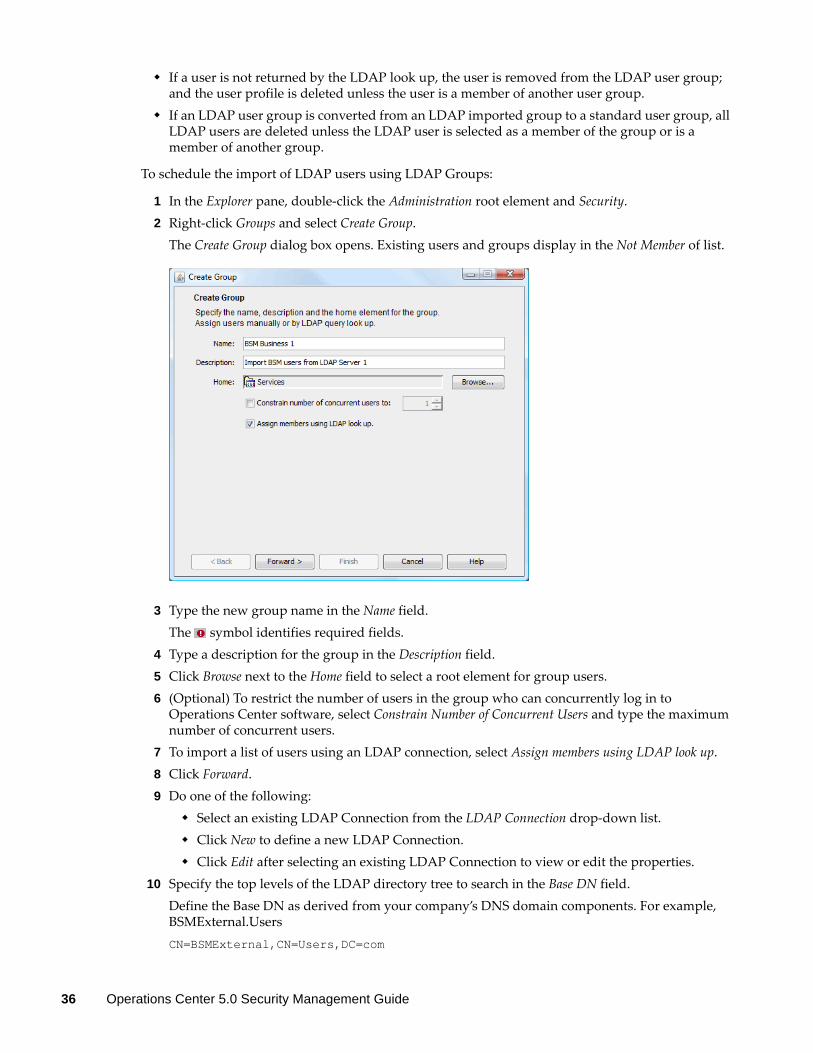
To schedule the import of LDAP users using LDAP Groups:
1 In the Explorer pane, double‐click the Administration root element and Security.2 Right‐click Groups and select Create Group.
The Create Group dialog box opens. Existing users and groups display in the Not Member of list.
3 Type the new group name in the Name field.The symbol identifies required fields.
4 Type a description for the group in the Description field.5 Click Browse next to the Home field to select a root element for group users.6 (Optional) To restrict the number of users in the group who can concurrently log in to
Operations Center software, select Constrain Number of Concurrent Users and type the maximum number of concurrent users.
7 To import a list of users using an LDAP connection, select Assign members using LDAP look up.8 Click Forward.9 Do one of the following:
Select an existing LDAP Connection from the LDAP Connection drop‐down list.Click New to define a new LDAP Connection.Click Edit after selecting an existing LDAP Connection to view or edit the properties.
10 Specify the top levels of the LDAP directory tree to search in the Base DN field. Define the Base DN as derived from your company’s DNS domain components. For example, BSMExternal.Users CN=BSMExternal,CN=Users,DC=com
36 Operations Center 5.0 Security Management Guide
11 Customize the LDAP search string in the Filter field. Use an LDAP expression to specify the filter. For example, the following looks for all objects where Department, Company, or Description is Sales:(|(department=Sales)(company=Sales)(description=Sales))
12 Specify the attribute from the LDAP server to create the User account name in the User Attribute field.
13 Specify maximum number of records to return in the Max Records field.14 Specify a comma delimited list of the object classes to search in the Object Classes field.15 Click Test Query to test the connection. A list of users is returned if successful.
TIP: If Operations Center is slow to return results, reduce the value for Max Records. After the test is complete, return the value to the desired maximum number of records for the LDAP Query.
16 Click Schedule to create and schedule a job for the LDAP query that updates the user list. By default the schedule is set to run once a day using the create time. To edit the schedule, do the following: 16a Click Job.16b Adjust the schedule as desired.
LDAP Connections use Job Scheduling. For more information on schedules, see “Scheduling Jobs” in the Operations Center 5.0 Server Configuration Guide .
16c Click Apply.17 Click Finish.
The new group is added to Groups in the Administration > Security root and users are imported under Users.If a problem arises during the user account creation process, an error dialog box displays and the errors are logged to the log file.If you are familiar with NOC Script, you can use the SetGroupNames function to change a user’s group membership. For instructions, see the Operations Center 5.0 Scripting Guide.To edit an LDAP User Group, see Section 2.6.2, “Editing a Group,” on page 22.
Maintaining LDAP ConnectionsConnection information, for each LDAP Server used to import users, is maintained by LDAP connection defintions under Security > LDAP Connections.
While LDAP Connection definitions are often created as part of the process of creating an LDAP user group, they can be created and edited directly from the LDAP connection definition:
“Creating an LDAP Connection” on page 38“Editing an LDAP Connection” on page 39
NOTE: Updates to the settings for an LDAP Connection defintion are automatically leveraged by all LDAP User Groups set for that LDAP server. Likewise, an LDAP connection cannot be deleted if it is used by one or more LDAP User Groups.
Identification and Authentication 37
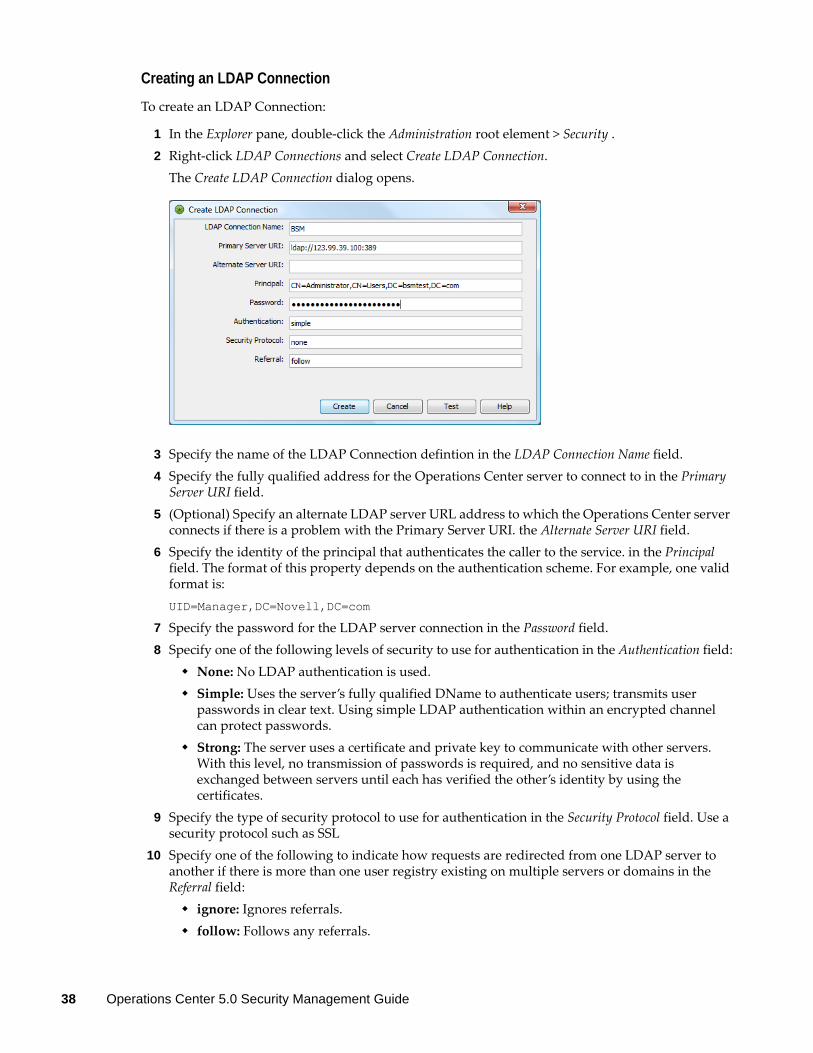
Creating an LDAP ConnectionTo create an LDAP Connection:
1 In the Explorer pane, double‐click the Administration root element > Security .2 Right‐click LDAP Connections and select Create LDAP Connection.
The Create LDAP Connection dialog opens.
3 Specify the name of the LDAP Connection defintion in the LDAP Connection Name field.4 Specify the fully qualified address for the Operations Center server to connect to in the Primary Server URI field.
5 (Optional) Specify an alternate LDAP server URL address to which the Operations Center server connects if there is a problem with the Primary Server URI. the Alternate Server URI field.
6 Specify the identity of the principal that authenticates the caller to the service. in the Principal field. The format of this property depends on the authentication scheme. For example, one valid format is:UID=Manager,DC=Novell,DC=com
7 Specify the password for the LDAP server connection in the Password field.8 Specify one of the following levels of security to use for authentication in the Authentication field:
None: No LDAP authentication is used.Simple: Uses the server’s fully qualified DName to authenticate users; transmits user passwords in clear text. Using simple LDAP authentication within an encrypted channel can protect passwords.Strong: The server uses a certificate and private key to communicate with other servers. With this level, no transmission of passwords is required, and no sensitive data is exchanged between servers until each has verified the other’s identity by using the certificates.
9 Specify the type of security protocol to use for authentication in the Security Protocol field. Use a security protocol such as SSL
10 Specify one of the following to indicate how requests are redirected from one LDAP server to another if there is more than one user registry existing on multiple servers or domains in the Referral field:
ignore: Ignores referrals.follow: Follows any referrals.
38 Operations Center 5.0 Security Management Guide
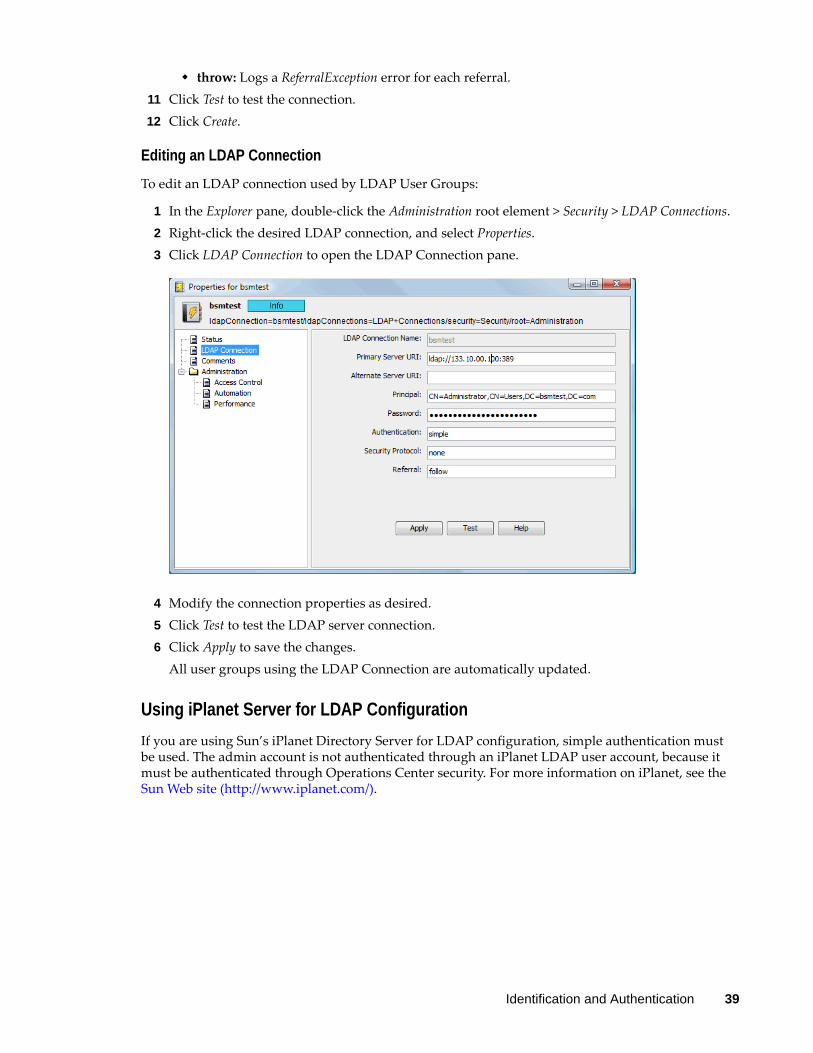
throw: Logs a ReferralException error for each referral.11 Click Test to test the connection.12 Click Create.
Editing an LDAP ConnectionTo edit an LDAP connection used by LDAP User Groups:
1 In the Explorer pane, double‐click the Administration root element > Security > LDAP Connections.2 Right‐click the desired LDAP connection, and select Properties.3 Click LDAP Connection to open the LDAP Connection pane.
4 Modify the connection properties as desired.5 Click Test to test the LDAP server connection.6 Click Apply to save the changes.
All user groups using the LDAP Connection are automatically updated.
Using iPlanet Server for LDAP ConfigurationIf you are using Sun’s iPlanet Directory Server for LDAP configuration, simple authentication must be used. The admin account is not authenticated through an iPlanet LDAP user account, because it must be authenticated through Operations Center security. For more information on iPlanet, see the Sun Web site (http://www.iplanet.com/).
Identification and Authentication 39
Configuring Case Sensitivity Settings for LDAP AuthenticationBy default, the LDAP authentication process used to match and authenticate user accounts is case‐sensitive, meaning the user name must be matched exactly. Update the Formula.custom.properties file to perform an additional case‐insensitive search when an exact match is not found.
To configure LDAP Authentication to use a case‐insensitve search for user accounts:
1 In a text editor, open the Operations_Center_install_path/NOC/config/Formula.custom.properties file.For more information about the Formula.custom.properties file, see “Making Custom Changes” in the Operations Center 5.0 Server Configuration Guide.
2 Add the following property:Server.allow.ldap.caseinsensitive=true
3 Stop and restart the Operations Center server for the changes to take effect.
Using Log and Trace Files to Troubleshoot LDAPSee the Operations Center 5.0 Server Configuration Guide for information about configuring logging levels.
To activate LDAP logging, set the log4j.category.Server.DirectoryService category to a log level in the /OperationsCenter_install_path/config/Formula.custom.properties file.
To activate LDAP logging for the Operations Center server session, enter Server.DirectoryService in the Log Settings dialog box.
3.3 Key Component I&AThe I&A processes between key components are described in this section:
Section 3.3.1, “Operations Server Servers,” on page 40Section 3.3.2, “Operations Center Server to Remote Management System,” on page 41Section 3.3.3, “Operations Center Server to Web Server I&A,” on page 42Section 3.3.4, “Operations Center Server to Database I&A,” on page 42Section 3.3.5, “Operations Center server to SQL Views and Web Services,” on page 42
3.3.1 Operations Server ServersYou can connect multiple Operations Center servers for different reasons, such as load balancing or creating a gateway to establish a single connection for users outside their firewall. Operations Center uses adapter technology to establish connections and interactions between Operations Center servers. Operations Center adapters are restricted by their credentials and optionally by a trusted list of IP addresses. This combination identifies the Operations Center servers from which the adapters can accept and process information requests.
Adapters are configured with a one‐to‐one relationship, where one adapter communicates with a specific Operations Center server. To establish communication between two Operations Center servers, the Operations Center administrator must configure an InterCommunication adapter (ICA) on each Operations Center server. See the Operations Center 5.0 Adapter and Integration Guide for details on creating and configuring adapters.
40 Operations Center 5.0 Security Management Guide
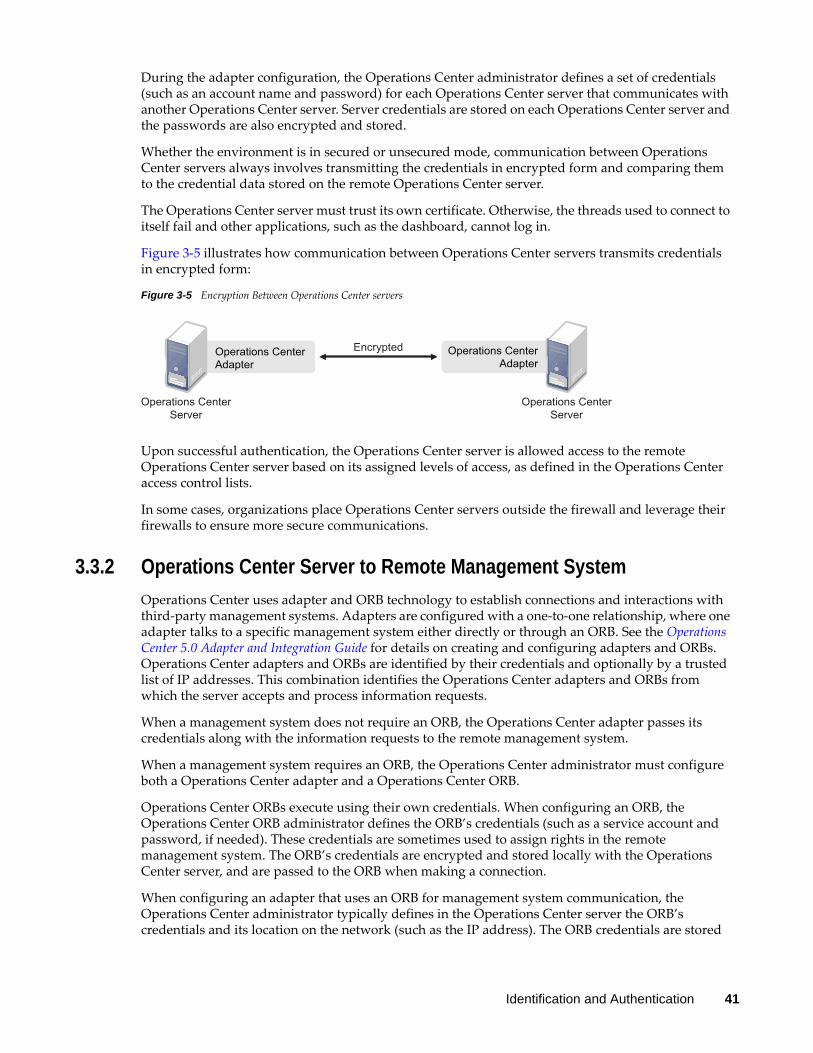
During the adapter configuration, the Operations Center administrator defines a set of credentials (such as an account name and password) for each Operations Center server that communicates with another Operations Center server. Server credentials are stored on each Operations Center server and the passwords are also encrypted and stored.
Whether the environment is in secured or unsecured mode, communication between Operations Center servers always involves transmitting the credentials in encrypted form and comparing them to the credential data stored on the remote Operations Center server.
The Operations Center server must trust its own certificate. Otherwise, the threads used to connect to itself fail and other applications, such as the dashboard, cannot log in.
Figure 3‐5 illustrates how communication between Operations Center servers transmits credentials in encrypted form:
Figure 3-5 Encryption Between Operations Center servers
Upon successful authentication, the Operations Center server is allowed access to the remote Operations Center server based on its assigned levels of access, as defined in the Operations Center access control lists.
In some cases, organizations place Operations Center servers outside the firewall and leverage their firewalls to ensure more secure communications.
3.3.2 Operations Center Server to Remote Management System Operations Center uses adapter and ORB technology to establish connections and interactions with third‐party management systems. Adapters are configured with a one‐to‐one relationship, where one adapter talks to a specific management system either directly or through an ORB. See the Operations Center 5.0 Adapter and Integration Guide for details on creating and configuring adapters and ORBs. Operations Center adapters and ORBs are identified by their credentials and optionally by a trusted list of IP addresses. This combination identifies the Operations Center adapters and ORBs from which the server accepts and process information requests.
When a management system does not require an ORB, the Operations Center adapter passes its credentials along with the information requests to the remote management system.
When a management system requires an ORB, the Operations Center administrator must configure both a Operations Center adapter and a Operations Center ORB.
Operations Center ORBs execute using their own credentials. When configuring an ORB, the Operations Center ORB administrator defines the ORB’s credentials (such as a service account and password, if needed). These credentials are sometimes used to assign rights in the remote management system. The ORB’s credentials are encrypted and stored locally with the Operations Center server, and are passed to the ORB when making a connection.
When configuring an adapter that uses an ORB for management system communication, the Operations Center administrator typically defines in the Operations Center server the ORB’s credentials and its location on the network (such as the IP address). The ORB credentials are stored
Operations CenterAdapter
Operations CenterServer
Operations CenterAdapter
Operations CenterServer
Encrypted
Identification and Authentication 41

on the Operations Center server and the password is encrypted and stored. An ORB can be configured to only accept a connection from a single IP address, to further insulate its possible connection paths.
When communicating with an ORB, the Operations Center adapter transmits the ORB’s credentials to the ORB in an encrypted format. The ORB authenticates the credentials and processes the request. Communication between the adapter and the ORB is accomplished using CORBA APIs.
Figure 3-6 Encryption Between Operations Center server and ORB
Operations Center uses adapter and ORB technology to establish connections and interactions with third‐party management systems.
When a Operations Center ORB accepts a request from a Operations Center server through its adapter, it passes its credentials along with the information requests to the remote management system. Communication between the ORB and the remote management system is accomplished by using the management platform’s defined API or database connection.
3.3.3 Operations Center Server to Web Server I&AOperations Center uses Apache Tomcat as its internal Web server, but Operations Center does not use Tomcat’s authentication. Operations Center prompts users to provide their credentials to access the Operations Center server. The Operations Center session is maintained within the HTTP session.
3.3.4 Operations Center Server to Database I&AOperations Center uses database management systems (DBMS) for several purposes:
To store system configuration dataTo store historical alarm (including audit alarms) and performance dataTo store portal configuration data
The interface between the DBMS and Operations Center engine consists of Java Database Connectivity (JDBC) API calls.
Operations Center uses Windows authentication when communicating with a third party DBMS on the Windows platforms.
For information on how to configure Single Sign On (SSO) for Operations Center databases, see “Configuring and Administering the Database” in the Operations Center 5.0 Server Configuration Guide.
3.3.5 Operations Center server to SQL Views and Web ServicesWhen using SQL Views, the Operations Center user ID and password are used to access data. The data is transferred unencrypted between the requesting application and SQL Views.
Operations CenterAdapter
Operations CenterServer
ORB
ORBCredentials
Encrypted
42 Operations Center 5.0 Security Management Guide
4 4Access Control
Access control determines who can access Novell® Operations Center components and determines the permission level to interact with the various components. This section describes the following aspects of access control:
Section 4.1, “Security Mechanisms for Access Control,” on page 43Section 4.2, “Accessing Servers,” on page 46Section 4.3, “Viewing the Access Control Hierarchy,” on page 46Section 4.4, “Access Privileges Overview,” on page 47Section 4.5, “Assigning Access Privileges,” on page 48Section 4.6, “Access Control Affects Different Views,” on page 53Section 4.7, “Importing and Exporting User, Group, and Access Control Information,” on page 55Section 4.8, “Metamodel Access Control,” on page 55Section 4.9, “Service Models Access Control,” on page 64Section 4.10, “Setting Security on Graphic Elements,” on page 64Section 4.11, “Feature‐Specific Access Control,” on page 65
4.1 Security Mechanisms for Access ControlOperations Center provides three mechanisms for access control:
Section 4.1.1, “Operations Center Administrator Account,” on page 43Section 4.1.2, “Operations Center Security Manager,” on page 44Section 4.1.3, “Delegated Administration,” on page 45
4.1.1 Operations Center Administrator AccountThe Operations Center Administrator user account has supreme administrative authority within the Operations Center environment. Operations Center installs with a default Administrator account and password. You can change the password for the Operations Center administrator through the Operations Server console. In fact, it is strongly recommended that the administrator change the password immediately after logging into the system for the first time.
If the external identification and authentication option is deployed, the Operations Center Administrator account remains independent of the external LDAP authentication methods. This enables the Operations Center administrator to log in to Operations Center even if the Operations Center server is configured to use an I&A module other than its native I&A method. This ensures that the Operations Center administrator can perform critical Operations Center administrative functions even if the external I&A mechanism is changed or becomes dysfunctional.
Access Control 43
If the Business Service Dashboard component is deployed, the Operations Center Administrator account has supreme authority in the dashboard environment as well.
The Operations Center software Administrator account uses a standard default password. To prevent unauthorized access to Operations Center software by other users, you should change the administrator’s password to a new password known only to you.
To change the Administrator password:
1 Click File > Change Password.2 In the Change Password dialog box, enter the new password in the New password and New password (again) fields.
3 Click OK.The password is updated.
4.1.2 Operations Center Security ManagerUser names, passwords, and security permissions must be specified to allow access to the Operations Center environment.
The Operations Center Security Manager manages all authorization data and enforces access control. Access control is defined by using access control lists (ACLs) similar to those that exist in common operating systems. You can grant or deny users and groups of users permissions to elements managed by Operations Center. Defining access privileges for elements is explained in Section 4.5, “Assigning Access Privileges,” on page 48.
A summary of the Operations Center permissions is listed below. The privileges are not cumulative. For example, both View and Manage permissions must be assigned to a user to enable the user to view elements and their properties, and also to change the property values or add new custom properties.
Permissions can be granted or denied. Deny permissions take precedence.
View: The user can view elements and related components such as property sheets and alarms.Access: The user can connect to remote elements managed in the Operations Center environment, including elements on remote servers.Manage: The user can perform update actions such as editing property pages, creating custom properties on an element, acknowledging or clearing alarms, and performing nonintrusive actions such as Ping or TraceRoute.Define: The user can perform administrative tasks such as adding, removing or changing scripts, sites, and administrative elements such as calendars, jobs, automations, and operations, as well as creating and changing the definition of adapters, service model elements and SLAs.
Operations Center is constructed much like an X.500 directory in that it allows you to set permissions at any level of the element hierarchy and have those permissions automatically inherited by child elements in the hierarchy. You can revoke permissions at any level of the hierarchy and prevent inheritance from continuing through the hierarchy. When an element is assigned explicit permissions, it no longer automatically inherits from its parents.
44 Operations Center 5.0 Security Management Guide
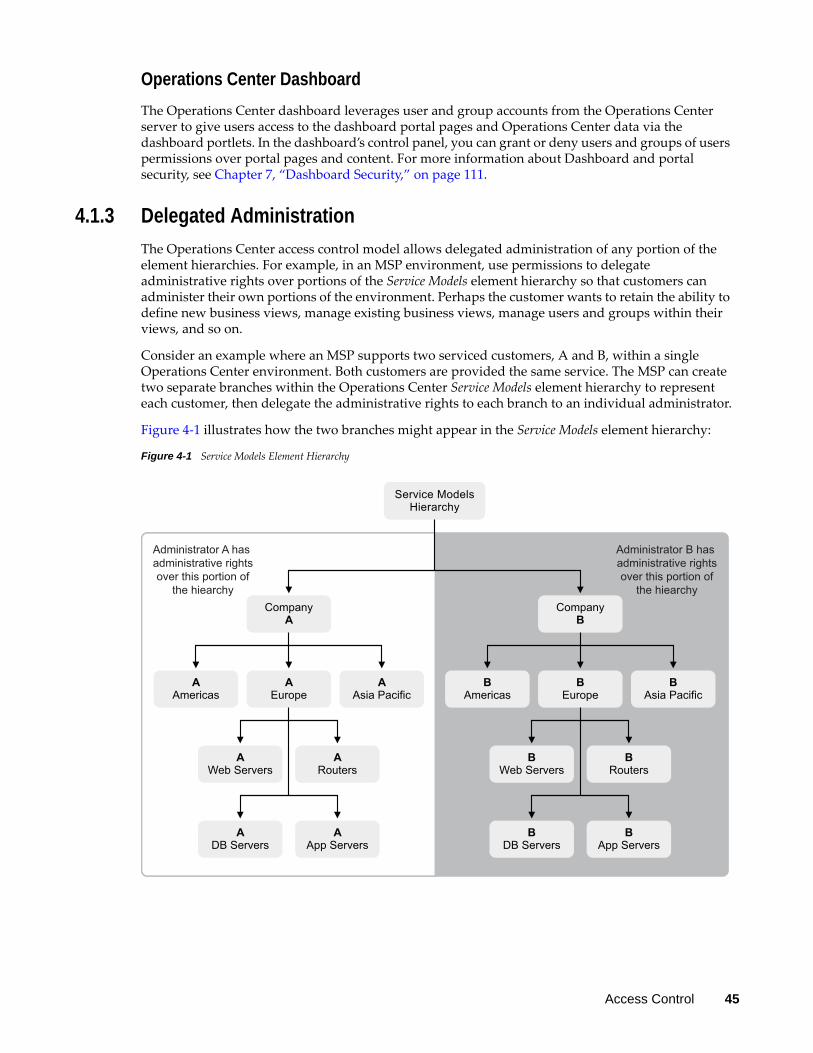
Operations Center DashboardThe Operations Center dashboard leverages user and group accounts from the Operations Center server to give users access to the dashboard portal pages and Operations Center data via the dashboard portlets. In the dashboard’s control panel, you can grant or deny users and groups of users permissions over portal pages and content. For more information about Dashboard and portal security, see Chapter 7, “Dashboard Security,” on page 111.
4.1.3 Delegated AdministrationThe Operations Center access control model allows delegated administration of any portion of the element hierarchies. For example, in an MSP environment, use permissions to delegate administrative rights over portions of the Service Models element hierarchy so that customers can administer their own portions of the environment. Perhaps the customer wants to retain the ability to define new business views, manage existing business views, manage users and groups within their views, and so on.
Consider an example where an MSP supports two serviced customers, A and B, within a single Operations Center environment. Both customers are provided the same service. The MSP can create two separate branches within the Operations Center Service Models element hierarchy to represent each customer, then delegate the administrative rights to each branch to an individual administrator.
Figure 4‐1 illustrates how the two branches might appear in the Service Models element hierarchy:
Figure 4-1 Service Models Element Hierarchy
Service ModelsHierarchy
CompanyA
CompanyB
AEurope
AAmericas
AAsia Pacific
AWeb Servers
ARouters
ADB Servers
AApp Servers
BWeb Servers
BRouters
BDB Servers
BApp Servers
BEurope
BAmericas
BAsia Pacific
Administrator A has administrative rightsover this portion of
the hiearchy
Administrator B has administrative rightsover this portion of
the hiearchy
Access Control 45

4.2 Accessing ServersAccess to Operations Center servers requires administrative privileges as well as a valid admin user ID and password, and knowledge of the correct URL to the server. Having access to the Operations Center server enables configuring the server components through the Configuration Manager. Edit the /OperationsCenter_install_path/config/Formula.custom.properties file to configure environment settings that cannot be configured with the Configuration Manager.
A separate administration console is used to manage the Image server, which is a key component of the Business Server Dashboard. It allows the dashoard to render dynamic and 3D charts including performance and geographic information.
The Image Server Administration Console is accessible through a Web browser, but requires a URL and password. Use the Image Server Administration Console to perform tasks such as setting security permissions (important in a multi‐homed server environment) and changing the admin password for the Image Server Console. The security settings include setting allowable URLs for the Image server, including valid IP addresses or hostnames. If you are operating in a multi‐homed server environment, add all servers to the PathMaps code. See the Operations Center 5.0 Server Configuration Guide for details.
4.3 Viewing the Access Control HierarchyAn Access Control hierarchy located under the Administration root element lists all objects in the Operations Center environment. Access control settings are defined through this hierarchy.
To view the Access Control hierarchy in the Operations Server console:
1 In the Explorer pane, expand the Administration root element > Security > Access Control.The Access Control hierarchy replicates the entire element hierarchy for the purpose of assigning access control privileges:
Figure 4-2 Explorer Pane
2 Bookmark the Access Control hierarchy to avoid confusing it with the Elements hierarchy.
46 Operations Center 5.0 Security Management Guide
4.4 Access Privileges OverviewAccess privileges are integral to presenting users with their views of data. Users can view only those elements and menu options for which they have a View permission.
In general, it is efficient to define access privileges for groups, then assign users to the groups, and finally customize the access privileges for individual users, if necessary.
Section 4.4.1, “Access Permissions,” on page 47Section 4.4.2, “Permission Inheritance,” on page 47
4.4.1 Access PermissionsWhen determining access permissions, the server first checks to see if the element has permissions set for a user or group. Three types of permission are possible:
Positive: Grants the user permissions for an objectNull: Permissions have no effect on user access for an objectDeny: Permissions override the inheritance of a granted permission
Individual user permissions always override the privileges of the groups to which the user belongs. If a group is denied access to an object, but a user who is a group member is granted access, that user can access the object. Conversely, if the group can access an object, but a group member is denied access, that user cannot access the object. If a user holds a null permission and is a member of two or more groups with conflicting permissions, deny permissions take precedence.
Access privileges can be granted for specific elements at any level of the element hierarchy. For example, a user can have access to view a server that is connected to the network, but can be denied access to any other network components. Access control can be assigned to the Administration, Elements, Generational Models, Locations, Services, and Service Models hierarchies.
Perform the following steps to assign access privileges:
1 Create groups, but do not assign users to them yet.2 Go through the element hierarchy and assign access privileges to different groups.3 Assign users to groups.4 Assign different access privileges for specific elements to individual users in groups.
4.4.2 Permission InheritanceBy default, the privileges assigned to higher levels of a hierarchy are automatically inherited by the lower levels of the hierarchy. However, it is possible to set different permissions on a lower‐level element and have those permissions flow down the hierarchy.
If there is no defined permission for a requested element, then security processing moves up the hierarchy until it locates a defined permission. In ascending the hierarchy, the first permission granting or denying permission takes precedence. However if a user is a member of two or more groups with conflicting permissions at the same level in the element hierarchy, the Deny permissions take precedence.
Access Control 47
4.5 Assigning Access PrivilegesAccess privileges can be viewed and modified in the Operations Server console.
It is helpful to consider a user’s role in the organization when assigning access privileges to element hierarchies and/or individual elements. The following primary roles can be subdivided into additional categories if necessary to match your organization:
System Administrator: Responsible for configuring and maintaining the Operations Center environment, including:
Defining adapter connections to key components such as databases and remote management systems Defining service model hierarchies, automations, and operations, Defining custom classes, behavior models, and property pagesDefining calendars, schedules, and jobsCreating custom SQL Views viewsCreating Layout viewsDetermining which users should have access to specific element hierarchies
Security Manager: Responsible for enforcing company security policies regarding user access to the system, user identification and authorization, password rules, access privileges, and so on. Also responsible for managing users and groups and enforcing password policies and rules.End Users: Responsible for analyzing and reporting information collected in Operations Center from various sources. You should organize users who have similar authorization to access data into groups, such as by job function or security clearance level.
Special considerations apply to assigning access privileges to elements in the Access Control hierarchy and to the Groups and Users listed under the Security element. The following sections discuss these considerations:
Section 4.5.1, “Assigning Privileges to Elements,” on page 48Section 4.5.2, “Inheriting Access Privileges,” on page 52Section 4.5.3, “Assigning Permissions to User and Group Elements,” on page 53
4.5.1 Assigning Privileges to ElementsWhen you select an element under Security, Access Control, the access privileges for users and groups display in the Access Control pane of the Portal view. Four distinct access privileges can be assigned: View, Manage, Access, and Define. A fifth option is to not define any access privileges.
“Understanding Access Control Privileges” on page 48“Assigning Group Access Privileges for an Element” on page 50“Assigning Different Privileges for an Individual User” on page 51
Understanding Access Control PrivilegesThe View, Manage, Access, and Define categories have one of three possible settings (see Figure 4‐3):
Granted: The user has the selected level of access to the elementDenied: The user explicitly does not have the selected level of access
48 Operations Center 5.0 Security Management Guide

Undefined (null/blank): The access level has not been defined.Use the Undefined setting to avoid conflicts, as explained in Table 4‐1.
Figure 4-3 Portal View Access Control Panel
Check marks identify rights that are granted to different user groups. An X explicitly denies a set of privileges to a user or group.
Table 4‐1 summarizes each level of access control privilege. The privileges are distinct, and not cumulative. For example, a user who has View but not Manage privileges can view elements, but cannot update their properties or acknowledge their alarms in the Operations Server console. For a user to have Access, Define, or Manage privileges on an element, they must also have View privileges.
Users must have View privileges to at least one element in the Operations Server console before they can log in to the Business Service Dashboard or the Console:
Table 4-1 Access Control Privileges
Access Privilege Description
View The user can view elements, as well as their alarms and properties, and relationships to other elements that the user can view.
Note for T/EC adapters: Any user with the View permission can suppress a T/EC alarm; however, this user cannot acknowledge or close the alarm.
Manage The user can perform nonintrusive actions (such as Ping or TraceRoute) as well as update element information (such as custom properties).
Note for T/EC adapters: Any user with the Manage permission can acknowledge or close a T/EC alarm.
Access The user can access remote managed elements by using “connect to” operations with adapters that support cut-through telnet such as the Event Manager, OpenView, and Netcool*. An example operation is using the Console capability in the Elements hierarchy.
Define The user can perform administrative tasks such as adding scripts, sites, and service model elements, as well as creating, deleting, and changing the definition of adapters, service models and SLAs in Operations Center.
Access Control 49
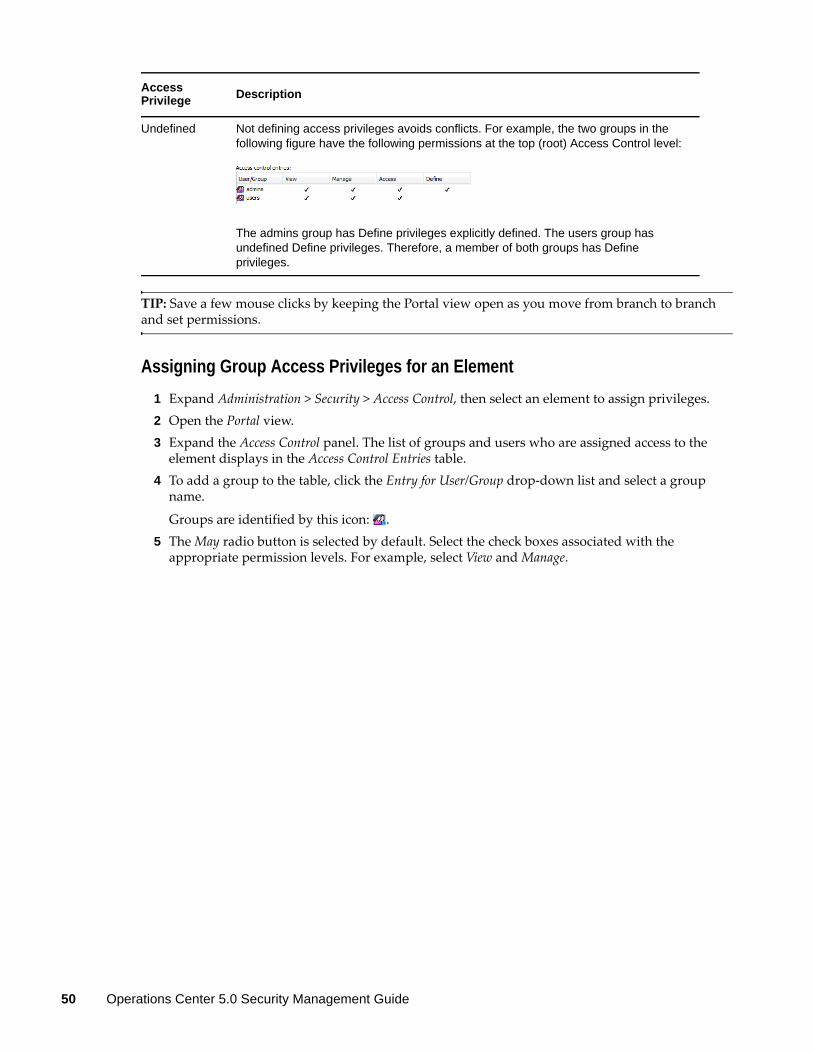
TIP: Save a few mouse clicks by keeping the Portal view open as you move from branch to branch and set permissions.
Assigning Group Access Privileges for an Element1 Expand Administration > Security > Access Control, then select an element to assign privileges.2 Open the Portal view.3 Expand the Access Control panel. The list of groups and users who are assigned access to the
element displays in the Access Control Entries table.4 To add a group to the table, click the Entry for User/Group drop‐down list and select a group
name.
Groups are identified by this icon: .5 The May radio button is selected by default. Select the check boxes associated with the
appropriate permission levels. For example, select View and Manage.
Undefined Not defining access privileges avoids conflicts. For example, the two groups in the following figure have the following permissions at the top (root) Access Control level:
The admins group has Define privileges explicitly defined. The users group has undefined Define privileges. Therefore, a member of both groups has Define privileges.
Access Privilege Description
50 Operations Center 5.0 Security Management Guide
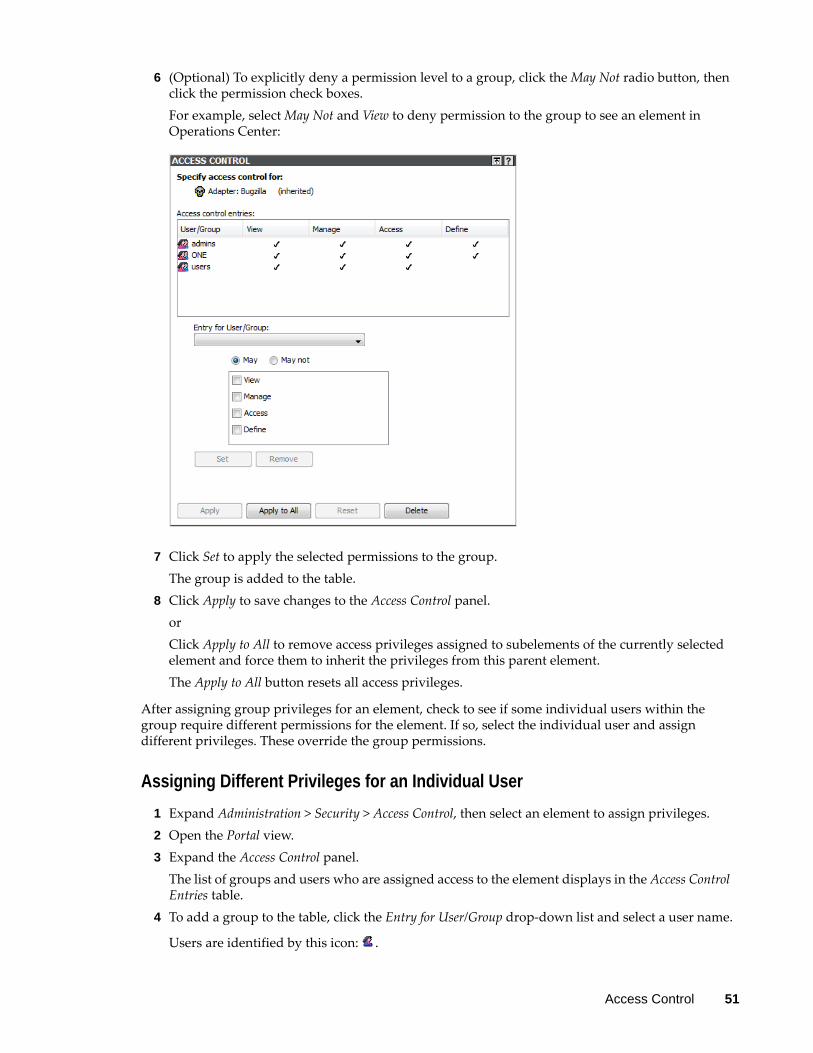
6 (Optional) To explicitly deny a permission level to a group, click the May Not radio button, then click the permission check boxes.For example, select May Not and View to deny permission to the group to see an element in Operations Center:
7 Click Set to apply the selected permissions to the group.The group is added to the table.
8 Click Apply to save changes to the Access Control panel.orClick Apply to All to remove access privileges assigned to subelements of the currently selected element and force them to inherit the privileges from this parent element.The Apply to All button resets all access privileges.
After assigning group privileges for an element, check to see if some individual users within the group require different permissions for the element. If so, select the individual user and assign different privileges. These override the group permissions.
Assigning Different Privileges for an Individual User1 Expand Administration > Security > Access Control, then select an element to assign privileges.2 Open the Portal view.3 Expand the Access Control panel.
The list of groups and users who are assigned access to the element displays in the Access Control Entries table.
4 To add a group to the table, click the Entry for User/Group drop‐down list and select a user name.
Users are identified by this icon: .
Access Control 51

5 The May radio button is selected by default. Select the check boxes associated with the appropriate permission levels. For example, select View and Access.
6 (Optional) To explicitly deny a permission level to a group, click the May Not radio button, then click the permission level check boxes.For example, select May Not and Manage to deny an individual the ability to update the element in Operations Center. Even if a group to which the user belongs has Manage privileges, the user‐level privilege prevails, so the user is denied Manage privileges:
This example shows user‐level privileges taking precedence over group privileges. The user tjones can view and access the element, but cannot manage it, even though the user belongs to the auditors group, which does have Manage privileges.
4.5.2 Inheriting Access PrivilegesBy default, every child element inherits permissions from its parent. The exception is if the child element is specifically assigned privileges that are different from its parent. Elements displayed in boldface in the Access Control hierarchy do not inherit access privileges from their parents. You should define general privileges for all groups and users before making individual assignments. This ensures that all levels properly inherit access privileges.
In Figure 4‐4, you can see at a glance that the bolded elements have different security settings than their parents:
Figure 4-4 Explorer Pane
52 Operations Center 5.0 Security Management Guide
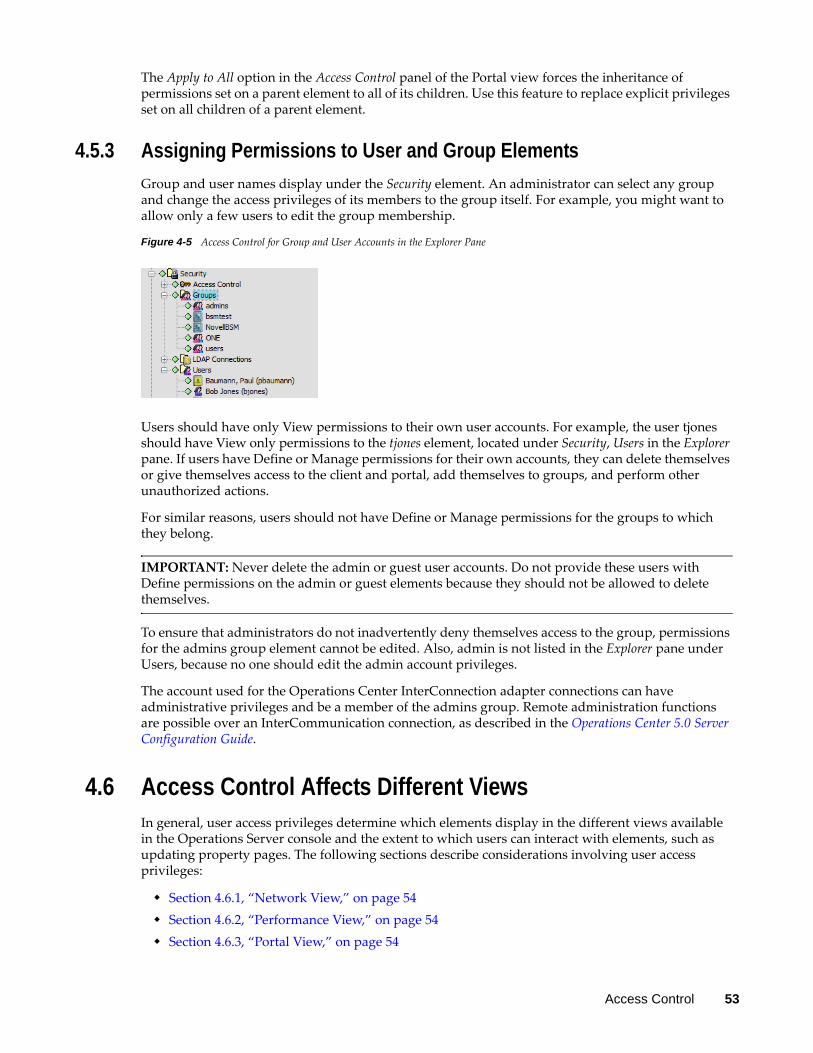
The Apply to All option in the Access Control panel of the Portal view forces the inheritance of permissions set on a parent element to all of its children. Use this feature to replace explicit privileges set on all children of a parent element.
4.5.3 Assigning Permissions to User and Group ElementsGroup and user names display under the Security element. An administrator can select any group and change the access privileges of its members to the group itself. For example, you might want to allow only a few users to edit the group membership.
Figure 4-5 Access Control for Group and User Accounts in the Explorer Pane
Users should have only View permissions to their own user accounts. For example, the user tjones should have View only permissions to the tjones element, located under Security, Users in the Explorer pane. If users have Define or Manage permissions for their own accounts, they can delete themselves or give themselves access to the client and portal, add themselves to groups, and perform other unauthorized actions.
For similar reasons, users should not have Define or Manage permissions for the groups to which they belong.
IMPORTANT: Never delete the admin or guest user accounts. Do not provide these users with Define permissions on the admin or guest elements because they should not be allowed to delete themselves.
To ensure that administrators do not inadvertently deny themselves access to the group, permissions for the admins group element cannot be edited. Also, admin is not listed in the Explorer pane under Users, because no one should edit the admin account privileges.
The account used for the Operations Center InterConnection adapter connections can have administrative privileges and be a member of the admins group. Remote administration functions are possible over an InterCommunication connection, as described in the Operations Center 5.0 Server Configuration Guide.
4.6 Access Control Affects Different Views In general, user access privileges determine which elements display in the different views available in the Operations Server console and the extent to which users can interact with elements, such as updating property pages. The following sections describe considerations involving user access privileges:
Section 4.6.1, “Network View,” on page 54Section 4.6.2, “Performance View,” on page 54Section 4.6.3, “Portal View,” on page 54
Access Control 53

Section 4.6.4, “Alarms View,” on page 54Section 4.6.5, “Layout View,” on page 55Section 4.6.6, “Relationship Browser,” on page 55
4.6.1 Network ViewThe Network view can be disabled so that users are unable to access it. See Disabling the Network and Layout Views in the Operations Center 5.0 Server Configuration Guide for instructions on doing this.
User access privileges determine which elements display in the Network view. Users must have View privileges to see the elements display in the Network view. If a user cannot see a specific element, check the element Access Control property page to see if the group to which the user belongs has View privileges.
4.6.2 Performance ViewThe Performance view has a file export feature that saves performance data as a comma‐separated text file. Users with View privileges can save the performance data.
For details on the Export command, see Charting Performance Data in the Operations Center 5.0 User Guide.
4.6.3 Portal ViewThe Portal view provides a comprehensive view and management gateway for each system element. Administrators find the Portal view is useful for system setup activities such as managing user permissions and setting up automated events or actions.
For users, access to the various panels and links displayed in the Portal view depends on the user’s access privileges. For example, only members of the Admins group can view the Access Control and Automation panels in the Portal view.
4.6.4 Alarms ViewAlarms are events associated with specific elements. You must have View privileges to an element to view its alarms in the Alarms view.
Figure 4-6 Sample Alarm Right‐Click Menu
The right‐click menu for alarms varies by adapter and management system. The ability to access some alarm operations requires appropriate user access privileges. In some cases, the access privileges are set using the adapter properties.
54 Operations Center 5.0 Security Management Guide

If an alarm operation is missing from the right‐click menu, check the specific adapter properties to see if the alarm operation display can be set.
4.6.5 Layout ViewThe Layout view can be disabled so that users are unable to access it. See the Disabling the Network and Layout Views in the Operations Center 5.0 Server Configuration Guide for instructions on doing this.
Only administrators should edit the Layout view. Users can navigate and analyze results. There is no mechanism to prevent users from editing the Layout view, but they should be discouraged from doing so.
4.6.6 Relationship BrowserThe Relationship browser provides advanced presentation features, increased visualization of element relationships, and enhanced navigation of hierarchical structures. See the Operations Center 5.0 Service Modeling Guide for information on the Relationship browser features.
Users must have a minimum of View security privileges to both elements in a relationship or else the relationship is not displayed in the Relationship browser. Furthermore, users must have a minimum of View security privileges to both the origin and end point elements in a relationship or the relationship is not displayed in the Relationship browser’s Explore Dependencies dialog box.
4.7 Importing and Exporting User, Group, and Access Control InformationUse the exportcfg and importcfg commands in the /OperationsCenter_install_path/bin directory to export and import ACLs in a Operations Center configuration. Administrator rights to access the Operations Center server are required and you must type your User ID and password as part of the export/import command syntax.
See “Backing Up, Copying, and Restoring Configurations” the Operations Center 5.0 Server Configuration Guide for details on the exportcfg and importcfg command syntax.
4.8 Metamodel Access Control Access rights can be set on all metamodel elements, including classes, behavior models, and property pages. For more information on creating Metamodel elements, see the Operations Center 5.0 Service Modeling Guide.
Access rights to Service Model elements is discussed in Section 4.9, “Service Models Access Control,” on page 64.
Figure 4-7 Metamodel Elements in the Explorer Pane
Access Control 55
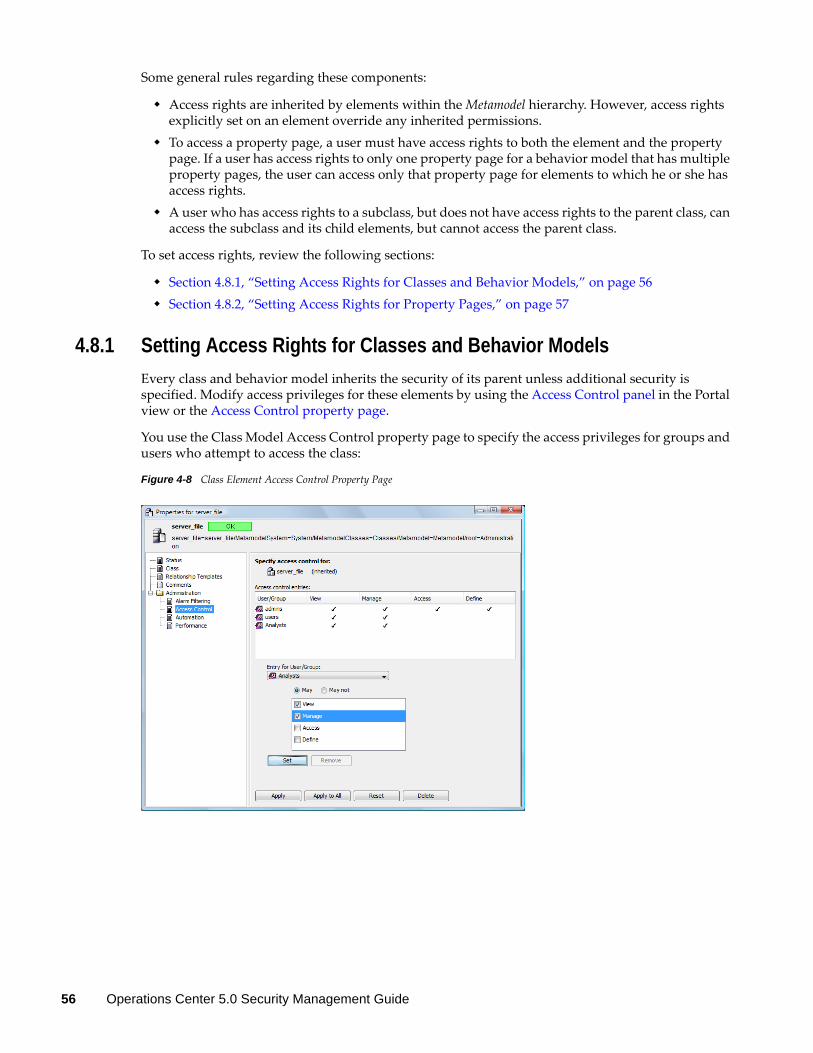
Some general rules regarding these components:
Access rights are inherited by elements within the Metamodel hierarchy. However, access rights explicitly set on an element override any inherited permissions. To access a property page, a user must have access rights to both the element and the property page. If a user has access rights to only one property page for a behavior model that has multiple property pages, the user can access only that property page for elements to which he or she has access rights. A user who has access rights to a subclass, but does not have access rights to the parent class, can access the subclass and its child elements, but cannot access the parent class.
To set access rights, review the following sections:
Section 4.8.1, “Setting Access Rights for Classes and Behavior Models,” on page 56Section 4.8.2, “Setting Access Rights for Property Pages,” on page 57
4.8.1 Setting Access Rights for Classes and Behavior ModelsEvery class and behavior model inherits the security of its parent unless additional security is specified. Modify access privileges for these elements by using the Access Control panel in the Portal view or the Access Control property page.
You use the Class Model Access Control property page to specify the access privileges for groups and users who attempt to access the class:
Figure 4-8 Class Element Access Control Property Page
56 Operations Center 5.0 Security Management Guide
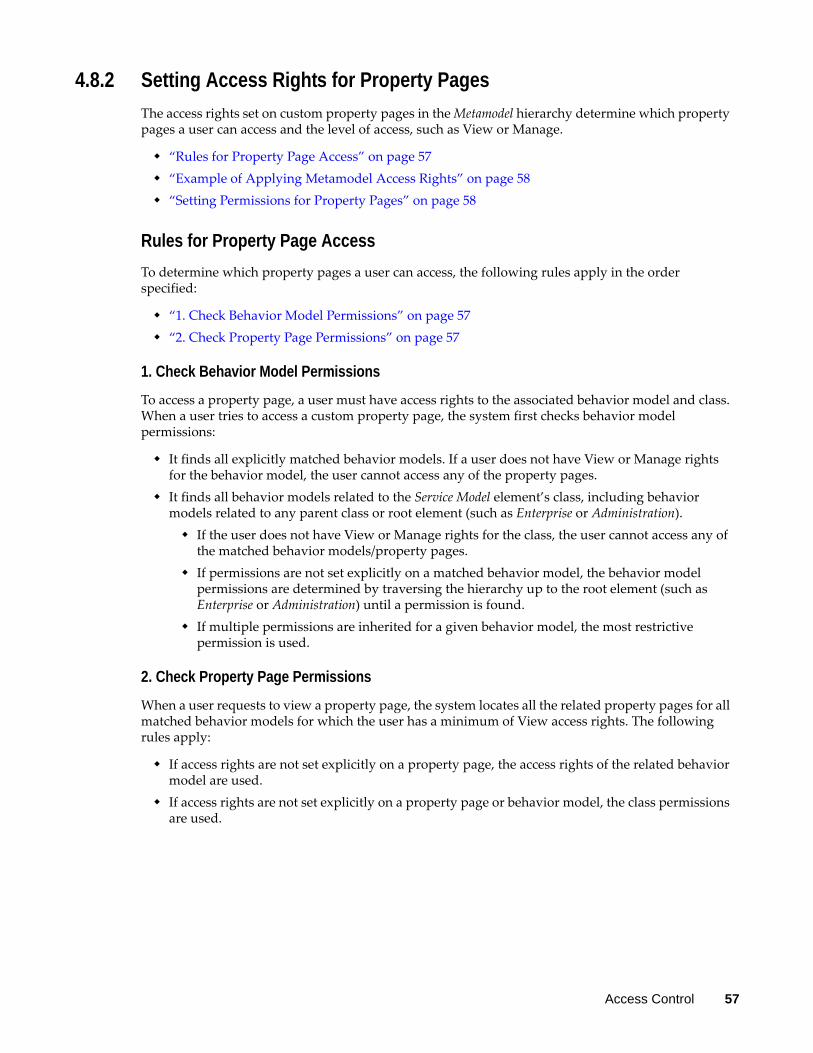
4.8.2 Setting Access Rights for Property PagesThe access rights set on custom property pages in the Metamodel hierarchy determine which property pages a user can access and the level of access, such as View or Manage.
“Rules for Property Page Access” on page 57“Example of Applying Metamodel Access Rights” on page 58“Setting Permissions for Property Pages” on page 58
Rules for Property Page AccessTo determine which property pages a user can access, the following rules apply in the order specified:
“1. Check Behavior Model Permissions” on page 57“2. Check Property Page Permissions” on page 57
1. Check Behavior Model PermissionsTo access a property page, a user must have access rights to the associated behavior model and class. When a user tries to access a custom property page, the system first checks behavior model permissions:
It finds all explicitly matched behavior models. If a user does not have View or Manage rights for the behavior model, the user cannot access any of the property pages.It finds all behavior models related to the Service Model element’s class, including behavior models related to any parent class or root element (such as Enterprise or Administration).
If the user does not have View or Manage rights for the class, the user cannot access any of the matched behavior models/property pages.If permissions are not set explicitly on a matched behavior model, the behavior model permissions are determined by traversing the hierarchy up to the root element (such as Enterprise or Administration) until a permission is found.If multiple permissions are inherited for a given behavior model, the most restrictive permission is used.
2. Check Property Page PermissionsWhen a user requests to view a property page, the system locates all the related property pages for all matched behavior models for which the user has a minimum of View access rights. The following rules apply:
If access rights are not set explicitly on a property page, the access rights of the related behavior model are used.If access rights are not set explicitly on a property page or behavior model, the class permissions are used.
Access Control 57

Example of Applying Metamodel Access Rights It might be helpful to step through an example showing how inherited access rights apply to different types of metamodel components. Custom property pages can be assigned to elements in the Service Models hierarchy. Inherited access rights from the relevant class and behavior model apply to the custom property pages that are attached to a service model element.
Assume the Service Models hierarchy is as follows:
Service ModelsRouter2 (Not matched using the Routers behavior model)Routers
Router1 (Matched using the Routers behavior model)
Table 4‐2 lists the access rights for two groups of users for a class, behavior model, and custom property page:
Table 4-2 Access Rights for IT Managers and Users
These settings have different results when different users try to access a router class element’s property pages:
When an IT Manager accesses the Router1 or Router2 element, the Router Leasing property page displays and the user can enter new property values. This is because access rights are not set explicitly on a property page, so the Define behavior model permissions are used.When an IT user accesses Router1 or Router2, the Router Leasing property page displays, but users are not allowed to update the property values. This is because access rights are not set explicitly on a property page, so the View behavior model permissions are used.When users who are not IT managers or IT users access Router1 or Router2, they do not see any of the Router Leasing property pages. This is because View or Manage rights for the Router class are not defined for any other user groups. These other users cannot access any of the matched Routers behavior models/property pages.
Setting Permissions for Property PagesAnother security parameter specifies access rights to different users or groups who access a custom property page. For example, you can allow any user to view a property page, but allow only specific groups to edit/update the properties.
The following steps describe two scenarios for the process you can use to establish different property page permissions:
“Scenario 1: Creating a Custom Property Page with Properties” on page 59“Scenario 1: Modifying the Access Privileges for the Property Page” on page 60“Scenario 2: General Steps” on page 61“Scenario 2: Creating the Master Property Page” on page 61
Access Rights Set On For IT Managers For IT Users
Class - Router Define View
Behavior Model – Routers Define View
Property Page – Leasing None None
58 Operations Center 5.0 Security Management Guide
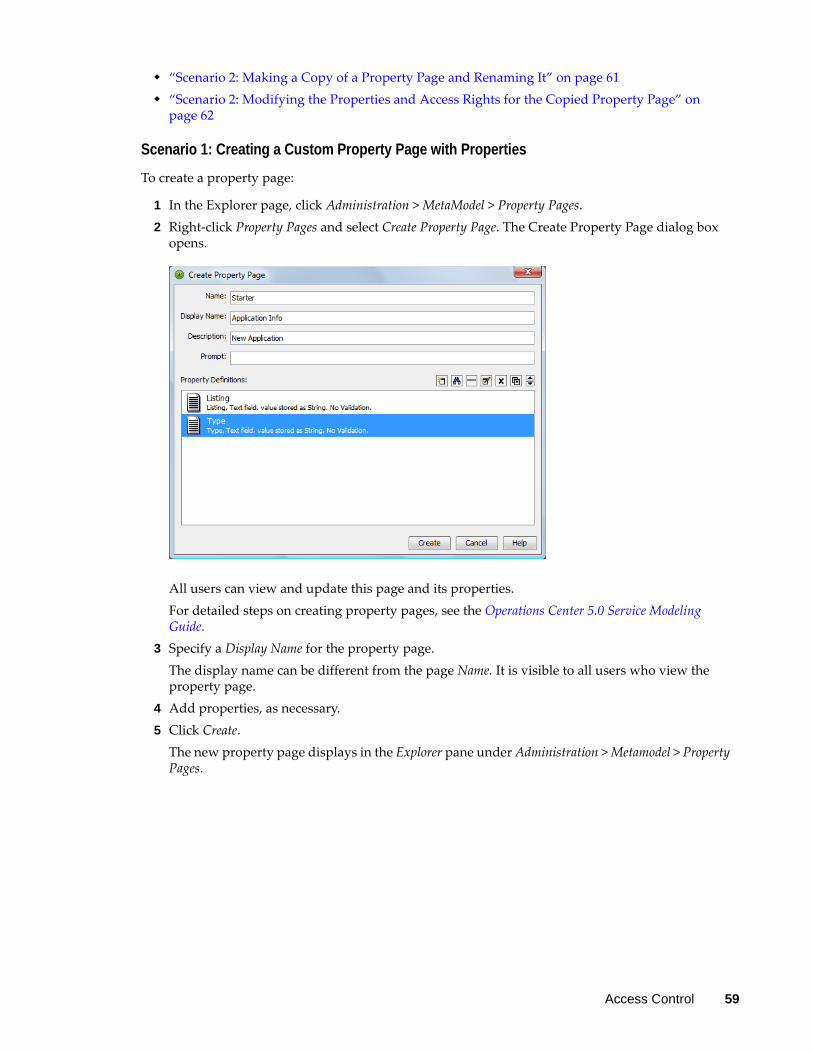
“Scenario 2: Making a Copy of a Property Page and Renaming It” on page 61“Scenario 2: Modifying the Properties and Access Rights for the Copied Property Page” on page 62
Scenario 1: Creating a Custom Property Page with PropertiesTo create a property page:
1 In the Explorer page, click Administration > MetaModel > Property Pages.2 Right‐click Property Pages and select Create Property Page. The Create Property Page dialog box
opens.
All users can view and update this page and its properties.For detailed steps on creating property pages, see the Operations Center 5.0 Service Modeling Guide.
3 Specify a Display Name for the property page.The display name can be different from the page Name. It is visible to all users who view the property page.
4 Add properties, as necessary.5 Click Create.
The new property page displays in the Explorer pane under Administration > Metamodel > Property Pages.
Access Control 59
Scenario 1: Modifying the Access Privileges for the Property PageTo modify access privileges for the property page:
1 Right‐click the property page that you just created and select Properties.2 In the left pane, click Access Control.
The inherited permissions for the property page display in the right pane:
3 Modify the access rights for the new property page. For example, select a group and specify View or Manage only to establish read‐only or read‐write access to the associated properties.Editing the Access Control property page is the same as editing an element’s access control page, described in Section 4.5.1, “Assigning Privileges to Elements,” on page 48.
4 Click Apply.
60 Operations Center 5.0 Security Management Guide
Scenario 2: General StepsA variation of Scenario 1 is to establish different access rights for multiple properties on the same property page. For example, Group A can update two properties but only view the remaining properties. Group B can update one property but not view any other properties.
To manage this scenario, you need to create variations of a property page for each group of intended users. The general steps are:
1 Create the property page with all properties.2 Use the Copy, Paste, and Rename commands to create additional pages.3 To modify these pages for each intended user group, modify or remove properties, then set the
access control rights to the property page.4 Create a behavior model and add each property page. The intended users for each property
page have access as defined for the properties on the property pages.Create a behavior model and add each property page. The intended users for each property page have access as defined for the properties on the property pages.
Scenario 2: Creating the Master Property PageTo create the master property page:
1 Create a property page or use the property page created in the previous scenario.2 Specify a display name for the property page that you want to display to all users. This name
does not change among the copied property pages that you will create.3 Add all properties relevant to the property page.4 Click Create.
The new property page displays in the Explorer pane under Administration > Metamodel > Property Pages.
By default, the new property page inherits the access control rights set for its parent, the Property Pages element. To change the access rights for the new property page, see Section 4.5.1, “Assigning Privileges to Elements,” on page 48.
Scenario 2: Making a Copy of a Property Page and Renaming ItNow use the Copy and Paste commands to create a variation of this property page. You can then change the properties and access rights to the page.
To make a copy of the property page and rename it:
1 In the Explorer pane, right‐click the new property page and select Copy.2 Right‐click the Property Pages element and select Paste. The copied property page has the same
name as the original, with (1) appended.
Access Control 61

3 Right‐click the copied page and select Rename.
Specify the new name and click OK. The new name displays.
Use a name that identifies the intended users, to help you identify the appropriate properties to use on the property page.
Scenario 2: Modifying the Properties and Access Rights for the Copied Property Page1 Right‐click the copied property page and select Properties. The property pages display.2 Remove or modify the properties that you want to display to intended users.
For example, if the Auditors group should not view some properties, remove them from this property page. Leave the properties that they can edit.Do not modify the Display Name. This maintains a link to the original property page.
62 Operations Center 5.0 Security Management Guide
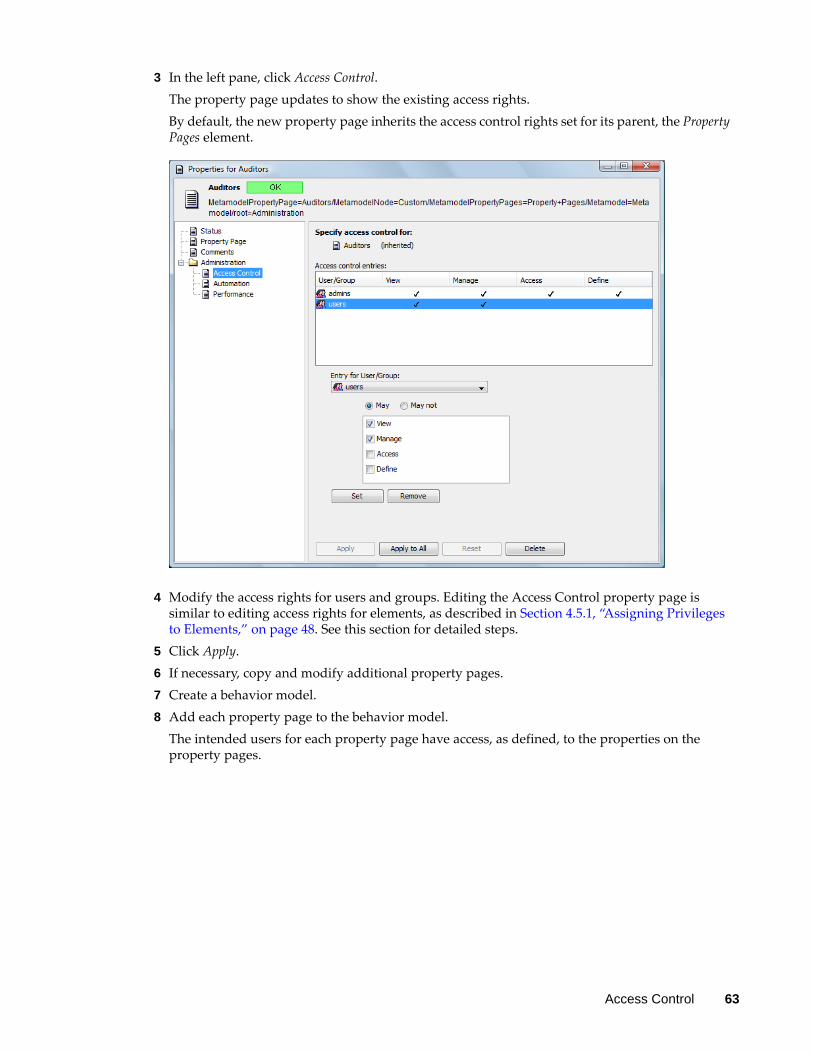
3 In the left pane, click Access Control.The property page updates to show the existing access rights.By default, the new property page inherits the access control rights set for its parent, the Property Pages element.
4 Modify the access rights for users and groups. Editing the Access Control property page is similar to editing access rights for elements, as described in Section 4.5.1, “Assigning Privileges to Elements,” on page 48. See this section for detailed steps.
5 Click Apply.6 If necessary, copy and modify additional property pages.7 Create a behavior model.8 Add each property page to the behavior model.
The intended users for each property page have access, as defined, to the properties on the property pages.
Access Control 63
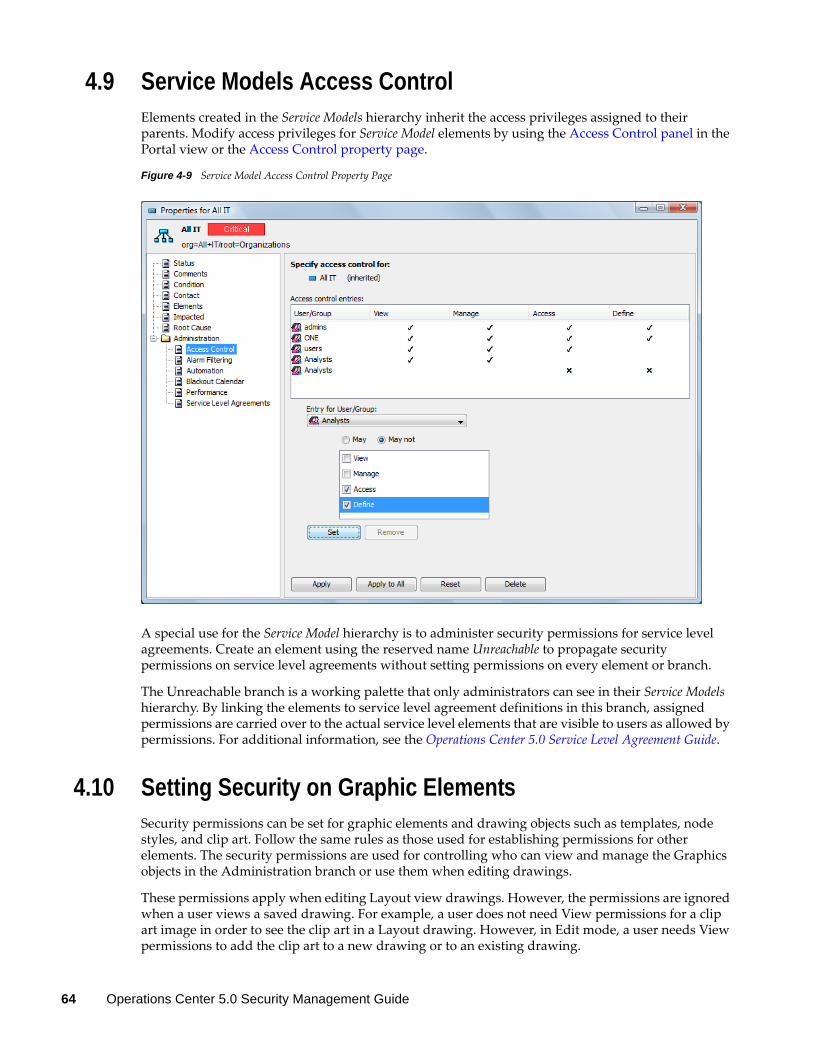
4.9 Service Models Access ControlElements created in the Service Models hierarchy inherit the access privileges assigned to their parents. Modify access privileges for Service Model elements by using the Access Control panel in the Portal view or the Access Control property page.
Figure 4-9 Service Model Access Control Property Page
A special use for the Service Model hierarchy is to administer security permissions for service level agreements. Create an element using the reserved name Unreachable to propagate security permissions on service level agreements without setting permissions on every element or branch.
The Unreachable branch is a working palette that only administrators can see in their Service Models hierarchy. By linking the elements to service level agreement definitions in this branch, assigned permissions are carried over to the actual service level elements that are visible to users as allowed by permissions. For additional information, see the Operations Center 5.0 Service Level Agreement Guide.
4.10 Setting Security on Graphic ElementsSecurity permissions can be set for graphic elements and drawing objects such as templates, node styles, and clip art. Follow the same rules as those used for establishing permissions for other elements. The security permissions are used for controlling who can view and manage the Graphics objects in the Administration branch or use them when editing drawings.
These permissions apply when editing Layout view drawings. However, the permissions are ignored when a user views a saved drawing. For example, a user does not need View permissions for a clip art image in order to see the clip art in a Layout drawing. However, in Edit mode, a user needs View permissions to add the clip art to a new drawing or to an existing drawing.
64 Operations Center 5.0 Security Management Guide
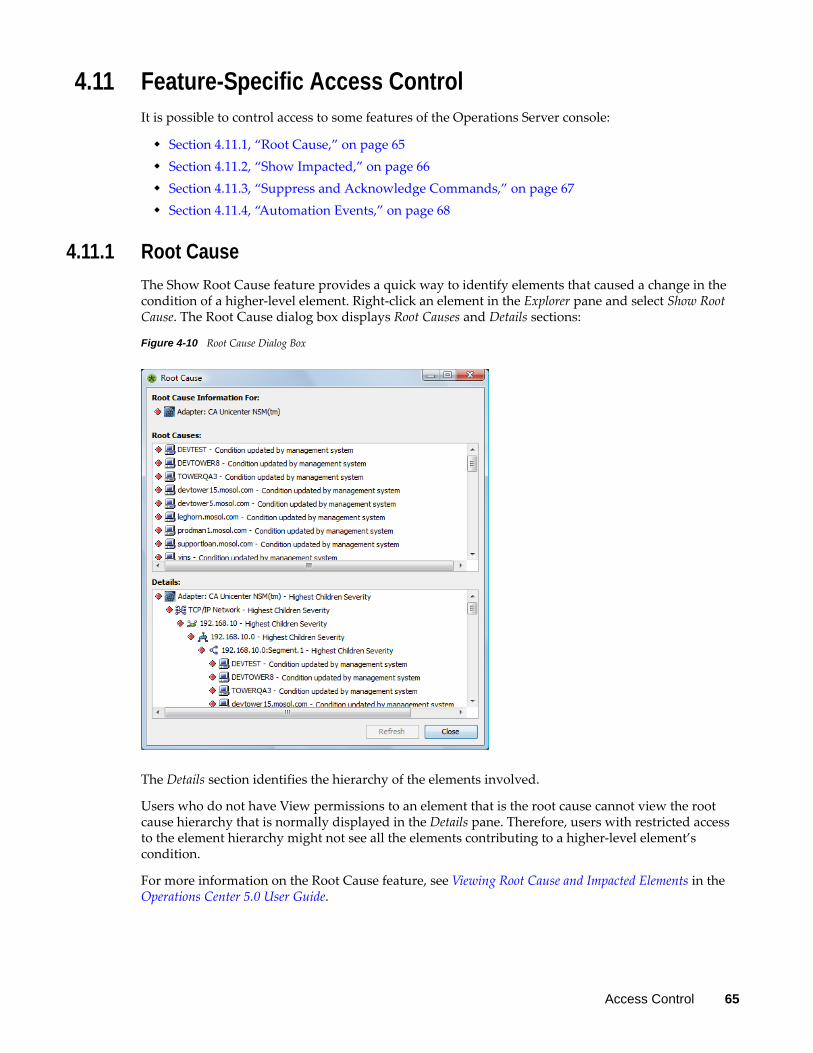
4.11 Feature-Specific Access Control It is possible to control access to some features of the Operations Server console:
Section 4.11.1, “Root Cause,” on page 65Section 4.11.2, “Show Impacted,” on page 66Section 4.11.3, “Suppress and Acknowledge Commands,” on page 67Section 4.11.4, “Automation Events,” on page 68
4.11.1 Root CauseThe Show Root Cause feature provides a quick way to identify elements that caused a change in the condition of a higher‐level element. Right‐click an element in the Explorer pane and select Show Root Cause. The Root Cause dialog box displays Root Causes and Details sections:
Figure 4-10 Root Cause Dialog Box
The Details section identifies the hierarchy of the elements involved.
Users who do not have View permissions to an element that is the root cause cannot view the root cause hierarchy that is normally displayed in the Details pane. Therefore, users with restricted access to the element hierarchy might not see all the elements contributing to a higher‐level element’s condition.
For more information on the Root Cause feature, see Viewing Root Cause and Impacted Elements in the Operations Center 5.0 User Guide.
Access Control 65
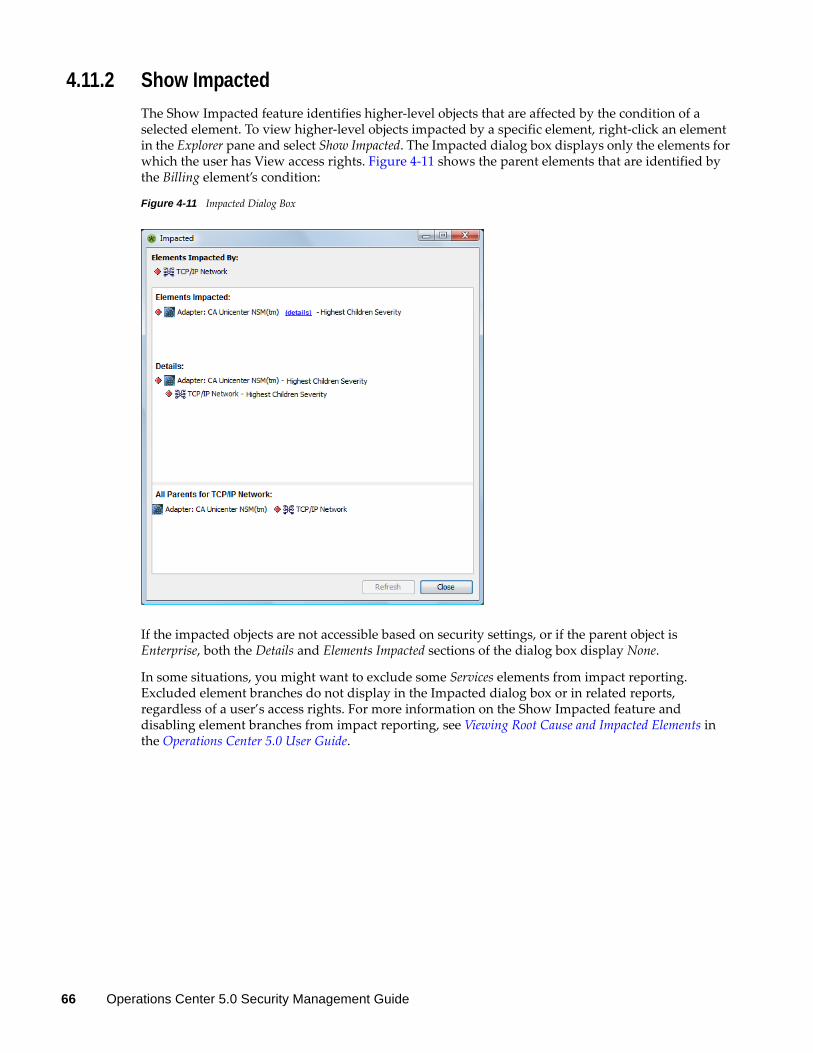
4.11.2 Show ImpactedThe Show Impacted feature identifies higher‐level objects that are affected by the condition of a selected element. To view higher‐level objects impacted by a specific element, right‐click an element in the Explorer pane and select Show Impacted. The Impacted dialog box displays only the elements for which the user has View access rights. Figure 4‐11 shows the parent elements that are identified by the Billing element’s condition:
Figure 4-11 Impacted Dialog Box
If the impacted objects are not accessible based on security settings, or if the parent object is Enterprise, both the Details and Elements Impacted sections of the dialog box display None.
In some situations, you might want to exclude some Services elements from impact reporting. Excluded element branches do not display in the Impacted dialog box or in related reports, regardless of a user’s access rights. For more information on the Show Impacted feature and disabling element branches from impact reporting, see Viewing Root Cause and Impacted Elements in the Operations Center 5.0 User Guide.
66 Operations Center 5.0 Security Management Guide
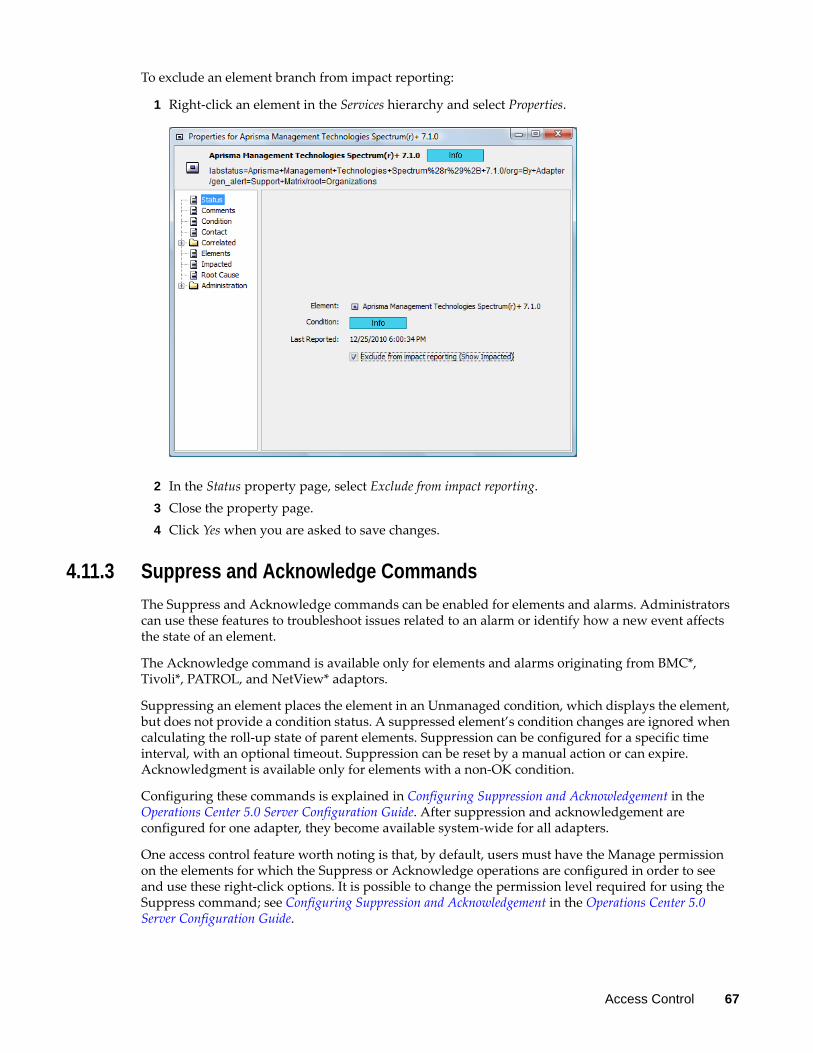
To exclude an element branch from impact reporting:
1 Right‐click an element in the Services hierarchy and select Properties.
2 In the Status property page, select Exclude from impact reporting.3 Close the property page.4 Click Yes when you are asked to save changes.
4.11.3 Suppress and Acknowledge CommandsThe Suppress and Acknowledge commands can be enabled for elements and alarms. Administrators can use these features to troubleshoot issues related to an alarm or identify how a new event affects the state of an element.
The Acknowledge command is available only for elements and alarms originating from BMC*, Tivoli*, PATROL, and NetView* adaptors.
Suppressing an element places the element in an Unmanaged condition, which displays the element, but does not provide a condition status. A suppressed element’s condition changes are ignored when calculating the roll‐up state of parent elements. Suppression can be configured for a specific time interval, with an optional timeout. Suppression can be reset by a manual action or can expire. Acknowledgment is available only for elements with a non‐OK condition.
Configuring these commands is explained in Configuring Suppression and Acknowledgement in the Operations Center 5.0 Server Configuration Guide. After suppression and acknowledgement are configured for one adapter, they become available system‐wide for all adapters.
One access control feature worth noting is that, by default, users must have the Manage permission on the elements for which the Suppress or Acknowledge operations are configured in order to see and use these right‐click options. It is possible to change the permission level required for using the Suppress command; see Configuring Suppression and Acknowledgement in the Operations Center 5.0 Server Configuration Guide.
Access Control 67
4.11.4 Automation EventsAutomation events can trigger an alert when a network event occurs that might require intervention. Automation alerts can include audio signals, notifications sent using e‐mail, or entering information in a database about an event. Scripting capabilities are available to define more complex actions, such as tracking actions performed on alarms.
The Automation features are described inDefining and Managing Automation Events in the Operations Center 5.0 Server Configuration Guide.
The access control features relevant to automation tasks are:
The user who creates an automation event is the event owner. Only the owner should configure different automation actions for the same conditions.Automation events can be defined for a user, group, or the Automation server. Automation events run on a selected element only for the users and groups for which they are set up.
68 Operations Center 5.0 Security Management Guide

5 5Communications Security
Communications security ensures that information is protected when it is transmitted over a communications channel. In Novell® Operations Center, the following communications security topics are relevant:
Section 5.1, “Configuring Communications Security,” on page 69Section 5.2, “Keystore and Trust Store Configuration,” on page 77Section 5.3, “Advanced Security Topics,” on page 91
5.1 Configuring Communications Security Standard communication settings for Operations Center, as well as the dashboard and CMS, are configured using the Configuration Manager for each component. In some cases, configuration changes on one server might require changes in another. In all cases, enabling SSL requires Keystore and Trust Store configuration.
For more information about configuring Keystore and Trust Stores, see Section 5.2, “Keystore and Trust Store Configuration,” on page 77.
The following sections describe the standard configuration options available and their interdependencies:
Section 5.1.1, “Understanding Options in the Operations Center Configuration Manager,” on page 69Section 5.1.2, “Understanding Options in the Dashboard’s Configuration Manager,” on page 71Section 5.1.3, “Understanding Options in the CMS’ Configuration Manager,” on page 73Section 5.1.4, “Understanding Dependency Requirements for Operations Center Client/Server Communications,” on page 74Section 5.1.5, “Understanding Security Requirements for the Image Server,” on page 76
5.1.1 Understanding Options in the Operations Center Configuration ManagerIn the Operations Center server’s Configuration Manager, use the settings on the Security pane to establish the type of communications security for the Operations Center server and between the dashboard, CMS, and Web services.
For information on accessing the Operations Center Configuration Manager, see the Operations Center 5.0 Server Configuration Guide.
Communications Security 69
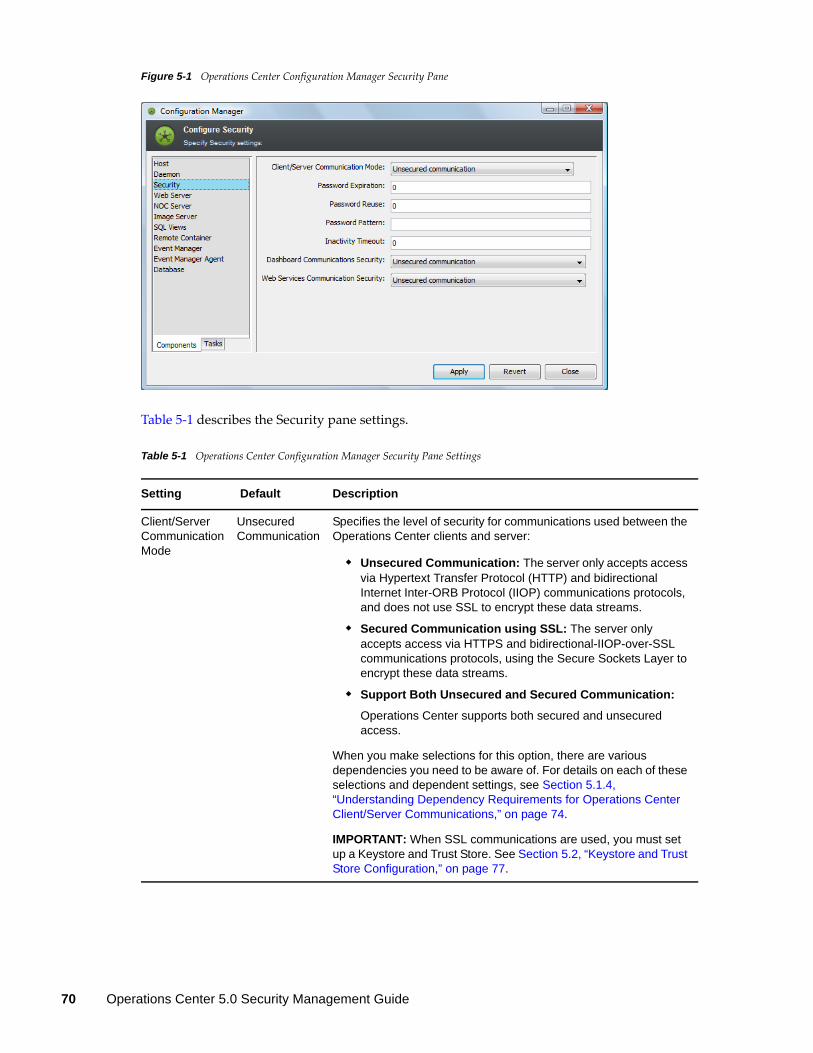
Figure 5-1 Operations Center Configuration Manager Security Pane
Table 5‐1 describes the Security pane settings.
Table 5-1 Operations Center Configuration Manager Security Pane Settings
Setting Default Description
Client/Server Communication Mode
Unsecured Communication
Specifies the level of security for communications used between the Operations Center clients and server:
Unsecured Communication: The server only accepts access via Hypertext Transfer Protocol (HTTP) and bidirectional Internet Inter-ORB Protocol (IIOP) communications protocols, and does not use SSL to encrypt these data streams.
Secured Communication using SSL: The server only accepts access via HTTPS and bidirectional-IIOP-over-SSL communications protocols, using the Secure Sockets Layer to encrypt these data streams.
Support Both Unsecured and Secured Communication: Operations Center supports both secured and unsecured access.
When you make selections for this option, there are various dependencies you need to be aware of. For details on each of these selections and dependent settings, see Section 5.1.4, “Understanding Dependency Requirements for Operations Center Client/Server Communications,” on page 74.
IMPORTANT: When SSL communications are used, you must set up a Keystore and Trust Store. See Section 5.2, “Keystore and Trust Store Configuration,” on page 77.
70 Operations Center 5.0 Security Management Guide
5.1.2 Understanding Options in the Dashboard’s Configuration ManagerThe dashboard has it’s own Configuration Manager to configure communication options with Operations Center and the Web browsers through which users access the dashboard:
In the dashboard’s Configuration Manager, use the settings on the Novell Operations Center pane to establish the type of communications security between the Operations Center server and the dashboard. The settings on the Novell Operations Center pane must match the settings in the Operations Center Configuration Manager.
For more information about these dependencies, see Section 5.1.4, “Understanding Dependency Requirements for Operations Center Client/Server Communications,” on page 74.Use the settings on the Dashboard pane to establish the type of communications security between Web clients and the dashboard. Table 5‐2 on page 72 describes the settings that govern communications with Web browsers.
Remote Services Security (RMI)
Unsecured communication
Specifies the level of security used for the RMI (Remote Services Port) communications between Operations Center and the dashboard, and between Operations Center and CMS.
Select from:
Unsecured communication
Secured communication using SSL
Secured communication using SSL and Client Certificates
IMPORTANT: When SSL communications are used, you must set up a Keystore and Trust Store. See Section 5.2, “Keystore and Trust Store Configuration,” on page 77.
Web Services Communication Security
Unsecured communication
Specifies the level of security used for communications between third-party applications and the Operations Center Web Services Application Programmer Interface (WSAPI):
Unsecured communication
Secured communication using SSL
Secured communication using SSL and Client Certificates
This setting governs the level of security for communications through the port as defined with the Web Services Port setting on the NOC Server page.
IMPORTANT: When SSL communications are used, you must set up a Keystore and Trust Store. See Section 5.2, “Keystore and Trust Store Configuration,” on page 77.
See the Operations Center 5.0 Web Services Guide for more information on Web Services.
Setting Default Description
Communications Security 71
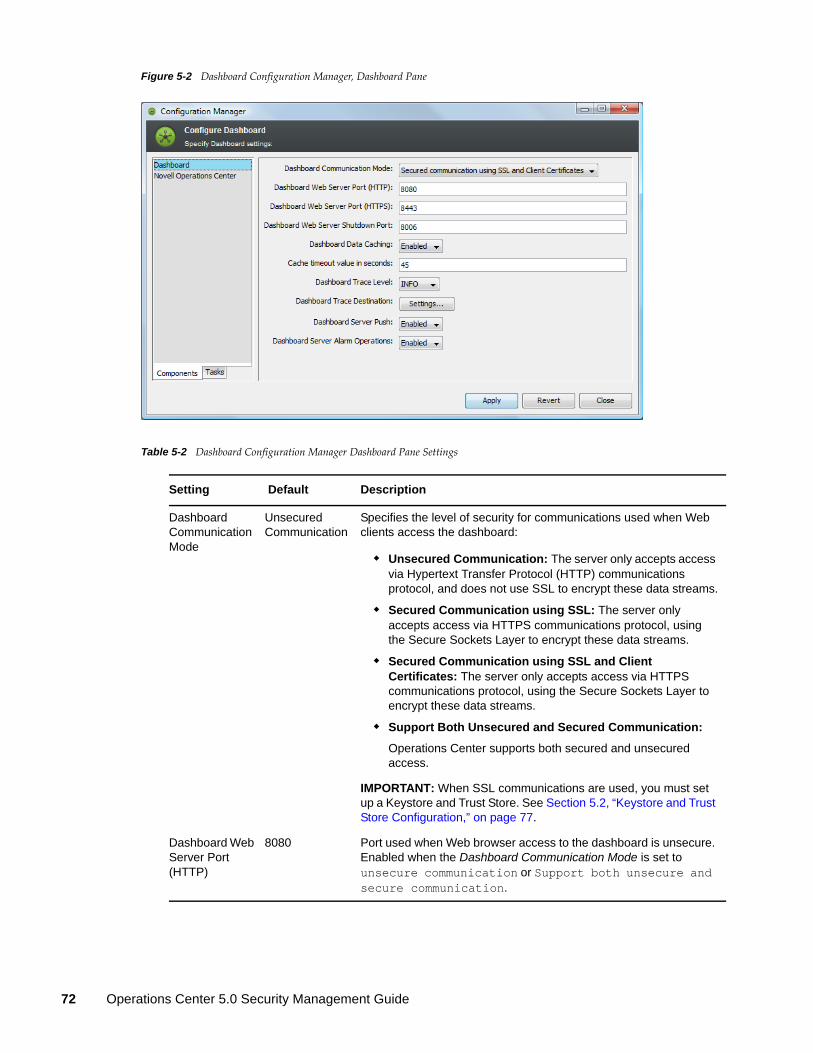
Figure 5-2 Dashboard Configuration Manager, Dashboard Pane
Table 5-2 Dashboard Configuration Manager Dashboard Pane Settings
Setting Default Description
Dashboard Communication Mode
Unsecured Communication
Specifies the level of security for communications used when Web clients access the dashboard:
Unsecured Communication: The server only accepts access via Hypertext Transfer Protocol (HTTP) communications protocol, and does not use SSL to encrypt these data streams.
Secured Communication using SSL: The server only accepts access via HTTPS communications protocol, using the Secure Sockets Layer to encrypt these data streams.
Secured Communication using SSL and Client Certificates: The server only accepts access via HTTPS communications protocol, using the Secure Sockets Layer to encrypt these data streams.
Support Both Unsecured and Secured Communication: Operations Center supports both secured and unsecured access.
IMPORTANT: When SSL communications are used, you must set up a Keystore and Trust Store. See Section 5.2, “Keystore and Trust Store Configuration,” on page 77.
Dashboard Web Server Port (HTTP)
8080 Port used when Web browser access to the dashboard is unsecure. Enabled when the Dashboard Communication Mode is set to unsecure communication or Support both unsecure and secure communication.
72 Operations Center 5.0 Security Management Guide
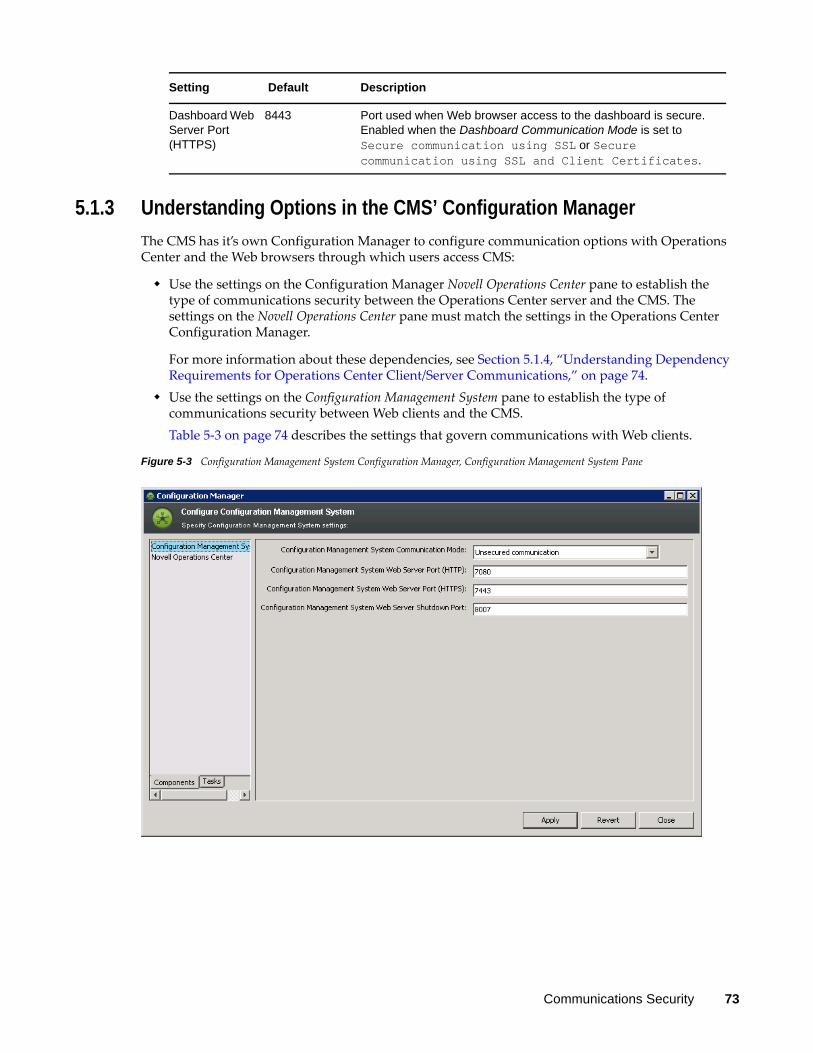
5.1.3 Understanding Options in the CMS’ Configuration ManagerThe CMS has it’s own Configuration Manager to configure communication options with Operations Center and the Web browsers through which users access CMS:
Use the settings on the Configuration Manager Novell Operations Center pane to establish the type of communications security between the Operations Center server and the CMS. The settings on the Novell Operations Center pane must match the settings in the Operations Center Configuration Manager.
For more information about these dependencies, see Section 5.1.4, “Understanding Dependency Requirements for Operations Center Client/Server Communications,” on page 74.Use the settings on the Configuration Management System pane to establish the type of communications security between Web clients and the CMS. Table 5‐3 on page 74 describes the settings that govern communications with Web clients.
Figure 5-3 Configuration Management System Configuration Manager, Configuration Management System Pane
Dashboard Web Server Port (HTTPS)
8443 Port used when Web browser access to the dashboard is secure. Enabled when the Dashboard Communication Mode is set to Secure communication using SSL or Secure communication using SSL and Client Certificates.
Setting Default Description
Communications Security 73
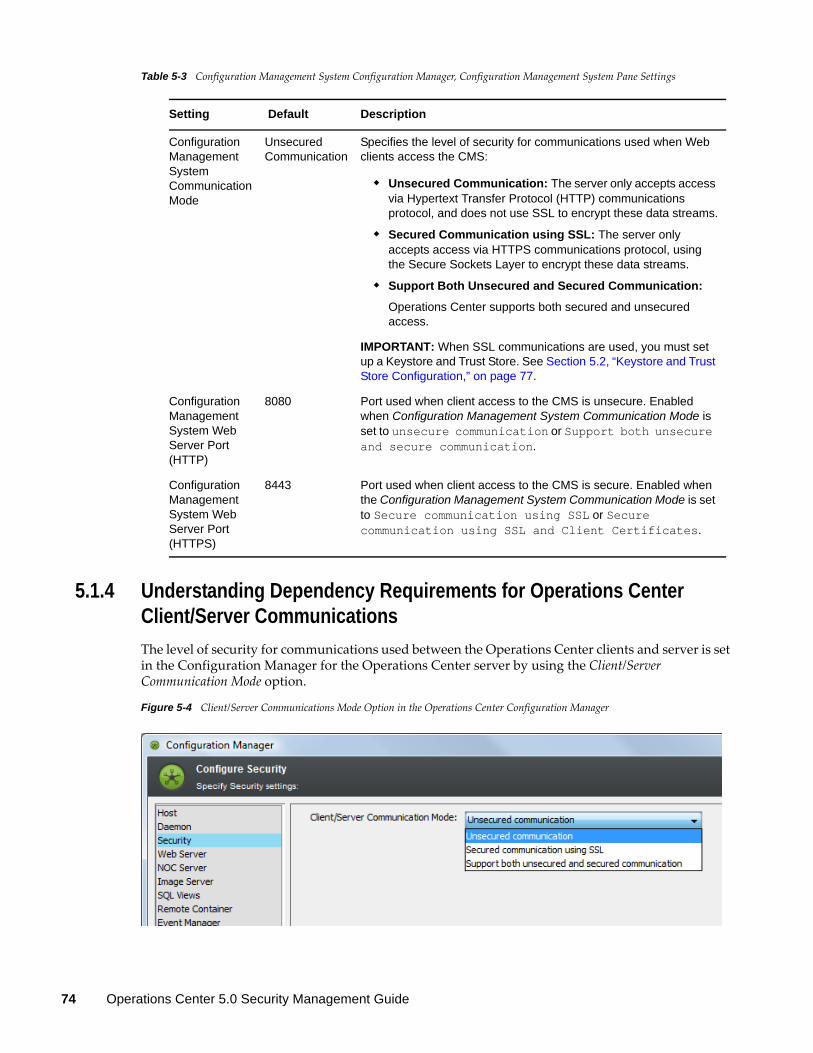
Table 5-3 Configuration Management System Configuration Manager, Configuration Management System Pane Settings
5.1.4 Understanding Dependency Requirements for Operations Center Client/Server CommunicationsThe level of security for communications used between the Operations Center clients and server is set in the Configuration Manager for the Operations Center server by using the Client/Server Communication Mode option.
Figure 5-4 Client/Server Communications Mode Option in the Operations Center Configuration Manager
Setting Default Description
Configuration Management System Communication Mode
Unsecured Communication
Specifies the level of security for communications used when Web clients access the CMS:
Unsecured Communication: The server only accepts access via Hypertext Transfer Protocol (HTTP) communications protocol, and does not use SSL to encrypt these data streams.
Secured Communication using SSL: The server only accepts access via HTTPS communications protocol, using the Secure Sockets Layer to encrypt these data streams.
Support Both Unsecured and Secured Communication: Operations Center supports both secured and unsecured access.
IMPORTANT: When SSL communications are used, you must set up a Keystore and Trust Store. See Section 5.2, “Keystore and Trust Store Configuration,” on page 77.
Configuration Management System Web Server Port (HTTP)
8080 Port used when client access to the CMS is unsecure. Enabled when Configuration Management System Communication Mode is set to unsecure communication or Support both unsecure and secure communication.
Configuration Management System Web Server Port (HTTPS)
8443 Port used when client access to the CMS is secure. Enabled when the Configuration Management System Communication Mode is set to Secure communication using SSL or Secure communication using SSL and Client Certificates.
74 Operations Center 5.0 Security Management Guide
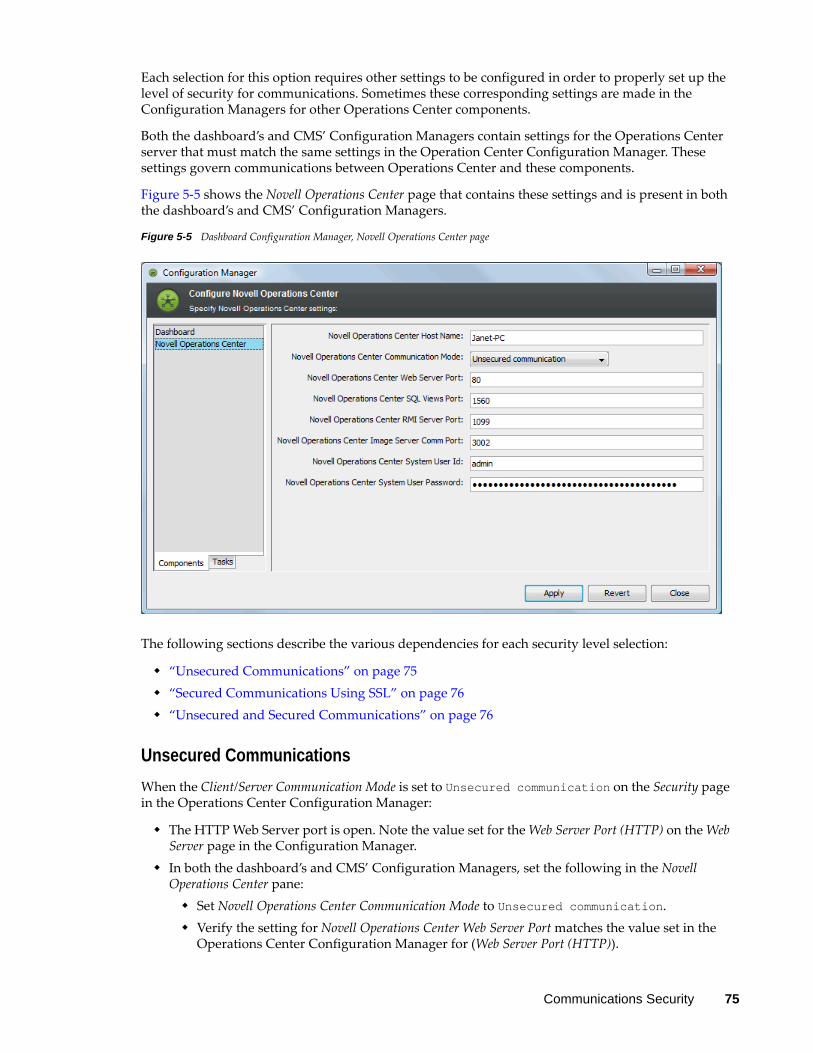
Each selection for this option requires other settings to be configured in order to properly set up the level of security for communications. Sometimes these corresponding settings are made in the Configuration Managers for other Operations Center components.
Both the dashboard’s and CMS’ Configuration Managers contain settings for the Operations Center server that must match the same settings in the Operation Center Configuration Manager. These settings govern communications between Operations Center and these components.
Figure 5‐5 shows the Novell Operations Center page that contains these settings and is present in both the dashboard’s and CMS’ Configuration Managers.
Figure 5-5 Dashboard Configuration Manager, Novell Operations Center page
The following sections describe the various dependencies for each security level selection:
“Unsecured Communications” on page 75“Secured Communications Using SSL” on page 76“Unsecured and Secured Communications” on page 76
Unsecured CommunicationsWhen the Client/Server Communication Mode is set to Unsecured communication on the Security page in the Operations Center Configuration Manager:
The HTTP Web Server port is open. Note the value set for the Web Server Port (HTTP) on the Web Server page in the Configuration Manager.In both the dashboard’s and CMS’ Configuration Managers, set the following in the Novell Operations Center pane:
Set Novell Operations Center Communication Mode to Unsecured communication.Verify the setting for Novell Operations Center Web Server Port matches the value set in the Operations Center Configuration Manager for (Web Server Port (HTTP)).
Communications Security 75
Secured Communications Using SSLWhen the Client/Server Communication Mode is set to Secured communication using SSL on the Security page in the Operations Center Configuration Manager:
The HTTPS Web Server port is open. Note the value set for the Web Server Port (HTTPS) on the Web Server page in the Configuration Manager.In both the dashboard’s and CMS’ Configuration Managers, set the following in the Novell Operations Center pane:
Set Novell Operations Center Communication Mode to Secured communication using SSL.Verify the setting for Novell Operations Center Web Server Port matches the value set in the Operations Center Configuration Manager for (Web Server Port (HTTPS)).
IMPORTANT: When SSL communications are used for the Operations Center server, dashboard or CMS, you must set up a Keystore and Trust Store. See Section 5.2, “Keystore and Trust Store Configuration,” on page 77.
Unsecured and Secured CommunicationsWhen the Client/Server Communication Mode is set to Support both unsecured and secured communications on the Security page in the Operations Center onfiguration Manager:
Both the HTTP and HTTPS Web Server ports are open. Note the value set for the Web Server Port (HTTP) and Web Server Port (HTTPS) on the Web Server page in the Configuration Manager.In the dashboard’s and/or CMS’ Configuration Manager, set the following:
To use secure communications do the following:Set Novell Operations Center Communication Mode to Secured communication using SSL.Verify the setting for Novell Operations Center Web Server Port matches the value set in the Operations Center Configuration Manager for (Web Server Port (HTTPS)).
To use unsecure communications do the following:Set Novell Operations Center Communication Mode to Unsecured communication.Verify the setting for Novell Operations Center Web Server Port matches the value set in the Operations Center Configuration Manager for (Web Server Port (HTTP)).
IMPORTANT: When SSL communications are used for the Operations Center server, dashboard or CMS, you must set up a Keystore and Trust Store. See Section 5.2, “Keystore and Trust Store Configuration,” on page 77.
5.1.5 Understanding Security Requirements for the Image ServerAn Image Server allows Web clients (including the Operations Center console and dashboard) to render dynamic and 3‐D charts. It is important to secure the image server port .
For more information about the Image Server and the Image Server port, see “Image Server” in the Operations Center 5.0 Server Configuration Guide
76 Operations Center 5.0 Security Management Guide

5.2 Keystore and Trust Store ConfigurationA Java keystore (JKS) file is a secure file format used to hold certificate information for Java applications. If any Operations Center server (Operations Center, Dashboard, or CMS) uses SSL, it requires two JKS files:
keystore contains a single complete certificate (public and private key) used to identify the Operations Center server.trust store contains the public keys of certificates that should be trusted by the Operations Center server.
If SSL is enabled in the Configuration Manager on any connection for any Operations Center server, for Operations Center, the dashboard or CMS, it is necessary to provide a keystore containing a certificate that identifies the host on which the Operations Center Server is running and is trusted by any other Operations Center server that connects to it—whether a certificate is trusted is determined by whether it is signed by a certificate found in the trust store of the server reading the certificate.)
The following sections provide both basic information about SSL connections, certificates, the JKS files; and how to configure SSL for Operations Center servers:
Section 5.2.1, “Understanding SSL Connections, Certificate Components, and JKS Files,” on page 77Section 5.2.2, “Keystore and Trust Store Configuration Details,” on page 78Section 5.2.3, “Examples SSL Configurations,” on page 83
5.2.1 Understanding SSL Connections, Certificate Components, and JKS FilesThe following sections provide a brief introduction to SSL connection types, certificate components, and JKS files:
“Understanding SSL Connections” on page 77“Understanding Certificate Components” on page 78“Understanding Java Keystore (JKS) Files” on page 78
Understanding SSL ConnectionsWhen an SSL connection is established between a client and an Operations Center server, the server must provide a certificate with a CN matching the serverʹs host name and that is signed by a certificate in the trust store used by the client. If the client is a web browser, it is possible for a user to tell the browser to ignore any certificate problems and proceed with a connection.
However, when the client is another Operations Center server, such as the dashboard connecting to Operations Center, certificate problems cannot be overridden and must be corrected before SSL connectivity can be established.
In some cases, the server might also ask the client for a certificate that the server validates using the same criteria that the client used to validate the serverʹs certificate. Validation of client certificates is only available on certain ports and is enabled by setting the Client/Server Communications Mode to Secured communication using SSL and Client Certificates in the Configuration Manager.
Communications Security 77
Understanding Certificate ComponentsAn SSL certificate contains four components that are important to SSL configuration:
Private Key: used when encrypting data sent from the server to the client. Data encrypted with the private key can only be deciphered using the public key. For Operations Center Servers, private keys should only be contained in the keystore file.Public Key: used when encrypting sent from client to server (such as the session key). Data encrypted with the public key can only be decrypted using the private key. The public key is shared with all clients during the SSL handshake that occurs during SSL connection establishment. Public keys of trusted certificates are contained in the trust store.Signature: serves both to prevent certificate tampering and to establish trust for the certificate. The signature is a hash of other key parts of the certificate that is then encrypted using the private key of either the same certificate (for a self‐signed certificate) or a certificate authority (CA) such as Verisign, Thawte, Entrust, etc. If a certificate is signed by a CA, the certificate will also contain the certificate(s) of the signer(s) in a certificate chain. The certificate at the end of a certificate chain (the root CA) must be trusted for the certificate to be accepted.Common Name (CN): usually the name of the host being authenticated. The HTTPS protocol requires that the CN in the certificate matches the host name in the HTTPS URL. This type of CN validation is also provided for other protocols used between BSM servers (such as RMI) using a custom certificate validator called com.mosol.util.security.ssl.DefaultValidator. This feature is enabled by default in the serverʹs .properties file.
Understanding Java Keystore (JKS) FilesA Java keystore (JKS) file is a secure file format that contains certificate information for Java applications.
A JKS file might contain multiple entries. Following are types of keystore entries:
PrivateKeyEntry: indicates that the entry contains both the public and private key information needed for it to used as a server certificate.trustedCertEntry: indicates that the entry contains only the public key information and can only be used to indicate that the certificate is trusted.
Each entry is identified by a unique Alias name which is only used to distinguish an entry in the keystore. It is not used at run‐time by Operations Center Servers.
Each JKS file is password protected. Individual entries can also be password protected, but there is no support for this feature in Operations Center Servers.
5.2.2 Keystore and Trust Store Configuration DetailsThe following sections provide information about configuring SSL and requirements for Operations Center servers:
“Configuring Keystore and Trust Store Files” on page 79“Creating a certificate using gencert” on page 80“Importing the Response to a Certificate Signing Request” on page 81“Setting Up Trust for Self‐signed Certificates” on page 81“Certificate Requirements for Operations Center Servers” on page 82
78 Operations Center 5.0 Security Management Guide
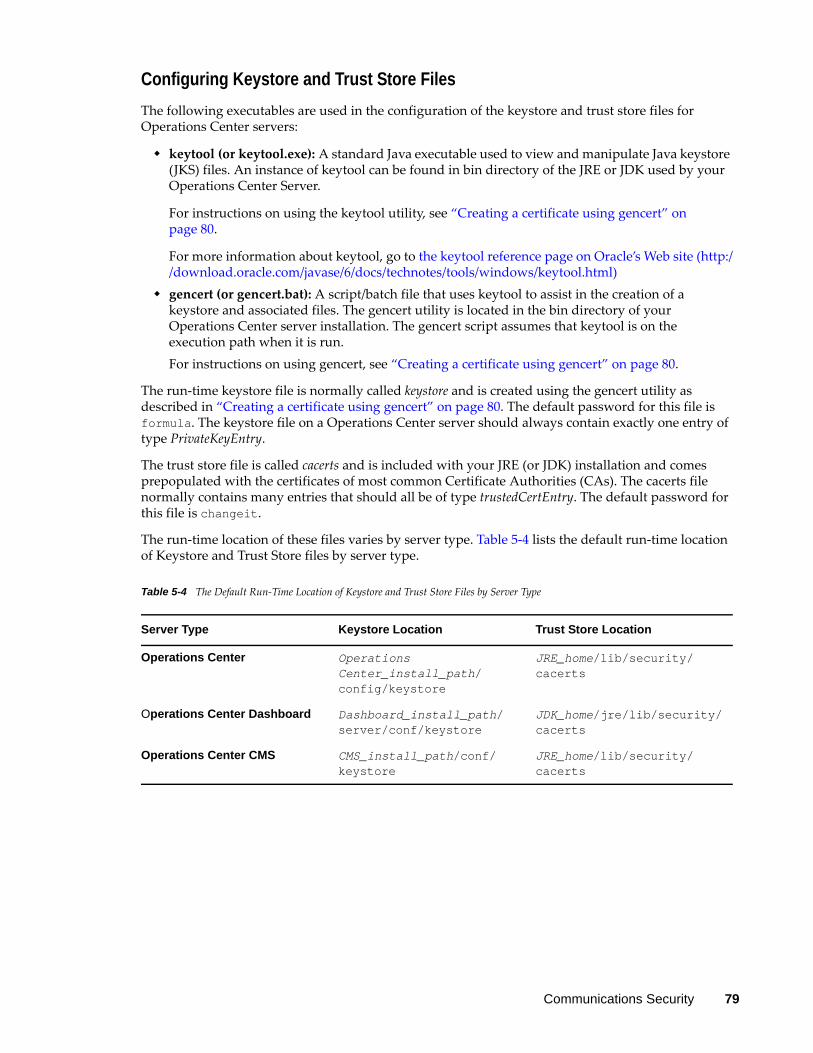
Configuring Keystore and Trust Store FilesThe following executables are used in the configuration of the keystore and trust store files for Operations Center servers:
keytool (or keytool.exe): A standard Java executable used to view and manipulate Java keystore (JKS) files. An instance of keytool can be found in bin directory of the JRE or JDK used by your Operations Center Server.
For instructions on using the keytool utility, see “Creating a certificate using gencert” on page 80.
For more information about keytool, go to the keytool reference page on Oracle’s Web site (http://download.oracle.com/javase/6/docs/technotes/tools/windows/keytool.html)gencert (or gencert.bat): A script/batch file that uses keytool to assist in the creation of a keystore and associated files. The gencert utility is located in the bin directory of your Operations Center server installation. The gencert script assumes that keytool is on the execution path when it is run. For instructions on using gencert, see “Creating a certificate using gencert” on page 80.
The run‐time keystore file is normally called keystore and is created using the gencert utility as described in “Creating a certificate using gencert” on page 80. The default password for this file is formula. The keystore file on a Operations Center server should always contain exactly one entry of type PrivateKeyEntry.
The trust store file is called cacerts and is included with your JRE (or JDK) installation and comes prepopulated with the certificates of most common Certificate Authorities (CAs). The cacerts file normally contains many entries that should all be of type trustedCertEntry. The default password for this file is changeit.
The run‐time location of these files varies by server type. Table 5‐4 lists the default run‐time location of Keystore and Trust Store files by server type.
Table 5-4 The Default Run‐Time Location of Keystore and Trust Store Files by Server Type
Server Type Keystore Location Trust Store Location
Operations Center Operations Center_install_path/config/keystore
JRE_home/lib/security/cacerts
Operations Center Dashboard Dashboard_install_path/server/conf/keystore
JDK_home/jre/lib/security/cacerts
Operations Center CMS CMS_install_path/conf/keystore
JRE_home/lib/security/cacerts
Communications Security 79
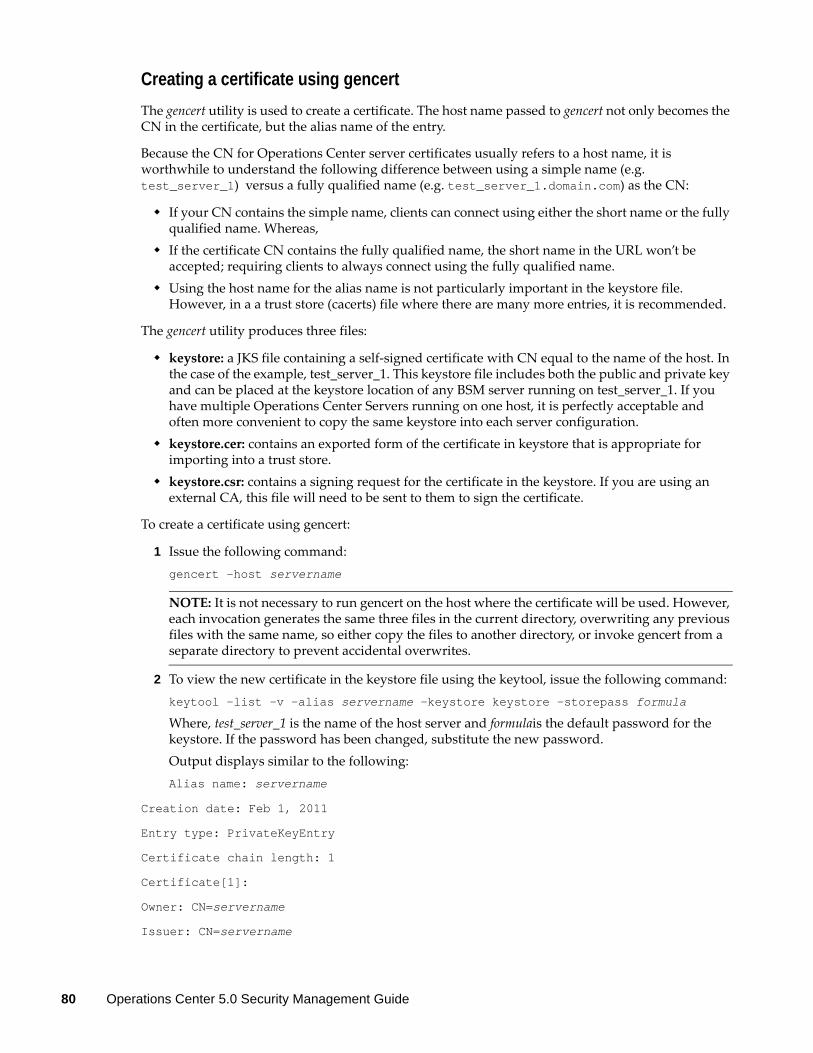
Creating a certificate using gencertThe gencert utility is used to create a certificate. The host name passed to gencert not only becomes the CN in the certificate, but the alias name of the entry.
Because the CN for Operations Center server certificates usually refers to a host name, it is worthwhile to understand the following difference between using a simple name (e.g. test_server_1) versus a fully qualified name (e.g. test_server_1.domain.com) as the CN:
If your CN contains the simple name, clients can connect using either the short name or the fully qualified name. Whereas, If the certificate CN contains the fully qualified name, the short name in the URL won’t be accepted; requiring clients to always connect using the fully qualified name. Using the host name for the alias name is not particularly important in the keystore file. However, in a a trust store (cacerts) file where there are many more entries, it is recommended.
The gencert utility produces three files:
keystore: a JKS file containing a self‐signed certificate with CN equal to the name of the host. In the case of the example, test_server_1. This keystore file includes both the public and private key and can be placed at the keystore location of any BSM server running on test_server_1. If you have multiple Operations Center Servers running on one host, it is perfectly acceptable and often more convenient to copy the same keystore into each server configuration.keystore.cer: contains an exported form of the certificate in keystore that is appropriate for importing into a trust store.keystore.csr: contains a signing request for the certificate in the keystore. If you are using an external CA, this file will need to be sent to them to sign the certificate.
To create a certificate using gencert:
1 Issue the following command:gencert -host servername
NOTE: It is not necessary to run gencert on the host where the certificate will be used. However, each invocation generates the same three files in the current directory, overwriting any previous files with the same name, so either copy the files to another directory, or invoke gencert from a separate directory to prevent accidental overwrites.
2 To view the new certificate in the keystore file using the keytool, issue the following command:keytool -list -v -alias servername -keystore keystore -storepass formula
Where, test_server_1 is the name of the host server and formulais the default password for the keystore. If the password has been changed, substitute the new password.Output displays similar to the following:Alias name: servername
Creation date: Feb 1, 2011
Entry type: PrivateKeyEntry
Certificate chain length: 1
Certificate[1]:
Owner: CN=servername
Issuer: CN=servername
80 Operations Center 5.0 Security Management Guide
Serial number: 4d48598a
Valid from: Tue Feb 01 14:05:46 EST 2011 until: Fri Jan 29 14:05:46 EST 2021
Certificate fingerprints:
MD5: FF:6D:5F:C6:21:69:E1:5C:30:FA:59:59:31:A9:44:08
SHA1: C4:55:48:D7:3B:65:56:28:5E:A8:07:40:19:E2:7E:09:95:1F:02:36
Signature algorithm name: SHA1withRSA
Version: 3
Importing the Response to a Certificate Signing RequestIf submitting a certificate signing request (usually the keystore.csr file from above), then you need to import the response file.
When a certificate is signed by a known CA in this way, no further trust configuration should be necessary.
To import the response file to sign the certificate, run the following command:
keytool -importcert -keystore keystore -storepass formula -alias test_server_1 -trustcacerts -file ca_response_file
Where, test_server_1 is the name of the host server. keystore is the file name and path of the keystore file, and ca_response_file is the file name and path to the certificate response file. formulais the default password for the keystore. If the password has been changed, substitute the new password.
If you have any problems, refer to the on‐line documentation for the keytool.
Setting Up Trust for Self-signed CertificatesIf setting up SSL connections using self‐signed certificates, the certificates that need to be trusted by a particular Operations Center server need to be imported into that serverʹs trust store (cacerts file). This is done using the keystore.cer file from the server‐to‐trusted. It is imported as follows:
To import the certificates into the Operations Center’s trust store:
1 Issue the following command:keytool -importcert -keystore cacerts -storepass changeit -alias servername -file keystore.cer
Where, servername is your own alias name. We recommend that you use the name of the host identified in the certificate. Be sure to specify the cacerts and keystore.cer with file path references appropriate to your environment.
2 When the keytool has read in the certificate information, it prints out the certificate data and asks that you confirm that it should be trusted:Trust this certificate? [no]:
Type yes and enter.
Communications Security 81
Certificate Requirements for Operations Center ServersEach Operations Center server has a set of configuration options that impact whether that server needs its own keystore and whether it needs to trust the certificates of other servers. Remember that if using self‐signed certificates, then you must manually import the exported certificate (keystore.cer) file of the server that is to be trusted. If you are using CA‐signed certificates, you can skip the steps to import the certificate.
The following sections list the various certificate requirements for the Operations Center servers:
“Requirements for Operations Center” on page 82“Requirements for Dashboard” on page 82“Requirements for CMS” on page 83
Requirements for Operations CenterOperations Center requires a keystore file if SSL is enabled by any of the following settings in the Operations Center Configuration Manager:
Client/Server Communications is set to Secured Communications using SSL, or Support both unsecured and secured communications when connecting to the HTTPS Web Server Port.Remote Services Security (RMI) is set to Secured Communications using SSL or Secured Communications using SSL and Client Certificates.Web Services Communications Security is set to Secured Communications using SSL or Secured Communications using SSL and Client Certificates.
Operations Center server must trust its own certificate if Secured Communications using SSL is enabled for Remote Services Security (RMI). Dashboard communications uses RMI which requires the server to connect to itself when registering remote objects.
Operations Center must trust the certificate used by any Dashboard or CMS server accessing the Operations Center server if Secured Communications using SSL and Client Certificates is enabled for Remote Services Security (RMI).
Operations Center must trust the certificate used by any Web Services client accessing the Operations Center server if Secured Communications using SSL and Client Certificates is enabled for Web Services Communications Security.
Requirements for DashboardOperations Center dashboard requires a keystore file if SSL is enabled by any of the following conditions:
In the dashboard’s Configuration Manager, Dashboard Communication Mode is set to Secured Communications using SSL or Secured Communications using SSL and Client Certificates, or set to Support both unsecured and secured communications when connecting to the Dashboard HTTPS port.In the Operations Center Configuration Manager, Remote Services Security (RMI) is set to Secured Communications using SSL or Secured Communications using SSL and Client Certificates.
Dashboard must trust the Operations Center certificate if:
In the Operations Center Configuration Manager, Client/Server Communications Mode is set to Secured Communications using SSL, or Support both unsecured and secured communications when connecting to the HTTPS Web Server Port.
82 Operations Center 5.0 Security Management Guide
AND
In the dashboard’s Configuration Manager, Novell Operations Center Communications Mode is set to (Secured Communication using SSL.)In the Operations Center Configuration Manager, Remote Services Security (RMI) is set to Secured Communications using SSL or Secured Communications using SSL and Client Certificates.
In the dashboard’s Configuration Manager, you can also set Dashboard Communication Mode to Secured Communications using SSL and Client Certificates. This is typically only used if an Apache Server is configured as a reverse proxy in front of the dashboard. In that case, the dashboard would need to trust the certificate used by the Apache Server.
Requirements for CMSIf running CMS with SSL enabled, it is necessary for CMS to trust its own certificate.
CMS uses the same communications ports as the dashboard, so some settings designated for the dashboard also apply to CMS.
CMS requires a keystore file if SSL is enabled by any of the following:
In the CMS’ Configuration Manager, Configuration Management System Communication Mode is set to Secured Communications using SSL, or set to Support both unsecured and secured communication when connecting to the CMS HTTPS port.In the Operations Center Configuration Manager, Remote Services Security (RMI) is set to Secured Communications using SSL and Client Certificates .
CMS must trust the Operations Center certificate if SSL is enabled by any of the following:
In the Operations Center Configuration Manager, Client/Server Communications Mode is set to Secured Communications using SSL, or Support both unsecured and secured communications when connecting to the HTTPS Web Server Port.
AND
In the CMS’ Configuration Manager, Novell Operations Center Communications Mode is set to (Secured Communication using SSL.)In the Operations Center Configuration Manager, Remote Services Security (RMI) is set to Secured Communications using SSL or Secured Communications using SSL and Client Certificates.
CMS must trusts its own certificate if SSL is enabled by any of the following:
In the CMS’ Configuration Manager, Configuration Management System Communications Mode is set to Secured Communications using SSL, or Support both unsecured and secured communications when connecting to the Configuration Management System HTTPS Web Server Port.
5.2.3 Examples SSL ConfigurationsThe following sections provide step‐by‐step examples for configuring SSL for Operations Center implementations:
“Example #1: Securing Operations Center with self‐signed certificates.” on page 84“Example #2: Securing Operations Center Dashboard with self‐signed certificates.” on page 87
Communications Security 83
“Example #3: Securing Operations Center CMS with Self‐signed Certificates.” on page 89“Example #4 Enabling “Secured Communications with SSL and Client Certificates” for Dashboard Communications Mode” on page 90
Example #1: Securing Operations Center with self-signed certificates.Before starting this example, note that the following are running unsecured, each on different servers:
Operations Center (server_n)Operations Center dashboard (server_d)Operations Center CMS (server_c)
To secure Operations Center with self‐signed certificates:
1 Do the following on the Operations Center server:1a Launch the Configuration Manager and do the following:
1a1 Set Client/Server Communication Mode and Dashboard Communications Mode to Secured Communication using SSL
1a2 Click Apply to update the settings and close the Configuration Manager.1b Create a certificate for Operations Center by running gencert:
D:/OperationsCenter_install_path/bin>gencert -host server_n
Output similar to the following displays:Begin generation of certificate...
Generating 1,024 bit RSA key pair and self-signed certificate (SHA1withRSA) with
a validity of 3,650 days
for: CN=server_n
[Storing keystore]
New certificate (self-signed):
[
[
Version: V3
Subject: CN=server_n
Signature Algorithm: SHA1withRSA, OID = 1.2.840.113549.1.1.5
Key: Sun RSA public key, 1024 bits
modulus: 126594161902785932578498390566758897158889875795766986682747367546879
21623477113745782975608516623257878112533924320431753602482119294342127992841686
21288530695581508650693079783886386743819609211347936490147505802310833541691070
03031151690724296688499549945749741970232448084495541581146498657884672944445159
public exponent: 65537
84 Operations Center 5.0 Security Management Guide
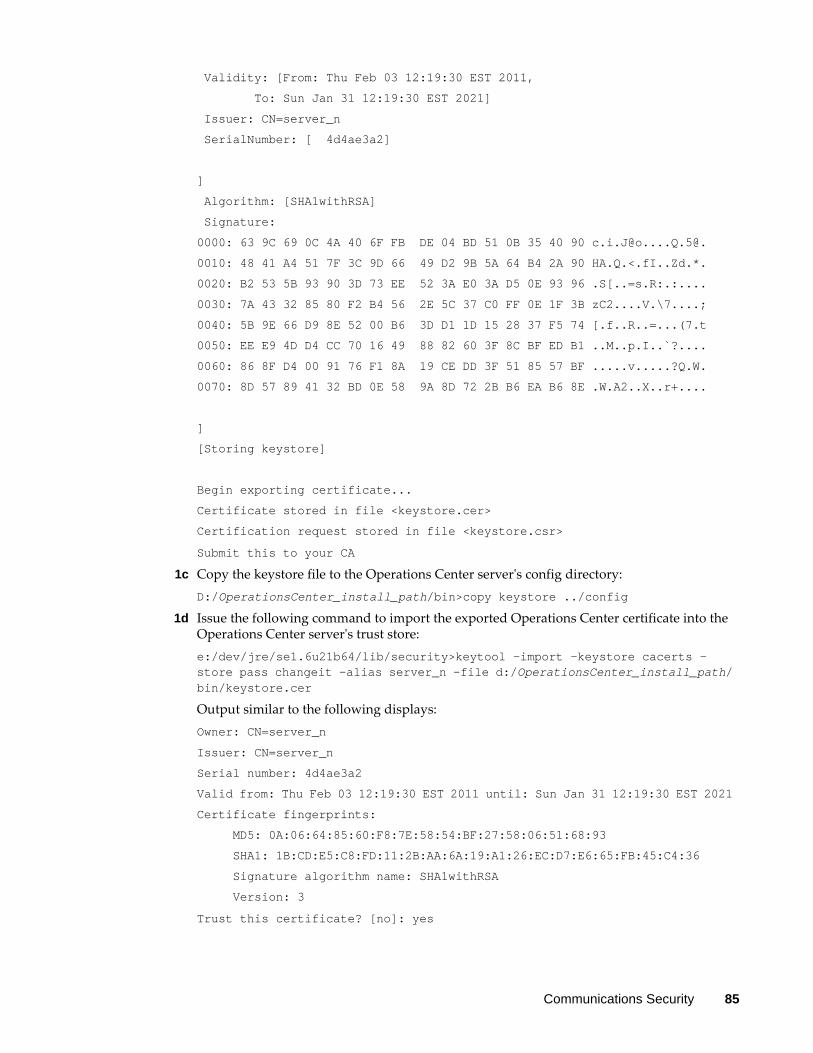
Validity: [From: Thu Feb 03 12:19:30 EST 2011,
To: Sun Jan 31 12:19:30 EST 2021]
Issuer: CN=server_n
SerialNumber: [ 4d4ae3a2]
]
Algorithm: [SHA1withRSA]
Signature:
0000: 63 9C 69 0C 4A 40 6F FB DE 04 BD 51 0B 35 40 90 [email protected]@.
0010: 48 41 A4 51 7F 3C 9D 66 49 D2 9B 5A 64 B4 2A 90 HA.Q.<.fI..Zd.*.
0020: B2 53 5B 93 90 3D 73 EE 52 3A E0 3A D5 0E 93 96 .S[..=s.R:.:....
0030: 7A 43 32 85 80 F2 B4 56 2E 5C 37 C0 FF 0E 1F 3B zC2....V.\7....;
0040: 5B 9E 66 D9 8E 52 00 B6 3D D1 1D 15 28 37 F5 74 [.f..R..=...(7.t
0050: EE E9 4D D4 CC 70 16 49 88 82 60 3F 8C BF ED B1 ..M..p.I..`?....
0060: 86 8F D4 00 91 76 F1 8A 19 CE DD 3F 51 85 57 BF .....v.....?Q.W.
0070: 8D 57 89 41 32 BD 0E 58 9A 8D 72 2B B6 EA B6 8E .W.A2..X..r+....
]
[Storing keystore]
Begin exporting certificate...
Certificate stored in file <keystore.cer>
Certification request stored in file <keystore.csr>
Submit this to your CA
1c Copy the keystore file to the Operations Center serverʹs config directory: D:/OperationsCenter_install_path/bin>copy keystore ../config
1d Issue the following command to import the exported Operations Center certificate into the Operations Center serverʹs trust store:e:/dev/jre/se1.6u21b64/lib/security>keytool -import -keystore cacerts -store pass changeit -alias server_n -file d:/OperationsCenter_install_path/bin/keystore.cer
Output similar to the following displays:Owner: CN=server_n
Issuer: CN=server_n
Serial number: 4d4ae3a2
Valid from: Thu Feb 03 12:19:30 EST 2011 until: Sun Jan 31 12:19:30 EST 2021
Certificate fingerprints:
MD5: 0A:06:64:85:60:F8:7E:58:54:BF:27:58:06:51:68:93
SHA1: 1B:CD:E5:C8:FD:11:2B:AA:6A:19:A1:26:EC:D7:E6:65:FB:45:C4:36
Signature algorithm name: SHA1withRSA
Version: 3
Trust this certificate? [no]: yes
Communications Security 85
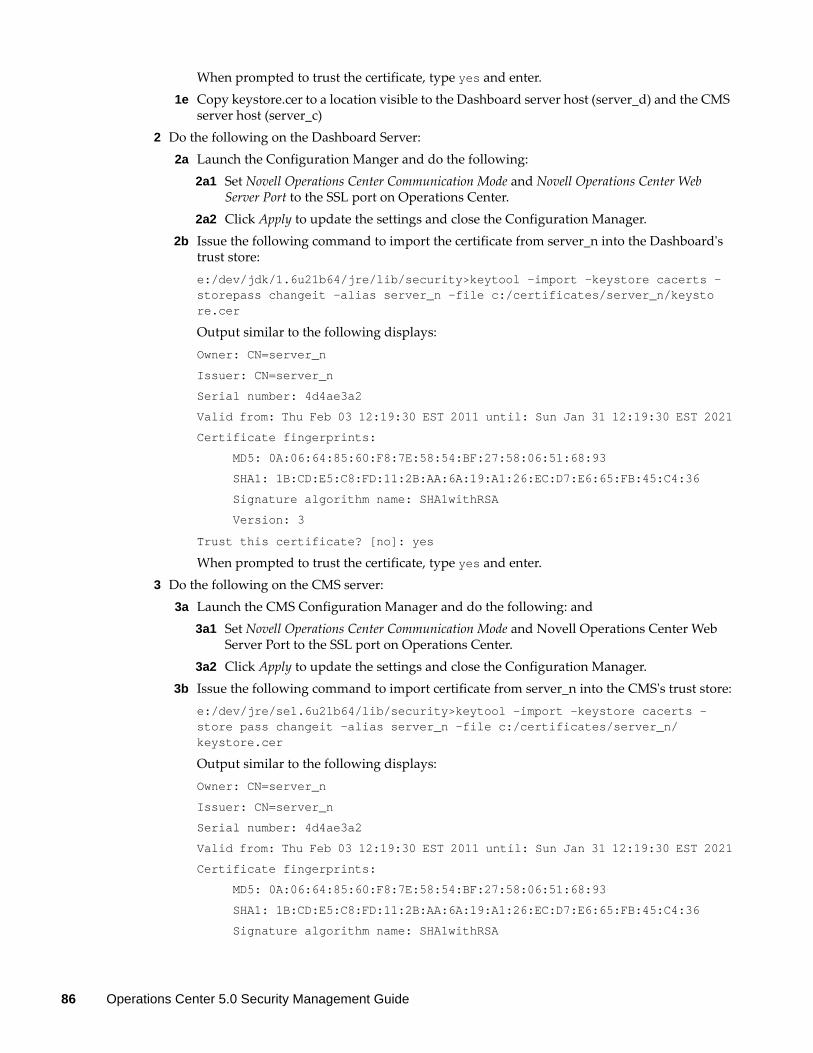
When prompted to trust the certificate, type yes and enter.1e Copy keystore.cer to a location visible to the Dashboard server host (server_d) and the CMS
server host (server_c)2 Do the following on the Dashboard Server:
2a Launch the Configuration Manger and do the following:2a1 Set Novell Operations Center Communication Mode and Novell Operations Center Web
Server Port to the SSL port on Operations Center.2a2 Click Apply to update the settings and close the Configuration Manager.
2b Issue the following command to import the certificate from server_n into the Dashboardʹs trust store:e:/dev/jdk/1.6u21b64/jre/lib/security>keytool -import -keystore cacerts -storepass changeit -alias server_n -file c:/certificates/server_n/keysto re.cer
Output similar to the following displays:Owner: CN=server_n
Issuer: CN=server_n
Serial number: 4d4ae3a2
Valid from: Thu Feb 03 12:19:30 EST 2011 until: Sun Jan 31 12:19:30 EST 2021
Certificate fingerprints:
MD5: 0A:06:64:85:60:F8:7E:58:54:BF:27:58:06:51:68:93
SHA1: 1B:CD:E5:C8:FD:11:2B:AA:6A:19:A1:26:EC:D7:E6:65:FB:45:C4:36
Signature algorithm name: SHA1withRSA
Version: 3
Trust this certificate? [no]: yes
When prompted to trust the certificate, type yes and enter.3 Do the following on the CMS server:
3a Launch the CMS Configuration Manager and do the following: and 3a1 Set Novell Operations Center Communication Mode and Novell Operations Center Web
Server Port to the SSL port on Operations Center.3a2 Click Apply to update the settings and close the Configuration Manager.
3b Issue the following command to import certificate from server_n into the CMSʹs trust store:e:/dev/jre/se1.6u21b64/lib/security>keytool -import -keystore cacerts -store pass changeit -alias server_n -file c:/certificates/server_n/keystore.cer
Output similar to the following displays:Owner: CN=server_n
Issuer: CN=server_n
Serial number: 4d4ae3a2
Valid from: Thu Feb 03 12:19:30 EST 2011 until: Sun Jan 31 12:19:30 EST 2021
Certificate fingerprints:
MD5: 0A:06:64:85:60:F8:7E:58:54:BF:27:58:06:51:68:93
SHA1: 1B:CD:E5:C8:FD:11:2B:AA:6A:19:A1:26:EC:D7:E6:65:FB:45:C4:36
Signature algorithm name: SHA1withRSA
86 Operations Center 5.0 Security Management Guide
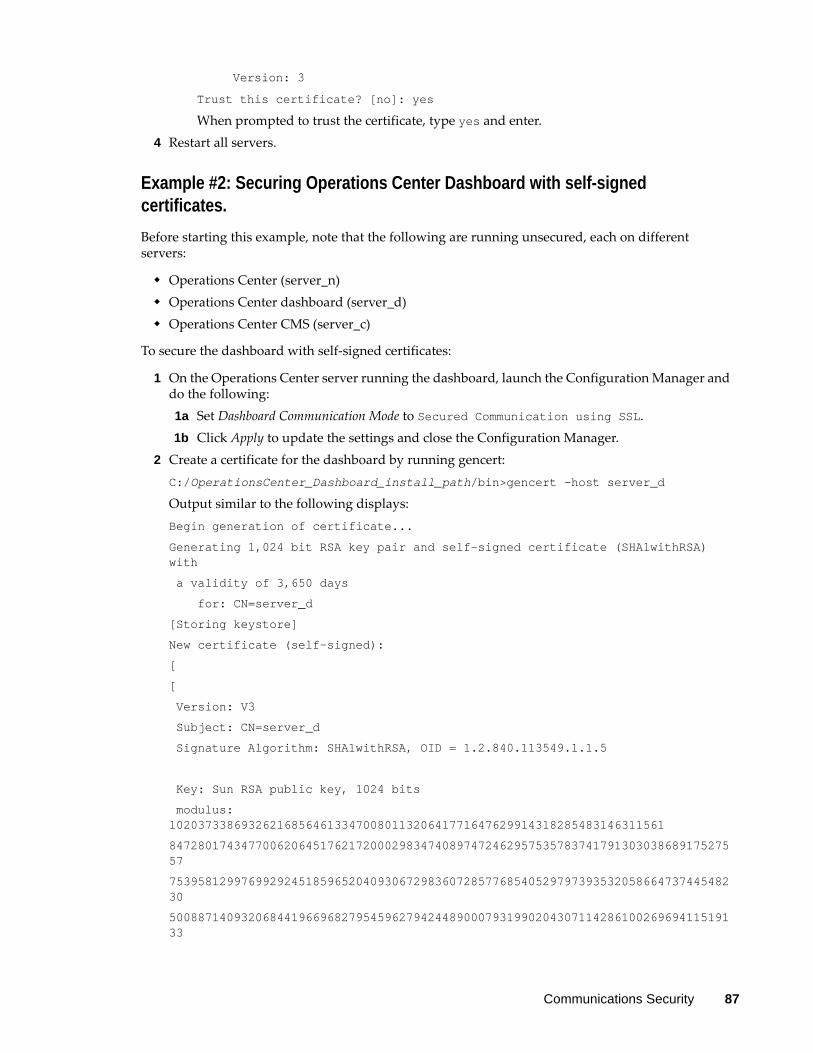
Version: 3
Trust this certificate? [no]: yes
When prompted to trust the certificate, type yes and enter.4 Restart all servers.
Example #2: Securing Operations Center Dashboard with self-signed certificates.Before starting this example, note that the following are running unsecured, each on different servers:
Operations Center (server_n)Operations Center dashboard (server_d)Operations Center CMS (server_c)
To secure the dashboard with self‐signed certificates:
1 On the Operations Center server running the dashboard, launch the Configuration Manager and do the following:1a Set Dashboard Communication Mode to Secured Communication using SSL.1b Click Apply to update the settings and close the Configuration Manager.
2 Create a certificate for the dashboard by running gencert:C:/OperationsCenter_Dashboard_install_path/bin>gencert -host server_d
Output similar to the following displays:Begin generation of certificate...
Generating 1,024 bit RSA key pair and self-signed certificate (SHA1withRSA) with
a validity of 3,650 days
for: CN=server_d
[Storing keystore]
New certificate (self-signed):
[
[
Version: V3
Subject: CN=server_d
Signature Algorithm: SHA1withRSA, OID = 1.2.840.113549.1.1.5
Key: Sun RSA public key, 1024 bits
modulus: 102037338693262168564613347008011320641771647629914318285483146311561
84728017434770062064517621720002983474089747246295753578374179130303868917527557
75395812997699292451859652040930672983607285776854052979739353205866473744548230
50088714093206844196696827954596279424489000793199020430711428610026969411519133
Communications Security 87
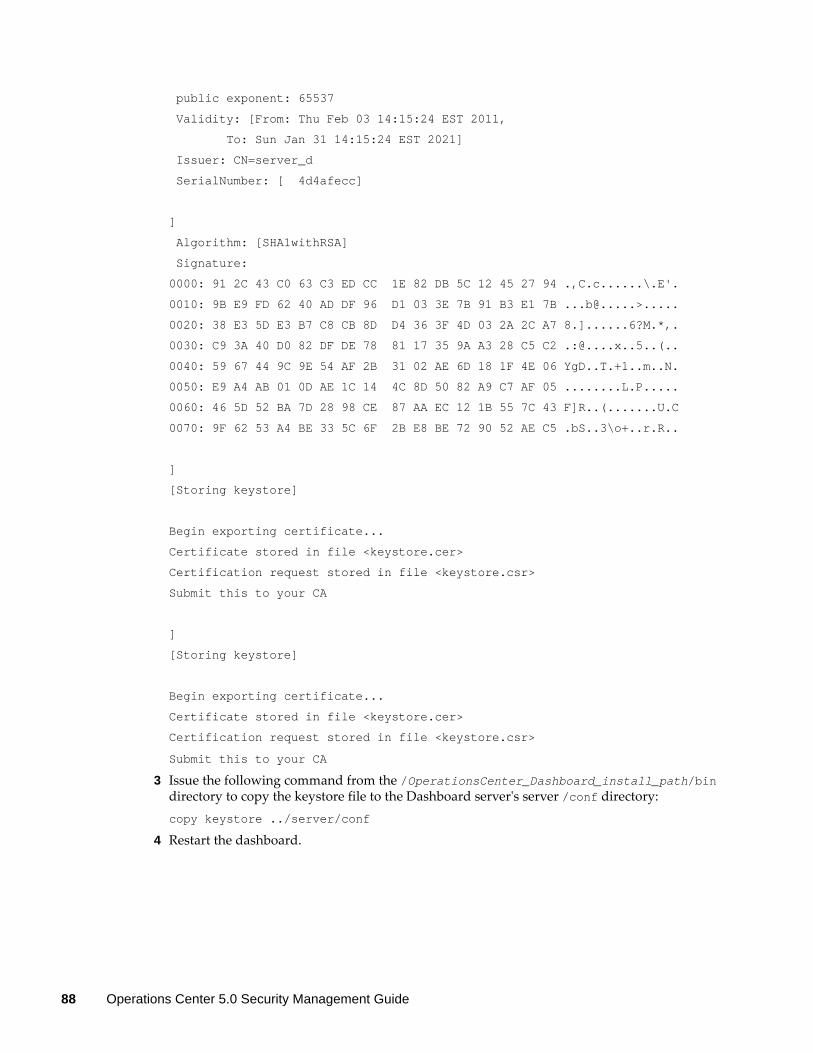
public exponent: 65537
Validity: [From: Thu Feb 03 14:15:24 EST 2011,
To: Sun Jan 31 14:15:24 EST 2021]
Issuer: CN=server_d
SerialNumber: [ 4d4afecc]
]
Algorithm: [SHA1withRSA]
Signature:
0000: 91 2C 43 C0 63 C3 ED CC 1E 82 DB 5C 12 45 27 94 .,C.c......\.E'.
0010: 9B E9 FD 62 40 AD DF 96 D1 03 3E 7B 91 B3 E1 7B ...b@.....>.....
0020: 38 E3 5D E3 B7 C8 CB 8D D4 36 3F 4D 03 2A 2C A7 8.]......6?M.*,.
0030: C9 3A 40 D0 82 DF DE 78 81 17 35 9A A3 28 C5 C2 .:@....x..5..(..
0040: 59 67 44 9C 9E 54 AF 2B 31 02 AE 6D 18 1F 4E 06 YgD..T.+1..m..N.
0050: E9 A4 AB 01 0D AE 1C 14 4C 8D 50 82 A9 C7 AF 05 ........L.P.....
0060: 46 5D 52 BA 7D 28 98 CE 87 AA EC 12 1B 55 7C 43 F]R..(.......U.C
0070: 9F 62 53 A4 BE 33 5C 6F 2B E8 BE 72 90 52 AE C5 .bS..3\o+..r.R..
]
[Storing keystore]
Begin exporting certificate...
Certificate stored in file <keystore.cer>
Certification request stored in file <keystore.csr>
Submit this to your CA
]
[Storing keystore]
Begin exporting certificate...
Certificate stored in file <keystore.cer>
Certification request stored in file <keystore.csr>
Submit this to your CA
3 Issue the following command from the /OperationsCenter_Dashboard_install_path/bin directory to copy the keystore file to the Dashboard serverʹs server /conf directory:copy keystore ../server/conf
4 Restart the dashboard.
88 Operations Center 5.0 Security Management Guide
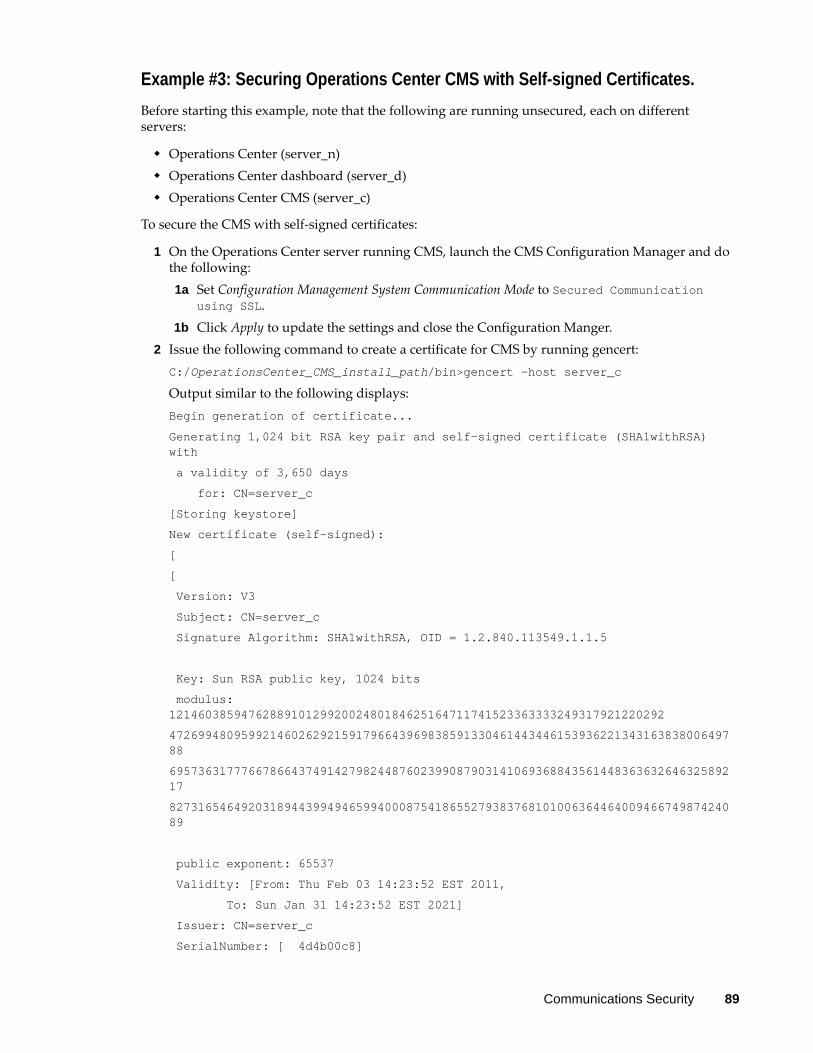
Example #3: Securing Operations Center CMS with Self-signed Certificates.Before starting this example, note that the following are running unsecured, each on different servers:
Operations Center (server_n)Operations Center dashboard (server_d)Operations Center CMS (server_c)
To secure the CMS with self‐signed certificates:
1 On the Operations Center server running CMS, launch the CMS Configuration Manager and do the following:1a Set Configuration Management System Communication Mode to Secured Communication
using SSL.1b Click Apply to update the settings and close the Configuration Manger.
2 Issue the following command to create a certificate for CMS by running gencert:C:/OperationsCenter_CMS_install_path/bin>gencert -host server_c
Output similar to the following displays:Begin generation of certificate...
Generating 1,024 bit RSA key pair and self-signed certificate (SHA1withRSA) with
a validity of 3,650 days
for: CN=server_c
[Storing keystore]
New certificate (self-signed):
[
[
Version: V3
Subject: CN=server_c
Signature Algorithm: SHA1withRSA, OID = 1.2.840.113549.1.1.5
Key: Sun RSA public key, 1024 bits
modulus: 121460385947628891012992002480184625164711741523363333249317921220292
47269948095992146026292159179664396983859133046144344615393622134316383800649788
69573631777667866437491427982448760239908790314106936884356144836363264632589217
82731654649203189443994946599400087541865527938376810100636446400946674987424089
public exponent: 65537
Validity: [From: Thu Feb 03 14:23:52 EST 2011,
To: Sun Jan 31 14:23:52 EST 2021]
Issuer: CN=server_c
SerialNumber: [ 4d4b00c8]
Communications Security 89
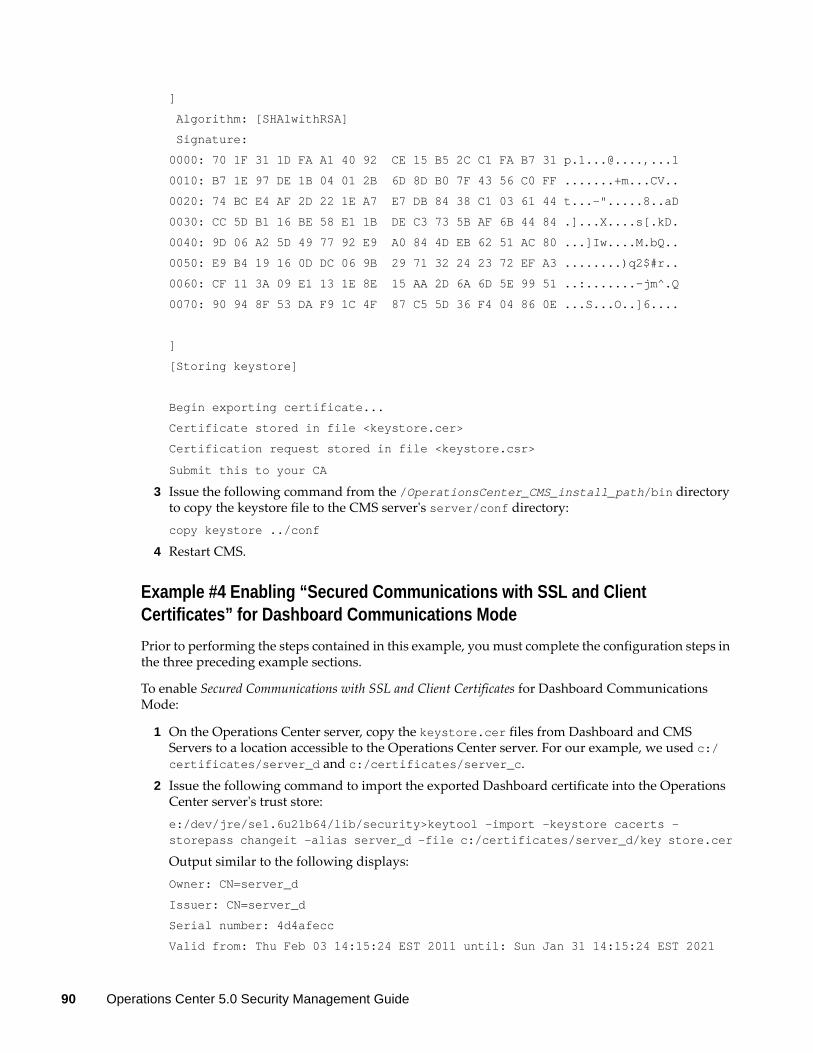
]
Algorithm: [SHA1withRSA]
Signature:
0000: 70 1F 31 1D FA A1 40 92 CE 15 B5 2C C1 FA B7 31 p.1...@....,...1
0010: B7 1E 97 DE 1B 04 01 2B 6D 8D B0 7F 43 56 C0 FF .......+m...CV..
0020: 74 BC E4 AF 2D 22 1E A7 E7 DB 84 38 C1 03 61 44 t...-".....8..aD
0030: CC 5D B1 16 BE 58 E1 1B DE C3 73 5B AF 6B 44 84 .]...X....s[.kD.
0040: 9D 06 A2 5D 49 77 92 E9 A0 84 4D EB 62 51 AC 80 ...]Iw....M.bQ..
0050: E9 B4 19 16 0D DC 06 9B 29 71 32 24 23 72 EF A3 ........)q2$#r..
0060: CF 11 3A 09 E1 13 1E 8E 15 AA 2D 6A 6D 5E 99 51 ..:.......-jm^.Q
0070: 90 94 8F 53 DA F9 1C 4F 87 C5 5D 36 F4 04 86 0E ...S...O..]6....
]
[Storing keystore]
Begin exporting certificate...
Certificate stored in file <keystore.cer>
Certification request stored in file <keystore.csr>
Submit this to your CA
3 Issue the following command from the /OperationsCenter_CMS_install_path/bin directory to copy the keystore file to the CMS serverʹs server/conf directory:copy keystore ../conf
4 Restart CMS.
Example #4 Enabling “Secured Communications with SSL and Client Certificates” for Dashboard Communications ModePrior to performing the steps contained in this example, you must complete the configuration steps in the three preceding example sections.
To enable Secured Communications with SSL and Client Certificates for Dashboard Communications Mode:
1 On the Operations Center server, copy the keystore.cer files from Dashboard and CMS Servers to a location accessible to the Operations Center server. For our example, we used c:/certificates/server_d and c:/certificates/server_c.
2 Issue the following command to import the exported Dashboard certificate into the Operations Center serverʹs trust store:e:/dev/jre/se1.6u21b64/lib/security>keytool -import -keystore cacerts -storepass changeit -alias server_d -file c:/certificates/server_d/key store.cer
Output similar to the following displays:Owner: CN=server_d
Issuer: CN=server_d
Serial number: 4d4afecc
Valid from: Thu Feb 03 14:15:24 EST 2011 until: Sun Jan 31 14:15:24 EST 2021
90 Operations Center 5.0 Security Management Guide
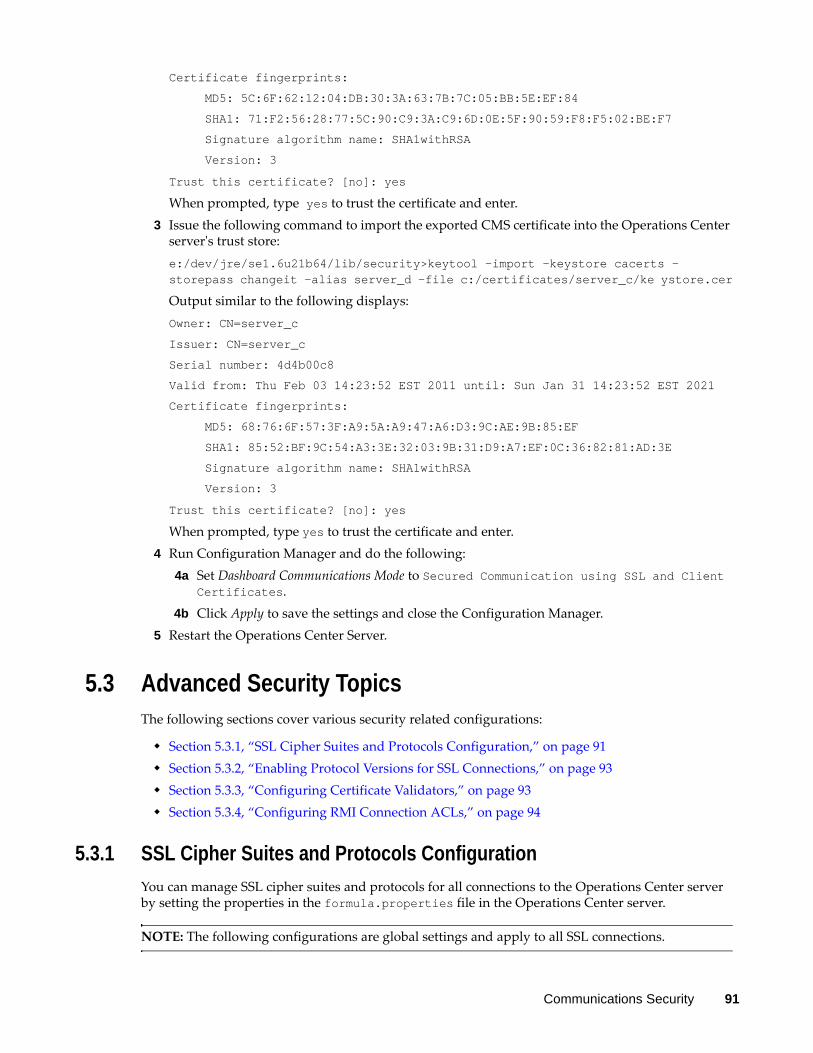
Certificate fingerprints:
MD5: 5C:6F:62:12:04:DB:30:3A:63:7B:7C:05:BB:5E:EF:84
SHA1: 71:F2:56:28:77:5C:90:C9:3A:C9:6D:0E:5F:90:59:F8:F5:02:BE:F7
Signature algorithm name: SHA1withRSA
Version: 3
Trust this certificate? [no]: yes
When prompted, type yes to trust the certificate and enter.3 Issue the following command to import the exported CMS certificate into the Operations Center
serverʹs trust store:e:/dev/jre/se1.6u21b64/lib/security>keytool -import -keystore cacerts -storepass changeit -alias server_d -file c:/certificates/server_c/ke ystore.cer
Output similar to the following displays:Owner: CN=server_c
Issuer: CN=server_c
Serial number: 4d4b00c8
Valid from: Thu Feb 03 14:23:52 EST 2011 until: Sun Jan 31 14:23:52 EST 2021
Certificate fingerprints:
MD5: 68:76:6F:57:3F:A9:5A:A9:47:A6:D3:9C:AE:9B:85:EF
SHA1: 85:52:BF:9C:54:A3:3E:32:03:9B:31:D9:A7:EF:0C:36:82:81:AD:3E
Signature algorithm name: SHA1withRSA
Version: 3
Trust this certificate? [no]: yes
When prompted, type yes to trust the certificate and enter.4 Run Configuration Manager and do the following:
4a Set Dashboard Communications Mode to Secured Communication using SSL and Client Certificates.
4b Click Apply to save the settings and close the Configuration Manager.5 Restart the Operations Center Server.
5.3 Advanced Security TopicsThe following sections cover various security related configurations:
Section 5.3.1, “SSL Cipher Suites and Protocols Configuration,” on page 91Section 5.3.2, “Enabling Protocol Versions for SSL Connections,” on page 93Section 5.3.3, “Configuring Certificate Validators,” on page 93Section 5.3.4, “Configuring RMI Connection ACLs,” on page 94
5.3.1 SSL Cipher Suites and Protocols ConfigurationYou can manage SSL cipher suites and protocols for all connections to the Operations Center server by setting the properties in the formula.properties file in the Operations Center server.
NOTE: The following configurations are global settings and apply to all SSL connections.
Communications Security 91
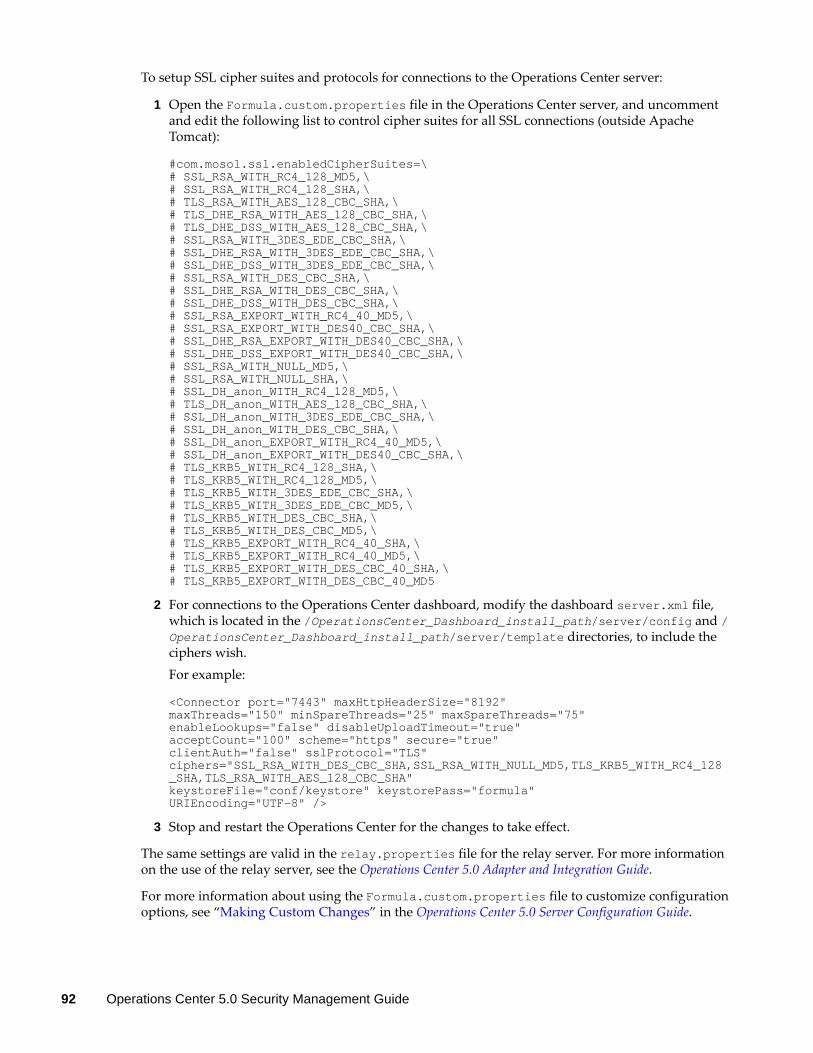
To setup SSL cipher suites and protocols for connections to the Operations Center server:
1 Open the Formula.custom.properties file in the Operations Center server, and uncomment and edit the following list to control cipher suites for all SSL connections (outside Apache Tomcat):
#com.mosol.ssl.enabledCipherSuites=\# SSL_RSA_WITH_RC4_128_MD5,\# SSL_RSA_WITH_RC4_128_SHA,\# TLS_RSA_WITH_AES_128_CBC_SHA,\# TLS_DHE_RSA_WITH_AES_128_CBC_SHA,\# TLS_DHE_DSS_WITH_AES_128_CBC_SHA,\# SSL_RSA_WITH_3DES_EDE_CBC_SHA,\# SSL_DHE_RSA_WITH_3DES_EDE_CBC_SHA,\# SSL_DHE_DSS_WITH_3DES_EDE_CBC_SHA,\# SSL_RSA_WITH_DES_CBC_SHA,\# SSL_DHE_RSA_WITH_DES_CBC_SHA,\# SSL_DHE_DSS_WITH_DES_CBC_SHA,\# SSL_RSA_EXPORT_WITH_RC4_40_MD5,\# SSL_RSA_EXPORT_WITH_DES40_CBC_SHA,\# SSL_DHE_RSA_EXPORT_WITH_DES40_CBC_SHA,\# SSL_DHE_DSS_EXPORT_WITH_DES40_CBC_SHA,\# SSL_RSA_WITH_NULL_MD5,\# SSL_RSA_WITH_NULL_SHA,\# SSL_DH_anon_WITH_RC4_128_MD5,\# TLS_DH_anon_WITH_AES_128_CBC_SHA,\# SSL_DH_anon_WITH_3DES_EDE_CBC_SHA,\# SSL_DH_anon_WITH_DES_CBC_SHA,\# SSL_DH_anon_EXPORT_WITH_RC4_40_MD5,\# SSL_DH_anon_EXPORT_WITH_DES40_CBC_SHA,\# TLS_KRB5_WITH_RC4_128_SHA,\# TLS_KRB5_WITH_RC4_128_MD5,\# TLS_KRB5_WITH_3DES_EDE_CBC_SHA,\# TLS_KRB5_WITH_3DES_EDE_CBC_MD5,\# TLS_KRB5_WITH_DES_CBC_SHA,\# TLS_KRB5_WITH_DES_CBC_MD5,\# TLS_KRB5_EXPORT_WITH_RC4_40_SHA,\# TLS_KRB5_EXPORT_WITH_RC4_40_MD5,\# TLS_KRB5_EXPORT_WITH_DES_CBC_40_SHA,\# TLS_KRB5_EXPORT_WITH_DES_CBC_40_MD5
2 For connections to the Operations Center dashboard, modify the dashboard server.xml file, which is located in the /OperationsCenter_Dashboard_install_path/server/config and /OperationsCenter_Dashboard_install_path/server/template directories, to include the ciphers wish.For example:
<Connector port="7443" maxHttpHeaderSize="8192"maxThreads="150" minSpareThreads="25" maxSpareThreads="75"enableLookups="false" disableUploadTimeout="true"acceptCount="100" scheme="https" secure="true"clientAuth="false" sslProtocol="TLS"ciphers="SSL_RSA_WITH_DES_CBC_SHA,SSL_RSA_WITH_NULL_MD5,TLS_KRB5_WITH_RC4_128_SHA,TLS_RSA_WITH_AES_128_CBC_SHA"keystoreFile="conf/keystore" keystorePass="formula"URIEncoding="UTF-8" />
3 Stop and restart the Operations Center for the changes to take effect.
The same settings are valid in the relay.properties file for the relay server. For more information on the use of the relay server, see the Operations Center 5.0 Adapter and Integration Guide.
For more information about using the Formula.custom.properties file to customize configuration options, see “Making Custom Changes” in the Operations Center 5.0 Server Configuration Guide.
92 Operations Center 5.0 Security Management Guide

5.3.2 Enabling Protocol Versions for SSL ConnectionsNOTE: The following configuration is a global setting and applies to all SSL connections.
To enable SSL connection protocols:
1 Open the Operations_Center_install_path/NOC/config/Formula.custom.properties file and set the following properties:
2 To control protocol versions for all SSL connections (outside Apache Tomcat), uncomment and edit the following list:
#com.mosol.ssl.enabledProtocols=\# SSLv2Hello,\# SSLv3,\# TLSv1
3 Stop and restart the Operations Center for the changes to take effect.
For more information about using the Formula.custom.properties file to customize configuration options, see “Making Custom Changes” in the Operations Center 5.0 Server Configuration Guide.
5.3.3 Configuring Certificate ValidatorsOperations Center provides a default validator to guarantee that client and server certificates are valid and active between Operations Center server and dasbhoard and CMS clients. Other validator implementations are only available as customizations.
To enable the default Operations Center certificate validators:
1 Open the Operations_Center_install_path/NOC/config/Formula.custom.properties file and set the following properties:mymo.rmi.security.serverCertValidator: Server certificate validator; the default is com.mosol.Formula.Common.remote.security.DefaultValidator.The server certificate is checked to verify that it is trusted and active during the SSL handshake. A certificate validator extends the basic SSL certificate validation and ensures that the server certificate matches the hostname of the server that provided it..To disable the default validation, set this property to NONE.mymo.rmi.security.clientCertValidator: Client certificate validator; the default is com.mosol.Formula.Common.remote.security.DefaultValidator.When client certificate authentication is enabled (sslWithClientAuth), the client certificate is checked to that it is trusted and active during the SSL handshake. A certificate validator extends the basic SSL certificate validation and ensures that the client certificate matches the hostname of the client that provided it.To disable the default validation, set this property to NONE.
2 Stop and restart the Operations Center for the changes to take effect.
For more information about using the Formula.custom.properties file to customize configuration options, see “Making Custom Changes” in the Operations Center 5.0 Server Configuration Guide.
Communications Security 93

5.3.4 Configuring RMI Connection ACLsOperations Center uses Remote Services Port (RMI) services to connect with the dashboard and CMS. Configure the Formula.custom.properties file to ensure security on the RMI port.
To configure the servers that are allowed to access the RMI port:
1 Set the following property in the Operations_Center_install_path/NOC/config/Formula.custom.properties file:mymo.rmi.acl: The Connection ACL (Access Control List) limits the servers that can access the interface; the default is empty.To configure this setting, precede the hostname or IP address of each CMS/dashboard server that accesses this interface with a plus sign (+), and separate the entries with a semicolon (;). For example:
mymo.rmi.acl=+devtower10;+qasun1;
2 Stop and restart the Operations Center for the changes to take effect.
For more information about using the Formula.custom.properties file to customize configuration options, see “Making Custom Changes” in the Operations Center 5.0 Server Configuration Guide.
94 Operations Center 5.0 Security Management Guide
6 6Auditing
Auditing features enable the monitoring of various functional areas within the Novell® Operations Center environment. Audited events are displayed in the Alarms view and can be stored with other alarm history data in the Event Data Store so that changes over time can be analyzed.
Section 6.1, “Support and Management Information Surfaced by Auditing,” on page 95Section 6.2, “Monitoring Session Activity,” on page 95Section 6.3, “Administration Events that Can Be Audited,” on page 96Section 6.4, “Globally Enabling Auditing and Storage of Audit Events,” on page 97Section 6.5, “Auditing Administration Elements,” on page 101Section 6.6, “Generating Audit Alarms for Non‐Adapter Log Messages,” on page 107Section 6.7, “Viewing Audit Events,” on page 108
6.1 Support and Management Information Surfaced by AuditingAudit alarms generated for specific events can help managers identify and assess performance problems, security violations, and potential application flaws. Maintaining a history of audit alarms creates a traceable record of system activity by application and system processes and by users of these applications and systems.
Auditing can assist with:
Reconstructing events after a problem has occurred, such as a system outageDetermining when and how normal operations ceased by reviewing system activityVerifying that the system or resources have not been adversely affected by intruders or technical problems
6.2 Monitoring Session ActivityYou can monitor user session information by using the Session property for each user. Alternatively, you can configure auditing of session usage in order to monitor session activity across all users.
Auditing 95
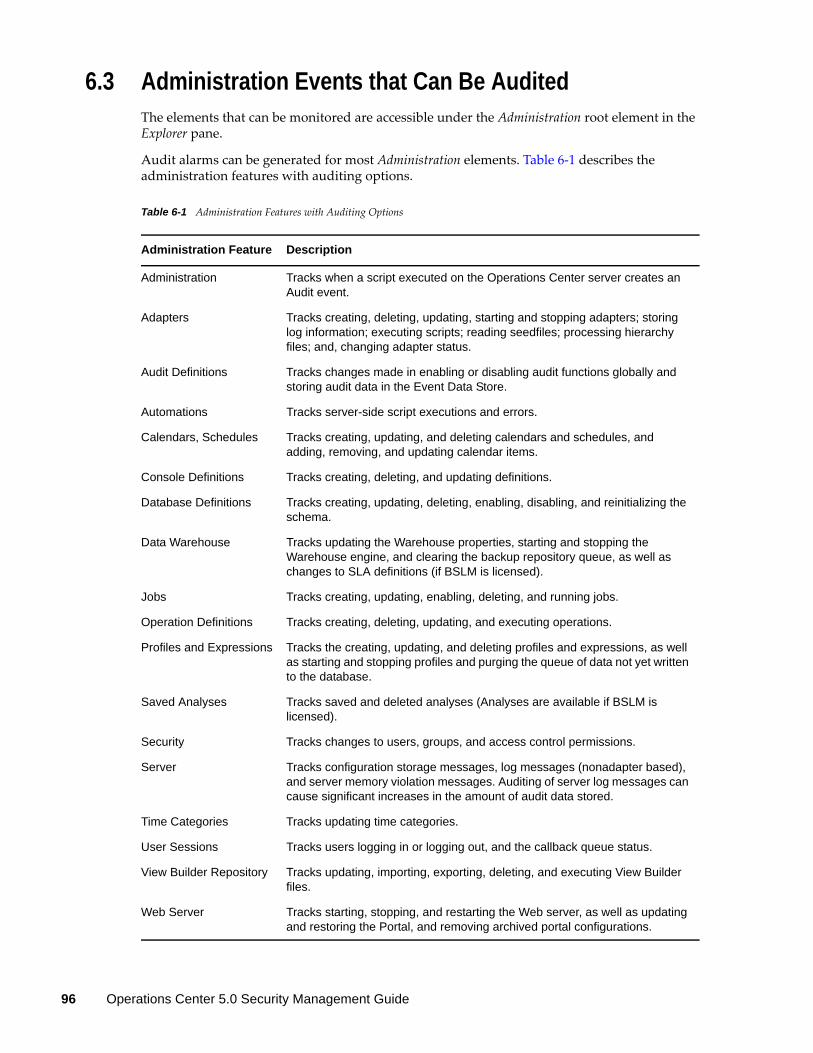
6.3 Administration Events that Can Be AuditedThe elements that can be monitored are accessible under the Administration root element in the Explorer pane.
Audit alarms can be generated for most Administration elements. Table 6‐1 describes the administration features with auditing options.
Table 6-1 Administration Features with Auditing Options
Administration Feature Description
Administration Tracks when a script executed on the Operations Center server creates an Audit event.
Adapters Tracks creating, deleting, updating, starting and stopping adapters; storing log information; executing scripts; reading seedfiles; processing hierarchy files; and, changing adapter status.
Audit Definitions Tracks changes made in enabling or disabling audit functions globally and storing audit data in the Event Data Store.
Automations Tracks server-side script executions and errors.
Calendars, Schedules Tracks creating, updating, and deleting calendars and schedules, and adding, removing, and updating calendar items.
Console Definitions Tracks creating, deleting, and updating definitions.
Database Definitions Tracks creating, updating, deleting, enabling, disabling, and reinitializing the schema.
Data Warehouse Tracks updating the Warehouse properties, starting and stopping the Warehouse engine, and clearing the backup repository queue, as well as changes to SLA definitions (if BSLM is licensed).
Jobs Tracks creating, updating, enabling, deleting, and running jobs.
Operation Definitions Tracks creating, deleting, updating, and executing operations.
Profiles and Expressions Tracks the creating, updating, and deleting profiles and expressions, as well as starting and stopping profiles and purging the queue of data not yet written to the database.
Saved Analyses Tracks saved and deleted analyses (Analyses are available if BSLM is licensed).
Security Tracks changes to users, groups, and access control permissions.
Server Tracks configuration storage messages, log messages (nonadapter based), and server memory violation messages. Auditing of server log messages can cause significant increases in the amount of audit data stored.
Time Categories Tracks updating time categories.
User Sessions Tracks users logging in or logging out, and the callback queue status.
View Builder Repository Tracks updating, importing, exporting, deleting, and executing View Builder files.
Web Server Tracks starting, stopping, and restarting the Web server, as well as updating and restoring the Portal, and removing archived portal configurations.
96 Operations Center 5.0 Security Management Guide
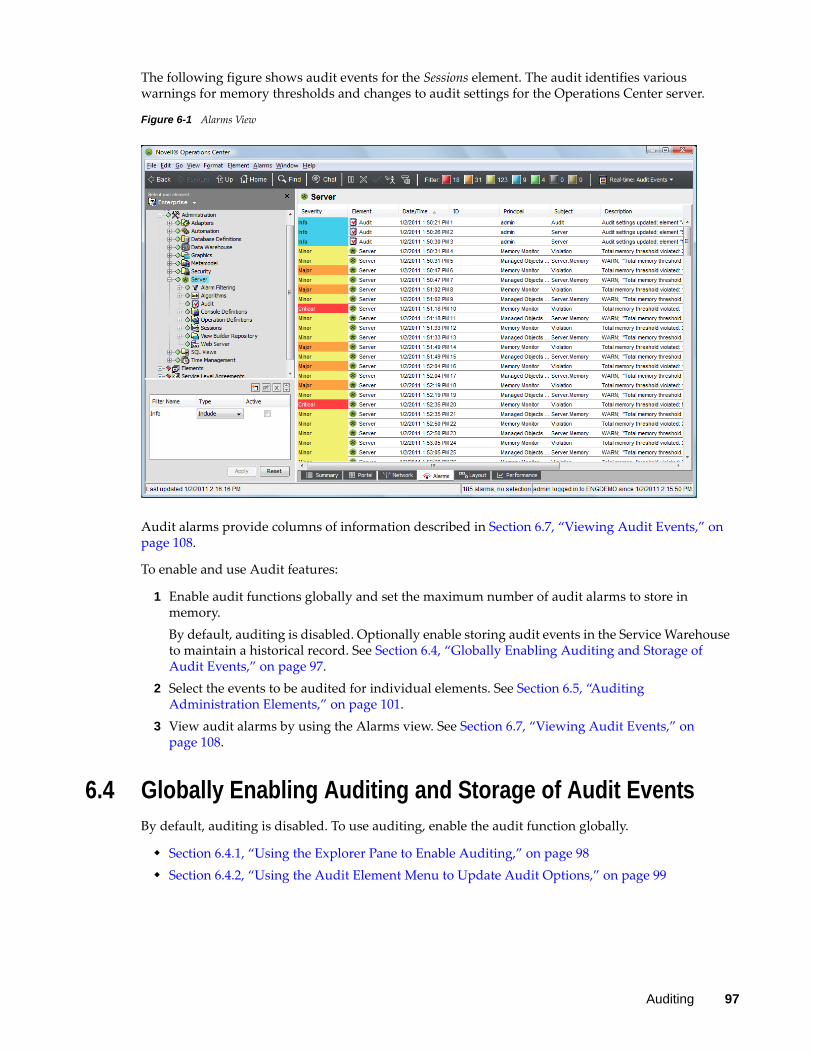
The following figure shows audit events for the Sessions element. The audit identifies various warnings for memory thresholds and changes to audit settings for the Operations Center server.
Figure 6-1 Alarms View
Audit alarms provide columns of information described in Section 6.7, “Viewing Audit Events,” on page 108.
To enable and use Audit features:
1 Enable audit functions globally and set the maximum number of audit alarms to store in memory.By default, auditing is disabled. Optionally enable storing audit events in the Service Warehouse to maintain a historical record. See Section 6.4, “Globally Enabling Auditing and Storage of Audit Events,” on page 97.
2 Select the events to be audited for individual elements. See Section 6.5, “Auditing Administration Elements,” on page 101.
3 View audit alarms by using the Alarms view. See Section 6.7, “Viewing Audit Events,” on page 108.
6.4 Globally Enabling Auditing and Storage of Audit EventsBy default, auditing is disabled. To use auditing, enable the audit function globally.
Section 6.4.1, “Using the Explorer Pane to Enable Auditing,” on page 98Section 6.4.2, “Using the Audit Element Menu to Update Audit Options,” on page 99
Auditing 97
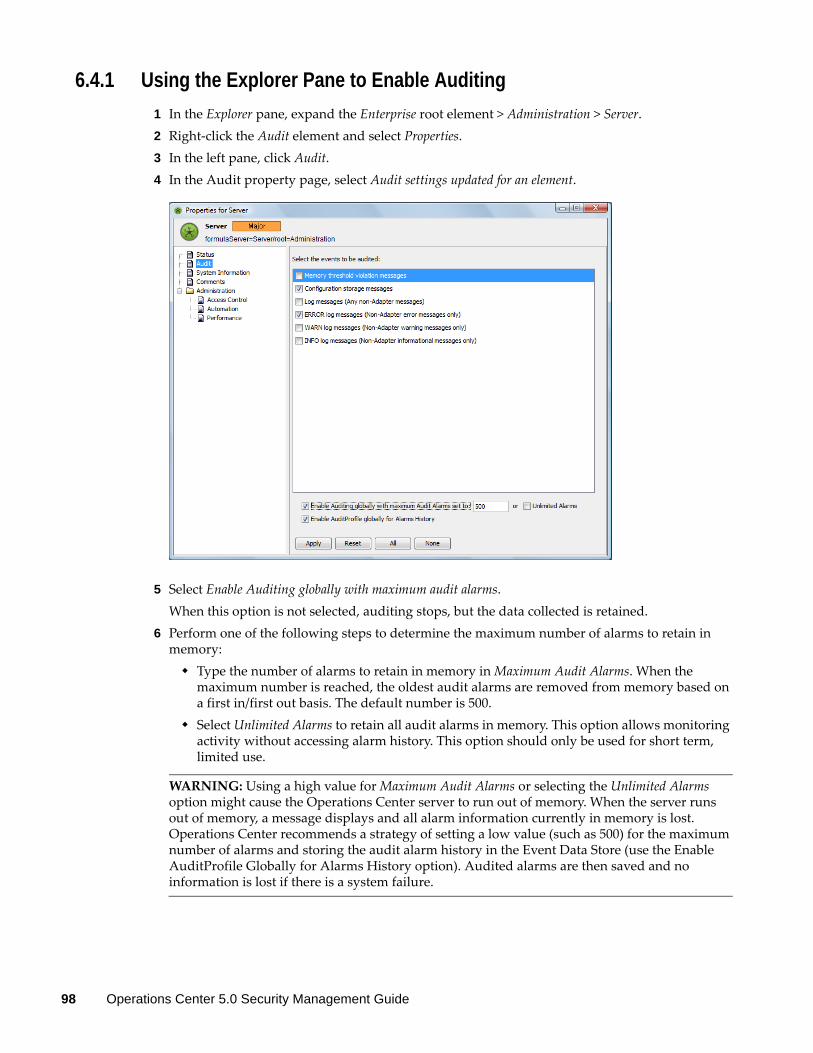
6.4.1 Using the Explorer Pane to Enable Auditing1 In the Explorer pane, expand the Enterprise root element > Administration > Server.2 Right‐click the Audit element and select Properties.3 In the left pane, click Audit.4 In the Audit property page, select Audit settings updated for an element.
5 Select Enable Auditing globally with maximum audit alarms.When this option is not selected, auditing stops, but the data collected is retained.
6 Perform one of the following steps to determine the maximum number of alarms to retain in memory:
Type the number of alarms to retain in memory in Maximum Audit Alarms. When the maximum number is reached, the oldest audit alarms are removed from memory based on a first in/first out basis. The default number is 500.Select Unlimited Alarms to retain all audit alarms in memory. This option allows monitoring activity without accessing alarm history. This option should only be used for short term, limited use.
WARNING: Using a high value for Maximum Audit Alarms or selecting the Unlimited Alarms option might cause the Operations Center server to run out of memory. When the server runs out of memory, a message displays and all alarm information currently in memory is lost. Operations Center recommends a strategy of setting a low value (such as 500) for the maximum number of alarms and storing the audit alarm history in the Event Data Store (use the Enable AuditProfile Globally for Alarms History option). Audited alarms are then saved and no information is lost if there is a system failure.
98 Operations Center 5.0 Security Management Guide
7 Select Enable AuditProfile Globally for Alarms History to automatically store audit alarms in the Event Data Store.To facilitate storing audit alarms, a profile named AuditProfile is automatically created and configured with an alarm expression that captures alarm history, and uses a schedule named AuditProfileSchedule, which is also created automatically.The matches for the AuditProfile are completed automatically by using a DName matcher against the Administration element, to capture selected events for all Administration elements.Settings for the AuditProfile, AuditProfileExpression, and AuditProfileSchedule default definitions are not editable. However, data retention settings for the AuditProfile can be modified. Significant data storage might be required depending on the amount and type of audit data retained. It is recommended that the AuditProfile data retention setting be configured to a reasonable amount of time (the default is 30 days).To create and configure a custom profile for capturing audit data or to not store audit alarm history in the Event Data Store, do not select this check box.
8 Click Apply to save and activate the audit selections.
The two check boxes that control global auditing can be modified in multiple places in Operations Center software. The Enable Auditing globally with maximum audit alarms or Enable AuditProfile Globally for Alarms History settings can be modified in an individual element’s Audit Properties page.
WARNING: If the Service Warehouse is not available, none of the audit events in the queue are retained.
6.4.2 Using the Audit Element Menu to Update Audit OptionsThe Audit element found under Administration, Server provides two menu commands for supporting global audit settings for audit‐related alarms.
“Adjusting the Maximum Number of Audit Alarms Retained in Memory” on page 100“Enabling the Alarm History” on page 100
Auditing 99
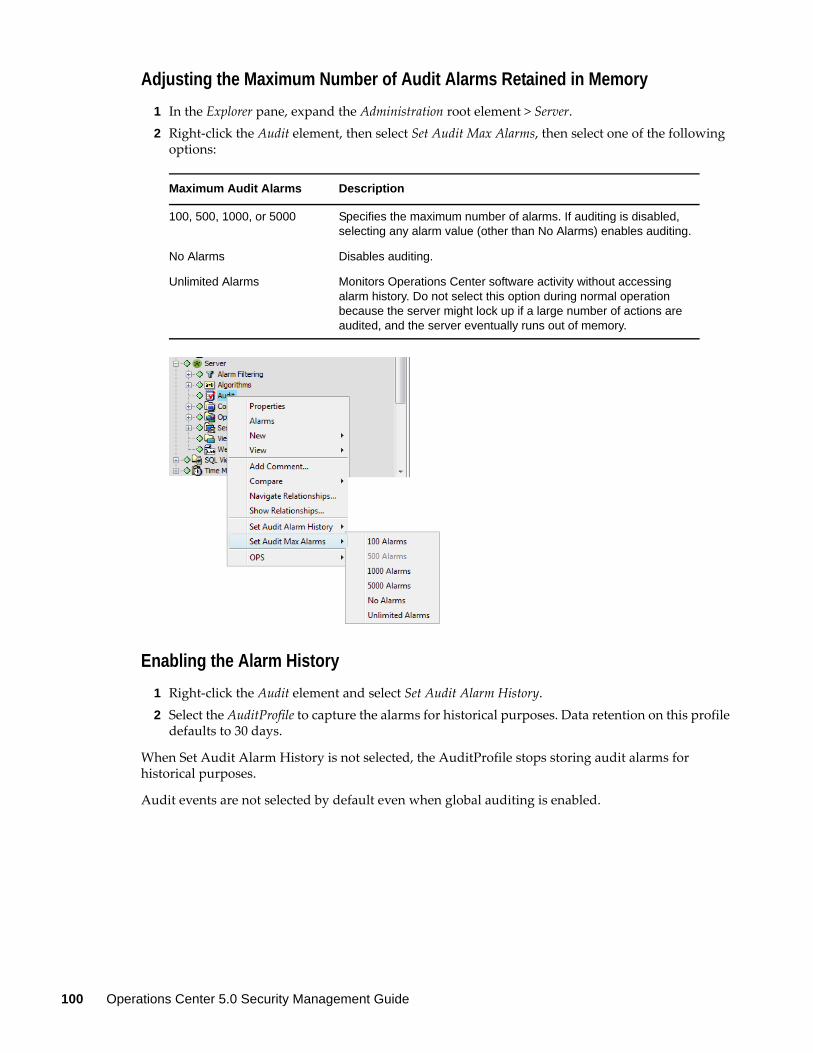
Adjusting the Maximum Number of Audit Alarms Retained in Memory1 In the Explorer pane, expand the Administration root element > Server.2 Right‐click the Audit element, then select Set Audit Max Alarms, then select one of the following
options:
Enabling the Alarm History1 Right‐click the Audit element and select Set Audit Alarm History.2 Select the AuditProfile to capture the alarms for historical purposes. Data retention on this profile
defaults to 30 days.
When Set Audit Alarm History is not selected, the AuditProfile stops storing audit alarms for historical purposes.
Audit events are not selected by default even when global auditing is enabled.
Maximum Audit Alarms Description
100, 500, 1000, or 5000 Specifies the maximum number of alarms. If auditing is disabled, selecting any alarm value (other than No Alarms) enables auditing.
No Alarms Disables auditing.
Unlimited Alarms Monitors Operations Center software activity without accessing alarm history. Do not select this option during normal operation because the server might lock up if a large number of actions are audited, and the server eventually runs out of memory.
100 Operations Center 5.0 Security Management Guide
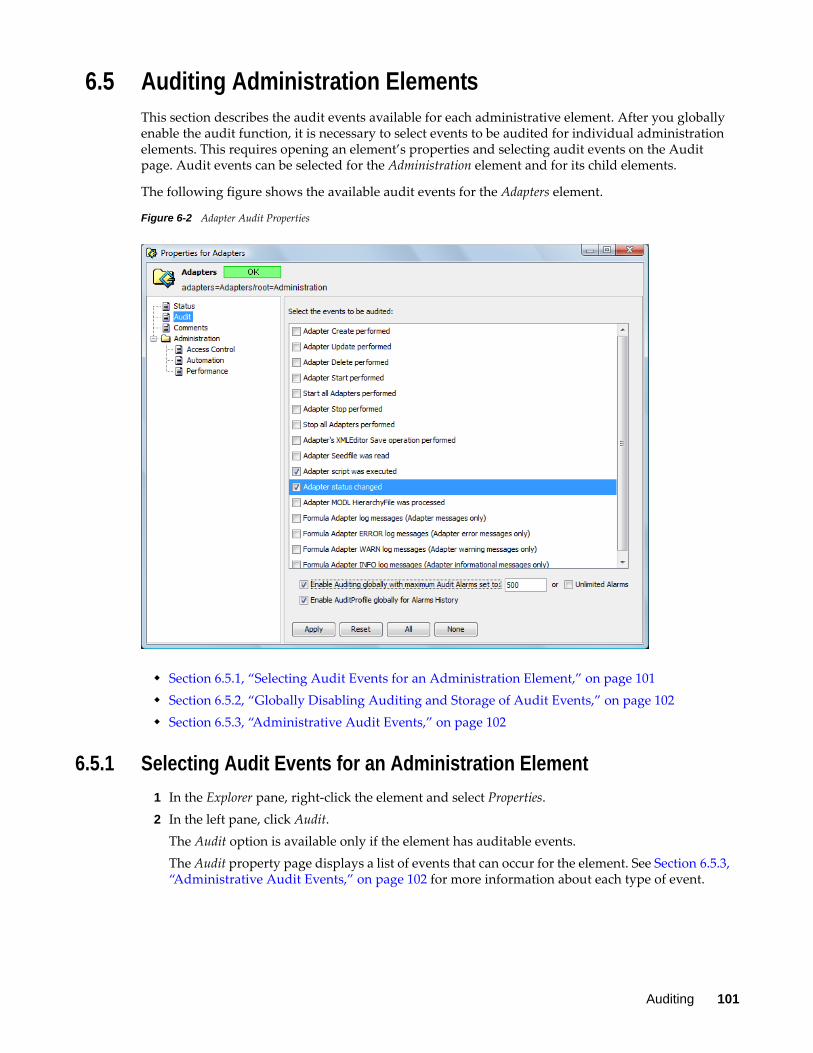
6.5 Auditing Administration ElementsThis section describes the audit events available for each administrative element. After you globally enable the audit function, it is necessary to select events to be audited for individual administration elements. This requires opening an element’s properties and selecting audit events on the Audit page. Audit events can be selected for the Administration element and for its child elements.
The following figure shows the available audit events for the Adapters element.
Figure 6-2 Adapter Audit Properties
Section 6.5.1, “Selecting Audit Events for an Administration Element,” on page 101Section 6.5.2, “Globally Disabling Auditing and Storage of Audit Events,” on page 102Section 6.5.3, “Administrative Audit Events,” on page 102
6.5.1 Selecting Audit Events for an Administration Element1 In the Explorer pane, right‐click the element and select Properties.2 In the left pane, click Audit.
The Audit option is available only if the element has auditable events.The Audit property page displays a list of events that can occur for the element. See Section 6.5.3, “Administrative Audit Events,” on page 102 for more information about each type of event.
Auditing 101
3 Perform one of the following steps:Click All to select all events.Select the check box next to an event to enable auditing for the event.Click None to deselect all check boxes on the Audit page.
4 Click Apply to save your changes. Audit alarms are generated for the selected audit events.
6.5.2 Globally Disabling Auditing and Storage of Audit EventsThe global settings displayed at the bottom of the element’s Audit property page are Enable Auditing globally with maximum audit alarms and Enable AuditProfile Globally for Alarms History. Changing these settings on any element’s Audit page affects the entire Operations Center enterprise.
For example, if you deselect the Enable Auditing globally with maximum audit alarms check box, auditing is disabled for all elements and for the entire enterprise. No new audit alarms are generated. Similarly, if you deselect the Enable AuditProfile Globally for Alarms History check box, no additional audit alarms are stored in the Data Warehouse.
6.5.3 Administrative Audit EventsTable 6‐2 lists the audit events available for each element. It also defines the condition for issuing an audit alarm for each event.
Table 6-2 Audit Event Options
Element Event An Audit alarm is issued when…
Access Control ACL Update operation performed
Changes are made to an element’s Access Control property page.
Access Control ACL Delete operation performed
A deletion is made on an element’s Access Control property page.
Adapters Adapter Create performed An adapter is created.
Adapters Adapter Update performed Adapter property changes are applied to an adapter.
Adapters Adapter Delete performed An adapter is deleted.
Adapters Adapter Start performed An adapter is started.
Adapters Adapter Stop performed An adapter is stopped.
Adapters Adapter’s XMLEditor Save operation performed
An adapter’s hierarchy XML file is modified and saved by using the Operations Center XMLEditor.
Adapters Adapter Seedfile was read The Operations Center server reads an adapter’s seedfile.
Adapters Adapter script was executed The Operations Center server executes an adapter script (Script.on.Error, Script.on.Initialized, Script.onStarted, or Script.onStopped).
102 Operations Center 5.0 Security Management Guide
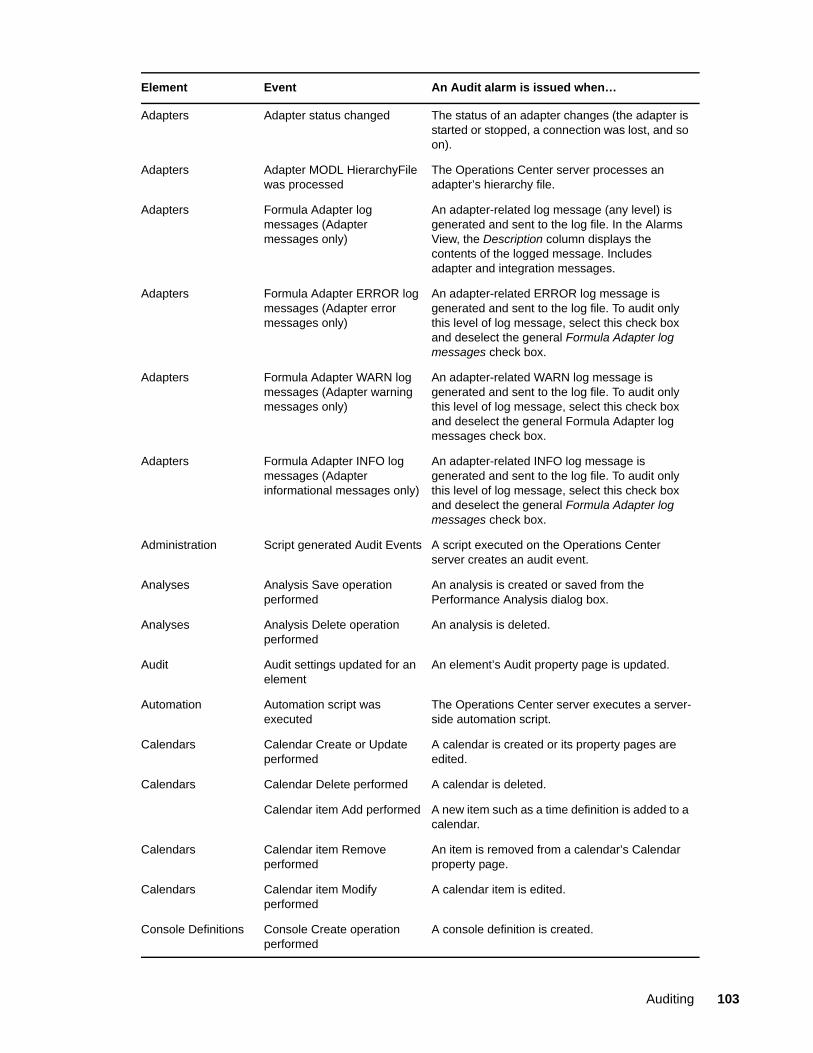
Adapters Adapter status changed The status of an adapter changes (the adapter is started or stopped, a connection was lost, and so on).
Adapters Adapter MODL HierarchyFile was processed
The Operations Center server processes an adapter’s hierarchy file.
Adapters Formula Adapter log messages (Adapter messages only)
An adapter-related log message (any level) is generated and sent to the log file. In the Alarms View, the Description column displays the contents of the logged message. Includes adapter and integration messages.
Adapters Formula Adapter ERROR log messages (Adapter error messages only)
An adapter-related ERROR log message is generated and sent to the log file. To audit only this level of log message, select this check box and deselect the general Formula Adapter log messages check box.
Adapters Formula Adapter WARN log messages (Adapter warning messages only)
An adapter-related WARN log message is generated and sent to the log file. To audit only this level of log message, select this check box and deselect the general Formula Adapter log messages check box.
Adapters Formula Adapter INFO log messages (Adapter informational messages only)
An adapter-related INFO log message is generated and sent to the log file. To audit only this level of log message, select this check box and deselect the general Formula Adapter log messages check box.
Administration Script generated Audit Events A script executed on the Operations Center server creates an audit event.
Analyses Analysis Save operation performed
An analysis is created or saved from the Performance Analysis dialog box.
Analyses Analysis Delete operation performed
An analysis is deleted.
Audit Audit settings updated for an element
An element’s Audit property page is updated.
Automation Automation script was executed
The Operations Center server executes a server-side automation script.
Calendars Calendar Create or Update performed
A calendar is created or its property pages are edited.
Calendars Calendar Delete performed A calendar is deleted.
Calendar item Add performed A new item such as a time definition is added to a calendar.
Calendars Calendar item Remove performed
An item is removed from a calendar’s Calendar property page.
Calendars Calendar item Modify performed
A calendar item is edited.
Console Definitions Console Create operation performed
A console definition is created.
Element Event An Audit alarm is issued when…
Auditing 103
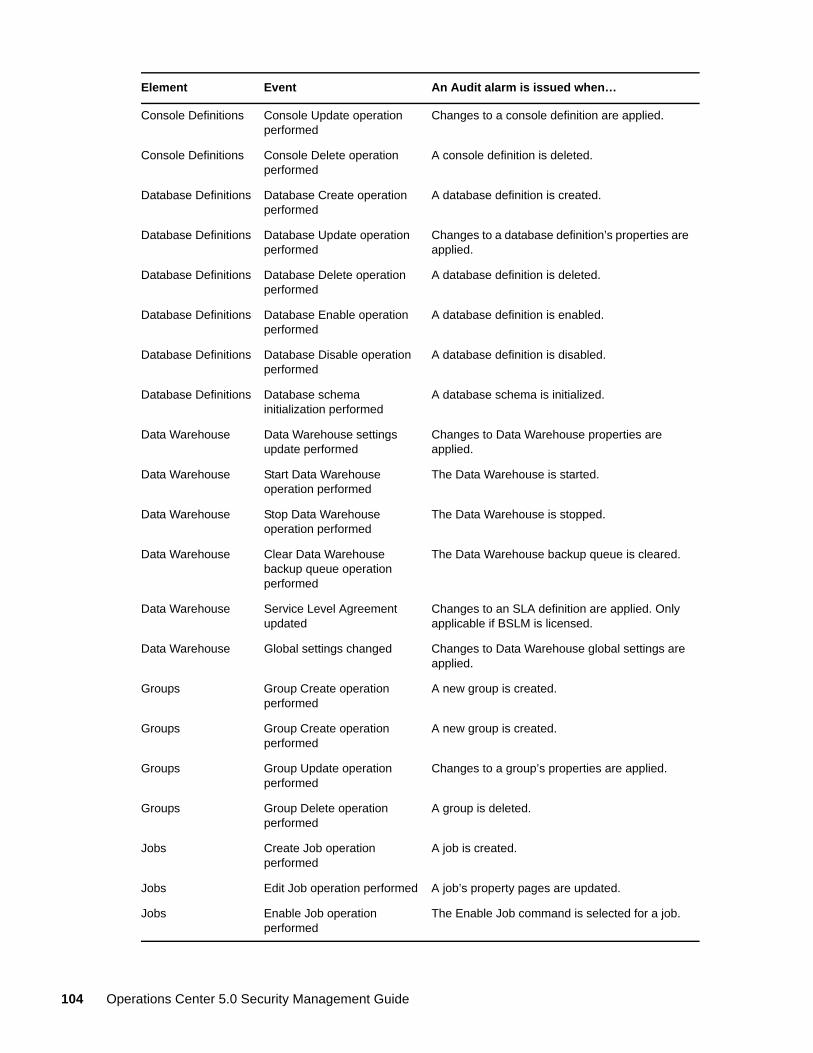
Console Definitions Console Update operation performed
Changes to a console definition are applied.
Console Definitions Console Delete operation performed
A console definition is deleted.
Database Definitions Database Create operation performed
A database definition is created.
Database Definitions Database Update operation performed
Changes to a database definition’s properties are applied.
Database Definitions Database Delete operation performed
A database definition is deleted.
Database Definitions Database Enable operation performed
A database definition is enabled.
Database Definitions Database Disable operation performed
A database definition is disabled.
Database Definitions Database schema initialization performed
A database schema is initialized.
Data Warehouse Data Warehouse settings update performed
Changes to Data Warehouse properties are applied.
Data Warehouse Start Data Warehouse operation performed
The Data Warehouse is started.
Data Warehouse Stop Data Warehouse operation performed
The Data Warehouse is stopped.
Data Warehouse Clear Data Warehouse backup queue operation performed
The Data Warehouse backup queue is cleared.
Data Warehouse Service Level Agreement updated
Changes to an SLA definition are applied. Only applicable if BSLM is licensed.
Data Warehouse Global settings changed Changes to Data Warehouse global settings are applied.
Groups Group Create operation performed
A new group is created.
Groups Group Create operation performed
A new group is created.
Groups Group Update operation performed
Changes to a group’s properties are applied.
Groups Group Delete operation performed
A group is deleted.
Jobs Create Job operation performed
A job is created.
Jobs Edit Job operation performed A job’s property pages are updated.
Jobs Enable Job operation performed
The Enable Job command is selected for a job.
Element Event An Audit alarm is issued when…
104 Operations Center 5.0 Security Management Guide
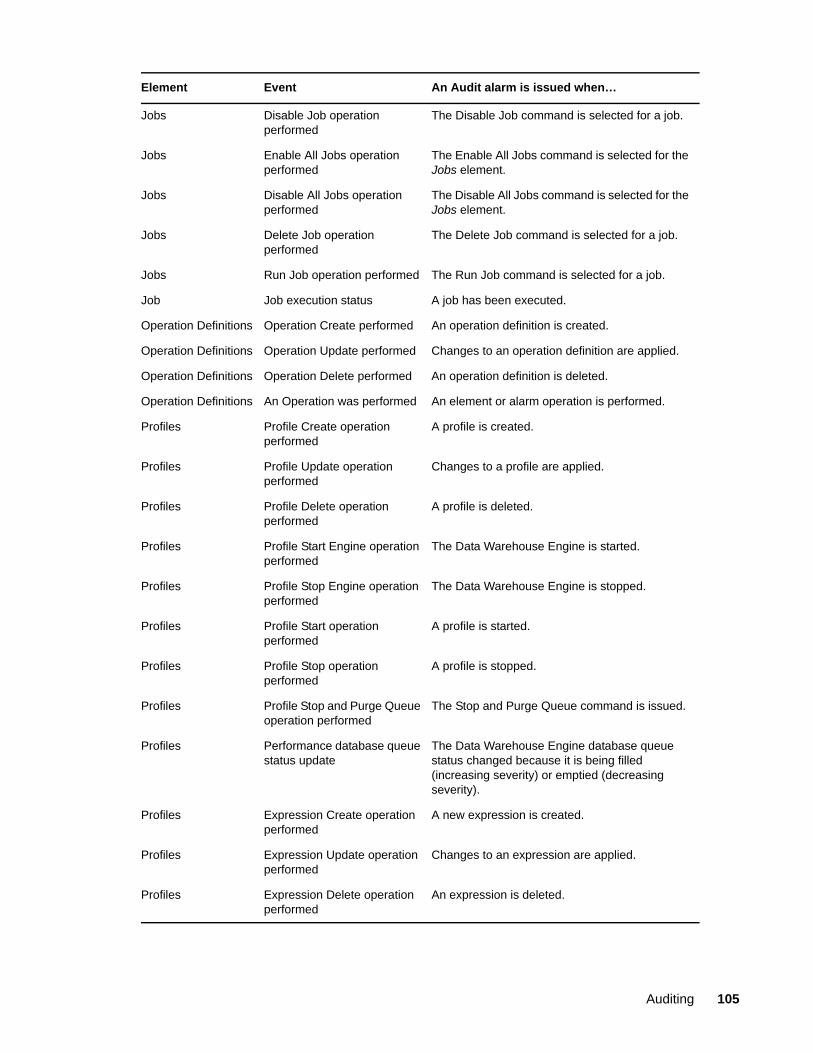
Jobs Disable Job operation performed
The Disable Job command is selected for a job.
Jobs Enable All Jobs operation performed
The Enable All Jobs command is selected for the Jobs element.
Jobs Disable All Jobs operation performed
The Disable All Jobs command is selected for the Jobs element.
Jobs Delete Job operation performed
The Delete Job command is selected for a job.
Jobs Run Job operation performed The Run Job command is selected for a job.
Job Job execution status A job has been executed.
Operation Definitions Operation Create performed An operation definition is created.
Operation Definitions Operation Update performed Changes to an operation definition are applied.
Operation Definitions Operation Delete performed An operation definition is deleted.
Operation Definitions An Operation was performed An element or alarm operation is performed.
Profiles Profile Create operation performed
A profile is created.
Profiles Profile Update operation performed
Changes to a profile are applied.
Profiles Profile Delete operation performed
A profile is deleted.
Profiles Profile Start Engine operation performed
The Data Warehouse Engine is started.
Profiles Profile Stop Engine operation performed
The Data Warehouse Engine is stopped.
Profiles Profile Start operation performed
A profile is started.
Profiles Profile Stop operation performed
A profile is stopped.
Profiles Profile Stop and Purge Queue operation performed
The Stop and Purge Queue command is issued.
Profiles Performance database queue status update
The Data Warehouse Engine database queue status changed because it is being filled (increasing severity) or emptied (decreasing severity).
Profiles Expression Create operation performed
A new expression is created.
Profiles Expression Update operation performed
Changes to an expression are applied.
Profiles Expression Delete operation performed
An expression is deleted.
Element Event An Audit alarm is issued when…
Auditing 105
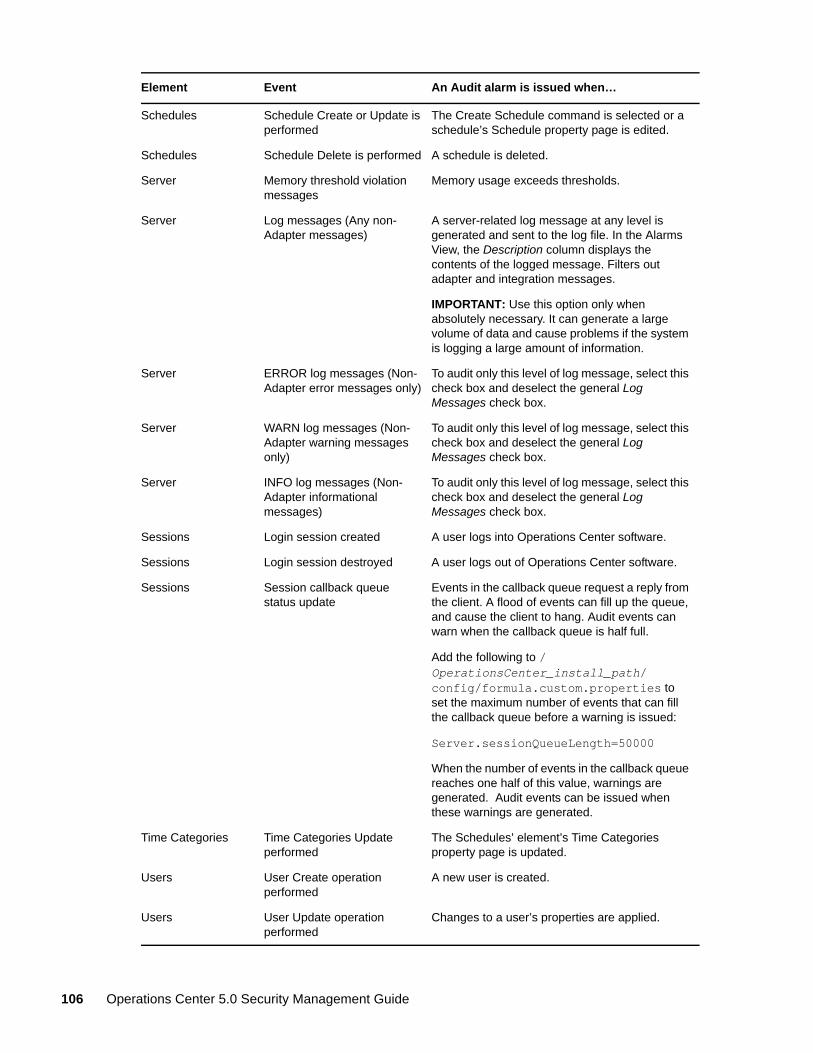
Schedules Schedule Create or Update is performed
The Create Schedule command is selected or a schedule’s Schedule property page is edited.
Schedules Schedule Delete is performed A schedule is deleted.
Server Memory threshold violation messages
Memory usage exceeds thresholds.
Server Log messages (Any non-Adapter messages)
A server-related log message at any level is generated and sent to the log file. In the Alarms View, the Description column displays the contents of the logged message. Filters out adapter and integration messages.
IMPORTANT: Use this option only when absolutely necessary. It can generate a large volume of data and cause problems if the system is logging a large amount of information.
Server ERROR log messages (Non-Adapter error messages only)
To audit only this level of log message, select this check box and deselect the general Log Messages check box.
Server WARN log messages (Non-Adapter warning messages only)
To audit only this level of log message, select this check box and deselect the general Log Messages check box.
Server INFO log messages (Non-Adapter informational messages)
To audit only this level of log message, select this check box and deselect the general Log Messages check box.
Sessions Login session created A user logs into Operations Center software.
Sessions Login session destroyed A user logs out of Operations Center software.
Sessions Session callback queue status update
Events in the callback queue request a reply from the client. A flood of events can fill up the queue, and cause the client to hang. Audit events can warn when the callback queue is half full.
Add the following to /OperationsCenter_install_path/config/formula.custom.properties to set the maximum number of events that can fill the callback queue before a warning is issued:
Server.sessionQueueLength=50000
When the number of events in the callback queue reaches one half of this value, warnings are generated. Audit events can be issued when these warnings are generated.
Time Categories Time Categories Update performed
The Schedules’ element’s Time Categories property page is updated.
Users User Create operation performed
A new user is created.
Users User Update operation performed
Changes to a user’s properties are applied.
Element Event An Audit alarm is issued when…
106 Operations Center 5.0 Security Management Guide

6.6 Generating Audit Alarms for Non-Adapter Log MessagesGenerating an audit alarm each time a non‐Adapter log message is sent to the log file can help identify potential system problems, especially when the administrator does not have direct access to the trace (.trc) files on remote Operations Center servers. For information on generating audit alarms for adapter‐related log messages, see Section 6.4, “Globally Enabling Auditing and Storage of Audit Events,” on page 97.
To generate audit alarms for non‐Adapter log messages:
1 In the Explorer pane, expand the Enterprise root element > Administration.2 Right‐click the Server element and select Properties.3 In the left pane, click Audit.4 In the Audit property page, select one of the non‐Adapter log message events to audit.
The selected event generates an audit alarm for every non‐Adapter log message that is created and sent to the log file.
5 Click Apply.
Users User Delete operation performed
A user is deleted.
View Builder Repository
View Builder Import operation performed
The Import command is issued.
View Builder Repository
View Builder Export operation performed
The Export command is issued.
View Builder Repository
View Builder Run operation performed
The Run command is issued for a View Builder element.
View Builder Repository
View Builder’s XMLEditor Save operation performed
A View Builder’s XML file is saved using the Operations Center XML Editor.
View Builder Repository
View Builder Delete operation performed
A View Builder element is deleted.
Web Server Web Server Start operation performed
The Start Web Server command is selected.
Web Server Web Server Stop operation performed
The Stop Web Server command is selected.
Web Server Web Server Restart operation performed
The Restart Web Server command is selected.
Element Event An Audit alarm is issued when…
Auditing 107

6.7 Viewing Audit EventsWhen auditing is enabled, audit‐related alarms are generated and displayed in the Alarms view of the associated element.
To change the type of alarms displayed in the Alarms view:
1 In the Explorer pane, select an element.2 Click the Alarms tab.3 In the toolbar, click the Alarm Selector and select Real‐Time or Historical, and Audit Events.
The selector button displays the types of alarms currently displayed in the Alarms view so its label can vary. For example, if audit alarms are currently displayed, the toolbar displays Real‐Time: Audit Events.
4 If the entire description is not visible in the Alarms view, right‐click the alarm and select Properties to open the Alarm Properties property page.
TIP: All audit alarms can be viewed from the Administration or Enterprise root elements if they are configured to show alarms. However, before enabling this feature, verify that your machine has enough memory to handle the number of events being audited. If it does, alarms can be enabled for the Administration or Enterprise root elements by editing the formula.custom.properties file.
108 Operations Center 5.0 Security Management Guide
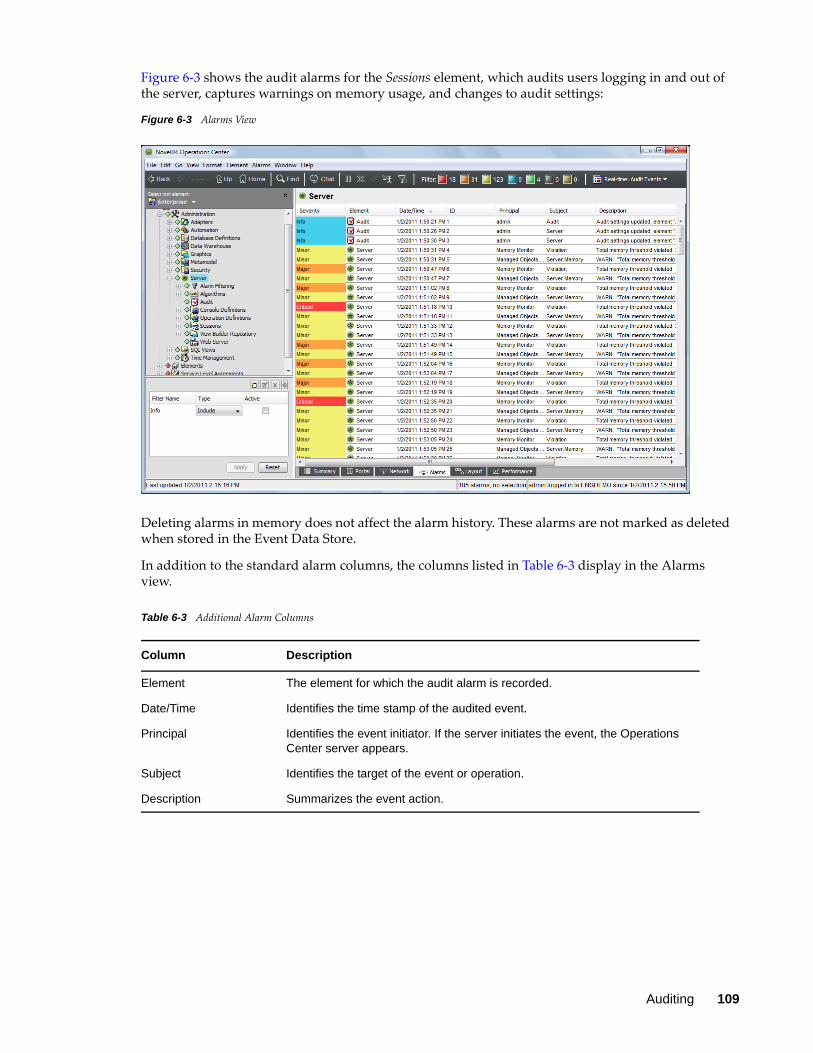
Figure 6‐3 shows the audit alarms for the Sessions element, which audits users logging in and out of the server, captures warnings on memory usage, and changes to audit settings:
Figure 6-3 Alarms View
Deleting alarms in memory does not affect the alarm history. These alarms are not marked as deleted when stored in the Event Data Store.
In addition to the standard alarm columns, the columns listed in Table 6‐3 display in the Alarms view.
Table 6-3 Additional Alarm Columns
Column Description
Element The element for which the audit alarm is recorded.
Date/Time Identifies the time stamp of the audited event.
Principal Identifies the event initiator. If the server initiates the event, the Operations Center server appears.
Subject Identifies the target of the event or operation.
Description Summarizes the event action.
Auditing 109

110 Operations Center 5.0 Security Management Guide
7 7Dashboard Security
The Operations Center dashboard is a Web‐based application that provides Operations Center users with a personalized and portable view into the Operations Center server. It allows for single sign‐on, personalization, and integration of data from both Operations Center and other sources.
The Operations Center dashboard must be purchased and installed separately on the Operations Center server with which it communicates. In addition, there must be an adequate number of Dashboard user licenses purchased for each Operations Center server with which the dashboard communicates.
A separate login screen is used to access the dashboard and dashboard pages. However, user account and user group profiles as well as permissions are leveraged from Operations Center. Because of this, it is important to understand how these accounts are synchronized and configured.
Secure, role‐based portal views can be established by setting security permissions on portal pages and portlets within pages, as well as on the data content within each portlet. A complete discussion of security in the dashboard is found in the Operations Center 5.0 Dashboard Guide. This section highlights the security features and potential issues involving dashboard applications.
Section 7.1, “Logging In to the Dashboard,” on page 111Section 7.2, “Operations Center and Dashboard Interaction,” on page 111Section 7.3, “Setting User Permissions on Portal Pages and Page Content,” on page 112Section 7.4, “Dashboard Control Panel and Administration Portlets,” on page 112
7.1 Logging In to the DashboardYou access the dashboard from the URL (Internet address) to the Operations Center server and appending with the port number of the dashboard. Or, access the dashboard from a link on the Operations Center home page. Enter a Operations Center user ID and password in the Sign In portlet, which shows by default on the dashboard home page.
7.2 Operations Center and Dashboard InteractionUser and group accounts from the Operations Center server are leveraged by the dashboard to give users access to the dashboard portal pages and Operations Center data via the dashboard portlets.
Operations Center and the dashboard use the same user and group accounts. User accounts are organized into groups that exist both in Operations Center and in the dashboard. Because the same user accounts are used by both Operations Center and the dashboard, actions performed on a user account in the dashboard impact the account in Operations Center and vice versa.
In contrast to the above, actions performed on user groups in Operations Center impact the groups in the dashboard, while the reverse is not true. Because of this, groups in the dashboard can be organized into a different structure designed to follow your corporate hierarchy.
Dashboard Security 111
Any Admin accounts imported from Operations Center, must be given Dashboard administrative permission from the Dashboard control panel. For example, after the initial synchronization of accounts, you can give the Admin group administrative permissions in the Dashboard.
For more information about interaction and synchronization between the Operations Center server and dashboard, see “User Accounts” in the Operations Center 5.0 Dashboard Guide.
7.3 Setting User Permissions on Portal Pages and Page ContentOperations Center permissions (determines the data in the Operations Center server that the user can access) cannot be changed in the dashboard. To change permissions to Operations Center, you must access the permissions in the Operations Center console.
Dashboard permissions are relevant to all functionality in the dashboard. When user accounts are created in the dashboard and thus added to the Operations Center server, the user is automatically added to the users group in the Operations Center server and receives all permissions assigned to the users group.
These accounts are automatically set to have restricted access to the Operations Center console. This means that the user can only log in to the dashboard or another Operations Center Web client; the user cannot log in to the Operations Center console.
Dashboard permissions are granted to users or user groups to perform actions that on a set of resources using roles. Dashboard roles are used to define permissions across their scope: across the portal, across a user groups, or across a portal community, or assign individual permissions to a specific portlet.
Permissions can be used to assign tasks to users to help with the administration of the dashboard. For example, assign to a user some of the roles of an enterprise, organization, or location administrator. Assign users to manage communities and pages within communities. You can moderate content by distributing it among communities and delegate the responsibility for moderating communities to various users.
For more information about dashboard users and permssions, see “User Accounts” and “Portal and Community Permissions” in the Operations Center 5.0 Dashboard Guide.
7.4 Dashboard Control Panel and Administration PortletsAll of the administrative functions needed to maintain the portal or its content can be found in the control panel. This provides access to user and group accounts and the assigning of dashboard permissions.
For more information about the dashboard control panel, see “About the Dashboard Control Panel” in the Operations Center 5.0 Dashboard Guide.
For more information about dashboard roles and permssions, see and “Portal and Community Permissions” in the Operations Center 5.0 Dashboard Guide.
112 Operations Center 5.0 Security Management Guide
A ADocumentation Updates
This section contains information on documentation content changes that were made in the Security Management Guide after the initial release of Operations Center 5.0. The changes are listed according to the date they were published.
If you need to know where a copy of the PDF documentation you are using is the most recent, the PDF document includes a publication date on the title page.
Section A.1, “April 2013 Patch Release,” on page 113Section A.2, “June 2012 Patch Release,” on page 113Section A.3, “September 2011 Patch Release,” on page 114
A.1 April 2013 Patch ReleaseGlobal updates were made to installation and file path references for Operations Center and Operations Center features, as follows:
Operations Center: The location of the main Operations Center installation is shown as OperationsCenter_install_path
Operations Center Dashboard: The location of the Dashboard is shown as OperationsCenter_Dashboard_install_path
Operations Center Configuration Management System (CMS): The location of the CMS is shown as OperationsCenter_CMS_install_pathOperations Center Experience Manager: The location of the Experience Manager is shown as OperationsCenter_ExperienceManager_install_path
In addition, updates were made to the following sections:
A.2 June 2012 Patch ReleaseUpdates were made to the following sections:
Location Update
Section 5.1.5, “Understanding Security Requirements for the Image Server,” on page 76
Secure the Image Server port against connections that are not from Operations Center server or the Operations Center Dashboard.
Section 7.2, “Operations Center and Dashboard Interaction,” on page 111
After the initial synchronization of Operations Center accounts, give the Admin group administrative permissions in the Dashboard.
Documentation Updates 113
A.3 September 2011 Patch ReleaseUpdates were made to the following sections:
Location Update
Section 2.3.2, “Creating a User,” on page 14 New property to enable 508 accessibility Dashboard features for a user.
Section 2.3.5, “Alerting Users About Password Expiration,” on page 17
New property to alert users that their password is expiring.
Location Update
Section 2.3.5, “Alerting Users About Password Expiration,” on page 17
New property to alert users that their password is expiring.
114 Operations Center 5.0 Security Management Guide
Glossary
Authentication. A method of proving a person’s identity based on a user name and password.
Cipher. A method of data encryption and decryption.
HyperText Transfer Protocol (HTTP). A standard Internet transport protocol used by Web sites and Web browsers. Novell® Operations Center is fully Web‐enabled; therefore, users can connect to Operations Center via a standard Web browser that uses HTTP.
HyperText Transfer Protocol, Secure (HTTPS). A secure Internet transport protocol used by Web sites and Web browsers. Commonly identified by the padlock icon displayed in a browser when a secured, authenticated session is established with a Web server. Operations Center supports the use of HTTPS to provide secure connections between a client and server.
Internet Inter‐Orb Protocol (IIOP). A standard protocol that eases legacy application and platform integration by allowing application components written in C++, Smalltalk, and other CORBA supported languages to communicate with components running on the Java platform. Operations Center uses unidirectional IIOP for its communications between ORBs and Operations Center servers.
Bidirectional Internet Inter‐Orb Protocol (IIOP). A dialect or modification of standard IIOP that permits better navigation through corporate firewalls and network address translation (NAT) devices. This protocol does not establish two socket channels to communicate bidirectionally; it reuses the socket established by the first connecting side of a two‐way channel. Operations Center uses bidirectional IIOP for its base communications between Operations Center clients and servers and between Operations Center servers.
Lightweight Directory Access Protocol (LDAP). An open, platform‐independent, and vendor‐independent information model and network protocol for querying and manipulating information in a directory. LDAP is essentially X.500 designed specifically to run on TCP/IP. It has become the standard used throughout large companies to access directory information about users and resources. With its External I&A Option, Operations Center supports integration with LDAP for external identification and authorization.
Object Request Broker (ORB). Part of the Common Object Request Broker Architecture (CORBA) specification. Acts as a mediator between objects and allows applications to communicate with one another no matter where they reside on a network (such as on a client or server). Operations Center uses ORBs to communicate with some third‐party management systems.
Secure Sockets Layer (SSL) Protocol . A standard protocol for secure communication over a network. SSL uses a combination of cryptographic protocols for authentication, privacy, and data protection of Internet communications. The application most commonly used with SSL is Hypertext Transfer Protocol (HTTP), which is the protocol for Internet Web pages. Lightweight Directory Access Protocol (LDAP) and other protocols, such as File Transfer Protocol (FTP), can also be used with SSL. Operations Center provides configurable options for using SSL to secure communications between Operations Center clients and servers, as well as between Operations Center servers and Operations Center ORBs and LDAP.
Tiny Encryption Algorithm (TEA) Cipher. One of the fastest and most efficient cryptographic algorithms. Operations Center uses the TEA Cipher to encrypt passwords.
Glossary 115
X.500. A standard that describes an overall model for directory services, providing an information model and a network protocol for querying and manipulating information in a directory. Operations Center implements an X.500 directory structure for managing its internal data.
116 Operations Center 5.0 Security Management Guide