Embed Size (px)
Citation preview

RESCUE GUIDE
Pole Top Platform Tower
Bucket Rescue Bucket Escape Substation &
Transformer Rescue


RESCUE GUIDE
© Copyright 2000 All rights reserved. Reproduction of this document in whole or in part by any means is prohibited, unless authorized in writing by: ATCO Electric Work Standards Group 1006 - 15th Ave Nisku, Alberta, Canada, T9E 7S5 Phone: (780) 955-6226 Fax: (780) 955-6234


December 2009 Page i © Rescue Guide
TABLE OF CONTENTS INTRODUCTION .......................................................................... 1
General Procedures ....................................................................... 1
POLE TOP RESCUE ................................................................... 5 Practice Session ............................................................................ 5 Emergency Rescue........................................................................ 7
PLATFORM RESCUE................................................................... 9 Practice Session ............................................................................ 9 Emergency Rescue...................................................................... 11
TOWER RESCUE...................................................................... 13 Practice Session .......................................................................... 13 Emergency Rescue...................................................................... 15
BUCKET RESCUE .................................................................... 17 Practice Session/Emergency Rescue........................................... 17
BUCKET ESCAPE..................................................................... 19 Practice Session .......................................................................... 19 Emergency Escape...................................................................... 21
SUBSTATION & TRANSFORMER RESCUE ................................... 22
APPENDICES .......................................................................AP-1 Appendix A: Rescue Equipment Requirements ..................AP-1


INTRODUCTION
December 2009 Page 1 © Rescue Guide
INTRODUCTION This guide provides step-by-step procedures for conducting rescue practice sessions and emergency rescues from various types of equipment. Rescue procedures must be practiced annually to make sure all employees can complete the specific emergency rescue procedures associated with their work activities.
General Procedures Periodically inspect all rescue equipment to make sure it is in good operating condition. NEVER reuse a practice rope or a rope that has been used to arrest a fall in an actual rescue.
Immediately remove rescue equipment from service if:
• The rescue rope shows signs of excessive wear or damage to the strands.
• Markings (labels) are illegible or absent.
• There are defects or damage to hardware.
• There is evidence of improper function, improper fit or alteration of any mechanical component.
• There are missing parts.
Appendix A identifies equipment requirements for conducting emergency rescues and practice sessions. Replacement parts for rescue and escape equipment are included in the Operations PPE Intranet catalogue. Contact the warehouse for ordering assistance.

INTRODUCTION
Page 2 December 2009 © Rescue Guide
BEFORE attempting a rescue:
1. Identify and take precautions to eliminate or control the hazard(s).
Table 1 Hazards Precautions
Body Mechanics • Use fall protection equipment when accessing the victim.
• Keep rescue rope tight.
Electrical • When conducting a rescue on lines with isolated circuits, ground phase conductors before lowering the victim.
• Observe and maintain limits of approach when using fall protection and rescue ropes near energized equipment.
• DON’T climb if you have received an electrical shock because you may lose consciousness unexpectedly.
Mechanical • Replace any component in the fall protection system that has arrested a fall.
2. Make sure the victim is clear of the power source and/or the hazard that caused the initial accident. Don't become a second victim.
3. Check:
• Full body harness fitting;
• All rigging; and
• Back-up system, if applicable.
4. Call the ATCO Electric emergency number (1-888-667-1261 or 911 on ATCO Electric radio) and provide your location and vital information.

INTRODUCTION
December 2009 Page 3 © Rescue Guide
When you reach the victim:
• Check for breathing by "look, listen and feel." If the victim is not breathing, open their airway and give two deep breaths using an artificial resuscitation barrier one-way valve.
• Lower the victim to the ground.
• Once the victim is on the ground, administer first aid as required. Focus on breathing, pulse and bleeding. Administer artificial resuscitation and CPR as required.


POLE TOP RESCUE
December 2009 Page 5 © Rescue Guide
POLE TOP RESCUE Practice Session
When practicing pole top rescue a mannequin (Rescue Buck, Tuff Kelly etc.) must be used and an appropriate mechanical back up system must be in place, such as a polecat, a material handling unit, hoisting device, etc. Equipment requirements are provided in Appendix A.
1. The lineman up the pole attaches the rescue line around the cross arm.
2. Position the back up system in place, hoist up mannequin and belt him into position above the cross arm.
3. Attach the rescue line snap to the dorsal D-ring on the mannequin full body harness. Position yourself to safely undo the pole strap and lower the mannequin.
4. Practice the rescue by placing a screw driver deep into the pole and placing the rescue rope as per diagram 2. In this situation utilize the back up system to support the mannequin prior to undoing the pole strap.
• See Practice Diagrams 1 & 2, on the next pages.

RESCUE GUIDE
Page 6 December 2009
Practice Diagram 1
© Rescue Guide

POLE TOP RESCUE
December 2000 Page 7
Emergency Rescue
Equipment
• A 13 mm (1/2 inch) rescue rope (hand line) of sufficient length to reach from the victim’s location to the ground.
Procedure 1. Climb up to the victim and administer artificial
resuscitation, if necessary.
2. Split the hand line and throw one end over the cross arm approximately 30 centimeters (12 inches) from the pole.
3. IF THERE IS NO CROSSARM, improvise with whatever equipment that is available. For example:
• Make an attachment point by driving a screwdriver deep into the pole with the blade crossways to the grain. To make sure it can withstand the pressure; drive the screwdriver well into the pole with no consideration for recovery (see Diagram 2).
Diagram 2 Diagram B-2
© Rescue Guide

4. Twist the load line around the fall line TWICE to gain adequate friction to safely and easily lower the victim.
5. Place the load line under the victim's arms and tie a knot at about face level. Always tie or snap the loose end above the knot.
6. Remove excess slack from the hand line.
7. Remove the victim’s pole strap.
8. Lower the victim, paying out the hand line to control his descent.

PLATFORM RESCUE
December 2009 Page 9 © Rescue Guide
PLATFORM RESCUE
Practice Session When practicing platform rescue a mannequin (Rescue Buck, Tuff Kelly, etc.) must be used and an appropriate mechanical back up system must be in place, such as a polecat, a material handling unit, hoisting device, etc. Equipment requirements are provided in Appendix A.
1 The lineman up the pole attaches the rescue line onto the Personal Fall Arrest System (PFAS) Anchor.
2 Position the back up system in place, hoist up mannequin and position him on the platform.
3 Attach the rescue line snap to the dorsal D-ring on the mannequin full body harness. Maneuver mannequin close to the edge of the platform. In a crouch position start moving mannequin over the platform and then lower him to the ground.
See Practice Diagram 3, next page.

RESCUE GUIDE
Page 10 December 2009
Practice Diagram 3
© Rescue Guide

PLATFORM RESCUE
December 2009 Page 11 © Rescue Guide
Emergency Rescue Equipment
• A 13 mm (1/2”) rescue rope (hand line) of sufficient length to reach from the victim’s location to the ground.
Procedure
1. Climb up to the victim and administer artificial resuscitation, if necessary.
2. Split the hand line and thread the end with the locking snap TWICE through the eye of the free hanging sling.
3. Clip the locking snap from the hand line into the dorsal D-ring on the victim's full body harness.
4. Remove excess slack from the hand line.
5. Remove the victim's fall protection rope or lanyard.
6. In a crouch, position the victim in front of your body to enable the victim to safely clear the platform when being lowered to avoid any further injury to the victim.
7. Lower the victim, paying out the hand line to control his descent.


TOWER RESCUE
December 2009 Page 13 © Rescue Guide
TOWER RESCUE Practice Session
When practicing tower rescue a mannequin (Rescue Buck, Tuff Kelly, etc.) must be used and an appropriate mechanical back up system must be in place, such as a polecat, a material handling unit, hoisting device, etc. Equipment requirements are provided in Appendix A.
1 The lineman up the pole attaches the rescue line around the cross arm.
2 Position the back up system in place, hoist up the mannequin and belt him into position above the cross arm.
3 Attach the rescue line snap to the dorsal D-ring on the mannequin full body harness. Position yourself to safety undo the pole strap and lower the mannequin.
See Practice Diagram 4, next page.

RESCUE GUIDE
Page 14 December 2009
Practice Diagram 4
© Rescue Guide

TOWER RESCUE
December 2009 Page 15 © Rescue Guide
Emergency Rescue
Equipment
• A 13 mm rescue rope (hand line) of sufficient length to reach from the victim’s location to the ground; OR
• If the ground crew will control the victim’s rate of descent, a rope twice the length of the structure height.
Procedure
1. Climb to a location above the victim and attach your lanyard to a steel member on the structure.
2. Wrap the snap end of the hand line two times around the main steel member above the victim.
3. Connect the snap to the dorsal D-ring on the victim's full body harness.
4. Remove excess slack from the hand line and tie it to a steel member.
5. Remove the victim's fall protection rope or lanyard.
6. Untie the hand line and lower the victim, paying out the rope to control his descent.


BUCKET RESCUE Practice Session/Emergency Rescue
Equipment
• Bucket rescue rope blocks (for non-tipping bucket only).
Procedure
Remove the worker using one of the following two methods, depending on the design of the bucket.
Tipping Bucket
Lower the bucket to the ground, tip the bucket and extract the worker.
• For a bucket with knuckle booms, you must be able to lay the booms out flat to get the bucket to the ground.
• For telescoping booms, you must be able to lower the bucket to the ground, then extend the boom to slightly tilt the bucket until you can extract the worker.
• In the event of a hydraulic failure, use the override controls to tip the bucket.
Non-Tipping Bucket
A rescue block system is required for non-tipping buckets. The rescue rope blocks are attached to the boom and the victim's D-ring. The rescuer pulls on the fall line of the blocks until the victim is clear of the bucket, and then lowers the victim to the ground. The upper boom of the aerial device must be in a near vertical position for this method to be effective. Use the following steps:

RESCUE GUIDE
Page 18 December 2009 © Rescue Guide
Rescue Block Procedure
1. Snap the fixed block (yellow) to the D-ring on the boom strap.
2. Unfold the blocks and throw the fall line to the ground. Make sure there are no kinks or knots in the fall line.
3. Snap the running block to the dorsal D-ring on the victim's harness.
4. Pull the fall line of the blocks to straighten the victim. Administer artificial resuscitation, if necessary.
5. Remove the victim's lanyard.
6. Unfold the upper boom to position the bucket 2 metres (6 to 8 feet) from the truck deck.
7. Proceed carefully from the truck deck to the ground.
8. Pull the fall line to raise the victim clear of the bucket.
9. Lower the victim to a clear spot on the ground.
10. Unsnap the rescue blocks.

BUCKET ESCAPE
December 2009 Page 19 © Rescue Guide
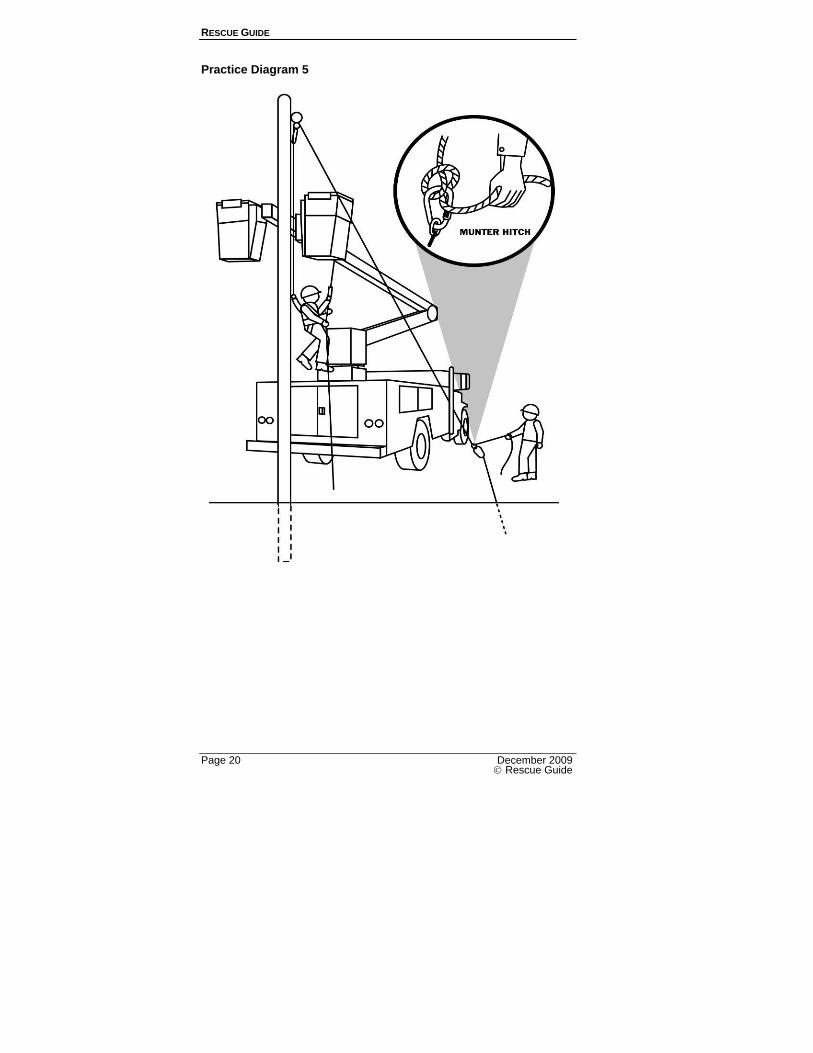
BUCKET ESCAPE Practice Session
Equipment requirements are provided in Appendix A.
1. Attach the rope descender/rider to the bucket and then snap the dorsal D-ring onto the full body harness to the worker. With the worker standing on the ground raise the bucket/worker 3 – 4.5 metres off the ground.
2. The worker then lowers himself to the ground using the rope descender.
See Practice Diagram 5, next page.
RESCUE GUIDE
Page 20 December 2009
Practice Diagram 5
© Rescue Guide
BUCKET ESCAPE
December 2009 Page 21
Emergency Escape
Equipment
• Bucket escape rescue system (e.g., Rope Descender or Rope Rider rescue system).
Procedure
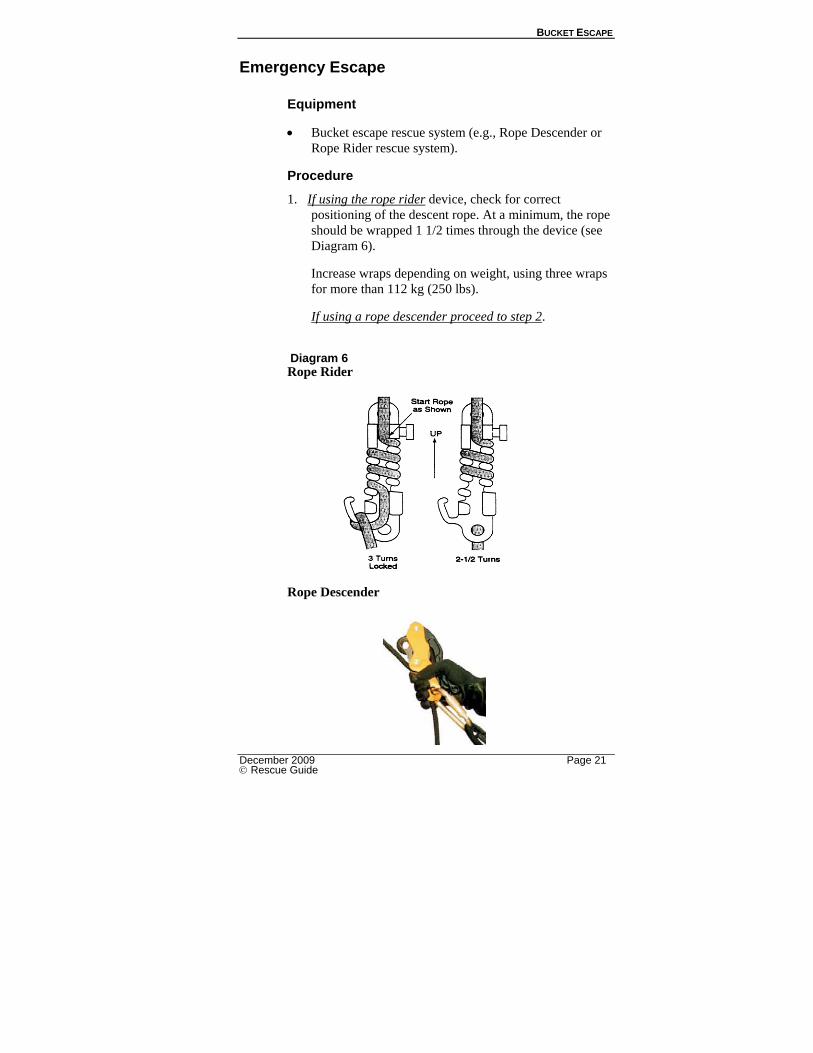
1. If using the rope rider device, check for correct positioning of the descent rope. At a minimum, the rope should be wrapped 1 1/2 times through the device (see Diagram 6).
Increase wraps depending on weight, using three wraps for more than 112 kg (250 lbs).
If using a rope descender proceed to step 2.
Rope Rider Diagram 6
Rope Descender
© Rescue Guide
RESCUE GUIDE
Page 22 December 2009 © Rescue Guide
Use the carabiner to attach the top end of the descent rope to the attachment on the boom. Make sure the attachment point is reliable.
2. Position the descent device as close as possible to the attachment point to minimize drop when leaving the bucket.
3. Use a carabiner to attach the bottom end of the lowering device to the attachment loop on your descent cradle or harness.
4. Lower the free end of the descent rope to the ground. Make sure the rope is not tangled, the descent path is clear and the person on the ground is in control of the fall line.
5. Remove your lanyard and begin descent:
• Climb from the bucket and transfer your weight to the descent rope. Adjust the descent harness so you are comfortable.
• Pull downward on the descent device to start your descent. You can stop at any time by releasing the descent device.
• Continue until you have reached the ground.
SUBSTATION & TRANSFORMER RESCUE
Please follow the training document stored on the transmission drive under Tech Training.

APPENDICES
December 2009 Page AP-1 © Rescue Guide
Appendix A: Rescue Equipment Requirements
BACK UP SYSTEM
Qty Description Catalogue #
1 Mechanical Device, such as a polecat, material handler, hoist, vehicle & rope blocks
34 03 3300
1 Carabiner 34 13 0552
1 Full body harness with dorsal D-ring 34 03 3880 Note: an anchor must be installed next to the practice structure to operate the back up system.
POLE TOP, PLATFORM AND TOWER RESCUE
Qty Description Catalogue #
1 Hand line of suitable length (13 mm diameter rope minimum)
34 03 3300
BUCKET RESCUE
Qty Description Catalogue #
1 Bucket Rescue Rope Blocks 34 13 0303
BUCKET ESCAPE
Qty Description Catalogue #
1 Bucket Escape Rescue System 34 13 0304