Embed Size (px)
Citation preview
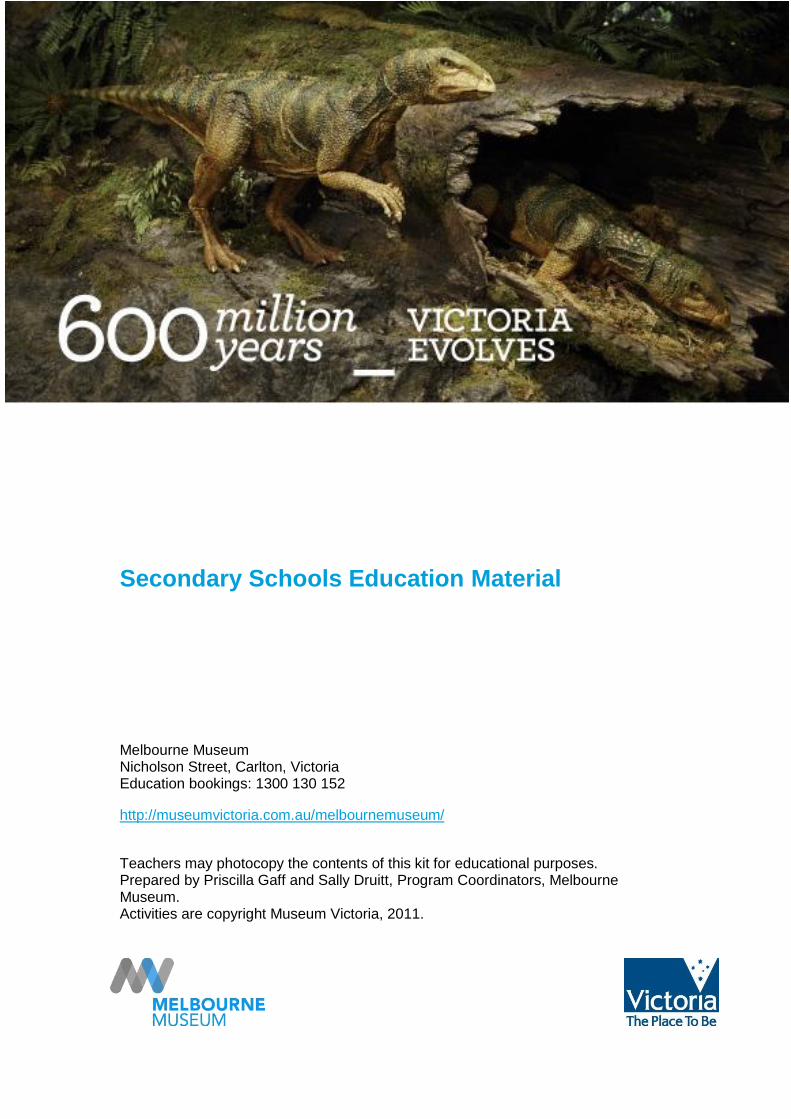
Secondary Schools Education Material
Melbourne Museum Nicholson Street, Carlton, Victoria Education bookings: 1300 130 152
http://museumvictoria.com.au/melbournemuseum/
Teachers may photocopy the contents of this kit for educational purposes. Prepared by Priscilla Gaff and Sally Druitt, Program Coordinators, Melbourne Museum. Activities are copyright Museum Victoria, 2011.
http://museumvictoria.com.au/MelbourneMuseum/Education/ 2
Contents
Page
Teachers notes 3
Exhibition map
VELS curriculum links – Level 5
4
5
VELS curriculum links – Level 6 6
Classroom Activities
Activity 1: Prior knowledge and evolution 7
Activity 2: Fossilisation 9
Activity 3: Timeline of evolution 14
Activity 4: Get selected… naturally 17
Activity 5: Survivor… dice-style 19
Activity 6: Convergent, divergent or homology? 28
Activity 7: Australian palaeontologists 30
Activity 8: Prehistoric ‘pictionary’ 32
Activity 9: Evolution ‘slowmation’ 34
Websites 39
http://museumvictoria.com.au/MelbourneMuseum/Education/ 3
Teachers notes
This education kit provides teachers with resources to plan a successful class visit to the 600 million years: Victoria evolves exhibition at Melbourne Museum and implement a unit of work around this topic.
600 million years: Victoria evolves brings to life the fantastic landscapes and life forms of the past. It is laid out in a timeline starting 600 million years ago. Your students will start their journey exploring early multicellular life from the fossils of Ediacara, South Australia. Students will see the real fossils alongside models and multimedia interactives of these early life forms. They will find out about fish evolution, eventually to vertebrates walking and breathing on land; see animatronic dinosaurs modelled on scientific evidence found in Inverloch, Victoria; observe multiple fossil whales to explore how these grand animals evolved from land animals into water dwellers; and listen to scientists explain their discoveries and answer the question ‘how do we know?’
This highly engaging and interactive exhibition allows students to discover how life and landforms in Victoria have changed over millennia, and how extinction events have shaped the ecosystems of today.
Themes in 600 million years: Victoria evolves link to the displays in the Dinosaur Walk exhibition, with exhibits combining geology and palaeontology to tell the story of our changing landscapes and life over millions of years.
Please note:
600 million years: Victoria evolves is at Melbourne Museum.
Melbourne Museum is open from 10am until 5.00pm each day.
Bookings are essential.
Telephone: (03) 1300 130 152.
MVteachers
Subscribe to MVteachers, the only way to get free teacher entry to Melbourne Museum.
Join at:
http://www.museumvictoria.com.au/Education/MVteachers/
http://museumvictoria.com.au/MelbourneMuseum/Education/ 4
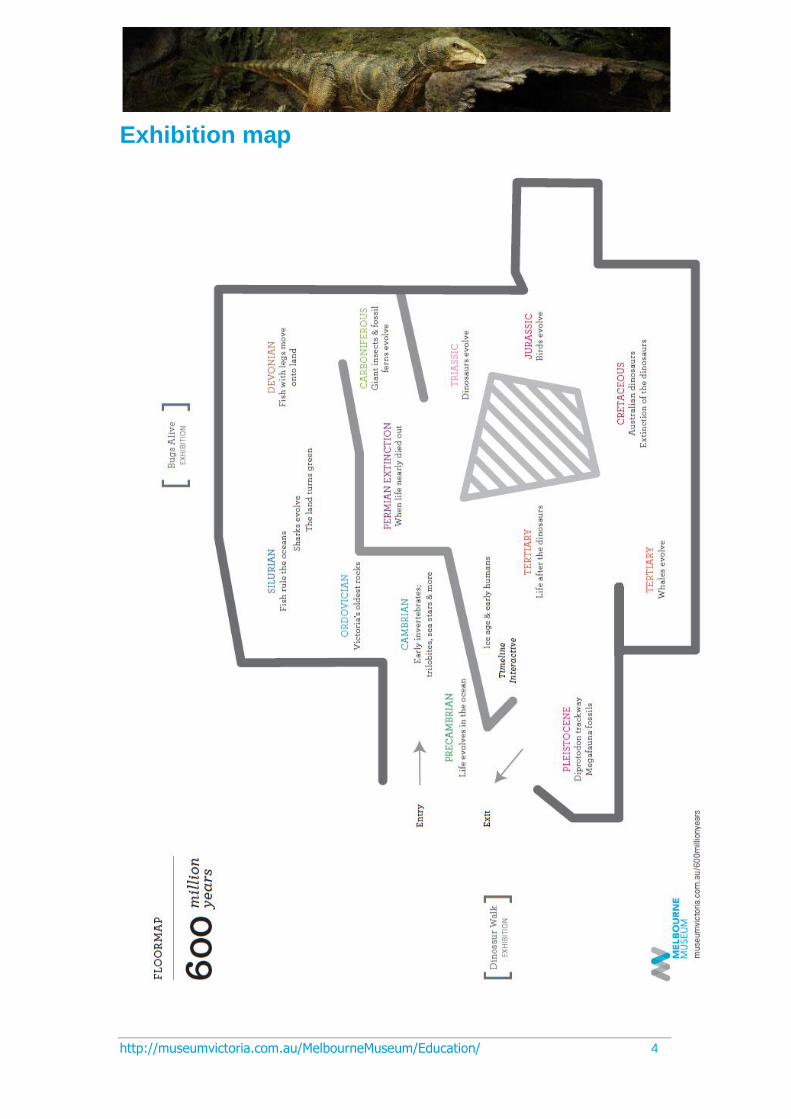
Exhibition map
http://museumvictoria.com.au/MelbourneMuseum/Education/ 5
VELS curriculum links
Activities in this education kit will cover the following areas of the Victorian Essential Learning Standards (VELS).
Level 5 VELS links
Domain Dimension & Standard
Dis
cip
line-b
ase
d L
ea
rnin
g
Science
Students use time scales to explain the changing Earth and its place in space. Students distinguish ideas about the universe that have a scientific basis from those that do not. They use physical and theoretical models to investigate geological processes. They describe aspects of scientists’ work and how this has contributed to science knowledge.
English
Students express creative and analytical responses to texts, themes and issues. They critically evaluate the spoken language of others and select, prepare and present spoken texts for specific audiences and purposes.
The Arts
Students – independently and collaboratively – plan, design, improvise, interpret, evaluate, refine, make and present works that represent and communicate ideas and their purpose.
Inte
rdis
cip
linary
Lea
rnin
g
Communication
Students modify their verbal and non-verbal responses to suit particular audiences. They interpret complex information and evaluate the effectiveness of its presentation. When responding, they use specialised language and symbols as appropriate to the contexts in which they are working.
ICT
During the processing stage of collaborative work, students monitor project plans and record reasons for adjusting them. They apply criteria to evaluate the extent to which their information products meet user needs and comply with intellectual property laws.
Ph
ysic
al,
Pe
rso
na
l &
So
cia
l
Lea
rnin
g
Interpersonal Development
Students accept responsibility as a team member, supporting other members to share information, exploring the ideas of others and working cooperatively to achieve a shared purpose within a realistic timeframe.
http://museumvictoria.com.au/MelbourneMuseum/Education/ 6
Level 6 VELS links
Domain Dimension & Standard
Dis
cip
line-b
ase
d L
ea
rnin
g
Science
Students demonstrate the link between natural selection and evolution. They apply concepts of geological time to elaborate their explanations of natural selection and evolution, and the origin and evolution of the universe.
They also describe the contributions Australian scientists have made to improve and/or change science knowledge.
English
In their presentations, students make effective use of the structures and features of spoken language to deal with complex subject matter in a range of situations.
The Arts
Students effectively use a range of traditional and contemporary media, materials, equipment and technologies.
Inte
rdis
cip
linary
Lea
rnin
g
ICT
Students demonstrate efficiency and effectiveness in using appropriate ICT tools and editing techniques for assisting in visualising thinking.
Communication
Students identify the ways in which complex messages are effectively conveyed and apply this knowledge to their communication. They demonstrate their understanding of the relationship between form, content and mode, and select suitable resources and technologies to effectively communicate.
Ph
ysic
al, P
ers
on
al &
So
cia
l L
ea
rnin
g
Interpersonal Development
Students work collaboratively, negotiate roles and delegate tasks to complete complex tasks in teams. Working with the strengths of a team, they achieve agreed goals within set timeframes.

http://museumvictoria.com.au/MelbourneMuseum/Education/ 7
Activity 1: Prior knowledge and evolution
Objectives and VELS links
Students’ prior conceptions are a major factor affecting how and if they learn, and these can be established and addressed. This activity aims to elicit students’ prior knowledge of the topic of evolution. By identifying their conceptions of evolution, the information can be used to challenge any misconceptions. This activity links to the Science and Thinking domains of VELS.
e5 Instructional Model links: engage and explore
What you need
Photocopies of the worksheet
Five boxes
Scissors
What to do
1. Give each student a copy of the worksheet and have them fill it in, stressing that the exercise is anonymous. At this stage, the point of the activity is to find out what students already know about the topic and establish the range of ideas in the classroom.
2. Set out the five post boxes on the front desk, labelling them 1 to 5.
3. Students need to cut up their worksheet and post their responses in the correct box, numbered according to the corresponding question.
4. After the students have posted their responses, split the class into five groups. Each group takes a post-box.
5. Instruct the students to sort the responses, but not judge the answers. They can bundle the ideas and see if there are some common threads.
6. On a large piece of paper, have each group summarise the common ideas held by the class for each question. Each group needs to report to the whole class on these points.
7. These posters can then be placed on the walls and used for reflection throughout the unit of work.
http://museumvictoria.com.au/MelbourneMuseum/Education/ 8
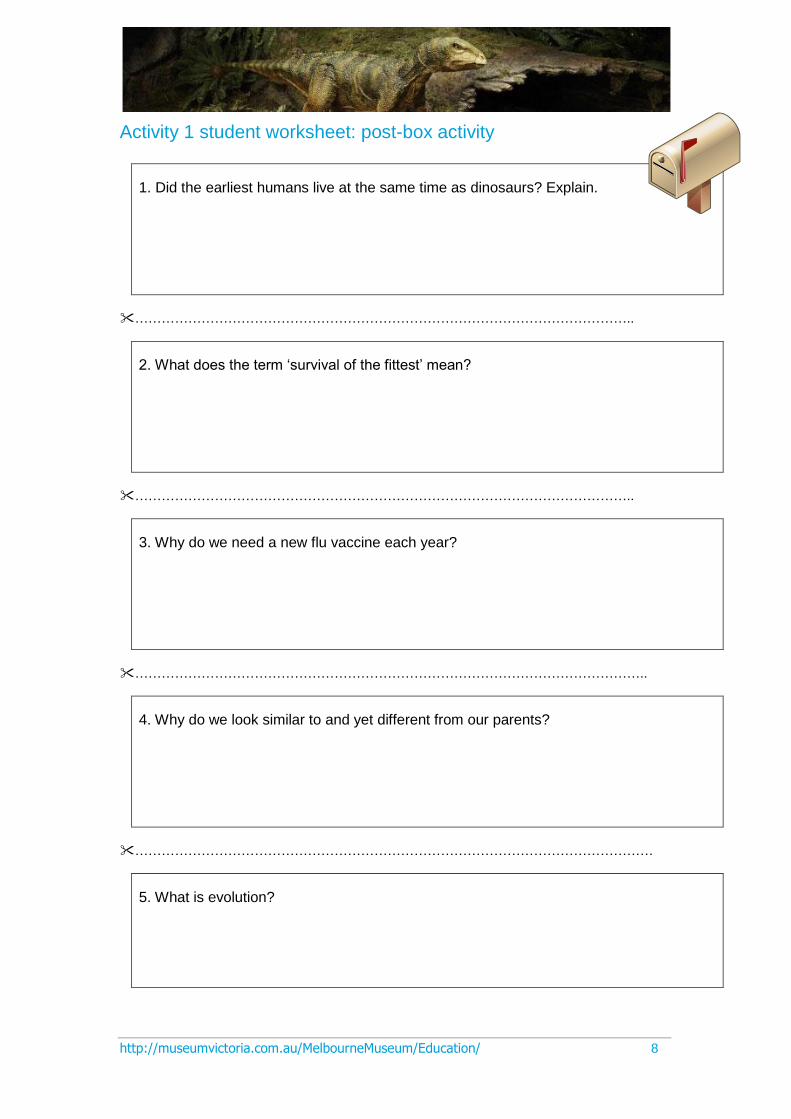
Activity 1 student worksheet: post-box activity
1. Did the earliest humans live at the same time as dinosaurs? Explain.
…………………………………………………………………………………………………..
2. What does the term ‘survival of the fittest’ mean?
…………………………………………………………………………………………………..
3. Why do we need a new flu vaccine each year?
……………………………………………………………………………………………………..
4. Why do we look similar to and yet different from our parents?
………………………………………………………………………………………………………
5. What is evolution?
http://museumvictoria.com.au/MelbourneMuseum/Education/ 9
Activity 2: Fossilisation
Objectives and VELS links
In this activity students are encouraged to think about how the process of fossilisation happens. The activity links to the Science and Thinking domains of VELS.
e5 Instructional Model links: engage and explore
What you need
Scissors
Printouts of the images
What to do
1. Start by giving the students the Dinosaur Fossilisation sheet or the Diprotodon track way sheet. Ask the students to discuss what they see.
2. Allow the students to cut out the images and order them as they think appropriate. Next, have the students write under each image what they think is happening.
3. Have students share their thoughts on the order they created and the content in each image.
4. Each sequence represents a real fossilisation sequence that occurred in Victoria. More information about each sequence can be found at these websites:
http://museumvictoria.com.au/melbournemuseum/discoverycentre/600-million-years/timeline/cretaceous/qantassaurus/ http://museumvictoria.com.au/melbournemuseum/discoverycentre/600-million-years/timeline/quaternary/megafauna-track-way/ http://museumvictoria.com.au/melbournemuseum/discoverycentre/600-million-years/timeline/quaternary/diprotodon/ http://museumvictoria.com.au/about/mv-news/2009/giant-steps/
5. Having completed the two sequences, which show two very different ways for fossil formation, have the students create a definition for the term ‘fossil’ and for the term ‘fossilisation’.
http://museumvictoria.com.au/MelbourneMuseum/Education/ 10
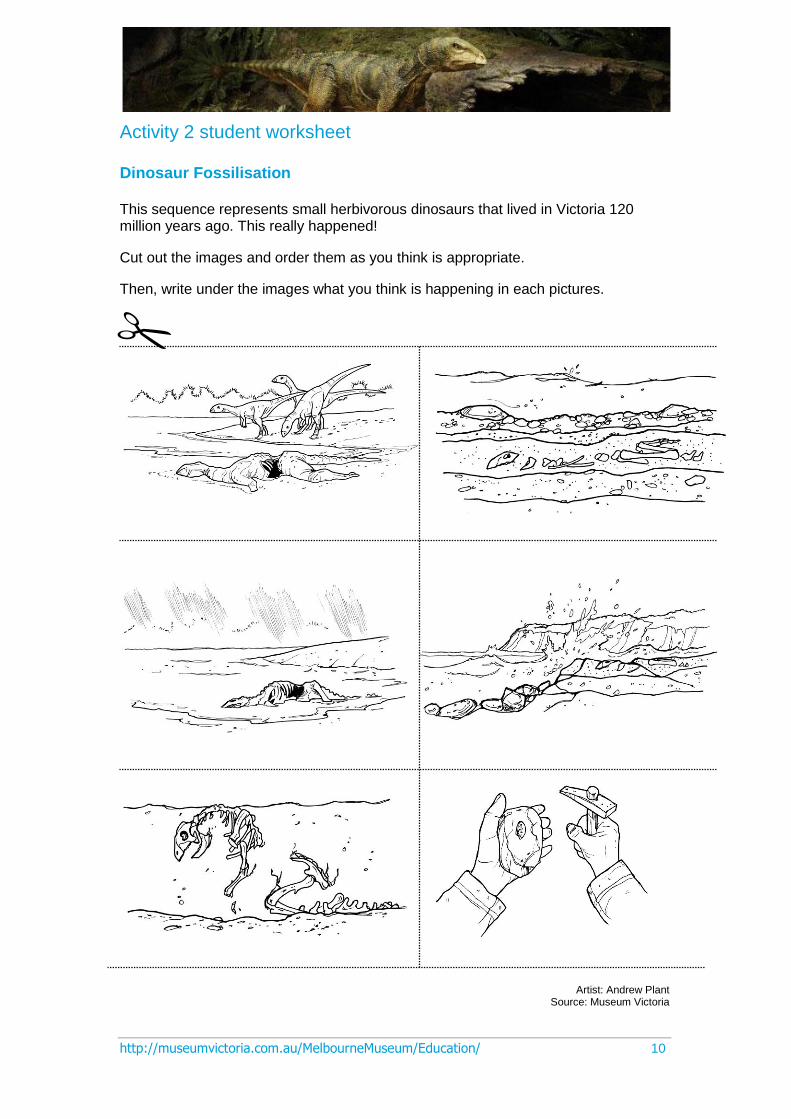
Activity 2 student worksheet
Dinosaur Fossilisation
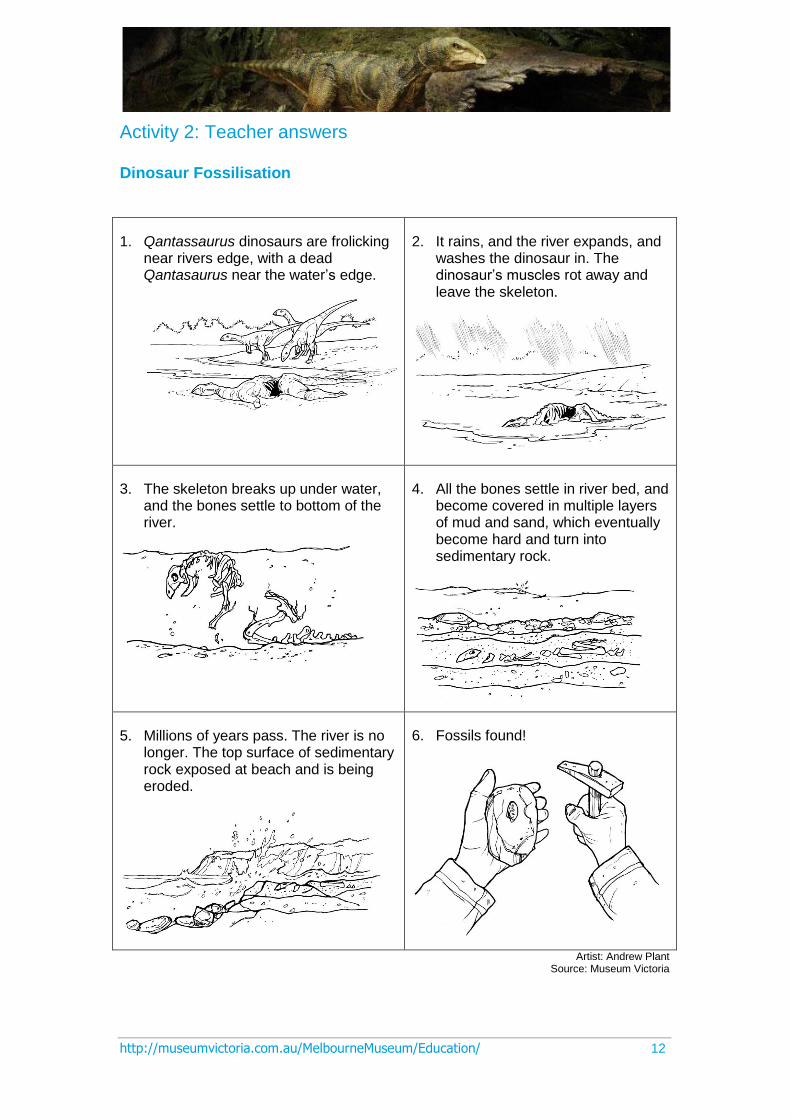
This sequence represents small herbivorous dinosaurs that lived in Victoria 120 million years ago. This really happened!
Cut out the images and order them as you think is appropriate.
Then, write under the images what you think is happening in each pictures.
Artist: Andrew Plant
Source: Museum Victoria
http://museumvictoria.com.au/MelbourneMuseum/Education/ 11
Activity 2 student worksheet
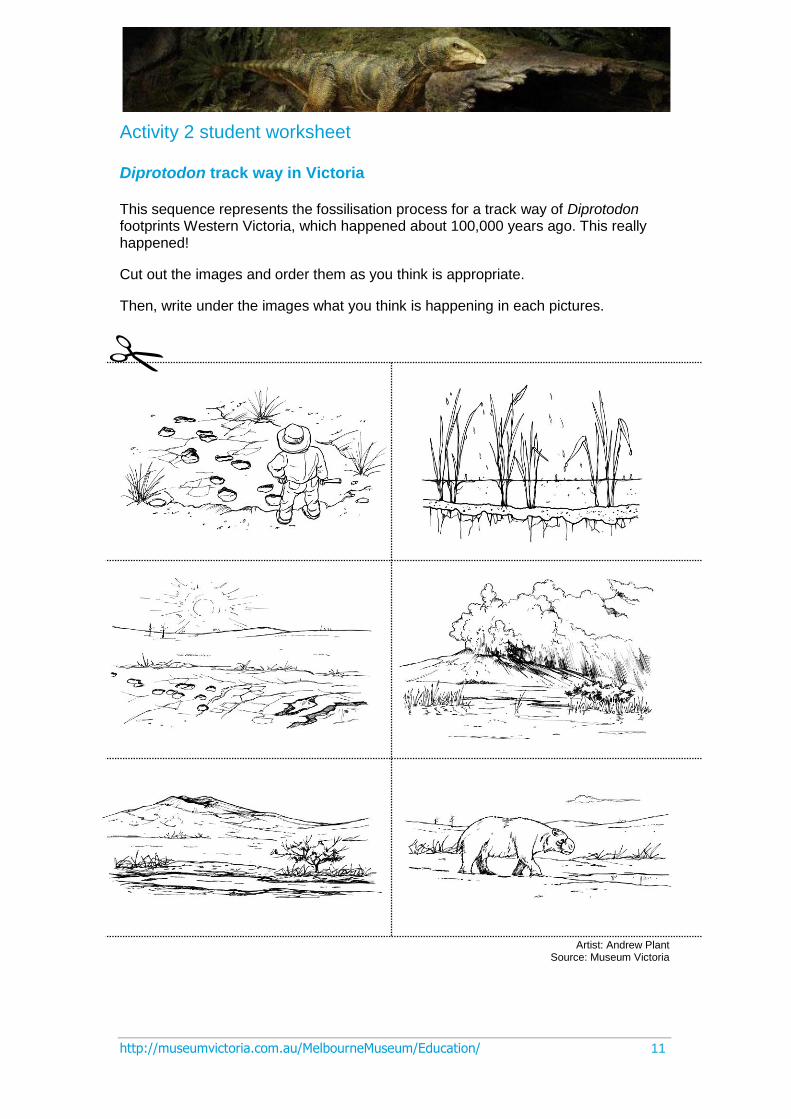
Diprotodon track way in Victoria
This sequence represents the fossilisation process for a track way of Diprotodon footprints Western Victoria, which happened about 100,000 years ago. This really happened!
Cut out the images and order them as you think is appropriate.
Then, write under the images what you think is happening in each pictures.
Artist: Andrew Plant Source: Museum Victoria
http://museumvictoria.com.au/MelbourneMuseum/Education/ 12
Activity 2: Teacher answers
Dinosaur Fossilisation
1. Qantassaurus dinosaurs are frolicking near rivers edge, with a dead Qantasaurus near the water’s edge.
2. It rains, and the river expands, and washes the dinosaur in. The dinosaur’s muscles rot away and leave the skeleton.
3. The skeleton breaks up under water, and the bones settle to bottom of the river.
4. All the bones settle in river bed, and become covered in multiple layers of mud and sand, which eventually become hard and turn into sedimentary rock.
5. Millions of years pass. The river is no longer. The top surface of sedimentary rock exposed at beach and is being eroded.
6. Fossils found!
Artist: Andrew Plant Source: Museum Victoria

http://museumvictoria.com.au/MelbourneMuseum/Education/ 13
Activity 2: Teacher answers
Diprotodon track way in Victoria
1. Western Victoria, 100,000 years ago. A volcano erupts and ash falls onto the ground, and over a nearby lake.
2. Drought conditions mean that the lake has dried up, exposing the volcanic ash mud. The volcano is now dormant.
3. A Diprotodon walks across the mud to get to the lakes edge to have a drink.
4. Footprints are left behind. The drought continues, and the volcanic mud hardens, preserving the footprints.
5. Rains returns. The hardened footprints are once again covered by a lake.
6. Drought again, but now the date is 2008, and palaeontologists find the fossil footprints.
Artist: Andrew Plant Source: Museum Victoria
http://museumvictoria.com.au/MelbourneMuseum/Education/ 14
Activity 3: Timeline of evolution
Objectives and VELS links
In this activity students are encouraged to express what they already know about the timeline of life on Earth, and then use a model to visually represent this. This activity links to the Science and Thinking domains of VELS.
e5 Instructional Model links: engage, explore, explain and evaluate
What you need
Toilet paper (the recycle toilet-paper brand Naturale has 230 sheets per roll; the Safe brand has 240 sheets).
A long corridor, hall or outdoor area
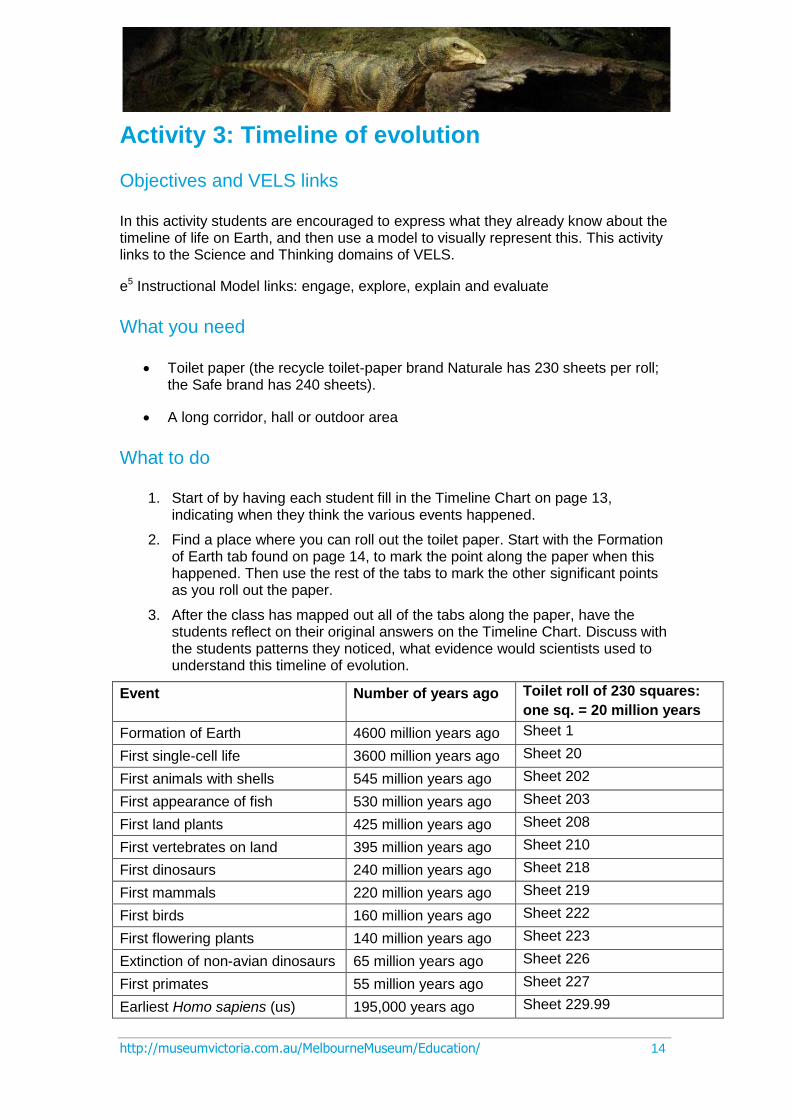
What to do
1. Start of by having each student fill in the Timeline Chart on page 13, indicating when they think the various events happened.
2. Find a place where you can roll out the toilet paper. Start with the Formation of Earth tab found on page 14, to mark the point along the paper when this happened. Then use the rest of the tabs to mark the other significant points as you roll out the paper.
3. After the class has mapped out all of the tabs along the paper, have the students reflect on their original answers on the Timeline Chart. Discuss with the students patterns they noticed, what evidence would scientists used to understand this timeline of evolution.
Event Number of years ago Toilet roll of 230 squares:
one sq. = 20 million years
Formation of Earth 4600 million years ago Sheet 1
First single-cell life 3600 million years ago Sheet 20
First animals with shells 545 million years ago Sheet 202
First appearance of fish 530 million years ago Sheet 203
First land plants 425 million years ago Sheet 208
First vertebrates on land 395 million years ago Sheet 210
First dinosaurs 240 million years ago Sheet 218
First mammals 220 million years ago Sheet 219
First birds 160 million years ago Sheet 222
First flowering plants 140 million years ago Sheet 223
Extinction of non-avian dinosaurs 65 million years ago Sheet 226
First primates 55 million years ago Sheet 227
Earliest Homo sapiens (us) 195,000 years ago Sheet 229.99
http://museumvictoria.com.au/MelbourneMuseum/Education/ 15
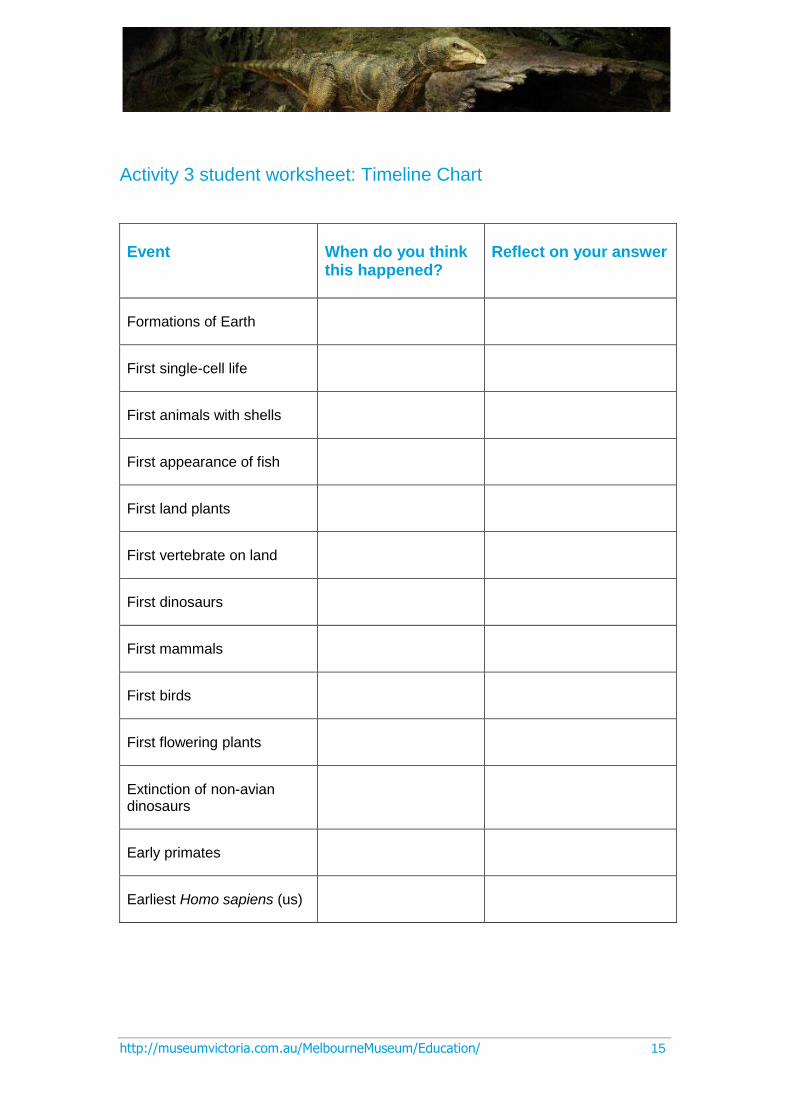
Activity 3 student worksheet: Timeline Chart
Event When do you think this happened?
Reflect on your answer
Formations of Earth
First single-cell life
First animals with shells
First appearance of fish
First land plants
First vertebrate on land
First dinosaurs
First mammals
First birds
First flowering plants
Extinction of non-avian dinosaurs
Early primates
Earliest Homo sapiens (us)
http://museumvictoria.com.au/MelbourneMuseum/Education/ 16
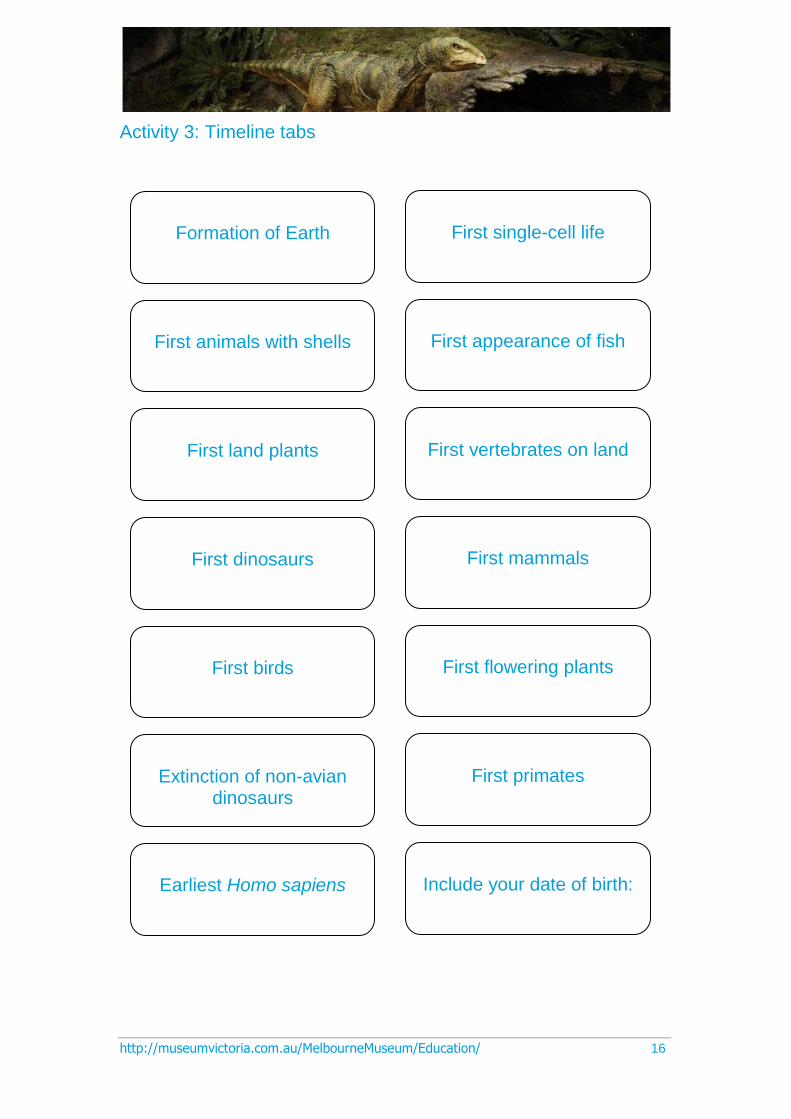
Activity 3: Timeline tabs
Formation of Earth First single-cell life
First animals with shells First appearance of fish
First land plants First vertebrates on land
First dinosaurs First mammals
First birds First flowering plants
Extinction of non-avian dinosaurs
First primates
Earliest Homo sapiens Include your date of birth:
http://museumvictoria.com.au/MelbourneMuseum/Education/ 17
Activity 4: Get selected… naturally
Objective and VELS links
In this activity, students are encouraged to explore the idea that organisms with certain traits are more likely than others without these traits to survive environmental changes (or in this case, selection pressure by predation). This represents the idea of natural selection. The activity links to the Science and Interpersonal Development domains of VELS.
e5 Instructional Model links: engage, explain and explore.
What you need
Tape measure
Stopwatch and whistle
Four orange ‘witches’ hats’
Coloured chalk – four different colours, including green
What to do
1. Map out a square field on a grassy area, about 5x5m, and mark the corners with the witches’ hats.
2. Break the chalk sticks in half and randomly scatter them on the square. Each chalk piece represents a worm.
3. Organise the students into groups of three and give each group a printout of the activity sheet on page 16. Divide the tasks in each group as follows: mother bird, baby bird and the scientist.
4. Nominate a timekeeper, who times each 10-second round of ‘worm collecting’. The timekeeper uses the whistle to signal the start and end of each round.
5. The ‘mother bird’ has 10 seconds per round to go into the field to collect food for her ‘baby bird’. She can only collect one worm at a time and cannot throw the worms to her baby. The baby bird is not allowed to enter the field, but must remain at the edge of the square.
6. At the end of each round, ‘the scientist’ records the number of each colour of worm collected.
7. Play five rounds. If you have plenty of worms, don’t throw the ‘eaten’ worms back into the field at the end of each round, so the colour ratio on the field changes.
8. Discuss the results back in class. You may like students to graph the results in MS Excel. If your class completed the post-box activity, you may like to review students’ answers and revisit questions such as ‘what is meant by survival of the fittest?’ And ‘what is evolution?’
http://museumvictoria.com.au/MelbourneMuseum/Education/ 18
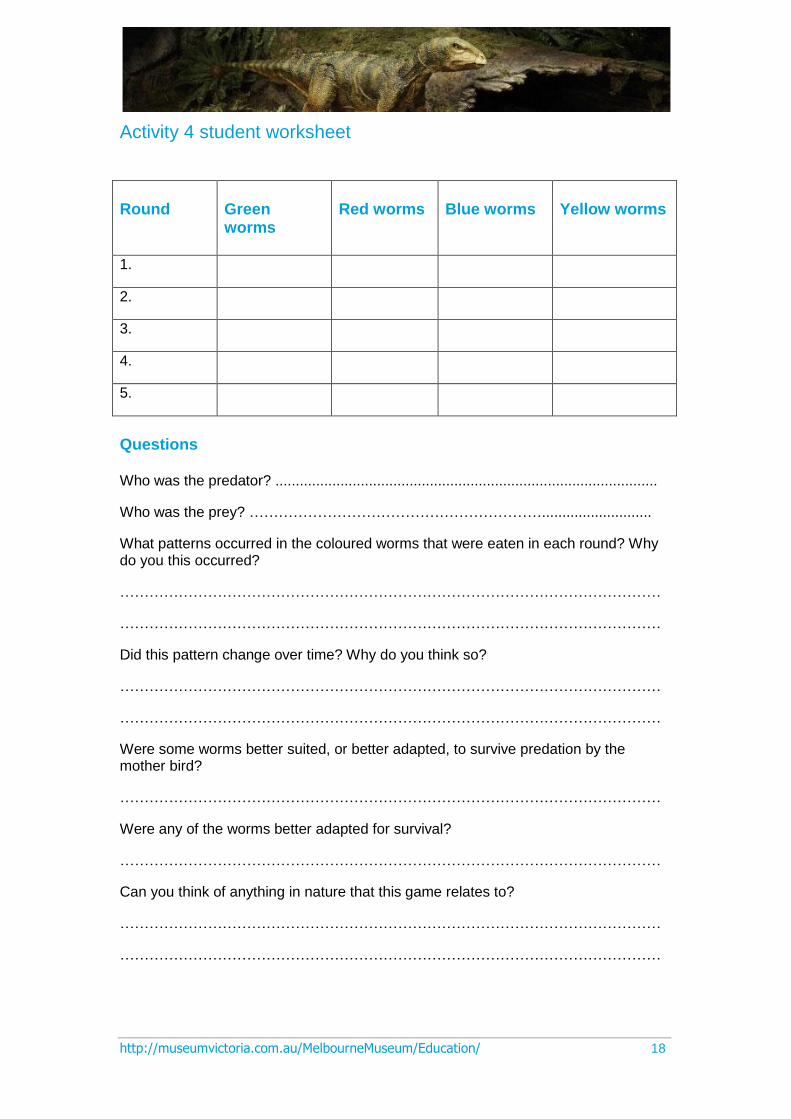
Activity 4 student worksheet
Round Green worms
Red worms Blue worms Yellow worms
1.
2.
3.
4.
5.
Questions
Who was the predator? ..............................................................................................
Who was the prey? ……………………………………………………...........................
What patterns occurred in the coloured worms that were eaten in each round? Why do you this occurred?
…………………………………………………………………………………………………
…………………………………………………………………………………………………
Did this pattern change over time? Why do you think so?
…………………………………………………………………………………………………
…………………………………………………………………………………………………
Were some worms better suited, or better adapted, to survive predation by the mother bird?
…………………………………………………………………………………………………
Were any of the worms better adapted for survival?
…………………………………………………………………………………………………
Can you think of anything in nature that this game relates to?
…………………………………………………………………………………………………
…………………………………………………………………………………………………
http://museumvictoria.com.au/MelbourneMuseum/Education/ 19
Activity 5: Survivor… dice-style
Objectives and VELS links
In this activity, students can simulate the process of natural selection by using fictional variations of Diprotodon. This activity links to the Science and Interpersonal Development domains of VELS.
e5 Instructional Model links: engage, explore, explain and elaborate.
Note to teachers:
This simulation uses probabilities based on incomplete dominance and random mating, and involves potential selective pressures. Students should have a grasp of basic terminology relating to natural selection.
Approximately 15 minutes is required for setup, 60 minutes for the simulation and 30 minutes to respond to the questions.
Please read the questions and edit to suit your students’ abilities; questions assume a unit of genetics has been completed.
What you need
Copies of each Diprotodon variation, each size backed with a different coloured card (e.g., all small Diprotodons glued to red card)
Scissors
Glue
Coloured card (three colours)
Two butterfly pins
Pens/pencils
What to do
1. Work in small groups of two to four.
2. Create and/or collect all materials required: 50 small, 50 medium and 50 large Diprotodons, spinning wheel of death, spinning wheel of life, generation table copied.
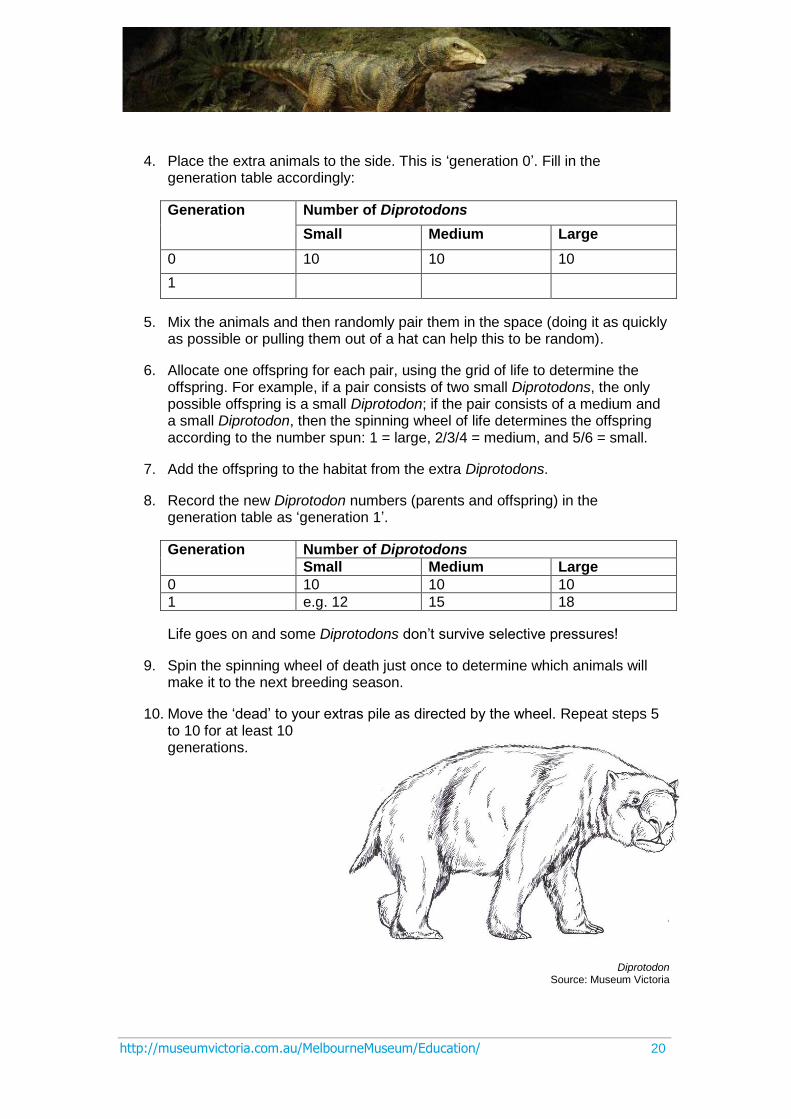
3. Create a space on the floor or on a table, and place 10 of each Diprotodon type in the space.
http://museumvictoria.com.au/MelbourneMuseum/Education/ 20
4. Place the extra animals to the side. This is ‘generation 0’. Fill in the generation table accordingly:
Generation Number of Diprotodons
Small Medium Large
0 10 10 10
1
5. Mix the animals and then randomly pair them in the space (doing it as quickly as possible or pulling them out of a hat can help this to be random).
6. Allocate one offspring for each pair, using the grid of life to determine the offspring. For example, if a pair consists of two small Diprotodons, the only possible offspring is a small Diprotodon; if the pair consists of a medium and a small Diprotodon, then the spinning wheel of life determines the offspring according to the number spun: 1 = large, 2/3/4 = medium, and 5/6 = small.
7. Add the offspring to the habitat from the extra Diprotodons.
8. Record the new Diprotodon numbers (parents and offspring) in the generation table as ‘generation 1’.
Generation Number of Diprotodons
Small Medium Large
0 10 10 10
1 e.g. 12 15 18
Life goes on and some Diprotodons don’t survive selective pressures!
9. Spin the spinning wheel of death just once to determine which animals will make it to the next breeding season.
10. Move the ‘dead’ to your extras pile as directed by the wheel. Repeat steps 5 to 10 for at least 10 generations.
Diprotodon Source: Museum Victoria
http://museumvictoria.com.au/MelbourneMuseum/Education/ 21
Think about these questions
1. Incomplete dominance involves a heterozygote showing a blend of the phenotypes of the dominant and recessive alleles. How is this demonstrated in the Diprotodon variations?
2. What might punnet squares for the matings look like?
3. What ratios would the phenotypes exhibit?
4. This simulation relies on random mating. Was it truly random? Is mating truly random in nature? Explain.
5. This simulation also restricts the number of offspring to a single child. Is this always the case in nature?
6. Which animals are more likely to have multiples?
7. Twenty generations or more have been simulated in a very short time to affect a change in the frequency of variation types (proportions of each). If the lifespan of a Diprotodon were about 60 years, with sexual maturity (ability to breed) beginning at 15 years, and pregnancies every five to 10 years, how long would the scenario of this simulation have taken? (Rough estimate only)
8. What is a selective pressure?
9. Consider the selective pressures described on the spinning wheel of death. Are they realistic selective pressures for an animal of the megafauna group? How do they relate to the theories about the megafauna extinctions?
10. Do you think the outcomes of each selective pressure are fair? Explain.
11. Convert your generation table into a line graph, using a different colour for small, medium and large. Put the number of Diprotodons on the Y-axis and the generation number on the X-axis.
This skull of Diprotrodon is on display at Melbourne Museum. Find out more at:
http://museumvictoria.com.au/melbournemuseum/discoverycentre/600-million-years/timeline/quaternary/diprotodon/
http://museumvictoria.com.au/MelbourneMuseum/Education/ 22
Activity 5 student worksheet
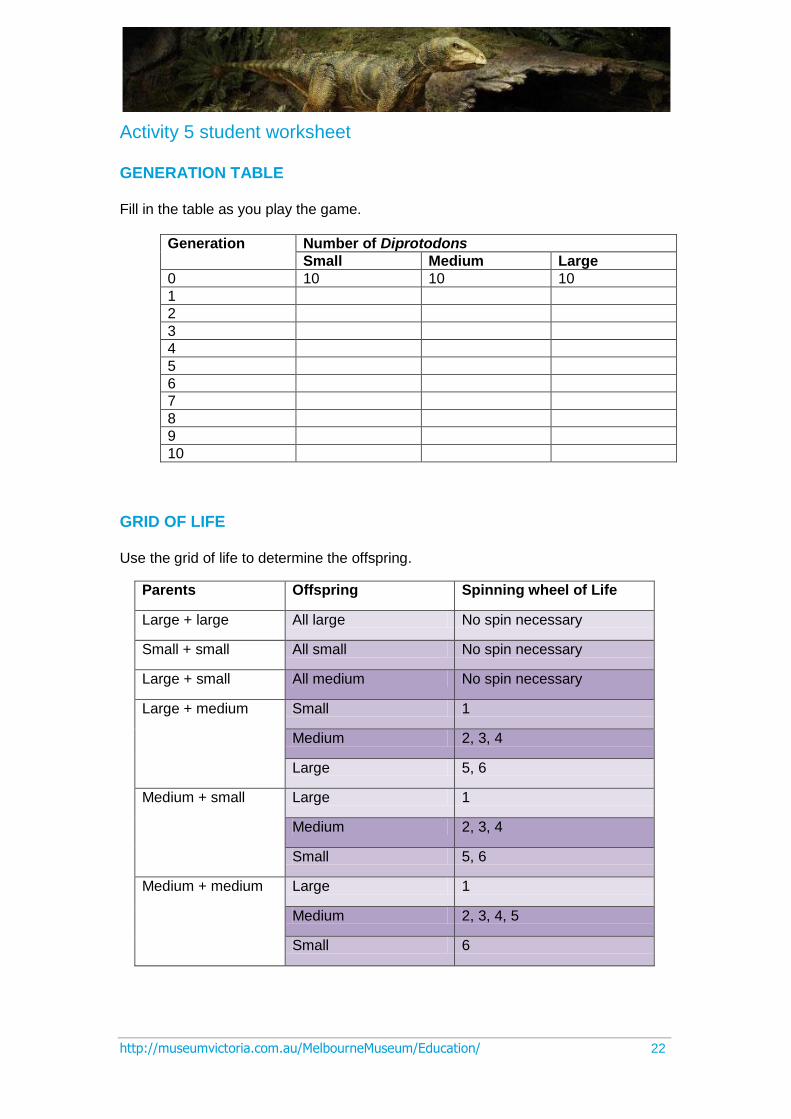
GENERATION TABLE
Fill in the table as you play the game.
Generation Number of Diprotodons
Small Medium Large
0 10 10 10
1
2
3
4
5
6
7
8
9
10
GRID OF LIFE
Use the grid of life to determine the offspring.
Parents Offspring Spinning wheel of Life
Large + large All large No spin necessary
Small + small All small No spin necessary
Large + small All medium No spin necessary
Large + medium Small 1
Medium 2, 3, 4
Large 5, 6
Medium + small Large 1
Medium 2, 3, 4
Small 5, 6
Medium + medium Large 1
Medium 2, 3, 4, 5
Small 6
http://museumvictoria.com.au/MelbourneMuseum/Education/ 23
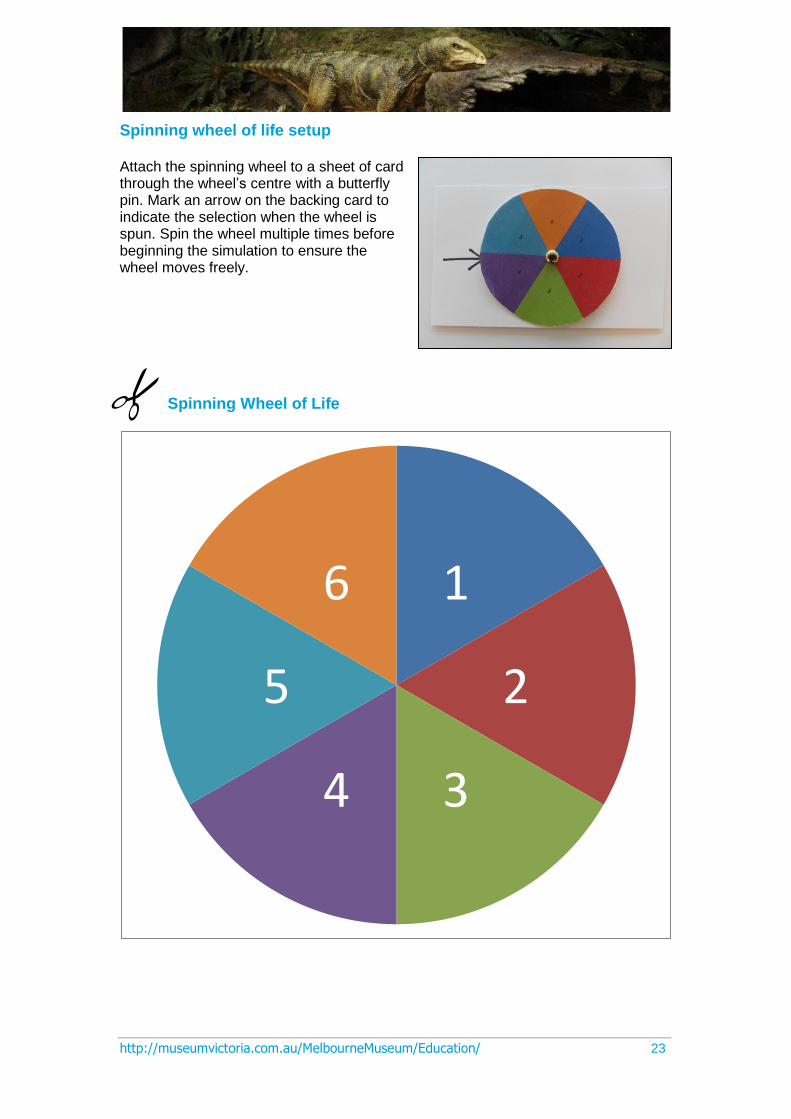
Spinning wheel of life setup
Attach the spinning wheel to a sheet of card through the wheel’s centre with a butterfly pin. Mark an arrow on the backing card to indicate the selection when the wheel is spun. Spin the wheel multiple times before beginning the simulation to ensure the wheel moves freely.
Spinning Wheel of Life
1
2
34
5
6
http://museumvictoria.com.au/MelbourneMuseum/Education/ 24
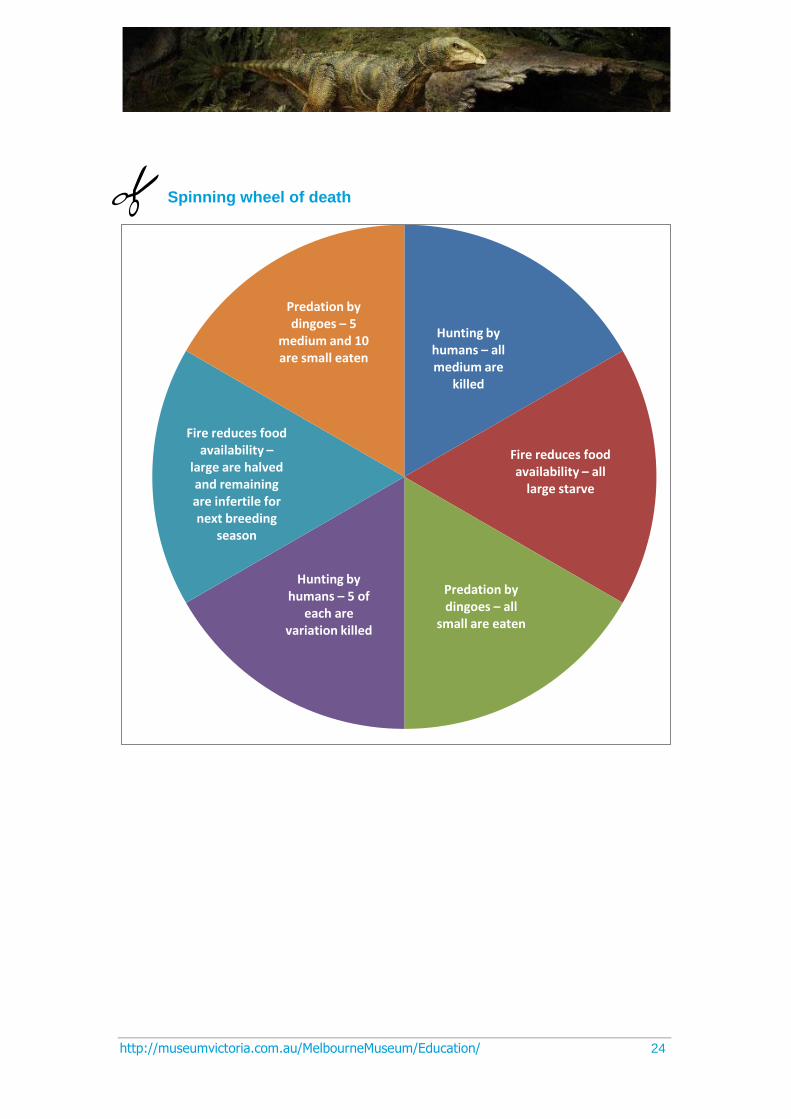
Spinning wheel of death
Hunting by humans – all medium are
killed
Fire reduces food availability – all
large starve
Predation by dingoes – all
small are eaten
Hunting by humans – 5 of
each are variation killed
Fire reduces food availability –
large are halved and remaining are infertile for next breeding
season
Predation by dingoes – 5
medium and 10 are small eaten
http://museumvictoria.com.au/MelbourneMuseum/Education/ 25
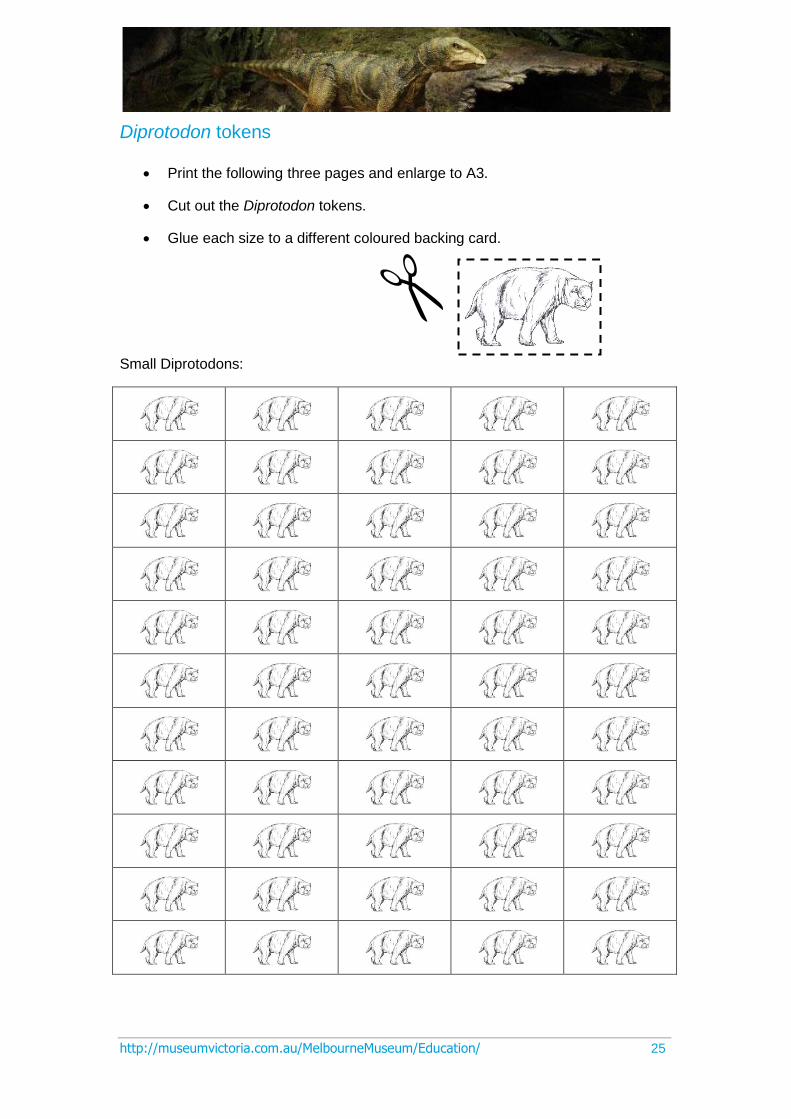
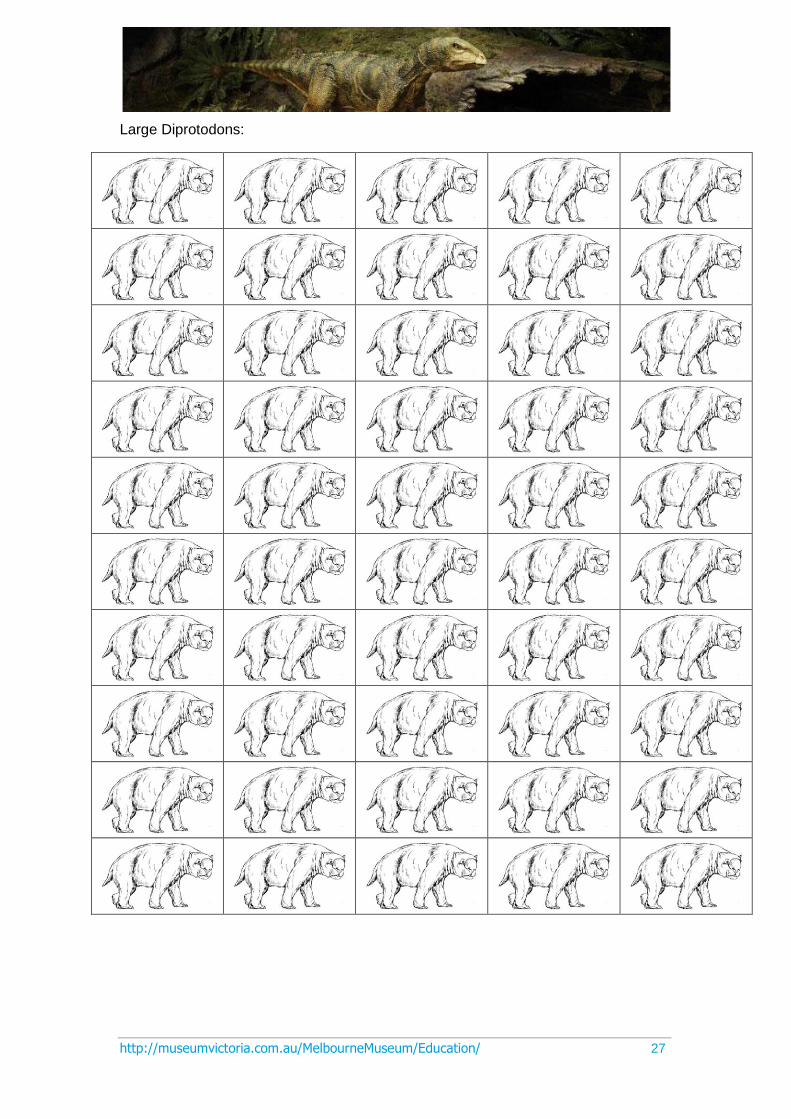
Diprotodon tokens
Print the following three pages and enlarge to A3.
Cut out the Diprotodon tokens.
Glue each size to a different coloured backing card.
Small Diprotodons:

http://museumvictoria.com.au/MelbourneMuseum/Education/ 26
Medium Diprotrodons:
http://museumvictoria.com.au/MelbourneMuseum/Education/ 27
Large Diprotodons:
http://museumvictoria.com.au/MelbourneMuseum/Education/ 28
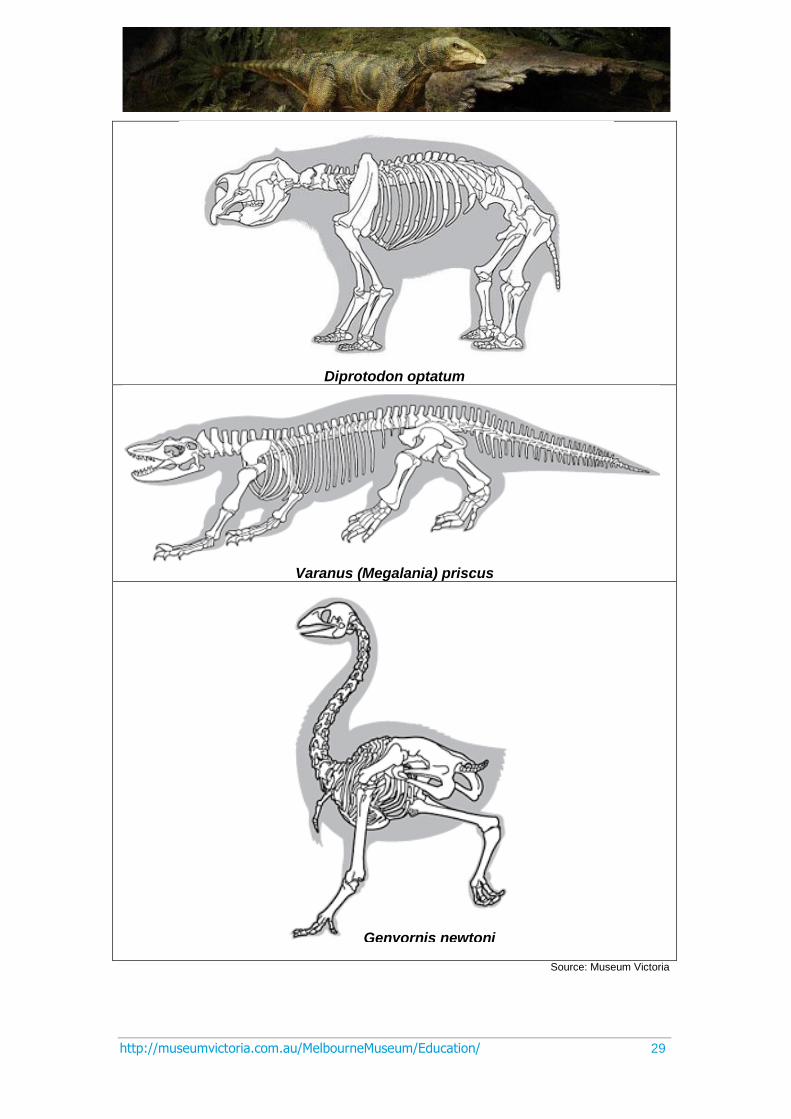
Activity 6: Convergent, divergent or homology?
Objectives and VELS links
In this activity, students identify structural homologies in megafauna skeletons to illustrate evidence of divergent evolution, and functional homologies as possible evidence of convergent evolution.
e5 Instructional Model links: explore, explain and elaborate.
What you need
Coloured textas or pencils
Images of skeletons printed from this activity
Images of skeletons representing extant species
Images of skeletons representing long-extinct species
What to do
The megafauna skeletons on the following page represent three classes of vertebrates: mammals, birds and reptiles.
1. Students study the skeletons carefully and identify as many similarities as they can, colouring them on each image. For example, all three have a single thigh bone (femur), so all femurs would be coloured the same colour.
2. Once students have identified similar structures, they consider the functions of each:
a. Consider the similarities: are they the same? How do they differ?
b. Is the structure modified to suit a particular function (e.g., running)?
c. Are the species likely to have diverged from a common ancestor relatively recently? How would one tell?
d. Do they live in similar environments? How might this influence the evolution of their body structures?
e. Do they experience similar environmental pressures?
Extension activity
Analyse skeletons of extant and long-extinct species to demonstrate the longevity of successful structures. Find images at:
www.museumvictoria.com.au/dinosaur-walk
http://museumvictoria.com.au/MelbourneMuseum/Education/ 29
Diprotodon optatum
Varanus (Megalania) priscus
Source: Museum Victoria
Genyornis newtoni
http://museumvictoria.com.au/MelbourneMuseum/Education/ 30
Activity 7: Australian palaeontologists
Objective and VELS links
This activity links strongly to Science at Work in VELS. Students describe the contributions Australian scientists have made to improve and/or change scientific knowledge. They provide two examples of the work of scientists that demonstrate different approaches to developing scientific knowledge or solving a scientific problem.
e5 Instructional Model links: engage and elaborate.
What you need
Internet connection
Data projector and screen
What to do
1. Discuss with the class what they think the work of a palaeontologist might be. Have the students make notes, or write their ideas on a board. You may want to use a ‘KWL’ chart provided on page 29. For example, what kinds of people go into palaeontology? What kinds of work would they do? What does their work contribute to our understanding of the world? Set up the room so students can watch the selected clips. You may not be able to get through all clips, so let the students choose which ones to watch.
2. Revisit the students’ ideas. Have their views changed? How did these scientists use the evidence to understand our world? Did they take different approaches to understanding the past? Has our understanding of prehistoric animals always been the same or have the ‘facts’ changed over time?
Museum Victoria palaeontology clips
Dr Tom Rich talks about finding an ichthyosaur: http://museumvictoria.com.au/melbournemuseum/discoverycentre/600-million-years/videos/finding-fossils/ Dr Erich Fitzgerald talks about whale evolution: http://museumvictoria.com.au/melbournemuseum/discoverycentre/600-million-years/videos/whale-evolution/ Peter Trusler talks about reconstructing prehistoric animals: http://museumvictoria.com.au/melbournemuseum/discoverycentre/600-million-years/videos/reconstructing-palorchestes/ Leslie Kool and Mike Cleeland talk about finding Koolosuchus in Victoria: http://museumvictoria.com.au/melbournemuseum/discoverycentre/600-million-years/videos/koolasuchus/
http://museumvictoria.com.au/MelbourneMuseum/Education/ 31
Activity 7 student worksheet: KWL
What do you know about working as a palaeontologist, or palaeontology in Australia?
What do you want to know?
What have you learnt?
Want to find out more? Go to the following website:
http://museumvictoria.com.au/melbournemuseum/discoverycentre/600-million-years/
Or, post your questions on the museum’s website here:
http://museumvictoria.com.au/discoverycentre/ask-us-a-question/
http://museumvictoria.com.au/MelbourneMuseum/Education/ 32
Activity 8: Prehistoric ‘pictionary’
Objective and VELS links
For many students, a great barrier for learning in science is its language. This activity encourages students to develop their scientific vocabulary. This activity links to the Science at Work standards of VELS. The game can be used part way through a unit, after students have been introduced to these words, as a way of reinforcing the scientific vocabulary.
e5 Instructional Model links: engage
What you need
Printouts of ‘pictionary’ cards
Scissors to cut out cards
Stopwatch
Blackboard and chalk for scoring
What to do
1. This can be played as a whole class, by dividing the class into two teams of equal numbers (A and B). Alternatively, it can be played in small groups of five, with two pairs and one person as timekeeper.
2. If playing as a whole class, the teacher chooses the first student from Team A to begin. If playing in small teams, the timekeeper gives out a word and both pairs compete at the same time. Each student has one minute to draw clues to the randomly chosen word.
3. The team members of the student drawing work together and call out their guess of the word. If the word is guessed within one minute, that team wins one point.
4. When playing as a whole class, the opposing team gets a chance at guessing the word if it is not guessed within a minute. When playing in small groups, the timekeeper may reveal the word.
5. When playing as a whole class, teams alternate turns at drawing.
6. The team with the most points when all cards are used, or when the full time is reached, is the winner.
7. The timekeeper’s call is final, regarding time signalling and the correct answer.
http://museumvictoria.com.au/MelbourneMuseum/Education/ 33
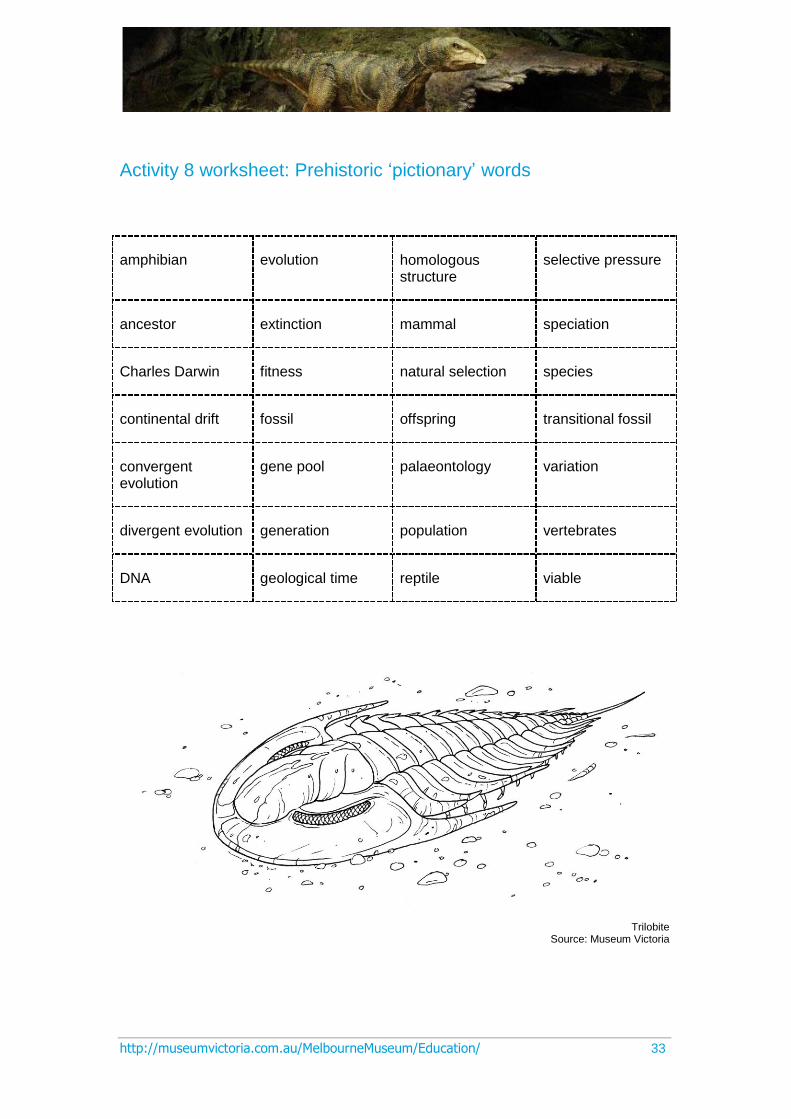
Activity 8 worksheet: Prehistoric ‘pictionary’ words
amphibian evolution homologous structure
selective pressure
ancestor extinction mammal speciation
Charles Darwin fitness natural selection species
continental drift fossil offspring transitional fossil
convergent evolution
gene pool palaeontology variation
divergent evolution generation population vertebrates
DNA geological time reptile viable
Trilobite
Source: Museum Victoria
http://museumvictoria.com.au/MelbourneMuseum/Education/ 34
Activity 9: Evolution ‘slowmation’
Objective and VELS links
Students will develop their understanding of evolution by creating a ‘slowmation’ clip. Slowmation is a simple form of stop-motion animation, in which learners create animations. This links to the Science, ICT and Communication domains in VELS.
e5 Instructional Model links: engage, explore, explain and elaborate
This teaching concept was originally developed by Garry Hoban, Associate Professor of Science Education and Teacher Education, University of Wollongong, Australia. See www.slowmation.com.
What you need
Play dough, plasticine, pipe cleaners
A3 coloured paper or white paper (as background for the clip)
Digital cameras (or web cameras) and tripod (one per group is best)
Computers (with Movie Maker – standard with latest versions of Microsoft Office)
Microphones on each computer to record student’s narration
What to do
1. Organise students into groups of four and explain they will be making a one-minute animation to show how evolution occurs, using a technique called ‘slowmation’. Show the students some examples of slowmation, which can be found at:
http://slowmation.uow.edu.au/cgi-bin/WebObjects/slowmation-PROD.woa/
2. Allow students time in the library or in a computer room to research the idea of evolution. Two good websites are:
http://museumvictoria.com.au/melbournemuseum/discoverycentre/600-million-years/
http://evolution.berkeley.edu/
3. Plan and storyboard and give students a copy of the planning sheet, discussing what they need to do.
http://museumvictoria.com.au/MelbourneMuseum/Education/ 35
4. Hand out a copy of the instructions (below) to students, for making objects and photographing them. Ideally, each group will have a digital camera (or webcam), a tripod and equipment to make their own clip.
5. Upload the photographs to a computer and produce the clip using Windows Movie Maker. Each group will need a computer and the instructions for Movie Maker.
6. Share the clip and ask students to reflect on the experience. How did they feel about using this method as a process to learn about plate tectonics. Did they find it was useful? Did they enjoy the process? What would make it better?
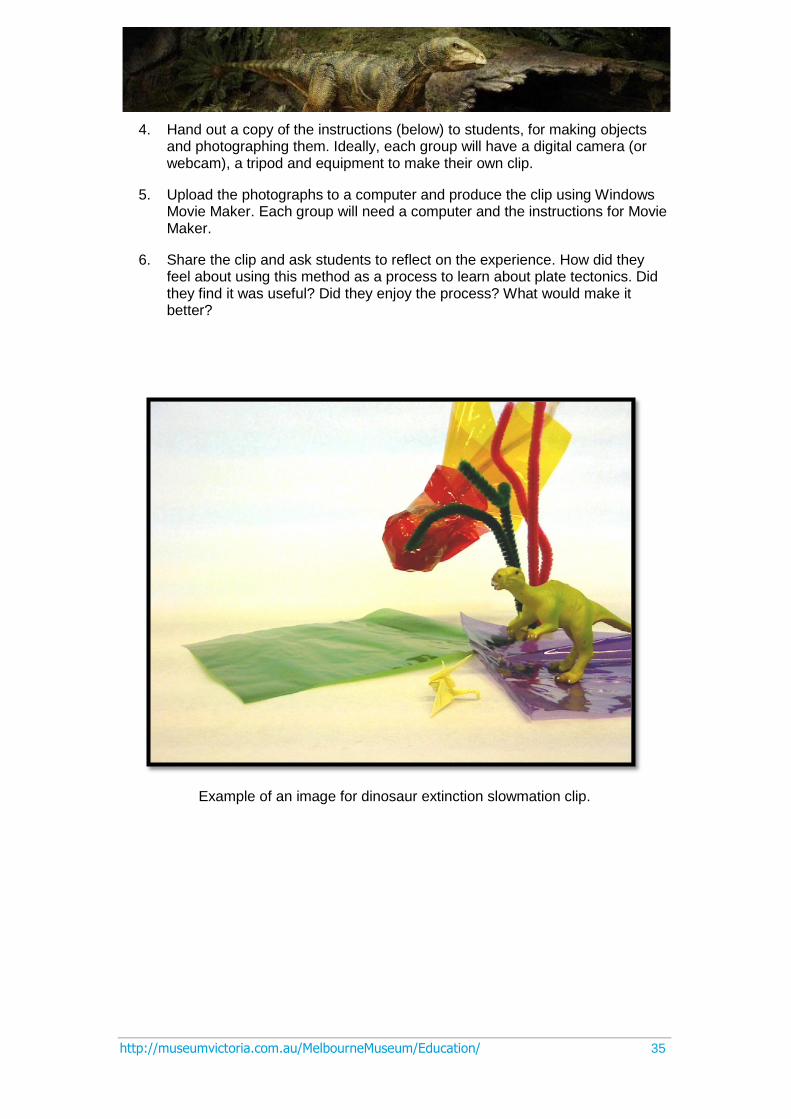
Example of an image for dinosaur extinction slowmation clip.
http://museumvictoria.com.au/MelbourneMuseum/Education/ 36
Activity 9 student worksheet: planning your slowmation clip
What is the main message you want to get across in your clip?
…………………………………………………………………………………………………
To convey message, what do you need to include?
…………………………………………………………………………………………………
Will you use voiceover or include text/subtitles to explain what is happening?
…………………………………………………………………………………………………
Your clip should not be longer than one minute, for which you will need about 100 photos. Plan the sequence of events in your clip using the squares below.
1.
2.
3.
4.
5.
6.
What equipment will you need to do this?
…………………………………………………………………………………………………
What tasks will each team member have?
…………………………………………………………………………………………………

http://museumvictoria.com.au/MelbourneMuseum/Education/ 37
How to construct a slowmation
You can create clips using Windows Movie Maker. It usually comes free and is installed with Windows XP or Windows Vista. On a PC, Movie Maker is the movie-making program and Movie Player the video-playing program.
Taking the photographs
1. Small movements are best! Demonstrate a simple animation first on some Post-it notes and flick through them. Start small by making a simple slowmation.
2. Lay down the A3 paper, which can be coloured, and build the models on the floor, with the tripod-mounted camera looking down on the models. Make sure the models are movable and not stuck to cardboard. You can use any materials to create your slowmation, such as play dough, paper, and pipe cleaners.
3. Make sure the image size of the camera is set on ‘smallest size’, such as 640x480 pixels. If you are using more than one camera make sure that they are set on the same photo size.
4. Take the photos, moving the materials a small bit at a time between shots. For example, a one-minute slowmation needs about 100 photos.
5. Minimise text and only label key concepts, taking one photo that can be copied for a static image.
6. Connect the camera to the computer and download the photos, which should be available from ‘My Computer’. Open the ‘Removable Disk’, copy the photos onto the desktop and then disconnect the camera.
Using Windows Movie Maker
1. Click on ‘Start’, at the bottom of the PC, and click on the Windows Media Maker icon to open the program.
2. Go to ‘Movie Tasks’ on the left-hand side, then to ‘Import’ and next click on ‘Pictures’.
3. Locate the folder containing your digital images and click on first photo. Click Ctrl + A and then ‘all’ to select all. Click ‘Import’, so that all the photos appear on the photo board.
4. Go to ‘Tools’, then ‘Options’, then ‘Advanced’ and choose picture duration at 0.500; the transition should be set at 0.25. Click ‘OK’.
5. Click on the first slide and then Ctrl + A to select all. Drag the photos down to the storyboard.
6. The movie will appear in the storyboard. Play it by clicking the large arrow in the animation.
7. If you want to show it at full screen, click ‘View’ and then full screen.
http://museumvictoria.com.au/MelbourneMuseum/Education/ 38
Making static images to suit a narration
1. Click on the relevant photo in the storyboard and then click Ctrl + C to copy and Ctrl + V as many times as you need to keep the static image on the screen, which is important for the narration to be recorded later.
2. Use the arrows on the bottom right-hand side of the computer to find the images you want to copy and follow the step above.
3. You can rewind the storyboard with Ctrl + Q and play the storyboard with Ctrl + W.
4. You can delete any unwanted photos by clicking on them and pressing ‘Delete’.
5. You can add your own photos or those from Google Images by copying and pasting them.
Adding narration
1. Slowmations need a narration or text, but not both. It is advisable to write a script to get the best possible narration. This should have occurred in the storyboarding phase.
2. Go into ‘Tools’ and select ‘Narrate Timeline’, or click on the microphone icon above the storyboard. Make sure you click on ‘Audio device’ to select the microphone.
3. Ensure your computer microphone is working. Click on ‘Start Narration’ and stop when necessary.
4. Make sure you save and name the file.
Saving the animation
1. You can save the project by clicking ‘Publish to this Computer’ or ‘Save to this Computer’, under the ‘Finish Movie’ heading. This saves the movie as a .wmv (window media video) file, which allows it to be shared and opened on other computers.
2. Chose a movie location to suit your needs. It may be best to save it to ‘My Computer’. It must be saved as a .wmv to be uploaded to a website or shared with others. If you save under the ‘File’ menu in Movie Maker it becomes a .WMMV file, which cannot be transferred or uploaded.
Alternatively, use the Microsoft website instructions:
http://www.microsoft.com/windowsxp/using/moviemaker/create/default.mspx
http://museumvictoria.com.au/MelbourneMuseum/Education/ 39
Websites
Discover more about palaeontology on Melbourne Museum’s websites:
http://museumvictoria.com.au/melbournemuseum/discoverycentre/dinosaur-walk/ http://museumvictoria.com.au/melbournemuseum/discoverycentre/600-million-years/
Find out more at these ABC websites:
http://www.abc.net.au/science/ozfossil/ http://www.abc.net.au/beasts/fossilfun/ http://www.abc.net.au/science/tag/browse.htm?topic=latest&tag=palaeontology http://www.abc.net.au/science/topics/?site=science&topic=ancient
There is great information at the National History Museum of London website:
http://www.nhm.ac.uk/kids-only/dinosaurs/
There are great videos on the National Geographic website:
http://video.nationalgeographic.com/video/index.html
The Smithsonian has very useful palaeontology websites:
http://paleobiology.si.edu/dinosaurs/interactives/dig/main.html http://paleobiology.si.edu/
For the teaching of evolution, these are two great websites:
http://evolution.berkeley.edu/ http://www.pbs.org/wgbh/evolution/
To find out more about the e5 Instructional Model:
http://www.education.vic.gov.au/proflearning/e5/
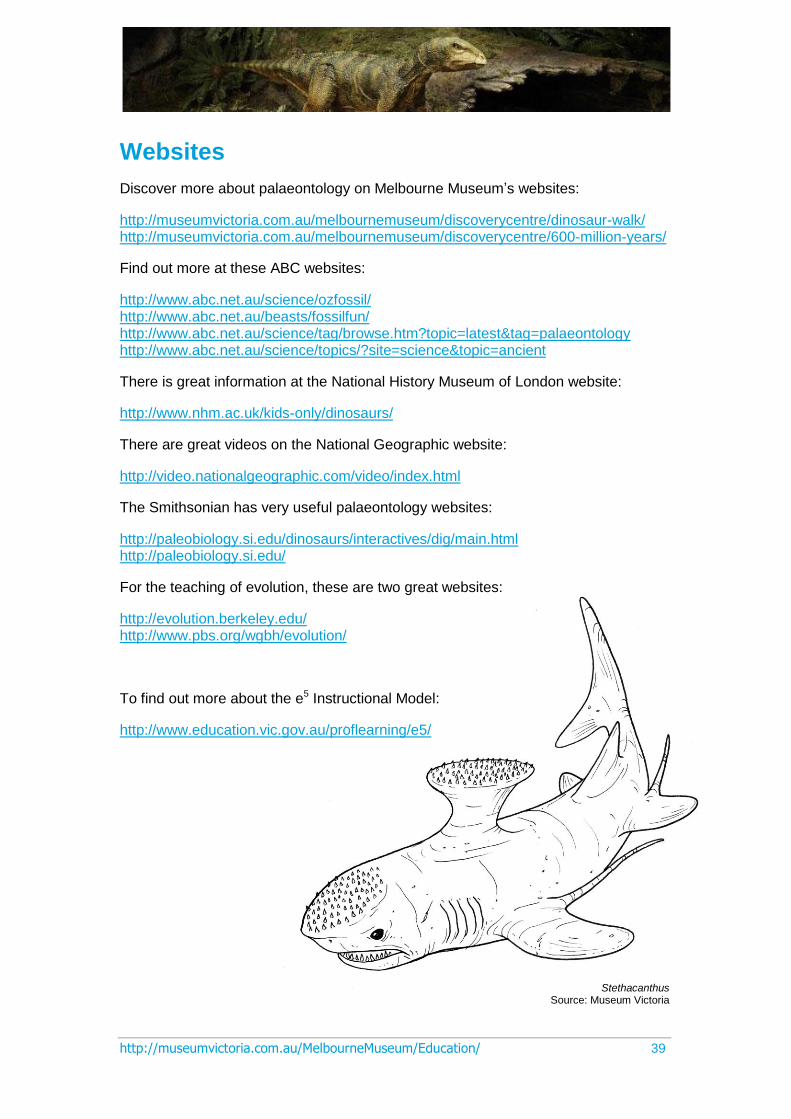
Stethacanthus Source: Museum Victoria