Embed Size (px)
Citation preview
Sea
ttle
Ch
apte
r N
ews
Seattle Chapter IPMS/USANovember 2013
PREZNOTES
In This Issue
Dragon sIG 33 3Revell ‘90 Mustang LX 5.0 7HPH Ilyushin Il-28 8Meeting Dates for 2014 9Hurricane Bookshelf 10November Meeting Agenda 11Skyway Modle Shop Sale 11AD Flying Boats 11Hasegawa Ju 87R-2 12Monogram Eager Beaver 14
How the Other Half LivesAKA What the Heck Were
They Thinking?
As some of you know, I was recentlyblessed with the opportunity to accom-pany my daughter to the University ofStirling in Scotland, where she is to attendcollege for the next few years. While onthis journey, we took a little side trip toParis for five days, and while there, I hadthe opportunity to talk to talk to theowners of two small businesses. One wasa café/restaurant, the other a small modelshop, the latter selling the products ofothers, as well as its own in-housecreations.
Each “firm” was very small. The café hadonly four tables, plus a small bar. Themodel shop had perhaps a tenth the stockof Emil Minerich’s Skyway Model Shop.Both were entirely family run and oper-ated, and while the thought has occurredto both to expand, each told the exactsame story: based on their calculations,expansion was economically impossible.
The model shop is a niche operation,based entirely around the concept of1/48th scale military vehicles. No airplanes,no cars, no space craft, etc., simply militaryvehicles. Their main business is sellingtheir own creations, either full kits fromresin, PE and turned metal, or conversionsfor the likes of Tamiya’s 1/48th scale rangeof military vehicle kits. The owner told mehe had “dozens” of projects partiallycompleted, but due to a lack of time, hewondered if he would ever get around tofinishing some of them. The model shop’smain income stream comes from producinghigh quality “desk top” prebuilts of 1/48thscale modern French military vehicles. Thefirm is given plans and photographs of thelatest French armored car, tank, etc. fromthe 1/1 vehicle’s manufacturer, and thehobby shop’s owner then produces ascratch built master of this, which is then
used to produce RTV molds, followed byupwards of 500 “kits”, which are in turnshipped to China for assembly, paintingand weathering. The finished, boxed kits(gorgeous works of art) are then returnedto France and given to the military contrac-tor, who gives them to potential customersat military trade shows. The sole employ-ees of this model shop are the owner, andhis daughter.
The café was a completely family affair aswell: retirement age Mother as chef, helpedout by Father doing everything fromdishes, to helping with food preparation.The two sons, late 20s, early 30s, in age,acted as waiter and barman, and every-thing else. The café opened early forbreakfast, and closed past 10PM, six daysa week. Very long hours for everyone!
When I asked each of the owners of thesetwo firms why they didn’t hire more peoplein order to either expand their operations,or in the case of the model shop, toactually better meet pre-existing demand(to finish those masters on much delayedprojects for example), the story was thesame: “the cost of extra employees wouldkill us”. Turns out that if a family firmemploys anyone other than a direct familymember, they must not only pay them theirwages, but a 100% tax to cover all the
continued on page 13

SEATTLE CHAPTER CONTACTS
President: Vice President: Treasurer: Show Chair:Andrew Birkbeck Eric Christianson Spencer Tom TBDP.O. Box 15983 18215 NE 95th Way #103 318 N.E. 81st St.Seattle, WA 98115 Redmond, WA 98052 Seattle, WA 98115Ph: 206-522-3539 Ph: 425-591-7385 Ph: [email protected] [email protected] [email protected]
IPMS Seattle Web Site (Webmaster, John Kaylor): http://www.ipms-seattle.org
Public Disclaimers, Information, and Appeals for Help
This is the official publication of the Seattle Chapter, IPMS-USA. As such, it serves as the voice for our Chapter, and depends largelyupon the generous contributions of our members for articles, comments, club news, and anything else involving plastic scale modeling andassociated subjects. Our meetings are generally held on the second Saturday of each month, (see below for actual meeting dates), at the NorthBellevue Community/Senior Center, 4063-148th Ave NE, in Bellevue. See the back page for a map. Our meetings begin at 10:00 AM, exceptas noted, and usually last for two to three hours. Our meetings are very informal, and are open to any interested modeler, regardless of interests.Modelers are encouraged to bring their models to the meetings. Subscriptions to the newsletter are included with the Chapter dues. Dues are $25a year for regular mail delivery of the newsletter, and $15 for e-mail delivery, and may be paid to Spencer Tom, our Treasurer. (See addressabove). We also highly recommend our members join and support IPMS-USA, the national organization. See below for form. Any of the memberslisted above will gladly assist you with further information about the Chapter or Society.
The views and opinions expressed in this newsletter are those of the individual writers, and do not constitute the official position of theChapter or IPMS-USA. You are encouraged to submit any material for this newsletter to the editor. He will gladly work with you and see thatyour material is put into print and included in the newsletter, no matter your level of writing experience or computer expertise. The newsletter iscurrently being edited using a PC, and PageMaker 6.5. Any Word, WordPerfect, or text document for the PC would be suitable for publication.Please do not embed photos or graphics in the text file. Photos and graphics should be submitted as single, separate files. Articles can also besubmitted via e-mail, to the editor’s address above. Deadline for submission of articles is generally twelve days prior to the next meeting - earlierwould be appreciated! Please call me at 425-823-4658 if you have any questions.
If you use or reprint the material contained in the newsletter, we would appreciate attribution both to the author and the sourcedocument. Our newsletter is prepared with one thing in mind; this is information for our members, and all fellow modelers, and is prepared andprinted in the newsletter in order to expand the skills and knowledge of those fellow modelers.
IPMS Seattle Chapter Newsletter Page 2
Upcoming Meeting DatesThe IPMS Seattle 2013 meeting schedule is as follows. All meetings are from 10 AM to 1 PM, except as indicated. To avoidconflicts with other groups using our meeting facility, we must NOT be in the building before our scheduled start times, andMUST be finished and have the room restored to its proper layout by our scheduled finish time. We suggest that you keep thisinformation in a readily accessable place.
November 9 December 14
Newsletter Editor:Robert Allen12534 NE 128th Way #E3Kirkland, WA 98034Ph: [email protected]

IPMS Seattle Chapter Newsletter Page 3
Dragon 1/35th Scale 15cm Sturminfanteriegeschutz 33 – Smart Kit
by Eric Christianson
(Editor’s note – this abridged version has been edited for use in our newsletter. You can see the full build article posted in the‘Reviews’ section of the IPMS USA website.)
Dragon Models has released their third incarnation of the GermanSturminfanteriegeschutz 33 self-propelled heavy infantry gun in1/35th scale. Based on the venerable Sturmgeschütz III chassis,this version of the sIG 33 mounted the improved 15cm infantrygun, offset to the right side, for which 30 rounds were carried.Fielded in 1942, the sIG 33 saw service on the Eastern front,notably in the breakout attempt at Stalingrad late in that year.Only one survived the war and is on display at the Kubinka NIIBTResearch Collection in Russia.
Previously released as Dragon #6042 and Cyberhobby’s #9123,this ‘Smart Kit’ release has been improved upon by the inclusionof two additional photo-etch sheets and their wonderful DS track.The new track replaces the individual, clip-clean-and-glue trackfound in the earlier kits. German armor modelers will recognize thecompact Stug III chassis, nicely detailed with on-board equipmentand two large (optional) storage boxes mounted on the rear deck,along with up to four spare wheels. The highly detailed mainweapon is housed within a box-shaped casemate, allowing (atleast) some of the detail visible if the hatches are left open.
Opening the boxAs is usual with Dragon kits based on other Dragon kits, about half of the (abundant) parts included in the box are not used. Fortu-nately, many of these unused parts will be useful for other projects - nice personal weapons, handy pioneer tools, antennas, cables –‘the good stuff’.
The kit appears to be cobbled together using (sprues) from several previous products;
(A/U/B/V) – Dragon 6631 or 6474 ‘PzKpfw III’(K) – Dragon 6463 ‘PzKpfw III Initial Production’(E) – Dragon 6620 ‘Stug III’(A/G/B/E) – Dragon 6365 or 6581 ‘Stug III G(B/C) – Original Dragon sIG 33 kit (6042), released 2008(W/T) – New sprues for this kit
The contents of this box include:Main lower hull, packaged separately.19 sprues in soft, light grey plastic, packaged separately.Two runs of yellow DS track2 small photo-etch sheets, including an engine exhaust grille and storage box.1 Aluminum barrel1 6-page blue and white instruction sheet with 16 steps, plus a single addendum sheet replacing portions of Step 10.
The kit comes with two schemes represented using the ubiquitous Dragon blue-and-white three-view drawings, and a small (butperfectly registered) sheet of decals from Cartograph of Italy. These include:
IPMS Seattle Chapter Newsletter Page 4
• Pz.Rgt.201, 23.Pz.Div., Eastern Front 1943, Overall German Yellow, with brown and Green camouflage.• StuG.Abt. 177, 1942, Overall gray with whitewash.
The InstructionsThere are sprues from several different Dragon kits included in the box. That said, I found nothing significant as far as errors oromissions. There are some minor inconsistencies and these are pointed out where needed, below. The only criticism I have is that inmany steps the exact placement of crucial parts is vague at best, illustrated by a simple arrow pointing ‘somewhere in this general area’.As a direct result, I had some fit issues later on, which are detailed below.
Things to consider before starting:The build sequence is pretty straight forward. The chassis first, then the interior and gun, followed by the main deck, fore and aft, andthen the right and left fenders, in that order. Once all this is completely dry, the main casemate is fitted over the top of everything. In theinstructions, all this happens in one Step (14) using arrows and little else, so we’ll re-visit that later. If you intend to close the hatchesyou can relax with the gun assembly, but some of the significant pieces are still visible out the front end either way.
The track is completely exposed so it can go on at the very end. The fit is tight, however, so representing the ‘track-sag’ common to thisvehicle will require after-market tracks.
The two large storage boxes can either be attached or left off, and that decision can also wait until the end of the build.
Finally, the build-it-all-and-then-paint-it approach will work (it’s what I did) but it still pays to plan ahead and proceed slowly.
The Build
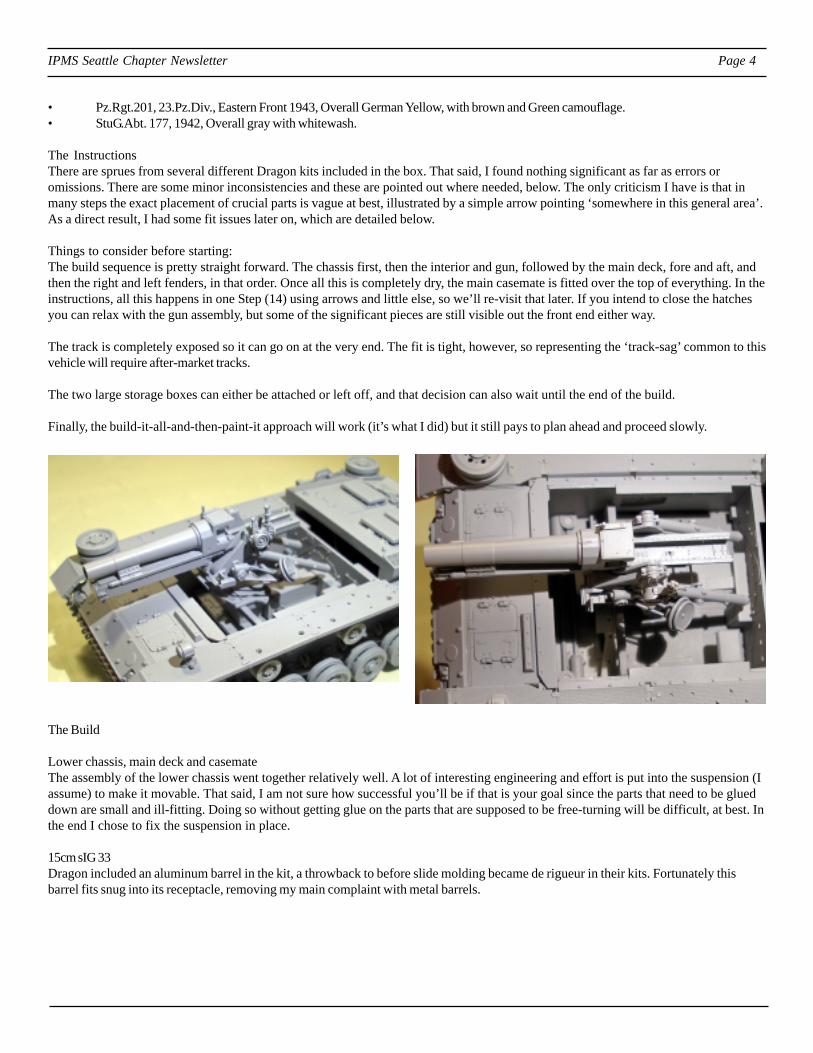
Lower chassis, main deck and casemateThe assembly of the lower chassis went together relatively well. A lot of interesting engineering and effort is put into the suspension (Iassume) to make it movable. That said, I am not sure how successful you’ll be if that is your goal since the parts that need to be glueddown are small and ill-fitting. Doing so without getting glue on the parts that are supposed to be free-turning will be difficult, at best. Inthe end I chose to fix the suspension in place.
15cm sIG 33Dragon included an aluminum barrel in the kit, a throwback to before slide molding became de rigueur in their kits. Fortunately thisbarrel fits snug into its receptacle, removing my main complaint with metal barrels.

IPMS Seattle Chapter Newsletter Page 5
The TrackThe two lengths of DS track in this kit are a welcome addition and a huge improvement over the previous releases of this vehicle, whichdid not even have Magic track but rather the time-intensive and sanity-sapping sprues of individual links that needed to be cut,cleaned and assembled, one by one. The two runs of tan-yellow track are highly detailed top and bottom and are ‘sided’ (left and right)– marked by a small tab on each that you remove before attaching.
The DS track responded beautifully to Tamiya (Green Top) liquid cement and all the lacquer paint and weathering products used onthem. Unfortunately, the runs are just long enough to fit over the bogies and return rollers, not leaving any extra length for ‘track sag’.You will have to go to aftermarket products for that.
Painting and Finish
Departing from the two schemes identified in the instructions , I decided to finish my vehicle using a scheme that I saw at a model showrecently. I kept the German crosses but discarded the remaining decals. I felt the red numerals in the kit would not do against a yellowand brown background.
The only item I left off the completed model for painting was the antenna. Painting and finishing followed these steps:
(Note: I thin all Tamiya paint and primer products 50:50 with Gunze Mr. Color Leveling Thinner, which has its own retarder forairbrushing. If you haven’t tried this thinner with Tamiya paints, you really should. I use a Pasche-H Single-Action airbrush, Number #3tip, at 20 lbs. pressure for everything. I use the same thinner for thinning Humbrol paints. I use Vallejo's own thinner for all Vallejopaints.)
1. I started by airbrushing a primer coat of Gunze Mr. Surfacer 1200 to give the plastic and PE some grip for the following coats.2. I followed this with an overall pre-shade coat Tamiya NATO Black (XF-69) – this would fill in the dark recesses and providethe shadows near the flat surface edges, adding depth to the camouflage coats to come.3. Next came the first camouflage coat consisting of a mixture of Tamiya Desert Yellow (XF-59), Deck Tan (XF-55) and Flat White(XF-2), which results in a color that is close to Tamiya Buff, but a little more yellow than brown. I sprayed it carefully, allowing some ofthe black to show along the edges and behind the pioneer tools, etc.4. Next I applied the second (mottled) camouflage coat using a 50/50 mixture of Tamiya Flat Black (XF-1) and Tamiya Flat Brown(XF-10). I wanted the color to be darker than the standard German (red) brown.5. Once the camouflage coats were dry, I hand-painted the areas that would receive decals with Future.6. While the Future was drying, I painted the wooden portions of the pioneer tools Vallejo Acrylics New Wood and all the steelparts Tamiya Metallic Grey (XF-56). For Vallejo paints I mix a tiny bit of Vallejo Slow Dry and water with each color until it flowssmoothly off a red sable brush. I painted the hull machine gun Tamiya Gun Metal (X-10) and highlighted it with Gamblin Silver Oil paint.7. To give the wooden parts of the tools more depth, I brushed on a little Mig Wash Brown Oil straight from the tube and let thatset overnight. Don’t let this paint leach out its oil beforehand, like you would when you are using oils for detailing. The oil helps it stayworkable. In the morning I carefully removed most of the oil paint using a brush dampened with Mona Lisa, leaving the areas near thebuckles and metal parts darker than the wooden shafts. Finally, I let a little Black wash puddle up on the horizontal surfaces of the metalaxe head. When dry, this gives it a convincing look of used steel.8. I applied the decals using the Red and Blue Micro Sol/Set system without any problems.9. Next, while I still had a flat coat on the model, I applied several filters to enhance the colors. I first gave the whole vehicle afilter of MIG Wash Brown. I then gave the jack and spare track runs a filter of MIG Black. I applied a filter of MIG Dark Rust to the rearexhaust filters. Finally, I used several filter applications of Paynes Gray and Dark Rust on the track sections. I heavily thin all of mywashes and filters with Mona Lisa White Spirit.10. Once dry, I hand-brushed another coat of Future over the decals to seal them.11. I then gave the vehicle a pin wash using Mig Dark Wash (aka Raw Umber) straight from the bottle, paying special attention tothe wheels and various latches.12. Once dry, I flipped the hull over and applied a mix of MIG Old Rust and MIG Black Soot pigments to the track.13. I followed this with a ‘road-dusting’ coat of Vallejo Model Air Light Brown and then shot the whole vehicle with Vallejo FlatVarnish to kill any shiny spots still remaining. I cut each of these 50/50 with Vallejo Airbrush Thinner to improve flow.14. Finally, I applied a light dusting of various Mig pigments, light earth tones such as European Dust and Dry Mud for the bodyand wheels, dark rust and black for the track, and then attached the antenna up on top.

IPMS Seattle Chapter Newsletter Page 6
Conclusion
I thought this kit would be easier to build than it was. I had some fit problems, and there were some PE parts that did not have anyplastic alternatives as usually found in other Dragon kits. I also felt there could have been one or two more pages in the instructionscontaining images of some of the more complicated areas from different angles.
Still – this is the best sIG 33 kit on the market, and Dragon should again be commended for their attention to detail and engineering. TheDS track is excellent; the fit of the aluminum barrel perfect; and the hunkered-down look of the real vehicle is captured well.
That said, I recommend this kit for average-to-experienced modelers – beginners might have issues with the instructions, the photo-etch, and the number of small parts. The complexity of the design and the fit problems require a bit of actual modeling to occur. Irecommend that you go slow, pay attention to the instructions, and consider the suggestions included above.
I would like to thank Dragon Models and Dragon USA for providing this kit for review, and to IPMS USA for giving me the opportunityto build it.
IPMS Seattle Chapter Newsletter Page 7
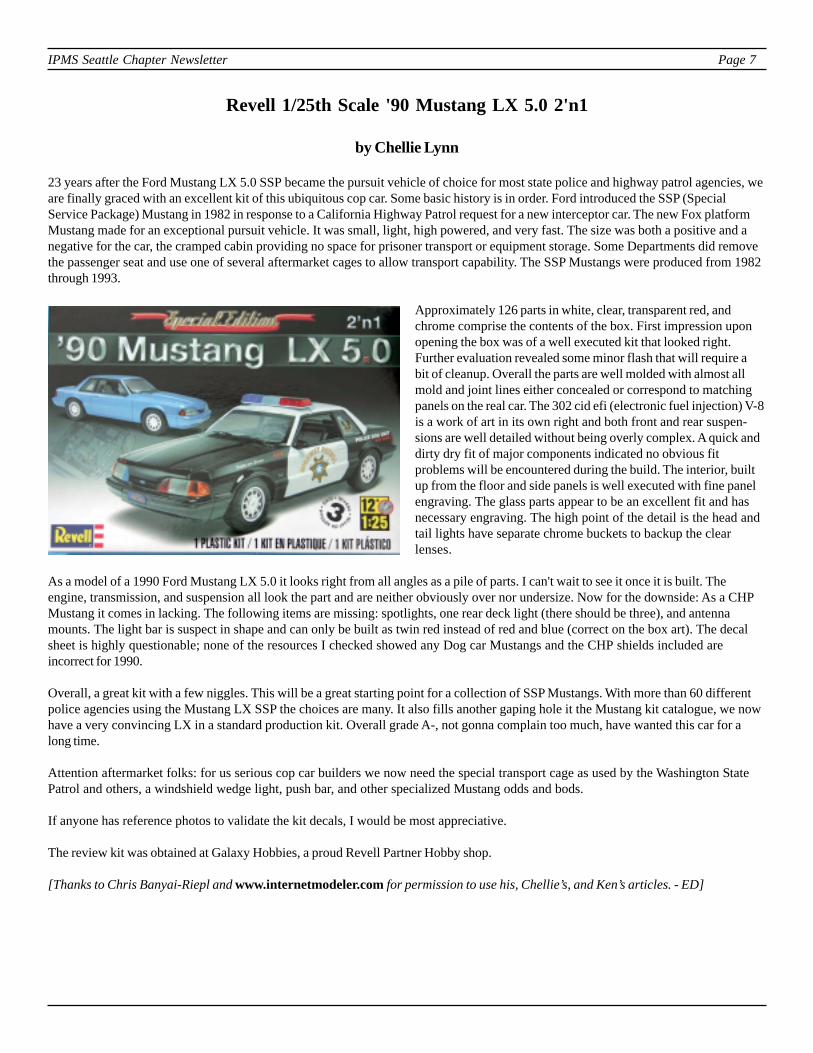
Revell 1/25th Scale '90 Mustang LX 5.0 2'n1
by Chellie Lynn
23 years after the Ford Mustang LX 5.0 SSP became the pursuit vehicle of choice for most state police and highway patrol agencies, weare finally graced with an excellent kit of this ubiquitous cop car. Some basic history is in order. Ford introduced the SSP (SpecialService Package) Mustang in 1982 in response to a California Highway Patrol request for a new interceptor car. The new Fox platformMustang made for an exceptional pursuit vehicle. It was small, light, high powered, and very fast. The size was both a positive and anegative for the car, the cramped cabin providing no space for prisoner transport or equipment storage. Some Departments did removethe passenger seat and use one of several aftermarket cages to allow transport capability. The SSP Mustangs were produced from 1982through 1993.
Approximately 126 parts in white, clear, transparent red, andchrome comprise the contents of the box. First impression uponopening the box was of a well executed kit that looked right.Further evaluation revealed some minor flash that will require abit of cleanup. Overall the parts are well molded with almost allmold and joint lines either concealed or correspond to matchingpanels on the real car. The 302 cid efi (electronic fuel injection) V-8is a work of art in its own right and both front and rear suspen-sions are well detailed without being overly complex. A quick anddirty dry fit of major components indicated no obvious fitproblems will be encountered during the build. The interior, builtup from the floor and side panels is well executed with fine panelengraving. The glass parts appear to be an excellent fit and hasnecessary engraving. The high point of the detail is the head andtail lights have separate chrome buckets to backup the clearlenses.
As a model of a 1990 Ford Mustang LX 5.0 it looks right from all angles as a pile of parts. I can't wait to see it once it is built. Theengine, transmission, and suspension all look the part and are neither obviously over nor undersize. Now for the downside: As a CHPMustang it comes in lacking. The following items are missing: spotlights, one rear deck light (there should be three), and antennamounts. The light bar is suspect in shape and can only be built as twin red instead of red and blue (correct on the box art). The decalsheet is highly questionable; none of the resources I checked showed any Dog car Mustangs and the CHP shields included areincorrect for 1990.
Overall, a great kit with a few niggles. This will be a great starting point for a collection of SSP Mustangs. With more than 60 differentpolice agencies using the Mustang LX SSP the choices are many. It also fills another gaping hole it the Mustang kit catalogue, we nowhave a very convincing LX in a standard production kit. Overall grade A-, not gonna complain too much, have wanted this car for along time.
Attention aftermarket folks: for us serious cop car builders we now need the special transport cage as used by the Washington StatePatrol and others, a windshield wedge light, push bar, and other specialized Mustang odds and bods.
If anyone has reference photos to validate the kit decals, I would be most appreciative.
The review kit was obtained at Galaxy Hobbies, a proud Revell Partner Hobby shop.
[Thanks to Chris Banyai-Riepl and www.internetmodeler.com for permission to use his, Chellie’s, and Ken’s articles. - ED]

IPMS Seattle Chapter Newsletter Page 8
HPH 1/48th Scale Ilyushin Il-28
by Terry D. Moore
One of my favorite Russian aircraft is the Il-28 (NATO code name: Beagle) and when I saw this new 1/48th scale kit available for sale atthe IPMS Nats in Loveland, CO this past August I just had to have one. Until now the only available kits were the ancient Airfix kit andthe more recent Italeri/Bilek kit, both in 1/72nd scale. I built the Airfix kit over 40 years ago and as I recall it was quite clunky. I've notseen the other 1/72nd scale kit, so have no comment about that.
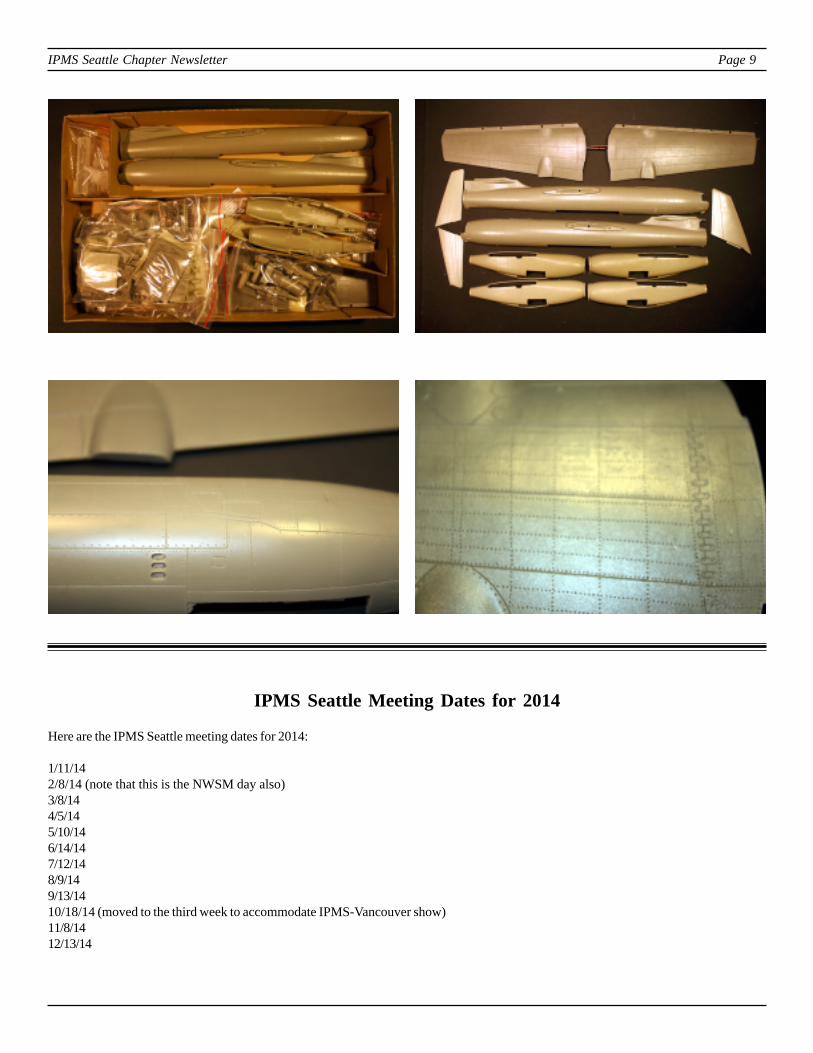
This is an all-resin kit and certainly more work will be involved in assembly. The model came in a segmented box, with all related partscollected in plastic bags and plenty of bubble wrap to protect the parts. The parts are all molded in a grey/green resin and the canopyparts molded in clear resin. And there are a LOT of resin parts, along with two photo-etch frets, nose weights, and decals for Russianand Chinese aircraft. The instructions are provided on a CD-R. One of the best features of this kit are the metal spars embedded into thewings. The panel line/rivet detail is very fine throughout as is padding on the interior fuselage walls. My example is very cleanly castand I have not found any air bubbles or short castings. Fuselage halves and engine nacelle halves will require only minor cleanupbefore assembly.
The challenge for this kit will be the removal of the all the small cast parts from their pour gates and clean up of same. I expect it to be arather time consuming effort. More than likely, some of the finer cast parts may have to rebuilt with plastic or metal replacements if theyprove too difficult to remove from their pour gates (at least I fully expect my ham-handedness will require some parts being rebuilt!).
The HPH Il-28 is certainly not a shake and bake kit, but for 1/48th scale builders, it's the only game in town. Somewhat pricey, as are allresin kits, but I think it was worth the cost just due to its uniqueness. There are certainly a lot of markings options, as well, as it sawservice with a lot of countries. I'm considering doing mine in Nigerian AF colors, just because it's so different.
Kit provided by my (now somewhat thinner) wallet.
IPMS Seattle Chapter Newsletter Page 9
IPMS Seattle Meeting Dates for 2014
Here are the IPMS Seattle meeting dates for 2014:
1/11/142/8/14 (note that this is the NWSM day also)3/8/144/5/145/10/146/14/147/12/148/9/149/13/1410/18/14 (moved to the third week to accommodate IPMS-Vancouver show)11/8/1412/13/14

IPMS Seattle Chapter Newsletter Page 10
Hurricane Bookshelf: “Hey! - I Haven't Seen That One!”
by Scott Kruize
One of the very great pleasures I get by going to events in exotic places, like theVancouver, BC Contest, or the US IPMS Nationals in Loveland, or even the yearlyLibrary Clearance Sale at the Museum of Flight, is to paw through magazines: stacks ontabletops and in boxes underneath.
I haven't tired of writing this ‘Hurricane Bookshelf’ column, at least partly because of therealization I’m never going to read every single word written about the Hurricane, theBattle of Britain, and all the other campaigns the Hurri participated in. Besides, it stillappears in the news, at least the kind of news we aviation buffs attend to. Take themagazine whose cover you see here. Around this time four years ago, the big news wasabout Hangar 11 Collection’s newly-restored Hurricane Mark IIB, and the bomb racksthey were busy fitting dummy 250-pound bombs into, to impress spectators at air shows.
When the movie The Battle of Britain was made, by diligent efforts its producersmanaged to scrounge up three real Hurricanes. There are many more today. I had achance to put my hands on one at the Planes of Fame museum in Chino!
Books about that great Battle: one was written by Richard Townsend Bickers. (I think Iread it. I can’t keep every such book I come across on the Bookshelf; there’d soon beroom for nothing else!)
He wrote a few other aviation history books. I'm currently after one about the operational history of the Hawker Typhoon, theHurricane’s successor. These must have taken a lot of dry scholarly research. Perhaps that’s why he did a novel in 1976.
I'm not heavily into novels, but when one of the Vancouver BC dealer’s box of assorted books hadTHIS COVER, of course it leapt out at me and demanded I buy it. The Recommended Retail Priceswere on the back cover: in the United Kingdom, the book was 70 pence, or two Australian dollars,or $2.30 in New Zealand money, or $4.95 in Canada. The dealer in Vancouver took my last Canadiantwo-dollar coin.
I took Summer of No Surrender to work to read during my breaks. I can’t claim to be a greatconnoisseur of potboiler novels, but I think this one's pretty good. The plot line, such as it is,depicts all these young men, on both sides, issued with the most lethal weapons their countriescan devise, and then flung at each other over southern England to wreak as much mayhem on theiropposite numbers as possible. If they survive a particular day’s combat, they go back to theirrespective mess halls or chateaus to drink large quantities of alcohol before resuming chasing afterthe local girls. The latter aren’t very committed to defending their feminine charms against theirpursuers.
The dark part of the novel is about how, in combat, where these young men are flying around athigh speed, almost sloshing with testosterone and adrenaline in their cockpits, sometimes ThingsHappen. Things not entirely in keeping with medieval chivalry, Marquis of Queensbury rules, andthe Geneva Conventions. Look again at the cover painting. One afternoon, the German raid arrivesover the Hurricane squadron’s aerodrome when they’re not quite ready for takeoff, and what a
mess they make. The survivors that can pull themselves together before the next encounter are not at all the sort of chaps you think ofat an English tea party. Some of the Things that Happen encompass not just the foes, but supposed comrades-in-arms who—for onereason or another—don’t quite rise to the occasion. I won’t say more for fear of ‘spoiling’ the effect of the book on any of you fellowclub members who’d like to read it. If you convince me you’re a Hurricane fan and read this column, I won’t even charge you twoCanadian dollars, or even 70 English pence!
IPMS Seattle Chapter Newsletter Page 11
November Meeting Agenda
by Andrew Birkbeck
Per the brief discussion at the last meeting, the IPMS Nationals Study Committee has completed its fact finding mission, and is set topresent its report at the November meeting this Saturday. So at 11 AM sharp, after a brief introduction, Brian Cahill and Tim Nelson willtake the floor, and present a power point presentation. The presentation is limited to the facts and data related to the feasibility ofputting on such an event. It is requested that all questions be withheld until these two gentlemen are finished with the entire presenta-tion. We will then have a Q&A session.
Skyway Model Shop Anniversary Sale
Skyway Model Shop will be having its annual Anniversary Sale Friday, November 29, to Sunday, December 1.
Starting the Friday after Thanksgiving, Skyway will be opening early to help out with those needing refuge from door-buster sales. 10AM - 8 PM on Friday, 11 AM - 6 PM on Saturday, and 11 AM - 5 PM on Sunday. There will be 20% off everything in the store all threedays, with 50% off specials on selected items.
Skyway's address is 126 Renton Ave S., Seattle, 98178. For directions or more info, their web site is www.skywaymodel.com
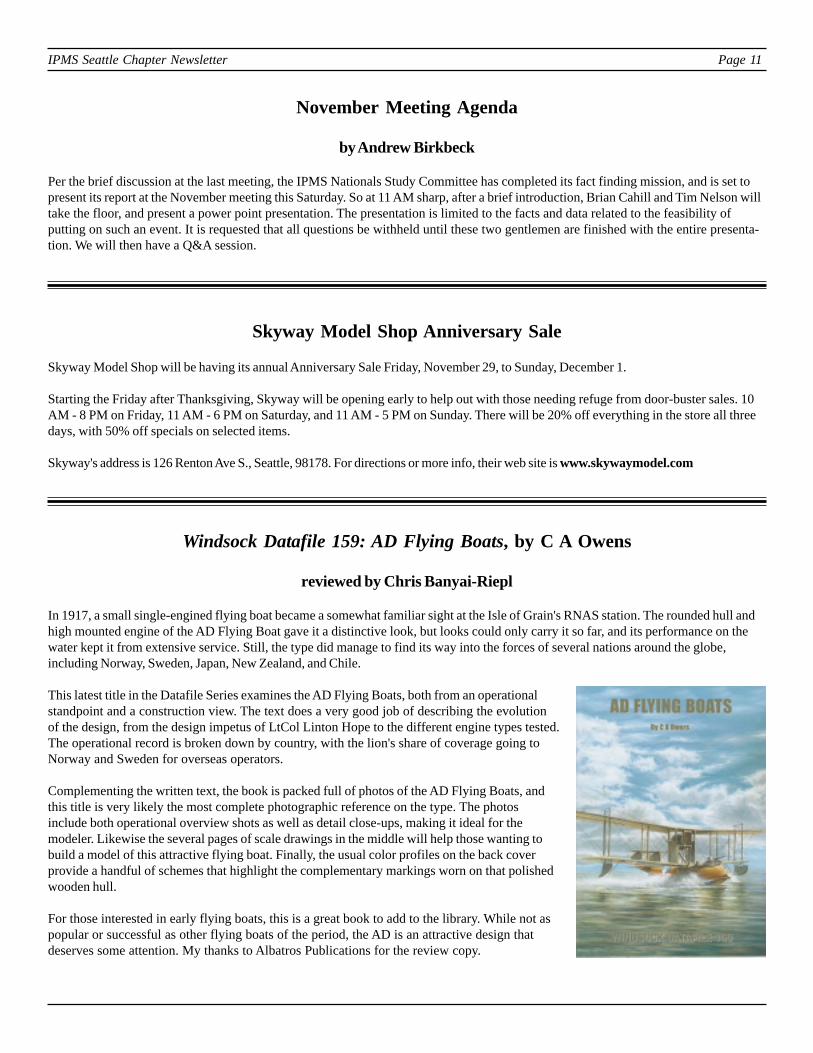
Windsock Datafile 159: AD Flying Boats, by C A Owens
reviewed by Chris Banyai-Riepl
In 1917, a small single-engined flying boat became a somewhat familiar sight at the Isle of Grain's RNAS station. The rounded hull andhigh mounted engine of the AD Flying Boat gave it a distinctive look, but looks could only carry it so far, and its performance on thewater kept it from extensive service. Still, the type did manage to find its way into the forces of several nations around the globe,including Norway, Sweden, Japan, New Zealand, and Chile.
This latest title in the Datafile Series examines the AD Flying Boats, both from an operationalstandpoint and a construction view. The text does a very good job of describing the evolutionof the design, from the design impetus of LtCol Linton Hope to the different engine types tested.The operational record is broken down by country, with the lion's share of coverage going toNorway and Sweden for overseas operators.
Complementing the written text, the book is packed full of photos of the AD Flying Boats, andthis title is very likely the most complete photographic reference on the type. The photosinclude both operational overview shots as well as detail close-ups, making it ideal for themodeler. Likewise the several pages of scale drawings in the middle will help those wanting tobuild a model of this attractive flying boat. Finally, the usual color profiles on the back coverprovide a handful of schemes that highlight the complementary markings worn on that polishedwooden hull.
For those interested in early flying boats, this is a great book to add to the library. While not aspopular or successful as other flying boats of the period, the AD is an attractive design thatdeserves some attention. My thanks to Albatros Publications for the review copy.
IPMS Seattle Chapter Newsletter Page 12
Thoroughbred
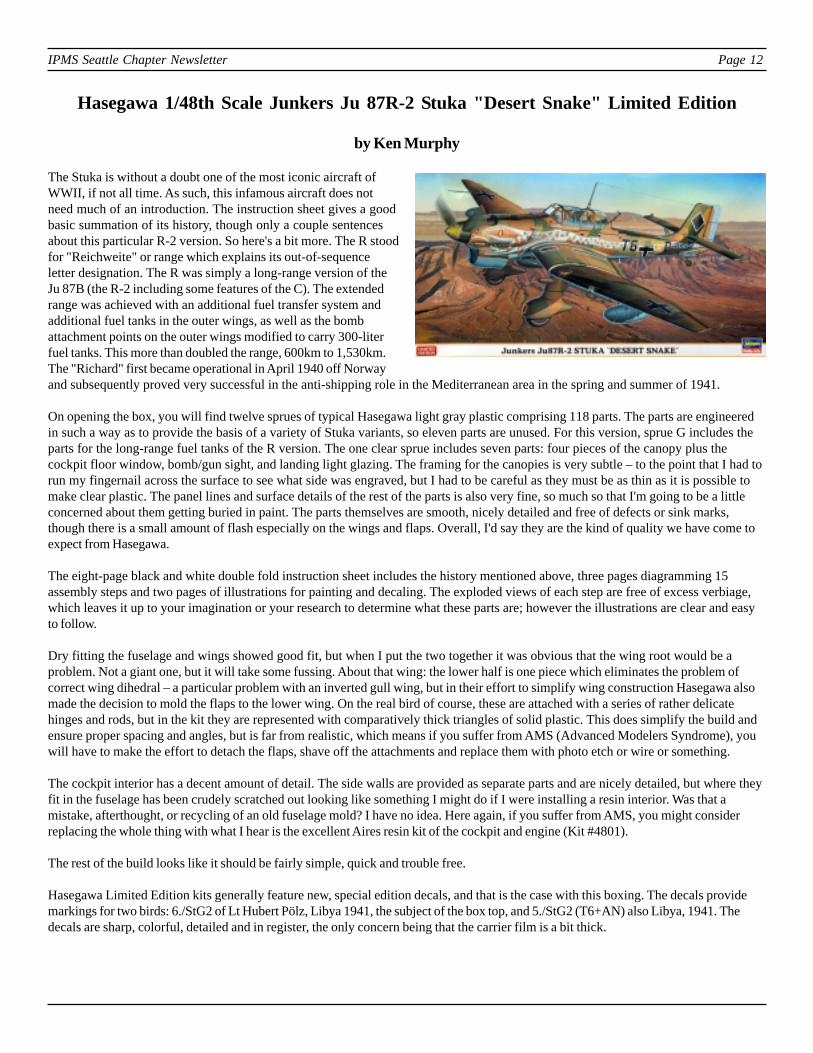
Hasegawa 1/48th Scale Junkers Ju 87R-2 Stuka "Desert Snake" Limited Edition
by Ken Murphy
The Stuka is without a doubt one of the most iconic aircraft ofWWII, if not all time. As such, this infamous aircraft does notneed much of an introduction. The instruction sheet gives a goodbasic summation of its history, though only a couple sentencesabout this particular R-2 version. So here's a bit more. The R stoodfor "Reichweite" or range which explains its out-of-sequenceletter designation. The R was simply a long-range version of theJu 87B (the R-2 including some features of the C). The extendedrange was achieved with an additional fuel transfer system andadditional fuel tanks in the outer wings, as well as the bombattachment points on the outer wings modified to carry 300-literfuel tanks. This more than doubled the range, 600km to 1,530km.The "Richard" first became operational in April 1940 off Norwayand subsequently proved very successful in the anti-shipping role in the Mediterranean area in the spring and summer of 1941.
On opening the box, you will find twelve sprues of typical Hasegawa light gray plastic comprising 118 parts. The parts are engineeredin such a way as to provide the basis of a variety of Stuka variants, so eleven parts are unused. For this version, sprue G includes theparts for the long-range fuel tanks of the R version. The one clear sprue includes seven parts: four pieces of the canopy plus thecockpit floor window, bomb/gun sight, and landing light glazing. The framing for the canopies is very subtle – to the point that I had torun my fingernail across the surface to see what side was engraved, but I had to be careful as they must be as thin as it is possible tomake clear plastic. The panel lines and surface details of the rest of the parts is also very fine, so much so that I'm going to be a littleconcerned about them getting buried in paint. The parts themselves are smooth, nicely detailed and free of defects or sink marks,though there is a small amount of flash especially on the wings and flaps. Overall, I'd say they are the kind of quality we have come toexpect from Hasegawa.
The eight-page black and white double fold instruction sheet includes the history mentioned above, three pages diagramming 15assembly steps and two pages of illustrations for painting and decaling. The exploded views of each step are free of excess verbiage,which leaves it up to your imagination or your research to determine what these parts are; however the illustrations are clear and easyto follow.
Dry fitting the fuselage and wings showed good fit, but when I put the two together it was obvious that the wing root would be aproblem. Not a giant one, but it will take some fussing. About that wing: the lower half is one piece which eliminates the problem ofcorrect wing dihedral – a particular problem with an inverted gull wing, but in their effort to simplify wing construction Hasegawa alsomade the decision to mold the flaps to the lower wing. On the real bird of course, these are attached with a series of rather delicatehinges and rods, but in the kit they are represented with comparatively thick triangles of solid plastic. This does simplify the build andensure proper spacing and angles, but is far from realistic, which means if you suffer from AMS (Advanced Modelers Syndrome), youwill have to make the effort to detach the flaps, shave off the attachments and replace them with photo etch or wire or something.
The cockpit interior has a decent amount of detail. The side walls are provided as separate parts and are nicely detailed, but where theyfit in the fuselage has been crudely scratched out looking like something I might do if I were installing a resin interior. Was that amistake, afterthought, or recycling of an old fuselage mold? I have no idea. Here again, if you suffer from AMS, you might considerreplacing the whole thing with what I hear is the excellent Aires resin kit of the cockpit and engine (Kit #4801).
The rest of the build looks like it should be fairly simple, quick and trouble free.
Hasegawa Limited Edition kits generally feature new, special edition decals, and that is the case with this boxing. The decals providemarkings for two birds: 6./StG2 of Lt Hubert Pölz, Libya 1941, the subject of the box top, and 5./StG2 (T6+AN) also Libya, 1941. Thedecals are sharp, colorful, detailed and in register, the only concern being that the carrier film is a bit thick.
IPMS Seattle Chapter Newsletter Page 13
That is all the information the instructions give about the subject of this "Limited Edition's" featured aircraft. It would be nice to knowsomething more about the pilot than simply name, rank and serial number and more about the plane than that it had a really cool paintjob. So here's a brief summary of what I could find on Wikipedia:
"Hubert Pölz joined the Luftwaffe in 1938. He served on most of the German theatres of operations, taking part the Polish Campaign,French Campaign, Battle of Britain, Siege of Malta and North African Campaign. On 24 June 1941 he sank HMS Auckland off Tobruk. InMay 1942 he took command of 6 Staffel. He later took part in the fighting on the Eastern Front. By the end of the war he was command-ing I./Schlachtgeschwader 151."
He had quite a career, but to me the most amazing thing is that he survived the war!
As for his plane, it was in Libya, during the North African Campaign, that it acquired the snake motif depicted in this kit. Trying to findout more about that led me down some very confusing and contradictory paths. As far as I could discover, there are only two photo-graphically documented snake Stukas: T6+DP and T6+AN. As mentioned above, the kit has decals for both, but doesn't include theslightly different snake (they were hand painted after all) for AN. In fact, the painting instructions show AN without the snake at all.Strange. There are no known photos showing any other Stukas in snake markings. However, I was able to find snake scheme illustra-tions depicting a T6+CP and T6+MP as well as DP and AN. They also depict the snake as white with red markings whereas the kitdecals are white with sand yellow markings. Hasegawa's markings seem to be based on photos clearly depicting T6+DP.
Translating colors from a black and white image is always a dicey issue, so I will defer to Hasegawa's research. One more interestingpoint: In photos of the aircraft, under the left wing, you can clearly see a "J" next to the cross. It's certainly not the fuselage code.Could it be the factory code? The decal sheet includes a pair of "Js" as well as Ds, Bs and Ks. The instructions give no indication ofwhere these markings go, but the fine print at the bottom states: "Decals without placement instructions may be used freely." I guessthey just expect you to do your own research and come to your own conclusions. No doubt much easier than trying to explain all this!
In the end I guess you can do – and defend – whatever you want. If you want to go with the white and red snake, you could use thedecals from the Revell kit or go aftermarket with the Tally Ho set for T6+CP.
Hasegawa has been turning out Stuka kits at the rate of nearly one a year since 1994, including a whole array of Bs, Cs, Ds, Gs, and nowan R. They've had a long time to get this subject down and I think this kit is an excellent example of the results. The moldings are clean,the detail sharp and the decals excellent. The simple basic construction should make this a relatively easy out-of-the-box build, and thekiller paint scheme will make it a standout on the shelf. I highly recommend it!
My thanks to Hasegawa USA for the review copy.
PrezNotes from page 1
social security, medical insurance, etc, etc, that the French Government demands. AND you can’t work that person more than 35 hoursa week without having to pay overtime. Great for the employee, kiss of death for the business. Thus in France you apparently havelarge numbers of very small “family” businesses, and very large firms often geared to the export market (and thus receiving massive taxexport “incentives”), and not much in the middle.
Thus the model firm was unable to meet the demand for their 1/48th prebuilts by employing French workers, nor was it able to meet thedemand for its other products, and the café was unable to expand beyond four tables and a bar. So the next time you visit France, andwonder why there are so many “dinky” establishments, you know why! Each nation to their own way of thinking, and there are plentyof great things to admire about the French and France. But helping small businesses isn’t something their Government does very well,apparently!
Happy Modeling,
Andrew
IPMS Seattle Chapter Newsletter Page 14
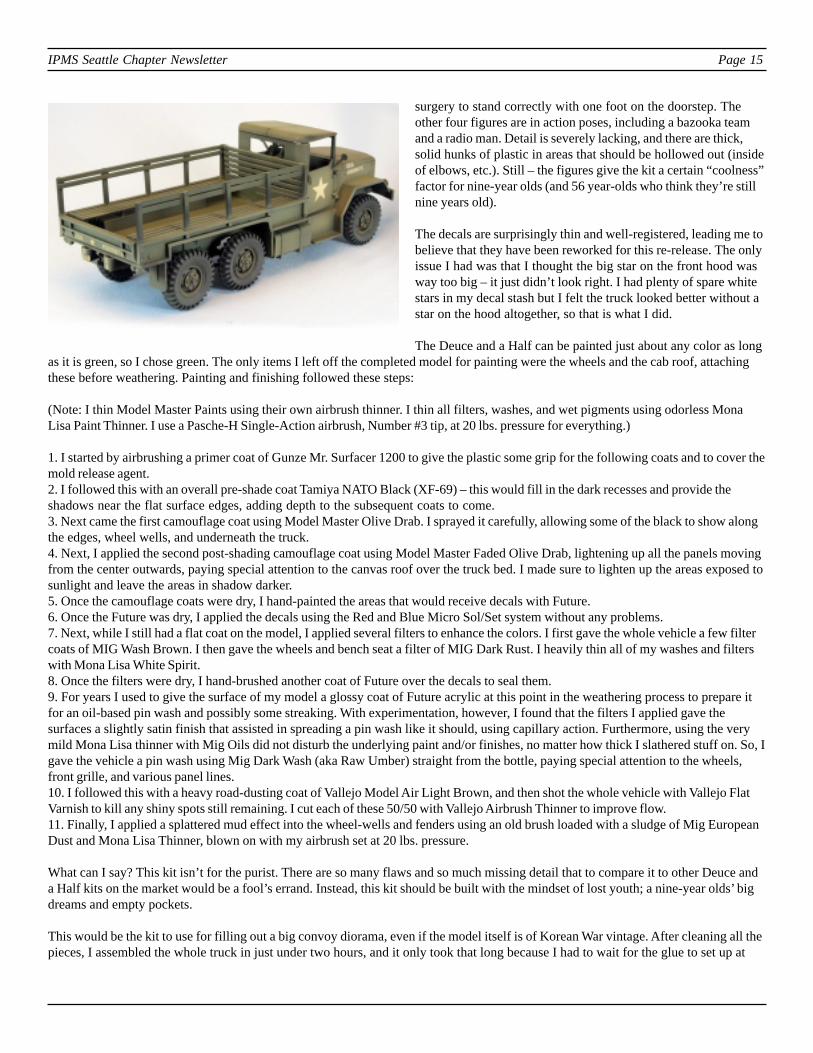
Monogram 1/35th Scale Eager Beaver 2.5 Ton Truck
by Eric Christianson
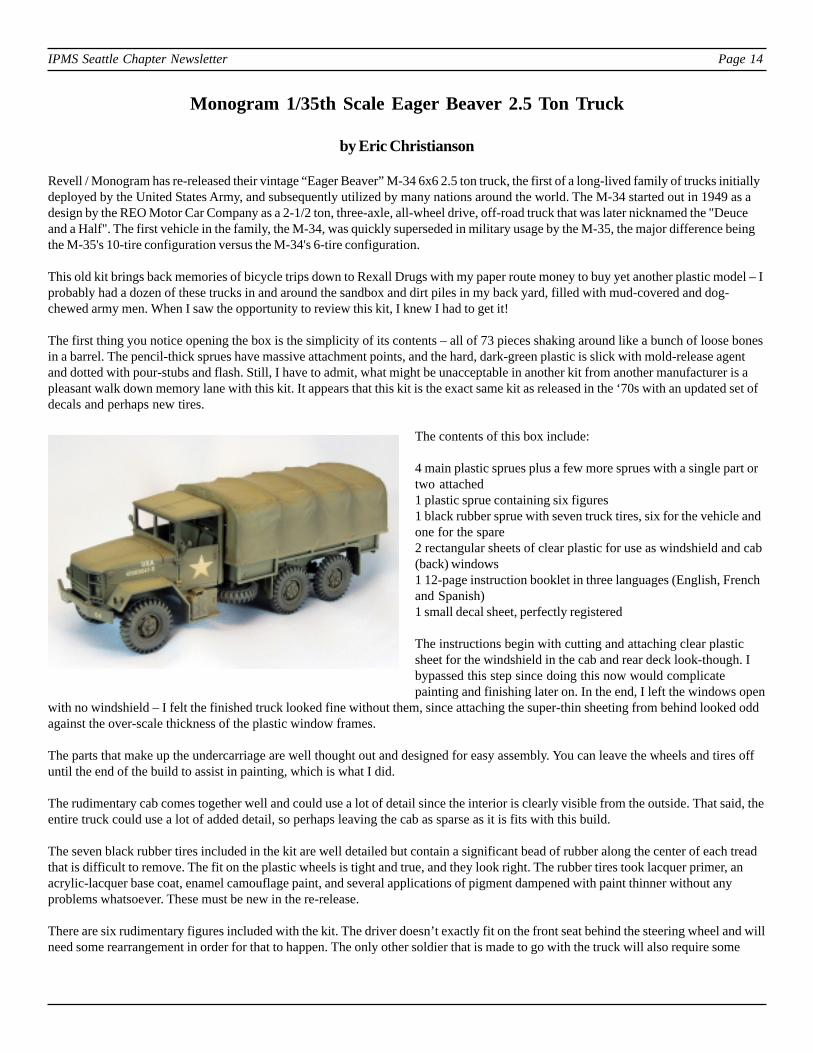
Revell / Monogram has re-released their vintage “Eager Beaver” M-34 6x6 2.5 ton truck, the first of a long-lived family of trucks initiallydeployed by the United States Army, and subsequently utilized by many nations around the world. The M-34 started out in 1949 as adesign by the REO Motor Car Company as a 2-1/2 ton, three-axle, all-wheel drive, off-road truck that was later nicknamed the "Deuceand a Half". The first vehicle in the family, the M-34, was quickly superseded in military usage by the M-35, the major difference beingthe M-35's 10-tire configuration versus the M-34's 6-tire configuration.
This old kit brings back memories of bicycle trips down to Rexall Drugs with my paper route money to buy yet another plastic model – Iprobably had a dozen of these trucks in and around the sandbox and dirt piles in my back yard, filled with mud-covered and dog-chewed army men. When I saw the opportunity to review this kit, I knew I had to get it!
The first thing you notice opening the box is the simplicity of its contents – all of 73 pieces shaking around like a bunch of loose bonesin a barrel. The pencil-thick sprues have massive attachment points, and the hard, dark-green plastic is slick with mold-release agentand dotted with pour-stubs and flash. Still, I have to admit, what might be unacceptable in another kit from another manufacturer is apleasant walk down memory lane with this kit. It appears that this kit is the exact same kit as released in the ‘70s with an updated set ofdecals and perhaps new tires.
The contents of this box include:
4 main plastic sprues plus a few more sprues with a single part ortwo attached1 plastic sprue containing six figures1 black rubber sprue with seven truck tires, six for the vehicle andone for the spare2 rectangular sheets of clear plastic for use as windshield and cab(back) windows1 12-page instruction booklet in three languages (English, Frenchand Spanish)1 small decal sheet, perfectly registered
The instructions begin with cutting and attaching clear plasticsheet for the windshield in the cab and rear deck look-though. Ibypassed this step since doing this now would complicatepainting and finishing later on. In the end, I left the windows open
with no windshield – I felt the finished truck looked fine without them, since attaching the super-thin sheeting from behind looked oddagainst the over-scale thickness of the plastic window frames.
The parts that make up the undercarriage are well thought out and designed for easy assembly. You can leave the wheels and tires offuntil the end of the build to assist in painting, which is what I did.
The rudimentary cab comes together well and could use a lot of detail since the interior is clearly visible from the outside. That said, theentire truck could use a lot of added detail, so perhaps leaving the cab as sparse as it is fits with this build.
The seven black rubber tires included in the kit are well detailed but contain a significant bead of rubber along the center of each treadthat is difficult to remove. The fit on the plastic wheels is tight and true, and they look right. The rubber tires took lacquer primer, anacrylic-lacquer base coat, enamel camouflage paint, and several applications of pigment dampened with paint thinner without anyproblems whatsoever. These must be new in the re-release.
There are six rudimentary figures included with the kit. The driver doesn’t exactly fit on the front seat behind the steering wheel and willneed some rearrangement in order for that to happen. The only other soldier that is made to go with the truck will also require some
IPMS Seattle Chapter Newsletter Page 15
surgery to stand correctly with one foot on the doorstep. Theother four figures are in action poses, including a bazooka teamand a radio man. Detail is severely lacking, and there are thick,solid hunks of plastic in areas that should be hollowed out (insideof elbows, etc.). Still – the figures give the kit a certain “coolness”factor for nine-year olds (and 56 year-olds who think they’re stillnine years old).
The decals are surprisingly thin and well-registered, leading me tobelieve that they have been reworked for this re-release. The onlyissue I had was that I thought the big star on the front hood wasway too big – it just didn’t look right. I had plenty of spare whitestars in my decal stash but I felt the truck looked better without astar on the hood altogether, so that is what I did.
The Deuce and a Half can be painted just about any color as longas it is green, so I chose green. The only items I left off the completed model for painting were the wheels and the cab roof, attachingthese before weathering. Painting and finishing followed these steps:
(Note: I thin Model Master Paints using their own airbrush thinner. I thin all filters, washes, and wet pigments using odorless MonaLisa Paint Thinner. I use a Pasche-H Single-Action airbrush, Number #3 tip, at 20 lbs. pressure for everything.)
1. I started by airbrushing a primer coat of Gunze Mr. Surfacer 1200 to give the plastic some grip for the following coats and to cover themold release agent.2. I followed this with an overall pre-shade coat Tamiya NATO Black (XF-69) – this would fill in the dark recesses and provide theshadows near the flat surface edges, adding depth to the subsequent coats to come.3. Next came the first camouflage coat using Model Master Olive Drab. I sprayed it carefully, allowing some of the black to show alongthe edges, wheel wells, and underneath the truck.4. Next, I applied the second post-shading camouflage coat using Model Master Faded Olive Drab, lightening up all the panels movingfrom the center outwards, paying special attention to the canvas roof over the truck bed. I made sure to lighten up the areas exposed tosunlight and leave the areas in shadow darker.5. Once the camouflage coats were dry, I hand-painted the areas that would receive decals with Future.6. Once the Future was dry, I applied the decals using the Red and Blue Micro Sol/Set system without any problems.7. Next, while I still had a flat coat on the model, I applied several filters to enhance the colors. I first gave the whole vehicle a few filtercoats of MIG Wash Brown. I then gave the wheels and bench seat a filter of MIG Dark Rust. I heavily thin all of my washes and filterswith Mona Lisa White Spirit.8. Once the filters were dry, I hand-brushed another coat of Future over the decals to seal them.9. For years I used to give the surface of my model a glossy coat of Future acrylic at this point in the weathering process to prepare itfor an oil-based pin wash and possibly some streaking. With experimentation, however, I found that the filters I applied gave thesurfaces a slightly satin finish that assisted in spreading a pin wash like it should, using capillary action. Furthermore, using the verymild Mona Lisa thinner with Mig Oils did not disturb the underlying paint and/or finishes, no matter how thick I slathered stuff on. So, Igave the vehicle a pin wash using Mig Dark Wash (aka Raw Umber) straight from the bottle, paying special attention to the wheels,front grille, and various panel lines.10. I followed this with a heavy road-dusting coat of Vallejo Model Air Light Brown, and then shot the whole vehicle with Vallejo FlatVarnish to kill any shiny spots still remaining. I cut each of these 50/50 with Vallejo Airbrush Thinner to improve flow.11. Finally, I applied a splattered mud effect into the wheel-wells and fenders using an old brush loaded with a sludge of Mig EuropeanDust and Mona Lisa Thinner, blown on with my airbrush set at 20 lbs. pressure.
What can I say? This kit isn’t for the purist. There are so many flaws and so much missing detail that to compare it to other Deuce anda Half kits on the market would be a fool’s errand. Instead, this kit should be built with the mindset of lost youth; a nine-year olds’ bigdreams and empty pockets.
This would be the kit to use for filling out a big convoy diorama, even if the model itself is of Korean War vintage. After cleaning all thepieces, I assembled the whole truck in just under two hours, and it only took that long because I had to wait for the glue to set up at

IPMS Seattle Chapter Newsletter Page 16
Meeting Reminder November 9
North Bellevue Community/Senior Center4063-148th Ave NE, Bellevue
Directions: From Seattle or from I-405, take 520 East to the148th Ave NE exit. Take the 148th Ave North exit (thesecond of the two 148th Ave. exits) and continue north on148th until you reach the Senior Center. The Senior Centerwill be on your left. The Center itself is not easily visiblefrom the road, but there is a signpost in the median.
least a little. This model was made forbeginners – but it also delivers forexperienced modelers as well, providing awelcome diversion from all the super–serious builds we normally busy ourselveswith.
I recommend this kit for all modelers,young and old. There are no fit problemsand assembly is a breeze.
I would like to thank Revell/Monogram forproviding this kit for review, and IPMSUSA for giving me the opportunity to buildit.