Embed Size (px)
Citation preview
SEAKER:
A Mobile Digital Forensic Triage Device
A Thesis Presented to
The Faculty of the Computer Science Department
California State University Channel Islands
In (Partial) Fulfillment
of the Requirements for the Degree
Master of Science in Computer Science
by
Eric Elwood Gentry
Advisor: Michael Soltys
April 2019

c© 2019
Eric Elwood Gentry
ALL RIGHTS RESERVED
SEAKER:
A Mobile Digital Forensic Triage Device
Eric Elwood Gentry
April 3rd, 2019
Keywords: Digital Forensics, Digital Forensics Triage, Mobile Digital Foren-
sics, Digital Evidence, Forensic Tools, Raspberry Pi
Abstract
As our world of digital devices continues to expand, the potential
for digital evidence available to law enforcement during case investiga-
tion is ever increasing. The growing amount of digital evidence, along
with the considerable lack of Digital Forensic Investigators [9] is caus-
ing a backlog to form at many of the digital forensics labs around the
world. This backlog leads to delays in evidence analysis and report-
ing, causing investigators and prosecutors to postpone or even drop
on-going cases.
The SEAKER device is a digital forensic triage tool that is de-
signed to be simple, portable, inexpensive, robust, and easy to use.
SEAKER is an acronym for Storage Evaluator and Knowledge Ex-
traction Reader. Utilizing a Raspberry Pi, this digital forensic triage
device is a novel approach to providing immediate feedback to in-
vestigators. It is also intended to help stem the backlog problem in
digital forensics labs worldwide [9]. It was originally developed for
on-scene investigations that require immediate feedback, especially in
time-sensitive investigations. It also appears to be an excellent tool to
help reduce the digital evidence backlog by preventing over-collection
of digital evidence. SEAKER is not meant to replace a fully-functional
digital forensic lab, but instead to augment the initial triage and help
reduce the backlog. This research and device overview have led to the
development of the inexpensive, mobile, digital triage device called
SEAKER.
Contents
1 Introduction and Literature Review 1
1.1 Introduction . . . . . . . . . . . . . . . . . . . . . . . . . . . . . . . 1
1.1.1 Author’s Contributions . . . . . . . . . . . . . . . . . . . . 5
1.2 Literature Review . . . . . . . . . . . . . . . . . . . . . . . . . . . 6
1.2.1 History of Digital Evidence . . . . . . . . . . . . . . . . . . 6
1.2.2 Process and Procedure Standardization . . . . . . . . . . . 9
1.2.3 Reactive Digital Forensic Investigation Processes . . . . . . 14
1.2.4 Digital Evidence Triage . . . . . . . . . . . . . . . . . . . . 15
1.2.5 Acquisition Methodology . . . . . . . . . . . . . . . . . . . 20
1.2.6 Analysis Methodology . . . . . . . . . . . . . . . . . . . . . 21
1.2.7 Combined acquisition and Analysis Methodologies . . . . . 23
1.2.8 Digital Evidence Backlog . . . . . . . . . . . . . . . . . . . 28
1.2.9 How SEAKER Can Help . . . . . . . . . . . . . . . . . . . 32
2 Background 33
2.1 Legal Details . . . . . . . . . . . . . . . . . . . . . . . . . . . . . . 34
2.2 Technical Details . . . . . . . . . . . . . . . . . . . . . . . . . . . . 36
3 Development of SEAKER Device 38
3.1 Conception . . . . . . . . . . . . . . . . . . . . . . . . . . . . . . . 38
3.2 Setup Script For Raspberry Pi . . . . . . . . . . . . . . . . . . . . 41
3.2.1 Web Server . . . . . . . . . . . . . . . . . . . . . . . . . . . 43
3.2.2 WIFI Setup . . . . . . . . . . . . . . . . . . . . . . . . . . . 44
3.3 Rules For Mounting . . . . . . . . . . . . . . . . . . . . . . . . . . 45
i
3.4 Code for Searching Device . . . . . . . . . . . . . . . . . . . . . . . 45
3.5 Web Code . . . . . . . . . . . . . . . . . . . . . . . . . . . . . . . . 47
3.6 Process Flow . . . . . . . . . . . . . . . . . . . . . . . . . . . . . . 50
3.7 Tools Used for Development . . . . . . . . . . . . . . . . . . . . . . 53
3.7.1 Hardware . . . . . . . . . . . . . . . . . . . . . . . . . . . . 53
3.7.2 Programming Languages and Scripting . . . . . . . . . . . . 54
3.7.3 Raspbian Operating System . . . . . . . . . . . . . . . . . . 55
3.7.4 Collaboration Tools . . . . . . . . . . . . . . . . . . . . . . 57
3.7.5 Setup Tools . . . . . . . . . . . . . . . . . . . . . . . . . . . 58
4 Experimental Results 59
4.1 Prototype Demonstration . . . . . . . . . . . . . . . . . . . . . . . 59
4.2 Results . . . . . . . . . . . . . . . . . . . . . . . . . . . . . . . . . . 61
4.2.1 Data Saturation and Its Effect on Collection Latency . . . . 61
4.2.2 Drive Format Type Comparisons . . . . . . . . . . . . . . . 63
4.2.3 Write-Blocking Results . . . . . . . . . . . . . . . . . . . . . 65
5 Conclusions and Future Work 66
6 Appendix 77
6.1 SEAKER Setup . . . . . . . . . . . . . . . . . . . . . . . . . . . . . 77
6.2 SEAKER Usage . . . . . . . . . . . . . . . . . . . . . . . . . . . . 84
6.3 Code . . . . . . . . . . . . . . . . . . . . . . . . . . . . . . . . . . . 89
6.3.1 Directory and Filename Collection Code (in C) . . . . . . . 89
6.3.2 udev rules file for automount . . . . . . . . . . . . . . . . . 91
6.4 Results of Testing . . . . . . . . . . . . . . . . . . . . . . . . . . . . 92
ii
6.4.1 Collection Algorithm Timing Data . . . . . . . . . . . . . . 92
6.4.2 Data Saturation vs Timing Latency Data . . . . . . . . . . 93
6.4.3 Collection Time by Drive Type Data . . . . . . . . . . . . . 94
iii
Glossary
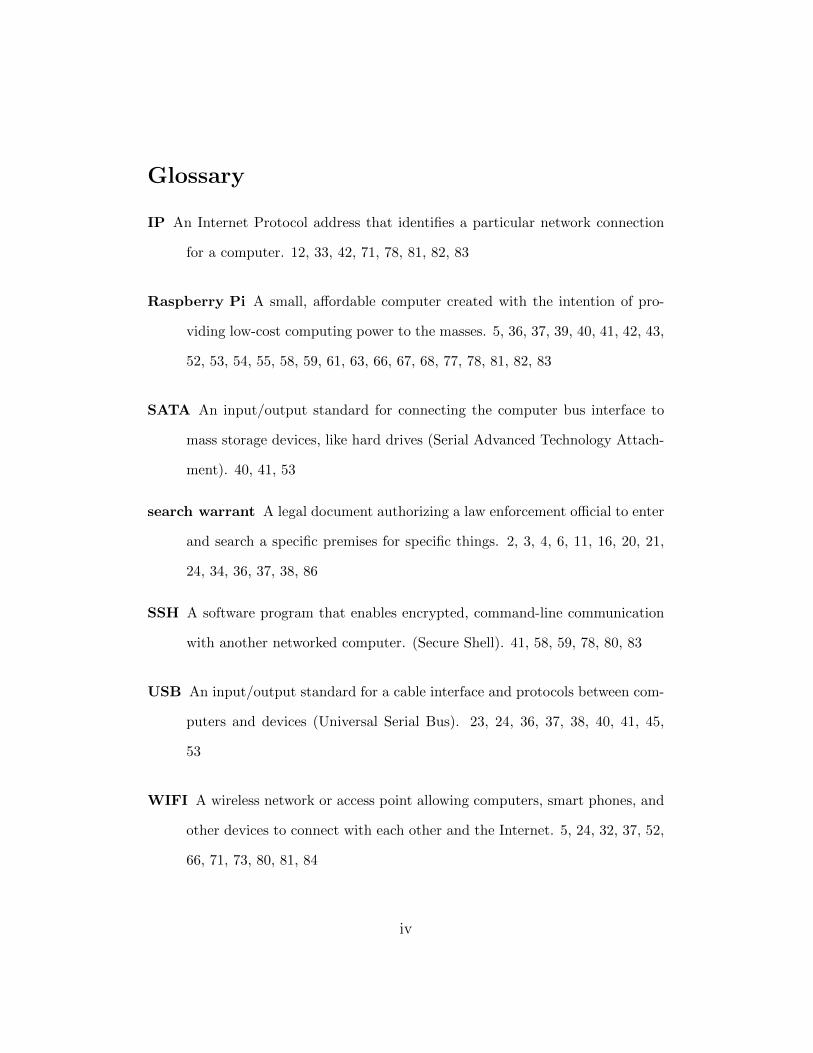
IP An Internet Protocol address that identifies a particular network connection
for a computer. 12, 33, 42, 71, 78, 81, 82, 83
Raspberry Pi A small, affordable computer created with the intention of pro-
viding low-cost computing power to the masses. 5, 36, 37, 39, 40, 41, 42, 43,
52, 53, 54, 55, 58, 59, 61, 63, 66, 67, 68, 77, 78, 81, 82, 83
SATA An input/output standard for connecting the computer bus interface to
mass storage devices, like hard drives (Serial Advanced Technology Attach-
ment). 40, 41, 53
search warrant A legal document authorizing a law enforcement official to enter
and search a specific premises for specific things. 2, 3, 4, 6, 11, 16, 20, 21,
24, 34, 36, 37, 38, 86
SSH A software program that enables encrypted, command-line communication
with another networked computer. (Secure Shell). 41, 58, 59, 78, 80, 83
USB An input/output standard for a cable interface and protocols between com-
puters and devices (Universal Serial Bus). 23, 24, 36, 37, 38, 40, 41, 45,
53
WIFI A wireless network or access point allowing computers, smart phones, and
other devices to connect with each other and the Internet. 5, 24, 32, 37, 52,
66, 71, 73, 80, 81, 84
iv
Acronyms
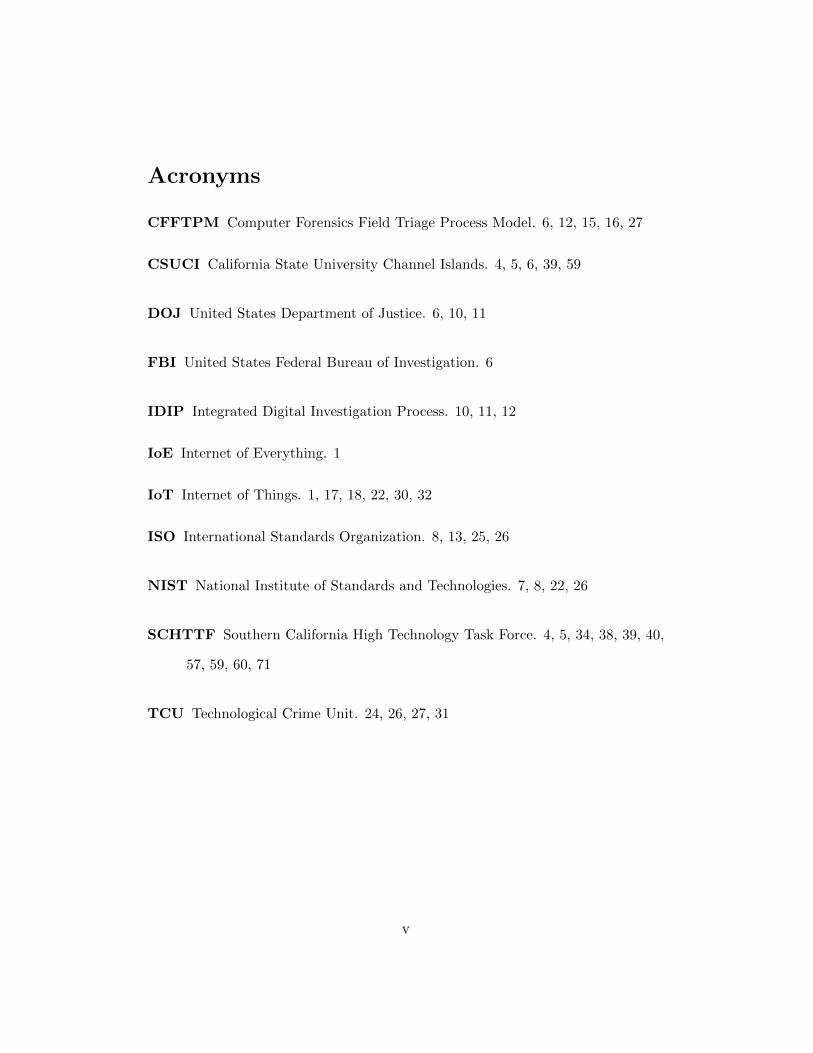
CFFTPM Computer Forensics Field Triage Process Model. 6, 12, 15, 16, 27
CSUCI California State University Channel Islands. 4, 5, 6, 39, 59
DOJ United States Department of Justice. 6, 10, 11
FBI United States Federal Bureau of Investigation. 6
IDIP Integrated Digital Investigation Process. 10, 11, 12
IoE Internet of Everything. 1
IoT Internet of Things. 1, 17, 18, 22, 30, 32
ISO International Standards Organization. 8, 13, 25, 26
NIST National Institute of Standards and Technologies. 7, 8, 22, 26
SCHTTF Southern California High Technology Task Force. 4, 5, 34, 38, 39, 40,
57, 59, 60, 71
TCU Technological Crime Unit. 24, 26, 27, 31
v
List of Figures
1 Integrated Digital Investigation Process Model (IDIP) . . . . . . . 11
2 Computer Forensic Field Triage Process Model (CFFTPM) . . . . 16
3 IOT Device Data Growth . . . . . . . . . . . . . . . . . . . . . . . 28
4 Main Page . . . . . . . . . . . . . . . . . . . . . . . . . . . . . . . . 48
5 Results Page . . . . . . . . . . . . . . . . . . . . . . . . . . . . . . 49
6 Default Keywords page . . . . . . . . . . . . . . . . . . . . . . . . . 50
7 General Process Flow . . . . . . . . . . . . . . . . . . . . . . . . . 51
8 Data Saturation vs Collection Latency . . . . . . . . . . . . . . . . 62
9 Collection Time by Drive Format Type . . . . . . . . . . . . . . . 64
10 SEAKER Creation Process . . . . . . . . . . . . . . . . . . . . . . 80
11 iPhone WIFI connection to SEAKER . . . . . . . . . . . . . . . . 84
12 Using a browser to connect to http://seaker01.local . . . . . . 85
13 The results of the search of a particular device . . . . . . . . . . . 86
14 The functionality of SEAKER from the user perspective . . . . . . 88
vi
List of Tables
1 SEAKER set up: Required Hardware and Software . . . . . . . . . 79
2 Collection Algorithm Timing Data . . . . . . . . . . . . . . . . . . 92
3 Data Saturation vs Collection Timing Data . . . . . . . . . . . . . 93
4 Collection Time by Drive Type Data . . . . . . . . . . . . . . . . . 94
vii

1 Introduction and Literature Review
1.1 Introduction
Law enforcement investigations involve many aspects of criminality and need care-
fully thought-out procedures and practices. These procedures and practices are
essential to finding the evidentiary information necessary to determine criminal
liability. They are also in place to ensure that the evidence collected is not tainted
and is sound, viable, admissible court evidence. Establishing and retaining the
forensic integrity of the evidence is a required and crucial part of the investigator’s
task.
Performing investigations is also a noteworthy endeavor. There are many steps
involved that require special training to be performed properly. One primary ex-
ample is the chain of custody. This refers to the step-by-step documentation record
regarding evidence that includes details such as who had custody of the evidence,
when they had custody, who it was transferred to, who analyzed it, etc. An-
other is the exacting science of collecting, labeling, itemizing, and acquiring of
evidence. For instance, collecting physical evidence requires the use of gloves, ev-
idence bags, fingerprint-dusting equipment, etc., to prevent cross-contamination,
fingerprint smudging, DNA evidence mishandling, and a multitude of other poten-
tial evidence tainting. Without the proper adherence to guidelines, even conclusive
evidence may not be admissible during a trial.
Digital evidence is very essential to many investigations and cases in the mod-
1
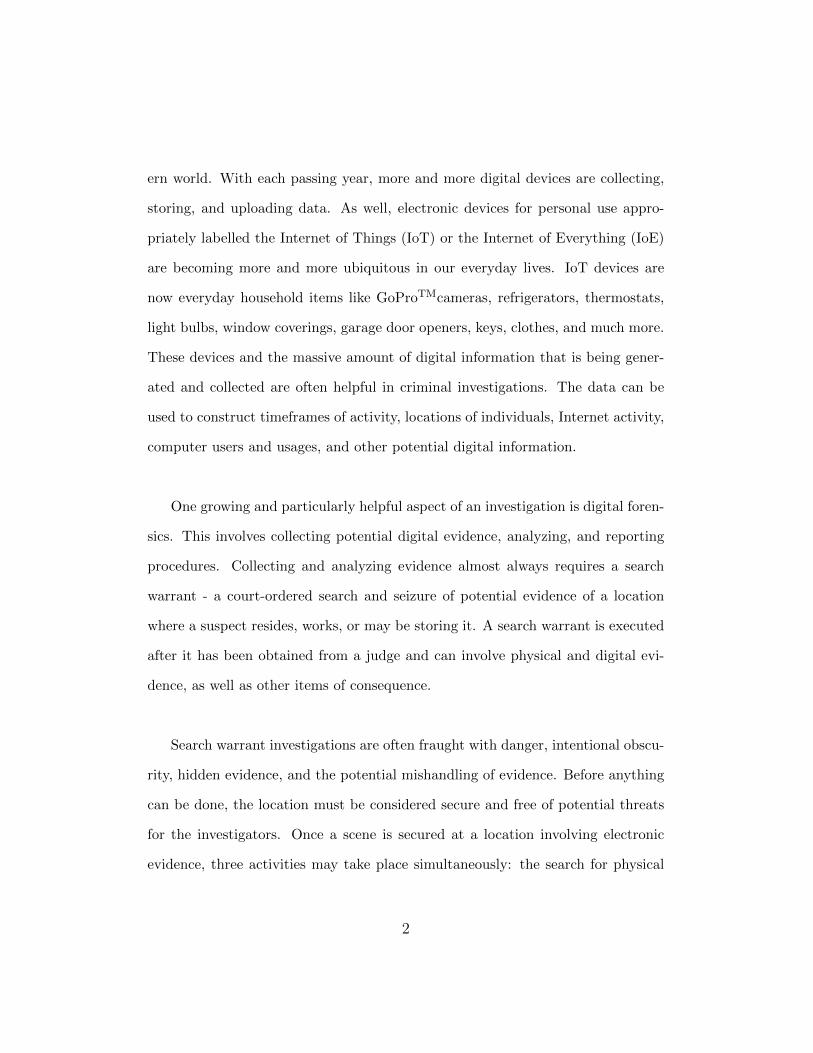
ern world. With each passing year, more and more digital devices are collecting,
storing, and uploading data. As well, electronic devices for personal use appro-
priately labelled the Internet of Things (IoT) or the Internet of Everything (IoE)
are becoming more and more ubiquitous in our everyday lives. IoT devices are
now everyday household items like GoProTMcameras, refrigerators, thermostats,
light bulbs, window coverings, garage door openers, keys, clothes, and much more.
These devices and the massive amount of digital information that is being gener-
ated and collected are often helpful in criminal investigations. The data can be
used to construct timeframes of activity, locations of individuals, Internet activity,
computer users and usages, and other potential digital information.
One growing and particularly helpful aspect of an investigation is digital foren-
sics. This involves collecting potential digital evidence, analyzing, and reporting
procedures. Collecting and analyzing evidence almost always requires a search
warrant - a court-ordered search and seizure of potential evidence of a location
where a suspect resides, works, or may be storing it. A search warrant is executed
after it has been obtained from a judge and can involve physical and digital evi-
dence, as well as other items of consequence.
Search warrant investigations are often fraught with danger, intentional obscu-
rity, hidden evidence, and the potential mishandling of evidence. Before anything
can be done, the location must be considered secure and free of potential threats
for the investigators. Once a scene is secured at a location involving electronic
evidence, three activities may take place simultaneously: the search for physical
2
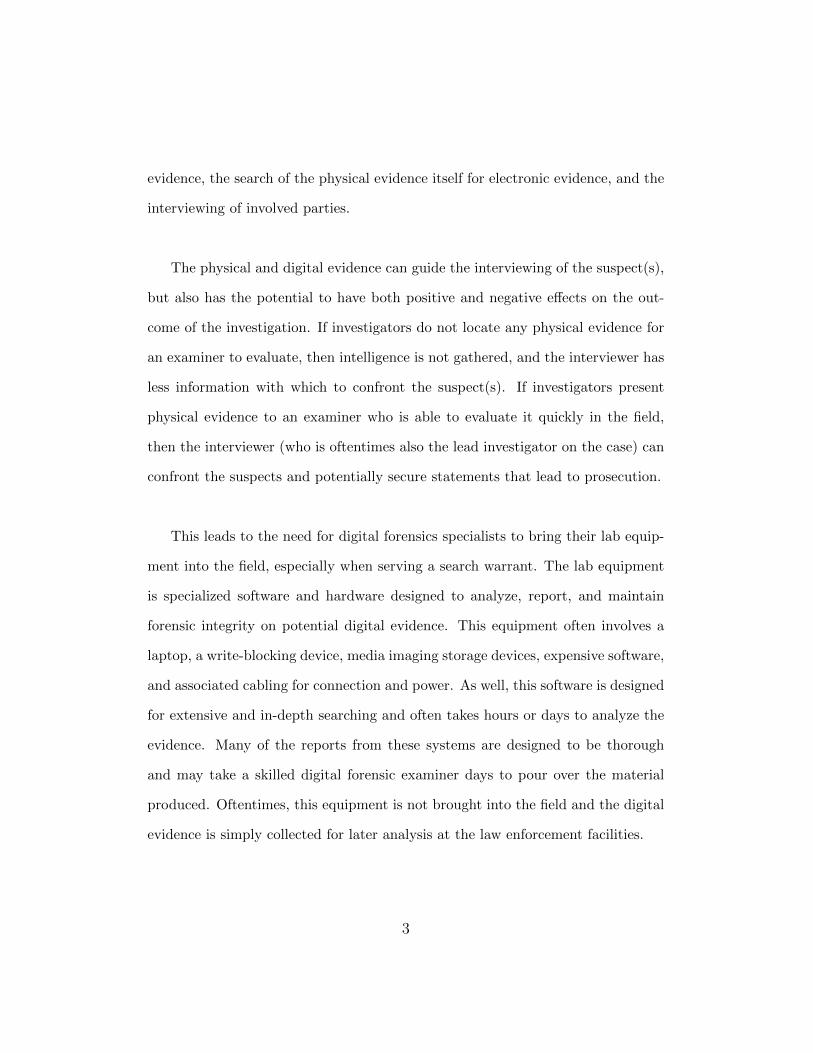
evidence, the search of the physical evidence itself for electronic evidence, and the
interviewing of involved parties.
The physical and digital evidence can guide the interviewing of the suspect(s),
but also has the potential to have both positive and negative effects on the out-
come of the investigation. If investigators do not locate any physical evidence for
an examiner to evaluate, then intelligence is not gathered, and the interviewer has
less information with which to confront the suspect(s). If investigators present
physical evidence to an examiner who is able to evaluate it quickly in the field,
then the interviewer (who is oftentimes also the lead investigator on the case) can
confront the suspects and potentially secure statements that lead to prosecution.
This leads to the need for digital forensics specialists to bring their lab equip-
ment into the field, especially when serving a search warrant. The lab equipment
is specialized software and hardware designed to analyze, report, and maintain
forensic integrity on potential digital evidence. This equipment often involves a
laptop, a write-blocking device, media imaging storage devices, expensive software,
and associated cabling for connection and power. As well, this software is designed
for extensive and in-depth searching and often takes hours or days to analyze the
evidence. Many of the reports from these systems are designed to be thorough
and may take a skilled digital forensic examiner days to pour over the material
produced. Oftentimes, this equipment is not brought into the field and the digital
evidence is simply collected for later analysis at the law enforcement facilities.
3
A more field-friendly digital forensic triage solution like SEAKER will assist
in the initial investigation tasks in multiple ways:
1. It enforces a structured procedure and approach that is user-friendly to non-
digital forensic trained investigators with the goal of simple instructions for
use and very simple evidence location.
2. It enables investigators, especially interrogators, a very fast digital-evidence
overview into the types of files and information being accessed and stored
on the computer equipment at the site of the search warrant.
3. It limits the number of devices and therefore the amount of data required
for the in-depth analysis phase at the lab.
4. It minimizes the impact and inconvenience to other parties at the site of
the search warrant. The devices that are searched and found to have no
evidentiary value can be deemed inconsequential to the case and not be
taken into custody.
5. It may be used to provide initial, albeit simplified, analysis results on po-
tential digital evidence received by digital forensic labs.
This paper presents a portable, inexpensive, efficient device, named SEAKER,
that is intended to overcome the need for a full digital forensic lab equipment suite
to be brought into the field. The SEAKER device was conceived and produced
at the California State University Channel Islands (CSUCI) campus in a Masters
level Cyber Security class (COMP 524, Summer 2017) in direct collaboration with
the Southern California High Technology Task Force (SCHTTF) division of the
4

Ventura County District Attorney’s Office.
1.1.1 Author’s Contributions
The author’s direct contributions to the SEAKER device project:
1. Developed the bash script to turn a standard Raspberry Pi into a SEAKER
device by programmatically installing Raspbian software packages, setting
up WIFI as a wireless access point, adding a web server, and preparing the
running environment with the proper file set
2. Wrote a custom executable using the C programming language to increase
the SEAKER device’s searching efficiency in lieu of slower, native operating
system solutions for finding content on digital media
3. Co-presented and demonstrated the initial SEAKER prototype for the Sum-
mer 2017 Masters level CSUCI Security class project to SCHTTF, CSUCI
department heads, and local community leaders
4. Presented the SEAKER device as a thesis project at the April 2018 CSUCI
Cyber Security Event to CSUCI President Erika Beck, California State As-
sembly Member Jacqui Irwin, Ventura County Sheriff’s Department, and
other local community leaders
5. Co-authored a conference paper [8] on the SEAKER project and the tech-
nology behind it
6. Updated and enhanced the SEAKER device functionality to support the lat-
est Raspbian operating system (Stretch Lite, April 2018 release), including
5
enabling ethernet passthrough to the wireless access point
7. Co-authored a United States Department of Justice (DOJ) grant proposal
[6], providing Logic Models for (SEAKER) and Voyager (another digital
forensic tool project at CSUCI)
1.2 Literature Review
1.2.1 History of Digital Evidence
The digital forensics field began in the mid 1980s with an understanding from sev-
eral law enforcement agencies that computers would play a critical role in future
criminal investigations. In 1993, the United States Federal Bureau of Investigation
(FBI) hosted an international conference on computer evidence in Virginia. This
was the first major conference on the subject and had attendees from 26 different
countries. Much of the original computer forensics at that time related to recov-
ering information from local computers.
Among the early pioneers in the digital forensics field, there was a common
understanding that a system of processes and procedures were needed to locate,
record, analyze and report information. This process would have to be similar to
how non-digital physical evidence was handled, but also include other computer
specific preservation methods to ensure the integrity of evidence found. Those pro-
cesses and procedures have increased in complexity over time and have suffered
from the lack of unanimous adoption to a single standard.
6
In 2006, Rogers et al proposed a standardization model for a portion of the en-
tire process called triage for digital forensic examiners to follow: Computer Foren-
sics Field Triage Process Model (CFFTPM) [15]. The authors of the CFFTPM
noted the important legal and technical considerations prior to implementing
CFFTPM on a particular investigation. The legal considerations include issues
related to search warrant scope and its limitations, U.S. Constitutional 4th Amend-
ment rights, etc. The technical considerations include type of case, criticality of
timeliness, skillset of the on-site digital forensic examiner, skillset of the suspect,
having proper lab equipment on-site, scene control, etc.
Even as late as 2013, Shaw et al points out that neither digital forensic triage
examination nor digital forensic full examination are well defined [16]. Digital
forensic triage may mean something completely different to two digital forensic
examiners. As well, full digital forensic examination has no robust standard to
follow, although there has been no shortage of attempts.
National Institute of Standards and Technologies (NIST) is a technological,
non-regulatory federal agency under the U.S. Department of Commerce (DOC).
The NIST process model (labeled NIST SP 800-101) lays out the digital evidence
procedures in four steps [1]:
1. Preservation – searching, recognition, documentation, and collection of dig-
ital evidence
2. Acquisition – creating a copy of the digital media and storing the original
device
7
3. Examination and Analysis – process of uncovering digital evidence and an-
alyzing the results (typically done in a digital forensics lab environment)
4. Reporting – detailed summary of all steps taken and analysis conclusions
(includes information about tools and techniques utilized in the entire pro-
cess)
These four steps provide the forensic steps for the digital evidence process
model as a suggested way to evaluate mobile device information.
The NIST guidelines [2] documenting a digital forensics process were published
in 2014 and included several different types of digital evidence such as mobile
phones and computers. However, NIST focuses on the analysis portion of the sci-
ence, but leaves the collection and reporting aspects unexplored.
The International Standards Organization (ISO) published a set of guidelines
[10] in 2012 that primarily focused on collection and handling aspects of digital
evidence.
Ajijola et al provided a thorough review in 2014 [1] of the NIST SP 800-101
Revision 1 guidelines titled Guidelines on Mobile Devices Forensics and ISO/IEC
27037 titled Guidelines for Identification, Collection, Acquisition, and Preservation
of Digital Evidence. Their recommendation was a combined approach that incor-
porates both guidelines for maximum effect. Even with the recommendation of a
combined guidelines approach, the solution was still not fully formed.
8
Recently some specialized training is available to those investigators who want
to become digital forensic investigators. The typical learning takes place over a full
year of classes and hands-on work through one of several federal or law enforce-
ment agencies. These lead to certifications like Digital Evidence First Responder
(DEFR), Digital Evidence Specialist (DES), or Digital Forensic Investigator (DFI).
This training is not standardized across the world, but serves as a good standard
within the community of those it certifies.
1.2.2 Process and Procedure Standardization
Over the years, several different approaches have been proposed as universal pro-
cesses and procedures to gathering, reviewing, and presenting digital evidence.
These approaches range in number of steps, process coverage, and overall method-
ology, but all have the common goal of finding usable digital evidence for preventing
future harm to society and preserving the potential digital evidence’s integrity for
means of presentation in court cases.
In the early years (circa 1990), some research facilities arose to help create and
define the processes and procedures necessary. Among these were the Computer
Analysis and Response Team (CART), the Scientific Working Group on Digital Ev-
idence (SWGDE), the Technical Working Group on Digital Evidence (TWGDE),
and the National Institute of Justice (NIJ). Since their respective inceptions, they
have all strived and contributed to standardization on approaches and methods
for the handling and processing of all digital evidence [13].
9
In addition, the DOJ first published Electronic Crime Scene Investigation: A
Guide to First Responders [3] in 2001 (with several revisions since) that outlines
the necessary four steps for properly investigating digital evidence:
1. Collection – which involves physically searching for digital evidence, deci-
phering what should be collected, acquiring the media devices, and chain of
custody documentation.
2. Examination – which includes searching the digital media and attempting
to reveal the evidence, especially when it is hidden or obscured.
3. Analysis – intending to review the evidence for important legal infringe-
ments.
4. Reporting – for documenting the process used and evidence uncovered in the
investigation.
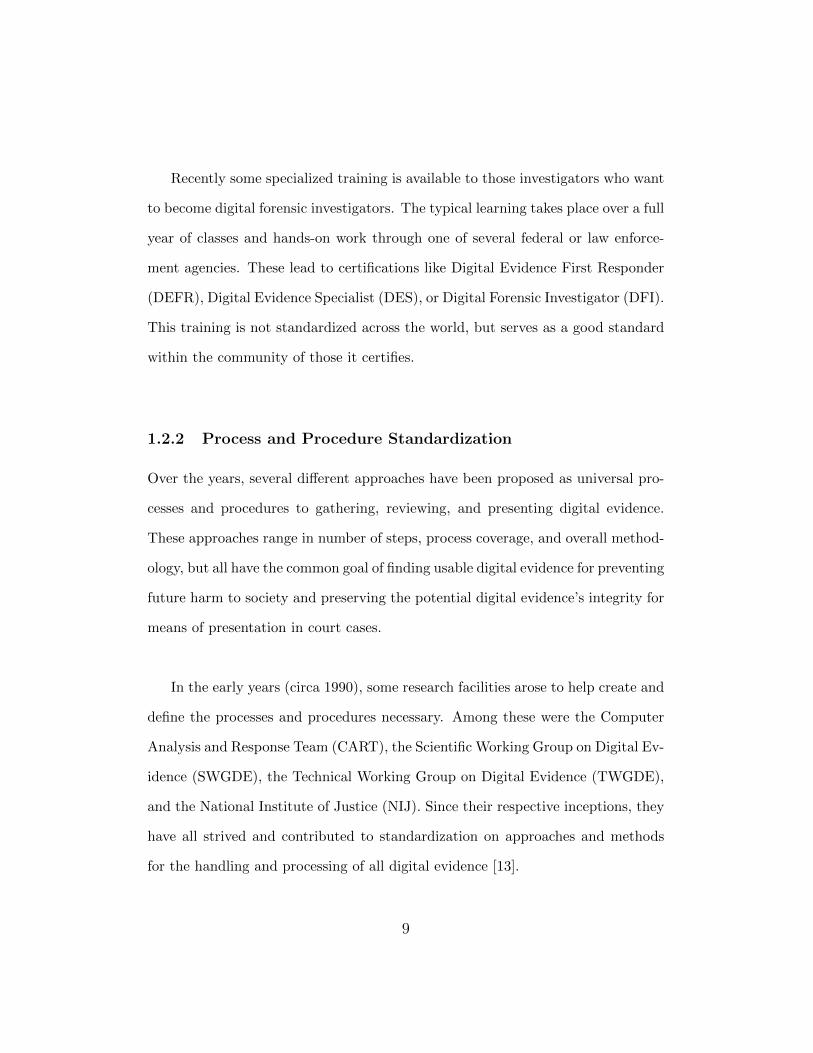
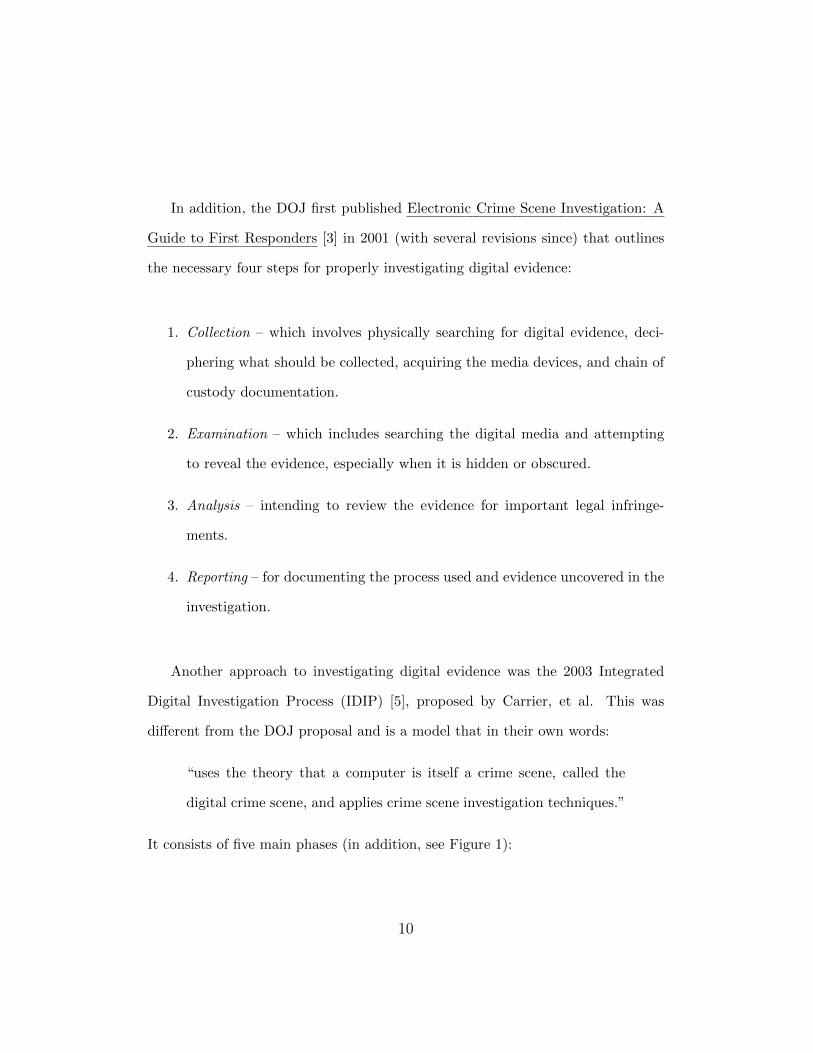
Another approach to investigating digital evidence was the 2003 Integrated
Digital Investigation Process (IDIP) [5], proposed by Carrier, et al. This was
different from the DOJ proposal and is a model that in their own words:
“uses the theory that a computer is itself a crime scene, called the
digital crime scene, and applies crime scene investigation techniques.”
It consists of five main phases (in addition, see Figure 1):
10
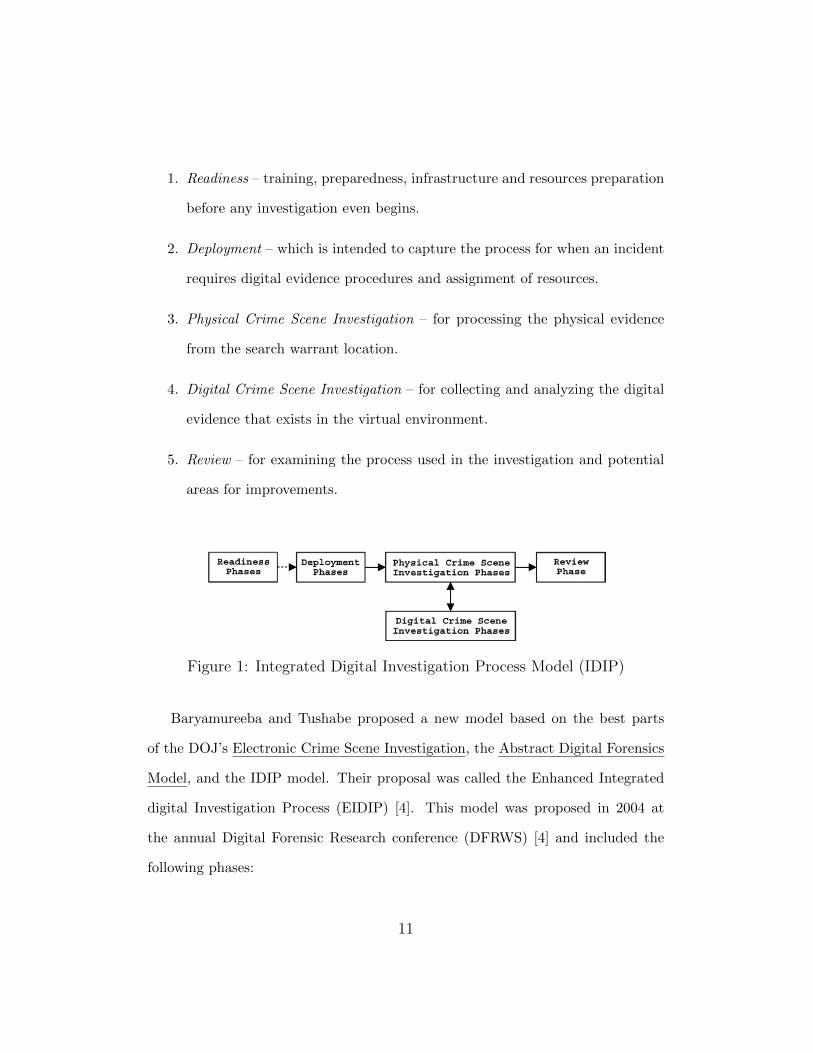
1. Readiness – training, preparedness, infrastructure and resources preparation
before any investigation even begins.
2. Deployment – which is intended to capture the process for when an incident
requires digital evidence procedures and assignment of resources.
3. Physical Crime Scene Investigation – for processing the physical evidence
from the search warrant location.
4. Digital Crime Scene Investigation – for collecting and analyzing the digital
evidence that exists in the virtual environment.
5. Review – for examining the process used in the investigation and potential
areas for improvements.
Figure 1: Integrated Digital Investigation Process Model (IDIP)
Baryamureeba and Tushabe proposed a new model based on the best parts
of the DOJ’s Electronic Crime Scene Investigation, the Abstract Digital Forensics
Model, and the IDIP model. Their proposal was called the Enhanced Integrated
digital Investigation Process (EIDIP) [4]. This model was proposed in 2004 at
the annual Digital Forensic Research conference (DFRWS) [4] and included the
following phases:
11
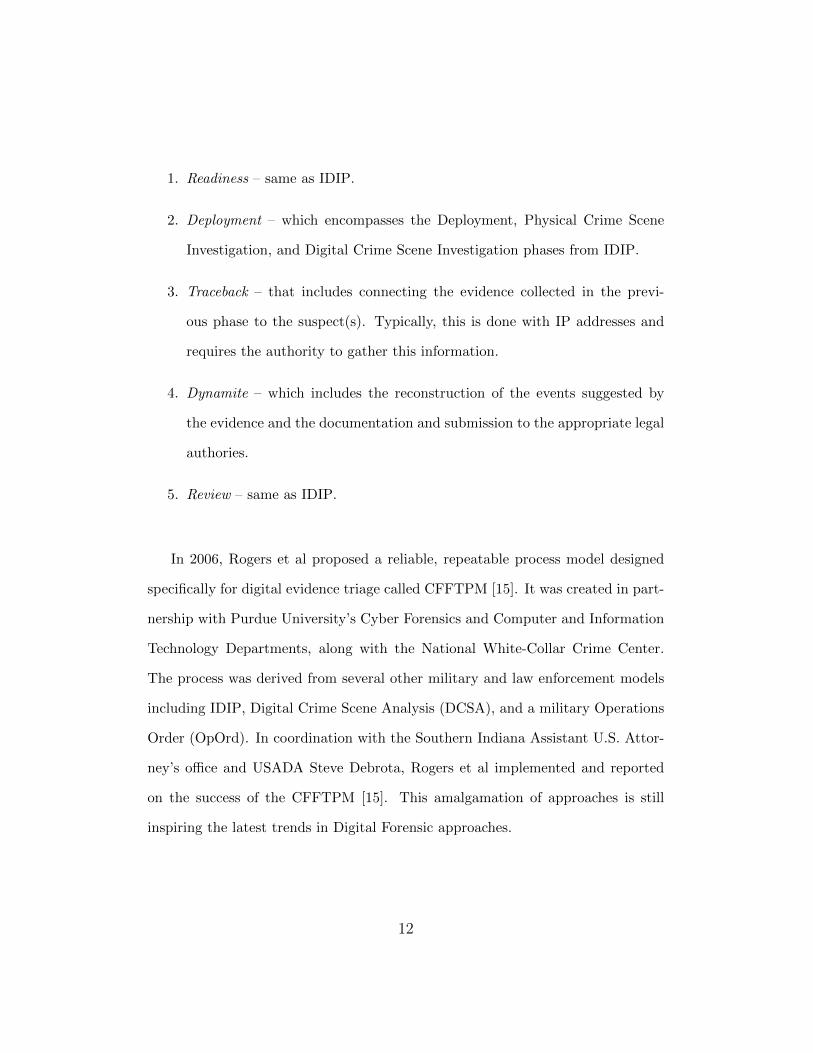
1. Readiness – same as IDIP.
2. Deployment – which encompasses the Deployment, Physical Crime Scene
Investigation, and Digital Crime Scene Investigation phases from IDIP.
3. Traceback – that includes connecting the evidence collected in the previ-
ous phase to the suspect(s). Typically, this is done with IP addresses and
requires the authority to gather this information.
4. Dynamite – which includes the reconstruction of the events suggested by
the evidence and the documentation and submission to the appropriate legal
authories.
5. Review – same as IDIP.
In 2006, Rogers et al proposed a reliable, repeatable process model designed
specifically for digital evidence triage called CFFTPM [15]. It was created in part-
nership with Purdue University’s Cyber Forensics and Computer and Information
Technology Departments, along with the National White-Collar Crime Center.
The process was derived from several other military and law enforcement models
including IDIP, Digital Crime Scene Analysis (DCSA), and a military Operations
Order (OpOrd). In coordination with the Southern Indiana Assistant U.S. Attor-
ney’s office and USADA Steve Debrota, Rogers et al implemented and reported
on the success of the CFFTPM [15]. This amalgamation of approaches is still
inspiring the latest trends in Digital Forensic approaches.
12
Another researcher, Shaw et al, analyzed the Association of Chief Police Offi-
cers (ACPO) and focused on the second step (Capture) as the primary guideline
for evidential integrity [16]. They strongly suggest compliance with digital foren-
sics best practices, like the ones provided in the ACPO. Their final approach and
recommendation was to combine Linux utilities with a simplistic interface to stan-
dardize the output and enable investigators who may not have full digital forensic
backgrounds to perform triage on potential digital evidence.
The ACPO, a private company that helped establish and develop policing prac-
tices in England, Wales, and Northern Ireland for many years, put together a Good
Practice Guide for Digital Evidence [18] in 2012 that outlines some recommended
procedures for dealing with digital evidence. As with other methodologies, this
guide explains utilizing a four-step approach: Plan, Capture, Analyze, Present.
The ISO/IEC 27037 guidelines (completed in 2012) provide an attempt at an
internationally recognized approach, with the goal of making it easier to compare,
combine, and contrast results for out-of-jurisdiction cases and for data scientists’
research [10]. It provides a common reference line for digital forensics [1]. But it is
not meant to replace laws or regulations. The main purpose is to provide practical
assistance for investigations involving potential digital evidence, while preventing
digital evidence corruption. This process facilitates the usability of evidence by
other jurisdictions. This guideline provided four steps for handling potential dig-
ital evidence: Identification, Collection, Acquisition, and Preservation. However,
this is incomplete, as it only addresses gathering, not actually evaluating or pro-
13
viding results to law enforcement investigators.
All of these different guidelines and approaches are intended to help find and
gather digital evidence. They are also intended to maintain the forensic integrity
of the media devices. Unfortunately, there is not a universally agreed upon ap-
proach. Some organizations combine these approaches into a system of processes
and procedures intended for use in their own facilities. Many organizations have
home-grown solutions passed down from senior members of the digital forensics
team to the newer team members. Not having a universally recognized and ac-
cepted standard leads to complications and difficulties when digital evidence needs
to be shared across other jurisdictions and boundaries [1].
The SEAKER device could be utilized to standardize an approach to the triage
phase of digital media device investigation. It is also easily altered to conform to
an existing reporting standard, if circumstances warrant it.
1.2.3 Reactive Digital Forensic Investigation Processes
Reactive digital forensic investigation processes are utilized after an offense has
been committed to help identify the charges and suspects. This is the most com-
mon process for digital forensics.
The SEAKER digital evidence triage tool is designed to help the reactive pro-
cess. It is based on the reactive digital forensic investigation process with the goal
14
of reducing the digital forensic lab backlogs across the world in two ways. The first
way is to reduce the amount of digital evidence acquired for the digital forensics
lab. This is done by enabling efficient and effective on-site triage to occur by com-
bining digital evidence collection and analysis into a single step. The SEAKER
device enables an initial collection of information and subsequent searches by any
number of local, on-scene investigators. These investigators do not need extensive
training in digital forensics to utilize it.
The second way SEAKER will reduce digital forensics backlogs is by enabling
a faster, more streamlined approach to initial potential evidence gathering and
reporting. This approach utilizes the SEAKER digital evidence triage tool to
perform an initial acquisition and analysis on every existing case to provide a
“first-look” at the information. Within a few minutes of plugging in digital evi-
dence media, SEAKER will enable digital forensic investigators a quick review of
materials. The process will help with prioritization of evidence, a basic analysis
and potentially initial evidence in the form of a report that can be provided to
investigators and prosecutors.
1.2.4 Digital Evidence Triage
Rogers et al (2006) seems to be among the first researchers to formally propose
a triage phase in digital forensic investigations [15]. The process (CFFTPM) is
broken up into phases (see Figure 2) and specifically focused on the Microsoft
WindowsTMplatform, as it was the prevailing home computer operating system
15
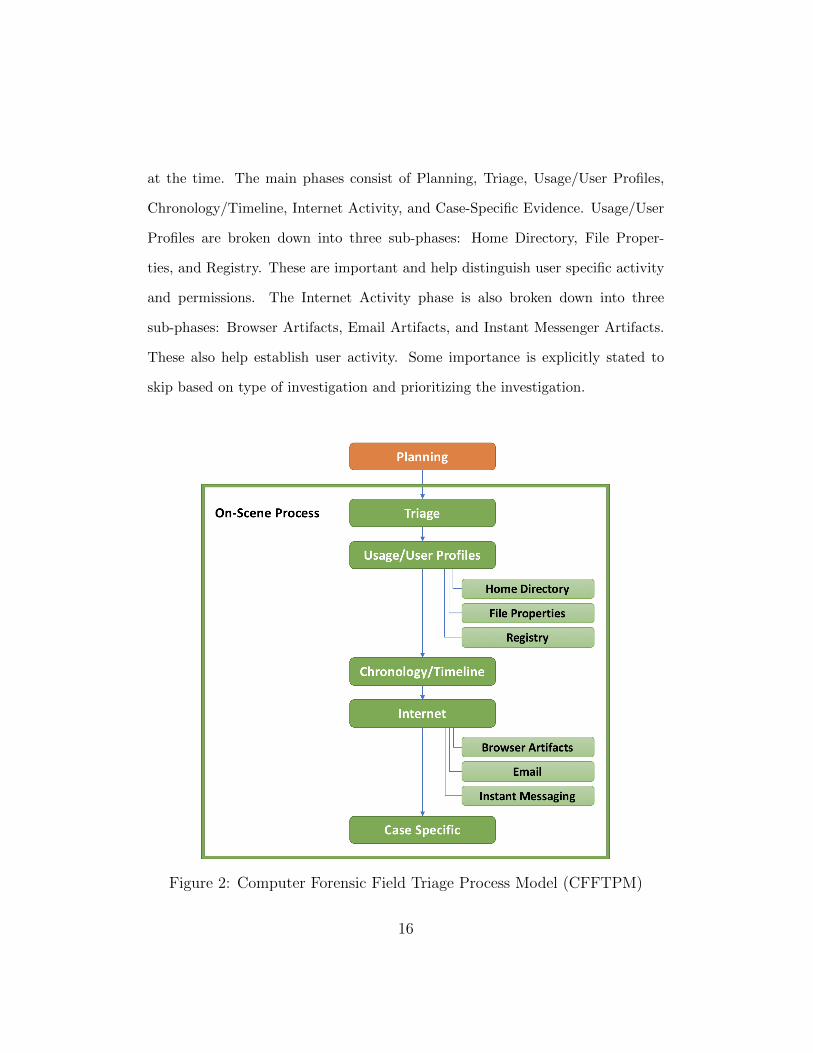
at the time. The main phases consist of Planning, Triage, Usage/User Profiles,
Chronology/Timeline, Internet Activity, and Case-Specific Evidence. Usage/User
Profiles are broken down into three sub-phases: Home Directory, File Proper-
ties, and Registry. These are important and help distinguish user specific activity
and permissions. The Internet Activity phase is also broken down into three
sub-phases: Browser Artifacts, Email Artifacts, and Instant Messenger Artifacts.
These also help establish user activity. Some importance is explicitly stated to
skip based on type of investigation and prioritizing the investigation.
Figure 2: Computer Forensic Field Triage Process Model (CFFTPM)
16
The process of triaging digital evidence is an especially effective method when
implemented on-scene at search warrant execution time. The CFFTPM proposed
by Rogers et al was created to enhance the investigators ability to obtain useful
information at execution time of a warrant at the suspect’s dwelling or place of
work [15]. The process is designed to be used in the first few hours of the investi-
gation, especially during the first suspect interview and search execution phase of
the investigation. It is known that suspects are more likely to divulge more infor-
mation and be more cooperative in that environment (Yeschke 2003 [19]). As well,
location of and presentation with suspect “triggers” from the potential evidence
increase the suspect’s willingness to talk and cooperate while on site [15].
The research done by Hitchcock et al also concludes that on-scene triage is
useful [9]. They sought to expedite the process of sending digital evidence for
analysis and results. One of their goals is to enable more field triage of digital
evidence to reduce the amount collected, and act specifically, on pertinent digital
information. They recommended that some front-line crime scene investigators
(non-forensic analysts) be trained in the implementation of digital evidence triage
and evaluation. These trained individuals would be DFT experts and have the
ability perform field-level digital evidence triage. This triage would specifically
weed out the benign from the consequential digital evidence with high certainty,
while also protecting the digital evidence from spoilage and preserving evidentiary
integrity.
Utilizing triage helps reduce the potential backlog and associated delays in
17

digital evidence gathering. With the proliferation of IoT devices and cloud stor-
age, the field of digital forensics continues to expand. These areas pose a great
challenge, but also new opportunities for investigative research and potential un-
derstanding of cases. Lillis et al researched cloud storage and found some areas
of opportunity to expand the digital forensics landscape, for instance parallel pro-
cessing, distributed computing, GPU/FPGA utilization, and others [12]. These
areas for increasing the efficiency of digital forensics can be explored further due
to the substantially reduced I/O limitations in cloud storage.
Another potential augmentation to the digital evidence triage method was
proposed by Shaw et al and seeks to standardize on an approach they dubbed en-
hanced previewing [16]. Enhanced previewing seeks to solve some of the problems
associated with typical triage approaches, but may fall short due to the extended
time necessary to complete the processing involved [11].
Shaw’s et al enhanced previewing starts with an open source, CD-bootable
image of GNU/Linux and enhances its features to include boot-time application
launching, and a simple to use interface with minimal ability to deviate from task
[16]. This bootable CD is intended to be placed into evidentiary computer sys-
tems and booted using a series of BIOS modifications or boot-time interruptions.
This mechanism to boot the system off of a bootable CD is difficult, and where
the typical problems with untrained users of the enhanced previewing will happen.
This process of enhanced previewing does not take into account any IoT de-
18
vices or cloud-based storage. It also assumes that there is a DVD drive or USB
port available and working, as well as the ability to access the computer’s BIOS
settings, as those connections are not typically setup to boot by default.
There are also other existing triage software such as EnCase, Blacklight, Foren-
sic Explorer and Internet Evidence Finder. These also require use of the existing
computers at the scene and are not among the explored topics here.
As is the case in other research, Shaw et al extolls the need to reduce digital
forensic evidence analysis backlogs, especially with the evolution of big data and
the proliferation of digital devices [16].
The enhanced previewing concept has valuable merit, in that the collection
mechanisms are thorough. Using the GNU/Linux based system and having writ-
ten code for it, Shaw et al utilized some well-thought-out approaches [16]. First,
all hard drives from the evidentiary system are mounted into the GNU/Linux
filesystem as read-only, thereby eliminating the need for write-blockers. As well,
the entire hard drive is evaluated, including the file system, all partitions, unallo-
cated space, deleted files, and compressed files. In addition, other mechanisms are
employed that continue to enhance the previewing are employed.
Shaw’s et al proposal for a practical and robust enhanced previewing method-
ology aims to stem the concerns of a typical triage process. Risks still exist, for in-
stance overlooking digital evidence, but it is argued that those risks are outweighed
by the risks of a lengthy process due to large backlogs and the associated delays in
19
evaluating that evidence. Another concern exists that inadequately trained people
will be charged with performing on-scene digital evidence triage and mishandling
or incorrectly evaluating results will cause evidence spoilage. Other concerns are
the potential high cost of software and training [16].
1.2.5 Acquisition Methodology
Acquisition has multiple definitions across the digital forensic universe. Some de-
fine this as the process of gathering the digital devices, logging them using the
chain of custody paperwork, and removing them from the location denoted in the
search warrant. Others define this as the collection of potential evidence from
the digital devices. However, in this case it is meant to imply the entire set of
processes and procedures. These include training the digital forensic examiners
and SEAKER users, collecting the media that potential digital evidence may be
stored on, and gathering of potential evidence from each digital device.
The SEAKER tool is designed specifically for the triage phase of digital foren-
sic investigations. As a general approach, this research will split the act of dealing
with digital evidence into two separate methodologies: acquisition and analysis
(discussed in the next section). These are the main foci since the SEAKER device
is designed to do both in a very timely fashion, with comprehensive searching re-
sults.
When a search warrant is being executed, the SEAKER device is intended to
20
be used to help manage the triage process of the potential digital evidence. This
helps on-scene investigators determine priority, potential to contain crime-related
evidence, whether or not to seize the device into custody, and documentation of
the digital media [9].
The set of processes and procedures for training and usage of the SEAKER
device is well documented in the appendix, but could also be supplemented by
more specific guidelines that combine the digital forensic lab’s procedures with the
usage documents.
The collection phase of acquisition specifically highlighted here is the gather-
ing of physical digital media information and the capturing of potential digital
evidence content in the triage environment. The setup and training materials for
creating and using the SEAKER device are referenced in the appendix.
1.2.6 Analysis Methodology
Comprehensive forensic analysis of digital media is an arduous and time-consuming
task. A full analysis could take many hours or even days and is not the first pri-
ority when serving a search warrant. The SEAKER device is intended to reduce
the time this takes down to minutes, especially during the triage stage of a search
warrant execution.
The analysis methodology is considered the second phase in the SEAKER ap-
21
proach and can consist of both the triage analysis stage and the full analysis stage.
Specifically, this research and the SEAKER device focus on the triage stage of
Analysis. This stage can be applied in the field or at the digital forensics lab,
while the full analysis is unlikely to be accomplished in the field.
Digital evidence triage analysis is a very useful part of an investigation and
can be implemented using the SEAKER device. The triage analysis stage is con-
sidered in this research to consist of an interactive web page that detectives and
investigators can use to lookup search terms from the digital evidence collected
from suspect devices plugged into the SEAKER device. It also consists of the re-
ports that are generated and stored on the SEAKER device. The reports consist
mainly of the metadata about the digital media and the collection statistics but
does not include specific digital media content.
Previous versions of analysis included specific types of operating systems.
Rogers’ et al research in 2006 covered the primary machine type at the time: the
standard Windows machine [15]. Unfortunately, focusing on a single operating
system leads to an outdated model over time, since the processes and procedures
become obsolete as new technology arises. Along with the proliferation of IoT
devices, new technologies also have emerged as more mainstream that need to be
incorporated into a more generalized approach. More operating systems are being
utilized on a regular basis, like Linux, UNIX versions, and Apple OS. In fact, even
our SEAKER device is an IoT device based on a variant of Debian.
22
Other versions of analysis research deal directly with specific types of devices.
Ajijola et al reviewed the NIST guidelines that provide an in-depth look into mo-
bile devices, helping to explain the technology involved and its relationship to the
forensic process [1]. This is useful, but not a complete analysis guideline for law
enforcement investigators.
The SEAKER device currently supports multiple operating systems, as well
as multiple device types (provided there is a way to adapt the device to USB). It
achieves the goal of being device and operating system independent in terms of
being able to collect content information from digital media. The only limitation
to the SEAKER device’s ability to read the content is the availability of a device
driver that allows mounting on Raspbian Lite’s operating system.
1.2.7 Combined acquisition and Analysis Methodologies
The SEAKER project is intended to cover the areas of acquisition and analysis
with regards to the triage stage of an investigation. In order to simplify the process
and enable non-digital evidence specialists to utilize the SEAKER device, both the
acquisition and analysis phases are combined.
In addition, the users are well guided along the path of acquisition. Most
of this process is automated for ease of use and successful digital media content
gathering. The acquisition steps involved are:
23

1. Plug in the SEAKER device
2. Wait 20-30 seconds
3. Plug in the potential evidence via USB to the SEAKER device
4. Wait until the light stops flashing
The analysis side of the equation is also simple and well guided. The user
interface is designed to be very easy to use (see the Appendix section for exact
usage details). The steps involved here are:
1. Connect to the SEAKER WIFI Access Point
2. Bring up the webpage: http://seaker01.local
3. Choose which digital media devices to search
4. Search based on default or custom search criteria
5. View results (expand/collapse tree-based format)
The combination of these two phases and the straightforward nature of the
procedures to use the SEAKER device make it an ideal digital forensics triage
device. The ability for non-digital forensic specialists to apply this technology is
crucial to its feasibility. Hitchcock et al proposed and evaluated a “tiered foren-
sic methodology” model that defines a process of digital forensic triage utilizing
non-digital evidence specialists [9]. They would be considered the first tier of
24
investigation and their contributions are considered extremely helpful in the ini-
tial stages of a search warrant. The next tier is when the already-triaged digital
evidence is sent for full evaluation from a fully trained and qualified digital evi-
dence specialist. The potential evidence would be sent to a certified facility that
can perform full digital forensic analysis, called a Technological Crime Unit (TCU).
This tiered approach is based on a Computer Forensic Field Triage Process
Model proposed by Rogers et al [15] and the international standard ISO 27037
(Information Technology - Security Techniques - Guidelines for identification, col-
lection, acquisition, and presentation of digital evidence). The process model
breaks down the six phases of digital evidence categorization, which Hitchcock
et al loosely based their four-phase approach on [9]. The four phases are: plan-
ning, assessment, reporting, and threshold. The ISO 27037 standard specifically
attempts to address the need to minimize the risk of potential digital evidence
being spoiled by mishandling, while also attempting to maximize the evidentiary
value of digital evidence collection.
Utilizing a tiered approach is not without risks. One concern is the acciden-
tal exclusion of an item of digital evidence that is important to the investigation.
Another is the level of computer skills and training of the Digital Field Triage
(DFT) expert. An attempt could be made to mitigate the latter with training
and management process, while providing evidence that the former is a common
misconception in most cases [15].
25
Of course, the simplification of acquisition and analysis for use in a triage
phase is also not a full analysis. Certain factors related to recent advancement in
technologies can cause the SEAKER device to under-inform and potentially miss
critical information. One example of missing potential evidence is when encrypted,
compressed files or folders are located [16]. Others include hidden or encrypted
partitions, password protected files and folders, images and videos obscured by
significantly altering the filenames and extensions, and use of rare, specialized op-
erating systems. However, these issues can all easily be overcome by marking the
digital media as suspect and noting it for review in the second tier at the lab.
This process cannot and does not supersede the ability or need to perform a
full forensic examination at a full-featured digital forensic lab [15] or TCU. This
step is essential and necessary to fully consider all of the digital evidence that can
be obtained by full analysis.
Other research also indicates that combining the best pieces of process models
and reviewing latest digital forensic devices and methods are great ways to main-
tain adherence to good practices [1]. In 2014, Ajijola et al proposed a new process
model that is a hybrid of both NIST recommendations and ISO standards with
the resulting combination being much more effective than either of its individual
parts [1].
In the research for combining the NIST and ISO guidelines, Ajijola et al ex-
plores the commonality, differences, and limitations of each model [1]. Although
26
both models follow the Auditability, Repeatability, Reproducibility, and Justi-
fiability requirements, as well as the Confidentiality, Integrity, and Availability
standards, they individually lack some necessary phases to enable them to be used
separately. The NIST process model lacks the Identification and Collection phases,
while the ISO process model lacks Examination, Analysis, and Reporting aspects
of a full Digital Evidence processing model.
The combination of these two approaches, as suggested by Ajijola et al, pro-
vides a new five step approach: Identification, Collection and Acquisition, Preser-
vation, Examination and Analysis, and Reporting [1]. These steps provide a more
comprehensive approach that law enforcement can use to fulfill its evidentiary du-
ties in an investigation. When both process methods are used, the goals approach
a full set of tasks from initial on-scene evaluation to the end of the in-lab digital
forensics investigation.
The combining of steps, approaches, and methodologies is encouraged. The
combination of acquisition and analysis works well in the SEAKER model because
they are closely related, function well as a pair, and encourage everyone to be
able to use the tool for initial digital media investigation. The SEAKER project
combines the triage acquisition phase proposed here along with the analysis phase,
which is the rest of the CFFTPM on-scene process, into the full functionality of
the device.
27
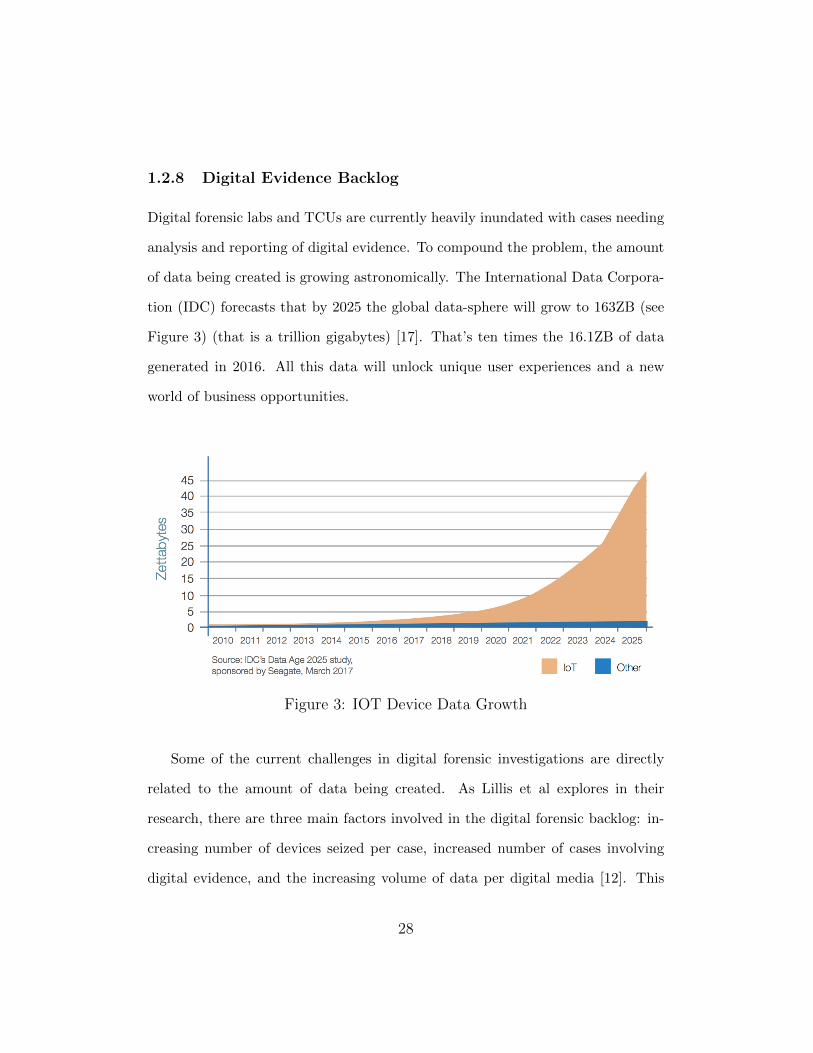
1.2.8 Digital Evidence Backlog
Digital forensic labs and TCUs are currently heavily inundated with cases needing
analysis and reporting of digital evidence. To compound the problem, the amount
of data being created is growing astronomically. The International Data Corpora-
tion (IDC) forecasts that by 2025 the global data-sphere will grow to 163ZB (see
Figure 3) (that is a trillion gigabytes) [17]. That’s ten times the 16.1ZB of data
generated in 2016. All this data will unlock unique user experiences and a new
world of business opportunities.
Figure 3: IOT Device Data Growth
Some of the current challenges in digital forensic investigations are directly
related to the amount of data being created. As Lillis et al explores in their
research, there are three main factors involved in the digital forensic backlog: in-
creasing number of devices seized per case, increased number of cases involving
digital evidence, and the increasing volume of data per digital media [12]. This
28
has led to a growing and already substantial backlog in digital forensic investiga-
tions.
As well, in Hitchcock’s et al research [9], they identified a large and growing
backlog of digital evidence. They indicated that the extra time required due to
the backlog has led to problems in the law enforcement community with regards
to collecting, analyzing, reporting, and prosecuting.
Another effect of this increased delay and backlog is that cases become inactive,
waiting for new leads. A more aggressive approach to solving the backlog could
help prevent dismissals, cold cases, and future societal harm from unprosecuted
criminals.
Raghavan has accumulated a list of 5 major challenges that the digital forensics
community is facing and continue to add to the backlog problem [14]. The first is
the complexity of binary data acquisition, i.e. low level data acquisition through
digital media duplication. This challenge causes the need for sophisticated data
reduction techniques.
Another complexity is the diversity of data and lack of standard examination
techniques. The plethora of operating systems and file formats has been increasing
and is posing a more and more significant challenge over time.
Raghavan explored the second major challenge of consistency and correlation.
29

This is a problem resulting from the current digital media investigation triage
tools not providing the entire picture to investigators. Only part of the whole
picture is provided when triage tools are utilized to find digital evidence. The
digital evidence from the full digital forensic investigation, usually performed in a
lab environment, must be understood in order to provide a more comprehensive
picture of the crime(s).
Another issue that Raghavan proposed is the volume of data to sort through
[14]. The sheer amount of data that exists per user is increasing at an alarming
rate [15], and has led to a very large backlog of digital evidence to investigate.
These delays have even caused some cases to be dismissed. This challenge is ex-
acerbated by the lack of adequate automation for digesting the data.
The last challenge proposed by Raghavanis the timeline synchronization issue
with digital evidence [14]. Since the evidence could be collected in different time
zones, with different timestamp formats, clock skew, etc., lining up the events in
order can be challenging or infeasible.
These are all contributing factors, but some are reduced or eliminated when
the digital evidence triage phase is implemented. Even more issues are taken care
of when digital media devices are prioritized, excluded (due to lack of evidentiary
leads), and the digital forensics backlog can be reduced.
The IoT also poses new challenges and could significantly increase the backlog.
30
IoT devices are estimated to number more than 40 billion by 2020 [7], contribut-
ing to the overwhelming amount of digital data. Since these devices tend to have
more non-persistent memory and less storage, this causes added complexity for
gathering and analysis. This is a good case for expanding the potential uses of the
SEAKER device to include more digital media devices. In addition, a portion of
IoT devices are battery operated and computationally challenged, leading to loss
of data over time, and the necessity of implementing on-scene triage.
The backlog and delays in case reporting are contributing to a common prob-
lem of time sensitivity [9], especially related to being charged with a crime and
the legal process. Some countries have given their citizens a right to a “speedy”
trial. As well, some of the same countries have statutes of limitation (limits on
how long after the crime was committed to resolve the case) for most crimes. Some
administrative situations are also contributors to the backlog problem, for instance
whether the case prioritization is based on chronological filing, crime severity, or
victim needs.
Everything that can be done to reduce or eliminate backlogs at digital forensic
labs or TCUs should be fully utilized. The SEAKER device is a great option for
many law enforcement organizations to begin that process.
31
1.2.9 How SEAKER Can Help
Instead of attempting to put together an alternate operating system that uses the
potentially tainted computer system, the SEAKER device evaluates individual dig-
ital media devices after being removed from the computer system it was originally
from. This eliminates the possibility of self-deleting media, virus infection, and
other potential hardware-related problems that may exist as evidence eliminating
utilities.
The SEAKER device is portable in size, inexpensive to obtain (even in multi-
ples), simple to create and easy to use. It is effective in on-scene triage, efficient in
collecting and searching digital media, and very well suited to handle the required
purview of a digital forensic device.
Digital forensics triage, especially with the SEAKER device, has the oppor-
tunity to expand its influence on the initial investigation phase by expanding to
incorporate digital evidence from IoT and cloud storage devices.
The research of Hitchcock et al [9] should be referenced as a good process
starting point for new digital forensic labs. As well, the SEAKER device is a great
tools to enhance the existing law enforcement arsenal of digital forensic tools.
The SEAKER portable triage device can help by evaluating crucial aspects of
the file system and prevent the on-site investigators from skipping or de-prioritizing
critical potential evidence [15]. This is done by collecting all of the filenames and
32
locations of the entire media device and preparing the SEAKER search mechanism.
The search mechanism is accessed via WIFI from investigator phones, tablets, or
laptops. Once connected to the SEAKER’s WIFI access point, the main web-
page allows the media devices that have been attached to be selected and shows
an editable, default list of keywords to search for. Once Search is selected, the
SEAKER device finds all matching keywords from the filename and location list
and returns any results found. The results are well formatted for browsing in an
expandable tree-sectioned web page.
The SEAKER portable triage device can help eliminate some of the existing
and potential future problems that many jurisdictions face. With shrinking bud-
gets, the lack of digital forensics specialists, coupled with the lack of technical
prowess of the on-site investigators and proper on-scene lab equipment [15], this
new technology can easily and immediately benefit the law enforcement commu-
nity.
2 Background
In a laboratory environment, digital forensics investigators have the ability to dis-
cover a tremendous amount of material that is potential evidence. This includes
anything digitally stored on the evidentiary media from explicitly illegal files, to
IP address connections, to a digital chronology of events [14] [15]. The software
and hardware necessary to perform the in-depth, full evaluation of the media are
specialized for digital forensics work, but typically are costly, don’t travel well, and
33
can take many hours for results from a single digital media device.
In the field environment, digital forensics investigators are likely to not have
the time, equipment, or proper environment to obtain evidence from the digital
devices found during the execution of a search warrant. In some cases, due to
various reasons, digital forensics investigators are not able to attend and therefore
all of the digital media is taken into custody for analysis at the digital forensics
lab. When they are able to attend, they typically bring a subset of their lab en-
vironment with them to start deciphering the digital information and attempt to
perform a triage analysis.
In a coordinated effort with the supervising investigator at SCHTTF and his
team, this research is an attempt to help solve some of the field environment
limitations of digital forensics investigators.
2.1 Legal Details
In order for digital forensic investigators to obtain the data from a digital device, a
search warrant for that device must usually be obtained. Other means for proper
search are court order, as a condition of probation or parole, or direct consent
from the owner. As well, law enforcement must usually obtain a search warrant to
acquire the device for searching in the first place. Law enforcement must provide
probable cause that a crime was committed and that items connected to that crime
are likely to be found in the place specified by the warrant. A judge will review
the matter and if they are in agreement, will typically authorize law enforcement
34
to search a particular location for specific items which are declared in the search
warrant.
After a digital device has been acquired by digital forensic investigators, they
must take special care not to alter the device’s information in any way. This re-
quirement figuratively mimics the care a physical forensic investigator must take to
preserve physical evidence. Special processes must be followed to ensure that the
potential digital evidence is not altered and, in fact, must be able to be proven if
the matter ends up in a trial. This is critical to ensure that the evidence obtained
from the device is admissible in court.
One device to aid in the proper handling of digital evidence is called a write-
blocker. Digital forensic investigators use this device as an intermediary between
the devices and the computer systems they plug the devices into for investigation.
The typical first step when a device is acquired by a digital forensic lab is for the
device to imaged (or copied bit by bit) so that the image can be used for further
evidence searching. This provides an extra level of abstraction, so that the actual
device is kept in pristine digital condition.
Write-blocking has been implemented in digital forensics labs with an in-line
piece of hardware. Companies like Guidance Software and others have created
write-blocking devices that are added to the list of hardware necessary to prevent
modification of any kind to the potential digital evidence. The Tableau product
line is a great set of these types of devices. Although they are made to be simple
35
and easy to use, they create yet another piece of the lab that must be carried
into the field and required to be plugged-in and used. As well, there are software
write-blockers that can be installed on forensic laptops.
For this research, the SEAKER device is intended to be used for triage investi-
gation on digital devices to perform an initial search for potential digital evidence.
Instead of having a separate write-blocking device, the Raspberry Pi is set up with
write-blocking capabilities when digital devices are connected to it. This config-
uration enables the SEAKER’s own system to act as a software-write-blocker to
prevent any digital alteration to the device. This eliminates the need for the extra
write-blocking device and reduces the footprint required to bring to search warrant
execution.
2.2 Technical Details
Choosing the Raspberry Pi as the base platform for the SEAKER device was in-
tentional due to its low cost, extreme portability, and the ability to adapt it for
use as a digital forensic device.
Raspberry Pi is manufactured by the Raspberry Pi Foundation in the United
Kingdom for the purpose of teaching Computer Science in schools and around the
world. It is a fully functional CPU with RAM, status lights, and input and output
connections. It has the ability to be powered by batteries, USB, or an electrical
wall socket connection. The form factor is small, and the cost is kept to a min-
36
imum for ease of acquisition, use, and adaptability. As of this writing, the most
powerful version of the Raspberry Pi is $35 USD.
The SEAKER device project is an example of how the Raspberry Pi device can
be converted into a working model. Through the setup script, it is transformed
into a fully featured digital evidence triage device.
A goal of the SEAKER project is to enable investigators without digital ev-
idence training and/or with limited computer training to utilize it on-site at the
execution of a search warrant. The SEAKER device is designed to be self-sufficient
and automatically self-preparing when it is plugged into a power source. The de-
vice will boot, prepare the web server, the WIFI hotspot and be enabled to handle
digital devices that are attached to its USB port. Once a digital device is plugged
in, it is automatically mounted and scanned. A web-page interface was created for
accessing the scanned devices when a portable WIFI-enabled phone or tablet are
connected to SEAKER.
These attempts to make the process as simple as possible are intentional and
make the process of digital evidence triage acquisition and analysis accessible to
investigators with or without specialized computer knowledge or training.
37
3 Development of SEAKER Device
The SEAKER device concept is very novel, not only in its capacity as a digital
forensics evidence triage device, but also in the fact that it is low cost, highly
available, simple to setup and use, and provides very fast results.
There are other digital triage tools on the market, but almost every one is a
software solution that involves either a separate laptop or a bootable CD, DVD
or USB drive to enable the interaction. These types of software tools typically re-
quire advanced computer knowledge and digital forensics specialists to be involved.
Since the SEAKER device project was a collaboration with SCHTTF, it al-
ready has built-in law enforcement acumen related to digital forensics. The re-
quirements were provided the SCHTTF team. They provided input during and
after the development of the initial prototype. As a digital forensics evidence triage
device, it could be shaping the way investigators handle computers and other dig-
ital equipment during execution of a search warrant.
3.1 Conception
The proposal for the SEAKER device project initially came from the SCHTTF.
They wanted a device that could quickly ascertain potential evidence and enable
on-scene investigators to search devices while questioning suspects. This process of
searching the digital devices immediately is called triage. With it, investigators are
able to provide actionable intelligence quickly, prioritize devices to be previewed,
38
reduce preview setup time, and triage larger amounts of devices.
The SEAKER device project specification was presented in the master’s level
Cyber Security class (COMP 524) at CSUCI in the summer semester of 2017.
It was proposed to the class by professor Dr. Michael Soltys during one of the
initial lectures as the final project for the course. The attending students liked the
idea and work began on it immediately. Dr. Soltys broke down the problem into
categories so that student teams could form and work on each piece individually.
The categories were:
• Connecting a digital media device to a Raspberry Pi, sensing OS and mount-
ing (2 teams together)
• Searching in the mounted file system (2 teams together)
• Sending report to an iPad/laptop/handheld
• Documentation and troubleshooting
• Testing
This breakdown helped guide each team to get started on their contribution
to the final project. Before the students could begin, a few decisions needed to be
made: the device platform to use, the technology methods for input and output,
and an agreed on feature set.
39
The device platform chosen was the Raspberry Pi. This enabled the students
to work on the platform independently, due to the inexpensive nature of it. As
well, two Raspberry Pis were provided for the classroom by SCHTTF and Dr.
Soltys, respectively.
The input method chosen was setup for two types of input. The first type was
connecting the digital devices to the SEAKER device. This was agreed upon to
be either with the USB port that was built into the Raspberry Pi or via a USB to
SATA converter cable. This enabled the digital device to be mounted by the Rasp-
bian Operating System and automatically searched for content via the mounting
rules. The second type of input was human input for a set of terms to search. The
search terms were agreed to be put into a web form that would be submitted to
the on-board web-server.
The output method clearly needed to match the input method in terms of
technology, so the use of the on-board web-server was chosen to be the output
method. When investigators are using the SEAKER device, they would be shown
a webpage asking them to submit a set of search criteria. The results would be
given back to the phone or tablet in HTML. This also enabled the quick building
of the HTML framework and response mechanisms.
Finally, the feature set needed to be agreed upon. With direct guidance from
the SCHTTF, specifically, Frank Lyu, the class agreed to the following:
40
• Write-blocking of attached digital evidence devices
• SATA and USB storage devices
• FAT, NTFS and EXT* file systems to be read from storage devices
• Filename-keyword filter
– Prepopulated keyword list
– Customization of keyword list
• Status lights for power, and device status
• Wireless connection to a phone or tablet for keyword input and results
• Ability to find and display search results and digital device hardware infor-
mation
3.2 Setup Script For Raspberry Pi
The idea of a setup script for the Raspberry Pi was conceived by the author very
quickly after the project was presented to the class, since each team was assigned
to work independently, and the deadline of implementation was extremely short.
In order to get everyone in the class up and running and able to do work on
their individual pieces, there needed to be a baseline for everyone to start working
with. Starting with the base operating system image, called Raspbian, the setup
script was meant to modify it to handle the scenarios we were attempting to create.
41
First, there needed to be some initial setup for keyboard, timezone, SSH, host-
name, and installing some additional packages. To prevent unnecessary software
from occupying the local Micro SD card, the “Lite” version of Raspbian was cho-
sen as the base operating system. However, that meant that additional Raspbian
packages needed to be added; for instance, the Apache web server, a DHCP server,
PHP, the software to convert the wireless NIC card to an access point, and the
device drivers for FAT32, NTFS, HFS, EXT*, etc.
Next, the setup script needed to customize the SEAKER device based on user
parameters. These include hostname, IP address, DHCP supported range, the
default Raspbian user’s (pi) password, and the wireless access point password.
The setup script then prepares the Raspberry Pi access point configuration,
web server configuration, mounting rules, default web-pages, and compiles the cus-
tom C code for searching (listed in appendix).
Finally, in order to avoid simple hacking and password locations, the setup
script clears the history, sets itself up to be deleted at boot time, and removes any
other remnants from the original setup.
Once the author finished programming the setup script to properly configuring
the device with a majority of the features, it was published to the class so that
they could begin using the Raspberry Pi as a SEAKER device and complete the
minor bits of functionality left.
42
3.2.1 Web Server
The author chose the Apache web server, since it is a standard Unix-based op-
erating system choice for serving web pages and can easily be included in the
Raspberry Pi environment using the Raspbian package manager command line:
apt-get install apache2. It also supports backend coding opportunities when
coupled with a server-side code execution program like PHP. Setting this up was
done by the author and was included as a part of the setup script.
A few steps were needed to implement the web server. The first was to load
the Apache and PHP packages coinciding with the Raspbian operating system.
Since it is a branch off of the Debian operating system, these were easily found
and worked well. The next step was to load all of the files that were needed for the
HTML and PHP to display and operate properly. The final step was to modify the
access to each of the files to be specifically accessible by the web server daemon
account. This was necessary to ensure the files could be read and served up by
the web server when requested.
In addition, the acquisition code for searching the drive needed to have access
to a shared location for the filename and folder searching algorithm. The \tmp
folder was chosen by the author as a suitable location, since both the collection
program and the web server have access to it. An extra feature of using \tmp
is that the operating system clears out the entire folder every time it boots up,
43
causing the previous data to no longer show up.
3.2.2 WIFI Setup
The wireless NIC also needed to be setup to be a wireless access point so that
investigators could connect with a phone or tablet and use the web page access
to perform searches on the digital devices. The main idea here was to have a
password-protected closed network where the potential evidence could be searched.
This was included as a part of the setup script.
The steps involved here were complicated and difficult to set up properly. As
with the web server, the proper Raspbian operating system packages needed to be
acquired and installed. In addition, the setup of those packages required setting
up DHCP, WPA, the wireless NIC, and the access point daemon. Setting these
up mainly required adding and altering text configuration files. As is common
in the Computer Science field, researching the Internet was not much help. This
led the author to experiment extensively with these packages’ settings, using trial
and error to ensure the system was correctly configured to the specifications of the
SEAKER device.
Finally, this process required a reboot, which was able to be postponed until
the end of the setup script.
44
3.3 Rules For Mounting
Mounting is the process by which the Raspbian Lite operating system attaches a
media device, providing access to the file system on that device.
During the setup script for the SEAKER device, auto-mounting is setup to
automatically mount new digital media devices that are plugged into the USB
port. Another script was written to handle the post-mounting acquisition of the
applicable drive contents. The post-mounting script is also configured to run once
any new digital media devices are plugged in.
In order to accommodate the request to ensure the forensic integrity of the
suspected digital evidence, special mounting options were required. There are two
different aspects for how drive contents can be modified. The first is the standard
writable option, which allows the files and folders to be created, deleted, and mod-
ified. The second is called journaling, which is an operating system concept for
logging when and what the OS did to the drive. Both options, ro and noload,
are applied to the mounting options. This makes the SEAKER device functionally
consistent with a write-blocking device, as mentioned earlier in Chapter 2.
3.4 Code for Searching Device
The code for searching the digital devices was specifically aimed at gathering ev-
ery filename and location into a searchable file and storing it so that those drive
contents could be searched, even after the digital device had been disconnected
45
from the SEAKER device.
There are several options for searching for files. The simplest way is to use the
built-in operating system mechanisms, for instance ls or find. These utilities are
well written and have been optimized over time by the Unix/Linux community.
Another way is to code a simple C program that performs the singular task of
outputting the directories and filenames. This method avoids extraneous logic in
code and provides opportunities to add more functionality in the future.
There is another built-in operating system mechanism that is much faster at
exposing the filesystem when used on standard UNIX-based environments called
locate. However, it utilizes an index that is built up over time and does not
provide immediate indexing with newly attached devices.
Since one of the goals of the SEAKER project was speed of collection, a test
was performed by the author that measured the built-in mechanisms vs the simple
C program. The simple C program was by far the fastest, beating the other two
methods by an average of 26% (see Table 2 on page 92 for data). The author’s the-
ory on why this is the case is that the other programs have many built-in options
and functionalities that are not utilized. Those extra functionalities have unneces-
sary code switches and therefore extra execution paths that are not necessary for
this file and directory collection application.
46
3.5 Web Code
HTML and PHP were chosen as a simple interface for quick development. It also
allows for easy access via many different devices through a standard web browser.
The main page (Figure 4) was designed to be very easy to use and as auto-
matic as possible. The list of searchable devices is populated at the load-time of
the page. As well, the page refreshes itself until searchable media is found. The
default keyword search list is also shown on the page. Each keyword is searched
independently and are entered one per line on the input keyword text form. The
keyword search list is read in using PHP from a pre-determined file that resides
on the Micro SD card.
47
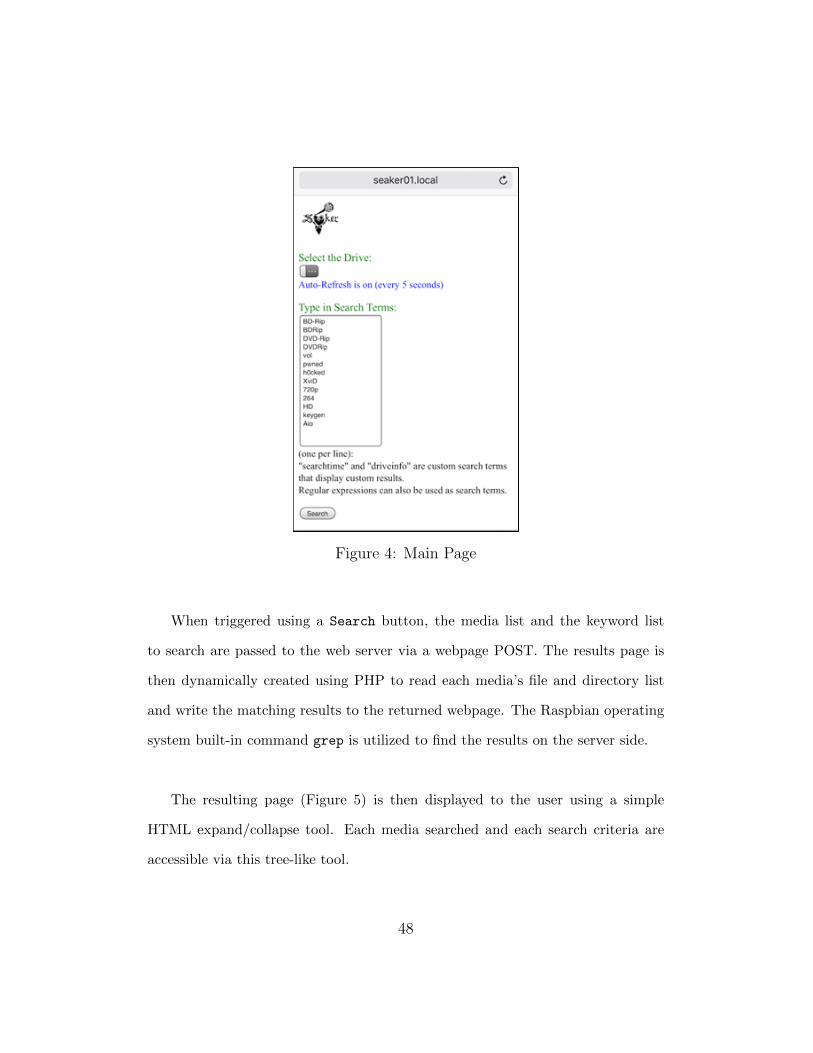
Figure 4: Main Page
When triggered using a Search button, the media list and the keyword list
to search are passed to the web server via a webpage POST. The results page is
then dynamically created using PHP to read each media’s file and directory list
and write the matching results to the returned webpage. The Raspbian operating
system built-in command grep is utilized to find the results on the server side.
The resulting page (Figure 5) is then displayed to the user using a simple
HTML expand/collapse tool. Each media searched and each search criteria are
accessible via this tree-like tool.
48
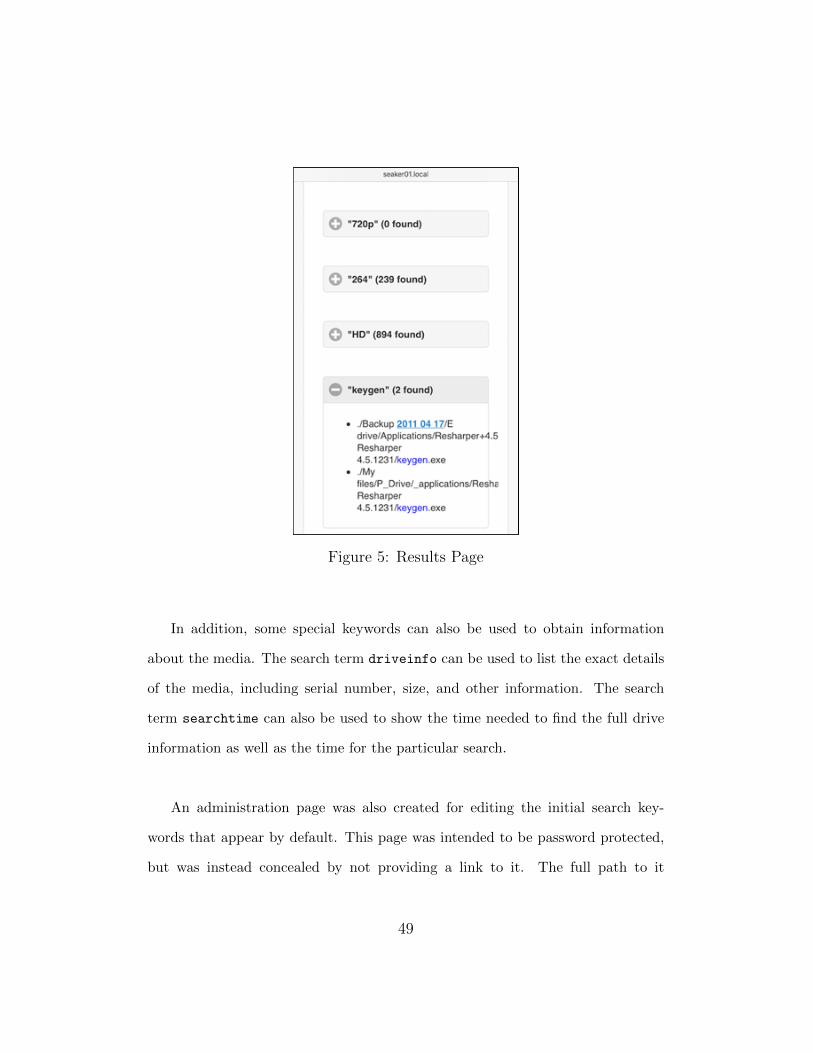
Figure 5: Results Page
In addition, some special keywords can also be used to obtain information
about the media. The search term driveinfo can be used to list the exact details
of the media, including serial number, size, and other information. The search
term searchtime can also be used to show the time needed to find the full drive
information as well as the time for the particular search.
An administration page was also created for editing the initial search key-
words that appear by default. This page was intended to be password protected,
but was instead concealed by not providing a link to it. The full path to it
49
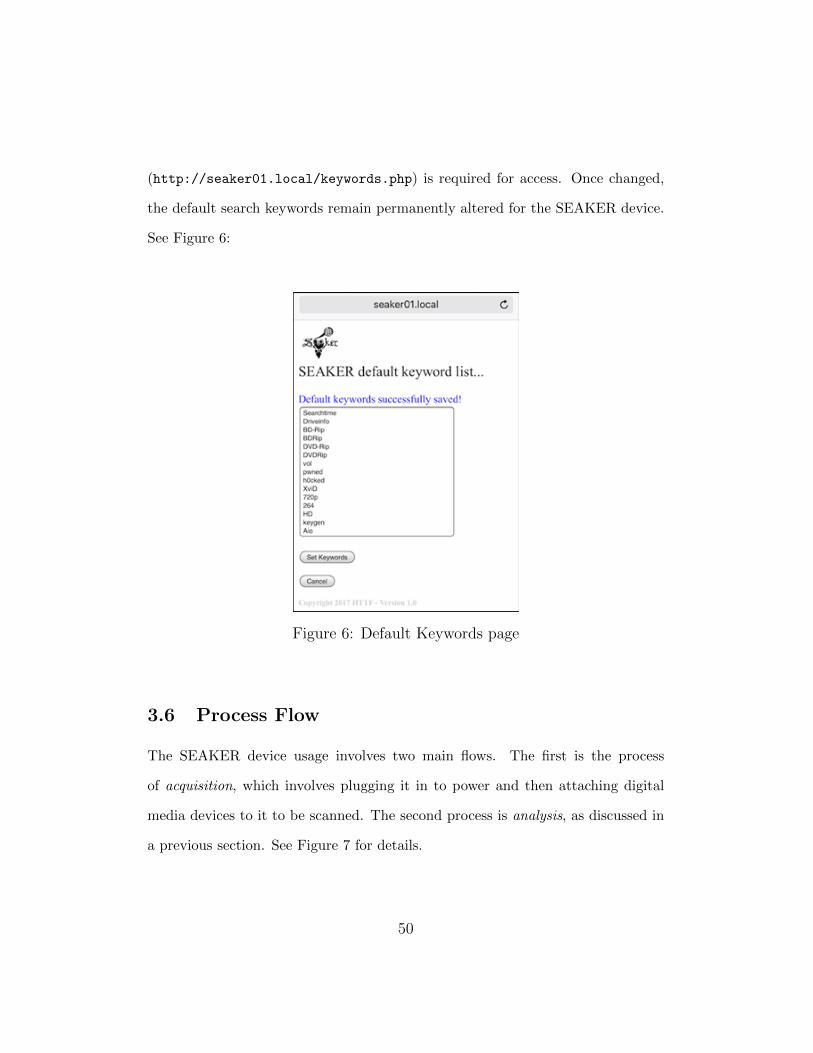
(http://seaker01.local/keywords.php) is required for access. Once changed,
the default search keywords remain permanently altered for the SEAKER device.
See Figure 6:
Figure 6: Default Keywords page
3.6 Process Flow
The SEAKER device usage involves two main flows. The first is the process
of acquisition, which involves plugging it in to power and then attaching digital
media devices to it to be scanned. The second process is analysis, as discussed in
a previous section. See Figure 7 for details.
50
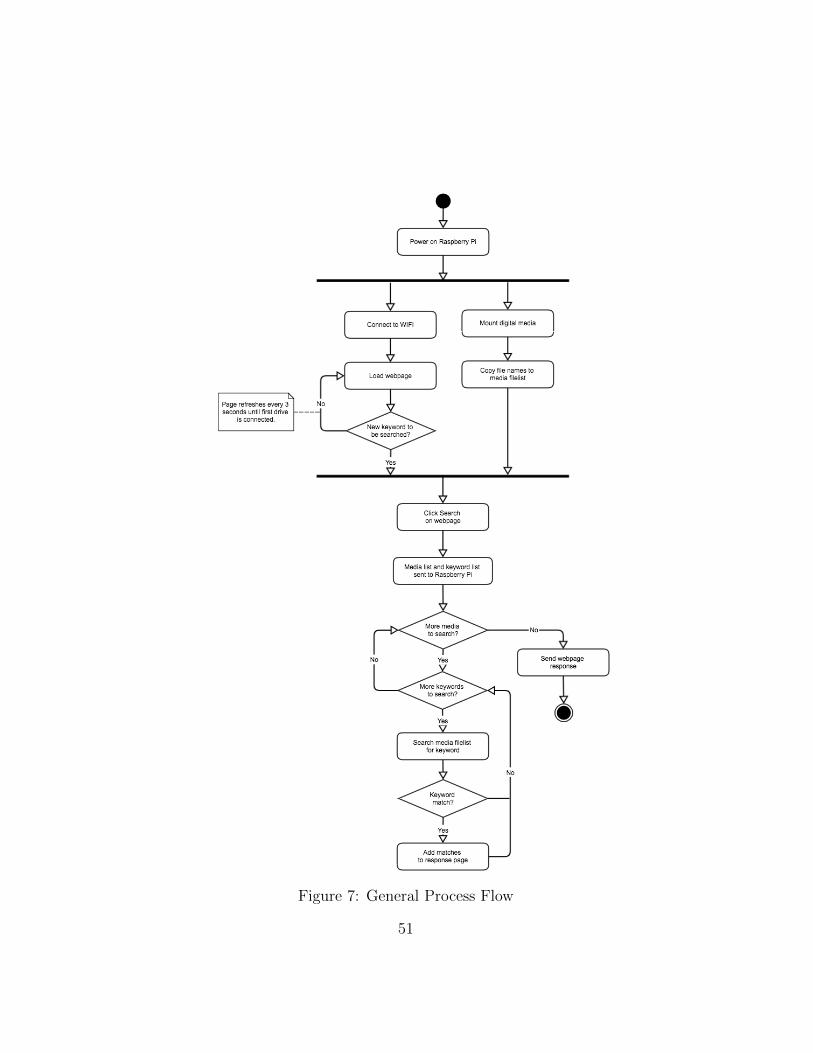
Figure 7: General Process Flow
51
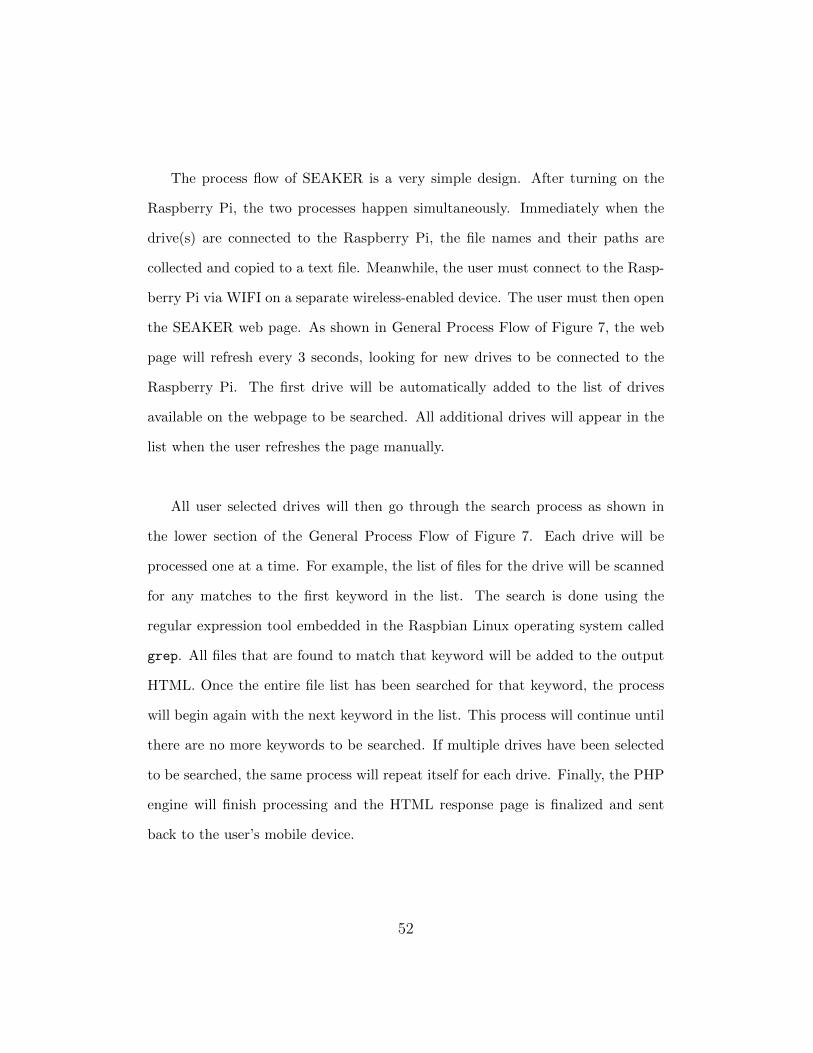
The process flow of SEAKER is a very simple design. After turning on the
Raspberry Pi, the two processes happen simultaneously. Immediately when the
drive(s) are connected to the Raspberry Pi, the file names and their paths are
collected and copied to a text file. Meanwhile, the user must connect to the Rasp-
berry Pi via WIFI on a separate wireless-enabled device. The user must then open
the SEAKER web page. As shown in General Process Flow of Figure 7, the web
page will refresh every 3 seconds, looking for new drives to be connected to the
Raspberry Pi. The first drive will be automatically added to the list of drives
available on the webpage to be searched. All additional drives will appear in the
list when the user refreshes the page manually.
All user selected drives will then go through the search process as shown in
the lower section of the General Process Flow of Figure 7. Each drive will be
processed one at a time. For example, the list of files for the drive will be scanned
for any matches to the first keyword in the list. The search is done using the
regular expression tool embedded in the Raspbian Linux operating system called
grep. All files that are found to match that keyword will be added to the output
HTML. Once the entire file list has been searched for that keyword, the process
will begin again with the next keyword in the list. This process will continue until
there are no more keywords to be searched. If multiple drives have been selected
to be searched, the same process will repeat itself for each drive. Finally, the PHP
engine will finish processing and the HTML response page is finalized and sent
back to the user’s mobile device.
52
3.7 Tools Used for Development
3.7.1 Hardware
(1) Raspberry Pi and power cord - An affordable, very small form-factor computer
with average computing power. It is a powerful educational and research tool that
follows the standard “von Neumann architecture” by incorporating three main
components: input/output devices, memory, and a central processing unit. Models
3 and 3B+ of the Raspberry Pi were used for creation and testing of the SEAKER
project. More information can be found at http://raspberrypi.org.
(2) Micro SD Card - A solid state storage device that when combined with
a Raspberry Pi becomes a local hard drive for operating system, programs, and
storage while the SEAKER device is powered on. The range of Micro SD cards
available are sorted by storage size and speed of reading and writing (denoted by
“class” designation). For the SEAKER device, the faster the write speed, the faster
the collection phase happens because of having to store the results. A “class 10”
or better cards have produced results more quickly than other cards with slower
write speeds.
(3) Powered USB to SATA adaptor - These devices are fairly common, and
allow a SATA style hard drive to be connected to a computer through the standard
USB port. This enables SATA style hard drives to be connected to the SEAKER
device. It is important to note that the USB ports alone on the Raspberry Pi do
not have enough power to support the power requirements of larger hard drives. A
standard ”powered” USB to SATA adaptor will enable the drives to be searched.
(4) Router or switch - A router or switch allows multiple computers to connect
to each other using specialized software through network interface cards. During
53
the setup phase of the SEAKER device, one of these is necessary to be able to
connect to Raspberry Pi with another computer. Remotely logging into the Rasp-
berry Pi and running the setup script is a required step (see setup steps in the
appendix).
(5) Ethernet cable - This is a hard-wire cable designed to connect a computer
to a network. Since the setup process alters the wireless network interface card,
using the wireless interface of the Raspberry Pi to connect to it is not an option
for the SEAKER device.
3.7.2 Programming Languages and Scripting
(1) bash - A UNIX-based shell, command language, and shell scripting language
used to gather and run a set of operating system commands together. Bash is
used in several places in the SEAKER project, including the setup script, as an
auto-mount script for automatic acquisition and in the PHP code to obtain and
push search details to the output HTML.
(2) C - The C programming language is a mid-to-high level language for writing
computer programs. This was used for two applications: a program for digital
media content collection (see the code in Appendix section 6.3.1 on page 90),
and for a late-addition feature to control a light-bar of LEDs that plugs into a
controllable, customizable I/O port of the Raspberry Pi.
(3) HTML - A tag (or element) based system of organizing information to be
shown in a web browser.
(4) CSS - An HTML styling language that simplifies the ability to modify how
HTML is displayed in modern web browsers.
54
(5) PHP - A server-side programming language, typically associated with dy-
namic web page creation. For the SEAKER project, this was a vital component
of creating the search and results web pages.
(6) JavaScript - A client-side programming language that enables web devel-
opers to make web pages more interactive without having to access server-side
resources.
(7) JQuery - A standard JavaScript library of useful functions to simplify and
expand the ability to make a web page more interactive.
(8) Regular Expressions via grep - Regular expressions are a complex way to
specify a search or replace pattern. A UNIX-based operating system command-line
utility, grep, is used to search for regular expression patterns in plain-text files.
This is a very critical part of the SEAKER device, since the searching mechanism
plays a vital role in the project.
3.7.3 Raspbian Operating System
(1) Raspbian Linux (a Debian distribution) - One of the standard operating systems
that support the Raspberry Pi hardware. It is derived from the Debian operating
system. There are two versions available for every release: Full and Lite. The
full version provides lots of useful default packages, a built-in user interface and
a very simple to use guided setup. The Lite version provides only a minimum of
packages, no built-in user interface (with the exception of a command line), and
no initial guided setup. In order to keep the SEAKER project as uncomplicated
as possible, the Lite version of the Raspbian operating system was chosen. The
releases called Jessie (2017) and Stretch (2018) were the most recent at the time
55
and were both supported.
(2) grep - A command-line utility included with almost every UNIX-based
operating system. It is widely known as a very powerful tool for finding regular
expression patterns in plain-text files. In the Raspbian operating system, the
initial configuration contains some useful features that colorize the results of grep.
Unfortunately, this also slows down the grep mechanism due to the extra code
burden. The SEAKER setup script removes the color features of grep to enable
the fastest searching experience. It also changes the default searching mechanism
to ASCII search, enabling an even faster grep result.
(3) apt-get for Raspbian packages - Advanced Packaging Tool packages are
automatically searched, downloaded, and installed using the apt-get command-
line utility. It is a tool based on the Debian software packaging system. The
SEAKER project uses this tool inside the setup script to add necessary packages
to the Raspbian Lite operating system.
(4) Apache HTTP server - An industry standard web server application that
is open source and cross platform.
(5) PHP add-on for Apache - Hypertext Preprocessor utility that enables a
programming language for server-side coding.
(6) Rules file for auto-mounting - The udev utility is a user-space device man-
ager for Linux-based operating systems. One mechanism of device control is to
write a simple script file called a “rules file” (similar to a shell script; see the
code in Appendix section 6.3.2 on page 91) that enables the device manager to
automatically control the specified device(s). Because the SEAKER project is in-
tended to auto-mount digital media and launch a collection script to gather the
56
information from it, a rules file was created during the setup script that enables the
device manager to automatically perform these tasks. As this project progresses
to support more digital media types, this file will be the main area of focus.
3.7.4 Collaboration Tools
The collaboration tools were mainly utilized during the initial development process
to allow the students, professor, and SCHTTF staff to communicate, exchange in-
formation, and plan activities. Some of the use of these tools were continued to be
used for deployment of the setup script, versioning control systems for the code-
base, and communication of the SEAKER project progress.
(1) Gliffy - A free Google Chrome application that enables the diagramming
of charts, graphs, flowcharts, and other drawing templates. This tool has a simple
drag and drop interface that allows for online collaboration and sharing during
diagram creation. The SEAKER project participants utilized this for creating
flowcharts describing the user and process flows.
(2) Slack - An online instant messaging and group chatting platform freely
available for simple use. The SEAKER project participants utilized this for collab-
orating, setting up meetings, online video discussions, and some initial document
sharing.
(3) AWS S3 - Amazon Web Services’ Simple Storage Service (S3) is for on-
line storage of files. The SEAKER project utilized this for beta versions of the
setup script and eventually storage of the final working version along with the
documentation to accompany it.
57
(4) GitHub - An online code sharing, repository, and version control system. It
is widely known to host many open source projects and repositories. The SEAKER
project used it during development to share the code base and create an informa-
tional readme file that is displayed in GitHub on the main repository page.
(5) Dropbox Paper - An online document repository and collaboration tool that
enables multiple people to edit the same document simultaneously. The SEAKER
project team utilized this tool for writing up the setup guide, user guide, technical
specification, and presentations.
3.7.5 Setup Tools
(1) Hardwire Connection to the Internet - The SEAKER setup script requires a
connection to the internet in order to download the necessary operating system
packages. The ideal SEAKER setup environment is to connect the Raspberry
Pi to a router or switch that is also connected to the internet without a proxy
server. This allows another computer to securely connect to it as well as having a
connection to the Internet.
(2) Apple Computer System: Etcher, Paragon NTFS, terminal, SSH - If the
secondary computer required to remotely access the Raspberry Pi in order to run
the setup script is an Apple computer, a program like Etcher will load the initial
Raspbian Lite operating system onto the Micro SD card. It is a tool for copying
a disk image from an image file to a Micro SD card. Another tool is an NTFS
reader/writer driver like Paragon NTFS. It is necessary in order to access the
newly copied image of Raspbian Lite on the Micro SD card. This is used to copy
the setup script and enable SSH access to the Raspberry Pi. Finally, a command
58
line program like terminal can be used to remotely and securely connect to the
Raspberry Pi after the Micro SD card is installed and the system is booted.
(3) Windows Computer System: Win32DiskImager, Windows Explorer, Putty
- If the secondary computer required to remotely access the Raspberry Pi in order
to run the setup script is a Windows computer, a program like Win32DiskImager
is used to load the initial Raspbian Lite operating system onto the Micro SD card.
It is a tool for copying a disk image from a file onto a Micro SD card. Another
required action is to access the newly copied image of Raspbian Lite on the Micro
SD card. This is necessary to copy the setup script and enable SSH access to the
Raspberry Pi. Finally, a SSH program like Putty can be used to remotely and
securely connect to the Raspberry Pi after the Micro SD card is installed and the
system is booted.
4 Experimental Results
4.1 Prototype Demonstration
As the final project in the summer 2017 Cyber Security class, the SEAKER de-
vice project was presented to the SCHTTF representatives and other faculty and
administration from CSUCI.
The SEAKER device presentation consisted of an introduction from Dr. Soltys,
a slide presentation from every student team, and a recommendation for hardware
to use for real-world SEAKER implementations. It also included a live demonstra-
tion of SEAKER’s functionalities with digital media provided by the SCHTTF. In
59
advance, SCHTTF prepared one external hard drive and two USB thumb drives
for the class to collect files on in real-time during the presentation. These devices
had not been seen by the students prior to the demonstration.
The live demonstration was intended to be fully functional and prove that a
prototype could be created using the described parameters and features requested.
In addition to the three devices SCHTTF provided, the audience was also encour-
aged to participate as “detectives” using their personal phones to experience the
SEAKER functionality first hand. An Apple iPad was also used by the presenters
to participate as “detectives” and had the experience projected on a screen for the
audience. This allowed everyone to see the SEAKER working in real-time.
The demonstration began with an initial test using a hard drive that had pre-
viously been tested and found to be able to be acquired and analyzed. After
attaching it to the SEAKER device, the auto-mount script ran automatically and
the information was properly collected and searchable. The auto-refresh function-
ality on the webpage worked as expected and showed the attached media as a
selectable drive. A quick search also was successful, and the product was demon-
strated without flaw.
The SCHTTF prepared digital media devices were tested next. All three de-
vices were able to be auto-mounted, collected, and searched. SCHTTF then pro-
vided search criteria after the drive information was collected. The final phase
was to perform the search and see if the proper file set was exposed in the results.
60
The conclusion of the live demonstration was that the file set was properly found
and the SEAKER device was properly working and ready to experiment more in
a real-world situation.
SEAKER also proved very successful as a WIFI access point to the “detec-
tives” in the audience. Multiple different phones were used to connect and search.
All were successful in utilizing the SEAKER, as well as the iPad used in the
demonstration.
4.2 Results
4.2.1 Data Saturation and Its Effect on Collection Latency
The results of this collection timing (Figure 8) were gathered using the SEAKER
device and a single hard drive for the media device. Only one media device was
used to reduce the variables in the experiment and focus solely on the data size
and collection timing.
Experiment details:
• Hardware – Raspberry Pi 3B+, Class 10 Micro SD card
• Operating System – Raspbian Stretch Lite, version 2018-06-27
• Media Device – Western Digital My PassportTM, 500GB
• Drive Format Type – NTFS
61
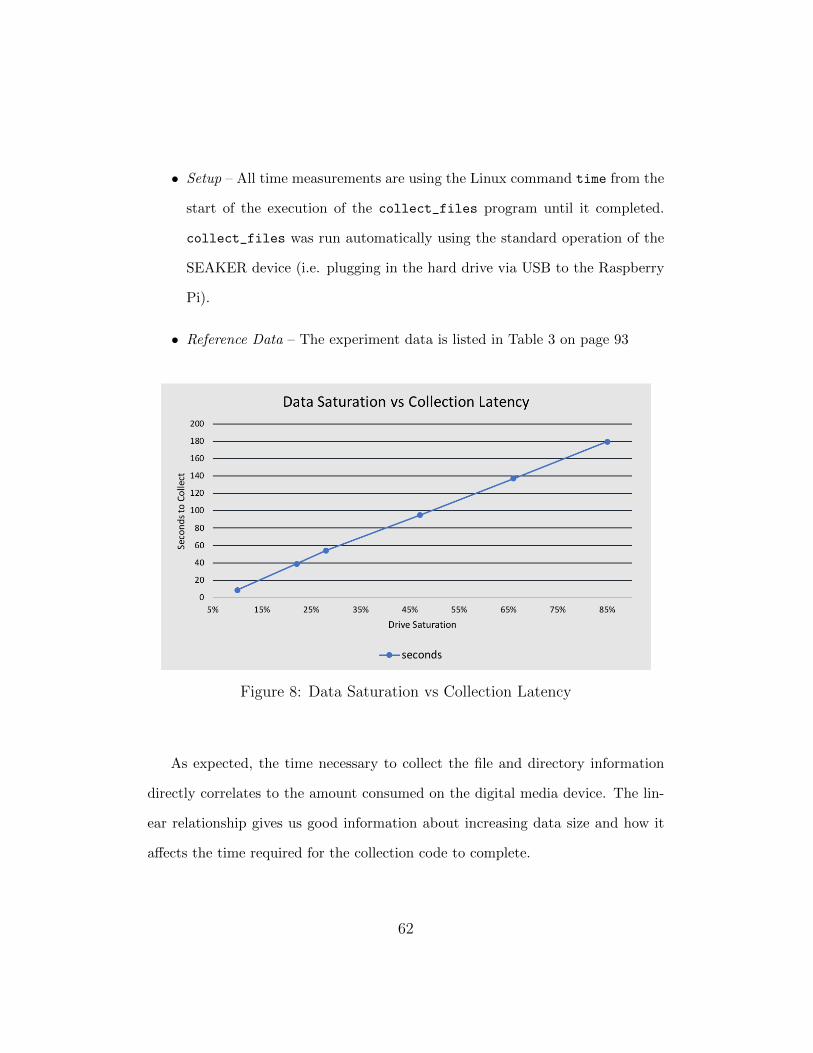
• Setup – All time measurements are using the Linux command time from the
start of the execution of the collect_files program until it completed.
collect_files was run automatically using the standard operation of the
SEAKER device (i.e. plugging in the hard drive via USB to the Raspberry
Pi).
• Reference Data – The experiment data is listed in Table 3 on page 93
Figure 8: Data Saturation vs Collection Latency
As expected, the time necessary to collect the file and directory information
directly correlates to the amount consumed on the digital media device. The lin-
ear relationship gives us good information about increasing data size and how it
affects the time required for the collection code to complete.
62
4.2.2 Drive Format Type Comparisons
The results of the drive format type comparisons (Figure 9) were gathered using
the SEAKER device and a single hard drive for the media device. Only one media
device was used to reduce the variables in the experiment and focus solely on the
timing for each drive format type.
Experiment details:
• Hardware – Raspberry Pi 3B+, Class 10 Micro SD card
• Operating System – Raspbian Stretch Lite, version 2018-06-27
• Media Device – Western Digital My PassportTM, 500GB
• Setup – All time measurements are using the Linux command time from the
start of the execution of the collect_files program until it completed.
collect_files was run automatically using the standard operation of the
SEAKER device (i.e. plugging in the hard drive via USB to the Raspberry
Pi).
• Reference Data – The experiment data is listed in Table 4 on page 94
63
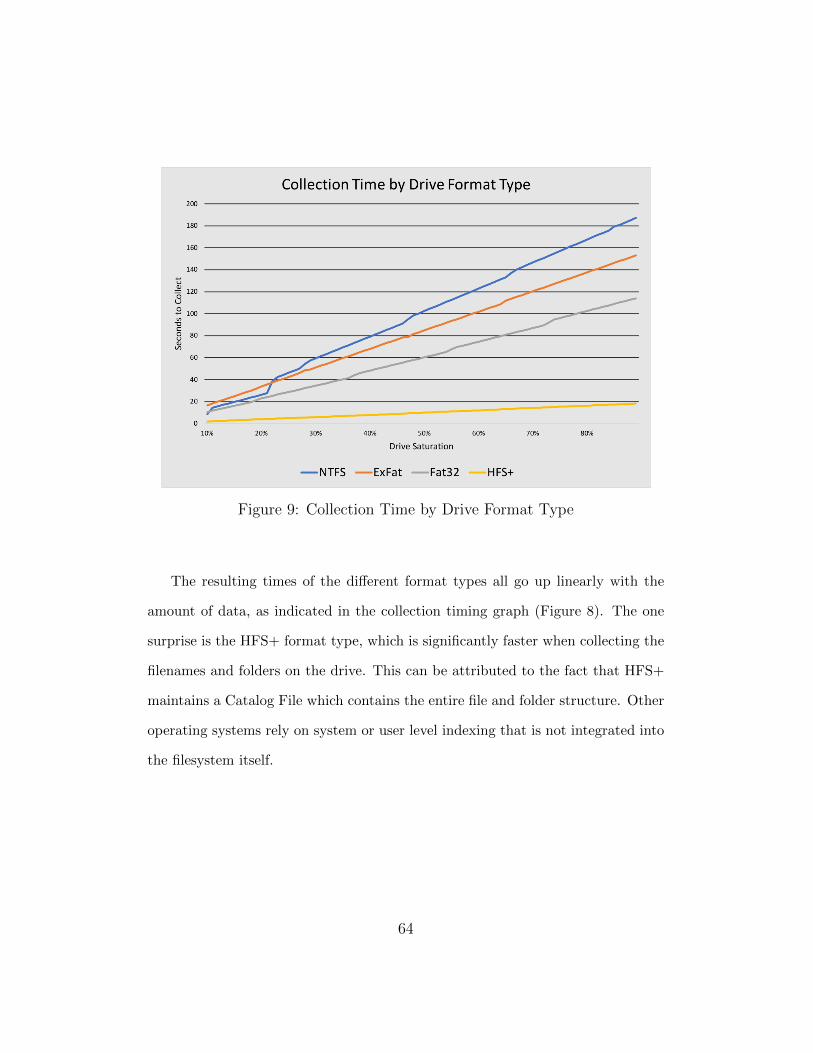
Figure 9: Collection Time by Drive Format Type
The resulting times of the different format types all go up linearly with the
amount of data, as indicated in the collection timing graph (Figure 8). The one
surprise is the HFS+ format type, which is significantly faster when collecting the
filenames and folders on the drive. This can be attributed to the fact that HFS+
maintains a Catalog File which contains the entire file and folder structure. Other
operating systems rely on system or user level indexing that is not integrated into
the filesystem itself.
64

4.2.3 Write-Blocking Results
A critical feature of the SEAKER device is the necessity to preserve digital ev-
idence. Modification of any kind to the digital content of a device would likely
cause admissibility issues in a litigation environment. The testing done on the
SEAKER device to ensure that no modifications were made to the digital media
that is mounted (read-only) and searched is documented here.
Using a physical write-blocking device, the digital media was attached to a
standard Mac laptop. This ensured that the device was not altered prior to at-
taching it to the SEAKER device. After mounting the drive, a hashing algorithm
called SHA256 was used to determine the initial hash value of the drive (in this case
b715a2b3f4dad11f578aa26c851cb4022e655115cb6b6bf9c029f1b4d000ac2d). The util-
ity used to get the SHA256 hash was shasum -a 256 with the mounted drive lo-
cation as the last parameter on the command line.
The digital media was then connected to the SEAKER device. Mounting and
collection phases were verified with a quick search of the device from the web in-
terface of SEAKER.
The digital media was then removed from the SEAKER device and the identical
procedure for retrieving the original SHA256 hash was performed. This included
using the write-blocking Tableau device. The hash was identical to the original
(b715a2b3f4dad11f578aa26c851cb4022e655115cb6b6bf9c029f1b4d000ac2d), thereby
providing direct proof of the unaltered state of the digital media.
65
The media used for this testing was a 500GB portable 2.5” Western Digital
SATA Hard Disk Drive. The file system was NTFS, and the hard drive was filled
to 90% capacity.
5 Conclusions and Future Work
The SEAKER device was successfully created with the agreed upon functionality.
It properly acquires digital media content and enables analysis by investigators
via WIFI connections to the Raspberry Pi. It collects potential digital evidence
without the fear of tainting the evidentiary integrity. And, it keeps a log of devices
that have been acquired.
It shows promise for real world law enforcement via digital forensics triage.
The SEAKER device is useful for on-scene investigations during search warrant
execution. It is also useful for helping reduce the backlogs at digital forensics labs.
The SEAKER project was a successful collaboration between two different in-
stitutions in the public sector: law enforcement and academia. The former has
many interesting problems to offer, but as they are overwhelmed with cases they
typically do not have the man power to do research and development. The latter
is happy to do the research and development, as it enhances the educational ex-
perience of the students to be learning in the context of applications to real life
problems. It is a fortuitous and symbiotic relationship, and we plan to embark on
66
other such projects in the future.
SEAKER is also the testament to the fact that supremely useful devices, meet-
ing the needs of practitioners, can be constructed from relatively simple com-
ponents; what is required is expertise and enthusiasm, which in the best cases
academia possesses in ample measure. Raspberry Pis are a revolution in embed-
ded controllers, and we are just scratching the surface of their applicability. They
are inexpensive, but wield the power of the Linux Operating System.
The potential uses for the SEAKER device are great with the existing set of
functionality. More so, the future potential functionalities are even greater.
The general implementation and code do have some limitations. For instance,
in addition to the regular expressions, there could also be fuzzy matching, size
grouping, internet browser data, registry, swap file, and email searching, and many
others. These improvements may be implemented by future students, or by dig-
ital forensics professionals. We encourage anyone who implements them to share
their work; the main bash script for the SEAKER device is available on github at
https://github.com/michaelsoltys/seaker.
The SEAKER device only supports a few filesystems, whose contents can be
collected (namely, NTFS and FAT (exfat, FAT32, FAT16...)). There may be un-
known bugs to be worked out in the supported filesystems, and there is certainly
work to be done in expanding the list of supported systems.
67
If an unsupported filesystem is found on the digital media, it may fail to mount
and not show up on the SEAKER’s search page at all. Similarly, digital media that
cannot be read or are not supported do not appear; the search page displays them
only after files have been collected. Here, there is opportunity for improvement:
as opposed to displaying digital media for which collection is complete, SEAKER
could display all devices attempted with a status next to each. This status could
be one of three states: failed search, collection in progress, and collection complete.
It can be difficult to match a hard drive to its corresponding search results.
Partitions are uniquely identified by a UUID, and some properties (capacity, for
example) are displayed with the search results, but these properties do not provide
a perfect way to determine which physical device corresponds to which mounted
partition or device. Storage devices generally have a serial number of sorts, but
this serial number is not visible to SEAKER. This is a problem which requires
some creativity to fully solve.
SEAKER could also take a picture when a drive is plugged in, and associate
that picture with the search results, for instance, but this solution requires that
investigators position each storage device in front of a camera. This approach
requires a specialized camera, made exclusively for the Raspberry Pi. Moreover, it
is tedious and error-prone, especially because many hard drives and digital media
have the same look and may be difficult to visually distinguish.
68

When a search finds a hit (i.e., a matched expression or file extension), investi-
gators may want to view the corresponding file. As SEAKER is currently set up,
this would require them to manually find and open the file. Speed and ease of use
are priorities, so it would be best if investigators could select a file in the search
results and have SEAKER fetch a copy of it for them. This function inevitably
requires that the storage device being queried is still connected, assuming that this
condition is met, copying and viewing a file should not be too complex.
Similarly, it would be useful if investigators could view thumbnails of images
and videos in the search results. One example of the motivation here is child
pornography cases; incriminating images may have innocuous names, but thumb-
nails would indicate the true content.
This leads to another issue: as incriminating files may be named innocuously,
investigators will often want to search simply for all images, videos, etc. SEAKER
could minimize the work necessary by allowing for preset groups of search terms,
which can be created and edited by administrators. For example, an admin could
create an “images” group which causes SEAKER to include jpg, pdf, png...
A very interesting area of future research is “Data Carving”. Data carving is
the identification and extraction of files from unallocated clusters using file signa-
tures. A file signature, also commonly referred to as a magic number is a constant
numerical or text value used to identify a file format. The object of carving is to
identify and extract (carve) the file based on this signature information alone. The
69
main interest is in hidden files (which are sometimes easy to locate, as for example
in UNIX with ls -a command) and deleted files, which is trickier as the files can
be partially overwritten. A partially overwritten file may still constitute valuable
evidence: for example, a portion of an image can be taken as solid evidence that
the entire image was on the disk at some point. How can one establish whether a
portion of an image comes from a particular image? It seems that the only way
to accomplish that is by visual inspection, and having an investigator recognize
the original image. In order to automate this process, one could attempt one of
two things: build a massive database of frequently-circulating illegal images, and
hashing different formats of these images (.pdf, .jpg, .giff, .tiff, etc.), as well as dif-
ferent resolutions, and chunks of standard sizes (say, 64Kb). This still seems like a
shot in the dark. The second approach is to define something akin to fuzzy hashes,
the type of hashes that are used to recognize variants of the same malware. This
new type of fuzzy hashing would be invariant under differing formats, or standard
resolutions, and chunks of an image could be identified by close proximity to the
original hash. Hits would be still confirmed visually to avoid false positives; a
bigger issue would be false negatives.
Finally, documentation is important in any investigation. When triage re-
veals media that motivates investigators to confiscate the corresponding storage
device, they should document this motivation. As such, it would aid investigators
if SEAKER could generate a search report for a selected drive from the search re-
sults screen. This report could be downloaded to the investigators device or saved
on the SEAKER unit for later access by an administrator. It should contain the
70
search results along with some circumstantial information, such as the date, the
name(s) of investigator(s) requesting the report, and their reason for confiscating
the device.
Another potential area for improvements to existing code could be a location
for entering passwords obtained from suspects. These could be used to unlock
entire drives, zip files, PDFs, user folders, files, email, website usage, etc. This
could also be extended to find online account passwords, especially in the case of
browsers that allow saving site-specific usernames and passwords.
The SCHTTF has asked for some new functionality as well. They would like
the ability to search multiple partitions, local WIFI networks and access levels,
thumbnails of images and videos, support newer operating systems (for instance
APFS), and extract IP addresses from known suspect configuration files and other
locations. These are just a few of the requests, but seemed to be at the top of
their list.
There are also many different libraries that could be included and built into
a searching algorithm. Be aware that these will slow down the gathering process
and could be more useful if searched in stages. Here are a few:
• LibForensics (http://code.google.com/p/libforensics/) – a Python li-
brary for developing digital forensics applications and is licensed under the
GNU Lesser General Public License
71

• Volatility (https://github.com/volatilityfoundation/volatility) – a
memory extraction utility framework written in Python designed to obtain
digital artifacts from volatile memory (RAM)
• WindowsSCOPE (http://www.windowsscope.com/) – a Microsoft WindowsTM
based memory forensics analysis tool designed specifically with security
breaches in mind
• Oxygen Forensic Detective (http://www.oxygen-forensic.com/en) – all-
in-one forensic software tool to extract and analyze data from mobile devices
and their off-device related data
In researching this topic, a lot of other potential improvement features came
to mind. This is by no means a comprehensive list, but it is a start:
• More supported media types
• Add AJAX (or similar technology) to give live feedback for search and collection
• Create web service calls for using the Raspberry Pi
• Clean up HTML code, use CSS
• Write SEAKER iPhone/iPad/Android apps to connect to Raspberry Pi and per-
form searches, edit keywords, etc.
• Use heap memory instead of stack memory for path
• Better way to skip current and parent directories (. and ..) by (possibly) skipping
the first two directory entries
• Reduce size of file/directory listing file. This may involve changing how to grep or
implementing custom grep
72
• Possibly store files in a database instead of a file
• Implement the ability to connect to Raspberry Pi using Bluetooth instead of WIFI
• Customize web pages for device type
• Use a better wireless network adapter for better range. These adapters are inex-
pensive.
• Implement Linux setup with puppet/cfengine/salt/etc.
• Better error messages about why drive could not be read
• Complete the Blinkt! light panel integration to show visual status of the Raspberry
Pi
• Check the health (SMART status) of the hard drive before scanning
• Add support for RAID, mSATA, SCSI hard drives (mdadm is a RAID driver for
Unix-based systems)
• Read directly from rawdisk to find file list to speed up collect
• Make SEAKER an available Raspbian/Debian package
• Support Unicode filenames
• Auto-unmount the hard drive at the end of collection
• Support multiple partitions gracefully
• Search for filename matches only
• Search for path matches only
• Offer option via checkbox for searching inside compressed files
• Offer option via checkbox for searching inside text files
• Find all deleted files (foremost, ntfsundelete)
73
• Search deleted partitions and unpartitioned space
• Build another web page for troubleshooting/access/administration/etc.
• Search on-media virtual hard drives (vhd, vdi, vmdk) (vmware, virtual pc, parallels,
hyper-v)
• Search on-media hard drive images (.iso)
• Searching the raw drive instead of using the on-media operating system
• Online hard drive investigation (i.e. Cloud Forensics)
• Network Traffic Investigation
• Video segmentation and video image hashing
• Crime-specific searches:
– financial crimes
– credit card fraud
– hacking
– bullying
– blackmail
– espionage
– fraud
– customizable (corporate / military)
• OS lockdown (Raspbian)
• Decrypting encrypted devices (password entry location, assessment without pass-
word)
• Utilize forensics as a service
74
• Integrate with Microsoft’s photoDNA cloud service
• Build an iPad app to provide simpler, more guided use
• Query Expansion - automatically searching for same query maybe in other contexts
• Synonym Matching - automatically searching for similar words to the query word
• Collect everything in UTC time for chronology matching
• Universal way of collecting hard drive hash value for verification of evidence integrity
• Data Visualizations:
– present all data visualizations for a particular drive or all hard drives
– graph - size vs number of files (one hard drive, and all hard drives)
– graph - common details (like file type, etc.) maybe make it clickable!
– graph/chart - files by date
– graph/chart - files by file type
– chart - website visits
– digital image hashes list (stored and compared)
– many others...
• Improve analysis speed: skip known OS files, known applications files, etc.
• More extensive testing with different file systems, especially related to the built-in
write-blocking features
• Investigation Gathering rollup: (possibly stored online or in a report)
– Database schema for storing case specific data
– metadata
– Unique “gathering ID”
75
– case number
– observation report
– crimes severity
– potential offenses
– time gathered
– gatherer
– suspect list
– location gathered
– suggestions for other research
– which computer system it came from
– Set of evidence
– Digital Evidence item
– images of item
– unique item ID
– file contents
– ranking within set of evidence
– image thumbnails
– collection statistics
• Find encryption Keys
• Thumb strips of videos
• Predetermined search criteria (passwords, pw, etc.)
• Output more file information: file owner, MAC times
76
• Sorting ability, for instance make it based on user or access times
• Ability to search by time, i.e. time=lastweek, time=5/5/18-5/15/18
• Internet usage timeline
• Auto-search / Auto-filter
• For drug related crimes, search... Spreadsheets, documents, databases, internet
purchase strives
• For financial related crimes, search... Spreadsheets, databases, MSMoney, Quicken
• CRC of any acquired files (for later integrity comparison)
For the students, the experience was invaluable. Perhaps the most important aspect
was non-technical: how to work well in a large team. There were eighteen students in the
class; a composition of different backgrounds, talents and strengths.
Digital forensics and academia would both benefit greatly from increased collaboration;
students can offer relatively inexpensive development in exchange for real-world experience
and the opportunity to create something which will be used. As a side effect more students
would consider digital forensics as a career, resulting in some level of alleviation of the
problems mentioned in the second quote in the introduction [9].
6 Appendix
6.1 SEAKER Setup
The following set of instructions will detail how to setup the SEAKER environment for
the first time. There are three install options that enable SEAKER creators to prepare
the device. See Table 1 on page 79 for more details.
77
1. Router – This option is where the Raspberry Pi and the secondary computer are
connected directly to the same router, thus allowing the same local DHCP to assign
the IPs of both. The secondary computer is used to prepare the Micro SD card and
to later remotely and securely connect to the Raspberry Pi to complete the setup.
2. Direct Connect – This option is where the Raspberry Pi is connected directly to a
monitor and keyboard to enable direct user input via the termnial. The secondary
computer is necessary to prepare the Micro SD card, but not used to remotely
connect to the Raspberry Pi to complete the set up.
3. Corporate LAN – This option is almost identical to the Router option, but utilizes
a corporate network instead of a local router to connect to the Raspberry Pi. This
option is the most IT intensive, since the IP address assigned to the Raspberry Pi
is often not easily found.
78
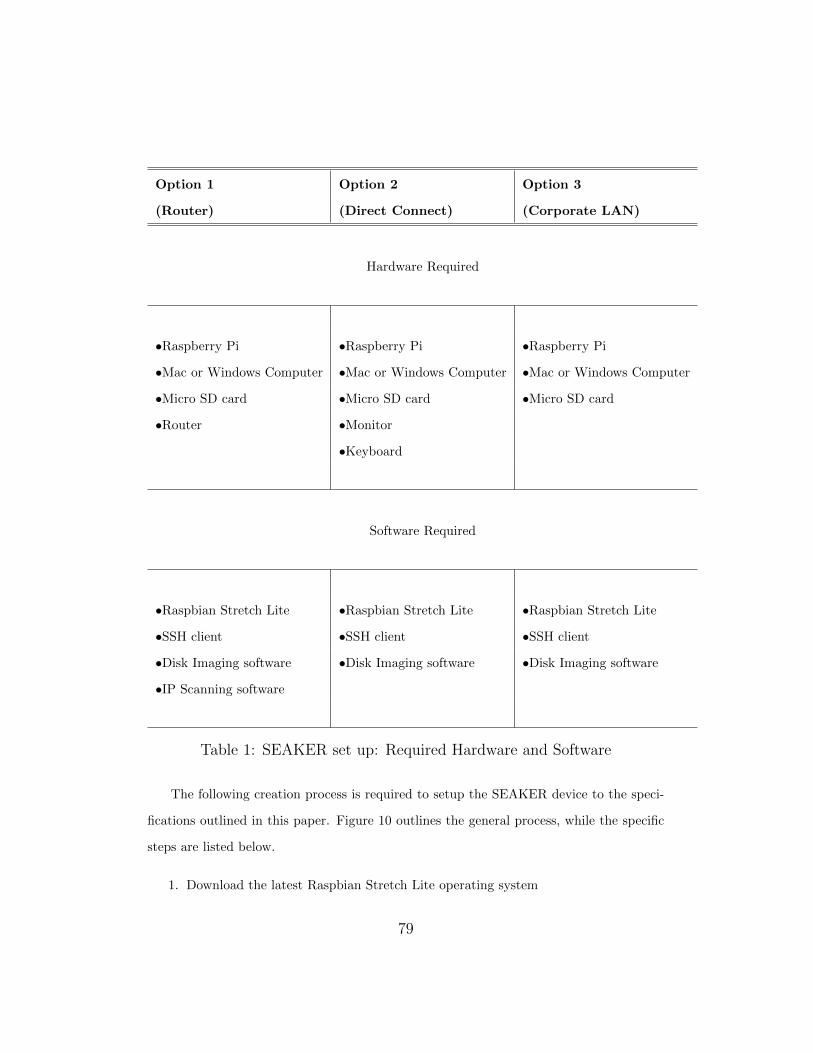
Option 1 Option 2 Option 3
(Router) (Direct Connect) (Corporate LAN)
Hardware Required
•Raspberry Pi •Raspberry Pi •Raspberry Pi
•Mac or Windows Computer •Mac or Windows Computer •Mac or Windows Computer
•Micro SD card •Micro SD card •Micro SD card
•Router •Monitor
•Keyboard
Software Required
•Raspbian Stretch Lite •Raspbian Stretch Lite •Raspbian Stretch Lite
•SSH client •SSH client •SSH client
•Disk Imaging software •Disk Imaging software •Disk Imaging software
•IP Scanning software
Table 1: SEAKER set up: Required Hardware and Software
The following creation process is required to setup the SEAKER device to the speci-
fications outlined in this paper. Figure 10 outlines the general process, while the specific
steps are listed below.
1. Download the latest Raspbian Stretch Lite operating system
79
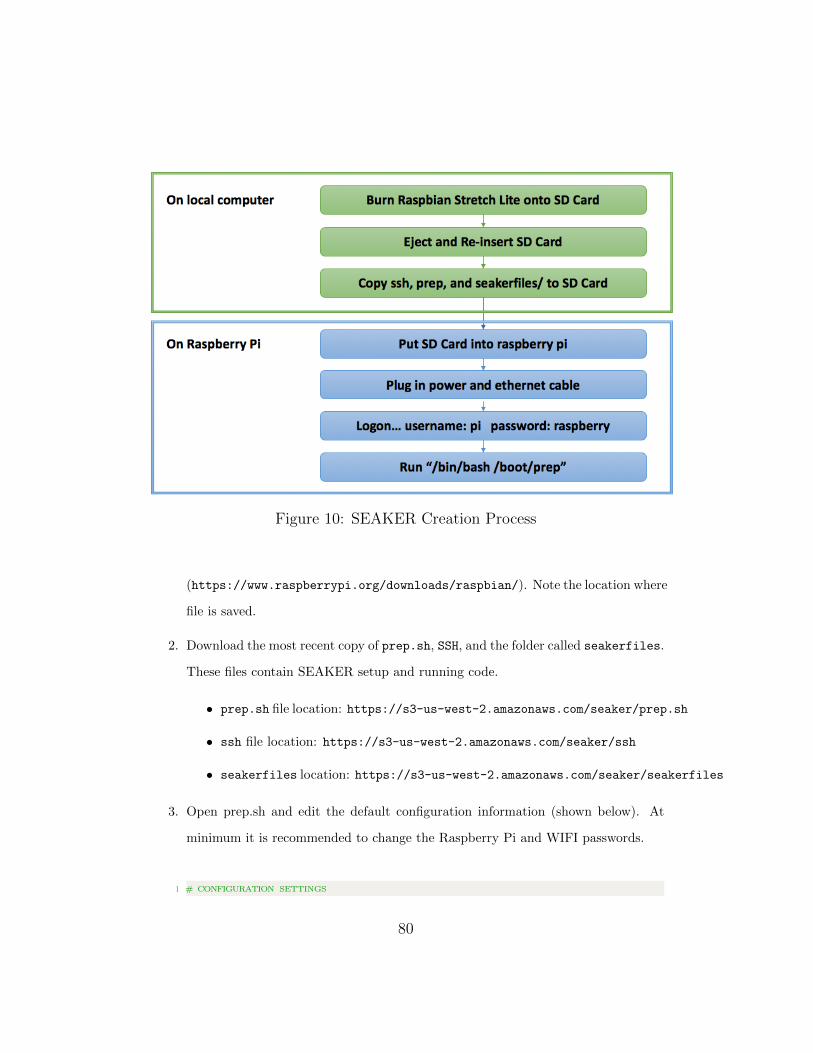
Figure 10: SEAKER Creation Process
(https://www.raspberrypi.org/downloads/raspbian/). Note the location where
file is saved.
2. Download the most recent copy of prep.sh, SSH, and the folder called seakerfiles.
These files contain SEAKER setup and running code.
• prep.sh file location: https://s3-us-west-2.amazonaws.com/seaker/prep.sh
• ssh file location: https://s3-us-west-2.amazonaws.com/seaker/ssh
• seakerfiles location: https://s3-us-west-2.amazonaws.com/seaker/seakerfiles
3. Open prep.sh and edit the default configuration information (shown below). At
minimum it is recommended to change the Raspberry Pi and WIFI passwords.
1 # CONFIGURATION SETTINGS
80

2 # Raspberry Pi Password
3 PI PASSWORD=” raspberry ”
4 # WiFi Network Name
5 WIFI NAME=”SEAKER01”
6 # WiFi Network Password :
7 WIFI PASSWORD=” raspberry ”
8 # IP address which i s used to ac c e s s SEAKER web page
9 WIFI ROUTER IP=” 192 . 168 . 101 . 1 ”
10 # DHCP Range (How many connect ions can be made s imul taneous ly )
11 WIFI ROUTER DHCP RANGE=” 192 . 168 . 101 . 50 192 . 168 . 101 . 100
NOTE: It is recommended to change the WIFI Name and IP Address when set-
ting up multiple SEAKER environments over time to ensure each environment has
unique identifying information.
For example: If setting up three SEAKER environments, configuration could be:
(a) Name: SEAKER01, IP Address: 192.168.101.1
(b) Name: SEAKER02, IP Address: 192.168.102.1
(c) Name: SEAKER03, IP Address: 192.168.103.1
4. Insert Micro SD card into computer (not the Raspberry Pi). An adapter will likely
be required.
5. Open disk imaging software (Etcher for Mac, or SDFormatter and Win32 Disk
Imager for Windows). Map to the Raspbian Stretch Lite file location, choose the
Micro SD card as the destination, and select to burn the image. (Refer to the
chosen imaging software documentation for specific instructions on using this tool.)
Do not remove the Micro SD card from the computer.
6. Map to the Micro SD card (Finder for Mac, File Explorer for Windows). Copy ssh,
prep.sh, and the seakerfiles folder onto the Micro SD card’s boot partition.
7. Remove the Micro SD card from the computer.
8. Insert the card into the Raspberry Pi.
81
9. Power on the Raspberry Pi by plugging it in with the power cord.
10. Identify the local IP Address of the Raspberry Pi:
If installing with Option 1 (router):
(a) Plug the Raspberry Pi into the same router being used by the Windows or
Mac computer.
(b) Use the IP Scanning tool on the computer to find the local IP Address of the
Raspberry Pi. The Manufacturer should be Raspberry Pi Foundation.
If installing with Option 2 (Direct Connect):
(a) Connect the monitor and keyboard to the Raspberry Pi.
(b) Login using the default username (pi) and password (raspberry).
(c) Enter the following command to retrieve the local IP Address:
ifconfig eth0
If installing with Option 3 (Corporate Network):
(a) The MAC Address of the Raspberry Pi is required. This can be located on
the original Raspberry Pi box.
(b) For Windows systems, open a command prompt and enter the command
below. Replace the “c8:26:3b:d2:63:d5” sequence with the MAC Address of
the Raspberry Pi being configured. Use the following command:
arp -a | findstr "c8:26:3b:d2:63:d5"
(c) For Unix or Linux systems such as Apple or Ubuntu, open a terminal window
and enter the command below. Replace the “c8:26:3b:d2:63:d5” sequence with
82

the MAC Address of the Raspberry Pi being configured. Use the following
command:
arp -a | grep "c8:26:3b:d2:63:d5"
11. If installing with Option 1 or 3:
• SSH into the Raspberry Pi from the laptop or desktop computer.
– If using a client such as Putty, enter the local IP address of the Raspberry
Pi, choose SSH and connect. Click OK or Yes on the security warning.
– If using a command line utility such as Bash enter the following at the
prompt:
ssh pi@<ip_address> -l pi
– Login using the default username (pi) and password (raspberry).
12. Run the preparation script by typing the following on the command line:
/bin/bash /boot/prep.sh
13. Wait for the Raspberry Pi to finish running the script and rebooting. The Raspberry
Pi should now be configured as a SEAKER and be up and running.
83
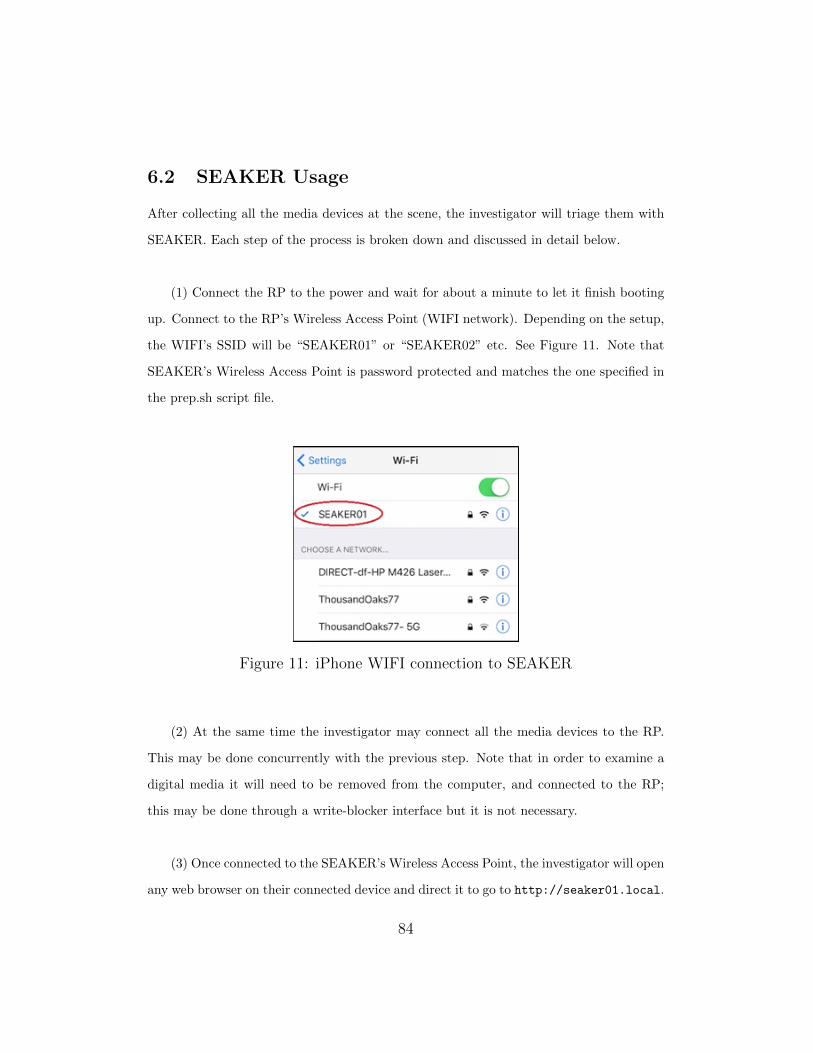
6.2 SEAKER Usage
After collecting all the media devices at the scene, the investigator will triage them with
SEAKER. Each step of the process is broken down and discussed in detail below.
(1) Connect the RP to the power and wait for about a minute to let it finish booting
up. Connect to the RP’s Wireless Access Point (WIFI network). Depending on the setup,
the WIFI’s SSID will be “SEAKER01” or “SEAKER02” etc. See Figure 11. Note that
SEAKER’s Wireless Access Point is password protected and matches the one specified in
the prep.sh script file.
Figure 11: iPhone WIFI connection to SEAKER
(2) At the same time the investigator may connect all the media devices to the RP.
This may be done concurrently with the previous step. Note that in order to examine a
digital media it will need to be removed from the computer, and connected to the RP;
this may be done through a write-blocker interface but it is not necessary.
(3) Once connected to the SEAKER’s Wireless Access Point, the investigator will open
any web browser on their connected device and direct it to go to http://seaker01.local.
84
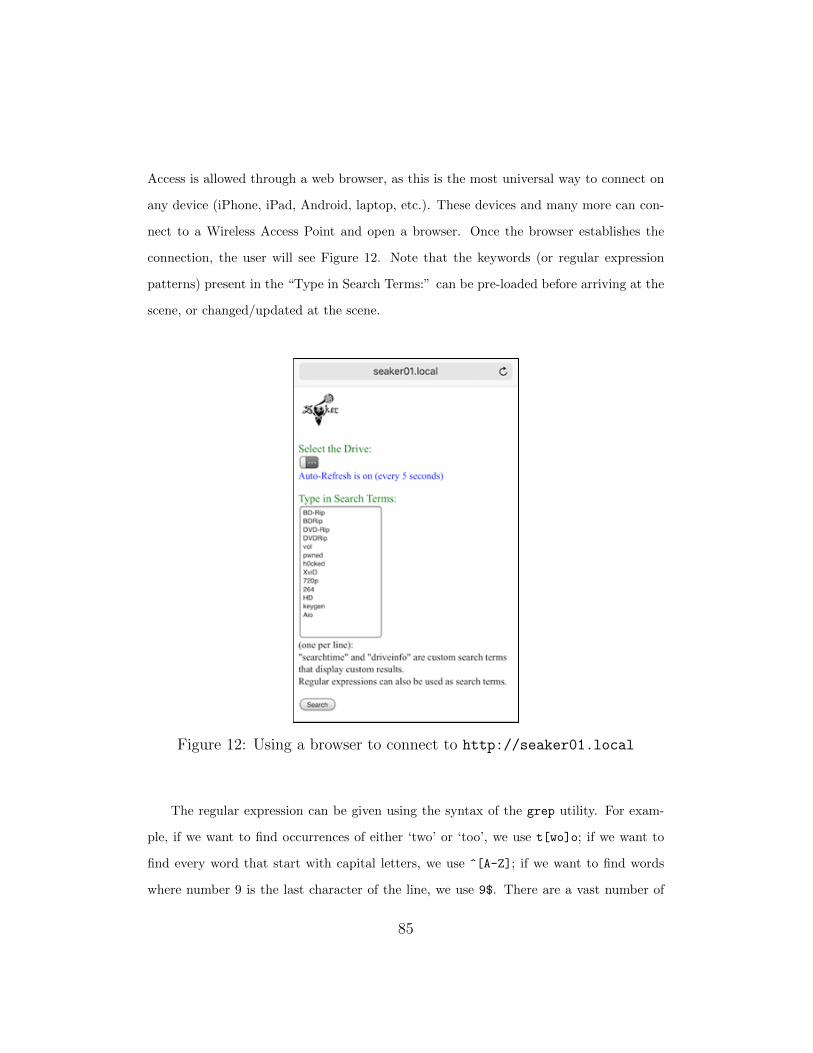
Access is allowed through a web browser, as this is the most universal way to connect on
any device (iPhone, iPad, Android, laptop, etc.). These devices and many more can con-
nect to a Wireless Access Point and open a browser. Once the browser establishes the
connection, the user will see Figure 12. Note that the keywords (or regular expression
patterns) present in the “Type in Search Terms:” can be pre-loaded before arriving at the
scene, or changed/updated at the scene.
Figure 12: Using a browser to connect to http://seaker01.local
The regular expression can be given using the syntax of the grep utility. For exam-
ple, if we want to find occurrences of either ‘two’ or ‘too’, we use t[wo]o; if we want to
find every word that start with capital letters, we use ^[A-Z]; if we want to find words
where number 9 is the last character of the line, we use 9$. There are a vast number of
85
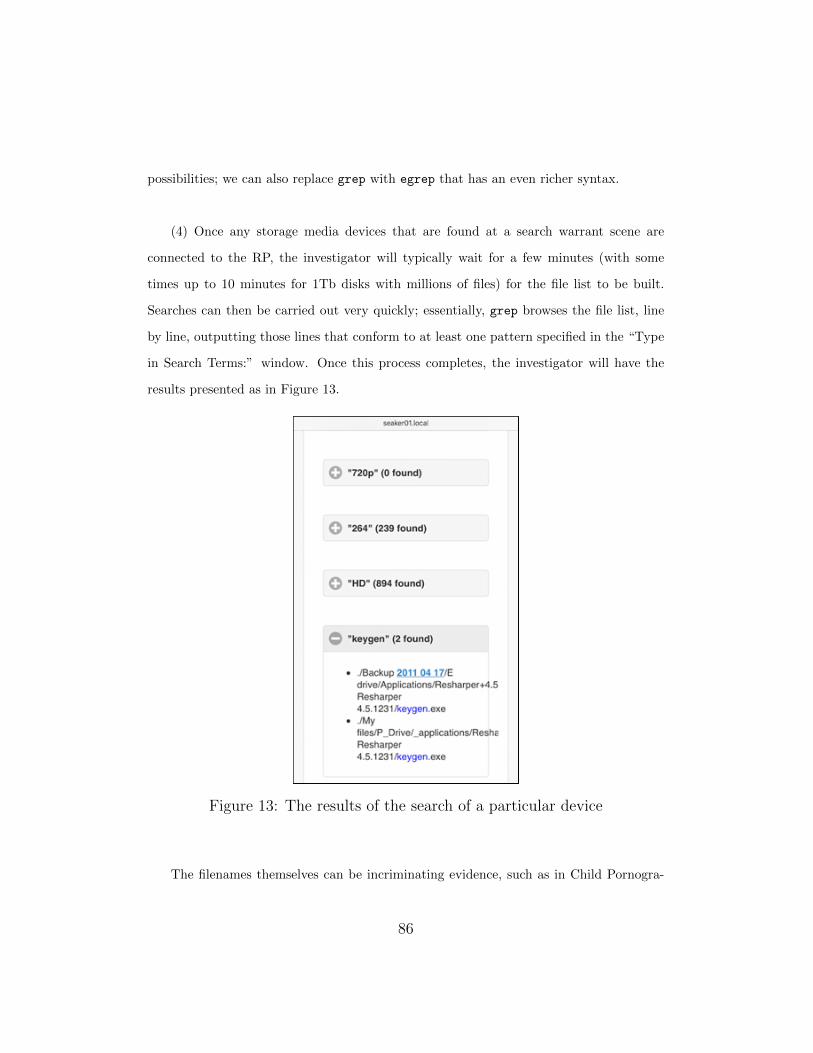
possibilities; we can also replace grep with egrep that has an even richer syntax.
(4) Once any storage media devices that are found at a search warrant scene are
connected to the RP, the investigator will typically wait for a few minutes (with some
times up to 10 minutes for 1Tb disks with millions of files) for the file list to be built.
Searches can then be carried out very quickly; essentially, grep browses the file list, line
by line, outputting those lines that conform to at least one pattern specified in the “Type
in Search Terms:” window. Once this process completes, the investigator will have the
results presented as in Figure 13.
Figure 13: The results of the search of a particular device
The filenames themselves can be incriminating evidence, such as in Child Pornogra-
86
phy (CP) cases, where the material has a commonly used naming convention, e.g., “lolita”
which can be found with the grep pattern .*lolita.* (‘.*’ means the following: ‘.’
(period) matches any single character of any value, except a newline, and ‘*’ (asterisk)
matches zero or more of the preceding character or expression) or simply lolita. This
can be used by the investigators to question the suspects. The questioning usually takes
place at the same time as the forensic examiners triage the evidence, and one of the re-
quirements of SEAKER was to be fast so that investigators can start getting intelligence
quickly from the initial processing of the scene.
(5) The user process flow is documented in the following figure 14.
87
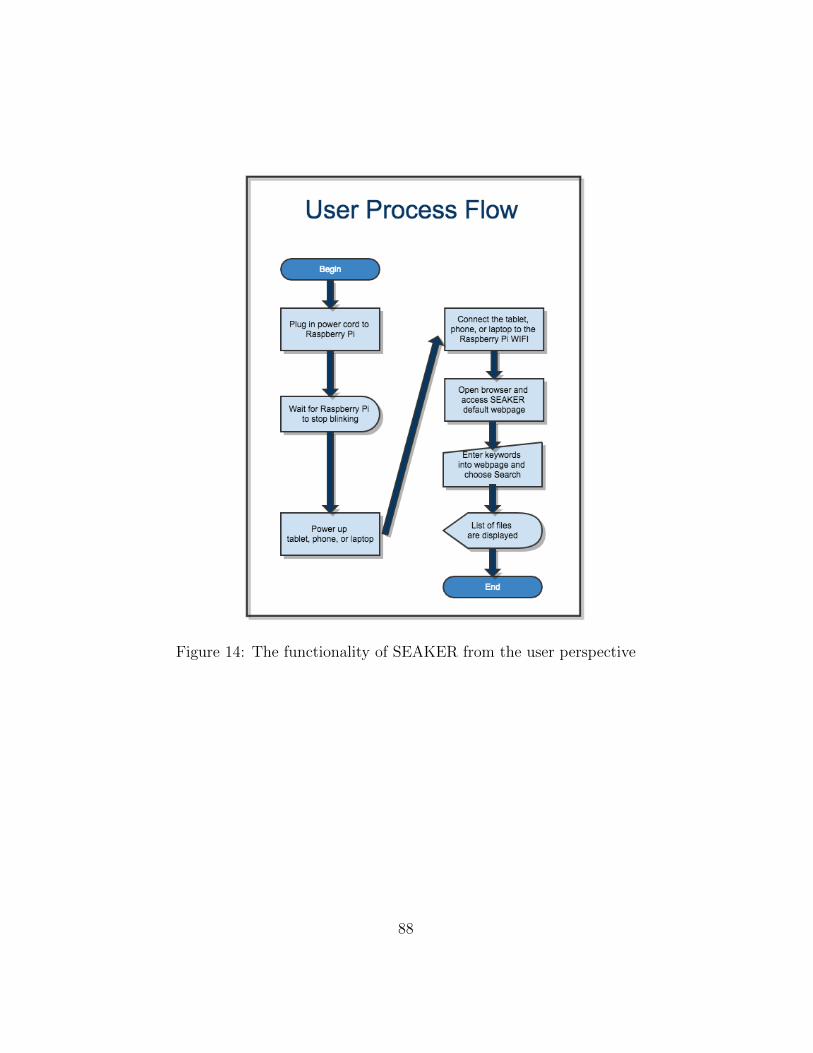
Figure 14: The functionality of SEAKER from the user perspective
88
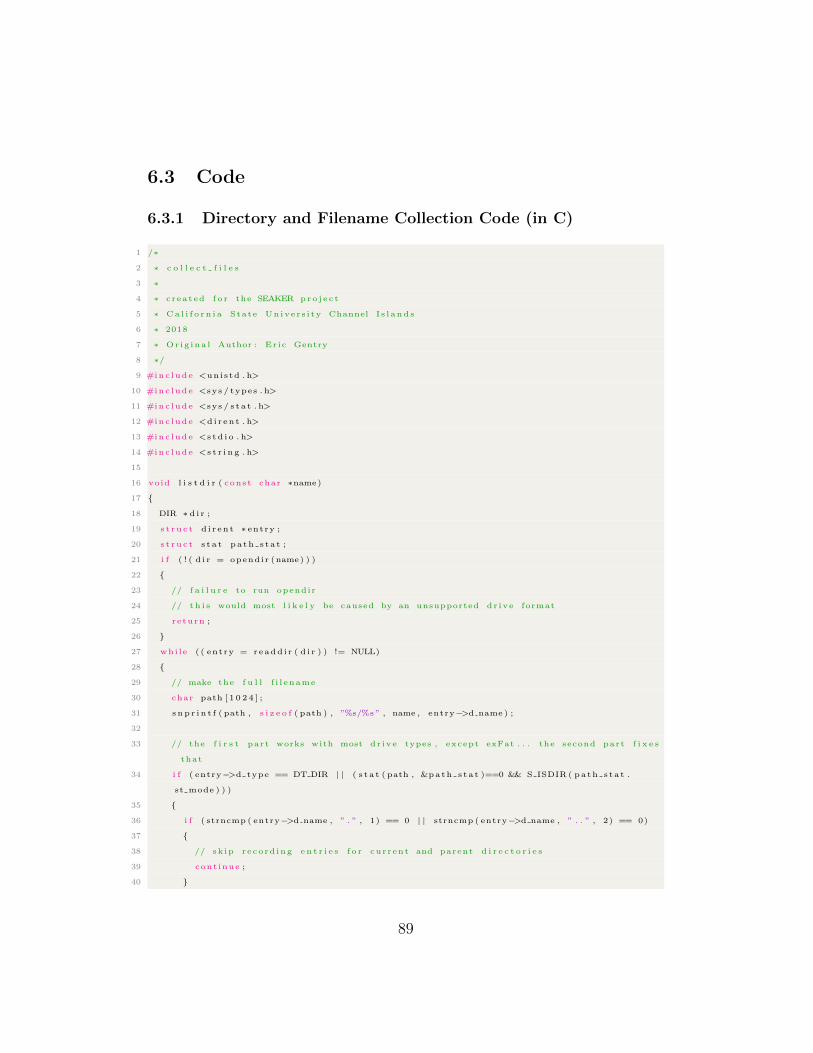
6.3 Code
6.3.1 Directory and Filename Collection Code (in C)
1 /∗
2 ∗ c o l l e c t f i l e s
3 ∗
4 ∗ c reated f o r the SEAKER pro j e c t
5 ∗ Ca l i f o r n i a State Un ive r s i ty Channel I s l and s
6 ∗ 2018
7 ∗ Or ig ina l Author : Er ic Gentry
8 ∗/
9 #inc lude <uni s td . h>
10 #inc lude <sys / types . h>
11 #inc lude <sys / s t a t . h>
12 #inc lude <d i r en t . h>
13 #inc lude <s t d i o . h>
14 #inc lude <s t r i n g . h>
15
16 void l i s t d i r ( const char ∗name)
17 {
18 DIR ∗ d i r ;
19 s t r u c t d i r en t ∗ entry ;
20 s t r u c t s t a t pa th s ta t ;
21 i f ( ! ( d i r = opendir (name) ) )
22 {
23 // f a i l u r e to run opendir
24 // t h i s would most l i k e l y be caused by an unsupported dr ive format
25 return ;
26 }
27 whi le ( ( entry = readd i r ( d i r ) ) != NULL)
28 {
29 // make the f u l l f i l ename
30 char path [ 1 0 2 4 ] ;
31 s np r i n t f ( path , s i z e o f ( path ) , ”%s/%s” , name , entry−>d name ) ;
32
33 // the f i r s t part works with most dr ive types , except exFat . . . the second part f i x e s
that
34 i f ( entry−>d type == DT DIR | | ( s t a t ( path , &path s ta t )==0 && S ISDIR ( path s ta t .
st mode ) ) )
35 {
36 i f ( strncmp ( entry−>d name , ” . ” , 1) == 0 | | strncmp ( entry−>d name , ” . . ” , 2) == 0)
37 {
38 // sk ip r eco rd ing e n t r i e s f o r cur rent and parent d i r e c t o r i e s
39 cont inue ;
40 }
89
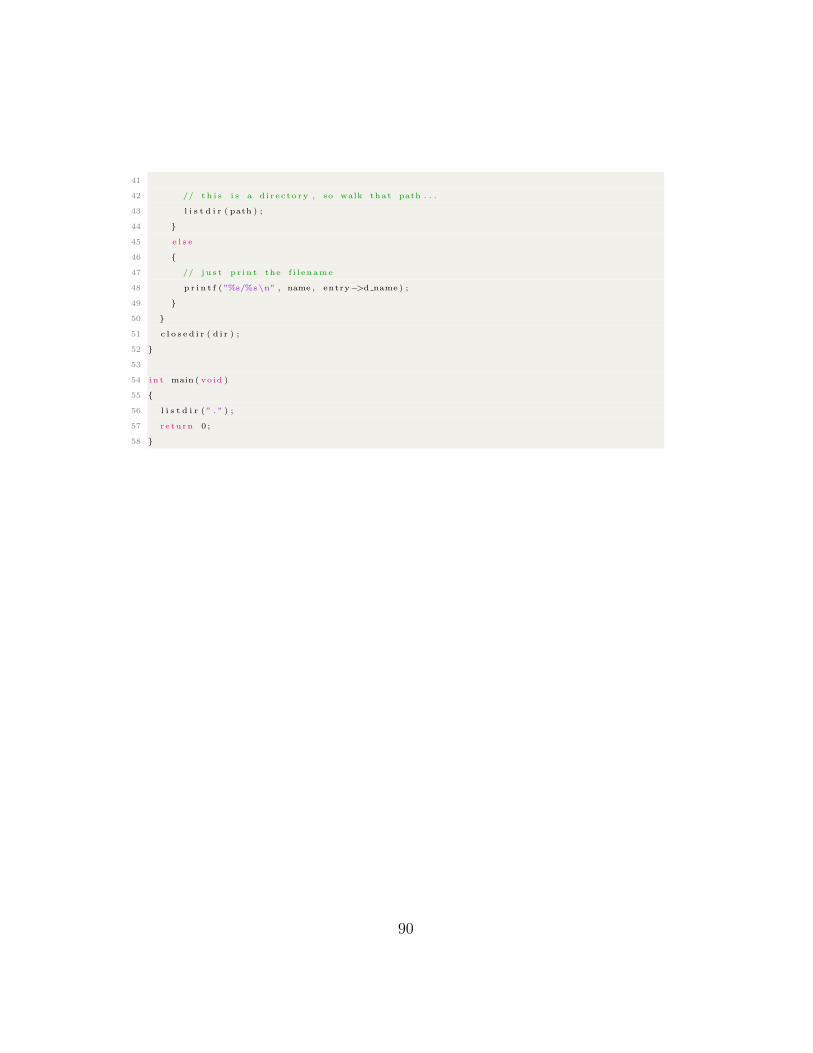
41
42 // t h i s i s a d i r e c to ry , so walk that path . . .
43 l i s t d i r ( path ) ;
44 }
45 e l s e
46 {
47 // j u s t p r in t the f i l ename
48 p r i n t f ( ”%s/%s\n” , name , entry−>d name ) ;
49 }
50 }
51 c l o s e d i r ( d i r ) ;
52 }
53
54 in t main ( void )
55 {
56 l i s t d i r ( ” . ” ) ;
57 return 0 ;
58 }
90
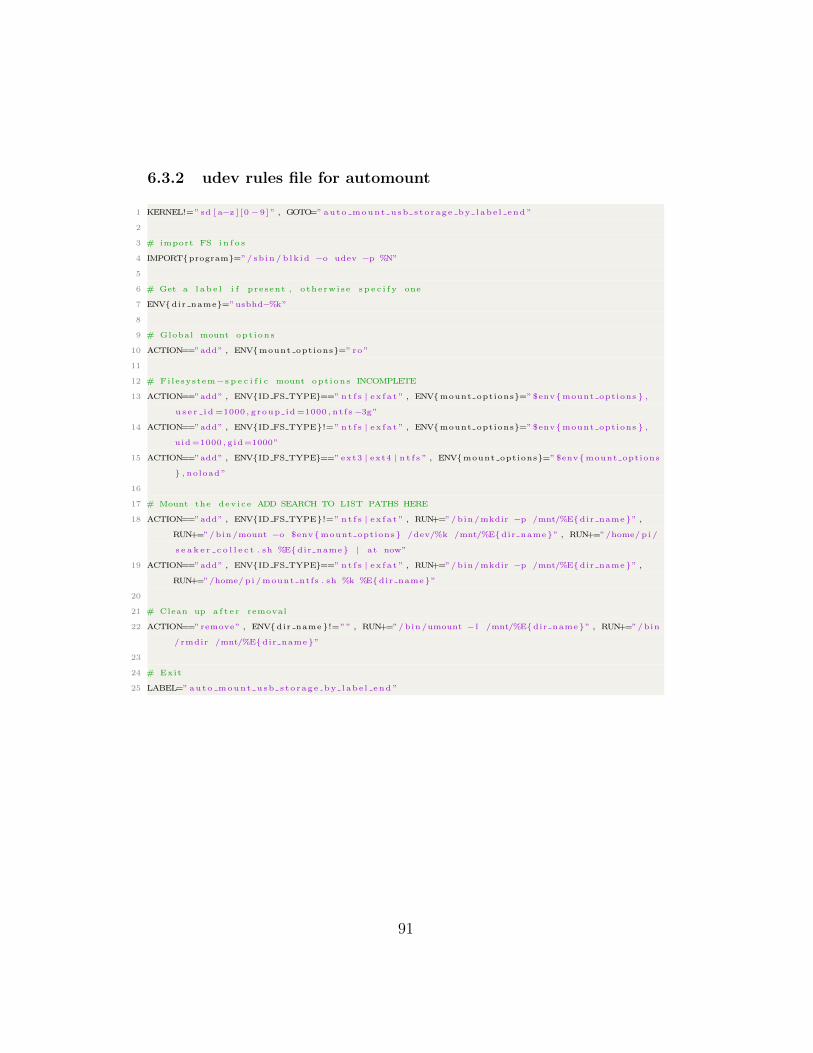
6.3.2 udev rules file for automount
1 KERNEL!=”sd [ a−z ] [0 −9 ] ” , GOTO=” auto mount usb s to rage by labe l end ”
2
3 # import FS i n f o s
4 IMPORT{program}=”/ sb in / b lk id −o udev −p %N”
5
6 # Get a l a b e l i f present , o therwi se s p e c i f y one
7 ENV{dir name}=”usbhd−%k”
8
9 # Global mount opt ions
10 ACTION==”add” , ENV{mount options}=”ro ”
11
12 # Filesystem−s p e c i f i c mount opt ions INCOMPLETE
13 ACTION==”add” , ENV{ID FS TYPE}==” n t f s | ex f a t ” , ENV{mount options}=”$env{mount options } ,
u s e r i d =1000 , group id =1000 , nt f s−3g”
14 ACTION==”add” , ENV{ID FS TYPE}!=” n t f s | ex f a t ” , ENV{mount options}=”$env{mount options } ,
uid=1000 , g id=1000”
15 ACTION==”add” , ENV{ID FS TYPE}==”ext3 | ext4 | n t f s ” , ENV{mount options}=”$env{mount options
} , noload”
16
17 # Mount the dev i ce ADD SEARCH TO LIST PATHS HERE
18 ACTION==”add” , ENV{ID FS TYPE}!=” n t f s | ex f a t ” , RUN+=”/bin /mkdir −p /mnt/%E{dir name}” ,
RUN+=”/bin /mount −o $env{mount options} /dev/%k /mnt/%E{dir name}” , RUN+=”/home/ pi /
s e a k e r c o l l e c t . sh %E{dir name} | at now”
19 ACTION==”add” , ENV{ID FS TYPE}==” n t f s | ex f a t ” , RUN+=”/bin /mkdir −p /mnt/%E{dir name}” ,
RUN+=”/home/ pi /mount ntfs . sh %k %E{dir name}”
20
21 # Clean up a f t e r removal
22 ACTION==”remove” , ENV{dir name}!=”” , RUN+=”/bin /umount − l /mnt/%E{dir name}” , RUN+=”/bin
/ rmdir /mnt/%E{dir name}”
23
24 # Exit
25 LABEL=” auto mount usb s to rage by labe l end ”
91
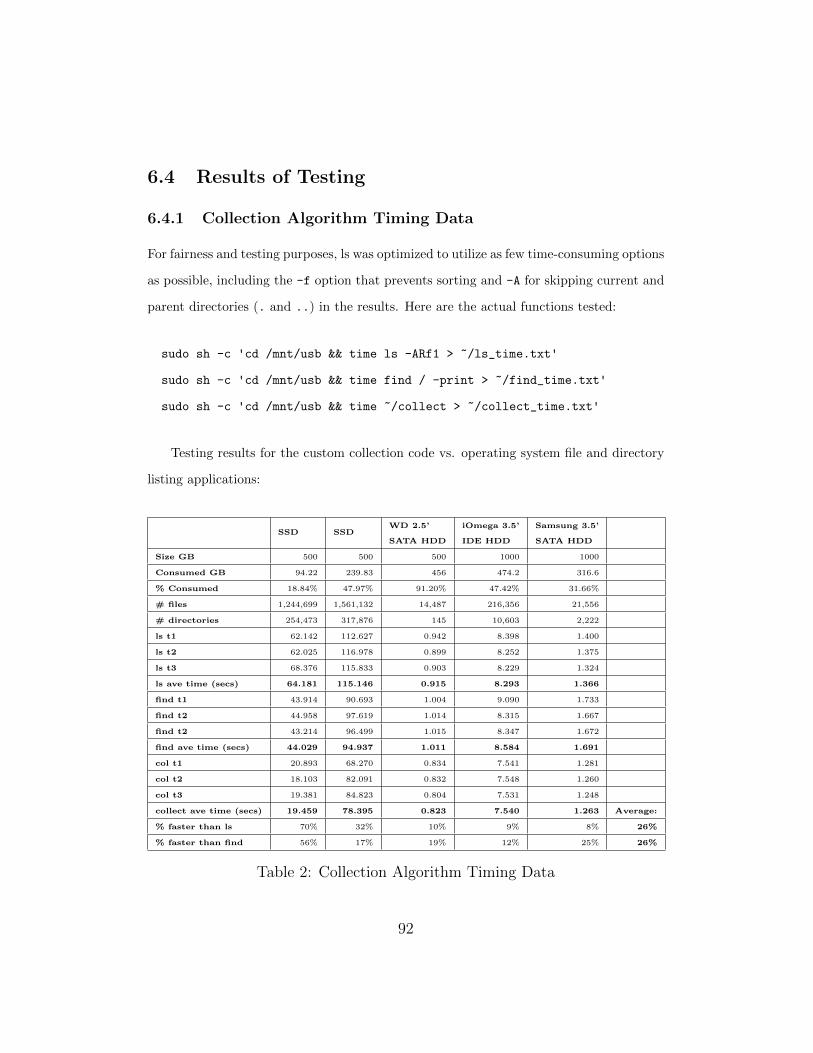
6.4 Results of Testing
6.4.1 Collection Algorithm Timing Data
For fairness and testing purposes, ls was optimized to utilize as few time-consuming options
as possible, including the -f option that prevents sorting and -A for skipping current and
parent directories (. and ..) in the results. Here are the actual functions tested:
sudo sh -c 'cd /mnt/usb && time ls -ARf1 > ~/ls_time.txt'
sudo sh -c 'cd /mnt/usb && time find / -print > ~/find_time.txt'
sudo sh -c 'cd /mnt/usb && time ~/collect > ~/collect_time.txt'
Testing results for the custom collection code vs. operating system file and directory
listing applications:
SSD SSDWD 2.5’
SATA HDD
iOmega 3.5’
IDE HDD
Samsung 3.5’
SATA HDD
Size GB 500 500 500 1000 1000
Consumed GB 94.22 239.83 456 474.2 316.6
% Consumed 18.84% 47.97% 91.20% 47.42% 31.66%
# files 1,244,699 1,561,132 14,487 216,356 21,556
# directories 254,473 317,876 145 10,603 2,222
ls t1 62.142 112.627 0.942 8.398 1.400
ls t2 62.025 116.978 0.899 8.252 1.375
ls t3 68.376 115.833 0.903 8.229 1.324
ls ave time (secs) 64.181 115.146 0.915 8.293 1.366
find t1 43.914 90.693 1.004 9.090 1.733
find t2 44.958 97.619 1.014 8.315 1.667
find t2 43.214 96.499 1.015 8.347 1.672
find ave time (secs) 44.029 94.937 1.011 8.584 1.691
col t1 20.893 68.270 0.834 7.541 1.281
col t2 18.103 82.091 0.832 7.548 1.260
col t3 19.381 84.823 0.804 7.531 1.248
collect ave time (secs) 19.459 78.395 0.823 7.540 1.263 Average:
% faster than ls 70% 32% 10% 9% 8% 26%
% faster than find 56% 17% 19% 12% 25% 26%
Table 2: Collection Algorithm Timing Data
92
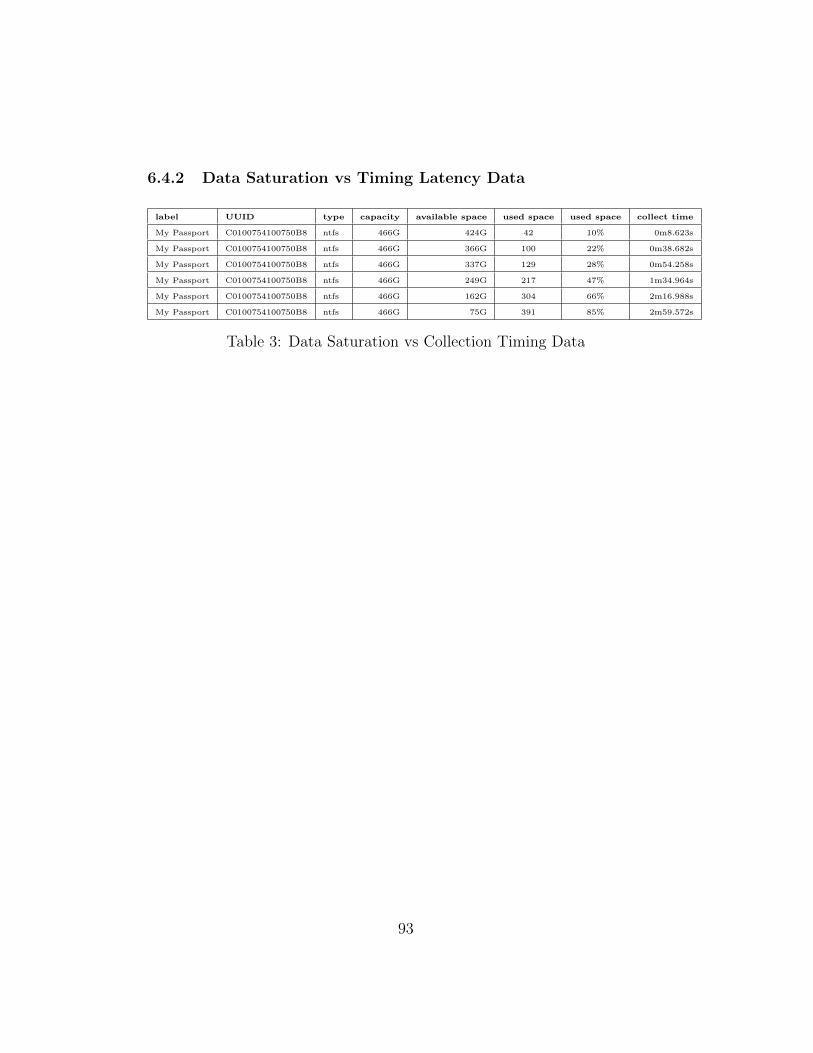
6.4.2 Data Saturation vs Timing Latency Data
label UUID type capacity available space used space used space collect time
My Passport C0100754100750B8 ntfs 466G 424G 42 10% 0m8.623s
My Passport C0100754100750B8 ntfs 466G 366G 100 22% 0m38.682s
My Passport C0100754100750B8 ntfs 466G 337G 129 28% 0m54.258s
My Passport C0100754100750B8 ntfs 466G 249G 217 47% 1m34.964s
My Passport C0100754100750B8 ntfs 466G 162G 304 66% 2m16.988s
My Passport C0100754100750B8 ntfs 466G 75G 391 85% 2m59.572s
Table 3: Data Saturation vs Collection Timing Data
93
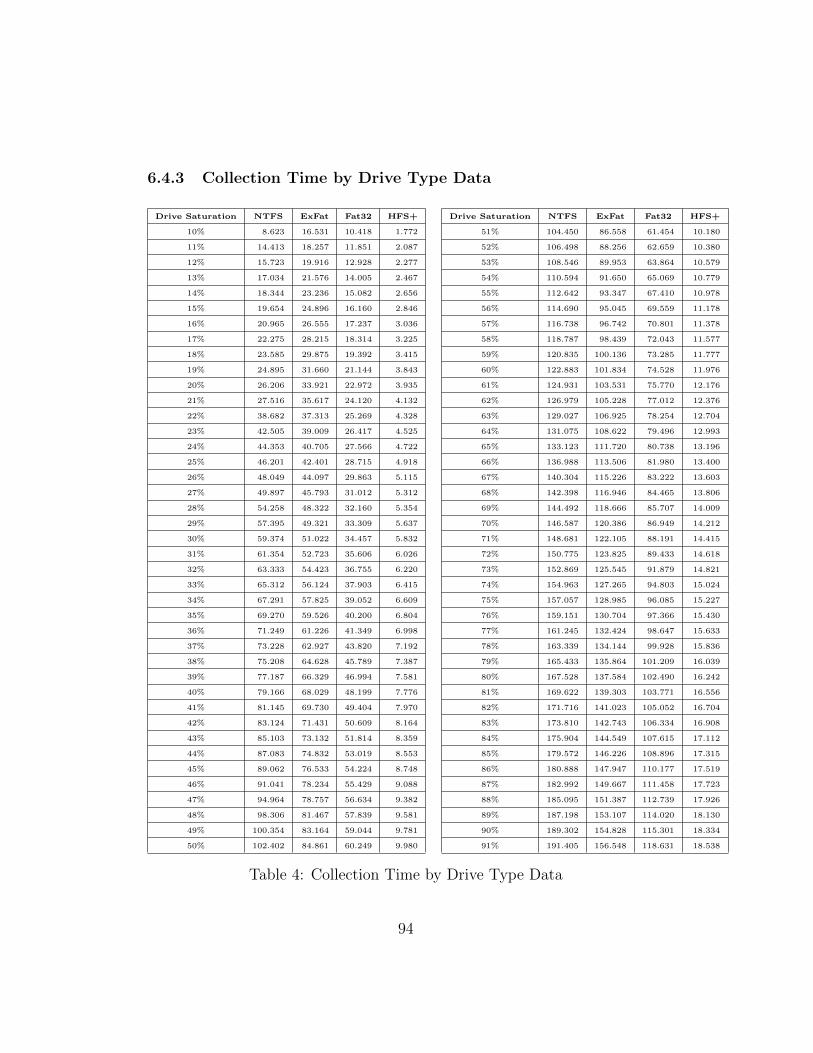
6.4.3 Collection Time by Drive Type Data
Drive Saturation NTFS ExFat Fat32 HFS+ Drive Saturation NTFS ExFat Fat32 HFS+
10% 8.623 16.531 10.418 1.772 51% 104.450 86.558 61.454 10.180
11% 14.413 18.257 11.851 2.087 52% 106.498 88.256 62.659 10.380
12% 15.723 19.916 12.928 2.277 53% 108.546 89.953 63.864 10.579
13% 17.034 21.576 14.005 2.467 54% 110.594 91.650 65.069 10.779
14% 18.344 23.236 15.082 2.656 55% 112.642 93.347 67.410 10.978
15% 19.654 24.896 16.160 2.846 56% 114.690 95.045 69.559 11.178
16% 20.965 26.555 17.237 3.036 57% 116.738 96.742 70.801 11.378
17% 22.275 28.215 18.314 3.225 58% 118.787 98.439 72.043 11.577
18% 23.585 29.875 19.392 3.415 59% 120.835 100.136 73.285 11.777
19% 24.895 31.660 21.144 3.843 60% 122.883 101.834 74.528 11.976
20% 26.206 33.921 22.972 3.935 61% 124.931 103.531 75.770 12.176
21% 27.516 35.617 24.120 4.132 62% 126.979 105.228 77.012 12.376
22% 38.682 37.313 25.269 4.328 63% 129.027 106.925 78.254 12.704
23% 42.505 39.009 26.417 4.525 64% 131.075 108.622 79.496 12.993
24% 44.353 40.705 27.566 4.722 65% 133.123 111.720 80.738 13.196
25% 46.201 42.401 28.715 4.918 66% 136.988 113.506 81.980 13.400
26% 48.049 44.097 29.863 5.115 67% 140.304 115.226 83.222 13.603
27% 49.897 45.793 31.012 5.312 68% 142.398 116.946 84.465 13.806
28% 54.258 48.322 32.160 5.354 69% 144.492 118.666 85.707 14.009
29% 57.395 49.321 33.309 5.637 70% 146.587 120.386 86.949 14.212
30% 59.374 51.022 34.457 5.832 71% 148.681 122.105 88.191 14.415
31% 61.354 52.723 35.606 6.026 72% 150.775 123.825 89.433 14.618
32% 63.333 54.423 36.755 6.220 73% 152.869 125.545 91.879 14.821
33% 65.312 56.124 37.903 6.415 74% 154.963 127.265 94.803 15.024
34% 67.291 57.825 39.052 6.609 75% 157.057 128.985 96.085 15.227
35% 69.270 59.526 40.200 6.804 76% 159.151 130.704 97.366 15.430
36% 71.249 61.226 41.349 6.998 77% 161.245 132.424 98.647 15.633
37% 73.228 62.927 43.820 7.192 78% 163.339 134.144 99.928 15.836
38% 75.208 64.628 45.789 7.387 79% 165.433 135.864 101.209 16.039
39% 77.187 66.329 46.994 7.581 80% 167.528 137.584 102.490 16.242
40% 79.166 68.029 48.199 7.776 81% 169.622 139.303 103.771 16.556
41% 81.145 69.730 49.404 7.970 82% 171.716 141.023 105.052 16.704
42% 83.124 71.431 50.609 8.164 83% 173.810 142.743 106.334 16.908
43% 85.103 73.132 51.814 8.359 84% 175.904 144.549 107.615 17.112
44% 87.083 74.832 53.019 8.553 85% 179.572 146.226 108.896 17.315
45% 89.062 76.533 54.224 8.748 86% 180.888 147.947 110.177 17.519
46% 91.041 78.234 55.429 9.088 87% 182.992 149.667 111.458 17.723
47% 94.964 78.757 56.634 9.382 88% 185.095 151.387 112.739 17.926
48% 98.306 81.467 57.839 9.581 89% 187.198 153.107 114.020 18.130
49% 100.354 83.164 59.044 9.781 90% 189.302 154.828 115.301 18.334
50% 102.402 84.861 60.249 9.980 91% 191.405 156.548 118.631 18.538
Table 4: Collection Time by Drive Type Data
94
References
[1] Akinola Ajijola, Pavol Zavarsky, and Ron Ruhl. A review and comparative evaluation
of forensics guidelines of NIST SP 800-101 Rev. 1: 2014 and ISO/IEC 27037: 2012.
In Internet Security (WorldCIS), 2014 World Congress on, pages 66–73. IEEE, 2014.
[2] R Ayers, W Jansen, and S Brothers. Guidelines on mobile device forensics (NIST
Special Publication 800-101 Revision 1), 1, 85, 2014.
[3] Susan Ballou. Electronic crime scene investigation: A guide for first responders.
Diane Publishing, 2010.
[4] Venansius Baryamureeba and Florence Tushabe. The enhanced digital investigation
process model. In Proceedings of the Fourth Digital Forensic Research Workshop,
pages 1–9, 2004.
[5] Brian Carrier, Eugene H Spafford, et al. Getting physical with the digital investigation
process. International Journal of digital evidence, 2(2):1–20, 2003.
[6] Terry Dobrosky, Eric Gentry, Michael Soltys, and Adam Wittkins. Digital Foren-
sic Tools for ICAC Investigators. DOJ Grant Proposal, California State University
Channel Islands, Southern California High Technology Task Force, 1 University Dr.,
Camarillo, California 93012, 2018.
[7] ABI Research for visionaries. Market Research: Internet of Everyting Market Tracker,
2014. https://www.abiresearch.com/market-research/product/1017637-internet-of-
everything-market-tracker/.
[8] Eric Gentry, Ryan McIntyre, Michael Soltys, and Frank Lyu. SEAKER: A Tool for
Fast Digital Forensic Triage, 2018.
[9] Ben Hitchcock, Nhien-An Le-Khac, and Mark Scanlon. Tiered forensic methodology
model for Digital Field Triage by non-digital evidence specialists. Digital Investiga-
tion, 16:S75–S85, 2016.
95
[10] Information technology – Security techniques – Guidelines for identification, collec-
tion, acquisition and preservation of digital evidence. Standard, International Orga-
nization for Standardization, Geneva, Switzerland, October 2012.
[11] Vacius Jusas, Darius Birvinskas, and Elvar Gahramanov. Methods and tools of digital
triage in forensic context: survey and future directions. Symmetry, 9(4):49, 2017.
[12] David Lillis, Brett Becker, Tadhg O’Sullivan, and Mark Scanlon. Current chal-
lenges and future research areas for digital forensic investigation. arXiv preprint
arXiv:1604.03850, 2016.
[13] Michael G Noblett, Mark M Pollitt, and Lawrence A Presley. Recovering and exam-
ining computer forensic evidence. Forensic Science Communications, 2(4), 2000.
[14] Sriram Raghavan. Digital forensic research: current state of the art. CSI Transactions
on ICT, 1(1):91–114, 2013.
[15] Marcus K Rogers, James Goldman, Rick Mislan, Timothy Wedge, and Steve Debrota.
Computer forensics field triage process model. In Proceedings of the conference on
Digital Forensics, Security and Law, page 27. Association of Digital Forensics, Secu-
rity and Law, 2006.
[16] Adrian Shaw and Alan Browne. A practical and robust approach to coping with large
volumes of data submitted for digital forensic examination. Digital Investigation,
10(2):116–128, 2013.
[17] IDC Custom Solutions. IDC Thought Leadership Practice Case Study,
Data Age 2025: Seagate, 2017. https://www.idc.com/prodserv/custom-
solutions/RESOURCES/ATTACHMENTS/thought-leadership-cs.pdf.
[18] J Williams. ACPO Good Practice Guide for Digital Evidence. Metropolitan Police
Service, Association of Chief Police Officers, GB, 2012.
[19] Charles L Yeschke. The art of investigative interviewing: A human approach to
testimonial evidence, Second Edition. Butterworth-Heinemann Boston, 2003.
96