Embed Size (px)
Citation preview
SDS-MW Analysis Kit For the PA 800 Plus Pharmaceutical Analysis System
Application Guide
RUO-IDV-05-6934-B November 2019

This document is provided to customers who have purchased SCIEX equipment to use in the operation of such SCIEX equipment. This document is copyright protected and any reproduction of this document or any part of this document is strictly prohibited, except as SCIEX may authorize in writing.
Software that may be described in this document is furnished under a license agreement. It is against the law to copy, modify, or distribute the software on any medium, except as specifically allowed in the license agreement. Furthermore, the license agreement may prohibit the software from being disassembled, reverse engineered, or decompiled for any purpose. Warranties are as stated therein.
Portions of this document may make reference to other manufacturers and/or their products, which may contain parts whose names are registered as trademarks and/or function as trademarks of their respective owners. Any such use is intended only to designate those manufacturers' products as supplied by SCIEX for incorporation into its equipment and does not imply any right and/or license to use or permit others to use such manufacturers' and/or their product names as trademarks.
SCIEX warranties are limited to those express warranties provided at the time of sale or license of its products and are SCIEX’s sole and exclusive representations, warranties, and obligations. SCIEX makes no other warranty of any kind whatsoever, expressed or implied, including without limitation, warranties of merchantability or fitness for a particular purpose, whether arising from a statute or otherwise in law or from a course of dealing or usage of trade, all of which are expressly disclaimed, and assumes no responsibility or contingent liability, including indirect or consequential damages, for any use by the purchaser or for any adverse circumstances arising therefrom.
For Research Use Only. Not for use in Diagnostic Procedures.
Trademarks and/or registered trademarks mentioned herein are the property of AB Sciex Pte. Ltd., or their respective owners, in the United States and/or certain other countries.
AB SCIEX™ is being used under license.© 2019 DH Tech. Dev. Pte. Ltd.
AB Sciex Pte. Ltd. Blk33, #04-06 Marsiling Ind Estate Road 3 Woodlands Central Industrial Estate, Singapore 739256
Application Guide SDS-MW Analysis Kit
RUO-IDV-05-6934-B 2 / 44
Contents
SDS-MW Analysis Kit . . . . . . . . . . . . . . . . . . . . . . . . . . . . . . . . . . . . . . . . . . . . . . . . . . . . . . . 5Safety. . . . . . . . . . . . . . . . . . . . . . . . . . . . . . . . . . . . . . . . . . . . . . . . . . . . . . . . . . . . . . . . . . . . . . . . . . . . 5Intended Use . . . . . . . . . . . . . . . . . . . . . . . . . . . . . . . . . . . . . . . . . . . . . . . . . . . . . . . . . . . . . . . . . . . . . . 5Introduction . . . . . . . . . . . . . . . . . . . . . . . . . . . . . . . . . . . . . . . . . . . . . . . . . . . . . . . . . . . . . . . . . . . . . . . 5
Protein Size Standard . . . . . . . . . . . . . . . . . . . . . . . . . . . . . . . . . . . . . . . . . . . . . . . . . . . . . . . . . . . . . 6Internal Standard . . . . . . . . . . . . . . . . . . . . . . . . . . . . . . . . . . . . . . . . . . . . . . . . . . . . . . . . . . . . . . . . 6Sample Buffers . . . . . . . . . . . . . . . . . . . . . . . . . . . . . . . . . . . . . . . . . . . . . . . . . . . . . . . . . . . . . . . . . . 6
Equipment and Materials Required . . . . . . . . . . . . . . . . . . . . . . . . . . . . . . . . . . . . . . . . . . . . . . . . . . . . 7Storage Conditions . . . . . . . . . . . . . . . . . . . . . . . . . . . . . . . . . . . . . . . . . . . . . . . . . . . . . . . . . . . . . . . 8Customer-Supplied Equipment and Supplies. . . . . . . . . . . . . . . . . . . . . . . . . . . . . . . . . . . . . . . . . . . 8Required Detector . . . . . . . . . . . . . . . . . . . . . . . . . . . . . . . . . . . . . . . . . . . . . . . . . . . . . . . . . . . . . . . . 8Required Cartridge or Capillary . . . . . . . . . . . . . . . . . . . . . . . . . . . . . . . . . . . . . . . . . . . . . . . . . . . . . 8
Methods and Sequences . . . . . . . . . . . . . . . . . . . . . . . . . . . . . . . . . . . . . . . . . . . . . . . . . . . . . . . . . . . . . 9Prepare the Samples . . . . . . . . . . . . . . . . . . . . . . . . . . . . . . . . . . . . . . . . . . . . . . . . . . . . . . . . . . . . . . . . 9
Prepare the SDS-MW Size Standard . . . . . . . . . . . . . . . . . . . . . . . . . . . . . . . . . . . . . . . . . . . . . . . . . . 9Desalt the Protein Sample . . . . . . . . . . . . . . . . . . . . . . . . . . . . . . . . . . . . . . . . . . . . . . . . . . . . . . . . 10Determine the Protein Sample Concentration . . . . . . . . . . . . . . . . . . . . . . . . . . . . . . . . . . . . . . . . . 10Prepare the Reduced Protein Sample. . . . . . . . . . . . . . . . . . . . . . . . . . . . . . . . . . . . . . . . . . . . . . . . 10Perform a Buffer Exchange for the Protein Sample . . . . . . . . . . . . . . . . . . . . . . . . . . . . . . . . . . . . . 11Prepare the Non-reduced Protein Sample . . . . . . . . . . . . . . . . . . . . . . . . . . . . . . . . . . . . . . . . . . . . 12
Prepare the Alkylating Agent (250 mM IAM Solution) . . . . . . . . . . . . . . . . . . . . . . . . . . . . . . . . . 12Prepare Non-reduced Samples Using an Alkylating Agent . . . . . . . . . . . . . . . . . . . . . . . . . . . . . 12
Prepare the PA 800 Plus System. . . . . . . . . . . . . . . . . . . . . . . . . . . . . . . . . . . . . . . . . . . . . . . . . . . . . . 13Install the PDA Detector . . . . . . . . . . . . . . . . . . . . . . . . . . . . . . . . . . . . . . . . . . . . . . . . . . . . . . . . . . 13Clean the Interface Block . . . . . . . . . . . . . . . . . . . . . . . . . . . . . . . . . . . . . . . . . . . . . . . . . . . . . . . . . 13
Insert the Cartridge and Calibrate the Detector . . . . . . . . . . . . . . . . . . . . . . . . . . . . . . . . . . . . . . . 14Load the Buffer Trays . . . . . . . . . . . . . . . . . . . . . . . . . . . . . . . . . . . . . . . . . . . . . . . . . . . . . . . . . . . . 14Load the Sample Tray . . . . . . . . . . . . . . . . . . . . . . . . . . . . . . . . . . . . . . . . . . . . . . . . . . . . . . . . . . . . 17
Run the Samples . . . . . . . . . . . . . . . . . . . . . . . . . . . . . . . . . . . . . . . . . . . . . . . . . . . . . . . . . . . . . . . . . . 19Create the Sequence and Start the Run . . . . . . . . . . . . . . . . . . . . . . . . . . . . . . . . . . . . . . . . . . . . . 19
Waste Disposal . . . . . . . . . . . . . . . . . . . . . . . . . . . . . . . . . . . . . . . . . . . . . . . . . . . . . . . . . . . . . . . . . . . 23Store the Cartridge . . . . . . . . . . . . . . . . . . . . . . . . . . . . . . . . . . . . . . . . . . . . . . . . . . . . . . . . . . . . . . . . 23
Store the Cartridge for More Than 10 Days . . . . . . . . . . . . . . . . . . . . . . . . . . . . . . . . . . . . . . . . . . . 24Prepare the Cartridge After Storage. . . . . . . . . . . . . . . . . . . . . . . . . . . . . . . . . . . . . . . . . . . . . . . . . 24
Analyze the Results . . . . . . . . . . . . . . . . . . . . . . . . . . . . . . . . . . . . . . . . . . . . . . . . . . . . . . . . . . . . . . . . 25Estimate the Protein Molecular Weights . . . . . . . . . . . . . . . . . . . . . . . . . . . . . . . . . . . . . . . . . . . . . 25
Troubleshooting. . . . . . . . . . . . . . . . . . . . . . . . . . . . . . . . . . . . . . . . . . . . . . . . . . . . . . . . . . . . . . . . . . . 27
A Hazardous Substance Information . . . . . . . . . . . . . . . . . . . . . . . . . . . . . . . . . . . . . . . . . 29Acid Wash/Regenerating Solution (0.1 M HCl) . . . . . . . . . . . . . . . . . . . . . . . . . . . . . . . . . . . . . . . . . . . 29Basic Wash Solution (0.1 M NaOH) . . . . . . . . . . . . . . . . . . . . . . . . . . . . . . . . . . . . . . . . . . . . . . . . . . . . 29SDS-MW Gel Buffer . . . . . . . . . . . . . . . . . . . . . . . . . . . . . . . . . . . . . . . . . . . . . . . . . . . . . . . . . . . . . . . . 29SDS-MW Sample Buffer . . . . . . . . . . . . . . . . . . . . . . . . . . . . . . . . . . . . . . . . . . . . . . . . . . . . . . . . . . . . . 30
Application Guide SDS-MW Analysis Kit
RUO-IDV-05-6934-B 3 / 42
Other Reagents . . . . . . . . . . . . . . . . . . . . . . . . . . . . . . . . . . . . . . . . . . . . . . . . . . . . . . . . . . . . . . . . . . . 30
B Methods . . . . . . . . . . . . . . . . . . . . . . . . . . . . . . . . . . . . . . . . . . . . . . . . . . . . . . . . . . . . . . 31Initial Conditions . . . . . . . . . . . . . . . . . . . . . . . . . . . . . . . . . . . . . . . . . . . . . . . . . . . . . . . . . . . . . . . . . . 31Time Programs. . . . . . . . . . . . . . . . . . . . . . . . . . . . . . . . . . . . . . . . . . . . . . . . . . . . . . . . . . . . . . . . . . . . 32
C Using the Low pH SDS Sample Buffer . . . . . . . . . . . . . . . . . . . . . . . . . . . . . . . . . . . . . . 35Add a Pressure Injection to the Low pH SDS Sample Buffer Separation Method . . . . . . . . . . . . . . . . 35Results Obtained Using the Low pH SDS Sample Buffer . . . . . . . . . . . . . . . . . . . . . . . . . . . . . . . . . . . 37
Revision History . . . . . . . . . . . . . . . . . . . . . . . . . . . . . . . . . . . . . . . . . . . . . . . . . . . . . . . . . . 39
Contact Us . . . . . . . . . . . . . . . . . . . . . . . . . . . . . . . . . . . . . . . . . . . . . . . . . . . . . . . . . . . . . . 41Customer Training. . . . . . . . . . . . . . . . . . . . . . . . . . . . . . . . . . . . . . . . . . . . . . . . . . . . . . . . . . . . . . . . . 41Online Learning Center . . . . . . . . . . . . . . . . . . . . . . . . . . . . . . . . . . . . . . . . . . . . . . . . . . . . . . . . . . . . . 41Purchase Consumables . . . . . . . . . . . . . . . . . . . . . . . . . . . . . . . . . . . . . . . . . . . . . . . . . . . . . . . . . . . . . 41SCIEX Support . . . . . . . . . . . . . . . . . . . . . . . . . . . . . . . . . . . . . . . . . . . . . . . . . . . . . . . . . . . . . . . . . . . . 41CyberSecurity . . . . . . . . . . . . . . . . . . . . . . . . . . . . . . . . . . . . . . . . . . . . . . . . . . . . . . . . . . . . . . . . . . . . 42Documentation . . . . . . . . . . . . . . . . . . . . . . . . . . . . . . . . . . . . . . . . . . . . . . . . . . . . . . . . . . . . . . . . . . . 42
SDS-MW Analysis Kit Application Guide
4 / 42 RUO-IDV-05-6934-B
SDS-MW Analysis Kit
The SCIEX SDS-MW Analysis Kit provides reagents and supplies for sample preparation and methods to resolve
both reduced and non-reduced proteins using the PA 800 Plus Pharmaceutical Analysis System.This document provides instructions for sample preparation and methods to resolve both reduced and non-reduced proteins by size using the PA 800 Plus Pharmaceutical Analysis System.
Safety
Refer to the Safety Data Sheets (SDS), available at sciex.com/tech-regulatory, for information about the proper handling of materials and reagents. Always follow standard laboratory safety guidelines. Refer to APPENDIX A for hazardous substance information.
Intended Use
The SDS-MW Analysis Kit is for laboratory use only.
Introduction
Capillary electrophoresis (CE) has become an effective replacement for manual slab gel electrophoresis processes due to its automation, quantitation, fast speed, and high efficiency. Many biomolecules, such as proteins, carbohydrates, and nucleic acids are separated by molecular sieving electrophoresis using gel matrices, a technique referred to as capillary gel electrophoresis (CGE). The separation results from the differential migration of the analyte through a gel matrix. In this case, smaller molecules will move faster than large molecules through the separation gel. For polypeptides and proteins, it is necessary to denature the sample in the presence of SDS, an anionic detergent that binds the proteins in a constant ratio of 1:1.4 of protein. The constant mass-to-charge property of the SDS-bound proteins allows separation in a constant ratio of 1 gram of protein : 1.4 grams of SDS.
Note: Refer to the System Overview Guide for instructions for safe use of the system.
Application Guide SDS-MW Analysis Kit
RUO-IDV-05-6934-B 5 / 42
SDS-MW Analysis Kit
The methodology involves the separation of protein-SDS complexes using a replaceable gel matrix. The gel is formulated to provide an effective sieving range of approximately 10 kDa to 225 kDa. Within this size range, the logarithm of protein molecular mass is linear with its reciprocal electrophoretic mobility. Therefore, the molecular weight of an unknown protein may be estimated from a standard curve of known protein sizes. This kit can also be used to quantify the amount of protein and to determine the purity of a protein product.
Protein Size Standard
The SDS-MW size standard contains 10 kDa, 20 kDa, 35 kDa, 50 kDa, 100 kDa, 150 kDa, and 225 kDa proteins. The SDS-MW size standard is used to calibrate the gel to estimate the protein molecular weight of the sample. It also provides confirmation of the resolving power of your experiment.
Internal Standard
A 10 kDa protein internal standard is used as a mobility marker. The mobility of all protein samples are calculated relative to this mobility marker allowing for more accurate size estimation and analyte identification.
Sample Buffers
• SDS-MW sample buffer: The SDS-MW sample buffer is provided as part of the SDS-MW Analysis Kit. This buffer consists of 100 mM Tris-HCl at pH 9.0 with 1% SDS.
• Low pH SDS sample buffer: In some cases, a sample buffer with a lower pH (than that of the SDS-MW sample buffer) might improve sample stability by minimizing protein degradation. For these samples, the SCIEX low pH SDS sample buffer is available separately. This buffer consists of 100 mM Tris-HCl at pH 6.8 with 1% SDS.
If precipitation is present in the SDS-MW gel buffer or the SDS-MW sample buffer, bring the buffer to room temperature overnight.
Note: This application guide has been validated with the PA 800 Plus Pharmaceutical Analysis System.
SDS-MW Analysis Kit Application Guide
6 / 42 RUO-IDV-05-6934-B
SDS-MW Analysis Kit
Equipment and Materials Required
Note: For items with a reorder part number, sometimes the reorder quantity is different than the quantity in the kit.
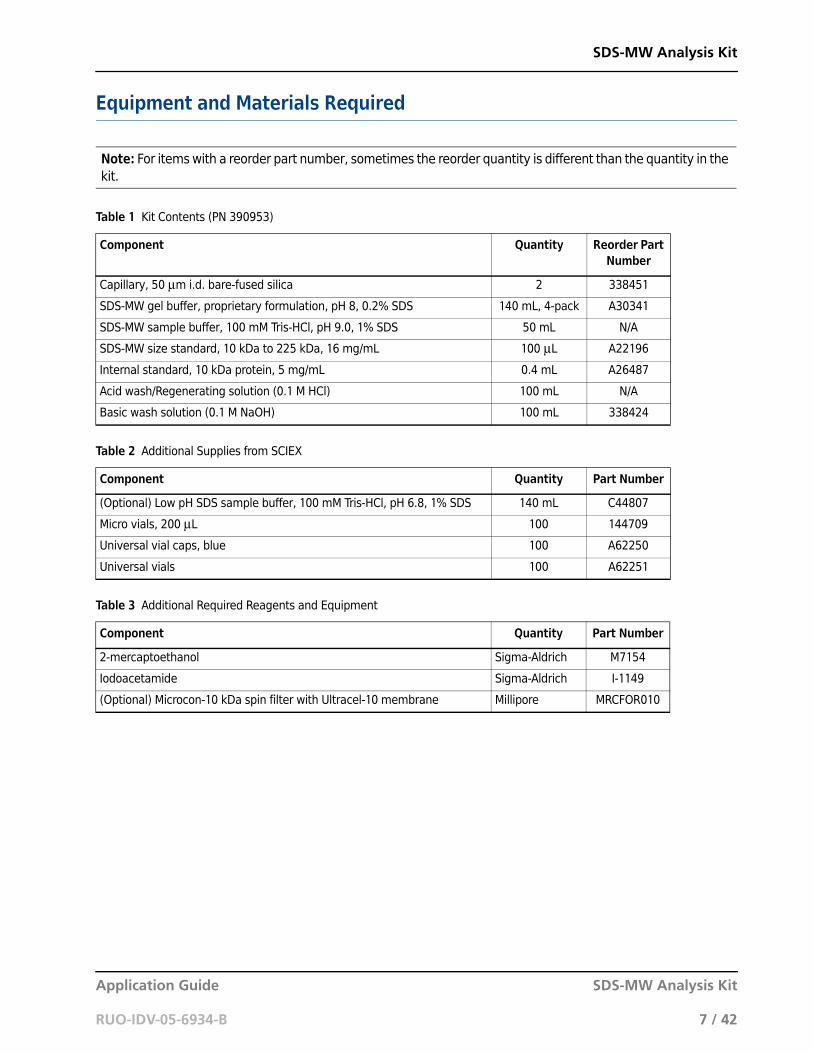
Table 1 Kit Contents (PN 390953)
Component Quantity Reorder Part Number
Capillary, 50 μm i.d. bare-fused silica 2 338451
SDS-MW gel buffer, proprietary formulation, pH 8, 0.2% SDS 140 mL, 4-pack A30341
SDS-MW sample buffer, 100 mM Tris-HCl, pH 9.0, 1% SDS 50 mL N/A
SDS-MW size standard, 10 kDa to 225 kDa, 16 mg/mL 100 μL A22196
Internal standard, 10 kDa protein, 5 mg/mL 0.4 mL A26487
Acid wash/Regenerating solution (0.1 M HCl) 100 mL N/A
Basic wash solution (0.1 M NaOH) 100 mL 338424
Table 2 Additional Supplies from SCIEX
Component Quantity Part Number
(Optional) Low pH SDS sample buffer, 100 mM Tris-HCl, pH 6.8, 1% SDS 140 mL C44807
Micro vials, 200 μL 100 144709
Universal vial caps, blue 100 A62250
Universal vials 100 A62251
Table 3 Additional Required Reagents and Equipment
Component Quantity Part Number
2-mercaptoethanol Sigma-Aldrich M7154
Iodoacetamide Sigma-Aldrich I-1149
(Optional) Microcon-10 kDa spin filter with Ultracel-10 membrane Millipore MRCFOR010
Application Guide SDS-MW Analysis Kit
RUO-IDV-05-6934-B 7 / 42
SDS-MW Analysis Kit
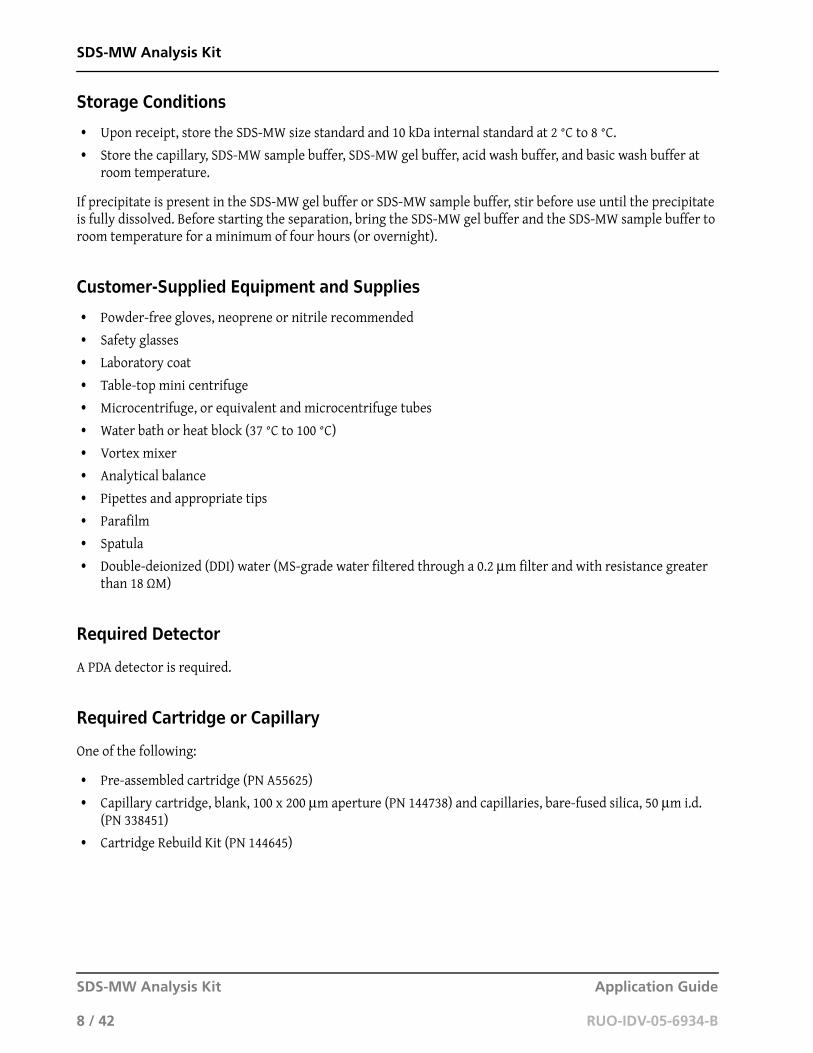
Storage Conditions
• Upon receipt, store the SDS-MW size standard and 10 kDa internal standard at 2 °C to 8 °C.
• Store the capillary, SDS-MW sample buffer, SDS-MW gel buffer, acid wash buffer, and basic wash buffer at room temperature.
If precipitate is present in the SDS-MW gel buffer or SDS-MW sample buffer, stir before use until the precipitate is fully dissolved. Before starting the separation, bring the SDS-MW gel buffer and the SDS-MW sample buffer to room temperature for a minimum of four hours (or overnight).
Customer-Supplied Equipment and Supplies
• Powder-free gloves, neoprene or nitrile recommended
• Safety glasses
• Laboratory coat
• Table-top mini centrifuge
• Microcentrifuge, or equivalent and microcentrifuge tubes
• Water bath or heat block (37 °C to 100 °C)
• Vortex mixer
• Analytical balance
• Pipettes and appropriate tips
• Parafilm
• Spatula
• Double-deionized (DDI) water (MS-grade water filtered through a 0.2 μm filter and with resistance greater than 18 ΩM)
Required Detector
A PDA detector is required.
Required Cartridge or Capillary
One of the following:
• Pre-assembled cartridge (PN A55625)
• Capillary cartridge, blank, 100 x 200 μm aperture (PN 144738) and capillaries, bare-fused silica, 50 μm i.d. (PN 338451)
• Cartridge Rebuild Kit (PN 144645)
SDS-MW Analysis Kit Application Guide
8 / 42 RUO-IDV-05-6934-B
SDS-MW Analysis Kit
Methods and Sequences
The methods and data files are installed on the PA 800 Plus controller. They are not available for download. The methods and sequence can also be created manually with the 32 Karat Software. Refer to APPENDIX B.
The methods are in the PA 800 Plus controller at C:\32Karat\projects\SDS-MW\Method.
• SDS MW Conditioning - PA 800 plus.met: Conditions the capillary at the start of each day.
• SDS MW Separation - PA 800 plus.met: Performs an SDS-MW separation.
• SDS MW Shutdown - PA 800 plus.met: Shuts down and cleans the capillary at the end of a sequence, to rinse the capillary for storage, and to turn off the UV lamp (turns off the laser in the PDA detector).
The sequence file is in the PA 800 Plus controller at C:\32Karat\projects\SDS-MW\Sequence.
• SDS MW - 24 samples - PA 800 plus.seq
Prepare the Samples
Prepare the SDS-MW Size Standard
1 Thaw the SDS-MW size standard at room temperature for 15 minutes.
2 Mix the SDS-MW size standard thoroughly and centrifuge briefly in a standard microcentrifuge.
3 Pipette 10 μL of the SDS-MW size standard into a 0.5 mL microcentrifuge tube.
4 Add 85 μL of the SDS-MW sample buffer to the microcentrifuge tube.
5 Add 2 μL of the 10 kDa internal standard to the microcentrifuge tube.
6 Inside a fume hood, add 5 μL of 2-mercaptoethanol to the microcentrifuge tube.
7 Seal the vial cap with Parafilm, mix thoroughly, and heat in a water bath at 100 °C for 3 minutes.
8 Put the tube in a room-temperature water bath to cool for five minutes before injection. The sample will
remain stable for approximately 24 hours.
Application Guide SDS-MW Analysis Kit
RUO-IDV-05-6934-B 9 / 42
SDS-MW Analysis Kit
9 Transfer 100 μL of the prepared sample to a micro vial, put the micro vial into a universal vial, and cap the
universal vial.
Desalt the Protein Sample
1 Add 1 mL of protein sample to a Microcon-10 kDa spin filter, and then add 1 mL of SDS-MW sample buffer.
2 Centrifuge for 20 minutes at 7000 g.
3 Add 2 mL of SDS-MW sample buffer, then centrifuge for 20 minutes at 7000 g.
4 Put the Microcon-10 kDa spin filter into a new vial in an inverted position and then centrifuge for 3 minutes
at 5000 g. The protein solution will collect in the vial.
5 Transfer the collected protein to an appropriate sterile tube. Add SDS-MW sample buffer to a final volume of
1 mL.
Determine the Protein Sample Concentration
After addition of the SDS-MW sample buffer, the total protein concentration should be between 0.2 mg/mL to 2 mg/mL. For best results, the recommended protein concentration is 1 mg/mL. If the protein concentration is too high, it can result in insufficient SDS binding, giving broad peaks and poor resolution. If the protein concentration is too low, a low signal is likely to occur.
Prepare the Reduced Protein Sample
Reduction of the disulfide bonds will provide a more accurate assessment of the molecular weight of a protein, and will allow you to gain additional structural information on a given protein.
1 Dilute the sample with the SDS-MW sample buffer to a total volume of 95 μL to give a final protein
concentration between 0.2 mg/mL to 2 mg/mL.
Note: The signal intensity and resolution of this assay are sensitive to the salt concentration in the protein sample. If the sample concentration is less than 10 mg/mL and the buffer concentration is more than 50 mM, the sample loading efficiency will be reduced. The buffer of the protein sample must be exchanged with SDS-MW sample buffer by using the Microcon-10 kDa spin filter. Refer to Perform a Buffer Exchange for the Protein Sample.
SDS-MW Analysis Kit Application Guide
10 / 42 RUO-IDV-05-6934-B
SDS-MW Analysis Kit
2 Add 2 μL of the 10 kDa internal standard to the protein sample tube.
3 Inside a fume hood, add 5 μL of 2-mercaptoethanol to the protein sample tube.
4 Cap the tube tightly, seal with Parafilm, and mix thoroughly.
5 Heat the tube in a water bath at 100 °C for 3 minutes.
6 Put the tube in a room-temperature water bath to cool for 5 minutes before injection.
7 Transfer 100 μL of the prepared sample to a micro vial, put the micro vial in a universal vial, and cap the
universal vial.
Perform a Buffer Exchange for the Protein Sample
The signal intensity and resolution of this assay is sensitive to the salt concentration in the protein sample. If the salt concentration is too high, low signal and peak tailing is likely to occur. Exchange the sample buffer with a Microcon-10 kDa spin filter using the following procedure:
1 Add 1 mL of protein sample to a Microcon-10 kDa spin filter.
2 Centrifuge for 15 minutes at 4000 g.
3 Add 2 mL of SDS-MW sample buffer, then centrifuge for 25 minutes at 4000 g.
4 Put the Microcon-10 kDa spin filter into a new vial in an inverted position and then centrifuge for 3 minutes
at 1000 g. The protein solution will collect in the vial.
5 Transfer the collected protein to an appropriate sterile tube. Add SDS-MW sample buffer to give a final
volume of 1 mL.
Application Guide SDS-MW Analysis Kit
RUO-IDV-05-6934-B 11 / 42
SDS-MW Analysis Kit
Prepare the Non-reduced Protein Sample
Comparison of the reduced versus the non-reduced state of a protein can yield important structural information.
Before preparing the non-reduced sample, prepare a 250 mM iodoacetamide (IAM) solution. The IAM solution acts as the alkylating agent during preparation of the sample to minimize any heterogeneity created from partial auto-reduction of the protein.
Prepare the Alkylating Agent (250 mM IAM Solution)
1 Weigh 46 mg of iodoacetamide (IAM).
2 Transfer the IAM to a 1.5 mL centrifuge tube.
3 Add 1 mL of DDI water to the 1.5 mL centrifuge tube.
4 Cap the tube tightly, mix thoroughly until dissolved, and then store in the dark at room temperature. The
solution is stable for approximately 24 hours at room temperature.
Prepare Non-reduced Samples Using an Alkylating Agent
1 Dilute the sample with the SDS-MW sample buffer to a total volume of 95 μL to give a final protein
concentration between 0.2 mg/mL to 2 mg/mL.
2 Add 2 μL of the 10 kDa internal standard to the protein sample tube.
3 Inside a fume hood, add 5 μL of the 250 mM IAM solution to the sample protein tube.
4 Cap the tube tightly, seal with Parafilm, and mix thoroughly.
5 Centrifuge for 1 minute at 300 g.
Note: Under non-reduced conditions, heating the sample solution at high temperature is required to accelerate SDS binding. However, heating a protein sample at high temperature may introduce fragmentation and aggregation, and introduce artifacts to the sample analysis.
We recommend this alkylation step to minimize temperature-induced artifacts in the protein sample.
SDS-MW Analysis Kit Application Guide
12 / 42 RUO-IDV-05-6934-B
SDS-MW Analysis Kit
6 Heat the vial in a water bath at 70 °C for 3 minutes.
7 Put the tube in a room-temperature water bath to cool for 5 minutes before injection.
8 Transfer 100 μL of the prepared sample to a micro vial, put the micro vial in a universal vial, and cap the
universal vial.
Prepare the PA 800 Plus System
This section describes the steps to prepare the PA 800 Plus System to acquire data.
The procedures described in this section assume the system has already been properly installed and initialized.
Install the PDA Detector
1 Turn off the PA 800 Plus System and install the PDA detector. Refer to the System Maintenance Guide.
2 Turn on the system and permit the lamp to warm up for at least 30 minutes.
Clean the Interface Block
Clean the electrodes, opening levers, capillary tips, and interface block weekly or when changing chemistries. Refer to the System Maintenance Guide for detailed instructions.
The SDS-MW gel buffer is very viscous and can accumulate in the system unless regular and thorough cleaning is performed. Gel accumulation might cause broken capillaries, bent electrodes, vial jams, and missed injections.
CAUTION: Potential System Damage. Do not allow the gel to accumulate on the electrodes, opening levers, capillary ends, and interface block. Gel accumulation might cause broken capillaries, bent electrodes, jammed vials, or missed injections.
Application Guide SDS-MW Analysis Kit
RUO-IDV-05-6934-B 13 / 42

SDS-MW Analysis Kit
Insert the Cartridge and Calibrate the Detector
1 Remove the cartridge from the box and, if necessary, install the capillary.
2 Install the cartridge in the PA 800 Plus System. Refer to the System Maintenance Guide for detailed
instructions.
3 Calibrate the detector.
Use the Calibration wizard, available from the Instrument Configuration dialog in the 32 Karat Software.
Load the Buffer Trays
Refer to APPENDIX A for additional information.
Fill the appropriate number of reagent vials with the SDS-MW gel buffer, 0.1 M NaOH solution, 0.1M HCl solution, and DDI water according to the buffer tray maps (Figure 2 and Figure 3).
The number of reagent vials depends on upon the number of method cycles. The methods have been developed to automatically advance the reagent vials after eight cycles, providing a fresh set of buffers every eight cycles.
1 Fill the gel rinse (Gel-R) vials with 1.2 mL of SDS-MW gel buffer.
2 Fill the gel separation (Gel-S) vials with 1.1 mL of SDS-MW gel buffer.
3 Fill the water (H2O) vials with 1.5 mL of DDI water.
Note: To make sure that the analysis results are consistent over time, we strongly recommend calibrating the detector each time it is installed in the PA 800 Plus System or when the capillary cartridge is replaced.
DANGER! Toxic Chemical Hazard. Read the Safety Data Sheets for Acid Wash/Regenerating Solution (0.1 M HCl Solution), Basic Wash Solution (0.1 M NaOH), and SDS-MW Gel Buffer before use.
Note: Make sure to fill the buffer vials with SDS-MW gel buffer without producing bubbles and use the recommended volume. If the volume is too low (less than half the volume of the vial), the capillary and electrode might not be able to dip into the SDS-MW gel buffer during the separation. If the volume is too high, the SDS-MW gel buffer may accumulate on the capillary ends and electrodes, resulting in system failure.
SDS-MW Analysis Kit Application Guide
14 / 42 RUO-IDV-05-6934-B
SDS-MW Analysis Kit
4 Fill the NaOH and HCl vials with 1.5 mL of 0.1 M NaOH and 0.1 M HCl solutions, respectively.
5 Fill the waste vials with 1.0 mL of DDI water.
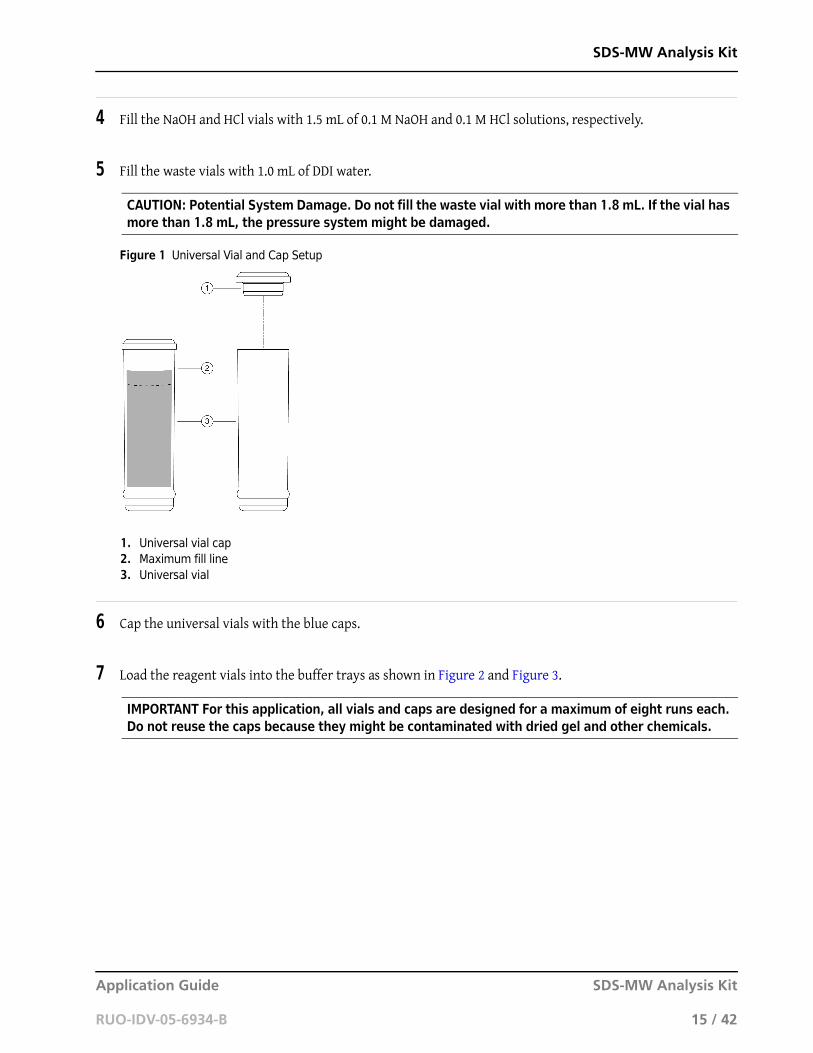
Figure 1 Universal Vial and Cap Setup
6 Cap the universal vials with the blue caps.
7 Load the reagent vials into the buffer trays as shown in Figure 2 and Figure 3.
CAUTION: Potential System Damage. Do not fill the waste vial with more than 1.8 mL. If the vial has more than 1.8 mL, the pressure system might be damaged.
1. Universal vial cap2. Maximum fill line3. Universal vial
IMPORTANT For this application, all vials and caps are designed for a maximum of eight runs each. Do not reuse the caps because they might be contaminated with dried gel and other chemicals.
Application Guide SDS-MW Analysis Kit
RUO-IDV-05-6934-B 15 / 42
SDS-MW Analysis Kit
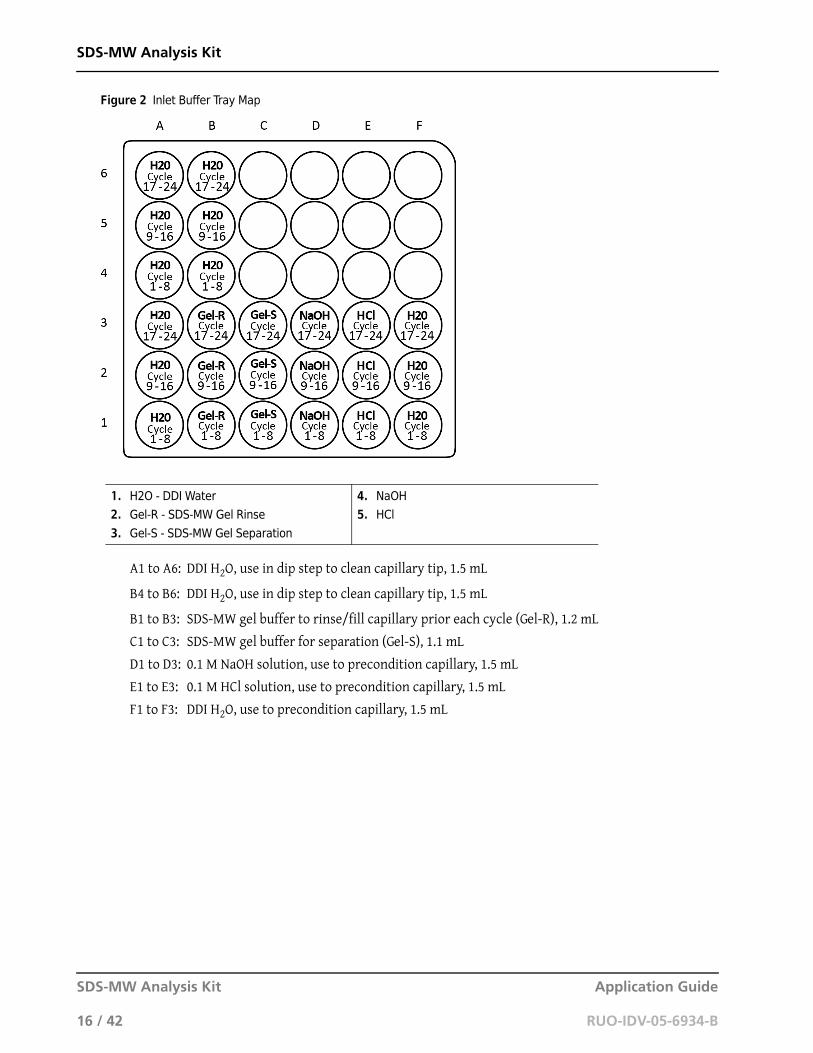
Figure 2 Inlet Buffer Tray Map
A1 to A6: DDI H2O, use in dip step to clean capillary tip, 1.5 mL
B4 to B6: DDI H2O, use in dip step to clean capillary tip, 1.5 mL
B1 to B3: SDS-MW gel buffer to rinse/fill capillary prior each cycle (Gel-R), 1.2 mL
C1 to C3: SDS-MW gel buffer for separation (Gel-S), 1.1 mL
D1 to D3: 0.1 M NaOH solution, use to precondition capillary, 1.5 mL
E1 to E3: 0.1 M HCl solution, use to precondition capillary, 1.5 mL
F1 to F3: DDI H2O, use to precondition capillary, 1.5 mL
1. H2O - DDI Water
2. Gel-R - SDS-MW Gel Rinse
3. Gel-S - SDS-MW Gel Separation
4. NaOH
5. HCl
SDS-MW Analysis Kit Application Guide
16 / 42 RUO-IDV-05-6934-B
SDS-MW Analysis Kit
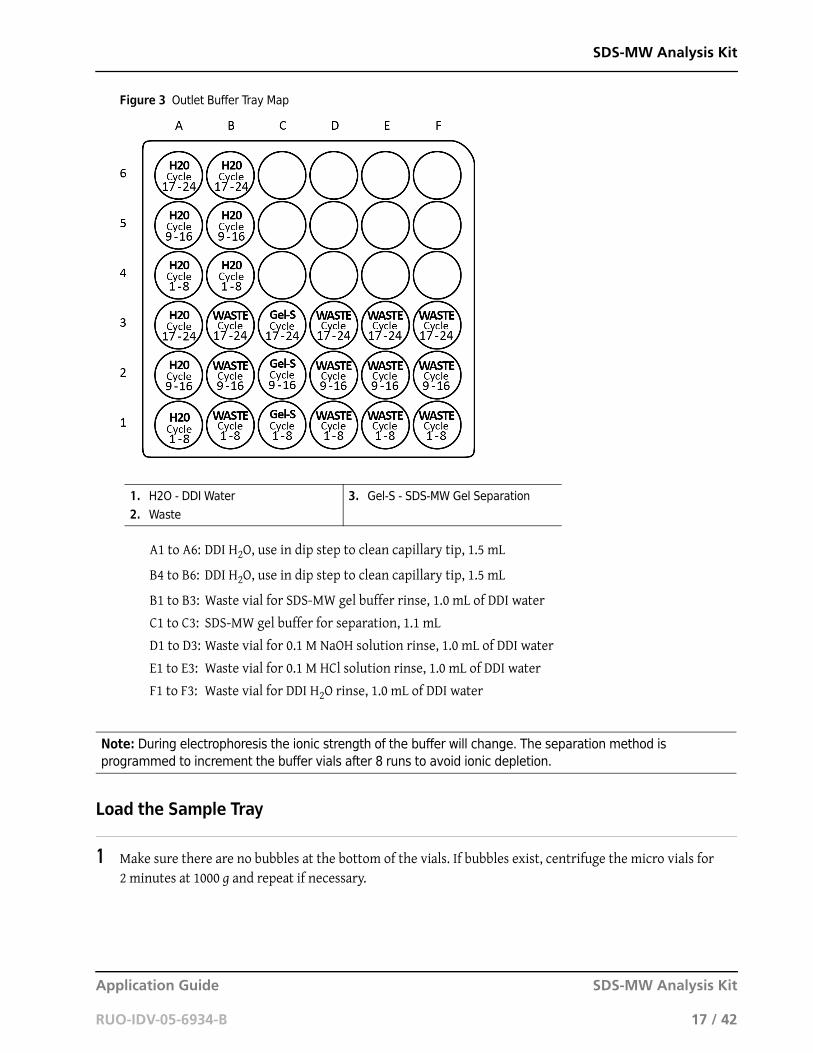
Figure 3 Outlet Buffer Tray Map
A1 to A6: DDI H2O, use in dip step to clean capillary tip, 1.5 mL
B4 to B6: DDI H2O, use in dip step to clean capillary tip, 1.5 mL
B1 to B3: Waste vial for SDS-MW gel buffer rinse, 1.0 mL of DDI water
C1 to C3: SDS-MW gel buffer for separation, 1.1 mL
D1 to D3: Waste vial for 0.1 M NaOH solution rinse, 1.0 mL of DDI water
E1 to E3: Waste vial for 0.1 M HCl solution rinse, 1.0 mL of DDI water
F1 to F3: Waste vial for DDI H2O rinse, 1.0 mL of DDI water
Load the Sample Tray
1 Make sure there are no bubbles at the bottom of the vials. If bubbles exist, centrifuge the micro vials for
2 minutes at 1000 g and repeat if necessary.
1. H2O - DDI Water
2. Waste
3. Gel-S - SDS-MW Gel Separation
Note: During electrophoresis the ionic strength of the buffer will change. The separation method is programmed to increment the buffer vials after 8 runs to avoid ionic depletion.
Application Guide SDS-MW Analysis Kit
RUO-IDV-05-6934-B 17 / 42
SDS-MW Analysis Kit
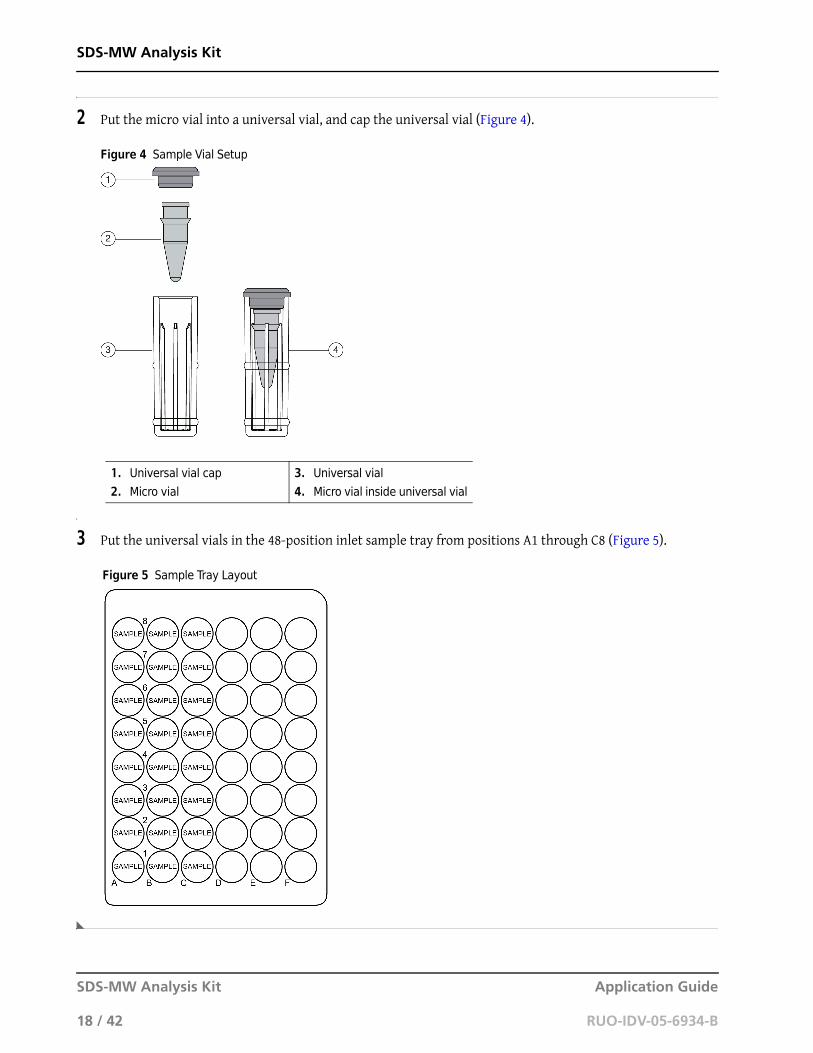
2 Put the micro vial into a universal vial, and cap the universal vial (Figure 4).
Figure 4 Sample Vial Setup
3 Put the universal vials in the 48-position inlet sample tray from positions A1 through C8 (Figure 5).
Figure 5 Sample Tray Layout
1. Universal vial cap
2. Micro vial
3. Universal vial
4. Micro vial inside universal vial
SDS-MW Analysis Kit Application Guide
18 / 42 RUO-IDV-05-6934-B
SDS-MW Analysis Kit
Run the Samples
Create the Sequence and Start the Run
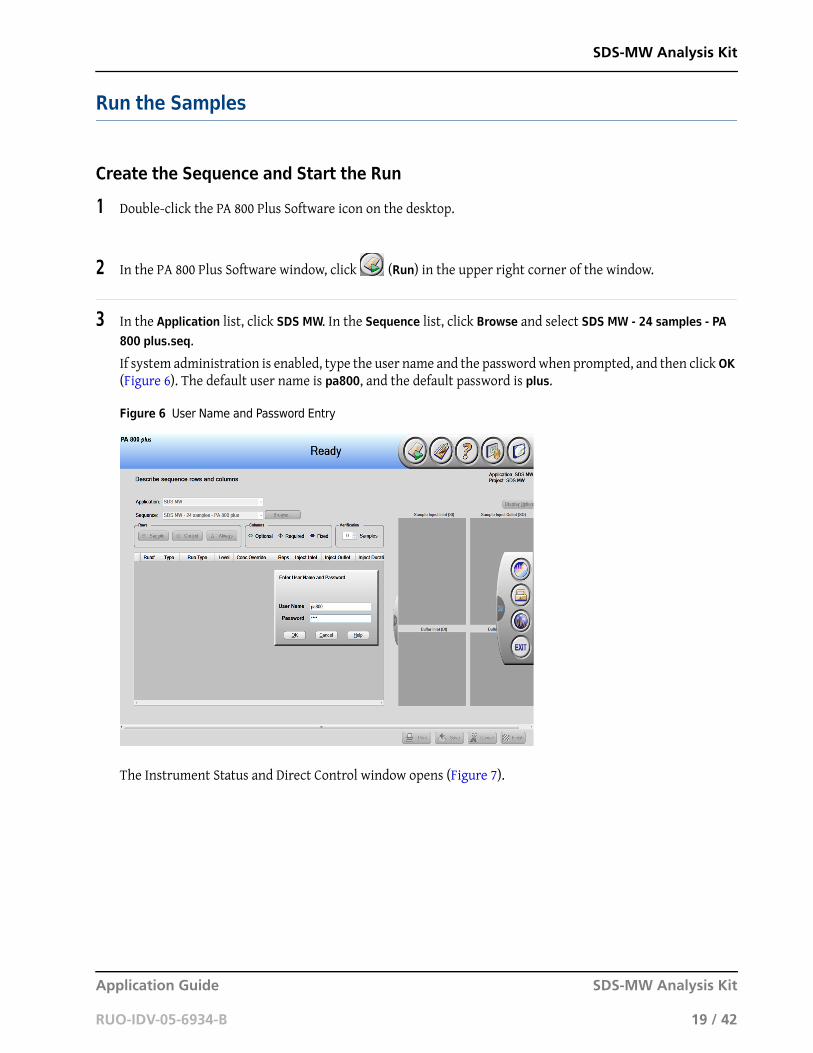
1 Double-click the PA 800 Plus Software icon on the desktop.
2 In the PA 800 Plus Software window, click (Run) in the upper right corner of the window.
3 In the Application list, click SDS MW. In the Sequence list, click Browse and select SDS MW - 24 samples - PA
800 plus.seq.
If system administration is enabled, type the user name and the password when prompted, and then click OK (Figure 6). The default user name is pa800, and the default password is plus.
Figure 6 User Name and Password Entry
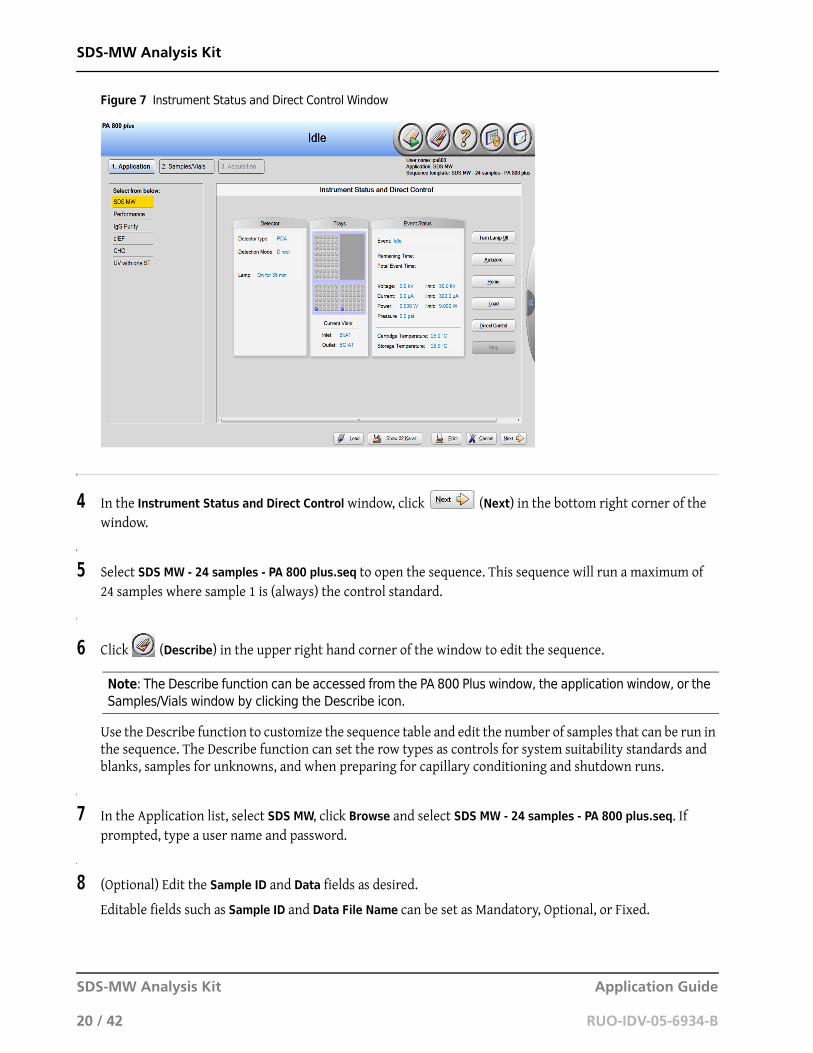
The Instrument Status and Direct Control window opens (Figure 7).
Application Guide SDS-MW Analysis Kit
RUO-IDV-05-6934-B 19 / 42
SDS-MW Analysis Kit
Figure 7 Instrument Status and Direct Control Window
4 In the Instrument Status and Direct Control window, click (Next) in the bottom right corner of the
window.
5 Select SDS MW - 24 samples - PA 800 plus.seq to open the sequence. This sequence will run a maximum of
24 samples where sample 1 is (always) the control standard.
6 Click (Describe) in the upper right hand corner of the window to edit the sequence.
Use the Describe function to customize the sequence table and edit the number of samples that can be run in the sequence. The Describe function can set the row types as controls for system suitability standards and blanks, samples for unknowns, and when preparing for capillary conditioning and shutdown runs.
7 In the Application list, select SDS MW, click Browse and select SDS MW - 24 samples - PA 800 plus.seq. If
prompted, type a user name and password.
8 (Optional) Edit the Sample ID and Data fields as desired.
Editable fields such as Sample ID and Data File Name can be set as Mandatory, Optional, or Fixed.
Note: The Describe function can be accessed from the PA 800 Plus window, the application window, or the Samples/Vials window by clicking the Describe icon.
SDS-MW Analysis Kit Application Guide
20 / 42 RUO-IDV-05-6934-B
SDS-MW Analysis Kit
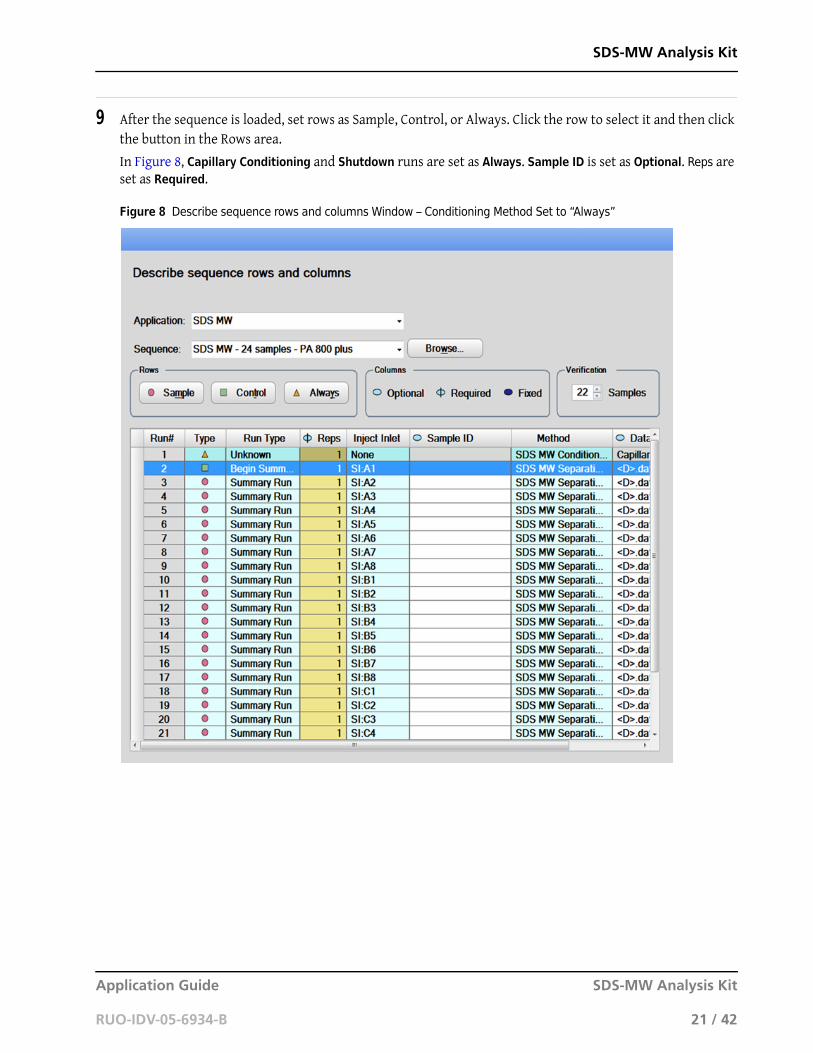
9 After the sequence is loaded, set rows as Sample, Control, or Always. Click the row to select it and then click
the button in the Rows area.
In Figure 8, Capillary Conditioning and Shutdown runs are set as Always. Sample ID is set as Optional. Reps are set as Required.
Figure 8 Describe sequence rows and columns Window – Conditioning Method Set to “Always”
Application Guide SDS-MW Analysis Kit
RUO-IDV-05-6934-B 21 / 42
SDS-MW Analysis Kit
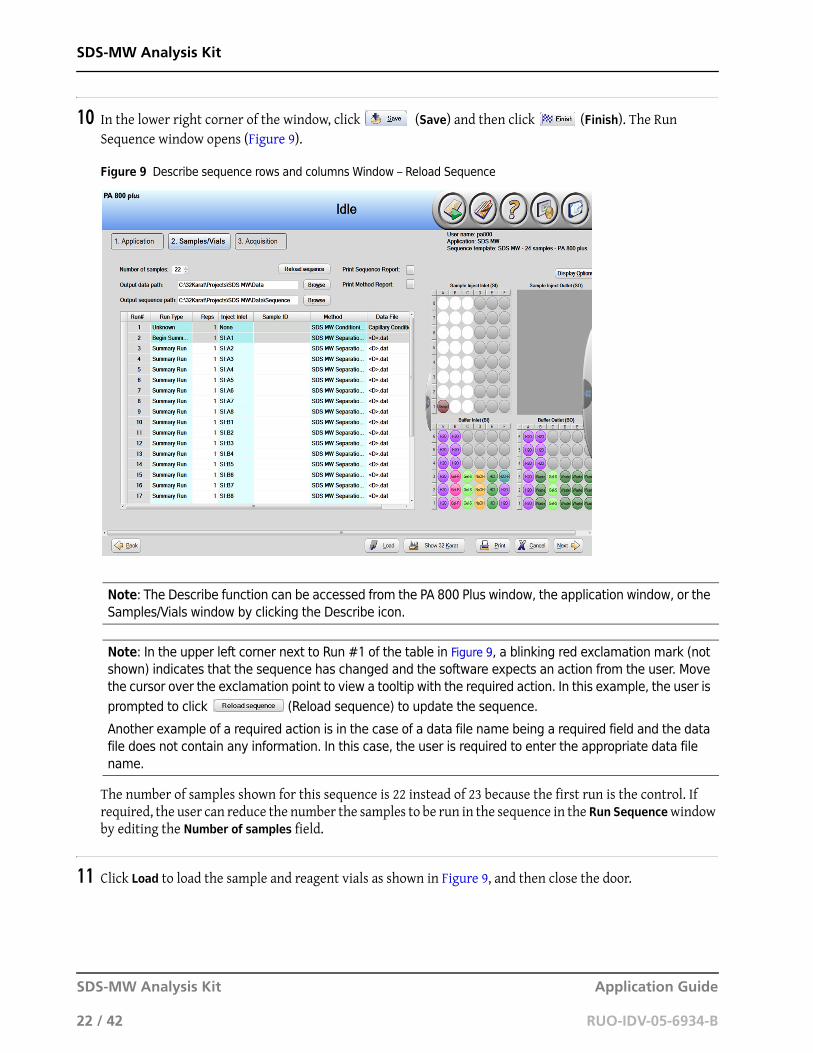
10 In the lower right corner of the window, click (Save) and then click (Finish). The Run
Sequence window opens (Figure 9).
Figure 9 Describe sequence rows and columns Window – Reload Sequence
The number of samples shown for this sequence is 22 instead of 23 because the first run is the control. If required, the user can reduce the number the samples to be run in the sequence in the Run Sequence window by editing the Number of samples field.
11 Click Load to load the sample and reagent vials as shown in Figure 9, and then close the door.
Note: The Describe function can be accessed from the PA 800 Plus window, the application window, or the Samples/Vials window by clicking the Describe icon.
Note: In the upper left corner next to Run #1 of the table in Figure 9, a blinking red exclamation mark (not shown) indicates that the sequence has changed and the software expects an action from the user. Move the cursor over the exclamation point to view a tooltip with the required action. In this example, the user is
prompted to click (Reload sequence) to update the sequence.
Another example of a required action is in the case of a data file name being a required field and the data file does not contain any information. In this case, the user is required to enter the appropriate data file name.
SDS-MW Analysis Kit Application Guide
22 / 42 RUO-IDV-05-6934-B
SDS-MW Analysis Kit
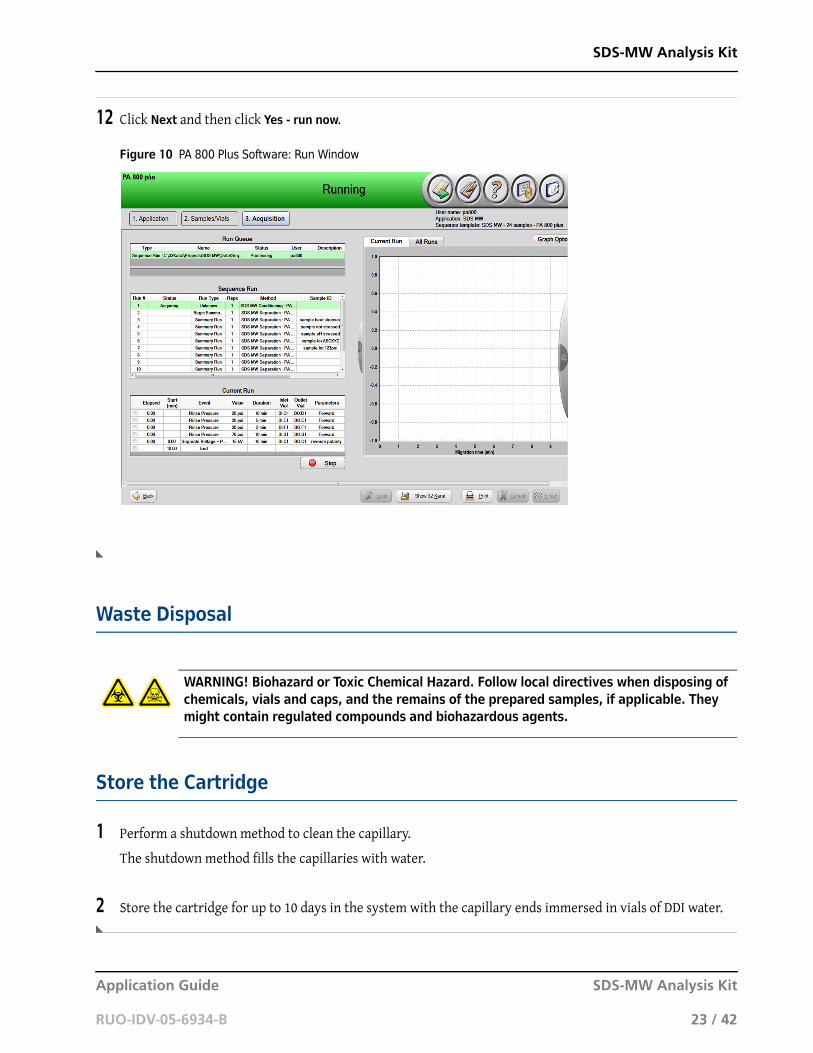
12 Click Next and then click Yes - run now.
Figure 10 PA 800 Plus Software: Run Window
Waste Disposal
Store the Cartridge
1 Perform a shutdown method to clean the capillary.
The shutdown method fills the capillaries with water.
2 Store the cartridge for up to 10 days in the system with the capillary ends immersed in vials of DDI water.
WARNING! Biohazard or Toxic Chemical Hazard. Follow local directives when disposing of chemicals, vials and caps, and the remains of the prepared samples, if applicable. They might contain regulated compounds and biohazardous agents.
Application Guide SDS-MW Analysis Kit
RUO-IDV-05-6934-B 23 / 42
SDS-MW Analysis Kit
Store the Cartridge for More Than 10 Days
1 Perform a shutdown method to clean the capillary.
2 Rinse the capillary with DDI water for 10 minutes at 100 psi.
3 Remove the cartridge from the system.
4 Store the cartridge upright in the cartridge box at room temperature, with the capillary ends immersed in
vials of DDI water.
Prepare the Cartridge After Storage
• If the cartridge has not been used for more than a day or it has been stored for an extended time, then condition the capillary using the SDS MW Conditioning method.
SDS-MW Analysis Kit Application Guide
24 / 42 RUO-IDV-05-6934-B
SDS-MW Analysis Kit
Analyze the Results
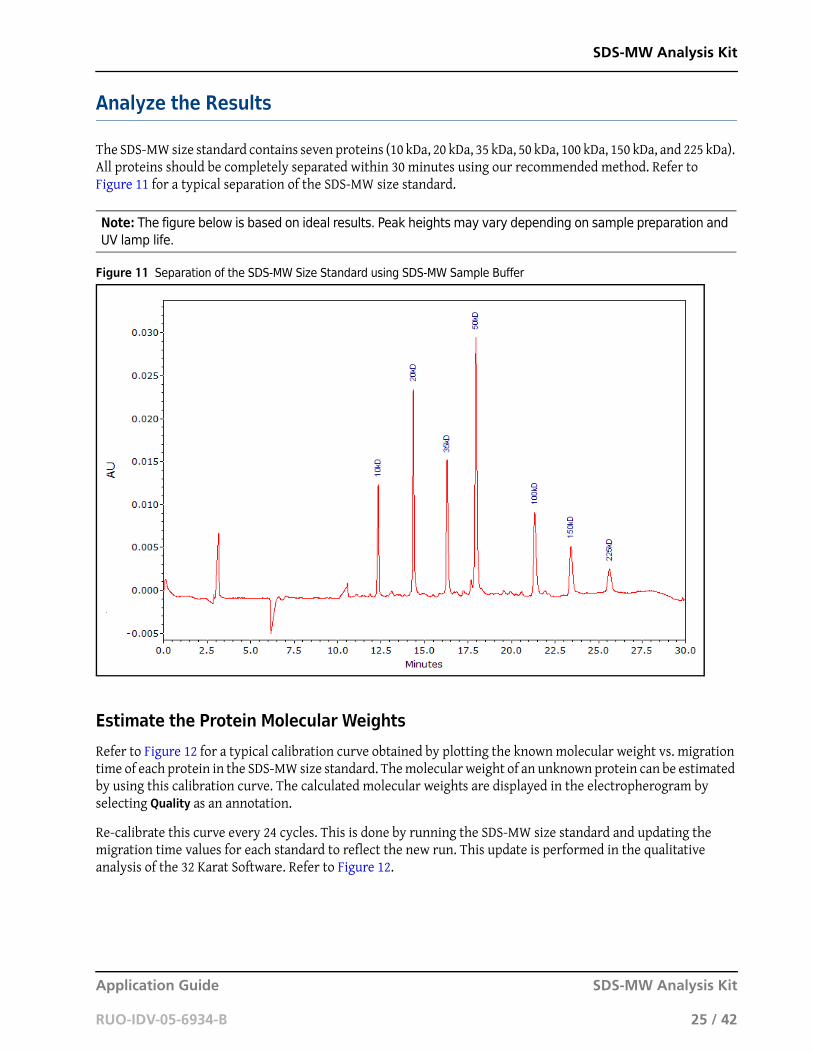
The SDS-MW size standard contains seven proteins (10 kDa, 20 kDa, 35 kDa, 50 kDa, 100 kDa, 150 kDa, and 225 kDa). All proteins should be completely separated within 30 minutes using our recommended method. Refer to Figure 11 for a typical separation of the SDS-MW size standard.
Figure 11 Separation of the SDS-MW Size Standard using SDS-MW Sample Buffer
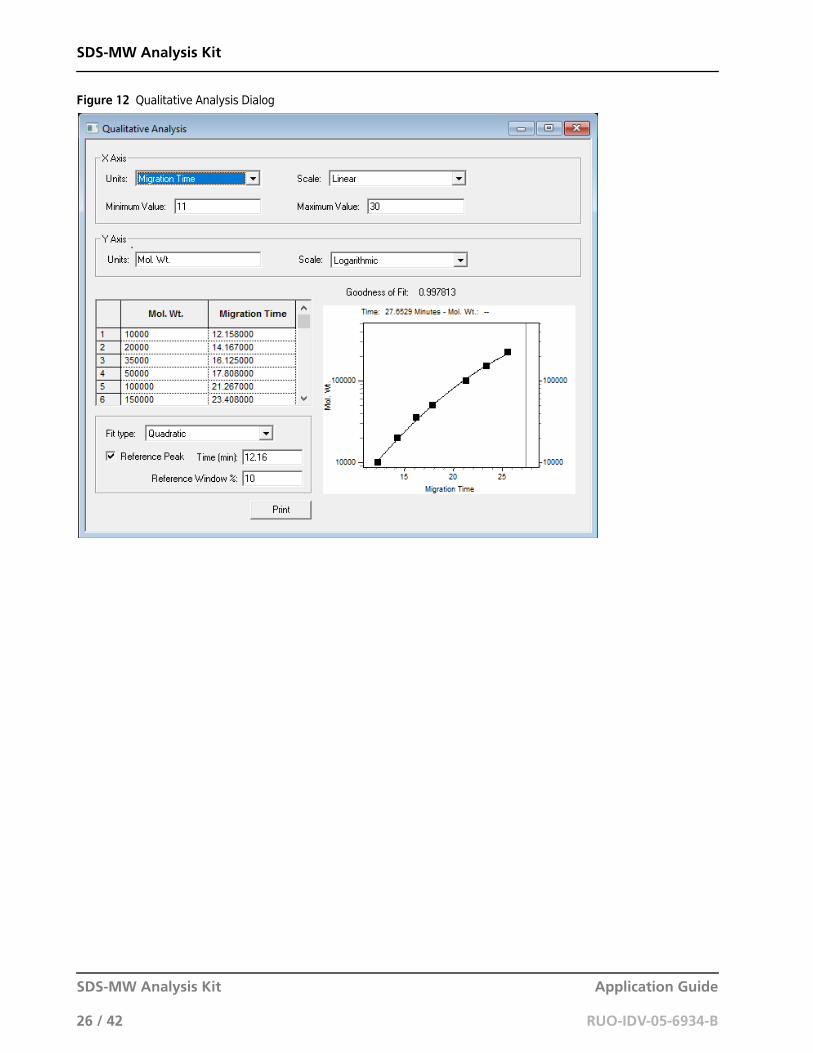
Estimate the Protein Molecular Weights
Refer to Figure 12 for a typical calibration curve obtained by plotting the known molecular weight vs. migration time of each protein in the SDS-MW size standard. The molecular weight of an unknown protein can be estimated by using this calibration curve. The calculated molecular weights are displayed in the electropherogram by selecting Quality as an annotation.
Re-calibrate this curve every 24 cycles. This is done by running the SDS-MW size standard and updating the migration time values for each standard to reflect the new run. This update is performed in the qualitative analysis of the 32 Karat Software. Refer to Figure 12.
Note: The figure below is based on ideal results. Peak heights may vary depending on sample preparation and UV lamp life.
Application Guide SDS-MW Analysis Kit
RUO-IDV-05-6934-B 25 / 42
SDS-MW Analysis Kit
Figure 12 Qualitative Analysis Dialog
SDS-MW Analysis Kit Application Guide
26 / 42 RUO-IDV-05-6934-B
SDS-MW Analysis Kit
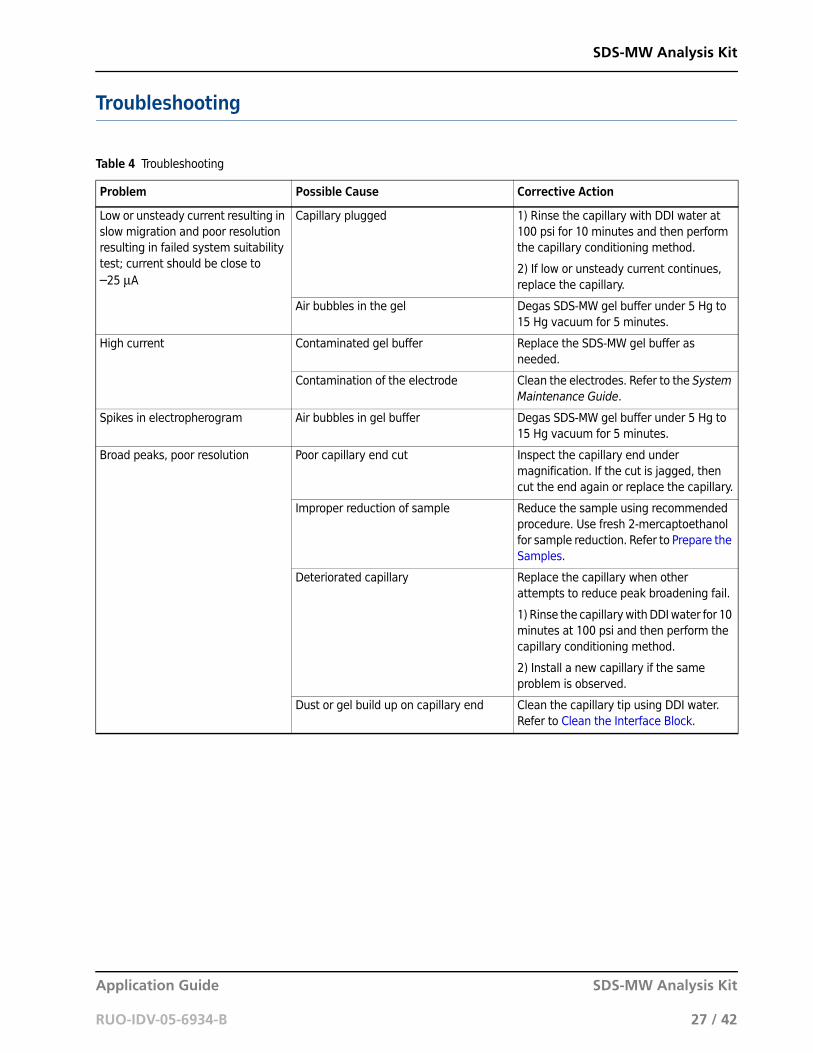
Troubleshooting
Table 4 Troubleshooting
Problem Possible Cause Corrective Action
Low or unsteady current resulting in slow migration and poor resolution resulting in failed system suitability test; current should be close to
–25 μA
Capillary plugged 1) Rinse the capillary with DDI water at 100 psi for 10 minutes and then perform the capillary conditioning method.
2) If low or unsteady current continues, replace the capillary.
Air bubbles in the gel Degas SDS-MW gel buffer under 5 Hg to 15 Hg vacuum for 5 minutes.
High current Contaminated gel buffer Replace the SDS-MW gel buffer as needed.
Contamination of the electrode Clean the electrodes. Refer to the System Maintenance Guide.
Spikes in electropherogram Air bubbles in gel buffer Degas SDS-MW gel buffer under 5 Hg to 15 Hg vacuum for 5 minutes.
Broad peaks, poor resolution Poor capillary end cut Inspect the capillary end under magnification. If the cut is jagged, then cut the end again or replace the capillary.
Improper reduction of sample Reduce the sample using recommended procedure. Use fresh 2-mercaptoethanol for sample reduction. Refer to Prepare the Samples.
Deteriorated capillary Replace the capillary when other attempts to reduce peak broadening fail.
1) Rinse the capillary with DDI water for 10 minutes at 100 psi and then perform the capillary conditioning method.
2) Install a new capillary if the same problem is observed.
Dust or gel build up on capillary end Clean the capillary tip using DDI water. Refer to Clean the Interface Block.
Application Guide SDS-MW Analysis Kit
RUO-IDV-05-6934-B 27 / 42
SDS-MW Analysis Kit
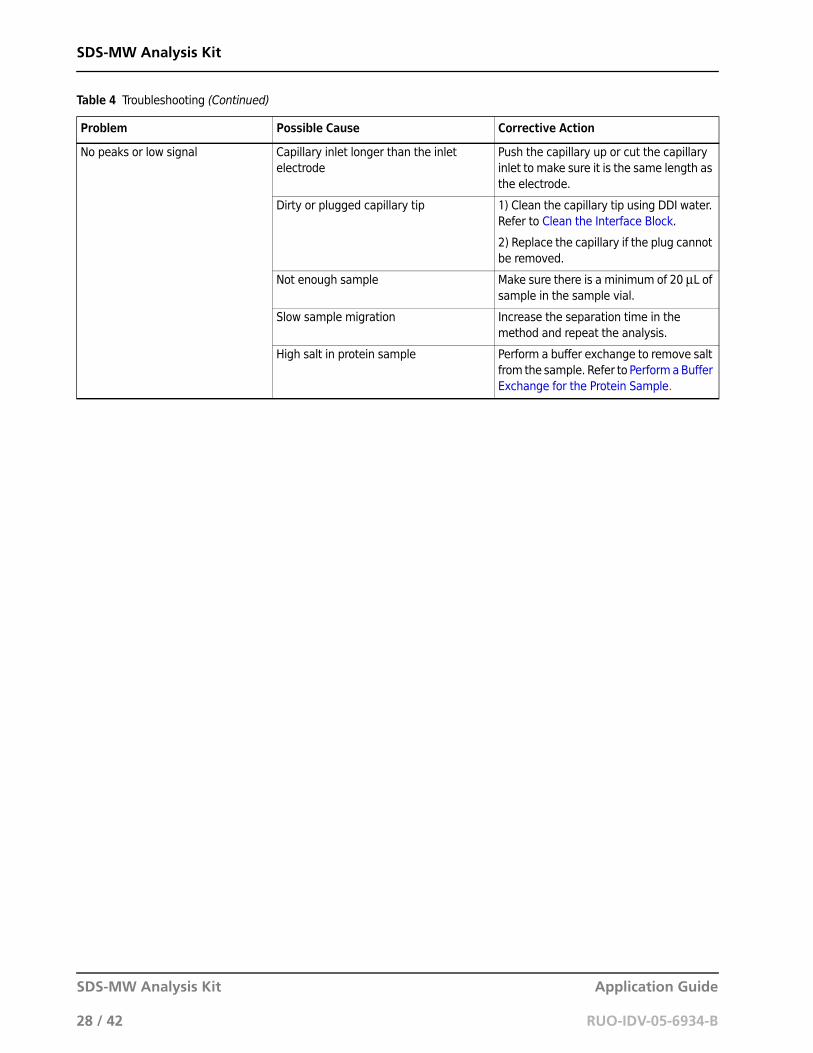
No peaks or low signal Capillary inlet longer than the inlet electrode
Push the capillary up or cut the capillary inlet to make sure it is the same length as the electrode.
Dirty or plugged capillary tip 1) Clean the capillary tip using DDI water. Refer to Clean the Interface Block.
2) Replace the capillary if the plug cannot be removed.
Not enough sample Make sure there is a minimum of 20 μL of sample in the sample vial.
Slow sample migration Increase the separation time in the method and repeat the analysis.
High salt in protein sample Perform a buffer exchange to remove salt from the sample. Refer to Perform a Buffer Exchange for the Protein Sample.
Table 4 Troubleshooting (Continued)
Problem Possible Cause Corrective Action
SDS-MW Analysis Kit Application Guide
28 / 42 RUO-IDV-05-6934-B
APPENDIX A
Hazardous Substance Information
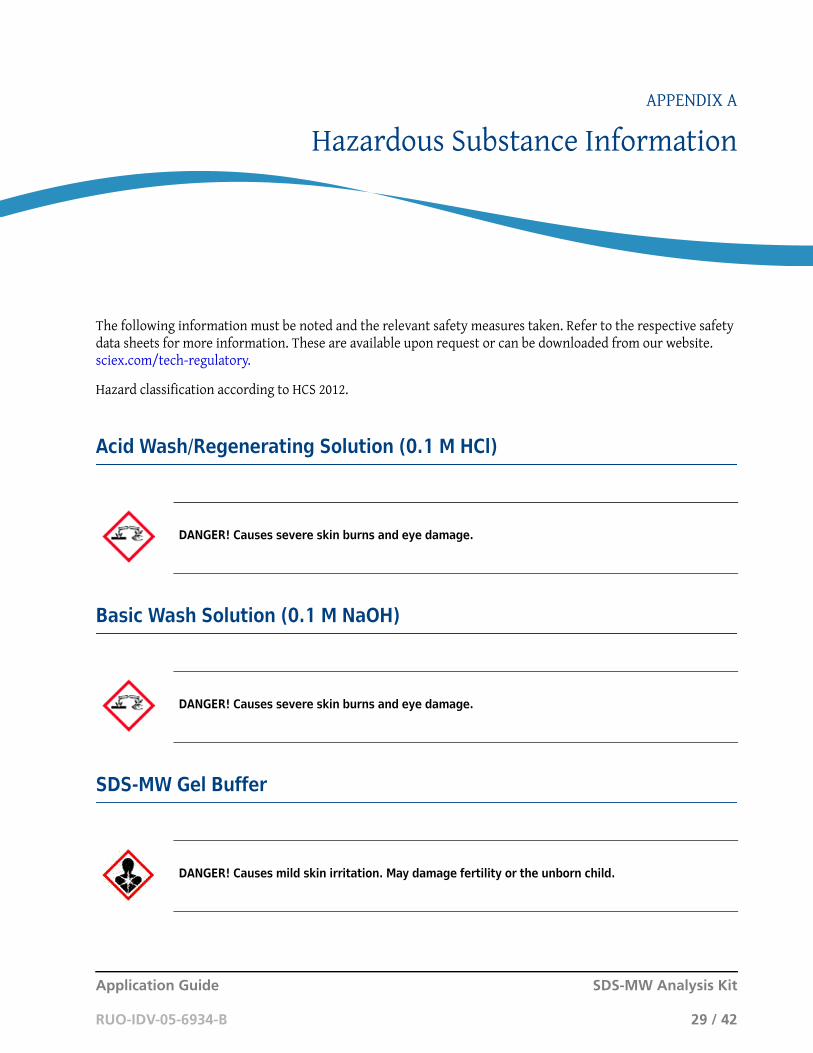
The following information must be noted and the relevant safety measures taken. Refer to the respective safety
data sheets for more information. These are available upon request or can be downloaded from our website. sciex.com/tech-regulatory.Hazard classification according to HCS 2012.
Acid Wash/Regenerating Solution (0.1 M HCl)
Basic Wash Solution (0.1 M NaOH)
SDS-MW Gel Buffer
DANGER! Causes severe skin burns and eye damage.
DANGER! Causes severe skin burns and eye damage.
DANGER! Causes mild skin irritation. May damage fertility or the unborn child.
Application Guide SDS-MW Analysis Kit
RUO-IDV-05-6934-B 29 / 42
Hazardous Substance Information
SDS-MW Sample Buffer
Other Reagents
This component is not classified as hazardous:
• SDS-MW Size Standard
WARNING! Causes mild skin irritation.
SDS-MW Analysis Kit Application Guide
30 / 42 RUO-IDV-05-6934-B
APPENDIX B
Methods
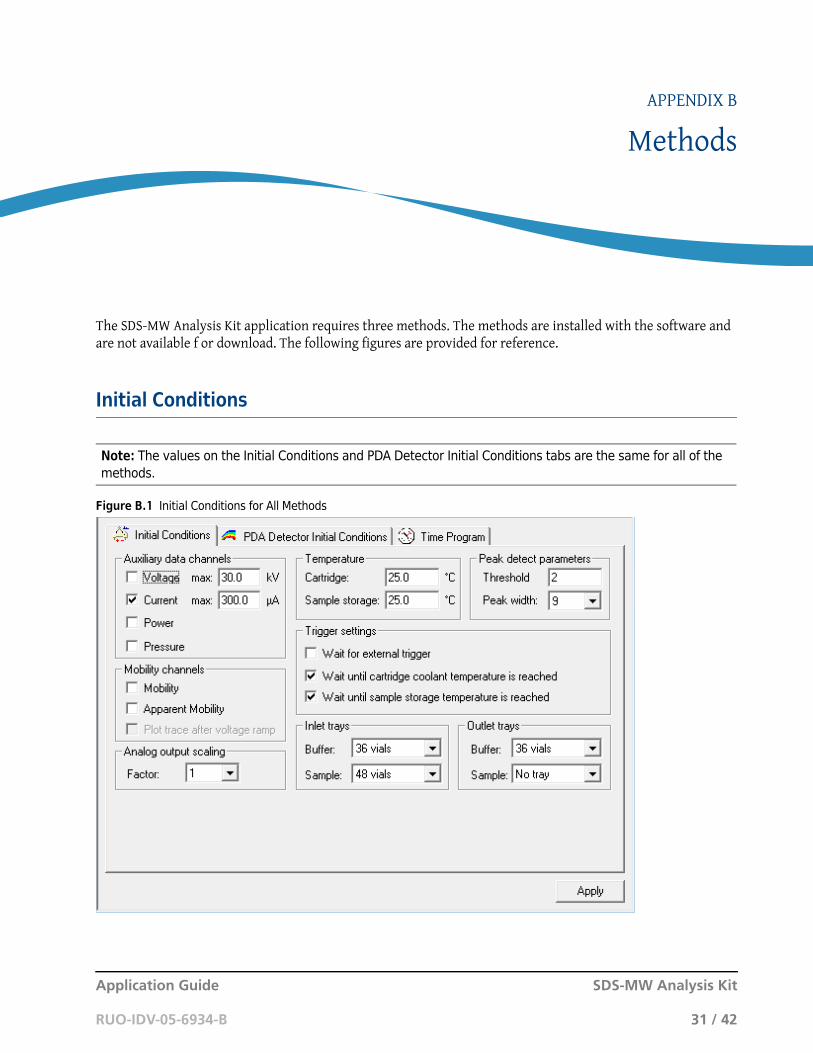
The SDS-MW Analysis Kit application requires three methods. The methods are installed with the software and
are not available f or download. The following figures are provided for reference.Initial Conditions
Figure B.1 Initial Conditions for All Methods
Note: The values on the Initial Conditions and PDA Detector Initial Conditions tabs are the same for all of the methods.
Application Guide SDS-MW Analysis Kit
RUO-IDV-05-6934-B 31 / 42
Methods
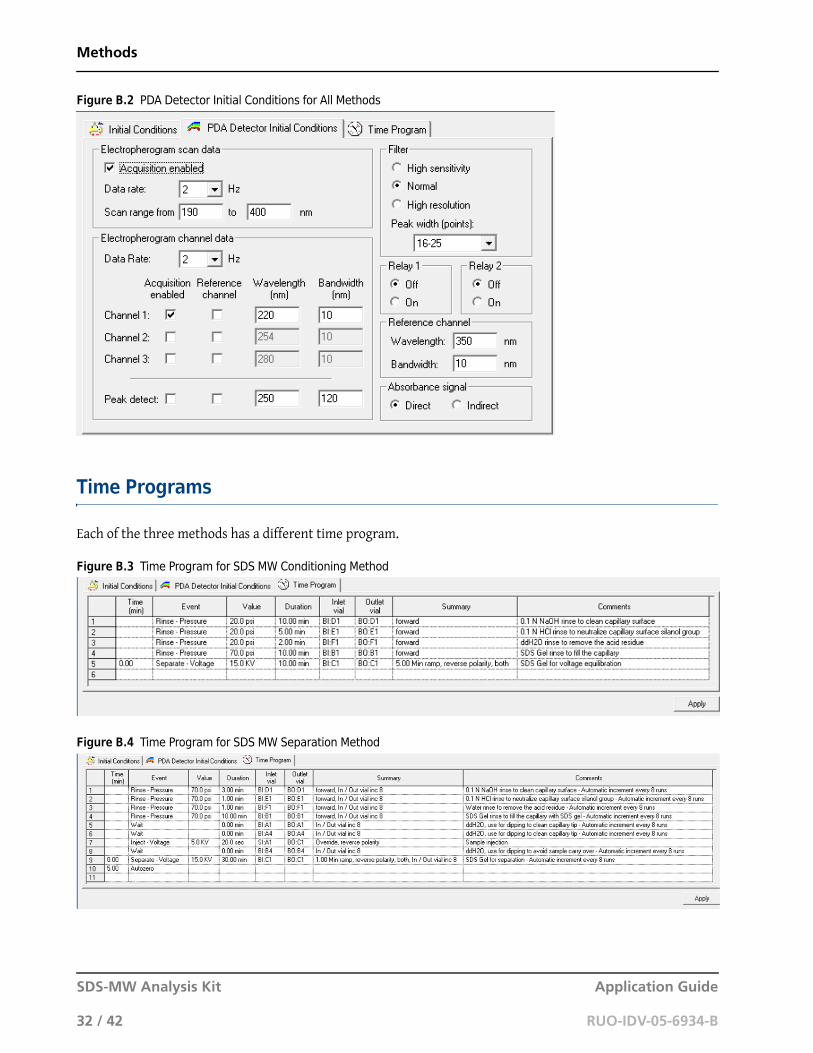
Figure B.2 PDA Detector Initial Conditions for All Methods
Time Programs
Each of the three methods has a different time program.
Figure B.3 Time Program for SDS MW Conditioning Method
Figure B.4 Time Program for SDS MW Separation Method
SDS-MW Analysis Kit Application Guide
32 / 42 RUO-IDV-05-6934-B
Methods
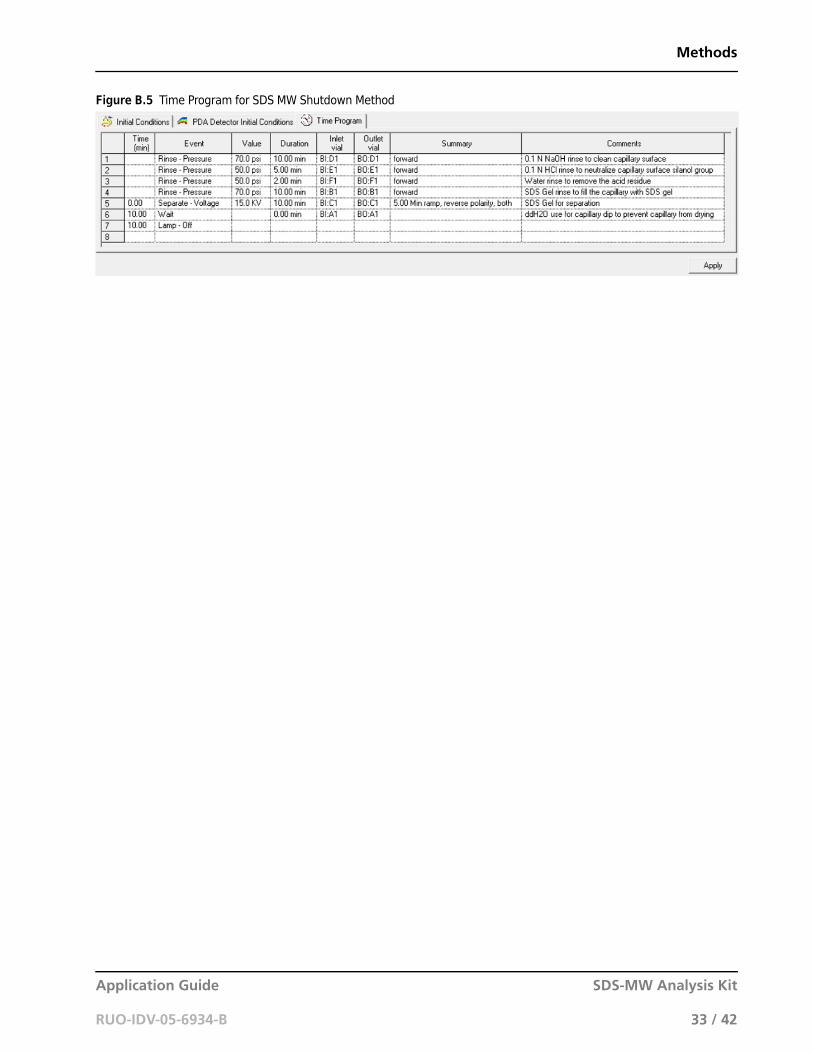
Figure B.5 Time Program for SDS MW Shutdown Method
Application Guide SDS-MW Analysis Kit
RUO-IDV-05-6934-B 33 / 42
Methods
SDS-MW Analysis Kit Application Guide
34 / 42 RUO-IDV-05-6934-B
APPENDIX C
Using the Low pH SDS Sample Buffer
Some samples may be more stable in a sample buffer with a lower pH. The Low pH SDS sample buffer (PN C44807,
pH 6.8) is available from SCIEX. To use the Low pH SDS sample buffer, prepare the samples as described previously, but replace the SDS-MW sample buffer with the Low pH SDS sample buffer.Due to the increased ionic strength of the Low pH SDS sample buffer, we recommend modifying the SDS-MW separation method by increasing the injection voltage or duration to avoid any signal loss. Adjust the separation time based on the samples to be analyzed. For example, for analysis of Rituxan (rituximab) sample, change the separation time to 35 minutes.
Alternatively, a pressure injection may be used in the separation method. Start with the same SDS-MW separation method as for samples prepared with the SDS-MW sample buffer and edit the method as described in the following section.
Add a Pressure Injection to the Low pH SDS Sample Buffer Separation Method
Use the following instructions to add a pressure injection and make other necessary changes to the separation method.
1 Open the SDS MW separation method in the 32 Karat Software.
No changes to the Initial Conditions or the PDA Detector Initial Conditions are required.
2 Click the Time Program tab.
3 Add a Rinse event after row 5. Set the parameters as shown.
Application Guide SDS-MW Analysis Kit
RUO-IDV-05-6934-B 35 / 42
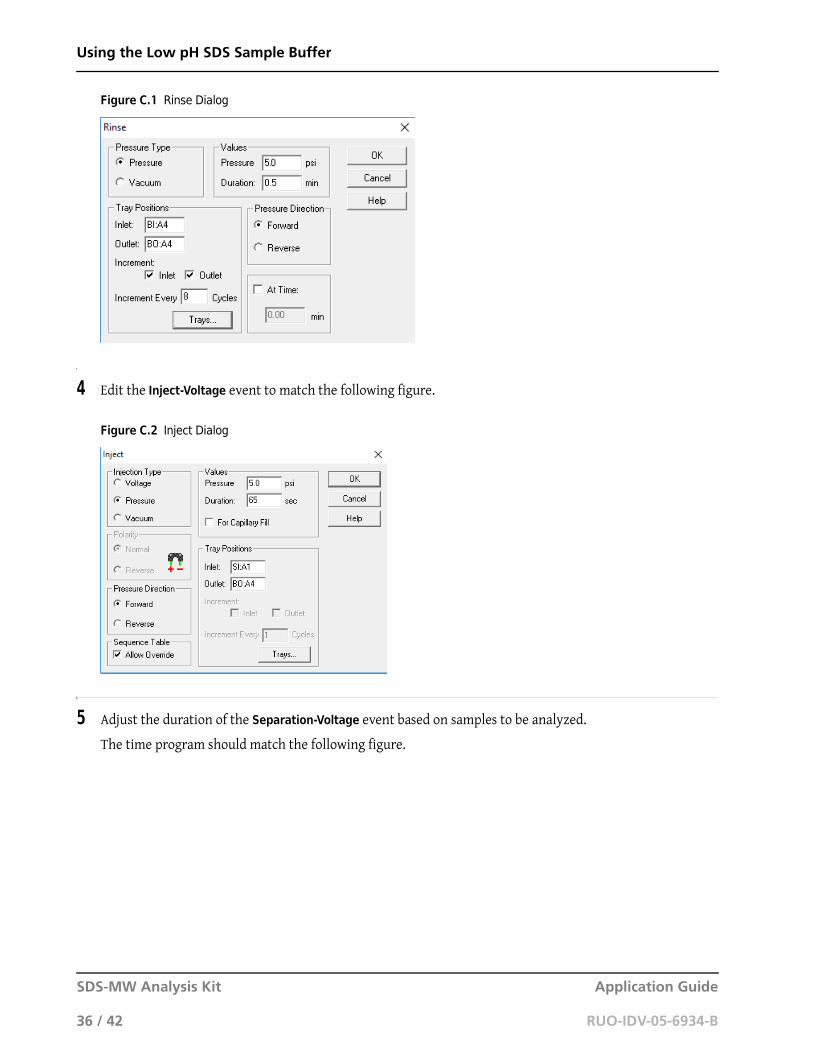
Using the Low pH SDS Sample Buffer
Figure C.1 Rinse Dialog
4 Edit the Inject-Voltage event to match the following figure.
Figure C.2 Inject Dialog
5 Adjust the duration of the Separation-Voltage event based on samples to be analyzed.
The time program should match the following figure.
SDS-MW Analysis Kit Application Guide
36 / 42 RUO-IDV-05-6934-B
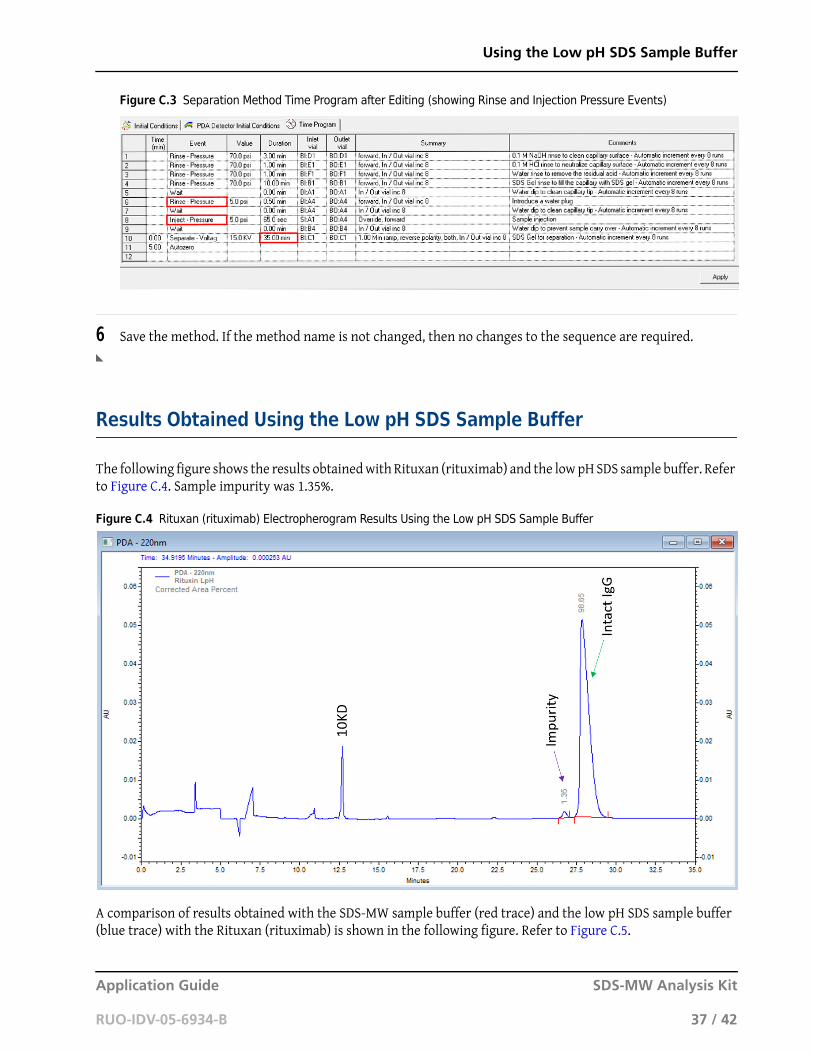
Using the Low pH SDS Sample Buffer
Figure C.3 Separation Method Time Program after Editing (showing Rinse and Injection Pressure Events)
6 Save the method. If the method name is not changed, then no changes to the sequence are required.
Results Obtained Using the Low pH SDS Sample Buffer
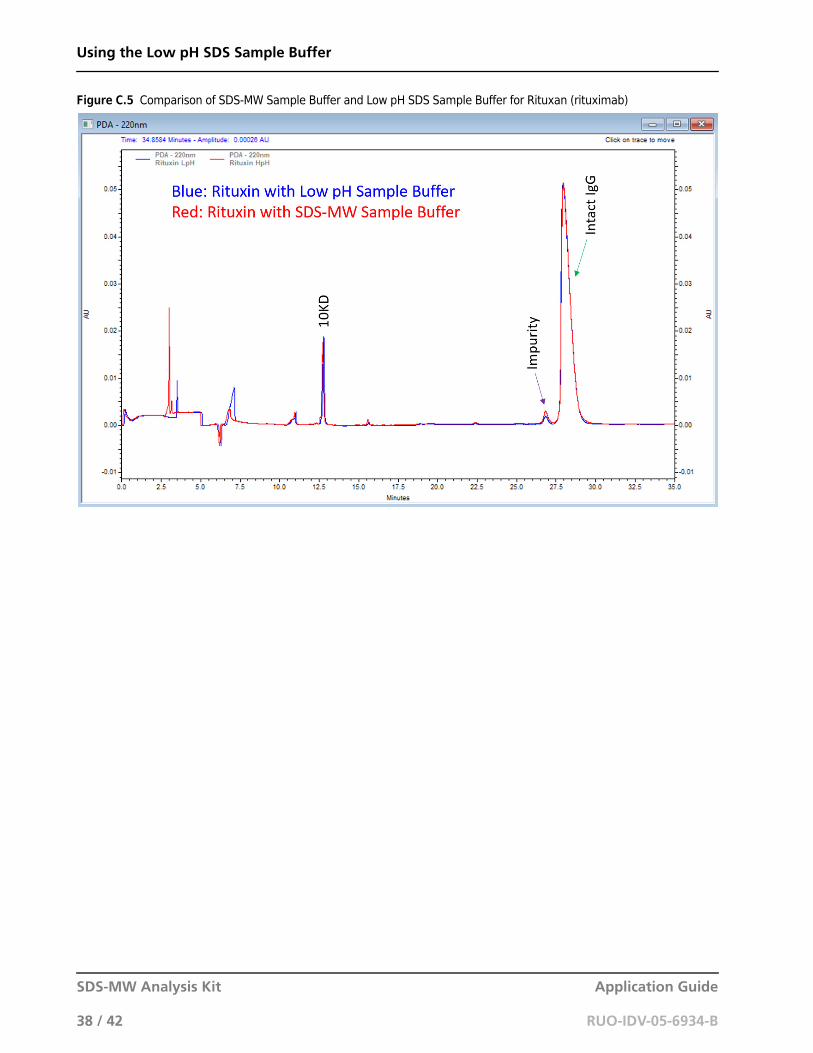
The following figure shows the results obtained with Rituxan (rituximab) and the low pH SDS sample buffer. Refer to Figure C.4. Sample impurity was 1.35%.
Figure C.4 Rituxan (rituximab) Electropherogram Results Using the Low pH SDS Sample Buffer
A comparison of results obtained with the SDS-MW sample buffer (red trace) and the low pH SDS sample buffer (blue trace) with the Rituxan (rituximab) is shown in the following figure. Refer to Figure C.5.
Application Guide SDS-MW Analysis Kit
RUO-IDV-05-6934-B 37 / 42
Using the Low pH SDS Sample Buffer
Figure C.5 Comparison of SDS-MW Sample Buffer and Low pH SDS Sample Buffer for Rituxan (rituximab)
SDS-MW Analysis Kit Application Guide
38 / 42 RUO-IDV-05-6934-B
Application Guide SDS-MW Analysis Kit
RUO-IDV-05-6934-B 39 / 42
Revision HistoryInitial Issue, A51970AA, April 200932 Karat Software version 9.1
PA 800 plus Software version 1.1
PA 800 plus Firmware version 9.0
First Revision, A51970AB, December 2009Revised corporate address
Second Revision, A51970AC, February 201132 Karat Software version 9.1 patch
PA 800 plus Software version 1.1 patch
PA 800 plus Firmware version 9.2
Numerous syntax and grammatical edits
Third Revision, A51970AD, January 2014Dimension & instruction edit
Fourth Revision, A51970AE, RUO-IDV-05-6934-A, April 2018Rebranded. Applied new template. Legal content updated. Safety chapter removed and a reference to the safety content found in the System Overview Guide added. Replaced instructions for creating methods with instructions for using the PA 800 Plus Software. Added Hazardous Substance Information appendix.
Fifth Revision, RUO-IDV-05-6934-B, November 2019Applied new template. Legal content updated. Added low pH SDS sample buffer including sample preparation instructions. Added methods appendix. Added Contact Us.
This guide applies to the latest software and firmware listed above, and any higher subsequent versions. When a subsequent software or firmware version affects the information in this guide, a new issue will be released to the SCIEX website. For updates, go to www.sciex.com and download the latest version of the guide.
SDS-MW Analysis Kit Application Guide
40 / 42 RUO-IDV-05-6934-B
Revision History
Contact Us
Customer Training
• In North America: [email protected]
• In Europe: [email protected]
• Outside the EU and North America, visit sciex.com/education for contact information.
Online Learning Center
• SCIEXUniversity™
Purchase Consumables
Reorder SCIEX consumables online at store.sciex.com. To set up an order, use the account number, found on the quote, order confirmation, or shipping documents.
SCIEX Support
SCIEX and its representatives maintain a staff of fully-trained service and technical specialists located throughout the world. They can answer questions about the system or any technical issues that might arise. For more information, visit the SCIEX website at sciex.com or contact us in one of the following ways:
• sciex.com/contact-us
• sciex.com/request-support
Application Guide SDS-MW Analysis Kit
RUO-IDV-05-6934-B 41 / 42
Contact Us
CyberSecurity
For the latest guidance on cybersecurity for SCIEX products, visit sciex.com/productsecurity.
Documentation
This version of the document supercedes all previous versions of this document.
To view this document electronically, Adobe Acrobat Reader is required. To download the latest version, go to https://get.adobe.com/reader.
To find software product documentation, refer to the release notes or software installation guide that comes with the software.
To find hardware product documentation, refer to the Customer Reference DVD that comes with the system or component.
The latest versions of the documentation are available on the SCIEX website, at sciex.com/customer-documents.
Note: To request a free, printed version of this document, contact sciex.com/contact-us.
SDS-MW Analysis Kit Application Guide
42 / 42 RUO-IDV-05-6934-B