Embed Size (px)
Citation preview
Date of Issue: 23/04/2015
Document Version: 0.1
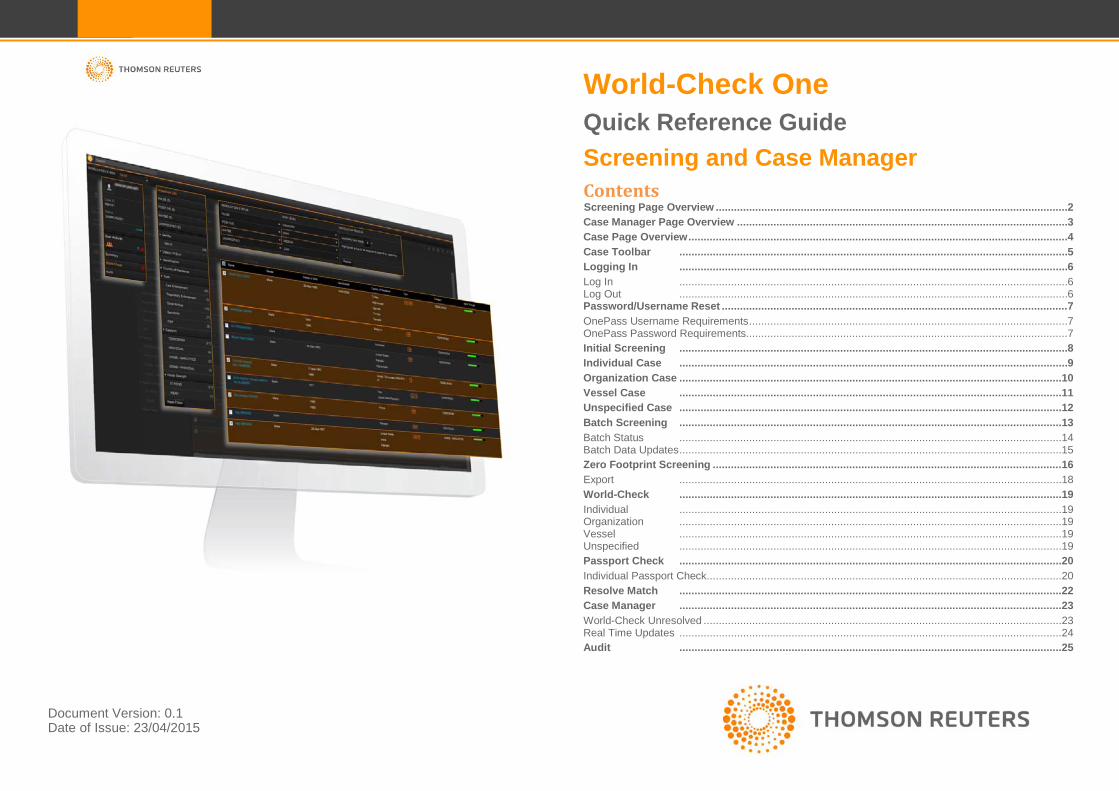
World-Check One Quick Reference Guide Screening and Case Manager Contents Screening Page Overview .................................................................................................................... 2 Case Manager Page Overview ............................................................................................................. 3 Case Page Overview ............................................................................................................................. 4 Case Toolbar ................................................................................................................................ 5 Logging In ................................................................................................................................ 6 Log In ................................................................................................................................ 6 Log Out ................................................................................................................................ 6 Password/Username Reset .................................................................................................................. 7 OnePass Username Requirements ......................................................................................................... 7 OnePass Password Requirements.......................................................................................................... 7 Initial Screening ................................................................................................................................ 8 Individual Case ................................................................................................................................ 9 Organization Case .............................................................................................................................. 10 Vessel Case .............................................................................................................................. 11 Unspecified Case .............................................................................................................................. 12 Batch Screening .............................................................................................................................. 13 Batch Status .............................................................................................................................. 14 Batch Data Updates .............................................................................................................................. 15 Zero Footprint Screening ................................................................................................................... 16 Export .............................................................................................................................. 18 World-Check .............................................................................................................................. 19 Individual .............................................................................................................................. 19 Organization .............................................................................................................................. 19 Vessel .............................................................................................................................. 19 Unspecified .............................................................................................................................. 19 Passport Check .............................................................................................................................. 20 Individual Passport Check ..................................................................................................................... 20 Resolve Match .............................................................................................................................. 22 Case Manager .............................................................................................................................. 23 World-Check Unresolved ...................................................................................................................... 23 Real Time Updates .............................................................................................................................. 24 Audit .............................................................................................................................. 25
Date of Issue: 23/04/2015 Page 2 of 26
Document Version: 0.1
Screening Page Overview
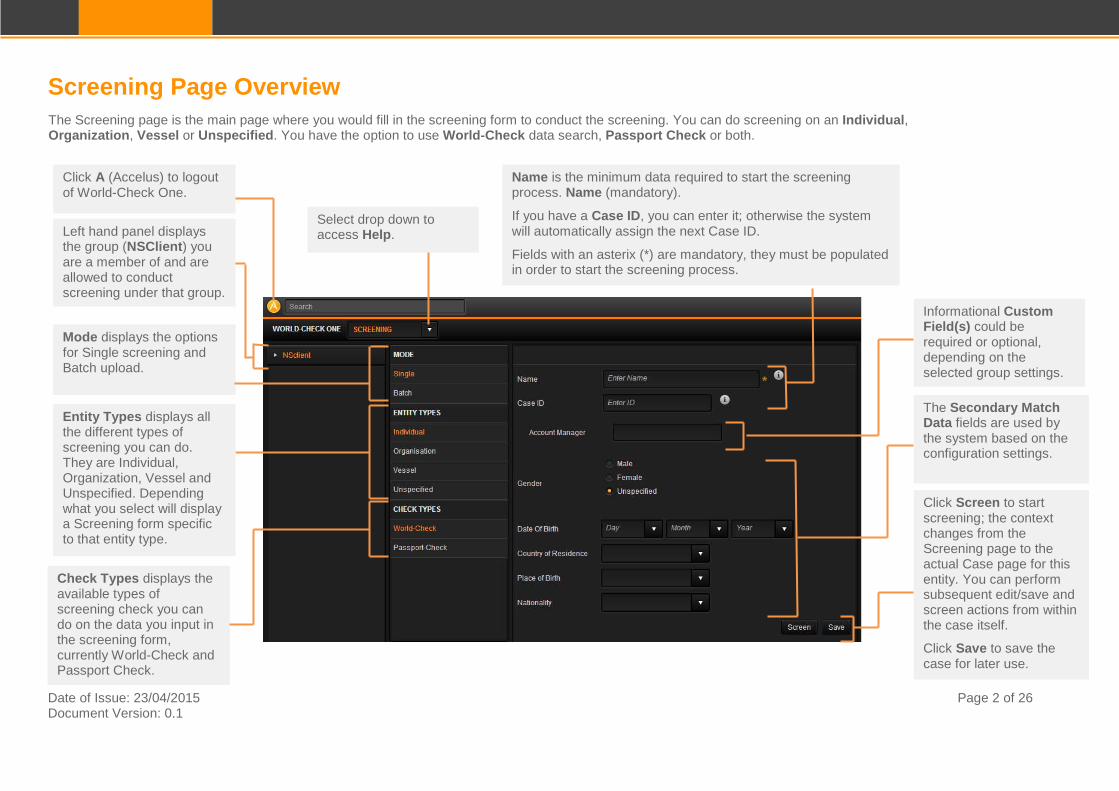
The Screening page is the main page where you would fill in the screening form to conduct the screening. You can do screening on an Individual, Organization, Vessel or Unspecified. You have the option to use World-Check data search, Passport Check or both.
Click A (Accelus) to logout of World-Check One.
Select drop down to access Help. Left hand panel displays
the group (NSClient) you are a member of and are allowed to conduct screening under that group.
Name is the minimum data required to start the screening process. Name (mandatory).
If you have a Case ID, you can enter it; otherwise the system will automatically assign the next Case ID.
Fields with an asterix (*) are mandatory, they must be populated in order to start the screening process.
Entity Types displays all the different types of screening you can do. They are Individual, Organization, Vessel and Unspecified. Depending what you select will display a Screening form specific to that entity type.
The Secondary Match Data fields are used by the system based on the configuration settings.
Click Screen to start screening; the context changes from the Screening page to the actual Case page for this entity. You can perform subsequent edit/save and screen actions from within the case itself.
Click Save to save the case for later use.
Check Types displays the available types of screening check you can do on the data you input in the screening form, currently World-Check and Passport Check.
Informational Custom Field(s) could be required or optional, depending on the selected group settings.
Mode displays the options for Single screening and Batch upload.

Date of Issue: 23/04/2015 Page 3 of 26
Document Version: 0.1
Case Manager Page Overview
Case Manager is the key work space for managing Cases. This is effectively a list of Cases with key information displayed that will inform and assist a user in managing Cases. For example multiple cases could be selected and assigned to a User.
You need to be assigned to a role with permission to maintain cases depending of the action you would like to do (permission = ‘Review a Case’, ‘Archive a Case’, ‘Assign a Case’ etc).
Filters allow you to Search Names or use the filter to restrict/expand the Case Manager List.
If you have specified any filter and would like to see the full list of results again, click Reset Filters and filters will be reset.
Case Manager toolbar displays options for Archive, Assign, Ongoing Screening and Export.
The list of the cases loaded depends on the Filters you are using. Cases can be sorted ascending/descending by using any of the column headings (for example Case Name).
Click ON/OFF to Include/Exclude archived cases from the list.
Click on any of the horizontal arrows to expand the related filter section e.g. Check Type.
Click on the vertical arrow to collapse the related filter section again.
Date of Issue: 23/04/2015 Page 4 of 26
Document Version: 0.1
Case Page Overview
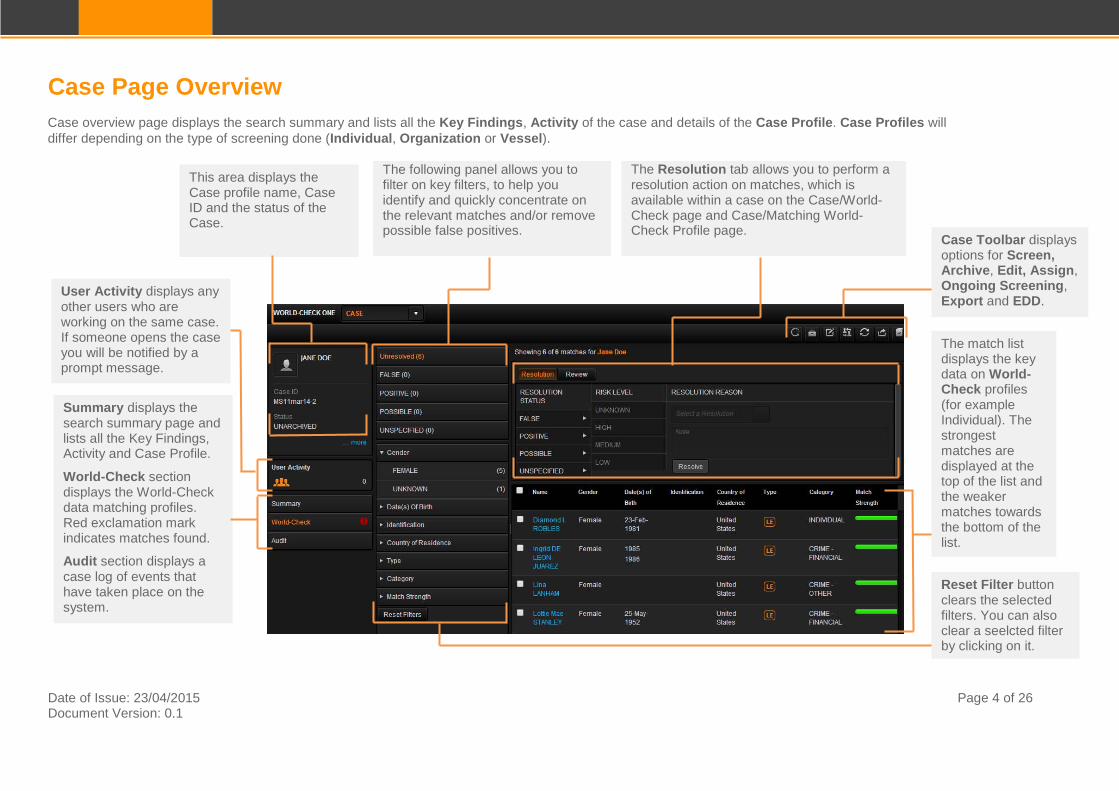
Summary displays the search summary page and lists all the Key Findings, Activity and Case Profile.
World-Check section displays the World-Check data matching profiles. Red exclamation mark indicates matches found.
Audit section displays a case log of events that have taken place on the system.
User Activity displays any other users who are working on the same case. If someone opens the case you will be notified by a prompt message.
This area displays the Case profile name, Case ID and the status of the Case.
The following panel allows you to filter on key filters, to help you identify and quickly concentrate on the relevant matches and/or remove possible false positives.
The Resolution tab allows you to perform a resolution action on matches, which is available within a case on the Case/World-Check page and Case/Matching World-Check Profile page.
The match list displays the key data on World-Check profiles (for example Individual). The strongest matches are displayed at the top of the list and the weaker matches towards the bottom of the list.
Case overview page displays the search summary and lists all the Key Findings, Activity of the case and details of the Case Profile. Case Profiles will differ depending on the type of screening done (Individual, Organization or Vessel).
Case Toolbar displays options for Screen, Archive, Edit, Assign, Ongoing Screening, Export and EDD.
Reset Filter button clears the selected filters. You can also clear a seelcted filter by clicking on it.
Date of Issue: 23/04/2015 Page 5 of 26
Document Version: 0.1
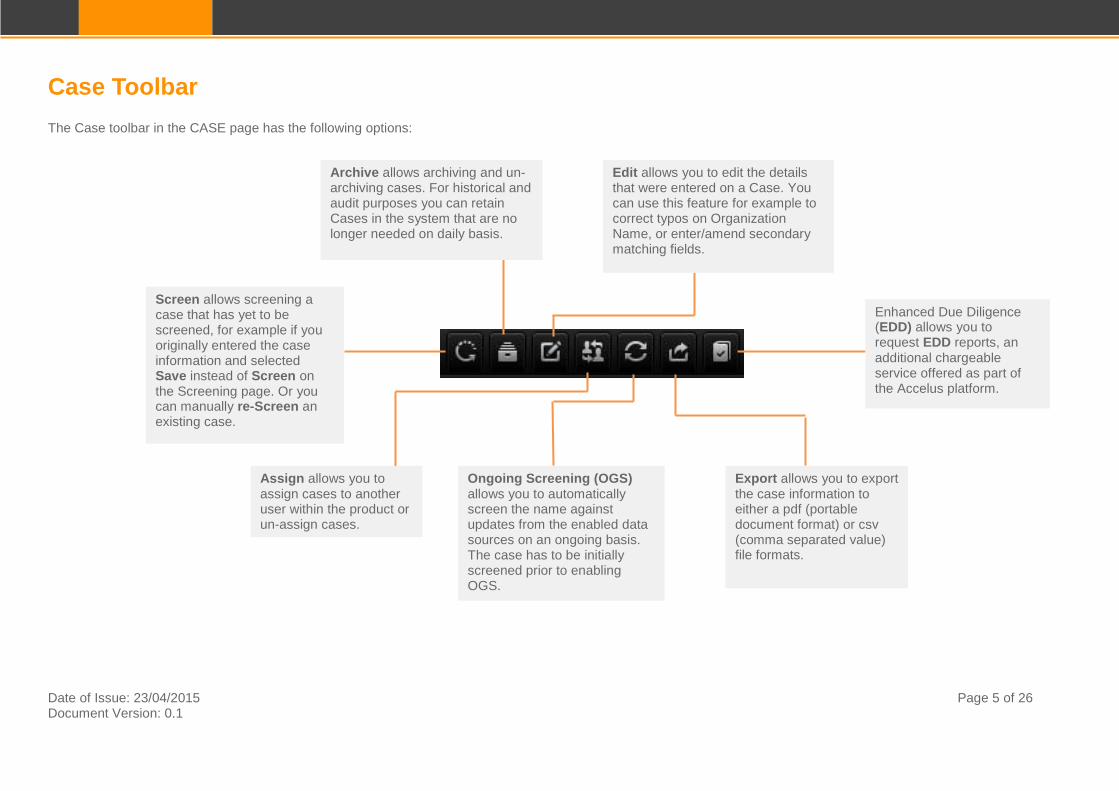
Case Toolbar The Case toolbar in the CASE page has the following options:
Edit allows you to edit the details that were entered on a Case. You can use this feature for example to correct typos on Organization Name, or enter/amend secondary matching fields.
Archive allows archiving and un-archiving cases. For historical and audit purposes you can retain Cases in the system that are no longer needed on daily basis.
Screen allows screening a case that has yet to be screened, for example if you originally entered the case information and selected Save instead of Screen on the Screening page. Or you can manually re-Screen an existing case.
Assign allows you to assign cases to another user within the product or un-assign cases.
Enhanced Due Diligence (EDD) allows you to request EDD reports, an additional chargeable service offered as part of the Accelus platform.
Export allows you to export the case information to either a pdf (portable document format) or csv (comma separated value) file formats.
Ongoing Screening (OGS) allows you to automatically screen the name against updates from the enabled data sources on an ongoing basis. The case has to be initially screened prior to enabling OGS.
Date of Issue: 23/04/2015 Page 6 of 26
Document Version: 0.1
Logging In
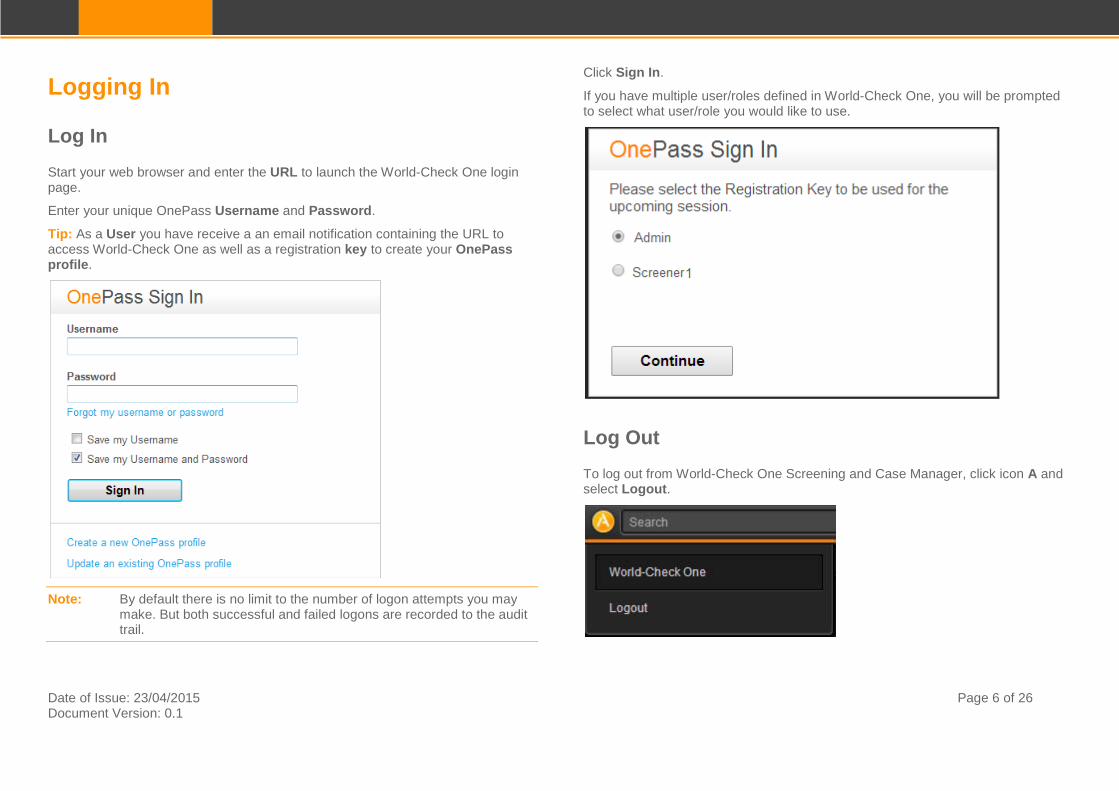
Log In Start your web browser and enter the URL to launch the World-Check One login page.
Enter your unique OnePass Username and Password.
Tip: As a User you have receive a an email notification containing the URL to access World-Check One as well as a registration key to create your OnePass profile.
Note: By default there is no limit to the number of logon attempts you may make. But both successful and failed logons are recorded to the audit trail.
Click Sign In.
If you have multiple user/roles defined in World-Check One, you will be prompted to select what user/role you would like to use.
Log Out To log out from World-Check One Screening and Case Manager, click icon A and select Logout.
Date of Issue: 23/04/2015 Page 7 of 26
Document Version: 0.1
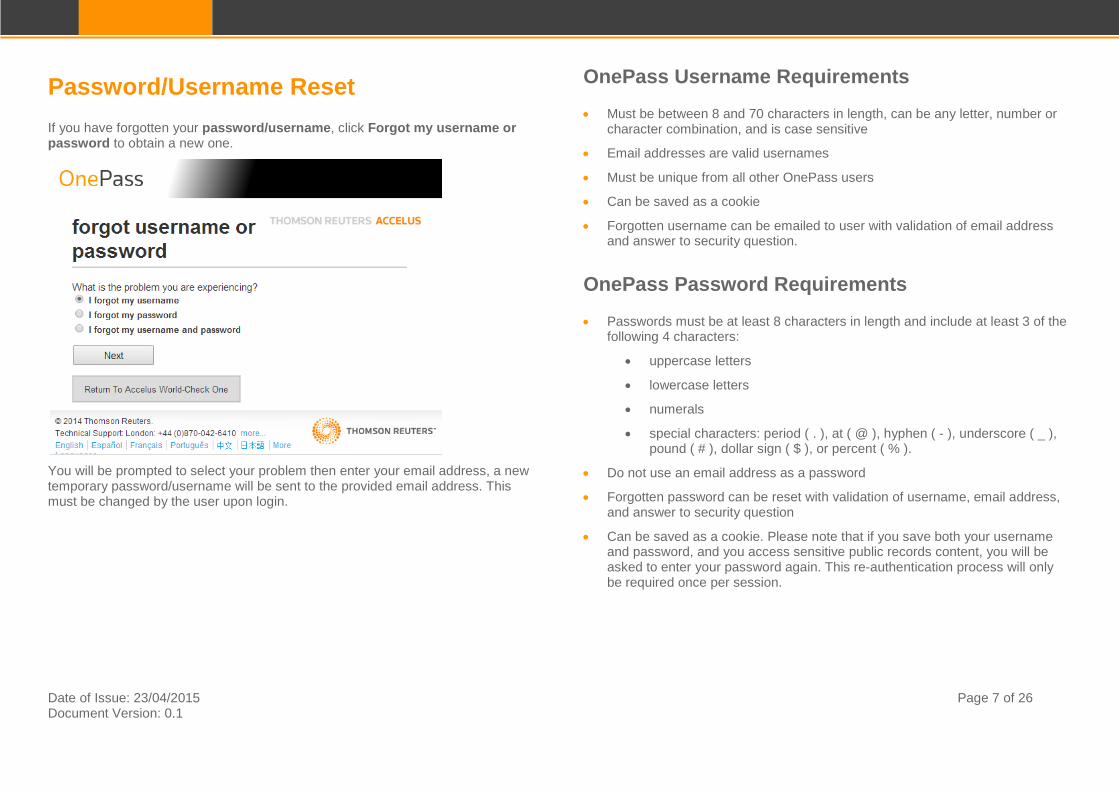
Password/Username Reset If you have forgotten your password/username, click Forgot my username or password to obtain a new one.
You will be prompted to select your problem then enter your email address, a new temporary password/username will be sent to the provided email address. This must be changed by the user upon login.
OnePass Username Requirements
• Must be between 8 and 70 characters in length, can be any letter, number or character combination, and is case sensitive
• Email addresses are valid usernames
• Must be unique from all other OnePass users
• Can be saved as a cookie
• Forgotten username can be emailed to user with validation of email address and answer to security question.
OnePass Password Requirements
• Passwords must be at least 8 characters in length and include at least 3 of the following 4 characters:
• uppercase letters
• lowercase letters
• numerals
• special characters: period ( . ), at ( @ ), hyphen ( - ), underscore ( _ ), pound ( # ), dollar sign ( $ ), or percent ( % ).
• Do not use an email address as a password
• Forgotten password can be reset with validation of username, email address, and answer to security question
• Can be saved as a cookie. Please note that if you save both your username and password, and you access sensitive public records content, you will be asked to enter your password again. This re-authentication process will only be required once per session.
Date of Issue: 23/04/2015 Page 8 of 26
Document Version: 0.1
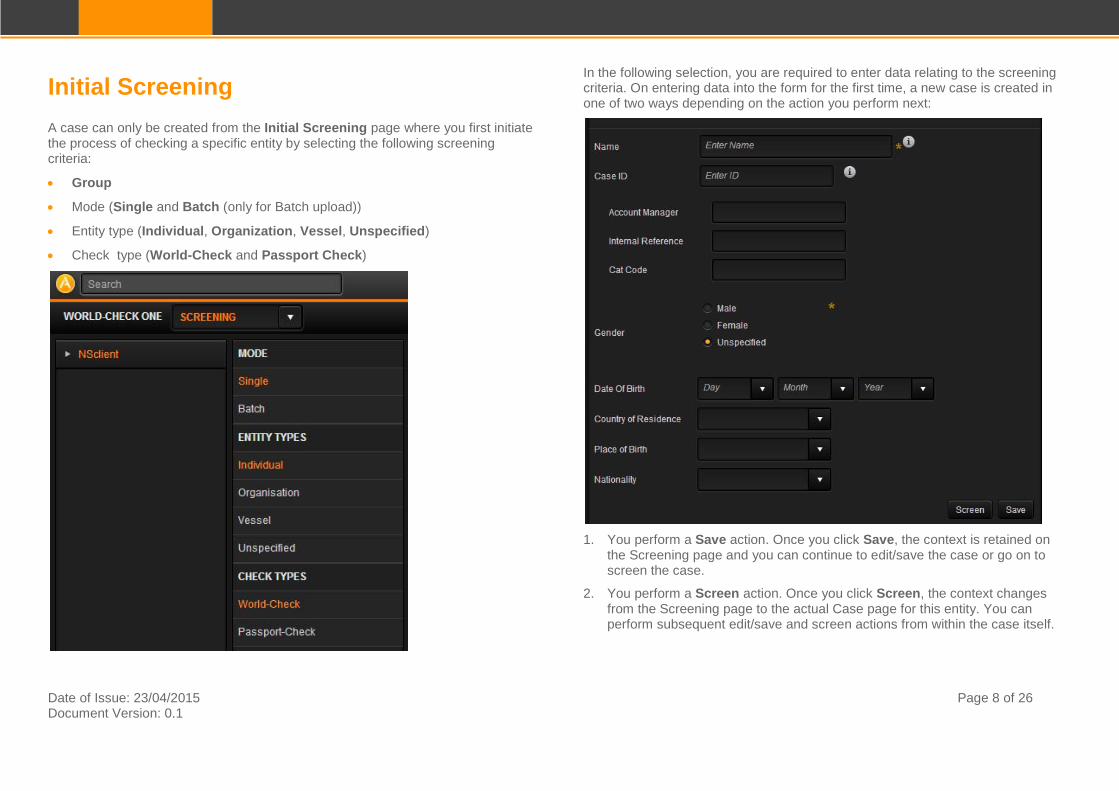
Initial Screening A case can only be created from the Initial Screening page where you first initiate the process of checking a specific entity by selecting the following screening criteria:
• Group
• Mode (Single and Batch (only for Batch upload))
• Entity type (Individual, Organization, Vessel, Unspecified)
• Check type (World-Check and Passport Check)
In the following selection, you are required to enter data relating to the screening criteria. On entering data into the form for the first time, a new case is created in one of two ways depending on the action you perform next:
1. You perform a Save action. Once you click Save, the context is retained on
the Screening page and you can continue to edit/save the case or go on to screen the case.
2. You perform a Screen action. Once you click Screen, the context changes from the Screening page to the actual Case page for this entity. You can perform subsequent edit/save and screen actions from within the case itself.
Date of Issue: 23/04/2015 Page 9 of 26
Document Version: 0.1
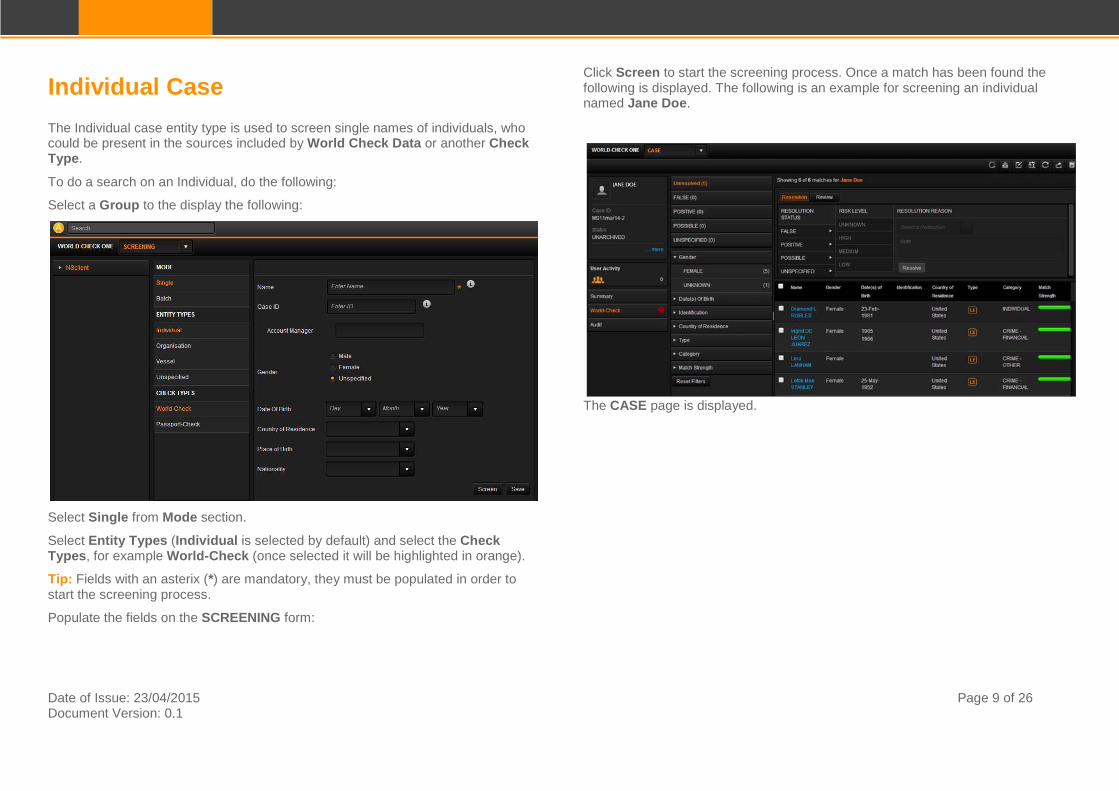
Individual Case The Individual case entity type is used to screen single names of individuals, who could be present in the sources included by World Check Data or another Check Type.
To do a search on an Individual, do the following:
Select a Group to the display the following:
Select Single from Mode section.
Select Entity Types (Individual is selected by default) and select the Check Types, for example World-Check (once selected it will be highlighted in orange).
Tip: Fields with an asterix (*) are mandatory, they must be populated in order to start the screening process.
Populate the fields on the SCREENING form:
Click Screen to start the screening process. Once a match has been found the following is displayed. The following is an example for screening an individual named Jane Doe.
The CASE page is displayed.
Date of Issue: 23/04/2015 Page 10 of 26
Document Version: 0.1
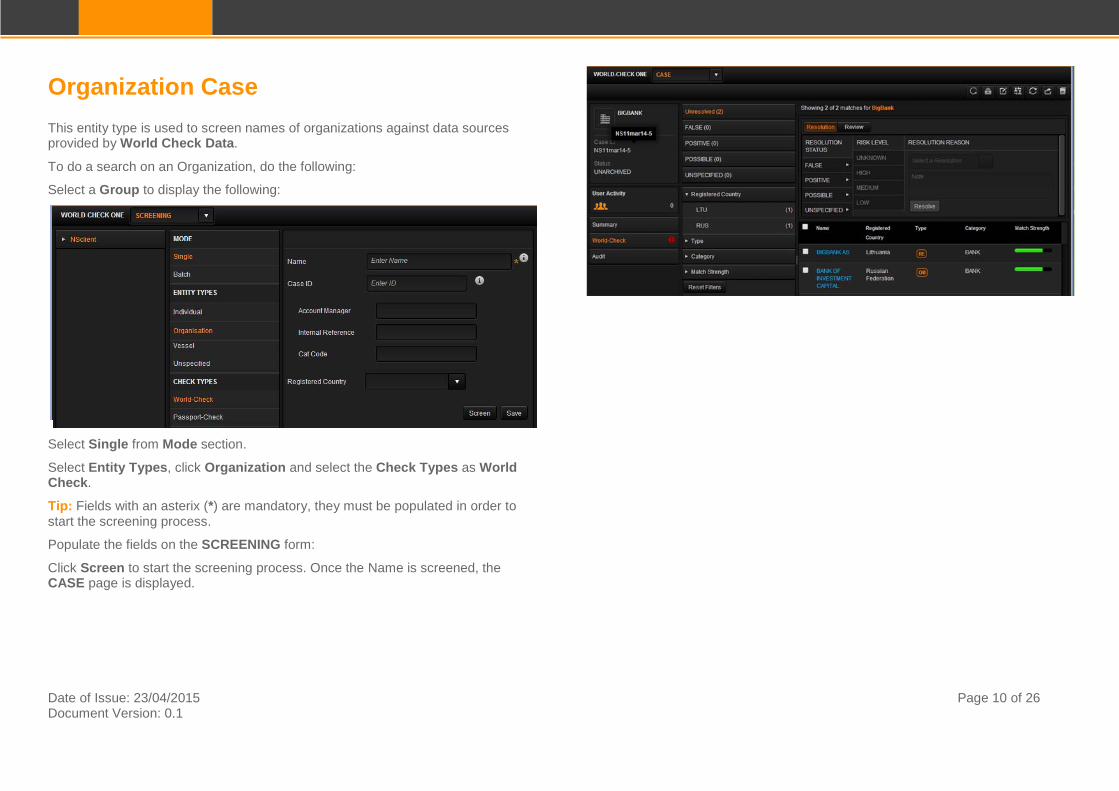
Organization Case This entity type is used to screen names of organizations against data sources provided by World Check Data.
To do a search on an Organization, do the following:
Select a Group to display the following:
Select Single from Mode section.
Select Entity Types, click Organization and select the Check Types as World Check.
Tip: Fields with an asterix (*) are mandatory, they must be populated in order to start the screening process.
Populate the fields on the SCREENING form:
Click Screen to start the screening process. Once the Name is screened, the CASE page is displayed.
Date of Issue: 23/04/2015 Page 11 of 26
Document Version: 0.1
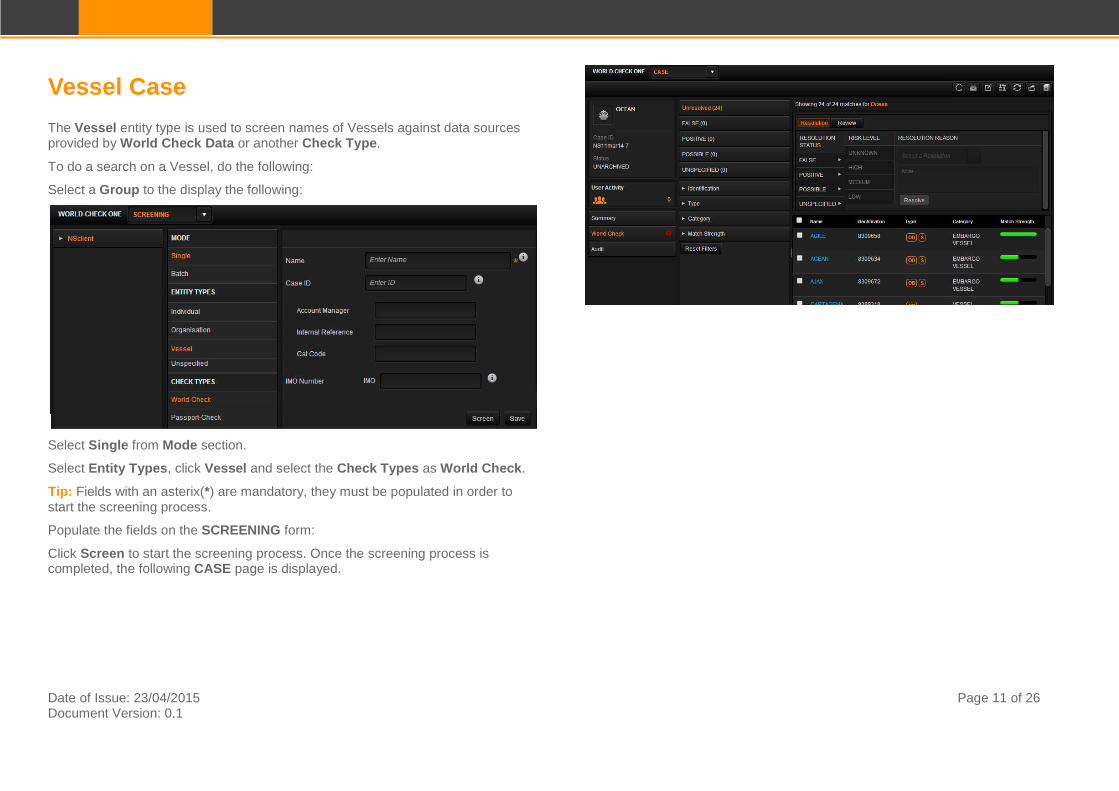
Vessel Case The Vessel entity type is used to screen names of Vessels against data sources provided by World Check Data or another Check Type.
To do a search on a Vessel, do the following:
Select a Group to the display the following:
Select Single from Mode section.
Select Entity Types, click Vessel and select the Check Types as World Check.
Tip: Fields with an asterix(*) are mandatory, they must be populated in order to start the screening process.
Populate the fields on the SCREENING form:
Click Screen to start the screening process. Once the screening process is completed, the following CASE page is displayed.

Date of Issue: 23/04/2015 Page 12 of 26
Document Version: 0.1
Unspecified Case The Unspecified function is used to screen Unspecified entity (any entity that does not fall under the other entity types e.g. airport) names, against the data sources provided by World Check Data.
To do a search on an Unspecified name, do the following:
Select a Group to display the following:
Select Single from Mode section.
Select Entity Types, click Unspecified and select the Check Types, for example World Check.
Tip: Fields with an asterix(*) are mandatory, they must be populated in order to start the screening process.
Populate the fields on the SCREENING form.
Click Screen to start the screening process. Once the screen process is completed, the CASE page is displayed.
Date of Issue: 23/04/2015 Page 13 of 26
Document Version: 0.1
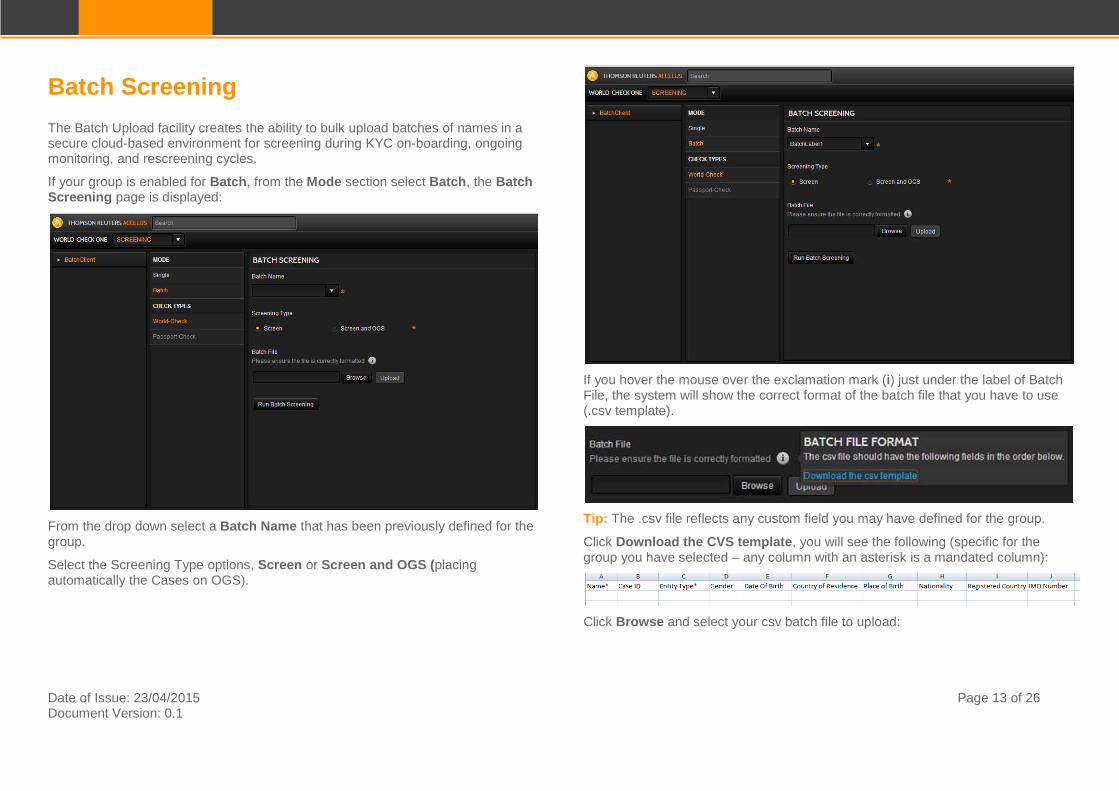
Batch Screening The Batch Upload facility creates the ability to bulk upload batches of names in a secure cloud-based environment for screening during KYC on-boarding, ongoing monitoring, and rescreening cycles.
If your group is enabled for Batch, from the Mode section select Batch, the Batch Screening page is displayed:
From the drop down select a Batch Name that has been previously defined for the group.
Select the Screening Type options, Screen or Screen and OGS (placing automatically the Cases on OGS).
If you hover the mouse over the exclamation mark (i) just under the label of Batch File, the system will show the correct format of the batch file that you have to use (.csv template).
Tip: The .csv file reflects any custom field you may have defined for the group.
Click Download the CVS template, you will see the following (specific for the group you have selected – any column with an asterisk is a mandated column):
Click Browse and select your csv batch file to upload:
Date of Issue: 23/04/2015 Page 14 of 26
Document Version: 0.1
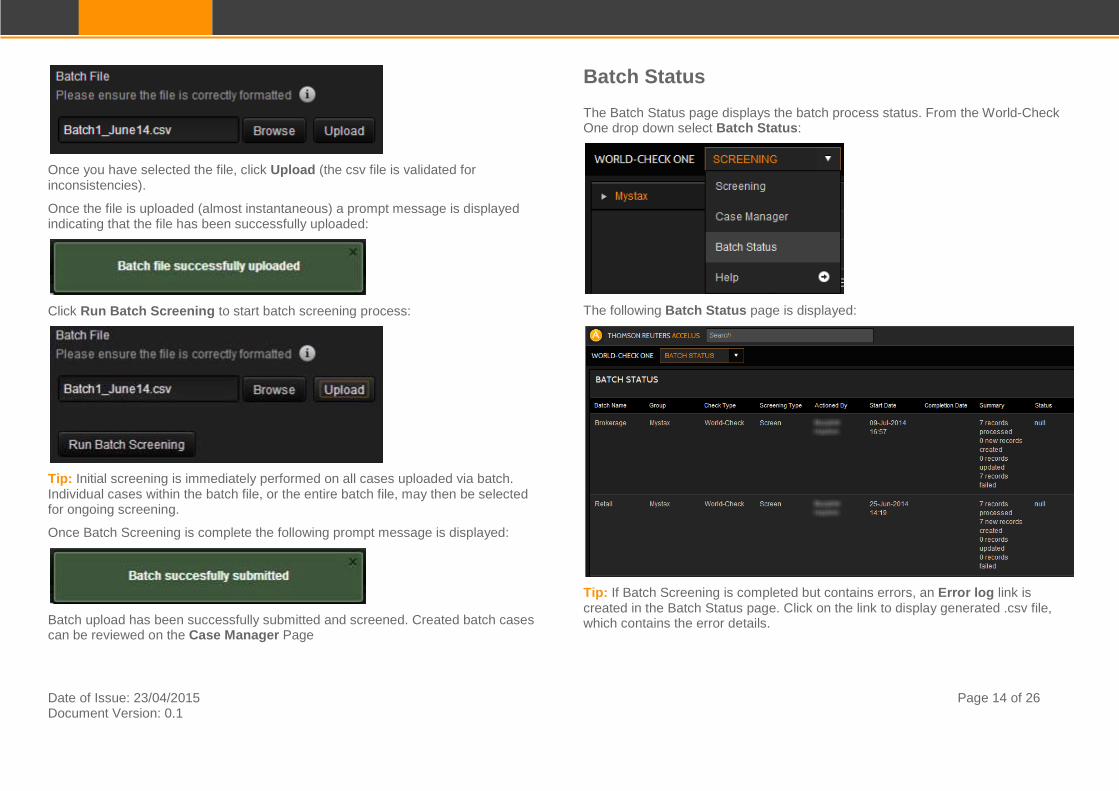
Once you have selected the file, click Upload (the csv file is validated for inconsistencies).
Once the file is uploaded (almost instantaneous) a prompt message is displayed indicating that the file has been successfully uploaded:
Click Run Batch Screening to start batch screening process:
Tip: Initial screening is immediately performed on all cases uploaded via batch. Individual cases within the batch file, or the entire batch file, may then be selected for ongoing screening.
Once Batch Screening is complete the following prompt message is displayed:
Batch upload has been successfully submitted and screened. Created batch cases can be reviewed on the Case Manager Page
Batch Status The Batch Status page displays the batch process status. From the World-Check One drop down select Batch Status:
The following Batch Status page is displayed:
Tip: If Batch Screening is completed but contains errors, an Error log link is created in the Batch Status page. Click on the link to display generated .csv file, which contains the error details.
Date of Issue: 23/04/2015 Page 15 of 26
Document Version: 0.1
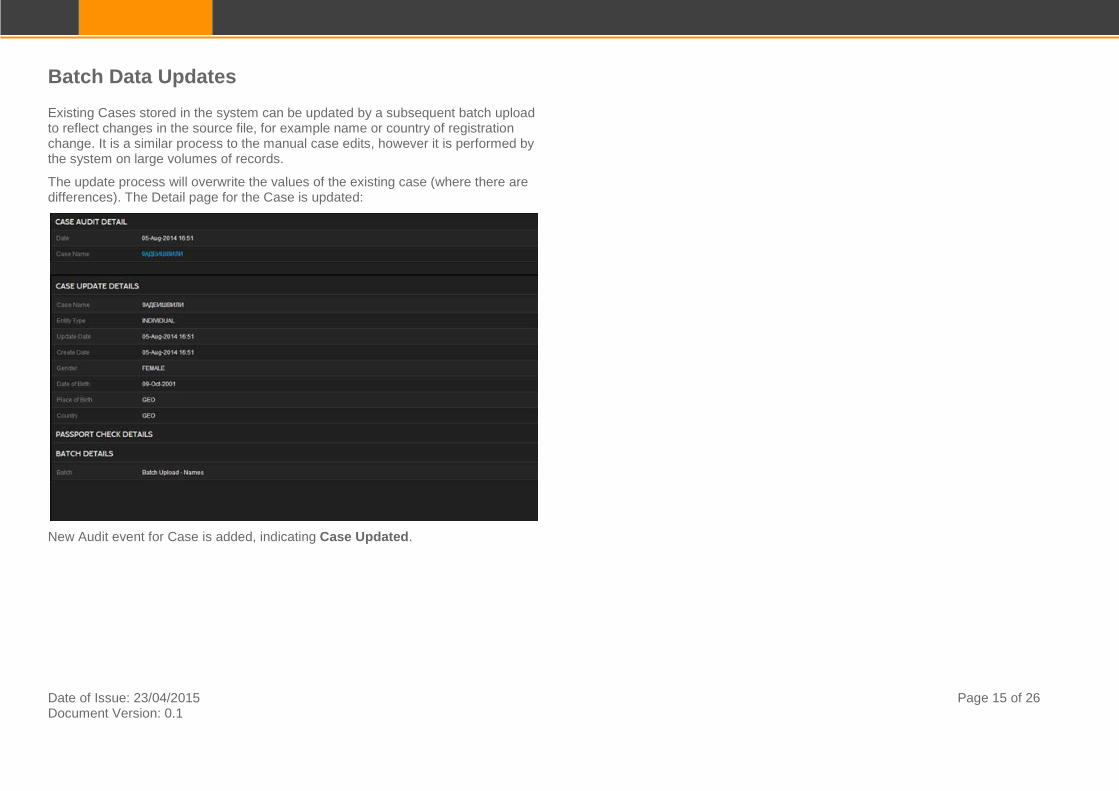
Batch Data Updates Existing Cases stored in the system can be updated by a subsequent batch upload to reflect changes in the source file, for example name or country of registration change. It is a similar process to the manual case edits, however it is performed by the system on large volumes of records.
The update process will overwrite the values of the existing case (where there are differences). The Detail page for the Case is updated:
New Audit event for Case is added, indicating Case Updated.
Date of Issue: 23/04/2015 Page 16 of 26
Document Version: 0.1
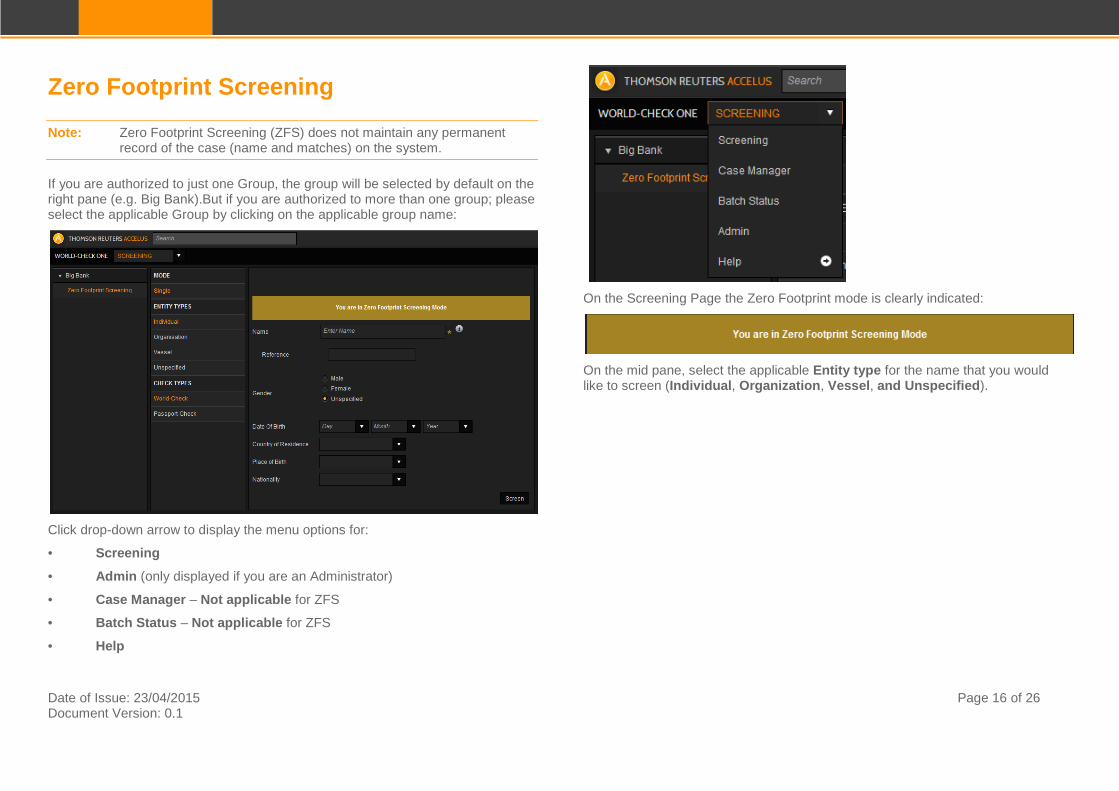
Zero Footprint Screening
Note: Zero Footprint Screening (ZFS) does not maintain any permanent record of the case (name and matches) on the system.
If you are authorized to just one Group, the group will be selected by default on the right pane (e.g. Big Bank).But if you are authorized to more than one group; please select the applicable Group by clicking on the applicable group name:
Click drop-down arrow to display the menu options for:
• Screening
• Admin (only displayed if you are an Administrator)
• Case Manager – Not applicable for ZFS
• Batch Status – Not applicable for ZFS
• Help
On the Screening Page the Zero Footprint mode is clearly indicated:
On the mid pane, select the applicable Entity type for the name that you would like to screen (Individual, Organization, Vessel, and Unspecified).
Date of Issue: 23/04/2015 Page 17 of 26
Document Version: 0.1
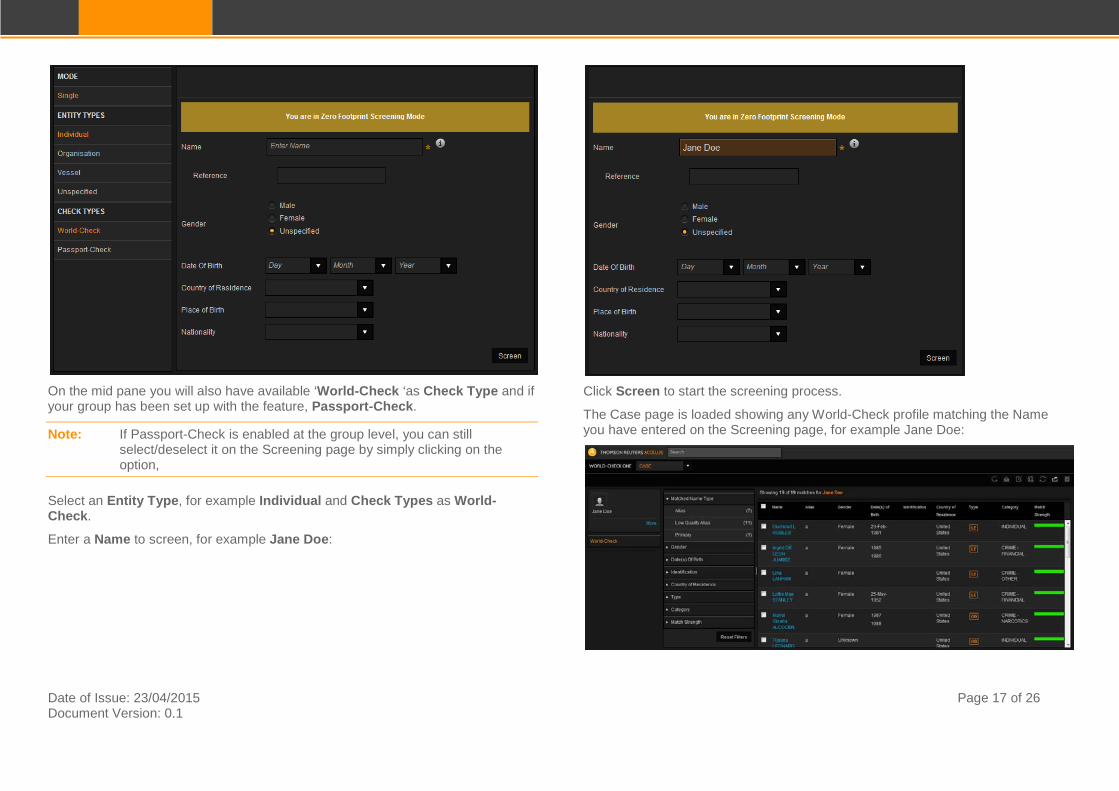
On the mid pane you will also have available ‘World-Check ‘as Check Type and if your group has been set up with the feature, Passport-Check.
Note: If Passport-Check is enabled at the group level, you can still select/deselect it on the Screening page by simply clicking on the option,
Select an Entity Type, for example Individual and Check Types as World-Check.
Enter a Name to screen, for example Jane Doe:
Click Screen to start the screening process.
The Case page is loaded showing any World-Check profile matching the Name you have entered on the Screening page, for example Jane Doe:
Date of Issue: 23/04/2015 Page 18 of 26
Document Version: 0.1
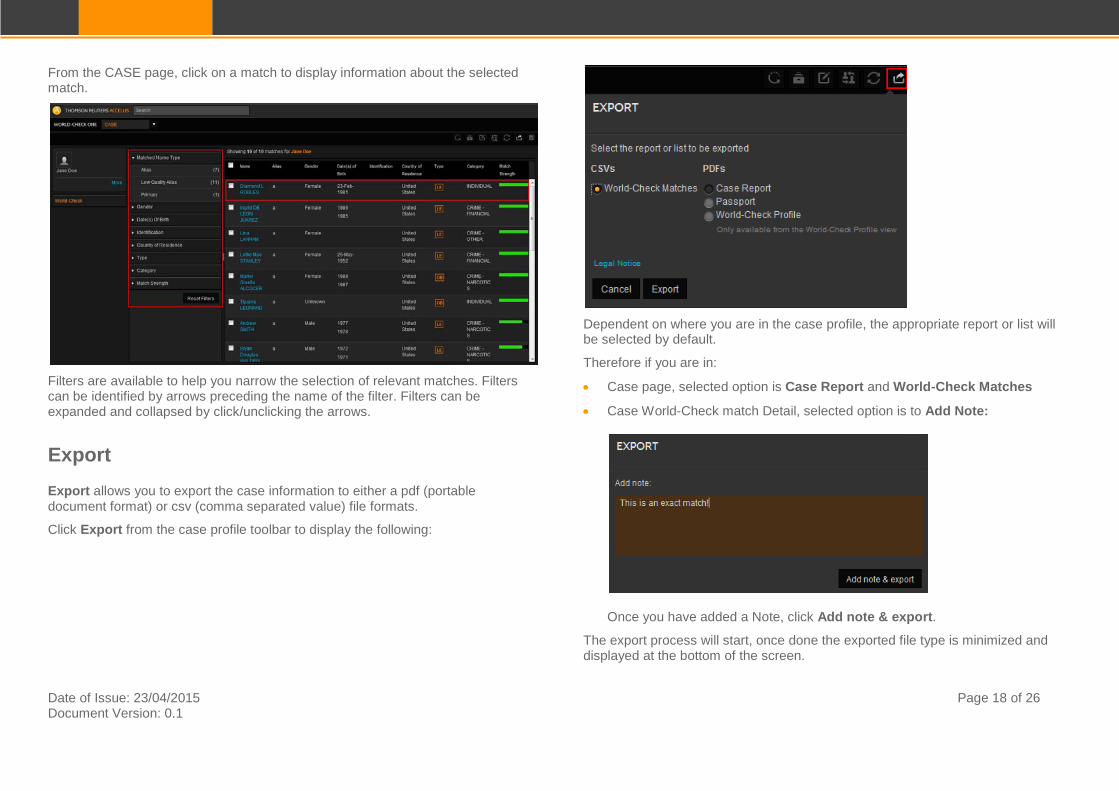
From the CASE page, click on a match to display information about the selected match.
Filters are available to help you narrow the selection of relevant matches. Filters can be identified by arrows preceding the name of the filter. Filters can be expanded and collapsed by click/unclicking the arrows.
Export Export allows you to export the case information to either a pdf (portable document format) or csv (comma separated value) file formats.
Click Export from the case profile toolbar to display the following:
Dependent on where you are in the case profile, the appropriate report or list will be selected by default.
Therefore if you are in:
• Case page, selected option is Case Report and World-Check Matches
• Case World-Check match Detail, selected option is to Add Note:
Once you have added a Note, click Add note & export.
The export process will start, once done the exported file type is minimized and displayed at the bottom of the screen.
Date of Issue: 23/04/2015 Page 19 of 26
Document Version: 0.1
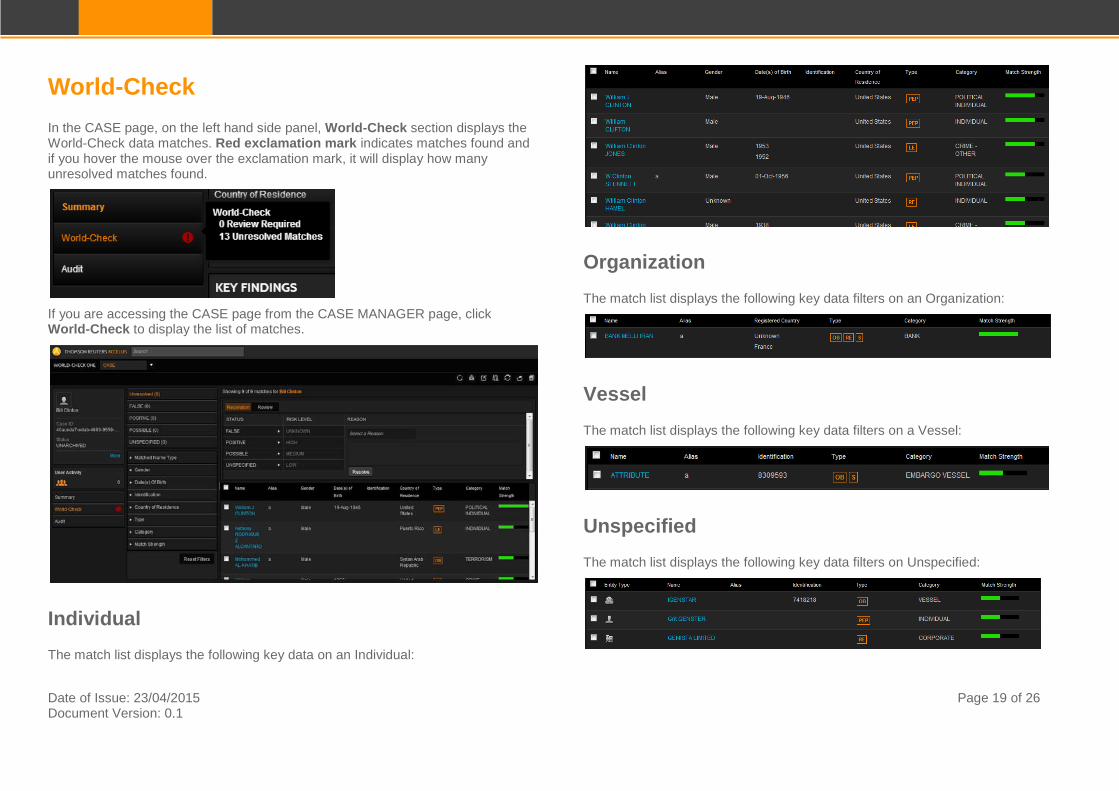
World-Check In the CASE page, on the left hand side panel, World-Check section displays the World-Check data matches. Red exclamation mark indicates matches found and if you hover the mouse over the exclamation mark, it will display how many unresolved matches found.
If you are accessing the CASE page from the CASE MANAGER page, click World-Check to display the list of matches.
Individual The match list displays the following key data on an Individual:
Organization The match list displays the following key data filters on an Organization:
Vessel The match list displays the following key data filters on a Vessel:
Unspecified The match list displays the following key data filters on Unspecified:
Date of Issue: 23/04/2015 Page 20 of 26
Document Version: 0.1
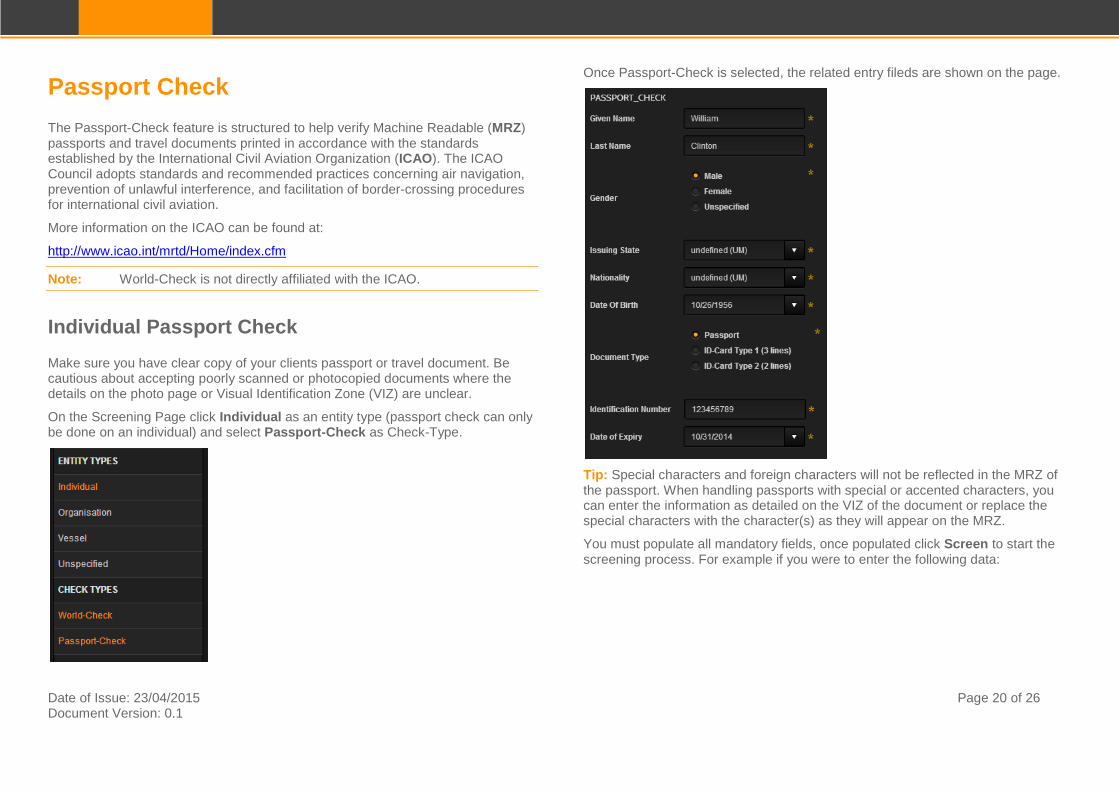
Passport Check The Passport-Check feature is structured to help verify Machine Readable (MRZ) passports and travel documents printed in accordance with the standards established by the International Civil Aviation Organization (ICAO). The ICAO Council adopts standards and recommended practices concerning air navigation, prevention of unlawful interference, and facilitation of border-crossing procedures for international civil aviation.
More information on the ICAO can be found at:
http://www.icao.int/mrtd/Home/index.cfm
Note: World-Check is not directly affiliated with the ICAO.
Individual Passport Check Make sure you have clear copy of your clients passport or travel document. Be cautious about accepting poorly scanned or photocopied documents where the details on the photo page or Visual Identification Zone (VIZ) are unclear.
On the Screening Page click Individual as an entity type (passport check can only be done on an individual) and select Passport-Check as Check-Type.
Once Passport-Check is selected, the related entry fileds are shown on the page.
Tip: Special characters and foreign characters will not be reflected in the MRZ of the passport. When handling passports with special or accented characters, you can enter the information as detailed on the VIZ of the document or replace the special characters with the character(s) as they will appear on the MRZ.
You must populate all mandatory fields, once populated click Screen to start the screening process. For example if you were to enter the following data:
Date of Issue: 23/04/2015 Page 21 of 26
Document Version: 0.1
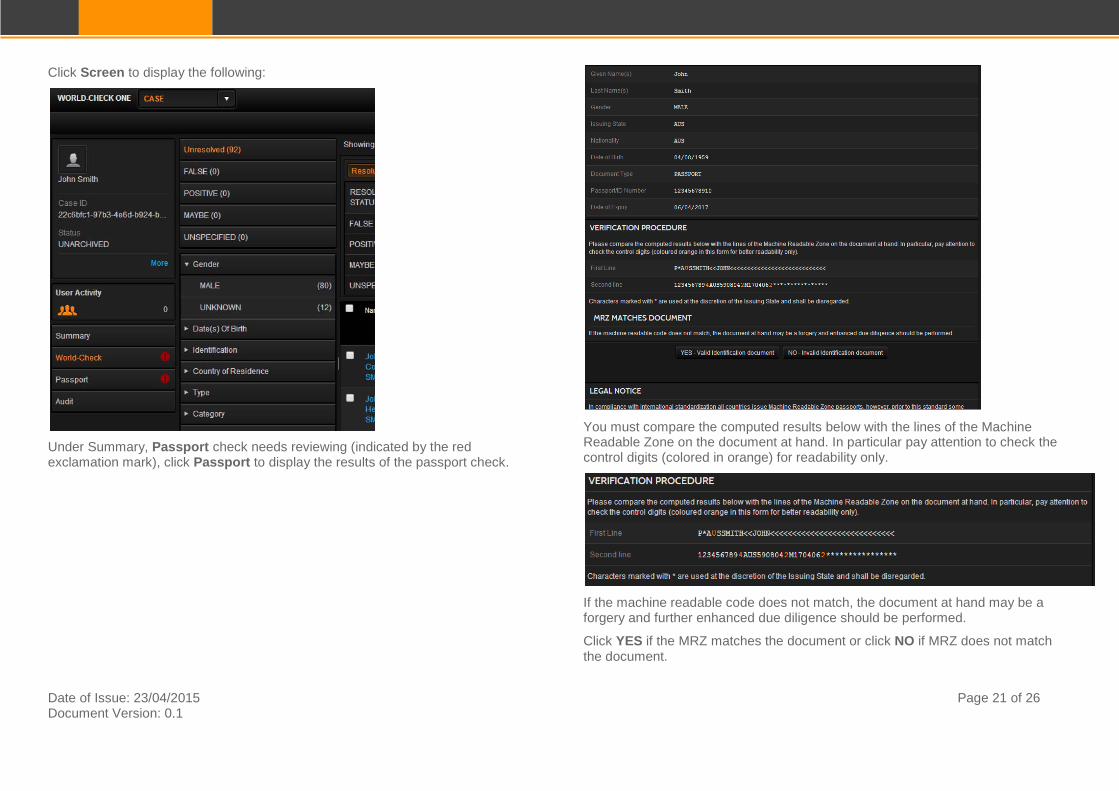
Click Screen to display the following:
Under Summary, Passport check needs reviewing (indicated by the red exclamation mark), click Passport to display the results of the passport check.
You must compare the computed results below with the lines of the Machine Readable Zone on the document at hand. In particular pay attention to check the control digits (colored in orange) for readability only.
If the machine readable code does not match, the document at hand may be a forgery and further enhanced due diligence should be performed.
Click YES if the MRZ matches the document or click NO if MRZ does not match the document.
Date of Issue: 23/04/2015 Page 22 of 26
Document Version: 0.1
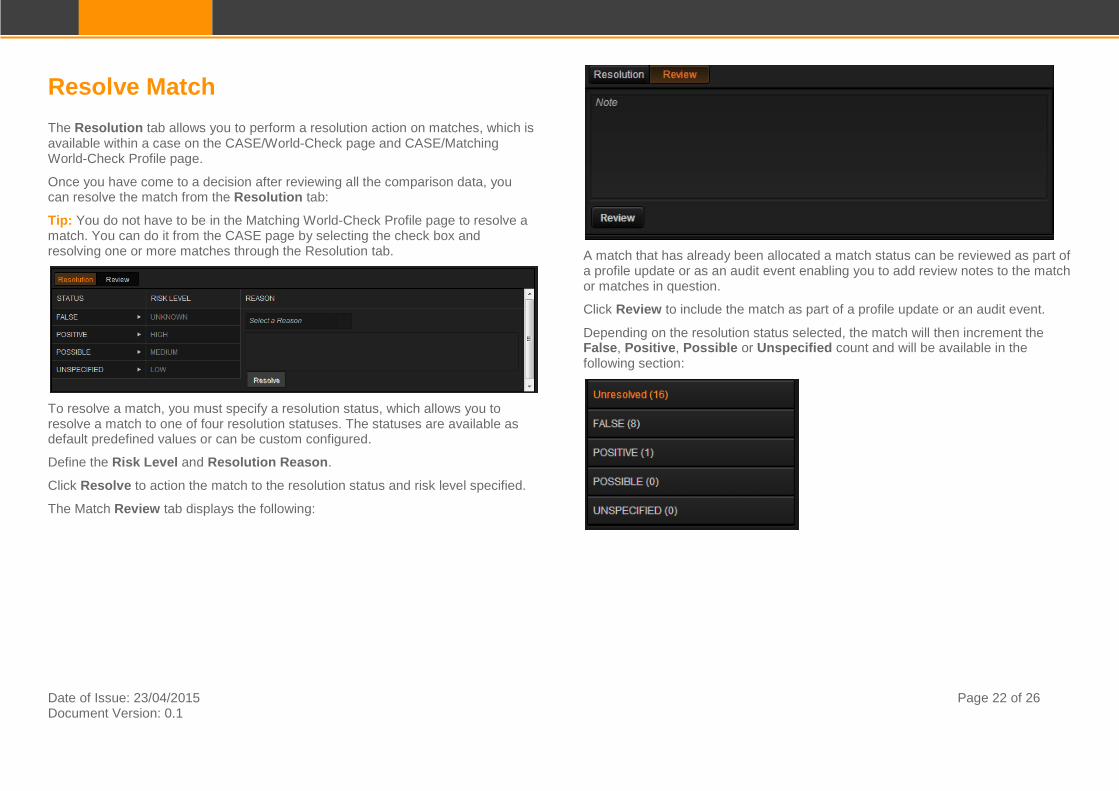
Resolve Match The Resolution tab allows you to perform a resolution action on matches, which is available within a case on the CASE/World-Check page and CASE/Matching World-Check Profile page.
Once you have come to a decision after reviewing all the comparison data, you can resolve the match from the Resolution tab:
Tip: You do not have to be in the Matching World-Check Profile page to resolve a match. You can do it from the CASE page by selecting the check box and resolving one or more matches through the Resolution tab.
To resolve a match, you must specify a resolution status, which allows you to resolve a match to one of four resolution statuses. The statuses are available as default predefined values or can be custom configured.
Define the Risk Level and Resolution Reason.
Click Resolve to action the match to the resolution status and risk level specified.
The Match Review tab displays the following:
A match that has already been allocated a match status can be reviewed as part of a profile update or as an audit event enabling you to add review notes to the match or matches in question.
Click Review to include the match as part of a profile update or an audit event.
Depending on the resolution status selected, the match will then increment the False, Positive, Possible or Unspecified count and will be available in the following section:
Date of Issue: 23/04/2015 Page 23 of 26
Document Version: 0.1
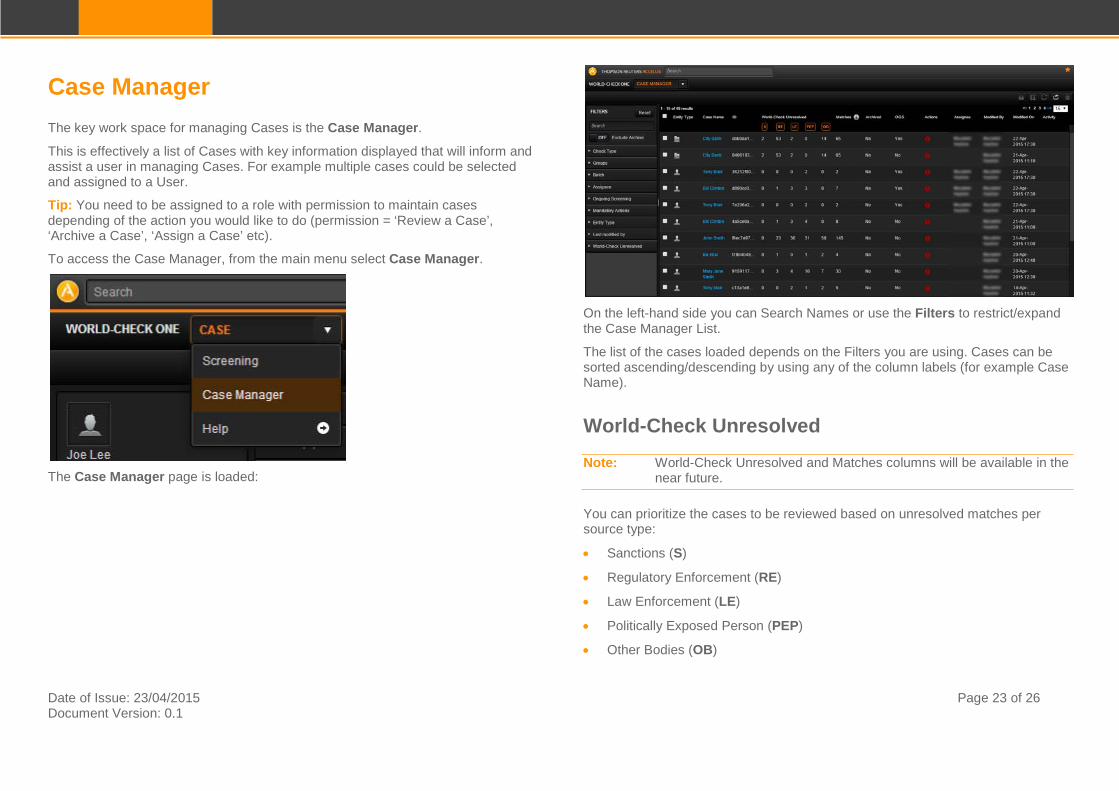
Case Manager The key work space for managing Cases is the Case Manager.
This is effectively a list of Cases with key information displayed that will inform and assist a user in managing Cases. For example multiple cases could be selected and assigned to a User.
Tip: You need to be assigned to a role with permission to maintain cases depending of the action you would like to do (permission = ‘Review a Case’, ‘Archive a Case’, ‘Assign a Case’ etc).
To access the Case Manager, from the main menu select Case Manager.
The Case Manager page is loaded:
On the left-hand side you can Search Names or use the Filters to restrict/expand the Case Manager List.
The list of the cases loaded depends on the Filters you are using. Cases can be sorted ascending/descending by using any of the column labels (for example Case Name).
World-Check Unresolved Note: World-Check Unresolved and Matches columns will be available in the
near future.
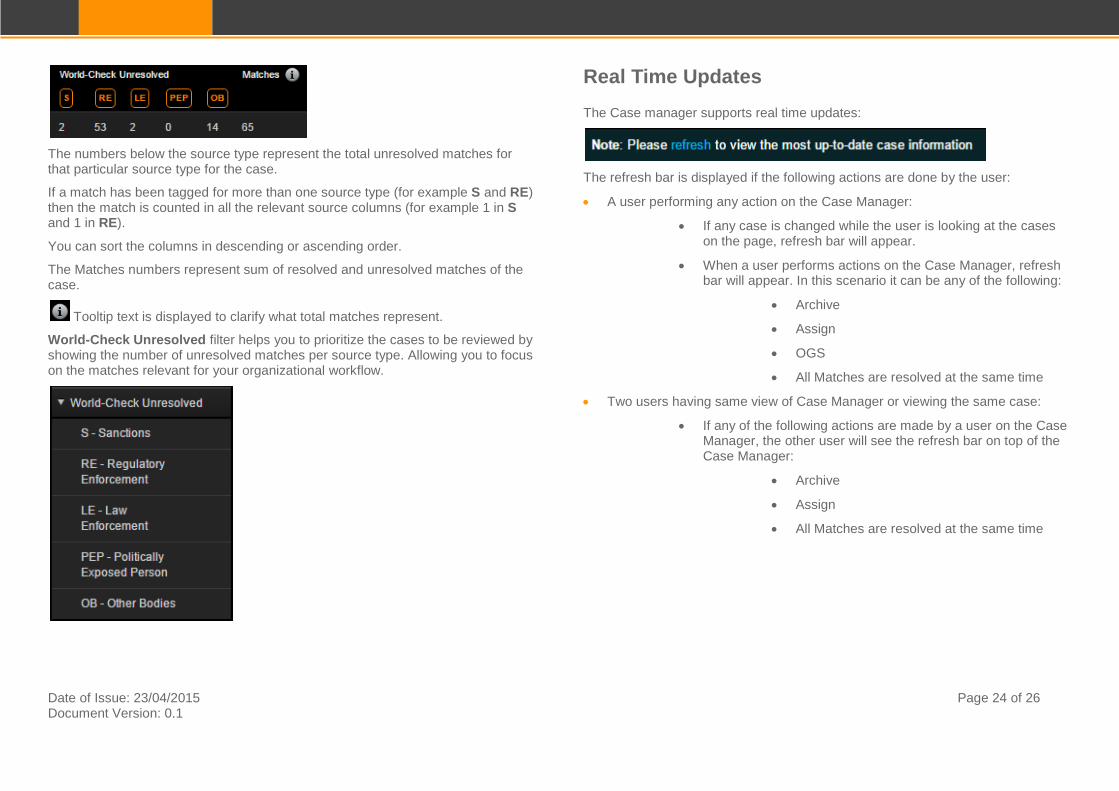
You can prioritize the cases to be reviewed based on unresolved matches per source type:
• Sanctions (S)
• Regulatory Enforcement (RE)
• Law Enforcement (LE)
• Politically Exposed Person (PEP)
• Other Bodies (OB)
Date of Issue: 23/04/2015 Page 24 of 26
Document Version: 0.1
The numbers below the source type represent the total unresolved matches for that particular source type for the case.
If a match has been tagged for more than one source type (for example S and RE) then the match is counted in all the relevant source columns (for example 1 in S and 1 in RE).
You can sort the columns in descending or ascending order.
The Matches numbers represent sum of resolved and unresolved matches of the case.
Tooltip text is displayed to clarify what total matches represent.
World-Check Unresolved filter helps you to prioritize the cases to be reviewed by showing the number of unresolved matches per source type. Allowing you to focus on the matches relevant for your organizational workflow.
Real Time Updates The Case manager supports real time updates:
The refresh bar is displayed if the following actions are done by the user:
• A user performing any action on the Case Manager:
• If any case is changed while the user is looking at the cases on the page, refresh bar will appear.
• When a user performs actions on the Case Manager, refresh bar will appear. In this scenario it can be any of the following:
• Archive
• Assign
• OGS
• All Matches are resolved at the same time
• Two users having same view of Case Manager or viewing the same case:
• If any of the following actions are made by a user on the Case Manager, the other user will see the refresh bar on top of the Case Manager:
• Archive
• Assign
• All Matches are resolved at the same time
Date of Issue: 23/04/2015 Page 25 of 26
Document Version: 0.1
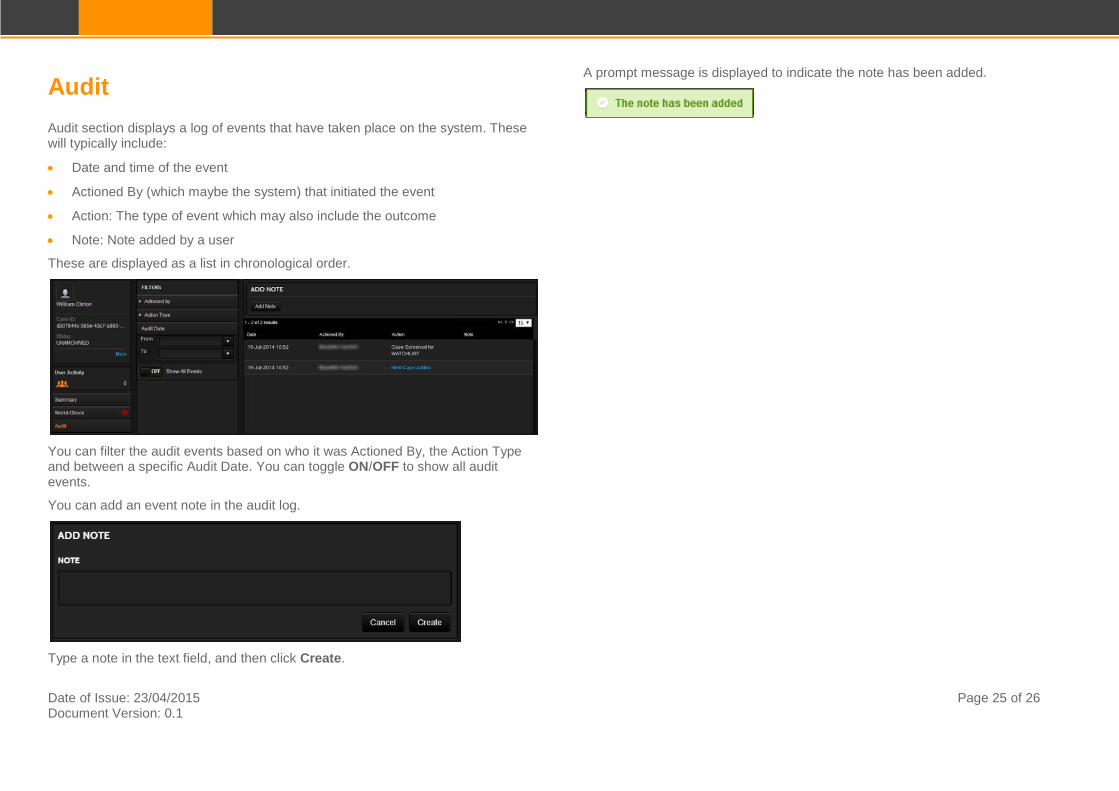
Audit Audit section displays a log of events that have taken place on the system. These will typically include:
• Date and time of the event
• Actioned By (which maybe the system) that initiated the event
• Action: The type of event which may also include the outcome
• Note: Note added by a user
These are displayed as a list in chronological order.
You can filter the audit events based on who it was Actioned By, the Action Type and between a specific Audit Date. You can toggle ON/OFF to show all audit events.
You can add an event note in the audit log.
Type a note in the text field, and then click Create.
A prompt message is displayed to indicate the note has been added.
© 2015 Thomson Reuters. All rights reserved. Republication or redistribution of Thomson Reuters content, including by framing or similar means, is prohibited without the prior written consent of Thomson Reuters. 'Thomson Reuters' and the Thomson Reuters logo are registered trademarks and trademarks of Thomson Reuters and its affiliated companies.
For more information
Send us a sales enquiry at https://accelus.thomsonreuters.com/about-us/contact-us
Read more about our products at http://accelus.thomsonreuters.com Find out how to contact your local office http://accelus.thomsonreuters.com/about-us/where-we-are
Document Version: 0.1 Date of Issue: 23/04/2015