Embed Size (px)
Citation preview

Version 2.10.2 150622
mt
Screencasting with Camtasia Mac 2 June 2015
Overview of Screencasting with Camtasia 2 Recording
Before You open Camtasia 3
Setup Camera & Microphone for Recording 4
Record the Full Screen 5
About Recording PowerPoint or Keynote 6
Record a Selected Area of the Screen 7
Where are Recording Files Saved? 10
Edit Your Recording
A Tour of the Camtasia Editing Workspace 11
Set the Canvas Dimensions for Your Production 12
Basic Editing
(Set markers, trim clips, delete segments, split clips) 13
Add Effects (Titles, annotations & transitions, import media,
edit audio, overdub narration, zoom effects, captions) 16
Export & Share your Screencast 21
Appendices:
Where to Get More Help 23
Production & Publishing Best Practices 22 Basic Camtasia Keyboard Commands 24 Prepare PowerPoint or Keynote for Screencasting 25 Software & Hosting Alternatives 26
Academic Computing UMass Amherst Information Technology
www.it.umass.edu/instruct/
Screencasting with Camtasia Mac
UMass Information Technology, Academic Computing http://it.umass.edu/instruct 150622 mt
2
An Overview of Screencasting with Camtasia
What is a Screencast? While a screenshot is a still picture of a computer screen, a screencast is a recording of a screen over time, often with accompanying narration, that is distributed, typically, online. Screencasts are popular for capturing slide presentations, creating tutorials on how to use software, and demonstrating how to locate resources on the Web. Instructors can record a lecture “live” in a classroom, or they can record in the privacy of their office. Screencasting can be combined with “inking” technology, for instance using a Tablet PC, to annotate PowerPoint slides or give feedback on papers.
With the right apps installed, you can record from a phone or tablet.
What do you need to create a screencast? Camtasia provides the software for recording, editing and publishing screencasts. You will also need:
• A microphone to record narration. • A webcam if you want to record video of the presenter to appear in a corner of the screencast. • A way to share your screencast movie, such as a Moodle course, your Apps at UMass (Google)
Drive, UMass Box account, a blog, or another sort of Web site.
Screencasting Process Overview There are three distinct steps to creating a screencast in Camtasia, with different file types for each step.
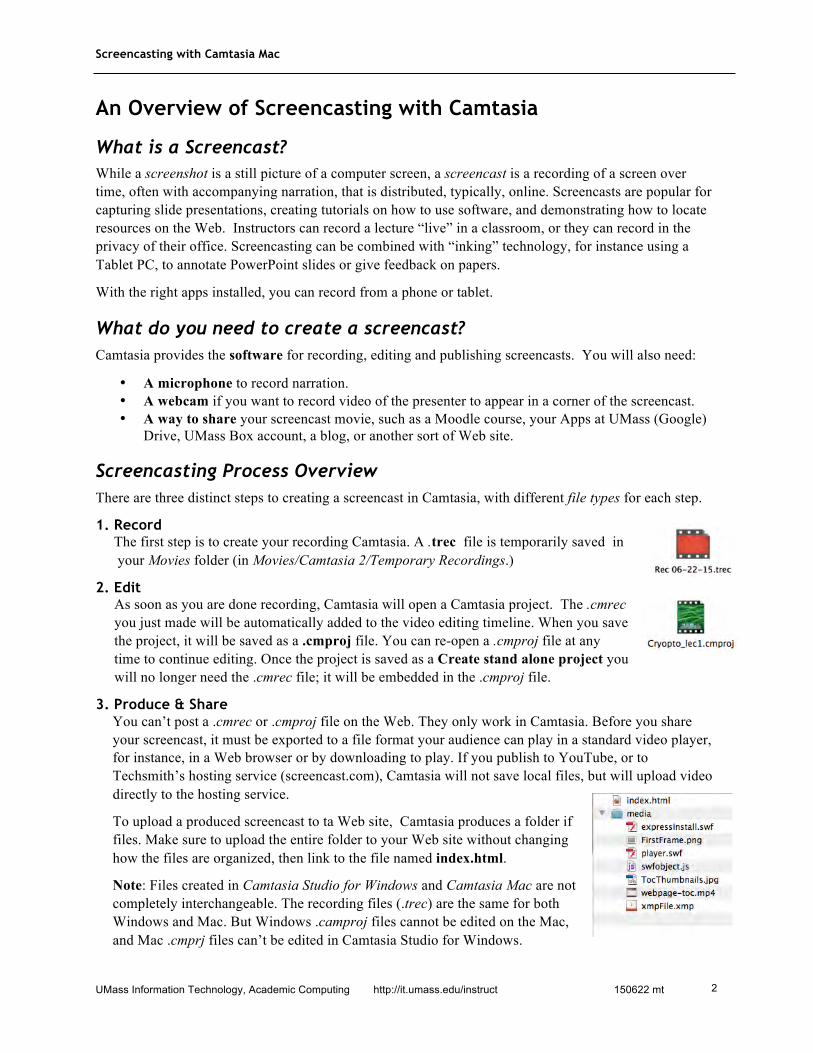
1. Record The first step is to create your recording Camtasia. A .trec file is temporarily saved in your Movies folder (in Movies/Camtasia 2/Temporary Recordings.)
2. Edit As soon as you are done recording, Camtasia will open a Camtasia project. The .cmrec you just made will be automatically added to the video editing timeline. When you save the project, it will be saved as a .cmproj file. You can re-open a .cmproj file at any time to continue editing. Once the project is saved as a Create stand alone project you will no longer need the .cmrec file; it will be embedded in the .cmproj file.
3. Produce & Share You can’t post a .cmrec or .cmproj file on the Web. They only work in Camtasia. Before you share your screencast, it must be exported to a file format your audience can play in a standard video player, for instance, in a Web browser or by downloading to play. If you publish to YouTube, or to Techsmith’s hosting service (screencast.com), Camtasia will not save local files, but will upload video directly to the hosting service.
To upload a produced screencast to ta Web site, Camtasia produces a folder if files. Make sure to upload the entire folder to your Web site without changing how the files are organized, then link to the file named index.html.
Note: Files created in Camtasia Studio for Windows and Camtasia Mac are not completely interchangeable. The recording files (.trec) are the same for both Windows and Mac. But Windows .camproj files cannot be edited on the Mac, and Mac .cmprj files can’t be edited in Camtasia Studio for Windows.

Screencasting with Camtasia Mac
UMass Information Technology, Academic Computing http://it.umass.edu/instruct 150622 mt
3
Recording
Before You Open Camtasia
Prepare your narration It is useful to have a script or at least, an outline to work from if your screencast will include narration. Depending on your needs and personal style, a well-organized outline may be as useful as a detailed script in ensuring that you cover the relevant material and still sound natural and engaging.
Set up your computer Turn off mail alerts, messaging services, or other applications that may interrupt your recording. Also consider what you will record:
• Do you need to record the entire computer screen, including application menus, or just the inside of a document window or browser window?
• Will your computer’s desktop show in the demo? Do you need to clean it up? • Are you recording a software or Web site demo? If so, avoid custom settings or add-ons in your
application or browser that your audience may not have on their own computers.
Attach Microphone If you will be recording with a headset or other microphone, plug it in before you begin recording. You need to test to make sure the system recognizes the input. Also, plug it in before you launch Camtasia, or it might not be recognized by the software.
Set Up System Preferences for Sound Before you launch Camtasia, make certain the System software recognizes your microphone.
1. From the Apple Menu, go to System Preferences > Sound.
2. If you are using a headset, for Output, (playback), choose your headset.
3. For Input (recording source), select the microphone you wish to record with. 4. Speak normally into the mic. You should see the Input level fluctuate (blue bars). Adjust the Input
volume so that the markers don’t light up on the right side of the scale.
Match Input to your Mic.
To playback on a headset, select Output.
Adjust Input volume. (This volume is too loud)

Screencasting with Camtasia Mac
UMass Information Technology, Academic Computing http://it.umass.edu/instruct 150622 mt
4
Set up Camera & Microphone in Camtasia for Recording Launch Camtasia. Unless you open an existing project file to edit, Camtasia assumes you want to make a new recording and displays the Recording control panel.
1. Turn on/off the Microphone and select mic input. To record audio, click the Microphone button (it will be green if on, gray of off), then pop-out the menu next to the mic button, and select the source to record.
2. Adjust the volume. Once your mic is selected, speak into it in a normal voice. Meter readings should be in the middle of the range. If the meter shows red, or is too low, adjust the volume (back in the System Sound panel) or move the mic away from you.
3. Turn on/off recording for System Audio. To include audio playback from other sources than your microphone, click the System Audio button. You would want to record system audio if, for example, you were recording a PowerPoint lecture that includes a video with a soundtrack. As with the camera and mic buttons, the system audio button is green when on, and gray if off. Note: Recording system audio requires a utility to be installed on your computer. If you click the System Audio button but do not have Soundflower installed, Camtasia will help you to install it. It is free, and takes only a moment to install, but you must be an administrator of the computer to install the software.
4. Turn on/off the Web Cam (optional). If you have a Web Cam connected to your computer, to turn it on click the Camera icon. It will be highlighted green and preview will show below the panel. The web cam recording can be resized and repositioned later when you edit your recording, but initially, it will be positioned in the bottom right corner of your movie.
5. Turn on/off Screen recording. Turn screen recording off to record just an audio track, or to record only audio and camera input without recording the screen. Click the screen icon to toggle screen recording on and off. As with the camera and mic, the icon will be highlighted green if on, and gray if off.
Enable Microphone and select input.
If you see red here, you need to lower the input volume.
System audio is on if green.
Camera is on if green. Preview shows below.
Screen recording is on if green.

Screencasting with Camtasia Mac
UMass Information Technology, Academic Computing http://it.umass.edu/instruct 150622 mt
5
Record the Full Screen If you are recording a PowerPoint or Keynote presentation, or for certain other recordings, you will want to record the entire screen. Recording a selected area of the screen is covered later in this handout.
Select Full Screen & Start Recording 1. Pop-out the menu next to the Screen icon, and under Full
Screen, select the display to record (e.g., Color LCD for a laptop or iMac for a desktop iMac screen. If you are connected to a projector that is not mirrored, you will also have the option to record the projection).
2. Click the red rec button to start recording. You’ll see a count-down and then the recording will begin. Note: When recording PowerPoint or Keynote, you'll need to launch into presentation mode after the recording begins. Don’t worry; it will be easy to trim off the beginning of the recording when you edit your movie.
Pause, Resume, Delete and Stop 1. Unless you are recording a PowerPoint or Keynote
presentation in presentation mode, use the Camtasia menu in the Apple task bar at the top of the screen to choose Pause Recording. You can also pause recording, for example, if recording a full screen presentation, with the keyboard shortcut: SHIFT - COMMAND - 2.
2. Once paused, the Camtasia – Paused dialog box opens. Name the recording then click Delete, Start Over, Resume or Complete. Tip: If you pause before you stop recording, you’ll be able to name your recording file. Pausing will also improve the results if you use Camtasia’s SmartFocus feature to zoom in on important areas of the screen. If you click Complete, the recording will be saved, and the Camtasia editor will open. Note: If a project is not already open in the editor, the recording will be added to the Timeline. If you already have a project open for editing in Camtasia, the recording will be added to the Clip Bin for that project, but not to the timeline.
Click the triangle to open the Screen menu
Click to start Recording
Camtasia menu
Name your recording
Screencasting with Camtasia Mac
UMass Information Technology, Academic Computing http://it.umass.edu/instruct 150622 mt
6
Record the Full Screen, continued
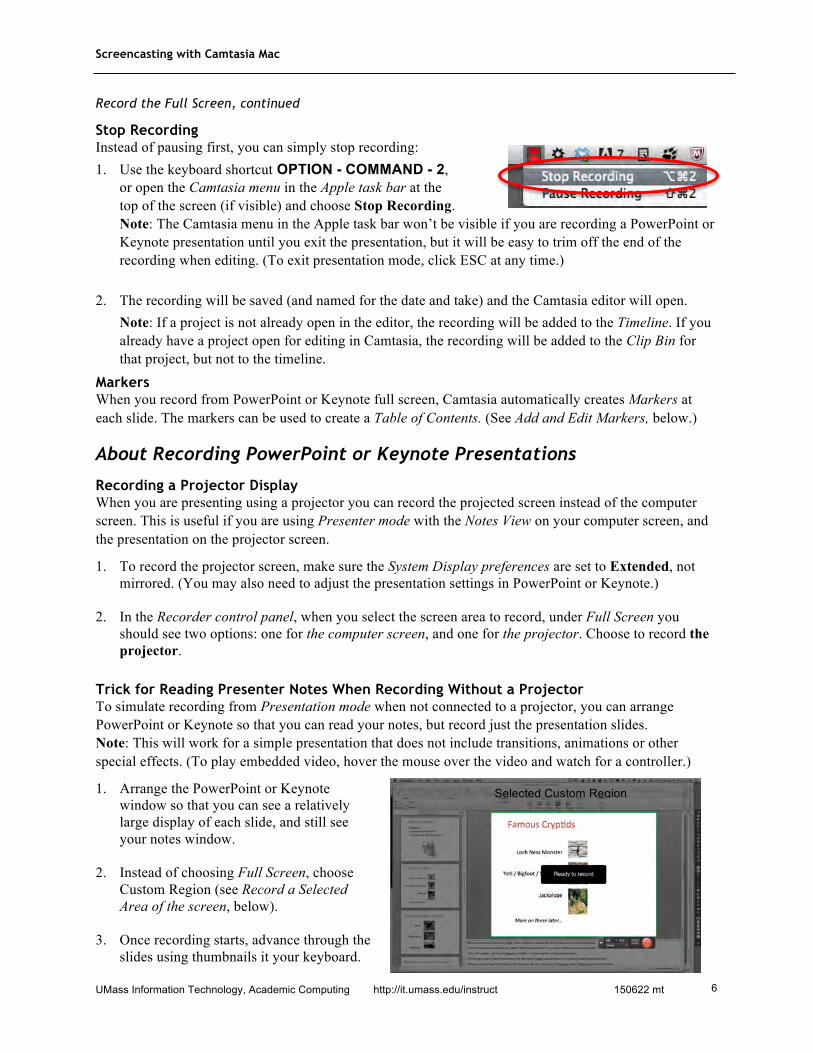
Stop Recording Instead of pausing first, you can simply stop recording: 1. Use the keyboard shortcut OPTION - COMMAND - 2,
or open the Camtasia menu in the Apple task bar at the top of the screen (if visible) and choose Stop Recording. Note: The Camtasia menu in the Apple task bar won’t be visible if you are recording a PowerPoint or Keynote presentation until you exit the presentation, but it will be easy to trim off the end of the recording when editing. (To exit presentation mode, click ESC at any time.)
2. The recording will be saved (and named for the date and take) and the Camtasia editor will open. Note: If a project is not already open in the editor, the recording will be added to the Timeline. If you already have a project open for editing in Camtasia, the recording will be added to the Clip Bin for that project, but not to the timeline.
Markers When you record from PowerPoint or Keynote full screen, Camtasia automatically creates Markers at each slide. The markers can be used to create a Table of Contents. (See Add and Edit Markers, below.)
About Recording PowerPoint or Keynote Presentations
Recording a Projector Display When you are presenting using a projector you can record the projected screen instead of the computer screen. This is useful if you are using Presenter mode with the Notes View on your computer screen, and the presentation on the projector screen.
1. To record the projector screen, make sure the System Display preferences are set to Extended, not mirrored. (You may also need to adjust the presentation settings in PowerPoint or Keynote.)
2. In the Recorder control panel, when you select the screen area to record, under Full Screen you should see two options: one for the computer screen, and one for the projector. Choose to record the projector.
Trick for Reading Presenter Notes When Recording Without a Projector To simulate recording from Presentation mode when not connected to a projector, you can arrange PowerPoint or Keynote so that you can read your notes, but record just the presentation slides. Note: This will work for a simple presentation that does not include transitions, animations or other special effects. (To play embedded video, hover the mouse over the video and watch for a controller.)
1. Arrange the PowerPoint or Keynote window so that you can see a relatively large display of each slide, and still see your notes window.
2. Instead of choosing Full Screen, choose Custom Region (see Record a Selected Area of the screen, below).
3. Once recording starts, advance through the slides using thumbnails it your keyboard.
Selected Custom Region

Screencasting with Camtasia Mac
UMass Information Technology, Academic Computing http://it.umass.edu/instruct 150622 mt
7
Record a Selected Area of the Screen
Aspect Ratio for your Production: Wide or Standard? To avoid letterboxing or distortion when the finished video is uploaded to an online service or viewed on a particular device, you can target your capture proportions to match where your audience is most likely to view your video.
There are two aspect ratios (or screen proportions) typically used for digital video.
• Wide (16:9) is used on YouTube and Vimeo, and fits many tablets, phones, and HD displays. Standard (4:3) is used by older computer displays, data projectors, and tablets such as iPads.
Select the Area to Record and Start Recording 1. Pop-out the Screen menu and choose between:
• Custom Region—Select Custom Region to snap the recording area to a window that’s open on your computer, or to draw a custom area on your screen.
Note: This can result in a non-standard aspect ratio and result in letterboxing or distortion when the published video is played back. TIP: Use a utility such as “Pixel Window” to set up a standard-sized recording area, then fit the window you’ll record to that area.
• Preset—Select a preset region to match the aspect ratio of your recording to the produced video (standard or widescreen). If you are not sure what to choose, select 1080p HD
• Recent—Select the same dimensions of a recent recording. Note: If you intend to add Zoom or Pan effects to your video, or use Camtasia’s automated zooming feature (SmartFocus), the original recording must be larger in dimensions than the final production. For example, you could record at 1080p HD (1920 x 1080), and publish at 720p HD (1280 x 720) or 480p SD (854 x 480).
2. Click the (red) Record button. Recording won’t start immediately—next you will set up the area of the screen to record.
Wide (16:9) Standard (4:3)
1080p HD (YouTube) (1920 x 1080)
720p HD (YouTube) (1280 x 720)
iPhone 5 (1136 x 640)
480p SD (854 x 480)
iPad & Mini (1024 x 768)
Computer displays & projectors (800 x 600, 1024 x 768, 1600 x 1200)
Click the triangle to open the Screen menu
Click to start Recording

Screencasting with Camtasia Mac
UMass Information Technology, Academic Computing http://it.umass.edu/instruct 150622 mt
8
Record a Selected Area of the Screen, continued
3. Arrange the area of the screen to record. How you do this will depend on what you chose in the previous step. Note: To start over at any time, and return to the Recording control panel, press the ESC key on your keyboard. For a Custom Region After you click Record, crosshairs will appear.
• To draw a custom box, drag the cursor. The recording area will be outlined in green and the surrounding area will be masked with a dark tint.
• To reposition the recording region, drag from the center. • To resize the recording region, drag from the (green) edges.
• To snap to an application window or dialog box, hover your cursor the window & wait; a green box will snap to the window. Click in the center of the box to lock in the region.
For a Preset Region: After you click Record, the preset recording area will appear at the top left, with un-recorded areas masked in a dark tint.
• Drag from the center to relocate the recording area. You can also choose a new preset size from the drop-down menu.
4. Once a recording area is selected, a Ready to
record message appears on screen. To start recording, click the red rec button (below the selected area).
5. You’ll see a count-down and then the recording will begin.
TIP: To easily match up the area you want to record with a Preset region: 1. Draw out a Custom Region roughly in the center of your screen. 2. Select a recording dimensions Preset. 3. Start recording and line up your application window with the recording area. 4. Later, you can then trim off the beginning of the recording with Camtasia's editing tools.
Start recording
Screencasting with Camtasia Mac
UMass Information Technology, Academic Computing http://it.umass.edu/instruct 150622 mt
9
Record a Selected Area of the Screen, continued
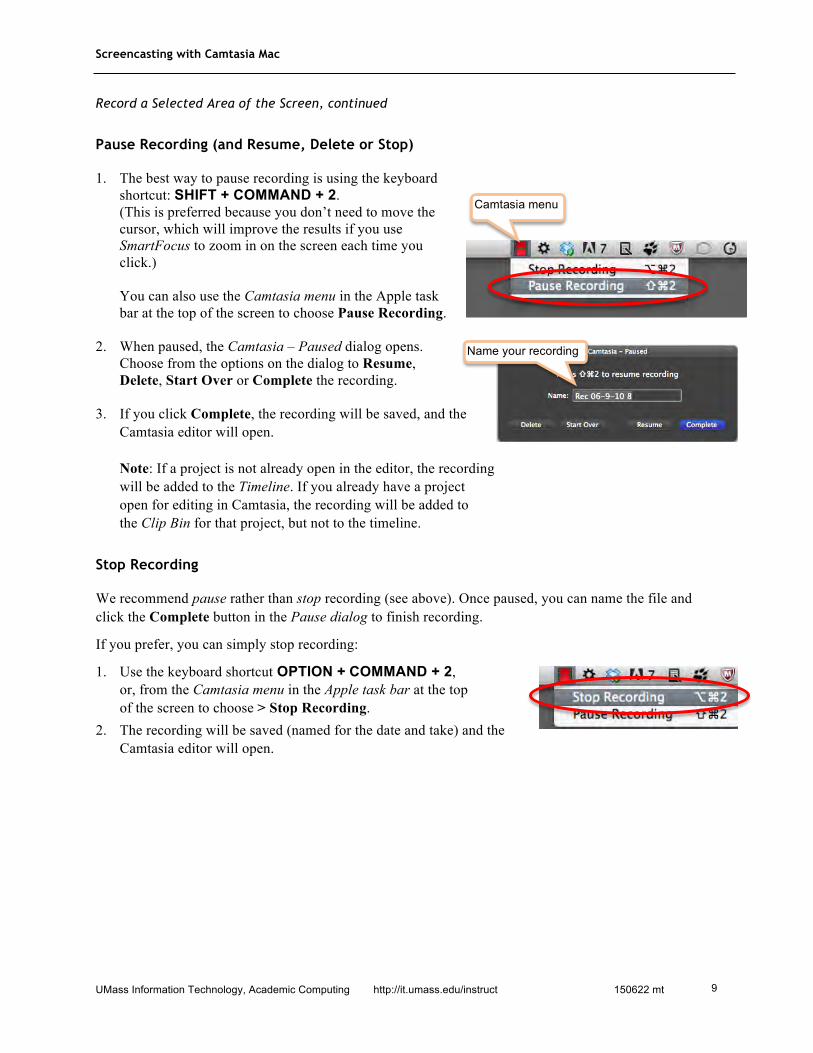
Pause Recording (and Resume, Delete or Stop) 1. The best way to pause recording is using the keyboard
shortcut: SHIFT + COMMAND + 2. (This is preferred because you don’t need to move the cursor, which will improve the results if you use SmartFocus to zoom in on the screen each time you click.) You can also use the Camtasia menu in the Apple task bar at the top of the screen to choose Pause Recording.
2. When paused, the Camtasia – Paused dialog opens. Choose from the options on the dialog to Resume, Delete, Start Over or Complete the recording.
3. If you click Complete, the recording will be saved, and the Camtasia editor will open. Note: If a project is not already open in the editor, the recording will be added to the Timeline. If you already have a project open for editing in Camtasia, the recording will be added to the Clip Bin for that project, but not to the timeline.
Stop Recording We recommend pause rather than stop recording (see above). Once paused, you can name the file and click the Complete button in the Pause dialog to finish recording.
If you prefer, you can simply stop recording:
1. Use the keyboard shortcut OPTION + COMMAND + 2, or, from the Camtasia menu in the Apple task bar at the top of the screen to choose > Stop Recording.
2. The recording will be saved (named for the date and take) and the Camtasia editor will open.
Camtasia menu
Name your recording
Screencasting with Camtasia Mac
UMass Information Technology, Academic Computing http://it.umass.edu/instruct 150622 mt
10
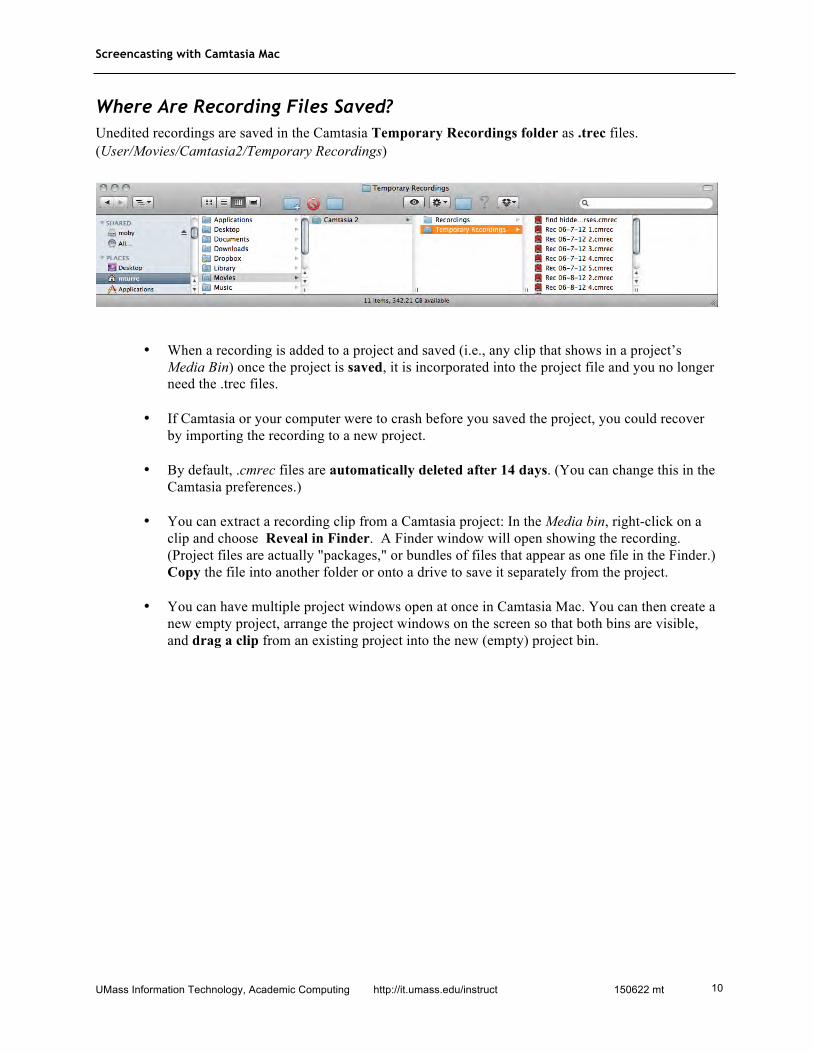
Where Are Recording Files Saved? Unedited recordings are saved in the Camtasia Temporary Recordings folder as .trec files. (User/Movies/Camtasia2/Temporary Recordings)
• When a recording is added to a project and saved (i.e., any clip that shows in a project’s Media Bin) once the project is saved, it is incorporated into the project file and you no longer need the .trec files.
• If Camtasia or your computer were to crash before you saved the project, you could recover by importing the recording to a new project.
• By default, .cmrec files are automatically deleted after 14 days. (You can change this in the Camtasia preferences.)
• You can extract a recording clip from a Camtasia project: In the Media bin, right-click on a clip and choose Reveal in Finder. A Finder window will open showing the recording. (Project files are actually "packages," or bundles of files that appear as one file in the Finder.) Copy the file into another folder or onto a drive to save it separately from the project.
• You can have multiple project windows open at once in Camtasia Mac. You can then create a new empty project, arrange the project windows on the screen so that both bins are visible, and drag a clip from an existing project into the new (empty) project bin.
Screencasting with Camtasia Mac
UMass Information Technology, Academic Computing http://it.umass.edu/instruct 150622 mt
11
Edit Your Recording Why edit? At minimum, you may want to trim off the beginning and end of your screencast. Camtasia lets you combine recordings, overdub audio, add titles, call outs and cursor effects, and create transitions between segments of your video.
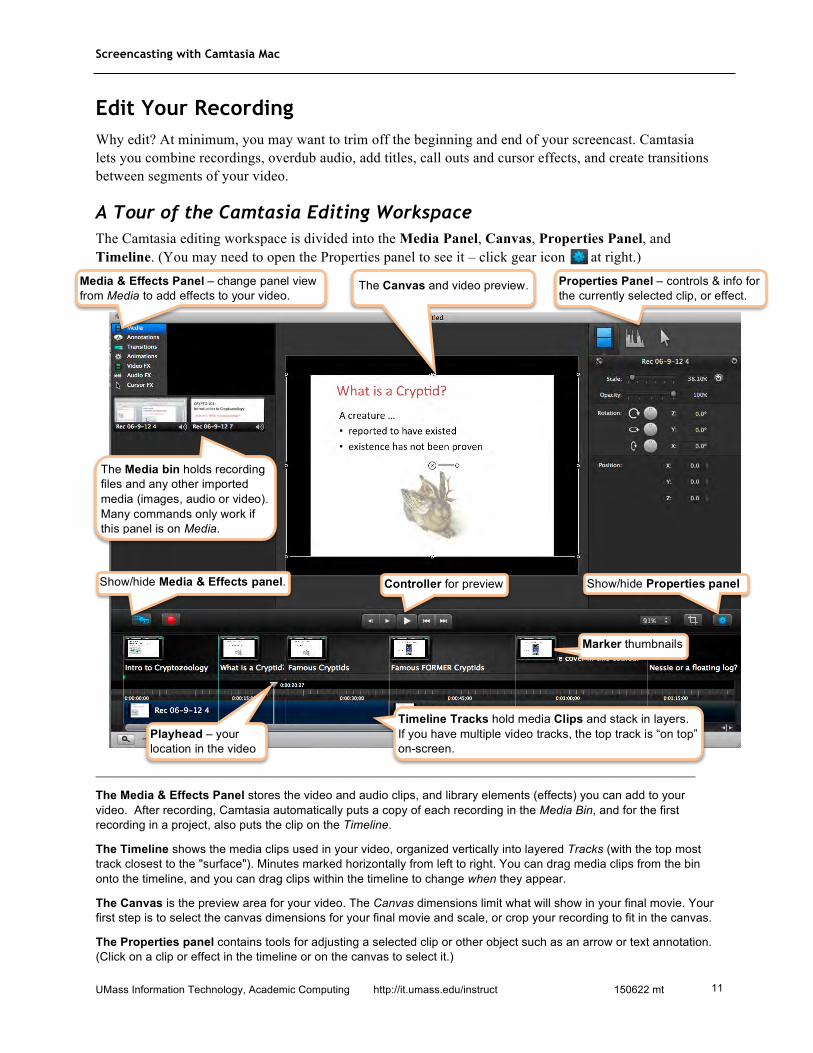
A Tour of the Camtasia Editing Workspace The Camtasia editing workspace is divided into the Media Panel, Canvas, Properties Panel, and Timeline. (You may need to open the Properties panel to see it – click gear icon at right.)
__________________________________________________________________________________
The Media & Effects Panel stores the video and audio clips, and library elements (effects) you can add to your video. After recording, Camtasia automatically puts a copy of each recording in the Media Bin, and for the first recording in a project, also puts the clip on the Timeline.
The Timeline shows the media clips used in your video, organized vertically into layered Tracks (with the top most track closest to the "surface"). Minutes marked horizontally from left to right. You can drag media clips from the bin onto the timeline, and you can drag clips within the timeline to change when they appear.
The Canvas is the preview area for your video. The Canvas dimensions limit what will show in your final movie. Your first step is to select the canvas dimensions for your final movie and scale, or crop your recording to fit in the canvas.
The Properties panel contains tools for adjusting a selected clip or other object such as an arrow or text annotation. (Click on a clip or effect in the timeline or on the canvas to select it.)
The Media bin holds recording files and any other imported media (images, audio or video). Many commands only work if this panel is on Media.
Properties Panel – controls & info for the currently selected clip, or effect.
Timeline Tracks hold media Clips and stack in layers. If you have multiple video tracks, the top track is “on top” on-screen.
Controller for preview
Show/hide Properties panel
Media & Effects Panel – change panel view from Media to add effects to your video.
Show/hide Media & Effects panel.
The Canvas and video preview.
Playhead – your location in the video
Marker thumbnails
Screencasting with Camtasia Mac
UMass Information Technology, Academic Computing http://it.umass.edu/instruct 150622 mt
12
Set the Canvas Dimensions for Your Final Production It is important to edit your video at the dimensions you will produce it: Your first task after recording is to set the canvas dimensions for your final movie.
Did you record a small area that you can publish at the same size, or did you record a large area that you will need to shrink-down for the version you share with your audience? For example, a full screen PPT recording would need its dimensions reduced to fit on a web page.
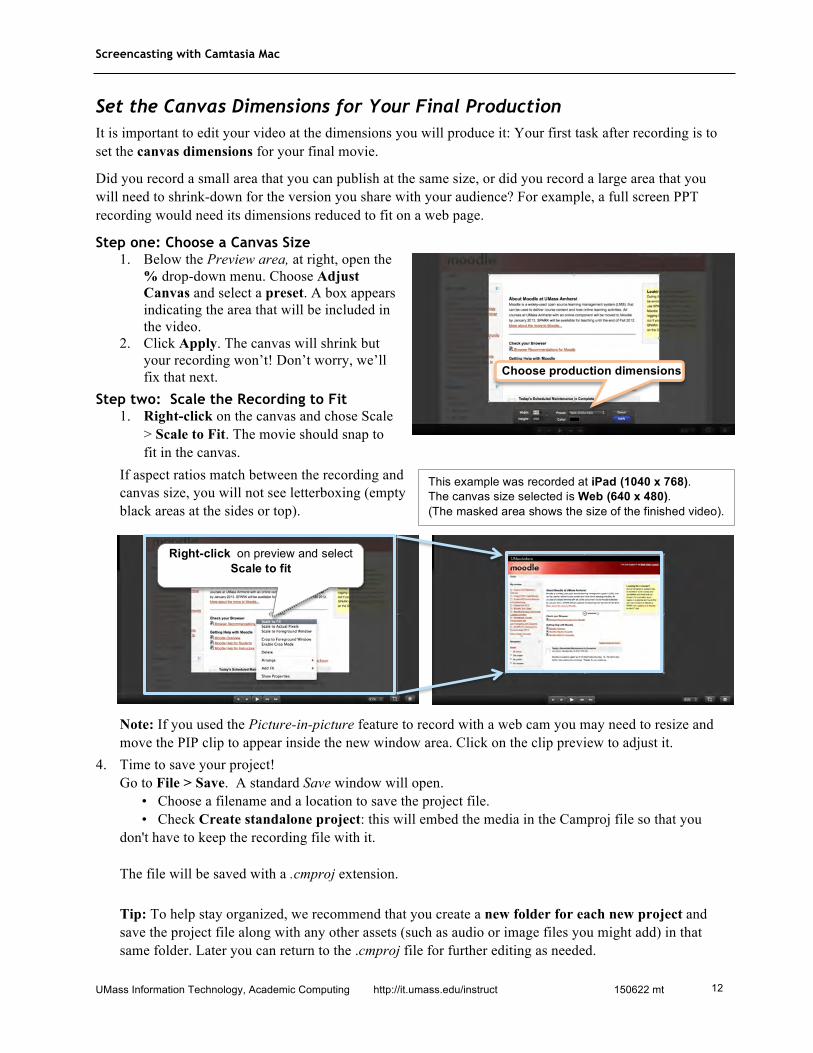
Step one: Choose a Canvas Size 1. Below the Preview area, at right, open the
% drop-down menu. Choose Adjust Canvas and select a preset. A box appears indicating the area that will be included in the video.
2. Click Apply. The canvas will shrink but your recording won’t! Don’t worry, we’ll fix that next.
Step two: Scale the Recording to Fit 1. Right-click on the canvas and chose Scale
> Scale to Fit. The movie should snap to fit in the canvas.
If aspect ratios match between the recording and canvas size, you will not see letterboxing (empty black areas at the sides or top). Note: If you used the Picture-in-picture feature to record with a web cam you may need to resize and move the PIP clip to appear inside the new window area. Click on the clip preview to adjust it.
4. Time to save your project! Go to File > Save. A standard Save window will open. • Choose a filename and a location to save the project file. • Check Create standalone project: this will embed the media in the Camproj file so that you don't have to keep the recording file with it. The file will be saved with a .cmproj extension. Tip: To help stay organized, we recommend that you create a new folder for each new project and save the project file along with any other assets (such as audio or image files you might add) in that same folder. Later you can return to the .cmproj file for further editing as needed.
Choose production dimensions
Right-click on preview and select Scale to fit
This example was recorded at iPad (1040 x 768). The canvas size selected is Web (640 x 480). (The masked area shows the size of the finished video).
Screencasting with Camtasia Mac
UMass Information Technology, Academic Computing http://it.umass.edu/instruct 150622 mt
13
Basic Editing
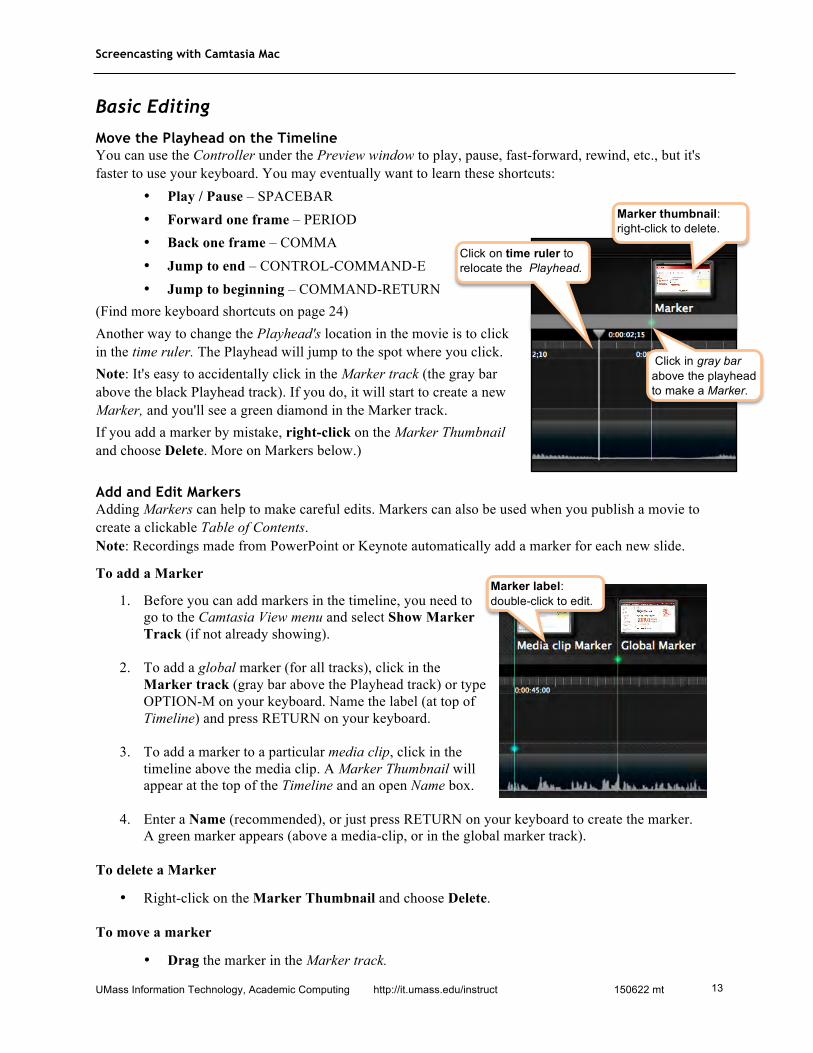
Move the Playhead on the Timeline You can use the Controller under the Preview window to play, pause, fast-forward, rewind, etc., but it's faster to use your keyboard. You may eventually want to learn these shortcuts:
• Play / Pause – SPACEBAR • Forward one frame – PERIOD • Back one frame – COMMA • Jump to end – CONTROL-COMMAND-E • Jump to beginning – COMMAND-RETURN
(Find more keyboard shortcuts on page 24) Another way to change the Playhead's location in the movie is to click in the time ruler. The Playhead will jump to the spot where you click. Note: It's easy to accidentally click in the Marker track (the gray bar above the black Playhead track). If you do, it will start to create a new Marker, and you'll see a green diamond in the Marker track. If you add a marker by mistake, right-click on the Marker Thumbnail and choose Delete. More on Markers below.)
Add and Edit Markers Adding Markers can help to make careful edits. Markers can also be used when you publish a movie to create a clickable Table of Contents. Note: Recordings made from PowerPoint or Keynote automatically add a marker for each new slide.
To add a Marker
1. Before you can add markers in the timeline, you need to go to the Camtasia View menu and select Show Marker Track (if not already showing).
2. To add a global marker (for all tracks), click in the Marker track (gray bar above the Playhead track) or type OPTION-M on your keyboard. Name the label (at top of Timeline) and press RETURN on your keyboard.
3. To add a marker to a particular media clip, click in the timeline above the media clip. A Marker Thumbnail will appear at the top of the Timeline and an open Name box.
4. Enter a Name (recommended), or just press RETURN on your keyboard to create the marker. A green marker appears (above a media-clip, or in the global marker track).
To delete a Marker
• Right-click on the Marker Thumbnail and choose Delete.
To move a marker
• Drag the marker in the Marker track.
Click on time ruler to relocate the Playhead.
Marker thumbnail: right-click to delete.
Click in gray bar above the playhead to make a Marker.
Marker label: double-click to edit.

Screencasting with Camtasia Mac
UMass Information Technology, Academic Computing http://it.umass.edu/instruct 150622 mt
14
Basic Editing, continued
Trim a Clip You'll often need to trim the beginning and end of a recording, for example, if you are recording a PowerPoint presentation at full screen and want don't want to include launching and closing the presentation in your video.
1. Position the Playhead at the location you want the video to start.
2. Hover the cursor over the very beginning or end of the timeline. The cursor will change to a bar with arrows.
3. Drag the edge of the clip into the timeline (to the Playhead line) and release. The area you dragged over will be trimmed off the clip.
4. Rewind (COMMAND-RETURN) the movie and play it back (SPACEBAR). If you clipped off too much, you can recover the recorded video by dragging back from the edge. (It’s still there, it was just hidden.)
5. Once the you are satisfied, place the cursor over the clip (rather than at the edge), and drag the entire clip to the left, to the beginning of the timeline.
6. Move the playhead to the end of the timeline (CONTROL-COMMAND-E) and trim as needed by placing the cursor over the right edge of the clip and dragging to the left.
Select a Segment of the Video, and Delete It Selecting a segment will let you delete it. You can delete a segment from all tracks or just selected tracks. Note: To apply certain effects to just part of a video, you must first Split the clip (see below). Selecingt a segment will not let you apply effects to it – the only choice is to delete.).
1. Position the Playhead at one side of the segment you want to select. 2. To select all tracks
Hold down the SHIFT key on your keyboard, and drag the playhead across the timeline. The selected segment will be highlighted blue. To select a segment of one clip Hold down the SHIFT key, and drag across the clip (you can also include clips above or below). The selected segment will be highlighted blue. To de-select the area (and start over): Go to Edit > Deselect all (COMMAND - SHIFT - A).
5. Once selected, right-click on the highlighted selection and choose between: • Delete – leaves a blank space in your timeline.
• Ripple delete – the selected area snaps closed everything to right of the selection, snaps back to the beginning of the selection).
Hold down SHIFT and drag the Playhead to select a duration to edit.

Screencasting with Camtasia Mac
UMass Information Technology, Academic Computing http://it.umass.edu/instruct 150622 mt
15
Basic Editing, continued
Split a Clip In order to apply certain effects to just part of a clip (for instance, to apply a transition between parts of a movie), you must first split the clip.
1. Position the playhead at the point where you will make the split (i.e., the place where you want the edit to begin or end).
2. To split all tracks Right-click on the playhead and choose Split All At Playhead. To split only one clip Click on the clip in the timeline to select it. When you right-click on the playhead, you will also have the choice to Split Selected At Playhead.
Make Sure you Edit the Correct Clip When a recording is first placed on the timeline it is all one clip. During the editing process you may split the clip by cutting it into segments, and add new clips to additional tracks. It is important to make sure you are editing the correct clip:
• Play and Pause the movie, or drag the Playhead through its track to the moment to edit. The playbead should match what's on screen when you pause.
• In the Preview window, click on the Canvas. The clip you are previewing will be highlighted in blue on the Timeline.
• On the Timeline, double-click a clip to jump the Playhead to its beginning. The Canvas will show the movie as it appears at that moment. Note: Single-clicking on a clip in the timeline does not move the Playhead.
Delete a clip from the timeline You can delete a selection (see above), or you can split a clip into smaller clips and then delete a clip.
To delete a clip without affecting other clips on the timeline:
1. Click on the clip in the track to select it. The clip will be outlined in blue. 2. Press DELETE on your keyboard, or right click and choose Delete. Note: This will leave a gap in the track for the clip you deleted.
To delete a clip and have the subsequent clips on the track snap to fill the gap: 1. Click on the clip to select it. 2. Right click and choose > Ripple delete. IMPORTANT! Ripple delete is best used on all tracks simultaneously. When there are multiple tracks with overlapping content (for example, if you have separated the audio and video tracks, or imported a second audio track), if you delete a segment of just one track, audio and video can easily get out of sync.

Screencasting with Camtasia Mac
UMass Information Technology, Academic Computing http://it.umass.edu/instruct 150622 mt
16
Add Effects to Your Production
Add Titles to Your Movie Add an opening title
For a title at the opening of the movie, you’ll create a blank space at the beginning, then add an annotation:
3. Choose Edit > Select all (COMMAND + A) then drag all the clips on all the tracks of the timeline to the right to make room for the title.
4. On the left panel, click Annotations. The library containing the text tool, and shapes and arrows opens.
5. Rewind the playhead to the beginning of the timeline. 6. Drag a block from the Annotation panel onto the Canvas in the Preview window. To create a
solid background under the text, choose the square text box. For text that floats over whatever is under it, use the plain Abc box.
7. On the Canvas, double click in the text box to enter type. For formatting options go to the properties panel (at right).
• To reposition the type or text box on the canvas, first click away from the text box, then click and drag the box into place. (When the center of the box is over the center lines of the canvas, yellow lines appear to help you align the text box)
Edit the duration of the title and add effects The title (annotation clip) appears in the track above the recording. You can edit it independently from the movie.
• To change its duration, click on the annotation clip in the Timeline, and then trim it just as you would a recording, by dragging on the start or end of the clip.
• To fade the title in, in the Media panel, click Animations and drag the Fade Out block onto the right side of the selected title clip in the timeline. To fade the title in, drag the Fade In block onto the left side of the title clip.
Add titles between scenes of your movie To insert titles between scenes of your movie, you may want to create a split and gap in the timeline. You can simply place an annotation over your recording, but if you do, make sure the text is readable and does not cover important content. 1. To create a gap, Split All Tracks (see Split a Clip, above). 2. Select all the clips to the right of the split, by holding down SHIFT, clicking on the next clip,
then the last clip. Tip: It may help to zoom-in the timeline. To fit the entire timeline in view, use the Zoom slider for the Timeline (at bottom-left of Camtasia screen).
3. Drag the selected clips to the left. Once near, they will snap to the end of the previous clip. 4. Proceed as described above to add a title.
Remove a title
1. In the Timeline, click the annotation clip you wish to remove. The clip will be highlighted blue. 2. Right-click on the clip and select Delete, or press the DELETE key on your keyboard.

Screencasting with Camtasia Mac
UMass Information Technology, Academic Computing http://it.umass.edu/instruct 150622 mt
17
Add Effects to Your Production, continued
Import media Import Camtasia recordings, video clips, audio clips, or still images into a project: 1. Select File > Import Media or right-click in the Media Bin and choose Import Media. 2. Select the file(s) to import. (Hold Command and click to select multiple files).
Note: Unsupported file formats will be disabled and include files with 5.1 audio, DRM protected files, Photoshop documents (.psd), Camtasia Studio for Windows (.camrec) files.
3. Click Import. The imported media added to the Media panel under Media. 4. Drag the image onto the timeline to add it to your movie. Note: While you can easily include Camtasia recordings (.camrec files) to combine Camtasia Projects you would first have to publish them, and certain elements, such as applied effects, could no longer be edited.
Add transitions between clips You can only add a transition to the beginning or end of a clip.
1. Split the video where you want the transition to occur (see Split a Clip above). 2. In the Media panel, click Transitions. 3. Drag a transition block (e.g., Fade in/Out, or Slide in/out) onto the right end of the first clip; this
will cause it to fade-out. Note: The transition appears as a green block 4. Drag a transition block onto the beginning of the next clip: it will fade-in. 5. By default, transitions last one second. To change the duration, position
the cursor over the inside edge of the transition and drag. 6. To remove a transition click on the transition in the timeline. It will be
highlighted yellow. Click delete. Note: Some transitions, such as Audio Fade in/Out affect audio rather than video.
Edit Audio 1. In the Media panel, click Audio FX. A palette of audio effects will appear. 2. Drag an audio effect onto the clip in in the timeline.
• The green audio effects filter audio quality and are applied to an entire clip. These effects show as a bar across the entire bottom of the clip. • The blue audio effects include controlling volume and are applied, like transitions, for a duration. You do not need to split the clip to adjust the volume, for example, on just part of a clip. These effects show as an arrow on top of the clip. To adjust the duration, drag from either end of the arrow.
3. To adjust audio effects, click on the effect in the timeline (Volume effects show as an arrow, filters as a bar at the bottom of the clip). Make sure the Properties panel is showing to the right of the canvas (see Tour of Workspace, 11,) and click the Audio icon to find controls.
4. To remove an audio effect, click on it in the timeline (it will be highlighted yellow.), then press delete on your keyboard.
Selected transition Drag edge to extend duration
Drag ends to extend duration
Screencasting with Camtasia Mac
UMass Information Technology, Academic Computing http://it.umass.edu/instruct 150622 mt
18
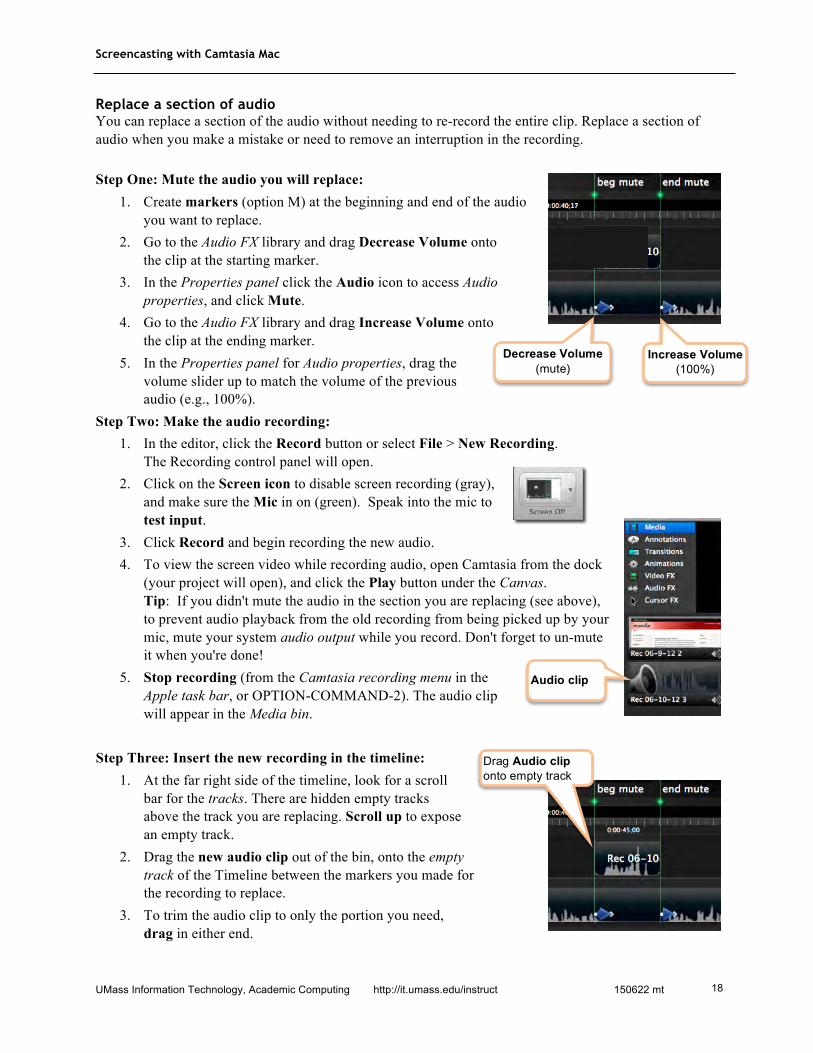
Replace a section of audio You can replace a section of the audio without needing to re-record the entire clip. Replace a section of audio when you make a mistake or need to remove an interruption in the recording. Step One: Mute the audio you will replace:
1. Create markers (option M) at the beginning and end of the audio you want to replace.
2. Go to the Audio FX library and drag Decrease Volume onto the clip at the starting marker.
3. In the Properties panel click the Audio icon to access Audio properties, and click Mute.
4. Go to the Audio FX library and drag Increase Volume onto the clip at the ending marker.
5. In the Properties panel for Audio properties, drag the volume slider up to match the volume of the previous audio (e.g., 100%).
Step Two: Make the audio recording: 1. In the editor, click the Record button or select File > New Recording.
The Recording control panel will open. 2. Click on the Screen icon to disable screen recording (gray),
and make sure the Mic in on (green). Speak into the mic to test input.
3. Click Record and begin recording the new audio. 4. To view the screen video while recording audio, open Camtasia from the dock
(your project will open), and click the Play button under the Canvas. Tip: If you didn't mute the audio in the section you are replacing (see above), to prevent audio playback from the old recording from being picked up by your mic, mute your system audio output while you record. Don't forget to un-mute it when you're done!
5. Stop recording (from the Camtasia recording menu in the Apple task bar, or OPTION-COMMAND-2). The audio clip will appear in the Media bin.
Step Three: Insert the new recording in the timeline:
1. At the far right side of the timeline, look for a scroll bar for the tracks. There are hidden empty tracks above the track you are replacing. Scroll up to expose an empty track.
2. Drag the new audio clip out of the bin, onto the empty track of the Timeline between the markers you made for the recording to replace.
3. To trim the audio clip to only the portion you need, drag in either end.
Drag Audio clip onto empty track
Audio clip
Decrease Volume (mute)
Increase Volume (100%)

Screencasting with Camtasia Mac
UMass Information Technology, Academic Computing http://it.umass.edu/instruct 150622 mt
19
Zoom In on Important Areas of the Canvas SmartFocus zooms in on any area of the canvas where you typed or clicked while recording, and magnifies that area of the screen so that your audience can see it in detail. You can also apply zoom effects manually using SmartFocus at Time, or use Scale to 100% and Scale to Fit, (not covered here, but not hard to figure out after you try SmartFocus).
TIP: It's best to apply zoom effects before other edits. If you split the recording into short clips, zooming won’t work; Camtasia needs at least 30 seconds of recording to apply a zoom.
Also, the original recording must be larger in dimension than the production. For example, if you record and produce at the same dimensions you will not be able to apply zoom effects. But if you record at 1080p HD (1920 x 1080) and produce at 720p HD (1280 x 720) or 480p SD (854 x 480), you can apply zoom effects such as SmartFocus or SmartFoucs at Time.
Apply SmartFocus to the entire recording:
This will zoom into any area of the screen where you clicked or typed while recording. You will probably want to edit the results, but SmartFocus can make a good starting point. Tip: You probably only need a few zooms in an entire video, if any. Too much zooming in and out is distracting and will give your audience motion sickness!
1. In the left panel, click Animation (at top). A library of animation effects will replace the Media bin.
2. Drag the SmartFocus block onto the clip in the timeline. Zoom-and-pan will be applied to the entire clip:The movie will zoom in to each location on the screen where you typed or clicked while recording.
Apply SmartFocus manually to a particular spot on the timeline: SmartFocus at Time lets you manually apply a zoom on the frame where the playhead is located. If there are just a few places in the timeline where you want to zoom in, apply SmartFocus manually.
1. Move the playhead to the frame you want to magnify. 2. In the Animations palette, locate SmartFocus at Time. 3. Drag the SmartFocus at Time block onto video track at the playhead. A blue arrow will appear on
the timeline at the playhead. (You may need to zoom the timeline to see it clearly) • Drag the arrow edges to extend the duration of the zoom. • Click on arrow (it will turn yellow), then open the Properties Panel (at right of Preview), drag the scale slider to enlarge the image and zoom in. To reposition the screen within the zoom, click in the canvas and drag.
Tip: Each time you are finished adding effects, return to the Media palette. Some commands are not available when the effects panels are open.

Screencasting with Camtasia Mac
UMass Information Technology, Academic Computing http://it.umass.edu/instruct 150622 mt
20
Add Captions Adding captions makes your content accessible to the wide range of individuals who depend on captions, including those with hearing impairments, non-native English speakers, and students with learning disabilities.
TIP: Wait until you have finished editing all other aspects of your production. It will save you time to add captions last!
1. In the View menu (at top), select Show Caption Track. Once the option is checked, a new track appears at the top of the timeline.
2. If the audio and video in your recording are on the same track, right-click on the track and choose Separate Audio & Video. If your audio is on more than one track, you may find it helpful to drag all the clips to be captioned onto the same track.
3. In the Timeline, select the audio clip to caption (typically, the entire duration of the video).
4. In the Media & Effects panel, click Audio FX. Above the timeline you'll see a message, "Drag captions onto an audio clip."
5. Drag the Caption block onto the selected (blue) clip in the Timeline. Camtasia will expand the tack and divide it into 4-second segments.
6. Click on a segment. The audio will play: Type what you hear into the text entry box for that segment.
7. As you finish entering text for each segment, press Tab to advance to the next segment. You may need to replay a segment to catch all the narration.
8. To preview the captioning for your video, Rewind to the beginning and click Play.
9. If you find a typo or other mistake, Pause playback and click in the caption segment above the playhead to open the text entry box and make your correction.
10. To publish a video with captions, use the Share option to Export as Web Page. You be able to choose whether to place captions in closed captions, or to have them always show at the bottom of the video. For details see the next section of this handout.
Screencasting with Camtasia Mac
UMass Information Technology, Academic Computing http://it.umass.edu/instruct 150622 mt
21
Export & Share Your Screencast The export process assembles your screen recording, narration, and effects into a final product that can be delivered online.
Note: In Camtasia Mac, videos are published at the dimensions at which the project was edited. You do not have the option to target devices at this stage.
Share on a hosted service The easiest way to share a video is to host it on a streaming service such as YouTube. This is most appropriate for videos that you are willing to make public, though most hosting services let you make videos private (shared only with selected users on a service), or unsearchable (but available to anyone with the URL). These options do not save files on your local computer.
1. From the Share menu, choose a publishing method: • Screencast.com processes the movie with the best dimensions and correct file type for TechSmith’s hosting service. You'll be asked to sign in to your account and the file will upload directly to screencast.com. • YouTube automatically processes the movie with the best dimensions and correct file type for YouTube, and uploads the file to a YouTube account.
• Google Drive automatically processes the movie with the best dimensions and correct file type for Dive on your Apps at UMass account (or Google consumer account) and uploads the file. You may get better results processing in Camtasia and uploading to Google Drive. • Export to iTunes gives you the option to publish the best size for various phones or tablets.
Export files to upload to a website The most versatile way to distribute your finished production is to publish as a web page (.html file) with the video embedded. An .mp4 video is played with a controller (HTML5 or Flash, depending on what's available in someone's browser). The controller can provide amenities such as a table of contents, closed captioning, and playback speed control for visitors who benefit from being able to read your narration, jump between segments, or watch at faster or slower speeds. This is the best method for hosting files on Moodle or Blackboard, but will not work on Google Drive or Box. 1. From the Share menu, choose Export as Web Page. The Export window will open. 2. For Export as, name the file and choose a location to save your finished video.
No Camtasia will make a new folder containing the files to share. 3. A Quality slider lets you adjust the degree of compression applied to your processed video. Higher
Quality will result in a larger file. Lower quality will create a smaller file size but may be choppy and blurry. We recommend starting with the default.
4. To create a Table of Contents, (optional) check Create table of content from Markers. Note: Each marker in the timeline will be used as an item in the TOC.
5. If your project includes captions, you will have the option to choose a caption style. • Closed captions allows viewers to click a CC button in the controller to hide or show captions. • Under video always shows the captions below the video.
6. Click Export. Camtasia will begin to process the files for export (this may take a while). 7. When the files are ready, you'll see a message offering to reveal the new files in the Finder.

Screencasting with Camtasia Mac
UMass Information Technology, Academic Computing http://it.umass.edu/instruct 150622 mt
22
Export a single MP4 Video If you will upload your screencast to an online video service such as Vimeo, or share it from Google Drive, or Box, the best option is to export a single file (you cannot share the Web page version from these services).
This option produces a single MP4 file. It will show captions as "Open" captions (always on) and cannpot include a table of contents. 1. From the Share menu, choose Export. The Export window will open. 2. For Export as, name the file and choose a location to save your finished video. 3. A Quality slider lets you adjust the degree of compression applied to your processed video. Higher
Quality will result in a larger file. Lower quality will create a smaller file size but may be choppy and blurry. We recommend starting with the default.
4. If your project includes captions, they will be shown below the video. 5. Click Export. 6. Camtasia will begin to process the files for export. This generally takes as long as your video runs. 7. When the files are ready, you'll see a message offering to reveal the new files in the Finder.
Advanced Upload Use this option to select custom export settings such as file format, codecs, audio settings, etc.. You would use Advanced Upload if, for example, you will burn the project to DVD. You can also export just the audio from your project using Advanced Upload.
Post Your Exported Files Online When you Export with the Web page option checked, Camtasia produces a folder containing other files and folders. 1. Upload all the files to your Web site without changing how they are organized in the folder.
For tips on embedding your produced video on an existing webpage (rather than its own web page), on the Export dialog box click the Help button (?). It will open the Camtasia Help article, "Embed a video on a webpage or blog." (Requires some understanding of HTML).
2. Link to the file named index.html. For more on how to share files on Box or Moodle, search the OIT site Support Center or contact the Instructional Media Lab.
Upload both the index.html file and the media folder to the same directory on your website.
Link to index.html.

Screencasting with Camtasia Mac
UMass Information Technology, Academic Computing http://it.umass.edu/instruct 150622 mt
23
APPENDICES
Where to get more help Techsmith, the makers of Camtasia, provide excellent video and written tutorials and quick help pages: www.techsmith.com/tutorial-camtasia-mac-current.html
Production & Publishing Best Practices Set up your recording environment To avoid extraneous noises and interruptions to your recording, make sure your computer and the room in which you will e recording will not interfere with your recording.
• On your computer, turn off mail alerts, instant messaging, calendar alarms, etc.. • Silence your cell phone, put out the dog or cat, close the door to your office, etc.
Use the same stylistic conventions for all the videos in a set Use standard practices for each set of movies published on the same Web site or CD. Use similar title screens, closing screens, and consistent recording of keyboard sounds, etc..
Movie length Several short “bite-sized” movies are often more effective than one long movie. Break training demos into segments not more than 5 or 6 minutes long. Lectures can also be broken into several sections. Providing an index with informative tiles will help students to find the material they are looking for without needing to seek through the entire lecture.
On the Web page that links to the movie… To help your audience to decide when and where to watch the movie:
• Indicate the movie length (in minutes).
• Indicate if the movie has an audio track. Your audience may want to use earphones, or turn on their speakers.
Screencasting with Camtasia Mac
UMass Information Technology, Academic Computing http://it.umass.edu/instruct 150622 mt
24
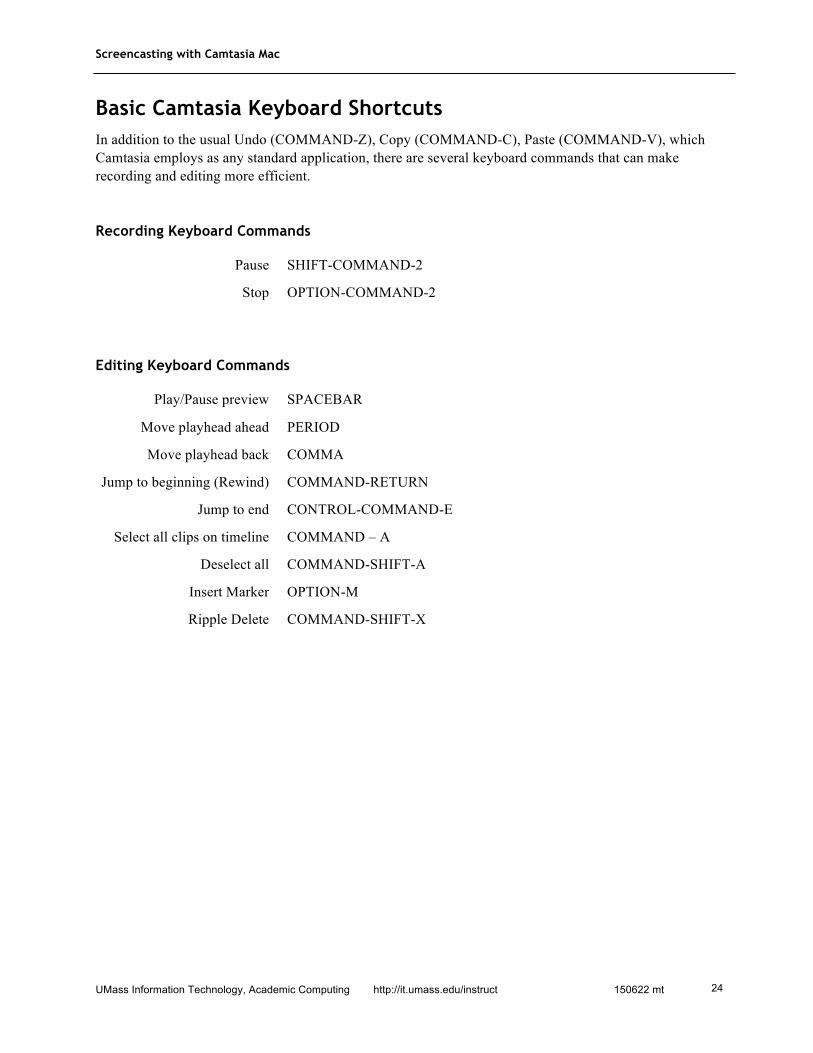
Basic Camtasia Keyboard Shortcuts In addition to the usual Undo (COMMAND-Z), Copy (COMMAND-C), Paste (COMMAND-V), which Camtasia employs as any standard application, there are several keyboard commands that can make recording and editing more efficient.
Recording Keyboard Commands Pause SHIFT-COMMAND-2
Stop OPTION-COMMAND-2
Editing Keyboard Commands Play/Pause preview SPACEBAR
Move playhead ahead PERIOD
Move playhead back COMMA
Jump to beginning (Rewind) COMMAND-RETURN
Jump to end CONTROL-COMMAND-E
Select all clips on timeline COMMAND – A
Deselect all COMMAND-SHIFT-A
Insert Marker OPTION-M
Ripple Delete COMMAND-SHIFT-X

Screencasting with Camtasia Mac
UMass Information Technology, Academic Computing http://it.umass.edu/instruct 150622 mt
25
Prepare PowerPoint or Keynote Presentations for Screencasting
Visual Design Tips Screencasts of PowerPoint or Keynote presentations will be improved by facilitating the readability of your slides. Follow these basic visual design principles:
• Use large type Your screencast will be much smaller than the full screen presentation, so you want to make sure the text can be read. (32 pt rule of thumb).
• Use Sans serif fonts Arial, Verdana, Tahoma, are good choices.
• Use high contrast between text and background Light on dark or dark on light. Avoid highly saturated (intense) colors for text or background.
• Use a simple backgrounds with minimal texture This will improve readability and also reduce file sizes.
• Leave breathing room around lines or blocks of text Whitespace helps readability.
• Minimize use of slide transitions or fancy animation Use effects to call attention to critical moments. Used for their own sake, special effects are distracting.
Tips for Recording Embedded Audio or Video within a Screencast To capture system audio, for example, in a video embedded in a PowerPoint, be sure to:
1. Install the TechSmith Audio Capture Component: On the Recording control panel, below the Mic settings, if your see "Need System Audio?" click the (?). You will be stepped through installing the component on your Mac.
2. Before recording, on the Recording control panel, click the System Audio button . (If the System audio button is green, system audio will be recorded.)
If your recording will include online media, it may improve the quality of streaming video or audio (and avoid skipping, jumpy playback) to pause both your recording and the on-screen playback and wait for an entire video to finish downloading (watch the loading progress bar) before recording.
Screencasting with Camtasia Mac
UMass Information Technology, Academic Computing http://it.umass.edu/instruct 150622 mt
26
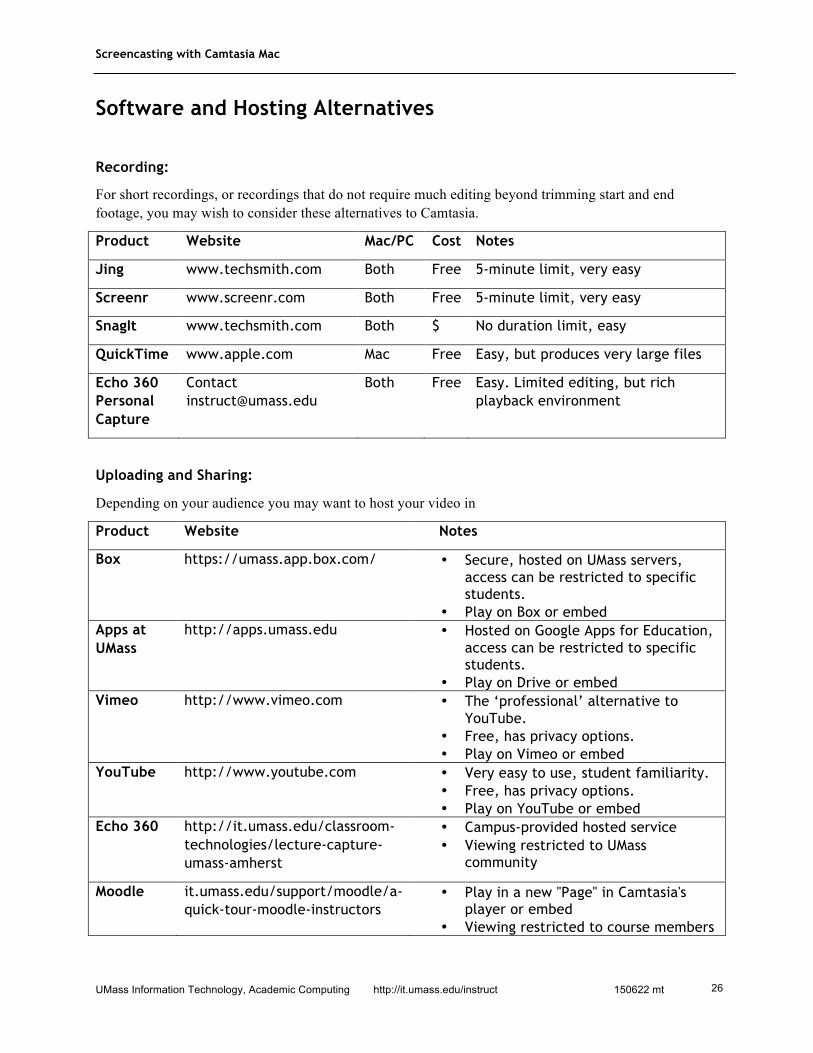
Software and Hosting Alternatives
Recording:
For short recordings, or recordings that do not require much editing beyond trimming start and end footage, you may wish to consider these alternatives to Camtasia.
Product Website Mac/PC Cost Notes
Jing www.techsmith.com Both Free 5-minute limit, very easy
Screenr www.screenr.com Both Free 5-minute limit, very easy
SnagIt www.techsmith.com Both $ No duration limit, easy
QuickTime www.apple.com Mac Free Easy, but produces very large files
Echo 360 Personal Capture
Contact [email protected]
Both Free Easy. Limited editing, but rich playback environment
Uploading and Sharing:
Depending on your audience you may want to host your video in
Product Website Notes
Box https://umass.app.box.com/ • Secure, hosted on UMass servers, access can be restricted to specific students.
• Play on Box or embed Apps at UMass
http://apps.umass.edu • Hosted on Google Apps for Education, access can be restricted to specific students.
• Play on Drive or embed Vimeo http://www.vimeo.com • The ‘professional’ alternative to
YouTube. • Free, has privacy options. • Play on Vimeo or embed
YouTube http://www.youtube.com • Very easy to use, student familiarity. • Free, has privacy options. • Play on YouTube or embed
Echo 360 http://it.umass.edu/classroom-technologies/lecture-capture-umass-amherst
• Campus-provided hosted service • Viewing restricted to UMass
community
Moodle it.umass.edu/support/moodle/a-quick-tour-moodle-instructors
• Play in a new "Page" in Camtasia's player or embed
• Viewing restricted to course members