Embed Size (px)
Citation preview
SCOUT© SUSPENSE TRACKER Version 10.0
USER’S MANUAL
HPC-COM LLC Help Desk
800-795-1902
Updated: January 2011
SCOUT©
Suspense Tracker V10.0 User’s Manual
Copyright HPC-COM LLC 2009 2
TABLE OF CONTENTS
Table of Contents
WELCOME ................................................................................................................................. 4 Features ................................................................................................................................ 4
USING SCOUT© Suspense Tracker V10.0 .................................................................................. 4 STEP 1: SCOUT© Suspense Tracker V10.0 Introduction ....................................................... 5 STEP 2: Creating a New Suspense ........................................................................................ 9 STEP 4: EPRs/OPRs ............................................................................................................. 14 STEP 5: Awards .................................................................................................................. 17 STEP 6: Decorations ........................................................................................................... 18 STEP 7: Reports .................................................................................................................. 18 STEP 8: My Control Center. ............................................................................................... 19 STEP 9: My Profile .............................................................................................................. 20
Final Notes .............................................................................................................................. 21
LIST OF FIGURES
Figure 1. SCOUT© Suspense Tracker V10.0 .............................................................................. 4 Figure 2. The Workflows Menu .................................................. Error! Bookmark not defined. Figure 3. The Work Space Window ............................................ Error! Bookmark not defined. Figure 4. General Tasks Toolbar ................................................. Error! Bookmark not defined. Figure 5. Create a New Suspense .............................................................................................. 7 Figure 6. Stand-in/Act as Window ........................................................................................... 7 Figure 7. Search Tab ................................................................................................................. 8 Figure 8. Search Window ......................................................................................................... 8 Figure 9. Save as Home Page Window ..................................................................................... 9 Figure 10. New Suspense Data Input Form .............................................................................. 9 Figure 11. Calendar Date Picker .............................................................................................. 10 Figure 12. Recurrence Tab ..................................................................................................... 11 Figure 13. Suspense Type ....................................................................................................... 11 Figure 14. Choose an Originator ............................................................................................ 11 Figure 15. Workflow – Parallel or Chain ................................................................................ 12 Figure 16. Default Check Boxes .............................................................................................. 13 Figure 17. Status Tabs ............................................................................................................ 13 Figure 19. Designating Assignee Roles ................................................................................... 14 Figure 20. Email Notification in Parallel or Chain Order ........................................................ 14 Figure 20. EPRs/OPRs ............................................................................................................. 14 Figure 22. EPR/OPR Input Form Page .................................................................................... 15 Figure 23. Task Details Page ................................................................................................... 16
SCOUT©
Suspense Tracker V10.0 User’s Manual
Copyright HPC-COM LLC 2009 3
Figure 24. Choosing Reviewers Window ................................................................................ 16 Figure 25. Choose Assignee Role Window ............................................................................. 16 Figure 26. My Awards Tables ................................................................................................. 17 Figure 27. Awards Suspense Form ......................................................................................... 17 Figure 28. My Decorations Tables .......................................................................................... 18 Figure 29. Reports Display Choices Page ............................................................................... 18 Figure 30. Report Page ........................................................................................................... 19 Figure 31. The Control Center page ....................................................................................... 19 Figure 32. The Edit My Profile page ....................................................................................... 20
SCOUT©
Suspense Tracker V10.0 User’s Manual
Copyright HPC-COM LLC 2009 4
WELCOME
Welcome to SCOUT© Suspense Tracker V10.0, an easy to use, yet extremely powerful web-
based suspense tracking tool that will provide solutions to all of your organization’s suspense tracking needs.
Features
With SCOUT© Suspense Tracker V10.0 you can:
Create a suspense/task with or without subtasks
Attach/upload documents or any files to any suspense
Automatically notify assignees via email in parallel or chain order
Track the suspense progress, comments, acceptance, declines, or completions
Create alerts for short suspense dates or past due suspenses
Create staff packages with routing lists and digital signatures
Track status, review, approve, assign, re-assign, info-only
Create customizable reports, stoplight charts, or metrics.
USING SCOUT© Suspense Tracker V10.0
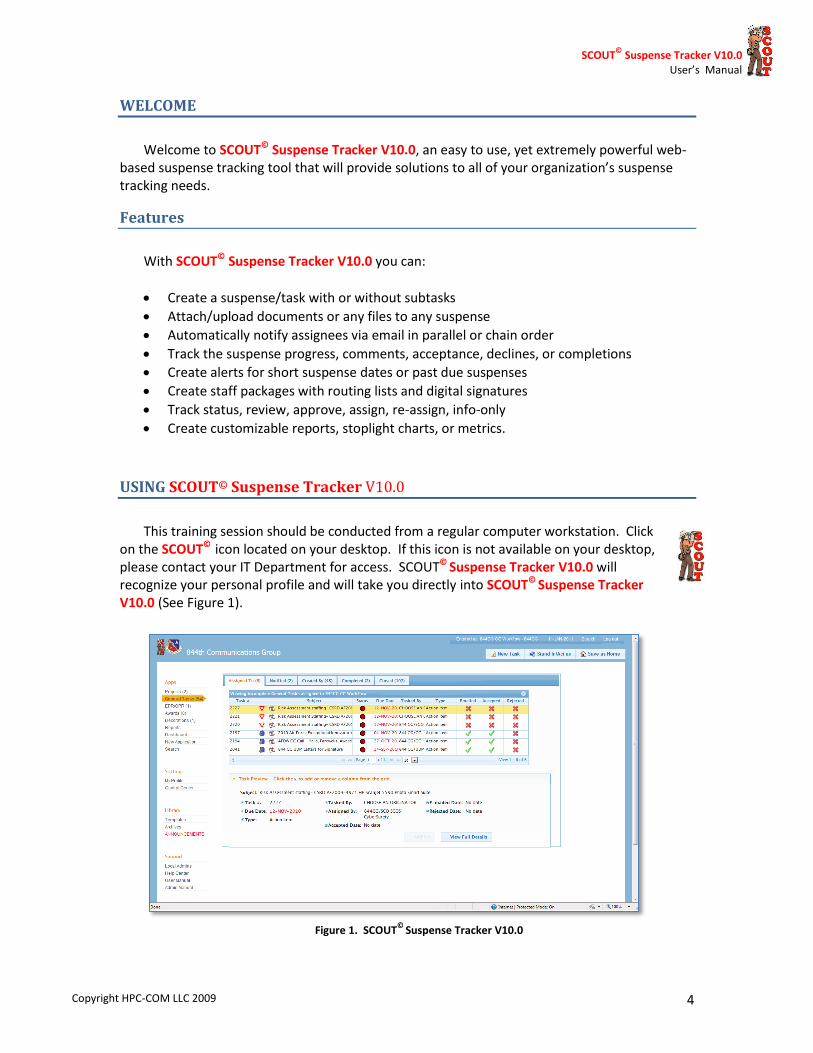
This training session should be conducted from a regular computer workstation. Click
on the SCOUT© icon located on your desktop. If this icon is not available on your desktop, please contact your IT Department for access. SCOUT© Suspense Tracker V10.0 will recognize your personal profile and will take you directly into SCOUT© Suspense Tracker V10.0 (See Figure 1).
Figure 1. SCOUT
© Suspense Tracker V10.0
SCOUT©
Suspense Tracker V10.0 User’s Manual
Copyright HPC-COM LLC 2009 5
STEP 1: SCOUT© Suspense Tracker V10.0 Introduction
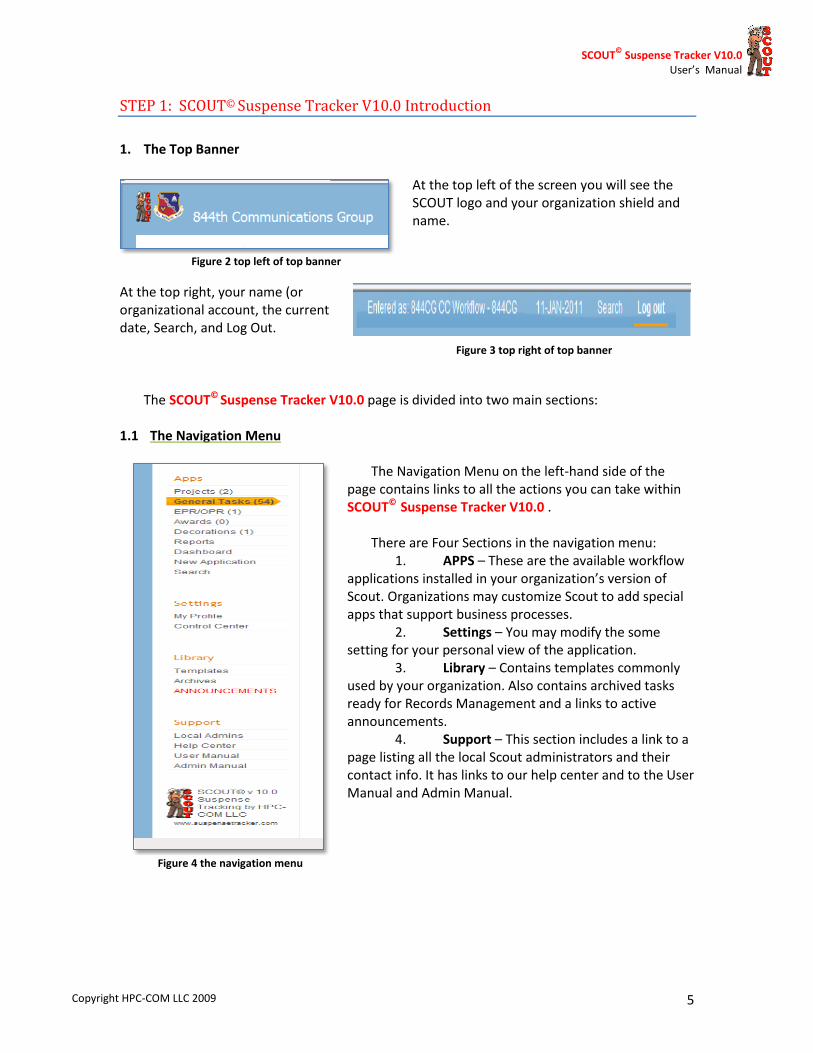
1. The Top Banner
At the top left of the screen you will see the SCOUT logo and your organization shield and name.
At the top right, your name (or organizational account, the current date, Search, and Log Out.
The SCOUT© Suspense Tracker V10.0 page is divided into two main sections:
1.1 The Navigation Menu The Navigation Menu on the left-hand side of the
page contains links to all the actions you can take within SCOUT© Suspense Tracker V10.0 .
There are Four Sections in the navigation menu:
1. APPS – These are the available workflow applications installed in your organization’s version of Scout. Organizations may customize Scout to add special apps that support business processes.
2. Settings – You may modify the some setting for your personal view of the application.
3. Library – Contains templates commonly used by your organization. Also contains archived tasks ready for Records Management and a links to active announcements.
4. Support – This section includes a link to a page listing all the local Scout administrators and their contact info. It has links to our help center and to the User Manual and Admin Manual.
Figure 4 the navigation menu
Figure 2 top left of top banner
Figure 3 top right of top banner
SCOUT©
Suspense Tracker V10.0 User’s Manual
Copyright HPC-COM LLC 2009 6
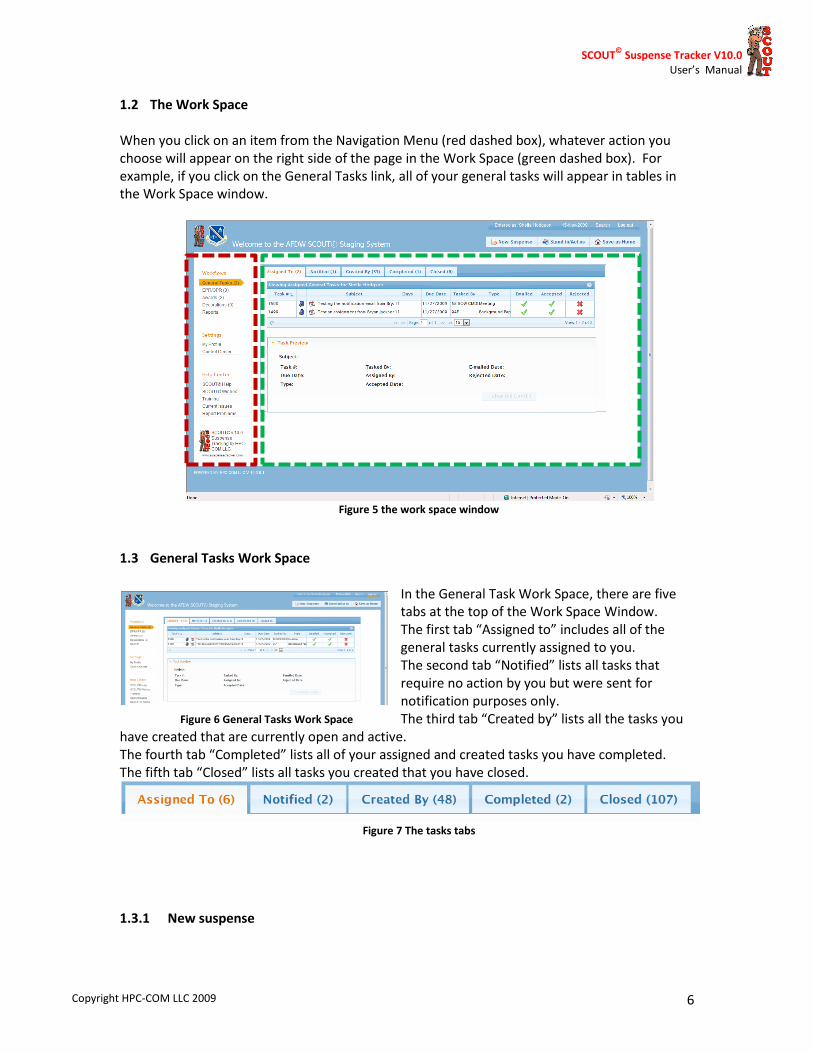
1.2 The Work Space
When you click on an item from the Navigation Menu (red dashed box), whatever action you choose will appear on the right side of the page in the Work Space (green dashed box). For example, if you click on the General Tasks link, all of your general tasks will appear in tables in the Work Space window.
Figure 5 the work space window
1.3 General Tasks Work Space
In the General Task Work Space, there are five tabs at the top of the Work Space Window. The first tab “Assigned to” includes all of the general tasks currently assigned to you. The second tab “Notified” lists all tasks that require no action by you but were sent for notification purposes only. The third tab “Created by” lists all the tasks you
have created that are currently open and active. The fourth tab “Completed” lists all of your assigned and created tasks you have completed. The fifth tab “Closed” lists all tasks you created that you have closed.
Figure 7 The tasks tabs
1.3.1 New suspense
Figure 6 General Tasks Work Space
SCOUT©
Suspense Tracker V10.0 User’s Manual
Copyright HPC-COM LLC 2009 7
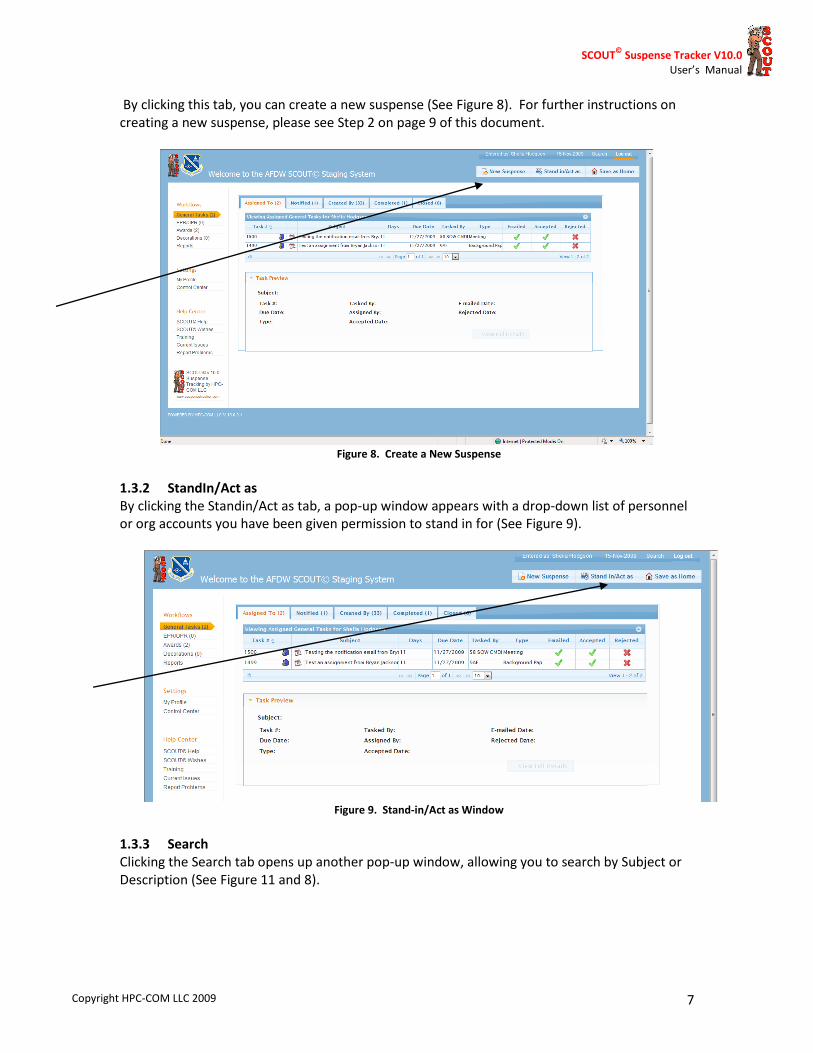
By clicking this tab, you can create a new suspense (See Figure 8). For further instructions on creating a new suspense, please see Step 2 on page 9 of this document.
Figure 8. Create a New Suspense
1.3.2 StandIn/Act as By clicking the Standin/Act as tab, a pop-up window appears with a drop-down list of personnel or org accounts you have been given permission to stand in for (See Figure 9).
Figure 9. Stand-in/Act as Window
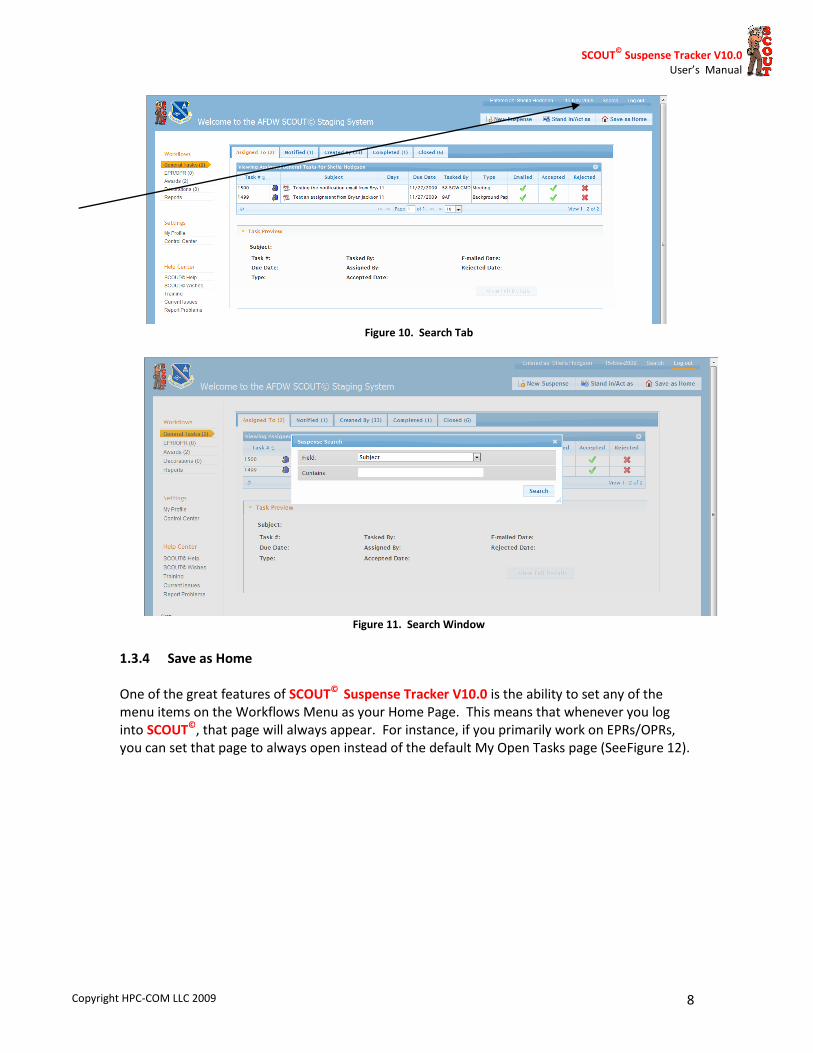
1.3.3 Search Clicking the Search tab opens up another pop-up window, allowing you to search by Subject or Description (See Figure 11 and 8).
SCOUT©
Suspense Tracker V10.0 User’s Manual
Copyright HPC-COM LLC 2009 8
Figure 10. Search Tab
Figure 11. Search Window
1.3.4 Save as Home One of the great features of SCOUT© Suspense Tracker V10.0 is the ability to set any of the menu items on the Workflows Menu as your Home Page. This means that whenever you log into SCOUT©, that page will always appear. For instance, if you primarily work on EPRs/OPRs, you can set that page to always open instead of the default My Open Tasks page (SeeFigure 12).
SCOUT©
Suspense Tracker V10.0 User’s Manual
Copyright HPC-COM LLC 2009 9
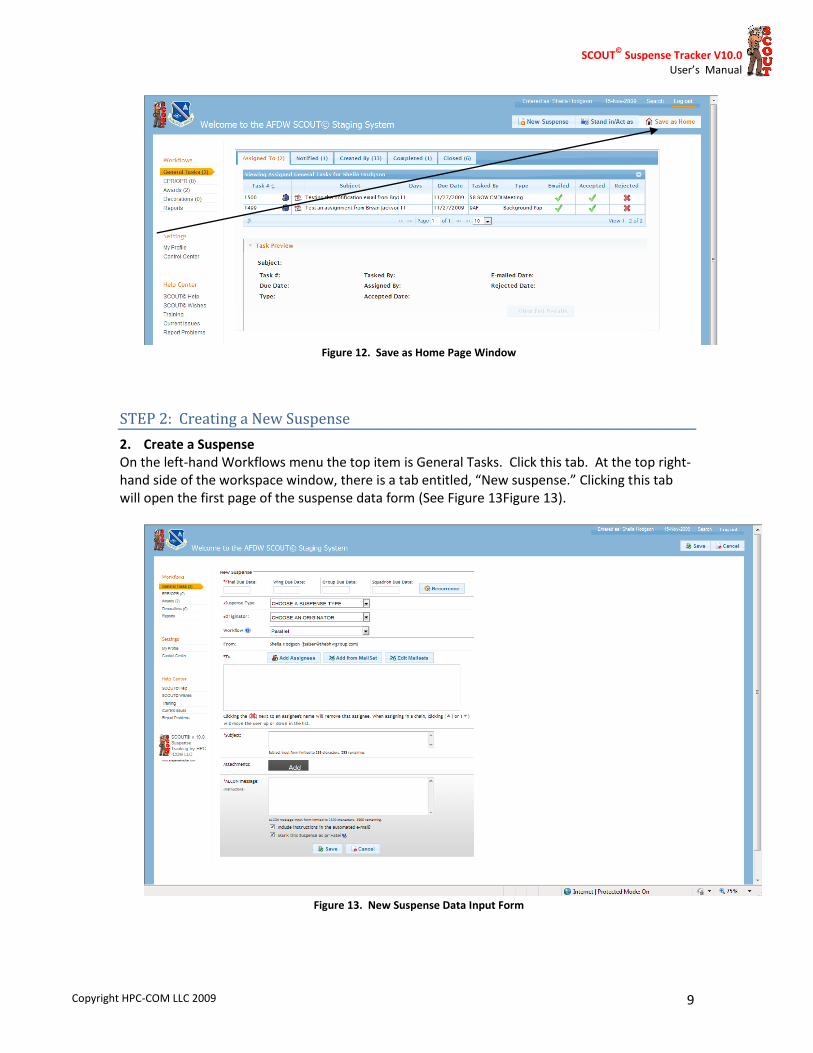
Figure 12. Save as Home Page Window
STEP 2: Creating a New Suspense
2. Create a Suspense On the left-hand Workflows menu the top item is General Tasks. Click this tab. At the top right-hand side of the workspace window, there is a tab entitled, “New suspense.” Clicking this tab will open the first page of the suspense data form (See Figure 13Figure 13).
Figure 13. New Suspense Data Input Form

SCOUT©
Suspense Tracker V10.0 User’s Manual
Copyright HPC-COM LLC 2009 10
At the top of the Workspace Window, there are the following date windows: Final Due Date, Wing Due Date, Group Due Date, and Squadron Due Date. You must enter a final date for which this suspense is due by either typing in a date dd/mm/yyyy or click on the calendar icon and selecting a date (See Figure 14). You can also add Wing, Group, or Squadron due dates.
Figure 14. Calendar Date Picker
1) Recurrence Icon: Clicking this icon opens up a pop-up window, which allows you to
make this task recur (daily, weekly, monthly, or yearly). (See Figure 15).

SCOUT©
Suspense Tracker V10.0 User’s Manual
Copyright HPC-COM LLC 2009 11
Figure 15. Recurrence Tab
2) Suspense Type: Clicking on the right down arrow opens a pull-down menu listing all of
the available suspense types (See Figure 16.
Figure 16. Suspense Type
3) Choose an Originator: Clicking on the right arrow opens a pull-down menu listing all of
the available Originator names (See Figure 17).
Figure 17. Choose an Originator
SCOUT©
Suspense Tracker V10.0 User’s Manual
Copyright HPC-COM LLC 2009 12
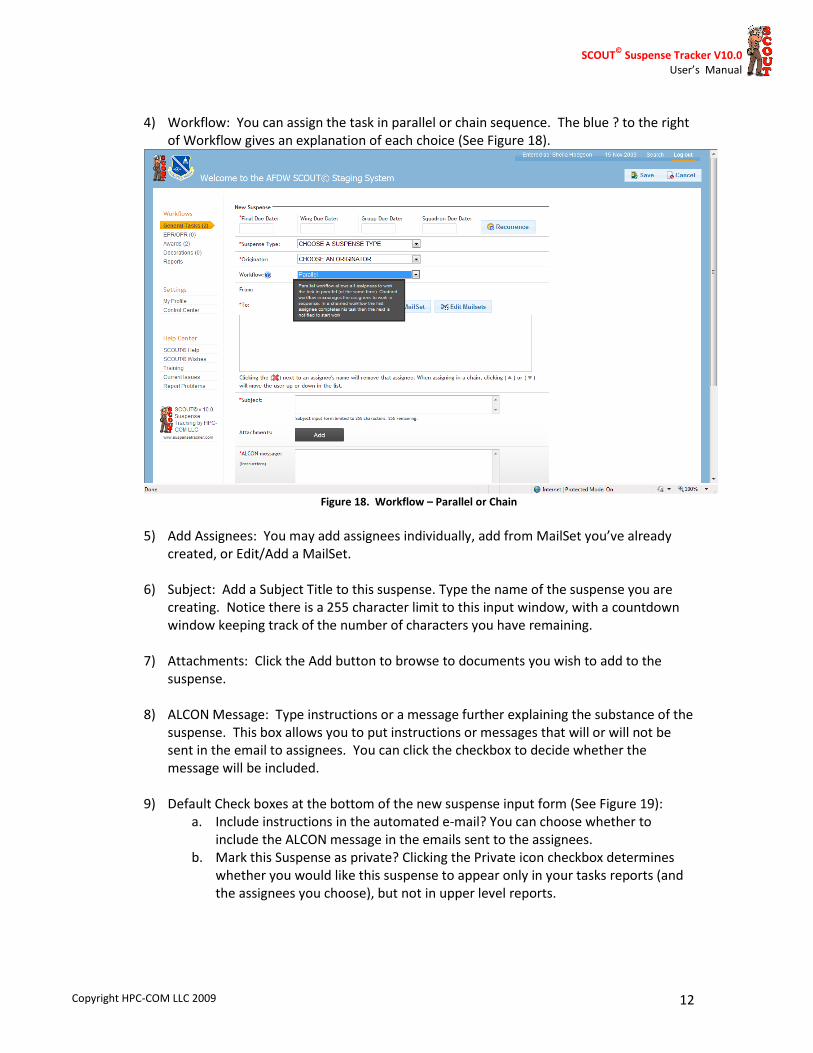
4) Workflow: You can assign the task in parallel or chain sequence. The blue ? to the right
of Workflow gives an explanation of each choice (See Figure 18).
Figure 18. Workflow – Parallel or Chain
5) Add Assignees: You may add assignees individually, add from MailSet you’ve already
created, or Edit/Add a MailSet. 6) Subject: Add a Subject Title to this suspense. Type the name of the suspense you are
creating. Notice there is a 255 character limit to this input window, with a countdown window keeping track of the number of characters you have remaining.
7) Attachments: Click the Add button to browse to documents you wish to add to the
suspense. 8) ALCON Message: Type instructions or a message further explaining the substance of the
suspense. This box allows you to put instructions or messages that will or will not be sent in the email to assignees. You can click the checkbox to decide whether the message will be included.
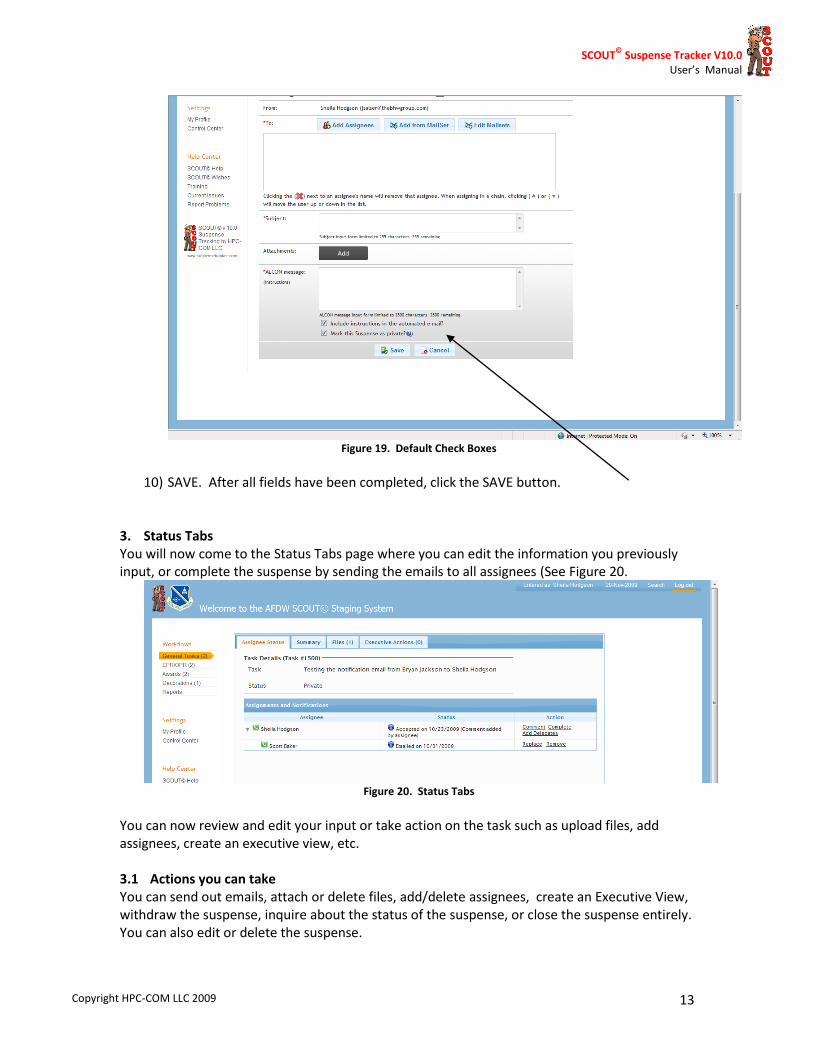
9) Default Check boxes at the bottom of the new suspense input form (See Figure 19): a. Include instructions in the automated e-mail? You can choose whether to
include the ALCON message in the emails sent to the assignees. b. Mark this Suspense as private? Clicking the Private icon checkbox determines
whether you would like this suspense to appear only in your tasks reports (and the assignees you choose), but not in upper level reports.
SCOUT©
Suspense Tracker V10.0 User’s Manual
Copyright HPC-COM LLC 2009 13
Figure 19. Default Check Boxes
10) SAVE. After all fields have been completed, click the SAVE button.
3. Status Tabs You will now come to the Status Tabs page where you can edit the information you previously input, or complete the suspense by sending the emails to all assignees (See Figure 20.
Figure 20. Status Tabs
You can now review and edit your input or take action on the task such as upload files, add assignees, create an executive view, etc.
3.1 Actions you can take You can send out emails, attach or delete files, add/delete assignees, create an Executive View, withdraw the suspense, inquire about the status of the suspense, or close the suspense entirely. You can also edit or delete the suspense.
SCOUT©
Suspense Tracker V10.0 User’s Manual
Copyright HPC-COM LLC 2009 14
3.1.1 Designating Assignee Roles/Due Dates The following page allows you to designate the role of the assignee. If you choose Assign, then that person is responsible for working the suspense. If you choose Notify, that person cannot work the suspense but can track its progress and status. After choosing roles, you may also change the assigned due date for different assignees. However, you should never choose a date later than the overall Suspense due date you chose for this suspense (See Figure 21).
Figure 21. Designating Assignee Roles
3.1.2 Sending Email Notifications in Parallel or Chain The next page allows you to send out emails to the assignees in two different ways. Sending in Parallel will send all assignees an email simultaneously. Sending in Chain will send an email to the first assignee only…and when he/she completes their portion of the suspense, then the next assignee will receive an email. In this stage of the test, we will use the Parallel choice. In another part of the training we will be using the Chain choice. Click the Parallel button (See Figure 22).
Figure 22. Email Notification in Parallel or Chain Order
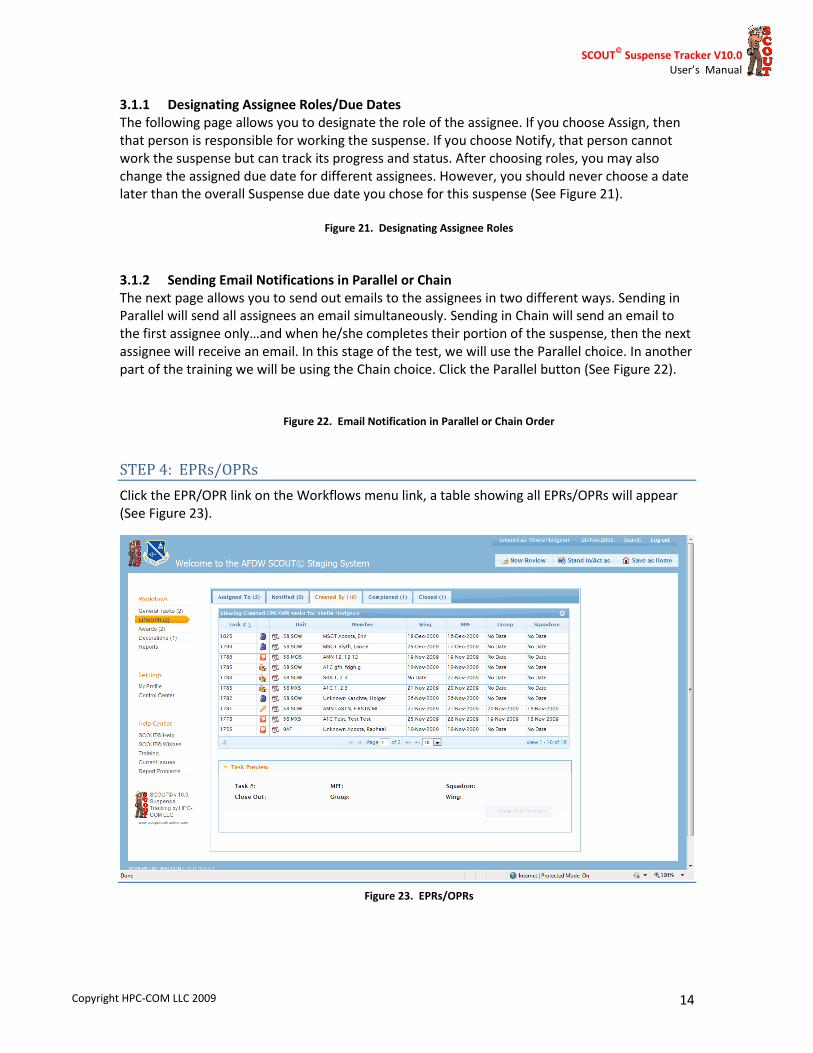
STEP 4: EPRs/OPRs
Click the EPR/OPR link on the Workflows menu link, a table showing all EPRs/OPRs will appear (See Figure 23).
Figure 23. EPRs/OPRs

SCOUT©
Suspense Tracker V10.0 User’s Manual
Copyright HPC-COM LLC 2009 15
4. Creating a New EPR/OPR Package Click the “New Review” button in the far right-hand window. This will open the new EPR/OPR Package input form. Fill in the blanks (See Figure 24). Click Save.
Figure 24. EPR/OPR Input Form Page
1.1. Task Details Page. The Task Details appears. Fill in any additional information. Click Save.
SCOUT©
Suspense Tracker V10.0 User’s Manual
Copyright HPC-COM LLC 2009 16
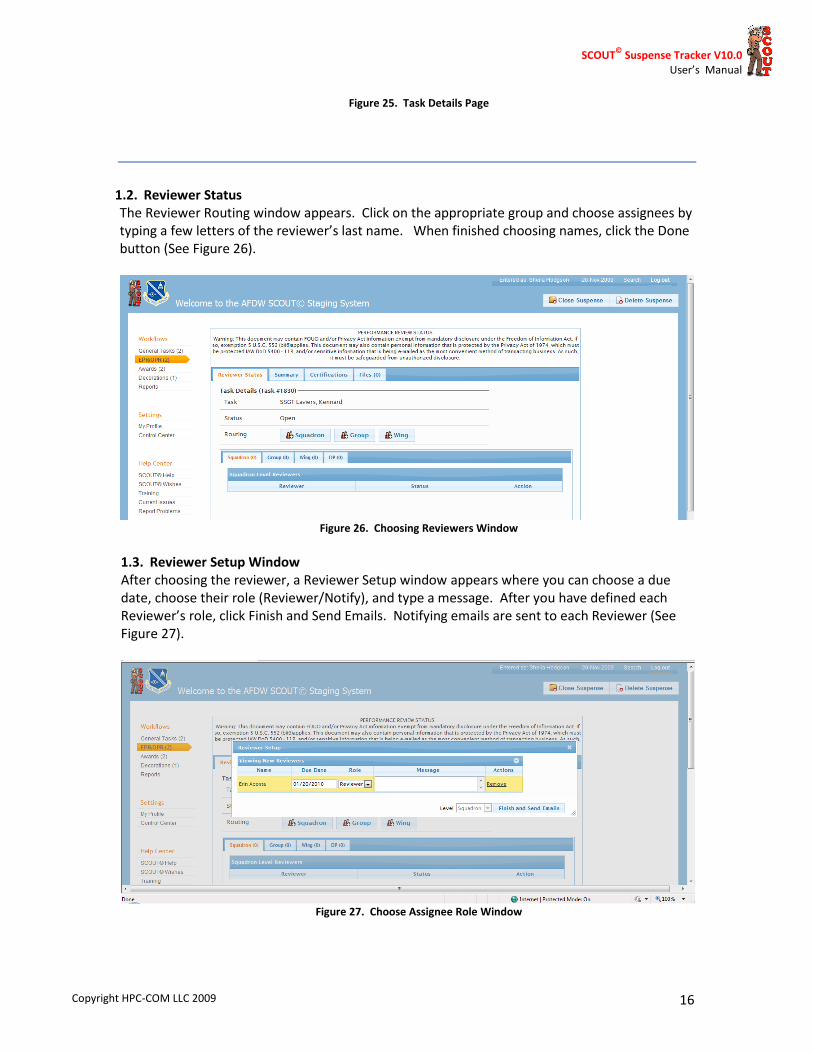
Figure 25. Task Details Page
1.2. Reviewer Status The Reviewer Routing window appears. Click on the appropriate group and choose assignees by typing a few letters of the reviewer’s last name. When finished choosing names, click the Done button (See Figure 26).
Figure 26. Choosing Reviewers Window
1.3. Reviewer Setup Window After choosing the reviewer, a Reviewer Setup window appears where you can choose a due date, choose their role (Reviewer/Notify), and type a message. After you have defined each Reviewer’s role, click Finish and Send Emails. Notifying emails are sent to each Reviewer (See Figure 27).
Figure 27. Choose Assignee Role Window
SCOUT©
Suspense Tracker V10.0 User’s Manual
Copyright HPC-COM LLC 2009 17
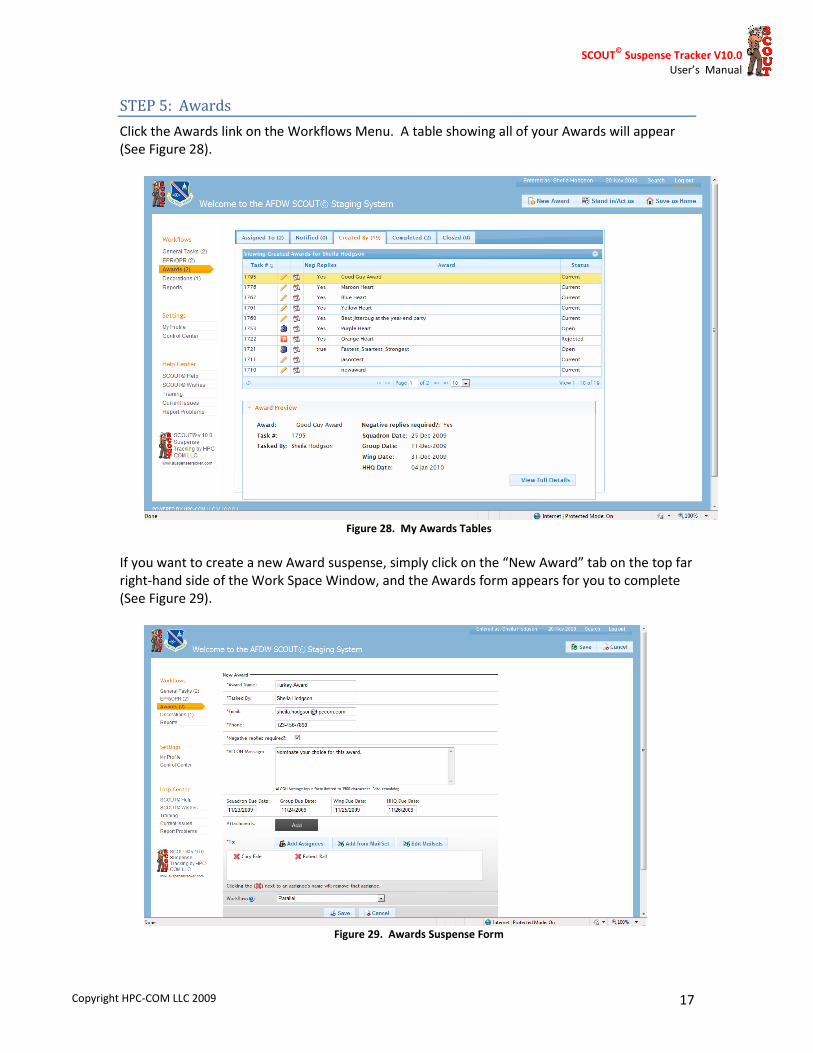
STEP 5: Awards
Click the Awards link on the Workflows Menu. A table showing all of your Awards will appear (See Figure 28).
Figure 28. My Awards Tables
If you want to create a new Award suspense, simply click on the “New Award” tab on the top far right-hand side of the Work Space Window, and the Awards form appears for you to complete (See Figure 29).
Figure 29. Awards Suspense Form
SCOUT©
Suspense Tracker V10.0 User’s Manual
Copyright HPC-COM LLC 2009 18
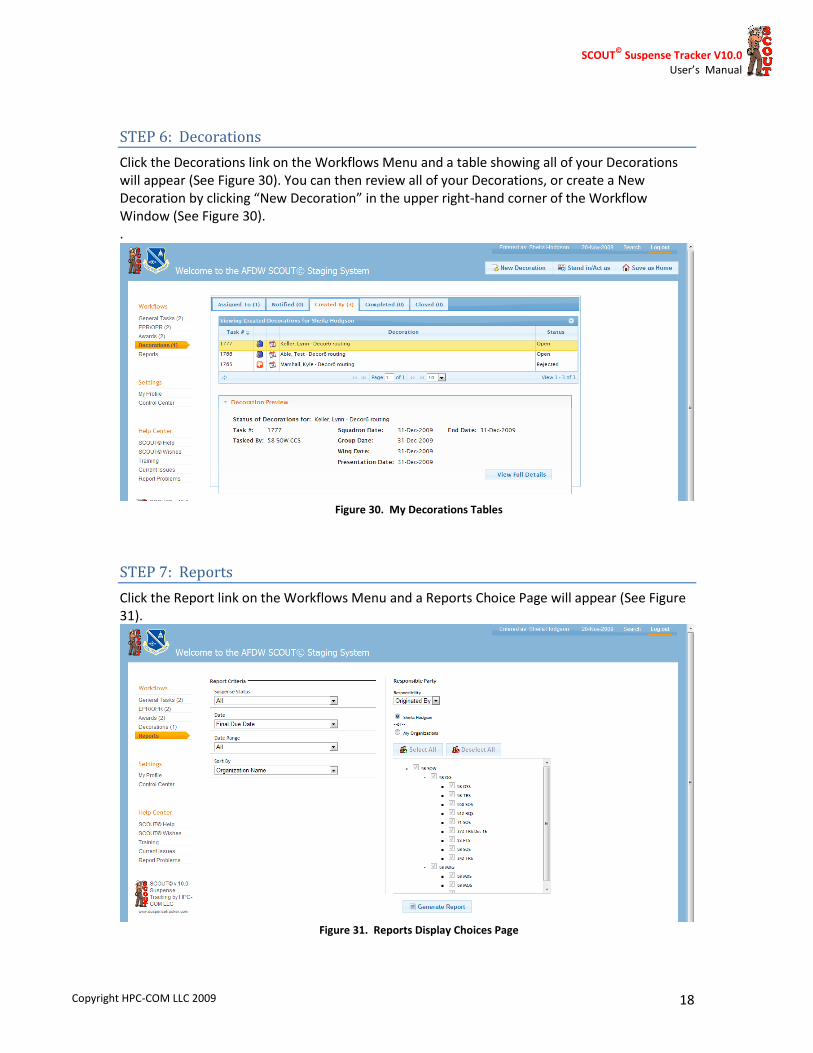
STEP 6: Decorations
Click the Decorations link on the Workflows Menu and a table showing all of your Decorations will appear (See Figure 30). You can then review all of your Decorations, or create a New Decoration by clicking “New Decoration” in the upper right-hand corner of the Workflow Window (See Figure 30). .
Figure 30. My Decorations Tables
STEP 7: Reports
Click the Report link on the Workflows Menu and a Reports Choice Page will appear (See Figure 31).
Figure 31. Reports Display Choices Page
SCOUT©
Suspense Tracker V10.0 User’s Manual
Copyright HPC-COM LLC 2009 19
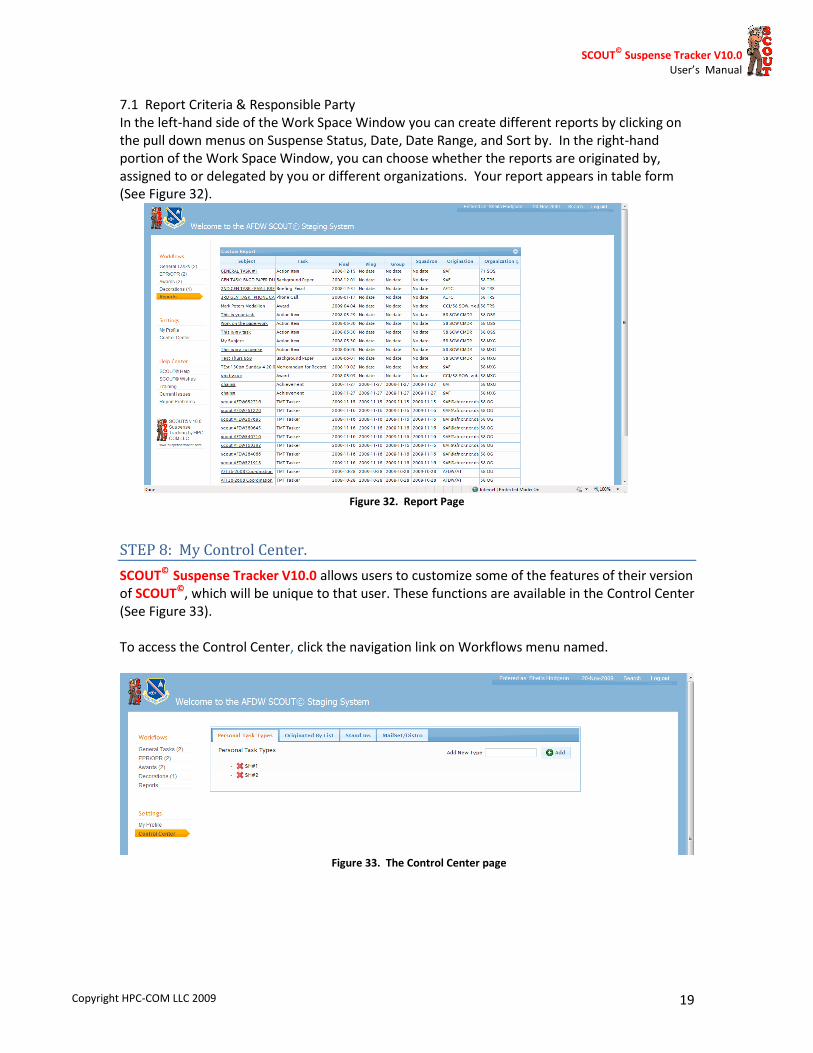
7.1 Report Criteria & Responsible Party In the left-hand side of the Work Space Window you can create different reports by clicking on the pull down menus on Suspense Status, Date, Date Range, and Sort by. In the right-hand portion of the Work Space Window, you can choose whether the reports are originated by, assigned to or delegated by you or different organizations. Your report appears in table form (See Figure 32).
Figure 32. Report Page
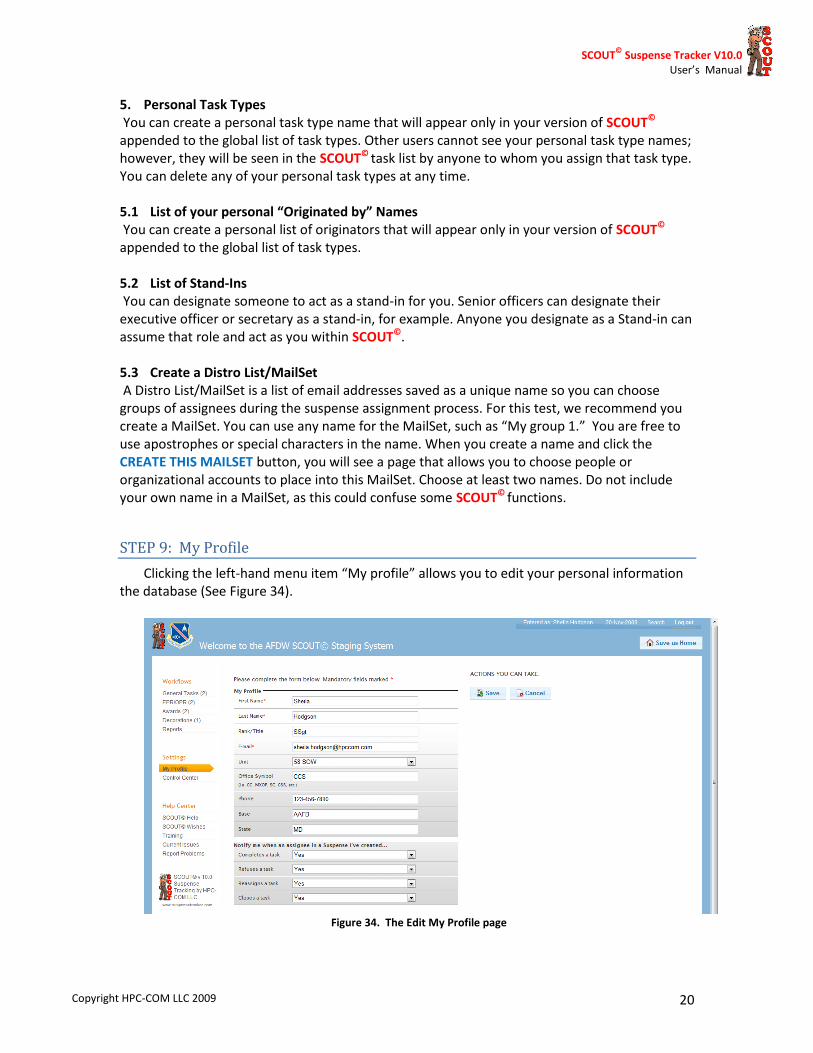
STEP 8: My Control Center.
SCOUT© Suspense Tracker V10.0 allows users to customize some of the features of their version of SCOUT©, which will be unique to that user. These functions are available in the Control Center (See Figure 33).
To access the Control Center, click the navigation link on Workflows menu named.
Figure 33. The Control Center page
SCOUT©
Suspense Tracker V10.0 User’s Manual
Copyright HPC-COM LLC 2009 20
5. Personal Task Types You can create a personal task type name that will appear only in your version of SCOUT©
appended to the global list of task types. Other users cannot see your personal task type names; however, they will be seen in the SCOUT© task list by anyone to whom you assign that task type. You can delete any of your personal task types at any time.
5.1 List of your personal “Originated by” Names You can create a personal list of originators that will appear only in your version of SCOUT©
appended to the global list of task types.
5.2 List of Stand-Ins You can designate someone to act as a stand-in for you. Senior officers can designate their executive officer or secretary as a stand-in, for example. Anyone you designate as a Stand-in can assume that role and act as you within SCOUT©.
5.3 Create a Distro List/MailSet A Distro List/MailSet is a list of email addresses saved as a unique name so you can choose groups of assignees during the suspense assignment process. For this test, we recommend you create a MailSet. You can use any name for the MailSet, such as “My group 1.” You are free to use apostrophes or special characters in the name. When you create a name and click the CREATE THIS MAILSET button, you will see a page that allows you to choose people or organizational accounts to place into this MailSet. Choose at least two names. Do not include your own name in a MailSet, as this could confuse some SCOUT© functions.
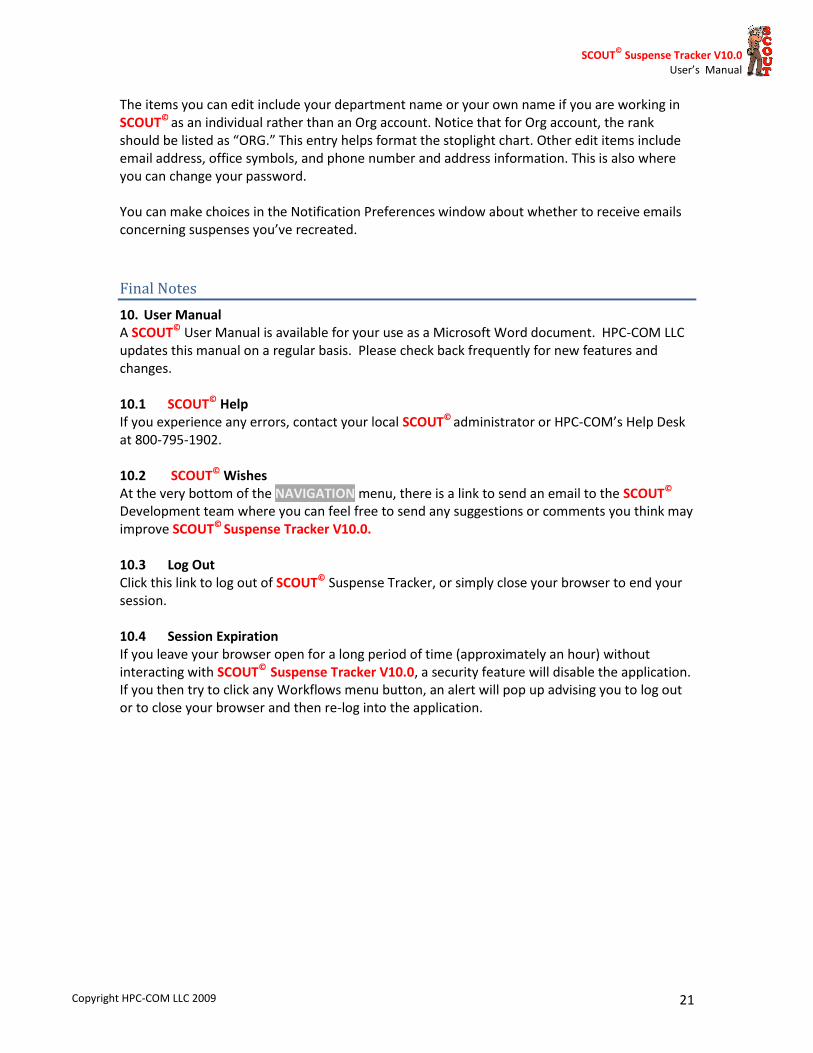
STEP 9: My Profile
Clicking the left-hand menu item “My profile” allows you to edit your personal information the database (See Figure 34).
Figure 34. The Edit My Profile page
SCOUT©
Suspense Tracker V10.0 User’s Manual
Copyright HPC-COM LLC 2009 21
The items you can edit include your department name or your own name if you are working in SCOUT© as an individual rather than an Org account. Notice that for Org account, the rank should be listed as “ORG.” This entry helps format the stoplight chart. Other edit items include email address, office symbols, and phone number and address information. This is also where you can change your password. You can make choices in the Notification Preferences window about whether to receive emails concerning suspenses you’ve recreated.
Final Notes
10. User Manual A SCOUT© User Manual is available for your use as a Microsoft Word document. HPC-COM LLC updates this manual on a regular basis. Please check back frequently for new features and changes. 10.1 SCOUT© Help If you experience any errors, contact your local SCOUT© administrator or HPC-COM’s Help Desk at 800-795-1902. 10.2 SCOUT© Wishes At the very bottom of the NAVIGATION menu, there is a link to send an email to the SCOUT©
Development team where you can feel free to send any suggestions or comments you think may improve SCOUT© Suspense Tracker V10.0. 10.3 Log Out Click this link to log out of SCOUT© Suspense Tracker, or simply close your browser to end your session. 10.4 Session Expiration If you leave your browser open for a long period of time (approximately an hour) without interacting with SCOUT© Suspense Tracker V10.0, a security feature will disable the application. If you then try to click any Workflows menu button, an alert will pop up advising you to log out or to close your browser and then re-log into the application.