Embed Size (px)
Citation preview

Scout centralHandbook
9 October 2017Photo - Angus Boxall

Section: Logging In
Scout Central - User Handbook Page 2
Logging In
Whether logging into Scout Cloud, Scout Central, or the Scout Wiki, you’ll begin here. The three bits of information you’ll need are:
Select Branch The Branch you belong to
Membership Number Your Branch membership number
Password The password you’ve set
Note: If you are logging in for the first time, your password will be your date of birth - DDMMYYYY
User Types
Scout Central provides different tools for different users. These vary depending upon your role within your Formation. Throughout this document, items will have icons next to them to denote which users have access to what tools.
Leader Section Leader, Group Leader, etc.
Young Leader Sixers, Patrol Leaders, Venturer Scouts, and Rover Scouts
Youth Member Joey Scouts, Cub Scouts, and Scouts.
Note: Sixer and PL access is given by Leaders through a Members Register see Register Sheet: History

Photo - Angus Boxall
Logging In 2Scout central 5Getting Started 6Personal Account Settings 7Accessing your Formation/s 8Formation Information 9Term Program Create Term 10Add New Meeting 11Add From Library 11Add New Program 12Photo Albums Create an Album 13Adding Photos 14Attendance and Register Marking attendance 16Member Register Sheet 16History 17Attendance 17Camps/Excursions Attended 18Badgework 19Progress Chart 20Name Bar 20Requirements and Marking Off 21Program Finder 22Search / Sort / Filter 23Activities & Programs 24Submit a Program/Activity 25
table of contentS

Photo - Angus Boxall
Introduction
Scout Central is a new and exciting tool that has been developed for Scouts Australia. Through it, every member is able to actively organise and track the part they play in our Movement.
Scout Central pools its member information from each of the Branches. At times this may lead to Scout Central not displaying accurate information. If you notice this happening, check with your Branch to make sure they are sharing your information correctly.

Photo - Angus Boxall
Scout central

Section: Scout Central
Scout Central - User Handbook Page 6
Getting Started
Once you’ve logged in, you’ll be presented with a personalised lander page. This will give you access to all the features and tools within Scout Central. These include Scout Cloud, eLearning, the Scout Wiki, as well as all your Group/Section specific information.
Navigating Scout Cloud is done through the top navigation bar. Hovering over each menu item will display sub-menu items that can be clicked. The ‘house’ ( ) icon will bring you back to this landing page from any other page; while the ‘arrow’ ( ) icon will log you out of Scout Central.

Section: Scout Central
Scout Central - User Handbook Page 7
Personal Account Settings
At some point you may want to modify your account settings, change password, or your account picture. Doing all of this and more can be accomplished in the settings page.
Your settings can be accessed through the ‘About Me’ tab, and clicking ‘My Settings.’ To change your personal details including your date of birth and email, you will have to contact your Branch. They will need to update your Membership records, which will be reflected on Scout Central. You are able to change any of the other settings present, including those below.
Preferred Youth Section The section that you areinvolved with
Theme Change the colour scheme of Scout Cloud to a section other than your preferred section
Change your Avatar This is image that will be displayed next to any information you include on Scout Central
Change Password This settings is found on the right side context menu

Section: Scout Central
Scout Central - User Handbook Page 8
Accessing your Formation/s
The ‘My Formations’ section is one of the most important, and most used tools in Scout Central. Getting to it can be done a number of ways. Either from the ‘About Me’ tab in the navigation menu, or from the ‘My Formations’ button on your landing page.
This will bring you to a list of Formations that you’re a part of. For Group Leaders, and Leaders in Charge, you’ll have access to all of the Sections within your Formation. For Section Leaders, you’ll have access to the Section that you are a part of within your formation. Clicking on a Formation will give you access to all the information relating to that Section.

Section: Scout Central
Scout Central - User Handbook Page 9
Formation Information
Once you’ve selected a Formation, you’ll be able to access their ‘Term Programs,’ ‘Photo Albums,’ and ‘Attendance and Registers’ records. Term ProgramsAll the programs you’ve added will show up here. It will show all previous, and upcoming programs that you’ve planned, so it can be used as an archive, and a term planner.
Attendance and Register / My Achievements Every registered youth member in your Formation will be visible here. You will be able to mark attendance for activities, and access a specific youth member’s records (their ‘Register Sheet’).
Photo AlbumsYou can create albums for events, and place the photos you’ve taken in them. All the Leaders in your Formation can add photos to an album, and all the youth members can see them, and add comments.
Progress ChartEvery youth member and badge will be visible here for assessing the overall progress of the formation through the award scheme. You will be able to mark off requirements against multiple youth members.

Section: Scout Central
Scout Central - User Handbook Page 10
Term Programs: Create Term
Creating a term allows you to catalogue your programs within the year more easily. Doing so will make finding specific programs in the future much easier. Term programs can also be printed for reference.
To create a term, click the ‘Create Term’ button in the top right corner of the ‘Term Programs.’ This will bring up a ‘Add a New Term’ form that you can add information too.
Name Title of the term
Start Date
First date in the term. This can be the first night the formation will meet, or the first day in the week of the term.
Theme The theme of the term, if any.
Remarks Any comments about the term.
Once a term has been created, it will be placed in the list of terms in order of its date. This may mean that it isn’t displayed if it’s not the previous, current, or next term.
To display all your Formation’s terms, you press the ‘Show all Terms’ button, located next to the ‘Create Term’ button.

Section: Scout Central
Scout Central - User Handbook Page 11
Term Programs: Add New Meeting
To add meetings to your term, you click the “Add New Meeting” button. This will bring up a form to fill in. The first section lets you give basic details of the meeting, including Name and Type. If the meeting is a camp or a hike, you’ll be able to include nights and kilometres respectively.
The next section allows you to specify date and location and the section after that will let you include specifics about the night including duty six/patrol, theme, sections of the award you plan on covering and any additional remarks. Finally, you’re able to include resources to run the evening. You are also able to include a program from the program library or build your own.
Term Programs: Add From Library
Adding a program from the Program Finder Library makes it easy to program terms. After clicking the ‘Add From Library’ button, you’ll then have to navigate through the list of programs to find the one you wish to add to your term. Clicking on it will show you a detailed view of the program, and give you the option to ‘schedule’ it.
You’ll then be able to program it as part of your term, including date and time. You also have the option to include extra details such as ‘Theme,’ ‘Award Scheme Coverage,’ and ‘Remarks.’ Once you’ve saved it, you’ll be able to go back an edit it as you would any other program.
Note: Details on using the Program Finder can be found in the ‘Program Finder’ Section.

Section: Scout Central
Scout Central - User Handbook Page 12
Term Programs: Add New Program
Adding a new program requires you to fill out more details about the activity, including the theme, parts of the award scheme covered, items as part of the program, and any comments.
The parts of the form that can be filled out as part of step two, are:
Theme A theme, if any, for the night
Form Required
Whether a form is required for the program
Award Scheme
Coverage
Any part of the program that pertains to an aspect of the award scheme
Remarks Any comments on the program. Contacts, etc.
Program Items
Items that form part of the program
As you add ‘Program Items’ to the list, their times will be added, to give a running total of how much time has been programmed. For each item, you can add information such as:
Length The length of time the item will take as part of the program
Title Title of the item
Leader Who will be in charge of running the item
Equipment Any equipment needed for the item to run
AoPG Any Areas of Personal Growth that the item covers
Method Any parts of the method that are used in the activity
For help working out any Areas of Personal Growth, or parts of the Scout Method, check the context menu on the right side of the Program form. There is also a video that further explains how to schedule a program.

Section: Scout Central
Scout Central - User Handbook Page 13
Photo Albums
Photo albums allow you to amass a collection of photos of your formation that spans youth members, and Leaders. You can keep track of events and share them with the rest of your Group. Clicking the ‘Photo Album’ tab, you’ll be shown a grid of all of your albums.
Photo Albums: Create an Album
To create a new album, you can click the ‘Create an Album’ button. This will bring up a form that will ask you for an album ‘Title,’ and ‘Description.’ Once you’ve saved your changes, your new album will load for you to add photos.
A photo album can also be created in the term program tab, by clicking the camera icon to the right of a meeting night.

Section: Scout Central
Scout Central - User Handbook Page 14
Photo Albums: Adding Photos
To add photos to your photo album, you click “Upload Some Photos” in the right sidebar. This will then let you select which photos you intend on uploading. Once they’ve been uploaded, you’ll be able to view, comment, add captions, and delete photos.
You are also able to delete an album. On doing so you will be able to select another album to put the photos it contains, or delete the photos with the album.
Note:• Any photos uploaded as a photo album are visible to all other members on Scout Central. If you would like to restrict access to photos; they can be uploaded to Scout Cloud.• Videos can’t be uploaded as part of a Photo Album.

Section: Scout Central
Scout Central - User Handbook Page 15
Attendance and Register
The Attendance and Register allows you to keep tabs on the members within your section. It gives you the ability to monitor meeting attendance, badgework, maintain a record of camps and excursions, and move the member up to the next section. Note: Members of merged formations will not be visible, as they are not part of your formation on Branch Records. For them to become visible in Scout Central, they must first be registered to your formation through your Branch Membership System.

Section: Scout Central
Scout Central - User Handbook Page 16
Attendance and Register: Marking attendance
Once you’ve ‘created a record’ of the meeting, you’ll be able to mark the youth members attendance. The options for attendance are:
Undefined Attendance has not been set, or has been reset.
Attended Marked as attending a meeting.
Not Attended Marked as not attending a meeting.
All members will begin as having their attendance as undefined. To alter a member’s attendance, you click the dashed box corresponding to the member’s name, and meeting. Clicking it once will mark them as attending; twice as not attending; and three times will reset their attendance to undefined. Unlike the Terms, and Meetings, you are able to change a members attendance at will.
Note: Sixers, Patrol Leaders, Venturer Scouts, and Rover Scouts have access to change the attendance, as part of their duties. They cannot see other information about members.
Attendance and Register: Member Register Sheet (All) (Own)
Youth Member Register Sheets give you access to an array of youth member details. You’ll see basic details such as their joining date; what position they may hold, attendance for meetings, camps and, excursions; and badgework.
To access a member’s Register Sheet, you click the members name in the ‘Attendance and Register’ tab.

Section: Scout Central
Scout Central - User Handbook Page 17
Register Sheet: History
The history tab displays basic information about a member. Clicking the edit button will make contents in the row modifiable.
Register Sheet: Attendance
In a Member’s Register, the Attendance is individualised, showing the members attendance for the current year. You are able to look at a members attendance history by clicking the ‘Previous Year’ button. Attendance can be marked in the Register Sheet in similar fashion to the ‘Attendance and Register’ tab, with the exception that it must be saved.

Section: Scout Central
Scout Central - User Handbook Page 18
Register Sheet: Camps/Excursions Attended
The ‘Camps Attended’ and ‘Excursions Attended’ modules offer comparable features, with the exception that excursions can only go over a one day period, while Camps can spread over multiple days.
To create a new Camp/Excursion, click the ‘Add New Camp/Excursion’ button. This will prompt you to select the beginning date, add a description, select a Camp/Excursion type and input how many nights it ran over (for camps) as well as kilometres you’ve travelled (for hikes). Be sure to save any changes you make.
If you have already created a Camp/Excursion in another Members Register Sheet, you’ll be able to add it, by clicking the ‘Add Existing Camp/Excursion’ button. This will present a drop-down box for you to select a existing Camp/Excursion. To handle variations on a Camp/Excursion, a new entry will have to be created for each variant. Multiple events can co-exist on the same day.

Section: Scout Central
Scout Central - User Handbook Page 19
Register Sheet: Badgework
You are able to monitor what badges a youth member has been awarded in their Register Sheet. For each badge in the respective sections award scheme, you are able to set the date that it was awarded to the youth member.
Clicking the ( ) arrow to the right side of any badge reveals the awarded field. To the right of this will be an ‘edit’ button. Clicking this will allow you to select the date that a badge was awarded.

Section: Scout Central
Scout Central - User Handbook Page 20
Progress Chart
The Progress Chart allows you to see the progress of your whole formation and mark off everyone’s requirements in one screen. The Progress Chart shows every member of your formation along the top, and all the badges and requirements of the section down the side.
The Progress Chart is accessed through the formation portal, by clicking “Progress Chart” on the far right.
Progress Chart: Name Bar
The name bar has a number of features that allow you to configure how you’d like to work within the Progress Chart.
Six/PatrolsYouth members are grouped into patrols for easy management. Compact View This allows you to view more youth members across the screen by shortening their names. It’s useful when you need to manage a large number of members. Hide Name Hovering over a name will let you hide their column from view. This is useful if you only want to see some youth members, for example when reviewing the progress of everyone at a particular level or for those who attended a specific activity. Show All This brings back any hidden youth members. Effective Date This is the date that any requirements will be recorded against.

Section: Scout Central
Scout Central - User Handbook Page 21
Progress Chart: Requirements and Marking Off
The badges and requirements of each section are displayed down the length of the page and the tick boxes correspond to each youth member across the name bar.
Marking Off Requirements
Clicking the arrow to the left of a badge will display all its requirements. By default, all the requirements will be shown.
You are able to show and hide each category of a badge by toggling the arrow next to each category. This is useful for badges with a large number of requirements or where youth members have completed a category in its entirety.
To mark off a badge, category or requirement, you click the tick box. If you mark off a badge, it will show a green tick. If you mark off a category or requirement, it will show a green tick and an orange dash for the badge (and category if you marked off a requirement). This indicates the badge has been started.
Note: Youth members are able to see all the badge requirements and progress, but are unable to mark any requirements as completed.

Section: Scout Central
Scout Central - User Handbook Page 22
Program Finder See Term Program: Add from Library
The Program finder is a one stop shop for programs that have been developed by other Leaders. You’re able to search through the programs, and add them to your term.To get to the program finder, you can either hover over the ‘Programs’ tab in the Navigation bar, and click ‘Program and Activity Ideas,’ or on the home page, click the ‘Program Finder’ tile.
Programs are shown in a list giving you the details, duration, activity type, section, and Areas of Personal Growth that it incorporates. Each program has a star rating, based on feedback given by other members.
Clicking a program’s title, brings up more details on the program.
Section: Scout Central
Scout Central - User Handbook Page 23
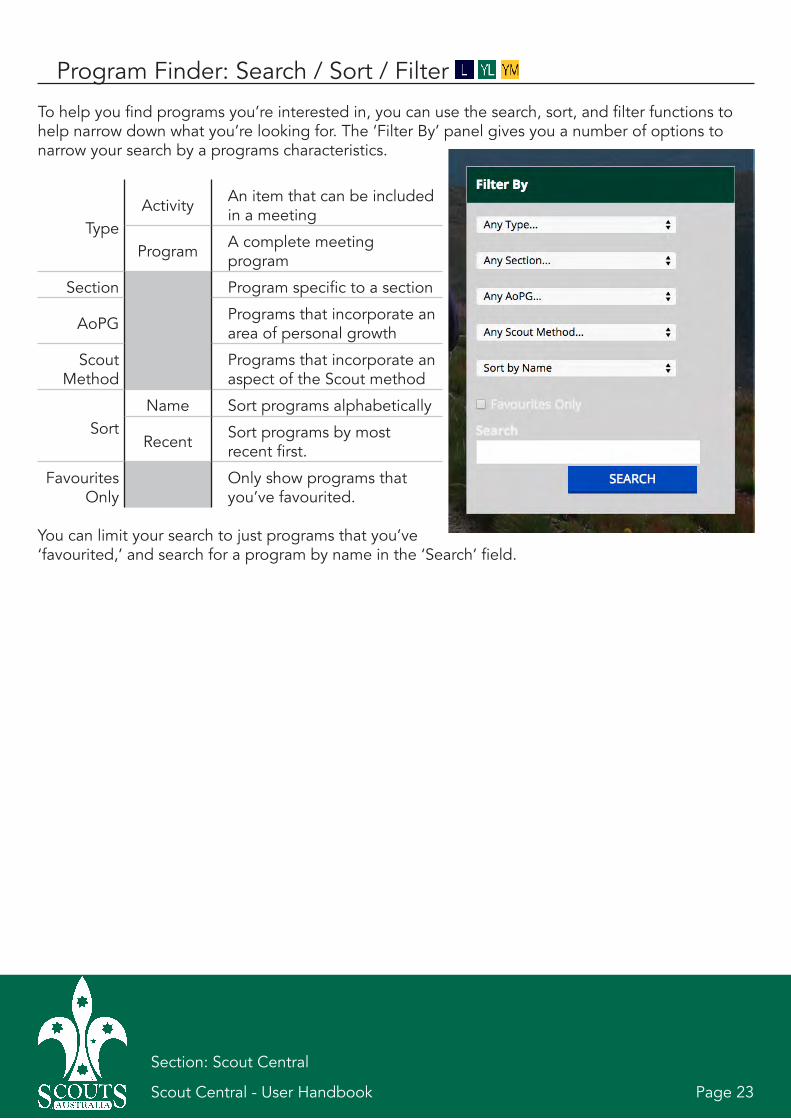
Program Finder: Search / Sort / Filter
To help you find programs you’re interested in, you can use the search, sort, and filter functions to help narrow down what you’re looking for. The ‘Filter By’ panel gives you a number of options to narrow your search by a programs characteristics.
TypeActivity An item that can be included
in a meeting
Program A complete meeting program
Section Program specific to a section
AoPG Programs that incorporate an area of personal growth
Scout Method
Programs that incorporate an aspect of the Scout method
SortName Sort programs alphabetically
Recent Sort programs by most recent first.
Favourites Only
Only show programs that you’ve favourited.
You can limit your search to just programs that you’ve ‘favourited,’ and search for a program by name in the ‘Search’ field.

Section: Scout Central
Scout Central - User Handbook Page 24
Program Finder: Activities & Programs
Clicking an item will provide you with its information in detail. You are able to ‘Favourite’ a program to make it easier to find again. There are a few notable differences between an ‘Activity,’ and a ‘Program.’ A program will let you schedule it as part of a term, and give you access to a PDF version of the program to print. Both may have resources attached to download as well.
You can rate how fun it is, how well it fits into the Areas of Personal Growth, and its ease of delivery out of 5 stars. Additionally, you can comment on an item as well.

Section: Scout Central
Scout Central - User Handbook Page 25
Program Finder: Submit a Program/Activity
Adding a program to the Program Finder shares it with the rest of the Movement, and adds it to the growing list of programs already available.
Step 1This step asks you to select what type of activity you’ll be submitting. The three options are: ‘an Activity’; ‘a Game’; or ‘a complete program.’
Step 2 Here you add the basic details of your program. You can give your program a name, and select the Youth Section it’s aimed for, whether it’s a camp or night, and if it’s indoors or outdoors. Finally, you can choose a theme from the drop down menu, or add your own.

Section: Scout Central
Scout Central - User Handbook Page 26
Step 3 This step requires you to add the following:
Description
The description of your program. How to do your program, and any notes. This will be visible to anyone who searches your program.
Keywords A few descriptive words that will help people find your program.
Attachment
Whether you wish to upload an attachment to supplement your program. Note: You will be asked to upload your attachment after the last step.
EquipmentAny equipment that might be needed as part of your program.
Step 4In this step you can nominate a part of any award scheme that your program works towards, as well as any Areas of Personal Growth, and part of the Scout Method that it includes.
Note: This will help others find it when they are searching for suitable programs.

Section: Scout Central
Scout Central - User Handbook Page 27
Step 5This step simply confirms your programs details, and asks you to attach a PDF version of your program.
Adding Attachment from Step 3After you’ve confirmed your details, if you elected to upload an attachment, you will be asked to do it now.
Program Finder CurationBefore programs are made available on the program finder they are verified by a committee of Youth Program Leaders to assure the content fits the Scout Program and has been catogoried correctly.

AAccount
Login 2logout 6Password 2Settings 7
FFormation 8, 9
Attendance and Register 9, 16, 17, 18Photo Albums 9, 14, 15Register Sheet 19, 20, 21Term Programs 9, 10, 11, 12
PProgram
Adding Programs 11, 12Program Finder 22Submit a Program 25Term Programs 9
Index