Embed Size (px)
Citation preview

TM
SPACEMAKER12-CUP PROGRAMMABLE UNDER THE CABINET COFFEEMAKER
Use & Care Manual
SCM1000BD

2
Should you have any questions or concerns with your new product, please call our Customer Service Line at
1-800-231-9786 (US and Canada).
Please do not return to the store.
3
• Do not use this appliance for anything other than its intended purpose.
• Close supervision is necessary when any appliance is being used by or near children.
• Always use handles or knobs. Do not touch hot surfaces.
• Allow unit to cool prior to moving detachable parts or cleaning.
• Keep lid on the carafe during the brewing cycle. Scalding may occur if it is removed.
• To reduce the risk of fire or electric shock:
• Do not rest cord on hot surfaces. • Do not place on or near a hot gas or
electric burner, or in a heated oven. • Do not mount this unit over or near any
portion of another heating or cooking appliance.
• Do not place another heating or cooking appliance beneath this appliance.
• Do not store anything directly on top of the appliance.
• Do not immerse cord, plugs or appliance in liquid.
• Do not mount over a sink.
• Do not let cord hang over edge of table or counter.
• The use of accessory attachments not recommended by the manufacturer may result in fire, electrical shock or other injury.
• Unplug unit when not in use and before cleaning.
• To disconnect, turn all controls to OFF, then remove plug from wall outlet.
• Do not use outdoors.
• This appliance is not intended for use by persons (including children) with reduced physical, sensory or mental capabilities, or lack of experience and knowledge, unless they have been given supervision or instruction concerning use of the appliance by a person responsible for their safety.
• Do not operate if cord or plug or appliance have been damaged, or after a malfunction of any manner. Call the appropriate toll-free number found in this manual.
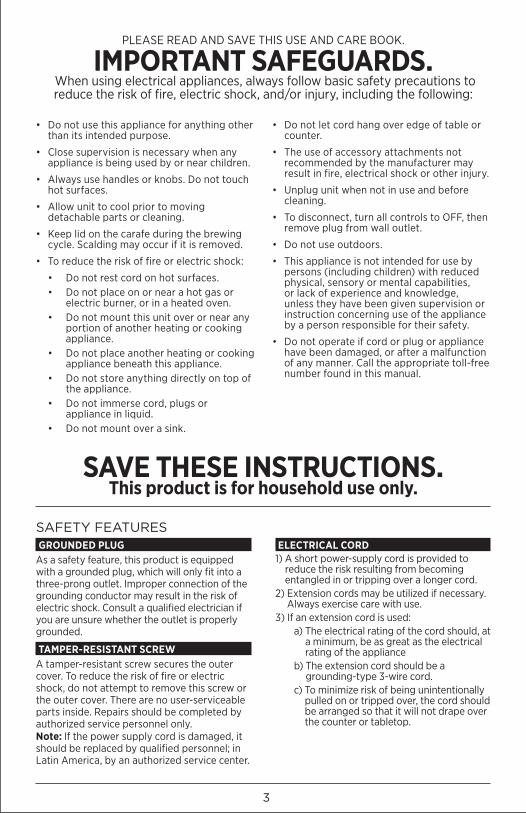
PLEASE READ AND SAVE THIS USE AND CARE BOOK.
IMPORTANT SAFEGUARDS. When using electrical appliances, always follow basic safety precautions to reduce the risk of fire, electric shock, and/or injury, including the following:
SAVE THESE INSTRUCTIONS.This product is for household use only.
GROUNDED PLUGAs a safety feature, this product is equipped with a grounded plug, which will only fit into a three-prong outlet. Improper connection of the grounding conductor may result in the risk of electric shock. Consult a qualified electrician if you are unsure whether the outlet is properly grounded.
TAMPER-RESISTANT SCREWA tamper-resistant screw secures the outer cover. To reduce the risk of fire or electric shock, do not attempt to remove this screw or the outer cover. There are no user-serviceable parts inside. Repairs should be completed by authorized service personnel only. Note: If the power supply cord is damaged, it should be replaced by qualified personnel; in Latin America, by an authorized service center.
ELECTRICAL CORD1) A short power-supply cord is provided to
reduce the risk resulting from becoming entangled in or tripping over a longer cord.
2) Extension cords may be utilized if necessary. Always exercise care with use.
3) If an extension cord is used: a) The electrical rating of the cord should, at
a minimum, be as great as the electrical rating of the appliance
b) The extension cord should be a grounding-type 3-wire cord.
c) To minimize risk of being unintentionally pulled on or tripped over, the cord should be arranged so that it will not drape over the counter or tabletop.
SAFETY FEATURES
4
CONTENTS
Important Safeguards . . . . . . . . . . . . . . . . . . . . . . . . . . . . . . . . . . . . . . . . . . . . . 3
Table of Contents . . . . . . . . . . . . . . . . . . . . . . . . . . . . . . . . . . . . . . . . . . . . . . . . . 4
Getting to Know Your Coffeemaker . . . . . . . . . . . . . . . . . . . . . . . . . . . . . . . . . 5
Installation Hardware . . . . . . . . . . . . . . . . . . . . . . . . . . . . . . . . . . . . . . . . . . . . . . 6
Installing your SpaceMaker™ . . . . . . . . . . . . . . . . . . . . . . . . . . . . . . . . . . . . . . . 7
Programming Your Coffemaker . . . . . . . . . . . . . . . . . . . . . . . . . . . . . . . . . . . . . 10
Auto Brew Delay . . . . . . . . . . . . . . . . . . . . . . . . . . . . . . . . . . . . . . . . . . . . . . . . . . 11
1-4 Cup Setting . . . . . . . . . . . . . . . . . . . . . . . . . . . . . . . . . . . . . . . . . . . . . . . . . . . 11
Before Brewing . . . . . . . . . . . . . . . . . . . . . . . . . . . . . . . . . . . . . . . . . . . . . . . . . . . 11
Brewing Coffee . . . . . . . . . . . . . . . . . . . . . . . . . . . . . . . . . . . . . . . . . . . . . . . . . . . 12
Care and Cleaning . . . . . . . . . . . . . . . . . . . . . . . . . . . . . . . . . . . . . . . . . . . . . . . . . 13
Troubleshooting . . . . . . . . . . . . . . . . . . . . . . . . . . . . . . . . . . . . . . . . . . . . . . . . . . 14
Warranty and Customer Service Information . . . . . . . . . . . . . . . . . . . . . . . . . 15
WELCOME!Congratulations on your purchase of the Black+Decker SpaceMaker™ 12 Cup Programmable Coffeemaker. We have developed this guide to ensure optimal product performance and your complete satisfaction. Save this use and care manual and be sure to register your appliance online at www.prodprotect.com/applica.
SAVE THESE INSTRUCTIONS.
5
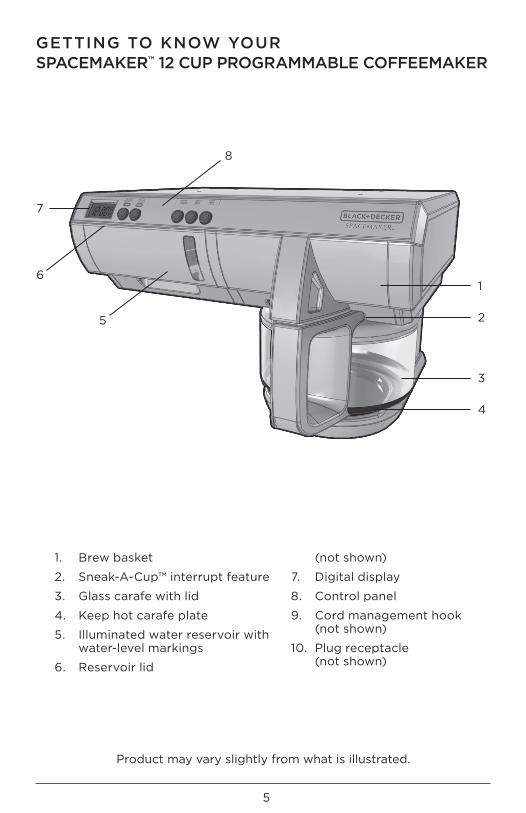
1. Brew basket
2. Sneak-A-Cup™ interrupt feature
3. Glass carafe with lid
4. Keep hot carafe plate
5. Illuminated water reservoir with water-level markings
6. Reservoir lid
(not shown)
7. Digital display
8. Control panel
9. Cord management hook (not shown)
10. Plug receptacle (not shown)
1
3
2
4
7
5
6
8
Product may vary slightly from what is illustrated.
GETTING TO KNOW YOUR SPACEMAKER™ 12 CUP PROGRAMMABLE COFFEEMAKER
6
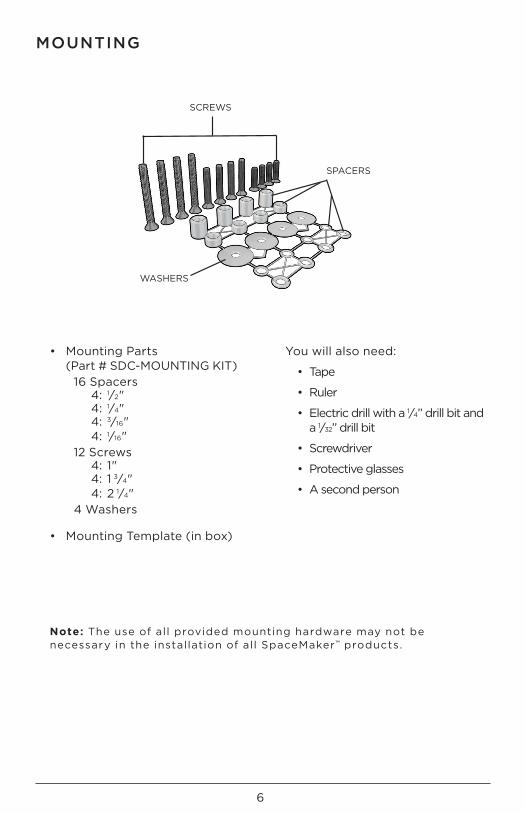
SPACERS
SCREWS
WASHERS
MOUNTING
• Mounting Parts (Part # SDC-MOUNTING KIT) 16 Spacers 4: 1⁄2" 4: 1⁄4" 4: 3⁄16" 4: 1⁄16" 12 Screws 4: 1" 4: 1 3⁄4" 4: 2 1⁄4" 4 Washers
• Mounting Template (in box)
You will also need:
• Tape
• Ruler
• Electric drill with a 1⁄4” drill bit and a 1⁄32” drill bit
• Screwdriver
• Protective glasses
• A second person
Note: The use of all provided mounting hardware may not be necessary in the installation of all SpaceMaker™ products.

7
GETTING STARTED• Carefully unpack your coffeemaker, removing all packaging materials,
labels and/or stickers, and the plastic band around the power plug.
• Register your product at www.prodprotect.com/applica
• Remove and save literature.
• Remove mounting hardware and template. Set them safely aside.
• For warranty verifi cation, do not remove cord tag.
Do not attempt to operate appliance until properly installed.
INSTALLING YOUR SPACEMAKER™
CHOOSE A LOCATIONWhen choosing your location, consider the following:
• DO make sure to mount within reach of an electrical outlet.
• DO consider your normal work patterns in the kitchen when choosing location.
• DO NOT mount over any heating or cooking appliance such as your range or oven.
• DO NOT mount over or near a sink.
• DO NOT mount under, in front of or behind any under-cabinet light fi xtures.
Note: If you are mounting multiple SpaceMaker™ appliances, they should not be mounted fl ush to one another. Allow at least 1” of space between appliances and 4” of space if you are installing a toaster oven. This is necessary for adequate cooling.
Note: This appliance may feature a Save-A-Plug™ outlet receptacle to connect smaller SpaceMaker™ appliances. Do not use this outlet for any other purpose!
If you are connecting this appliance to the receptacle of another SpaceMaker™ appliance such as the toaster oven or coffeemaker, make sure you can easily unplug the appliance following use.
DETERMINE CABINET TYPEImportant: SpaceMaker™ appliances are only recommended to be installed on cabinets without a top lip and with a fl at bottom. It is not recommended to install SpaceMaker™ appliances on cabinets with an overhang. See image below for recommended cabinet types.
FLAT BOTTOM TOP LIP OVERHANG

8
STANDARD INSTALLATION FOR FLAT CABINETS ONLYImportant: Always wear protective glasses or goggles to prevent injury when drilling.
Important: Do not align screw holes on the template directly under the partition between cabinets, as this will prevent you from installing the appliance properly. Pay close attention to where drill holes will be set so as not to damage your cabinets during mounting. Drilling through your cabinet’s partition may cause damage to cabinets and prevent proper installation.
1. Clear countertop under installation area to avoid getting dust or debris on other appliances or items. Open cabinets and remove contents to make mounting easier.
2. Clean both the underside and topside of the bottom panel of the cabinet.
3. Decide whether you will be drilling from the top down or from the bottom up.
4. IF DRILLING FROM THE BOTTOM UP: With cabinet doors open, place mounting template against the surface of the front edge of your cabinet. Align the thick line on the template (labeled “front edge of cabinet”) with the lower front edge of your cabinet (D).
5. Fold the balance of the template up along the underside of your cabinet, ensuring the “front edge of cabinet” line remains aligned with the bottom front cabinet edge.
6. Make sure the template is smooth and fl ush against the cabinet’s underside. Pull template tight and tape down to hold in place.
7. IF DRILLING FROM THE TOP DOWN: With cabinet doors open, place mounting template against the surface of the front edge of your cabinet. Align the thick line on the template (labeled “front edge of cabinet”) with the upper front edge of your cabinet (E).
8. Fold the balance of the template over into the inside of your cabinet, ensuring the “front edge of cabinet” line remains aligned with the upper front cabinet edge.
9. Make sure the template is smooth and fl ush against the cabinet’s inside. Pull template tight and tape down to hold in place.
D
E

9
Important: Always ensure you are drilling straight up or straight down through the marked mounting holes on the template. Drilling at an angle may prevent proper installation and may damage cabinets if the drill bit pierces the partition.
8. Using a 1⁄32” drill bit, drill from the underside of the cabinet up or the top down, creating pilot holes through the 4 holes marked on the template. This will help guide the ¼” drill bit in the next step. (F)
9. Switch to a ¼” drill bit and drill straight up or straight down through the holes that have just been created. (G)
10. Once holes are drilled, remove tape and mounting template.
11. Wipe dust and debris off the top side and the underside of the cabinet surface.
12. Place a washer inside the cabinet over each of the 4 holes you drilled. (H)
11. Determine what size screws to use by placing a screw through the hole in the cabinet without the appliance in place. The screw should be ½” exposed underneath the cabinet to ensure the appliance is properly attached to the cabinet. Once you have determined the screw size, proceed to step 12. (I)
Note: Several standard screw lengths are provided but may not fi t all cabinet sizes.
12. Place one of the screws through each of the washers covering the holes in the cabinet, from the inside of the cabinet down.
13. Hold appliance up to the screws, aligning the front of the appliance with the front edge of the cabinet base. The screws in the cabinet should align with the mounting holes in the appliance. (J)
Note: It may require two people to ensure the appliance is held in place while drilling.
14. Screwing from inside the cabinet down into the appliance holes, use your drill or screwdriver to tighten the four screws in place. (K)
Note: Always tighten screws to properly secure the appliance to the cabinet and to ensure the appliance does not move or shake during operation.
F
G
H
I
J
K

10
PROGRAMMING YOUR COFFEEMAKER
SETTING THE DIGITAL CLOCK
1. Plug your coffeemaker into a standard electrical outlet.
2. The entire digital clock will fl ash “12:00” to indicate that the time has not yet been set.
3. Press the HOUR and MIN (minute) buttons until the correct time appears on the display.
*A “PM” symbol will appear to indicate afternoon time settings. This symbol will not appear for AM settings.
4. Your clock is now set.
SETTING THE AUTO BREW DELAY
1. Ensure the digital clock has been set (see “SETTING THE DIGITAL CLOCK” section for assistance).
2. Press the PROG (program) button. The display will fl ash “12:00.”
3. Press the HOUR and MIN buttons until they indicate the time you would like automatic brewing to begin.
*A “PM” symbol will appear in the upper right hand corner of the digital display to indicate afternoon time settings. This symbol will not appear for AM settings.
4. The Auto Brew display will fl ash for a few moments before switching back to the digital clock.
TIP: After programming, press the PROG button to check the preset Auto Brew time.
15. Pull out cord from cord storage behind the appliance and plug into a standard electrical outlet. Extra cord can be fed back into storage or hung over cord management hook behind the appliance. (L)
Note: If you are connecting this appliance to the receptacle of another SpaceMaker™ appliance such as the toaster oven or coffeemaker, make sure you can easily unplug the appliance following use.
16. Your SpaceMaker™ appliance is now ready for use!
L
11
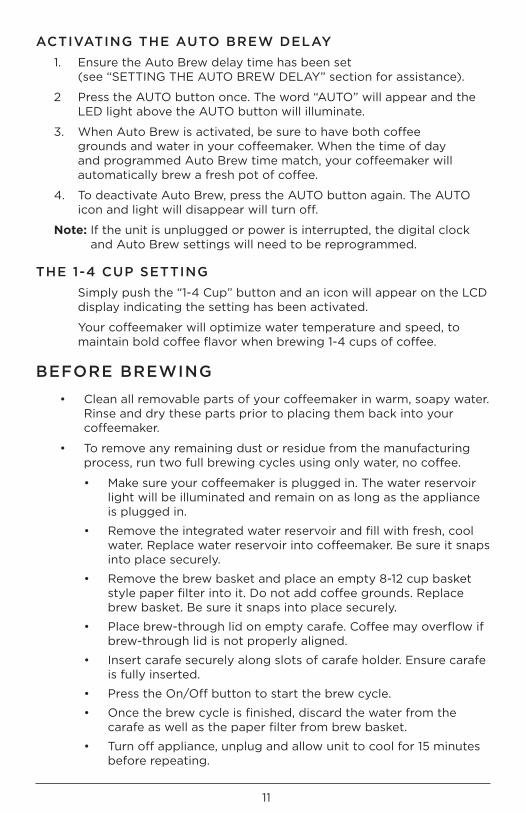
ACTIVATING THE AUTO BREW DELAY
1. Ensure the Auto Brew delay time has been set (see “SETTING THE AUTO BREW DELAY” section for assistance).
2 Press the AUTO button once. The word “AUTO” will appear and the LED light above the AUTO button will illuminate.
3. When Auto Brew is activated, be sure to have both coffee grounds and water in your coffeemaker. When the time of day and programmed Auto Brew time match, your coffeemaker will automatically brew a fresh pot of coffee.
4. To deactivate Auto Brew, press the AUTO button again. The AUTO icon and light will disappear will turn off.
Note: If the unit is unplugged or power is interrupted, the digital clock and Auto Brew settings will need to be reprogrammed.
THE 1-4 CUP SETTING
Simply push the “1-4 Cup” button and an icon will appear on the LCD display indicating the setting has been activated.
Your coffeemaker will optimize water temperature and speed, to maintain bold coffee flavor when brewing 1-4 cups of coffee.
BEFORE BREWING
• Clean all removable parts of your coffeemaker in warm, soapy water. Rinse and dry these parts prior to placing them back into your coffeemaker.
• To remove any remaining dust or residue from the manufacturing process, run two full brewing cycles using only water, no coffee.
• Make sure your coffeemaker is plugged in. The water reservoir light will be illuminated and remain on as long as the appliance is plugged in.
• Remove the integrated water reservoir and fill with fresh, cool water. Replace water reservoir into coffeemaker. Be sure it snaps into place securely.
• Remove the brew basket and place an empty 8-12 cup basket style paper filter into it. Do not add coffee grounds. Replace brew basket. Be sure it snaps into place securely.
• Place brew-through lid on empty carafe. Coffee may overflow if brew-through lid is not properly aligned.
• Insert carafe securely along slots of carafe holder. Ensure carafe is fully inserted.
• Press the On/Off button to start the brew cycle.
• Once the brew cycle is finished, discard the water from the carafe as well as the paper filter from brew basket.
• Turn off appliance, unplug and allow unit to cool for 15 minutes before repeating.

12
BREWING COFFEE
1. Fill water reservoir with desired amount of fresh, cool water using water markings on water reservoir window. Do not exceed the maximum marked level. Replace water reservoir into coffeemaker. Be sure it snaps into place securely.
2. Remove the brew basket and place an empty 8-12 cup basket style paper filter into it.
3. Add ground coffee into the filter (we suggest 1 tablespoon per cup).
4. Replace brew basket. Be sure it snaps into place securely.
5. Place brew-through lid on empty carafe. Coffee may overflow if brew-through lid is not properly aligned.
6. Insert carafe securely along slots of carafe holder. Make sure carafe is fully inserted.
7. For immediate brewing press the On/Off button. To use the Auto Brew Delay Start, Brew Strength Selector or 1-4 Cup setting, follow the instructions in the “PROGRAMMING YOUR COFFEEMAKER”
section of this guide.
8. While brewing, the Sneak-A-Cup™ feature stops coffee flow out of the unit, allowing you to pour a cup of coffee before the brew cycle finishes. Always return the carafe on to the carafe plate within 20 seconds to prevent coffee overflow.
9. After brewing is complete, brewed coffee will be kept warm on the “Keep Hot” carafe plate for up to 2 hours before shutting off automatically.
10. When the coffee grounds are cool, carefully remove and dispose them as well as the used filter.
11. Clean your coffeemaker according to the instruction in the “CARE AND CLEANING” section.

13
CARE AND CLEANING
CLEANING:
Follow the directions below to clean your coffeemaker after each use.
1. Make sure your coffeemaker is unplugged and cool.
2. Open your coffeemaker’s filter basket lid and remove the brew basket.
3. If remaining, throw away the used paper filter and coffee grounds.
4. Wash the brew basket and carafe by hand in warm, soapy water or on the top rack of your dishwasher (ensure carafe is applicable below).
5. Wipe the outside of the coffeemaker, power cord and carafe plate with a soft, damp cloth.
6. To clean the inside of the filter basket lid, open the filter basket lid and wipe any surfaces with a damp cloth.
Note: Do not use abrasive cleansers or scouring pads on this product. Never immerse the coffeemaker in water.
COFFEEMAKER PART CLEANING INSTRUCTIONS
Housing Carafe PlatePower Cord
Wipe with a soft, damp cloth.
Carafe LidBrew Basket Glass Carafes
Wash by hand in warm soapy water, or in the dishwasher (top rack only).
Thermal Carafes Wash by hand in warm soapy water
DESCALING WITH VINEGAR:
To remove mineral build up that can affect the taste and quality of your coffee, descaling your coffeemaker with vinegar every 3 to 6 months is recommended. To descale, follow the instructions below:
1. Open the filter basket lid and fill the water reservoir approximately half way with white vinegar. Fill the remaining half of the water reservoir with cool water.
2. Place a paper filter into the brew basket, close the lid and check to ensure the empty carafe is placed on the carafe plate.
3. Push the POWER button to start the brewing cycle.
4. After approximately half the cleaning mixture has brewed into the carafe, press the POWER button again to turn OFF the unit.
5. Let soak for a minimum of 15 minutes and then press POWER again to turn the coffeemaker on.
6. Brew the remaining cleaning mixture into the carafe.
7. Following ‘Cleaning’ instructions from above.
8. Run a full brew cycle using only water. You may want to repeat this step more than once.
9. Wash the brew basket and carafe as instructed above.

14
TROUBLESHOOTING
PROBLEM POSSIBLE CAUSE SOLUTION
Coffeemaker does not turn on.
Coffeemaker is not plugged in.
Check to be sure appliance is plugged into a working outlet and the ON/OFF (I/O) button has been pressed.
Coffeemaker is leaking.
Water reservoir may be overfilled.
Make sure the water reservoir has not been filled beyond the MAX fill line.
Brewing takes too long.
The coffeemaker may need to be descaled.
Follow procedure in Descaling With Vinegar section of this guide.
Coffee is not brewing.
Water reservoir might be empty.
Make sure water reservoir has sufficient water to brew desired number of cups of coffee.
The coffeemaker brews clear water.
There may be no coffee grounds in the brew basket.
Add sufficient amount of coffee grounds to filter lined brew basket.
Brew basket overflows.
Carafe may be improperly placed.
Remove carafe and insert back into place. Ensure carafe is placed correctly on and is centered under the filter basket.
Grounds in the brewed coffee.
The filter and/or the brew basket are not properly placed.
Reinsert paper filter into brew basket and insert basket properly into brew basket.
15
NEED HELP?
For support or any questions regarding your appliance, call the appropriate 800 number listed within this section. Please DO NOT return the product to the place of purchase. Also, please DO NOT mail product back to manufacturer, nor bring it to a service center. You may also want to consult our Product Protection Center at www.prodprotect.com/applica .
Two-Year Limited Warranty (Applies only in the United States and Canada)
What does my warranty cover?• Your warranty covers any defect in material or workmanship provided; however, the
liability of Spectrum Brands Inc. will not exceed the purchase price of product.
How long is the warranty period?• Your warranty extends two years from the date of original purchase with proof of
purchase.
What support does my warranty provide?• Your warranty provides you with a reasonably similar replacement product that is
either new or factory refurbished.
How do you get support?• Save your receipt as proof of date of sale.• Visit the online service website at www.prodprotect.com/applica, or call toll-free
1-800-231-9786, for general warranty service.• If you need parts or accessories, please call 1-800-738-0245.
What does my warranty not cover?• Damage from commercial use• Damage from misuse, abuse or neglect• Products that have been modified in any way• Products used or serviced outside the country of purchase• Glass parts and other accessory items that are packed with the unit• Shipping and handling costs associated with the replacement of the unit• Consequential or incidental damages (Please note, however, that some states do
not allow the exclusion or limitation of consequential or incidental damages, so this limitation may not apply to you.)
How does state law affect my warranty?• This warranty gives you specific legal rights. You may also have other rights that
vary from state to state or province to province.

16
TM
2014/9/16/119
T22-5001377
© 2014 The Black & Decker Corporation and Spectrum Brands, Inc., Middleton, WI 53562
Made in People’s Republic of China
BLACK+DECKER and the BLACK+DECKER logo are trademarks of The Black & Decker Corporation and are used under license. All rights reserved.