Embed Size (px)
Citation preview
Scientia User Guide – Enrolment Services
How to use this guide:
This guide is organized to introduce the Scientia applications based on their use in the UBC
scheduling process.
Users can read the guide through or can use the table of contents below to hyperlink to points
in the manual for the stage of the process they are in and looking for information.
This document aims to provide users with a step by step process while also providing
information on why the recommended process should be followed and tips for efficiently and
effectively using the system.
It is highly recommended that users review the Glossary of Terms on the connect course before
reading the User Guide.
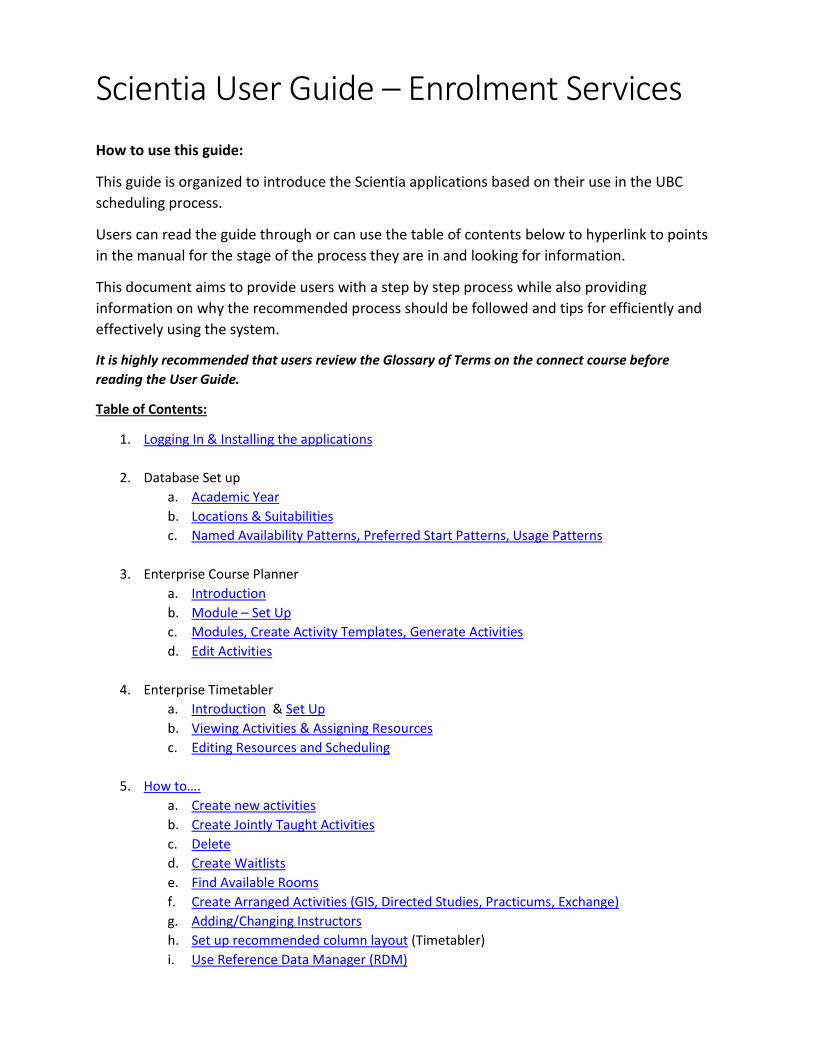
Table of Contents:
1. Logging In & Installing the applications
2. Database Set up
a. Academic Year
b. Locations & Suitabilities
c. Named Availability Patterns, Preferred Start Patterns, Usage Patterns
3. Enterprise Course Planner
a. Introduction
b. Module – Set Up
c. Modules, Create Activity Templates, Generate Activities
d. Edit Activities
4. Enterprise Timetabler
a. Introduction & Set Up
b. Viewing Activities & Assigning Resources
c. Editing Resources and Scheduling
5. How to….
a. Create new activities
b. Create Jointly Taught Activities
c. Delete
d. Create Waitlists
e. Find Available Rooms
f. Create Arranged Activities (GIS, Directed Studies, Practicums, Exchange)
g. Adding/Changing Instructors
h. Set up recommended column layout (Timetabler)
i. Use Reference Data Manager (RDM)
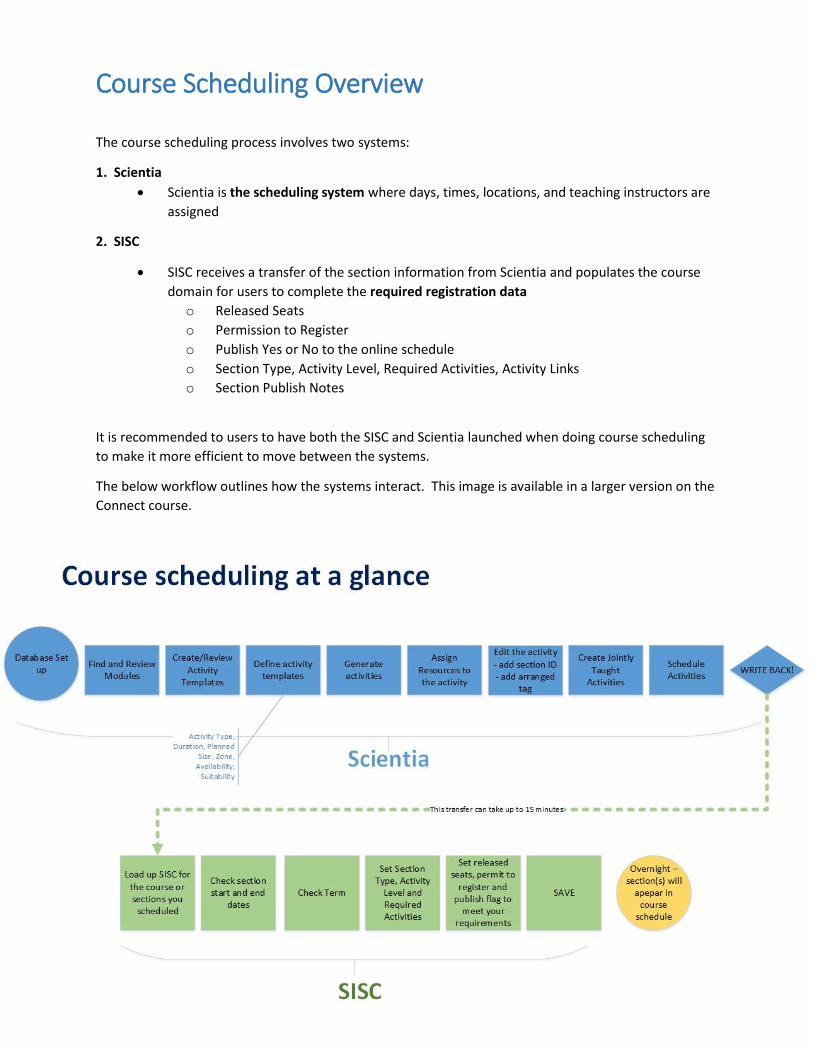
Course Scheduling Overview
The course scheduling process involves two systems:
1. Scientia
Scientia is the scheduling system where days, times, locations, and teaching instructors are
assigned
2. SISC
SISC receives a transfer of the section information from Scientia and populates the course
domain for users to complete the required registration data
o Released Seats
o Permission to Register
o Publish Yes or No to the online schedule
o Section Type, Activity Level, Required Activities, Activity Links
o Section Publish Notes
It is recommended to users to have both the SISC and Scientia launched when doing course scheduling
to make it more efficient to move between the systems.
The below workflow outlines how the systems interact. This image is available in a larger version on the
Connect course.
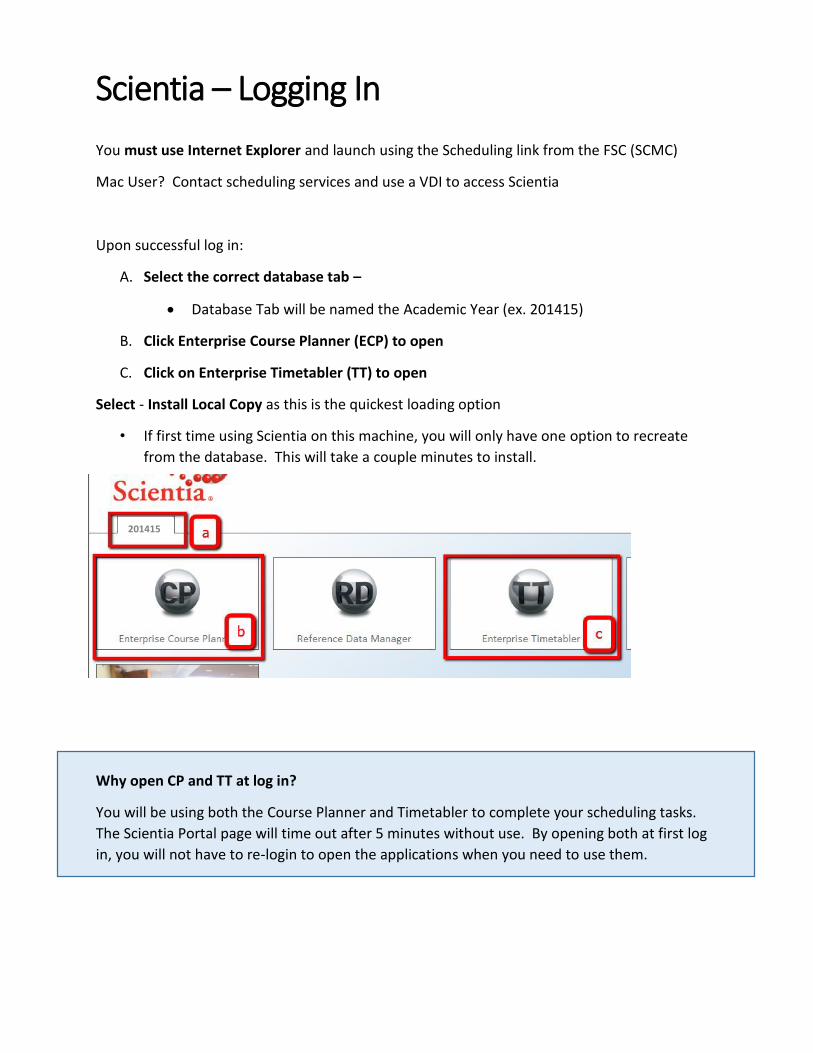
Scientia – Logging In
You must use Internet Explorer and launch using the Scheduling link from the FSC (SCMC)
Mac User? Contact scheduling services and use a VDI to access Scientia
Upon successful log in:
A. Select the correct database tab –
Database Tab will be named the Academic Year (ex. 201415)
B. Click Enterprise Course Planner (ECP) to open
C. Click on Enterprise Timetabler (TT) to open
Select - Install Local Copy as this is the quickest loading option
• If first time using Scientia on this machine, you will only have one option to recreate
from the database. This will take a couple minutes to install.
Why open CP and TT at log in?
You will be using both the Course Planner and Timetabler to complete your scheduling tasks.
The Scientia Portal page will time out after 5 minutes without use. By opening both at first log
in, you will not have to re-login to open the applications when you need to use them.
201415
Database Set Up
Academic Year – New Database
Academic Year databases in Scientia are set up to match the academic year (September
to August)
Scheduling for Winter and Summer (ex. 14W, 15S) will happen in one database
We know that some courses start before September, therefore the database will start
approx. 2 weeks before September 1 and end approximately at the end of the Summer
session Term 2 period)
What does this mean for your scheduling process?
o For courses and events that bridge two databases, you may have to make the
booking twice in order for activity and resources to be scheduled correctly.
o Space booking is the primary concern to make sure that double booking does not
happen
Locations, Suitabilities and Permissions
Locations tables will be reviewed and populated at the start of each new database
o Facilities Planning and Infrastructure Development will manage the list of
teaching space and ownership that is transferred to Scientia for the purposes of
scheduling
Don’t see the location you are looking for? Contact Enrolment Services. They
will investigate and determine if the room should be scheduled in Scientia
Suitabilities will be managed by Enrolment Services
o Enrolment Services will attach and update suitabilities for locations and
resources as new information becomes available
How will you know what suitabilities are available for you to select?
o Suitabilities will be available for you to select when you are assigning resources
to your activities
o If it is not listed, it is not a suitability in our list
Can new suitabilities be added to the list?
o We do not want Scientia to become the room amenity inventory, but we know
that needs for suitabilities will change over time
o If there is a new suitability, or a request to change a current suitability, that
would be a benefit the scheduling process, please contact Enrolment Services.
We will review the request.
Database Set Up
Revisions to Patterns and Preferences
Named Availability Patterns
o Pre-defined week patterns to apply to activity templates or to individual
activities
For example: Winter Term 1, Winter Term 2, Winter Term 1 Odd Weeks,
Winter Term 1 Even Weeks
o Named availability patterns are created and maintained by Enrolment Services
o Users select a pattern when creating activity templates to specify the term and
weeks the activities are to be scheduled for
What if there is not a pattern that fits what you are trying to schedule?
Users can create a custom pattern to adjust the scheduling weeks to reflect the
weeks the activity must be scheduled
Preferred Start Pattern
o Start patterns are created and maintained by Enrolment Services and are set up
to match the scheduling sequence/pattern (ex. MWF starting on the hour, TR,
starting every 1.5 hours)
o Preferred start patterns must be attached to each module. This will ensure all
activities are scheduled for the campus preferred start pattern when the ‘Auto
Schedule’ is run by Enrolment Services.
Usage Preferences
o A Usage Preference is attached to Modules to ensure that, when the auto
schedule is run, all activities are scheduled based on the preferred usage.
o The Usage Preference will, almost always, be a standard preference for each campus.
Prior to the Auto Schedule, Enrolment Services will ensure the standard preference for
each campus has been applied correctly and consistently
Course Planner (ECP) - Introduction
Users will use Enterprise Course Planner (ECP) to complete the following steps in the scheduling
process:
Finding and setting up available modules
Creating Activity Templates and applying Named Availability Patterns
Generating Activities
What are modules, activity templates and activities? See the Glossary of Terms
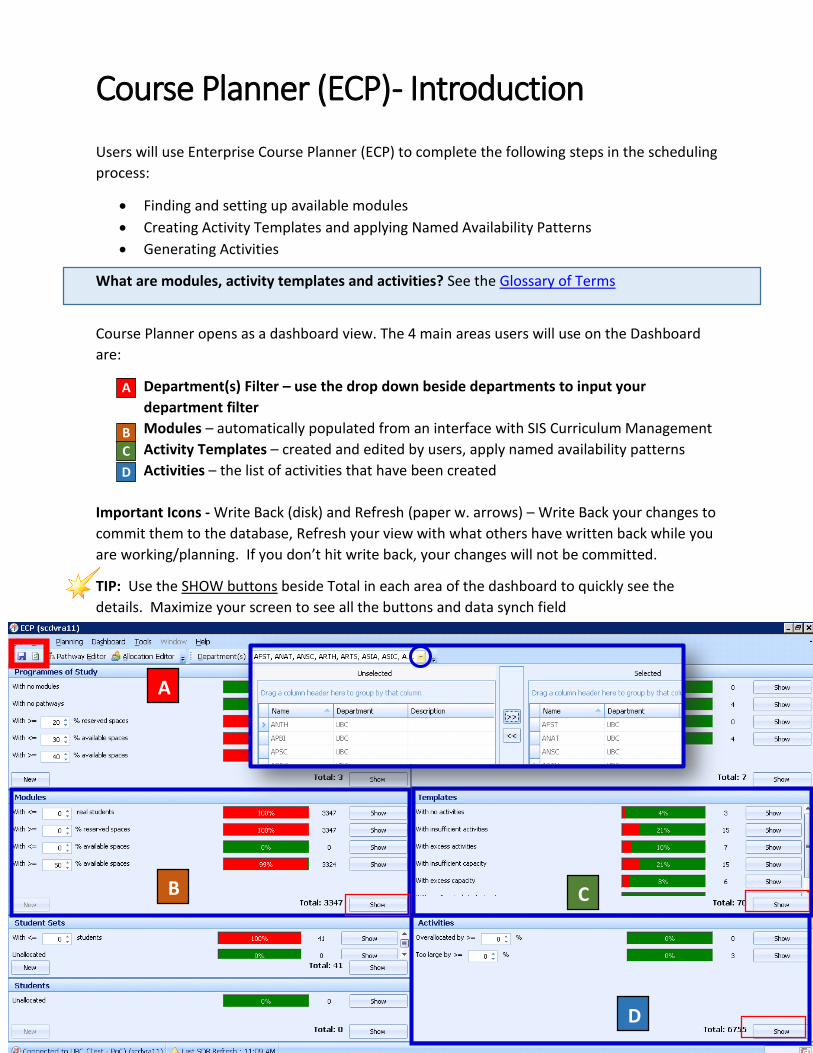
Course Planner opens as a dashboard view. The 4 main areas users will use on the Dashboard
are:
A. Department(s) Filter – use the drop down beside departments to input your
department filter
B. Modules – automatically populated from an interface with SIS Curriculum Management
C. Activity Templates – created and edited by users, apply named availability patterns
D. Activities – the list of activities that have been created
Important Icons - Write Back (disk) and Refresh (paper w. arrows) – Write Back your changes to
commit them to the database, Refresh your view with what others have written back while you
are working/planning. If you don’t hit write back, your changes will not be committed.
TIP: Use the SHOW buttons beside Total in each area of the dashboard to quickly see the
details. Maximize your screen to see all the buttons and data synch field
A
B
C
D
A
D
B C
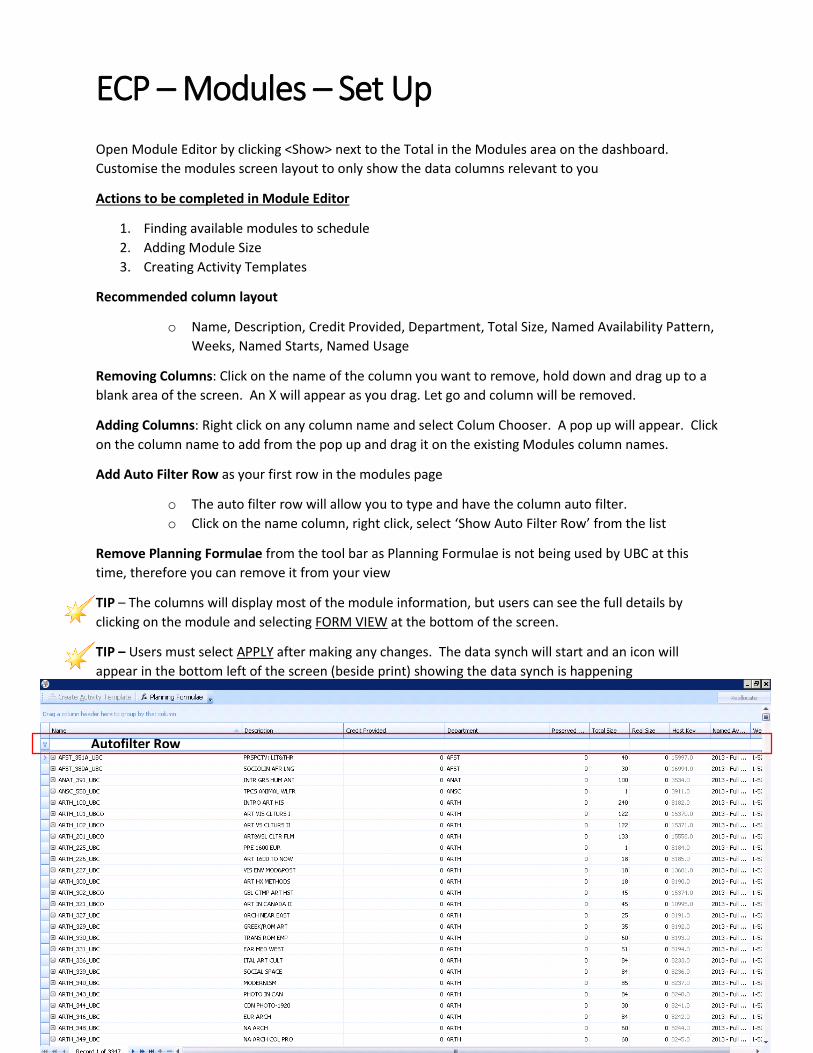
ECP – Modules – Set Up
Open Module Editor by clicking <Show> next to the Total in the Modules area on the dashboard.
Customise the modules screen layout to only show the data columns relevant to you
Actions to be completed in Module Editor
1. Finding available modules to schedule
2. Adding Module Size
3. Creating Activity Templates
Recommended column layout
o Name, Description, Credit Provided, Department, Total Size, Named Availability Pattern,
Weeks, Named Starts, Named Usage
Removing Columns: Click on the name of the column you want to remove, hold down and drag up to a
blank area of the screen. An X will appear as you drag. Let go and column will be removed.
Adding Columns: Right click on any column name and select Colum Chooser. A pop up will appear. Click
on the column name to add from the pop up and drag it on the existing Modules column names.
Add Auto Filter Row as your first row in the modules page
o The auto filter row will allow you to type and have the column auto filter.
o Click on the name column, right click, select ‘Show Auto Filter Row’ from the list
Remove Planning Formulae from the tool bar as Planning Formulae is not being used by UBC at this
time, therefore you can remove it from your view
TIP – The columns will display most of the module information, but users can see the full details by
clicking on the module and selecting FORM VIEW at the bottom of the screen.
TIP – Users must select APPLY after making any changes. The data synch will start and an icon will
appear in the bottom left of the screen (beside print) showing the data synch is happening
Autofilter Row
ECP – Modules & Activity Templates
When a new course is approved by Senate OR a new detail version is added a user will have to:
1. Find the module
2. Add details to the module (ex. Size, named availability pattern)
3. Create activity template(s); and
4. Generate activities
Steps to follow:
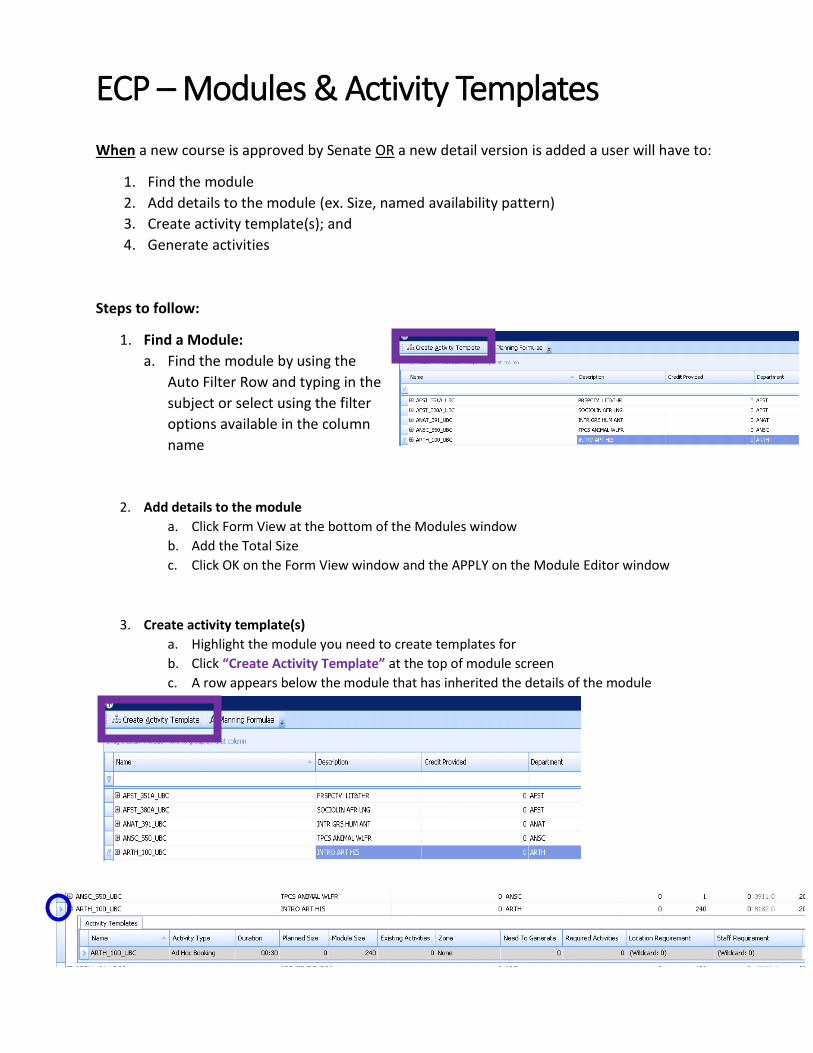
1. Find a Module:
a. Find the module by using the
Auto Filter Row and typing in the
subject or select using the filter
options available in the column
name
2. Add details to the module
a. Click Form View at the bottom of the Modules window
b. Add the Total Size
c. Click OK on the Form View window and the APPLY on the Module Editor window
3. Create activity template(s)
a. Highlight the module you need to create templates for
b. Click “Create Activity Template” at the top of module screen
c. A row appears below the module that has inherited the details of the module
ECP – Modules & Activity Templates
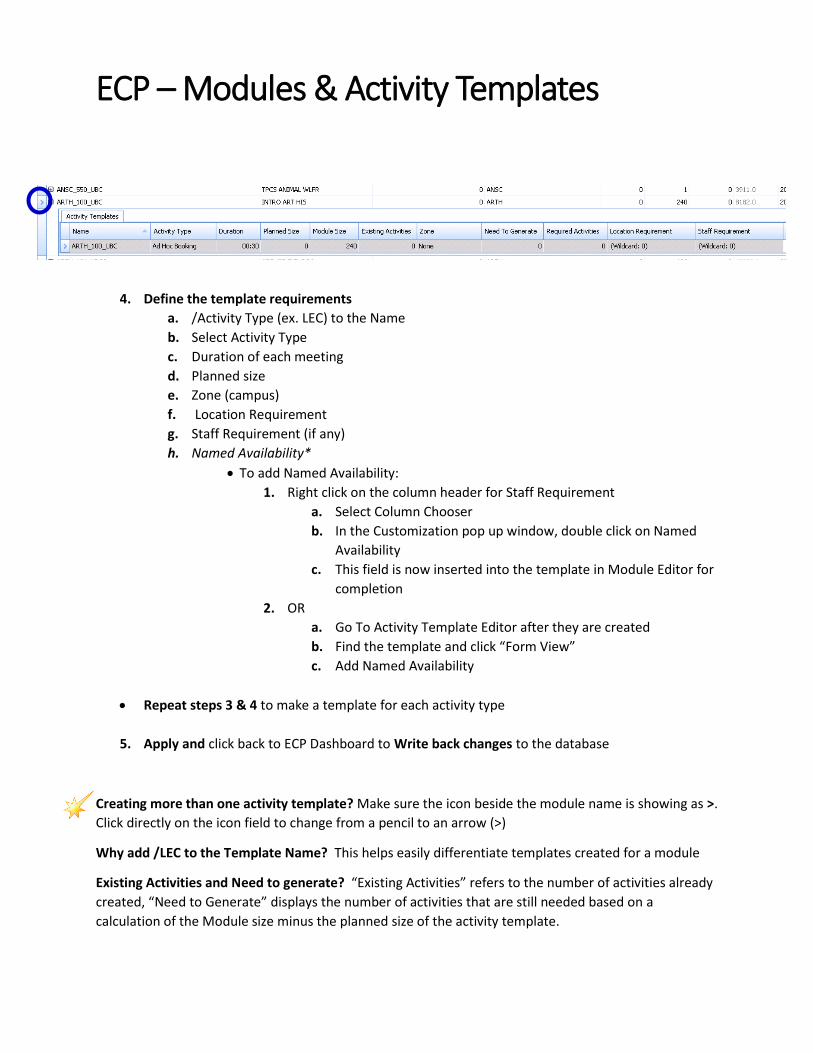
4. Define the template requirements
a. /Activity Type (ex. LEC) to the Name
b. Select Activity Type
c. Duration of each meeting
d. Planned size
e. Zone (campus)
f. Location Requirement
g. Staff Requirement (if any)
h. Named Availability*
To add Named Availability:
1. Right click on the column header for Staff Requirement
a. Select Column Chooser
b. In the Customization pop up window, double click on Named
Availability
c. This field is now inserted into the template in Module Editor for
completion
2. OR
a. Go To Activity Template Editor after they are created
b. Find the template and click “Form View”
c. Add Named Availability
Repeat steps 3 & 4 to make a template for each activity type
5. Apply and click back to ECP Dashboard to Write back changes to the database
Creating more than one activity template? Make sure the icon beside the module name is showing as >.
Click directly on the icon field to change from a pencil to an arrow (>)
Why add /LEC to the Template Name? This helps easily differentiate templates created for a module
Existing Activities and Need to generate? “Existing Activities” refers to the number of activities already
created, “Need to Generate” displays the number of activities that are still needed based on a
calculation of the Module size minus the planned size of the activity template.
ECP - Generate Activities
Why generate activities from templates?
Generating activities from templates ensures that the activities inherit the details from the
activity template, such as the named availability pattern. We recommend users always create
activities using the activity template. Generate from template is also available from Timetabler
d. Open the Activity Template Editor
a. From the CP Dashboard, click <Show> beside the Total in the “Templates” Section
e. Find the Activity Templates that activities need to have generated
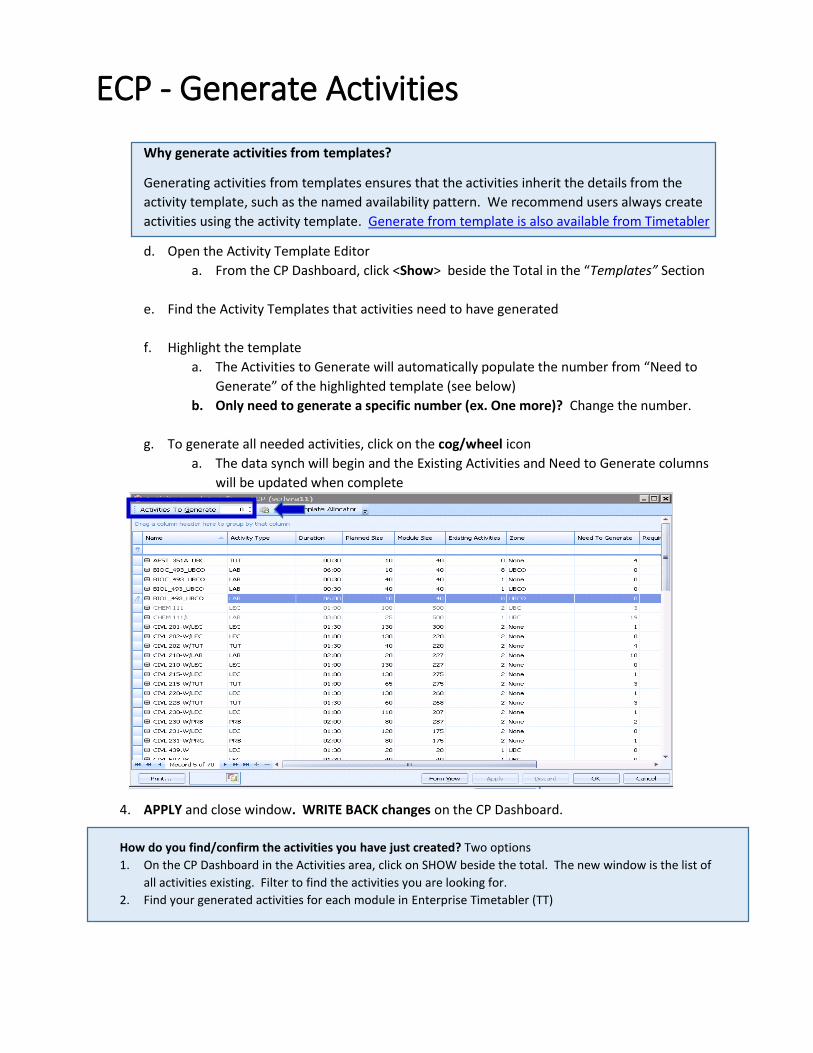
f. Highlight the template
a. The Activities to Generate will automatically populate the number from “Need to
Generate” of the highlighted template (see below)
b. Only need to generate a specific number (ex. One more)? Change the number.
g. To generate all needed activities, click on the cog/wheel icon
a. The data synch will begin and the Existing Activities and Need to Generate columns
will be updated when complete
4. APPLY and close window. WRITE BACK changes on the CP Dashboard.
How do you find/confirm the activities you have just created? Two options
1. On the CP Dashboard in the Activities area, click on SHOW beside the total. The new window is the list of
all activities existing. Filter to find the activities you are looking for.
2. Find your generated activities for each module in Enterprise Timetabler (TT)
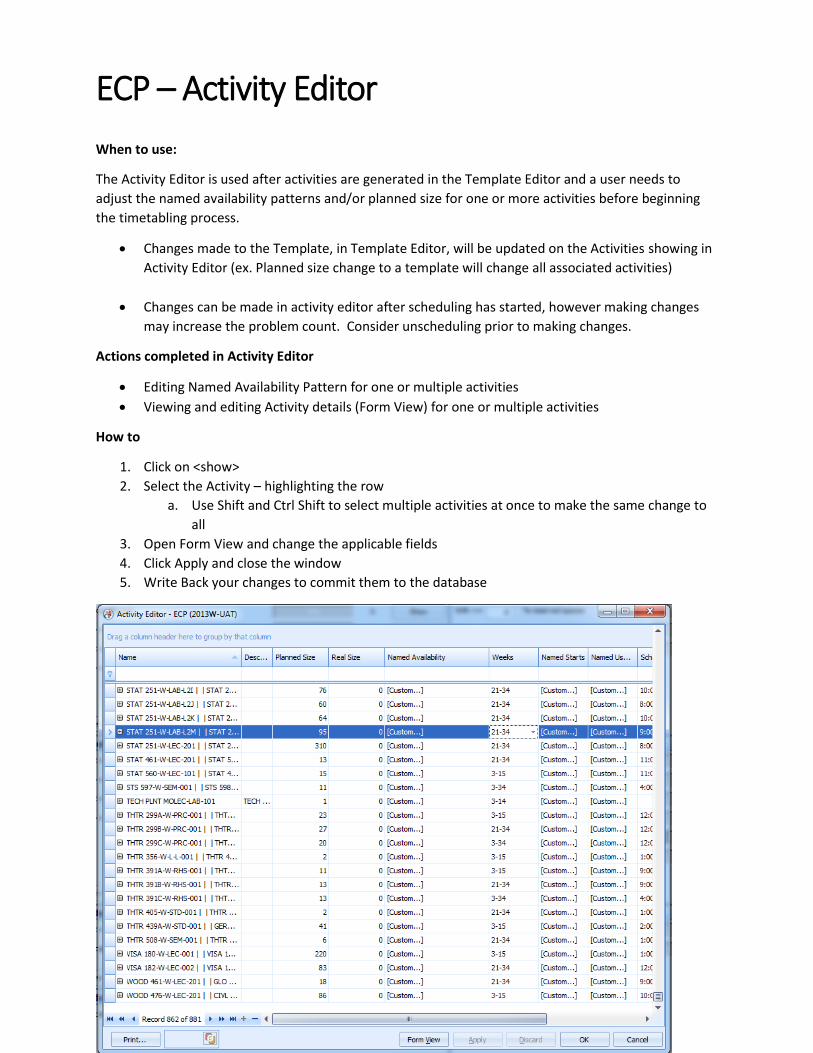
ECP – Activity Editor
When to use:
The Activity Editor is used after activities are generated in the Template Editor and a user needs to
adjust the named availability patterns and/or planned size for one or more activities before beginning
the timetabling process.
Changes made to the Template, in Template Editor, will be updated on the Activities showing in
Activity Editor (ex. Planned size change to a template will change all associated activities)
Changes can be made in activity editor after scheduling has started, however making changes
may increase the problem count. Consider unscheduling prior to making changes.
Actions completed in Activity Editor
Editing Named Availability Pattern for one or multiple activities
Viewing and editing Activity details (Form View) for one or multiple activities
How to
1. Click on <show>
2. Select the Activity – highlighting the row
a. Use Shift and Ctrl Shift to select multiple activities at once to make the same change to
all
3. Open Form View and change the applicable fields
4. Click Apply and close the window
5. Write Back your changes to commit them to the database
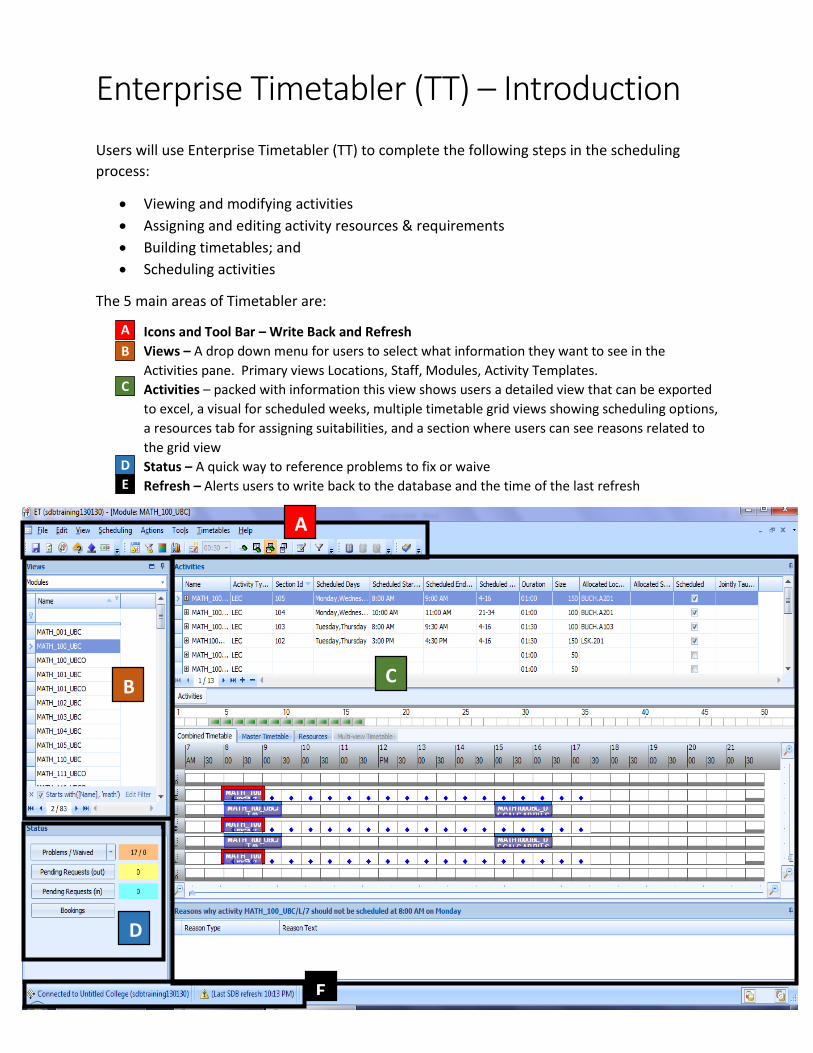
Enterprise Timetabler (TT) – Introduction
Users will use Enterprise Timetabler (TT) to complete the following steps in the scheduling
process:
Viewing and modifying activities
Assigning and editing activity resources & requirements
Building timetables; and
Scheduling activities
The 5 main areas of Timetabler are:
A. Icons and Tool Bar – Write Back and Refresh
B. Views – A drop down menu for users to select what information they want to see in the
Activities pane. Primary views Locations, Staff, Modules, Activity Templates.
C. Activities – packed with information this view shows users a detailed view that can be exported
to excel, a visual for scheduled weeks, multiple timetable grid views showing scheduling options,
a resources tab for assigning suitabilities, and a section where users can see reasons related to
the grid view
D. Status – A quick way to reference problems to fix or waive
E. Refresh – Alerts users to write back to the database and the time of the last refresh
A
E
D
B C
A
B
C
D
E
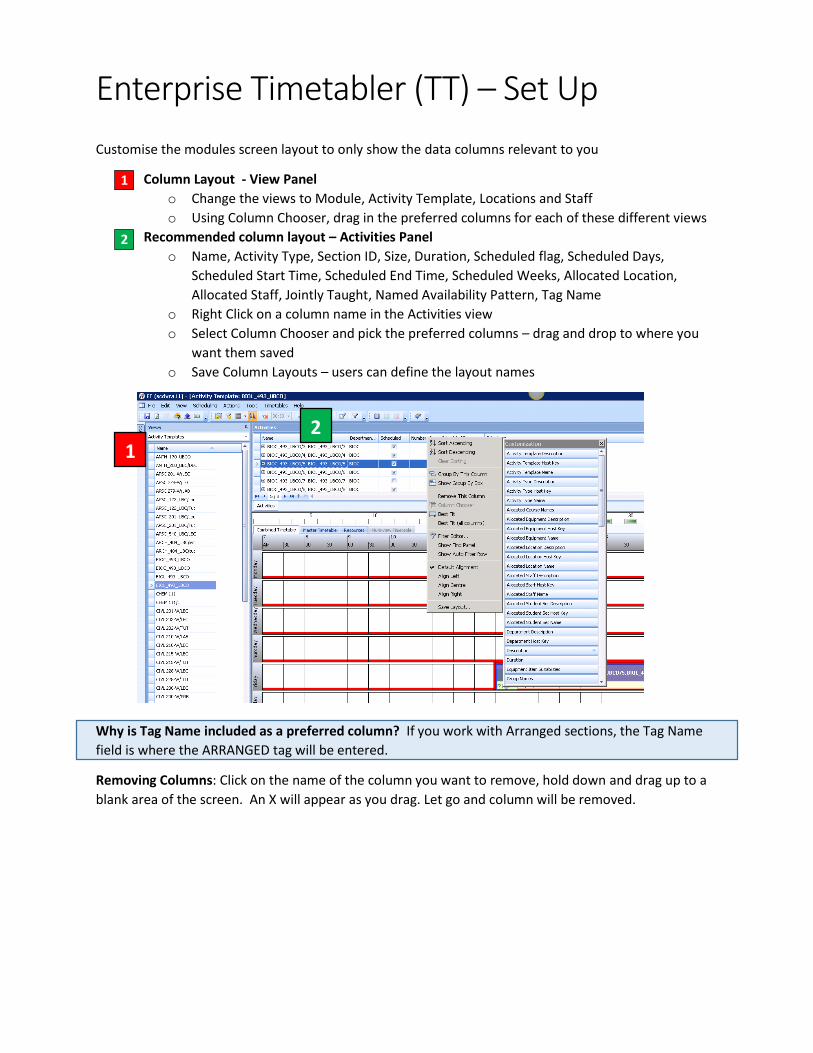
Enterprise Timetabler (TT) – Set Up
Customise the modules screen layout to only show the data columns relevant to you
1. Column Layout - View Panel
o Change the views to Module, Activity Template, Locations and Staff
o Using Column Chooser, drag in the preferred columns for each of these different views
2. Recommended column layout – Activities Panel
o Name, Activity Type, Section ID, Size, Duration, Scheduled flag, Scheduled Days,
Scheduled Start Time, Scheduled End Time, Scheduled Weeks, Allocated Location,
Allocated Staff, Jointly Taught, Named Availability Pattern, Tag Name
o Right Click on a column name in the Activities view
o Select Column Chooser and pick the preferred columns – drag and drop to where you
want them saved
o Save Column Layouts – users can define the layout names
Why is Tag Name included as a preferred column? If you work with Arranged sections, the Tag Name
field is where the ARRANGED tag will be entered.
Removing Columns: Click on the name of the column you want to remove, hold down and drag up to a
blank area of the screen. An X will appear as you drag. Let go and column will be removed.
1 2
1
2
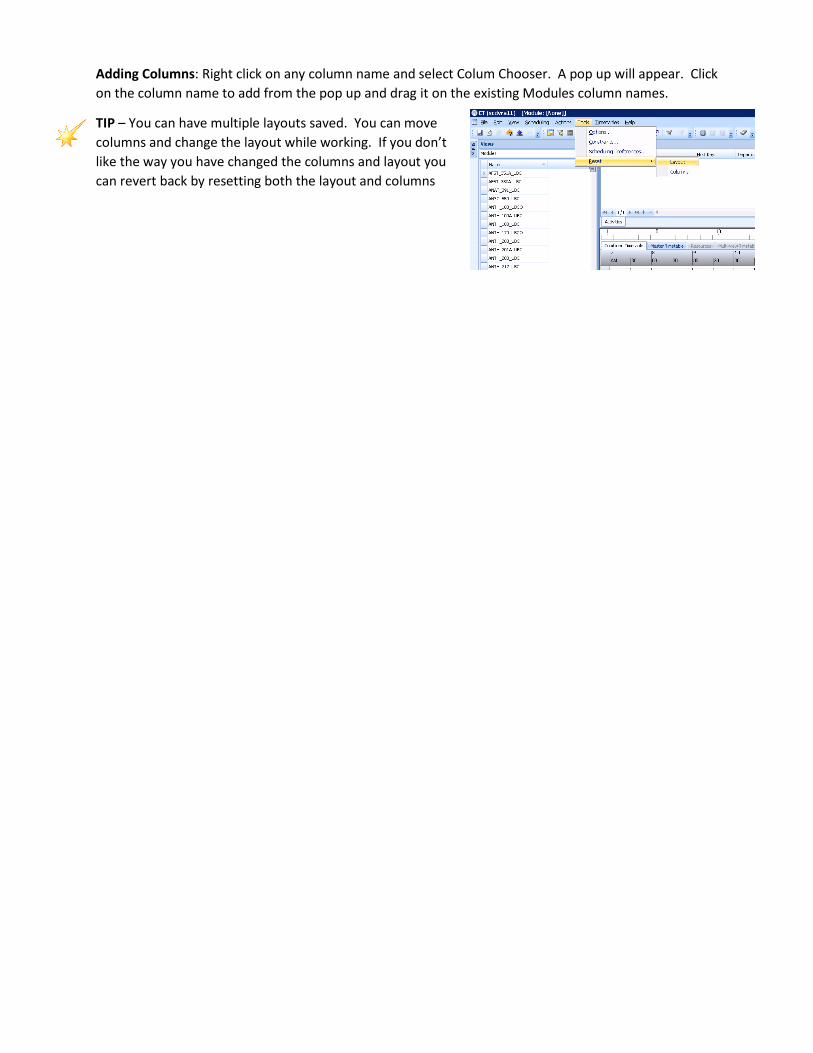
Adding Columns: Right click on any column name and select Colum Chooser. A pop up will appear. Click
on the column name to add from the pop up and drag it on the existing Modules column names.
TIP – You can have multiple layouts saved. You can move
columns and change the layout while working. If you don’t
like the way you have changed the columns and layout you
can revert back by resetting both the layout and columns
TT – Set Up (Continued)
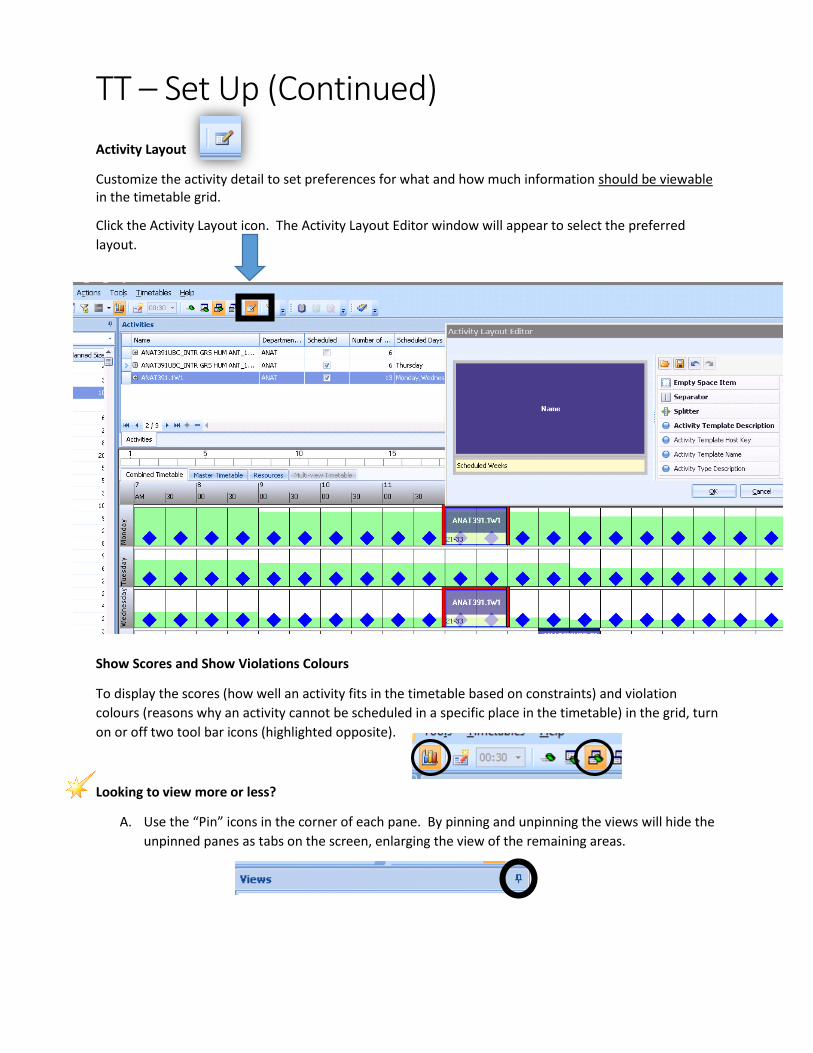
Activity Layout
Customize the activity detail to set preferences for what and how much information should be viewable in the timetable grid.
Click the Activity Layout icon. The Activity Layout Editor window will appear to select the preferred
layout.
Show Scores and Show Violations Colours
To display the scores (how well an activity fits in the timetable based on constraints) and violation
colours (reasons why an activity cannot be scheduled in a specific place in the timetable) in the grid, turn
on or off two tool bar icons (highlighted opposite).
Looking to view more or less?
A. Use the “Pin” icons in the corner of each pane. By pinning and unpinning the views will hide the
unpinned panes as tabs on the screen, enlarging the view of the remaining areas.
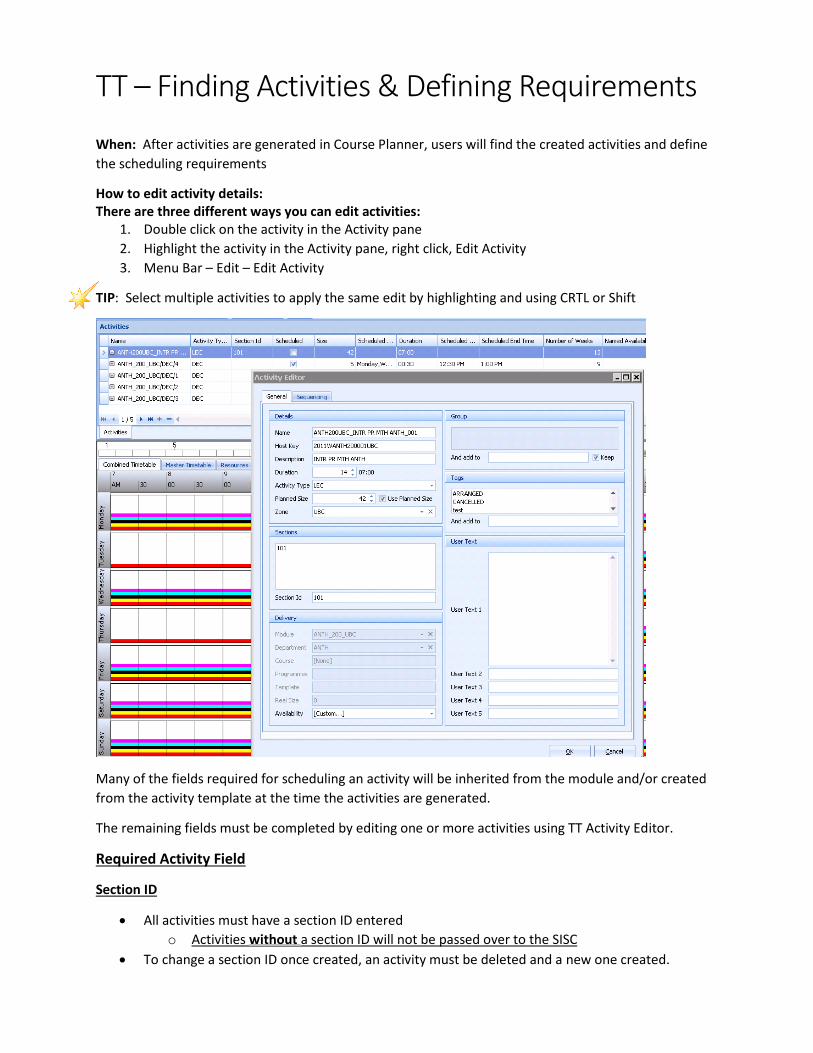
TT – Finding Activities & Defining Requirements
When: After activities are generated in Course Planner, users will find the created activities and define
the scheduling requirements
How to edit activity details: There are three different ways you can edit activities:
1. Double click on the activity in the Activity pane
2. Highlight the activity in the Activity pane, right click, Edit Activity
3. Menu Bar – Edit – Edit Activity
TIP: Select multiple activities to apply the same edit by highlighting and using CRTL or Shift
Many of the fields required for scheduling an activity will be inherited from the module and/or created
from the activity template at the time the activities are generated.
The remaining fields must be completed by editing one or more activities using TT Activity Editor.
Required Activity Field
Section ID
All activities must have a section ID entered
o Activities without a section ID will not be passed over to the SISC
To change a section ID once created, an activity must be deleted and a new one created.
Activities with the same section ID (duplicates):
o Will be passed to the SISC but the meetings of both activities will be brought together
under the one section number
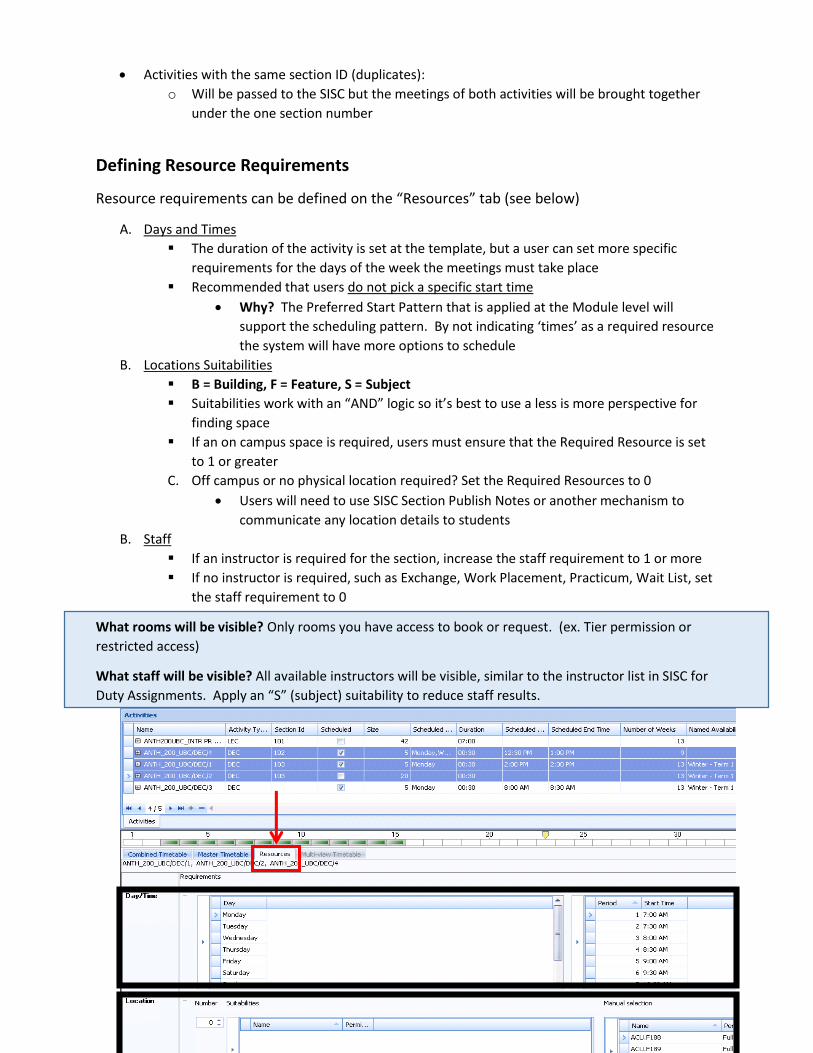
Defining Resource Requirements
Resource requirements can be defined on the “Resources” tab (see below)
A. Days and Times
The duration of the activity is set at the template, but a user can set more specific
requirements for the days of the week the meetings must take place
Recommended that users do not pick a specific start time
Why? The Preferred Start Pattern that is applied at the Module level will
support the scheduling pattern. By not indicating ‘times’ as a required resource
the system will have more options to schedule
B. Locations Suitabilities
B = Building, F = Feature, S = Subject
Suitabilities work with an “AND” logic so it’s best to use a less is more perspective for
finding space
If an on campus space is required, users must ensure that the Required Resource is set
to 1 or greater
C. Off campus or no physical location required? Set the Required Resources to 0
Users will need to use SISC Section Publish Notes or another mechanism to
communicate any location details to students
B. Staff
If an instructor is required for the section, increase the staff requirement to 1 or more
If no instructor is required, such as Exchange, Work Placement, Practicum, Wait List, set
the staff requirement to 0
What rooms will be visible? Only rooms you have access to book or request. (ex. Tier permission or
restricted access)
What staff will be visible? All available instructors will be visible, similar to the instructor list in SISC for
Duty Assignments. Apply an “S” (subject) suitability to reduce staff results.
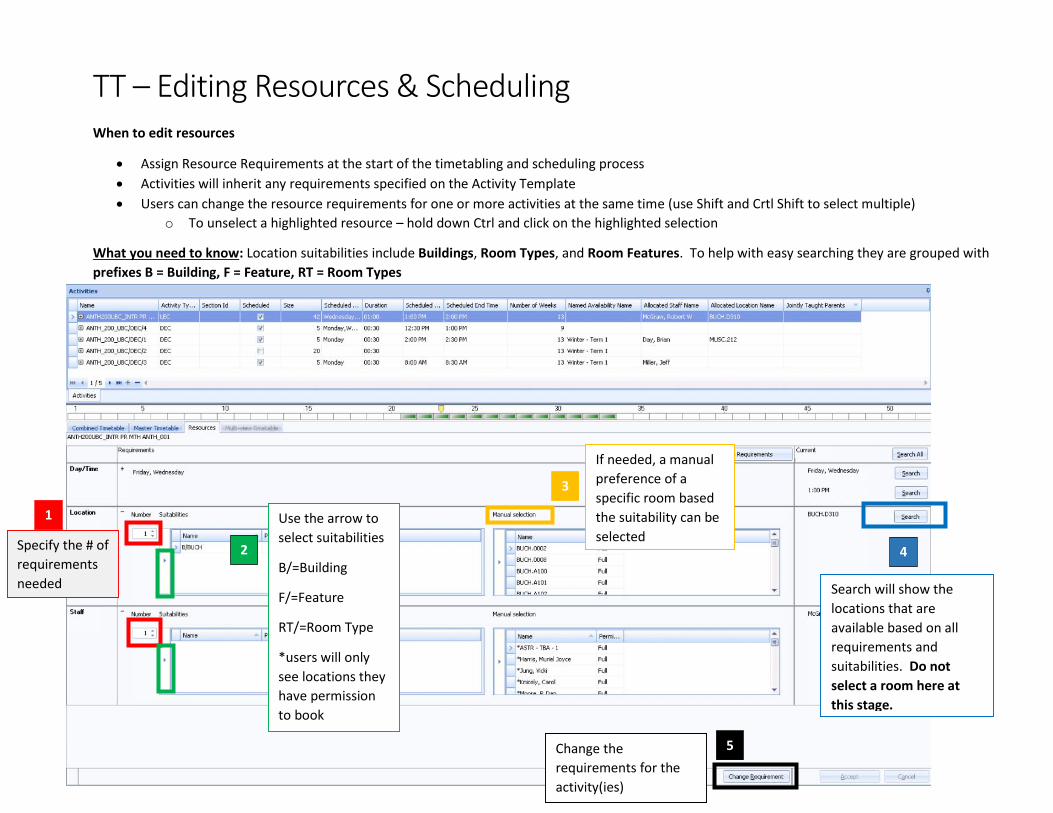
TT – Editing Resources & Scheduling
When to edit resources
Assign Resource Requirements at the start of the timetabling and scheduling process
Activities will inherit any requirements specified on the Activity Template
Users can change the resource requirements for one or more activities at the same time (use Shift and Crtl Shift to select multiple)
o To unselect a highlighted resource – hold down Ctrl and click on the highlighted selection
What you need to know: Location suitabilities include Buildings, Room Types, and Room Features. To help with easy searching they are grouped with
prefixes B = Building, F = Feature, RT = Room Types
Specify the # of
requirements
needed
Use the arrow to
select suitabilities
B/=Building
F/=Feature
RT/=Room Type
*users will only
see locations they
have permission
to book
If needed, a manual
preference of a
specific room based
the suitability can be
selected
1
2
3
5 Change the
requirements for the
activity(ies)
4
Search will show the
locations that are
available based on all
requirements and
suitabilities. Do not
select a room here at
this stage.
TT – Schedule Activities
Once an activity has a section ID and resource requirements specified, with the exception of arranged,
you are probably ready to schedule
An activity can be scheduled by highlighting in the Activity Pane of TT and:
1. Right clicking and choosing Schedule; OR
2. Finding a blue diamond in the timetable grid, right clicking, and choosing Schedule Here; OR
3. Using the menu bar along the top, under Scheduling, and choosing Schedule
You can highlight one or multiple activities in the activities pane by using CRTL and Shift to schedule
more than one activity at a time.
When an activity is scheduled:
1. The scheduled tick box will display a check mark in the Activities Pane
2. The scheduled activity(ies) will appear in the combined timetable grid for the days, times and
term schedule
3. Recommended to add in the columns for Allocation Location Name, Allocated Staff Name,
Schedule Days, Scheduled Start Time, Scheduled End Time, Scheduled Weeks in to the Activities
Pane view
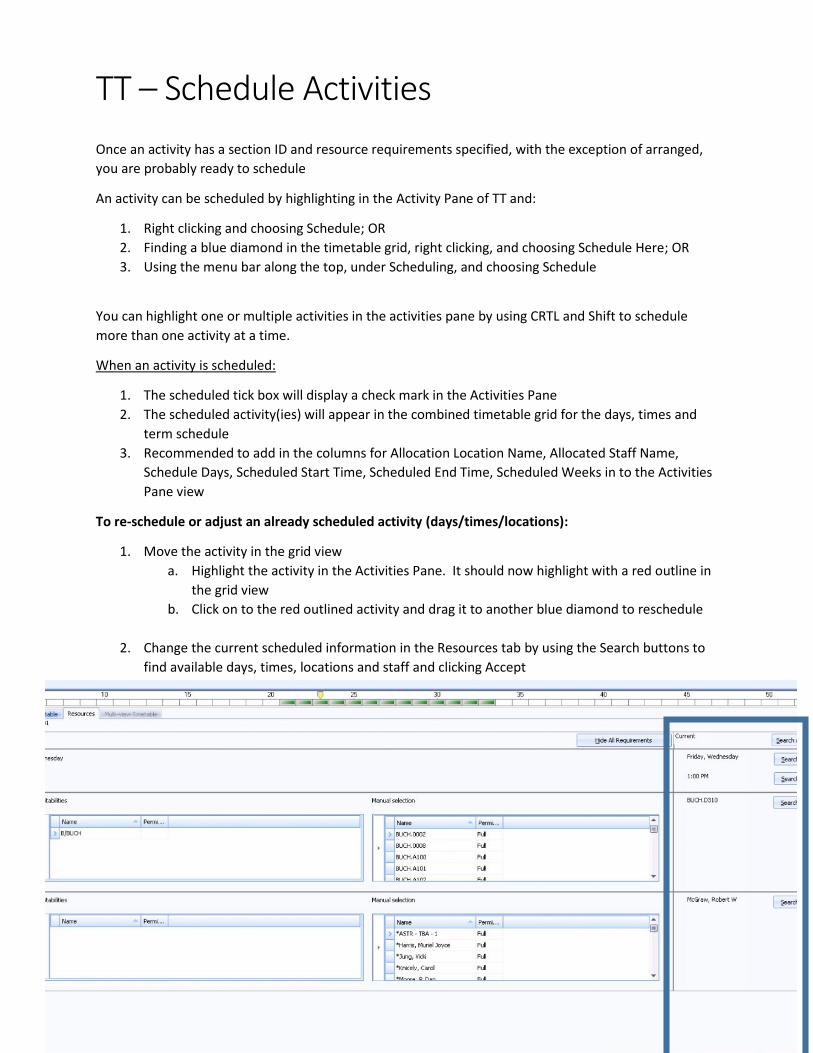
To re-schedule or adjust an already scheduled activity (days/times/locations):
1. Move the activity in the grid view
a. Highlight the activity in the Activities Pane. It should now highlight with a red outline in
the grid view
b. Click on to the red outlined activity and drag it to another blue diamond to reschedule
2. Change the current scheduled information in the Resources tab by using the Search buttons to
find available days, times, locations and staff and clicking Accept
How to…
Create new activities (sections)
The easiest, quickest and preferred way to create a new section is to generate another activity from the
template.
Two ways to generate from template:
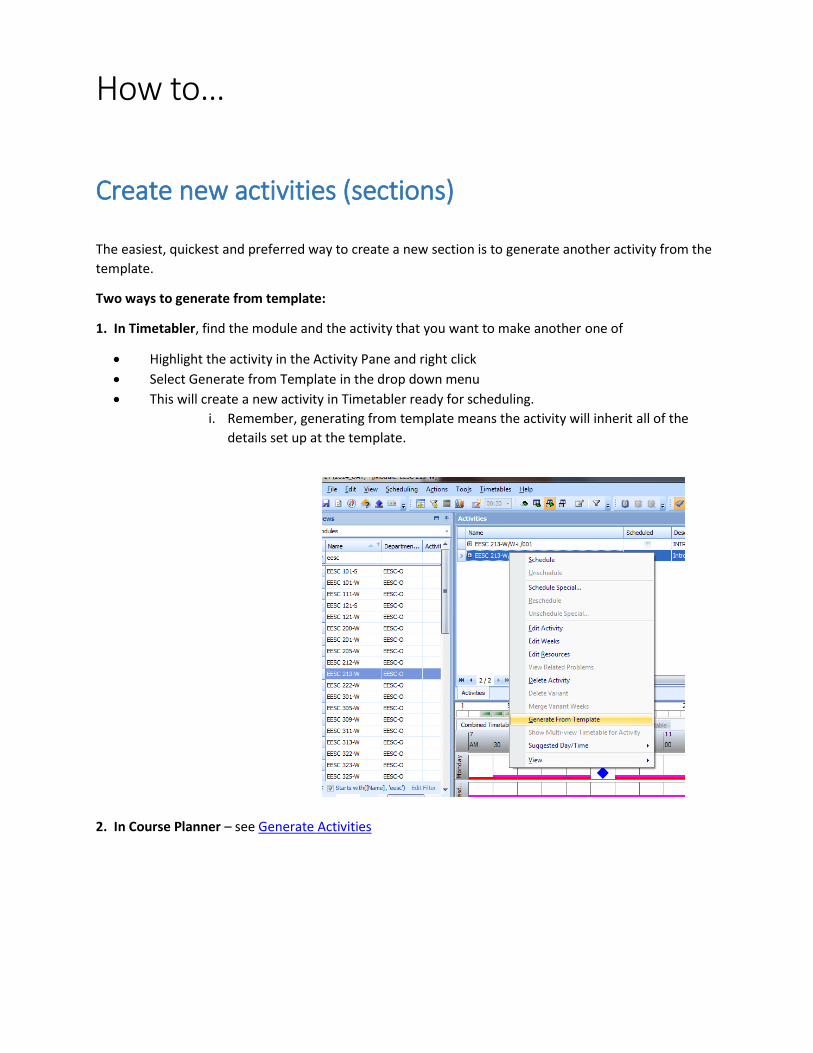
1. In Timetabler, find the module and the activity that you want to make another one of
Highlight the activity in the Activity Pane and right click
Select Generate from Template in the drop down menu
This will create a new activity in Timetabler ready for scheduling.
i. Remember, generating from template means the activity will inherit all of the
details set up at the template.
2. In Course Planner – see Generate Activities
How to…
Create Jointly Taught Activities
When: Create jointly taught activities when you need two or more activities to meet at the same days,
same times, same location. We commonly call these activities “cross listed”.
It is recommended to create jointly taught activities with activities in an unscheduled status.
Steps:
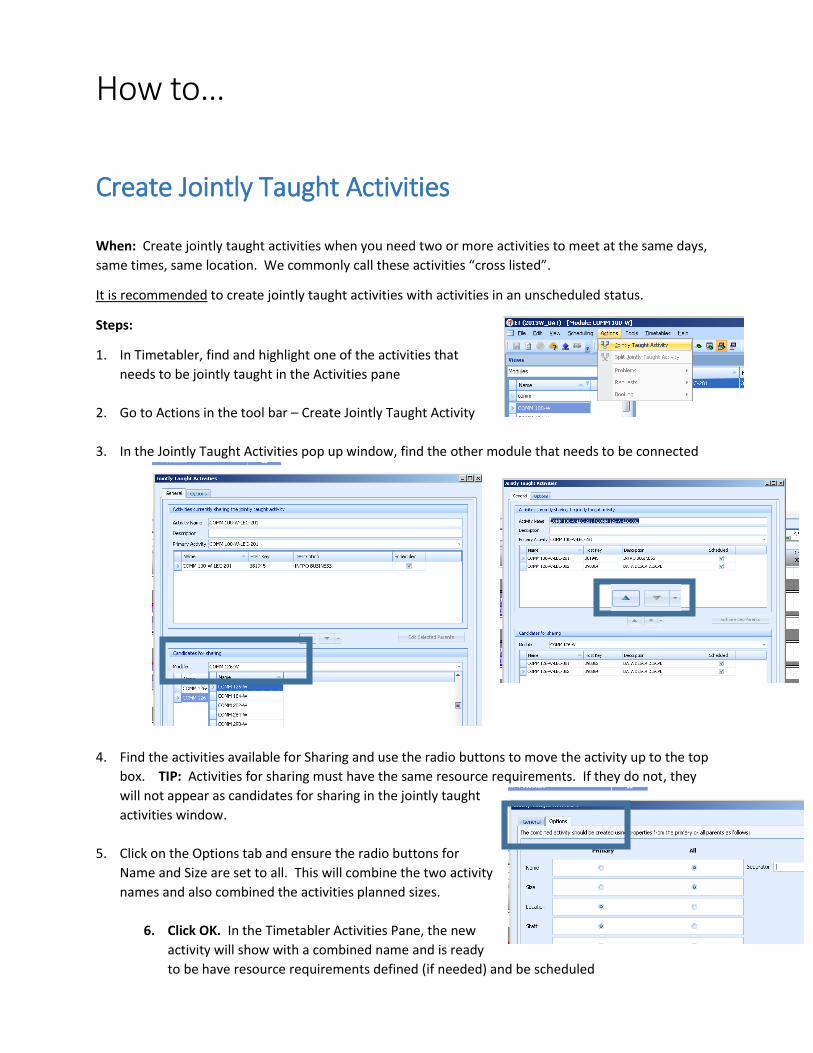
1. In Timetabler, find and highlight one of the activities that
needs to be jointly taught in the Activities pane
2. Go to Actions in the tool bar – Create Jointly Taught Activity
3. In the Jointly Taught Activities pop up window, find the other module that needs to be connected
4. Find the activities available for Sharing and use the radio buttons to move the activity up to the top
box. TIP: Activities for sharing must have the same resource requirements. If they do not, they
will not appear as candidates for sharing in the jointly taught
activities window.
5. Click on the Options tab and ensure the radio buttons for
Name and Size are set to all. This will combine the two activity
names and also combined the activities planned sizes.
6. Click OK. In the Timetabler Activities Pane, the new
activity will show with a combined name and is ready
to be have resource requirements defined (if needed) and be scheduled
How to…
Delete
Activity Templates
Templates can only be deleted in the Template Editor
If you accidentally create too many templates in Module Editor, cancel your edits and re-start
your template creation in module editor
o If you have gone too far – deletion of templates can only happen in template editor
CAUTION – if you delete a template, ALL activities associated with the template with also be
deleted!
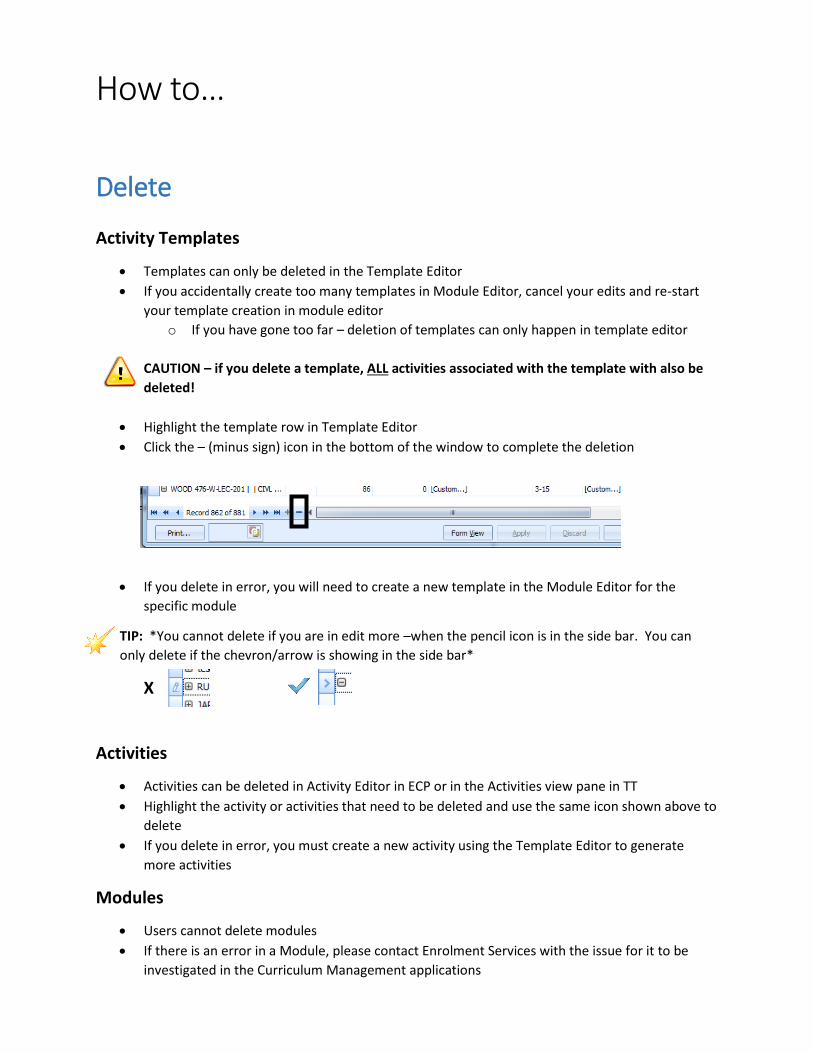
Highlight the template row in Template Editor
Click the – (minus sign) icon in the bottom of the window to complete the deletion
If you delete in error, you will need to create a new template in the Module Editor for the
specific module
TIP: *You cannot delete if you are in edit more –when the pencil icon is in the side bar. You can
only delete if the chevron/arrow is showing in the side bar*
X
Activities
Activities can be deleted in Activity Editor in ECP or in the Activities view pane in TT
Highlight the activity or activities that need to be deleted and use the same icon shown above to
delete
If you delete in error, you must create a new activity using the Template Editor to generate
more activities
Modules
Users cannot delete modules
If there is an error in a Module, please contact Enrolment Services with the issue for it to be
investigated in the Curriculum Management applications
How to…
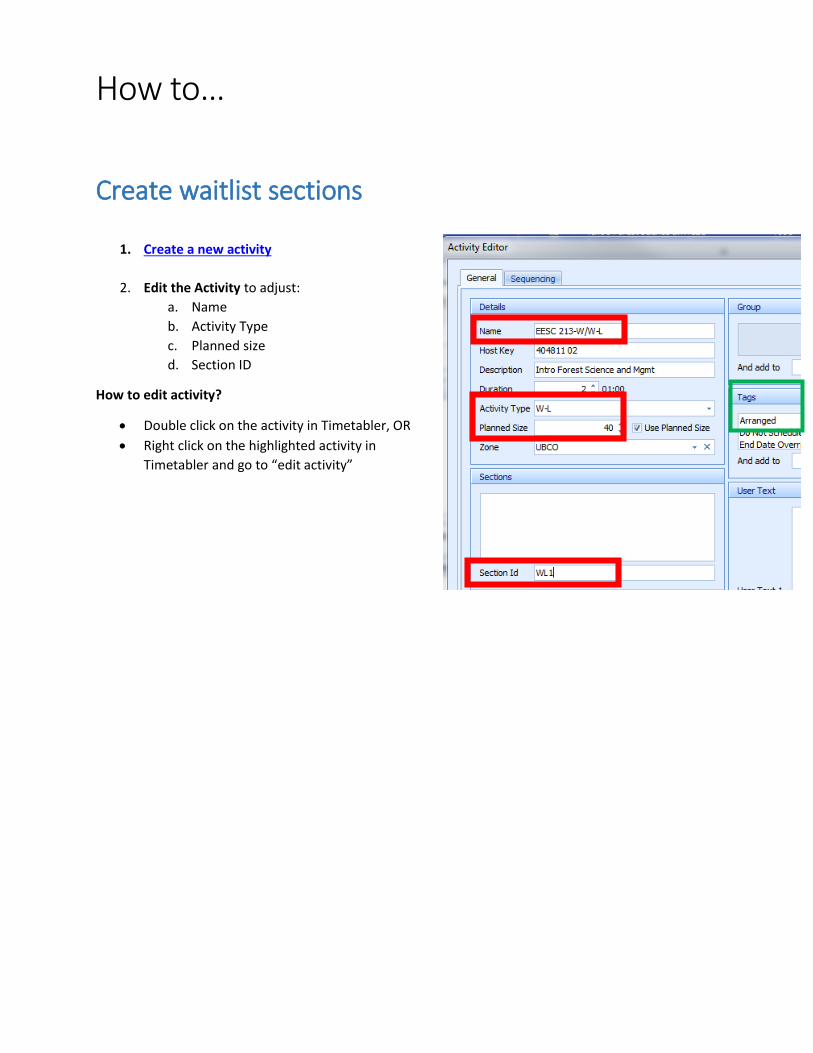
Create waitlist sections
1. Create a new activity
2. Edit the Activity to adjust:
a. Name
b. Activity Type
c. Planned size
d. Section ID
How to edit activity?
Double click on the activity in Timetabler, OR
Right click on the highlighted activity in
Timetabler and go to “edit activity”
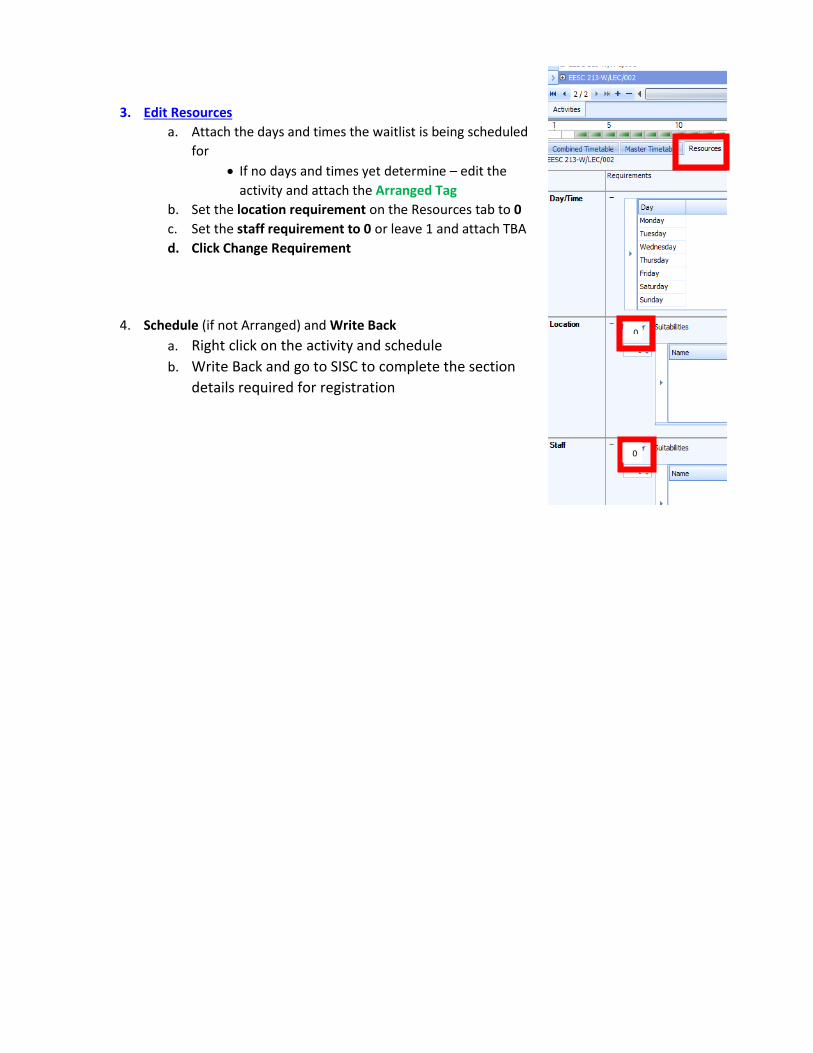
3. Edit Resources
a. Attach the days and times the waitlist is being scheduled
for
If no days and times yet determine – edit the
activity and attach the Arranged Tag
b. Set the location requirement on the Resources tab to 0
c. Set the staff requirement to 0 or leave 1 and attach TBA
d. Click Change Requirement
4. Schedule (if not Arranged) and Write Back
a. Right click on the activity and schedule
b. Write Back and go to SISC to complete the section
details required for registration
0
0
How to…
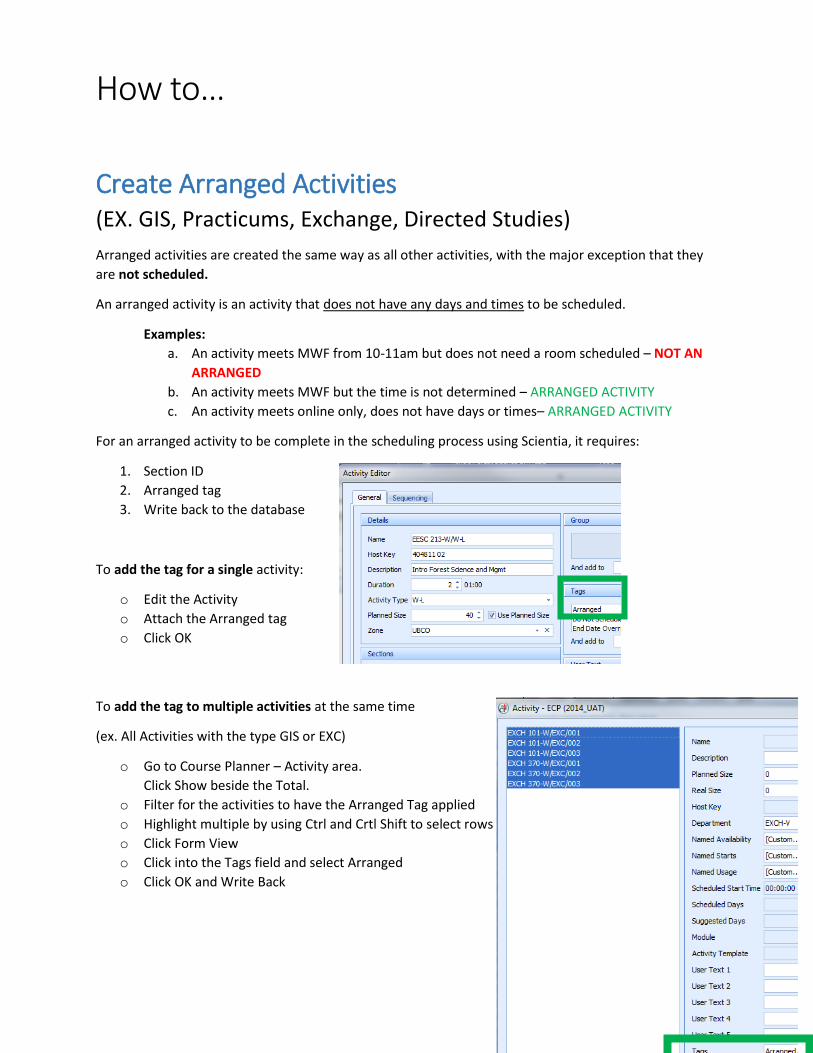
Create Arranged Activities (EX. GIS, Practicums, Exchange, Directed Studies) Arranged activities are created the same way as all other activities, with the major exception that they
are not scheduled.
An arranged activity is an activity that does not have any days and times to be scheduled.
Examples:
a. An activity meets MWF from 10-11am but does not need a room scheduled – NOT AN
ARRANGED
b. An activity meets MWF but the time is not determined – ARRANGED ACTIVITY
c. An activity meets online only, does not have days or times– ARRANGED ACTIVITY
For an arranged activity to be complete in the scheduling process using Scientia, it requires:
1. Section ID
2. Arranged tag
3. Write back to the database
To add the tag for a single activity:
o Edit the Activity
o Attach the Arranged tag
o Click OK
To add the tag to multiple activities at the same time
(ex. All Activities with the type GIS or EXC)
o Go to Course Planner – Activity area.
Click Show beside the Total.
o Filter for the activities to have the Arranged Tag applied
o Highlight multiple by using Ctrl and Crtl Shift to select rows
o Click Form View
o Click into the Tags field and select Arranged
o Click OK and Write Back
How to…
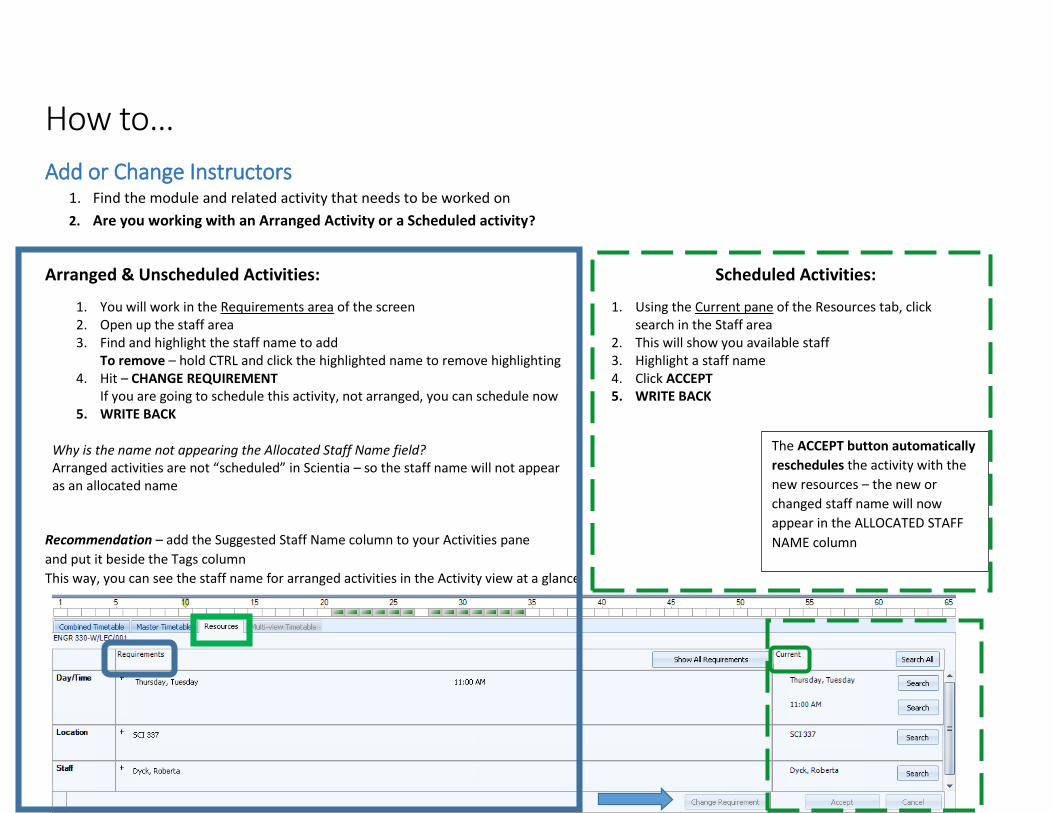
Add or Change Instructors 1. Find the module and related activity that needs to be worked on
2. Are you working with an Arranged Activity or a Scheduled activity?
Arranged & Unscheduled Activities: Scheduled Activities:
1. You will work in the Requirements area of the screen 2. Open up the staff area 3. Find and highlight the staff name to add
To remove – hold CTRL and click the highlighted name to remove highlighting 4. Hit – CHANGE REQUIREMENT
If you are going to schedule this activity, not arranged, you can schedule now 5. WRITE BACK
1. Using the Current pane of the Resources tab, click search in the Staff area
2. This will show you available staff 3. Highlight a staff name 4. Click ACCEPT 5. WRITE BACK
Why is the name not appearing the Allocated Staff Name field? Arranged activities are not “scheduled” in Scientia – so the staff name will not appear as an allocated name
Recommendation – add the Suggested Staff Name column to your Activities pane
and put it beside the Tags column
This way, you can see the staff name for arranged activities in the Activity view at a glance
The ACCEPT button automatically
reschedules the activity with the
new resources – the new or
changed staff name will now
appear in the ALLOCATED STAFF
NAME column
How to…
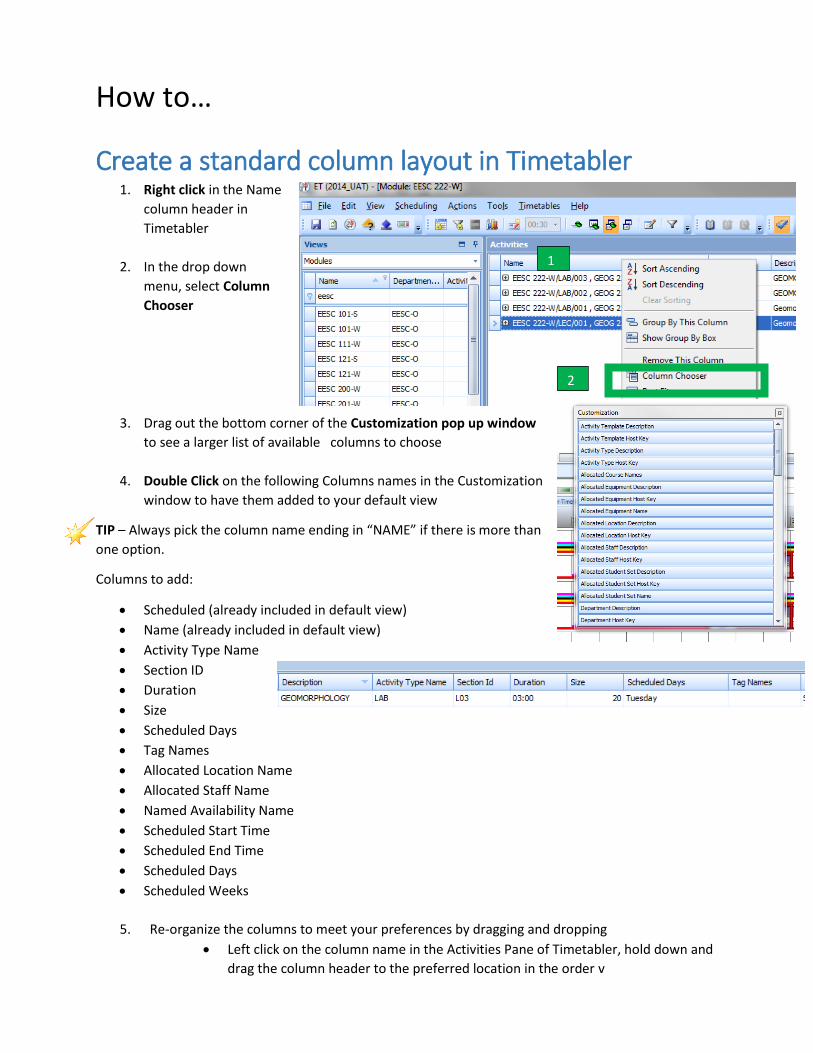
Create a standard column layout in Timetabler 1. Right click in the Name
column header in
Timetabler
2. In the drop down
menu, select Column
Chooser
3. Drag out the bottom corner of the Customization pop up window
to see a larger list of available columns to choose
4. Double Click on the following Columns names in the Customization
window to have them added to your default view
TIP – Always pick the column name ending in “NAME” if there is more than
one option.
Columns to add:
Scheduled (already included in default view)
Name (already included in default view)
Activity Type Name
Section ID
Duration
Size
Scheduled Days
Tag Names
Allocated Location Name
Allocated Staff Name
Named Availability Name
Scheduled Start Time
Scheduled End Time
Scheduled Days
Scheduled Weeks
5. Re-organize the columns to meet your preferences by dragging and dropping
Left click on the column name in the Activities Pane of Timetabler, hold down and
drag the column header to the preferred location in the order v
1
2
How to…
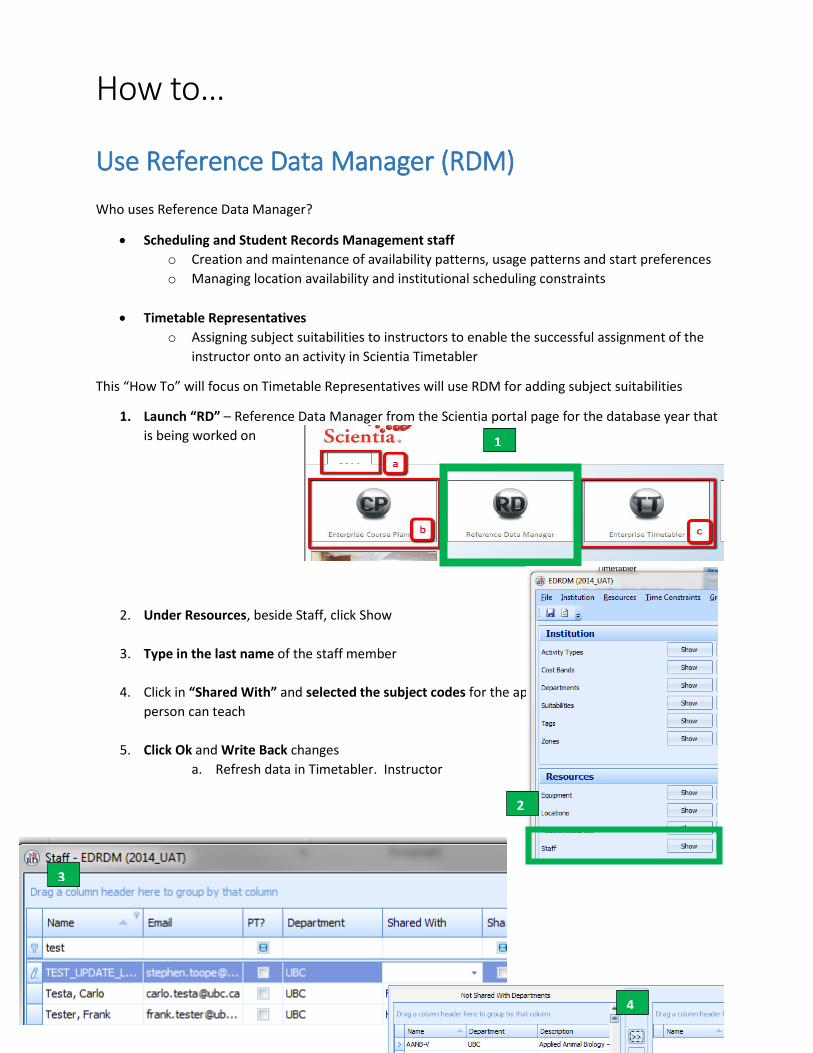
Use Reference Data Manager (RDM)
Who uses Reference Data Manager?
Scheduling and Student Records Management staff
o Creation and maintenance of availability patterns, usage patterns and start preferences
o Managing location availability and institutional scheduling constraints
Timetable Representatives
o Assigning subject suitabilities to instructors to enable the successful assignment of the
instructor onto an activity in Scientia Timetabler
This “How To” will focus on Timetable Representatives will use RDM for adding subject suitabilities
1. Launch “RD” – Reference Data Manager from the Scientia portal page for the database year that
is being worked on
2. Under Resources, beside Staff, click Show
3. Type in the last name of the staff member
4. Click in “Shared With” and selected the subject codes for the appropriate campus that the
person can teach
5. Click Ok and Write Back changes
a. Refresh data in Timetabler. Instructor
2014
1
2
3
4