Embed Size (px)
Citation preview

Schools Cash Office How to import pre-admission pupils
Tucasi Ltd Wessex House Upper Market Street Eastleigh Hampshire SO50 9FD School Support - 02380 016564 Sales Team - 02380 016563 www.tucasi.com
Copyright Tucasi Ltd 2004 - 2019
Schools Cash Office Income Administration Software

SCO How to Import Pre-Admission Pupils 2 Last revised 08-03-2019 v2.4.0.100
Contents
1. ABOUT THIS GUIDE ........................................................................................................................ 3
2. SCHOOLS CASH OFFICE AND GDPR COMPLIANCE ................................................................................. 3
3. CHECKS BEFORE IMPORTING PRE-ADMISSION PUPILS (ALL SCHOOLS) ......................................................... 4
3.1 Check the Pupil ID used in SCO ......................................................................................... 4
3.2 Verify the Default year group for imports ........................................................................ 4
4. SCHOOLS THAT USE THE ONLINE PAYMENTS CASHLESS CATERING LINK ....................................................... 5
5. DO YOU USE THE SIMS DYNAMIC LINK TO UPDATE PUPIL DATA IN SCO? ................................................... 5
5.1 Is the SIMS Dynamic link set up on my PC? ...................................................................... 5
5.2 Change the SIMS link settings in SCO ............................................................................... 6
6. CREATE A PUPIL DATA REPORT FOR PRE-ADMISSIONS IN YOUR MIS SYSTEM ............................................... 7
7. IMPORT THE PRE-ADMISSION PUPIL DATA INTO SCO ............................................................................. 8
8. WHAT HAPPENS IN SEPTEMBER? ...................................................................................................... 9
8.1 Re-configure the SIMS Dynamic Link settings in SCO ........................................................ 9
8.2 Importing pupil data using the SIMS Dynamic Link .......................................................... 9
8.3 Reset the SIMS Dynamic Link to run on start-up of SCO.................................................. 10
9. IMPORT PUPIL DATA USING A CSV FILE .............................................................................................. 11
10. IMPORTING PARENT CONTACT INFO FOR PRE-ADMISSION PUPILS ........................................................... 12
11. DOCUMENTATION AND SUPPORT.................................................................................................... 12
SCO How to Import Pre-Admission Pupils 3 Last revised 08-03-2019 v2.4.0.100
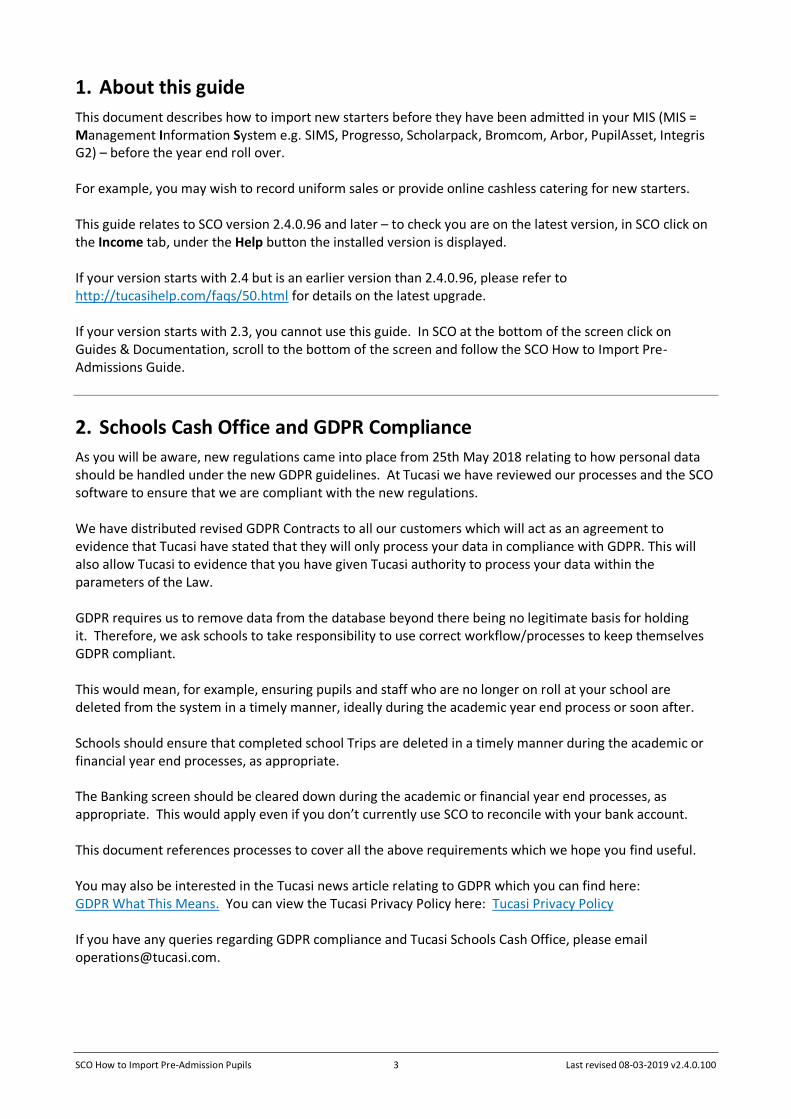
1. About this guide
This document describes how to import new starters before they have been admitted in your MIS (MIS = Management Information System e.g. SIMS, Progresso, Scholarpack, Bromcom, Arbor, PupilAsset, Integris G2) – before the year end roll over. For example, you may wish to record uniform sales or provide online cashless catering for new starters. This guide relates to SCO version 2.4.0.96 and later – to check you are on the latest version, in SCO click on the Income tab, under the Help button the installed version is displayed. If your version starts with 2.4 but is an earlier version than 2.4.0.96, please refer to http://tucasihelp.com/faqs/50.html for details on the latest upgrade. If your version starts with 2.3, you cannot use this guide. In SCO at the bottom of the screen click on Guides & Documentation, scroll to the bottom of the screen and follow the SCO How to Import Pre-Admissions Guide.
2. Schools Cash Office and GDPR Compliance
As you will be aware, new regulations came into place from 25th May 2018 relating to how personal data should be handled under the new GDPR guidelines. At Tucasi we have reviewed our processes and the SCO software to ensure that we are compliant with the new regulations. We have distributed revised GDPR Contracts to all our customers which will act as an agreement to evidence that Tucasi have stated that they will only process your data in compliance with GDPR. This will also allow Tucasi to evidence that you have given Tucasi authority to process your data within the parameters of the Law. GDPR requires us to remove data from the database beyond there being no legitimate basis for holding it. Therefore, we ask schools to take responsibility to use correct workflow/processes to keep themselves GDPR compliant. This would mean, for example, ensuring pupils and staff who are no longer on roll at your school are deleted from the system in a timely manner, ideally during the academic year end process or soon after. Schools should ensure that completed school Trips are deleted in a timely manner during the academic or financial year end processes, as appropriate. The Banking screen should be cleared down during the academic or financial year end processes, as appropriate. This would apply even if you don’t currently use SCO to reconcile with your bank account. This document references processes to cover all the above requirements which we hope you find useful. You may also be interested in the Tucasi news article relating to GDPR which you can find here: GDPR What This Means. You can view the Tucasi Privacy Policy here: Tucasi Privacy Policy If you have any queries regarding GDPR compliance and Tucasi Schools Cash Office, please email [email protected].

SCO How to Import Pre-Admission Pupils 4 Last revised 08-03-2019 v2.4.0.100
3. Checks before importing pre-admission pupils (all schools)
3.1 Check the Pupil ID used in SCO
Check which ID is currently being used as the unique identifier for pupils in SCO. This will be one of UPN, Admission Number or your MIS ID (PupilID).
Check which Pupil ID you are using in SCO
• Click on the Configuration tab
• Click on System options
• Click on the General tab
• Note the Pupil ID field used for imports (usually either Pupil ID, UPN or Admission Number)
• Click on Done
Locate a Sample Pupil ID
• Click on the Accounts tab
• Note the Last name, First name and Pupil ID for the first pupil
• Cross check this with your MIS to see which ID it matches
For example these are the general formats:
UPN X123456789123
Admission No 001234
Admission No 1234 (without leading zeroes)
MIS Pupil or Person ID 6789
Make a note of the Pupil ID type used in SCO: ________________
3.2 Verify the Default year group for imports
If you are going to import Nursery pupils into SCO and their Year Group in your MIS is marked as N1 or N2, you will need to import these as Year 15s in SCO. To do this, simply change the Default year group for imports setting:
• Click on the Configuration tab
• Click on System options
• Enter the Default year group for imports: as 15
• Click on Done
This will ensure that any pupils imported with a Year Group outside of 0-13, or a Year Group with an alphabetical character in the import file, will go into the Year 15 Year Group in SCO. Proceed to section 4.

SCO How to Import Pre-Admission Pupils 5 Last revised 08-03-2019 v2.4.0.100
4. Schools that use the online payments cashless catering link
If your school does not use a link to an external cashless catering system for online payments, proceed to section 5. If your school uses Tucasi online payments to top up your cashless catering system you will need to read this section carefully. If pre-admission pupils are imported into Schools Cash Office without a Pupil ID then parents will NOT be able to top up their child’s dinner account online. Depending on which Pupil ID you wrote down in section 3.1 please read the relevant section below:
Pupil ID Action
MIS ID When a pre-admission pupil is added to your MIS system a MIS ID number is generated. For example, in SIMS.net this is called Person ID. You should be able to generate a report (as described later) for pre-admissions using this ID.
UPN When pre-admissions are entered into your MIS, the UPN number may also be entered. At this point you should be able to generate a report (as described later) in your MIS containing details of the pre-admission pupils and their UPN.
Admission Number Admission numbers are not generated until the first day of the new academic year. If you are using Admission Number in SCO and your cashless system and you import your pre-admissions without an Admission Number, parents won’t be able to top up the cashless catering account online. The solution is to wait until the pupils are on roll in your MIS and an Admission Number is available.
Proceed to section 5.
5. Do you use the SIMS dynamic link to update pupil data in SCO?
If you don’t use SIMS, proceed to section 6. If you do use SIMS, carry out the checks below.
5.1 Is the SIMS Dynamic link set up on my PC?
• In SCO, click on the Configuration tab
• Select Import from external system
• Select Import configuration
• Click on Dynamic link configuration
If the SIMS dynamic link status indicates Not installed, click on Cancel, Cancel and proceed to section 6. If the SIMS dynamic link status indicates Installed and there is a username and password in the SIMS Login section of this screen, click on Cancel and proceed to section 5.2.

SCO How to Import Pre-Admission Pupils 6 Last revised 08-03-2019 v2.4.0.100
5.2 Change the SIMS link settings in SCO
You will need to temporarily turn off the automatic SIMS import to enable pre-admissions to be imported
via a csv file.
Turn off auto import
• In SCO, click on the Configuration tab
• Select Import from external system
• Click on Import configuration
• Select Setup auto import
• Are there any imports set to run in the large white box?
• If there are no auto import settings configured in the large white box, click on Cancel and proceed to the next step.
• If there are imports set, make a note of these so that you can set them up again later.
• Click on each import e.g. Run Pupil import on Start up SCO and click on Remove from auto import
• Repeat the above steps and remove any other auto-import tasks such as Pupil contact import
• Click OK twice
Check this setting on all computers with SCO installed which might be running the Dynamic link to SIMS on start up, then return to the original PC to proceed.
Change the pupil import to csv
• You are only required to change this setting on the computer you wish to use for the pre-admissions import
• Click on the Configuration tab
• Select Import from external system
• Click on Import configuration
• Select CSV file from the Data source drop-down next to the Pupil import type
• Click on OK and then Close
Proceed to section 6.

SCO How to Import Pre-Admission Pupils 7 Last revised 08-03-2019 v2.4.0.100
6. Create a pupil data report for Pre-admissions in your MIS system
A report containing the fields listed below will need to be generated for all Applicants (pre-admissions) and saved (from Excel) as a CSV (comma delimited) file. Use either UPN, Admission Number or Person Id (this should match the Pupil ID you wrote down earlier) Depending on which Pupil ID you are using will determine how you will complete this process and what actions, if any, you need to take in September. Please refer to the table. SCO Communications schools only - Note that if you import pre-admission pupils without an ID, you won’t be able to import contact details for these pupils because it is the ID that is used as the identifier to match the pupil with the parent contact.
Existing Pupil IDs in SCO (view on Accounts screen)
Pre-admission IDs to be used in the MIS report
Caption/field header to be used in the csv file
Important notes
UPN
e.g.
X123456789123
UPN UPN The values may not be available in your MIS as yet. You can import blank UPNs at this stage and update them in SCO at the start of the new academic year as described later in this document.
Admission Number
e.g.
001234 or 1234 (without leading zeroes)
Admission Number
AdmissionNumber As the values will not be available in your MIS before the first day of the new academic year, you can import blank Admission Numbers at this stage and update them in SCO at the start of the new academic year as described later in this document.
ID
e.g.
6789
Person Id PupilID In SIMS.net, Person Id becomes MIS ID when pre-admissions have been admitted.
In SIMS.net, the ID / Person Id fields are only available to users who are part of the Third Party Reporting group. If appropriate, you may wish to ask your IT department or SIMS manager to give you access to this group.
When you create the report in your MIS system you will need to change the caption/heading of each field in the csv as specified below:
Field Caption/field header
Legal Forename Forename
Legal Surname Surname
Date of Birth Date of Birth
Choose either UPN or Admission Number or person_id (choose this if you are using ID for your existing pupils in SCO)
UPN or AdmissionNumber or PupilID
Year Taught In Year Taught In
Registration Group Reg Group
Home Address Line AddressLine

SCO How to Import Pre-Admission Pupils 8 Last revised 08-03-2019 v2.4.0.100
You should not have all three Pupil ID fields in your report, you should have one of UPN, AdmissionNumber or PupilID. Once you have created your csv file it should look similar to this:
Forename Surname Date of Birth
UPN or AdmissionNumber or PupilID
Year Taught In
Reg Group Address Line
John Smith 01/01/2006 UPN e.g. X123456789123 Admission No e.g. 001234 ID e.g. 6789
15 PreAdmissions 1 High Street, Anytown, AB1 2CD
• Check the csv file carefully to ensure that the data is correct and that the Pupil ID matches that currently used for pupils in SCO, unless blank
• Select File, Save As, select a suitable folder location (make a note of the location) and enter a filename, for example SCO PreAdmissions 2019
• In the Save as type field, select CSV (Comma delimited)
• Click on Save
• Click Yes when prompted
• Close the file and exit Excel
• Click No when prompted
Note that subsequently opening the csv file to view or change information may cause corruption of data. If amendments are required, do not open and amend this file – run the report again in SIMS, make the required changes and re-save the file in csv format.
Proceed to section 7.
7. Import the Pre-admission pupil data into SCO
• In SCO, click on the Configuration tab
• Click on Import from external system, select Pupil import
• Browse and select the SCO PreAdmissions 2019 CSV file you saved in section 6
• A window will be displayed summarising the actions taken
• Carefully review the Data discrepancies section to ensure no duplicates are imported
• Carefully review the Pupil accounts to be modified section to ensure any pupils marked as [New] are the required pre-admission pupils
• For any pre-admissions without Pupil ID, tick Allow blank pupil ID, then click Re-scan data
• Click Confirm
• Click Close
• Click on the Accounts tab and review the data
For schools that use the SIMS Dynamic Link proceed to section 8. For schools that don’t use the SIMS Dynamic Link proceed to section 9.

SCO How to Import Pre-Admission Pupils 9 Last revised 08-03-2019 v2.4.0.100
8. What happens in September?
8.1 Re-configure the SIMS Dynamic Link settings in SCO
Follow this step once your pre-admission pupils are marked as On roll in SIMS.
• In SCO, click on the Configuration tab
• Select Import from external system
• Click on Import configuration
• Select SIMS dynamic link from the Data source drop-down next to the Pupil import type
• Click OK
• Click on Close
Proceed to next section.
8.2 Importing pupil data using the SIMS Dynamic Link
On or after the first day of the new academic year, import from your MIS all your pupils on roll. This will change the class and year of any existing pupils and will assign the correct class to the pre-admissions you imported earlier on in the year.
• In SCO, click on the Configuration tab
• Select Pupil import
• In case of discrepancies, a Data discrepancies screen will appear to ensure no duplicates are imported
• If you previously imported pre-admissions with blank Pupil IDs, tick Merge with existing pupil without ID and click on Re-scan data
SCO How to Import Pre-Admission Pupils 10 Last revised 08-03-2019 v2.4.0.100
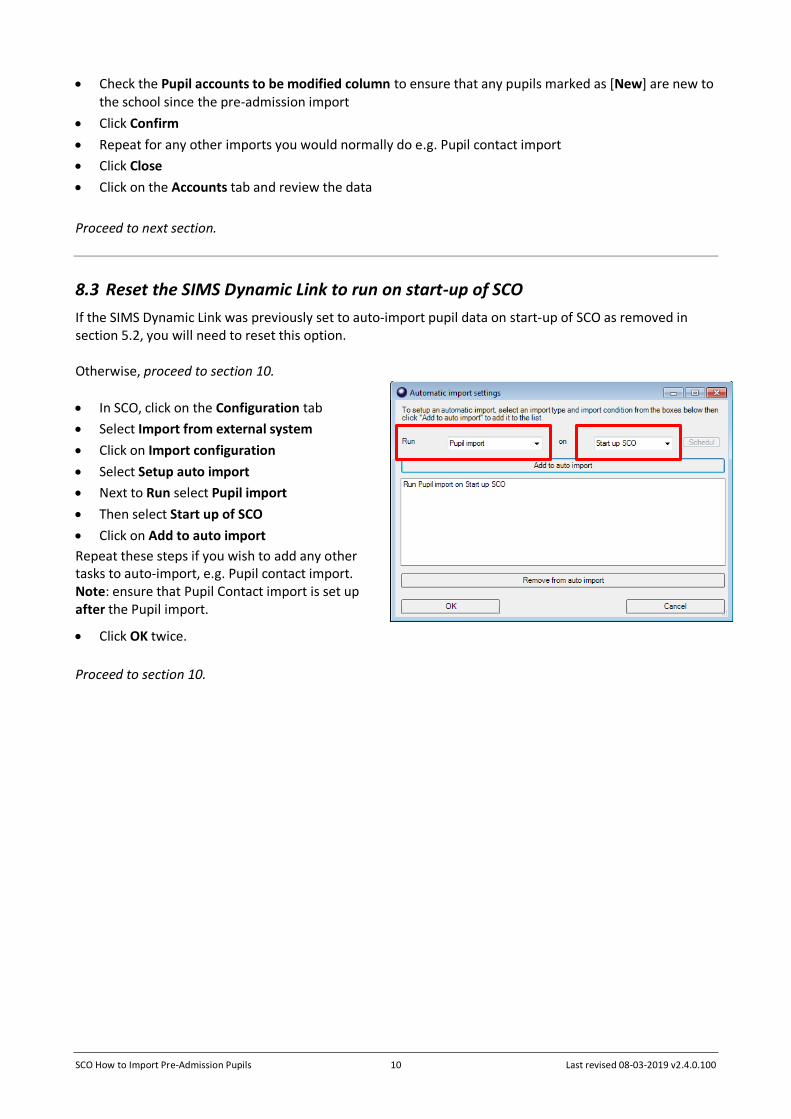
• Check the Pupil accounts to be modified column to ensure that any pupils marked as [New] are new to the school since the pre-admission import
• Click Confirm
• Repeat for any other imports you would normally do e.g. Pupil contact import
• Click Close
• Click on the Accounts tab and review the data
Proceed to next section.
8.3 Reset the SIMS Dynamic Link to run on start-up of SCO
If the SIMS Dynamic Link was previously set to auto-import pupil data on start-up of SCO as removed in section 5.2, you will need to reset this option. Otherwise, proceed to section 10.
• In SCO, click on the Configuration tab
• Select Import from external system
• Click on Import configuration
• Select Setup auto import
• Next to Run select Pupil import
• Then select Start up of SCO
• Click on Add to auto import
Repeat these steps if you wish to add any other tasks to auto-import, e.g. Pupil contact import. Note: ensure that Pupil Contact import is set up after the Pupil import.
• Click OK twice.
Proceed to section 10.

SCO How to Import Pre-Admission Pupils 11 Last revised 08-03-2019 v2.4.0.100
9. Import pupil data using a csv file
You may already have a Pupil data import report in your MIS which you can generate to give the following information. If not you will need to create one, as follows: The generated report must contain all the mandatory fields listed below with exact field names as indicated. You may need to manually rename or merge fields in Excel if your MIS system does not automatically generate the required fields. The column label for the pupil ID MUST match Pupil ID field set for imports in SCO
Mandatory fields: Optional fields:
Forename Notes
Surname Gender
Date of Birth Salutation
Either UPN or PupilID or AdmissionNumber (this needs to match the Pupil ID field used for imports, as you wrote down in section 2.1)
PupilPremiumIndicator
Year Taught In
Reg Group
Address Line
Eligible for Free Meals
• In SCO, click on the Configuration tab
• Select Pupil import
• Browse and select the SCO Pupil Data CSV file you saved above
• A window will be displayed summarising the actions taken
• Review the Data discrepancies screen to ensure no duplicates are imported
• If you previously imported pre-admissions with blank Pupil IDs, tick Merge with existing pupil without ID and click on Re-scan data. This is important as it will ensure no duplicate pupil records are created
SCO How to Import Pre-Admission Pupils 12 Last revised 08-03-2019 v2.4.0.100
• Check the Pupil accounts to be modified column to ensure that any pupils marked as [New] are new to the school since the pre-admission import
• Click Confirm
• Click Close
• Click on the Accounts tab and review the data
Proceed to section 10.
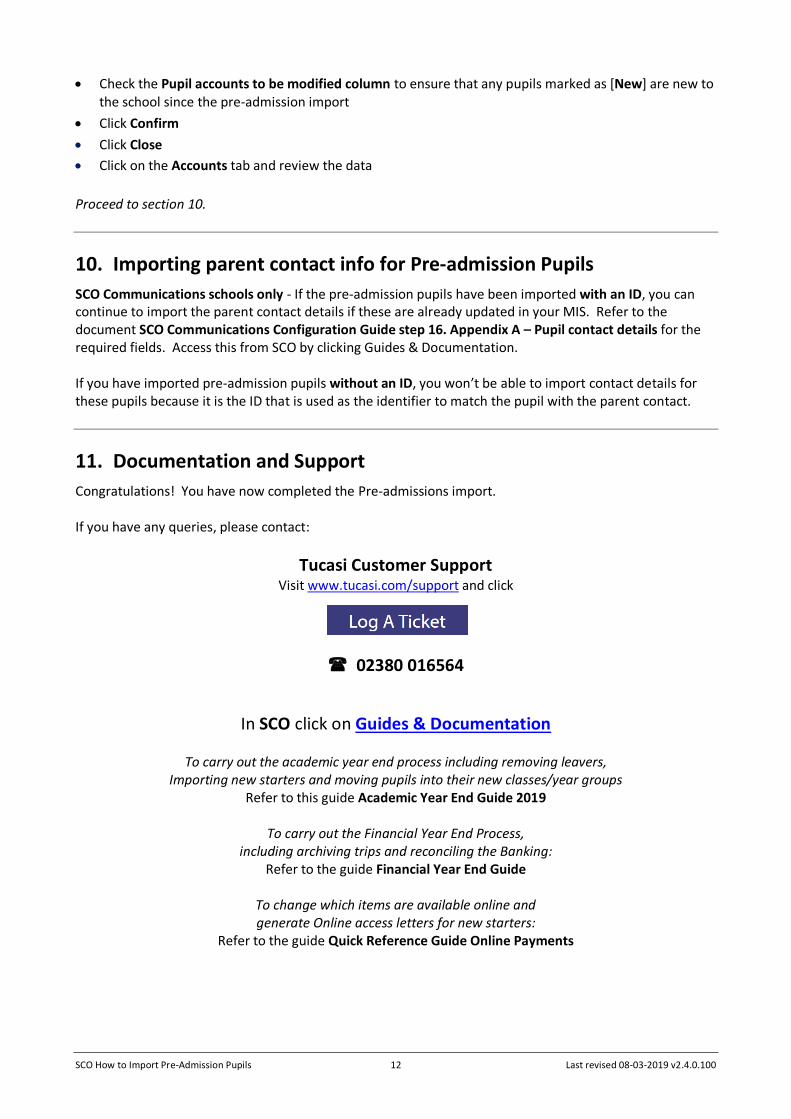
10. Importing parent contact info for Pre-admission Pupils
SCO Communications schools only - If the pre-admission pupils have been imported with an ID, you can continue to import the parent contact details if these are already updated in your MIS. Refer to the document SCO Communications Configuration Guide step 16. Appendix A – Pupil contact details for the required fields. Access this from SCO by clicking Guides & Documentation. If you have imported pre-admission pupils without an ID, you won’t be able to import contact details for these pupils because it is the ID that is used as the identifier to match the pupil with the parent contact.
11. Documentation and Support
Congratulations! You have now completed the Pre-admissions import. If you have any queries, please contact:
Tucasi Customer Support Visit www.tucasi.com/support and click
02380 016564
In SCO click on Guides & Documentation
To carry out the academic year end process including removing leavers, Importing new starters and moving pupils into their new classes/year groups
Refer to this guide Academic Year End Guide 2019
To carry out the Financial Year End Process, including archiving trips and reconciling the Banking:
Refer to the guide Financial Year End Guide
To change which items are available online and generate Online access letters for new starters:
Refer to the guide Quick Reference Guide Online Payments


![PySession4 - it.uu.se filePySession4 February 5, 2019 In [1]: import pandas as pd import numpy as np import matplotlib.pyplot as plt import sklearn.preprocessing as skl_pre import](https://img.pdfslide.us/doc/110x75/5cb2863a88c993f5708be449/pysession4-ituuse-february-5-2019-in-1-import-pandas-as-pd-import-numpy.jpg)