Embed Size (px)
Citation preview

School IT Systems Support Herts for Learning Ltd SROB220, Robertson House, Six Hills Way, Stevenage, Herts, SG1 2FQ
Doc Ref S1502
Published December 2014
© School IT Systems Support (SITSS) Herts for Learning Ltd, 2014
Technical Support Centre Accredited by the Learning and Performance Institute (formerly, the Institute of IT Training) RM Approved Support Partner
Fully accredited by Capita SIMS for proven quality of SIMS support
School Census 2015
Data Preparation and Sending Guide
Return Date: Thursday 15th
January 2015 For
Secondary and Middle deemed Secondary schools
IMPORTANT NOTE
This guide has been provided to enable you to make the necessary preparations for the January 2015 School Census return.
The purpose of this document is to point out what data is required for the return, help to identify missing or invalid data, and shows you how to correct or edit the data. Please work through all sections in order, as it is imperative that each of the required data areas are checked, and if necessary, edited. Please use the check sheet to tick off each area once you are satisfied the data recorded is correct. Remember this is the largest return of the year and is funding related. All documentation relating to the School Census 2015 can be found on the SITSS website at the following address.
http://bit.ly/hertscensus/

CONTENTS
INTRODUCTION ............................................................................................................. 6
How has the School Census Spring Return Changed? ........................................ 6
SIMS Permissions required by users producing the School Census .................... 7
OVERVIEW OF THE SCHOOL CENSUS SPRING 2015 RETURN PROCESS ............. 8
Importing Manifest File Set ................................................................................... 9
Creating the School Census return ..................................................................... 11
Producing Detailed Reports ................................................................................ 15
Checking Data Using Reports ............................................................................. 16
Preparing Pupil Level Information ....................................................................... 17
Updating Information Using Bulk Update ............................................................ 18
HOW TO CORRECT YOUR DATA ............................................................................... 21
Checking/Correcting UPNs ................................................................................. 21
Checking/Correcting Unique Learner Numbers .................................................. 22
Checking/Correcting the National Curriculum Year Group (Year Taught In) ...... 23
Checking Home Information ............................................................................... 26
Checking Ethnic/Cultural and First Language Information .................................. 27
Checking Free School Meal Eligibility ................................................................. 28
Checking Service Children in Education Information .......................................... 29
Checking/Recording Funded Hours (all-through schools only) ........................... 30
Checking/Recording Hours at Setting (all through schools only) ........................ 30
Managing School Dinners Taken on Census Day .............................................. 31
Updating Class Types (all through schools only) ................................................ 34
Updating Students in receipt of Top-up Funding................................................. 36
Updating Students Adopted from Care ............................................................... 37
Checking/Correcting Youth Support Services Agreement .................................. 39
Checking/Correcting the Learner Support Code ................................................. 40
Checking/Correcting In Care/Looked After Details ............................................. 41
Recording Leavers and Re-Admissions ............................................................. 43
Leaving Date for Year 12 and 13 Leavers .......................................................... 43
Checking/Correcting Special Educational Needs (SEN) Information ................. 45
Preparing Exclusions Information ...................................................................... 48
PREPARING TO SEND YOUR CENSUS RETURN ..................................................... 51
Final data checks and corrections - order of working ......................................... 51
Opening your return ........................................................................................... 51
Calculating All Details ........................................................................................ 52
Saving your Work ............................................................................................... 52
Re-Opening a Return ......................................................................................... 52
Copying a Return ............................................................................................... 53
Deleting a Return ............................................................................................... 53
Checking Census Details and School Information ............................................. 53
ENTERING/CHECKING ADDITIONAL DATA IN THE CENSUS RETURN .................. 54
Top-up Funding (panel 4) ................................................................................... 54
Adopted from Care (panel 5) .............................................................................. 55
Editing Classes (panel 6) ................................................................................... 55
Entering Student Reconciliation Figures (panel 7) ............................................. 58
Student Attendance (panel 8) ............................................................................ 59
Entering General Information (panel 9) .............................................................. 60
Entering the Admission Appeals (panel 10) ....................................................... 60
Producing and printing the Summary Report ..................................................... 61
Saving the Summary Report .............................................................................. 62
Authorising the School Census Return .............................................................. 62
SUBMITTING THE RETURN FROM ACADEMIES TO THE DFE ................................ 63
SUBMITTING THE RETURN FROM SCHOOLS TO THE LA VIA ANYCOMMS + ...... 64
School Census January 2015 Data Preparation Guide Herts for Learning
Doc Ref S1502 - 5 -
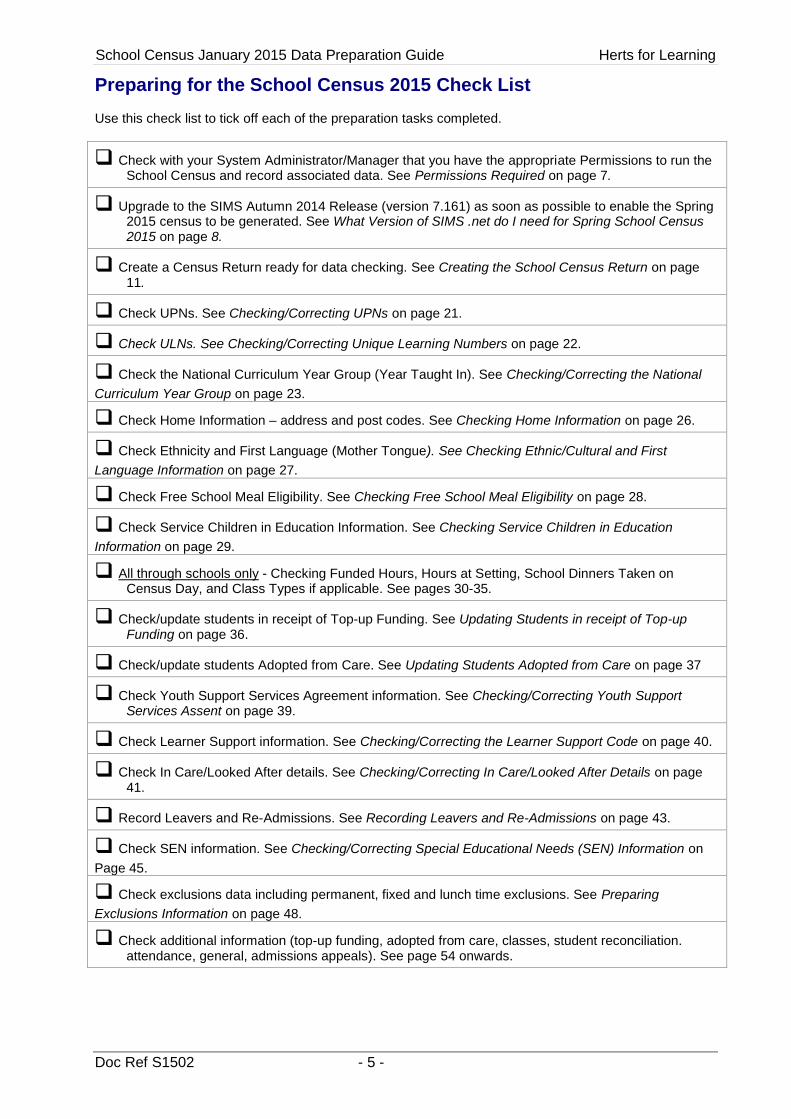
Preparing for the School Census 2015 Check List Use this check list to tick off each of the preparation tasks completed.
Check with your System Administrator/Manager that you have the appropriate Permissions to run the School Census and record associated data. See Permissions Required on page 7.
Upgrade to the SIMS Autumn 2014 Release (version 7.161) as soon as possible to enable the Spring 2015 census to be generated. See What Version of SIMS .net do I need for Spring School Census 2015 on page 8.
Create a Census Return ready for data checking. See Creating the School Census Return on page 11.
Check UPNs. See Checking/Correcting UPNs on page 21.
Check ULNs. See Checking/Correcting Unique Learning Numbers on page 22.
Check the National Curriculum Year Group (Year Taught In). See Checking/Correcting the National
Curriculum Year Group on page 23.
Check Home Information – address and post codes. See Checking Home Information on page 26.
Check Ethnicity and First Language (Mother Tongue). See Checking Ethnic/Cultural and First
Language Information on page 27.
Check Free School Meal Eligibility. See Checking Free School Meal Eligibility on page 28.
Check Service Children in Education Information. See Checking Service Children in Education
Information on page 29.
All through schools only - Checking Funded Hours, Hours at Setting, School Dinners Taken on Census Day, and Class Types if applicable. See pages 30-35.
Check/update students in receipt of Top-up Funding. See Updating Students in receipt of Top-up Funding on page 36.
Check/update students Adopted from Care. See Updating Students Adopted from Care on page 37
Check Youth Support Services Agreement information. See Checking/Correcting Youth Support Services Assent on page 39.
Check Learner Support information. See Checking/Correcting the Learner Support Code on page 40.
Check In Care/Looked After details. See Checking/Correcting In Care/Looked After Details on page 41.
Record Leavers and Re-Admissions. See Recording Leavers and Re-Admissions on page 43.
Check SEN information. See Checking/Correcting Special Educational Needs (SEN) Information on
Page 45.
Check exclusions data including permanent, fixed and lunch time exclusions. See Preparing
Exclusions Information on page 48.
Check additional information (top-up funding, adopted from care, classes, student reconciliation. attendance, general, admissions appeals). See page 54 onwards.
Herts for Learning School Census January 2015 Data Preparation Guide
- 6 - Doc Ref S1502
Introduction
This preparation guide will assist you in producing the Spring School Census 2015 and includes instructions for the most common tasks. The following other documents may also be of assistance:
School Census 2014 to 2015 Guide, v1.7 (DfE)
School Census Validation Errors and Resolutions, Academic Year 2014/2015 (Capita document)
These can be obtained from our website at this location:
http://bit.ly/hertscensus/
Some readers of this document will already be very familiar with SIMS and with the census process. If so, you should review this section to understand the changes made to census since Spring 2014 and then refer to these sections:
Overview of the School Census Spring 2015 Return Process (page 8)
Preparing to Send Your Census Return (page 51)
Entering/Checking Additional Data (page 54)
Submitting the Return (page 64 for a school, page 63 for an academy)
Readers who are less familiar with SIMS and/or census may need to use the section entitled How to correct your data (page 21) for guidance on making changes on individual student records to the data items required to be returned in census.
How has the School Census Spring Return Changed?
Changes to the School Census Spring Return since last year are as follows:
Selected Period on Census Day Focus | Statutory Returns | School Census An option to Include alternative curriculum periods in the Classes panel is now available in the Selected Period on Census day panel.
Adopted from care changes Focus | Statutory Returns | School Census Residence orders have now been replaced by child arrangement orders, prompting the introduction of a new code: C – Ceased to be looked after through a Child Arrangement Order (CAO). See page 37. Please Note: to attract the Pupil Premium for adopted children, and those who are the subject of a Statutory Guardianship Order or Residence Order, parents and guardians will need to inform the school about their child’s circumstances and provide supporting evidence, for example the Adoption (Court) Order in time for the school to record the child’s status for the January 2015 School Census.
School Census January 2015 Data Preparation Guide Herts for Learning
Doc Ref S1502 - 7 -
Special Educational Need Changes Focus | Student | Special Educational Needs SEN Needs (Rank 1 and 2), SEN Unit Indicator and Resourced Provision Indicator are reported for the following SEN provision/status codes.
S – Statement
E – Education, Health And Care Plan
K – SEN Support
P – School/Early Years Action Plan
The following SEN provision/status do not have SEN Needs (Rank 1 and 2), SEN Unit Indicator or Resourced Provision Indicator reported:
A – School/Early Years Action
N – No Special Educational Need
Special Educational Need Type Changes
Focus | Student | Special Educational Needs
The following changes have been made to the Need Type options:
New SEN Type SEMH (Social, Emotional and Mental Health)
New SEN Type NSA (No Special Assessment) i.e. SEN support but no specialist assessment of type of need, has been intr0duced
SEN Type BESD (Behaviour, Emotional and Social Difficulties) is now inactive, and will trigger a validation error if found to be present in a student’s record.
SIMS Permissions required by users producing the School Census
Producing the Return To produce the return, you will need to be a member of one of the following user groups in System Manager:
Returns Manager or Returns Operator
Editing and Preparing Data Users editing and preparing data must have permissions to access other areas of SIMS, e.g. student details, school details, etc. They must be members of any of the following user groups in System Manager:
Administration Assistant
Admissions Officer
School Administrator.
Importing Revised Manifest Files for Validation and Reports SIMS provides the Import Fileset functionality, to enable updates to the Validation Errors Summary and the Summary Report (derived from files supplied by the Statutory Body), and detailed reports (provided by SIMS) to be imported into SIMS between SIMS releases. To use this, you must be a member of one of the following user groups in System Manager (refer to page 9 for more detail about this process):
System Manager, Returns Manager or Personnel Officer
Herts for Learning School Census January 2015 Data Preparation Guide
- 8 - Doc Ref S1502
Overview of the School Census Spring 2015 Return Process
For full instructions on any process you may be unfamiliar with, you can refer to the relevant SIMS handbook. All handbooks can be accessed from the Documentation Centre which is launched by clicking the Documentation button on the Home Page in SIMS. Once open, click the Handbooks button, select the required category then click the required handbook from the Handbooks page. The following list provides a brief outline of the steps involved in producing the School Census return: 1. Upgrade to the SIMS 2014 Autumn Release (SIMS 7.161). If necessary, import the
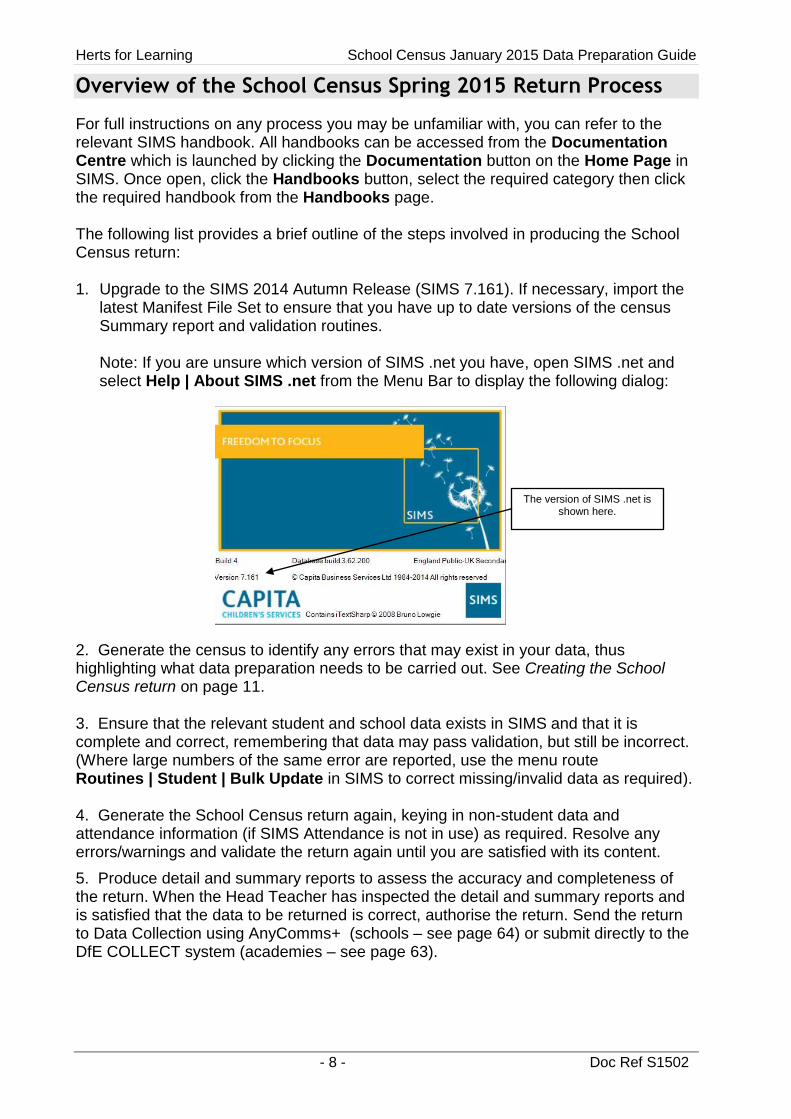
latest Manifest File Set to ensure that you have up to date versions of the census Summary report and validation routines. Note: If you are unsure which version of SIMS .net you have, open SIMS .net and select Help | About SIMS .net from the Menu Bar to display the following dialog:
2. Generate the census to identify any errors that may exist in your data, thus highlighting what data preparation needs to be carried out. See Creating the School Census return on page 11. 3. Ensure that the relevant student and school data exists in SIMS and that it is complete and correct, remembering that data may pass validation, but still be incorrect. (Where large numbers of the same error are reported, use the menu route Routines | Student | Bulk Update in SIMS to correct missing/invalid data as required). 4. Generate the School Census return again, keying in non-student data and attendance information (if SIMS Attendance is not in use) as required. Resolve any errors/warnings and validate the return again until you are satisfied with its content.
5. Produce detail and summary reports to assess the accuracy and completeness of the return. When the Head Teacher has inspected the detail and summary reports and is satisfied that the data to be returned is correct, authorise the return. Send the return to Data Collection using AnyComms+ (schools – see page 64) or submit directly to the DfE COLLECT system (academies – see page 63).
The version of SIMS .net is shown here.
School Census January 2015 Data Preparation Guide Herts for Learning
Doc Ref S1502 - 9 -
Importing Manifest File Set
As you know, SIMS provides detailed reports to enable the checking of data used to generate your School Census return. However, the Validation Errors Summary and the Summary Report are derived from files supplied by the DfE.
The SIMS upgrade to the Autumn 2014 Release (Version 7.161) automatically installs version 0180 of this file set. However, it is always possible that a new manifest file set might be provided during census season that improves the quality of validation or the accuracy of figures in the Summary Report. If so, this should be downloaded and imported by all schools.
Please check our website regularly over the next few weeks to see if updated versions of these files become available.
Importing the revised manifest files only needs to be carried out once at a single SIMS workstation in school, as the files are stored in the SIMS Document Server and will therefore become available to all users once imported. To do this:
1. Create a folder in a known location called Spring 2015 Fileset.
2. The files to download and import can be found at: bit.ly/hertscensus.
3. Locate the file:
0186_statutoryreturns_spring2015_update_fileset.mfs on this page, right-click on the file and select Save Target As from the menu, changing the Save As type to All files and replace .zip with .mfs to save this file into the Spring 2015 Fileset Folder.
Now right-click and select Save Target As on the file:
0186_statutoryreturns_spring2015_update_fileset.mfs.signature into the same folder.
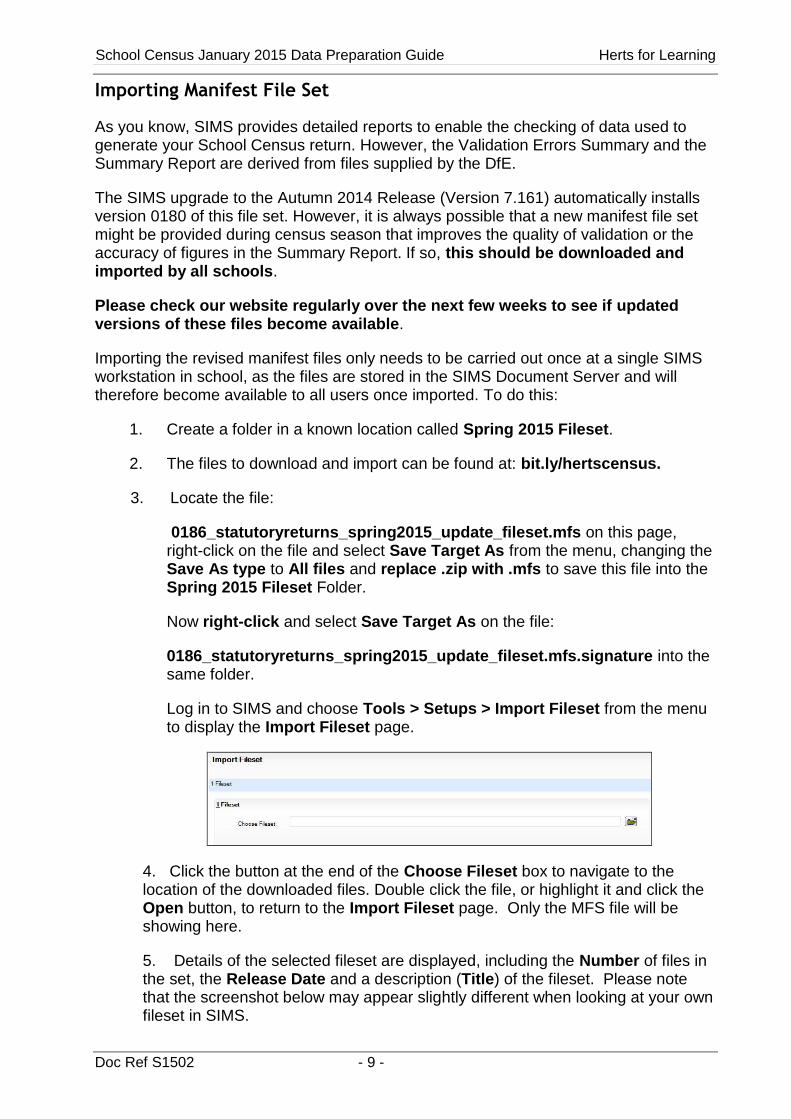
Log in to SIMS and choose Tools > Setups > Import Fileset from the menu to display the Import Fileset page.
4. Click the button at the end of the Choose Fileset box to navigate to the location of the downloaded files. Double click the file, or highlight it and click the Open button, to return to the Import Fileset page. Only the MFS file will be showing here.
5. Details of the selected fileset are displayed, including the Number of files in the set, the Release Date and a description (Title) of the fileset. Please note that the screenshot below may appear slightly different when looking at your own fileset in SIMS.
Herts for Learning School Census January 2015 Data Preparation Guide
- 10 - Doc Ref S1502
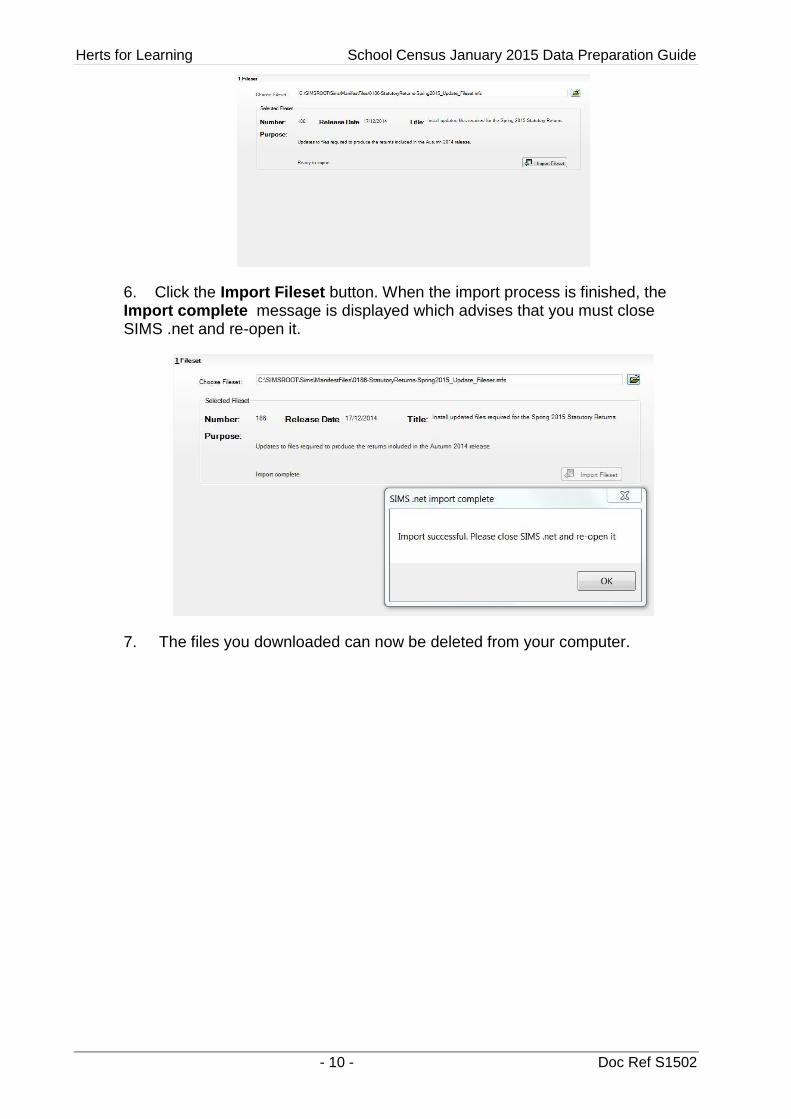
6. Click the Import Fileset button. When the import process is finished, the Import complete message is displayed which advises that you must close SIMS .net and re-open it.
7. The files you downloaded can now be deleted from your computer.
School Census January 2015 Data Preparation Guide Herts for Learning
Doc Ref S1502 - 11 -
Creating the School Census return
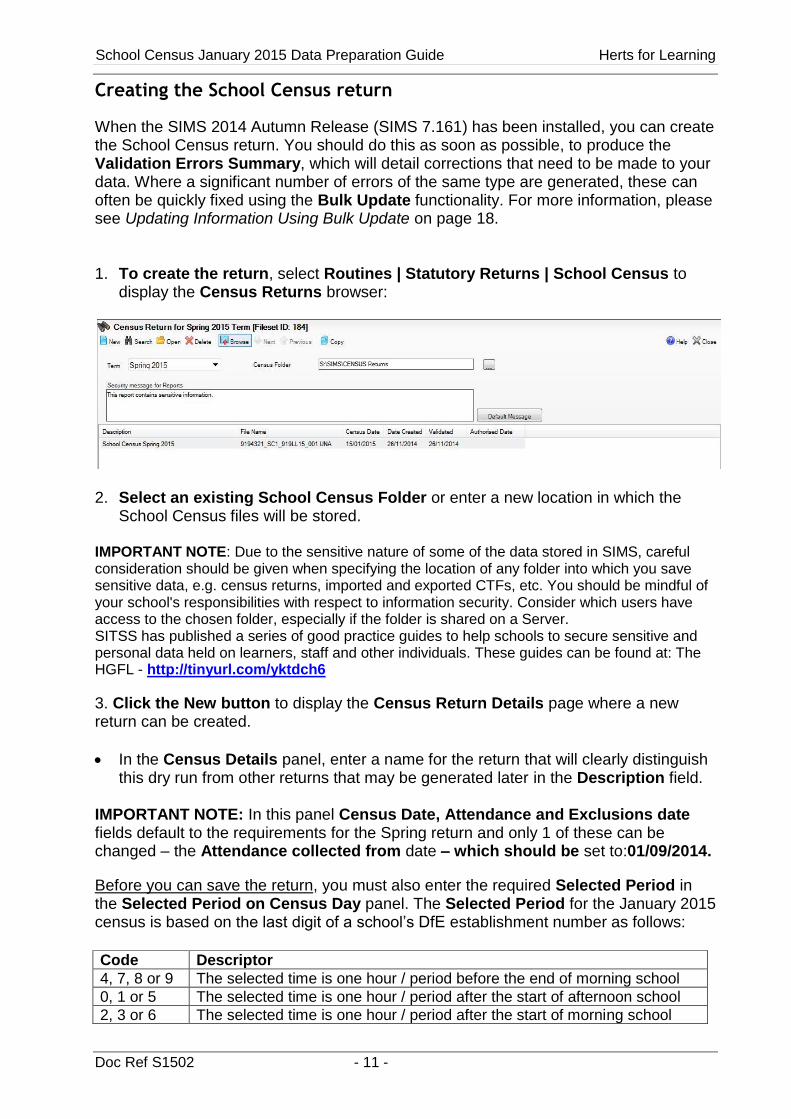
When the SIMS 2014 Autumn Release (SIMS 7.161) has been installed, you can create the School Census return. You should do this as soon as possible, to produce the Validation Errors Summary, which will detail corrections that need to be made to your data. Where a significant number of errors of the same type are generated, these can often be quickly fixed using the Bulk Update functionality. For more information, please see Updating Information Using Bulk Update on page 18. 1. To create the return, select Routines | Statutory Returns | School Census to
display the Census Returns browser:
2. Select an existing School Census Folder or enter a new location in which the
School Census files will be stored.
IMPORTANT NOTE: Due to the sensitive nature of some of the data stored in SIMS, careful consideration should be given when specifying the location of any folder into which you save sensitive data, e.g. census returns, imported and exported CTFs, etc. You should be mindful of your school's responsibilities with respect to information security. Consider which users have access to the chosen folder, especially if the folder is shared on a Server. SITSS has published a series of good practice guides to help schools to secure sensitive and personal data held on learners, staff and other individuals. These guides can be found at: The HGFL - http://tinyurl.com/yktdch6
3. Click the New button to display the Census Return Details page where a new return can be created.
In the Census Details panel, enter a name for the return that will clearly distinguish this dry run from other returns that may be generated later in the Description field.
IMPORTANT NOTE: In this panel Census Date, Attendance and Exclusions date fields default to the requirements for the Spring return and only 1 of these can be changed – the Attendance collected from date – which should be set to:01/09/2014.
Before you can save the return, you must also enter the required Selected Period in the Selected Period on Census Day panel. The Selected Period for the January 2015 census is based on the last digit of a school’s DfE establishment number as follows:
Code Descriptor
4, 7, 8 or 9 The selected time is one hour / period before the end of morning school
0, 1 or 5 The selected time is one hour / period after the start of afternoon school
2, 3 or 6 The selected time is one hour / period after the start of morning school
Herts for Learning School Census January 2015 Data Preparation Guide
- 12 - Doc Ref S1502
If your school has a 2-week timetable and census day falls in week 2, you should calculate the selected period by counting all the periods in week 1 plus the periods in week 2 up to the specific selected period. If the selected time is not appropriate to the school timetable (for example, if the selected time is when the whole school or a large proportion of the school is in an assembly with the head teacher) schools should choose an hour/period that reflects a ‘normal’ class situation that applies at the selected time each Thursday of the term.
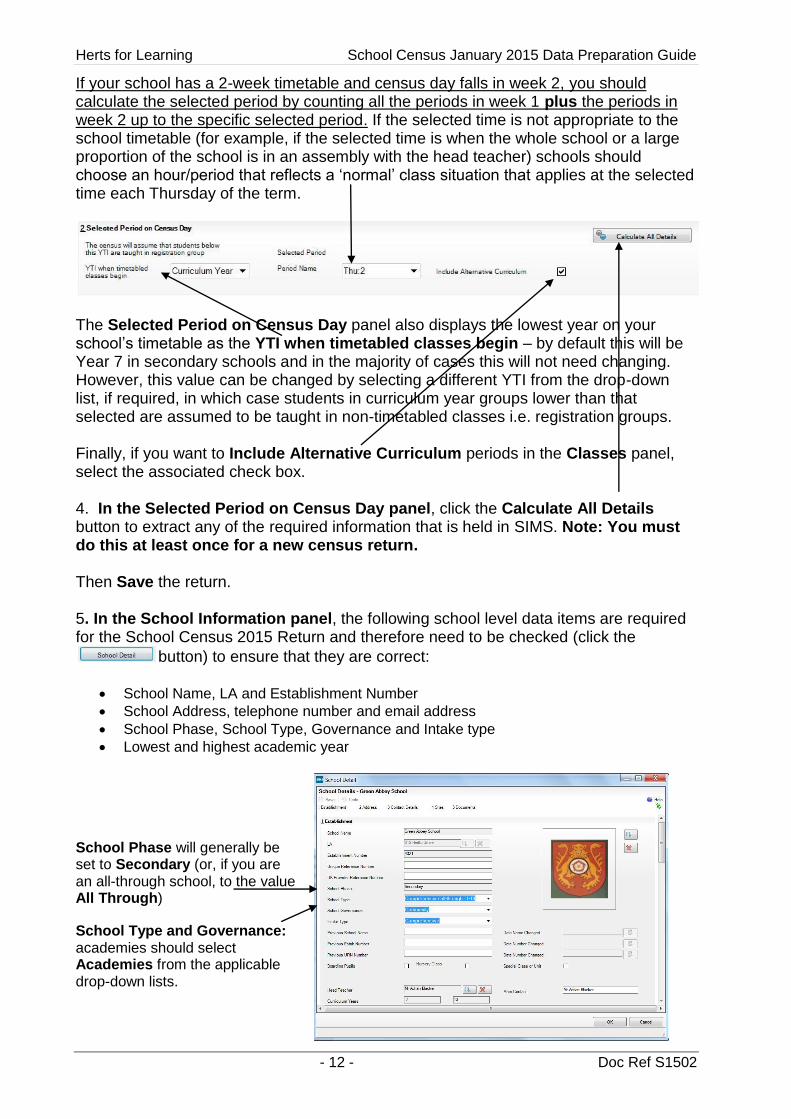
The Selected Period on Census Day panel also displays the lowest year on your school’s timetable as the YTI when timetabled classes begin – by default this will be Year 7 in secondary schools and in the majority of cases this will not need changing. However, this value can be changed by selecting a different YTI from the drop-down list, if required, in which case students in curriculum year groups lower than that selected are assumed to be taught in non-timetabled classes i.e. registration groups. Finally, if you want to Include Alternative Curriculum periods in the Classes panel, select the associated check box. 4. In the Selected Period on Census Day panel, click the Calculate All Details button to extract any of the required information that is held in SIMS. Note: You must do this at least once for a new census return. Then Save the return. 5. In the School Information panel, the following school level data items are required for the School Census 2015 Return and therefore need to be checked (click the
button) to ensure that they are correct:
School Name, LA and Establishment Number
School Address, telephone number and email address
School Phase, School Type, Governance and Intake type
Lowest and highest academic year
School Phase will generally be set to Secondary (or, if you are an all-through school, to the value All Through)
School Type and Governance: academies should select Academies from the applicable drop-down lists.
School Census January 2015 Data Preparation Guide Herts for Learning
Doc Ref S1502 - 13 -
Academies should also ensure that the following information is recorded where applicable: The school’s Previous Name, Date Name Changed, Previous Estab Number, Date Number Changed, Previous URN Number and Date Number Changed fields. This information is used by School Census. If the DfE number has changed for sponsor-led Academies, historical information is not collected and the date of arrival is reported as the date the DfE number changed.
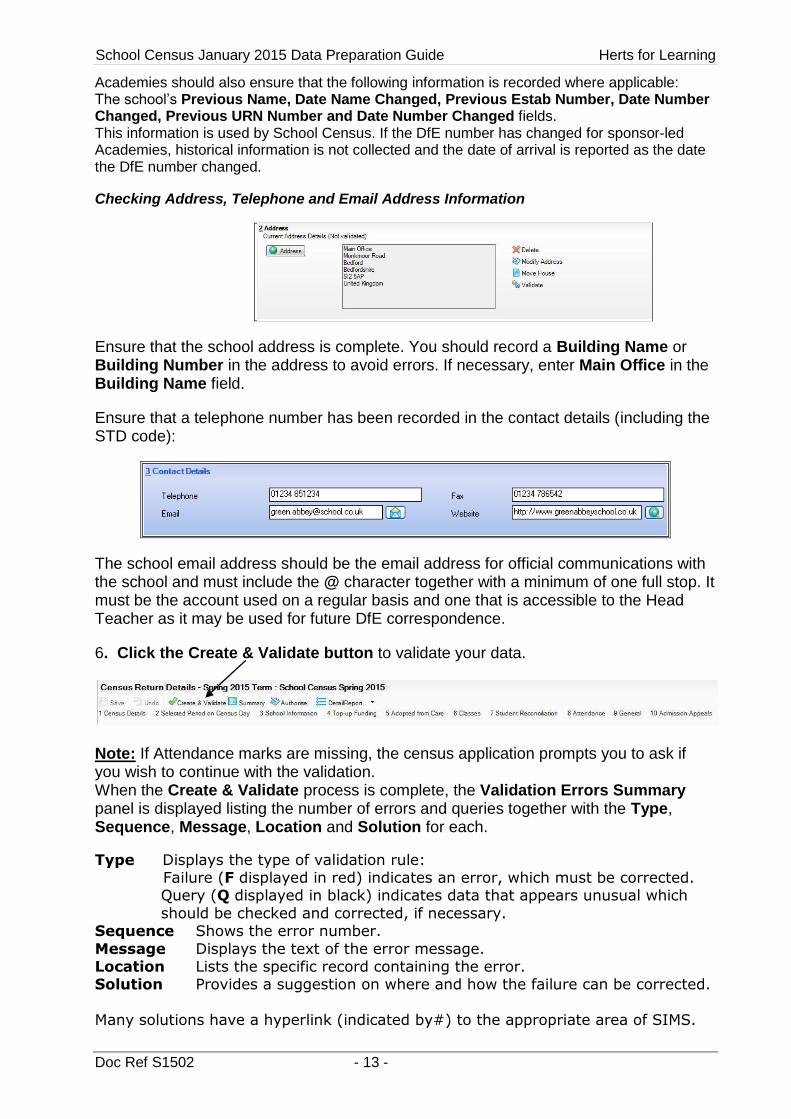
Checking Address, Telephone and Email Address Information
Ensure that the school address is complete. You should record a Building Name or Building Number in the address to avoid errors. If necessary, enter Main Office in the Building Name field.
Ensure that a telephone number has been recorded in the contact details (including the STD code):
The school email address should be the email address for official communications with the school and must include the @ character together with a minimum of one full stop. It must be the account used on a regular basis and one that is accessible to the Head Teacher as it may be used for future DfE correspondence.
6. Click the Create & Validate button to validate your data.
Note: If Attendance marks are missing, the census application prompts you to ask if you wish to continue with the validation. When the Create & Validate process is complete, the Validation Errors Summary panel is displayed listing the number of errors and queries together with the Type, Sequence, Message, Location and Solution for each. Description Type Displays the type of validation rule:
Failure (F displayed in red) indicates an error, which must be corrected. Query (Q displayed in black) indicates data that appears unusual which
should be checked and corrected, if necessary. Sequence Shows the error number.
Message Displays the text of the error message. Location Lists the specific record containing the error. Solution Provides a suggestion on where and how the failure can be corrected.
Many solutions have a hyperlink (indicated by#) to the appropriate area of SIMS.
Herts for Learning School Census January 2015 Data Preparation Guide
- 14 - Doc Ref S1502
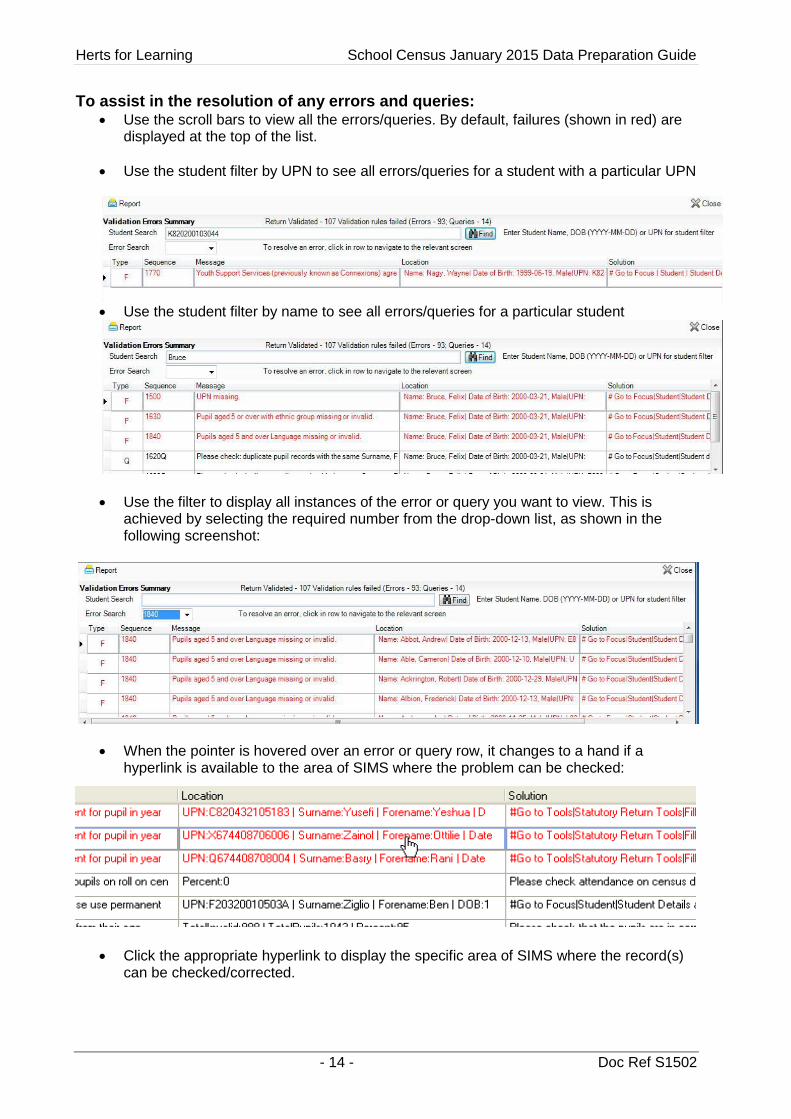
To assist in the resolution of any errors and queries: Use the scroll bars to view all the errors/queries. By default, failures (shown in red) are
displayed at the top of the list.
Use the student filter by UPN to see all errors/queries for a student with a particular UPN
Use the student filter by name to see all errors/queries for a particular student
Use the filter to display all instances of the error or query you want to view. This is achieved by selecting the required number from the drop-down list, as shown in the following screenshot:
When the pointer is hovered over an error or query row, it changes to a hand if a hyperlink is available to the area of SIMS where the problem can be checked:
Click the appropriate hyperlink to display the specific area of SIMS where the record(s)
can be checked/corrected.
School Census January 2015 Data Preparation Guide Herts for Learning
Doc Ref S1502 - 15 -
Change the order of the summary by clicking the appropriate column heading. If required, change the width of the columns by dragging the dividing line between the column headings until the required size is achieved.
View a summary of errors/queries by clicking the Report button, (located above the Validation Errors Summary panel). This summary displays the same error/query number(s) as displayed in the Validation Errors Summary panel and is displayed in a web browser, e.g. Windows® Internet Explorer, from where it can be printed, or transferred to another application.
Proceed by resolving as many errors and queries as possible and running Create & Validate again, as many times as necessary. Where there are large numbers of the same type of error, these can be fixed quickly using bulk update functionality via
Routines | Student | Bulk Update
Note: All errors must be resolved and all queries must be investigated before the return is authorised. In addition to the Validation Errors Summary, you may find it helpful to refer to the School Census Validation Errors and Resolutions, Academic Year 2014/2015 document
which can be accessed on The Grid website here: http://bit.ly/hertscensus/ This document contains a list of all errors/queries that can be generated, together with explanations and information on how to resolve the errors, and indicates queries that can be ignored. The document can also save you time and effort by helping to identify the order in which errors should be corrected. For example, if a UPN is missing, several UPN related errors might be generated. Therefore, adding missing UPNs can remove several errors.
Producing Detailed Reports
Once the School Census return has been created and validated, the following detailed reports can be used to check the data used to generate the return:
On Roll Basic Details Report
Leavers Basic Details Report
Exclusions Report
Attendance Report
Absentee Report
SEN Report
Address Details Report
Free School Meal Eligibility Report
Learner Support Report
Top-up Funding Report
Adopted From Care Report
Class Report
General Report
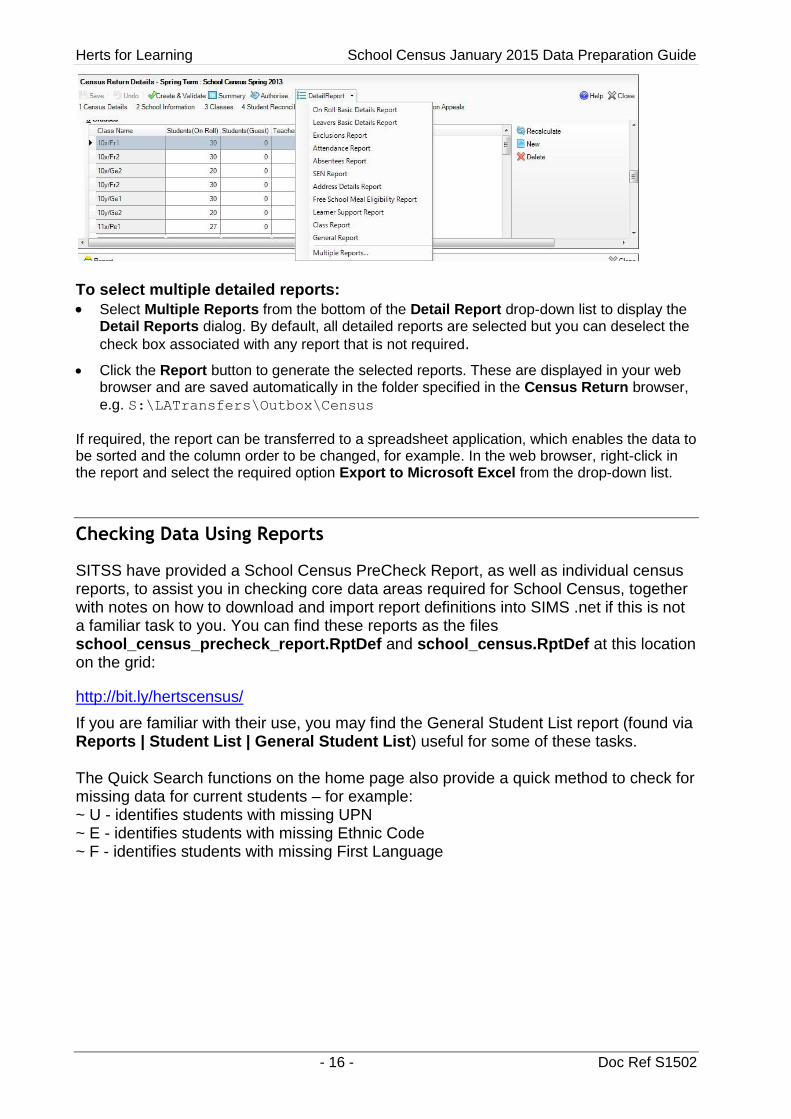
To select a single detailed report: Select the required report from the Detail Report drop-down list located at the top of the
Census Return Details page. The selected report is generated automatically and displayed in your web browser.
Herts for Learning School Census January 2015 Data Preparation Guide
- 16 - Doc Ref S1502
To select multiple detailed reports:
Select Multiple Reports from the bottom of the Detail Report drop-down list to display the Detail Reports dialog. By default, all detailed reports are selected but you can deselect the
check box associated with any report that is not required.
Click the Report button to generate the selected reports. These are displayed in your web browser and are saved automatically in the folder specified in the Census Return browser,
e.g. S:\LATransfers\Outbox\Census
If required, the report can be transferred to a spreadsheet application, which enables the data to be sorted and the column order to be changed, for example. In the web browser, right-click in the report and select the required option Export to Microsoft Excel from the drop-down list.
Checking Data Using Reports
SITSS have provided a School Census PreCheck Report, as well as individual census reports, to assist you in checking core data areas required for School Census, together with notes on how to download and import report definitions into SIMS .net if this is not a familiar task to you. You can find these reports as the files school_census_precheck_report.RptDef and school_census.RptDef at this location on the grid:
http://bit.ly/hertscensus/
If you are familiar with their use, you may find the General Student List report (found via Reports | Student List | General Student List) useful for some of these tasks. The Quick Search functions on the home page also provide a quick method to check for missing data for current students – for example: ~ U - identifies students with missing UPN ~ E - identifies students with missing Ethnic Code ~ F - identifies students with missing First Language
School Census January 2015 Data Preparation Guide Herts for Learning
Doc Ref S1502 - 17 -
Preparing Pupil Level Information
Before beginning the School Census return, ensure that all current students are included in SIMS .net and that as far as possible, the information is current and accurate. You should ensure that:
new students have been added.
any leavers have been recorded.
Note: ensure that a student’s ethnicity, first language and boarder status are entered before they are recorded as a leaver.
any duplicate or unwanted student records have been deleted.
UPNs have been checked/entered as required.
ethnicity and first language information has been recorded
the Service Children in Education Indicator is supplied where applicable.
in care details have been checked and updated for those pupils having exclusions.
the National Curriculum Year Group (Year Taught In) is correct.
free school meal eligibility has been updated.
student address information is up-to-date and complete.
The Unique Learner Numbers (ULNs) are entered for all students aged 14 and above
Youth Support Services Agreement has been recorded/updated where applicable.
exclusions information is up-to-date.
attendance records are up-to-date.
the Learner Support code is recorded where appropriate
The following sections provide additional information and specific instructions on checking and completing Pupil Level data. Much of this data can be checked/updated using the Bulk Update functionality described in the next section.
A note about students on a part-time timetable
SIMS .net allows students to be indicated as being part-time in education if their attendance is anything less than 10 sessions per week. However, the part-time setting (available in the Registration panel in Student Details in SIMS) is only relevant to Nursery schools (or schools with nursery age children) and Primary schools with Reception years. Students of compulsory school age should not be marked as part-time, even if they are on a part-time timetable for a period of time for example when a medical condition prevents full time attendance. Compulsory school-age students on a part-time timetable are not present in school for part of the school week or day. They are also not attending approved educational activity and must therefore be absent from school. In agreeing to the part-time timetable the school has agreed to the absence and must therefore record it as an authorised absence. This will ensure that the school has a record of the amount of education a pupil has missed and helps it to identify students needing additional support. Compulsory school-age pupils on a part-time timetable should be recorded as full-time with the appropriate absence code used for the sessions when they are not expected to attend. For information about this and other attendance related matters, please refer to this document, in particular the FAQs section:
https://www.gov.uk/government/publications/school-attendance
Herts for Learning School Census January 2015 Data Preparation Guide
- 18 - Doc Ref S1502
Updating Information Using Bulk Update
Most errors generated when producing the return can be avoided by checking your data for missing or invalid values. The best way to achieve this is by using the Bulk Update functionality available within SIMS .net, enabling you to search for missing or invalid data and then update in bulk. For example, it is possible to search for all students who do not have their ethnicity recorded. From the search results, you can highlight groups of students and assign the same value to each group, avoiding the need to manually enter or change values for individual students.
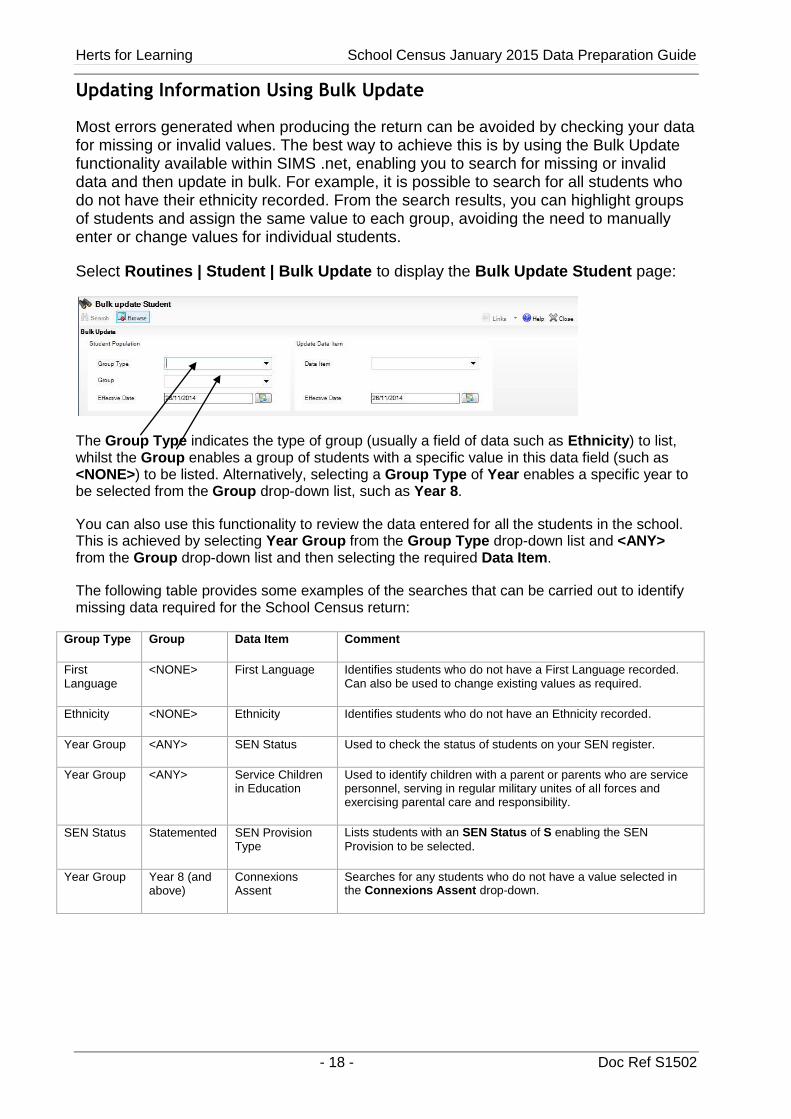
Select Routines | Student | Bulk Update to display the Bulk Update Student page:
The Group Type indicates the type of group (usually a field of data such as Ethnicity) to list, whilst the Group enables a group of students with a specific value in this data field (such as <NONE>) to be listed. Alternatively, selecting a Group Type of Year enables a specific year to be selected from the Group drop-down list, such as Year 8.
You can also use this functionality to review the data entered for all the students in the school. This is achieved by selecting Year Group from the Group Type drop-down list and <ANY> from the Group drop-down list and then selecting the required Data Item.
The following table provides some examples of the searches that can be carried out to identify missing data required for the School Census return:
Group Type Group Data Item Comment
First Language
<NONE> First Language Identifies students who do not have a First Language recorded. Can also be used to change existing values as required.
Ethnicity <NONE> Ethnicity Identifies students who do not have an Ethnicity recorded.
Year Group <ANY> SEN Status Used to check the status of students on your SEN register.
Year Group <ANY> Service Children in Education
Used to identify children with a parent or parents who are service personnel, serving in regular military unites of all forces and exercising parental care and responsibility.
SEN Status Statemented SEN Provision Type
Lists students with an SEN Status of S enabling the SEN
Provision to be selected.
Year Group Year 8 (and above)
Connexions Assent
Searches for any students who do not have a value selected in the Connexions Assent drop-down.

School Census January 2015 Data Preparation Guide Herts for Learning
Doc Ref S1502 - 19 -
To carry out a search:
1. Select the required Group Type and Group from the drop-down lists, e.g. Ethnicity and <NONE>.
2. In the Student Population panel, the Effective Date is the date on which the membership of the group is based and defaults to today’s date. For census purposes you will usually need to change this to the start of the academic year, to display students who were on-roll on that date.
3. In the Update Data Item panel, select the required Data Item from the drop-down list, e.g. Ethnicity. The Effective Date in this panel is used to determine the date when the change will become effective and defaults to today’s date. In most circumstances, it is best to change this date to the start of your academic year as most data recorded will be applicable from the start of the academic year.
Once all the required criteria have been selected, click the Search button to display a list of students matching the chosen criteria e.g. all the students who have no ethnicity recorded:
NOTE: Use the horizontal and vertical scroll bars to view additional columns or rows as required. To increase the number of columns visible on the page, right-click on any column heading and select Narrow Columns from the pop-up menu.
To bulk update the data:
Often, the most effective method of populating missing data is to fill all the rows with the same data item and then edit the exceptions (depending for example, on the ethnic range within your school). The following example illustrates how to set all the students as White - English and then edit the exceptions:
1. To choose an ethnicity for all the students in the list, right-click on the heading of a data entry column (white background), e.g. English - White (hover over the heading to see the full title) and select Check All from the pop-up menu:
All the cells within that column will be populated with ticks.
Herts for Learning School Census January 2015 Data Preparation Guide
- 20 - Doc Ref S1502
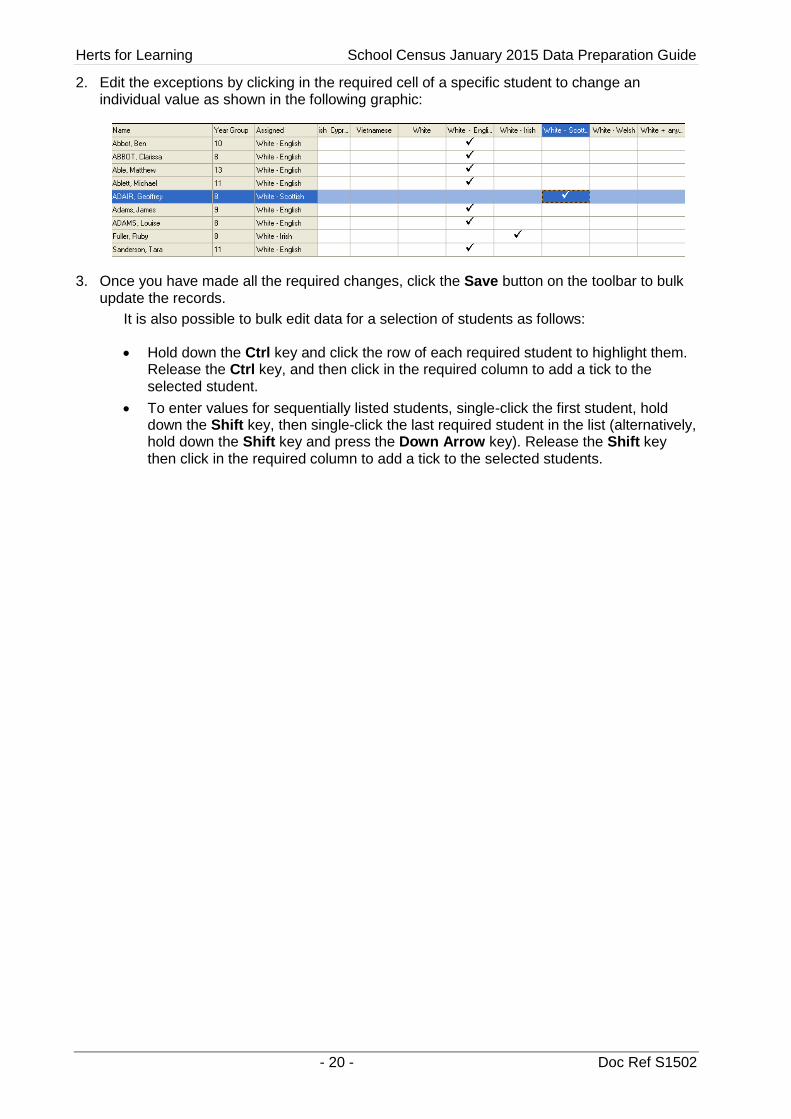
2. Edit the exceptions by clicking in the required cell of a specific student to change an individual value as shown in the following graphic:
3. Once you have made all the required changes, click the Save button on the toolbar to bulk update the records.
It is also possible to bulk edit data for a selection of students as follows:
Hold down the Ctrl key and click the row of each required student to highlight them. Release the Ctrl key, and then click in the required column to add a tick to the selected student.
To enter values for sequentially listed students, single-click the first student, hold down the Shift key, then single-click the last required student in the list (alternatively, hold down the Shift key and press the Down Arrow key). Release the Shift key then click in the required column to add a tick to the selected students.
School Census January 2015 Data Preparation Guide Herts for Learning
Doc Ref S1502 - 21 -
How to correct your data
You should use this section in conjunction with the census checking reports listed on pages 15 and 16. This section advises how to record missing data in all of the required areas.
Checking/Correcting UPNs
Ensure that all students have a UPN recorded and in the correct format. A temporary UPN is acceptable in some circumstances.
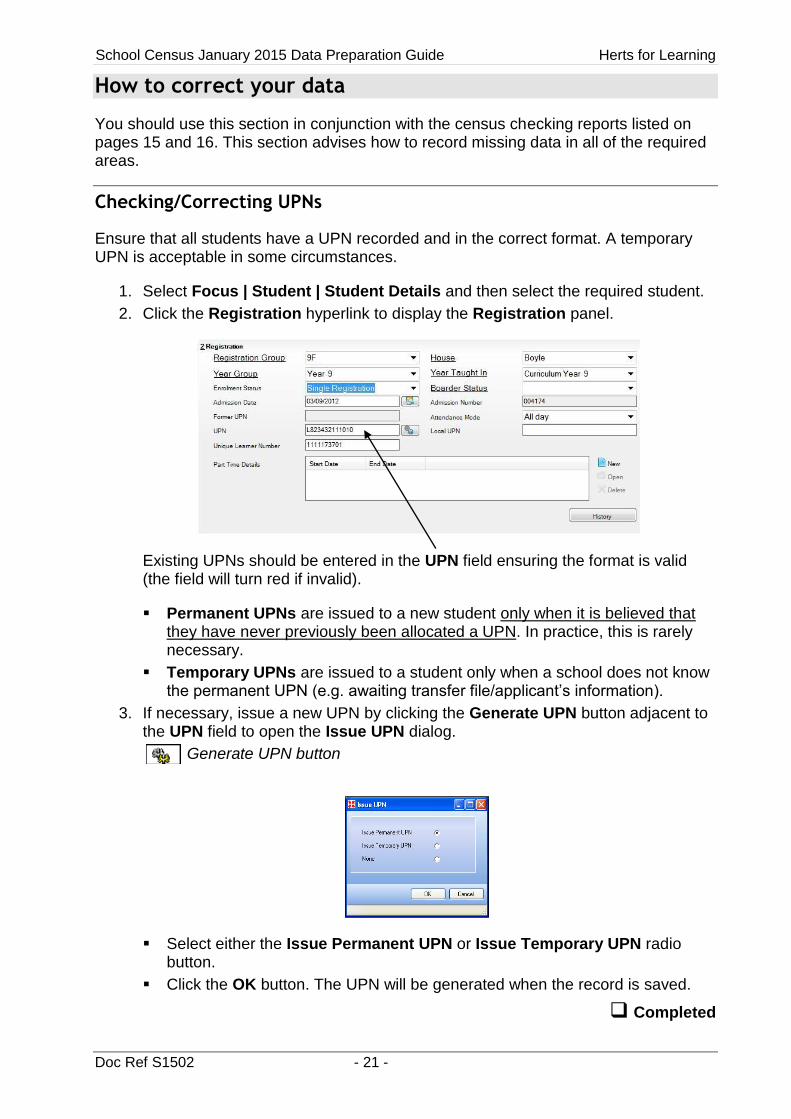
1. Select Focus | Student | Student Details and then select the required student.
2. Click the Registration hyperlink to display the Registration panel.
Existing UPNs should be entered in the UPN field ensuring the format is valid (the field will turn red if invalid).
Permanent UPNs are issued to a new student only when it is believed that they have never previously been allocated a UPN. In practice, this is rarely necessary.
Temporary UPNs are issued to a student only when a school does not know the permanent UPN (e.g. awaiting transfer file/applicant’s information).
3. If necessary, issue a new UPN by clicking the Generate UPN button adjacent to the UPN field to open the Issue UPN dialog.
Generate UPN button
Select either the Issue Permanent UPN or Issue Temporary UPN radio button.
Click the OK button. The UPN will be generated when the record is saved.
Completed
Herts for Learning School Census January 2015 Data Preparation Guide
- 22 - Doc Ref S1502
Checking/Correcting Unique Learner Numbers
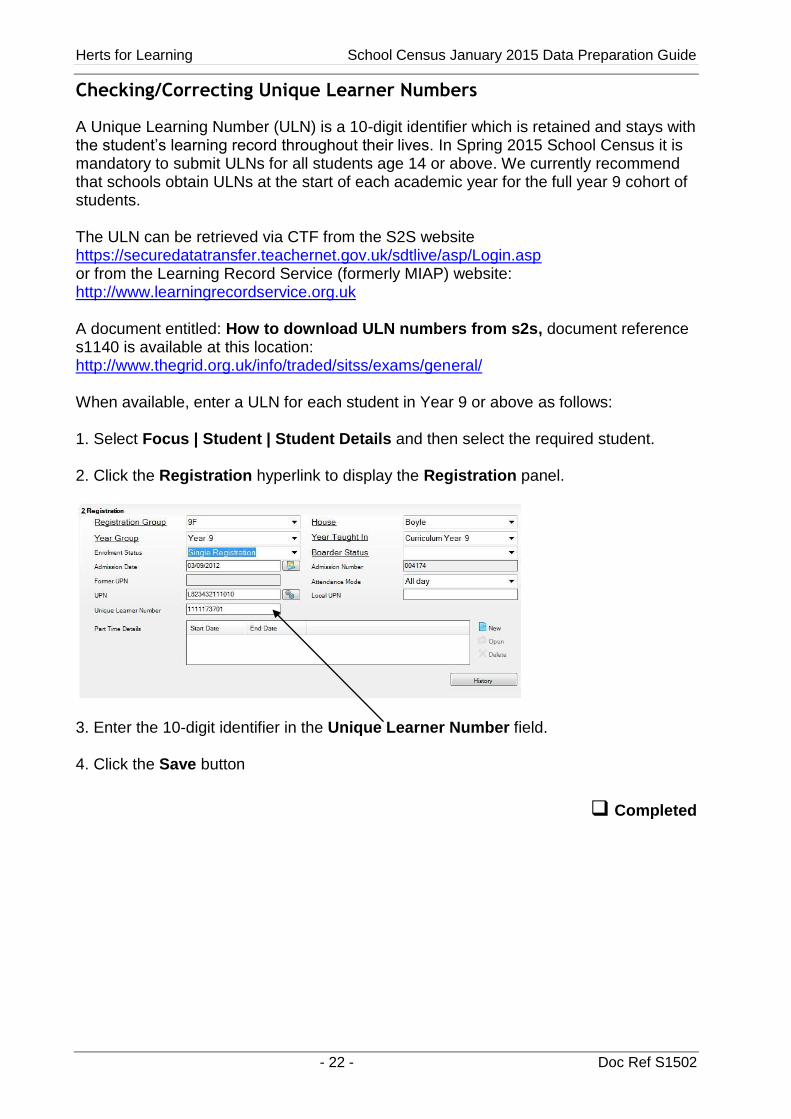
A Unique Learning Number (ULN) is a 10-digit identifier which is retained and stays with the student’s learning record throughout their lives. In Spring 2015 School Census it is mandatory to submit ULNs for all students age 14 or above. We currently recommend that schools obtain ULNs at the start of each academic year for the full year 9 cohort of students. The ULN can be retrieved via CTF from the S2S website https://securedatatransfer.teachernet.gov.uk/sdtlive/asp/Login.asp or from the Learning Record Service (formerly MIAP) website: http://www.learningrecordservice.org.uk A document entitled: How to download ULN numbers from s2s, document reference s1140 is available at this location: http://www.thegrid.org.uk/info/traded/sitss/exams/general/ When available, enter a ULN for each student in Year 9 or above as follows: 1. Select Focus | Student | Student Details and then select the required student. 2. Click the Registration hyperlink to display the Registration panel.
3. Enter the 10-digit identifier in the Unique Learner Number field. 4. Click the Save button
Completed
School Census January 2015 Data Preparation Guide Herts for Learning
Doc Ref S1502 - 23 -
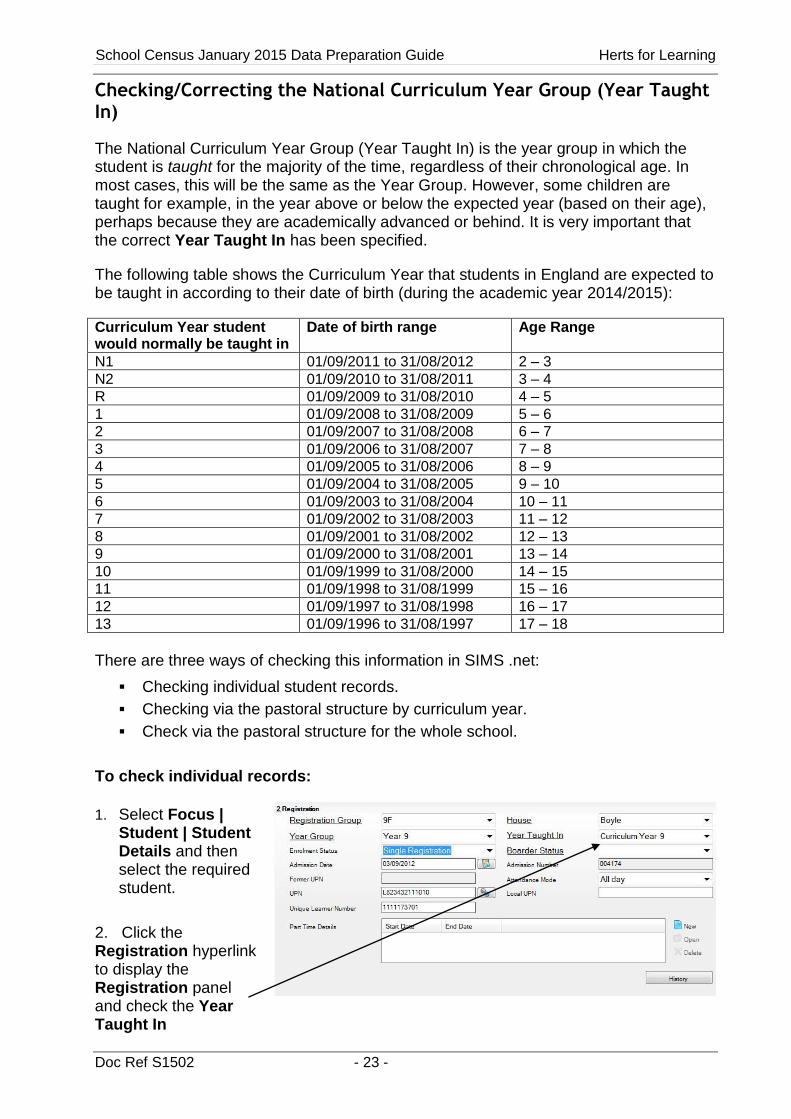
Checking/Correcting the National Curriculum Year Group (Year Taught In)
The National Curriculum Year Group (Year Taught In) is the year group in which the student is taught for the majority of the time, regardless of their chronological age. In most cases, this will be the same as the Year Group. However, some children are taught for example, in the year above or below the expected year (based on their age), perhaps because they are academically advanced or behind. It is very important that the correct Year Taught In has been specified.
The following table shows the Curriculum Year that students in England are expected to be taught in according to their date of birth (during the academic year 2014/2015):
Curriculum Year student would normally be taught in
Date of birth range Age Range
N1 01/09/2011 to 31/08/2012 2 – 3
N2 01/09/2010 to 31/08/2011 3 – 4
R 01/09/2009 to 31/08/2010 4 – 5
1 01/09/2008 to 31/08/2009 5 – 6
2 01/09/2007 to 31/08/2008 6 – 7
3 01/09/2006 to 31/08/2007 7 – 8
4 01/09/2005 to 31/08/2006 8 – 9
5 01/09/2004 to 31/08/2005 9 – 10
6 01/09/2003 to 31/08/2004 10 – 11
7 01/09/2002 to 31/08/2003 11 – 12
8 01/09/2001 to 31/08/2002 12 – 13
9 01/09/2000 to 31/08/2001 13 – 14
10 01/09/1999 to 31/08/2000 14 – 15
11 01/09/1998 to 31/08/1999 15 – 16
12 01/09/1997 to 31/08/1998 16 – 17
13 01/09/1996 to 31/08/1997 17 – 18
There are three ways of checking this information in SIMS .net:
Checking individual student records.
Checking via the pastoral structure by curriculum year.
Check via the pastoral structure for the whole school.
To check individual records:
1. Select Focus | Student | Student Details and then select the required student.
2. Click the Registration hyperlink to display the Registration panel and check the Year Taught In
Herts for Learning School Census January 2015 Data Preparation Guide
- 24 - Doc Ref S1502
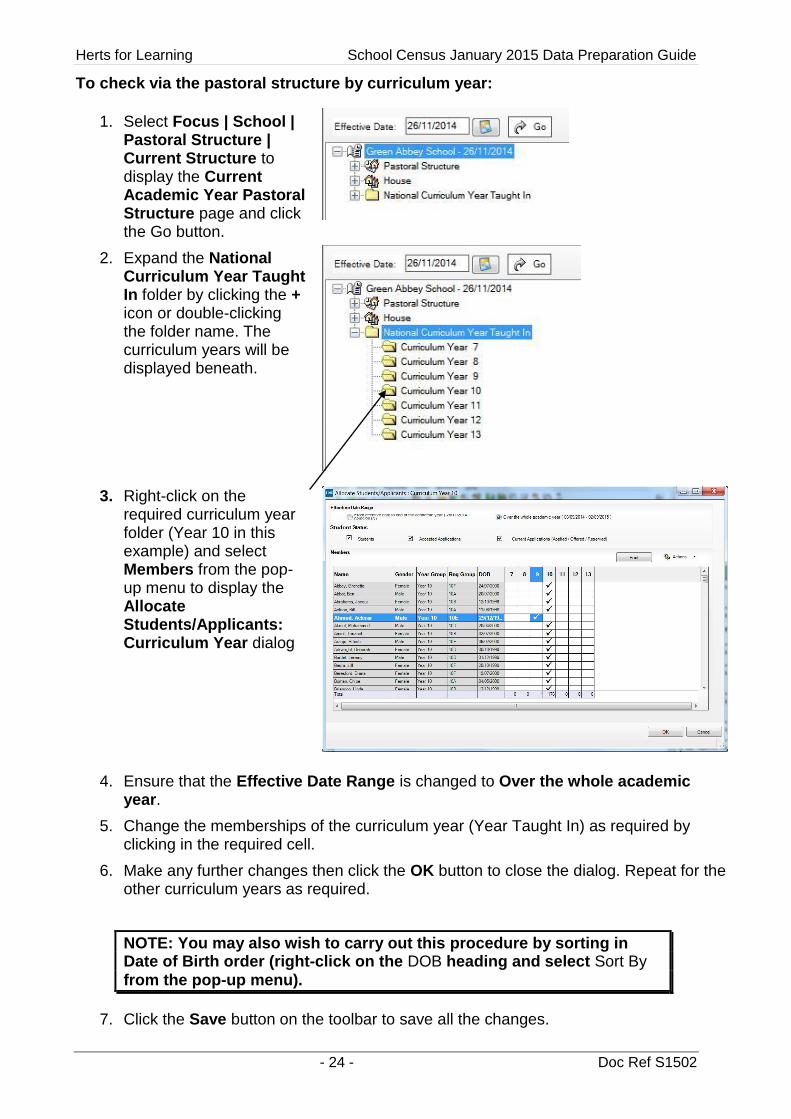
To check via the pastoral structure by curriculum year:
1. Select Focus | School | Pastoral Structure | Current Structure to display the Current Academic Year Pastoral Structure page and click the Go button.
2. Expand the National Curriculum Year Taught In folder by clicking the + icon or double-clicking the folder name. The curriculum years will be displayed beneath.
3. Right-click on the required curriculum year folder (Year 10 in this example) and select Members from the pop-up menu to display the Allocate Students/Applicants: Curriculum Year dialog
4. Ensure that the Effective Date Range is changed to Over the whole academic year.
5. Change the memberships of the curriculum year (Year Taught In) as required by clicking in the required cell.
6. Make any further changes then click the OK button to close the dialog. Repeat for the other curriculum years as required.
NOTE: You may also wish to carry out this procedure by sorting in Date of Birth order (right-click on the DOB heading and select Sort By from the pop-up menu).
7. Click the Save button on the toolbar to save all the changes.
School Census January 2015 Data Preparation Guide Herts for Learning
Doc Ref S1502 - 25 -
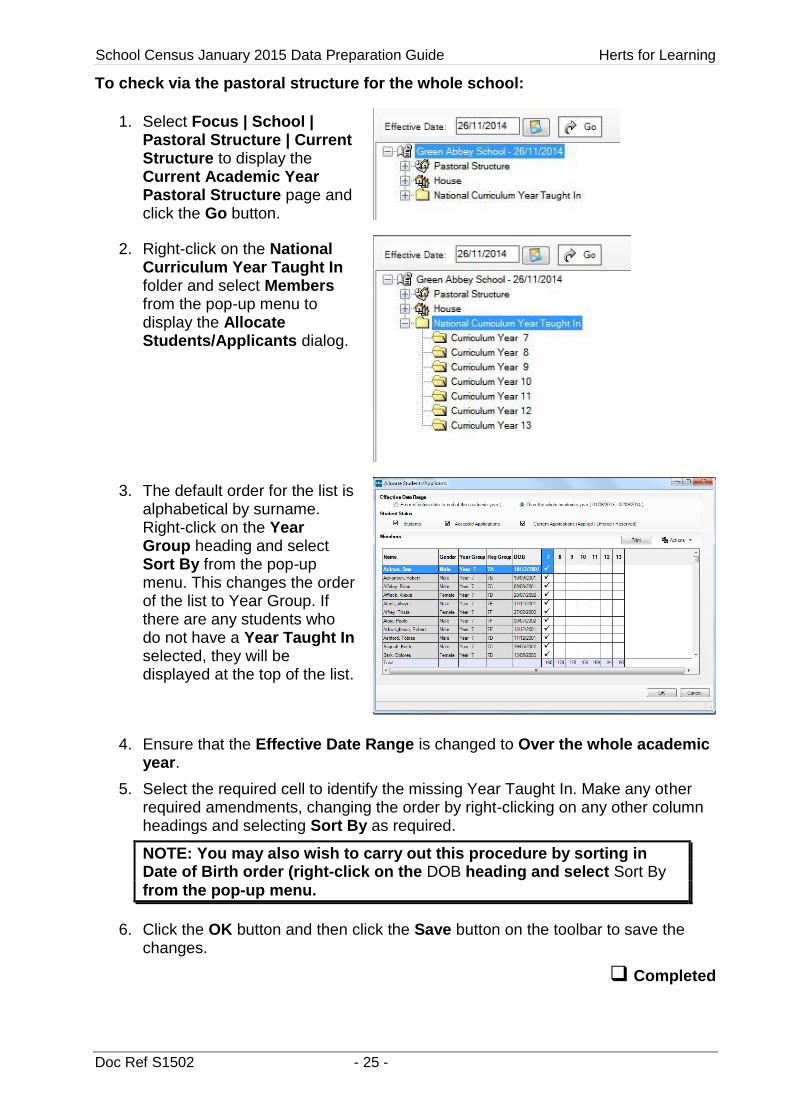
To check via the pastoral structure for the whole school:
1. Select Focus | School | Pastoral Structure | Current Structure to display the Current Academic Year Pastoral Structure page and click the Go button.
2. Right-click on the National Curriculum Year Taught In folder and select Members from the pop-up menu to display the Allocate Students/Applicants dialog.
3. The default order for the list is alphabetical by surname. Right-click on the Year Group heading and select Sort By from the pop-up menu. This changes the order of the list to Year Group. If there are any students who do not have a Year Taught In selected, they will be displayed at the top of the list.
4. Ensure that the Effective Date Range is changed to Over the whole academic year.
5. Select the required cell to identify the missing Year Taught In. Make any other required amendments, changing the order by right-clicking on any other column headings and selecting Sort By as required.
NOTE: You may also wish to carry out this procedure by sorting in Date of Birth order (right-click on the DOB heading and select Sort By from the pop-up menu.
6. Click the OK button and then click the Save button on the toolbar to save the changes.
Completed
Herts for Learning School Census January 2015 Data Preparation Guide
- 26 - Doc Ref S1502
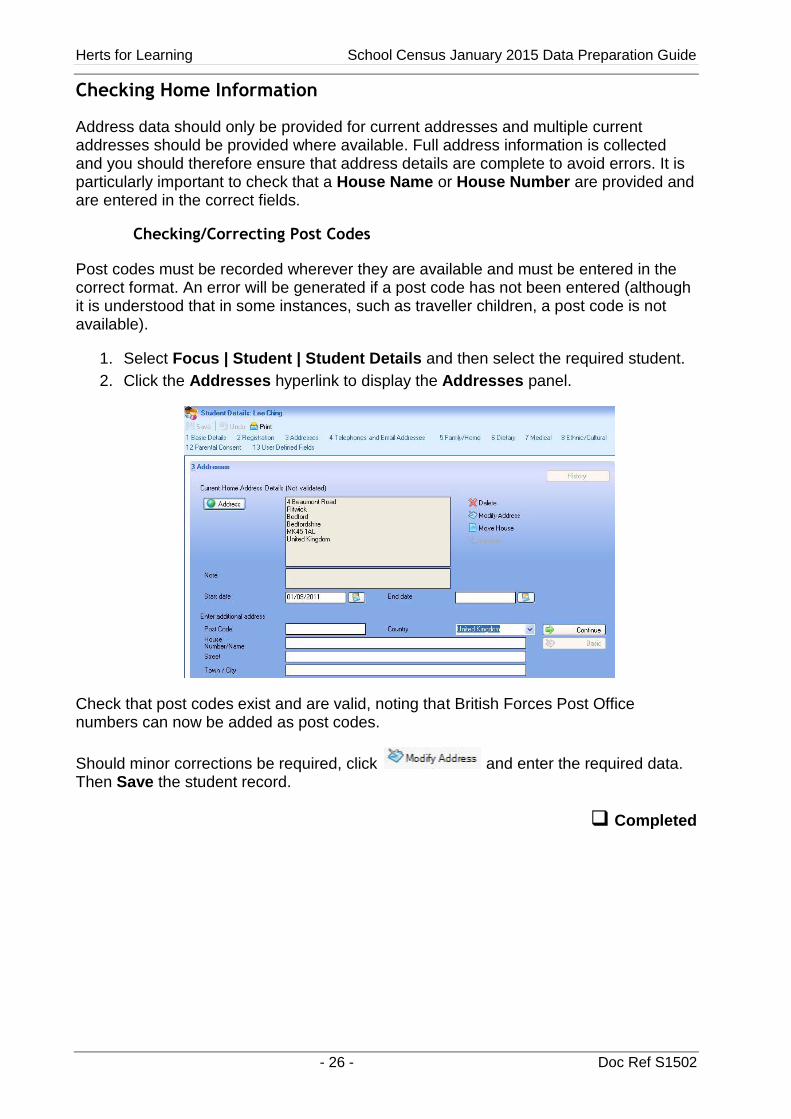
Checking Home Information
Address data should only be provided for current addresses and multiple current addresses should be provided where available. Full address information is collected and you should therefore ensure that address details are complete to avoid errors. It is particularly important to check that a House Name or House Number are provided and are entered in the correct fields.
Checking/Correcting Post Codes
Post codes must be recorded wherever they are available and must be entered in the correct format. An error will be generated if a post code has not been entered (although it is understood that in some instances, such as traveller children, a post code is not available).
1. Select Focus | Student | Student Details and then select the required student.
2. Click the Addresses hyperlink to display the Addresses panel.
Check that post codes exist and are valid, noting that British Forces Post Office numbers can now be added as post codes.
Should minor corrections be required, click and enter the required data. Then Save the student record.
Completed
School Census January 2015 Data Preparation Guide Herts for Learning
Doc Ref S1502 - 27 -
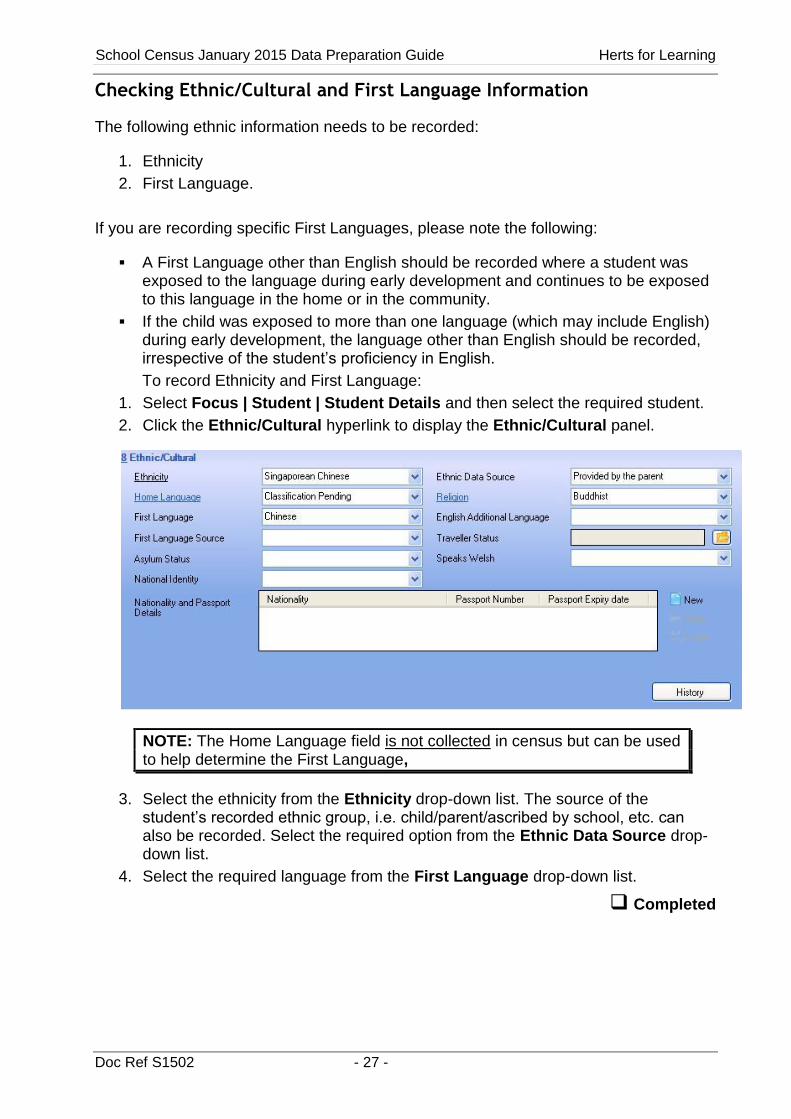
Checking Ethnic/Cultural and First Language Information
The following ethnic information needs to be recorded:
1. Ethnicity
2. First Language.
If you are recording specific First Languages, please note the following:
A First Language other than English should be recorded where a student was exposed to the language during early development and continues to be exposed to this language in the home or in the community.
If the child was exposed to more than one language (which may include English) during early development, the language other than English should be recorded, irrespective of the student’s proficiency in English.
To record Ethnicity and First Language:
1. Select Focus | Student | Student Details and then select the required student.
2. Click the Ethnic/Cultural hyperlink to display the Ethnic/Cultural panel.
NOTE: The Home Language field is not collected in census but can be used to help determine the First Language,
3. Select the ethnicity from the Ethnicity drop-down list. The source of the student’s recorded ethnic group, i.e. child/parent/ascribed by school, etc. can also be recorded. Select the required option from the Ethnic Data Source drop-down list.
4. Select the required language from the First Language drop-down list.
Completed
Herts for Learning School Census January 2015 Data Preparation Guide
- 28 - Doc Ref S1502
Checking Free School Meal Eligibility
As you may be aware, additional funding is provided via the Pupil Premium, directed to those children from deprived backgrounds (based on their FSM eligibility). Therefore, the Census collection will require the inclusion of any periods of FSM eligibility since the previous Census for those pupils on roll on census day. The following data items will be used to collect this information:
FSM Eligibility Start Date
FSM Eligibility End Date
These data items will be collected for pupils with:
a) an FSM Eligibility Start Date on or before 15 January 2015 and no FSM Eligibility End Date (eligibility on-going on census day); or b) an FSM Eligibility End Date from the first day after the previous Census (i.e. 3 October 2014) and on or before 15 January 2015.
Multiple FSM Eligibility Start and End Dates falling within the period should be returned where applicable. Note: the Meal Pattern section is for information purposes only and does not need to be recorded if not required. It is perfectly acceptable for example, for a student to be eligible for free school meals, but to bring sandwiches (PL - packed lunch) or go home (HO -home).
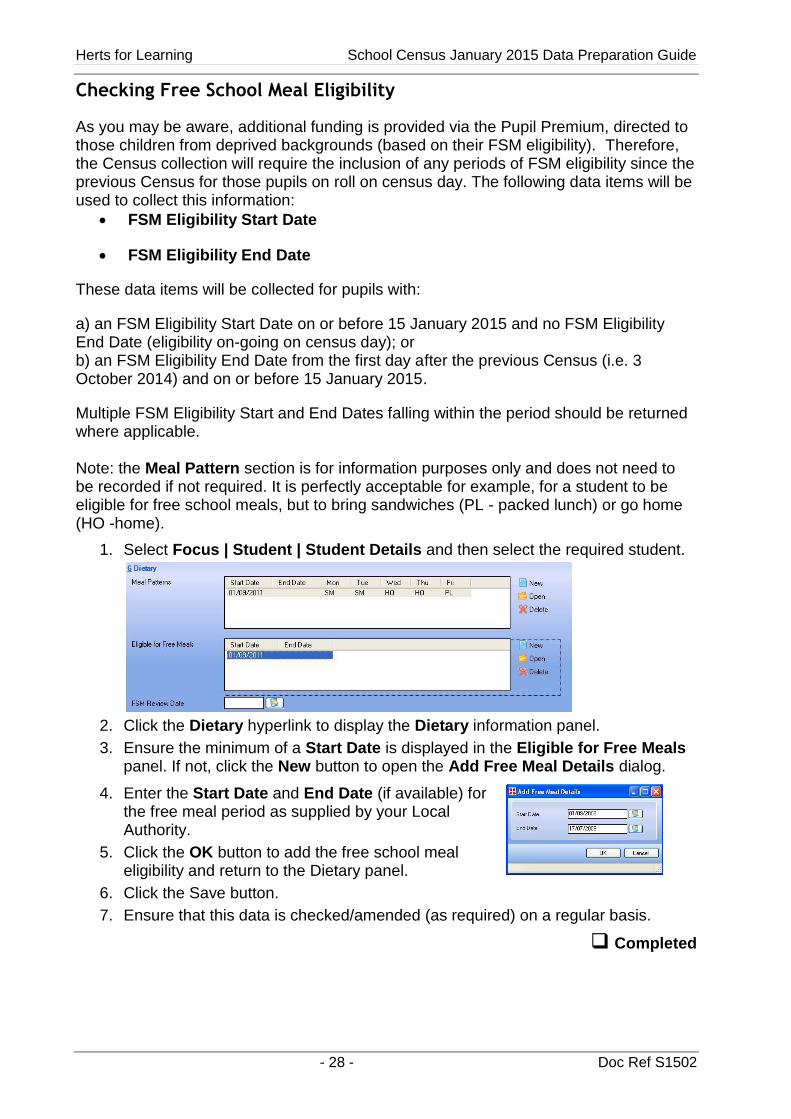
1. Select Focus | Student | Student Details and then select the required student.
2. Click the Dietary hyperlink to display the Dietary information panel.
3. Ensure the minimum of a Start Date is displayed in the Eligible for Free Meals panel. If not, click the New button to open the Add Free Meal Details dialog.
4. Enter the Start Date and End Date (if available) for the free meal period as supplied by your Local Authority.
5. Click the OK button to add the free school meal eligibility and return to the Dietary panel.
6. Click the Save button.
7. Ensure that this data is checked/amended (as required) on a regular basis.
Completed
School Census January 2015 Data Preparation Guide Herts for Learning
Doc Ref S1502 - 29 -
Checking Service Children in Education Information
The Service Children in Education indicator is collected for all students on roll on the census day: This indicates if a child has a parent or parents who are service personnel, serving in regular military units of all forces, or in the Armed Forces of another nation and stationed in England, and exercising parental care and responsibility. The information helps to identify both the impact that being a service child has on their education and the impact that catering for large numbers of service children has on the school. Extra funding is also provided by way of the pupil premium for such children.
A value of ‘No’ will be returned for all students unless otherwise specified. You will therefore need to specify any students with a parent or parents who are service personnel. This can either be done on an individual basis as described in this section, or via bulk update as described in Updating Information Using Bulk Update (page 18).
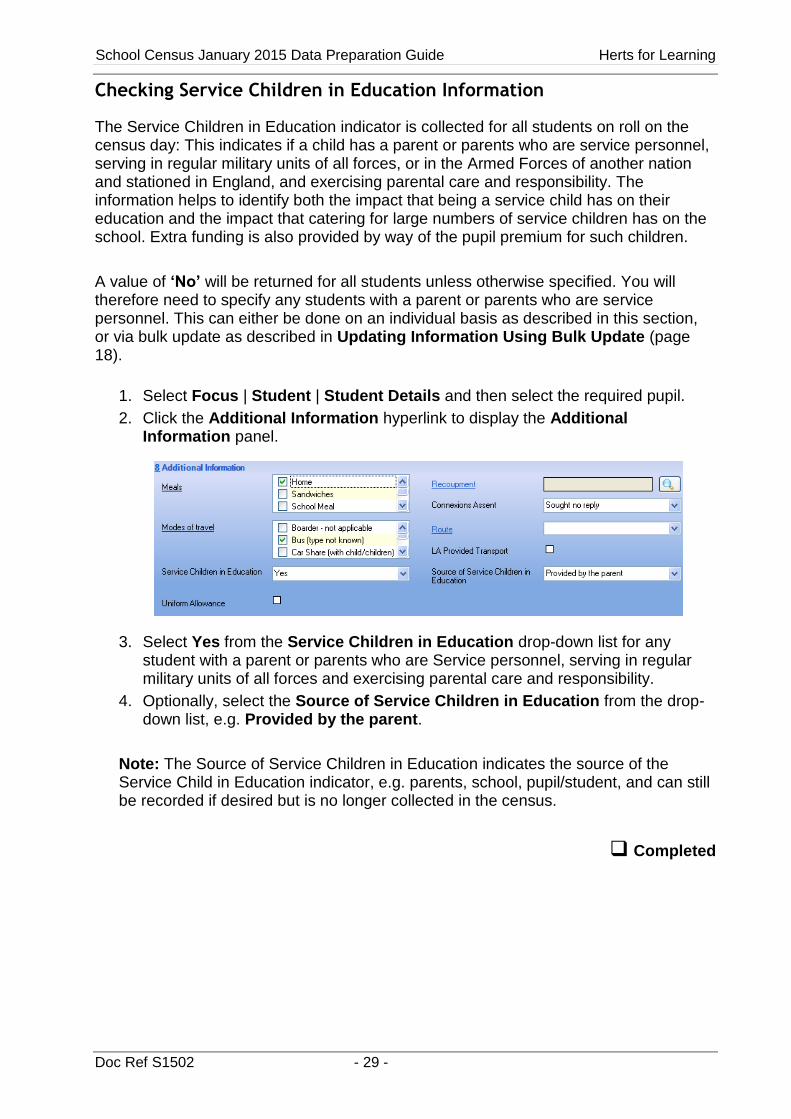
1. Select Focus | Student | Student Details and then select the required pupil.
2. Click the Additional Information hyperlink to display the Additional Information panel.
3. Select Yes from the Service Children in Education drop-down list for any student with a parent or parents who are Service personnel, serving in regular military units of all forces and exercising parental care and responsibility.
4. Optionally, select the Source of Service Children in Education from the drop-down list, e.g. Provided by the parent.
Note: The Source of Service Children in Education indicates the source of the Service Child in Education indicator, e.g. parents, school, pupil/student, and can still be recorded if desired but is no longer collected in the census.
Completed
Herts for Learning School Census January 2015 Data Preparation Guide
- 30 - Doc Ref S1502
Checking/Recording Funded Hours (all-through schools only)
This data item records for pupils aged 2, 3 and 4 the total number of hours spent in education provision at the school which are funded under the free entitlement to education for under 5’s. This information should be provided only by schools with relevant age children, for example all-through schools. Funded hours should only include the hours the pupil spent in education provision and should exclude any hours of ‘childcare’ and breaks or extended schools services (e.g. breakfast clubs and after school clubs as they are not considered as education provision) where the pupils are not receiving education or any additional hours which are funded by other means e.g. the parent. Children will become eligible for the free entitlement from the term following a child’s third birthday up until they reach compulsory school age, for every child, irrespective of background or family circumstances’ and for a specified subset of disadvantaged 2 year olds from the term following a child’s second birthday. The table below shows the ages and dates of birth of children for whom funded hours are required. Age range for Spring Census
Date of birth ranges
Maximum entitlement to funded hours
two and three four
01/09/2010 and 31/12/2012 01/09/2009 and 31/08/2010
15 hours 25 hours
For dually registered pupils, only record the funded hours spent in education at your school i.e. the main registration school should only include the funded hours spent in education at the main registration and the subsidiary registration school should only include the funded hours spent in education at the subsidiary registration. It is important that the funded hours recorded on the Census accurately reflect the hours at the setting, to the nearest 0.5, funded under the free entitlement to education for under 5’s. Examples of rounding to the nearest 0.5:
12 hours and 0 to 14 minutes = 12.0 hours
12 Hours and 15 to 44 minutes = 12.5 hours
12 Hours and 45 to 59 minutes = 13.0 hours
Checking/Recording Hours at Setting (all through schools only)
Hours at setting are collected for the same pupils and schools for whom funded hours are collected, recording for pupils aged 2, 3 and 4 the total number of hours they spent in education provision at the school irrespective of who funded the hours (i.e. it is the total of any hours funded under the free entitlement to nursery education plus any additional hours of education funded from other sources such as parents). For dually registered pupils, the main registration school should only include the hours spent in education there. The subsidiary registration school should only include the hours spent in education there. Hours at setting should only include the hours the pupil spent in education provision rounded to the nearest 0.5 as explained in the funded hours section above. Hours at setting should exclude any hours of ‘childcare’ and breaks where the pupils are not receiving education, as defined in the funded hours section above.
School Census January 2015 Data Preparation Guide Herts for Learning
Doc Ref S1502 - 31 -
Managing School Dinners Taken on Census Day
Applicable only to schools with pupils in Reception, Year 1 and Year 2
All pupils in Reception, Year 1 and Year 2 in English state-funded schools are eligible for free school meals from September 2014. This applies to Academies, Free Schools and Pupil Referral Units, as well as to schools maintained by the local authority. The School Census Spring 2015 Return collects information about pupils in these years who receive school dinners on Census day. IMPORTANT NOTES: Existing entitlements to free school meals for disadvantaged pupils
in nursery classes and at key stages 2-4 will continue as before, based on the existing free
school meals eligibility criteria. The pupils listed in the School Dinner Taken panel are
those who are on-roll on census day, whereas the data calculated via the Calculate From
Attendance and the Calculate From Dinner Money buttons is based on the reference
date.
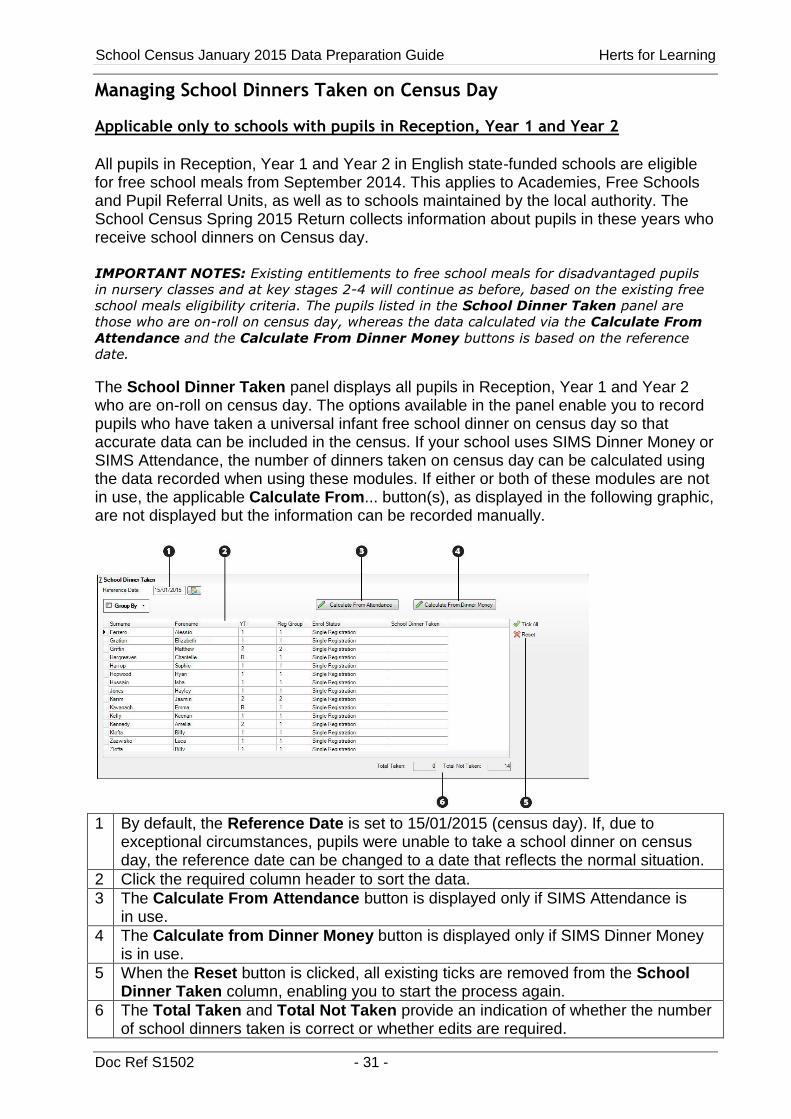
The School Dinner Taken panel displays all pupils in Reception, Year 1 and Year 2 who are on-roll on census day. The options available in the panel enable you to record pupils who have taken a universal infant free school dinner on census day so that accurate data can be included in the census. If your school uses SIMS Dinner Money or SIMS Attendance, the number of dinners taken on census day can be calculated using the data recorded when using these modules. If either or both of these modules are not in use, the applicable Calculate From... button(s), as displayed in the following graphic, are not displayed but the information can be recorded manually.
1 By default, the Reference Date is set to 15/01/2015 (census day). If, due to
exceptional circumstances, pupils were unable to take a school dinner on census day, the reference date can be changed to a date that reflects the normal situation.
2 Click the required column header to sort the data.
3 The Calculate From Attendance button is displayed only if SIMS Attendance is in use.
4 The Calculate from Dinner Money button is displayed only if SIMS Dinner Money is in use.
5 When the Reset button is clicked, all existing ticks are removed from the School Dinner Taken column, enabling you to start the process again.
6 The Total Taken and Total Not Taken provide an indication of whether the number of school dinners taken is correct or whether edits are required.
Herts for Learning School Census January 2015 Data Preparation Guide
- 32 - Doc Ref S1502
After the return has been created and validated, the School Dinner Taken detail report can be run to assist with the checking of results.
Using Dinner Money to Calculate School Dinners Taken on Census Day
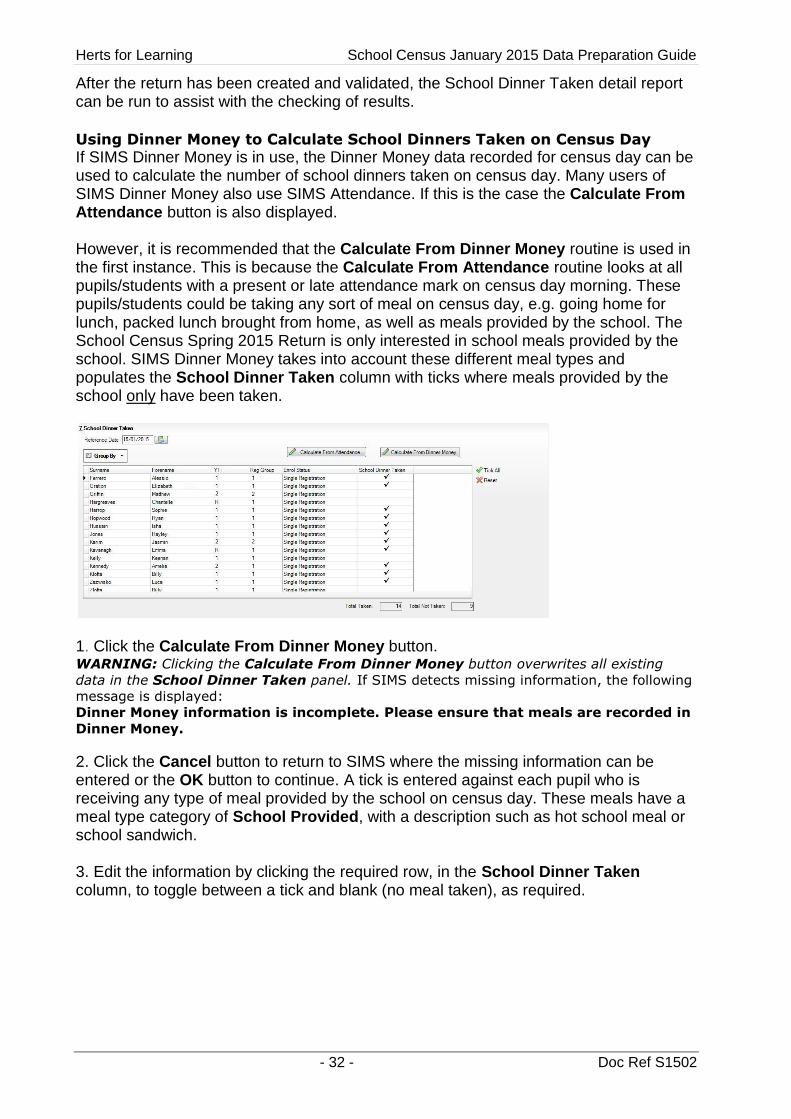
If SIMS Dinner Money is in use, the Dinner Money data recorded for census day can be used to calculate the number of school dinners taken on census day. Many users of SIMS Dinner Money also use SIMS Attendance. If this is the case the Calculate From Attendance button is also displayed. However, it is recommended that the Calculate From Dinner Money routine is used in the first instance. This is because the Calculate From Attendance routine looks at all pupils/students with a present or late attendance mark on census day morning. These pupils/students could be taking any sort of meal on census day, e.g. going home for lunch, packed lunch brought from home, as well as meals provided by the school. The School Census Spring 2015 Return is only interested in school meals provided by the school. SIMS Dinner Money takes into account these different meal types and populates the School Dinner Taken column with ticks where meals provided by the school only have been taken.
1. Click the Calculate From Dinner Money button. WARNING: Clicking the Calculate From Dinner Money button overwrites all existing
data in the School Dinner Taken panel. If SIMS detects missing information, the following
message is displayed:
Dinner Money information is incomplete. Please ensure that meals are recorded in
Dinner Money.
2. Click the Cancel button to return to SIMS where the missing information can be entered or the OK button to continue. A tick is entered against each pupil who is receiving any type of meal provided by the school on census day. These meals have a meal type category of School Provided, with a description such as hot school meal or school sandwich. 3. Edit the information by clicking the required row, in the School Dinner Taken column, to toggle between a tick and blank (no meal taken), as required.
School Census January 2015 Data Preparation Guide Herts for Learning
Doc Ref S1502 - 33 -
Using Attendance to Calculate School Dinners Taken on Census Day
The School Census Spring 2015 Return is only interested in school meals provided by the school but if SIMS Attendance is in use, the attendance data recorded for census day morning can be used to calculate all pupils who are taking any sort of meal on census day. These meals include going home for lunch, packed lunch brought from home, as well as meals provided by the school. 1. Click the Calculate From Attendance button. WARNING: Clicking the Calculate From Attendance button overwrites existing data in
the School Dinner Taken panel. If missing marks exist, a message is displayed:
Please ensure that registers have been taken. Missing marks have been
interpreted as absent and no dinner taken.
2. Click the Cancel button to return to SIMS where missing marks can be entered or the OK button to continue. A tick is entered against each pupil who is marked as present on census day morning (i.e. AM session). It is possible that some of these pupils are not taking meals provided by the school, e.g. they go home for dinner or bring a packed lunch from home. Meals provided by the school only are required for the return. Use the Group By functionality to group pupils by Year Taught In, Reg Group or Enrolment Status, enabling school dinners taken information to be updated from class lists, etc. 3. Edit the information by clicking the required row, in the School Dinner Taken column, to toggle between a tick and blank (no meal taken), as required. Using Manual Entry to Record School Dinners Taken on Census Day
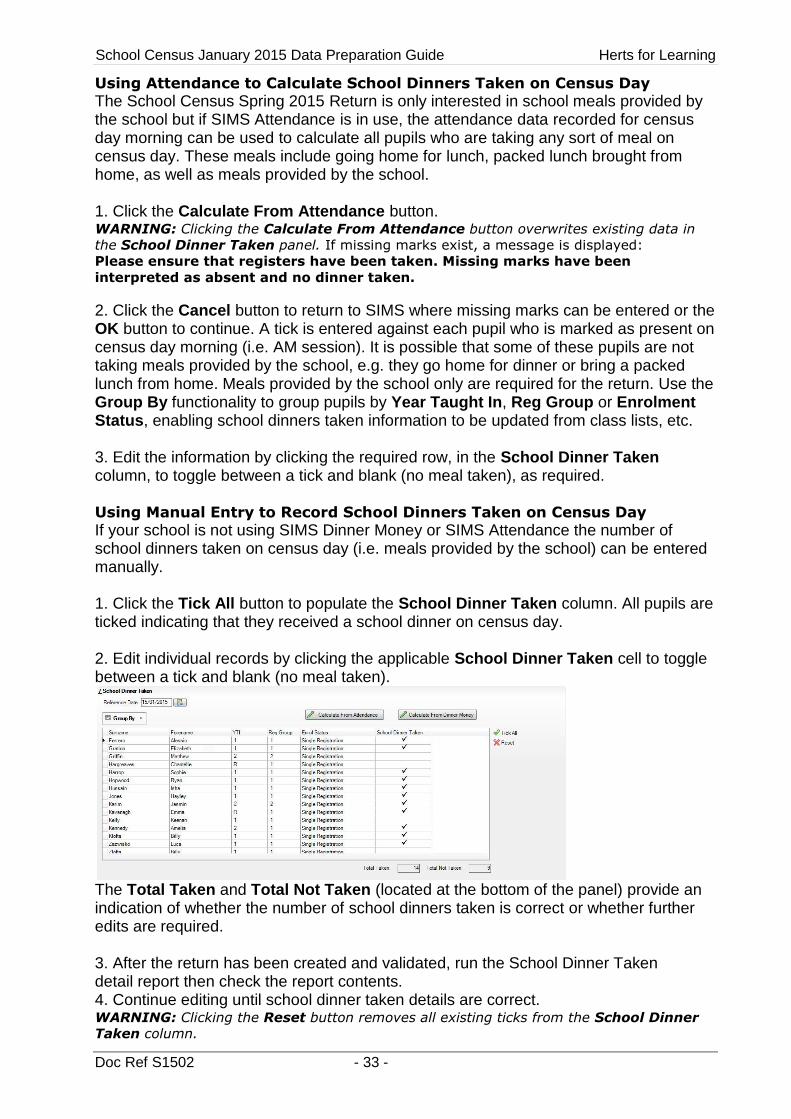
If your school is not using SIMS Dinner Money or SIMS Attendance the number of school dinners taken on census day (i.e. meals provided by the school) can be entered manually. 1. Click the Tick All button to populate the School Dinner Taken column. All pupils are ticked indicating that they received a school dinner on census day. 2. Edit individual records by clicking the applicable School Dinner Taken cell to toggle between a tick and blank (no meal taken).
The Total Taken and Total Not Taken (located at the bottom of the panel) provide an indication of whether the number of school dinners taken is correct or whether further edits are required. 3. After the return has been created and validated, run the School Dinner Taken detail report then check the report contents. 4. Continue editing until school dinner taken details are correct. WARNING: Clicking the Reset button removes all existing ticks from the School Dinner
Taken column.
Herts for Learning School Census January 2015 Data Preparation Guide
- 34 - Doc Ref S1502
Updating Class Types (all through schools only)
For schools with pupils aged 2, 3, or 4,the type of class (either Nursery or Other) that each pupil/student belongs to on census day must be specified. Pupils in your Nursery class should be specified as Nursery, with all other pupils specified as Other.
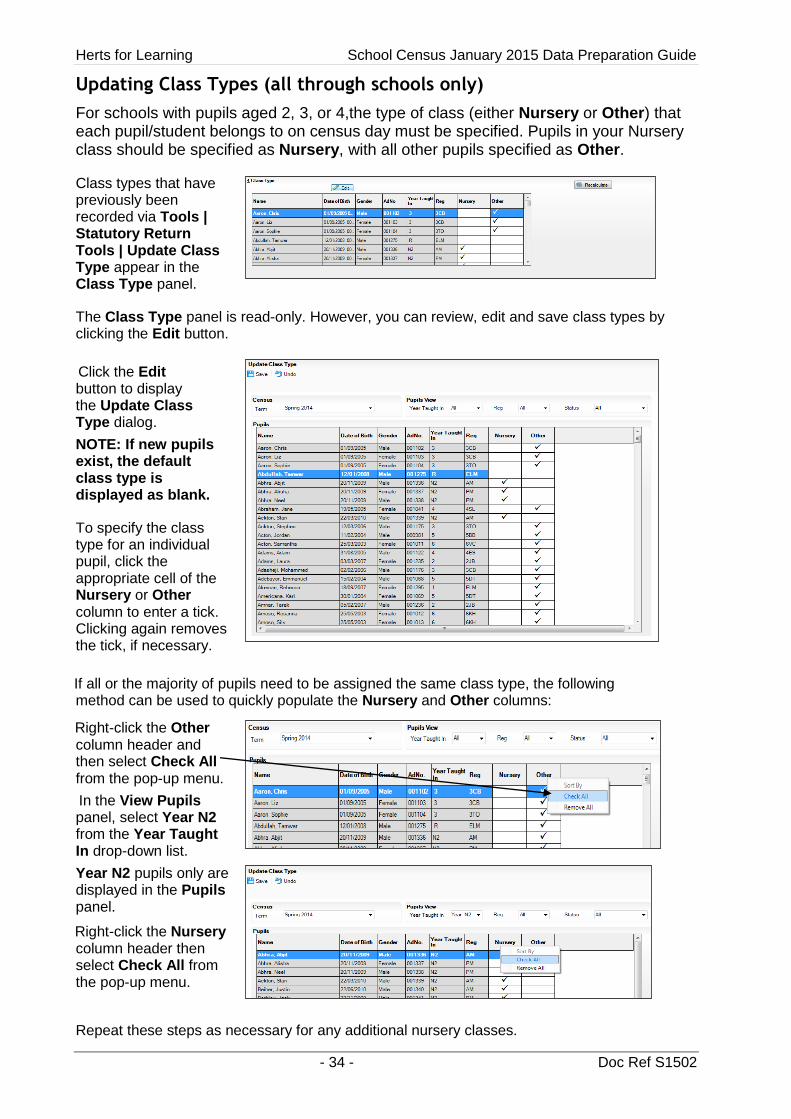
Class types that have previously been recorded via Tools | Statutory Return Tools | Update Class Type appear in the Class Type panel.
The Class Type panel is read-only. However, you can review, edit and save class types by clicking the Edit button.
Click the Edit button to display the Update Class Type dialog.
NOTE: If new pupils exist, the default class type is displayed as blank.
To specify the class type for an individual pupil, click the appropriate cell of the Nursery or Other column to enter a tick. Clicking again removes the tick, if necessary.
If all or the majority of pupils need to be assigned the same class type, the following method can be used to quickly populate the Nursery and Other columns:
Right-click the Other column header and then select Check All from the pop-up menu.
In the View Pupils panel, select Year N2 from the Year Taught In drop-down list.
Year N2 pupils only are displayed in the Pupils panel.
Right-click the Nursery column header then select Check All from the pop-up menu.
Repeat these steps as necessary for any additional nursery classes.
School Census January 2015 Data Preparation Guide Herts for Learning
Doc Ref S1502 - 35 -
To ensure that your selection is correct, select All from the Year Taught In drop-down list and inspect the list. When satisfied, click the Save button.
If a message is displayed advising you that some pupil/students have not been assigned a class type, click the No button then ensure that a class type is allocated to every pupil before saving again.
IMPORTANT NOTE: Not assigning a class type to every pupil/student will result in a validation failure when the School
Census file is created.
Click the OK button to return to the Census Return Details page, where the updated class types are displayed in the Class Type panel.
Resetting All Class Types
To reset all class types, right-click the Nursery (or Other) column header then select Remove All from the pop-up list. The Nursery (or Other) column is cleared of all ticks.
Re-enter the correct class types as previously described.
Identifying which Pupils have no Class Type Specified
To ensure that all pupils are assigned to a class type, select No Class Type from the Status drop-down list in the Pupils View panel. Any pupils without a Class Type are displayed in the Pupils panel.
Herts for Learning School Census January 2015 Data Preparation Guide
- 36 - Doc Ref S1502
Updating Students in receipt of Top-up Funding
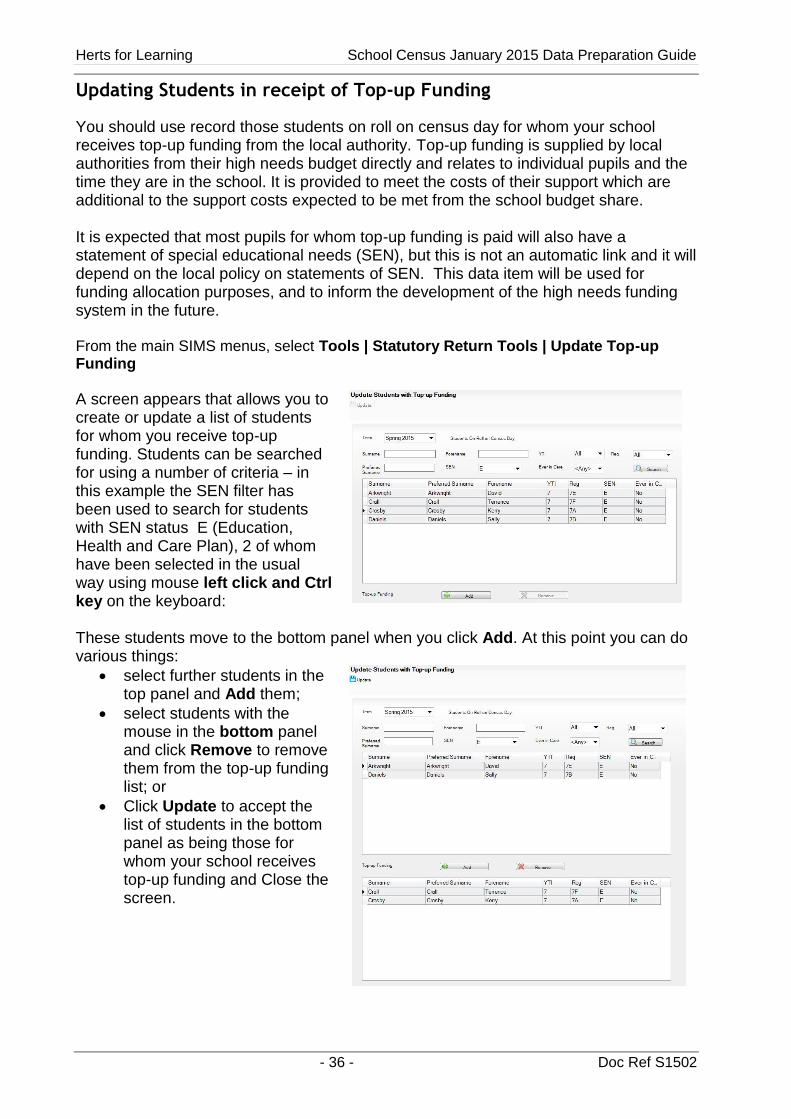
You should use record those students on roll on census day for whom your school receives top-up funding from the local authority. Top-up funding is supplied by local authorities from their high needs budget directly and relates to individual pupils and the time they are in the school. It is provided to meet the costs of their support which are additional to the support costs expected to be met from the school budget share. It is expected that most pupils for whom top-up funding is paid will also have a statement of special educational needs (SEN), but this is not an automatic link and it will depend on the local policy on statements of SEN. This data item will be used for funding allocation purposes, and to inform the development of the high needs funding system in the future. From the main SIMS menus, select Tools | Statutory Return Tools | Update Top-up Funding
A screen appears that allows you to create or update a list of students for whom you receive top-up funding. Students can be searched for using a number of criteria – in this example the SEN filter has been used to search for students with SEN status E (Education, Health and Care Plan), 2 of whom have been selected in the usual way using mouse left click and Ctrl key on the keyboard:
These students move to the bottom panel when you click Add. At this point you can do various things:
select further students in the top panel and Add them;
select students with the mouse in the bottom panel and click Remove to remove them from the top-up funding list; or
Click Update to accept the list of students in the bottom panel as being those for whom your school receives top-up funding and Close the screen.

School Census January 2015 Data Preparation Guide Herts for Learning
Doc Ref S1502 - 37 -
Updating Students Adopted from Care
Information regarding students who were looked after immediately before adoption is collected in the return.
Select Tools | Statutory Return Tools | Update Adopted from Care to display the Update Students Adopted from Care page.
Any students currently recorded as being adopted from care are displayed in the Adopted from care table.
Use the search criteria to locate the additional students you wish to record as being adopted from care then highlight their details.
Herts for Learning School Census January 2015 Data Preparation Guide
- 38 - Doc Ref S1502
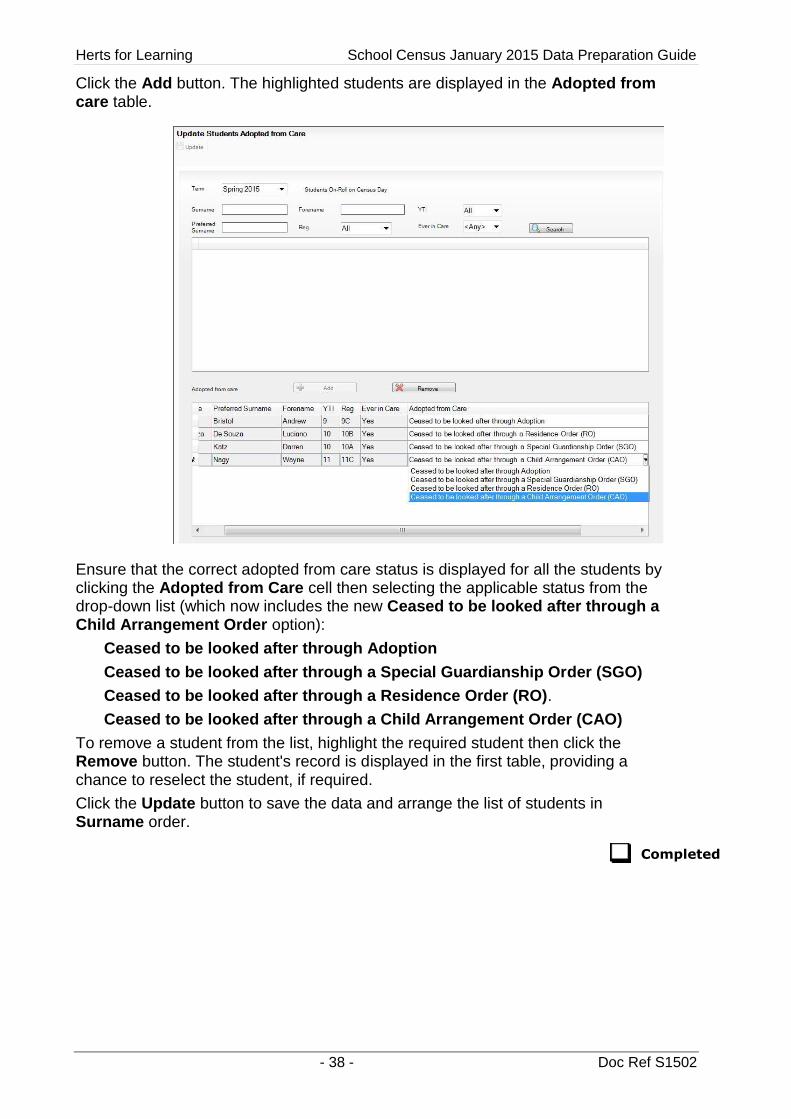
Click the Add button. The highlighted students are displayed in the Adopted from care table.
Ensure that the correct adopted from care status is displayed for all the students by clicking the Adopted from Care cell then selecting the applicable status from the drop-down list (which now includes the new Ceased to be looked after through a Child Arrangement Order option):
Ceased to be looked after through Adoption
Ceased to be looked after through a Special Guardianship Order (SGO)
Ceased to be looked after through a Residence Order (RO).
Ceased to be looked after through a Child Arrangement Order (CAO)
To remove a student from the list, highlight the required student then click the Remove button. The student's record is displayed in the first table, providing a chance to reselect the student, if required.
Click the Update button to save the data and arrange the list of students in Surname order.
Completed
School Census January 2015 Data Preparation Guide Herts for Learning
Doc Ref S1502 - 39 -
Checking/Correcting Youth Support Services Agreement
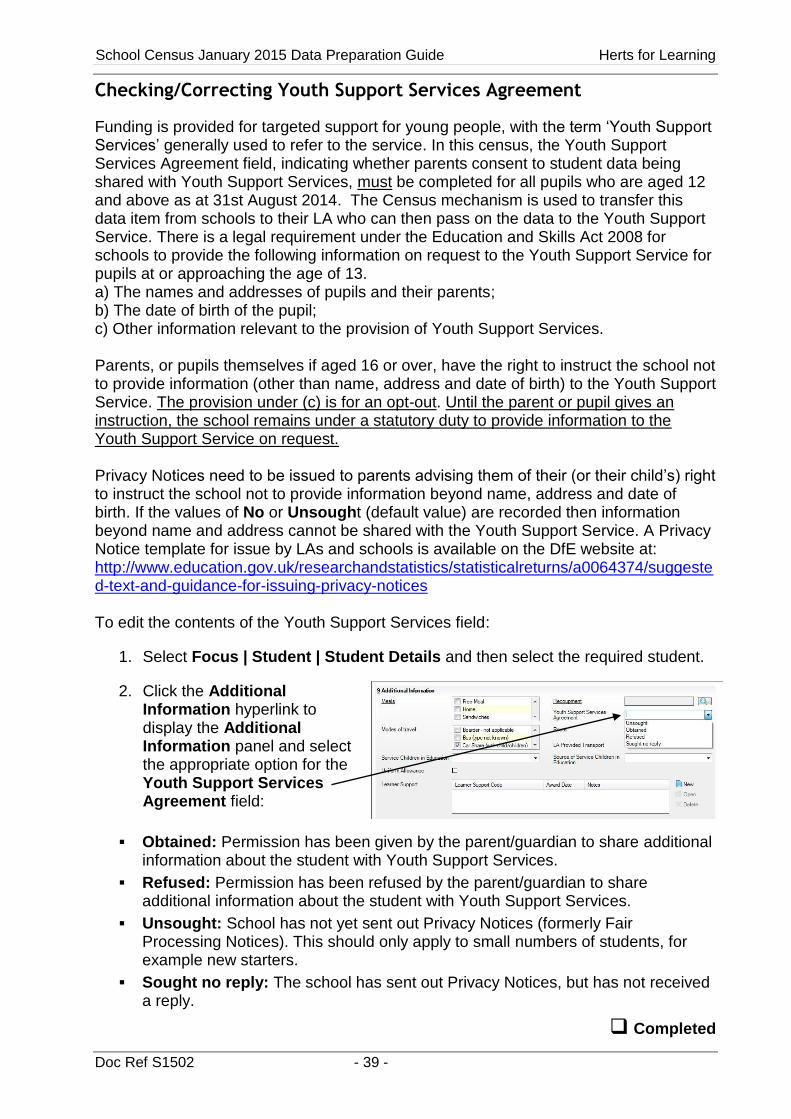
Funding is provided for targeted support for young people, with the term ‘Youth Support Services’ generally used to refer to the service. In this census, the Youth Support Services Agreement field, indicating whether parents consent to student data being shared with Youth Support Services, must be completed for all pupils who are aged 12 and above as at 31st August 2014. The Census mechanism is used to transfer this data item from schools to their LA who can then pass on the data to the Youth Support Service. There is a legal requirement under the Education and Skills Act 2008 for schools to provide the following information on request to the Youth Support Service for pupils at or approaching the age of 13. a) The names and addresses of pupils and their parents; b) The date of birth of the pupil; c) Other information relevant to the provision of Youth Support Services. Parents, or pupils themselves if aged 16 or over, have the right to instruct the school not to provide information (other than name, address and date of birth) to the Youth Support Service. The provision under (c) is for an opt-out. Until the parent or pupil gives an instruction, the school remains under a statutory duty to provide information to the Youth Support Service on request. Privacy Notices need to be issued to parents advising them of their (or their child’s) right to instruct the school not to provide information beyond name, address and date of birth. If the values of No or Unsought (default value) are recorded then information beyond name and address cannot be shared with the Youth Support Service. A Privacy Notice template for issue by LAs and schools is available on the DfE website at: http://www.education.gov.uk/researchandstatistics/statisticalreturns/a0064374/suggested-text-and-guidance-for-issuing-privacy-notices To edit the contents of the Youth Support Services field:
1. Select Focus | Student | Student Details and then select the required student.
2. Click the Additional Information hyperlink to display the Additional Information panel and select the appropriate option for the Youth Support Services Agreement field:
Obtained: Permission has been given by the parent/guardian to share additional information about the student with Youth Support Services.
Refused: Permission has been refused by the parent/guardian to share additional information about the student with Youth Support Services.
Unsought: School has not yet sent out Privacy Notices (formerly Fair Processing Notices). This should only apply to small numbers of students, for example new starters.
Sought no reply: The school has sent out Privacy Notices, but has not received a reply.
Completed
Herts for Learning School Census January 2015 Data Preparation Guide
- 40 - Doc Ref S1502
Checking/Correcting the Learner Support Code
The Learner Support Code indicates the type of financial support awarded to pupils beyond compulsory school leaving age at any point in the academic year of the School Census. Whilst schools may be able to record in their systems other types of financial support awarded to these pupils, the School Census will only collect the following two types of financial support awarded: • Vulnerable group bursary • Discretionary bursary
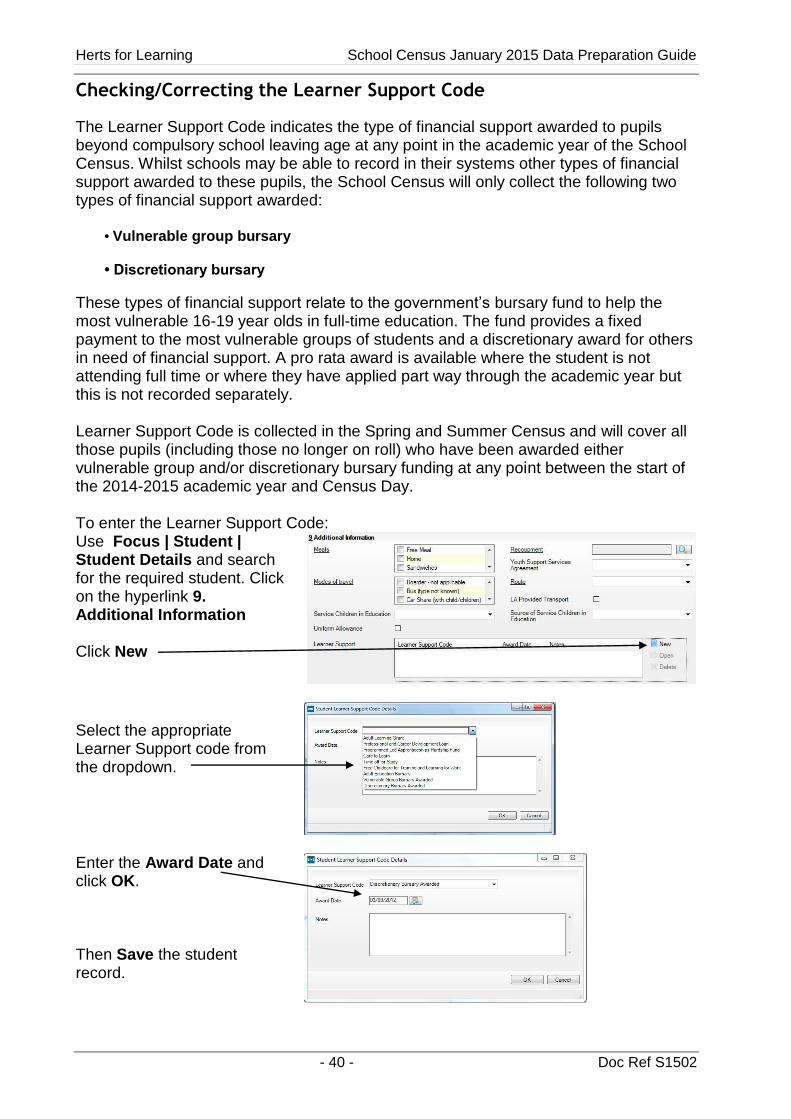
These types of financial support relate to the government’s bursary fund to help the most vulnerable 16-19 year olds in full-time education. The fund provides a fixed payment to the most vulnerable groups of students and a discretionary award for others in need of financial support. A pro rata award is available where the student is not attending full time or where they have applied part way through the academic year but this is not recorded separately. Learner Support Code is collected in the Spring and Summer Census and will cover all those pupils (including those no longer on roll) who have been awarded either vulnerable group and/or discretionary bursary funding at any point between the start of the 2014-2015 academic year and Census Day. To enter the Learner Support Code: Use Focus | Student | Student Details and search for the required student. Click on the hyperlink 9. Additional Information Click New
Select the appropriate Learner Support code from the dropdown.
Enter the Award Date and click OK. Then Save the student record.
School Census January 2015 Data Preparation Guide Herts for Learning
Doc Ref S1502 - 41 -
Checking/Correcting In Care/Looked After Details
Previous advice has been that any students in care (looked after children) should be recorded as such in SIMS .net. A child is considered ‘In Care’ or ‘Looked After’ if he or she is in the care of the Local Authority or is provided with accommodation for more than 24 hours by the authority.
In this census the In Care indicator will only be returned for those students who also have exclusions recorded, but schools may wish to continue to record In Care information. Please consult the person at school with the designated authority for in care children, e.g. the SEN Co-ordinator.
To add a new in care record:
1. Select Focus | Student | Student Details and then select the required student.
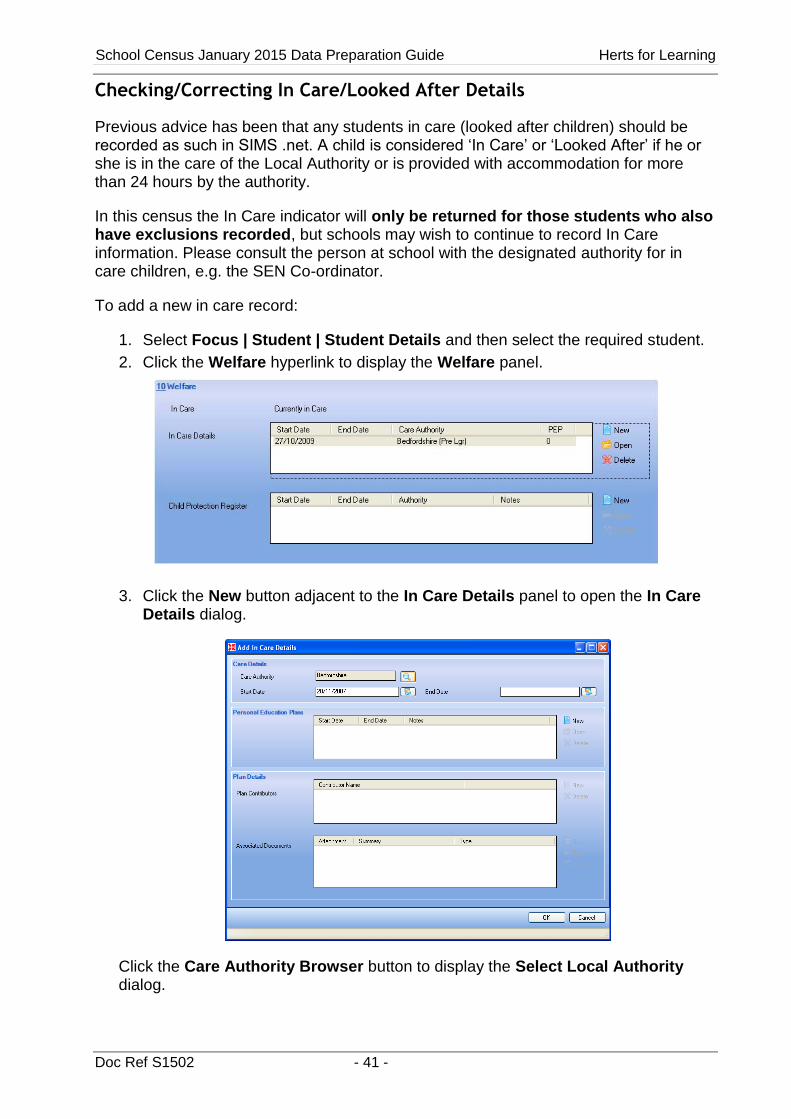
2. Click the Welfare hyperlink to display the Welfare panel.
3. Click the New button adjacent to the In Care Details panel to open the In Care Details dialog.
Click the Care Authority Browser button to display the Select Local Authority dialog.
Herts for Learning School Census January 2015 Data Preparation Guide
- 42 - Doc Ref S1502
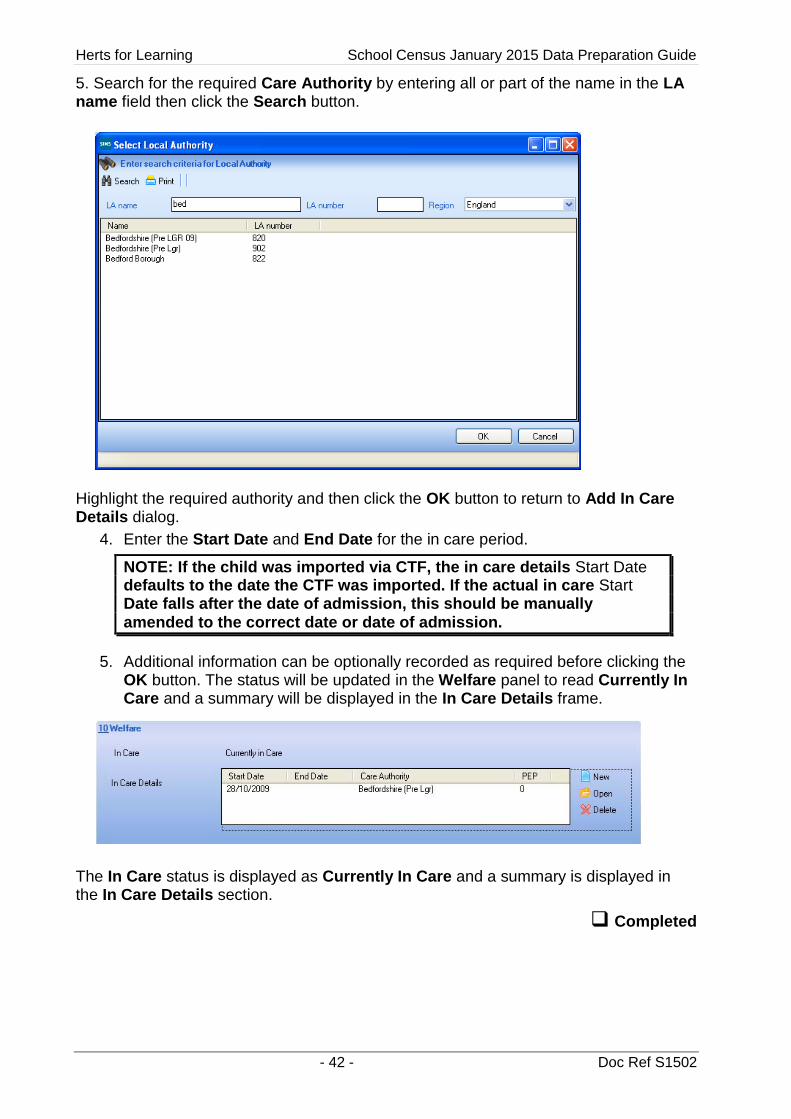
5. Search for the required Care Authority by entering all or part of the name in the LA name field then click the Search button.
Highlight the required authority and then click the OK button to return to Add In Care Details dialog.
4. Enter the Start Date and End Date for the in care period.
NOTE: If the child was imported via CTF, the in care details Start Date defaults to the date the CTF was imported. If the actual in care Start Date falls after the date of admission, this should be manually amended to the correct date or date of admission.
5. Additional information can be optionally recorded as required before clicking the OK button. The status will be updated in the Welfare panel to read Currently In Care and a summary will be displayed in the In Care Details frame.
The In Care status is displayed as Currently In Care and a summary is displayed in the In Care Details section.
Completed
School Census January 2015 Data Preparation Guide Herts for Learning
Doc Ref S1502 - 43 -
Recording Leavers and Re-Admissions
Ensure that all your leavers are taken off-roll and any returning students are re-admitted.
IMPORTANT NOTES: It is essential that you do not record leavers by removing their date of admission as this will affect all historical data relating to that student.
If someone who was a leaver subsequently returns, please ensure that you re-admit them – do not simply remove the date of leaving as this will also affect the history.
To ensure that all information required for School Census is accurate and up to date, you should check that all leavers have their Attendance, Exclusions, Ethnic and SEN information recorded correctly before making the student a leaver
Leaving Date for Year 12 and 13 Leavers
It is VERY IMPORTANT for the Post 16 Data collection that the implications of when the leaving date is actually entered is fully understood:
- entering a leaving date in advance of the student actually leaving will mark all of the student’s Post 16 Learning Aims as COMPLETED
- entering a leaving date on the date of leaving or after the event will mark that student as WITHDRAWN from all of their Post 16 Learning Aims.
We recommend that students are made to leave using the leavers routines as follows: 1. Select Routines > Student > Leavers to display the Find Student(s) browser.
2. Search for the required student then double-click their name to select them.
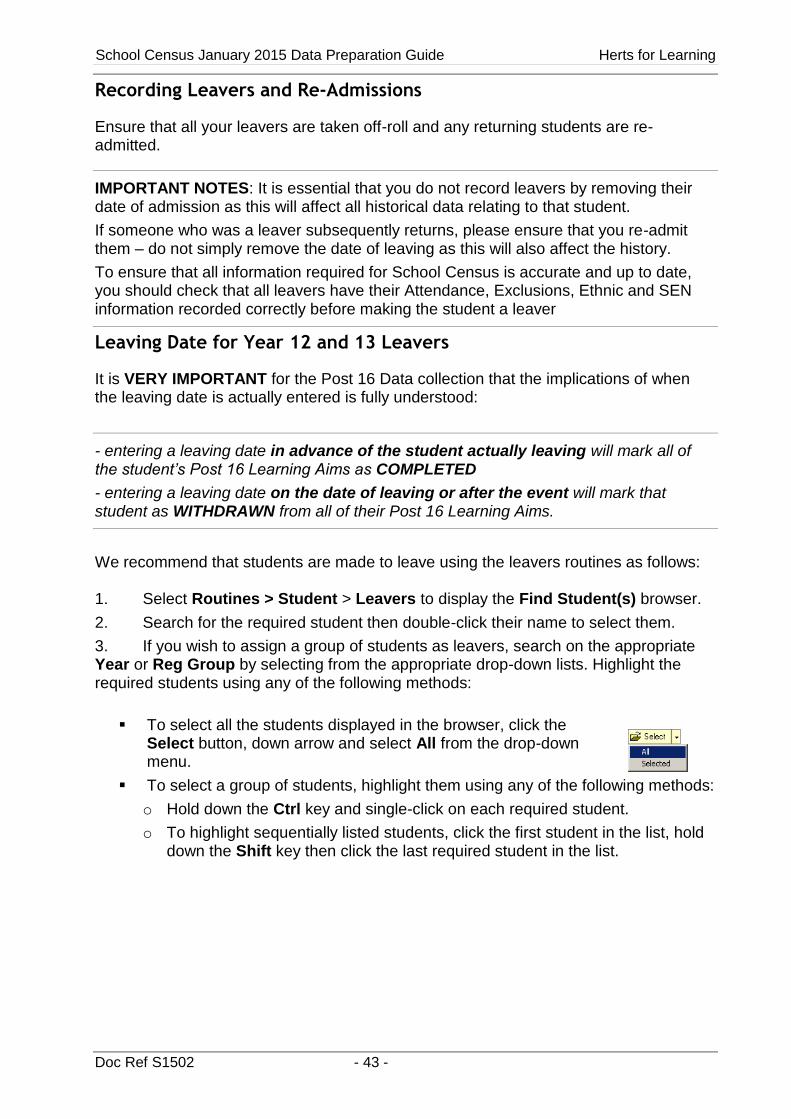
3. If you wish to assign a group of students as leavers, search on the appropriate Year or Reg Group by selecting from the appropriate drop-down lists. Highlight the required students using any of the following methods:
To select all the students displayed in the browser, click the Select button, down arrow and select All from the drop-down menu.
To select a group of students, highlight them using any of the following methods:
o Hold down the Ctrl key and single-click on each required student.
o To highlight sequentially listed students, click the first student in the list, hold down the Shift key then click the last required student in the list.

Herts for Learning School Census January 2015 Data Preparation Guide
- 44 - Doc Ref S1502
4. Once the required students have been highlighted, click the Select button to add them to the Students panel. The selected students will then be transferred to the Student panel:
5. In the Leaving Information panel, enter the date of leaving or click the Calendar button to select the required date, and select the Reason for Leaving from the drop-down list.
6. Enter the Destination after leaving if required. Alternatively, you can apply the Reason for Leaving to one set of students (as described in the next step) and then select the Destination after leaving for a different, or subset of students.
7. Highlight the students to which this information applies using the Ctrl and Shift keys (as described in step 3) then click the Assign to Selected button. If the information applies to all the students in the list, click the Assign to All button.
8. If an error has been made, highlight the particular student, correct the information in the Leaving Information panel then click the Assign to Selected button.
9. To remove a student from the list, highlight their name then click the Remove button.
10. To clear the contents of the Date of Leaving, Reason for Leaving and Destination after Leaving fields, highlight the required student(s) then click the Clear button. Re-enter the information as required.
11. Click the Save button to save the changes. The chosen student(s) will be recorded with a date of leaving on the date specified.
Please be patient - this could take some time.
Re-admitting a Student
Any student who leaves the school and subsequently decides to return must be re-admitted. Do not simply remove the date of leaving as this will not show a period of absence from the school. However, if a student is intending to leave, but subsequently changes their mind, i.e. doesn't leave, the date of leaving can be removed.
Completed
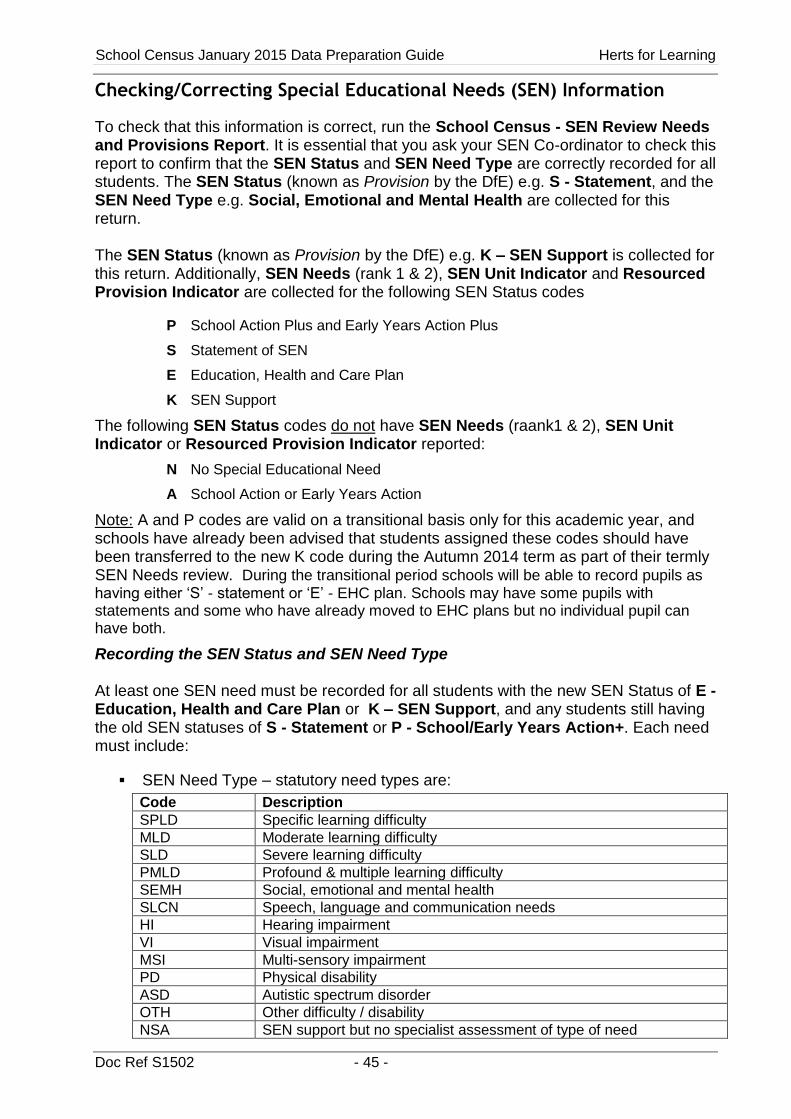
School Census January 2015 Data Preparation Guide Herts for Learning
Doc Ref S1502 - 45 -
Checking/Correcting Special Educational Needs (SEN) Information
To check that this information is correct, run the School Census - SEN Review Needs and Provisions Report. It is essential that you ask your SEN Co-ordinator to check this report to confirm that the SEN Status and SEN Need Type are correctly recorded for all students. The SEN Status (known as Provision by the DfE) e.g. S - Statement, and the SEN Need Type e.g. Social, Emotional and Mental Health are collected for this return. The SEN Status (known as Provision by the DfE) e.g. K – SEN Support is collected for this return. Additionally, SEN Needs (rank 1 & 2), SEN Unit Indicator and Resourced Provision Indicator are collected for the following SEN Status codes
P School Action Plus and Early Years Action Plus
S Statement of SEN
E Education, Health and Care Plan
K SEN Support
The following SEN Status codes do not have SEN Needs (raank1 & 2), SEN Unit Indicator or Resourced Provision Indicator reported:
N No Special Educational Need
A School Action or Early Years Action
Note: A and P codes are valid on a transitional basis only for this academic year, and schools have already been advised that students assigned these codes should have been transferred to the new K code during the Autumn 2014 term as part of their termly SEN Needs review. During the transitional period schools will be able to record pupils as having either ‘S’ - statement or ‘E’ - EHC plan. Schools may have some pupils with statements and some who have already moved to EHC plans but no individual pupil can have both.
Recording the SEN Status and SEN Need Type At least one SEN need must be recorded for all students with the new SEN Status of E - Education, Health and Care Plan or K – SEN Support, and any students still having the old SEN statuses of S - Statement or P - School/Early Years Action+. Each need must include:
SEN Need Type – statutory need types are:
Code Description
SPLD Specific learning difficulty
MLD Moderate learning difficulty
SLD Severe learning difficulty
PMLD Profound & multiple learning difficulty
SEMH Social, emotional and mental health
SLCN Speech, language and communication needs
HI Hearing impairment
VI Visual impairment
MSI Multi-sensory impairment
PD Physical disability
ASD Autistic spectrum disorder
OTH Other difficulty / disability
NSA SEN support but no specialist assessment of type of need
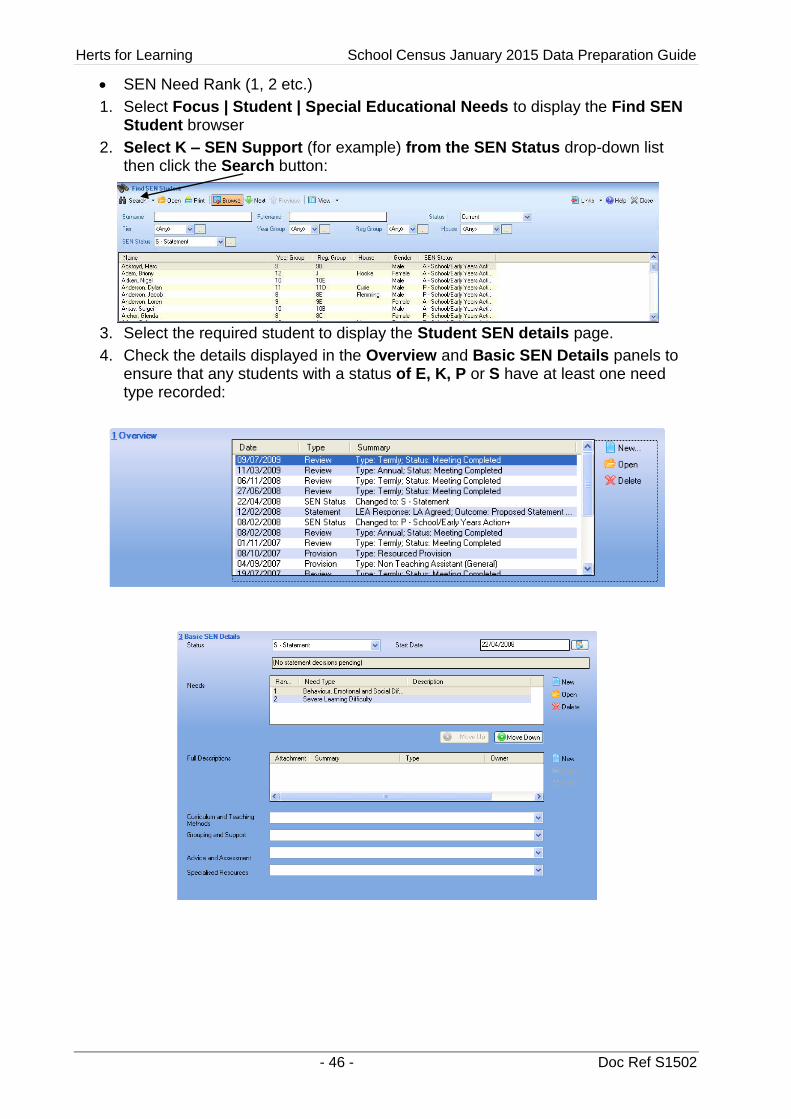
Herts for Learning School Census January 2015 Data Preparation Guide
- 46 - Doc Ref S1502
SEN Need Rank (1, 2 etc.)
1. Select Focus | Student | Special Educational Needs to display the Find SEN Student browser
2. Select K – SEN Support (for example) from the SEN Status drop-down list then click the Search button:
3. Select the required student to display the Student SEN details page.
4. Check the details displayed in the Overview and Basic SEN Details panels to ensure that any students with a status of E, K, P or S have at least one need type recorded:
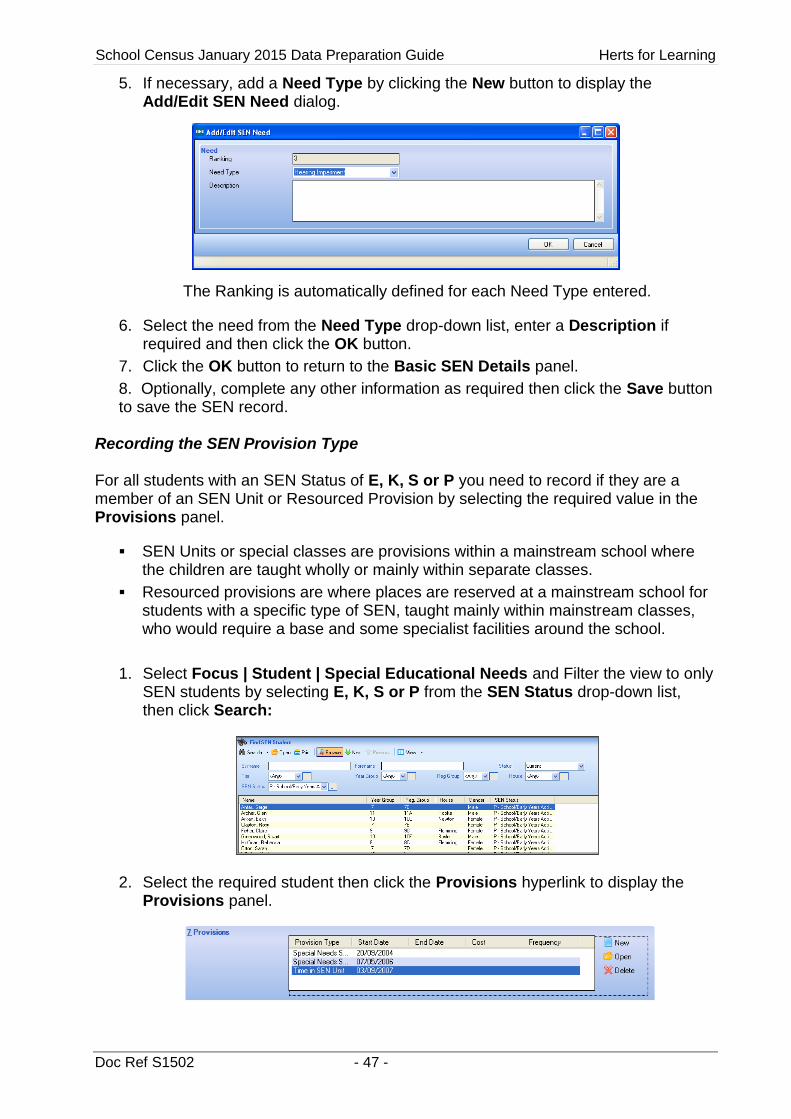
School Census January 2015 Data Preparation Guide Herts for Learning
Doc Ref S1502 - 47 -
5. If necessary, add a Need Type by clicking the New button to display the Add/Edit SEN Need dialog.
The Ranking is automatically defined for each Need Type entered.
6. Select the need from the Need Type drop-down list, enter a Description if required and then click the OK button.
7. Click the OK button to return to the Basic SEN Details panel.
8. Optionally, complete any other information as required then click the Save button to save the SEN record.
Recording the SEN Provision Type For all students with an SEN Status of E, K, S or P you need to record if they are a member of an SEN Unit or Resourced Provision by selecting the required value in the Provisions panel.
SEN Units or special classes are provisions within a mainstream school where the children are taught wholly or mainly within separate classes.
Resourced provisions are where places are reserved at a mainstream school for students with a specific type of SEN, taught mainly within mainstream classes, who would require a base and some specialist facilities around the school.
1. Select Focus | Student | Special Educational Needs and Filter the view to only SEN students by selecting E, K, S or P from the SEN Status drop-down list, then click Search:
2. Select the required student then click the Provisions hyperlink to display the Provisions panel.
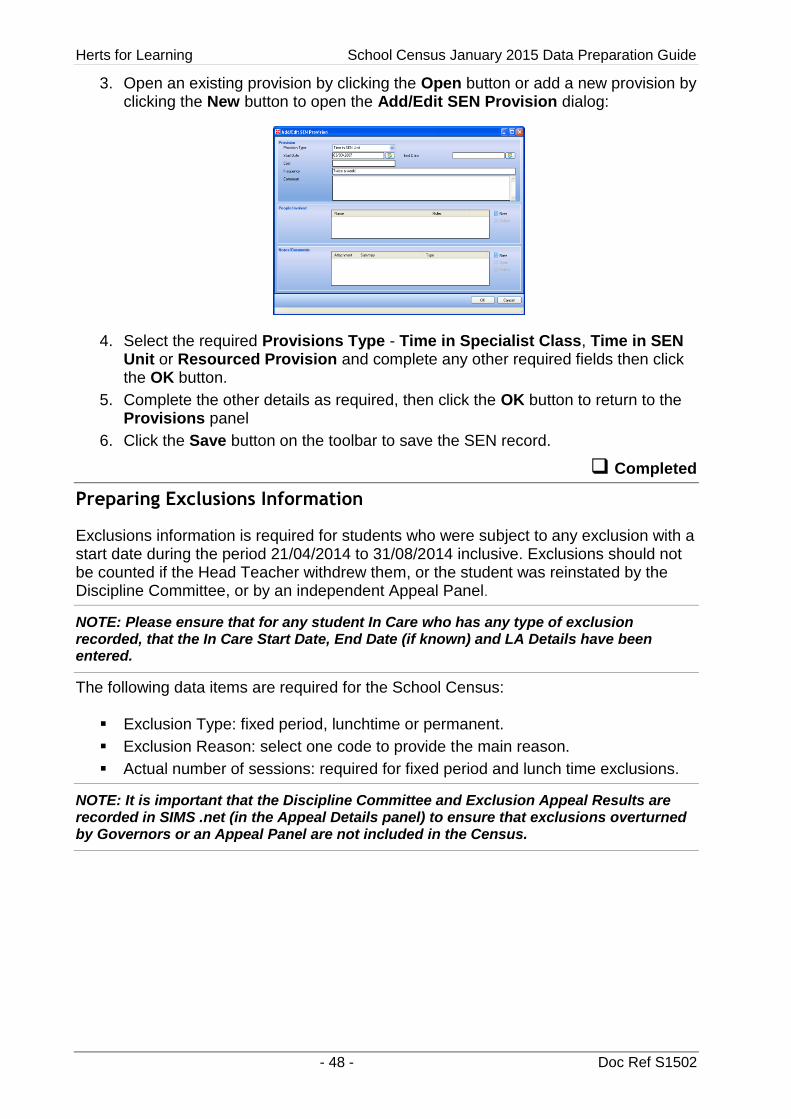
Herts for Learning School Census January 2015 Data Preparation Guide
- 48 - Doc Ref S1502
3. Open an existing provision by clicking the Open button or add a new provision by clicking the New button to open the Add/Edit SEN Provision dialog:
4. Select the required Provisions Type - Time in Specialist Class, Time in SEN Unit or Resourced Provision and complete any other required fields then click the OK button.
5. Complete the other details as required, then click the OK button to return to the Provisions panel
6. Click the Save button on the toolbar to save the SEN record.
Completed
Preparing Exclusions Information
Exclusions information is required for students who were subject to any exclusion with a start date during the period 21/04/2014 to 31/08/2014 inclusive. Exclusions should not be counted if the Head Teacher withdrew them, or the student was reinstated by the Discipline Committee, or by an independent Appeal Panel.
NOTE: Please ensure that for any student In Care who has any type of exclusion recorded, that the In Care Start Date, End Date (if known) and LA Details have been entered.
The following data items are required for the School Census: Exclusion Type: fixed period, lunchtime or permanent.
Exclusion Reason: select one code to provide the main reason.
Actual number of sessions: required for fixed period and lunch time exclusions.
NOTE: It is important that the Discipline Committee and Exclusion Appeal Results are recorded in SIMS .net (in the Appeal Details panel) to ensure that exclusions overturned by Governors or an Appeal Panel are not included in the Census.
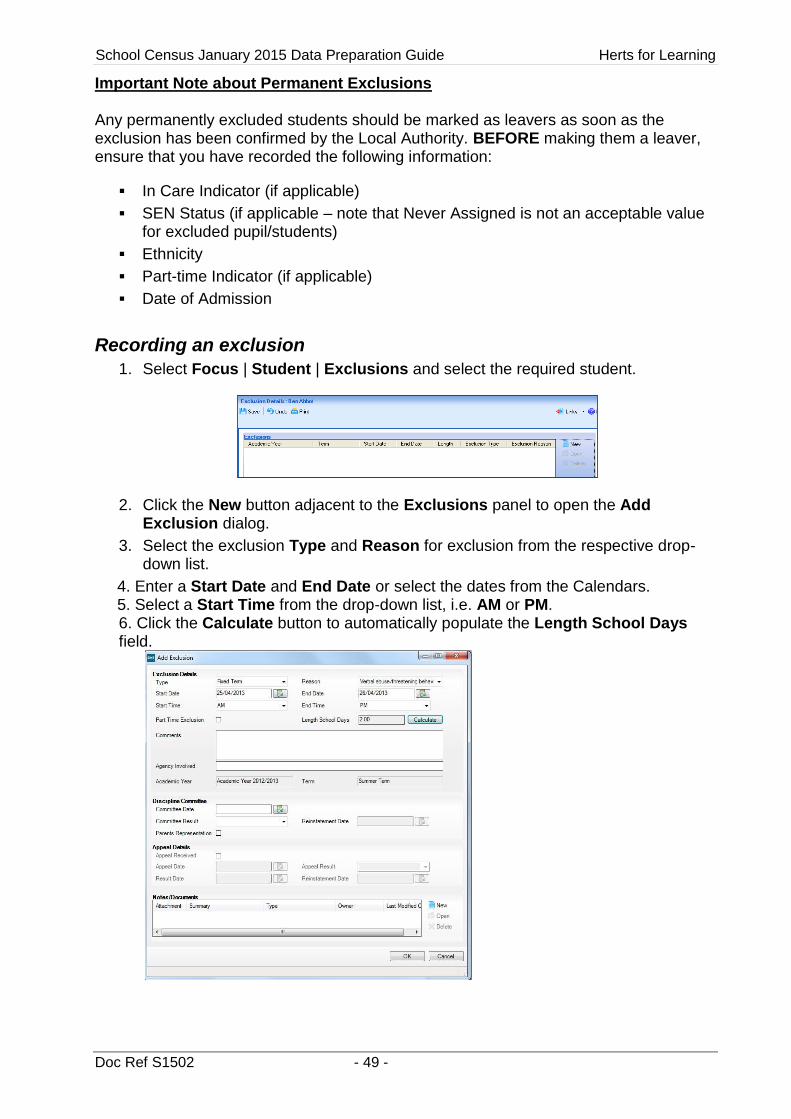
School Census January 2015 Data Preparation Guide Herts for Learning
Doc Ref S1502 - 49 -
Important Note about Permanent Exclusions Any permanently excluded students should be marked as leavers as soon as the exclusion has been confirmed by the Local Authority. BEFORE making them a leaver, ensure that you have recorded the following information:
In Care Indicator (if applicable)
SEN Status (if applicable – note that Never Assigned is not an acceptable value for excluded pupil/students)
Ethnicity
Part-time Indicator (if applicable)
Date of Admission
Recording an exclusion
1. Select Focus | Student | Exclusions and select the required student.
2. Click the New button adjacent to the Exclusions panel to open the Add Exclusion dialog.
3. Select the exclusion Type and Reason for exclusion from the respective drop-down list.
4. Enter a Start Date and End Date or select the dates from the Calendars. 5. Select a Start Time from the drop-down list, i.e. AM or PM.
6. Click the Calculate button to automatically populate the Length School Days field.

Herts for Learning School Census January 2015 Data Preparation Guide
- 50 - Doc Ref S1502
7. Click OK to save the exclusion and return to the Exclusion Details page. A summary of the new exclusion will be displayed on the Exclusion Details page.
8. Click the Save button on the toolbar to save the exclusion.
For more information on exclusions, please refer to the DfE website.
Completed
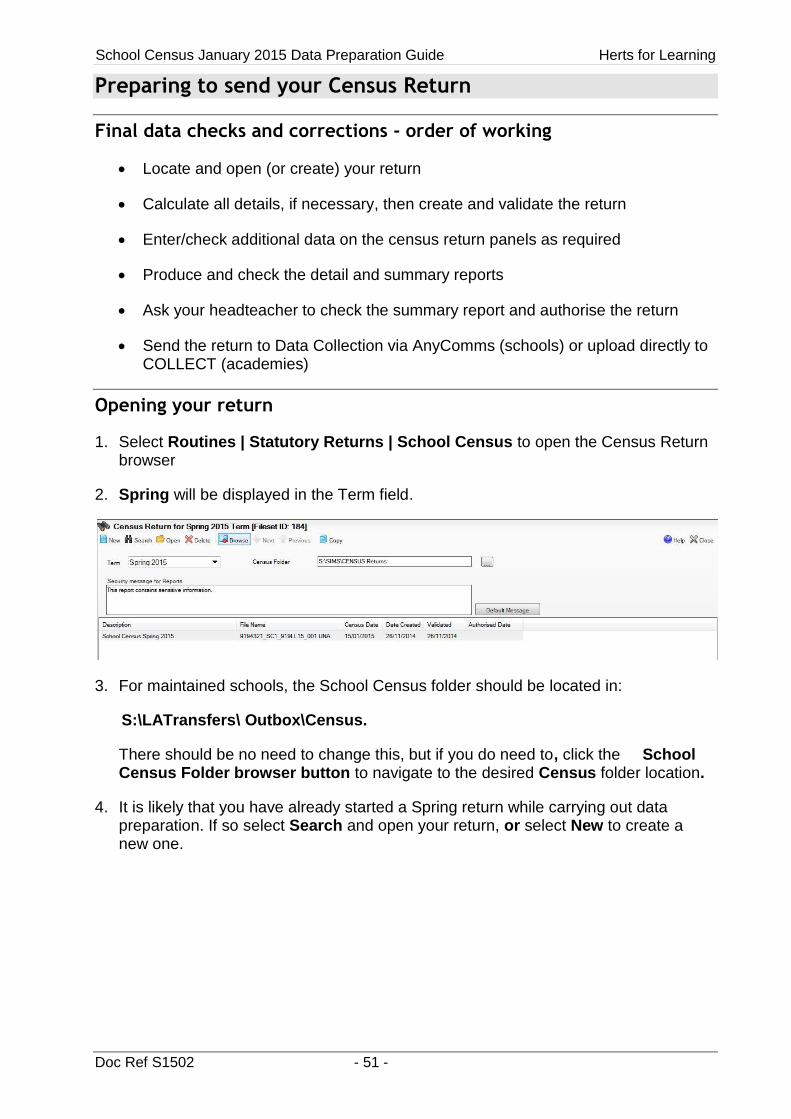
School Census January 2015 Data Preparation Guide Herts for Learning
Doc Ref S1502 - 51 -
Preparing to send your Census Return
Final data checks and corrections - order of working
Locate and open (or create) your return
Calculate all details, if necessary, then create and validate the return
Enter/check additional data on the census return panels as required
Produce and check the detail and summary reports
Ask your headteacher to check the summary report and authorise the return
Send the return to Data Collection via AnyComms (schools) or upload directly to COLLECT (academies)
Opening your return
1. Select Routines | Statutory Returns | School Census to open the Census Return browser
2. Spring will be displayed in the Term field.
3. For maintained schools, the School Census folder should be located in:
S:\LATransfers\ Outbox\Census.
There should be no need to change this, but if you do need to, click the School Census Folder browser button to navigate to the desired Census folder location.
4. It is likely that you have already started a Spring return while carrying out data preparation. If so select Search and open your return, or select New to create a new one.
Herts for Learning School Census January 2015 Data Preparation Guide
- 52 - Doc Ref S1502
Calculating All Details
If you have not done so already, calculate all details by clicking on the Calculate All Details button on panel 11 Census Details.
When you do this, using data present in SIMS .net, the system calculates some of the information to be included in the school census return. Other school census details are collected directly from SIMS .net, e.g. school details, pupil names, addresses, UPNs, SEN, Free Meal entitlement.
The data that has been collected during the Calculate All Details process will be displayed in the Classes, Student Reconciliation and General panels (and, for Foundation or Voluntary Aided schools, Admission Appeals). You will need to check these details and edit them, if necessary.
Once the Calculate All Details process has been completed, each panel on the Census Return Details page can be visited in any order. To navigate between panels, use the right-hand scroll bar or click the underlined hyperlinks at the top of the Census Return Details page.
You must calculate details for a school census return at least once to populate the return. If you have already Calculated All Details and subsequently changed details in any of the other panels (e.g. Classes), those edits will be overwritten if you choose to Calculate All Details again. To retain a record of these changes, you can take a copy of the return before you Calculate All Details again.
Panels on the return that contain information directly calculated from SIMS .net have a Recalculate button, allowing each panel to be recalculated individually, reducing the need to Calculate All Details again.
Saving your Work
You can save your work at any time by clicking the Save button. You must save the file before you Create and Validate the schools census return. We recommend saving your edits after each panel is completed.
Re-Opening a Return
Once the details have been saved, the return can be closed and re-opened at a later date to make edits. Double-click the required file in the Census Return browser to re-open your return.
School Census January 2015 Data Preparation Guide Herts for Learning
Doc Ref S1502 - 53 -
Copying a Return
You can, at any time, copy an existing return and save it as a new return. This allows you to take a ‘snapshot’ of the file at any time and provides a backup of any manual changes you may have made to the return. This could be useful if you wish to retain details of manual edits after you have recalculated details. You might also use this functionality to, in effect, de-authorise a return. Once you have authorised a return it can no longer be edited. However, you can make a copy of the authorised return, rename it if required, make the necessary corrections to the data and then create, validate and authorise the copied return.
1. Select Routines | Statutory Returns | School Census to display the Census Return browser.
2. Select the census return file you wish to copy and click the Copy button. A message dialog will display asking you to confirm that you want to make a copy of the selected return.
3. Click the Yes button and a copy will be made and displayed in the Census Return browser named Copy of <name of selected file>. If required, this name can be changed in the Description field of the Census Details panel when you open the return in the Census Return Details page.
Deleting a Return
A return can be deleted at any time prior to authorisation. Authorised returns cannot be deleted.
1. Select Routines | Statutory Returns | School Census to display the Census Return browser.
2. Select the census return file that you want to delete and click the Delete button. A message dialog will display asking you to confirm that you want to delete the selected return.
3. Click the Yes button and the selected return will be deleted and removed from the Census Return browser.
Checking Census Details and School Information
These panels should contain correct information already, from the previous work you did on your return, but you should check that the information contained in them is correct, referring to earlier sections in this document if necessary.
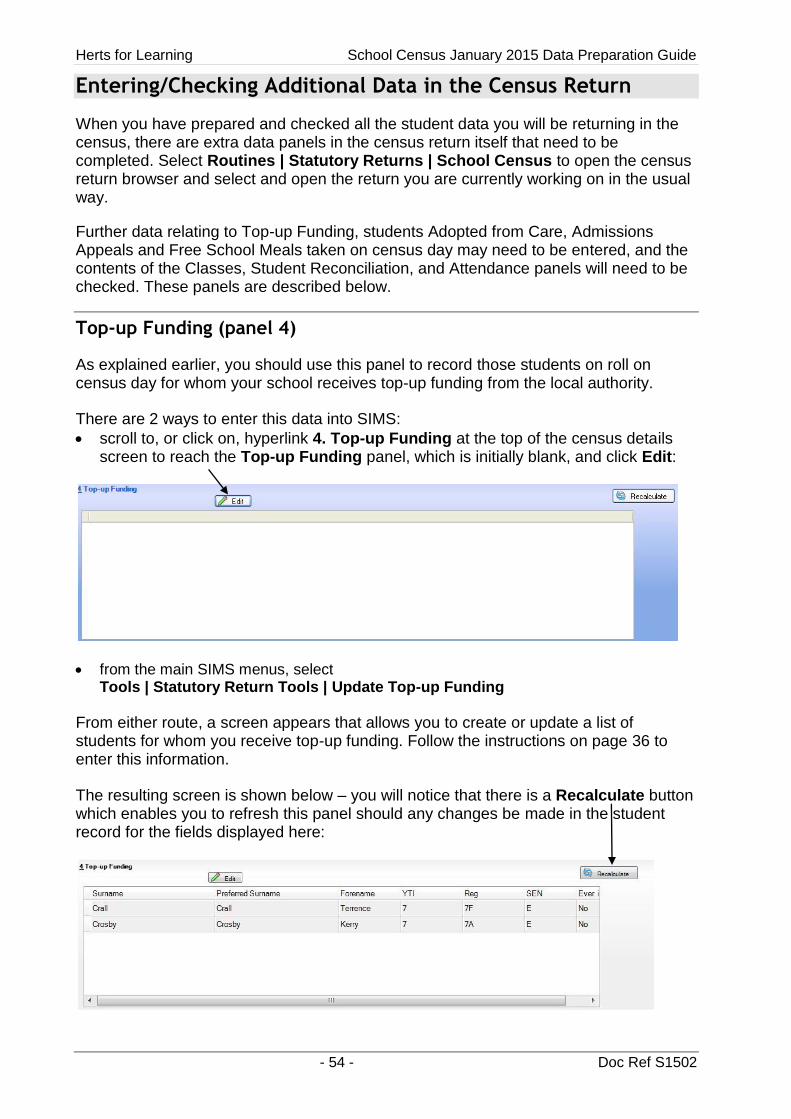
Herts for Learning School Census January 2015 Data Preparation Guide
- 54 - Doc Ref S1502
Entering/Checking Additional Data in the Census Return
When you have prepared and checked all the student data you will be returning in the census, there are extra data panels in the census return itself that need to be completed. Select Routines | Statutory Returns | School Census to open the census return browser and select and open the return you are currently working on in the usual way.
Further data relating to Top-up Funding, students Adopted from Care, Admissions Appeals and Free School Meals taken on census day may need to be entered, and the contents of the Classes, Student Reconciliation, and Attendance panels will need to be checked. These panels are described below.
Top-up Funding (panel 4)
As explained earlier, you should use this panel to record those students on roll on census day for whom your school receives top-up funding from the local authority.
There are 2 ways to enter this data into SIMS:
scroll to, or click on, hyperlink 4. Top-up Funding at the top of the census details screen to reach the Top-up Funding panel, which is initially blank, and click Edit:
from the main SIMS menus, select Tools | Statutory Return Tools | Update Top-up Funding
From either route, a screen appears that allows you to create or update a list of students for whom you receive top-up funding. Follow the instructions on page 36 to enter this information.
The resulting screen is shown below – you will notice that there is a Recalculate button which enables you to refresh this panel should any changes be made in the student record for the fields displayed here:
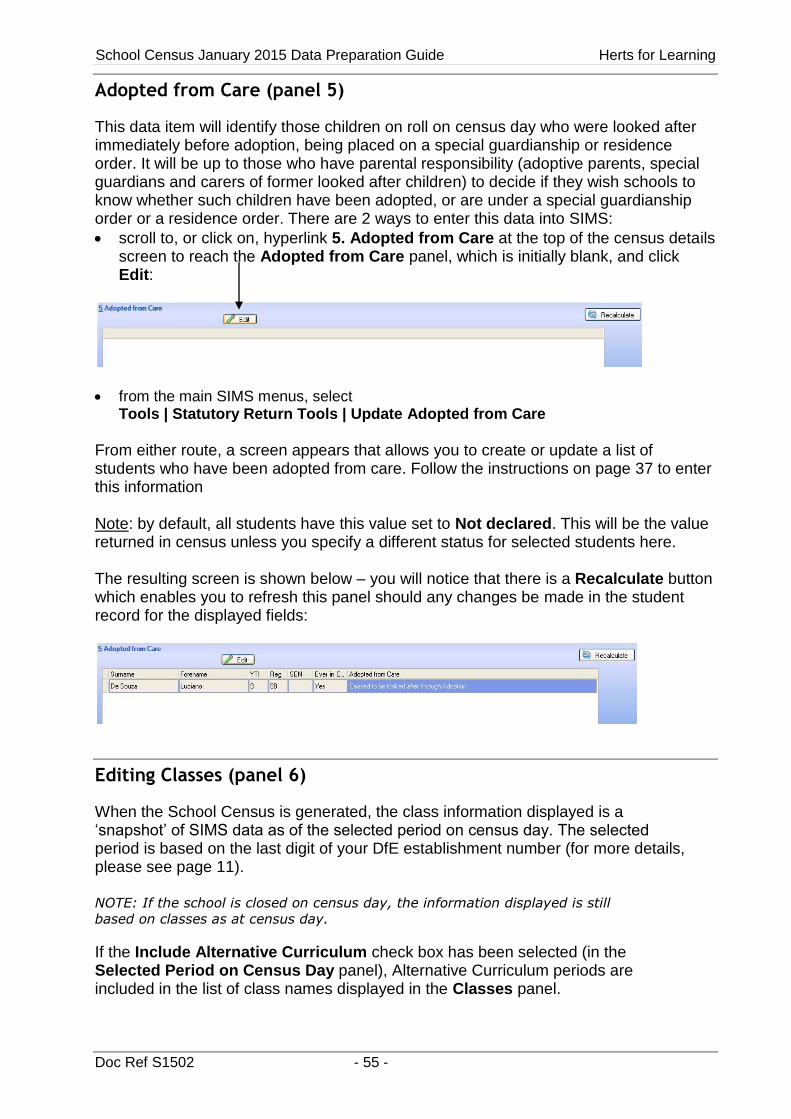
School Census January 2015 Data Preparation Guide Herts for Learning
Doc Ref S1502 - 55 -
Adopted from Care (panel 5)
This data item will identify those children on roll on census day who were looked after immediately before adoption, being placed on a special guardianship or residence order. It will be up to those who have parental responsibility (adoptive parents, special guardians and carers of former looked after children) to decide if they wish schools to know whether such children have been adopted, or are under a special guardianship order or a residence order. There are 2 ways to enter this data into SIMS:
scroll to, or click on, hyperlink 5. Adopted from Care at the top of the census details screen to reach the Adopted from Care panel, which is initially blank, and click Edit:
from the main SIMS menus, select Tools | Statutory Return Tools | Update Adopted from Care
From either route, a screen appears that allows you to create or update a list of students who have been adopted from care. Follow the instructions on page 37 to enter this information Note: by default, all students have this value set to Not declared. This will be the value returned in census unless you specify a different status for selected students here. The resulting screen is shown below – you will notice that there is a Recalculate button which enables you to refresh this panel should any changes be made in the student record for the displayed fields:
Editing Classes (panel 6)
When the School Census is generated, the class information displayed is a ‘snapshot’ of SIMS data as of the selected period on census day. The selected period is based on the last digit of your DfE establishment number (for more details, please see page 11). NOTE: If the school is closed on census day, the information displayed is still
based on classes as at census day.
If the Include Alternative Curriculum check box has been selected (in the Selected Period on Census Day panel), Alternative Curriculum periods are included in the list of class names displayed in the Classes panel.
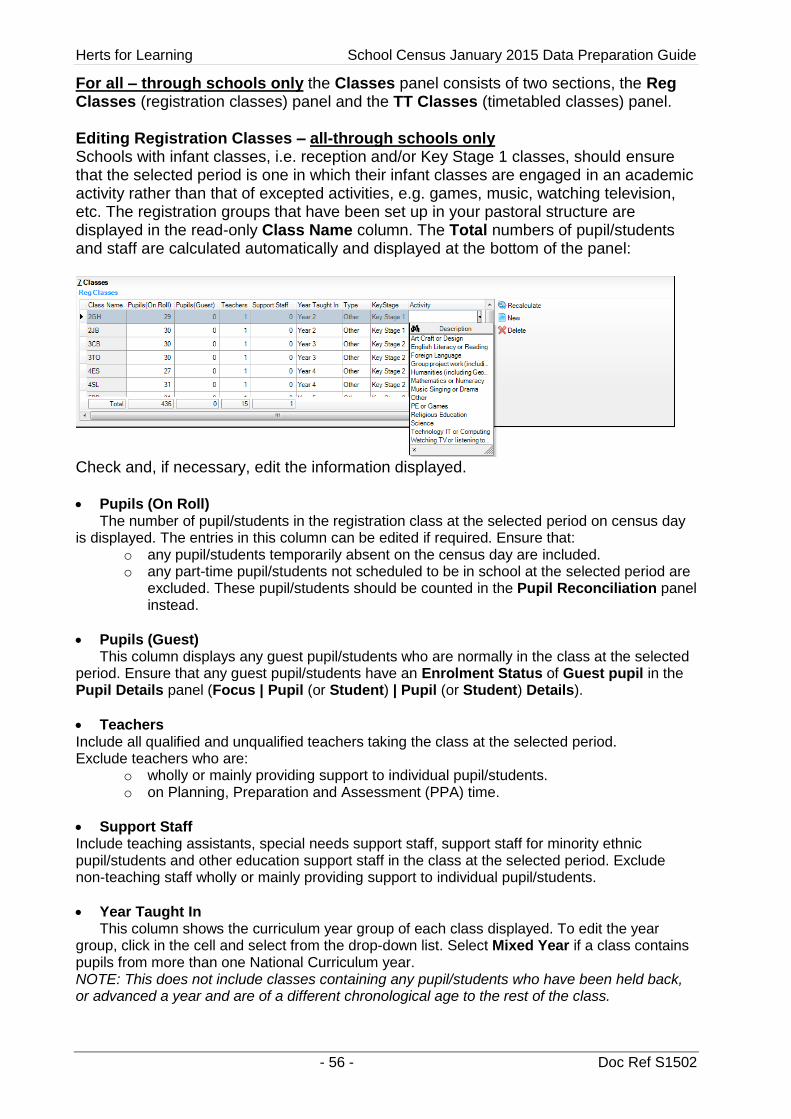
Herts for Learning School Census January 2015 Data Preparation Guide
- 56 - Doc Ref S1502
For all – through schools only the Classes panel consists of two sections, the Reg Classes (registration classes) panel and the TT Classes (timetabled classes) panel. Editing Registration Classes – all-through schools only Schools with infant classes, i.e. reception and/or Key Stage 1 classes, should ensure that the selected period is one in which their infant classes are engaged in an academic activity rather than that of excepted activities, e.g. games, music, watching television, etc. The registration groups that have been set up in your pastoral structure are displayed in the read-only Class Name column. The Total numbers of pupil/students and staff are calculated automatically and displayed at the bottom of the panel:
Check and, if necessary, edit the information displayed. Pupils (On Roll)
The number of pupil/students in the registration class at the selected period on census day is displayed. The entries in this column can be edited if required. Ensure that:
o any pupil/students temporarily absent on the census day are included. o any part-time pupil/students not scheduled to be in school at the selected period are
excluded. These pupil/students should be counted in the Pupil Reconciliation panel instead.
Pupils (Guest) This column displays any guest pupil/students who are normally in the class at the selected
period. Ensure that any guest pupil/students have an Enrolment Status of Guest pupil in the Pupil Details panel (Focus | Pupil (or Student) | Pupil (or Student) Details).
Teachers Include all qualified and unqualified teachers taking the class at the selected period. Exclude teachers who are:
o wholly or mainly providing support to individual pupil/students. o on Planning, Preparation and Assessment (PPA) time.
Support Staff Include teaching assistants, special needs support staff, support staff for minority ethnic pupil/students and other education support staff in the class at the selected period. Exclude non-teaching staff wholly or mainly providing support to individual pupil/students.
Year Taught In This column shows the curriculum year group of each class displayed. To edit the year
group, click in the cell and select from the drop-down list. Select Mixed Year if a class contains pupils from more than one National Curriculum year. NOTE: This does not include classes containing any pupil/students who have been held back, or advanced a year and are of a different chronological age to the rest of the class.
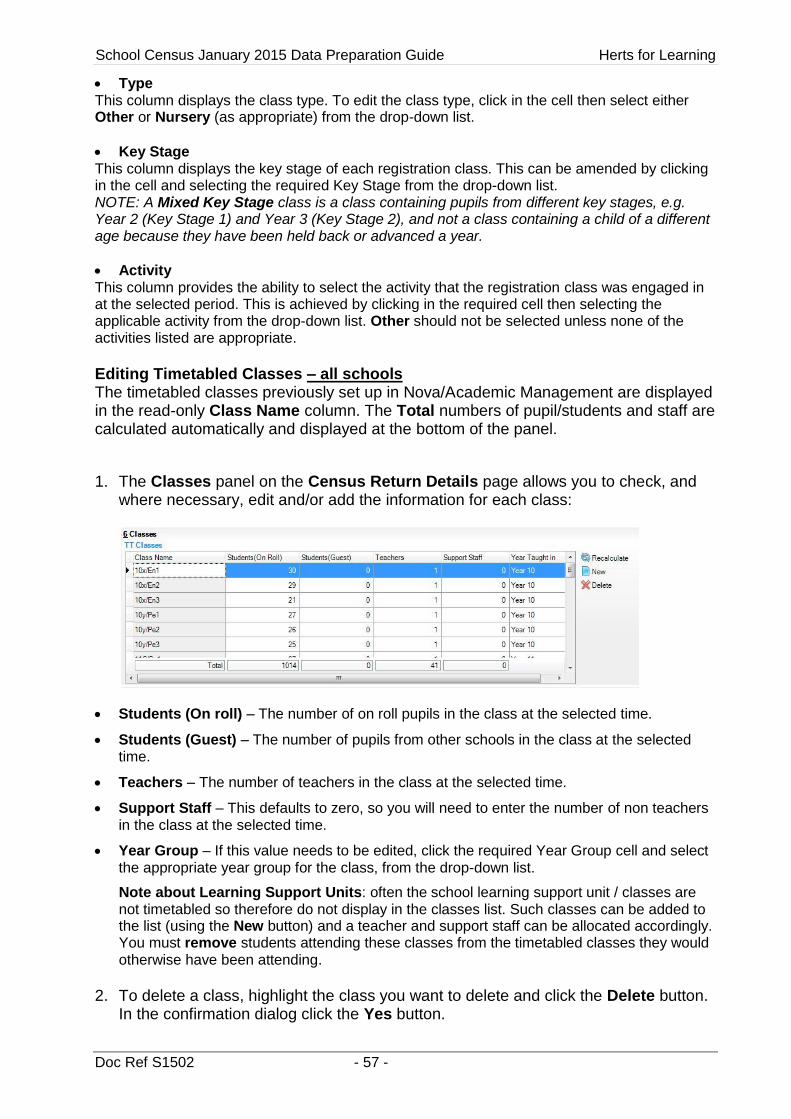
School Census January 2015 Data Preparation Guide Herts for Learning
Doc Ref S1502 - 57 -
Type This column displays the class type. To edit the class type, click in the cell then select either Other or Nursery (as appropriate) from the drop-down list.
Key Stage This column displays the key stage of each registration class. This can be amended by clicking in the cell and selecting the required Key Stage from the drop-down list. NOTE: A Mixed Key Stage class is a class containing pupils from different key stages, e.g. Year 2 (Key Stage 1) and Year 3 (Key Stage 2), and not a class containing a child of a different age because they have been held back or advanced a year.
Activity This column provides the ability to select the activity that the registration class was engaged in at the selected period. This is achieved by clicking in the required cell then selecting the applicable activity from the drop-down list. Other should not be selected unless none of the activities listed are appropriate.
Editing Timetabled Classes – all schools The timetabled classes previously set up in Nova/Academic Management are displayed in the read-only Class Name column. The Total numbers of pupil/students and staff are calculated automatically and displayed at the bottom of the panel.
1. The Classes panel on the Census Return Details page allows you to check, and where necessary, edit and/or add the information for each class:
Students (On roll) – The number of on roll pupils in the class at the selected time.
Students (Guest) – The number of pupils from other schools in the class at the selected time.
Teachers – The number of teachers in the class at the selected time.
Support Staff – This defaults to zero, so you will need to enter the number of non teachers in the class at the selected time.
Year Group – If this value needs to be edited, click the required Year Group cell and select the appropriate year group for the class, from the drop-down list.
Note about Learning Support Units: often the school learning support unit / classes are not timetabled so therefore do not display in the classes list. Such classes can be added to the list (using the New button) and a teacher and support staff can be allocated accordingly. You must remove students attending these classes from the timetabled classes they would otherwise have been attending.
2. To delete a class, highlight the class you want to delete and click the Delete button.
In the confirmation dialog click the Yes button.
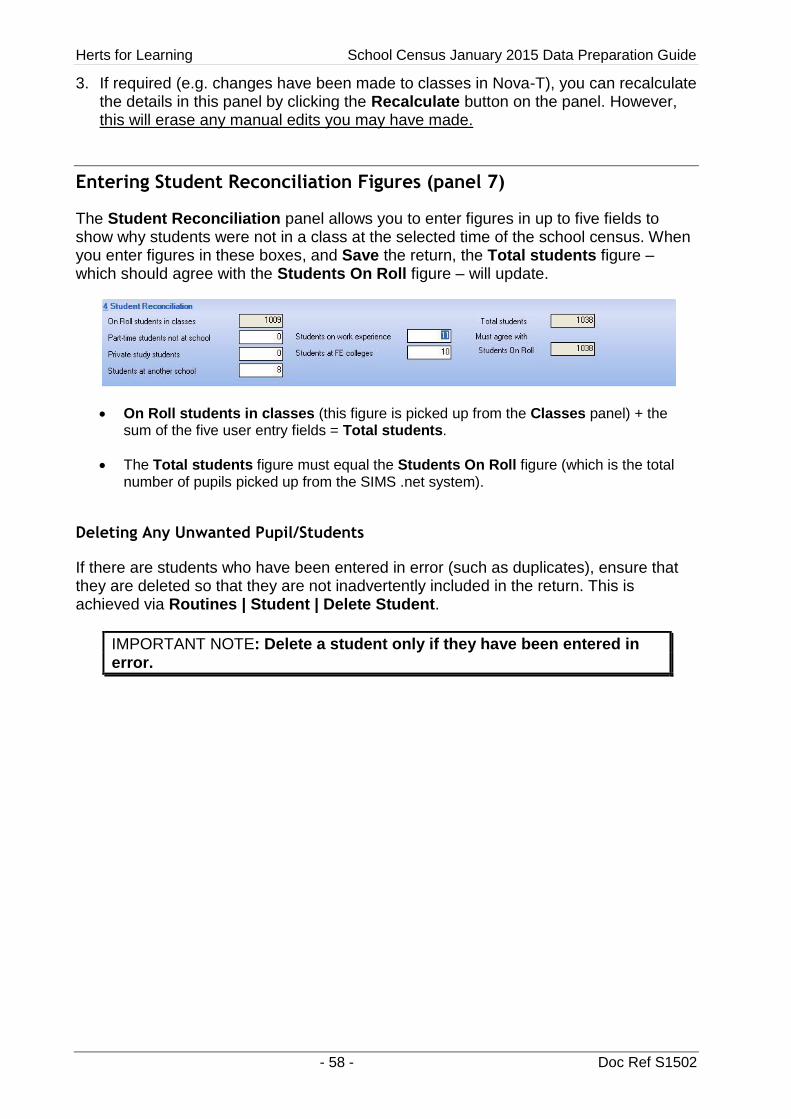
Herts for Learning School Census January 2015 Data Preparation Guide
- 58 - Doc Ref S1502
3. If required (e.g. changes have been made to classes in Nova-T), you can recalculate the details in this panel by clicking the Recalculate button on the panel. However, this will erase any manual edits you may have made.
Entering Student Reconciliation Figures (panel 7)
The Student Reconciliation panel allows you to enter figures in up to five fields to show why students were not in a class at the selected time of the school census. When you enter figures in these boxes, and Save the return, the Total students figure – which should agree with the Students On Roll figure – will update.
On Roll students in classes (this figure is picked up from the Classes panel) + the sum of the five user entry fields = Total students.
The Total students figure must equal the Students On Roll figure (which is the total number of pupils picked up from the SIMS .net system).
Deleting Any Unwanted Pupil/Students
If there are students who have been entered in error (such as duplicates), ensure that they are deleted so that they are not inadvertently included in the return. This is achieved via Routines | Student | Delete Student.
IMPORTANT NOTE: Delete a student only if they have been entered in error.
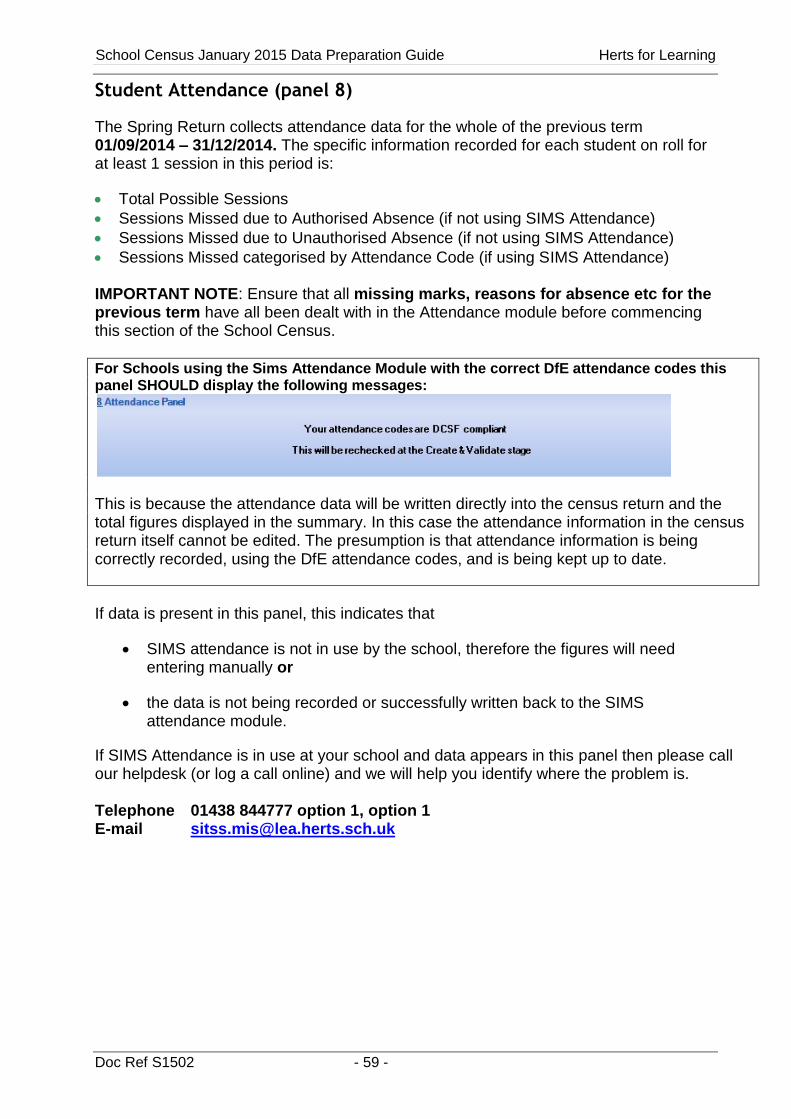
School Census January 2015 Data Preparation Guide Herts for Learning
Doc Ref S1502 - 59 -
Student Attendance (panel 8)
The Spring Return collects attendance data for the whole of the previous term 01/09/2014 – 31/12/2014. The specific information recorded for each student on roll for at least 1 session in this period is:
Total Possible Sessions
Sessions Missed due to Authorised Absence (if not using SIMS Attendance)
Sessions Missed due to Unauthorised Absence (if not using SIMS Attendance)
Sessions Missed categorised by Attendance Code (if using SIMS Attendance) IMPORTANT NOTE: Ensure that all missing marks, reasons for absence etc for the previous term have all been dealt with in the Attendance module before commencing this section of the School Census.
For Schools using the Sims Attendance Module with the correct DfE attendance codes this panel SHOULD display the following messages:
This is because the attendance data will be written directly into the census return and the total figures displayed in the summary. In this case the attendance information in the census return itself cannot be edited. The presumption is that attendance information is being correctly recorded, using the DfE attendance codes, and is being kept up to date.
If data is present in this panel, this indicates that
SIMS attendance is not in use by the school, therefore the figures will need entering manually or
the data is not being recorded or successfully written back to the SIMS attendance module.
If SIMS Attendance is in use at your school and data appears in this panel then please call our helpdesk (or log a call online) and we will help you identify where the problem is. Telephone 01438 844777 option 1, option 1 E-mail [email protected]

Herts for Learning School Census January 2015 Data Preparation Guide
- 60 - Doc Ref S1502
Entering General Information (panel 9)
The information recorded in the General panel needs to be entered manually, as it is not stored by the SIMS .net system.
Enter the Number of free school meals taken on the Census date.
This number cannot be greater than the number of students who are eligible for a Free Meal. Please ensure that you have updated details for those students who are entitled to Free School Meals and also for those who were previously, but are no longer, entitled.
Once satisfied the correct figure has been entered, Click Save and continue to the next panel.
Entering the Admission Appeals (panel 10)
Information in this module is only required if your school has governance VA (Voluntary Aided), FO (Foundation) or CA (Academy) and was responsible for its own admission appeals against non-admission for entry into the 2014-2015 academic year. All-through schools with a governance of VA, FO or CA should include admission appeals for infants both in this module and also in the separate infant admissions appeal module. Only appeals organised by the school’s governing body should be included. If your school operates arrangements jointly with other schools, your return should include appeals for your school only.
The fields in this panel should be completed as follows: Lodged: Total number of admission appeals lodged by parents between March 2014 and August 2014 (i.e. before 1 September 2014) inclusive against non-admission to the school for the start of the academic (admission) year beginning September 2014. This will include: appeals lodged prior to 1 September, where the hearing and/or decision took place after
that date
appeals not pursued to the hearing stage, and those not resolved
appeals that did not reach a hearing because a place became available (at your school or another) which was accepted by parents
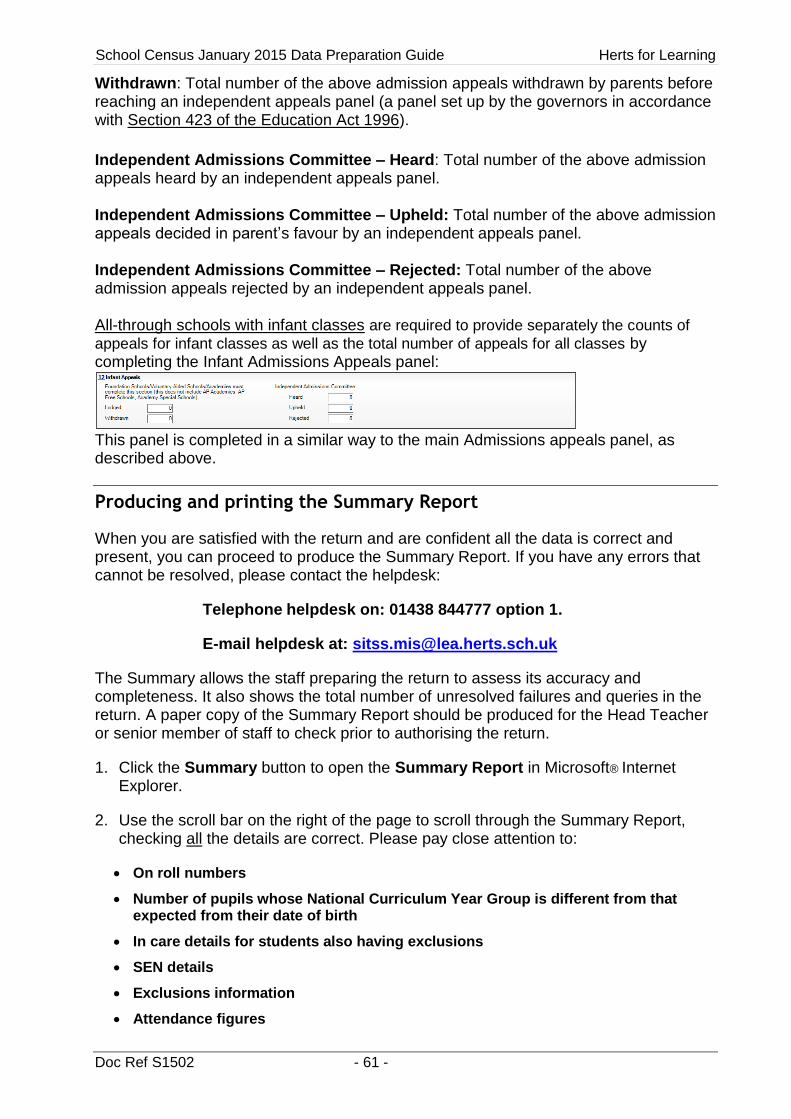
School Census January 2015 Data Preparation Guide Herts for Learning
Doc Ref S1502 - 61 -
Withdrawn: Total number of the above admission appeals withdrawn by parents before reaching an independent appeals panel (a panel set up by the governors in accordance with Section 423 of the Education Act 1996).
Independent Admissions Committee – Heard: Total number of the above admission appeals heard by an independent appeals panel. Independent Admissions Committee – Upheld: Total number of the above admission appeals decided in parent’s favour by an independent appeals panel. Independent Admissions Committee – Rejected: Total number of the above admission appeals rejected by an independent appeals panel. All-through schools with infant classes are required to provide separately the counts of
appeals for infant classes as well as the total number of appeals for all classes by completing the Infant Admissions Appeals panel:
This panel is completed in a similar way to the main Admissions appeals panel, as described above.
Producing and printing the Summary Report
When you are satisfied with the return and are confident all the data is correct and present, you can proceed to produce the Summary Report. If you have any errors that cannot be resolved, please contact the helpdesk:
Telephone helpdesk on: 01438 844777 option 1.
E-mail helpdesk at: [email protected]
The Summary allows the staff preparing the return to assess its accuracy and completeness. It also shows the total number of unresolved failures and queries in the return. A paper copy of the Summary Report should be produced for the Head Teacher or senior member of staff to check prior to authorising the return.
1. Click the Summary button to open the Summary Report in Microsoft® Internet Explorer.
2. Use the scroll bar on the right of the page to scroll through the Summary Report, checking all the details are correct. Please pay close attention to:
On roll numbers
Number of pupils whose National Curriculum Year Group is different from that expected from their date of birth
In care details for students also having exclusions
SEN details
Exclusions information
Attendance figures
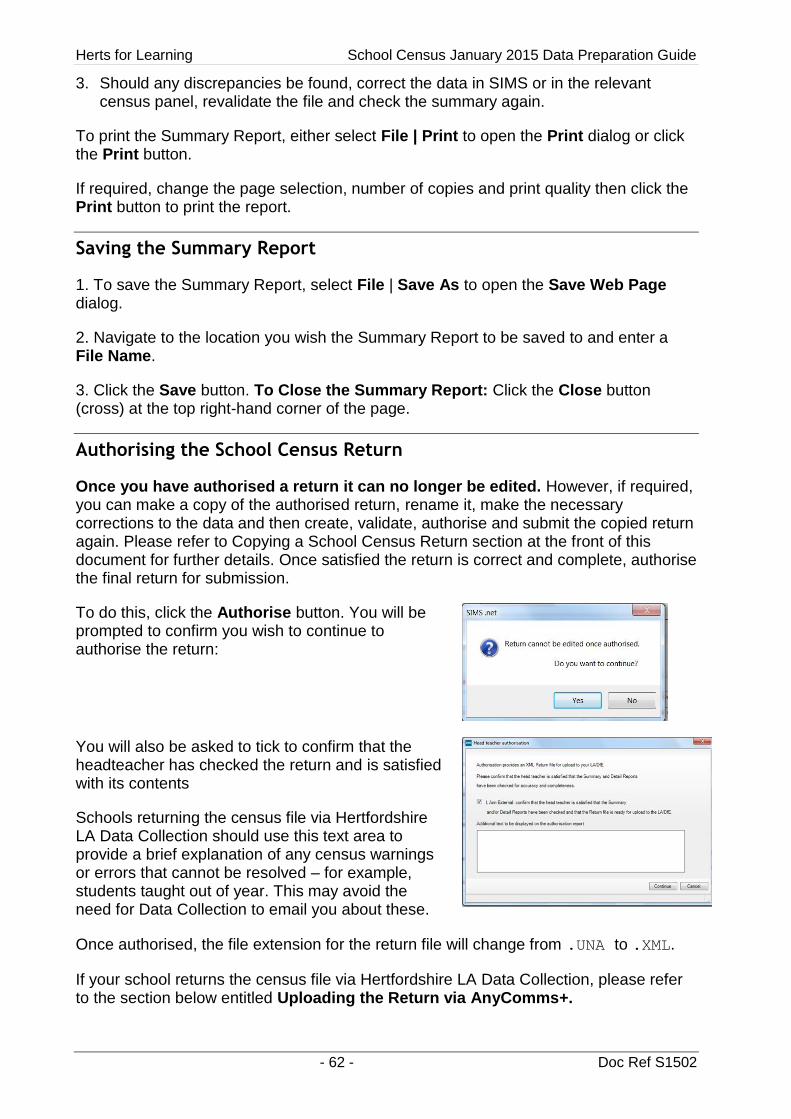
Herts for Learning School Census January 2015 Data Preparation Guide
- 62 - Doc Ref S1502
3. Should any discrepancies be found, correct the data in SIMS or in the relevant census panel, revalidate the file and check the summary again.
To print the Summary Report, either select File | Print to open the Print dialog or click the Print button.
If required, change the page selection, number of copies and print quality then click the Print button to print the report.
Saving the Summary Report
1. To save the Summary Report, select File | Save As to open the Save Web Page dialog.
2. Navigate to the location you wish the Summary Report to be saved to and enter a File Name.
3. Click the Save button. To Close the Summary Report: Click the Close button (cross) at the top right-hand corner of the page.
Authorising the School Census Return
Once you have authorised a return it can no longer be edited. However, if required, you can make a copy of the authorised return, rename it, make the necessary corrections to the data and then create, validate, authorise and submit the copied return again. Please refer to Copying a School Census Return section at the front of this document for further details. Once satisfied the return is correct and complete, authorise the final return for submission.
To do this, click the Authorise button. You will be prompted to confirm you wish to continue to authorise the return:
You will also be asked to tick to confirm that the headteacher has checked the return and is satisfied with its contents
Schools returning the census file via Hertfordshire LA Data Collection should use this text area to provide a brief explanation of any census warnings or errors that cannot be resolved – for example, students taught out of year. This may avoid the need for Data Collection to email you about these.
Once authorised, the file extension for the return file will change from .UNA to .XML.
If your school returns the census file via Hertfordshire LA Data Collection, please refer to the section below entitled Uploading the Return via AnyComms+.
School Census January 2015 Data Preparation Guide Herts for Learning
Doc Ref S1502 - 63 -
Submitting the Return from Academies to the DfE
Academies should submit and approve the data via the Department’s secure web-based collection tool, COLLECT, which will be available on the live site from 15 January 2015. Information is available in the COLLECT training guide as to how this should be done. Academies may wish to carry out dry runs of the census using the COLLECT blade on the familiarisation site.
A COLLECT User Guide for Academies is available on the DfE site at
https://www.gov.uk/government/collections/school-census
FAQs
Resubmissions to COLLECT Question: With XML files, will a second submission to COLLECT overwrite the first? Answer: Yes a second XML file will overwrite the data already submitted if the LA Number, Estab, Software Code and Source Level in the file header are the same as that already submitted to COLLECT. Returning data via COLLECT Question: Is COLLECT the only way to submit the returns to the Department?
Answer: Yes it is.
Question: We are an academy and have completed the School Census and submitted the data on COLLECT. We understand that we are responsible for approving this data; however there is no approve button.
Answer: You need to go back to the main screen and instead of selecting Source you need to select Agent then you will be able to click the approve button.
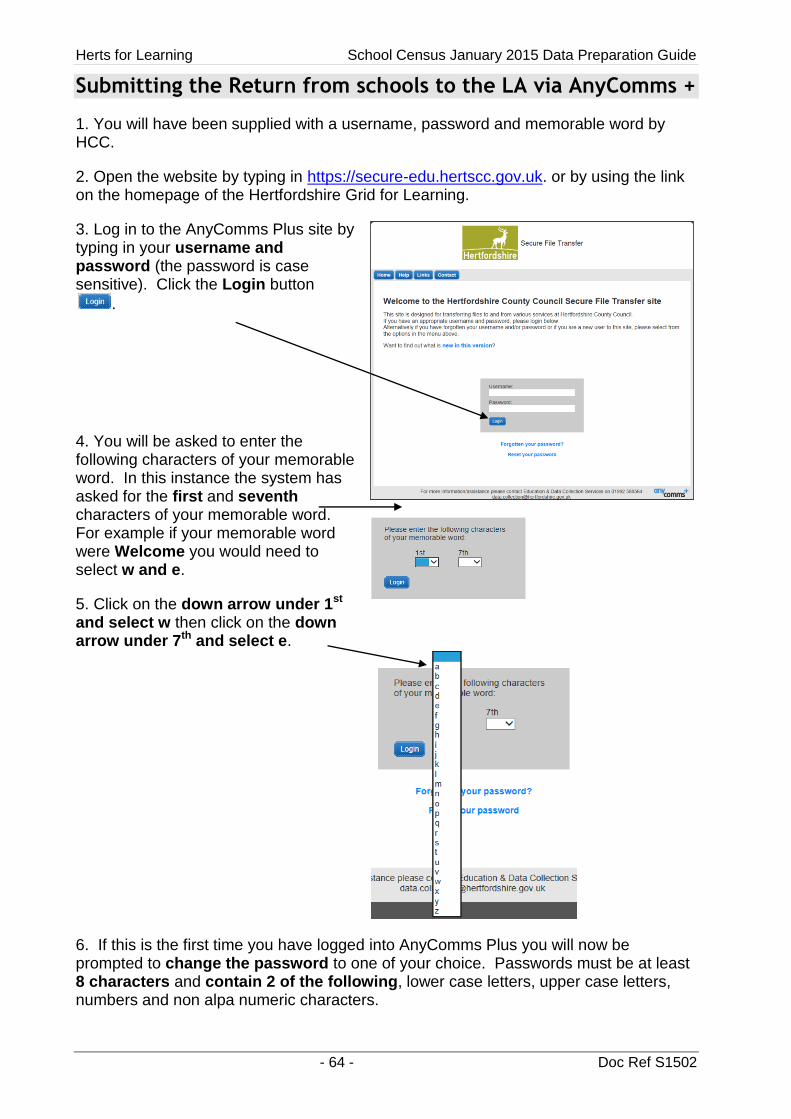
Herts for Learning School Census January 2015 Data Preparation Guide
- 64 - Doc Ref S1502
Submitting the Return from schools to the LA via AnyComms +
1. You will have been supplied with a username, password and memorable word by HCC.
2. Open the website by typing in https://secure-edu.hertscc.gov.uk. or by using the link on the homepage of the Hertfordshire Grid for Learning.
3. Log in to the AnyComms Plus site by typing in your username and password (the password is case sensitive). Click the Login button
.
4. You will be asked to enter the following characters of your memorable word. In this instance the system has asked for the first and seventh characters of your memorable word. For example if your memorable word were Welcome you would need to select w and e.
5. Click on the down arrow under 1st and select w then click on the down arrow under 7th and select e.
6. If this is the first time you have logged into AnyComms Plus you will now be prompted to change the password to one of your choice. Passwords must be at least 8 characters and contain 2 of the following, lower case letters, upper case letters, numbers and non alpa numeric characters.
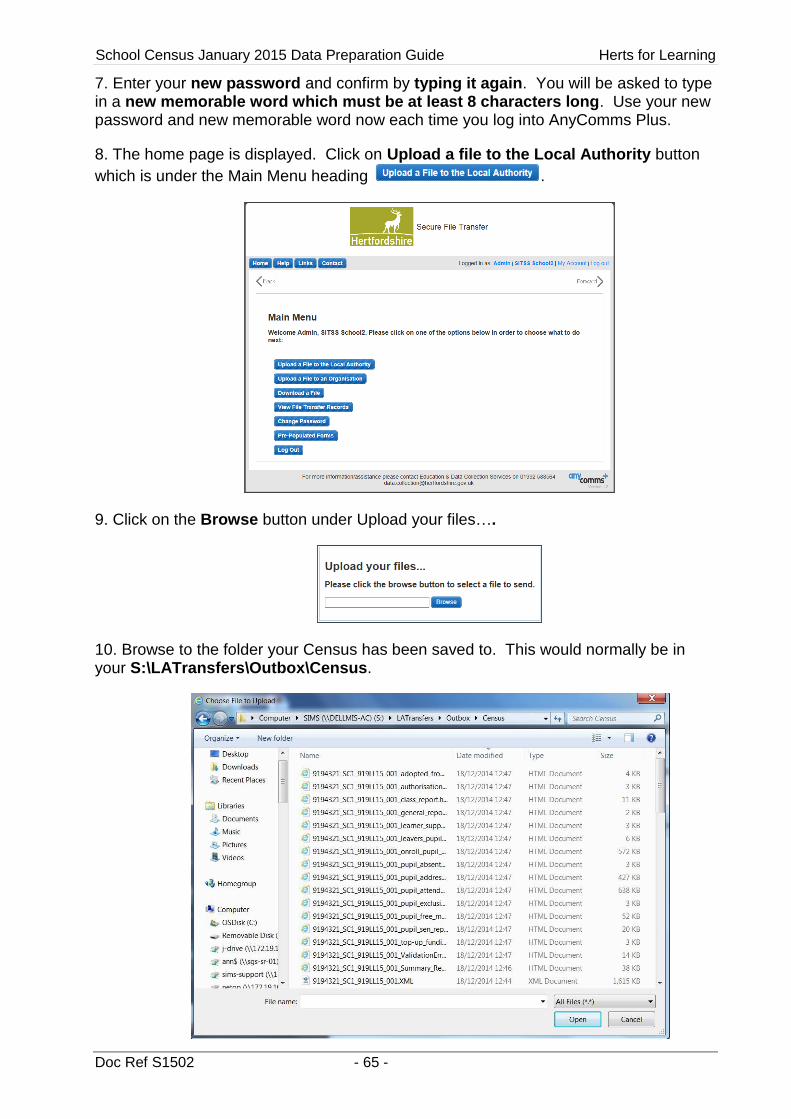
School Census January 2015 Data Preparation Guide Herts for Learning
Doc Ref S1502 - 65 -
7. Enter your new password and confirm by typing it again. You will be asked to type in a new memorable word which must be at least 8 characters long. Use your new password and new memorable word now each time you log into AnyComms Plus.
8. The home page is displayed. Click on Upload a file to the Local Authority button
which is under the Main Menu heading .
9. Click on the Browse button under Upload your files….
10. Browse to the folder your Census has been saved to. This would normally be in your S:\LATransfers\Outbox\Census.
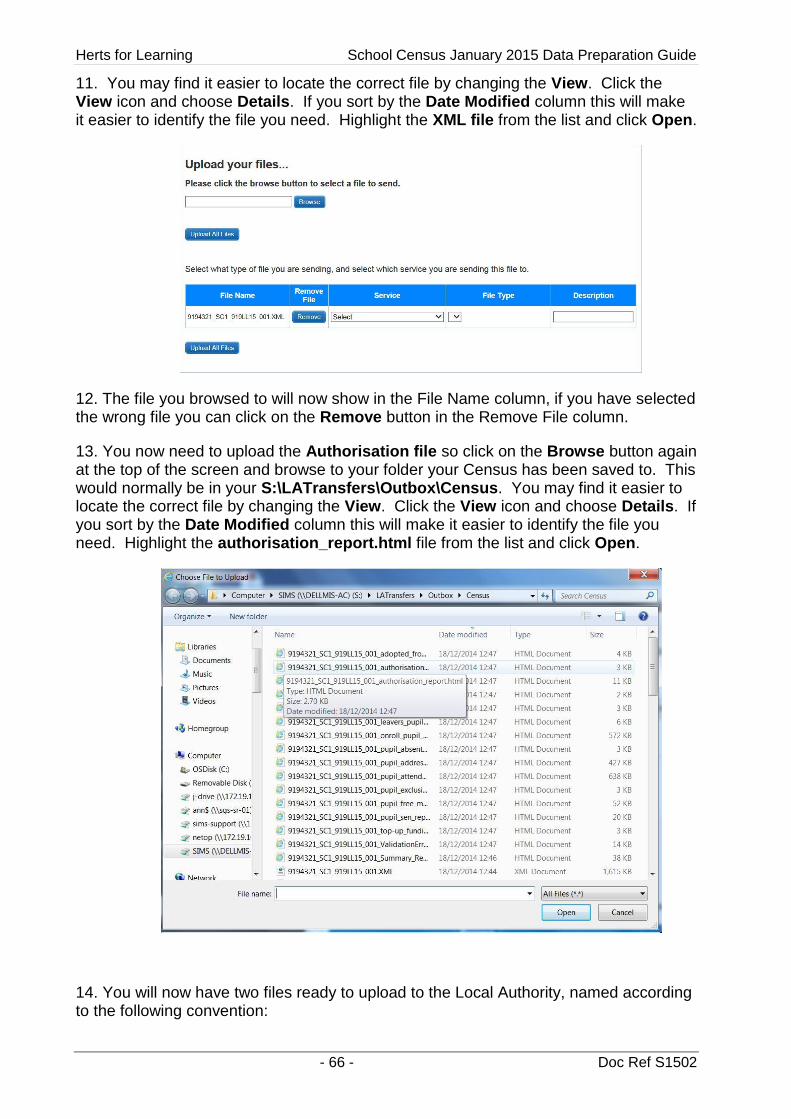
Herts for Learning School Census January 2015 Data Preparation Guide
- 66 - Doc Ref S1502
11. You may find it easier to locate the correct file by changing the View. Click the View icon and choose Details. If you sort by the Date Modified column this will make it easier to identify the file you need. Highlight the XML file from the list and click Open.
12. The file you browsed to will now show in the File Name column, if you have selected the wrong file you can click on the Remove button in the Remove File column.
13. You now need to upload the Authorisation file so click on the Browse button again at the top of the screen and browse to your folder your Census has been saved to. This would normally be in your S:\LATransfers\Outbox\Census. You may find it easier to locate the correct file by changing the View. Click the View icon and choose Details. If you sort by the Date Modified column this will make it easier to identify the file you need. Highlight the authorisation_report.html file from the list and click Open.
14. You will now have two files ready to upload to the Local Authority, named according to the following convention:
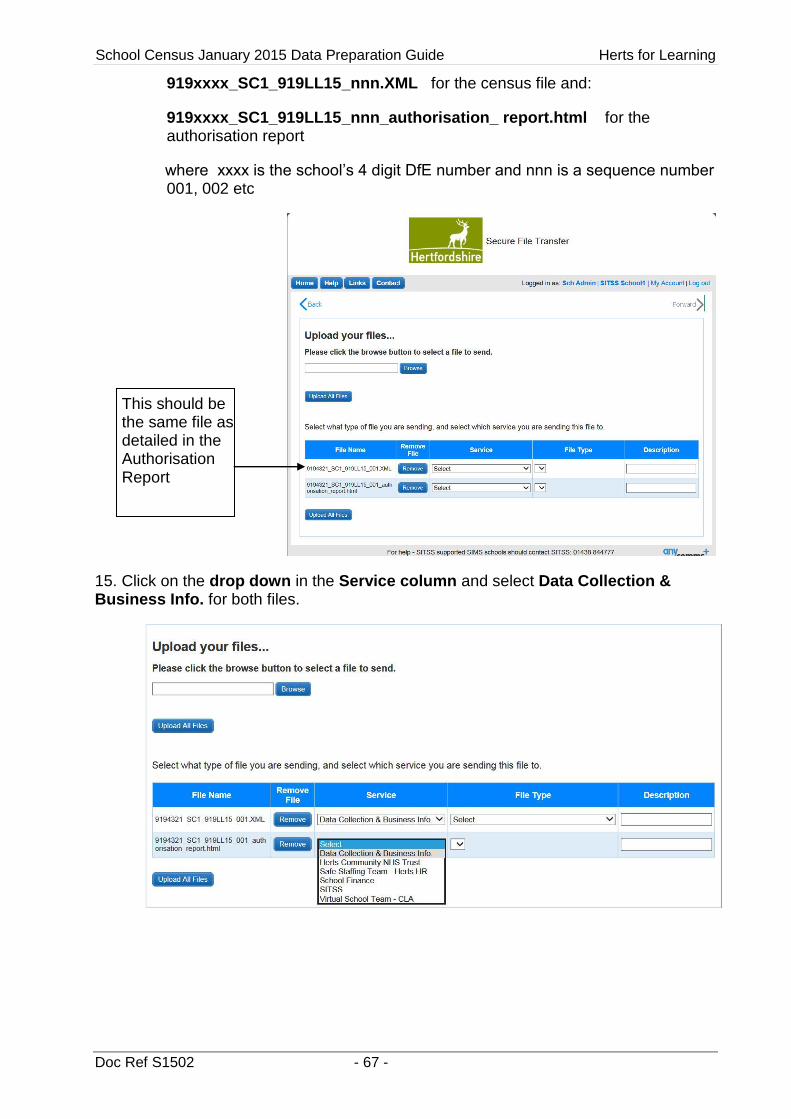
School Census January 2015 Data Preparation Guide Herts for Learning
Doc Ref S1502 - 67 -
919xxxx_SC1_919LL15_nnn.XML for the census file and:
919xxxx_SC1_919LL15_nnn_authorisation_ report.html for the authorisation report
where xxxx is the school’s 4 digit DfE number and nnn is a sequence number 001, 002 etc
15. Click on the drop down in the Service column and select Data Collection & Business Info. for both files.
This should be the same file as detailed in the Authorisation Report
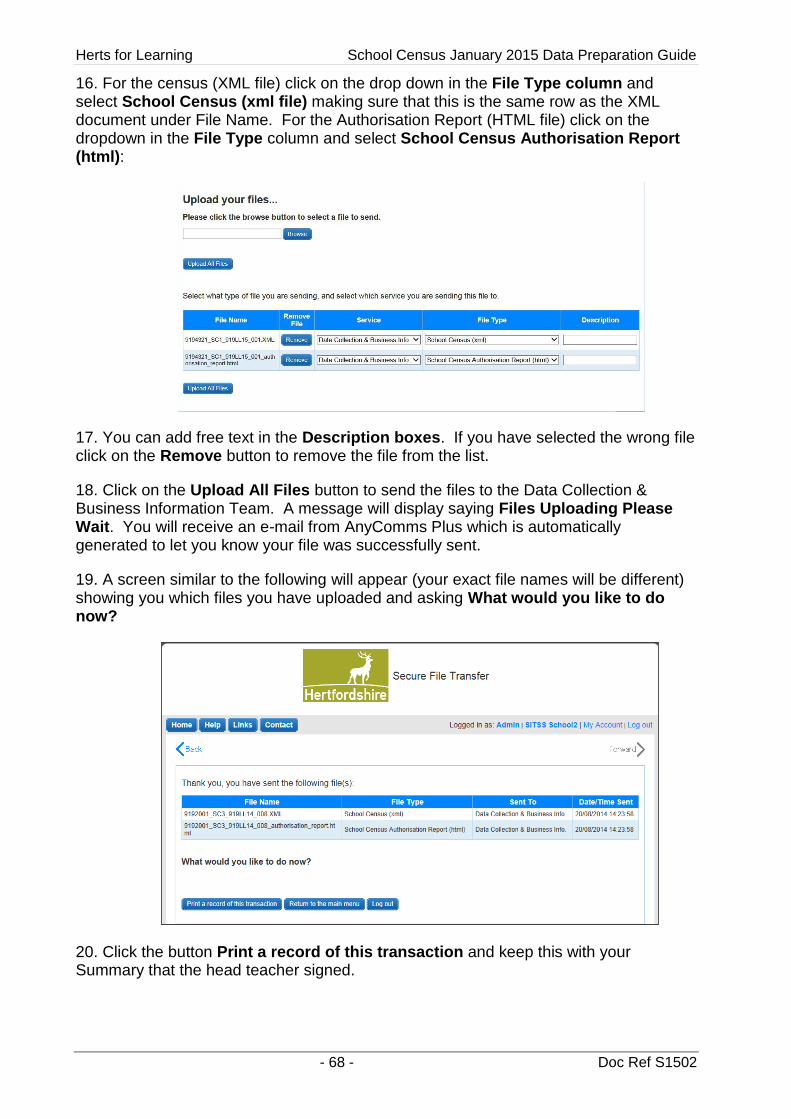
Herts for Learning School Census January 2015 Data Preparation Guide
- 68 - Doc Ref S1502
16. For the census (XML file) click on the drop down in the File Type column and select School Census (xml file) making sure that this is the same row as the XML document under File Name. For the Authorisation Report (HTML file) click on the dropdown in the File Type column and select School Census Authorisation Report (html):
17. You can add free text in the Description boxes. If you have selected the wrong file click on the Remove button to remove the file from the list.
18. Click on the Upload All Files button to send the files to the Data Collection & Business Information Team. A message will display saying Files Uploading Please Wait. You will receive an e-mail from AnyComms Plus which is automatically generated to let you know your file was successfully sent.
19. A screen similar to the following will appear (your exact file names will be different) showing you which files you have uploaded and asking What would you like to do now?
20. Click the button Print a record of this transaction and keep this with your Summary that the head teacher signed.
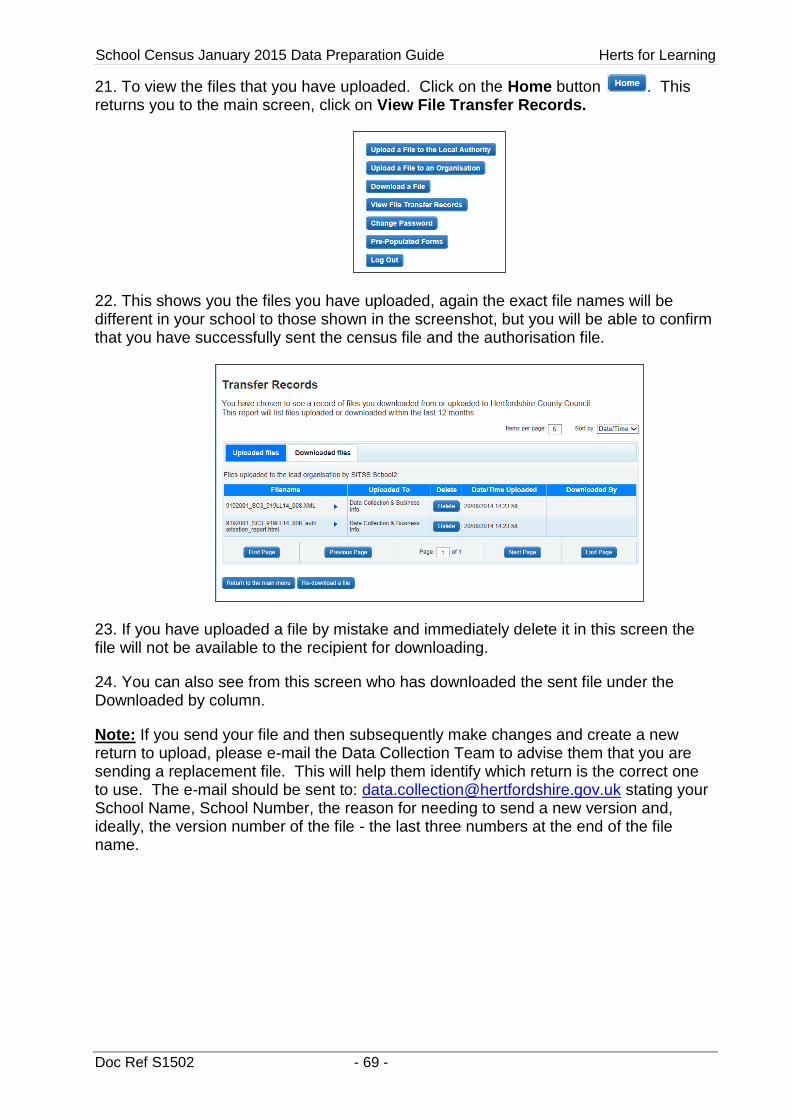
School Census January 2015 Data Preparation Guide Herts for Learning
Doc Ref S1502 - 69 -
21. To view the files that you have uploaded. Click on the Home button . This returns you to the main screen, click on View File Transfer Records.
22. This shows you the files you have uploaded, again the exact file names will be different in your school to those shown in the screenshot, but you will be able to confirm that you have successfully sent the census file and the authorisation file.
23. If you have uploaded a file by mistake and immediately delete it in this screen the file will not be available to the recipient for downloading.
24. You can also see from this screen who has downloaded the sent file under the Downloaded by column.
Note: If you send your file and then subsequently make changes and create a new return to upload, please e-mail the Data Collection Team to advise them that you are sending a replacement file. This will help them identify which return is the correct one to use. The e-mail should be sent to: [email protected] stating your School Name, School Number, the reason for needing to send a new version and, ideally, the version number of the file - the last three numbers at the end of the file name.