Embed Size (px)
Citation preview
SCHOOL BUS EVACUATION
MANUAL
DRIVER/PASSENGER SAFETY
AND
EMERGENCY PROCEDURES
To Be Used As An Instructional Guide
In the Delivery of Safe School Transportation Services
By School Districts.
Prepared By
Office of Transportation
South Carolina Department of Education
Reviewed By
South Carolina Association of Pupil Transportation
June 1999
II
SCHOOL BUS EVACUATION MANUAL Driver/Passenger Safety And Emergency Procedures
I. Introduction Page 1
II. Who Makes an Emergency Evacuation Plan Work?
A. School District Administrators and Their Personnel Page 2
Being Prepared
Know it and Practice It
B. Transportation Supervisors Page 2
Plan and Assign Duties
III. What Are The School Bus Drivers’ Responsibilities?
A. The Driver Must Know What Needs To Be Done and How To Do It Page 3
B. The Driver Must Be Physically Fit to Carry Out the Plan Page 3
C. The Driver Should Inspect The Bus Each Day Before Each Route Page 3
Walk-Around Inspections
Exterior Bus Inspection Page 3
Interior Bus Inspection Page 4
D. Drivers Should Make Announcements To Students Page 5
E. How A Driver Should Manage or Supervise Page 6
Student Seating at Emergency Exits
Student Clothing
Carry-on Items
F. Selecting Student Helpers Page 7
IV. Evacuate?
A. Should the Bus Be Evacuated? Page 8
B. Assess the Need to Evacuate Page 8
C. Be Aware Of Restraining Devices Used Page 9
D. Emergency Release Guidelines For Restraint Devices Page 9
E. Student Responsibility During Evacuation Page 9
F. Where Do Students Go When Evacuating The Bus? Page 10
Scenario I -- Stalled on a Railroad Track, No Immediate Danger Page 10
Scenario II -- Stalled on a Railroad Track, in Immediate Danger Page 11
Scenario III -- Fuel Tanker and School Bus Collision Page 12
G. Accident Position of Vehicle Versus Best Exit To Use: Page 12
Scenario I -- Fuel Tanker and School Bus Collision Page 13
Scenario I (Alternative) -- Flammable Liquid is Spilled Page 14
Scenario II -- Bus Off Roadway, Turned on Side Page 16
Scenario III -- Bus Off Roadway, Upside Down Page 17
H. Selecting The Best Exit Page 18
1995-96 Transit School Bus Page 18
1990 Transit – 72 Passenger Rear Engine – Side Door on Driver’s Side Page 19
1990 Conventional School Bus – No Side Door Exits Page 19
Conventional – 54 Passenger – No Side Door Exits Page 20
Conventional – 60 Passenger – No Side Door Exits Page 20
Conventional – 66 Passenger – No Side Door Exits Page 21
III
V. Evacuation Exercise
A. Safety Suggestions That Help To Avoid Injury During Drills Page 22
B. Driver Drill Exercise Procedures Page 23
Front Service Door Evacuation Page 23
Side Emergency Door Evacuation Page 23
Front Service Door and Side (Floor-Level) Door Evacuation Page 24
Left and Rear Emergency (Floor-level) Door Evacuation Page 25
Rear and Side Emergency (Floor-level) and Front Service Door Evacuation Page 26
Rear (Floor-level) Emergency Door Evacuation Page 26
VI. Proper Use of School Bus Emergency Exits
A. 1995-96, Thomas Rear Engine Transit - 78 Passenger Page 28
Front Service Entrance/Exit Door Page 28
Side Emergency Exit Doors Page 28
Side Emergency Exit Windows Page 29
Rear Emergency Exit Page 30
Roof Exits Page 31
B. 1995-96, Thomas Built Rear Engine Transit - 35 Passenger Special Needs Page 32
Front Service Entrance/Exit Page 32
Side Emergency Exit Door Page 33
Side Emergency Exit Windows Page 33
Lift Door Page 34
Rear Emergency Exit Page 34
Roof Exits Page 35
C. 1992-94 Conventional School Bus - 19 Passenger Special Needs Page 36
Front Service Entrance/Exit Page 36
Rear Emergency Exit Door Page 37
Side Emergency Exit Windows Page 37
Emergency Roof Exit Page 38
Lift Door Page 39
Aisle Clearance Page 39
D. 1990 Blue Bird Front Engine Transit School Bus - 72 Passenger Page 39
Front Service Entrance/Exit Page 39
Rear Emergency Exit Page 39
Side Door Page 40
Emergency Roof Exit Page 40
Side Emergency Exit Windows Page 40
Other Inside Measurements Page 41
E. 1990 International Conventional School Bus - 16 Passenger Special Needs Page 42
Front Service Entrance/Exit Page 42
Rear Emergency Exit Page 42
Side Emergency Exit Windows Page 42
Emergency Roof Exit Page 43
Lift Door Page 44
F. 1990 International Conventional School Bus - 54, 60 & 66 Passenger Page 44
Front Service Entrance/Exit Page 44
IV
Rear Emergency Exit Page 45
Side Emergency Exit Windows Page 45
Emergency Roof Exit Page 46
Aisle Clearance Page 47
G. 1990 Thomas Rear Engine Transit School Bus - 72 Passenger Page 47
Front Service Entrance/Exit Page 47
Side Emergency Door Page 48
Emergency Roof Exit Page 48
Side Emergency Exit Windows Page 48
Other Inside Measurements Page 49
H. 1988 International Conventional School Bus - 60 & 66 Passenger Page 49
Front Service Entrance/Exit Page 49
Side Emergency Exit Page 49
Rear Emergency Exit Page 50
I. 1988 International Conventional School Bus - 54 Passenger Page 50
Front Service Entrance/Exit Page 50
Side Emergency Exits Page 50
Rear Emergency Exit Page 50
Aisle Clearances Page 51
J. 1985 International Conventional School Bus - 16 Passenger Page 52
Front Service Entrance/Exit Page 52
Rear Emergency Exit Door Page 52
Side Emergency Exit Page 52
Lift Door Page 52
K. 1983 International and 1985 Ford Conventional School Bus - 60 Passenger Page 53
Front Service Entrance/Exit Page 53
Side Emergency Exits Page 53
Rear Emergency Exit Door Page 53
L. Type A Buses Page 54
Appendix A: Exit and Aisle Dimensions Page 55
1995 - 1996 Thomas Rear Engine Transit - 78 passenger Page 55
1995 - 1996 Thomas Rear Engine Transit - 35 Passenger Special Needs Page 56
1992 - 1994 International Conventional School Bus - 19 Passenger Special Needs Page 57
1990 Blue Bird Front Engine Transit - 72 Passenger Page 58
1990 International Conventional School Bus - 16 Passenger Special Needs Page 59
1990 International Conventional School Bus - 54, 60 & 66 Passenger Page 60
1990 Thomas Rear Engine Transit - 72 Passenger Page 61
1988 International Conventional School Bus - 60 & 66 Passenger Page 62
1988 International Conventional School Bus - 54 Passenger Page 62
1985 International Conventional School Bus - 16 Passenger Special Needs Page 63
1983 International and 1985 Ford Conventional School Bus - 60 Passenger Page 63
Type A Buses Page 64
1
I. INTRODUCTION
Everyone in school bus transportation agrees that evacuating students from a school bus should
never be done unless absolutely necessary. Quite often in the event of an accident or other
impending crisis situation, students are much safer and easier to control when they remain on the
bus. However, when a situation arises that requires a bus to be evacuated, whether it be an
accident, fire, stalled vehicle or any number of unsuspected crises, the driver and the students
must be prepared.
Transporting school children has its unique challenges. Having one adult bus driver maintain
control over sixty or more small children while quickly and safely evacuating them from a bus is
no simple task. To some, this would seem virtually impossible, but to school administrators,
transportation officials and school bus drivers it must be accepted as nothing less than reality, a
reality for which they must be ready to react with correct, split-second decisions to ensure the
children’s safety. These decisions cannot be based upon unproven methods and skills.
Quite often, the most important training conducted is in preparation for something that may never
happen. As individuals responsible for transporting children, transportation personnel must be
prepared for all types of emergency situations. Students should be trained to correctly operate
and use the emergency exits on each type of vehicle which may be used to transport students. To
administer this type training, transportation personnel need to fully understand the intent of the
design, operations and proper utilization of each type of school bus emergency exit.
The goal of this Manual is to better familiarize transportation officials, school bus drivers,
students and school administrators with the number, location, and utilization of the various types
of emergency exits which exist on Public School Buses operated in South Carolina. The Manual
serves as a guide to local school districts in developing an emergency evacuation procedure for
each type bus. The suggestions and/or recommendations made in this manual should not be
interpreted as a South Carolina State Department of Education mandated emergency evacuation
drill exercise or procedure. The Manual is provided to assist each school district in developing
an evacuation plan which will best serve its individual transportation system.
2
II. WHO MAKES AN EMERGENCY EVACUATION PLAN WORK?
A. School District Administrators and Their Personnel
Being Prepared: The local school board and district superintendent should acknowledge the
importance of being prepared for emergency situations. Requirements set by the board or
superintendent that establish the frequency of drills, who must participate in the drills, and the
scope of each drill, will help acknowledge how important emergency planning and practice are.
Support from all aspects of the educational system is a must!
Know It & Practice It: Classroom instruction, demonstrations and evacuation practice are
needed to develop a sound, efficient evacuation program. Simply put, a designated amount of
time must be allotted. A special effort may be required to develop a schedule that best utilizes
study periods, small amounts of classroom time, or other activity periods for training and
practice. School administrators and teachers must be willing to give both their talent and time
towards the training of their students. During emergency evacuation drills, teachers should be in
attendance to observe what students are being taught--this enables teachers to accurately follow
up once the students return to class. Classroom instruction is an important part of student
emergency situation training. Everyone associated with student transportation--whether
transporting students to or from school on school buses or utilizing a district activity bus on
extra-curricular trips--must work together to assure this time is allotted and is used to its
maximum potential for the training of safe practices of all students.
B. Transportation Supervisors
Plan & Assign Duties: A Transportation Supervisor’s primary concern is to provide safe
transportation to everyone that may be transported. The bus driver and the vehicle are key parts
of a safe trip. However, even with properly maintained vehicles and well-trained and responsible
people behind the wheel, things do happen that can quickly turn a safe trip into a dangerous
situation. A situation may require the immediate evacuation of a school bus. That is why
preparation is needed! Transportation Supervisors and their staff should have an emergency
evacuation plan which considers each type of vehicle and the individual capabilities and needs of
the students being transported. The plan should clearly define the duties and responsibilities of
the bus drivers, students, teachers and others. The plan should identify how bus drivers, students,
teachers and others will be trained to carry out their responsibilities. For example, supervisors
should conduct periodic training sessions with their drivers prior to conducting emergency
evacuation drills with students. This preparation will help assure that drivers are prepared
mentally and physically to instruct and demonstrate to students the proper way to evacuate a
school bus. Incorrect instructions will teach the wrong lessons.
3
III. WHAT ARE THE SCHOOL BUS DRIVERS’ RESPONSIBILITIES?
A. The Driver Must Know What Needs To Be Done and How To Do It
The success of any emergency evacuation plan will be based upon the actions of the individual
bus driver. The driver is the only adult that is likely to be present from the onset of an emergency
situation that may require an evacuation. If not totally incapacitated, the driver will be required
to make the decision to evacuate, determine the method of evacuation, and supervise the
evacuation through to its completion. The bus driver’s tremendous responsibility requires that
they have a good working knowledge of all policies, procedures and regulations mandated by
their local district and/or the state relating to evacuation of a school bus.
B. The Driver Must Be Physically Fit to Carry Out The Plan
The importance of drivers keeping themselves in the proper physical condition necessary to
evacuate a school bus should be emphasized. All school bus drivers should be capable of exiting
or entering any emergency exit installed on the vehicle they operate, when presented as the only
possible means of evacuating students. The well-being of each student may depend upon how
quickly a driver can move a child to safety and return. Drivers and students are naturally more
familiar with the buses they are assigned; for this reason they should be allowed to participate in
emergency evacuation drills using these vehicles. However, drivers and students should be given
emergency evacuation training on different type buses. Instruction must be given on buses that a
driver might use on extra-curricular trips, or buses which a driver might be required to drive and
students may be required to ride, should their regular bus be out of service. Using these different
buses ensures that students are familiar with various exit locations and know how to operate and
utilize them.
C. The Driver Should Inspect The Bus Each Day Before Each Route
Walk-Around Inspection: School bus drivers are trained to always conduct a walk-around
inspection of their bus before beginning their route. This inspection is to detect any maintenance
problems that might create a dangerous situation along the route. During this inspection, the
driver should be checking that all emergency doors are clearly marked on the outside of the bus,
all emergency door handles are in place and in good working order, and all exits open and close
easily. The following is a preliminary listing of the type of things that should be checked:
Exterior Bus Inspection--
The bus driver must turn on all lights and deploy all safety features, exit the bus and visually
inspect each of the following items:
(1) Lights:
Is any lens cracked, missing or obscured?
Are the bulbs working?
Do they flash, if required?
(2) Leaks:
4
Is there any noticeable oil, water, fuel or other vehicle fluids on the ground under the
bus?
(3) Tires:
Are there any cuts, abrasions, or punctures, or signs of under inflation or loose or
missing lugs?
Are there any fluid leaks from axle seal and/or hub oil seals?
(4) Windows:
Are the windshield, front driver side, passenger door and rear windows clean and free
of visual obstructions?
(5) Emergency doors:
Do they open easily from the outside?
(6) Stop Arm:
Is the sign properly deployed?
Is there any damage to the “Stop” sign or wiring that would make the sign
ineffective?
Is the “Stop” lettering clean?
(7) Crossing Gate:
Is the gate properly deployed?
Is there any damage to the gate, bent or broken, that would make it ineffective?
Is the direction arrow clean?
Interior Bus Inspection--
Drivers should also perform daily checks inside the bus to ensure that all emergency exits are not
obstructed and are operating properly. This should be done, if possible, each time a driver
returns to their bus after having left it unattended. Checking the exits each time the driver returns
to their bus requires very little time, yet ensures that no one has vandalized, obstructed, or
rendered the exit inoperable. In the event of an actual emergency, it is imperative that all exits
function properly. Driver checks of the vehicle about to be operated are essential to prevent
possible emergency situations. The following is a preliminary listing of the type of things that
should be checked. On return to the bus, the driver must check the following interior items
before transporting students:
(1) Primary Service Entrance/Exit:
Does the door open properly and close securely?
(2) Seats:
Are the seat frames stable and securely attached to the floor?
Are seat-covers or cushions cut or damaged?
(3) Emergency Exits:
Do all emergency exits open and close as required?
Are the audible emergency exit “ajar indicators” functioning properly?
(4) Mirrors:
Are any mirrors cracked or broken?
Are all mirrors in proper adjustment?
(5) Steering:
5
Does the steering have excessive play?
(6) Horn:
Does the horn give clear audible sound when easily depressed?
(7) Lights:
Do the headlights, warning lights, stop lights, hazard lights and other required vehicle
lights appear to be operating properly?
(8) Windshield Wipers:
Are the windshield wipers operating properly?
Are there any defects in the wiper blades?
(9) Stop Arm:
After deploying the stop arm one full cycle, does the device extend to its proper
position and are all lights properly functioning?
(10) Crossing Gate:
After deploying the crossing gate one full cycle, did the device extend to its proper
position and function properly?
(11) Forward and Back-up Alarms (1995 or newer buses):
After deploying the stop arm and crossing gate one full cycle, did the Forward Alarm
activate for at least seven seconds and function properly?
After placing the bus transmission in reverse, did the back-up alarm activate and
function properly?
(12) Gauges:
Are all gauges operating properly and do they indicate that the vehicle is operating
within the proper range for each function represented?
In particular, does the air brake indicator register at least 100 psi? The driver must
check brake application before transporting students or operating the bus greater
than five miles per hour.
(13) Parking Brake:
With the engine running, the driver applies the parking brake, and slightly accelerates
with the bus transmission in drive. Did the bus remain stationary? For school
buses equipped with hydraulic brakes, with the bus moving forward slowly
(approximately 5 mph), the driver sets the parking brake. Did the bus stop?
(14) Service Brake:
At five miles per hour, when the driver applies the service brake, are the brakes
functioning properly and is there sufficient room between the bottom of the brake
pad and the bus floor to allow for stronger application of the brake?
D. Drivers Should Make Announcements To Students
The driver or driver’s aide should make an announcement before each trip (regular route or extra-
curricular), reminding students of emergency exits and a safety rule. If the trip is
transporting a new passenger or if this is a different bus type, the announcement should remind
students where emergency exits are located and how they should be utilized for the specific type
bus that is being used. If there are no new passengers and the bus type has not changed, the
announcement should include a reminder about at least one of the key safety features available
for use by the students. The driver should choose a different safety feature each day, covering all
safety announcements over a sequence of days. The key purpose of the announcement process is
6
to refresh frequent riders how to use the safety features of the bus and to provide complete
instruction to any first time rider on the type of vehicle being used. It is recommended that the
announcement should be made after the last passenger-loading stop on the pickup route and
before the first unloading stop on the return route.
If the school district has established an emergency evacuation floor plan for each vehicle,
students should be informed how their individual seating location dictates, if possible, the exit or
exits they should use in the event of an emergency evacuation.
Drivers should remember that students are often transported in buses that they are not familiar
with, especially on extra-curricular trips. When this occurs, it is very important that the driver
take the time to identify all emergency exits on the vehicle and how to use them. Drivers should
also remember that on extra-curricular trips the students may be familiar with the bus but the
teachers and/or chaperones may not. The teachers and chaperones also need to be instructed in
the use of the emergency exits and procedures.
E. How A Driver Should Manage or Supervise:
Student Seating At Emergency Exits
Student Clothing
Carry-On Items
The driver should stress the importance of keeping the aisles and emergency exits clear, and must
make sure that the seats located adjacent to emergency exits, especially flip-up seats in the exit
aisle at the side emergency door exits, are the last to be occupied by students. If students must
occupy these seats, the driver must make sure the student is trained and is physically capable of
opening the exit and assisting others in an emergency situation. Students should be informed to
hold their books in their lap or, if in a book bag, possibly secure them under their seat. Book bags
and other items should never be stored under or in flip-up seats.
A book bag is a great way to carry and secure books; however, they should never be worn while
riding a school bus. A child wearing a book bag while riding a bus is more likely to suffer back
or neck injuries in the event of a rear end collision. That child is also more likely to take longer
exiting--or even become snagged or caught on an emergency door handle or other objects--in the
event an emergency evacuation becomes necessary. Drivers should always alert students of the
danger in wearing a book bag while riding a school bus and insist that the bag be carried in their
lap or placed under the seat. The driver should make this announcement for each route.
Sometimes it may be necessary to
give this type instruction or other specific instructions to students individually as they board the
bus, especially on pickup routes, instead of waiting until all passengers have boarded. Book bags
and other items should never be stored under or in flip-up seats.
Students who have large band instruments or other objects that could obstruct an exit should not
be allowed to bring the item on the bus. Students who have several carry-on items--or items that
are not easily controlled or held--should not be allowed to sit at or near emergency exits. If such
a student has an assigned seat at an emergency exit, the driver should temporarily reassign the
student to a non-exit seat. Students trained to open emergency exits and assist students in exiting

7
the bus should be assigned seating at or near emergency exits. Drivers should frequently remind
these students of their responsibility.
Bus drivers have a great opportunity to observe students from the driver’s seat as a student
boards the bus. This is a very good time to evaluate the manner in which the student dresses
relative to safety. Quite often when parents dress their children or allow them to wear certain
types of clothing, they are not familiar with the possible dangers that exist. Students of all ages
wear clothing of various designs. Some clothing may be tight and not allow the required
freedom of movement to evacuate a bus. Clothing may also be very loose fitting or have large
buttons or strings. These and other items of clothing--or accessories such as shoulder-carry bags
with long straps--can easily become entangled or snagged in the event of an emergency
evacuation. Bus drivers should always be looking for anything that could create an unsafe
situation. If detected, a driver should professionally and courteously inform the student of their
findings and possibly suggest corrective measures. Where small children are involved, drivers
should contact the student’s teacher, who should then notify the parents of the situation.
Drivers should remind students that carry-on and extra clothing items (coats and hats) should be
left behind when conducting an emergency evacuation.
F. Selecting Student Helpers
Each bus driver should have between two and six student helpers to assist with the evacuation of
the school bus. The number of student helpers needed depends on the type of school bus and the
number of emergency exits. This Manual includes several recommendations that refer to the use
of a “Student Helper”. It is recommended that the bus driver evaluate the students that frequently
ride the bus and select student helper candidates that demonstrate potential to assist others (their
size/strength enables them to operate emergency exits and assist other students using the
emergency exits) and students that have demonstrated reliability and leadership to perform their
designated functions. These functions are usually limited to assisting other students out of the
emergency bus exits, maintaining order during evacuation, directing students to a safe waiting
area and monitoring the students while at a waiting area. The driver is responsible for assuring
that the designated student helpers are aware of their function, that they accept this function and
that they are trained to perform their function. It is recommended that these students receive
some type of annual recognition or reward for accepting/performing this responsibility.
IV. EVACUATE?
A. Should The Bus Be Evacuated?
A school bus driver should always remember that a school bus offers a great degree of safety, and
students are usually much safer and easier to supervise when inside the bus. The safety provided
by the bus is the main reason why school buses are not usually evacuated. However, in situations
that pose an extremely high risk of serious injury or death, the school bus must be evacuated.
Once the driver has made the decision to evacuate the school bus, the driver must realize that this
is only the first step towards creating a safer environment for the students. As the students are
8
evacuating the bus, the driver must also establish a safe place for the students to wait for help.
Quite often, this can be an enormous challenge, one that the driver frequently overlooks.
B. Assess The Need To Evacuate
The need to evacuate the bus can arise at anytime or anyplace. It can happen on a deserted
country road surrounded with wide-open spaces or at a busy intersection in the middle of town.
The driver must remember there are two primary factors in determining where students are to be
placed after evacuating the bus:
1. The situation requiring the bus to be evacuation, and
2. The location where the evacuation is conducted.
Student safety and control is best maintained by keeping students on the bus during an
emergency and/or impending crisis situation, if doing so does not expose them to unnecessary
risk or injury. A decision to evacuate should include consideration of the following conditions:
1. Recognize the hazard. The decision to exit/evacuate the bus must be a timely one.
Wheelchair students take a lot more time.
2. Is there a fire involved?
3. Is there a smell of raw or leaking fuel?
4. Is the bus likely to be hit by other vehicles?
5. Does the possibility exist that the bus will roll/tip over causing further threat to safety?
6. Is the bus in the direct path of a sighted tornado?
7. Has there been a major earthquake creating a dangerous environment?
8. Would removing students expose them to speeding traffic, severe weather, or a dangerous
environment, such as downed power lines?
9. Would moving pupils complicate injuries such as neck, back and other fractures?
10. Is there a hazardous materials spill involved? It may be safer to remain on the bus and
not come in contact with the material.
Evacuation is a very difficult situation. Consideration must be given that the safest place for the
students may be on the bus. School buses do not have seat belts. This is one less problem about
which the emergency responder has to worry. However, special education buses will have
special restraining devices with which the emergency responder and driver must be familiar.
C. Be Aware of Restraining Devices Used
The mainstreaming of special education students into the general population has generated new
transportation problems. A major concern for everyone is restraining devices. Due to the varied
nature and condition of the students, the types of restraining devices will vary. The driver and
emergency responders must be aware of the following:
Types of devices:
1. Harnesses.
2. Wheelchair tie-downs.
3. Other special devices.
9
How devices operate:
1. Methods of release.
D. Emergency Release Guidelines For Restraint Devices
Certainly the safest way to remove a student is by releasing the device under normal operating
procedures. However, during an emergency situation, time may not permit this to be done. The
fastest way to release the student may be to cut the restraining device. Plans and provisions
should be made for everyone involved, including the driver, to carry a cutting device such as a
seat belt cutter for emergency use.
E. Student Responsibility During Evacuation
Every rider should know the following:
(1) Emergency doors
a. Location.
b. Operation.
c. Count the seats to the exit.
(2) Fire extinguisher
a. Location.
b. Operation.
c. How to remove from mounting bracket.
(3) First aid kit
a. Location.
b. Types of units in the kit.
NOTE: ALL CAPABLE RIDERS SHOULD BE FAMILIAR WITH THE
CONTENTS. EVACUATION HELPERS MAY BE INCAPACITATED DURING
AN EMERGENCY.
(4) Exiting the bus
a. Front door
(1) Use handrails provided.
(2) Do not push.
(3) Watch for traffic and/or pedestrians.
b. Floor level exits
(1) Stoop down as low as possible.
(2) Place hands on top of evacuation helper's hands. Do not grasp.
(5) Evacuation helpers
a. All passengers should know who is assigned.
b. Have assigned seats.
c. Know the following:
(1) Seats assigned to each exit.
(2) Order of evacuation departure.
(3) How to assist others from the bus.
(4) How to exit themselves.
(5) Area to send evacuees to regroup.
10
F. Where Do Students Go When Evacuating The Bus?
Since there is no way to review every evacuation situation or location, there is no way to list all
the places that students are to be evacuated to. The following scenarios are offered as a guide to
a few evacuation scenarios. It is hoped that these will assist the driver in better understanding the
proper placement of passengers after an evacuation.
Scenario I
Stalled on a Railroad Track, No Immediate Danger-- A school bus, transporting 60 students, is
stalled extremely close to or on a railroad grade crossing. The driver determines that the school
bus will not restart and the topography of the crossing will not allow the bus to roll unassisted off
the tracks. The crossing is protected with crossing gates, flashing lights and audible signals. The
driver has a sight distance of approximately one-half mile in each distance. Sight and sound
checks determine no train is approaching. The driver decides to evacuate the bus.
In this situation it is possible to evacuate everyone quickly and safely using only the service
entrance/exit door. However, depending upon the age of the students being transported, the rear
and/or side emergency door exits may be utilized.
In any event, once the students are off the bus, they should congregate at a safe place as far as
possible to the rear of the bus. They should remain at that location until their driver or another
district or public safety official provides instructions and personally leads the students. One of
the following actions is likely to occur:
The bus driver restarts the bus and moves the bus away from the tracks and the students can
be safely loaded.
Another bus arrives and can safely load and transport the students to their destination.
Public safety officials arrive at the scene and move the students to a safer location.
If the bus driver or some other official determines that a train is approaching the crossing, and
if it can be determined in which direction the train is moving, the students must then be
instructed to move in the direction of the oncoming train and as far away from the bus and
train as possible. This movement will protect the students from flying debris in the event
there is a collision between the train and the bus.
Scenario II
Stalled on a Railroad Track, in Immediate Danger-- A school bus transporting 78 students stalls
on a railroad grade crossing. An attempt by the driver to restart the engine fails and an
approaching train activates the crossing gates, audible signal and flashing lights. The driver
gives the order for the students to evacuate the bus.
The driver should instruct the students to use all available side and rear emergency exits and
front entrance door. This type of immediate evacuation is complicated by the fact that there is
only one adult, the driver, on board the bus to direct student evacuation through possibly eight or

11
more exits. In situations of this type, time or lack of it is a primary factor. A driver may not have
time to supervise students inside and outside the bus. Things become very chaotic if the driver
and students have not been properly trained. This type of quick evacuation is why training is so
important.
Training of students and drivers should be targeted on this type of evacuation. If the students and
driver can learn to handle this type of evacuation, evacuations for other emergencies will be easy.
This particular training exercise should not stop with evacuating the bus. Students should be
instructed once out of the bus to travel at a 45 degree angle away from the back of the bus and in
the direction of the on-coming train. Movement in this direction will help the students to best
avoid injury from flying debris in the event of a train and bus collision. In cases where the bus
only has a driver--no aide--on board, the driver should make an extra effort to have a student or
students trained to direct other passengers to the proper location once out of the bus. Students
must be instructed to stay together in a safe area until another means of transportation is
provided.
NOTE: THIS PROCEDURE WOULD ALSO BE USED IN THE EVENT A SCHOOL BUS
STALLS ON OR NEAR A HIGHWAY RAILCROSSING WHERE THERE ARE NO
AUTOMATIC TRAFFIC CONTROL DEVICES, ALARMS OR MECHANICAL ARMS TO
WARN THE DRIVER. THE DRIVER HAS LITTLE TO WARN HIM OF AN
APPROACHING TRAIN, SO THE DRIVER STARTS AN IMMEDIATE PRECAUTIONARY
EVACUATION. IN THIS CASE IT IS VERY IMPORTANT FOR THE DRIVER TO
INSTRUCT THE STUDENTS TO REMAIN QUIET SO THAT ALL CAN LISTEN FOR THE
POSSIBILITY OF AN APPROACHING TRAIN.
Scenario III
Fuel Tanker and School Bus Collision-- A school bus transporting 72 students is involved in an
accident when a tanker truck loaded with 10,000 gallons of a flammable liquid fails to yield the
right of way to the bus. The bus impacts the truck in the side causing it to overturn. The bus has
sustained severe damage to the front rendering the service entrance/exit door inoperable. The
impact of the bus has caused a rupture in the tanker trailer allowing large quantities of the
flammable liquid to be spilled onto the ground, into ditches and low lying areas. There is no
smoke or indication of fire, but the potential exists.
Students should be informed of the existing situation. They should be informed of the dangers
which may exist with having to possibly walk through a flammable liquid. They should be
instructed to evacuate immediately, walking carefully to avoid falling and to leave all loose items
on the bus so as to assure nothing would be dropped which might ignite the liquid.
An evacuation of this type should be conducted using emergency exits which would allow the
children to exit quickly and as far away from the spilled liquid as possible, affording them the
least possible chance for contact with the substance.
12
Once the students are off the bus they should be congregated at a safe place, staying upwind and
avoiding low areas. If there exists a serious threat of fire or explosion, passengers should
possibly be moved up to one-half mile away from the scene.
NOTE: THIS PROCEDURE CAN ALSO BE USED IN THE EVENT A SCHOOL BUS MUST
BE EVACUATED DUE TO AN EMERGENCY SITUATION INVOLVING TOXIC
CHEMICALS, ETC.
G. Accident Position Of Vehicle Versus Best Exit To Use:
While assessing the need to evacuate, it is important to remember that the safety and control of
the students is best maintained by keeping them on the bus during an emergency if doing so does
not expose them to unnecessary harm or injury. The decision to evacuate the school bus is one of
the most important decisions that a driver will have to make. The decision must be made as
quickly as possible. The driver must, in any emergency situation, always analyze conditions to
determine the safest exit(s) to use.
A school bus should always be evacuated when, but not limited to, the following situations
occur:
1. Fire or the potential for fire is present.
2. Bus is situated on a curved part of the roadway.
3. Bus is situated just beyond the crest of a hill.
4. Bus is stalled on or adjacent to railroad tracks.
5. A hazardous materials spill has occurred.
REMEMBER: STUDENTS SHOULD, WHEN EVACUATING, ALWAYS MOVE TO AN
AREA AT LEAST 100 FEET AWAY FROM THE SCHOOL BUS. THIS AREA SHOULD BE
UPWIND FROM ANY FIRE OR HAZARDOUS MATERIALS SPILL.
Scenario I
Fuel Tanker and School Bus Collision-- This scenario demonstrates an accident involving a
school bus and tanker truck transporting flammable liquid where the truck is overturned with a
ruptured tanker trailer, allowing large quantities of flammable liquid to spill onto the ground and
surrounding area. The bus has sustained severe damage to the front entrance/exit of the bus.
Buses designed with only front entrance/exit door, and rear exit door (standard style model year
1981-89):
1. Damage to front entrance/exit door: All students should exit the bus through the rear exit
door and move to an area of safety as far away as possible from the accident.
2. Damage to the rear exit door only: All students should exit through the front entrance/exit
door moving to safety.
Buses designed with front entrance/exit door, rear exit door, side window exits, and roof hatches
(standard style model year 1990-94):
1. Damage to the front entrance/exit door only: All students should exit the bus through the
rear exit door and move to an area of safety as far away from the accident as possible.
13
2. Damage to the rear exit only: All students should exit through the front entrance/exit
door, and side exit windows would also be used depending on the urgency of the
evacuation. Students should move to a place of safety as far away from the accident as
possible.
3. Damage to the front and rear exit doors: All students should exit through the side exit
windows and move to a place of safety as far away from the accident as possible.
Buses designed with front entrance/exit door, side windows, driver side exit door only, and rear
exit door (transit style rear engine, model year 1990):
1. Damage to the front entrance/exit: All students should exit the bus through the driver side
exit door and move to a place of safety as far away from the accident as possible.
2. Damage to the rear exit door. All students should exit the bus through the front
entrance/exit and driver side exit door and move to a place of safety as far away from the
accident as possible.
3. Damage to the driver side exit door. All students should exit the bus through the front
and rear exits and move to a place of safety as far away from the accident as possible.
14
Buses designed with front entrance/exit door, side exit windows, and rear door (1990 Blue Bird
transit style front engine):
1. Damage to the front entrance/exit door only: All students should exit through the rear exit
door and move to a place of safety as far away from the accident as possible.
2. Damage to the rear exit door only: All students should exit the bus through the front
entrance/exit door and move to a place of safety as far away from the accident as possible.
Window exits may also be used depending on the urgency of the evacuation.
3. Damage to the front and rear exit: All students should exit through the side exit windows
and move to a place of safety as far away from the accident as possible.
Buses designed with front entrance/exit door, side exit windows, two side exit doors, rear exit
door, and roof hatches (Thomas transit style rear engine year model 1995):
1. Damage to the front entrance/exit door only: All students should exit through the two side
exit doors and move to a place of safety as far away from the accident as possible.
2. Damage to the rear exit only: All students should exit through the side exit doors and the
front entrance/exit door and move to a place of safety as far away from the accident as
possible.
3. Damage to the right side exit door: All students should exit through the left side exit,
front entrance/exit and rear exit and move to a place of safety as far away from the
accident as possible.
4. Damage to the left side exit door: All students should exit through the right side exit,
front entrance/exit and rear exit and move to a place of safety as far away from the
accident as possible.
NOTE: IF ANY EMERGENCY OCCURS WHERE AN EVACUATION IS NECESSARY,
ALL AVAILABLE EXITS SHOULD BE UTILIZED. STUDENTS SHOULD FOLLOW THE
INSTRUCTIONS OF THE DRIVER IN ORDER TO EXPEDITE THE EVACUATION AND
ELIMINATE CONFUSION AND DISORDER.
Scenario I (Alternative)
Flammable Liquid is Spilled-- Given events of Scenario I and add as a result of the impact, the
truck is overturned with a ruptured tanker trailer allowing large quantities of flammable liquid to
spill onto the ground and surrounding areas. The bus has sustained severe damage to the front
service/entrance door and there is a potential danger of fire.
15
Buses designed with only front entrance/exit door, and rear exit door (standard style model year
1981-89):
1. Fire/smoke coming from the engine area: All students should exit the bus through the rear
exit door and move to an area of safety at least 100 feet upwind away from the accident.
2. Fire/smoke coming from the rear: All students should exit through the front entrance/exit
door and move to an area of safety at least 100 feet upwind away from the accident.
Buses designed with front entrance/exit door, rear exit door, side windows exits, and roof hatches
(standard style year model 1990-94):
1. Fire/smoke coming from the engine area: All students should exit through the rear exit
door and move to an area of safety at least 100 feet upwind away from the accident.
2. Fire/smoke coming from the rear: All students should exit through the front entrance/exit
door and move to an area of safety at least 100 feet upwind away from the accident. Side
exit windows would also be used depending on the urgency of the evacuation.
3. Fire/smoke coming from the engine area with damage to the rear exit door: All students
should exit through the side exit windows and move to a place of safety at least 100 feet
upwind away from the accident.
Buses designed with front entrance/exit door, side windows, left side exit door only, rear exit
door, and roof hatches (Thomas transit style rear engine, model year 1990:)
1. Fire/smoke coming from the front area: All students should exit the bus through the left
side exit door, window exits, and rear exit door, and move to a place of safety at least 100
feet upwind from the accident.
2. Fire/smoke coming from the rear engine area: All students should exit the bus through the
front entrance/exit door, window exits, and left side exit door, and move to a place of
safety at least 100 feet upwind away from the accident.
3. Fire/smoke coming from the rear engine area with the damage to left side exit door: All
students should exit the bus through the front service/exit door and windows, and move
to a place of safety at least 100 feet upwind away from the accident.
Buses designed with front entrance/exit door, side exit windows, rear door, and roof hatches
(1990 Blue Bird transit style front engine):
1. Fire/smoke coming from the engine area: All students should exit through the rear exit
door and side exit windows and move to an area of safety at least 100 feet upwind away
from the accident.
2. Fire/smoke coming from the rear: All students should exit the bus through the front
entrance/exit door and window exits and move to an area of safety at least 100 feet
upwind away from the accident.
3. Fire/smoke coming from the front engine area with damage to the rear exit door: All
students should exit through the side exit windows and move to an area of safety at least
100 feet upwind away from the accident.
Buses designed with front entrance/exit door, side exit windows, two side exit doors, rear exit
door, and roof hatches (Thomas transit style rear engine year model 1995):
16
1. Fire/smoke coming from front area: All students should exit through the two side exit
doors, side exit windows, and rear exit door, and move to a place of safety at least 100
feet upwind away from the accident.
2. Fire/smoke coming from the rear engine area: All students should exit through the side
exit doors, side exit windows, and the front entrance/exit door, and move to a place of
safety at least 100 feet upwind away from the accident.
3. Fire/smoke coming from the rear engine area with damage to right side exit door: All
students should exit through the left side exit door, front entrance/exit and side window
exits, and move to a place of safety at least 100 feet upwind away from the accident.
4. Fire/smoke coming from the rear engine area with damage to the left side door: All
students should exit through the right side exit door, front entrance/exit window exits,
and move to a place of safety at least 100 feet upwind away from the accident.
NOTE: IN ANY EMERGENCY WHERE THERE IS A POTENTIAL OF FIRE, THE
EVACUATION IS MANDATORY AND, DEPENDING UPON THE SEVERITY OF THE
FIRE, ALL AVAILABLE EXITS SHOULD BE UTILIZED AND ARE NOT LIMITED TO
THE ABOVE.
Scenario II
Bus Off Roadway, Turned On Side-- A school bus transporting 35 students is involved in an
accident. An eighteen wheeler crossed the centerline. In an attempt to avoid a head-on collision,
the school bus ran off the road. Once the bus came to its final stopping point, it was resting on
its right side, thus preventing the use of any emergency exits on that side.
In a school bus equipped with only a front entrance/exit door and a rear emergency exit door, the
best--and in this case, the only--exit would be the rear emergency exit door. (1981 through 1989
models.)
In a school bus equipped with not only a front entrance/exit door and a rear emergency exit door
but also with two roof hatches and four side emergency exit windows (two on each side), the best
exits to use would probably be the two roof hatches and rear emergency exit door. Depending
upon the severity, the two emergency exit windows on the left side could and should be used if
the situation warrants, although this is virtually impossible since the windows would be nearly
eight feet in the air. (1990 and 1994 models.)
In school buses designed with a front entrance/exit door, side emergency exit windows, a driver’s
side (left) emergency exit door, roof hatches, and a rear emergency exit, the best exits to use
would be the rear emergency exit and the roof hatches. Once again, depending upon the
circumstances, the driver’s side (left) emergency exit door and the side emergency exit windows
(left) are available for the evacuation and should be utilized if needed. (1990 Thomas Transit
Style, Rear Engine.)
In school buses designed with a front entrance/exit door, side emergency exit windows, and a
rear emergency exit door, the best exit to use would be the rear emergency exit door. As
17
previously stated, the side emergency exit windows (left) can and should be used if needed.
(1990 Blue Bird Transit Style, Front Engine.)
In school buses designed with a front entrance/exit door, side emergency exit windows, two side
emergency exit doors (left and right sides), a rear emergency exit door, and two roof hatches, the
best exits to use would be the two roof hatches and the rear emergency exit door. With this style
bus, not only are there two emergency exit windows (left side) that could be used, but there is
also an emergency exit door (left side). (1995-1996 Thomas Transit Style, Rear Engine.)
While using this same scenario, the bus is found to be resting on its left side instead of the right
side, the above listed type of buses, and best exits to use, remains the same except now the exits
on the right side including the entrance/exit door would be available for evacuation whereas
those exits on the left side would not. The entrance/exit door and side exit windows may be
difficult, if not impossible to use, however, because they will be eight feet in the air.
Scenario III
Bus Off Roadway, Upside Down-- A school bus transporting 35 students is involved in an
accident. An eighteen wheeler crossed the centerline. In an attempt to avoid a head-on collision,
the school bus ran off the road. Once the bus came to its final stopping point, it was resting
upside down on its top, thus preventing the use of any emergency roof hatches.
In a school bus equipped with only a front entrance/exit door and a rear emergency exit door, the
best exit to use would be the rear emergency exit door. If damage to the bus has not prevented
the front entrance/exit door from operating, then this too can and should be used for evacuating.
(1981 through 1989 models.)
In a school bus equipped with not only a front entrance/exit door and a rear emergency exit door
but also with two roof hatches and four side emergency exit windows (two on each side), the best
exit to use would be the rear emergency exit door. Again, if the side emergency exit windows
and the front entrance/exit door could be operated, then those emergency exits should also be
used if needed. (1990 through 1994 models.)
In school buses designed with a front entrance/exit door, side emergency exit windows, a driver’s
side (left) emergency exit door, and a rear emergency exit, the best exits to use would be the rear
emergency exit and the driver’s side (left) emergency exit door. If
18
emergency exit windows and front entrance/exit door are functional, they can be used if the
evacuation warrants. (1990 Thomas Transit Style, Rear Engine.)
In school buses designed with a front entrance/exit door, side emergency exit windows, and a
rear emergency exit, the best exit to use would be the rear emergency exit door. If the other
emergency exits are operable, they are to be used if needed. (1990 Blue Bird Transit Style, Front
Engine.)
In school buses designed with front entrance/exit, side emergency exit windows, two side
emergency exit doors (left and right sides), a rear emergency exit, and two roof hatches, the best
exits to use would be the rear emergency exit door and two side emergency exit doors. If the
evacuation is such that all emergency exits are needed, then all exits should be used. (1995-1996
Thomas Transit Style, Rear Engine.)
H. Selecting The Best Exit
Each seating location should use a specific exit to expedite evacuation. The driver should assure
that each student rider knows which exit to use depending on the assigned seat in the school bus.
The different types of school buses or seating designs in the South Carolina fleet present the
following information. In addition, emergency exit designs are tailored by accident situations.
1995-96 Transit School Bus:
Railroad Cross (Stall)--The front six rows of seats exit the front entrance door. Right side
exits first, alternating with left side until all have evacuated. The right-side back seven rows
of seats exit the right side emergency exit door, left back seven rows of seats exit left side
emergency exit door.
Front End Collision-- Back bench seat exits back emergency window. Right side seats exit
alternating with each other utilizing right side emergency door. Procedure repeated on left
side. Those seats adjacent to emergency windows may utilize them.
Rear-End Collision-- Five back rows of seats on the right exit the right side emergency door,
and the seven back rows of seats on the left side exit the left side emergency door. First seven
rows of seats on the right side exit the front door; front six rows of seats on the left side also
exit the front entrance door.
Right Side Impact (Emergency Door Not Accessible)-- Back bench seat exits back
emergency window. First seven rows of seats on the right side exit the front entrance door,
first six rows of seats on the left side exit front entrance door. Back six rows of seats on the
left side and the back five rows of seats on the right side exit the left side emergency door.
Right Side Impact (Front Entrance Door Not Accessible)-- Right side rows of seats exit right
side emergency door, left side rows of seats exit left side emergency door, alternating as they
exit.
Left Side Impact (Side Door Not Accessible)-- First front six rows of seats on the left side
and the front seven rows of seats on the right side exit the front entrance door.
19
Back six rows of seats on the left side and the back five rows of seats on the right side and
the passengers on the back bench-seat exit the right side emergency door.
Left Side Impact (Side Door Accessible)-- Front six rows of seats on the left side and the
front seven rows of seats on the right side exit the front entrance door. Back six rows of seats
on the left exit through the left side emergency door, back five rows of seats on the right side
exit the right side emergency door. Back bench seat exits on the right side.
1990 Transit - 72 Passenger Rear Engine - Side Door on Driver’s Side:
Stall on Railroad-- When a bus is stalled on the railroad, all twelve seats on the right side and
the first six seats on the left side should exit through the front entrance door. The front right
seat should proceed first followed by the left front seat alternating until all have exited. The
back six seats on the left side should exit through the left side emergency door until all have
exited.
Front Impact (Front Door Accessible)-- If the bus is in a front impact collision, the first seven
seats on the right and the first six seats on the left side should exit through front entrance
door. The first seat on the right should proceed first followed by the front left seat,
alternating until all have exited. The back six seats on the left side and the back five seats on
the right side should exit through left side emergency door. The left side should proceed first
followed by the right, alternating until all have exited.
Front Impact (Entrance Door Not Accessible)-- The first eight seats on both sides exit side
emergency door on driver’s side. The last four seats in the rear of the bus exit through back
emergency window. If it is not an emergency, all may exit through side emergency door on
driver’s side.
Rear Impact-- The first six seats on the left and the first seven seats on the right should exit
through the front entrance door. The last six seats on the left and the last five seats on the
right should exit through side emergency door on the driver’s side.
Right Side Impact (Front Entrance Door Accessible)-- Use same procedure as Front Impact
(Entrance Door Accessible).
Right Side Impact (Front Entrance Door Not Accessible)-- Use same procedure as Front
Impact (Entrance Door Not Accessible).
Left Side Impact (Side Door Not Accessible)-- All seats should exit through front entrance
door, right side alternating with left side. If it is an emergency, the first seven seats on the
left and the first eight seats on the right should exit through the front entrance door, and the
last five seats on the left and the last four seats on the right should exit through the rear
emergency window.
Left Side Impact (Side Emergency Door Accessible)-- Use same procedure as Front Impact
(Entrance Door Accessible).
1990 Conventional School Bus-- No Side Door Exits:
Railroad Crossing (Stall)-- Row seats one through six (left and right) evacuate through front
entrance door. Right side front exits first then alternating with left front with a continuation
through the row six seats. Back five seat on each side exit
20
through the rear exits. Right side exits first alternating with left side until all have evacuated.
Front End Collision-- All seats must use rear exit. Right rear exits first, alternating with left
side until all have evacuated.
Rear End Collision-- All seats must exit through front entrance door. Right front exits first,
alternating with left front until all have exited the bus.
Right Side Impact (Front Door Not Accessible)-- All seats must use rear exits. Right rear
exits first, alternating with left side until all have evacuated. Passengers sitting adjacent to
emergency exit windows opposite impact should exit through windows.
Right Side Impact (Front Door Accessible)-- Row seats one through six (left and right)
evacuate through front entrance door. Right side front exits first and then alternating with
left front with a continuation through the row six seats. Back five seats on each side exit
through rear door. Right side exits first, alternating with left side until all have evacuated.
Left Side Impact-- Passengers sitting adjacent to emergency exit windows opposite impact
exit through windows. Row seats one through six (left and right) evacuate through front
entrance door. Right side front exits first and then alternating with left front with
continuation through the row six seats. Back five seats on each side exit through rear door.
Right side exits first, alternating with left side until all have evacuated.
Conventional - 54 Passenger-- No Side Door Exits:
Railroad Cross Stall-- When evacuating the bus, the first five seats on the right and the first
five seats on the left should exit out of the front entrance door. The right front seat should
proceed first followed by the left front seat and alternating until all have exited. The last four
seats on the right side and last four seats on the left side should evacuate out of the rear
emergency door. The right side back seat should proceed first followed by the left side back
seat and alternating until all have exited.
Front Impact (Entrance Door Accessible)-- Use same procedure as stalled on railroad.
Front Impact (Entrance Door Not Accessible)-- All seats must exit through rear emergency
door. The back right seat will exit first, then the back left seat, alternating right and left until
all have exited.
Rear Impact-- In a rear impact collision, all seats must exit through the front entrance door.
The front right seat should proceed first followed by the left front seat alternating until all
have exited.
Right Side Impact (Front Entrance Door Not Accessible)-- Same as Front Impact (Entrance
Door Not Accessible).
Right Side Impact (Front Door Accessible)-- Use same procedure as stalled on railroad.
Left Side Impact-- Use same procedure as stalled on railroad.
Conventional - 60 Passenger-- No Side Door Exits:
Railroad Cross Stall-- When evacuating the bus, the first six seats on the right and the first
six seats on the left should exit out of the front entrance door. The right front seat should
proceed first followed by the left front seat and alternating until all have
21
exited. The last four seats on the right side and the last four seats on the left side should
evacuate out of the rear emergency door. The right side back seat should proceed first
followed by the left side back seat and alternating until all have exited.
Front Impact (Entrance Door Accessible)-- Use same procedure as stalled on railroad.
Front Impact (Entrance Door Not Accessible)-- All seats must exit through rear emergency
door. The back right seat will exit first, then the back left seat, alternating right and left until
all have exited.
Rear Impact-- In a rear impact collision, all seats must exit through the front entrance door.
The front right seat should proceed first followed by the left front seat alternating until all
have exited.
Right Side Impact (Front Entrance Door Not Accessible)-- Use same procedure as Front
Impact (Entrance Door Not Accessible).
Right Side Impact (Front Door Accessible)-- Use same procedure as stalled on railroad.
Left Side Impact-- Use same procedure as stalled on railroad.
Conventional - 66 Passenger-- No Side Door Exits:
Stalled on Railroad-- When evacuating the bus, the first seven seats on the right and first
seven seats on the left should exit out of the front entrance door. The right front seat should
proceed first followed by the left front seat and alternating until all have exited. The last five
seats on the right side and the last five seats on the left side should evacuate out of the rear
emergency door. The right side back seat should proceed first followed by the left side back
seat and alternating until all have exited.
Front Impact (Entrance Door Accessible)-- Use same procedures as stalled on the railroad.
Front Impact (Entrance Door Not Accessible)-- All seats must exit through rear emergency
door. The back right seat will exit first, then the back left seat, alternating right and left until
all have exited.
Rear Impact-- In a rear impact collision, all seats must exit through the front entrance door.
The front right seat should proceed first followed by the left front seat alternating until all
have exited.
Right Side Impact (Front Entrance Door Not Accessible)-- Use same procedure as Front
Impact (Entrance Door Not Accessible).
Right Side Impact (Front Door Accessible)-- Use same procedure as stalled on railroad.
Left Side/ Impact-- Use same procedure as stalled on railroad.
22
V. EVACUATION EXERCISE
A. Safety Suggestions That Help To Avoid Injury During Drills:
1. Make sure students understand proper procedures for each drill before attempting practice
drills.
2. Demonstrate each maneuver to show proper technique, thus reducing the possibility of
injury.
3. All drills should be conducted in an orderly manner. As soon as each student exits the
bus, move a safe distance away to avoid injury.
4. Avoid wearing clothes that are too loose/tight. Students should be able to move about
freely. Also avoid clothes with drawstrings which could become entangled when trying
to exit the bus.
5. Designate an area for students to go to after exiting the bus. This will keep the area
around the bus clear and avoid injury.
6. Have older students sit near the emergency exits to assist younger pupils when exiting the
bus.
7. Avoiding exiting the bus with personal belongings (ex: book bags, books, lunch boxes,
etc.).
8. Keep all book bags, books and other belongings out of the aisle.
9. When sitting in the bus seats, keep feet and legs out of the aisle.
10. Never carry any items in hands or wear book bags.
11. Always avoid wearing loose clothing or have it secure to prevent the possibility of it
being caught on windows, doors, etc.
12. Remove all sharp objects or anything that could cause injury from pockets and the person.
13. Insure that all exits are free from obstructions.
14. Park the bus on a soft surface such as grass, sand, etc.
15. Park the bus on a level surface.
16. If possible and if available, place a soft mat on the ground under each exit being utilized
to help cushion the fall when a child exits the bus.
17. When possible, a driver or aide should be available to assist passengers in safely exiting
the bus.
18. Provide close supervision of the passengers to insure there is no horseplay during the
entire evacuation process.
19. After exiting, the passengers should be instructed to move to a safe location until the
evacuation is completed.
Once the evacuation is completed, review the procedures with the passengers to insure there are
no misunderstandings.
23
B. Driver Drill Exercise Procedures
Step-by-step evacuation drill procedures are presented for each available school bus exit. Each
school bus driver should learn these procedures and practice them during drill simulation:
Front Service Door Evacuation--
1. Stop the bus in a pre-selected location on the school grounds.
2. Shut off the engine and set the parking brake.
3. Place the transmission in neutral.
4. Remove the ignition key.
5. Stand, open the front door, face the children, and get their attention.
6. Give the command: “Front door emergency evacuation drill - remain seated.”
7. Direct the two helpers to their places beside the front door.
8. Stand between the first occupied seats, facing the front door.
9. Starting with the right-hand seat, ask the leader to lead all pupils 100 feet or 40 paces
from the bus and instruct the other occupants of the right seat to follow. WARN ALL
PUPILS: “Walk. Do not run. Use the handrails.”
10. Hold your hand before the occupants of the left-hand seat in a restraining gesture.
11. When the pupils in the right-hand seat have moved forward enough to clear the aisle,
dismiss the occupants of the left-hand seat.
12. Continue the evacuation procedure as described, right and left seats alternately, until
the bus is empty.
13. When the last seat is empty, walk to the front of the bus, and check to ensure that
everyone is out.
Side Emergency Door Evacuation--
NOTE: BE SURE AMPLE ADULT SUPERVISION IS AT THE LOCATION BEFORE
THE DRILL IS HELD.
1. Stop the bus on the pre-selected location on the grounds away from traffic.
2. Shut off the engine and set the parking brake.
3. Place the transmission in neutral.
4. Remove the ignition key.
5. If using a mat, see that it is placed on the ground in the center of the rear emergency
door.
6. Stand, face the children, and get their attention.
7. Give the command: “Side emergency door evacuation drill - remain seated.”
8. Walk to the emergency door.
9. Ask Helper Number One to open the emergency door, and jump out to take a position.
10. Ask Helper Number Two to jump out and take a position.
11. Ask the leader to jump out and lead the other pupils seated 100 feet or 40 paces from
the bus.
12. Face the rear of the bus and ask pupils seated in the first right seat to leave; then left,
then right, until all pupils have exited.
13. Face the front of the bus, and ask pupils in the first left seat forward of the emergency
door to leave; then right, then left until the bus is empty.
24
14. See that all pupils remain seated until it is their turn to leave. Stay near the
emergency door to space pupils so that each pupil has cleared the mat before allowing
the next pupil to jump.
15. Check all seats to see that everyone is out, and leave through the emergency door in
the same manner as the pupils and join the waiting pupils in the regrouping area.
Front Service Door and Side (Floor-level) Door Evacuation
NOTE: BE SURE AMPLE ADULT SUPERVISION IS AT THE LOCATION BEFORE
DRILL IS HELD.
1. Stop the bus in the pre-selected location on the school grounds, away from the traffic.
2. Shut off the engine and secure the parking brake.
3. Place the transmission in neutral.
4. Remove the ignition key.
5. If using a mat, see that it is placed on the ground in the center of the rear emergency
door.
6. Stand, face the children, and get their attention.
7. Give the command, “Front and side emergency door evacuation drill - remain seated.”
8. Stand between the first two seats and ask Helper Number One to open the front door
(using emergency release, if so equipped). Ask Helpers One and Two to take their
positions outside, one on each side of the front door.
9. Ask the leader to take a position 100 feet or 40 paces from the bus.
10. Release the pupils in the left front seat. Step back and release the pupils in the next
right hand seat, then left, and so on, until the center is reached.
11. Ask the rest of the pupils to remain seated.
12. Walk back to the left emergency door. Ask Helper Number Three to open the
emergency door. Jump to the ground and take a position.
13. Ask Helper Number Four to jump out and take a position.
14. Ask pupils seated behind the emergency door to leave first, in proper rotation - right,
left, right.
15. As soon as the rear seats are empty, ask pupils seated forward of the emergency door
to leave, starting with the right seat, then left, and so on, until pupils are out. Be sure
all pupils stay seated until their turn to leave. Stay near the side emergency door to
ensure that each pupil clears the mat before allowing the next pupil to jump.
16. Check each seat to ensure that everyone is out and leave by the front door to join the
pupils in the regrouping area.
25
Left and Rear Emergency (Floor-level) Door Evacuation
NOTE: BE SURE AMPLE ADULT SUPERVISION IS AT THE LOCATION BEFORE
DRILL IS HELD.
1. Stop the bus in the pre-selected location on the school grounds away from traffic.
2. Shut off the engine and set the parking brake.
3. Place the transmission in neutral.
4. Remove the ignition key.
5. If using a mat, see that it is placed on the ground in the center of the rear and side
emergency doors.
6. Stand, face the children, and get their attention.
7. Give the command: “Left and rear door evacuation drill - remain seated.”
8. Walk to the rear row of seats and face the door.
9. Ask Helper Number One to open the rear door, and jump out to take a position. Ask
Helper Number Two to take a position.
10. Turn, face the left-side emergency door, and ask Helper Number Three to open the
emergency door, jump out and take a position. Ask Helper Number Four to jump out
and take a position.
11. Ask the leader to take a position in the rear doorway.
12. Face the front of the bus and explain to the children what order they are to leave their
seats, reminding them to remain seated until it is their turn to move.
13. Start the evacuation with the right rear seat, then left rear seat, then right, then left,
until the bus is empty. All pupils seated on the right side of the bus leave through the
rear door; all pupils seated on the left leave through the left rear door.
14. Ask the leader to assume a semi-squat position, reach out and take both hands on top
the helper’s hands, hop out, and go to a position 100 feet or 40 paces away from the
bus.
15. Ask the pupils in the first right rear seat to leave through the rear door. Ask the pupils
in the first left rear seat to leave through left rear door, and so on.
16. Stand in a position to control both doors to prevent pushing and shoving, allowing
ample room for each pupil to assume a semi-squat position before jumping.
17. This can be done by having the first pupil go out the rear door and the next pupil go
out the left rear door - then rear, then left, space and time to allow each pupil who has
jumped ample time to clear the mats before the next person jumps.
18. Walk to the front of the bus, and check to ensure that everyone is out. Leave through
the front door, and join the waiting pupils. The driver should evaluate the evacuation
performance, point out improvement needed, and commend the pupils on activities
well done.
26
Rear and Side Emergency (Floor-level), and Front Service Door Evacuation
NOTE: BE SURE AMPLE ADULT SUPERVISION IS AT THE LOCATION BEFORE
DRILL IS HELD.
1. Stop the bus in the pre-selected location on the school grounds away from traffic.
2. Shut off the engine and apply the parking brake.
3. Place the transmission in neutral.
4. Remove the ignition key.
5. If using a mat, see that it is placed on the ground in the center of the rear emergency
door.
6. Stand, face the children, and get their attention. Open the front door.
7. Give the command: “Rear, side and front emergency door evacuation drill - remain
seated.”
8. Ask Helpers Number One and Two, for the front, to take their positions outside the
front entrance door.
9. Walk to the rear door and ask Helper Number Three to open the rear emergency door
and jump out to take a position. Ask Helper Number Four to jump out and take a
position.
10. Face the left rear emergency door. Ask Helper Number Five to open the door and
jump out to take a position. Ask Helper Number Six to jump out and take a position.
11. Walk to the front of the bus. Ask the leader to leave through the front door and take a
position 100 feet or 40 paces from the bus. Start with the left front seat and ask those
pupils to leave through the front door, then seat number three, then four, then five.
Back down the aisle, releasing pupils from seats on alternate sides of the bus, until the
center of the bus has been reached. Ask the rest of the students to remain seated.
Walk back to the left side emergency door. Starting at the rear of the bus, ask all
remaining pupils seated on the left side to leave by the left side emergency door.
Stand at the left door to control the pupils and space their jumps so that each pupil has
cleared the mat before allowing the next pupil to jump.
12. After the pupils on the left side of the bus have left the bus, turn to the rear door and
ask the pupils closest to the rear door to leave. All remaining pupils are to leave
through the rear emergency door. Again, see that each pupil has cleared the mat
before allowing the next pupil to jump. Walk to the front and back to ensure that
everyone has left the bus. Exit through the front door and go to the regrouping area.
Rear (Floor-level) Emergency Door Evacuation
NOTE: BE SURE AMPLE ADULT SUPERVISION IS AT THE LOCATION BEFORE
DRILL IS HELD.
1. Stop the bus in the pre-selected location on the school grounds, away from traffic.
2. Shut off the engine and secure the parking brake.
3. Place the transmission in neutral.
4. Remove the igniton key.
5. If using a mat, see that it is placed on the ground in the center of the rear
emergency door.
6. Stand, face the children, and get their attention.
7. Give the command: “Rear door emergency evacuation drill - remain seated.”
27
8. Walk to the rear seat and face the front on the bus.
9. Ask Helper Number One to open the emergency door, jump out, and take a position.
10. Have Helper Number Two jump out and take a position. He/she becomes the pupil
leader.
11. Ask the pupil leader to stand at the emergency door.
12. Explain to the pupils in what order they are to leave their seats (starting with the right
rear or divan seat, the left, then right, and so on), until the bus is empty. Remind
pupils to remain seated until it is their turn to move.
13. Ask the pupil leader to assume a semi-squat position, reach out with both hands and
go to a position 100 feet or 40 paces away from the bus. Pupils are told to exit and go
to the pupil leader.
14. Remain near the emergency door to control pupils leaving the bus and to prevent
shoving or pushing. See that each pupil assumes a semi-squat position before
jumping.
15. Make sure that each pupil who has jumped clears the mat on the ground before
allowing the next pupil to jump.
16. After the last pupil leaves the bus, walk to the front of the bus and check to ensure
that everyone is out.
17. Leave the bus by the front door and join the pupils in the regrouping area.
28
VI. PROPER USE OF SCHOOL BUS EMERGENCY EXITS
The following is intended to provide guidelines for utilizing the various emergency exits found
on South Carolina School Buses. These guidelines are intended only as a suggestion to local
school districts, as to how and when certain emergency exits might be utilized during emergency
evacuation drills or in the event of an actual emergency.
It is important that all transportation personnel are aware of the number of emergency exits that
may be utilized, their location and their variances in design.
A. 1995-96, Thomas Rear Engine Transit - 78 Passenger:
This type school bus has a service door located to the extreme right front of the vehicle and nine
(9) emergency exits. These emergency exits are located at various locations along the sides, top
and rear of the vehicle.
Front Service Entrance/Exit Door: The passenger service entrance/exit door is located to the
extreme right front of the bus. This door can be easily opened by moving the door control
switch, which is located to the driver’s immediate left, towards the front of the bus. In an
emergency, this door can be opened manually by turning the emergency release handle,
which is located directly above the service entrance/exit door stairwell, clockwise and
pushing the door outward. The door opening is seven feet (7 ft.) high and two feet six inches
(2 ft. 6 in.) wide. The entrance/exit is one foot two inches (1 ft. 2 in.) from ground level and
upon entry there are three (3) steps, each of which are nine inches (9 in.) high which lead up
to the floor level of the vehicle. There is a handrail located on the left side of the service
entrance doorway that aids passengers in safely entering or leaving the bus.
The front entrance/exit door, even though not actually classified as an emergency exit, should
always be utilized during an actual emergency or when conducting emergency evacuation
drills where circumstances would allow exiting from the front of the vehicle. This exit is
easier to access, has a larger clearance area and is lower to the ground than the other
emergency exits. In the event the bus driver is incapacitated, several students who ride the
bus should be given training on how to open the service entrance. Students, large or small,
being familiar with the use of this exit may leave the vehicle very quickly in an upright,
walking position. Students of all ages should physically participate in drills demonstrating
how to exit this door in an orderly fashion during an emergency situation. Evacuation drills
should also be conducted using this exit in conjunction with other emergency exits, having
some students use the front exit while other students use various emergency exits, depending
on the type of emergency situation being depicted for the drill and their seating location on
the bus.
Side Emergency Exit Doors: There are two (2) side emergency exit doors, one (1) on each
side of the bus. These doors open outward to approximately a 90-degree angle to the bus.
The side emergency door exits are located approximately midway the vehicle. When either
emergency door is open, the space provided for evacuation is four feet three inches (4 ft. 3
in.) high and two feet nine inches (2 ft 9 in.) wide. Both emergency door exits are aligned
with the space provided for legroom between two passenger seats. When unoccupied, one
29
seat folds upward and back, clearing the path of travel to the emergency exit. The other seat
is attached securely to the floor, positioned approximately one foot four inches (1 ft 4 in.)
into the doorway, causing the back of the seat to somewhat restrict the actual width of the
exit space from two feet nine inches (2 ft. 9 in.) down to one foot five inches (1 ft. 5 in.). The
bottom of the door opening is three feet four inches (3 ft. 4 in.) from the ground.
Emergency door exits are easily accessible due to their location, (on each side, midway in the
bus), within reasonable distance of ground level and providing the most clearance for an
easier exit. Therefore, these exits are the most commonly used for a wide variety of
emergency situations. When conducting emergency evacuation drills, consideration should
be given towards having students physically utilize these exits. Students should be given
instructions on how to evacuate the vehicle using these exits with the aid of someone outside
the vehicle to assist them to ground.
This type exit, being closer to the ground than any other emergency exits when the bus is in
an upright position should also be used to train students on how to evacuate the vehicle in an
emergency situation unassisted. This may be accomplished by instructing smaller students to
quickly sit in the exit with their feet and legs outside the vehicle, then with the palms of their
hands facing downward, pushing against the floor of the vehicle, lift themselves up and out of
the emergency exit away from the bus. Larger students because of the restricted space should
be instructed to firmly grip the upper back portion of the seat back with both hands and with
their body turned slightly towards the seat, at a slight angle to the door, lower themselves to
the floor of the bus, then boost themselves outward, feet first, to the ground. As with all
emergency evacuation drills, this should be very closely supervised.
Side Emergency Exit Windows: There are four (4) side emergency exit windows, two (2) on
each side of the bus. These windows open outward and up; however, they are not equipped
with any type of locking device to support them in an open position. They are located in the
fourth (4th) and tenth (10th) window positions from the front of the bus on both sides. These
windows open horizontally to the vehicle, being hinged at the top, with the release or opening
mechanism located at the bottom of the windows. The windows are two feet (2 ft.) wide and
one foot nine inches (1 ft. 9 in.) high and it is approximately six feet three inches (6 ft. 3 in.)
from the bottom of the windows to outside ground level. The windows are located directly in
line with passenger seating and are approximately one foot four inches (1 ft. 4 in.) above the
seat cushion. Each window has a seat back that is located slightly to the left or right of the
center of the window. The seat backs are approximately four inches (4 in.) higher than the
base of the window and aid in utilizing the window in an emergency evacuation.
Due to the dimensions of the emergency exit windows and their height from ground level, a
responsible person should demonstrate using these exits during an emergency evacuation
drill. Students should not be required to use these exits during an evacuation drill. The
instructor can accomplish this by standing between the seats directly in front of the
emergency window exit, grasping the release handle of the window, pulling upward on the
handle, then pushing outward on the window to assure it opens freely. The instructor then
steps onto the seat cushion of the seat in line with the emergency exit window, turns toward
the front of the bus and sits on the back of the seat. While sitting on the back of the seat, the
30
instructor places both legs out the window, and, with one hand on each of the seat backs
closest to the window, lifts his/her body onto the base of the window. While sitting on the
base of the window, the instructor turns his/her body at a slight angle to the bus and twists the
upper body to change grip on the seat backs or uses the base of the window for support while
turning the body. Now, the front, midsection of the body should be resting on the base of the
window. With the stomach or pelvis portion supporting the body, the instructor grasps the
base of the window with both hands and lowers onto the ground. Once instructors are shown
how to accomplish this, it can be done quickly, and once students have observed this exit
being used, they are much more likely to think of it and use it if needed in an actual
emergency situation.
Students should not physically utilize these exits when conducting emergency evacuation
drills. Verbal instructions should be given in reference to these exits during emergency
evacuation drills, so as to inform students of the exit locations, how the exits are opened and
the proper way to evacuate the vehicle utilizing this type exit. Evacuation drills should
demonstrate the different positions, which a vehicle may come to rest, such as on its side or
top, and how these exits should be utilized in each instance.
Rear Emergency Exit: This vehicle has one (1) rear emergency exit. The exit is located
across the rear of the bus just above the seat back of the extreme rear seat. Being five feet ten
inches (5 ft. 10 in) from ground level and measuring four feet eight inches (4 ft. 8 in.) across,
and one foot eleven inches (1 ft. 11 in.) high, this emergency exit opens horizontally to an out
and upward position. It is equipped with hinged hydraulic type supports that maintain the
exit in its most opened position to allow for faster departure.
To utilize this exit in an emergency situation with the vehicle in an upright position, someone
should step onto the seat cushion of the rear most seat, reach forward, release the emergency
handle, and with a firm push open the exit. Passengers should lie face down on the shelf
behind the rear seat, allow their feet and legs to drop towards the ground with the upper body
to follow. This procedure, if performed properly, can be done quickly, and since it allows the
individual to make ground contact, feet first, this exit may be utilized safely by small children
in an actual emergency. An adult can easily demonstrate this during an evacuation drill.
Verbal instructions should also be given to students during emergency evacuation drills
pertaining to the possible use of this exit in the event a bus comes to rest on its top or side,
which in either event some portion of the exit should be very close to the ground. Under
these type conditions, instructions on how to open the exit and the quickest, safest route by
which to get to it should be stressed.
Roof Exits: There are two (2) emergency roof exits. These exits are fourteen feet ten inches
(14 ft. 10 in.) apart, with one located seven feet ten inches (7 ft. 10 in.) from the front of the
bus; the other is located eight feet one inch (8 ft. 1 in.) from the rear of the bus. Both are
located center the width of the bus which is two feet ten inches (2 ft. 10 in.) from each side,
directly in line with the aisle through the passenger seating compartment of the vehicle. Both
have an exit clearance of one foot ten inches (1 ft. 10 in.) by one foot eleven inches (1 ft. 11
in.). The height of both roof exits is six feet one inch (6 ft. 1 in.) from the floor of the
31
vehicle, four feet eight inches (4 ft. 8 in.) from the seat cushion and two feet eight inches (2
ft. 8 in.) from the top of the seat back closest to the roof exits. With the bus in an upright
position, these exits open upward and back, where they will remain in an open position,
completely clearing the exit.
The emergency roof exits should most often be utilized when a bus comes to rest on its side
or under circumstances where the vehicle comes to rest upright in a ravine or a body of water.
A bus which comes to rest on its side allows a person exiting through the top of the bus to be
relatively close to the ground, permitting an individual to exit arms and head first, then
pulling the remainder of their body clear of the vehicle. Verbal instructions would be given
explaining how this is done.
When a bus comes to rest in an upright position in a ravine or body of water, this situation
provides the greatest possibility for only the extreme top of the vehicle being clear of
obstacles or not submerged. When this occurs and all other exits are obscured and
evacuation necessitates the use of the roof exits with the bus in an upright position, the
following should be taken into consideration:
1. The height of the exit from the floor of the bus, the seat cushion and the seat back
closest to the exit.
2. How much assistance will be needed to help passengers access the exit.
3. Once an individual has exited the bus, what type of obstacles will they face en route
to safety, such as water, high banks or high ground clearance.
Accessing these exits may require individuals to step into the seat closest to the exit, reach
upward, grip the rim of the exit, step onto the upper most part of the seat back, and then pull
with their arms while pushing with their legs to climb through the exit onto the top of the bus.
Demonstrations should be given showing students how to accomplish this assisted and
unassisted.
Smaller students who may require assistance should be shown what to expect in an
emergency. They should be shown how someone inside the vehicle might lift them to gain
access to and through the exit.
Because of the danger which may exist outside the vehicle, drivers may be required to
position themselves on the roof of the vehicle prior to evacuating any students. In the event
this becomes necessary and the driver has no assistant, an older responsible student should be
appointed to help if one is available. If not, the driver may be forced to re-enter the vehicle
several times during an evacuation. During evacuation drills where there is a possibility that
a student may be needed to assist a driver, several students should be shown what their duties
would be in the event of an actual emergency. In this situation, students should be shown
how to climb onto the seat themselves so someone might reach them from the roof of the
vehicle.
During emergency evacuation drills students should not use the roof exits. School district
officials and/or bus drivers should conduct demonstrations.
32
B. 1995-96, Thomas Rear Engine Transit - 35 Passenger Special Needs:
Front Service Entrance/Exit: The passenger service entrance/exit door is located to the
extreme right front of the bus. This door can be easily opened by moving the door control
switch, which is located to the driver’s immediate left, towards the front of the bus. In an
emergency this door can be opened manually by turning the emergency release handle, which
is located directly above the service entrance/exit door stairwell, clockwise and pushing the
door outward. The door opening is seven feet (7 ft.) high and two feet six inches (2 ft. 6 in.)
wide. The entrance/exit is one foot two inches (1 ft. 2 in.) from ground level and upon entry
there are three (3) steps, each of which are nine inches (9 in.) high which lead up to the floor
level of the vehicle. There is a handrail located on the left side of the service entrance
doorway that aids passengers in safely entering or leaving the bus.
The front entrance/exit door, even though not actually classified as an emergency exit, should
always be utilized during an actual emergency or when conducting emergency evacuation
drills where circumstances would allow exiting from the front of the vehicle. This exit is
easier to access, has a larger clearance area and is lower to the ground than the other
emergency exits. In the event the bus driver is incapacitated, several students who ride the
bus should be given training on how to open the service entrance. Students, large or small,
being familiar with the use of this exit may leave the vehicle very quickly in an upright,
walking position. Students of all ages should physically participate in drills demonstrating
how to exit this door in an orderly fashion during an emergency situation. Evacuation drills
should also be conducted using this exit in conjunction with other emergency exits, having
some students use the front exit while other students use various emergency exits, depending
on the type of emergency situation being depicted for the drill and their seating location on
the bus.
Side Emergency Exit Door: There is a left side emergency exit door. This door opens
outward to approximately a 90-degree angle to the bus. The side emergency door exit is
located approximately midway the vehicle. When the emergency door is open, the space
provided for evacuation is four feet three inches (4 ft. 3 in.) high and two feet nine inches (2
ft 9 in.) wide. The emergency door exit is aligned with the space provided for legroom
between two passenger seats. One of the seats, when unoccupied, folds upward and back
clearing the path of travel to the emergency exit. The other seat is attached securely to the
floor, positioned approximately one foot four inches (1 ft 4 in.) into the doorway, causing the
back of the seat to somewhat restrict the actual width of the exit space from two feet nine
inches (2 ft. 9 in.) down to one foot five inches (1 ft. 5 in.). The bottom of the door opening
is three feet four inches (3 ft. 4 in.) from the ground.
The emergency door exit is easily accessible due to the location, (midway in the bus), within
reasonable distance of ground level and providing the most clearance for an easier exit.
Therefore, this exit is the most commonly used for a wide variety of emergency situations.
When conducting emergency evacuation drills, consideration should be given towards having
students physically utilize this exit. Students should be given instructions on how to evacuate
the vehicle using this exit with the aid of someone outside the vehicle to assist them to
ground.
33
This type exit, being closer to the ground than any other emergency exit when the bus is in an
upright position, should also be used to train students on how to evacuate the vehicle in an
emergency situation unassisted. This may be accomplished by instructing smaller students to
quickly sit in the exit with their feet and legs outside the vehicle, then with the palms of their
hands facing downward, pushing against the floor of the vehicle, lift themselves up and out of
the emergency exit away from the bus. Larger students because of the restricted space should
be instructed to firmly grip the upper back portion of the seat back with both hands and with
their body turned slightly towards the seat, at a slight angle to the door, lower themselves to
the floor of the bus, then boost themselves outward, feet first, to the ground. As with all
emergency evacuation drills, this should be very closely supervised.
Side Emergency Exit Windows: There are four (4) side emergency exit windows, two (2) on
each side of the bus. These windows open outward and up; however, they are not equipped
with any type of locking device to support them in an open position. They are located in the
fourth (4th) and tenth (10th) window positions from the front of the bus on both sides. These
windows open horizontally to the vehicle, being hinged at the top, with the release or opening
mechanism located at the bottom of the windows. The windows are two feet (2 ft.) wide and
one foot nine inches (1 ft. 9 in.) high and it is approximately six feet three inches (6 ft. 3 in.)
from the bottom of the windows to outside ground level. The windows are located directly in
line with passenger seating and are approximately one foot four inches (1 ft. 4 in.) above the
seat cushion. Each window has a seat back that is located slightly to the left or right of the
center of the window. The seat backs are approximately four inches (4 in) higher than the
base of the window and aid in utilizing the window in an emergency evacuation.
Due to the dimensions of the emergency exit windows and their height from ground level, a
responsible person should demonstrate using these exits during an emergency evacuation
drill. Students should not be required to use these exits during an evacuation drill. The
instructor can accomplish this by standing between the seats directly in front of the
emergency window exit, grasping the release handle of the window, pulling upward on the
handle, then pushing outward on the window to assure it opens freely. The instructor then
steps onto the seat cushion of the seat in line with the emergency exit window, turns toward
the front of the bus and sits on the back of the seat. While sitting on the back of the seat, the
instructor places both legs out the window, and, with one hand on each of the seat backs
closest to the window, lifts his/her body onto the base of the window. While sitting on the
base of the window, the instructor turns his/her body at a slight angle to the bus and twists the
upper body to change grip on the seat backs or uses the base of the window for support while
turning the body. Now, the front, midsection of the body should be resting on the base of the
window. With the stomach or pelvis portion supporting the body, the instructor grasps the
base of the window with both hands and lowers onto the ground. Once instructors are shown
how to accomplish this, it can be done quickly, and once students have observed this exit
being used, they are much more likely to think of it and use it if needed in an actual
emergency situation.
Students should not physically utilize these exits when conducting emergency evacuation
drills. Verbal instructions should be given in reference to these exits during emergency
34
evacuation drills, so as to inform students of the exit locations, how the exits are opened and
the proper way to evacuate the vehicle utilizing this type exit. Evacuation drills should
demonstrate the different positions, which a vehicle may come to rest, such as on its side or
top, and how these exits should be utilized in each instance.
Lift Door: THIS DOOR SHOULD NOT BE USED FOR EMERGENCY
EVACUATION PURPOSES. OPENING THE DOOR AND OPERATING THE LIFT
WOULD WASTE PRECIOUS TIME AND COULD PROVE DISASTROUS.
Passengers who would normally require the lift should be evacuated through any of the other
available exits.
Rear Emergency Exit: This vehicle has one (1) rear emergency exit. The exit is located
across the rear of the bus just above the seat back of the extreme rear seat. Being five feet ten
inches (5 ft. 10 in) from ground level and measuring four feet eight inches (4 ft. 8 in.) across,
and one foot eleven inches (1 ft. 11 in.) high, this emergency exit opens horizontally to an out
and upward position. It is equipped with hinged hydraulic type supports that maintain the
exit in its most opened position to allow for faster departure.
To utilize this exit in an emergency situation with the vehicle in an upright position, someone
should step onto the seat cushion of the rear most seat, reach forward, release the emergency
handle, and with a firm push open the exit. Passengers should lie face down on the shelf
behind the rear seat, allow their feet and legs to drop towards the ground with the upper body
to follow. This procedure, if performed properly, can be done quickly, and since it allows the
individual to make ground contact, feet first, this exit may be utilized safely by small children
in an actual emergency. An adult can easily demonstrate this during an evacuation drill.
Verbal instructions should also be given to students during emergency evacuation drills
pertaining to the possible use of this exit in the event a bus comes to rest on its top or side,
which in either event some portion of the exit should be very close to the ground. Under
these type conditions, instructions on how to open the exit and the quickest, safest route by
which to get to it should be stressed.
Roof Exits: There are two (2) emergency roof exits. These exits are fourteen feet ten inches
(14 ft. 10 in.) apart, with one located seven feet ten inches (7 ft. 10 in.) from the front of the
bus; the other is located eight feet one inch (8 ft. 1 in.) from the rear of the bus. Both are
located center the width of the bus which is two feet ten inches (2 ft. 10 in.) from each side,
directly in line with the aisle through the passenger seating compartment of the vehicle. Both
have an exit clearance of one foot ten inches (1 ft. 10 in.) by one foot eleven inches (1 ft. 11
in.). The height of both roof exits are six feet one inch (6 ft. 1 in.) from the floor of the
vehicle, four feet eight inches (4 ft. 8 in.) from the seat cushion and two feet eight inches (2
ft. 8 in.) from the top of the seat back closes to the roof exits. With the bus in an upright
position, these exits open upward and back, where they will remain in an open position,
completely clearing the exit.
The emergency roof exits should most often be utilized when a bus comes to rest on its side
or under circumstances where the vehicle comes to rest upright in a ravine or a body of water.
35
A bus, which comes to rest on its side, allows a person exiting through the top of the bus to
be relatively close to the ground, permitting an individual to exit arms and head first, then
pulling the remainder of their body clear of the vehicle. Verbal instructions would be given
explaining how this is done.
When a bus comes to rest in an upright position in a ravine or body of water, this situation
provides the greatest possibility for only the extreme top of the vehicle being clear of
obstacles or not submerged. When this occurs and all other exits are obscured and
evacuation necessitates the use of the roof exits with the bus in an upright position, the
following should be taken into consideration:
1. The height of the exit from the floor of the bus, the seat cushion and the seat back
closest to the exit.
2. How much assistance will be needed to help passengers access the exit.
3. Once an individual has exited the bus, what type of obstacles will they face en route
to safety, such as water, high banks or high ground clearance.
Accessing these exits may require individuals to step into the seat closest to the exit, reach
upward, grip the rim of the exit, step onto the upper most part of the seat back, and then pull
with their arms while pushing with their legs to climb through the exit onto the top of the bus.
Demonstrations should be given showing students how to accomplish this assisted and
unassisted.
Smaller students who may require assistance should be shown what to expect in an
emergency. They should be shown how someone inside the vehicle might lift them to gain
access to and through the exit.
Because of the danger that may exist outside the vehicle, drivers may be required to position
themselves on the roof of the vehicle prior to evacuating any students. In the event this
becomes necessary and the driver has no assistant, an older responsible student should be
appointed to help if one is available. If not, the driver may be forced to re-enter the vehicle
several times during an evacuation. During evacuation drills where there is a possibility that
a student may be needed to assist a driver, several students should be shown what their duties
would be in the event of an actual emergency. In this situation, students should be shown
how to climb onto the seat themselves so someone might reach them from the roof of the
vehicle.
During emergency evacuation drills students should not use the roof exits. School district
officials and/or bus drivers should conduct demonstrations.
C. 1992-1994 Conventional School Bus - 19 Passenger Special Needs:
Front Service Entrance/Exit: The passenger service entrance/exit door is located to the
extreme right front of the bus. This door can be easily opened by pulling the door handle
back and pushing it to the right. The door handle is located near the dash to the right of the
driver. The door opening is two feet five inches (2 ft. 5 in.) wide and six feet nine inches (6
ft. 9 in.) in height. This door is located ten inches (10 in.) from the outside ground level.
36
Upon entry there are three (3) steps, each of which are eight inches (8 in.) high and lead up to
the floor level of the vehicle. There are two (2) handrails located inside the doorway, one (1)
on each side to assist passengers in safely entering and exiting the bus.
The front entrance/exit door, even though not actually classified as an emergency exit, should
always be utilized during an actual emergency or when conducting emergency evacuation
drills where circumstances would allow exiting from the front of the vehicle. This exit is
easier to access, has larger clearance area and is lower to the ground then the other emergency
exits. In the event the bus driver is incapacitated, capable students that ride the bus should be
trained how to open the service entrance. If this exit has to be utilized in an emergency
situation, an aide should assist the passengers in exiting the bus. Evacuation drills should
also be conducted using this exit in conjunction with other emergency exits, having some
students use the front exit while other students use various emergency exits, depending on the
type of emergency situation being depicted for the drill and their seating location on the bus.
Rear Emergency Exit Door: This vehicle has one (1) rear emergency exit. The exit is located
at the rear of the bus and in the center. This exit measures two feet nine inches (2 ft. 9 in.)
wide and four feet three inches (4 ft. 3 in.) high. This door is located three feet (3 ft.) from
the outside ground level. The rear exit door opens out and to the side. It is equipped with a
locking device that will hold the door in an open position. To utilize this exit in an
emergency situation, the bus driver or aide should be inside the bus and the other outside the
bus to assist passengers in safely exiting the vehicle. This procedure should be followed at
all times when utilizing this exit.
Side Emergency Exit Windows: There are two (2) side emergency windows located on this
vehicle. The driver’s side location is the fourth (4th) window from the front excluding the
driver’s window. The passenger’s side location is the second (2nd) from the front. The
windows measure one foot eight inches (1 ft. 8 in.) by two feet (2 ft.). The windows are
located five feet seven inches (5 ft. 7 in.) from the outside ground level.
These windows open horizontally to the vehicle and are hinged at the top with the opening
mechanism located at the bottom of the window. These windows are located directly in line
with passenger seating.
Due to the dimensions of the emergency exit windows and their height from ground level, a
responsible person should demonstrate using these exits during an emergency evacuation
drill. Students should not be required to use these exits during an evacuation drill. The
instructor can accomplish this by standing between the seats directly in front of the
emergency window exit, grasping the release handle of the window, pulling upward on the
handle, then pushing outward on the window to assure it opens freely. The instructor then
steps onto the seat cushion of the seat in line with the emergency exit window, turns toward
the front of the bus and sits on the back of the seat. While sitting on the back of the seat, the
instructor places both legs out the window, and, with one hand on each of the seat backs
closest to the window, lifts his/her body onto the base of the window. While sitting on the
base of the window, the instructor turns his/her body at a slight angle to the bus and twists the
upper body to change grip on the seat backs or uses the base of the window for support while
37
turning the body. Now, the front, midsection of the body should be resting on the base of the
window. With the stomach or pelvis portion supporting the body, the instructor grasps the
base of the window with both hands and lowers onto the ground. Once instructors are shown
how to accomplish this, it can be done quickly, and once students have observed this exit
being used, they are much more likely to think of it and use it if needed in an actual
emergency situation.
Students should not physically utilize these exits when conducting emergency evacuation
drills. Verbal instructions should be given in reference to these exits during emergency
evacuation drills, so as to inform students of the exit locations, how the exits are opened and
the proper way to evacuate the vehicle utilizing this type exit. Evacuation drills should
demonstrate the different positions, which a vehicle may come to rest, such as on its side or
top, and how these exits should be utilized in each instance.
Emergency Roof Exit: This vehicle is equipped with one (1) roof exit. This exit is located in
the center over the aisle three feet one inch (3 ft. 1 in.) from the rear of the bus, six feet one
inch (6 ft. 1 in.) from the floor of the bus, four feet seven inches (4 ft. 7 in.) from the seat
cushion, and two feet nine inches (2 ft. 9 in.) from the top of the seat back. This exit is
located two feet ten inches (2 ft. 10 in.) from the side of the bus. This exit measures one foot
eleven inches (1 ft. 11 in.) by one foot eleven inches (1 ft. 11 in.). With the bus in an upright
position, this exit opens upward and back where it will remain in an open position,
completely clearing the exit.
The emergency roof exits should most often be utilized when a bus comes to rest on its side
or under circumstances where the vehicle comes to rest upright in a ravine or a body of water.
A bus which comes to rest on its side allows a person exiting through the top of the bus to be
relatively close to the ground, provided they exit arms and head first, and pull the remainder
of their body clear of the vehicle. Verbal instructions should be given explaining how this is
done.
When a bus comes to rest in an upright position in a ravine or body of water, this situation
provides the greatest possibility for only the extreme top of the vehicle being clear of
obstacles or not submerged. When this occurs and all other exits are obscured and
evacuation necessitates the use of the roof exits with the bus in an upright position, the
following should be taken into consideration:
1. The height of the exit from the floor of the bus, the seat cushion and the seat back
closest to the exit.
2. How much assistance will be needed to help passengers access the exit.
3. Once an individual has exited the bus, what type of obstacles will they face en route
to safety, such as water, high banks or high ground clearance.
Accessing these exits may require individuals to step into the seat closest to the exit, reach
upward, grip the rim of the exit, step onto the upper most part of the seat back, and then pull
with their arms while pushing with their legs to climb through the exit onto the top of the bus.
38
Demonstrations should be given showing students how to accomplish this assisted and
unassisted.
Smaller students who may require assistance should be shown what to expect in an
emergency. They should be shown how someone inside the vehicle might lift them to gain
access to and through the exit.
Because of the danger that may exist outside the vehicle, drivers may be required to position
themselves on the roof of the vehicle prior to evacuating any students. In the event this
becomes necessary and the driver has no assistant, an older responsible student should be
appointed to help if one is available. If not, the driver may be forced to re-enter the vehicle
several times during an evacuation. During evacuation drills where there is a possibility that
a student may be needed to assist a driver, several students should be shown what their duties
would be in the event of an actual emergency. In this situation, students should be shown
how to climb onto the seat themselves so someone might reach them from the roof of the
vehicle.
During emergency evacuation drills students should not use the roof exits. School district
officials and/or bus drivers should conduct demonstrations.
Lift Door: THIS DOOR SHOULD NOT BE USED FOR EMERGENCY
EVACUATION PURPOSES. OPENING THE DOOR AND OPERATING THE LIFT
WOULD WASTE PRECIOUS TIME AND COULD PROVE DISASTROUS.
Passengers who would normally require the lift should be evacuated through any of the other
available exits.
Aisle Clearance: Aisle clearance of this type vehicle is two feet six inches (2 ft. 6 in.) in
width.
D. 1990 Blue Bird Front Engine Transit School Bus - 72 Passenger:
Front Service Entrance/Exit: The passenger service entrance/exit door is located to the
extreme right front of the bus. This door can be easily opened by pulling the door hand back
and pushing it to the right. The door handle is located near the dash to the right of the driver.
The door opening is twenty-four inches (24 in.) wide and seventy-six inches (76 in.) high. It
is located fourteen inches (14 in.) from the outside ground level. Upon entry, there are three
(3) steps, each of which are seven inches (7 in.) high which lead up to the floor level of the
vehicle. There is a handrail located inside the doorway to assist passengers in safely entering
and exiting the bus.
Rear Emergency Exit: This vehicle has one (1) rear emergency exit. This exit is located at
the rear of the bus and in the center. This exit measures thirty-five inches (35 in.) wide and
fifty-three inches (53 in.) in height. This door opens outward and to the side. There is no
locking device to hold the door in an open position. This door is located approximately forty
inches (40 in.) from the outside ground level. To utilize this exit in an emergency situation,
children should sit on the floor in the doorway and push themselves outward and away from
39
the bus with their palms facing downward. This procedure should be followed at all times,
whether the child is being assisted or unassisted, to reduce the possibility of injury. This
procedure, when performed properly, can be executed in a timely manner and will provide a
safe escape route in an emergency situation when the rear door can be used.
Side Door: This vehicle is not equipped with an Emergency Side Door Exit.
Emergency Roof Exit: This vehicle is equipped with two (2) roof exits. These exits are
located in the center over the aisle. One is located nine feet ten inches (9 ft. 10 in.) from the
front of the bus. The other is located eight feet four inches (8 ft. 4 in.) from the rear of the
bus. The distance between the two is nine feet nine inches (9 ft. 9 in.). These exit openings
measure twenty-three inches (23 in.) from side to side and front to back. With the bus in an
upright position, this exit opens upward and back, where it will remain in an open position
completely clearing the exit.
Side Emergency Exit Windows: There are four (4) side emergency windows located on this
vehicle. The driver’s side location is the sixth (6th) and eight (8th) window from the front
excluding the driver’s window. The passenger’s side location is the fifth (5th) and seventh
(7th) window from the front. The windows measure twenty-four inches (24 in.) in width and
twenty-two inches (22 in.) in height and are seventy inches (70 in.) from the outside ground
level. These windows open horizontally to the vehicle and are hinged at the top with the
opening mechanism located at the bottom of the window. These windows are located
directly in line with the passenger seating.
Due to the dimensions of the emergency exit windows and their height from ground level, a
responsible person should demonstrate using these exits during an emergency evacuation
drill. Students should not be required to use these exits during an evacuation drill. The
instructor can accomplish this by standing between the seats directly in front of the
emergency window exit, grasping the release handle of the window, pulling upward on the
handle, then pushing outward on the window to assure it opens freely. The instructor then
steps onto the seat cushion of the seat in line with the emergency exit window, turns toward
the front of the bus and sits on the back of the seat. While sitting on the back of the seat, the
instructor places both legs out the window, and, with one hand on each of the seat backs
closest to the window, lifts his/her body onto the base of the window. While sitting on the
base of the window, the instructor turns his/her body at a slight angle to the bus and twists the
upper body to change grip on the seat backs or uses the base of the window for support while
turning the body. Now, the front, midsection of the body should be resting on the base of the
window. With the stomach or pelvis portion supporting the body, the instructor grasps the
base of the window with both hands and lowers onto the ground. Once instructors are shown
how to accomplish this, it can be done quickly, and once students have observed this exit
being used, they are much more likely to think of it and use it if needed in an actual
emergency situation.
Students should not physically utilize these exits when conducting emergency evacuation
drills. Verbal instructions should be given in reference to these exits during emergency
evacuation drills, so as to inform students of the exit locations, how the exits are opened and

40
the proper way to evacuate the vehicle utilizing this type exit. Evacuation drills should
demonstrate the different positions, which a vehicle may come to rest, such as on its side or
top, and how these exits should be utilized in each instance.
Other Inside Measurements: Width of bus is seven feet eight inches (7 ft. 8 in.); from the
floor to the roof is six feet two inches (6 ft. 2 in.); and the aisle clearance inside this vehicle is
thirteen inches (13 in.).
41
E. 1990 International Conventional School Bus - 16 Passenger Special Needs:
Front Service Entrance/Exit: The passenger service entrance/exit door is located to the
extreme right front of the bus. This door can be easily opened by pulling the door handle
back and pushing it to the right. The door handle is located near the dash and to the right of
the driver. The door opening is two feet (2 ft.) wide and six feet six inches (6 ft. 6 in.) high.
The entrance/exit door is located approximately twelve inches (12 in.) from the outside
ground level and upon entry there are two (2) steps, each of which are twelve inches (12 in.)
high and lead up to the floor level of the vehicle. There is a handrail located inside the
doorway to assist passengers in safely entering and exiting the bus.
The front entrance/exit door, even though not classified as an emergency exit, should always
be utilized during an actual emergency or when conducting emergency evacuation drills
where circumstances would allow exiting from the front of the vehicle. This exit is easier to
access, has a larger clearance area and is lower to the ground than the other emergency exits.
In the event the bus driver is incapacitated, capable students that ride the bus should be
trained on how to open the service entrance. If this exit has to be used in an emergency
situation, an aide would assist the passengers in exiting the bus. Evacuation drills should also
be conducted using this exit in conjunction with other emergency exits, having some students
use the front exit while other students use various emergency exits, depending on the type of
emergency situation being depicted for the drill and their seating location on the bus.
Rear Emergency Exit: This vehicle has one (1) rear emergency exit. This exit is located at
the rear of the bus in the center. This exit measures thirty-five inches (35 in.) in width and
four feet five inches (4 ft. 5 in.) in height. This exit is located three feet three inches (3 ft. 3
in.) from the outside ground level. The emergency door opens outward and to the side.
There is no locking device to hold the door in an open position.
To utilize this exit in an emergency situation, the bus driver or aide should be inside the bus
and the other outside the bus to assist passengers in safely exiting the vehicle. This procedure
should be followed at all times when utilizing this exit.
Side Emergency Exit Windows: There are two (2) side emergency windows located on this
vehicle. The driver’s side location is the third (3rd) window from the front excluding the
driver’s window. The passenger’s side location is the second (2nd) from the front. The
windows measure two feet (2 ft.) wide and one foot eight inches (1 ft. 8 in.) in height. The
windows are located five feet nine inches (5 ft. 9 in.) from the outside ground level. These
windows open horizontally to the vehicle and are hinged at the top with the opening
mechanism located at the bottom of the window. The windows are located directly in line
with passenger seating and are approximately one foot four inches (1 ft. 4 in.) above the seat
cushion.
Due to the dimensions of the emergency exit windows and their height from ground level, a
responsible person should demonstrate using these exits during an emergency evacuation
drill. Students should not be required to use these exits during an evacuation drill. The
instructor can accomplish this by standing between the seats directly in front of the
emergency window exit, grasping the release handle of the window, pulling upward on the
42
handle, then pushing outward on the window to assure it opens freely. The instructor then
steps onto the seat cushion of the seat in line with the emergency exit window, turns toward
the front of the bus and sits on the back of the seat. While sitting on the back of the seat, the
instructor places both legs out the window, and, with one hand on each of the seat backs
closest to the window, lifts his/her body onto the base of the window. While sitting on the
base of the window, the instructor turns his/her body at a slight angle to the bus and twists the
upper body to change grip on the seat backs or uses the base of the window for support while
turning the body. Now, the front, midsection of the body should be resting on the base of the
window. With the stomach or pelvis portion supporting the body, the instructor grasps the
base of the window with both hands and lowers onto the ground. Once instructors are shown
how to accomplish this, it can be done quickly, and once students have observed this exit
being used, they are much more likely to think of it and use it if needed in an actual
emergency situation.
Students should not physically utilize these exits when conducting emergency evacuation
drills. Verbal instructions should be given in reference to these exits during emergency
evacuation drills, so as to inform students of the exit locations, how the exits are opened and
the proper way to evacuate the vehicle utilizing this type exit. Evacuation drills should
demonstrate the different positions, which a vehicle may come to rest, such as on its side or
top, and how these exits should be utilized in each instance.
Emergency Roof Exit: This vehicle is equipped with one (1) roof exit. This exit is located in
the center over the aisle two feet six inches (2 ft. 6 in.) from the rear of the bus, thirteen feet
two inches (13 ft. 2 in.) from the front of the bus, six feet two inches (6 ft. 2 in.) from the
floor of the bus, four feet ten inches (4 ft. 10 in.) from the seat cushion, and three feet one
inch (3 ft. 1 in.) from the top of the seat back. This exit measures twenty-two and one half
inches (22.5 in.) by twenty and one half inches (20.5 in.). With the bus in an upright
position, this exit opens upward and back where it will remain in an open position,
completely clearing the exit.
The emergency roof exits should most often be utilized when a bus comes to rest on its side
or under circumstances where the vehicle comes to rest upright in a ravine or a body of water.
A bus which comes to rest on its side allows a person exiting through the top of the bus to be
relatively close to the ground, provided they exit arms and head first, and pull the remainder
of their body clear of the vehicle. Verbal instructions should be given explaining how this is
done.
When a bus comes to rest in an upright position in a ravine or body of water, this situation
provides the greatest possibility for only the extreme top of the vehicle being clear of
obstacles or not submerged. When this occurs and all other exits are obscured and
evacuation necessitates the use of the roof exits with the bus in an upright position, the
following should be taken into consideration:
1. The height of the exit from the floor of the bus, the seat cushion and the seat back
closest to the exit.
2. How much assistance will be needed to help passengers access the exit.
43
3. Once an individual has exited the bus, what type of obstacles will they face en route
to safety, such as water, high banks or high ground clearance.
Accessing these exits may require individuals to step into the seat closest to the exit, reach
upward, grip the rim of the exit, step onto the upper most part of the seat back, and then pull
with their arms while pushing with their legs to climb through the exit onto the top of the bus.
Demonstrations should be given showing students how to accomplish this assisted and
unassisted.
Smaller students who may require assistance should be shown what to expect in an
emergency. They should be shown how someone inside the vehicle might lift them to gain
access to and through the exit.
Because of the danger that may exist outside the vehicle, drivers may be required to position
themselves on the roof of the vehicle prior to evacuating any students. In the event this
becomes necessary and the driver has no assistant, an older responsible student should be
appointed to help if one is available. If not, the driver may be forced to re-enter the vehicle
several times during an evacuation. During evacuation drills where there is a possibility that
a student may be needed to assist a driver, several students should be shown what their duties
would be in the event of an actual emergency. In this situation students should be shown
how to climb onto the seat themselves so someone might reach them from the roof of the
vehicle.
During emergency evacuation drills students should not use the roof exits. School district
officials and/or bus drivers should conduct demonstrations.
Lift Door: THIS DOOR SHOULD NOT BE USED FOR EMERGENCY
EVACUATION PURPOSES. OPENING THE DOOR AND OPERATING THE LIFT
WOULD WASTE PRECIOUS TIME AND COULD PROVE DISASTROUS.
Passengers who would normally require the lift should be evacuated through any of the other
available exits.
F. 1990 International Conventional School Bus - 54, 60 & 66 Passenger:
Front Service Entrance/Exit: This passenger service entrance/exit door is located to the
extreme right front of the bus. This door can be easily opened by pulling the door handle
back and pushing it to the right. The door handle is located near the dash to the right of the
driver. The door opening is one foot eleven inches (1 ft. 11 in.) wide and six feet six inches
(6 ft. 6 in.) in height. The entrance/exit door is located approximately eleven inches (11 in.)
from the outside ground level and upon entry there are two (2) steps, each of which is twelve
inches (12 in.) high which lead up to the floor level of the vehicle. There is a handrail located
inside the doorway to assist passengers in safely entering and exiting the bus.
The front entrance/exit door, even though not actually classified as an emergency exit, should
always be utilized during an actual emergency or when conducting emergency evacuation
drills where circumstances would allow exiting from the front of the vehicle. This exit is
easier to access, has a larger clearance area and is lower to the ground than the other
44
emergency exits. In the event the bus driver is incapacitated, several students who ride the
bus should be given training on how to exit this door in an orderly manner during an
emergency situation. Evacuation drills should also be conducted using this exit in
conjunction with other emergency exits, having some students use the front exit while other
students use various emergency exits, depending on the type of emergency situation being
depicted for the drill and their seating location on the bus.
Rear Emergency Exit: This vehicle has one (1) rear emergency exit. This exit is located at
the rear of the bus in the center. This exit measures two feet eleven inches (2 ft. 11 in.) in
width and four feet five inches (4 ft. 5 in.) in height. This exit is located three feet seven
inches (3 ft. 7 in.) from the outside ground level. This emergency door opens outward and to
the side. There is no locking device to hold the door in an open position.
To utilize this exit in an emergency situation, with the vehicle in an upright position, children
should sit on the floor in the doorway and push themselves outward and away from the bus
with their palms facing downward. This procedure should be followed at all times whether
the child is being assisted or unassisted to reduce the possibility of injury. This procedure,
when performed properly, can be executed in a timely manner and will provide a safe escape
route in an emergency situation when the rear door can be used.
Side Emergency Exit Windows: There are four (4) side emergency windows located on this
vehicle. The drivers’ side location is the third (3rd) and sixth (6th) window from the front
excluding the driver’s window. The passenger’s side location is the fourth (4th) and seventh
(7th) window from the front. The windows measure two feet (2 ft.) by one foot eight inches
(1 ft. 8 in.). The windows are located five feet ten inches (5 ft. 10 in.) from the outside
ground level. These windows open horizontally to the vehicle and are hinged at the top with
the opening mechanism located at the bottom of the window. These windows are located
directly in line with the passenger seating.
Due to the dimensions of the emergency exit windows and their height from ground level, a
responsible person should demonstrate using these exits during an emergency evacuation
drill. Students should not be required to use these exits during an evacuation drill. The
instructor can accomplish this by standing between the seats directly in front of the
emergency window exit, grasping the release handle of the window, pulling upward on the
handle, then pushing outward on the window to assure it opens freely. The instructor then
steps onto the seat cushion of the seat in line with the emergency exit window, turns toward
the front of the bus and sits on the back of the seat. While sitting on the back of the seat, the
instructor places both legs out the window, and, with one hand on each of the seat backs
closest to the window, lifts his/her body onto the base of the window. While sitting on the
base of the window, the instructor turns his/her body at a slight angle to the bus and twists the
upper body to change grip on the seat backs or uses the base of the window for support while
turning the body. Now, the front, midsection of the body should be resting on the base of the
window. With the stomach or pelvis portion supporting the body, the instructor grasps the
base of the window with both hands and lowers onto the ground. Once instructors are shown
how to accomplish this, it can be done quickly, and once students have observed this exit

45
being used, they are much more likely to think of it and use it if needed in an actual
emergency situation.
Students should not physically utilize these exits when conducting emergency evacuation
drills. Verbal instructions should be given in reference to these exits during emergency
evacuation drills, so as to inform students of the exit locations, how the exits are opened and
the proper way to evacuate the vehicle utilizing this type exit. Evacuation drills should
demonstrate the different positions, which a vehicle may come to rest, such as on its side or
top, and how these exits should be utilized in each instance.
Emergency Roof Exit: This vehicle is equipped with two (2) roof exits. These exits are
located in the center of the bus over the aisle. One is located two feet nine inches (2 ft. 9 in.)
from the rear of the bus and five feet three inches (5 ft. 3 in.) from the front of the bus. The
distance between the two roof exits is twelve feet four inches (12 ft. 4 in.). These exits are
located five feet (5 ft.) from the seat cushion, three feet one inch (3 ft. 1 in.) from the top of
the seat back and six feet four inches (6 ft. 4 in.) from the floor of the bus. These exits are
located two feet ten inches (2 ft. 10 in.) from the side of the bus. These exits measure two
feet ten inches (2 ft. 10 in.) by two feet ten inches (2 ft. 10 in.). With the bus in an upright
position, this exit opens upward and back where it will remain in an open position,
completely clearing the exit.
The emergency roof exits should most often be utilized when a bus comes to rest on its side
or under circumstances where the vehicle comes to rest upright in a ravine or a body of water.
A bus which comes to rest on its side allows a person exiting through the top of the bus to be
relatively close to the ground, provided they exit arms and head first, and pull the remainder
of their body clear of the vehicle. Verbal instructions should be given explaining how this is
done.
When a bus comes to rest in an upright position in a ravine or body of water, this situation
provides the greatest possibility for only the extreme top of the vehicle being clear of
obstacles or not submerged. When this occurs and all other exits are obscured and
evacuation necessitates the use of the roof exits with the bus in an upright position, the
following should be taken into consideration:
1. The height of the exit from the floor of the bus, the seat cushion and the seat back
closest to the exit.
2. How much assistance will be needed to help passengers access the exit.
3. Once an individual has exited the bus, what type of obstacles will they face en route
to safety, such as water, high banks or high ground clearance.
Accessing these exits may require individuals to step into the seat closest to the exit, reach
upward, grip the rim of the exit, step onto the upper most part of the seat back, and then pull
with their arms while pushing with their legs to climb through the exit onto the top of the bus.
Demonstrations should be given showing students how to accomplish this assisted and
unassisted.
46
Smaller students who may require assistance should be shown what to expect in an
emergency. They should be shown how someone inside the vehicle might lift them to gain
access to and through the exit.
Because of the danger that may exist outside the vehicle, drivers may be required to position
themselves on the roof of the vehicle prior to evacuating any students. In the event this
becomes necessary and the driver has no assistant, an older responsible student should be
appointed to help if one is available. If not, the driver may be forced to re-enter the vehicle
several times during an evacuation. During evacuation drills where there is a possibility that
a student may be needed to assist a driver, several students should be shown what their duties
would be in the event of an actual emergency. In this situation students should be shown
how to climb onto the seat themselves so someone might reach them from the roof of the
vehicle.
During emergency evacuation drills students should not use the roof exits. School district
officials and/or bus drivers should conduct demonstrations.
Aisle Clearance: The aisle clearance of this type vehicle is one foot one inch (1 ft. 1 in.) in
width.
G. 1990 Thomas Rear Engine Transit School Bus - 72 Passenger:
Front Service Entrance/Exit: The passenger service entrance/exit door is located to the
extreme right front of the bus. This door can be easily opened by pulling the door handle
back and pushing it to the right. The door handle is located near the dash to the right of the
driver. The door opening is eighteen inches (18 in.) wide and eighty-four inches (84 in.)
high. It is located fourteen inches (14 in.) from the outside ground level. Upon entry, there
are three (3) steps, each of which are nine inches (9 in.) high which lead up to the floor level
of the vehicle. There is a handrail located inside the doorway to assist passengers in safely
entering and exiting the bus.
Side Emergency Door: There is one (1) side emergency door located on this vehicle. It is
located on the driver’s side of the vehicle and measures twenty-four inches (24 in.) in width,
forty-nine inches (49 in.) in height and is forty-six inches (46 in.) from outside ground level.
To use this exit, children should sit in the doorway, legs outside the bus and palms facing
downward, and then push out and away from the bus.
Emergency Roof Exit: This vehicle is equipped with two (2) roof exits. The exits are located
in the center over the aisle. One is located seven feet nine inches (7 ft. 9 in.) from the front of
the bus. The other is located five feet seven inches (5 ft. 7 in.) from the rear of the bus. The
distance between the two exits is seventeen feet (17 ft.). These exit openings measure
twenty-two inches (22 in.) from side to side and twenty-three inches (23 in.) from front to
back. With the bus in an upright position, these exits will open upward and back, where they
will remain in an open position, completely clearing the exit.
Side Emergency Exit Windows: There are four (4) side emergency windows located on this
vehicle. The driver’s side location is the sixth (6th) and tenth (10th) window from the front
47
excluding the driver’s window. The passenger’s side location is the second (2nd) and eight
(8th) window from the front. The windows measure twenty-four inches (24 in.) in width,
twenty inches (20 in.) in height, and are seventy-six (76 in.) from the outside ground level.
These windows open horizontally to the vehicle and are hinged at the top with the opening
mechanism located at the bottom of the window. These windows are located directly in line
with the passenger seating. The distance from the side of the bus to the roof exit is thirty-four
inches (34 in.). From the emergency window, the opposite seat leg is fifty-four inches (54
in.).
Due to the dimensions of the emergency exit windows and their height from ground level, a
responsible person should demonstrate using these exits during an emergency evacuation
drill. Students should not be required to use these exits during an evacuation drill. The
instructor can accomplish this by standing between the seats directly in front of the
emergency window exit, grasping the release handle of the window, pulling upward on the
handle, then pushing outward on the window to assure it opens freely. The instructor then
steps onto the seat cushion of the seat in line with the emergency exit window, turns toward
the front of the bus and sits on the back of the seat. While sitting on the back of the seat, the
instructor places both legs out the window, and, with one hand on each of the seat backs
closest to the window, lifts his/her body onto the base of the window. While sitting on the
base of the window, the instructor turns his/her body at a slight angle to the bus and twists the
upper body to change grip on the seat backs or uses the base of the window for support while
turning the body. Now, the front, midsection of the body should be resting on the base of the
window. With the stomach or pelvis portion supporting the body, the instructor grasps the
base of the window with both hands and lowers onto the ground. Once instructors are shown
how to accomplish this, it can be done quickly, and once students have observed this exit
being used, they are much more likely to think of it and use it if needed in an actual
emergency situation.
Students should not physically utilize these exits when conducting emergency evacuation
drills. Verbal instructions should be given in reference to these exits during emergency
evacuation drills, so as to inform students of the exit locations, how the exits are opened and
the proper way to evacuate the vehicle utilizing this type exit. Evacuation drills should
demonstrate the different positions, which a vehicle may come to rest, such as on its side or
top, and how these exits should be utilized in each instance.
Other Inside Measurements: Width of bus is seven feet seven inches (7 ft. 7 in.); from the
floor to the roof is six feet one inch (6 ft. 1 in.); and the aisle clearance inside this vehicle is
twelve and one-half inches (12.5 in.).
H. 1988 International Conventional School Bus - 60 & 66 Passenger:
Front Service Entrance/Exit: The passenger service entrance/exit door is located to the
extreme right front of the bus. This door can be easily opened by pulling the door handle
back and pushing it to the right. The door handle is located near the dash to the right of the
driver. The door opening is two feet (2 ft.) wide and six feet six inches (6 ft. 6 in.) in height.
The entrance/exit door is located approximately eleven inches (11 in.) from the outside
ground level and upon entry there are two steps, each of which are twelve (12 in.) inches high
48
which lead up to the floor level of the vehicle. There is a handrail located inside the doorway
to assist passengers in safely entering and exiting the bus.
The front entrance/exit door, even though not actually classified as an emergency exit, should
always be utilized during an actual emergency or when conducting emergency evacuation
drills where circumstances would allow exiting from the front of the vehicle. This exit is
easier to access, has a larger clearance area and is lower to the ground than the other
emergency exits. In the event the bus driver is incapacitated, several students who ride the
bus should be given training on how to exit this door in an orderly manner during an
emergency situation. Evacuation drills should also be conducted using this exit in
conjunction with other emergency exits, having some students use the front exit while other
students use various emergency exits, depending on the type of emergency situation depicted
for the drill and their seating location on the bus.
Side Emergency Exit: This vehicle is not equipped with side emergency doors or windows.
Rear Emergency Exit: This vehicle has one (1) rear emergency exit. This exit is located at
the rear of the bus in the center. This exit measures thirty-seven inches (37 in.) in width and
fifty three inches (53 in.) in height. This exit is located three feet four inches (3 ft. 4 in.) from
the outside ground level. This emergency door opens outward and to the side. There is no
locking device to hold the door in an open position.
To utilize this exit in an emergency situation, with the vehicle in an upright position, a child
should sit on the floor in the doorway and push themselves outward and away from the bus
with their palms facing downward. This procedure should be followed at all times whether
the child is being assisted or unassisted to reduce the possibility of injury. This procedure,
when performed properly, can be executed in a timely manner and will provide a safe escape
route in an emergency situation when the rear door can be used.
I. 1988 International Conventional School Bus - 54 Passenger:
Front Service Entrance/Exit: Passenger service entrance/exit door is located to the extreme
right front of the bus. This door can be easily opened by pulling the door handle back and
pushing it to the right. The door handle is located near the dash to the right of the driver.
The door opening is two feet (2 ft.) wide and six feet six inches (6 ft. 6 in.) in height. The
entrance/exit door is located approximately twelve inches (12 in.) from the outside ground
level and upon entry there are two (2) steps, each of which are twelve inches (12 in.) in height
which lead up to the floor level of the vehicle. There is a handrail located inside the doorway
to assist passengers in safely entering and exiting the bus.
The front entrance/exit door, even though not actually classified as an emergency exit, should
always be utilized during an actual emergency or when conducting emergency evacuation
drills where circumstances would allow exiting from the front of the vehicle. This exit is
easier to access, has a larger clearance area and is lower to the ground than the other
emergency exits. In the event the bus driver is incapacitated, several students who ride the
bus should be given training on how to exit this door in an orderly manner during an
emergency situation. Evacuation drills should also be conducted using this exit in

49
conjunction with other emergency exits, having some students use the front exit while other
students use various emergency exits, depending on the type of emergency situation being
depicted for the drill and their seating location on the bus.
Side Emergency Exits: This vehicle is not equipped with side emergency doors or windows.
Rear Emergency Exit: Vehicle has one (1) rear emergency exit. This exit is located at the
rear of the bus in the center. This exit measures two feet eleven inches (2 ft. 11 in.) in width
and four feet five inches (4 ft. 5 in.) in height. This exit is located three feet five inches (3 ft.
5 in.) from the outside ground level. This emergency door opens outward and to the side.
There is no locking device to hold the door in an open position.
To utilize this exit in an emergency situation, with the vehicle in an upright position, a child
should sit on the floor in the doorway and push themselves outward and away from the bus
with their palm facing downward. This procedure should be followed at all times, whether
the child is being assisted or unassisted, to reduce the possibility of injury. This procedure,
when performed properly, can be executed in a timely manner and will provide a safe escape
route in an emergency situation when the rear door can be used.
Aisle Clearance: The aisle clearance of this type vehicle is one foot one inch (1 ft. 1 in.) in
width.

50
J. 1985 International Conventional School Bus - 16 Passenger:
Front Service Entrance/Exit: The passenger service entrance/exit door is located to the
extreme right front of the bus. This door can be easily opened by pulling the door handle
back and pushing it to the right. The door handle is located near the dash and to the right of
the driver. The door opening is two feet (2 ft.) wide and six feet ten inches (6 ft. 10 in.) high.
The entrance/exit door is located thirteen inches (13 in.) from the outside ground level. Upon
entry of this door, there are two (2) steps, each of which are twelve (12 in.) inches high and
lead up to the floor level of the vehicle. There is a handrail located inside the doorway to
assist passengers in safely entering and exiting the bus.
The front entrance/exit door, even though not actually classified as an emergency exit, should
always be utilized during an actual emergency, or when conducting emergency evacuation
drills where circumstances would allow exiting from the front of the vehicle. This exit is
easier to access, has a larger clearance area and is lower to the ground than the other
emergency exits. In the event the bus driver is incapacitated, capable students that ride the
bus should be trained on how to open the service entrance. If this exit has to be utilized in an
emergency situation, an aide should assist the passengers in exiting the bus. Evacuation drills
should also be conducted using this exit in conjunction with other emergency exits, having
some students use the front exit while other students use various emergency exits, depending
on the type of emergency situation being depicted for the drill and their seating location on
the bus.
Rear Emergency Exit: This vehicle has one (1) rear emergency exit. The exit is located at the
rear of the bus in the center. This exit measures thirty-five inches (35 in.) in width and four
feet five inches (4 ft. 5 in.) in height. This exit is located thirty-nine inches (39 in.) from the
outside ground level. This door is not equipped with a locking device to hold the door in an
open position.
To utilize this exit in an emergency situation, the bus driver or aide should be inside the bus
and the other outside the bus to assist passengers in safely exiting the vehicle. This procedure
should be followed at all times when utilizing this exit.
Side Emergency Exit: This vehicle is not equipped with side emergency windows or doors
other than the lift door.
Lift Door: THIS DOOR SHOULD NOT BE USED FOR EMERGENCY
EVACUATION PURPOSES. OPENING THE DOOR AND OPERATING THE LIFT
WOULD WASTE PRECIOUS TIME AND COULD PROVE DISASTROUS.
Passengers who would normally require the lift should be evacuated through any of the other
available exits.
K. 1983 International and 1985 Ford Conventional School Bus - 60 Passenger:
Front Service Entrance/Exit: The passenger service entrance/exit door is located to the
extreme right front of the bus. This door can be easily opened by pulling the door handle
51
back and pushing it to the right. The door handle is located near the dash to the right of the
driver. The door opening is two feet four inches (2 ft. 4 in.) wide and six feet seven inches (6
ft. 7 in.) high. The entrance/exit door on the 1983 International is located eleven inches (11
in.) from the outside ground level. The entrance/exit door on the 1985 Ford is located
fourteen inches (14 in.) from the outside ground level. Upon entry there are two (2) steps,
each of which are twelve (12) inches high which lead up to the floor level of the vehicle.
There is a handrail located inside the doorway to assist passengers in safely entering and
exiting the bus.
The front entrance/exit door, even though not actually classified as an emergency exit, should
always be utilized during an actual emergency or when conducting emergency evacuation
drills where circumstances would allow exiting from the front of the vehicle. This exit is
easier to access, has a larger clearance area and is lower to the ground than the other
emergency exits. In the event the bus driver is incapacitated, several students who ride the
bus should be given training on how to open the service entrance. Students, large or small,
being familiar with the use of this exit may leave the vehicle very quickly in an upright,
walking position. Students should be shown how to exit this door in an orderly manner
during an emergency situation. Evacuation drills should also be conducted using this exit in
conjunction with other emergency exits, having some students use the front exit while other
students use various emergency exits, depending on the type of emergency situation being
depicted for the drill and their seating location on the bus.
Side Emergency Exits: This vehicle is not equipped with side emergency doors or windows.
Rear Emergency Exit: This vehicle has one (1) rear emergency exit. The exit is located at the
rear of the bus and in the center. This exit measures two feet nine inches (2 ft. 9 in.) wide
and four feet five inches (4 ft. 5 in.) high. This door opens outward and to the side. There is
no locking device to hold the door in an open position. This door is located approximately
three feet six inches (3 ft. 6 in.) from the outside ground level. To utilize this exit in an
emergency situation, children should sit on the floor in the doorway and push themselves
outward and away from the bus with their palms facing downward. This procedure should be
followed at all times whether the child is being assisted or unassisted to reduce the possibility
of injury. This procedure, when performed properly, can be executed in a timely manner and
will provide a safe escape route in an emergency situation when the rear door can be used.
L. Type A Buses
Specific evacuation instructions are not provided for the three Type A school buses in the
State Fleet, but evacuation procedures would be the same as those for similar exits on other
vehicles described in this manual
Dimensions are not provided for the three Type A school buses in the State Fleet.
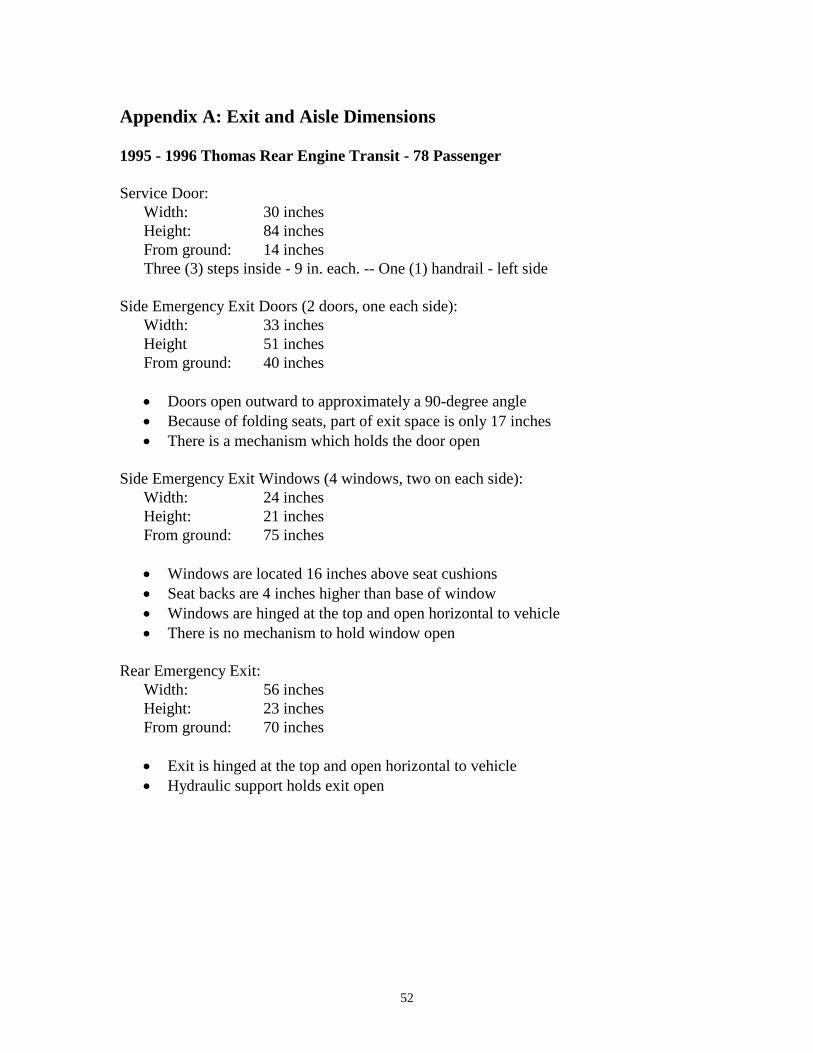
52
Appendix A: Exit and Aisle Dimensions
1995 - 1996 Thomas Rear Engine Transit - 78 Passenger
Service Door:
Width: 30 inches
Height: 84 inches
From ground: 14 inches
Three (3) steps inside - 9 in. each. -- One (1) handrail - left side
Side Emergency Exit Doors (2 doors, one each side):
Width: 33 inches
Height 51 inches
From ground: 40 inches
Doors open outward to approximately a 90-degree angle
Because of folding seats, part of exit space is only 17 inches
There is a mechanism which holds the door open
Side Emergency Exit Windows (4 windows, two on each side):
Width: 24 inches
Height: 21 inches
From ground: 75 inches
Windows are located 16 inches above seat cushions
Seat backs are 4 inches higher than base of window
Windows are hinged at the top and open horizontal to vehicle
There is no mechanism to hold window open
Rear Emergency Exit:
Width: 56 inches
Height: 23 inches
From ground: 70 inches
Exit is hinged at the top and open horizontal to vehicle
Hydraulic support holds exit open
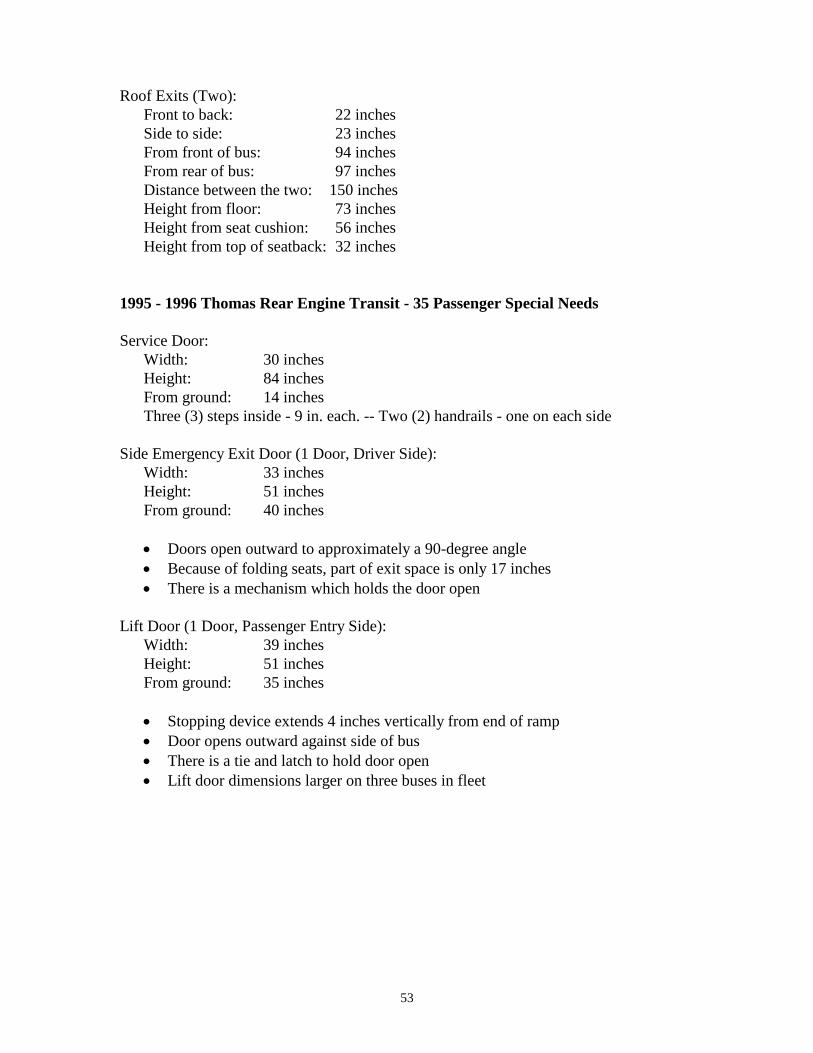
53
Roof Exits (Two):
Front to back: 22 inches
Side to side: 23 inches
From front of bus: 94 inches
From rear of bus: 97 inches
Distance between the two: 150 inches
Height from floor: 73 inches
Height from seat cushion: 56 inches
Height from top of seatback: 32 inches
1995 - 1996 Thomas Rear Engine Transit - 35 Passenger Special Needs
Service Door:
Width: 30 inches
Height: 84 inches
From ground: 14 inches
Three (3) steps inside - 9 in. each. -- Two (2) handrails - one on each side
Side Emergency Exit Door (1 Door, Driver Side):
Width: 33 inches
Height: 51 inches
From ground: 40 inches
Doors open outward to approximately a 90-degree angle
Because of folding seats, part of exit space is only 17 inches
There is a mechanism which holds the door open
Lift Door (1 Door, Passenger Entry Side):
Width: 39 inches
Height: 51 inches
From ground: 35 inches
Stopping device extends 4 inches vertically from end of ramp
Door opens outward against side of bus
There is a tie and latch to hold door open
Lift door dimensions larger on three buses in fleet
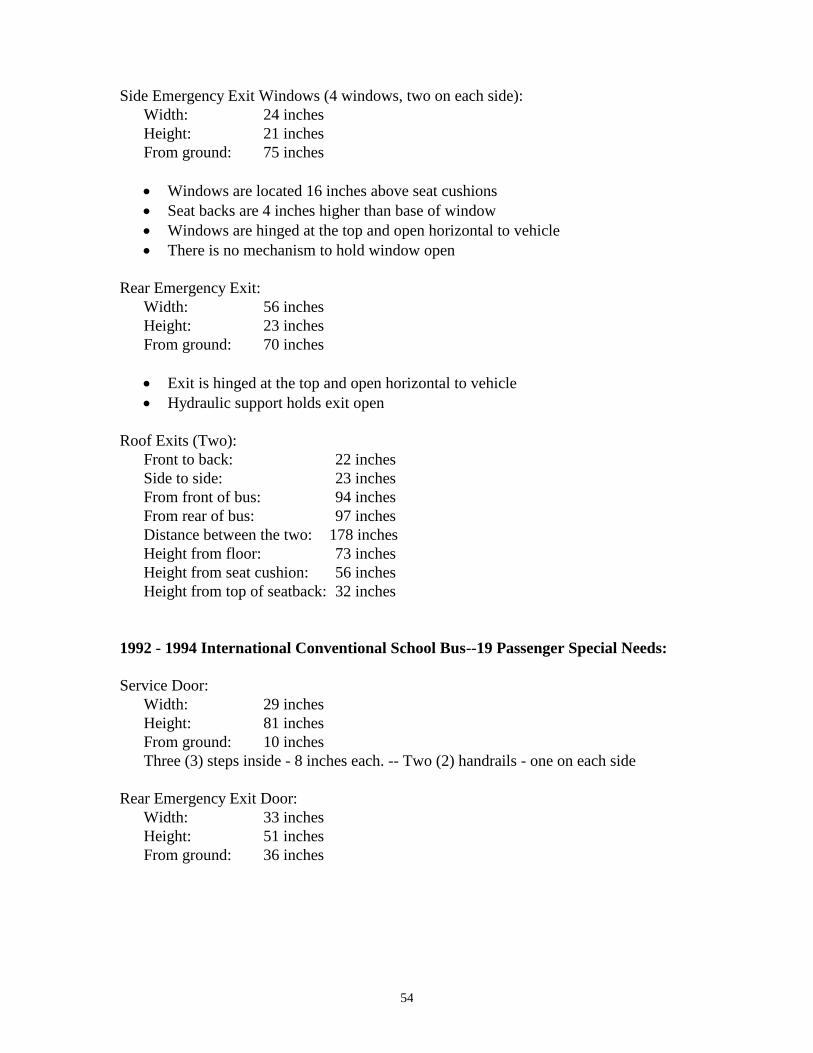
54
Side Emergency Exit Windows (4 windows, two on each side):
Width: 24 inches
Height: 21 inches
From ground: 75 inches
Windows are located 16 inches above seat cushions
Seat backs are 4 inches higher than base of window
Windows are hinged at the top and open horizontal to vehicle
There is no mechanism to hold window open
Rear Emergency Exit:
Width: 56 inches
Height: 23 inches
From ground: 70 inches
Exit is hinged at the top and open horizontal to vehicle
Hydraulic support holds exit open
Roof Exits (Two):
Front to back: 22 inches
Side to side: 23 inches
From front of bus: 94 inches
From rear of bus: 97 inches
Distance between the two: 178 inches
Height from floor: 73 inches
Height from seat cushion: 56 inches
Height from top of seatback: 32 inches
1992 - 1994 International Conventional School Bus--19 Passenger Special Needs:
Service Door:
Width: 29 inches
Height: 81 inches
From ground: 10 inches
Three (3) steps inside - 8 inches each. -- Two (2) handrails - one on each side
Rear Emergency Exit Door:
Width: 33 inches
Height: 51 inches
From ground: 36 inches
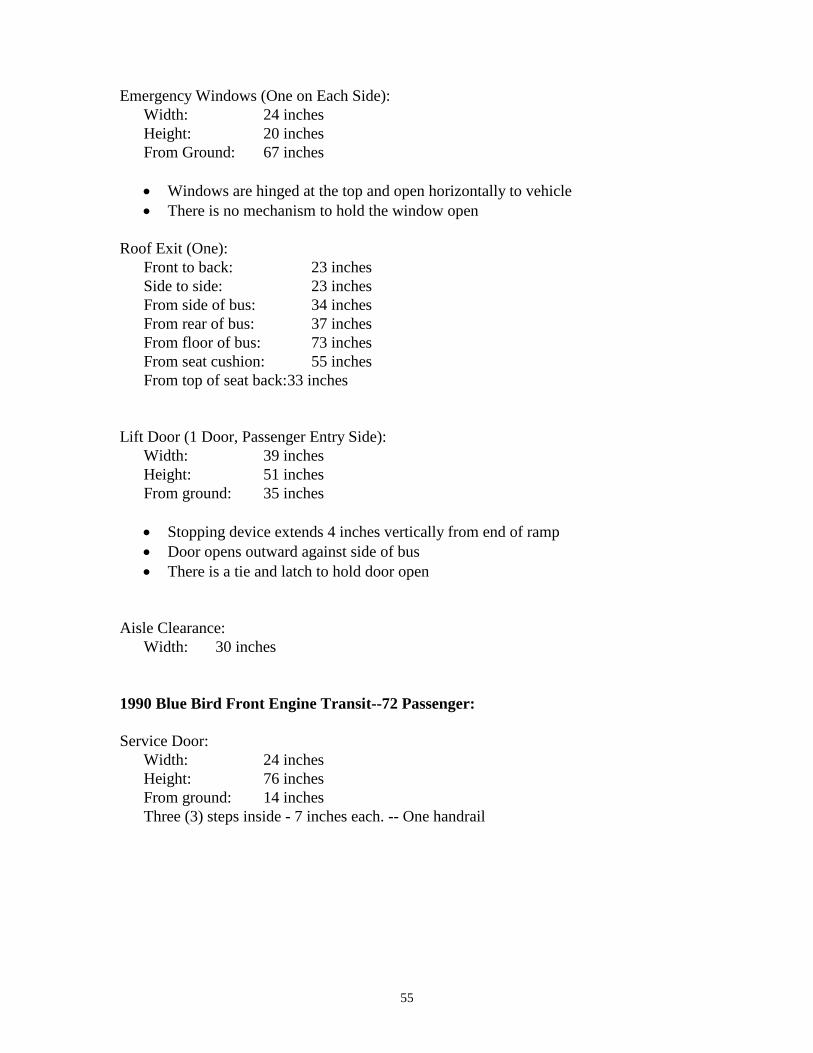
55
Emergency Windows (One on Each Side):
Width: 24 inches
Height: 20 inches
From Ground: 67 inches
Windows are hinged at the top and open horizontally to vehicle
There is no mechanism to hold the window open
Roof Exit (One):
Front to back: 23 inches
Side to side: 23 inches
From side of bus: 34 inches
From rear of bus: 37 inches
From floor of bus: 73 inches
From seat cushion: 55 inches
From top of seat back: 33 inches
Lift Door (1 Door, Passenger Entry Side):
Width: 39 inches
Height: 51 inches
From ground: 35 inches
Stopping device extends 4 inches vertically from end of ramp
Door opens outward against side of bus
There is a tie and latch to hold door open
Aisle Clearance:
Width: 30 inches
1990 Blue Bird Front Engine Transit--72 Passenger:
Service Door:
Width: 24 inches
Height: 76 inches
From ground: 14 inches
Three (3) steps inside - 7 inches each. -- One handrail
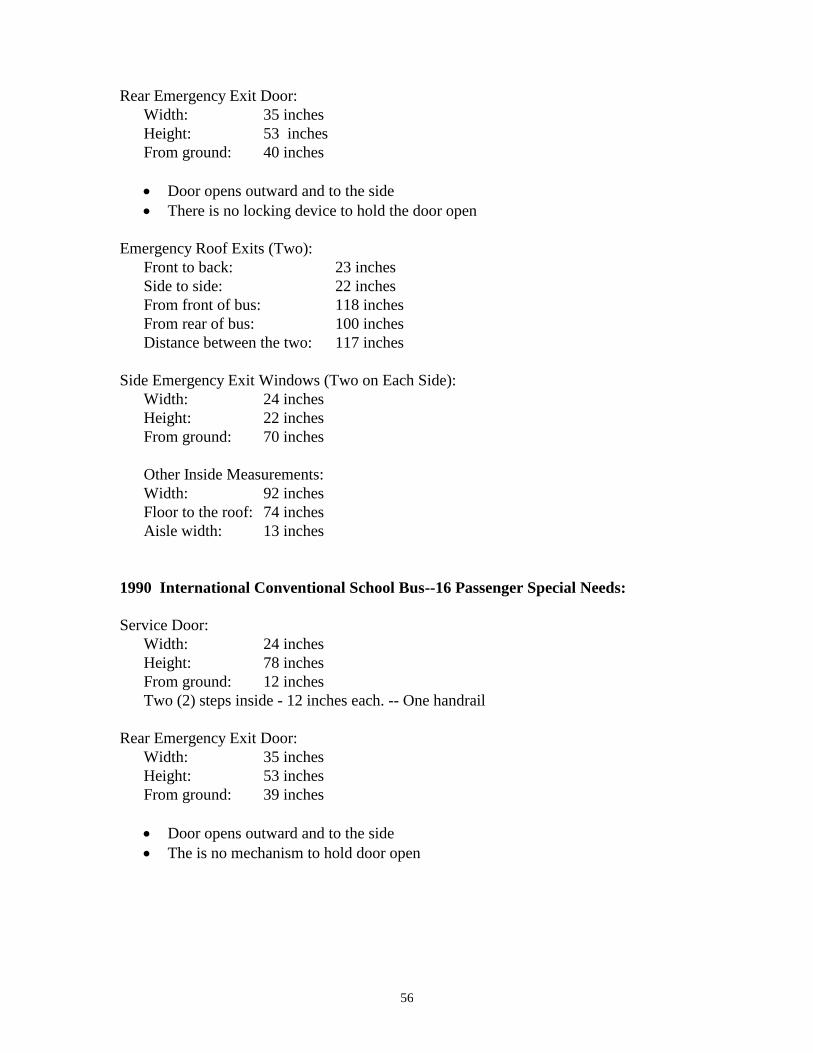
56
Rear Emergency Exit Door:
Width: 35 inches
Height: 53 inches
From ground: 40 inches
Door opens outward and to the side
There is no locking device to hold the door open
Emergency Roof Exits (Two):
Front to back: 23 inches
Side to side: 22 inches
From front of bus: 118 inches
From rear of bus: 100 inches
Distance between the two: 117 inches
Side Emergency Exit Windows (Two on Each Side):
Width: 24 inches
Height: 22 inches
From ground: 70 inches
Other Inside Measurements:
Width: 92 inches
Floor to the roof: 74 inches
Aisle width: 13 inches
1990 International Conventional School Bus--16 Passenger Special Needs:
Service Door:
Width: 24 inches
Height: 78 inches
From ground: 12 inches
Two (2) steps inside - 12 inches each. -- One handrail
Rear Emergency Exit Door:
Width: 35 inches
Height: 53 inches
From ground: 39 inches
Door opens outward and to the side
The is no mechanism to hold door open
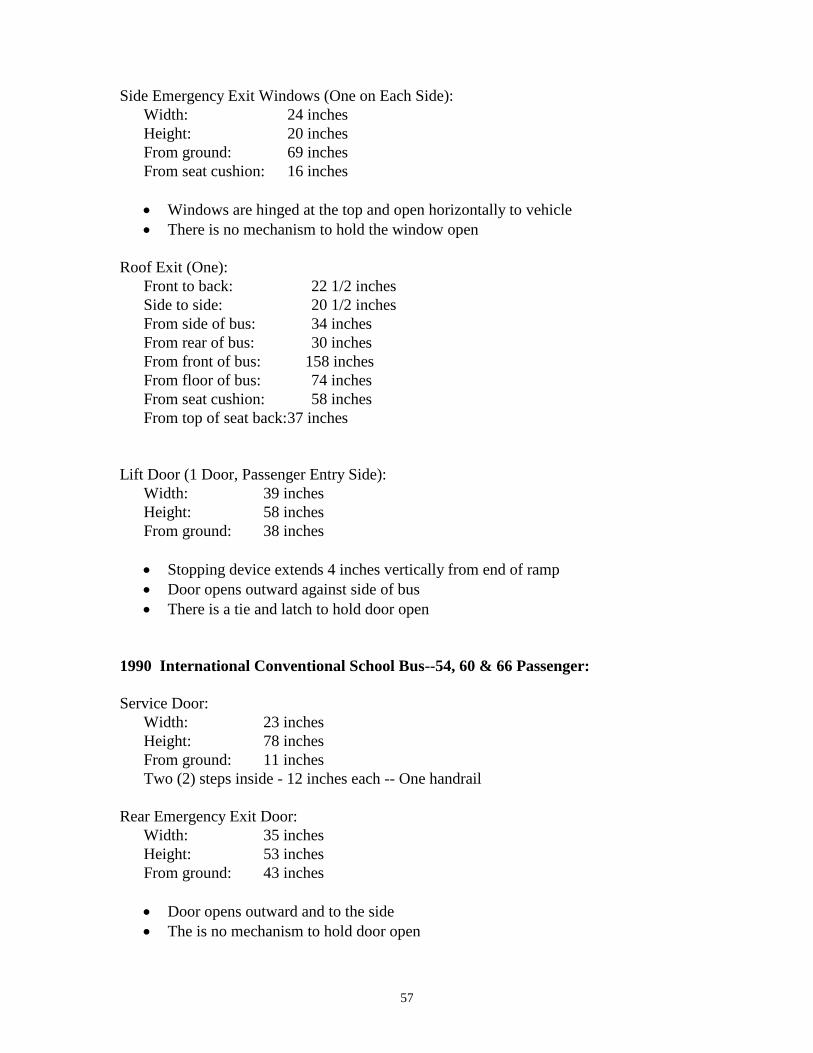
57
Side Emergency Exit Windows (One on Each Side):
Width: 24 inches
Height: 20 inches
From ground: 69 inches
From seat cushion: 16 inches
Windows are hinged at the top and open horizontally to vehicle
There is no mechanism to hold the window open
Roof Exit (One):
Front to back: 22 1/2 inches
Side to side: 20 1/2 inches
From side of bus: 34 inches
From rear of bus: 30 inches
From front of bus: 158 inches
From floor of bus: 74 inches
From seat cushion: 58 inches
From top of seat back: 37 inches
Lift Door (1 Door, Passenger Entry Side):
Width: 39 inches
Height: 58 inches
From ground: 38 inches
Stopping device extends 4 inches vertically from end of ramp
Door opens outward against side of bus
There is a tie and latch to hold door open
1990 International Conventional School Bus--54, 60 & 66 Passenger:
Service Door:
Width: 23 inches
Height: 78 inches
From ground: 11 inches
Two (2) steps inside - 12 inches each -- One handrail
Rear Emergency Exit Door:
Width: 35 inches
Height: 53 inches
From ground: 43 inches
Door opens outward and to the side
The is no mechanism to hold door open
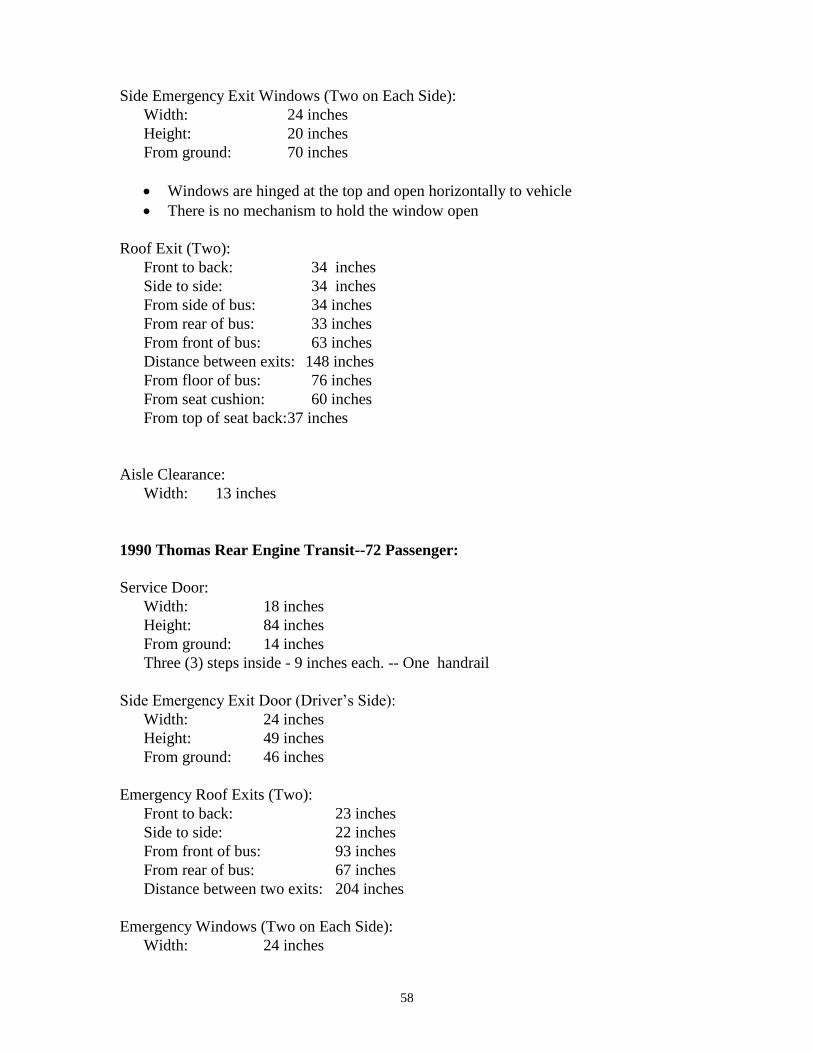
58
Side Emergency Exit Windows (Two on Each Side):
Width: 24 inches
Height: 20 inches
From ground: 70 inches
Windows are hinged at the top and open horizontally to vehicle
There is no mechanism to hold the window open
Roof Exit (Two):
Front to back: 34 inches
Side to side: 34 inches
From side of bus: 34 inches
From rear of bus: 33 inches
From front of bus: 63 inches
Distance between exits: 148 inches
From floor of bus: 76 inches
From seat cushion: 60 inches
From top of seat back: 37 inches
Aisle Clearance:
Width: 13 inches
1990 Thomas Rear Engine Transit--72 Passenger:
Service Door:
Width: 18 inches
Height: 84 inches
From ground: 14 inches
Three (3) steps inside - 9 inches each. -- One handrail
Side Emergency Exit Door (Driver’s Side):
Width: 24 inches
Height: 49 inches
From ground: 46 inches
Emergency Roof Exits (Two):
Front to back: 23 inches
Side to side: 22 inches
From front of bus: 93 inches
From rear of bus: 67 inches
Distance between two exits: 204 inches
Emergency Windows (Two on Each Side):
Width: 24 inches
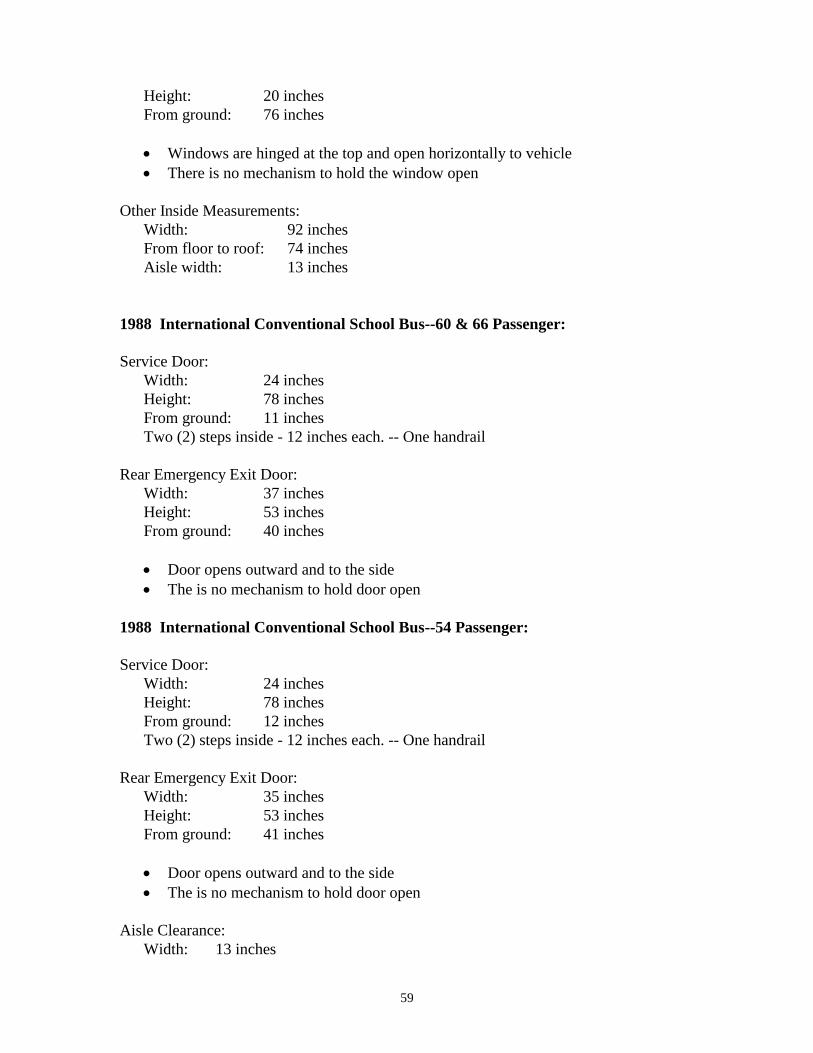
59
Height: 20 inches
From ground: 76 inches
Windows are hinged at the top and open horizontally to vehicle
There is no mechanism to hold the window open
Other Inside Measurements:
Width: 92 inches
From floor to roof: 74 inches
Aisle width: 13 inches
1988 International Conventional School Bus--60 & 66 Passenger:
Service Door:
Width: 24 inches
Height: 78 inches
From ground: 11 inches
Two (2) steps inside - 12 inches each. -- One handrail
Rear Emergency Exit Door:
Width: 37 inches
Height: 53 inches
From ground: 40 inches
Door opens outward and to the side
The is no mechanism to hold door open
1988 International Conventional School Bus--54 Passenger:
Service Door:
Width: 24 inches
Height: 78 inches
From ground: 12 inches
Two (2) steps inside - 12 inches each. -- One handrail
Rear Emergency Exit Door:
Width: 35 inches
Height: 53 inches
From ground: 41 inches
Door opens outward and to the side
The is no mechanism to hold door open
Aisle Clearance:
Width: 13 inches
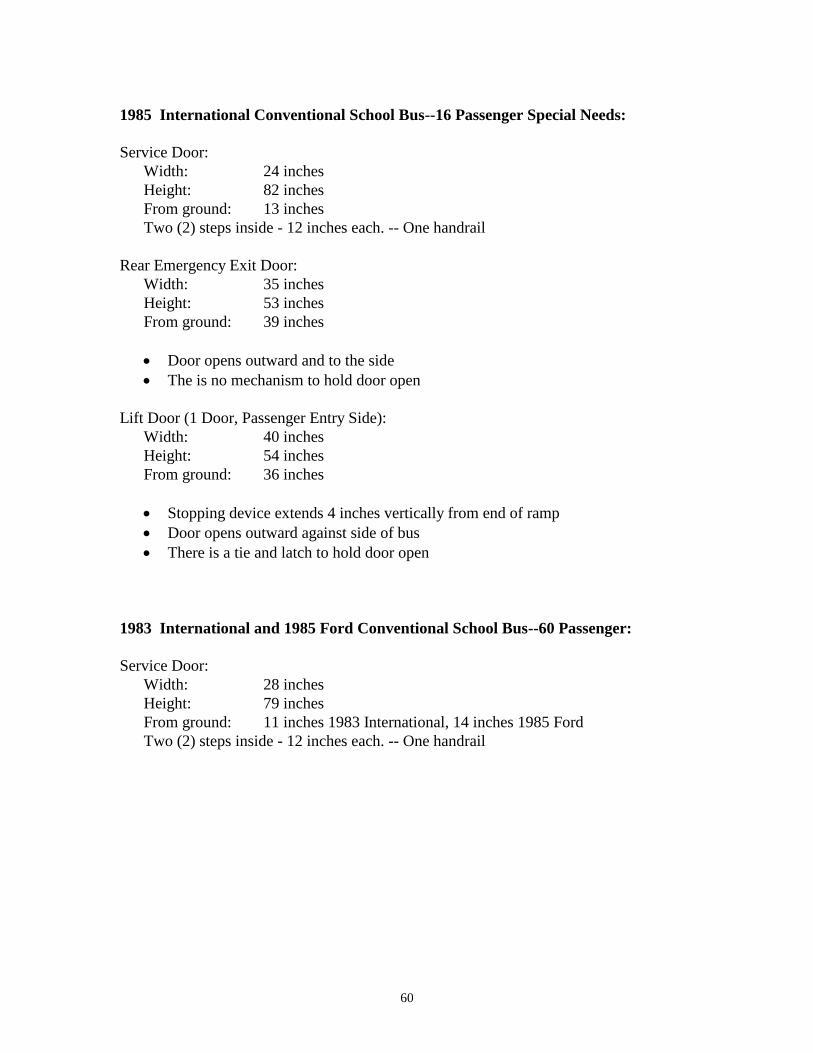
60
1985 International Conventional School Bus--16 Passenger Special Needs:
Service Door:
Width: 24 inches
Height: 82 inches
From ground: 13 inches
Two (2) steps inside - 12 inches each. -- One handrail
Rear Emergency Exit Door:
Width: 35 inches
Height: 53 inches
From ground: 39 inches
Door opens outward and to the side
The is no mechanism to hold door open
Lift Door (1 Door, Passenger Entry Side):
Width: 40 inches
Height: 54 inches
From ground: 36 inches
Stopping device extends 4 inches vertically from end of ramp
Door opens outward against side of bus
There is a tie and latch to hold door open
1983 International and 1985 Ford Conventional School Bus--60 Passenger:
Service Door:
Width: 28 inches
Height: 79 inches
From ground: 11 inches 1983 International, 14 inches 1985 Ford
Two (2) steps inside - 12 inches each. -- One handrail

61
Rear Emergency Exit Door:
Width: 33 inches
Height: 53 inches
From ground: 39 inches
Door opens outward and to the side
The is no mechanism to hold door open
Type A Buses:
Dimensions are not provided for the three Type A buses in the state fleet.
F:\USERS\TRN\SAFETY\EVACUATI\Evacuation Manual.doc