Embed Size (px)
Citation preview

®
Scholastic
Reading Inventory™
Installation Guide
For use with SRI v1.8.1 and SAM v1.8.1
Copyright © 2009 by Scholastic Inc. All rights reserved. Published by Scholastic Inc.
PDF0018 (PDF)
SCHOLASTIC, SYSTEM 44, SCHOLASTIC PHONICS INVENTORY, SCHOLASTIC ACHIEVEMENT MANAGER, SCHOLASTIC READING COUNTS!, SCHOLASTIC READING INVENTORY, READ 180,
and associated logos and designs are trademarks and/or registered trademarks of Scholastic Inc. LEXILE and LEXILE FRAMEWORK are registered trademarks of MetaMetrics, Inc. Other company names, brand names, and product names are the property and/or
trademarks of their respective owners.
Scholastic Reading Inventory™ Installation Guide
SRI v1.8.1 Installation Guide Updated 11.7.08 Table of Contents • 2 TM & © Scholastic Inc. All rights reserved. PDF0018 (PDF)
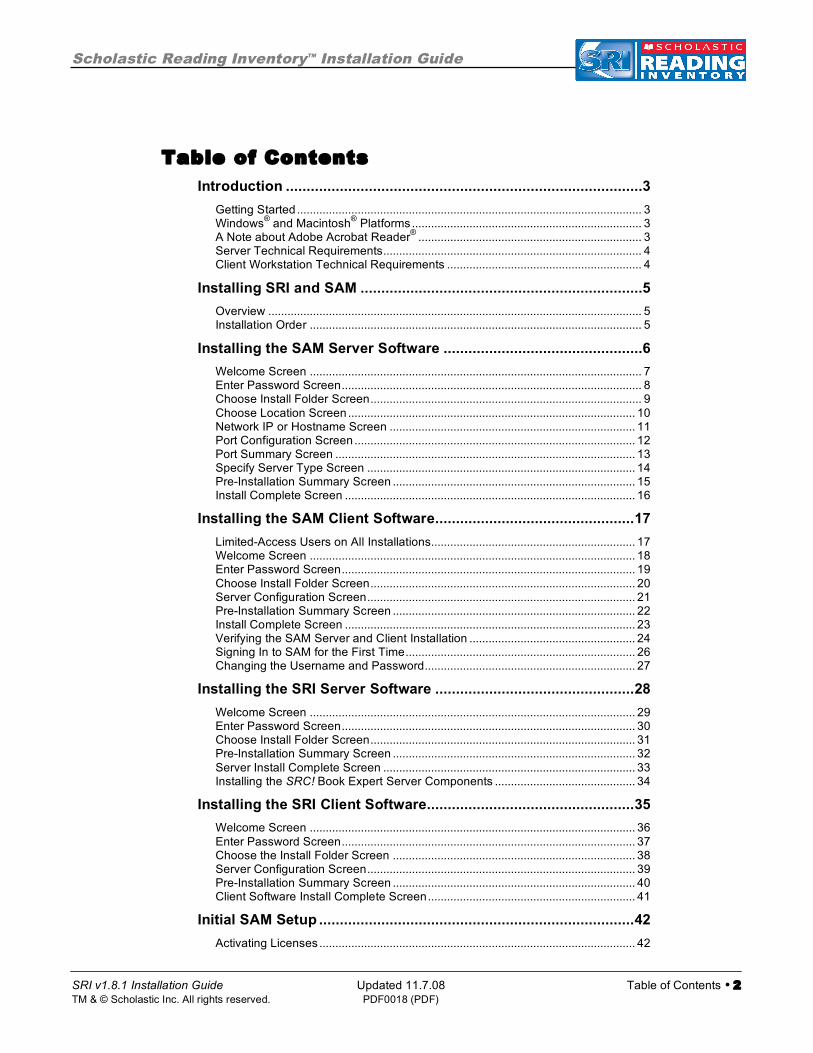
Table of Contents
Introduction ......................................................................................3 Getting Started ............................................................................................................ 3 Windows® and Macintosh® Platforms........................................................................ 3 A Note about Adobe Acrobat Reader® ...................................................................... 3 Server Technical Requirements................................................................................. 4 Client Workstation Technical Requirements ............................................................. 4
Installing SRI and SAM ....................................................................5 Overview ..................................................................................................................... 5 Installation Order ........................................................................................................ 5
Installing the SAM Server Software ................................................6 Welcome Screen ........................................................................................................ 7 Enter Password Screen.............................................................................................. 8 Choose Install Folder Screen..................................................................................... 9 Choose Location Screen.......................................................................................... 10 Network IP or Hostname Screen ............................................................................. 11 Port Configuration Screen........................................................................................ 12 Port Summary Screen .............................................................................................. 13 Specify Server Type Screen .................................................................................... 14 Pre-Installation Summary Screen ............................................................................ 15 Install Complete Screen ........................................................................................... 16
Installing the SAM Client Software................................................17 Limited-Access Users on All Installations................................................................ 17 Welcome Screen ...................................................................................................... 18 Enter Password Screen............................................................................................ 19 Choose Install Folder Screen................................................................................... 20 Server Configuration Screen.................................................................................... 21 Pre-Installation Summary Screen ............................................................................ 22 Install Complete Screen ........................................................................................... 23 Verifying the SAM Server and Client Installation .................................................... 24 Signing In to SAM for the First Time........................................................................ 26 Changing the Username and Password.................................................................. 27
Installing the SRI Server Software ................................................28 Welcome Screen ...................................................................................................... 29 Enter Password Screen............................................................................................ 30 Choose Install Folder Screen................................................................................... 31 Pre-Installation Summary Screen ............................................................................ 32 Server Install Complete Screen ............................................................................... 33 Installing the SRC! Book Expert Server Components ............................................ 34
Installing the SRI Client Software..................................................35 Welcome Screen ...................................................................................................... 36 Enter Password Screen............................................................................................ 37 Choose the Install Folder Screen ............................................................................ 38 Server Configuration Screen.................................................................................... 39 Pre-Installation Summary Screen ............................................................................ 40 Client Software Install Complete Screen................................................................. 41
Initial SAM Setup ............................................................................42 Activating Licenses ................................................................................................... 42
Scholastic Reading Inventory™ Installation Guide
SRI v1.8.1 Installation Guide Updated 11.7.08 Introduction • 3 TM & © Scholastic Inc. All rights reserved. PDF0018 (PDF)
Introduction
Welcome to the Scholastic Reading Inventory Installation Guide. This manual
is a guide to installing the Scholastic Reading Inventory (SRI) and Scholastic
Achievement Manager (SAM) software, as well as to troubleshooting technical
issues that may arise during installation or operation.
Getting Started
Scholastic recommends that these programs be installed by a school or district
Systems Administrator; however, anyone with the following attributes may install
the software:
• Access to computers on which the SRI software will be installed;
• Full network-level Administrator permissions, including permissions that
allow modifying network settings and user privileges. This is controlled
by a network administrator, as determined by school or district IT
policies.
Windows® and Macintosh® Platforms
Installation steps are described and shown on a Macintosh platform. Installation
on Windows platforms is essentially the same and any significant differences are
noted in the text. Windows and Macintosh screens display slightly different button
designs but, unless otherwise noted, all labels are the same.
File folder separators are in Macintosh format, using the forward slash convention.
This has the same significance as the backslash used in Windows operating
systems.
A Note about Adobe Acrobat Reader®
SRI and SAM require Adobe Acrobat Reader to work correctly. Acrobat Reader is
included in the installation package; however, the installation process does not
automatically install it.
Scholastic recommends that classroom computers with Acrobat Reader already
installed use their paid version of the program rather than the version included in
the installation package. Teachers and administrators that need to install Acrobat
Reader should use the Adobe installer enclosed in the support directory on the
System 44™ installation CD.
Scholastic Reading Inventory™ Installation Guide
SRI v1.8.1 Installation Guide Updated 11.7.08 Introduction • 4 TM & © Scholastic Inc. All rights reserved. PDF0018 (PDF)
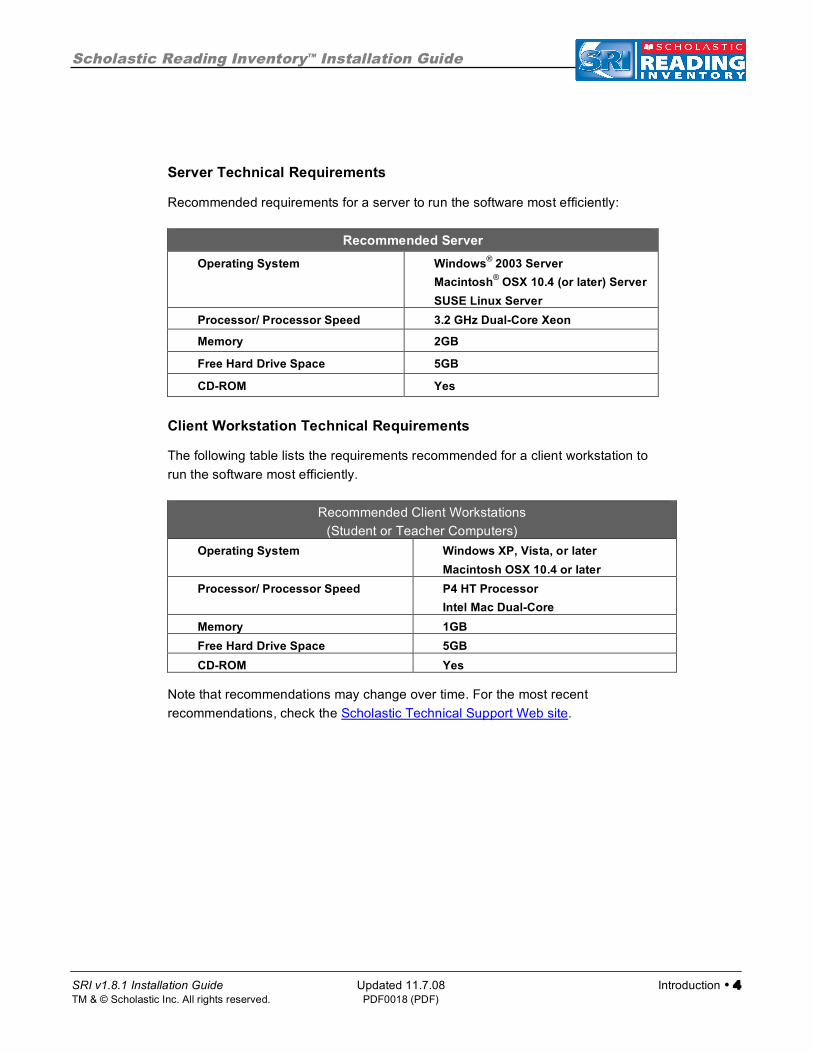
Server Technical Requirements
Recommended requirements for a server to run the software most efficiently:
Recommended Server
Operating System Windows® 2003 Server
Macintosh® OSX 10.4 (or later) Server
SUSE Linux Server
Processor/ Processor Speed 3.2 GHz Dual-Core Xeon
Memory 2GB
Free Hard Drive Space 5GB
CD-ROM Yes
Client Workstation Technical Requirements
The following table lists the requirements recommended for a client workstation to
run the software most efficiently.
Recommended Client Workstations
(Student or Teacher Computers)
Operating System Windows XP, Vista, or later
Macintosh OSX 10.4 or later
Processor/ Processor Speed P4 HT Processor
Intel Mac Dual-Core
Memory 1GB
Free Hard Drive Space 5GB
CD-ROM Yes
Note that recommendations may change over time. For the most recent
recommendations, check the Scholastic Technical Support Web site.
Scholastic Reading Inventory™ Installation Guide
SRI v1.8.1 Installation Guide Updated 11.7.08 Installing SRI and SAM • 5 TM & © Scholastic Inc. All rights reserved. PDF0018 (PDF)
Installing SRI and SAM
Overview
Installing SRI is a multistep process that covers;
• Installing, upgrading, or verifying the SAM Server;
• Installing SRI server components on the network server;
• Installing SRI client software onto workstations;
• Activating student licenses.
SRI version 1.8.1 is compatible only with Scholastic SAM Server v1.8.x or later. If
a previous version of SAM Server is installed, upgrade to v1.8.1 using the
software included in the SRI installation kit. SAM and SRI Server software should
be installed on a computer that is accessible over a network, and the Client
software should be installed separately on student and teacher workstations.
NOTE: SAM v1.8.1, included in the System 44™ installation kit, will not work with
older versions of other Scholastic Enterprise Edition programs, including READ
180®, rSkills®, ReadAbout®, and Fastt Math®. These programs will need to be
upgraded to EE 1.8.1 to work with SAM v1.8.1.
Installation Order
Scholastic strongly recommends performing the installation in the following order:
1. SAM Server: Manages the SAM database and the communication between
server and client computers. It must be installed on the server designated for
all Scholastic software programs.
• If the SAM Server is not installed, install SAM Server v1.8.1.
• If the SAM Server is earlier than v1.8.1, upgrade to SAM Server v1.8.1.
2. SAM Client: The interface that administrators and teachers use when
managing districts, schools, classrooms, and students in the SAM database.
First install the SAM Client on the SAM Server computer, then install on any
other administrator or teacher computer.
3. SRI Server Component: This software stores information for and
communicates with the program client software. Install these components on
the same server where the SAM Server is installed.
4. SRI Client Software: The software with which students interact. This
component must be installed separately on each student workstation.
To set up a SAM Data Aggregation Server, see the SAM Data Movement Guide.
Scholastic Reading Inventory™ Installation Guide
SRI v1.8.1 Installation Guide Updated 11.7.08 SAM Server Installation • 6 TM & © Scholastic Inc. All rights reserved. PDF0018 (PDF)
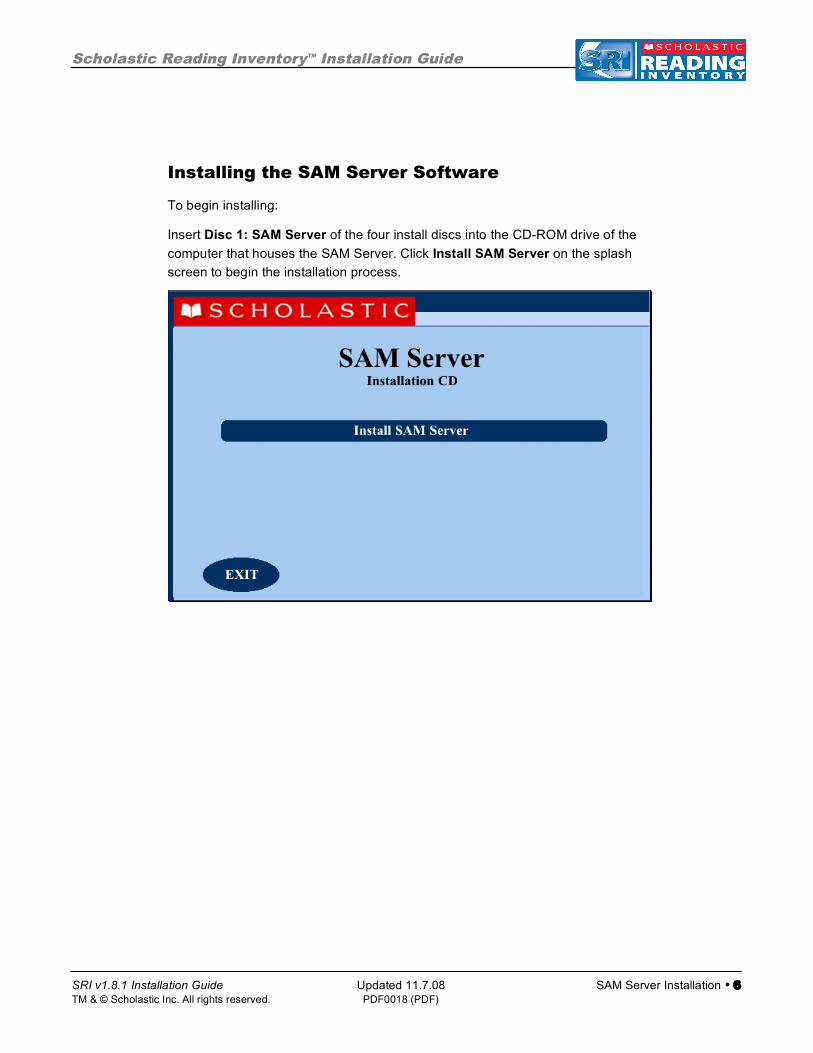
Installing the SAM Server Software
To begin installing:
Insert Disc 1: SAM Server of the four install discs into the CD-ROM drive of the
computer that houses the SAM Server. Click Install SAM Server on the splash
screen to begin the installation process.
Scholastic Reading Inventory™ Installation Guide
SRI v1.8.1 Installation Guide Updated 11.7.08 SAM Server Installation • 7 TM & © Scholastic Inc. All rights reserved. PDF0018 (PDF)
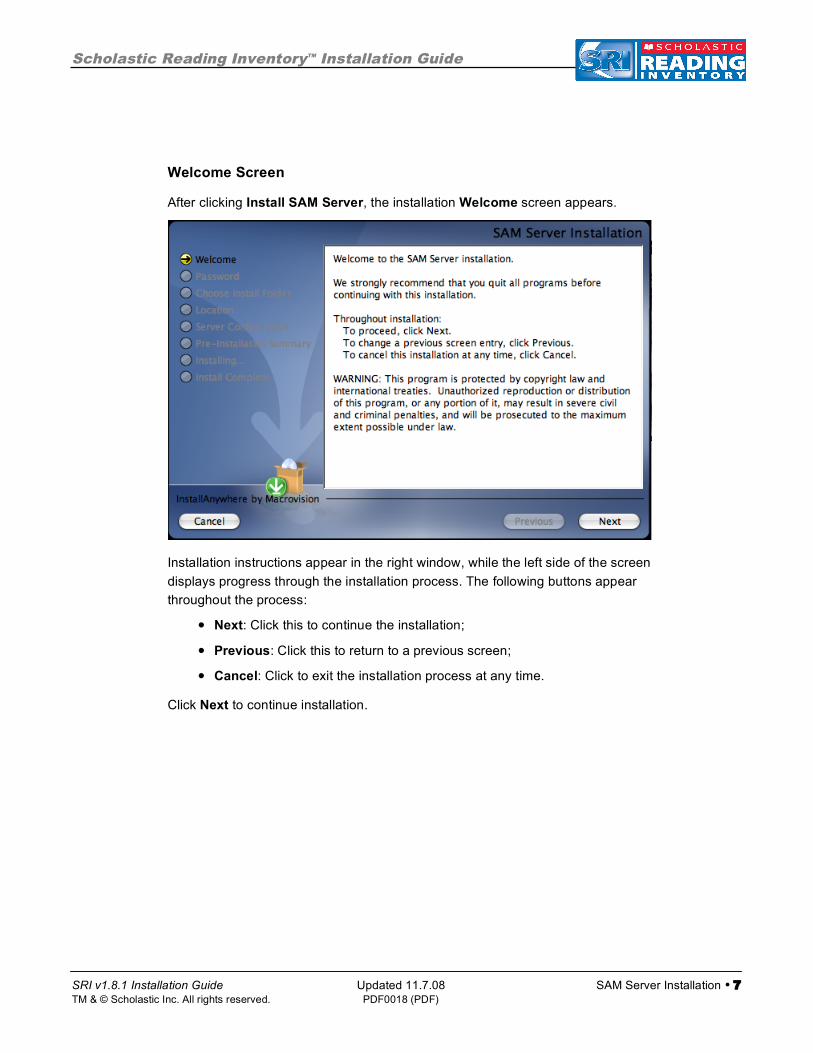
Welcome Screen
After clicking Install SAM Server, the installation Welcome screen appears.
Installation instructions appear in the right window, while the left side of the screen
displays progress through the installation process. The following buttons appear
throughout the process:
• Next: Click this to continue the installation;
• Previous: Click this to return to a previous screen;
• Cancel: Click to exit the installation process at any time.
Click Next to continue installation.
Scholastic Reading Inventory™ Installation Guide
SRI v1.8.1 Installation Guide Updated 11.7.08 SAM Server Installation • 8 TM & © Scholastic Inc. All rights reserved. PDF0018 (PDF)
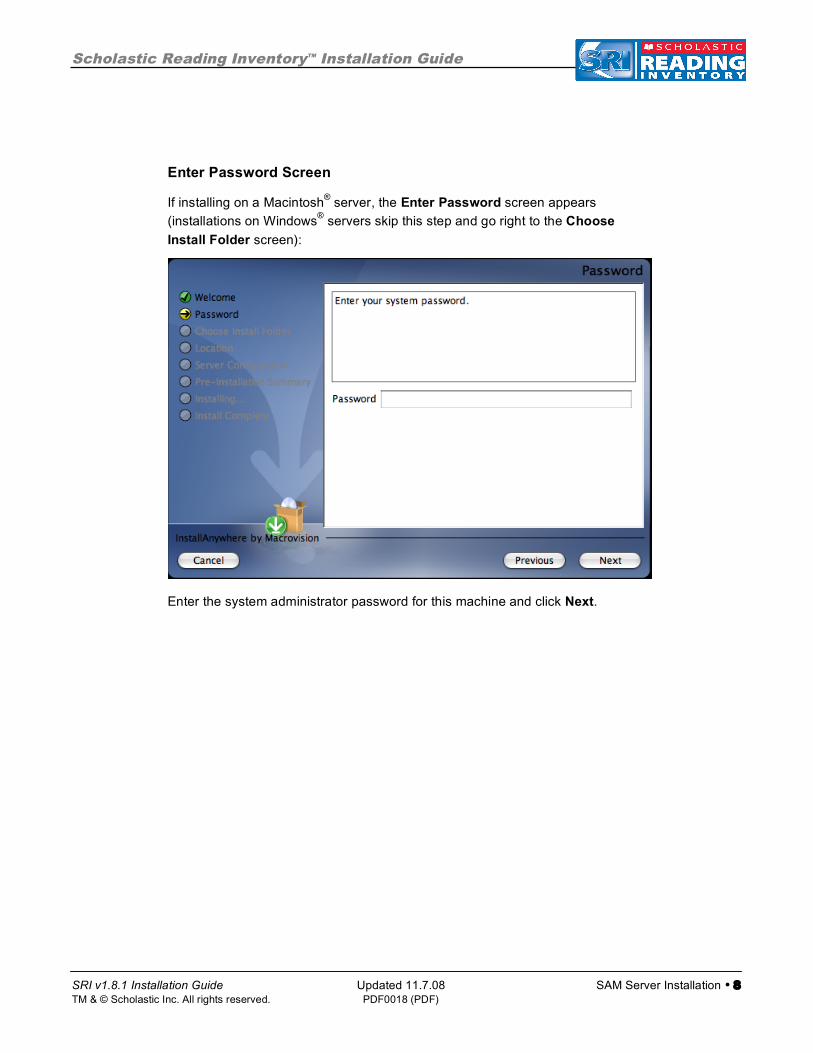
Enter Password Screen
If installing on a Macintosh® server, the Enter Password screen appears
(installations on Windows® servers skip this step and go right to the Choose
Install Folder screen):
Enter the system administrator password for this machine and click Next.
Scholastic Reading Inventory™ Installation Guide
SRI v1.8.1 Installation Guide Updated 11.7.08 SAM Server Installation • 9 TM & © Scholastic Inc. All rights reserved. PDF0018 (PDF)
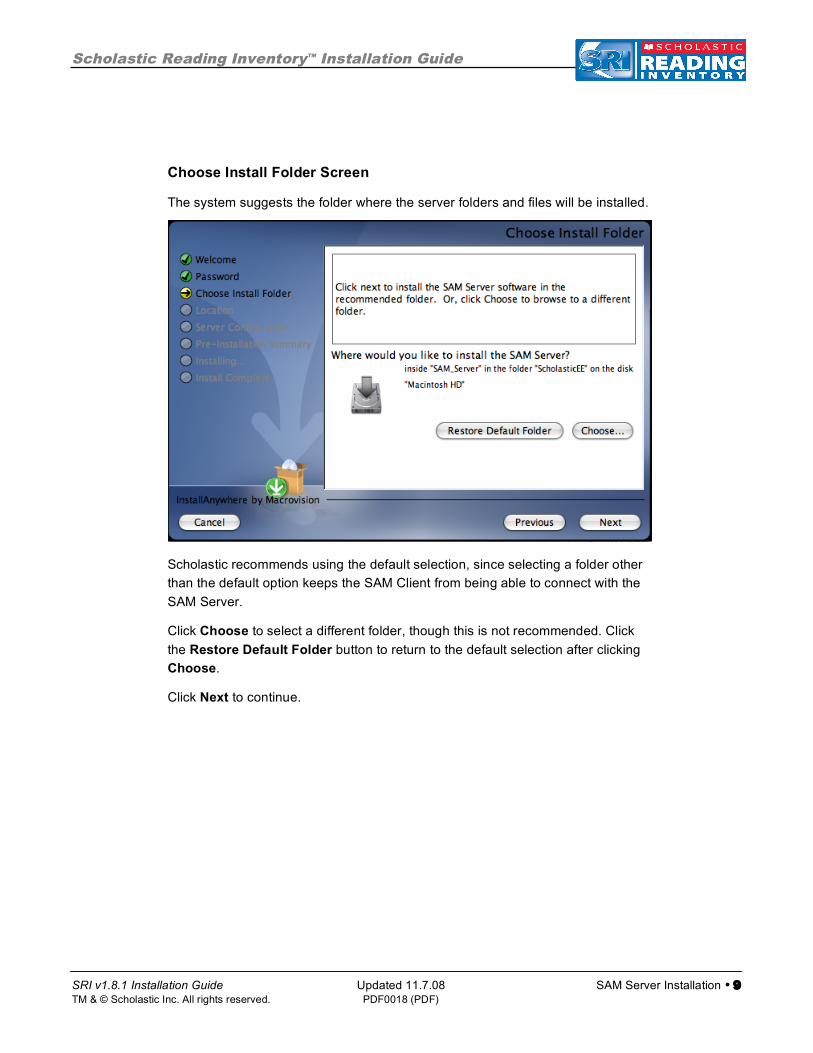
Choose Install Folder Screen
The system suggests the folder where the server folders and files will be installed.
Scholastic recommends using the default selection, since selecting a folder other
than the default option keeps the SAM Client from being able to connect with the
SAM Server.
Click Choose to select a different folder, though this is not recommended. Click
the Restore Default Folder button to return to the default selection after clicking
Choose.
Click Next to continue.
Scholastic Reading Inventory™ Installation Guide
SRI v1.8.1 Installation Guide Updated 11.7.08 SAM Server Installation • 10 TM & © Scholastic Inc. All rights reserved. PDF0018 (PDF)
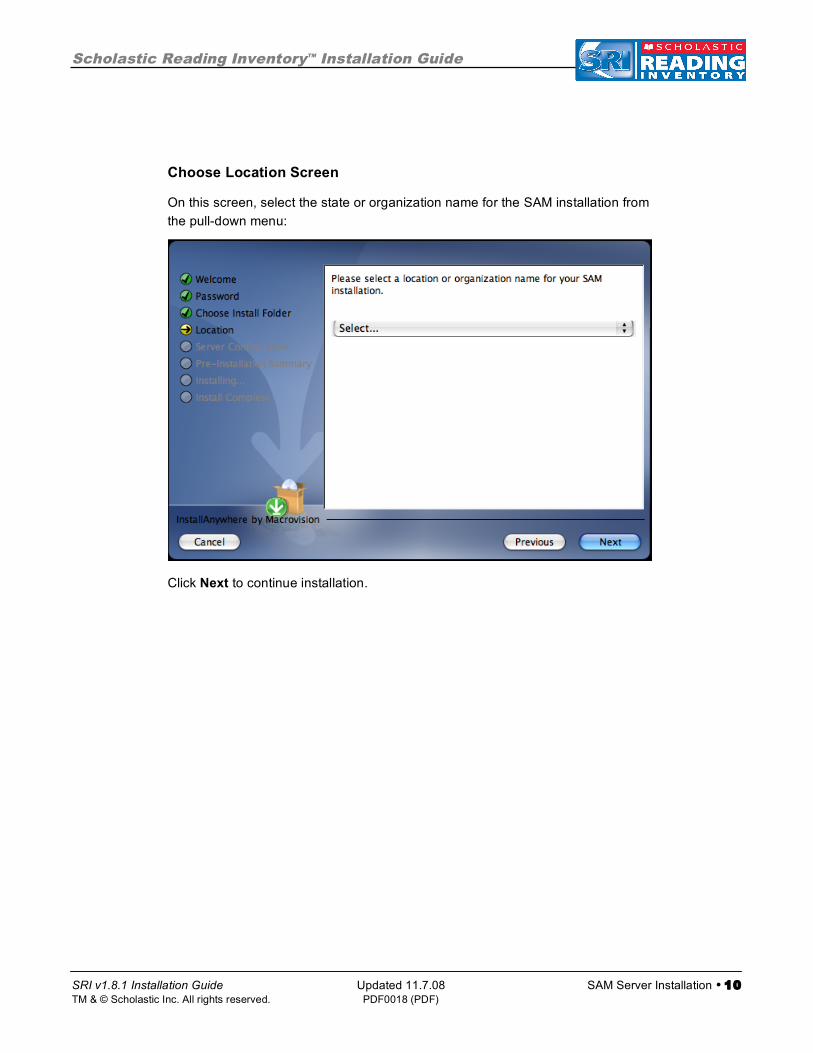
Choose Location Screen
On this screen, select the state or organization name for the SAM installation from
the pull-down menu:
Click Next to continue installation.
Scholastic Reading Inventory™ Installation Guide
SRI v1.8.1 Installation Guide Updated 11.7.08 SAM Server Installation • 11 TM & © Scholastic Inc. All rights reserved. PDF0018 (PDF)
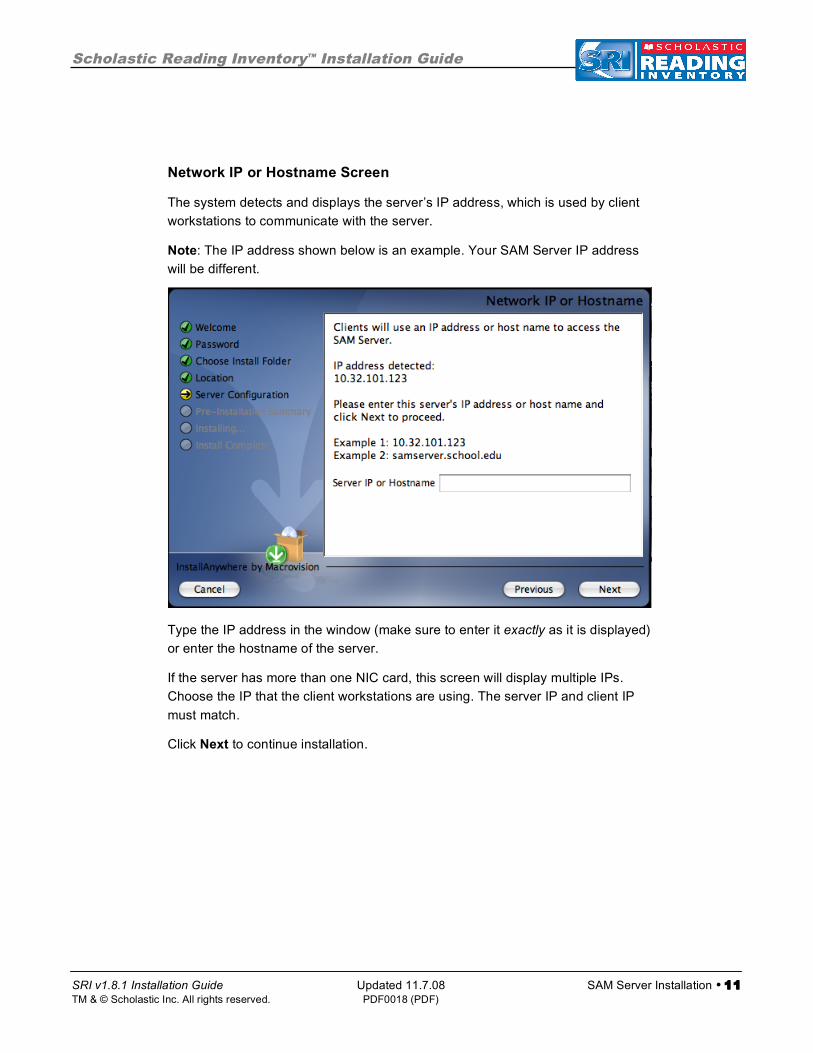
Network IP or Hostname Screen
The system detects and displays the server’s IP address, which is used by client
workstations to communicate with the server.
Note: The IP address shown below is an example. Your SAM Server IP address
will be different.
Type the IP address in the window (make sure to enter it exactly as it is displayed)
or enter the hostname of the server.
If the server has more than one NIC card, this screen will display multiple IPs.
Choose the IP that the client workstations are using. The server IP and client IP
must match.
Click Next to continue installation.
Scholastic Reading Inventory™ Installation Guide
SRI v1.8.1 Installation Guide Updated 11.7.08 SAM Server Installation • 12 TM & © Scholastic Inc. All rights reserved. PDF0018 (PDF)
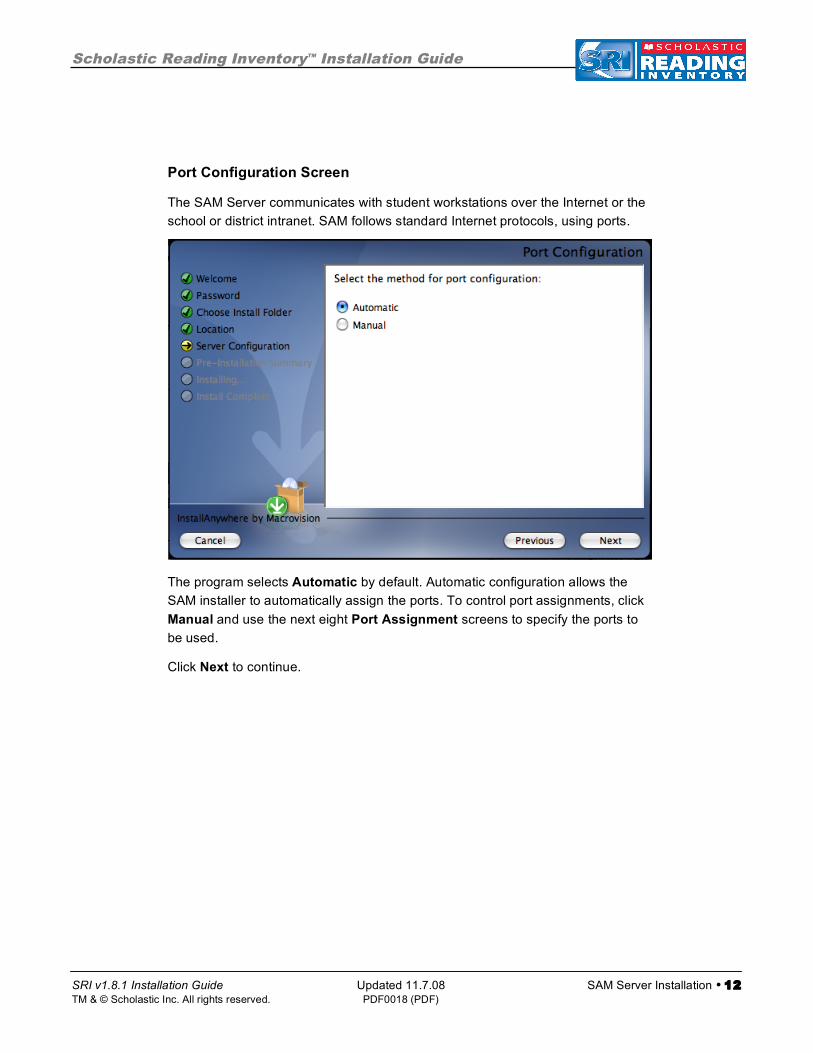
Port Configuration Screen
The SAM Server communicates with student workstations over the Internet or the
school or district intranet. SAM follows standard Internet protocols, using ports.
The program selects Automatic by default. Automatic configuration allows the
SAM installer to automatically assign the ports. To control port assignments, click
Manual and use the next eight Port Assignment screens to specify the ports to
be used.
Click Next to continue.
Scholastic Reading Inventory™ Installation Guide
SRI v1.8.1 Installation Guide Updated 11.7.08 SAM Server Installation • 13 TM & © Scholastic Inc. All rights reserved. PDF0018 (PDF)
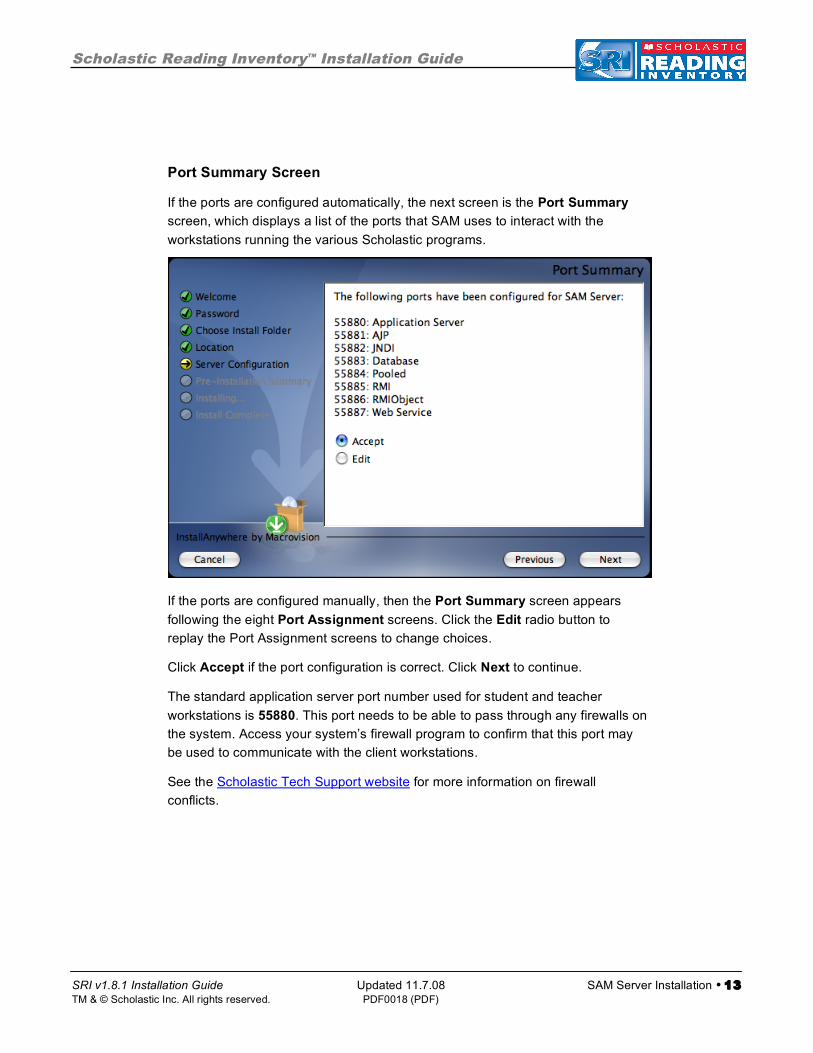
Port Summary Screen
If the ports are configured automatically, the next screen is the Port Summary
screen, which displays a list of the ports that SAM uses to interact with the
workstations running the various Scholastic programs.
If the ports are configured manually, then the Port Summary screen appears
following the eight Port Assignment screens. Click the Edit radio button to
replay the Port Assignment screens to change choices.
Click Accept if the port configuration is correct. Click Next to continue.
The standard application server port number used for student and teacher
workstations is 55880. This port needs to be able to pass through any firewalls on
the system. Access your system’s firewall program to confirm that this port may
be used to communicate with the client workstations.
See the Scholastic Tech Support website for more information on firewall
conflicts.

Scholastic Reading Inventory™ Installation Guide
SRI v1.8.1 Installation Guide Updated 11.7.08 SAM Server Installation • 14 TM & © Scholastic Inc. All rights reserved. PDF0018 (PDF)
Specify Server Type Screen
The next screen asks which type of server the SAM Server software is being
installed on. For SAM and System 44 to work properly, it must be an Application
Server. This is the default setting in the installer program. An Aggregation
Server, used for generating district-wide reports, will not run SAM or EE programs
correctly.
Confirm that Application Server is selected, then click Next to continue.
If the computer has less than 2GB of memory, a pop-up window appears warning
that this is less than the recommended amount of memory for SAM installation.
Scholastic recommends clearing memory or using another computer or hard drive
if the memory is insufficient.
Scholastic Reading Inventory™ Installation Guide
SRI v1.8.1 Installation Guide Updated 11.7.08 SAM Server Installation • 15 TM & © Scholastic Inc. All rights reserved. PDF0018 (PDF)
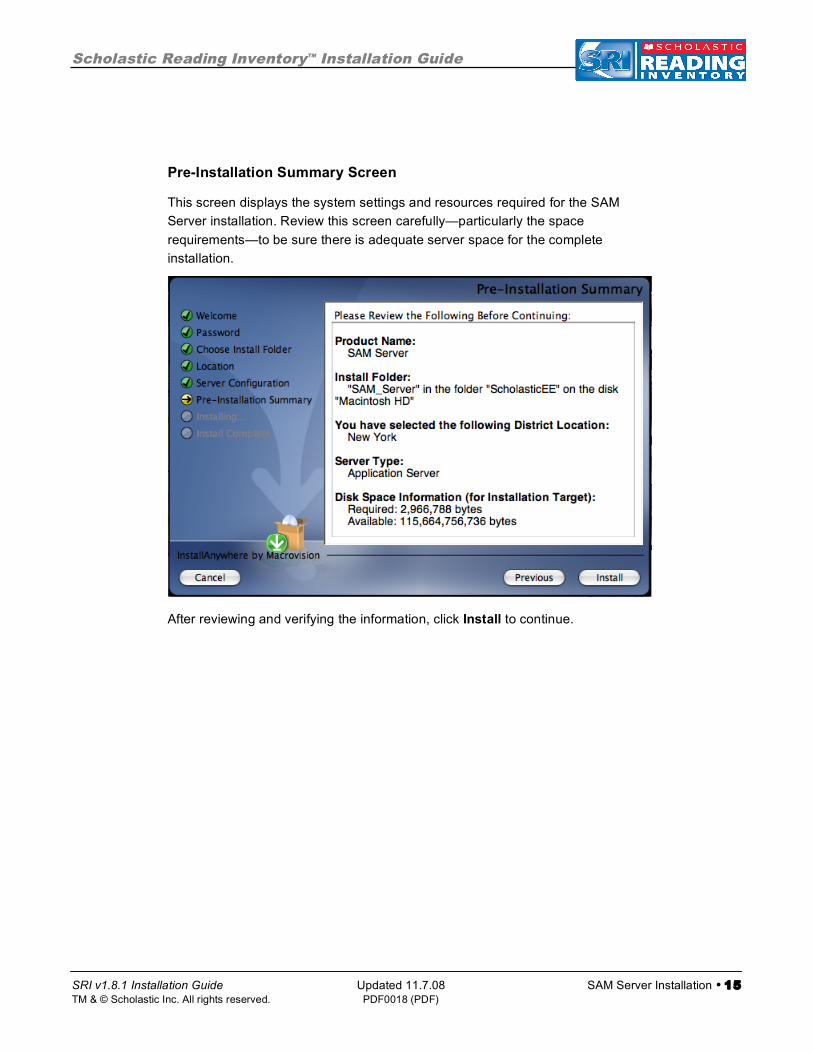
Pre-Installation Summary Screen
This screen displays the system settings and resources required for the SAM
Server installation. Review this screen carefully—particularly the space
requirements—to be sure there is adequate server space for the complete
installation.
After reviewing and verifying the information, click Install to continue.
Scholastic Reading Inventory™ Installation Guide
SRI v1.8.1 Installation Guide Updated 11.7.08 SAM Server Installation • 16 TM & © Scholastic Inc. All rights reserved. PDF0018 (PDF)
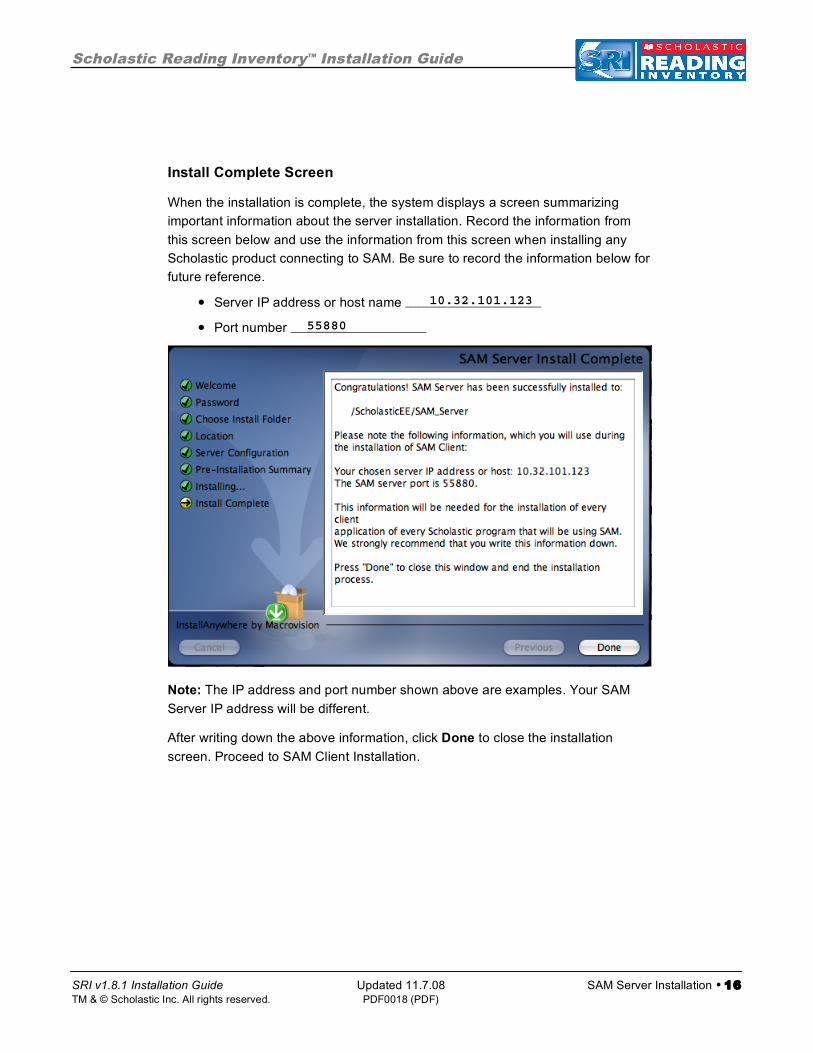
Install Complete Screen
When the installation is complete, the system displays a screen summarizing
important information about the server installation. Record the information from
this screen below and use the information from this screen when installing any
Scholastic product connecting to SAM. Be sure to record the information below for
future reference.
• Server IP address or host name ___10.32.101.123_
• Port number __55880__________
Note: The IP address and port number shown above are examples. Your SAM
Server IP address will be different.
After writing down the above information, click Done to close the installation
screen. Proceed to SAM Client Installation.
Scholastic Reading Inventory™ Installation Guide
SRI v1.8.1 Installation Guide Updated 11.7.08 SAM Client Installation • 17 TM & © Scholastic Inc. All rights reserved. PDF0018 (PDF)
Installing the SAM Client Software
Install the SAM Client software on the same computer where the SAM Server is
installed, then install it on any workstation from which the teacher or administrator
accesses the SAM database.
IMPORTANT NOTE ABOUT RIGHTS AND PERMISSIONS FOR
CLIENT INSTALLATIONS
Limited-Access Users on All Installations
If the Scholastic workstations have limited access permissions, permissions must
be updated after installing the Scholastic Client applications. Make sure to grant
users modify permissions to the Scholastic Enterprise folder, including all files and
subfolders on the client workstations. However, do not share or reset the default
permissions for the ScholasticEE folder on the server.
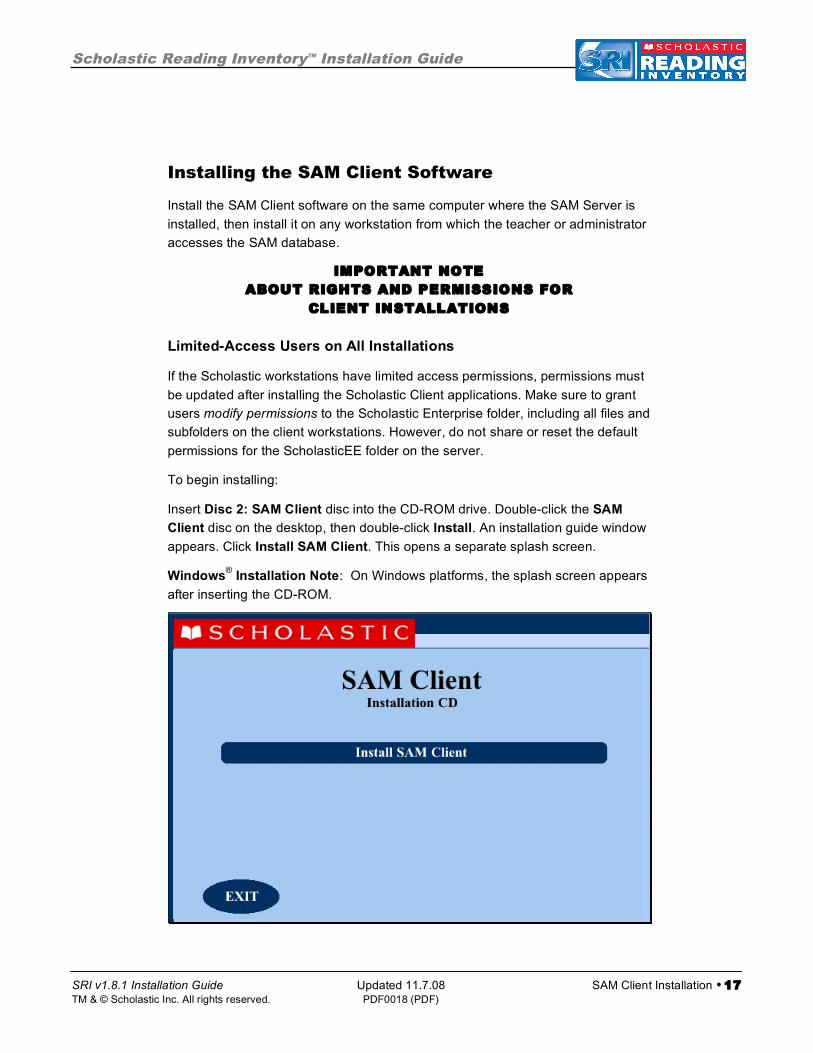
To begin installing:
Insert Disc 2: SAM Client disc into the CD-ROM drive. Double-click the SAM
Client disc on the desktop, then double-click Install. An installation guide window
appears. Click Install SAM Client. This opens a separate splash screen.
Windows® Installation Note: On Windows platforms, the splash screen appears
after inserting the CD-ROM.

Scholastic Reading Inventory™ Installation Guide
SRI v1.8.1 Installation Guide Updated 11.7.08 SAM Client Installation • 18 TM & © Scholastic Inc. All rights reserved. PDF0018 (PDF)
Welcome Screen
In a separate installation window, the Welcome screen appears:
Installation instructions appear in the right window, while the left side of the screen
displays progress through the installation process. The following buttons appear
throughout the process:
• Next: Click this to continue the installation;
• Previous: Click this to return to a previous screen;
• Cancel: Click to exit the installation process at any time.
Click Next to continue installation.

Scholastic Reading Inventory™ Installation Guide
SRI v1.8.1 Installation Guide Updated 11.7.08 SAM Client Installation • 19 TM & © Scholastic Inc. All rights reserved. PDF0018 (PDF)
Enter Password Screen
If installing on a Macintosh® server, the Enter Password screen appears next. If
installing in Windows®, the installation goes right to the Choose Install Folder
screen.
Enter the system administrator password and click Next.
Scholastic Reading Inventory™ Installation Guide
SRI v1.8.1 Installation Guide Updated 11.7.08 SAM Client Installation • 20 TM & © Scholastic Inc. All rights reserved. PDF0018 (PDF)
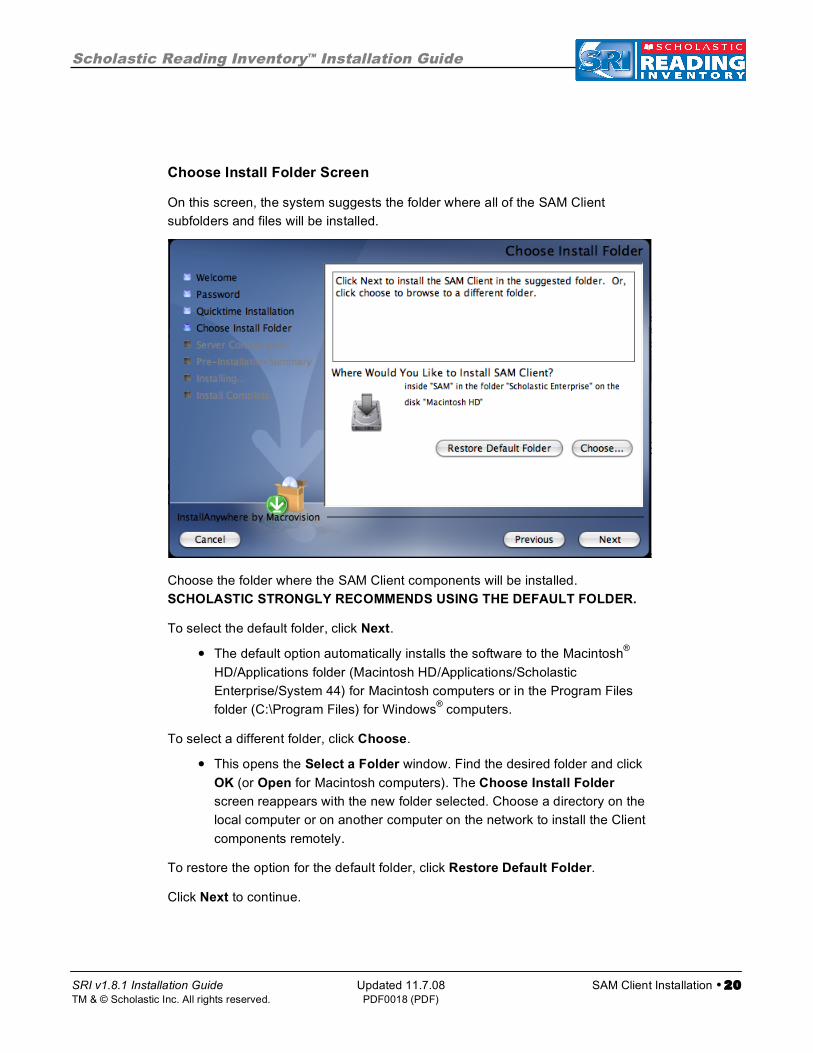
Choose Install Folder Screen
On this screen, the system suggests the folder where all of the SAM Client
subfolders and files will be installed.
Choose the folder where the SAM Client components will be installed.
SCHOLASTIC STRONGLY RECOMMENDS USING THE DEFAULT FOLDER.
To select the default folder, click Next.
• The default option automatically installs the software to the Macintosh®
HD/Applications folder (Macintosh HD/Applications/Scholastic
Enterprise/System 44) for Macintosh computers or in the Program Files
folder (C:\Program Files) for Windows® computers.
To select a different folder, click Choose.
• This opens the Select a Folder window. Find the desired folder and click
OK (or Open for Macintosh computers). The Choose Install Folder
screen reappears with the new folder selected. Choose a directory on the
local computer or on another computer on the network to install the Client
components remotely.
To restore the option for the default folder, click Restore Default Folder.
Click Next to continue.

Scholastic Reading Inventory™ Installation Guide
SRI v1.8.1 Installation Guide Updated 11.7.08 SAM Client Installation • 21 TM & © Scholastic Inc. All rights reserved. PDF0018 (PDF)
Server Configuration Screen
The SAM Client computer needs to know which computer to access in order to
communicate with the SAM Server.
Enter the same IP address or hostname entered in the Network IP or Hostname
step of the SAM Server installation process (page 11).
If the port number was automatically chosen in the Port Configuration step in the
SAM Server installation process (page 12), leave the default value of 55880 here.
If the port number was manually entered, enter that new number or hostname in
the Server Port field here.
When the appropriate IP address (or hostname) and port number are entered,
click Next.

Scholastic Reading Inventory™ Installation Guide
SRI v1.8.1 Installation Guide Updated 11.7.08 SAM Client Installation • 22 TM & © Scholastic Inc. All rights reserved. PDF0018 (PDF)
Pre-Installation Summary Screen
This screen displays the system settings and resources required for the SAM
Client installation. Review this screen carefully—particularly the space
requirements—to be sure there is adequate server space for the complete
installation.
After reviewing and verifying the information, click Install to continue.
Scholastic Reading Inventory™ Installation Guide
SRI v1.8.1 Installation Guide Updated 11.7.08 SAM Client Installation • 23 TM & © Scholastic Inc. All rights reserved. PDF0018 (PDF)
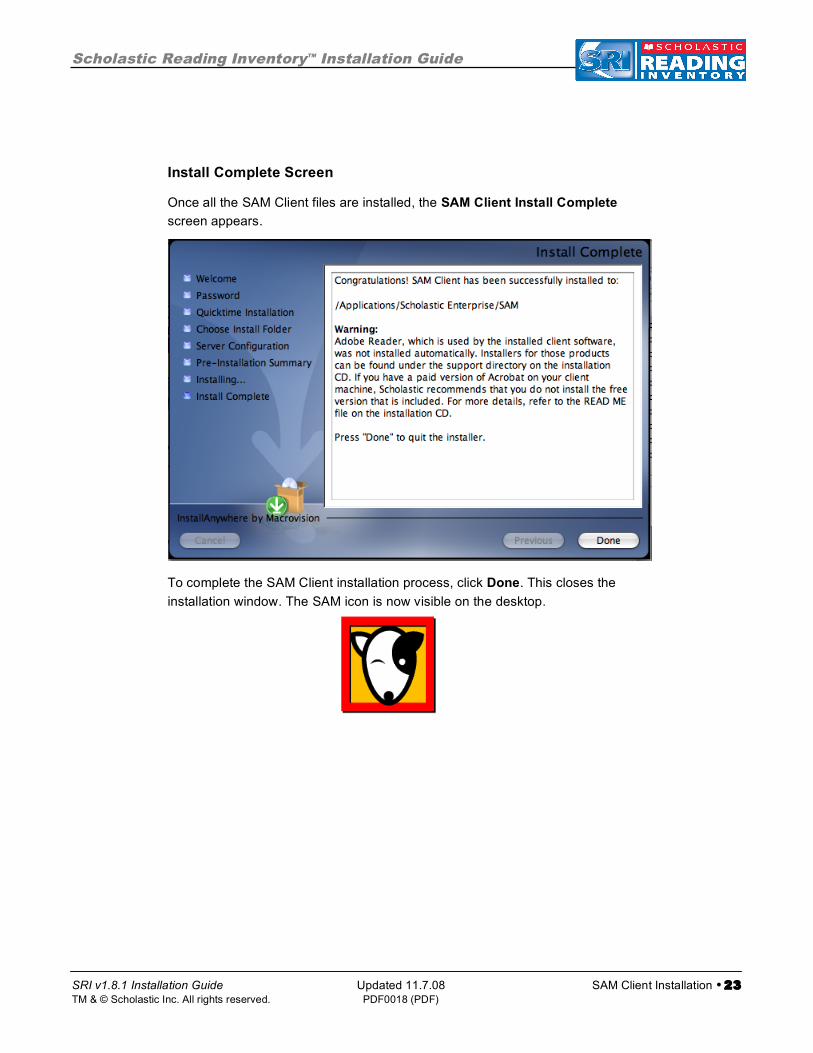
Install Complete Screen
Once all the SAM Client files are installed, the SAM Client Install Complete
screen appears.
To complete the SAM Client installation process, click Done. This closes the
installation window. The SAM icon is now visible on the desktop.
Scholastic Reading Inventory™ Installation Guide
SRI v1.8.1 Installation Guide Updated 11.7.08 SAM Client Installation • 24 TM & © Scholastic Inc. All rights reserved. PDF0018 (PDF)
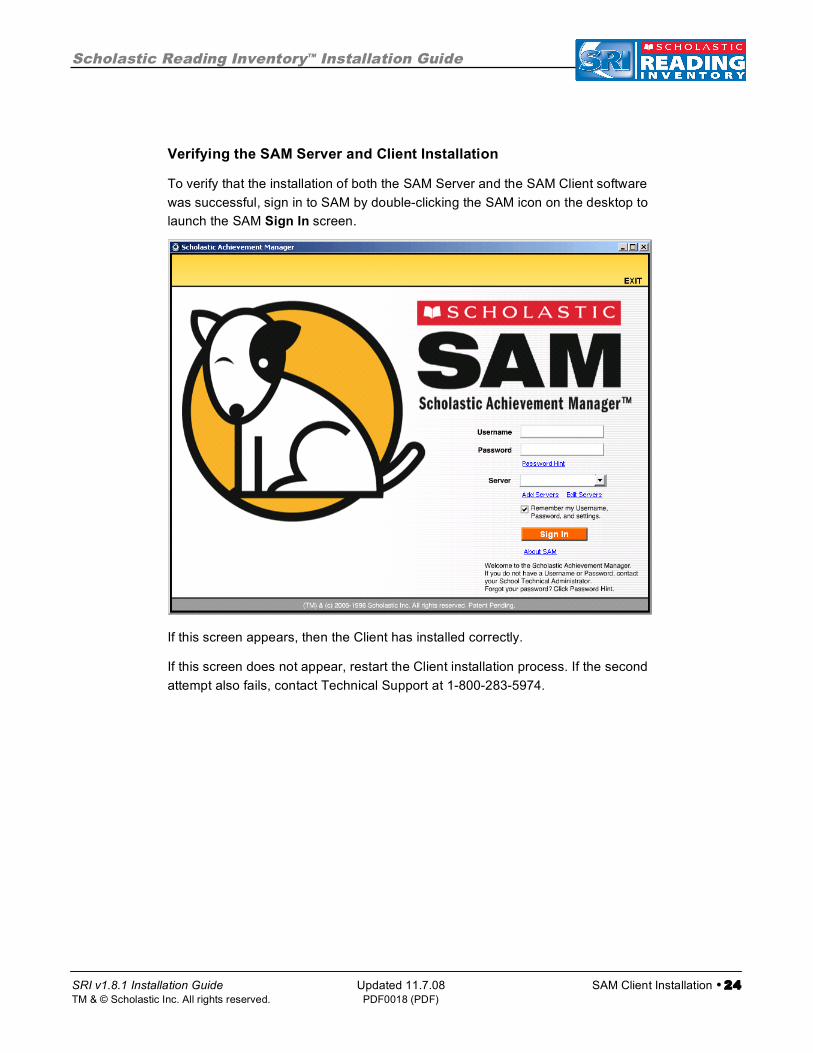
Verifying the SAM Server and Client Installation
To verify that the installation of both the SAM Server and the SAM Client software
was successful, sign in to SAM by double-clicking the SAM icon on the desktop to
launch the SAM Sign In screen.
If this screen appears, then the Client has installed correctly.
If this screen does not appear, restart the Client installation process. If the second
attempt also fails, contact Technical Support at 1-800-283-5974.
Scholastic Reading Inventory™ Installation Guide
SRI v1.8.1 Installation Guide Updated 11.7.08 SAM Client Installation • 25 TM & © Scholastic Inc. All rights reserved. PDF0018 (PDF)
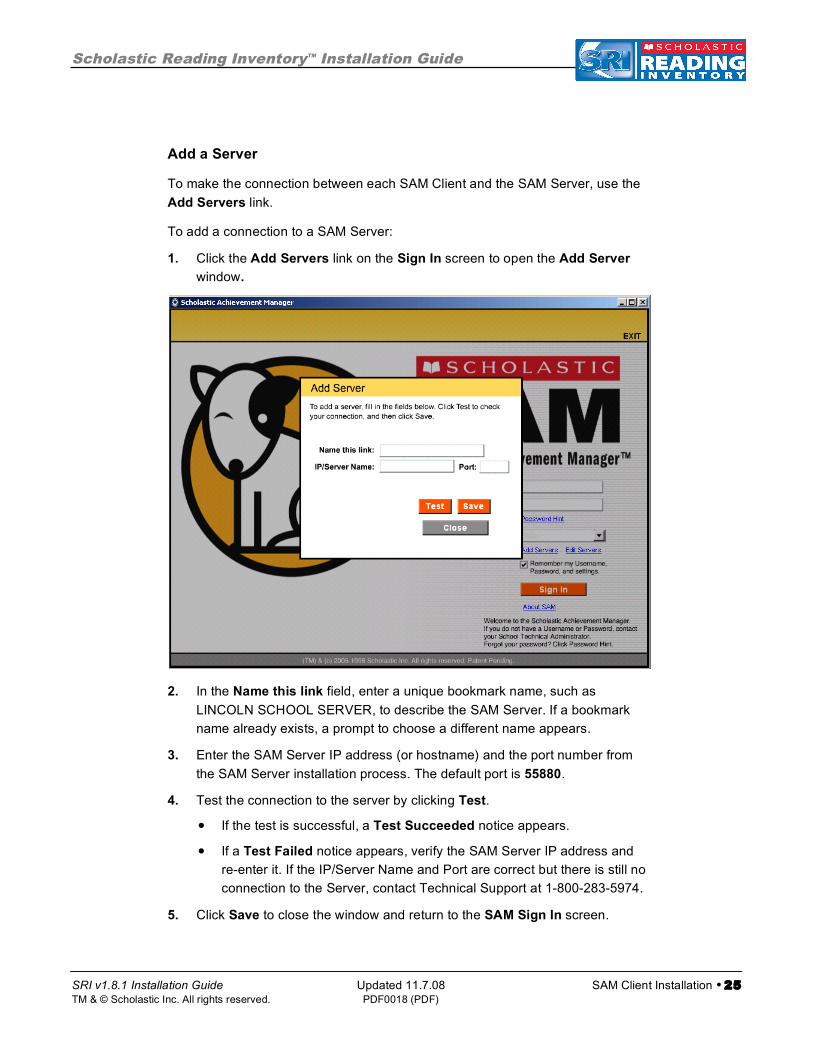
Add a Server
To make the connection between each SAM Client and the SAM Server, use the
Add Servers link.
To add a connection to a SAM Server:
1. Click the Add Servers link on the Sign In screen to open the Add Server
window.
2. In the Name this link field, enter a unique bookmark name, such as
LINCOLN SCHOOL SERVER, to describe the SAM Server. If a bookmark
name already exists, a prompt to choose a different name appears.
3. Enter the SAM Server IP address (or hostname) and the port number from
the SAM Server installation process. The default port is 55880.
4. Test the connection to the server by clicking Test.
• If the test is successful, a Test Succeeded notice appears.
• If a Test Failed notice appears, verify the SAM Server IP address and
re-enter it. If the IP/Server Name and Port are correct but there is still no
connection to the Server, contact Technical Support at 1-800-283-5974.
5. Click Save to close the window and return to the SAM Sign In screen.
Scholastic Reading Inventory™ Installation Guide
SRI v1.8.1 Installation Guide Updated 11.7.08 SAM Client Installation • 26 TM & © Scholastic Inc. All rights reserved. PDF0018 (PDF)
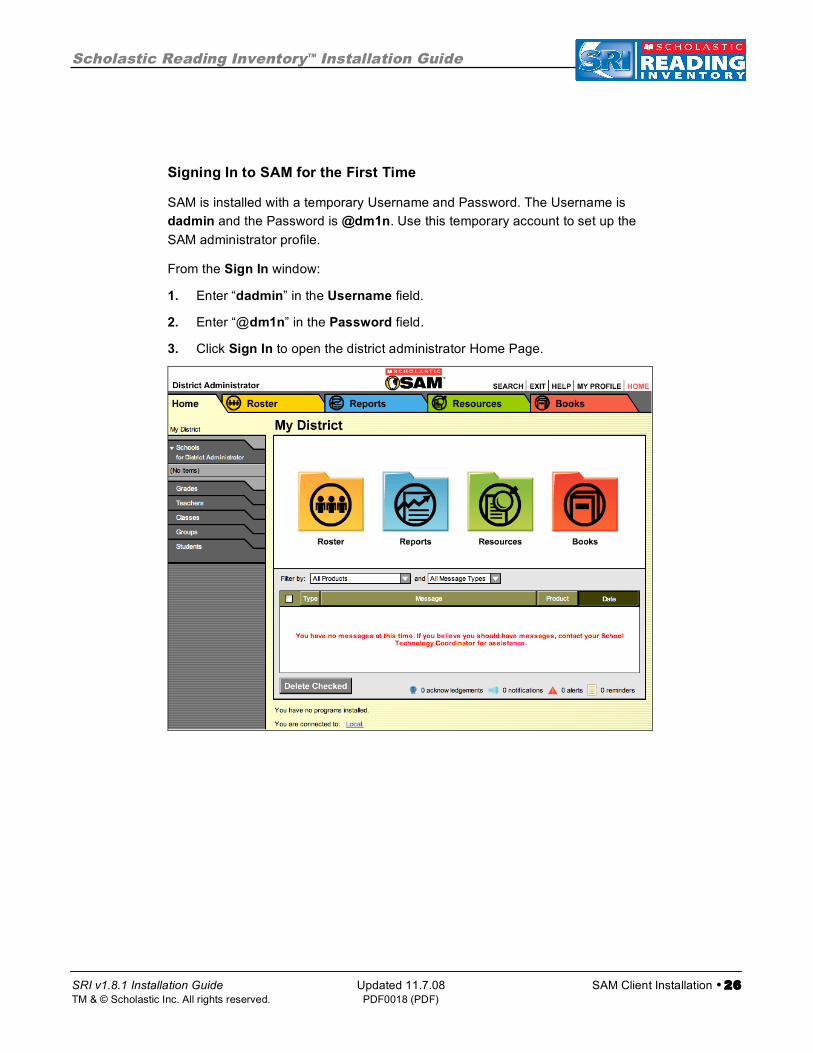
Signing In to SAM for the First Time
SAM is installed with a temporary Username and Password. The Username is
dadmin and the Password is @dm1n. Use this temporary account to set up the
SAM administrator profile.
From the Sign In window:
1. Enter “dadmin” in the Username field.
2. Enter “@dm1n” in the Password field.
3. Click Sign In to open the district administrator Home Page.
Scholastic Reading Inventory™ Installation Guide
SRI v1.8.1 Installation Guide Updated 11.7.08 SAM Client Installation • 27 TM & © Scholastic Inc. All rights reserved. PDF0018 (PDF)
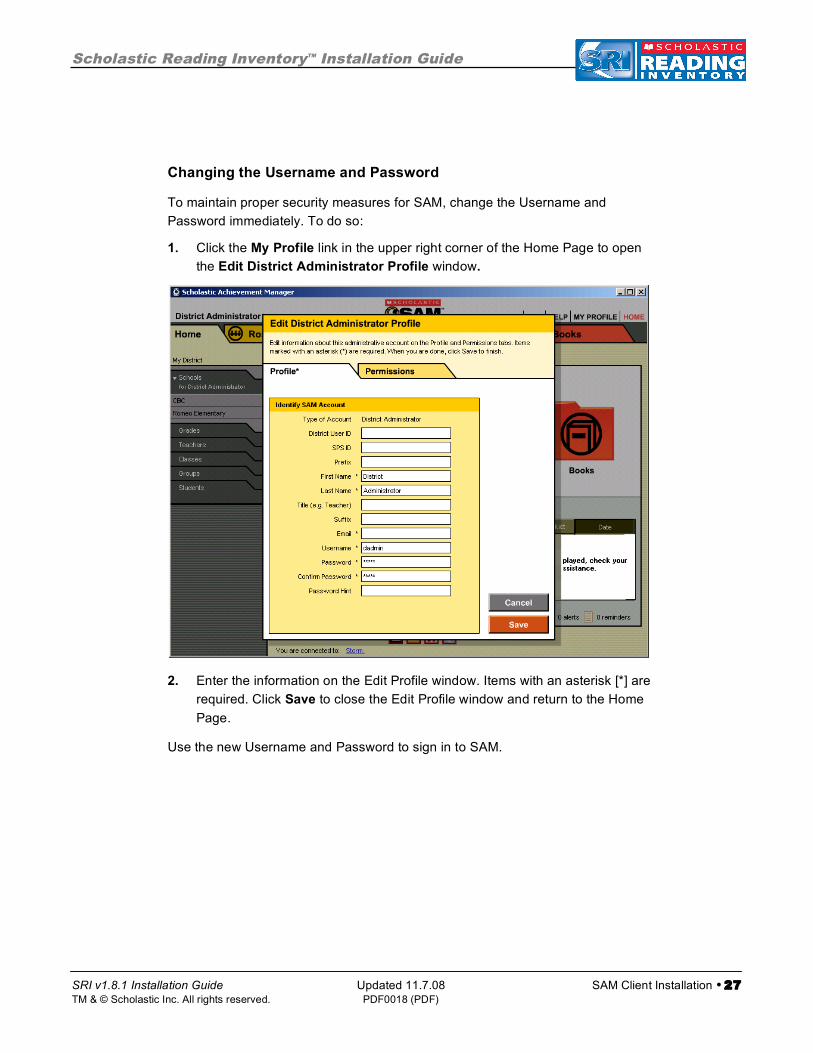
Changing the Username and Password
To maintain proper security measures for SAM, change the Username and
Password immediately. To do so:
1. Click the My Profile link in the upper right corner of the Home Page to open
the Edit District Administrator Profile window.
2. Enter the information on the Edit Profile window. Items with an asterisk [*] are
required. Click Save to close the Edit Profile window and return to the Home
Page.
Use the new Username and Password to sign in to SAM.
Scholastic Reading Inventory™ Installation Guide
SRI v1.8.1 Installation Guide Updated 11.7.08 SRI Server Installation • 28 TM & © Scholastic Inc. All rights reserved. PDF0018 (PDF)
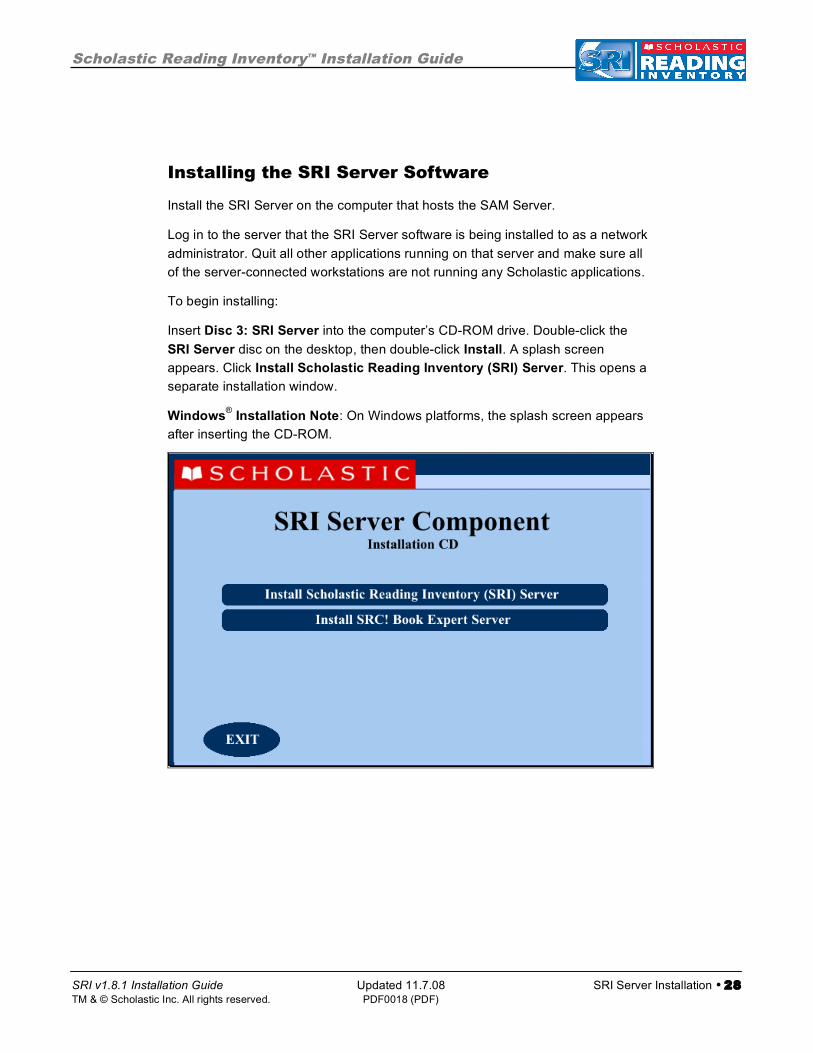
Installing the SRI Server Software
Install the SRI Server on the computer that hosts the SAM Server.
Log in to the server that the SRI Server software is being installed to as a network
administrator. Quit all other applications running on that server and make sure all
of the server-connected workstations are not running any Scholastic applications.
To begin installing:
Insert Disc 3: SRI Server into the computer’s CD-ROM drive. Double-click the
SRI Server disc on the desktop, then double-click Install. A splash screen
appears. Click Install Scholastic Reading Inventory (SRI) Server. This opens a
separate installation window.
Windows® Installation Note: On Windows platforms, the splash screen appears
after inserting the CD-ROM.
Scholastic Reading Inventory™ Installation Guide
SRI v1.8.1 Installation Guide Updated 11.7.08 SRI Server Installation • 29 TM & © Scholastic Inc. All rights reserved. PDF0018 (PDF)
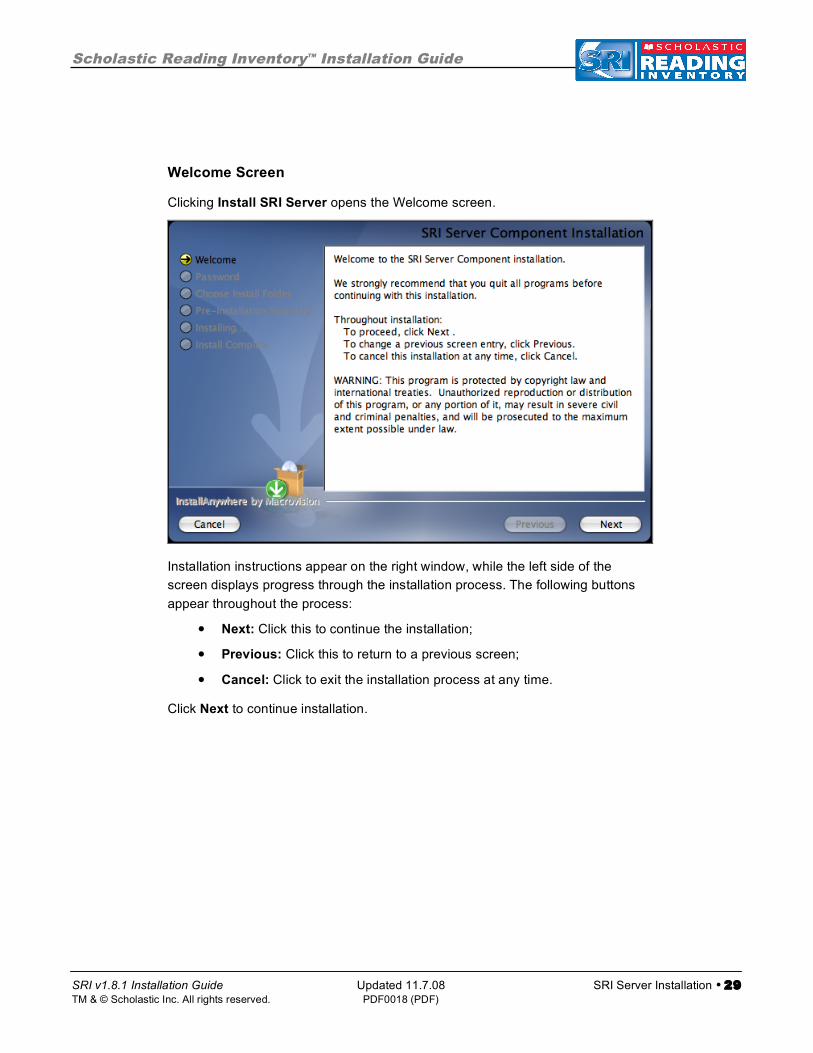
Welcome Screen
Clicking Install SRI Server opens the Welcome screen.
Installation instructions appear on the right window, while the left side of the
screen displays progress through the installation process. The following buttons
appear throughout the process:
• Next: Click this to continue the installation;
• Previous: Click this to return to a previous screen;
• Cancel: Click to exit the installation process at any time.
Click Next to continue installation.
Scholastic Reading Inventory™ Installation Guide
SRI v1.8.1 Installation Guide Updated 11.7.08 SRI Server Installation • 30 TM & © Scholastic Inc. All rights reserved. PDF0018 (PDF)
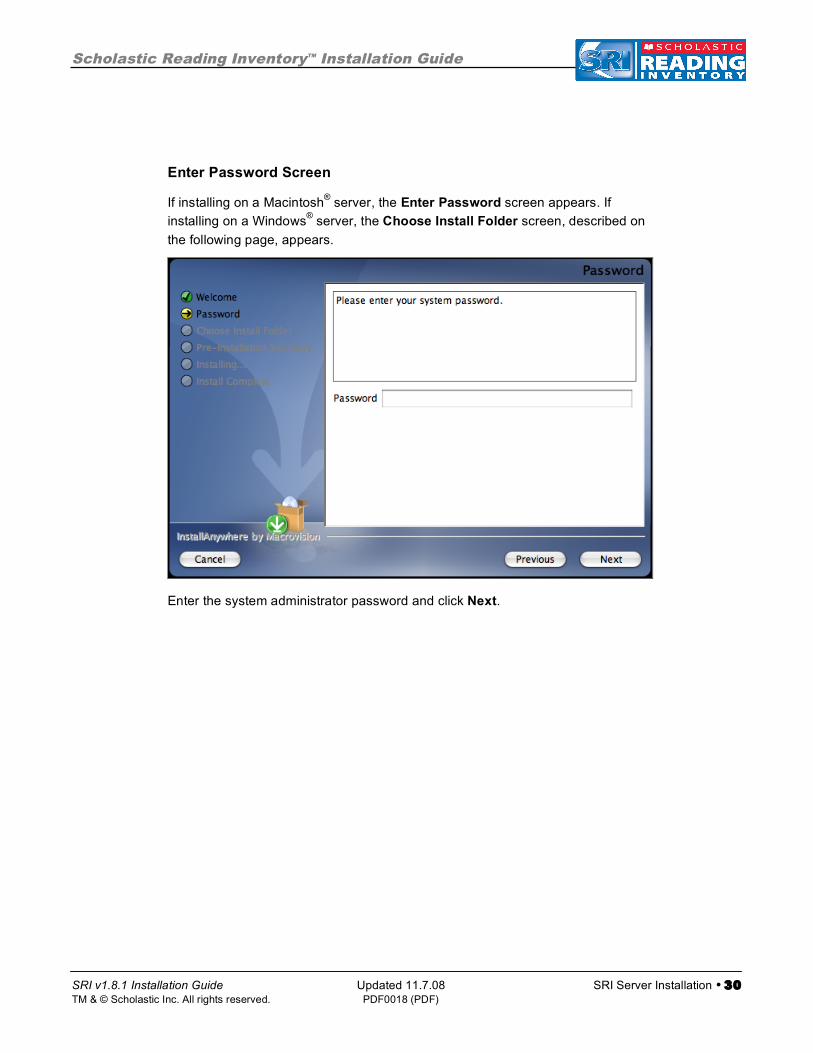
Enter Password Screen
If installing on a Macintosh® server, the Enter Password screen appears. If
installing on a Windows® server, the Choose Install Folder screen, described on
the following page, appears.
Enter the system administrator password and click Next.
Scholastic Reading Inventory™ Installation Guide
SRI v1.8.1 Installation Guide Updated 11.7.08 SRI Server Installation • 31 TM & © Scholastic Inc. All rights reserved. PDF0018 (PDF)
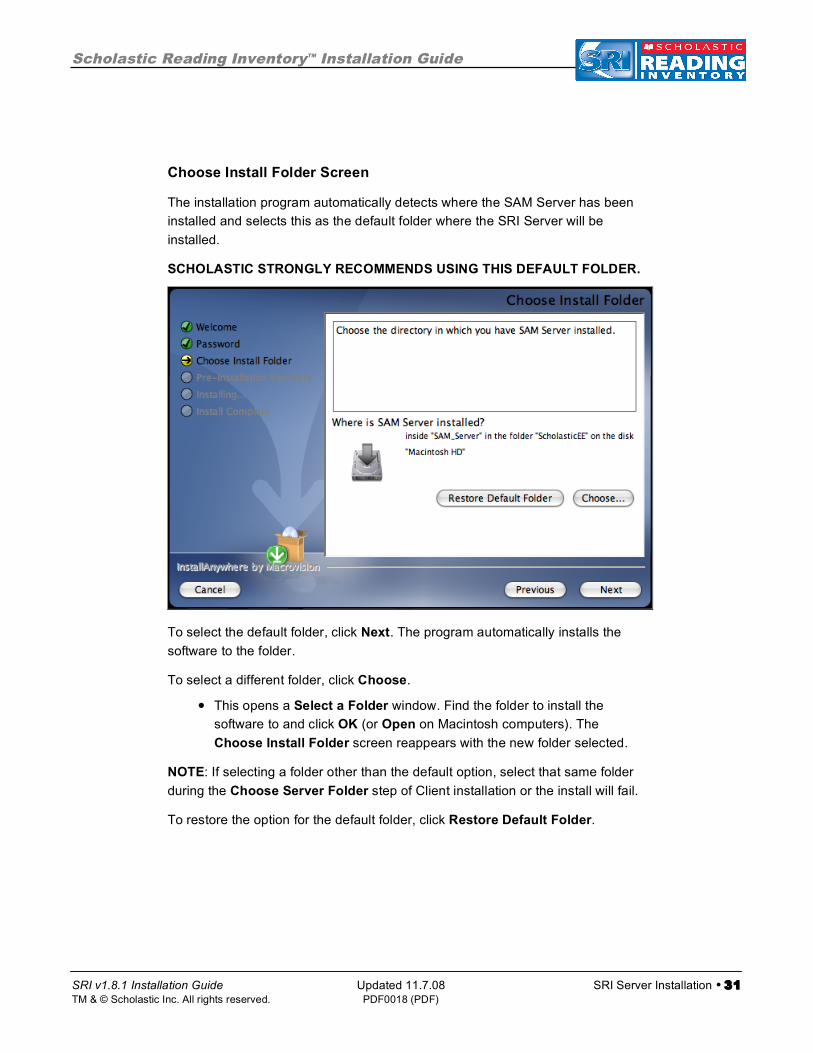
Choose Install Folder Screen
The installation program automatically detects where the SAM Server has been
installed and selects this as the default folder where the SRI Server will be
installed.
SCHOLASTIC STRONGLY RECOMMENDS USING THIS DEFAULT FOLDER.
To select the default folder, click Next. The program automatically installs the
software to the folder.
To select a different folder, click Choose.
• This opens a Select a Folder window. Find the folder to install the
software to and click OK (or Open on Macintosh computers). The
Choose Install Folder screen reappears with the new folder selected.
NOTE: If selecting a folder other than the default option, select that same folder
during the Choose Server Folder step of Client installation or the install will fail.
To restore the option for the default folder, click Restore Default Folder.

Scholastic Reading Inventory™ Installation Guide
SRI v1.8.1 Installation Guide Updated 11.7.08 SRI Server Installation • 32 TM & © Scholastic Inc. All rights reserved. PDF0018 (PDF)
Pre-Installation Summary Screen
Review the summary of the choices for the Server installation.
If satisfied with the choices, click Next. This installs the Server components onto
the computer.
If not satisfied with the choices, click Previous to return to the preceding screens
in the installation process.
NOTE: Write down the Install Folder listed to reference it again on the Choose
Server Folder screen during the Client installation process.
Scholastic Reading Inventory™ Installation Guide
SRI v1.8.1 Installation Guide Updated 11.7.08 SRI Server Installation • 33 TM & © Scholastic Inc. All rights reserved. PDF0018 (PDF)
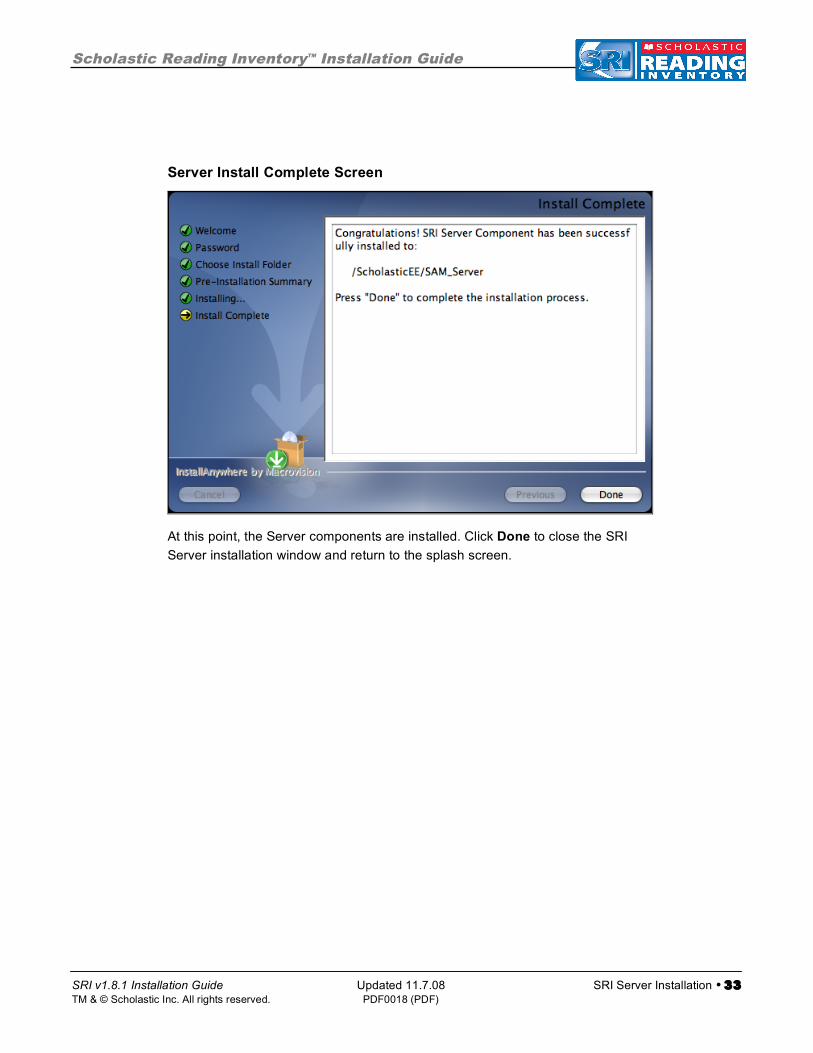
Server Install Complete Screen
At this point, the Server components are installed. Click Done to close the SRI
Server installation window and return to the splash screen.
Scholastic Reading Inventory™ Installation Guide
SRI v1.8.1 Installation Guide Updated 11.7.08 SRI Server Installation • 34 TM & © Scholastic Inc. All rights reserved. PDF0018 (PDF)
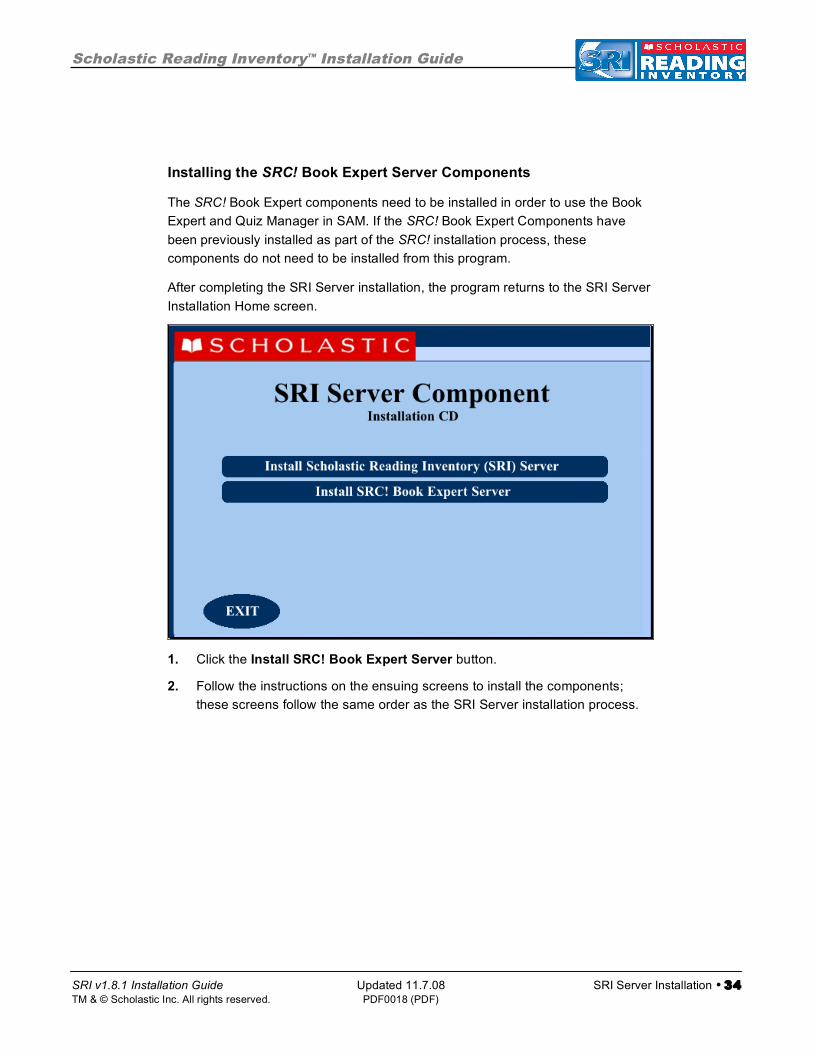
Installing the SRC! Book Expert Server Components
The SRC! Book Expert components need to be installed in order to use the Book
Expert and Quiz Manager in SAM. If the SRC! Book Expert Components have
been previously installed as part of the SRC! installation process, these
components do not need to be installed from this program.
After completing the SRI Server installation, the program returns to the SRI Server
Installation Home screen.
1. Click the Install SRC! Book Expert Server button.
2. Follow the instructions on the ensuing screens to install the components;
these screens follow the same order as the SRI Server installation process.
Scholastic Reading Inventory™ Installation Guide
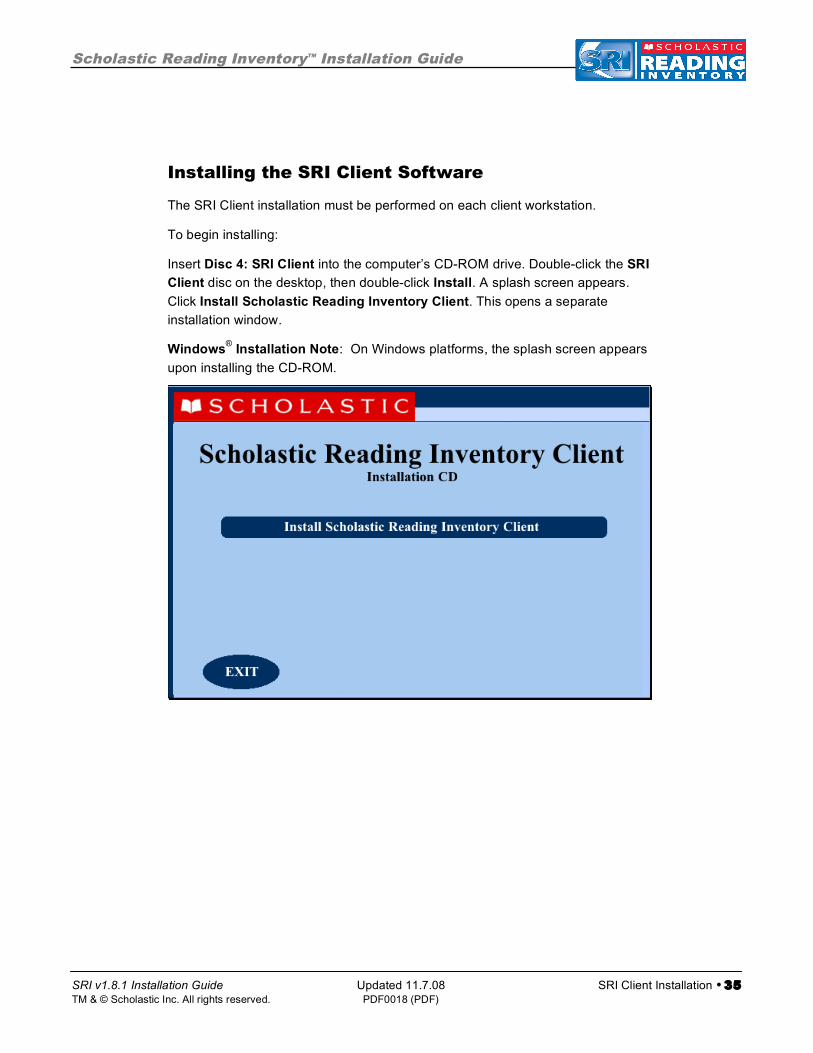
SRI v1.8.1 Installation Guide Updated 11.7.08 SRI Client Installation • 35 TM & © Scholastic Inc. All rights reserved. PDF0018 (PDF)
Installing the SRI Client Software
The SRI Client installation must be performed on each client workstation.
To begin installing:
Insert Disc 4: SRI Client into the computer’s CD-ROM drive. Double-click the SRI
Client disc on the desktop, then double-click Install. A splash screen appears.
Click Install Scholastic Reading Inventory Client. This opens a separate
installation window.
Windows® Installation Note: On Windows platforms, the splash screen appears
upon installing the CD-ROM.
Scholastic Reading Inventory™ Installation Guide
SRI v1.8.1 Installation Guide Updated 11.7.08 SRI Client Installation • 36 TM & © Scholastic Inc. All rights reserved. PDF0018 (PDF)
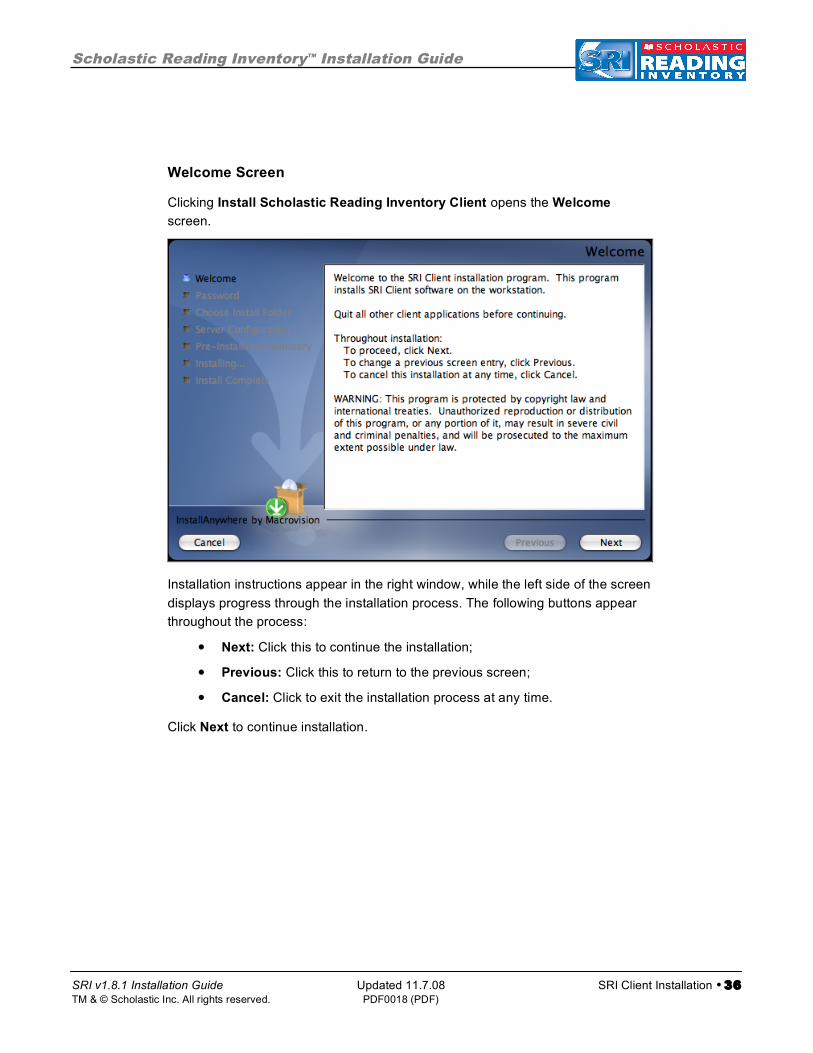
Welcome Screen
Clicking Install Scholastic Reading Inventory Client opens the Welcome
screen.
Installation instructions appear in the right window, while the left side of the screen
displays progress through the installation process. The following buttons appear
throughout the process:
• Next: Click this to continue the installation;
• Previous: Click this to return to the previous screen;
• Cancel: Click to exit the installation process at any time.
Click Next to continue installation.
Scholastic Reading Inventory™ Installation Guide
SRI v1.8.1 Installation Guide Updated 11.7.08 SRI Client Installation • 37 TM & © Scholastic Inc. All rights reserved. PDF0018 (PDF)
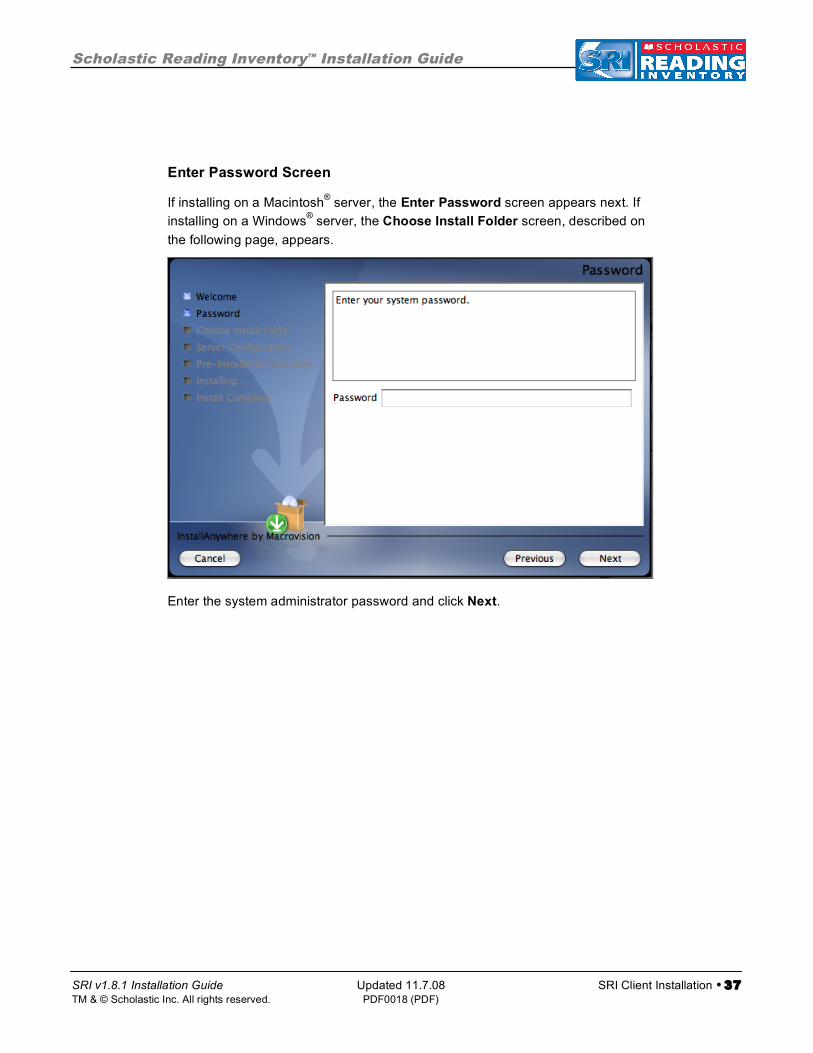
Enter Password Screen
If installing on a Macintosh® server, the Enter Password screen appears next. If
installing on a Windows® server, the Choose Install Folder screen, described on
the following page, appears.
Enter the system administrator password and click Next.
Scholastic Reading Inventory™ Installation Guide
SRI v1.8.1 Installation Guide Updated 11.7.08 SRI Client Installation • 38 TM & © Scholastic Inc. All rights reserved. PDF0018 (PDF)
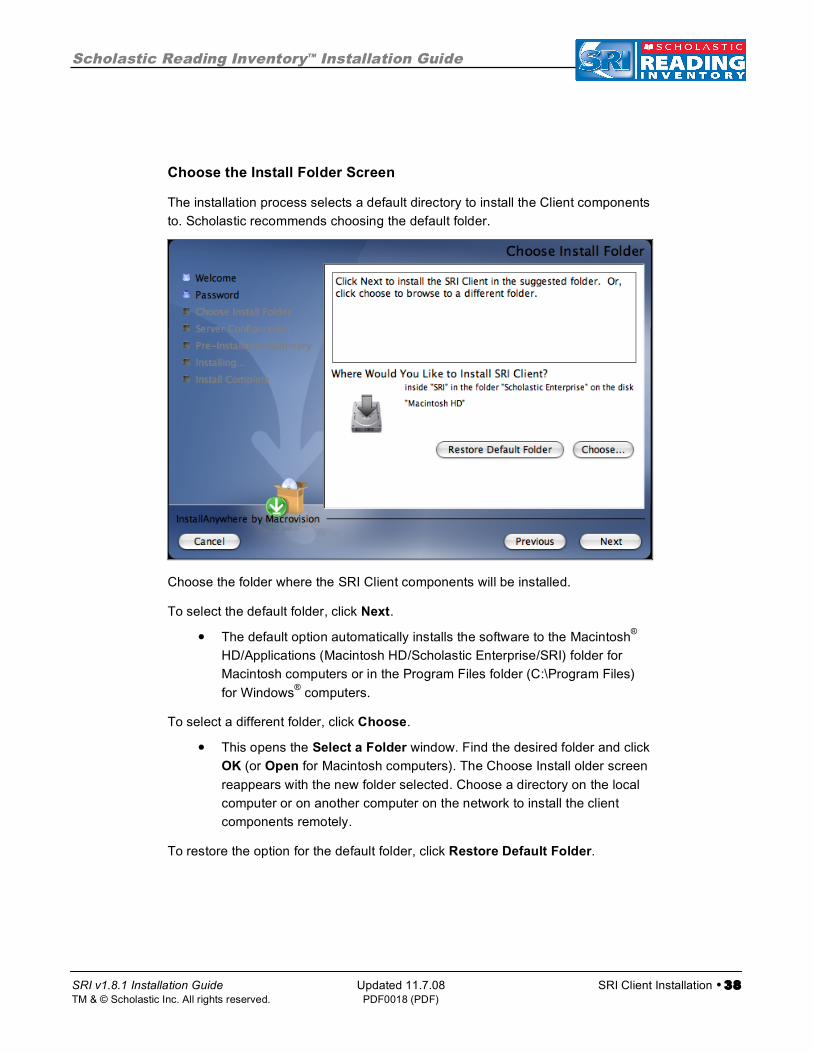
Choose the Install Folder Screen
The installation process selects a default directory to install the Client components
to. Scholastic recommends choosing the default folder.
Choose the folder where the SRI Client components will be installed.
To select the default folder, click Next.
• The default option automatically installs the software to the Macintosh®
HD/Applications (Macintosh HD/Scholastic Enterprise/SRI) folder for
Macintosh computers or in the Program Files folder (C:\Program Files)
for Windows® computers.
To select a different folder, click Choose.
• This opens the Select a Folder window. Find the desired folder and click
OK (or Open for Macintosh computers). The Choose Install older screen
reappears with the new folder selected. Choose a directory on the local
computer or on another computer on the network to install the client
components remotely.
To restore the option for the default folder, click Restore Default Folder.
Scholastic Reading Inventory™ Installation Guide
SRI v1.8.1 Installation Guide Updated 11.7.08 SRI Client Installation • 39 TM & © Scholastic Inc. All rights reserved. PDF0018 (PDF)
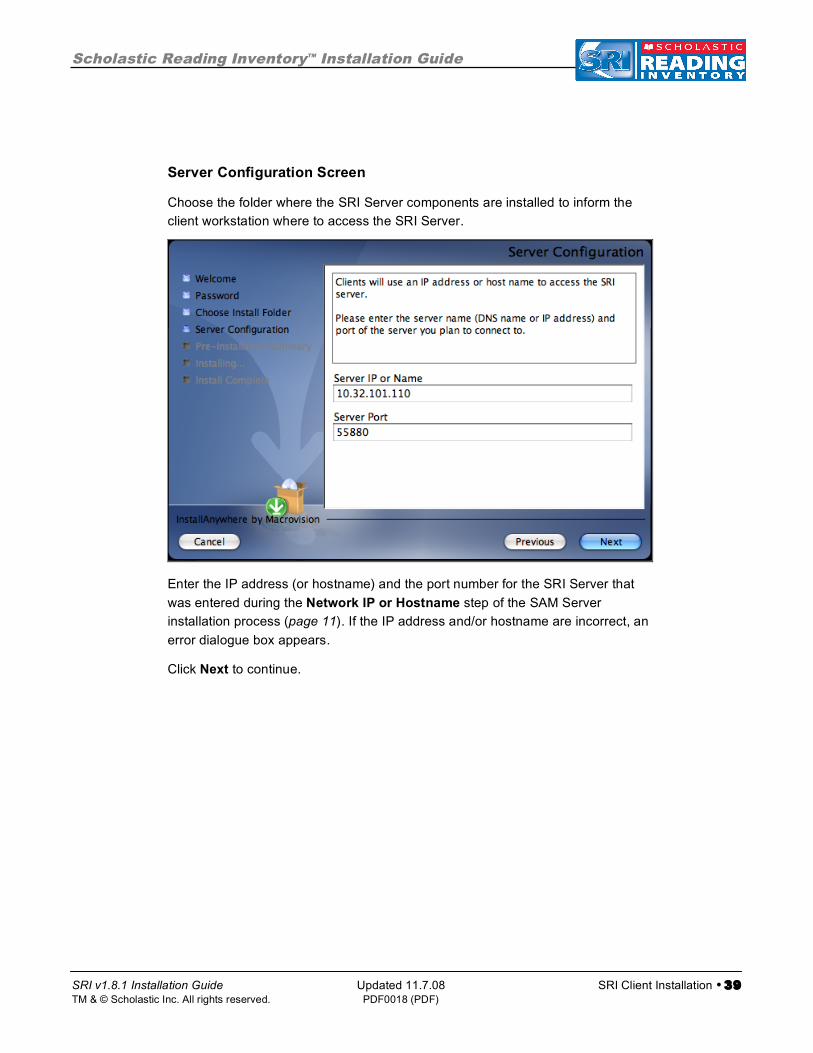
Server Configuration Screen
Choose the folder where the SRI Server components are installed to inform the
client workstation where to access the SRI Server.
Enter the IP address (or hostname) and the port number for the SRI Server that
was entered during the Network IP or Hostname step of the SAM Server
installation process (page 11). If the IP address and/or hostname are incorrect, an
error dialogue box appears.
Click Next to continue.
Scholastic Reading Inventory™ Installation Guide
SRI v1.8.1 Installation Guide Updated 11.7.08 SRI Client Installation • 40 TM & © Scholastic Inc. All rights reserved. PDF0018 (PDF)
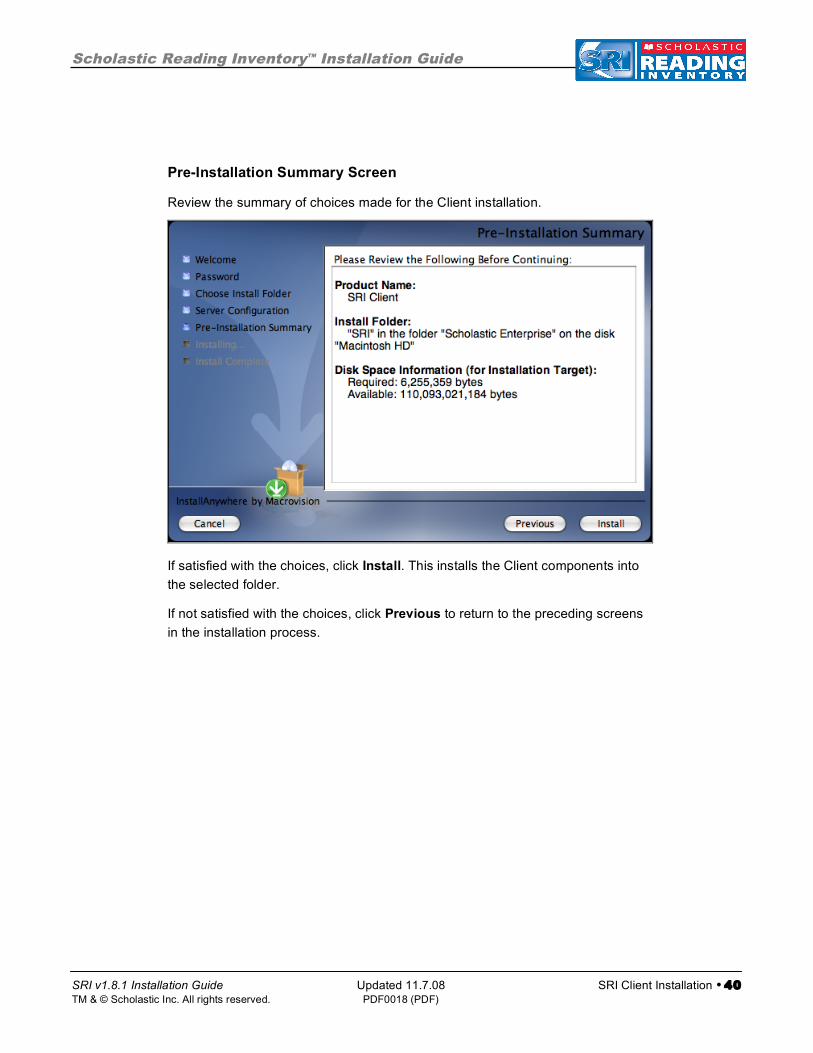
Pre-Installation Summary Screen
Review the summary of choices made for the Client installation.
If satisfied with the choices, click Install. This installs the Client components into
the selected folder.
If not satisfied with the choices, click Previous to return to the preceding screens
in the installation process.
Scholastic Reading Inventory™ Installation Guide
SRI v1.8.1 Installation Guide Updated 11.7.08 SRI Client Installation • 41 TM & © Scholastic Inc. All rights reserved. PDF0018 (PDF)
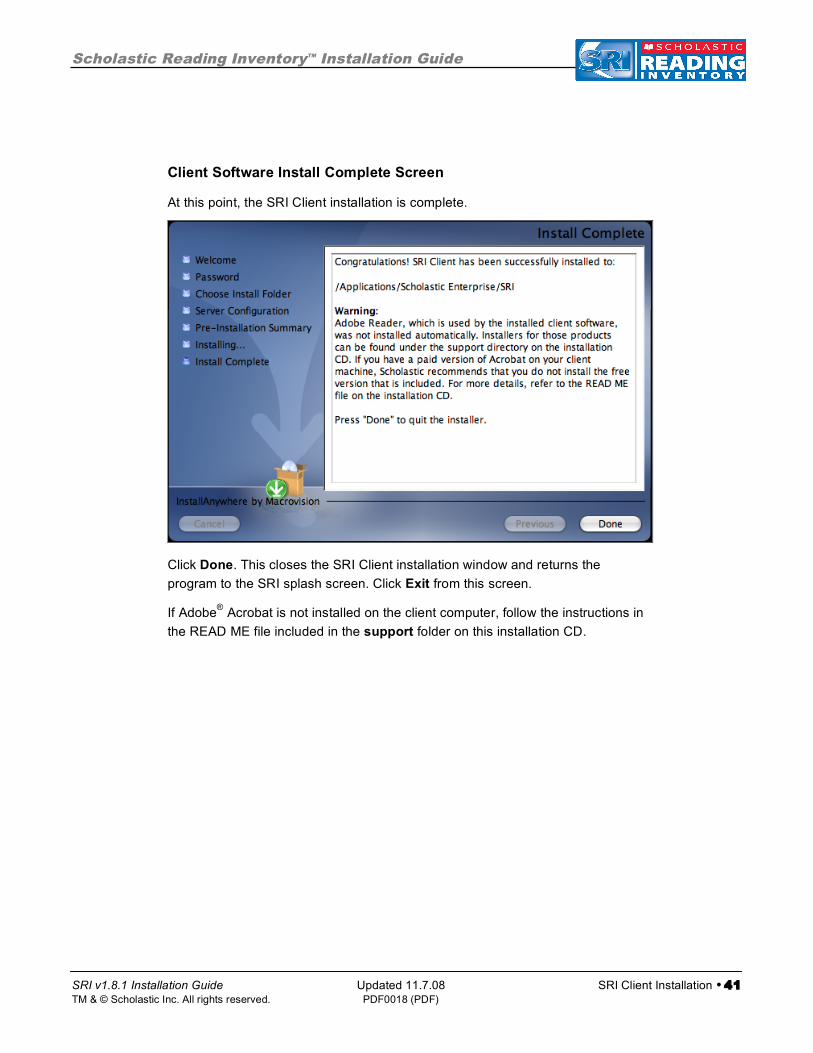
Client Software Install Complete Screen
At this point, the SRI Client installation is complete.
Click Done. This closes the SRI Client installation window and returns the
program to the SRI splash screen. Click Exit from this screen.
If Adobe® Acrobat is not installed on the client computer, follow the instructions in
the READ ME file included in the support folder on this installation CD.
Scholastic Reading Inventory™ Installation Guide
SRI v1.8.1 Installation Guide Updated 11.7.08 SAM Server Setup • 42 TM & © Scholastic Inc. All rights reserved. PDF0018 (PDF)
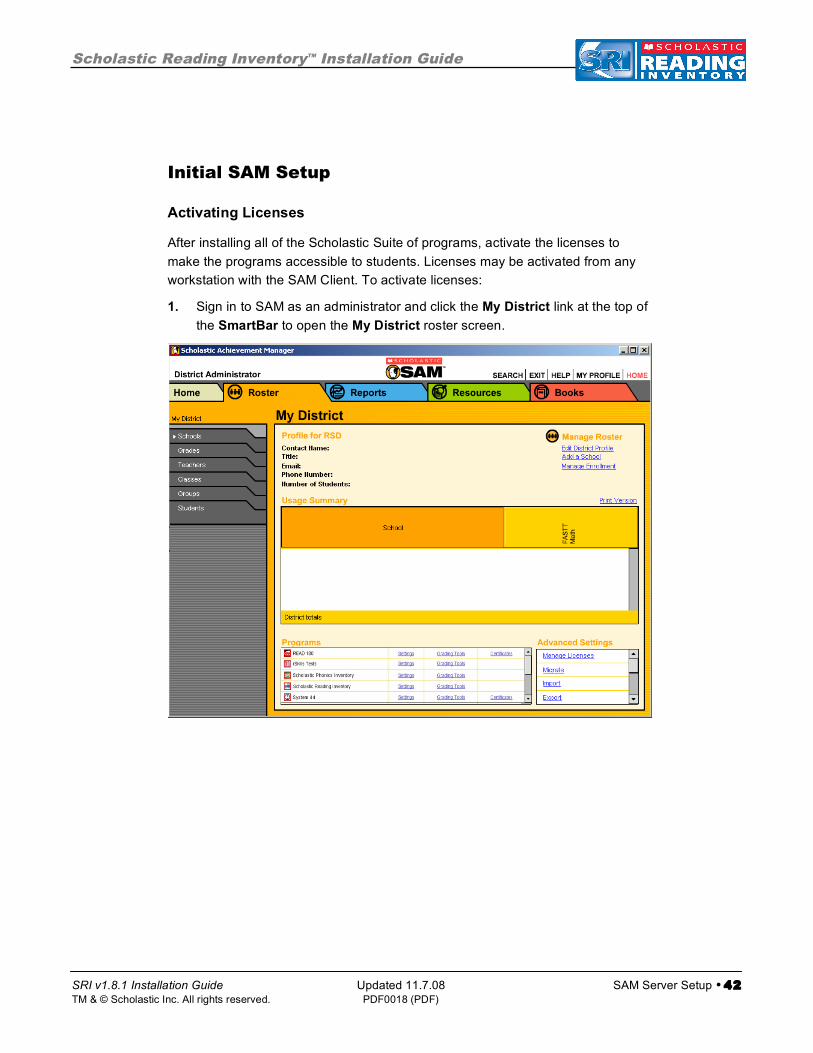
Initial SAM Setup
Activating Licenses
After installing all of the Scholastic Suite of programs, activate the licenses to
make the programs accessible to students. Licenses may be activated from any
workstation with the SAM Client. To activate licenses:
1. Sign in to SAM as an administrator and click the My District link at the top of
the SmartBar to open the My District roster screen.
Scholastic Reading Inventory™ Installation Guide
SRI v1.8.1 Installation Guide Updated 11.7.08 SAM Server Setup • 43 TM & © Scholastic Inc. All rights reserved. PDF0018 (PDF)
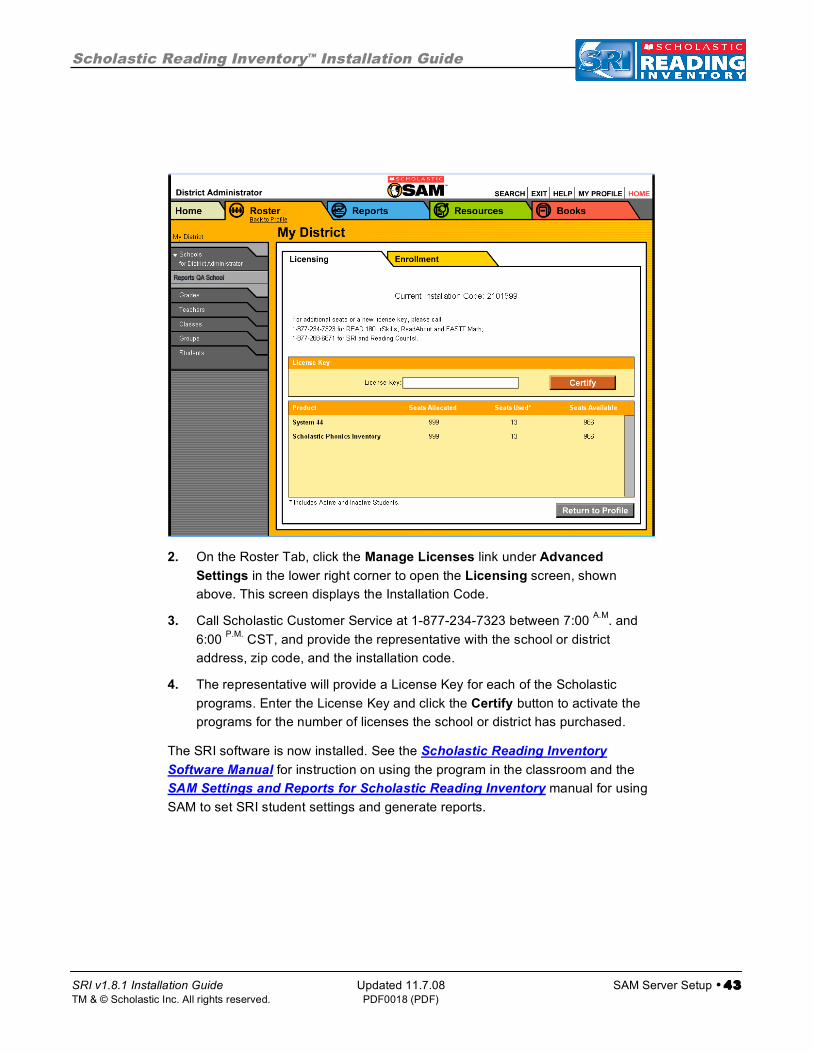
2. On the Roster Tab, click the Manage Licenses link under Advanced
Settings in the lower right corner to open the Licensing screen, shown
above. This screen displays the Installation Code.
3. Call Scholastic Customer Service at 1-877-234-7323 between 7:00 A.M. and
6:00 P.M. CST, and provide the representative with the school or district
address, zip code, and the installation code.
4. The representative will provide a License Key for each of the Scholastic
programs. Enter the License Key and click the Certify button to activate the
programs for the number of licenses the school or district has purchased.
The SRI software is now installed. See the Scholastic Reading Inventory
Software Manual for instruction on using the program in the classroom and the
SAM Settings and Reports for Scholastic Reading Inventory manual for using
SAM to set SRI student settings and generate reports.