Embed Size (px)
Citation preview
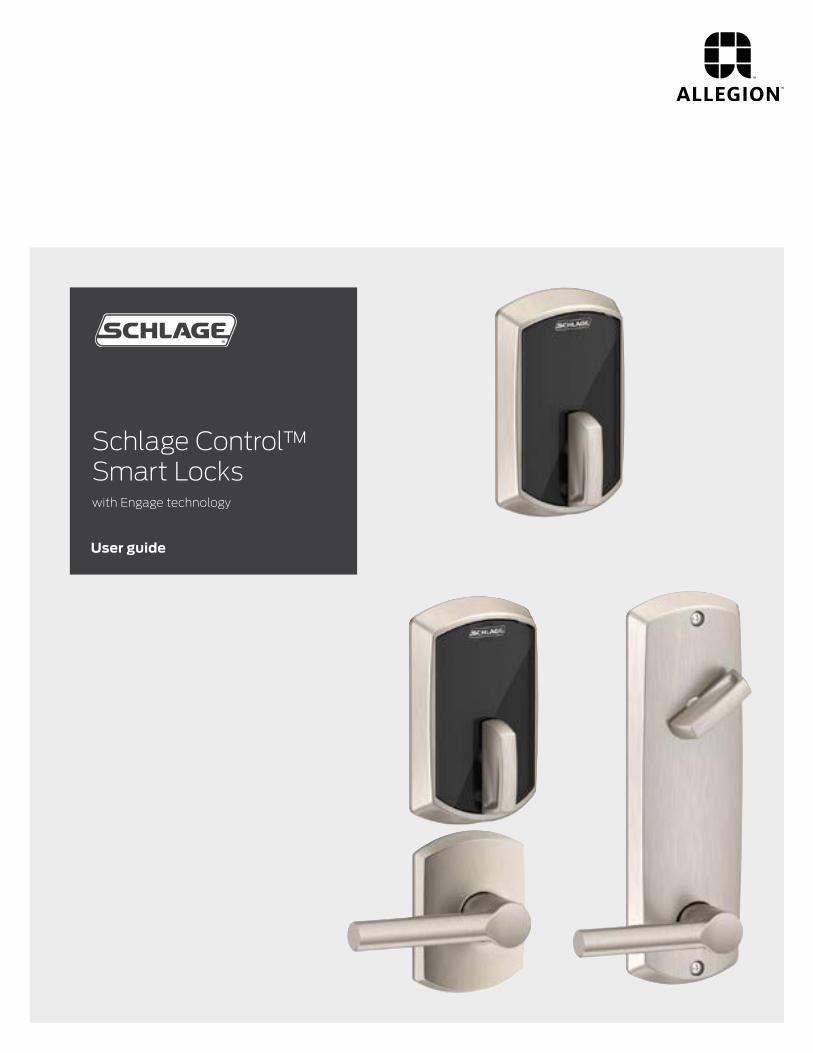
Schlage Control™ Smart Lockswith Engage technology
User guide
2 • Schlage • Schlage Control Smart Locks User Guide
Schlage Control™ Smart Locks with Engage technology
User GuideContents
3 Warranty
4 Standard Operation4 Operation from the Inside4 Operation from the Outside
5 Lock Indicator Guide
6 Changing the Batteries6 BE467 Deadbolt6 FE410 Interconnect
7 Battery Jump
8 Construction Mode
8 Factory Default Reset
9 Getting Started with the ENGAGE™ Mobile Application
10 Troubleshooting
Schlage • Schlage Control Smart Locks User Guide • 3
FCC Statement
This equipment has been tested and found to comply with the limits for a Class B digital device, pursuant to Part 15 of the FCC Rules. These limits are designed to provide reasonable protection against harmful interference in a residential installation. This equipment generates, uses, and can radiate radio frequency energy and, if not installed and used in accordance with the instructions, may cause harmful interference to radio communication. However, there is no guarantee that interference will not occur in a particular installation. If this equipment does cause harmful interference to radio or television reception, which can be determined by turning the equipment off and on, the user is encouraged to try to correct the interference by one of the following measures:• Reorient or relocate the receiving antenna.• Increase the separation between the equipment and receiver.• Connect the equipment into an outlet on a circuit different from that to which the receiver is connected.• Consult the dealer or an experienced radio/TV technician for help.
FCC Caution: Any changes or modifications not expressly approved by the party responsible for compliance could void the user’s authority to operate this equipment. This device complies with Part 15 of the FCC Rules. Operation is subject to the following two conditions: (1) This device may not cause harmful interference, and (2) this device must accept any interference received, including interference that may cause undesired operation.
FCC Radiation Exposure Statement
To comply with FCC/IC RF exposure requirements for mobile transmitting devices, this transmitter should only be used or installed at locations where there is at least 20 cm separation distance between the antenna and all persons.
Industry Canada Statement
Under Industry Canada regulations, this radio transmitter may only operate using an antenna of a type and maximum (or lesser) gain approved for the transmitter by Industry Canada. To reduce potential radio interference to other users, the antenna type and its gain should be so chosen that the equivalent isotropically radiated power (e.i.r.p.) is not more than that permitted for successful communication.
Industry Canada Radiation Exposure Statement
This Device complies with Industry Canada License-exempt RSS standard(s). Operation is subject to the following two conditions: (1) this device may not cause interference, and (2) this device must accept any interference, including interference that may cause undesired operation of the device.
Warranty
Lifetime Limited Mechanical and Finish Warranty and 1-Year Limited Electronics Warranty
Subject to the terms and conditions of the warranty, Schlage extends a lifetime limited mechanical and finish warranty and a one-year limited electronics warranty to the original consumer user (“Original User”) of our Schlage brand product (“Product”) against defects in material and workmanship, as long as the Original User occupies the residential premises upon which the Product was originally installed.
See answers.schlage.com for specific warranty details and limitations, or contact Schlage Customer Service at (888) 805-9837 in the U.S., 800-997-4734 in Canada or 018005067866 in Mexico for assistance.
Need Help?U.S.A.: 1-800-847-1864www.allegion.com/us
4 • Schlage • Schlage Control Smart Locks User Guide
Standard Operation
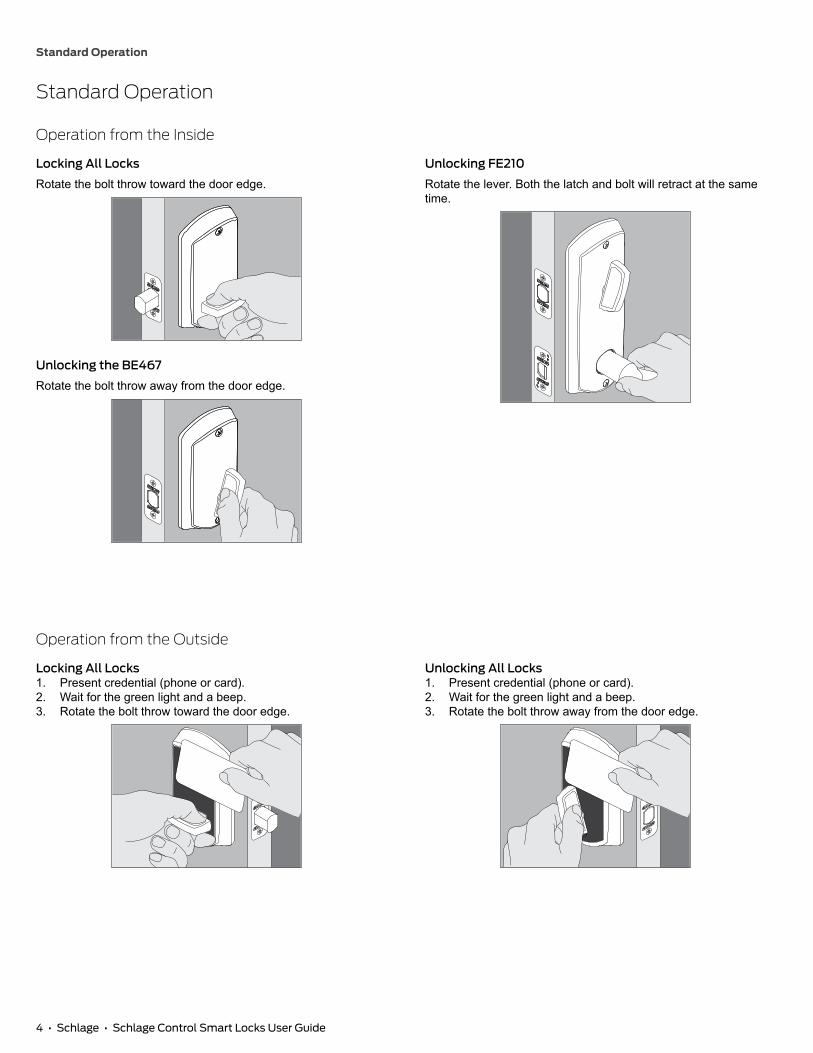
Standard Operation
Operation from the Inside
Locking All Locks
Rotate the bolt throw toward the door edge.
Unlocking the BE467
Rotate the bolt throw away from the door edge.
Unlocking FE210
Rotate the lever. Both the latch and bolt will retract at the same time.
Operation from the Outside
Locking All Locks1. Present credential (phone or card).2. Wait for the green light and a beep.3. Rotate the bolt throw toward the door edge.
Unlocking All Locks1. Present credential (phone or card).2. Wait for the green light and a beep.3. Rotate the bolt throw away from the door edge.
Lock Indicator Guide
Schlage • Schlage Control Smart Locks User Guide • 5
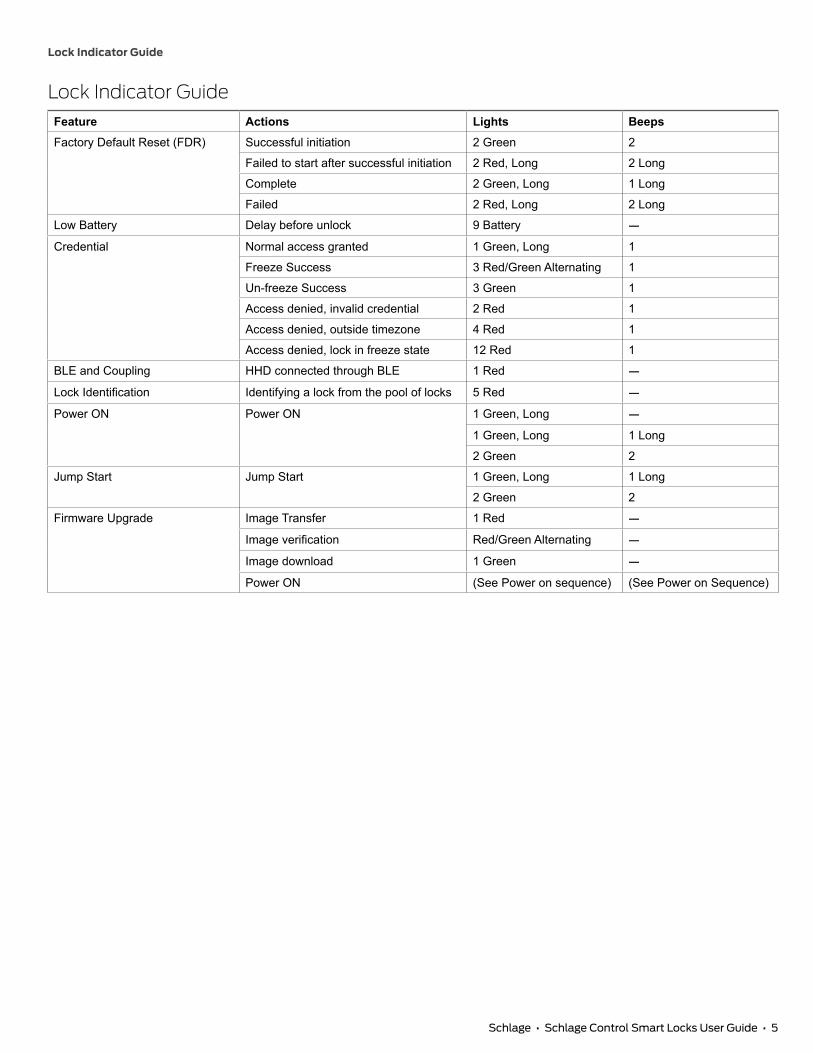
Lock Indicator GuideFeature Actions Lights BeepsFactory Default Reset (FDR) Successful initiation 2 Green 2
Failed to start after successful initiation 2 Red, Long 2 Long
Complete 2 Green, Long 1 Long
Failed 2 Red, Long 2 Long
Low Battery Delay before unlock 9 Battery —
Credential Normal access granted 1 Green, Long 1
Freeze Success 3 Red/Green Alternating 1
Un-freeze Success 3 Green 1
Access denied, invalid credential 2 Red 1
Access denied, outside timezone 4 Red 1
Access denied, lock in freeze state 12 Red 1
BLE and Coupling HHD connected through BLE 1 Red —
Lock Identification Identifying a lock from the pool of locks 5 Red —
Power ON Power ON 1 Green, Long —
1 Green, Long 1 Long
2 Green 2
Jump Start Jump Start 1 Green, Long 1 Long
2 Green 2
Firmware Upgrade Image Transfer 1 Red —
Image verification Red/Green Alternating —
Image download 1 Green —
Power ON (See Power on sequence) (See Power on Sequence)
6 • Schlage • Schlage Control Smart Locks User Guide
Changing the Batteries
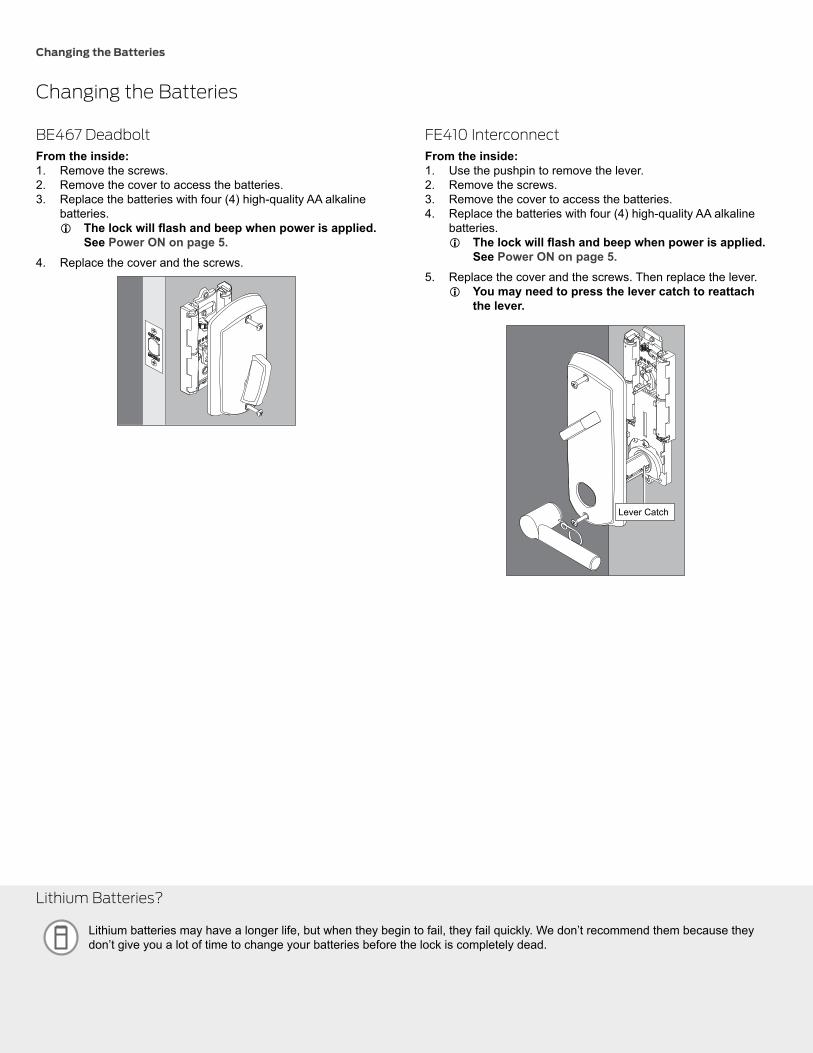
Changing the Batteries
BE467 DeadboltFrom the inside:1. Remove the screws.2. Remove the cover to access the batteries.3. Replace the batteries with four (4) high-quality AA alkaline
batteries. L The lock will flash and beep when power is applied.
See Power ON on page 5.4. Replace the cover and the screws.
FE410 InterconnectFrom the inside:1. Use the pushpin to remove the lever.2. Remove the screws.3. Remove the cover to access the batteries.4. Replace the batteries with four (4) high-quality AA alkaline
batteries. L The lock will flash and beep when power is applied.
See Power ON on page 5.5. Replace the cover and the screws. Then replace the lever.
L You may need to press the lever catch to reattach the lever.
Lever Catch
Lithium Batteries?
Lithium batteries may have a longer life, but when they begin to fail, they fail quickly. We don’t recommend them because they don’t give you a lot of time to change your batteries before the lock is completely dead.
Battery Jump
Schlage • Schlage Control Smart Locks User Guide • 7
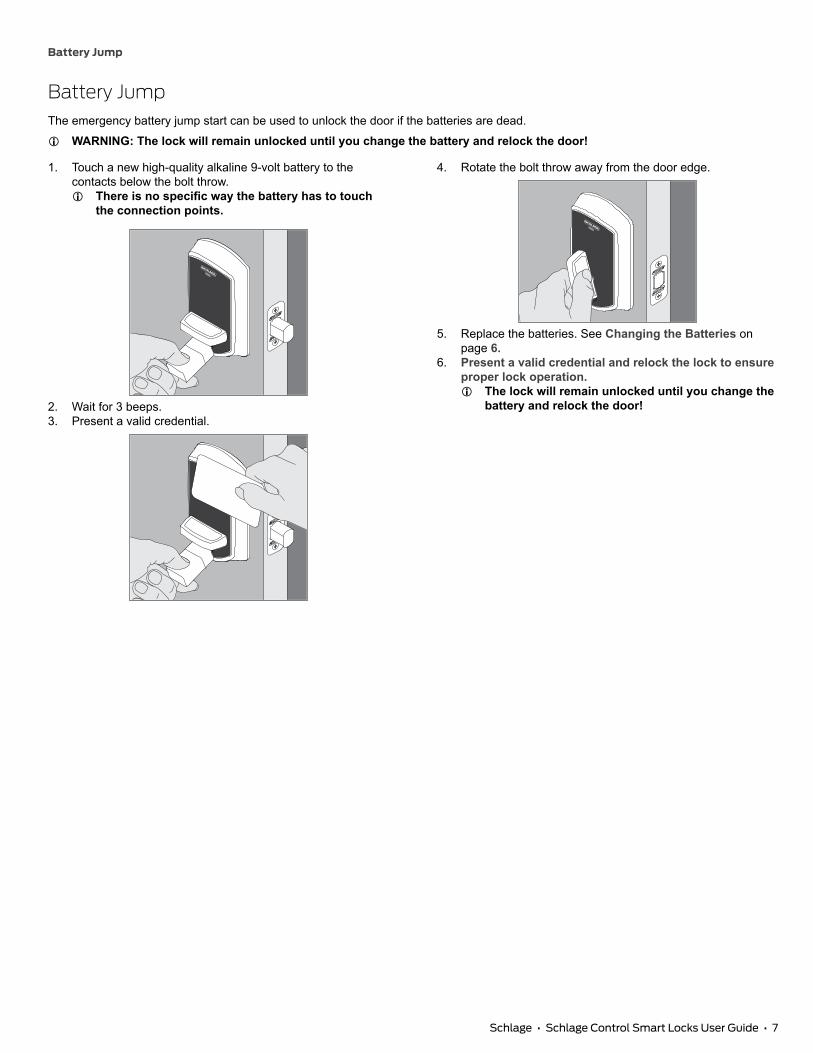
Battery JumpThe emergency battery jump start can be used to unlock the door if the batteries are dead.
L WARNING: The lock will remain unlocked until you change the battery and relock the door!
1. Touch a new high-quality alkaline 9-volt battery to the contacts below the bolt throw.
L There is no specific way the battery has to touch the connection points.
2. Wait for 3 beeps.3. Present a valid credential.
4. Rotate the bolt throw away from the door edge.
5. Replace the batteries. See Changing the Batteries on page 6.
6. Present a valid credential and relock the lock to ensure proper lock operation.
L The lock will remain unlocked until you change the battery and relock the door!
8 • Schlage • Schlage Control Smart Locks User Guide
Construction Mode
Construction ModeConstruction Mode is NOT required to operate lock. Construction Mode is used to allow access before the lock is captured and/or for testing purposes before capturing.• Enabled by default and after a factory reset.• The lock will remain in Construction Mode until the mode is cancelled as described below.• No access audits are captured while the lock is in Construction Mode.To enter construction mode, present a valid construction credential. Any other construction credentials ordered at the same time or programmed for your site work in the lock while it is in construction mode.To exit construction mode, retract the bolt and then use the mobile app to capture the lock. All construction credentials are not valid once the lock exits construction mode.
Factory Default ResetA Factory Default Reset (FDR) returns the lock to the original settings as shipped from the factory. This removes configurations, databases, and requires the lock to be re-captured. The FDR process does not remove the lock from your ENGAGE account.1. Disconnect the batteries for at least ten (10) seconds.2. Reconnect the batteries.3. Wait for the lock to beep and flash three (3) times.4. Within ten (10) seconds, rotate the iterior tail piece back and forth two (2) times.5. The lock will flash one (1) long green flash and beep one (1) long beep to indicate the process was successful.
Getting Started with the ENGAGE™ Mobile Application
Schlage • Schlage Control Smart Locks User Guide • 9
Getting Started with the ENGAGE™ Mobile ApplicationENGAGE cloud-based web and mobile applications make it easy to configure lock settings, manage user access and view audits and alerts from anywhere. Your new lock can be updated anytime from the ENGAGE mobile application when within Bluetooth range.
Download the ENGAGE mobile application
Search for “Allegion ENGAGE” on the App Store (iOS) or Google Play Store (Android) to download the free ENGAGE mobile application. The ENGAGE app is compatible with iPhone 4S and newer models running iOS 7 or newer. Android devices require Android Kitkat 4.4 or newer.
ENGAGE Account Setup
An account is required to use the ENGAGE cloud-based web and mobile tools. Register for an ENGAGE account in the mobile app by selecting the “Create an Account” button from the sign in screen. You can also register for a new account on the web at https://portal.allegionengage.com/signup. After registering for a new account, you will receive a verification email. You must click on the link in the message to verify your account. This is required to keep your account active.To invite others to assist with administrative duties for your site:1. Select “My Team” form the tab bar.2. Select the “+” icon in the upper right corner.3. Enter the email address, first name, last name and role of the person you wish to invite.
• Administrator: The most trusted administrative access role. The Administrator can perform all duties within the ENGAGE web and mobile applications.
• Manager: Same administrative privileges as an Administrator but cannot invite or remove other Managers or Administrators.• Operator: The most limited access. An operator can only connect to locks to send updates or perform diagnostics.
4. Select “Save.”
Commission a lock
To manage your lock with the ENGAGE cloud-based web and mobile applications, it must be commissioned with the ENGAGE app. Before commissioning, the lock must be fully assembled with the batteries installed and the battery connector plugged in.The lock can be in Factory Default or Construction Mode. The deadbolt must be retracted.1. Sign in to the ENGAGE mobile app.2. Select “Connect from the tab bar at the bottom of the screen.3. Select the “+” icon in the upper right corner.4. Follow the lock commissioning wizard to complete initial setup of the lock. Locks can be commissioned as new, from a previously created
profile, or cloned from an existing lock in your site. Upon selecting from these options (described below), the LED on the outside of the lock will begin blinking red to indicate connectivity with the app.• Select “Create New” to commission the lock with new configuration and access rights. This is the most common scenario when
commissioning a lock.• Select “Assign” if you have already created a profile for the lock in the “Manage Locks” view in the mobile app or in the ENGAGE web
portal (if you have already created the lock in the ENGAGE cloud).• Select “Clone” to give the lock the same configuration and access rights as another lock you’ve already commissioned on your site. If
you’re unsure which option to choose, select “Create New.”
10 • Schlage • Schlage Control Smart Locks User Guide
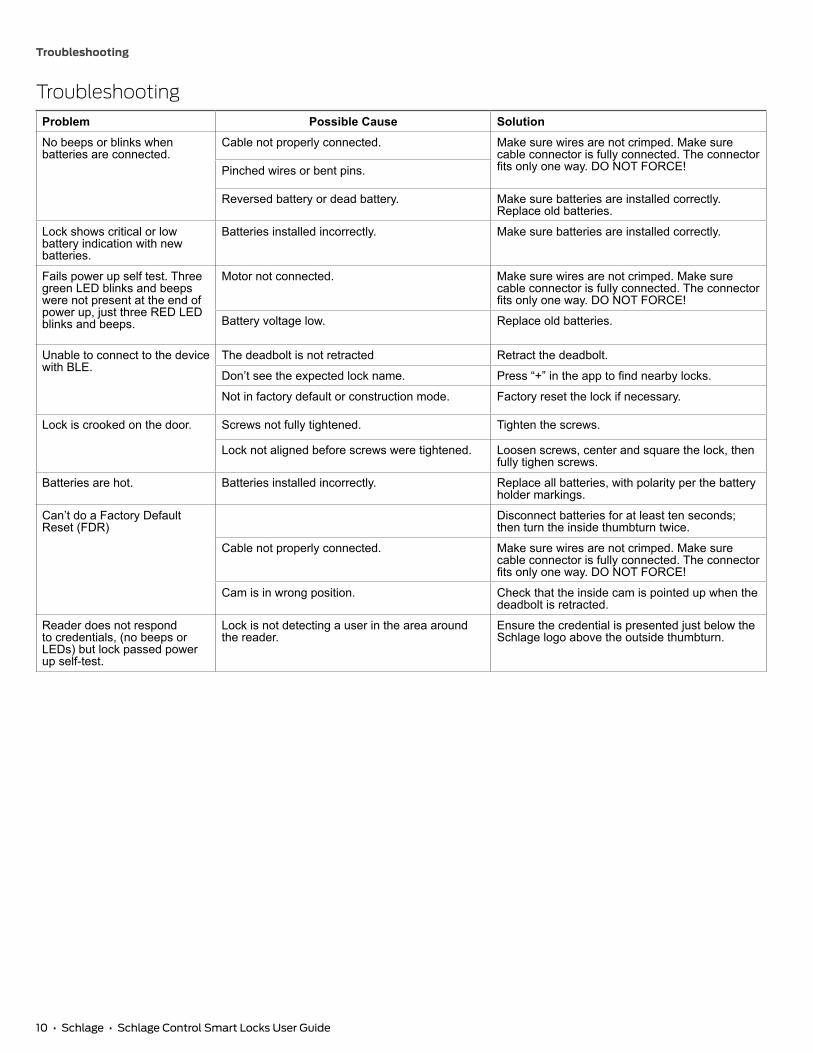
Troubleshooting
TroubleshootingProblem Possible Cause SolutionNo beeps or blinks when batteries are connected.
Cable not properly connected. Make sure wires are not crimped. Make sure cable connector is fully connected. The connector fits only one way. DO NOT FORCE!Pinched wires or bent pins.
Reversed battery or dead battery. Make sure batteries are installed correctly. Replace old batteries.
Lock shows critical or low battery indication with new batteries.
Batteries installed incorrectly. Make sure batteries are installed correctly.
Fails power up self test. Three green LED blinks and beeps were not present at the end of power up, just three RED LED blinks and beeps.
Motor not connected. Make sure wires are not crimped. Make sure cable connector is fully connected. The connector fits only one way. DO NOT FORCE!
Battery voltage low. Replace old batteries.
Unable to connect to the device with BLE.
The deadbolt is not retracted Retract the deadbolt.
Don’t see the expected lock name. Press “+” in the app to find nearby locks.
Not in factory default or construction mode. Factory reset the lock if necessary.
Lock is crooked on the door. Screws not fully tightened. Tighten the screws.
Lock not aligned before screws were tightened. Loosen screws, center and square the lock, then fully tighen screws.
Batteries are hot. Batteries installed incorrectly. Replace all batteries, with polarity per the battery holder markings.
Can’t do a Factory Default Reset (FDR)
Disconnect batteries for at least ten seconds; then turn the inside thumbturn twice.
Cable not properly connected. Make sure wires are not crimped. Make sure cable connector is fully connected. The connector fits only one way. DO NOT FORCE!
Cam is in wrong position. Check that the inside cam is pointed up when the deadbolt is retracted.
Reader does not respond to credentials, (no beeps or LEDs) but lock passed power up self-test.
Lock is not detecting a user in the area around the reader.
Ensure the credential is presented just below the Schlage logo above the outside thumbturn.

Schlage • Schlage Control Smart Locks User Guide • 11
Allegion (NYSE: ALLE) is a global pioneer in safety and security, with leading brands like CISA®, Interflex®, LCN®, Schlage® and Von Duprin®. Focusing on security around the door and adjacent areas, Allegion produces a range of solutions for homes, businesses, schools and other institutions. Allegion is a $2 billion company, with products sold in almost 130 countries. For more, visit www.allegion.com.
About Allegion™
© Allegion 2016P517-268, Rev. 06/16www.allegion.com/us
© Allegion 2016P517-268, Rev. 06/16-dwww.allegion.com/us