Embed Size (px)
Citation preview

Scheduling Master Schedule Board - Procedures January 21, 2009
Please be aware that Eagle Software’s objective is to provide their users with documented procedures, such as the one that follows, in an attempt to expedite the steps necessary to accomplish certain tasks within Aeries™. However, Eagle Software recognizes that each school and district using Aeries™ has established their own unique guidelines and policies. By using these procedures you assume full responsibility for the appropriate application, the results of their use, any impact upon your database and conforming to all guidelines and policies that have been established by your school or district.
The Scheduling Master Schedule Board is an Aeries™ program that has been created to assist the user with setting up and updating the Scheduling Master Schedule. Scheduling process usually involves a white board with the periods, teachers and different colored labels with the names of the classes to be scheduled. The labels are then moved around to try and create a successful Master Schedule for the upcoming semester or school year. The purpose of this Aeries™ program is to eliminate manually moving the colored labels around on a white board and then entering the changes into the Aeries™ database. This form displays an overall view of the Scheduling Master Schedule. The user can add, change, delete and move classes instantly within the Scheduling Master Schedule, and then schedule all students to see the results.
NOTE:
The information that will be displayed on this form depends upon the size of the monitor. These procedures have been written with the use of a 17 inch monitor. If the monitor is less than 17 inches the scroll bar will need to be utilized to display any existing information outside of these parameters. Also, the monitor settings should be set at a minimum of 1024 X 768.

Page 2 –Aeries™ Student Information System
DISPLAY SCHEDULINGMASTER SCHEDULE BOARD
The Scheduling Master Schedule Board is accessible from the Scheduling Master Schedule form on the Student Scheduling Cycle.
Page 3 –Aeries™ Student Information System
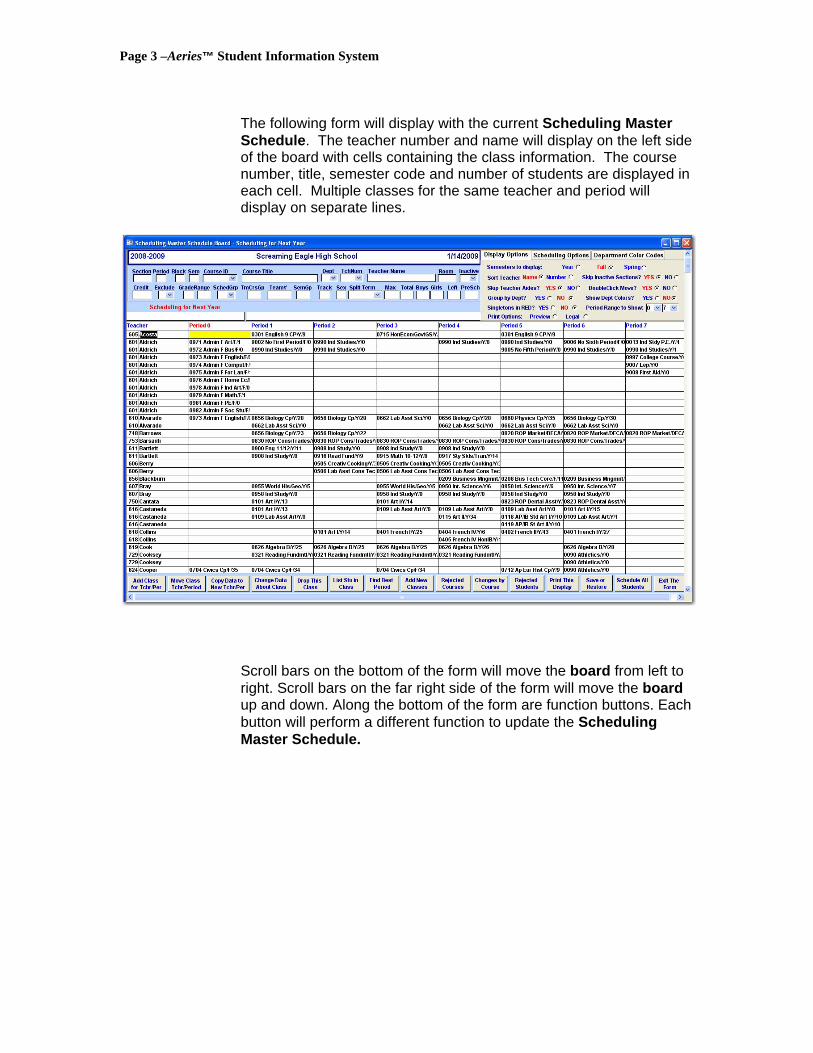
The following form will display with the current Scheduling Master
Schedule. The teacher number and name will display on the left side of the board with cells containing the class information. The course number, title, semester code and number of students are displayed in each cell. Multiple classes for the same teacher and period will display on separate lines.
Scroll bars on the bottom of the form will move the board from left to
right. Scroll bars on the far right side of the form will move the board up and down. Along the bottom of the form are function buttons. Each button will perform a different function to update the Scheduling Master Schedule.

Page 4 –Aeries™ Student Information System
The top right of the form displays the different options available.
There are 3 tabs – Display Options, Scheduling Options and Department Color Codes.
Below are the Display Options available. The options selected will
display in RED. These options will change how the Scheduling Master Schedule board displays.
• Semesters to display: Select the term to display, Year, Fall, Spring or Trimesters 1, 2 or 3.
• Sort Teacher: Select to sort by teacher name or teacher
number.
• Skip Inactive Sections? Selecting Yes will not display sections tagged as inactive.
• Skip Teacher Aides? Selecting Yes will not display sections
of courses that are tagged as Teacher Aide as defined in the Course Data.

Page 5 –Aeries™ Student Information System
• DoubleClick Move? Selecting Yes will enable the user to
double click on an existing class then click on any empty teacher/period cell to move the class into. A message will display to warn of possible errors.
• Group by Dept? Selecting Yes will sort the classes by
department and display the department name in the teacher name column. The department codes are assigned on the Course Data form.
• Show Dept Colors? Selecting Yes will display the classes
with the colors assigned to the departments on the Department Color Codes tab.
• Singletons in RED? Selecting Yes will display all singleton
classes for a course in red.
• Period Range to Show: User can limit the period range to display on the board. The starting period may be 0 or 1 and the ending period may be 4-9.
• Print Options: Preview will display a print preview of the
board when the Print This Display button is clicked on the bottom of the form. If Legal is selected, the board will print on legal sized paper (8 1/2 by 13). If Legal is not selected, the board will print on letter sized paper (8 1/2 by 11).
Below are the Scheduling Options available. The results and options are also available on the Schedule All Students Into Classes form on the Student Scheduling Cycle. The Scheduling Statistics will display the results of the last scheduling run.

Page 6 –Aeries™ Student Information System
Below are the Department Color Codes available. Up to 10 different
departments can be assigned colors. If the Department Color Codes are changed, click the Refresh button for the new color settings to take effect.
DISPLAY CLASS INFO FOR A SELECTED PERIOD AND TEACHER
To display more class information for a particular period and teacher, click the mouse on the class selected for the teacher. The detailed information will display at the top of the form. The selected class will be hi-lighted in yellow.
ADD A CLASS To add a class to the Scheduling Master Schedule, click the mouse
on the Period and Teacher selected and the class will be hi-lighted in yellow. Click the mouse on the Add Class for Tchr/Per button.
Page 7 –Aeries™ Student Information System
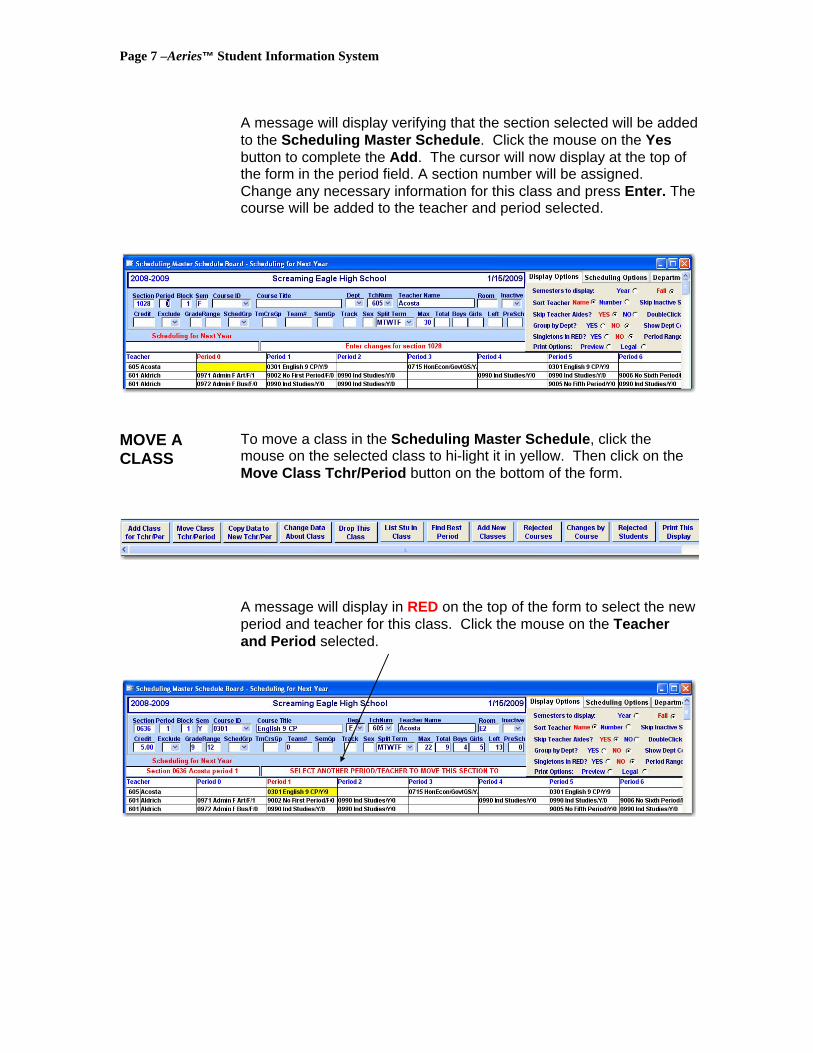
A message will display verifying that the section selected will be added
to the Scheduling Master Schedule. Click the mouse on the Yes button to complete the Add. The cursor will now display at the top of the form in the period field. A section number will be assigned. Change any necessary information for this class and press Enter. The course will be added to the teacher and period selected.
MOVE A CLASS
To move a class in the Scheduling Master Schedule, click the mouse on the selected class to hi-light it in yellow. Then click on the Move Class Tchr/Period button on the bottom of the form.
A message will display in RED on the top of the form to select the new
period and teacher for this class. Click the mouse on the Teacher and Period selected.

Page 8 –Aeries™ Student Information System
A message will display verifying the section selected will be moved to
the Teacher and Period selected. To complete the move, click the mouse on the Yes button. The following message will display if the student has been previously scheduled and a conflict may occur.
To continue with the move click the mouse on the Yes button and the Scheduling Master Schedule Board will be updated. To cancel the move, click the mouse on the No button.
COPY A CLASS
To copy a selected section to a new teacher and period, click on the selected class. The class will be hi-lighted. Click on the Copy Data to New Tchr/Per button on the bottom of the form.
A message will display in RED to select another period/teacher to
copy this section to.

Page 9 –Aeries™ Student Information System
A message will display verifying the section will be copied to the teacher and period selected. To complete the copy, click the mouse on the Yes button. To cancel the copy, click the mouse on the No button.
CHANGE CLASS DATA
To change data on an existing class in the Scheduling Master Schedule, click the mouse on the Period and Teacher selected and the class will be hi-lighted. Click the mouse on the Change Data About Class button.
The class information will display at the top of the form. Change any
necessary information for this class and press Enter. The new class information will display.
DROP A CLASS
To drop a class from the Scheduling Master Schedule, click the mouse on the Class selected and the class will be hi-lighted. Click the mouse on the Drop This Class button.

Page 10 –Aeries™ Student Information System
A message will display verifying that the section selected will be
deleted from the Scheduling Master Schedule. To complete the delete, click the mouse on the Yes button. The class will no longer display and will be deleted from the Scheduling Master Schedule. To cancel the delete, click the mouse on the No button.
If there are students scheduled in the class, the following message will
display. To continue with the delete click the mouse on the Yes button. To cancel the delete, click the mouse on the No button.
If there are any students with course requests for this class a message
will display. If Yes is selected the students course request will be deleted. If No is selected the students course request will remain but the section will be deleted from the Scheduling Master Schedule.
NOTE:
The total number of students scheduled for this class should be zero prior to deleting this class from the Scheduling Master Schedule.

Page 11 –Aeries™ Student Information System
LIST CLASS To display a listing of students in a class, click the mouse on the
class selected and the class will be hi-lighted. Click the mouse on the List Stu in Class button on the bottom of the form. A message to include inactive students will display. Select Yes or No. The following report will display in print preview with all students currently enrolled in the class selected.
FIND BEST PERIOD
Click the mouse on the Period and Teacher selected and the class will be hi-lighted. Click the mouse on the Find Best Period button. This option will temporarily move the class to each period and attempt to schedule all students.
After it has scheduled each period, it shows the total rejects above the period. When finished, it will display a recommendation based on the period with the fewest rejects.
The recommended period is not based on the available teachers or rooms.

Page 12 –Aeries™ Student Information System
ADD NEW CLASSES
Clicking on the Add New Classes button on the bottom of the form will display the Inter-Active Scheduling Master Schedule Builder form. This form allows you to add sections for a selected course.
To add sections for a course, enter a course number in the Course ID
field or click the mouse on the drop down to locate a course. Once the course has been selected in Area 1 press Tab and the number of Course Requests that have been made for this course will display to the right by grade.

Page 13 –Aeries™ Student Information System
Area 2 will display all of the scheduling conflicts by term for each
period. To display the conflict details double click the mouse on the period column and term.
The following text box will display with all potential conflicts for this
course.

Page 14 –Aeries™ Student Information System
Press Tab and the cursor will display in the Sections to Add fields. In
Area 3 the number of sections to be added can be entered for each period. As each number is added the information for the period will display in Area 4.
To setup ALL sections the same enter the information in Area 4 on
the top line.

Page 15 –Aeries™ Student Information System
To setup each section differently enter the information in Area 4 for
each section in each period.
After all section information has been entered click the mouse on the
Add Sections button in Area 5 and the sections will be added to the Scheduling Master Schedule.
REJECTED COURSES
After running the scheduler the rejected courses can be displayed. Click the mouse on the Rejected Courses button on the bottom of the form. The following text box will display courses that have students rejected from them. The Total column will display the total number of rejects. The columns to the right will show the total number of students rejected, broken down by the reject reason.

Page 16 –Aeries™ Student Information System
To display the rejected students for a course click the mouse on the STU button located to the right of the Total column. The following text box will display showing each student rejected from this course and the reject reason.
To delete a students course request click the mouse on the Delete
button and the following message will display. Click the mouse on the Yes button. Click on the Red X on the upper right corner of the form to Exit.

Page 17 –Aeries™ Student Information System
To display the Scheduling Master Schedule for a course click the mouse on the SMS button. The following text box will display which allows you to Change Course information. See the information Changes by Course for details.
Changes can be made for each individual section by entering the change in the desired field displayed. To make a change to all sections displayed enter the information on the bottom line. Click the mouse on the CHG ALL button. A message will display verifying the change. Click the mouse on the Yes button. Click on the Red X on the upper right corner of the form to Exit.
CHANGES BY COURSE
To change section information for a specific course, select any class for that specific course. Click the mouse on the Changes by Course button on the bottom of the form. The following text box will display with all sections setup for this course.

Page 18 –Aeries™ Student Information System
Changes can be made for each individual section by entering the change in the field selected. To make a change to all sections displayed enter the information on the bottom line. Click the mouse on the CHG ALL button. A message will display verifying the change. Click the mouse on the Yes button.
In the example below the room number will be changed to F1 for all sections for the course 0835. The Scheduling Master Schedule Board has been updated with this change. Click on the Red X on the upper right corner of the form to Exit.

Page 19 –Aeries™ Student Information System
PRINT DISPLAY
To Print the class information for the teachers and periods as displayed on the form, click the mouse on the Print This Display.
The following is an example of the report that will be generated.
SAVE OR RESTORE
This button lets you save the current SMS/SSS tables or restore previously saved results. This is the same form as the Save or Restore Scheduling Results from the Student Scheduling cycle.

Page 20 –Aeries™ Student Information System
The Save or Restore Scheduling Results allows the user to keep the current SMS and SSS tables, and to restore them later on if desired. Creates and updates a database named SAV------.MDB containing multiple backups of the SMS and SSS tables. Form shows list of available saved results, allows user to save more results, restore saved results, or delete saved results
To save the current scheduling results click on the button labeled
Save current scheduling results (SMS and SSS tables). The following message will display.
A comment can be entered by typing over the default text of Saved scheduling results. The date and time will automatically be saved.

Page 21 –Aeries™ Student Information System
To Restore a prior backup of the SMS and SSS tables click the mouse on the result listed under Comments. Click on the Restore scheduling results button. The following message will display.
To continue with the restore click on Yes. Click on No to cancel the process.
To Delete a prior backup of the SMS and SSS tables click the mouse on the result listed under Comments. Click on the Delete sscheduling results button. The following message will display.
tored
To continue with the delete click on Yes. Click on No to cancel the process.

Page 22 –Aeries™ Student Information System
SCHEDULE ALL STUDENTS
Before Scheduling All Students, verify that all Scheduling Options have been correctly selected. To schedule students into classes click the mouse on the Schedule All Students button. The following message will display.
Click the mouse on Yes to start the Scheduler. The scheduling
progress will display at the top of the form. When the scheduler has been completed the results can be viewed on the Scheduling Options tab at the top right of the board.
After scheduling is complete, a red message will display indicating if you have more, less, or the same number of rejects from the previous scheduling run.