Embed Size (px)
Citation preview
Scheduling Guide
Revised August 30, 2010
Instructions for creating and managing employee schedules
ADP’s TrademarksThe ADP Logo is a registered trademark of ADP of North America, Inc. ADP Workforce Now is a trademark of Automatic Data Processing, Inc.
Third-Party TrademarksMicrosoft and Windows are registered trademarks of Microsoft Corporation in the United States and/or other countries.Adobe, the Adobe logo, Acrobat, the Acrobat logo and Reader are registered trademarks of Adobe Systems Incorporated in the United States and/or other countries.
All other trademarks are the property of their respective owners.
Copyright © 2010 ADP, Inc. All rights reserved.
U.S. Government Restricted Rights. The Software and written materials accompanying the Software are “commercial computer software” or “commercial computer software documentation.” Absent a written agreement to the contrary, the Government’s rights with respect to such Software or materials are limited by the terms of the applicable product/service license agreement, pursuant to FAR' 12.212(a) and/or DFARS' 227.7202-1(a), as applicable.
The information contained herein constitutes proprietary and confidential information of ADP. It must not be copied, transmitted, or distributed in any form or by any means, electronic, mechanical, or other, including photocopy, recording, or any information storage and retrieval system, without the express written permission of ADP.
ADP provides this publication “as is” without warranty of any kind, either express or implied, including, but not limited to, the implied warranties of merchantability or fitness for a particular purpose. ADP is not responsible for any technical inaccuracies or typographical errors which may be contained in this publication. Changes are periodically made to the information herein, and such changes will be incorporated in new editions of this publication. ADP may make improvements and/or changes in the product and/or the programs described in this publication at any time without notice.


Contents
Contents i
Introduction 1Why Use Schedules? . . . . . . . . . . . . . . . . . . . . . . . . . . . . . . . . . . . . . . . . . . . . . . . . 1Types of Schedules . . . . . . . . . . . . . . . . . . . . . . . . . . . . . . . . . . . . . . . . . . . . . . . . . 1Using Schedules. . . . . . . . . . . . . . . . . . . . . . . . . . . . . . . . . . . . . . . . . . . . . . . . . . . . 2Using the Single-Employee Calendar View to Perform Scheduling Tasks . . . . . . . . . . . . 2Getting Help on Performing Scheduling Tasks . . . . . . . . . . . . . . . . . . . . . . . . . . . . . . . 2
Chapter 1The Schedules Overview 3
Schedule Viewing Options and Features . . . . . . . . . . . . . . . . . . . . . . . . . . . . . . . . . . . 3Employee Viewing Options and Features . . . . . . . . . . . . . . . . . . . . . . . . . . . . . . . . . . 5
Using Single-Employee Schedule Calendars . . . . . . . . . . . . . . . . . . . . . . . . . . . . . . . . . . . . . 6Viewing an Employee’s 4-Week Schedule . . . . . . . . . . . . . . . . . . . . . . . . . . . . . . . . . . 7
Chapter 2Working With Filters 9
Using Employee Filters . . . . . . . . . . . . . . . . . . . . . . . . . . . . . . . . . . . . . . . . . . . . . . . 9Using Schedule Filters . . . . . . . . . . . . . . . . . . . . . . . . . . . . . . . . . . . . . . . . . . . . . . . 9
Employee Filters . . . . . . . . . . . . . . . . . . . . . . . . . . . . . . . . . . . . . . . . . . . . . . . . . . . . . . . . . . 10Applying an Existing Employee Filter . . . . . . . . . . . . . . . . . . . . . . . . . . . . . . . . . . . . 10Creating a New Employee Filter. . . . . . . . . . . . . . . . . . . . . . . . . . . . . . . . . . . . . . . . 10Editing an Employee Filter . . . . . . . . . . . . . . . . . . . . . . . . . . . . . . . . . . . . . . . . . . . 11
Schedule Filters . . . . . . . . . . . . . . . . . . . . . . . . . . . . . . . . . . . . . . . . . . . . . . . . . . . . . . . . . . 12Applying an Existing Schedule Filter . . . . . . . . . . . . . . . . . . . . . . . . . . . . . . . . . . . . . 12Creating a New Schedule Filter . . . . . . . . . . . . . . . . . . . . . . . . . . . . . . . . . . . . . . . . 12Editing a Schedule Filter . . . . . . . . . . . . . . . . . . . . . . . . . . . . . . . . . . . . . . . . . . . . . 14Temporarily Adding Employees to the Filtered Schedule View. . . . . . . . . . . . . . . . . . . 14
Chapter 3Using Daily Schedules 15
The Daily Schedules - Edit Single Mode. . . . . . . . . . . . . . . . . . . . . . . . . . . . . . . . . . . . . . . . 16Creating a Schedule for a Single Employee on a Single Day . . . . . . . . . . . . . . . . . . . . 17Editing a Single Schedule for a Single Employee . . . . . . . . . . . . . . . . . . . . . . . . . . . . 18Deleting a Single Schedule for a Single Employee . . . . . . . . . . . . . . . . . . . . . . . . . . . 19
The Daily Schedules - Assign Multiple Mode . . . . . . . . . . . . . . . . . . . . . . . . . . . . . . . . . . . . 20Replacing all Schedules on Selected Dates . . . . . . . . . . . . . . . . . . . . . . . . . . . . . . . . 21Adding New Schedules for One or More Employees
on One or More Days . . . . . . . . . . . . . . . . . . . . . . . . . . . . . . . . . . . . . . . . . . . . 22Modifying Selected Properties of Multiple Schedules . . . . . . . . . . . . . . . . . . . . . . . . . 24
ADP Workforce Now Time & Attendance Module i Scheduling Guide - Rev. August 30, 2010
Contents
The Daily Schedules - Delete or Restore Mode . . . . . . . . . . . . . . . . . . . . . . . . . . . . . . . . . . 25Deleting all Schedules on Selected Days for
One or More Employees . . . . . . . . . . . . . . . . . . . . . . . . . . . . . . . . . . . . . . . . . . 26Deleting Schedule Deviations and Restoring Recurring Schedules . . . . . . . . . . . . . . . . 26
Using Quick Shifts. . . . . . . . . . . . . . . . . . . . . . . . . . . . . . . . . . . . . . . . . . . . . . . . . . . . . . . . . 27
Chapter 4Recurring Schedules 29
Understanding Recurring Schedules. . . . . . . . . . . . . . . . . . . . . . . . . . . . . . . . . . . . . 29
The Recurring Schedules - Edit Single Mode. . . . . . . . . . . . . . . . . . . . . . . . . . . . . . . . . . . . 30Assigning a Recurring Schedule to an Employee . . . . . . . . . . . . . . . . . . . . . . . . . . . . 31Editing a Recurring Schedule Assignment . . . . . . . . . . . . . . . . . . . . . . . . . . . . . . . . . 32Deleting a Recurring Schedule Assignment . . . . . . . . . . . . . . . . . . . . . . . . . . . . . . . . 33
The Recurring Schedules - Assign Multiple Mode . . . . . . . . . . . . . . . . . . . . . . . . . . . . . . . . 34Assigning a Recurring Schedule to Multiple Employees . . . . . . . . . . . . . . . . . . . . . . . 34
The Recurring Schedules - Delete or End Multiple Mode . . . . . . . . . . . . . . . . . . . . . . . . . . 36Deleting Multiple Recurring Schedule Assignments . . . . . . . . . . . . . . . . . . . . . . . . . . 37Changing the End Date of a Recurring Schedule . . . . . . . . . . . . . . . . . . . . . . . . . . . . 38Changing the End Date of all Effective Recurring Schedules . . . . . . . . . . . . . . . . . . . . 39Changing the End Date of all Recurring Schedules . . . . . . . . . . . . . . . . . . . . . . . . . . 40
ADP Workforce Now Time & Attendance Module ii Scheduling Guide - Rev. August 30, 2010
Introduction
The Time & Attendance module’s Scheduling feature provides a robust set of tools that makes it easy for you to assign and manage your employees' schedules.
Why Use Schedules?Assigning schedules allows you to see when specific employees are scheduled to work and to compare employees’ actual reported work time to their assigned schedules. If you schedule both your employees' expected work hours and their planned non-worked time (such as vacations, jury duty, or bereavement), it will be easy for you to see the impact of non-worked time on your staffing levels.
If you have assigned schedules to your employees, you can flag as exceptions certain types of deviations (such as early or late arrivals or departures). When some types of exceptions occur (such as missing in or out punches), you can easily resolve them by choosing the automatic solution “Use Schedule”. If your company supports employee loan, you can schedule an employee to work certain hours in a labor charge category overseen by a different manager.
Your employees also benefit from having their schedules recorded in the Time & Attendance module. They will be able to view their assigned schedules, which makes it easy for them to verify when they are expected to work.
Note: Although the use of schedules can make tasks easier or more automated, assigning schedules is not required to use the Time & Attendance module.
Types of Schedules As a manager, you can create individualized daily schedules for your employees, or you can assign employees to standard recurring schedules that are predefined by a practitioner. You can use recurring schedules and daily schedules together, which allows you to assign a standard recurring schedule to an employee while also accommodating special circumstances that cause deviations from the assigned recurring schedule.
All deviations are recorded as daily schedules, which supersede employees' assigned recurring schedules. For more information about recurring schedules and deviations, see Understanding Recurring Schedules.
ADP Workforce Now Time & Attendance Module 1 Scheduling Guide - Rev. August 30, 2010

Introduction
Using SchedulesThe Scheduling feature is very flexible and allows you to perform a wide variety of scheduling tasks. Most of these tasks are initiated from a schedule grid on the Schedules page. The schedule grid can be viewed using either of the two following tabs:
• The Daily Schedules tab allows you to view, create, modify, and delete daily schedules, which are not based on (and which supersede) recurring schedules.
• The Recurring Schedules tab allows you to assign recurring schedules to employees, remove recurring schedule assignments, or change recurring schedule assignments.
The schedule grid that appears on the Daily Schedules page and the Recurring Schedules page displays scheduling information for up to 100 employees for up to 31 days. You can use the grid to perform scheduling operations for multiple employees in one operation, and to visualize the effects of your actions both before and immediately after you submit your actions.
Using the Single-Employee Calendar View to Perform Scheduling Tasks
Although the schedule grid makes it easy to view and manage schedules for one or more employees, you may prefer to view and manage individual employees' schedules using the single-employee monthly calendar and recurring schedule calendar. These pages display four weeks of a single employee's complete schedule or effective recurring schedule assignments. From these calendars, you can open additional pages that allow you to create, edit, or delete assigned daily or recurring schedules, one employee and one schedule at a time. For more information about using the Single-Employee Calendar, see Using Single-Employee Schedule Calendars.
Notes: Unlike the schedule grid, the single-employee calendars and additional pages do not allow you to edit schedules for multiple employees or multiple days at one time, preview the results of your edits, see the results of your edits immediately, or view your overall employee staffing levels.
Additionally, if you want to use functions in the application such as time generation, exceptions, and 9/80, you must use the schedule grid.
Getting Help on Performing Scheduling TasksThe online Help system is designed to provide easy access to all of the information you need to use the Time & Attendance Module’s Scheduling feature. If you are looking for information about a specific topic, you can browse the table of contents, use the index, or perform a search to find the information you need. You can also use context-sensitive Help to find information related to the specific page you are viewing or using. Every page in the Help can be printed and used as a quick reference.
To access the Help, click the Help link on any main Time & Attendance module page, then navigate to the Scheduling Employees section of the Contents page for a list of related topics.
Scheduling Guide - Rev. August 30, 2010 2 ADP Workforce Now Time & Attendance Module

Chapter 1
The Schedules Overview
The Time & Attendance module’s Schedules page offers a number of options that can adjust the content of the display and provide expanded information on employees and schedules.
Note: When the Schedules tab is first opened, the Daily Schedules page is displayed by default.
Schedule Viewing Options and Features
Option Description
Filters You apply filters to the schedule calendar to designate which employees will be displayed according to the parameters that you define. See Chapter 2 - Working With Filters for detailed information on creating and applying filters.
Date Ranges You enter the starting date of the time period you wish to view in the first date field (or click on the icon and select a date from the calendar). Repeat this action in the second date field to enter the end date. The date range selected may include up to 31 days. Click on the Find icon to apply the new dates. You can also click on the arrows to scroll back or forward by the same number of days currently displayed.
ADP Workforce Now Time & Attendance Module 3 Scheduling Guide - Rev. August 30, 2010

The Schedules Overview
View By default, the calendar date field displays schedules by their in and out times. You can select to view schedules by shift hours by clicking on the arrow in the View drop-down box and selecting Hours, or select Labor Charges to view schedules by shift labor charge. The display will adjust automatically.
You can also select Compact to display summary (vs. detailed) schedule information to allow more employee schedules to be displayed on the page at one time.
Selection Mode You can select to work with Daily Schedules or Recurring Schedules.
Action Mode You can select the following scheduling action modes:
• Edit Single• Assign Multiple• Delete Restore Multiple (Daily Schedules only)• Delete or End Multiple (Recurring Schedules only)
Option Description
Scheduling Guide - Rev. August 30, 2010 4 ADP Workforce Now Time & Attendance Module
The Schedules Overview
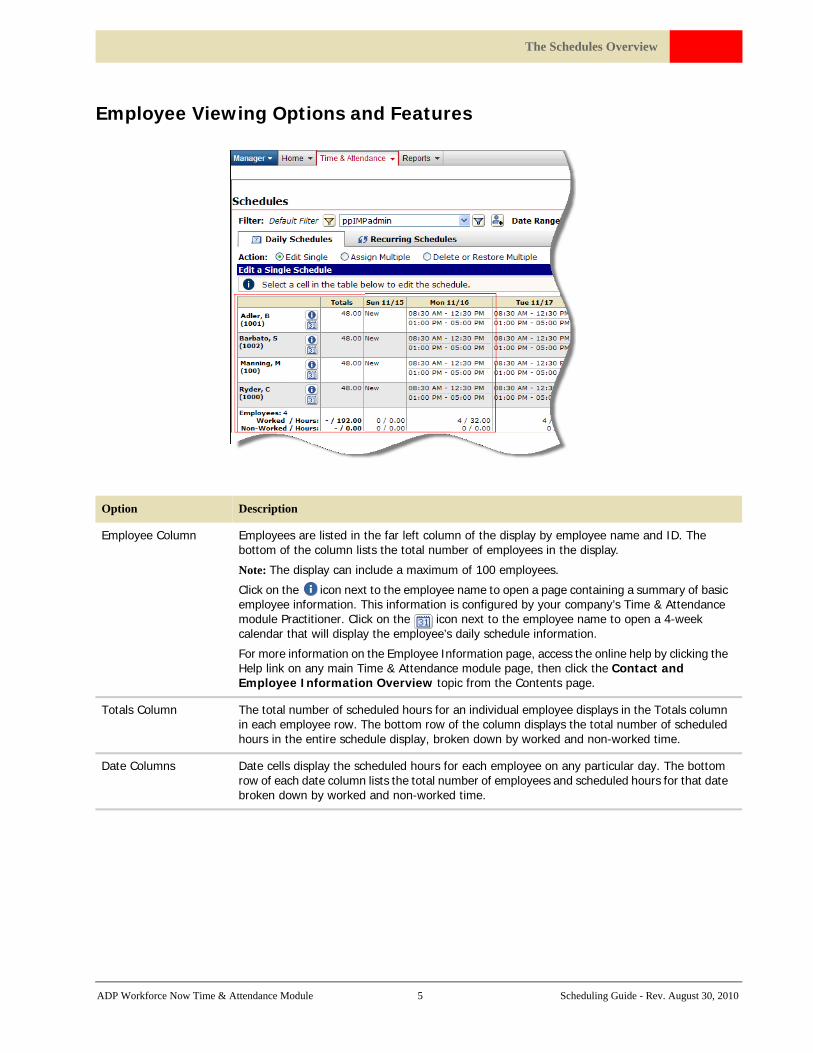
Employee Viewing Options and Features
Option Description
Employee Column Employees are listed in the far left column of the display by employee name and ID. The bottom of the column lists the total number of employees in the display.
Note: The display can include a maximum of 100 employees.
Click on the icon next to the employee name to open a page containing a summary of basic employee information. This information is configured by your company’s Time & Attendance module Practitioner. Click on the icon next to the employee name to open a 4-week calendar that will display the employee’s daily schedule information.
For more information on the Employee Information page, access the online help by clicking the Help link on any main Time & Attendance module page, then click the Contact and Employee Information Overview topic from the Contents page.
Totals Column The total number of scheduled hours for an individual employee displays in the Totals column in each employee row. The bottom row of the column displays the total number of scheduled hours in the entire schedule display, broken down by worked and non-worked time.
Date Columns Date cells display the scheduled hours for each employee on any particular day. The bottom row of each date column lists the total number of employees and scheduled hours for that date broken down by worked and non-worked time.
ADP Workforce Now Time & Attendance Module 5 Scheduling Guide - Rev. August 30, 2010
The Schedules Overview
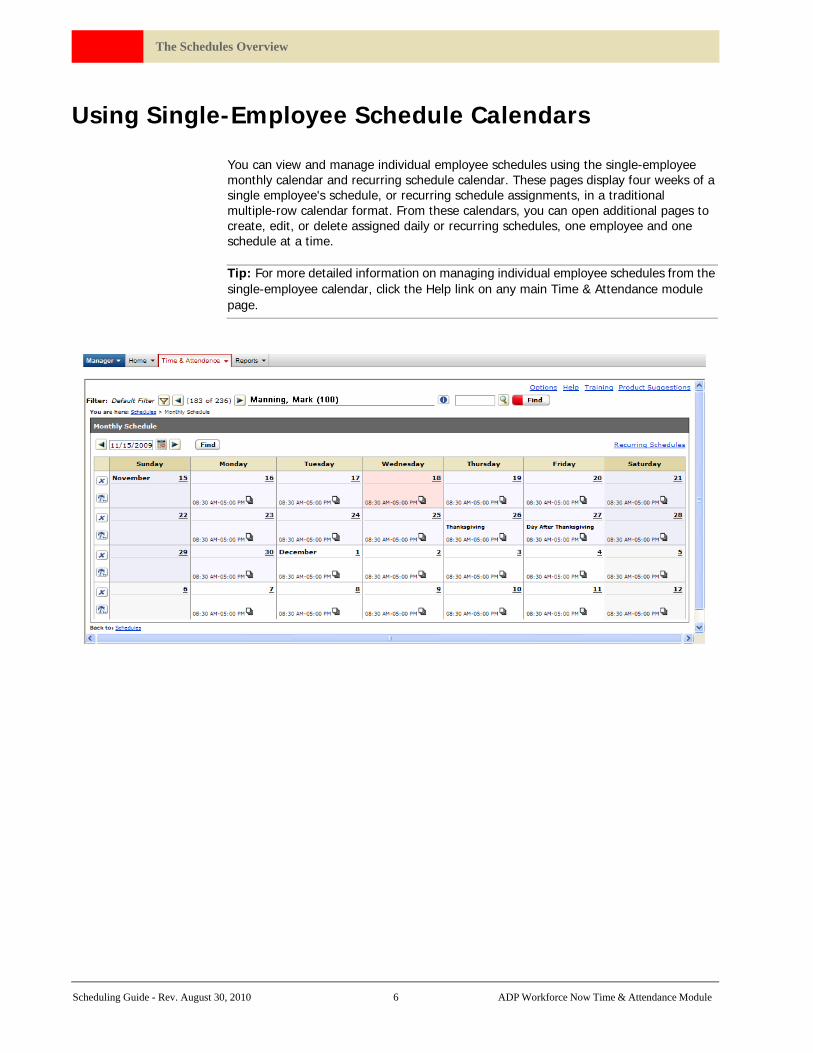
Using Single-Employee Schedule Calendars
You can view and manage individual employee schedules using the single-employee monthly calendar and recurring schedule calendar. These pages display four weeks of a single employee's schedule, or recurring schedule assignments, in a traditional multiple-row calendar format. From these calendars, you can open additional pages to create, edit, or delete assigned daily or recurring schedules, one employee and one schedule at a time.
Tip: For more detailed information on managing individual employee schedules from the single-employee calendar, click the Help link on any main Time & Attendance module page.
Scheduling Guide - Rev. August 30, 2010 6 ADP Workforce Now Time & Attendance Module

The Schedules Overview
Viewing an Employee’s 4-Week Schedule1 To view an employee’s 4-week schedule from the Daily Schedules page, click on the
icon next to the employee name. A 4-week calendar will open and display the employee’s daily schedule information.
2 To view an employee’s 4-week schedule from the Recurring Schedules page, click on the icon next to the employee name. A 4-week calendar will open and display the employee’s recurring schedule information.
3 You can use the following viewing options:
4 When you are finished viewing the 4-week schedule, click on the Schedules link to return to the Schedules page.
Option Description
To change the time period that you are viewing
Click on the arrows to scroll back or forward four weeks at a time. You can also click on the button and select a date from the calendar for the start week of the 4-week display. Click on the Find button to apply this change. If you have altered the display dates, click on the Current Week icon to restore the 4-week display to begin on the current week.
To view the calendar in either daily or recurring schedule assignment mode
The schedule viewing mode link at the top right corner of the display offers the option to view the calendar in either daily or recurring schedule assignment mode. The default mode will match the schedule page from which you originally selected to view the employee 4-week calendar (daily or recurring).
To display the recurring schedule assignment mode, click on the Recurring Schedules link. The name of the recurring schedule will be added to the display in the appropriate date cells.
To display the daily schedule assignment mode, click on the Monthly Schedule link.
To view the details of a day’s schedule from the Monthly Schedule calendar
View the details of a day’s schedule by clicking in the appropriate date cell. A window will open that displays date/time in and out, earnings code, shift rule, Flextime rule, lunch plan, total hours and labor charge assignment. Click on the Monthly Schedule link to return to the 4-week schedule.
To view the details of a day’s schedule from the Recurring Schedules calendar
From the Recurring Schedules calendar, click in the appropriate date cell. A window will open that displays the recurring schedule name, start week number and start/end dates.
ADP Workforce Now Time & Attendance Module 7 Scheduling Guide - Rev. August 30, 2010

The Schedules Overview
Scheduling Guide - Rev. August 30, 2010 8 ADP Workforce Now Time & Attendance Module

Chapter 2
Working With Filters
Filters can be applied to the Time & Attendance Module’s Schedules page in order to limit the employees that will be viewed. By default, all employees are displayed unless a filter is applied.
If the current employee filter includes more than 100 employees, however, a message will instruct you to modify the filter criteria to reduce the number of employee records for display. You can do this by editing the employee filter to make it more restrictive, by selecting or creating a more narrowly defined employee filter, and/or by applying a schedule filter to the selected employee filter.
Note: Depending upon how your system is configured, an employee may have more than one position and therefore more than one employee ID. For example, if an employee holds several positions within a company (such as superintendent, teacher, and coach), each position will have its own employee ID. If necessary, you may need to adjust the employee filter to include the employee’s multiple IDs.
Using Employee FiltersAn employee filter allows you to select employees based on each employee's ID, manager, pay group, shift rule, Flextime rule, time zone, and/or default labor charge categories. Although you can create and save an unlimited number of employee filters, only one employee filter can be active at one time. Each employee filter can, however, filter on multiple selection criteria. Your employee filter selection persists as you move from one page to another.
Using Schedule FiltersA schedule filter is really a sub-filter that is applied to the active employee filter. This sub-filter allows you to select employees whose assigned schedules meet certain criteria. You can create schedule filters that are based on employees' scheduled in times, scheduled out times, and/or total scheduled worked hours per day. You can also filter for employees who have assigned schedules that use specific earnings codes, recurring schedules, lunch plans, shift rules, Flextime rules and/or labor charge category assignments (up to two labor charge categories can be associated with schedules; department and job are the most commonly used).
You can create, save, and reuse up to 15 schedule filters, although only one schedule filter can be applied at a time. Each schedule filter can define multiple schedule selection criteria. Schedule filters are only available on the Schedules tab.
Tip: For more detailed information on working with schedule filters, click the Help link on any main Time & Attendance module page then click on the Filtering the Data Displayed on the Schedule Grid topic from the Contents page.
ADP Workforce Now Time & Attendance Module 9 Scheduling Guide - Rev. August 30, 2010

Working With Filters
Employee Filters
Applying an Existing Employee FilterTo apply an existing employee filter or switch to a different filter, complete the following steps from any view and mode on the Schedules page:
1 On the Schedules page, click the button to display a list of employee filters.
2 Select the filter you want to apply. The schedule grid will be reloaded with the selected filter applied.
Creating a New Employee Filter1 On the Schedules page, click the button to display a list of employee filters.
2 Click the New button. The New Filter: Select Item window opens.
3 In the Choose Items to Filter On box, select one or more items. To select more than one item, hold down the Ctrl key while clicking each selection. The application filters the list of employees based on the items you select in this box. For example, if you select Pay Group, the filter includes only employees belonging to the Pay Groups that you select later in this procedure.
4 Click the button to add the selected categories. To remove items, select the items from the right-hand box and click the button.
5 In the Choose Sort Order box, select the criteria you want for sorting the filtered employee list. Last Name is selected by default in the box. You can add, remove, and sort the items to meet your needs. The application sorts the list of employees based on the criteria and sort order you select in this box. For example, if you have Last Name and Employee ID as the criteria (with Last Name listed first and Employee ID listed second), the employees are listed in alphabetical order by last name. Any employees with the same last name are then sorted by the Employee ID.
6 Click the button to add the selected sorting categories.
Tip: If necessary, use the and buttons to reorder the sorting criteria. To remove sorting item, select the items from the right-hand box and click the button.
7 Click the Next button.
8 In the Filter Name box, enter a name for the new filter. This is a required field.
9 For each category criteria box, click the corresponding button next to the box.
Scheduling Guide - Rev. August 30, 2010 10 ADP Workforce Now Time & Attendance Module

Working With Filters
10 In the Multiple Selection Lookup window, select the check box next to each criteria that you want to include in the filter. For example, if you selected Pay Group as a category, select each Pay Group that you want included in this filter.
11 When you have made your selections, click the Done button.
12 If you want to remove selections from the category criteria box, highlight them in the left-hand box, and then click the corresponding button next to the box.
13 To save the new filter, click the Save button. You are then returned to the My Filters window. A red arrow appears to the left of the filter that is currently active.
14 To make the new filter the active filter, click the underlined filter name.
Editing an Employee FilterTo delete or make changes to an existing employee filter, complete the following steps from any view and mode on the Schedules page:
1 On the Schedules page, click the button to display a list of employee filters.
2 To delete a filter, click in the check box next to the Filter Name, then click the Delete button. When the confirmation message displays, click OK to delete the filter.
3 To make changes to a filter, click on the edit icon next to the filter that you want to edit. The Edit Filter window will open displaying the current settings for the filter.
4 Make the changes to filter using the same process as Creating a New Employee Filter.
5 To save the changes you made to the filter, click the Save button. You are then returned to the My Filters window. A red arrow appears to the left of the currently-active filter.
6 To make a filter the active filter, click the underlined filter name.
ADP Workforce Now Time & Attendance Module 11 Scheduling Guide - Rev. August 30, 2010

Working With Filters
Schedule Filters
Applying an Existing Schedule FilterTo apply an existing schedule filter or switch to a different filter, complete the following steps from any view and mode on the Schedules page:
1 On the Schedules page, click the button to display a list of filters.
2 Select the filter you want to apply. The schedule grid will be reloaded with the selected filter applied.
Creating a New Schedule Filter1 On the Schedules page, navigate to the selection box in the Filter area, then click
and select Create new schedule filter.
Note: If you have already created 15 schedule filters, the Create new schedule filter menu option will not be available. You must delete an existing filter before you can create a new filter.
2 In the Filter Name field of the New Schedule Filter window, enter a short, descriptive name for your new filter (for example, Starts between 6-8 AM).
3 In the Select Field box of the Create a New Filter section, click and select a schedule feature for which you want to define a filter condition. The available options are:
• Daily Total Worked Hours• Earnings Code• In Time• Lunch Plan ID• Out Time• Recurring Schedule• Scheduled Department (or other labor charge category used by your company)• Scheduled Job (or other labor charge category used by your company)• Scheduled Shift Rule (if your company is using the optional shift rule feature)• Scheduled Flextime Rule (if your company is using the optional Flextime feature)
Scheduling Guide - Rev. August 30, 2010 12 ADP Workforce Now Time & Attendance Module

Working With Filters
Note: Filter conditions that are created based on Daily Total Worked Hours, In Time, Lunch Plan ID, Out Time, and Schedule Department/Job/Shift Rule/Flextime Rule/Other Labor Category only apply to scheduled worked time. They do not apply to schedules for non-worked time, such as Vacation.
4 In the Qualifier field, click and select the appropriate relationship for the filter condition you want to apply. The available choices will vary depending on which field you selected in the previous step:
• If you selected Earnings Code, Lunch Plan ID, Recurring Schedule, Scheduled Department, Scheduled Job, Flextime Rule or Scheduled Shift Rule, the only available option is Equals.
• If you selected Daily Total Worked Hours, In Time, or Out Time, the following options will be available:
Equals
< (Less Than)
<= (Less Than or Equal To)
> (Greater Than)
>= (Greater Than or Equal To)
• If you selected Earnings Code, Lunch Plan ID, Recurring Schedule, Scheduled Department, Scheduled Job, Flextime Rule or Scheduled Shift Rule, use the multiple selection lookup buttons( or ) to move to the Selected Values box.
Note: You can select more than one value to create an “or” condition. For example, if you are creating an Earnings Code filter condition and you select both Vacation and Bereavement, employees who have scheduled vacation time or scheduled bereavement time off (or both) will be displayed in the schedule grid.
5 If you selected Daily Total Worked Hours, In Time, or Out Time, enter an appropriate value in the Enter Value text box.
Note: Although you can only specify one value per Daily Total Worked Hours, In Time, or Out Time filter condition, you can define multiple filter conditions, which are evaluated as an “and” relationship. For example, to filter for all employees who start work between 6:00 and 8:00 AM, create a schedule filter that includes the following two filter conditions: In Time >= 6:00 AM and In Time <=8:00 AM.
6 Click Add Filter to add the filter condition you just defined to your schedule filter. The new condition will appear in the New Filters table.
7 Repeat steps 3-6 until you have added all the filter conditions you want to define for your schedule filter.
Tip: If you want to delete a filter condition you have added, click the appropriate button in the New Filters table.
8 Click Save. The New Schedule Filter window will close and the Schedules page will be reloaded with the new schedule filter selected and applied.
ADP Workforce Now Time & Attendance Module 13 Scheduling Guide - Rev. August 30, 2010

Working With Filters
Editing a Schedule FilterTo delete or make changes to an existing schedule filter, complete the following steps from any view and mode on the Schedules page:
1 On the Schedules page, click the button to display a list of employee filters.
2 To delete a filter, click in the check box next to the Filter Name, then click the Delete button. When the confirmation message displays, click OK to delete the filter.
3 To make changes to a filter, click on the edit icon next to the filter that you want to edit. The Edit Filter window will open displaying the current settings for the filter.
4 Make the changes to filter using the same process as new.
5 To save the changes you made to the filter, click the Save button. You are then returned to the My Filters window. A red arrow appears to the left of the currently-active filter.
6 To make a filter the active filter, click the underlined filter name.
Temporarily Adding Employees to the Filtered Schedule ViewYou can temporarily add to the current schedule grid, one or more employees who have been excluded due to a schedule filter condition. To do this, complete the following steps from any view and mode on the Schedules page:
1 Verify that a schedule filter has been applied.
Note: You can only add employees who have been filtered out of the current view by the active schedule filter. If no schedule filter has been applied, or if the active schedule filter has not excluded any employees, you will not be able to add any employees to the current view. You cannot add to the schedule grid employees who have been excluded by the active employee filter.
2 Click the button. A Temporarily Add Employees to Filter pop-up window will open and display a list of employees who have been excluded from the view by the active schedule filter.
3 Click the check box for each employee you want to add, or click the check box in the header row to select all of the listed employees.
4 Click Done. The pop-up window will close and the schedule grid will reload and display scheduling information for the filtered employees and any employees you have temporarily added.
Note: You will be returned to the Schedules page. If you want to remove the employees that you have added temporarily, click the Find button to refresh the page.
Scheduling Guide - Rev. August 30, 2010 14 ADP Workforce Now Time & Attendance Module
Chapter 3
Using Daily Schedules
When the Schedules page is first opened, the Daily Schedules tab is displayed by default. From this page, you can view employee schedules and create, modify, and delete daily schedule records (also known as schedule deviations) for one or more employees on one or more days.
The Daily Schedules tab contains the following action modes:
• The Daily Schedules - Edit Single action mode is used to create, edit, or delete a single schedule for a single employee on a single day. Although you can edit only one employee's schedule at a time in this mode, the schedule grid displays scheduling information for all of your filtered employees, allowing you to view the effects of your edits on your staffing levels.
• The Daily Schedules - Assign Multiple action mode allows you to create or modify schedules for one or more employees on one or more days. The schedule grid displays scheduling information for all of your filtered employees, allowing you to view the effects of your edits on your staffing levels.
• The Daily Schedules - Delete or Restore Multiple action mode allows you to delete one or more schedules for one or more employees. You can also remove schedule deviations (daily schedules that have been created to modify or override recurring schedules on certain days). This has the effect of restoring any assigned recurring schedule.
Tip: For more information on using daily schedules, click the Help link on any main Time & Attendance module page then navigate to the Using Daily Schedules section of the Contents page for a list of related topics.
ADP Workforce Now Time & Attendance Module 15 Scheduling Guide - Rev. August 30, 2010

Using Daily Schedules
The Daily Schedules - Edit Single Mode
When you create or modify a schedule using this mode, you actually create a daily schedule record (or a schedule deviation). If a daily schedule overlaps with a schedule time pair that is based on a recurring schedule assignment, the recurring schedule will be superseded. You can remove schedule deviations (and thus restore any underlying recurring schedule) using the Daily Schedules - Delete or Restore Multiple mode. For more information about recurring schedules and schedule deviations, see Understanding Recurring Schedules.
The specific tasks you can perform from the Daily Schedules - Edit Single mode include:
• Creating a Schedule for a Single Employee on a Single Day• Editing a Single Schedule for a Single Employee• Deleting a Single Schedule for a Single Employee
Scheduling Guide - Rev. August 30, 2010 16 ADP Workforce Now Time & Attendance Module

Using Daily Schedules
Creating a Schedule for a Single Employee on a Single Day1 From the Time & Attendance menu, click Schedules. The Daily Schedules - Edit
Single action mode will be selected by default.
2 In the schedule grid, click the cell that represents the employee and date for which you want to create a schedule.
Tip: You can adjust the employee filter and schedule filter, change the date range, and/or use the scroll bars if the employee and date are not visible in the schedule grid.
3 In the Schedules box, near the top left corner of the page, select New.
Tip: If the employee has no pre-existing schedules for the selected date, New will be selected by default.
4 At the top of the page, enter the In time and Out time for the new schedule. These fields are required.
Notes: The In and Out date fields default to the date of the cell you selected in the schedule grid. If the out time you enter is equal to or earlier than the in time, the application will increase the out date by one when you apply your changes.
In most cases, you do not need to enter a value in the Hours field. The Time & Attendance module will calculate the hours for the time pair when you apply the schedule. However, if you are using an hours-based earnings code (for example, a non-worked earnings code such as Vacation or Jury), you must enter the total hours rather than in and out times.
To use schedule properties you have saved as a Quick Shift, click . In the Quick Shift area, select the appropriate shift, and then click . For more information about Quick Shifts, see Using Quick Shifts.
5 If desired, use the buttons to add or select an earnings code, a lunch plan, a shift rule, a Flextime rule, and/or one or two labor charge codes to be associated with the schedule.
Tip: These fields are optional. If you do select or enter values for these fields, they will override the employee's assigned defaults.
6 Click the Apply button. The newly created schedule will be added to the selected cell in the schedule grid, and a small blue triangle will appear in the bottom right corner of the cell to indicate that the cell contains unsaved changes.
Note: Using the Apply button does not save your changes. Your applied changes are not saved until you click the Submit button. If you navigate out of the Daily Schedules page without submitting your applied changes, they will be lost. You can remove your unsaved changes, if desired, by clicking the Cancel button.
7 Click the Submit button to save your changes.
ADP Workforce Now Time & Attendance Module 17 Scheduling Guide - Rev. August 30, 2010
Using Daily Schedules
Editing a Single Schedule for a Single Employee1 From the Time & Attendance menu, click Schedules. The Daily Schedules - Edit
Single action mode will be selected by default.
2 In the schedule grid, click the cell that represents the employee and date for which you want to create a schedule.
Tip: You can adjust the Employee Filter and Schedule Filter, change the date range, and/or use the scroll bars if the employee and date are not visible in the schedule grid.
3 If more than one schedule exists for the cell you selected, select from the Schedules box (near the top left corner of the page) the specific schedule you want to modify.
Tip: If the employee has only one schedule on the selected day, you can skip this step. The schedule will already be selected.
4 At the top of the page, edit the In time and Out times, if necessary.
Notes: In most cases, you should not need to edit the value in the Hours field. The hours for the schedule time pair will be recalculated when you apply your changes. Any value you enter in the Hours field will be overwritten. However, if you are using an hours-based earnings code (for example, a non-worked earnings code such as Vacation or Jury), you should edit the hours value rather than the in and out times.
To use schedule properties you have saved as a Quick Shift, click in the Quick Shift area, select the appropriate shift, and then click . For more information, see Using Quick Shifts.
5 If necessary, use the buttons to add or change the earnings code, lunch plan, shift rule, Flextime rule, and/or labor charge codes to be associated with the schedule.
Tip: These fields are optional. If you do select or enter values for these fields, they will override the employee's assigned defaults.
6 Click the Apply button. The changes to the selected schedule will be reflected in the appropriate cell in the schedule grid, and a small blue triangle will appear in the bottom right corner of the cell to indicate that the cell contains unsaved changes.
Note: Using the Apply button does not save your changes. Your applied changes are not saved until you click the Submit button. If you navigate out of the Daily Schedules page without submitting your applied changes, they will be lost. You can remove your unsaved changes, if desired, by clicking the Cancel button.
7 Click the Submit button to save your changes.
Scheduling Guide - Rev. August 30, 2010 18 ADP Workforce Now Time & Attendance Module

Using Daily Schedules
Deleting a Single Schedule for a Single Employee1 From the Time & Attendance menu, click Schedules. The Daily Schedules - Edit
Single action mode will be selected by default.
2 In the schedule grid, click the cell that represents the employee and date for which you want to create a schedule.
Tip: You can adjust the Employee Filter and Schedule Filter, change the date range, and/or use the scroll bars if the employee and date are not visible in the schedule grid.
3 If more than one schedule exists for the cell you selected, select from the Schedules box (near the top left corner of the page) the specific schedule you want to delete.
Tip: If the employee has only one schedule on the selected day, you can skip this step. The schedule will already be selected.
4 Click the Delete Selected button. The selected schedule time pair will be removed from the schedule grid, and a small blue triangle will appear in the bottom right corner of the cell to indicate that the cell contains unsaved changes.
Note: This delete action is not permanent until you click the Submit button.
5 Click the Submit button to save your changes.
ADP Workforce Now Time & Attendance Module 19 Scheduling Guide - Rev. August 30, 2010
Using Daily Schedules
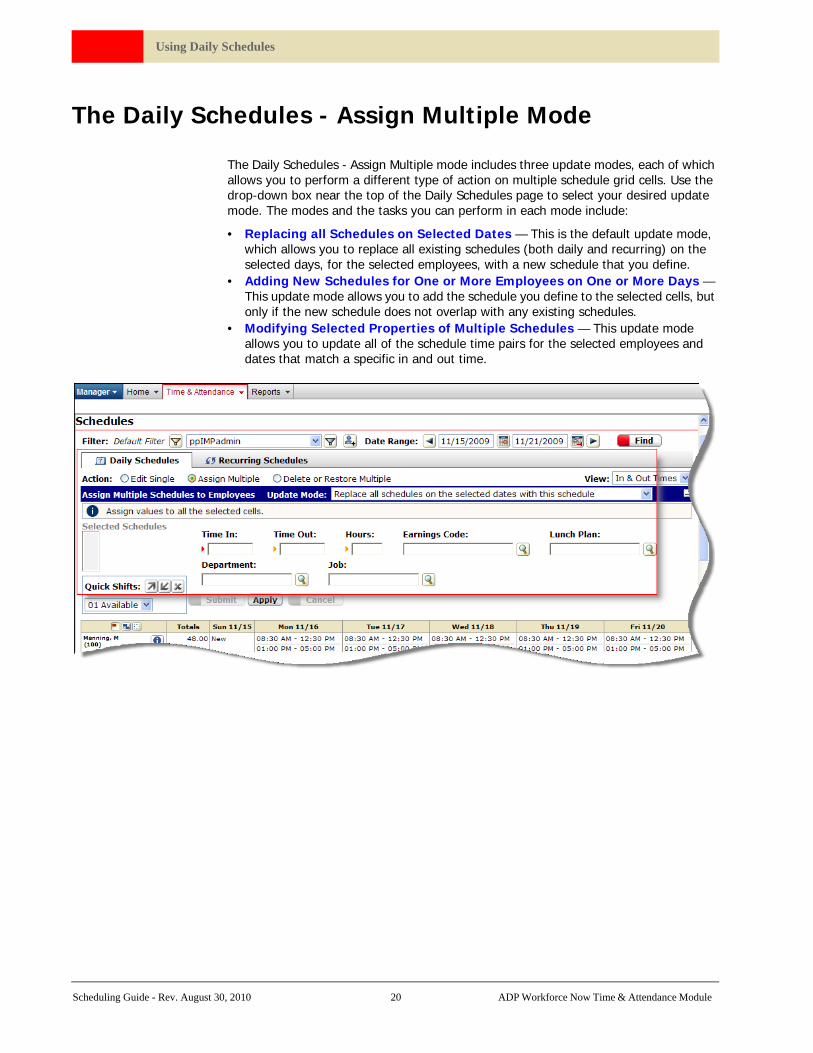
The Daily Schedules - Assign Multiple Mode
The Daily Schedules - Assign Multiple mode includes three update modes, each of which allows you to perform a different type of action on multiple schedule grid cells. Use the drop-down box near the top of the Daily Schedules page to select your desired update mode. The modes and the tasks you can perform in each mode include:
• Replacing all Schedules on Selected Dates — This is the default update mode, which allows you to replace all existing schedules (both daily and recurring) on the selected days, for the selected employees, with a new schedule that you define.
• Adding New Schedules for One or More Employees on One or More Days — This update mode allows you to add the schedule you define to the selected cells, but only if the new schedule does not overlap with any existing schedules.
• Modifying Selected Properties of Multiple Schedules — This update mode allows you to update all of the schedule time pairs for the selected employees and dates that match a specific in and out time.
Scheduling Guide - Rev. August 30, 2010 20 ADP Workforce Now Time & Attendance Module

Using Daily Schedules
Replacing all Schedules on Selected Dates1 From the Time & Attendance menu, click Schedules. The Daily Schedules - Edit
Single action mode will be selected by default.
2 Select the Assign Multiple radio button. The Replace all schedules on the selected dates with this schedule update mode will be selected by default.
3 In the schedule grid, select the cells that represent the employees and dates for which you want to replace all existing schedules with a single new schedule.
Tips: You can adjust the Employee Filter and Schedule Filter, change the date range, and/or use the scroll bars if the employees and/or dates are not visible in the schedule grid.
Selected cells are highlighted in a dark blue color. To select cells, click each desired cell, one after the other. To clear a cell, click it again. You can also use the button in the top left corner of the schedule grid if you want to quickly select a “boxed” group of contiguous cells. To clear all selected cells, click the button (or press the ALT key and click a selected cell).
4 At the top of the page, enter a Time In and Time Out time for the new schedule. These fields are required.
Notes: In most cases, you do not need to enter a value in the Hours field. The Time & Attendance module will calculate the hours for the time pair when you apply the schedule. However, if you are using an hours-based earnings code (for example, a non-worked earnings code such as Vacation or Jury), you must enter the total hours rather than in and out times.
To use schedule properties you have saved as a Quick Shift, click in the Quick Shift area, select the appropriate shift, and then click . For more information, see Using Quick Shifts.
5 If desired, use the buttons to select an earnings code, a lunch plan, a shift rule, a Flextime rule, and/or one or two labor charge codes to be associated with the schedule.
Tip: These fields are optional. If you do select or enter values for these fields, they will override the employees' assigned defaults.
6 Click the Apply button. The newly created schedule will replace any and all schedules in the selected cells in the schedule grid, and a small blue triangle will appear in the bottom right corner of the affected cells to indicate that the cells contain unsaved changes.
7 Click the Submit button to save your changes.
ADP Workforce Now Time & Attendance Module 21 Scheduling Guide - Rev. August 30, 2010

Using Daily Schedules
Adding New Schedules for One or More Employeeson One or More Days
1 From the Time & Attendance menu, click Schedules. The Daily Schedules - Edit Single action mode will be selected by default.
2 Select the Assign Multiple radio button. The Replace all schedules on the selected dates with this schedule update mode will be selected by default.
3 In the Update Mode field, click and select Add this schedule to the selected dates if it does not conflict from the drop-down menu.
4 In the schedule grid, select the cells that represent the employees and dates for which you want to add the new schedule.
Tip: You can adjust the Employee Filter and Schedule Filter, change the date range, and/or use the scroll bars if the employees and/or dates are not visible in the schedule grid.
5 At the top of the page, enter a Time In and a Time Out time for the new schedule. These fields are required.
Notes: In most cases, you do not need to enter a value in the Hours field. The hours for the time pair will be calculated when you apply the schedule. However, if you are using an hours-based earnings code (for example, a non-worked earnings code such as Vacation or Jury), you must enter the total hours rather than in and out times.
To use schedule properties you have saved as a Quick Shift, click in the Quick Shift area, select the appropriate shift, and then click . For more information, see Using Quick Shifts.
6 If desired, use the buttons to select an earnings code, a lunch plan, a shift rule, a Flextime rule, and/or one or two labor charge codes to be associated with the schedule.
Tip: These fields are optional. If you do select or enter values for these fields, they will override the employees' assigned defaults.
7 Click the Apply button. The newly created schedule will be added to the selected cells in the schedule grid, and a small blue triangle will appear in the bottom right corner of the affected cells to indicate that the cells contain unsaved changes.
8 Click the Submit button to save your changes. The new schedule will be saved in all of the selected cells on employee rows that do not have any schedules that conflict with the new schedule.
Scheduling Guide - Rev. August 30, 2010 22 ADP Workforce Now Time & Attendance Module

Using Daily Schedules
Saving Your SelectionsIf any of the selected cells contain schedules that conflict with the newly applied schedule, the changes to those cells will not be saved. The cells will be highlighted in red and the blue triangle will remain in the bottom right corner. If, after reviewing the conflicts, you determine that you want to replace the existing schedules, you can do so by changing the update mode to Replace all schedules on the selected dates with this schedule and then clicking Apply and then Submit. Your selections and the properties you define for the new schedule will be used for the replacement action.
All schedule changes for an employee are saved at once, so if a conflict or error occurs in any selected cell for a given employee, no changes in any cells will be made for that employee.
For example, if you attempt to add a new schedule to three days for Employee A, but a conflicting schedule exists for one of those days, the new schedule will not be applied to any of the three selected days. After you click Submit, the day with the conflict will be highlighted in red, and all three days you attempted to change will contain small blue triangles in the bottom right corner, indicating that they contain unsaved changes.
ADP Workforce Now Time & Attendance Module 23 Scheduling Guide - Rev. August 30, 2010
Using Daily Schedules
Modifying Selected Properties of Multiple SchedulesWhen you use this mode, you must perform an extra selection step. As you select the cells you want to update, the Selected Schedules section of the page will list each unique time in-time out pairing from all of the cells you have selected. After you have selected all of the cells you want to modify, you must select which specific schedules pairs you want your modification to be applied. You can select multiple schedules by holding down the Ctrl key and clicking each desired time pair in the Selected Schedules box.
There are no required fields for this update mode. Instead, you can selectively update any one or more of the schedule properties for the selected schedules. The check box next to each field indicates which fields will be updated on the selected records.
1 From the Time & Attendance menu, click Schedules. The Daily Schedules - Edit Single action mode will be selected by default.
2 Select the Assign Multiple radio button. The Replace all schedules on the selected dates with this schedule update mode will be selected by default.
3 In the Update Mode field, click and select Modify schedules on selected dates that match Selected Schedules times from the drop-down menu.
4 In the schedule grid, select the cells that represent the employees and dates for which you want to modify existing schedules.
5 In the Selected Schedules box near the upper left corner of the page, select the specific schedule time pairs you want to modify.
6 At the top of the page, enter values for only those fields you want to modify. You can use the buttons to select an earnings code, a lunch plan, a shift rule, a Flextime rule, and/or one or two labor charge codes to apply to the modified schedules.
Tips: When you enter a value in a field, a check mark will appear next to the field, indicating that field will be updated. Only those fields marked with check marks will be updated.
To use schedule properties you have saved as a Quick Shift, click in the Quick Shift area, select the appropriate shift, and then click . When you apply a Quick Shift in this mode, the check box next to every field will be selected, even for fields for which no value has been defined for the selected Quick Shift. If you apply and then submit the Quick Shift values, each selected schedule will be modified to match the Quick Shift configuration exactly. If you do not want to override existing values for one or more fields, clear the appropriate check boxes before applying and saving your changes. For more information about Quick Shifts, see Using Quick Shifts.
7 Click the Apply button. The changes to the selected schedules will be reflected in the schedule grid, and a small blue triangle will appear in the bottom right corner of the affected cells to indicate that the cells contain unsaved changes.
8 Click the Submit button to save your changes.
Scheduling Guide - Rev. August 30, 2010 24 ADP Workforce Now Time & Attendance Module

Using Daily Schedules
The Daily Schedules - Delete or Restore Mode
The Daily Schedules - Delete or Restore Multiple action mode allows you to delete one or more schedules for one or more employees. You can also remove schedule deviations (daily schedules that have been created to modify or override recurring schedules on certain days). This has the effect of restoring any assigned recurring schedule. (For more information about recurring schedules and schedule deviations, see Understanding Recurring Schedules.) The schedule grid displays scheduling information for all of your filtered employees, allowing you to view the effects of your edits on your staffing levels.
The specific tasks you can perform from the Daily Schedules - Delete or Restore Multiple mode include:
• Deleting all Schedules on Selected Days for One or More Employees• Deleting Schedule Deviations and Restoring Recurring Schedules
(scheduled time pairs that deviate from an employee's assigned recurring schedule)
ADP Workforce Now Time & Attendance Module 25 Scheduling Guide - Rev. August 30, 2010
Using Daily Schedules
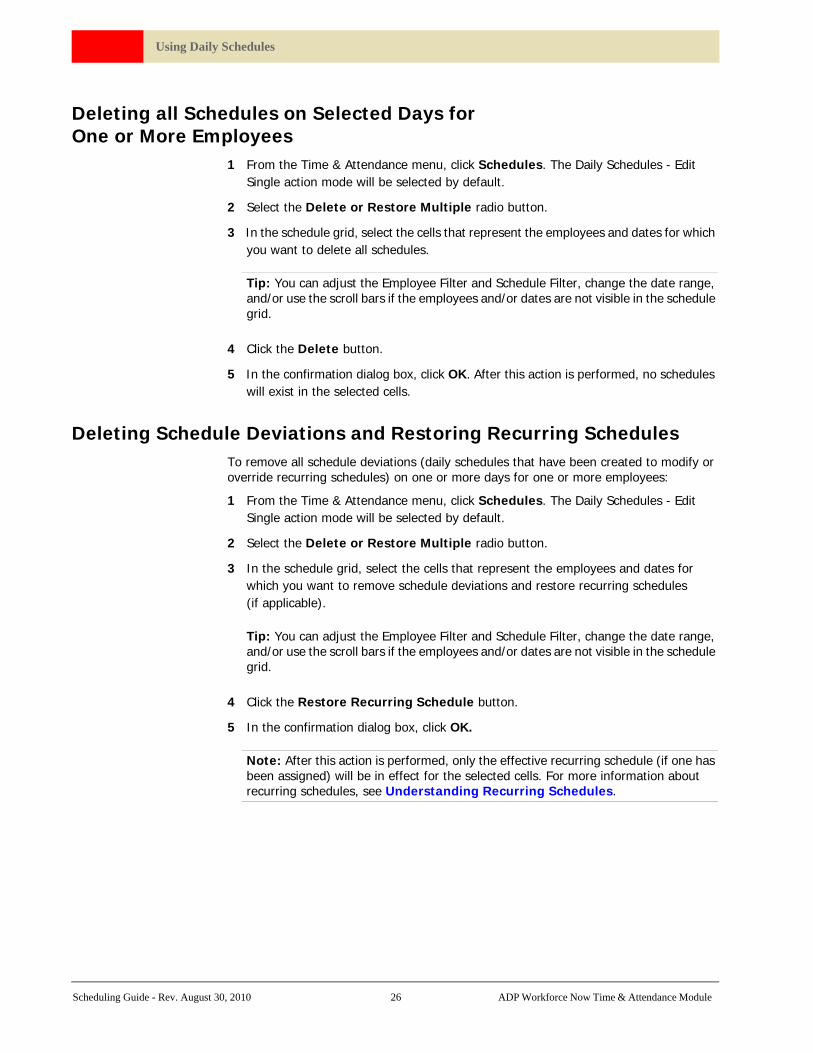
Deleting all Schedules on Selected Days for One or More Employees
1 From the Time & Attendance menu, click Schedules. The Daily Schedules - Edit Single action mode will be selected by default.
2 Select the Delete or Restore Multiple radio button.
3 In the schedule grid, select the cells that represent the employees and dates for which you want to delete all schedules.
Tip: You can adjust the Employee Filter and Schedule Filter, change the date range, and/or use the scroll bars if the employees and/or dates are not visible in the schedule grid.
4 Click the Delete button.
5 In the confirmation dialog box, click OK. After this action is performed, no schedules will exist in the selected cells.
Deleting Schedule Deviations and Restoring Recurring SchedulesTo remove all schedule deviations (daily schedules that have been created to modify or override recurring schedules) on one or more days for one or more employees:
1 From the Time & Attendance menu, click Schedules. The Daily Schedules - Edit Single action mode will be selected by default.
2 Select the Delete or Restore Multiple radio button.
3 In the schedule grid, select the cells that represent the employees and dates for which you want to remove schedule deviations and restore recurring schedules (if applicable).
Tip: You can adjust the Employee Filter and Schedule Filter, change the date range, and/or use the scroll bars if the employees and/or dates are not visible in the schedule grid.
4 Click the Restore Recurring Schedule button.
5 In the confirmation dialog box, click OK.
Note: After this action is performed, only the effective recurring schedule (if one has been assigned) will be in effect for the selected cells. For more information about recurring schedules, see Understanding Recurring Schedules.
Scheduling Guide - Rev. August 30, 2010 26 ADP Workforce Now Time & Attendance Module

Using Daily Schedules
Using Quick Shifts
Quick Shifts allow you to save up to 15 commonly used schedules and quickly apply them to selected dates or schedules.
You can save new or existing schedule configurations for future use to be applied to employee date cells. Quick Shifts are listed at the top of the schedule grid and are available for use with the Edit Single and Assign Multiple action options on the Daily Schedules page.
Quick Shifts function similarly to clipboards or macros in other applications.
1 To save shift information for reuse, enter the shift information into the grid (or populate the grid by selecting an existing schedule with the desired properties), highlight which Quick Shift numbered slot you want the information to be saved to, and then click the button.
2 To apply saved Quick Shift settings to a selected schedule, highlight the desired Quick Shift in the drop-down list and click to upload the settings to the grid. Then click Apply to apply the settings to the selected schedule or date. After you have previewed the effect of your change in the schedule grid, click Submit to save your changes.
3 To delete a Quick Shift, click the desired Quick Shift in the drop-down list then click the Delete button.
ADP Workforce Now Time & Attendance Module 27 Scheduling Guide - Rev. August 30, 2010

Using Daily Schedules
Scheduling Guide - Rev. August 30, 2010 28 ADP Workforce Now Time & Attendance Module

Chapter 4
Recurring Schedules
A recurring schedule is a repeatable pattern of schedules that is based on a template created by a Practitioner.
Note: If you need to have a new recurring schedule created, contact your Practitioner. If you are a Practitioner, you can define recurring schedule templates by selecting Maintenance from the Time & Attendance menu, then selecting the Recurring Schedules link.
Understanding Recurring SchedulesAs a manager, you can use recurring schedule templates to assign recurring schedules to one or more of your employees. When assigning a recurring schedule to a specific employee, you select an available template and specify a start date on which the recurring schedule will become effective. You can also specify an end date for the recurring schedule, or you can leave the end date undefined so that the schedule is applied indefinitely. If the template is a multiple-week rotation, you must also specify which week of the recurring schedule template will be in effect on the start date. A single recurring schedule can include multiple time pairs on a scheduled day.
A single employee can have multiple recurring schedule assignments. However, no two recurring schedule assignments for a single employee can have the same start date, and only one recurring schedule can be in effect on each day. If an employee has been assigned to two or more recurring schedules that overlap, the recurring schedule with the latest start date will be in effect on any dates that fall within both (or all of) the overlapping recurring schedule assignments.
If you need to change the schedule of an employee who normally works a recurring schedule, you can create a daily schedule (also known as a deviation) that overrides the recurring schedule. Creating a daily schedule allows you to leave the underlying recurring schedule in place, so that it will be effective on any day for which you do not create a daily schedule.
The Recurring Schedules page allows you to view existing assignments, assign new schedules, modify assignments, or delete assignments for one or more employees. You can use the Daily Schedules page to create deviations from recurring schedules or to remove deviations and restore recurring schedules.
Tip: You can also manage recurring schedule assignments from individual editing pages accessed from the Schedules page through the single-employee Monthly Schedule and Recurring Schedule calendars.
For more information on using recurring schedules, click the Help link on any main Time & Attendance module page then navigate to the Using Recurring Schedules section of the Contents for a list of related topics.
ADP Workforce Now Time & Attendance Module 29 Scheduling Guide - Rev. August 30, 2010

Recurring Schedules
The Recurring Schedules - Edit Single Mode
The Recurring Schedules - Edit Single action mode allows you to edit or delete an existing recurring schedule assignment or create a new recurring schedule assignment for a single employee.
Although you can edit only one employee's recurring schedule assignments at a time in this mode, the schedule grid displays recurring schedule information for all of your filtered employees, allowing you to view the effects of your edits on your staffing levels.
The specific tasks you can perform from the Recurring Schedules - Edit Single mode include:
• Assigning a Recurring Schedule to an Employee• Editing a Recurring Schedule Assignment• Deleting a Recurring Schedule Assignment
Scheduling Guide - Rev. August 30, 2010 30 ADP Workforce Now Time & Attendance Module
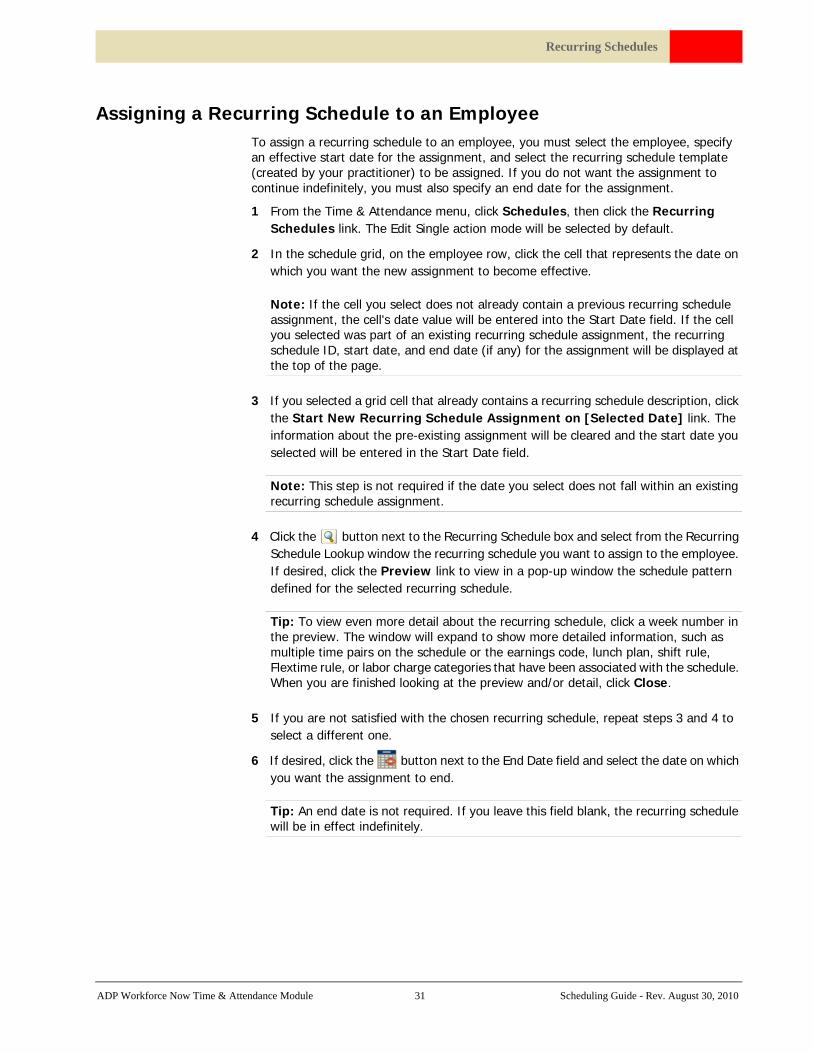
Recurring Schedules
Assigning a Recurring Schedule to an EmployeeTo assign a recurring schedule to an employee, you must select the employee, specify an effective start date for the assignment, and select the recurring schedule template (created by your practitioner) to be assigned. If you do not want the assignment to continue indefinitely, you must also specify an end date for the assignment.
1 From the Time & Attendance menu, click Schedules, then click the Recurring Schedules link. The Edit Single action mode will be selected by default.
2 In the schedule grid, on the employee row, click the cell that represents the date on which you want the new assignment to become effective.
Note: If the cell you select does not already contain a previous recurring schedule assignment, the cell's date value will be entered into the Start Date field. If the cell you selected was part of an existing recurring schedule assignment, the recurring schedule ID, start date, and end date (if any) for the assignment will be displayed at the top of the page.
3 If you selected a grid cell that already contains a recurring schedule description, click the Start New Recurring Schedule Assignment on [Selected Date] link. The information about the pre-existing assignment will be cleared and the start date you selected will be entered in the Start Date field.
Note: This step is not required if the date you select does not fall within an existing recurring schedule assignment.
4 Click the button next to the Recurring Schedule box and select from the Recurring Schedule Lookup window the recurring schedule you want to assign to the employee. If desired, click the Preview link to view in a pop-up window the schedule pattern defined for the selected recurring schedule.
Tip: To view even more detail about the recurring schedule, click a week number in the preview. The window will expand to show more detailed information, such as multiple time pairs on the schedule or the earnings code, lunch plan, shift rule, Flextime rule, or labor charge categories that have been associated with the schedule. When you are finished looking at the preview and/or detail, click Close.
5 If you are not satisfied with the chosen recurring schedule, repeat steps 3 and 4 to select a different one.
6 If desired, click the button next to the End Date field and select the date on which you want the assignment to end.
Tip: An end date is not required. If you leave this field blank, the recurring schedule will be in effect indefinitely.
ADP Workforce Now Time & Attendance Module 31 Scheduling Guide - Rev. August 30, 2010
Recurring Schedules
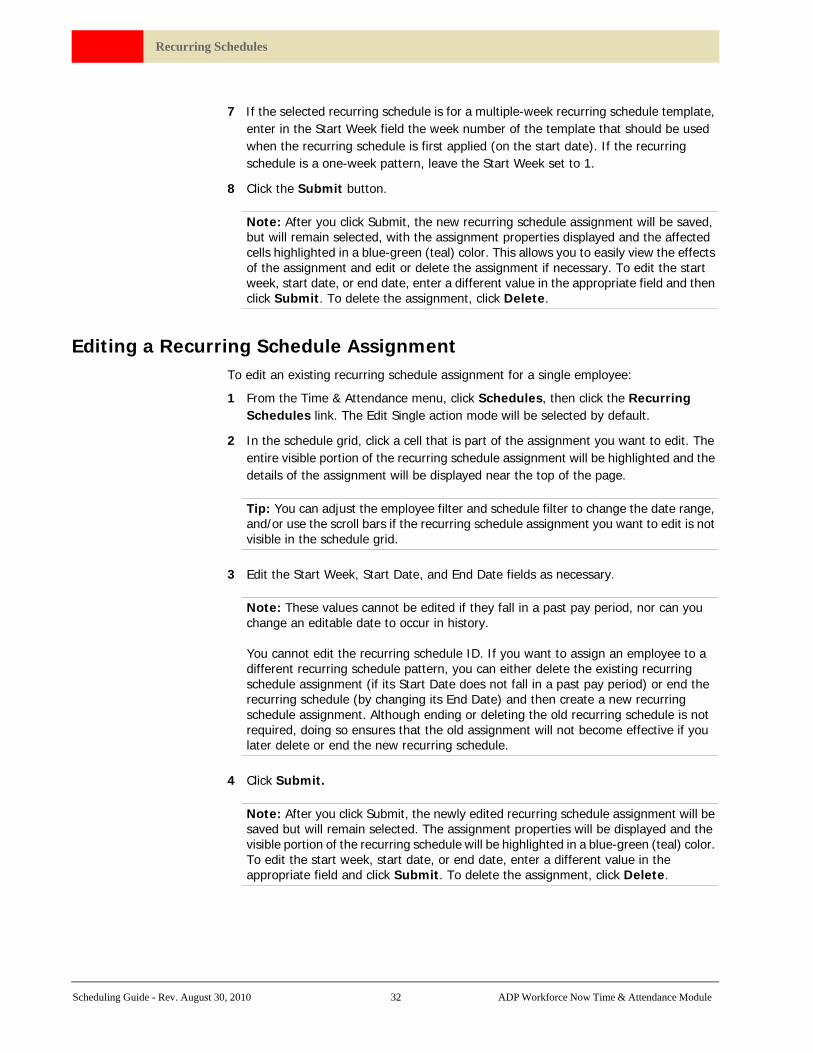
7 If the selected recurring schedule is for a multiple-week recurring schedule template, enter in the Start Week field the week number of the template that should be used when the recurring schedule is first applied (on the start date). If the recurring schedule is a one-week pattern, leave the Start Week set to 1.
8 Click the Submit button.
Note: After you click Submit, the new recurring schedule assignment will be saved, but will remain selected, with the assignment properties displayed and the affected cells highlighted in a blue-green (teal) color. This allows you to easily view the effects of the assignment and edit or delete the assignment if necessary. To edit the start week, start date, or end date, enter a different value in the appropriate field and then click Submit. To delete the assignment, click Delete.
Editing a Recurring Schedule AssignmentTo edit an existing recurring schedule assignment for a single employee:
1 From the Time & Attendance menu, click Schedules, then click the Recurring Schedules link. The Edit Single action mode will be selected by default.
2 In the schedule grid, click a cell that is part of the assignment you want to edit. The entire visible portion of the recurring schedule assignment will be highlighted and the details of the assignment will be displayed near the top of the page.
Tip: You can adjust the employee filter and schedule filter to change the date range, and/or use the scroll bars if the recurring schedule assignment you want to edit is not visible in the schedule grid.
3 Edit the Start Week, Start Date, and End Date fields as necessary.
Note: These values cannot be edited if they fall in a past pay period, nor can you change an editable date to occur in history.
You cannot edit the recurring schedule ID. If you want to assign an employee to a different recurring schedule pattern, you can either delete the existing recurring schedule assignment (if its Start Date does not fall in a past pay period) or end the recurring schedule (by changing its End Date) and then create a new recurring schedule assignment. Although ending or deleting the old recurring schedule is not required, doing so ensures that the old assignment will not become effective if you later delete or end the new recurring schedule.
4 Click Submit.
Note: After you click Submit, the newly edited recurring schedule assignment will be saved but will remain selected. The assignment properties will be displayed and the visible portion of the recurring schedule will be highlighted in a blue-green (teal) color. To edit the start week, start date, or end date, enter a different value in the appropriate field and click Submit. To delete the assignment, click Delete.
Scheduling Guide - Rev. August 30, 2010 32 ADP Workforce Now Time & Attendance Module
Recurring Schedules
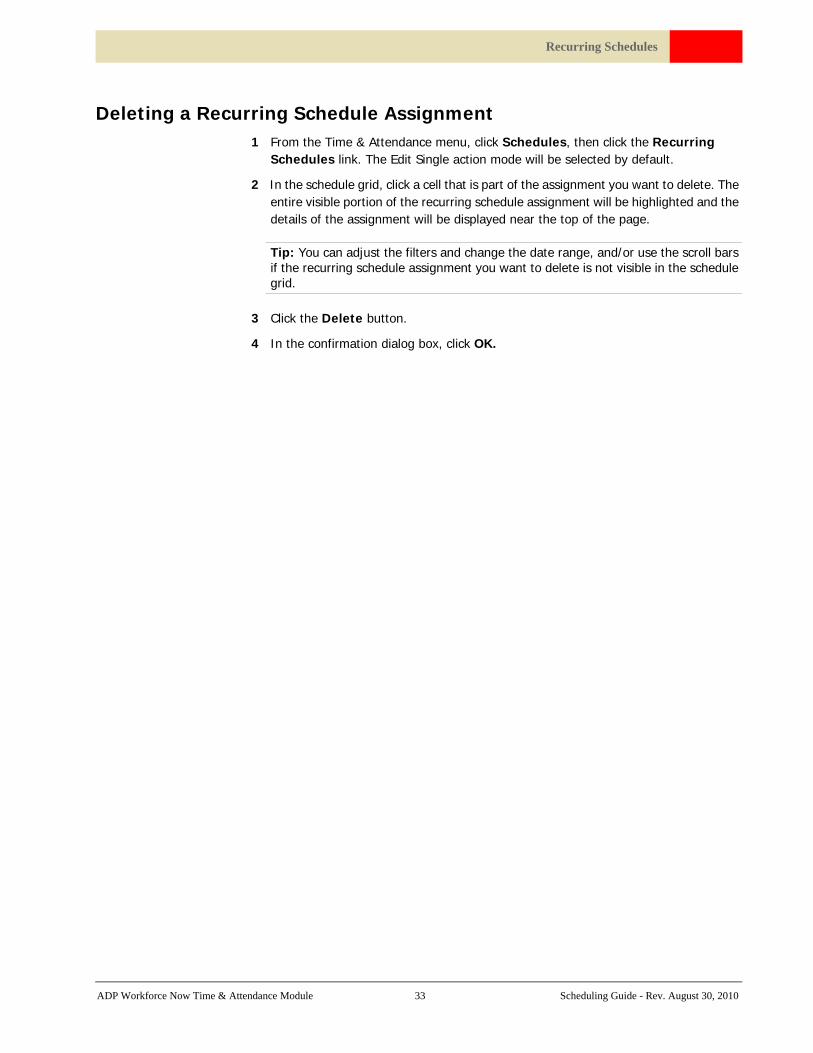
Deleting a Recurring Schedule Assignment1 From the Time & Attendance menu, click Schedules, then click the Recurring
Schedules link. The Edit Single action mode will be selected by default.
2 In the schedule grid, click a cell that is part of the assignment you want to delete. The entire visible portion of the recurring schedule assignment will be highlighted and the details of the assignment will be displayed near the top of the page.
Tip: You can adjust the filters and change the date range, and/or use the scroll bars if the recurring schedule assignment you want to delete is not visible in the schedule grid.
3 Click the Delete button.
4 In the confirmation dialog box, click OK.
ADP Workforce Now Time & Attendance Module 33 Scheduling Guide - Rev. August 30, 2010
Recurring Schedules
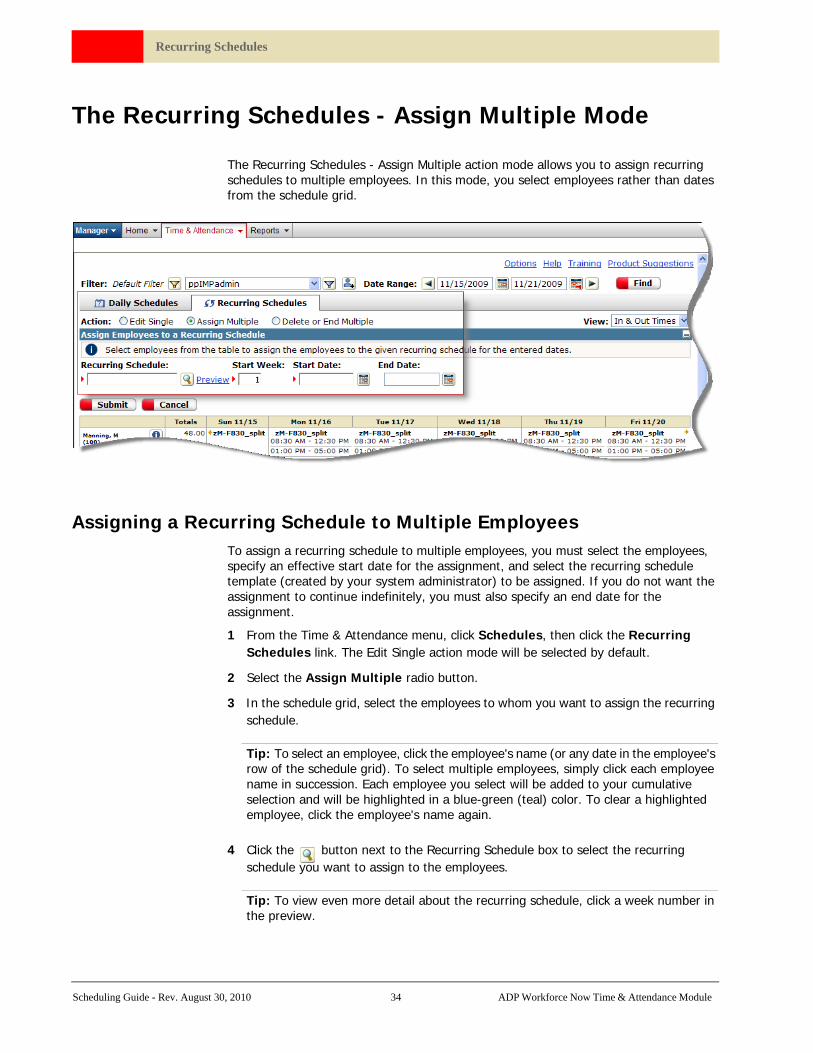
The Recurring Schedules - Assign Multiple Mode
The Recurring Schedules - Assign Multiple action mode allows you to assign recurring schedules to multiple employees. In this mode, you select employees rather than dates from the schedule grid.
Assigning a Recurring Schedule to Multiple EmployeesTo assign a recurring schedule to multiple employees, you must select the employees, specify an effective start date for the assignment, and select the recurring schedule template (created by your system administrator) to be assigned. If you do not want the assignment to continue indefinitely, you must also specify an end date for the assignment.
1 From the Time & Attendance menu, click Schedules, then click the Recurring Schedules link. The Edit Single action mode will be selected by default.
2 Select the Assign Multiple radio button.
3 In the schedule grid, select the employees to whom you want to assign the recurring schedule.
Tip: To select an employee, click the employee's name (or any date in the employee's row of the schedule grid). To select multiple employees, simply click each employee name in succession. Each employee you select will be added to your cumulative selection and will be highlighted in a blue-green (teal) color. To clear a highlighted employee, click the employee's name again.
4 Click the button next to the Recurring Schedule box to select the recurring schedule you want to assign to the employees.
Tip: To view even more detail about the recurring schedule, click a week number in the preview.
Scheduling Guide - Rev. August 30, 2010 34 ADP Workforce Now Time & Attendance Module

Recurring Schedules
5 If you are not satisfied with the chosen recurring schedule, repeat steps 3 and 4 to select a different one.
6 Click the button next to the Start Date field and select the date on which you want the assignment to become effective.
Note: You can configure a new recurring schedule assignment to begin on any date that does not fall in a past pay period and is not already the start date of another recurring schedule assignment for the employees for whom you are creating the new assignment. You can even begin a new recurring schedule on a date that falls within a previously assigned recurring schedule. However, only one recurring schedule can be in effect per day per employee. When an employee is assigned to two or more recurring schedules that overlap or are nested, the recurring schedule with the latest effective start date takes precedence. In such cases, the schedule grid on the Recurring Schedules page displays only the effective recurring schedule for each day.
7 If desired, click the button next to the End Date field and select the date on which you want the assignment to end. Since an end date is not required, if you leave this field blank, the recurring schedule will be in effect indefinitely.
8 If the selected recurring schedule is for a multiple-week recurring schedule template, enter in the Start Week field the week number of the template that should be used when the recurring schedule is first applied (on the start date). If the recurring schedule is a one-week pattern, leave the Start Week set to 1.
9 Click the Submit button.
Note: After you click Submit, the new recurring schedule assignment will be saved and applied to the schedule information displayed in the grid, but the employees and recurring schedule will also remain selected. The assignment properties will continue to be displayed and the names of the affected employees will remain highlighted in a blue-green (teal) color. This allows you to easily undo the assignment you just made, if necessary. To do this, click the Delete or End Multiple radio button.
ADP Workforce Now Time & Attendance Module 35 Scheduling Guide - Rev. August 30, 2010
Recurring Schedules
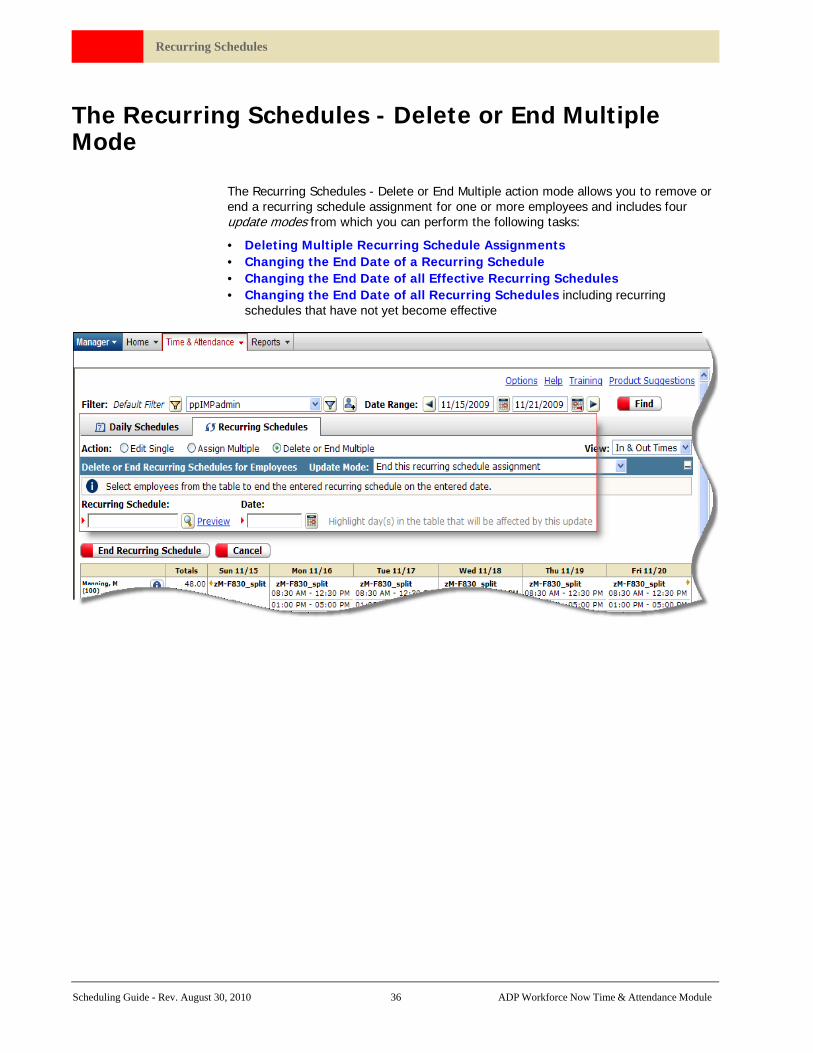
The Recurring Schedules - Delete or End Multiple Mode
The Recurring Schedules - Delete or End Multiple action mode allows you to remove or end a recurring schedule assignment for one or more employees and includes four update modes from which you can perform the following tasks:
• Deleting Multiple Recurring Schedule Assignments• Changing the End Date of a Recurring Schedule• Changing the End Date of all Effective Recurring Schedules• Changing the End Date of all Recurring Schedules including recurring
schedules that have not yet become effective
Scheduling Guide - Rev. August 30, 2010 36 ADP Workforce Now Time & Attendance Module

Recurring Schedules
Deleting Multiple Recurring Schedule AssignmentsThe Delete this recurring schedule assignment update mode allows you to delete a recurring schedule assignment for multiple employees who are assigned to the same schedule.
To delete a recurring schedule assignment using this mode, you must identify the recurring schedule ID and the start date of the assignment you want to delete. You can then manually select employees with the specified recurring schedule assignment, or you can use a link to automatically select all employees in your filtered grid that share the assignment. You cannot delete in one action multiple recurring schedule assignments that have different recurring schedule IDs or start dates.
1 From the Time & Attendance menu, click Schedules, then click the Recurring Schedules link. The Edit Single action mode will be selected by default.
2 Select the Delete or End Multiple radio button.
3 In the Update Mode field, click and select Delete this recurring schedule assignment.
4 In the schedule grid, click a cell that is part of the assignment you want to delete. The entire visible portion of the recurring schedule assignment will be highlighted in red, the recurring schedule ID will be displayed in the Recurring Schedule text box, and the start date of the assignment will be displayed in the Date field.
Note: You cannot delete a schedule with a start date that falls in a past pay period.
5 If you want to select all employees who have assignments with the same recurring schedule ID and start date, click the Select all employees with this assignment link. Alternatively, if you want to delete the assignment from only some of the employees to whom it is assigned, manually select the employees by clicking a cell within the matching assignment for each employee you want to select.
Note: If you select an employee, schedule, or date that is not part of a matching schedule assignment, a confirmation pop-up window will ask you whether you want to discard your previous selection. In this update mode, you cannot select two different recurring schedule assignments.
6 Click the Delete button then click OK to confirm the action.
ADP Workforce Now Time & Attendance Module 37 Scheduling Guide - Rev. August 30, 2010

Recurring Schedules
Changing the End Date of a Recurring Schedule The End this recurring schedule assignment update mode allows you to end recurring schedule assignments for a specified recurring schedule on a designated date for selected employees. This is the default update mode for the Recurring Schedules - Delete or End Multiple page.
To end a recurring schedule assignment using this mode, you must identify the recurring schedule ID for which you want to end recurring schedule assignments, specify the last day on which you want the assignments to be effective, and select the employees to whom the modification should be applied. You can use a link on the Schedules tab to preview in the schedule grid the effect your action will have. In this mode, you cannot end recurring schedule assignments that have different recurring schedule IDs.
To end recurring schedules with the same ID on a specific day:
1 From the Time & Attendance menu, click Schedules, then click the Recurring Schedules link. The Edit Single action mode will be selected by default.
2 Select the Delete or End Multiple radio button. The End this recurring schedule assignment update mode will be selected by default.
3 Click the button next to the Recurring Schedule box and select from the Recurring Schedule Lookup window the recurring schedule you want to end.
4 Click the button next to the Date field and select the last date on which you want the assignment to be in effect.
5 In the Employee column of the schedule grid, click each employee for whom you want to change the end date of the selected recurring schedule. To select multiple employees, click each employee name in succession. Each employee you select will be added to your cumulative selection and will be highlighted in a blue-green (teal) color. To clear a highlighted employee, click the employee's name again.
6 To preview the effect of your selections, click the Highlight day(s) in the table that will be affected by this update. The cells that will be affected if you complete the action will be highlighted in red. The recurring schedule will, in effect, be removed from the highlighted dates.
7 If you are satisfied with the preview, click the End Recurring Schedule button and then click OK in the confirmation dialog box.
Tip: If you are not satisfied with the preview, edit your recurring schedule, date, and/or employee selections, or click the Cancel button to refresh the page and discard your changes.
Scheduling Guide - Rev. August 30, 2010 38 ADP Workforce Now Time & Attendance Module

Recurring Schedules
Changing the End Date of all Effective Recurring SchedulesThe End effective recurring schedule assignment update mode allows you to end all recurring schedules for one or more employees as of a certain date, without affecting any assignments that have already been made but which have effective start dates that occur after the specified end date.
In this mode, the Recurring Schedule field defaults to All and is not editable. All recurring schedule assignments that are assigned to the employees you have selected and that span the date you specify in the Date field will be modified to end on that date. This includes overlapped or nested recurring schedule assignments that are not visible in the schedule grid because they have been superseded by a recurring schedule with a later start date.
Note: If the end date you define is the same as the start date of a recurring schedule, that recurring schedule will be deleted.
1 From the Time & Attendance menu, click Schedules, then click the Recurring Schedules link. The Edit Single action mode will be selected by default.
2 Select the Delete or End Multiple radio button.
3 In the Update Mode field, click and select End effective recurring schedule assignments.
4 Click the button next to the Date field and select the date on which you want to end all current effective recurring schedules.
5 In the Employee column of the schedule grid, click each employee for whom you want to end all effective recurring schedules. To select multiple employees, click each employee name in succession. Each employee you select will be added to your cumulative selection and will be highlighted in a blue-green (teal) color. To clear a highlighted employee, click the employee's name again.
6 To preview the effect of your selections, click the Highlight day(s) in the table that will be affected by this update. The cells that will be affected if you complete the action will be highlighted in red. All recurring schedules will be removed from the highlighted dates.
7 If you are satisfied with the preview, click the End Recurring Schedule button and then click OK in the confirmation dialog box.
Tip: If you are not satisfied with the preview, edit the Date field, change your employee selections, or click the Cancel button to refresh the page and discard your changes.
ADP Workforce Now Time & Attendance Module 39 Scheduling Guide - Rev. August 30, 2010
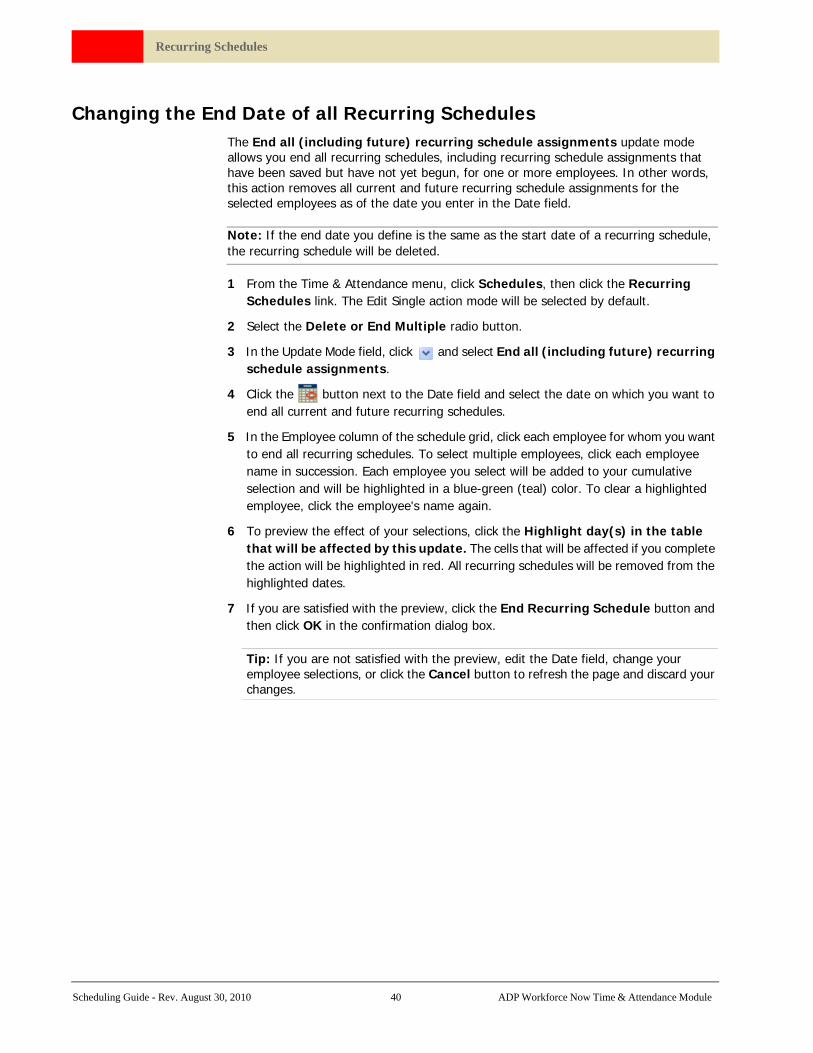
Recurring Schedules
Changing the End Date of all Recurring SchedulesThe End all (including future) recurring schedule assignments update mode allows you end all recurring schedules, including recurring schedule assignments that have been saved but have not yet begun, for one or more employees. In other words, this action removes all current and future recurring schedule assignments for the selected employees as of the date you enter in the Date field.
Note: If the end date you define is the same as the start date of a recurring schedule, the recurring schedule will be deleted.
1 From the Time & Attendance menu, click Schedules, then click the Recurring Schedules link. The Edit Single action mode will be selected by default.
2 Select the Delete or End Multiple radio button.
3 In the Update Mode field, click and select End all (including future) recurring schedule assignments.
4 Click the button next to the Date field and select the date on which you want to end all current and future recurring schedules.
5 In the Employee column of the schedule grid, click each employee for whom you want to end all recurring schedules. To select multiple employees, click each employee name in succession. Each employee you select will be added to your cumulative selection and will be highlighted in a blue-green (teal) color. To clear a highlighted employee, click the employee's name again.
6 To preview the effect of your selections, click the Highlight day(s) in the table that will be affected by this update. The cells that will be affected if you complete the action will be highlighted in red. All recurring schedules will be removed from the highlighted dates.
7 If you are satisfied with the preview, click the End Recurring Schedule button and then click OK in the confirmation dialog box.
Tip: If you are not satisfied with the preview, edit the Date field, change your employee selections, or click the Cancel button to refresh the page and discard your changes.
Scheduling Guide - Rev. August 30, 2010 40 ADP Workforce Now Time & Attendance Module